

Page 1
ST600 Model #490
• Operating Instructions
• Product Registration
• Warranty
44537
Page 2

IMPORTANT SAFEGUARDS
When using electrical appliances, basic safety precautions should always be
followed, including the following:
1. Read all instructions.
2. Do not touch hot surfaces. Use handles or knobs.
3. To protect against fire, electric shock and injury to persons, do not immerse
cord, plugs, or body of machine in water or other liquid.
4. Close supervision is necessary when any appliance is used by or near children.
5. Unplug from outlet when not in use and before cleaning. Allow to cool
before putting on or taking off parts, and before cleaning the appliance.
6. Do not operate any appliance with a damaged cord or plug or after the
appliance malfunctions, or has been damaged in any manner. Return appliance
to the nearest authorized service facility for examination, repair, or adjustment.
7. The use of accessory attachments not recommended by the appliance
manufacturer may result in fire, electric shock, or injury to persons.
8. Do not use outdoors.
9. Do not let the cord hang over the edge of a table or counter, or touch hot
surfaces.
10. Do not place on or near a hot gas or electric burner, or in a heated oven.
11. Always attach plug to appliance first, then plug cord into the wall outlet. To
disconnect, turn any control to “OFF”, then remove plug from wall outlet.
12. Do not use appliance for other than intended use.
13. Scalding may occur if the water container lid is opened during the brewing
or decalcifying cycle.
14. Do not place stainless steel carafe on a hot surface. The internal vacuum
seal might get damaged.
15. Do not immerse the stainless steel carafe in any liquid. The coffee maker
and the stainless steel carafe are NOT dishwasher safe.
16. After coffee brewing is finished and the on-light has turned off, wait five
minutes before refilling the water container with cold water. Otherwise hot
steam could shoot out of the lid and cause injuries.
17. For household use only.
SAVE THESE INSTRUCTIONS
SPECIAL CORD SET INSTRUCTIONS
A. A short power supply cord is provided to reduce the risk resulting
om becoming entangled in or tripping over a long cor
fr
B. Longer extension cords are available and may be used if care is
cised in their use.
exer
C. If an extension cord is used,
1) the marked electrical rating of the extension cor
eat as the electrical rating of the appliance, and
as gr
2) if the appliance is of the grounded type, the extension cord should
be a rounding type 3-wire cord, and
2
d.
d should be at least
Page 3

3) the longer cord shall be arranged so that it will not drape over the
counter top or tabletop where it can be pulled on by children or
tripped over.
Notice: Your ST600 has a 3-prong grounded plug. To reduce the risk of electrical
shock this plug will fit in an outlet only one way. If the plug does not fit in the
outlet, contact a qualified electrician. DO NOT modify the plug in any way.
CAUTION
This appliance is for household use. Any servicing other than cleaning and user
maintenance should be performed by an authorized service representative.
• Do not immerse base in water or try to disassemble.
• To reduce the risk of fire or electric shock, do not remove the base.
No user serviceable parts inside. Repair should be done by authorized
service personnel only.
• Check voltage to be sure that the voltage indicated on the name plate
agrees with your voltage.
• Never use warm or hot water to fill the water container. Use cold water only!
• Keep your hands and the cord away from hot parts of the appliance during
operation.
• Never clean with scouring powders or hard implements.
Welcome and Thank You
Thank you for choosing the CAPRESSO ST600. The ST600 combines
Capresso’s coffee brewing expertise with a timeless sculptured stainless steel
design and a unique through-the-spout brewing process. Completely equipped
with a stainless steel vacuum carafe, digital clock/timer, Goldtone
filter, water charcoal filter with automatic replacement indicator, a second
brewing cycle for smaller badges and auto-shut-off safety features the ST600
makes brewing coffee easy and convenient.
PLEASE READ ALL OPERATING INSTRUCTIONS BEFORE USING THE ST600.
Understanding and complying with these directions is essential to ensure that
the machine is used without risk and to ensure safety during operation and
maintenance.
Customer Service
Should you require further information or if particular problems occur that are
not covered in this manual, please
CALL our toll free HELP LINE: 1-800-767-3554 Mon.-Fri. 9AM to 8PM,
•
Sat. 9AM to 5PM EST. If you call at any other time, please leave a message
with your telephone number and when we can call you back.
FAX us at 1-201-767-9684
•
• E-MAIL at contact@capresso.com
WRITE to Capresso Inc., Customer Service, P.O.Box 775, Closter, NJ 07624
•
•
WEBSITE www.capresso.com
3
Page 4

Contents... Page
Important Safeguards.......................................................................................... 2
Welcome and Thank You..................................................................................... 3
Customer Service ................................................................................................ 3
Line Drawings (Figures 1 to 14)....................................................................... 5, 6
1 Equipment..................................................................................................... 7
2 Preparing the ST600 ..................................................................................... 7
2a Before First Use ............................................................................................ 7
2b The Display ................................................................................................... 7
2c Setting the Current Time............................................................................... 7
2d Setting the Auto-On Time............................................................................. 7
3 The Charcoal Water Filter ............................................................................. 7
3a Installing and Using the Charcoal Filter........................................................ 8
3b Replacing the Charcoal Filter ....................................................................... 8
3c Resetting the Filter Indicator......................................................................... 8
3d Turning the Charcoal Filter Indicator OFF .................................................... 8
4 The Proper Sequence of Making Coffee ...................................................... 8
5 Coffee Brewing Tips...................................................................................... 9
5a How Much Ground Coffee?.......................................................................... 9
5b Goldtone Filter and Filter Paper.................................................................... 9
5c The Stainless Steel Carafe.......................................................................... 10
5d Pouring Coffee while Brewing .................................................................... 10
5e Extra Brewing Cycle for 4 to 6 Cups .......................................................... 10
6 Brewing at a Pre-Programmed Time.......................................................... 10
7 Cleaning the Coffee Maker ......................................................................... 11
8 Cleaning the Inside of the Stainless Steel Carafe ...................................... 11
9 Decalcifying................................................................................................. 11
9a Decalcifying with Durgol ............................................................................. 11
9b Using other Decalcifying Agents ................................................................ 12
oubleshooting
r
T
10
11 Supplies ...................................................................................................... 12
12 Limited Warranty......................................................................................... 12
Product Registration.......................................................................................... 14
.......................................................................................... 12
4
Page 5
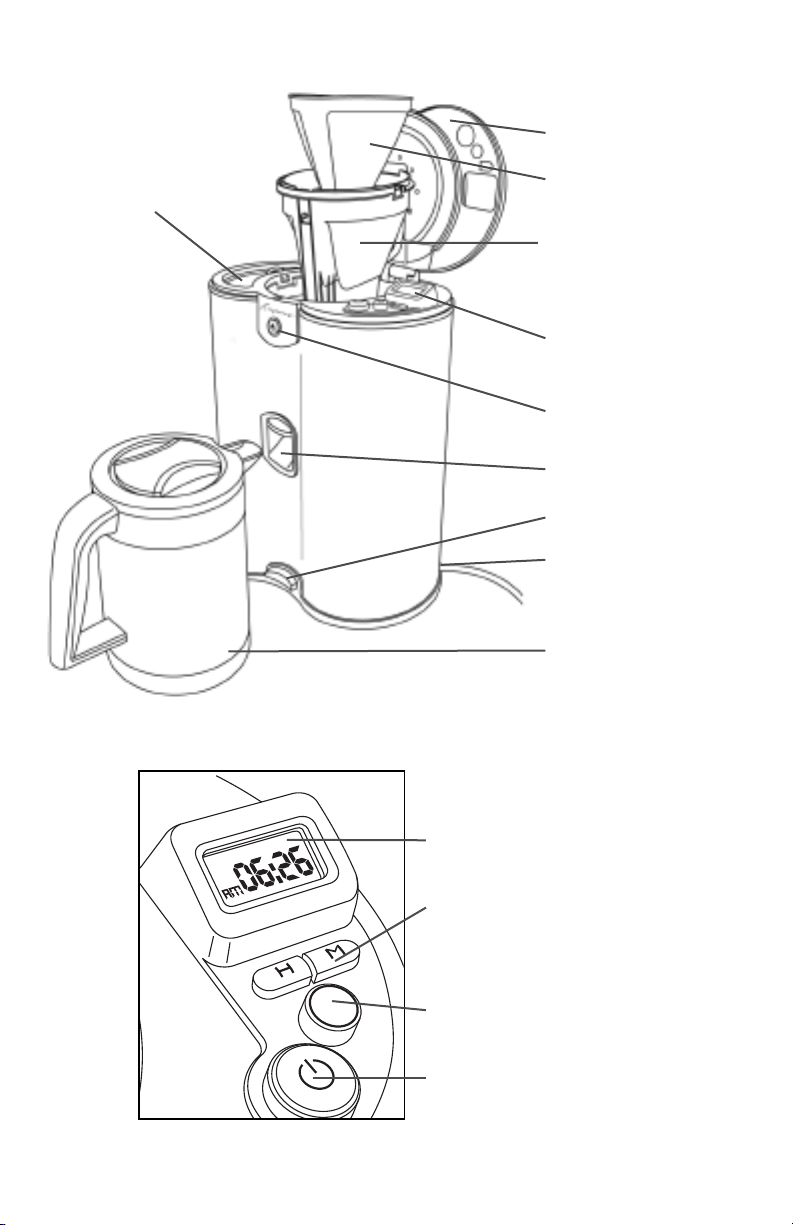
J. Water tank
FIG. 1
A. Pop-up lid
B. Goldtone Filter
C. Removable Filter
Holder with
Drip Stop
D. Operating Panel
(see Fig.2)
E. Release button
F. Brewing slot
G. Safety switch
H. Cord storage
I. Carafe
FIG. 2
K. Display
L. Hour and Minute buttons
(H and M)
Auto-on button
M.
N.On/Of
f button
5
Page 6

6
8
10
MAX
Extra brewing cycle
indicator
FIG. 3
FIG. 6
Brewing Slot
FIG. 9
Safety
Switch
FIG. 4 FIG. 5
FIG. 7 FIG. 8
Push lid down and
rotate one full turn
FIG. 10
FIG. 11
Brewin
Cut out
6
g/Pouring Position
FIG. 12
Closed Position
FIG. 13
Cut out
FIG. 14
Page 7

1. Equipment
The ST600 comes with: Stainless
Steel Vacuum Thermal Carafe with
Lid, Goldtone Filter (inserted into the
removable Filter Holder), Measuring
Scoop, Charcoal Filter with Charcoal
Filter Holder, this operating instruction
booklet and a Mail Order Form.
2. Preparing the ST600
2a. Before First Use
After unpacking clean all loose parts
with warm water and make yourself
familiar with the different functions.
After reading these instructions, let
some water run through the coffee
maker to clean all internal parts.
• Push the Release button beneath
the Capresso logo. (Fig.1,E).
The Pop-up lid will flip open (Fig.1,A).
On the left is the water tank with outside water level indicator. The removable filter holder with drip stop and
removable Goldtone Filter are located
in the middle. To the right you will find
the operating buttons and the display.
2b. The Display
The Pop-up lid is open.
• Pull the power cord (Fig.10) to the
required length (max. about 38”).
You can always push unneeded
cord back into the machine.
• Plug in the machine.
The display will illuminate and will
flash AM 00:00 for five seconds.
The flashing will stop and the
illumination dims.
2c. Setting the Current Time (Fig. 2).
• Push the H button down for a
second and release. Now the display
flashes.
Push the H button r
•
the actual hour is set. W
the AM / PM indicator changes.
• Now push the M button to set the
minutes. The display will flash five
times after your last setting and will
dim and show the actual time.
epeatedly until
atch how
• To change the time, just push the
M or the H button for a second and
release. The display flashes and you
can repeat the above procedure.
Please note: When you disconnect
the machine from the power source or
if your power circuit is interrupted
(power outage) the machine will lose
all settings. You must set the time and
the Auto-on time again.
Please note: You must change the
clock (not the Auto-on time) when the
time changes (Standard Time,
Daylight Savings Time).
2d. Setting the Auto-on Time.
• Push and hold the H button down
until the display flashes 11:11.
• Release the button and now push
the H button again until the desired
Auto-on hours are displayed, then
push the M button for setting the
minutes. When finished, the
display will flash five times and
then revert to the actual time.
• To check the Auto-on time, push
the H button down until the display
starts flashing (at this time it shows
the Auto-on time). Release the H
button and the display reverts to
the actual time.
• To change the Auto-on time, push
and hold down the H button until
the display starts flashing.
• Release the button and set the new
Auto-on time.
3. The Charcoal Filter
Most tap water is treated with chlorine.
The charcoal filter removes up to 82%
of the chlorine and other impurities
found in tap water, improving the
taste of water. If you use spring or
bottled water it is not necessary to
use the charcoal filter. However water
might attract impurities when sitting in
the water container overnight. The
coal filter will remove most of
char
these impurities since the water will
be filtered just before entering the
heating element.
7
Page 8

3a. Using the Charcoal Water Filter
• Remove the charcoal filter from the
plastic bag and insert it into the
charcoal filter base and attach to
the charcoal filter rod (Fig. 4).
• Insert the assembly into a glass
with cold water for a few minutes.
This will activate the charcoal.
• Now insert the assembly into the
water tank (Fig. 5) and make sure
the filter fits snuggly into the opening
in the bottom of the water tank.
The ring handle of the rod should
be flush with the upper level of the
water container.
3b. Replacing the Cartridge
Over time the charcoal filter loses its
cleaning power.
• Replace after six weeks or when
the Auto-on button (Fig. 2,M) starts
flashing whichever comes first.
After 80 on/off cycles the Auto-on
button starts flashing.
If you brew only one pot a day, we
recommend to replace the filter after
6 weeks.
Please note: If you unplug the
machine or if you have a power failure,
the charcoal control indicator loses its
information. In this case it is best to
replace the charcoal filter six weeks
after first use.
Replacement cartridges are available
through your local Capresso dealer or
by using the enclosed mail order form
or though our website:
www.capresso.com
3c. Resetting the Filter Indicator
After inserting the new charcoal filter
push the H and the M button down
simultaneously for 3 seconds. This
will reset the internal counter and will
stop the flashing of the Auto-on button.
3d. Turning the Charcoal Filter
Indicator OFF
If you don’t use the charcoal filter, you
can turn the indicator off as follows:
• Push and hold down the H and M
button at the same time for two
seconds and release, the display
shows OFF for a few seconds and
then reverts to the actual time. In
this position the Auto-on button will
never flash.
• To turn the charcoal indicator on
again, push both buttons for
2 seconds, then release. The
display will show ON and then
reverts to the actual time.
4. The Proper Sequence for Making
Coffee
Coffee makers produce hot water. If
you follow the sequence below you
will avoid possible accidents which
might cause severe injuries and
burns.
Please note: As an added safety
precaution the ST600 will not operate
when the carafe is not inserted properly into the machine. If you remove
the carafe during brewing, the ST600
will shut off. When inserting the carafe
again, you must push the ON/OFF
button, to continue brewing.
1. Remove carafe from machine.
2. Push the Release button to open
the Pop-up lid.
3. Pour water into the water tank.
Caution: Watch the water level indicator. Make sure the water level does
not exceed the line below the letters
MAX (Fig.7). If you fill too much water
into the tank the water will over
the back of the machine.
4. Make sure the filter holder (Fig.8)
sits firmly inside the machine with
the handle pushed forward. If the
handle of the filter holder does not
sit flush with the upper rim, the
filter holder is not inserted properly.
flow in
8
Page 9

Caution: If the filter holder is not
inserted into the machine hot water or
coffee will spill out of the brewing slot.
5. Insert the Goldtone Filter or size #4
Filter paper (see chapter 5b).
6. Add ground coffee. Do not use too
much or too finely ground coffee.
This could create an overflow
during brewing. (see chapter 5a).
7. Close the Pop-up lid.
8. Make sure the Thermal Carafe is
clean and empty.
9. Line up the carafe lid with the cutout pointing to the spout (Fig.11).
Turn the lid clockwise one full
rotation until it clicks. The lid is now
securely attached to the carafe.
This is the brewing and pouring
position (Fig.12).
Please note: If the lid is not in the
brewing position you cannot fully
insert the spout into the brewing slot
of the machine (Fig.9). Brewing will
not be possible.
10. Insert the spout of the carafe into
the brewing slot of the machine.
Make sure the Safety Switch
(Fig.9) is pushed in.
11. Push the On/Off button (Fig.2,N).
It will illuminate in red indicating
that the machine is brewing.
Caution: Never open the Pop-up lid
as long as the On/Off Button is illuminated. Hot water could spill out causing burns and injuries. Wait until the
On/Off button is no longer illuminated.
Please note: The On/Off button will
stay illuminated for 11 minutes. The
actual brewing time for 10 cups will
take approx. 8 minutes. However it
will take an additional 1 to 3 minutes
until all the hot water has passed
through the ground coffee. This
depends on how much coffee you
used and how fine the coffee is
ground. Once the On/Off light turns
itself off, it is safe to assume that all
coffee has passed into the carafe. It is
also safe to open the Pop-up lid at
this point.
12. Remove the carafe from the
machine and pour a cup of coffee.
Please note: Remove the carafe
SLOWLY from the machine. This will
give the drip-stop time to close preventing coffee droplets from running
down the machine.
Please note: The spout has a small
brewing/pouring opening to prevent
heat loss.
13. To close the lid completely turn
clock-wise until it tightens
(approx. the 5 o’clock position)
(Fig.13). In this position you can
"park" the carafe inside the brewing slot without activating the
Safety Switch.
5. Coffee Brewing Tips
5a. How Much Ground Coffee?
A coffee scoop comes with the
machine. We recommend using one
level scoop per cup. Never use more
ground coffee than indicated in the
chart below, otherwise hot coffee can
overflow inside the filter, causing a
mess on your counter.
Maximum #
of Scoops
Regular or Drip
(Supermarket
Grind
Version)
Fine Grind (finer
than Drip Grind)
Goldtone
Filter
12
scoops
8-10
scoops
Size 4
Paper Filter
14
scoops
9-11
scoops
5b. Goldtone Filter and Filter Paper
• Coffee flows slower through a
Goldtone filter than through a
paper filter. Make sure the Goldtone
Filter is always clean and the holes
in the filter ar
ee of cof
e fr
fee oils.
• Never use filter paper inside a
Goldtone Filter
Use size #4 Filter paper only and
•
.
fold the bottom and side crimps
over for a proper fit (Fig.6). When
folding the filter paper
, make sur
e
that the paper does not rip.
9
Page 10

5c. The Stainless Steel Carafe
Before brewing, always make sure the
carafe is empty. For best results rinse
the carafe with hot water.
Please note: Always remove the
carafe slowly from the machine. This
makes sure that the drip stop can
close, preventing coffee from dripping
down the coffee maker.
The carafe has three small rubber feet
to prevent slipping. Lift the carafe to
avoid the rubber feet from marking
surfaces.
Important:
• Do not place the carafe on any hot
surfaces. This will damage the
vacuum seal inside the carafe. In
this case the carafe will not keep
the coffee warm.
• If you drop the carafe the vacuum
seal can get damaged resulting in
heat loss.
• Do not place carafe in dishwasher
and do not immerse in any liquid.
• Do not turn carafe upside down
with hot liquid inside (Fig. 14).
For cleaning see chapter 8.
5d. Pouring Coffee While Brewing
You can slowly pull the carafe out
during brewing and pour a cup of
coffee. The machine turns off (On/Off
button is no longer illuminated).
Replace the carafe, push the On/Off
button again and brewing will resume.
5e. Extra Brewing Cycle for 4 to 6
Cups.
We recommend not brewing less than
4 cups of coffee. The ST600 has a
slower brewing cycle for small batches.
This will help to increase the temperature for small amounts of coffee. Use
this feature when brewing 4 to 6 cups
of coffee. With the carafe inserted into
the machine, push and hold the
On/Off button until the “cup” symbol
appears in the display (Fig.3). The
On/Off switch is now illuminated and
br
ewing will start. The next time you
10
make coffee the machine will automatically return to the regular brewing cycle.
6. Brewing at a Pre-Programmed
Time
1. Set the Auto-on time as described
in chapter 2d. Make sure the Autoon time is correct (AM or PM).
Hint: If you want your coffee ready
by 7:15 AM, set the Auto-on time
to 7:03. At 7:15 AM your coffee is
in the carafe. Remove carafe slowly
from the machine and pour your first
cup. Then close the lid to keep the
rest hot. This way you get the
hottest coffee possible.
Please note: Avoid any air conditioner blowing cold air against the
thermal carafe. This will cool down
the carafe overnight and reduce
the temperature in the carafe.
2. Prepare the machine as described
in chapter 4, steps 1 through 10.
3. Push the Auto-on button (Fig.2,M).
It will illuminate green. At the Autoon time, the On/Off button will
illuminate red and the green Auto
light will go off indicating that
brewing has started.
Please note:
• If you pushed the Auto-on button
by mistake, just push it again and
the green illumination will turn off.
• Small batch brewing in the AutoOn position: With the Auto-on light
illuminated in green, push and hold
the On/Off button until the cup
symbol in the display appears.
• Power Interruption:
If you experience a temporary
power failure, the coffee maker will
shut down. The machine will not
brew at the pre-programmed time.
Once power is restored, push the
On/Off button and coffee will be
ready in a few minutes. Later reset
the clock and the Auto-on time
(chapter 2c and 2d).
Page 11

7. Cleaning the Coffee Maker
1. Make sure the coffee maker is
turned off. Always unplug appliance from outlet before cleaning.
2. Never use scoring agents.
3. Never immerse the appliance in
any liquid.
4. Never clean under running water.
5. To clean the outside wipe off with
a soft, damp cloth.
6. The cleaner “Goo Gone” can be
used to remove sticky deposits
from exterior
surfaces only. Please follow the
directions on the bottle.
7. Only the filter holder and the
Goldtone Filter can go into the
dishwasher (upper rack).
8. Make sure the drip stop on the
bottom of the filter holder is free
of any coffee particles, otherwise
it might not close properly when
removing the carafe from the
machine.
Important: Before inserting the
9.
filter holder back, wipe the inside
of the machine clean with a paper
towel
10. Clean the Goldtone Filter after
every use. Otherwise coffee oils
can clog up the small filter openings. Old, hardened coffee oils
can spoil the taste of your coffee.
11. Clean the lid of the carafe with a
soft, damp cloth. Do not clean
under running water and do not
immerse in any liquid.
8. Cleaning the Inside of the
Stainless Steel Carafe
Over time coffee oils will darken the
inside of your carafe, especially if
coffee sits for a prolonged time in the
carafe.
• Special tablets such as our cleaning
tablet #62205 will remove any
coffee oils and make the inside look
like new.
• Add one tablet to the carafe, fill
carafe with war
stainless steel
m water and let sit
over night. The next day the carafe
will be clean. Rinse thoroughly with
fresh water. Tablets are available at
your local retail store or with the
enclosed mail order form, or through
our website www.capresso.com
9. Decalcifying
As a guideline we recommend decalcifying at least every 6 months or
whenever the brewing process slows
down. If brewing ten cups of water
takes more than 10 minutes it is
definitely time to decalcify.
Attention:
• Before decalcifying, remove the
Goldtone Filter and the Charcoal
Filter from the machine.
• All decalcifying agents are acidic
and must be handled carefully.
Check the information on the packaging before using.
Caution: Never open the Pop-up lid
as long as the machine processes
any liquid. Hot water could spill out
causing burns and injuries. Wait until
all water is processed through the
machine or until the On/Off button is
no longer illuminated.
9a. Decalcifying with DURGOL
Capresso recommends DURGOL for
drip coffee makers. Durgol removes
any calcium deposit up to 20 times
faster than vinegar. Durgol is available
through www.frieling.com.
1. Remove Goldtone Filter and
Charcoal Filter.
2. Fill water container with 18 oz. of
cold water and then add 6 oz.
Durgol.
Important: Make sure the filter
3.
holder is in place and the Stainless
Steel Carafe is empty.
4. Insert the carafe into the machine.
5. Turn the machine on.
6. When the solution has run through,
remove the carafe, empty and rinse
thoroughly.
machine cool down for 5 minutes.
Important: let the
11
Page 12

7. Fill 20 oz. of fresh cold water into
the water tank and brew through
the machine.
9b. Using other Decalcifying Agents
Please make you only use decalcifying agents suitable for drip coffee
makers and follow the instructions
which come with the agent.
10. Troubleshooting
Coffee drips from the spout when
carafe is removed.
• Remove carafe slowly so that the
drip-stop has time to close.
• Remove filter holder and rinse
under running water. Make sure the
drip stop is free of any particles
and seals properly.
Ground Coffee is flowing over the
rim of the Goldtone Filter
• Coffee is ground too fine.
• The Goldtone filter is not clean.
Coffee oils have clogged the fine
holes. Clean the Goldtone filter.
• Use less coffee the next time (see
chapter 5a).
• The drip stop is clogged with
ground coffee particles and the
water cannot pass through fast
enough.
On/Off light does not illuminate
• The carafe needs to be inserted
completely into the machine,
depressing the Safety Switch
on the bottom of the machine
(Fig.9).
The Auto-on light does not illuminate
• The carafe needs to be inserted
completely into the machine,
depressing the Safety Switch on
the bottom of the machine.
11. Supplies
See mail order form which comes
with this machine.
For Durgol decalcifying liquid please
contact www
.frieling.com
12
12. One year Limited Warranty
This limited warranty covers your new
Capresso ST600 coffee maker, model
#490. This warranty is in effect for the
period and usage described above
from the date of the first purchase
and is limited to the United States of
America.
defects in materials or workmanship (parts and labor) including free
UPS ground transportation for both
ways within the continental United
States.
is not covered by this warranty.
TRANSPORT: When sending the
machine, use the original packing
materials, the inner and outer cartons
or use approximately 2” of bubble
wrap and secure the machine properly.
Any damage in transit is NOT covered
by this warranty.
This warranty does not cover:
• Any machine NOT distributed by
CAPRESSO within the United States.
• Any machine not purchased from
an Authorized Dealer.
• Damage caused by accident,
abuse, negligence, misuse, improper
operation or failure to follow instructions contained in this manual.
• Any service or alteration performed
by an unauthorized person, company
or association.
• Damage caused by neglecting and
omitting maintenance, cleaning and
decalcifying.
• Damage caused by ingredients not
allowed in this product.
• Damage to the carafe due to
improper use (see chapter 5c).
Other limitations and exclusions:
Any implied warranties including
fitness for use and merchantability are
limited in duration to the period of the
express warranty set forth above and
no person is authorized to assume for
CAPRESSO any other liability in con
This warranty covers all
For Hawaii and Alaska freight
-
Page 13

nection with the sale of the machine.
CAPRESSO expressly disclaims liability for incidental and consequential
damages caused by the machine. The
terms "incidental damages" refer to
the loss of the original purchasers
time, loss of the use of the machine
or other costs relating to the care and
custody of the machine. The terms
"consequential damages" refer to the
cost of repairing or replacing other
property which is damaged when this
machine does not work properly. Any
loss of income is excluded. The remedies provided under this warranty are
exclusive and in lieu of all others. This
warranty gives you specific legal
rights, and you may also have other
rights which vary from state to state.
Capresso Inc.
81 Ruckman Road
Closter, NJ 07624
201-767-3999
Fax: 201-767-9684
Customer Service: 1-800-767-3554
Email: contact@capresso.com
Website: www.capresso.com
13
Page 14

CAPRESSO Product Registration
ST600 – Model #490
Please complete this registration after you have used your machine for a
few days. Your information will help us to better serve you in the future.
Thank you for buying from CAPRESSO.
P
lease print clearly
Last Name_________________________________________________________________
First Name_______________________________________________ ❑ Male ❑ Female
Address___________________________________________________________________
City_________________________________________State_______Zip________________
Your Email Address_________________________________________________________
Purchased from:
Name of retailer_____________________________________________________________
Purchase Date_______________ Purchase Price $_____________
Reasons for buying this product:
❑ Concept/Features ❑ Design ❑ Stainless steel housing ❑ Print advertising
❑ Store recommendation ❑ Recommended by friend
I drink (mark all that apply):
❑ Regular coffee ❑ Cappuccino ❑ Latte ❑ Espresso ❑ Hot Chocolate
❑ Specialty store ❑ Mail order ❑ Department Store
❑ Website ❑ Received as gift
What other coffee maker did you use before?:
❑ None ❑ Mr. Coffee ❑ Braun ❑ Krups ❑ Cuisinart ❑ Capresso
❑ Other:______________________________
Would you like more information about our products?: ❑ Yes ❑ No
Your annual household income:
❑ Under $50,000 ❑ $50,000 – $100,000 ❑ $100,000 – $250,000 ❑ $250,000 +
Your age group: ❑ Under 25 ❑ 25–40 ❑ 41–45 ❑ 46-55 ❑ 56-65 ❑ 65 +
Any suggestions on how we can improve this product?
___________________________________________________________________________
___________________________________________________________________________
Would you recommend this product to your friends?: ❑ Yes ❑ No
Mail to CAPRESSO Inc., P.O. Box 775, CLOSTER, NJ 07624
or FAX to: (201) 767-9684.
14
 Loading...