

Page 1
Instruction manual for wall chimney hoods
Model codes: ZC920 / ZC620
Contact Caple on 0844 800 3830 or for spare parts www.4caple.co.uk
Page 2

IMPORTANT SAFETY INFORMATION
IMPORTANT SAFETY INFORMATION
**Read the complete manual carefully before installation**
**Read the complete manual carefully before installation**
Intended for Domestic Kitchen Use Only
Intended for Domestic Kitchen Use Only
Warnings:
Warnings:
TO REDUCE HE ISK F IRE LECTRICAL HOCK R ERSONAL NJURY LEASE
TO REDUCE HE ISK F IRE LECTRICAL HOCK R ERSONAL NJURY LEASE
BSERVE HE OLLOWING
BSERVE HE OLLOWING
OTF
OTF
1 Installation and electrical work must be done by a qualified person in accordance with all
1 Installation and electrical work must be done by a qualified person in accordance with all
.
.
applicable codes and standards
applicable codes and standards
2 If the power cord is damaged it must be replaced by the manufacturer its service
2 If the power cord is damaged it must be replaced by the manufacturer its service
., ,
., ,
agent or a similarly qualified person to avoid a hazard Any modifications that may be
agent or a similarly qualified person to avoid a hazard Any modifications that may be
required to the electrical system for the installation of the cooker hood must only be
required to the electrical system for the installation of the cooker hood must only be
made by qualified electricians
made by qualified electricians
3 Before servicing or cleaning unit switch the power off at the service panel Lock panel
3 Before servicing or cleaning unit switch the power off at the service panel Lock panel
., .
., .
to prevent power from being switched on accidentally
to prevent power from being switched on accidentally
4 Use this unit only in the manner intended by the manufacturer
4 Use this unit only in the manner intended by the manufacturer
. .
. .
5 Sufficient air is needed for combustion and exhausting of gases through the chimney of
5 Sufficient air is needed for combustion and exhausting of gases through the chimney of
.
.
fuel burning equipment to prevent back drafting Follow the heating equipment
fuel burning equipment to prevent back drafting Follow the heating equipment
manufacturer's guidelines with safety standards and the local authorities code
manufacturer's guidelines with safety standards and the local authorities code
6 When cutting or drilling into the wall or ceiling be careful not to damage existing
6 When cutting or drilling into the wall or ceiling be careful not to damage existing
.,
.,
electrical wiring and other hidden utilities
electrical wiring and other hidden utilities
TR OF E S OP I P
TR OF E S OP I P
,,
,,
:
:
.
.
.
.
.
.
.
.
,.
,.
.
.
7 Ducted fans must always be vented to the outdoors
7 Ducted fans must always be vented to the outdoors
..
..
8 To reduce the risk of fire use only metal ductwork
8 To reduce the risk of fire use only metal ductwork
.,.
.,.
9 This unit must be earthed
9 This unit must be earthed
..
..
TO REDUCE HE ISK F ANGE OP REASE IRE
TO REDUCE HE ISK F ANGE OP REASE IRE
1 Never leave surface units unattended at high settings Boil overs cause smoke and
1 Never leave surface units unattended at high settings Boil overs cause smoke and
..-
..-
greasy spillovers that may ignite Heat oils slowly on low or medium settings
greasy spillovers that may ignite Heat oils slowly on low or medium settings
2 Always turn the hood ON when cooking at high heat
2 Always turn the hood ON when cooking at high heat
..
..
3 Clean ventilating fans frequently Grease should not be allowed to accumulate on fan or
3 Clean ventilating fans frequently Grease should not be allowed to accumulate on fan or
..
..
filter
filter
4 Use correct pan size Always use cookware appropriate for the size of the surface
4 Use correct pan size Always use cookware appropriate for the size of the surface
..
..
element
element
TR OAR TG F
TR OAR TG F
..
..
.
.
.
.
:
:
Page 3
WARNING
TO REDUCE THE RICK OF INJURY TO PERSONS IN THE EVENT OF A GREASE FIRE
OBSERVE THE FOLLOWING,:
1 SMOTHER FLAMES with a close fitting lid cookie sheet or metal tray and then turn off
.-,,
the burner If the flames do not go out immediately evacuate and call the fire
department
2 NEVER PICK UP A FLAMING PAN You may be burned
..–.
3 DO NOT USE WATER including wet dishcloths or towels a violent steam explosion will
., –
result
4 Use an extinguisher ONLY if
.:
.,
.
.
You know you have a Class ABC extinguisher and you know how to operate it
Thefireissmallandcontainedintheareawhereitstarted
The fire department is being called
Youcanfightthefirewithyourbacktoanexit
.
.
.
.
CAUTION
1 To reduce the risk of fire and to properly exhaust air be sure to duct air outside
.,.
Do not vent exhaust air into spaces within walls or ceiling or into attics crawl
spaces or garages
2 Take care when using cleaning agents or detergents
..
3.
Avoid using food products that produce flames under the cooker hood.
4. The cooker hood must only be used for the exhaust of cooking fumes in home kitchens.
The manufacturer disclaims all liability for any other use of the appliance.
5. Two installers are recommended because of the large size and weight of this hood.
6. Use with approved cord-connection kit only.
7. Please read specification label on product for further information and requirements.
.
,
Page 4
INSTALLATION INSTRUCTIONS
Before You Start...
1. Read this manual carefully and completely.
2. The cooker hoods conform to related appliances standards. Please check your local building codes for any
additional requirements.
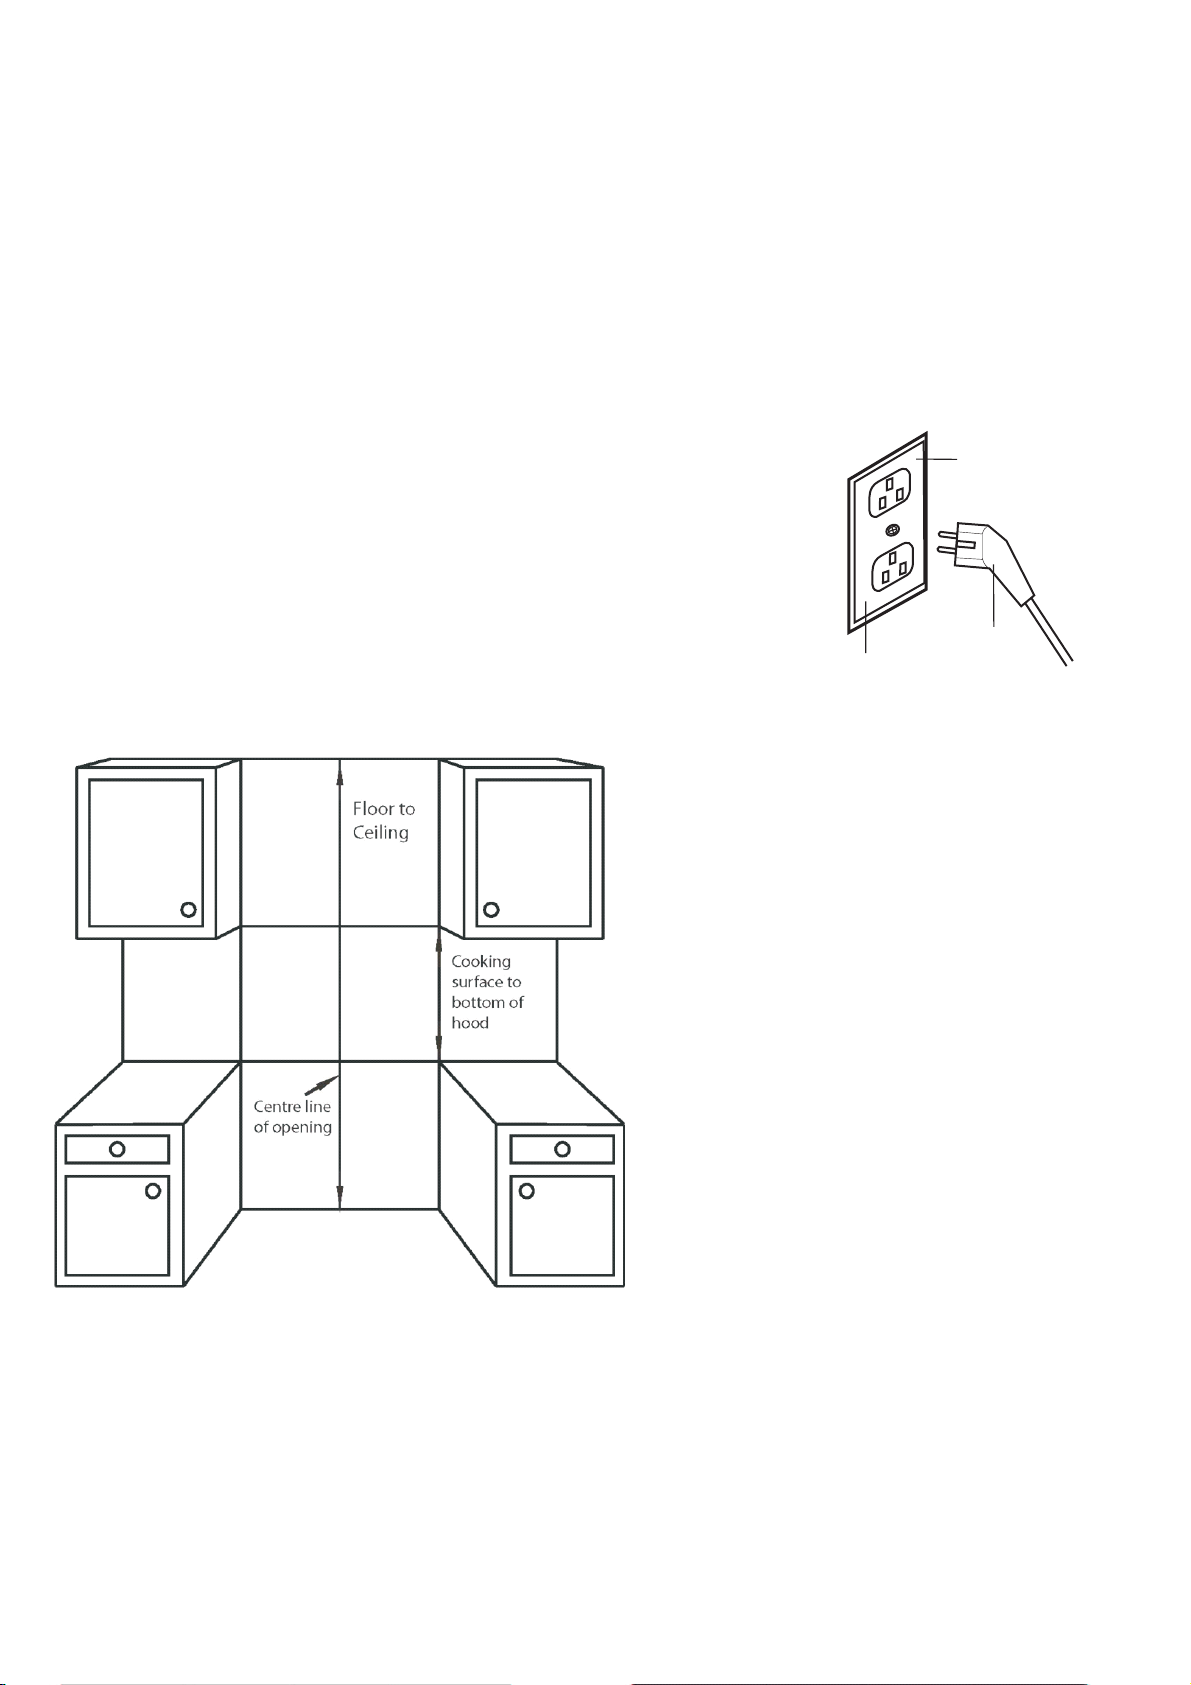
3. The appliance has been manufactured as class I, therefore earthed connection is necessary. The cooker hood
must be installed so that the plug is easily accessible.
Earthed
Outlet Box
Planning Your Installation
Earthed Plug
Earthed
Outlet
1. Measure the floor to ceiling height. This hood
can be installed on walls between 8” and 9” tall.
2. Find the centre point of your opening. Mark a
plumb line through this point from ceiling to your
range/cook-top.
3. Check your range/cook-top User Manual for the
minimum distance above your cooking surface.
The minimum distance between any element or
flame height and the nearest combustible surface
is 61cm (24”).
4. Decided where the ductwork will run between
the hood and the outside. Short, straight duct runs
will provide the most air flow.
5. If a recirculating kit is necessary, you may
purchase one through your dealer.
Unpacking
Remove the packaging with the product in place. Cut off the packing ribbons and carefully cut open the packaging
(do not cut too deeply), remove the packaging. Check that the product is free from transport damage. Any damage
shall be reported immediately to the carrier or retailer. Damage, faults and missing parts must be reported
immediately to the retailer
Page 5

Installing the Ductwork
1. Plan where the ductwork will run between the hood and the outside. The
hoods exhaust vertically but can be ducted to the rear behind the chimney
duct through an outside wall or vertically up through the ceiling to the
roof. A short straight duct run will produce the most air flow. Length and
elbows will reduce the efficiency of the blower.
2. Install a roof or wall cap. Connect a 6” round metal duct to the cap and
work backwards toward the hood. Ensure joints are completely sealed
with duct tape.
Fixing to the Wall
1. Before mounting the hood, plug in and test all functions for correct
operation.
2. Remove the filters from the bottom of the hood to prevent damage during
the installation.
to roof cap
decorative
chimney duct
to wall cap
hood
210
20
3. With assistance, hold the hood temporary in position ensuring the bottom
is above the minimum clearance for the cooking surface. Mark on the
wall the holes for the two mounting screws.
4. Drill the holes (A) at the distances indicated. Use the appropriate screws
and screw anchors for your wall type (e.g. reinforced concrete, drywall,
etc.). If necessary, prepare back wall with cross framing for secure
installation.
5. Mount the hood on the wall screws. Align it in a horizontal position
relative to cabinets. When the hood has been adjusted, secure unit by
tightening screws (A).
Connect a 6” aluminum duct tube (not included) to the exhaust piece
6.
using duct tape on all seals. (C)
Fixing the Decorative Chimney
Flu
1
.
Carefully losen but do not separate the telescopic chimney duct pieces.
230
A
C
2
.
Arrange the electrical power supply within the dimensions of the
decorative chimney duct.
3
.
Adjust the width of the support bracket to match the upper duct. Fix it
to the ceiling using the screws (B) so that it is centered in line with your
hood and at a distance from the ceiling indicated.
Page 6

Installing Guideline
Wall Mounted-
1200~1700mm
650~700mm
Duct-out
Note: The above installation guideline for references only, please contact your local dealer
for a installation service.
Leveling Device
When mounting the hood on the wall,the level can be adjusted by turning the two screws on the motor
housing.
Page 7

INSTALLATION ALTERNATIVES
The cooker hood can be installed in the following ways:
Circulating indoor air (A)
Outdoor venting (B)
A
REMEMBER!
B
The distance between the top of the hob and the lowest part of the cooker
hood must be at least 65 cm.
If a two-part connection tube is used, the lower section must sit outside the
upper sec tion.
Do not connect the cooker hood exhaust to a duct used to circulate hot air or
vent steam from another appliance.
Always use protective gloves when installing the appliance!
Page 8

USE AND CARE INSTRUCTIONS
Operations
1. For optimum performance in removing cooking odors, it is recommended that you turn on your cooker hood
prior to cooking and you leave it operating for 15 minutes after cooking.
2. Clean the surfaces of the cooker hood regularly using a non-abrasive detergent.
3. The anti-grease filters capture the grease particles suspended in the air. They will accumulate grease and dirt
depending on the frequency of the use of your range/cook top.
4. In order to prevent a fire hazard, it is recommended that you clean the aluminum filter at least every 2 months
WARNINGS: Do not attempt to remove the filters while the Cooker Hood is
operating.
Disconnect the electrical plug prior to any maintenance.
This appliance is not intended for use by young children or infirm persons without
supervision.
There should be adequate ventilation in the room when the Cooker Hood is used at
the same time as other fuel burning appliances.
DESCRIPTION OF THE CONTROLS
Electronic Control.
1
1
Touch
Touch
Touch 3 seconds
2
Touch
Touch
Touch 3 seconds
3
Touch
3
2
Low speed setting
Off
Medium speed setting
Off
High speed setting
Delay off timer 5 min.
Delay off timer 5 min.
Touch
Touch 3 seconds
Off
Delay off timer 5 min.
Page 9

CARE AND CLEANING
General
Regular maintenance is required to ensure that the
cooker hood functions properly. This is especially true
of the grease and charcoal filters.
Clean the fan and other surfaces of the cooker hood
regularly with a cloth dipped in denatured alcohol or a
non-abrasive liquid cleaner.
The charcoal filter cleans the circulating air in the
room. Such filters cannot be cleaned or recycled and
must be replaced at least every four months. The speed
at which the charcoal filter becomes saturated depends
on how often the fan is used, the type of food that is
cooked and how often the grease filter is cleaned.
To prevent the risk of fire and to ensure that the cooker
hood functions properly, the grease filter must always
be cleaned as instructed below when the display
indicates the need or at least every two months.
Cleaning the grease filter
Remove the flter from the cooker hood and clean it in a
solution of water and neutral cleaning liquid. Leave the
flter to soak in the solution for a while.
Replacing the charcoal filter (standard
hood)
Replace the charcoal filter (standard hood) as
follows:
Remove the grease filter.
Squeeze the clips on the charcoal filter a pull the
charcoal filter back to remove it.
Replacing the charcoal filter (for hood
with sloping surface)
1. Press the middle of the right edge of the glass cover
to open it
Rinse thoroughly with hot water and leave the filter
-
to dry.
The filter can also be cleaned in a dishwasher. The
-
color of the grease filter may change after a few
washes. This is normal.
NB:
If you clean the grease flter in the
dishwasher: load only the grease flter
and no other ite ms as foo d parti cles from
dishes can fas ten in th e filter.
Page 10

Emptying and cleaning the fat collector (For these fitted with a fat collector)
The fan is fitted with a fat collector that collects fat from the fan blades and fan housing.
1. Remove the grease f ilt er and the charcoal filt er (if fitted).
2. Remove the fat collector and clean it in warm water with washing up liquid. It can
also be cleaned in a dishwasher.
DO NOT le t dirt build up on th e hood
DO NOT use steel wool or steel brushes to clean the hood
DO NOT leave salt solutions, disinfectants, bleaches or cleaning compounds on
the hoo d for any length of t ime a s they may damage t he stainless st eel . Rinse
after u se with clean wat er an d wipe dry with a cle an cloth.
Replacing th e bulbs
Depending on your model of hood, there are two possible types of lighting, halogen and LED. The illumination
is designed for use during cooking and not for prolonged general illumination of your kitchen. Prolonged use of
the lights may reduce the life time of the bulbs.
WARNING: Do not touch or change light bulbs while the hood is
operating. Wait until the bulb has cooled before removing.
Use only the same bulbs as the original specification. Replacement lights are available through the dealers.
Halogen and LED Lights.
With the grease filter removed, from inside the hood press the light fixture out of its mounting bracket. Unplug
the light from the wiring harness. Avoid direct contact between the lense and your hands.
Replace the damaged lamp by reversing the steps. Snap in place.
Replace the bulbs as follows:
1. Lift up and remove the light fitting with a screwdriver or other suitable tool.
Page 11

2. Remove the blown halogen bulb (if the fan has 4 bulbs = 10W, 2 bulbs = 20W). Remember that the bulb can
be hot!
3. Insert the new halogen bulb.
If you touch the halogen bulb with your bare hands this may reduce its service life. Always use a glove or a cloth
to avoid direct contact.
NB:
The light is only meant for use during cooking and not for illuminating the surroundings for longer periods. If
the light is used for longer periods, this will considerably shorten the burn time of the bulbs.
Recycling
This appliance complies with European Community directive 2002/96/EC, Waste Electrical and Electronic
Equipment (WEEE). By ensuring that this product is recycled responsibly, the user helps prevent possible
negative impact on the environment.
NB:
Dispose of this product responsibly. Irresponsible disposal can result in negative environmental impact or
personal injury.'
Under no circumstances may this extractor fan be disposed of as household waste. It must be taken to a recycling
centre for electrical and electronic equipment.
This product must be disposed of in accordance with local legislation.
For more information on disposal, recycling and reuse of this product, contact your local authority, your
household waste collection service or the store where you purchased the product
For reliable service and original parts:
Tel 0844 800 3830
:
Website www caple co uk
:. ..
Page 12

Hood Size:
300
300
320
320
560 1050~
60
500
3
2
1
600
560-1050
60
500
900
Page 13

Trouble Shooting Guide
Problem
Hood doesn't turn on.
Poor Airflow
Hood is vibrating
Motor running but no
air flow
Motor stops after a few
minutes
Possible Reason Solution
No electrical supply.
Power cord is damaged
Aluminum grease filters clogged
Charcoal filters clogged.
Re-circulating mode only.
Hood is not secured in place
Butterfly valve jammed.
High temperature safety device
activated.
The hood is installed too near the
cooking surface.
Check the plug is connected.
Check the main switch is turned
on.
Contact your service technician
Clean the filters and replace
when dry.
Replace the charcoal filters.
Check the installation of hood.
Tighten mounting screws.
Contact your service technician
The kitchen is not sufficiently
ventilated.
The hood must be at least
61cm (24”) from the stove
Strong cooking smell.
Oil dripping onto stove.
Whirring sound
Lights are working but
fan isn't
Fan is working but lights
are not
Fan speed too low
Charcoal filters not installed.
Aluminum grease filter saturated.
Something in contact with fan blade.
Use one of the higher settings.
In re-circulating mode, charcoal
filters must be installed.
Wash the aluminum grease
filters
Contact your service technician
Contact your service technician
Contact your service technician
GUARANTEE AND SERVICE!
Before booking a service call,read the Trouble Shooting Guide above , for more information on
guarantee and service conditions, please contact local dealer.
 Loading...