

Page 1
Waste Disposers
WD050
WD065
WD075
1 INSTALLATION
The installation of a Food Waste Disposer is very simple. Please read through the entire
installation manual before commencing installation.
Damage caused by incorrect installation is not covered by warranty.
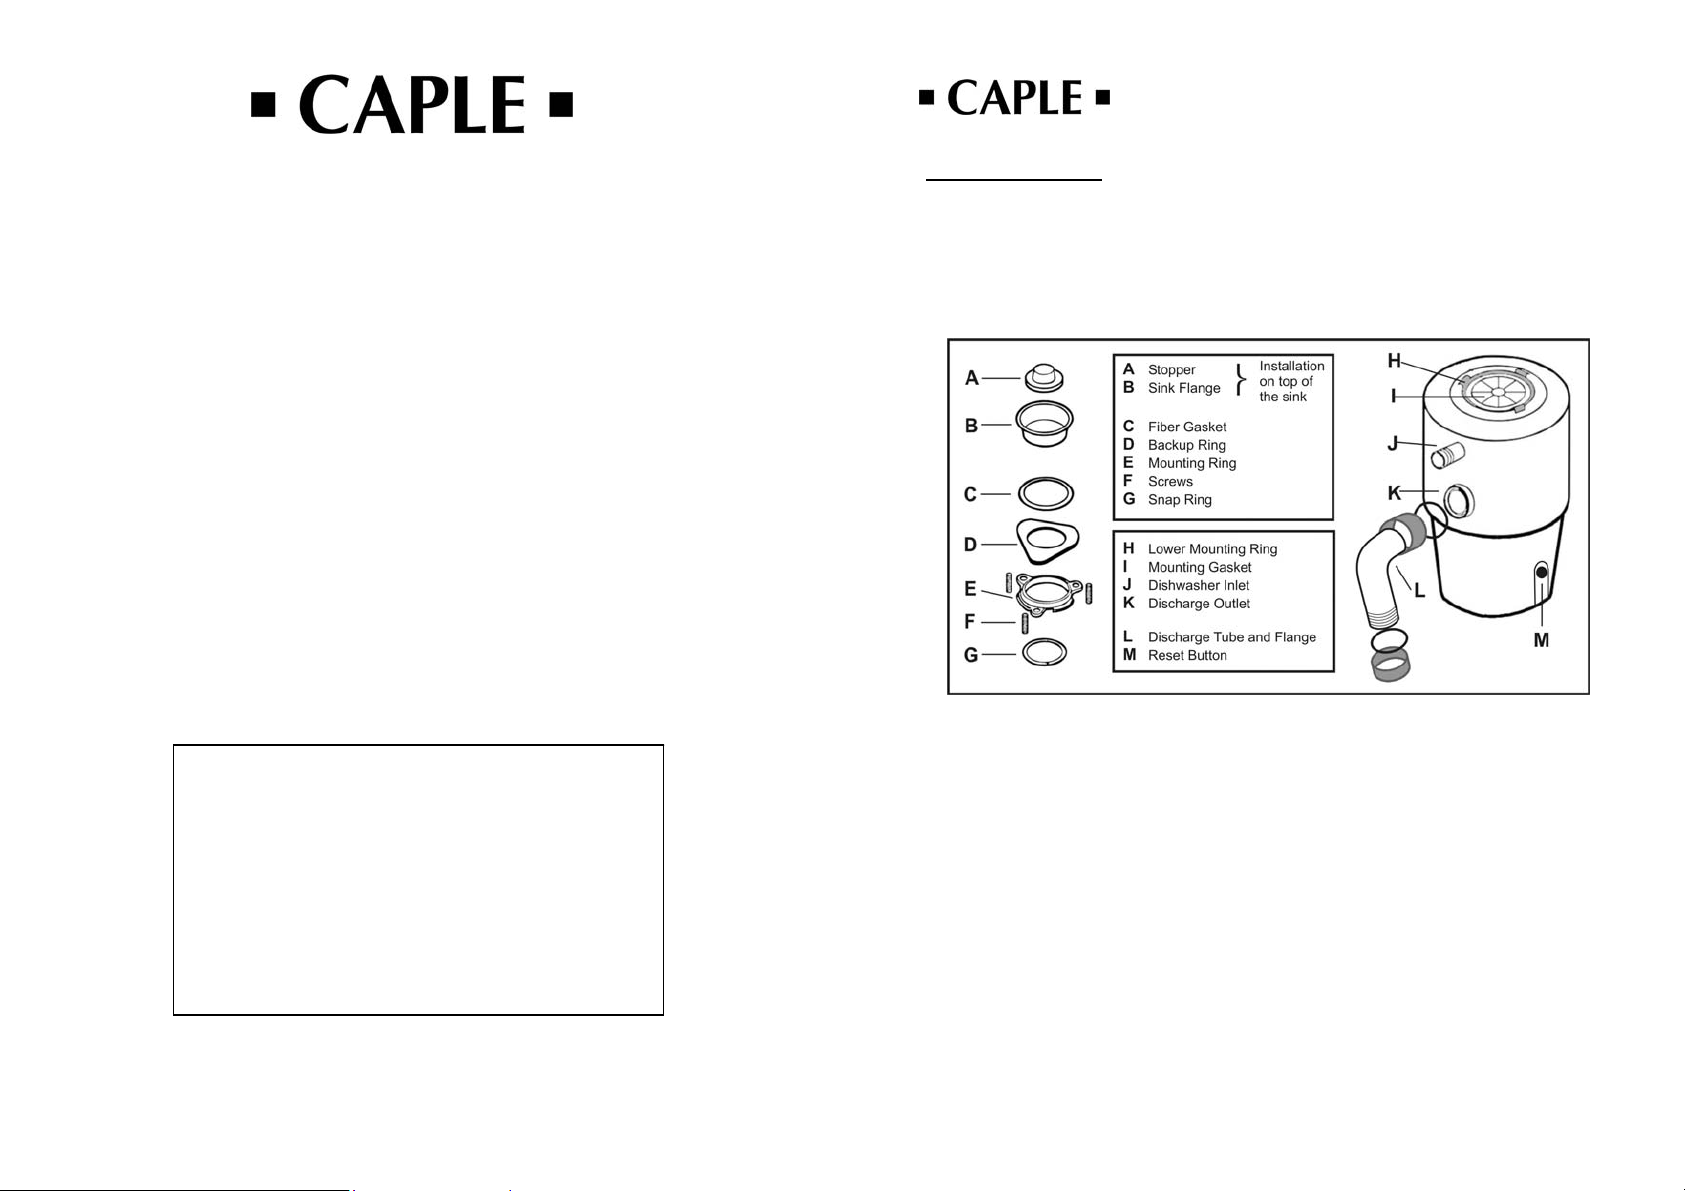
1.1 Guide to the Disposer:
Food-Waste-Disposer
Operating
Instructions
1.2 Installation tools
Page
CONTENTS
Installation 2
Connection to Electrical Supply 7
Operating instructions 9
Safety instructions 10
Accessories 10
Care Instructions 10
• Screwdriver
• Hammer
• Hacksaw
• Pipe Wrench
1.3 Installation materials
• Caple Waste Disposer
• Dishwasher Drain Connection Kit
• Silicone sealant & putty
• Drain connecting pipework
1.4 Installation
1.4.1 Preparation
Ensure the power is disconnected.
Turn off the water.
2
Page 2
Waste Disposer Installation Manual
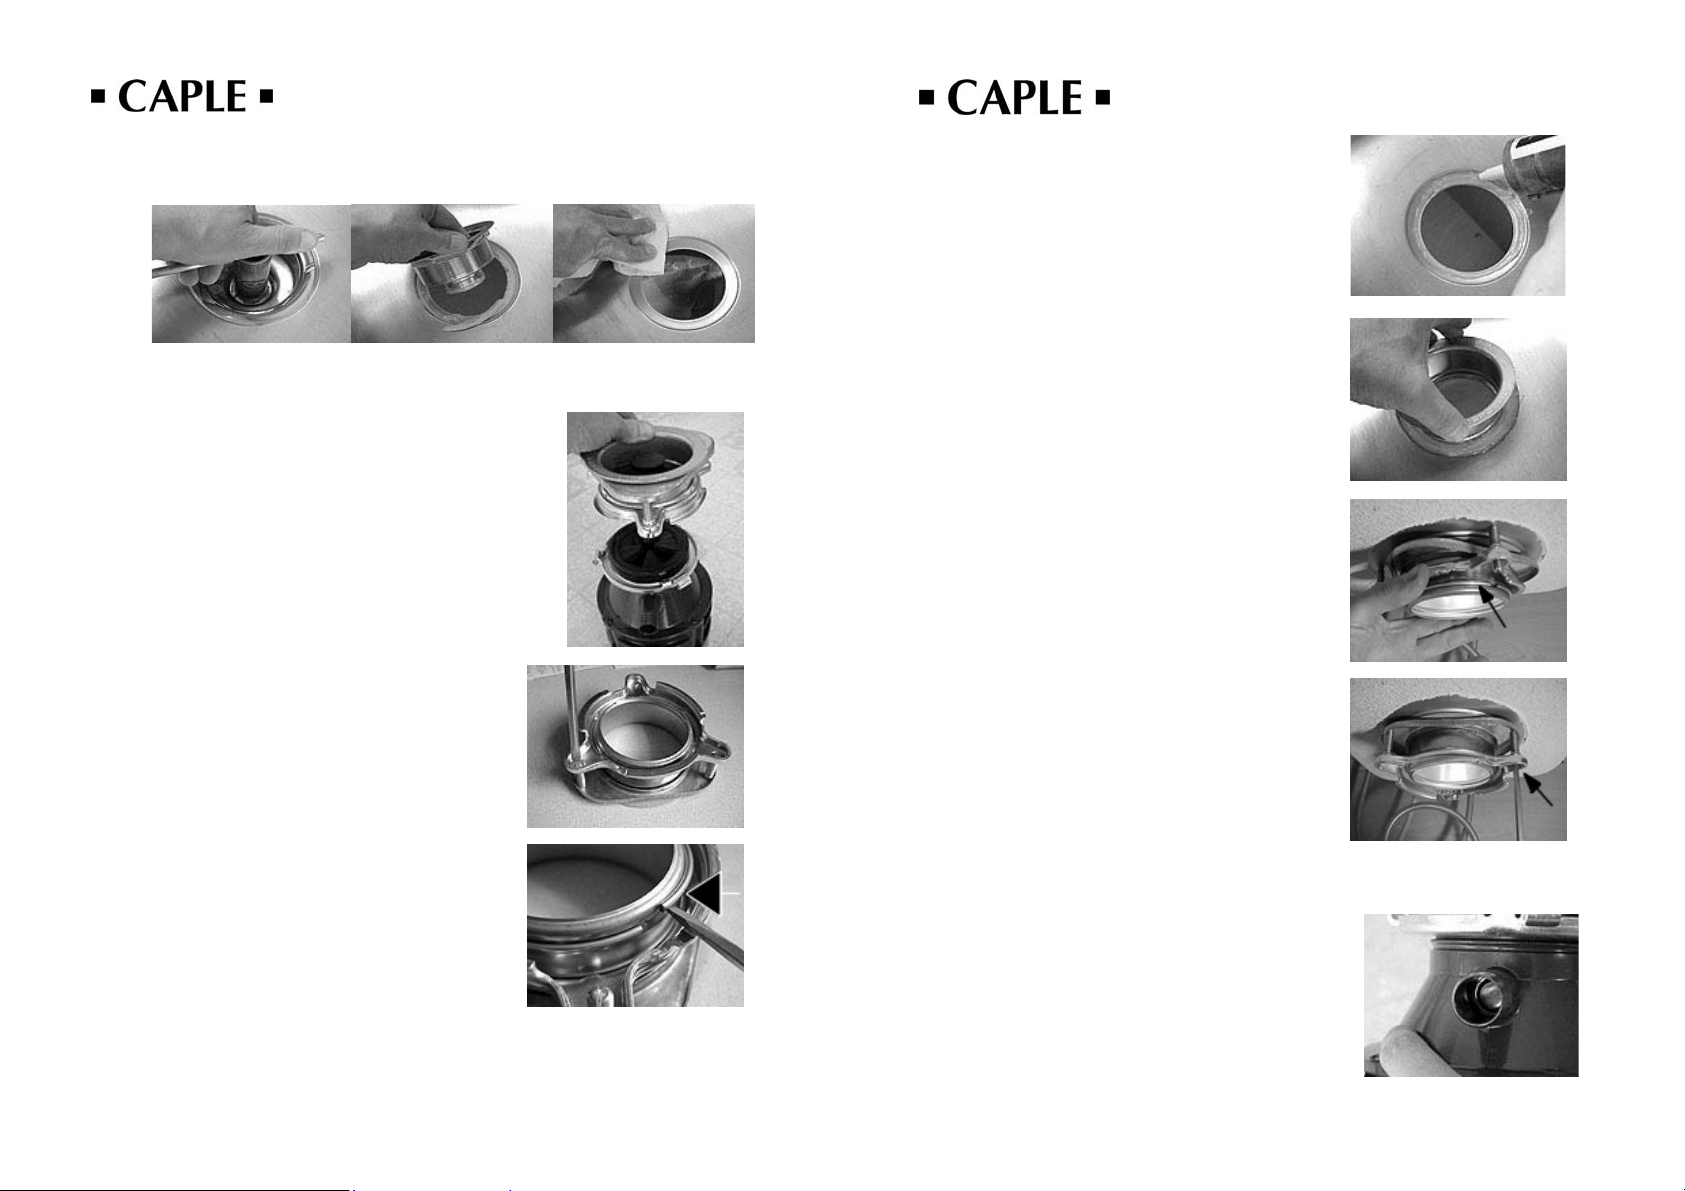
1.4.2 Remove the Existing Sink Waste
Remove the existing waste from the sink outlet. Remove the old sealing compound from
the hole and clean the surface. (Figure 1)
Food-Waste-Disposer
After cleaning the rim of the sink outlet apply a
thin bead of clear silicone.
Figure 1 Figure 2 Figure 3
1.4.3 Install the Flange into the Sink Hole
The Caple Food Waste Disposer comes
with an assembled mounting flange.
Remove the upper part (see drawing on
Page 2, parts A-G) by opening the upper
mounting ring. Insert a screwdriver into the
mounting lug and hold the lower mounting
ring while you turn the mounting assembly
counterclockwise to remove.
Turn the mounting assembly over and
loosen the three screws to gain access to
the snap ring (G).
Lever off the snap ring with a screwdriver.
Take the bracket apart.
Now you have 4 parts (refer to the drawing
on page 2 for the correct sequence).
Place the sink flange (B) into the hole, applying
pressure while you make the next step.
Place the fibre gasket (C) and triangular-shaped
backup ring (D) on the stem of the top flange, slip
the mounting ring (E & F - with the three screws)
over the top and install the snap ring (G) –
(stopping the flange from moving).
Put on the upper mounting ring (E) and tighten the
screws (F) that hold the assembly together.
Dishwasher Connection
To open the dishwasher inlet (J), tap the end of a
screwdriver handle with a hammer until the
knockout plug breaks loose.
3
4
Page 3

Waste Disposer Installation Manual
Food-Waste-Disposer
IMPORTANT
Remove the loose knockout plug
from inside the Disposer.
1.4.4 Connect the Disposer to the Mounting Bracket
Now you can install the Food Waste Disposer onto the
newly installed mounting bracket.
The lower mounting ring (which is part of the Disposer) has
3 tabs that hold the lower mounting ring (H) :
1) the flange
2) the tab that holds onto the flange
3) the “ear” that is used to rotate the lower ring
Install the dishwasher drain hose onto the
disposer inlet (j).
1.4.6 Silicone
After the silicone has dried, cut any surplus away
with a sharp knife
The Waste Disposer is now ready for use.
IMPORTANT
Ensure that the 3 tabs
Disposer is fixed.
are tightened and the
1.4.5 Plumbing Connections
The waste pipes can now be reconnected.
5
6
Page 4

Waste Disposer Installation Manual
Food-Waste-Disposer
1.5.CONNECTION TO ELECTRICAL SUPPLY
IMPORTANT
Before connecting your Waste Disposer to the electricity supply, make sure the
grinder runs freely and there are no foreign objects in the grinding chamber.
The Disposer should be connected to a single phase 220/240V
power supply, controlled by a switch and should be a safe
distance from wet areas. We recommend the use of our
air-switch (Part No: AIR)
1.5.1 Air-switch
Product code. AIR
The air-switch is a safety device that isolates the user from the
waste disposer’s electrical components.
1.5.1.1 Installation of the Air Switch Button
Find a suitable position near the sink for
the operating button.
Make sure that there is sufficient space
underneath to turn the securing nut.
Drill a hole, 35mm into the worktop.
Seal the sides with a thin film of silicone and fix the
operating button.
IMPORTANT
The lower side of the air hose is often difficult
to reach.
It is recommended that you connect the air
hose before you insert the operating element.
1.5.1.2 Connection
Connect the Air Hose to the Air Switch.
Plug the Air Switch into the socket and plug the Waste Disposer into the Electric Switch.
1.5.2 Wall Switch
The power outlet where the disposer is plugged in must be switched by a double pole switch.
We recommend the use of a push button so the disposer runs only while the button is
depressed.
7
8
Page 5

Waste Disposer Installation Manual
Food-Waste-Disposer
2....OPERATING INSTRUCTIONS
• Insert food waste into the sink and turn on the cold water.
• Switch the Disposer on.
• After grinding is complete, turn the disposer off and run water for a few seconds
to flush.
2.1 You can grind:
• Most food refuse
• Peelings from most vegetables and fruits
• Tea bags and coffee pods
• Bones and egg shells
2.2 Do not:
• Grind materials other than organic waste (e.g. plastics, metal, glass etc.)
• Grind extremely fibrous materials (e.g. asparagus, corn husks etc.) as they
can cause drain blockage.
• Pour too much fat into the Disposer – it can build up in pipes and cause a
blockage.
• Use hot water while grinding.
• Overfill the Disposer.
• Put fingers into the Waste Disposer while it is in operation.
• Turn off the disposer before grinding is completed.
IMPORTANT
Periodically inspect the disposer and plumbing fittings for water
leaks.
Damage as a result of water leaks is not covered by warranty.
3 SAFETY INSTRUCTIONS
• Before touching the disposer, be sure that every electrical connection is
disconnected.
• Use a wooden utensil to remove any obstructions from the grinding chamber.
• Replace the stopper when your Waste Disposer is not in use to avoid foreign
objects falling into the grinding chamber.
4.ACCESSORIES
4.1.Air Switch
Product code: AIR
Air Switch to fit into the worktop.
Chrome effect
5 CARE INSTRUCTIONS
The Disposer will be cleaned by normal and correct daily use but you can also:
• Grind some ice-cubes.
• Citrus fruit peelings will deodorize the Disposer and remove drain
smells.
9
10
Page 6

Waste Disposer Installation Manual
Caple Products
Fourth Way
Avonmouth
Bristol, BS11 8DW
Phone: 0870 606 9 606
Fax: 0800 373163
info@caple.co.uk
http://www.caple.co.uk
11
 Loading...