

Page 1

Instruction manual for integrated fridge
Model code:RIR178
Contact Caple on 0844 800 3830 or for spare parts www.4caple.co.uk
Page 2

Contents
Cautions---------------------------------------------------------------------------------------1~2
Diagram----------------------------------------------------------------------------------------3
Preparation------------------------------------------------------------------------------------4~5
Operation--------------------------------------------------------------------------------------6
Instruction-------------------------------------------------------------------------------------7~10
Defrosting,cleaning and de-commissioning------------------------------------------11~12
Trouble shooting----------------------------------------------------------------------------13
Page 3
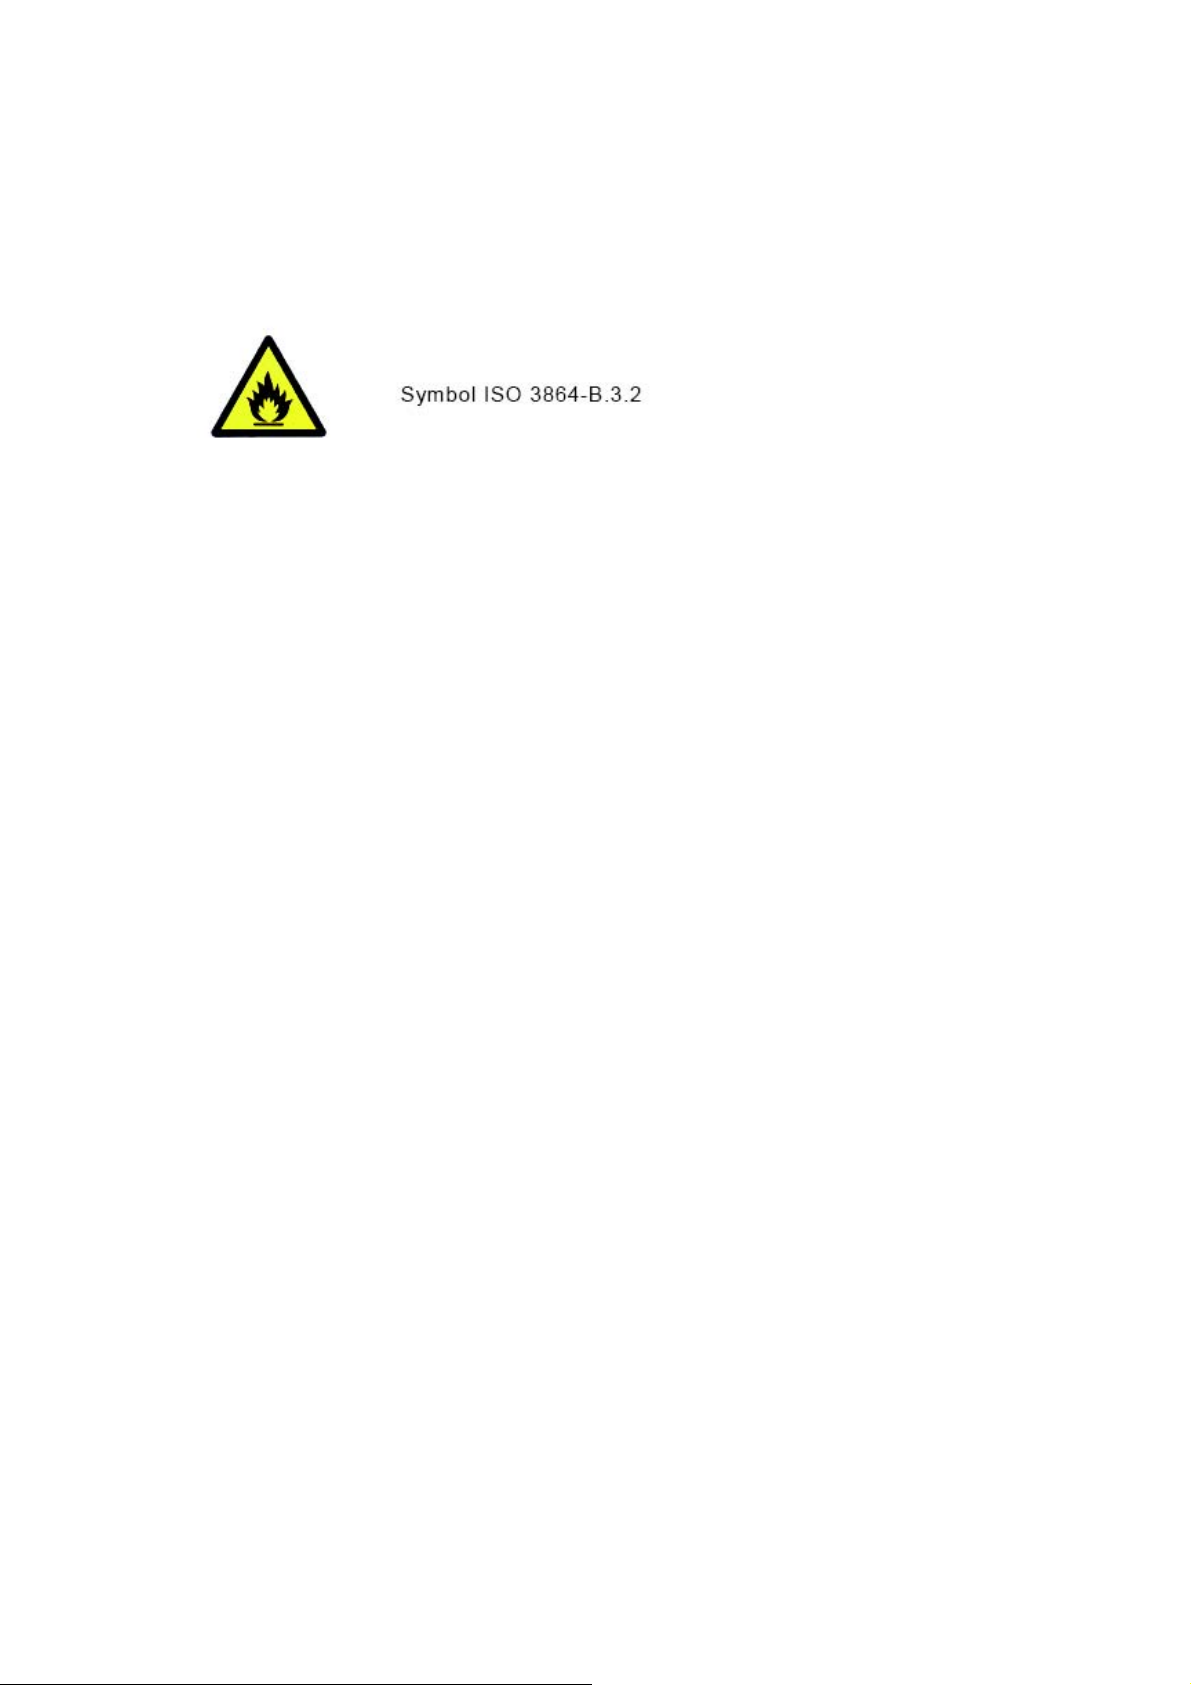
1. Compression-type appliances which use flammable refrigerants shall be marked
with the
symbol “Caution: risk of fire”.
Caution:risk of fire
The height of the triangle in the symbol “Caution: risk of fire” shall be at least 15 mm.
2.
– WARNING: Keep ventilation openings, in the appliance enclosure or in the built-in
structure, clear of obstruction.
– WARNING: Do not use mechanical devices or other means to accelerate the defrosting
process, other than those recommended by the manufacturer.
– WARNING: Do not damage the refrigerant circuit.
– WARNING: Do not use electrical appliances inside the food storage compartments of
liance, unless they are of the type recommended by the manufacturer.
app
the
Do not store explosive substances such as aerosol cans with a flammable propellant in
this appliance.
3.
If the supply cord is damaged, it must be replaced by a special cord or assembly available
from the manufacturer or its service agent.
This appliance is not intended for use by persons (including children) with reduced physical,
sensory or mental capabilities, or lack of experience and knowledge, unless they have been
n supervis
give
ion or instruction concerning use of the appliance by a person responsible for
their safety.
Children should be supervised to ensure that they do not play with the appliance.
Page 4

Cautions
Disposal of the old appliance
Before disposing an old appliance, please make sure it’s inoperative and safe. Unplug
the appliance and remove or destroy all of the springs, latches, or bolt-locks in order to
avoid the risk of child entrapment.
It must be noted that the refrigeration system contains insulating gases and refrigerants,
which require specialized waste disposal. The valuable materials contained in a refrigerator can be recycled. Contact your local waste disposal center for proper disposal of
an old appliance and contact your local authority or your dealer if you have any question. Please ensure that the pipe work of your refrigerator dose not get damaged prior to
being picked up by the relevant waste disposal center.
Disposal of the packaging of your new appliance
All the packaging materials employed in the package of your new appliance may be
disposed without any danger to the environment.
The cardboard box may be broken or cut into smaller pieces and given to a waste paper
disposal service. The wrapping foil is made of polyethylene and the polyethylene pads
and stuffing contain no fluorochloric hydrocarbon.
All these valuable materials may be taken to a waste collecting center and used again
after adequate recycling.
Consult your local authorities for the name and address of the waste materials collecting centers and waste paper disposal services nearest to your house.
Safety Instructions and Warnings
Before starting the appliance, read the information given in the User’s Guide carefully.
The User’s Guide contains very important observations relating to the assembly,
operation and maintenance of the appliance.
Keep the User’s Guide in a safe place and remember to hand it over to the subsequent
owner, if you ever sell the appliance.
The manufacturer does not accept responsibility for any damages that may arise due to
non-observation of the following instruction.
*Damaged appliances are not to be put into operation. In case of doubt ,consult your
supplier.
1
Page 5
is to be carried out in strict compliance
2
Page 6
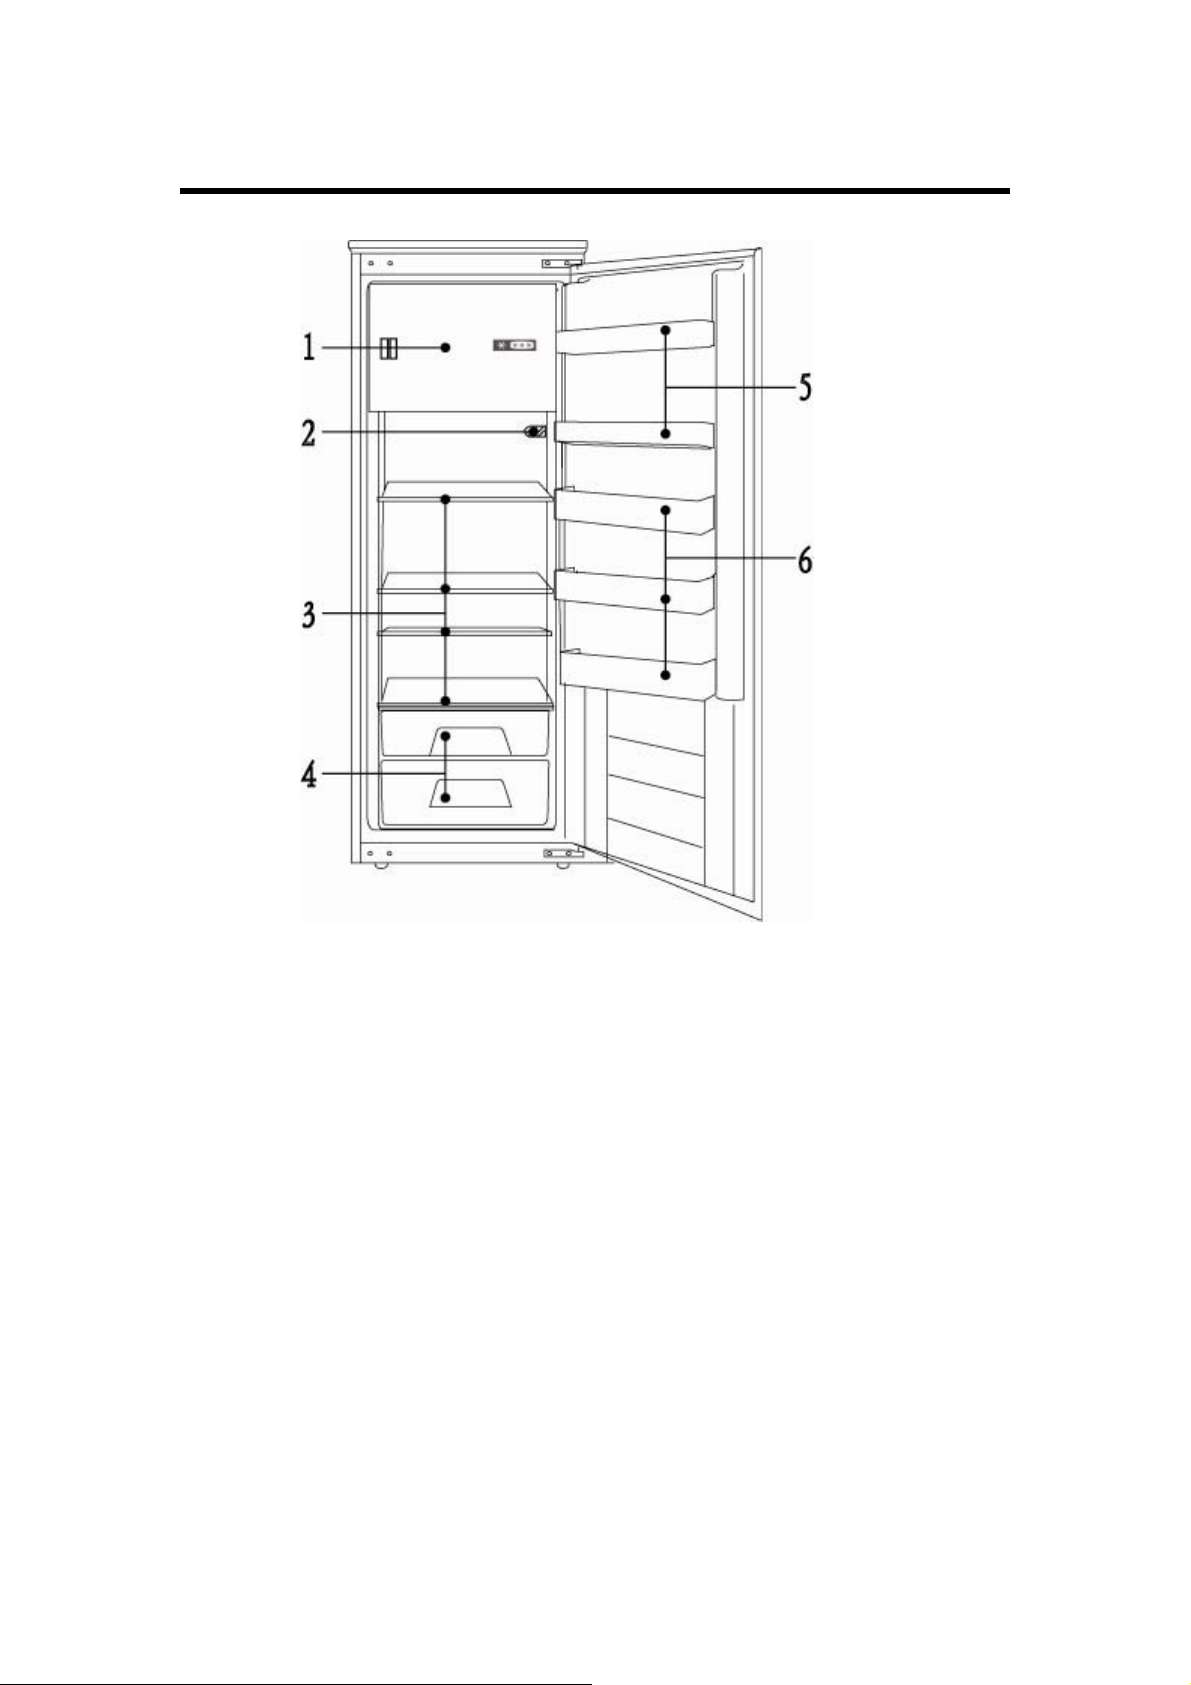
Refrigerator Diagram
1.Freezing compartment 2.Temperature Controller
3.Shelves 4.Vegetable and fruit tray
5.Egg tray 6.Bottle racks
This diagram may vary slightly with the layout of the refrigerator you
have
just purchased due to technical improvements.
3
Page 7

Preparation
Unpacking
Remove all packing materials.
Check attachments and materials
Checking should be conducted with reference to the Packing List. Contact the local
distributor if discrepancies are found.
Ensure proper location of the refrigerator.
Clean the refrigerator before use.
(See the following section “Cleaning”)
Idle time
After the refrigerator has been sited and cleaned, let it stand for more than 12 hours
before connecting the power source.
Ventilation(Figure 1)
*Level the kitchen cabinet unit with a spirit level and a
try square. Level the unit by placing packing material
underneath if required.
*A minimum gap of 38mm must be maintained at
the back of the appliance for ventilation.
*Air inlet A must be at least 200 cm square and
air must flow through the panel in the cabinet
plinth.
*Check that the position of the power socket (1)
is correct. AC voltage in the location at which
the appliance is to be used must comply with
that as shown on the data plate located on the
left inside wall of the appliance next to the
vegetable bins. The p
itably earthed.
su
ower supply must be
(Figure 1)
4
Page 8
Preparation
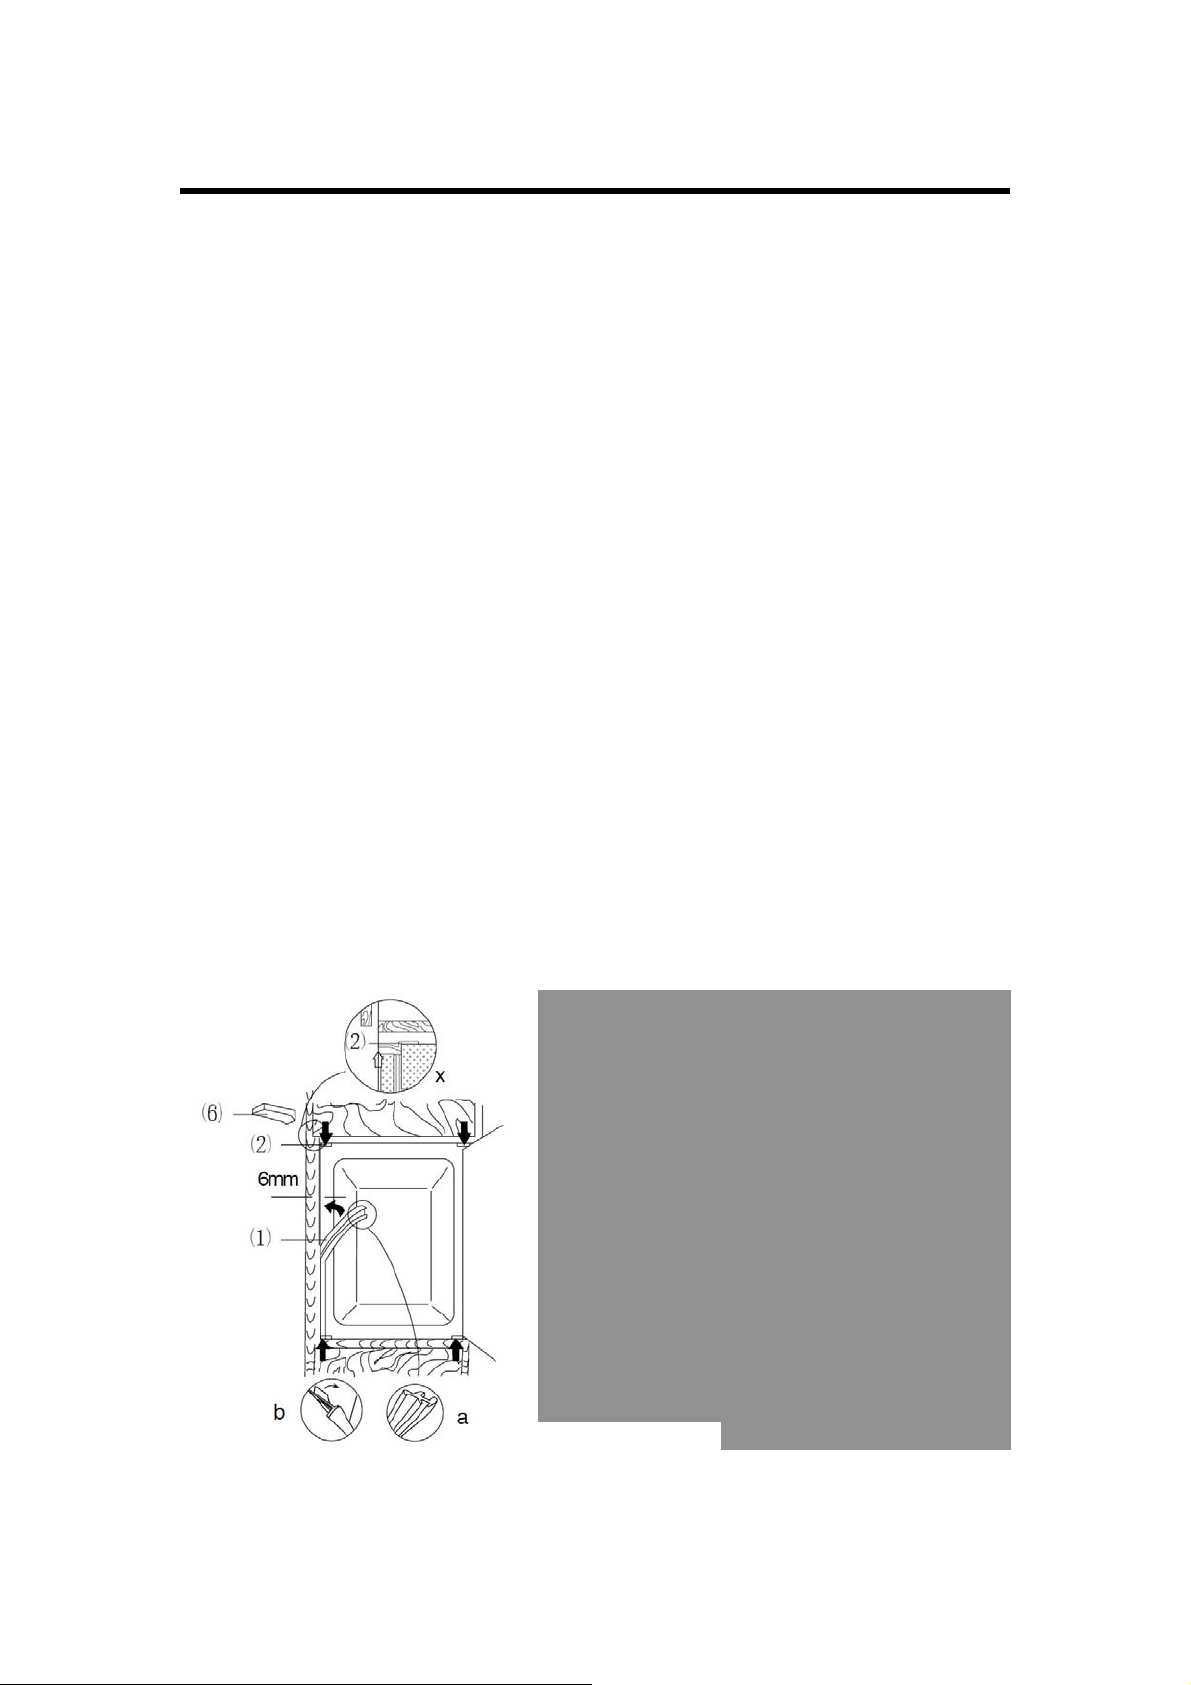
Installation(Figure 2)
1.Check that the kitchen unit door is in the correct operating position.
2.Run the mains cable through the unit such that it can be connected to the power supply
after installing the appliance. Remove the cover (6) only if space is restricted.
3.Place the refrigerator into the kitchen unit. Fix the mountings (1) with screws (2) onto the
upper frame when two third of the refrigerator has been pushed in. Then push the
refrigerator in completely, ensuring that the gib clamp of the mountings stuck on the
horizontal frame of the kitchen unit. Adjust the position of the refrigerator making a 6mm
space between inside wall of the kitchen unit and external sides of the refrigerators. Fix
the mountings to the horizontal frame of the kitchen unit with screws.
4.Insert the seal in the aperture (approx. 10mm) between the lower front frame and bottom
board of the kitchen. Fix lower mountings (3) to the lower front frame with screws (2). Fix
the lower mountings to the bottom board of the kitchen unit with screws (2).
5.Properly insert seals in the apertures on the left, upper and right sides of the refrigerator.
6.Fix the door to the holders (4) (each upper and lower position has one) with screws (2).
Press close the doors of the refrigerator and of the kitchen unit, and then completely
open the doors, and then place the connecting plate (5)to the corresponding holder and
fix it to the door of the kitchen unit (space between the connecting plate and the edge of
the kitchen unit "t" equals to the thickness of the external board of the kitchen unit, about
20mm).Adjust the connecting element so that the handle side of the kitchen unit door
does not make contact with the unit body when closed. (Approximately 1mm gap for
large appliances), mount the second door connecting element where appropriate.
7.Plug the open hole in the appliance door.
5
(Figure 2)
Page 9

Caution: Some time will be required for the refrigerator to reach the set level when
temperature adjustments are made. The length of this period is determined by
difference in the existing and set temperatures, the ambient temperature, the
frequency with which the door is opened and closed and the amount of food in
storage.
℃
Caution: If ambient temperature is below 16
Controller”.
, please turn on the “Low-temp
Loading the refrigerator with food
When the refrigerator is switched on, do not load
food until 1~2 hours have passed. Usually, food
for cold storage or deep freezing can be loaded
when the temperature inside the compartment
reaches the set point.
Temperature Controllor
Page 10

Instructions
Cold storage is for short-term food
Storage or for daily consumption.
Although the temperature in most parts of the cold
storage compartment can be regulated between 0
and 10 degrees Centigrade, extended periods of
food storage is not recommended. Cold storage
should only be used for short-term storage.
Cold storage compartment
1. Eggs and butter
2. Pickled food and seasonings
3. Beverages and bottled food
4. Food to be frozen
5. Cookies, cooked food and milk
6. Meat and sausages
7. Fruits, vegetables and salads
6
Page 11

7
Shelf cleaing
Lamp & Replacement:
Lamp: 240V, 10W
Lamp holder: E14 (lamps exceeding 15W
must not be used)
* For replacement, unplug to disconnect the
power
* Remove the lamp by turning anti-clockwise
Page 12

8
Page 13

9
Making ice cubes
Page 14

10
Page 15

11
Prolonged power failure
Page 16

become damp.
12
stays
work
Dry food
Page 17

13
Page 18

Installation guide for built-in refrigeration
Please carefully read this guide before installing the appliance.
Page 19

x
xx
y
yy
z
zz
Page 20

Model X Y Z XX YY ZZ
RI734 540 1773 - 1778 540 550 - 560 1774 - 1782 560 2
RI733
RIR177
RI555 540 1773 - 1778 540 550 - 560 1774 - 1782 560 2
RI554 540 1773 - 1778 540 550 - 560 1774 - 1782 560 2
RIL177 540 1773 - 1778 540 550 - 560 1774 - 1782 560 1
RIF177 540 1773 - 1778 540 550 - 560 1774 - 1782 560 1
RIL122 540 1222 - 1224 540 550 - 560 1225 - 1233 560 1
RIF122 1
RIL88 540 873 - 875 540 550 - 560 874 - 882 560 1
RIF88 540 873 - 875 540 550 - 560 874 - 882 560 1
550 1773 - 1778 540 560 1774 - 1782 560 2
540 1773 - 1778 540 550 - 560 1774 - 1782 560
540 1222 - 1224 540 550 - 560 1225 - 1233 560
1
1
2
2
Page 21

20 2 - 4 - 1 1 1,8m 411 1
20 2 - 4 - 1 1 1,8m 411 1
14 2 1 4 - 1 1 1,3m 2 1 - -
14 2 1 4 - 1 1 1,3m 2 1 - -
12 214 1 - - 0,9m 2 1 - -
12 214 1 - - 0,9m 2 1 - -
Model
RI734
RI733
RIR177 20 2 - 4 - 1 1 1,8m 411 1
RI554 20 2 1 4 - 1 1 1,8m 411 1
RI555 20 2 1 4 - 1 1 1,8m 411 1
RIF177 20 2 1 4 - 1 1 1,8m 4 1 - -
RIL177 20 2 1 4 - 1 1 1,8m 4 1 - -
RIL122
RIF122
RIF88
RIL88
3
Page 22

4
3
4
5
2
1
Page 23

56 6
Page 24

7
 Loading...