

Page 1

RiF871RiF871
RiF871
RiF871RiF871
Domestic RefrigeratorDomestic Refrigerator
Domestic Refrigerator
Domestic RefrigeratorDomestic Refrigerator
Operation InstructionsOperation Instructions
Operation Instructions
Operation InstructionsOperation Instructions
Contents
Cautions---------------------------------------------------------------------1~2
Refrigerator diagram--------------------------------------------------------3
Preparation-----------------------------------------------------------------4~6
Operation-------------------------------------------------------------------7~8
Instructions---------------------------------------------------------------9~10
Defrosting-Cleaning -De-commissioning----------
Questions and Answers ---------------------------------------------13~14
-----
--------11~12
No. 0711 1398
Page 2

Cautions
Disposal of the old appliance
Before disposing an old appliance, please make sure it’s inoperative and safe. Unplug
the appliance and remove or destroy all of the springs, latches, or bolt-locks in order to
avoid the risk of child entrapment.
It must be noted that the refrigeration system contains insulating gases and refrigerants,
which require specialized waste disposal. The valuable materials contained in a refrig-
erator can be recycled. Contact your local waste disposal center for proper disposal of
an old appliance and contact your local authority or your dealer if you have any ques-
tion. Please ensure that the pipe work of your refrigerator dose not get damaged prior to
being picked up by the relevant waste disposal center, and contribute to environmental
awareness by insisting on an appropriate, any-pollution method of disposal.
Disposal of the packaging of your new appliance
All the packaging materials employed in the package of your new appliance may be
disposed without any danger to the environment.
The cardboard box may be broken or cut into smaller pieces and given to a waste paper
disposal service. The wrapping foil is made of polyethylene and the polyethylene pads
and stuffing contain no fluorochloric hydrocarbon.
All these valuable materials may be taken to a waste collecting center and used again
after adequate recycling.
Consult your local authorities for the name and address of the waste materials collect-
ing centers and waste paper disposal services nearest to your house.
Safety Instructions and Warnings
Before starting the appliance, read the information given in the User’s Guide carefully.
The User’s Guide contains very important observations relating to the assembly,
operation and maintenance of the appliance.
Keep the User’s Guide in a safe place and remember to hand it over to the subsequent
owner, if you ever sell the appliance.
The manufacturer does not accept responsibility for any damages that may arise due to
non-observation of the following instruction.
*Damaged appliances are not to be put into operation. In case of doubt ,consult your
supplier.
1
Page 3

Cautions
*Connection and installation of the appliance are not to be carried out in strict compliance
with the relative instructions set forth in the Use’s Guide.
*For the purpose of safety ,the appliance must be properly grounded in accordance with
specifications.
*Always remember to unplug the appliance before cleaning.To disconnect the appliance,
pull at the plug itself not the cord.
*Keep alcoholic beverages in airtight bottles or containers and always store in an upright
position. In addition, do not store any explosive substances inside the appliance-Danger
of explosion!
*Do not damage any parts of the appliance that carry refrigerant by piercing or perforating
the refrigerant’s grooves with sharp or pointed items,crushing or twisting any tubes, or
scraping the coatings off the surfaces. If the refrigerant spurts out and gets into eyes, it
may result in serious eye injuries.
*Do not obstruct or cover the ventilation grille of the appliance.
*Do not allow children to play with the appliance. In no case should children be allowed to
sit on the drawers or hang onto the door.
*Warning: Keep ventilation openings in the appliance enclosure or in the structure for
building in ,clear of obstruction.
*Warning: Do not use mechanical devices or other means to accelerate the defrosting
process, other than those recommended by the manufacturer.
*Warning: Do not damage the refrigerant circuit.
*Warning: Do not use electrical appliances inside the food storage of the appliance.
* It is necessary to have the plug accessible after installation.
* If the supply cord is damaged, it must be replaced by a supplied cord or assembly
available from the manufacturer or its service agent.
* Connection of power supply and installation should be conducted in accordance with the
instructions in the operation manual.
* Only the tools regulated by the manufacturer can be used for defrosting.
Specifications
*This appliance is designed for food refrigeration, ice making and frozen food storage.
*It is intended strictly for household use. If using it for industrial or commercial purpose ,
be sure to observe the relevant norms and regulations.
*The refrigerating circuit is leak-proof.
2
Page 4

Refrigerator Diagram
1
2
3
1.Control Panel
2.Sliding labels
3.Drawers
This diagram may vary slightly with the layout of the refrigerator you
have just purchased due to technical improvements.
3
Page 5

Preparation
Unpacking
Remove all packing materials.
Check attachments and materials
Checking should be conducted with reference to the Packing List. Contact the local
distributor if discrepancies are found.
Ensure proper location of the refrigerator.
Clean the refrigerator before use.
(See the following section “Cleaning”)
Idle time
After the refrigerator has been sited and cleaned, let it stand for more than 30 minutes
before connecting the power source
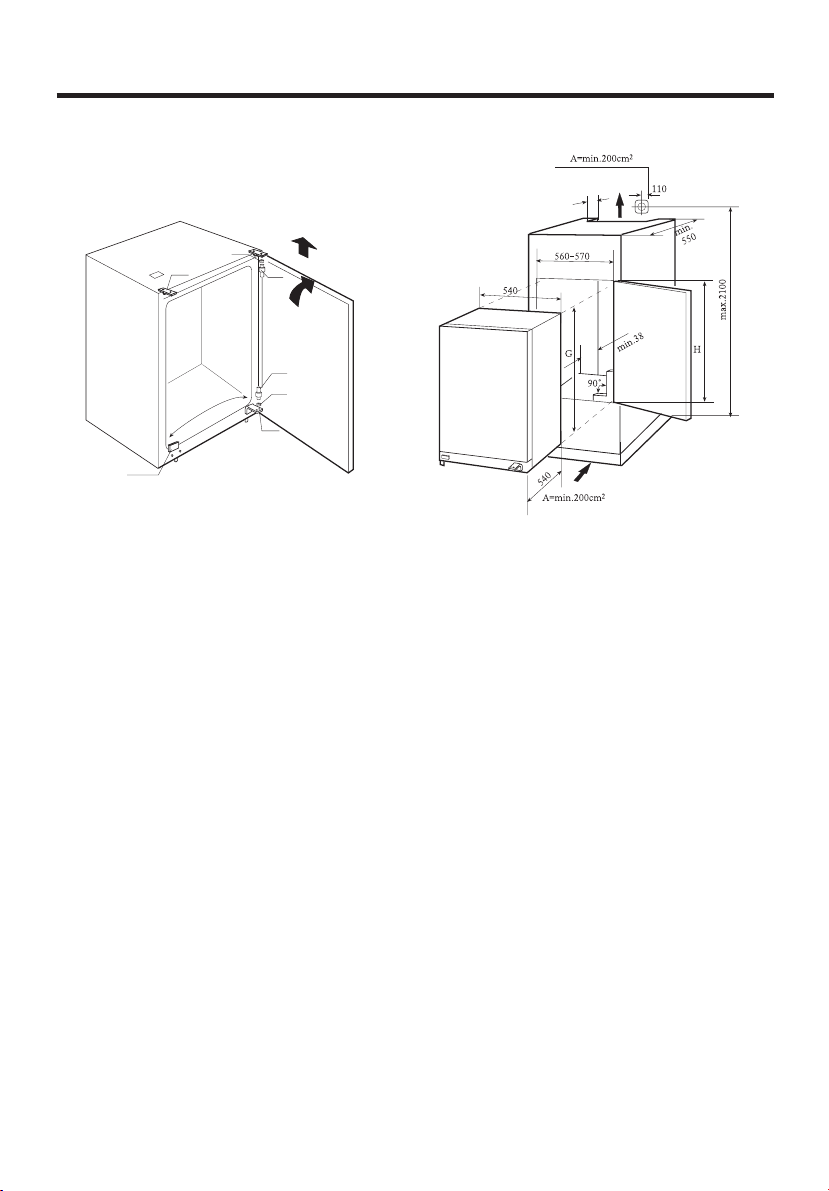
Left/Right Door Opening
The door of the refrigerator can be opened both from the left or right as required. The
following are the steps required to position the door to open to the right.
1. Remove the lower bracket (1) on the right, the door and the screw hole cover (4).
2. Remove the lower bracket pivot (3) and the spring washer(2), and then place and fix
them in the hole on the left of the lower bracket.
3. Remove the cover (5) on the upper brackets on both left and right sides; remove the
bracket pivot on the right side and the spring washer and then fix them in the bracket
hole.
4. Fix the door between the upper and lower brackets on the left and fasten the lower
bracket by tightening the screws.
5. Fix the screw hole cover in the lower bracket hole on the right, and then fix the upper
bracket covers to the upper brackets on the left and right.
6. After installation open and close the door to ensure the door operates smoothly.
((
(Figure A
((
))
)
))
4
Page 6
Preparation
⑸
⑷
⑴
⑵
⑶
⑶
⑵
⑴
(Figure A)
Ventilation
*Level the kitchen cabinet unit with a spirit level and a try square. Level the unit by placing
packing material underneath if required.
*A minimum gap of 38mm must be maintained at the back of the appliance for ventilation.
*Air inlet A must be at least 200 cm square and air must flow through the panel in the
cabinet plinth.
*Check that the position of the power socket (1) is correct. AC voltage in the location at
which the appliance is to be used must comply with that as shown on the data plate
located on the left inside wall of the appliance next to the vegetable bins. The power
supply must be suitably earthed.
((
(Figure B
((
))
)
))
(Figure B)
5
Page 7

Preparation
Installation
1.Check that the kitchen unit door is in the correct operating position.
2.Run the mains cable through the unit such that it can be connected to the power supply
after installing the appliance. Remove the cover (6) only if space is restricted.
3.Place the refrigerator into the kitchen unit. Fix the mountings (1) with screws (2) onto the
upper frame when two third of the refrigerator has been pushed in. Then push the
refrigerator in completely, ensuring that the gib clamp of the mountings stuck on the
horizontal frame of the kitchen unit. Adjust the position of the refrigerator making a 6mm
space between inside wall of the kitchen unit and external sides of the refrigerators. Fix
the mountings to the horizontal frame of the kitchen unit with screws.
4.Insert the seal in the aperture (approx. 10mm) between the lower front frame and bottom
board of the kitchen. Fix lower mountings (3) to the lower front frame with screws (2). Fix
the lower mountings to the bottom board of the kitchen unit with screws (2).
5.Properly insert seals in the apertures on the left, upper and right sides of the refrigerator.
6.Fix the door to the holders (4) (each upper and lower position has one) with screws (2).
Press close the doors of the refrigerator and of the kitchen unit, and then completely
open the doors, and then place the connecting plate (5)to the corresponding holder and
fix it to the door of the kitchen unit (space between the connecting plate and the edge of
the kitchen unit "t" equals to the thickness of the external board of the kitchen unit, about
20mm).Adjust the connecting element so that the handle side of the kitchen unit door
does not make contact with the unit body when closed. (Approximately 1mm gap for
large appliances), mount the second door connecting element where appropriate.
7.Plug the open hole in the appliance door.
((
(Figure C
((
))
)
))
⑹
⑵
6mm
⑴
⑵
⑵
x
b
a
(Figure C )
⑵
⑶
⑴
⑵
⑵
⑷
⑸
t
⑵
6
Page 8

Operation
Starting the refrigerator
*Before storing the food in a new appliance,
start the appliance four hours in advance;
*Connecting the power: The green indicator (2)
and the red warning indicator (1) blink after
the refrigerator is connected to the power
supply. This is designed to prevent accidental
disconnection of the power supply.
*The red warning indicator goes out when the
temperature inside the refrigerator reaches the
desired temperature.
Adjusting the temperature
*The temperature inside the refrigerator is
adjusted by turning the temperature
controller clockwise. Using a coin to turn
the temperature controller to desired
position.
(1) (2) (3)
Starting the refrigerator
Adjusting the temperature
7
Page 9
Operation
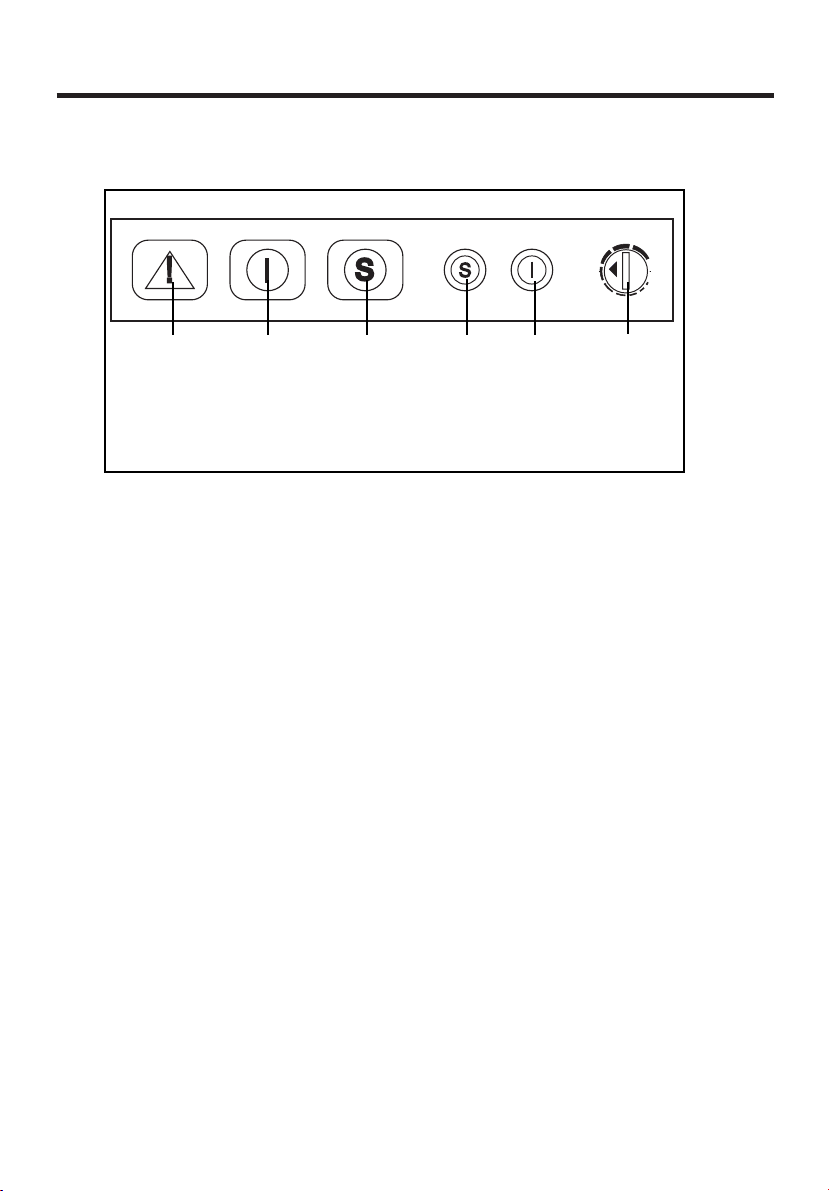
Introduction to the Main Control Panel
(3)(2)(1)
(1) Red indicator
(2)Green indicator
(3)Yellow indicator
Green indicator(2)
The green indicator blinks when the
refrigerator is connected to the power
supply.
If the green indicator goes out, please
check the bulb. If the yellow indicator (3)
blinks, the bulb is broken. If the yellow
indication goes out, please check:
If the power switch is turned on;
If the plug is loose or the fuse is broken.
Please contact qualified electrician for the
any problems detected.
Yellow indicator(3)
When the quick freezing switch (4) is
turned on, the yellow indicator blinks and
the quick freezing system is operative
and the desired temperature will be
reached. When the quick freezing
function is reset, the yellow indicator
goes out, and the quick freezing function
is terminated. Please see the section of
Quick Freezing hereafter.
(4)
(4)Quick freezing switch
(5)Power switch
(6)Temperature controller
(5)
(6)
Red warning indicator(1)
The red warning indicator blinks when
the temperature inside the refrigerator
is below the required temperature.
This is commons when the refrigerator
is first started, or a large volume of
fresh food is placed for freezing
storage.
Circumstances above mentioned are
not problems, and the red indicator will
go out automatically when the tempera-
ture is reached. If the red indicator
blinks in the process of normal opera-
tion, please check: if the door if prop-
erly closed, the fresh food has just
been placed inside, or may have
occured power failure. Please contact
the closet authorized technician for
abnormal circumstances.
8
Page 10

Instructions
Long-term storage of food
As the freezer storage temperature is below 18℃, bacterial actively stops. Food requir-
ing long-term storage can be stored in the frozen food compartment. Attention should
be paid to the storage information printed on the food packing.
Quick frozen food storage
To maintain the nutrition, flavor and shape of the food to be stored, freeze it as quickly
as possible in the quick freezing compartment.
*Operate the quick freezing system (6 hours in advance)
for fresh food: turn the quick freezing switch (4) and the
yellow indicator (3) blinks. (the quick freezing function does
not need to be operated when a small amount of food,
10% less than the designed freezing capacity, or frozen
food is to be stored. )
*The food to be quickly frozen should be placed separately
in more than one drawer.
*The food will become completely frozen 24 hours later.
Then turn the quick freezing switch (4) to close the function
and the yellow indicator (3) goes out..
(4)(3)
Frozen food storage
*The recommended weight of fresh food should not be
excesive 2 kg .
*Hot food should not be stored in the refrigerator until it has
cooled down to room temperature.
*Food cut into small portions will freeze faster and be easier
to defrost and cook. The recommended weight for each
portion is less than 2.5kg.
*The outside of any food packing should dried before
storage in the freezer, and any packing materials should
be odor-free, airtight, non-poisonous and nontoxic.
Attention shall be made for the information on the packing.
*Only remove the required amount of food from the
refrigerator. Defrosted food cannot be re-stored in the
freezer unless it is first cooked.
* Do not put in bottled beer or drinks.
9
Page 11

Instructions
49
Making water-Ice
*Pour water into the water ice mould up to three-
quarters of the mould volume, and then place
the mould in the freezing compartment.
*Do not a use knife or other metal tools to take
the ice out of the mould.
*The ice can be easily removed by hand after
the mould has been placed in warm water for a
short time.
Method to take out the drawers
Pull inward first and then raise slightly as
shown in the figure.
Using marks and sliding labels on
the drawers
*The front side of each drawer is labeled with
information on the correct foods for storage, and
the storage limit in months to ensure freshness
and edibility. Decimal figures mean the period
of freshness storage, and capital figures indicate
the period for edibility storage period.
*The figures indicate the acceptable storage
periods for chicken, beef, shrimps and lamb.
Within a 4 month period freshness can be
guaranteed. Food stored for a period in excess
of 9 months must not be eaten. When placing
food in the refrigerator, move the sliding label
to indicate the type of food stored in the drawer
as a reminder and indication of the acceptable
storage period.
10
Page 12

Defrosting-Cleaning-De-commissioning
Defrosting
*Manual defrosting is needed for the cold
storage compartment. After the
refrigerator is used for a period of time, a
layer of ice will form on the evaporator in
the compartment. Additional power will
be consumed if the thick layer of ice is
formed. The ice should cleaned manually
with a plastic tool when the ice layer is
thick enough.
*For defrosting, disconnect the power
supply and remove all the food inside and
the drawers and place them back when
defrosting process if completed. Placing
a bowl of hot water on the evaporator will
help shorten the period of defrosting.
Caution: Never use a metal tool or electrical heather for defrosting.
Cleaning
The refrigerator should be cleaned regularly to prevent the formation of bad odors.
*Disconnect the power before cleaning the refrigerator.
*Do not use a hard brush, steel brush, detergent, gasoline or other solvents, hot water,
acid or alkali for cleaning.
*Wipe water drops on the surface of the refrigerator with a soft cloth.
1) Do not use excessive amounts of water for cleaning the refrigerator.
2) Use a dry cloth to clean the switch, the lamp and the temperature controller.
* Always keep the rubber door seal clean
* Clean the back and sides of the refrigerator regularly.
11
Page 13

Defrosting-Cleaning-De-commissioning
Power failure
Even in summer, food can be stored in the refrigerator for a few hours after a power
failure.
* Don’t put additional food into the refrigerator during a power failure.
* Avoid opening the door during power failures.
* If prior notice of a power failure is given, make some ice and put it in a container in the
top of the cold storage compartment.
* Caution: temperature in the refrigerator will rise during a power failure or in the event of
technical problems, and the storage period will be reduced.
Cessation of Operation
*If the power failure lasts for an extended period, unplug the refrigerator and clean the
refrigerator as previously described.
*Keep the door of refrigerator open when the power is turned off to prevent any food
remaining in the compartment from producing bad odors.
Caution: It is recommended that the refrigerator is not turned off.
During Vacations
* Remove any food from refrigerator is the vacation is short. Turn the temperature selection
knob to the proper position, and make sure that the door of the refrigerator is properly
closed.
* If the vacation is long, take out the food from the refrigerator and disconnect the power.
When the frost inside melts, clean and dry the compartment.
Discarding
* Remove the door of the refrigerator when you get rid of it, in case children may get
trapped in.
Moving the refrigerator
* Unplug the refrigerator
* Remove any food
* Tightly close the door with tape
12
Page 14

Questions and Answers
Events below are not problems:
*The temperature of the refrigerator and the compressor will rise and the compressor will
run for comparatively longer periods when the refrigerator is first start.
*Wipe water drops on the external surface of the refrigerator with a soft cloth.
*When the refrigerator is opened frequently or stay open too long in humid seasons, the
cavity will be dampened.
*A slight sound will be heard when the liquid refrigerant circulates or when the compressor
switches on and off.
*The compressor will operate for comparatively longer periods if excessive quantities of
food are stored or the ambient temperature is high.
*The external sides of the refrigerator become worm.
Caution:The refrigerator should never be restarted until a period of at least
five minutes has elapsed.
13
Page 15

Questions and Answers
Please determine the cause of the problem before making any
repairs.
Phenomena Causes
* Bad connection to power source (plug, socket and fuse)
Refrigerator will not
start.
* The temperature knob is at the 0 position
* Low voltage
Excessive noise.
Compressor operates
for a long period or
temperature does not
reach set point.
Food dry
Strange odor
Thick frost on frozen
food
* Uneven placement
* Contact between the refrigerator and a wall or other article
* First time of operation
* Excessive food stored
* Frequent opening of the refrigerator door due to hot
weather
* The temperature controller is not set properly
* Refrigerator is in direct sunlight, or close to a heat source
* Poor ventilation, or dirt on the condenser
* Food not properly covered or sealed
* Failure to seal food properly
* Rotting food inside refrigerator
* Refrigerator should be cleaned. See “Cleaning”
* Door is not properly closed.
* Frequent opening of the refrigerator door
* Frost inside food bags is normal
14
 Loading...