

Page 1

Contact Caple on 0117 938 7420 or for spare parts www.caple.co.uk
Built in 70/30
Fridge Freezer
instruction manual
RI7305
Page 2

Instruction manual Ri7305
Please keep this instruction manual for future reference
2
CONTENTS
Warnings 3
Installation Warnings 6
During Usage 7
Environmental Protection 8
Electrical Connection 9
Ventilation Requirements 10
Description Of The Appliance 11
Using The Appliance 12
Operating your Fridge Freezer 13
Caple Fresh 15
Humidity Controlled Drawer 16
Easy adjustable door balcony 16
Food Storage 17
Cleaning And Maintenance 23
Transport And Repositioning 25
Troubleshooting 25
Energy Saving Tips 28
Technical Fiche 29
Page 3

Instruction manual Ri7305
Please keep this instruction manual for future reference
3
WARNING:
- Keep ventilation openings, in the appliance enclosure
or in the built-in structure, clear of obstruction.
- Do not use mechanical devices or other means to
accelerate the defrosting process, other than those
recommended by the manufacturer.
- Do not use electrical appliances inside the food
storage compartments of the appliance, unless they
are of the type recommended by the manufacturer.
- Do not damage the refrigerant circuit.
- In order to avoid any hazards resulting from the
instability of the appliance, it must be fixed in
accordance with the following instructions
If your appliance uses R600a as a refrigerant
(this information will be provided on the label
of the cooler) you should take care during
transportation and installation to prevent the
cooler elements from being damaged. R600a
is an environmentally friendly and natural gas,
but it is explosive. In the event of a leak due
to damage of the cooler elements, move your
fridge away from open flames or heat sources
and ventilate the room where the appliance is
located for a few minutes.
Page 4

Instruction manual Ri7305
Please keep this instruction manual for future reference
4
- While carrying and positioning the fridge, do not damage
the cooler gas circuit.
- Do not store explosive substances such as aerosol cans
with a flammable propellant in this appliance.
- This appliance is not designed for commercial use, it is
a household appliance only. It is not intended to be
used in:
- Staff kitchen areas in shops, offices and other working
environments.
- Bed and breakfast type environments;
- By clients in hotels, motels and other residential type
environments.
- If the socket does not match the refrigerator plug, it
must be replaced by the manufacturer, a service agent or
similarly qualified persons in order to avoid a hazard.
- A specially grounded plug has been connected to the
power cable of your refrigerator. This plug should be used
with a specially grounded socket of 13 amperes.
If there is no such socket in your house, please have one
installed by an authorised electrician.
- This appliance can be used by children aged from 8years
and above and persons with reduced physical, sensory or
mental capabilities or lack of experience and knowledge
if they have been given supervision or instruction
concerning use of the appliance in a safe way and
understand the hazards involved.
Page 5

Instruction manual Ri7305
Please keep this instruction manual for future reference
5
- If the supply cord is damaged, it must be replaced by
the manufacturer, an authorised service agent or similar
qualified persons, in order to avoid a hazard.
- This appliance is not intended for use at altitudes
exceeding 2000 m.
- Children shall not play with the appliance. Cleaning and
user maintenance shall not be made by children without
supervision.
Page 6

Instruction manual Ri7305
Please keep this instruction manual for future reference
6
INSTALLATION WARNINGS
Before using your fridge freezer for the first time, please pay attention to the
following points:
- The operating voltage for your fridge freezer is 220-240 V at 50Hz.
- The plug must be accessible after installation.
- Your fridge freezer may have an odour when it is operated for the first time. This is
normal and the odour will fade when your fridge freezer starts to cool.
- Before connecting your fridge freezer, ensure that the information on the rating
plate (voltage and connected load) matches that of the mains electricity supply. If
in doubt, consult a qualified electrician.
- Insert the plug into a socket with an efficient ground connection. If the socket
has no ground contact or the plug does not match, we recommend you consult a
qualified electrician for assistance.
- The appliance must be connected with a properly installed fused socket. The
power supply (AC) and voltage at the operating point must match with the details
on the rating plate of the appliance (the rating plate is located on the inside left of
the appliance).
- We do not accept responsibility for any damages that occur due to ungrounded
usage.
- Place your fridge freezer where it will not be exposed to direct sunlight.
- Your fridge freezer must never be used outdoors or exposed to rain.
- Your appliance must be at least 50 cm away from gas hobs, gas ovens and heater
cores, and at least 5 cm away from electrical ovens.
- If your fridge freezer is placed next to a deep freezer, there must be at least 2 cm
between them to prevent humidity forming on the outer surface.
- Do not cover the body or top of fridge freezer with lace. This will affect the
performance of your fridge freezer.
- Clearance of at least 150 mm is required at the top of your appliance. Do not
place anything on top of your appliance.
- Do not place heavy items on the appliance.
Page 7

Instruction manual Ri7305
Please keep this instruction manual for future reference
7
- Clean the appliance thoroughly before use (see Cleaning and Maintenance).
- The installation procedure into a kitchen unit is given in the installation section.
This product is intended to be used in proper kitchen units only.
- Before using your fridge freezer, wipe all parts with a solution of warm water and
a teaspoon of sodium bicarbonate. Then, rinse with clean water and dry. Return all
parts to the fridge freezer after cleaning.
DURING USAGE
- Do not connect your fridge freezer to the mains electricity supply using an
extension lead.
- Do not use damaged, torn or old plugs.
- Do not pull, bend or damage the cord.
- This appliance is designed for use by adults. Do not allow children to play with the
appliance or hang off the door.
- Never touch the power cord/plug with wet hands. This may cause a short circuit or
electric shock.
- Do not place glass bottles or cans in the freezer compartment as they will burst
when the contents freezes.
- Do not place explosive or flammable material in your fridge. Place drinks with high
alcohol content vertically in the fridge compartment and make sure their tops are
tightly closed.
- When removing ice from the freezer compartment, do not touch it with bare
hands. Ice may cause frost burns and / or cuts.
- Do not touch frozen goods with wet hands. Do not eat ice-cream or ice cubes
immediately after they are removed from the freezer compartment.
- Do not re-freeze thawed frozen food. This may cause health issues such as food
poisoning. Old and Out-of-order Fridges
- If your old fridge or freezer has a lock, break or remove the lock before discarding
it, because children may get trapped inside it and may cause an accident.
- Old fridges and freezers contain isolation material and refrigerant with CFC.
Therefore, take care not to harm environment when you are discarding your old
fridges.
Page 8
Instruction manual Ri7305
Please keep this instruction manual for future reference
8
ENVIRONMENTAL PROTECTION
Waste electrical products should not be disposed of with household waste. Please
recycle where facilities exist. Check with your Local Authority or retailer for recycling
advice. This appliance is marked according to the European directive on Waste
Electrical and Electronic Equipment (WEEE).
By ensuring this product is disposed of correctly, you will help prevent potential
negative consequences for the environment and human health, which could
otherwise be caused by inappropriate waste handling of this product. The symbol
on the product indicates that this product may not be treated as household waste.
Instead it shall be handed over to the applicable collection point for the recycling of
electrical and electronic equipment. Disposal must be carried out in accordance with
local environmental regulations for waste disposal.
For more detailed information about treatment, recovery and recycling of this
product, please contact your local council, your household waste disposal service or
the retailer where you purchased the product.
CE DECLARATIONS OF CONFORMITY
This appliance has been manufactured to the strictest standards and complies
with all applicable legislation, Low Voltage Directive (LVD) and Electromagnetic
Compatibility (EMC).
Page 9
Instruction manual Ri7305
Please keep this instruction manual for future reference
9
ELECTRICAL CONNECTION
For your safety please read the following information
WARNING: THIS APPLIANCE MUST BE EARTHED
This appliance must be earthed.
This appliance operates from 220-240 volts and should be protected by a 13 amp
fuse in the plug.
The appliance is supplied with a standard 13 amp 3-pin mains plug fitted with a
13-amp fuse. Should the fuse require replacement, it must be replaced with a fuse
rated at 13 amp and approved to BS1362.
If the mains plug which is fitted is unsuitable for the socket outlet in your home or
is removed for any other reason, please follow the instructions below on how to
wire a 13 amp 3 pin plug.
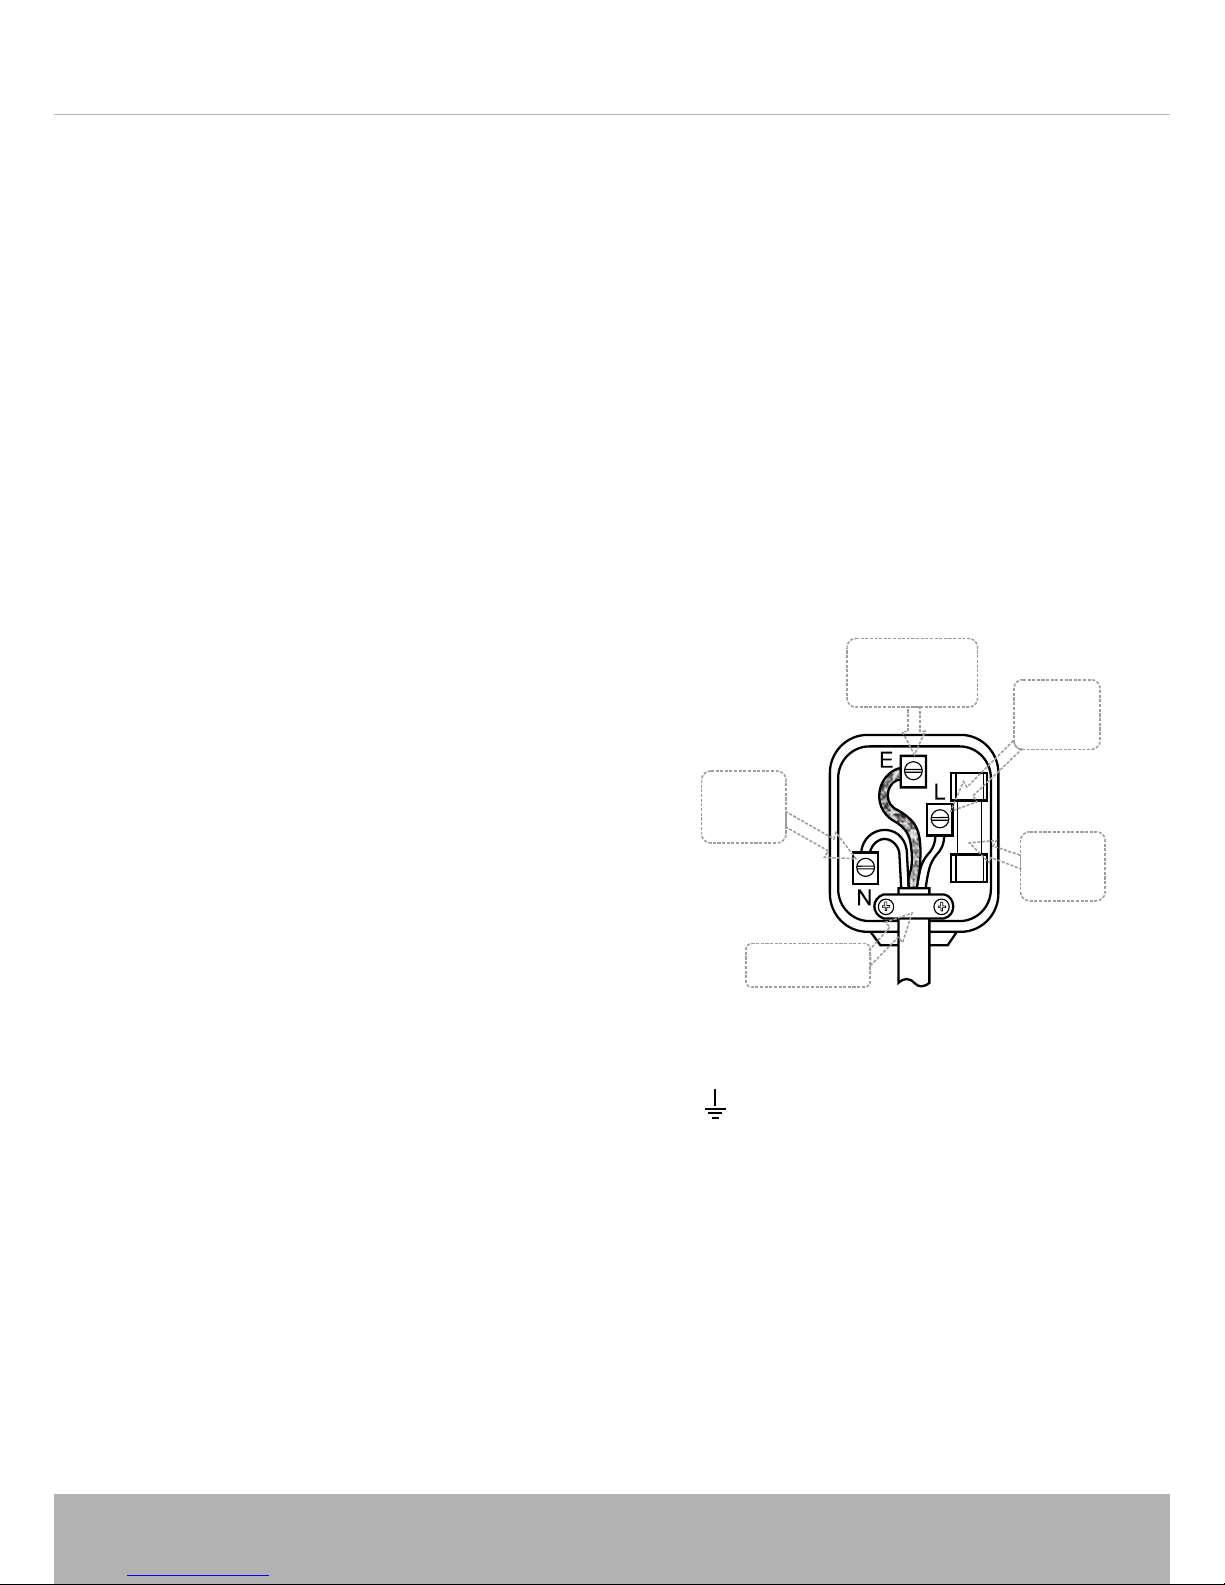
HOW TO WIRE A 13 AMP PLUG.
IMPORTANT:
The wires in the mains lead on this appliance are
coloured in accordance with the following code:
Green and Yellow - Earth
Blue – Neutral
Brown – Live
As the colours may not correspond with the
markings identifying the terminals in your plug
proceed as follows.
The green and yellow wire must be connected to the terminal in the plug which is
marked with the letter E or with the earth symbol
or coloured green and yellow.
The blue wire must be connected to the terminal marked N.
The brown wire must be connected to the terminal marked L.
You must make sure the lead is firmly secured under the cord clamp.
GREEN/YELLOW
Earth
BROWN
Live
FUSE
13 Amps
BLUE
Neutral
Cord Clamp
Page 10
Instruction manual Ri7305
Please keep this instruction manual for future reference
10
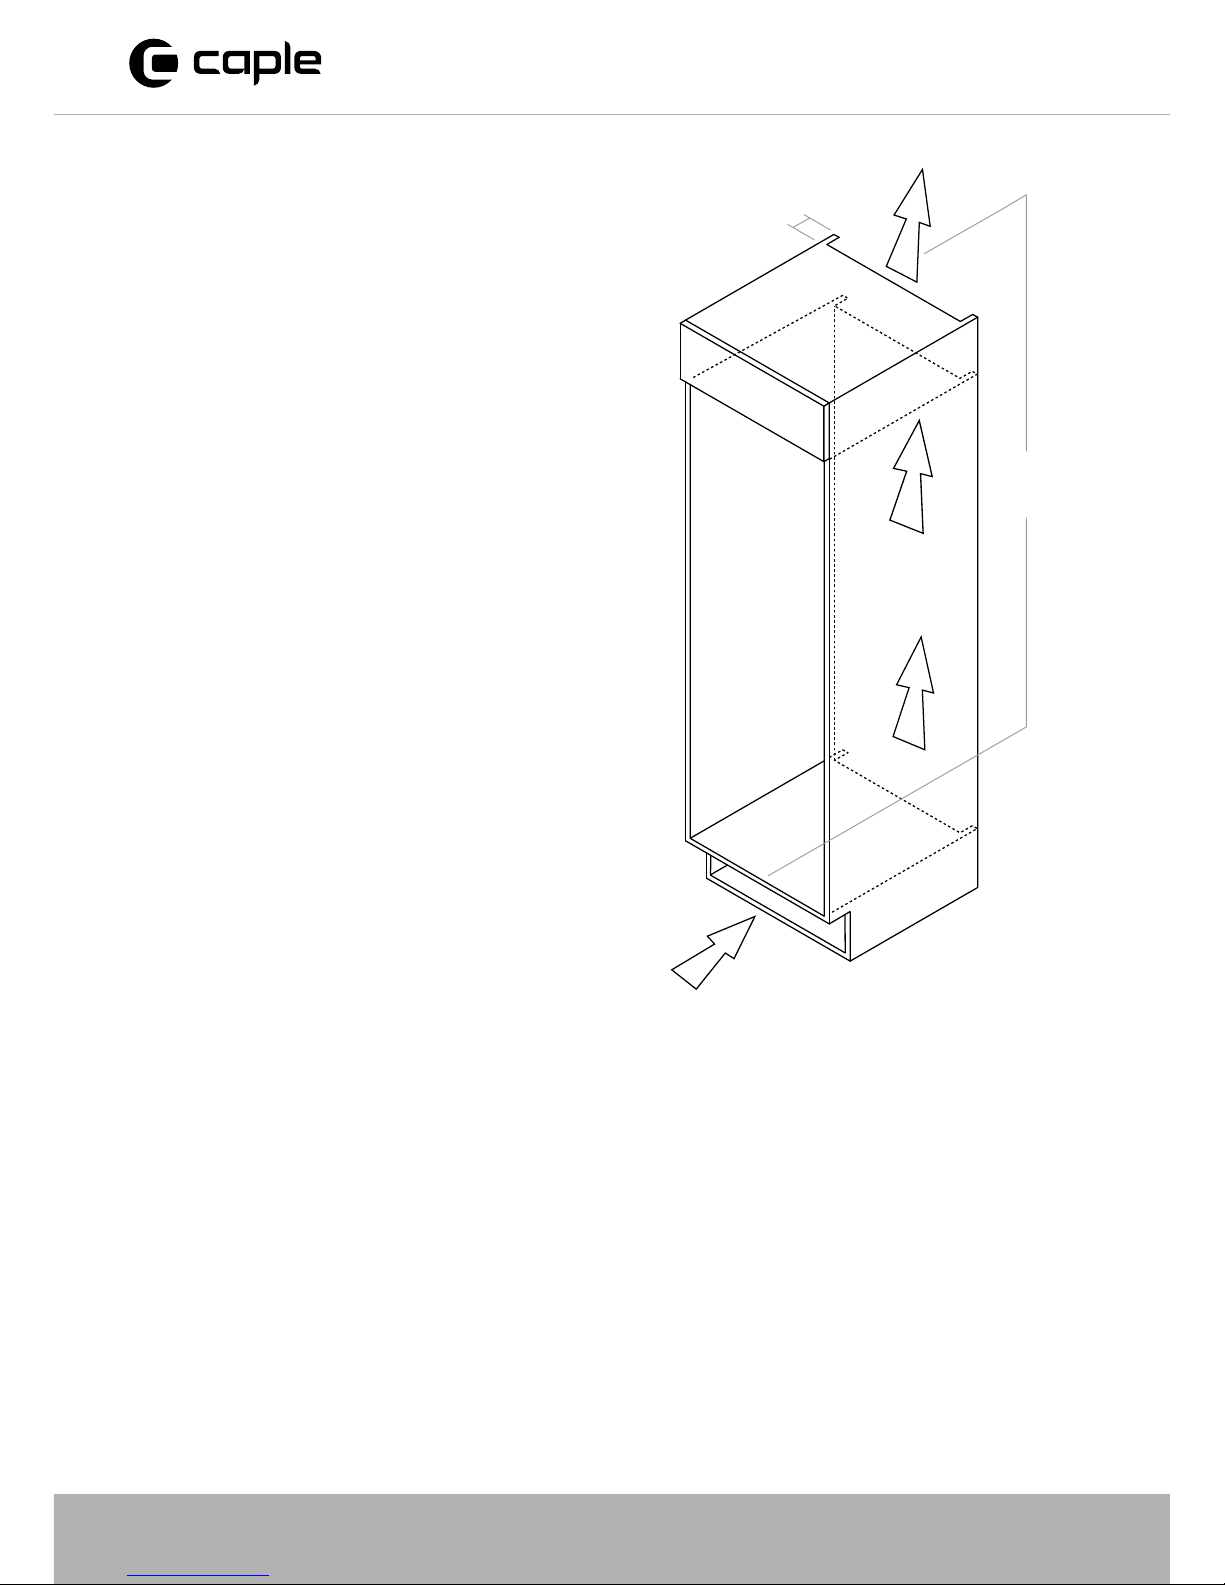
min. 75mm
Ventilation space at
rear to allow heat
dissipation from the
condenser
Plinth ventilation
min. 200cm
2
Air flow
Air flow
min. 75mm
VENTILATION REQUIREMENTS
The main consideration when installing
a refrigeration product into a cabinet is
ventilation. The heat removed from the
appliance needs to be dissipated into the
room. Failure to correctly ventilate the
product can result in increased running costs
and premature failure. It will also invalidate
the guarantee provided with the appliance.
An air intake in the plinth is required to
allow for the correct air flow (recommended
500mm x 75mm). If preferred a decorative
stainless steel plinth grille is available, product
code: GRILL/SENSE600. This can be purchased
from your retailer or www.caple.co.uk.
To ensure the correct operation of the
appliance it is important the top of the
housing is not blocked off. The top of the
cabinet needs to be vented into the room,
the recommended minimum size of the vent
opening is 500x75mm.
There should also be space at the rear
of the cabinet to allow the cool air to be
drawn over the condenser. This should also
be at least 500mm x 75mm. The more air
available to circulate the product, the more
efficiently it will operate.
Page 11

Instruction manual Ri7305
Please keep this instruction manual for future reference
11
APPLIANCE
A
B
1
2
3
4
5
6
7
8
9
10
11
12
13
A) Refrigerator compartment
B) Freezer compartment
1) Control panel
2) Turbo fan
3) Refrigerator shelves
4) Crisper cover
5) Crisper
6) Freezer upper flap / drawer
7) Freezer drawers
8) Ice box tray
9) Freezer glass shelves
10) Bottle shelf
11) Adjustable door shelf
12) Door shelf
13) Egg tray
This presentation is only for information about the
parts of the appliance.
Parts may vary according to the appliance model
DESCRIPTION OF THE APPLIANCE
Page 12

Instruction manual Ri7305
Please keep this instruction manual for future reference
12
USING THE APPLIANCE
FROST FREE TECHNOLOGY
Frost Free refrigerators have a different
operating system to static refrigerators.
In normal (static) fridges, the humidity entering
the fridge due to opening the door, and the
humidity inherent in the food, causes frost
build-up in the freezer compartment.
To defrost the frost and ice in the freezer
compartment, you are required to periodically
switch off the fridge, place the frozen food in
a separate cooled container, then remove the
ice gathered in the freezer compartment. The
situation is completely different in Frost free
fridges.
A built-in fan blows dry and cold air
evenly throughout the cooler and freezer
compartments. The cold air disperses uniformly
between the shelves, ensuring all your food is
cooled equally, thus preventing humidity and
frost build-up. Therefore, your Frost free fridge
allows ease of use, in addition to its huge
capacity and stylish appearance.
Operating your Fridge Freezer
Temperature Set Button
This button allows you to change and set
the temperature of the fridge freezer. In
order to set the temperature of the fridge
freezer, press this button until the desired
temperature setting is selected. Use this
button also to activate super cooling mode.
Temperature Settings
• The initial temperature of the setting display
is middle temperature indicator.
• Every time you press the button, the set
temperature will decrease.
• If you press temperature set button until the
Super cooling symbol is displayed on the
display and you do not press any button
within the following 3 seconds, the super
cooling LED will blink.
•
•
If you keep on pressing the button, it will
restart from the last value.
It may be set to any value ranging from MIN
to MAX. As you press temperature set button
from MIN to MAX, the temperature
decreases. To save energy in winter months,
operate your refrigerator in a lower position.
Page 13

Instruction manual Ri7305
Please keep this instruction manual for future reference
13
DISPLAY AND CONTROL PANEL
1 23 4
• The initial temperature of the setting display
is middle temperature indicator.
• Every time you press the button, the set
temperature will decrease.
• If you press temperature set button until the
Super cooling symbol is displayed on the
display and you do not press any button
within the following 3 seconds, the super
cooling LED will blink.
•
•
If you keep on pressing the button, it will
restart from the last value.
It may be set to any value ranging from MIN
to MAX. As you press temperature set button
from MIN to MAX, the temperature
decreases. To save energy in winter months,
operate your refrigerator in a lower position.
Super Cooling Mode
When Would It Be Used?
• To cool/freeze huge quantities of food.
• To cool/freeze fresh food.
• To cool/freeze quickly.
• To store seasonal food for a long time.
How To Use?
• Press temperature set button until super
cooling light comes on.
• Super cooling LED will light during this
mode.
• For optimal appliance performance in
maximum cooling capacity, set the
appliance to active Super Cooling mode 5
hours before you put the fresh food into
1) Temperature set button
2) Super cooling mode LED
3) Alarm indicator LED
4) Temperature setting indicator
OPERATING YOUR FRIDGE FREEZER
TEMPERATURE SET BUTTON
This button allows you to change and set the temperature of the fridge freezer. In
order to set the temperature of the fridge freezer, press this button until the desired
temperature setting is selected. Use this button also to activate super cooling mode.
TEMPERATURE SETTINGS
- The initial temperature of the setting display is middle temperature indicator.
- Every time you press the button, the set temperature will decrease.
- If you press temperature set button until the Super cooling symbol is displayed on
the display and you do not press any button within the following 3 seconds, the
super cooling LED will blink.
- If you keep on pressing the button, it will restart from the last value. It may be
set to any value ranging from MIN to MAX. As you press temperature set button
from MIN to MAX, the temperature decreases. To save energy in winter months,
operate your refrigerator in a lower position.
Page 14

Instruction manual Ri7305
Please keep this instruction manual for future reference
14
SUPER COOLING MODE - WHEN WOULD IT BE USED?
- To cool/freeze huge quantities of food.
- To cool/freeze fresh food.
- To cool/freeze quickly.
- To store seasonal food for a long time.
HOW TO USE?
- Press temperature set button until super cooling light comes on.
- Super cooling LED will light during this mode.
- For optimal appliance performance in maximum cooling capacity, set the
appliance to active Super Cooling mode 5 hours before you put the fresh food
into the fridge.
- During this mode if you press the temperature set button, the mode will be
cancelled and the setting will be restore back to the MAX setting. Super cooling
mode will be automatically cancelled after 5 hours.
ALARM LIGHT
- In case of a problem within the fridge, the alarm LED will illuminate red.
TEMPERATURE ADJUSTMENT WARNINGS
- It is not recommended that you operate your fridge in environments colder than
10°C in terms of its efficiency.
- Do not start another adjustment while you are already making an adjustment.
- Temperature adjustments should be made according to the frequency of door
openings, the quantity of food kept inside the fridge and the ambient temperature
in the location of your fridge.
- In order to allow your fridge to reach the operating temperature after being
connected to mains, do not open the doors frequently or place large quantities
of food in the fridge. Please note that, depending on the ambient temperature, it
may take 24 hours for your fridge to reach the operating temperature.
- A 5 minute delay function is applied to prevent damage to the compressor of your
fridge when connecting or disconnecting to mains, or when an energy breakdown
occurs. Your fridge will begin to operate normally after 5 minutes.
Page 15

Instruction manual Ri7305
Please keep this instruction manual for future reference
15
- Your appliance is designed to operate in the ambient temperature range
T/N = 16°C - 43°C intervals stated in the standards, according to the climate
class displayed on the information label. We do not recommend operating your
appliance out of the stated temperature limits in terms of cooling effectiveness.
Climate
Class
Ambient Temperature
o
C
T Between 16 and 43 (°C)
ST Between 16 and 38 (°C)
N Between 16 and 32 (°C)
SN Between 10 and 32 (°C)
THE TURBO FAN
- Do not block the air inlet and outlet openings when storing food, otherwise air
circulation provided by the turbo fan will be impaired.
Climate
Class
Ambient Temperature
o
C
T Between 16 and 43 (°C)
ST Between 16 and 38 (°C)
N Between 16 and 32 (°C)
SN Between 10 and 32 (°C)
Turbo fan
CAPLE FRESH (MAXI-FRESH PRESERVER)
- Caple Fresh technology eliminates the
ethylene gas (a by product of fresh foods)
inside the vegetable draw. By this method,
it maximizes the fresh foods shelf life,
especially green vegetables. Caple Fresh
also blocks the bad smells produced in the
refrigerator.
- The Caple Fresh filter must be cleaned
once a year. It can be cleaned by leaving in
sunlight for one day.
- When you want to clean the filter, remove
the back side in the direction of the arrow.
- Don’t wet this part with water or detergent.
13
• The Caple Fresh filter must be cleaned once a year. It can be
cleaned by leaving in sunlight for one day.
• When you want to clean the filter, remove the back side in the
direction of the arrow.
Caple Fresh
(Maxi-fresh preserver)
13
13
Page 16

Instruction manual Ri7305
Please keep this instruction manual for future reference
16
HUMIDITY CONTROLLED DRAWER
When the humidity controller is in the closed position, it allows fresh fruit and
vegetables to be stored longer.
When the drawer is totally full, the humidity controller should be opened. By means
of this the air in the drawer and humidity rate will be controlled and endurance life
will be increased. If you see any condensation on the glass shelf above, the humidity
control should be moved into the open position...
NOTE: These drawers are specifically designed to store fruit & vegetables only.
We do not recommend storing meats and/or fish in these drawers.
HUMIDITY CONTROLLED DRAW
When the humidity controller is in the closed position, it allows fresh fruit and
vegetables to be stored longer.
When the draw is totally full, the humidity controller should be opened. By means
of this the air in the draw and humidity rate will be controlled and endurance life
will be increased. If you see any condensation on the glass shelf above, the humidity
control should be moved into the open position..
NOTE:
These draws are specifically designed to store fruit & vegetables only. We do not
recommend storing meats and/or fish in these draws.
Humidity control
EASY ADJUSTABLE DOOR BALCONY
One door balcony is adjustable (the rest are fixed). To adjust the balcony to the
appropriate height, hold the bottom of the balcony and pull on the button on each
end to unlock as shown in below. Whilst pulled down move the door balcony to
the appropriate height (there are 6 height positions). Once set at the correct height,
release the buttons to lock it into position.
NOTE: Please ensure the balcony is empty before adjusting
.
Page 17

Instruction manual Ri7305
Please keep this instruction manual for future reference
17
FOOD STORAGE
REFRIGERATOR COMPARTMENT
- To reduce humidity and avoid the consequent formation of frost, always store
liquids in sealed containers in the refrigerator. Frost tends to concentrate in the
coldest parts of the evaporating liquid and, in time, your appliance will require
more frequent defrosting.
- Never place warm food in the refrigerator. Warm food should be allowed to cool
at room temperature and should be arranged to ensure adequate air circulation in
the refrigerator compartment.
- Make sure no items are in direct contact with the rear wall of the appliance as
frost will develop and packaging will stick to it. Do not open the refrigerator door
frequently.
- We recommend that meat and clean fish are loosely wrapped and stored on the
glass shelf just above the vegetable bin where the air is cooler, as this provides the
best storage conditions.
- Store loose fruit and vegetable items in the crisper containers.
- Storing fruit and vegetables separately helps prevent ethylene-sensitive vegetables
(green leaves, broccoli, carrot, etc.) being affected by ethylene-releaser fruits
(banana, peach, apricot, etc.).
- Do not put wet vegetables into the refrigerator.
- Storage time for all food products depends on the initial quality of the food and
an uninterrupted refrigeration cycle before refrigerator storage.
- To avoid cross-contamination do not store meat products with fruit and
vegetables. Water leaking from meat may contaminate other products in the
refrigerator. You should package meat products and clean any leakages on the
shelves.
- Do not put food in front of the air flow passage.
- Consume packaged foods before the recommended expiry date.
NOTE: Potatoes, onions and garlic should not be stored in the refrigerator. The
table on page 20 is a quick guide to show you the most efficient way to store the
major food groups in your refrigerator compartment.
Page 18

Instruction manual Ri7305
Please keep this instruction manual for future reference
18
FOOD MAXIMUM STORAGE
TIME*
HOW AND WHERE
TO STORE
Vegetables and fruits 1 week Vegetable bin
Meat and fish Between 16 and 38 (°C)
Wrap in plastic foil, bags, or in a
meat container and store on the
glass shelf
Fresh cheese Between 16 and 32 (°C) On the designated door shelf
Butter and margarine Between 10 and 32 (°C) On the designated door shelf
Bottled products e.g. milk
and yoghurt
Until the expiry date
recommended by the
producer
On the designated door shelf
Eggs 1 month On the designated egg tray
Cooked food All shelves
* These are guidelines only, always refer to the expiry date, or best before date
recommended by the producer.
FREEZER COMPARTMENT
- The freezer is used for storing frozen food, freezing fresh food, and making ice
cubes.
- To freeze fresh food, ensure that as much of the surface of the food as possible is
in contact with the cooling surface.
- Do not store fresh food next to frozen food as it can thaw the frozen food.
- Before freezing fresh food, divide it into portions that can be consumed in one
sitting.
- Consume thawed frozen food within a short period of time after defrosting
- Never place warm food in the freezer compartment as it will thaw the frozen food.
- Always follow the manufacturer’s instructions on food packaging when storing
frozen food. If no information is provided food, should not be stored for more
than 3 months from the date of purchase.
- When purchasing frozen food, make sure that it has been stored under
appropriate conditions and that the packaging is not damaged.
- Frozen food should be transported in appropriate containers and placed in the
freezer as soon as possible.
Page 19

Instruction manual Ri7305
Please keep this instruction manual for future reference
19
- Do not purchase frozen food if the packaging shows signs of humidity and
abnormal swelling. It is probable that it has been stored at an unsuitable
temperature and that the contents have deteriorated.
- The storage life of frozen food depends on the room temperature, the thermostat
setting, how often the door is opened, the type of food, and the length of time
required to transport the product from the shop to your home. Always follow the
instructions printed on the packaging and never exceed the maximum storage life
indicated.
- The maximum amount of fresh food (in kg) that can be frozen in 24 hours is
indicated on the appliance label.
- To use the maximum capacity of the freezer compartment, use the glass shelves
for the upper and middle section, and use the lower basket for the bottom
section.
NOTE: If you attempt to open the freezer door immediately after closing it, you will
find that it will not open easily. This is normal. Once equilibrium has been reached,
the door will open easily.
IMPORTANT NOTE:
- Never refreeze thawed frozen food.
- The taste of some spices found in cooked dishes (aniseed, watercress, vinegar,
assorted spices, ginger, garlic, onion, mustard, thyme, black pepper, etc.) changes
and they assume a strong taste when they are stored for a long period of time.
Therefore, add small amounts of spices to food to be frozen, or the desired spice
should be added after the food has thawed.
- The storage time of food is dependent on the type of oil used. Suitable oils are
margarine, calf fat, olive oil and butter. Unsuitable oils are peanut oil and pig fat.
- Food in liquid form should be frozen in plastic cups and other food should
be frozen in plastic or bags or containers. The table below is a quick guide to
show you the most efficient way to store the major food groups in your freezer
compartment.
Page 20

Instruction manual Ri7305
Please keep this instruction manual for future reference
20
MEAT AND FISH PREPARATION
MAXIMUM STORAGE
TIME (MONTHS)
Steak Wrap in foil 6 - 8
Lamb meat Wrap in foil 6 - 8
Veal roast Wrap in foil 6 - 8
Veal cubes In small pieces 6 - 8
Lamb cubes In pieces 4 - 8
Minced meat
In packaging without
using spices
1 - 3
Giblets (pieces) In pieces 1 - 3
Bologna sausage/salami
Should be kept
packaged even if it
has a membrane
Chicken and turkey Wrap in foil 4 - 6
Goose and duck Wrap in foil 4 - 6
Deer, rabbit, wild boar
In 2.5 kg portions or
as fillets
6 - 8
Freshwater fish (Salmon,
Carp, Crane, Catfish)
After cleaning the
bowels and scales of
the fish,
wash and dry it. If
necessary, remove the
tail and
head.
2
Lean fish (Bass, Turbot,
Flounder)
4
Fatty fishes (Tuna, Mackarel,
Bluefish, Anchovy)
2 - 4
Shellfish Clean and in a bag 4 - 6
Caviar
In its packaging, or
in an aluminium or
plastic container
2 - 3
NOTE: Thawed frozen meat should be cooked as fresh meat. If the meat is not
cooked after defrosting, it must not be re-frozen.
Page 21

Instruction manual Ri7305
Please keep this instruction manual for future reference
21
VEGETABLES AND
FRUITS
PREPARATION
MAXIMUM STORAGE
TIME (MONTHS)
String beans and beans
Wash, cut into small pieces
and boil in water
10 - 13
Beans Hull, wash and boil in water 12
Cabbage Clean and boil in water 6 - 8
Carrot
Clean, cut into slices and boil
in water
12
Pepper
Cut the stem, cut into two
pieces, remove the core and
boil in water
8 - 10
Spinach Wash and boil in water 6 - 9
Cauliflower
Remove the leaves, cut the
heart into pieces and leave it
in water with a little lemon
juice for a while
10 - 12
Aubergine
Cut into pieces of 2cm after
washing
10 - 12
Sweet corn
Clean and pack with its stem
or as sweet corn
12
Apple and pear Peel and slice 8 -10
Apricot and Peach
Cut into two pieces and
remove the stone
4 - 6
Strawberry and
Blackberry
Wash and hull 8 - 12
Cooked fruits
Add 10 % of sugar to the
container
12
Plum, cherry, raspberry Wash and hull the stems 8 - 12
Page 22

Instruction manual Ri7305
Please keep this instruction manual for future reference
22
MAXIMUM
STORAGE TIME
(MONTHS)
THAWING TIME AT
ROOM TEMPERATURE
(HOURS)
THAWING TIME IN
OVEN (MINUTES)
Bread 4 - 6 2 - 3 4-5 (220-225 °C)
Biscuits 3 - 6 1 - 1.5 5-8 (190-200 °C)
Pastry 1 - 3 2 - 3 5-10 (200-225 °C)
Pie 1 - 1.5 3 - 4 5-8 (190-200 °C)
Filo dough 2 - 3 1 - 1.5 5-8 (190-200 °C)
Pizza 2 - 3 2 - 4 15-20 (200 °C)
DAIRY
PRODUCTS
PREPARATION
MAXIMUM STORAGE
TIME (MONTHS)
STORAGE
CONDITIONS
Packet
(Homogenized)
Milk
In its own
packetwashing
2 - 3
Pure Milk – in its own
packet
Cheese excluding
white cheese
In slices 6 - 8
Original packaging
may be used for
short-term storage.
Keep wrapped in foil
for longer periods.
Butter,
margarine
In its packaging 6
Page 23

Instruction manual Ri7305
Please keep this instruction manual for future reference
23
CLEANING AND MAINTENANCE
Disconnect the unit from the power supply before cleaning.
Do not wash your appliance by pouring water on it.
Do not use abrasive products, detergents or soaps for cleaning the appliance. After
washing, rinse with clean water and dry carefully. When you have finished cleaning,
reconnect the plug to the mains supply with dry hands.
- Make sure that no water enters the lamp housing and other electrical
components.
- The appliance should be cleaned regularly using a solution of bicarbonate of soda
and lukewarm water.
- Clean the accessories separately by hand with soap and water. Do not wash
accessories in a dish washer.
- Clean the condenser with a brush at least twice a year. This will help you to save
on energy costs and increase productivity.
NOTE: The power supply must be disconnected during cleaning.
DEFROSTING THE REFRIGERATOR COMPARTMENT
- Your refrigerator performs
automatic defrosting. The water
formed as a result of defrosting
passes through the water collection
spout, flows into the vaporisation
container behind your refrigerator and
evaporates there.
- Make sure you have disconnected
the plug of your refrigerator before
cleaning the vaporisation container.
- Remove the vaporisation container
from its position by removing the
screws as indicated. Clean it with
soapy water at specific time intervals.
This will prevent odours from forming.
• Do the food packages prevent closing
of the door?
• Are the door compartments, shelves
and drawers placed properly?
• Are door joints broken or torn?
• Is your fridge freezer on a level
surface?
Recommendations
• To stop the appliance completely,
unplug from main socket (for cleaning
and when the door is left open)
Replacing LED Lighting
To replace any of the LEDs, please
contact Caple service to arrange. This
should only be performed by a qualified
electrician.
Note: The numbers and location of the
LED strips may change according to the
model.
LED strip
Page 24

Instruction manual Ri7305
Please keep this instruction manual for future reference
24
REPLACING LED LIGHTING
To replace any of the LEDs, please contact Caple service to arrange. This should only
be performed by a qualified electrician.
NOTE: The numbers and location of the LED strips may change according to
the model.
LED strip
Page 25

Instruction manual Ri7305
Please keep this instruction manual for future reference
25
TRANSPORT AND REPOSITIONING
TRANSPORTATION AND CHANGING POSITIONING
- The original packaging and foam may be kept for re-transportation (optional).
- Fasten your appliance with thick packaging, bands or strong cords and follow the
instructions for transportation on the packaging.
- Remove all movable parts (shelves, accessories, vegetable bins, and so on) or fix
them into the appliance against shocks using bands/tape when re-positioning or
transporting. Always carry your appliance in the upright position.
TROUBLESHOOTING
ERRORS
Your fridge will warn you if the temperatures for the fridge and freezer are at
improper levels or if a problem occurs with the appliance.
TROUBLESHOOTING
Errors
Your fridge will warn you if the temperatures for the fridge and freezer are at improper levels
or if a problem occurs with the appliance.
Alarm
i
ndicator LED
i
s turning on
Meaning Why What to do
Failure Warning
There is/are some part(s)
out of order or there is a
failure in the cooling
process.
Check if the door is open or not. If the door is
not open, call Caple service for assistance as
soon as possible.
If your fridge freezer is not working properly, it may be a minor problem, therefore
check the following, before calling an electrician to save time and money.
THE APPLIANCE DOES NOT OPERATE CHECK IF:
- There if their is power to the unit
- The general switch in your home is connected
- The socket is working. To check this, plug in another appliance that you know is
working into the same socket.
Page 26

Instruction manual Ri7305
Please keep this instruction manual for future reference
26
THE APPLIANCE PERFORMS POORLY CHECK IF:
- You have not overloaded the appliance
- The fridge temperature set to MAX
- The door is closed perfectly
- There is no dust on the condenser
- There is enough space at the rear and side walls for venitlation
WHY IS MY FRIDGE OPERATING LOUDLY?
CRACKING (ICE CRACKING) :
- During automatic defrosting.
- When the appliance is cooled or warmed (due to expansion of appliance material).
SHORT CRACKING:
- Heard when the thermostat switches the compressor on/ off.
COMPRESSOR NOISE:
- Normal motor noise. This noise means that the compressor operates normally
Compressor may cause more noise for a short time when it is activated.
BUBBLING NOISES:
- This noise is caused by the flow of the refrigerant in the tubes of the system.
WATER FLOW NOISE:
- Normal flow noise of water flowing to the evaporation container during
defrosting. This noise can be heard during defrosting.
AIR BLOW NOISE:
- Normal fan noise. This noise can be heard in fridges during normal operation of
the system due to the circulation of air.
DOOR JOINTS
- If the edges of fridge cabinet that the door joint contact are warm; especially in
summer (hot weather), the surfaces that the joint contact may get warmer during
the operation of the compressor, this is normal. If humidity builds up inside the
fridge freezer;
Page 27

Instruction manual Ri7305
Please keep this instruction manual for future reference
27
IS ALL THE FOOD PACKED PROPERLY?
- Are the containers dried before placing them in the fridge?
- Are the fridge freezeer’s doors opened frequently? Humidity of the room gets in
the fridge when the door is opened. Humidity build up will be faster when you
open the door more frequently, especially if the humidity of the room is high.
IF THE DOORS ARE NOT OPENED AND CLOSED PROPERLY
- Do the food packages prevent closing of the door?
- Are the door compartments, shelves and drawers placed properly?
- Are door joints broken or torn?
- Is your fridge freezer on a level surface?
RECOMMENDATIONS
- To stop the appliance completely, unplug from main socket (for cleaning and when
the door is left open)
Page 28

Instruction manual Ri7305
Please keep this instruction manual for future reference
28
ENERGY SAVING TIPS
1. Install the appliance in a cool, well ventilated room, but not in direct sunlight and
not near a heat source (such as a radiator or oven) otherwise an insulating plate
should be used.
2. Allow warm food and drinks to cool before placing them inside the appliance.
3. Place thawing food in the refrigerator compartment. The low temperature of
the frozen food will help cool the refrigerator compartment while the food is
thawing. This will save energy. Frozen food left to thaw outside of the appliance
will result in a waste of energy.
4. Drinks or other liquids should be covered when inside the appliance. If left
uncovered, the humidity inside the appliance will increase, therefore the
appliance uses more energy. Keeping drinks and other liquids covered helps
preserve their smell and taste.
5. Avoid keeping the doors open for long periods and opening the doors too
frequently as warm air will enter the appliance and cause the compressor to
switch on unnecessarily often.
6. Keep the covers of the different temperature compartments ( such as the crisper
and chiller) closed.
7. The door gasket must be clean and pliable. Replace gaskets if worn.
Page 29

Instruction manual Ri7305
Please keep this instruction manual for future reference
29
TECHNICAL FICHE
EN PRODUCT FICHE
1 Brand CAPLE
2 Model RI7305
3 Product category 7 (Fridge - Freezer)
4 Energy class A++
5 Annual energy consumption* 226 kWh
6 Total gross volume 256 l
7 Total net volume 243 l
8 Refrigerator gross volume 181 l
9 Refrigerator net volume 180 l
10 Chiller compartment net volume - l
11 Freezer gross volume 75 l
12 Freezer net volume 63 l
13 Star rating ****
14 Refrigeration system
Fridge Comp.: STATIC
Freezer Comp.: NO FROST
15 Temperature rise time (-18°C/-9°C) 12 Hours
16 Freezing capacity 3 kg / 24 h
17 Climate class ** T/N (16°C - 43°C)
18 Noise emission 41 dB(A)
*
Energy consumption of 226 kWh kWh per year, calculated on the basis of
results obtained in 24 hours under normalised test conditions. Real energy
consumption depends on the conditions in which the equipment is used as
well as where it is placed.
**
This appliance is designed for use at an ambient temperature within the 16°C
- 43°C range.
Page 30

Instruction manual Ri7305
Please keep this instruction manual for future reference
30
Notes:
Page 31

Instruction manual Ri7305
Please keep this instruction manual for future reference
31
Notes:
Page 32

Instruction manual Ri7305
Please keep this instruction manual for future reference
32
Caple Service
Fourth Way
Avonmouth
Bristol
BS11 8DW
t: 0117 938 7420
e: service@caple.co.uk
www.caple.co.uk
 Loading...