

Page 1
Instruction manual for fridge
Model
code: RFL70
Contact Caple on 0844 800 3830 or for spare parts www.4caple.co.uk
Page 2

Please read this manual before use.
Thank you for purchasing this Caple product.
Due to continued product development some features and accessories may vary slight to what is detailed below. Please refer to
the packing list.
Attention:
* Please understand the safety instructions before use.
* Please keep this manual for future reference.
* Due to continued product development and improvement the actual product may vary slightly.
WARNING
1. WARNING Keep ventilation openings in the appliance enclosure or in the built-in structure clear of obstruction.
2. WARNING Do not use mechanical devices or other means to accelerate the defrosting process, other than those
recommended by the manufacturer.
3. WARNING Do not damage the refrigerant circuit.
4. WARNING Do not use electrical appliances inside the food storage compartments of the appliance, unless they are of
the type recommended by the manufacturer.
5. The appliance must be unplugged after use and before carrying out user maintenance on the appliance.
6. This appliance is not intended for use by persons (including children) with reduced physical, sensory or m ental
.
Display panel
Upper door tray
Glass shelf
Sealed preservation
Glass shelf
door tray
Glass shelf
capabilities, or lack of experience and knowledge, unless they have been given supervision or instruction concerning use of
the appliance by a person responsible for their safety.
7. Children should be supervised to ensure that they do not play with the appliance.
8. If the supply cord is damaged, it must be replaced by Caple, its service agent or similarly qualified persons in order to
avoid a hazard.
9. Please dispose of the refrigerator according to local regulators for it use flammable blowing gas and refrigerant.
10. Disconnect the power supply before replacing the lamp.
11. Please adhere to local regulations regarding disposal of the appliance for it contains flammable refrigerant and blowing
gas. Before you scrap the appliance, please remove the doors to prevent children trapped.
Small fruit and
vegetable container
Large fruit and
vegetable container
Lower door tray
1
Page 3

Preparation before using
f
r
Correct application o
the refrigerato
Warning
·Unless recommended by the manufacturer, no mechanical equipment or other means can be adopted to speed up the
defrosting process.
·Unless recommended by the manufacturer, no electrical items can be used in the food compartments.
·The R600a refrigerant and cyclopentane foaming materials used in this refrigerator are all flammable materials, so the
discarded old refrigerators should be isolated from any fire, with disposal by burning forbidden.
Your new refrigerator
· Before using a new refrigerator, remove all packaging materials, including the bottom pad, as well as the foam pads and
adhesive tape in the refrigerator;
·Use damp cloth to clean the refrigerator inside and outside (A small amount of detergent can be added in the warm water
and finally clean water should be used to clean the refrigerator);
·A separate socket with two poles grounded must be prepared, and it is forbidden to share the same multipurpose socket with
other appliances;
·Please be sure to connect the grounding wire well. The socket should have its grounding electrode reliably grounded.
Make sure that the refrigerator is correctly and steadily placed, and that all safety precautions are clearly
understood.
1. Power on
BEFORE SWITCHING THE APPLIANCE ON ALLOW IT TOSTANDINSITUFORAMINIMUMOF12HOURS
After power on, the refrigerator will automatically enter the factory default status.
2. Adding food to the refrigerator
Recommended: Allow the fridge to work for a period of time and the required temperature to be reached or the compressor
has stopped working for the first time, and then add the food into the refrigerator, which is conducive to the first food
preservation.
Tips: When the temperature s etting is changed or new food is added, the
refrigerator needs a period of time to have its internal temperature balanced. The
time length depends on the change of the temperature setting, the ambient
temperature, the door-opening frequency and the a mount of stored food, etc.
Transport and placement
Transport
· Do not have the refrigerator upside down, horizontally placed, squeezed or shaken. When moving the fridge, do not tilt the
product more than a 45 degree angle.
· When moving, do not use excessive pressure on the door or top cover to avoid deformation.
·The refrigerator can be drawn slightly backwards (no more than 20 degrees), so that it can be moved a short distance with
rear casters rolling.
Placement
·Place the refrigerator in a well-ventilated place. Keep away from heat and direct sunlight. Do not keep it close to damp or wet
areas, to prevent rusting or the insulation weakening.
·The top space should be no less than 30cm. Distance against two sides and back should be no less than 10cm away from the
walls to facilitate the door opening and closing, and to disperse the heat.
·Placed the refrigerator on a flat and solid ground. (If not, it can be levelled by adjusting the levelling toes)
Note
The power line should not be compressed by the refrigerator or other objects, to avoid any accident due to damage of the
power line.
Before connecting to the power source, please carefully check whether the refrigerator has its voltage range identical to the
power supply.
2 3
Page 4

Function introduction
Function introduction
The following function operations shall be completed in the ON status.
·High Humidity Mode
In the non-High Humidity mode, press the “Hi Humidity” key (A-key) for consecutive 3 seconds to have the “High Humidity”
mode effective, with the High Humidity icon lighting up.
In the High Humidity mode, press the “Hi Humidity” key (A-key) for consecutive 3 seconds to quit the High Humidity mode,
with the High Humidity icon going out.
After the High Humidity mode takes effect, the refrigerator will switch to the High Humidity working status to have its internal
relative humidity increased.
1. Buttons
A. Hi Humidity mode
B. ON / OFF - System ON / OFF
C. ∧ temperature adjustment UP
D. ∨ temperature adjustment DOWN
2. Names of the display functions
1. Hi Humidity icon
2. Temperature area digital hose
3. Centigrade icon
3. Display control
· Initial power on: Full display for 3 seconds, at the same time sound the starting-up tone and displaying the default
temperature of 5℃.
· Display of normal operation:
Temperature display area: displays the set temperature, if a fault is detected the error code will flash and be displayed.
Hi Humidity icon: When in Hi Humidity mode, the light is on.
· Display control:
1. In the normal mode, if the door is not opened and there is no operation of any button, the screen will go out after 30
seconds;
2. If the door is open, the display screen will illuminate, and 30 seconds after the door is closed, the screen will go out;
3. When the “visible failure code” type failure occurs, the screen will automatically display once, and go out in 30 seconds (If
the buzzer is ringing continuously, press any button to cancel it).
·Temperature setting
Press the temperature adjustment ∧ key (C-key) or ∨ key (D-key) to set the temperature. The temperature icon will flash
when setting the temperature, with the range between 2 and 8℃ (circulating adjustment unavailable); in 5 seconds, it will
quit to make the setting effective. (Within 5 seconds after setting of the temperature, you can also manually confirm the
setting state by pressing the A key or B key to have the setting effective).
5. Lighting control
The internal light will illuminate when the door is opened and automatically switch off when the door is closed.
6. Door-opening and door-open alarm control
When the door is opened a bell can be heard. If the refrigerator door is open for consecutive 120 seconds, it will sound an
alarm every 2 seconds until the door closed. Press any key to disable the door-open alarm.
7. Power-off m emory and Initial power-up
·When the power supply is lost to this appliance has an internal memory that will remember the last settings before the power
was lost. When the refrigerator is switched back on the last settings will be selected.
·Initial power-up: The fridge has the default temperature of +5℃.
·Memory: It includes the set temperature, High Humidity mode and the cumulative working time of the compressor.
For example: If the power is cut off in Hi Humidity mode, it will be working based on the “Hi Humidity mode” after power-on.
4. User mode operation
·Startup and shutdown
In the ON mode, if the ON / OFF key (B-key) is pressed for 3 seconds, the OFF tone will sound with the OFF setting effective
immediately;
In the OFF mode, if the ON / OFF key (B-key) is pressed for 3 seconds, the ON tone will sound with the ON setting effective
immediately;
If the ON / OFF key is pressed continuously for 3 seconds to enable the OFF function, the display screen will go out, except for
the ON / OFF key (B-key), other keys will stop functioning, and the compressor, defrosting heater, door lamp and other loads
will immediately shut down; press the ON / OFF key continuously for 3 seconds to enable the ON function, and if it was
working in the Hi Humidity mode before shutdown, the display screen will show the Hi Humidity time initially set; otherwise,
the display screen will show the temperature previously set, and all the functions will work based on the settings before
shutdown.
4 5
Page 5

Function introduction
Considerations
8. High-temperature alarm
When the temperature is above 15℃ for 6 hours or more, the high-temperature warning will sound. The buzzer will beep for
10 times once every second, and 10 time every 30 min thereafter. The temperature display area will flash to show the failure
code (E9); the warning will be disabled when the temperature is below 10℃. Press any key to cancel the warning buzzer, but
the failure code display state is not cancelled until the failure is solved.
9. Failure prompts
Failure Code Description Failure Code
E2 Sensor failure E6 Communication failure
E5 Defrosting sensor failure E9 High-temperature alarm
E7 Ambient temperature sensor
failure
Note: When a failure occurs, it will alternatively display the failure code and after the failure is solved, the alarm will be
automatically cancelled or any display control icon can be pressed to cancel the alarm. When a failure occurs, it will take the
priority to display the failure code until the failure is solved, or the set temperature and the Hi Humidity state cannot be
EC EEPROM circuit failure
Description
Do not dismantle or attempt a
repair this appliance. Please
Contact the Caple service
centre
Please do not use any
flammable solvent in the
vicinity of the refrigerator, to
avoid fire.
Do not allow any child climb
into or climb on the appliance
to prevent the child being
trapped in the refrigerator or
hurt due to it falling.
Use the 10A or above standard
three-hole power socket. The socket
must be well earthed.
Please do not keep flammable,
explosive, volatile or corrosive goods
into the refrigerator, so as not to
cause damage or fire accident.
Please do not put any bottle or
closed container filled with liquid
into the freezer to avoid other
damages due to frozen bursting.
Please do not put heavy
things on the refrigerator.
Otherwise, it they may fall
and cause damage, when the
door is closed.
displayed.
If the failure continues and cannot restore automatically, please contact the after-sales department for maintenance.
10. Compulsory defrosting
Press the temperature adjusting “∧” key and the temperature adjusting “∨” key for 3 seconds to enter the compulsory
defrosting mode. The LED temperature zone always displays “3” at the top, but there is no display at the bottom. After the
compulsory defrosting mode is enabled, the compressor and fan will stop immediately; in time of compulsory defrosting
operation, press the temperature adjusting “∧” key and the temperature adjusting “∨” key for consecutive 3 seconds or the
conditions for exit is satisfied, it will quit the compulsory defrosting mode.
Please do not keep too much
food in the refrigerator.
When the refrigerator is damaged or
not in normal operation, make sure
you cut off the power supply and
notify the local service centre.
Note:
This product is for household use only, as the national standard requires, the household refrigerators can only be used to store
food, but for other purposes, such as storing blood, drugs and biological products, etc.
Please do not have the door
open too long or too
frequently to avoid reducing
the efficiency of the whole
machine and increasing the
load of its operation.
Please do not splash any water onto
the top and rear, so as not to
weaken the effect of electrical
insulation.
6
7
Page 6

Maintenance
r
e
Changing the doo
handing
Cleaning
Use dry towels to wipe off the fingerprints left on the panel.
Regularly clean the rear of the refrigerator and the ground.
The refrigerator should have its interior frequently cleaned in order to avoid odours. While cleaning, pleas
unplug the power, use soft towels and neutral detergents, and finally use c lear water to clean it.
Do not use the following materials to clean the refrigerator:
·Alkaline or weak alkaline cleaning agent; (The container and the plastic components may crack)
·Soap powder, light gasoline, banana oil, alcohol and so on; (The plastic parts may be damaged)
·If dirtied with edible oil or sauce, please promptly remove it. (The plastic components may crack)
Lights and replacement
If the lights fail, please contact the professional servicemen for repair.
Shutdown
No use for a prolonged period: You should unplug the power, so as to avoid electric shocks or fires due to power line aging;
clean the refrigerator inside; leave the doors open for a period of time until the cabinet is completely dry.
Power failure: When the power fails, try to reduce the number of time the door is opened; it is not appropriate to add fresh
food.
1. Remove the two screw caps and the two hinge end caps on the top decorations (when the door is opened to the right.)
Left hinge end cap
Screw cap
Right hinge end cap
Roof decoration
2 Remove the roof decorative components
Roof decoration
Harness
Disposal: If a refrigerator is discarded, its door seal must be removed to prevent any child entering and being trapped in the
refrigerator.
Roof decoration
3. Remove the two screws to fix the top hinge, draw the top hinge out from the side, remove it together with the door, and
finally take the hinge out from the door.
Two screws
Hinge
8 9
Page 7

Changing the door handing
r
Changing the doo
handing
4. Reassemble the bottom hinge shaft: remove the original shaft of the hinge and relocated it as shown in the figure.
5. Reassemble the top hinge shaft: first remove the hinge shaft and screw this shaft from the other end of the screw hole.
7. Mount the bottom hinge on the right side of the cabinet.
Bottom hinge
8. First mount the top hinge in the corresponding shaft hole on the right side of the door upper cover, place the door body
on the bottom hinge, and press the top hinge into the hinge fixation column to fix the hinge.
6. Mount the left top hinge fixation column on the right.
9. Mount the roof decoration, the screw caps and the hinge end cap.
10 11
Page 8
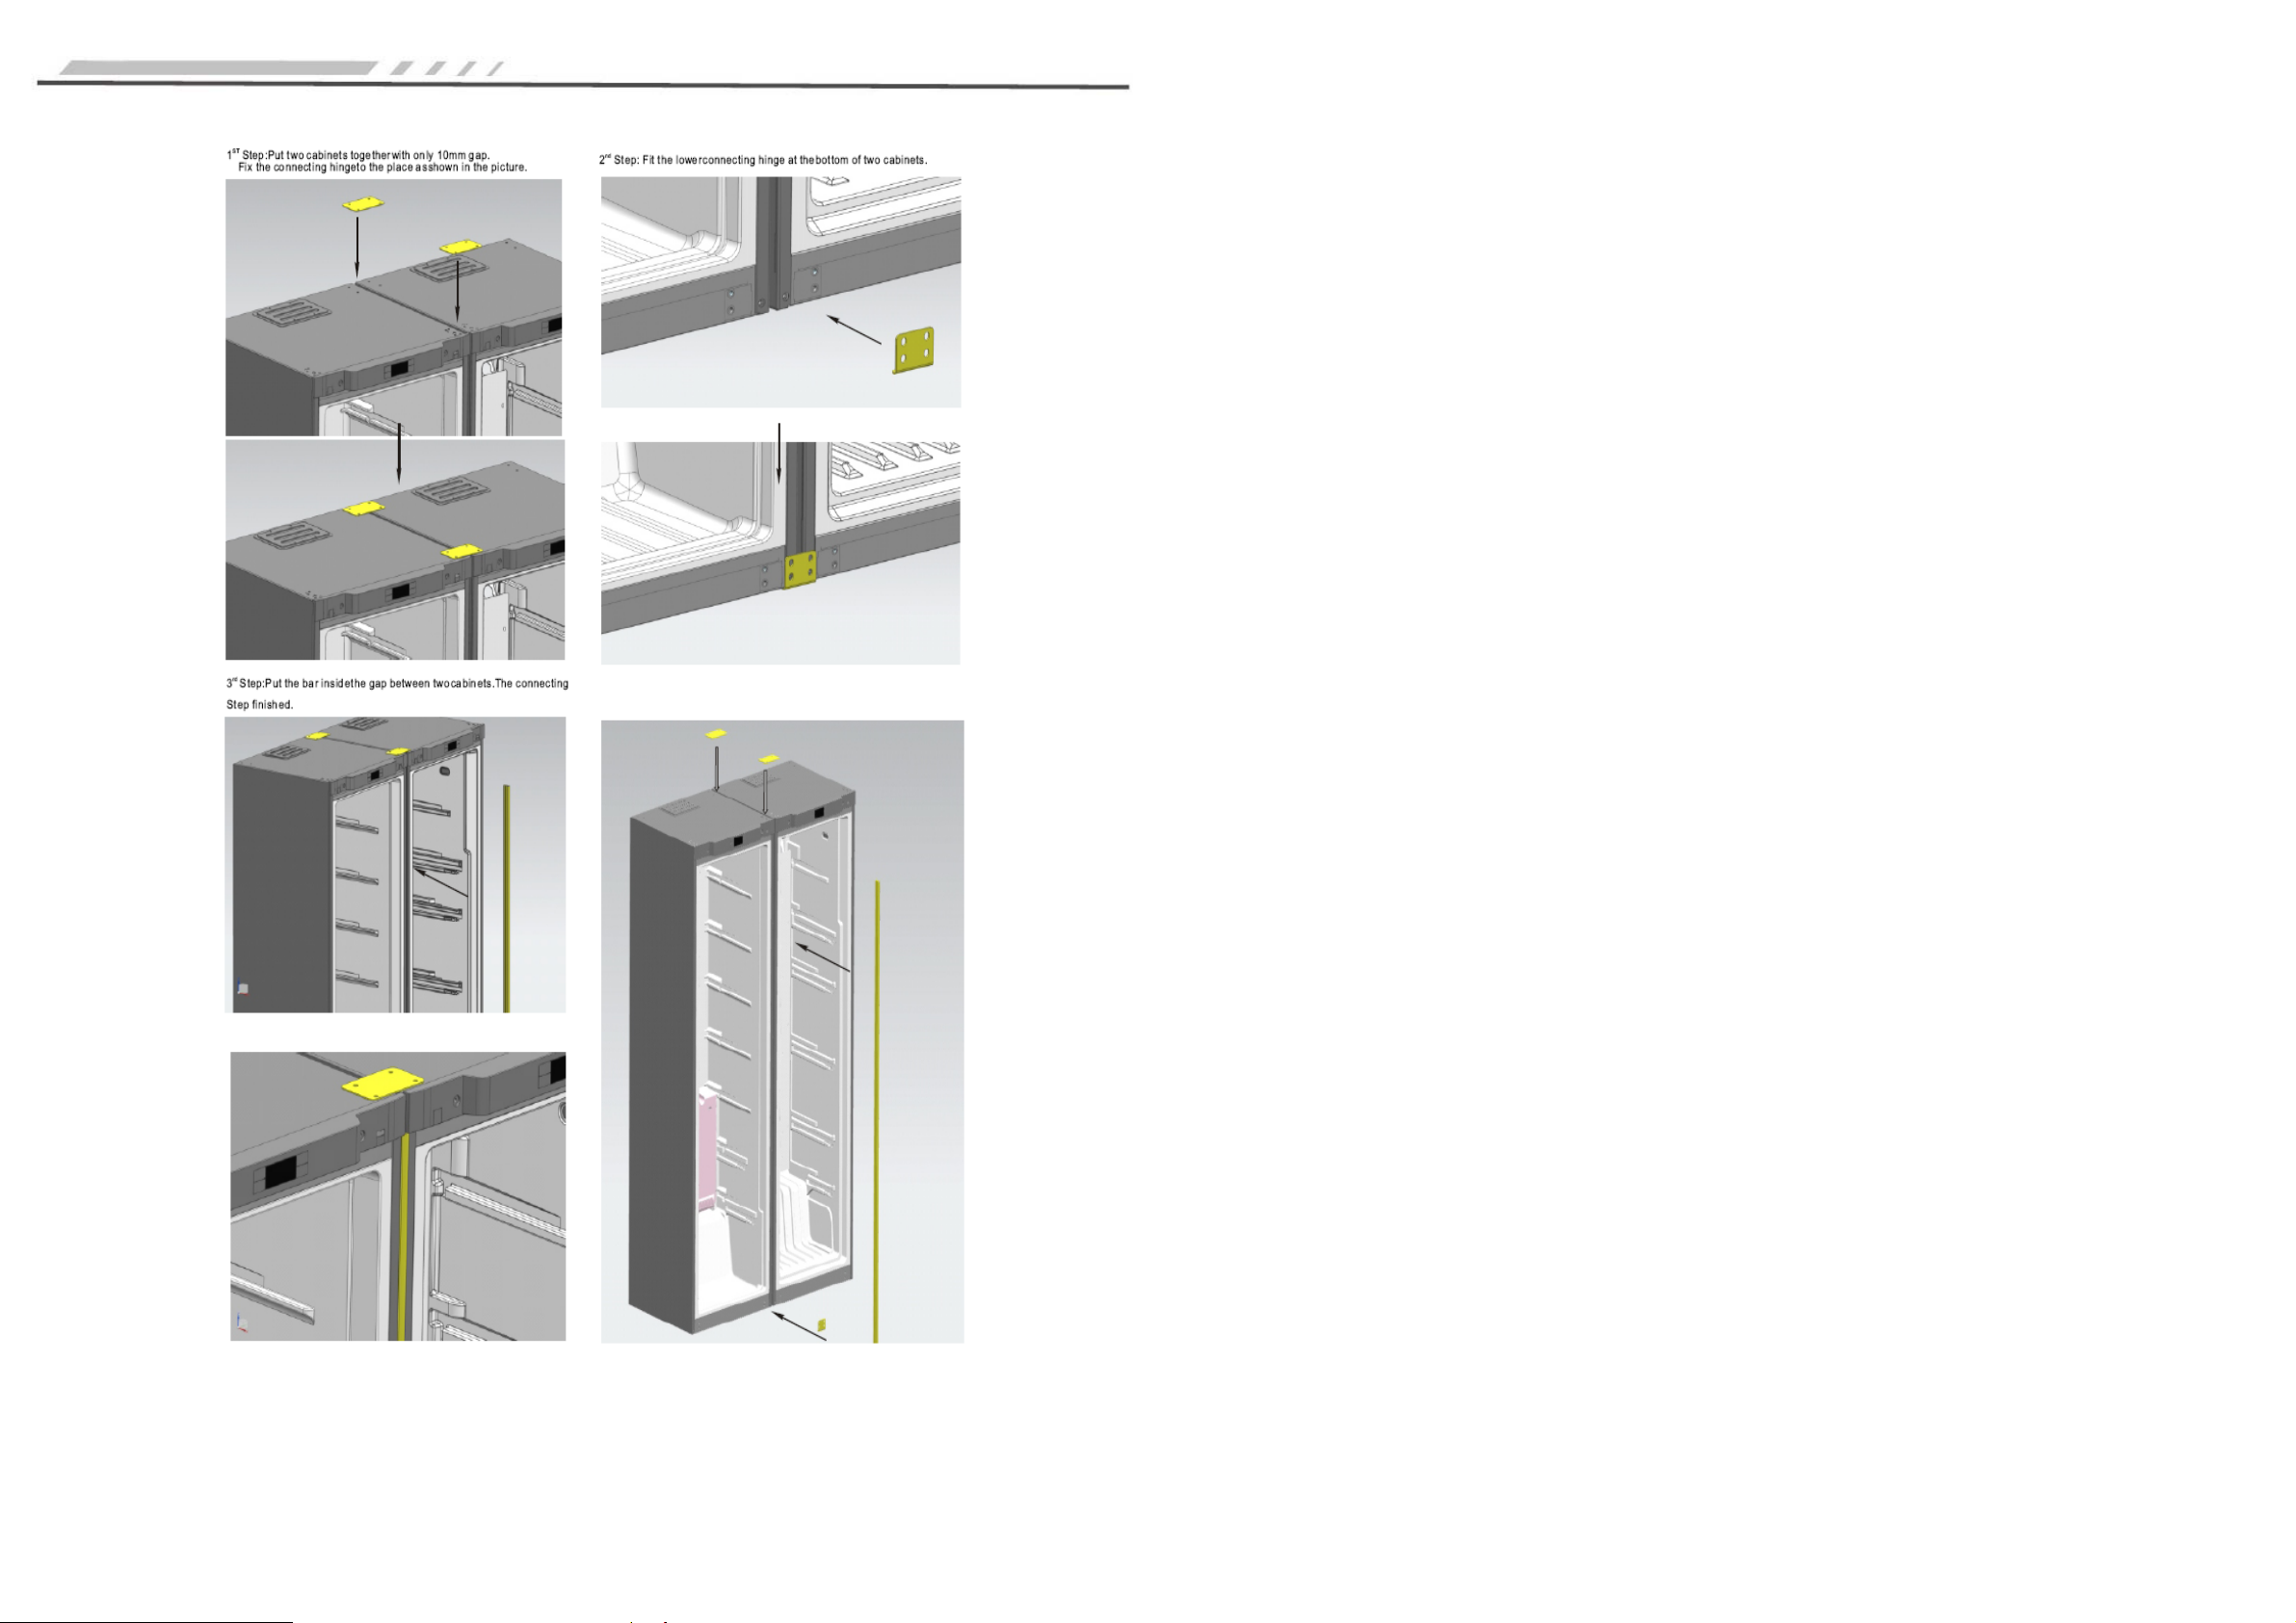
Joining the fridge and freezer
12
Page 9
Troubleshooting
gram
g
Compressor
Protector
Technical Parameters and schematic dia
Before request for repair, please read the following contents carefully.
Problem Possible Reasons and Items to be Checked
No power Is the power supply is connected and is the plug inserted
correctly
Is the voltage is too low
Poor refrigeration Is the temperature is set too high
Is too much food been stored
Has any hot food been added
Is the door is opened / closed too frequently
Is the door closed correctly
Is any heat source is kept around the refrigerator
Too noisy Is the floor flat and the refrigerator is steadily placed
Does the refrigerator have its accessories correctly
positioned
Bad smell The odorous food should be tightly wrapped
Climate Class SN/T
Protection Against
Electric Shock I
Rated Voltage/Frequency AC220-240V/50Hz
Rated Power 65W
Defrost Power Lamp Rated Power 8.8W
Rated Current 0.3A
Foaming Agent Cyclopentane
Energy Consumption 0.309kW h/24h
Energy Efficiency Class A++
Total Gross Volume Gross Freezer Volume Total Storage Volume 350L
Freezer Storage Volume Refrigerant Amount R600a,58g
Freezing Capacity Net Weight 74kg
Dimensions W595xD685xH1855
Compressor NS1060Y
Fan motor
Check whether there is any bad food
The refrigerator inside needs cleaning
If the above items have been checked but there is no improvement, please contact the Caple after-sales service department of this
company.
If damaged, the power cord must be replaced by the servicemen designated by this company to avoid potential dangers.
Non-fault Phenomenon
The refrigerant liquid in the capillary tubes of the refrigerator flows at a high speed, and sometimes there may be a few air bubbles
inside. Therefore, some irregular noises will be produced at the exit. When the refrigerator is in rapid refrigeration, the wind noise will
be heard when the refrigerator door is opened, and that is the sound of the high-speed fan.
If the air is much too humid, the refrigerator door may be wetted around, and dry cloth can be used to wipe it.
Defrosting sensor
Display
control panel
Rsensor
Running capacitor
Control mainboard
Blue
Yellow
reen
Lighting
lamps
Lamp switch
Brown
Starter
Power plug
Blue
13 14
Page 10

Correct Disposal of this product
Correct Disposal of this product
This marking indicates that this product should not be disposed with other household wastes throughout
the EU. To prevent possible harm to the environment or human health from uncontrolled waste disposal,
recycle it responsibly to promote the sustainable reuse of material resources. To return your used device,
please use the return and collection systems or contact the retailer where the product was purchased. They
can take this product for environmental safe recycling.
Requesting assistance or service
If you have any doubt or require extra assistance, please call:
Caple Service:
Telephone: 0844 800 3830
Email: service@caple.co.uk
Caple
Fourth Way
Avonmouth
Bristol
BS11 8DW
www.caple.co.uk
15
 Loading...