

Page 1
Contact Caple on 0117 938 7420 or for spare parts www.caple.co.uk
Free standing fridge freezer
instruction manual
RFF730
Page 2

Instruction manual RFF730
Please keep this instruction manual for future reference
2
CONTENTS
General Warnings 3
Safety Warnings 8
Installing And Operating Your Fridge 9
Before Using Your Fridge 10
Frost Free Technology 10
Parts Of The Appliance 11
Functions And Settings 12
Cleaning And Maintenance 21
Refrigerator Compartment 22
Freezer Compartment 23
Storing Frozen Food 25
Transportation And Repositioning 28
Troubleshooting 29
Energy Saving Tips 33
Caple Contact Details 36
Page 3

Instruction manual RFF730
Please keep this instruction manual for future reference
3
GENERAL WARNINGS
WARNING:
- Keep ventilation openings in the appliance enclosure
or in the built-in structure, clear of obstruction.
WARNING:
- Do not use mechanical devices or other means to
accelerate the defrosting process, other than those
recommended by the manufacturer.
WARNING:
- Do not use electrical appliances inside the food
storage compartments of the appliance, unless they
are of the type recommended by the manufacturer.
WARNING:
- Do not damage the refrigerant circuit.
WARNING:
- To avoid a hazard due to the instability of the
appliance, it must be fixed in accordance with
the instructions.
Page 4

Instruction manual RFF730
Please keep this instruction manual for future reference
4
WARNING:
- If your appliance uses R600a as a refrigerant (you
can learn this information from the rating label on
the appliance) you should be careful during transport
and installation to prevent your appliance’s cooler
elements from being damaged. Although R600a is
an environmentally friendly and natural gas. As it is
explosive, in the event of a leak due to damage to the
cooler elements, move your fridge from open flames or
heat sources and ventilate the room where the appliance
is located for a few minutes.
- While carrying and positioning the fridge, do not damage
the cooler gas circuit.
- Do not store explosive substances such as aerosol cans
with a flammable propellant in this appliance.
- This product is not designed for commercial use, it is
a household appliance only. It is not intended to be
used in:
•
Staff kitchen areas in shops, offices and other working
environments.
•
Bed and breakfast type environments.
•
By clients in hotels, motels and other residential type
environments.
- If the socket does not match the refrigerator plug, it must
be replaced by the manufacturer, its service agent or
similarly qualified persons in order to avoid a hazard.
Page 5

Instruction manual RFF730
Please keep this instruction manual for future reference
5
- A specially grounded plug has been connected to the
power cable of your refrigerator. This plug should be used
with a specially grounded socket of 13amp. If there is no
such socket in your house, please have it installed by an
authorised electrician.
- This appliance can be used by children aged from 8
years and above and persons with reduced physical,
sensory or mental capabilities or lack of experience
and knowledge if they have been given supervision or
instruction concerning use of the appliance in a safe way
and understand the hazard involved. Children shall not
play with the appliance. Cleaning and user maintenance,
shall not be made by children without supervision.
- If the supply cord is damaged, it must be replaced by a
Caple approved engineer or similar qualified persons in
order to avoid a hazard.
- This appliance is not intended for use at altitudes
exceeding 2000 m.
Page 6
Instruction manual RFF730
Please keep this instruction manual for future reference
6
ENVIRONMENTAL PROTECTION
Waste electrical products should not be disposed of with household waste. Please
recycle where facilities exist. Check with your Local Authority or retailer for recycling
advice. This appliance is marked according to the European directive 2002/96/EC on
Waste Electrical and Electronic Equipment (WEEE).
By ensuring this product is disposed of correctly, you will help prevent potential
negative consequences for the environment and human health, which could
otherwise be caused by inappropriate waste handling of this product. The symbol
on the product indicates that this product may not be treated as household waste.
Instead it shall be handed over to the applicable collection point for the recycling of
electrical and electronic equipment. Disposal must be carried out in accordance with
local environmental regulations for waste disposal.
For more detailed information about treatment, recovery and recycling of this
product, please contact your local council, your household waste disposal service or
the retailer where you purchased the product.
CE DECLARATIONS OF CONFORMITY
This appliance has been manufactured to the strictest standards and complies
with all applicable legislation, Low Voltage Directive (LVD) and Electromagnetic
Compatibility (EMC).
Page 7

Instruction manual RFF730
Please keep this instruction manual for future reference
7
OLD AND OUT-OF-ORDER FRIDGES
- If your old fridge has a lock, break or remove the lock
before discarding it, because children may get trapped
inside it and may cause an accident.
- Old fridges and freezers contain isolation material and
refrigerant with CFC. Therefore, take care not to harm
environment when you are discarding your old fridge.
NOTES:
- Please read the instruction manual carefully before
installing and using your appliance. Caple cannot be held
responsible for the damage occurred due to misuse.
- Follow all instructions on your appliance and instruction
manual, and keep this manual in a safe place to resolve
the problems that may occur in the future.
- This appliance is produced to be used in homes and
it can only be used in domestic environments and for
the specified purposes. It is not suitable for commercial
or common use. Such use will cause the guarantee of
the appliance to be cancelled and Caple will not be
responsible for the losses to be occurred.
Page 8

Instruction manual RFF730
Please keep this instruction manual for future reference
8
SAFETY WARNINGS
- Do not use multiple receptacles or extension cord.
- Do not plug in damaged, torn or old plugs.
- Do not pull, bend or damage the cord.
- This appliance is designed for use by adults, do not allow
children to play with the appliance or let them hang off
the door.
- Do not plug-in or pull out the plug from the receptacle
with wet hands to prevent electrocution!
- Do not place glass bottles or beverage cans in the freezer
department. Bottles or cans may explode.
- Do not place explosive or flammable material in your
fridge for your safety. Place drinks with higher alcohol
amount vertically and by closing their necks tightly in the
fridge department.
- When taking ice made in the freezer department, do not
touch it with bare hands, ice may cause ice burns and/or cuts.
- Do not touch frozen goods with wet hands! Do not eat
icecream and ice cubes immediately after you have taken
them out of the freezer department!
- Do not re-freeze frozen goods after they have melted. This
may cause health issues like food poisoning.
- Do not cover the body or top of fridge with lace. This
affects the performance of your fridge.
- Fix the accessories in the fridge during transportation to
prevent damage to accessories.
Page 9

Instruction manual RFF730
Please keep this instruction manual for future reference
9
INSTALLING AND OPERATING YOUR FRIDGE
Before starting to use your fridge, you should pay attention to the following points:
- Operating voltage for your fridge is 220-240 V at 50Hz.
- Mains cord of your fridge has a grounded plug. This plug should be used with
a grounded receptacle that has a 13 ampere fuse minimum. If you don’t have a
receptacle confirming with this, please have it done by a qualified electrician.
- Caple do not take the responsibility for damages that occur due
to ungrounded usage.
- Place your fridge in a place that would not be exposed to direct sunlight.
- Your appliance should be at least 50 cm away from hobs, Gas ovens and heater
cores, and should be at least 5 cm away from electrical ovens.
- Your fridge should never be used outdoors or left under the rain.
- When your fridge is placed next to a deep freezer, there should be at least 2 cm
between them to prevent humidity on the outer surface.
- Do not place anything on your fridge, and install your fridge in a suitable place so
that at least 15 cm is available on the upper side.
- The adjustable front legs should be stabilized at an appropriate height to allow
your fridge to operate in a stable and proper way. You can adjust the legs by
turning them clockwise (or in the opposite direction). This should be done before
placing food in the fridge.
- Before using your fridge, wipe all parts with warm water
added with a tea spoonful of sodium bicarbonate, and
then rinse with clean water and dry. Replace all parts
after cleaning.
- Install the distance adjustment plastic (the part with
black vanes at the rear) by turning it 90° as shown in the
figure to prevent the condenser from touching the wall.
- Refrigerator should be placed against a wall with a free
distance not exceeding 75 mm.
Page 10
Instruction manual RFF730
Please keep this instruction manual for future reference
10
BEFORE USING YOUR FRIDGE
- When it is operated for the first time or after transportation, keep your fridge
in the upright position for 12 hours and plug it in to allow efficient operation.
Otherwise, you may damage the compressor.
- Your fridge may have a smell when it is operated for the first time; This is normal
and the smell will fade away when your fridge starts to cool.
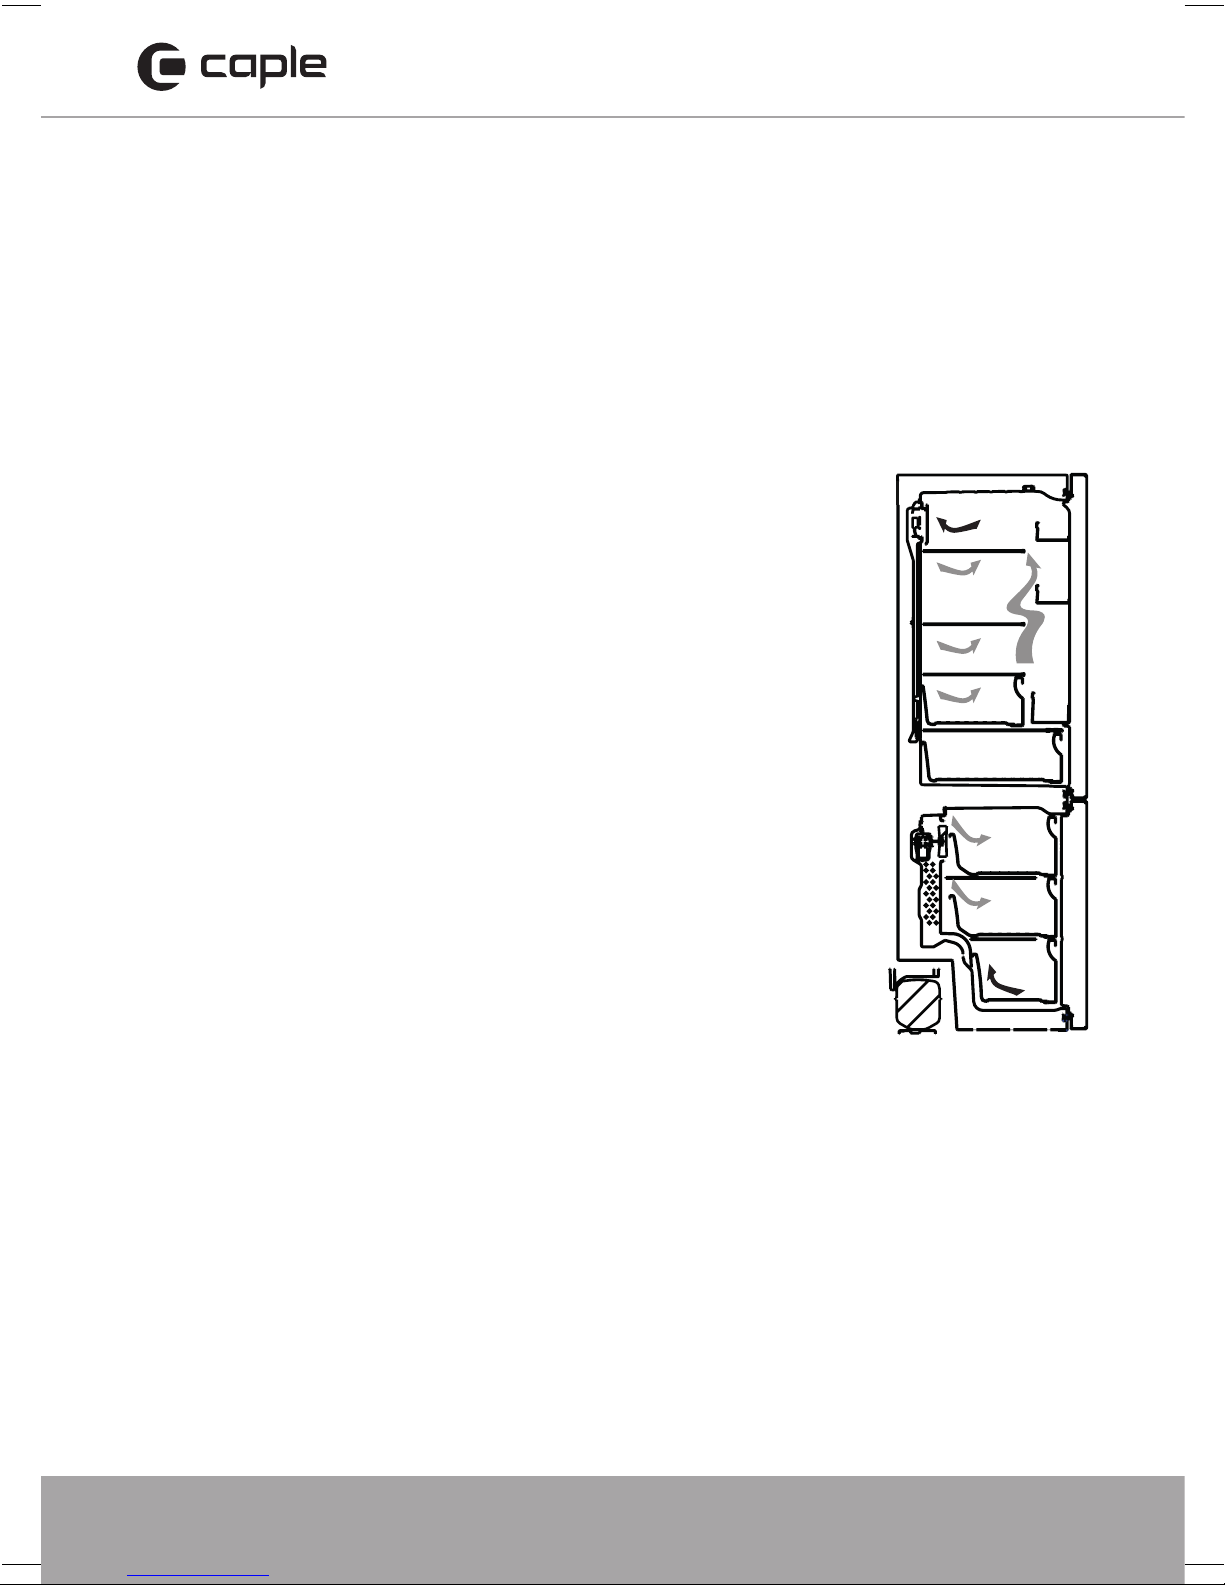
FROST FREE TECHNOLOGY
Fridges with Frost free technology have a different working
system than static fridges. In normal fridges, humid air that
enters into the fridge and the water vapor that comes out
from the foods, accumulates frost formation in the freezer
compartment. In order to melt this frost, in other words defrost,
the fridge has to be stopped. During the stopping period, to
keep the foods cold, the user must remove all foods from the
fridge and then clear all the ice during this period.
In the fridges with frost free technology, the situation in the
freezer compartment is completely different. With the aid of
the fan, cold and dry air is blown out through many points into
the freezer compartment. As a result of the blown cold air,
even in the spaces between shelves, foods are frozen equally
and correctly. On the other hand there will also be no frost
formation.
In the refrigerator compartment, there will be nearly the
same configuration as the freezer compartment. Air, that is
emitted with the fan, located at the top of refrigerator compartment, is cooled
while passing through the gap behind the air duct. At the same time, air is blown
out through the holes on the air duct so that the cooling process is successfully
completed in the refrigerator compartment. Holes on the air duct are designed such
that the air distribution becomes homogeneous in this compartment.
As there is no air passage between freezer and refrigerator compartment, there will
be no odor mixing. As a result of this, your fridge with new cooling technology,
gives you ease of use as well as the huge volume and aesthetic appearance.
Page 11
Instruction manual RFF730
Please keep this instruction manual for future reference
11
13
12
11
10
14
1
2
3
4
5
6
7
8
9
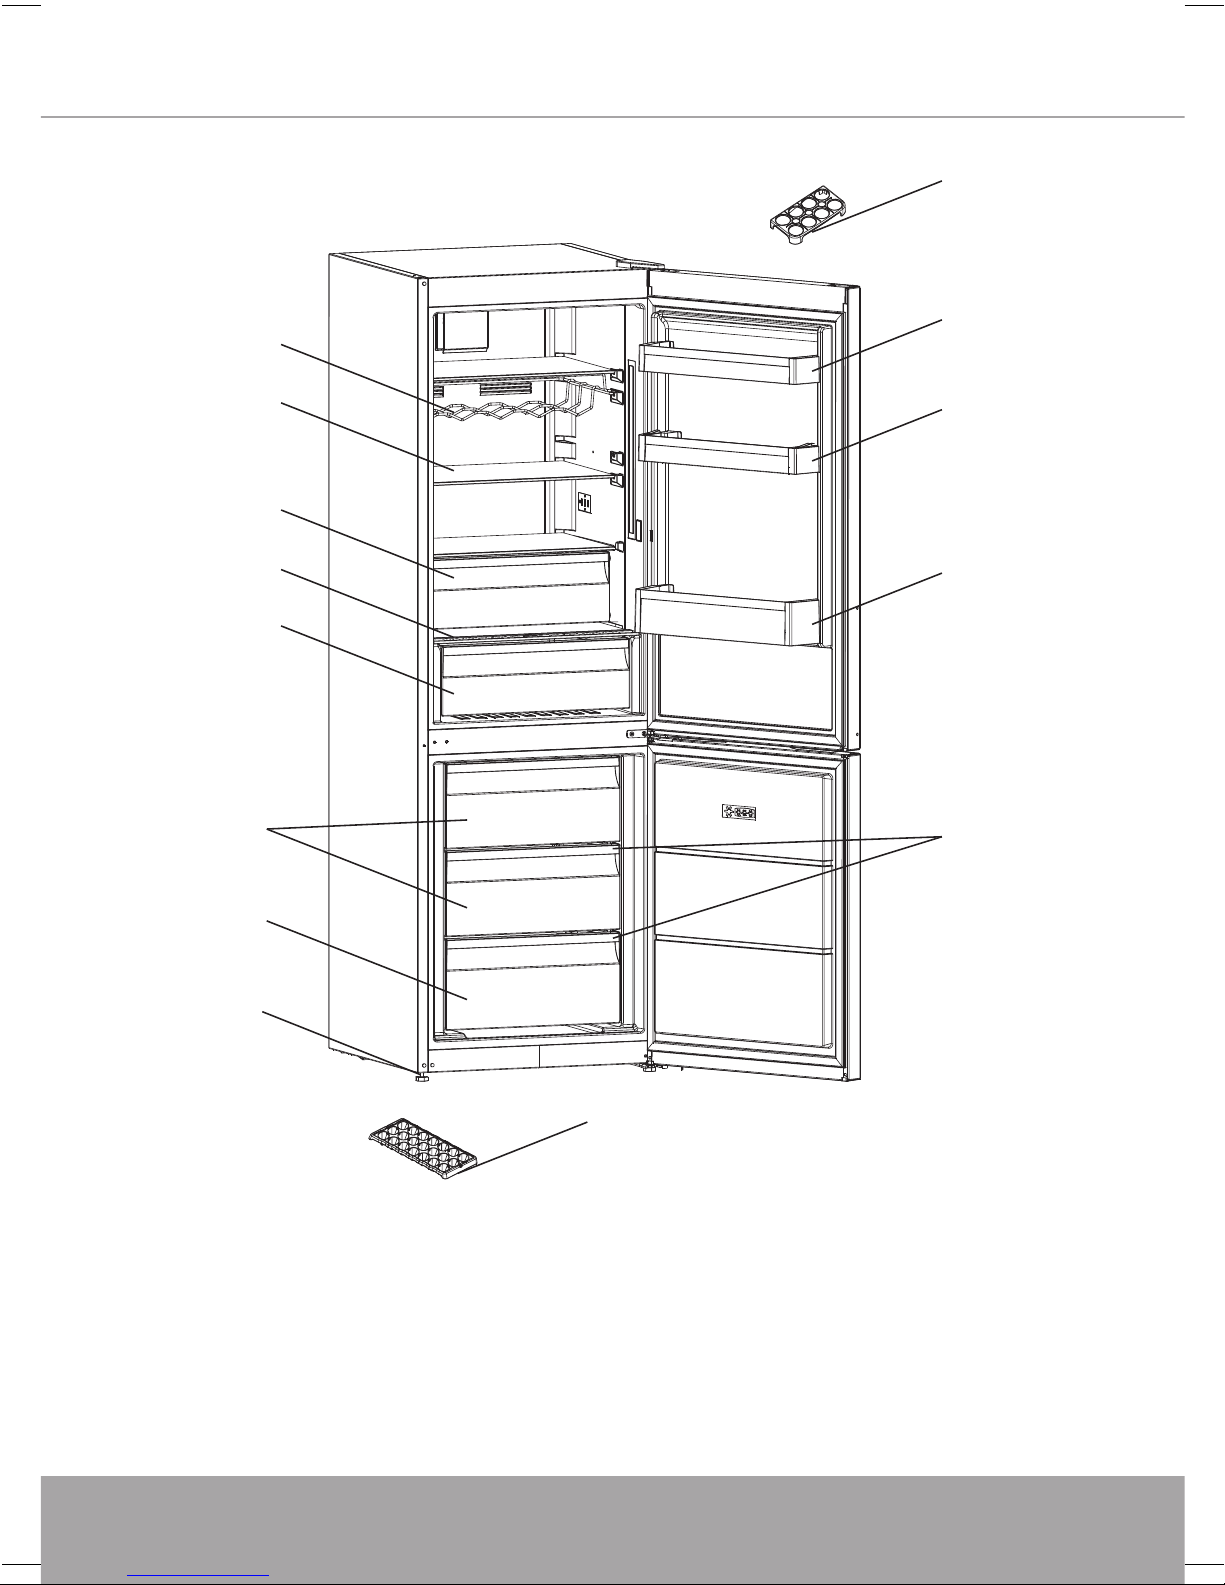
1. Wine rack
2. Fridge shelves
3. Chiller
4. Crisper cover
5. Crisper
6. Freezer top-middle basket
7. Freezer bottom basket
8. Leveling feet
9. Ice tray
10. Freezer glass shelves
11. Bottle shelf
12. Door shelf
13. Door shelf
14. Egg holder
PARTS OF THE APPLIANCE
Page 12

Instruction manual RFF730
Please keep this instruction manual for future reference
12
FUNCTIONS AND SETTINGS
234
6
7
9
8
1. Fridge temperature
value screen.
2. Super cooling indicator.
3. Freezer temperature
value screen.
4. Super freeze indicator.
5. Warning / alarm symbol.
6. Eco mode symbol.
7. Holiday mode symbol.
8. Child-lock symbol.
9. Fridge set button.
10. Freezer set button.
11. Mode button.
Page 13

Instruction manual RFF730
Please keep this instruction manual for future reference
13
OPERATING YOUR FRIDGE
Super freeze mode
How to use:
- Press the freezer set button until the Super freeze symbol can be
seen on the screen. The buzzer will sound. Mode will be set.
During this mode:
- Temperature of cooler and super cool mode may be adjusted. In this
case super freeze mode continues.
-Economy and Holiday mode can not be selected.
- Super freeze mode can be cancelled by the same operation
of selecting.
Super cool mode
How to use:
- Press the Fridge set button until Super cool symbol can be seen on
the screen. The buzzer will sound. Mode will be set.
During this mode:
- Temperature of freezer and super freeze mode may be adjusted.
In this case super cool mode continues.
-Economy and Holiday mode can not be selected.
- Super cool mode can be cancelled by the same operation
of selecting.
Economy mode
How to use:
-Push the “mode button” until the ‘eco’ symbol appears.
- Eco symbol will blink 3 times. When mode is set,
the buzzer will sound.
-Freezer and refrigerator temperature segments will show “E”.
-Economy symbol and E will light till mode finishes.
Page 14
Instruction manual RFF730
Please keep this instruction manual for future reference
14
During this mode:
- Freezer may be adjusted. When economy mode is cancelled, the selected setting
values will proceed.
- Fridge may be adjusted. When economy mode is cancelled, the selected setting
values will proceed.
- Super cool and super freeze modes can be selected. Economy mode is
automatically cancelled and the selected mode is activated.
- Holiday mode can be selected after canceling the economy mode. Then the
selected mode is activated.
- To cancel, you will just need to press on mode button.
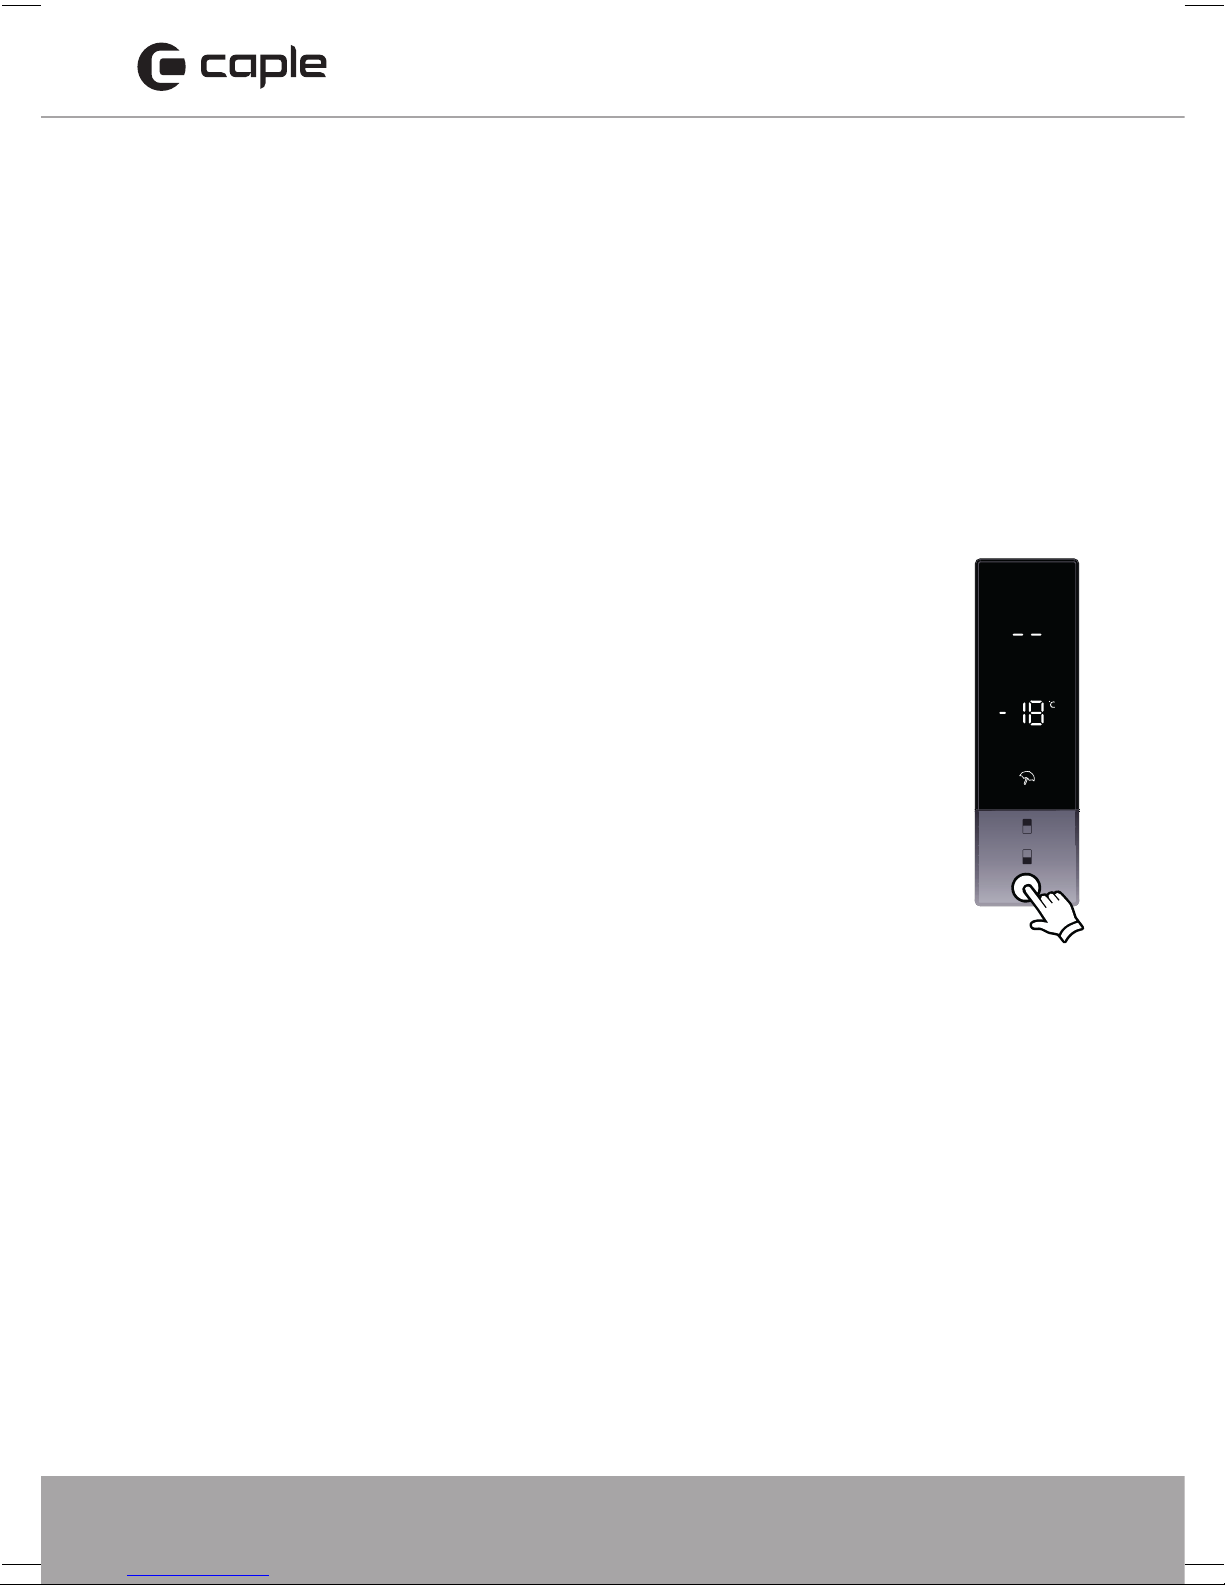
Holiday mode
How to use:
- Push “mode button” until holiday symbol appears
- Holiday symbol will blink 3 times. When mode is set,
the buzzer will sound.
- Fridge temperature segment will show “--”.
- Holiday symbol and “--” will light till mode finishes.
During this mode:
- Freezer may be adjusted. When holiday mode is cancelled , the selected
setting values will proceed.
- Fridge may be adjusted. When holiday mode is cancelled, the selected setting
values will proceed.
- Super cool and super freeze modes can be selected. Holiday mode is automatically
cancelled and the selected mode is activated.
- Economy mode can be selected after cancelling the holiday mode. Then the
selected mode is activated.
- To cancel, you will just need to press on mode button.
Page 15

Instruction manual RFF730
Please keep this instruction manual for future reference
15
Drink cool mode
When would it be used?
- This mode is used to cool the drinks within an adjustable time. After
the selected period of time an alarm will sound.
How to use:
- Press and hold freezer button for 3 seconds.
- Special animation will show on the freezer set value screen and ‘05’
will blink on cooler set value screen.
- Press the cooler button to adjust the time
(05 - 10 - 15 - 20 -25 - 30 minutes).
- When you select the time the numbers will blink 3 times
on screen and a beep will sound.
- If no button is pressed within 2 seconds the time will be set.
- The countdown starts from the adjusted time minute by minute.
- Remaining time will blink on the screen.
- To cancel this mode press the freezer set button for 3 seconds.
Screen saver mode
How to use:
- This mode will be activated when you press on the Mode button for
5 seconds.
- If no button is pressed within 5 seconds when the mode is active,
lights of the control panel will go off.
- If you press any button when lights of control panel are off, the
current settings will appear on the screen, and then you can make the
adjustment as you want. If you neither cancel screen saver mode nor
press on any button in 5 seconds, the control panel will go off again.
- To cancel screen saver mode press on the Mode button for 5
seconds again.
- When screen saver mode is active you can also activate child lock.
- If no button is pressed within 5 seconds after child lock is activated,
the lights of the control panel will turn off. You can see latest status
of settings or modes after you press any button. While the control
panels light is on, you can cancel child lock as described in the
instruction for this mode.
Page 16

Instruction manual RFF730
Please keep this instruction manual for future reference
16
Fridge temperature settings
- Initial temperature value for Fridge Setting Indicator is +4 °C.
- Press the Fridge button once.
- When you first push this button, the last value appears on the setting
indicator of the fridge.
- Whenever you press on this button, lower temperature will be set.
(+8°C, +6°C, +5°C, +4°C, +2°C, supercool)
- When you push the Fridge set button until supercool symbol appears,
and if you do not push any button in 1 seconds Super Cool will flash.
- If you continue to press, it will restart from +8°C.
- The temperature value selected before Holiday Mode, Super Freeze
Mode, Super Cool Mode or Economy Mode is activated will remain
the same when the mode is over or cancelled. The appliance
continues to operate with this temperature value.
Freezer temperature settings
- Initial temperature value for Freezer Setting Indicator is -18°C.
- Press the Freezer set button once.
- When you first push this button, the last set value will blink on screen.
- Whenever you press on this button, lower temperature will be set
(-16°C, -18°C, -20°C, -22°C, -24°C superfreeze).
- When you push the freezer set button until superfreeze symbol
appears, and if you do not push any button in 1 seconds Super Freeze
will flash.
- If you continue to press, it will restart from -16°C.
- The temperature value selected before Holiday Mode, Super Freeze
Mode, Super Cool Mode or Economy Mode is activated will remain
the same when the mode is over or cancelled. The appliance
continues to operate with this temperature value.
Page 17

Instruction manual RFF730
Please keep this instruction manual for future reference
17
Light cancelling mode
When would it be used?
- If you want to cancel the fridge lights, you can select this mode.
- While pushing the freezer and mode buttons, open and close cooler
door 3 times. The mode will be selected in this way. From now on,
the lights will not come on when the function is not cancelled by the
same way.
- If you want to cancel this mode, repeat the same process or the
mode will automatically cancel itself after 24 hours.
Child lock
When would it be used?
- To prevent children from playing with the buttons and changing the
settings you have made, child lock is available on the appliance.
Activating Child Lock
- Press on the Fridge and Freezer buttons simultaneously for 5 seconds.
Deactivating Child Lock
- Press on Fridge and Freezer buttons simultaneously for 5 seconds.
NOTE:
Child lock will also be deactivated if electricity is interrupted or the
Fridge freezer is unplugged.
Page 18

Instruction manual RFF730
Please keep this instruction manual for future reference
18
WARNINGS ABOUT TEMPERATURE ADJUSTMENTS
- Your temperature adjustments will not be deleted when an energy breakdown
occurs.
- Temperature adjustments should be made according to the frequency of door
openings and the quantity of food kept inside the fridge.
- Do not pass to another adjustment before completing an adjustment.
- Your fridge should be operated up to 24 hours according to the ambient
temperature without interruption after being plugged in to be completely cooled.
Do not open doors of your fridge frequently and do not place much food inside it
in this period.
- A 5 minute delaying function is applied to prevent damage to the compressor of
your fridge, when you take the plug off and then plug it on again to operate it or
when an energy breakdown occurs. Your fridge will start to operate normally after
5 minutes.
- Your fridge is designed to operate in the ambient temperature intervals stated in
the standards, according to the climate class stated in the information label. We
do not recommend operating your fridge out of stated temperatures value limits in
terms of cooling effectiveness.
- This appliance is designed for use at an ambient temperature within the 10°C 43°C range.
CLIMATE CLASS AMBIENT TEMPERATURE OC
T
Between 16 and 43 (°C)
ST
Between 16 and 38 (°C)
N
Between 16 and 32 (°C)
SN
Between 10 and 32 (°C)
Page 19

Instruction manual RFF730
Please keep this instruction manual for future reference
19
FREEZER DRAWS
The freezer draws allows foods to be stored more conveniently.
Removing the freezer draws;
- Pull the draw out as far as
possible
- Pull the front of the draw up and
out. Reverse these instruction to
reinsert the freezer draws.
NOTE:
Always keep hold of the handle while removing the draws.
FRIDGE DRAWS (CRISPERS)
Keeping food in the fridge draw compartment instead of
the freezer or refrigerator compartment allows food to
retain its freshness and flavour for longer, while preserving
its fresh appearance. When the fridge draws becomes
dirty, remove it and wash it with warm soapy water, rinse
and dry thoroughly.
(Water freezes at 0°C, but foods containing salt or sugar
freeze at temperature lower than that).
The fridge draw compartments are usually used for fresh
meats, fruit & vegetables.
DO NOT PUT FOODS YOU WANT TO FREEZE OR ICE TRAYS IN ORDER TO
MAKE ICE.
Removing the fridge draws
- Pull the fridge draw out toward you by sliding on rails.
- Pull the fridge draw up from rail to remove.
- Reverse these instructions to reinsert the fridge draws.
Freezer draws
ACCESSORIES
• Pull the draw out as far as possible
• Pull the front of the draw up and out.
Reverse these instruction to reinsert the freezer draws.
Keeping food in the fridge draw compartment instead
of the freezer or refrigerator compartment allows food
to retain its freshness and flavour for longer, while
preserving its fresh appearance. When the fridge
draws becomes dirty, remove it and wash it with warm
soapy water, rinse and dry thouroughly.
(Water freezes at 0°C, but foods containing salt or
sugar freeze at temperature lower than that)
The fridge draw compartments are usually used for fresh
Freezer draws
Page 20

Instruction manual RFF730
Please keep this instruction manual for future reference
20
HUMIDITY CONTROLLER
When the humidity controller is in the closed position, it allows fresh fruit and
vegetables to be kept fresh for longer.
When the crisper is totally full, the humidity controller should be opened. By means
of this the air in the crisper and humidity rate will be controlled and endurance life
will be increased.
If you see any condensation on the glass shelf above, the humidity control should
be in the open position.
EN
21
Page 21

Instruction manual RFF730
Please keep this instruction manual for future reference
21
CLEANING AND MAINTENANCE
Make sure to unplug the fridge before starting to clean it.
- Do not wash your fridge by pouring water onto, or inside it.
- You can wipe the inner and outer sides of your appliance with a soft cloth or a
sponge using warm and soapy water.
- Remove the parts individually and clean with soapy water. Do not wash in a
dishwasher.
- Never use flammable, explosive or corrosive material like thinner, gas, acid for
cleaning.
- You should clean the condenser with a brush at least once a year in order to save
energy and increase the productivity and efficiency.
DEFROSTING
Your refrigerator performs fully automatic defrosting. The water formed as a result
of defrosting passes through the water collection spout, flows into the vaporization
container behind your refrigerator and evaporates by itself in there.
- Make sure you have disconnected the plug of your refrigerator before cleaning the
vaporization container.
- Remove the vaporization container from its position by unscrewing the screws
as indicated. Clean it with soapy water at specific time intervals. Thus, the odor
formation will have been prevented.
REPLACING LED LIGHTING
LED lights should be changed by authorised personnel only. please contact an
electrician, or Caple service for assistance - 0117 938 7420
Page 22

Instruction manual RFF730
Please keep this instruction manual for future reference
22
REFRIGERATOR COMPARTMENT
- For normal operating conditions, adjusting the temperature value of the fridge to
4°C will be suitable.
- To reduce humidity and consequently increase of frost, never place liquids in
unsealed containers in the refrigerator. Frost tends to concentrate in the coldest
parts of the evaporator and in time will require more frequent defrosting.
- Never place warm food in the refrigerator. Warm food should be allowed to cool
at room temperature and should be arranged to ensure adequate air circulation in
the refrigerator compartment.
- Nothing should touch on the back wall as it will cause frost and the packages can
stick to the back wall. Do not open the refrigerator door too frequently.
- Arrange meat and cleaned fish (wrapped in packages or sheets of plastic) which
you will use in 1-2 days,in the bottom section of the refrigerator compartment
(above the salad crisper) as this is the coldest section and will ensure the best
storing conditions.
- You can put the fruits and vegetables into the crisper without packing. Some
recommendations have been specified below for the placement and storage of
your food in the fridge compartment.
Food Maximum Storing time Where to place in the
fridge department
Vegetables and fruits 1 week bottom Crisper
Meat and fish 2 -3 days Wrapped in plastic foil,
bags or in a meat container
(Crisper)
Fresh cheese 3 - 4 days In special door shelf
Butter and
margarine
1 week In special door shelf
Bottled products milk
and yoghurt
Until the expiry date
recommended by the
producer
In special door shelf
Eggs 1 month In the egg shelf
Cooked food All shelves
Page 23

Instruction manual RFF730
Please keep this instruction manual for future reference
23
FREEZER COMPARTMENT
- Please use the freezer compartment of your refrigerator for storing frozen foods
and producing ice.
- Please do not place the food you shall newly freeze next to already frozen food.
- You should freeze the food to be frozen (meat, minced meat, fish, etc.) by dividing
them into portions in such a way that they can be consumed once.
- Please do not refreeze frozen food once they are thawed. It may pose a danger for
your health as it may cause problems such as food poisoning.
- Do not place hot food in the freezer before it has cooled. You would cause the
other frozen foods in the freezer to decay.
- When you buy frozen foods, makes sure that they were frozen under appropriate
conditions and the package is not torn.
- While storing frozen food, the storage conditions on the package should certainly
be observed. If there is not any explanation, the food must be consumed within
the shortest time possible.
- The storage durations of frozen food change depending on the ambient
temperature, the frequent opening and closing of the doors, thermostat settings,
food type and the time elapsed from the purchase time of the food to the time
it is placed into the freezer. Always abide by the instructions on the package and
never exceed the indicated storage duration.
- During long lasting power failures, please do not open the door of the freezer
compartment. Your refrigerator shall preserve your frozen food for about 18 hours
in ambient temperatures of 25°C and for about 13 hours in ambient temperatures
of 32°C. This value will decrease under higher ambient temperatures. During
longer power failures, do not refreeze your food and consume them as soon as
possible.
PLEASE NOTE:
If you want to open the door again immediately after closing it, it may be slightly
tougher. This is normal due to the vacuum created. After reaching equilibrium
condition, the door will open easily.
Page 24

Instruction manual RFF730
Please keep this instruction manual for future reference
24
IMPORTANT NOTE:
- Frozen foods, when thawed, should be cooked just like fresh foods. If they are not
cooked after being thawed they must NEVER be refrozen.
- The taste of some spices found in cooked dishes (anise, basilica, watercress,
vinegar, assorted spices, ginger, garlic, onion, mustard, thyme, marjoram, black
pepper, etc.) changes and they assume a strong taste when they are stored for a
long period. Therefore, frozen food should be added with only a little amount of
spices or the desired spice should be added after the food has been thawed.
- The storage period of food is dependent on the oil used. The suitable oils are
margarine, calf fat, olive oil and butter and the unsuitable oils are peanut oil and
pig fat.
- The food in liquid form should be frozen in plastic cups and the other food should
be frozen in plastic bags or foil.
Page 25

Instruction manual RFF730
Please keep this instruction manual for future reference
25
Meat and Fish Preparation Maximum
Storing time
(months)
Steak Wrapped in foil 6 - 8
Lamb meat Wrapped in foil 6 - 8
Veal roast Wrapped in foil 6 - 8
Veal cubes In small pieces 6 - 8
Lamb cubes In pieces 4 - 8
Minced meat In packages without using spices 1 - 3
Giblets (pieces) In pieces 1 - 3
Bologna sausage/ salami
Should be packaged even if it has
membrane
4 - 6
Chicken and turkey Wrapped in foil 4 - 6
Goose and Duck Wrapped in foil 4 - 6
Deer, Rabbit, Wild Boar In 2.5 kg portions and as fillets 6 - 8
Freshwater fishes (Salmon,
Carp, Crane, catfish)
After cleaning the bowels and scales
of the fish, wash and dry it; and if
necessary, cut the tail and head.
2
Lean fish; bass, turbot,
flounder
4
Fatty fishes (Tuna,
Mackarel, bluefish,
anchovy)
2 - 4
Shellfish Cleaned and in bags 4 - 6
Caviar
In its package, aluminium or plastic
container
2 - 3
NOTE:
Frozen meat should be cooked as fresh meat after being thawed. If the meat is not
cooked after being thawed, it should never be frozen again.
STORING FROZEN FOOD
Page 26

Instruction manual RFF730
Please keep this instruction manual for future reference
26
Vegetables and Fruits Preparation Maximum
Storing time
(months)
String beans and beans
Wash and cut to small pieces
and boil in water
10 - 13
Beans Hull and wash and boil in water 12
Cabbage Cleaned and boil in water 6 - 8
Carrot
Clean and cut to slices and
boil in water
12
Pepper
Cut the stem, cut into two pieces
and remove the core and boil
in water
8 - 10
Spinach Washed and boil in water 6 - 9
Cauliflower
Take the leaves apart, cut the
heart into pieces, and leave it in
water with a little lemon juice for
a while
10 - 12
Aubergine
Cut to pieces of 2cm after
washing
10 - 12
Corn
Clean and pack with its stem
or as sweet corn
12
Apple and pear Peel and slice 8 - 10
Apricot and Peach
Cut into two pieces and remove
the stone
4 - 6
Strawberry and Blackberry Wash and hull 8 - 12
Cooked fruits
Adding 10 % of sugar
in the container
12
Plum, cherry, raspberry Wash and hull the stems 8 - 12
Page 27

Instruction manual RFF730
Please keep this instruction manual for future reference
27
Dairy Products Preparation Maximum
Storing time
(months)
Storing Conditions
Packet (Homogenize)
Milk
In its own
packet
2 - 3
Pure Milk – In its
own packet
Cheese excluding
white cheese
In slices 6 - 8
Original package
may be used for
short storing period.
It should be wrapped
in foil for longer
periods.
Butter, margarine In its package 6
Maximum
Storing time
(months)
Thawing
time in room
temperature
(hours)
Thawing time in
oven (minutes)
Bread 4 - 6 2 - 3 4 - 5 (220-225°C)
Biscuits 3 - 6 6 - 8 5 - 8 (190-200°C)
Pastry 1 - 3 6 5 - 10 (200-225°C)
Pie 1 - 1,5 3 - 4 5 - 8 (190-200°C)
Phyllo dough 2 - 3 1 - 1,5 5 - 8 (190-200°C)
Pizza 2 - 3 2 - 4 15 - 20 (200°C)
Page 28

Instruction manual RFF730
Please keep this instruction manual for future reference
28
TRANSPORTATION AND REPOSITIONING
- Original package and foam may be kept for retransportation (optionally).
- You should fasten your fridge with thick packaging, bands or strong cords and
follow the instructions for transportation on the package for re-transportation.
- Remove movable parts (shelves, accessories, crisper draws etc.) or fix them into
the fridge and protect against shocks using bands during re-positioning and
transportation.
Carry your fridge in the upright position.
REPOSITIONING THE DOOR
- It is possible to change the opening direction of the appliance doors.
- If the door opening direction of your fridge is required to be changed, due to
difficulties, this should only be attempted by a Caple approved engineer. please
contact Caple service to arrange this.
Page 29

Instruction manual RFF730
Please keep this instruction manual for future reference
29
TROUBLESHOOTING
Your fridge warns you if the temperatures for fridge and freezer are at improper
levels or when a problem occurs in the appliance. Warning codes are displayed in
the Freezer and Cooler Indicators.
Error Type Error Type Why What To Do
SR
“Failure
Warning”
There is/are some
part(s) Out of order
or there is a failure in
cooling process.
Call Caple service for assistance as
soon as possible.
SR – Set
value blink
on freezer
set value
screen
Freezer comp.
Not Cold
enough
This caution will be
seen especially after
long term of power
failure.
1. Do not freeze the foods that are
thaw and use in short time period.
2. Set the freezer temperature
to colder values or set the super
freeze , until the compartment gets
to normal temperature.
3. Do not put fresh food until this
warning is off.
SR – Set
value Blink
on cooler
set value
screen
“Refrigerator
comp. Not
Cold enough”
Ideal temperature for
Ref. Compartment
is + 4
o
C. If you see this
warning your foods
have risk of spoiling.
1. Set the refrigerator temperature
to colder values or set the
super cooling mode until the
compartment gets to normal
temperature.
2. Do not open the door much
until this warning is off.
SR – Set
value blink
on freezer
and cooler
set value
screen
“not cold
enough
Warning”
It is combination of
“not cool enough”
error for both of the
compartments.
You will see this failure when first
starting the appliance. It will turn
off after the compartments gets to
normal temperature.
SR – Set
value blink
on cooler
set value
screen
Refrigerator
comp. too
Cold
The foods starts to
freeze because of
the too much cold
temperature.
1. Check if the “Super cooling
mode” is on.
2. Decrease the refrigerator
temperature values.
“--”
“Low voltage
Warning”
When the power
supply gets lower than
170 V the appliance
gets to steady
position.
This is not a failure. This prevents
any damages on the compressor.
This warning will off after the
voltage gets to the required level.
Page 30

Instruction manual RFF730
Please keep this instruction manual for future reference
30
If your fridge is not operating;
- Is there a power failure?
- Is the plug connected to the socket correctly?
- Is the fuse of the socket to which the plug is connected or the main fuse blown?
- Is there any failure at the socket? To check this, plug your refrigerator to a socket
this is surely operating.
If your fridge is not cooling enough;
- Is the temperature adjustment right?
- Is the door of your fridge opened frequently and left open for a long while?
- Is the door of fridge closed properly?
- Did you put a dish or food on your fridge so that it contacts the rear wall of your
fridge so as to prevent the air circulation?
- Is your fridge filled excessively?
- Is there adequate distance between your fridge and the rear and side walls?
- Is the ambient temperature within the range of values specified in the operating
manual?
If the food in your refrigerator compartment is over cooled
- Is the temperature adjustment right?
- Are there many food recently put inside the freezer compartment?
- If so, your fridge may over cool the food inside the refrigerator compartment as it
will operate longer to cool these food.
If your fridge is operating too loudly;
To maintain the set cooling level, compressor may be activated from time to time.
Noises from your fridge at this time are normal and due to its function. When the
required cooling level is reached, noises will be decreased automatically. If the
noises persist;
- Is your appliance stable? Are the legs adjusted?
- Is there anything behind your fridge?
- Are the shelves or dishes on the shelves vibrating? Re-place the shelves and/or
dishes if this is the case.
- Are the items placed on your fridge vibrating?
Page 31

Instruction manual RFF730
Please keep this instruction manual for future reference
31
Normal Noises;
CRACKING (ICE CRACKING) NOISE:
- During automatic defrosting.
- When the appliance is cooled or warmed (due to expansion of appliance material).
SHORT CRACKING:
Heard when the thermostat switches the compressor on/off.
COMPRESSOR NOISE (NORMAL MOTOR NOISE):
This noise means that the compressor operates normally Compressor may cause
more noise for a short time when it is activated.
BUBBLING NOISE AND SPLASH:
This noise is caused by the flow of the refrigerant in the tubes of the system.
WATER FLOW NOISE:
Normal flow noise of water flowing to the evaporation container during defrosting.
This noise can be heard during defrosting.
AIR BLOWING NOISE (NORMAL FAN NOISE):
This noise can be heard in No- Frost fridge during normal operation of the system
due to the circulation of air.
IF HUMIDITY BUILDS UP INSIDE THE FRIDGE;
- Are all food packed properly? Are the containers dried before placing them in the
fridge?
- Are the fridge doors opened frequently? Humidity of the room gets in the fridge
when the doors are opened. Humidity build up will be faster when you open the
doors more frequently, especially if the humidity of the room is high.
IF THE DOORS ARE NOT OPENED AND CLOSED PROPERLY;
- Do the food packages prevent closing of the door?
- Are the door compartments, shelves and drawers placed properly?
- Are door gaskets broken or torn?
- Is your fridge on a level surface?
Page 32

Instruction manual RFF730
Please keep this instruction manual for future reference
32
IMPORTANT NOTES:
- Compressor protection function will be activated after sudden power
breakdowns or after unplugging the appliance, because the gas in the cooling
system is not stabilized yet. Your fridge will start after 5 minutes, there is
nothing to worry about.
- If you will not use your fridge for a long time (e.g. in summer holidays) unplug it.
Clean your fridge and leave the door open to prevent humidity and smell.
- If the problem persists after you have followed all the instructions above, please
contact Caple service for assistance.
- The appliance you bought is designed for home use and can be used only at
home and for the stated purposes. It is not suitable for commercial or common
use. If the consumer use the appliance in a way that does not comply with these
features, we emphasize that Caple cannot be held responsible for any repair and
failure within the guarantee period.
Page 33

Instruction manual RFF730
Please keep this instruction manual for future reference
33
ENERGY SAVING TIPS
1. Install the appliance in a cool, well ventilated room , but not in direct sunlight and
not near heat source (radiator, cooker.. etc). Otherwise use an insulating plate.
2. Allow warm food and drinks to cool down outside the appliance.
3. When thawing frozen food, place it in the refrigerator compartment. The low
temperature of the frozen food will help to cool the refrigerator compartment
when it is thawing. So it saves energy
4. When placing drinks and soups into the fridge they must be covered. Otherwise
humidity increases in the appliance. Therefore the working time gets longer. Also
covering drinks and soups helps to save smell and taste.
5. When placing food and drinks, open the appliance door as briefly as possible.
6. Keep close the covers of any different temperature compartment in the appliance
(crisper, chiller ...etc ).
7. Door gasket must be kept clean and pliable. Replace gaskets if worn.
Page 34

Instruction manual RFF730
Please keep this instruction manual for future reference
34
ELECTRICAL CONNECTION (FOR UK TYPE PLUG)
For your safety please read the following information
Warning: This appliance must be earthed.
This appliance operates from 220-240 volts and should be protected by a 13 amp
fuse in the plug.
The appliance is supplied with a standard 13 amp 3-pin mains plug fitted with a
13-amp fuse. Should the fuse require replacement, it must be replaced with a fuse
rated at 13 amp and approved to BS1362.
If the mains plug which is fitted is unsuitable for the socket outlet in your home or
is removed for any other reason, please follow the instructions below on how to
wire a 13 amp 3 pin plug.
HOW TO WIRE A 13 AMP PLUG
IMPORTANT
The wires in the mains lead on this appliance are
coloured in accordance with the following code:
- Green and Yellow - Earth
- Blue – Neutral
- Brown – Live
As the colours may not correspond with the
markings identifying the terminals in your plug
proceed as follows.
The green and yellow wire must be connected to the terminal in the plug which is
marked with the letter E or with the earth symbol
or coloured green and yellow.
The blue wire must be connected to the terminal marked N.
The brown wire must be connected to the terminal marked L.
You must make sure the lead is firmly secured under the cord clamp.
GREEN/YELLOW
Earth
BROWN
Live
FUSE
13 Amps
BLUE
Neutral
Cord Clamp
Page 35

Instruction manual RFF730
Please keep this instruction manual for future reference
35
Notes
Page 36

Instruction manual RFF730
Please keep this instruction manual for future reference
36
Caple Service
Fourth Way
Avonmouth
Bristol
BS11 8DW
t: 0117 938 7420
e: service@caple.co.uk
www.caple.co.uk
 Loading...