

Page 1
Model code: Di628
Contact Caple on 0844 8 00 3830 or for spare parts www.4caple.co.uk
Page 2
Fordetailedoperatingmethod read the correspondingcontentonthe instruction manual.
Switch on the appliance Open the door,press the On/Off button to switch on the appliance .
Witheachwashcycle.
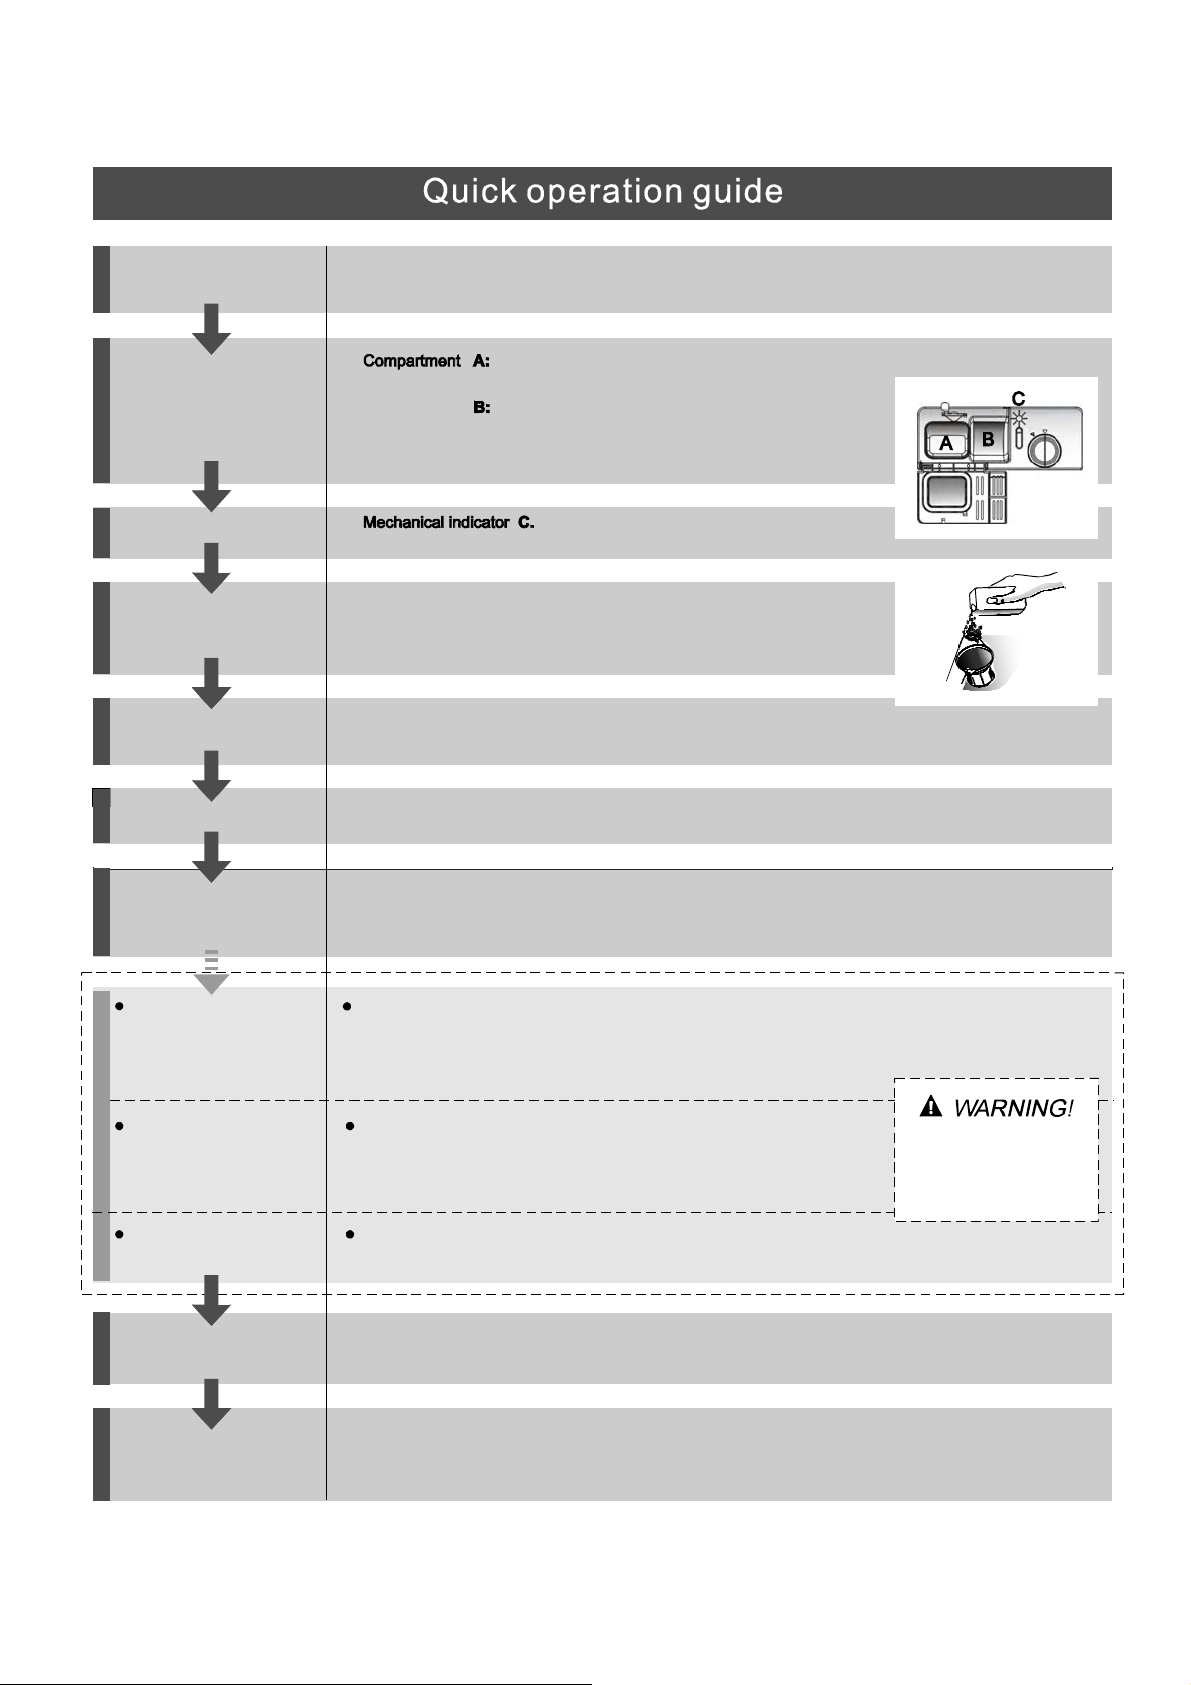
Fill the detergent dispenser
Compartment
For programmes with pre-wash only.
(Follow the user instructions!)
Check the rinse aid level
Checkthe regeneration
salt level
Load the baskets
Select a programme
Running the dishwasher
Changing theprogramme
Electric indicatoroncontrolpanel (if provided).
(On models with water softener system only.)
Electric indicator on control panel (if provided).
If there is no salt warning light in the control panel
(for some models), you can estimate when to fill the salt into
the softener by the number of cycles the dishwasher has run.
Scrapeoff any largeamountofleftoverfood. Soften remnants of burnt food in pans,
thenload the baskets.Refer to thedishwasher loading instructions.
Press the Menue Button, then press + or - Button select one programme, at last press
OK button( See the section entitled Operationinstruction )
Turnonthewatertap,closethedoor.Themachinewillstartworkingafterabout10seconds.
1.A runningcycle canonly be modified if it has beenrunningfor a short time. Otherwise the detergent
may have already been released and the water already drained. If this is the case, the detergent
dispensermust be refilled.
2. Open the door,Press the Menue .
“” “”
3. Press + or - buttonselect a new programme.
4. Press OK button ,close the door Restart the dishwasher.
“” “”
“”
button
Add forgottendishes in the
dishwasher.
If the appliance is switched
off during a wash cycle.
Switch off the appliance
Turn off the water tap,
unload the baskets
1.Open the door a little to stop the dishwasher.
2.After the spray arms stop working, you can open the door completely.
3.Add the forgotten dishes.
4.Close the door, the dishwasher will start running again after 10 seconds.
If the appliance is switched off during a wash cycle, when switched
on again, please re-select the washing cycle and operate the dishwasher
according to the original Power-on state ).
When the working cycle has finished, the buzzer of the
dishwasher will sound 8 times, dishwasher reverting automatically to
off-mode after the end of the programme
Warning: wait a few minutes (about 15 minutes) before unloading the dishwasher to avoid handling
the dishes and utensils while they are still hot and more susceptible to break.
They will alsodry better.Unload the appliance,startingfrom the lower basket.
Open th e door car eful l y.
Hotsteam may escape
when the doorisopened!
Page 3
Dear Cus to m er ,
This appliance is intended tobeused inhousehold
and similar ap plicatio ns such a s:
-staffkitchen areas in shops, offices andother
workingenvironments;
-farm houses;
-by cli ent s in hotels , m otels and ot her r esid ential
ty pe envi ron m ent s ;
-bed and breakfa st ty pe enviro nmen ts.
Pleasecarefully read thismanualbef oreusing the
dishwasher, it willhelp y outouseand maintain the
dishwasher properly.
Keep for fu t ure refe rence.
Passit ontoany subsequentownerof the appliance.
Controlpanel...................................................3
Dishwasher features.................................... ...3
A Watersoftener....... ..... ........ . ....... ..... ...... ....4、
B L oading thesalt into the softener.................5、
C F ill therinse ai d dispens er............. ........ .....5、
D Function ofdetergent .................................6
、
Thismanual contains sectionsonsafety Instructions,
Operating Instructions, InstallationInstructions and
Trouble sho o tin g Tip s, etc.
Toreview the sect ion on tro ubleshooting tips
will helpyoutosolvesome commonproblems
byyourself .
Ifyou can not solv e the pro blems by you rself ,
please ask for the help of profe ssional te chnician s.
Before or after loa ding t he di shwa sher ba skets .....9
Loading the upper b ...............................10asket
LoadingtheLower b ...............................10asket
Washc ycletable...........................................11
Turning on the ap pl ia nce.... ..... .. . .... ... .. .... ... . .. .11
Changetheprogramme.............. ................12....
At theendofthe wash cycle...........................12
Filtering system.............................................13
Caringforthe dishwasher..................... .........14.
..................................15Install atio n prep arat ion
...16Fur nitu re doordimen sions and ins tal lati on.. ..
..............18Tension ad justm ent ofthe door spring
..............................18Connection of drainhoses
......................... 19Dis h w a she r install ati on steps
...........................20Electrical connection..........
Coldwaterconnection...................................21
The manufacturer, following a policy of const ant
pro duc t deve l o pm ent m ay mak e mo di fica tions
withoutgiving priornotice.
Beforecalling for service........................... .....22.
Errorcodes.................................... ..............23.
Technicalinformation.............................. .....24..
Page 4
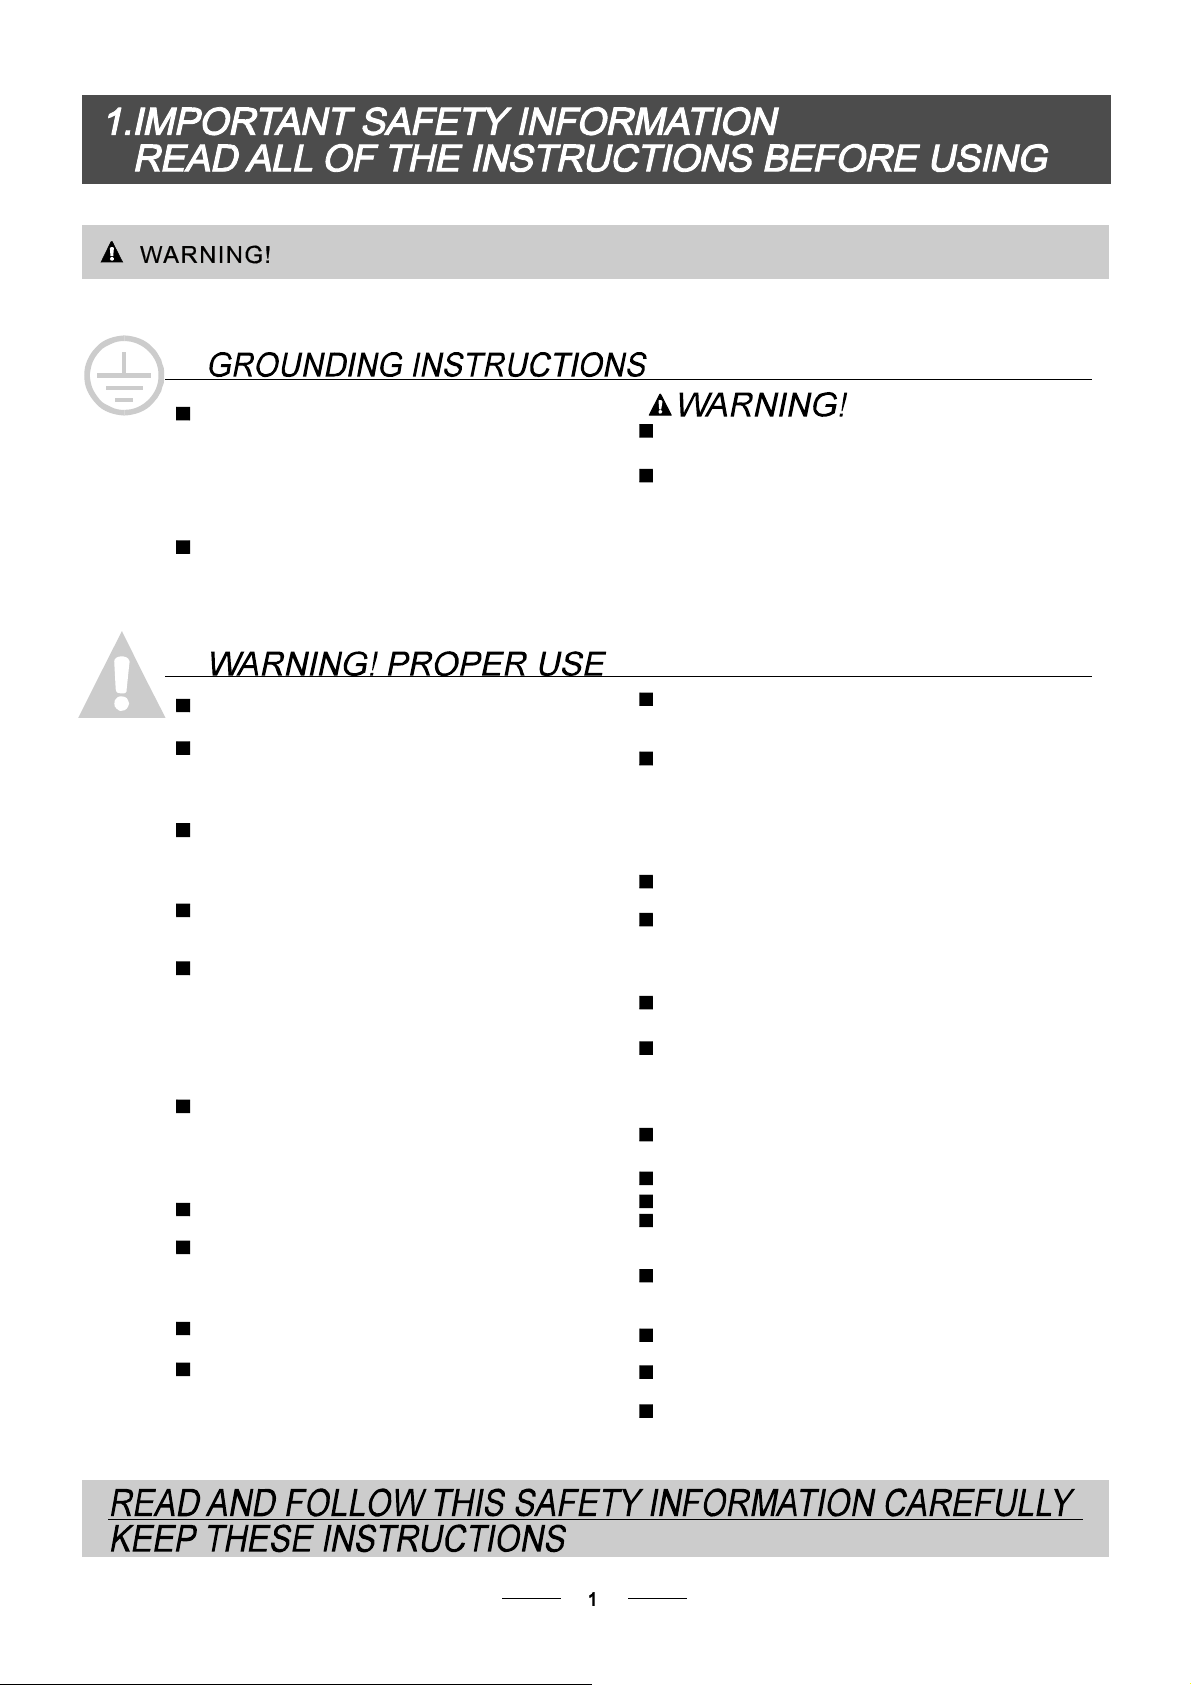
When u sing your dishwashe r, fo ll ow the p r ecaut i ons listed below:
This appliance must be grounded. In the event of a
malfunction or breakdown, grounding will reduce
the risk of anelectric shock by providing a path of
least resistance of electric current. This appliance
is equipped with a cord having an equipmentgrounding conductor and a grounding plug.
The plug must be plugged into an appropriate outlet
that is installed and grounded in accordance with
all local codes and ordinances.
Donotabuse,siton,orstandonthedoorordish
rack of the dishwasher.
Do not touch the heating element during or
immediately after use.
(This instruction is only applicable to machines
with a visual heating element.)
Do not operate your dishwasher unless all
enclosure panels are properly in place. Open
the door very carefully if the dishwasher is
operating, there is a risk of water squirting out.
Do not place any heavy objects the
door when it is open. The appliance could tip
forward.
When loadin g items to be washed:
1) Locate sharp items so that theyare not likely
to damage the door seal;
2 Warni ng: Knives and other utensils with
)
sharp points m ust be loade d in the ba sket
with their poi nts down or p laced in a
horizontal position.
When using y our dishw asher,youshould
pr ev en t pl a stic item s fro m comi ng i n to c o nta c t
with the he ating el ement.(T his instru ction is only
applicable to machines wit h a visual heating
element. )
Check th at the det erg ent comparm ent i s e mpty
after completio n of the wash c ycle.
Do not wash plastic items unless they are marked
dishwasher safe or the equivalent. For plastic items
n
ot so marked, check the manufacturer's
recommendations.
Use only deterge nt and rin se addi tives
design ed for an aut omati c dishwas her.
Never use soap, l aundry de tergent, or h and
washing deter gent in y our dis hwasher. Keep
these pro ducts ou t of the re ach of c hil dren.
on or standon
Improper connection of the equipment-grounding
conductor can result in the risk of an electric shock.
Check with a qualified electrician or service
representative if you are in doubt whether the
appliance is properly grounded. Do not modify the
plug provided with the appliance; If it does not fit
the outlet. Have a proper outlet installed by a
qualified electrician.
Keep children away from detergent and rinse aid, keep
child away from the open door of the dishwasher,
ren
there could still be some detergent left inside.
This appliance is not intended for use by persons
(including children with reduced physical, sensory or
mental capabilities, or lack of experience and
knowledge ,unless they have been given supervision
or instruction concerning use of the appliance by a
person responsible for their safety.
Children should be supervised to ensure that they do
not play with the appliance.
Dishwasher deterge nts are strongly alkaline, th ey
can be extremel y dangerous if swallowed.Avoid
contact with skin a nd eyes and keep children away
from the dishwasher when the door is open.
The door sh ould not be left open,
since this could increase the ris k of trippi ng.
Ifthesupplycordisdamaged, itmustbereplaced
bythemanufactureroritsserviceagentora
similar ly q uali fied person i n or der to avoid a
hazar d .
Remove the door to the washing compartment when
removing an old dishwasher from service or discarding it.
Pleasedispose of packin g mater ials properly.
Use the dishwasher only for its intended function.
During installatio n, the power supply must not
be excessive ly or dange rously be nt or flatten ed.
Do not tamper with controls.
The applianc e is to be conn ected to the water
mains using new hose sets and th at old ho se-sets
should not be re used.
The maximum nu mber of place sett ings to be
washed is 14 .
The maximum pe rmissible i nlet water pressure is
1Mpa.
The minimum per missible i nlet water pressure is
0.04Mpa.
)
Page 5
Dispose of the dishwasher pack aging mater ial correctly.
All packaging materials can be recycled.
Plastic pa rts are marked w ith th e standard i nternati onal abbrevi ations:
PE for polyethylene, e .g. sheet wrappin g mater ial
PS for polystyrene, e.g. padding material
POM polyoxymethylene, e.g . pla stic clips
PP pol ypropylene , e.g. Salt filler
ABS Acrylonitri le Butad iene Sty rene, e.g . Control Pa nel .
Packagingmaterialcouldbe dangerous forchildren!
For disposi ng of pa ckage and the appliance please go to arecycling centr e. Therefore cu t
offthe powersupplycableand makethe doorclosing device unusable.
Cardboard packagingis manufactured fromrecycledpaperand shouldbedisposed in the
waste paper c ollecti on for re cycling .
By ensuring th is produ ct is dispo sed of corr ectly, you will help pre vent potent ial negat ive
consequences for the envir onment and humanhealth, which cou ld otherw ise be caus ed
byinappropriate wastehandling ofthis product.
For mor edetailed information about recycling of t his prod uct, please contact your local
city office and your household w aste disposal se rvice.
DISPOSAL: Do not dispose this pr oduct as unsort ed municip al waste. Collection of such
waste separa tely for spec ial treatment i s n ecessary.
Page 6
To get thebestperformancefromyourdishwasher,read all operatinginstructions
beforeusingit forthe firsttime.
Menu
OK
Di628
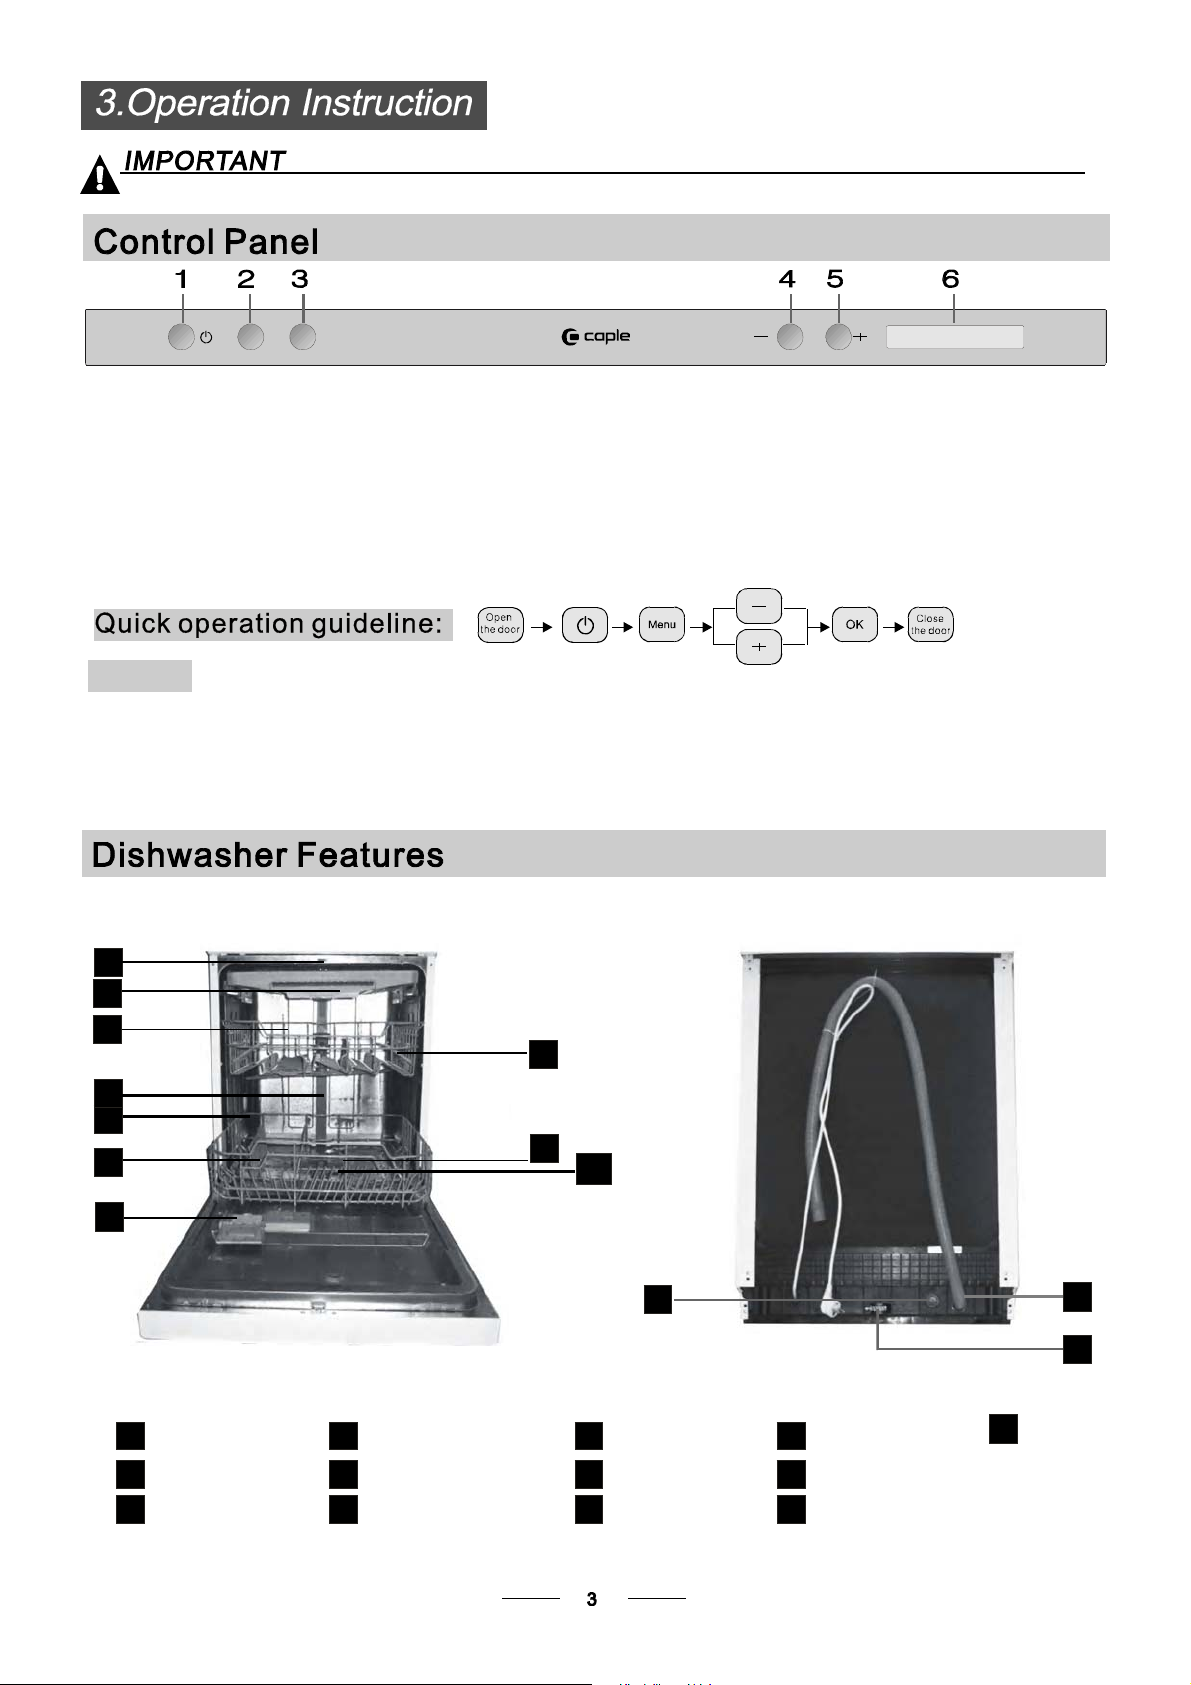
1.On/Off Butt on: To turn on/off the power s upply.
2.Menu Button: Press to select a men u option in the
following cycl e:
option sett ing alternative wash function sel ecti on
→→
add Salt Consumption setting l an guage setting
→→
Pressing Menu, you can choose opt i onal functions an d
programmes.
3.OK Button: C onfirm s t he menu se lected after pressing
the button.
programme selection delay time setting
→
4. - Button: Move to the le ft. Press once and th e
menu moves to the next item o n the l eft.
5. + Button: Move to the r ight. Press once
and the menu mo ves t o the next item on the right
6.DisplayS creen:Showsthe delay time,running
indicator , e rror codes , programme s, Language and etc .
NOTE:
1.When a s electe d programme ha s f inis hed , all of the setting s w il l be recorded by the system, b ut for the language
setting, it will berecorded immediatelyafter you press the OK button.
2.The display will show add rinse or add salt information if you press power button, reminding you to refill the rinse
aid or salt. However you can still keep using the machine following the same operations as mentioned above after
pressing the MENU button once.
“”
“”
Front view
Back View
1
2
3
4
5
6
7
Topspr a y ar m
1
Cutlery tray
2
Upper basket
3
Inner pipe
4
Lower basket
5
Salt co nta in er
6
8
9
10
11
12
13
Adjuster
Dispenser
7
Cup shel f
8
Spra y arms
9
Filt er a ssem bl y
10
11
Inlet pipe conne ctor
12
Drainpipe
13
Page 7
Before using your di shwasher for the first time:
A. Set t h e water softener
B. Add 1.5Kg dishw asher salt an d then f ill the s alt contai ner with wa ter
C. Filltherinseaiddispenser
D. Adddetergent
The water softener must be set m anually, using the water ha rdness di al.
The water softener is designed to rem ove mineral s and salts f rom t hewater,which would ha ve
a detrimental or adverse effect on the ope ration of the appliance.
The higher the conte nt of the se minerals and salts, the h arder your w ater is .
The softener should be adjusted accordin g to thehardness of the wate r in your area. Your local WaterAuthority
can advise youon the hardness o fthewater inyour area.
Adjusting Salt Consumption
The dishwasher isdesigned to all ow for a djustment in the amount of sa lt co nsumed bas ed on the ha rdne ss of
the water used. This is intended to op timise and cus tomise th e level of salt consumption.
Pleasefollowthestepsbelow foradjustment in saltconsumption.
1. Open the door ,Switch on the applia nce;
2. Pressthe menu button to selec t Salt Consumpt ion setti ng to start the water softe ner;
3. Press the + or - button to select the correct s etting according to your w ater hardne ss,
the setti ngs will ch ange in the following sequen ce: H1->H 2->H3->H4 ->H5->H6;
4. Press the OK butt on t o e nd the set up mode.
“” “”
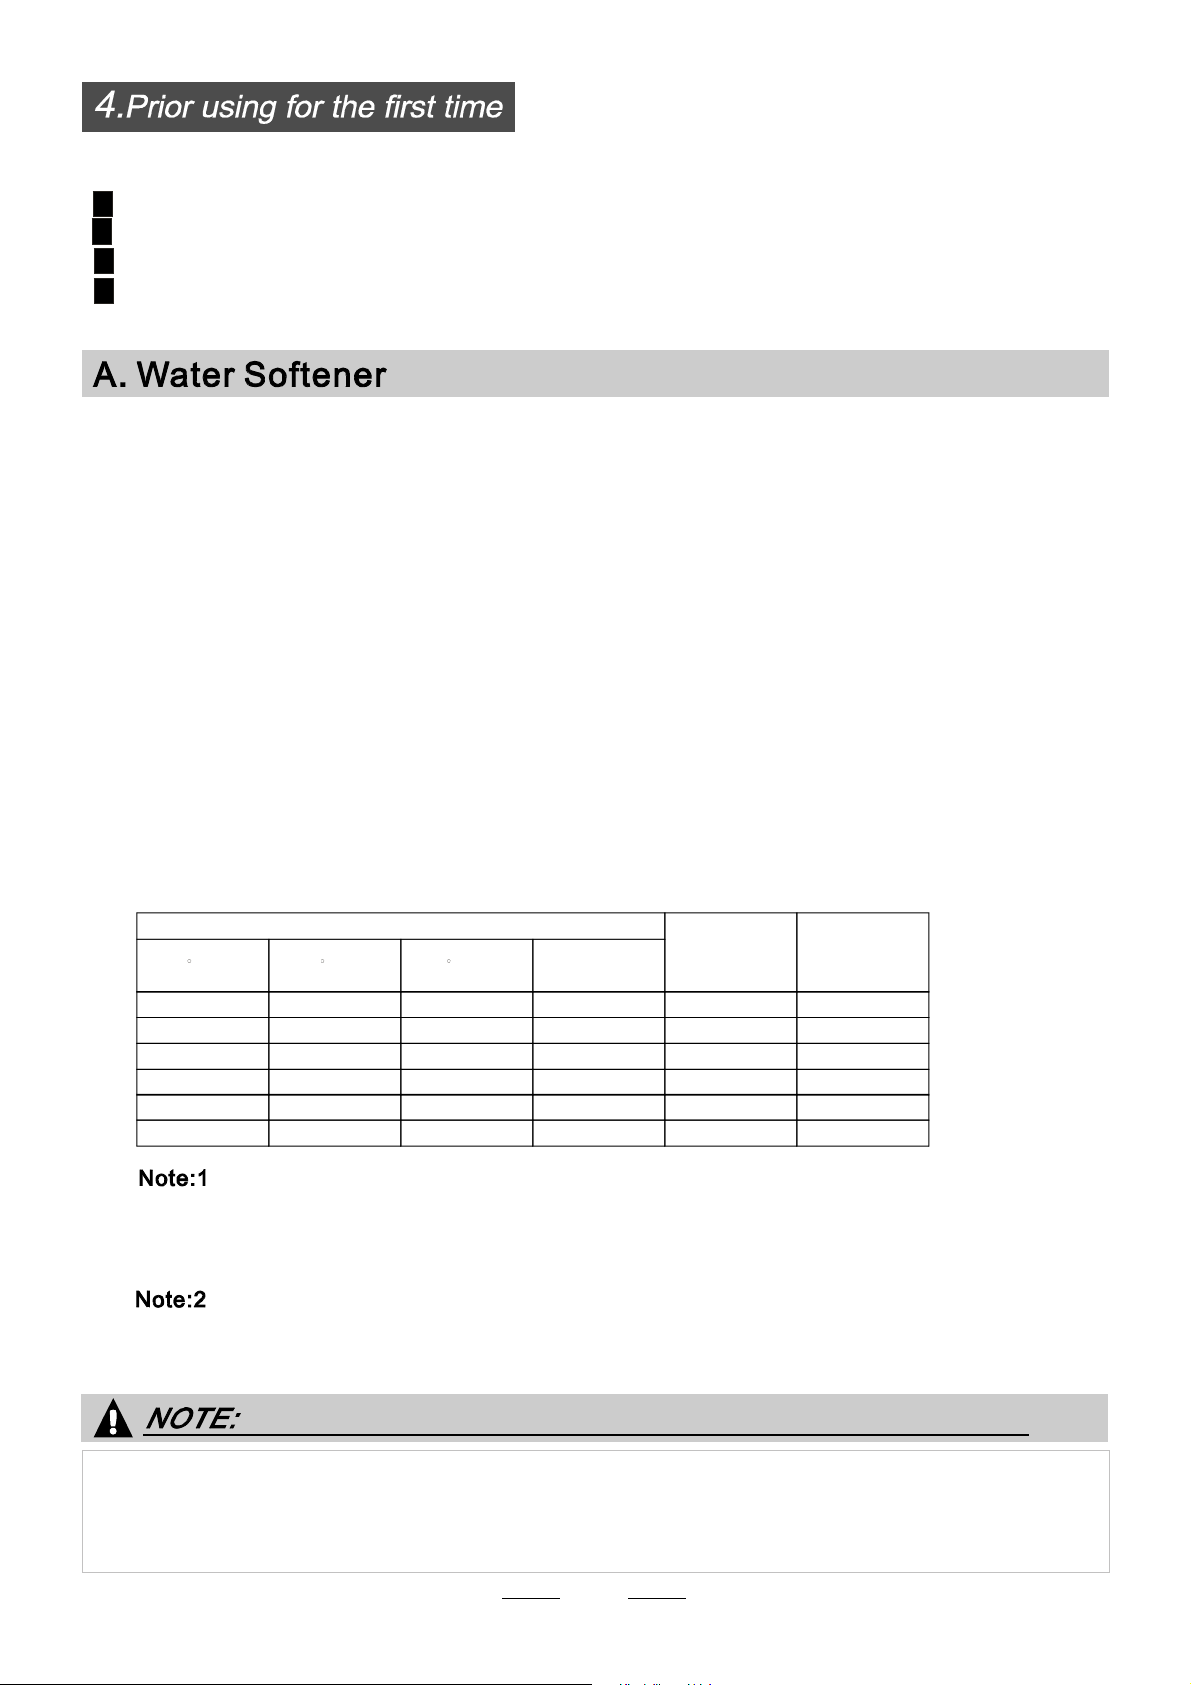
WATERHARDNESS
dH
6-11
12-17 2.1-3.0
18-22 31-40 22-28 3.1- 4.0
23-34 4.1-6.0
35-55 61-98 43-69 6.1- 9.8
dH=1.25Clarke=1.78 fH=0.178mmol/l
1
fH
0~90~5 0~0.94
10-20
21-30
41-60
Clarke
0~6
7-14
15-21
29-42
mmol/l
1.0-2.0 H2 9
Softenersetting
H1
H3
H4
H5
H6
Salt consumption
(gram/cycle)
0
12
20
30
60
DH: Germ a n degre e
fH: Frenchdegree
Clark: British degree
The factor y setting is: H4 (EN 50242)
Contact your local water board for i nformat ion on t he har dness of your water su pply.
If your model doesno t have any w ater softener,you may s kip this section.
WATER SOFTENER
Thehardness of the wa ter varie s from place t o plac e. If hard water is used in the di shwasher, deposits will
form on the dish es and utensils.
Theappliance is eq uipped with aspecial softener tha t uses asalt container spe cifically des igned to elimi nate
lime and m inerals fr om the water.
4
Page 8
Always use the sal t int ended for u se with di shwashers.
The salt co ntainer i s located beneath the l ower bas ket and sh ould be f illed as e xplaine d
inthe follow ing:
Attention!
Only use salt spe cifically designed for the use i n dishwash ers! Every ot her type of
salt not specif ically de signed for theuse in a dishwas her, especially tab le salt, wi ll
damage the w ater softener. In case of d ama ges caused b y the useof unsuitable
salt the manuf acturer doe s not gi ve any wa rranty nor is liable for a ny damage s caused.
Only fill with sal t just b efore start ing one o f the complete washing programmes.
This will p revent any g rains of s alt or sa lty wate r,which may have b een spill ed,
remaining on th e bottom o f the m achine for any period of ti me, which may cause
corrosion.
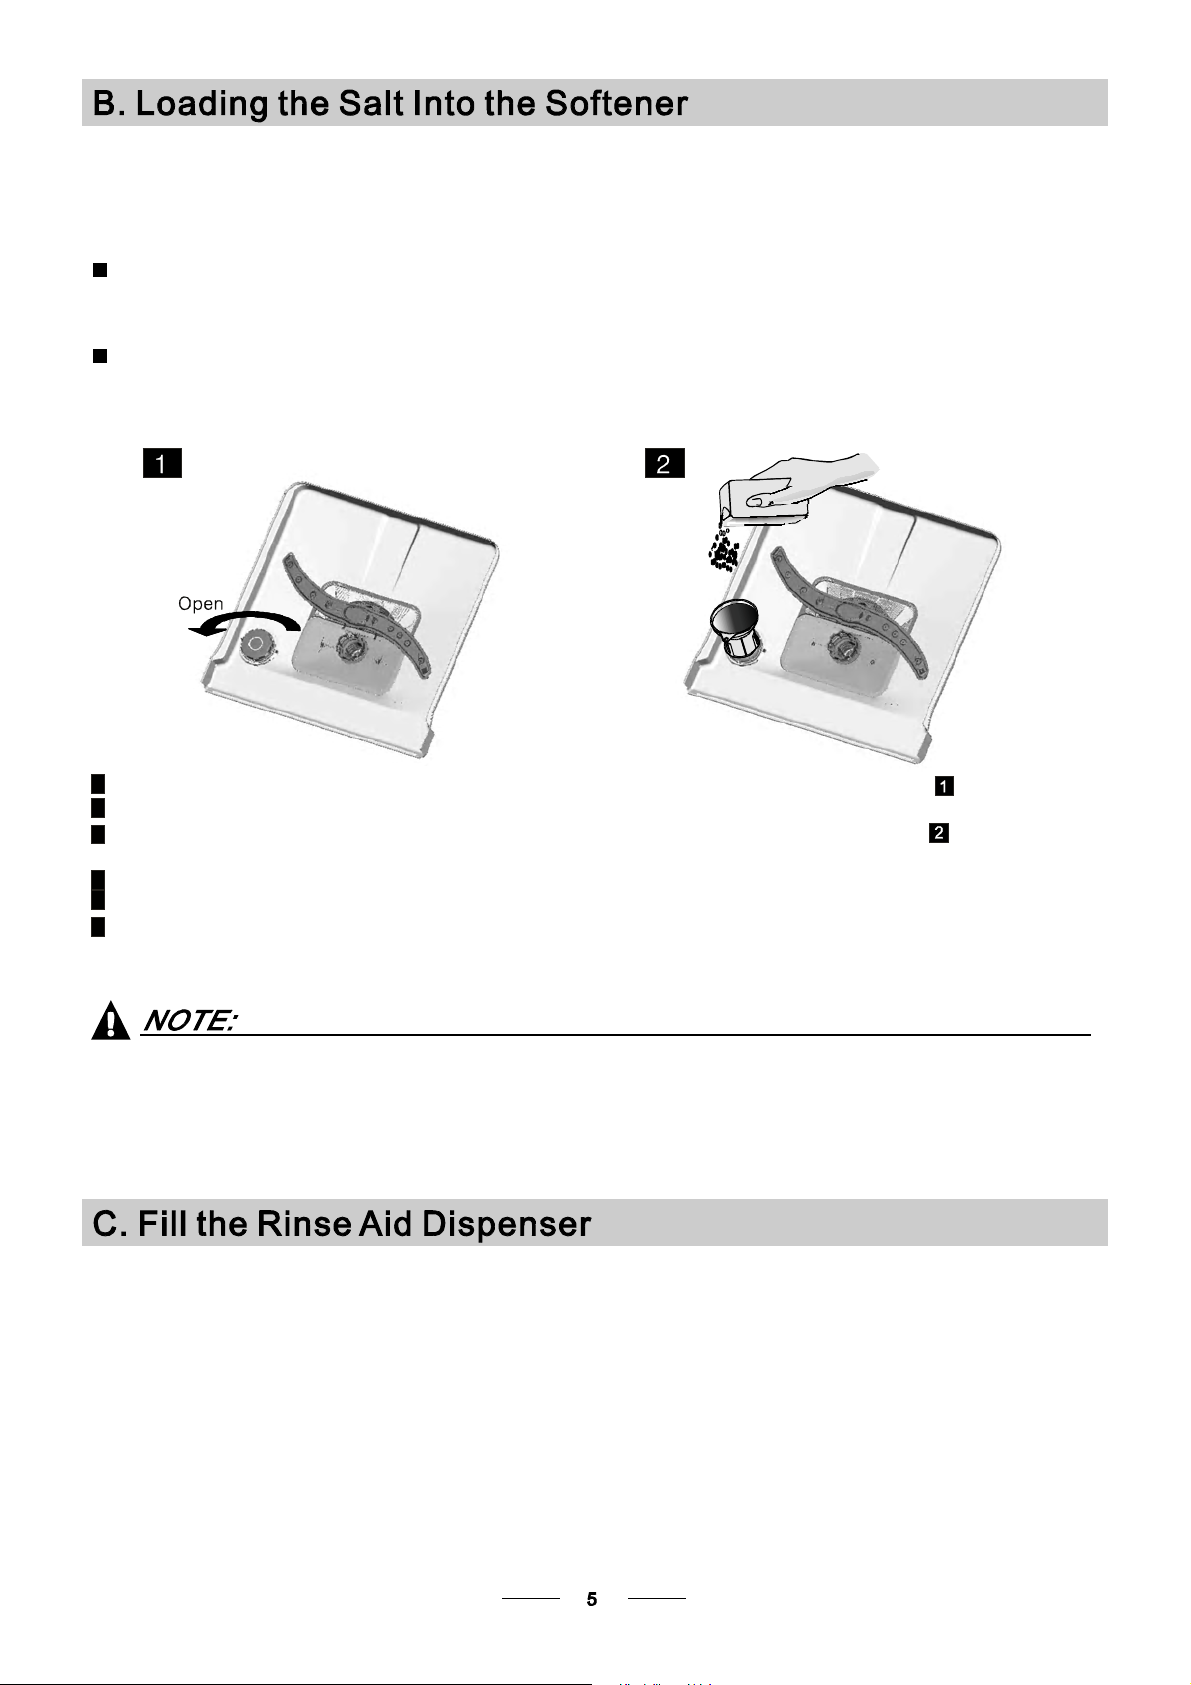
A After th e lower ba sket ha s be en remo ved, un screw and remove the cap from the salt conta iner.
B Place the end of the funnel ( suppli ed) into t he ho le and in trodu ce abou t 1.5 kg of di shwasher salt.
Full fill t he salt container w ith wa ter,It is normal for a small a mount o f water to come out of the
C
salt container.
D After filling the contain er , scr ew the c ap t ightly b ack clo ckwise.
E The sal t warning light will stop illumin ating af ter t he s alt contai ner h as been f il led with salt.
F Immed iately a fter f illing t he s alt into the salt co ntain er, a washing pr ogramme should be started
useashort ).
bysalty water.This is out ofwarranty.
programme Otherwise thefilter system,pumporotherimportant partsof the machinemay be damaged
1. The salt container must only be refilled when the salt warning l ight in th e control panel comes on.
Depending on how w ell t he salt disso lves, t he salt warning light ma y still be oneven though t he
salt container i s filled .
2. If there are spill s of the salt, a soak or arapid programme s hould be run to remove the excessive salt.
(Wesuggest to
RinseAid Dispenser
The rinse aid is rel eas ed d uring t he final rin se to prevent water from forming droplets on your dishes, w hich can
leave spots and st reaks. It also improves drying by allowing water to roll off the dishes. Your dishwasher i s
designedto use liquid rinseaids.The rinseaid dispenser islocatedinsidethe door nextto thedetergent dispenser.
To fill the dispens er, open the cap an d pour the rinse ai d int o the dispens er until the l ev el i ndicator turn s com plete ly
black. The volume of the rinse aid contain eris about 110ml.
Function ofRinseAid
Rinse aid is aut oma tically a dded d uring t he last r inse, ensuring th orough rinsing, and spot and s treak fr ee dryi ng.
Attention!
Only usebranded rinse aidfordishwasher.Neverfillthe rinseaid dispenserwithany othersubstances
(e.g. Di shwasher cleaning ag ent, liqu id dete rge nt). This would damage the appliance .
Page 9
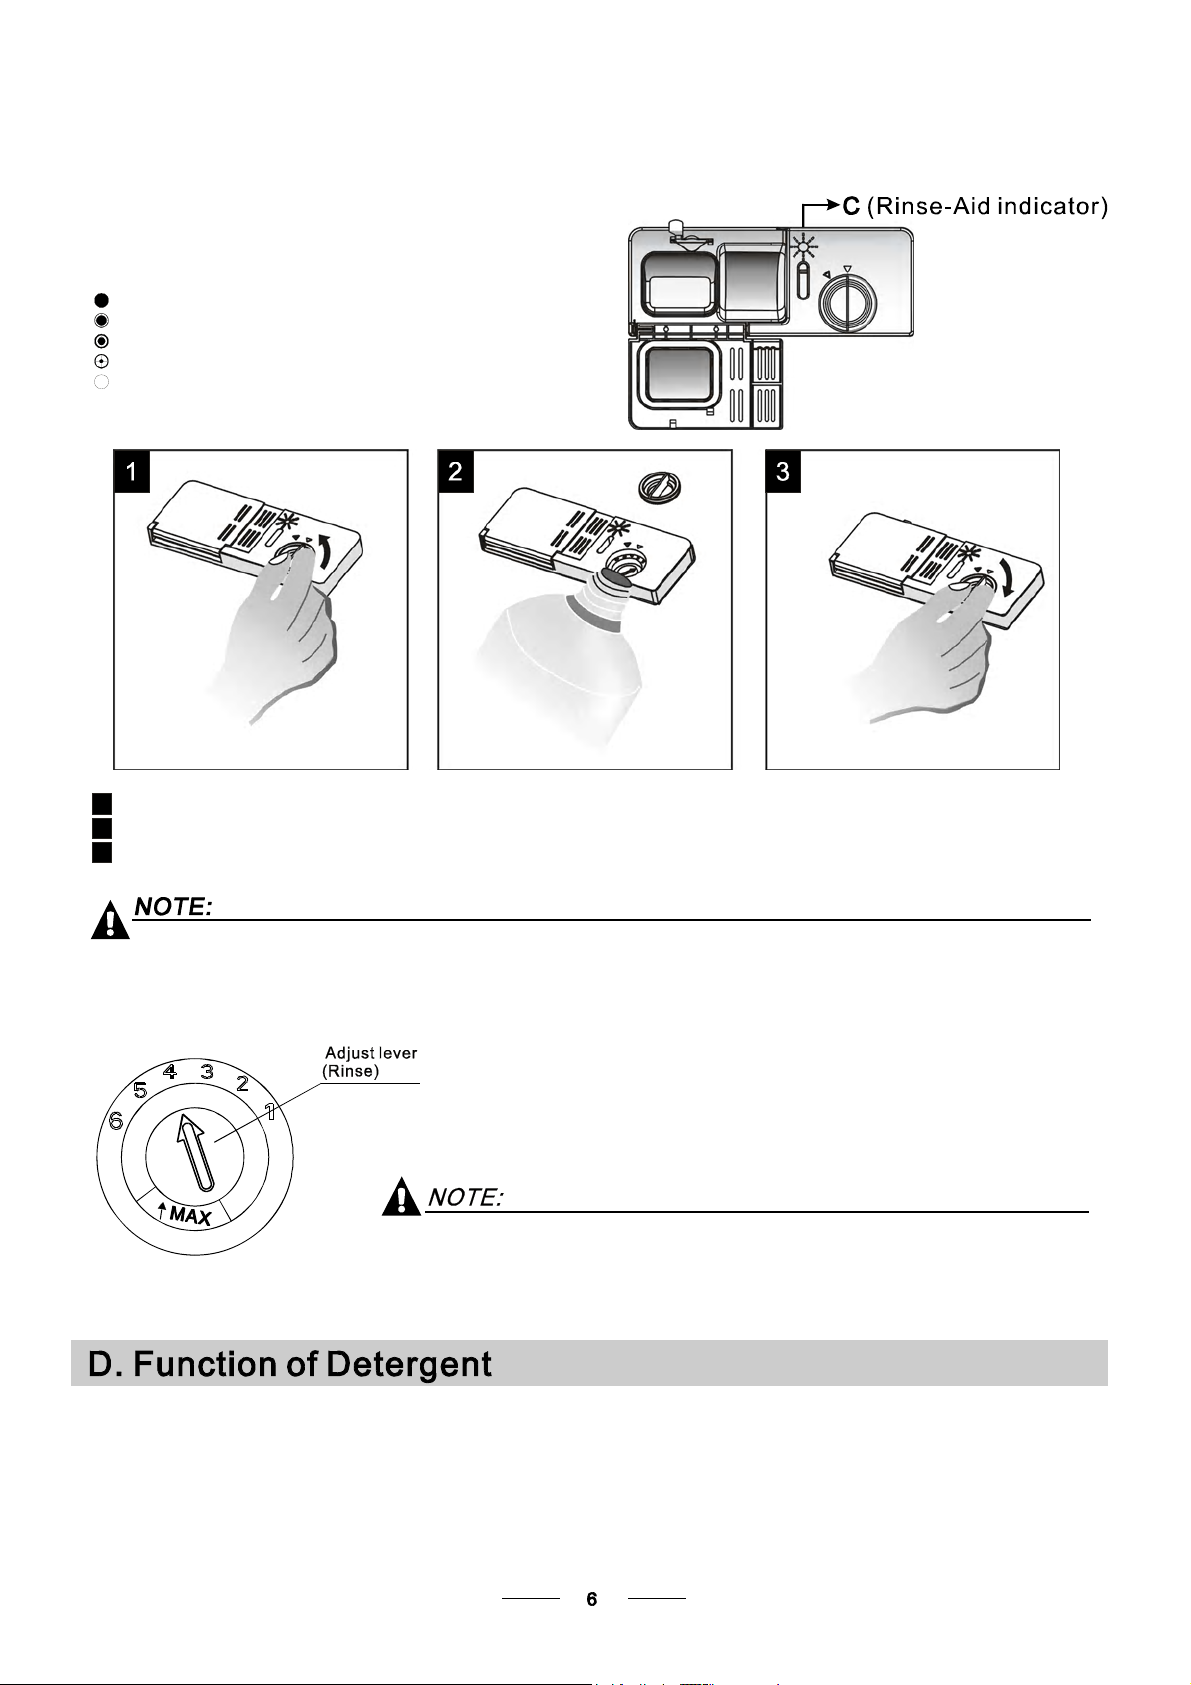
Whento Refill theRinseAid Dispenser
Ifthere is no ri nse-aid warning light in t he contr ol panel, you can estimate the amount from the col our
ofthe optical l evel indi cator C located next to the cap. When the rinse-a id contai ner is ful l, the wh ole
indicator will be d ark .As t he rinse-aid diminishes, th esize of the dark dot decreases. Youshouldnever let
the ri ns e ai d level f a ll 1 / 4 ful l.
Asthe rinse aid d iminishe s, the siz e of the black dot
onthe rinseaid level indicator changes, as illustrated below.
Full
3/4full
1/2full
1/4full-Shouldrefill to eliminatespotting
Empty
""
To open t he dispenser, tu rn the cap to t he "open" ( le ft) arr ow an d l ift it out.
1
Pour th e rin se ai d int o th e dispenser, being carefu l n ot to o ver fill .
2
Replace the cap b y inserting it aligned with "open" arrowand turning it to t he closed (right) arrow.
3
Clean up any rinse aid spilled w hile filling with a n absor bent clot h to avoi d excess ive foam ing
during the next wa sh.
Don't forget t o replac e the cap be fore you close dishwa sher door.
Adjusti ng RinseA id Di spenser
The rinse aid dispenser ha s six or four settings. Always start with t he dispens er
set on "4". I f spots andpoor dryin g are a problem, incre ase t he amount o f rinse
aid dispensed b y remov ing the di spenser l id and r otating t he dial to "5". If t he
dishes still are not drying properly or ar e show sp ots, adj ust the di al to the n ext
higher lever until your dish es are sp ot-free. The recommended setting is "4".
(Factoryvalueis"4".)
Increase the dose if there aredrops ofwateror limespotson t hedishes after washing.
Reduce it ifthereare sticky whitish stainsonyourdishes or abluish film onglasswareor
knifeblades.
Detergents w ith its chem ic al ingred ients a re ne cessary to r emove dirt, crus h dirt an d trans port it o ut of the dishw asher.
Mosto f thecommercialqualitydetergentsaresuitableforthis purpose.
Attention!
ProperUse ofDetergent
Useonly detergent s pecifical ly made for the use in dis hwashers. K eep your d etergent fr esh and dry.
Don't put powdered detergentinto the dispenseruntil you're ready towash dishes.
Page 10

Deterg ents
The re a re 3 sorts of detergent s
1.Withphosphateand with ch lorine
2.Withphosphate and without c hlorine
3.Withoutphosphate and without chlorine
Nor mally n ew p owd er ed dete r gen t is wit hou t pho sph at e. Thu s t he wa t er so f te ne r fu nc tion o f
phosph ate is not give n. In thi s case we r e com m e nd to fill sa l t in the salt contai n er e ven w he n
the hardnessofwaterisonly6 dH.Ifdetergents without phosphate areused in thecaseofhardwater
often white spots appear on dishe s and glasses. I n this cas e please add more deter gent to r each
better re sults . De te rg en ts w ith o ut chl orin e do only bleach a lit t le. Str o ng an d co lo u red s p o t s wi ll not
beremoved completely. In this casepleasechoose a programmewith ahighertemperature.
°
Concentr ated Det ergent
Basedon theirchemical composition,detergents can besplitin two basic types:
conventional,alkaline detergentswith causticcomponents
lo w al k aline c onc entra t ed d et er ge nt s wi th n atur a l en zy mes
DetergentTablets
Detergenttabletsof differentbrands dissolve atdifferentspeeds.Forthisreasonsome
detergent tablets can not dissolve and develop the ir full cle aning power dur ing short
programmes.Thereforepleaseuselong programmeswhen usingdetergent tablets,to
ens ure the comp lete removal of de ter g e n t resi du al s.
Detergent Dispenser
The dispenser must b e refilled be fore the star t of each wash cycle following the instructions
provided in the w ash cycle ta ble . Yourdishwasher uses less de tergent and rinse aid tha n
conventional dishwa shers. Gene rally,onlyone tablesp oon of detergen t is n eeded for
anormalwashload. Moreheavilysoileditemsneedmore detergent.Alwaysaddthe
detergen t jus t be fore star ting the dish was her, otherw ise it coul d ge t damp and w ill n ot
dissol v e pr ope r ly.
Amountof Detergent toUse
Push latchto open
Detergent powder
Detergent tablet
If the lid is close d: press release button. The li d will sp ring open.
Always add the dete rgent just b efore starting ea ch wash cycle.
Only usebranded detergentaid for dishwasher.
Dishwasher detergen t is co rrosive! Take care to keepit out ofreach of children.
Page 11

FillinDetergent
Fillthe detergent dispenser with d etergent.
The marking ind i c ates the dos ing le vels , a s
illus t ra ted on the righ t:
Forthemain washcycledetergent.
A
Forthepre-wash cycledetergent.
B
Pleaseobserve th emanufactur ers dosing and storage
Recommendationsasstated on thedetergent packaging.
Closethelid and pressuntilit locksinplace.
If t h e dishes are he avily soi l ed , place an addit i onal
detergent dose in the pre-wash deterg ent chamber.Thisdetergent will takeeffect during the pre -wash phas e.
You will find inf orm ation ab ou t t he am ou nt of de t e r ge nt f o r th e singl e programme on th e last p ag e.
Pl eas e be awa re, that accordin g to the le v el so il ing and the s pe ci f ic h ardnes s of wa te r di ffer ences are possib le .
Please observe the manufacturer's recommendations on thedetergentpackaging.
5.Features5.Features
Express
For lighter loads the Express function by raising the temperature when used with the programmes: intensive, normal,
economy and glass can shorten the washing time by up to 40 minutes.
Extra drying
To increase the efficiency of normal drying this feature increases the temperature at the end of the wash programme.
This works with Intensive, Normal, Eco, Glass, and 1 Hour Express programmes.
Auto wash programme
Sensors intelligently check the level of cleanliness of your crockery to make maximum savings of time, energy and
water. Here at Caple we want to do all that we can to save water for both ecological and financial reasons, an
astonishingly low 8.4L can be used the Auto wash programme.
Cutlery tray
The clever cutlery trays sit at the top of your dishwasher and frees up much more space in the lower basket.
The centre tray is easily removed to speed the delivery of your perfectly clean cutlery to your drawer.
Delay timer
The Delay timer allows the user to select the start time from 1 to 24 hours to most efficiently take
advantage of convenient times and energy saving windows.
'Easy' adjustable upper basket
This feature allows the height of the upper basket to be changed (even with full loads) with the simple release of 2
conveniently placed levers.
Internal light
A well placed light helps internal illumination, and looks great too!
Aqua Stop
This system will at the first sign of any leak automatically cut off the water supply helping to avoid costly water damaged.
Alternative wash function.
This flexible system works like the Half load function, but also allows you to select either the upper or lower baskets
for the load. Providing further water and energy savings for those smaller loads.
Power
When this Power Wash is used with five programmes (intensive, normal, economy, glass and 1 Hour Express),
it can help break through very heavily soiled loads by increasing washing temperature and duration.
wash
Page 12

Considerbuying utensilswhich areidentifiedas dishwasher-proof.
Use a milddetergent that i sdescribedas'kindto dishes'.Ifnecessary, seek further
information from thedetergentmanufacturers.
Forparticularitems, selecta programmewithaslow atemperatureaspossible.
To prev ent damage, do not t ake glass a nd cutl ery out of the dishw ashe r i mmed iatel y
after t he pr ogr amm e has e nde d.
Are not s uitable
Cutlerywithwooden, horn china or
mother-of-pearl handles
Plastic items that are not h eat resis tant
Older cutler y with glued parts that are not
temperatureresistant
Bonded cutler y items or dishes
Pewter or coop er items
Crystal glass
Steel items su bject to r usting
Wooden platters
Items made fromsyntheticfibres
(For best perform ance of the dishwasher,follow these load ing guide lines.
Features and appear ance of baske ts and cut lery ba skets may vary from your model.)
Scrape off any largeamounts o f leftover foo d. Soften remnan ts o f burnt food in pans.
It is not necess ary torinse the dishes u nder running water.
Place objects in the dishwasher i n followi ng way:
1.Itemssuch as cups, glasses, pots/pans, etc. are fa ced downwards.
2.Curveditems, or ones wit h recess es, should be loade d aslant s o that water can run off.
3.Allutensils are stacked secu rely and can not tip ov er.
4.Allutensils are placed in the way t hat the spray ar ms can rot ate freely during washin g.
Very sm all items sho uld not be w ashed in the dishwasher as they c ould eas ily fall out o f the basket.
Are of limited suitability
Some types of gl asses can b ecome
dull after a larg e number of washes
Silver an d al uminu m parts ha ve a
tendencyto discolour duringwashing
Glazedpatterns mayfade ifmachine
washed frequently
Load hollow items such as cups, gl asses, pans etc. With the opening facing downward s so that
wat e r cann o t colle c t in the conta ine r or a dee p base.
Dishes anditemsof cutlery must not lieinside oneanother, orcovereach other.
To avoid da mage to glasses, they mus t not t ouch.
Load large items which are most difficult to c lean into the lower basket.
The upper bas ket is de signed to ho ld more deli cate and li ghter dishwa re such as glasses, coffee
andtea cups
Long blad ed knives stored in an upright position are a potential haza rd!
Long and/ or sharp itemsof cutle ry such as carving knives must be positione d
horizon tally in t he upper b asket .
Please donot overload yo ur di shwasher. T his is important for g ood resu lts and fo r
reasonab le consum ption of en ergy.
To prevent wat er drippi ng from the upper basket into the lower ba sket, we re commend th at you
empty the lower basket first an d the n the upper ba sket.
Page 13

The upper bas ket isdesigned to hol d more delicate
and lighter dishware s uch as gl asses, coffee and
teacupsand saucers,as wellas plates, small bowls
andshallow pans(as longas theyare nottoodirty).
Positionthed ishesandcookware sothattheywill
notgetmoved by thespray of w ater.
Please be reminded that:
Pots,servingbowls,etc,mustalwaysbeplacedtopdown.
D eep po ts sh oul d be slanted to al low w ater t o f low out.
The B otto m Bask et f eatur es foldin g spi kes so that l arge r or more pot s an d pan s can be lo aded.
We sugges t tha t yo u pl ace large items and the mo st
difficulttoclean items are to beplaced into the lower
basket: suchaspots, pans, lids, serving dishes and
bowls, as sh own i n the fi gure be low. I t is prefer ab l e to
pla ce s er vi n g dishe s an d lids o n the si d e of t h e ra cks
in order to a void blocking th e rotation of the top spray
arm.
Adju sting the Upper B ask et
Theheightoftheupperbasketcan be adjustedin order to
c re at e mor e s pa ce f or l a rge utensi ls both for the upper
/lower basket.The height of theupperbasket can be
adjusted to the upper position by liftin g the basket upuntil
it clicks i nto place . Pull upwards on the ha ndle to l ower the
upper ba sket, see the pi cture belo w:
Folding back the cup shelves
For better stacking of pots and pans,
theshelves canbefolded downas
showin the pictureright.
Folding Spikes of Lower Basket
For betterstacking of pots and pans,
thespikes canbe folded down as
showninthepicturetotheright.
Cutleryshouldbe placed inthe cutlery rackseparately
from each oth er in the appropr iate pos itions, and d o
make sure th e utensils do not nest together, this may
re duc e t he c le an in g per f or mance .
For a top quality cleani ng, place the silverware in the basket
making sure that:
They do not nes t together.
Silverware is po sitioned not to hold water.
Long utensils in the middle.
Page 14

7.Starting a washing program7.Starting a washing program
Wash Cycle TableWash Cycle Table
( )
NOTE:NOTE:
ProgramProgram
Means: need to add rinse aid into the Rinse-Aid Dispenser.
Water comsumption doesn t include regeneration water.Water comsumption doesn t include regeneration water.
Cycle Selection
Cycle Selection
Information
Information
,,
Description
Description
of Cycle
of Cycle
Detergent
Detergent
pre/main
pre/main
Running
Running
time(min)
time(min)
Energy
Energy
(Kwh)
(Kwh)
Water
Water
(L)
(L)
Rinse
Rinse
Aid
Aid
AutoAuto
(*EN 5 0242)
Auto sensing wash, lightly,
normally or heavily soiled
crockery, with or with out
dried-on food
For heaviest soiled crockery,
and normally soiled pots
pans dishes etc with dried
on soiling.
For normally soiled loads,
such as pots plates
glasses and lightly
soiled pans.
This is Standard programme,
it is suitable to clean normally
soiled tableware and it is the
most efficient programme in
terms of its combined energy
and water consumption for
that type of tableware.
For lightly soiled crockery
and glass.
For lightly soiled loads that
do not need excellent
drying efficiency.
A shorter wash for lightly
soiled loads and quick
wash.
To rinse dishes that you plan
to wash later that day.
Pre-wash (45 )
Autowash(45-55 )
Rinse
Rinse (62 )
Drying
Pre-wash(50 )
Wash (65 )
Rinse
Rinse
Rinse(55 )
Drying
Pre-wash(45 )
Wash (55 )
Rinse
Rinse (65 )
Drying
Pre-wash
Wash (50 )
Rinse
Rinse(65 )
Drying
Pre-wash
Wash (40 )
Rinse
Rinse(60 )
Drying
Pre-wash(50 )
Wash(60 )
Rinse (60 )
Drying
Wash (45 )
Rinse
Rinse (45 )
Pre-wash
5/30g
(or3in1)
5/30g
(or3in1)
5/30g
(or3in1)
5/30g
(or3in1)
5/30g
5/30g
20g
120~180
165
180
179
115 0.82
60 101.05
40
8
0.9~1.3
1.3
1.2
0.85
0.6
0.01
8.4~12.7
17
13
10
13
11
4
NOTE:NOTE:
*EN 5 0242 : This programme is the test cycle. The information for comparability test
in accordance with EN 50242, as follows:
Capacity: 14 setting
Position Upper basket: upper wheels on rails
Rinse aid setting: 6
Pl:0.49w; Po:0.45w(dishwasher is equipped with a power management system) .
Turning On the ApplianceTurning On the Appliance
Starting a cycle wash
1 Draw out the lower and upper basket, load the dishes and push them back.
It is recommended to load the lower basket first, then the upper one (see the section entitled
Loading the Dishwasher ).
2 Pour in the detergent (see the section entitled Salt, Detergent and Rinse Aid ).
3 Insert the plug into the socket. The power supply is 220-240 VAC /50 HZ, the specification
of the socket is 10A 250VAC. Make sure that the water supply is turned on to full pressure.
4 Open the door, press the ON/OFF Button.
Page 15

5 Pres s t he ,then pre ss - or + button cha nge t he programme as fol lows
menu butt on
“” “ ”
direction:
Auto->Intensive->Normal->Eco->Glass->60 Min->Rap id->Soak;
If a programme is s elected,the display s creen will show it. P ress the OK button,Close the door,
the dishwasher will thenstart.
Acyclethat is underw ay can on ly be mod ified if it has been runni ng for a short ti me. Othe rwis e, the
1
detergent m ay hav e already be en relea sed, a nd the appli ance m ay have alrea dy drained the wash water.
If this is t he case , the dete rgent d ispenser must be refil led (see t he section ent itled " Load ing the
Detergent " ).
2
Open the do or , press the menu button ,t hen press + or - but ton,
you can change the programm e to the de sired set ting (see the sectio n entitled " Starting a
wash cycle. . ." ) .
“” “”
If you open the door during a wash cyc le, the machinewillpause. Theprogramme lightwill
stopflashingandthe buzzerwill sound everyminuteunlessyouclosethedoor.After
youclosethe door,themachine willstartagainafter 10 s econds.
Aforgottendish can be added any time before the detergent cup opens.
Open the door a little .
1
After the spray arms stop working, you can open the door
2
completely.
Add forgotten dishes.
3
When the working cycle has finished, the buzzer of the dishwasher will sound for 8 seconds, then the dishwasher
reverts automatically to off-mode after the end of the programme.(If you open the door while the buzzer is sounding
you must press the on/off button to switch off the dishwasher). ,Shut off the water supply and open the door of the
dishwasher. Wait for a few minutes before unloading the dishwasher to avoid handling the dishes and utensils while
they are still hot and more susceptible to breakage. They will also dry better.
Close the door
4
The dishwasher will run after 10 seconds.
5
Switchoffthe dishwasher
1.Thebuzzerof the dishwasher will sound for 8 seco nds, the n the dishw asher .will revert automati cally to off-mode
2.Turnoff thewater tap!
Openthe doorcarefully.
Hot dishes are sensitive to knocks. The di shes shou ld therefore b e allowed t o cool down around 15 minutes
beforeremovingfrom the appliance.
Open the dish washer's door, leave i t ajar and wait a few mi nutes befor e remov ing the dis hes. This way they
will be cooler an d the dryi ng will be i mproved.
Unloading thedishwasher
Itis normal that t he dishw asher is we t inside.
Empty the lower basket first and then the upper on e. This will avoid water dr ipping from the upper basket onto
the dishes in thelower one.
Washthearms in soapy a nd warm w at er and u se a soft bru sh to
cleanthe jets.Replace themafter rinsing themthoroughly.
When following this procedure from step1 to step 3, the filter system will be removed;
when following it from S tep 3 to Step 1, the filter system will be installed.
It is dangerou s to ope n th e door w h en washi ng , be c a use the hot water may scald you .
Page 16

The filter prevents larger remnants of food or other obj ects from get ting insi de the pu mp.
Theresidues mayblockthefilter, inthis case they must be removed.
The filter system consi sts of a coar se filter,a flat (Mainfilter)
An d a mic ro fil t e r( F i ne filte r).
1
2
3
2
1
3
Main filter
Foodand soil particlestrapped inthisfilterare pulverized by a
special jet onthe lower spr ay arm and w ashed down todrain.
Coarse filter
Larger i t ems, s uch as pie c es o f bone s or gla ss, that c oul d bl o ck
thedrainare trapped in the coarsefilter.To removetheitems
caught by t he filter, gently s queeze the t ap on the to p of this
filterand l ift out.
Fine filter
This filterholdssoiland foodresidues in thesumparea and
preventsit frombeingredeposit onthe dishesduringwashcycle.
Filterassembly
Thefilterefficiently
For best p erformance and results, the filter must be cleaned regula rly. thisreason, it is a goodidea to
remove th e larger food particles trapp ed in the filter after e ach was h cycle by rin sing the semicircular filter and
cup under ru nning wat er.Toremove the filter de vice, pull th e cup ha ndle in t he upward d irection.
removes food part icles fro m the wa sh water,allowing it to be recycled dur ing the cycl e.
For
Th e dishwas her mus t ne ver be us ed wi t ho ut the filters.
Improper repl acement of the filter may re duce the performance level of the applian ce
anddamagedishes a ndutensils.
2
1
Step 1 Turn the fi lter in ant i-clockwise d irection,:
Step 2 lift the filter assy up:
When following this procedure from step1 to step 2, the filter system will be removed;
when following it from S tep 2 to Step 1, the filter system will be installed.
Page 17

Remarks:
- Inspect the filters for blockin gafter ever y time the di shwasher ha s been us ed.
- By unscrewing the coarse fil ter,you can remove t he filter system. Remove any foo d remna nts and
cleanthe filtersunder running water.
Theentirefilter assemblyshouldbe cleanedoncea week.
Cleaning the Filter
To cle an th e co a rs e f il t er a nd the f i n e fi lter , use a c l ean i n g b ru sh. Re as se mbl e th e f il ter par t s as s hown in the fi gur es
on the la st pa ge a nd r eins ert t he e ntire assem bly in the dis hwa sher, pos itio ning it in i ts se at and press ing downwa rds.
When c leanin g the fil t ers, don 't k nock them. Other wis e , the filter s cou l d be
contorted and theperformanceof thedishwashercould bedecreased.
The control pane l can be cleaned by using a l ightly dam pened cloth .
After cleaning, m ake sure to dry i t thor oughly.
For the exteri or, use a g ood app liance po li s h wax .
Neveruse sharp object s, scouring pa ds or har sh clean ers on any p art of the di shwasher.
CleaningTheDoor
To clean the e dge around t he door, you should u se only a sof t warm, d amp cloth.
To avoid penetrati on of wa ter into the d oor lock and electrical componen ts, do not
usea spray cle aner of any ki nd.
Never use a spray c leaner t o clean t he door panel asit may dam age the door loc k
and electricalcomponents.
Abrasive agents or some paper towels s hould not be u sed becau se of the ris k of
scra tching or le av in g spots on t he stainless st eel su r f a ce.
Protec tAgain st Freez ing
Please take f rost protectio n measures onthe dishwasher in w inter.Every fter washing cycl es,
please op erate as foll ows
1.Cutoff theelectricalpowerto thedishwasher.
2.Turnoffthewater supply and d isconnec t the water i nlet pi pe from the w ater valve.
3.Drain the water fr om the inlet p ipe an d water va lve. (Use a p an to gathe r the wat er)
4.Reconnect the water i nlet pipe to the water val ve.
5.Remove the filter at t he bottom of the tub and use a sponge to soak up water in the sump.
:
If your dishwasher cannot work because of t he ice,
please con tact pr ofessiona l service persons.
timea
Cleani ng the SprayArms
It is neces s ary to cle an t h e spr ay arm s re g ula rly f or h ar d
water chemicals w ill clogthespray arm jets a ndbearings.
Toremove the upper spr a y a rm, hold t he nut, rot ate th e a rm
clockwise toremove it.
Toremovethelowersprayarm, pull out the sprayarmupward.
Washthearms in soapy an d warm wat er and use a soft brush to
clean the jets. R eplace them after rinsing the m thorough ly.
Page 18

AfterEvery Wash
After ever y wash, turn offthe water supp ly to the
appliance and leave the doo r slightly op en so tha t
moisture an d odours a re not tra pped ins ide.
Removethe Plug
Before cleaning or performing maintenance, always
remove the plug from t he socket.
No Solv ents orAbras ive C leani ng
To clean theexterior and rubber parts of the dishwasher,
donotusesolvents or abrasivecleaningproducts.
Only use a cloth with warm soapy water.
Tor em ove s pots or st ains from the surf ace of the
interi or, use a cloth da mpe ned wit h wa ter and alittle
vinegar,or a cleaning pro duct mad especifically fo r
dishwashers.
Whennot in Use for aLongTime
It isrecommend that yourun awashcyclewith the
dishwasher empty an d then remove th e plug fro m the
socket, turn off the wa ter supp ly and le ave the door of
the app l ian c e sl ig ht ly open. T h is wil l help the d oo r
sealstolastlongerand prevent odoursfrom forming
withintheappliance.
Moving theAppli ance
If the applian ce must be mo ved, tr y to keep it in the
verticalposition.If absolutely necessary,it canbe
positioned on its back.
Seals
Oneofthefactorsthatcauseodourstoforminthe
dishwasher is foo d that remain s trappe din the seals .
Periodic clea ning with adamp sponge wi ll preve nt this
fro m occu rr in g.
Electrical Shock Hazard
Theinstallationof thepipes
and electrical equipment
shouldbe done by professionals.
●
Installationpreparation
Disconnect electricalpowerbefore
installingdishwasher.
Failuretodosocanresultindeathor
elect r ical sh ock .
The installation position of di shwasher shouldbe near the existing inlet and d rain hosesand
powercord.
One side of t he cabinet si nk should be chosen to faci litate the conne ction of dra in hoses of
the dishwasher.
Note:please checkth e accompanying installation ac cessories(hookfor th e f urnituredoor,
screw)
Page 19

Pleasecarefully read the installationinstruction.
●
Illustrations of cabinet dimensio ns and i nstallation pos it ion of the dishwasher
Preparations sh ould be mad e before mov ing the d ishwash er to the f inal locat ion.
1
Choose a place near the sink tofacilitate the install ation of i nlet and dra in hoses
(see figure 1).
Ifdishwasher is installed at t he corner of the cabinet, a llow for s ome sp ace
2
(illustrated i n figure 2 ) when the d oor is o pened.
【】Figure1
Cabinet d imensions
Less tha n 5mm
be tw een the top
ofdishwasher and
cabin e t and the
outerdooraligned
tocabinet.
【】Figure2
Minimumspace when
the door is opened
820mm
580mm
90 °
Electrical, drain and
water supply line
entrances
Space betweencabinet
bottom and floor
600 mm
Dishwa s her
Door of
dishwash er
Minimum space of 50mm
90 °
80
100
Cabinet
●
dimensions and installationFurniture do or
1 The fur ni tur e door sho uld be in stalled ac cord ing t o t he Figure 3.
【】Figure3
Thefurnituredoorshouldbe
installedinaccordance
withtheillustrateddimensions
(Unit : mm)
Page 20

2 Instal l the hook on the furniture door andput the hook into the slot of the out er doorof
dishwasher(seefigure 4a).After pos itioning of the pane l , fix the panel onto t he outer door by
screws and bolts(See figu re 4b) .
【Figure
4a】
Installationof furnituredoor
【Figure4b】
Installationof
the f urnit ure door
.takeawaythefour
1
short screws
2
. pin up the four long
screws
Page 21

●
Tension adjustment of the door spring
Thedoor springsareset at the factorytothe propertensionfor theouter door.
Whenthe furniture dooris installed, youwill have to adjustthe doorspring tension.
Rotatethe adjustingscrew todrive theadjustorto strainor relaxthe steelcable
(seefigure5).
Door springtensioniscorrectwhen
the door rem ains horizontal in t he
fully opened position yetrises
to a clo se with the sli ght l ift of a
finge r.
,
【Figure
Tension adjustment
of th e d oo r s pring
●
Connection of drain hoses
Insert the drai n hose into adrain pipe with aminimum diameter of 40mm, or let i t run into the sink, mak ing sure to
avoid bending or crimping it. The top of thehosemust belessthan 1000mm .hig h
Front
5】
Counter
NOTE
The top of the hose
must be less than
1000mm.
Drain pipe
A
B
φ 40m m
Page 22

●
Dishwash er inst allation steps
1
Install the f urniture d oor t o the ou ter door of th e di shwasher using the brac kets provi ded. Re fer
to t he template for posi tioning of the bra ckets.
Adjustthe te nsion of the door springs byusing an Allen key turn ing in a clockwis e motion to
2
tightentheleftandrightdoorsprings.Failure to dothiscould cause d amagetoyour dishwasher
(Illust ration 2)
Connect the inlet hose to t he cold water suppl y
3.
Connect the drain hose. Refer to diagram (Figure 6)
4.
Connect the powercord
5.
Affix the condensation st rip under the work surface of cabinet. Please ensu re the c ondensation
6
strip is flush withedgeof work surface.
Place the dis hwasher int o po sition.(Ill ustration 4)
7
8
Levelthe dis hwasher.The rear fe et can be ad justed fro mthe f ront o f the dishwasher by turning
theAllen screw in the m iddle of the b ase of dishwasher u se anAllen k ey (I llustration 5A ). Toadjust
thefrontfeet, usea flatscrewdriver and turnthefrontfeetuntilthe dishwasherislevel(Illustration5B).
9 The dish washer must be s ecured in place. The re are t wo ways to do t his:
A. Norma l wo r k su rf ace:Put the ins ta lla ti on h oo k in t o t h e sl o t of t h e side pl ane and se cur e it to t h e
work sur f ace with t h e wo od sc rew s ( Illus t r at io n 6).
B. Marble or g r anit e wo rk top:F ix the side w i th Sc rew. (I ll ustr atio n 7).
.
【】Figure7
Page 23

The dis hwa sher m ust b e le vel for proper d ish r ack op era tion a nd wa sh p erfor manc e.
Placea spiritlevel on door andrack trackinside the tub asshown to check thatthe
1
dishwasheris level.
levelthe dishwasherby adjusting the threelevelling legs individually.
2
3
Whenlevellingthe dishwasher,please pay attentionnot to let the dishwasher tipover.
【】Figu re 8
Illustra tion of fe et adjus tment
Check leve l Fron t to Bac k
NOTE:
Themaximumadjustment
heightofthe feet is 50 mm.
For personalsafety:
DO NOTUSEANEXTENSIONCORDORAN ADAPTER PLUG W ITHTHISAPPLIANCE.
DO NOT, UN DERANYCIRCUMSTANCES,CUTORREMOVE THE EARTHING
CONNECTION FROMTHE POWER CORD.
Please look at the rating lab el to know th e rat ing volta ge and c onnect t he dishwash er to the app ropriate pow er s upply.
Use the requ ired fuse 10 amp, tim e delay fuse or circui t breake r rec ommended and provide separa te circ uit serv ing
only this appliance.
Spirit le ve l
Check level si de to s ide
Ensurethevoltage and frequencyof thepowercorrespondsto
thoseontheratingplate. Only insert theplug into an electrical socket whichisearthed
properly. If the el ectrical socket to wh ich the applianc e must be co nne cted is not
appropriate forthe plug,replacethesocket,ratherthanusingaadaptorsor thelikeas
they coul d cause ove rhea ting and bu rns.
This applia nce must b e eart hed. In t he event
of a malfunc tion or breakdown, earthing wil l
reduce the risk of electric sho ck by provi ding a
path of leastresistance forthe electric current.
This app liance isequipped w ith a cor d ha ving an
equipment-ea rthin g conduct or and an e arthing
plug. The plug must be plu gged into an appropri ate
outlet that i s inst alled and earthed in accordance
with all loc al sta ndards a nd requ irement s.
Impr oper c onnec tion of the equipment grou nding conducto r ca n res ult i n th e risk
of an electric shock. Check wi th a qual ified
electricianorservicerepresentative if you
are i n doubt whethe r t he app lian ce is properly
grou nded. Do not mo dify the plug p ro vid ed w ith
theappliance;Ifitisnotfit fortheoutlet.
Have a properoutlet installed bya qualified
electrician.
Page 24

The appliance must be connected to the water mains using new hose-sets.
The old hose-sets should not be reused.
Water pressure must be between 0,04 MPa and 1 MPa. If the pressure is below the minimum
consult our Service Department for advice.
1. Pull The safety supply hoses completely out from storage compartment located at rear of
dishwasher.
2. Fix the hose to the water supply connection with a 3/4 inch thread.
3. Turn water fully on before starting the dishwasher.
The safety supply hose consists of the double walls. The hose's system guarantees its intervention by blocking the flow of water
in case of the supply hose breaking and the air space between the supply hose itself and the outer corrugated hose is full
of water.
A hose that attaches to a sink spray can burst if it is installed on the same water line as the dishwasher.If your sink has one,
it is recommended thet the hose be disconnected and the hole plugged.
1. Turn off the water.
2. Release the water pressure by depressing the pressure release button. This relieves water pressure and protects you,
and the room, from severe splashing.
3. Unscrew The safety supply hose from the connection.
Connect the cold water supply hose to a threaded 3/4(inch) connector and make sure that it is fastened tightly in place.
If the water pipes are new or have not been used for an extended period of time, let the water run to make sure that the
water is clear and free of impurities. If this precaution is not taken, there is a risk that the water inlet can get blocked and
damage the appliance.
Posit ioning theA pplian ce
Po s ition the ap p lia nce in t he d esire d lo c ation. The back should rest against th e wal l be hind it , a nd the s i de s,
along the ad j ace n t ca bine ts or walls . T he d is hw ash er i s equ ipp ed w i th w at er s up pl y a nd d rai n h os es tha t ca n
be positio ned either to the right or the le ft sides t o facilitate p roper ins tallation.
How to Drain Excess Water From Hoses
If the sink is 1000mmhigher fromthe floor, theexcess waterin hosescannotbe draineddirectly
into the s ink. It will be necessary to dra in excess wa ter from hos es into a bow l or suita ble
containerthatis heldoutside and lower than thesink.
Wa ter Outl et
Connect the water drain h ose. The drain h ose must be corr ectly fitt ed to avoid water leaks.
Ensurethat thewaterdrainhoseis not kinked orsquashed.
Extension Hose
If you nee d a drai n hose e xtension , make sure to use a similar drain hos e.
It must be no longe r than 4 metres; otherw ise the c leanin g effect of the dishwash er co uld be re duced.
Syphon Connection
Insertthedrainhoseintoadrainpipewithaminimumdiameterof40mm,orletitrunintothesink,makingsureto
avoid ben ding or crimping i t.The top o f the hose must b e less than 1 000 mm from the floor.
The follow ing thin gs shou ld be ch ecked bef ore sta rting the dishwasher.
1 Thedishwasher is level an d fix ed properly
2 Theinletvalveisopen
3 leakageat the connections of theconductsIs therea
4 Thew iresare tightlyconnected
5 The poweris switchedon
6 The in let and drain hoses a re not k n otte d
7 A ll packingmaterialsand printings shouldbetaken outof thedishwasher
Afterinstallation, please make sure tokeepthis manual.
The contentofthis manualisveryhelpfultotheusers.
Page 25

Fuse blown, or the
circuit breaker acted
Replace fuse or reset circuit breaker. Remove any other
appliance s sharing the same circuit with the dishwasher
Power supply is not
turned on
Water pressure is low
Door of dishwasher
not properly closed.
Kink in drain hose
Filter clogged
Kitchen sink clogged
Improper detergent
Spilled rinse-aid
Make sure the dishwasher is turned on and the door is
closed securely.
Make sure the power cord is properly plugged into the
wall socket.
Check that the water supply is connected properly and
the water is turned on.
Make sure to close the door properly and latch it.
Check drain hose.
Check coarse the filter
(see section titled )" Cleaning The Filter "
Check the kitchen sink to make sure it is draining well.
If the problem is the kitchen sink not draining ,you may
need a plumber rather than a serviceman for dishwashers.
Use only the special dishwasher detergent to avoid suds.
If this occurs, open the dishwasher and let suds evaporate.
Add 1 gallon of cold water to the tub. Close and latch the
dishwasher, thenselect anycycle.Dishwasher willdrain
outthewateratthe first step.Openthe doorafter draining
is stop and check if the suds is disappeared.
Repeat if necessary.
Always wipe up rinse-aid spills immediatel y.
Detergent with
colourant was used
Hard water minerals
The affected items are
notcorrosionresistant.
A programme was not
run after dishwasher
salt was added.
Traces of salt have
gotten into the wash cycle.
Thelid of the softener
is loose
r
Aspayarmis
knocking against
an item in a basket
Items of crockery
are loose in the
wash cabinet
This may be caused
by on-site installation
or the cross-section of
the piping.
Make sure that the detergent is the one without
colourant.
To clean the interior, use a damp sponge with
dishwasher detergent and wear rubber gloves.
Never use any other cleaner than dishwasher
detergent for the risk of foaming or suds.
Always run the quick wash programme .
without any crockery in the dishwasher and
without selecting the Turbo function (if present),
after adding dishwasher salt.
Check the lip .Ensure the fix is fine.
Interrupt the programme, and rearrange the items
which are obstructing the sp ay arm.r
Interrupt the programme,
and rearrange the items of crockery.
This has no influence on the dishwasher function.
if in doubt, contact a suitably qualified plumber .
Page 26

The dishes were not
loaded correctly.
See notes in " Loading the Dishwasher Baskets ".
Theprogrammewas
notpowerfulenough.
Not enough detergent
wasdispensed.
Items are blocking
the path of sp ay arms.r
The filter combination
inthebaseofwash
cabinet is not clean or
is not correctly fitted.
This may cause
the sp ay arm jets
r
to get blocked.
Combination of soft
water and too much
detergent.
Aluminum utensils
have rubbed against
dishes.
Dishes block
detergentcups.
Improper loading
Too little rinse-aid
Select a more intensive programme.
See" Wash Cycle Table ."
Use more detergent,or change your detergent.
Rearrange the items so that the sp ay can rotate freely.r
Clean and/or fit the filter combination correctly.
Clean the sp ay arm jets. See "Cleaning the Spray
Arms".
Use less detergent if you have soft water and select
a shortest cycle to wash the glassware and to get
them clean.
Use a mild abrasive cleaner to eliminate those marks.
Re-loadin g the dishes properly.
Load the dishwasher as suggested in the directions.
Increase the amount of rinse-aid/refill the rinse-aid
dispenser.
r
Dishes are removed
too soon
Wrong program
has been selected
Use of cutlery with
a low-quality coating
Do not empty your dishwasher immediately after
washing. Open the door slightly so that the steam can
escape. Begin unloading the dishwasher only once
the dishes are barely warm to the touch. Empty the low
basket first. This prevents water form dropping off
dishes in the upper basket.
In short programme the washing temperature is lower.
This also lowers cleaning performance. Choose
a programme with a long washing time.
Water drainage is more difficult with these items.
Cutlery or dishes of this type are not suitable for
washing in the dishwasher.
If a malfunction appears, the appliance will display error codes to warn you:
Erro r1
Erro r4
Error8
Longer inlet time.
Overflow.
Failure of orientation of distributary valve.
Water supplyisnoton, or waterintakeis
restricted,orwaterpressure istoolow.
Someelement o f thedishwasher is leaking
Opencircuit orbrokenof distributaryvalve.
Error C
FaultofPCBdatatransmission.
PCBfailure
If overflow occurs, turn offthe main water supply before callin gfor service.
If there is water in the base pan because of an overfill or small leak,
the water should be removed before restarting the dishwasher.
Page 27

Height: 815mm
Width : 598mm
()
Depth: 550mm
with the door closed
Water press ure : 0.04- 1.0M Pa
Pow er sup pl y: see rat in g lab el
Capacity: 14place settings
Page 28

Technical Data Sheet
Sheet of household dishwash er accor ding to EU D irective 1 059/2010:
Manufacturer
Type/ Description
Standardplacesettings
En erg y efficie ncy cla ss
Annualenergy consumption
En erg y co ns u mpt io n of the stan da rd c l ean in g cy cle
Power con sumptio n of off-mod e
Power con sumptio n of left- on mode
Annualwaterc onsumption
Dr yi n g efficiency cl as s
Standard cleaning cycle
Programme duration of thestandardcleaning cycle
Noiselevel
Mounting
Couldbebuilt-in
CAPLE
Di628
14
A+++
238 kW h
0.8 5 kW h
0.4 5 W
0.4 9 W
2800litre
A
ECO 50
179 min
45 dB(A) re 1pW
Buildunder
Yes
℃
Height
Width
De pth (with co nn ec t ors )
Powe r consumpti on
Ratedvoltage / frequency
Waterpressure (flow pressure)
NOTE
:
A+++(highest efficiency) to D (lowest efficiency)
Energy consumpti on 238 kWh peryear,basedon 280 standard cleaning cycles us ing cold water fill and
the consumpti on of the low power mode s.Actual energy consumptio n will depend on how the appliance is used.
Waterconsumption 2800 litres p er year,based on 280 stand ard cleaning cycl es.Actual water cons umption
will depend on how the app liance is use d.
A(highest efficiency)to G (lowest efficiency)
This p rogr amm e is suitable for cl eani ng nor mal l y soi led t abl ewar e an d th at it is th e
most efficient prog ramme in ter ms of its com bined ener gy and water consumption for
th at type of tableware.
The device me ets the E uropean sta ndards and the directives in the curre nt version at de livery:
- LVD2006/95/EC
-EMC2004/108/EC
- EUP 2009/12 5/EC
“”
“”
81. 5 cm
59. 8 cm
55 cm
1850 W
230 V~ 50 Hz
0.4-10bar = 0.04-1MPa
The above val ues have be en measured in accor dance with s tandards und er spec ified operating co nditions .
Results may var y greatly a ccording toquantity and pol lution ofthe dishes, water ha rd ness,
amount of dete rgent, e tc.
The manual i s based on the European Uni on's stand ards and rules.
Page 29

 Loading...