

Page 1

Di627
Contact Caple on 0117 938 7420 or for spare parts www.caple.co.uk
Page 2
Review the section on troubleshooting tips to help you
solve some common problems.
Dear Custo m er ,
Passitontoanysubsequent owner of theappliance.
This manual contains sections on safety instructions,
operating instructions, installation instructions
and troubleshooting tips, etc.
The manufacturer, following a policy of constant
development and product upgrades, may
make modifications without giving prior notice.
A copy of this user manual can also be sourced
directly from Caple.
Please carefully read this manual before using the
dishwasher, it will help you to use and maintain your
Caple dishwasher properly.
Keep it to refer to it at a later date.
If you can not solve the problems by yourself,
please contact Caple Service on 0844 800 3830.
Dishwasher Features.......................................3
A Water Softener..............................................4
Attention before or after loading the dishwasher
baskets........................................................9
Filtering system.............................................13
Caring for the dishwasher...................................14
B Loading the salt into the softener.................5
C Fill the rinse aid dispenser..............................5
D Function of Detergent .....................................6
Loading the upper basket.................................10
Loading the lower basket...............................10
Wash cycle table...........................................11
Turning on the appliance...................................11
Changing the programme...............................12
At the end of the Wash Cycle..........................12
Before calling Caple Service..........................22
Errorcodes.................................... ..............23.
Technicalinformation.............................. .....24..
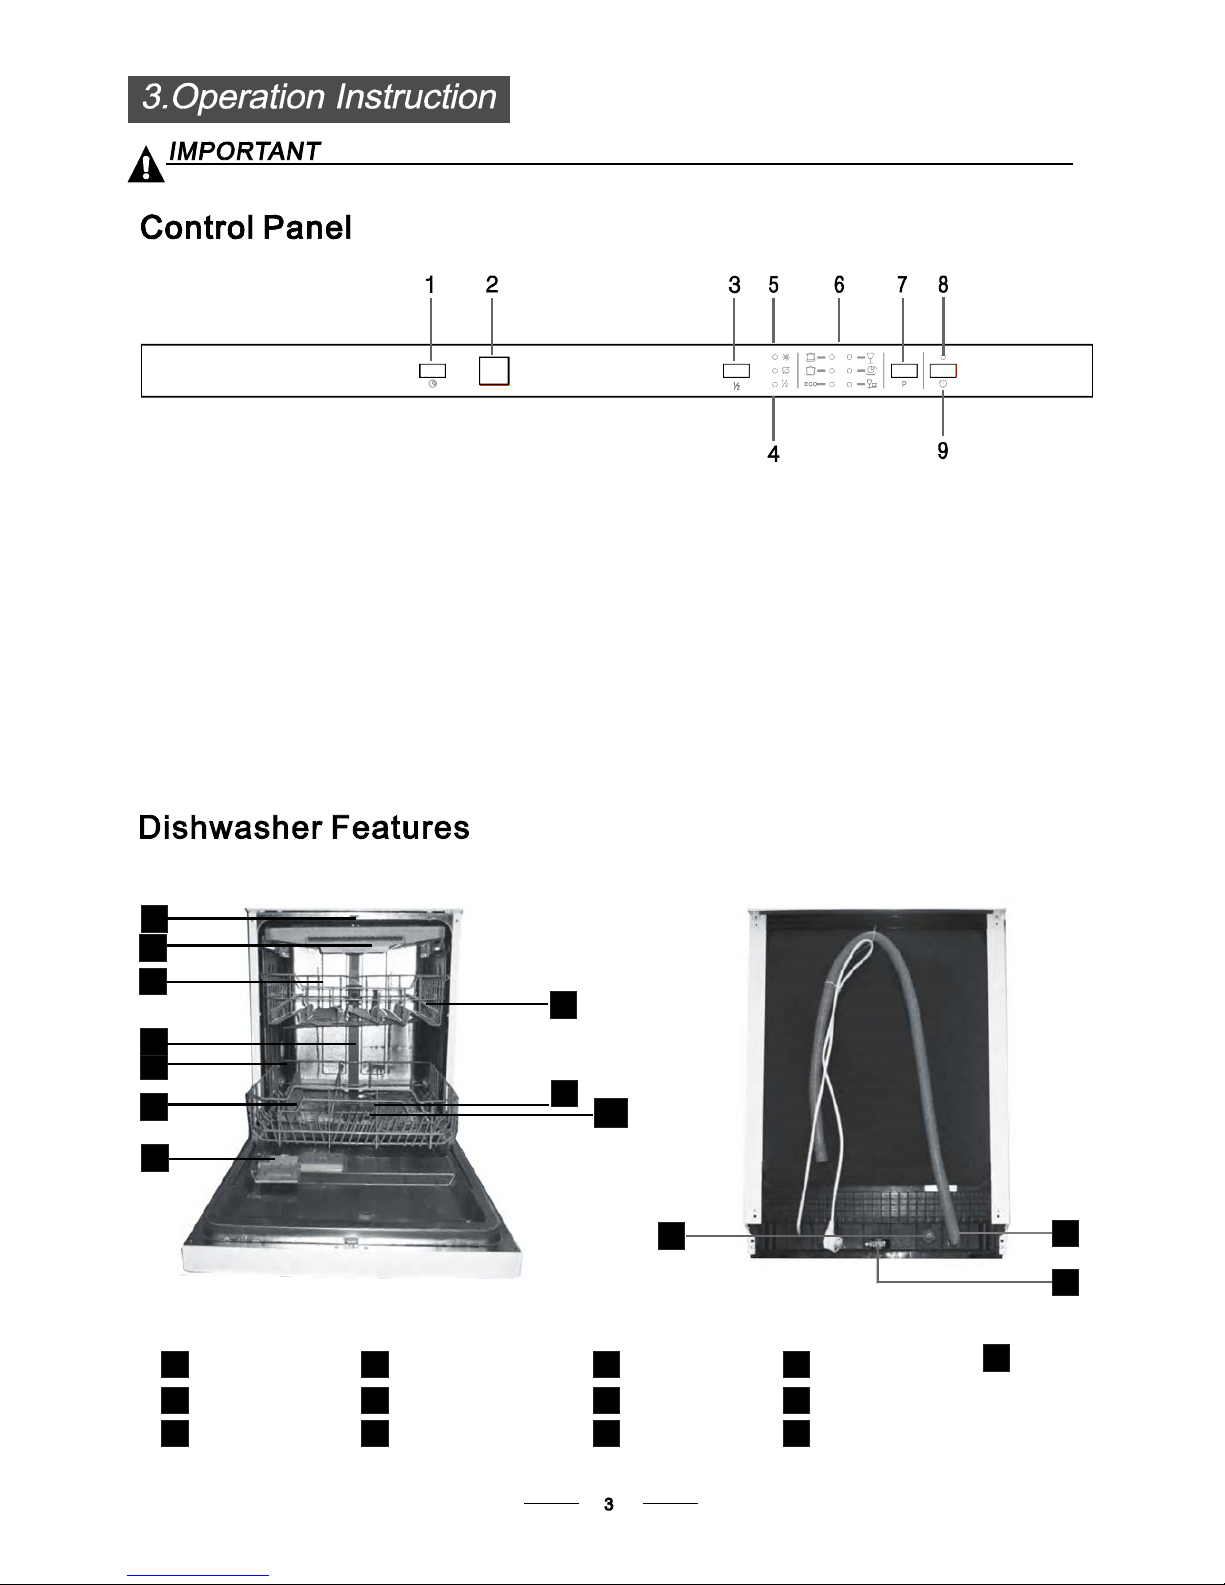
ControlPanel...................................................3
.................................. 15Installati o n p repara tion
Furntiure door dimensions and installation.........16
..............18Tension ad jus tment ofthe doorspring
..............................18Connection of drainhoses
......................... 19Dis h w a sher inst a ll a tion steps
Electrical connection....................................20
Cold water connection.................................. 21
Page 3
Thisapplianceisintendedtobeusedinhouseholdandsimilar
applicationssuch as:
-staff kitche n areas in shops, offices a ndother w orking environment s;
-farm houses;
-by cli ents in hotels , mote ls and other res idential type environm ents;
-bed andbreakfast typeenvironments.
This appliancecan be usedbychildrenaged from 8yearsand above and
personswithreducedphysical,sensoryormentalcapabilities orlackof
experience andknowledgei ftheyhave beengivensupervisionor
instruction conce rning u se of t he app liance in a s afe wa y and u nderstand
the hazard s invol ved. Children shall not pla y with the a ppliance . Cleani ng
and user mainten ance s hall not be made by chil dre nwithout superv ision.
For EN60335-1
This applia nce is not in tended for use by per sons(inclu ding c hildren )with
reduced ph ysical, sensory or m ental c apabilities , or lac k of exp erience an d
knowledge , unless they have been given s upervision o r instru ction
concerning use o f the appli ance b y a person responsib le for their safety.
For IEC60335- 1
Thisapplianceis for indooruseonly,for householduseonly. Toprotect
againsttherisk of electricalshock, do notimmersetheunit,cordor plug in
wateror otherliquid.
Please un plug be fore cl eaning and m ainten ance t he appl iance .Use a soft
cloth moistenwith mildsoap,andthenuse a dry clothto wipeitagain .
()
()
When using y our dishwasher,
follow the precautions listed below:
Thisappliancemust be earthed. In the event of a malfunction or breakdown,
earthing will reduce the risk of anelectric shock by providing apath of least
resistance of electric current. This appliance is equipped with a cord having
an equipment-earthing conductor and a earthing plug.
The plug must be plugged into an appropriate outlet that is installed and
earthed in accordance with all local codes and ordinances.
Improper connection of the equipment-earthing conductor can result
in the risk of an electric shock. Check with a qualified electrician or service
representative if you are in doubt whether the appliance is properly earthed.
Do not modify the plug provided with the appliance; If it does not fit the outlet.
Have a proper outlet installed by a qualified electrician.
Page 4

Do not abuse, sit on, or stand on the door or dish rack of the dishwasher.
Do not operate your dishwasher unless all enclosure panels are properly in place.
Open the door very carefully if the dishwasher is operating, there is a risk of water
squirting out.
Do not place any heavy objects on or stand on the door when it is open. The
appliance could tip forward.
When loading items to be washed:
1) Locate sharp items so that they are not likely to damage the door seal;
2) Warning: Knives and other utensils with sharp points must be loaded in the
basket with their points down or placed in a horizontal position.
Check that the detergent powder is empty after completion of the wash cycle.
Do not wash plastic items unless they are markeddishwasher safe or the
equivalent. For plastic items n
ot so marked,
check the manufacturer's
recommendations.
Use only detergent and rinse additives designed for an automatic dishwasher.
Never use soap, laundry detergent, or hand washing detergent in your dishwasher.
Children should be supervised to ensure that they do not play with the appliance.
The door should not be left open, since this could increase the risk of tripping.
Do not tamper with controls.
The appliance is to be connected to the water mains using new hose sets and
that old hose-sets should not be reused.
The maximum number of place settings to be washed is 14.
The maximum permissible inlet w ater pressure is 1MPa.
The minimum permissible inlet water pressure is 0.04MPa.
If the supply cord is damaged, it must be replaced by the manufacturer or
its service agent or a similarly qualified person in order to avoid a hazard.
During installation, the power supply must not be excessively or dangerously
bent or flattened.
Page 5
Dispose of the dishwasher packaging material correctly.
All packaging materials can be recycled.
Plastic parts
are
marked
with
the standard international
abbreviations:
PE for polyethylene, e.g. sheet wrapping material
PS for polystyrene, e.g. padding material
POM polyoxymethylene, e.g. plastic clips
PP polyprop ylene , e.g. Salt f iller
ABS
Acrylonitrile Butadiene Styrene, e.g. Control panel .
Packagin g mate rial co uld be dangerous for c hildren !
For disposing of the packaging and the appliance please
go to a recycling centre. Please cut off the power supply
cable and make the door closing device unusable.
Cardbo ard packag ing is manufa cture d from rec ycled paper
and s hould b edisposed in the waste pap er col lection for
recycling.
By e nsuring this product is dispo sed of c orrectl y,you will
help p revent potenti al nega tive co nseque nces fo r the
environme nt and human h ealth, which co uld othe rwise b e
causedby inappropriatewaste handlingofthisp roduct.
For more detailed information about recycling of this
product, please contact your local city office or your
household waste disposal service .
DISPOSAL:Donotdisposethis productas unsorted
municipal waste.Collectionofsuchwasteseparately for
special tr eatment is necess ary.
Page 6

Witheachwashcycle.
Compartment
For programmes with pre-wash only.
(Follow the user instructions!)
Electric indicator on controlpanel (if provided).
Check the rinse aid level
(On models with water softener system only.)
Electric indicator on control panel (if provided).
If there is no salt warning light in the control panel
(for some models), you can estimate when to fill the salt into the
softener by the number of cycles the dishwasher has run.
Checkthe regeneration
salt level
Load the baskets
Select a programme
Turnonthewatertap ,closethedoor.Themachinewillstartworkingafterabout10seconds.
Running the dishwasher
Switch off the appliance
Turn off the water tap,
unload the baskets
Fill the detergent dispenser
Warning: wait a few minutes (about 15 minutes) before unloading the dishwasher to avoid handling
the dishes andutensils while they are still hot and more susceptible to break.
They will alsodry better.Unload the appliance, startingfrom the lowerbasket.
Changing theprogramme
Add forgottendishes in the
dishwasher.
Scrapeoff any largeamount of leftover food.Softenremnants ofburnt food in pans,
thenload the baskets. Referto the dishwasher loading instructions.
Press the Programme Button until the selected programme lights up.
( See the sectionentitled Operation instruction )“”
When the working cycle has finished, the buzzer will sound 8
times, then stop.
Turn off the appliance using the On/Off button.
If the appliance is switched
off during a wash cycle.
Open the door caref ully.
Hots t eam may escape
when the dooris opened!
If the appliance is switched o ff during a wash cycle, w hen switched
on again, please re-select the washing cycle and operate the dishwasher
according to the original selection ).
For detailed operating methods read the corresponding content on the instruction manual.
Switch on the appliance
Open the door,press the On/Off button to switch on the appliance .
1.Open the door a littleto stop the dishwasher.
2.After the spray arms stop working, you can open the door completely.
3.Add the forgotten dishes.
4.Close the door, the dishwasher will start running again after 10 seconds.
1.A runningcycle canonlybe modified if it has been runningfora short time.Otherwisethe detergent
may have already been released and the water already drained. If this is the case, the detergent
dispenser must be refilled.
2. Press the for more than3 secondstocancel the running programme.
3. Select a new programme.
4. Restart thedishwasher.
programme button
Page 7
before using itforthe first time.
To getthe best performancefrom your di shwasher,read all operatinginstructions
11
12
Back View
1
2
3
4
5
7
8
9
10
Front view
Lower basket
Salt co nta in er
Dispenser
Cup sh elf
Spra y arms
Filter assembly
Inlet pipe connector
Drainpipe
Upper basket
Cutlery tray
Topspr ay arm
1
Inner pipe
5
6
7
8
9
10
12
11
3
2
4
6
13
Adjuster
13
9.On/OffButton:To turn on/offthepowersup ply.
1.
Delay button : Press the button to select delay.
7.
Program Button : Press this button to select a
wash program.
5.Salt a nd rinseaid warning lights: To show
whe n th e salt con t ainer or dispenser need to be
refilled
4.Half load indicator: To show w hen you selectthe
half load function .
3.
Half load functions button: To select Half load
functions. (With this half load function you can
only use it when you have less than 7 place
settings of dish wave, and you will see less water
and energy consumption. To only be used with
Intensive, Normal, ECO, Glass and 60 min .)
6.Program indicators: tos how which program
you have selected.
8.Powerindicator: To showwhenthe power on.
2.
Display window: To show the
fault codes
and etc
del ay time,
Page 8
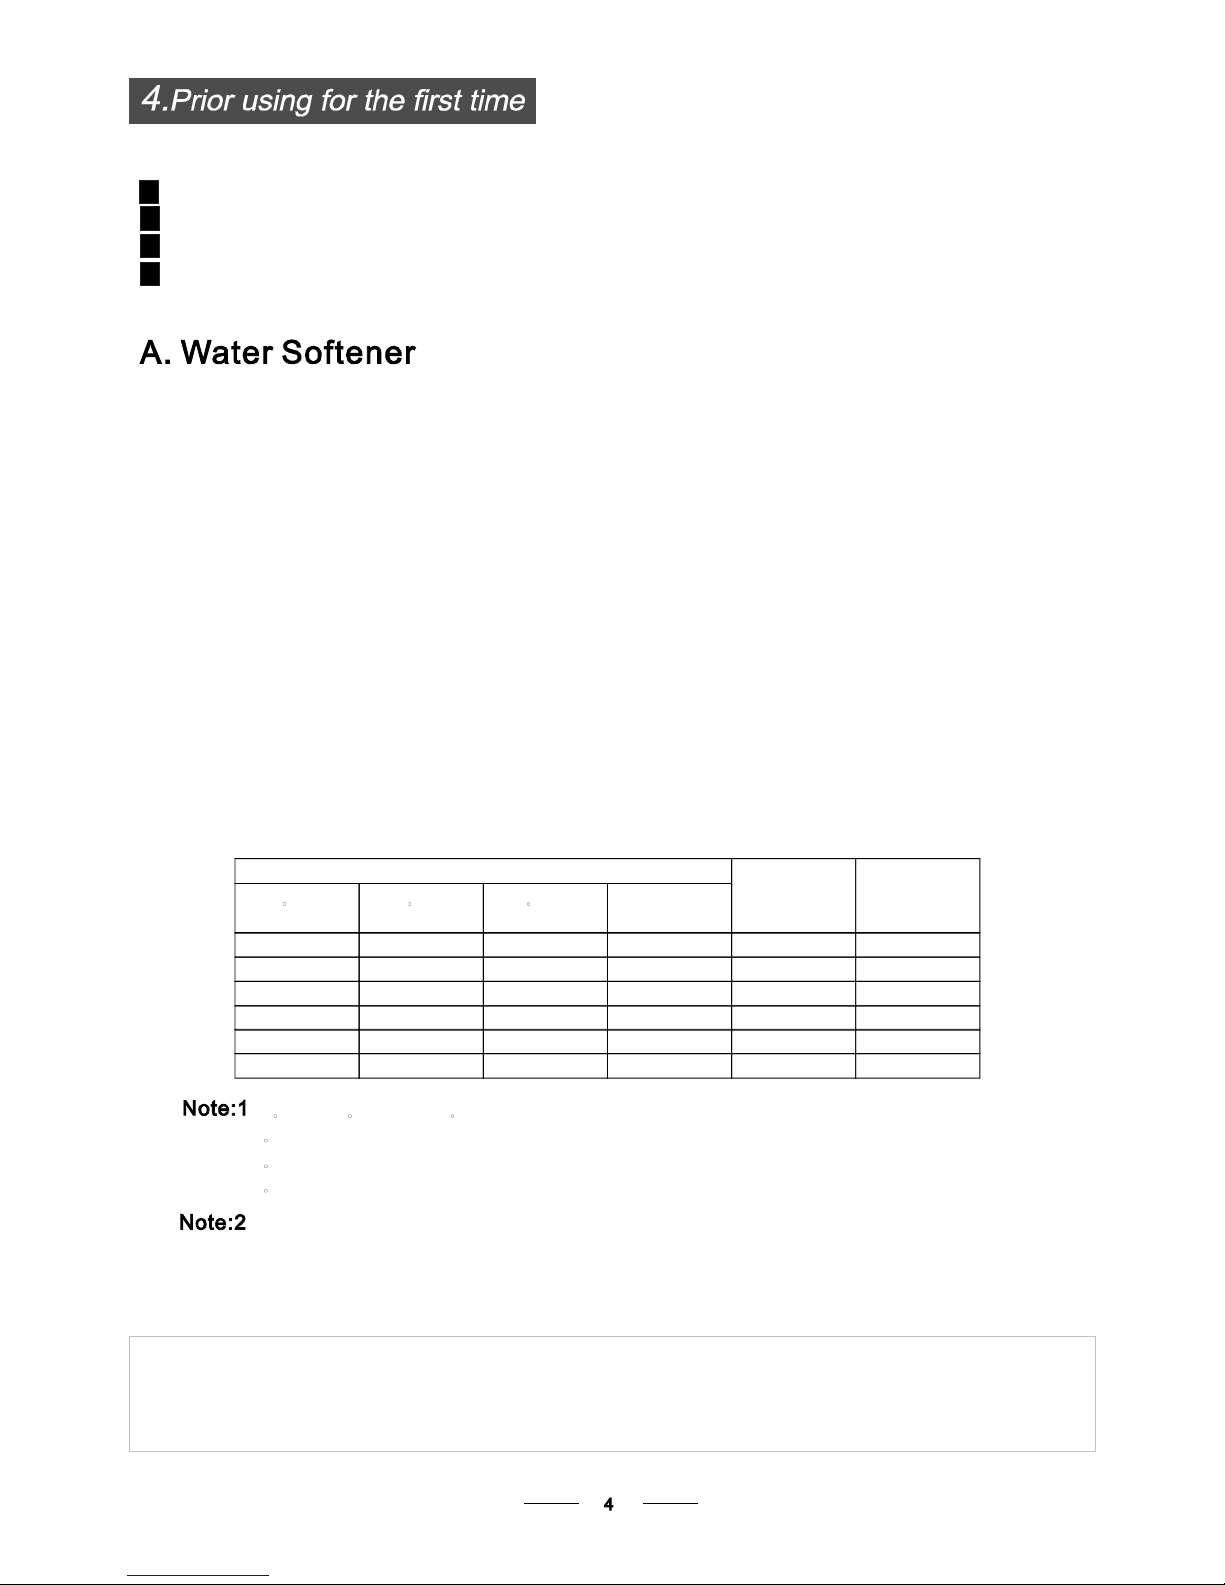
The water softener must be set manually, using the water hardness dial.
The water softener is designed to remove minerals and salts from the water, which would have a detrimental
or adverse effect on the operation of the appliance.
The higher the content of the se miner als and salts, the harder your water is.
The softener should be adjusted according to the hardness of the water in your area. Your local Water Authority
can advise you on the hardness of the water i n your area.
Adjusting Salt Consumption
The dishwasher is designed to allow for adjustment in the amount of salt consumed based on the hardness
of the water used. This is intended to optimise and customise the level of salt consumption.
WATER SOFTENER
Thehardness o f the watervaries from place to plac e. If hardwater i s used inthe dishwasher,deposits wil l
form on the dish es a nd utensils.
Theapplian ceis eq uipped withaspecial so ftener thatuses a sal t c ontainer spe cifically designed to elimi nate
lime an d m inera ls from the water.
The factory setting
is: H4 (EN 50242)
Contact your local water board for information on the hardness of your water supply.
Clark: British degree
fH: French degree
dH: German degree
dH=1.25Clarke=1.78fH=0.178mmol/l
1
Be
fore using yourdishwasher forth e first time:
A. Set the water softener
B. Add 1.5Kg dishwasher salt and then full the salt container with water
C. Filltherinse aiddispenser
D. Fill in d eter gent
dH
mmol/l
0~90~5 0~0.94
H1
0
10-20
6-11
1.0-2.0 H2 9
21-30
12-17 2.1-3.0
H3
12
H4
20
fH
0~6
7-14
15-21
Clarke
WATER HARD N E SS
Selector Position
Salt consumption
(gram/ cycle)
18-22 31-40 22-28 3.1-4.0
41-60
23-34 4.1-6.0
H5
30
H6
60
29-42
35-55 61-98 43-69 6.1-9.8
1.
Open the door ,
switch on the appliance;
2. P ress theProgram buttonformore than5seconds tostart the watersoftener
set model within 60seconds after the appliance was switched on( The salt and
rinse aid warning lights will be on periodically while it gets into set mode);
3.
Press the
program button to select the proper set according to your local environment,
the s ets wil l chang e in thefollowing sequence:H1->H2->H3- >H4->H5 ->H6;
4.
Press the power button to end the set up mode.
Please follow the steps belowfor adjustm entin salt consumption.
Page 9
1.The salt container must onl y be refil led when the salt wa rning lightin the controlpanel comes on.
Depending on how well the s alt dissolves, the sa lt warning light may still be on even though the
salt container is filled.
If there is no salt warning light in the control panel (for some models),you can estimate when to
fill the salt into the softener by the cycles that the dishwasher has run.
2.
If there are salt spills, a soak or a rapid program should be run to remove the excessive salt.
Always use thesalt int ended f or u se wi th di shwasher.
The salt c ont ainer i s l ocated beneath the l ower bas ket andsh ould befilled as explained
inthe following:
Attention!
Only use saltspe cificall y desi gned f or the usei n di shwashers! E very othertype of
salt not specificallydesigned for the use inadishwas her, especially tab le salt,will
damage the water softener.In caseof damages caused by the use ofunsuitable
salt the manufacturer does notg ive anywa rranty nor is li able fora ny damag es cau sed.
Only fill wi th sal t ju st b efore star ting one of the co mplete washingp rogra ms.
This will prevent any g rains ofs alt or salty water,which mayhave been spilled,
remaining on the bottom o f the machine for anyp eriod oft ime, which may cau se
corrosion.
The ri nse aidis relea se d d uring the final rinse to prevent waterfrom forming dr oplets onyour dishes, wh ich can
leave spots ands treaks. Italso improves drying by allowing water tor oll off t he di shes. Yourd ishwasher i s
designed to useliquid rinseaids.Therinse aiddispenser is located insidethedoornext to thedetergent dispenser.
To fill the dispenser, open the cap and pour the rinse aid int o the dispense r until the l ev el i ndi cator turns c omplete ly
black. The vol ume ofthe rinseaidcontain er is about110ml.
RinseAid Dispenser
Function of RinseAi d
Rinse aid isautomaticall y a dded d uring thelast ri nse, ensuring thor ough rinsing, and spot and s treak f ree drying.
Attention!
Only u
se branded rinse a id fo r dis h washers. Never fill the r in s e a id dispenser with any other s ubstances
(e.g. Dishwasher cleaning agent, liqu id d eterge nt). Th is woulddamage the appliance.
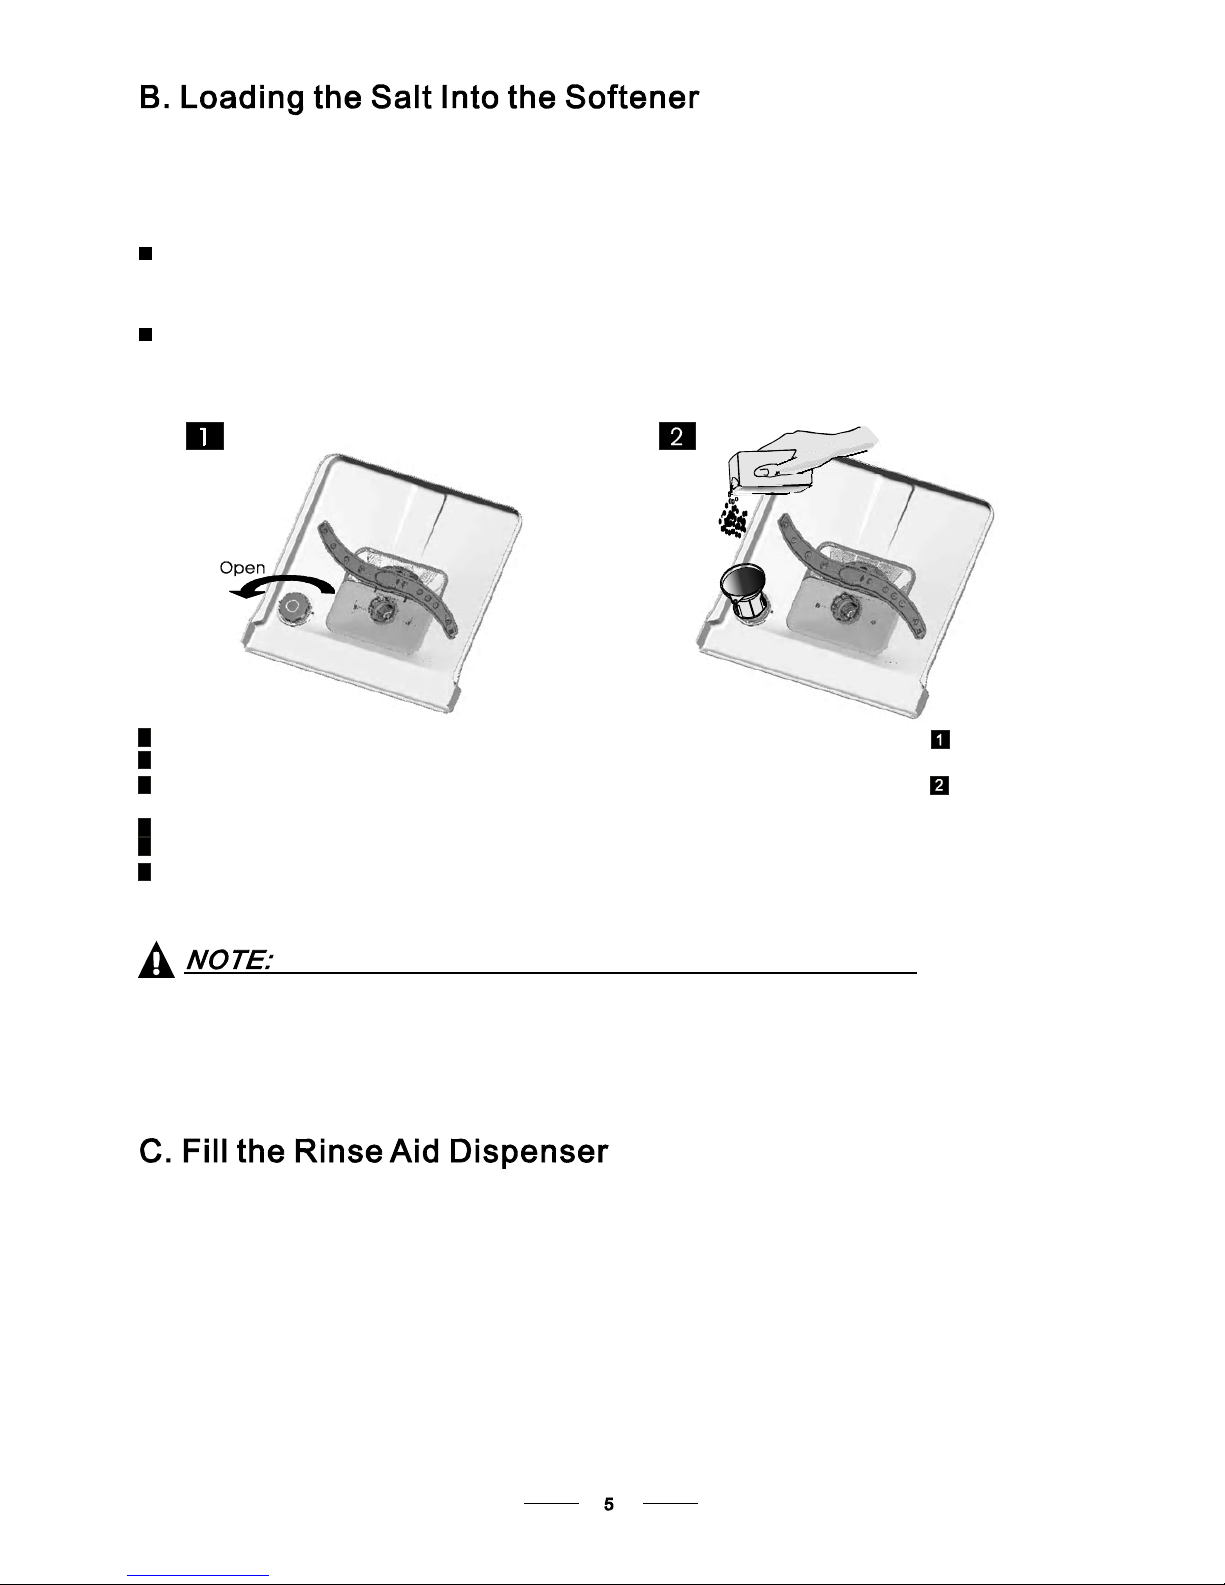
Fill the salt container with water,It is norm a l for a small amount of water to come out of the
salt container.
A Af ter thelower ba sket ha s be en removed, unscr ew and remove the cap from the salt conta iner.
B Place th e en d o f th e funn el ( suppli ed) i nto t he holeand in trodu ce abou t 1. 5kg ofdishwasher salt.
C
D After filling the container , scre w the cap tightly back clockwise.
E The salt warning light will switch offafter the salt container has been filled with salt.
F Immediately afterfillin g t he s alt into the sa lt co ntainer, a washing program should be started
program Otherwise thefilter system, pump o r otherimportant parts of t he machinemay be damaged
by salty water. This would not be covered by the warranty.
(We suggest a short
).
Page 10
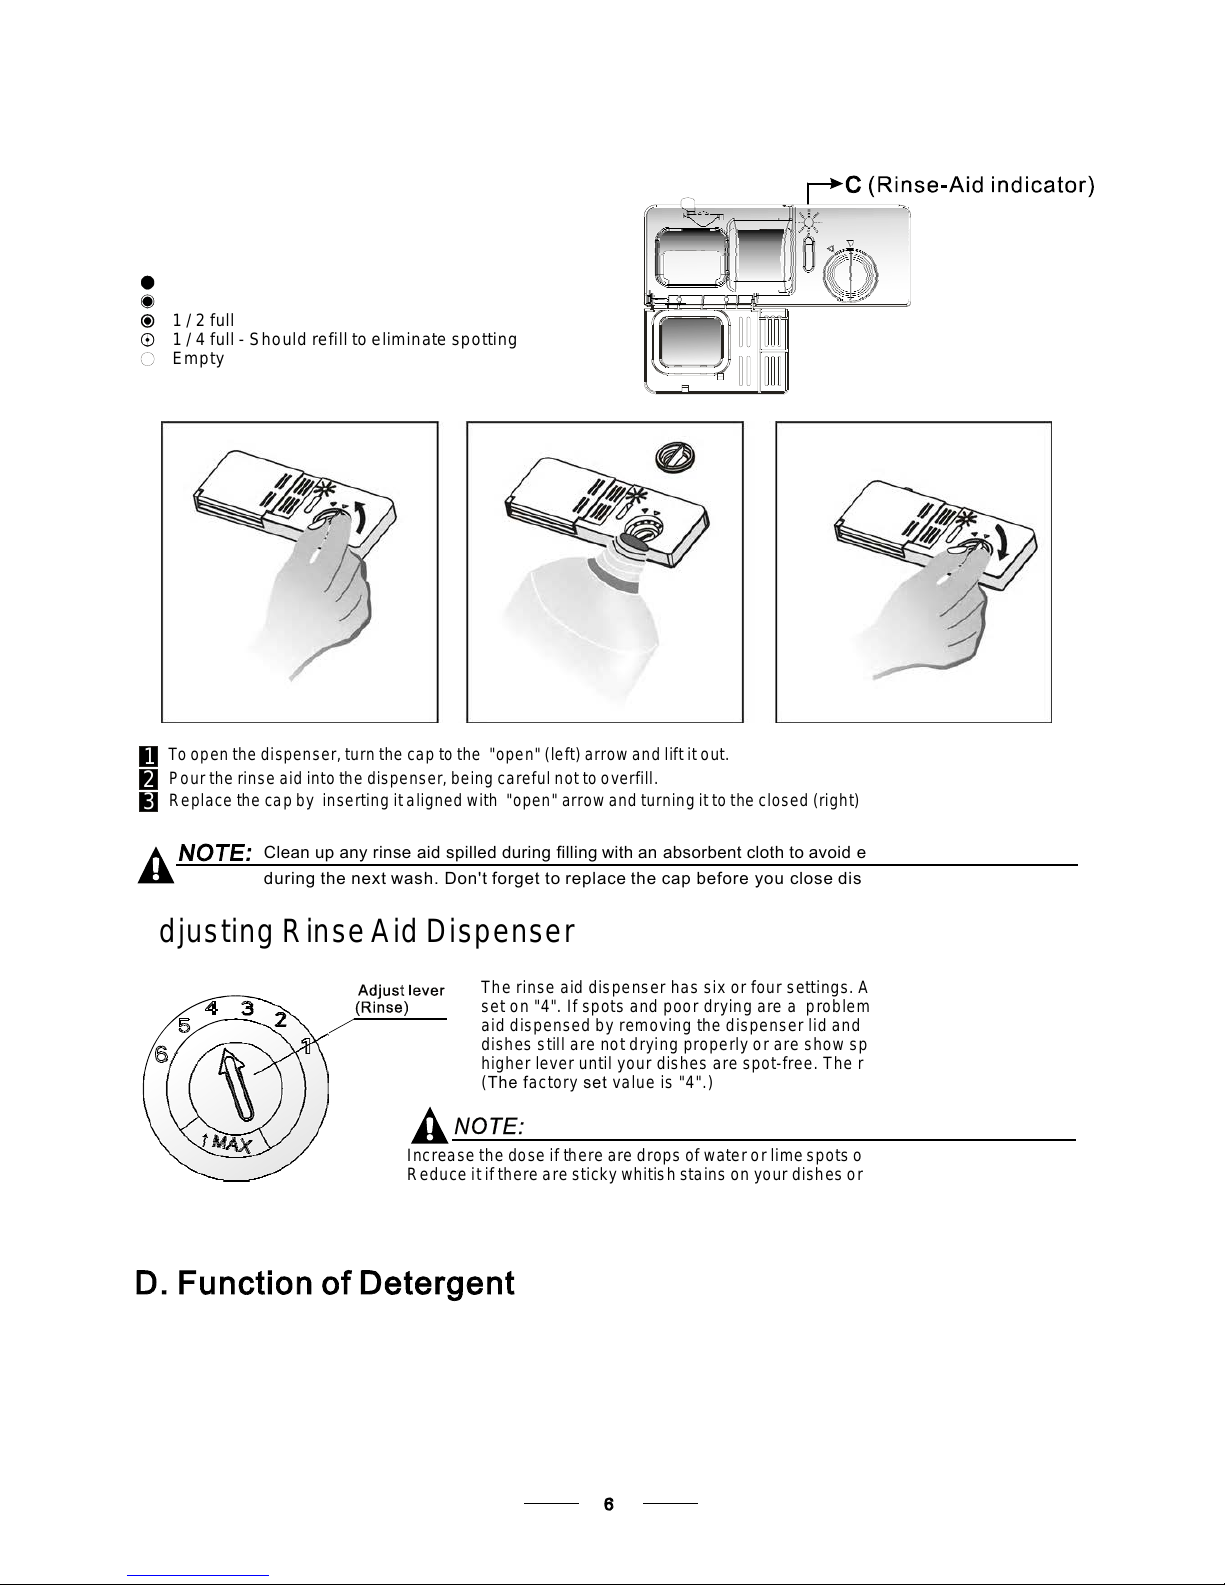
Toopen the di spenser, t urn t he cap to t he "ope n" ( left ) ar row and lift it out.
Pour t he rinse aid into the dispenser, be ing careful n ot tooverfill .
Replace the capb y inserting i t aligned with "open " arrowand turningit to t he cl osed (righ t) arrow.
Adjusti ng RinseA id D ispense r
The rins e a id dis pe ns er has si x or four settings. Always start with the dispenser
set on "4". If spots and poor drying are a problem, increase the amount of rinse
aid dispensed by removing the dispenser lid and rotating the dial to "5". If the
dishes still a re not drying properly or are show spots, adjust th e d ial to the next
higher lever until your dishes are spot-free. The recommended setting is "4".
(The factory set value is " 4".)
Increase the doseif there aredropsofwater o rlimespots on thedishesafterwashing.
Reduce i tifthereare sticky whitishstainson yourdishesorabluishfilm on glassware or
knifeblades.
1
2
3
Asthe ri nse aid diminishes, the sizeof the blackdot
on the rinse aid levelindicatorchanges, as illustra ted b elow.
Full
3/4full
1/2full
1/4full - Shouldrefill to eliminate spotting
Emp ty
Whento Refillthe RinseAidDispenser
Ifthere i s no ri nse-aid warning light in thec ontr ol panel , you can estimate the amount from thec olour
of the optical level indicator C
""
located next to the cap. When the rinse-aid contai ner is full, the whole
indicator will be dark .As the rinse-aid diminishes, the size of the dark dot decreases. You should never
let the rinse aid level fall below 1 / 4 full.
during the next wash.
Don't forget to replace the cap before you close dishwasher door.
Clean up any rinse aid spilled during filling with an absorbent cloth to avoid excessive foaming
Detergents with its chem ical ingredients a re ne cessary tor emove dirt,crus h dirt and transport itout of thedishw asher.
Mostof the commercialqualityd etergentsare suitable for this purpose.
Proper Use of Detergent
Use only detergent specifically made for the use in dishwashers. Keep your detergent fresh and
dry. Don't put
powdered detergent into the dispenser until you are ready to wash dishes.
Attention!
Page 11

AmountofDetergentto Use
Based on theirchemical composition, detergentscan be splitin twobasictypes:
Dete rgent tabletsof differentbrands dissolveat different speeds. Forthis reasonsome
detergent tablets cannot dissolve anddevelop the irfull cl eaning powerduring s hort
programs. There fore plea se use long programs whenu sin g de tergent t ablets, t o
ensure the complet e remova l of deterge n t residuals.
The dispenser m ust b e re filled be fore the s tart of each wash cy cle following the instructions
provided in t he w ash cycleta ble .Yourdishwasher usesless detergent and rinse aid than
Conventional dishwasher. Generally, only one tablespoon ofdetergent isneededfor
anormalwash load.Moreheavilysoiled itemsneed moredetergent. Always addthe
detergen t j us t be fore starting the dish was her, othe rwis e it could g e t da mp andwill not
dissolv e properly.
Concentr ated Deter gent
DetergentTa blets
Detergen tDispenser
conventional, alkaline detergents withcaustic components
lo w alk alin e conc entr ated deterge nts with natural enzy mes
Normally new pulverised detergent is without phos phate. T hus the wate r soften er fu nction o f
phosphate i s no t given. In t h i s case w e rec ommend t o fill sa lt in the salt con ta i n er e ven when
the hardness o f wate r is only6 d H. If detergents witho ut phosp hate are usedin the caseof hard water
often white s pots appearon dishe s and glasses.In this caseplease add more detergent tor each
better result s . Det ergen ts w itho ut chlor ine do only bleac h a litt le. Strong and colo u red spots will no t
beremoved completely.I nthis c ase pleasechoose a program with ahi gher temperature.
°
Deterg ents
There are 3 sorts of dete rgen ts
1.With phosphate andwithchlorine
2.Withphos phate andwithout chlo rine
3.Withoutphosphate and with out chlorine
If the lid is closed: press the release button. The lid will spring open.
Always add the detergent just before starting each wash cycle. Only use
branded detergent aid for dishwashers.
Detergenttablet
Detergent powder
Dishwasher d etergent is c orrosive!
Takecare to keepitout ofreach ofchildren.
Page 12

Fill the detergent dispenser with detergent. The
marking indicates the dosing levels , as illustrated on
the right:
The place of main wash cycle detergent placed.
The place of
pre-wash cycle detergent placed or 3in1 tablets if used.
Pleaseobserve them anufa cturers do sing and storage
Recommendations as stated on thedetergent packaging.
Closethe lid and pressuntilit locks in place.
If the d i shes are heavil y soil ed, pla c e an additio nal
detergent do se in thepre-wash det ergent chamber. This deter gent willtake effect d uring thepre-wash phas e.
A
B
Fillin Detergent
You find information about the amount of detergent for the single program on the
last page.
Please aware, that according to the level soiling and the specific hardness of water differences are po ssible.
Please observe t he manufacturer's recommendations on the detergent packaging.
Cutlery tray
The clever cutlerytrays si t at thetop of yo ur di shwasher andfrees up much more sp ace inth e lower b ask et.
The centre t ray i s eas ily remo ved tos peed the delivery of your perfectly clean cutleryto you r drawer.
Delay timer
On s ome mode ls the De l a y timer allow s the u s er to sel e ct the start time from 1 to 24 hours to mos t effici e ntl y take
advantage of convenient times a nd en ergy sav ing windows.
'Easy' adjustable upper basket
This feat ure allows theheight of theupper bas ket t o be changed(even with fullloads) with th e s imple rel ease of2
con veni e ntly pla c ed lev ers.
Aqua Stop
This system willa t th e firs t sig n of anyleak automa tically cut offt he watersupply hel ping to avoidcostly wate r damag ed.
Half load
The Half loadfun ction isi deal ly suited tosmalls lo ads, unlike traditional half l oad pr ogramm es (whic h us ually on ly
utilise one basket)this us es b oth uppe r an d lo wer spay arms,therefore allowingyou to l oad dishware in b oth baskets
- wi th t he b e nefi t of reduced water a n d ene r g y usage.
Features
Page 13

Cutlery withwooden, horn china or
mother-of-pearl handles
Plastic i tems t hat ar e not heat resistant
Older cutl ery wit h glue d par ts t hat are n ot
temperatureresistant
Bonded cutl ery i tems or dishes
Pewter or copper items
Crystal glass
Steel item s subj ect t o rusti ng
Wooden platte rs
Items madefrom syntheticfibres
Some types ofg lasses canbecome
dull after a large number ofwashes
Silver an d aluminum parts have a
tendency to discolourduringwashing
Glaz edpatterns mayfade if machine
washed frequent ly
Are not su itable
Are of limited suitability
Dishes anditemsofcutlerymustnot lie inside one another, orcover eachother.
To avoid d amage toglasses, th ey m ust nottouch.
Load largeitems which aremost difficult toc lean in to th e l ower bask et.
The uppe r basket isdesigned to holdmore deli cate andli ghter d ishware suchas glasses , coffee
and t eacups
Long bladedk nives stored in an upright position area potenti al haza rd!
Long and/orsharp item s of cutlery such as carving knives must be positi oned
horizon tally in the upper b asket .
Please donot overload your dishwashe r. This isimportant forg ood resultsand fo r
reasonab le consu mption o f en ergy.
Load items such as cups, glasses,
pans etc. With the opening facing downwards so that water
cannot collect in the container or a deep base.
Considerbuying utensilswhich areidentifiedas dishwasher-proof.
Use a mild detergent that i sdescribedas'kindtodishes'.Ifnecessary, seekfurther
informationfromthe detergentmanufacturers.
Forparticularitems, selecta program withas low a temperatureas possible.
Toprev ent damage, d o not take glassand cutlery out of thedishwas her immediatel y
after theprogra mme has e nde d.
(For best performance of the dishwasher,f ollow t he se loading guidelines.
Features and appearance of baske ts and cutlery basket s may varyfrom your m odel.)
Scrape off anylarge amounts ofleftover fo od. Sof ten rem nants ofb urnt foodin pans.
It is no t necess ary tori nse thed ishes u nder running water.
Place obje cts i n the dishwasher in following way:
1.Itemssuch as cups, glasses, pots /pans, etc. a re fa ced dow nwards.
2.Curveditems, or oneswith recess es, shoul d be loadedaslant s o th at water canrun off.
3.Allutensils are stacked securely andcan not ti p ov er.
4.Allutensils a re placed inthe way thatthe spray armscan rotate freely during w ashin g.
Very sm all it ems sho uld not bewashed in thedishwasher as theycould eas ily fall outof the basket.
To prevent water drippingfrom the upper basket intothe lower basket,we re commend thatyou
empty the lowerbasket f irst an d the n the upper basket.
Page 14

The u pper bas ket isde signed t o ho ld more delicate
and lighter dishware s uch as
glasses, coffee and
tea cups and saucers, as well as plate s, small bowls
and sha l low pans (as long as they are not too dirty).
Position the dishes and cookware so that they will
not be moved by the spray of water.
We sug gest that you place large items andthe most
difficult to cleanitems are to beplaced into the lower
basket: such as p ots, p ans, lids,serving d ishes and
bowls, as show n in the figu re below. It i s preferabl e to
pla ce ser vin g dish es and l i ds o n the side of t h e racks
in order toa void bl ocking t he ro tation of the top spray
arm .
Pots,servingbowls,etc,mustalwaysbeplacedtopdown.
D eep pots sh ould be slante d to allow water to f low out.
Please be r eminded that:
The B otto m B ask et f eatu r es fo ldin g spikes so that larg er or more po t s an d p ans can be l oade d.
Folding spikes in lower basket
For better stacking of pots and pans,
the spikes can be folded down as
shown in the picture to the right.
Folding back the cup shelve s
For better stacking of pots and pans, the shelves can be
folded down as shown in the picture below right.
Cutlery should be placed in the cutlery tray with the handles at the bottom. If the rack has side baskets, the
spoons should be loaded separately into the appropriate slots, especially long utensils should be placed in
the horizontal position at the front of the upper basket as shown in the picture.
Do not let a ny ite m ext end t hroug h the bottom.
Alway s load sharp ute nsils with the sh arp
pointdown!
Theheightof the upperbasketcan be adjusted in order to
c re ate more spa ce f or l a rge utensils bot h for the uppe r
/lower basket.The height of the upperbasket can be
adjusted tothe upper position by li fting th e bas ket up until
it clicks intoplace. Pull u pwards o n th e ha ndle to lowert he
upper ba sket, s ee the picture below:
Adjusting the upper basket
Cutlery Tray
Page 15

*EN 50242 : This p rogramme ist he testcycle. The i nformation forcomparability test
in accordance withEN 50242, asfollows:
Capacity: 14 setting
Position Uppe r basket : upp er wheels onr ails
Rinse aid setting: 6
Pl:0.49w;Po:0.45w.
Startin g acycle wash
Means:need tofill rinse into
the rinse aid dispenser.
()
(or )3in1
5/30g
(or )3in1
5/30g
5/30g
Wash (40 )
Rinse
Rinse (45 )
℃
℃
160
185
145
40
1.35
0.93
1.60
0.6
19
15
1
11.5
(50 )
Wash( 6 0 )
Rinse (55 )
Drying
Pre-wash
℃
℃
℃
60 101.0
30g
For normally soiledloads,
such as , plates,glasses
and lightly soiledpan s.
pots
For heaviest soiled crockery,
and normally soiled pots,
pans,dishes etc with dried
onsoiling.
For lightly so iled loadstha t
donot n eed excellent drying
efficiency.
Ashorter washfor lightly
soiled loadsthat do not
need drying.
For lightly s o il ed loads,
suchas glasses ,
crystal and f ine chin a.
5/30g
Pre-wa sh
wash( 40 )
Rinse
Rinse(60 )
Drying
℃
℃
120
0.85 15
5/30g
Prewash 50
Wash 65
Rinse
Rinse
Rinse 65
Drying
(
℃)
(
℃)
(
℃)
Prewash(45 )
Wash (55 )
Rinse
Rinse (65 )
Drying
℃
℃
℃
Prewash
Wash(45 )
Rinse(65 )
Drying
℃
℃
Draw out the lower and upper basket, load the dishes and push them back into place.
It is recommended to load the lower basket first, then the upper one (see the section
entitled loading the dishwasher).
Pour in the deterg ent (see the section entitled Salt, D etergen t and Rinse Aid
“”
).
Insert the plug into the socket. The power supply is 220-240 VAC /50 HZ, the specification of the socket is
10A 250VAC. Make sure that the water supply is turned on to full pressure.
Open the door, press the ON/OFF Button, and the display windows will illuminate.
Press the program button, the wash program will be selected in the below sequence:
Intensive->Normal->ECO->Glass->1Hour->Rapid;
If a program is selected, the response light will illuminate. Then close the door to start the wash cycle.
1
2
3
4
5
This is standard program, it is
suitable to clean no rm al ly s oil ed
tableware and it is the most
efficient programme in t erms
of its combi ned energy and wat er
consump ti on for that type of
table ware.
ECO
(*EN 5024 2)
Intensive
Normal
Glass
1Hour
Rapid
0
Turning on the dishwasher
Page 16

It is da ngero us to open the door when washi ng,
becaus e the hot wate r may sc ald you.
When t h e wo rking cyc l e has fini shed, the buzzer of the dishw a sher wil l sound f or 8 sec o n d s , then stop . Turn off
the a ppliance usi ng th e O N/OFF b utton, sh ut o ff the watersupply and open the door ofthe di shwashe r.
Wait for a f ew mi nutes b ef ore unlo ading th e dishwa sher t o avoi d ha ndling th e dishes andutensils w hile they
are s till h ot and m ore susceptible to br eakage. The y wil l also d ry be tter.
Switch off the
dishwasher
The program light is on but is not blinking, only in this case has the program ended.
1.Switch off the dishwasher by pressing the ON/OFF button.
2.Turn off the water tap.
Open the door carefully.
Hot dishes are sensitive to knocks. The dishes should therefore be allowed to cool down around 15 minutes
before removing from the appliance.
Open the dishwasher's door, leave it ajar and wait a few minutes before removing the dishesBy doing this
the contents will be cooler and the drying will be improved.
Unloading the dishwasher
It is normal that the dishwasher is wet inside.
Empty the lower basket first and then the upper one. This will avoid water dripping from the upper basket
onto the dishes in the lower one.
Aforgotten dish can be added any time before the detergent cup opens.
Add forgotten dishes.
Close the door
After the spray arms stop working, you can open the door
completely.
2
3
Open the door a little .
1
4
5
The dishwasher will run after 10 seconds.
Ifyou open thedoor ,the machine will pause. The program light w ill
stop flashing and the buzzer will sound every minute unless you close the door .
After you close the door, the machine will continue working after 10 seconds.
duringawash cycle
A cycle that is underway can only be modified if it has only been running for a short time. Other w ise, the
detergent m ay have already be en released, and the appliance may have already drained the wash water.
If this is t he case, the detergent d isp enser must be refilled (see the section entitled " Loading the
Detergent " ).
Open the door ,press and hold the program button more than 3 seconds , the machine will be in standby
state, then you can change the program to the desired cycle setting (see the section entitled " Starting a
wash cycle. . ." ).
1
2
Changing the program
Forgot to add a dish?
At the end of the wash cycle
Page 17

The fil ter pre vents l arger remnants of foodor other objects fromgetting i nside th e pu mp.
Theresidues mayblockthe filter, in thiscasetheymust beremoved.
The filter system consists of a coarse filter,a flat (Main
filter) and a microfilter(Fine filter).
Foodand soilparticlestrappedinthis filterare pulverized by a
special jet onthe l ower spr ay arm a nd w ashed d own tod rain.
Large r ite ms, s uc h as pieces of bone s or glass, tha t could blo ck
the drain are trapped in the coarse filter. To remove the i tems
caught by the filter, gently s queeze thetap on th e top ofthis
filter andl ift out.
This filterholdssoil andfoodresidues in the sump areaa nd
prevents i t fro m be ing depo sited on the dishes d urin g wash cycle.
Main filter
1
Coarse filter
2
Fine filter
3
2
3
1
Filterassembly
Thefilterefficiently
For best performance and results, the f ilter mustb e cle aned regularly. thisreason, it isa goo d idea to
remove t he la rger foodparticles trapp ed in thefilter aft er e ach wash cycleby rinsing thesemicircular filter and
cup unde r runnin g wa ter.To removethe fil ter de vice, p ull th e cup handle in the upwarddirection.
removes food particles from th e wa sh w ater,allowing it tobe rec ycled dur ing the cycle.
For
The dis h washer must never be used without the filters.
Improper replacementof the f ilter mayre duce theperformance lev el o f the appliance
anddamagedishesand utensils.
1
2
Step 1 Turn the filterin ant i-clockwise direction,:
Step 2:lift the filter assembly up
When following this procedure from step1 to step 2, the filter system will be removed;
when following it from Step2 to Step 1,the filter system will beinstalled.
Page 18

The control panelcan be cleaned by using al ightly dampened cloth.
After cleaning, make sure to dryi t tho roughly.
For the exte rior, use agood applianc e polish wax.
Neveruse shar p obj ects, sco uring pa ds o r har sh c leaners ona ny part oft he di shwasher.
Protect against freezing
1.Cut offtheelectricalpowerto the dishwasher.
2.Turnof f the watersupply an d disco nnect thew ater i nlet pipefrom the w ater valve.
3.Drain the w ater fr om the inletpipe an d water valve. (Use ap an to gather the water )
4.Reconnect the waterinlet pipe tothe water valve.
5.Remove the f ilter at the bottom of thetub and usea sponge t o soakup water in the sump.
please t ake fros t prot ection m easures ont he di shwasher inwinter.Every fter washi ng cycles ,
please op erate asfollows
timea
:
Cleaning the filter
Cleaning the door
To c l ean the coar sefilt er and the fine filter, use acleani n g bru sh. Reas semble the f ilt er parts as show n in the figu res
on the last page and reins ert the enti re assembly in the dis hwa sher, po s itio ning iti n itsseat and pres sing downwards .
When cleaning the filters, don't knock
or bang them. Otherwise, the filters
could be contorted and the performance of the dishwasher could be
decreased.
To clean the e dge around thedoor,you shoul d use onlya soft warm,damp cloth.
To avoid penetration o f wa ter in to t he door lockand electrica l com ponents, d o not
usea spr ay cle aner ofany kind.
Never use a spray cleaner tocl ean t he d oor panelas itmay dam age the door lock
andelectrical components.
Abrasive agent s or somepaper towels shouldnot be u sed b ecause of therisk of
scra t chi ng or leav ing spots on the stainl es s ste el surfa ce.
Cleaning the spray arms
If your dishwasher cannot work because oft he ice,
please contact Caple service.
It is n e cess ary to c lean the spra y arm s reg ular l y for hard
water chemicals willclogthe spray armjets a ndbearings.
- Inspect the filters for blockages after every time the dishwasher has been used.
- By unscrewing the coarse fil ter, you can remove the filter system. Remove any food remnants and
cleanthe filtersunder running water.
Remarks:
Theentire filterassemblyshouldbecleanedonce a week.
To remove thelower spray arm,pull out thesprayarm upward.
Tor e mov e the upper spra y a rm , hold t he nut, rotat e the a rm
clockwisetoremove it.
Washthe arms insoapy and w arm w ater an d use asoft brush to
clean the j ets. Replacethem after rinsingthem th oroughly.
Caring for your dishwasher
Page 19

When not in use for long time
It is recommend that you run a wash cycle with the
dishwasher empty and then remove the plug from the
socket, turn off the water supply and leave the door of
the appliance slightly open. This will help the door
sea ls to last longer and prevent odour s f rom forming
within the appliance.
If the appliance must be moved,try to keepit in t he
vertical position. If absolutely necessary, it canbe
positioned on its back.
Oneofthefactorsthatcauseodourstoforminthe
dishwasher is foodthat remain s tr apped in theseals.
Periodic cleaning with a d amp spongewill prev ent t his
fro m occ urri ng.
Before cleani ng or performing mainten ance, always
remove the p lug fr om the socket.
Toclean the exteriorand rubber parts of the dishwasher,
donot use solvents or abrasivecleaning products.
Only use a cloth w ith warm soapy water.
Torem ov e sp ots or sta ins from the surface oft h e
interi or, use a cloth dampened withwater an a little
vinegar,or a cleaningproduct mad e sp ecifically f or
dishwashers.
Remove the plug
No solvents or a
brasive cleaning
Moving the appliance
Seals
After ever y wa sh, turn offt he w ater supplyto the
appliance andleave the doors lightl y open soth at
moisture a nd odou rs a re no t tra pped in side.
After every
wash
The installation of the pipes
and electrical equipments
should be done by
professionals.
The installation position of dishwasher should be near the existing inlet and
drain hoses and power cord.
One side of the cabinet a sink should be chosen to facilitate the connection of
the drainer hoses of the dishwasher.
Installation preparation
Note: please check the accompanying installation accessories (hook for furniture door
screw)
●
Electrical Shock Hazard
Disconnect electrical power
beforeinstalling dishwasher.
Failure to do so can result in
death or electrical shock.
How to keep your dishwasher in good shape
Page 20

Please carefully read the installation instruction.
●
Illustrations of cabinet dimensions and installation position of the dishwasher
Preparations should be made before moving the dishwasher to the installation place.
Choose a place near the sink to facilitate the installation of inlet and drain hoses
(see figure 1).
If the dishwasher is installed at the corner of the cabinet, there should be some space
(illustrated in figure 2) when the door is opened.
2
1
16
Minimum space
when the door is
opened
【Figure2】
Cabinet dimensions
【Figure1】
Cabinet
Dishwasher
Door of
dishwasher
Minimum space of 50mm
1
The furniture door panel should be fitted according to the Figure 3.
The furniture door should
be processed in
accordance with the
illustrated dimensions
【Figure3】
●
Furniture door dimensions and installation
Less than 5mm
between the top
of dishwasher
and cabinet and
the outer door
aligned to
cabinet.
90 °
90 °
600 mm
820mm
100
580mm
80
Space between cabinet
bottom and floor
Electrical, drain and
water supply line
entrances
(Unit: mm)
Page 21

Installation of the furniture door
Note: the max. door weight is 7kg
【Figure
4a】
2
Install the hook on the furniture door panel and put the hook into the slot of the
outer door of the dishwasher ( see figure 4a). After positioning of the door panel , fix the
panel on to the outer door using the screws and bolts (See figure 4b) .
Installation furniture door
【Figure4b】
Take away the
four short screws.
Pin up the four long
screws
1
2
17
Page 22

18
Tension adjustment of
the door spring
【Figure
5】
Tension adjustment of the door spring
●
The door springs are set at the factory to the proper tension for the outer door. If
a aesthetic wooden panel is installed, you will have to adjust the door spring tension.
Rotate the adjusting screw to drive the adjustor to strain or relax the steel
cable(see figure 5).
Door spring tension is correct
when the door remains
horizontal in the fully opened
position, yet rises to a close
with a slight lift of a finger.
Connection of
drain hoses
●
Insert the drain hose into a drain pipe with a minimum diameter of 40mm, or let it run into the sink, making sure
to avoid bending or crimping it. The top of the hose must be less than 1000mm.
A
Counter
Front
Drain pipe
NOTE:
The top of the hose
must be less than
1000mm.
φ 40mm
B
Page 23

19
Dishwash er inst allation steps
●
1
2
.
3.
4.
5.
6
7
8
Install t he fu rniture d oor tothe ou ter doorof th e di shwasher using the brackets provi ded. Re fer
to thetemplate forpositioning o f thebracket s.
Adjustthe tension of the door springs by using anAllen key turning ina clockwisemotion to
tightentheleft and rightdoor springs.Failuretodothis could cause damageto yourdishwasher
(Illustr ation 2)
Connect the inlet hos e to the c old wat er s upply
Connect the drain hose. Refer to diagram (Figure 6)
Connect the powercord
Affix the condensation st rip u nder thework su rface ofcabinet. Please ensu re th e co ndensation
strip is flushwithedgeofworksurface.
Place the dishwasher int o po sition.(Ill ustration 4)
Level the dishwasher. The rear feet can be adjusted from the front of the dishwasher by turning
theAllen s crew inthe m iddle ofthe b ase ofdishwasher useanAllen key(Illustratio n 5A ). Toad just
thefrontfeet,use a flatscrew driver and turnthefront feetuntil t hedishwasheris level (Illustr ation 5B).
9 The dishwasher must be secured in place. Thereare twoways todo thi s:
A. Nor ma l wor k su rface:Put the inst a ll a tion hoo k int o th e slot oft h e si de pl an e and secure it to the
work surf ace wit h the wood screws (Illustrati o n 6).
B. Marble orgr anit e w o rk top:Fix the sidewi th Screw.(Illustra tion 7).
【Figure
7】
Page 24

20
The dishwasher must be level for proper dish rack operation
and wash performance.
Placea spiritlevel ondoor andrack trackinsidethetub asshown tocheck thatthe
dishwasheris level.
level the dishwas
her by
adjusting
the three levelling legs individually.
When levelling the dishwasher, please pay attention not to let the dishwasher
tip over.
1
2
3
Illustra tion of feet adjustment
【】Figu re 8
NOTE:
Themaximum adjustment
heightof thefeet is50 mm.
Ensure the voltage and fre quency of the power being co rre sponds to
those on the rating plate. Only insert the plug into an electri cal socket which is earthed
properly. If the electrical socket to which the appliance must be connected is not
appropriate for the plug , replace the socket, rather than using adaptors or the like
as they could cause overheating and burns.
Please lo ok at th e ra ting label to knowthe rat ing v olta ge a nd conn ect t he d ishwash er to the app ropriate powersupply.
Use the requ ired fuse10 amp, time delay fuseor circuit breaker rec ommended and provide sepa rate ci rcuit serving
only thisappliance.
Check level side to side
Spirit level
Check level Fron t to Back
For personal safety:
Do not use an extension cord or an adapter plug
with this appliance.
Do not, under any circumstances, cut or remove the
earthing
Connection from the power cord.
Electrical connection
Ensure the
correct earthing
exists before use
Page 25

21
How to
drain excess water from hoses
If the sink is 1000 higher from the floor, t he excess water in hoses cannot b e dr a ined di r ectl y
into the sink. It will be necessary to drain excess water from hoses into a bowl or suita ble
container thatis held outside and lower thanthe sink.
Extension hose
I
f you need a drain hose extension, make sure to use a similar drain hose.
It must be no longer than 4 metres; otherwise the cleaning effect of the dishwasher could be reduced.
Positioning the a
ppliance
Posit ion the appl iance in the desired location. The b ack should rest against the wall behind it, and the si de s,
al on g th e ad jace n t cabinets or walls. The dishwasher i s equipped with w ater supply and drain hoses that can
be positio ned eithert o the right or the lefts ides tofacilitate p roper ins tallation.
A hose that attaches to a sink spray can burst if it is installed on the same water line as the dishwasher. If your sink has one ,
it is recommended thet the hose be disconnected and the hole plugged.
1.
Pull the safety supply hoses completely out from storage compartment located at rear of
dishwasher.
3. Turn water fully on before starting the dishwasher.
The safety supply hose consists of the double walls. The hose's system guarantees its intervention by blocking the flow of water
in case of the supply hose breaking and theair space between the supply hose itself and the outer corrugated hose is full
of water.
1. Turn off the water.
2. Release the water pressure by depressing the pressure release button. This relieves water pressure and protects you,
and the room, from severe splashing.
3. Unscrew The safety supply hose from the connection.
The a ppliance must be connected to the water mains using new hose-sets.
The oldhose-sets should not be reused.
Water pressure must be between 0,04 MPa and 1 MPa. Ifthe pressure is below the minimum
consult our Service Department for advice.
Connect the cold water supply hose to a threaded 3/4(inch) connector and make sure that it is fastened tightly in place.
If the water pipes are new or have notbeen used for an extended period of time, let the water run to make sure that the
water is clear and free of impurities. Ifthis precaution is not taken, there is a risk that the water inlet can get blocked and
damage the appliance.
Water outlet
C
onnect the water drain hose. The drain hose must be correctly fitted to avoid water leaks.
Ensure that the water drain hose is not kinked or squashed.
2. Fix the hose to the water supply connection with a 3/4 inch thread.
Syphon connection
I
nsert the drainhoseintoa drainpipewith a minimumdiameter of40mm, or letit run into the sink, making sure to
avoid bending or crimping it. The top of the hose must be less than 1000mm from the floor.
The follo wing things should b e ch ecke d befor e startingthe d ishwasher.
The contentofthismanual isvery helpfultothe users.
Afterinstallation,pleasemake sure tokeep thismanual.
1 The dishw asher is level an d fix ed p roperly
2 Theinletvalveisopen
3 leakage at theconnections
of the conducts?
Is there a
4 Thew iresaretightlyco nnected
5 The poweris switched on
6 The i n let and drai n hoses are n ot knotte d
7 Allpackingmaterialsandprintingsshould b etaken outof the dishwasher
d
Page 26

Fuse blown, or the
circuit breaker acted
Replace fuse or reset circuitbreaker. Remove any other
appliances sharing the same circuit with the dishwasher
Spilled rinse-aid
Always wipe up rinse-aid spills immediately.
Hard water minerals
The affected items are
notcorrosionresistant.
Thelid of the softer
is loose
Aspayarmis
knocking against
an itemin a basket
r
Items of crockery
are loose in the
wash cabinet
This may be caused
by on-site installation or
the cross section of
the piping.
A program was not run
after dishwasher
salt was added.
Traces of salt have
gotten into the wash cycle.
To clean the interior, use a damp sponge with
dishwasher detergent and wear rubber gloves.
Never use any other cleaner than dishwasher
detergent for the risk of foaming or suds.
Always run the quick wash program . without
any crockery in the dishwasher and without
selecting the Turbo function (if present), after
adding dishwasher salt.
Check the lip .Ensure the fix is fine.
Interrupt the program, and rearrange the items
which are obstructing the spray arm.
Interrupt the program, and rearrange
the items of crockery.
This has no influence on the dishwasher function.
if in doubt, contacta suitably qualified plumber.
Detergent with
colourant was used
Make sure that the detergent is the one without
colourant.
Improper detergent
Make sure the dishwasher isturned on and thedoor is
closed securely.
Check that the water supply is connected properly and
the water is turned on.
Make sure to close the door properly and latch it.
Make sure the power cord is properlyplugged into the
wall socket.
Power supply is not
turned on
Water pressure is low
Door of dishwasher
not properly closed.
Kink in drain hose
Filter clogged
Kitchen sink clogged
Check drain hose.
Check the coarse filter
(see section titled )" CleaningThe Filter "
Check the kitchen sink to make sure it is draining well.
If the problem is the kitchen sink not draining ,you may
need a plumber rather than a serviceman for dishwashers.
Use only the special dishwasher detergent to avoid suds.
If this occurs, open thedishwasher and let suds evaporate.
Add 1 gallon of cold water to the tub. Close and latch the
dishwasher, then select anycycle. Dishwasherwilldrain
outthewaterat the first step.Openthe door after draining
is stop and check if the suds is disappeared.
Repeat if necessary.
Page 27

The dishes were not
loaded correctly.
See notes in " Loading the DishwasherBaskets ".
Select a more intensive program.
See" Wash Cycle Table ".
Use more detergent,or changeyour det ergent.
Rearrange the items so that the sp ay can rotate freely.r
Clean and/or fit the filtercombination correctly.
Clean the sp ay arm jets. See "Cleaning the Spray
Arms".
r
Use less detergent if you have soft water and select
a shortest cycle to wash the glassware andto get
them clean.
Use a mild abrasive cleaner to eliminate those marks.
Re-loading the dishesproperly.
Load the dishwasher as suggested in the directions.
Increase the amountof rinse-aid/refill the rinse-aid
dispenser.
Do not empty your dishwasher immediately after
washing. Open the door slightly sothat the steam can
escape. Begin unloading the dishwashe r only once t
he dishes are barely warm to the touch. Empty the low
basket first. This prevents water form dropping off
dishes in the upper basket.
In short program the washing temperature is lower.
This also lowerscleaning performance. Choose
a program with a long washing time.
Water drainage is more d ifficult with these items.
Cutlery or dishes of this type are not suitable for
washing in the dishwasher.
The program was
not powerful enough.
Not enough detergent
wasdispensed.
Items are blocking
the path of sp ay arms.r
The filter combination
inthebaseofwash
cabinet is not clean or
is not correctly fitted.
This may cause
the sp ay arm jets
to get blocked.
r
Combination of soft
water and too much
detergent.
Aluminum utensils
have rubbed against
dishes.
Dishes block
detergent cups.
Improper loading
Too little rinse-aid
Dishes are removed
too soon
Wrong program
has been selected
Use of cutlery with
a low-quality coating
If an overflow occurs, turn off the main water supply before calling Caple service.
If there is water in the base pan because of an overfill or small leak, the water
should be removed before restarting the dishwasher.
Overflow.
When a malfunction is present, the appliance will display error codes to warn you:
Longer inlet time.
No water flow, or water
intake is restricted,or
water pressure is too low.
Some element of dishwasher is leaking.
E1
E4
Page 28

Height : 815mm
Width : 598mm
Depth: 550mm
()
with th e doo r closed
Water pr ess ur e: 0.04- 1.0M Pa
Pow er supp l y: see r at i ng lab el
Capa ci ty : 14 plac e sett i ngs
Page 29

6
Large serving bowl
Small serving bowl
4
5
Medium serving bowl
3
Glasses
Saucers
2
1
Cups
10
Oval platter
8
Dinner plates
9
Soup plates
Dessert dishes
7
T easpoons
4
Soup spoons2Forks
1
Serving forks
8
Serving spoons
6
Knives
5
3
Dessert spoons
7
Gravy ladles
Loading the baskets according to En50242: Loading the baskets according to En50242:
1.Upper basket:1.Upper basket:
2.Low
er basket:2.Low
er basket:
3.Cutterly basket:3.Cutterly basket:
Informatio
n for co
mparability tests in accordance
with EN 50242
Informatio
n for co
mparability tests in accordance
with EN 50242
Capacity: 14 place settingsCapacity: 14 place settings
Position of th
e upper basket: lower position
Position of th
e upper basket: lower position
Programme: ECOProgramme: ECO
Rinse aid
setting: 6Rinse aid
setting: 6
So
ftener setting
: H
4 So
ftener setting
: H
4
88
77
99
1010
77
1010
99
8 8
77
77
22
44
55
IN
IN
11
33
11
66
22
11
33
33
11
33
11
11
2525
Page 30

Position one: lift theleft basketup, both leftand right
baskets ar e angle d.
Position t wo: ad just theleft basket to lower positi on, left
basket is flat and right basket is angled .
Position thr ee: liftt he r ight b asket up, both left a nd rig ht
baskets ar e flat .
Position F our: Mov e the right basket fr om righ t to l eft, two
basket ar e over lappin g.
Position Five: Remove theright basketfromt he tray,
only has t he le ft bas ket.
Mode 1
Mode 2
Mode 3
Mode 4
Mode 5
5 position cutlery basket:
Page 31

14
A++
266 kWh
0.9 3 kWh
0.4 5 W
0.4 9 W
2800litre
A
185 min
81. 5 cm
59. 8 cm
55 cm
193 0 W
Sheet of householddishwash er ac cording toE U D irective 1059/2010:
Manufacturer
Type/ Description
Standard place settings
En er gy e ffici e ncy class
Annualenergyconsumption
En ergy cons u m p ti o n of t h e sta ndard cl eaning cycl e
Power consumption of off-mode
Power consumption of left-onmode
Annualwa terconsumption
Dr yi n g efficiency class
Standard cleaning cycle
Programme duration of thestandardcleaningcycle
Noise level
Moun ting
Height
Width
De pth ( w i th conn ecto rs)
Powe r consum ptio n
Rated voltage /frequency
A+ ++ (highest efficiency) to D (lowest efficiency)
Energy consumpt ion 266 kWh per year,bas ed on 280s tandard cleaning cycles using cold wat er fill and
the co nsumption oft he low power mode s.Actual energy consum ptio n will dependon how t he applianceis used.
“”
Waterconsumption 2800 litres per year, based on28 0 stand ard c leaning cycles. Actual water consumption
will de pend on howthe app liance is used.
“”
A( highest efficiency) to G(lowest efficiency)
This programme i s suitable forcleani ng normally soiled tabl ew are and that it is the
most efficient programme in ter ms of itscombined ener gy an d water consumption for
th at ty pe of tab l e ware .
The devic e me ets the Europeanstandards andthe direc tives in thecurrent ver sion atde livery :
- LVD2006/95/EC
-EMC2004/108/EC
- ErP 2009 /125/EC
The above values have be en m easured inacc or dance w ith s tandards und er spe cified operating conditions .
Results may varygreatly a ccording toquantity and pollution of t he dis hes, wat er ha rdness,
amount of detergent, etc.
The manual is based on theEuropean U nion's standardsand ru les.
Technical Data Sheet
NOTE:
ECO 45
℃
49 dB(A) r e 1pW
Buildunder
230 V~ 50 H z
Waterpressure(flow p ressure)
0.4-10bar = 0.04-1 MPa
Could bebuilt-in
Yes
CAPLE
Di627
Page 32

 Loading...