

Page 1
Di481
Contact Caple on 0117 938 7420 or for spare parts www.caple.co.uk
Page 2

To revi ew th e sect ion on trou blesho oting Tips
will help you t o sol ve some co mmon prob lems
by yo ur self .
De ar Cu stomer ,
Plea se ca re fu ll y read this manu al befo re usin g the
dishwasher, it wi ll help you to use an d m aint ai n the
dishwasher pr operly.
Pass it on to an y s ubse quen t own er of the app liance.
This manual contai ns sectio ns on sa fety In structions,
Operat ing Instruc ti ons,
Inst alla ti on In structions an d
Tro ub le sh ooting Tip s, et c.
The man ufact urer, followin g a policy of co nstant
de ve lopm ent and u pdating of the produ ct, may
ma ke mo di ficati ons without giving prio r notice.
K
ee p it as a r efer in the lat er da ys.
I
f you can n ot solv e the prob lems by yo ur self ,
plea se as k f or th e help of pr of essional technicians.
Dishwasher Fe at ures....... .... .. ......... ... .... .. ..... . ..6
A
Water S often er..... ........ ...... ...... ...... ............ 7、
Attenti on b ef or e or af ter loadin g the Dish washe r
Baskets ....... .. ....... .. ...... ... ......... ........ . ...... ..... 12
Fi lt er in g System.......... ...... .... .. ......... .... ..... .....1 6
Ca ring for th e Dishwa sher..... ......... ... .... .... .....1 7.
B Loading the Salt into the Softener............ .....8、
C Fill the Rinse A id Dis pens er................. .. ...... 8、
D Function of De tergen t ... ............... ............... 9、
Lo ading the upper .. ......... ...... ......... .....1 3Ba sket
Lo ading the Lower .. ......... .. . ...... ...... .....1 3Ba sket
Was h Cycle Tab le..... ............... ............... ........1 4
Tur ning on th e Appliance ....... .. ...... ....... .. ...... .. 1 4
Ch an g e t he Programme.. .... ..... ... .. .... .. ...... .. 15....
At th e end of the Wash Cycle................. .... .. ....15
Befor e ca lling for se rvice.. .... .. ... .. . .... .. .. ..... . ....25.
Error co d es.... ... .............. .... ......... . . ... ...... ... ..26.
Techni cal information....... ...... ...... ...... ..... ..... 2 7..
Co ntr ol Pan el.... ......... ... ......... .... ..... ......... ........6
...... ...... ............. .. ....... 1 8In stal lation pre paration
...19Aest hetic pane l's dimens io ns and instal l ation
.... ... ...... .2 1Tension adjustm ent of t he door sprin g
.. .... .. ......... .... ..... .... 2 1Co nnection of d rain ho ses
.. ............... ........ 22Dish washe r ins t al lation st eps
Abou t Electricity Connecting .. ......... .... .. ... ...... .23
Co ld Wate r Connection .. ...... ....... .. .. ...... ... ...... 24
Page 3

1
This appliance is intended to be used in h ousehold
and similar applications such as:
-staff kitchen areas in shops, offices and other
working environments;
-farm houses;
-by clients in hotels, motels a nd other residential type
environments;
-bed and breakfast type environments.
This appliance can be used by children aged from 8
years and above and persons with reduced physical,
sensory or mental capabilitie s or lack of experience
and knowledge if they have b een given supervision
or instruction co ncerning use of the applia nce in a
safe way and un derstand the hazards involved.
Children shall not play with the appliance. Cleaning
and user maintenance shall not be made by children
without supervision. For EN60335-1
This appliance is not intended for use by p ersons
(including children )with reduced physical, sensory
or mental capabilities, or lack of experience and
knowledge ,unless they have been given supervision
or instruction co ncerning use of the applia nce by a
person responsible for their safety. For IEC60335-1
This appliance is for indoor u se only, for household
use only.
To protect against the risk of electrical shock, do not
immerse the unit, cord or plug in water or other liquid.
Please unplug before cleaning and maintenance the
appliance .
Use a soft cloth moisten with mild soap, and then use
a dry cloth to wipe it again.
( )
( )
When using your dishwasher,
follow the precautions listed below:
Page 4

2
This appliance must be earthed. In the event of a
malfunction or breakdown, earthing will reduce the risk
of anelectric shock by providing a path of least
resistance of electric current. This appliance is equipped
with a cord having an equipment-earthing conductor
and a grounding plug.
The plug must be plugged into an appropriate outlet that
is installed and earthed in accordance with all local
codes and ordinances.
Improper connection of the equipment-earthing
conductor can result in the risk of an electric shock.
Check with a qualified electrician or service
representative if you are in doubt whether the appliance
is properly grounded.
Do not modify the plug provided with the appliance;
If it does not fit the outlet.
Have a proper outlet installed by a qualified electrician.
Do not abuse, sit on, or stand on the door or dish rack of
the dishwasher.
Do not operate your dishwasher unless all enclosure
panels are properly in place.
Open the door very carefully if the dishwasher is
operating, there is a risk of water squirting out.
Do not place any heavy objects on or stand on the door
when it is open. The appliance could tip forward.
When loading items to be washed:
1) Locate sharp items so that they are not likely to
damage the door seal;
Page 5

3
2) Warning: Knives and other utensils with sharp points
must be loaded in the basket with their points down or
placed in a horizontal position.
Check that the detergent powder is empty after
completion of the wash cycle.
Do not wash plastic items unless they are marked
dishwasher safe or the equivalent.
For plastic items n
ot so marked,
check the manufacturer's
recommendations.
Use only detergent and rinse additives designed for
an automatic dishwasher.
Never use soap, laundry detergent, or hand washing
detergent in your dishwasher.
Children should be supervised to ensure that they do not
play with the appliance.
The door should not be left open, since this could increase
the risk of tripping.
If the supply cord is damaged, it must be replaced by the
manufacturer or its service agent or a similarly qualified
person in order to avoid a hazard.
During installation, the power supply must not be
excessively or dangerously bent or flattened.
Do not tamper with controls.
The appliance is to be connected to the water mains using
new hose sets and that old hose-sets should not be reused.
The maximum number of place settings to be washed
is 9.
The maximum permissible inlet water pressure is 1MPa.
The minimum permissible inlet water pressure is 0.04MPa.
Page 6
Dispose of t he dishwash er packaging material
correctly.
All packaging materials can be recycled.
Plastic parts are marked with the standard
international abbreviatio ns:
PE for polyethylene, e.g. sheet wrapping material
PS for polystyrene, e.g. padding material
POM polyoxymethylene, e.g. plastic clips
PP polypropylene, e.g. Salt filler
ABS Acrylonitrile Butadiene Styrene, e.g. Control
Panel .
Packaging material could be dange rous for children!
For disposing of package and the appliance please
go to a recycling centre. Therefore cut off the power
supply cable and make the door closing device
unusable.
Cardboard packaging is manufactured from recycled
paper and should be disposed in the waste paper
collection for recycling.
By ensuring this product is disposed of correctly, you
will help prevent potential negative consequences
for the environment and human health, which could
otherwise be caused by inappropriate waste handling
of this product.
For more detailed information about recycling of this
product, please contact your local city office and your
household waste disposal service.
DISPOSAL: Do not dispose this product as unsorted
municipal waste. Collection of such waste separately
for special treatment is necessary.
4
Page 7
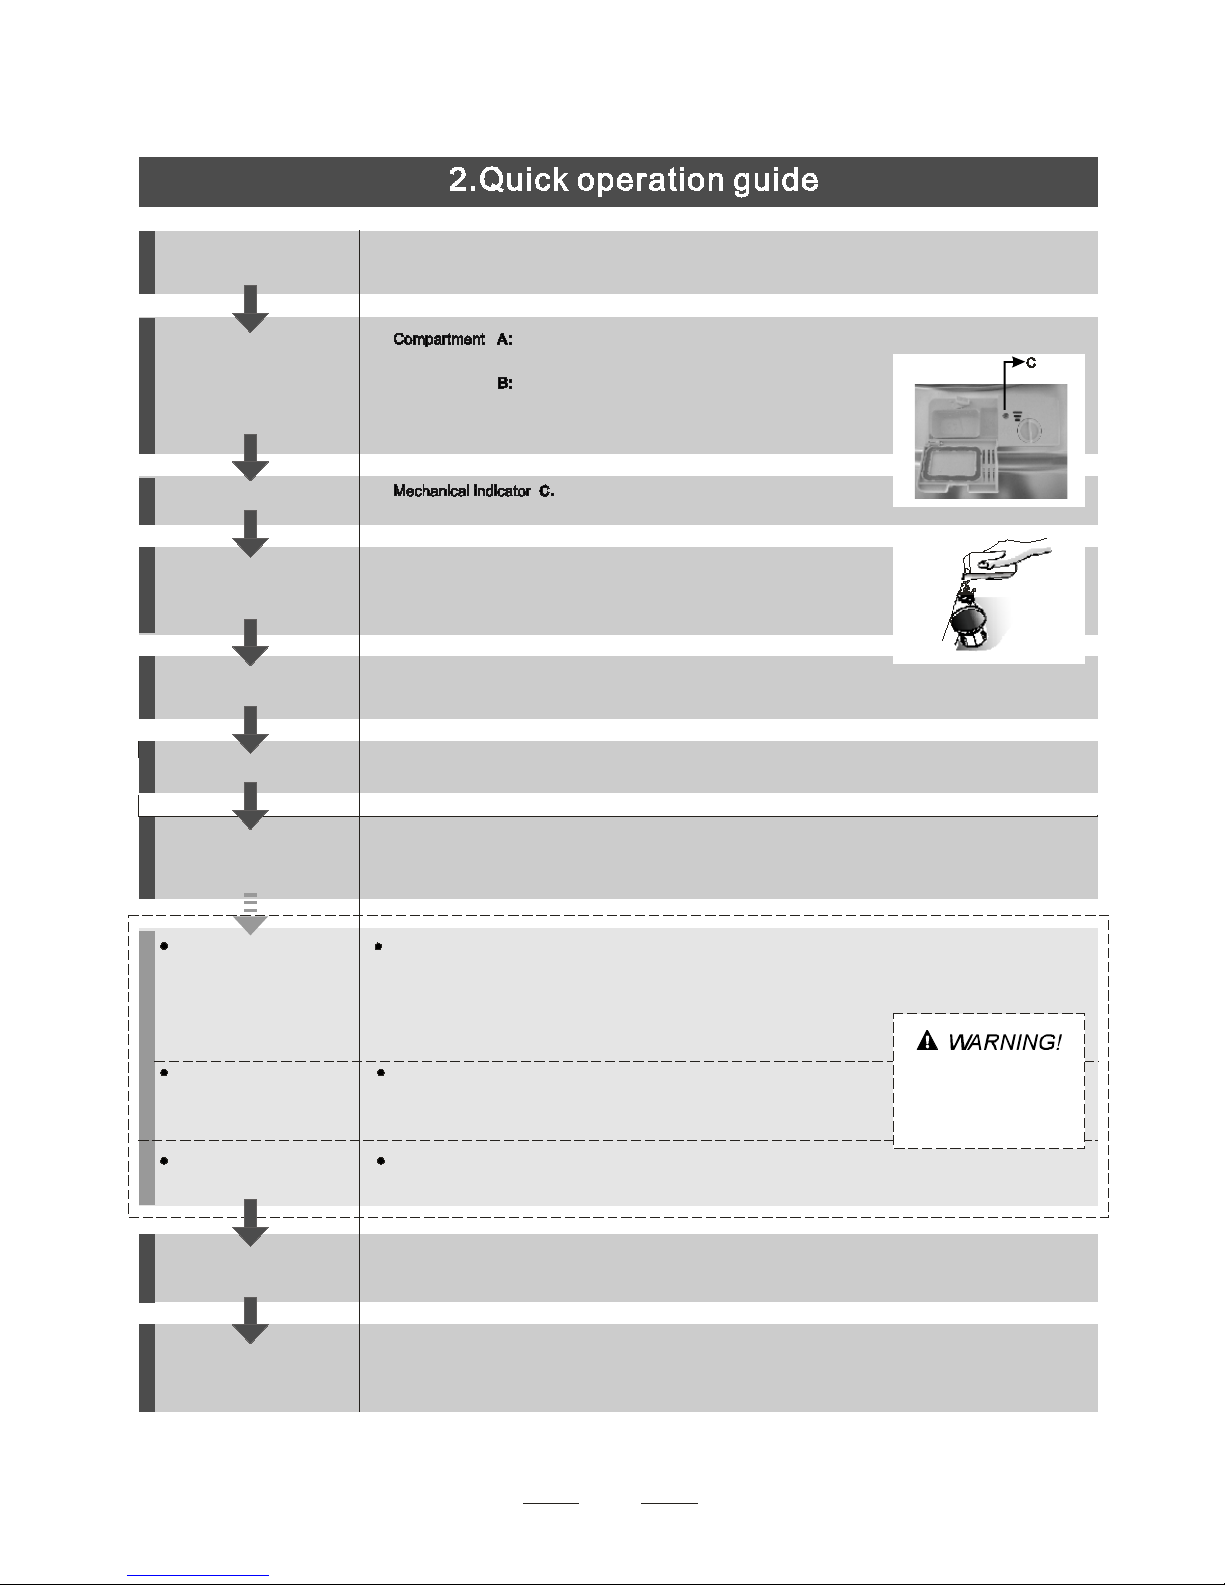
With each wash cycle.
Compartment
For programmes with pre-wash only.
(Follow the user instructions!)
Electric indicator on control panel (if provided).
Check the rinse aid level
(On models with water softener system only.)
Electric indicator on control panel (if provided).
If there is no salt warning light in the control panel
(for some models), you can estimate when to fill the salt into
the softener by the number of cycles the dishwasher has run.
Check the regeneration
salt level
Load the baskets
Select a programme
Turn on t he water tap ,close the door . The machine will star t working after about 10 seconds.Running the dishwasher
Switch off the appliance
Turn off the water tap,
unload the baskets
Fill the detergent dispenser
Warning: wait a few minutes ( about 15 minutes) be fore unloading the dishwasher to avoid handling
the dishes and utensils while they are still hot and more susceptible to break.
They will also dry better.Unload the appliance, starting from the lower b asket.
Changing the programme
Add forgotten dishes in the
dishwash er.
Scrape off any large amount of leftover food. Soften remnants of burnt food in pans,
then load the baskets. Refer to the dishwasher loading instructions.
Press the Programme Button until the selected programme lights up.
( See the section entitled Operation instruction )“ ”
When the working cycle has finished, the buzzer o f the
dishwasher will sound 8 times, then stop.
Turn off the appliance using the On/Off B utton.
If the appliance is switched
off during a wash cycle.
Open the door car e fully.
Ho t steam may esc ape
wh en the doo r is ope ne d!
If the appliance is switched off during a w ash cycle, when sw itched
on again, please re-select the washing cycle and o perate the dishwasher
according to the original Power-on state ).
Switch on the ap pliance Open the door,press the On/Off b utton to switch on th e appliance .
1.Open th e door a li ttle to stop the dishwasher.
2.After the spray arms stop working, you can open the door completely.
3.Add the forgotten dishes.
4.Close the door, the dishwasher will start running a gain after 10 seconds.
For detailed op erating m ethod read the co rre sponding con ten t on the instruction manual.
1. A running cycle c an only be modified if it has be en running for a short time. Oth erwise the detergent
may have already been released and the water already drained. If this is the case, the detergent
dispenser must be refilled.
2. Open th e door.
3. Press the for more than 3 seconds to cancel the running programme.
4. Select a new programme.
5. Restart the dishwasher.
Programme Button
5
A B
Page 8
Back ViewFront vi ew
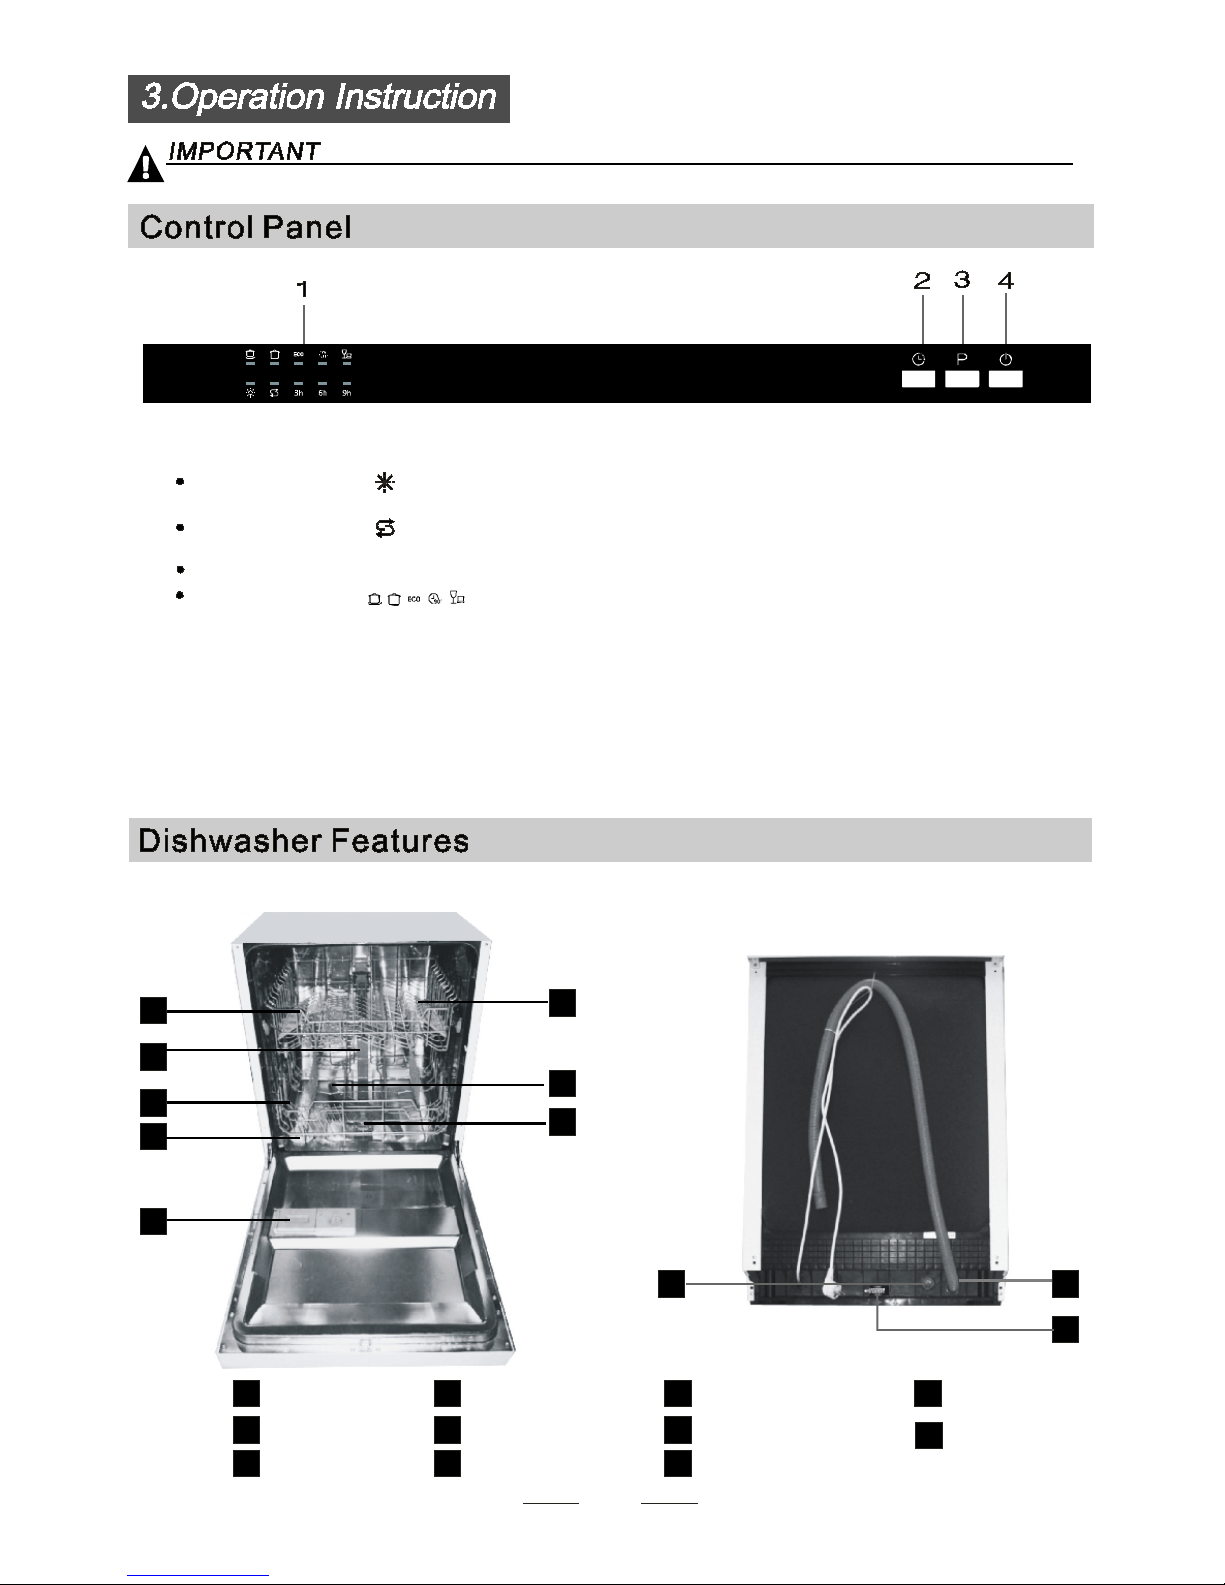
6
be f ore usin g it f or the first time.
To get the best p erformanc e fr om your d i shwashe r, read all operat ing in st ruc t ion s
11
Adju st er
11
1
2
3
4
5
6
7
8
9
10
Disp enser
Cu p Shelf
Spray arms
Fi lter as sembly
In le t pipe connector
Drain p ipe
Lo wer Basket
In ner pipe
Up per Basket
1
Salt Co nt ai ner
5
6
7
8
9
10
3
2
4
2. Dela y Button : To p re ss th e button to de lay.
3. Program Button : To press the bu tton to select a
wa sh Prog ra m.
4. On /off Button:
To tu rn on/off the power su pply.
1. in dic ators:D isp lay to sh ow th e e rror c ode,
delay tim e e tc .
Pr ogram ind ic ators:
De lay time: 3/6/9 hou rs opti on
Rins e Aid indicator:
In di cate s w hen the d ispens er ne eds to be refilled .
Add salt indicator:
In di cate s w hen the d ispens er ne eds to be refilled .
Page 9
The water s oftener m ust be set manually, usin g t he wa ter h ar dnes s dia l.
The water s oftener i s des igned to remo ve mi nerals an d s alts fr om th e w at er, which w ou ld have
a detriment al or ad ve rse effect on the o peration of the a pplian ce.
The higher the content of th ese minerals an d salt s, the h arder y ou r water is.
The softene r shoul d be adjust ed ac cordin g to t he hardness of the water in yo ur area . You r local Water Authority
can adv ise you o n t he hardness of th e water in yo ur area .
Adjusting S alt Consumption
The dishw asher is de signed to allow for adju stment in the amount of salt cons umed based on the hardne ss of
th e wat er used. This is intend ed to op timise and c us to mi se the level o f salt co nsum ptio n.
1. Ope n the door ,Swi tch on the applia nc e;
2. Press the Program bu tton fo r m or e than 5 seco nds to start the water soft ener
set model within 60 second s a fter the a pplian ce was s witche d o n( Th e Salt and
Rinse ai d w arningli ghts will be on peri od ically when it ge t in the set m odel );
3. Press the Program bu tton to select th e p ro pe r set ac cordin g to you r local en vironm ent,
the sets will chan ge in the f ol lowing se quence : H4 H 5 H6 H1 H 2 H3;
4. Press the Power bu tt on to en d t he set up model.
→ → → → →
WATER SOF TENE R
The hardn ess of the water varies from place to place. I f hard water is used in the di sh wa sh er, deposits wi ll
fo rm on the d is hes and uten sils .
The app li ance is equi pp ed wi th a spe cial so ften er that use s a salt cont ainer specifical ly de sig ned to elim inate
lime an d m in er als from the water.
Co ntac t your local water board for information on the har dness of your water s up ply.
Plea se fo ll ow th e s teps belo w for ad just me nt in salt consumption.
7
If your model d o es n o t ha ve an y water softener, y ou m ay sk ip th is se ctio n .
C lar k: Br itis h de gr ee
fH : Fren ch de gree
D H: G er man degree
dH =1.25 Clarke =1. 78 fH=0 .1 78mm ol /l
1
Th e manuf ac to ry se tting: H3 (E N 50242)
Before us in g y our dishwas her for t he fi rst time:
A. Set th e wat er soften er
B. A dd 1.5Kg dishwasher s alt a nd then full fi ll the s al t c onta iner with wate r
C. Fill t he rinse a id di spen se r
D. Fill i n deter ge nt
dH
mm ol/l
0~ 90~ 5 0~ 0.94
H1( Rap id Li g ht brig ht)
0
10- 20
6-1 1
1. 0- 2.0
H2( 90 Mi n )Ligh t b rig ht
9
21- 30
12- 17 2. 1- 3. 0
H3( Rapid )、9 0 Min Ligh t b rig ht
12
H4( Eco )Li gh t bri gh t
20
fH
0~ 6
7-14
15- 21
Clark e
WATER HAR DN ESS
Sel ector Po sition
Sal t consu mption
(gram /cy cle)
18- 22 31- 40 2 2- 28 3. 1-4.0
41- 6023- 34 4. 1- 6. 0
H5( Eco Rapid L i gh t b ri gh t)、
30
H6( Eco 90 Min Ligh t br ig ht)、
60
29- 42
35- 55 61- 98 4 3- 69 6. 1-9.8
Page 10
1. The sa lt co ntainer m us t o nly be re filled when th e sal t warning light i n the control panel comes on .
Depending on ho w w el l the salt di ss ol ve s, the salt warning light may still be on even t houg h the
salt cont ainer is fi lled .
If th er e is no salt wa rn ing light in th e c ontr ol panel ( fo r s ome M odels) ,you can e stimate when to fi ll
the salt into the s of tener by the cy cl es that the dishw ashe r has run.
2. If there are spills of the salt, a soak or a rapid p ro gram shou ld be ru n t o remove the e xces sive salt .
Alway s u se th e sa lt int ended f or use wit h dis hwasher.
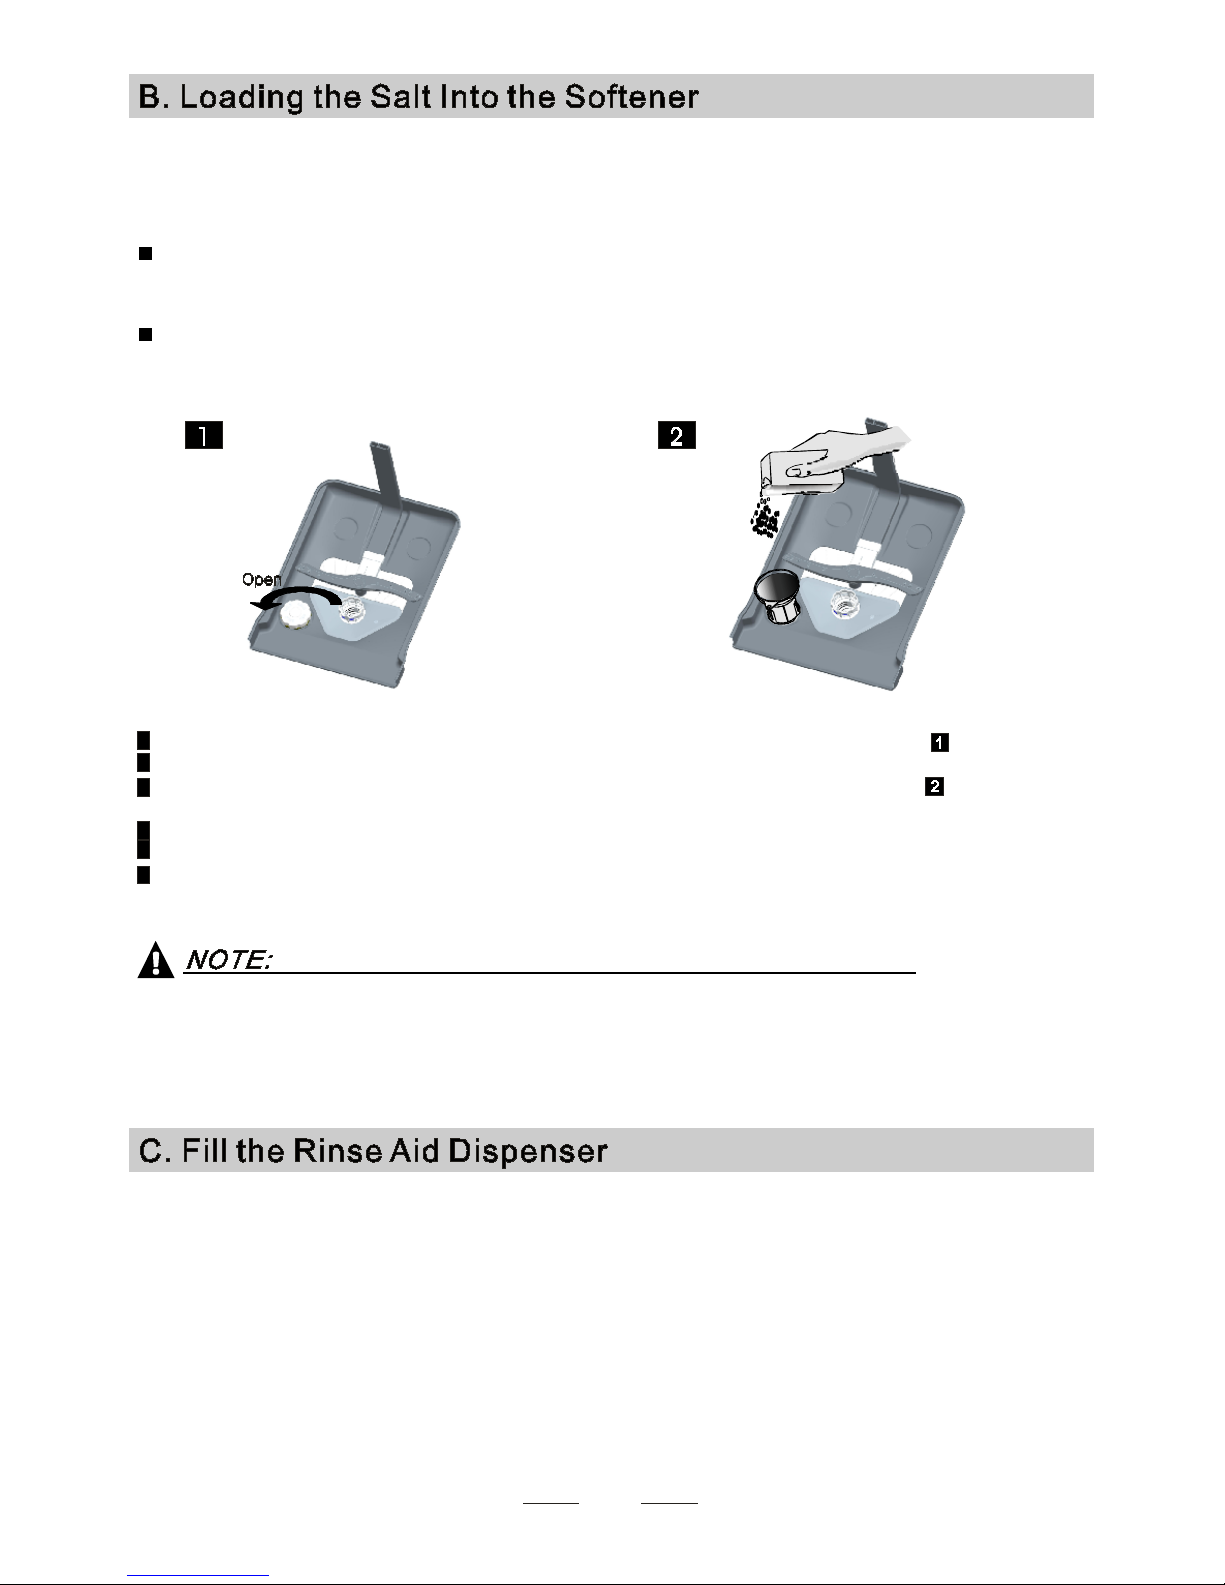
The sa lt contai ner is loca ted beneath th e low er basket an d sho uld be fil led as explained
in the fo llowin g:
Attenti on!
Only u se sa lt specifi c al ly design ed for the use in dishw ashe rs! Ev er y oth er t ype o f
salt n ot s p ecif ically desi gned fo r the use in a dishwa sher, es pecially ta ble salt, wi ll
dam age the wate r so fte ner. In c ase o f dama ges ca used by the u s e of unsu itable
salt t he m anu fa cturer does no t gi ve any wa rr an ty no r is lia ble f or a ny d amages caus ed.
Only f ill with s alt just befor e start ing o ne of th e com ple te wa shin g program s.
This wi ll preve nt an y grain s of salt or sal t y wate r, w hich may have be en spilled,
rem aining on th e botto m of the m achine for any p er iod o f tim e, wh ich m ay ca use
cor ro sion.
8
T he r inse a id is rel ease d during the f inal r inse to prevent w ater fr om forming dropl ets o n yo ur di s hes , whi c h can
leave spo ts an d streaks. I t als o im pro ve s dryi ng b y all o wi ng w ater t o roll of f the dishes. Your dishw ashe r is
de sig ned to u se l iq ui d r in se a ids . The ri ns e aid di spenser is located i nside the door next t o t he d et er g ent dispense r.
To fil l t he di s pen ser, o pen t h e cap and pour the ri n se a id in to the d ispenser unti l t he l ev el indicator tu rns com plet ely
black . The volum e of t he rin se a id co ntai ner is abo ut 110ml.
Rinse Aid Dispenser
Function of Rinse Aid
Rin se ai d is automatic al ly adde d d ur ing the l ast ri nse, ensu r ing t horough rinsi ng, and s pot and str eak free dr ying.
Attention!
Only u se branded r in se aid f o r d ishwa sher. Never f il l t he r inse ai d d ispens er with any o the r substan ces
( e.g . Di shw a sher cl eani ng a gent, liqui d de ter gen t) . This would dam age the ap pl iance .
Ful l fi ll the s alt c onta iner wit h wate r,I t is normal fo r a small a m ount o f wa t er t o come out o f t he
sal t con ta iner.
A Af te r the low er b as ket has be en r emo ved , u nscr ew an d re mov e the cap f ro m the sa lt co nt ai ne r.
B P lace the end of the fu nne l (supplied) into the h ol e an d i nt roduce ab ou t 1. 5kg of dish washer sa lt.
C
D A fte r fil l in g t he conta iner , sc re w the ca p tight ly back clockw is e.
E The salt w ar ni ng l i ght will stop being a fter t he sal t cont ai ne r h as b een fi l le d wi th sa lt.
F Immediately a ft er fi ll in g t he salt int o the s al t c ont ai ner, a wa sh in g pr og ra m sho ul d be started
program O th erw is e t he f i lter sy st em, pump or other important parts of th e machine may b e damage d
by s al ty w at er. Thi s is ou t of w arra nty.
(We su g gest t o u se a sho rt
) .
Page 11

9
To ope n the d isp ense r, t urn the c ap t o t he "op en" (left ) arr ow an d lift i t o ut.
Pour t he rinse aid into t he dispen ser, be ing careful not to ov er fill .
Replace the cap by inser ti ng i t ali g ned w it h "open" arr ow and tur ning it t o t he closed (ri ght) a rrow.
Adjusting Rinse A id Dispenser
The rinse aid di spense r has s ix or four s etti ngs. A lway s start w ith t he di spen ser
set on " 4 ". If s pot s a nd poor dr yi ng ar e a probl em , incre ase the amount o f ri n se
aid di sp e nsed by r emoving th e dispe nser lid and ro tat in g t he di al to "5 ". If th e
dis hes still ar e not dryi ng pr operly or are sh ow spots, adj ust the dial to the n ext
hig her l ever unti l y our di she s a re spo t-free. Th e re co mm ended s et ti ng is "4".
(Fac tor y value is "4".)
Incre a se the dose if th e re ar e d rops o f wate r or lime sp ots on t he dishes af te r w ashi ng.
Reduc e i t i f there a re stic k y w hi tish st ains on your d ish es o r a bl ui sh fi lm on gl assware or
kni fe bl ades.
1
2
3
As the r inse ai d diminishes, the size of the b lack dot
on th e rin se ai d lev el in di cato r changes, as illustrate d below.
Full
3 / 4 full
1 / 2 full
1 / 4 full - Should r ef ill to elimi nate spotting
Empty
When to Refill th e Rinse Ai d Dispenser
If th er e i s no rinse- ai d w arning light i n the control panel , y ou can est im ate t he amount from th e co l our
of the opt ica l leve l ind ica tor C loc ated next to th e cap. When the rinse- aid container is fu ll, t he wh ol e
indic a tor will be dark .As the rinse-aid diminis he s, the s iz e o f the dark dot decreases. You should never let
th e rinse aid level fall 1 / 4 full .
du ring th e next wash. Do n't forget to repl ace t he cap bef ore you close dishwasher d oor.
Clean up any rinse aid spilled while d uring filling wi th an abso rb ent c lo th to av oi d exc essi ve foaming
Deterge n ts wi th it s ch e mica l ingre dien ts a re necessar y to re move di rt , crush di rt a nd tr ansport it o ut of the di shwash er.
Mo st o f t he co mm er ci al qu ality d et ergents a re suitab le for th is pu rpose.
" "
Pr oper Use of Detergent
Use only de tergent specifical ly made for t he use in dishw ashers. Keep yo ur de tergent fresh an d d ry.
Do n't put powdered de tergent i nto the di spen ser until yo u're re ady to wash dish es.
Attention!
Page 12

10
Base d on thei r chemical comp os ition, dete rg ents can be split in tw o basic ty pes:
De tergent tablets of different brands diss olve at differ ent speeds. Fo r t hi s rea son s ome
de tergen t tab lets ca nnot di ssol ve and devel op thei r ful l cleaning power d uring short
prog ra ms . Ther ef ore please use long programs when using detergent tablets, to
en su re th e c omplete r emoval of dete rg en t r es idua ls .
The dispe ns er mu st be re fi ll ed be fore the sta rt of each wa sh cycle follo wing th e i ns truction s
provided in the wash cycle tabl e . Your dishwasher u ses l ess deter gent and r inse ai d tha n
Co nven ti onal dish washer. Gene ra lly, only one tablespoon of de tergen t i s needed for
a normal wash load. M ore h eavi ly so iled item s need mor e det er gent. Always a dd th e
de tergen t j ust before st arting th e dishwasher, o therwise it co uld get da mp an d w ill not
dissolve pr op er ly.
Conc entrated Detergen t
Detergent Tablets
Detergent Dispenser
convention al, alkaline de tergents with caustic c omponents
low alkaline co ncentrated d etergents with natu ra l e nzym es
No rm al ly new pulve rised d eterge nt is wi thout pho sp hate. Thus the wat er so ftener func tion of
ph os phate is not given. In this ca se we re commend to fill salt in the s al t c onta iner even when
th e hardnes s of wate r is o nly 6 dH. If detergen ts wi thout pho sp hate ar e used i n the case of hard wa te r
of ten w hite spot s a ppea r on di shes and glasses . I n t hi s case ple ase add mo re detergen t to reach
be tter resu lts. Detergents wi thout c hlorin e do only bleach a little. Strong and c oloured spots will not
be remo ved c ompletely. In this ca se please choo se a p ro gram wi th a h igher t empe ra ture.
°
Detergents
There are 3 so rts of dete rg ents
1.Wit h phosphate an d with chlorin e
2.With p hosph a te and w ithout chlo rine
3.Wit hout phos ph ate and wi th ou t chlorine
Amoun t of Detergent to Use
Alwa ys ad d the de tergent j us t bef or e starting ea ch wash cycle.
Only us e branded dete rgent a id fo r d ishwashe r.
If th e l id is cl os ed: p re ss release b utton. The lid will spri ng open .
Dishwasher detergent is corro sive!
Take care to keep it out of reach of children.
Page 13

Fi ll th e detergent disp enser with d eterge nt.
The marking indic a tes the do si ng le vels , a s
illustrated on the r ight:
The pla ce of main wash cy cl e det er gent plac ed.
The pla ce of pre-wash cy cle d etergent placed .
Plea se ob serv e the ma nufa ctur er s d os ing and st or age
Re commen da ti ons as st ated on the deter ge nt packaging.
Clos e the li d and press until it lock s in place.
If th e dishes are heavily soiled, pl ac e an additional
de tergen t dose in the p re -w ash det ergent chamber. This detergen t will t ake effect d ur ing the pre-wa sh phase.
A
B
Fil l in Detergent
You find inf or mati on about the amount of dete rg en t f or th e s ingle programme on th e last page .
Plea se awar e, that ac cord in g to the leve l s oi li ng and the specif ic ha rdne ss of water differ en ce s are po ssib le.
Plea se ob serv e the ma nufa ctur er 's re co mm enda tions on the detergent pa ckaging.
11
A
B
Page 14

Cu tlery with wo oden, horn china o r
mo ther-of-pe ar l h andles
Plastic i tems th at ar e n ot heat resistan t
Ol der c utlery with glue d parts that ar e not
te mperat ur e res istant
Bonded cutler y ite ms or dishes
Pewter or cooper item s
Crysta l gla ss
Steel items subject t o rusting
Woode n platters
It ems made from sy nt hetic f ib re s
Some ty pes of glasses can become
du ll af ter a la rg e number of washes
Silv er an d alumi num parts ha ve a
te nden cy to discolour d ur ing washi ng
Gl azed pa tterns ma y fade if machin e
wa shed freq uently
Are not suitable
Are of lim ited suita bility
Dishes an d it ems of cutlery must not li e insi de one another, or co ver each othe r.
To avoid d amag e t o glasses, they must not t ouch.
Load la rg e i tems wh ich a re mo st di fficult to clea n i nt o t he lower b as ke t.
The upper bask et is design ed to ho ld mo re delicate an d lig hter dishware such as glas ses, coffee
and tea cups
Long bl aded kn ives stored in an upri ght p os ition are a potenti al hazard!
Long and/ or sharp items of cutlery s uc h as carving knives must be posi tion ed
horizontally in the upp er ba sk et.
Please do not overload your dishwasher. Thi s is i mp ortant for g ood r es ults an d f or
reason able consum ptio n of energ y.
Lo ad hollow it ems s uc h as cups, glasses, pa ns etc. With the o pe ning faci ng do wn wards so t hat
wa ter c anno t co llect in the container or a d eep bas e.
Co nsider buying ut ensi ls wh ic h are iden ti fi ed as dish washer-proof.
Use a mild detergen t that is desc ribed a s ' ki nd to dish es'. If ne cessary, s eek furth er
info rm atio n from the de tergent manu facturers .
For particular items, select a progra m with as low a temperature a s possible.
To prevent dam age, do not tak e glass a nd cutl er y out of the dishwasher immedi ately
af ter the programme has ended.
(For best perfor mance o f the dish washer, fo llow thes e loading guidelin es .
Feat ur es and app earance o f baskets and cutlery bask ets may vary from your model. )
Scrape off an y l ar ge amounts o f leftover f ood. So ften re mn an ts of burnt food in pan s.
It is not nec es sa ry to ri ns e the di sh es unde r r unni ng wate r.
Place obj ects in th e dishw as her i n following wa y:
1.I tems such as cu ps , g lass es, pots/pans , etc. a re faced dow nw ar ds .
2.C ur ve d i tems, o r ones with re cesses, should b e l oade d a slant s o tha t wat er can run off.
3.All uten si ls ar e s ta cked se cu re ly and c an not t ip over.
4.All uten si ls ar e pla ce d i n the wa y that the s pray ar ms can rotat e f reel y during washing.
Ver y sma ll item s should not b e w as he d in t he di sh washer as they coul d easily fall out of the baske t.
To preven t wate r drippi ng fr om the u pper basket into th e l ow er basket, w e recom mend that yo u
em pty the lower b asket first and th en th e u pper bask et .
12
Page 15

13
The upper bask et is de sign ed to ho ld more de li ca te
an d lig hter dishware su ch as glas se s, co ffee and
te a cups and saucers, as well as pl at es, small bowls
an d shallow pa ns (as long a s they are not too dirty).
Positio n the dishe s a nd cookwa re so th at th ey will
no t get move d by the spray of water.
We s uggest that you pla ce la rg e items and the most
diffi cult to clean i tems are to be placed into the lower
ba sket: such as pots, pan s, lids , s er ving dis hes and
bo wls, as sh own in the fi gure be lo w. It is preferabl e to
place serving dish es and l ids o n the side of the ra cks
in or der to avoid bloc king the r otation of the top s pr ay
arm.
Pots , serving bowls, et c, must alwa ys be placed top d own.
De ep pots should be slanted to allow water t o f low out .
Plea se be remind ed th at :
The Bottom Basket features folding s pi kes s o tha t larger or more po ts and p an s can be loaded .
Folding Sp ikes of Lo wer Bas ket
For b etter stacking of pots an d p ans,
th e spi kes can b e f ol de d d own a s
show in the pic ture ri ght.
Adjusting the Upper Basket
The height of th e u pp er basket ca n b e adjusted in order t o
cr eate more sp ac e for la rg e ute nsil s both for the upper
/lower bask et . The height of the uppe r baske t can b e
ad ju sted by placing the wheels on differ en t hei gh t of the
rails. Long it ems, serv in g c utle ry, s al ad se rv ers and knives
shou ld be pl ac ed on the s helf so th at they do not obstruct
th e rotatio n of the s pr ay arms..
Folding bac k the cup shelive s
For b etter stacking of pots an d p ans,
th e spi kes can b e f ol de d d own a s
show in the pic ture ri ght.
Cu tlery should be pl aced in the c ut le ry bask et wi th th e han dles at the botto m. If th e rack has si de bask et s, the
spoo ns sh ould be loaded separate ly into t he appropriate s lo ts, e spec iall y l ong utensils should be pl aced in the
ho rizontal position at the f ro nt of th e upper ba sk et as shown in the pi ct ur e.
Do not let any item extend through th e bottom.
Always load sharp utensils with the sharp
point down!
Page 16

*EN 50242 : Thi s p ro gr am me is th e test cycle. Th e infor mation fo r comparability test
in ac cordan ce wi th EN 50 242, as fo llows:
Ca pacity: 9 sett ing
Positio n Upper bas ket: upper wheels on rails
Rins e a id se ttin g: 6
Pl:0 .49w; Po: 0.45 w.
Starti ng a c ycle wash
Draw out the lower and upper basket, load t he di shes an d push th em back .
It is commended to load the l ow er ba sket fi rst, then the upp er on e ( se e the secti on enti tl ed
Loading the Dishwasher ).
Pour in t he detergen t (see t he section e ntitle d Salt, De tergent and Ri nse Aid ) .
Insert the plug into the s oc ke t. Th e power supply is 220-240 VAC /5 0 HZ, the s pe ci ficati on
of the sock et is 10A 250VAC. Ma ke su re th at th e w ater supp ly is turned on to full pr es sure.
Open th e door, press t he ON /O FF Button , and th e ON/OFF light wil l tu rn on .
Press th e program Button , th e w as h program will be change d as fo ll ows dir ection:
;
If a progr am is se lected , the response light will l ig ht . Then clos e the do or, the dishwasher
begin s to s tart.
“ ”
“ ”
Intensive->Normal- >E CO-> 90Min->R apid
1
2
3
4
5
Means: n eed to fi ll rins e i nto the R ins e-Aid Dispense r.
( )
14
N ormal
5/ 22g
5/ 22g
5/ 22 g
For normally soiled load s,
suc h as pots plate s
glass es and l igh tly
soi led p an s.
、 、
For hea vi es t s o ile d croc ke ry,
and normally soile d pots
pans dishes etc wi th dr ie d
on so ili ng.
、
、
A shorter wa sh for ligh tly
soi led l oads and q ui ck
was h.
P re -wa sh (5 0 )
Wa sh ( 60 )
Rin se
Rin se
Rin se( 70 )
Dry in g
℃
℃
℃
Pre-wash (4 5 )
Wash (55 )
Rin se
Rin se ( 65 )
Dry ing
℃
℃
℃
Pr e- wa sh
Was h ( 45 )
Rins e( 65 )
Drying
℃
℃
Wa sh ( 45 )
Rins e
Rins e ( 55 )℃℃
(50 )℃
17 5
19 0
16 5
3 0
1. 1
0. 69
1. 4
0. 7
16 .5
13
9
1 0
Was h(65 )
Rins e
Rins e (65 )
Drying
℃
℃
90 11.51. 15
27 g
20 g
Intensi ve
90 Min
EC O
(* EN 502 42 )
This is s tan da rd programm e, i t is
suit able to clean norma ll y soil ed
tableware a nd it i s the mos t effici en t
progr amme i n te rm s of its com bi ned
energ y and wate r cons ump t io n for
that type of tableware.
Rapid
Fo r n orm ally soiled lo ad s
that need quic k wash .
(o r )3in1
( or )3in1
( or )3in1
( or )3 in1
Page 17

When the working cycl e has finish ed, the buzz er of the dishwashe r will sound f or 8 s econds , then s top. Tur n o ff
th e appliance us ing the ON /O FF button, shu t off the water supp ly an d open the door of th e dis hwas her.
Wai t f or a few mi nutes before un loadi ng the dishwasher to a void h andling the di shes and ute nsils w hile th ey
are still h ot an d m ore susce ptib le to br ea kage. The y wi ll also dr y b et ter.
Sw itch Off the D ishwasher
The program ligh t is on but is no t bli nking, on ly in th is case th e p ro gr amme has e nded .
Open the door.1. Switch off th e dishwasher by press ing th e O N/OFF button.
2.Tu rn of f the wate r tap!
Open the door carefu lly.
Ho t dishes are sensitive to knocks . The di shes should ther efore b e allowed to cool do wn ar ou nd 15 minutes
be fore re moving from th e app li ance.
Open th e dishw as her's doo r, leave it ajar and w ai t a few minutes be fore re moving the dis hes. In this way the y
will be co oler an d t he dr yi ng will be impr ov ed .
Un loadin g the dishwa sher
It is norm al th at the d ishwasher is wet inside.
Empty the lowe r bas ket first a nd then the upp er on e. Th is will avoid water dripping fr om the upp er Basket onto
th e dis hes in the lower on e.
If you open the door , the machin e will pau se. The progr am lig ht will
stop b linking and the buzzer w ill mooing every minu te unless you close the door . After
you close the doo r ,th e machine w il l k eep on workin g af ter 10 seconds .
during a wash cy cle
Pr emise:
A cycle that is underw ay can o nly be m odifie d if it has o nly been runn in g for a s hort tim e. Otherwise, th e
detergent may have already been re leased, and the applia nce may hav e al read y drain e d the wash water.
If th is is the case, the detergent disp enser must be refi ll ed (s ee t he sec ti on en ti tled " L o adin g t he
Detergent " ).
Open the door ,press the Program b u tton , the m achine wi ll be in s tand by st ate,
then y ou can ch an ge the program to t he de si red c yc le sett in g (s ee th e s ection entitl ed " Starting a
wash cycle. . ." ).
more than 3 seco nds
1
2
A forgotten dish can be added any time before the detergent cup opens.
Add forgotten dishes.
Close the door
After the spray arms stop working, you can open the door
completely.
2
3
Open the door a little .
1
4
5
The dishwasher will run after 10 seconds.
15
It is dangerous to open the door w hen washing,
because the hot water may scald you.
Page 18

The filte r prevents la rg er remnants of food or other objects from getting i ns id e t he pu mp.
The r esidue s may block the f ilter, i n this case they must be remove d.
The filte r system cons is ts of a c oars e fil te r,a flat (Main fi lter)
And a microf ilter(Fine filt er ).
Food an d soi l particle s trapped in th is fi lt er ar e pulve rize d b y a
special jet on the lower spray arm and wash ed down to dr ai n.
Larger item s, such as piec es of bone s o r glass, that coul d b lo ck
th e drain ar e trapped i n t he coar se fi lt er. To remove t he item s
caug ht by the filter, gently squeeze the tap o n the to p of this
filt er an d li f t out .
This fi lter hold s s oil and food resi dues in th e sump area and
preven ts it from being redeposit on th e d is hes during wash cy cle.
Ma i n fi lter
1
Co arse fi lter
2
Fine fil ter
3
2
3
1
Filt er assembly
The filte r effi ci entl y
For b est performance and results, the filte r mu st be clea ned reg ular ly. this reas on , it i s a good id ea to
remo ve the l ar ger food particles t rapped in the filter af ter each wash cycle by r insing the semicircular f ilter and
cup under r un ning water. To r emove t he fi lter device, p ull the cup handle in the upwar d dir ec tion.
removes food particles from the wash water, a llowing it to b e recycled du ri ng the c ycle.
For
The dishw asher mus t never be used wi th out the fi lt er s.
Im pr oper replacement of th e filte r may reduce the per formance level of th e appliance
an d damage di shes a nd utensi ls .
St ep 1 Turn the f ilt er in an ti-clockwise direction,:
Step 2 l ift the fi lter a ssy up:
When following this procedure from step1 to step 2, the filter system will be removed;
when following it from Step 2 to Step 1, the filter system will be installed.
16
1
2
Page 19

The control pa nel can be cl eane d by using a lightly dampen ed cl oth.
After cleaning, make sure to dr y it thoroughl y.
For t he exterior, us e a good appl iance p ol is h wax.
Ne ver use sharp o bjects, scouring pads or ha rsh c leaner s o n any part of th e d ish washe r.
Protect Against Freezing
1.C ut off the e lectrical power to the dishwasher.
2.Tu rn of f the wate r suppl y and disc onne ct the water in let pip e from the water valve.
3.D ra in the water fr om the inlet pi pe an d w ater va lv e. (Use a pan to gath er the water)
4.R ec onnect the w ater inlet p ip e to the w ater valv e.
5.R emove t he filter at th e b ottom of the t ub an d u se a spo nge to soak up wate r i n the sump.
plea se take fr os t prote ction measures on the d ishwas her i n win te r. Every fter wa shing cycles,
plea se operat e as follows
time a
:
Cleaning t he Filter
Cleaning The Door
To cl ean the c oarse f ilter and th e f ine filte r, use a clean in g brush. Re assemble the filter pa rt s as show n in t he fi gu re s
on th e l as t pag e and reinsert the entire assembly in the d ishwasher, pos itio ning it in its s eat and pr es si ng down wards.
When cleani n g the filt ers, do n 't knoc k on t hem . O therwise, the fil ters could be
con to r te d and the p erformanc e of the d is hwasher could be decreased .
To cl ean the e dge a ro und the do or, yo u sh ould use only a soft warm, da mp cloth.
To avoid penetration of water into the door lock an d elect rical components, do no t
use a spray cl eaner of an y kind.
Ne ver use a spray cl eane r to clean t he do or pa nel as it may d amag e t he do or lock
an d electrical compo nent s.
Abrasive ag en ts or so me pa per towels s hould n ot be used becaus e o f the ri sk of
sc ra tching or leavin g spots on the stainless steel s urface.
Cleaning t he Spray Arms
If yo ur di shwa sh er ca nn ot wo rk be ca us e o f the ice,
please co ntac t p rofessio na l s er vice persons.
It is necessary to clean the sp ra y arms r egula rly for hard
wa ter c hemicals will clo g the spray arm jets and be arings.
- Inspect th e filters for blocking after e very ti me the d is hw as he r h as been us ed.
- By unscrewing the c oa rs e fil ter, y ou ca n r emove t he fi lt er sy st em . R emov e a ny food remn ants an d
cl ean the filters und er runn ing water.
Remarks:
The entire filter as sembly should be cle aned once a week.
To remove th e lower spray arm , pull out t he sp ra y arm upward.
To remove th e upper spray arm, hold the nut, rotate th e arm
cl ockwise to remove it .
Was h the ar ms in soap y a nd warm wa te r and us e a soft brush t o
cl ean t he jets. R eplace th em after rinsing them th or ou gh ly.
17
Page 20

It is re commend tha t you ru n a wash cyc le w ith the
dishwasher empt y a nd th en re mo ve th e p lug from the
socket , turn off t he wate r s upply and le av e the do or of
th e appliance slig htly open. This will help the d oor
seals to last longer and pre vent odou rs fr om fo rm in g
within the a pplian ce .
If th e app lia nce must be mo ved, tr y to keep it in the
vertical position . If a bs olut el y n ecessary, it can be
po siti oned on it s b ack.
One of th e facto rs th at caus e o dour s t o f or m i n the
dishwasher is food th at rema in s trapped in th e s eals.
Period ic cl eani ng wi th a damp sponge will prevent t his
from occurr ing.
Before clea ning or perf or mi ng main te nanc e, al ways
remo ve the plug from the socket.
To cl ean the e xter ior and rubber pa rt s of t he di sh washer,
do no t use solv ents or abrasi ve clea ning pr od ucts.
Only us e a cloth with warm soapy water.
To remove spot s o r stains fr om th e surface of th e
inte ri or, use a cl oth d ampe ned wit h water an a littl e
vi negar, o r a cle aning product made specifica lly for
dishwashers.
Re move the Plug
No Solve nts or Abrasive Cle aning
Moving the Ap p liance
Seal s
After e very wa sh, turn off the wate r sup ply to the
ap pl iance and le ave the door slightly open so th at
mo isture and odo ur s a re no t trapp ed insi de.
Af ter Eve ry Wa sh
When not in Use for a Lon gTime
18
The insta llation of the pipes
an d electrical equipments
shou ld be done by prof es si onals.
Electrical Shock Haza rd
Discon nect electr ical powe r bef or e
instal li ng di shwash er.
Fail ur e to do so can r es ul t i n death or
elect rical shock.
The insta llation position of di sh wash er sh ould be near th e e xi st ing inlet an d drain hose s and
po wer co rd.
One side of th e cabinet si nk sh ould be chos en to faci litate the con nectio n of drain hose s of
th e dis hwas her.
Installation preparation
No te: p lease check the ac companyi ng in stallation ac cessor ies(hook for aesthet ic panel, screw)
●
Page 21

19
Pl ease caref ully read the installation instruc t ion.
Illustrations of cabi net dimensions and installation position of the dishwasher
Pr eparat ion s s houl d be made before mo vi ng th e dishw as he r to the installa ti on place.
Ch oose a place n ear t he sink to facili ta te the insta ll atio n of inlet an d drain hoses
(s ee figu re 1) .
If dish wa sher is in stalled at the corner of th e c abinet , the re should be some space
(i ll us tr ated in figur e 2) w he n t he do or is opened.
2
1
Min im um spac e when
the door is opene d
【 】Figu r e2
Cabinet dimensions
【 】Fi g ure1
Cabinet
Dis hwa she r
Do or o f
dis hwa sh er
Minimum space of 50mm
1
The a est heti c wooden p anel c ould be p roce s se d ac co rding to the Fig ure 3 .
The aesthetic p anel sh o uld
be p roce sse d in accord a nce
with the i llu strat ed dime nsi ons
【 】Figure 3
●
Aesthetic panel's dimensions and installation
Less than 5mm
betw een the top
of d ishw asher and
cabinet and the
outer do or align ed
to cabinet.
90 °
90 °
450 mm
820mm
100
580mm
80
Space between cabinet
bottom and floor
Electrical, drain and
water supply line
entrances
(Uni t: mm)
dp8
439
416 0. 2±
390 0.2±
287.5 0.2±
286
38
8 - 2
dp8
4- 2
dp8
2- 2
20 MAX( )
5
Page 22

Installa tion of aesth etic panel
【 】Figure4a
2 Install the hook o n the aestheti c wooden panel and put th e hook into the s lot of th e o uter door of
dishwasher(s ee figu re 4a). A fter position ing of th e p anel , fix th e p anel on to th e outer door by
sc re ws a nd bolt s(See figure 4b ) .
Ins tallati o n of a esthetic
wood en pan el
【 】Figure4b
. take awa y the four
short s cre ws
. pin up the four lon g
screws
1
2
20
Page 23

Tension ad justment
of th e door sprin g
【 】Figure5
Tension adjustment of the door spring
●
Connection of drain hoses
●
The door sp rings are set at the facto ry to t he pro pe r tensi on for th e oute r door.
If aest hetic woode n pan el are instal led, you will have to ad j ust the door sp ring tensi on.
Rotate the a djusti ng scr ew to drive t he ad justor to strain or r el ax t he steel cab le
(see fi gure 5 ).
Door s pring t ension is cor rect w hen
the door rem ains horizontal in the
fully opened position y et rises
to a close wit h the slight lift of a
finge r.
,
21
In se rt the drain ho se in to a drain pi pe wi th a m in imum diamet er of 40mm, or l et it ru n in to the s ink, m aking sure to
avoid b ending or cr im pi ng it . The top of the hos e m ust b e less t han 1000mm.
A
Counter
Fr ont
Drain pipe
NOTE
The top of the hose
must be less than
1000mm.
φ 40 mm
B
Page 24

22
Dishwasher installation steps
●
1
2
.
3 .
4 .
5 .
6
7
8
In s tal l the furn iture d oor t o the ou t er do or of th e dish washe r usin g the b r acke ts provided. Refer
to the temp late for positi oning of the brack ets.
Ad j ust th e ten sion of the door springs by using an All e n key turni n g in a clockw i se m otion t o
tight en the left an d righ t door spring s . Fai lure to do this could cause dama ge to y our di shwas her
(Illu stra ti o n 2)
Con nect the inl e t hos e to the cold water supply
Con nect the drain hose. Re fer t o diagram (Fi g ure 6)
Con nect the po wer cord
Affix the conden sation str ip under the w ork surface o f cab inet. Please ensure the condens atio n
str ip is f lus h with edge o f work surf a ce.
Pl a ce the dish w ashe r into p osition .(Illu s tration 4)
Le v el th e di sh w asher. The rear food can be a d justed from t he front o f the di sh w ashe r by turning
the A llen sc rew in the mi ddle o f the b ase of dishwasher u se a n Allen key (I llus tra tion 5 A). To adjust
the front feet, use a fl at scr ew driver and t urn t he front feet un til the dish w asher is level (Ill ust ration 5B) .
9 Th e dish wash e r mus t be se c ured in pl ace . The re are two w ays to d o thi s :
A. No r mal w ork s urfa ce:Pu t th e i nstallatio n hoo k i nto the slo t of the side p l ane a nd se cure it to the
wor k sur f ace wit h th e woo d screw s (I llu stratio n 6).
B. Mar ble o r gra n ite wo rk to p:F ix the si de w i th S c rew. (Illustra tion 7 ).
【Figure 7】
Page 25

Dishwash er mus t be le vel for prope r dish rack o perati o n and wash perfor mance.
Place a spirit level on door a nd rac k track inside the tub a s show n to c heck t hat the
dishwa sher is le vel.
level th e dishwasher by a djustin g the t hree levellin g legs individ ually.
When l eve l the dish washe r, plea se pay attention n ot to let the d ishwa sher t ip over.
1
2
3
Illus trati on of feet a dju stmen t
【 】Figure 8
NO TE:
The maximum a d justm ent
hei g ht of t he fee t is 50 mm.
23
Check l e vel side to si de
Spirit l evel
C heck leve l Fr ont t o B ack
Ensu re th e voltage and frequency o f the powe r bei ng cor re sp onds to
th os e on the rating pl at e. Only in se rt t he pl ug into an el ec tr ic al socket wh ich is e ar th ed
prop er ly. If the electri ca l socke t to w hi ch th e a ppli ance must be conn ecte d i s not
ap pr opri ate for the plug , replace th e socket, rather than us in g a adaptors or the lik e as
th ey co ul d cause ov er he ating a nd burns.
Plea se lo ok at the rati ng la bel to know the rating voltage and connect the dishwasher to th e a ppropria te powe r sup ply.
Use t he re quired fu se 10 amp, time delay fuse o r circ uit b re aker re co mmen ded and prov ide s eparate c ircuit serv ing
on ly th is ap pl iance.
For personal safety:
Do not use an extension cord or an adapter plug
with this appliance.
Do not, under any circumstances, cut or remove the
earthing
Connection from the power cord.
Page 26

24
Positioning the Ap pliance
How to Drain Excess Water From Hoses
If th e s ink is 1000 higher fr om th e f loor, th e excess wat er in ho ses can not b e drained direct ly
into the sink. It will be ne ce ssary to drain exce ss wa ter from hoses into a bowl or suit able
cont aine r that is he ld outs id e a nd lowe r than the si nk.
Water Outlet
Co nnec t the wa ter drain hose. Th e drain hose must be co rr ec tly fitted to avo i d wat er leak s.
Ensu re th at th e w ater inlet h os e i s not kink ed or squa shed.
The foll ow ing things should be c hecked before star ting the dish washer.
Syphon Connection
In se rt the drain ho se in to a drain pi pe wi th a m in imum diamet er of 40mm, or l et it ru n in to the s ink, m aking sure to
avoid b ending or cr im pi ng it . The top of the hos e m ust b e less t han 1000mm.
Th e cont ent of t his ma n ual i s very helpful to the u sers .
After installation, please make sure t o keep this manual .
Extensio n Hose
If yo u nee d a drain hose exte nsion, ma ke sure to use a similar dr ain h os e.
It must be no longe r than 4 me tr es ; other wise the c leaning e ffec t of t he di sh washer could be reduced.
1 The di shwashe r is le vel an d fixed prope rly
2 The inlet v alve is ope n
3 There is a lea k age at the co n nections o f the co nducts
4 The wires are t ightly conn e cted
5 The po w e r is s witche d on
6 The inlet a nd d rain h oses are knotte d
7 Al l packi ng materials a nd p rinting s should be t aken out fro m the dis hwa sher
Positio n the a p plianc e i n the desired location. T he back should re st agains t the wa ll be hi nd it, and the sides,
alon g the ad ja cent cabinets or wal ls . The di shwa sh er is eq uipped with wa ter suppl y a nd dr ain hos es th at can
be po si ti oned eithe r to the ri ght or t he left si de s to f ac il itat e proper installation.
Co nnec t the cold wa ter supply hose to a threa ded 3/4(inch) c onnector and make sure
th at it is fa stened ti ghtl y in pla ce.
If th e water pi pes are n ew or have no t been us e d f or an extended pe ri od of ti me, let the
wa ter run t o make sure that the water i s clear. This precaut ion is ne eded to av oi d the
ri sk of the wat er in le t to be bl ocked a nd dama ge th e applia nc e.
Please cl o se the h ydrant af ter using .
Page 27

25
Fuse blown, or the
circuit breaker acted
Replace fuse or reset circuit breaker. Remove any other
appliances sharing the same circuit with the dishwasher
Spilled rinse-aid
Always wipe up rinse-aid spills immediately.
Hard water minerals
The affected items are
not corrosion resistant.
The lid of the softer
is loose
A sp ay arm is
knocking against
an item in a basket
r
Items of crockery
are loose in the
wash cabinet
This may be caused
by on-site installation
or the cross-section of
the piping.
A programme was not
run after dishwasher
salt was added.
Traces of salt have
gotten into the wash cycle.
To clean the interior, use a damp sponge with
dishwasher detergent and wear rubber gloves.
Never use any other cleaner than dishwasher
detergent for the risk of foaming or suds.
Always run the quick wash programme .
without any crockery in the dishwasher and
without selecting the Turbo function (if present),
after adding dishwasher salt.
Check the lip .Ensure the fix is fine.
Interrupt the programme, and rearrange the items
which are obstructing the sp ay arm.r
Interrupt the programme,
and rearrange the items of crockery.
This has no influence on the dishwasher function.
if in doubt, contact a suitably qualified plumber.
Detergent with
colourant was used
Make sure that the detergent is the one without
colourant.
Improper detergent
Make sure the dishwasher is turned on and the door is
closed securely.
Check that the water supply is connected properly and
the water is turned on.
Make sure to close the door properly and latch it.
Make sure the power cord is properly plugged into the
wall socket.
Power supply is not
turned on
Water pressure is low
Door of dishwasher
not properly closed.
Kink in drain hose
Filter clogged
Kitchen sink clogged
Check drain hose.
Check coarse the filter
(see section titled )" Cleaning The Filter "
Check the kitchen sink to make sure it is draining well.
If the problem is the kitchen sink not draining ,you may
need a plumber rather than a serviceman for dishwashers.
Use only the special dishwasher detergent to avoid suds.
If this occurs, open the dishwasher and let suds evaporate.
Add 1 gallon of cold water to the tub. Close and latch the
dishwasher, then select any cycle. Dishwasher will drain
out the water at the first step.Open the door after draining
is stop and check if the suds is disappeared.
Repeat if necessary.
Page 28

Overflow.
When some malfunctions come on, the appliance will display error codes to warn you:
26
Longer inlet time.
Faucets is not opened, or water intake is
restricted,or water pressure is too low.
Some element of dishwasher leaks .
Th e Ra pid light flic kers q uickly
Th e E CO light flick ers quick ly
The dishes were not
loaded correctly.
See notes in " Loading the Dishwasher Baskets ".
Select a more intensive programme.
See" Wash Cycle Table ."
Use more detergent, or change your detergent.
Rearrange the items so that the sp ay can rotate freely.r
Clean and/or fit the filter combination correctly.
Clean the sp ay arm jets. See "Cleaning the Spray
Arms".
r
Use less detergent if you have soft water and select
a shortest cycle to wash the glassware and to get
them clean.
Use a mild abrasive cleaner to eliminate those marks.
Re-loading the dishes properly.
Load the dishwasher as suggested in the directions.
Increase the amount of rinse-aid/refill the rinse-aid
dispenser.
Do not empty your dishwasher immediately after
washing. Open the door slightly so that the steam can
escape. Begin unloading the dishwasher only once t
he dishes are barely warm to the touch. Empty the low
basket first. This prevents water form dropping off
dishes in the upper basket.
In short program the washing temperature is lower.
This also lowers cleaning performance. Choose
a program with a long washing time.
Water drainage is more difficult with these items.
Cutlery or dishes of this type are not suitable for
washing in the dishwasher.
The programme was
not powerful enough.
Not enough detergent
was dispensed.
Items are blocking
the path of sp ay arms.r
The filter combination
in the base of wash
cabinet is not clean or
is not correctly fitted.
This may cause
the sp ay arm jets
to get blocked.
r
Combination of soft
water and too much
detergent.
Aluminum utensils
have rubbed against
dishes.
Dishes block
detergent cups.
Improper loading
Too little rinse-aid
Dishes are removed
too soon
Wrong program
has been selected
Use of cutlery with
a low-quality coating
If overflow occurs, turn off the main water supply before calling a service.
If there is water in the base pan because of an overfill or small leak,
the water should be removed before restarting the dishwasher.
Page 29

27
Height : 815mm
Width : 448 mm
Depth : 550mm
( )
with t he door clos ed
Power su pply: se e ra ting la bel
Capacity: 9 pl ace settings
Page 30

28
Page 31

9
A++
19 7 kWh
0. 69 kW h
0. 45 W
0. 49 W
25 20 li tr e
A
19 0 min
81 .5 cm
44 .8 cm
55 cm
19 30 W
Sheet of household d ishwasher a ccording to EU Direct ive 1 05 9/2010:
Ma nufa cturer
Type / Desc ription
Standa rd place setting s
Energy effi ciency class
Annual energy consu mpt ion
Energy consum pt ion of the st anda rd clea ni ng cy cle
Power consump tion of off-mode
Power consump tion of left -o n mod e
Annual water con sump ti on
Drying effi ciency class
Standa rd cl ea ni ng cycle
No is e lev el
Mo unting
He ight
Widt h
De pth (with c onnect ors)
Power consump tion
Ra ted voltage / frequen cy
A + + + (highe st effi ci ency) t o D (lowest effici ency)
Energy consum pt ion 197 kWh per year, ba sed on 280 standard clea ning cycles us ing cold water fill an d
th e consump tion of the l ow po wer m odes . Actu al energy consumption wi ll de pend on ho w the ap plia nc e i s use d.
“ ”
Wat er co nsumpt ion 252 0 litr es per y ea r, based on 28 0 s ta nd ar d c lean in g c ycl e s. Actual water consumpt ion
will depe nd on how the appl iance is used.
“ ”
A (highest efficiency) to G ( lowest efficien cy)
This prog ra mme is su itabl e for c leaning n ormally s oi le d t able ware an d t hat it is the
mo st effici ent programme in terms of its combin ed energy an d wat er consum pt ion for
th at type of tabl ewar e.
The device meets the European standards and the directives in the current version at delivery:
- LVD 2006/9 5/EC
- EMC20 04/108/EC
- ErP 2 009/ 12 5/EC
The above v alues have been measured in acco rd ance with st andards u nder sp ecifie d o perati ng cond itions .
Re sults may va ry gr ea tl y a ccordi ng to quantity an d p olluti on of th e d is hes, wa te r har dn ess,
am ount of dete rg ent, etc.
The man ual is ba sed on the Eu ro pean Union's s tand ards an d rules.
Technical Data Sheet
NOTE:
EC O 45℃
49 dB(A) re 1 pW
Build under
23 0 V~ 50 Hz
Wat er pressu re (flow p re ssure) 0. 4- 10 bar = 0. 04-1 MPa
Co uld be buil t-in
Yes
CA PL E
Di481
29
Pr ogramm e durat ion of the s tand ard c leaning c yc le
Page 32

 Loading...