

Page 1
Instruction manual for Extractor Motor
Model code: DDMEXT2
Contact Caple on 0844 800 3830 or for spare parts www.4caple.co.uk
Page 2

Page 3
GB
The symbol on the product or on its packaging indicates that this product may not be
treated as household waste. Instead it shall be handed over to the applicable collection
point for the recycling of electrical and electronic equipment. By ensuring this product
is disposed of correctly, you will help prevent potential negative consequences for the
environment and human health, which could otherwise be caused by inappropriate
waste handling of this product. For more detailed information about recycling of this
product, please contact your local city oce, your household waste disposal service or
the shop where you purchased the product. This appliance is marked according to the
European directive 2002/96/EC on waste electrical and electronic equipment (WEEE).
3
Page 4

GB
Warnings!
- The air outlet of the appliance must not be connected to a ue which is used for exhausting
other fumes from appliances, such as a central heating, boilers etc..
- Ensure the external exhausting of the fumes, comply with the regulations in force.
- Ventilate the room suitably according to the laws in force when the appliance is working together with gas, oil or coal burning appliances, at the same time.
- The motor of the peripheral exhausting group is powered by the cookerhood placed in the
kitchen.
- Before connecting the cooker hood to the mains supply, make sure that the voltage indicated
in the rating plate corresponds to the mains voltage in the home.
- Before carrying out any sort of maintenance or cleaning operation, make sure that the appliance is disconnected from the electrical mains.
- Appropriate maintenance ensures good working and good performance in the long run.
Advice for good performance of the appliance:
- Use an exhausting pipe with the necessary minimum length.
- A few bends with a maximun 90° bending angle.
- Materials in accordance with the directives.
- Avoid any drastic change in the section (constant diameter: ø 150 mm. advised)
- Read the mounting and operating istructions of the exhausting cookerhood carefully.
- The manufacturer cannot be held responsible for a decrease of the air ow or for an increase
of noise level caused by non-compliance with the instructions above.
Warning!
The the DDMEXT2 suction centrals can be connected to any other products from the
same manufacturer if they are equipped with the External Motor version.
In case they are connected to products from other suppliers, the SCET-1 central unit can
command them.
The manufacturer cannot be held responsible for damages caused by a incorrect use. No
garantee or indemnity will be due.
4
Page 5

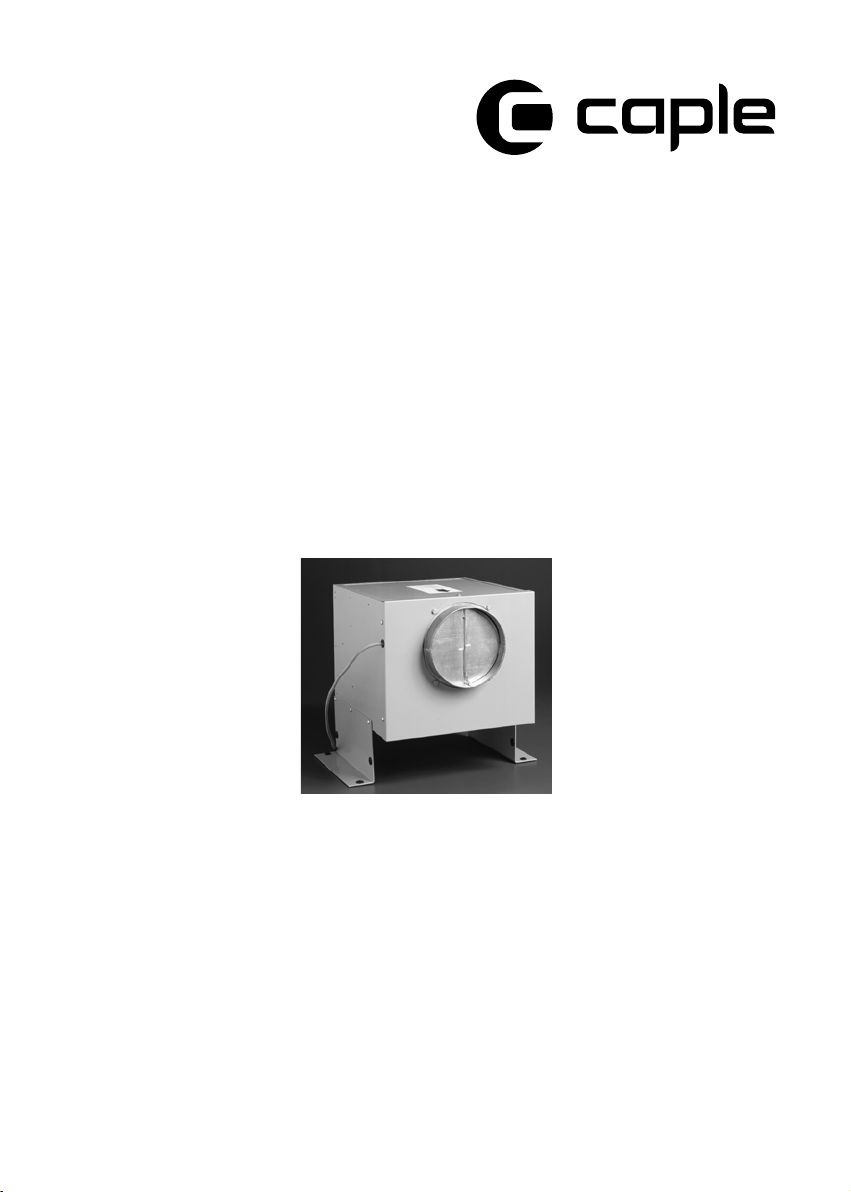
DDMEXT2 (g. 1)
Warning! The peripheral exhausting group (remote tted extraction motor) is built in class
II (symbol on the rating plate), therefore it must not be earthed.
The appliance is designed to exhaust fumes and odours very silently and in the best way. It
must be installed in the house and connected to the cookerhood, which is in the kitchen (g.
2) or to the SCET control unit 1.
Types of installation: to make the installation easy, the appliance can be xed on the wall,
on the ceiling or on the oor in a horizontal position (g. 3 ) or vertically (g. 4) to the xing
level.
Note: in the vertical xing, the brackets supplied can be used only on the longest side (g. 6).
Installation of the appliance: after deciding the position and the type of installation, insert the
anti-vibration rubber caps in the holes of the brackets supplied (g. 5C).
The rubber caps must be put on the sides which are in contact with the wall.
Put the brackets (g. 5A) on the remote tted extraction motor by matching its holes with those
of the brackets. Fix with the screws supplied (g. 5B).
Put the group on the point previously chosen for the installation and mark the points on the wall
where the holes must be drilled.
Insert the dowels supplied in the holes (g. 6A). Put the remote tted extraction motor on the
wall by matching the holes of the brackets with the plastic dowels. Screw with the screws sup-
plied (g. 6B).
Connection of the pipes: the appliance is fitted with an entrance and an outlet to connect
the pipes. Before connecting the exhaust pipes, check the direction of the air shown on the
external label (g. 7). Connect the pipes and x them with appropriate metal clamps (exhaust
pipes and metal clamps have to be supplied by the installer). The pipe (g. 7A) must be connected with the cookerhood placed in the kitchen, and the pipe (g. 7B) must be directed
outside the building.
Electrical connection of the hood: the appliance is equipped with a 7m electrical cable with a
six- pin connection at one end. Insert it into the hood’s connection (External Motor version) or
into the SCET-1 central unit (see g. 8 for the end result).
5
Page 6

SCET - 1
6
Page 7

DDMEXT2
1
3
4 5
2
6
7
8
7
Page 8

00000000000 - GM 02/10
 Loading...