

Page 1
Instruction manual for 4 plate electric hob
model code: C603E
0
6
1
2
5
4
3
0
6
1
2
5
4
3
0
6
1
2
5
4
3
0
6
1
2
5
4
3
Contact Caple o n 0844 800 3830 or for spare p arts www.4caple.co.uk
Page 2
Safety instructions
This manual explains the proper installation and use of your appliance, please read it
carefully before using even if you are familiar with the product. The manual should be kept
in a safe place for future reference. In case of failure, only the Authorised Technical
Service may repair this hob. Otherwise the guarantee will be null and void.
Warning
General safety
The appliance may only be installed and connected
by trained, registered service engineers.
Built-in appliances may only be used after they have
built in to suitable built-in units and work surfaces
that meet standards.
In the event of faults with the appliance or damage,
the appliance must be switched off and
disconnected from the electrical supply, to prevent
the possibility of an electric shock.
Repairs to the appliance must only be carried out by
trained registered service engineers.
The technical and identification data for the hob
figure on the reference plate fixed to the appliance.
This reference plate must be consulted before
making the electrical connections.
The electrical connections must be made by
specialist aware to the legal and regulatory,
requirements in each country.
If the cable is damaged in any way it must be
replaced by the manufacturer or after sale service
or by authorized technical staff, to avoid hazard.
Correct use
This appli ance is not intended for use by per sons
(including children ) with reduced phys ic al, sensory
or mental capabilities, or lack of experi ence and
k n o w l e dg e , u n l e s s th e y h a v e b e en giv e n
supervision or instruction concerning use of the
appliance by a person respo nsible for their safety.
Children should be s upervised to ensure that they
do not play with the applia nc e.
This appliance should be used only for normal
domestic cooking and frying of food.
The appliance must not be used as a work surface
or as a storage surface.
Additions or modifications to the appliance are not
permitted.
Do not place or store flammable liquids, highly
inflammable materials or fusible objects (e.g. plastic
film, plastic, aluminum) on or near the appliance.
1
Do not heat an empty pan on the appliance.
Children’s safety
The cooking zones will become hot when you
cook. Therefore, always keep small children
away from the appliance.
The appliance is not intended for use by
young children or infirm persons without
supervision.
Young children should be supervised to
ensure that they do not play with the
appliance.
Safety during use
There is the risk of burns from the appliance if
used carelessly.
Cables from electrical appliances must not
touch the hot surface of the appliance or hot
cookware.
Overheated fats and oils can ignite very
quickly. Warning! Fire hazard!
Switch the cooking zones off after each use.
Users with implanted pacemakers should
keep their upper body at least 30 cm from
heating cooking zones that are switched on.
Risk of burns! Do not place objects made of
metal, such as knives, forks, spoons and
saucepan lids on the cooking surface, as they
can get hot.
Page 3
Safety instructions
Safety when cleaning
z For cleaning, the appliance must be switched off
and cooled down.
z For safety reasons, the cleaning of the appliance
with steam jet or high pressure cleaning
equipment is not permitted.
How to avoid damage to the appliance
z Objects that melt and things that boil over should
be removed straightaway.
Disposing of the device
When disposing of the device, do not bring it to regular municipal waste containers. Instead, bring
it to electrical and electronic waste recycling and reuse center. A relevant label has been put on the
device, its instructions manual, or the package. The device has been manufactured of recyclable
material. By bringing old device to recycling collection center, you show that you care about nature.
Ask your local environmental care authority for information on location of such facilities.
z Do not use the cooking zones with empty
cookware or without cookware.
z To avoid damaging cookware, do not allow
saucepans or frying pans to boil dry.
z The ventilation gap of 5mm between the worktop
and front of the unit underneath it must not be
covered.
2
Page 4

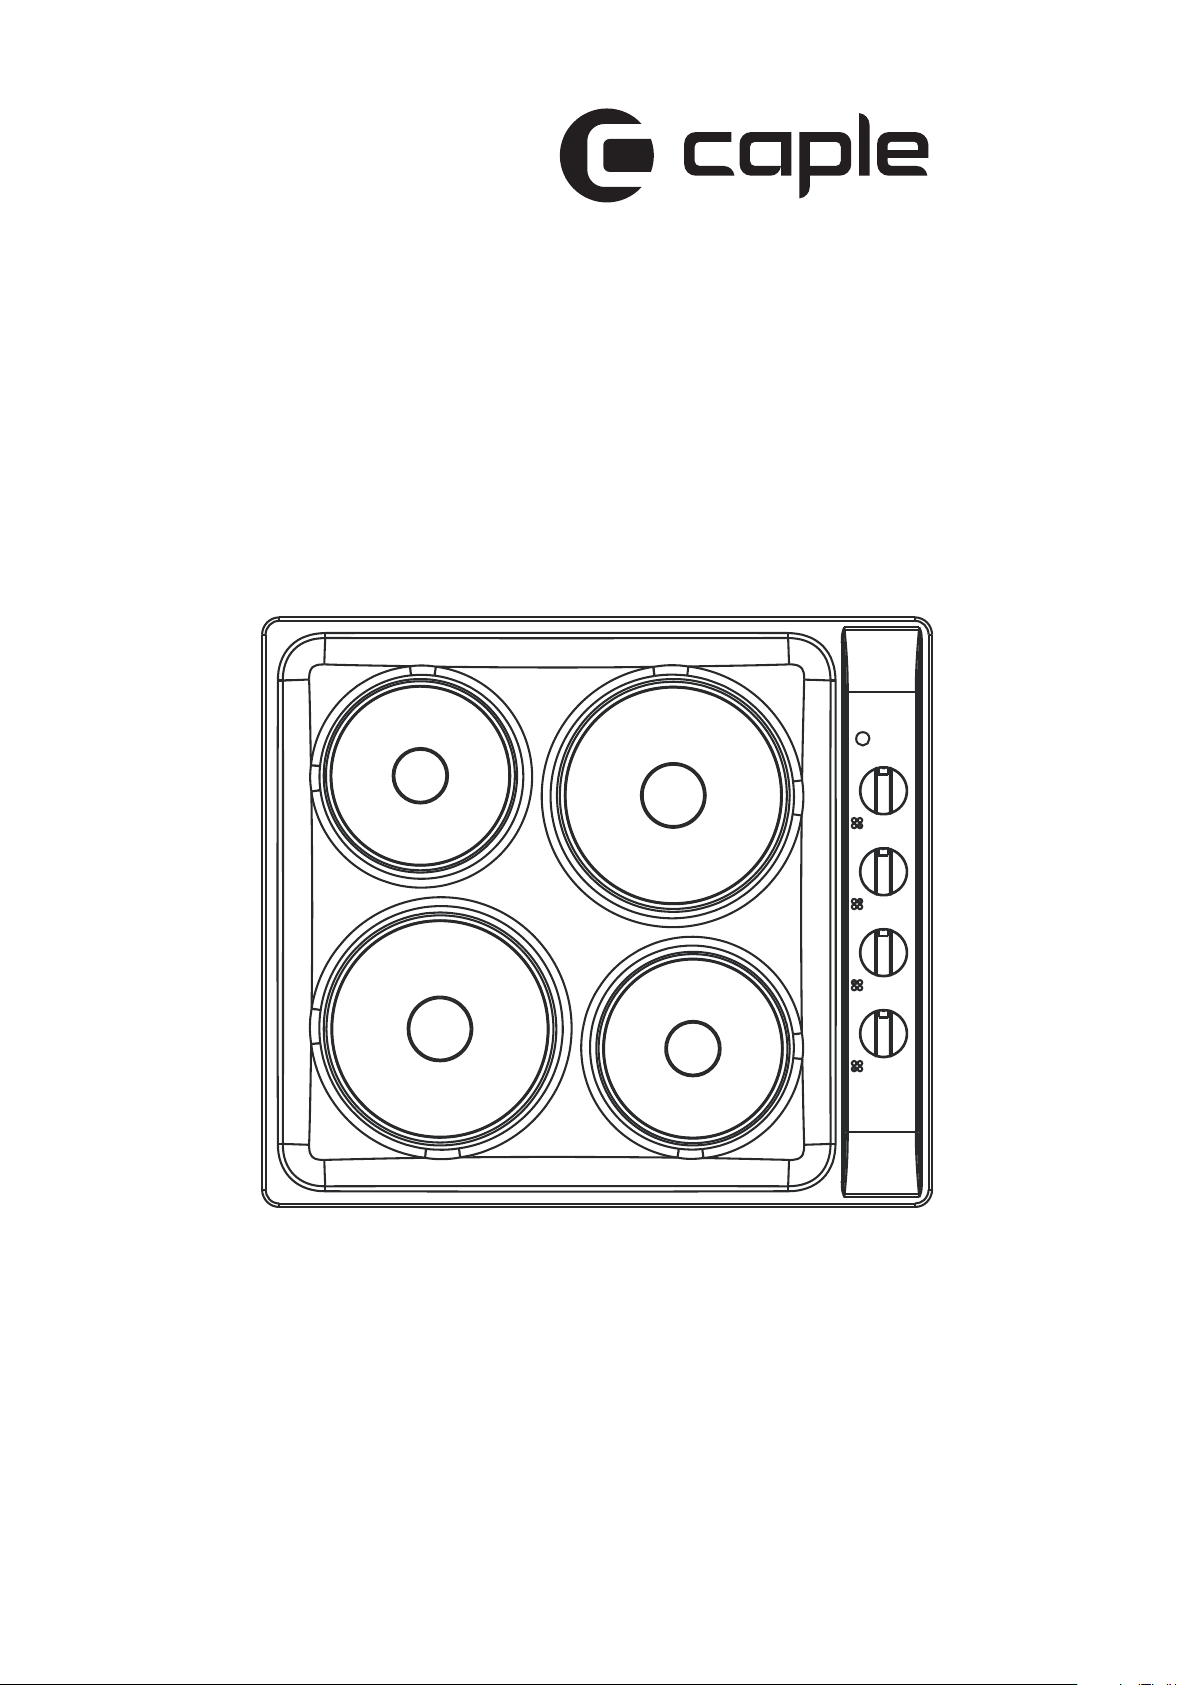
Features Of Your Product
Pilot Light
Hotplate Control Knobs
Technical Data
Product Dimensions
Model
C603E 45x580x510 220-240V/50Hz 5500 W User Manual 1
Left-upper(standard) 1000 W
Right-lower(standard) 1000 W
Right-upper(standard) 1500 W
Heating Elements
Left-lower(rapid) 2000 W
(h x w x d) mm
Electrical
Connection
Max. Power
Rating
Ø 155mm
Ø 155mm
Ø 188mm
Ø 188mm
Description QTY
ST4.2x22
Installation bracket
Accessories
4
4
3
Page 5

Installing The Appliance
IMPORTANT: The benchtop and surrounding cabinet(s) must be able to withstand a minimum
temperature rise of 100°C above the ambient temperature of the room it is located in, during period of
use.
This appliance is to be built into a kitchen unit (depending on size) or 600mm worktop, providing the following
minimum distances are allowed:
z 600mm (minimum) between the hob surface and the underside of any horizontal surface above it.
z 50mm clearance around the appliance and between the appliance surface and any combustible materials.
CAUTION: The surface temperature of the top and bottom of the appliance exce eds 95°C. To avoid a
hazard, access to the bottom of the appliance from underneath the benchtop must be restricted
IMPORTANT: There must be a gap of at least 35mm between the bottom of the appliance in situ and
any surface directly below it.
Cut a hole in the benchtop that corresponds with the dimension shown on above drawings and carefully turn
the cooktop upside down and place it on a cushioned mat and apply the sealing strip provided around the edge
of the appliance. The protective covering must be removed from both sides. Do not leave a gap in the
sealing agent or overlap the thickness.
4
Page 6

IMPORTANT: Do not use a silicon sealant to seal the appliance against the benchtop. This will make
it difficult to remove the cooktop from the benchtop in future, particularly if it needs to be serviced.
1. Benchtop
2. Screw
3. Bracket
4. Cooktop
5. Sealing
IMPORTANT:
z Using a standard screwdriver, tighten the tension clamps evenly starting at the centre and moving
diagonally, until the cooktop rim is tight on the worktop.
z Do not over fasten screws to avoid thread stripped.
z Do not use an electric or pneumatic screw driver without an adjustable safety clutch.
Electrical Connection
z This appliance must be installed by a qualified electrician or service agent.
z There is no cord & plug supplied with this appliance as it is to be hardwired in.
z It is not connected via a mains socket, it is hardwired in.
z If the mains supply where the appliance is to be installed is different from 220...240V~ make the
connection as shown in the enclosed diagrams. (The cable must be able to withstand temperatures of
120°C). Before doing this disconnect the mains
supply. A good earth connection necessary and a switch
for disconnecting all the phases must be placed accessibly, with a minimum distance of 3 mm between
contacts.
Open terminal board cover at rear panel of appliance and connect as per below diagram for 220V – 240V
earthed single phase. Close the cover after complete electrical connection.
5
Page 7

Start Using Your Appliance
Before first use, switch on one hotplate at a time for 5 minutes at the maximum setting. This will help to
eliminate any new smell that exists and evaporate any humidity that has formed on the heating elements during
transit.
Control Knobs
All operations are performed by means of the 4 control knobs that are located on the right hand side of the
cooktop.
The control knobs can be turned either clockwise or anti-clockwise to select a heating level. The numbers
around the outside of each control knob indicates the power level that you have set the hotplate to.
A marking to the bottom of each control knob, indicates which hotplate it controls.
Turn the control knob of the hotplate that you wish to cook on, clockwise or anti-clockwise until it reaches the
power level that you desire.
Each hotplate can be adjusted between 1 and 6. 1 being the lowest temperature setting and 6 being the
highest temperature setting.
When you have finished cooking, make sure that you turn the control knob anti-clockwise to the 0 position.
Cooktop Guidelines
The first few times the cooktop is used, it may give off an acrid, burning smell. This smell will disappear
completely with repeated use.
The hotplates are fitted with cooking areas of different diameter and power. The positions where the heat will
radiate from are clearly marked on the cooktop. The saucepans must be positioned exactly on these
hotplates for efficient heating to occur. Pans should have the same diameter as the hotplate that they are
being used on.
6
Page 8

You should not use saucepans with rough bottoms, as this can scratch the solid plates.
Before use, make sure that the bottoms of the saucepans are clean and dry.
Cover pans with a lid to permit cooking at a lower heat.
Food or liquid that has a high sugar content may damage the cooktop if it comes into contact with the hotplates.
Any spillages should be wiped up immediately, however, this may not prevent the hotplates from becoming
damaged.
Large pots MUST NOT be placed over two or more hotplates as damage will more than likely occur.
Do not leave pans unattended on a hotplate.
Never heat an empty pan.
Switch off the heating element before removing the pan. Once switched off, the hotplates will remain warm for
a while.
Avoid using oversized pans that may radiate excessive heat and cause damage to surrounding surfaces.
WARNING: Do not use the hotplate if the surface becomes broken or cracked.
7
Page 9

Maintenance
Caution:
Before maintenance or cleaning is carried out, the range hood should be disconnected from the main power
supply. Ensure that the range hood is switched off at the wall socket and the plug removed.
Cleaning Your Cooktop
z Allow the cooktop to cool before cleaning.
z The hotplates should be cleaned after every use to avoid build up of food.
z If a major spillage occurs, wipe clean as soon as possible with a damp cloth.
z Do not immerse in water.
z DO NOT use spray on or other cleaners as they may cause electrical damage. DO NOT use sharp utensils
to clean.
z Abrasive cleaners or sharp objects will damage the cooktop surface. You should clean it using water and a
little washing up liquid.
z Although it is easier to clean some deposits whilst the hotplates are still warm, you should take care not to
burn yourself.
After Each Use
z Wipe the appliance over with a damp cloth and a little washing up liquid.
z Dry the appliance by rubbing the surface with a clean cloth.
Stainless Steel Surface
The stainless steel surface should be cleaned with only a damp cloth or with a purpose made product or a few
drops of olive oil on a damp cloth.
Hotplates
z Weekly clean
z Use a small amount of concentrated household detergent and a nylon scourer to remove all baked on grime.
Wipe off with a damp cloth and dry with about 10 seconds of high temperature heat.
z Apply a hotplate protector to the cleaned hotplates such as Solid Hotplate Protector or lightly oil with
olive oil while plate is still warm.
z The chrome element rings around the hotplates will change colour over time due to the effect of the heat on
the metal. The colour changes are dependent on the temperature levels and is common to all electric
cooktops.
ing of frequently used hotplates is recommended to maintain their surface finish.
8
Page 10

Caple
Fourth Way
Avonmo uth
Bristol
BS11 8DW
www.caple.co .uk
t: 0117 938 1 900
e: sales@capl e.co.uk
 Loading...