

Page 1

Instruction Manual
Ceramic Cooker
with
Double Oven
Model: C 5220
Page 2

2
Thank you for buying your new CAPLE Cooker. To ensure that you get the best
results from your new CAPLE Cooker, we strongly suggest that you read this instruction manual thoroughly before use. This manual contains installation advice, cleaning
tips and a cooking guide, as well as other important facts about your CAPLE cooker.
If treated with care, your CAPLE appliance should give you years of trouble-free
cooking.
For Spare Parts, Technical Advice
or Product Service call the
CAPLE HELPLINE on 0870 241 1142
(Answerphone outside office hours)
The CEmarking confirms that the appliance conforms to the following EU directives:
- safety requirements of EEC Directive “Low voltage” 73/23;
- protection requirements of EEC Directive “EMC” 89/336;
- requirements of EEC Directive 93/68.
Page 3

3
Safety Reminders
Instruction Book
This appliance should only be used for
it’s intended purpose as described in
these instructions.
Ensure that you fully understand these
instructions before operating this appliance.
Space Requirements
Ensure that the specified ventilation
space around the appliance is not
obstructed.
Food Splashes
Always wipe clean the oven after use.
Food splashes can carry on cooking next
time and may become a fire hazard.
Hot Surfaces
It is important to remember that the surfaces of cooking appliances get hot during use and retain the heat for some time
after switching off.
It is therefore advisable to keep small
children away from the appliance.
The Grill and Top oven element
are exposed, so take great care when
placing food in the oven or removing it.
Use the grill pan handles or gloves.
DO NOT line the oven, grids, trays etc.
with aluminium foil as this could adversely affect the heating elements and it
could also damage the interior surfaces.
DO NOT place flammable materials in
the oven.
Faults
Do not continue to use this appliance if it
appears to be faulty.
After Use
Switch the appliance controls off.
Always switch off at the isolating switch
before cleaning the appliance, or
attempting any maintenance task, or
when not in use for long periods (when
on holiday).
CAPLE Service
To ensure the continued safe and efficient operation of this appliance, we recommend that any servicing or repairs are
carried out only by an authorised CAPLE
SERVICE ENGINEER.
Page 4

4
Electrical Requirements
N.B. For connection to the mains, do
not use adapters, reducers or
branching devices as they can cause
overheating and burning.
If the installation requires alterations to
the domestic electrical system call an
expert.
He should also check that the socket
cable section is suitable for the power
absorbed by the appliance.
IMPORTANT: The appliance must
be installed in accordance with the
manufacturer’s instructions.
Incorrect installation, for which the
manufacturer accepts no responsibility, may cause damage to persons, animals and things.
General
– Connection to the mains must be
carried out by qualified personnel in
accordance with current regulations.
– The appliance must be connected to
the mains checking that the voltage
corresponds to the value given in the
rating plate and that the electrical
cable sections can withstand the load
specified on the plate.
– The cooker can be connected directly
to the mains placing an omnipolar
switch with minimum opening
between the contacts of 3 mm
between the appliance and the mains.
– The power supply cable must not
touch the hot parts and must be
positioned so that it does not exceed
75°C at any point.
– Once the cooker has been installed,
the switch or socket must always be
accessible.
IMPORTANT: this cooker must be
connected to a suitable double
pole control unit adjacent to the
cooker.
WARNING!
This appliance must be
earthed.
Page 5

5
1 - Electrical Installation - Wall box connection
Technical data
230 V AC - 50 Hz
Top conventional oven
– Top element 0.700 kW
– Bottom element 1.100 kW
– Grill element 2.100 kW
Bottom fan oven
– Fan element 2.5 kW
Vitroceramic hob
– Front left 1.7 kW
– Back left 1.2 kW
– Back right 2.2 kW
– Front right 1.2 kW
Maximum power rating
– Top oven 2.1 kW
– Bottom oven 2.5 kW
Oven lamp 0.015 kW
300 °C, miniature edison screw
Fan motor 0.025 kW
Maximum power
usable simultaneusly 10.96 kW
Connecting the mains cable
– Remove the two screws securing the
cover plate A behind the cooker.
– Remove the screw C from the cable
clamp.
– Insert the mains cable (type H05RR-
F) of minimum 6 mm
2
section into the
cable protector P.
– Connect the phase and earth cables
to the mains terminal connection block
B.
EARTH
N NEUTRAL
L LIVE
– Refit the cable clamp so that it clamps
the outer sleeving of the cable.
– Refit the cover plate A.
IMPORTANT:
This appliance must be earthed.
Green &Yellow
(Earth)
Brown
(Live)
Blue
(Neutral)
P
C
B
A
Fig. 1.1
N
L
Page 6

6
650 mm
450 mm
300
mm
2 - Location
FOR THE INSTALLER
The appliance afford type “X” protection against overheating of surrounding
surfaces. The appliance must be kept no less than 300 mm away from any side wall
which exceed the height of the cooktop (fig. 2.1).
The furniture walls adjacent to the cooker must be made of material resistant to heat. The
veneered syntetical material and the glue used must be resistant to a temperature of
120°C in order to avoid ungluing or deformations.
The cooker may be located in a kitchen, a kitchen/diner or bed-sitting room but not in a
room containing a bath or shower.
Curtains must not be fitted immediatly behind appliance or within 500 mm of the sides.
It is essential that the cooker is positioned as stated below.
Secure the four feet in the holes on the base of the appliance and adjust the height.
The cooker must be installed by a qualified technician and in compliance with
local safety standards.
Fig. 2.1
Page 7

7
34
1
2
3 - Features and Technical Data
Fig. 3.1
Cooking zones (Fig. 3.1)
1. Radiant hotplate Ø 145, 1200 W
2. Radiant hotplate Ø 180, 1700 W
3. Radiant hotplate Ø 145, 1200 W
4. Halogen hotplate Ø 210, 2200 W
5. Residual heat indicators
Fig. 3.2
7
9
10
8
11
65
4
3
2
1
Control panel
Controls description
1. Front right hotplate control knob
2. Rear right hotplate control knob
3. Rear left hotplate control knob
4. Front left hotplate control knob
5. Main oven switch and thermostat knob
6. Conventional top oven function selector knob
7. Conventional top oven thermostat knob
8. Electronic clock/end cooker timer (main oven only)
Pilot lamps:
9. Conventional top oven temperature
10. Main oven temperature
11. Hotplates
Attention: Detach the appliance from the
mains if the ceramic hobs is cracked.
5
Page 8

8
How To Use the Hotplates
The ceramic surface of the hob allows a
fast transmission of heat in the vertical
direction, from the heating elements
underneath the ceramic glass to the
pans set upon it.
The heat does not spread in the horizontal direction, so that the glass stays
“cool” at only a few centimeters from the
cooking plate.
The 4 cooking plates are shown by dark
disks on the ceramic surface.
Fig. 3.3
Type A Type B
Type of hotplates
Halogen hotplate (fig. 3.3).
Incorporating 1 halogen lamp and 2
heating elements (fig. 3.3 - type A or B).
Instantly reaches the working temperature.
Controlled by energy regulator switch.
Radiant hotplate
Incorporating 3 heating elements you
can control and light up all together or
separately by a 6 position switch.
Reaches the working temperature in a
very short time.
Page 9

9
Fig. 3.5
Radiant hotplate control
knob
The radiant hotplates are controlled by a
6-position control switch (fig. 3.4).
Fig. 3.4
Halogen hotplate control
knob
The halogen hotplate is controlled by a
energy regulator switch (fig. 3.5).
The heat power of the halogen hotplate
can be adjusted within steps from “0” to
its max “12”.
Page 10

10
TYPE OF COOKING
Switched OFF
For melting operations
(butter, chocolate).
To maintain food hot and to
heat small quantities of liquid (sauces, eggs).
To heat bigger quantities; to
whip creams and sauces.
(vegetables, fruits, soups).
Slow boiling, i.e.: boiled
meats, spaghetti, soups,
continuations of steam cooking of roasts, stews, potatoes.
For every kind of frying, cutlets, uncovered cooking, i.e.:
risotto.
Browning of meats, roasted
potatoes, fried fish,
omelettes, and for boiling
large quantities of water.
Fast frying, grilled steaks,
etc.
0
0
Position
of switch
1
2
1
2
3
4
5
6
2
2
3
4
3
4
6
7
4
7
8
4
5
8
9
10
6
11
12
After a short period of use, experience
will teach you which setting is the right
one for your needs.
Cooking hints
Cooking plate
controlled by a 6
position switch
Quick-light star
hotplates
Cooking plate
controlled by a 12
position switch
Halogen
hotplate
1
2
3
4
5
6
7
8
9
10
11
12
1
2
3
4
5
6
Heating
Cooking
Roasting-frying
Fig. 3.6
Page 11
11
Fig. 3.7
Residual heat indicator
The hob also features 5 warning lamps
which are wired to the corresponding
plate.
When the temperature of a cooking plate
is over 60°C, the relevant warning lamp
is also lit-up to warn of heat on the surface of the hob.
This lamp also stay on after the cooking
plate has been switched off to shown
that the hob surface is still hot.
This residual heat lasts for a rather long
time after the cooking plate has been
switched off.
During this period of time you
should avoid touching the hob
surface over the cooking area.
Please pay special attention to
ensuring children are not allowed
near the hob.
The lamp will switch off automatically as
soon as the surface temperature of the
cooking plate falls below 60°C.
Cooking hints:
– To reduce the cooking time, you can
turn the control knob to the max when
you switch the plate on.
After a short time you will set the
control knob to the required position
for the cooking.
– You should use pots and pans with
flat bases (pans with the test mark for
glass-ceramic hobs are available from
specialist shops).
The diameter of the pan should match
that of the cooking plate (or be slightly
bigger) to make the most of the
energy.
– Since the cooking surface stays hot
for a certain time after the plate has
been switched off, you can switch it
off 5 or 10 minutes before the end of
the cooking.
The residual heat of the hob will
complete the cooking.
– To save electricity, use pan lids
whenever possible.
– Never cook the food directly on the
glass ceramic cooktop, but in special
pans or containers.
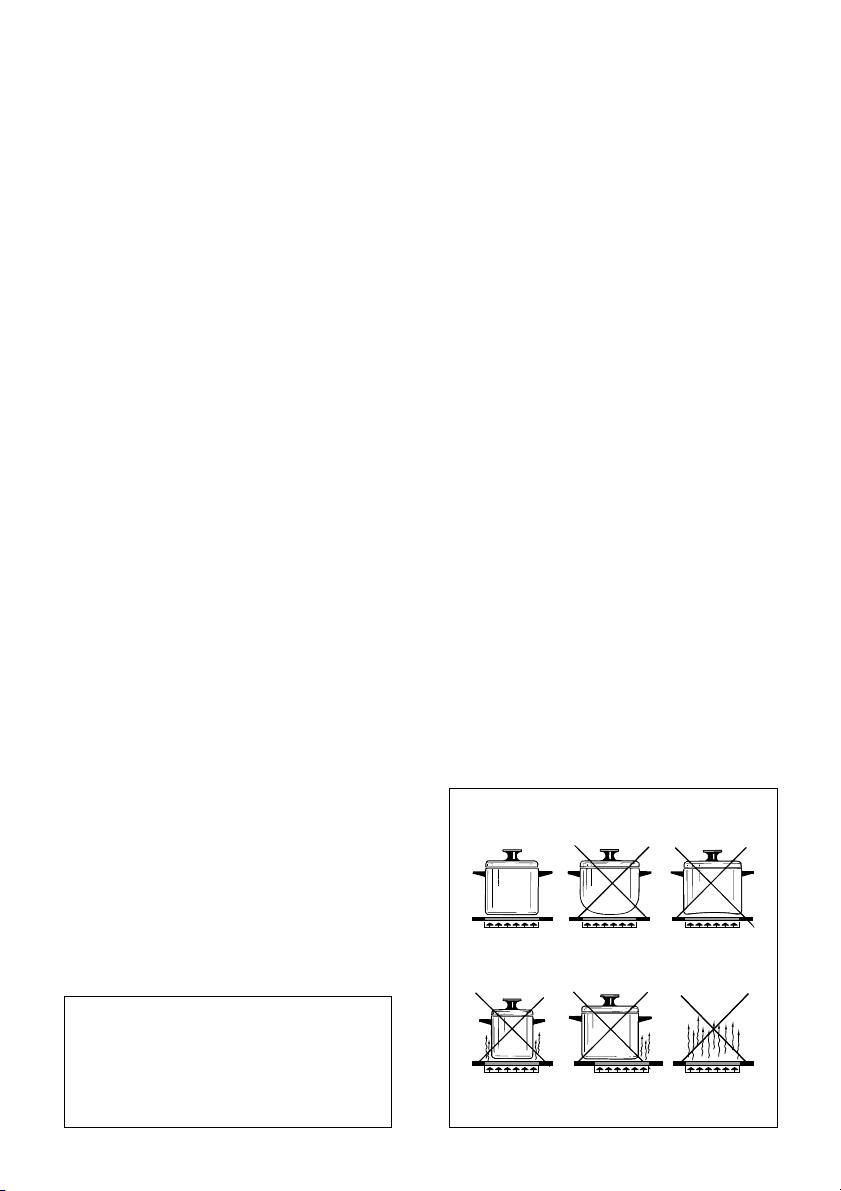
Caution!
the cooking hob becomes very
hot during operation.
Keep children well out of reach.
Page 12

12
Fig. 3.8
Safety hints:
– Before you switch the hob on, make sure
you know which knob controls the
required cooking plate. We advise you
to set the pan over the cooking plate
before switching it on. Remove the pan
after you have switched the cooking
plate off.
– Do not use pots and pans with rough
bases (pay attention to cookware made
of cast-iron). Rough bases can damage
(scratch) the glass surface of the hob.
Make sure that the pan bottom of the
pan is dry and clean.
– Pots with aluminium bottoms may leave
silver streaks or spots on the hob.
– Do not leave wet or damp lids on the
hob.
– The glass-ceramic surface and pans
must be clean. Carefully remove any
food debris (especially containing
sugar), dirt etc. with the aid of a cleans-
ing agent.
– Pan handles should never stand out
beyond the kitchen worktop, as there is
a great danger of knocking the pan
over.
This will also ensure that children
cannot reach them.
– Do not use the hob if the glass sur-
face is broken or cracked in any
way. Please disconnect the hob
from the mains and contact the
after-sales service.
– Do not lean over the cooking plate when
in use.
– Do not lay cooking foil or plastic materi-
als on the ceramic surface when it is
hot.
– Remember that the surface remains hot
for a long time (about 30 min.) after the
cooking plate has been switched off.
– Follow the cleaning instructions careful-
ly.
– Do not stare at the light of the
halogen hotplate.
Do not use the glass surface for
storage.
Cleaning
Before you begin cleaning make
sure that the appliance is
switched off.
Remove spillages and other types of
incrustations.
Dust or food particles can be removed
with a damp cloth.
If you use a detergent, please make sure
that it is not abrasive or scouring.
Abrasive or scouring powders can damage the glass surface of the hob.
All traces of the cleaner must be
removed with a damp cloth.
Do not put articles on the hob which can
melt: i.e plastic, aluminium foil, sugar,
sugar syrup mixtures etc.
If any of these products items have melted on the ceramic surface, you should
remove it immediately (when the surface
is still hot) by using a scraper to avoid
any permanent damage to the surface of
the hob.
Avoid using a knife or other sharp
utensils since these can damage the
ceramic.
Do not use steel wool or an abrasive
sponge which could scratch the surface
permanently.
ATTENTION: MOST IMPORTANT!
If cleaning the glass ceramic hob
using a special scraper tool take
extra care to avoid damaging to the
seal at the edges of the glass ceramic surface.
Page 13

13
The electronic programmer is a device
with the following functions:
– 24 hours clock with illuminated
display
– Timing of oven cooking with automatic
switch-off (max. 99 minutes).
Electronic clock
Upon immediate connection of the oven
or after a mains failure, three zeros will
flash on the programmer panel.
To set the clock it is necessary to push
the button and then, within 7
seconds, the or button until you
have set the correct time.
The clock will show zero after a mains
failure.
Attention: When the programmer
display shows three flashing zeros the
oven cannot be switched on.
The oven can be switched on when the
symbol is shown in the display.
Setting the frequency of
the alarm sound
The selection from 3 possibilities of
sound can be made by pressing the
button.
Cooking with automatic
switch-off
The aim of this function is to
automatically stop the cooking after a pre
programmed time, for a maximum period
of 99 minutes.
To set the cooking time, push the or
button until you obtain the desired
time in the display. The symbol AUTO
will be shown in the display.
Then you adjust the oven thermostat
knob according to the required temperature. The oven will immediately start to
operate and will work for the pre programmed time. The display shows the
count down.
Clock time can be displayed by pressing
the button.
Once the time has elasped, the oven will
switch off automatically, the symbol
AUTO will go off and an intermittent
buzzer, lasting 7 minutes, will start; this
can be stopped by pressing the buttons.
Important: Before the buzzer is
stopped switch off the oven manually.
To cancel the cooking program at any
time press the and buttons
together and release the button first.
Electronic alarm
The programmer can be used as an
alarm only for a maximum period of 99
minutes. To set the alarm, push the
or button until you obtain the
desired time in the display.
Once the time has elasped, an intermittent buzzer, lasting 7 minutes, will start;
this can be stopped by pressing the
button.
Attention: If the bottom oven is
switched on when the buzzer starts, it
will be automatically switched off.
For it to operate furtherly you have to
stop the buzzer by pressing the
button.
4 - Electronic clock / end cooking timer
Fig. 4.1
A
U
T
O
Page 14

14
5 - How To Use the Top Conventional oven
Attention: the oven door becomes
very hot during operation.
Keep children away.
Fig. 5.1 Fig. 5.2
General features
As the name implies, this oven features
a number of special characteristics from
the functional point of view.
2 different thermostatic control functions
are available to satisfy all cooking
requirements, provided by 3 heating
elements:
– Top element 700 W
– Bottom element 1100 W
– Grill element 2100 W
NOTE: When using for the first time, you
are advised to run the oven at maximum
temperature (thermostat knob set to
225) for approximately one hour in the
mode and for another 15 minutes in
the mode in order to eliminate any
traces of grease from the electrical
resistances.
OPERATING PRINCIPLES
Heating and cooking in the conventional
oven are obtained:
a. by natural convection
The heat is produced by the upper and
lower heating elements.
b. by radiation
The heat is radiated by the infrared
grill resistance.
WARNING:
The door is hot, use the handle.
Page 15

15
Oven light
By turning the knob onto this setting
(see picture aside) we light the oven
cavity (15 W).
The oven remains alight while any of
the functions is on.
Grilling
The infrared electrical resistance comes
on.
The heat is diffused by radiation.
Use with the oven door closed and the
thermostat knob to 200°C.
For cooking hints, see the chapter “USE
OF THE GRILL”.
Recommended for:
Intense grilling, browning, cooking au
gratin and toasting etc.
Note: It is recommended that you do not
grill for longer than 30 minutes at any
one time.
Attention: the oven door becomes very
hot during operation. Keep children
away.
Traditional convection
cooking
The upper and lower heating elements
come on.
The heat is dispersed by natural convection and the temperature must be set to
between 50° and 225°C via the thermostat knob. The oven must be preheated
before cooking.
Recommended for:
Food that requires the same degree of
cooking both inside and out, for example
roasts, spare pork ribs, meringues etc.
Function selector knob (fig. 5.2)
Rotate the knob clockwise to set the
oven for one of the functions described.
Thermostat knob
(Fig. 5.1)
This only sets the cooking temperature
but does not switch the oven on.
Rotate clockwise until the required temperature is reached (from 50 to 225 °C).
The light above the knob will illuminate
when the oven is swiched on and turns
off when the oven reaches the correct
temperature.
The light will cycle on and off during
cooking in line with the oven temperature.
Use of the grill
Leave to warm up for approximately 5
minutes with the door closed.
Place the food inside positioning the rack
as near as possible to the grill.
Insert the drip pan under the rack to collect the cooking juices.
Grilling with the oven door closed.
Do not grill for longer than 30 minutes
at any one time.
Attention: the oven door becomes
very hot during operation.
Keep children away.
Page 16

16
Attention: the oven door becomes
very hot during operation.
Keep children away.
Fig. 6.1
50-225 The oven light is switched
on.
The oven temperature can
be set between 50°C 225°C.
The set temperature has
been reached when the
temperature indicator light
goes off.
Several different meals
may be cooked
simultaneously on various
shelves, as the heated air
circulates evenly
throughout the oven.
The hot air system cooks
more quickly than
conventional static
system, therefore the
temperature should be set
15°C 20°C below the
values recommended in
your recipe books.
The oven door may be
opened briefly while
cooking as any heat
losses are quickly
recovered when the door
is closed.
Switch and
thermostat
selector
(Fig. 6.1)
Turn the selector knob (fig. 6.1) to the
required function.
OFF as per fig. 6.1
The oven light is switched on.
The fan operates without the
heating element, this function can
be used for defrosting.
6 - How To Use the Bottom Main oven
WARNING:
The door is hot use the handle.
Page 17

17
Cooking with air forced
Fan cooking is more economical and
quicker than cooking in a conventional
oven.
The moving hot air surrounds the food
and penetrates it more quickly than in a
conventional oven.
The oven can be filled with different dishes all requiring the same cooking temperature. Subtract 10 minutes per hour
for every dish requiring a cooking time of
more than 1 hour and reduce the heat by
10-20°C; the hotter the oven, the more
the temperature can be reduced.
Generally, there is no need to pre-heat
the oven, but it is advisable to pre-heat
for about 5 minutes to ensure the best
results; use the indicator light as a guide,
it goes out when the set temperature is
reached.
Fan cooking is ideal for gelatine based
dishes and softening ice cream - a
microwave oven is much too strong for
these dishes. Cooking yeast based dishes is also speeded up this way. If the
oven door has been opened, the oven
quickly regains its temperature once the
door is closed.
Page 18

18
Recommended cooking temperature
N.B. For fan ovens reduce the tempera-
ture by 10-20°C. For any dish taking one
hour or over to cook, reduce the cooking
time by 10 minutes per hour.
* Shelf positions have been counted
from the top of the oven to the base.
A fan oven creates more even temperature throughout, therefore the shelf positions are not as critical.
Food °C °F Gas Shelf Cooking
Mark Position* Time (approx)
CAKES
Victoria sandwich 190 375 5 2 or 3 20-25 mins
Small cakes/buns 190 375 5 1 and 2 15-20 mins
Maidera cake 180 350 4 2 or 3 20 mins
Fruit cake 170 325 3 3 1
3
/4 hours
Rich fruit cake 150 300 2 3 or 4 2
1
/2 hours
Scones 225 425 8-9 2 8-10 mins
PASTRY
Puff 225 425 8-9 2 10-20 mins
Short crust 200 400 6 2 20-30 mins
Plate tarts 200-210 400-410 6 1 or 2 30-35 mins
Quiches and flans 200-210 400-410 6 1 or 2 40-45 mins
YEAST
Bread loaf 225 425 7-8 2 35-55 mins
Bread rolls 220 425 7 1 or 2 15-20 mins
Pizza dough 230 450 8 2 20 mins
ROAST MEAT
Beef – Medium 190 375 5 2 or 3 20 mins/lb + 20 mins
Lamb 190 375 5 2 or 3 25-30 mins/b + 25 mins
Pork 190-200 375-400 5-7 2 or 3 30 mins/lb + 30 mins
Veal 190 375 5 2 or 3 30 mins/b + 30 mins
Chicken 190 375 5 2 or 3 30 mins/b + 30 mins
Turkey up to 10lb 180 350 4 2 or 3 18-20 mins/b + 20 mins
Stews/casseroles 150-170 300-325 2-3 2 or 3 1
1
/2 2 hours
Page 19

19
Cleaning
All the enamelled parts must be cleaned
with a sponge and soapy water or other
non-abrasive products.
Dry preferably with a soft cloth.
Acidic substances like lemon juice,
tomato sauce, vinegar etc. can damage
the enamel if left too long.
Stainless steel surfaces
CAUTION
The STAINLESS STEEL front panels on
this cooker (facia, oven door, drawer or
storage compartment) are protected with
a Special Lacquer to reduce finger-print
marks.
To avoid damaging this lacquer, do not
clean the stainless steel with abrasive
cleaners or abrasive cloths or scouring
pads.
ONLY SOAP/WARM WATER MUST
BE USED TO CLEAN THE STAINLESS
STEEL SURFACES.
7 - Cleaning and Maintenance
General advice
– Important:
Before any operation of cleaning and maintenance disconnect the appliance
from the electrical network.
– It is advisable to clean when the appliance is cold.
– Do not use a steam cleaner because the moisture can get into the appliance
thus make it unsafe.
Replacing the oven light
bulb
Switch the cooker off at the mains.
When the oven is cool unscrew and
replace the bulb with another one
resistant to high temperatures (300°C),
voltage 230 V (50 Hz), 15 W, E14.
Note: Oven bulb replacement is not
covered by your guarantee.
Attention
The appliance gets very hot, mainly
around the cooking areas. It is very
important that children are not left
alone in the kitchen when you are
cooking.
Oven
The oven with smooth enamel must be
cleaned after every use, using suitable
products and keeping in mind that its
operation for 30 minutes on the highest
temperature eliminates most grime
reducing it to ashes.
It is mandatory not to use abrasive substances.
Page 20

20
Fig. 7.1
Fig. 7.2
Fig. 7.3
Using the top and the main
oven for the first time
You are advised to carry out the following operations:
– Clean the inside of the two ovens with
a cloth soaked in water and neutral
detergent and dry thoroughly.
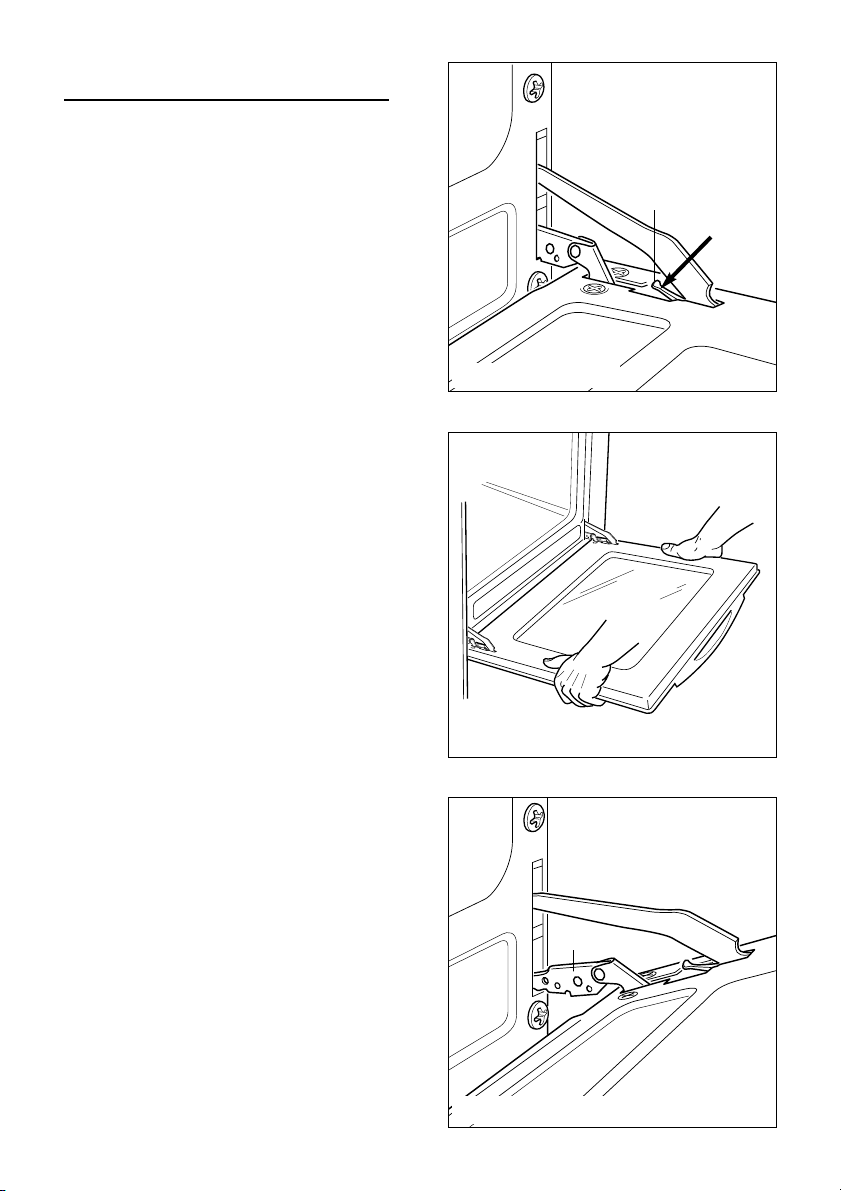
– Hang up the wire racks on the oven
walls (Figure 7.1 and 7.2).
– Slide in, on the guides, the shelf and
the tray etc. (Figure 7.3).
The shelf must be fitted so that the
safety catch, which stops it sliding out,
faces the inside of the oven.
– To eliminate traces of grease from the
heating elements, switch on the ovens
to the maximum temperature.
– To dismantle, operate in reverse order.
Oven door
The internal glass of the oven door can
be easily removed for cleaning by
unscrewing the two lateral fixing screws
(fig. 7.4).
Attention: Do not store flammable
material in the oven.
Fig. 7.4
Page 21

21
Fig. 7.5D
Fig. 7.5C
Fig. 7.5B
Fig. 7.5A
Type A
Removing the oven door
The oven door can easily be removed
as follows:
– Open the door to the full extent (fig.
7.5A).
– Attach the retaining rings to the hooks
on the left and right hinges (fig. 7.5B).
– Hold the door as shown in fig. 7.5.
– Gently close the door and withdraw
the lower hinge pins from their
location (fig. 7.5C).
– Withdraw the upper hinge pins from
their location (fig. 7.5D).
– Rest the door on a soft surface.
– To replace the door, repeat the above
steps in reverse order.
Fig. 7.5
Page 22
22
L
H
Fig. 7.6
Fig. 7.7
Fig. 7.8
Type B
Dismontling the door
Please operate as follows:
– Open the door completely.
– Push down the lever “L” and, keeping
it in this position, slowly close the
door in order to block the hinge.
– Grip the door (as indicated in fig. 7.7)
and, while closing it, release the two
hinges as shown in fig. 7.8.
Door assenbly
– Grip the door with your hands placed
near the hinges and raise the levers
“H” with your forefingers (fig. 7.8).
– Insert the hinges in their position until
levers “H” are hooked.
– Open the door completely to obtain
the release of levers “L”.
Page 23

23
Trouble shooting
Problem
Food too brown but not cooked.
Remedy
Turn down the oven temperature slightly
and cook a little longer
Problem
Food cooked but not brown enough.
Remedy
Increase temperature.
Problem
Food baking unevenly.
Remedy
1. The temperature may be slightly high
turn it down
2. Position the food in the centre of the
shelves rather than towards the sides
of tho oven.
3. Rotate the food a half turn in the oven.
4. Try pre-heating the oven for 5-15 minutes prior to baking.
Always remove cooked items as soon as
they are ready and continue cooking the
under-cooked items until they are completely finished.
Changing the Oven Cavity
Light Bulb.
If the oven light falls:
1. Turn off the oven by switching the
oven selector to 0, switch off at the
cooker point.
2. When the oven is cool, reach back
and upwards inside the oven, the bulb
is in the top left corner.
3. Unscrew the light glass cover, replace
the bulb with a new one of the same
specification and screw the cover
back until it is hand tight.
NOTE: Oven bulb replacement is not
covered by your guarantee.
Other bulbs cannot be changed by yourself and should be replaced by an authorised CAPLE Service Engineer.
IMPORTANT: Ovens get hot. Keep
children away from this appliance at
all times.
Safety precautions
(main oven only)
During use the oven door glass
becomes hot.
In the presence of children, in order to
avoid contact with the hot door, a third
internal glass should be mounted.
This third internal glass is supplied on
request as an optional (not included in
price).
Please contact your retailer or the AfterSales Service, indicating the model bought.
If Your Oven Does Not Work
Before calling a CAPLE service engineer
run through the following checklist.
1. The cooker is connected to the power
supply and that the fuse is intact.
2. Make sure the timer control is set to
the manual position, and that the oven
has not been set inadvertently for an
automatic or timed programme.
If you are in any doubt about carrying out
these checks, call the CAPLE Helpline
on 0870 241 1142.
A charge will be made if the appliance is
found to be in working order, or if it has
not been installed in accordance with
these instructions, or if it is has been
used incorrectly.
Helpful Advice
Page 24
Cod. 1102100
ß3
CAPLE “Built-in” Service
Should you require service at any time,
please contact the Caple Helpline on
0870 241 1142.
Caple have a nationwide service net-
work of engineers who will respond
quickly to your call.
YOUR GUARANTEE
CAPLE guarantees all parts of this product for one year from the date of pur-
chase. During that time, should it become necessary CAPLE engineers will
replace or repair all defective parts free of charge, except for parts subject to fair
wear and tear, such as lightbulbs.
Parts and the engineers labour costs are chargeable after the first 12 months.
To qualify for benefits under the guarantee, you must be able to provide proof of
date of purchase and the appliance must have been supplied, installed and used
for domestic purposes only in accordance with CAPLE instructions.
Consequential losses and accidental damage to the product are not covered by
the guarantee.
This guarantee does not affect your statutory or common law rights.
CAPLE cannot be responsible for the results of using this appliance for any other
purposes other than those described in these instructions.
Always replace spare parts with genuine
Caple spares. These are available from
authorised Caple Service Centres or by
mail order from our National Service
Stores, simply telephone 0870 241
1142.
When ordering parts always quote the
model number and serial number of your
appliance.
 Loading...