

Page 1
Page 2
Thank you for choosing a Caple oven. With minimal care, as outlined in this guide, your Caple oven is
designed to provide you with years of reliable service. This guide will provide you with the information
you need to become familiar with your oven’s care and operation, and to get the best results.
If you have any questions or comments about this product, please contact your Caple retailer, call
0870 850 8734, or email info@caple.co.uk. For more information about the complete selection of
Caple products, please visit www.caple.co.uk.
To reduce the risk of fire, electrical shock, or
injury when using your appliance, please
follows these basic precautions.
2
Page 3
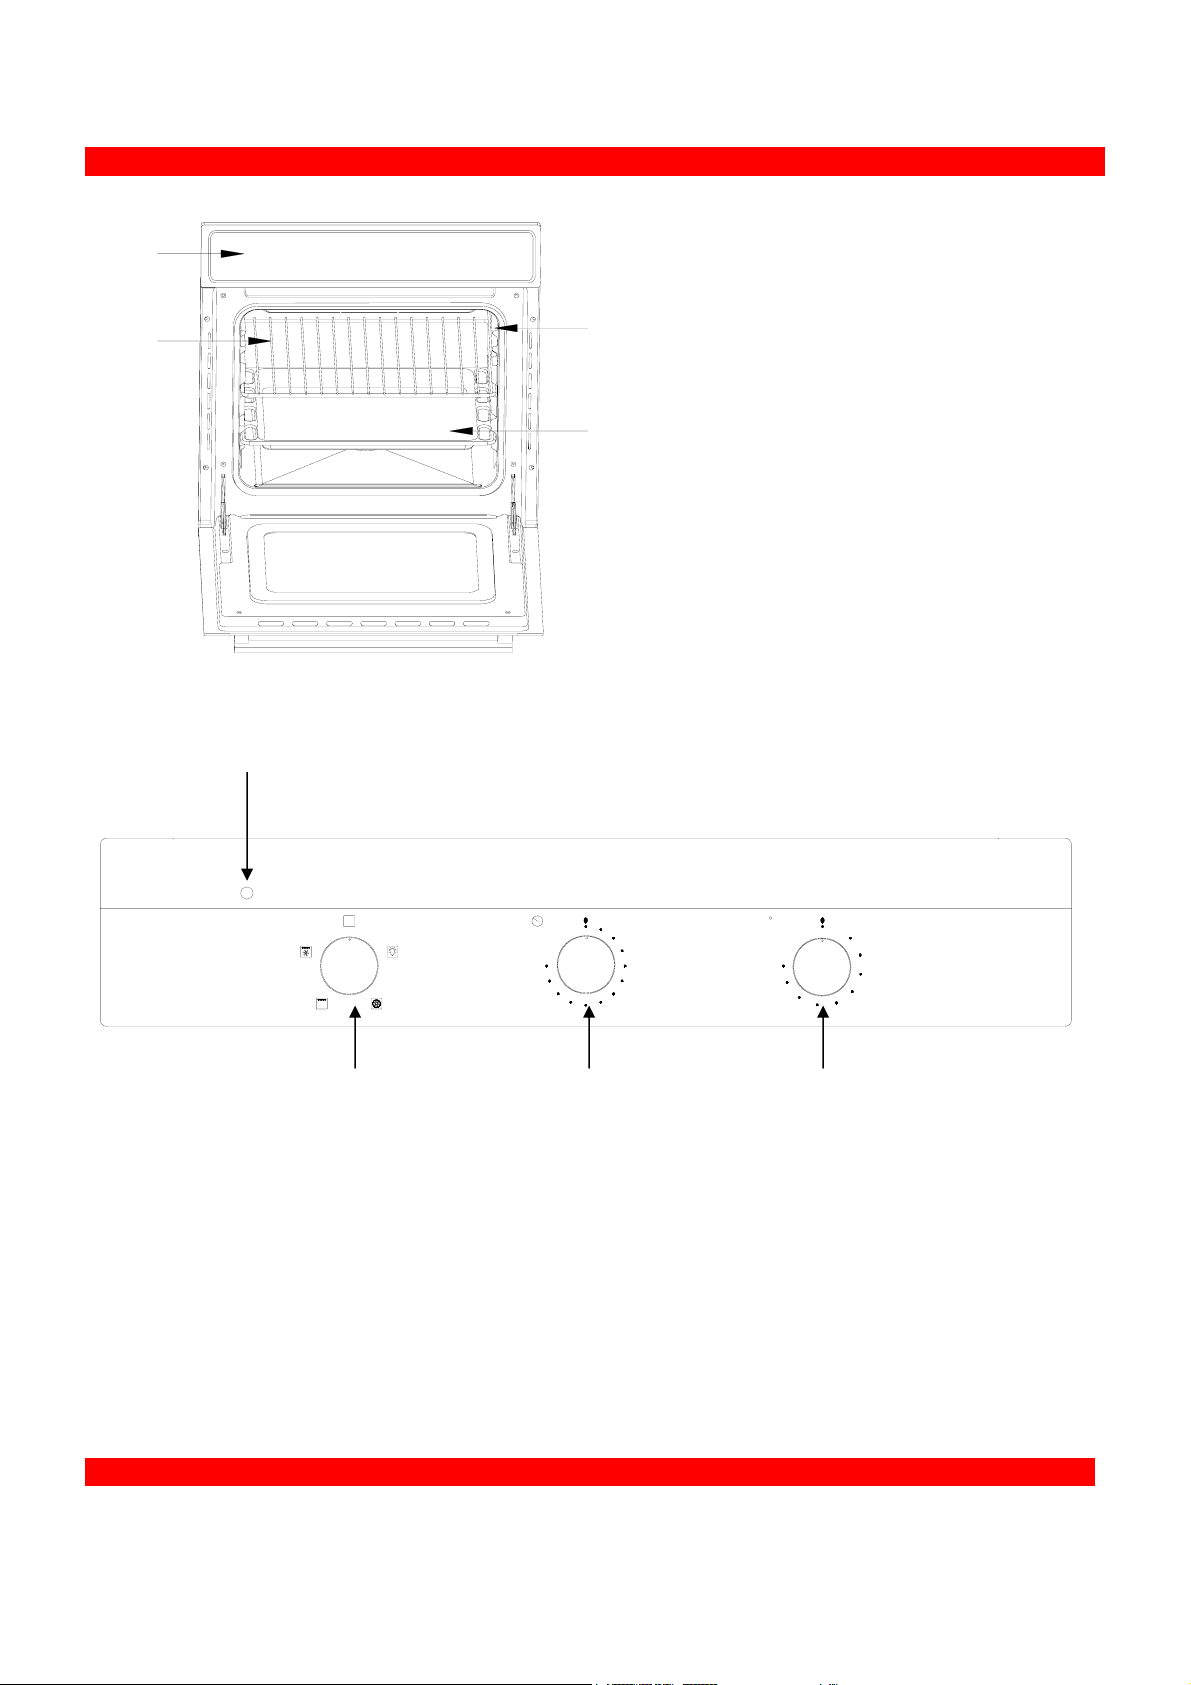
Close up View
A
G
H
F
E
0
00
10
20
30
120
110
100
90
40
50
60
70
80
0
C
MAX
225
200
50
75
100
125
150
175
B D C
A. Control panel
B. Cooking mode selection knob
C. Cooking temperature selection knob
D. Timer knob
E. Oven indicator light (when lit, the oven is heating up to the temperature set)
F. Baking tray with grilling rack
G. Chrome shelf
H. Chrome side racks
How to use your oven
The various functions offered by the oven are selected by means of cooking mode knob “B” and
cooking temperature knob “C” situated on the control panel.
3
Page 4

Notice:
For the first time you use your oven, we recommend that you set the thermostat to the highest setting
and leave the oven on for about half an hour with nothing in it, with the oven door shut. Then, open
the oven door and leave the oven to cool down. The odour that is often detected during this initial
use is due to the evaporation of substances used to protect the oven during storage and until it is
installed.
Notice:
Never place anything on the bottom of the oven when it is in operation because this could damage
the enamel. Always place your cookware (dishes, aluminum foil, etc.) on the chrome shelf.
Fan heat
Position of temperature selection knob “C”: between 50℃ and max
This method of cooking uses the circular element at the back of the oven while the heat is distributed
by the fan, resulting in a fast and economical operation. Different types of food can be cooked
simultaneously, without the transmission of smells and tastes from one to another. Food is cooked
crisp on the outside but is soft and juicy in the middle.
Grill
Position of temperature selection knob “C”: Max.
The top heating element comes on.
The extremely high and direct heat is a healthy way to cook thin meat or fish cuts, to toast or brown,
or to melt toppings.
Turbo grill
Position of temperature selection knob “C”: between 50℃ and 200℃.
The top heating element and fan come on. This combination of features increases the effectiveness
of the grill element and provides a less focused heat source.
This mode is ideal for cooking thicker meat or fish cuts like steaks or chops.
Timer(D)
The minute minder timer can be set to up to 2 hours. Please note – when the timer sounds, this does
not de-activate the cooking. The oven needs to be turned off or adjusted manually.
Oven light
Set knob “B” to symbol
to turn the oven light on. The oven light is illuminated when the oven is in
operation. This function is useful on its own for cleaning the oven interior.
Cooling fan
In order to cool down the exterior of the appliance, the oven is equipped with a cooling fan which
comes on automatically when the oven is hot, and remains on after the oven is turned off, for a short
time.
4
Page 5

Note: do not turn off the power while the oven is cooling.
How to look after your oven
Before cleaning your oven or performing maintenance, disconnect it from the power supply. To
extend the life of your oven, it must be cleaned frequently:
1 Do not use steam equipment to clean the appliance.
2 The inside of the oven and stainless steel parts should be cleaned after every use, when the oven
is cool, with a soft damp cloth with mild detergent. The detergent should be wiped away and the
interior dried thoroughly. Avoid using abrasive detergents (for example cleaning powders, etc...)
and abrasive sponges or acids (such as limescale-remover, etc…) as these could damage the
enamel and stainless steel. If the grease spots and dirt are particularly tough to remove, use a
special product for oven cleaning, following the instructions provided on the packet.
3 If you use your oven for an extended period of time, condensation may form. Dry it using a soft
cloth.
4 There is a rubber seal surrounding the oven opening which guarantees its perfect functioning.
Check the condition of this seal on a regular basis. If necessary, clean it and avoid using abrasive
products or objects to do so. Should it become damaged, please contact Caple service. We
recommend you avoid using the oven until it has been repaired.
5 Never line the oven bottom with aluminum foil, as the accumulation of heat could compromise
the cooking functionality and even damage the enamel.
6 Clean the glass door using non-abrasive products or sponges and dry it with a soft cloth.
7 Do not use harsh abrasive cleaners or sharp metal scrapers to clean the oven door glass as they
can scratch the surface, and could cause the glass to break.
How to remove the oven door
For a more thorough clean, you can remove the oven door, proceed as follows:
Open the door fully.
Lift up and turn the small levers situated on the two hinges;
Grip the door on the two external sides; close it slowly but not completely;
Pull the door towards you, pulling it out of its seat.
The door is replaced by reversing this process.
5
Page 6

Replacing the oven lamp
1 Warning: Ensure that the appliance is switched off before replacing the lamp to avoid the
possibility of an electric shock
2 Remove the glass cover of the lamp-holder;
3 Remove the lamp and replace with a lamp resistant to high temperature (300C) with the
following characteristics:
--Voltage:220-240V
--Wattage 25W
--Type T25
--Lamp-holder type: E14
4 Screw the glass cover back on and reconnect the oven to the mains power supply
6
Page 7

Practical cooking advice
The following directions are only a guideline which may be varied according to your own personal
experience.
Using the grill
Important: always use the grill with the oven door shut.
For the “grill” mode
, use the grilling rack inside the baking tray under the centre of the grill and
place it on the 3rd or 4th rack from the bottom.
When using this mode, we recommend you set the temperature to the highest setting.
For the “turbo grill” mode
, place the tray with the grilling rack on the 2nd or 3rd oven rack from
the bottom.
When using this mode, we advise you to set the thermostat to 200℃.
Baking cakes
When baking cakes, always use a preheated oven. Make sure you wait until the oven has been
preheated thoroughly ( the read light “E” will turn off). Do not open the oven door during baking to
prevent the cake from dropping. In general:
Cake is too dry
Increase the temperature by 10℃ and reduce the cooking time.
Cake has dropped
Use less liquid or lower the temperature by 10℃.
Cake is too dark on top
Place it on a lower rack, lower the temperature, and increase the cooking time.
Cake is cooked well on the inside but sticky on the outside
Use less liquid, lower the temperature, and increase the cooking time.
7
Page 8

Cake sticks to the tin
Grease the pan well and sprinkle it with a dusting of flour or use greaseproof paper.
I used more than one shelf level and the cakes are not all cooked the same
Use a lower temperature setting and leave some cakes for longer.
Cooking fish and meat
When cooking meat and fish, use temperature settings from 180℃ to 220℃.
For red meat that should be well done on the outside while tender and juicy on the inside, it is a good
idea to start with a high temperature setting (200℃-220℃) for a short time, then turn the oven down
afterwards.
Selector
knob
Food to be cooked
Weight(in
kg)
Cooking
rack
position
Preheating
time (m)
Thermostat
knob
setting
Cooking
time(m)
from
bottom
Fan
heat
Tarts
Fruitcakes
Plum cake
Sponge cake
Stuffed pancakes (on2
racks)
Small cakes(on2 racks)
Cheese puffs (on2
racks)
cream puffs (on2 racks)
Biscuits (on 3 racks)
Meringues (on 3 racks)
0.5
1
0.7
0.5
1.2
0.6
0.4
0.7
0.7
0.5
3
2 or 3
3
3
2 and 4
2 and 4
2 and 4
1and
3and 5
1and
3and 5
15
15
15
15
15
15
15
15
15
15
180
180
180
160
200
190
210
180
180
90
20-30
40-45
40-50
25-30
30-35
20-25
15-20
20-25
20-25
180
1and
3and 5
Grill
Soles and cuttlefish
Squid and prawn
kebabs
Cod filet
Grilled vegetable
Veal steak
Cutlets
Hamburgers
Mackerels
1
1
1
1
1
1
1
1
0.4
4
4
4
3/4
4
4
4
4
4
5
5
5
5
5
5
5
5
5
Max
Max
Max
Max
Max
Max
Max
Max
Max
8-10
6-8
10
10-15
15-20
15-20
7-10
15-20
2-3
Toasted sandwiches
Turbo
grill
Grilled chicken
Cuttlefish
1.5
1.5
3
3
5
5
200
200
55-60
30-35
NB: Cooking times are approximate and may vary according to personal taste.
8
Page 9

Health and safety
To maintain the efficiency and safety of this appliance, we recommend that you do the following:
1 For any problem, use Caple service.
2 Always use original spare parts.
3 When handling the appliance, we recommend you always use the purpose provided handles
recessed into the sides of the oven to prevent harm or damaging the appliance itself.
4 This appliance is designed for non-commercial, house-hold use and its functions must not be
changed.
5 These instructions are only valid for the countries whose symbols appear on the manual and the
serial number plate.
6 The electrical system of this appliance can only be used safely when it is correctly connected to
an efficient earthing system in compliance with current safety standards.
7 This appliance is not intended for use by persons (including children) with reduced physical,
sensory or mental capabilities, or lack of experience and knowledge, unless they have been
given supervision or instruction concerning use of the appliance by a person responsible for their
safety.
8 Children should be supervised to ensure that they do not play with the appliance.
9 During use the appliance becomes hot. Care should be taken to avoid touching heating
elements inside the oven.
10 When the appliance is in use, the heating elements and some parts of the oven door become
extremely hot. Make sure you don’t touch them and keep children well away.
The following items are potentially dangerous, and therefore appropriate measures must be taken to
prevent children and disabled from coming into contact with them:
-controls and the appliance in general;
-packaging (bags, polystyrene, nails, etc.);
-the appliance itself, immediately after use of the oven or gill due to the heat generated;
-the appliance itself, when no longer in use (potentially dangerous parts must be made safe).
Avoid the following:
-touching the appliance with wet parts of the body;
-using the appliance when barefoot;
-pulling on the appliance or the supply cable to unplug it from the electrical outlet;
-improper or dangerous operations;。
-obstructing the ventilation or heat dissipation slot;
-allowing power supply cables of small appliances to come into contact with the hot parts of the
appliance;
-exposing the appliance to atmospheric agents such as rain, or sunlight;
-using the oven for storage purposes;
-using flammable liquids near the appliance;
-using adapters, multiple sockets and/or extension leads;
-attempting to install or repair the appliance without the assistance of qualified personnel.
-WARNING: Accessible parts may become hot during use Young children or infirm persons should be
kept away.
Qualified personnel must be contacted in the following cases:
-installation (following the manufacturer’s instructions);
-when in doubt about operating the appliance;
9
Page 10

-replacing the electrical socket when it is not compatible with the appliance plug.
Caple service must be contacted in the following cases:
-If in doubt about the soundness of the appliance after removing it from its packaging;
-if the power supply cable has been damaged or needs to be replaced;
-if the appliance breaks down or functions poorly.
You must do as following:
-only use the appliance to cook food and nothing else;
-check the soundness of the appliance after it has been unpacked.
-disconnect the appliance from the electrical mains if it is not functioning properly and before
cleaning or performing maintenance.
-when left unused, unplug the appliance from the electricity mains;
-use oven gloves to place cookware in the oven or when removing it.
-always grip the oven door handle in the centre.
-make sure the knobs B and C are in the “●” position when the appliance is not in use.
-disconnect the oven from the mains when you decide not to use the appliance for long periods of
time.
-the manufacturer may not be held responsible for any damage due to: incorrect installation,
improper, incorrect or irrational use.
-If the power cord is damaged, it must be replaced by the manufacturer or a qualified service
engineer to avoid any risks to safety.
-The appliance is for indoor use only.
Installation
The appliance must be installed only by a qualified person in compliance with the instructions
provided. The manufacturer declines all responsibility for improper installation which may be harmful
or may damage property.
Important: the power supply to the appliance must be cut off before any adjustments or
maintenance work carried out.
Installation of built-in ovens
In order to ensure that the built-in appliance functions properly, the cabinet containing it must be
appropriate. The figure below gives the dimensions of the cut-out for installation under the counter or
in a wall cabinet unit.
10
Page 11

m
m
5
4
5
6
0
-
5
6
6
m
m
22mm
595mm
568mm
5mm
m
m
3
4
5
m
m
5
.
1
2
N.B.: Installation in compliance with the consumption declaration
583-585mm
m
m
0
0
6
5
6
0
-
5
6
6
m
m
22mm
595mm
568mm
5mm
m
5
9
5
m
m
m
m
5
21.
543
m
595mm
583-585mm
m
0m
60
In order to ensure adequate ventilation, the back panel of the cabinet unit must be removed.
Installing the oven so that it rests on two strips of wood is preferable. If the oven rests on a continuous,
11
Page 12

flat surface, there must be an aperture of at least 45x560mm.
4
5
m
m
m
m
0
6
5
The panels of the adjacent cabinets must be made of heat resistant material. In particular, cabinets
with a veneer exterior must be assembled with glues which can withstand temperature of up to
100℃
In compliance with current safety standards, contact with the electrical parts of the oven must not
be possible once it has been installed.
All parts which ensure the safe operation of the appliance must be removable only with the aid of a
tool.
For the correct centring of your appliance, position the 4 tabs on the sides of the oven in
correspondence with 4 holes on the perimeter of the frame. In particular, if the cabinet side panel:
1 is 20mm thick: removable part of the tab must be removed (Fig A);
2 is 18mm thick: use the first groove, which is factory-set (Fig B)
3 is 16mm thick: use the second groove (Fig.)
<Fig A> <Fig B>
12
Page 13

<Fig C>
To fasten the oven to the cabinet, open the door of the oven and attach it by inserting the 4 metal
screws into the 4 holes located on the perimeter of the frame.
Do not dispose of electrical appliances as unsorted municipal waste, use separate
collection facilities.
Contact you local government for information regarding the collection systems
available.
If electrical appliances are disposed of in landfills or dumps, hazardous substances can
leak into the groundwater and get into the food chain, damaging your health and
well-being.
Technical specifications
Inner dimensions of the oven:
Width 43.5cm
Depth 40cm
Height 32cm
Inner volume of the oven
56Liters
Voltage and frequency of power supply:
220-240V 50/60Hz or 50Hz 2250W
(see data plate)
13
Page 14

This appliance conforms to the following European Economic Community directives:
-2006/95/EC (Low Voltage) and subsequent modifications;
-2004/108/EC (Electromagnetic Compatibility) and subsequent modifications.
14
 Loading...