

Page 1

Instruction Manual
Electric
Fan Ovens
Multifunction
Ovens
Models: C 201 F/W
C 201 F/B
C 211 F/W
C 211 F/GRN
C 221 F/W
C 221 F/B
C 223 F/SS
Models: C 230 M/M
C 230 M/W
C 206 M/SS
Page 2

2
Safety Reminders ................................................................................................. 3
Electrical Requirements ........................................................................................ 4
Electrical Installation ............................................................................................. 5
How To Install Your Oven ........................... ......................................................... 6
Multifunction Ovens ............................ ................................................................ 10
Electric Fan Ovens ............................ ................................................................. 16
Alarm 60’............................ .................................................................................. 21
Cut-off Timer 120’............................ .................................................................... 21
Electronic Timer .................................................................................................. 22
Electronic Programmer ............................ ........................................................... 23
Analogical Programmer ............................ .......................................................... 26
Cleaning and Maintenance............................ ...................................................... 29
Helpful Advice ..................................................................................................... 30
Cooking Guide ......................... ........................................................................... 31
Your Guarantee ................................................................................................... 32
Thank you for buying your new CAPLE Built-Under Oven. To ensure that you get
the best results from your new CAPLE oven, we strongly suggest that you read this
instruction manual thoroughly before use. This manual contains installation advice,
cleaning tips and a cooking guide, as well as other important facts about your
CAPLE oven. If treated with care, your CAPLE oven should give you years of trouble-free cooking.
For Spare Parts, Technical Advice
or Product Service call the
CAPLE HELPLINE on 0870 241 1142
(Answerphone outside office hours)
Page 3

3
The Grill and Top oven element
(multifunction ovens only)
are exposed, so take great care when
placing food in the oven or removing it.
Use the grill pan handles or gloves.
DO NOT line the oven, grids, trays etc.
with aluminium foil as this could adversely affect the heating elements and it
could also damage the interior surfaces.
DO NOT place flammable materials in
the oven.
Faults
Do not continue to use this appliance if
it appears to be faulty.
After Use
Switch the oven controls off.
Always switch off at the isolating switch
befor e cleaning the appliance, or
attempting any maintenance task, or
when not in use for long periods (when
on holiday).
CAPLE Service
To ensure the continued safe and efficient operation of this appliance, we recommend that any servicing or repairs are
carried out only by an authorised CAPLE
SERVICE ENGINEER.
Instruction Book
This appliance should only be used for
it’s intended purpose as described in
these instructions.
Ensure that you fully understand these
instructions before operating this appliance.
Space Requirements
Ensure that the specified ventilation
space a roun d the a ppli ance is not
obstructed.
Food Splashes
Always wipe clean the oven after use.
Food splashes can carry on cooking next
time and may become a fire hazard.
Hot Surfaces
It is important to remember that the surfaces of cooking appliances get hot during use and retain the heat for some time
after switching off.
It is therefore advisable to keep small
children away from the appliance.
Safety precautions
Durin g use t he oven door g lass
becomes hot.
In the presence of children, in order to
avoid contact with the hot door, a third
internal glass should be mounted.
This third internal glass is supplied on
request as an optional (not included in
price).
Please contact your retailer or the AfterSales Service , indica ting the model
bought.
Safety Reminders
Page 4

4
This Installation should be carried out by
a competent electrician in accordance
with current l.E.E. Regulations.
This CAPLE product must be connected
to an electricity supply at the voltage
shown on the rating plate. Connection
must be made via a double pole isolating
switch with a contact separation of at
least 3 mm.
Use supply cable, having a minimum conductor cross-sectional area of 1.5 mm
2
.
Where both hob unit and an oven are
to be installed adjacent to each other,
both appliances may be supplied via
the same double pole isolating switch
using separate supply cables. Check that
the total loading of the installation is within the capacity of the double pole isolating switch and the supply circuit.
Allow sufficient length in the supply
cable(s) for removal of the appliance(s)
for any subsequent servicing. Ensure
that this extra cable is not trapped and
is not in contact with the underside of
any hob when fitting the appliance(s) in
position.
As with all electrical appliances aIways
switch off the electricity supply when not
in use for long periods (when on holiday)
and before attempting any maintenance
task.
Fitting Into position
Your new CAPLE oven is designed to fit
into a kitchen unit which is at least 550
mm deep.
Before proceeding with the installation,
check that the oven will fit into the space
intended for it, appropriate ventilation
slots are provided as per installation
instructions on page 6 and that all packing material has been removed.
IMPORTANT
Materials used to build the oven housing
must be capable ot withstanding temperatures of up to 100°C and the housing
must be firmly fixed in position.
Before Use
Check that all accessories have been
removed from the oven interior.
Set the temperature to 225°C (fan
ovens) or 250°C (multifunction ovens)
using the temperature control knob.
Leave on for approximately 30 minutes. This will burn off any protective
coating applied to the oven during
manufacture.
The kitchen should be well ventilated
during this time as there may be an
odour given off.
When cool, wash the accessories and
the oven with warm water and mild
detergent.
WARNING!
ELECTRICITY CAN BE
EXTREMELY DANGEROUS.
THIS APPLIANCE MUST BE
EARTHED.
Electrical Requirements
Page 5
5
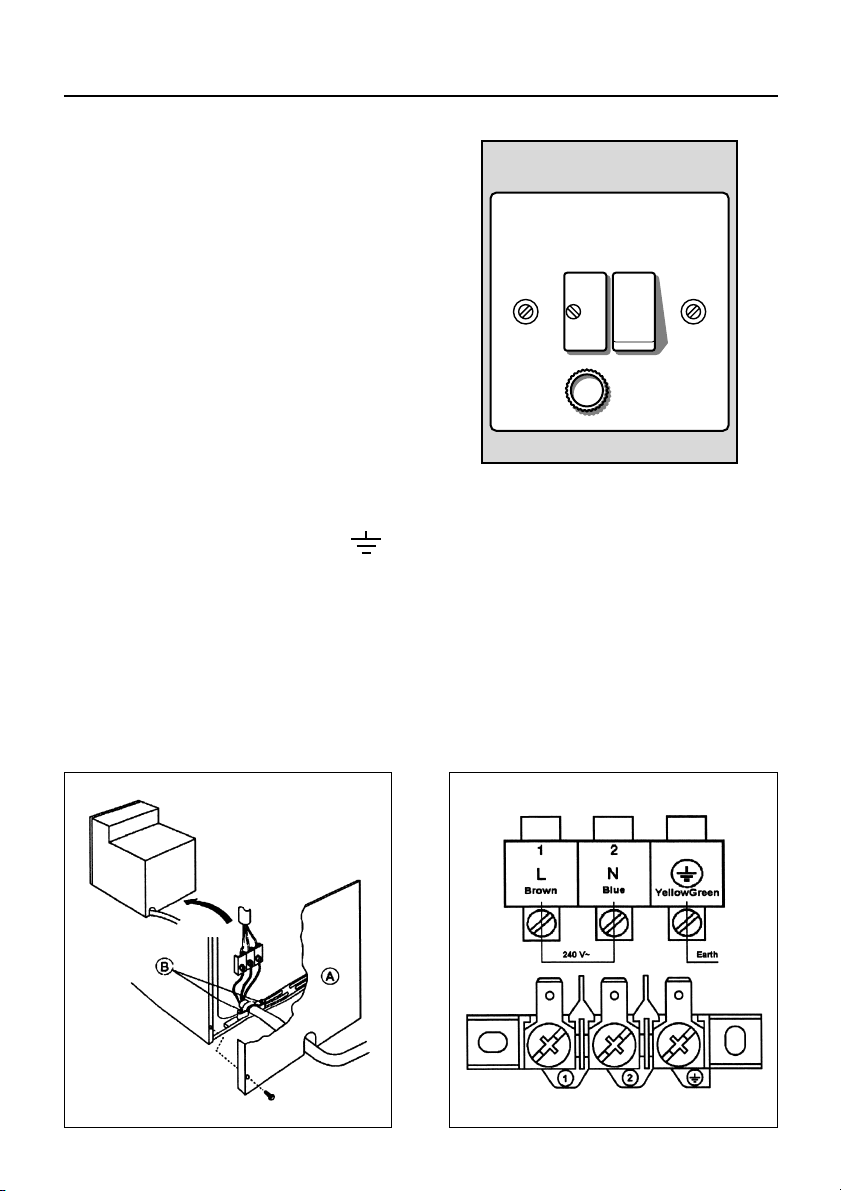
Electrical Installation
This appliance must be connected to a
double pole isolating switch (fig. 1) and
to the terminal block in the oven (figs. 2
& 3) using the following guide:
FUSE
DOUBLE POLE SWITCHED
FUSED SPUR OUTLET
USE A 13 AMP FUSE
ON
Fig. 1
1) The wire which is coloured brown
must be connected to the terminal
marked L (Live), or coloured Red.
2) The wire which is coloured blue
must be connected to the terminal
marked N (Neutral), or coloured
Black.
3) The wire which is coloured green
and yellow must be connected to
the terminal marked E (Earth)
or coloured Green.
IMPORTANT: These connections must
be carried out by a qualified electrical
engineer.
Fig. 2 Fig. 3
Page 6
6
How To Install Your Oven
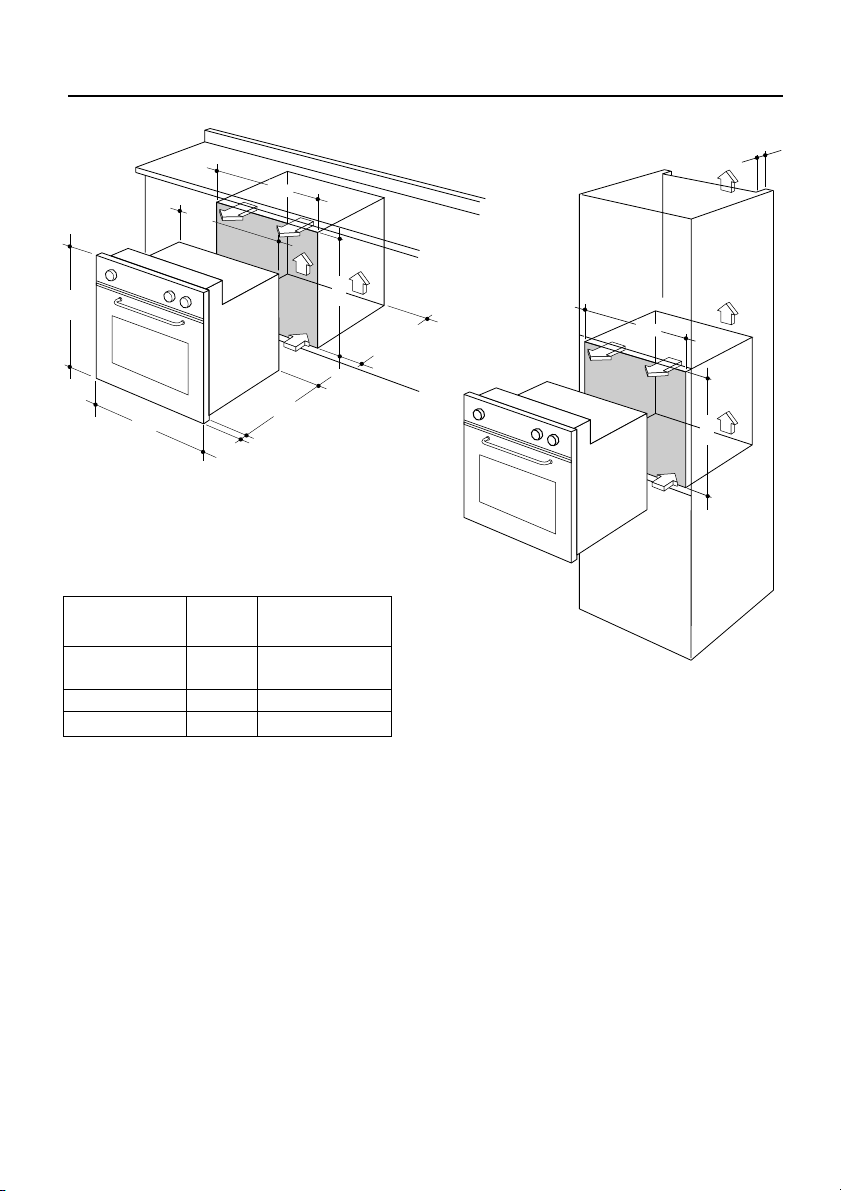
The oven is designed to fit into a cabinet 600 mm wide. The oven can be built-in or
built-under the kitchen units.
It is essential that the oven housing is well ventilated.
If the oven is being installed into a fully enclosed built-under oven housing (fig. 4) it
may be necessary to cut a small slot in the top of the plinth panel fitted under the unit.
Cut a section 400 mm wide and a minimum of 15 mm high to allow air to pass under
the unit.
Also ensure that the front rail the top of the unit is not installed as it could restrict
ventilation.
If the oven is being built in to a kitchen unit (fig. 5) ensure that the oven is ventilated
with a 50 mm space at the top of the kitchen unut.
Fig. 4 - Built under
Fig. 5 - Built in
560
591
594
594
540
20
555
min.
550
560
50
585
Dimensions
(mm)
Height
Width
Depth
594
594
560
585
Built in
591
Built Under
560
550
Housing
Oven
You need the following housing area to
fit your oven correctly.
Page 7

7
How To Install Your Oven
Fallure to allow adequate ventilation for the appliance may result in over heating or damage to adjacent units.
Caple does not accapt any responsibility for any damage caused due to non-compliance with these instructions.
To install the oven into a kitchen unit (fig. 5) first ensure that the oven housing is firmlysecured to the wall and/or adjacent fittings.
Lift the oven carefully into position on the shelf, taking care NOT to lift it by the door
handle.
If you lower the oven door, you will see four screw holes, two on each side of the oven.
The oven should then be secured to the housing by fitting screws into these holes.
Fig. 6
30 mm
600
50 mm
50 550
Fig. 7
To ensure internal ventilation, aeration
channels must be provided as illustrated
in the figures 6 and 7.
Page 8

8
How To Install Your Oven
The rating plate can be found on the bottom right hand side of the inner door.
Clean the oven thoroughly before using it for the first time; use water and soap, then
rinse carefully.
Once the above operations are completed, heat the oven to the max. temperature for
about one and a half hours so as to eliminate any residual factory grease that might
impart unpleasant smells to the meals being cooked.
Models with hump wall oven
C 221 F/W, C 221 F/B
Fitting up of oven shelves
The oven shelves are provided with a security block to prevent accidental extraction.
They must be inserted operating as per bottom figure 8.
To pull them out operate in the inverse order.
Important:
As a safety measure, before you start cleaning the oven be sure to disconnect it
from the mains supply.
Fig. 8
Page 9

9
How To Install Your Oven
Fig. 9
Fig. 10
Models with smooth wall
oven
C 201 F/W, C 201 F/B
C 230 M/M, C 230 M/W
C 211 F/W, C 211 F/GRN
C 223 F/SS
C 206 M/SS
Assembling and removing
the side racks
– Fit the side runner frames into the
holes on the side walls inside the oven
(Fig. 9).
– Slide the drip pan and rack into the
runners as shown in Fig. 10.
The rack must be fitted so that the
safety catch, which stops it sliding
out, faces the inside of the oven.
– To dism antl e, ope rate in r everse
order.
Important:
As a safety measure, before you start
cleaning the oven be sure to
disconnect it from the mains supply.
Page 10
10
CB A
Fig. 11
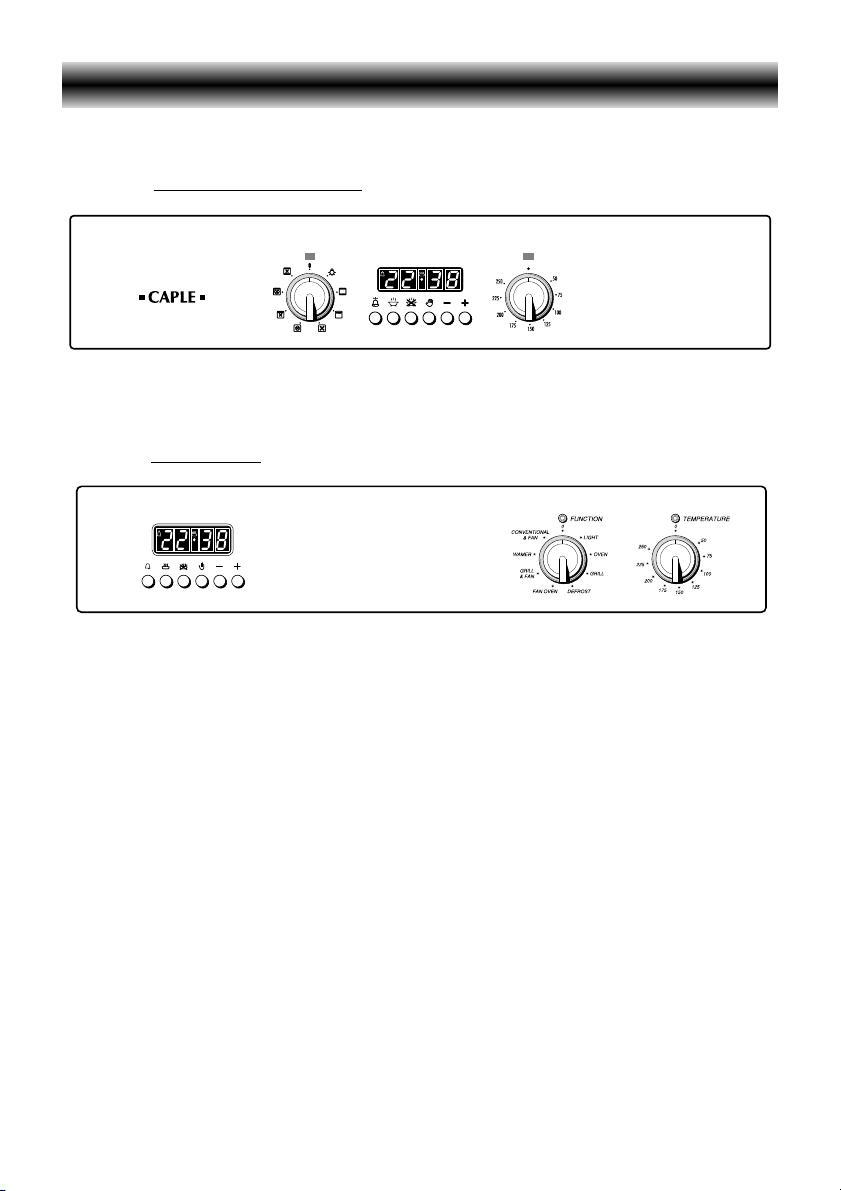
Multifunction ovens
Models: C 230 M/M, C 230 M/W
Model: C 206 M/SS
C
B
D
E
D
E
A
Fig. 12
General features
This is a MULTI-FUNCTION oven.
As its name indicates, this is an oven
that presents particular features from an
operational point of view.
In fact, it is possible to insert 7 different
programs to satisfy every cooking need.
The 7 positions, thermostatically controlled, are obtained by 4 heating elements which are:
- Lower element 1400 W
- Upper element 1000 W
- Grill element 2500 W
- Circular element 2500 W
Controls description
A. Digital electronic programmer
B. Oven switch knob
C. Oven thermostat knob
Pilot lamp:
D. Oven temperature indicator lamp
E. Power on indicator lamp
A
U
T
O
A
U
T
O
Page 11

11
Operating principles
Heating and cooking in the MULTI-FUNCTION oven are obtained in the following ways:
a. by normal convection. The heat is produced by the upper and lower heating elements.
b. by forced convection
A fan sucks in the air contained in the oven muffle, which sends it through the circular
heating element and then sends it back through the muffle. Before the hot air is
sucked back again by the fan to repeat the described cycle, it envelops the food in
the oven, provoking a complete and rapid cooking.
It is possible to cook several dishes simultaneously.
c. by semi-forced convection
The heat produced by the upper and lower heating elements is distributed throughout
the oven by the fan.
d. by radiation
The heat is irradiated by the infra red grill element.
e. by radiation and ventilation
The irradiated heat from the infra red grill element is distributed throughout the oven
by the fan.
7 - Function Oven
Models: C 230 M/M, C 230 M/W
Model: C 206 M/SS
Fig. 14
Fig. 13
Page 12

12
Function selector knob
Rotate the knob clockwise to set the
oven for one of the following functions.
Thermostat knob
This only sets the cooking temperature
and does not switch the oven on.
Rotate clockwise until the required temperature is reached (from 50 to 250°C)
OVEN
The upper and lower heating elements
come on. The heat is dispersed by natural convection and the temperature
must be set to between 50° and 250°C
via the thermostat knob.
The oven must be preheated before
cooking.
Recommended for:
Food that requires the same degree of
cooking both inside and out, for example
roasts, spare pork ribs, meringues etc.
LIGHT
By setting the knob to this position, only
the oven light comes on (15 W).
It remains on in all the cooking modes.
DEFROST
Only the oven fan comes on. Use with
the thermostat knob set to “0” - other
positions have no effect. The food is
thawed by ventilation without heating.
Recommended for:
Quick thawing of frozen foods; one kg
requires approximately 1 hour.
Thawing times vary according to the
quantity and type of food to be thawed.
GRILL
The infrared electrical resistance comes
on. The heat is dispersed by radiation.
Use with the thermostat knob set to
200°C and the oven door closed
.
For co okin g hin ts, see the chapter
“GRILLING and AU GRATIN”.
Caution: The oven door becomes
very hot during operation. Keep
children well out of reach.
Recommended for:
Intense grilling, browning, cooking au
gratin and toasting etc.
It is recommended that you do not
grill for longer than 30 minutes at any
one time.
7 - Function Oven
Page 13

13
GRILL & FAN
The infrared grill and the fan come on.
The heat is dispersed mainly by radiation and the fan then distributes it all
over the oven.
Use with the door closed.
The temperature can be regulated via the thermostat knob to between 50° and 175° max.
The oven must be preheated for approximately 5 minutes. For cooking hints,
see the chapte r “GRILLING AND
COOKING AU GRATIN.
Caution: The oven door becomes
very hot during operation. Keep
children well out of reach.
Recommended for:
Grilling where quick browning on the
outside is required to keep the juices in.
For example: veal steaks, chops, hamburgers etc.
It is recommended that you do not
grill for longer than 30 minutes at any
one time.
WARMER
The upper resistance, the circular resistance and the fan come on.
The heat is dispersed by forced convection with greater intensity in the upper
part.
The temperature can be set to between
50° and 140°C via the thermostat knob.
Recommended for:
Keeping food warm after any type of
cooking. Slow heating of cooked food.
CONVENTIONAL & FAN
The upper and lower heating elements
come on and the fan.
The heat coming from above and below
is dispersed by convection with ventilation.
The temperature can be set to between
50° and 250°C via the thermostat knob.
Recommended for:
Voluminous dishes and large quantities
which require the same degree of cooking both inside and out, for example
rolled roasts, turkey, roast legs, cakes
etc.
7 - Function Oven
FAN OVEN
The circular resistance and fan come
on. The heat is dispersed by forced convection and the temperature can be regulated to between 50° and 250°C via the
thermostat knob. The oven does not
require preheating.
Recommended for:
Food which has to be well-cooked outside and soft or rosy inside, for example
lasagne, lamb, roast beef, whole fish
etc.
Page 14

14
Regeneration
Set the switch to position CON-
VENTIONAL & FAN and the ther-
mostat knob to position 150° C.
Bread becomes fragrant again if wet with
a few drops of water and put into the
oven for about 10 minutes at the highest
temperature.
Simultaneous cooking of
different foods
The MULTI-FUNCT ION oven set on
position
CONVENTIONAL &
FAN consents a simultaneous hetero-
geneous cooking of different foods.
Different foods such as fish, cake and
meat can be cooked together without
mixing the smells and flavors together.
This is poss ible since the f ats and
vapor s are oxid ized while passing
through the electrical element and therefore are not deposited onto the foods.
The only precaution to follow are:
– The cooking temperatures of the dif-
ferent foods must be as close to as
possible, with a maximum difference of
20° - 25 °C.
– The introduction of the different dishes
in the oven must be done at different
times in relation to the cooking times
of each one.
The time and energy saved with this type
of cooking is obvious.
Grilling and “au gratin”
Grilling may be done without the roasting
jack on position
GRILL & FAN of
the switch, because the hot air completely
envelops the food that is to be cooked.
Set the thermostat to position 175 °C
and after having preheated the oven,
simply place the food on the rack.
Close the door and let the oven operate
with the thermostat on position 175 °C,
until grilling is done.
Adding a few dabs of butter before the
end of the cooking time gives the golden
“au gratin” effect.
It is recommended that you do not
grill for longer than 30 minutes at any
one time.
Attention: the oven door becomes
very hot during operation.
Keep children away.
7 - Function Oven
Cooking advice
Sterilization
Sterilization of foods to be conserved, in
full and hermetically sealed jars, is done
in the following way:
a. Set the switch to position
FAN
OVEN
.
b. Set the thermostat knob to position
185 °C and preheat the oven.
c. Fill the dripping pan with hot water.
d. Set the jars onto the dripping pan
making sure they do not touch each
other and the door and set the thermostat knob to position 135 °C.
When sterilization has begun, that is,
when the contents of the jars start to
bubble, turn off the oven and let cool.
Page 15

15
7 - Function Oven
Grease Filter
The inside of the oven can be easily
clean ed with a wet clot h and ove n
cleaner.
As a safety measure, before you start
clean ing t he oven, make sure the
electrical supply is switched off.
You should clean the oven when it is
cold.
Do not leave acid or alkaline residues
(lemon juice, vinegar, salt, tomato, etc)
on the enamelled surfaces.
Avoid abrasive cleaning products on the
painted parts.
Use of the grill
Set the switch to position GRILL
and the thermostat to position 200 max.
Leave to warm up for approximately 5
minutes with the door closed.
Introduce the food to be cooked, positioning the rack as close to the grill as
possible.
The dripping pan should be placed
under the rack to catch the cooking
juices and fats.
Grilling with the oven door closed.
Grilling with the oven door closed and
do not for longer than 30 minutes at
any one time.
Attention: the oven door becomes
very hot during operation.
Keep children away.
Fig. 15
Roasting
To obtain classical roasting, it is necessary to remember:
– that it is advisable to maintain a tem-
perature between 180 and 200 °C.
– that the cooking time depends on the
quantity and the type of foods.
A special screen is provided at the back
of the fan oven to catch grease particles,
mainly when meat is being roasted.
When baking pastry etc, the filter should
be removed.
Always clean the filter after cooking as
any solid residues on it might adversely
affect the oven performance.
Page 16

16
C
BF
Fig. 16
Models: C 221 F/W, C 221 F/B
D
Controls description
F. Alarm 60’
B. Oven switch knob
C. Oven thermostat knob
G. 120’ cut-off timer knob
H. Electronic timer (end cooking)
I. Electronic timer (start/end cooking)
Pilot lamp:
D. Oven temperature indicator lamp
Electric fan ovens
Fig. 17
Model: C 223 F/SS
D
Fig. 18
Models: C 201 F/W
, C 201 F/B
D
C
C
BH
BG
Fig. 19
Models: C 211 F/W, C 211 F/GRN
D
I
BC
A
U
T
O
XII
I
XI
II
X
III
IX
VIII
IV
VII
V
VI
Page 17

17
Electric Fan Oven
Fig. 21
Operating principles
Heating and cooking in the FAN oven are
obtained in the following ways:
a. by forced convection
A fan sucks in the air contained in the
oven muffle, which sends it through the
circular heating el ement and then
sends it ba ck th roug h the muffle.
Before the hot air is sucked back again
by the fan to repeat the described
cycle, it envelops the food in the oven,
provoking a complete and rapid cooking.
It is possible to cook several dishes
simultaneously.
b. by radiation
The heat is irradiated by the infra red
grill element.
General features
The heating and cooking in electrical hot
air ovens take place by forc ed
convection.
The two elements which make this process take place are:
- Circular element 2500 W
- Grill element 2500 W
NOTE:
Upon first use, it is advisable to operate
the oven at the maximum temperature
(thermostat knob on position 225) for 60
minutes in the position
FAN OVEN
and for anot her 1 5 min utes in the
GRILL mode in order to eliminate any
traces of grease from the electrical resistances.
Fig. 20
Models: C 221 F/W, C 221 F/B
Models: C 201 F/W, C 201 F/B, C 223 F/SS
Page 18

B. Function Selector
C
ook or grill by turning the knob until the
indicator on it is in line with the function
required.
LIGHT The oven light is switched on.
FAN The fan switches on. This
funct ion c an be use d for
defrosting food.
FAN OVEN Use in conjunction with the
temperature selector C.
GRILL Grill with the door closed. Set
the function selector B to the
grill position and the temperature selector C to the desired
tempe ratu re till to ma x.
200°C. The temperature can
be varied depending on the
food being cooked. Before
using the grill, pre-heat for
about five minutes. Position
the grill pan on the highest
shelf position and check continually as the food could easily burn.
Note : it is recommended
that you do not grill fo r
longer than 30 minutes at
any one time.
Atte nti on: the oven door
becomes very hot during
operation.
Keep children away.
18
Cooking advice
Sterilization
Sterilization of foods to be conserved, in
full and hermetically sealed jars, is done
in the following way:
a.
Set the switch to position FAN OVEN
b. Set the thermostat knob to position
185 °C and preheat the oven.
c. Fill the dripping pan with hot water.
d. Set the jars onto the dripping pan mak-
ing sure they do not touch each other
and the door and set the thermostat
knob to position 135 °C.
When sterilization has begun, that is,
when the contents of the jars start to bubble, turn off the oven and let cool.
Electric Fan Oven
Fig. 22
C.Temperature Selector
The light above this dial will illuminate
when the oven is switched on and turns
off when the oven reaches the correct
temperature.
The light will cycle on and off during
cooking in line with the oven temperature.
Models: C 211 F/W, C 211 F/GRN
Page 19

19
Roasting
To obtain classical roasting, it is necessary to remember:
– that it is advisable to maintain a tem-
perature between 180 and 200 °C.
– that the cooking time depends on the
quantity and the type of foods.
Regeneration
Set the switch to position FAN OVEN
and the thermostat knob to position 150°
C.
Bread becomes fragrant again if wet with
a few drops of water and put into the
oven for about 10 minutes at the highest
temperature.
Simultaneous cooking of different foods
The FAN consents a simultaneous heterogeneous cooking of different foods.
Different foods such as fish, cake and
meat can be cooked together without
mixing the smells and flavors together.
This is possible since the fats and vapors
are oxidized while passing through the
electrical element and therefore are not
deposited onto the foods.
The only precaution to follow are:
– The cooking temperatures of the dif-
ferent foods must be as close to as
possible, with a maximum difference of
20° - 25 °C.
– The introduction of the different dishes
in the oven must be done at different
times in relation to the cooking times
of each one.
The time and energy saved with this type
of cooking is obvious.
Electrical grill
The electrical grill is made up of an electrical element which, becoming red hot,
generates infra red rays which permit grill
cooking (input 2500 W).
Use of the grill
Switch the grill on, setting the two knobs:
– Function selector to
GRILL position.
– Thermostat selector to position 200°C
max.
Leave to warm up for approximately 5
minutes with the door closed.
Place the food inside positioning the rack
as near as possible to the grill.
Insert the drip pan under the rack to collect the cooking juices.
Grilling with the oven door closed.
Grilling with the oven door closed and
do not for longer than 30 minutes at
any one time.
Attention: the oven door becomes very
hot during operation.
Keep children away.
Electric Fan Oven
Page 20

20
A special screen is provided at the back
of the fan oven to catch grease particles,
mainly when meat is being roasted.
When baking pastry etc, the filter should
be removed.
Always clean the filter after cooking as
any solid residues on it might adversely
affect the oven performance.
The inside of the oven can be easily
clean ed with a wet clot h and ove n
cleaner.
As a safety measure, before you start
clean ing t he oven, make sure the
electrical supply is switched off.
You should clean the oven when it is
cold.
Do not leave acid or alkaline residues
(lemon juice, vinegar, salt, tomato, etc)
on the enamelled surfaces.
Avoid abrasive cleaning products on the
painted parts.
Grease Filter
Fig. 23
Electric Fan Oven
Page 21

21
Fig. 25
G. Cut-off timer - 120’ (Fig. 25)
The function of the timer runs the oven
for a preset time.
1) Starting up.
After setting the function selector and
thermostat to the required mode and
temperature, rotate the timer knob
clockwise until you reach the required
cooking time (max 120 minutes).
Once this time has elapsed, the timer
will return to the “0” position and the
oven will automatically switch off.
2) Manual position.
If the cooking time is longer than two
hours or if you wish to use the oven
manually, switching it off as required,
the knob must be turned to position
.
F. Manual timer - 60’
The minute counter is a timed acoustic
warning device which can be set for a
maximum of 60 minutes.
The knob (Fig. 24) must be rotated
clockwise as far as the 60 minute position and then set to the required time by
rotating it anticlockwise.
Fig. 24
60’ Alarm 120’ Cut-off Timer
Models: C 221 F/W, C 221 F/B Model: C 223 F/SS
Page 22

22
Electronic timer
Models: C 201 F/W, C 201 F/B
H. Electronic timer (end cooking)
The electronic programmer is a device
with the following functions:
– 24 hours clock with illuminated display
– Timing of oven cooking with automatic
switch-off (max. 99 minutes).
ELECTRONIC CLOCK
Upon immediate connection of the oven
or after a mains failure, three zeros will
flash on the programmer panel.
To set the clock it is necessary to push
the button and th e n , w ithin 7
seconds, the or button until you
have set the correct time.
The clock will show zero after a mains
failure.
Attent i o n : Wh e n t he progr a m m er
display shows three flashing zeros the
oven cannot be switched on.
The oven can be switched on when the
symbol is shown in the display.
SETTING THE FREQUENCY OF THE
ALARM SOUND
The selection from 3 possibilities of
sound can be made by pressing the
button.
Fig. 26
COOKING WITH AUTOMATIC
SWITCH-OFF
The a im o f t h i s f u n c tion is t o
automatically stop the cooking after a pre
programmed time, for a maximum period
of 99 minutes.
To set the cooking time, push the or
button until you obtain the desired
time in the display. The symbol AUTO
will be shown in the display. Then you
adjust the o ven t hermos t a t k n o b
according to the required temperature.
The ov en wi l l im m e d iately start to
operat e and will wor k for the pre
programmed time. The display shows the
count down. Clock time can be displayed
by pressing the button. Once the time
has elasped, the ov en w ill swi tch off
automatically, the symbol AUTO will go
off and an intermittent buzzer, lasting 7
minutes, will start; this can be stopped by
pressing the button.
Important: Before the buzzer is stopped
switch off the oven manually.
To cancel the cooking program at any
time pr ess th e and button s
together and release the button first.
ELECTRONIC ALARM
The programm er can b e used a s an
alarm only for a maximum period of 99
minutes.
To set the alarm, push the or
button until you obtain the desired time
in th e di s p lay. Once the time has
elasped, an intermittent buzzer, lasting 7
minutes, will start; this can be stopped
by pressing the button.
Attent i o n : If the bottom oven i s
switched on when the buzzer starts, it
will be automatically switched off.
For it to operate furtherly you have to
st o p the b u z zer by pre s sing th e
button.
A
U
T
O
Page 23

23
Electronic programmer
A. Autotimer
The electronic programmer is a device which
groups together the following functions:
– 24 hours clock with illuminated display
– Timer (up to 23 hours and 59 minutes)
– Program for automatic oven cooking
– Program for semi-automatic oven cooking.
Description of the buttons:
Timer
Cooking time
End of cooking time
Manual position and cancellation of programmed cooking
Advancement of the numbers of all programs
Turning back of the numbers of all programs and changing the frequency of the
audible signal.
Description of the lighted symbols:
AUTO - flashing - Programmer in automatic position but not programmed
AUTO - always lighted - Programmer in automatic position with program inserted.
Automatic cooking taking place
Timer in operation
and AUTO - flashing - Program error.
(The time of day lies between the calculated cooking start and end time).
NOTE: Select a function using the respective button and, in 5 seconds, set the required
time with the / buttons (“one-hand” operation).
A power-cut makes the clock go to zero and cancels the set programs.
Electronic Clock
The programmer is equipped with an electronic clock with lighted numbers which indicates hours and minutes.
Upon immediate connection of the oven or after a power-cut, three zeros will flash on
the programmer panel.
To set the hour it is necessary to push the button and then the or button
until you have set the exact hour.
In another way push simultaneously the two buttons and at the same time push
the or button.
NOTE: The hour setting after programmation delete any program.
Fig. 27
Models: C 230 M/M, C 230 M/W, C 206 M/SS
Mod. C 230 M/M, C 230 M/W
Mod. C 206 M/SS
A
U
T
O
Page 24

24
Normal Cooking without the use of the Programmer
To manually use the oven, that is, without the aid of the programmer, it is necessary
to cancel the flashing AUTO by pushing the button (AUTO will be switched off and
the symbol will go on).
Attention: If the AUTO is steady lighted (which means a cooking program has already
been inserted), by pushing the button you will cancel the program and revert to
manual operation.
If the oven is switched on, remember you must switch off manually.
Electronic Timer
The timer program consists only of a buzzer which may be set for a maximum period
of 23 hours and 59 minutes.
If the AUTO is flashing push the button.
To set the time, push the button and the or until you obtain the desired time
in the panel (fig. 8). Having finished the setting, the clock hour will appear on the panel
and the symbol will be lighted.
The countdown will start immediately and may be seen at any moment on the panel
by simply pressing the button . At the end of the time, the symbol will be switched
off and an intermittent buzzer will sound; this can be stopped by pressing one of any
of the buttons.
Setting the frequency of the Audible Signal
The selection from 3 possibilities of sound can be made by pressing the button.
The last setting remains on.
Setting the Automatic Oven Cooking
To cook food automatically in the oven, it is necessary to:
1. Set the length of the cooking time
2. Set the end of the cooking time
3. Set the temperature and the oven cooking program.
These operations are done in the following way:
1. Set the length of the cooking time by pushing the button and the button to
advance, or to go back if you have passed the desired time. The AUTO and the
symbol will be on.
2. Set the end of the cooking time by pressing the button (the cooking time already
added to the clock time will appear), and the button; if you pass the desired time
you may get back by pushing the button.
After this setting, the symbol will go off. If after this setting, the AUTO flashes on the
panel and a buzzer sounds, it means there was an error in the programming, that is that
the cooking cycle has been superimposed on the clock. In this case, modify the end of cooking time or the cooking time itself by following again the above mentioned instructions.
Electronic programmer
Page 25

25
3. Set the temperature and the cooking program by using the switch and thermostat
knobs of the oven (see specific chapters).
Now the oven is programmed and everything will work automatically, that is the oven
will turn on at the right moment and end the cooking at the selected time.
During cooking, the symbol remains on.
By pushing the button you can see the time that remains until the end of cooking.
The cooking program may be cancelled at any moment by pushing .
At the end of the cooking time the oven will turn off automatically, the symbol will
turn off, AUTO will flash and a buzzer will sound, which can be turned off by pushing
any of the buttons.
Turn the switch and thermostat knobs to zero and put the programmer onto “manual”
by pressing the button.
Attention: A power-cut makes the clock go to zero and cancels the set programs.
After a power-cut, three zeros will flash on the panel.
Setting the Semi-Automatic Oven Cooking
This is used to switch automatically off the oven after the desired cooking time has
elapsed. To effect the semi-automatic cooking there are two ways:
1. Set the length of the cooking time by pushing the button and the button to
advance, or to go backwards if you have passed the desired time.
or
2. Set the end of the cooking time by pushing the button and the button to
advance, or to go backwards if you have passed the desired time.
AUTO and the symbol will be on.
Then set the temperature and the cooking program using the oven switch and thermostat
knobs (see specific chapters).
The oven is switched on and it will be switched off automatically at the end of the
desired time.
During cooking, the symbol remains on and by pressing the button you can see
the time that remains till the end of the cooking. The cooking program
can be cancelled at any moment by pushing the button. At the end of the cooking, the oven and the symbol will turn off, the AUTO will flash and a buzzer will
sound; that can be stopped by pushing any of the buttons.Turn the switch and thermostat
knobs to zero and set the programmer onto “manual” by pressing the button.
Electronic programmer
Page 26

26
Autotimer
This device comprises the following functions:
– Electric clock
– Minute counter with acoustic signal (up to 55 minutes)
– Automatic cooking program (programming of end of cooking time and cooking dura-
tion)
– Semi-automatic cooking program (immediate start of cooking and programmed end
of cooking period).
Electric clock (Fig. 28)
To set the time, rotate the small knob (A) clockwise or anticlockwise exerting a slight
pressure.
Minute counter
The minute counter function consists simply of an acoustic signal which sounds once
the set time has elapsed.
To set the minute counter, rotate the small knob (A) clockwise or anticlockwise (without
pressing it) until the hand (C) coincides with the required time (max 55 minutes).
Countdown will begin immediately and the hand (C) will begin to turn anticlockwise,
always showing the remaining time.
Once the set time has elapsed the acoustic signal will sound until the hand (C) is turned
to the symbol by rotating the knob (A) anticlockwise.
Fig. 28
A
XII
VIII
VII
VI
V
IV
XI
X
IX
I
II
III
E
C
G
x
B
y
D
Analogical programmer
Models: C 211 F/W, C 211 F/GRN
Page 27

27
The oven is now programmed and everything will work automatically.
Referring to the example in Figure 28:
– the oven will come on at 7.00 (end x of the red sector G)
– cooking duration 2 hours
– end of cooking at 9.00 - oven will switch off and the “0” will appear in the window
(E).
When the “0” appears in the window (E) this means that cooking has finished; zero the
function selector and thermostat knob and reset the programmer to manual by rotating
the larger outer knob (B) clockwise until the symbol appears in the window (E).
Excluding the programmer
To use the oven manually the programmer must be excluded by turning the larger outer
knob (B, Fig. 28) clockwise until the symbol appears in the window (E, Fig. 28).
Programmer
The semicircular programming window (D) rotates clockwise, operated by the larger
outer knob (B).
The end (x) of the semicircular window (D) is the end of cooking indicator.
The end (y) of the red sector (G), which can be seen by rotating the knob (B) anticlockwise, is the beginning of cooking indicator.
The red section (G) shows the cooking time.
When “0” appears in the window (E) this indicates that cooking is finished.
Automatic cooking (Fig. 8)
If you wish the oven to switch on and off automatically:
1. Set the end of cooking time within a 12 hour range
2. Set the beginning of cooking time (end of cooking time minus cooking time)
3. Set the oven function and temperature.
These operations are carried out as follows:
1. Set the end of cooking time by turning the larger outer knob (B) clockwise until the
end (x) of the semicircular window (D) coincides with the required time.
If you go beyond the required time, you must repeat the whole cycle as it is not possible to scroll in reverse.
2. Set the beginning of cooking time by rotating the larger knob (B) anticlockwise until
the end (y) of the red sector (G) coincides with the required time.
The red sector (G) indicates the cooking time (max 3 hours 45 minutes) and therefore
the period the oven remains on.
As the cooking time elapses the red sector will rotate together with the clock hand.
3. Set the required cooking function and temperature via the function selector and thermostat knob.
Analogical programmer
Page 28

28
Semi-automatic cooking (Fig. 8)
This automatically switches the oven off at the required time. To do this, follow the
instructions below:
1. Set the end of cooking time by rotating the larger outer knob (B) clockwise until the
end (x) of the semicircular window (D) coincides with the required time.
2. Rotate the larger outer knob (B) anti-clockwise until it stops at the hour hand.
3. Set the required cooking function and temperature via the function selector and thermostat knob.
The oven will begin to work immediately and will switch off automatically at the set time.
Zero the oven knobs and reset the programmer to manual.
Analogical programmer
D
x
G
y
B
Fig. 29
X
IX
VIII
XI
VII
XII
VI
I
II
V
III
IV
Page 29

29
Oven doors
The internal glasses of the oven doors can be easily removed for cleaning by unscrewing
the two fixing screws (figure 30).
Stainless steel surfaces
CAUTION
The stainless steel used in this oven is protected with a Special Lacquer to reduce
finger-print marks.
To avoid damaging this lacquer, do not clean the stainless steel with abrasive cleaners or
abrasive cloths or scouring pads.
ONLY SOAP/WARM WATER MUST BE USED TO CLEAN THE STAINLESS STEEL
SURFACES.
Substitution of the oven light
The light bulb must be a type resistant to high temperatures (300° C).
General advice
It is advisable to clean when the appliance is cold and especially for cleaning the enamelled parts.
Avoid leaving alcaline or acidic substances (lemon juice, vinegar, etc.) on the surfaces.
Avoid using cleaning products with a chlorine or acidic base.
The ovens must always be cleaned after every use, using suitable products and keeping
in mind that its operation for 30 minutes on the highest temperature eliminates most
grime reducing it to ashes.
Cleaning and Maintenance
Fig. 30
Do not use a steam cleaner
because the moisture can get into
the appliance thus make it unsafe.
Important:
Before any operation of cleaning and
mainte n a n ce discon n e c t the
applia n c e f rom the el ectric a l
network.
Page 30

30
Helpful Advice
Trouble shooting
Problem
Food too brown but not cooked.
Remedy
Turn down the oven temperature slightly
and cook a little longer
Problem
Food cooked but not brown enough.
Remedy
Increase temperature.
Problem
Food baking unevenly.
Remedy
1. The temperature may be slightly high
turn it down
2. Position the food in the centre of the
shelves rather than towards the sides
of tho oven.
3. Rotate the food a half turn in the oven.
4. Try pre-heating the oven for 5-15 minutes prior to baking.
Always remove cooked items as soon as
they are ready and continue cooking the
under-cooked items until they are completely finished.
Changing the Oven Cavity Light Bulb.
If the oven light falls:
1. Turn off the oven by switching the
oven selector to 0, switch off at the
cooker point.
2. When the oven is cool, reach back
and upwards inside the oven, the bulb
is in the top left corner.
3. Unscrew the light glass cover, replace
the bulb with a new one of the same
specification and screw the cover
back until it is hand tight.
NOTE: Oven bulb replacement is not
covered by your guarantee.
Other bulbs cannot be changed by yourself and should be replaced by an authorised CAPLE Service Engineer.
Bulbs other than the oven bulb are covered by the guarantee.
IMPORTANT: Ovens get hot. Keep
children away from this appliance at
all times.
If Your OYen Does Not Work
Before calling a CAPLE service engineer
run through the following checklist.
– The oven is connected to the power
supply and that the fuse is intact.
If you are in any doubt about carrying
out thes e c heck s, call the CAPL E
Helpline on 0870 241 1142.
A charge will be made if the appliance
is found to be in working order, or if it
has not been installed in accordance
with these instructions, or if it is has been
used incorrectly.
Page 31

31
N.B. For fan ovens reduce the temperature by 10-20°C. For any dish taking one
hour or over to cook, reduce the cooking
time by 10 minutes per hour.
* Shelf positions have been counted
from the top of the oven to the base.
A fan oven creates more even temperature throughout, therefore the shelf positions are not as critical.
Food °C °F Gas Shelf Cooking
Mark Position* Time (approx)
CAKES
Victoria sandwich 190 375 5 2 or 3 20-25 mins
Small cakes/buns 190 375 5 1 and 2 15-20 mins
Maidera cake 180 350 4 2 or 3 20 mins
Fruit cake 170 325 3 3 1
3
/4
hours
Rich fruit cake 150 300 2 3 or 4 2
1
/2
hours
Scones 225 425 8-9 2 8-10 mins
PASTRY
Puff 225 425 8-9 2 10-20 mins
Short crust 200 400 6 2 20-30 mins
Plate tarts 200-210 400-410 6 1 or 2 30-35 mins
Quiches and flans 200-210 400-410 6 1 or 2 40-45 mins
YEAST
Bread loaf 225 425 7-8 2 35-55 mins
Bread rolls 220 425 7 1 or 2 15-20 mins
Pizza dough 230 450 8 2 20 mins
ROAST MEAT
Beef – Medium 190 375 5 2 or 3 20 mins/lb + 20 mins
Lamb 190 375 5 2 or 3 25-30 mins/b + 25 mins
Pork 190-200 375-400 5-7 2 or 3 30 mins/lb + 30 mins
Veal 190 375 5 2 or 3 30 mins/b + 30 mins
Chicken 190 375 5 2 or 3 30 mins/b + 30 mins
Turkey up to 10lb 180 350 4 2 or 3 18-20 mins/b + 20 mins
Stews/casseroles 150-170 300-325 2-3 2 or 3 1
1
/2
2 hours
Recommended cooking temperature
Page 32

Cod. 1101785.1
ß4
CAPLE “Built-in” Service
Should you require service at any time,
please contact the Caple Helpline on
0870 241 1142.
Caple have a nationwide service net-
work of engineers who will respond
quickly to your call.
YOUR GUARANTEE
CAPLE guarantees all parts of this product for one year from the date of pur-
chase. During that time, should it become necessary CAPLE engineers will
replace or repair all defective parts free of charge, except for parts subject to
fair wear and tear, such as lightbulbs.
Parts and the engineers labour costs are chargeable after the first 12 months.
To qualify for benefits under the guarantee, you must be able to provide proof
of date of purchase and the appliance must have been supplied, installed and
used for domestic purposes only in accordance with CAPLE instructions.
Consequential losses and accidental damage to the product are not covered
by the guarantee.
This guarantee does not affect your statutory or common law rights.
CAPLE cannot be responsible for the results of using this appliance for any
other purposes other than those described in these instructions.
Always replace spare parts with genuine Caple spares. These are available
from authorised Caple Service Centres
or by mail order from our National
Service Stores, simply telephone
0870 241 1142.
When ordering parts always quote the
model number and serial number of
your appliance.
 Loading...