

Page 1

OPERATOR MANUAL
IMPORTANT INFORMATION, KEEP FOR OPERATOR
This manual provides information for:
MODELS CKPF/3
CAPKOLD COOKCHILL SYSTEMS
PUMP-FILL STATION
THIS MANUAL MUST BE RETAINED FOR FUTURE REFERENCE.
READ, UNDERSTAND AND FOLLOW THE INSTRUCTIONS AND
WARNINGS CONTAINED IN THIS MANUAL.
NOTIFY CARRIER OF DAMAGE AT ONCE
It is the responsibility of the consignee to inspect the container upon receipt
of same and to determine the possibility of any damage, including concealed
damage. Unified Brands suggests that if you are suspicious of damage to make
a notation on the delivery receipt. It will be the responsibility of the consignee to
file a claim with the carrier. We recommend that you do so at once.
Manufacture Service/Questions 888-994-7636.
Information contained in this document is known to be current and accurate at the time
of printing/creation. Unified Brands recommends referencing our product line websites,
unifiedbrands.net, for the most updated product information and specifications.
PART NUMBER 137164 REV. G (02/18)
1055 Mendell Davis Drive
Jackson, MS 39272
888-994-7636, fax 888-864-7636
unifiedbrands.net
Page 2

IMPORTANT - READ FIRST - IMPORTANT
WARNING: Do NOT attempt to install, set-up or operate this machine before reading and understanding this manual and
ALL accompanying manuals. KEEP ALL MANUALS FOR FUTURE REFERENCE.
WARNING: Be sure operators read, understand and follow operating instructions, cautions and safety instructions in this
manual. Additional manuals may be supplied for specic sub-components of the CapKold CKPF/3 Mobile
Pump/Fill Station. Be sure operators read, understand and follow ALL operating instructions, cautions and
safety instructions in these additional manuals. Any potential user of this equipment MUST be trained in safe
and correct operating procedures.
WARNING: When using this machine, ALL operating instructions, safety instructions and precautions MUST be followed
and strictly adhered to.
WARNING: This machine is intended for use in the commercial transfer and packaging of food products, per the
instructions contained in this manual. Other use could result in personal injury or damage to the equipment
and will void ALL warranties.
WARNING: AVOID ALL direct contact with HOT equipment surfaces. Food products transferred through this machine
are at temperatures as high as 212°F (100°C). Direct skin contact could result in severe burns.
WARNING: AVOID ALL direct contact with HOT food. Food products transferred through this machine are at temperatures
exceeding 140°F (60°C) and in direct skin contact could produce severe burns.
WARNING: Use of any replacement parts other than those supplied by Unied Brands, or its authorized distributors
voids ALL warranties and may cause bodily injury or equipment damage. Service performed by other than
Unied Brands Authorized Service Agents will void ALL warranties.
WARNING: Turn electric power OFF and unplug the CKPF/3 unit BEFORE working on any internal components.
WARNING: Turn electric power OFF and unplug the CKPF/3 unit BEFORE performing and cleaning operation.
WARNING: AVOID contact with cleaning products and follow manufacturer’s instructions, warnings and recommendations
for using such products. Many cleaners and sanitizers are harmful to the skin, eyes, mucous membranes
and clothing. Read warning and follow directions on the cleaner/sanitizer product label.
CAUTION: NEVER leave a chlorine sanitizer in contact with stainless steel longer than 30 minutes, before thoroughly
rinsing off. Longer contact can cause corrosion.
WARNING: Do not use a fuse with a higher AMP rating than specied on the Wiring Diagram of the circuit.
WARNING: Never place ngers or other body parts in the groves of the Tipper Tie clipper accessory where the clips seal
the product casings.
2 OM-CKPF/3
Page 3
IMPORTANT - READ FIRST - IMPORTANT
WARNING: Always turn the air switch to the OFF position and disconnect the air hose to the Tipper Tie clipper accessory
when removing a clip jam. Always follow the manufacturer’s instructions and use a screwdriver to REMOVE
a clip jam. NEVER attempt to REMOVE a clip jam with your ngers.
WARNING: If a clip jams in the dies area of the Tipper Tie clipper accessory, DO NOT attempt to cycle the machine again
until the jam has been cleared. Follow ALL safety procedures. Place the air valve in the OFF position and
disconnect the air supply BEFORE attempting to REMOVE the clip or other obstruction from the die area.
Use a screwdriver, NOT your ngers, to remove the jam.
WARNING: Disconnect both air hoses on the air-operated product dispensing valve BEFORE disassembly.
OM-CKPF/3 3
Page 4
IMPORTANT - READ FIRST - IMPORTANT
WARNING: The CapKold CKPF/3 Mobile Pump/Fill Station electrical power cord should NOT be allowed to rest on the
oor in water or a high moisture environment.
WARNING: DO NOT operate the CapKold CKPF/3 Mobile Pump/Fill Station with the pump rotor housing cover removed,
or without ALL bolts installed and properly tightened.
WARNING: DO NOT spray or hose down the CapKold CKPF/3 Mobile Pump/Fill Station Control Panel or Inverter with
water.
CAUTION: When cleaning and working on the components of the CapKold CKPF/3 Mobile Pump/Fill Station, be careful
of metal surfaces, components and housings that may still be HOT. DO NOT touch HOT surfaces as direct
skin contact can result in severe burns.
4 OM-CKPF/3
Page 5
IMPORTANT - READ FIRST - IMPORTANT
CAUTION: When working on the rotor housing of the product pump or removing the rotors from the housing, be aware
that the surfaces may be HOT. Use protective devices and remove rotors with a tool to avoid skin contact.
Keep feet and other body parts clear of the rotor housing during rotor removal and installation.
CAUTION: REMOVE product tubing and rotors, BEFORE removing rotor housing from the unit.
CAUTION: CapKold CKPF/3 Mobile Pump/Fill Station MUST have a separate ground wire for safe operation
OM-CKPF/3 5
Page 6

Table of Contents
Important Operator Warnings ............................................................................ page 2
Equipment Description ...................................................................................... page 7
Installation ....................................................................................................... page 9
Start-Up ......................................................................................................... page 10
Operation ........................................................................................................ page 11
Equipment Cleaning/Sanitization Procedures ................................................. page 20
Maintenance ................................................................................................... page 22
Troubleshooting ............................................................................................... page 24
Suggested Spare Parts List .............................................................................. page 25
Wiring Schematic ............................................................................................ page 30
Service Log .................................................................................................... page 31
6 OM-CKPF/3
Page 7
Equipment Description
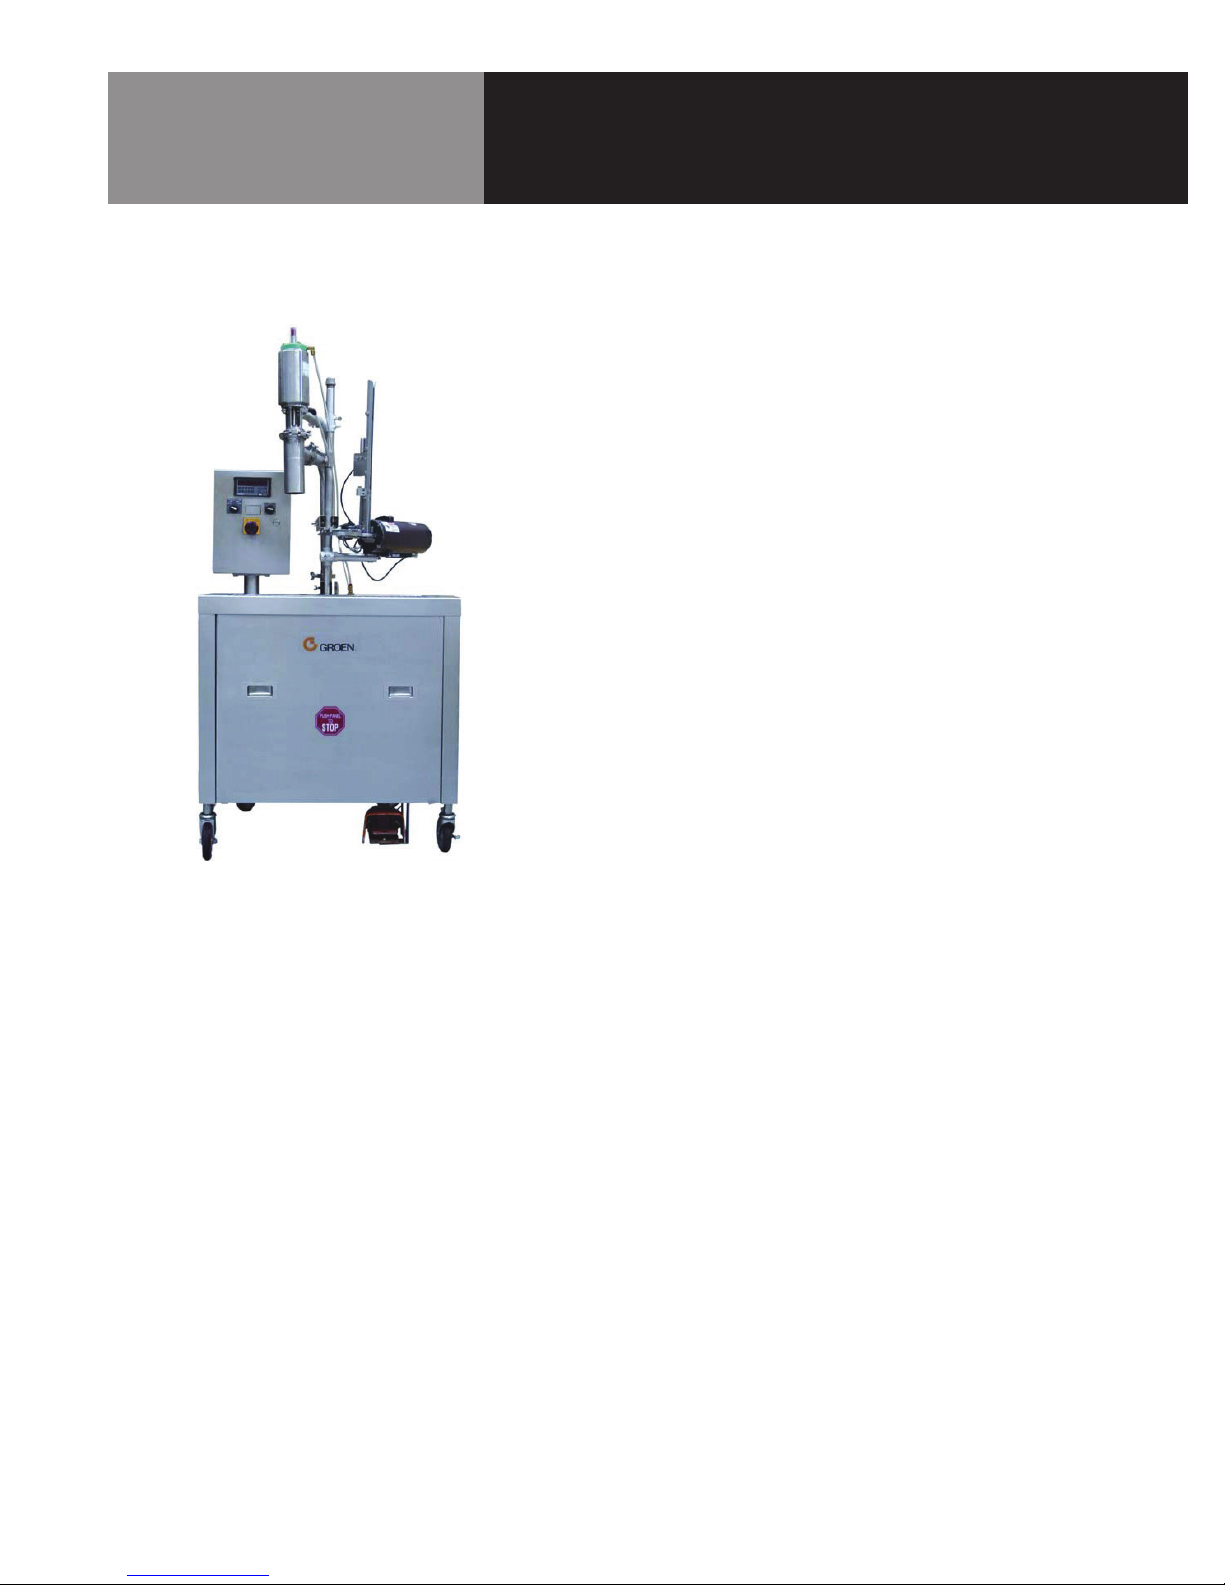
GROEN MODEL CKPF/3
MOBILE PUMP/FILL STATION
The CapKold CKPF/3 Mobile Pump/Fill Station is designed to rapidly and gently transfer food
product from a steam-jacketed kettle into flexible plastic casings and other food containers.
The base of the unit is a rectangular cabinet on locking casters.
A pedestal mounted control package is located on the left side of the deck of the cabinet. It
allows fast and simple adjustment of pumping speed and volume. An air-operated product
dispensing valve is mounted on a pipe frame over the right side of the cabinet deck, directly
over a grate with sink and drain. An accessory clipper mounts on the pipe frame between the
control panel and the product dispensing valve. It is used to close plastic casings filled with
food product.
A foot switch is mounted under the front of the cabinet to control operation of the product
dispensing valve. The product pump housing is mounted on the lower rear of the cabinet. It is
driven by a motor and inverter located inside the cabinet.
Standard Features:
1. All stainless steel construction
2. Rear-mounted positive displacement pump
3. Air-operated product flow control valve
4. Right-to-Left operator fill sequence
5. Full surface spill tray with drain and removable stainless steel grate
6. Four locking casters
7. 15-foot air hose; air regulator; air filter
8. UL and NSF listed; HACCP capable
Integrated Control Package:
The CapKold CKPF/3 Mobile Pump/Fill Station control panel is pedestal-mounted to the fill
station and is provided with a water resistant case and a clear, lockable cover to simplify
clean-up and to protect the touch screen. The height of the control panel is designed to
reduce operator fatigue and simplify changes of pump speed and volume settings for different
products.
The standard operating controls include:
1. Manual, Metered or Continuous pumping – operator selectable
2. Pump Speed (0 to 20 gallons per minute – GPM) – operator input
3. Metered Volume (0.0 to 10 gallons in 0.01 gallon increments) – operator input
4. Foot-activated fill switch
5. Knee-operated and hand-operated STOP switches
6. Digital display of volume pumped per casing, total casings pumped and total volume
pumped per batch
Additional controls provided for add-on options:
7. Temperature monitor and lock-out indicator with audible alert when product temperature
drops below user preset limit (typically 180°F or 82°C).
8. Product Temperature Recorder
OM-CKPF/3 7
Page 8

Equipment Description
OPTIONAL FEATURES
AND ACCESSORIES
• Air-Operated Casing Clipper (Tipper-Tie)
• Product Temperature Assurance with lockout and visual/audible alert
• Product Temperature Recorder
• 2-section 3” Transfer Hose assembly (6-foot long) with fittings to connect to pump-fill
station and kettle valve
• Additional 3” Transfer Hose section (3-foot long) with fittings
• High-volume air-eductor vacuum pump (for product vacuum packaging for cook tank
production)
• Casing Bin Holder (mounts to side of station and holds empty casing bags)
• Pan Fill adaptors for 2-1/2”, 4” and 6” hotel pans
• KIWI Label Maker (manual) with single set of letters and starter ink supply (casing content/
product date labeling on Tyvek® tape labels)
• Data Max Labeler
• Prison Package
8 OM-CKPF/3
Page 9
Installation
UNPACKING AND INSPECTION
CASING CLIPPER INSTALLATION
The CapKold CKPF/3 Mobile Pump/Fill Station is a mobile cabinet mounted on short legs and
lockable casters. It will arrive packed in a wooden crate. Carefully inspect the crate for any
signs of damage and then carefully remove the unit from the crate, inspecting it further for
any signs of damage. Notify the delivery agent immediately if damage is found and follow their
instructions regarding submission of an insurance claim.
During unpacking, inspect all packing materials to ensure that no loose parts are inadvertently
discarded.
Check the casters to ensure they are fully inserted in the leg sockets and that their locks are
released; then move the station to its intended operation location.
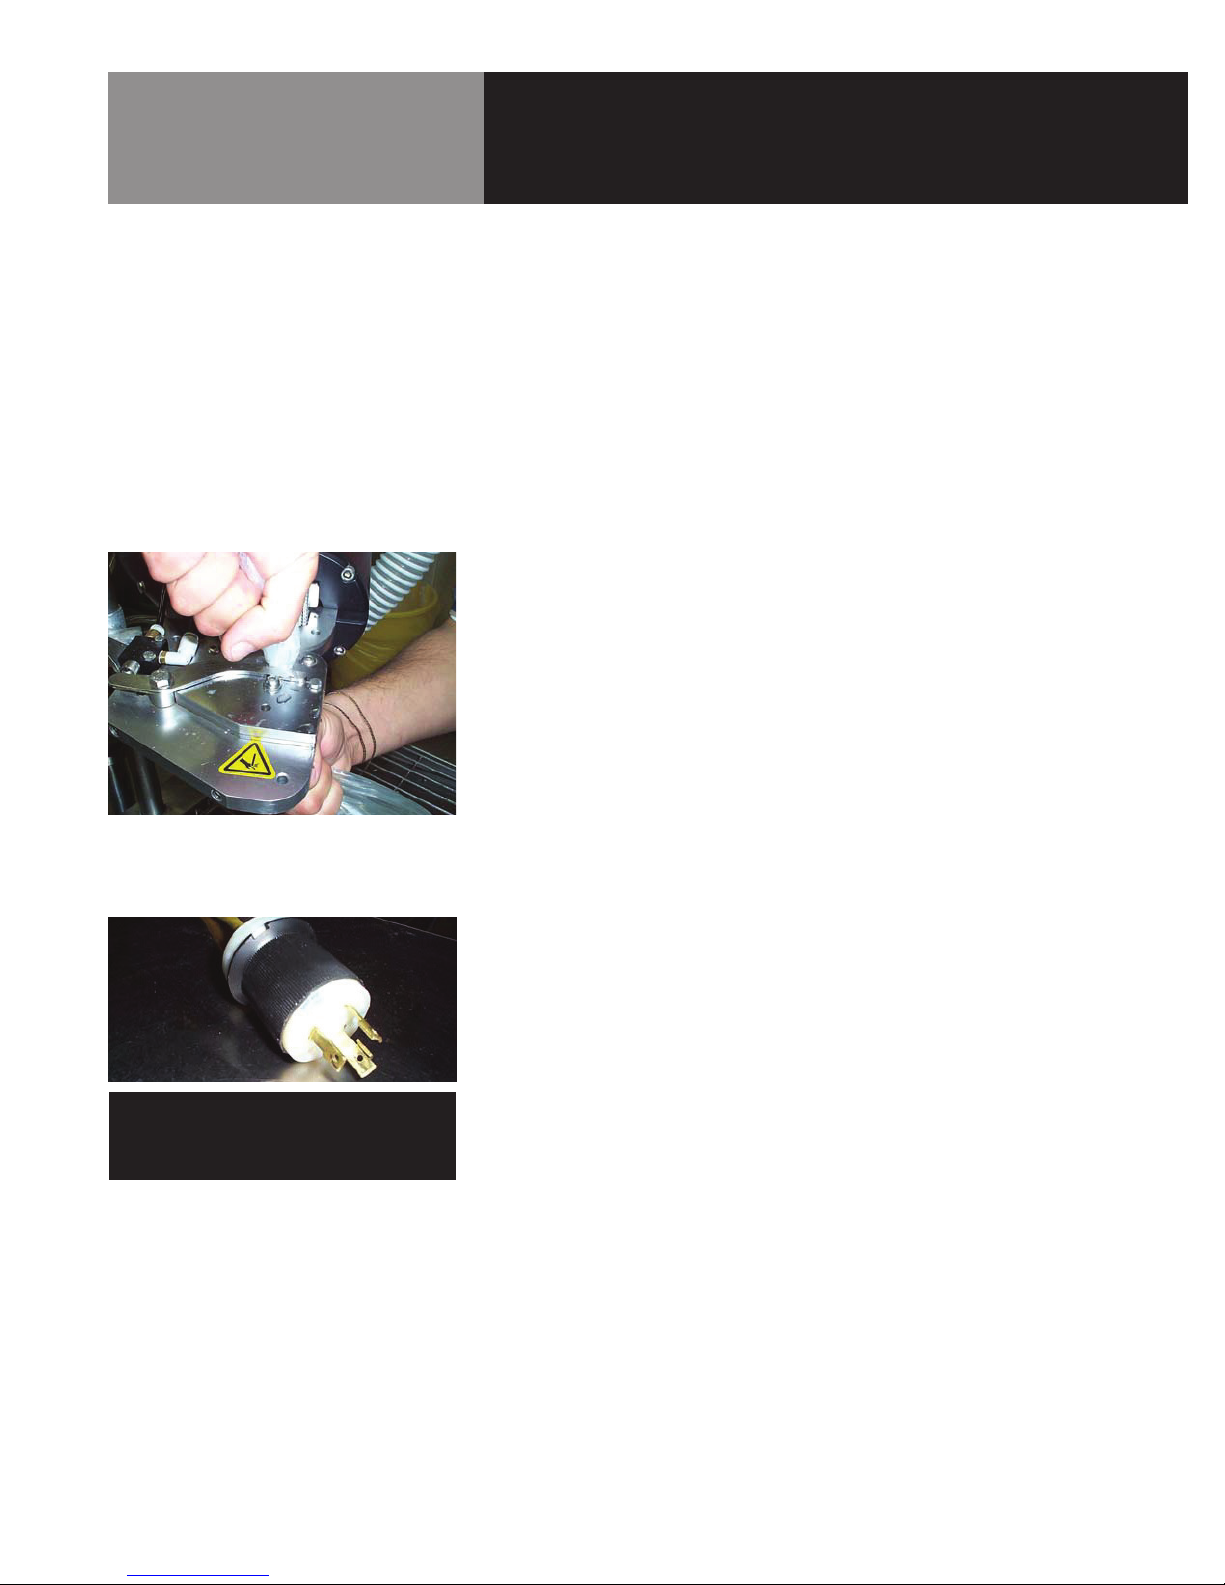
The CapKold CKPF Mobile Pump/Fill Station is intended for use with a Tipper Tie Casing Clipper
installed adjacent to the fill valve. Locate the clipper unit and mounting hardware (which may
have been packed and shipped separately). Mount the clipper to the CapKold CKPF/3 Mobile
Pump/Fill Station as follows:
The clipper unit is air-operated and requires a source of compressed air regulated between 80
to 90 PSI, minimum. Typical operation of the clipper at 10 cycles per minute will require approximately 60 CFM (cubic feet per minute) of clean dry air. Insufficient supply of air will cause
the clipper unit to malfunction.
ELECTRICAL POWER
REQUIREMENTS
WARNING
THE RECEPTACLE AND CIRCUIT MUST
BE PROPERLY GROUNDED.
CLEANING/SANITIZING
FOR FIRST USE
The CapKold CKPF/3 Mobile Pump/Fill Station is supplied with a 15-foot air hose terminated
with a quick disconnect fitting. It can be connected directly to the facility compressed air supply, or in some cases to an auxiliary compressed air outlet on the CapKold kettle.
Electrical power must be supplied to the CapKold CKPF/3 Mobile Pump/Fill Station through a
25-foot power cord attached to the cabinet and terminated with a three-prong, twist-lock plug.
The plug requires a NEMA L6-30R receptacle (Hubbell™ 2621 supplied with Single-Phase, 30
Amp 220-240 Volt (50/60Hz) AC service. The unit will draw approximately 15 Amps in normal
operation.
Before operating the CapKold CKPF/3 Mobile Pump/Fill Station it is recommended that the unit
be cleaned and sanitized for use. See the instructions starting on page 20.
OM-CKPF/3 9
Page 10
NOTE
SOME STYLES OF CAPKOLD KETTLES ARE
SUPPLIED WITH 3” PRODUCT ELBOWS FITTED
WITH TRI-CLAMP FLANGES IN LIEU OF 3”
SANITARY THREADS. IN SUCH CASES THE
6-FOOT HOSE ASSEMBLY WILL BE SUPPLIED
WITH A MATING TRI-CLAMP FLANGE AT ONE
END. INSTALL THE HOSE TO THE ELBOW BY
INSERTING A BEADED GASKET BETWEEN THE
TWO FLANGES AND THEN COMPRESS THE
FLANGES TOGETHER WITH A TRI-CLAMP.
Start-Up
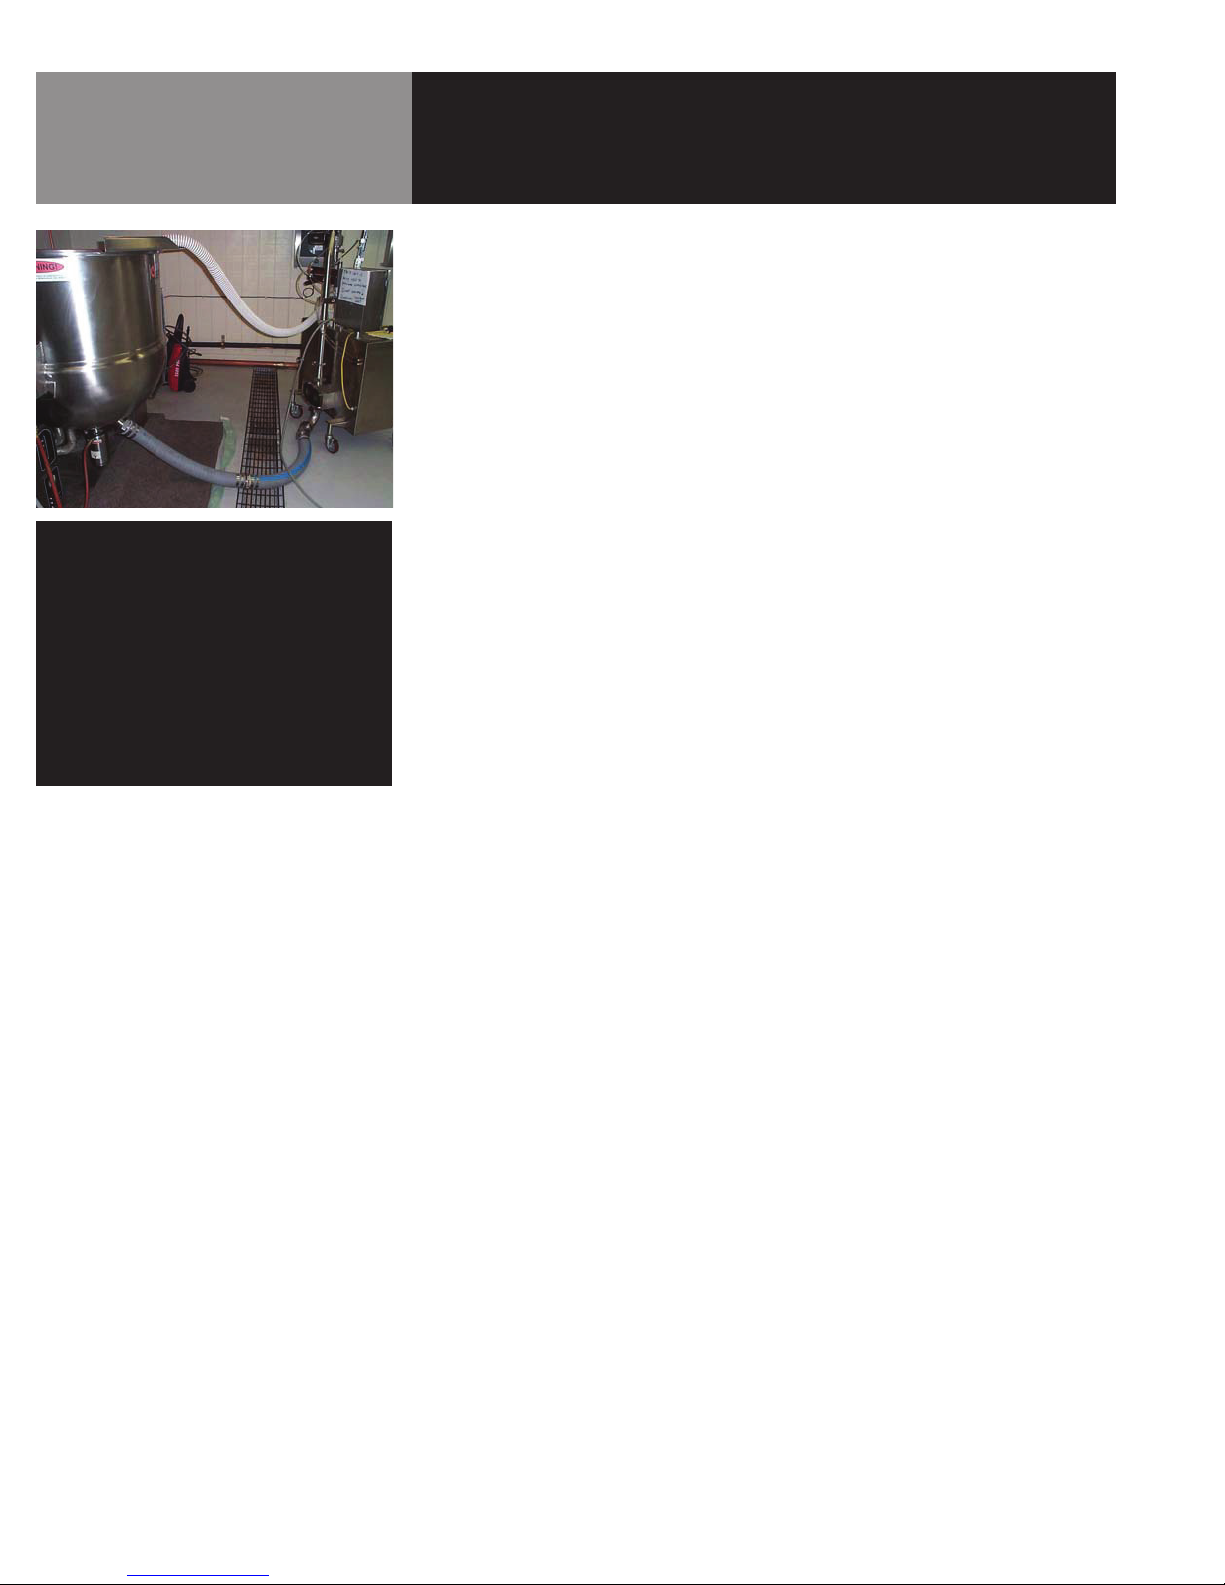
Move the CapKold CKPF/3 Mobile Pump/Fill Station adjacent to a CapKold kettle within 6’feet of
the kettle outlet valve. Lock the casters on the pump/sill station
Thoroughly wash, rinse and install the 3-inch sanitary-thread elbow to the underside of the
pump housing. Orient the elbow as desired and tighten the 3-inch hex nut with the wrench supplied with the CapKold CKPF/3 Mobile Pump/Fill Station.
Connect one end of the 2-section 6-foot sanitary hose to the outlet of the elbow on the pump
housing. Hand-tighten the 3-inch nut. Connect the other end of the sanitary hose to the 3-inch
threaded elbow outlet under the CapKold kettle. This will be located directly above the airoperated drop down valve (if one is supplied) or immediately below the manual or air-operated
ball valve (if one is supplied). Hand-tighten the 3-inch nut onto the elbow. Inspect the hose
installation and adjust the position of the pump/fill station, if needed. Finally, TIGHTEN BOTH
3-INCH NUTS WITH THE WRENCH SUPPLIED WITH THE UNIT.
10 OM-CKPF/3
Page 11

Operation
The CapKold CKPF/3 Mobile Pump/Fill Station Control Panel is controlled by a modular
HMC (human-machine controller). The HMC is a combination touch-screen HMI (humanmachine interface) and a PLC (programmable logic controller). The Pump Fill Control System
features language selection (English or French), motor speed control, bag totalizer, gallons/
liters totalizers (language dependent), enable/disable the temperature assurance feature,
temperature read out in ºF or ºC, and other user definable set points.
There are six User screens on the HMC display: Home, Mode, Pump Speed, Total, Maint, and
Cal.
The HMC display also has two alarm screens: Low Temperature and Emergency Stop; and two
pop-up menus: Navigation and Bag Fill Amount.
Description of Displays:
HOME DISPLAY
The Home Display will be the first window to show on a power-up cycle if the Emergency
Stop button is not pressed. This display allows the user to select a Language by pressing on
appropriate Flag. US = English and Canada = French. The default language on a power-up
cycle is English.
Press here to
select language
Press here to
navigate
The NAV button located on the lower left corner of every display allows the user to Navigate
between Displays by pressing the button and making a selection.
When the NAV button is pressed the Navigation Pop-Up Window will be displayed. This Popup is available on every display except on the Emergency Stop warning display. Press the
appropriate Display title on the Navigation Pop-Up and the chosen display will appear. (MAINT
display requires password entry)
Press here to
select measures
OM-CKPF/3 11
Page 12

Operation
MODE SELECT DISPLAY
The MODE SELECT display allows the user to select between OFF, AUTOmatic mode,
MANUAL mode, and CONTINUOUS Mode.
OFF = Turns off any Mode selection. The pump cannot be started when OFF is selected.
AUTO mode = Will turn on the pump at the desired speed when the foot switch is pressed until
the desired amount per bag is reached.
12 OM-CKPF/3
MANUAL mode = Will turn on the pump at the desired speed when the foot switch is pressed
and will stop the pump when the foot switch is released.
Page 13

Operation
CONTINUOUS mode = Will turn on the pump at the desired speed. Once the CONTINUOUS
button is pressed the user must select the OFF button to turn off the Pump.
PUMP SPEED DISPLAY
The Pump Speed Display allows the user adjust the speed of the pump two different ways. One
way is by pressing the Numeric display. By pressing on the numeric display a keypad entry will
pop-up allowing the user to enter 0 to 100%. The other way is by pressing the + and – buttons
which will increase or decrease the speed in 1% increments.
Press here for Keypad to
change speed 0 to 100%
Press here to increment or
decrement speed in +1% steps.
Press the desired speed
then press ENT
OM-CKPF/3 13
Page 14
Operation
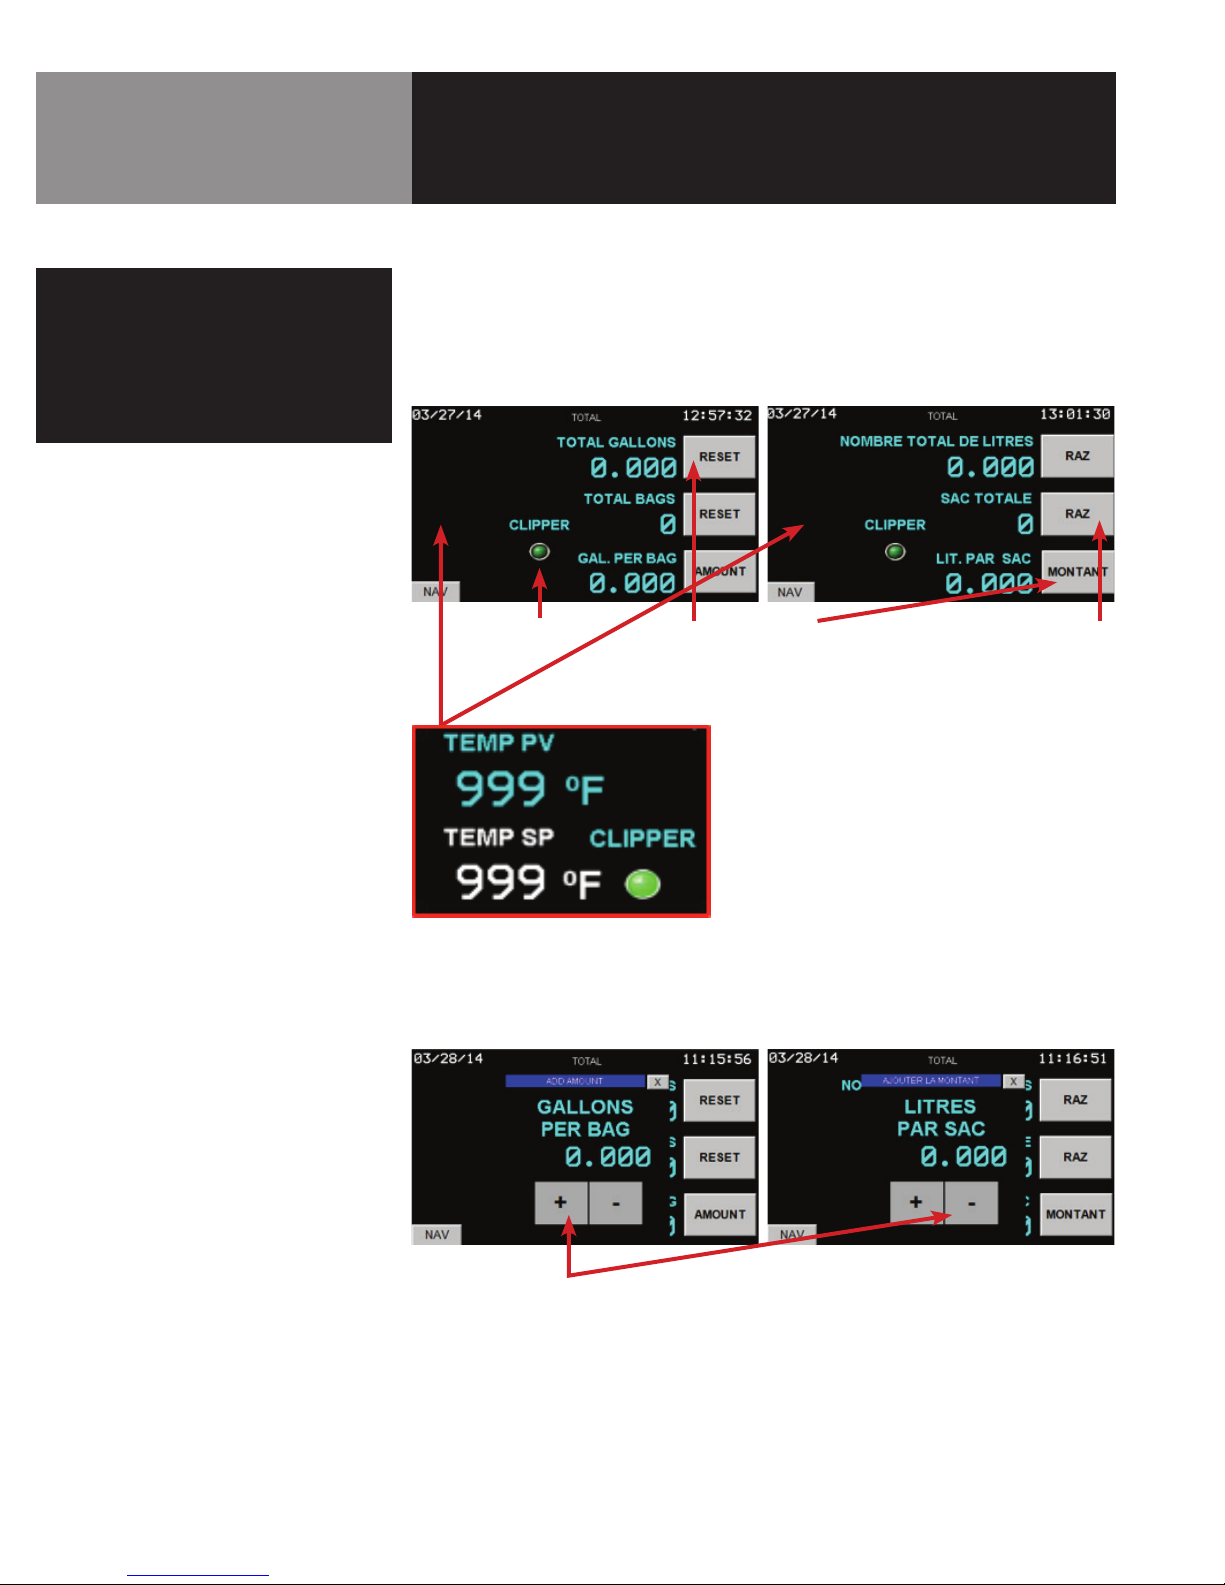
TOTAL DISPLAY
NOTE
GALLONS ARE 0.250 AND LITERS ARE 0.946
PER PULSE. THESE VALUES ARE SET UP ON THE
CAL DISPLAY AND MUST BE ENTERED BEFORE
YOU CAN SET THE AMOUNT PER BAG. THE
AMOUNT PER BAG MUST BE SET UP BEFORE
THE PUMP WILL OPERATE IN AUTO MODE.
The Total Display shows the total Gallons or Liters (Language dependent: English = Gallons,
French = Liters) pumped, total bags pumped, amount per bag, Temperature PV in ºF or ºC if
Temp Assurance is selected, Temperature SP in ºF or ºC if Temp Assurance is selected, and
Clipper OFF/ON indication. This Display allows the user to reset total accumulated gallons or
liters and total bags pumped, adjust the total amount per bag by pressing the AMOUNT button.
When the AMOUNT button is pressed, the Amount per bag pop-up appears allowing the user to
increment by the amount per pulse.
Clipper OFF
Indication
Press here to
reset totalizer
Press here to set
amount per bag
Press here to
reset total bags
Temperature PV and
SP (Visible only when
temp assurance is
turned on.)
14 OM-CKPF/3
Add Amount pop-up will display when the AMOUNT button is pressed. The + or – buttons are
pressed to increase or decrease the total per bag. The Gallons-per-Bag and Liters-par-Sac
must be set up on the CAL display in order to set the amount per bag.
Press these buttons to
increase or decrease the total
per bag amount
Page 15
Operation
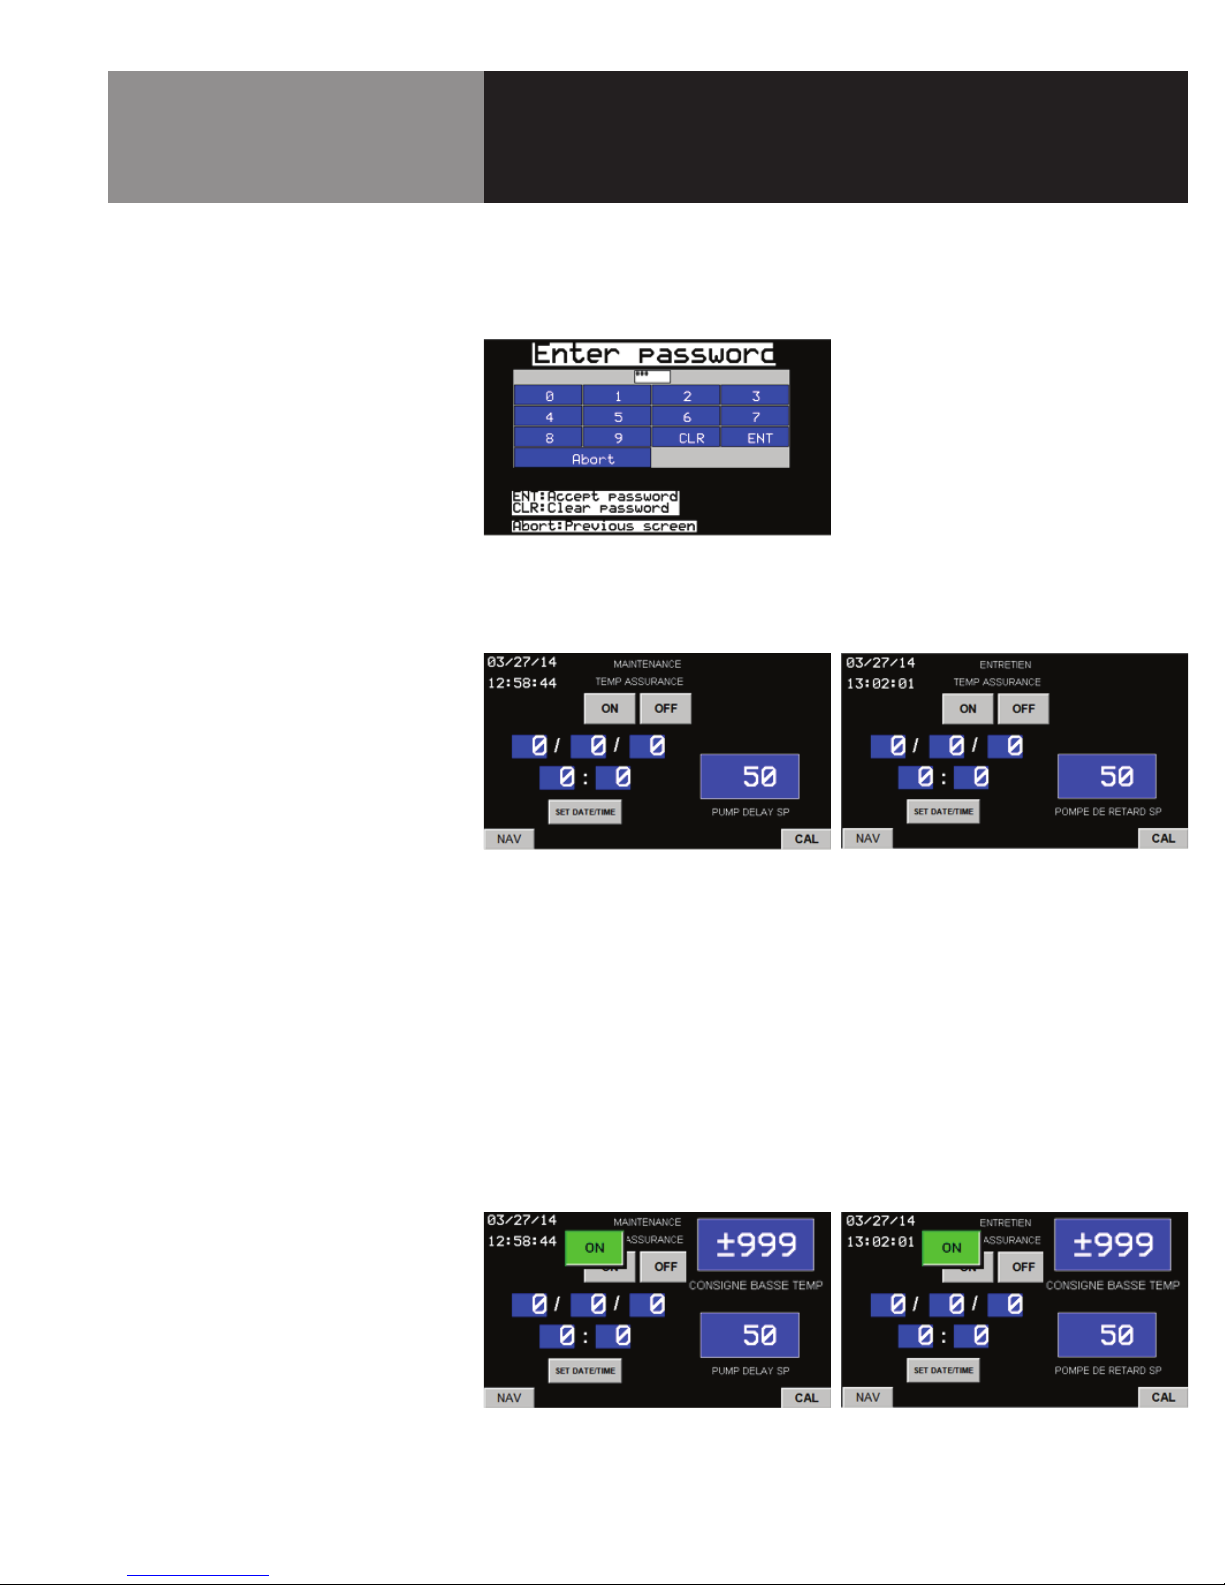
MAINT DISPLAY
The MAINTENANCE Display is Password Protected. The Default Password is 100. When the
MAINT button on the Navigation Pop-up display is pressed a keypad will be displayed to enter
the correct password. Once the correct password is entered the MAINTENANCE display is
accessed.
When the MAINTENANCE Display is accessed the user will have the option to set the clock
and date, turn Temp Assurance option on or off, set the Temp Assurance Low Temp Set Point,
adjust the Product pump ON delay or Navigate to the password protected CAL Display.
Set the Date and Clock
To set the date and clock press each number and enter a value on the keypad that will pop-up.
Once all the fields have a number press the Set DATE/TIME Button. This will change the Date
and Time only when all the fields have a number.
Set the Pump ON Delay
To set the Pump ON delay press on the Numeric Graphic and enter the amount of time after the
Product Valve Opens before the Pump begins. Default is 0.50 sec. This is set in Hundredths of a
second.
Turn On/Off Temperature Assurance
To turn on or off Temp Assurance simply press the ON or OFF button. When Temp Assurance
is turned ON the Low Temp Set point appears. Enter the desired Low Temperature Setting by
pressing on the numeric graphic and entering the set point in the pop-up keypad.
OM-CKPF/3 15
Page 16

Operation
CAL DISPLAY
The CAL Display is Password Protected. The Default Password is 1055. When the CAL button
located on the Lower Right corner on the MAINT display is pressed a keypad will be displayed
to enter the correct password. Once the correct password is entered the CAL Display is
accessed.
When the CAL display is accessed the User will be able to adjust the Pulse-per-gallon, Pulse
per liter, Temperature Bias in °F and °C and adjust the anti-repeat timer. These settings should
only be adjusted by qualified personnel.
NOTE
THE CAPKOLD CKPF/3 MOBILE
PUMP/FILL STATION CONTROLLER IS
FACTORY CALIBRATED BY JAC MFG INC.
To Set the Pulse per Gallon
Press on the numeric graphic and enter the value into the pop-up keypad. 4 pulses = 1 Gallon
so each pulse is ¼-gallon or 0.005
Enter 005 in the gallons keypad.
To Set the Pulse-per-Liter
Press on the numeric graphic and enter the value into the pop up keypad. 4 pulses = 1 Gallon
There are 3.784 liters in a gallon (3.784/4 = 0.946) so each pulse is 0.019 liters.
Enter 019 in the pop-up keypad.
To set the Temp °F or °C Bias
Press on the numeric graphic and enter the value + °F or °C into the pop-up keypad.
To set the Anti-Repeat Timer
Press on the numeric graphic and enter the value into the pop-up keypad. Units are in
hundredths of a second. This timer will not allow a second auto cycle for “X” amount of time if
the foot switch is pressed and not released. If the foot switch is pressed and not released and
the above time expires, then the pump will pump the next bag. Suggested setting of 500 is
recommended which equals 5 seconds.
16 OM-CKPF/3
Page 17

Operation
ALARMS
The CapKold CKPF/3 Mobile Pump/Fill Station comes with two alarm screens Low Temperature
Alarm and Emergency Stop Pressed. The Low Temperature Alarm Screen will display when
the alarm is triggered and the Emergency Stop Pressed display will only display when the
Emergency stop button is pressed.
Low Temperature Alarm Screen
This display is where the alarm silence button is located. Once the low temp alarm is triggered
an alarm horn will sound and the low temperature alarm screen will display. The user can then
silence the horn. Once silenced the NAV button will appear allowing the user to navigate to
another display.
Emergency Stop Screen
This display will pop-up every time and while the emergency stop button is pressed. It will
disappear when the emergency stop condition has been cleared.
COOK/CHILL OPERATION
The following steps are intended to give an overview of the typical steps employed in a cook/
chill kitchen when a CKPF/3 Pump/Fill Station is used to fill and seal the contents of a steamjacketed kettle into flexible casings, prior to safely chilling them for extended cold storage.
Preparatory Steps:
1. Before starting the first batch in the kettle, thoroughly sanitize and rinse the interior and
the kettle drain path through the product outlet valve, so that it is ready for connection to a
CapKold CKPF/3 Mobile Pump/Fill Station at the end of the batch cycle.
2. Clean and sanitize the 2-Section 3” hose that will be used to connect the CapKold CKPF/3
Mobile Pump/Fill Station to the kettle product drain valve.
3. Clean and sanitize the product path through the pump inlet to the product outlet valve on
the CapKold CKPF/3 Mobile Pump/Fill Station.
OM-CKPF/3 17
Page 18

Air
Connection
Selector
Switch Knob
Turn knob clockwise
To turn air off
Power Cord Plug
Air Valve
Indicator
Turn knob counter
clockwise to turn air on
Operation
Pump Set-Up:
1. Connect the air hose on the CapKold CKPF/3 Mobile Pump/Fill Station to a compressed air
service point.
2. Connect the power cord on the Pump/Fill Station to the 208/220 Vac GROUNDED receptacle
on the left side pedestal on the kettle or to a 208/220 Vac, 30A GROUNDED receptacle on
the wall. NOTE: The power cord is terminated with a three-prong twist-lock plug.
3. Connect the 2-Section 3” food transfer hose to the elbow outlet on the kettle product valve
and the pump inlet elbow on the CapKold CKPF/3 Mobile Pump/Fill Station.
4. Load the Tipper Tie casing clipper magazine with clips; check the printer ink and label paper
supplies, if applicable.
5. Turn the air valve to the UP position, making sure that the 4-position selector switch is in
the OFF position.
6. Set the batch size:
• Press the NAV button on the control panel and select the TOTAL display mode.
• Press the AMOUNT button on the TOTAL display.
• The ADD AMOUNT pop-up will appear. Press the + or – buttons on the pop-up to
increase or decrease the gallons per bag (or litres per sac) amount. Recommended
amount is 1.5 gallons per bag (6 litres par sac). NOTE: The adjustment and
measurement process compensates for differences in viscosity between batches of
different food products and ensures consistent bagging volumes.
• Test the setting by selecting the AUTO button on the MODE SELECT display and placing
a graduated measuring container below the product output valve. Depress the foot
switch once and check the amount of product dispensed into the container. Return the
product in the measuring container to the kettle.
• Make incremental adjustments on the ADD AMOUNT pop-up until the correct volume is
dispensed.
7. Pump warm-up: [This section allows the pump body to warm up and the rotors to expand
so the station can pump product in uniform measured quantities.]
• Select the MANUAL mode on the control panel.
• Set a clean, empty container under the pump valve outlet spout.
• Depress and hold the foot switch pedal until the container is almost filled with product.
[To STOP the pump, simply take your foot off the switch pedal.]
• Pour the contents of the container back into the kettle and repeat the filling steps as
necessary until the pump is operating smoothly.
8. Pump product into bags:
• Select the AUTO mode on the control panel.
• Place a flexible packaging bag over the spout of the pump outlet valve.
• Depress the foot switch once.
• Withdraw the bag from the valve spout and squeeze the air out of the upper portion
of the bag with one hand while holding the bag steady with the other. Twist the upper
portion of the bag.
• Place the upper portion of the bag into the clipper slot and gently pull toward you. (The
clipper will clip the bag and cut off the top of the bag.) NOTE: The bagging process
should produce a tight seal but a “loose” fill of the bag contents. This allows the
contents to move around in the bag chiller, shortening the chill time. The bag should
not be clipped near the product like a sausage casing, as this will impede the product
chilling operation.
9. Place each bag of product into a water-bath chilling device and gently tumble or agitate for
the recommended time needed for the product to reach a temperature of 40 °F (or 4 °C) or
lower.
18 OM-CKPF/3
Page 19

Operation
Between Batches:
• Remove any food product trapped inside the kettle that may affect the next batch of
product. Thoroughly scrub and rinse the kettle and agitator at the end of each batch.
• Fill the kettle half-full or more and pump at the highest speed until the water runs clear
through the hoses, pump and fill valve.
• Turn the rinse water off, continue to run the pump until the kettle is empty. Then turn the
pump OFF and CLOSE the kettle drop-down valve (or ball valve).
• Start a new batch.
Thermal Assurance Operation (Option):
• Thermal assurance is provided as an option to the pump/fill station. It allows operators to
maintain a minimum product temperature of product delivered at the pump/fill valve to the
packaging bag.
• The minimum temperature is set on the control panel [the default value is 180 ºF (or 82
°C).] At a minimum temperature of 180 ºF (or 82 °C) the delivered product is pasteurized.
• If the delivered product temperature falls below the set point, the air supply to the clipper is
disabled and the clipper is not allowed to operate. To restore operation, check the heating
condition of the kettle (it should have the steam source turned on) and then pump product
into a clean container until the product entering the fill valve exceeds the set point. Return
any product in the container to the kettle for reheating and bagging.
• The thermal probe for the temperature assurance feature is located in the tube feeding the
fill valve.
OM-CKPF/3 19
Page 20

Equipment Cleaning/
Sanitization Procedures
CLEANING/SANITIZING
SYSTEM DISASSEMBLY
& CLEANING
All parts of CapKold equipment should be cleaned periodically with detergent and hot water,
sanitized with water and a chlorine-based sanitizing agent (diluted to 200 ppm chlorine) and
rinsed with clean water.
Before using an agitator kettle, it should be filled with water and an approved commercial
sanitizing agent (diluted according to the manufacturer’s directions), agitated for several
minutes, pumped out via a CapKold CKPF/3 Mobile Pump/Fill Station, rinsed with clean water,
and pumped out a second time to remove the sanitizer. This procedure will sanitize and
prepare the kettle interior, the agitator, the 3” hose assembly, the pump assembly and the
piping up through and including the product fill valve. Kettles without agitators (such as pasta
kettles) only need the sanitizing solution emptied to a drain and then rinsed with clean water,
before they are ready for use
At the END of each day disassemble and thoroughly clean all of the components of the CapKold
system with hot water and detergent.
Agitated Kettles:
• Remove, clean and rinse the scraper blades, the blade holders, the drop down valve (or ball
valve) and the outlet elbow fitting.
• Clean the kettle interiors with a brush and a hot water detergent solution or a high pressure
spray hose.
• Clean the kettle exteriors with a brush and a hot water/detergent solution (DO NOT USE A
HIGH-PRESSURE SPRAY).
• Wipe down the control consoles and piping boxes with a cloth and hot water/detergent
solution and rinse with a second cloth and clean water.
• DO NOT USE stainless steel or other metal scrub pads, or other materials and implements
that may scratch the kettle surface.
Pasta Kettles:
• Remove, clean and rinse the drop down valve (or ball valve).
• Clean the kettle interiors with a brush and a hot water detergent solution or a high pressure
spray hose. Rinse with clean water and drain.
• Clean the kettle exteriors with a brush and a hot water/detergent solution.
• Wipe down the piping boxes with a cloth and hot water/detergent solution and rinse with a
second cloth and clean water.
• DO NOT USE stainless steel or other metal scrub pads, or other materials and implements
that may scratch the kettle surface.
Food Transfer Hose Assembly:
• Disconnect the hose from the kettle and the CapKold CKPF/3 Mobile Pump/Fill Station and
separate into two 3” sections by removing the Tri-Clamp in the middle.
• Clean the interior of each hose section with a hot water/detergent solution and a 3” hose
brush long enough to reach all interior surfaces of the hose. Scrub the outside of each hose
section with the same hot water/detergent solution and a brush or scrub pad. Rinse the
inside and outside of each hose section with clean water.
• The removable components, such as Tri-Clamps and Hex Nuts can be cleaned in a pot
washing machine.
• NOTE: Gaskets and pump rotors must be washed by hand, and NOT in a pot washing
machine.
• Reassemble the hose sections with the Tri-Clamp and beaded gasket.
20 OM-CKPF/3
Page 21

Equipment Cleaning/
Sanitization Procedures
Pump/Fill Station:
• Wipe down all exterior and interior surfaces with a cloth moistened with detergent in a hot
water solution. Rinse off the detergent with a second cloth moistened and frequently rinsed
in hot water and then dry all surfaces with a third cloth.
• Disassemble the entire pumping path assembly from the 3” elbow on the underside of the
pump housing to the product valve above the table. The components are connected with
Tri-Clamps, gaskets and holding brackets that secure the tubing to a pipe support frame.
• Clean the piping components (except for the gaskets) in a pot washing machine and rinse
thoroughly. Clean the gaskets and product valve by hand in a hot water/detergent solution
and rinse thoroughly with clean water.
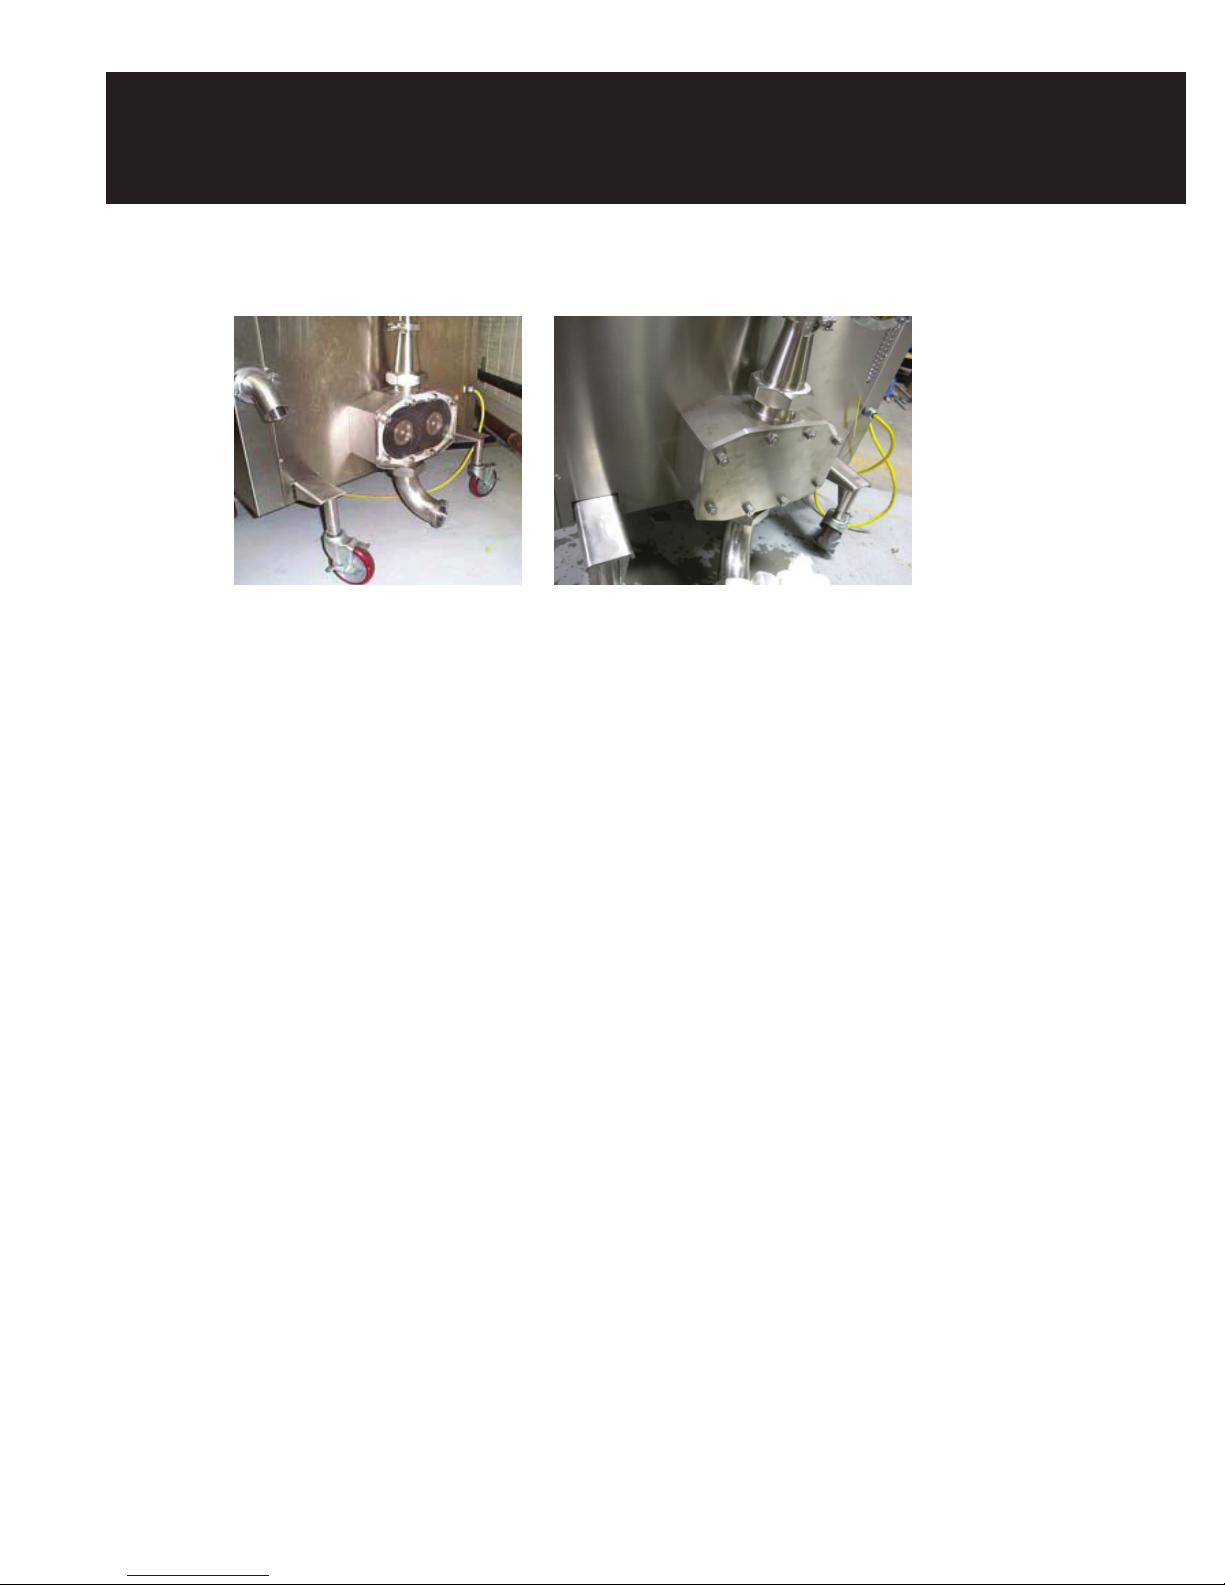
• Clean the pump housing and rotors as follows:
Step 1:
Remove the pump housing cover by loosening the eight nuts. Carefully pull off the rotors
and inspect the inside of the housing cavity. Hand wash the cavity, cover and rotors with a
solution of hot water and detergent. Rinse the cavity, cover and rotors with clean, hot water
and dry them with a clean cloth.
Step 2:
Slide the rotors back onto the shafts, taking care to match them to the mating corners on
each shaft. Place a new paper gasket on the pump housing (a new gasket is required each
time you clean and re-assemble the pump).
Step 3:
Place the pump cover on the pump housing with the edge stamped TOP uppermost. Install
the eight nuts hand-tight. Tighten the nuts fully with the cross-wrench supplied with the
pump/fill unit.
• Clean the pipe framework that the tubing and product valve is secured to with a cloth and
hot water/detergent solution and then rinse with a clean cloth and clear water.
• Reassemble the piping components and product valve with the Tri-Clamps and gaskets and
secure the assembly to the support pipe frame.
Cleaning Tips:
• When you are finished with a kettle load and intend to do another load:
- CLOSE the kettle outlet valve (drop down or ball), rinse the kettle interior with a high-
pressure spray hose and brush down any particles the spray does not loosen.
- OPEN the kettle outlet valve and set the pump/fill station to CONTINUOUS. The pump
will run continuously and the kettle will empty through the pump. Wastewater will flow
into the sink under the product valve, down the drain hose and out the rear of the pump/
fill cabinet to a floor drain. NOTE: if you wish to reduce the BOD rating due to debris in
the waste water, use a strainer or porous bag to remove the solids before they reach the
floor drain. This procedure effectively strains solids out of the pumped cleanup water.
- Rinse the kettle while continuously pumping, to ensure all particles and debris are
removed and the interior is clean.
- Turn OFF the pump and close the kettle valve – you are now ready for a new load.
• DO NOT SPRAY ELECTRONIC CONTROLS with a high pressure hose. The control console is
water resistant, but NOT waterproof.
• It is recommend that you consult with your provider of commercial cleaning supplies on the
proper chemicals to use in cleaning and sanitizing your CapKold CKPF/3 Mobile Pump/Fill
Station and other CapKold equipment. The supplier will have direct contact with technical
advisors who are knowledgeable in the best methods for cleaning and which chemicals are
most suited for the water available in your specific location.
OM-CKPF/3 21
Page 22

Maintenance
The CapKold CKPF/3 Mobile Pump/Fill Station requires regular maintenance. Please refer to the
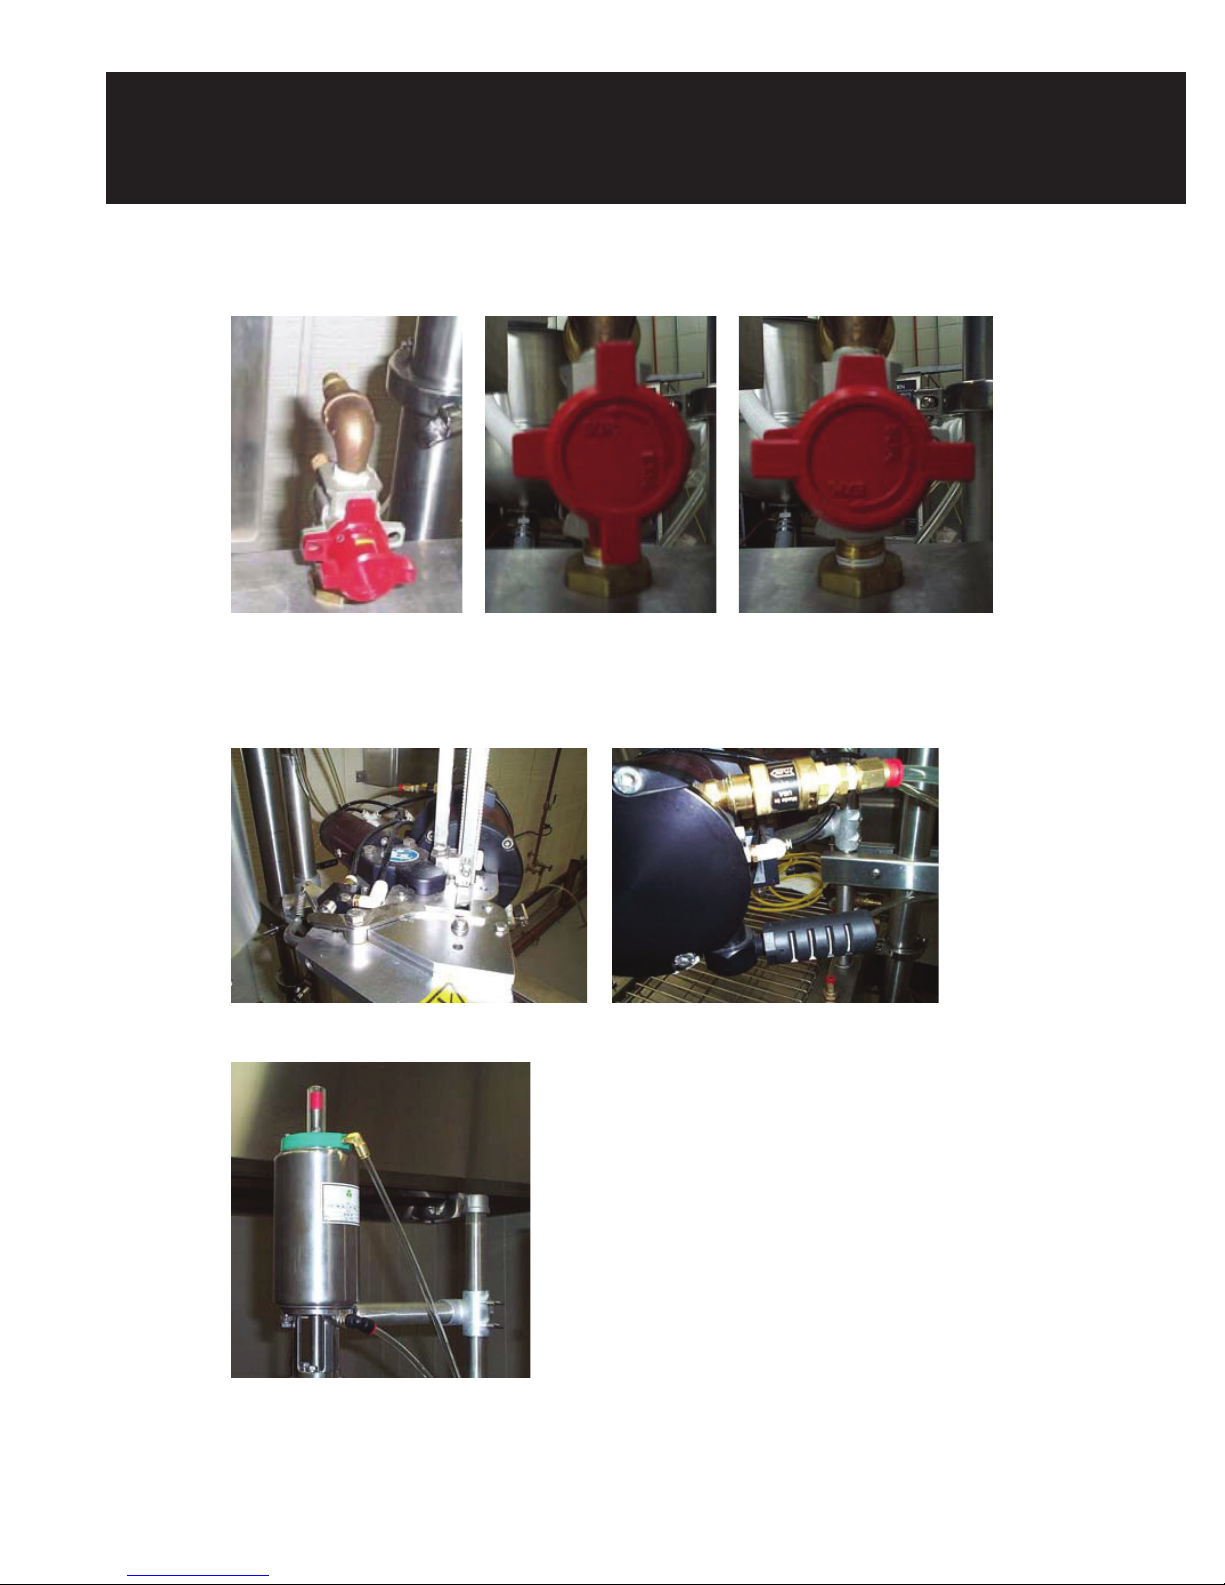
schedule and pictures below:
Component Schedule
PUMP
Inspect Rotors for nicks, cuts or separation from the metal base Daily
Inspect seals for integrity – no splits, cuts or frays Daily
Check oil levels in the pump and drive gearboxes Weekly
Change oil in the drive and pump gearboxes
[Use Shell Turbo Oil 100, or equivalent]
TIPPERTIE CLIPPER
Inspect Oiler and add oil if required
[Use light weight mineral oil]
Inspect air lines – should not be taught, pinched or bound Daily
Inspect cut-off knife – no nicks or dullness Monthly
Inspect Oiler drip rate – adjust, if necessary, to 1 drop per 6 strokes Monthly
Inspect clipper for tightness of clip – fill a casing with water, clip closely
(with little or no slack), and apply pressure to the casing (i.e. stand on the
casing) – there should be no signs of leakage
Semi-annually
Daily
Monthly
PUMP HOUSING VIEWS
AIR PRESSURE REGULATORS
OILER
22 OM-CKPF/3
Page 23

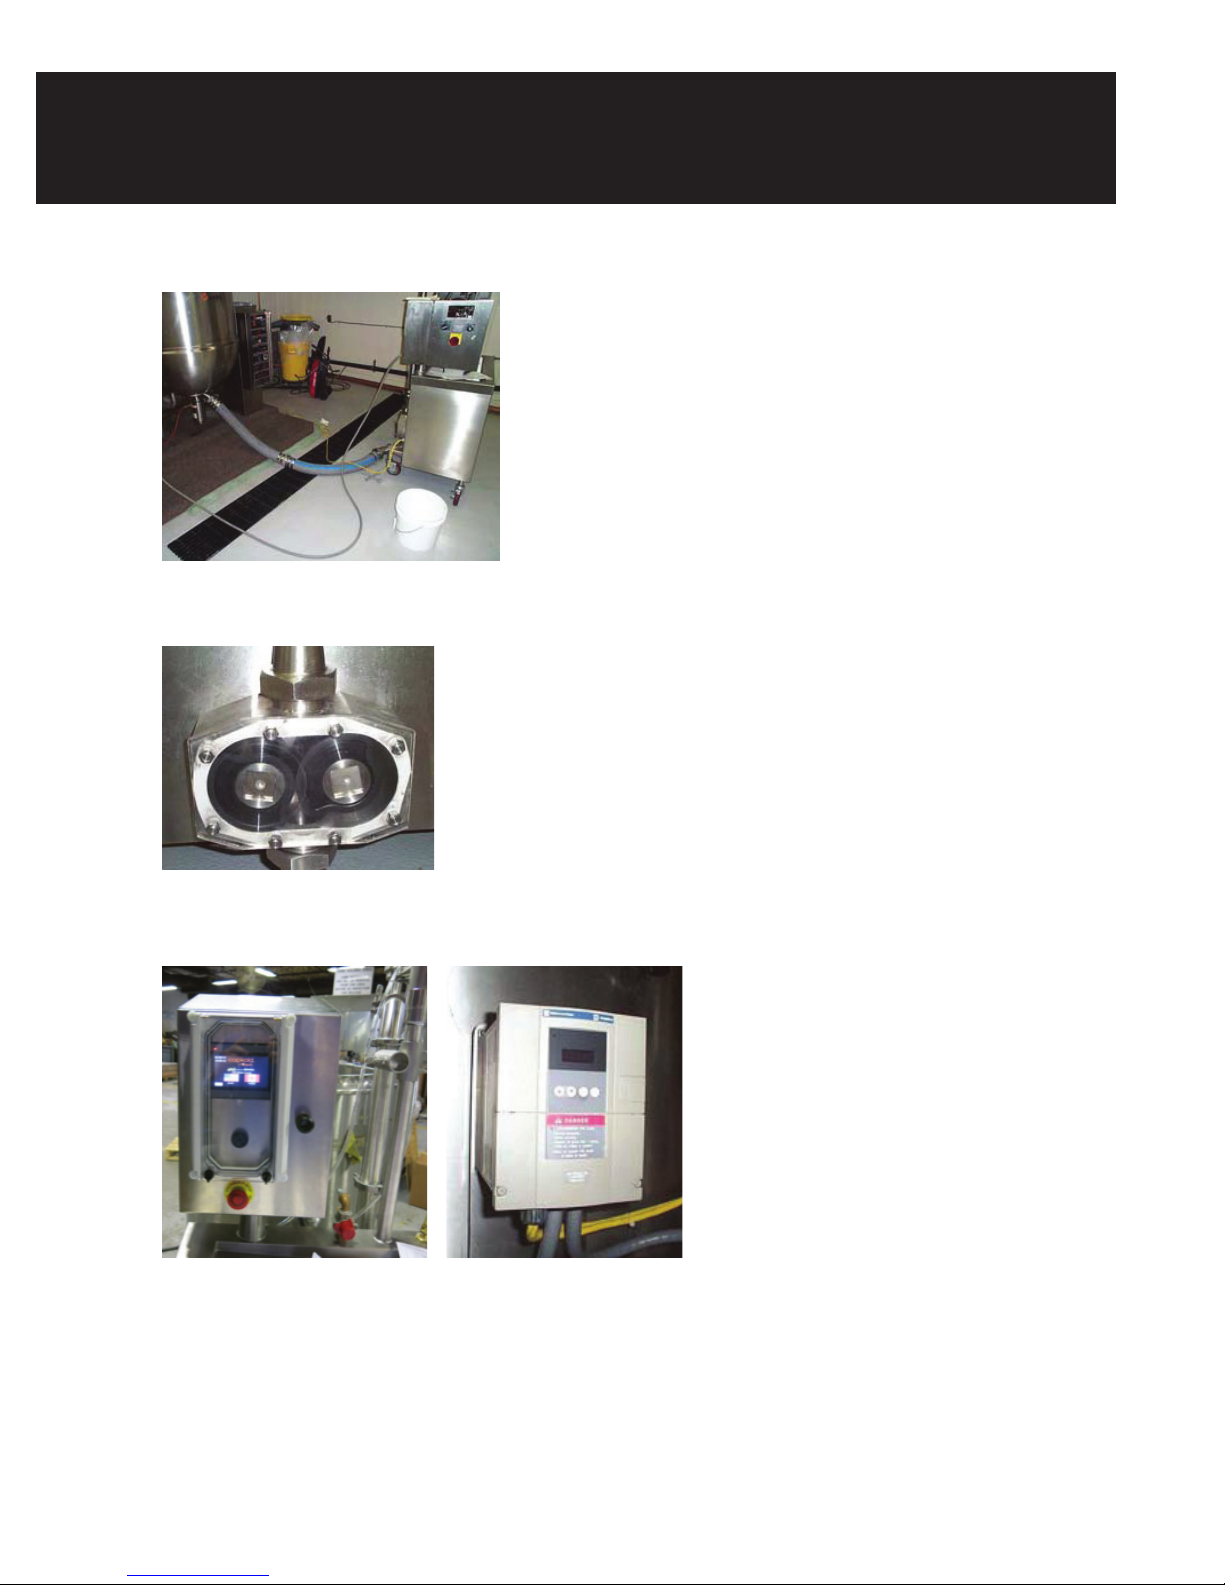
PRODUCT VALVE
OPERATOR FOOT SWITCH
INVERTER
Maintenance
PUMP MOTOR
OM-CKPF/3 23
Page 24

Troubleshooting
The CapKold CKPF/3 Mobile Pump/Fill Station is designed to operate smoothly and efficiently when properly maintained. The following is a list of
checks to make in the event of a problem. Wiring diagrams are furnished inside the service panel and later in this manual. If an item on the check
list is marked with an (X), it means the work should only be performed by an Authorized Service Agent (ASA). Reference material for options to the
CapKold CKPF/3 Mobile Pump/Fill Station are also included with this manual. Refer to the reference material instructions if problems arise.
SYMPTOM WHO WHAT TO CHECK
a. Pull the emergency STOP switch out
b. Turn the air switch ON.
c. Check to see if the cabinet lower front panel is correctly installed.
d. Plug in the unit and connect the air lines.
Unit will not pump. User
Tipper Tie clipper will not
operate.
User
e. Prime the food transfer hoses with water.
f. Check that valve on the kettle underside is OPEN.
g. Check the control panel to make sure the pump/fill is in the AUTO, CONTINUOUS
or MANUAL mode.
h. Check the pump motor for damage (X).
i. Check the drop-down/ball valve for damage (X).
a. Check for jammed clips and remove them.
b. Turn the air switch ON.
c. Check the air pressure – a minimum of 90 PSI is needed.
d. Check the loader to see if there are clips.
e. If the Temp Assurance option is installed, is the product temperature below the
set point?
f. Inspect the Tipper Tie for damage (X).
g. Check the oil level in the lubricator.
i. Check that the FRL is plugged in.
Bags fill to fast/too slow. User
Hoses leaking. User
24 OM-CKPF/3
a. Adjust the fill volume on the control panel.
b. Check food transfer hoses for blockage.
a. Replace worn, damaged or missing gaskets.
b. Tighten nuts and tri-clamps.
Page 25
Suggested Spare
Parts List
To obtain CapKold parts, contact your local Authorized Service Agency or contact the Unified Brands Technical Service (TS) department at 888-994-
7636. The TS department can advise you on the contact for the nearest ASA and also determine if you are eligible for the CapKold Parts Direct
program.
When requesting parts, please supply the model designation, serial number, voltage and phase information from the product label on your unit and the
part number, part description and quantity from the table below.
Item Part Description CapKold P/N Quantity
PRIMARY ITEMS
1 Shelf/Grate 129433 1
2 5” Swivel Caster 050462 4
3 Front Panel Assembly 115506 1
4 Clipper Mounting Kit 115517 1
5 Tipper Tie Clipper, Model SZ4135LG 144535 1
6 Foot Switch 005317 1
7 Knee Switch, Micro-Plunger 005329 1
8 Pump, Positive Displacement, Bevel Seat, #6 005324 1
8a Stud, Long, #6 Pump N103533 3
8b Gasket, #6 Pump 005330 1
8c O-Ring, #6 Pump 005887 4
8d Shaft Seal, #6 Pump 005886 4
8e Bearing Seal, #6 Pump 060108 2
8f Rotor, Single Lobe, #6 Pump 027179 2
Lip Seal Inserter Tool, #6 Pump 005340 1
Wrench, Cross, #6 Pump 005339 1
Wrench, Spanner, #6 Pump N91459 1
9 Pump Drive Motor, 1.5 HP 120437 1
10 Inverter, 3 HP, Pump Speed Control 141918 1
10a Thermal Overload Relay 171774 1
11 Control Panel Assembly 140101 1
12 Discharge Valve, Air-Operated 143072 1
13 3” Bagging Tube Assembly 172162 1
2” ID Drain Hose Assembly 105864 1
HOSE & SANITARY PIPE CONNECTIONS
3” Hex Wrench 005322 1
14a 3” Hex Nut, Sanitary, Acme Thread 003927 3
14b 3” Bevel Seat Gasket 005829 3
15a 2” Tri-Clamp, Sanitary 053786 6
15b 2” Tri-Clamp Gasket 016602 6
16a 3” Tri-Clamp, Sanitary 053338 2
16b 3” Tri-Clamp Gasket 053362 2
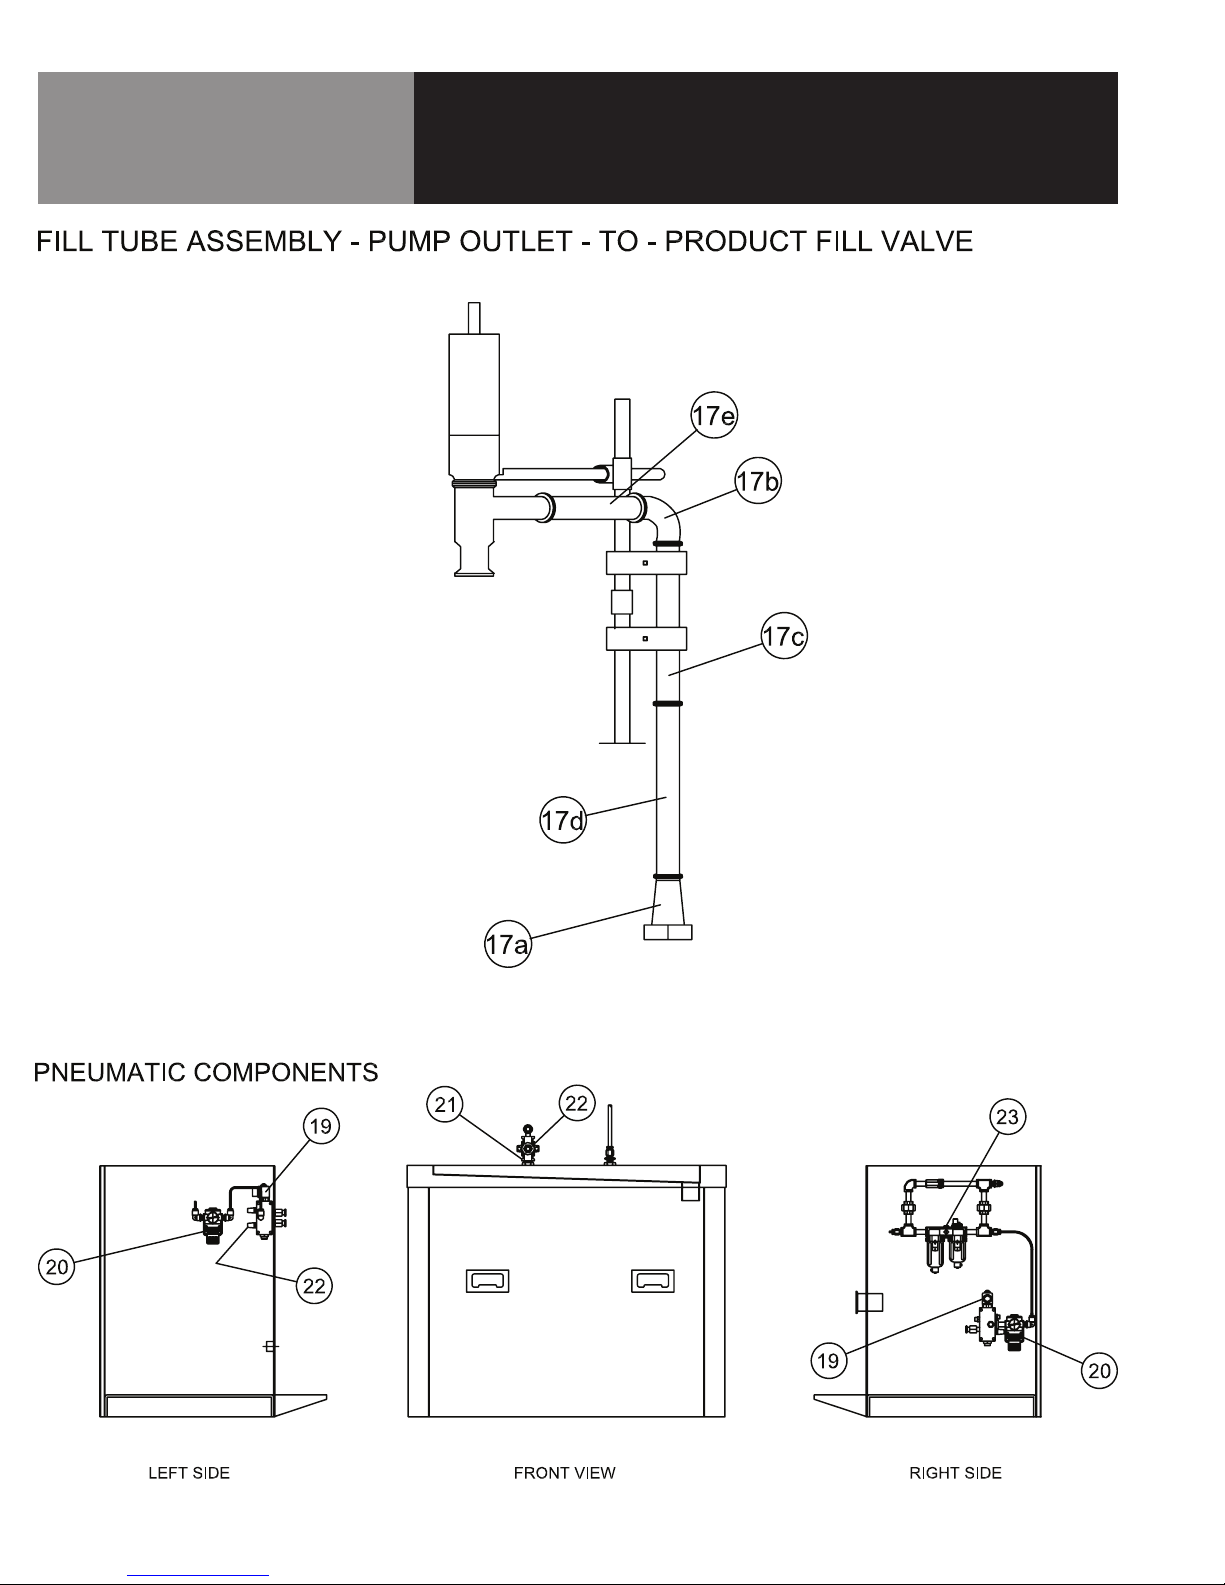
17a Reducer, 3”-to-2” Tri-Clamp 115528 1
17b 90 Degree Elbow, 2”Tri-Clamp 014617 1
17c 14” Spool, 2” Tri-Clamp 143068 1
17d 18-3/4” Spool, 2” Tri-Clamp 172166 1
17e 9” Spool, 2” Tri-Clamp 172165 1
17f 90 Degree 3” Sweep Elbow, Acme Thread one end; Hex Nut other end 015656 1
OM-CKPF/3 25
Page 26

Suggested Spare
Parts List
Item Part Description CapKold P/N Quantity
ELECTRICAL ITEMS
18a Power Cord, 3-Conductor 097187 25 ft
18b Plug, 3-Wire, 30A, Grounding 101030 1
PNEUMATIC ITEMS
Solenoid Valve, Air, 5-Way, 2-Position N110490 2
19
20 Regulator, 7-125 PSI 115533 2
21 Solenoid Valve, Air, 3-Way 115532 1
22 Muffler, Pneumatic 115555 3
23 Filter/Lubricator 115571 1
Air Hose Assembly, 15-foot 073169 1
TEMPERATURE ASSURANCE OPTION
24 Temperature Sensor, Flush Mount 115512 1
25 Temp Assure Mount, 2” T-C Spool, Modified 1158601 1
26 Cable, 3-Conductor, 18 Gauge 135042 24 in
VACUUM EDUCTOR OPTION
27 Vacuum Gauge N84184 1
28 Regulator, Air Pressure 084511 1
29 Pump, Vacuum Eductor 097114 1
30 Filter 097115 1
31 Valve, Air, 2-Way 097190 1
32 Air Valve Actuator 097191 1
33 Waste Tank Assembly 120412 1
33a Tank Cover 120408 1
33b Tank 120410 1
33c Gasket 120411 1
CONSUMABLE ITEMS
Paper Gasket, #6 Pump [Box of 100] 110898
Oil, Gear Box, #6 Pump, 5 Gallons 099733
Lubricant, 4 Ounces 162519
ACCESSORIES
3” Sanitary Hose, 2-Piece,Threaded Hex Nut both ends; 3” Tri-Clamp in middle 078842
3” Sanitary Hose, 2-Piece, Threaded Hex Nut one end; 3” Tri-Clamp in middle and other end
Casing Holding Bin Assembly 171592
Holding Bin (replacement) 171590
2-1/2” Hotel Pan Fill Tube Assembly 172096
4” Hotel Pan Fill Tube Assembly 172097
6” Hotel Pan Fill Tube Assembly 172098
26 OM-CKPF/3
Page 27

Suggested Spare
Parts List
OM-CKPF/3 27
Page 28
Suggested Spare
Parts List
28 OM-CKPF/3
Page 29

Suggested Spare
Parts List
OM-CKPF/3 29
Page 30

Wiring Schematic
30 OM-CKPF/3
Page 31

Service Log
Model No: Purchased From:
Serial No: Location:
Date Purchased: Date Installed:
Purchase Order No: For Service Call:
Date Maintenance Performed Performed By
OM-CKPF/3 31
Page 32

1055 Mendell Davis Drive • Jackson MS 39272
888-994-7636 • 601-372-3903 • Fax 888-864-7636
unifiedbrands.net
© 2018 Unified Brands. All Rights Reserved. Unified Brands is a wholly-owned subsidiary of Dover Corporation.
PART NUMBER 137164 REV. G (02/18)
 Loading...