

Capital MAESTRO MWO301ES, MAESTRO MWO302ES Use And Care Manual

USE AND CARE MANUAL
MAESTRO SERIES
30” OVEN
SINGLE AND DOUBLE
MODELS:
MWO301ES, MWO302ES

A SPECIAL MESSAGE TO CUSTOMERS
Dear Valued Customer,
Congratulations on making a smart choice! You have joined an elite group of cooking
enthusiasts who demand only the very best from their appliances. A Capital Cooking appliance
promises years of enjoyment and maximum performance, allowing cooks everywhere to create
culinary memories that last a lifetime.
Because of the unique features found in our appliances, we urge you to read this manual
thoroughly before installation and use. Please RETAIN THIS MANUAL FOR FUTURE
REFERENCE; it is an invaluable guide to help you better understand your Capital Cooking
appliance.
Since your satisfaction is our topmost priority, please feel free to contact our service experts.
You may reach us toll free at (866) 402-4600, or dial the factory direct at (562) 903-1168. You
can fax us a list of your concerns, comments, and/or compliments at (562) 903-1167, or drop
us an e-mail at customerservice@capital-cooking.com. Feel free to also write us at:
13211 East Florence Ave.
Santa Fe Springs, CA 90670
Our products are proudly designed and manufactured in America and we trust that our strict
adherence to the highest quality assurance standards will provide you with years of trouble
free gourmet cooking.
Happy Cooking!
Chairman
Capital Cooking Equipment, Inc.
1

TABLE OF CONTENTS
A SPECIAL MESSAGE TO CUSTOMERS............................................................................................................... 1
TABLE OF CONTENTS............................................................................................................................................. 2
WARNINGS AND GENERAL SAFETY..................................................................................................................... 3
WARNINGS AND GENERAL SAFETY (continued).................................................................................................. 4
CONTROL PANEL FUNCTIONS.............................................................................................................................. 5
OVEN LEGEND......................................................................................................................................................... 6
OVEN FEATURES DEFINED ................................................................................................................................... 7
OVEN FEATURES DEFINED (continued) ................................................................................................................ 8
USE OF YOUR OVEN............................................................................................................................................... 9
INITIAL OVEN SETUP.......................................................................................................................................... 9
CLOCK.............................................................................................................................................................. 9
FAHRENHEIT OR CELSIUS TEMPERATURE DISPLAY ............................................................................... 9
CONTROL BEEPER......................................................................................................................................... 9
OVEN LIGHTS.................................................................................................................................................. 9
OVEN HEATING MODES DEFINED ...................................................................................................................... 10
PRE-HEAT...................................................................................................................................................... 10
BAKE............................................................................................................................................................... 10
DELICATE BAKE............................................................................................................................................ 10
BROIL ............................................................................................................................................................. 10
PERFECT CONVECTION.............................................................................................................................. 10
CONVECTION COOKING.............................................................................................................................. 10
ROAST............................................................................................................................................................ 10
OVEN HEATING MODES DEFINED (continued)................................................................................................... 11
OVEN USE (Before Cooking).................................................................................................................................. 11
PREPARATION................................................................................................................................................... 11
POSITIONING OVEN RACKS............................................................................................................................ 12
SETTING THE OVEN ......................................................................................................................................... 12
WHILE THE OVEN IS RUNNING....................................................................................................................... 13
TURNING THE OVEN OFF ................................................................................................................................ 13
SECURING THE OVEN CONTROL................................................................................................................... 14
ADJUSTING THE OVEN MODE AND/OR TEMPERATURE............................................................................. 14
SETTING TIMERS.............................................................................................................................................. 15
TURNING LIGHTS ON AND OFF....................................................................................................................... 15
SPECIAL FUNCTIONS............................................................................................................................................ 16
SELF CLEAN ...................................................................................................................................................... 16
CONVECTION (Upper and Lower Oven on Double).......................................................................................... 17
ROTISSERIE (Upper Oven only on Double)....................................................................................................... 17
MOIST (Single Oven or Upper Oven only on Double)........................................................................................ 18
PROBE (Upper and Lower Oven on Double)...................................................................................................... 20
DELAY COOK..................................................................................................................................................... 21
TIMED COOK...................................................................................................................................................... 22
SABBATH MODE................................................................................................................................................ 22
TIPS......................................................................................................................................................................... 23
CARE AND MAINTENANCE................................................................................................................................... 24
MEAT PROBE: ............................................................................................................................................... 24
MEAT PROBE SOCKET:................................................................................................................................ 24
ROTISSERIE MOTOR SOCKET:................................................................................................................... 24
ROTISSERIE SPIT ROD AND FORKS:......................................................................................................... 24
BROIL PAN:.................................................................................................................................................... 24
CLEANING CHART:....................................................................................................................................... 25
TROUBLESHOOTING............................................................................................................................................. 26
SERVICE INFORMATION....................................................................................................................................... 27
WARRANTY............................................................................................................................................................ 28
2

W ARNINGS AND GENERAL SAFETY
WARNING
Do not install or use this product near water or outdoors, for example, near a kitchen sink, in a wet basement or
near a swimming pool.
GENERAL SAFETY PRECAUTIONS:
To reduce the risk of fire, electric shock, serious injury or death when using your appliance, follow basic safety
precautions, including the following:
1. Read the provided use and care manual before operating this appliance.
2. Keep packaging materials away from children. Plastic sheets and bags can cause suffocation.
3. If your oven is found to be damaged upon receipt, contact your dealer or builder immediately. Do not
install or use a damaged appliance or if the conduit is damaged.
4. This oven must be properly installed and grounded by a qualified installer according to these
installation instructions prior to use. The installer must show the customer the location of the circuit
breaker panel or fuse box so that they know where and how to turn off electric power to the oven.
Capital Cooking Equipment is not responsible for service required to correct a faulty installation. The
owner is responsible to make sure this appliance is properly installed.
5. To avoid electric shock hazard, do not install this appliance outside or near water. Do not install or use
this appliance if it has been exposed to water.
6. To prevent damage, do not use the oven handles as lift points or for moving the oven.
7. Do not install, repair or replace any part of the oven yourself unless specifically recommended in the
literature accompanying it. All other service must be performed by a qualified service technician.
8. Electric power to the oven must be turned off at the circuit breaker or fuse box prior to performing any
type of service or installation.
9. This oven is to be used only for cooking tasks expected of a home appliance. This oven is not intended
for commercial use.
10. Do not climb or sit on any part of the appliance.
11. Do not leave children or pets alone or unattended in the area around the oven. Do not allow children to
play with the controls, pull on the handle or touch other parts of the oven.
12. Do not store items of interest to children above the oven. Children can be burned or injured while
climbing on the appliance.
13. Do not tamper with the controls. Do not adjust or alter any part of the oven unless specifically
instructed to do so by this manual.
14. Secure the oven to the cabinet using the supplied mounting screws to prevent injury due to the unit
tipping forward,
15. Only use dry pot holders to prevent steam burns when moving items in or out of the oven.
16. Do not use water on grease fires. Smother any flames with a lid, cookie sheet, or flat tray. Use baking
soda or a foam fire extinguisher to extinguish flaming grease.
17. Keep flammable items, such as paper, cardboard, plastic and cloth away from hot surfaces. Do not put
such items in the oven. Do not allow pot holders to touch hot surfaces.
18. Do not wear loose or hanging apparel while using the oven. Do not allow clothing to come into contact
with the interior of the oven and the surrounding areas during and immediately after use.
19. Do not use the oven for storage.
20. Do not touch the interior surfaces of the oven during use. After use, make sure these surfaces have
had sufficient time to cool before touching them.
3

WARNINGS AND GENERAL SAFETY (continued)
21. Do not touch outside surfaces of the oven during the self-clean cycle, which may become hot.
22. Do not line the oven with aluminum foil or other materials while cooking or cleaning.
23. Do not leave metal objects, such as aluminum foil, the meat probe, cookie sheets, etc., on the bottom
of the oven. Objects left on the bottom of the oven could damage the oven.
24. Light lenses must always be in place when the oven is in use to protect the light bulbs from breakage.
25. Oven racks are to be positioned when the oven is cool to prevent burns. If racks require repositioning
when the oven is in use, a dry pot holder is to be used.
26. Do not heat unopened food containers (baby food jars, and cans). Pressure can build up and may
cause the container to burst and cause injury.
27. Do not store combustible, flammable, or explosive materials in the oven or in adjacent cabinets.
28. Use caution when opening the oven door to prevent burns from escaping hot air or steam. Opening the
door slowly will allow hot air and steam to escape.
29. Use caution when adding liquids to food or containers in a hot oven. Steam can cause serious burns or
scalding.
30. Never use the appliance for Warming or Heating the room.
31. Do not obstruct any venting areas or slots. The unit must be installed in manner which will keep the
area below the door unobstructed to allow free air flow.
32. Only clean parts as listed in the Use and Care Manual.
33. Do not clean the oven door gaskets. The door gaskets are essential for a good seal of the oven. Care
is to be taken during cleaning to prevent rubbing, damaging, or moving the gasket from its installed
position.
34. Prior to self-cleaning the oven, remove broiler pans, pots, other utensils and wipe up excess spillage.
4

CONTROL PANEL FUNCTIONS
CANCEL Button(s): Turns off any selected cooking mode with a single press. It is also used to lock and unlock the control panel when desired.
CONVECTION Button: Turns the Convection Fan On or Off when cooking for convection modes. Convection will not function during Pre-Heat
and Perfect Convection during which the fan is always On, or during Self-Clean, during which the fan is disabled.
ROTISSERIE Button: Turns the Rotisserie motor On and Off.
MOIST Button: Turns the Moist function On and Off during cooking modes. If activated during the oven pre-heat cycle, the mode will not
become active until pre-heating is complete.
PROBE Button: Selects the Meat Probe function
CLOCK button: Selects the Time of Day clock for setting or display
START Button: Starts selected functions.
LIGHT Button: Turn the oven lights On and Off (for both ovens of a double oven).
TIMER 1 / 2 Buttons: Selects Timer 1 or 2. Also used to display Timer 1 or 2 if a timer is active and a separate function is being displayed.
DELAY COOK Button: Selects the Delay Cook function
TIMED COOK Button: Select the Timed Cook function
MODE Dial: This knob is pressed to activate the Mode selection function and rotated to cycle through the modes
TIME/TEMP Dial: This knob is pressed to activate the Temperature adjustment function when a cooking mode is active and rotated
clockwise to increase the temperature or time setting or counter clockwise to decrease the temperature or time setting.
6
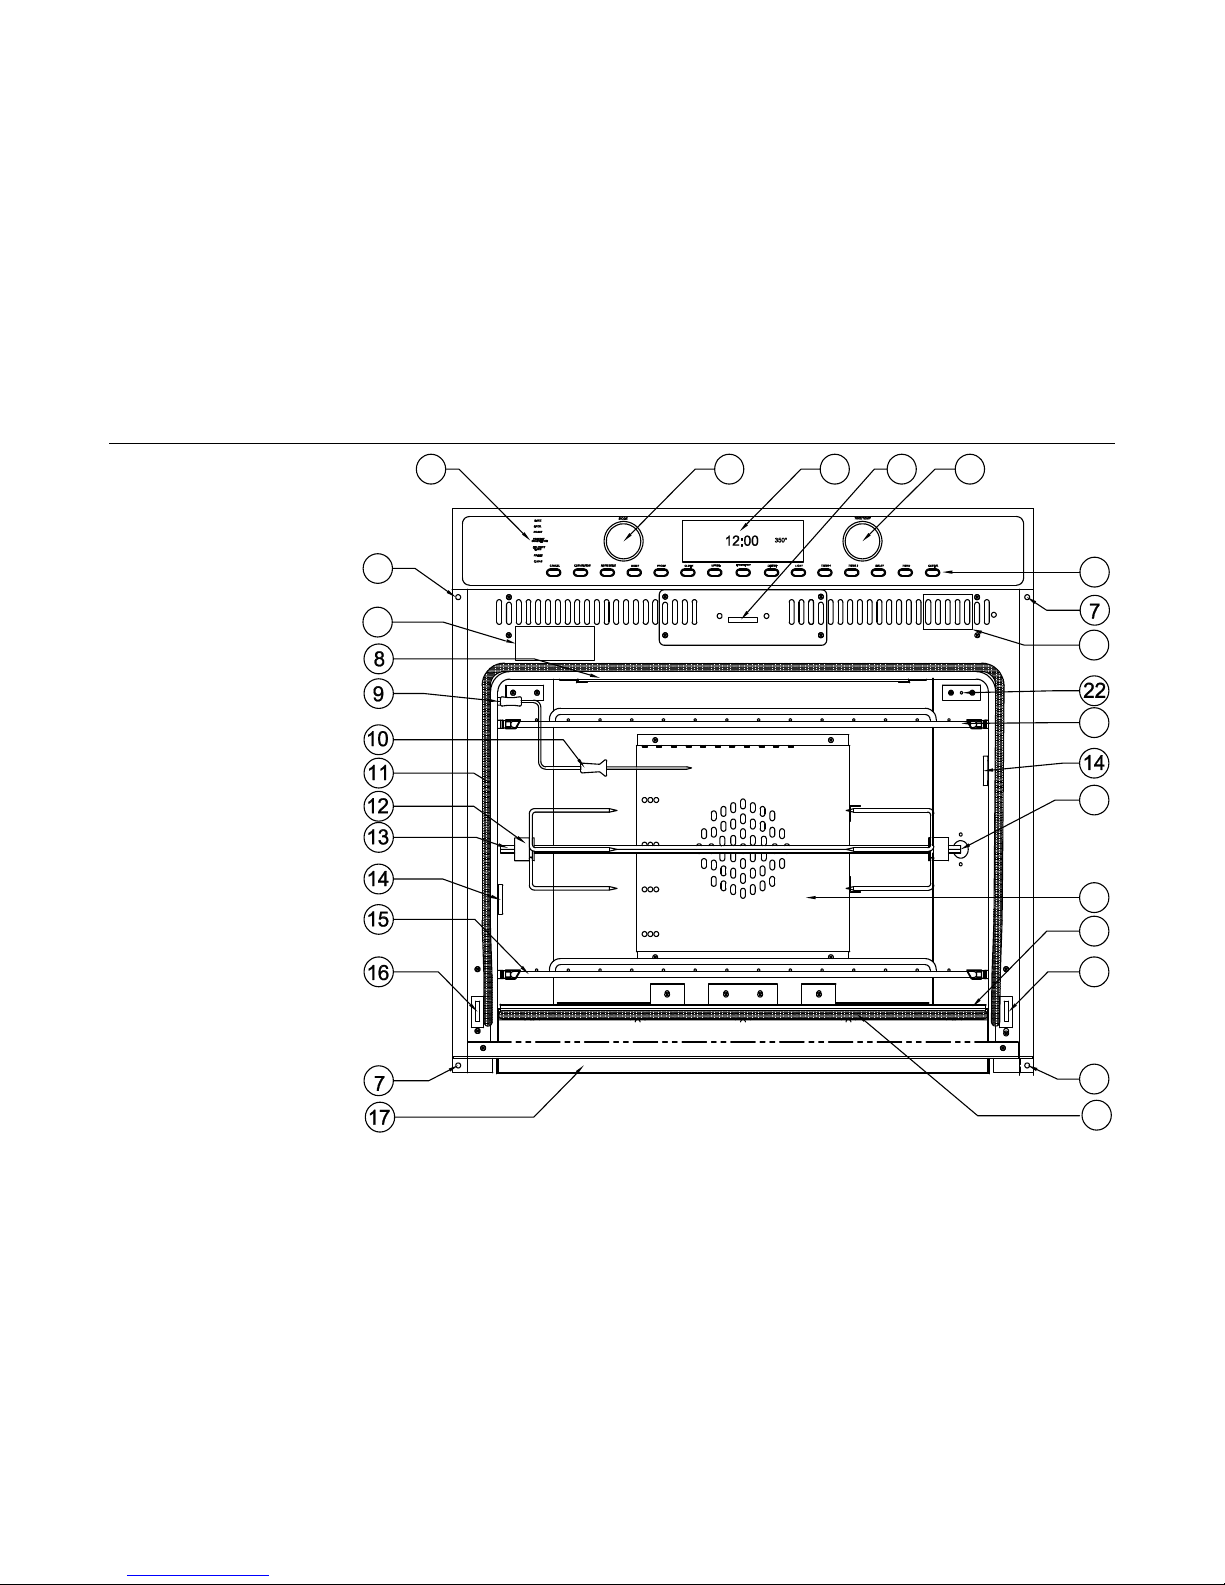
OVEN LEGEND
1. Mode Icons
2. Mode Dial / Button
3. Clock and
Temperature /
Function Display
4. Time / Temperature
Adjustment Dial /
Button
5. Door Latch
6. Control Panel Buttons
7. Cabinet Mounting
Holes
8. Broil Element (Under
Glass)
9. Meat Probe Socket
10. Meat Probe
11. Door Gasket (Upper)
12. Rotisserie Fork
13. Rotisserie Spit Rod
14. Halogen Light
15. Oven Roller Rack
16. Hinge Receptacle
17. Oven Heat Vent
18. Door Gasket (Lower)
19. Bake Elements
(Under Glass)
20. Convection Baffle
21. Rotisserie Motor
22. Temperature Sensor
23. Serial Number Label
24.
Moist Fill Access
7
1
2
354
6
1
5
2
1
2
0
1
9
1
6
7
1
8
2
4
23

OVEN FEATURES DEFINED
1. Mode Icons:
These icons illuminate to show which oven mode is being used. All icons will light up when Mode
selection is started and a single mode will be highlighted when the Mode Selector Dial is rotated and
Mode is selected.
2. Mode Dial / Button
The Mode Dial / Button will start Mode selection when pressed once and is rotated to
toggle between modes.
3. Clock and Temperature / Function Display
Displays the Time of Day when the oven or Timers are not in use. A single oven will display the set
temperature on the right side of the Time. A double oven will display Upper Oven Temperature on the
Left and Lower Oven Temperature on the right of the Time. Other oven status icons will be displayed
in this area during oven use.
4. Time / Temperature Adjustment Dial / Button
The Time / Temperature Adjustment Dial / Button will allow adjustment of the set temperature, time of
day, or timer settings when rotated. The temperature adjustment mode can be entered by pressi ng
the dial while the oven is in operation (except for Self-Clean) then rotating to change the temperature.
5. Door Latch
The Door Latch locks the door during the Self Clean cycle for safety.
6. Control Panel Buttons
The Control Panel is a smooth glass panel with button areas indicated by ovals. The button functions
are activated by a light touch. The CONVECTION, ROTISSERIE, and MOIST buttons will illuminate
when these functions are active.
7. Cabinet Mounting Holes
Mounting holes are located on the front and inside surfaces of the stainless trim and are used to
secure the oven to the cabinet.
8. Broil Element
A high intensity dual ribbon broiler is located under glass at the top of the oven.
9. Meat Probe Socket
Located above the top rack in the upper left front of the oven, this socket is where the meat probe is
plugged in to allow the oven to sense the temperature of large meat or poultry dishes and the put the
oven into Hold when the food is cooked.
10. Meat Probe
The Meat Probe plugs into the Meat Probe Socket in the wall of the oven and into the food being
cooked. The Meat Probe can then be set to the desired food temperature for cooking.
11. Door Gasket (Upper)
The Door Gasket is used to retain heat within the oven
12. Rotisserie Fork
Two Rotisserie Forks are provided with the oven and are used to secure food to the Rotisserie Spit
Rod during cooking.
13. Rotisserie Spit Rod
The Rotisserie Spit Rod is used in combination with the Rotisserie Forks to hold food when cooking in
Rotisserie mode.
7

OVEN FEATURES DEFINED (continued)
14. Halogen Light
Two high intensity low voltage halogen lights are provided for each oven and are located to give
maximum illumination throughout the cooking area.
15. Oven Roller Rack
Three oven racks are provided per oven. Each rack is hinged for easy insertion and removal from the
oven and allows the full width of the oven to be used when cooking. Rollers on each rack provide
smooth movement when cooking or checking food.
16. Hinge Receptacle
The hinge receptacles hold the oven doors in place and allow easy removal of the doors when
installing the oven.
17. Oven Heat Vent
Cool air circulates through the oven door to keep it cool during cooking and hot air is exhau sted
through the Oven Heat Vent at the bottom of the oven. Do not block or bend this area when the oven
is in use or during installation.
18. Door Gasket (Lower)
The Door Gasket is used to retain heat within the oven
19. Bake Elements (Under Glass)
Dual Bake Elements are located under black Ceran glass for even heating and easy cleaning.
20. Convection Baffle
The convection baffle is mounted to the rear of the oven and covers a remote third heating element
while evenly distributing heated are throughout the oven.
21. Rotisserie Motor
The rotisserie motor interface is located in the right rear of the oven. The square pointed end of the
Rotisserie Spit Rod is placed into the receptacle and the opposite end is secured in the front bracket
to allow rotisserie cooking.
22. Temperature Sensor
The temperature sensor reads the oven temperature and sends it to the control
23. Serial Number Label
The serial number is required for any service or warranty calls.
24. Water Reservoir Access
Provides access to the water reservoir for Moist mode to fill and empty.
8
 Loading...