

Page 1
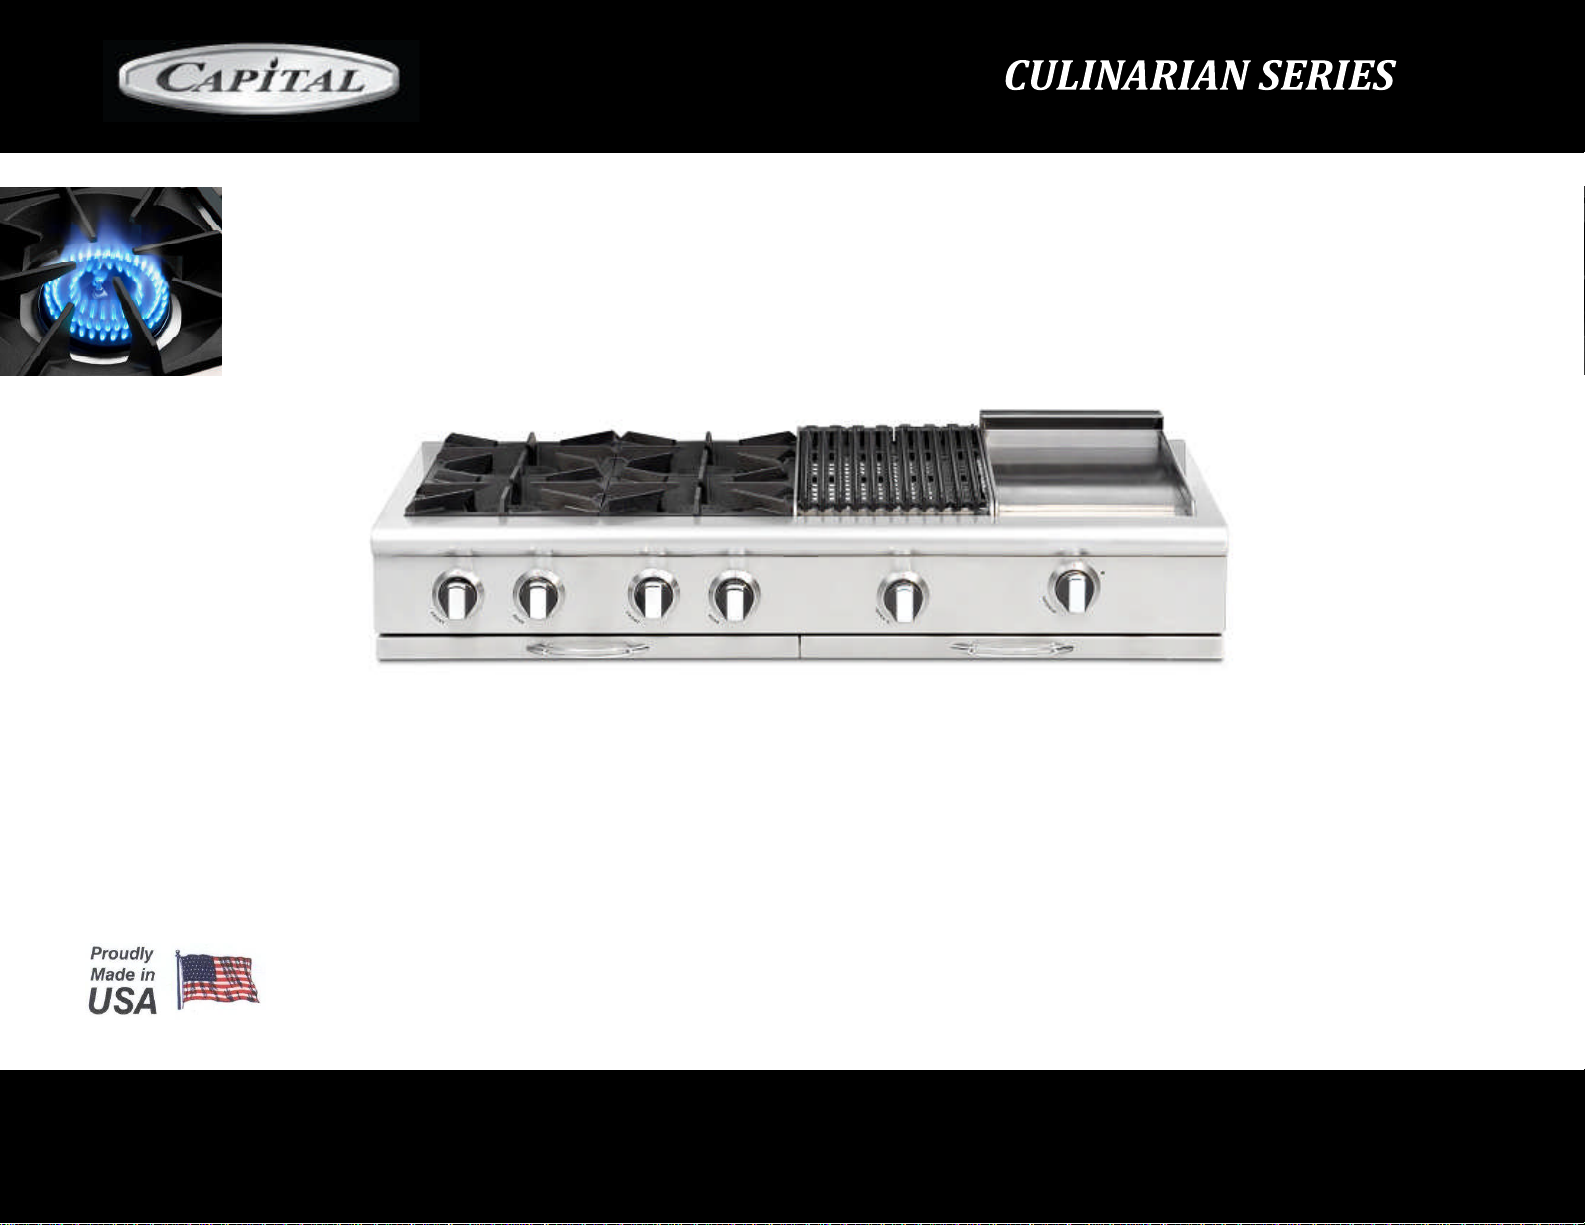
USE AND CARE & INSTALLATION GUIDE
RANGETOPS
Page 2

CULINARIAN SERIES
2
TABLE OF CONTENTS
Features
3
Warnings
4
Safety Practices / Electrical. General
5
Safety Practices / Cooking
6
Range Parts Identification
7
Using The Range
-
Top / Power Burners
8
Using The RangeTop
9
Care And Maintenance
11
Care And Maintenance / Locating The Rating Plate
12
Troubleshooting
13
Installation Instructions
14
Service / Warranty
28
Page 3
STAY
-
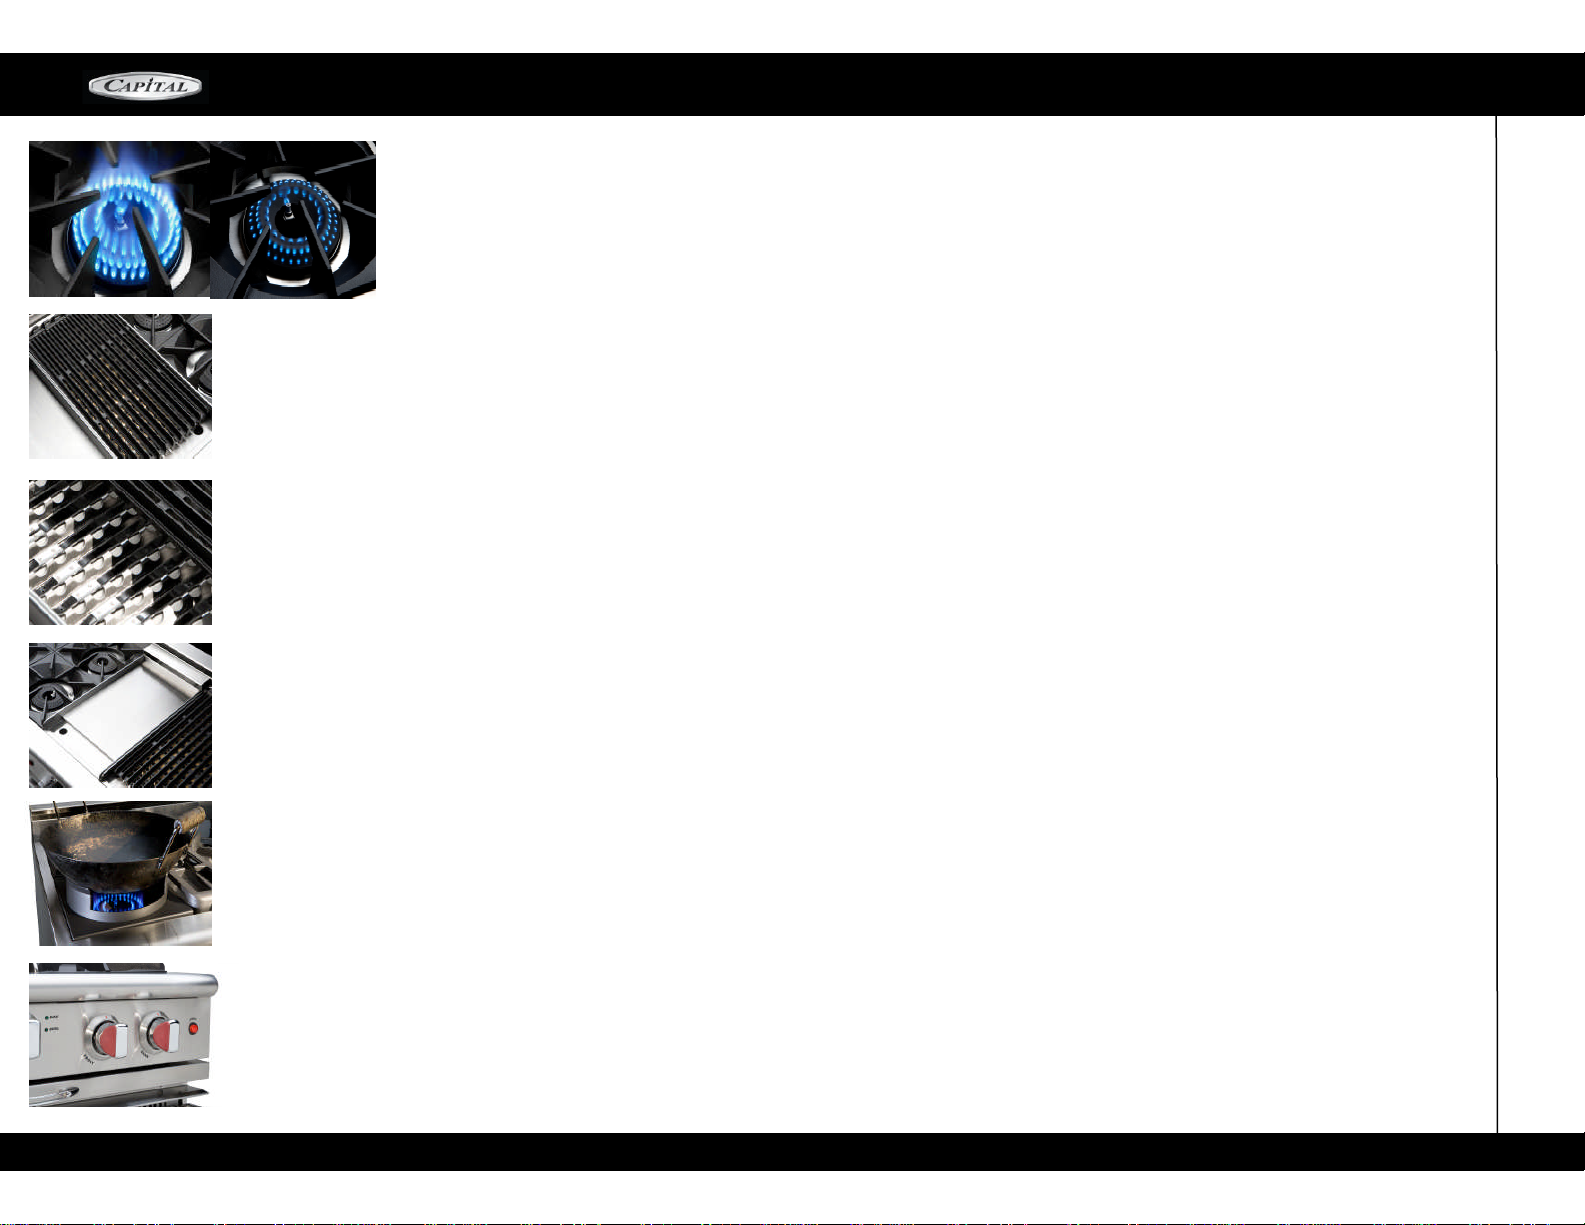
KOOL KNOBS
Our restaurant grade, die cast chrome plated metal knobs feature bold red graphics
for easy readings of settings. Plastic inserts
that stay cool to the touch when using
your Range
(Available in Black or Cabernet Red.).
MOST POWERFUL OPEN
-
TOP BURNERS IN THE INDUSTRY:
All burners are rated at 23,000 Btu / hr to deliver intense commercial kitchen heat to sauté food and
all burners are capable of turning down to give 145° F simmer
COMMERCIAL QUALITY TRADITIONAL BBQ
-
GRILL GRATES
Exclusive BBQ
-
Grill w/ CAST IRON channeling grates that help reduce flare
-
ups
by channeling the grease away from the burner into spillage tray.
THERMO
-
GRIDDLE
Our solid stainless steel thermostatically controlled griddle plate gives you precise control over the grid-
dle area. F
rom 18,000 BTUs on 12" griddle section and 30,000 BTUs on 24" griddle section Capital all
stainless steel griddle plates will never rust! Guaranteed!
HYBRID RADIANTS
With Ceramic Rods Encased in Stainless Steel Sheet Metal for reduced flare
-
ups and Prolonged life.
Cast Iron Wok Grate As Optional Accessory
CULINARIAN GAS RANGE
-
TOP FEATURES:
CULINARIAN SERIES
3
Page 4
CULINARIAN SERIES
4
WARNINGS
WARNING! If the information in this manual is
not
followed exactly, a fire or explosion may
result
causingpropertydamage,personalinjury
or death.
WHAT TO DO IF YOU SMELL GAS
Do not try to light any appliance
Do not touch any electrical switch
Do not use any phone in your building
Immediately call your gas supplier from a
neighbors phone. Follow the gas supplier's in-
structions.
If you can not reach your gas supplier, call the
fire department
Installation and service must be performed by a
qualifiedinstaller,serviceagencyorthegassupplier.
The appliance and its individual shutoff valve must
be
disconnected from the gas supply piping
system
during any pressure testing of that system on
test
pressures in excess of 5 psi (35 kpa).
Theappliancemustbeisolatedfromthegassupply
piping
system by closing its individual manual
shutoff
valve during any pressure testing of the
gas supply
WARNING! Disconnect Power before installing.
Before turning power ON, be sure that all
controls are in the OFF position.
IMPORTANT! Installation must conform with local
codes or, in the absence of local codes, with the
Na-
tionalfuel Gas Code,ANSI Z223.1/NFPA54.
You have CLASS ABC extinguisher and
you
know how to operate it.
Thefireis small andcontainedin theareawhereit
started.
Thefiredepartmenthasbeencalled.
Youcanfightthefirewithyourbackto theexit.
FOR YOUR SAFETY! If You Smell Gas:
Shut off gas to the appliance. Extinguish any
open
flames. If odor persists, immediately call
your gas
supplier.
This appliance is
designed for easy
installation
and operation. However, we recommend that you
read all sections of this
manual before installation and
that your range
is installed by an approved gas instal-
lation
techniciancapableof reviewingandperformingthe
manufacturers installation checklist included
in your
information packet.
The installation of appliances assigned for
manufac-
tured (mobile) home installation must
conform with the
Manufactured Home Construction
and Safety and Safety
Standard, Title 24 CFR, Part
3280 or, when such
standard is not applicable.
REFERTO
ANSI/NCSBCS A225.1, or with
local codes as applicable.
CAUTION! When connecting the unit to
propane gas, make certain the propane tank is
equipped with its own high
-
pressure regulator
in addition to the pressure regulator supplied
with the range. The pressure of the gas
supplied to the appliance must not exceed
14"
(34.57 mB) water column from the propane
gas tank to the pressure regulator.
CAUTION! Do not store or use gasoline or any
other flammable liquids in the vicinity of this or
any other appliance.
PLEASE RETAIN THIS
MANUAL FOR FUTURE
REFERENCE!
PLEASE NOTE:
In the Commonwealth of Massachusetts, gas con-
nection must be performed by a licensed plumber
or licensed gas fitter.
Smother flames with a close fitting lid, or any
metal tray.
TurnOFFtheburner.Becarefultopreventburns.
If
the flames do not extinguish, immediately
evacuate and call the fire department
NEVER pickup a flaming pan.By doingso,you
may be burned.
The installation of appliances designed for
Recreation Park Trailers must conform with state
or other codes or, in the absence of such codes,
with the standard for Recreational Park Trailers,
ANSI A119.5.
The appliance, when installed, must be electrically
grounded in accordance with local codes or, in
the absence of local codes, with the National
Electrical Code, ANSI/NFPA 70
DO NOT use water or a wet dishcloth on
fire.
A violent steam explosion will result.
Usea fire
extinguisher only if:
INCASEOF FIRE
Theinstallermustleavethechecklistdulycompleted
withthehomeownerandthehomeownermust retain
thischecklistasaproofofinstallerhavingcompleted
Allthetesting.
Page 5
CULINARIAN SERIES
5
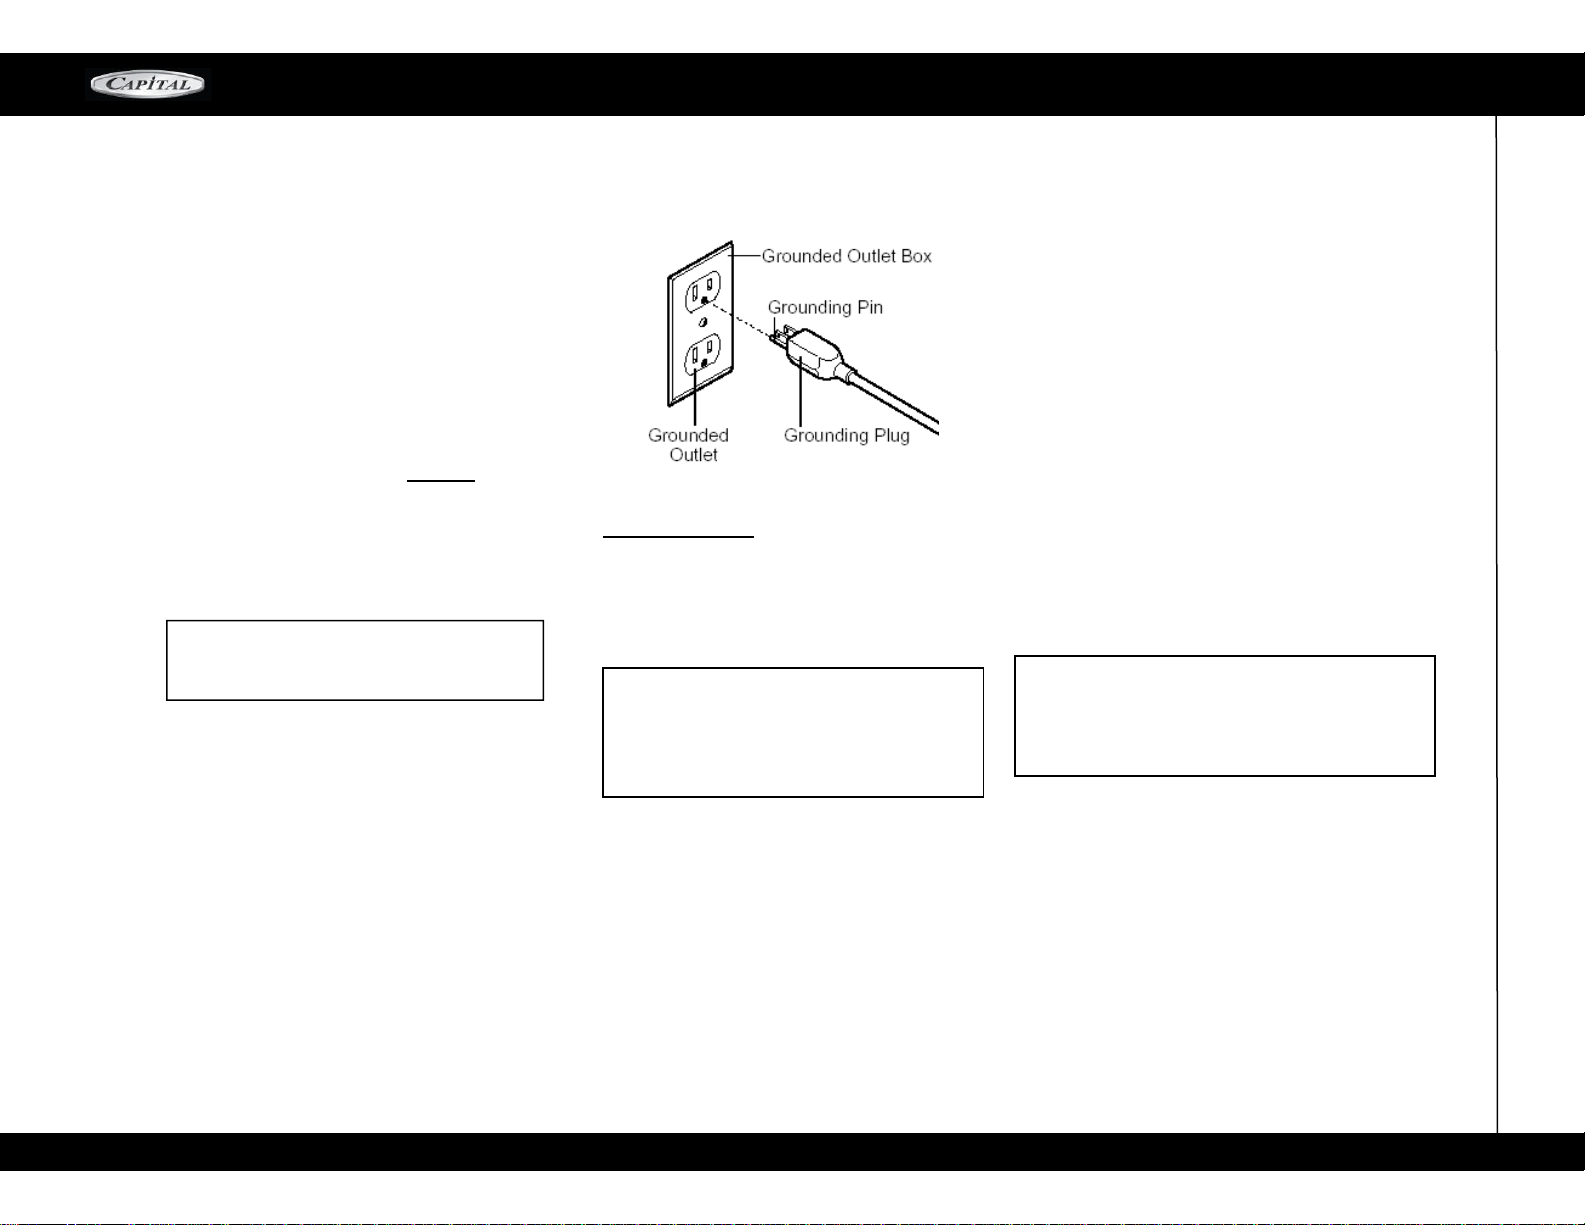
ELECTRICAL SAFETY:
ElectricalRequirementsand Grounding Instructions
NOTE:
ALL MODELS.
IN CASE OF AN ELECTRICAL FAILURE
If for any reason a gas control knob is turned ON and
there is no electric power to operate the electronic
igniters on the range burners, turn OFF the gas
control knob and wait 5 minutes for the gas to
dissipatebefore lighting the range burner manually.
To light the range burners manually, carefully
hold
a lighted match to the burner ports and turn
the
gas control knob to Hl. During a power failure, you
can manually light the rangetop burners with a
match.
The gas grill and thermo
-
griddle
CANNOT
be lit
manually during a power failure.
WARNING!
Do not
under any circumstances cut
or remove the separate ground wire or the third
(ground) prong from the power cord plug.
PLEASE READ CAREFULLY:
All gas rangetops models require an electrical
circuit
rated at 120 volts, 60 Hz., and 15 Amps. (VERIFY)
For personal safety, this appliance must
be connected
to a properly grounded and polarized
electrical
power supply. Always disconnect the
electrical
plug from the wall receptacle before
servicing this
unit. See Installation Instructions for electrical
requirements and grounding instructions.
It is the personal responsibility and obligation of
you, the user, to have this appliance connected to the
electrical power supply in accordance with the
National Electrical Code and/or applicable local
codes and ordinances by a qualified electrician.
*It is recommended that a dedicatedcircuit servicing
this appliance be provided.
GENERAL SAFETY:
Your new range
-
top has been designed to be
a
safe, reliable appliance when properly installed,
used and maintained. If not properly used, it could
be
dangerous. Read ALL the instructions in this
Use
andCare Guidecarefullybeforeusingthis range
-
top.
WARNING! These precautions will reduce the
risk
of burns, electric shock, fire, and injury to
persons.
Use extreme care when using this
restaurant
caliber rangetop as this
appliance provides intense
heat and can
increase accident potential.
Safety precautions must be followed when
using
any kitchen appliance.
Insure proper installation and servicing.
Follow
the installation instructions provided
with this product. Have the range installed
and grounded by a qualified technician.
Have the installer demonstrate how to use this
appliance and show you where the gas supply
shut off valve is located so that you know how
and
where to turn off the gas to the range.
If you smell gas, your installer has not done a proper
job of checking for leaks. If the connections
are not perfectly tight, you can have a small
leak and therefore smell of faint gas odor.
Finding a gas leak is not a "do
-it-
yourself"
procedure. Some leaks can only be found with
the burner control in the "ON"
position
andaqualified service technician must do this.
In the event a burner goes out and gas escapes,
open a window or door immediately. DO NOT
attempt to use the range until the gas has had time
to dissipate. Wait at least 5 minutes before using
the rangetop again.
DO NOT repair or replace any part of the appliance
unless specifically recommended in this manual.
All other servicing should be referred to a
qualified technician.
Children SHOULD NOT be left alone unattended
in
an area where appliances are in use. They
should never be allowed to sit or stand on any part
of the appliance.
CAUTION! Do not store items of interest to children
over the range or behind it. If children should climb
onto the appliance to reach these items, they could
be seriously injured.
NEVER use any part of the range for storage.
Flammable materials can catch fire and plastic
items may melt or ignite.
If the range is near a window, be certain the
curtains do not blow over or near the range burn-
ers,
griddle or broiler section; they could catch
fire and
cause serious damage and injury.
DO NOT USE WATERON GREASEFIRES! Turn
appliance off and smother fire with baking soda
or
use a dry chemical or foam
-
type extinguisher.
SAFETY PRACTICES / ELECTRICAL, GENERAL
Page 6
CULINARIAN SERIES
6
temperature
changes. Use only on low or medium
heat settings according to the utensil manufacturer's
directions.
COOKING SAFETY:
USE ONLY DRY POTHOLDERS. Moist or damp
potholders on hot surfaces may cause burns from
the steam. Do not use a towel or other bulky cloth
in place of potholders.
FOR PERSONAL SAFETY, wear proper apparel.
Loose fitting garments or hanging sleeves should
never be worn while using this appliance. Some
synthetic fabrics are highly flammable and should
not be worn while cooking.
DO NOT use aluminum foil as a shield against
food spills or drippings around the burners or
control panel area. This could obstruct the flow of
combustion air. This can damage
the finish of the
range.
WARNING!
This appliance
is for cooking!
Based
on safety considerations, never use
the range to
warm or heat a room. Such use can
damage the range.
DO NOT TOUCH THE BURNER GRATES OR THE
IMMEDIATE SURROUNDING AREAS adjacent to
the burners. When in use these areas may become
hot enough to cause burns.
NEVER leave the range unattended when using
high flame settings. Boil
-
overs cause smoking
and greasy spills that may ignite. More importantly,
if the burner flames are smothered, unburned
gas will escape into the room.
ONLY certain types of glass, heat proof glass
-
ceramic, ceramic earthenware or other glazed
utensils are suitable for range use. Other types of
utensils may break with sudden
DO NOT HEAT UNOPENED FOOD CONTAINERS.
A buildup of pressuremay cause the container to burst
and cause injury
DURING COOKING, set the burner control so that
the flame heats only the bottom of the pan and
does not extend beyond the bottom of the pan.
USE CAUTION to ensure that drafts like those
from forced air vents or fans do not blow flammable
materials toward the flames or push the flames so
that they extend beyond the edges of the pot.
TO MINIMIZE ACCIDENTS,
position handles
of utensil inward so that they do not extend
over adjacent work areas, cooking areas or the
edge
of the range.
HOLD THE HANDLE of the pan to prevent
movement of the utensil when stirring food.
DO NOT USE the BBQ grill top section
for
grilling excessively fatty meats or products
that
promote flare
-
ups.GREASE IS FLAMMABLE. Let hot grease cool
before attempting to handle it. Avoid letting grease
deposits to collect. Clean after each use.
KEEP BURNER PORTS CLEAN. This is essen-
tial
for proper lighting and maintenance of the
burners.
It is necessary to clean the burner
ports when
there is a boil over or when the
burner does
not light though the electronic igniters
click.CLEAN THE RANGE
-
TOPSECTIONWITHCAUTION.
Avoidsteam bums; do not use a wet spongeor cloth
to
clean the range while it is hot. Some cleanersproduce
noxious fumes if applied to a hot surface. Follow
directions provided by the cleaner manufacturer.
BESUREALLRANGETOPCONTROLSARETURNED
OFF
and the rangetop is cool before using any type of
aerosol
cleaner on or around the range. The chemi-
cal that
produces the spraying action could, in the
presence of heat, ignite or cause metal parts to
corrode. Only
an authorized service technician
should perform Service. Technicians must dis-
connect the power
supply before servicing this unit.
CLEAN THE VENTILATION HOOD and filters
above the range frequently so grease deposits
from cooking vapors do not accumulate on them.
IN CASE OF FIRE
or when intentionally using
"flaming" liquor or other spirits on the range, follow
hood manufacturer's instructions.
INSTALLA SMOKEDETECTORinor nearthekitchen
.
TURN THE KNOB CONTROL TO OFF if a burner
goes out and gas escapes. Open a window or door.
DO NOT attempt to use the
range until the gas has
had time to dissipate.
NEVER let clothing, potholders, or other flammable
materials come into contact with or too close to any
burner, or burner grate until it has cooled. Fabric may
ignite and result in personal injury.
SAFETY PRACTICES / COOKING
Page 7
CULINARIAN SERIES
7
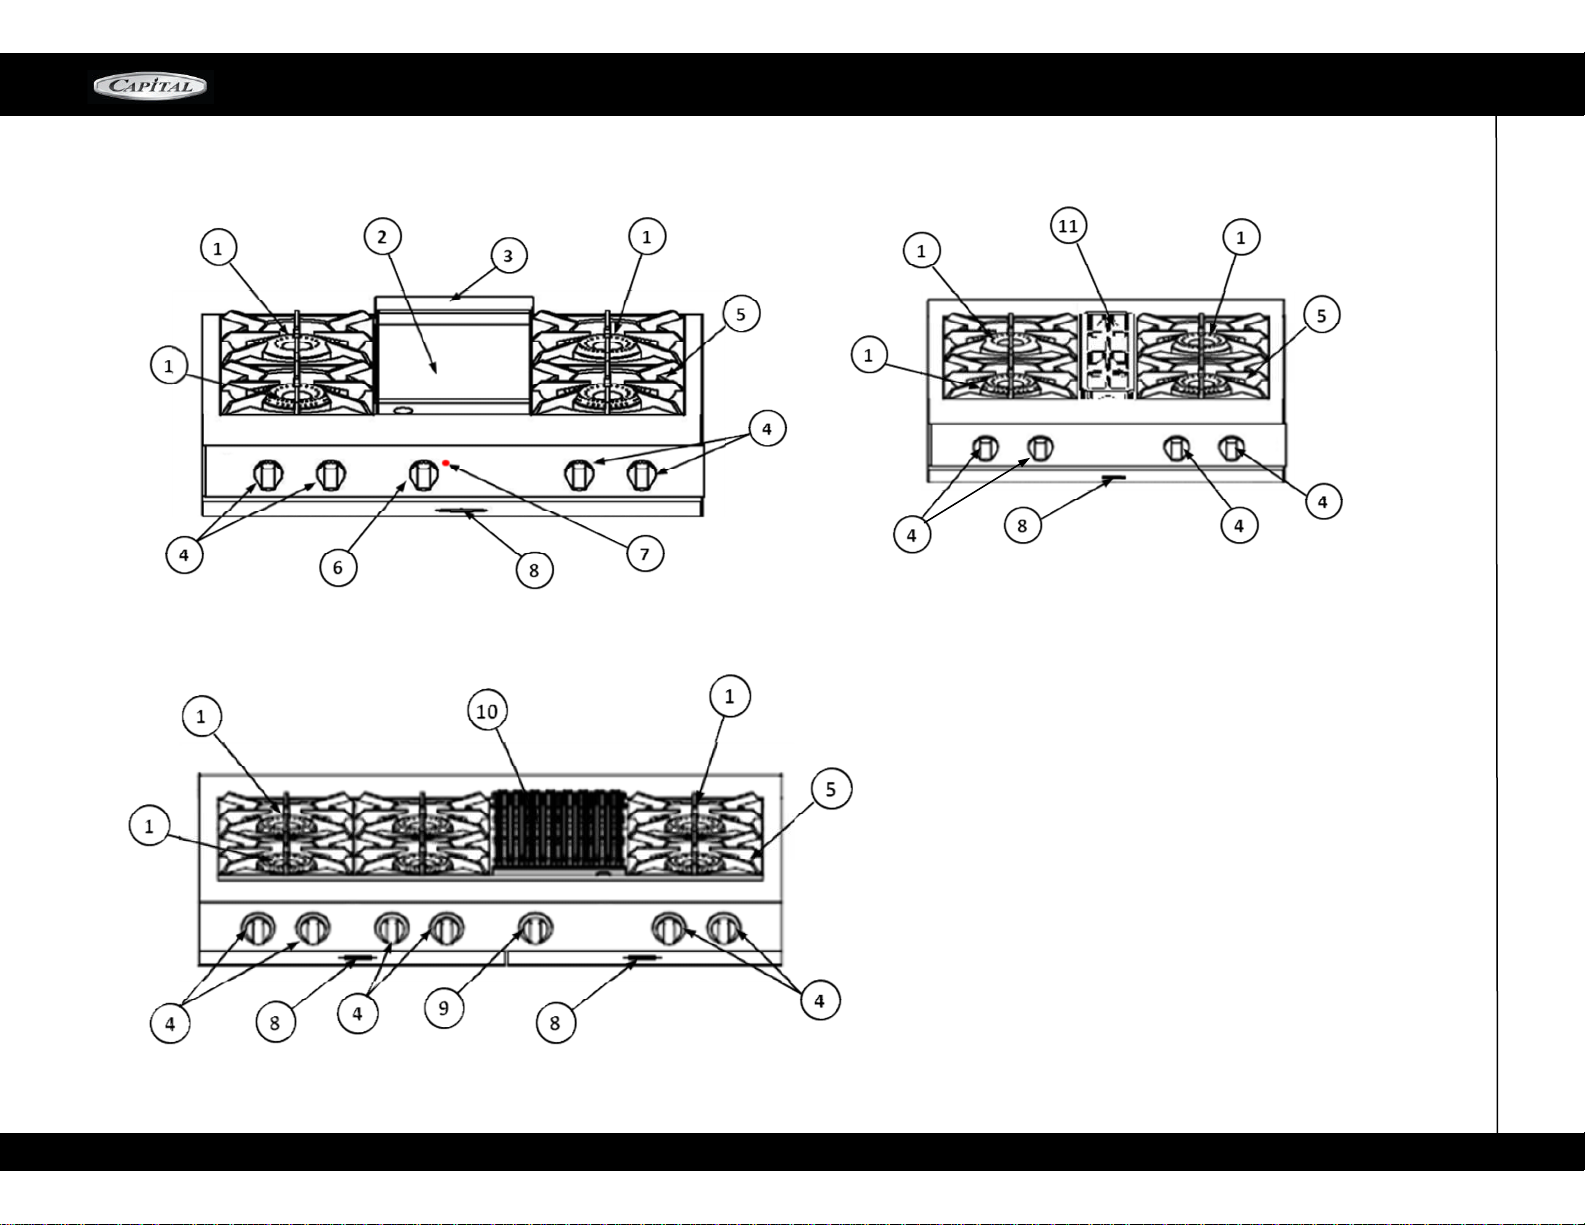
RANGETOP PART IDENTIFICATION
1.Burner 23k BTU
2.Griddle Plate
3.Griddle Flue Cover
4. Burner Control Knob
5. Cast Iron Grate
6.Griddle Knob
7.Indicating Lights
8.Drip pan Handle
9.Grill Knob
10.BBQ Grill
11.Center Grate
Page 8
CULINARIAN SERIES
8
ELECTRONIC IGNITERS
If a burner does not ignite, listen for the clicking
sound.
If th e b urner do es not c l i c k, TURN
OFF THE B U RNER. C h eck t h e ci r c u it
brea k e r for a bl own
fuse or a tripped circuit
breaker. If the i gn iter still
fails to ope rate, see
page 1 9 "Troubleshooting ",
"Before calling For
Service".
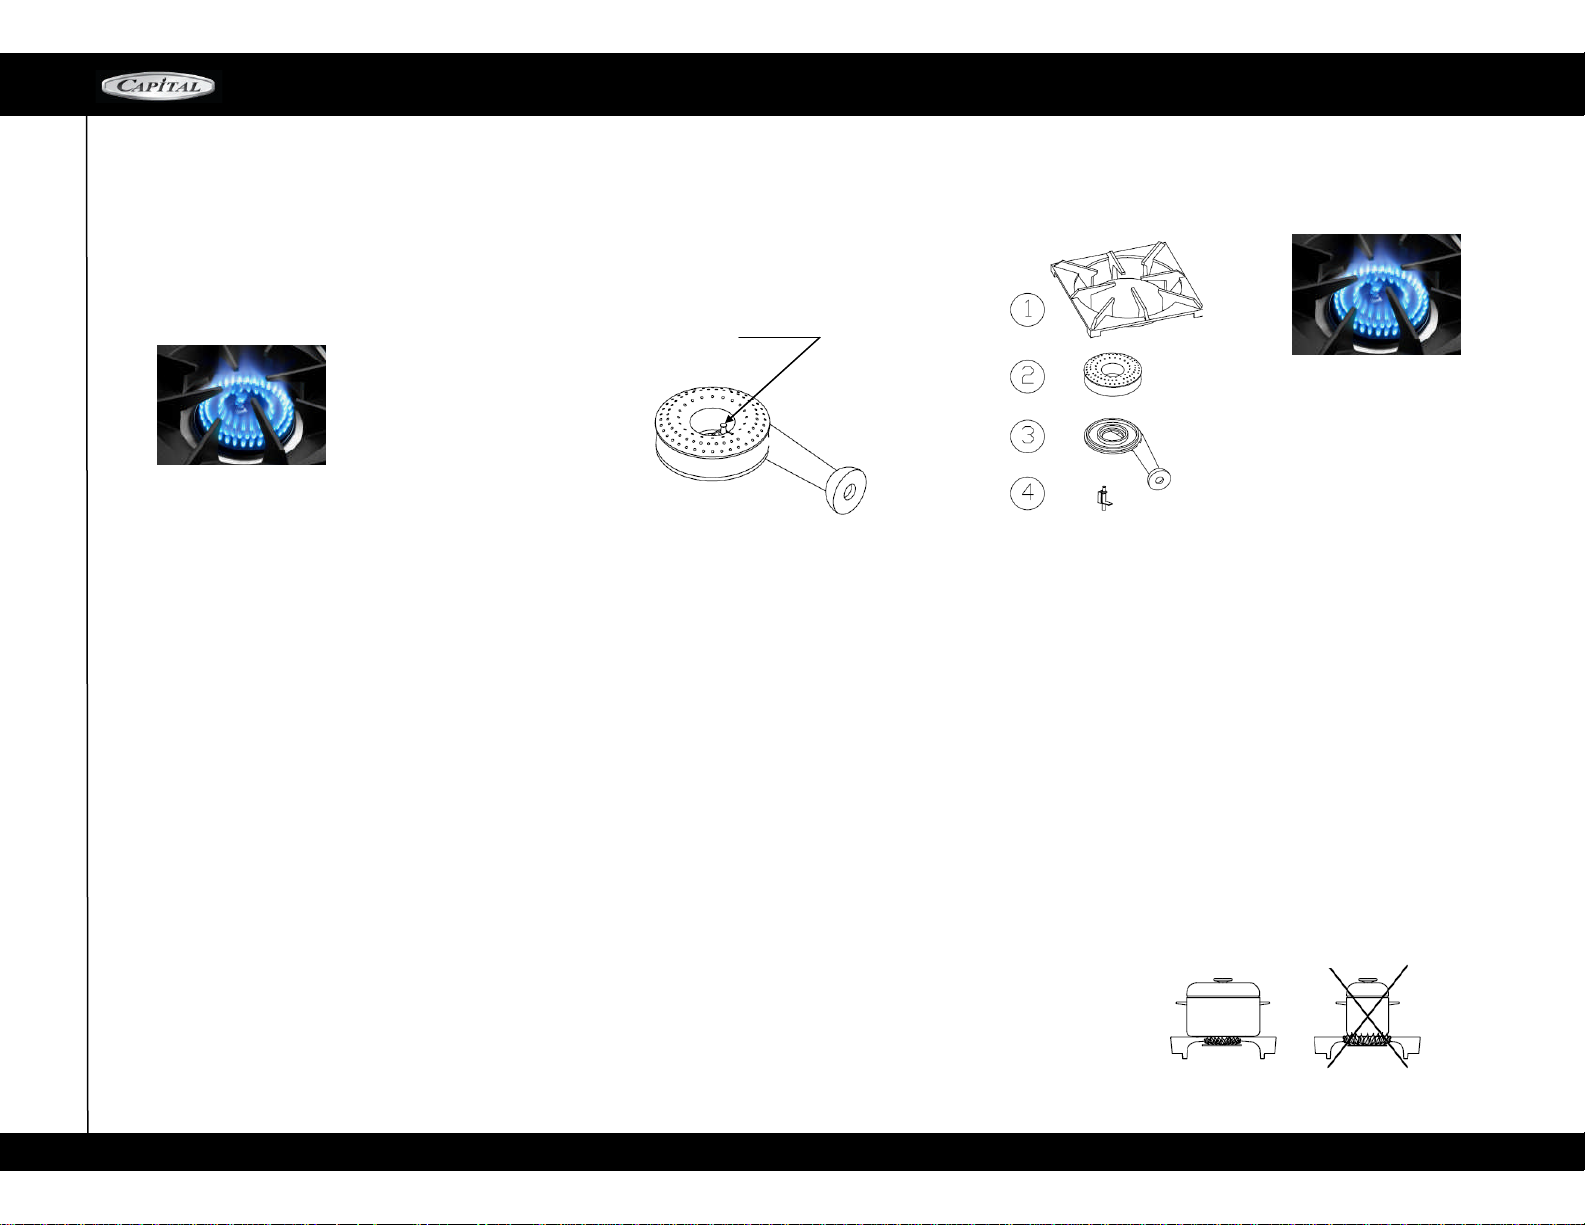
FLAME PORTS & IGNITER
(KEEP CLEAN)
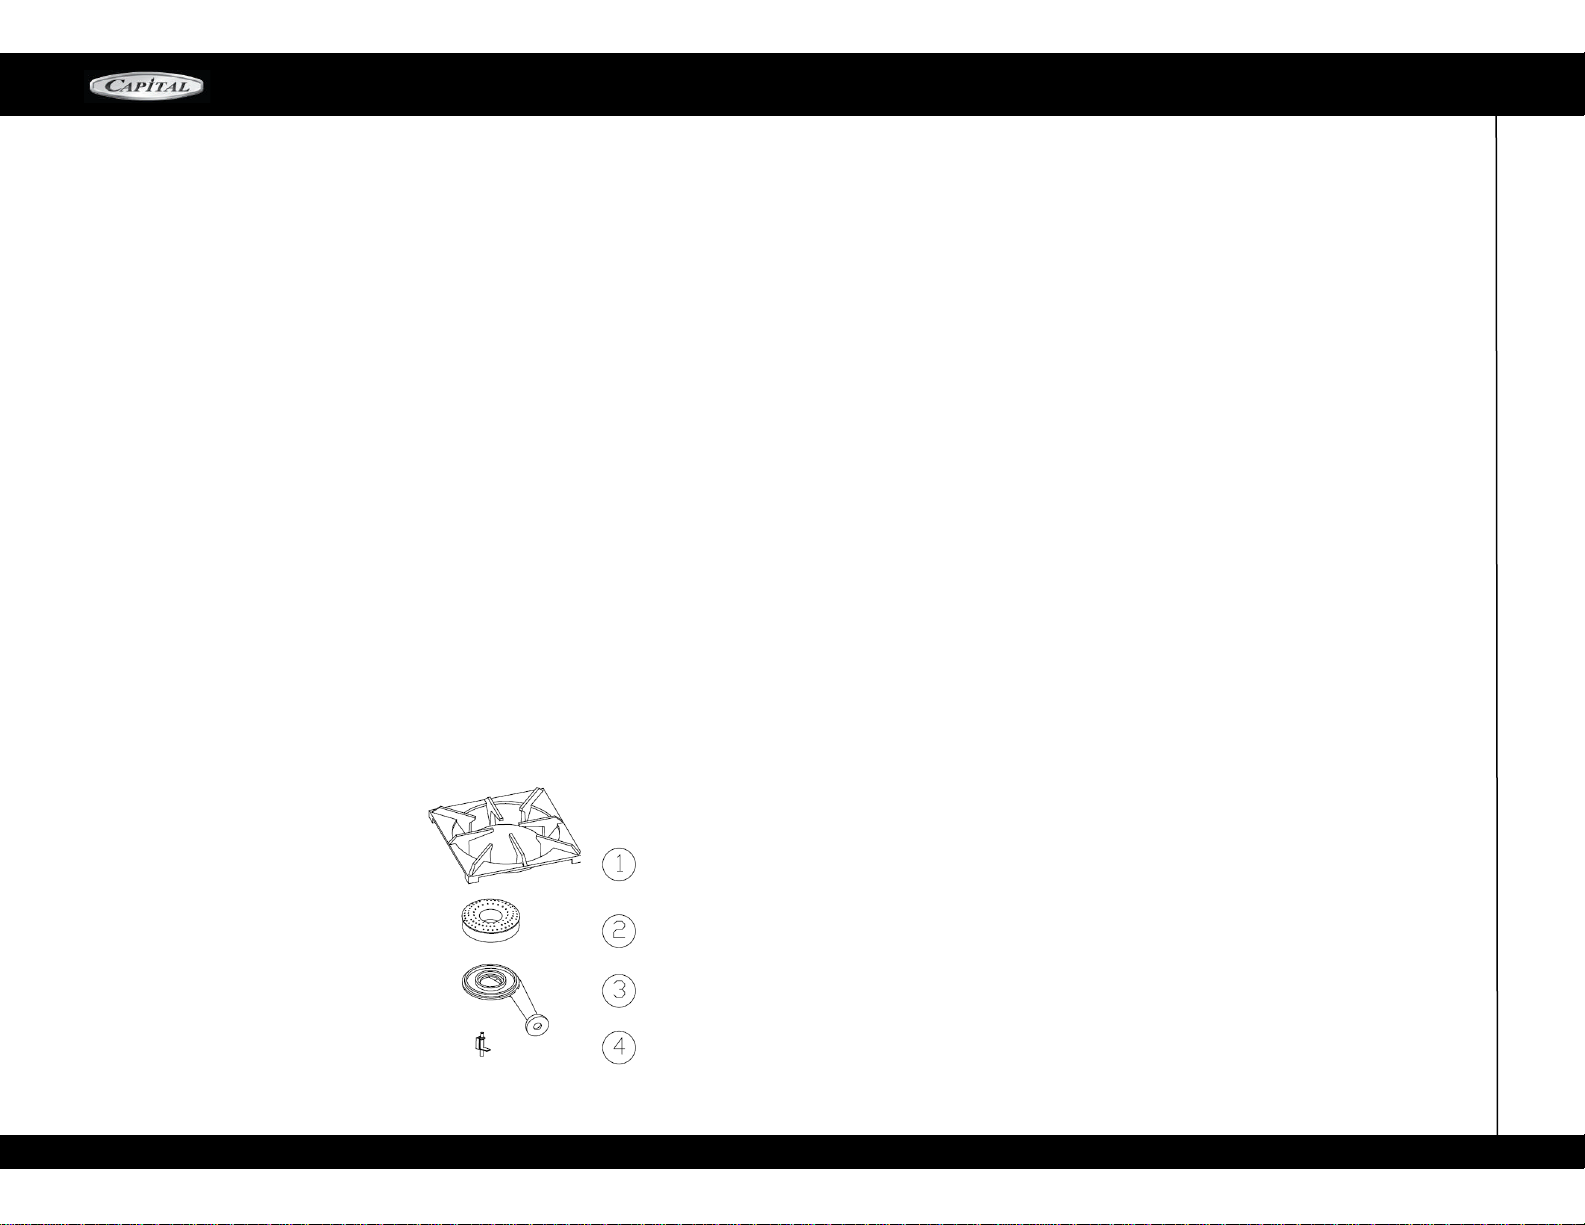
1-82362 GRATE
2-82361
-
01 23K Btu Burner Head
3-82361
-
02 Burner Base
4-20652 Electrode Assy
BURNER EFFICIENCY AND
FLAME CHARACTERISTICS
It is necessary to keep the burner ports and the
igniter s
-
cl ean for prope r light ing a nd effi cient
performance of the range
-
top burners.
The burner flame should burn completely around
the burner with no excessive noise or lifting. The
flame should be blue in color and sta ble with no
yellow tips.
An improper air
—
gas mixture may cause either a
burner flutter or a yellow tipped flame. A techni-
cian
.should adjust the flame. During initial use,
foreign
particles in the gas line, or dust in the air around
the appliance may cause an orange flame. This
will disappear with use.
NOTE. If you are using propane gas, a slight pop
flash may occur at the burner ports a few seconds
after the burner has been turned "off". This
"extinction pop" is normal for propane gas
.
FLAME
HEIGHT
The correct height of the flame mainly depends on
the size of the bottom of the cooking utensil.
Following are so m e basic rules fo r select i n g
flame height.
For safety reasons the flame must never extend
beyond the bottom of the cooking utensil. Never
allow flames to curl up the
s i de o f t he p a n .
Utensils which conduct heat slowly (such
as
glass-ceramic) should be used with
medium to
low flames. If you are cooking
with a large pot, a
larger flame can be used
.
SIMMERING
ALL Your new rangetop burners have
exceptionally low simmering capabilities
All the range
-
top burners have electronic spark
ignition.
Proper
Flame
Height
CULINARIAN BURNERS
Your new gas rangetop is equipped with the latest in
burn e r te chnolog y. T h e Cu l inarian b u rners a r e
the m ost e f f i c ient a n d mo st powe r f u l burn-
ers ( 23,000 B T U /HR) i n th e househol d ap p l i -
ance in d u s try
CORRECT
WRONG
USING THE RANGE
-
TOP BURNERS
Page 9
CULINARIAN SERIES
9
SAFETY PRACTICES / ELECTRICAL, GENERAL
Preheat the grill for approximately 5 minutes
minimum. The hot grill sears the food, sealing in
the juices.
The longer the preheat time, the faster the meat
browns and the darker the brand marks.
Grilling requires high heat for optimum results.
High heat is necessary for searing and proper
browning. Most foods are cooked at medium
heat settings for most of the cooking time.
However, when grilling large pieces of
meat or
BURNER SETTINGS
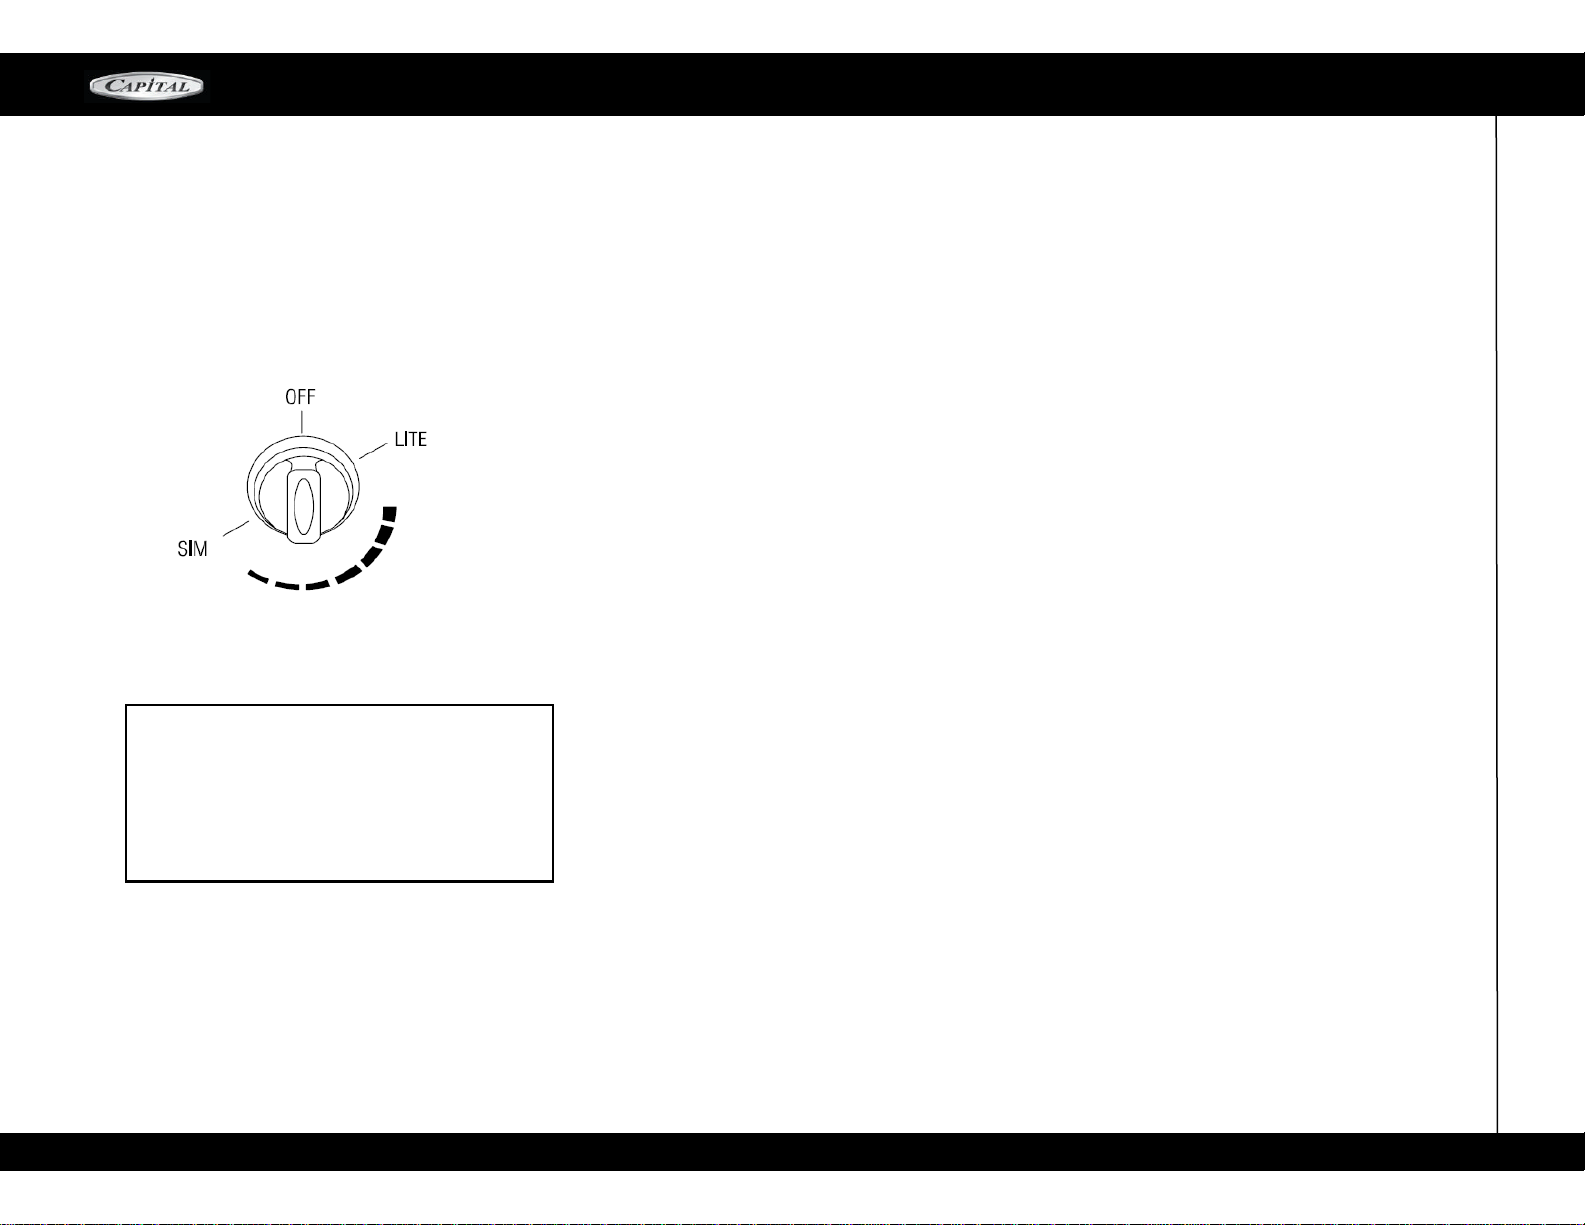
The rangetop burner valves have infinite
settings and there are no fixed positions on the
control knobs between HI and SIMMER. To
turn the
rangetop burner on, push in the
control knob and
turn it counterclockwise
to the "LITE" position. An
audible clicking
sound will be heard. When the gas
has
been ignited by the electronic spark igniter,
turn
the knob to the desired setting.
Note: If the Igniter continues to click after the
burner has been lit, turn the knob to a setting
other than LITE, or HI. If the problem still persists,
please call our Service Hotline at 866
-
402-4600.
CAUTION! When turning on any RANGETOP
burner, be sure to stop at the "LITE" position
before turning the burner to a flame setting for
cooking. If the burner is not lit and it is turned
beyond the "LITE" position, to HI, MEDIUM, or
LO, there will be a burst of flame when the burner
does light. This could cause burns or damage to
the surrounding counter top.
BURNER GRATES
The burner grates are a heavy cast iron. They ere
designed in sections to make them easier to remove
and clean.
PROPER COOKING UTENSILS
For best results we recommend using Professional
Cookware. These types of utensils can be found at your
finer department stores, specialty cooking shops, or
restaurant supply stores. If using regular cookware
be very careful if pans have plastic handles, as our
Culinarian
burners can melt or bubble the handles.
THE CONTROL KNOBS
The control knobs are readily associated with
the
burners they control. The RANGETOP control
knobs
are labeled in front of the burners. The
oven
control is placed slightly higher than the
other
control knobs. This is due to the physical size
of the commercial type thermostats used on the
product.
CAUTION!
Use extreme care when placing the
grill
components into the grill compart-
ment. Avoid
hitting the ceramic
igniter that could break,
preventing
operation of the grill.
Do not leave the grill unattended while in use.
Do not use charcoal briquettes, ceramic plates, or
coals of any kind.
After removing all packaging materials, check to
be certain that the grill components are correctly
assembled in the grill box. The grill grates and
the burner are assembled in the grill box from
the factory.
Note:Yourgrillracks aremadeof cast ironand
enameled
USING THE
WOK RING
Wok grate is available as accessory for wok cooking
and stir
-
fry: This can be placed on any top burner, by
removing the top grate and placing the wok grate
The Culinarian
Wok system
is perfectly designed to
deliver high intense heat, by spreading the flame under
the diameter of the wok pan.
All the range
-
top burners have electronic spark ignition
to eliminate continuously burning pilots. When the main
burner flame is blown out, it will relight.
Alsoeach
burner
has it
s o
wn ignition module. If one module fails
all others will continue to work and you are not inconven-
ienced.
If a burner does not ignite, listen for the clicking
sound. If the burner does not click, TURN OFF
BURNER. Check the circuit breaker for a blown
fuse or a tripped circuit breaker. If the igniter still
fails to operate, please call our customer service depart-
ment at 1
-
866-402-4600.
Note.
If you are using propane gas, a slight pop or flash may
occur at the burner ports a few seconds after the burner
has been turned "off". This "extinction pop" is normal for
propane gas.
COOKING ON THE GRILL
The burner should light within approximately 45 seconds.
Page 10

CULINARIAN SERIES
10
USING THE RANGETOP
Foods cooked for a long period of time or basted
with a sugary marinade may need a
lower heat
setting near the end of the cooking
time.After finishing grilling and the food has been re-
moved, turn
the knob to HI and burn off any excess
grease that may have accumulated on the burner.
When
cooled, the grill radiants can be turned up-
side down and heated on high for 10 minutes to
burn off any residual fat.
Use a brass wire brush, dipped in hot water,
to loosen food particles from the grate.
When the grill has cooled, clean the drip
tray and compartment.
GRILLING SUGGESTIONS
Trim any excess fat from the meat before cooking.
FATTY MEATS increase the likelihood of flare
-
ups.
slits in the remaining fat around the edges at (2 inch)
(51 mm) intervals.
Brush on basting sauces towards the end of cooking.
Add seasoning or salt after grilling. Early salting dries
out meat.
Use a spatula or tongs instead of a fork to turn the
meat. A fork punctures the meat and lets the juices
flow out.
After the juices begin to bubble to the surface, turn
the meat only once. This helps keep the juices in the
meat.Some pieces of meat and poultry cook faster than
others. Move those pieces to the cooler area of the
grill until the rest has cooked.
The doneness of meat is affected by the thickness of
the cut. Chefs say it is impossible to have a rare
doneness with a thin cut.
WARNING! Do not leave the BBQ
section unattend ed
while cooking!
poultry, it may be necessary to turn the heat to
a
lower setting after the initial browning. This
cooksthe food through without burning the outside
Page 11
CULINARIAN SERIES
11
C A R E A N D M A I N T E N A N C E
The porcelain may pop off the edge of the grates
due
to rapid temperature change when the burners
are
turned on, Do not be concerned as this doesnot
result in
thedeteriorationof the grates.The castiron
soondarkens
toblendwiththeporcelainenamel.Becarefulwhen wiping
anareawheretheporcelainhas
popped o
f
, as the edges
maybe sharp
For proper lighting and performance keep the
burners clean. It is necessary to clean the burners
if they do not light even through the igniter clicks, if
there has been a severe boil over, or when the flame
does not burn blue.
Alwayscleanall theburnersports by inserting a thin wire
ineachport.
Before attempting to clean the burners
.
The burners
have been designed for ease in cleaning. When
the
grates and burners are cool, remove the grate
.
and
Burner Cap
Wash these parts in hot soapy water, rinse
and dry thoroughly
.
The Burner Caps are porcelain
enameled, follow the directions on the previous page
givenfor the burner grates.
A
bristle brush
can be used
to clean burners and top grates if ports remain
clogged use thin wire to clean each port.
BURNERS
After cleaning, it is important to make sure the
Locating Notch at the bottom of the Burner Base
is
properly aligned with the Burner Cap.
Incorrect
alignment wi
ll
produce a potentially dangerous flame
andpoorburner performance.
IGNI
TERS
Wipe with a water
-
dampened cotton swab. Be
carefu
l
not to damagethe igniter
.
(See illustration).
LOWBACK,OR HIGHSHELF (IFINSTALLED)
Depending on the model, these are constructed of
eitherall
stainless stee
l
or a combination of stainless
steel and aluminized steel
.
Use the mildest cleaning
procedure
first—hot soapy water, rinse and dry
.
If the
panel has
food soi
l
remaining, try a general kitchen
cleaner,
such as Fantastik®, Simple Green®, or
Formula
409®.For hard to clean soil use a stainless
steel
cleaner such as, Bon
-
Ami®, Cameo®, or
Bar
Keepers Friend. Apply cleaner with a damp
sponge,
rinsethoroughlyanddry
.
Alwaysscrub lightlyin
the
direction of the grain. Do not use a stee
l
woolpad,
it will scratch the surface.To touch up noticeable
scratches in the stainless steel, sand very lightly with
dry100 grit emery paper, rubbing in the direction
of
the grain. After cleaning use a stainless steel
polish, such as Stainless Steel Magic®
1-82362 GRATE
2-82361
-
01 23K Btu Burner Head 3 Rows
3-82361
-
02 Burner Base
4–20652 Electrode Assy
The burner grates are matte porcelain ename
l
over cast iron
.
When coo
l
they may be placed in
the dishwasher, or wipe while on the rangetop
using hot soapy water, then rinsed and wiped dry
.
The burner grates wi
ll
not rust as they are matte
porcelainename
l
on both sidesfordurability
.
The occasional use of mild abrasive cleaners such
as Bon
-
Ami®, Soft Scrub®. Abrasive cleansers,
usedvigorously or too often, can eventually harm
the enamel. Apply with a damp sponge, rinse
thoroughlyand dry
.
When lifting the grates, be careful as they are heavy
.
Place them on a protected surface, so they won't
scratchthe surfacethey are laid on
.
Turn off a
ll
the burners and allow the grates to coo
l
before starring to clean the rangetop. If you wipe
off any part of the rangetop while it is hot do so
carefully as using a wet sponge or cloth can result
in steam burns.
RANGETOP
Chrome cleaners
, such as soft Scrub®, cameoof Bar
Keepers
Friend can be app
l
ied with a damp
sponge
following package directions. Rinse and dry.
Powdered
cleaners such as Bon
-
Ami® or Comet
are app
l
ied with
a damp sponge or c
l
oth, rubbed
l
ightly, rinsed and
dried
.
Harsh C
l
eaners which
are commercia
l
oven
cleaners, such as Easy Off®
or Dow can be used on
the racks. However, some commercial oven c
l
eaner's
cause darkening and
discoloration
.
Testthe c
l
eaner on a
smallpart of the
rack and check for
any
discoloration
beforec
l
eaning
the entire rack.A
ll
owto standfor15to 20
minutes
.
Rinsethorough
l
yanddry
.
Ifthe topburnerare usedextensivelyon highit is possible
for the vertical stainless steel panel to discolor
from the
burner heat. This discoloration can be
removed by
usingRevereWareStainlessSteelCleaner.
POWER
FAILURE
Tolight the open top burners, turn the contro
l
knob to " lite " hold a
lighted match to the port
.
Adjusttheflametothedesiredheight
.I
tis
necessary
tolight each burner individua
lly.
Do not
l
ight more
than one burner at a time.
Page 12
CULINARIAN SERIES
12
LOCAT I N G T H E RATIN G PLATE
LOCAT
I
NGRAT
INGPLATE
SERIAL#,MODEL
#
AND
VERIFYING
GAS
TYPE
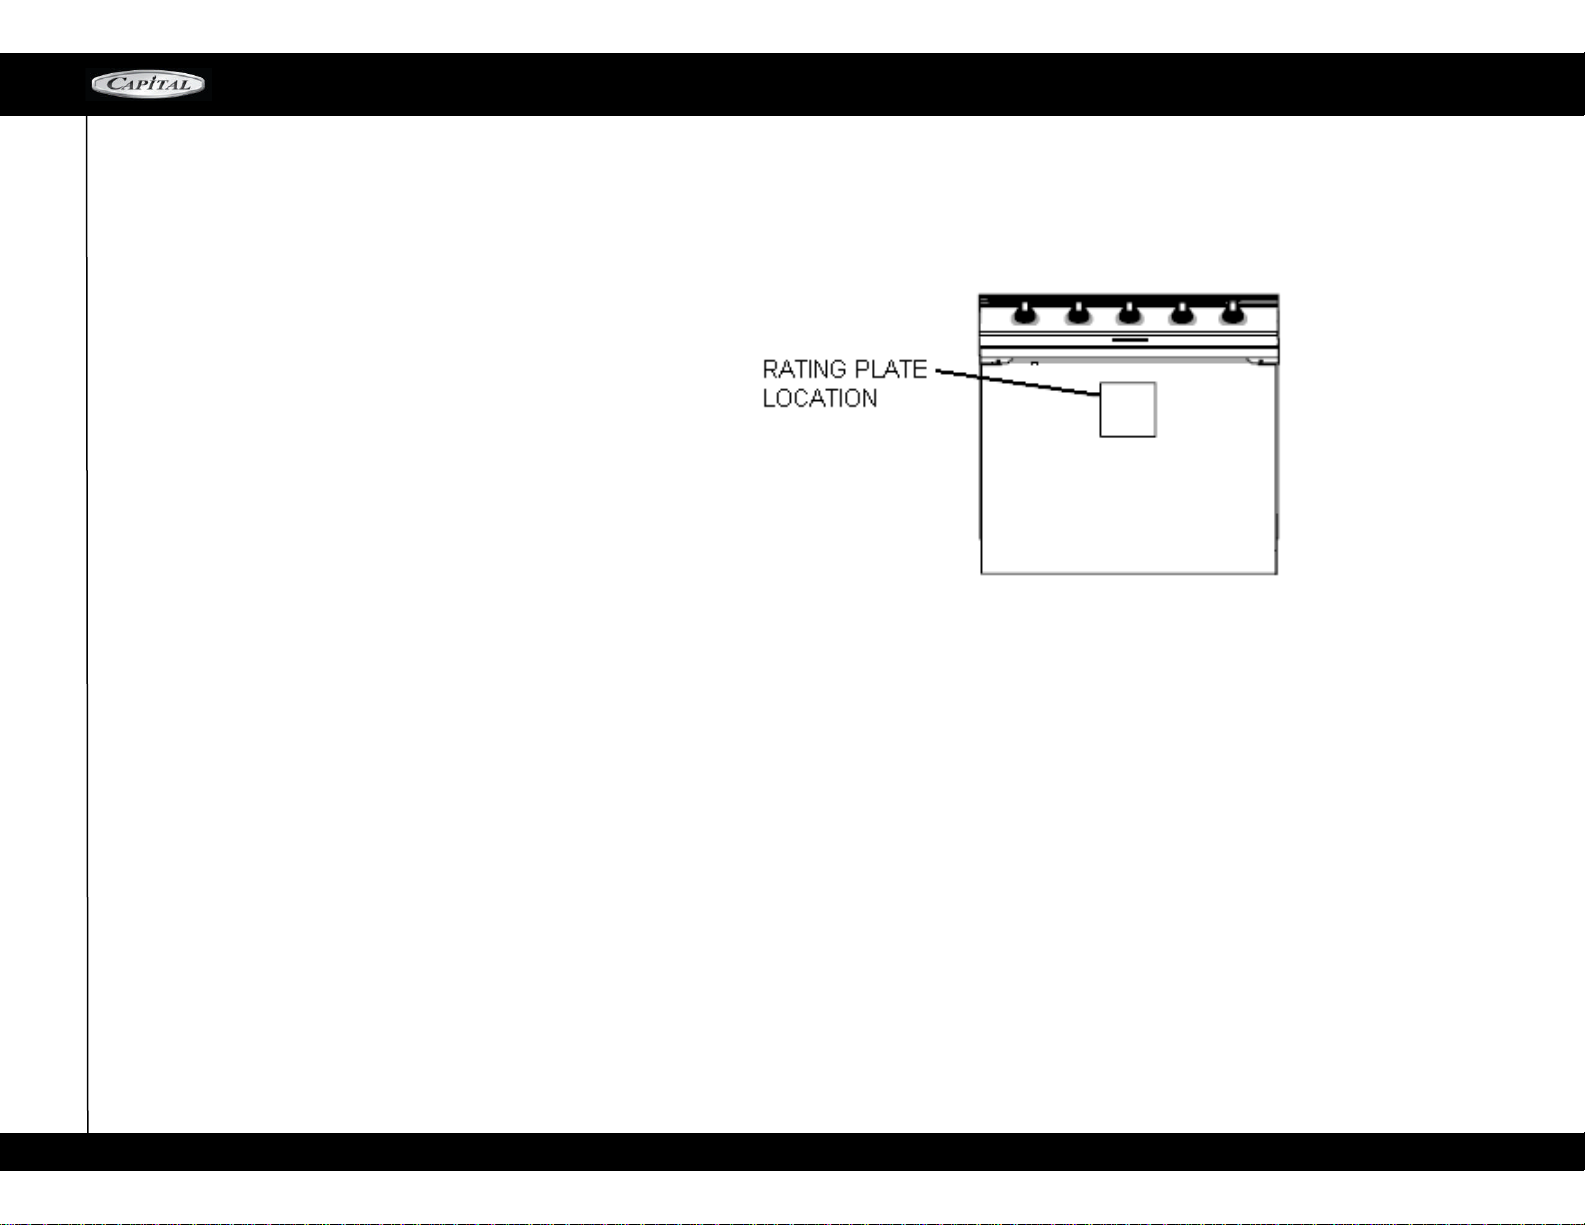
The rating plate contains necessary information
regarding
your range. It provides the model #,
serial# and verifiesthe
gas type and BTU input
ratings for each burner of your appli-
ance.
When
calling for service, please
have
this information at
hand. The rating plateis locatedon the undersideof theRange
top.It is best to record the information
in a convenientplacefor
futurereferencepriorto
installingthe unit.
Page 13
CULINARIAN SERIES
13
T R O U B L E S H O O T N G
PROBLEM
POSSBLECAUSE
PROPOSEDSOLUT
I
ON
Rangenon
-
functiona
l
Noelectricityorgassupply
Turn
on gas supp
l
y valve
Checkcircuitbreakers
Technica
lCall
forauthorizedservice
Oneormoreburnerswi
l
l notlight
Noelectricity
Check circuitbreakers
No gas
Check gassupplyat wall
Wronggastype
Verifygastype
Burnersaredirty
Cleanburners
Burners aremis
-al
ignedAl
ignandreassemb
l
eburners
Waterinburnerports
Dis-assemb
l
eanddryburners
Dirtye
l
ectrode(s)
Cleanburnere
l
ectrode
Technica
lCall
forauthorizedservice
incorrectflame/ sootyburnerflame
Toolargeorsma
llflame
Verifygastype
Mis-alignedburner assemb
lyRealignandre
-
assemble burnerassembly
BBQGRLLdoesn't light
NoElectricity
Checkcircuitbreaker
No gas
Checkgassupp
l
yatwa
ll
Burneris dirty
Clean burner
R A N G E
-
T O P
Page 14

CULINARIAN SERIES
14
INSTALLATION INSTRUCTIONS
CULINARIAN SERIES RANGETOP MODELS
CGRT30 (ALL MODELS)
CGRT36 (ALL MODELS)
CGRT48 (ALL MODELS)
CGRT60 (ALL MODELS)
Page 15

CULINARIAN SERIES
15
T A B L E O F C O N T E N T S
Important Information
30”-ALL MODELS
36”-ALL MODELS
48”-ALL MODELS
60”-ALL MODELS
Unpacking and / Ventilation Requirements
Cabinet Install Drawing / Front View
Cabinet Install Drawing / Side View
Installation Instructions
Gas Hook
-
Up / Testing and Adjustments
Post-Install Check
Service & Warranty
1617181920212324252627
28
Page 16
CULINARIAN SERIES
16
IMPORTANT INFORMATION
IMPORTANT:
Save these instructions for the Local
Gas Inspector's use.
INSTALLER:
Please leave these Installation
Instructions with the unit for the owner.
OWNER:
Please retain these instructions for future
reference.
The appliance, when installed, must be electrically
grounded in accordance with local codes or, in the
absence of local codes, with the National Electrical
Code, ANSI/NFPA 70
PLEASE READ ENTIRE
INSTRUCTIONS
BEFORE PROCEEDING.
WHAT TO DO IF YOU SMELL GAS
Do not try to light any appliance
Do not touch any electrical switch
Do not use any phone in your building
Immediatelycall your gas supplier from a
neighbor’s
phone. Follow the gas supplier's in-
structions.
If you can not reach your gas supplier, call
the
fire department.
WARNING! Disconnect Power before installing.
Before turning power ON, be sure that all controls
are in the OFF position.
In the commonwealth of Massachusetts, gas
connection must be performed by a licensed
plumber or gas fitter.
Be sure the unit being installed is set up for the
type of gas supplied. The Gas rangetop shipped
from
the factory is set for Natural Gas or LP (Propane),
depending on the specific model ordered.
ENSURE THAT THE RANGETOP IS COMPATIBLE
WITH GAS SUPPLY AT THE INSTALLATION SITE
BEFORE
PROCEEDING FURTHER. Contact the
dealer if it
is not set for the proper gas supply available
at the installation site.
IMPORTANT!
A back guard must be utilized when
there is
less
than 12" horizontal clearance between
combustible materials and the back edge of the
rangetop. The Capital CULINARIAN SERIES Low Back
or
High Shelf must be ordered separately and installed
at the rear of the rangetop. For island installations
and
other installations with more than 12" clearance, our
stainless steel Island Trim is suitable to cover the
back guard mounting flanges.
ELECTRIC POWER SUPPLY
CGRT30, CGRT30 models
-
120 VAC, 60 HZ, 1 PH.,
20 Amp Circuit
C
GRT
36, C
GRT
36 models
-
120 VAC, 60 HZ, 1
PH.,
20 Amp Circuit
CGRT48, CGRT48 models
-
120 VAC, 60 HZ, 1 PH.,
20 Amp Circuit
CGSR60, CGMR60 Models
-
120 VAC, 60 HZ, 1 PH,
20 Amp Circuit.
STEP 1: UNPACKING, MOVING and PLACING the
RANGE
GAS SUPPLY
NATURAL GAS:
6-inch water column. (14.9mb)
Min., 8 inch (20mb) nominal
PROPANE GAS:
11-inch water column. (27.4m b),
14 inch (37mb) maximum
CAUTION: Proper equipment and adequate
manpower must be used in moving the range to
avoid damage to the unit or the floor. The unit is
heavy and rests on stainless steel legs.
It is strongly recommended that after removing the
packing, top grates,
and drip pan(s) to
facilitate
lifting and easier handling.
Remove the outer carton and packing materials
from the shipping base. All gas ranges are held to
the
skid by three (3) bolts. After removing the bolts
the
rangetop must be lifted and removed from the skid.
WARNING!
If the information in this manual is
not followed exactly, a fire or explosion
may
result causing property damage, personal
injury or death.
The appliance and its individual shutoff valve must
be disconnected from the gas supply piping system
during any pressure testing of that system at test
pressures in excess of 5 psi (35 kPa).
The appliance must be isolated from the gas supply
piping system by closing its individual manual
shutoff valve during any pressure testing of the gas
supply piping system at test pressures equal to or
less than 5 psi (35 kpa).
IMPORTANT!
Installation, electrical connections,
grounding and gas connections must comply with
all applicable codes. In the absence of local codes,
the unit should be installed in accordance with the
National Fuel Gas Code ANSI Z223.1/NFPA54
-
CURRENT ISSUE and National Electrical Code ANSI/
NFPA70
-
CURRENT ISSUE.
NOTE: Local building codes vary. Cabinet storage
above the unit should be avoided to prevent the
risk of accidental fire or burns.
IMPORTANT!
Installationmustconform with localcodes.
IMPORTANT INSTALLATION INSTRUCTIONS
INTRODUCTION
Capital's CULINARIAN Series Gas Rangetops are
tested
and approved in accordance with ANSI
Z21.1.2005, CAN 1
-
1.1,M81
1995, Household Cook-
ing Appliances. It
is STRONGLY RECOMMENDED
that this appliance be
installed in conjunction with a suit-
able overhead CAPITAL
VENTHOODDuetothehighheat
outputofthisunit,particular
attention should be paid to the
hood and ductwork installation to ensure it meets local
building codes.
Page 17
CULINARIAN SERIES
17
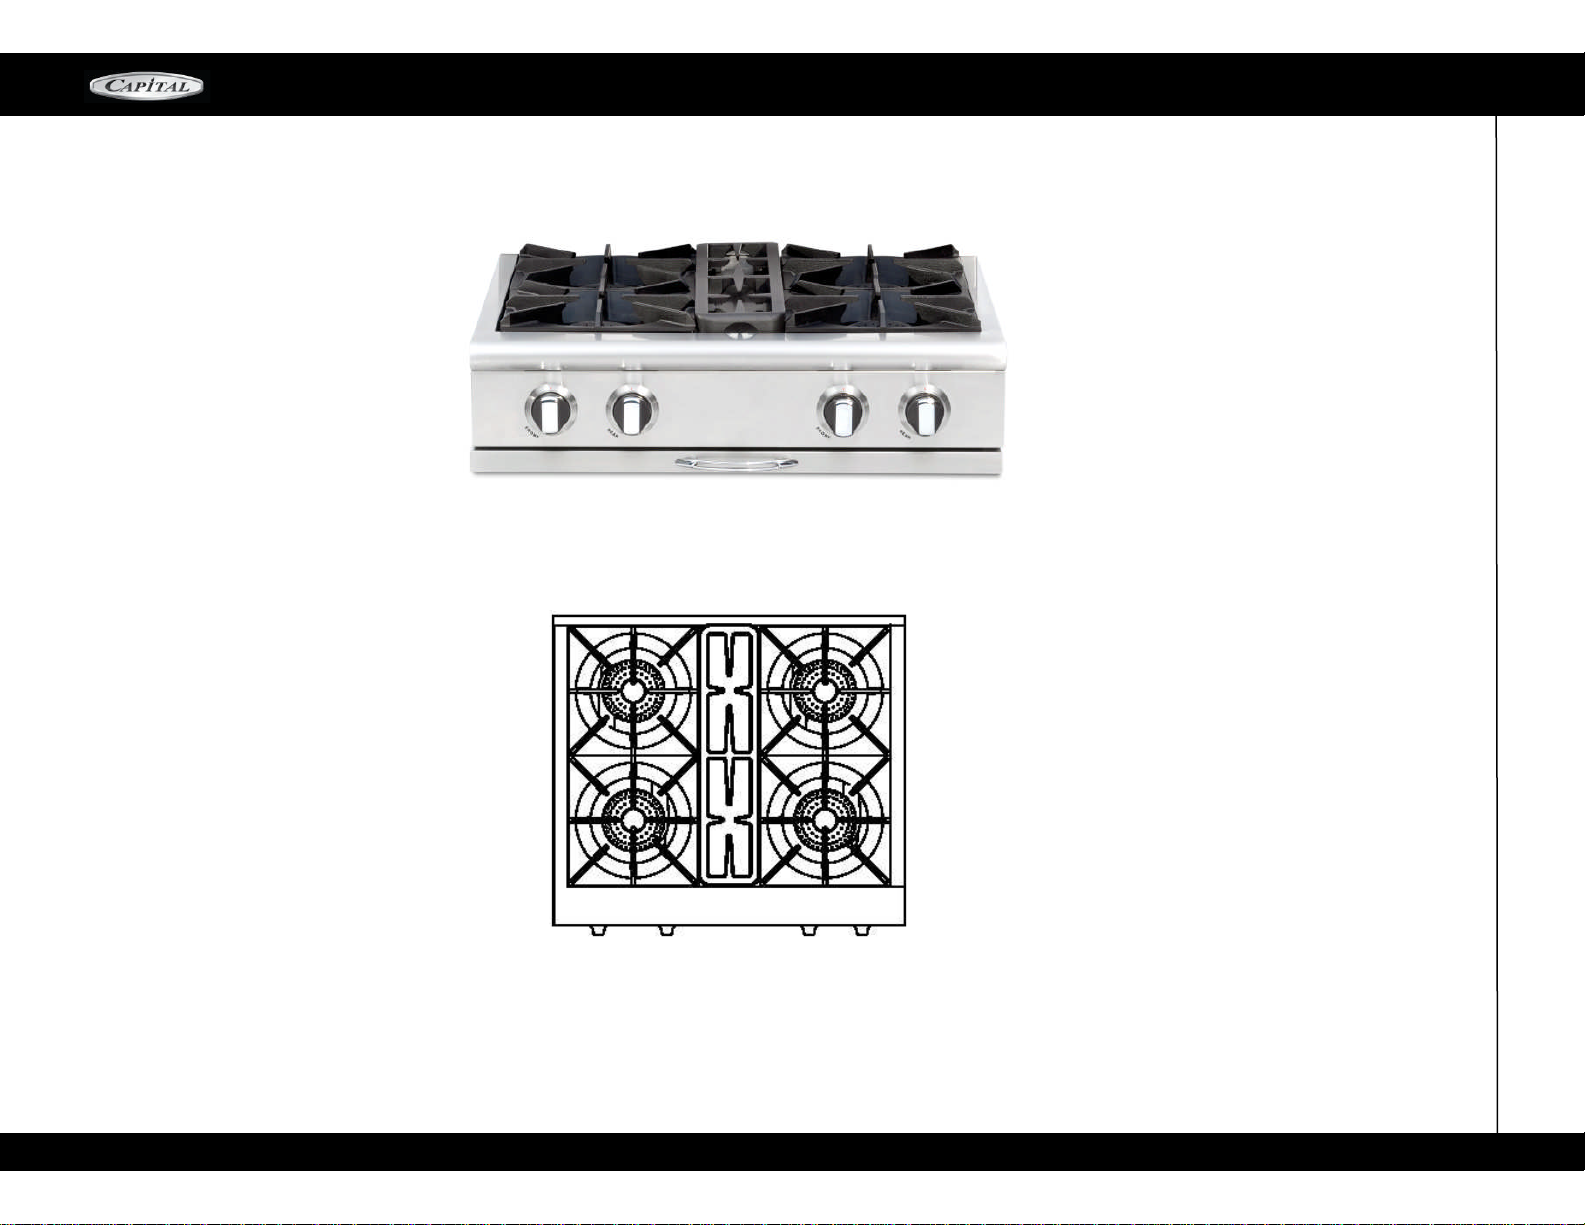
3 0 ” M O D E L S
CGRT304
CGRT304 23K BTU BURNERS
Page 18
CULINARIAN SERIES
18
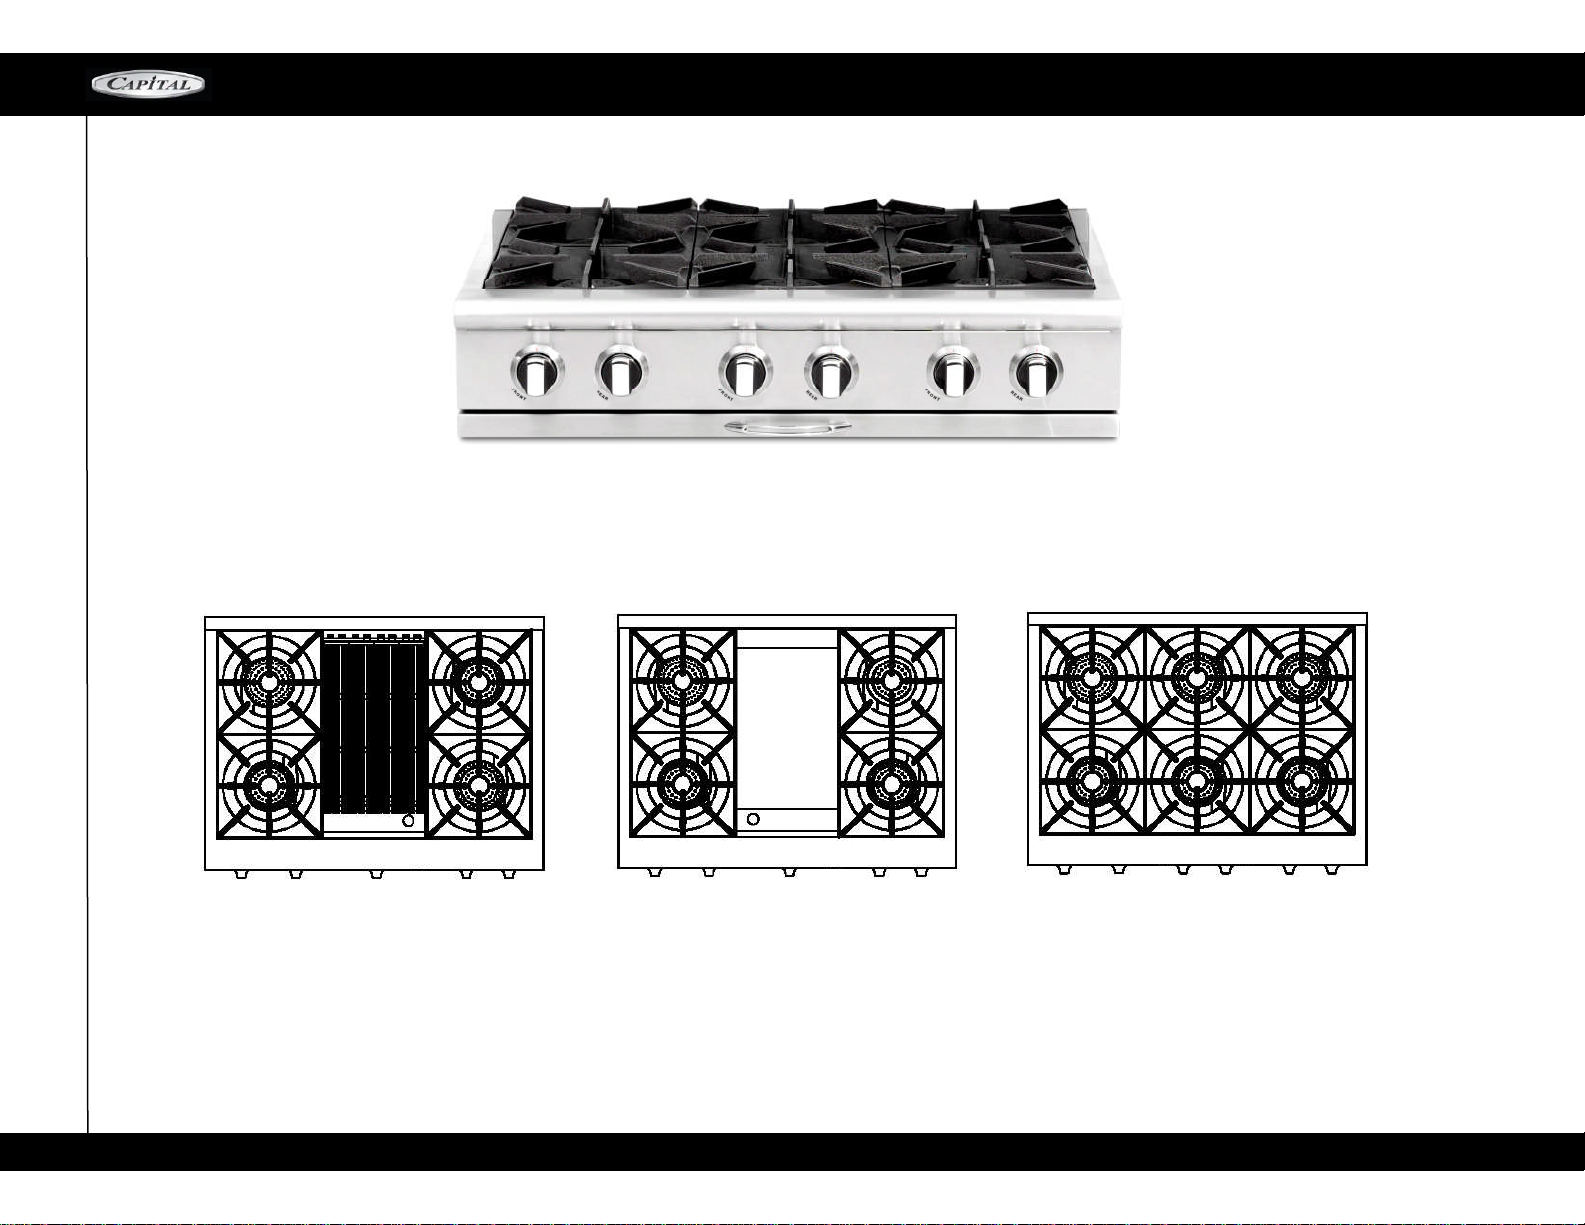
36” MODELS
CGRT366
CGRT362B2
23K BTU BURNERS
+ 12” BBQ Grill
CGRT362G2
23K BTU BURNERS
+ 12” Thermo
-
Griddle
CGRT366
23K BTU BURNERS
Page 19
CULINARIAN SERIES
19
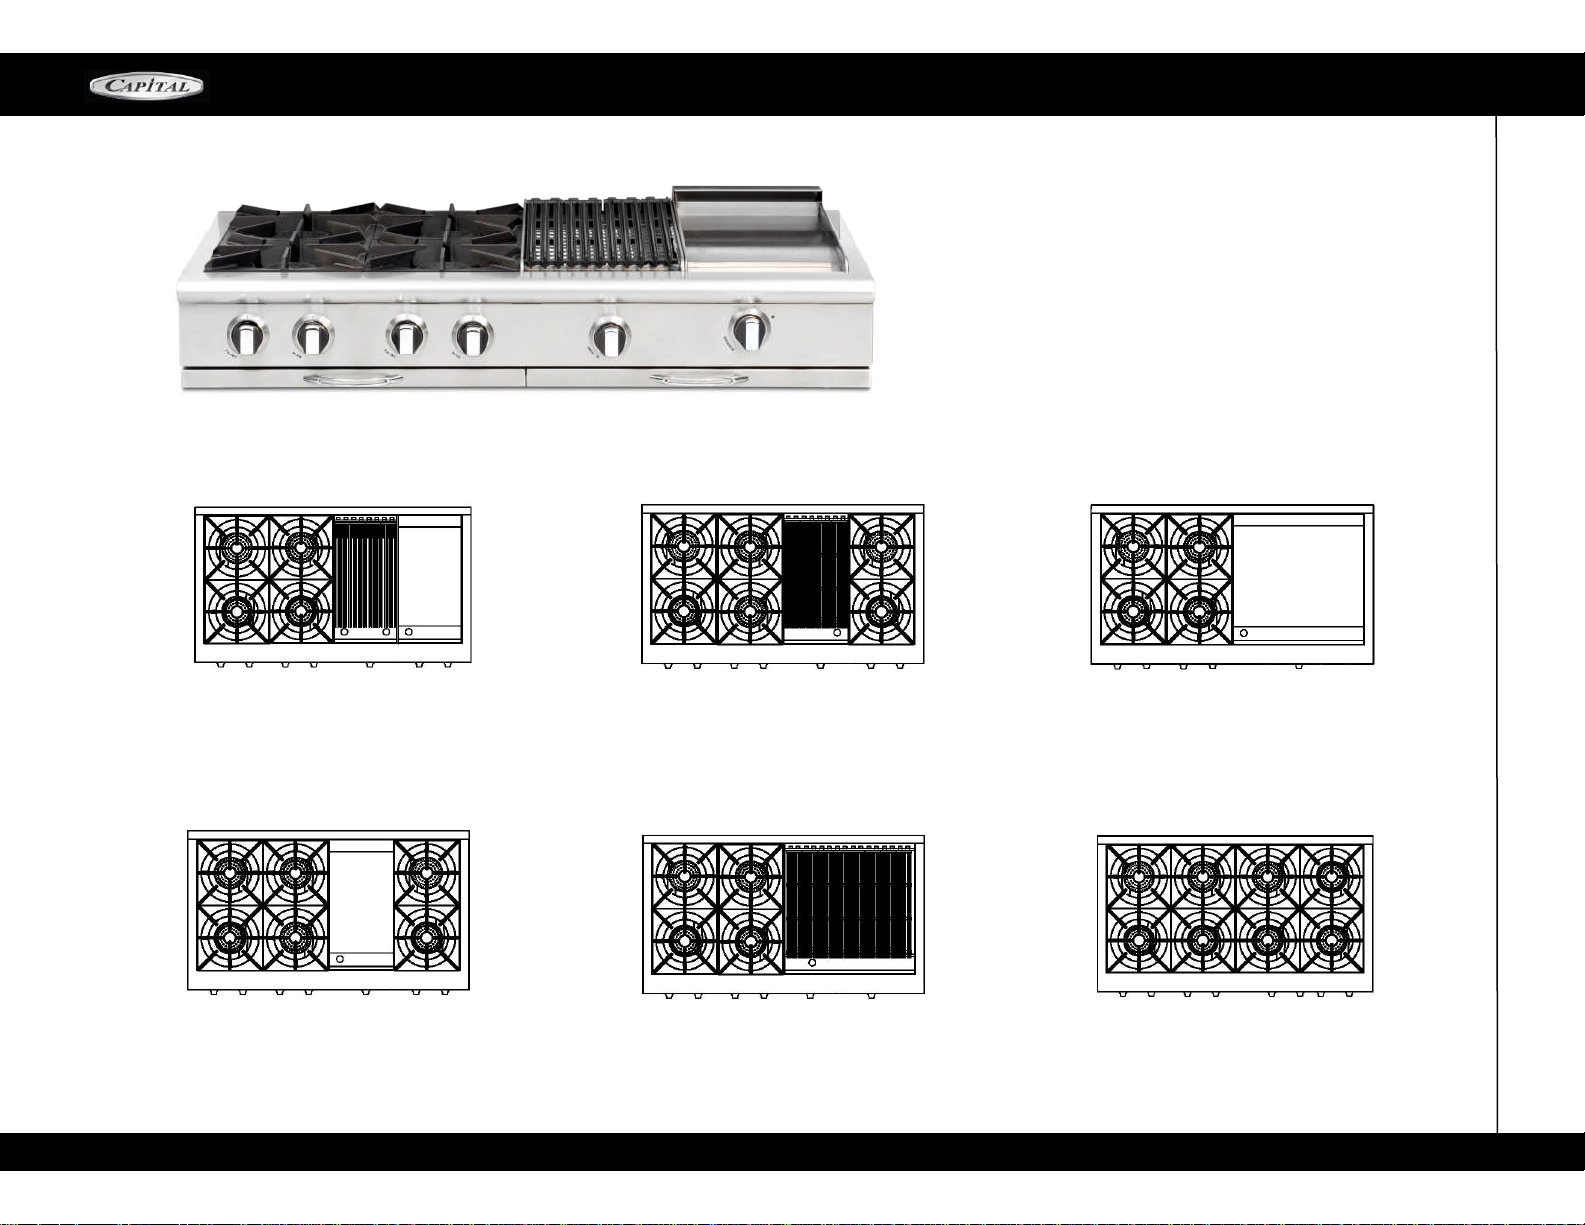
4 8 ” M O D E L S
CGRT484BG
CGRT484G2
23K BTU BURNERS
+ 12” Thermo
-
Griddle
CGRT484B2
23K BTU BURNERS
+ 12”BBQ Grill
CGRT484GG
23K BTU BURNERS
+ 24” Thermo
-
Griddle
CGRT484BG
23K BTU BURNERS
+ 12” Thermo
-
Griddle + BBQ Grill
CGRT484BB
23K BTU BURNERS
+ 24”BBQ Grill
CGRT488
23K BTU BURNERS
Page 20
CULINARIAN SERIES
20
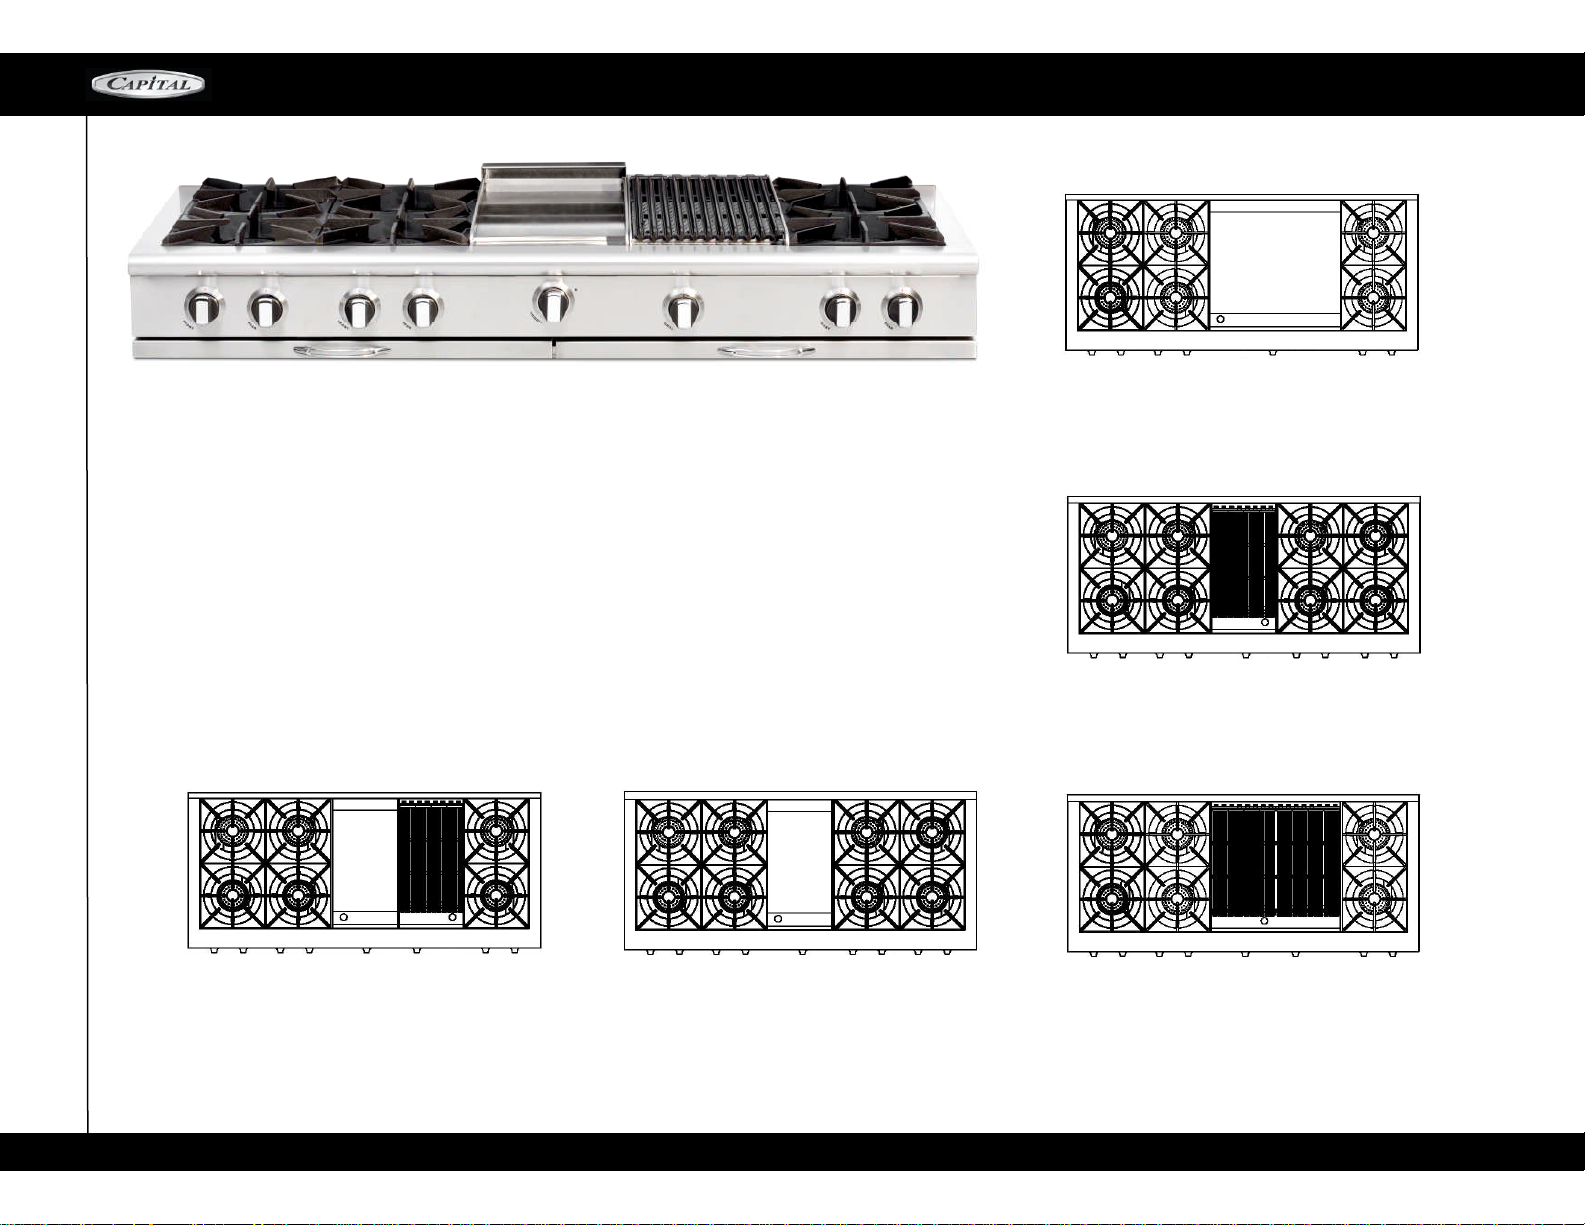
60” MODELS
CGRT604GB2
CGRT60GB2
23K BTU BURNERS
+ 12”Thermo
-
Griddle+12”BBQ Grill
CGRT604GG2
23K BTU BURNERS
+ 24”Thermo
-
Griddle
CGRT604B4
23K BTU BURNERS
+ 12”BBQ Grill
CGRT604BB2
23K BTU BURNERS
+ 24”BBQ Grill
CGRT604G4
23K BTU BURNERS
+ 12”Thermo
-
Griddle
Page 21

CULINARIAN SERIES
21
U N P A C K I N G A N D H A N D L I N G
STEP 1:
PLACING THR RANGE TOP
CAUTION:
Proper equipment and adequate manpower must be used in moving the range
top
avoid persona
l
injury or damage to the unit and other property
.
The range tops have the following approximate shipping weights
30” = 180 pounds
36" = 210 pounds
48" = 280 pounds
60" = 400 pounds
Visual
l
y inspect the unit for concea
l
ed shipping damage or missing parts upon opening the
packaging
. I
f damaged or missing parts are detected, immediate
l
y report it to the dea
ler.
After remova
l
of the packaging materia
l
s, it is recommended that the grates be
removed from the unit to faci
l
itate hand
l
ing and prevent damage
.
This wi
ll
reduce
the weight of the unit by approximate
l
y 10 pounds per grate.
The Range
-
top sho
ul
d be moved as c
l
ose as possib
l
e to its fina
l l
ocation
.
Prior to
unpacking and
l
ifting of the unit, e
l
ectrica
l
and gas connectionsshou
l
d be made based
upon the provided insta
ll
ation instructions (pgs
..23-
24) before the range
-
top is p
l
aced
into its fina
l
position.
Page 22
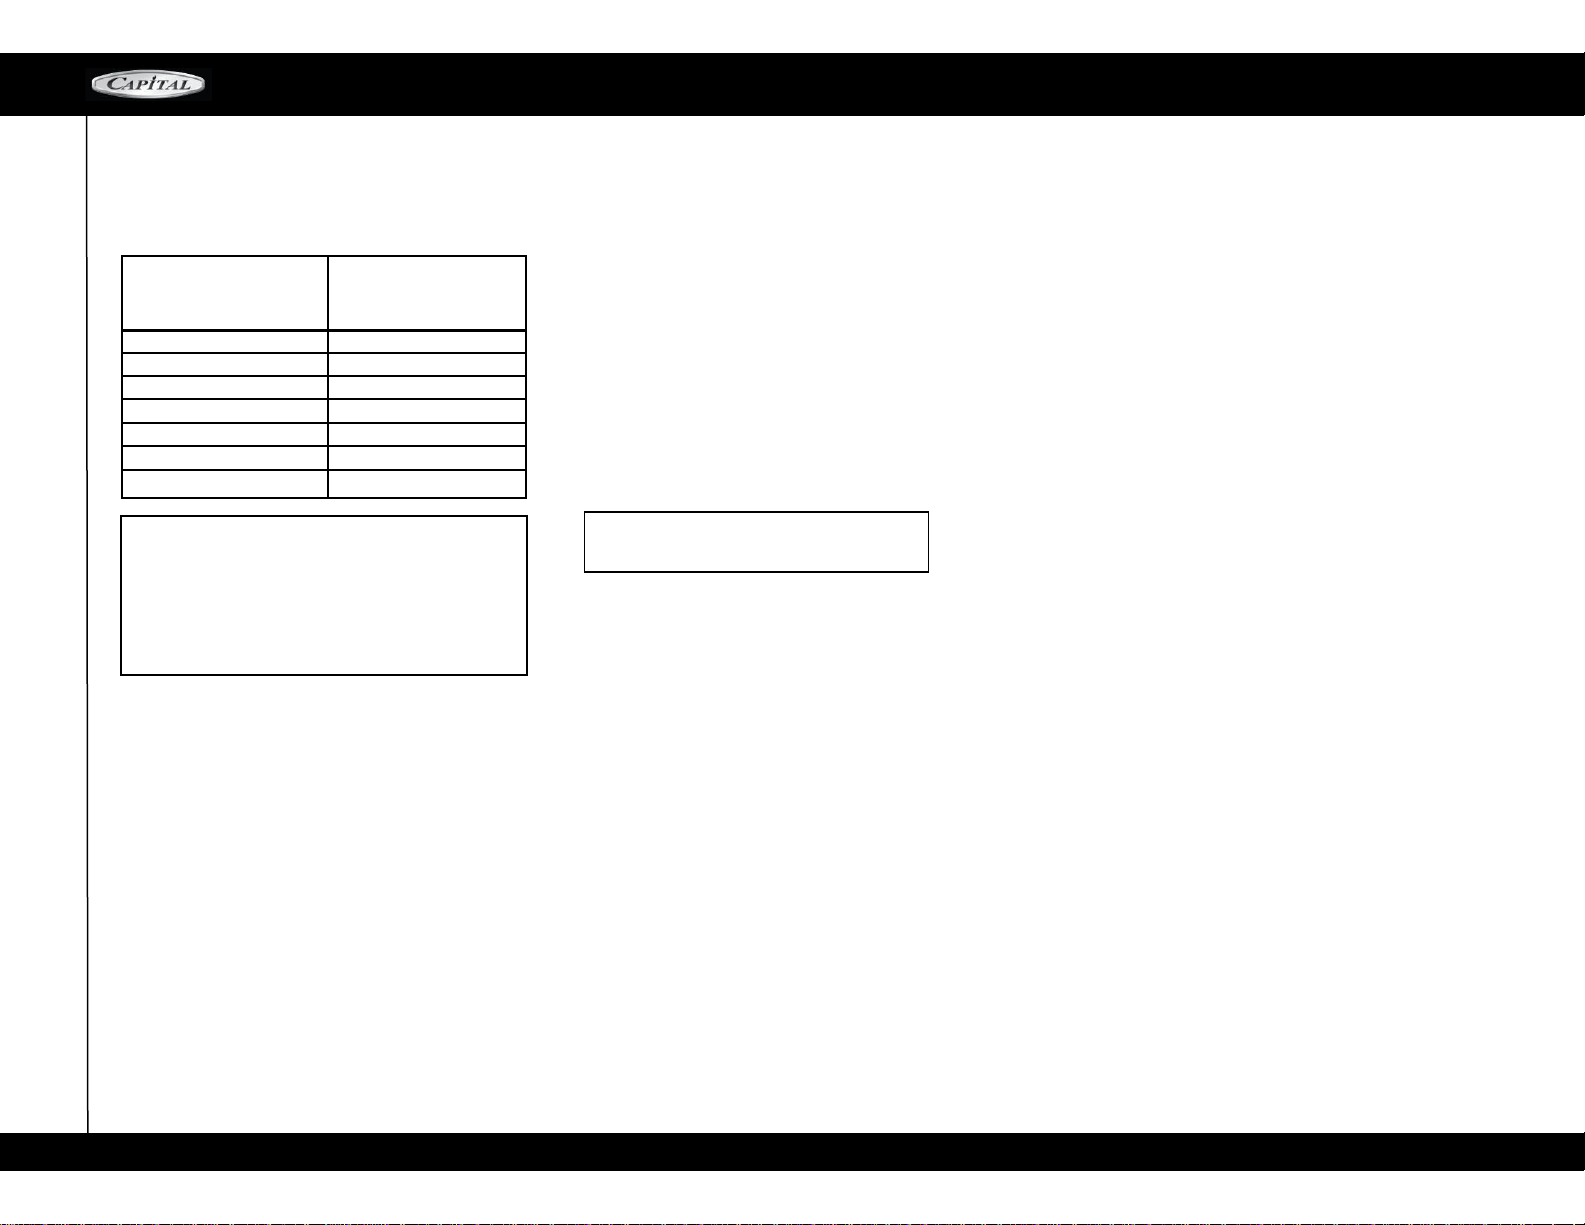
1. SELECT HOOD AND BLOWER MODELS:
CULINARIAN SERIES
22
It is strongly recommended that a suitable CAPITAL
exhaust hood be installed above the range.
Downdraft
ventilation should NOT be used. The
table above
indicates the PERFORMANCE Series
Hoods, by model number, that are recommended
for use with all rangetops.
STEP 2: VENTILATION REQUIREMENTS
For wall installations, the hood width must, at a
minimum, equal the width of the rangetops.
4.
Any openings in the wall behind the rangetop and in the
floor under the rangetop must be sealed.
5.
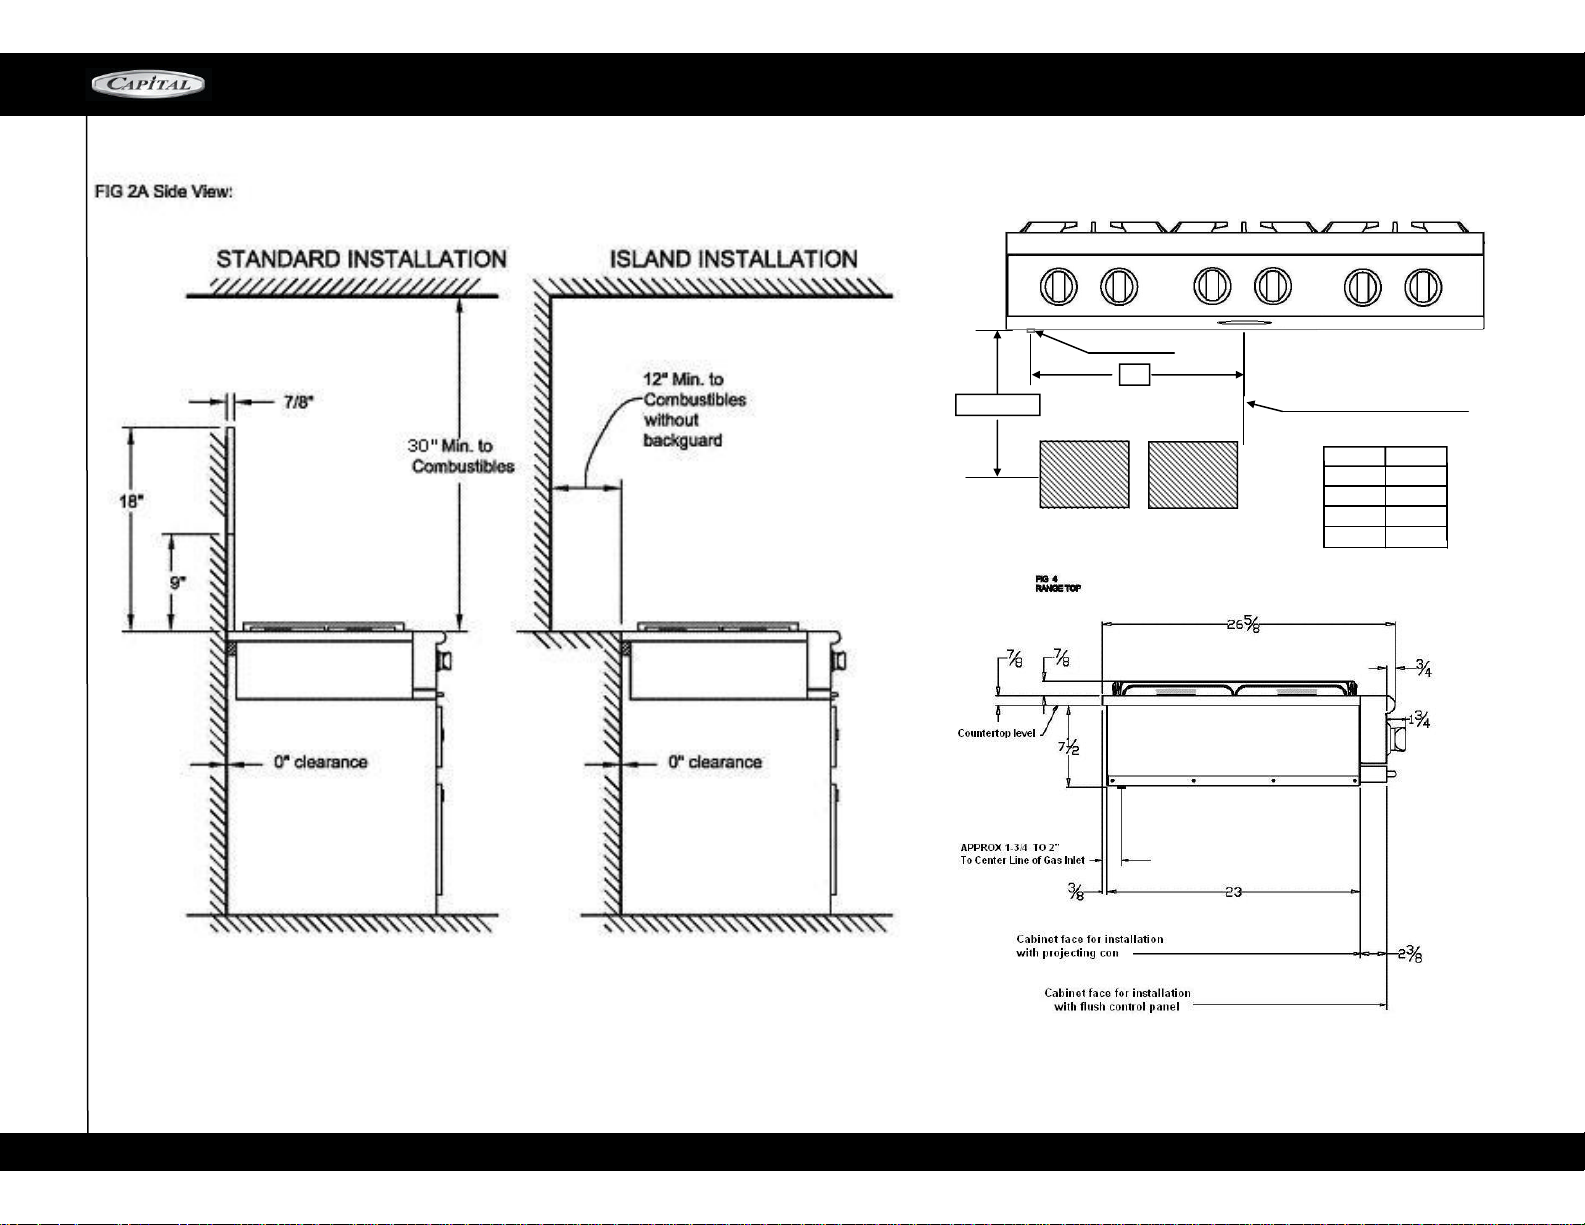
When th ere is less than 12 " horizonta l
clearance between combustible material D and
the back edge of the rangetop above the cooking
surface, a Capital Low Back or High Shelf
back guard must be installed (see Fig. 2A).
When clearance to combustible material D is
over 12", a Capital Island Trim may be used
(See Fig. 2B). Figures 2A and 2B indicate the
space required for each type of back guard.
6.
Always keep appliance area clear and free from
combustible
materials, gasoline, and other
flammable vapors and liquids.
VENTILATION UNIT
PERMORMANCE SERIES
STANDARD COUNTER
INSTALLATION
RECOMMENDATIONS
HOOD
(2 4" D EE P X UNIT WIDTH )
BLOWER CFM's
60" RANGE = 1200 CFM
48" RANGE =1200 CFM
36" RANGE =1200 CFM
30" RANGE = 600 CFM
CAPITAL Hood blower speeds are variable to reduce
noise and loss of heat or air
-
conditioned
household air when maximum ventilation is not
required. Normally the maximum blower speed is
only required when using the grill section.
2. HOOD PLACEMENT:
For best smoke elimination, the lower edge of the
hood should be installed a minimum of 30" to a
maximum of 36" above the rangetop cooking surface.
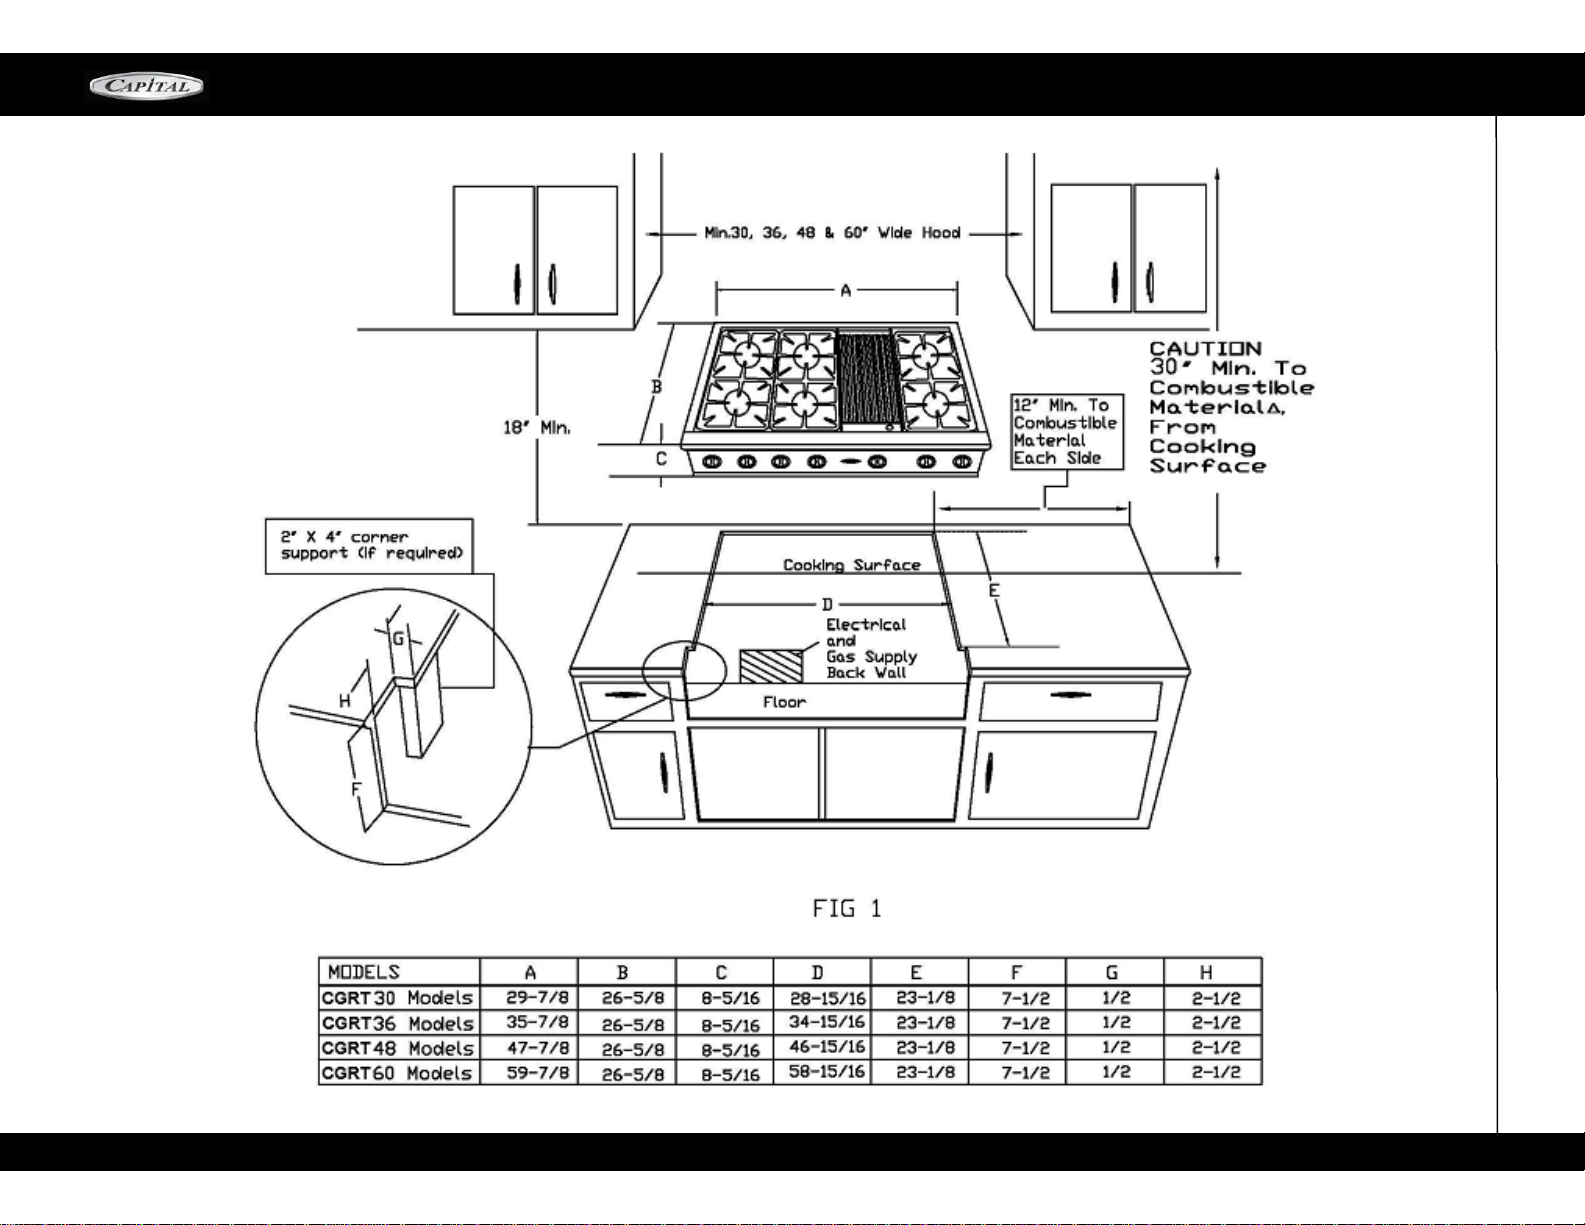
STEP 3: CABINET PREPARATION
If the unit is
to be placed adjacent to cabinets, the
clearances
shown in fig. 1 are required. The same clearances
apply to island installations, except for the
overhead cabinets, which must have a space wide
enough to accept a suitable flared island hood, as
indi-
cated in fig. 1.
Note: Capital does NOT offer
an island style
ventilation hood at this times.
2.
The maximum depth of overhead cabinets
installed on either side of the hood is 13".
3.
A 30-inch minimum clearance is required between
the top of the rangetop and the bottom of
an
unprotected cabinet.
7.
Models with open broiler, noncombustible
material is to be installed on the underside of
a cabinet located above the broiler section or
unit in accordance with local codes, or in the
absence of local codes, with the National
Fuel Gas code, ANSI Z223.1/NFPA.54
WARNING: DO NOT obstruct the flow of
combustion and ventilation air to the unit.
PLEASE NOTE:
In the Commonwealth of Massachusetts, gas
connection must be performed by a licensed
plumber or licensed gas fitter.
VENTILATION REQUIREMENTS
CAUT I O N : Ventila t i o n hoods a n d bl owers a r e
d e si gn ed fo r u s e wi th si n g le wa l l d uct i ng .
However, some local building codes or inspectors
may require double wall du cting. Consult local
bu ild ing c ode s and/or lo cal agencies, b efo re
starting, to assure that hood and duct installation
will meet local requirements.
1.
Page 23
CULINARIAN SERIES
23
C A B I N E T I N S T A L L D R A W I N G F R O N T V I E W
Page 24
CULINARIAN SERIES
24
C A B I N E T I N S T A L L D R A W I N G S I D E V I E W
Electrical
Outlet
A
Model
12” to 20”
CENTER OF THE UNIT.
A
Gas
Supply
Gas Inlet
12-1/415-
1/420-
7/826-
1/2
30”
36”
48”
60”
Page 25
CULINARIAN SERIES
25
INSTALLATION INSTTRUCTIONS
WARNING! The third prong SHOULD
NOT, under
any circumstances, be cut
or removed!
GROUNDING METHOD
The rangetop is factory fitted with a power supply and
cord with a three
-
prong grounding plug. It must be
plugged into a matching grounding type receptacle
co n -
ne c t e d t o a cor r e ct l y p o l ar i z ed 12 0 Vo l t
circuit. If
the circuit does not have a grounding type
receptacle, it is
the responsibility of the installer to
have the existing
receptacle changed to a properly
grounded and polarized
receptacle in accordance
with all applicable local codes
and ordinances. The
receptacle replacement shall be in
accordance with
the national Electrical Code.
CAUTION! Disconnect the electrical supply
cord
from the wall outle t before
servic ing
the rangetop.
Follow all governing codes and
ordinances when
gro u nding . In the absen c e of
cod e s follow th e
Na tion al Elec tric al
Co des
AN SI / N FPA No. 7 0
(current issue).
30" RangeTop
–
120V 15 Amps. Max.
36" RangeTop
–
120V 15Amps. Max.
48" RangeTop
–
120V 15 Amps. Max.
60" RangeTop
–
120V 15 Amps. Max
ELECTRICAL SUPPLY, ALL RANGES
Inst a l l a ti o n o f All Culi n a r i an ran g e t o ps mus t
be
planned so that the rough
-
in of the juncti on
box
for the receptacle or conduit connection allows for
maximum clearance to the rear of the unit.
This is especially critical if the junction box in the
wall i s direc t l y behin d t h e junc tion bo x of th e
unit when the unit is installed. To minimize binding
wh en the un it is con nec ted to th e recepta cle or
junc t i o n box, ori ent the r e c e ptacle or c o n d uit
connector, and slide back into position.
POWER REQUIREMENTS:
120VAC, 60 HZ single phase
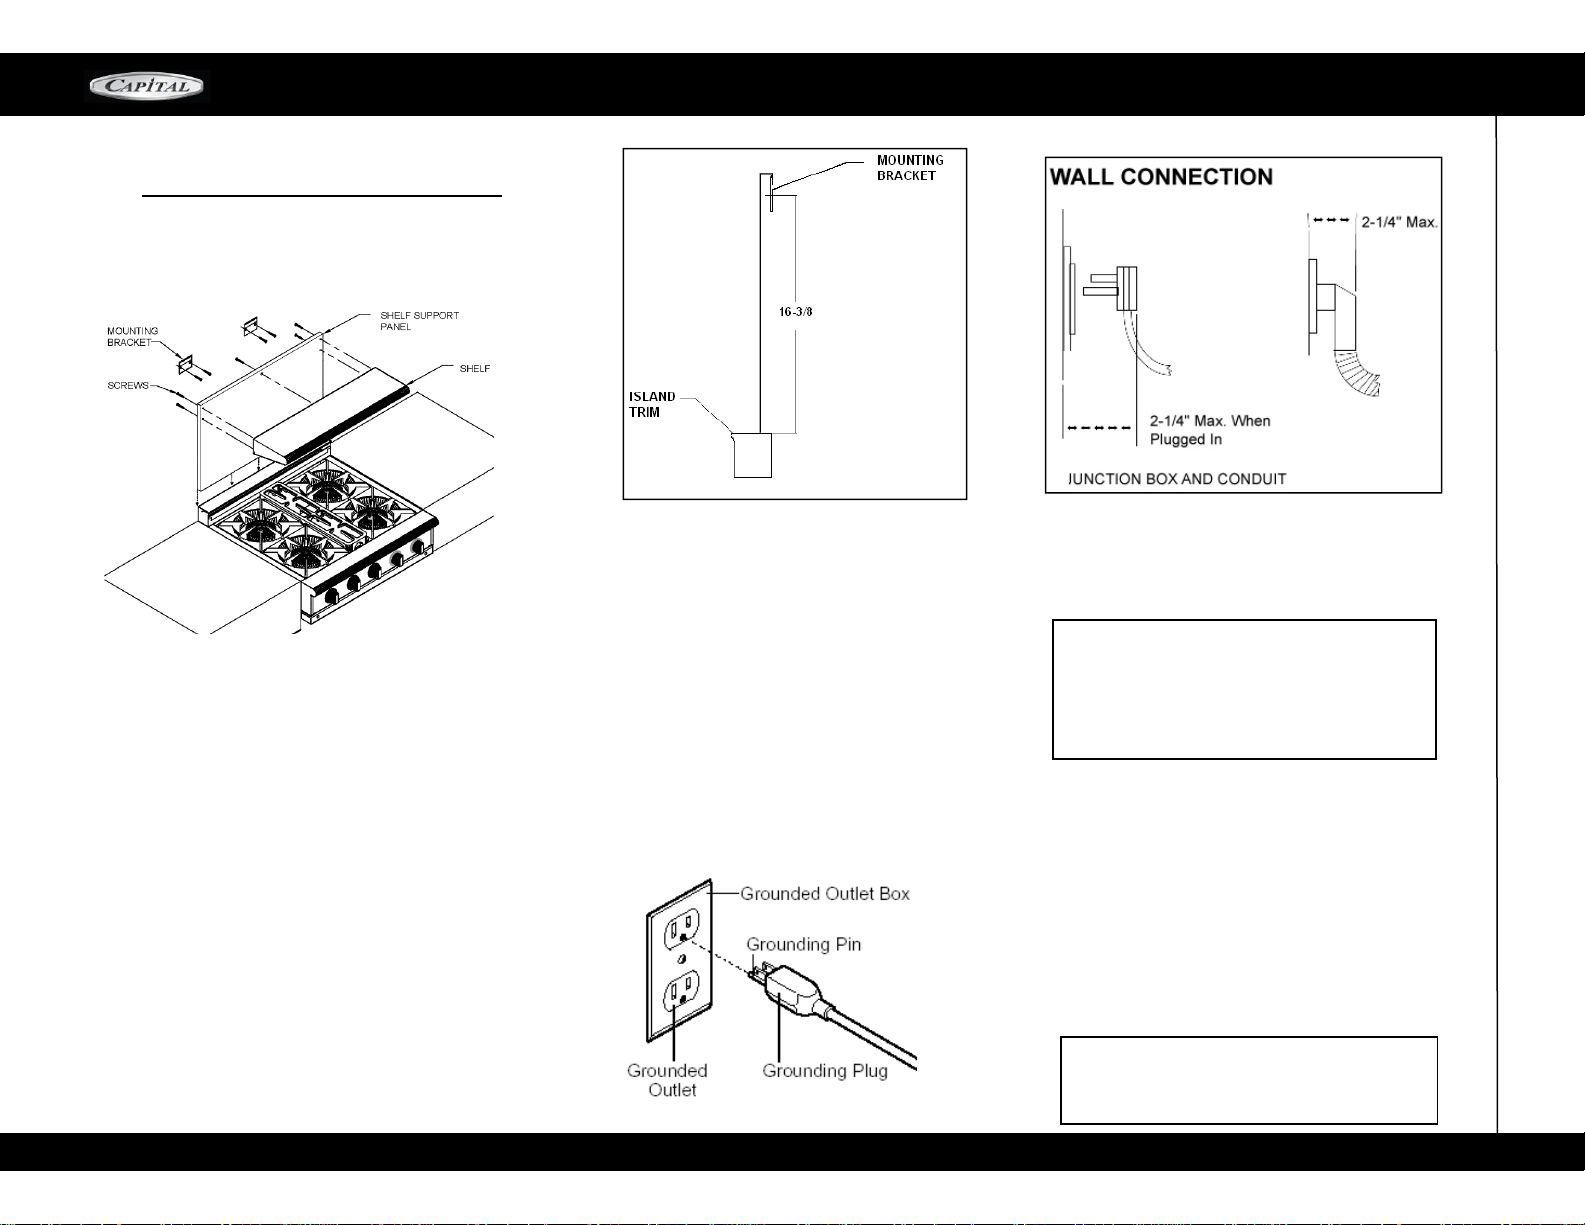
3.
Attach the shelf to the shelf support panels
with supplied screws.
4.
Slide shelf into position and over brackets.
NOTE
WALL MOUNT BACKGUARD INSTALLATION
2.
Se cure bot h b rack ets to the wal l
us ing the
screws included
1.
First measure from top of back trim to 16 3/8"
to what will be the center of the mounting
brackets. (see Fig 1)
Page 26
CULINARIAN SERIES
26
CAUTION!
When connecting unit to Propane (LP)
gas. Make certain the propane tank is equipped
with its own
high-pressure regulator in addition to
the
pressure regulator supplied with the appliance t
he
pressure & the gas
supplied
to the appliance
regulator
must not, exceed 14"
(
37 mb) water
column. A
pressure test point is provided near
the regulator
behind the kick plate
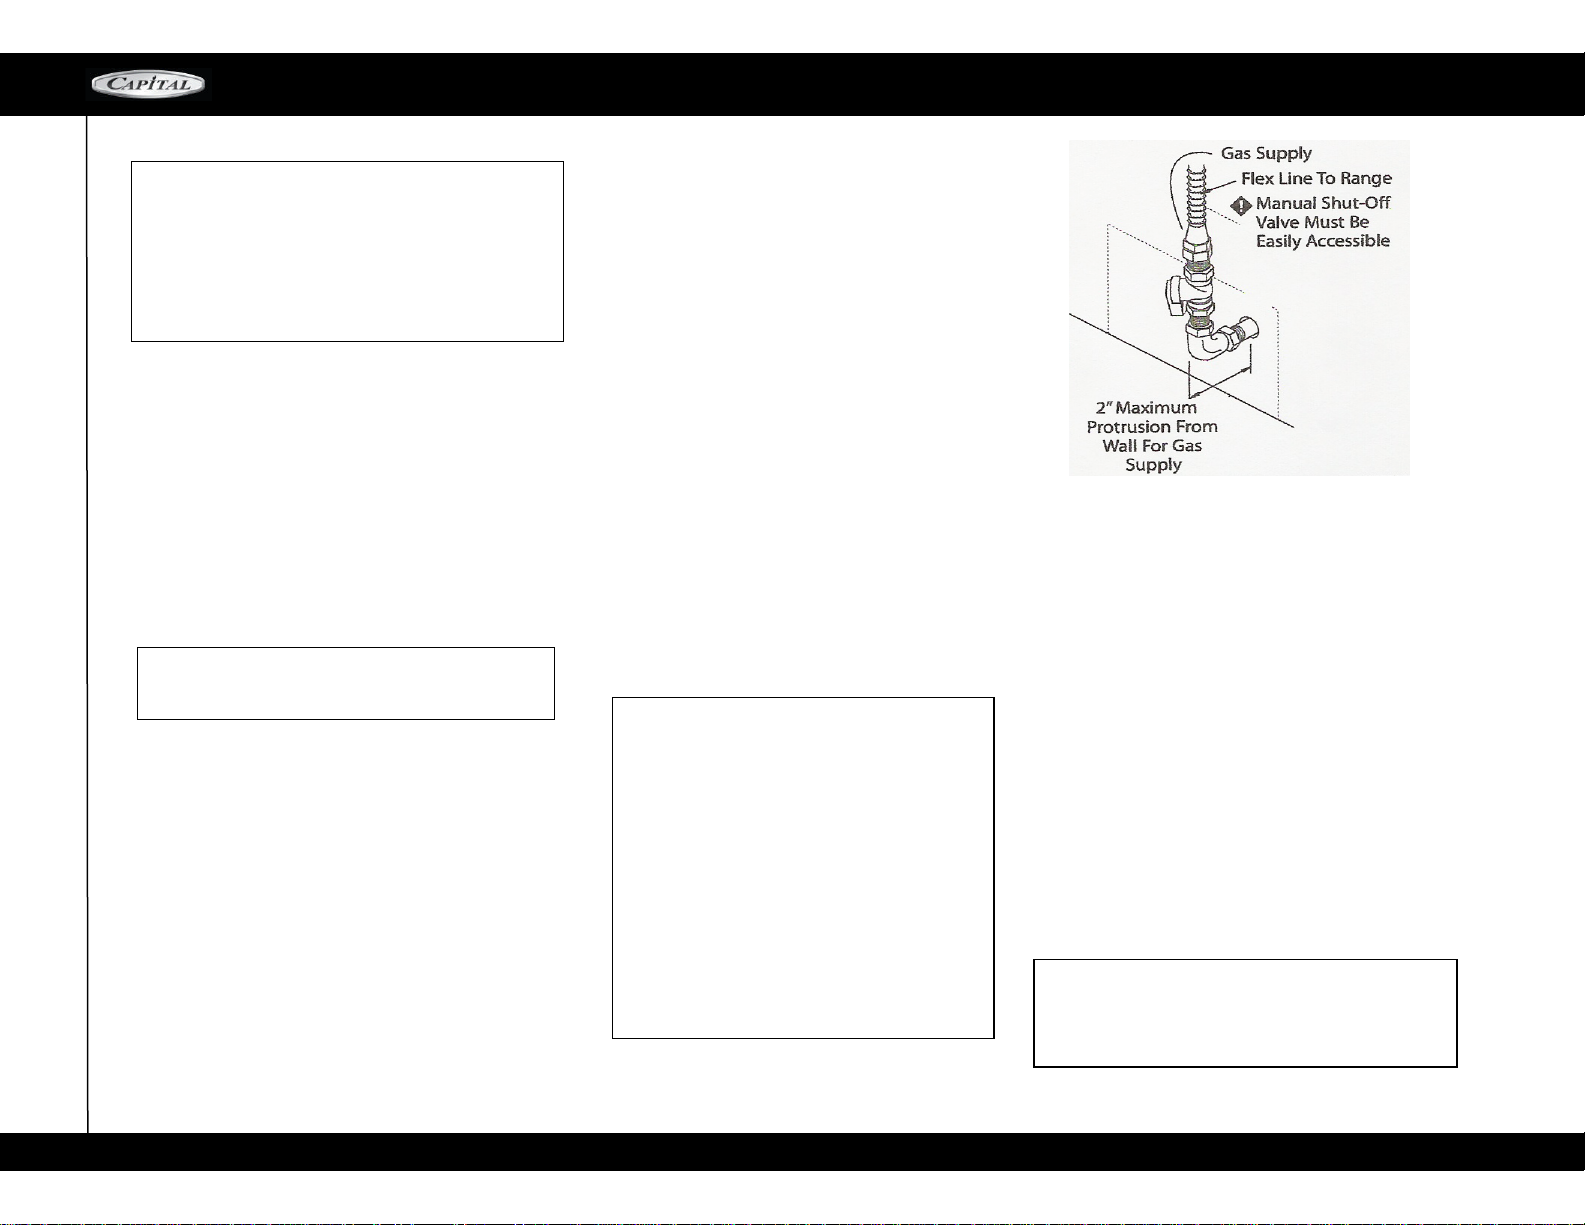
A manual shut off valve must be installed external
to
therangetop in an accessible locationfromthe front
for
shutting off the gas supply when required.
The supply line MUST NOT protrude beyond the
back of the rangetop.
Ensure that the gas supply is turned OFF at the
externalshut
-
offvalvebeforeconnectingthe range.
The
gas
supply connection must be made by an
experienced technician and in accordance with
local
codes or ordinances. In the absence of local
codes
or ordinances, please refer to National Fuel
Gas
Code ANSI Z223.1 / NFPA54
-
Current Issue.
Use 5/8" diameter flex line to connect between the
gas supply and the appliance manifold pipe, which
exists at the upper left rear of the appliance. The
appliance manifold pipe connection is 1/2". Use
caution to avoid crimping the 5/8" flex line.
NOTE: the flex line for the gas supply must be
metal and approved by an approved certifying
agency (AGA, CGA, CSA, UL or CUL). NEVER use
a hose made of rubber or other synthetic material
as the heat may cause the hose to melt and de-
velop leaks, thus causing fires, physical and prop-
erty damage.
Always use pipe dope or Teflon tape on the pipe
threads, and be careful not to apply excessive pres-
sure when tightening the fittings.
Leak testing of the appliance shall be in accor-
dance with the manufacturer's instructions.
Turn on gas and check supply line connections for
leaks using a soap solution.
Never use a flame of
any sort to test for leaks.
CAUTION! The appliance must be isolated from the
gas supply piping system by closing its individual
manual shut
-
off valve during any pressure testing
of the gas supply piping system at test pressures
equal to or less than 1/2 psig (3.5kPa.).
The Appliance and its individual shut off valve
must be disconnected from the gas supply piping
system during any pressure testing of the system
at test pressures in excess of 1/2 psig (3.5kPa.).
When checking the manifold gas pressure, the inlet
pressure to the regulator should be at least 6.0".
DO NOT attempt any adjustment of the pres-
sure regulator.
TESTING AND ADJUSTMENTS
Install any loose components, such as burner caps
and
grates that may have been removed
earlier to facilitate
moving the appliance. Be certain
that burner caps seat
properly
into the alignment slots in the burner bases.
Before
testing operation of the appliance, verify that the
unit
and the gas supply have been carefully checked
for leaks and that the unit has been connected to the
electrical power supply. Turn the manual gas shut
-
off
valve to the open position. Check the
operation of the
open gas burners by pushing
and turning each
knob counterclockwise to "Hl".
The burner igniters will
click until the flame ignites.
Burner flames should be
BLUE and stable with
no yellow tips, excessive
noise, or lifting of the
flame from the burner. If any of
these conditions exist, check that the air shutter or
burner ports are not blocked or clogged.
Remove any
blockages that exist. If the flame is too
yellow, indicating
insufficient air, adjust the shutter
counterclockwise to
increase air inlet.
CAUTION! A qualified technician must make
burner adjustments at the time of installation.
Improper or lack of adjustments may cause harmful
by-products and void your warranty!
WARNING! Gas line cannot be run inside back
cover of rangetop. Run gas line in channel in
back
of rangetop.
HOOK UP
The open top burner flames should be approximately
1/2"to 3/4" High.
NATURAL GAS REQUIREMENTS:
PROPANE (LP) GAS REQUIREMENTS:
Inlet Connection: 1/2" N.P.T.
Min. 5/8" Dia. Flex Line.
Supply Pressure: 6" to 14" W.C.
Inlet Connection: 1/2" N.P.T.
Min. 5/8" Dia, Flex Line.
Supply Pressure: 11" to 14" W.C.
A Regulator is required at the LP source to provide
a maximum of 14" W.C. pressure to the rangetop
regulator.
GAS HOOK
-
UP / TESTING AND ADJUSTMENTS
Page 27

CULINARIAN SERIES
27
ELECTRICAL
INSTALLER CHECKLIST
FINAL CHECKLIST
GAS SUPPLY
Connection: 1/2" NPT with a minimum of 5/8" diameter flex line
The appliance is connected only to the type of gas for which it is certified for
useManual gas shut
-
off valve installed in an accessible location (without requiring
removal of range)
Unit tested and free of gas leaks
Gas supply pressure does not exceed 14" (37 mb) W.C.
Open burner flames are adjusted according to instructions
No gas leaks found
Placement of unit
Specified clearances maintained to cabinet surfaces
Unit Level
–
front to back
–
side to side
Burnercaps positioned properly on
burner bases
All packing materials removed
Back guard attached ( required if
clearance to combus-
tible materials behind
cooking surface is less than 12")
Note to Customer.
Pleasemakesureinstaller signseach itemon this
checklist,explains eachitem before leavingand
ex-
plains the rangetop operation
to you thoroughly.
OPERATION
Receptacle is rated at recommended current capacity
Proper ground connection
Proper polarity at receptacle
All internal packing materials removed. Check below grates
and grill pans
If used on Propane gas, verify that the propane gas supply is
equipped with its own high
-
pressure regulator in addition to
the pressure regulator supplied with appliance.
Burner caps are properly seated into burner bases.
Grill Components properly seated (not all models).
Bezels centered on burner knobs and knobs turn freely.
Each burner lights satisfactorily, both individually and with
other burners operating
Air shutter adjustment for proper flame made for
Griddle is level and does not rock.
Burner grates correctly positioned, level and do not rock.
POST
-
INSTALL CHECK
Page 28

CULINARIAN SERIES
28
Replacement of parts will be freight prepaid by
Capital and shipped regular ground. Any requests
for other than standard ground shipments must
be paid by customer. The company will not be
liable for additional transportation costs, labor
cost, taxes or export/import duties. This warranty
shall not apply, nor can we assume responsibility
for damage that might result from failure to follow
manufacturer's instructions or local codes where
the appliance has been tempered with or altered
in any way or which, in our judgment, has been
subjected to misuse, negligence, or accident.
Implied warranty shall not extend beyond the
dura-
tion of this written warranty. This warranty is
in
lieu of all warranties, expressed or implied and all
other obligations or liability in connection with the
sale of this product.
WILL PAY FOR:
WILL NOT PAY FOR:
SERVICE & WARRANTY
SERVICE INFORMATION
If none of the above has occurred, contact our
customer service department at 1
-
866-402-4600.
Beforeyou call for service,pleasehavethefollowing
information available:
Model #
Serial #
Date of Installation
Copy of Receipt or Invoice
A brief description of the problem
Your satisfaction is our top priority If the problem
persists, or is not resolved to your satisfaction by
our service consultant,please write to us or fax us
a letter at:
All repair labor and parts found to be defective due
to material or workmanshipfor one (1) full year" IN
HOME" warranty This does not apply if the unit
was subjectedto other than normalhousehold use.
An Authorized Factory Agent must provide service
during normal working hours. No charges will be
made for repair or replacement at the location of
original installation. No charges will be made for
defective factory parts returned pre
-
paid, through
the dealer, and claimed within the warranty period.
All claims, regardless of warranty or non
-
warranty
must be documented with photos and detailed
description and/or narrative of the problem and
submitted to Capital's service department.
Installation or start
-
up.
Shipping damage that is not a direct result of packaging
(for example freight handling).
Service by an unauthorized agency
Use of unauthorized parts.
Serviceduringhoursotherthannormalworkinghours.
Improper installation.
Servicevisittoteachyouhowtooperatetheappliance,
correct
the installation, reset circuit breakers or replace fuses.
Repair other than normal household use.
Damage caused by accident, abuse, alteration, misuse,
incorrect installation or installation not in accordance
with local codes.
Unit(s) installed in non
-
residential applications.
Capital Cooking Equipment, Inc.
Attn: Customer Service Manager
13211 E. Florence Ave
Santa Fe Springs, CA
90670
USA
Fax #: 562
-
903-1167
Email: customerservice@capital
-
cook!ng.com
This warranty applies to appliances used In
residential application only. It does not cover their
use in commercial situations. This warranty is for
productspurchasedand retainedin the 50 States of
theU.S.A,the DistrictofColumbiaand Canada.This
warranty appliesevenIf you shouldmoveduringthe
warranty period. Should the original purchaser sell
the appliance during the warranty period, the new
ownercontinues to be protected until the expiration
dateof the originalpurchaser's warrantyperiod.This
warrantygivesyouthespecificlegal rights.Youmay
also
have other rights, which vary from State to
State.
ONE (1) Year full parts and labor covers entire product.
(Light bulbs covered for 60 days after installation)
FIVE (5) Years limited part replacement warranty. Covers
part replacement, as noted below, due to malfunction
during normal operation.
Ranges*, Range Tops*, & Ovens*: All Burners, Heating
Elements, Grates*, Griddle Plates, & Oven Racks
Barbeques: Gas Valves & all burners (excluding infrared
burners)
*Excludes Porcelain Enamel Coating for ovens and
grates. Porcelain enamel is prone to wear over time and
use.
LIFETIME warranty (non
-
transferable) on stainless steel
sheet metal body parts against rust. (Excludes damage
and normal heat discoloration). Does not include barbe-
que grates.
WARRANTY:
Page 29
ALLSPEC
IFI
CATIONSAREFORPLANN
I
NGPURPOSESONLY
.
REFERTO
I
NSTALLAT
IONI
NSTRUCT
I
ONS
ANDCONSULTYOURCOUNTERTOPSUPPL
I
ERPR
I
ORTOMAK
I
NGCOUNTEROPEN
ING.I
FYOUHAVE
ANYQUEST
I
ONS,PLEASECALLUSAT866
-
402-4600PR
I
ORTOCUTT
I
NGANYOPEN
I
NGS.CONSULT
WITHAHEAT
I
NGANDVENT
I
LATINGENG
I
NEERFORYOURSPEC
IFI
CVENT
I
LATIONREQU
I
REMENTS
.
FORTHEMOSTUPTODATEUSEANDCAREAND
I
NSTALLAT
IONI
NSTRUCT
I
ONSCONTACT
CAPITALCOOK
I
NGEQU
I
PMENT,
INC.INDI
CATINGTHEMODEL#
.
DUETOONGO
I
NGPRODUCT
I
MPROVEMENTS,WERESERVETHER
I
GHT
TOCHANGETHESESPEC
IFI
CATIONS,ORDES
I
GNSW
I
THOUTNOT
ICE.
13211E ForenceAve
.
SantaFeSprings,CA 90670
TollFree:866
-
402-4600
Main:562
-
903-1168
Fax:562
-
903-1167
Email:customerservice@capita
l-cooking
.
com
Website:
www.capital-
cooking
.
com
CERTIFIED FOR USA AND CANADA
87029
-
03
 Loading...