

capello CR2W User Manual

CR2W user guide
S.A.M.E. Technology
local weather emergency information
NOAA Weather Channels
weather band plus all hazards alerts
Safe & Sound
Weather Alert Clock Radio
FCC WARNING: Changes or modications to this equipment may cause harmful interference unless the modications
are expressly approved in the instruction manual. The user could lose the authority to operate this equipment if an
unauthorized change or modication is made.
CAUTION: TO REDUCE THE RISK OF ELECTRIC SHOCK, DO NOT REMOVE COVER (OR BACK).
NO USER-SERVICEABLE PARTS INSIDE. REFER SERVICING TO QUALIFIED SERVICE PERSONNEL.
The Rating Label is located at the bottom enclosure of the unit.
CAUTION
RISK OF ELECTRIC SHOCK
DO NOT OPEN
DANGEROUS VOLTAGE: The lightning ash with arrowhead symbol, within an equilateral triangle
is intended to alert the user to the presence of uninsulated dangerous voltage within the product’s
enclosure that may be of sufcient magnitude to constitute a risk of electric shock to persons.
ATTENTION: The exclamation point within an equilateral triangle is intended to alert the user to
the presence of important operating and maintenance (servicing) instructions in the literature
accompanying the appliance.
WARNING: TO PREVENT FIRE OR SHOCK HAZARD, DO NOT EXPOSE THIS UNIT TO RAIN OR MOISTURE.

NOTE: This equipment has been tested and found to comply with the limits for a Class B digital device, pursuant to part 15
of the FCC Rules. These limits are designed to provide reasonable protection against harmful interference in a residential
installation. This equipment generates, uses and can radiate radio frequency energy and, if not installed and used in
accordance with the instructions, may cause harmful interference to radio communications. However, there is no guarantee
that interference will not occur in a particular installation. If this equipment does cause harmful interference to radio or
television reception, which can be determined by turning the equipment off and on, the user is encouraged to try to correct
the interference by one or more of the following measures:
• Reorient or relocate the receiving antenna.
• Increase the separation between the equipment and receiver.
• Connect the equipment into an outlet on a circuit different from that to which the receiver is connected.
• Consult the dealer or an experienced radio/TV technician for help.
FCC STATEMENT: This device complies with Part 15 of the FCC Rules. Operation is subject to the following two
conditions: (1) this device may not cause harmful interference, and (2) this device must accept any interference received,
including interference that may cause undesired operation.
SURGE PROTECTORS: It is recommended to use a surge protector for AC connection. Lightning and power surges ARE
NOT covered under warranty for this product.
AC/DC adapter connection
Connect the AC adapter (included) to an AC outlet having 120V, 60Hz AC only. Plug the small end into the DC jack on the rear of
the unit. DC 7V
caution: Do not touch the AC/DC adapter with wet hands. Fully insert the plug without exposing any part of the blade.
inside the box
Capello CR2W Safe & Sound Weather Alert Clock Radio, AC/DC Power Adapter, User Manual and Quick Start Guide.
Congratulations on your purchase of the Capello CR2W Safe & Sound Weather Alert Clock Radio. Protect yourself
and your family or business from all hazards alerts for severe weather, natural disasters, civil emergencies and so
much more! Customize the alerts for your geographic location using S.A.M.E technology (Specic Area Message
Encoding) by programming your radio to receive alerts relevant to your area. You can eliminate unwanted broadcasts
of specic events and receive only what matters to you - 24 hours a day, 7 days a week. Stay informed of imminent
dangers; be prepared for local hazards and emergencies. Your Capello CR2W is Public Alert
™
certied, meeting the
standards of the Consumer Electronics Association for quality and reliability.
getting to know your
all hazards weather alert radio
For a step-by-step video describing this section, scan the QR code with your smartphone app
or visit www.hellocapello.com/weather-radio-video/#1
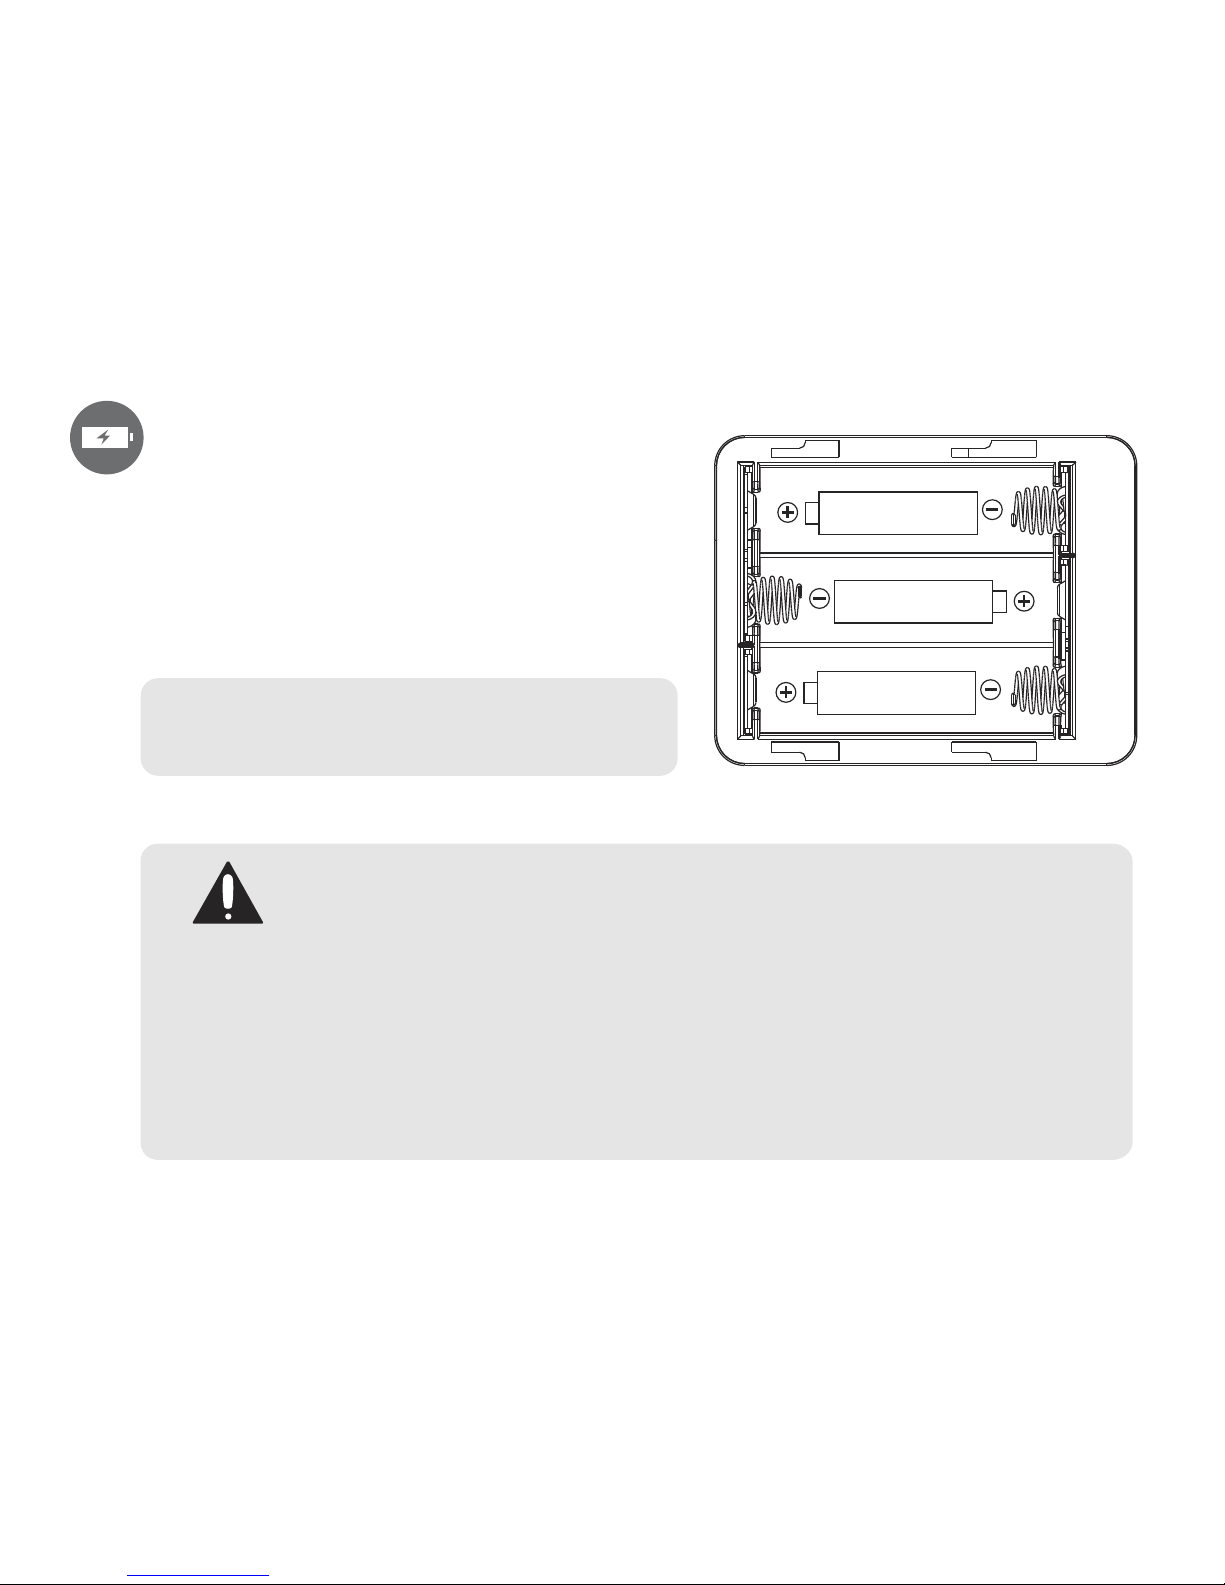
inserting the batteries
Three (3) ‘AA’ size batteries can also be used to power the unit,
as well as back-up for the clock, alarm time, preset memories if
the AC adapter is disconnected or there is a power failure.
Open the battery door by sliding it back and lifting up the edge.
Insert three (3) ‘A A’ batteries as shown. Alkaline batteries are
recommended for the longest playing time.
Replace the battery door back on the compartment.
notes: Battery life (alkaline battery):
Battery backup operating time: up to 100 hours
Battery audio-on operating time: up to 8 hours
battery precautions:
Follow these precautions when using batteries in this device:
Warning - Danger of explosion if batteries are incorrectly replaced. Replace only with the same or equivalent type.
Use only the size and type of batteries specied.
Be sure to follow the correct polarity when installing the batteries as indicated. A reversed battery may cause damage to the device.
Do not mix different types of batteries together
(e.g. Alkaline, Rechargeable and Carbon-zinc) or old batteries with fresh ones.
If the device is not to be used for a long period of time, remove the batteries to prevent damage or injury from possible
battery leakage.
Do not try to recharge a battery not intended to be recharged - it can overheat and rupture.
(Follow battery manufacturer’s directions)
Size ‘AA’ 1.5V
Size ‘AA’ 1.5V
Size ‘AA’ 1.5V

2 3 4 51 7
location of controls
VOLUME DOWN – Button
MENU Button
VOLUME UP + Button
LCD Display
Antenna
LEFT Button
UP Button
RIGHT Button
ON / OFF Switch (side of unit)
PRESET Button
BAND Button
RADIO / SNOOZE Button
WARNING LED (Red)
WATCH LED (Orange)
ADVISORY LED (Yellow)
DOWN Button
SELECT Button
86
10
9
1615 1714131211
BAND
PRESET
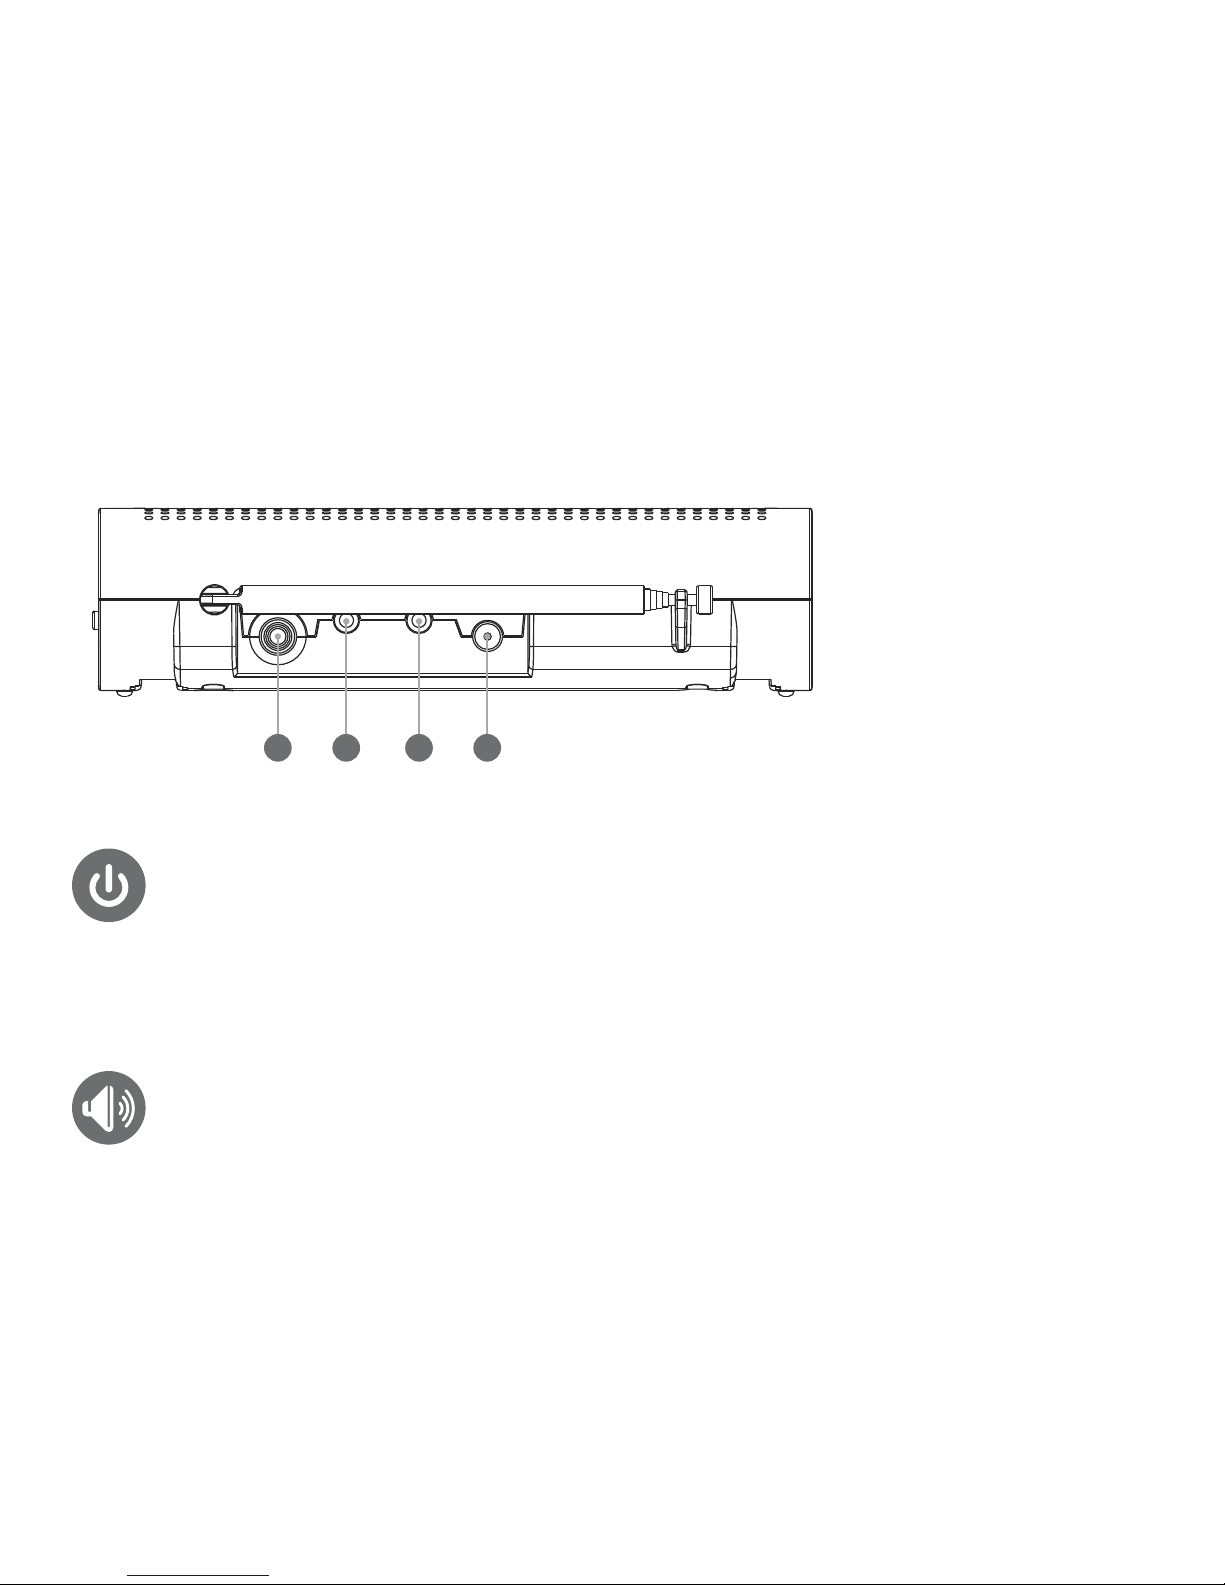
External Antenna jack
Alert Jack
Cloning Jack
DC Power Jack
adjusting the volume
Press VOLUME UP + or VOLUME DOWN – button to increase or decrease the volume.
turning the unit on
Refer to location of controls diagrams before operation.
To turn the unit on, slide the ON / OFF switch, located on the side of the unit, to the ‘ON’ position.
To turn the unit off, slide the switch to the ‘OFF’ position.
location of controls (con’t.)
18 2119 20
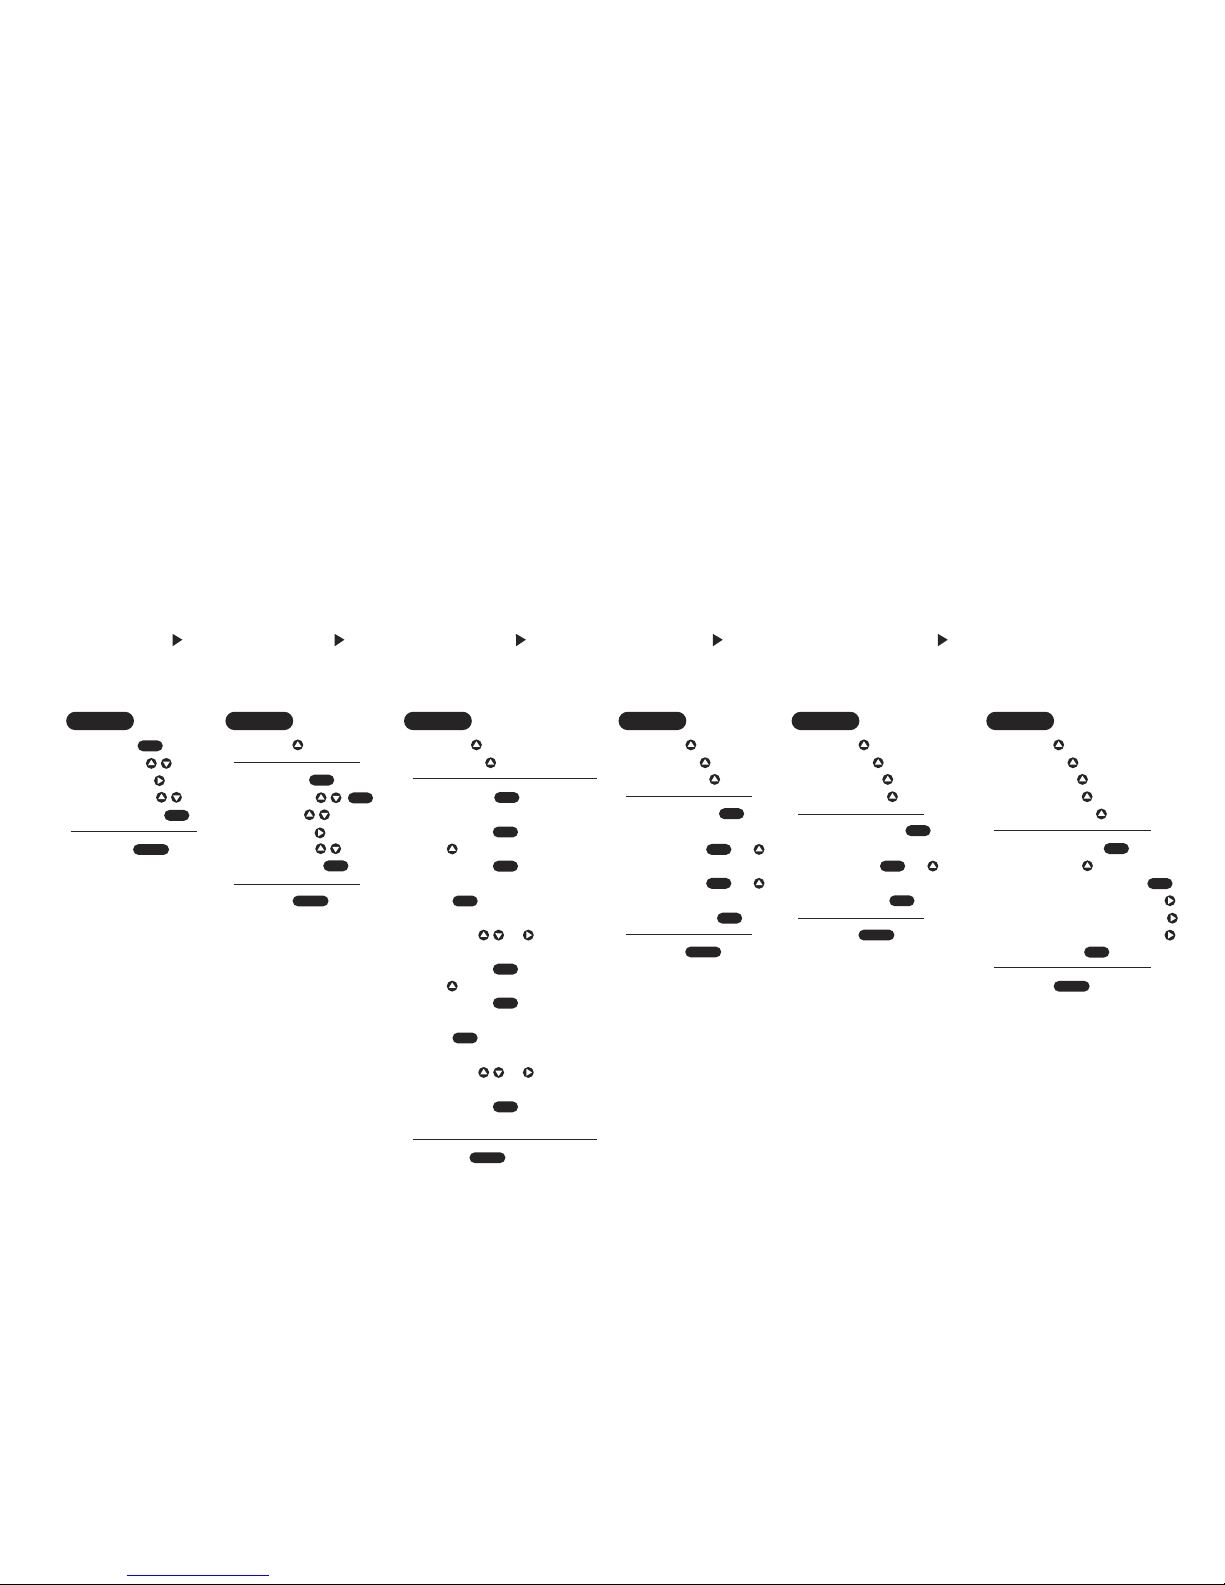
function overview
Below is a diagram of the functions of the Capello CR2W Safe & Sound Weather Alert Clock Radio. In the next sections we will walk
you through the steps for setting up the different functions. You will need to scroll through the list below to advance to the next one.
TIME ALARM COUNTY ALT TYPE LANGUAGE NEW ALERT
MENU
• TIME
“HOUR”
to set
“MINUTE”
to save
to exit
MENU
• TIME
• ALARM
“OFF/ON”
“HOUR”
to set
“MINUTE”
to save
to exit
SEL
SEL
SEL
SEL
MENU
• TIME
• ALARM
• COUNTY
“ANY”
to set
or “SINGLE”
to set
after “SAME01” appears
again
after “-------” appears
use +
to input all 6 digits
to set
or “MULTIPLE”
to set
after “SAME01” appears
again
after “-------” appears
use +
to input all 6 digits
to set
repeat for “SAME02” etc
to exit twice
SEL
SEL
SEL
SEL
SEL
SEL
SEL
SEL
MENU
• TIME
• ALARM
• COUNTY
• ALT TYPE
“VOICE”
to set or
“SIREN”
to set or
“DISPLAY”
to save
to exit
SEL
SEL
SEL
SEL
MENU
• TIME
• ALARM
• COUNTY
• ALT TYPE
• LANGUAGE
“ENGLISH”
to set or
PREFERRED LANGUAGE
to save
to exit
SEL
SEL
SEL
MENU
• TIME
• ALARM
• COUNTY
• ALT TYPE
• LANGUAGE
• NEW ALERT
“EVENT 1”
choose event 1-5
input 1st code letter
input 2nd code letter
input 3rd code letter
to save
to exit
SEL
SEL
SEL
SEL
MENU
MENU
MENU
MENU
MENU
MENU

MENU
• TIME
• ALARM
• COUNTY
• ALT TYPE
• LANGUAGE
• NEW ALERT
• DEFEAT SIREN
scroll event codes
select to change
“ENABLE” or “DISABLE”
to save each change
to exit
SEL
SEL
SEL
SEL
MENU
• TIME
• ALARM
• COUNTY
• ALT TYPE
• LANGUAGE
• NEW ALERT
• DEFEAT SIREN
• SIREN LEVEL
“LOW”
to set or
“HIGH”
to set or
to save each change
to exit
SEL
SEL
SEL
SEL
MENU
• TIME
• ALARM
• COUNTY
• ALT TYPE
• LANGUAGE
• NEW ALERT
• DEFEAT SIREN
• SIREN LEVEL
• ALT TEST
SOUND ALERT
SILENCE ALERT
to exit
SEL
SEL
SEL
MENU
• TIME
• ALARM
• COUNTY
• ALT TYPE
• LANGUAGE
• NEW ALERT
• DEFEAT SIREN
• SIREN LEVEL
• ALT TEST
• LIGHT
“BLT NORM”
to set or
“BLT ON”
to set or
“BLT OFF”
to save
to exit
SEL
MENU
• TIME
• ALARM
• COUNTY
• ALT TYPE
• LANGUAGE
• NEW ALERT
• DEFEAT SIREN
• SIREN LEVEL
• ALT TEST
• LIGHT
• BUTTON BEEPS
“ON”
to set or
“OFF”
to save
to exit
SEL
SEL
SEL
SEL
SEL
SEL
DEFEAT SIREN SIREN LEVEL ALT TEST LIGHT BUTTON BEEPS
MENU
MENU
MENU
MENU
MENU
All programming uses a combination of , + or and or arrows. button is used to save settings.
The menu consists of 11 customizable functions to scroll through and select your personalized settings. Press button to go
back to previous function and to exit menu mode.
 Loading...