

Page 1

Ci210 user guide
Rise & Shine
Alarm Clock Dock
with Lightning connector
and with USB* charging & audio
Page 2
FCC WARNING: This equipment may generate or use radio frequency energy. Changes or modications to this equipment
may cause harmful interference unless the modications are expressly approved in the instruction manual. The user could
lose the authority to operate this equipment if an unauthorized change or modication is made.
CAUTION: TO REDUCE THE RISK OF ELECTRIC SHOCK, DO NOT REMOVE COVER (OR BACK).
NO USER-SERVICEABLE PARTS INSIDE. REFER SERVICING TO QUALIFIED SERVICE PERSONNEL.
Rating Label is located at the bottom enclosure of the unit.
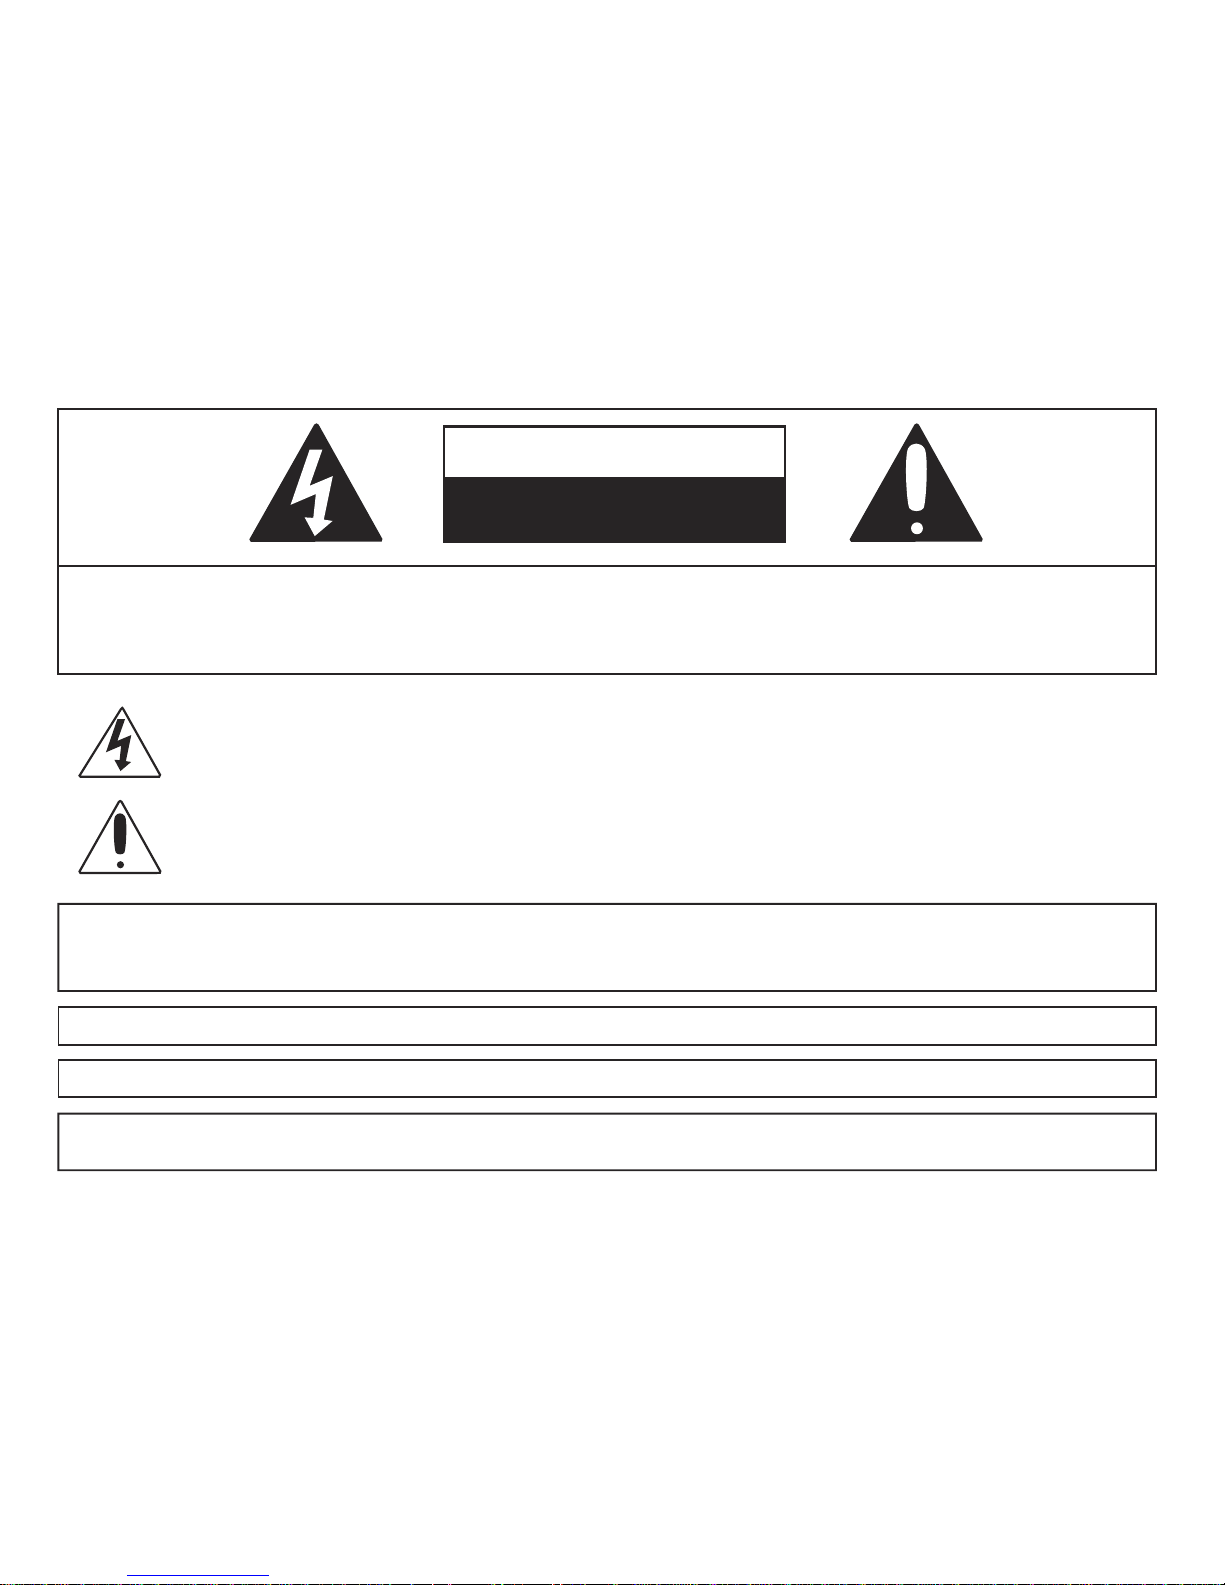
CAUTION
RISK OF ELECTRIC SHOCK
DO NOT OPEN
DANGEROUS VOLTAGE: The lightning ash with arrowhead symbol, within an equilateral triangle
is intended to alert the user to the presence of uninsulated dangerous voltage within the product’s
enclosure that may be of sufcient magnitude to constitute a risk of electric shock to persons.
ATTENTION: The exclamation point within an equilateral triangle is intended to alert the user to
the presence of important operating and maintenance (servicing) instructions in the literature
accompanying the appliance.
iPhone and iPod are trademarks of Apple Inc., registered in the U.S. and other countries.
ATTENTION: POUR ÉVITER LES CHOC ÉLECTRIQUES, INTRODUIRE LA LAME LA PLUS LARGE DE LA FICHE DANS LA BORNE
CORRESPONDANTE DE LA PRISES ET POUSSER JUSQU’AU FOND.
CAN ICES-3 (B) / NMB-3 (B)
Page 3

INFORMATION: This equipment has been tested and found to comply with the limits for a Class B digital device, pursuant to
Part 15 of the FCC Rules. These limits are designed to provide reasonable protection against harmful interference in a residential
installation. This equipment generates, uses and can radiate radio frequency energy and, if not installed and used in accordance
with the instructions, may cause harmful interference to radio communications. However, there is no guarantee that interference
will not occur in a particular installation. If this equipment does cause harmful interference to radio or television reception, which
can be determined by turning the equipment off and on, the user is encouraged to try to correct the interference by one or more
of the following measures:
• Reorient or relocate the receiving antenna.
• Increase the separation between the equipment and receiver.
• Connect the equipment into an outlet on a circuit different from that to which the receiver is connected.
• Consult the dealer or an experienced radio/TV technician for help.
Compliance information: This device complies with Part 15 of the FCC Rules. Operation is subject to the following two
conditions: (1) this device may not cause harmful interference, and (2) this device must accept any interference received,
including interference that may cause undesired operation
SURGE PROTECTORS: It is recommended to use a surge protector for AC connection. Lightning and power surges
ARE NOT covered under warranty for this product.
IMPORTANT SAFETY PRECAUTIONS
WARNING: TO PREVENT FIRE OR SHOCK HAZARD, DO NOT EXPOSE THIS UNIT TO RAIN OR MOISTURE.
Page 4

SAFETY PRECAUTIONS
a. Do not expose this unit or the AC/DC adaptor to dripping or splashing water. Keep liquid-lled objects
such as vases, away from this unit and AC/DC adaptor.
b. Unplug this unit during lightning storms or when unused for long periods of time.
c. Ensure that the AC/DC adaptor is easily accessible.
d. Please note the information printed underneath the unit.
e. Batteries should not be exposed to excessive heat such as direct sunshine, re, etc.
f. Do not impede the ventilation of this unit by covering the ventilation openings with items such as
newspapers, table-cloths, curtains, etc.
g. Keep open ames, such as lighted candles, away from this unit.
h. Do not place this unit in closed bookcases, racks, or other spaces without proper ventilation.
i. Use only the same or equivalent type batteries as there is a danger of explosion if the incorrect batteries
are used or they are installed incorrectly.
j. Dispose of batteries properly according to environmental regulations.
k. Only use attachments / accessories specied by the manufacturer.
Page 5
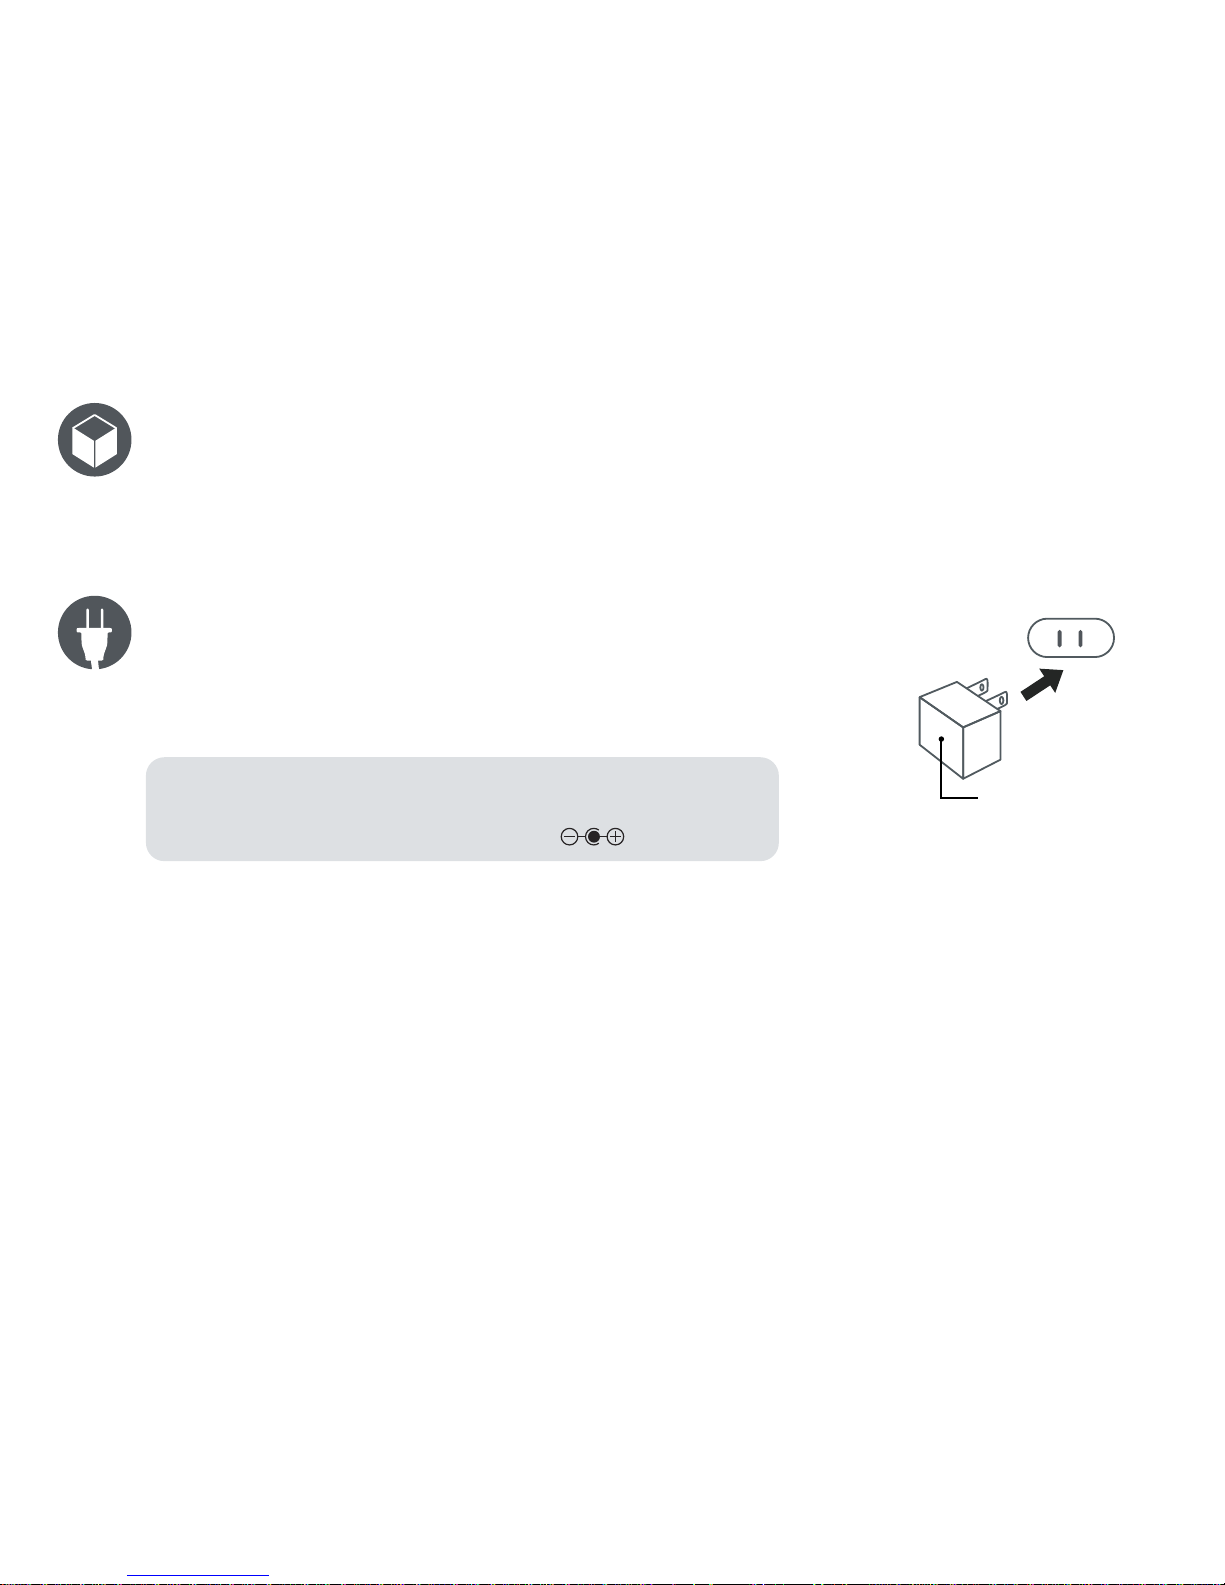
AC/DC adapter connection
Insert the small end of the AC adaptor into the DC IN Jack
(located on the rear of the unit). Connect the other end to a
wall outlet providing 100-240V AC, 50/60 Hz.
notes: Disconnect both the DC IN plug and the AC plug when not in use.
Use only the supplied AC adaptor with the following specs:
AC In –100-240V AC, 50/60Hz / DC Out - 5V 3A
inside the box
Ci210 alarm clock dock, AC/DC power adapter and user guide.
AC outlet
AC adapter plug
Page 6
battery precautions:
Follow these precautions when using batteries in this device:
Warning - Danger of explosion if batteries are incorrectly replaced. Replace only with the same or equivalent type.
Use only the size and type of batteries specied.
Be sure to follow the correct polarity when installing the batteries as indicated in the battery compartment.
note: A reversed battery may cause damage to the device.
Do not mix different types of batteries together (e.g. Alkaline, Rechargeable and Carbon-zinc) or old batteries with fresh ones.
If the device is not to be used for a long period of time, remove the batteries to prevent damage or injury from possible battery leakage.
Do not try to recharge a battery not intended to be recharged - it can overheat and rupture. (Follow battery manufacturer’s directions.)
inserting batteries
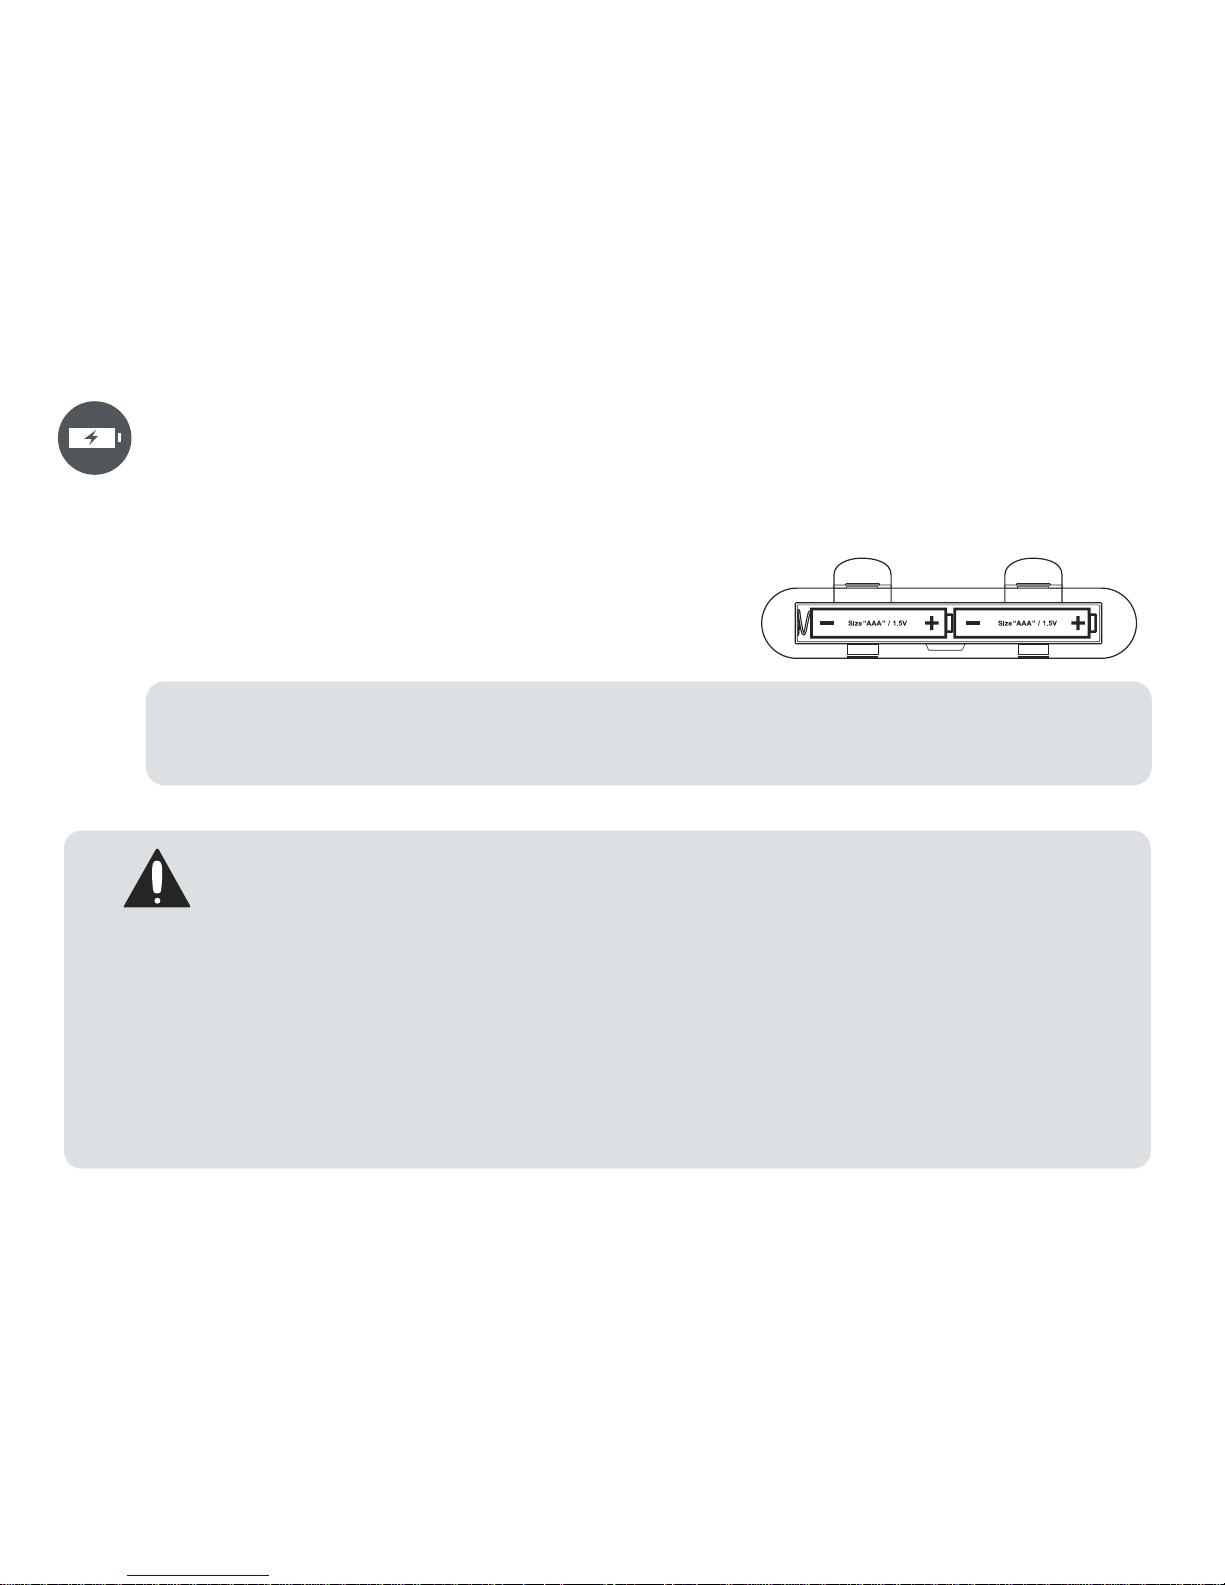
Two (2) ‘AAA’ size batteries (sold separately) can be used to backup the clock and keep up the memory of the alarm
setting if the AC adaptor is disconnected or there is a power failure. Install as listed below:
Open the battery door by pushing in on the tab, then removing the door.
Insert two (2) 1.5V ‘AAA’ batteries as shown. Alkaline batteries
are recommended for the longest backup time.
Replace the battery door back on the compartment.
notes: The battery indicator on the display will appear and ash when there are no batteries or battery low. The battery
indicator will disappear when new batteries are inserted in battery compartment.
To avoid the current time and alarm setting being erased/reset, do not disconnect the AC adaptor when replacing the batteries.
Page 7
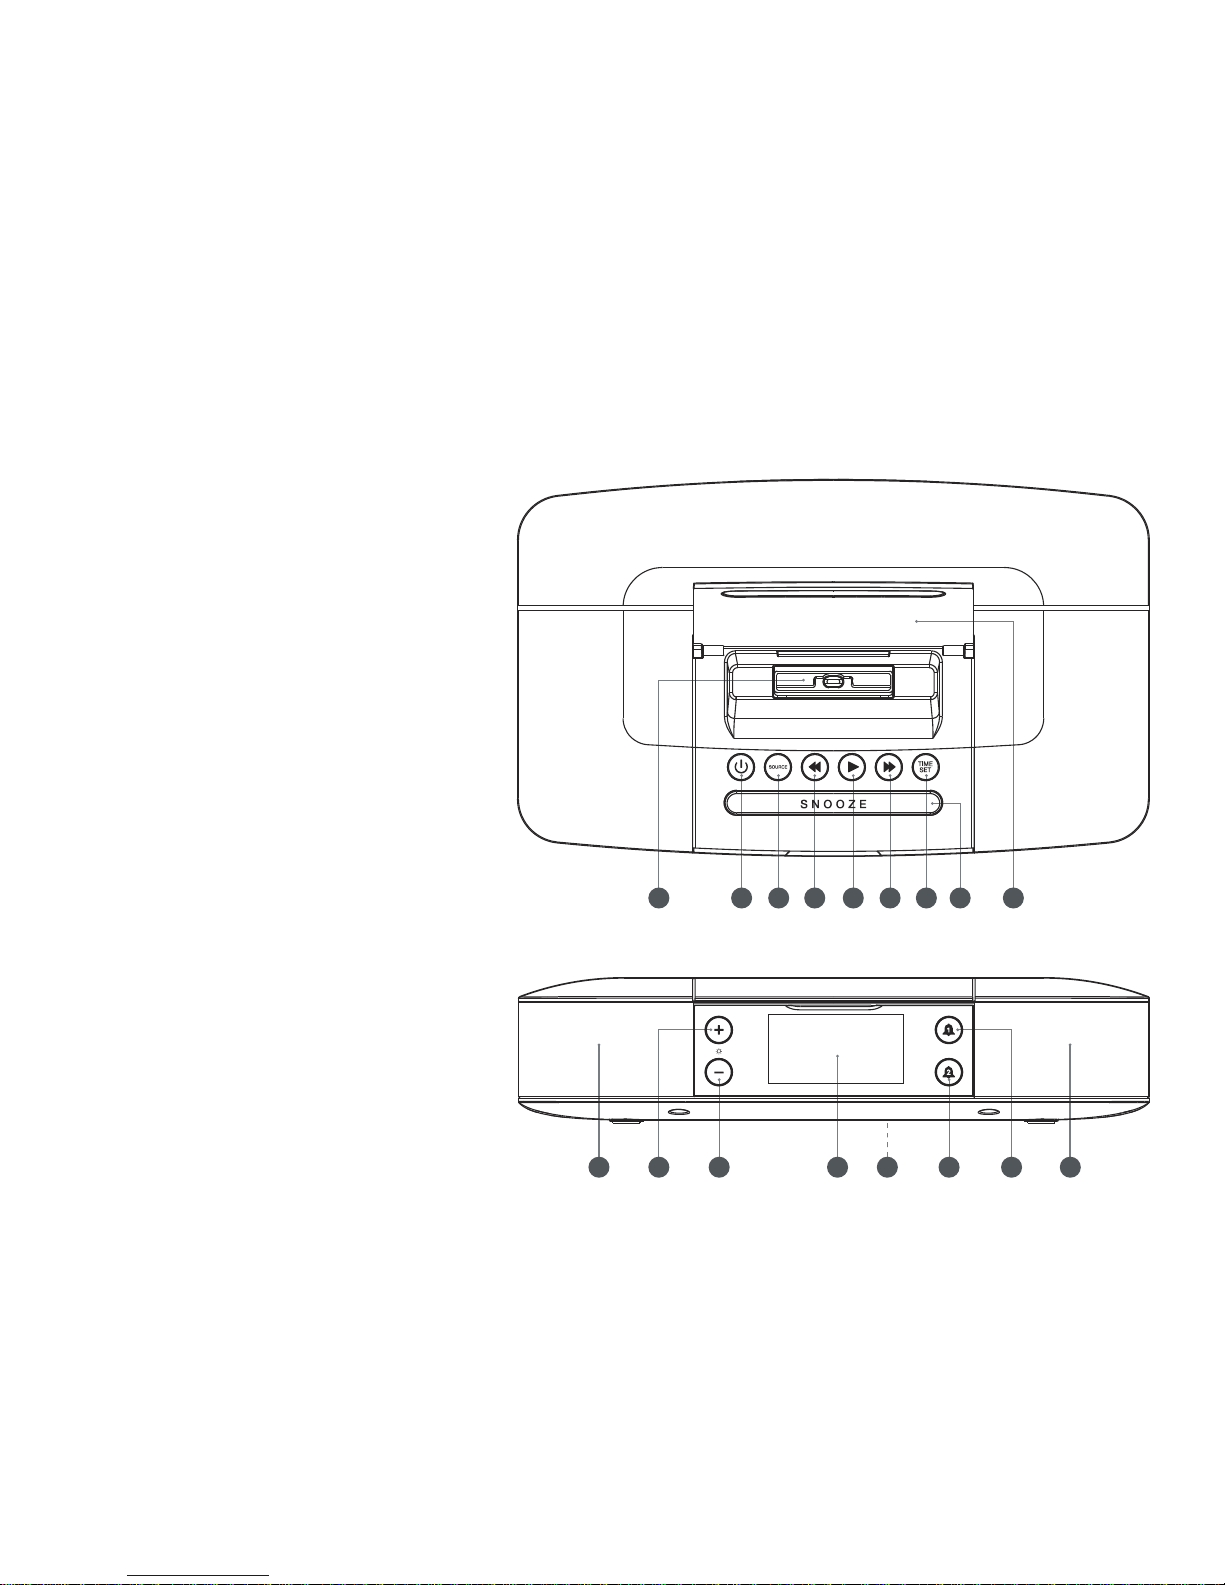
location of controls
3 421 985 6 7
1210 11 13 14 15 16 17
Dock with Lightning connector
POWER Button
SOURCE Button
TUNING DOWN / SKIP / SEARCH Button
PLAY / PAUSE / PRESET Button
TUNING UP / SKIP / SEARCH Button
TIME SET / TIME SYNC Button
SNOOZE / SLEEP Button
Top Cover
Left Speaker
VOLUME + / BRIGHTNESS UP Button
VOLUME – / BRIGHTNESS DOWN Button
LCD Display
Battery Compartment (bottom)
ALARM 2 Button
ALARM 1 Button
Right Speaker
Page 8
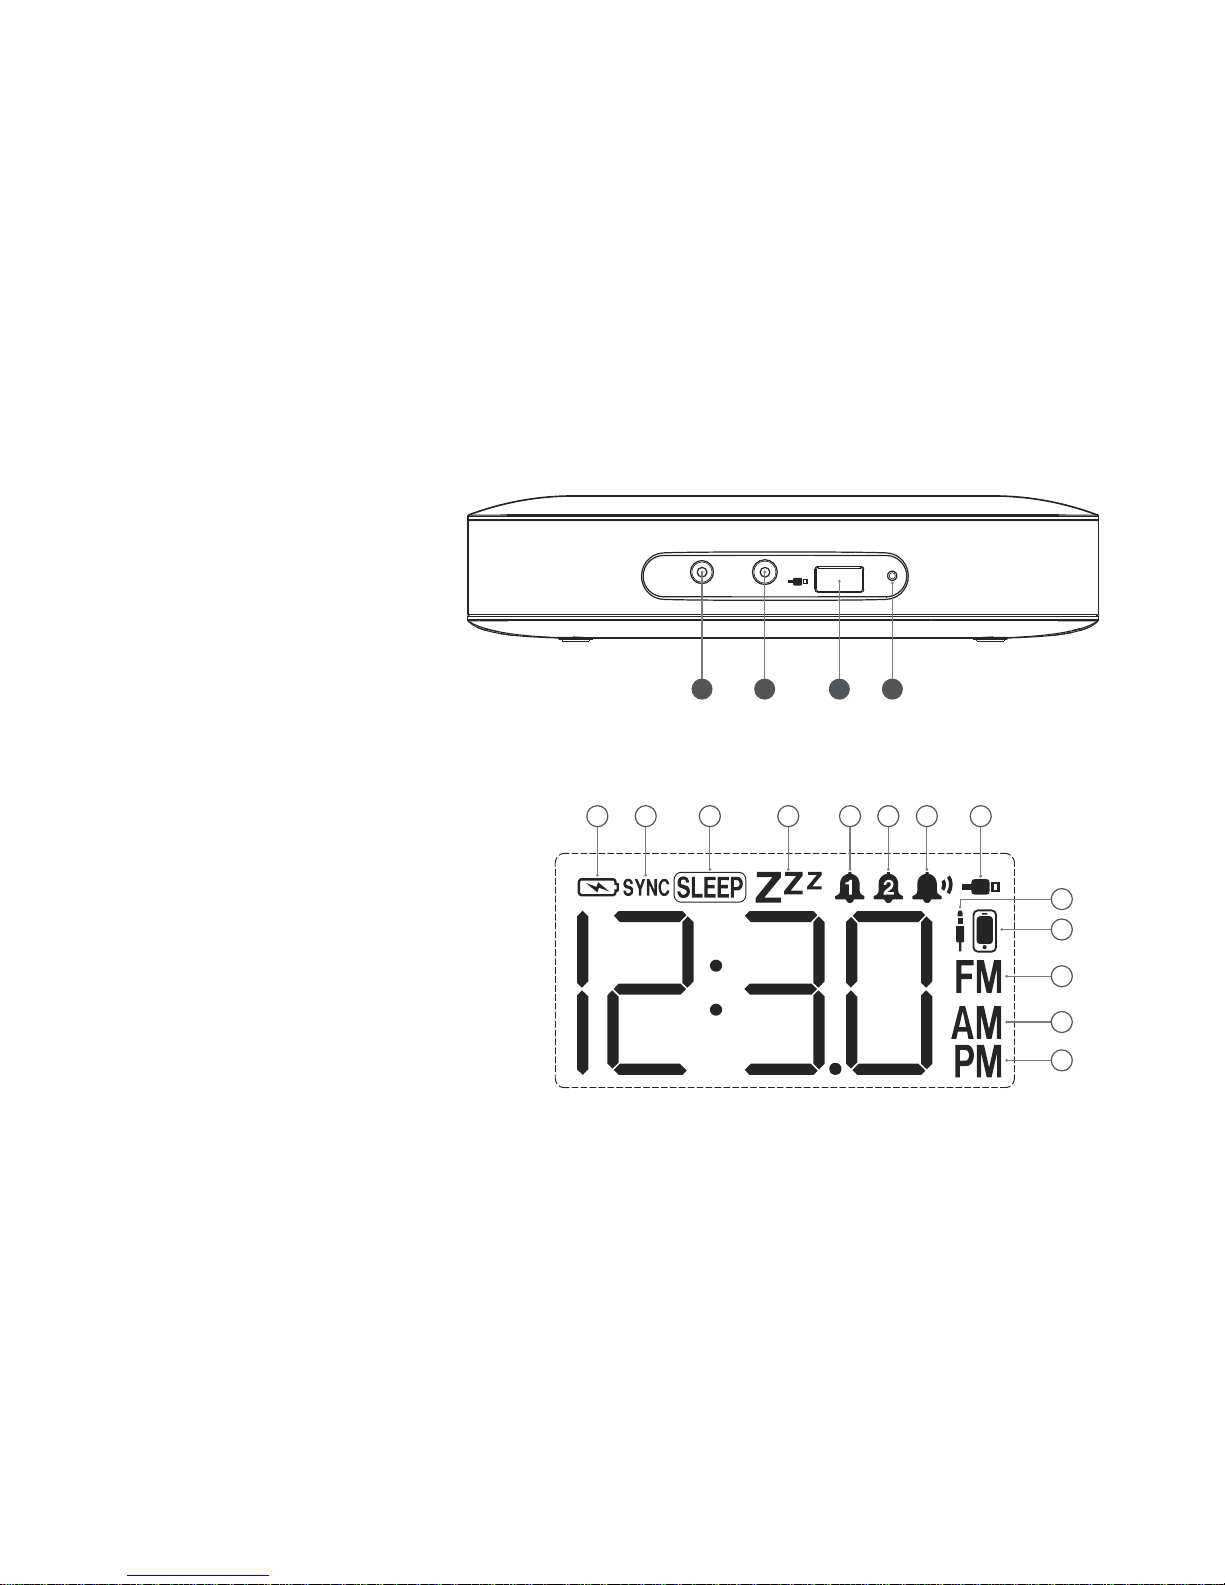
location of controls (con’t.)
LCD indicators
DC IN
LINE IN
USB
DC Power In Jack
3.5mm LINE In Jack
USB Port
FM Wire Antenna
19 2118
1 2 3 4 5 6 7 8
10
9
11
12
13
20
Low Battery
Time Sync
SLEEP
SNOOZE
ALARM 1
ALARM 2
Buzzer
USB Audio Mode
AUX IN Mode
Docking Mode
FM Radio Mode
AM
PM
FM
ANT
Page 9

adjusting the volume
Press the VOL + or VOL – button repeatedly to increase or decrease the volume respectively.
turning the unit on
Press the POWER button to turn the unit on.
Press the POWER button again to turn the unit off.
notes: In standby mode, the clock time will show as the display.
When you turn on the unit again, it activates on the same source mode as the last time you turning off the unit.
For power saving, the unit switches to standby mode if no audio signal for 15 minutes.
Page 10

iPod or iPhone playback (docking mode)
Place your iPod or iPhone onto the dock. Gently push down so the connector on the iPod or iPhone slides
onto the Lightning connector of the unit. The unit will switch to Docking mode automatically. You can also
press the SOURCE button repeatedly to select Docking mode.
Press the PLAY / PAUSE / PRESET button to start music playback from your docked iPod or iPhone.
Press the PLAY / PAUSE / PRESET button again to pause and once more to resume playback.
Press the TUNING DOWN / SKIP / SEARCH button to return to the beginning of the current track or to the
previous track.
Press TUNING UP / SKIP / SEARCH button to skip to the next track.
Press and hold the TUNING DOWN / SKIP / SEARCH or TUNING UP / SKIP / SEARCH buttons to search
backward or forward respectively from the current track.
notes: If you receive an incoming call from your docked iPhone during music playback, the unit will switch to pause and
can resume play after you nish the call.
The unit switches to Docking mode automatically after connecting an iPod or iPhone to the dock. The unit will revert to the
previous mode once you pull the iPod or iPhone out from the dock.
charging your iPod or iPhone (docking mode)
The unit charges the docked iPod or iPhone automatically as long as it is connected to power.
Page 11

iPod or iPhone playback (USB mode)
You can play or charge your iPod or iPhone through the USB input at the unit back with an Apple USB cable
(sold separately). Connect an Apple USB cable from the USB input on the back of the Ci210 to the dock
connector on your iPod or iPhone
Press the SOURCE button repeatedly to select USB audio mode.
Press the PLAY / PAUSE / PRESET button to start music playback from your USB connected iPod or iPhone.
Press the PLAY / PAUSE / PRESET button again to pause and once more to resume playback.
Press the TUNING DOWN / SKIP / SEARCH button to return to the beginning of the current track or to the
previous track.
Press TUNING UP / SKIP / SEARCH button to skip to the next track.
Press and hold the TUNING DOWN / SKIP / SEARCH or TUNING UP / SKIP / SEARCH buttons to search
backward or forward respectively from the current track.
notes: If you get an incoming call from your USB connected iPhone during music playback, the unit switches to pause and
will resume playback after you nish the call.
charging your iPod or iPhone (USB mode)
The unit charges the USB connected iPod or iPhone automatically as long as it is connected to power
Page 12

using the FM radio
Press the SOURCE button repeatedly to select Radio mode.
In RADIO MODE, you can tune radio stations manually or automatically.
For MANUAL TUNING, repeatedly press the TUNING DOWN / SKIP / SEARCH or TUNING UP / SKIP / SEARCH
buttons to manually advance the frequency in the display up or down until the desired frequency appears.
For AUTO TUNING, press and hold the TUNING DOWN / SKIP / SEARCH or TUNING UP / SKIP / SEARCH
buttons; the tuner will search and then stop on the next strong station it nds. Repeat this step until the desired
frequency appears in the display.
notes: For optimal reception, fully extend the FM wire antenna and adjust for best FM reception.
If there is no button operation for 5 seconds, the display will revert back to the time display.
universal USB charging port
This unit can charge smart phones, tablets, Android and USB devices when connected with a charging cable
(sold separately) through the USB port located on the back of the unit.
The unit charges the devices automatically as long as it is connected to a power source.
Page 13

setting radio presets
You can save up to 10 of your favorite radio stations as presets for easy station recall.
In RADIO MODE, follow the steps from the ‘using the FM radio’ section above to tune a desired radio station.
Press and hold the PLAY / PAUSE / PRESET button to activate PRESET SAVE MODE. (01-10) blinks on
the display.
Press the TUNING DOWN / SKIP / SEARCH or TUNING UP / SKIP / SEARCH button repeatedly to select the
desired preset number you wish to save that station as.
Press the PLAY / PAUSE / PRESET button again to conrm.
Repeat the above steps to program up to 9 additional stations, if desired.
retrieving radio presets
Press the SOURCE button repeatedly to select FM Radio mode.
In RADIO MODE, press the PLAY / PAUSE / PRESET button repeatedly until the desired preset number appears
on the display.
Page 14

setting the alarm(s)
Press and hold ALARM 1 or ALARM 2 button to enter ALARM SETTING MODE. (The ‘HOUR’ digits will begin
to blink on display)
Repeatedly press the TUNING DOWN / SKIP / SEARCH or TUNING UP / SKIP / SEARCH buttons to set the hour.
Press the ALARM 1 or ALARM 2 button to conrm. (The ‘MINUTE’ digits will begin to blink on display).
Repeat steps 2 – 3 to set the minute. (The ‘ALARM VOLUME’ digits begin to blink).
Press VOL + or VOL – buttons to set the alarm volume level.
Press the ALARM 1 or ALARM 2 button to conrm. (The ‘ALARM SOURCE’ icon will begin to blink on display).
Repeat steps 2 – 3 to select an alarm source; buzzer, iPod/iPhone on dock, iPod/iPhone on USB audio,
or FM radio. The corresponding alarm source icon lights up
notes: When the alarm rings, it sounds for 60 minutes then shut off automatically.
If alarm is set to iPod/iPhone (dock or USB), the unit begins playback from the current track that you were listening to on your
iPod/iPhone. Ensure that you have your iPod/iPhone set to “REPEAT”, otherwise the unit will stop playback after nishing
the current song if the remaining total play time is less than 60 minutes.
If iPod/iPhone is selected as alarm source but no iPod/iPhone is connected, the unit automatically switches to buzzer source.
Page 15

activate / deactivate the alarm(s)
Press ALARM 1 or ALARM 2 button repeatedly.
The corresponding alarm icon will appear on the display when the alarm is activated.
The corresponding alarm icon disappears when the alarm is deactivated.
turning off / snooze alarm
To TURN OFF the alarm when it sounds, press ANY button (except SNOOZE / SLEEP) one time. The alarm will
reset for the next day.
To SNOOZE the alarm when it sounds, press the SNOOZE / SLEEP button once. This will activate a snooze period
of 10 minutes. (The number ‘10’ and the ‘ZZZ’ icon will appear briey).
notes: When the number ‘10’ appears on the display, you can increase the preset SNOOZE duration up to 60 minutes by
repeatedly pressing the SNOOZE / SLEEP button.
To deactivate the SNOOZE function, press the POWER or ALARM 1 or ALARM 2 button until the
‘ZZZ’ icon no longer
appears on the display.
special feature
When the TOP COVER is closed, you can press or press and hold the COVER to activate or deactivate the snooze
or sleep function instead of opening the COVER and pressing SNOOZE / SLEEP button.
Page 16

setting the clock
Follow the instructions below to set the clock manually. To set the clock synchronizing with an iPod or iPhone
automatically, see the “Time Sync” section.
In STANDBY MODE, press and hold the TIME SET / TIME SYNC button until the clock blink on the display.
Press the TUNING DOWN / SKIP / SEARCH or TUNING UP / SKIP / SEARCH buttons to set the hour.
Then press the TIME SET / TIME SYNC button to conrm. (The ‘MINUTE’ digits will begin to blink on display).
Press the TUNING DOWN / SKIP / SEARCH or TUNING UP / SKIP / SEARCH buttons to set the minutes
Then press the TIME SET / TIME SYNC button again to conrm.
sleep timer
To TURN ON the SLEEP Timer, press and hold SNOOZE / SLEEP button to activate the sleep timer function.
This will activate a SLEEP Timer period of 10 minutes, at which time the unit will enter standby mode.
To TURN OFF the SLEEP Timer function, press and hold the SNOOZE / SLEEP button once and then repeatedly
press this button until the 'SLEEP' icon no longer appears on the display.
notes: When the number ‘10’ appears on the display, you can increase the preset SLEEP Timer duration up to 90 minutes
by repeatedly pressing the SNOOZE / SLEEP button.
To view the remaining sleep time after activated, press and hold SNOOZE / SLEEP button.
Page 17

setting the display brightness
There are three levels of display brightness (the default setting is High). In standby mode, press Volume + /
Brightness Up button or Volume – / Brightness Down button repeatedly to select the desired setting.
High (default) Middle Low
time sync
The Ci210 features ‘Time Sync’ which will automatically set the time when an iPod or iPhone is docked with the unit.
Press the SOURCE button repeatedly to switch to Docking mode or USB mode
Connect your iPod or iPhone to the unit
Press and hold the TIME SET / TIME SYNC button. The clock digits and the “SYNC” icon blinking on the display,
then the clock time updates to the unit automatically.
Page 18

aux-in connection
Insert one end of a 3.5mm audio cable (sold separately) into the LINE IN jack on the rear of this unit and the
other end into the headphone jack of an external audio device (e.g. iPad, iPod shufe, smart phones, MP3
players, digital media players, etc.)
Press the SOURCE button repeatedly to select AUX-IN mode.
In AUX-IN MODE, press the play button on your external audio device to begin playback through the
unit’s speakers.
specifications
Power Source .......................................................................................... DC 5V 3A Adaptor (Center Positive)
AC Power Supply ....................................................................................................100-240V ~50/60Hz 0.5A
Battery Backup .................................................................................................. 2 x 1.5V “AAA” size batteries
Output Power .................................................................................................................................... 3W x 2
speaker system:
Speaker Driver.......................................................................................................... 1.5" full-range driver x 2
Passive Radiator ........................................................................................ 3.38" x 1.38" passive radiator x 2
radio section:
Frequency Range (FM) .......................................................................................................... 87.5 – 108 MHz
Specications are subject to change without notice.
Page 19
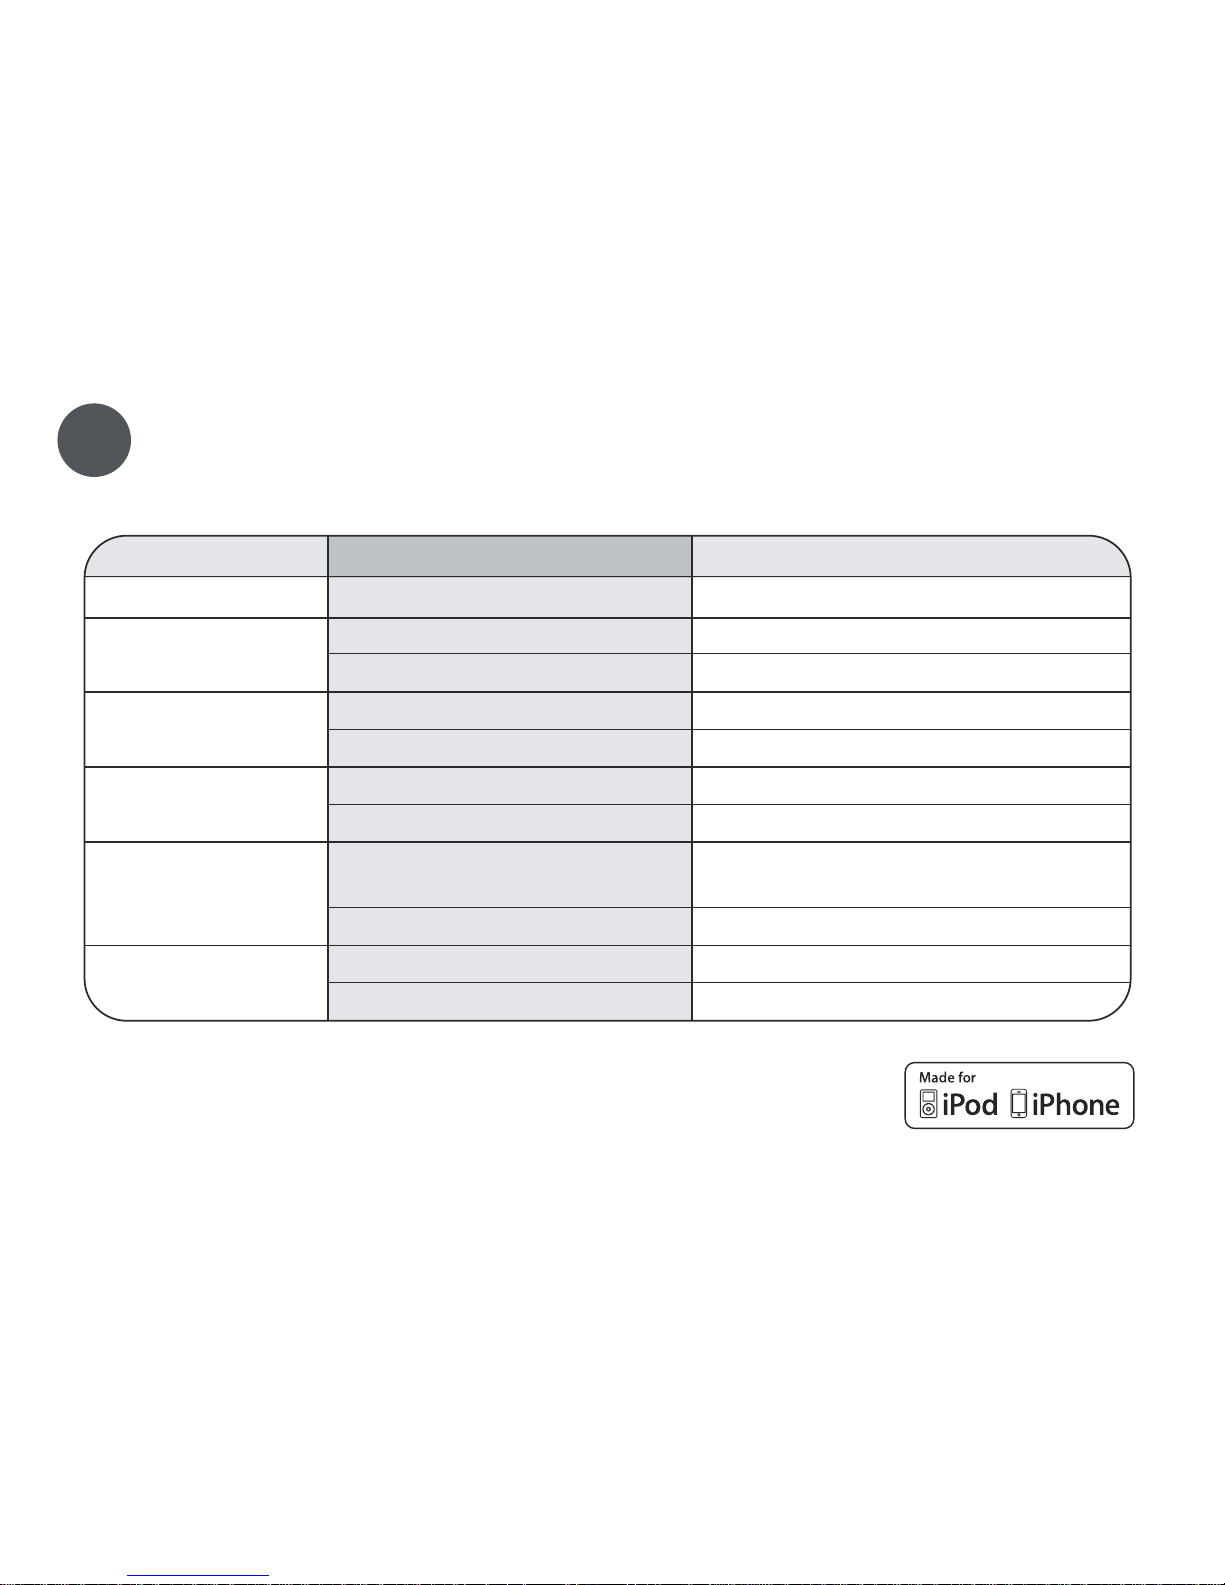
troubleshooting
If you experience a problem with this unit, please check the chart below before calling for service.
?
symptom cause solution
No Sound Volume is set to minimum Increase volume
Radio, no sound. Power is not on Press the power button to turn the power on
Volume is set to minimum Increase volume
Radio, poor sound. Station is not tuned properly Retune the FM broadcast station
FM: Wire antenna is not extended Extend FM wire antenna
iPod mode, no sound. Incorrectly connected Check the connection
Not in iPod mode Press SOURCE button
Time reset to “12:00” Batteries connected improperly, Check the batteries
not connected or dead.
Clock not set Set the clock.
Alarm does not turn on Alarm is not activated or set properly Set and activate alarm.
Clock is not set Set the clock.
Made for iPhone 5, iPod touch (5th generation),
iPod nano (7th generation) — iPod and iPhone sold separately
“Made for iPod” and “Made for iPhone” mean that an electronic accessory has been designed to connect
specically to iPod and iPhone respectively, and has been certied by the developer to meet Apple
performance standards. Apple is not responsible for the operation of this device or its compliance with
safety and regulatory standards. Please note that the use of this accessory with iPod and iPhone may
affect wireless performance.
iPhone, iPod classic, iPod nano, iPod touch and Lightning are trademarks of Apple Inc., registered in the
U.S. and other countries.
Page 20

For further assistance, please visit our website: hellocapello.com
or contact customer service at support@c apelloproducts.com or 1-855-896-1795
Life Lab International Ltd.
 Loading...