

Page 1
capcom-unity.com
©CAPCOM CO., LTD. 2012 ALL RIGHTS RESERVED. Resident Evil, CAPCOM and the
CAPCOM LOGO are registered trademarks of CAPCOM CO., LTD.
33047M
Page 2
WARNING Before playing this game, read the Xbox 360® console,
Xbox 360 Kinect® Sensor, and accessory manuals for important safety and health
information.www.xbox.com/support.
IMPORTANT HEALTH WARNING: PHOTOSENSITIVE SEIZURES
A very small percentage of people may experience a seizure when exposed to
certain visual images, including flashing lights or patterns that may appear in
video games. Even people with no history of seizures or epilepsy may have an
undiagnosed condition that can cause “photosensitive epileptic seizures” while
watching video games. Symptoms can include light-headedness, altered vision,
eye or face twitching, jerking or shaking of arms or legs, disorientation, confusion,
momentary loss of awareness, and loss of consciousness or convulsions that can
lead to injury from falling down or striking nearby objects. Immediately stop
playing and consult a doctor if you experience any of these symptoms.
Parents, watch for or ask children about these symptoms— children and teenagers
are more likely to experience these seizures. The risk may be reduced by being
farther from the screen; using a smaller screen; playing in a well-lit room, and not
playing when drowsy or fatigued. If you or any relatives have a history of seizures
or epilepsy, consult a doctor before playing.
CONTROLS
02
MAIN MENU
04
NEW GAME / SAVING & LOADING
05
GAME SCREEN
06
GAME RULES
07
ITEM SLOT
08
RECOVERY / ROUTE GUIDE
09
SKILL SETTINGS
10
MULTIPLAYER
11
EXTRA CONTENT
13
PLAYER ACTIONS
14
PARTNER ACTIONS
16
WARRANTY/CUSTOMER SUPPORT
18
Bioterror continues to grip the world in fear. A new B.O.W. called “J’avo”
has been spotted on the front lines of the Eastern European conflict. And
as the U.S. president prepares to meet the challenges head on, a horribly
cruel fate awaits him and the college town of Tall Oaks.
story contents
Seven heroes will rise to meet this deadly new threat. They begin on
separate paths, but their fates will intertwine as they all head towards
the final conclusion...
For more detailed information about games, systems, characters bios,
etc. please visit the following website
http://game.capcom.com/manual/re6/
Note: You can also access the website from a smartphone.
WEBSITE
01
Page 3
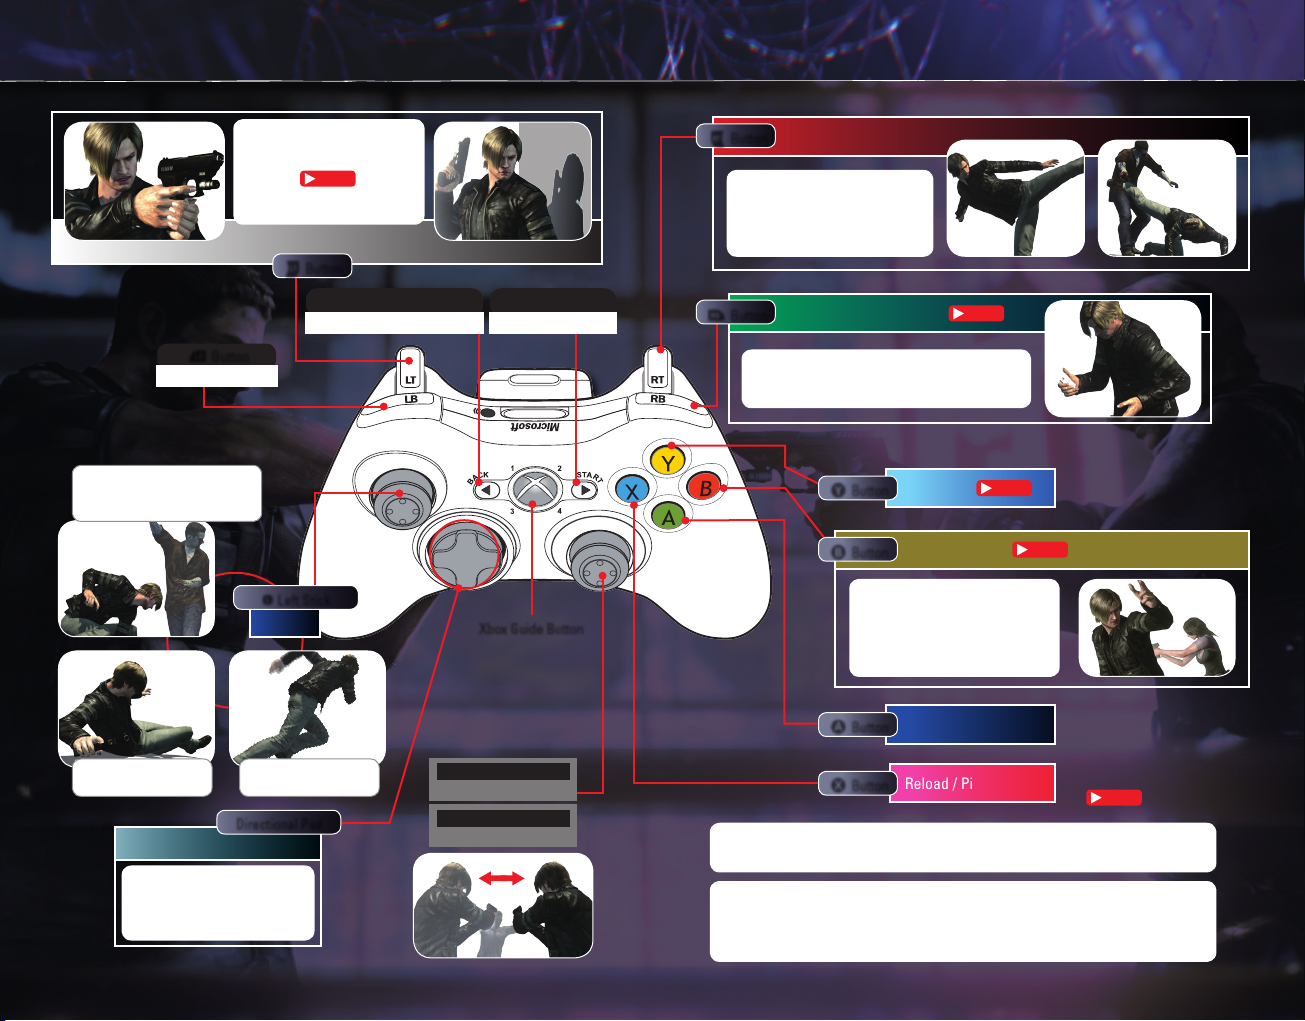
controls
Using the Xbox 360 Controller
Ready your weapon
y Button
Display route guide
Escape – Hold down w button,
press A button & move the L
left stick
Hold down w button & press x
button to attack
Quick Shot
Press w button & x button
simultaneously
P.15
Ready your weapon / Cover
w Button
< BACK Button
L Left Stick
Move
Hide behind walls, etc
>START Button
Pause game (offline)Options Menu / Skip cut scenes
Xbox Guide Button
x Button
z Button
Physical Attack
Perform regular attack with x
button. When the enemy attacks,
press x button to counter attack
Health Tablet (Recovery )
Health Tablet Auto-Reload – When you have
herbs, press z button & X button
Y Button
B Button
Look in partner’s direction /
Call – Hold down B button
Set Attack Tag – Ready weapon with
w button lock, aim on enemy, & press
B button
P.09
Item Slot
Partner Action / Cancel
P.08
P.16
A Button
Sliding – Press w
button during a Dash
Swap equipment / Select items
Up / Down – Swap hand
grenades, first aid spray, etc
Left / Right – Swap weapons
02 03
Dash – L Left stick
and A button
Directional Pad
C Right Stick
Aim / Control camera
h Button
Switch left / right hand
X Button
To use the vibration feature, press the Xbox Guide Button, then go to
Settings / Preferences / Vibration and activate the feature.
Pausing the Game - Campaign
The game can only be paused if you are playing the Campaign offline. The
BACK button will bring up the Options Menu, but the game will still be in
progress.
Action / Confirm
Reload / Pick up item
* These are the default
controls. They can be
changed in Options or
from the in-game Options
Menu within the game.
P.04
Page 4
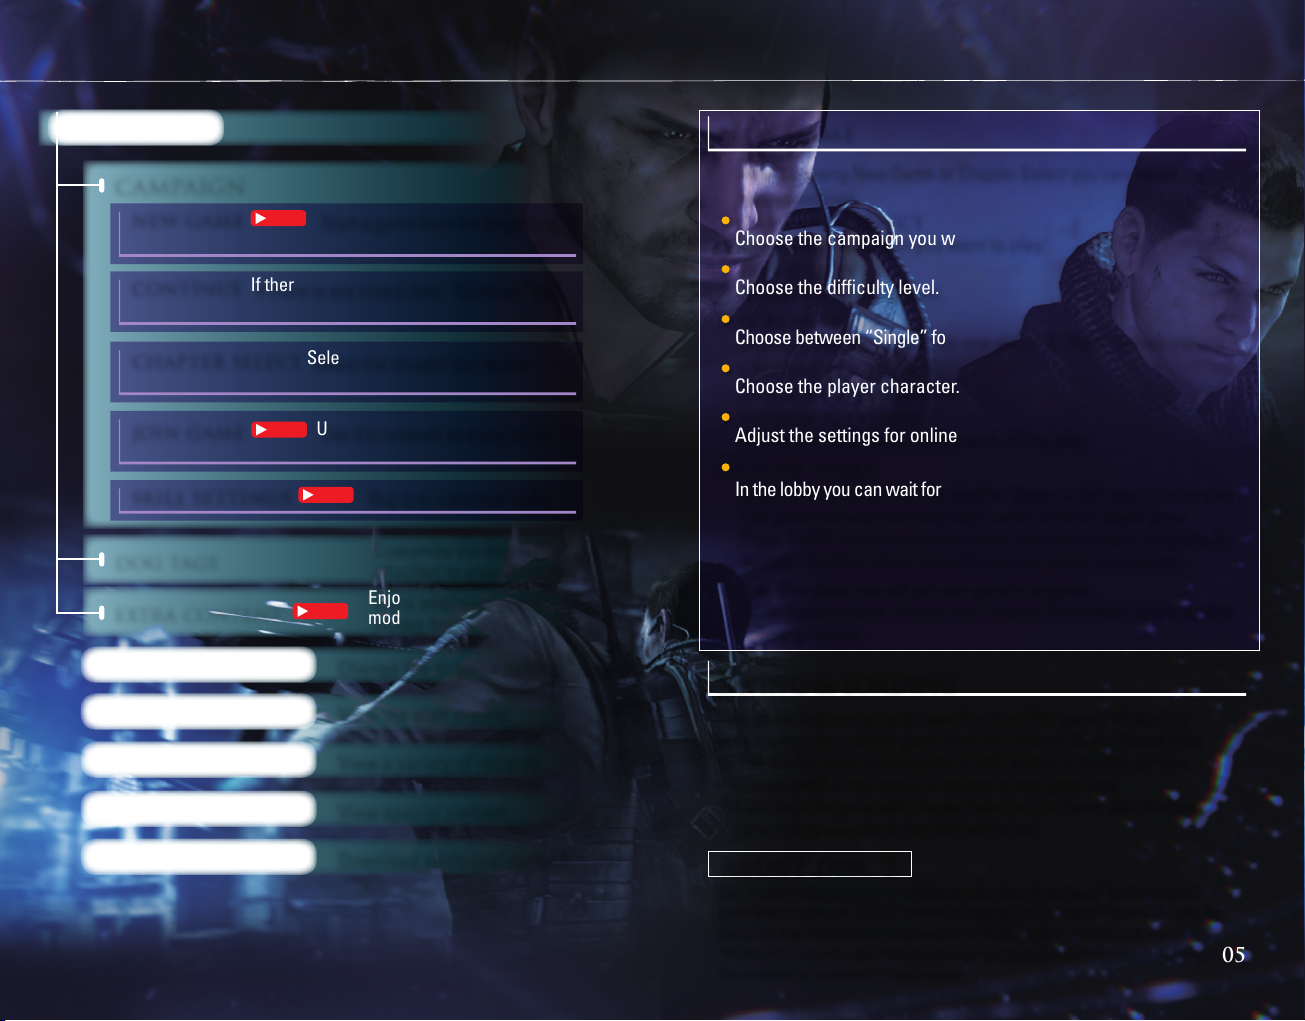
main menu new game / saving & loading
play game
new game
After choosing New Game or Chapter Select you can adjust the
campaign
P.05
new game
If there is any saved data, this will not be displayed.
Start a game from the beginning.
various settings.
campaign select
Choose the campaign you want to play.
difficulty
continue
be displayed. Choose this to continue with the existing game.
If there is any saved data, “Continue” will
Choose the difficulty level.
screen mode
Choose between “Single” for one player & “Split” for two players.
chapter select
like to play and start the game.
join game
play online.
Select the chapter you would
P.11
Use the network to enjoy co-op
character select
Choose the player character.
system settings
Adjust the settings for online and offline play.
co-op lobby
skill settings
P.10
Buy and customize skills.
In the lobby you can wait for another player to join you in co-op play .
The game will automatically begin when another player joins.
Press START button before someone else joins to start the game by
yourself. Another player may still join your game in-progress.
* Another player may still join your game in-progress.
* Not displayed when “Partner Join” is set to “Don’t Allow” on the System
Settings screen.
dog tags
extra content
options
Customize the dog tag
attached to your account.
Enjoy additional game
P.13
modes here.
Change the in-game settings.
saving & loading
credits
records
special features
Xbox LIVE Marketplace
04 05
View the staff credits.
View a variety of records.
View special content.
Download additional content.
This game features an auto-save function. The game will also be
saved when you quit the game from the Options Menu. Saved data
will be loaded upon pressing the START button at the title screen.
* At least 144KB of free space is required to save game data.
* If you begin the game with Chapter Select or Join Game, data from the
game in progress prior to that point will be lost.
about disc 2
Disc 2 is the installation disc for additional voice data. If you would like to enjoy the
game featuring French, Italian, German, or Spanish voices, please insert disc 2 into the
tray and follow the on-screen instructions to install the data onto your storage device.
*At least 2.8 GB per language of free disk space on the storage device is necessary for installation.
*No installation is necessary for English voices.
Page 5

game screen game rules
Player
Direction &
distance to target
Action Button
Vitality Gauge
Displays the player’s
vitality; decreases when
damage is incurred.
When less
than one
block of
been incurred, the
damage will regenerate
over time.
damage has
Physical Combat Gauge
Performing physical attacks or
quick shots will use up some of
the gauge . The gauge
will regenerate over time.
P.15
Chris Jake
Dropped item
Partner
COMS Device
Tablets Remaining
Ammo for Equipped
Weapon / Remaining
Rounds
Number of
Weapon Reloads
Weapon Function Switch
Displayed when you have
equipped a weapon that has
multiple functionality. Press the
Y button while in ready state.
The design of the COMS device will
vary depending on the character.
Tip
dying
When the player’s Vitality
Gauge reaches zero, they enter
the Dying state, and the Dying
Gauge is displayed. In this state
many actions are restricted,
and it will be game over if more
damage is incurred. The Dying
Dying Gauge
Gauge is replenished after a
set time, and when it becomes
full, the player can return to the
game again.
Tip
You can only use the weapon you had equipped when
you enter the Dying state. You will not be able to reload,
game over / continue
It’s game over when any of the following occurs:
• The player or their partner suffers more damage when in the
Dying state.
• Failed to accomplish your objectives, or failed certain QTE’s.
After a game over, you can restart the game from the previous
checkpoint by selecting “Continue.”
change weapons, or use any items.
P.17
06 07
Page 6

item slot recovery / route guide
Press the Y button during the game to open the Item Slot &
view the items you have or discard items you no longer need.
Item Slot Screen
Move Cursor
Cursor
Item Name
Right Stick
or Directional pad
Item Inventory (Number Possessed)
Switch screens with z button
Weapons Screen
Currently Equipped Weapon
Switch Weapon
Inventory Display
Right
Stick up /
Cursor
down or
Directional
pad up /
down
Item Menu
Use the cursor to choose
an item & press the A button.
recovery
In this game, herbs are used in tablet form.
Use health tablets and first aid spray to
replenish your Vitality and PC Gauges.
Health Tablets
Use one tablet with each press of the
z button. With one tablet, the Vitality
Gauge recovers by one block and the
PC Gauge recovers completely. You
need to convert the herbs into tablet
form beforehand. Select an herb in the
Item Slot and press the A button to
store in your tablet case. Another way
to recover is with your partner’s help.
Tip
Tip
Hold down
X
button to prepare and convert tablets
automatically without opening the Item Slot.
route guide
Press y button during the game to display the route guide.
Using the route guide you can confirm your current objectives as
well as view a marker that shows the direction you should head in.
z
button and press the
If you use health tablets or first aid spray near your
partner, their Vitality Gauge and PC Gauge are
replenished at the same time as yours.
Preparing several herbs at once
& then converting them into tablets
results in a greater number of tablets.
First Aid Spray
Equip from Weapons
Screen, x button
Tip
08 09
Page 7

skill settings multiplayer
Skills can be equipped in
skill sets. You can equip up to
three skills in one set.
When you clear a campaign,
the number of skill sets you
can have will increase to
eight.
Skill sets can be changed
at any time during the game
from the options menu (BACK
button).
* Certain skills are specific to the
Campaign or Extra Content
P.13
and can only be equipped in that
particular mode.etc, and must be
equipped specially in each mode.
Skill sets can be changed at any
time during the game from the
Options Menu (BACK button).
Tip
Prepare several favorite skill sets so that you
can use different ones depending on your play
style and the game circumstances.
Skill points can be acquired
by defeating enemies and at
various points throughout the
game. These points can be used
to purchase skills that will be
useful as you proceed through
the game.
There are various multiplayer options in this game, including
co-op play and competitive online modes.
Online Co-Op Multiplayer
As Host
On the System Settings screen in
the Campaign and Create
P.05
Game (Duo) in The Mercenaries
P.13
, you can use the
onscreen menus to incorporate
multiplayer into your game.
As Guest
You can join games that other users have created or are
currently playing. In each mode, select “Join Game” and follow
the onscreen instructions to set up online multi-play.
Typical Settings
Quick Match
Games you can join are
automatically selected.
Custom Match
Specify the types of games
you would like to join.
TO ENJOY ONLINE MULTIPLAYER:
• Use Xbox LIVE® to engage in multi-play with users
from around the world. You will need a broadband
connection in order to access the Xbox LIVE
service. Xbox LIVE Gold Membership is also
required. To view membership details, please see
http://www.xbox.com/en-US/live.
• Engage in multi-play via a system link. To nd out
how to set up a system link, please refer to your
Xbox 360 console instructions.
Typical Settings
Network Selection
Select something other
than “Offline.”
Partner Join
If you would like to accept a
partner, make sure this is not set
to “Don’t Allow.”
Agent Hunt Settings
(Campaign): If you would like to
take part in an Agent Hunt,
set this to “Allow.”
P.13
Private Slots
(The Mercenaries): If you would like
to take on a guest, set this to “1.”
10 11
Page 8

multiplayer extra content
story intersection co-op multiplayer
In certain stages in the CAMPAIGN, it’s possible for up to four
people to play together at story intersections.
Example of Story Intersection Co-Op
Two players in Leon’s CAMPAIGN
Split-Screen Multiplayer
Four players
Two players in Jake’s
CAMPAIGN Online Co-Op
working together at the
story intersection!
* To play with other players during story intersections, change your session
settings to public.
P.11
split-screen offline co-op
With two or more controllers connected
to your Xbox 360, select “Split” from the
Screen Mode to experience
co-op play split over two screens. Start the
game by pressing the START button on the
controller during Character Select.
* Split screen play is only possible in Campaign Mode and The
Mercenaries.
P.13
P.05
the mercenaries
In this mode, you aim to
score points by defeating as
many enemies in a stage as
possible within a set time.
Agent hunt
In this mode, you can join
other players’ games as
an enemy creature, and
compete to defeat as many
players (agents) as possible.
A maximum of two people can play
at the same time. Split-screen is also
possible.
Points are displayed on the leaderboards.
In The Mercenaries X Skill Settings,
you can buy and equip special skills
unique to this mode.
Skills equipped under Skill Settings in
the campaign will not be equipped in
The Mercenaries.
This mode must first be unlocked by
clearing one of the campaigns.
If the agent is defeated in a stage,
the victory falls to the creature.
Even if you are defeated, you can
recover indefinitely as long as the
agent doesn’t clear the stage.
The number of agents defeated is
displayed on a special leaderboard.
The type of creature character you
control is decided randomly. Each
creature has various different actions.
In Agent Hunt X Skill Select,
you can buy & equip special skills
unique to this mode.
12 13
Page 9

player actions
action buttons
Action buttons are displayed at various points during the game.
Be careful, as failing to press them correctly may mean you
lose the game.
* If the difficulty is set to “Amateur”, action buttons that make the difference between
life and death will be pressed automatically (Except for certain areas).
Hit the button within
the time limit!
Press the button
with the correct timing!
physical attack
When the PC Gauge is empty, you
can only perform weak attacks that
will leave you vulnerable.
One way to Take Down Enemies
x button
quick shot
A fast attack that automatically targets nearby enemies.
Press w button & x button simultaneously.
Tip
An enemy hit with a Quick Shot will always
be thrown off guard. This is a great time to
perform a martial physical attack!
escape counter
Holding down the
w button, move the
left stick (up/down/
left/right) & press
A button
After escaping, continue pressing w
button to ready your weapon while in
prone position.
cover
Press the x
button at the
instant the
enemy attacks.
Press the w button near walls or other
objects that may be used for cover. (Press
w button and A button at the same time
Perform the
Aim for a weak
Enemy is stunned!
coup de grâce!
point!
14 15
to duck behind objects such as tables or
crates.) When hiding behind cover and
holding down w button, you can use the
left stick to move around and edge out from
your hiding place to make attacks.
Page 10

partner actions
partner actions
Partner Action B button
There are many situations in the game where you will need the
help of a partner.
When you come to a location
where you will need to work
Tip
While waiting, press and hold down the
button to check your partner’s status.
B
with your partner, press
the B button to activate
the partner prompt. Your
character will wait for your
partner’s response (this can
be cancelled by pressing the
A button.)
rescue
If your partner has been captured they’ll enter Help status. Press
the B button in close vicinity to help them escape.
dying rescue
When your partner is in the Dying state, the Dying
icon is displayed onscreen. You can help your
partner by doing the following:
B button: Treatment
Their Vitality Gauge will not be replenished.
z button: Revival*
Use your health tablets to free your partner
from the Dying state and replenish their Vitality
Gauge at the same time. * Health tablets required.
call
Hold down the B button and press y button
or z button or the directional pad: You can
convey simple messages to your partner, including
thanks & instructions.
Hold down the w button, lock aim on the
enemy, & press the B button to issue an attack
command (set an attack tag).
Use your laser sight to attack a tag to an enemy. Your
partner will then target these enemies first.
(You can remove the tag by holding down w button &
pressing the B button when the enemy is not in your laser
sight.)
B button
passing items
(Only during Split-screen play)
During Split-screen play, you can pass items such as herbs and ammunition from your Item Slot to your partner.
16 17
Page 11

90-DAY LIMITED WARRANTY
CAPCOM U.S.A., INC.
(“CAPCOM”) warrants to the original
consumer that this game disc from CAPCOM
shall be free from defects in material and
workmanship for a period of 90 days from
date of purchase. If a defect covered by this
warranty occurs during this 90-day warranty
period, CAPCOM will replace the game disc
free of charge.
To receive this warranty service:
1. Notify the CAPCOM Consumer Service
Department of the problem requiring
warranty service by calling (650) 350-6700.
Our Consumer Service Department is in
operation from 8:30 a.m. to 5:00 p.m. Pacific
Time, Monday through Friday or please visit
shop.capcom.com and click the Support tab
at the top of the page.
2. If the CAPCOM service technician is
unable to solve the problem by phone, he/
she will instruct you to return the game
disc to CAPCOM freight prepaid at your own
risk of damage or delivery. We recommend
sending your game disc certified mail.
Please include your sales slip or similar
proof of purchase within the 90-day
warranty period to:
CAPCOM U.S.A., INC.
Consumer Service Department
800 Concar Drive, Suite 300
San Mateo, CA 94402-7045 U.S.A.
This warranty shall not apply if the game
disc has been damaged by negligence,
accident, unreasonable use, modification,
tampering or by other causes unrelated to
defective materials or workmanship.
REPAIRS AFTER EXPIRATION OF WARRANTY
If the game disc develops a problem after
the 90-day warranty period, you may contact
the CAPCOM Consumer Service Department
at the phone number noted previously. If
the CAPCOM service technician is unable
to solve the problem by phone, he/she may
instruct you to return the defective game
disc to CAPCOM freight prepaid at your
own risk of damage or delivery, enclosing
a check or money order for $20.00 (U.S.
funds) payable to CAPCOM. We recommend
sending your game disc certified mail.
CAPCOM will replace the game disc subject
to the conditions above. If replacement game
discs are not available, the defective product
will be returned to you and the $20.00
payment refunded.
WARRANTY LIMITATIONS
ANY EXPRESS OR IMPLIED WARRANTIES,
INCLUDING WARRANTIES OF
MERCHANTABILITY AND FITNESS FOR
A PARTICULAR PURPOSE, ARE HEREBY
DISCLAIMED. IN NO EVENT SHALL CAPCOM
BE LIABLE FOR SPECIAL, INDIRECT,
CONSEQUENTIAL OR INCIDENTAL DAMAGES
RESULTING FROM THE BREACH OF ANY
EXPRESS OR IMPLIED WARRANTIES.
The provisions of this warranty are valid in
the United States and Canada only. Some
states and provinces do not allow limitations
on how long an implied warranty lasts or
exclusions of consequential or incidental
damages, so the above limitations and
exclusions may not apply to you. This
warranty gives you specific legal rights, and
you may have other rights, which vary from
state to state or province to province.
ESRB RATING
This product has been rated by the
Entertainment Software Rating Board. For
information about the ESRB rating, or to
comment about the appropriateness of the
rating, please contact
the ESRB at www.esrb.org.
CAPCOM U.S.A., INC.
800 Concar Drive, Suite 300
San Mateo, CA 94402-7045 U.S.A.
©CAPCOM CO., LTD. 2012 ALL RIGHTS
RESERVED. Resident Evil, CAPCOM and the
CAPCOM LOGO are registered trademarks of
CAPCOM CO., LTD. Dolby and the double-D
symbol are trademarks of Dolby Laboratories.
KINECT, Xbox, Xbox 360, Xbox LIVE, and the Xbox logos
are trademarks of the Microsoft group of companies
and are used under license from Microsoft.
trademarks are owned by their respective
owners.
All other
18
 Loading...