

Page 1

Page 2

PLEASE CAREFULLY READ THE Wii™ OPERATIONS MANUAL COMPLETELY BEFORE USING YOUR
Wii HARDWARE SYSTEM, GAME DISC OR ACCESSORY. THIS MANUAL CONTAINS IMPORTANT
HEALTH AND SAFETY INFORMATION.
IMPORTANT SAFETY INFORMATION: READ THE FOLLOWING WARNINGS BEFORE YOU OR
YOUR CHILD PLAY VIDEO GAMES.
WARNING – Seizures
• Some people (about 1 in 4000) may have seizures or blackouts triggered by light flashes or
patterns, and this may occur while they are watching TV or playing video games, even if they have
never had a seizure before.
• Anyone who has had a seizure, loss of awareness, or other symptom linked to an epileptic
condition should consult a doctor before playing a video game.
• Parents should watch their children play video games. Stop playing and consult a doctor if you or
your child has any of the following symptoms:
Convulsions Eye or muscle twitching Altered vision
Loss of awareness Involuntary movements Disorientation
• To reduce the likelihood of a seizure when playing video games:
1. Sit or stand as far from the screen as possible.
2. Play video games on the smallest available television screen.
3. Do not play if you are tired or need sleep.
4. Play in a well-lit room.
5. Take a 10 to 15 minute break every hour.
WARNING –
Playing video games can make your muscles, joints, skin or eyes hurt. Follow these instructions to
avoid problems such as tendinitis, carpal tunnel syndrome, skin irritation or eyestrain:
• Avoid excessive play. Parents should monitor their children for appropriate play.
• Take a 10 to 15 minute break every hour, even if you don't think you need it.
• If your hands, wrists, arms or eyes become tired or sore while playing, or if you feel symptoms such
as tingling, numbness, burning or stiffness, stop and rest for several hours before playing again.
• If you continue to have any of the above symptoms or other discomfort during or after
play, stop playing and see a doctor.
Repetitive Motion Injuries and Eyestrain
CAUTION – Motion Sickness
Playing video games can cause motion sickness in some players. If you or your child feel dizzy or
nauseous when playing video games, stop playing and rest. Do not drive or engage in other
demanding activity until you feel better.
The Official Seal is your assurance that this product is licensed or manufactured by
Nintendo. Always look for this seal when buying video game systems, accessories,
games and related products.
Nintendo, Wii and the Official Seal are trademarks of Nintendo. © 2007 Nintendo.
CAUTION: WRIST STRAP USE
Please use the wrist strap to help prevent injury to other people or damage to
surrounding objects or the Wii Remote in case you accidentally let go of the Wii Remote
during game play.
Also remember the following:
• Make sure all players put on the wrist strap properly when it is their turn.
• Do not let go of the Wii Remote during game play.
• Dry your hands if they become moist.
• Allow adequate room around you during game play and make sure that all
areas you might move into are clear of other people and objects.
• Stay at least three feet from the television.
• Use the Wii Remote Jacket.
SYSTEM MENU UPDATE
Please note that when first loading the Game Disc into the Wii
console, the Wii will check if you have the latest system menu,
and if necessary a Wii system update screen will appear. Press
OK to proceed.
Licensed by Nintendo
This Nintendo game is not designed for use with
IMPORTANT LEGAL INFORMATION
any unauthorized device. Use of any such device will invalidate your Nintendo product warranty.
Copying of any Nintendo game is illegal and is strictly prohibited by domestic and international
intellectual property laws. “Back-up” or “archival” copies are not authorized and are not necessary to
protect your software. Violators will be prosecuted.
REV–E
Page 3
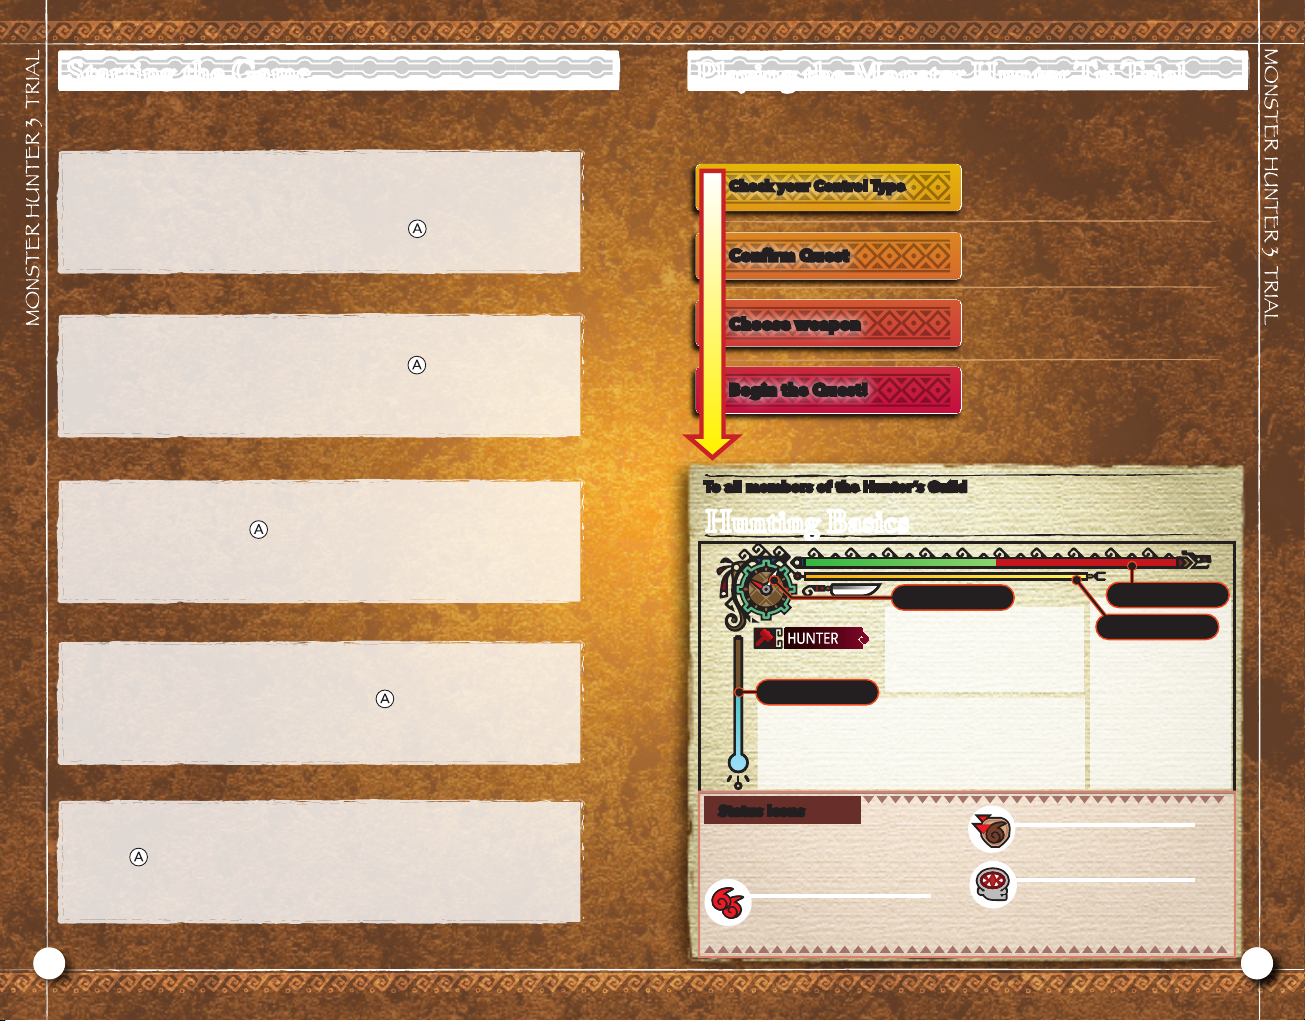
Starting the Game
Insert the Monster Hunter Tri Demo disk into the Wii’s disc slot. The Wii
console will then power on automatically, and when the Health and Safety
screen is displayed, confirm the contents and press .
Point to “Disc Channel” on the Wii Menu and press .
Playing the Monster Hunter Tri Trial
Welcome to the world of Monster Hunter Tri! In this demo, you will be
able to hunt two kinds of giant monsters.
Check your Control Type
Confirm Quest
Choose weapon
Begin the Quest!
To all members of the Hunter’s Guild
Choose your preferred method of
control. Your choices are Freestyle,
Classic Style 1, and Classic Style 2.
Choose the Quest you would like to try.
You can try your hand at hunting either
a Great Jaggi or a Qurupeco.
Choose your weapon. Different weapons
have different attributes, so remember to
choose wisely.
Once you have made all your selections,
the Quest will begin. Find the monster
within the time limit and make use of all
your items, strength and techniques to
hunt it down.
Point to “Start” and press . The Strap Usage screen will be displayed.
When your wrist strap is secured tightly, press . The Title Screen will
be displayed.
Press . The game will begin.
Hunting Basics
Clock
Displays the amount of time
remaining in the Quest. Once
time runs out, you will fail the
Quest if you have not yet com-
Oxygen Gauge
Indicates the amount of time you can hold your
breath. This gauge will decrease when you dive
under water, and if it runs out completely, your
Health will start to decrease in its place. Try to get
to the surface to breathe before it gets too low!
Status Icons
The icons shown here indicate when a
hunter is inflicted with the status they
represent.
Fireblight
Gradually reduces health. Jump
in some water or repeat evasive
maneuvers to recover.
pleted your objective.
Health Gauge
Stamina Gauge
Indicates your
remaining Health and
Stamina. You will fall
unconscious if you
lose all your Health,
and you will become
unable to sprint or
dodge attacks without Stamina.
Fire Resistance Down
Indicates that you have become
weak to fire-based attacks.
Life Drain
Indicates that a blood-sucking
parasite has attached itself to
your body. Shake it off with
evasive maneuvers.
32 3
Page 4
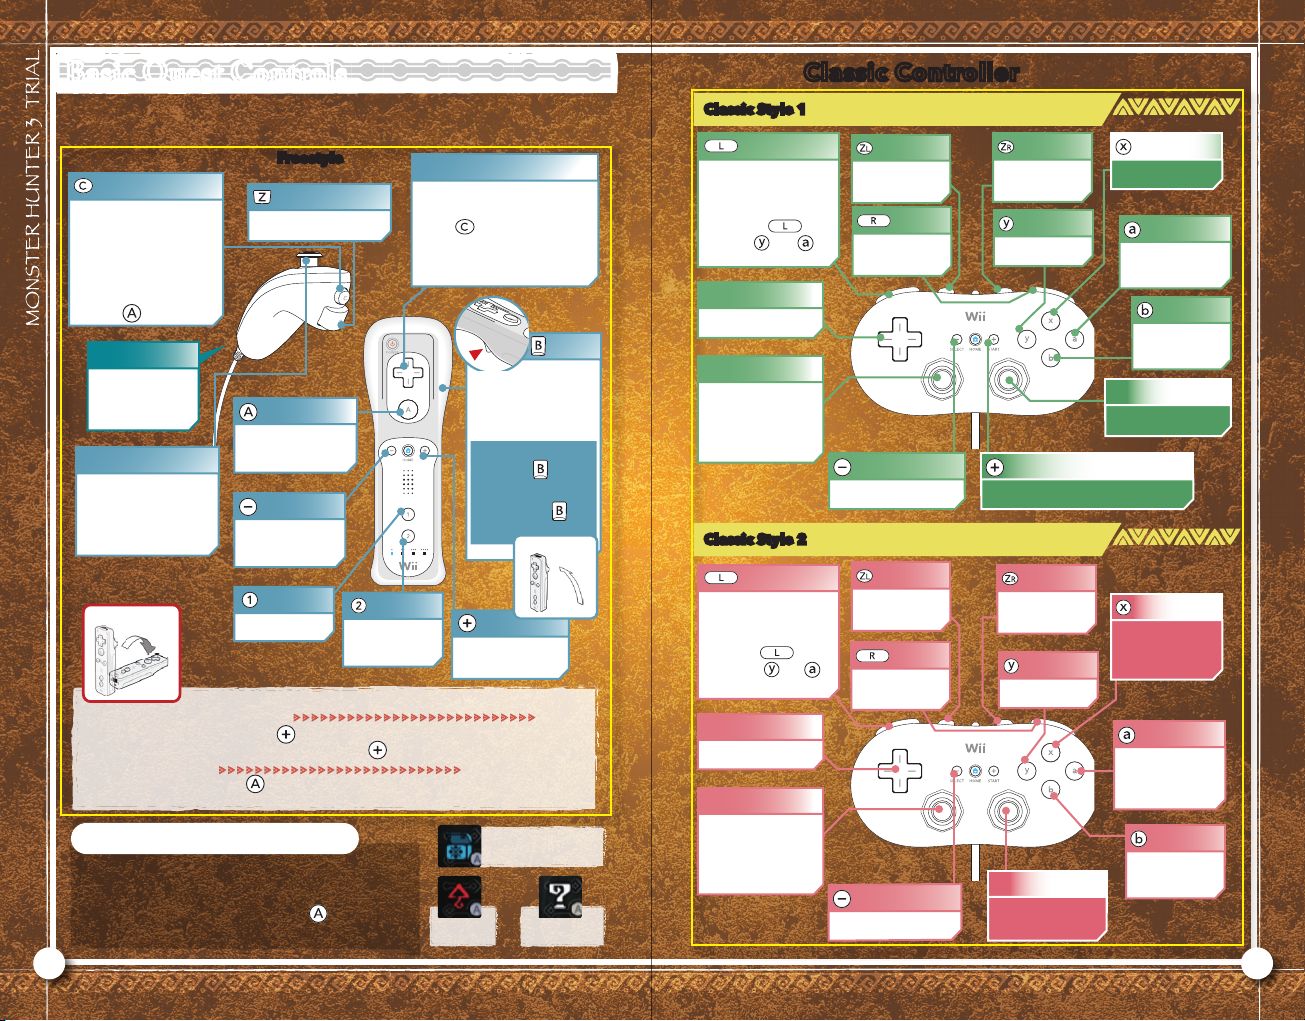
Basic Quest Controls
These are the methods used to control your hunter during a
Quest. Practice them until they become second nature.
Tap: Center camera
Hold: Open the Item Window
X
With the Item
Window open:
•
Change item with the
+Control Pad
•
Press
to use items
Swing Nunchuk
Gather, mine,
carve, climb
Control stick
Move
* Underwater: move
in the direction of the
camera angle
Freestyle
[Hold and Move] Dash
Gather, mine, carve,
climb
•
Kick
•
Tackle (underwater)
+Control Pad
CVZX
•
•
Camera operation
With the Item Window open:
(Hold )
Select Ammunition
CV
Select Item
ZX
•
While standing still:
Crouch (only on land)
•
While moving: Evade
Underwater:
•
Hold the Wii Remote
upright + : Surface
•
Hold the Wii Remote
horizontally + :
Dive
Upright
Classic Style 1
•Center camera
• Hold open the
item window
Hold down
and use and
to make selections
+Control Pad
Camera control
L Stick
Move
Can be used while
underwater to reset
the camera
Classic Style 2
Classic Controller
Surface
(underwater)
[Hold and Move]
Dash
/ SELECT Button
Open Game Menu
•
Kick • Tackle (underwater)
Dive
(underwater)
Use Item
/ START Button
Draw weapon
Gather, mine, carve,
climb
Evade/Crouch/
Cancel selection
R Stick
Camera control
Swing
Use Item
Open Game
Menu
Draw/sheathe
weapon
About taking out weapons
•Swing Wii Remote OR press : Take out weapon
•Control Stick + Swing Wii Remote OR press : Take out weapon and attack
About Attacking
Use the Wii Remote and in combination to perform attacks. (See
each weapon’s controls for more information)
About Pop-up Icons
When you stand at a point that allows you to gather,
mine, and perform other contextual actions, a special
kind of icon will be displayed over your hunter’s head.
When you see an icon like this, press or swing the
Nunchuk to perform the action indicated by the icon.
Climb Up
Open Supply Box
Gather Item
•Center camera
• Hold open the item
window
Hold down
and use the and to
make selections
+Control Pad
Change control
L Stick
Move
Can be used while
underwater to reset
the camera
Surface
(underwater)
[Hold and Move]
Dash
/ SELECT Button
Open Game Menu
Dive
(underwater)
Use Item
R Stick
Weapon Controls
Draw weapon
•
Kick
•
Tackle (underwater)
Gather, mine, carve,
climb
Evade/Crouch/
Cancel selection
4 5
Page 5

Sword and Shield
A basic style that employs both a sword and
a shield. Popular for its flexibility in adapting
to many different situations and for its high
maneuverability.
Block
Evade
Sword and Shield with Classic Controller
Classic Style 1
Block
Chop
Side Slash
Horizontal
Right
Left
•Roundslash
•Rising Slash (when used in combination with Control Stick)
Attacks
while Horizontal
three times while Horizontal
Twist Wii Remote Right
and twice
Twist Wii Remote Left and
Swing the Wii Remote or hold
the Wii Remote upright and
Chop
3 Hit Combo
Shield Attack X Back Knuckle
(underwater: Shield Attack X
Rising Slash)
Side Slash
Jumping Slash
(underwater: Rush
Attack)
Attack
Sheathe
weapon
Use Item
Upright
Swing
Evade
Roundslash/ START Button
Sheathe weapon
By combining different buttons, the following kinds
of techniques can be used.
With weapon
sheathed:
+ +
while blocking
Classic Style 2
Take out weapon
and perform a
+
Jumping Slash
Take out weapon
and block
Use item
while blocking
L Stick +
+
L Stick +
Block
Roundslash
/
Sheathe weapon
Evade
R Stick
Side Slash
Jumping Slash (Rising Slash if
performed while moving)
Block Slash
Shield Attack
Jumping Slash
Rising Slash
Chop
Shield Attack
You can use
items while
your weapon is
drawn
When using the Sword and Shield, you can continue to use
items even while your weapon is drawn.
When using Classic Style 2, the R Stick can be tilted in
different directions to perform various techniques.
*When underwater, the Jumping Slash will change to Rush Attack.
6 7
Page 6

Great Sword
Possesses the greatest destructive power and the
longest reach out of all weapons, and can be used
to block in place of a shield. The key is figuring out
how to make up for the loss in speed.
Evade
Great Sword with Classic Controller
Classic Style 1
Block
Overhead Slash
Wide Slash
Horizontal
Right
Left
Put the Charged
Slash to good
use
Block
Attacks
while Horizontal OR Swing
three times while Horizontal
Twist Wii Remote Right and
Twist Wii Remote Left and
Charged
Slash
Upright and hold down
Swing the Wii Remote
OR release
The Charged Slash, which builds up power before
unleashing it all at once, is a powerful technique only
available to Great Sword wielders. However, be aware
that while it does let you deal lots of damage to monsters,
it will also leave you defenseless while you are charging.
Kick
(underwater: Tackle)
Overhead Slash
3 Hit Combo
Rising Slash
Wide Slash
Begin charging
Charged Slash
Attack
Sheathe
weapon
Upright
Swing
Evade
Sheathe weapon
/ START Button
• Kick
• Tackle
(underwater)
By combining different buttons, the following kinds of
techniques can be used.
L Stick +
+
Classic Style 2
Take out weapon
and perform a
Vertical Slash
Rising Slash
Hold down
R Stick
Wide Slash Rising Slash
/
+ +
Block
• Kick
• Tackle
(underwater)
Sheathe weapon
Evade
Overhead Slash
Charged Slash
When using Classic Style 2, the R stick can be tilted in
different directions to perform various techniques.
Take out weapon
and block
Charged Slash
8 9
Page 7

Hammer
A melee weapon that sacrifices defense to focus purely on
offense. Charge up its power to unleash a variety of techniques
that will send monsters to an early grave.
Evade
Attack
Hammer with Classic Controller
Classic Style 1
Windup Smash
Ground Smash
Side Smash
Evade
Sheathe weapon
Windup Smash
Attacks
three times while Horizontal
Twist Wii Remote Right and OR
Begin charging X release to
unleash Windup Smash
and while weapon is put away
After charging to maximum, release
while tilting the Control Stick
A variety
of Windup
Smashes
The Hammer’s Windup Smashs will change depending
on how long they are charged. You can continue to move
about freely as your weapon charges, but be aware that
your stamina gauge will also decrease while you charge.
Ground Smash Combo
Side Smash
Side Smash
Take weapon out and
begin to charge
Roundslash X press
for a follow-up attack
Sheathe
weapon
Horizontal
Right
By combining different buttons, the following kinds of
techniques can be used.
L Stick +
Classic Style 2
Take out weapon
and perform an
Draw Smash
R Stick
+ +
Windup Smash
/
Evade
Ground Smash
Side Smash
Sheathe weapon
When using Classic Style 2, the R stick can be tilted in
different directions to perform various techniques.
Take out weapon
and perform a
Windup Smash
10 11
Page 8

Bowgun
A giant firearm that can shower enemies with
bullets from long range. Can be used for anything
from support to explosives by changing its ammunition type.
Scope View On/Off
• Hold down: Turn on
Quick Aim
+Control Pad
•When selecting items
Select Ammunition
CV
•When using Scope View
Zoom in
CX
Zoom Out
VZ
•When using Quick Aim
CVZX
Evade
Fire
Move sight
Bowgun with Classic Controller
Classic Style 1
+Control Pad
L Stick
By combining different buttons, the following kinds of
techniques can be used.
With the Item
Selection Window
open
Controls sight while using Quick Aim
Manipulate Sight
(when using Scope View)
and
Select
Ammunition
R Stick
Scope View On/Off
•Hold down: Turn on Quick Aim
Reload
Fire
Evade
Sheathe weapon
Zoom out (when
using Scope View)
+
Bash target with Bowgun
+ +
Zoom in (when
using Scope View)
Take weapon out
and reload
Swing
Weight
Difference
Using
the Sight
Reload
and Take out weapon and reload
Attacks
Swing the Wii Remote
There are two main types of Bowgun that are classified by
weight: the Light Bowgun, and the Heavy Bowgun. The different types of Bowgun will affect their user’s behavior in a
number of ways. For example, the Heavy Bowgun’s weight will
prevent its user from being able to move as quickly as usual.
A true gunner knows how to zoom in precisely on an enemy’s
weak point to deliver a deadly shot. The Bowgun lets you aim
in two different ways.
Scope View
Quick Aim
Move the sight with the Control Stick. Allows for precision aiming, but its user cannot move while using it.
Irradiates its target with a red dot that can be controlled using the +Control Pad. The user can also
move around while using the sight.
Sheathe
weapon
Bash target with Bowgun
Classic Style 2
+Control Pad
L Stick
With the Item
Selection Window
open
Controls sight while
using Quick Aim
Manipulate Sight
(when using Scope View)
and
Evade
Select Ammo
/
R Stick
Zoom out (when
using Scope View)
Scope View On/Off
•Hold down: Turn on Quick Aim
Fire
Sheathe weapon
Bash target with Bowgun
Zoom in (when
using Scope View)
Reload
12 13
Page 9

t
With the advantage of an impenetrable shield, strike your
foe down with your long, deadly fang from afar.
When the weapon is sheathe +
Move quickly from an unarmed state to
a guarded position. It’s the fundamental
Lance maneuver.
Control Stick ++
Block advance. Maintain a guarded
stance behind the shield and move
forward. Press the button to strike
with the shield.
Horizontal
while Horizontal
Twist Wii Remote right and
Right
Twist Wii Remote left and
Upright and hold down
Lance
Block
Attacks
Dash attack
Mid-thrust
Wide Slash
High thrust
Counter-thrust
Step
Attack
Sheathe
weapon
Upright
Left
Lance with Classic Controller
Classic Style 1
Block-advance
Mid-thrust
High Thrust
+
Sweep
Step
Dash Attack/ START Button
By combining different buttons, the following kinds of
techniques can be used.
Hold
while moving
and press
While
Blocking
Classic Style 2
* Hold the R Stick to the
left to engage in a
Counter-thrust.
Block Advance
Cancel Thrust
* Continue pressing
to engage in
a Counter-thrust
Sheathe weapon
+ +
during Block-Advance
during Dash Attack
during Dash Attack
Block
Dash Attack
/
Sheathe weapon
Take out weapon
and Draw-block
Shield Attack
Finishing Blow
Quick Halt
R Stick
Blocking: the
key to the Lance
Only masters of
the Block advance
can be called true
Lancers!
Unlike most other weapons, the Lance isn’t good for speedy
evasive maneuvers − what’s more, it makes for oppressively
slow movement when it’s out and at the ready. To overcome
these obstacles, it’s imperative that Lance hunters know how
to make the most of the block maneuver.
The Block advance can come in handy in a wide variety
of situations. You can even combat monster breath with a
Block advance Approach Shield Attack Mid-Thrust!
➝ ➝ ➝
Step
Cancel Thrust Sweep
When using Classic Style 2, the R stick can be tilted in
different directions to perform various techniques.
Mid-Thrust
High Thrust
14 15
Page 10

Switch Axe
New technology has brought forth a miraculous new weapon of phantasmagoric might.
Axe Mode
•Sword Mode
• Reload (when
gauge is falling)
Evade
You may step
after attacking
Attack
Switch Axe with Classic Controller
Classic Style 1
Sheathe weapon
Axe
/ START Button
Rising Slash
Sword
Element Discharge (strike several times to finish)
By combining different buttons, the following kinds of
Axe/Sword Mode
Axe
Overhead Slash
Sword
Side Slash
Axe
Side Slash
Sword
Overhead Slash
Evade
techniques can be used.
When the weapon is sheathed +
Changes from an unarmed state
to sword mode. Reloads when the
gauge is falling.
Pressing while in motion
Forward slash. Press to switch to
sword mode
Rising slash
Sword Mode
Element Discharge
Once pressed, continue to
repeatedly press or
to execute a barrage of
Axe Mode
In sword mode, the phials built in to the
weapon can use slash gauge energy to execute
special attacks. Depleted gauges will recover
slowly with time, but just know that when you
see the “RELOAD” display, you can reload to
replenish the gauge. If the gauge reaches 0,
the weapon will return to axe mode.
attacks with an elemental
discharge finish.
Sheathe
weapon
Evade
You may step
left/right after
attacking
Attack
Sheathe
weapon
+ +
while moving
after Forward
Slash in Axe mode
multiple times
Classic Style 2
Axe/Sword Mode
Evade
When using Classic Style 2, the R stick can be tilted in
different directions to perform various techniques.
Take out weapon and
perform an attack in
Sword mode
Axe
Forward Slash
Axe
Morph Slash
Axe
Hack ‘n’ Slash
R Stick
L stick up +
after Side
Slash in Sword
mode
Sword
(strike several times to finish)
/
Sheathe weapon
Axe
Sword
Axe
Side Slash
Sword Rising Slash
Axe
Sword
While moving
forward
Sword
Sword
Element Discharge
Overhead Slash
Side Slash
Axe
Sword Rising Slash
Rising Slash
Overhead Slash
Overhead
Slash
Morph
Slash
Side Slash
16 17
Page 11

Long Sword
With beauty in its strength, this spirited
blade slices through steel like paper.
A direct hit with the Long
Sword increases the spirit
gauge. This gauge decreases
with every use of the “Spirit
Blade”, but when charged to
capacity, it will remain full for
a given period of time.
•Wii Remote horizontal − Fade Slash
• Twist the Wii Remote left− Left
Moving Slash
•Twist the Wii Remote right − Right
Moving Slash
While blade is sheathed +
Take out weapon and perform a Spirit
Blade attack
Horizontal
while Horizontal
Left
Right
Spirit Blade
Combo Attacks
Step Slash
Thrust
Twist Wii Remote
Left/Right and
➝
➝
Rising Slash
Overhead Slash
Thrust
Rising Slash
➝ ➝
Overhead Slash
Evade
Attack
Sheathe
weapon
Long Sword with Classic Controller
Classic Style 1
Spirit Blade
Step Slash
Thrust
+
By combining different buttons, the following kinds of
techniques can be used.
after a Spirit Slash III
+ +
Classic Style 2
Spirit Roundslash
Take out weapon and
perform a Spirit Blade
attack
/
Fade Slash
Evade
Sheathe weapon
During a combo
attack: L Stick
left or right +
+
Spirit Blade
Thrust
Sheathe weapon
Moving
Slash
R Stick
Left Moving
Slash
Step Slash
Right Moving
Slash
Fade Slash
Spirit
Roundslash
Spirit Gauge
Changes
•
When you hit a monster with a Spirit Roundslash, the spirit
gauge color changes and attack power increases.
•
The weapon is sheathed after completing a
Spirit Roundslash.
• Press after a Spirit Blade combo
It takes a while to build this attack power-boosting gauge up to
red. You can maintain the white and yellow border until you fall
unconscious, but the far more powerful red border will expire
after a certain amount of time. Pull off a Spirit Roundslash when
the gauge is red and hit your foe with all your might.
Evade
When using Classic Style 2, the R stick can be tilted in
different directions to perform various techniques.
18 19
Page 12

Notes
90-DAY LIMITED WARRANTY
CAPCOM ENTERTAINMENT, INC.
(“CAPCOM”) warrants to the original
consumer that this game disc from
CAPCOM shall be free from defects in
material and workmanship for a period
of 90 days from date of purchase. If a
defect covered by this warranty occurs
during this 90-day warranty period,
CAPCOM will replace the game disc
free of charge.
To receive this warranty service:
1. Notify the CAPCOM Consumer
Service Department of the problem
requiring warranty service by calling
(650) 350-6700. Our Consumer Service
Department is in operation from 8:30
a.m. to 5:00 p.m. Pacific Time, Monday
through Friday.
2. If the CAPCOM service technician is
unable to solve the problem by phone,
he/she will instruct you to return the
game disc to CAPCOM freight prepaid
at your own risk of damage or delivery.
We recommend sending your game
disc certified mail. Please include your
sales slip or similar proof of purchase
within the 90-day warranty period to:
CAPCOM ENTERTAINMENT, INC.
Consumer Service Department
800 Concar Drive, Suite 300
San Mateo, CA 94402-2649
This warranty shall not apply if the
game disc has been damaged by negligence, accident, unreasonable use,
modification, tampering or by other
causes unrelated to defective materials
or workmanship.
REPAIRS AFTER EXPIRATION OF WARRANTY
If the game disc develops a problem
after the 90-day warranty period, you
may contact the CAPCOM Consumer
Service Department at the phone number noted previously. If the CAPCOM
service technician is unable to solve
the problem by phone, he/she may
instruct you to return the defective
DVDROM to CAPCOM freight prepaid
at your own risk of damage or delivery,
enclosing a check or money order for
$20.00 (U.S. funds) payable to CAPCOM. We recommend sending your
game disc certified mail. CAPCOM
will replace the game disc subject to
the conditions above. If replacement
game discs are not available, the defective product will be returned to you
and the $20.00 payment refunded.
WARRANTY LIMITATIONS
ANY EXPRESS OR IMPLIED WARRANTIES, INCLUDING WARRANTIES OF
MERCHANTABILITY AND FITNESS
FOR A PARTICULAR PURPOSE, ARE
HEREBY DISCLAIMED. IN NO EVENT
SHALL CAPCOM BE LIABLE FOR SPECIAL, INDIRECT, CONSEQUENTIAL
OR INCIDENTAL DAMAGES RESULTING FROM THE BREACH OF ANY
EXPRESS OR IMPLIED WARRANTIES.
The provisions of this warranty are
valid in the United States and Canada
only. Some states and provinces do
not allow limitations on how long an
implied warranty lasts or exclusions of
consequential or incidental damages,
so the above limitations and exclusions may not apply to you. This warranty gives you specific legal rights,
and you may have other rights, which
vary from state to state or province to
province.
ESRB RATING
This product has been rated by the
Entertainment Software Rating Board.
For information about the ESRB rating, or to comment about the appropriateness of the rating, please contact
the ESRB at www.esrb.org.
CAPCOM ENTERTAINMENT, INC., 800
Concar Drive
Suite 300, San Mateo CA 94402-2649.
©CAPCOM CO., LTD. 2009 ALL
RIGHTS RESERVED.
All other trademarks are owned by
their respective owners.
20
21
Page 13

Back cover
Do not Print
 Loading...