

Page 1

OC-B_iv
BIONIC COMMANDO
®
www.bioniccommando.com
Windows, the Windows Vista Start b ut to n an d Xb ox 3 60 a re t ra de ma rk s of t he M ic ro so ft g ro up o f co mp an ie s,
and ‘Games for Windows’ and the Windows Vista Start button logo are used under license from Microsoft.
Page 2
Important Health Warning About Playing Video Games
Photosensitive Seizures
A very small percentage of people may experience a seizure when exposed to certain
visual images, including ashing lights or patterns that may appear in video games.
Even people who have no history of seizures or epilepsy may have an undiagnosed
condition that can cause these “photosensitive epileptic seizures” while watching
video games.
These seizures may have a variety of symptoms, including lightheadedness,
altered vision, eye or face twitching, jerking or shaking of arms or legs, disorientation,
confusion, or momentary loss of awareness. Seizures may also cause loss of
consciousness or convulsions that can lead to injury from falling down or striking
nearby objects.
Immediately stop playing and consult a doctor if you experience any of these
symptoms. Parents should watch for or ask their children about the above
symptoms—children and teenagers are more likely than adults to experience these
seizures. The risk of photosensitive epileptic seizures may be reduced by taking
the following precautions: Sit farther from the screen; use a smaller screen; play
in a well-lit room; and do not play when you are drowsy or fatigued.
If you or any of your relatives have a history of seizures or epilepsy, consult a doctor
before playing.
2
3
4
5
7
9
12
18
19
20
22
24
32
34
35
36
Story
System Requirements
Installation and Game Operation
Controls
Basic Controls
Game Rules
Action
Weapons
Damage
Info Screen
Pause Menu
Multiplayer Online
Multiplayer LAN
Characters
Organizations
Enemies
1
Page 3
Story
Ten years have passed since Nathan “RAD” Spencer, the Bionic
Commando, managed to defeat the Imperials and destroy their
secret weapon, the Albatross. In the aftermath, Spencer and his
comrade Joseph “Super Joe” Gibson were praised as heroes
by the entire nation.
TASC, the military intelligence organization that provided
Spencer with his Bionic Arm, soon found their bionics program
in great demand. Now under the command of Joseph Gibson,
the organization flourished, and many other operatives were
enhanced with bionic parts.
As the original Bionic Commando, Nathan Spencer became
responsible for training these new operatives. At the same
time, Spencer began to undertake a series of high risk, covert
operations. On one such mission, codenamed Operation
Blackout, Spencer’s sense of justice came into conflict
with the orders from his superior and friend Gibson.
In refusing to kill two rogue bionic prototypes, Spencer
disobeyed a direct order, ultimately leading to the deaths
of several TASC agents. Spencer was court-martialed, convicted
of treason, and sentenced to death.
As Spencer rotted on death row, his conviction changed
the public’s view on bionic technology, and opinions on the
subject became divided. Pro- and anti-bionic factions arose
out of this dissension, and what started as a debate over morals
descended into civil unrest.
The issue came to a head when a Presidential directive
was issued to shut down the controversial bionics program.
In what came to be known as the “Bionic Purge”, TASC’s
bionics program was closed, and TASC personnel with bionic
augmentations were ordered to turn in their bionics or have
them forcibly removed. But this heavy-handed tactic backfired,
as pro-bionic followers rioted, and many of TASC’s bionic
operatives chose to flee instead of giving up their artificial parts.
The chaos eventually subsided, and bionic technology was
effectively purged from the nation. Pro-bionic followers went
underground, and the nation once again knew peace.
Until today...
System Requirements
OPERATING SYSTEM
PROCESSOR
Recommended: Intel
MEMORY
Recommended: Windows
VIDEO CARD
Recommended: DirectX
SOUND CARD
HARD DISC SPACE
DVD DRIVE
MONITOR
Recommended: 1280x700 and up
INPUT DEVICES
Recommended: Mouse & Keyboard required, Xbox 360
MULTIPLAYER
Minimum/Recommended: Microsoft® Windows® XP SP2 / Windows
Minimum: Dual-core processor (Intel® Core™2 Duo 2.4GHz or AMD
®
Vista
(Service Pack optional)
™
Athlon
X2 5200+ 2.6GHz)
®
Core™2 Quad 2.4Ghz or AMD Phenom™
9500 Quad Core and higher
Minimum: Windows® XP/Windows Vista®: 1GB and up
®
XP/Windows Vista®: 2GB and up
Minimum: DirectX®9.0c/Shader3.0 compatible, NVIDIA® GeForce®
7800 series (1) or ATI Radeon
9800 GTX+ series or ATI Radeon
™
X1900, or VRAM 512MB
®
10/Shader4.0 compatible, NVIDIA® GeForce®
™
HD 3800 series
or higher, or VRAM 256MB and up
Minimum/Recommended: DirectX®9.0c compatible sound cards
Minimum/Recommended: 8GB free space
Minimum/Recommended: DVD9 compatible drive
Minimum: 800x600 and up
Minimum: Mouse & Keyboard required
for Windows
®
Internet broadband connection required for online play
DEFAULT INPUT DEVICE
The game will default to whichever input device you are using when you enter
the Main Menu screen from the Title screen. If you use an Xbox 360 Controller
for Windows to enter the menu screen, this controller will be set as your input
device for the game. You can change your input device in the Options Menu.
®
Controller
2
3
Page 4
Installation and
Game Operation
Installation Is Required in Order to Play Bionic Commando
1. Insert the game disc in the DVD drive
2. At the Autorun Launcher screen, select “Install.”
3. Choose a setup language and click “Next.”
4. At the NVIDIA screen, click “Next.”
5. Confirm the InstallShield Wizard message by clicking “Next.”
6. Read through and accept the Software License Agreement, then click “Next.”
7. Select setup type (“Complete” or “Custom”), then click “Next.”
8. Confirm and begin installation by clicking “Install.”
9. US LOCALE ONLY: Choose to register your product with Capcom by selecting “Login” or “I don’t
have an account.” Cancel registration by clicking “Cancel” and exit the registration.
10. Ensure “Start Bionic Commando now.” is ticked and finish the installation by clicking “Finish.”
11. Once the game is launched and after the start-up screens, press
Screen.
12. Select the preferred game type—“Single Player,” “Multiplayer Online” or “Multiplayer LAN”—
to proceed into gameplay.
or > at the Title
e
Controls
Keyboard and Mouse
Basic Controls
............................Forward
W
............................Backward
S
.......................... Left
A
............................Right
D
............................Walk/Run
Z
Left Click ...................Fire Weapon
Right Click .................Wire Action
Left
Menu Navigation (Non-configurable)
e
s
s
t
.........Evade
v
/Left Click .......................Select
/Right Click ........................ Cancel selection
(from in-game) ................. Bring up Pause Menu
(from in-game) ..................Bring up Info Screen
............................Inventory
R
SPACE .........................Jump
............................Arm Actions
F
............................Heavy Punch
E
............................Adrenaline
T
............................Look
Q
Left
q
...............Zoom
Uninstalling the Game
1. Select BIONIC COMMANDO
2. When the launcher appears, click Uninstall and follow the on-screen prompts.
3. When the prompt to restart the computer appears, click Yes to complete the uninstall.
J
If you select No, the uninstallation procedure will be incomplete and you won’t be able
to reinstall BIONIC COMMANDO
®
from the list in Uninstall Program.
®
until after you restart your computer.
Note: This game is presented in Dolby® Digital surround sound. Connect your PC
with Dolby Digital Live technology to a sound system with Dolby Digital decoding
using a S/PDIF digital audio cable. Be sure that your PC is configured properly
to deliver Dolby Digital audio during gameplay to experience the excitement
of surround sound.
4
Weapon Shortcuts (Customizable)
You can bind weapons to different key control shortcuts. The weapons in the following list are
bound to the keys indicated by default. You can customize the control shortcuts to your preference.
Press
1
2
3
4
5
6
7
to bind a key; press ¡ to reset the default configuration.
e
...........Tungsten
...........Frag
.........Hiker
...........Yelena
...........Tarantula
...........Bulldog
...........SJMG
5
Page 5
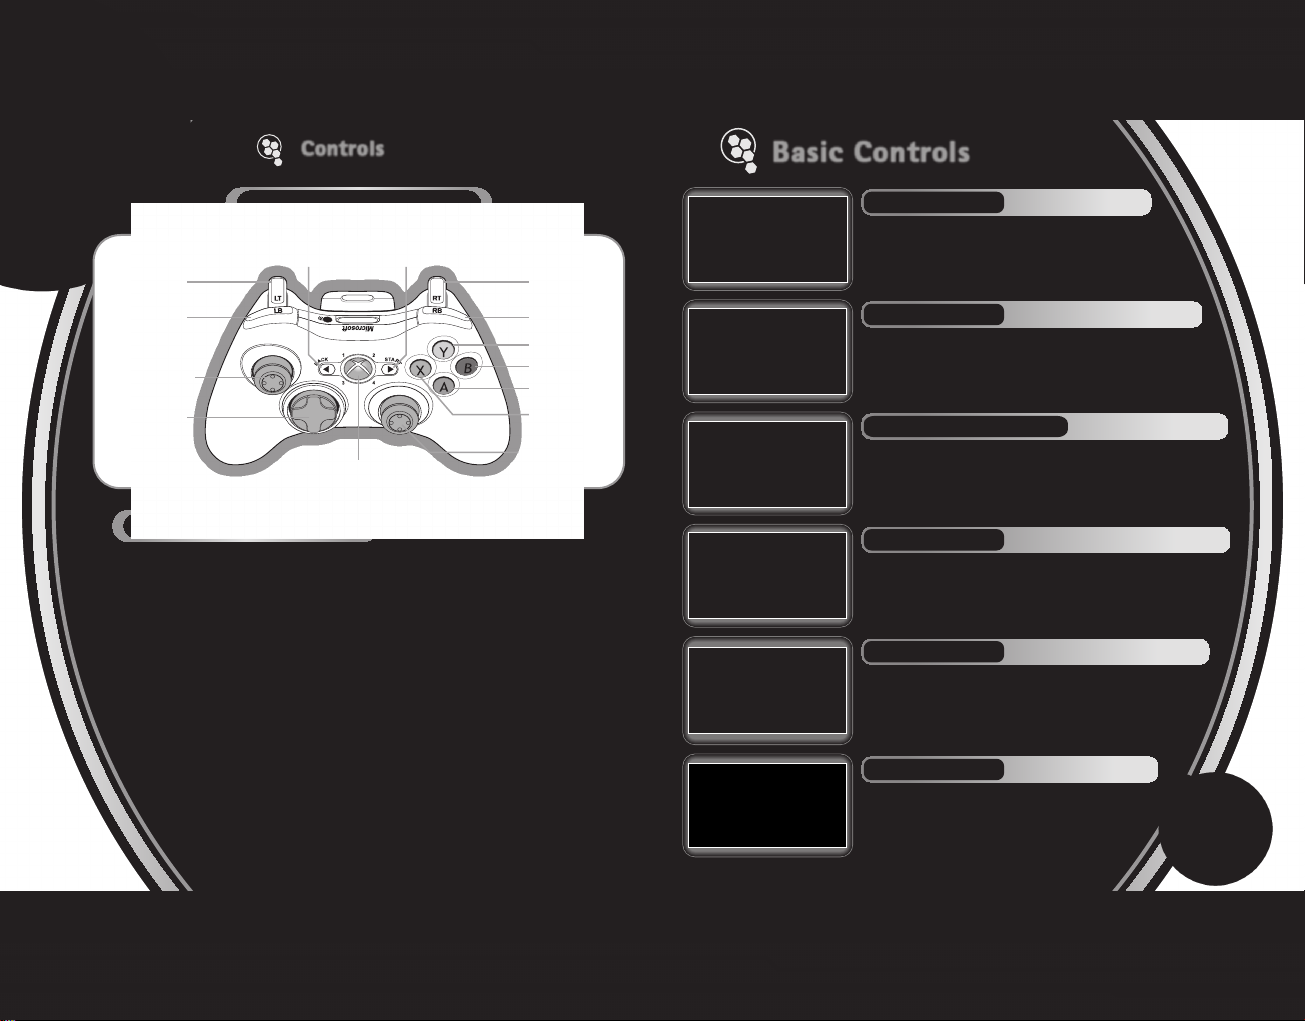
Controls
Basic Controls
Xbox 360 Controller for Windows
< >
w
y
L
l
Xbox Guide
Basic Controls
B
............ Light Punch / Arm Actions C / h ............Aim / Zoom (click C)
X
............ Look
Y
............ Heavy Punch
A
............ Jump
z
...........Inventory
x
............Fire Weapon
y
+L . . Evade Other Controls A: Confirm B: Cancel
w
.......... Wire Action
J
You can toggle the Vibration settings on / off from the Options Menu.
/ j ............Movement / Reset Camera (click L)
L
......................Quick Turn
l
>
.......................Pause Menu
<
.......................Info Screen
x
z
Y
B
A
X
C
MOVEMENT
Press
WASD
to run. Press and hold
slightly) to walk.
(press
L
JUMP
Press SPACE (A) to jump.
Tap SPACE (
A
down to perform a longer jump.
LIGHT PUNCH / ARM ACTIONS
Press
damage enemies or break certain objects with your arm.
HEAVY PUNCH
Press
to damage enemies or break certain objects.
WIRE ACTION
Use Right Click (
allowing you to attach onto different objects and perform many
unique moves
FIRE WEAPON
Use Left Click (
weapon. Different weapons have different functionalities
on the battlefield
) to perform a short jump, or hold it
(B) to execute a light punch. Use this attack to
F
(Y) to execute a heavy punch. You can use this attack
E
(see p.14).
x
WASD
(press L fully) in any direction
+
Z
SPACE (
E
RIGHT CLICK (
w
) to fire the wire of your Bionic Arm,
LEFT CLICK (
) to fire the currently equipp ed
(see p.18).
(L)
WASD
A
F
(Y)
)
(B)
w
)
x
)
7
6
Page 6
Basic Controls
Game Rules
INVENTORY
Press R (z) to switch weapons.
Battlefield Advice 1: Hold
EVADE
LEFT
v
Press Left
down
y
AIM
Use the MOUSE (
the Aiming Reticle and the Grappling Reticle.
ZOOM
Enter zoom mode with the left
In this view, it is easier to aim and target the enemy.
However, you cannot use grenades while zoomed in.
8
+
v
) to perform an evasive maneuver in the selected direction.
) to control the direction of both
C
QUICK TURN
Use
l
controls for keyboard settings.)
(z)
R
(z) to Switch Weapons Faster
R
Weapon Icon
Hold down R (z) to see a display of all the weapons you are
+
WASD
WASD
MOUSE (
LEFT
q
currently carrying. To switch between them, choose the icon of the
desired weapon with the ARROW KEYS (
(HOLD y + L)
(press L while holding
)
C
(h [CLICK C])
(h [click C]).
q
) and release R (z).
C
l
to turn quickly in the direction pressed. (There are no Quick Turn
Start Game
MAIN MENU OPTIONS
Single Player New Game .................... Start a new game.
Continue Game .............Continue a previously saved game.
Level Jump ...................Play any level you have already completed.
Multiplayer Online Nickname ......................Enter your registered nickname.
Password ...................... Enter your registered password.
Login ............................Login with your entered credentials.
Lost Password ...............Retrieve your lost credentials.
New ..............................Register a new account.
Multiplayer LAN Create Game .................Create a new Multiplayer LAN game.
Join Game ....................Join an active Multiplayer LAN game.
Options Video ............................Set Gamma, video, and resolution settings.
Controls ........................ Set various control options and bind keyboard actions.
Sound ...........................Adjust the volume of sound effects and music.
HUD ..............................Adjust the appearance of the in-game heads-up display.
Extras ........................... Check out various bonus items.
Quit Game Quit BIONIC COMMANDO
Game Over
When your character dies, the mission has
failed and the Game Over screen appears.
Press
to restart the game from the last save point.
(>) at the Game Over screen
e
®
back to the desktop.
9
Page 7
Game Rules Game Rules
10
Game Screen
The following information is displayed on the game screen.
Aiming
Objective
Waypoint
Grappling
Reticle
Enemy
Adrenaline Gauge Weapon Status Player Radar
Player ........................... The character you control.
Enemy ............................ Kill or be killed!
Adrenaline Gauge ........... The Adrenaline Gauge fills as you defeat enemies.
Action Buttons ............... Displays the actions that are currently available.
Weapon Status ............... Displays the weapon you have equipped, and the remaining ammo.
Aiming Reticle ................ Aims where your currently equipped weapon will fire.
Grappling Reticle ........... Aims where the wire of your Bionic Arm will fire.
Objective ........................ Displays your current mission and goals.
Waypoint ........................ Displays the location of objectives and points of note.
Radar ............................. Displays enemies and points of interest in your immediate vicinity.
Reticle
Action Buttons
Enemy Life Gauge
When you attack an enemy, its Life Gauge appears at the top
of the screen. Reduce this gauge to zero to defeat the enemy.
Objectives
As you move through the game, you are presented with many different objectives and missions.
Complete each objective to progress through the story.
Waypoints
Waypoint
Appearing throughout the levels are different kinds of waypoints to
guide you to various points of interest. These can be directional (green),
show the location of Relay Stations (yellow), or show the location
of collectible supplies (blue). Directional waypoints vanish after they
have been reached.
Saving Your Game
By accessing the enemy Relay Stations located throughout each level,
you can save your game’s progress. Your game is automatically saved
after exiting the Relay. Game data is also saved automatically at
various points in the game.
J
Profile Save 5KB
J
Each Save Game File: 20KB (x3)
J
Total Space Required: 65KB
The following free space is required to save:
How to Access Relays
To access a Relay Station, connect
to it with your Bionic Arm using Right
w
), and press F (B). Upon
Click (
accessing the Station, you are taken to its
administrative interface where you
can acquire classied data and control
security systems in your vicinity.
Your game is automatically saved
when you leave the Relay Station.
Relay Station
(see p.36)
11
Page 8

Punch Actions
Adrenaline Actions
Action
Action
Action
By using the Bionic Arm and different weapons, you’ll find that many different skills
and abilities are available to you. Some of these abilities are accessible from the start,
while others are unlocked as you make your way through the game.
LIGHT PUNCH
Executes a light punch.
By repeatedly pressing
attacks. You can also perform the Light Punch in mid-air.
HEAVY PUNCH
Executes a stronger punch.
You can use this move to knock enemies up into the air. This move
does considerably more damage than the Light Punch.
DEATH FROM ABOVE (DFA)
The Death From Above, or DFA, is a powerful body-slam technique that
enables you to knock out or ev en ki ll enemies . To perform a DFA, jump
or fall from a sufficient height and repeatedly press
reach the ground. You can boost DFA by using Adrenaline, making
the blow to surrounding enemies potentially lethal.
PUNCH UP
This technique enables you to punch objects up into the air,
and then hit them in the direction you’re aiming.
To perform a Punch Up, approach any highlighted object or enemy
and press
in the air, jump up using SPACE (
in the direction you are aiming by pressing
12
F (B)
(B), you can chain together melee
F
E (Y)
While in mid-air, E (
(
Y), then
E
(Y) to punch it up into the air. While it is
E
These moves can be powered up when you have a fully-charged Adrenaline Gauge (see p.13).
Adrenaline
A
Adrenaline
Y)
(Y) until you
E
(B) in mid-air
F
), and then hit it
(B).
F
Adrenaline
Adrenaline
Certain moves require you to gain Adrenaline before
you can perform them. Adrenaline can be built up
by defeating enemies which gradually fills up your
Adrenaline Gauge. Only when the Adrenaline Gauge is
completely filled may you unleash its power all at once
and perform special moves. Depending on the context in which you use Adrenaline, different moves
are performed. Performing one of these moves reduces your Adrenaline Gauge back to zero.
J
You gain access to the Adrenaline Gauge when you reach a certain stage in the game.
Adrenaline ONLY
FINISHING MOVE
The Finish ing Move is the ultimate tactic , allowing you to p erfor m a stylish move to dispose of certain
enemy types. To perform a Finishing Move, attach to a Polycraft or Biomech, then press
Y
simultaneously).
The Finishing Move can only be used on Polycraft and Biomechs.
Polycraft
Adrenaline ONLY
These moves can only be performed when you have a fully-charged Adrenaline Gauge.
WHIP SPIN
The Whip Spin is a formidable technique that performs a full 360
degree spin, using the Bionic Arm’s wire to devastate enemies.
While attached to an enemy, T (B + Y)
Adrenaline ONLY
(see p.36) Biomechs (see p.36)
T (B + Y)
Adrenaline ONLY
T
Adrenaline ONLY
(B +
Adrenaline ONLY
13
Page 9

Bionic Arm Actions
Bionic Arm Actions
Action
Action
The Bionic Arm
Many situations throughout the game require you to use the Bionic Arm to progress.
It is an effective means of transport, as well as an extremely powerful tool and weapon.
The following are some of the abilities that the Bionic Arm gives you.
ATTACH
Using the Bionic Arm to attach to surfaces, enemies, and objects is key
to progressing through the game. The Bionic Arm can also be useful
in picking up items and supplies dropped by defeated enemies.
To attach to an object, move the Grappling Reticle over it and hold
w
Right Click (
on the object selected. To release the attached object, release Right Click
w
(
THE GRAPPLING RETICLE
The Grappling Reticle changes color depending on what kind of object is being targeted:
J
A blue Grappling Reticle indicates an attachable point within reach.
J
A red Grappling Reticle signifies enemies.
J
A green Grappling Reticle indicates interactive objects and supplies.
). The color of the Grappling Reticle changes depending
) and the wire will automatically retract.
Battlefield Advice 2: Autolock
RIGHT CLICK (w)
The Grappling Reticle constantly searches for the closest
viable object for you to attac h to, meaning that you
can continue to hold Right Click (
automatically attach to the fi rst o bject that comes within
reach. When the Grappling Reticle is gray, it indicates that
an object is just out of reach, and that moving closer will
enable you to reach it.
14
w
) while airborne to
SWING
Battlefield Advice 3: Blue Indicator
REEL IN / REEL OUT
Reeling the wire of the Bionic Arm in and out are important functions for controlling your swing,
maximizing the distance you can travel, and for leaping up onto platforms.
While attached,
Swinging is often the fastest and most effective way to travel.
To swing, begin by attaching to an object or a surface with Right
Click (
in combination with
pendulum movement can be controlled by pressing
L
wire is reeled in or Right Click (
Indicator
When you’re nearing the optimal angle for release, a blue indicator
appears above the Aiming Reticle. If you release Right Click (
the indicator is displayed, you will travel the maximum distance.
While swinging, SPACE/
REEL IN
While you’re swinging, pressing SPACE (
the Bionic Arm’s wire.
REEL OUT
While you’re swinging, pressing
the Bionic Arm’s wire.
(
forward) + SPACE (A)
W
L
w
), then jump in any direction by pressing SPACE (A)
back and forth), and will not come to a halt until either the
(L)—or just walk over any edge. The
W
w
) is released.
(
A / B)
F
(B) will reel out
F
A
) will reel in
WS
(moving
w
) while
15
Page 10

Bionic Arm ActionsBionic Arm Actions
Action
Action
LEAP UP
Leap Up is a vital ability for scaling vertical surfaces and jumping
over edges.
To perform a Leap Up, press SPACE (
from a vertical surface or underneath an object.
While you’re hanging from undern eath an object, the Leap Up
will only work if you are attached close enough to an edge.
While hanging, SPACE (A)
A
) while hanging
Battlefield Advice 4: Keep Leaping
You can use the Leap Up ability multiple times to scale walls
and other vertical surfaces. To perform consecutive Leap Ups,
keep holding Right Click (
RIP
You can use the Rip ability to tear down certain parts of the
environmen t, or bring enemies closer to you. If you have grabbed
an enemy using the Rip ability, you can press
dispose of him.
ZIP KICK
The Zip Kick is a combat technique which lets you perform
a spectacular dropkick by using the Bionic Arm’s wire.
To perform a Zip Kick, attach to an enemy and press SPACE
A
) twice. If you take too much time to perform
(
the Zip Kick, the enemy may have time to counteract.
While attached to enemy/object, F (B) repeatedly, followed by E (Y)
E
While attached to an enemy, SPACE, SPACE (A, A)
w
(Y) to quickly
) while pressing SPACE (A).
THROW / SMASH
While attached to a throwable object, E (Y), then F (B)
Once acquired, the Throw/Smash move allows you to pick up
and throw objects long distances.
To per form a Throw, attach to any hi ghlighted object or defeated
enemy and press
(B) while aiming in any direction to throw or smash the
F
object depending on the target distance.
(Y) to kite the object into the air. Press
E
Battlefield Advice 5: Aim Your Throws Effectively
Kited objects and enemies can be used as weapons using the Throw/Smash technique. Use the Aiming
Reticle with the ARROW KEYS (
KITING
) to throw or smash objects where you want them to go.
C
While attached to an enemy, E (Y)
Kiting is a technique that all ows you to whip an en emy up
into the air while still attached to your wire. To perform the Kiting
technique, attach to an enemy and press
Once an enemy is up in the air, you can slam the enemy b ack down
into the ground by pressing
enemy, but can also damage other enemies nearby.
J
Kiting can only be performed on smaller enemies,
and is not effective against heavier ones.
(B). Doing this not only kills the kited
F
(Y).
E
16
17
Page 11

Weapons
Damage
FSA Standard Equipment
Weapons are always fired with Left Click (x). There is a mixed arsenal of weapons at
your disposal throughout the game, and each weapon has its own unique characteristics.
Agents in the field always carry the following equipment.
SteinMech M3-BC “TUNGSTEN”
The SteinMech 4.62mm “Tungsten” semi-automatic pistol is
the standard issue sidearm carried by TASC personnel. The M3-BC
model was specially designed for TASC’s bionic operatives and their unique needs.
Despite its compact size, it is accurate and effective at short to medium range.
Fragmentation Grenade
The standard-issue fragmentation grenade used by FSA military forces. Once a grenade
is set and released, it unfolds spikes that can attach to certain surfaces.
Weapon Ammo
The number next to your weapon display on the HUD indicates the amount of ammo
remaining. When it reaches zero, the weapon is unusable and you automatically
switch to the next available weapon. To replenish ammunition, collect pickups
dropped by defeated enemies, or look for Insertion Pods.
Insertion Pod
FSA Insertion Pods are used to offer quick supply drops to troops
in the field. Since the pods lack a propulsion system they cannot
be targeted easily by anti-air defense, and their homing beacon is
extremely precise. They are usually used to supply firearms
and/or ammunition to troops behind enemy lines.
18
Environmental Damage
When you’re taking damage from enemies or hostile environments, the screen gradually turns red.
Take too much damage and your character will die, at which point the Game Over screen will appear.
Environmental Damage 1: Radiation
Radiation Warning Icon
Scattered fields of radiation still linger throughout the ruins of Ascen sion
City. Stray too close to a rad iatio n field and a Radiation Warning Icon
appears at the top of the screen to let you know you’re in danger.
If you enter a radiation field, the Radiation Warning Icon will pulse
to alert you that you are taking damage. To avoid dying, you must
quickly exit the irradiated area.
J
The Bionic Arm cannot attach to irradiated surfaces.
Environmental Damage 2: Water
Due to the weight of your Bionic Arm, you cannot stay afloat
and swim. If you become submerged, your Oxygen Gauge will appear
and decrease as you run out of air. To avoid drowning, you must
quickly find an attachment point and reel yourself up above
the surface.
Oxygen Gauge
19
Page 12

Info Screen
Info Screen
Info Screen
During the game, press t (<) to display the Info
Screen, which contains the following options.
Objectives...................Review your current mission objectives.
Dossiers......................View information on characters, weapons and organizations.
Challenges ..................Check the various challenges available.
Rewards .....................View the rewards you have received.
INFO SCREEN CONTROLS
ACTION KEYBOARD/MOUSE CONTROLLER
Change page
Browse options
Confirm
Exit
Q/R
W/S
e
s
or i/k
y
L
A
B
/
z
/
l
OBJECTIVES
In the Objectives screen, you can review the details of your current mission goals, and also check
the Objectives that you have already completed.
Objectives Active Objectives ...................View your current Mission Objectives.
Completed Objectives ............ View Mission Objectives you have already completed.
DOSSIERS
You receive Doss ier f iles as you make your way t hroug h
the game. These Dossiers provide information about characters,
organizations and weapons that you encounter as you progress
through Ascension City.
CHALLENGES
Challenges are optional missions that are separate from your main objectives. By completing these
optional Challenges, you can earn new moves and upgrade your existing weapons and abilities.
Challenges Active Challenges .................. View Challenges that are currently available.
Cleared Challenges ................ View Challenges you have already completed.
REWARDS
In the Rewards screen, you can view the various rewards and upgrades you have received by completing
Challenges. The rewards you receive vary depending on what Challenges you have completed.
20
21
Page 13

Pause Menu
Pause Menu
Pause Menu
Pressing s (>) displays the Pause Menu. From this menu, you can quit the
game, load previously saved game data, and adjust various game options.
Options Selector
Load Game ............................ Load previously saved game data.
Options .................................. Check or adjust various game options
Quit to Main Menu ................ Quit the current game and return to the Main Menu.
PAUSE MENU CONTROLS
ACTION KEYBOARD/MOUSE CONTROLLER
Move selector MOUSE
Confirm
Exit Right Click
e
or Left Click
(see p.23).
L
A
B
Options
In the Options menu, you can check and adjust
various game options.
CONTROLS
Help .................................................... Check button functions. (Controller only.)
Invert Camera Vertically ...................... Set whether the camera is inverted vertically or not.
Invert Camera Horizontally ................. Set whether the camera is inverted horizontally or not.
Toggle Center Camera Button ............. Toggle the camera center button on or off. (Controller only.)
Rumble ................................................ Toggle rumble settings on or off.
Sensitivity ........................................... Adjust the sensitivity of the camera.
Bind Controls ...................................... Map the keyboard controls to different keys. (Keyboard only.)
Run by Default ................................... When this option is selected, the player will always run when moving,
instead of walk. (Keyboard only.)
SOUND
Music Volume ....................................... Adjust the volume of the music.
SFX Volume .......................................... Adjust the volume of the sound effects.
HUD
Show Action Buttons ........................... Toggle the display of the action buttons on or off.
Swing Release Indicator ...................... Toggle the display of the blue indicator on or off.
Highlight Throwables ........................... Toggle the display of throwable objects on or off.
Subtitles .............................................. Toggle the display of subtitles on or off.
Lock HUD Position .............................. Toggle the HUD position on or off.
Adjust various controller settings.
Adjust the sound settings.
Adjust the in-game heads-up display.
22
23
Page 14
Multiplayer Online
Multiplayer Online
New
Retype E-mail
24
Multiplayer Online
Connect to Multiplayer Online to play with or against
other players from around the world.
Multiplayer Nickname .............. Enter your registered nickname.
Online
Password ............... Enter your registered password.
Login ..................... Login with your entered credentials.
Lost Password ....... Retrieve your lost credentials.
New ....................... Register a new account.
MULTIPLAYER ONLINE BATTLE FLOW
Main Menu
Multiplayer
Online
Login
Overview
Clan Tag Leaderboards
Game Mode Public Private
Deathmatch
Team
Deathmatch
Capture
the Flag
E-mail
Create
Lost Password
NicknameNickname
E-mail
Retrieve
Nickname
Password
Change
Password
Old Password
New Password
Retype New
Password
Change
Password
Start Game
Group Lobby
Friends Find Game Map Name
Game Lobby
Frag Limit/
Capture Limit
Friends
Start Game/
Select Team
Game Rules
Game rules differ slightly when you’re playing Multiplayer Online games.
Multiplayer Only 1: Player Information
When you’re playing Multiplayer Online games, additional information is displayed on the game HUD.
The Life Gauge and Armor Gauge are visible at the bottom right of the screen.
PLAYER INFORMATION
Player Information Life Gauge ............ Shows how much health you have remaining. (Health
does not automatically regenerate in multiplayer mode.)
Armor Gauge ........ Shows the status of Armor you have picked up.
Armor Gauge
Life Gauge
Multiplayer Only 2: Available Actions
The Adrenaline Gauge and its associated moves are not available in multiplayer mode.
In addition, the Punch Up, Rip, Throw/Smash and Kiting moves are not available.
Group Lobby
After choosing to play Multiplayer Online, select
Start Game to proceed to the Group Lobby where
you can adjust various options
(see p.26).
25
Page 15

Game Mode : Deathmatch
Game Mode : Team Deathmatch
Public Group Lobby
Private Game Lobby
Multiplayer Online
Multiplayer Online
Group Lobby Options
Each Group Lobby has different options available to choose from.
In Public matches, you can play ranked games against opponents from around the world.
All matches played in this mode reflect on your rank and leaderboard status.
Options Game Mode ........... Choose which game mode to play.
Friends .................. Invite friends to join your group.
Find Game ............. After choosing your desired settings, search for a game.
In Private games, you can play ranked online matches with friends and rivals, and set
your own rules for the match.
Options Game Mode ........... Choose which game mode to play.
Map Name ............. Choose what stage to play on.
Frag Limit ............. Choose the frag limit for your game.
Time Limit ............. Choose the time limit for your game.
Friends .................. Invite friends from your Friends list to play together.
Start Game ............ The game will start once you select this option.
Game Modes
There are three different multiplayer game modes in Bionic Commando—Deathmatch,
Team Deathmatch and Capture the Flag. You can select which game mode to play
from the Group Lobby. Each mode has different conditions for victory.
Everyone is both hunter and prey. In order to win, be the first to reach the frag limit,
or have the highest number of frags when time runs out.
Time Remaining
Current No. of Frags Frag Limit
VICTORY
CONDITIONS
The first player to reach the frag limit wins. If time runs out,
the player with the highest number of frags wins.
Team-based Deathmatch game where the first team to reach the frag limit, or have the highest
frag count when time runs out, wins.
Time Remaining
Your Team’s Frags Opponents’ Frags
26
VICTORY
CONDITIONS
The first team to reach the frag limit wins. If time runs out,
the team with the highest number of frags wins.
27
Page 16

Game Mode : Capture The Flag
Multiplayer Online Multiplayer Online
Steal the enemy’s flag and bring it to your own base while preventing the enemy from stealing
your flag. The first team that meets the captured flag quota, or has captured the most flags
when time runs out, wins.
Time Remaining
Enemy with Flag
Opponents’
Flag Captures
VICTORY
CONDITIONS
Your Team’s
Flag Captures
The rst team to capture the required number of ags wins. If time
runs out, the team with the most ags captured wins.
Game Lobby
Once you have chosen your game, you proceed to the Game Lobby. Here you can view
information on your teammates and opponents, as well as chat with other players.
2829282928
29
Page 17

World Ranking
Friends Ranking
Multiplayer Online
Public Game
If you’re playing a Public Game, before the game begins
you’ll have the option to vote on the selected map. Maps
are selected at random, and if a majority of players in
the Game Lobby vote against the chosen map, another is
randomly selected.
Voting Screen Agree to Current Map ............. If you want to play the displayed map, do nothing.
Disagree with Current Map ..... If you don’t want to play the displayed map,
press
Private Game
If you’re playing a Private Game, the game begins once
the host chooses Start Game.
Set Teams
Before beginning a Team Deathmatch or Capture the Flag
game, you are given the option to set teams. Once you have
chosen the teams, the match begins.
(Y) to cast your vote against it.
¡
Multiplayer Online
Leaderboards
In the Leaderboards, you can view rankings
for each different game mode. You can also
view information on other playe rs from around
the world.
In the World Ranking column, you can see the results for t he to p players around the world
and how they compare against you.
In the Friends Ranking column, you can see a leaderboard of players registered on your Friends list.
LEADERBOARDS CONTROLS
ACTION KEYBOARD/MOUSE CONTROLLER
Switch between modes
Scroll through rankings
My Score
Friends Ranking
Return to Menu
Q/R
W/S
¡
™
s
or i/k
y
L
Y
X
B
/
z
/
l
30
31
Page 18

Multiplayer LAN
Game Lobby
By connecting two or more computers over a LAN
setup, you can play locally against other people.
From the Multiplayer LAN option in the Main Menu,
choose Create Game to start a new game, or Join
Game if there is a game in progress.
Create Game: Start a New Game
You can choose to create a new game and decide the rules that other players will play by. After
choosing Create Game, you follow the same Online Battle Flow as for Multiplayer Online games
Join Game: Join an Existing Game
If another player has already started a game on Multiplayer LAN, you can choose to join in.
J
Multiplayer LAN matches do not count toward your online ranking.
(see p.24).
32
33
Page 19

Nathan Spencer
Emily Spencer
Federal States of America
Tactical Arms and Security Committee
Bionic Resurrection Initiative
Super Joe
Characters
Organizations
The original Bionic Commando. Ten years ago during the Imperi al In cident, Nathan
Spencer single-handedly rescued the TASC agent Joseph “Super Joe” Gibson from
an Imperial POW camp. Toget her they stopped the Imperial weapons platform known
as the Albatross.
Some years late r, Spencer disobeyed dire ct or ders on a mission that resulted
in the deaths of several TASC agents. Spencer was court-martialed, convicted of treason,
and sentenced to death. Spencer has spent the last five years on death row awaiting
execution. However, following recent events in Ascension City he has been temporarily
reinstated, and sent in to investigate.
Joseph Gibson, aka “Super Joe”, is a rev ered war hero known
for his unshakable resolve and patr iotism. Gibson was captu red
during the Imperial Incident while behind enemy lines, but was
later rescued by Nathan Spencer. Together they stopped Project
Albatross and the man known as The Leader.
Afterwards, he was promoted to director of TASC, and became the
leading voice for the advancement of bionic technology. Joseph’s
reputation and dedication have earned him a place as one of the
nation’s most trusted military advisors. It was Gibson that proposed
the dispatch of Nathan Spencer into the ruins of Ascension City.
Emily is Nathan Spencer’s estranged wife, who has not been heard from in years.
Emily and Nathan met year s before the Imperial Incident. They fell in love a nd married
shortly thereafter. Sources indicate that they were happy together, but Nathan’s dangerous
choice of profession created animosity between them. After one particularly intense fight
they decided to spend some time apart—and that was the last known contact Spencer
had with Emily. She left only a note declaring her intention to leave her husband forever.
Shortly afterwards, Spencer entered the bionics program. He spent years
trying to loca te hi s mis sing wife, and is still haunted by her unexpec ted
34
disappearance.
A nation born from a political and economic crisis in t he United
States of America in the early 21st century. Due to its turbulent
conception, the FSA government took a hardline approach to
politics, putting libertarian values aside to maintain law and order.
Despite its youth, the FSA has had an eventful history. Most notable
is the Imperial Incident a decade previous, when a military faction
seeking to revive fascism attacked several FSA cities. The FSA is also
the home of the first military bionics technology, and FSA political
and ethical values on bionics have set a standard for the rest
of the world.
TASC is the FSA’s military intelligence and security
agency, mandated w ith p rotec ting the FSA from both
internal and external threats . Under the supervision
of Director Joseph Gibson, TASC diverted most of its
funding into the development of bionic technology.
Bionic operatives soon became the FSA’s most
entrusted part of national defense. In the wake of
the Bionic Purge, TASC lost much of its power as its
bionic division became illegal overnight. However,
the organization still retains a great deal
of influence over FSA military affairs.
Born out of the turmoil and anger during the Bionic Purge, BioReign
is considered to be most dange rous pro-bionic terror org anization
in the world. BioReign is a militia made up of former Imperial soldiers
and ex-TASC operatives, ostensibly dedicated to reversing the Bionic Purge
and forcing the FSA government to restore the legal status of bionics.
Due to the military capabilities, BioReign is regarded as a severe threat
to FSA security. Most of BioReign’s soldiers have live combat experience,
and their weapons arsenal is substantial. However, even with their
reputation, no one could have foreseen BioReign’s remorseless bombing
of Ascension City. Some say that this attack is the first part
of a greater scheme.
35
Page 20

Enemies
The elusive individual known only as “Silver ” is suspected
of being one of BioReign’s highest ranking officers. Military
intelligence suggests that the campaign in Ascension City might
be led by Silver himself.
Comprising the bulk of the BioReign force in Ascension City,
the BioReign infantry is made up of combat-experienced soldiers
who make formidable opponents.
Reports indicate that the BioReign strike force might have
brought mechanized combat suits, known as Biomechs,
to increase their defensive capabilities.
Polycraft are highly maneuverable air units,
designed for quick aerial assault and interception.
The BioReign force brought with them a large
number of the units to Ascension City. Polycraft
are easily refitted to excel in various situations,
and can act as both troop transports
and heavily-armed missile gunships.
To overcome the interference caused by the radiation that has flooded the ruins
of Ascension City, BioReign utilizes tactical Relay Stations to establish communication.
As with any communications system, it might be turned to an enemy’s advantage.
36
37
Page 21

Page 22

CREDITS
CAPCOM ENTERTAINMENT, INC.
VP Product Development: Scot Bayless
Director of Production:
Director of Technology:
Director of Design:
Director of Art:
Associate Producer:
QA Manager:
QA Lead: Gregory Lewickyi
PD Operations: Dave Witcher, Shuhei Yamamoto
Directors Brand Marketing:
Product Marketing Manager: Frank Filice
Product Marketing: John Diamonon, Colin Ferris, Grant Luke
Creative Services: Francis Mao, Lindsay Young, Kevin Converse, Derek Van Dyke,
Stacie Yamaki, Tom James, Mark Holtz, Sissy Chang
Product Management: Christine Converse
Manual Layout: Hanshaw Ink & Image
Public Relations: Chris Kramer, Melody Pfeiffer, Tim Ng, Jason Allen
Customer Service: Darin Johnston, Randy Reyes
Community: Seth Killian, Shawn Baxter www.Capcom-Unity.com
Channel Marketing: Josh Margulies, Reed Baird
Operations: Louie Reyes, John Abinsay
Divisional Communications: Kaori Tsukuda, Shino Imao
Business Development/Strategic Planning Strategy: Seon King, Christian Svensson, Dean Borgus
Legal: Estela Lemus, Toshi Hosaka
Licensing: Germaine Gioia, Junta Saito, Josh Austin, Amelia Denegre
Special Thanks: Hiroshi Tobisawa, Mark Beaumont, Kazuo Kano, Romanus Wong,
Our Friends & Family
Jay Dee Alley
James Morris
William Rompf
Emily Anadu, Mike Webster
Adam Boyes
Gary Lake
Kraig Kujawa
90-DAY LIMITED WARRANTY
CAPCOM ENTERTAINMENT, INC. (“CAPCOM”) warrants to the original consumer that this
DVD-ROM from CAPCOM shall be free from defects in material and workmanship for a
period of 90 days from date of purchase. If a defect covered by this warranty occurs during
this 90-day warranty period, CAPCOM will replace the DVD-ROM free of charge.
To receive this warranty service:
1. Notify the CAPCOM Consumer Service Department of the problem requiring warranty
service by calling (650) 350-6700. Our Consumer Service Department is in operation
from 8:30 a.m. to 5:00 p.m. Pacific Time, Monday through Friday.
2. If the CAPCOM service technician is unable to solve the problem by phone, he/she
will instruct you to return the entire DVD-ROM to CAPCOM freight prepaid at your
own risk of damage or delivery. We recommend sending your DVD-ROM certified
mail. Please include your sales slip or similar proof-of-purchase within the 90-day
warranty period to:
CAPCOM ENTERTAINMENT, INC.
Consumer Service Department
800 Concar Drive, Suite 300
This warranty shall not apply if the DVD-ROM has been damaged by negligence,
accident, unreasonable use, modification, tampering or by other causes unrelated
to defective materials or workmanship.
San Mateo, CA 94402-2649
REPAIRS AFTER EXPIRATION OF WARRANTY
If the DVD-ROM develops a problem after the 90-day warranty period, you may contact
the CAPCOM Consumer Service Department at the phone number noted previously.
If the CAPCOM service technician is unable to solve the problem by phone, he/she may
instruct you to return the defective DVD-ROM to CAPCOM freight prepaid at your own
risk of damage or delivery, enclosing a check or money order for $20.00 (U.S. funds only)
payable to CAPCOM. We recommend sending your DVD-ROM certified mail. CAPCOM will
replace the DVD-ROM, subject to the conditions above. If replacement DVD-ROMs are not
available, the defective product will be returned to you and the $20.00 payment refunded.
WARRANTY LIMITATIONS
ANY APPLICABLE IMPLIED WARRANTIES, INCLUDING WARRANTIES OF
MERCHANTABILITY AND FITNESS FOR A PARTICULAR PURPOSE, ARE HEREBY
LIMITED TO NINETY (90) DAYS FROM THE DATE OF PURCHASE AND ARE SUBJECT
TO THE CONDITIONS SET FORTH HEREIN. IN NO EVENT SHALL CAPCOM BE LIABLE
FOR CONSEQUENTIAL OR INCIDENTAL DAMAGES RESULTING FROM THE BREACH
OF ANY EXPRESS OR IMPLIED WARRANTIES.
The provisions of this warranty are valid in the United States and Canada only. Some states
and provinces do not allow limitations on how long an implied warranty lasts or exclusions
of consequential or incidental damages, so the above limitations and exclusions may not
apply to you. This warranty gives you specific legal rights, and you may have other rights,
which vary from state to state or province to province.
CAPCOM ENTERTAINMENT, INC., 800 Concar Drive, Suite 300, San Mateo, CA 94402-2649.
© CAPCOM CO., LTD. 2009 ALL RIGHTS RESERVED. Bionic Commando, CAPCOM and the
CAPCOM LOGO are registered trademarks of CAPCOM CO., LTD. Uses Bink Video. Copyright
©1997-2009 by RAD Game Tools, Inc. NVIDIA and PhysX, both stylized and non-stylized, are
trademarks or registered trademarks of NVIDIA Corporation. Copyright 2009 NVIDIA Corporation.
The ratings icon is a registered trademark of the Entertainment Software Association. All other
trademarks are owned by their respective owners.
40
 Loading...