

Page 1

Preface
Preface
PrefacePreface
SmartBase MPC190
SmartBase MPC190
SmartBase MPC190SmartBase MPC190
Quick Reference Guide
Quick Reference Guide
Quick Reference GuideQuick Reference Guide
Page 2

Copyright
Copyright
CopyrightCopyright
Copyright © 2003 by Canon Inc. All rights reserved. No part of this publication may be
reproduced, transmitted, transcribed, stored in a retrieval system, or translated into any
language or computer language in any form or by any means, electronic, mechanical,
magnetic, optical, chemical, manual, or otherwise, without the prior written permission
of Canon Inc.
Trademarks
Trademarks
TrademarksTrademarks
Canon and BJ are registered trademarks. BCI, MultiPASS, SmartBase, and ScanGear
are trademarks of Canon Inc.
All other product and brand names are registered trademarks, trademarks, or service
marks of their respective owners.
This equipment conforms with the essential requirements of EC Directive
1999/5/EC.
We declare that this product conforms with the EMC requirements of EC
Directive 1999/5/EC at nominal mains input 230V, 50Hz although the
rated input of the product is 200V-240V, 50/60Hz.
If you move to another EU country and are experiencing trouble, please
call the Canon Help Desk.
(For Europe Only)
Model Name
Model Name
Model NameModel Name
• H12260 (SmartBase MPC190)
As an ENERGY STAR® Partner, Canon Inc. has determined that this
product meets the ENERGY STAR® guidelines for energy efficiency.
II
II Preface
IIII
Page 3
P
P How to use the documentation provided
PP
How to use the documentation provided
How to use the documentation providedHow to use the documentation provided
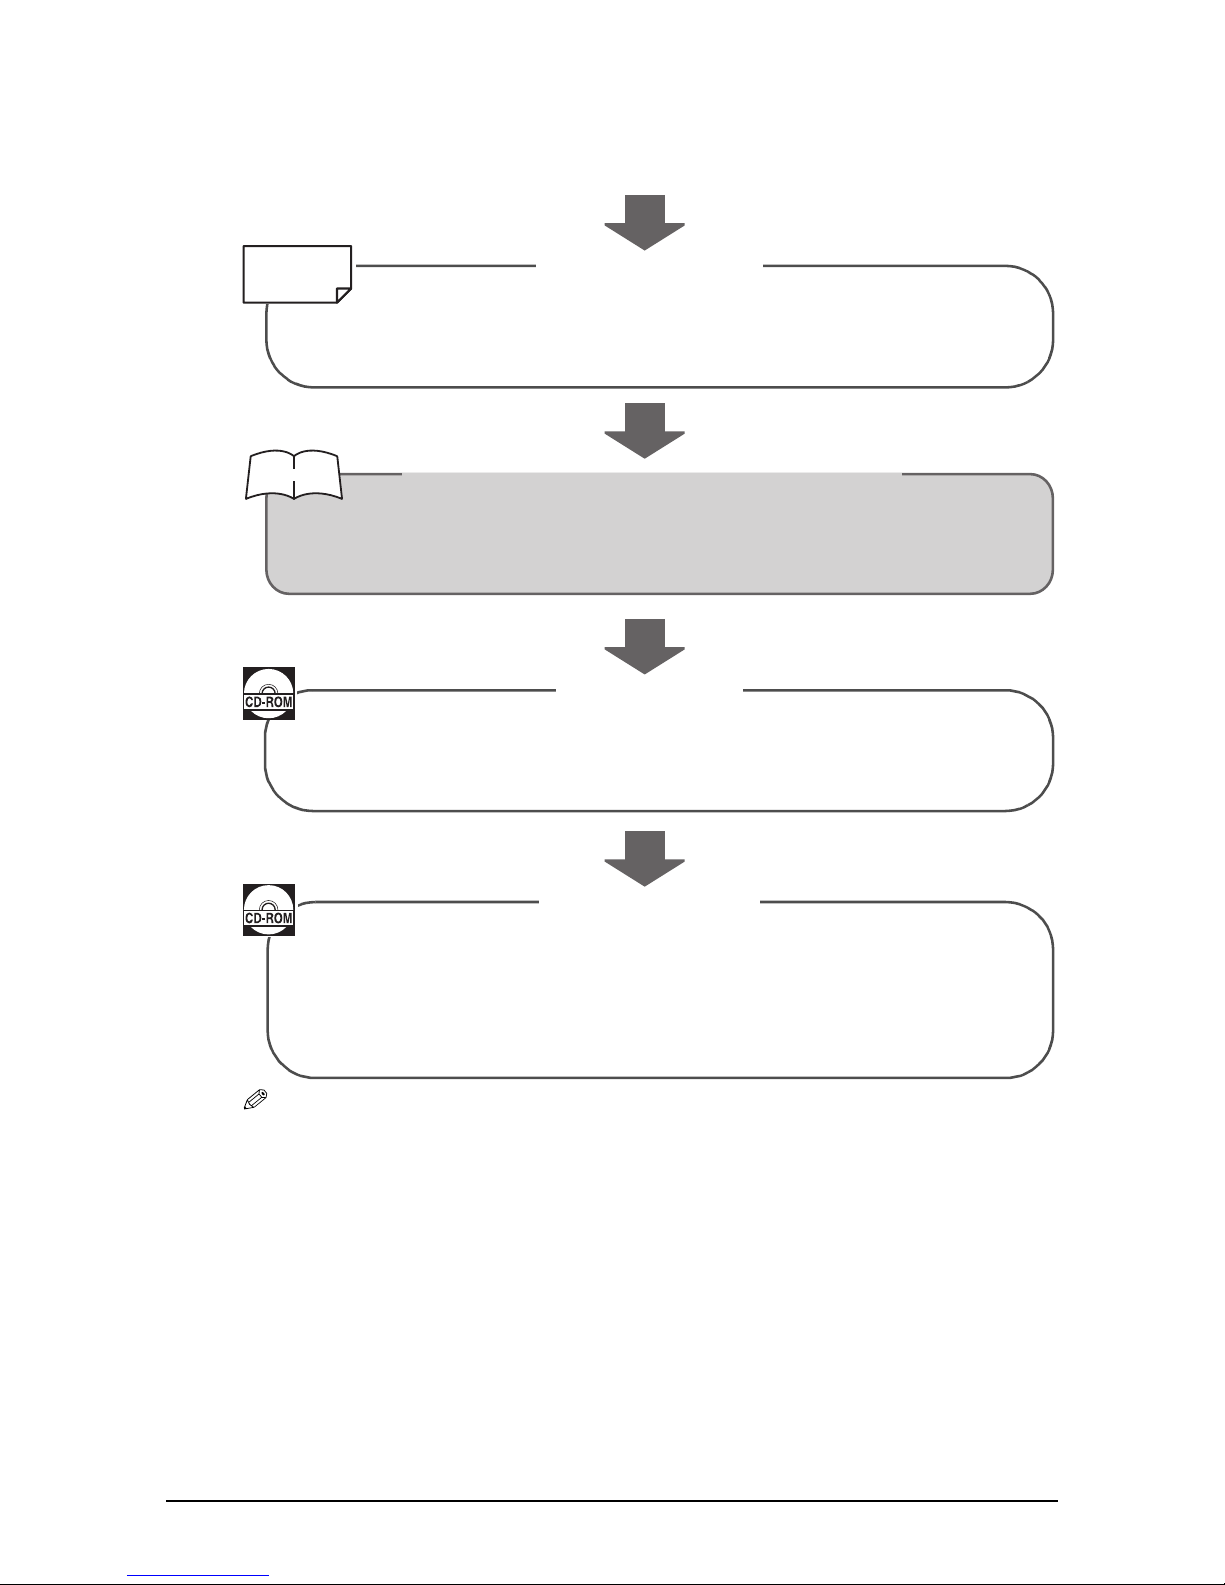
START HERE
START HERE
START HERESTART HERE
Set-Up Sheet
Set-Up Sheet
Printed sheet
Printed sheet
Printed sheetPrinted sheet
This sheet includes instructions for setting up your machine and getting it
ready for use. Follow all steps in this sheet befor using your machine.
Printed manual
Printed manual
Printed manualPrinted manual
After following instructions in the Set-Up Sheet, read this guide for basic
instructions on all functions of your machine.
Quick Reference Guide (This Guide)
Quick Reference Guide (This Guide)
Quick Reference Guide (This Guide)Quick Reference Guide (This Guide)
Set-Up SheetSet-Up Sheet
Be sure to read this sheet first!
Be sure to read this sheet first!
Be sure to read this sheet first!Be sure to read this sheet first!
Basic Guide
Basic Guide
Basic GuideBasic Guide
This guide, includes as a PDF file in the MultiPASS Suite softeware CD-ROM,
includes in more detail instructions on all functions of your machine.
Software Guide
Software Guide
Software GuideSoftware Guide
This guide, included as a PDF file in the MultiPASS Suite software CD-ROM,
includes comprehensive instructions on using the MultiPASS Suite softeware.
Refer to this guide for full instructions on printing and scanning from your
computer.
NOTE
NOTE
NOTENOTE
• In addition to the above documentation, you can also refer to the help in the MultiPASS
Suite software for information about a window or dialogue box, and for step by step
instructions on performing MultiPASS Suite tasks. To access the help, select or click
[Help] in the software.
Preface III
III
IIIIII
Page 4

Viewing documentation provided in the CD-ROM
Viewing documentation provided in the CD-ROM
Viewing documentation provided in the CD-ROMViewing documentation provided in the CD-ROM
To view the Basic Guide or Software Guide on your computer, you will need to have
Adobe Acrobat Reader installed. If you do not have this software installed, follow this
procedure:
Insert the MultiPASS Suite CD-ROM in your CD-ROM drive.
Insert the MultiPASS Suite CD-ROM in your CD-ROM drive.
1111
Insert the MultiPASS Suite CD-ROM in your CD-ROM drive.Insert the MultiPASS Suite CD-ROM in your CD-ROM drive.
When the main menu appears, click [INSTALL ADOBE ACROBAT READER].
When the main menu appears, click [INSTALL ADOBE ACROBAT READER].
2222
When the main menu appears, click [INSTALL ADOBE ACROBAT READER].When the main menu appears, click [INSTALL ADOBE ACROBAT READER].
Follow the on-screen instructions.
Follow the on-screen instructions.
3333
Follow the on-screen instructions.Follow the on-screen instructions.
IV
IV Preface
IVIV
Page 5

P
P Type conventions
PP
Type conventions
Type conventionsType conventions
Please read the list below of symbols, terms, and abbreviations used in this guide.
WARNING
WARNING Indicates a warning concerning operations that may lead to death or injury
WARNINGWARNING
CAUTION
CAUTION Indicates a caution concerning operations that may lead to injury to
CAUTIONCAUTION
IMPORTANT
IMPORTANT Indicates operational warnings and restrictions. Be certain to read these
IMPORTANTIMPORTANT
NOTE
NOTE Indicates notes for operation or additional explanations. Reading these is
NOTENOTE
(1 p. n-nn) Indicates a page number where additional information can be found.
Indicates a warning concerning operations that may lead to death or injury
Indicates a warning concerning operations that may lead to death or injury Indicates a warning concerning operations that may lead to death or injury
to persons if not performed correctly. In order to use the machine safely,
to persons if not performed correctly. In order to use the machine safely,
to persons if not performed correctly. In order to use the machine safely, to persons if not performed correctly. In order to use the machine safely,
always pay attention to these warnings.
always pay attention to these warnings.
always pay attention to these warnings.always pay attention to these warnings.
Indicates a caution concerning operations that may lead to injury to
Indicates a caution concerning operations that may lead to injury to Indicates a caution concerning operations that may lead to injury to
persons or damage to property if not performed correctly. In order to use
persons or damage to property if not performed correctly. In order to use
persons or damage to property if not performed correctly. In order to use persons or damage to property if not performed correctly. In order to use
the machine safely, always pay attention to these cautions.
the machine safely, always pay attention to these cautions.
the machine safely, always pay attention to these cautions.the machine safely, always pay attention to these cautions.
Indicates operational warnings and restrictions. Be certain to read these
Indicates operational warnings and restrictions. Be certain to read these Indicates operational warnings and restrictions. Be certain to read these
items to operate the machine correctly, and to avoid damage to the
items to operate the machine correctly, and to avoid damage to the
items to operate the machine correctly, and to avoid damage to the items to operate the machine correctly, and to avoid damage to the
machine.
machine.
machine.machine.
highly recommended.
Set-Up Sheet
1
Basic Guide
1
Software Guide
1
machine or printer General term used to represent the SmartBase MPC190.
default A setting that remains in effect unless you change it.
document The original sheet(s) of paper you copy or scan with the machine.
menu A list of settings from which you select an item to set up or change. A menu
Refer to the Set-Up Sheet for more details.
Refer to the Basic Guide (included in the CD-ROM) for more details.
Refer to the MultiPASS Suite Software User’s Guide (included in the
CD-ROM) for more details.
has a title which appears in the LCD.
Preface VVVV
Page 6

[key name] Text enclosed in these brackets indicate a key name or item on the computer
you have to click, double-click, or point to.
<message> Text enclosed in these brackets indicate an LCD message or a message on
the computer.
click, double-click Term used to select or choose a command or option on your computer,
generally with a mouse.
VI
VI Preface
VIVI
Page 7

Contents
Contents
PPPP
ContentsContents
1:
1: Introduction
Introduction
1:1:
IntroductionIntroduction
Main components of the machine ................ 1-1
Operation panel of the machine .............. 1-2
2:
2: Document and print media
Document and print media
2:2:
Document and print media Document and print media
handling
handling
handlinghandling
Document requirements ............................... 2-1
Loading documents ...................................... 2-1
Print media requirements ............................. 2-1
Loading print media...................................... 2-2
Setting the paper thickness lever ................. 2-2
Setting the print media size and type ........... 2-3
3:
3: The MultiPASS Suite software
The MultiPASS Suite software
3:3:
The MultiPASS Suite software The MultiPASS Suite software
—Basic operation
—Basic operation
—Basic operation—Basic operation
Installing the software................................... 3-1
System requirements ................................... 3-1
My MultiPASS............................................... 3-2
Opening My MultiPASS........................... 3-3
MultiPASS Viewer......................................... 3-3
Opening a document in the Viewer ......... 3-4
MultiPASS Status Monitor ............................ 3-5
Opening the Status Monitor .................... 3-5
MultiPASS Toolbar........................................ 3-6
Opening the Toolbar................................ 3-6
More information .......................................... 3-6
5:
5: Copying —Basic operation
Copying —Basic operation
5:5:
Copying —Basic operationCopying —Basic operation
Before copying.............................................. 5-1
Making copies .............................................. 5-1
Improving copied images ............................. 5-2
Setting colour or black & white
copying............................................... 5-2
Adjusting the image quality
(resolution) ......................................... 5-2
Adjusting the exposure (density)............. 5-3
Reducing or enlarging a copy....................... 5-4
Using preset copy ratios.......................... 5-4
Using custom copy ratios ........................ 5-5
Copying an image to fit the page............. 5-6
Advanced copy features ............................... 5-6
6:
6: Scanning —Basic operation
Scanning —Basic operation
6:6:
Scanning —Basic operationScanning —Basic operation
Before scanning ........................................... 6-1
Scanning methods........................................ 6-1
Scanning with the MultiPASS Toolbar ..... 6-1
Customising Toolbar buttons.............. 6-3
Scanning from within an application........ 6-4
Using the [Scan] key on
the operation panel ............................ 6-5
More information .......................................... 6-5
4:
4: Printing from your computer
Printing from your computer
4:4:
Printing from your computer Printing from your computer
—Basic operation
—Basic operation
—Basic operation—Basic operation
Before printing .............................................. 4-1
Printing ......................................................... 4-2
Cancelling printing........................................ 4-2
Changing print settings ................................ 4-3
Changing print settings with the Print
Advisor ............................................... 4-3
More information .......................................... 4-3
Preface VII
VII
VIIVII
Page 8

7:
7: Maintenance
Maintenance
7:7:
MaintenanceMaintenance
Replacing ink tanks ...................................... 7-1
Low ink warning ...................................... 7-1
When to replace an ink tank.................... 7-1
Guidelines ............................................... 7-2
Replacing an ink tank.............................. 7-3
Resetting the ink counter ........................ 7-5
Checking the ink level ............................. 7-6
Maintaining the printhead............................. 7-7
Flowchart of printhead maintenance....... 7-7
Printing the nozzle check pattern............ 7-8
Cleaning the printhead ............................ 7-9
Aligning the printhead ........................... 7-10
Aligning the printhead from
the operation panel ..................... 7-10
Aligning the printhead from
the MultiPASS Suite.................... 7-11
Cleaning your machine............................... 7-12
8:
8: Troubleshooting
Troubleshooting
8:8:
TroubleshootingTroubleshooting
Problems installing and removing
software................................................... 8-1
Problems turning on the computer
(when the MultiPASS Suite opens) ......... 8-3
Problems printing from your computer ......... 8-4
Copying problems......................................... 8-8
Problems scanning to a computer................ 8-9
If nothing displays in the LCD
(if there is no power).............................. 8-12
Removing jammed paper ........................... 8-13
Removing jams in the paper output
tray ................................................... 8-13
Removing jams from the machine’s
interior ............................................. 8-14
If there are repeated paper jams........... 8-15
If the nozzle check pattern does not print
properly ................................................. 8-15
Interpreting the messages.......................... 8-15
LCD messages...................................... 8-16
MultiPASS Status Monitor messages .... 8-19
If you cannot solve the problem.................. 8-19
9:
9: Machine settings
Machine settings
9:9:
Machine settingsMachine settings
Accessing the machine settings ................... 9-1
Settings ........................................................ 9-2
Menu: ENLARGE/REDUCE .................... 9-2
Menu: PAPER SELECT .......................... 9-2
Menu: DENSITY...................................... 9-2
Menu: IMAGE QUALITY.......................... 9-2
Menu: SPECIAL COPY........................... 9-3
Menu: INK VOLUME ............................... 9-3
Menu: MAINTENANCE ........................... 9-3
Menu: USER DATA.................................. 9-4
VIII
VIII Preface
VIIIVIII
Page 9
P
P Safety information
PP
Location
Location
LocationLocation
Safety information
Safety informationSafety information
Read this safety information thoroughly before using your machine and keep it handy in
case you need to refer to it later.
WARNING
WARNING
WARNINGWARNING
•••• This product emits low level magnetic flux. If you use a cardiac pacemaker and
This product emits low level magnetic flux. If you use a cardiac pacemaker and
This product emits low level magnetic flux. If you use a cardiac pacemaker and This product emits low level magnetic flux. If you use a cardiac pacemaker and
feel abnormalities, please move away from this product and consult your doctor.
feel abnormalities, please move away from this product and consult your doctor.
feel abnormalities, please move away from this product and consult your doctor.feel abnormalities, please move away from this product and consult your doctor.
CAUTION
CAUTION
CAUTIONCAUTION
•••• Do not disassemble or modify. There are high-temperature and high-voltage
Do not disassemble or modify. There are high-temperature and high-voltage
Do not disassemble or modify. There are high-temperature and high-voltage Do not disassemble or modify. There are high-temperature and high-voltage
components inside the machine which may result in fire or electrical shock.
components inside the machine which may result in fire or electrical shock.
components inside the machine which may result in fire or electrical shock.components inside the machine which may result in fire or electrical shock.
•••• Follow all warnings and instructions marked on the machine.
Follow all warnings and instructions marked on the machine.
Follow all warnings and instructions marked on the machine.Follow all warnings and instructions marked on the machine.
WARNING
WARNING
WARNINGWARNING
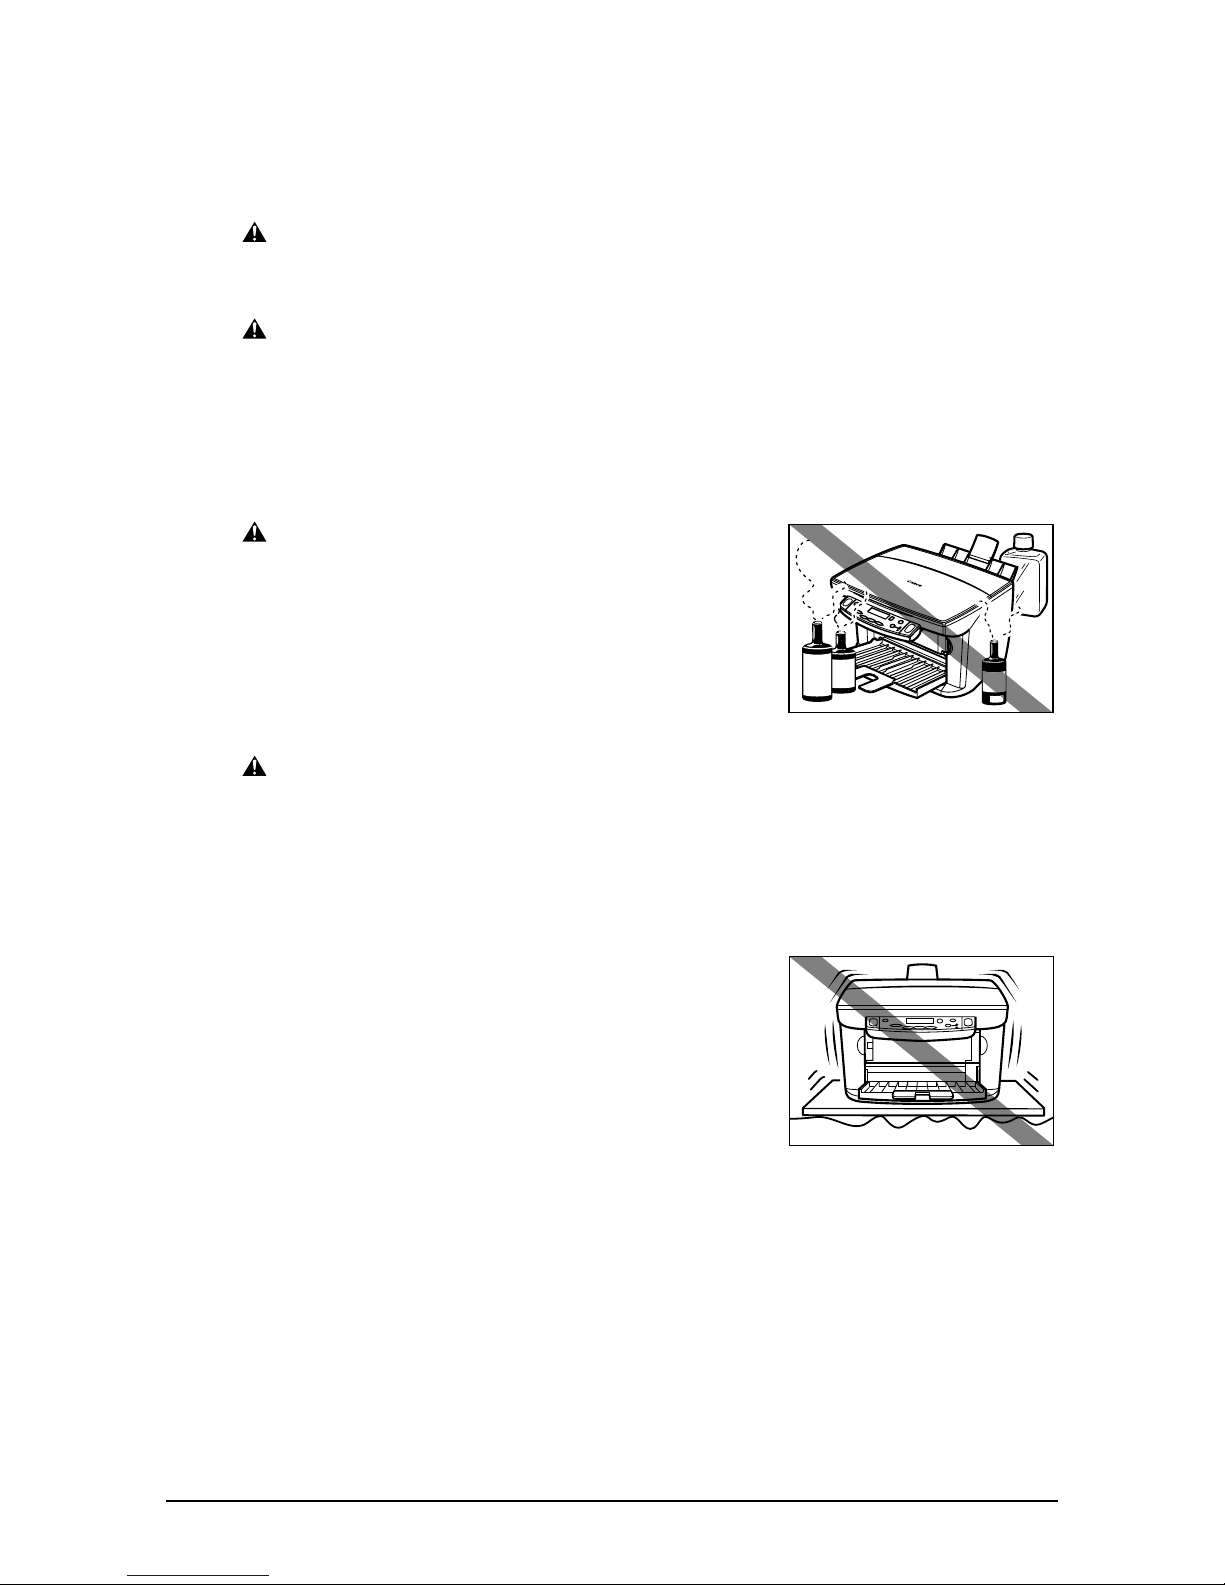
•••• Do not place the machine near alcohol, paint
Do not place the machine near alcohol, paint
Do not place the machine near alcohol, paint Do not place the machine near alcohol, paint
thinner, or other flammable substances. If
thinner, or other flammable substances. If
thinner, or other flammable substances. If thinner, or other flammable substances. If
flammable substances come into contact with
flammable substances come into contact with
flammable substances come into contact with flammable substances come into contact with
electrical parts inside the machine, it may
electrical parts inside the machine, it may
electrical parts inside the machine, it may electrical parts inside the machine, it may
result in fire or electrical shock.
result in fire or electrical shock.
result in fire or electrical shock.result in fire or electrical shock.
CAUTION
CAUTION
CAUTIONCAUTION
•••• Do not place the machine on top of a carpet or
Do not place the machine on top of a carpet or
Do not place the machine on top of a carpet or Do not place the machine on top of a carpet or
rug which has long pile. The threads may get
rug which has long pile. The threads may get
rug which has long pile. The threads may get rug which has long pile. The threads may get
inside the machine and cause a fire.
inside the machine and cause a fire.
inside the machine and cause a fire.inside the machine and cause a fire.
•••• Do not block or cover the ventilation port or any
Do not block or cover the ventilation port or any
Do not block or cover the ventilation port or any Do not block or cover the ventilation port or any
openings on the machine with objects as this
openings on the machine with objects as this
openings on the machine with objects as this openings on the machine with objects as this
may result in fire.
may result in fire.
may result in fire.may result in fire.
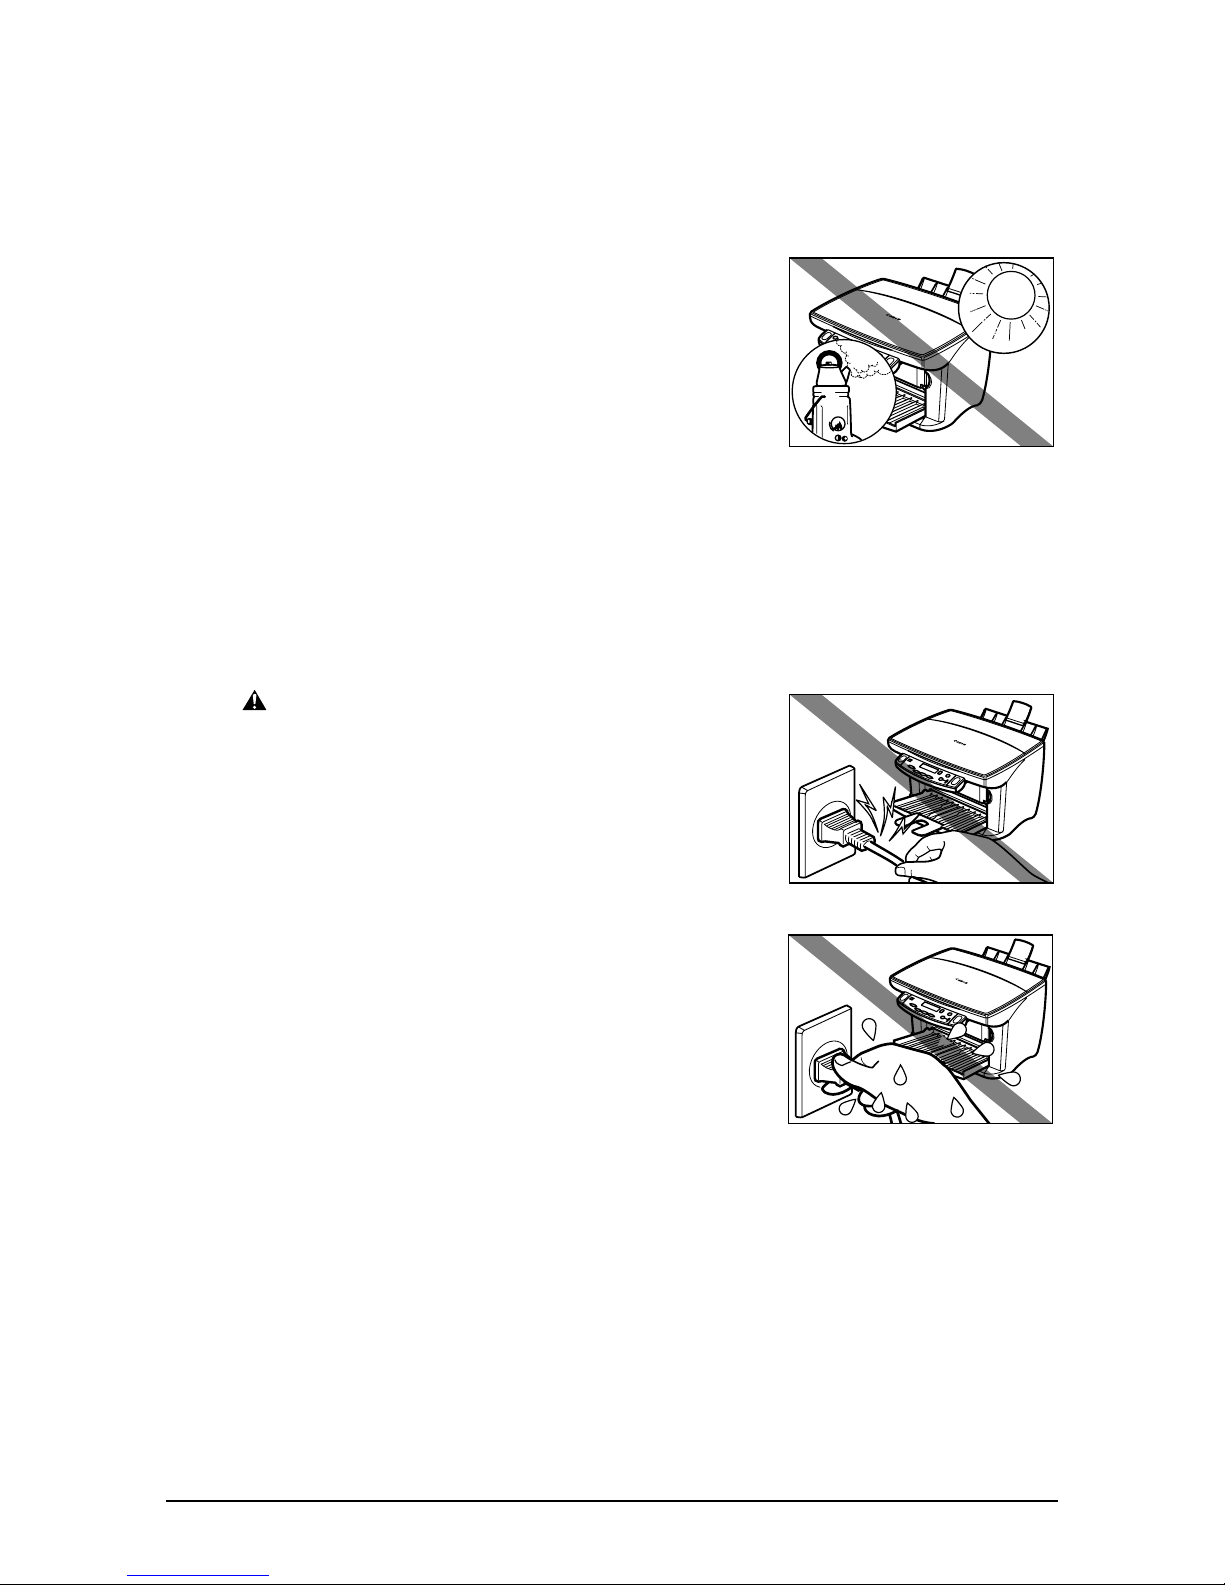
•••• Place the machine on a flat, stable,
Place the machine on a flat, stable,
Place the machine on a flat, stable, Place the machine on a flat, stable,
vibration-free surface that is strong enough to
vibration-free surface that is strong enough to
vibration-free surface that is strong enough to vibration-free surface that is strong enough to
support its weight. (For the weight of the
support its weight. (For the weight of the
support its weight. (For the weight of the support its weight. (For the weight of the
machine, see the
machine, see the
machine, see the machine, see the
Basic Guide
Basic Guide
Basic GuideBasic Guide
.)
.)
.).)
Preface IX
IX
IXIX
Page 10
•••• Do not place objects around the power plug so
Do not place objects around the power plug so
Do not place objects around the power plug so Do not place objects around the power plug so
that you are able to readily disconnect the
that you are able to readily disconnect the
that you are able to readily disconnect the that you are able to readily disconnect the
power plug from the wall socket at any time.
power plug from the wall socket at any time.
power plug from the wall socket at any time. power plug from the wall socket at any time.
Otherwise you will be unable to disconnect the
Otherwise you will be unable to disconnect the
Otherwise you will be unable to disconnect the Otherwise you will be unable to disconnect the
power plug in case of an emergency.
power plug in case of an emergency.
power plug in case of an emergency.power plug in case of an emergency.
• Make sure the area is free from dust.
• Make sure the location is not affected by extreme
temperature changes and always stays between
15° and 27.5°C (59° and 81.5°F).
• Make sure the relative humidity of the area is
between 20% and 80%.
• Keep the machine away from direct sunlight.
• Do not use or store the machine outdoors.
• Do not install the machine near devices that
contain magnets or generate magnetic fields,
such as speakers.
• To ensure proper ventilation, make sure the
machine is approximately 10 cm (4 inches) away
from walls and other equipment.
Power supply
Power supply
Power supplyPower supply
WARNING
WARNING
WARNINGWARNING
•••• Do not damage or modify the power cord and
Do not damage or modify the power cord and
Do not damage or modify the power cord and Do not damage or modify the power cord and
power plug. Also do not place heavy objects on
power plug. Also do not place heavy objects on
power plug. Also do not place heavy objects on power plug. Also do not place heavy objects on
the power cord, pull on it, or extensively bend
the power cord, pull on it, or extensively bend
the power cord, pull on it, or extensively bend the power cord, pull on it, or extensively bend
it. These actions may cause electrical damage
it. These actions may cause electrical damage
it. These actions may cause electrical damage it. These actions may cause electrical damage
and result in fire or electrical shock.
and result in fire or electrical shock.
and result in fire or electrical shock.and result in fire or electrical shock.
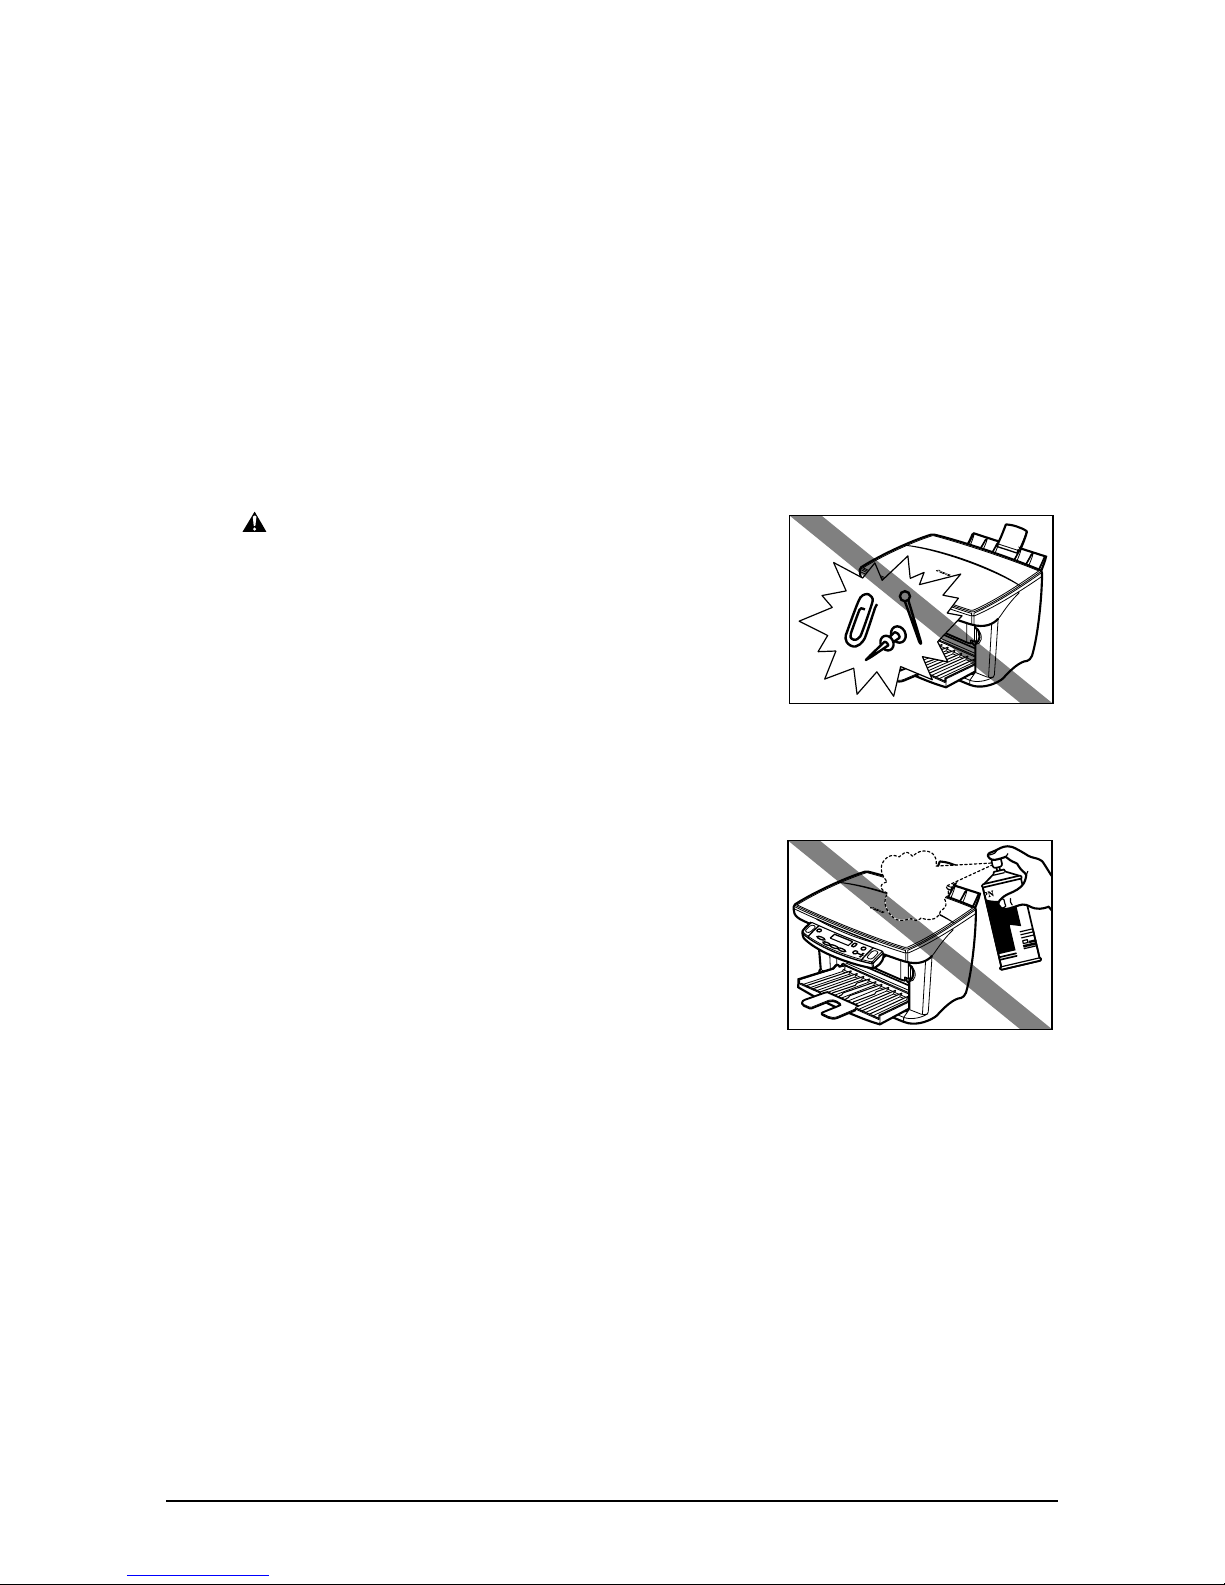
•••• Do not insert or unplug the power plug with wet
Do not insert or unplug the power plug with wet
Do not insert or unplug the power plug with wet Do not insert or unplug the power plug with wet
hands as this may result in electrical shock.
hands as this may result in electrical shock.
hands as this may result in electrical shock.hands as this may result in electrical shock.
XXXX Preface
Page 11

•••• Do not overload the wall outlet with too many
Do not overload the wall outlet with too many
Do not overload the wall outlet with too many Do not overload the wall outlet with too many
electrical appliances as this may result in fire
electrical appliances as this may result in fire
electrical appliances as this may result in fire electrical appliances as this may result in fire
or electrical shock.
or electrical shock.
or electrical shock.or electrical shock.
•••• Plug the machine into a standard 200–240 V
Plug the machine into a standard 200–240 V
Plug the machine into a standard 200–240 V Plug the machine into a standard 200–240 V
AC, 50/60 Hz, two-prong* outlet. Operate the
AC, 50/60 Hz, two-prong* outlet. Operate the
AC, 50/60 Hz, two-prong* outlet. Operate the AC, 50/60 Hz, two-prong* outlet. Operate the
machine only from the type of power source
machine only from the type of power source
machine only from the type of power source machine only from the type of power source
indicated on the machine’s label or a fire,
indicated on the machine’s label or a fire,
indicated on the machine’s label or a fire, indicated on the machine’s label or a fire,
electrical shock, or malfunction may occur. If
electrical shock, or malfunction may occur. If
electrical shock, or malfunction may occur. If electrical shock, or malfunction may occur. If
you are unsure of the type of power available,
you are unsure of the type of power available,
you are unsure of the type of power available, you are unsure of the type of power available,
consult your local power company.
consult your local power company.
consult your local power company.consult your local power company.
•••• Do not allow the power cord to be near objects
Do not allow the power cord to be near objects
Do not allow the power cord to be near objects Do not allow the power cord to be near objects
that emit heat. The outer cover of the power
that emit heat. The outer cover of the power
that emit heat. The outer cover of the power that emit heat. The outer cover of the power
cord may melt resulting in fire or electrical
cord may melt resulting in fire or electrical
cord may melt resulting in fire or electrical cord may melt resulting in fire or electrical
shock.
shock.
shock.shock.
•••• Make sure the power cord is fully extended and
Make sure the power cord is fully extended and
Make sure the power cord is fully extended and Make sure the power cord is fully extended and
has no knots in it when electricity is running
has no knots in it when electricity is running
has no knots in it when electricity is running has no knots in it when electricity is running
through it. Knots etc. in the cord may result in
through it. Knots etc. in the cord may result in
through it. Knots etc. in the cord may result in through it. Knots etc. in the cord may result in
fire or electrical shock.
fire or electrical shock.
fire or electrical shock.fire or electrical shock.
•••• Fully insert the power plug securely into the
Fully insert the power plug securely into the
Fully insert the power plug securely into the Fully insert the power plug securely into the
electrical outlet. If the prongs of the power plug
electrical outlet. If the prongs of the power plug
electrical outlet. If the prongs of the power plug electrical outlet. If the prongs of the power plug
come into contact with metallic objects etc., it
come into contact with metallic objects etc., it
come into contact with metallic objects etc., it come into contact with metallic objects etc., it
may result in fire or electrical shock.
may result in fire or electrical shock.
may result in fire or electrical shock.may result in fire or electrical shock.
•••• Do not use an extension cord as this may
Do not use an extension cord as this may
Do not use an extension cord as this may Do not use an extension cord as this may
result in fire or electrical shock.
result in fire or electrical shock.
result in fire or electrical shock.result in fire or electrical shock.
•••• Turn off the power and disconnect the power
Turn off the power and disconnect the power
Turn off the power and disconnect the power Turn off the power and disconnect the power
cord if the machine will not be used for a long
cord if the machine will not be used for a long
cord if the machine will not be used for a long cord if the machine will not be used for a long
period such as during holidays.
period such as during holidays.
period such as during holidays.period such as during holidays.
IMPORTANT
IMPORTANT
IMPORTANTIMPORTANT
•••• If dust accumulates around the power cord’s
If dust accumulates around the power cord’s
If dust accumulates around the power cord’s If dust accumulates around the power cord’s
plug when it is connected to a power outlet,
plug when it is connected to a power outlet,
plug when it is connected to a power outlet, plug when it is connected to a power outlet,
unplug the machine and wipe the plug with a
unplug the machine and wipe the plug with a
unplug the machine and wipe the plug with a unplug the machine and wipe the plug with a
clean, dry cloth.
clean, dry cloth.
clean, dry cloth.clean, dry cloth.
•••• Whenever you turn off the power and unplug
Whenever you turn off the power and unplug
Whenever you turn off the power and unplug Whenever you turn off the power and unplug
the machine, wait at least five seconds before
the machine, wait at least five seconds before
the machine, wait at least five seconds before the machine, wait at least five seconds before
you plug it in again.
you plug it in again.
you plug it in again.you plug it in again.
* The shape of the plug and outlet vary depending on the country of purchase.
Preface XI
XI
XIXI
Page 12
• Use only the power cord that came with the machine.
• Turn off the power and unplug the machine in the following conditions:
– When the power cord or plug is damaged or frayed.
– If liquid has spilled into the machine.
– If the machine has been exposed to rain or water.
– If the machine does not operate normally when you have followed the instructions in
the guides included with your machine. Adjust only those controls that are covered
by the instructions in the guides since improper adjustment of other controls may
result in damage and will often require extensive work by a qualified technician to
restore the product to normal operation.
– If the machine has been dropped or damaged.
– If the machine exhibits a distinct change in performance, indicating a need for
servicing.
Handling
Handling
HandlingHandling
WARNING
WARNING
WARNINGWARNING
•••• Do not drop paper clips, staples, or other metal
Do not drop paper clips, staples, or other metal
Do not drop paper clips, staples, or other metal Do not drop paper clips, staples, or other metal
objects inside the machine. Also do not spill
objects inside the machine. Also do not spill
objects inside the machine. Also do not spill objects inside the machine. Also do not spill
water, liquid, or flammable substances inside
water, liquid, or flammable substances inside
water, liquid, or flammable substances inside water, liquid, or flammable substances inside
the machine. If these items come into contact
the machine. If these items come into contact
the machine. If these items come into contact the machine. If these items come into contact
with high-voltage parts inside the machine, it
with high-voltage parts inside the machine, it
with high-voltage parts inside the machine, it with high-voltage parts inside the machine, it
may result in fire or electrical shock. If these
may result in fire or electrical shock. If these
may result in fire or electrical shock. If these may result in fire or electrical shock. If these
items are dropped or spilled in the machine,
items are dropped or spilled in the machine,
items are dropped or spilled in the machine, items are dropped or spilled in the machine,
turn off the power and unplug the power cord
turn off the power and unplug the power cord
turn off the power and unplug the power cord turn off the power and unplug the power cord
immediately with dry hands. Then contact your
immediately with dry hands. Then contact your
immediately with dry hands. Then contact your immediately with dry hands. Then contact your
local authorised Canon dealer or the Canon
local authorised Canon dealer or the Canon
local authorised Canon dealer or the Canon local authorised Canon dealer or the Canon
help line.
help line.
help line.help line.
•••• Do not use any highly flammable sprays near
Do not use any highly flammable sprays near
Do not use any highly flammable sprays near Do not use any highly flammable sprays near
the machine. If gas from a spray comes into
the machine. If gas from a spray comes into
the machine. If gas from a spray comes into the machine. If gas from a spray comes into
contact with the electrical components inside
contact with the electrical components inside
contact with the electrical components inside contact with the electrical components inside
the machine, it will result in fire.
the machine, it will result in fire.
the machine, it will result in fire.the machine, it will result in fire.
•••• There are high-voltage components inside the
There are high-voltage components inside the
There are high-voltage components inside the There are high-voltage components inside the
machine. If you are looking inside the machine
machine. If you are looking inside the machine
machine. If you are looking inside the machine machine. If you are looking inside the machine
to remove paper jams etc., do not allow
to remove paper jams etc., do not allow
to remove paper jams etc., do not allow to remove paper jams etc., do not allow
metallic objects such as jewellery to come into
metallic objects such as jewellery to come into
metallic objects such as jewellery to come into metallic objects such as jewellery to come into
contact with the inside of the machine. Contact
contact with the inside of the machine. Contact
contact with the inside of the machine. Contact contact with the inside of the machine. Contact
may result in burns or electrical shock.
may result in burns or electrical shock.
may result in burns or electrical shock.may result in burns or electrical shock.
XII
XII Preface
XIIXII
Page 13

CAUTION
CAUTION
CAUTIONCAUTION
•••• Close the document cover gently to avoid
Close the document cover gently to avoid
Close the document cover gently to avoid Close the document cover gently to avoid
catching your hand. Failing to do so may result
catching your hand. Failing to do so may result
catching your hand. Failing to do so may result catching your hand. Failing to do so may result
in injury.
in injury.
in injury.in injury.
•••• Do not press down hard on the document
Do not press down hard on the document
Do not press down hard on the document Do not press down hard on the document
cover when using the platen glass to scan thick
cover when using the platen glass to scan thick
cover when using the platen glass to scan thick cover when using the platen glass to scan thick
books. This may damage the platen glass and
books. This may damage the platen glass and
books. This may damage the platen glass and books. This may damage the platen glass and
document cover, and/or result in injury.
document cover, and/or result in injury.
document cover, and/or result in injury.document cover, and/or result in injury.
•••• Do not place the following objects on top of the machine. If such objects come
Do not place the following objects on top of the machine. If such objects come
Do not place the following objects on top of the machine. If such objects come Do not place the following objects on top of the machine. If such objects come
into contact with internal electrical components, the machine may short-circuit
into contact with internal electrical components, the machine may short-circuit
into contact with internal electrical components, the machine may short-circuit into contact with internal electrical components, the machine may short-circuit
resulting in fire or electrical shock.
resulting in fire or electrical shock.
resulting in fire or electrical shock.resulting in fire or electrical shock.
–––– Metallic objects such as jewellery and watches
Metallic objects such as jewellery and watches
Metallic objects such as jewellery and watchesMetallic objects such as jewellery and watches
–––– Containers of water or other liquids such as glasses, vases, or pot plants
Containers of water or other liquids such as glasses, vases, or pot plants
Containers of water or other liquids such as glasses, vases, or pot plantsContainers of water or other liquids such as glasses, vases, or pot plants
If water etc. does spill inside the machine, turn off the power immediately,
If water etc. does spill inside the machine, turn off the power immediately,
If water etc. does spill inside the machine, turn off the power immediately, If water etc. does spill inside the machine, turn off the power immediately,
disconnect the power cord and contact your local authorised Canon dealer or
disconnect the power cord and contact your local authorised Canon dealer or
disconnect the power cord and contact your local authorised Canon dealer or disconnect the power cord and contact your local authorised Canon dealer or
the Canon help line.
the Canon help line.
the Canon help line.the Canon help line.
•••• Do not touch the high-voltage electrical parts as this may result in electrical
Do not touch the high-voltage electrical parts as this may result in electrical
Do not touch the high-voltage electrical parts as this may result in electrical Do not touch the high-voltage electrical parts as this may result in electrical
shock.
shock.
shock.shock.
•••• Do not place heavy objects on top of the machine as these may topple over and
Do not place heavy objects on top of the machine as these may topple over and
Do not place heavy objects on top of the machine as these may topple over and Do not place heavy objects on top of the machine as these may topple over and
result in injury.
result in injury.
result in injury.result in injury.
•••• Do not insert your hands into the machine while it is printing as parts inside the
Do not insert your hands into the machine while it is printing as parts inside the
Do not insert your hands into the machine while it is printing as parts inside the Do not insert your hands into the machine while it is printing as parts inside the
machine are moving and this may result in injury.
machine are moving and this may result in injury.
machine are moving and this may result in injury.machine are moving and this may result in injury.
•••• After printing, do not touch the electrical contacts of the printhead. They will be
After printing, do not touch the electrical contacts of the printhead. They will be
After printing, do not touch the electrical contacts of the printhead. They will be After printing, do not touch the electrical contacts of the printhead. They will be
hot and may result in burns or electrical shock.
hot and may result in burns or electrical shock.
hot and may result in burns or electrical shock.hot and may result in burns or electrical shock.
Preface XIII
XIII
XIIIXIII
Page 14

• Do not subject the machine to strong physical
shock or vibration.
• Before moving the machine, turn off the power
and unplug the machine.
• Do not lift the machine by any of its attachments.
Close the multi-purpose tray and paper output
tray, and lift the machine by the recessed areas
on its sides as shown.
• A distinct change in performance may indicate a
need for servicing.
Maintenance
Maintenance
MaintenanceMaintenance
WARNING
WARNING
WARNINGWARNING
•••• Do not service the machine yourself except as specifically described in this guide.
Do not service the machine yourself except as specifically described in this guide.
Do not service the machine yourself except as specifically described in this guide. Do not service the machine yourself except as specifically described in this guide.
If further servicing is required, contact your local authorised Canon dealer or the
If further servicing is required, contact your local authorised Canon dealer or the
If further servicing is required, contact your local authorised Canon dealer or the If further servicing is required, contact your local authorised Canon dealer or the
Canon help line.
Canon help line.
Canon help line.Canon help line.
• Keep the machine clean. Dust accumulation may prevent the machine from operating
properly.
XIV
XIV Preface
XIVXIV
Page 15
Chapter
Chapter
ChapterChapter
1
P
P
PP
Introduction
Introduction
IntroductionIntroduction
Main components of the machine
Main components of the machine
Main components of the machineMain components of the machine
1111
Introduction
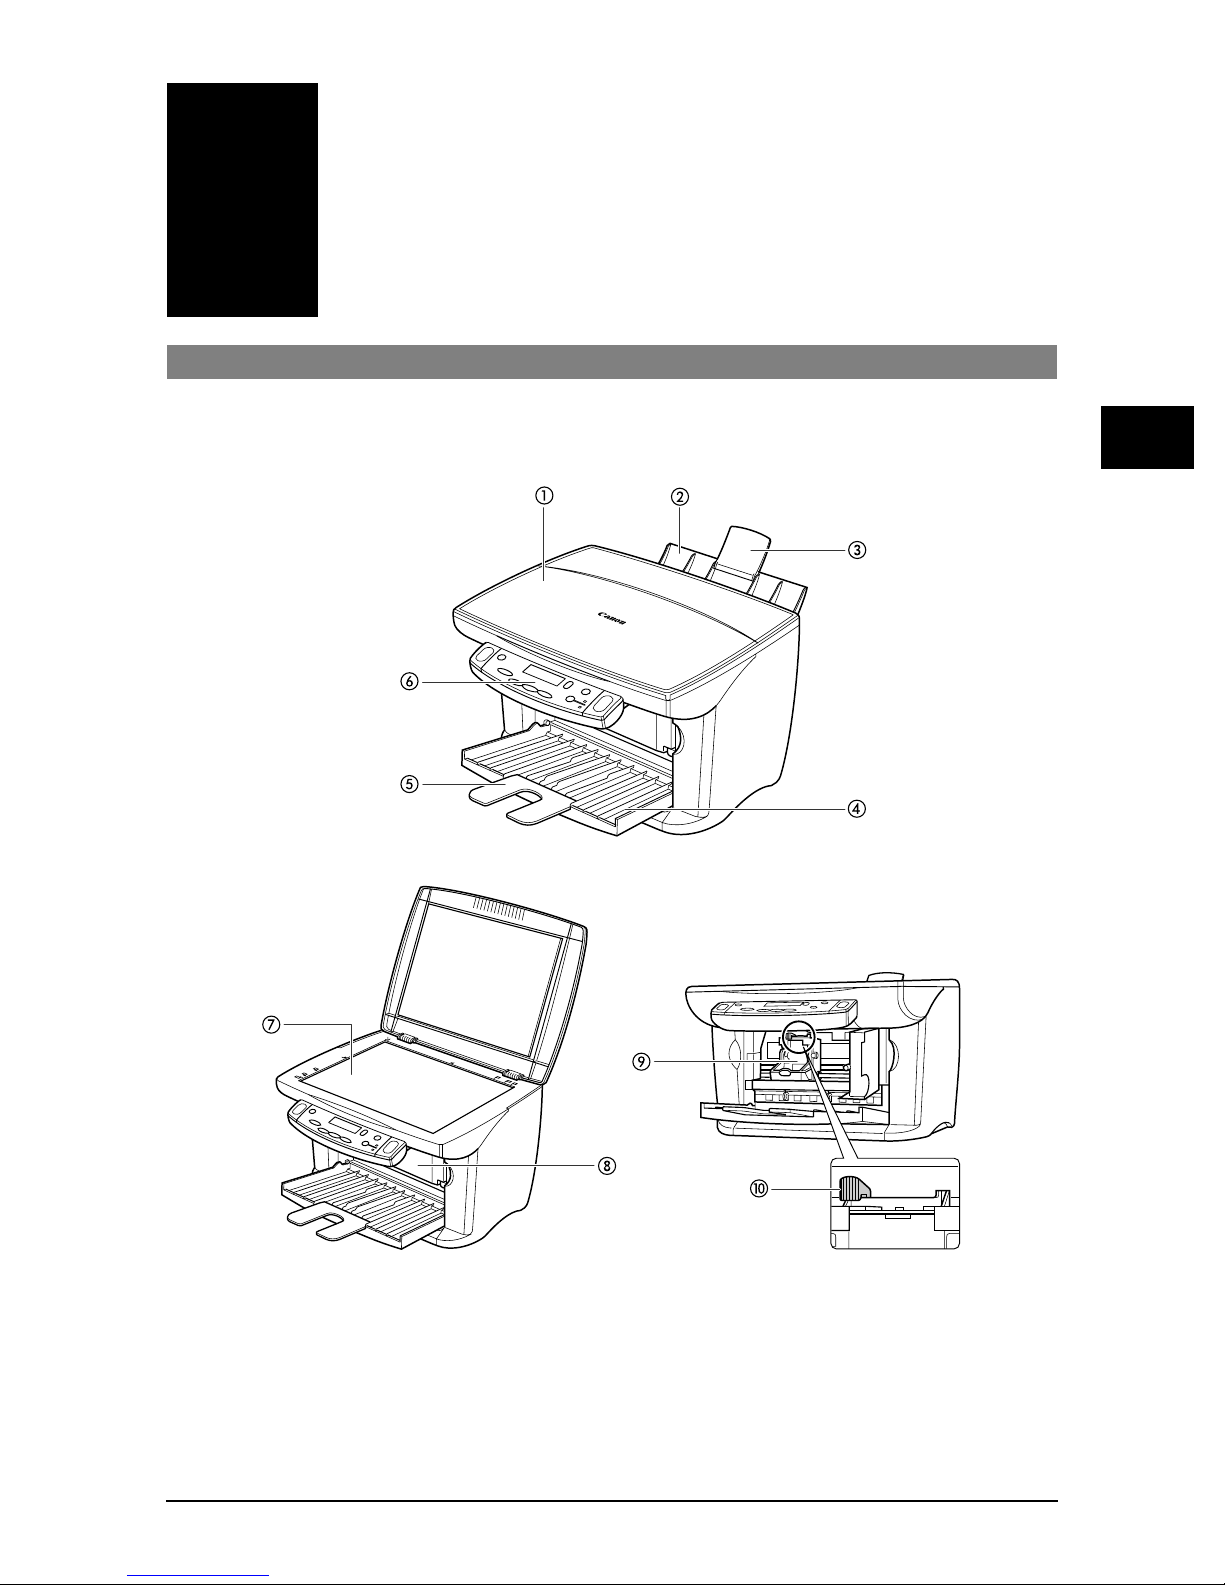
a Document cover f Operation panel
b Multi-purpose tray g Platen glass
c Tray extension h Inner cover
d Paper output tray i Printhead holder
e Tray extension j Paper thickness lever
Chapter 1 Introduction 1-1
1-1
1-11-1
Page 16
Operation panel of the machine
Operation panel of the machine
Operation panel of the machineOperation panel of the machine
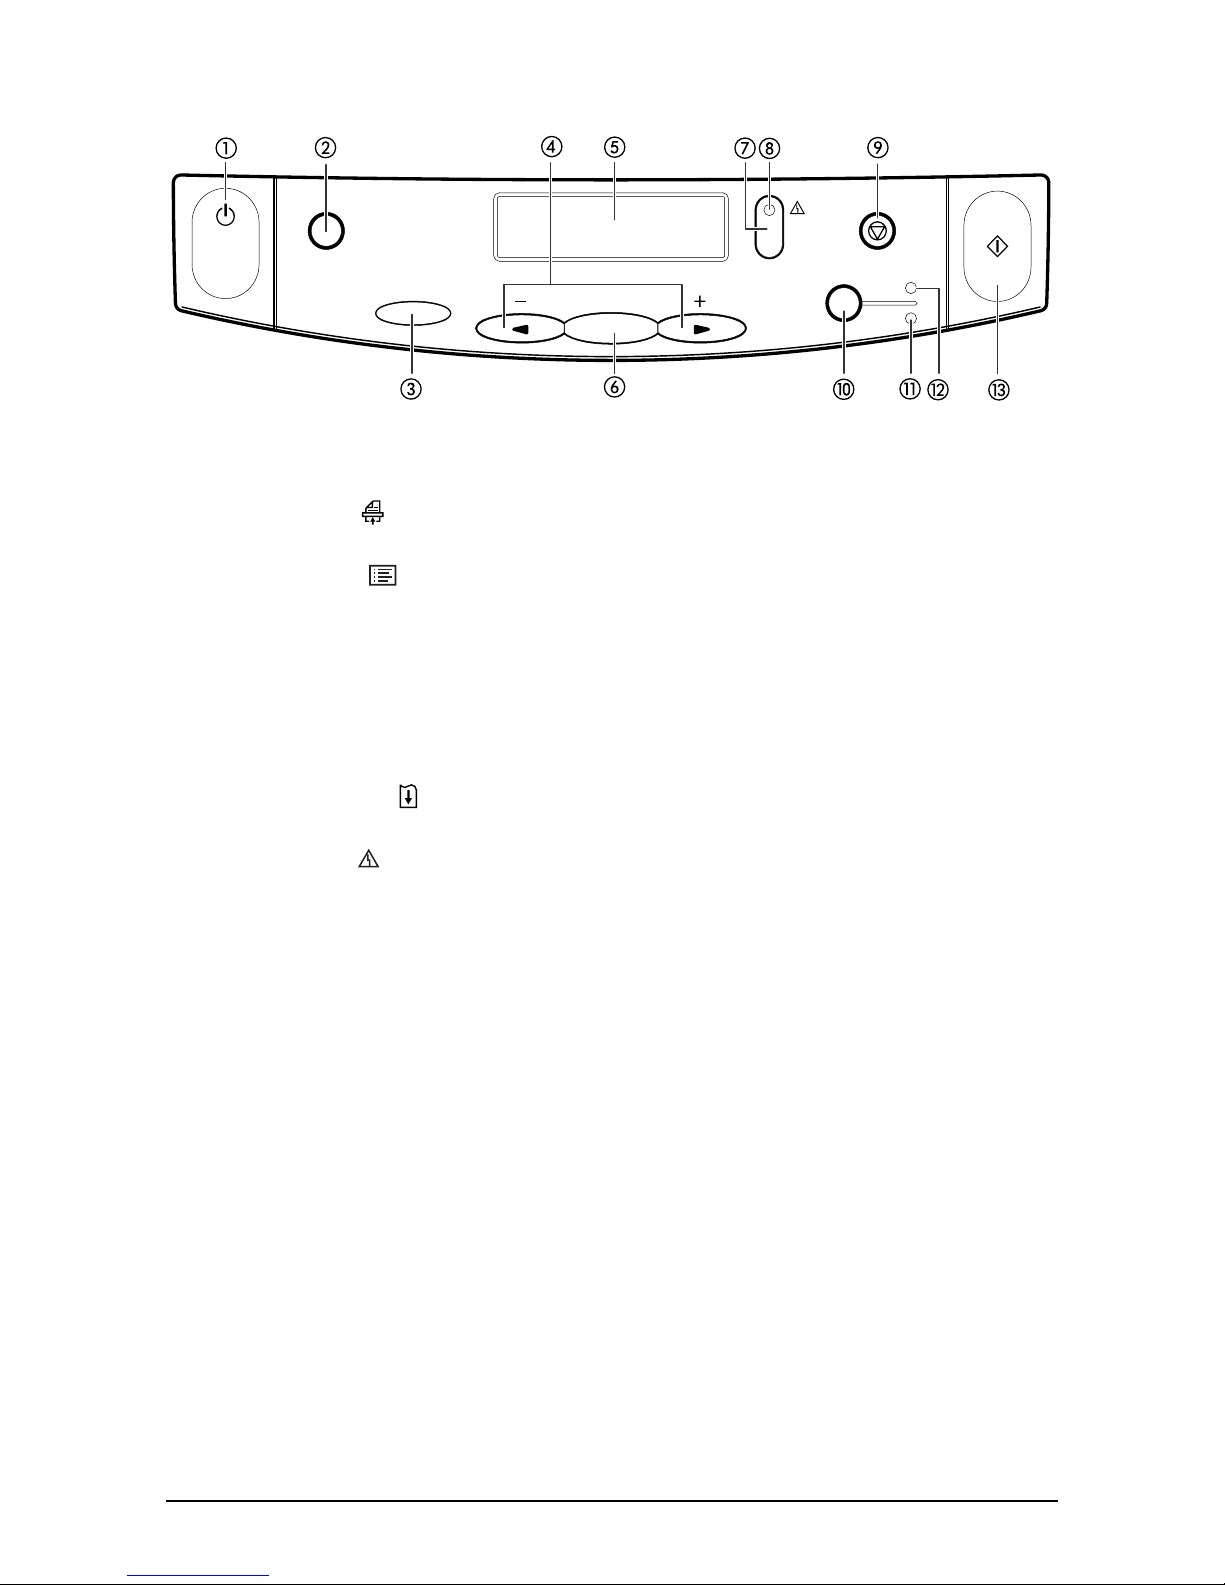
aaaa [ON/OFF] key
[ON/OFF] key
[ON/OFF] key[ON/OFF] key
Turns the machine on and off (keep pressed for a brief interval).
Before turning on the machine, make sure the document cover is closed.
bbbb [Scan] ( ) key
[Scan] ( ) key
[Scan] ( ) key[Scan] ( ) key
Scans a document to your computer according to the action selected.
cccc [Menu] ( )
[Menu] ( ) NNNN key
[Menu] ( ) [Menu] ( )
Accesses the settings to customise operation of your machine.
dddd [[[[OOOO (-)] and [
eeee LCD
ffff [OK] key
(-)] and [PPPP (+)] keys
(-)] and [ (-)] and [
Scroll through selections, and increase or decrease the number of copies.
LCD
LCDLCD
Displays messages and selections, and prompts during operation.
[OK] key
[OK] key[OK] key
Selects or confirms settings.
key
key key
(+)] keys
(+)] keys (+)] keys
gggg [Resume] ( ) key
[Resume] ( ) key
[Resume] ( ) key[Resume] ( ) key
Resumes an operation after an error is corrected.
hhhh Alarm ( ) light
Alarm ( ) light
Alarm ( ) lightAlarm ( ) light
Blinks when an error occurs or when the machine needs attention.
1-2
1-2 Introduction Chapter 1
1-21-2
Page 17

iiii [Stop/Reset] ( ) key
[Stop/Reset] ( ) key
[Stop/Reset] ( ) key[Stop/Reset] ( ) key
Cancels operations and returns the machine to standby mode.
jjjj [Colour/B&W] ( / ) key
[Colour/B&W] ( / ) key
[Colour/B&W] ( / ) key[Colour/B&W] ( / ) key
Sets the machine for colour or black & white copying.
kkkk B&W ( ) light
B&W ( ) light
B&W ( ) lightB&W ( ) light
Lights when black & white copying is selected.
llll Colour ( ) light
Colour ( ) light
Colour ( ) lightColour ( ) light
Lights when colour copying is selected.
mmmm [Copy/Start] ( ) key
[Copy/Start] ( ) key
[Copy/Start] ( ) key[Copy/Start] ( ) key
Starts operation.
IMPORTANT
IMPORTANT
IMPORTANTIMPORTANT
•••• To prevent the printhead from drying up, the machine automatically caps it when
To prevent the printhead from drying up, the machine automatically caps it when
To prevent the printhead from drying up, the machine automatically caps it when To prevent the printhead from drying up, the machine automatically caps it when
the power is turned off with the [ON/OFF] key. If you need to disconnect the
the power is turned off with the [ON/OFF] key. If you need to disconnect the
the power is turned off with the [ON/OFF] key. If you need to disconnect the the power is turned off with the [ON/OFF] key. If you need to disconnect the
machine from the main power source (e.g. disconnect the power cord), be sure to
machine from the main power source (e.g. disconnect the power cord), be sure to
machine from the main power source (e.g. disconnect the power cord), be sure to machine from the main power source (e.g. disconnect the power cord), be sure to
turn off the machine first by pressing [ON/OFF] before disconnecting it.
turn off the machine first by pressing [ON/OFF] before disconnecting it.
turn off the machine first by pressing [ON/OFF] before disconnecting it.turn off the machine first by pressing [ON/OFF] before disconnecting it.
•••• If you are not using the machine for a long period of time, we recommend that you
If you are not using the machine for a long period of time, we recommend that you
If you are not using the machine for a long period of time, we recommend that you If you are not using the machine for a long period of time, we recommend that you
print (in black and colour) or clean the printhead approximately once a month to
print (in black and colour) or clean the printhead approximately once a month to
print (in black and colour) or clean the printhead approximately once a month to print (in black and colour) or clean the printhead approximately once a month to
maintain the printhead in good working condition. The printhead contains
maintain the printhead in good working condition. The printhead contains
maintain the printhead in good working condition. The printhead contains maintain the printhead in good working condition. The printhead contains
high-precision nozzles that will become blocked if the printhead is not used for a
high-precision nozzles that will become blocked if the printhead is not used for a
high-precision nozzles that will become blocked if the printhead is not used for a high-precision nozzles that will become blocked if the printhead is not used for a
long period of time.
long period of time.
long period of time.long period of time.
1111
Introduction
NOTE
NOTE
NOTENOTE
• The power cannot be turned off when the machine is operating.
• Your machine performs printhead cleaning every time you unplug and then plug in the
machine. This ensures optimum print quality but also consumes a small amount of ink
during the cleaning process. For this reason, it is recommended that you only turn the
machine off and on with the [ON/OFF] key when instructed to do so in this guide.
Chapter 1 Introduction 1-3
1-3
1-31-3
Page 18

1-4
1-4 Introduction Chapter 1
1-41-4
Page 19

Chapter
Chapter
ChapterChapter
Document and print
Document and print
Document and print Document and print
2
media handling
media handling
media handlingmedia handling
P
P
PP
P
P Loading documents
PP
Document requirements
Document requirements
Document requirementsDocument requirements
For details on the documents you can load on the platen glass for copying and
scanning, refer to the
Loading documents
Loading documentsLoading documents
NOTE
NOTE
NOTENOTE
• Make sure any glue, ink, or correction fluid on the document is completely dry before
loading.
1111
Lift the document cover.
Lift the document cover.
Lift the document cover.Lift the document cover.
2222
Place your document face down on the platen
Place your document face down on the platen
Place your document face down on the platen Place your document face down on the platen
glass. Align the upper left corner of your
glass. Align the upper left corner of your
glass. Align the upper left corner of your glass. Align the upper left corner of your
document with the alignment mark on the
document with the alignment mark on the
document with the alignment mark on the document with the alignment mark on the
upper left corner of the platen glass.
upper left corner of the platen glass.
upper left corner of the platen glass.upper left corner of the platen glass.
Basic Guide
.
2222
Document and print media handling
3333
Gently lower the document cover.
Gently lower the document cover.
Gently lower the document cover.Gently lower the document cover.
P
P Print media requirements
PP
Chapter 2 Document and print media handling 2-1
Print media requirements
Print media requirementsPrint media requirements
For details on the print media you can load in the multi-purpose tray for printing and
copying, refer to the
Basic Guide
.
2-1
2-12-1
Page 20
P
P Loading print media
PP
Loading print media
Loading print mediaLoading print media
For details on loading paper in the multi-purpose tray, refer to the
Basic Guide
Guide
P
P Setting the paper thickness lever
PP
Setting the paper thickness lever
Setting the paper thickness leverSetting the paper thickness lever
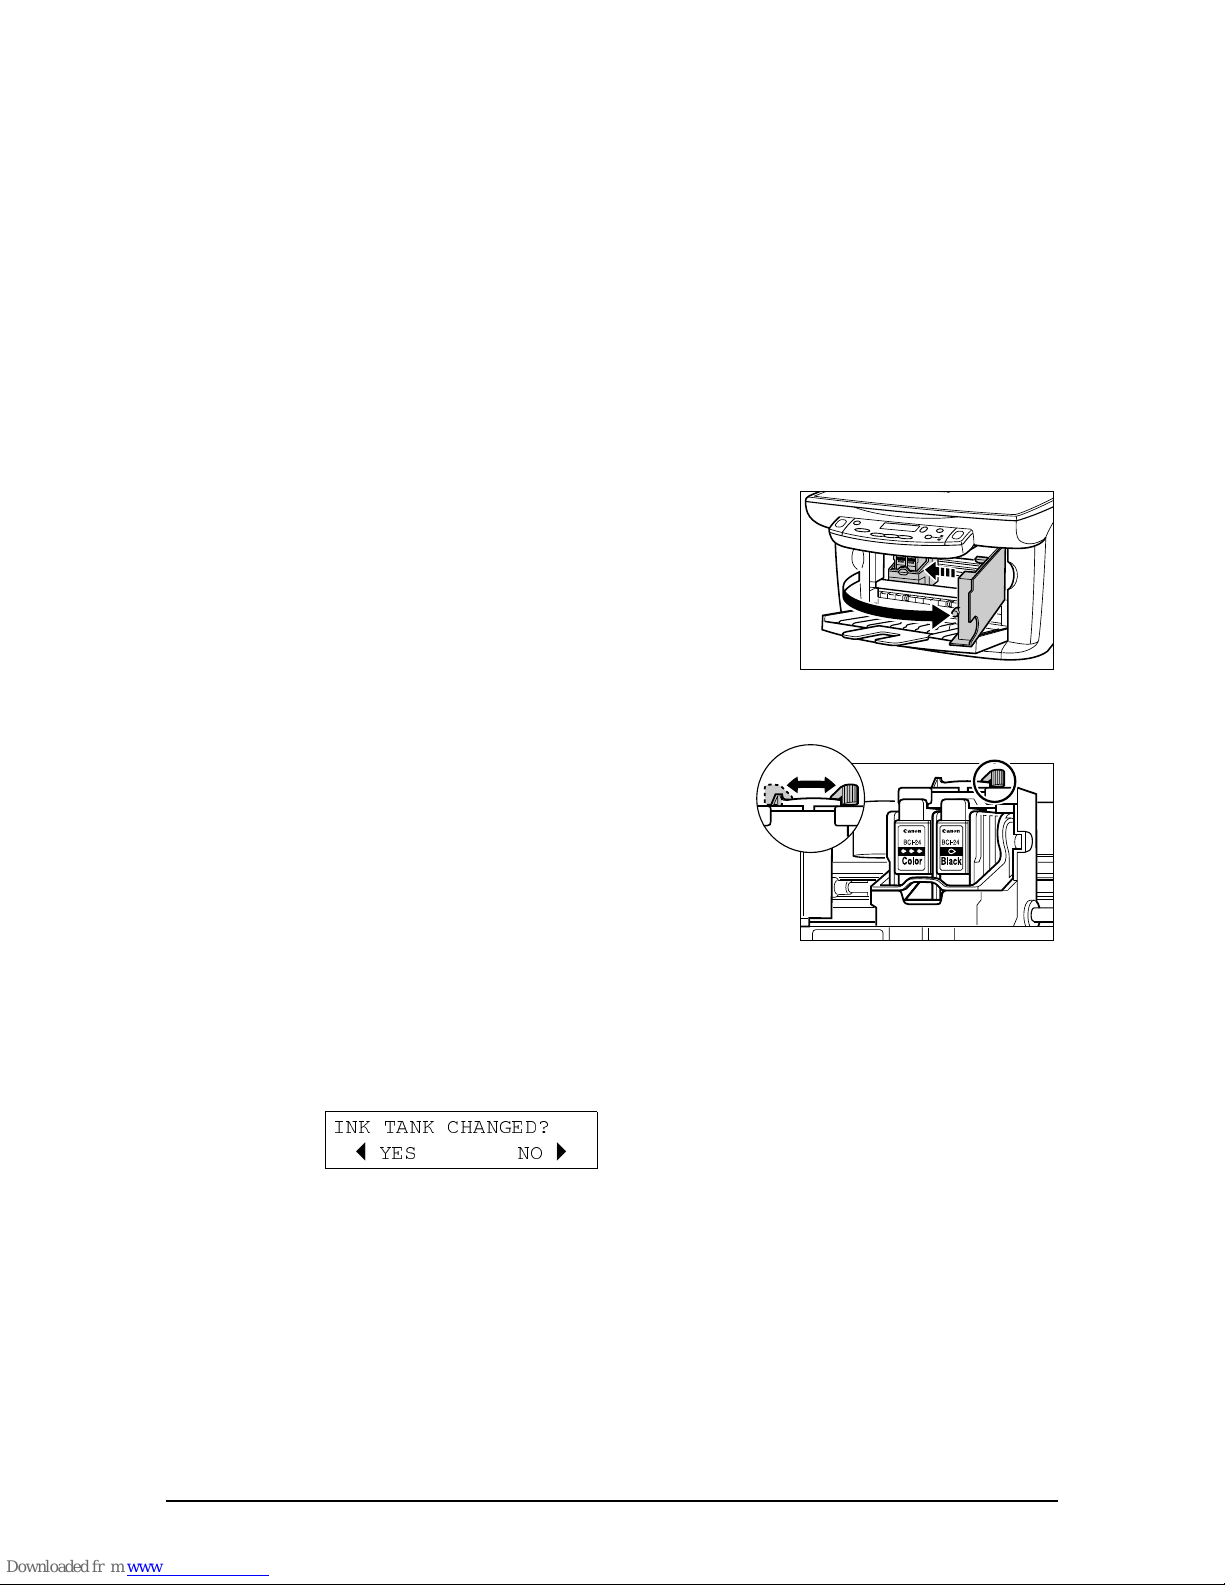
The paper thickness lever adjusts the gap between the printhead and the print media to
suit the print media’s thickness. Before printing, be sure to set the paper thickness
lever.
Follow this procedure to set the paper thickness lever:
Open the inner cover.
Open the inner cover.
1111
Open the inner cover.Open the inner cover.
• The printhead holder moves to the left.
. For details on loading envelopes or banner paper, refer to the
.
Set-Up Sheet
or
Basic
Move the paper thickness lever to the
Move the paper thickness lever to the
2222
Move the paper thickness lever to the Move the paper thickness lever to the
appropriate setting.
appropriate setting.
appropriate setting.appropriate setting.
• For details on which position to set for the print media
you are using, refer to the
Close the inner cover.
Close the inner cover.
3333
Close the inner cover.Close the inner cover.
The LCD displays the following message:
The LCD displays the following message:
4444
The LCD displays the following message:The LCD displays the following message:
INK TANK CHANGED?
YES NO
B
Press [
Press [PPPP].
Press [Press [
].
].].
Basic Guide
A
.
2-2
2-2 Document and print media handling Chapter 2
2-22-2
Page 21
P
P Setting the print media size and type
PP
Setting the print media size and type
Setting the print media size and typeSetting the print media size and type
For copying, you need to set the size and type of print media loaded in the
multi-purpose tray.
NOTE
NOTE
NOTENOTE
• For documents printed from your computer, specify the print media size and type on
your computer (1
Follow this procedure to set the print media size and type:
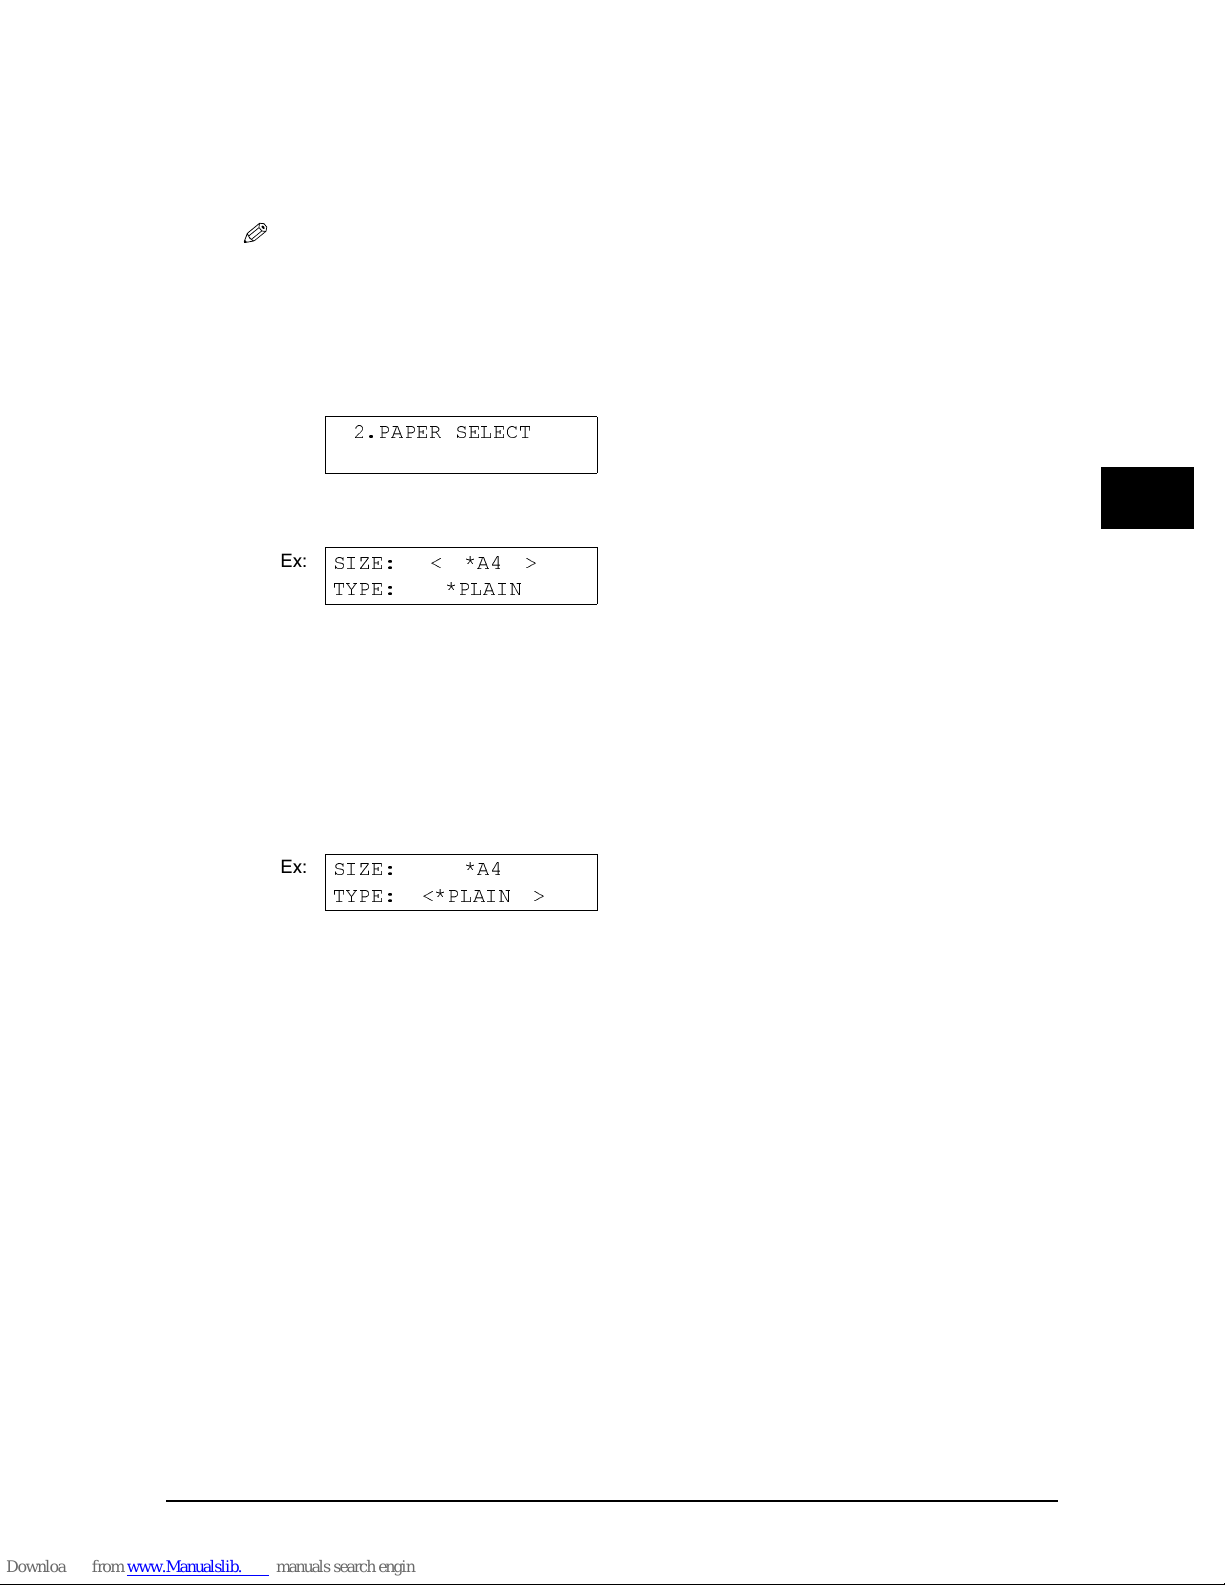
Press [Menu] twice.
Press [Menu] twice.
1111
Press [Menu] twice.Press [Menu] twice.
2.PAPER SELECT
D
Software Guide
).
Press [OK].
Press [OK].
2222
Press [OK].Press [OK].
Ex:
SIZE: < *A4 >
TYPE: *PLAIN
Use [
Use [OOOO] or [
3333
Use [Use [
• Select:
Press [OK].
Press [OK].
4444
Press [OK].Press [OK].
Ex:
Use [
Use [OOOO] or [
5555
Use [Use [
• Select:
] or [PPPP] to select the print media size.
] or [] or [
– <A4> for A4-size print media.
– <LTR> for letter-size print media.
– <B5> for B5-size print media.
– <A5> for A5-size print media.
–<4" × 6"> for card-size print media.
SIZE: *A4
TYPE: <*PLAIN >
] or [PPPP] to select the print media type.
] or [] or [
– <PLAIN> for plain paper.
– <GLOSSY> for glossy photo paper.
– <H.RES.> for high resolution paper.
– <TRANS.> for transparencies.
– <PHOTO> for Photo Paper Pro.
] to select the print media size.
] to select the print media size.] to select the print media size.
] to select the print media type.
] to select the print media type.] to select the print media type.
2222
Document and print media handling
Press [OK].
Press [OK].
6666
Press [OK].Press [OK].
• In copy mode, the LCD will display the print media size and type.
Chapter 2 Document and print media handling 2-3
2-3
2-32-3
Page 22

2-4
2-4 Document and print media handling Chapter 2
2-42-4
Page 23

Chapter
Chapter
ChapterChapter
The MultiPASS Suite
The MultiPASS Suite
The MultiPASS Suite The MultiPASS Suite
software
software
software software
3
—Basic operation
—Basic operation
—Basic operation—Basic operation
P
P
PP
P
P System requirements
PP
Installing the software
Installing the software
Installing the softwareInstalling the software
If you have not already installed the software as explained in the Set-Up Sheet, please
do so now. For instructions, see the
System requirements
System requirementsSystem requirements
To successfully install and operate the MultiPASS Suite, your system must meet the
following requirements:
• CD-ROM drive, or access to one over a network connection
• 256-colour SVGA monitor or greater
• Microsoft Internet Explorer version 4.01 or later
• Client for Microsoft Networks (Windows 98/Me only)
• 60 MB of available hard disk space (150 MB recommended)
• USB cable 5 m (16
IIII Windows 98
Windows 98
Windows 98Windows 98
• IBM or compatible computer with a Pentium® 90 processor or higher
• 32 MB of RAM (64 MB or more recommended)
3
⁄
ft.) or shorter
8
Set-Up Sheet
or the
Software Guide
.
3333
IIII Windows Me
Windows Me
Windows MeWindows Me
• IBM or compatible computer with a Pentium® 150 processor or higher
• 32 MB of RAM (64 MB or more recommended)
IIII Windows 2000
Windows 2000
Windows 2000Windows 2000
• IBM or compatible computer with a Pentium® 133 processor or higher
• 64 MB of RAM (128 MB or more recommended)
Chapter 3 The MultiPASS Suite software —Basic operation 3-1
3-1
3-13-1
The MultiPASS Suite software —Basic operation
Page 24
Windows XP
Windows XP
IIII
Windows XPWindows XP
• IBM or compatible computer with a Pentium® 233 processor (Pentium® 300 processor
or higher recommended)
• 64 MB of RAM (128 MB or more recommended)
P
P My MultiPASS
PP
My MultiPASS
My MultiPASSMy MultiPASS
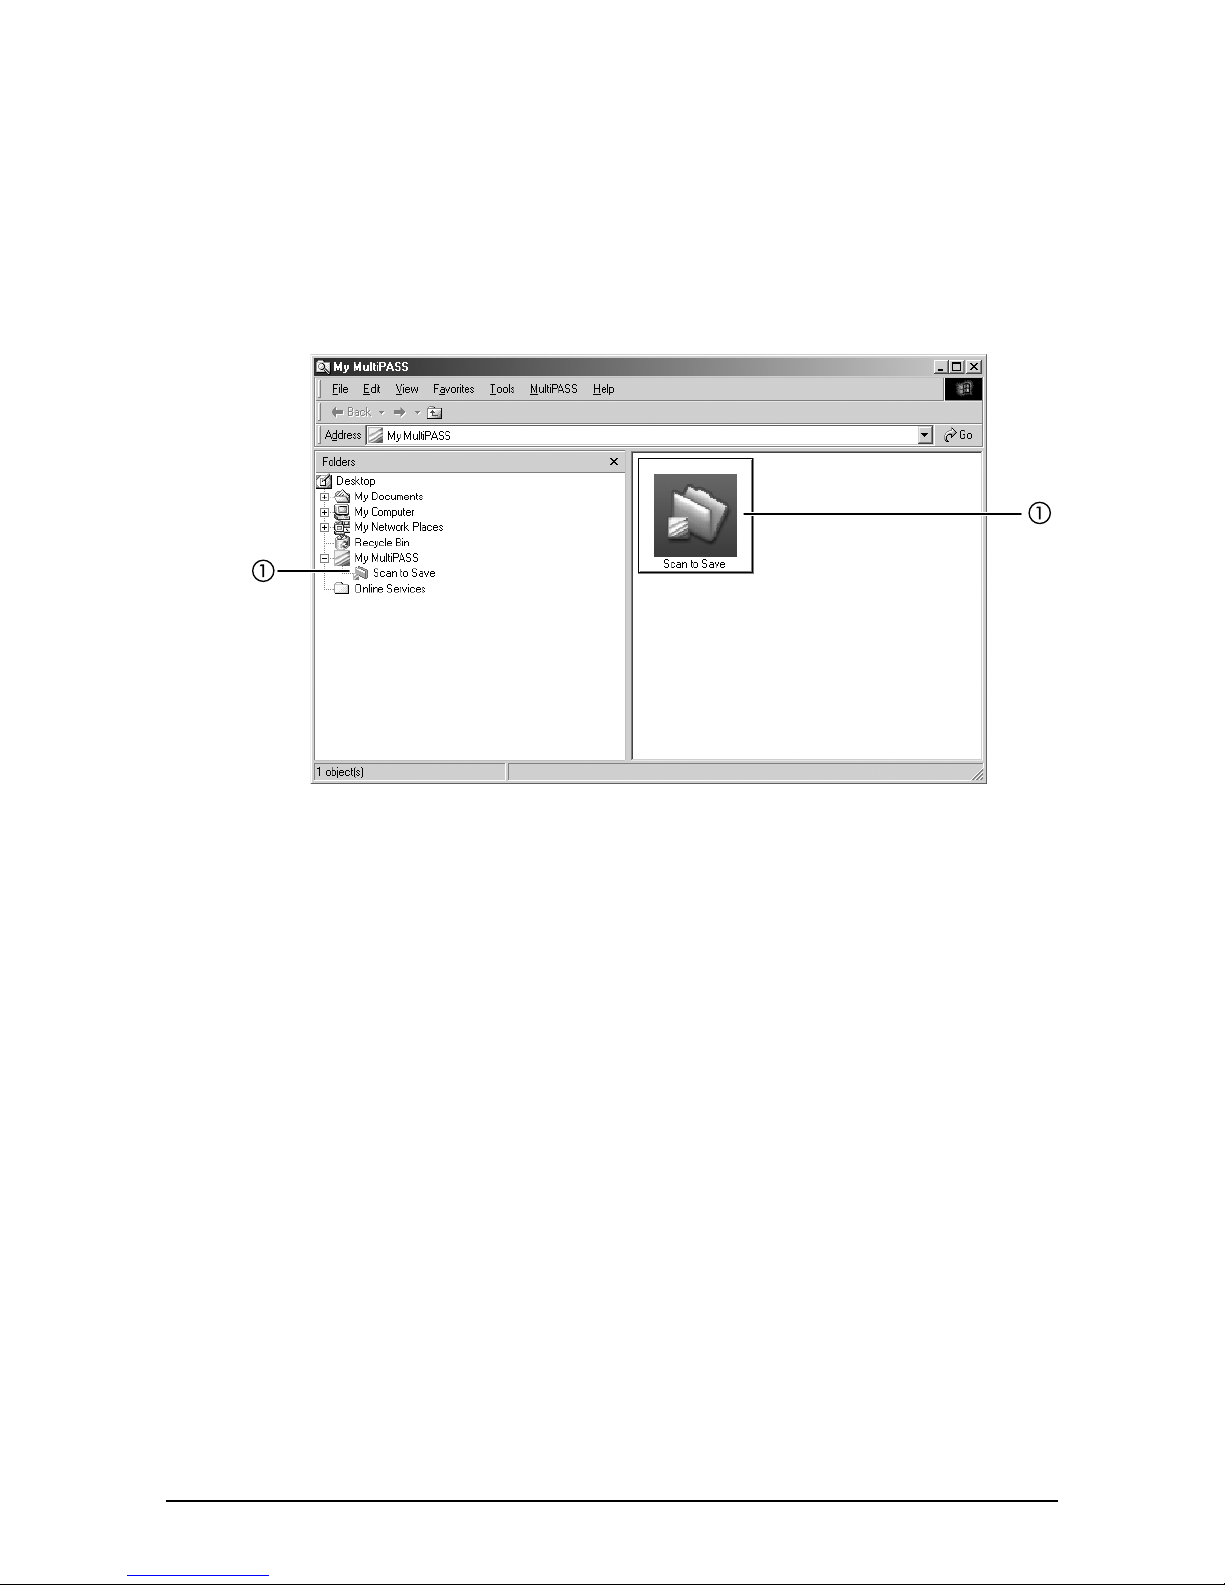
My MultiPASS is a folder that contains the Scan to Save folder that stores scanned
images.
aaaa Scan to Save folder
Scan to Save folder—Stores scanned images in the My Pictures folder, or if not
Scan to Save folderScan to Save folder
available, in the My Documents folder or Scan to Save folder.
My MultiPASS works within Windows Explorer and thus has a similar structure. For
more details on My MultiPASS, see the
Software Guide
.
3-2
3-2 The MultiPASS Suite software —Basic operation Chapter 3
3-23-2
Page 25

Opening My MultiPASS
Opening My MultiPASS
Opening My MultiPASSOpening My MultiPASS
Follow one of the procedures below to open My MultiPASS:
On the MultiPASS Toolbar, click [MultiPASS] (1 p. 6-1).
-or-
On the Windows desktop, double-click the My MultiPASS icon.
-or-
If opening My MultiPASS from Windows Explorer, click [My MultiPASS] under Desktop.
NOTE
NOTE
NOTENOTE
• When you open My MultiPASS, the MultiPASS menu appears on the menu bar.
P
P MultiPASS Viewer
PP
MultiPASS Viewer
MultiPASS ViewerMultiPASS Viewer
The MultiPASS Viewer allows you to open and view documents stored in the Scan to
Save folder. Once open in the Viewer, if you want to edit your document, you can open
it in the MultiPASS Photo Enhancer to make advanced image adjustments, such as
applying filters or effects to your document. For details on the MultiPASS Photo
Enhancer, refer to the
Software Guide
3333
.
Chapter 3 The MultiPASS Suite software —Basic operation 3-3
3-3
3-33-3
The MultiPASS Suite software —Basic operation
Page 26

Opening a document in the Viewer
Opening a document in the Viewer
Opening a document in the ViewerOpening a document in the Viewer
In the Scan to Save folder, double-click the document you want to open.
In the Scan to Save folder, double-click the document you want to open.
1111
In the Scan to Save folder, double-click the document you want to open.In the Scan to Save folder, double-click the document you want to open.
Toolbar buttons
Toolbar buttons
Toolbar buttonsToolbar buttons
a Saves the document under a new name.
b Displays the previous image.
c Displays the next image.
d Zooms out of the document.
e Zooms in on the document.
f Opens the document in the MultiPASS Photo Enhancer.
g Rotates the document.
h Prints the document.
i Opens the Properties dialogue box.
j Customises Viewer window options.
To save a document:
To save a document: On the File menu, click [Save As]. Enter a name for the
To save a document:To save a document:
document, then click [Save].
To close the Viewer:
To close the Viewer: On the File menu, click [Exit].
To close the Viewer:To close the Viewer:
For more details on the different functions and settings of the Viewer, refer to the online
help or the
Software Guide
.
3-4
3-4 The MultiPASS Suite software —Basic operation Chapter 3
3-43-4
Page 27
P
P MultiPASS Status Monitor
PP
Opening the Status Monitor
Opening the Status Monitor
Opening the Status MonitorOpening the Status Monitor
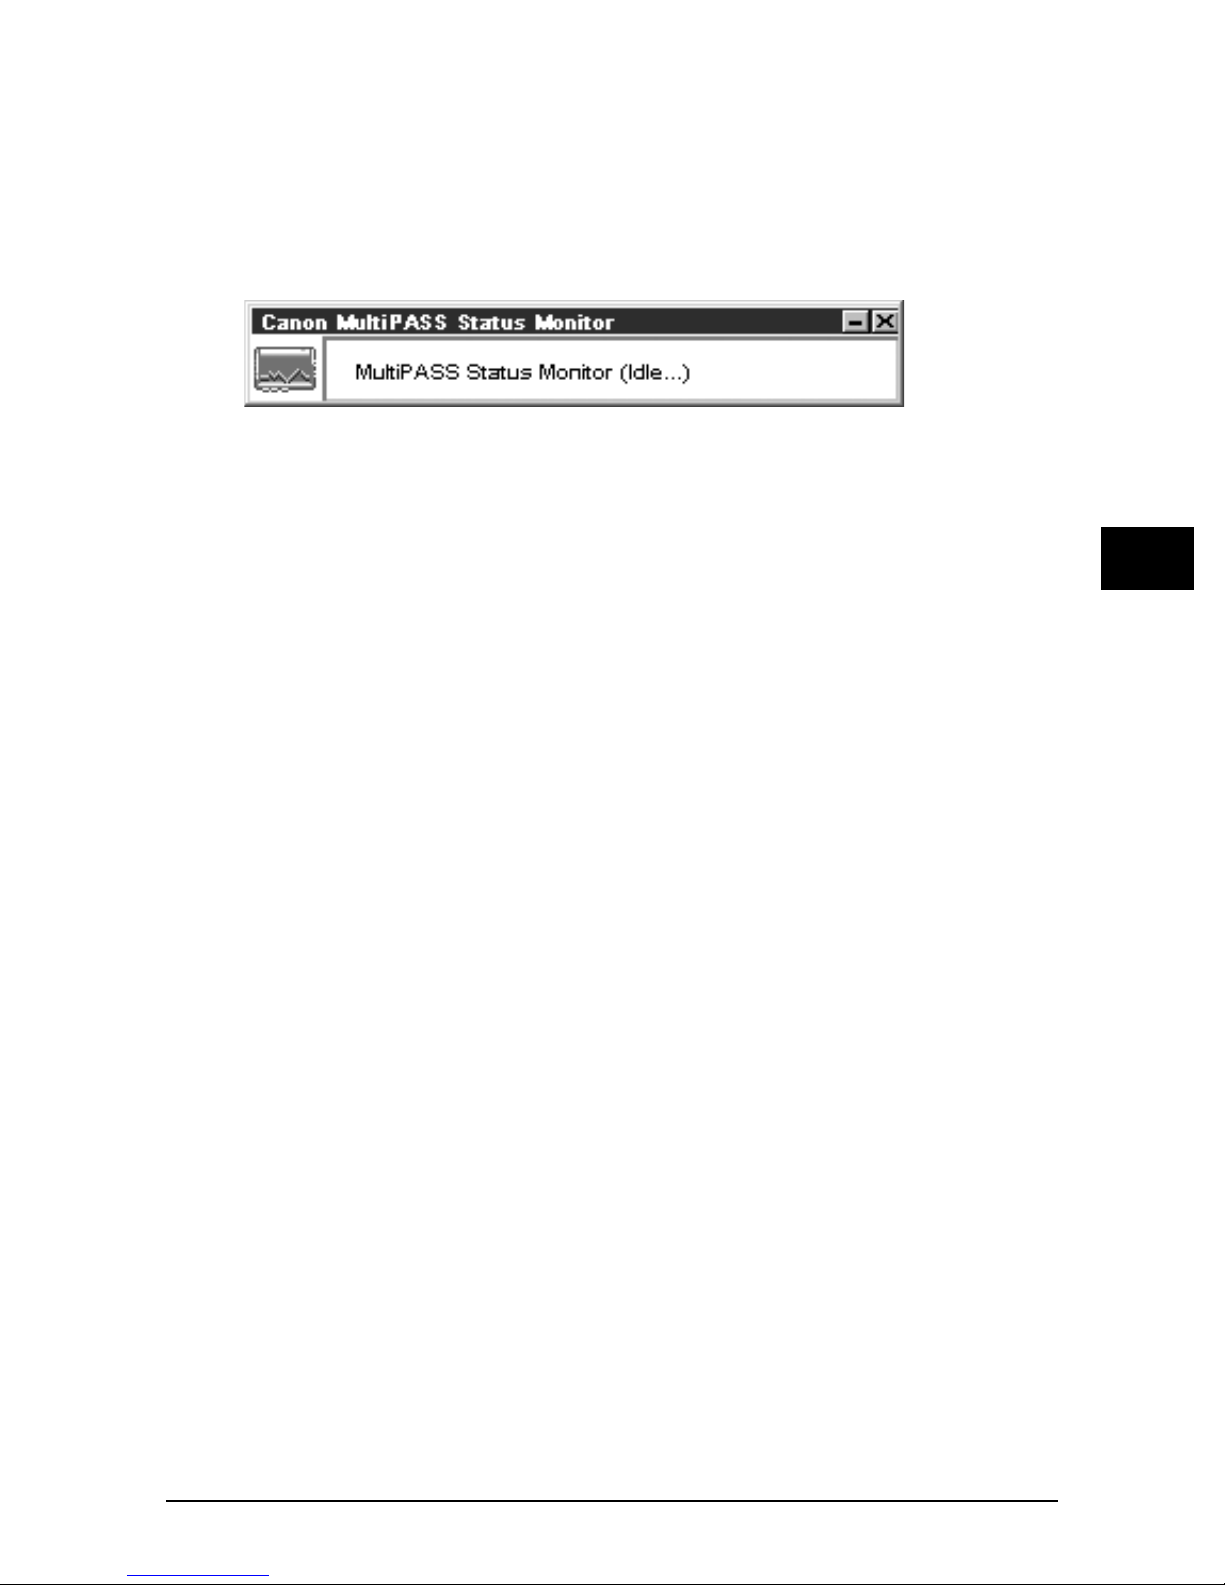
MultiPASS Status Monitor
MultiPASS Status MonitorMultiPASS Status Monitor
The MultiPASS Status Monitor shows the current status of the machine and any errors
that need your attention. It cannot interrupt any activities.
When the Status Monitor is open, it displays as a window on the Windows desktop and
as an icon in the Windows taskbar.
On the Windows desktop, click [Start], point to [Programs] or [All Programs], point to
[MultiPASS Suite], then click [MultiPASS Status Monitor].
For more details on the Status Monitor, refer to the online help or the
Software Guide
.
3333
The MultiPASS Suite software —Basic operation
Chapter 3 The MultiPASS Suite software —Basic operation 3-5
3-5
3-53-5
Page 28
P
P MultiPASS Toolbar
PP
Opening the Toolbar
Opening the Toolbar
Opening the ToolbarOpening the Toolbar
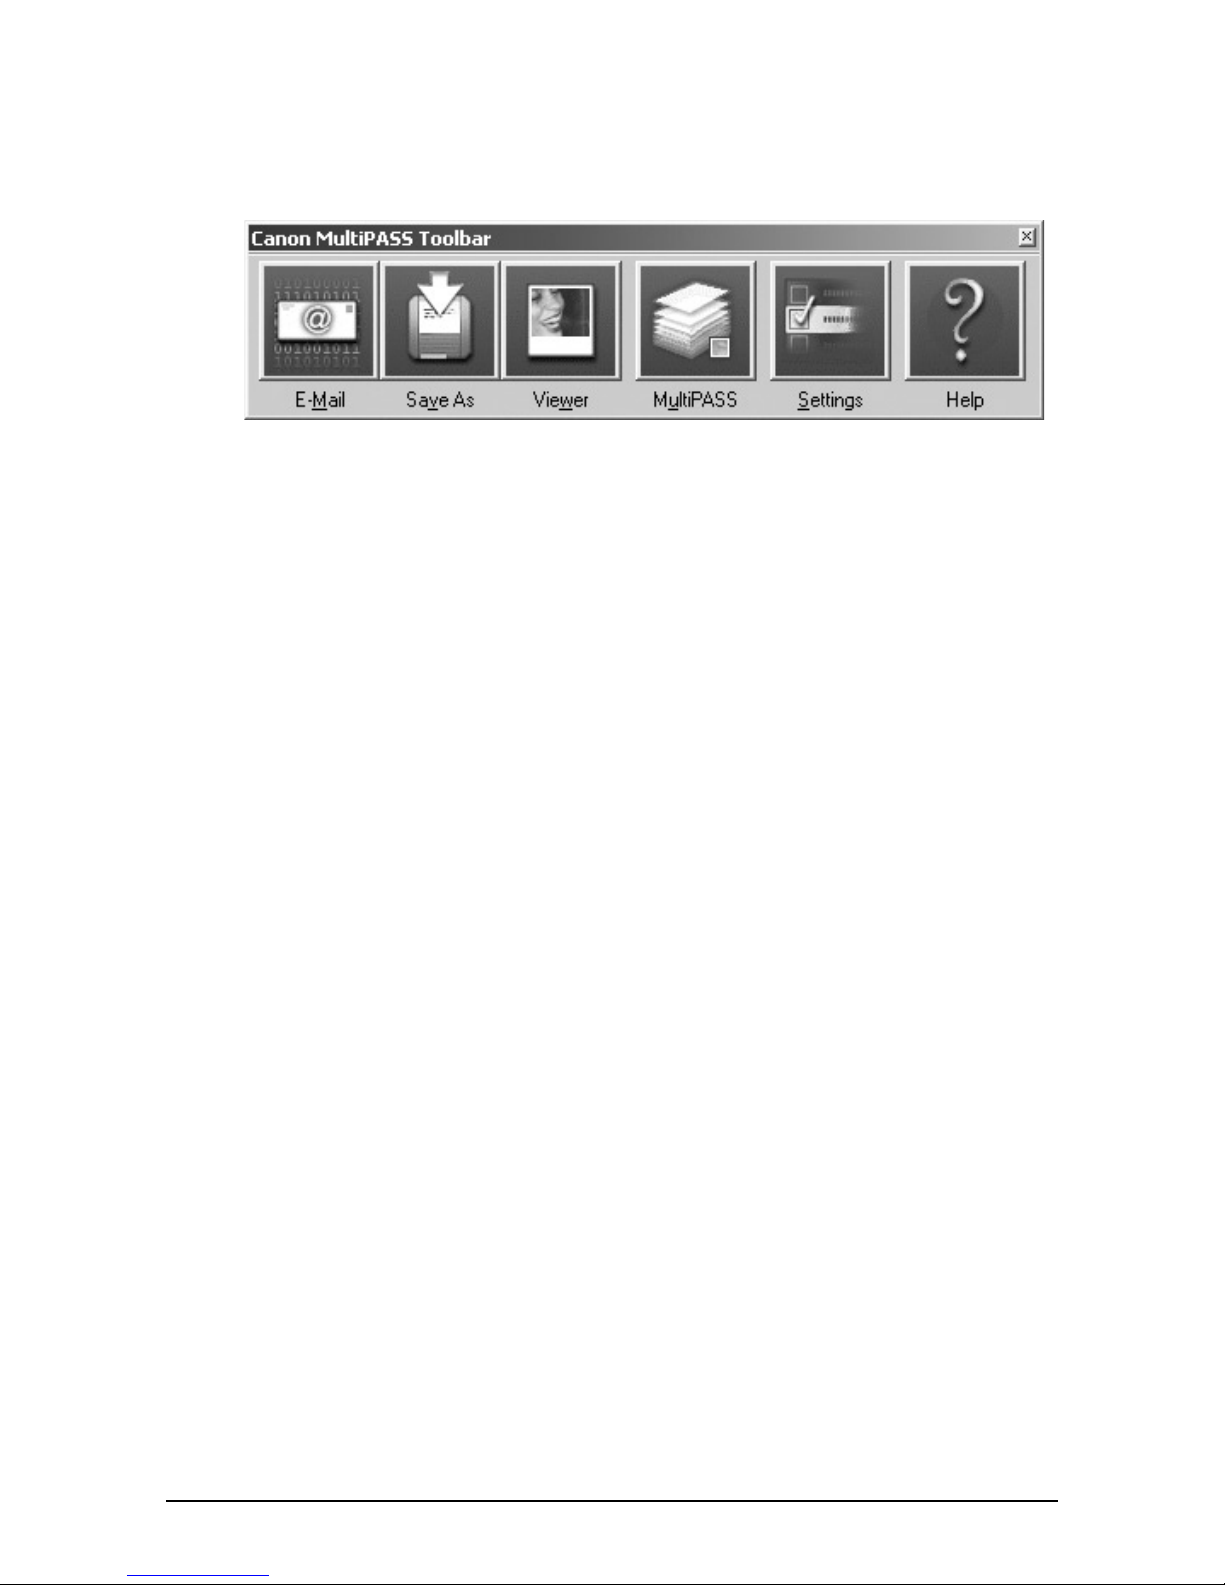
MultiPASS Toolbar
MultiPASS ToolbarMultiPASS Toolbar
The MultiPASS Toolbar appears on the Windows desktop and allows you to scan a
document to your computer and process it.
For more details on the different functions and settings of the Toolbar, see p. 6-1.
During installation, the Toolbar is set to automatically open every time you start
Windows. If for any reason you have closed it, follow this procedure to open it:
On the Windows desktop, click [Start], point to [Programs] or [All Programs], point to
[MultiPASS Suite], then click [MultiPASS Toolbar]. You can also double-click the
MultiPASS Toolbar icon on the Windows desktop.
P
P More information
PP
More information
More informationMore information
For detailed information on all features of the MultiPASS Suite Software, refer to the
online help or the
Software Guide
.
3-6
3-6 The MultiPASS Suite software —Basic operation Chapter 3
3-63-6
Page 29

Chapter
Chapter
ChapterChapter
Printing from your
Printing from your
Printing from your Printing from your
computer
computer
computer computer
4
—Basic operation
—Basic operation
—Basic operation—Basic operation
P
P
PP
Before printing
Before printing
Before printingBefore printing
Before printing, check the following:
l Have you installed the MultiPASS Suite software?
Have you installed the MultiPASS Suite software?
Have you installed the MultiPASS Suite software?Have you installed the MultiPASS Suite software?
If not, see the
l Is the machine selected as the default printer?
Is the machine selected as the default printer?
Is the machine selected as the default printer?Is the machine selected as the default printer?
You can check if your machine is set as the default printer when you open the Print
dialogue box in an application and your machine is selected in the Printer box.
Follow this procedure if it is not selected:
1111
On the Windows desktop, click [Start], point to [Settings], then click [Printers]
On the Windows desktop, click [Start], point to [Settings], then click [Printers]
On the Windows desktop, click [Start], point to [Settings], then click [Printers] On the Windows desktop, click [Start], point to [Settings], then click [Printers]
(Windows XP: Click [Start], then click [Printers and Faxes]).
(Windows XP: Click [Start], then click [Printers and Faxes]).
(Windows XP: Click [Start], then click [Printers and Faxes]).(Windows XP: Click [Start], then click [Printers and Faxes]).
2222
In the Printers (Printers and Faxes) window, click the printer icon.
In the Printers (Printers and Faxes) window, click the printer icon.
In the Printers (Printers and Faxes) window, click the printer icon.In the Printers (Printers and Faxes) window, click the printer icon.
3333
On the File menu, click [Set as Default] or [Set as Default Printer].
On the File menu, click [Set as Default] or [Set as Default Printer].
On the File menu, click [Set as Default] or [Set as Default Printer].On the File menu, click [Set as Default] or [Set as Default Printer].
l Is the correct print media loaded in the multi-purpose tray?
Is the correct print media loaded in the multi-purpose tray?
Is the correct print media loaded in the multi-purpose tray?Is the correct print media loaded in the multi-purpose tray?
For details, see the
Set-Up Sheet
Basic Guide
or the
.
Software Guide
.
4444
Chapter 4 Printing from your computer —Basic operation 4-1
4-1
4-14-1
Printing from your computer —Basic operation
Page 30
P
P Printing
PP
Printing
PrintingPrinting
Once you have installed the MultiPASS Suite software, you can begin printing from any
Windows application that supports printing.
The procedure for printing documents varies somewhat for different Windows
applications. Below is the general printing procedure. For detailed instructions on
printing from a specific application, refer to the documentation provided with that
application.
Follow this procedure to print a document:
With your document open in the Windows application, click the print command.
With your document open in the Windows application, click the print command.
1111
With your document open in the Windows application, click the print command.With your document open in the Windows application, click the print command.
• In most applications, the print command is on the File menu or toolbar.
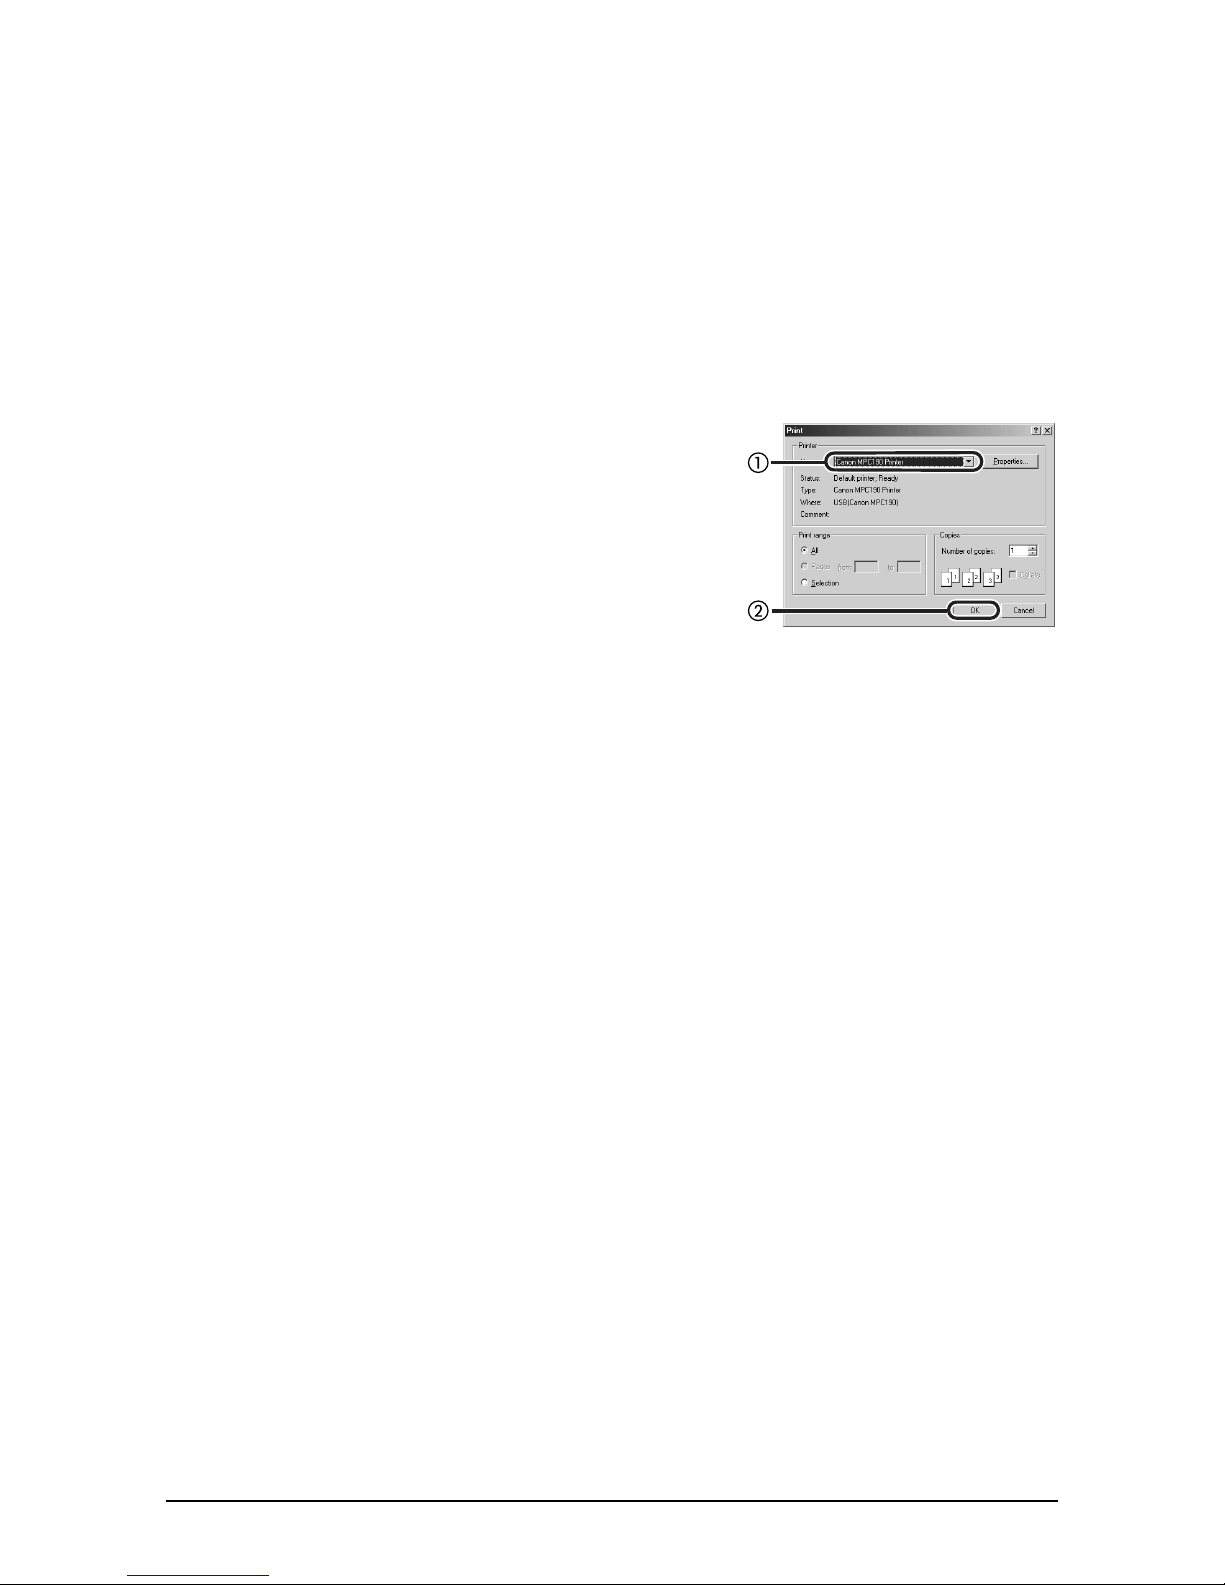
In the Print dialogue box, make sure your
In the Print dialogue box, make sure your
2222
In the Print dialogue box, make sure your In the Print dialogue box, make sure your
machine is selected in the Printer box. If not,
machine is selected in the Printer box. If not,
machine is selected in the Printer box. If not, machine is selected in the Printer box. If not,
select your machine from the printer name
select your machine from the printer name
select your machine from the printer name select your machine from the printer name
drop-down list
drop-down list a....
drop-down list drop-down list
Click the command to print your document
Click the command to print your document b....
3333
Click the command to print your document Click the command to print your document
• This command is usually [OK] or [Print].
P
P Cancelling printing
PP
Cancelling printing
Cancelling printingCancelling printing
Follow this procedure to cancel printing before clicking the print command in the Print
dialogue box:
In the Print dialogue box, press the command to cancel printing.
In the Print dialogue box, press the command to cancel printing.
1111
In the Print dialogue box, press the command to cancel printing.In the Print dialogue box, press the command to cancel printing.
• This command is usually [Cancel].
If printing has already begun, follow this procedure to cancel printing from Windows:
On the Windows desktop, click [Start], point to [Settings], then click [Printers]
On the Windows desktop, click [Start], point to [Settings], then click [Printers]
1111
On the Windows desktop, click [Start], point to [Settings], then click [Printers] On the Windows desktop, click [Start], point to [Settings], then click [Printers]
(Windows XP: Click [Start], then click [Printers and Faxes]).
(Windows XP: Click [Start], then click [Printers and Faxes]).
(Windows XP: Click [Start], then click [Printers and Faxes]).(Windows XP: Click [Start], then click [Printers and Faxes]).
In the Printers (Printers and Faxes) window, double-click the printer icon, right
In the Printers (Printers and Faxes) window, double-click the printer icon, right
2222
In the Printers (Printers and Faxes) window, double-click the printer icon, right In the Printers (Printers and Faxes) window, double-click the printer icon, right
click the print job, then click [Cancel Printing] or [Cancel].
click the print job, then click [Cancel Printing] or [Cancel].
click the print job, then click [Cancel Printing] or [Cancel].click the print job, then click [Cancel Printing] or [Cancel].
4-2
4-2 Printing from your computer —Basic operation Chapter 4
4-24-2
Page 31
P
P Changing print settings
PP
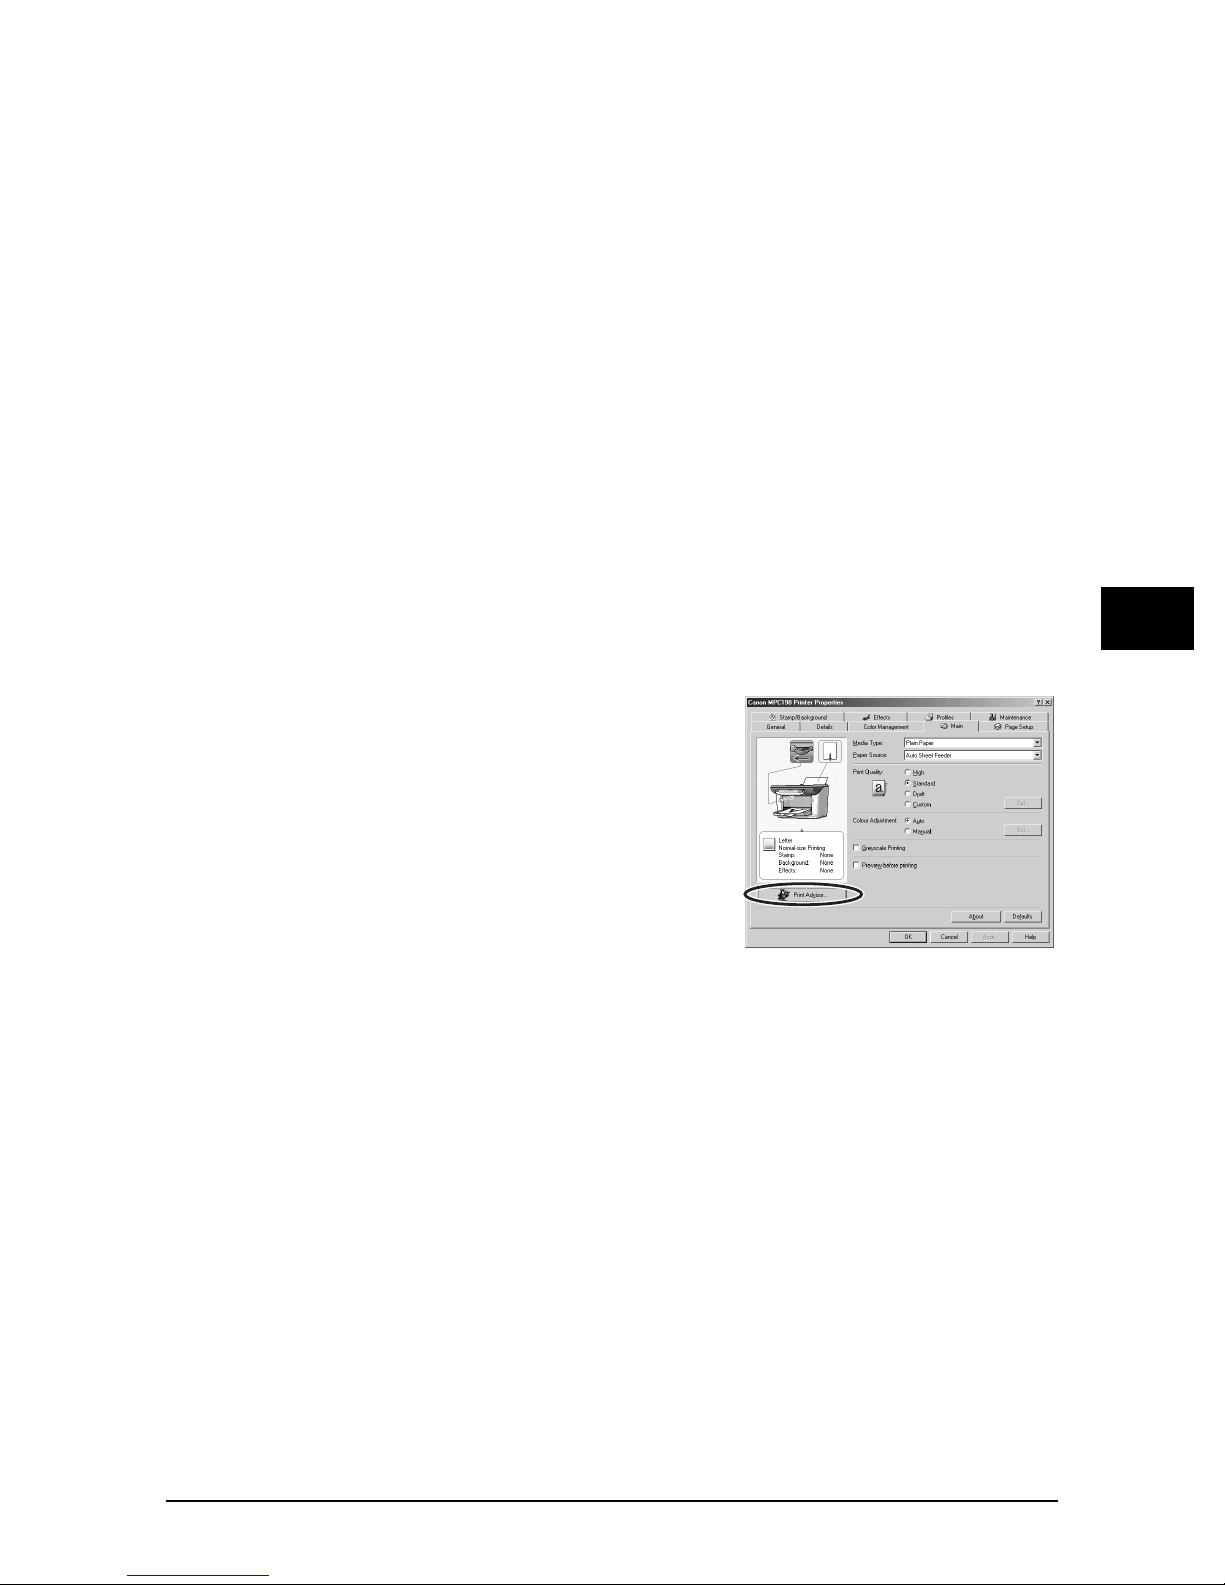
Changing print settings with the Print Advisor
Changing print settings with the Print Advisor
Changing print settings with the Print AdvisorChanging print settings with the Print Advisor
Changing print settings
Changing print settingsChanging print settings
Your machine is initially installed using factory-predefined settings, enabling you to print
immediately. These settings determine what your documents will look like when
printed. You can change these print settings to suit the document you are printing.
Unless you save your settings as a profile, your settings are available only for the
current print job. For details on print profiles, see the
You can define print settings in two ways:
Print Advisor
Print Advisor—Displays as a wizard that guides you through a series of questions to
Print AdvisorPrint Advisor
select the appropriate print settings for your document.
Manually
Manually—You can manually change individual settings to suit your document (1
ManuallyManually
Guide
).
Follow this procedure to change print settings with the Print Advisor:
With your document open in the Windows application, click the print command.
With your document open in the Windows application, click the print command.
1111
With your document open in the Windows application, click the print command.With your document open in the Windows application, click the print command.
• In most applications, the print command is on the File menu or toolbar.
In the Print dialogue box, click [Properties].
In the Print dialogue box, click [Properties].
2222
In the Print dialogue box, click [Properties].In the Print dialogue box, click [Properties].
Software Guide
.
Software
4444
In the Properties dialogue box, on the Main
In the Properties dialogue box, on the Main
3333
In the Properties dialogue box, on the Main In the Properties dialogue box, on the Main
tab, click [Print Advisor].
tab, click [Print Advisor].
tab, click [Print Advisor].tab, click [Print Advisor].
Follow the on-screen instructions.
Follow the on-screen instructions.
4444
Follow the on-screen instructions.Follow the on-screen instructions.
For more details, refer to the online help or the
P
P More information
PP
More information
More informationMore information
For detailed information on all printing features, refer to the online help or the
.
Guide
Software Guide
.
Printing from your computer —Basic operation
Software
Chapter 4 Printing from your computer —Basic operation 4-3
4-3
4-34-3
Page 32

4-4
4-4 Printing from your computer —Basic operation Chapter 4
4-44-4
Page 33

Chapter
Chapter
ChapterChapter
Copying
Copying
CopyingCopying
5
—Basic operation
—Basic operation
—Basic operation—Basic operation
P
P
PP
P
P Making copies
PP
Before copying
Before copying
Before copyingBefore copying
Before copying, check the following:
l Does the document you want to copy meet the requirements for loading on the
Does the document you want to copy meet the requirements for loading on the
Does the document you want to copy meet the requirements for loading on the Does the document you want to copy meet the requirements for loading on the
platen glass?
platen glass?
platen glass?platen glass?
For details, see the
l Is the correct print media loaded in the multi-purpose tray?
Is the correct print media loaded in the multi-purpose tray?
Is the correct print media loaded in the multi-purpose tray?Is the correct print media loaded in the multi-purpose tray?
For details, see the
l Have you set the correct print media size and type for copying on your machine?
Have you set the correct print media size and type for copying on your machine?
Have you set the correct print media size and type for copying on your machine?Have you set the correct print media size and type for copying on your machine?
For details, see p. 2-3.
Making copies
Making copiesMaking copies
Follow this procedure to make colour or black & white copies:
1111
Load the document on the platen glass.
Load the document on the platen glass.
Load the document on the platen glass.Load the document on the platen glass.
• For details on how to load documents, see p. 2-1.
Basic Guide
Basic Guide
.
.
5555
2222
Use [
Use [OOOO] or [
Use [Use [
3333
Adjust any necessary settings for your document.
Adjust any necessary settings for your document.
Adjust any necessary settings for your document.Adjust any necessary settings for your document.
• To select colour or black & white copying, see p. 5-2.
• To select the print media size and type, see p. 2-3.
• To select the image quality, see p. 5-2.
• To select the scanning exposure, see p. 5-3.
• To select the copy ratio, see p. 5-4.
4444
Press [Copy/Start].
Press [Copy/Start].
Press [Copy/Start].Press [Copy/Start].
• To cancel copying, press [Stop/Reset].
] or [PPPP] to select the number of copies.
] or [] or [
] to select the number of copies.
] to select the number of copies.] to select the number of copies.
Copying—Basic operation
Chapter 5 Copying—Basic operation 5-1
5-1
5-15-1
Page 34
P
P Improving copied images
PP
Setting colour or black & white copying
Setting colour or black & white copying
Setting colour or black & white copyingSetting colour or black & white copying
Improving copied images
Improving copied imagesImproving copied images
Refer to
follows:
For colour copying:
For colour copying: Press [Colour/B&W] to turn on the Colour light.
For colour copying:For colour copying:
For black & white copying:
For black & white copying: Press [Colour/B&W] to turn on the B&W light.
For black & white copying:For black & white copying:
Adjusting the image quality (resolution)
Adjusting the image quality (resolution)
Adjusting the image quality (resolution)Adjusting the image quality (resolution)
Refer to
1111
2222
Making copies
Making copies
Press [Menu] four times.
Press [Menu] four times.
Press [Menu] four times.Press [Menu] four times.
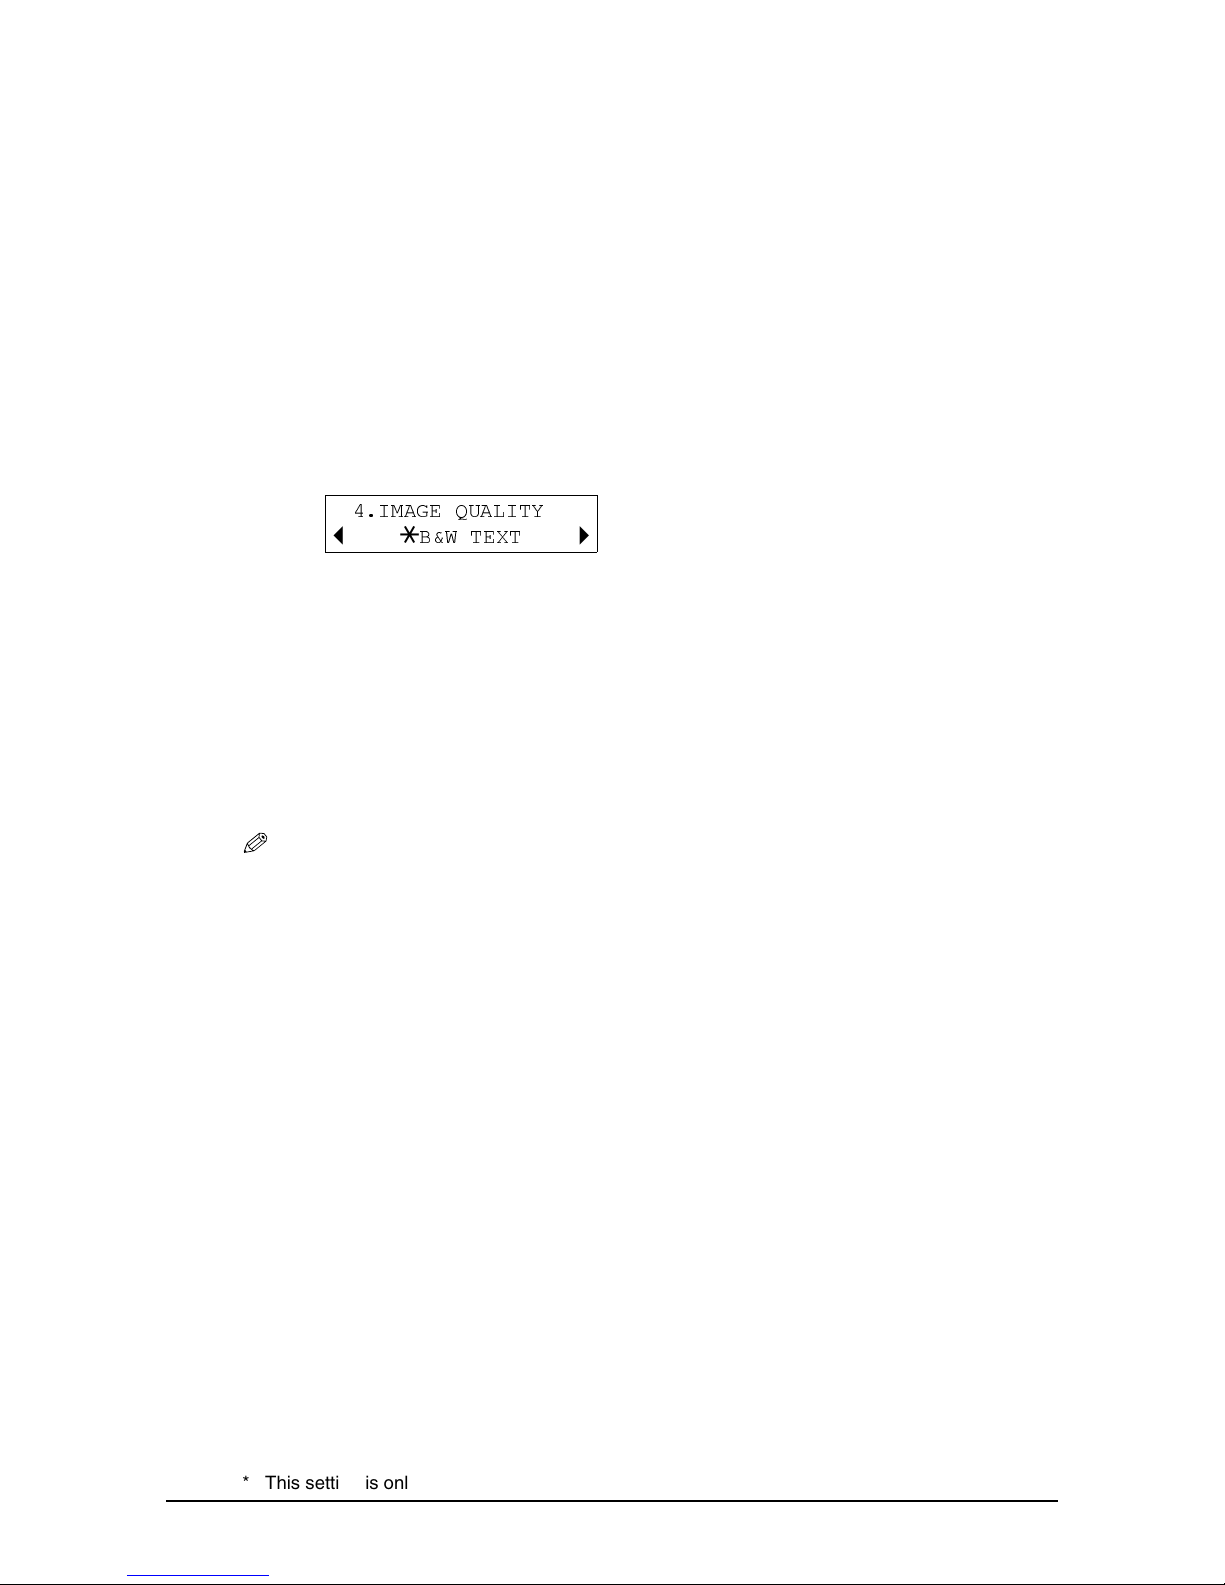
4.IMAGE QUALITY
D
B T
Use [
Use [OOOO] or [
Use [Use [
• In black & white mode, select:
] or [PPPP] to select the image quality.
] or [] or [
– <B&W TEXT> for text-only documents.
– <B&W PHOTO> for photographs.
– <B&W DRAFT> for high-speed copying at a lower resolution.*
In colour mode, select:
– <COLOUR NORMAL> for colour text-only documents.
– <COLOUR FINE> for colour photographs.
– <COLOUR FAST> for high-speed colour copying at a lower resolution.*
on p. 5-1 and in step 3, set colour or black & white copying as
on p. 5-1 and in step 3, adjust the image quality as follows:
B&W TEXT
] to select the image quality.
] to select the image quality.] to select the image quality.
A
Press [OK].
Press [OK].
3333
Press [OK].Press [OK].
NOTE
NOTE
NOTENOTE
• When using <COLOUR FAST>, if the colour output is different from that expected,
select <COLOUR NORMAL> or <COLOUR FINE> and try copying again.
* This setting is only available when <PLAIN> is selected as the print media type (1 p. 2-3).
5-2
5-2 Copying—Basic operation Chapter 5
5-25-2
Page 35

Adjusting the exposure (density)
Adjusting the exposure (density)
Adjusting the exposure (density)Adjusting the exposure (density)
Exposure (density) is the degree of difference between light and dark. A high exposure
setting will make blacks darker and whites brighter, whereas a low exposure setting will
make the differences between black and white less marked.
Refer to
1111
2222
3333
Making copies
Press [Menu] three times.
Press [Menu] three times.
Press [Menu] three times.Press [Menu] three times.
3.DENSITY
D
-LT DK+
Use [
Use [O] or [
Use [Use [
Press [OK].
Press [OK].
Press [OK].Press [OK].
] or [PPPP] to select the exposure.
] or [] or [
] to select the exposure.
] to select the exposure.] to select the exposure.
on p. 5-1 and in step 3, adjust the exposure as follows:
5555
Chapter 5 Copying—Basic operation 5-3
5-3
5-35-3
Copying—Basic operation
Page 36
P
P Reducing or enlarging a copy
PP
Using preset copy ratios
Using preset copy ratios
Using preset copy ratiosUsing preset copy ratios
Reducing or enlarging a copy
Reducing or enlarging a copyReducing or enlarging a copy
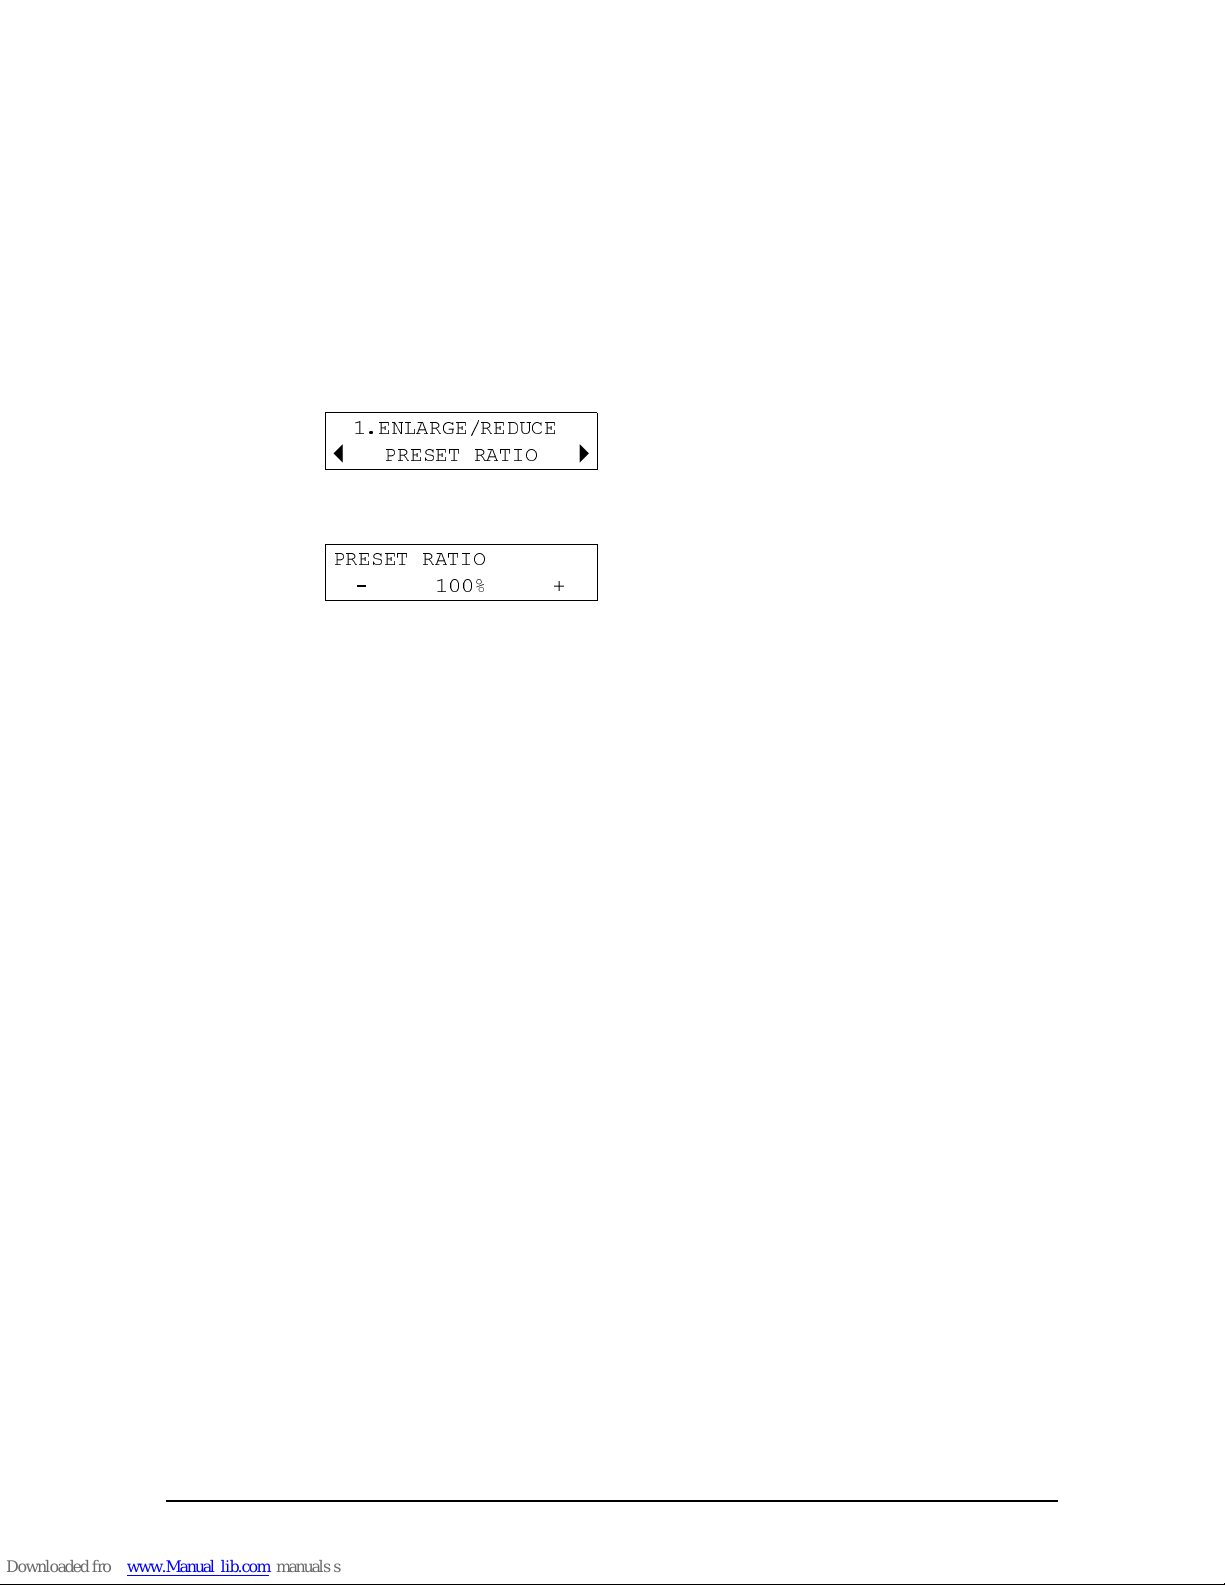
You can reduce or enlarge copies in three different ways: using preset copy ratios, using
custom copy ratios, or automatically reducing or enlarging an image to fit on the print
media size selected.
Refer to
1111
2222
3333
4444
Making copies
Press [Menu].
Press [Menu].
Press [Menu].Press [Menu].
1.ENLARGE/REDUCE
D
PRESET RATIO
B
Press [OK].
Press [OK].
Press [OK].Press [OK].
PRESET RATIO
- 100% +
Use [
Use [OOOO] or [
Use [Use [
• Select from the following:
Press [OK].
Press [OK].
Press [OK].Press [OK].
] or [PPPP] to select the copy ratio.
] or [] or [
– <25% MIN.>
– <70% A4 1 A5>
– <86% A4 1 B5>
– <100%>
– <115% B5 1 A4>
– <141% A5 1 A4>
– <400% MAX.>
on p. 5-1 and in step 3, adjust the copy ratio as follows:
A
] to select the copy ratio.
] to select the copy ratio.] to select the copy ratio.
5-4
5-4 Copying—Basic operation Chapter 5
5-45-4
Page 37
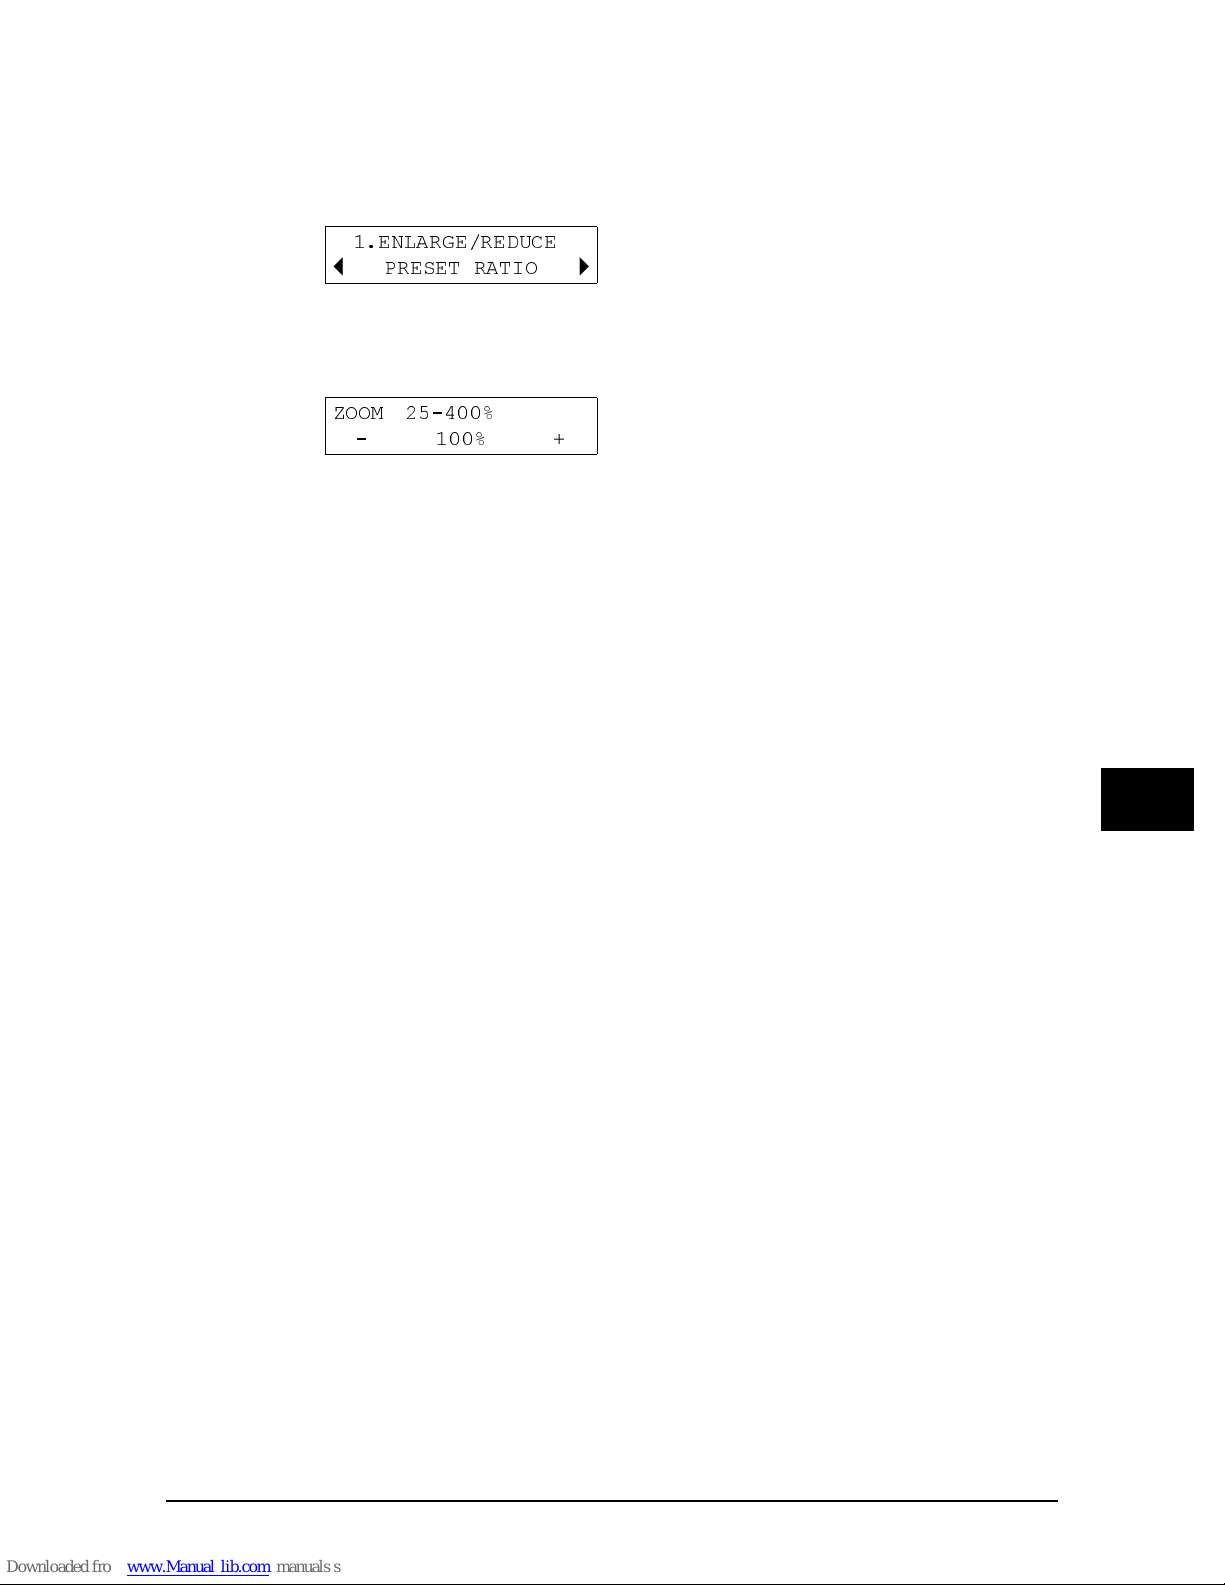
Using custom copy ratios
Using custom copy ratios
Using custom copy ratiosUsing custom copy ratios
Refer to
1111
2222
3333
4444
5555
Making copies
Press [Menu].
Press [Menu].
Press [Menu].Press [Menu].
1.ENLARGE/REDUCE
D
PRESET RATIO
B
Use [
Use [OOOO] or [
Use [Use [
Press [OK].
Press [OK].
Press [OK].Press [OK].
Use [
Use [OOOO] or [
Use [Use [
• Keep [O] or [P] pressed to advance quickly through the ratios.
Press [OK].
Press [OK].
Press [OK].Press [OK].
] or [PPPP] to select <ZOOM>.
] or [] or [
ZOOM 25-400%
- 100% +
] or [PPPP] to select a copy ratio between 25% and 400%.
] or [] or [
on p. 5-1 and in step 3, adjust the copy ratio as follows:
A
] to select <ZOOM>.
] to select <ZOOM>.] to select <ZOOM>.
] to select a copy ratio between 25% and 400%.
] to select a copy ratio between 25% and 400%.] to select a copy ratio between 25% and 400%.
5555
Copying—Basic operation
Chapter 5 Copying—Basic operation 5-5
5-5
5-55-5
Page 38

Copying an image to fit the page
Copying an image to fit the page
Copying an image to fit the pageCopying an image to fit the page
If the document to be copied is on paper larger or smaller than the specified print media
size (1 p. 2-3), you can automatically reduce or enlarge the image to fit the selected
print media size.
NOTE
NOTE
NOTENOTE
• Some document sizes may not be properly detected.
Refer to
1111
2222
3333
P
P Advanced copy features
PP
Advanced copy features
Advanced copy featuresAdvanced copy features
For details on advanced copy features, refer to the
Making copies
Press [Menu].
Press [Menu].
Press [Menu].Press [Menu].
1.ENLARGE/REDUCE
D
PRESET RATIO
B
Use [
Use [OOOO] or [
Use [Use [
Press [OK].
Press [OK].
Press [OK].Press [OK].
] or [PPPP] to select <FIT-TO-PAGE>.
] or [] or [
on p. 5-1 and in step 3, follow this procedure:
A
] to select <FIT-TO-PAGE>.
] to select <FIT-TO-PAGE>.] to select <FIT-TO-PAGE>.
Basic Guide
.
5-6
5-6 Copying—Basic operation Chapter 5
5-65-6
Page 39

Chapter
Chapter
ChapterChapter
Scanning
Scanning
ScanningScanning
6
—Basic operation
—Basic operation
—Basic operation—Basic operation
P
P
PP
P
P Scanning methods
PP
Before scanning
Before scanning
Before scanningBefore scanning
Before scanning, check the following:
l Have you installed the MultiPASS Suite software?
Have you installed the MultiPASS Suite software?
Have you installed the MultiPASS Suite software?Have you installed the MultiPASS Suite software?
If not, see the
l Does the document you want to scan meet the requirements for loading on the
Does the document you want to scan meet the requirements for loading on the
Does the document you want to scan meet the requirements for loading on the Does the document you want to scan meet the requirements for loading on the
platen glass?
platen glass?
platen glass?platen glass?
For details, see p. 2-1.
Scanning methods
Scanning methodsScanning methods
There are three methods of scanning images to your computer:
l Using the MultiPASS Toolbar (1 below)
l Using a TWAIN or WIA (Windows XP) compliant Windows application (1 p. 6-4)
Set-Up Sheet
or the
Software Guide
.
6666
l Using the [Scan] key on the operation panel (1 p. 6-5)
Scanning with the MultiPASS Toolbar
Scanning with the MultiPASS Toolbar
Scanning with the MultiPASS ToolbarScanning with the MultiPASS Toolbar
When you install the MultiPASS Suite software, the MultiPASS Toolbar is set to
automatically appear on the Windows desktop. The Toolbar contains several buttons
that allow you to scan a document to your computer and process it according to your
needs.
Follow this procedure to scan a document using the Toolbar:
1111
Load the document on the platen glass.
Load the document on the platen glass.
Load the document on the platen glass.Load the document on the platen glass.
• For details on how to load documents, see p. 2-1.
Scanning—Basic operation
Chapter 6 Scanning—Basic operation 6-1
6-1
6-16-1
Page 40
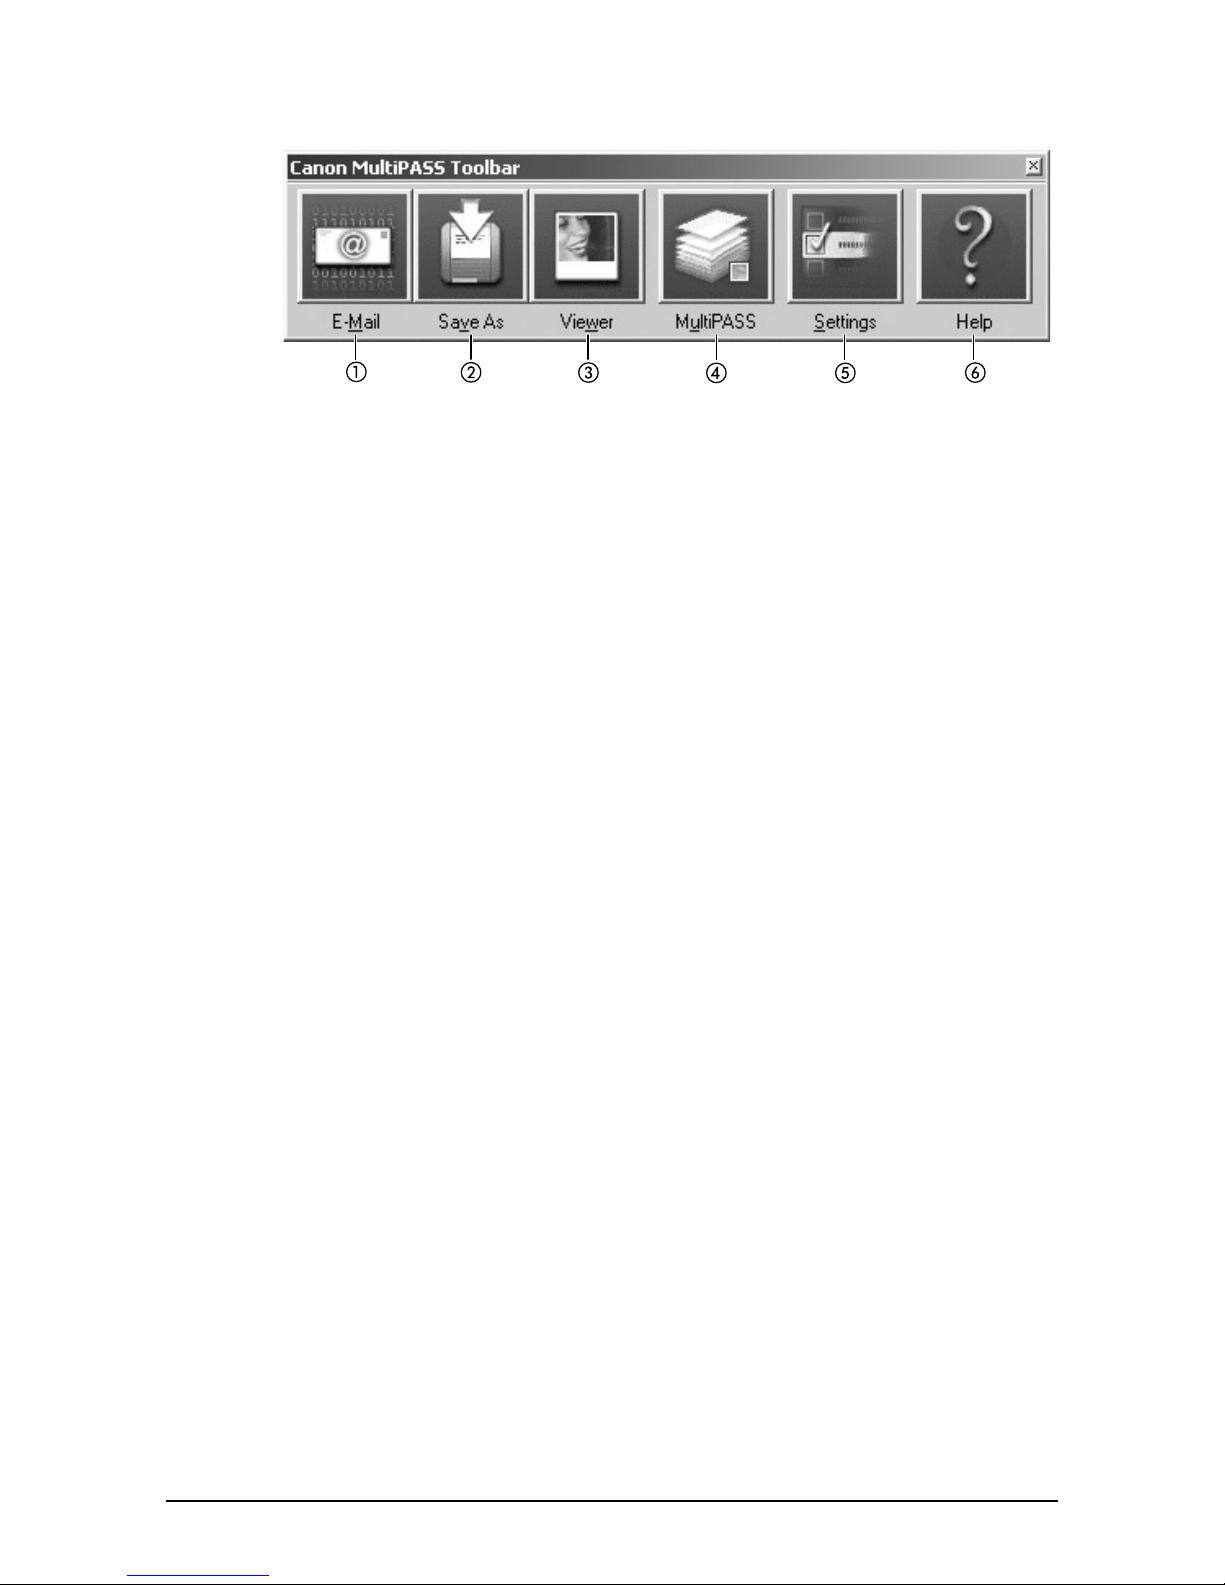
On the Windows desktop, on the MultiPASS Toolbar, click the appropriate scan
On the Windows desktop, on the MultiPASS Toolbar, click the appropriate scan
2222
On the Windows desktop, on the MultiPASS Toolbar, click the appropriate scan On the Windows desktop, on the MultiPASS Toolbar, click the appropriate scan
button.
button.
button.button.
a Scans the document and automatically attaches it to an e-mail message in
your e-mail application.
b Scans and saves the document in the My MultiPASS Scan to Save folder
(1 p. 3-2).
c Scans the document and automatically displays it in a graphic application
(which you can specify).
d Opens My MultiPASS (1 p. 3-3).
e Allows you to define Toolbar settings that affect the behaviour of the scan
buttons and other general settings.
f Displays the online help.
If the scanner window appears, define your scan settings as desired and scan
If the scanner window appears, define your scan settings as desired and scan
3333
If the scanner window appears, define your scan settings as desired and scan If the scanner window appears, define your scan settings as desired and scan
your document.
your document.
your document.your document.
• For details on the scanner window settings, see the
When the scan is complete, do one of the following:
When the scan is complete, do one of the following:
4444
When the scan is complete, do one of the following:When the scan is complete, do one of the following:
•••• If you clicked [E-Mail] in step 2—In the e-mail message window, enter the appropriate
If you clicked [E-Mail] in step 2—In the e-mail message window, enter the appropriate
If you clicked [E-Mail] in step 2—In the e-mail message window, enter the appropriate If you clicked [E-Mail] in step 2—In the e-mail message window, enter the appropriate
information and send the e-mail message.
information and send the e-mail message.
information and send the e-mail message.information and send the e-mail message.
•••• If you clicked [Save As] in step 2—The image file is automatically saved in the Scan to
If you clicked [Save As] in step 2—The image file is automatically saved in the Scan to
If you clicked [Save As] in step 2—The image file is automatically saved in the Scan to If you clicked [Save As] in step 2—The image file is automatically saved in the Scan to
Save folder (
Save folder (1 p. 3-2).
Save folder (Save folder (
•••• If you clicked [Viewer] in step 2—The image automatically appears in the associated
If you clicked [Viewer] in step 2—The image automatically appears in the associated
If you clicked [Viewer] in step 2—The image automatically appears in the associated If you clicked [Viewer] in step 2—The image automatically appears in the associated
graphic application.
graphic application.
graphic application.graphic application.
p. 3-2).
p. 3-2).p. 3-2).
Software Guide
.
6-2
6-2 Scanning—Basic operation Chapter 6
6-26-2
Page 41
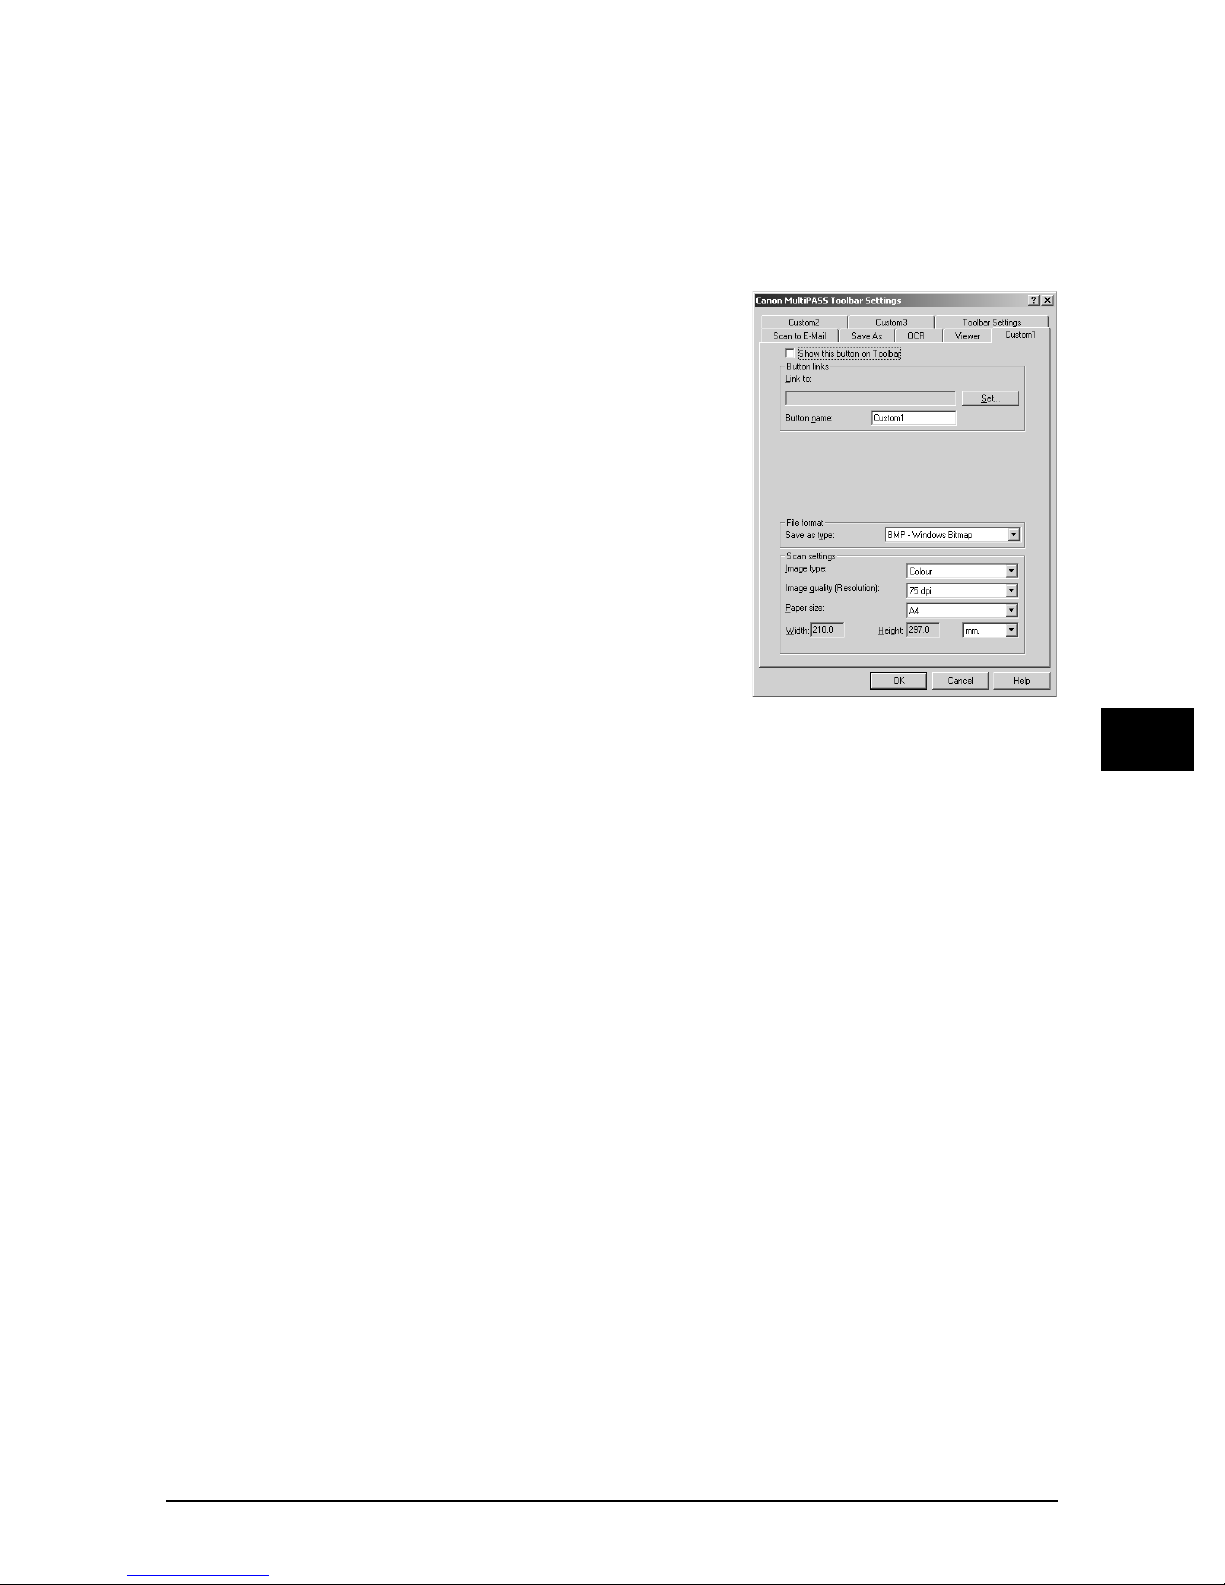
Customising Toolbar buttons
Customising Toolbar buttons
Customising Toolbar buttonsCustomising Toolbar buttons
You can customise settings for each Toolbar button. You can also set the Toolbar to
display other buttons that scan a document and process it differently.
Follow this procedure to customise Toolbar buttons:
On the Windows desktop, on the MultiPASS Toolbar, click [Settings].
On the Windows desktop, on the MultiPASS Toolbar, click [Settings].
1111
On the Windows desktop, on the MultiPASS Toolbar, click [Settings].On the Windows desktop, on the MultiPASS Toolbar, click [Settings].
Select the tab for the button you want and
Select the tab for the button you want and
2222
Select the tab for the button you want and Select the tab for the button you want and
modify as necessary.
modify as necessary.
modify as necessary.modify as necessary.
Click [OK].
Click [OK].
3333
Click [OK].Click [OK].
For details on each setting, refer to the online help or the
Software Guide
6666
.
Scanning—Basic operation
Chapter 6 Scanning—Basic operation 6-3
6-3
6-36-3
Page 42

Scanning from within an application
Scanning from within an application
Scanning from within an applicationScanning from within an application
You can scan documents directly from TWAIN or WIA (Windows XP) compliant
Windows applications. Some applications support multipage scans while others do not.
Refer to the documentation for the application you are using.
In Windows XP, you can select ScanGear or WIA as the scan driver.
Follow this procedure to scan from within an application:
Load the document on the platen glass.
Load the document on the platen glass.
1111
Load the document on the platen glass.Load the document on the platen glass.
• For details on how to load documents, see p. 2-1.
In your Windows application, click the command to scan a document.
In your Windows application, click the command to scan a document.
2222
In your Windows application, click the command to scan a document.In your Windows application, click the command to scan a document.
• In some applications, the appropriate command may be listed as Acquire or Acquire Image.
For the command to scan a document from a TWAIN-compliant application, refer to the
documentation of that application.
In the scanner window, specify the preview scan options for your document as
In the scanner window, specify the preview scan options for your document as
3333
In the scanner window, specify the preview scan options for your document as In the scanner window, specify the preview scan options for your document as
necessary.
necessary.
necessary.necessary.
Click [Preview].
Click [Preview].
4444
Click [Preview].Click [Preview].
Review the display of your scanned preview image. Adjust the properties of the
Review the display of your scanned preview image. Adjust the properties of the
5555
Review the display of your scanned preview image. Adjust the properties of the Review the display of your scanned preview image. Adjust the properties of the
image as necessary.
image as necessary.
image as necessary.image as necessary.
Click [Scan].
Click [Scan].
6666
Click [Scan].Click [Scan].
• When complete, the image appears in the Windows application.
6-4
6-4 Scanning—Basic operation Chapter 6
6-46-4
Page 43
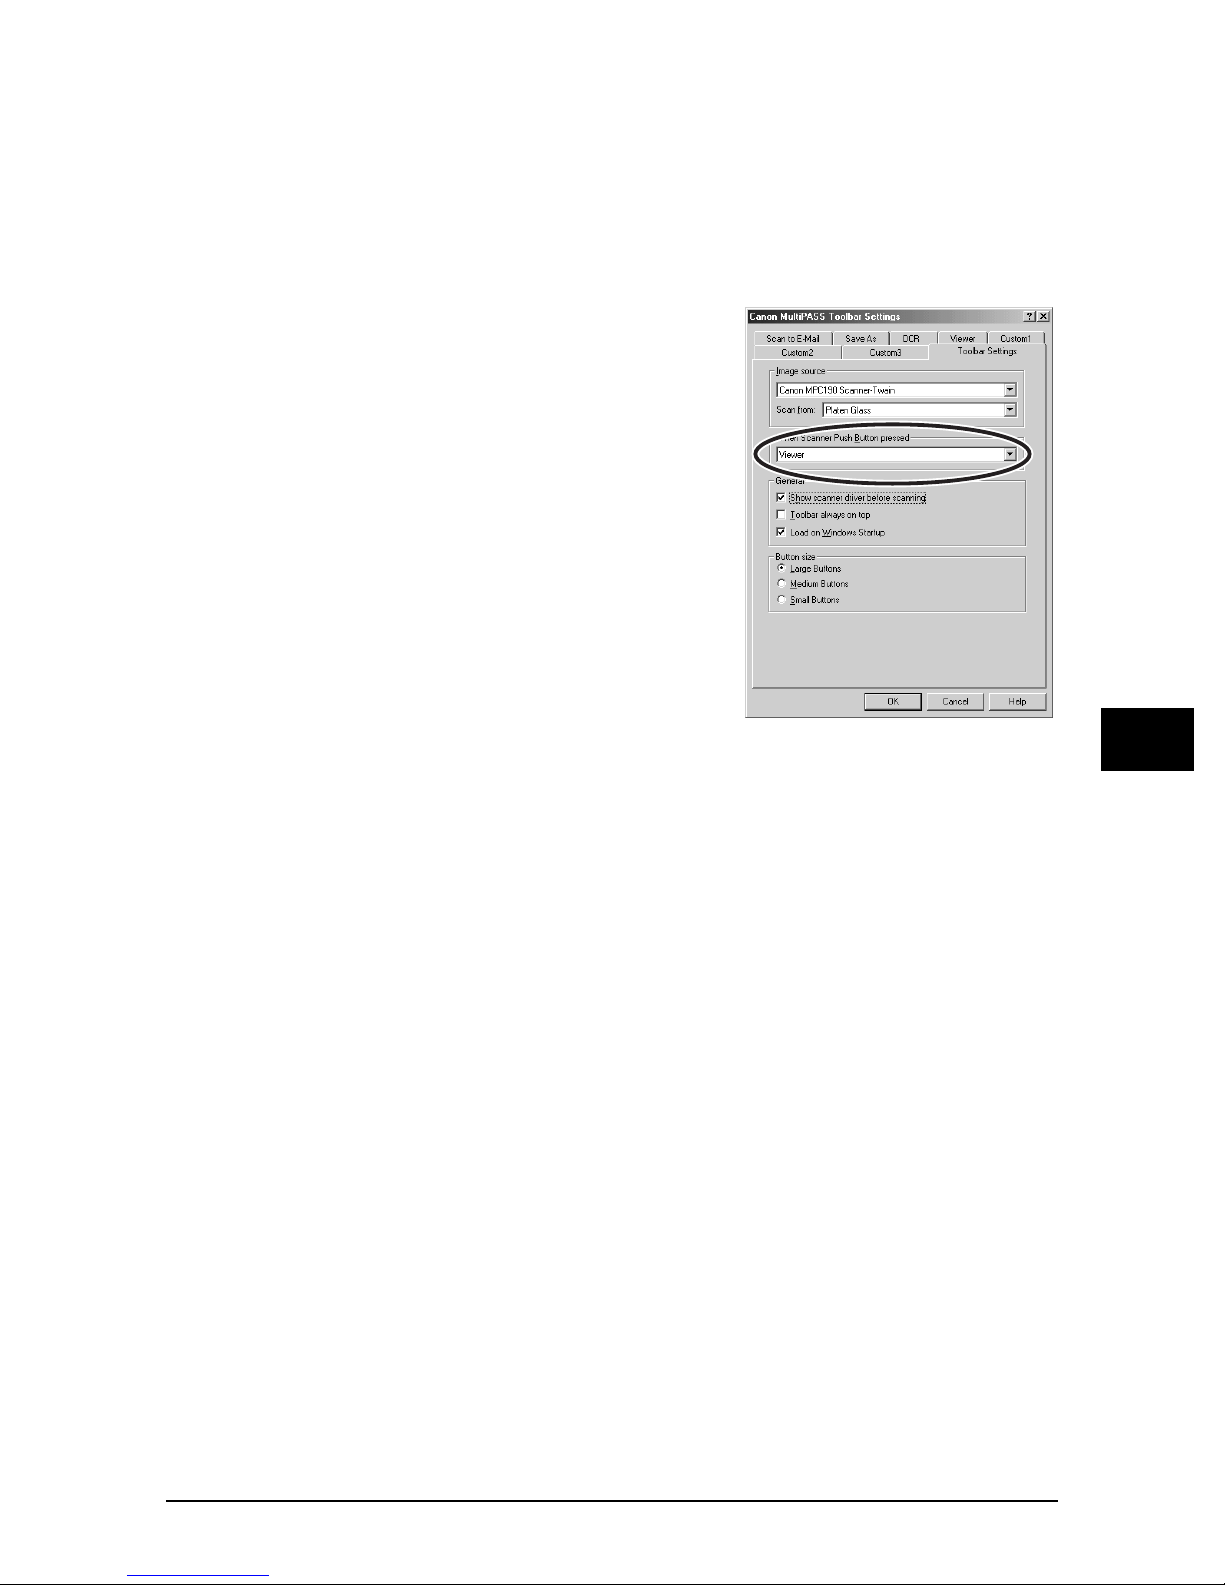
Using the [Scan] key on the operation panel
Using the [Scan] key on the operation panel
Using the [Scan] key on the operation panelUsing the [Scan] key on the operation panel
You can assign a scan action to the [Scan] key on the operation panel so that you only
have to press this key to perform the action. For example, you can set it to display the
toolbar, or to perform one of the actions of the Toolbar scan buttons.
Follow this procedure to select an action for the [Scan] key on the operation panel:
On the Windows desktop, on the MultiPASS Toolbar, click [Settings].
On the Windows desktop, on the MultiPASS Toolbar, click [Settings].
1111
On the Windows desktop, on the MultiPASS Toolbar, click [Settings].On the Windows desktop, on the MultiPASS Toolbar, click [Settings].
In When Scanner Push Button pressed, select
In When Scanner Push Button pressed, select
2222
In When Scanner Push Button pressed, select In When Scanner Push Button pressed, select
the desired action that will occur when you
the desired action that will occur when you
the desired action that will occur when you the desired action that will occur when you
press the [Scan] key on the operation panel.
press the [Scan] key on the operation panel.
press the [Scan] key on the operation panel.press the [Scan] key on the operation panel.
Click [OK].
Click [OK].
3333
Click [OK].Click [OK].
P
P More information
PP
More information
More informationMore information
For detailed information on all scanning features, refer to the online help or the
Software Guide
.
6666
Scanning—Basic operation
Chapter 6 Scanning—Basic operation 6-5
6-5
6-56-5
Page 44

6-6
6-6 Scanning—Basic operation Chapter 6
6-66-6
Page 45

Chapter
Chapter
ChapterChapter
7
Maintenance
Maintenance
MaintenanceMaintenance
P
P
PP
Low ink warning
Low ink warning
Low ink warningLow ink warning
Replacing ink tanks
Replacing ink tanks
Replacing ink tanksReplacing ink tanks
When you first installed the ink tanks, you will have reset the ink counter function that
keeps track of how much ink is left in the ink tanks. When ink is running low, the LCD
will display <BLACK INK LOW> or <COLOUR INK LOW>, warning you to have a new
ink tank ready for when the ink runs out.
When copying, if the machine stops printing when the warning appears, press
[Resume] to continue printing. However, note that ink may run out.
You can check the current ink level at any time as explained on p. 7-6.
NOTE
NOTE
NOTENOTE
• If you do not want the low ink warning to display, disable this feature (1 <LOW INK
WARNING>, p. 9-4).
7777
When to replace an ink tank
When to replace an ink tank
When to replace an ink tankWhen to replace an ink tank
In general, you will need to replace an ink tank when print quality deteriorates or when
output is blank. However before replacing, refer to the flow chart on p. 7-7 to check if
print quality deterioration is due to another problem.
Maintenance
Chapter 7 Maintenance 7-1
7-1
7-17-1
Page 46

Guidelines
Guidelines
GuidelinesGuidelines
CAUTION
CAUTION
CAUTIONCAUTION
•••• Keep the printhead and ink tanks out of the reach of children. If a child
Keep the printhead and ink tanks out of the reach of children. If a child
Keep the printhead and ink tanks out of the reach of children. If a child Keep the printhead and ink tanks out of the reach of children. If a child
inadvertently ingests ink, consult a physician immediately.
inadvertently ingests ink, consult a physician immediately.
inadvertently ingests ink, consult a physician immediately.inadvertently ingests ink, consult a physician immediately.
• Ink tanks compatible with the machine are as follows:
– Black ink tank: BCI-24 Black
– Colour ink tank: BCI-24 Color
• To ensure optimum printing results and to avoid printing problems, Canon
recommends using original Canon ink tanks only. Damage caused by using refilled ink
tanks is not covered by Canon’s warranty.
• Replaced ink tanks should be new. If you install partially used ink tanks, the nozzles
may block and the ink counter may not be accurate.
• For best ink quality, use ink tanks within one year of purchase. After placing ink tanks
in the machine, use the ink tanks within six months.
• Do not open the ink tank packaging until ready to install.
• Do not touch printed paper with wet hands or spill liquids on it as the ink may run.
• Replace ink tanks quickly. Once installed, do not remove from the machine and leave
out in the open. Doing so may cause the ink tank not to function when reinstalled in the
machine.
7-2
7-2 Maintenance Chapter 7
7-27-2
Page 47
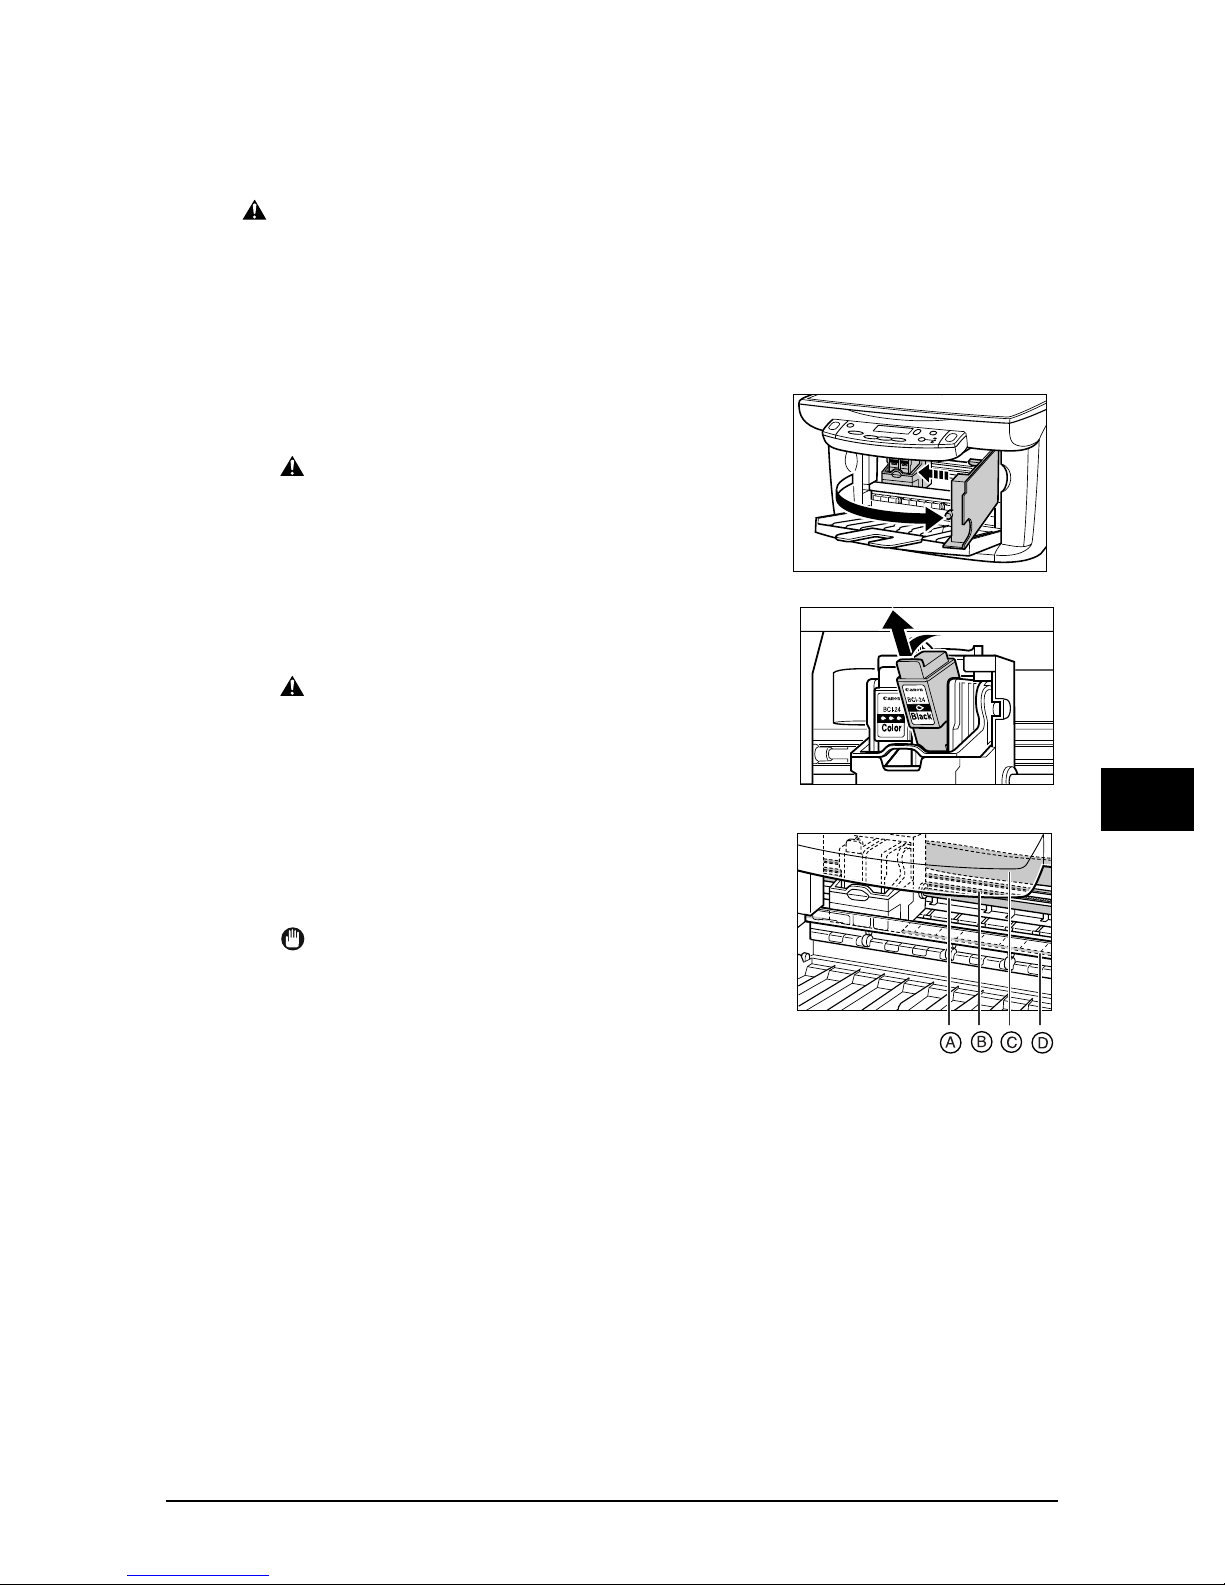
Replacing an ink tank
Replacing an ink tank
Replacing an ink tankReplacing an ink tank
This section describes how to replace an ink tank. Before replacing an ink tank, be sure
to read the section
CAUTION
CAUTION
CAUTIONCAUTION
•••• Do not replace ink tanks while the machine is printing or performing another
Do not replace ink tanks while the machine is printing or performing another
Do not replace ink tanks while the machine is printing or performing another Do not replace ink tanks while the machine is printing or performing another
operation.
operation.
operation.operation.
Follow this procedure to replace an ink tank and reset the ink counter:
Make sure the power is turned on.
Make sure the power is turned on.
1111
Make sure the power is turned on.Make sure the power is turned on.
Open the inner cover.
Open the inner cover.
2222
Open the inner cover.Open the inner cover.
• The printhead holder moves to the left.
CAUTION
CAUTION
CAUTIONCAUTION
•••• Do not try to manually move or stop the
Do not try to manually move or stop the
Do not try to manually move or stop the Do not try to manually move or stop the
printhead holder.
printhead holder.
printhead holder.printhead holder.
•••• Do not touch any metal parts.
Do not touch any metal parts.
Do not touch any metal parts.Do not touch any metal parts.
Hold the empty ink tank’s tab and pull forward
Hold the empty ink tank’s tab and pull forward
3333
Hold the empty ink tank’s tab and pull forward Hold the empty ink tank’s tab and pull forward
to release. Lift out the ink tank.
to release. Lift out the ink tank.
to release. Lift out the ink tank.to release. Lift out the ink tank.
When to replace an ink tank
(1 p. 7-1).
CAUTION
CAUTION
CAUTIONCAUTION
•••• Do not remove the printhead from the
Do not remove the printhead from the
Do not remove the printhead from the Do not remove the printhead from the
machine.
machine.
machine.machine.
•••• If both ink tanks need replacing, remove and
If both ink tanks need replacing, remove and
If both ink tanks need replacing, remove and If both ink tanks need replacing, remove and
replace each one individually.
replace each one individually.
replace each one individually.replace each one individually.
•••• Do not touch the round shaft
Do not touch the round shaft uuuu
Do not touch the round shaft Do not touch the round shaft
film
film uuuu
film film
part)
part) uuuu
part) part)
•••• Discard the empty ink tank immediately
Discard the empty ink tank immediately
Discard the empty ink tank immediately Discard the empty ink tank immediately
according to local laws and regulations for
according to local laws and regulations for
according to local laws and regulations for according to local laws and regulations for
disposal of consumables.
disposal of consumables.
disposal of consumables.disposal of consumables.
•••• Handle ink tanks carefully to avoid staining
Handle ink tanks carefully to avoid staining
Handle ink tanks carefully to avoid staining Handle ink tanks carefully to avoid staining
clothing or the surrounding area.
clothing or the surrounding area.
clothing or the surrounding area.clothing or the surrounding area.
, film cable
, film cable uuuuC, ink absorber (sponge
B
, film cable , film cable
, or any metal parts.
, or any metal parts.
D
, or any metal parts., or any metal parts.
IMPORTANT
IMPORTANT
IMPORTANTIMPORTANT
, ink absorber (sponge
, ink absorber (sponge , ink absorber (sponge
, transparent
, transparent
A
, transparent , transparent
7777
Maintenance
Chapter 7 Maintenance 7-3
7-3
7-37-3
Page 48
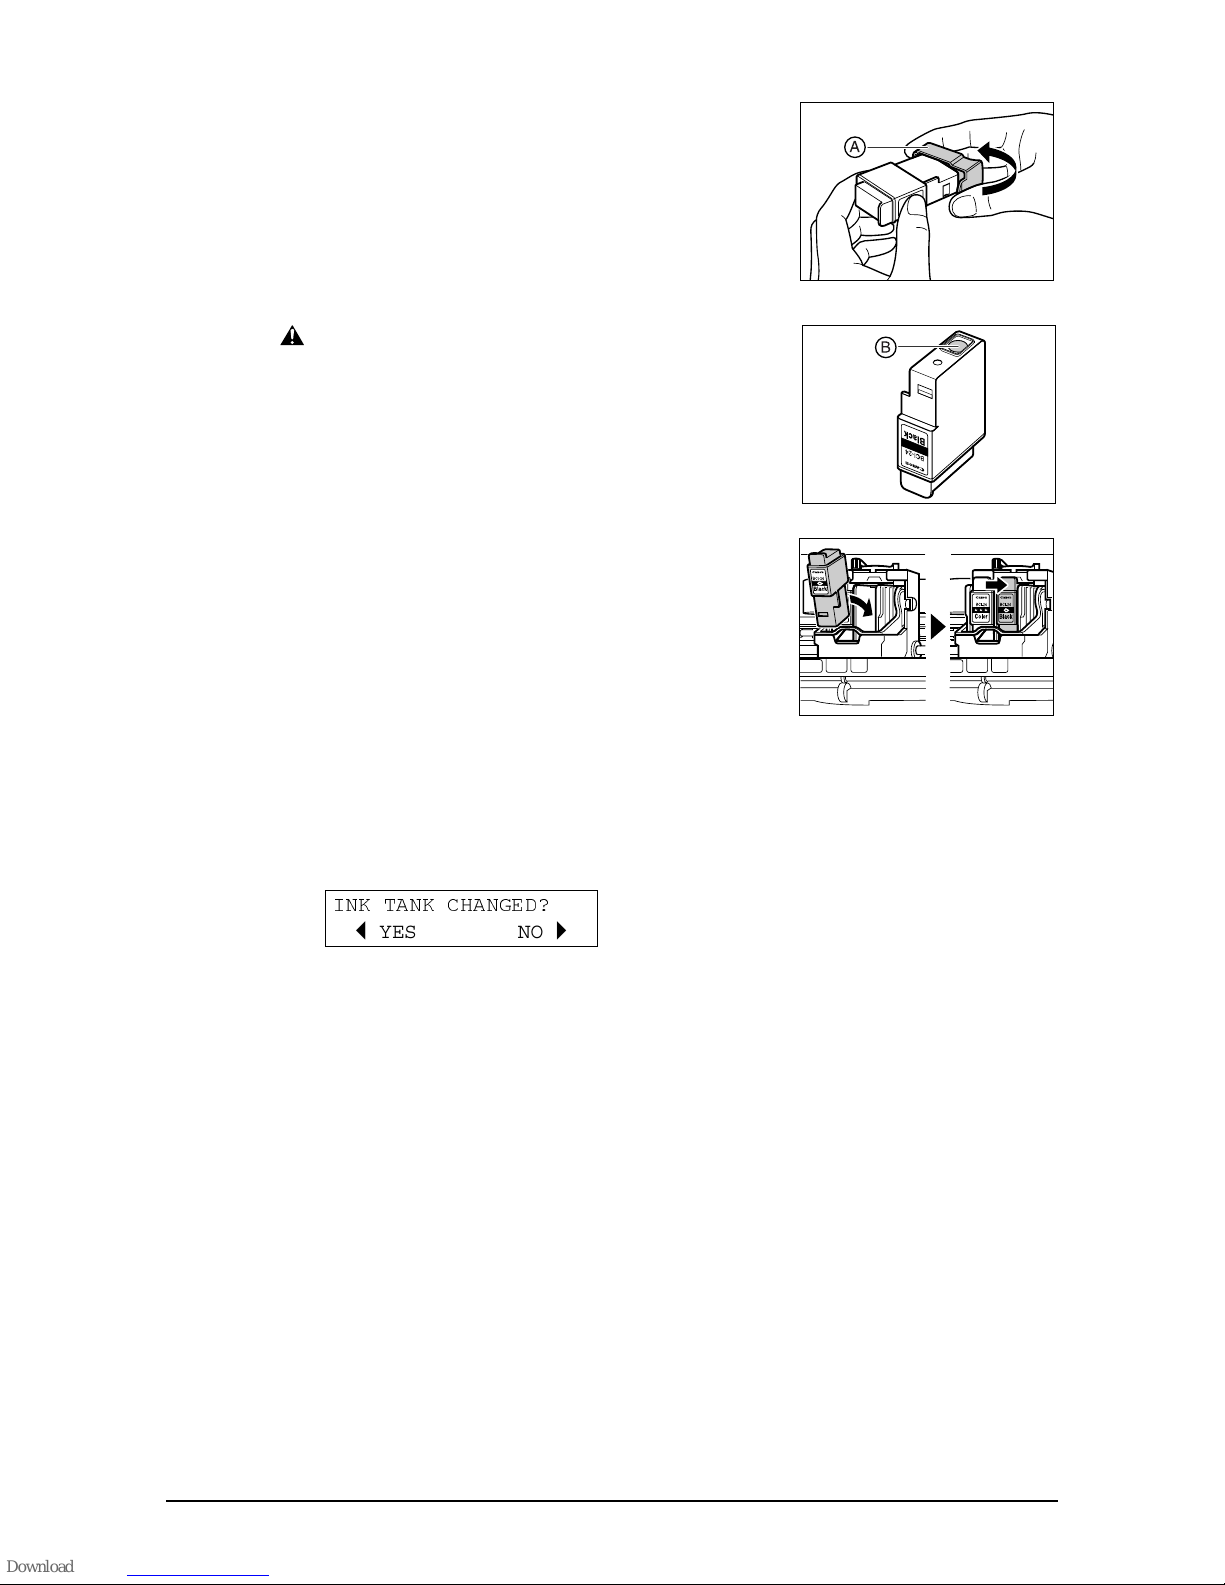
Remove the new ink tank from its packaging.
Remove the new ink tank from its packaging.
4444
Remove the new ink tank from its packaging. Remove the new ink tank from its packaging.
Then hold the ink tank as shown and remove
Then hold the ink tank as shown and remove
Then hold the ink tank as shown and remove Then hold the ink tank as shown and remove
the protective cap
the protective cap uuuu
the protective cap the protective cap
• Do not shake or drop the ink tank as the ink may leak
and stain your clothes or hands.
• Do not attempt to reattach the protective cap
you remove it.
CAUTION
CAUTION
CAUTIONCAUTION
•••• Do not touch the ink port
Do not touch the ink port uuuuB....
Do not touch the ink port Do not touch the ink port
Insert the ink tank into the empty slot on the
Insert the ink tank into the empty slot on the
5555
Insert the ink tank into the empty slot on the Insert the ink tank into the empty slot on the
printhead. Press firmly on the ink tank’s tab
printhead. Press firmly on the ink tank’s tab
printhead. Press firmly on the ink tank’s tab printhead. Press firmly on the ink tank’s tab
until it clicks into place.
until it clicks into place.
until it clicks into place.until it clicks into place.
....
A
uuuu
A
once
BCI-24
Color
If you need to replace the other ink tank,
If you need to replace the other ink tank,
6666
If you need to replace the other ink tank, If you need to replace the other ink tank,
repeat steps 3 to 5.
repeat steps 3 to 5.
repeat steps 3 to 5.repeat steps 3 to 5.
Close the inner cover.
Close the inner cover.
7777
Close the inner cover.Close the inner cover.
The LCD will display the following message:
The LCD will display the following message:
8888
The LCD will display the following message:The LCD will display the following message:
INK TANK CHANGED?
B YES NO A
Press [
Press [O] to continue with the ink counter
Press [Press [
reset.
reset.
reset.reset.
If you replaced the black ink tank, press [
If you replaced the black ink tank, press [OOOO]. If you did not, press [
9999
If you replaced the black ink tank, press [If you replaced the black ink tank, press [
If you replaced the colour ink tank, press [
If you replaced the colour ink tank, press [OOOO]. If you did not, press [
10
10
1010
If you replaced the colour ink tank, press [If you replaced the colour ink tank, press [
• The ink counter is now reset. To check the ink level of the ink tanks at any time, see
the ink level
] to continue with the ink counter
] to continue with the ink counter ] to continue with the ink counter
, p. 7-6.
]. If you did not, press [PPPP].
]. If you did not, press []. If you did not, press [
]. If you did not, press [PPPP].
]. If you did not, press []. If you did not, press [
].
].].
].
].].
Checking
7-4
7-4 Maintenance Chapter 7
7-47-4
Page 49
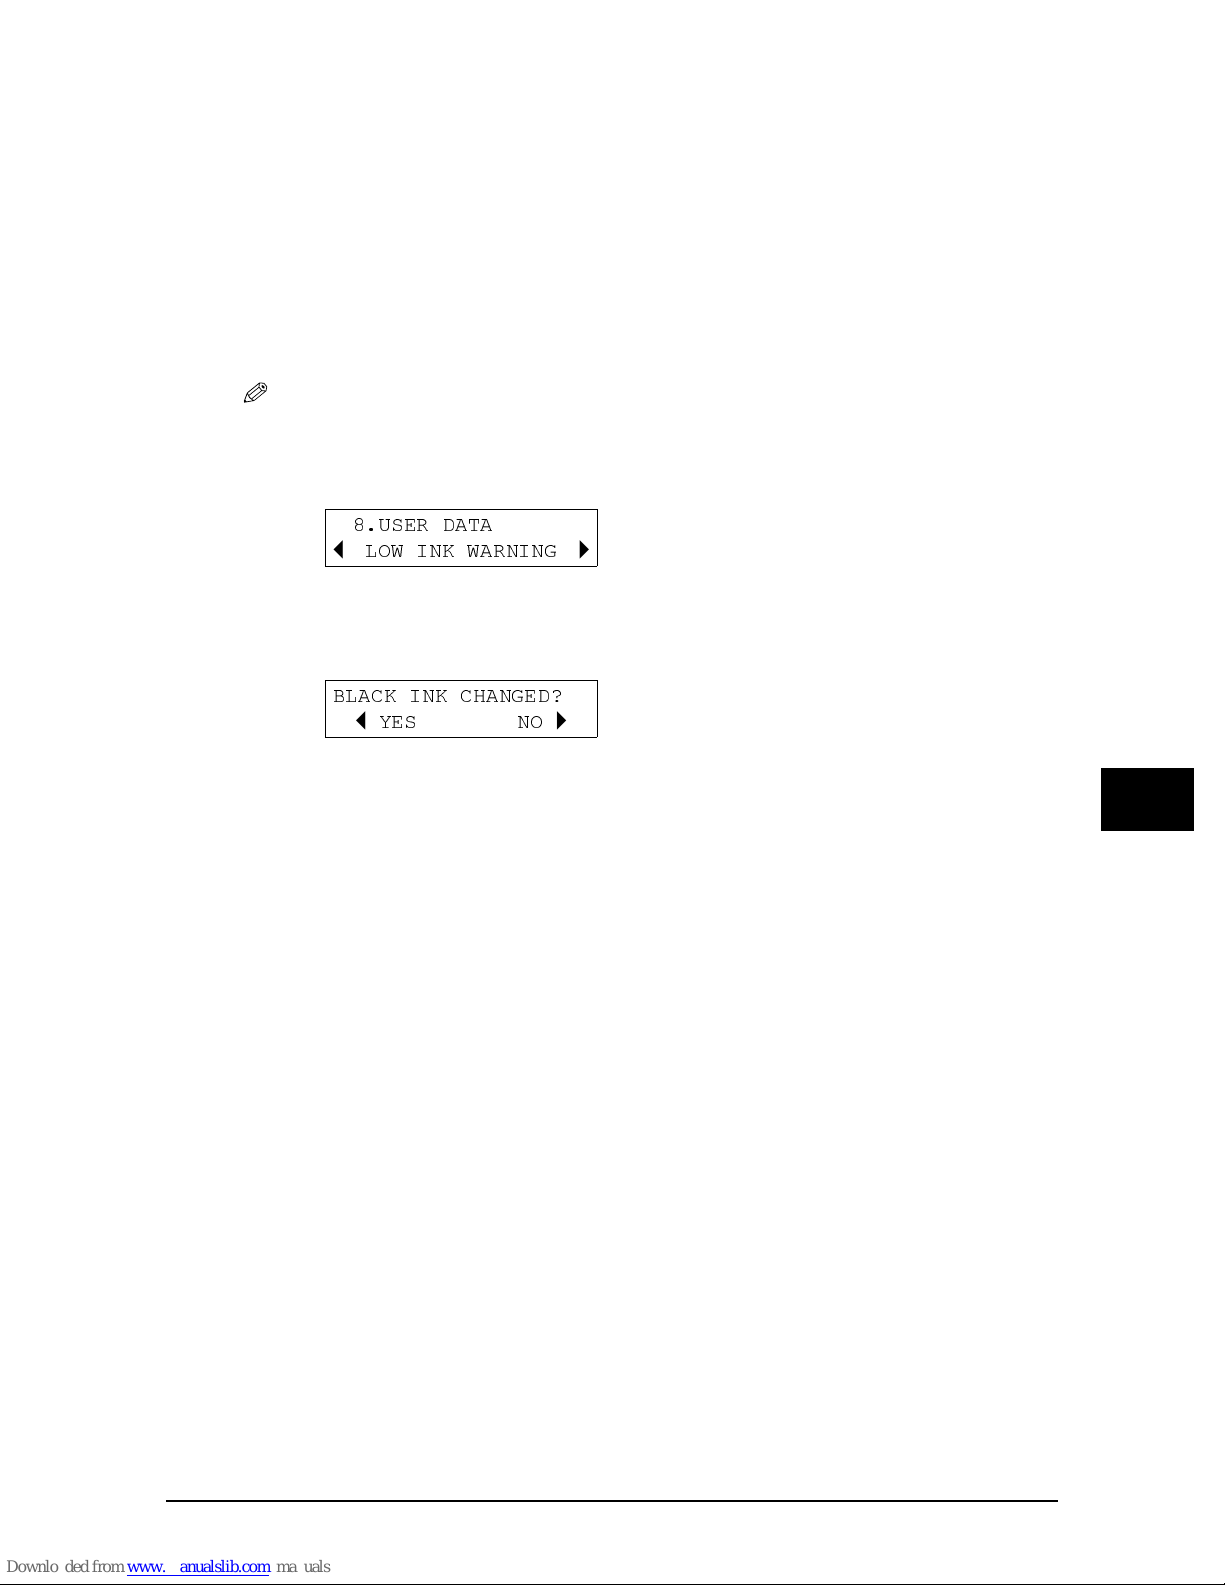
Resetting the ink counter
Resetting the ink counter
Resetting the ink counterResetting the ink counter
The ink counter keeps track of how much ink is left in the ink tanks allowing the machine
to warn you when ink is running low. It also allows you to check the current ink level of
the ink tanks at any time.
When you replace an ink tank, the LCD will automatically prompt you to reset the ink
counter. However, if for any reason you did not reset the ink counter when replacing the
ink tanks, follow this procedure to reset it.
Please note that if you do not reset the ink counter after replacing an ink tank, the low
ink warning will not display properly and you will not be able to check the ink level as
explained in
NOTE
NOTE
NOTENOTE
• You can also reset the ink counter from your computer (1
Press [Menu] repeatedly until <USER DATA> is displayed.
Press [Menu] repeatedly until <USER DATA> is displayed.
1111
Press [Menu] repeatedly until <USER DATA> is displayed.Press [Menu] repeatedly until <USER DATA> is displayed.
Checking the ink level
, below.
Software Guide
).
Ex:
Use [
Use [OOOO] or [
2222
Use [Use [
Press [OK].
Press [OK].
3333
Press [OK].Press [OK].
If you replaced the black ink tank, press [
If you replaced the black ink tank, press [OOOO]. If you did not, press [
4444
If you replaced the black ink tank, press [If you replaced the black ink tank, press [
If you replaced the colour ink tank, press [
If you replaced the colour ink tank, press [OOOO]. If you did not, press [
5555
If you replaced the colour ink tank, press [If you replaced the colour ink tank, press [
• The ink counter is now reset. To check the ink level of the ink tanks at any time, see below.
8.USER DATA
D
LOW INK WARNING
B
] or [PPPP] to select <INK COUNT RESET>.
] or [] or [
BLACK INK CHANGED?
B
] to select <INK COUNT RESET>.
] to select <INK COUNT RESET>.] to select <INK COUNT RESET>.
YES NO
A
A
]. If you did not, press [PPPP].
]. If you did not, press []. If you did not, press [
]. If you did not, press [PPPP].
]. If you did not, press []. If you did not, press [
].
].].
].
].].
7777
Maintenance
Chapter 7 Maintenance 7-5
7-5
7-57-5
Page 50

Checking the ink level
Checking the ink level
Checking the ink levelChecking the ink level
If you reset the ink counter when you installed/replaced the ink tanks, you can check
the current ink level as follows:
Press [Menu] repeatedly until <INK VOLUME> is displayed.
Press [Menu] repeatedly until <INK VOLUME> is displayed.
1111
Press [Menu] repeatedly until <INK VOLUME> is displayed.Press [Menu] repeatedly until <INK VOLUME> is displayed.
Ex:
Press [OK].
Press [OK].
2222
Press [OK].Press [OK].
6.INK VOLUME
D
• The LCD shows the current ink level.
: Approx. 100% to 30% full
: Approx. 30% full
: 0% (empty)
?: Ink counter not reset
– : The <LOW INK WARNING> setting is off (1 p. 9-4).
7-6
7-6 Maintenance Chapter 7
7-67-6
Page 51
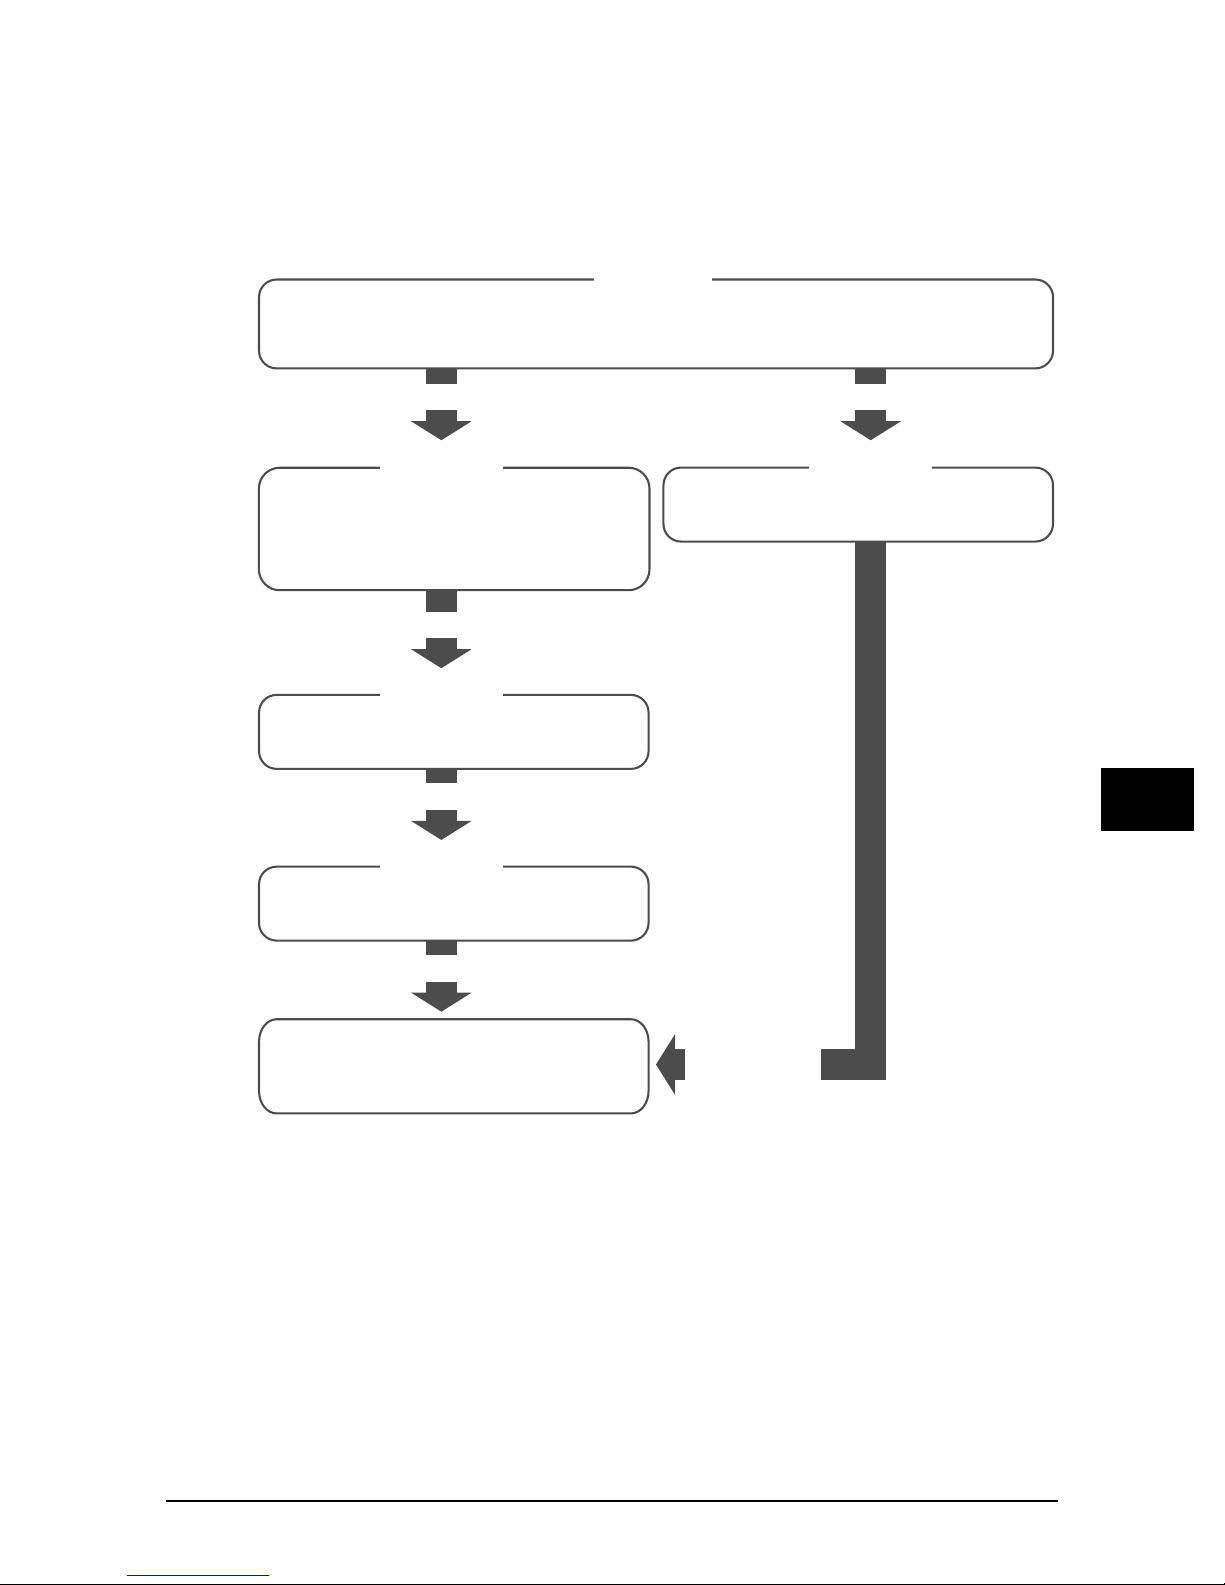
P
P Maintaining the printhead
PP
Flowchart of printhead maintenance
Flowchart of printhead maintenance
Flowchart of printhead maintenanceFlowchart of printhead maintenance
Maintaining the printhead
Maintaining the printheadMaintaining the printhead
If print quality deteriorates, follow this procedure:
Step 1
Step 1
Step 1Step 1
Print the nozzle check pattern
Print the nozzle check pattern (1p. 7-8).
Print the nozzle check pattern Print the nozzle check pattern
This pattern allows you to check if ink is coming out of the printhead nozzles correctly and if
the printhead is aligned.
The ink is not coming out correctly.
The ink is not coming out correctly.
The ink is not coming out correctly.The ink is not coming out correctly.
Step 2
Step 2 Step 2
Step 2Step 2
Perform normal printhead cleaning
Perform normal printhead cleaning
Perform normal printhead cleaning Perform normal printhead cleaning
(<HEAD CLEANING> setting)
(<HEAD CLEANING> setting)
(<HEAD CLEANING> setting)(<HEAD CLEANING> setting)
You can perform normal printhead cleaning up
to three times.
If there is no improvement.
If there is no improvement.
If there is no improvement.If there is no improvement.
(1
p. 7-8).
p. 7-8).p. 7-8).
p. 7-9).
p. 7-9).
p. 7-9).p. 7-9).
Align the printhead
Align the printhead
Align the printhead Align the printhead
The printhead is misaligned.
The printhead is misaligned.
The printhead is misaligned.The printhead is misaligned.
Step 2
Step 2Step 2
(1
p. 7-10).
p. 7-10).
p. 7-10).p. 7-10).
Step 3
Step 3
Step 3Step 3
Perform deep printhead cleaning (<HEAD
Perform deep printhead cleaning (<HEAD
Perform deep printhead cleaning (<HEAD Perform deep printhead cleaning (<HEAD
REFRESHING> setting)
REFRESHING> setting)
REFRESHING> setting)REFRESHING> setting)
If there is no improvement.
If there is no improvement.
If there is no improvement.If there is no improvement.
Step 4
Step 4
Step 4Step 4
Replace the ink tank(s)
Replace the ink tank(s)
Replace the ink tank(s) Replace the ink tank(s)
If there is no improvement.
If there is no improvement.
If there is no improvement.If there is no improvement.
The printhead may be damaged. Contact
The printhead may be damaged. Contact
The printhead may be damaged. Contact The printhead may be damaged. Contact
your local authorised Canon dealer or the
your local authorised Canon dealer or the
your local authorised Canon dealer or the your local authorised Canon dealer or the
Canon help line.
Canon help line.
Canon help line.Canon help line.
(1
(1
p. 7-9).
p. 7-9).
p. 7-9).p. 7-9).
p. 7-3).
p. 7-3).
p. 7-3).p. 7-3).
If there is no
If there is no
If there is no If there is no
improvement.
improvement.
improvement.improvement.
7777
Maintenance
Chapter 7 Maintenance 7-7
7-7
7-77-7
Page 52
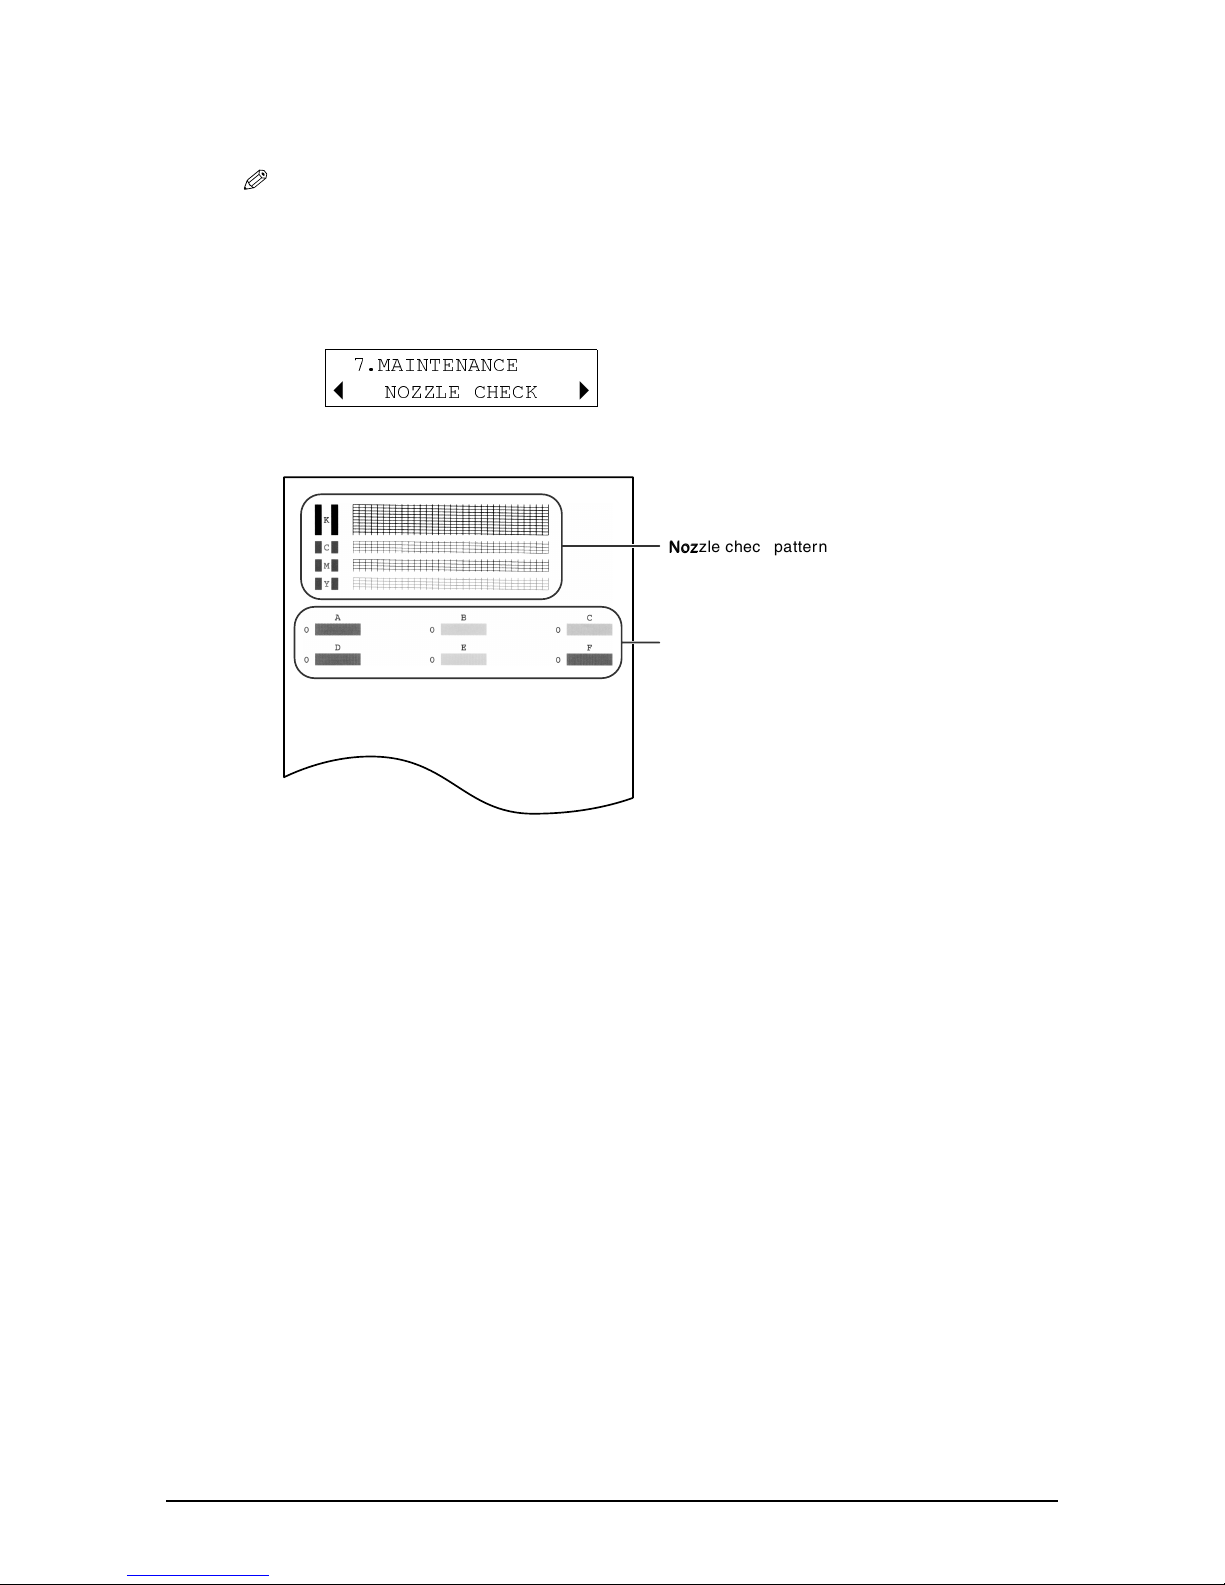
Printing the nozzle check pattern
Printing the nozzle check pattern
Printing the nozzle check patternPrinting the nozzle check pattern
The nozzle check pattern shows if each printhead nozzle is operating properly.
NOTE
NOTE
NOTENOTE
• You can also print the nozzle check pattern from your computer (1
Follow this procedure to print the nozzle check pattern from the machine:
Load A4- or letter-size plain paper in the multi-purpose tray.
Load A4- or letter-size plain paper in the multi-purpose tray.
1111
Load A4- or letter-size plain paper in the multi-purpose tray.Load A4- or letter-size plain paper in the multi-purpose tray.
Press [Menu] repeatedly until <MAINTENANCE> is displayed.
Press [Menu] repeatedly until <MAINTENANCE> is displayed.
2222
Press [Menu] repeatedly until <MAINTENANCE> is displayed.Press [Menu] repeatedly until <MAINTENANCE> is displayed.
7.MAINTENANCE
D
NOZZLE CHECK
Press [OK].
Press [OK].
3333
Press [OK].Press [OK].
B
A
Software Guide
Nozzle check pattern
Nozzle check pattern
Nozzle check patternNozzle check pattern
If the pattern is broken, missing, or a specific colour is
not printed, see
Printhead position
Printhead position
Printhead positionPrinthead position
If the pattern is no uniform, align the printhead
(1 p. 7-10)
Cleaning the printhead
, p.7-9.
).
7-8
7-8 Maintenance Chapter 7
7-87-8
Page 53
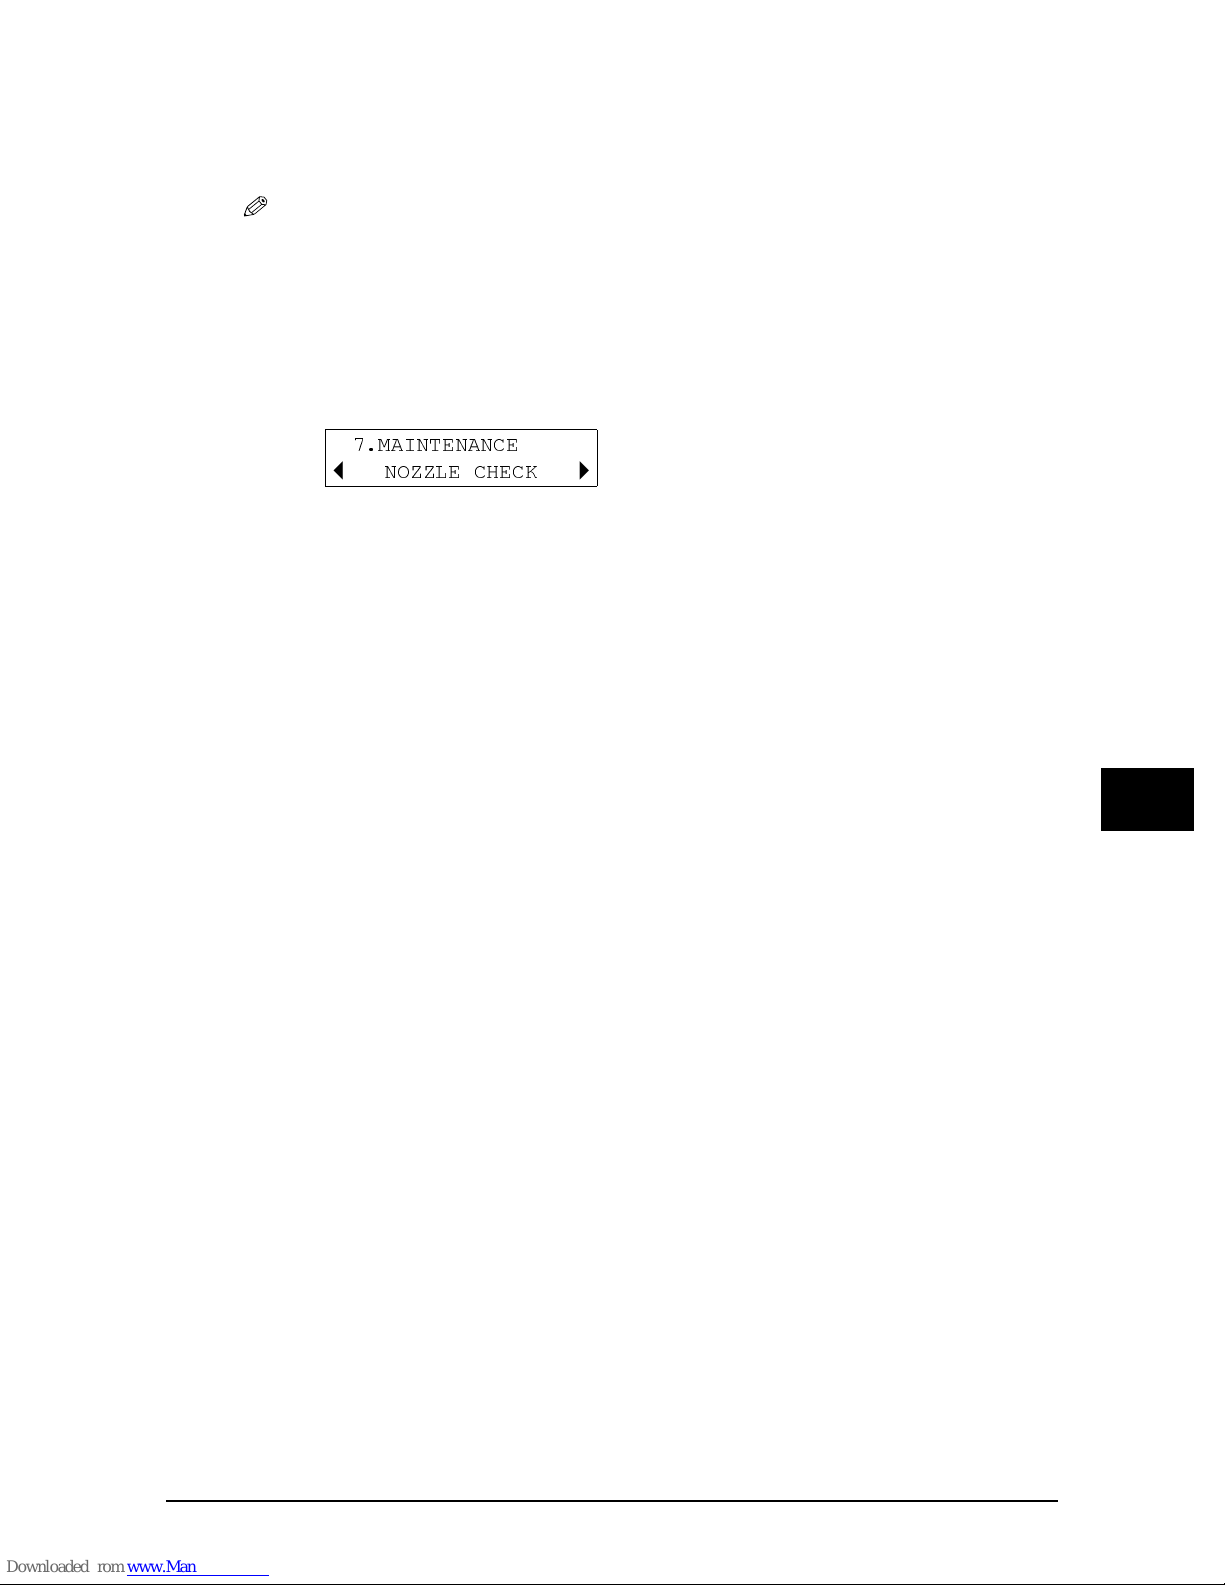
Cleaning the printhead
Cleaning the printhead
Cleaning the printheadCleaning the printhead
If the printed nozzle check pattern is broken, missing, or a specific colour is not printed,
clean the printhead.
NOTE
NOTE
NOTENOTE
• Cleaning the printhead consumes a small amount of ink. Cleaning too often reduces
the amount of ink in the ink tanks.
• You can also clean the printhead from your computer (1
Follow this procedure to clean the printhead from the machine:
Press [Menu] repeatedly until <MAINTENANCE> is displayed.
Press [Menu] repeatedly until <MAINTENANCE> is displayed.
1111
Press [Menu] repeatedly until <MAINTENANCE> is displayed.Press [Menu] repeatedly until <MAINTENANCE> is displayed.
7.MAINTENANCE
D
NOZZLE CHECK
B
Use [
Use [OOOO] or [
2222
Use [Use [
• Select:
• For details on which to select, see p. 7-7.
Press [OK].
Press [OK].
3333
Press [OK].Press [OK].
] or [PPPP] to select the cleaning setting you want.
] or [] or [
– <HEAD CLEANING> for normal printhead cleaning.
– <HEAD REFRESHING> for deep printhead cleaning.
] to select the cleaning setting you want.
] to select the cleaning setting you want.] to select the cleaning setting you want.
Software Guide
A
).
7777
Maintenance
Chapter 7 Maintenance 7-9
7-9
7-97-9
Page 54
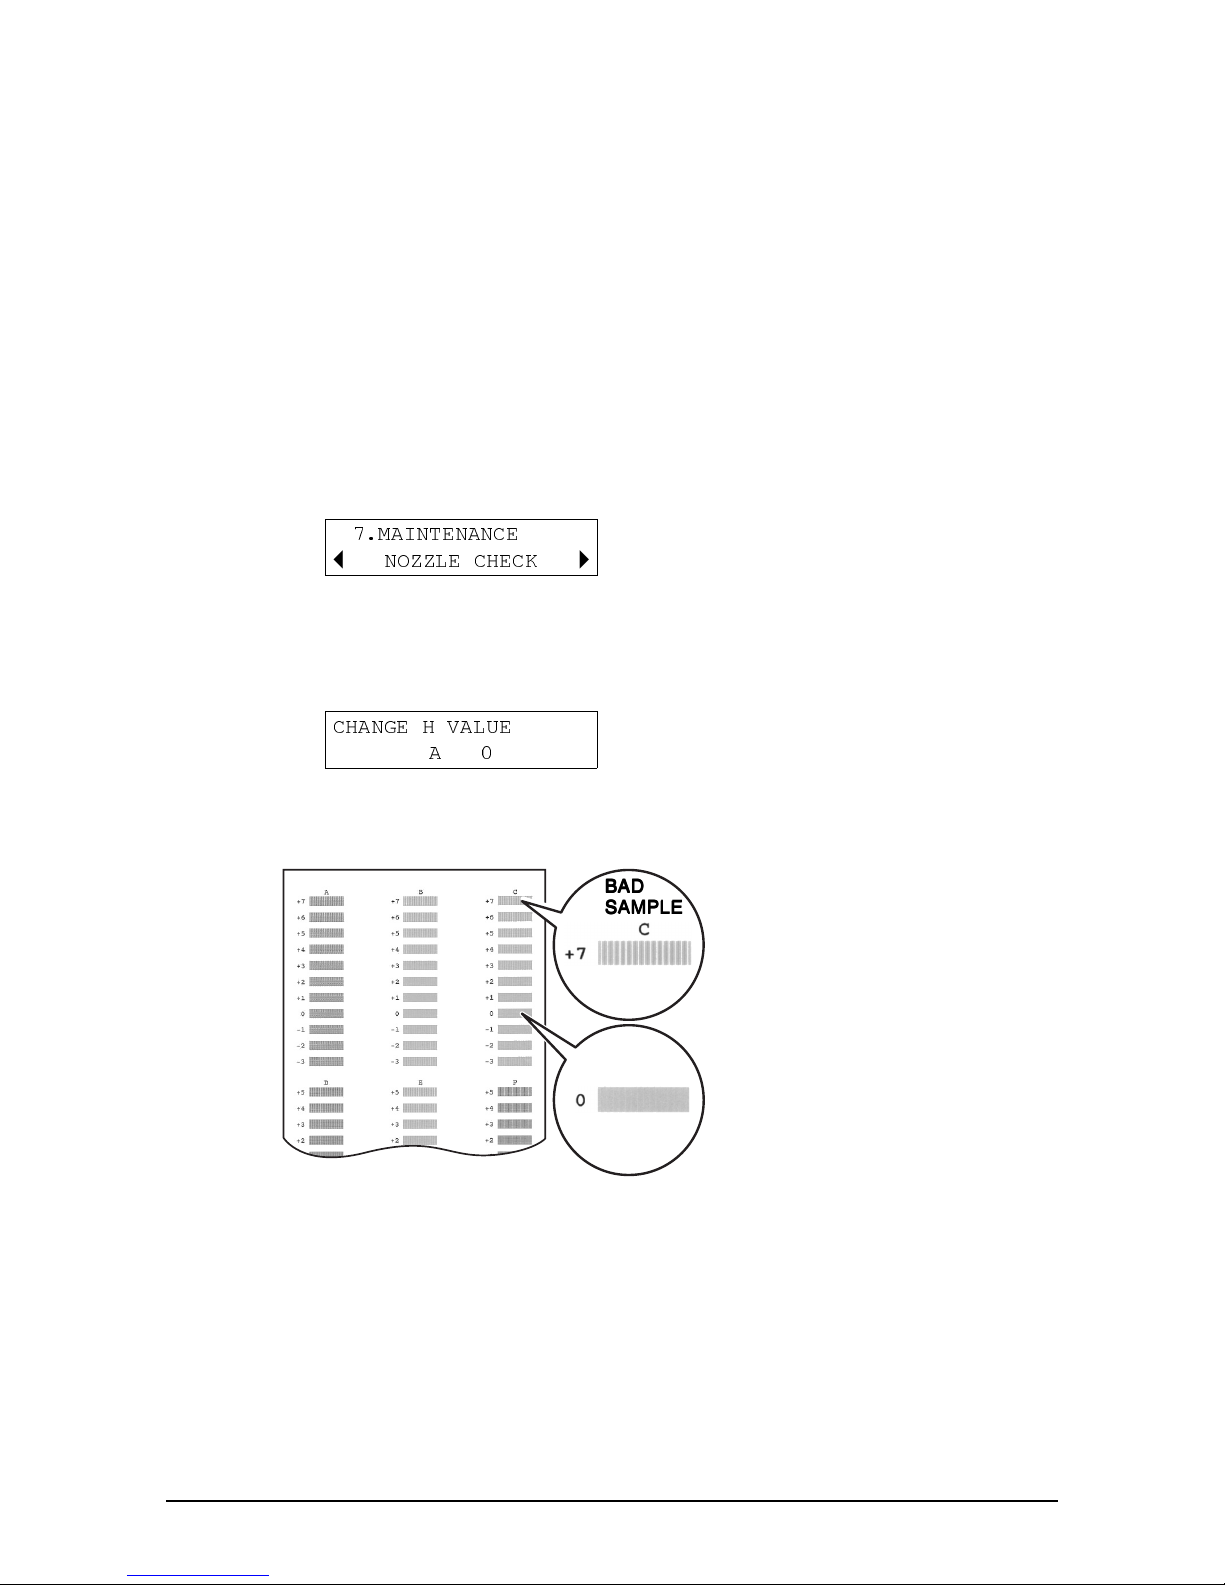
Aligning the printhead
Aligning the printhead
Aligning the printheadAligning the printhead
To align the printhead after you have just installed it, follow the procedure in the
Sheet
.
If you have printed the nozzle check pattern (1 p. 7-8) and determined that the
printhead needs aligning, align it from the operation panel or from the MultiPASS Suite
software.
Aligning the printhead from the operation panel
Aligning the printhead from the operation panel
Aligning the printhead from the operation panelAligning the printhead from the operation panel
Follow this procedure to align the printhead from the operation panel:
Load A4- or letter-size plain paper in the multi-purpose tray.
Load A4- or letter-size plain paper in the multi-purpose tray.
1111
Load A4- or letter-size plain paper in the multi-purpose tray.Load A4- or letter-size plain paper in the multi-purpose tray.
Press [Menu] repeatedly until <MAINTENANCE> is displayed.
Press [Menu] repeatedly until <MAINTENANCE> is displayed.
2222
Press [Menu] repeatedly until <MAINTENANCE> is displayed.Press [Menu] repeatedly until <MAINTENANCE> is displayed.
D
7.MAINTENANCE
NOZZLE CHECK
B
Use [
Use [OOOO] or [
3333
Use [Use [
Press [OK].
Press [OK].
4444
Press [OK].Press [OK].
• The machine prints a horizontal pattern.
] or [PPPP] to select <ALIGN PRINT HEAD>.
] or [] or [
] to select <ALIGN PRINT HEAD>.
] to select <ALIGN PRINT HEAD>.] to select <ALIGN PRINT HEAD>.
A
Set-Up
CHANGE H VALUE
A0
In column A on the printout, note which box has the most solid image. Note the
In column A on the printout, note which box has the most solid image. Note the
5555
In column A on the printout, note which box has the most solid image. Note the In column A on the printout, note which box has the most solid image. Note the
value next to this box and use [
value next to this box and use [OOOO] or [
value next to this box and use [value next to this box and use [
] or [PPPP] to enter it.
] or [] or [
BAD
BAD
BAD BAD
SAMPLE
SAMPLE
SAMPLESAMPLE
Least solid box
GOOD
GOOD
GOOD GOOD
SAMPLE
SAMPLE
SAMPLESAMPLE
Most solid box
] to enter it.
] to enter it.] to enter it.
7-10
7-10 Maintenance Chapter 7
7-107-10
Page 55

Press [OK].
Press [OK].
6666
Press [OK].Press [OK].
Repeat steps 5 and 6 for columns B to F.
Repeat steps 5 and 6 for columns B to F.
7777
Repeat steps 5 and 6 for columns B to F.Repeat steps 5 and 6 for columns B to F.
Aligning the printhead from the MultiPASS Suite
Aligning the printhead from the MultiPASS Suite
Aligning the printhead from the MultiPASS SuiteAligning the printhead from the MultiPASS Suite
Follow this procedure to align the printhead from the MultiPASS Suite software:
Load A4- or letter-size plain paper in the
Load A4- or letter-size plain paper in the
1111
Load A4- or letter-size plain paper in the Load A4- or letter-size plain paper in the
multi-purpose tray.
multi-purpose tray.
multi-purpose tray.multi-purpose tray.
On the Windows desktop, click [Start],
On the Windows desktop, click [Start],
2222
On the Windows desktop, click [Start], On the Windows desktop, click [Start],
point to [Settings], then click [Printers]
point to [Settings], then click [Printers]
point to [Settings], then click [Printers] point to [Settings], then click [Printers]
(Windows XP: Click [Start], then click
(Windows XP: Click [Start], then click
(Windows XP: Click [Start], then click (Windows XP: Click [Start], then click
[Printers and Faxes]).
[Printers and Faxes]).
[Printers and Faxes]).[Printers and Faxes]).
In the Printers (Printers and Faxes)
In the Printers (Printers and Faxes)
3333
In the Printers (Printers and Faxes) In the Printers (Printers and Faxes)
window, click the printer icon.
window, click the printer icon.
window, click the printer icon.window, click the printer icon.
On the File menu, click [Properties] or
On the File menu, click [Properties] or
4444
On the File menu, click [Properties] or On the File menu, click [Properties] or
[Printing Preferences...].
[Printing Preferences...].
[Printing Preferences...].[Printing Preferences...].
In the Properties dialogue box, on the
In the Properties dialogue box, on the
5555
In the Properties dialogue box, on the In the Properties dialogue box, on the
Maintenance tab, click the printhead
Maintenance tab, click the printhead
Maintenance tab, click the printhead Maintenance tab, click the printhead
alignment icon.
alignment icon.
alignment icon.alignment icon.
Follow the on-screen instructions.
Follow the on-screen instructions.
6666
Follow the on-screen instructions.Follow the on-screen instructions.
7777
Maintenance
Chapter 7 Maintenance 7-11
7-11
7-117-11
Page 56
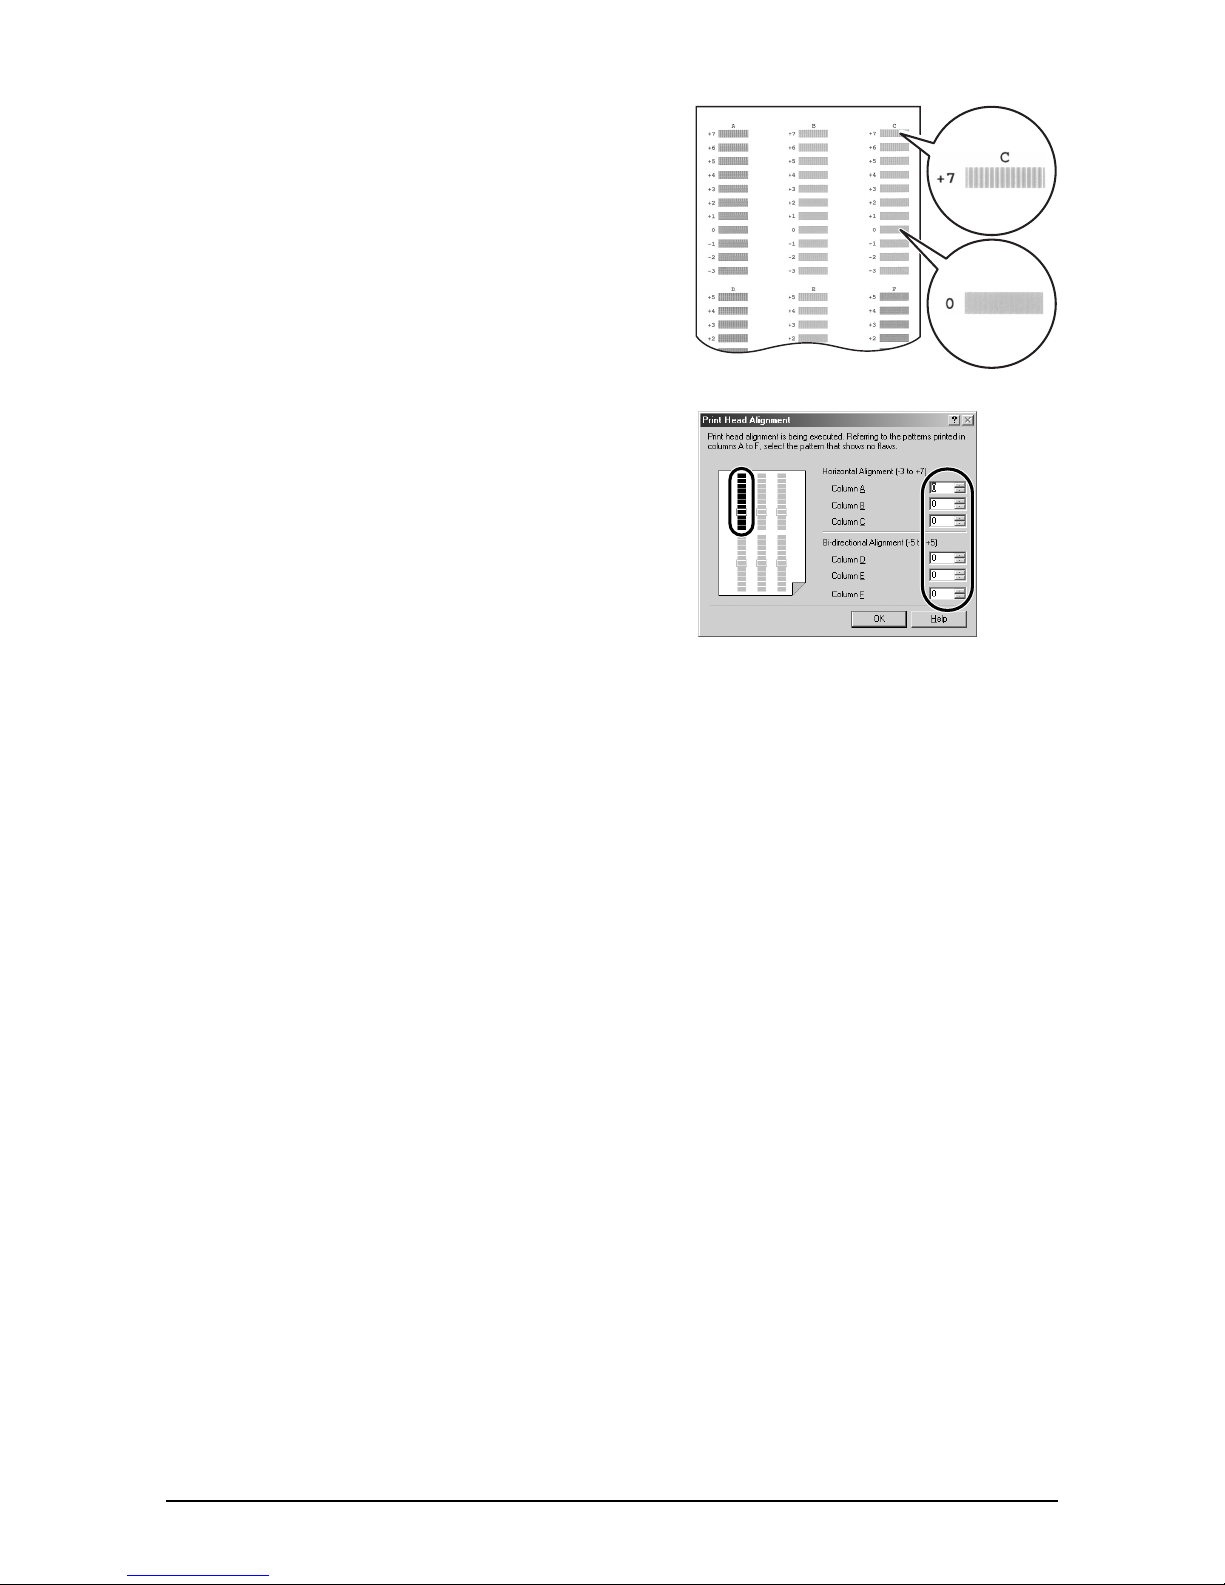
In column A on the printout, note which
In column A on the printout, note which
7777
In column A on the printout, note which In column A on the printout, note which
box has the most solid image. Note the
box has the most solid image. Note the
box has the most solid image. Note the box has the most solid image. Note the
value next to this box and enter the
value next to this box and enter the
value next to this box and enter the value next to this box and enter the
number. Repeat for columns B to F.
number. Repeat for columns B to F.
number. Repeat for columns B to F.number. Repeat for columns B to F.
Click [OK].
Click [OK].
8888
Click [OK].Click [OK].
BAD
BAD
BAD BAD
SAMPLE
SAMPLE
SAMPLESAMPLE
Least solid box
GOOD
GOOD
GOOD GOOD
SAMPLE
SAMPLE
SAMPLESAMPLE
Most solid box
P
P Cleaning your machine
PP
Cleaning your machine
Cleaning your machineCleaning your machine
For details on cleaning your machine, refer to the
Basic Guide
.
7-12
7-12 Maintenance Chapter 7
7-127-12
Page 57

Chapter
Chapter
ChapterChapter
8
Troubleshooting
Troubleshooting
TroubleshootingTroubleshooting
P
P Problems installing and removing
PP
l
Problems installing and removing
Problems installing and removing Problems installing and removing
software
software
softwaresoftware
See below if you were unable to install or remove the software.
See below if you were unable to install or remove the software.
See below if you were unable to install or remove the software.See below if you were unable to install or remove the software.
Cannot install the software.
Cannot install the software.
Cannot install the software.Cannot install the software.
1.
1. Have you followed the instructions in the Set-Up Sheet to install the software?
Have you followed the instructions in the Set-Up Sheet to install the software?
1.1.
Have you followed the instructions in the Set-Up Sheet to install the software?Have you followed the instructions in the Set-Up Sheet to install the software?
If you have not followed the installation procedure correctly, try reinstalling the software. If there
was an error during installation and installation was not completed, restart your computer and
try reinstalling the software.
2.
2. Are any other applications open?
Are any other applications open?
2.2.
Are any other applications open?Are any other applications open?
If you have other applications open, quit all of these and try reinstalling the software.
3.
3. Did you install an earlier version of the MultiPASS Suite software (version 4.3 or earlier)?
Did you install an earlier version of the MultiPASS Suite software (version 4.3 or earlier)?
3.3.
Did you install an earlier version of the MultiPASS Suite software (version 4.3 or earlier)? Did you install an earlier version of the MultiPASS Suite software (version 4.3 or earlier)?
(Is Canon MultiPASS registered as the startup item in the Start menu program?)
(Is Canon MultiPASS registered as the startup item in the Start menu program?)
(Is Canon MultiPASS registered as the startup item in the Start menu program?)(Is Canon MultiPASS registered as the startup item in the Start menu program?)
Remove the old version of the MultiPASS Suite software following the instructions in the
Software Guide of that version and try reinstalling the new version.
4.
4. During installation, did the message <Could not find Client for Microsoft Networks> appear
During installation, did the message <Could not find Client for Microsoft Networks> appear
4.4.
During installation, did the message <Could not find Client for Microsoft Networks> appear During installation, did the message <Could not find Client for Microsoft Networks> appear
on your computer (Windows 98/Me only)?
on your computer (Windows 98/Me only)?
on your computer (Windows 98/Me only)?on your computer (Windows 98/Me only)?
The Client for Microsoft Networks is not installed. Follow this procedure:
1. On the Windows desktop, click [Start], point to [Settings], then click [Control Panel].
2. In the Control Panel window, double-click [Network].
3. On the Configuration tab, check whether the Client for Microsoft Networks is installed. If it
is not installed, click [Add].
4. In the Select Network Component Type dialogue box, click [Client], then click [Add].
5. In the Select Network Client dialogue box, click [Microsoft] and [Client for Microsoft
Networks], then click [OK].
6. In the Network dialogue box, click [OK].
7. Restart your computer.
8. Reinstall the MultiPASS Suite (1
Set-Up Sheet
).
8888
Troubleshooting
Chapter 8 Troubleshooting 8-1
8-1
8-18-1
Page 58

During installation, you were prompted to connect a USB cable, and you
During installation, you were prompted to connect a USB cable, and you
l
During installation, you were prompted to connect a USB cable, and you During installation, you were prompted to connect a USB cable, and you
could not proceed further.
could not proceed further.
could not proceed further.could not proceed further.
Remove the device from the Device Manager as follows:
1. In the dialogue box prompting you to connect a USB cable, click [No] and exit installation of the
MultiPASS Suite.
2. On the Windows desktop, click [Start], point to [Settings], then click [Control Panel]. (Windows
XP: Click [Start], then [Control Panel].)
3. In the Control Panel window, double-click [System]. (Windows XP: Click [Performance and
Maintenance], then [System].)
4. On the Device Manager tab (Windows 2000/XP: On the Hardware tab, click [Device Manager].),
under Other Devices, click [MPC190], then press the [Delete] key.
5. Remove the USB cable from the port.
6. Install the MultiPASS Suite following the instructions in the
Installation or removal of the MultiPASS Suite cannot be completed.
Installation or removal of the MultiPASS Suite cannot be completed.
l
Installation or removal of the MultiPASS Suite cannot be completed.Installation or removal of the MultiPASS Suite cannot be completed.
1.
1. On the Windows desktop, double-click [My Computer], then double-click the CD-ROM icon.
On the Windows desktop, double-click [My Computer], then double-click the CD-ROM icon.
1.1.
On the Windows desktop, double-click [My Computer], then double-click the CD-ROM icon. On the Windows desktop, double-click [My Computer], then double-click the CD-ROM icon.
In the MultiPASS folder, in Setup, click [FrcInst] or [Frclnst.exe].
In the MultiPASS folder, in Setup, click [FrcInst] or [Frclnst.exe].
In the MultiPASS folder, in Setup, click [FrcInst] or [Frclnst.exe].In the MultiPASS folder, in Setup, click [FrcInst] or [Frclnst.exe].
2.
2. Install the MultiPASS Suite following the instructions in the
Install the MultiPASS Suite following the instructions in the
2.2.
Install the MultiPASS Suite following the instructions in the Install the MultiPASS Suite following the instructions in the
Cannot finish removing the MultiPASS Suite software (Windows XP only).
Cannot finish removing the MultiPASS Suite software (Windows XP only).
l
Cannot finish removing the MultiPASS Suite software (Windows XP only).Cannot finish removing the MultiPASS Suite software (Windows XP only).
Set-Up Sheet
Set-Up Sheet
Set-Up Sheet
Set-Up SheetSet-Up Sheet
.
....
Removal of the software will take longer if an application such as a virus checker is running.
Quit any applications (including virus checkers) before removing the MultiPASS Suite
software.
Cannot use the MultiPASS Suite software after upgrading to Windows XP.
Cannot use the MultiPASS Suite software after upgrading to Windows XP.
l
Cannot use the MultiPASS Suite software after upgrading to Windows XP.Cannot use the MultiPASS Suite software after upgrading to Windows XP.
If the MultiPASS Suite was installed in Windows 98/2000/Me and you upgraded to Windows
XP without removing the MultiPASS Suite, the machine may not being recognised.
Follow this procedure in Windows XP to remove the device from the Device Manager,
remove the MultiPASS Suite and then reinstall it:
1. On the Windows desktop, click [Start], then [Control Panel].
2. In the Control Panel window, click [Performance and Maintenance], then [System].
3. On the Hardware tab, click [Device Manager]. Under Other Devices, click [MPC190], then press
the [Delete] key.
4. Remove the MultiPASS Suite (1
5. Restart your computer.
6. Reinstall the MultiPASS Suite (1
Software Guide
Set-Up Sheet
).
).
8-2
8-2 Troubleshooting Chapter 8
8-28-2
Page 59

P
P
PP
l
Problems turning on the computer
Problems turning on the computer
Problems turning on the computerProblems turning on the computer
(when the MultiPASS Suite opens)
(when the MultiPASS Suite opens)
(when the MultiPASS Suite opens)(when the MultiPASS Suite opens)
When you install the MultiPASS Suite and you turn on your computer, the MultiPASS
When you install the MultiPASS Suite and you turn on your computer, the MultiPASS
When you install the MultiPASS Suite and you turn on your computer, the MultiPASS When you install the MultiPASS Suite and you turn on your computer, the MultiPASS
Toolbar is set to open.
Toolbar is set to open.
Toolbar is set to open.Toolbar is set to open.
See below if you have problems executing a job.
See below if you have problems executing a job.
See below if you have problems executing a job.See below if you have problems executing a job.
The message <Unable to communicate with the device> appears on your
The message <Unable to communicate with the device> appears on your
The message <Unable to communicate with the device> appears on your The message <Unable to communicate with the device> appears on your
computer.
computer.
computer.computer.
The MultiPASS Suite operates after checking that there is a USB cable connecting the
machine and the computer.
This message appears and the MultiPASS Suite will not open if there is no USB cable
connected or the machine is not turned on.
1.
1. Is there anything displayed in the LCD?
Is there anything displayed in the LCD?
1.1.
Is there anything displayed in the LCD?Is there anything displayed in the LCD?
If nothing is displayed, see p. 8-12.
2.
2. Is the USB cable connecting the computer to the machine?
Is the USB cable connecting the computer to the machine?
2.2.
Is the USB cable connecting the computer to the machine?Is the USB cable connecting the computer to the machine?
The USB cable may have become disconnected when the MultiPASS Suite was running. If it
has, reconnect the cable.
3.
3. Is another printer connected to the USB port?
Is another printer connected to the USB port?
3.3.
Is another printer connected to the USB port?Is another printer connected to the USB port?
You might have connected a different printer to the USB port allocated to the machine when the
MultiPASS Suite was running. Reconnect the machine to the USB port.
4.
4. Replace the USB cable with another USB cable.
Replace the USB cable with another USB cable.
4.4.
Replace the USB cable with another USB cable.Replace the USB cable with another USB cable.
The USB cable may be too long or defective. Replace it with another USB cable that complies
with the requirements (1 p. 3-1).
5.
5. The machine has been configured to use a port on the computer which does not exist or
The machine has been configured to use a port on the computer which does not exist or
5.5.
The machine has been configured to use a port on the computer which does not exist or The machine has been configured to use a port on the computer which does not exist or
which is malfunctioning.
which is malfunctioning.
which is malfunctioning.which is malfunctioning.
Disconnect the USB cable. Reconfigure the port, then reconnect the USB cable.
6.
6. Did you disconnect then reconnect the USB cable during standby?
Did you disconnect then reconnect the USB cable during standby?
6.6.
Did you disconnect then reconnect the USB cable during standby?Did you disconnect then reconnect the USB cable during standby?
Reconnect the USB cable.
8888
Chapter 8 Troubleshooting 8-3
8-3
8-38-3
Troubleshooting
Page 60

P
P Problems printing from your computer
PP
l
Problems printing from your computer
Problems printing from your computerProblems printing from your computer
See below if you have tried unsuccessfully to print from your computer, or if you
See below if you have tried unsuccessfully to print from your computer, or if you
See below if you have tried unsuccessfully to print from your computer, or if you See below if you have tried unsuccessfully to print from your computer, or if you
cannot print images scanned to your computer.
cannot print images scanned to your computer.
cannot print images scanned to your computer.cannot print images scanned to your computer.
The
The mark indicates problems that also occur when printing copies on your
The The
machine.
machine.
machine.machine.
Cannot print at all.
Cannot print at all.
Cannot print at all.Cannot print at all.
mark indicates problems that also occur when printing copies on your
mark indicates problems that also occur when printing copies on your mark indicates problems that also occur when printing copies on your
1.
1. Is there anything displayed in the LCD?
Is there anything displayed in the LCD?
1.1.
Is there anything displayed in the LCD?Is there anything displayed in the LCD?
If nothing is displayed, see p. 8-12.
2.
2. Is the Alarm light blinking?
Is the Alarm light blinking?
2.2.
Is the Alarm light blinking?Is the Alarm light blinking?
If it is blinking, see p. 8-15.
3.
3. Is there a warning or attention displayed in the Status Monitor?
Is there a warning or attention displayed in the Status Monitor?
3.3.
Is there a warning or attention displayed in the Status Monitor?Is there a warning or attention displayed in the Status Monitor?
If displayed, see p. 8-19.
4.
4. Print the nozzle check pattern (
Print the nozzle check pattern (1
4.4.
Print the nozzle check pattern (Print the nozzle check pattern (
5.
5. Are you trying to print in DOS?
Are you trying to print in DOS?
5.5.
Are you trying to print in DOS?Are you trying to print in DOS?
You can only print in Windows and not in DOS.
6.
6. Is there an application error or General Protection Fault error displayed on the computer?
Is there an application error or General Protection Fault error displayed on the computer?
6.6.
Is there an application error or General Protection Fault error displayed on the computer? Is there an application error or General Protection Fault error displayed on the computer?
Is the application you are using to print compatible with the operating system?
Is the application you are using to print compatible with the operating system?
Is the application you are using to print compatible with the operating system?Is the application you are using to print compatible with the operating system?
Refer to the application’s documentation. If the application is not compatible, generally you will
be unable to print.
7.
7. Has the application been allocated enough memory?
Has the application been allocated enough memory?
7.7.
Has the application been allocated enough memory?Has the application been allocated enough memory?
If other applications are open, close them to increase the available memory.
Refer to the application’s documentation to check the amount of memory the application
requires.
8.
8. If a problem occurs when printing a specific document
If a problem occurs when printing a specific document
8.8.
If a problem occurs when printing a specific documentIf a problem occurs when printing a specific document
Try printing again after opening and editing the document.
9.
9. Does the hard disk have enough available space?
Does the hard disk have enough available space?
9.9.
Does the hard disk have enough available space?Does the hard disk have enough available space?
If not, delete files you do not need to increase the available disk space.
10.
10. Restart the computer.
Restart the computer.
10.10.
Restart the computer.Restart the computer.
11.
11. There may be a problem with the printer driver.
There may be a problem with the printer driver.
11.11.
There may be a problem with the printer driver.There may be a problem with the printer driver.
Remove the MultiPASS Suite software and try reinstalling.
To remove the MultiPASS Suite, see the
Maintaining the printhead
Maintaining the printhead
Maintaining the printheadMaintaining the printhead
Software Guide
. To install, see the
, p. 7-7).
, p. 7-7).
, p. 7-7)., p. 7-7).
Set-Up Sheet
.
Cannot print to a shared printer.
Cannot print to a shared printer.
l
Cannot print to a shared printer.Cannot print to a shared printer.
1.
1. Is the server (the computer to which the machine is connected) turned on?
Is the server (the computer to which the machine is connected) turned on?
1.1.
Is the server (the computer to which the machine is connected) turned on?Is the server (the computer to which the machine is connected) turned on?
Turn the server on.
2.
2. Is the server set up for printer sharing?
Is the server set up for printer sharing?
2.2.
Is the server set up for printer sharing?Is the server set up for printer sharing?
Set up the server for printer sharing (1
3.
3. Is the server set up to allow your system access to the shared printer?
Is the server set up to allow your system access to the shared printer?
3.3.
Is the server set up to allow your system access to the shared printer?Is the server set up to allow your system access to the shared printer?
Set up the server to allow your system access to the shared printer.
8-4
8-4 Troubleshooting Chapter 8
8-48-4
Software Guide
).
Page 61
Printing stops in the middle.
Printing stops in the middle.
l
Printing stops in the middle.Printing stops in the middle.
1.
1. Has the machine been printing continuously over a long period?
Has the machine been printing continuously over a long period?
1.1.
Has the machine been printing continuously over a long period?Has the machine been printing continuously over a long period?
If so, the printhead will overheat. To protect the printhead, printing will stop temporarily and
resume after a period of time. Interrupt printing when appropriate, turn off the machine and wait
15 minutes.
CAUTION
CAUTION
CAUTIONCAUTION
•••• The area around the printhead may become extremely hot. Do not under any
The area around the printhead may become extremely hot. Do not under any
The area around the printhead may become extremely hot. Do not under any The area around the printhead may become extremely hot. Do not under any
circumstances touch it.
circumstances touch it.
circumstances touch it.circumstances touch it.
2.
2. Are you printing large files such as photographs or illustrations?
Are you printing large files such as photographs or illustrations?
2.2.
Are you printing large files such as photographs or illustrations?Are you printing large files such as photographs or illustrations?
If you are printing large files, it will take time to process the data and printing will appear to have
stopped. Wait until data is processed.
If you are printing a document with a large printing area or are printing more than two pages,
printing may stop to allow the ink time to dry.
Paper does not feed properly.
Paper does not feed properly.
l
Paper does not feed properly.Paper does not feed properly.
1.
1. Is the paper the correct weight?
Is the paper the correct weight?
1.1.
Is the paper the correct weight?Is the paper the correct weight?
Use 64–105 g/m
2.
2. Does the paper stack exceed the paper limit mark (
Does the paper stack exceed the paper limit mark ( ) or exceed the capacity of the
2.2.
Does the paper stack exceed the paper limit mark (Does the paper stack exceed the paper limit mark (
multi-purpose tray?
multi-purpose tray?
multi-purpose tray?multi-purpose tray?
If so, reduce the amount of paper.
3.
3. Has the paper been loaded correctly?
Has the paper been loaded correctly?
3.3.
Has the paper been loaded correctly?Has the paper been loaded correctly?
Check that the paper has been loaded correctly and that the paper guide is properly adjusted
(1
Set-Up Sheet
4.
4. Is the paper creased or curled?
Is the paper creased or curled?
4.4.
Is the paper creased or curled?Is the paper creased or curled?
You cannot use paper that is creased. Uncurl curled paper.
5.
5. Clean the roller (
Clean the roller (1
5.5.
Clean the roller (Clean the roller (
6.
6. Is there some foreign matter in the multi-purpose tray?
Is there some foreign matter in the multi-purpose tray?
6.6.
Is there some foreign matter in the multi-purpose tray?Is there some foreign matter in the multi-purpose tray?
Check and remove any foreign matter.
2
(17–28 lb.) paper.
).
Basic Guide
Basic Guide
Basic GuideBasic Guide
) or exceed the capacity of the
) or exceed the capacity of the ) or exceed the capacity of the
).
).
).).
8888
Troubleshooting
Chapter 8 Troubleshooting 8-5
8-5
8-58-5
Page 62

Paper curls.
Paper curls.
l
Paper curls.Paper curls.
1.
1. Remove the printed page after 30 to 60 seconds.
Remove the printed page after 30 to 60 seconds.
1.1.
Remove the printed page after 30 to 60 seconds.Remove the printed page after 30 to 60 seconds.
The paper may curl if you use thin paper and print images that use a large quantity of ink such
as photographs or pictures.
Leave the printed page in the paper output tray for 30 to 60 seconds and remove when the ink
has dried.
2.
2. Is intensity set too high?
Is intensity set too high?
2.2.
Is intensity set too high?Is intensity set too high?
The paper may curl or rub if intensity is set too high in the printer driver. In the Properties
dialogue box, on the Main tab, click [Manual] in Colour Adjustment, then click [Set]. In the
Manual Colour Adjustment dialogue box, reduce the intensity with the Intensity slider.
3.
3. Are you using thin paper?
Are you using thin paper?
3.3.
Are you using thin paper?Are you using thin paper?
The paper may curl if you use thin paper and print images that use a large quantity of ink such
as photographs or pictures with intense colours. Use thicker paper such as high resolution paper
or Photo Paper Pro (1
4.
4. Was the paper already curled before loading?
Was the paper already curled before loading?
4.4.
Was the paper already curled before loading?Was the paper already curled before loading?
Uncurl the paper and reload.
Meaningless characters and symbols are printing.
Meaningless characters and symbols are printing.
l
Meaningless characters and symbols are printing.Meaningless characters and symbols are printing.
1.
1. If this problem only occurs when printing a specific document
If this problem only occurs when printing a specific document
1.1.
If this problem only occurs when printing a specific documentIf this problem only occurs when printing a specific document
Open and edit the document and try printing again. If this does not work, there may be a problem
with the application. Contact the application’s manufacturer.
White streaks appear on the printout.
White streaks appear on the printout.
l
White streaks appear on the printout.White streaks appear on the printout.
1.
1. Print the nozzle check pattern (
Print the nozzle check pattern (1
1.1.
Print the nozzle check pattern (Print the nozzle check pattern (
2.
2. Are you printing on coated paper?
Are you printing on coated paper?
2.2.
Are you printing on coated paper?Are you printing on coated paper?
In the Properties dialogue box, on the Main tab, click [High] in Print Quality.
Basic Guide
).
Maintaining the printhead
Maintaining the printhead
Maintaining the printheadMaintaining the printhead
, p. 7-7).
, p. 7-7).
, p. 7-7)., p. 7-7).
8-6
8-6 Troubleshooting Chapter 8
8-68-6
Page 63

Printout is rubbed or stained.
Printout is rubbed or stained.
l
Printout is rubbed or stained.Printout is rubbed or stained.
1.
1. Is the paper thickness lever set correctly?
Is the paper thickness lever set correctly?
1.1.
Is the paper thickness lever set correctly? Is the paper thickness lever set correctly?
When you print documents that contain large quantities of ink such as documents with a lot of
detail, the paper may curl and rub. Move the paper thickness lever to the right (1 p. 2-2).
2.
2. Does the paper stack exceed the paper limit mark (
Does the paper stack exceed the paper limit mark ( ) or exceed the capacity of the
2.2.
Does the paper stack exceed the paper limit mark (Does the paper stack exceed the paper limit mark (
multi-purpose tray?
multi-purpose tray?
multi-purpose tray?multi-purpose tray?
If so, reduce the amount of paper.
3.
3. Are you printing outside the printable area?
Are you printing outside the printable area?
3.3.
Are you printing outside the printable area?Are you printing outside the printable area?
Change the margin settings in the application to keep the document within the recommended
printable area.
4.
4. Is intensity set too high?
Is intensity set too high?
4.4.
Is intensity set too high?Is intensity set too high?
The paper may curl or rub if intensity is set too high in the printer driver. In the Properties
dialogue box, on the Main tab, click [Manual] in Colour Adjustment, then click [Set]. In the
Manual Colour Adjustment dialogue box, reduce the intensity with the Intensity slider.
5.
5. Are you using recommended print media?
Are you using recommended print media?
5.5.
Are you using recommended print media?Are you using recommended print media?
For recommended print media, see the
6.
6. Are you printing on the wrong side of the paper?
Are you printing on the wrong side of the paper?
6.6.
Are you printing on the wrong side of the paper?Are you printing on the wrong side of the paper?
Some papers have a “right” side for printing. Turn the paper over and try printing again. There
are also types of paper such as Photo Paper Pro that can only be printed on one side.
7.
7. Borderless printing
Borderless printing
7.7.
Borderless printingBorderless printing
Check the print media.
For borderless printing, the quality of the printout at the top and bottom edges of the paper may
deteriorate or the printout may be stained. If the printout is dirty even on recommended print
media, move the paper thickness lever to the right (1 p. 2-2).
Basic Guide
) or exceed the capacity of the
) or exceed the capacity of the ) or exceed the capacity of the
.
8888
Troubleshooting
Chapter 8 Troubleshooting 8-7
8-7
8-78-7
Page 64
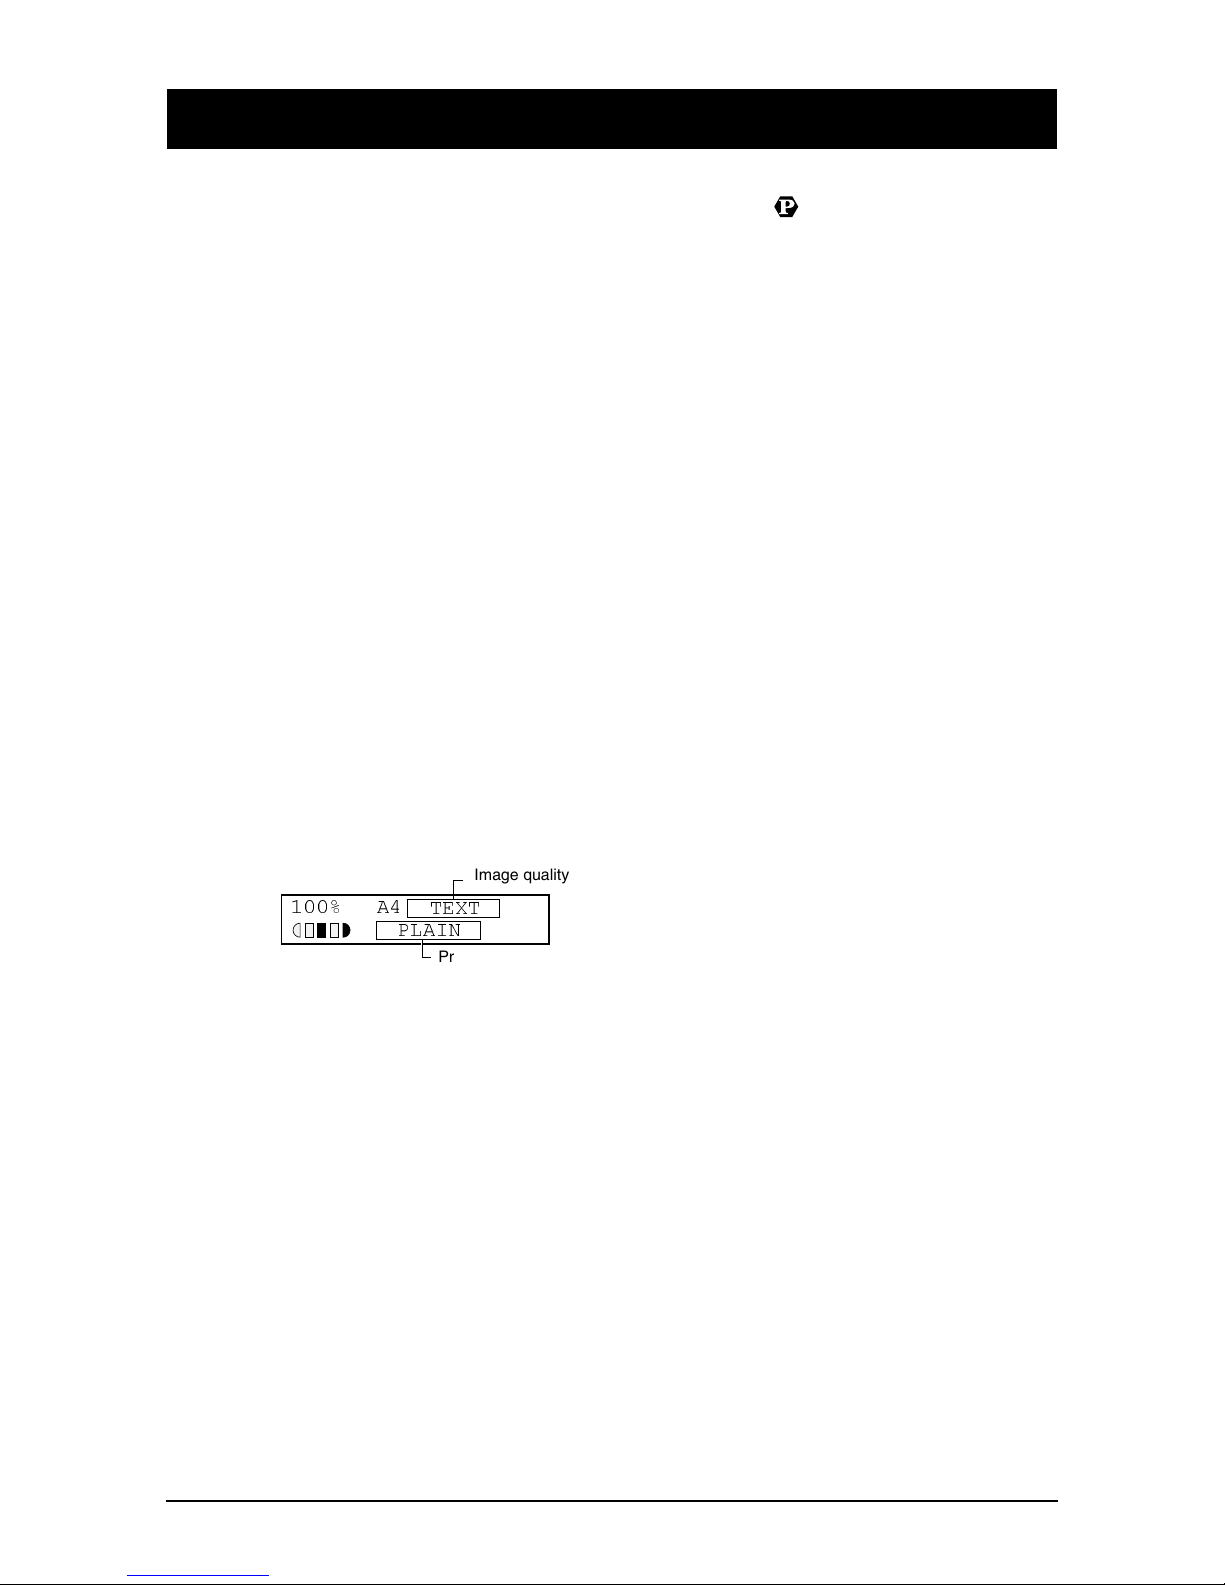
P
P Copying problems
PP
l
l
l
Copying problems
Copying problemsCopying problems
See below if you are having problems copying.
See below if you are having problems copying.
See below if you are having problems copying.See below if you are having problems copying.
For printing-related problems, see the items marked with
For printing-related problems, see the items marked with in
For printing-related problems, see the items marked with For printing-related problems, see the items marked with
your computer
your computer
your computeryour computer
Cannot make a copy.
Cannot make a copy.
Cannot make a copy.Cannot make a copy.
1.
1. Is there anything displayed in the LCD?
Is there anything displayed in the LCD?
1.1.
Is there anything displayed in the LCD?Is there anything displayed in the LCD?
If nothing is displayed, see p. 8-12.
2.
2. Is the Alarm light blinking?
Is the Alarm light blinking?
2.2.
Is the Alarm light blinking?Is the Alarm light blinking?
If it is blinking, see p. 8-15.
3.
3. Is the document loaded correctly?
Is the document loaded correctly?
3.3.
Is the document loaded correctly?Is the document loaded correctly?
Check that the document is loaded correctly on the platen glass (1 p. 2-1).
4.
4. See
See
4.4.
See See
5.
5. Print the nozzle check pattern (
Print the nozzle check pattern (1
5.5.
Print the nozzle check pattern (Print the nozzle check pattern (
Paper comes out but there is nothing copied on it.
Paper comes out but there is nothing copied on it.
Paper comes out but there is nothing copied on it.Paper comes out but there is nothing copied on it.
1.
1. Is the document loaded correctly?
Is the document loaded correctly?
1.1.
Is the document loaded correctly?Is the document loaded correctly?
The side to be copied should be face down on the platen glass.
2.
2. Print the nozzle check pattern (
Print the nozzle check pattern (1
2.2.
Print the nozzle check pattern (Print the nozzle check pattern (
Copy quality is poor.
Copy quality is poor.
Copy quality is poor.Copy quality is poor.
1.
1. Can you print the document from your computer instead of copying it?
Can you print the document from your computer instead of copying it?
1.1.
Can you print the document from your computer instead of copying it?Can you print the document from your computer instead of copying it?
Print quality will be better if you print the document from your computer instead of copying it.
2.
2. Clean the platen glass and document cover (
Clean the platen glass and document cover (1
2.2.
Clean the platen glass and document cover (Clean the platen glass and document cover (
3.
3. Does the LCD show the correct type of print media loaded?
Does the LCD show the correct type of print media loaded?
3.3.
Does the LCD show the correct type of print media loaded?Does the LCD show the correct type of print media loaded?
If not, set the print media type (1 p. 2-3).
4.
4. Is the image quality displayed in the LCD suitable for the document?
Is the image quality displayed in the LCD suitable for the document?
4.4.
Is the image quality displayed in the LCD suitable for the document?Is the image quality displayed in the LCD suitable for the document?
If not, set an image quality suitable for the document (1 p. 5-2).
, p. 8-4.
, p. 8-4.
, p. 8-4., p. 8-4.
Paper does not feed properly
Paper does not feed properly
Paper does not feed properlyPaper does not feed properly
on p. 8-5.
on p. 8-5.
on p. 8-5. on p. 8-5.
Maintaining the printhead
Maintaining the printhead
Maintaining the printheadMaintaining the printhead
Maintaining the printhead
Maintaining the printhead
Maintaining the printheadMaintaining the printhead
Basic Guide
Basic Guide
Basic GuideBasic Guide
Problems printing from
Problems printing from
in
Problems printing from Problems printing from
in in
, p. 7-7).
, p. 7-7).
, p. 7-7)., p. 7-7).
, p. 7-7).
, p. 7-7).
, p. 7-7)., p. 7-7).
).
).
).).
100% A4
TEXT
PLAIN
Print media type
Image quality
8-8
8-8 Troubleshooting Chapter 8
8-88-8
Page 65

P
P Problems scanning to a computer
PP
l
Problems scanning to a computer
Problems scanning to a computerProblems scanning to a computer
See below if you have problems scanning a document to your computer from the
See below if you have problems scanning a document to your computer from the
See below if you have problems scanning a document to your computer from the See below if you have problems scanning a document to your computer from the
machine.
machine.
machine.machine.
Cannot scan a document.
Cannot scan a document.
Cannot scan a document.Cannot scan a document.
1.
1. Is there anything displayed in the LCD?
Is there anything displayed in the LCD?
1.1.
Is there anything displayed in the LCD?Is there anything displayed in the LCD?
If nothing is displayed, see p. 8-12.
2.
2. Is the Alarm light blinking?
Is the Alarm light blinking?
2.2.
Is the Alarm light blinking?Is the Alarm light blinking?
If it is blinking, see p. 8-15.
3.
3. Is there a warning or attention displayed in the Status Monitor?
Is there a warning or attention displayed in the Status Monitor?
3.3.
Is there a warning or attention displayed in the Status Monitor?Is there a warning or attention displayed in the Status Monitor?
If displayed, see p. 8-19.
4.
4. Is the document loaded correctly?
Is the document loaded correctly?
4.4.
Is the document loaded correctly?Is the document loaded correctly?
Check that the document is loaded correctly on the platen glass (1 p. 2-1).
5.
5. Restart the computer.
Restart the computer.
5.5.
Restart the computer.Restart the computer.
6.
6. If using a USB hub or repeater, try connecting the USB cable directly to the computer.
If using a USB hub or repeater, try connecting the USB cable directly to the computer.
6.6.
If using a USB hub or repeater, try connecting the USB cable directly to the computer.If using a USB hub or repeater, try connecting the USB cable directly to the computer.
If you can scan when the USB cable is connected directly to the computer, the USB hub or
repeater may be defective. Replace them.
7.
7. After installing the MultiPASS Suite, did you install a TWAIN-compatible application?
After installing the MultiPASS Suite, did you install a TWAIN-compatible application?
7.7.
After installing the MultiPASS Suite, did you install a TWAIN-compatible application?After installing the MultiPASS Suite, did you install a TWAIN-compatible application?
If this is the case, the TWAIN system file is replaced with something inappropriate and you will
be unable to scan images. If this happens, reinstall the MultiPASS Suite.
8.
8. Is the machine recognised in the Scanners and Cameras Windows Control Panel
Is the machine recognised in the Scanners and Cameras Windows Control Panel
8.8.
Is the machine recognised in the Scanners and Cameras Windows Control Panel Is the machine recognised in the Scanners and Cameras Windows Control Panel
(Windows XP only)?
(Windows XP only)?
(Windows XP only)?(Windows XP only)?
Follow this procedure to check if Canon MPC190 scanner is in Scanners and Cameras:
1. On the Windows desktop, click [Start], then [Control Panel].
2. In the Control Panel window, click [Printers and Other Hardware], then [Scanners and
Cameras].
3. If Canon MPC190 scanner is present, the machine is recognised. If not, remove the
MultiPASS Suite and reinstall.
Computer has hung up or frozen.
Computer has hung up or frozen.
l
Computer has hung up or frozen.Computer has hung up or frozen.
1.
1. Quit other open applications and try again.
Quit other open applications and try again.
1.1.
Quit other open applications and try again.Quit other open applications and try again.
Memory may be insufficient. Quit other open applications and try again.
2.
2. Does the hard disk have enough available space?
Does the hard disk have enough available space?
2.2.
Does the hard disk have enough available space?Does the hard disk have enough available space?
Check that the hard disk has enough available space, in particular when scanning large
documents at a high resolution. For example, an A4-size document scanned at 600 dpi, full
colour requires a minimum of 300 MB of space.
3.
3. If an error occurs when scanning an image in Photoshop
If an error occurs when scanning an image in Photoshop
3.3.
If an error occurs when scanning an image in PhotoshopIf an error occurs when scanning an image in Photoshop
Change the allocated memory. On the Edit menu, point to [References], then click [Memory &
Image Cache]. Change the Physical Memory Usage to 10% or 20%.
4.
4. Remove the MultiPASS Suite software and reinstall.
Remove the MultiPASS Suite software and reinstall.
4.4.
Remove the MultiPASS Suite software and reinstall.Remove the MultiPASS Suite software and reinstall.
8888
Troubleshooting
Chapter 8 Troubleshooting 8-9
8-9
8-98-9
Page 66

When you click a button on the Toolbar, another application opens.
When you click a button on the Toolbar, another application opens.
l
When you click a button on the Toolbar, another application opens. When you click a button on the Toolbar, another application opens.
When you click a button on the Toolbar, you want another application to open.
When you click a button on the Toolbar, you want another application to open.
When you click a button on the Toolbar, you want another application to open.When you click a button on the Toolbar, you want another application to open.
1.
1. Set the application you want to open in Link To in the Toolbar Settings dialogue box
Set the application you want to open in Link To in the Toolbar Settings dialogue box
1.1.
Set the application you want to open in Link To in the Toolbar Settings dialogue box Set the application you want to open in Link To in the Toolbar Settings dialogue box
((((1
Software Guide
Software Guide
Software GuideSoftware Guide
The image you have scanned looks dirty.
The image you have scanned looks dirty.
l
The image you have scanned looks dirty.The image you have scanned looks dirty.
1.
1. If the image looks grainy, increase the scan resolution (
If the image looks grainy, increase the scan resolution (1
1.1.
If the image looks grainy, increase the scan resolution (If the image looks grainy, increase the scan resolution (
2.
2. Display the image at 100%.
Display the image at 100%.
2.2.
Display the image at 100%.Display the image at 100%.
Some applications do not display an image well at small sizes. Try displaying the image at 100%
magnification.
3.
3. There is moiré when you scan printed material.
There is moiré when you scan printed material.
3.3.
There is moiré when you scan printed material.There is moiré when you scan printed material.
In ScanGear, click [Descreen] (1
4.
4. Set the monitor display colours to 16-bit or higher.
Set the monitor display colours to 16-bit or higher.
4.4.
Set the monitor display colours to 16-bit or higher.Set the monitor display colours to 16-bit or higher.
In Display Properties, set the display colours to 16-bit colour, 24-bit colour, or higher.
5.
5. Clean the platen glass and document cover (
Clean the platen glass and document cover (1
5.5.
Clean the platen glass and document cover (Clean the platen glass and document cover (
White margins appear around the scanned image.
White margins appear around the scanned image.
l
White margins appear around the scanned image.White margins appear around the scanned image.
1.
1. Specify the scan area.
Specify the scan area.
1.1.
Specify the scan area.Specify the scan area.
In ScanGear, click [Multi-Photo Scan] to automatically specify the scan area.
If there are white margins around documents such as photographs, or if you want to trim a
document (i.e. you want to scan only one part of a document), specify the area of the scan
manually (1
To display ScanGear when scanning: On the Windows desktop, on the Toolbar, click [Settings].
Click [Show scanner driver before scanning] (1
2.
2. When you do not want to display ScanGear
When you do not want to display ScanGear
2.2.
When you do not want to display ScanGearWhen you do not want to display ScanGear
Even if you do not want to display ScanGear, you can make a scan at the paper size specified
and the area outside the paper size will not be scanned. Do the following:
On the Windows desktop, on the Toolbar, click [Settings]. In the Toolbar Settings dialogue box,
in the tab for the button used to scan, specify the paper size (1
).
).
).).
Software Guide
Software Guide
).
Software Guide
Software Guide
Software GuideSoftware Guide
).
Basic Guide
Basic Guide
Basic GuideBasic Guide
Software Guide
).
).
).).
).
Software Guide
).
).
).).
).
White lines appear on the left side of the image.
White lines appear on the left side of the image.
l
White lines appear on the left side of the image.White lines appear on the left side of the image.
1.
1. Place the document so that it is completely on the platen glass and is approximately 3 mm
Place the document so that it is completely on the platen glass and is approximately 3 mm
1.1.
Place the document so that it is completely on the platen glass and is approximately 3 mm Place the document so that it is completely on the platen glass and is approximately 3 mm
1111
((((
inch) away from the top and left edges of the platen glass.
inch) away from the top and left edges of the platen glass.
⁄⁄⁄⁄
inch) away from the top and left edges of the platen glass.inch) away from the top and left edges of the platen glass.
8888
8-10
8-10 Troubleshooting Chapter 8
8-108-10
Page 67

Cannot scan multiple photographs correctly.
Cannot scan multiple photographs correctly.
l
Cannot scan multiple photographs correctly.Cannot scan multiple photographs correctly.
1.
1. Does the position of the photographs and the way they are positioned fulfil the following
Does the position of the photographs and the way they are positioned fulfil the following
1.1.
Does the position of the photographs and the way they are positioned fulfil the following Does the position of the photographs and the way they are positioned fulfil the following
requirements?
requirements?
requirements?requirements?
• There should be a gap of at least 1 cm (
photographs.
• There should be a gap of at least 1 cm (
• There should be no more than ten photographs.
• The photographs should be straight (any tilting should be kept within 10 degrees).
2.
2. Some applications do not accept multiple scans of more than two images.
Some applications do not accept multiple scans of more than two images.
2.2.
Some applications do not accept multiple scans of more than two images.Some applications do not accept multiple scans of more than two images.
Check the application’s documentation or contact the application’s manufacturer.
3.
3. Clean the platen glass and document cover (
Clean the platen glass and document cover (1
3.3.
Clean the platen glass and document cover (Clean the platen glass and document cover (
4.
4. Thick or curled photographs may not be scanned properly.
Thick or curled photographs may not be scanned properly.
4.4.
Thick or curled photographs may not be scanned properly.Thick or curled photographs may not be scanned properly.
Press lightly on the document cover when scanning.
Scanned image is displayed at a large (small) size on the computer
Scanned image is displayed at a large (small) size on the computer
l
Scanned image is displayed at a large (small) size on the computer Scanned image is displayed at a large (small) size on the computer
screen.
screen.
screen.screen.
1.
1. Enlarge or reduce the image display in the application.
Enlarge or reduce the image display in the application.
1.1.
Enlarge or reduce the image display in the application.Enlarge or reduce the image display in the application.
However, if you open the image in Paint or Imaging, it may display at a large size and you will
not be able to reduce it. Open it in the MultiPASS Viewer (1 p. 3-3).
2.
2. Change the resolution in ScanGear and try scanning again.
Change the resolution in ScanGear and try scanning again.
2.2.
Change the resolution in ScanGear and try scanning again.Change the resolution in ScanGear and try scanning again.
The image will be large if resolution is high. It will be small if resolution is low (1
Guide
).
3
inch) between the edge of the platen glass and
⁄
8
3
inch) between the edges of the photographs.
⁄
8
Basic Guide
Basic Guide
Basic GuideBasic Guide
).
).
).).
Software
8888
Troubleshooting
Chapter 8 Troubleshooting 8-11
8-11
8-118-11
Page 68

P
P If nothing displays in the LCD (if there is
PP
If nothing displays in the LCD (if there is
If nothing displays in the LCD (if there is If nothing displays in the LCD (if there is
no power)
no power)
no power)no power)
When you connect the power cord to the machine and wall outlet, and press [ON/OFF],
the machine powers up and a message is displayed in the LCD.
While the Alarm light blinks, the machine is initialising and you will not be able to use it.
Wait until the Alarm light stops blinking.
If nothing is displayed in the LCD, make the checks in the following order until
something is displayed.
1.
1. Is the power cord correctly connected?
Is the power cord correctly connected?
1.1.
Is the power cord correctly connected?Is the power cord correctly connected?
Securely connect the power cord to the machine and wall outlet.
2.
2. Have you pressed [ON/OFF]?
Have you pressed [ON/OFF]?
2.2.
Have you pressed [ON/OFF]?Have you pressed [ON/OFF]?
The machine will power up and the LCD will show a message when you connect the power cord
and press [ON/OFF].
3.
3. Check that the wall outlet is working normally.
Check that the wall outlet is working normally.
3.3.
Check that the wall outlet is working normally.Check that the wall outlet is working normally.
Connect another electrical appliance to the wall outlet and check whether the wall outlet is
working properly.
4.
4. Connect the power cord directly to the wall outlet.
Connect the power cord directly to the wall outlet.
4.4.
Connect the power cord directly to the wall outlet.Connect the power cord directly to the wall outlet.
Disconnect the power cord from any table taps, OA taps or extension cords and connect directly
to the wall outlet. If the machine powers up when the power cord is connected directly, the table
taps, OA taps or extension cords are probably defective and should be replaced.
If they have a power switch, turn it on.
5.
5. Check that the power cord is not defective.
Check that the power cord is not defective.
5.5.
Check that the power cord is not defective.Check that the power cord is not defective.
Either replace the power cord with another, or using a tester, check whether the cord is
defective.
8-12
8-12 Troubleshooting Chapter 8
8-128-12
Page 69
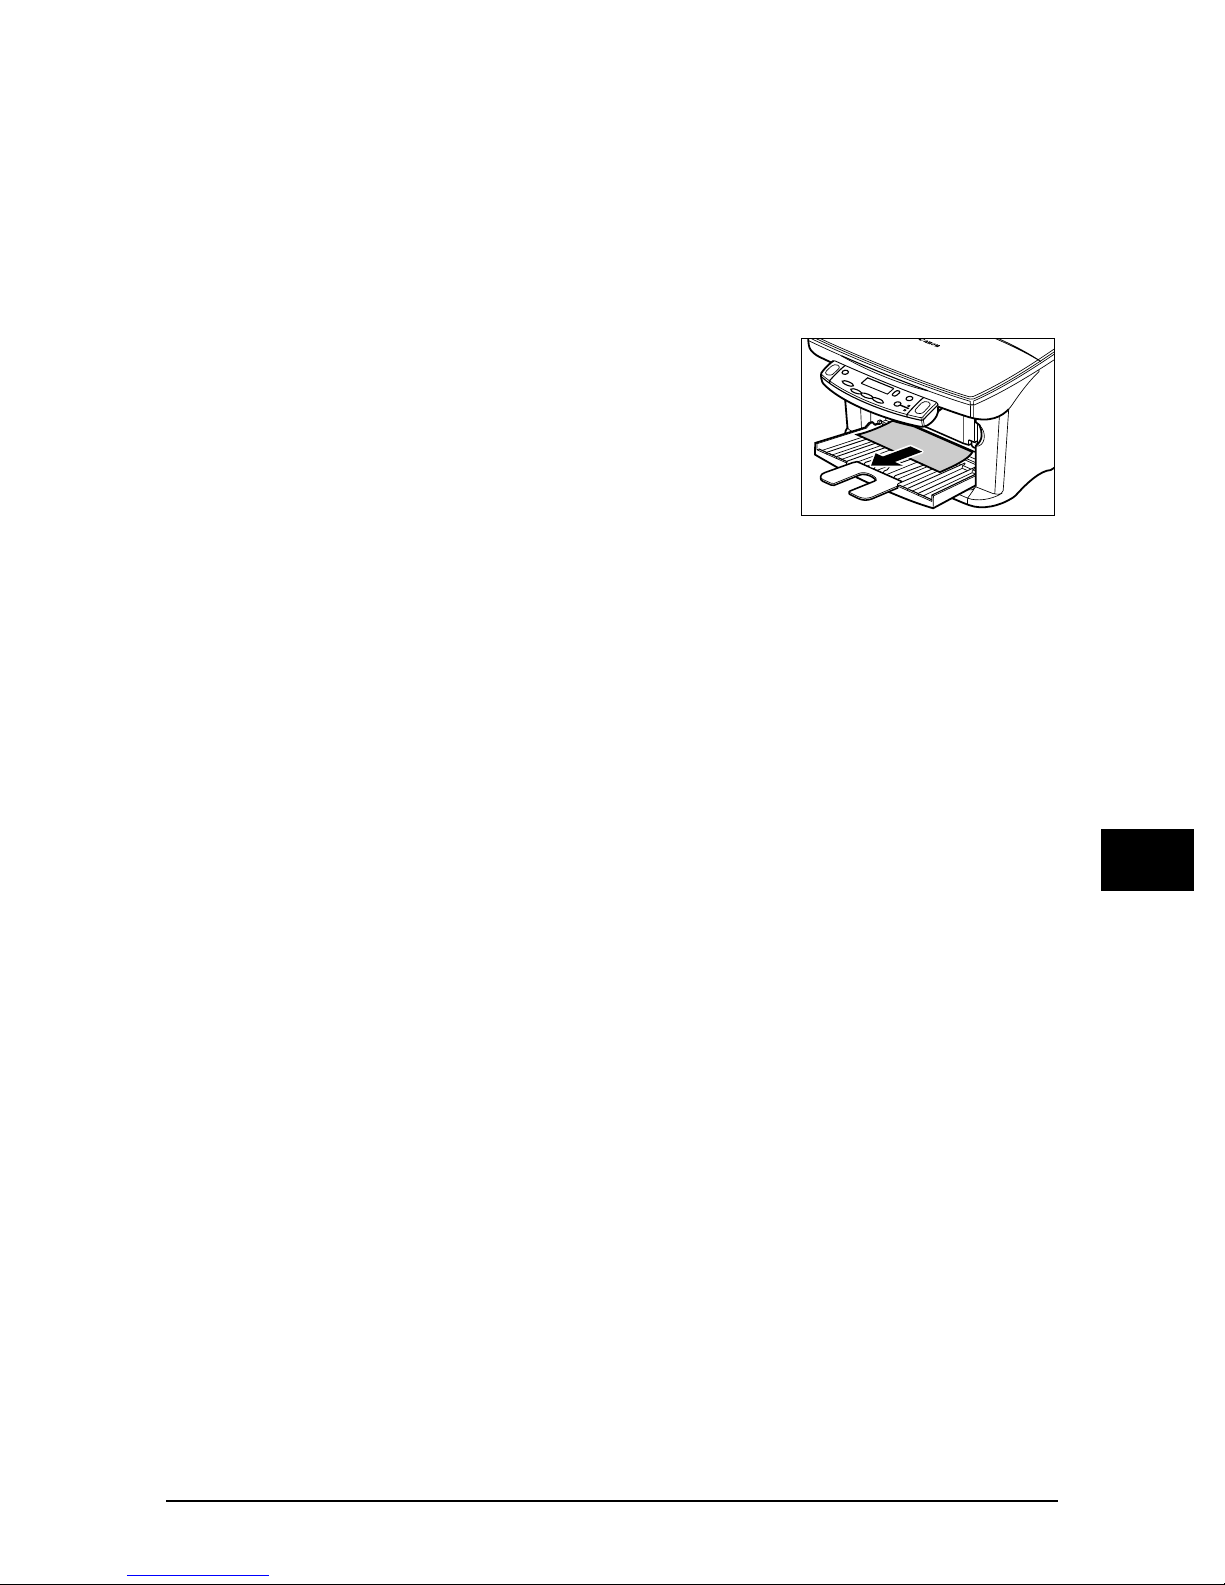
P
P Removing jammed paper
PP
Removing jams in the paper output tray
Removing jams in the paper output tray
Removing jams in the paper output trayRemoving jams in the paper output tray
Removing jammed paper
Removing jammed paperRemoving jammed paper
If <CLEAR PAPER JAM> is displayed in the LCD, follow this procedure to clear the
paper jam.
Follow this procedure to remove jams from the paper output tray:
Gently pull any jammed paper out of the paper
Gently pull any jammed paper out of the paper
1111
Gently pull any jammed paper out of the paper Gently pull any jammed paper out of the paper
output tray.
output tray.
output tray.output tray.
• If you cannot see any jammed paper in the paper
output tray, remove it from the machine’s interior
(1 below).
Press [Resume].
Press [Resume].
2222
Press [Resume].Press [Resume].
• If you are printing from a Windows application, follow
the instructions displayed on your computer.
8888
Troubleshooting
Chapter 8 Troubleshooting 8-13
8-13
8-138-13
Page 70
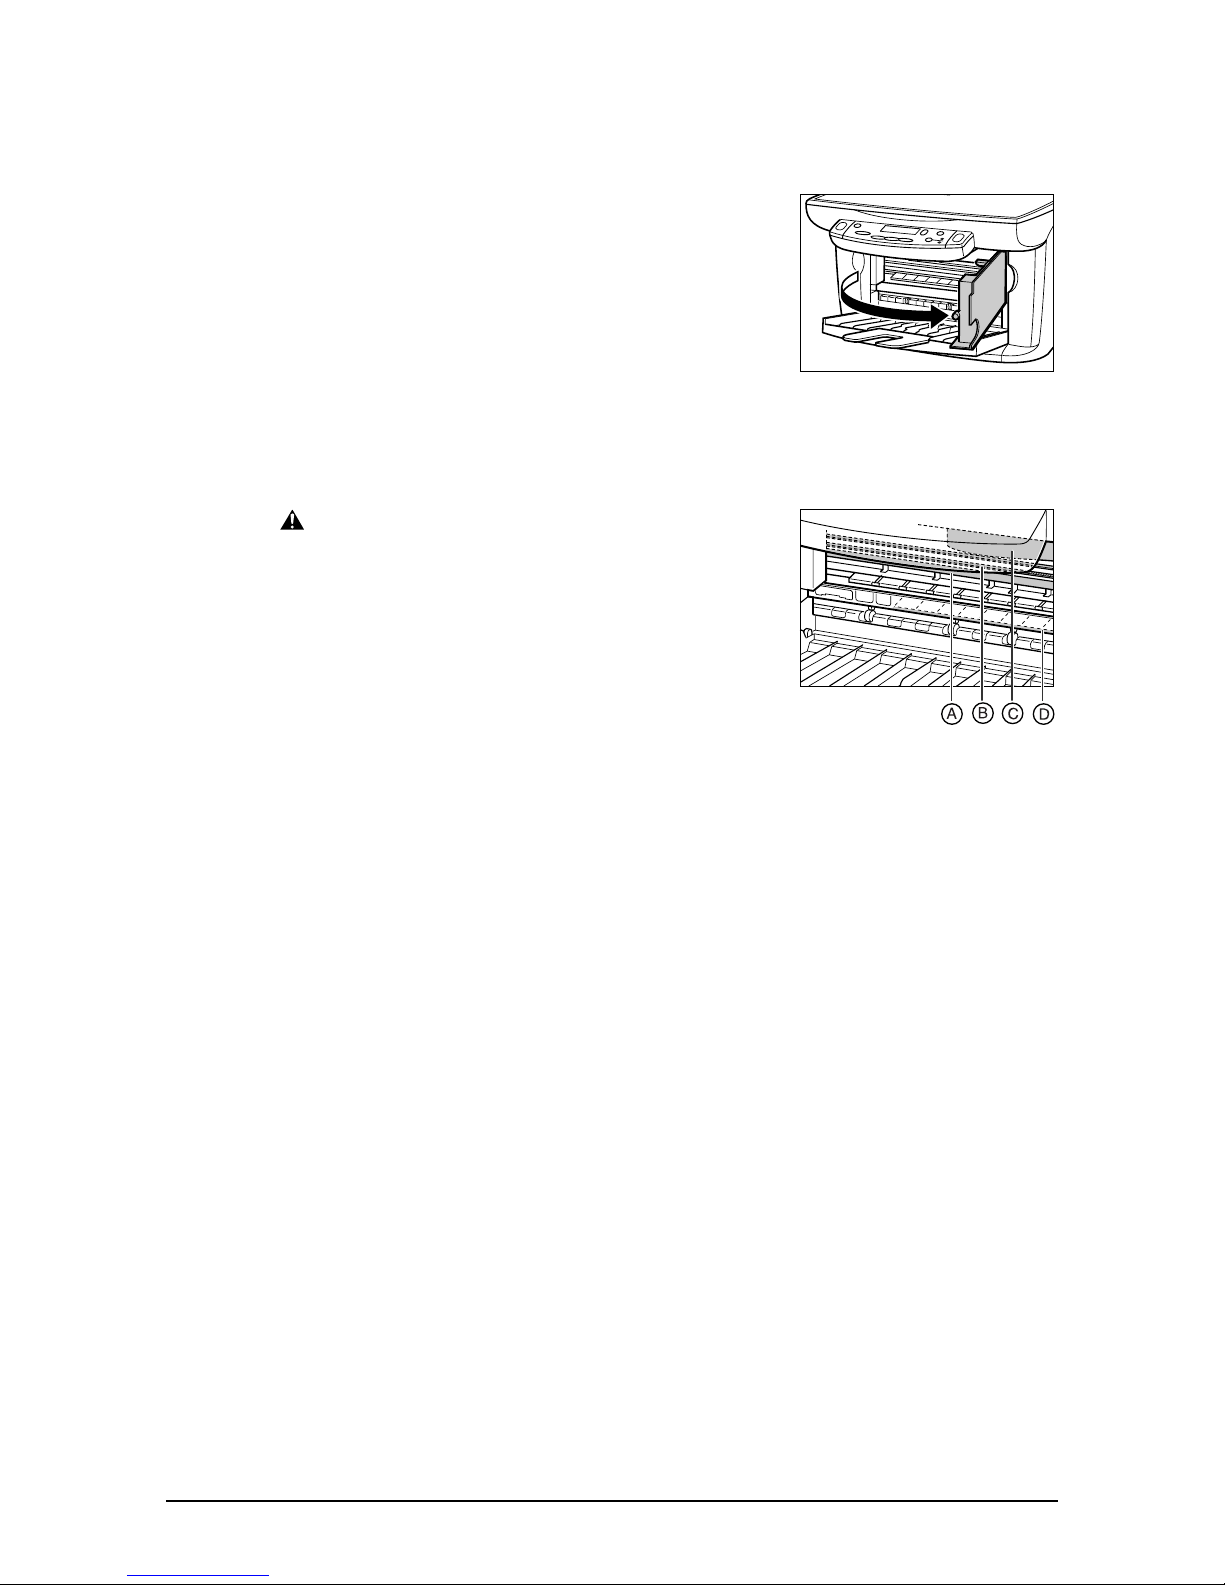
Removing jams from the machine’s interior
Removing jams from the machine’s interior
Removing jams from the machine’s interiorRemoving jams from the machine’s interior
Follow this procedure to remove jams from the machine’s interior:
Open the inner cover.
Open the inner cover.
1111
Open the inner cover.Open the inner cover.
Gently pull out any jammed paper from the
Gently pull out any jammed paper from the
2222
Gently pull out any jammed paper from the Gently pull out any jammed paper from the
machine’s interior or from the multi-purpose
machine’s interior or from the multi-purpose
machine’s interior or from the multi-purpose machine’s interior or from the multi-purpose
tray.
tray.
tray.tray.
CAUTION
CAUTION
CAUTIONCAUTION
•••• Do not touch the round shaft
Do not touch the round shaft uuuuA, transparent
Do not touch the round shaft Do not touch the round shaft
film
film uuuu
film film
part)
part) uuuu
part) part)
• If the jammed paper tears while you are pulling
and you cannot remove the torn pieces, turn
the machine off then on with the [ON/OFF] key.
The jammed pieces will automatically be
ejected.
, film cable
, film cable uuuuC, ink absorber (sponge
B
, film cable , film cable
, or any metal parts.
, or any metal parts.
D
, or any metal parts., or any metal parts.
, ink absorber (sponge
, ink absorber (sponge , ink absorber (sponge
, transparent
, transparent , transparent
Close the inner cover.
Close the inner cover.
3333
Close the inner cover.Close the inner cover.
Press [Resume].
Press [Resume].
4444
Press [Resume].Press [Resume].
• If you are printing from a Windows application, follow
the instructions displayed on your computer.
8-14
8-14 Troubleshooting Chapter 8
8-148-14
Page 71

If there are repeated paper jams
If there are repeated paper jams
If there are repeated paper jamsIf there are repeated paper jams
Paying attention to the following points, reload the paper.
Paying attention to the following points, reload the paper.
Paying attention to the following points, reload the paper.Paying attention to the following points, reload the paper.
1. Fan out the sheets of paper well so that they do not stick together.
2. Align the edges of the paper.
3. Adjust the paper guide correctly.
4. Make sure the paper stack does not exceed the paper limit mark ( ).
5. Make sure the paper loaded does not exceed the capacity of the multi-purpose tray
(1
Basic Guide
6. Do not force paper into the multi-purpose tray.
7. Only use the same type of paper.
8. Use recommended print media (1
P
P If the nozzle check pattern does not print
PP
If the nozzle check pattern does not print
If the nozzle check pattern does not print If the nozzle check pattern does not print
properly
properly
properlyproperly
).
Basic Guide
).
Refer to
P
P Interpreting the messages
PP
Interpreting the messages
Interpreting the messagesInterpreting the messages
When the Alarm light blinks
When the Alarm light blinks
When the Alarm light blinksWhen the Alarm light blinks
Check the message in the LCD. If there is a message, follow the instructions and correct
the error.
To resume operation, press [Resume]. The Alarm light will turn off.
If the error remains, turn off the machine and disconnect the power cord. Wait 15
seconds, then reconnect the power cord and turn on the power.
If you cannot clear a paper jam
If you cannot clear a paper jam
If you cannot clear a paper jamIf you cannot clear a paper jam
Turn off the machine and disconnect the power cord. Wait five seconds, reconnect the
power cord and turn on the power. If the problem has been resolved, the Alarm light will
turn off.
If the Alarm light still lights even after you have turned the power on again
If the Alarm light still lights even after you have turned the power on again
If the Alarm light still lights even after you have turned the power on againIf the Alarm light still lights even after you have turned the power on again
Contact your local authorised Canon dealer or the Canon help line.
Maintaining the printhead
, p. 7-7.
8888
Troubleshooting
Chapter 8 Troubleshooting 8-15
8-15
8-158-15
Page 72

LCD messages
LCD messages
LCD messagesLCD messages
Message
Message Cause
MessageMessage
Cause Action
Cause Cause
Action Details
ActionAction
Details
DetailsDetails
BLACK INK CHANGED? The machine is prompting you
to confirm whether you
replaced the black ink tank.
BLACK INK LOW The ink level in the black ink
tank is low.
CANNOT START The USB cable became
disconnected while printing
from your computer.
CARTRIDGE JAMMED The printhead holder cannot
move. This is normally due to a
paper jam.
CHECK PAPER SIZE The size of the paper in the
multi-purpose tray and that
specified in the paper size
setting are different.
If you replaced the black ink tank,
press [O]. If you did not, press [P].
Make sure you have a new black
ink tank ready to replace the used
one when it runs out. If the
machine stops printing when
copying, press [Resume] to
continue printing. However, note
that ink may run out. If print quality
deteriorates or output is blank,
replace the ink tank.
Wait for approximately one minute.
If nothing happens, reconnect the
USB cable. Then disconnect and
reconnect the power cord.
Clear the paper jam or whatever is
obstructing the printhead holder
and then press [Resume]. Do not
attempt to move the printhead
holder manually.
Load the correct paper size or
change the paper size setting.
Then press [Resume].
p. 7-5
p. 7-1
p. 8-13
Set-Up
Sheet
p. 2-3
8-16
8-16 Troubleshooting Chapter 8
8-168-16
Page 73

Message
Message Cause
MessageMessage
Cause Action
Cause Cause
Action Details
ActionAction
Details
DetailsDetails
CHECK PRINTER
(PRESS RESUME KEY)
CLEAR PAPER JAM
(PRESS START KEY)
COLOUR INK
CHANGED?
COLOUR INK LOW The ink level in the colour ink
There may be an obstruction
that is not allowing the
printhead holder mechanism to
move.
The waste ink tank (which
holds the ink used for printhead
cleaning) may be full.
There is a paper jam. Clear the paper jam and reload
The machine is prompting you
to confirm whether you
replaced the colour ink tank.
tank is low.
Check for any obstruction (paper
clip, small object, etc.). Check also
for a paper jam and clear the jam if
necessary. Then press [Resume]
and start again. If the message
does not clear after pressing
[Resume], contact your local
authorised Canon dealer or the
Canon help line.
Contact your local authorised
Canon dealer or the Canon help
line to have the waste ink tank
replaced immediately.
paper in the multi-purpose tray.
Then press [Copy/Start] or
[Resume].
If you replaced the colour ink tank,
press [O]. If you did not, press [P].
Make sure you have a new colour
ink tank ready to replace the used
one when it runs out. If the
machine stops printing when
copying, press [Resume] to
continue printing. However, note
that ink may run out. If print quality
deteriorates or output is blank,
replace the ink tank.
p. 8-13
p. 8-13
Set-Up
Sheet
p. 7-6
p. 7-1
COVER OPEN You opened the inner cover
during an operation.
DATA IN MEMORY
CANNOT TURN OFF
You are unable to turn the
machine off with the [ON/OFF]
key because the machine is
performing an operation.
Close the inner cover.
8888
Wait until the machine has
finished, then turn off the machine.
Troubleshooting
Chapter 8 Troubleshooting 8-17
8-17
8-178-17
Page 74

Message
Message Cause
MessageMessage
Cause Action
Cause Cause
Action Details
ActionAction
Details
DetailsDetails
INK TANK CHANGED? You opened the inner cover. If you replaced an ink tank, press
[O]. If you did not, press [P].
INVALID KEY/SETTING An invalid key was pressed or
an invalid setting was selected.
LOAD PAPER
(PRESS START KEY)
MACHINE IN USE
CANNOT TURN OFF
MEMORY FULL The machine’s memory is full
PUT IN CARTRIDGE There is no printhead installed
WAIT COOLING During printing, the printhead
WASTE INK NEAR FULL The waste ink tank is nearly
The multi-purpose tray is
empty.
You are unable to turn the
machine off with the [ON/OFF]
key because the machine is
performing an operation.
because you tried to copy too
many pages at once or a very
detailed document.
in the machine.
may have become too hot.
full.
Check the key or setting you want
to enter.
Load paper in the multi-purpose
tray. Make sure the stack is below
the paper limit mark ( ). Then
press [Copy/Start] or [Resume].
Wait until the machine has
finished, then turn off the machine.
Divide the document and copy
each part separately.
Install the printhead. Set-Up
Allow the machine to cool down.
The machine will resume printing
when it has cooled down.
If <CHECK PRINTER> then
appears, contact your local
authorised Canon dealer or the
Canon help line.
p. 7-4
Set-Up
Sheet
Sheet
WRONG CARTRIDGE The printhead is not installed
correctly.
Try to reinstall the printhead. If the
message remains in the LCD, the
printhead may be defective.
Contact your local authorised
Canon dealer or the Canon help
line.
Set-Up
Sheet
8-18
8-18 Troubleshooting Chapter 8
8-188-18
Page 75

MultiPASS Status Monitor messages
MultiPASS Status Monitor messages
MultiPASS Status Monitor messagesMultiPASS Status Monitor messages
Display the MultiPASS Status Monitor on your computer to see the status of the
machine.
On the Windows desktop, click [Start], point to [Programs] or [All Programs], point to
[MultiPASS Suite], then click [MultiPASS Status Monitor]. If a warning or attention is
displayed, follow the instructions of the message.
P
P If you cannot solve the problem
PP
If you cannot solve the problem
If you cannot solve the problemIf you cannot solve the problem
If you have a problem with your machine that you cannot solve with the information
provided in this chapter, contact your local authorised Canon dealer or the Canon help
line.
CAUTION
CAUTION
CAUTIONCAUTION
•••• If the machine makes strange noises, emits smoke or strange smells, unplug it
If the machine makes strange noises, emits smoke or strange smells, unplug it
If the machine makes strange noises, emits smoke or strange smells, unplug it If the machine makes strange noises, emits smoke or strange smells, unplug it
immediately and contact your local authorised Canon dealer or the Canon help
immediately and contact your local authorised Canon dealer or the Canon help
immediately and contact your local authorised Canon dealer or the Canon help immediately and contact your local authorised Canon dealer or the Canon help
line. Do not attempt to disassemble or repair the machine yourself.
line. Do not attempt to disassemble or repair the machine yourself.
line. Do not attempt to disassemble or repair the machine yourself.line. Do not attempt to disassemble or repair the machine yourself.
IMPORTANT
IMPORTANT
IMPORTANTIMPORTANT
•••• Attempting to repair the machine yourself may void the limited warranty.
Attempting to repair the machine yourself may void the limited warranty.
Attempting to repair the machine yourself may void the limited warranty.Attempting to repair the machine yourself may void the limited warranty.
If you contact your local authorised Canon dealer or the Canon help line, make sure
you have the following information ready:
• Product name: SmartBase MPC190
• Serial number (located on the label located at the back of the machine)
• Details of the problem
• Steps taken to try to resolve the problem and the results
8888
Troubleshooting
Chapter 8 Troubleshooting 8-19
8-19
8-198-19
Page 76

8-20
8-20 Troubleshooting Chapter 8
8-208-20
Page 77

Chapter
Chapter
ChapterChapter
9
P
P
PP
Machine settings
Machine settings
Machine settingsMachine settings
Accessing the machine settings
Accessing the machine settings
Accessing the machine settingsAccessing the machine settings
Follow this procedure to change a setting:
1111
Refer to the lists on the following pages to find the setting you want to change.
Refer to the lists on the following pages to find the setting you want to change.
Refer to the lists on the following pages to find the setting you want to change.Refer to the lists on the following pages to find the setting you want to change.
2222
If there is a reference for the
If there is a reference for the
If there is a reference for the If there is a reference for the
setting
setting uuuu
setting setting
details. If not, at the top of the
details. If not, at the top of the
details. If not, at the top of the details. If not, at the top of the
list, note under which menu
list, note under which menu uuuuB
list, note under which menu list, note under which menu
the setting is located.
the setting is located.
the setting is located.the setting is located.
3333
Press [Menu] repeatedly until the
Press [Menu] repeatedly until the
Press [Menu] repeatedly until the Press [Menu] repeatedly until the
menu
menu uuuu
menu menu
is located is displayed.
is located is displayed.
is located is displayed.is located is displayed.
A
, refer to that page for
, refer to that page for
, refer to that page for , refer to that page for
B
under which the setting
under which the setting
under which the setting under which the setting
Example:
Menu: SPECIAL COPY
Name Description Setting Details
2 on 1 Copies two pages onto one page (A4- or letter-size only). — BG
BORDERLESS COPY Copies without any borders (A4-, letter-, or 4" × 6"-size
IMAGE REPEAT Prints multiple copies of an image on a single sheet. — BG
AUTO Automatically selects the number of repetitions. —
MANUAL Manually selects the number or repetitions.
VERTICAL Selects the number of vertical repetitions. 1/2/3/4
HORIZONTAL Selects the number of horizontal repetitions. 1/2/3/4
MIRROR IMAGE Prints a mirror image of the original. — BG
ENTIRE IMAGE Prints the original image to fit the selected pint media
only).
size.
—BG
—BG
4444
Use [
Use [OOOO] or [
Use [Use [
5555
Press [OK].
Press [OK].
Press [OK].Press [OK].
6666
Follow these guidelines to scroll through and register settings:
Follow these guidelines to scroll through and register settings:
Follow these guidelines to scroll through and register settings:Follow these guidelines to scroll through and register settings:
NOTE
NOTE
NOTENOTE
•<A> in the LCD indicates the current setting.
] or [PPPP] to select the setting you want.
] or [] or [
••••Use [
Use [OOOO] or [
Use [Use [
•••• To register a setting or access sub-settings, press [OK].
To register a setting or access sub-settings, press [OK].
To register a setting or access sub-settings, press [OK].To register a setting or access sub-settings, press [OK].
•••• If necessary, to return to standby mode, press [Stop/Reset].
If necessary, to return to standby mode, press [Stop/Reset].
If necessary, to return to standby mode, press [Stop/Reset].If necessary, to return to standby mode, press [Stop/Reset].
] to select the setting you want.
] to select the setting you want.] to select the setting you want.
] or [PPPP] to scroll through settings.
] or [] or [
] to scroll through settings.
] to scroll through settings.] to scroll through settings.
9999
Machine settings
Chapter 9 Machine settings 9-1
9-1
9-19-1
Page 78

P
P Settings
PP
Menu: ENLARGE/REDUCE
Menu: ENLARGE/REDUCE
Menu: ENLARGE/REDUCEMenu: ENLARGE/REDUCE
Name
Name Description
NameName
Settings
SettingsSettings
Description Setting
DescriptionDescription
Reference abbreviation
Reference abbreviation
Reference abbreviation Reference abbreviation
BG=Basic Guide
Setting Details
SettingSetting
Details
DetailsDetails
PRESET RATIO Makes enlarged or reduced copies at preset
ratios.
ZOOM Makes enlarged or reduced copies at ratios
between 25% and 400%.
FIT-TO-PAGE Automatically reduces or enlarges an image
to fit on the specified print media size.
Menu: PAPER SELECT
Menu: PAPER SELECT
Menu: PAPER SELECTMenu: PAPER SELECT
For details, see p. 2-3
Menu: DENSITY
Menu: DENSITY
Menu: DENSITYMenu: DENSITY
For details, see p. 5-3
Menu: IMAGE QUALITY
Menu: IMAGE QUALITY
Menu: IMAGE QUALITYMenu: IMAGE QUALITY
For details, see p. 5-2
25% MIN.
70% A4 1 A5
86% A4 1 B5
100%
115% B5 1 A4
141% A5 1 A4
400% MAX.
25% to 400% p. 5-5
—p.5-6
p. 5-4
9-2
9-2 Machine settings Chapter 9
9-29-2
Page 79

Menu: SPECIAL COPY
Menu: SPECIAL COPY
Menu: SPECIAL COPYMenu: SPECIAL COPY
Name
Name Description
NameName
Description Setting
DescriptionDescription
Setting Details
SettingSetting
Details
DetailsDetails
2 on 1 Copies two pages onto one page (A4- or
letter-size only).
BORDERLESS COPY Copies without any borders (A4-, letter-, or
4” × 6”-size only).
IMAGE REPEAT Prints multiple copies of an image on a
single sheet.
AUTO Automatically selects the number of
repetitions.
MANUAL Manually selects the number or repetitions.
VERTICAL Selects the number of vertical repetitions. 1/2/3/4
HORIZONTAL Selects the number of horizontal repetitions. 1/2/3/4
MIRROR IMAGE Prints a mirror image of the original. — BG
ENTIRE IMAGE Prints the original image to fit the selected
pint media size.
Menu: INK VOLUME
Menu: INK VOLUME
Menu: INK VOLUMEMenu: INK VOLUME
For details, see p. 7-6
Menu: MAINTENANCE
Menu: MAINTENANCE
Menu: MAINTENANCEMenu: MAINTENANCE
—BG
—BG
—BG
—
—BG
Name
Name Description
NameName
NOZZLE CHECK Prints the nozzle check pattern. — p. 7-8
HEAD CLEANING Performs normal printhead cleaning. — p. 7-9
HEAD REFRESHING Performs deep printhead cleaning. — p. 7-9
ALIGN PRINT HEAD Aligns the printhead. — p. 7-10
HORIZ. PATTERN Prints the horizontal pattern. —
CHANGE H VALUE Selects the horizontal value for columns A to
ROLLER CLEANING Cleans the roller. — BG
Description Setting
DescriptionDescription
F on the printout.
Setting Details
SettingSetting
A,B,C: -3 to +7
D,E,F: -5 to +5
Details
DetailsDetails
9999
Machine settings
Chapter 9 Machine settings 9-3
9-3
9-39-3
Page 80

Menu: USER DATA
Menu: USER DATA
Menu: USER DATAMenu: USER DATA
Name
Name Description
NameName
Description Setting
DescriptionDescription
Setting Details
SettingSetting
Details
DetailsDetails
LOW INK WARNING Notifies you when ink in the ink tanks is
running low.
INK COUNT RESET —
BLACK INK CHANGED? Resets the ink counter for the black ink tank. YES = (B)
COLOUR INK
CHANGED?
QUIET MODE Enables/disables quiet printing mode. OFF
EXTENSION AMOUNT For borderless printing or copying, selects
DISPLAY LANGUAGE Selects the language for LCD messages. ENGLISH
Resets the ink counter for the colour ink
tank.
the width cropped from the borders of the
original image.
ON
OFF
NO = (A)
YES = (B)
NO = (A)
ON
SMALL
LARGE
FRENCH
SPANISH
GERMAN
ITALIAN
DUTCH
FINNISH
PORTUGUESE
NORWEGIAN
SWEDISH
DANISH
SLOVENE
CZECH
HUNGARIAN
RUSSIAN
p. 7-1
p. 7-6
p. 7-6
9-4
9-4 Machine settings Chapter 9
9-49-4
 Loading...