

Page 1
User Manual
S110 RGB/NIR/RE camera
Revision 3 / September 2014
Copyright © 2010-2014 senseFly Ltd
Page 2

Page 3

Copyright © 2010-2014 senseFly Ltd
User Manual
S110 RGB/NIR/RE camera
Page 4

Disclaimer
SenseFly Ltd reserves all rights related to this document and the information contained
herein. REPRODUCTION, USE OR DISCLOSURE TO THIRD PARTIES WITHOUT WRITTEN PERMISSION FROM SENSEFLY LTD IS STRICTLY PROHIBITED.
SenseFly Ltd makes no warranties based on the accuracy or completeness of the contents
of this document and reserves the right to make changes to specifications and product descriptions at any time without notice.
By using senseFly Ltd software and products you accept senseFly’s warranty and liability
terms.
ALL USE OF SENSEFLY LTD PRODUCTS, INCLUDING BUT NOT LIMITED TO THE USE CONFORM
TO THE APPLICABLE LAW OF THE COUNTRY IN WHICH THE PRODUCT IS OPERATED, IS UNDER YOUR SOLE RESPONSIBILITY. INFORM YOURSELF BEFORE USING THE PRODUCT. SOME
COUNTRIES MAY HAVE LAWS THAT LIMIT THE USE OF UNMANNED AIRCRAFT TO ‘LINE-OFSIGHT’ OPERATIONS AND/OR PROHIBIT THE USE OF UNMANNED AIRCRAFT IN SPECIFIC AREAS OR AT ALL.
Product limited warranty
SenseFly Ltd warrants that the product will be free from defects in workmanship and materials for a period of twelve (12) months from the date that the item was first purchased.
During Warranty Period, should the covered product, in senseFly Ltd’s sole opinion, malfunction due to any defect in material and/or workmanship, your sole remedy and senseFly
Ltd’s sole liability shall be, at senseFly Ltd’s option, to either repair or replace the malfunctioning product with a similar product at no charge or to reimburse the purchase payment,
provided that the malfunctioning product is returned, with proof of purchase in the form of
your original copy of the sales receipt, within the applicable Warranty Period.
The warranty shall exclude defects due to normal wear and tear, including but not limited
to deterioration of the airframe after first flight, normal degradation, misuse, moisture or
liquids, proximity or exposure to heat, accidents, excessive strain, abuse, neglect, misapplication, repairs or modifications made by anyone other than senseFly Ltd, damage due to
manual operation, damage due to take-off or landing location with obstacles, damage due
to low altitude flight, damage due to loss of data radio connection, damage due to strong
wind, rain or humidity or other causes for which senseFly Ltd is not answerable. Any claim
related to in-flight malfunction of the product will be considered by senseFly Ltd only if accompanied with the related flight log.
Page 5

There are no express or implied warranties, representations or conditions other than those
stated in this limited warranty. The remedy set forth herein shall be the sole, exclusive remedy with respect to the product.
Product liability
UNDER NO CIRCUMSTANCES WILL SENSEFLY LTD BE LIABLE FOR ANY DIRECT, INDIRECT, SPECIAL, INCIDENTAL OR CONSEQUENTIAL DAMAGES (EVEN IF SENSEFLY LTD IS NOTIFIED OF
THE POSSIBILITY OF SUCH DAMAGES) INCLUDING, BUT NOT LIMITED TO, ANY DAMAGES
CAUSED BY YOU OR A THIRD PARTY WHILE OPERATING OR USING THE PRODUCT, ANY LOSS
OF REVENUE, LOSS OF PROFIT, OR LOSS OF DATA WHETHER BASED UPON ANY ALLEGED
BREACH OF WARRANTY, REPRESENTATION OR CONDITION,CONTRACT, OR ANY OTHER CONDUCT INCLUDINGNEGLIGENCE (INTENTIONALOR OTHERWISE), GIVING RISE TO SUCH CLAIM.
UNDER NO CIRCUMSTANCES WILL SENSEFLY LTDBE LIABLE FOR ANY DIRECT, INDIRECT,SPECIAL, INCIDENTAL OR CONSEQUENTIAL DAMAGES (EVEN IF SENSEFLY LTD IS NOTIFIED OF
THE POSSIBILITY OF SUCH DAMAGES) INCLUDING, BUT NOT LIMITED TO, ANY DAMAGES
CAUSED BY FAILURE OF THE AUTOPILOT, ELECTRONICS OR SOFTWARE. YOU SHALL NOT OPERATETHEPRODUCT IN AREAS OR UNDER CIRCUMSTANCESWHERE A FAILURECOULDCAUSE
DAMAGES AND/OR HARM TO OBJECTS AND/OR PEOPLE.
Page 6

Address
senseFly Ltd
Route de Gen`eve 38
1033 Cheseaux-Lausanne
Switzerland
Website: http://www.sensefly.com
Technical support
If you havequestions on your eBee or your S110 camera please consult senseFlyLtd’s
technical support page at the following address:
http://www.sensefly.com/support/
Page 7

Page 8

Page 9
S110 RGB/NIR/RE camera
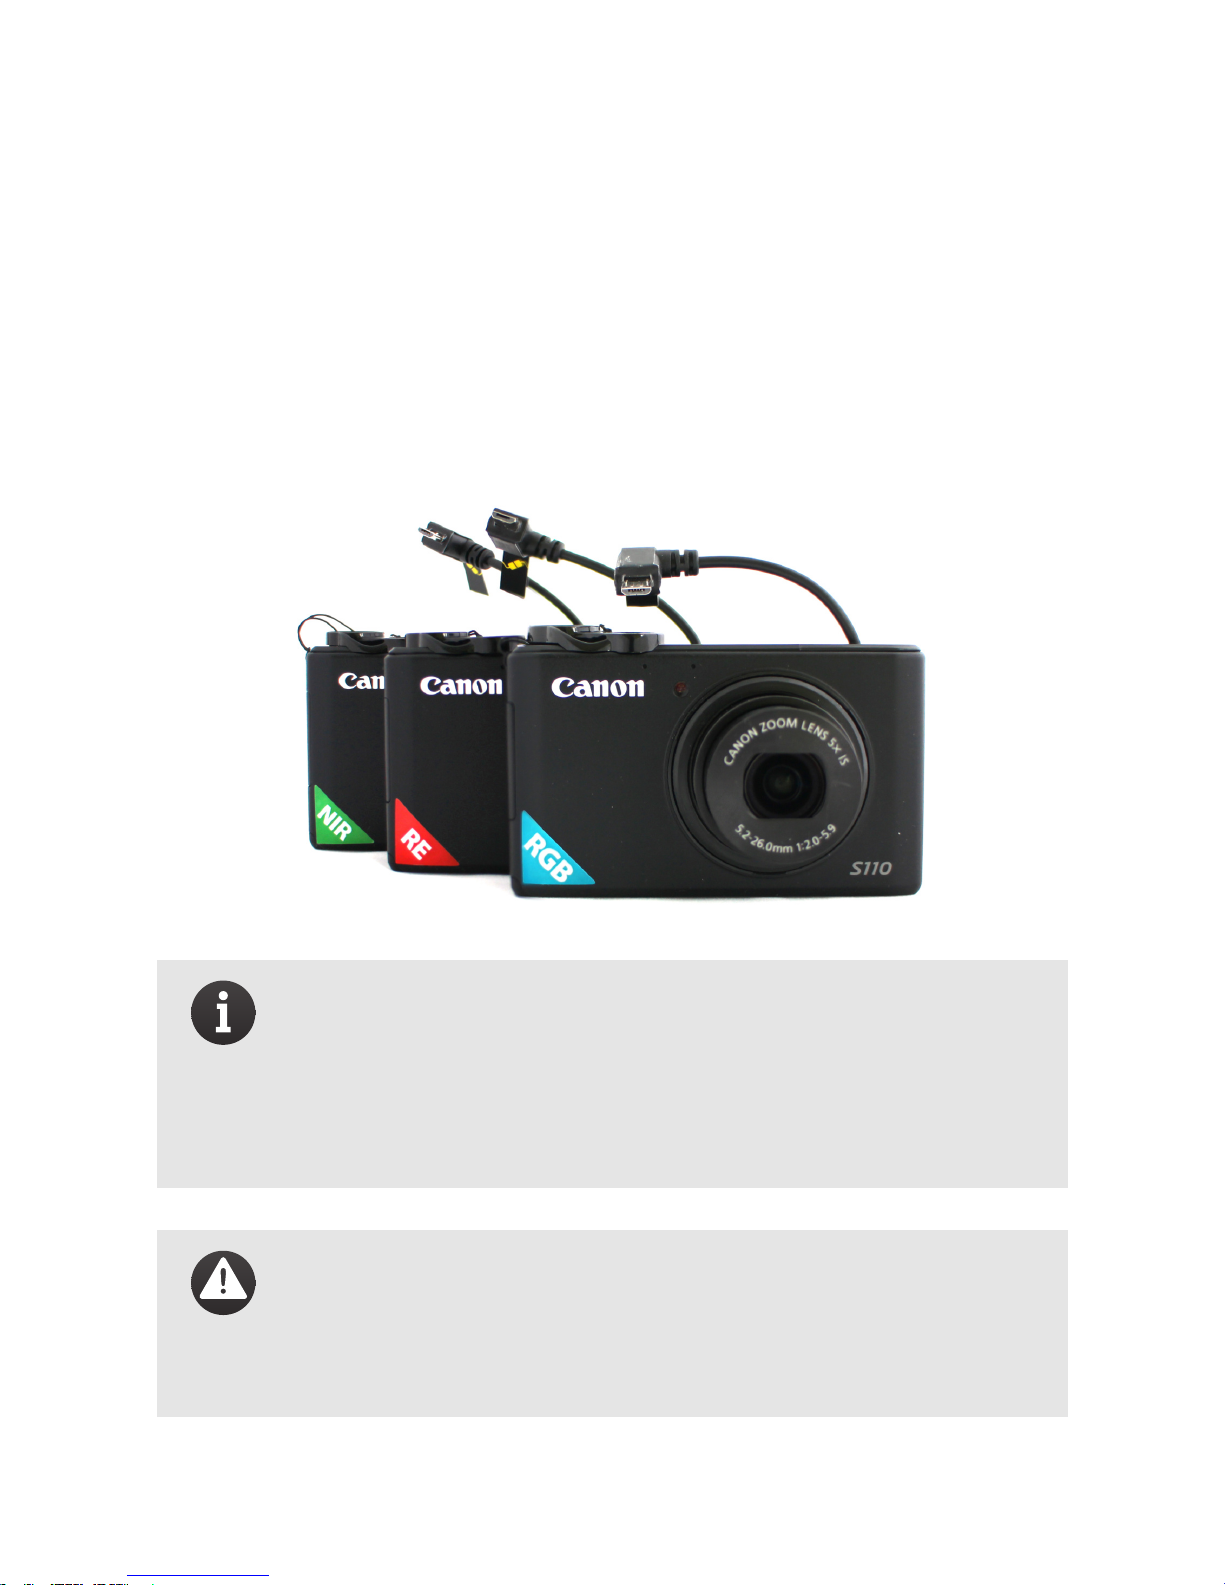
Congratulations on your purchase of the S110 camera, the advanced
payload for the eBee mapping drone that allows users to define their
own manual settings for better visual (RGB), Near Infrared (NIR), or RedEdge (RE) 2D and 3D mappings.
Note: This manual refers to versions 2.3 and later of the
eBee’s eMotion software. Check the software version in-
cluded in your eBee and consult the Release Notes for potential changes included in more recent versions of the
software.
Caution: The S110 camera has been modified to be com-
patible with the eBee drone. It is therefore not recommended to use it for other purposes than payload on a
senseFly drone.
Page 10
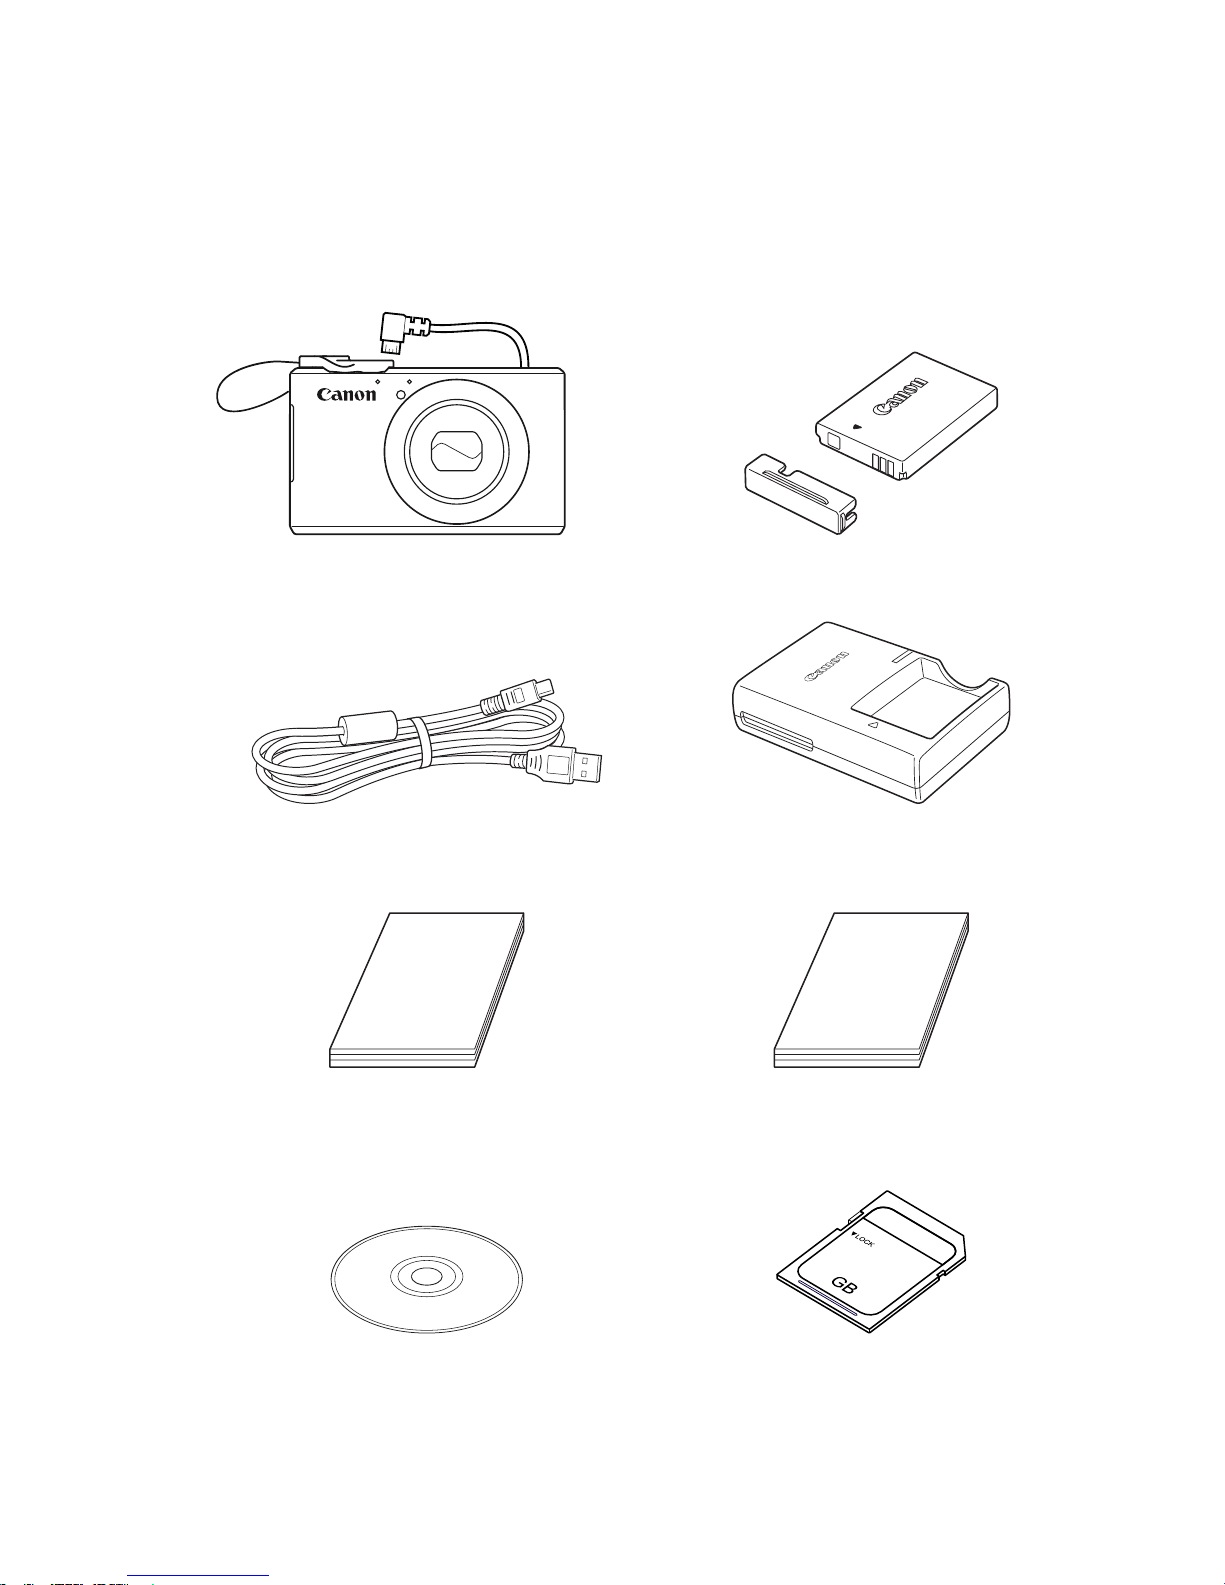
Box contents
SD memory card
Camera & dial lock
Interface cable
S110 RGB/RE/NIR
camera User Manual
Canon's Getting
Started guide
SD memory cardCanon's digital camera
solution disk
Battery charger
Battery pack
Page 11

The camera package contains the following items:
• 1×S110 RGB/NIR/RE camera with dial lock
• 1×S110 camera battery pack
• 1×S110 camera battery charger
• 1×S110 camera User Manual (this manual)
• 1×S110 camera manufacturer’s Getting Started guide
• 1×IFC-400PCU Interface cable
• 1×Digital camera solution disk
• 1×SD memory card
Depending on your order, your package may also include additional
items. Please verify upon delivery that your package is complete. In
case of a missing item, please contact your reseller immediately.
Page 12

Contents
I Getting started 15
1 Predefined camera settings 16
2 Pre-flight procedure 17
2.1 eMotion settings . . . . . . . . . . . . . . . . . . . . 19
3 Launching the eBee 21
4 In-flight performance 22
5 Processing flight data and images 22
5.1 Processing JPEG images . . . . . . . . . . . . . . . . 22
5.2 Processing RAW images . . . . . . . . . . . . . . . . . 23
II Advanced modes 25
6 Understanding exposure 26
6.1 Shutter speed . . . . . . . . . . . . . . . . . . . . . . 26
6.2 Aperture and ISO sensitivity . . . . . . . . . . . . . . 26
Page 13

7 Tv mode 27
7.1 Safety shift . . . . . . . . . . . . . . . . . . . . . . . 28
8 M mode 29
III Appendix 33
1 RGB, NIR and RE bands 34
2 RGB, NIR and RE images comparison 35
3 Specifications 36
4 Handling precautions 36
5 senseFly factory settings 37
Page 14

Page 15

Part I
Getting started
Goal of this part: The first part of this guide covers the
basicsof usingthe S110 RGB/NIR/RE camerawith the eBee.
Page 16
Getting started
1 Predefined camera settings
Although the S110 camera can be fully manually configured, a predefined set of parameters optimised by senseFly (hereafter called factory
settings) is saved within the camera. To use these predefined settings,
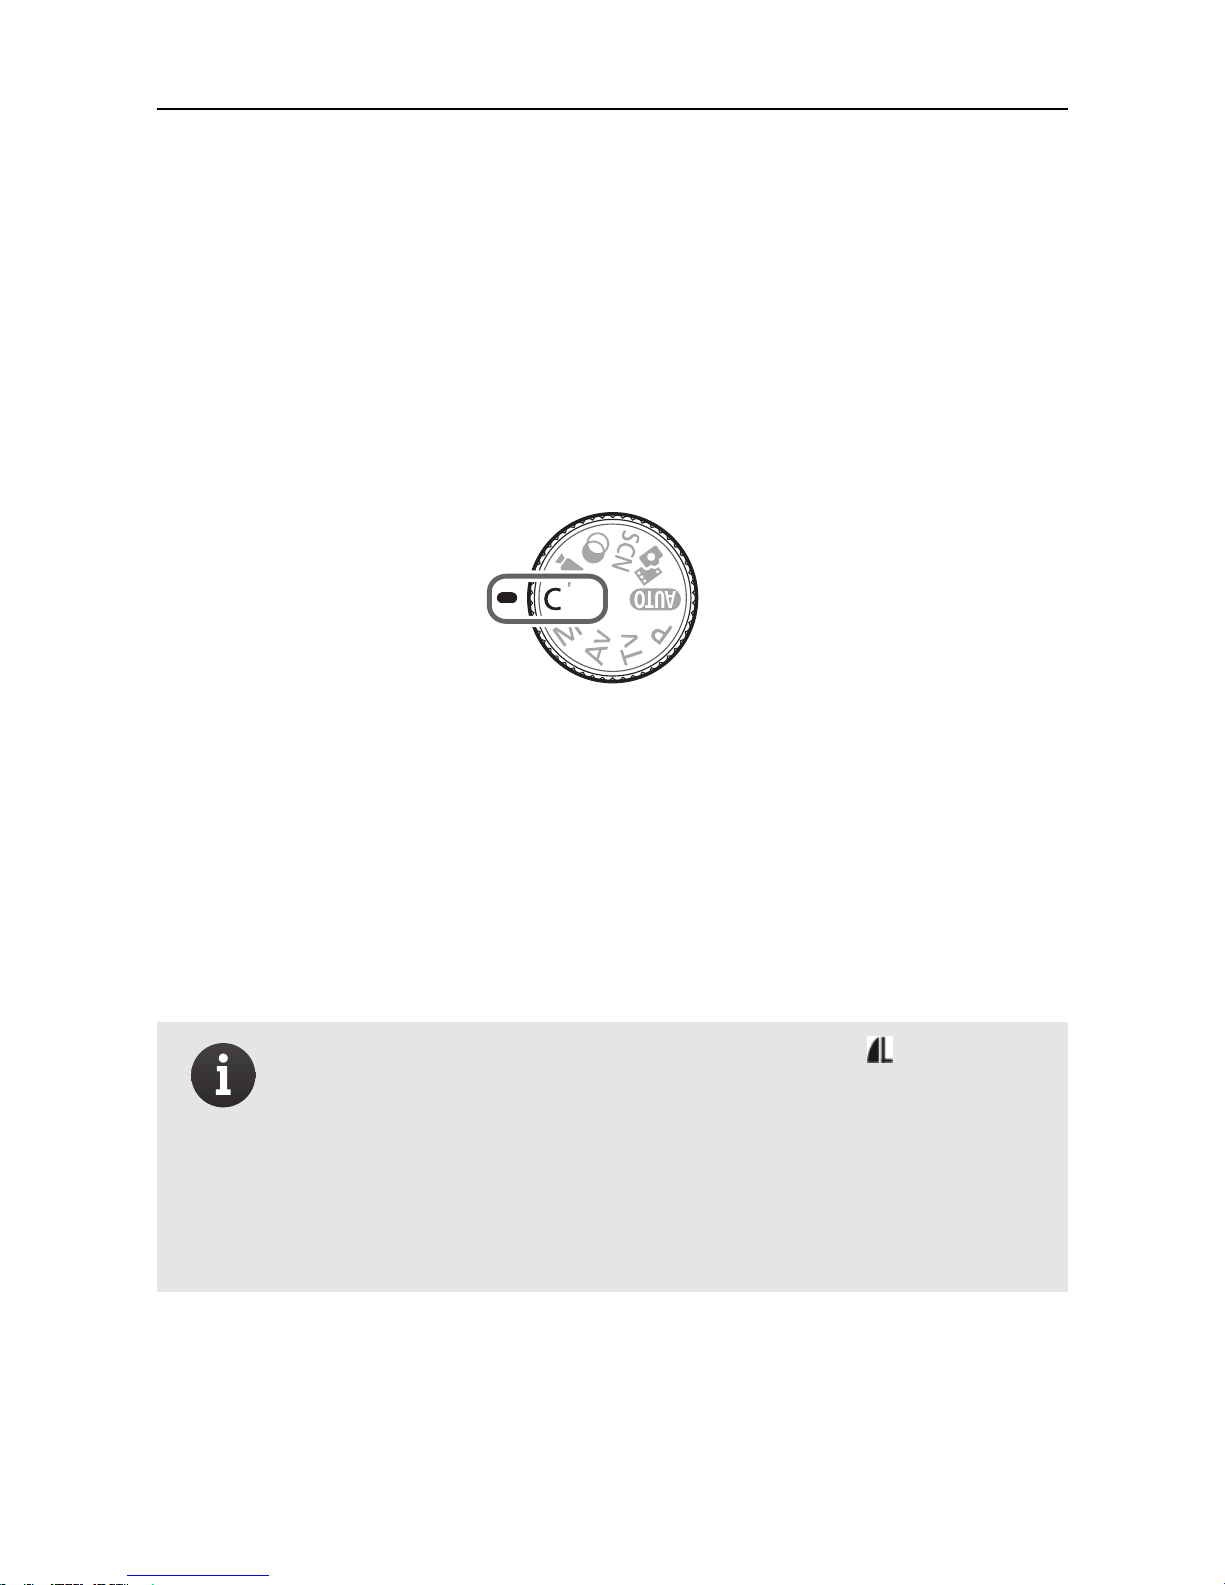
select C on the camera’s mode dial as shown below.
By default, the S110 RGB camera is set to store images in JPEG format,
while the S110 NIR and RE cameras are set to produce both JPEG and
RAW images. The JPEG format generates a good visual output without
requiring any further image processing. On the other hand, for agricultural applications, computing precise vegetation indices requires RAW
data, hence the default configuration of the NIR and RE cameras.
Note: For all of these cameras, image size ( ) is set to L
(4000x3000) pixels with an aspect ratio of 4:3 by default.
Only images taken with these settings can be processed
by Postflight Terra 3D. If you have changed these settings,
you must set them back to the default or carry out a reset
(See senseFly factory settings).
For drone mapping purposes, the most important setting is the Shut-
ter Speed as this can be configured to avoid motion blur on the im-
ages. Within the camera’s predefined settings, the Shutter Speed is set
16
Page 17

to 1/2000s (the fastest speed available) in order to prevent images being affected by vibrations and motion. In this mode, for every single
shot, the camera adapts the Aperture and ISO speed according to the
lightconditions to ensure the best image exposure. Pleaserefer toPartII
to learn more about customizing camera settings for specific environmental conditions.
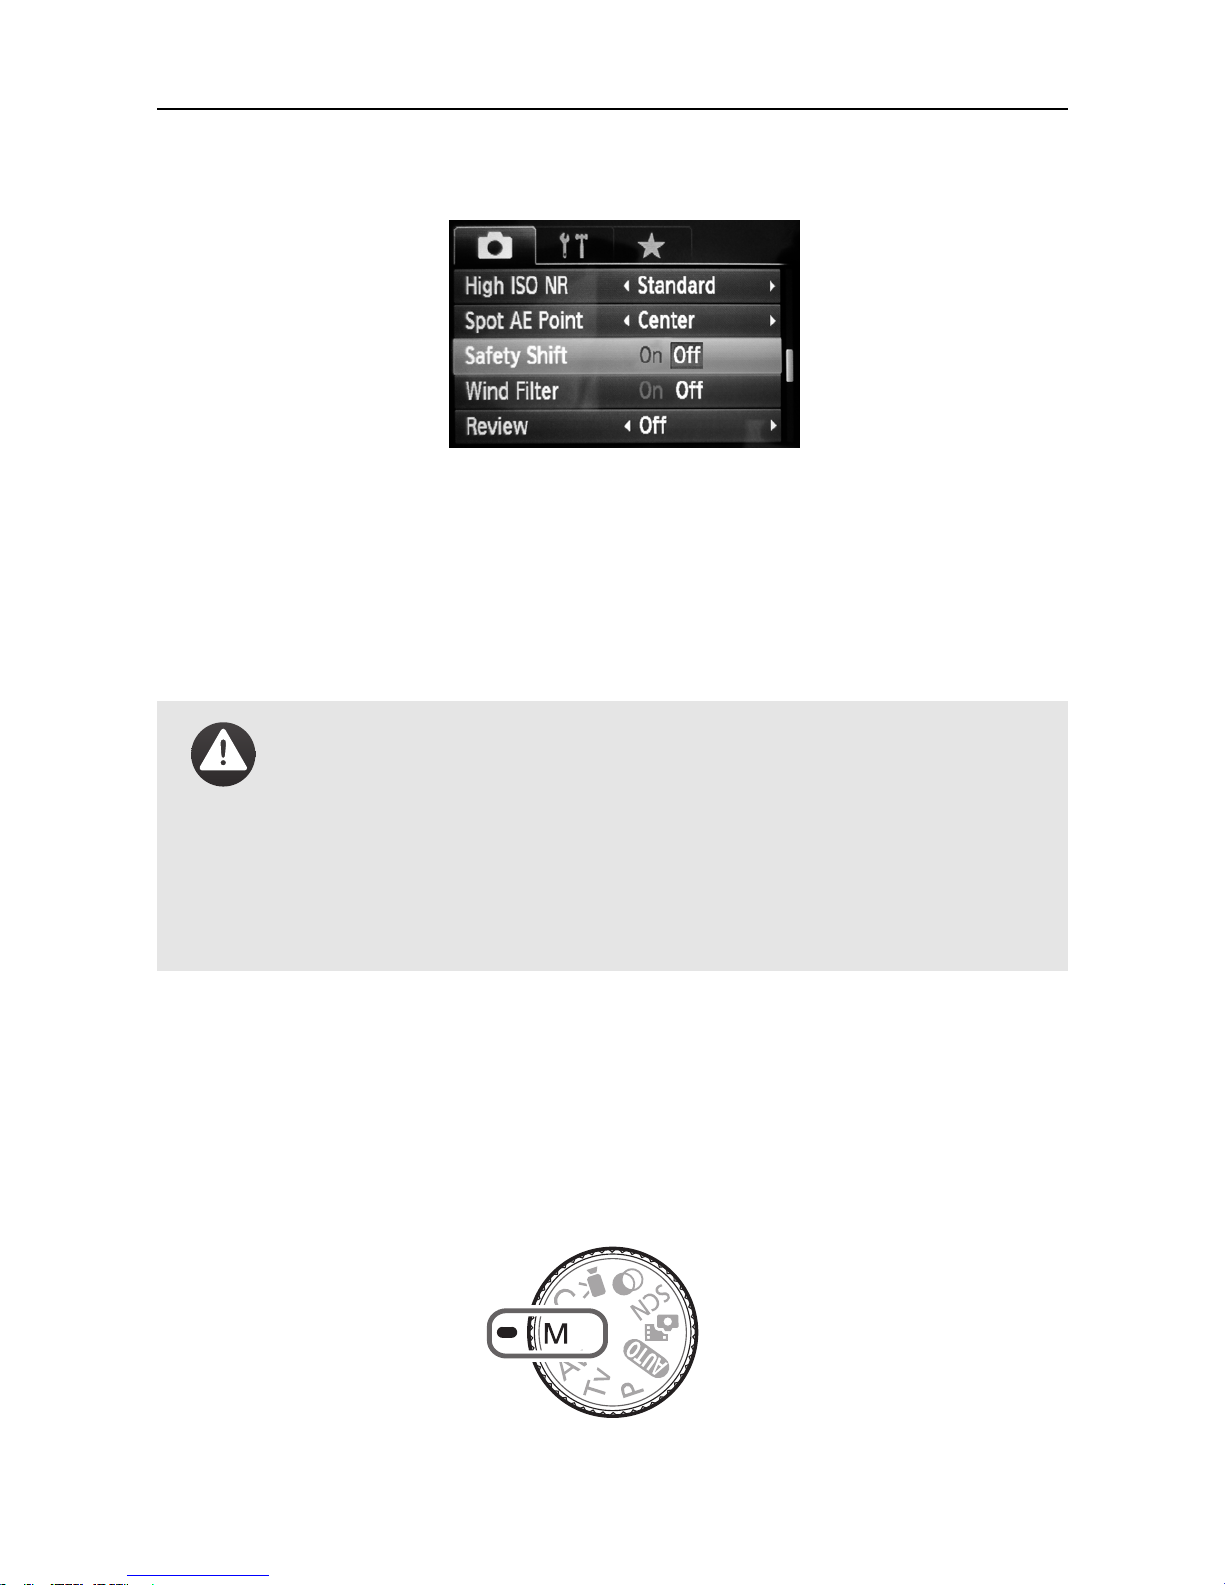
Note: The Safety Shift is activated by default in the
factory settings. With this option enabled, the camera
will automatically lower the Shutter Speed when reaching maximum Aperture and ISO speed to avoid underexposure in low light conditions.
2 Pre-flight procedure
Before installing your S110 camera in your eBee...
• Check that there’s enough space on your SD card.
• Check the camera’s date/time setting.
• Install the dial lock.
• Remove the camera’s battery¹.
• Check that the lens is clean.
Beforeevery flight, makesure that the SD memorycard contains enough
free space.
¹ If you have an earlier eBee’s with a serial number that starts with EB-01-, the camera’s
battery must remain in the S110 camera for flight.
17
Page 18
Getting started
With the battery installed in the camera, check that the camera has the
right date and time. If it hasn’t, set the correct date and time.
Caution: If the battery is left out of the S110 camera for
extended periods, the date/time may reset. We recommend storing the camera with the battery installed. A
battery with even a small amount of charge will keep the
camera’s internal clock running for extended periods.
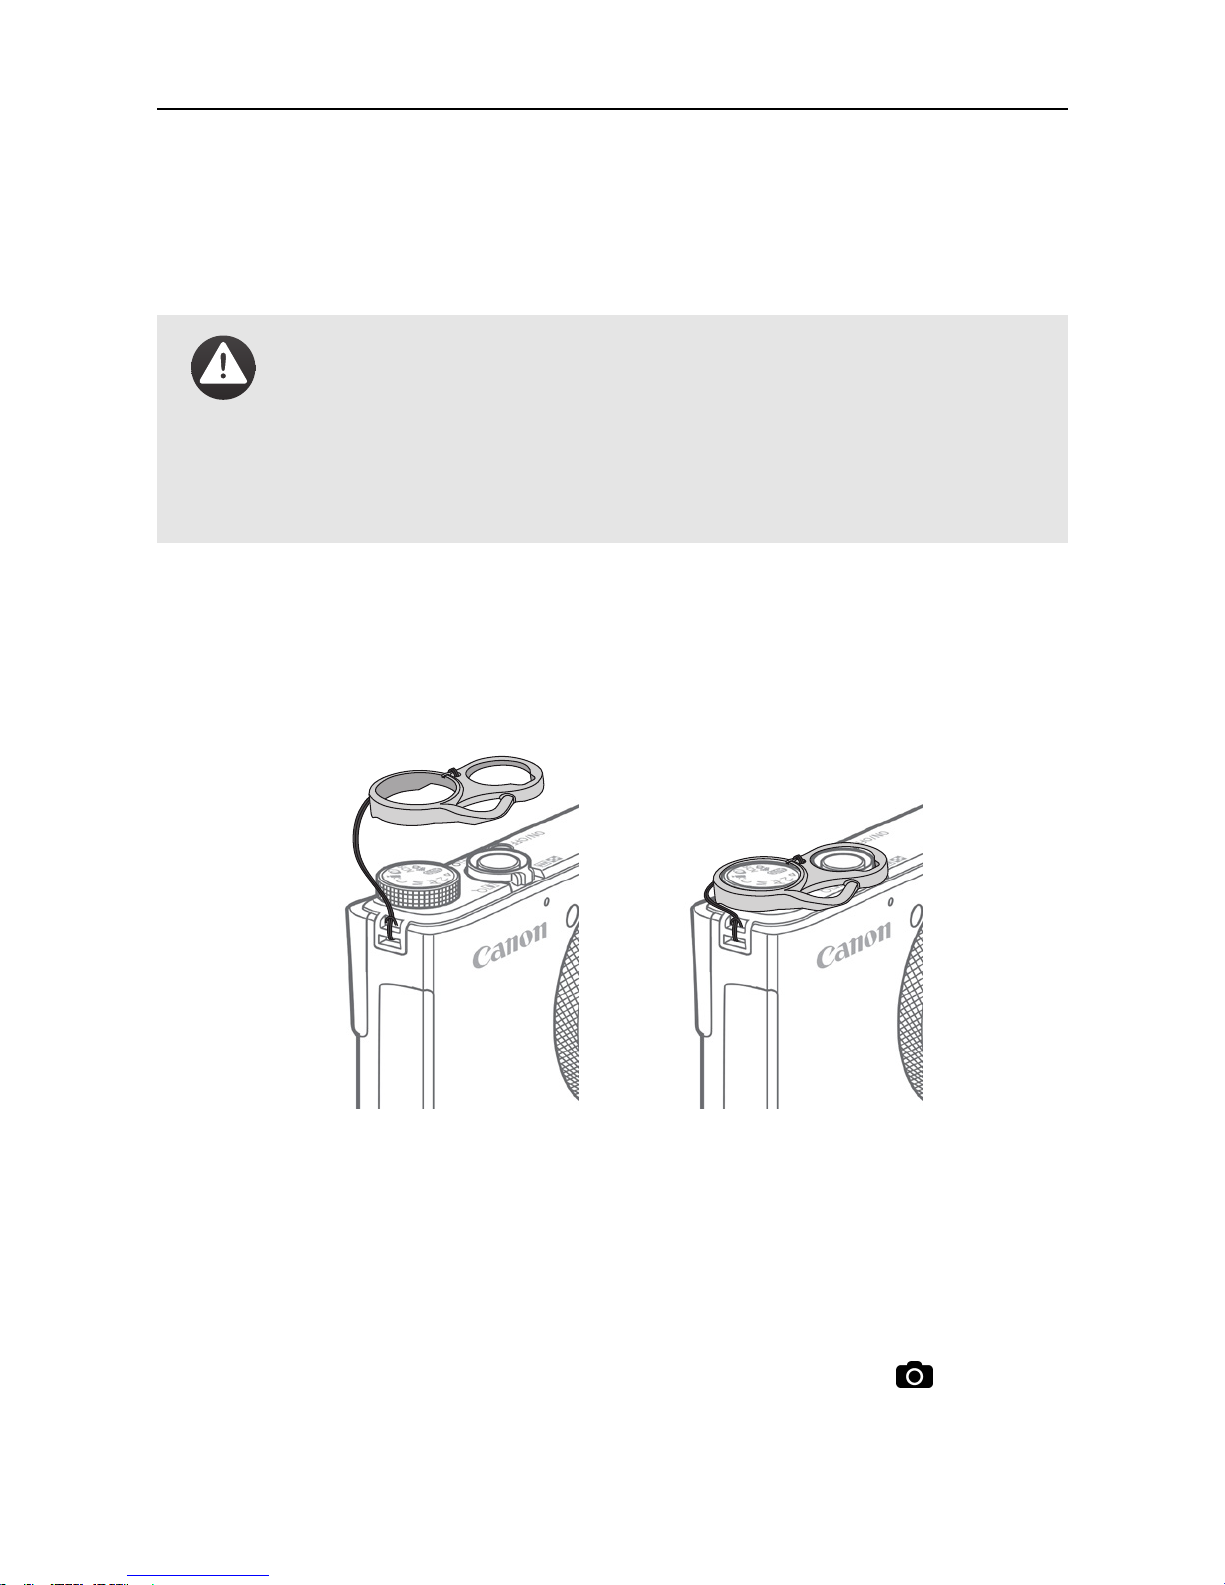
To prevent undesired settings changes upon camera insertion into the
drone or during flight, a camera dial lock is attached to the camera by
a strap. Before inserting your S110 camera into the eBee, the camera
dial lock must be placed onto the mode dial and the trigger, as shown
below.
The S110 camera is directly powered by the eBee and the S110 camera
battery must be removed before plugging it into your eBee. All flights
have to be conducted without camera battery for weight reduction and
safety reasons.
With the battery removed and the dial lock in place, insert the S110
camera into your eBee, plug it into the connector (see icon ) and close
the camera’s compartment lid.
18
Page 19
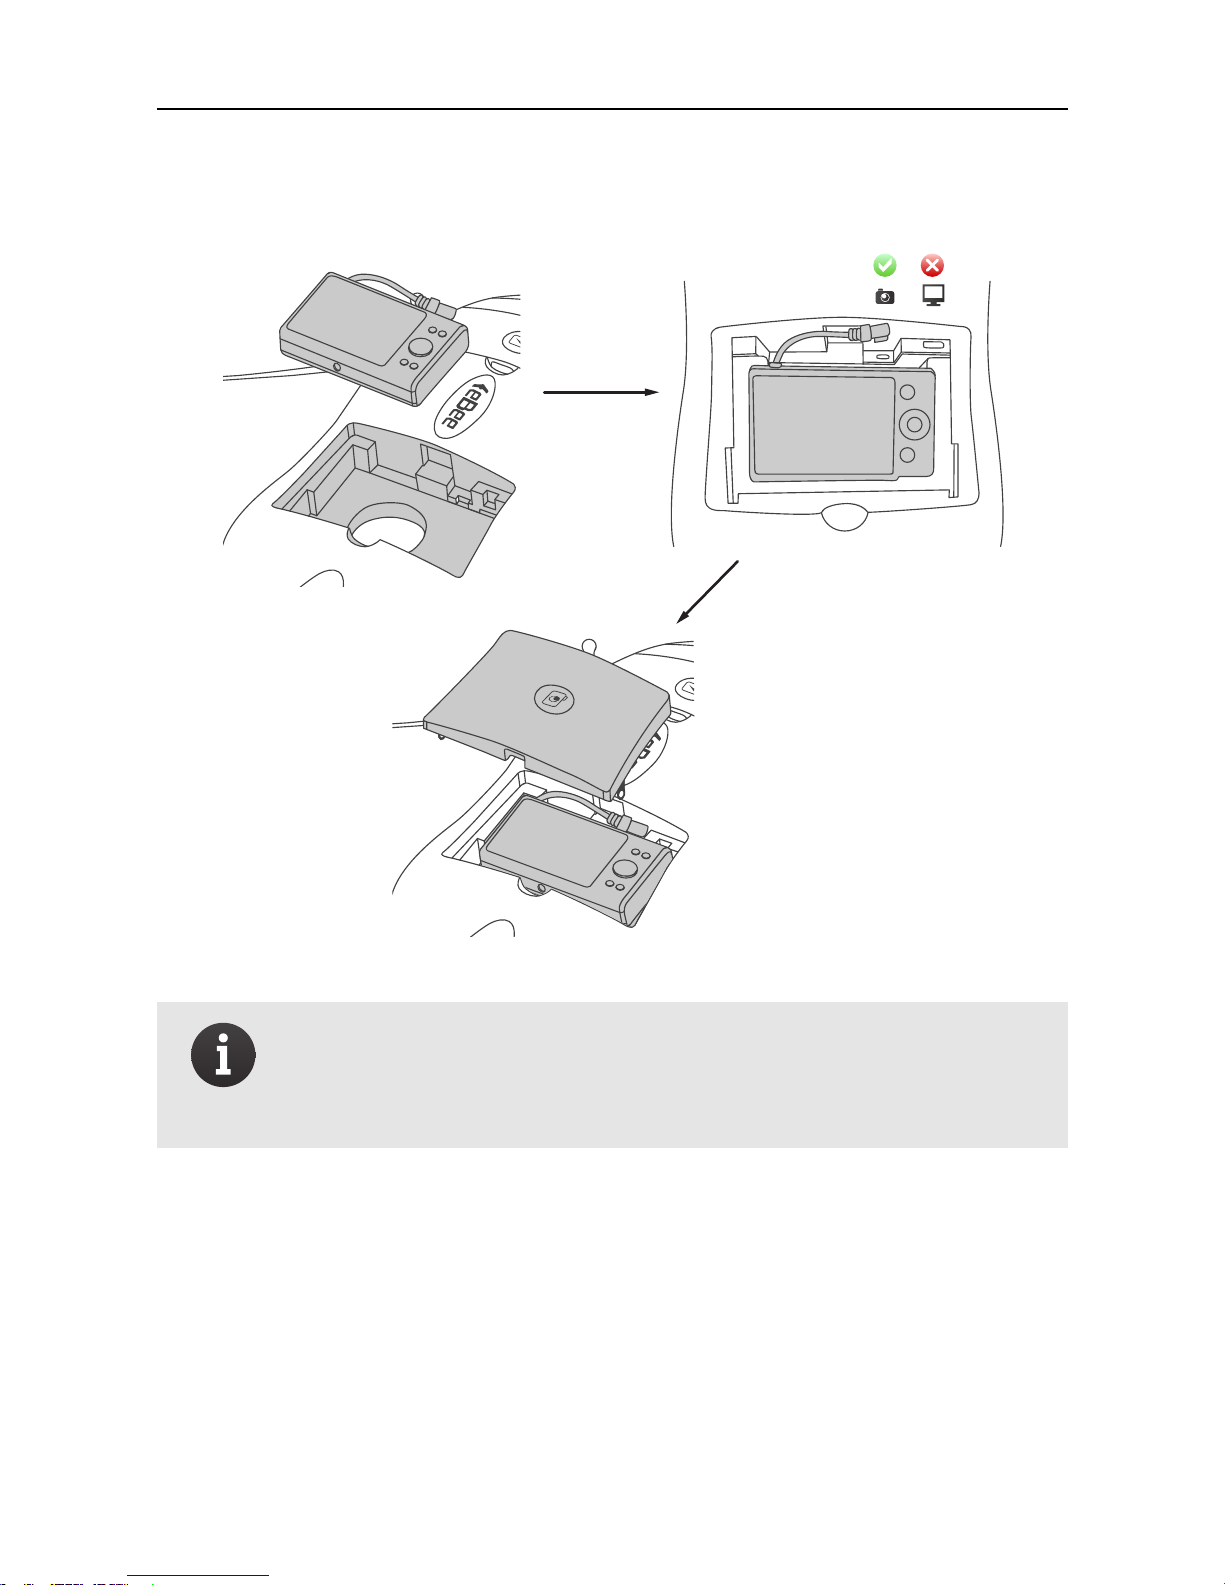
insert camera into
compartment
plug in camera connector to camera plug
close camera
compartment lid
Note: It is recommended before every take-off to perform a visual check of the camera’s lens in order to ensure
the best image quality for the 3D reconstruction.
2.1 eMotion settings
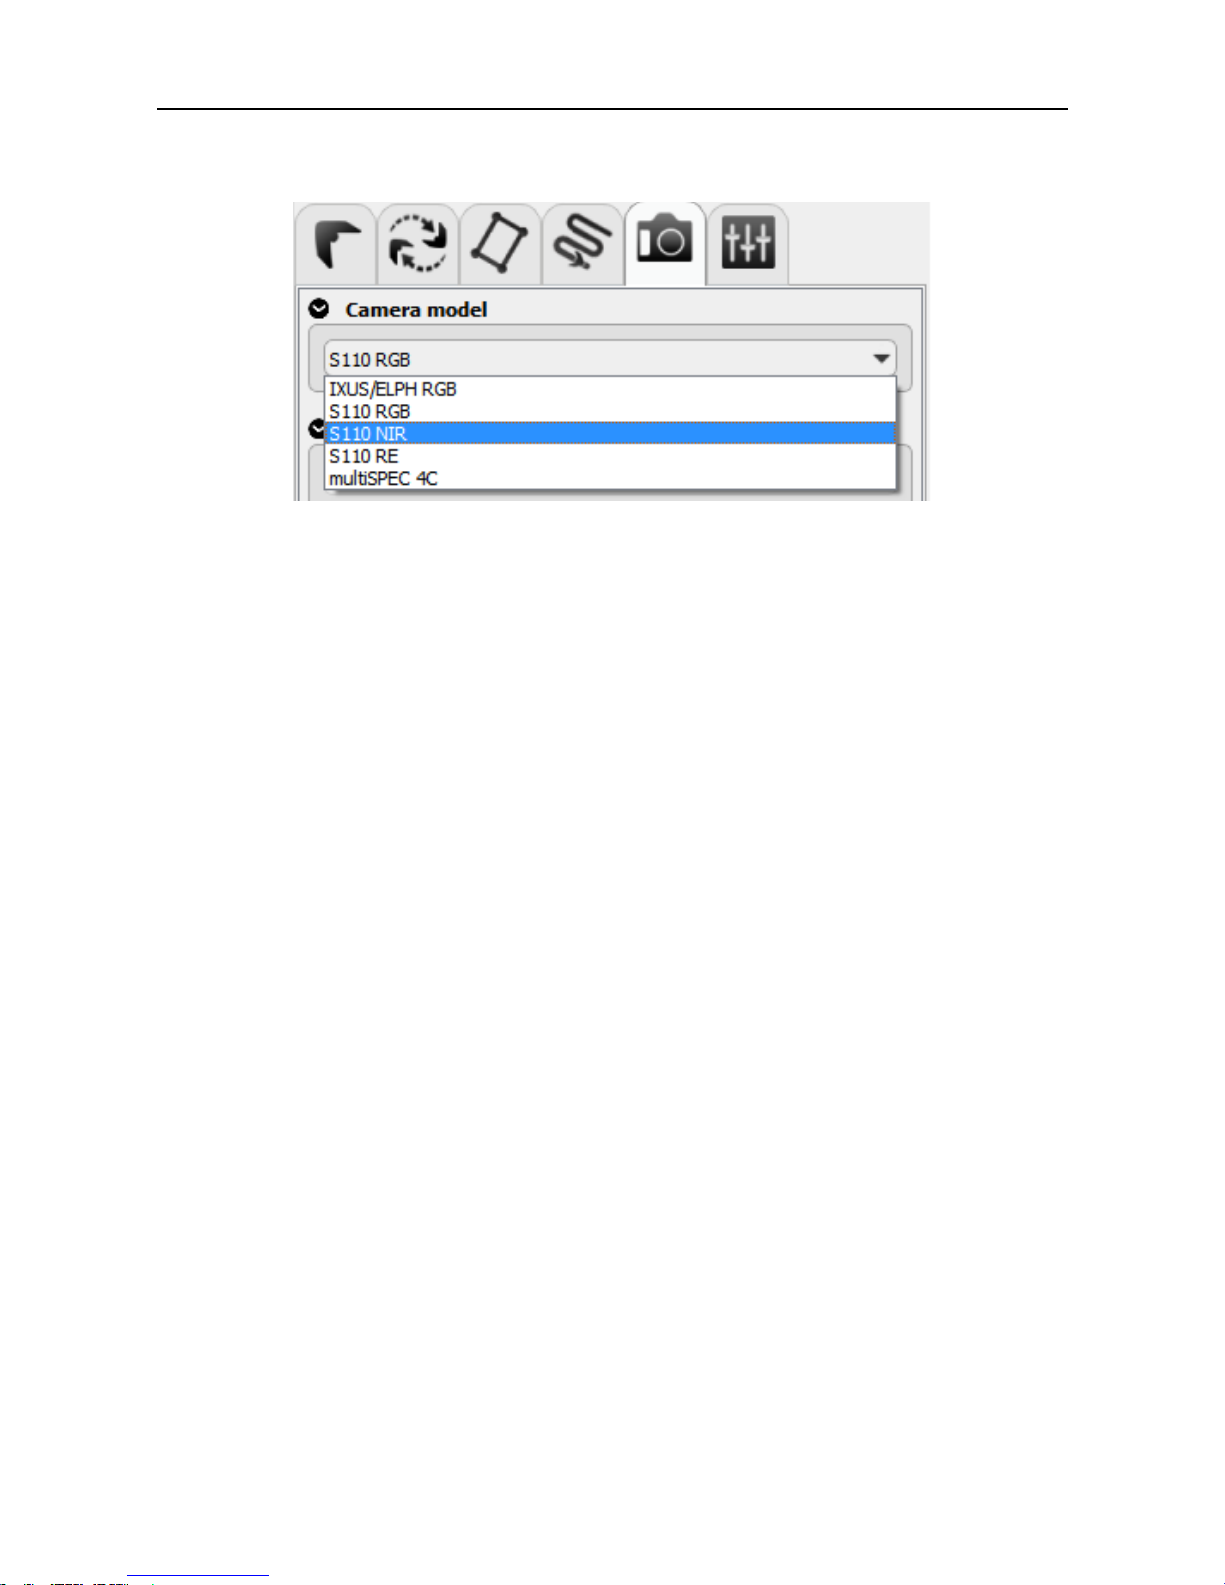
Once your eBee is connected to eMotion, verify that the correct camera
model is selected in the Camera tab according to your variant (RGB, NIR
or RE), as shown below.
19
Page 20
Getting started
Once the S110 camera is selected, the mission planner will automatically adjust flight altitude and other parameters to ensure the desired
ground sampling distance and display correct image footprints. Camera selection is stored in the flight logs and later retrieved by the Flight
data manager to select the appropriate image extraction method.
20
Page 21

Pre-flight checklist:
1. Check remaining space on SD card and install it into
camera.
2. Set/check camera date/time.
3. Select C on the mode dial (or any desired custom settings).
4. Remove the S110 camera’s battery².
5. Place the camera’s dial lock on.
6. Check/clean lens.
7. Plug the S110 camera into the eBee.
8. Connect the eBee’s battery.
9. Connect to the eBee with eMotion.
10. Verify that the right camera model is selected in eMo-
tion.
3 Launching the eBee
The take-off procedure is the same as described in your eBee User Manual. Nevertheless, the S110 camera is slightly heavier(+20 grams / 0.7 oz)
than the drone’s default payload. Therefore, be sure to launch the eBee
with a good initial speed against the direction of the wind.
² Not applicable if your eBee serial number starts with EB-01-.
21
Page 22

Getting started
4 In-flight performance
Flying with the S110 camera reduces the endurance by up to 10% of
flight time compared to the IXUS/ELPH camera. This is due to both the
additional weight and the fact that the camera drains some power from
the eBee’s main battery.
Note: Endurancecan vary greatlydepending on external
factors such as wind, altitude changes and temperature.
5 Processing flight data and images
The procedure for processing flight data on S110 images is the same as
described in the your eBee User Manual. However, do not connect the
eBee to your computer before unplugging the S110 camera from the
eBee to prevent overloading the autopilot power management system.
Similarly, never update your eBee with the S110 camera plugged into
the drone.
5.1 Processing JPEG images
Processing JPEG images adds geotags into their metadata. This information is then used to generate accurate 2D and 3D geo-referenced
models. Although, JPEG processing is mostly relevant for the RGB version of the S110 camera, this processing can also be used with the NIR
and RE variants to perform a fast processing and validate that the images provide enough overlap.
22
Page 23

5.2 Processing RAW images
The NIR and RE camera variants require each image to be preprocessed.
This takes place via the eMotion Flight data manager at the same time
as the image geotagging process. The processing of RAW images takes
significantly longer than processing JPEG, as this involves band arithmetic that corrects the images and converts them into large 16-bit linear TIFF images, optimised for vegetation indices calculation. This process prioritises accuracy over visual quality and therefore produces images that look very different (and usually dimmer) to their JPEG equivalents. In order for the processing to produce correct images, the image
source camera must be first identified. This information is stored with
the flight logs, but can be modified by selecting the image source in the
eMotion Flight data manager (see below).
This RAW processing can also be applied to RAW RGB images, for example if the RGB images are combined for index calculation with NIR or RE
images.
23
Page 24

Getting started
Note: Due to their high precision, the TIFF files gener-
ated are significantly larger than the RAW files. Therefore,
when archiving your projects it is more space-efficient
to archive the RAW images instead of the TIFF images.
Archiving these RAW versions also has the advantage of
future-proofing your images with regards any forthcoming software updates that may require, for example, the
reprocessing of RAW files in eMotion.
24
Page 25

Part II
Advanced modes
Goal of this part: This part describes howtooptimise the
S110 camera’s settings to suit specific terrain conditions.
Page 26

Advanced modes
6 Understanding exposure
Exposure is the amount of light a digital camera’s sensor captures in a
given amount of time. Camera Aperture, Shutter Speed and ISO settings
directly affect exposure. Selecting the right settings allows you to get
the best out of the camera and avoid overexposed, underexposed or
blurry images.
6.1 Shutter speed
The Shutter Speed is the speed at which the camera’s ‘curtain’opens and
closes, measured in fractions of a second. The Shutter Speed is the most
important setting as it directly influences an image’s sharpness when
the camera is moving: the faster the shutter speed, the less motion blur
occurs, and also the less light enters the optical system. To compensate
for this reduction of light, the Aperture and ISO sensitivity settings can
be modified (either automatically in Tv mode or manually in M mode).
6.2 Aperture and ISO sensitivity
TheAperture setting controls the lens’ diaphragm aperture and is representedby the F-number. It controlsthe amount of light passing through
the lens. Similarly, the ISO speed determines the image sensor’s sensitivity to light and each up/down incremental ISO setting represents a
doubling or halving of the sensor’s sensitivity to light, respectively.
26
Page 27
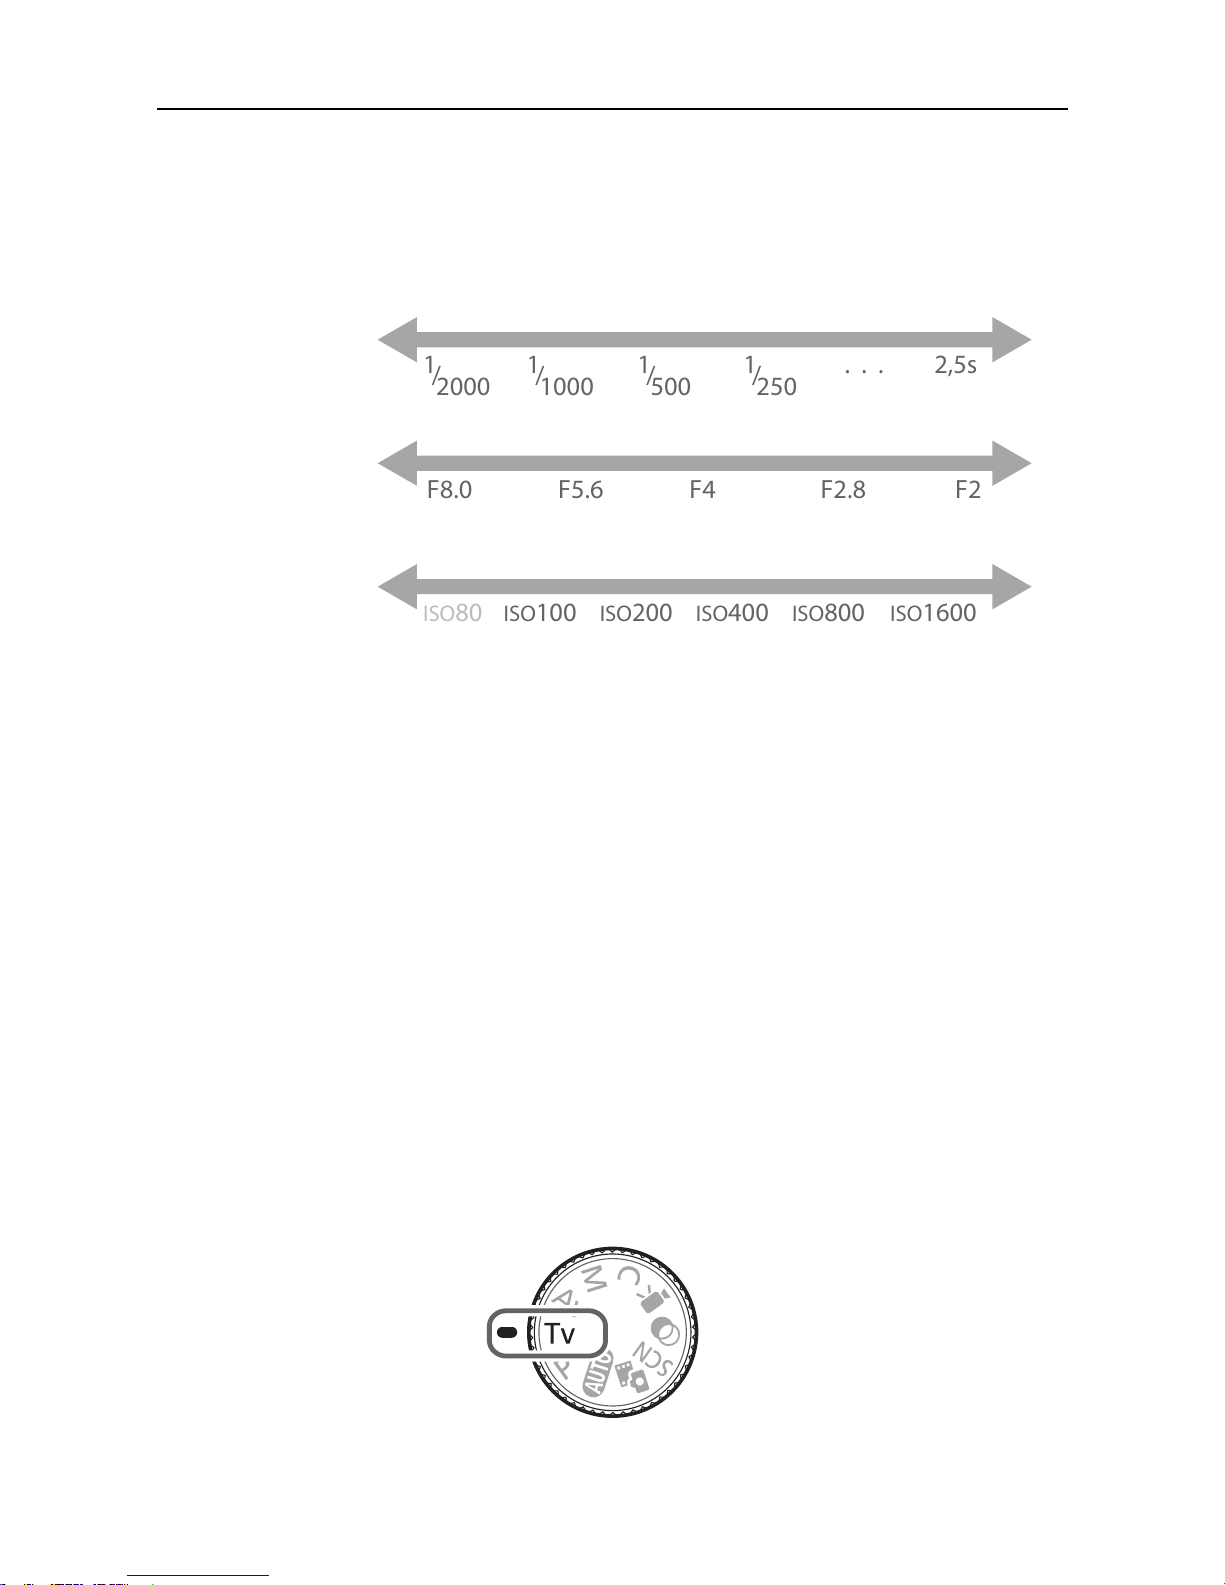
Shutter speed
1
/
2000
1
/
1000
. . .
F8.0
F5.6
F4
F2.8
F2
ISO80
ISO100
ISO200
ISO400
ISO800
ISO1600
2,5s
1
/
500
1
/
250
MIN
exposure
MAX
exposure
Aperture.
ISO sensitivity
7 Tv mode
As mentioned in the ‘Predefined camera settings’ section, factory settings are stored in the C mode. These default settings are based on the
Tv mode, where the Shutter Speed is set to 1/2000s and both Aperture
and ISO speed are automatically adjusted by the camera. Using this
mode allows users to set a preferred Shutter Speed. The camera automatically adjusts the Aperture and ISO speed to ensure optimal image
exposure. To customise the Shutter Speed, select Tv on the mode dial.
27
Page 28

Advanced modes
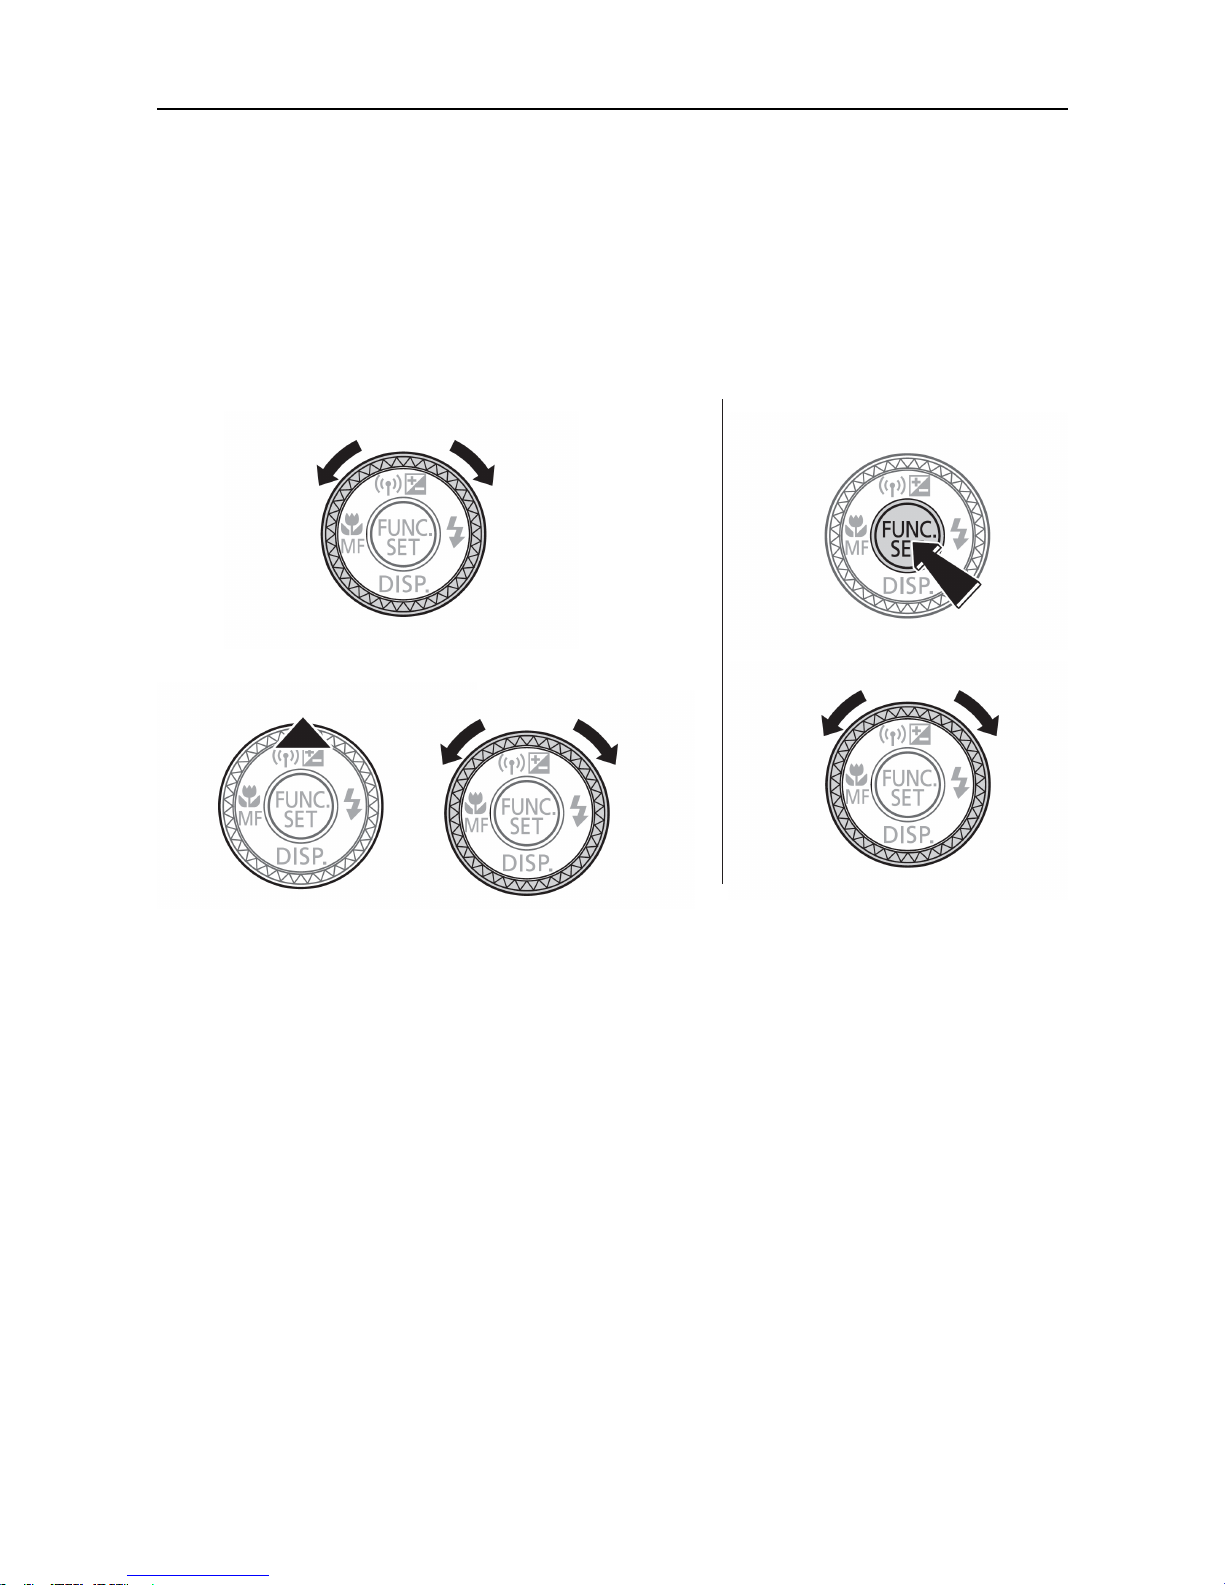
To change the Shutter Speed in Tv mode, turn the control dial right or
left to select the desired Shutter Speed as shown below.
A Shutter Speed of 1/2000s is the optimal value for most projects. Going
down to 1/500s may allow you to cope with low-light conditions without the ISO reaching extreme values, which would create pixel noise.
However, setting the Shutter Speed to longer values will significantly increase the risk of getting blurry images, especially in windy conditions.
7.1 Safety shift
As indicated in the ‘Predefined camera settings’ section, the camera will
lower the Shutter Speed when reaching the maximum Aperture and ISO
speed (poor light conditions) in order to prevent underexposed images.
This parameter can be deactivated by pressing Menu and then setting
Safety Shift to OFF on the Camera tab.
28
Page 29
8 M mode
Caution: This manual mode requires good knowledge
of exposure as there is no means of verifying the quality
of the images taken during flight. As this mode is totally
dependent on user-chosen settings, it has to be considered with the utmost attention in order to avoid bad image exposure.
In manual mode, the Shutter Speed, Aperture, and ISO sensitivity have
to be set manually before the flight. The manual mode can be useful if
you want to have a constant exposure across the mission area.
To enter manual mode, turn the mode dial to M.
29
Page 30
Advanced modes
Use the control dial to set Shutter Speed and Aperture. Press the Up button to switch between Shutter Speed setting and Aperture setting. ISO
sensitivity can be modified with the FUNC./SET button.
Set ISO sensitivity
+
+
Set shutter speed and aperture
switch from one to another
(shutter speed/aperture)
You can set a suitable exposure with the following procedure.
1. Take your S110 camera out of the eBee, insert its internal battery
and switch it on.
2. Point the camera toward a portion of the ground that is lit similarly to the planned mission area and manually trigger a single
picture in M mode (i.e., do not take a picture of a shadow on a
bright sunny day).
3. By pressing the playback button, you can visually check your image. Then, by pressing the DISP. button twice, you can access
30
Page 31
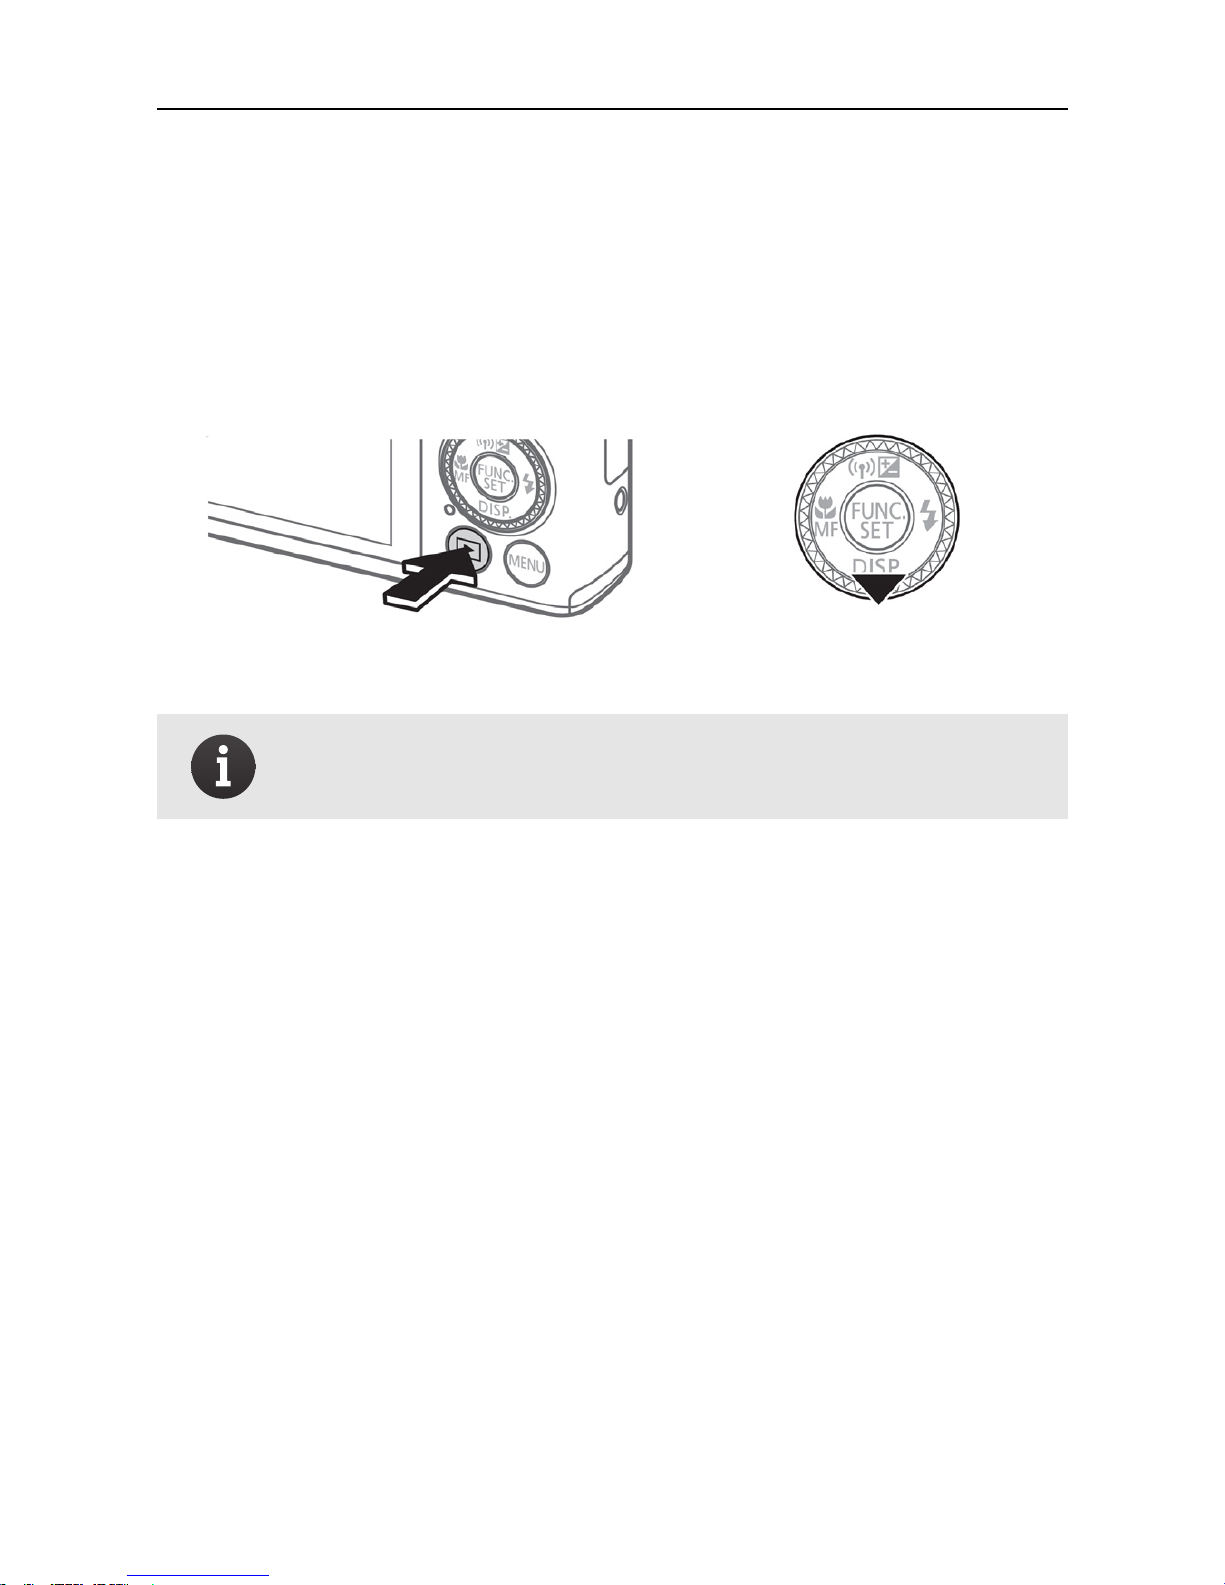
the exposure values and adjust the settings if necessary (motion
blur, overexposed, underexposed).
Repeat steps 2 and 3 until a satisfactory exposure setting is reached.
+
x2
Note: Pleasenote that this procedure has to be repeated
beforeevery flight as light conditions may change rapidly.
31
Page 32

Page 33

Part III
Appendix
Page 34
1 RGB, NIR and RE bands
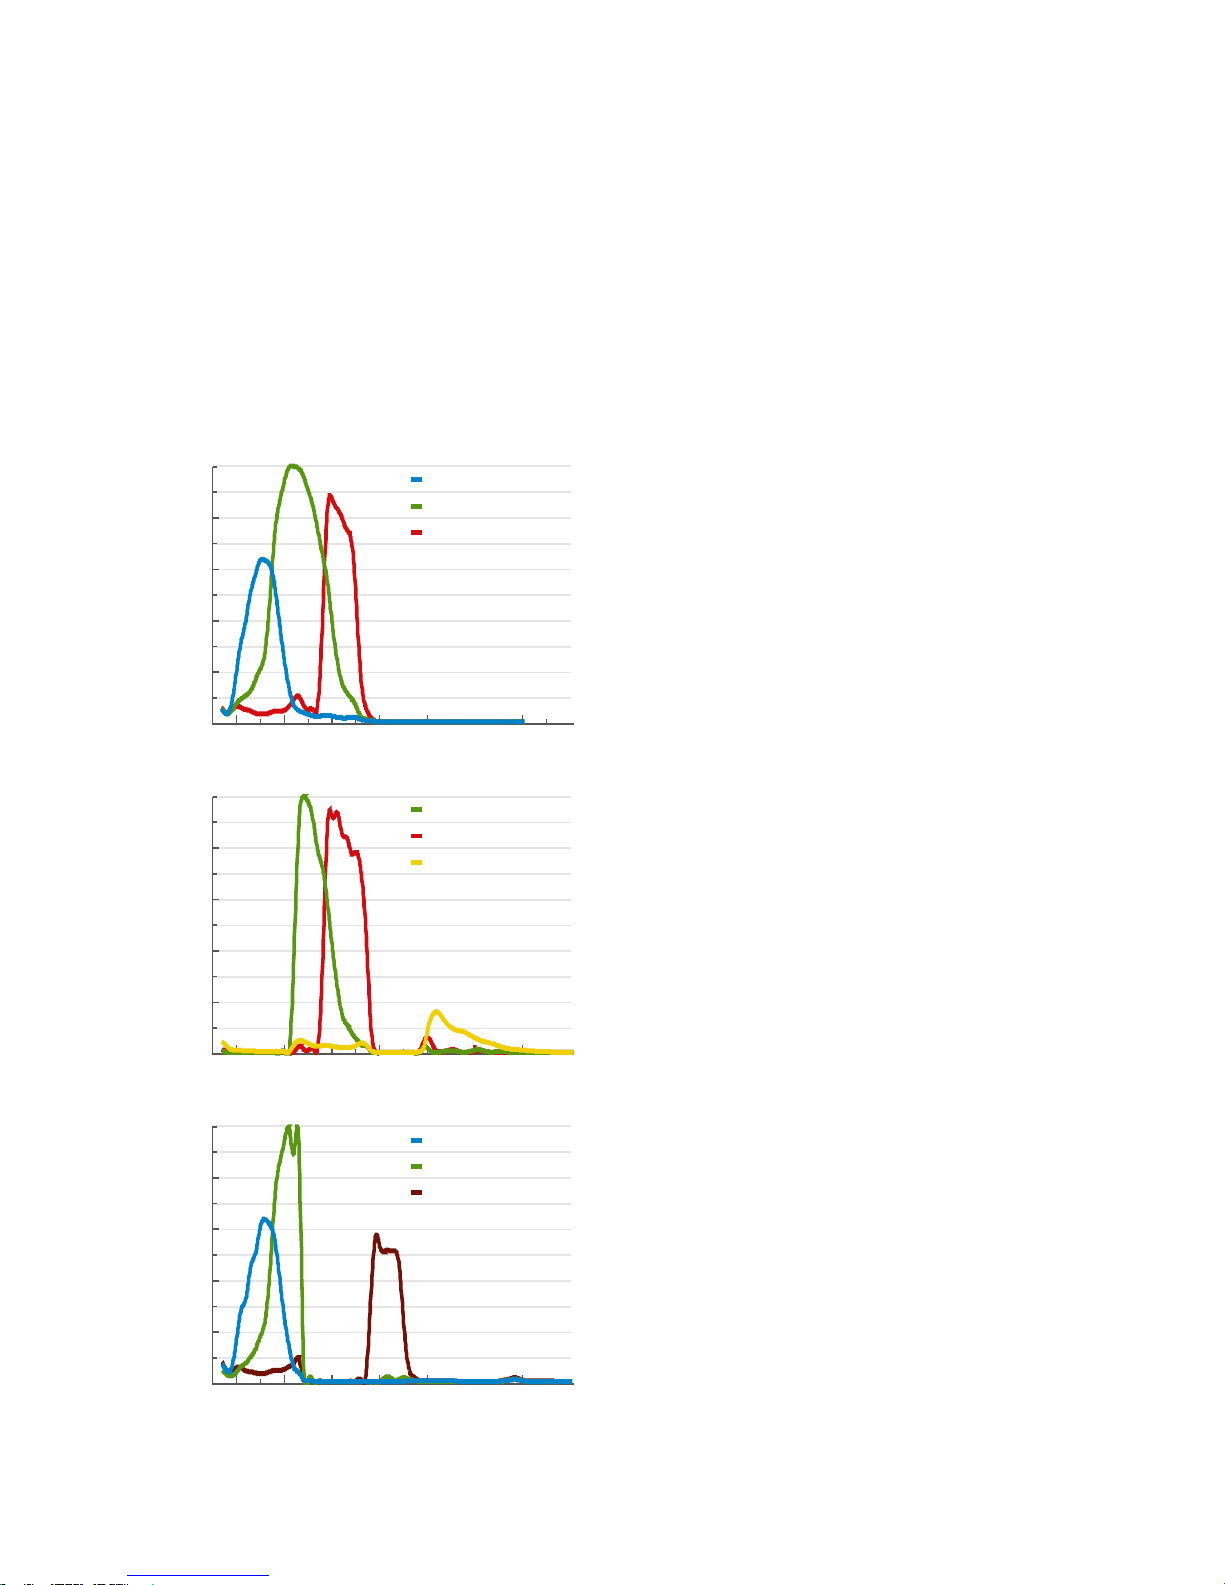
Each camera variant features a different filter, with each capable of acquiring information in different regions of the light spectrum. The figuresbelow compare the correspondingnormalised response spectrums.
400 1000
100
0
Wavelength [nm]
Response [%]
50
600 800
Blue (450 nm)
Green (520 nm)
Red (660 nm)
S110 RGB camera: The RGB variant
provides standard Red, Green and Blue
band data.
400 1000
100
0
Wavelength [nm]
Response [%]
50
600 800
Green (550 nm)
Red (625 nm)
NIR (850 nm)
S110 NIR camera: The NIR variant pro-
vides NIR, Red and Green band data.
400 1000
100
0
Wavelength [nm]
Response [%]
50
600 800
Blue (450 nm)
Green (500 nm)
Red edge (715 nm)
S110 RE camera: The RE provides Red-
Edge, Green and Blue band data.
Page 35
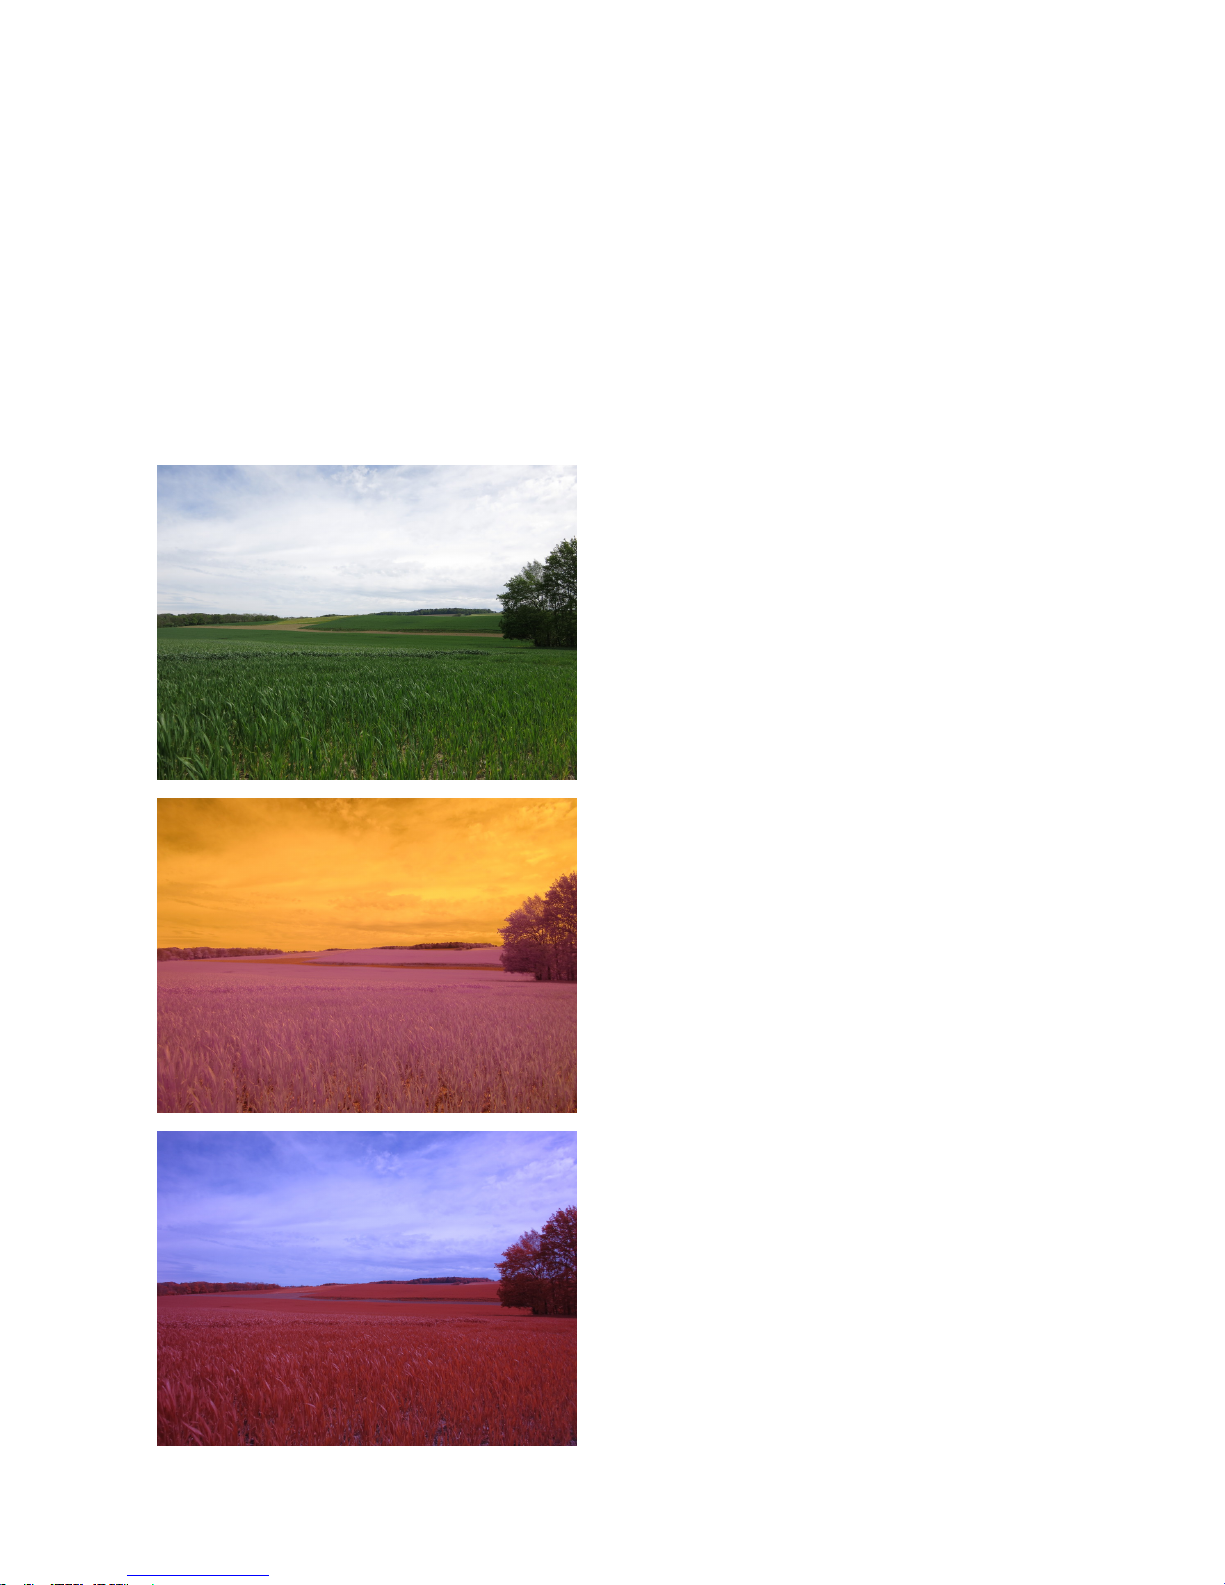
2 RGB, NIR and RE images comparison
The image guides below will help you to easily identify which camera
variant was used to acquire your images. For a colour version of these
figures, please refer to the electronic version of this User Manual.
S110 RGB camera: The RGB variant
corresponds to the original S110 camera. Colours are unmodified and look
natural, e.g., when looking through the
camera’s LCD screen the vegetation appears green and the sky blue.
S110 NIR camera: The NIR variant featurescustom filters, which capture Near
Infraredinformation in the blue channel. On the camera’s LCD screen the
vegetation therefore looks violet and
the sky appears yellow/orange.
S110 RE camera: The RE variant’s cus-
tom filters capture Red-Edge information in the red channel. On the camera’s
LCD screen, the vegetation appears red
and the sky blue.
Page 36

3 Specifications
Sensor 1/1.7” back-illuminated CMOS
Image size 12.1 Mpix
Maximum f/number f/2.0
Maximum shutter speed 1/2000s
Output formats JPEG and RAW
Operating environment 0 – 40 °C, 10 – 90% humidity
Weight Approx. 153 g (5.4 oz) excl. battery
4 Handling precautions
• If water droplets or dirt stick to the camera or screen, wipe with
a dry soft cloth, such as an eyeglass cloth. Do not rub hard or
apply force.
• Never use cleaners containing organic solvents to clean the camera or screen.
• Use a blower brush to remove dust from the lens.
• To prevent condensation from forming on the camera after sud-
den temperature changes (e.g., when the camera is transferred
from a cold to warm environment), put the camera in an airtight,
resealable plastic bag and let it gradually adjust to the temperature before removing it from the bag.
• If condensation does form on the camera, stop using it immediately. Continuing to use the camera in this state may damage it.
Page 37

Remove the battery and memory card, and wait until the moisture has evaporated before resuming use.
5 senseFly factory settings
The configuration of your S110 camera is critical for the acquisition of
quality images. In case of unwanted configuration changes, the camera
can be configured back to senseFly factory settings using the following
procedure.
• Insert the battery into the camera, and power it on.
• Reset to Canon factory settings:
– Press the MENU button and navigate to the Tools tab.
– Choose Reset All and confirm with OK.
• Select AUTO on the mode dial.
• In shooting mode, press MENU to enter into the Shooting settings
and set them as follow:
Digital Zoom OFF
AF-assist Beam OFF
Flash Settings. .. OFF
> Red-Eye Corr OFF
> Red-Eye Lamp OFF
Review OFF
IS Mode OFF
Face ID Settings > Face ID OFF
Page 38

• Into the Tools tab, set the options as follow:
Mute ON
Date/Time Correct the date and time
Time Zone Correct the time zone
LCD Brightness Set to minimum and press MENU
Power Saving...
> Auto Power Down OFF
> Display Off 3 min
• Leave the AUTO mode to enter the Tv mode with the mode dial.
• Press RING FUNC. and select ISO Speed, then FUNC./SET to confirm.
• Press FUNC./SET, press the Up and Down buttons to set:
Output format RAW+JPEG
Still Image Aspect Ratio 4:3
Image Resolution (Size) ( ) L
Press FUNC./SET to confirm.
• Set Shutter Speed to 1/2000 seconds with to the control dial.
• Press MENU and set the following:
Safety Shift ON
Save Settings... OK
(This last action will save the current settings into the C mode)
Note: Occasionally, the “Wrong flash position Restart
the camera” message may appear on startup. This is a
harmless message that can be safely ignored.
Page 39

Page 40

 Loading...