

Canon R-F10 Operation Manual
FULL AUTO REF
Operation Manual
Before using the instrument, be sure to read this manual thoroughly.
Keep the manual in easy-to-access place.

PLEASE NOTE
1. The user is responsible for the use and maintenance of the product.
We suggest that a member of the user’s staff be designated as being in charge of maintenance so as to ensure that the product is kept in a safe and good condition.
Also, medical products must be used only by a qualified person.
2. In no event will Canon be liable for direct or indirect consequential damage arising out of
the use of this product.
3. This product may malfunction due to electromagnetic waves caused by portable personal
telephones, transceivers, radio-controlled toys, etc.
Be sure to avoid having objects such as these, which affect this product, brought near the
product.
4. Canon reserves the right to change the specifications, configuration and appearance of
the product without prior notice.
© CANON INC. 2004
All rights reserved.
Under copyright laws, this manual may not be copied, in whole or in part, without the written
consent of Canon.

Safety Information
Regulations
For U. S. A.
This instrument is a CLASS I EQUIPMENT and TYPE B APPLIED PARTS according to
UL2601-1.
Do not make any changes or modifications to the equipment unless otherwise specified in
the manual.
If such changes or modifications should be made, you could be required to stop operation of
the equipment.
NOTE: This equipment has been tested and found to comply with the limits for a Class A
digital device, pursuant to Part 15 of the FCC rules.
These limits are designed to provide reasonable protection against harmful interference
when the equipment is operated in a commercial environment.
This equipment generates, uses, and can radiate radio frequency energy and, if not installed
and used in accordance with the instruction manual, may cause harmful interference to radio
communications.
Operation of this equipment in a residential area is likely to cause harmful interference in
which case the user will be required to correct the interference at his own expense.
Use of shielded cable is required to comply with class A limits in Subpart B of Part 15 of FCC
rules.
For Canada
This equipment complies with the Canadian ICES-003 class A specifications.
For EU Countries
This instrument is a Class I Equipment with measuring function.
This is a Group 1, Class B equipment according to EN55011.
The following mark shows compliance of the instrument with Directive 93/42/EEC.
Für Deutschland
Während des Betriebs liegt der Schalldruckpegel dieses Instruments bei 70 dB(A) oder
weniger gemäß ISO 7779.
(1)

Safety Information
ISO15004
This report provides information about the hazard to the examinee’s eyes in compliance with
ISO15004 (1997).
1. The spectral characteristics of radiant flux exiting from this instrument are as follows:
Irradiance
(relative)
Spectral irradiance (relative)
100
90
80
70
60
50
40
30
20
10
0
300
400
500
600 700
Wavelength [nm]
800 900
Refractometry IRED
Outer eye illumination IRED
Eye fixation target illumination LED
1000
1100 1200
2. Photochemical radiance
The photochemical radiances of each light source irradiated from this instrument to the
examinee’s eyes are indicated below. All the values in the following table were measured
when the instrument was operating at maximum light intensity and maximum aperture.
]rs/2mc/Wm[aL]rs/2mc/Wm[bL
DERIyrtemotcarfeR)1(0000.00000.0
DERInoitanimullieyeretuO)2(8750.05220.0
DELnoitanimullitegratnoitaxifeyE)3(9900.05800.0
3. The above values are spectrally weighted radiance on the pupil of examinee’s eyes in
each wavelength.
La gives the measure for eyes in which the crystalline lens has been removed (aphakes) or
for eyes of infants. Lb gives this measure for eyes in which the crystalline lens is in place
except for infants’.
Spectrally weighted photochemical radiances La and Lb give a measure of the potential that
exists for a beam of light to cause photochemical hazard to the retina.
According to “the American Conference of Governmental Industrial Hygienist (ACGIH) Threshold Limit Values for Chemical Substances and Physical Agents (1995 - 1996 edition)”,
at photochemical radiances La and Lb of 80 [mW/cm2/sr], 3 minutes irradiation would cause
the retinal exposure dose level to attain the recommended exposure limit.
(2)

Safety Information
If the value of radiance was 40 [mW/cm2/sr], 6 minutes would be needed to reach the recommended limit.
That is, the retinal exposure dose for a photochemical hazard is a product of the radiance
and the exposure time.
Since La and Lb of this instrument are extremely low, the risk of the photochemical hazard is
also very low. While no acute optical radiation hazards have been identified for this instrument, it is recommended that the intensity of light directed into the examinee’s eye be limited
to the minimum level which is necessary for diagnosis. Infants, aphakes and persons with
diseased eyes will be at greater risk. The risk may also be increased if the person being
examined has had any exposure with the same instrument or any other ophthalmic instrument using a visible light source during the previous 24h. This will apply particularly if the eye
has been exposed to retinal photography.
(3)
Safety Information
General Safety Information
Follow the safety instructions in this manual and all warnings and cautions printed on the warning
labels. Ignoring such cautions or warnings while handling the product may result in injury or accident.
Be sure to read and fully understand the manual before using this product.
Keep this manual for future reference.
Meaning of Caution Signs
GNINRAW!
NOITUAC!
.egamad
ETON
Installation and Environment of Use
GNINRAW!
.yrujniro
NOITUAC!
,dedeehtonfi,hcihwnoitautissuodrazahyllaitnetopasetacidnisihT
.srehtorouoyotyrujnisuoiresrohtaednitluserdluoc
nitluseryam,dedeehtonfi,hcihwsnoitautissuodrazahsetacidnisihT
enihcamnitluseryamro,srehtorouoyotyrujnietaredomroronim
.noitamrofnilaitnesseezisahpmeotdesusisihT
.noitarepotcerrocnidiovaotnoitamrofnisihtdaeroteruseB
sahcusslacimehcelbammalfynaraentnemurtsniehtllatsnitonoD
.cte,enizneb,renniht,lohocla
cirtceleroerifnitluseryamti,etaropaverodellipseraslacimehcfI
.tnemurtsniehtedisnistrapcirtcelehtiwtcatnochguorhtkcohs
.elbammalferastnatcefnisidemos,oslA
.mehtgnisunehweracekatoteruseB
detsilsnoitidnocehthtiwnoitacolanitnemurtsniehtllatsnitonoD
erifesuacrollaf,noitcnuflamroeruliafnitluseryamti,esiwrehtO.woleb
.desusiretawerehwseitilicafotesolC-
.thgilnustceridotdesopxeeblliwtierehW-
.tnempiuqenoitalitnevrorenoitidnoc-rianorootesolC-
.retaehasahcusecruostaehnorootesolC-
.noitarbivotenorP-
.dnatsroyellorterucesnI-
.tnemnorivneytsuD-
.tnemnorivnesuoruflusroenilaS-
.ytidimuhroerutarepmethgiH-
.noitasnednocrognizeerF-
NOITUAC!
NOITUAC!
.erifesuacyamdnaesirlliwtnemurtsnieht
ehtraenylemertxetiecalptonoD.elbatmrifanotnemurtsniehtecalP
.gnillafoteudyrujniroegamaddiovaotredronielbatehtfoegde
nierutarepmeteht,esiwrehtO.revocehtnoselohtnevehtrevoctonoD
(4)
Installation Operation
GNINRAW!
Power Supply
Safety Information
.deificepsnahtrehtognihtynahtiwtnemurtsniehttcennoctonoD
.kcohscirtceleroerifnitluseryamti,esiwrehtO
tnemurtsniehtotdetcennocebotgniogsitnempiuqerehtonehw,oslA
tahtnoitcennocretfakcehcoteruseb,ecafretnirofrotcennocehtgnisu
.eulavelbarelotehtnihtiwsitnerrucegakael
.rotubirtsidroevitatneserpernonaCtcatnocesaelp,sliatedroF
GNINRAW!
GNINRAW!
.nekattonsierac
.yrujnisuoiresrohtaednitluseryamtahtkcohscirtcelena
.teltuoCAehtotnielbacrewopehtnigulpyleruceS
GNINRAW!
.elbacehttcennocsidotrotcennocrogulpehtdlohoteruseB
GNINRAW!
.kcohscirtcele
GNINRAW!
.kcohscirtcele
nodetacidniylppusrewopfoepytehthtiwtnemurtsniehtetarepoylnO
.kcohscirtceleroerifnitluseryamti,esiwrehtO.etalpgnitareht
.launamsihtnidetacidnisaselbacehttcennoc/tcennocsidoteruseB
reporpfirevopityamtitahtdnimniraebos,gk12shgiewtinuehT
tegyamuoy,esiwrehtO.sdnahtewhtiwselbacehteldnahtonod,oslA
htiwtcatnocniemoctcejbolatemrotsudfiro,sruccoeruliaftcatnocfI
.tluseryamkcohscirtceleroerif,gulpehtfognorplatemdesopxeeht
roerifnignitluser,degamadebyameriweroceht,elbacehtllupuoyfI
,yvaehgnihtynaecalptonod,oslA.selbacehtssecorprotuctonoD
.tieldnubro,tidneb,tillup,tinopets,tinotnemurtsniehtgnidulcni
roerifnitluseryamhcihw,degamadebyamelbaceht,esiwrehtO
GNINRAW!
.kcohscirtceleroerifnitluseryamti,esiwrehtO.teltuo
NOITUAC!
.teltuorewopdednuorg
NOITUAC!
.teltuoehtraenselcatsbo
CAemasehtmorftnemurtsnienonahteromrofrewopehttegtonoD
rewop)eroc-eerht(epytgnidnuorgahtiwdeppihssitnemurtsniehT
aotnielbacehtgulpsyawla,kcohscirtcelefoksirehtecuderoT.elbac
ynagnittupdiova,emitynatagulpehttcennocsidotysaetiekamoT
(5)
Handling
Safety Information
roerifnitluseryamtisatcudorpehtyfidomroelbmessasidreveN
GNINRAW!
.yrujnisuoiresrohtaedesuacyammehtgnihcuot
GNINRAW!
GNINRAW!
.kcohscirtcele
.yrujniesuacdnallafyam
.kcohscirtceleroerifnitluseryamti,dellipssidiuqilfi
.yrujninignitluser,ffoemocyamyehtsastraprehto
egatlov-hgihsetaroprocnitnemurtsniehtecnis,oslA.kcohscirtcele
,strapsuodrazahrehtodnaskcohscirtceleesuacyamtahtstrap
tcejboeht,esiwrehtO.tnemurtsniehtfopotnognihtynaecalptonoD
ro,tnemurtsniehtotnisllafpilcroeldeensahcusstcejbolatemfi,oslA
ehtevomoteruseb,devomebotgniogsitnemurtsniehtnehW
ehtgulpnu,hctiwsrewopehtFFOnrut,retnecehtotdaehtnemerusaem
.selbacrehtotcennocsiddna,teltuoCAehtmorfelbacrewop
roerifnitluseryamhcihw,degamadebyamelbaceht,esiwrehtO
fomottobehttroppus,deirracebotgniogsitnemurtsniehtnehw,oslA
rotserecafehtybtidlohtonoD.yllatnozirohtidlohdnatnemurtsnieht
tifidegamadebyamtnemurtsniehT.tnemurtsniehtpordrotihtonoD
GNINRAW!
.deriapergniebtituohtiwdesusitnemurtsni
NOITUAC!
NOITUAC!
.noitcefni
.naelctsernihcehtpeekot
NOITUAC!
NOITUAC!
.tnemerusaemlaunam
NOITUAC!
.emitgnolarofdesuebotgniog
ehtfikcohscirtceleroerifnitluseryamhcihw,tlojgnortsaseviecer
otnoitulosedyhedlaratulgrolonahtehtiwtserdaeherofehtepiW
tneverpotredroni,tisesueenimaxetnereffidaemithcaetitcefnisid
.noitcefnisidroferudecorpehtroftsilaicepsatlusnocesaelP
redronisegnahceenimaxeehtemithcaerepaptsernihcehtegnahC
rotsernihcehtrednudnahreh/sihecalpeenimaxeehtevahtonoD
.truhebyamsregnif,esiwrehtO.daehtnemerusaemehtraen
ecafs'eenimaxeehtgnittihdaehtnemerusaemehtdiovaotluferaceB
nignisucofdnatnemngilagnirudeenimaxeehtdrawottignivomnehw
rewopehtFFOnrut,desuebotgniogtonsitnemurtsniehtnehW
tonsitinehwteltuoCAehtmorfelbacrewopehtgulpnu,oslA.hctiws
ehtetullopyamhcihw,yrettabmuihtilasetaroprocnitnemurtsnisihT
.denodnabasitnemurtsniehtfitnemnorivne
NOITUAC!
.tnemurtsni
,lasopsideldnahotynapmoclasopsidetsawlanoisseforpaksaesaelP
ehtfognisopsiderofebrotubirtsidroevitatneserpernonaCtcatnocro
(6)
When Problem Occurs
GNINRAW!
Maintenance and Inspection
GNINRAW!
GNINRAW!
Safety Information
rewopehtFFOnrutyletaidemmi,ruccogniwollofehtfoynadluohS
nonaCtcatnocdna,teltuoCAehtmorfelbacrewopehtgulpnu,hctiws
.rotubirtsidroevitatneserper
.dnuoslamronbarollemsddo,ekomssierehtnehW-
sahtcejbolatemarotnemurtsniehtotnidellipsneebsahdiuqilnehW-
.gnineponahguorhtderetne
.degamadsitidnadeppordneebsahtcudorpehtnehW-
ehtnehwhctiwsrewopehtFFOnrutoteruseb,snosaerytefasroF
.demrofrepebotgniogeralaunamsihtnidetacidnisnoitcepsni
.kcohscirtcelenitluseryamti,esiwrehtO
ehtFFOnrutoteruseb,denaelcebotgniogsitnemurtsniehtnehW
.teltuoCAehtmorfelbacrewopehtgulpnudna,hctiwsrewop
gninaelcelbammalfrehtoynarorenniht,enizneb,lohoclaesureveN
.tluseryamkcohscirtceleroerif,esiwrehtO.stnega
ehtmorftigniggulpnuybyllacidoirepelbacrewopehtfogulpehtnaelC
CAdnayrehpirepsti,gulpehtmorftridrotsudgnivomerdnateltuoCA
GNINRAW!
GNINRAW!
.tnediccaro,kcohscirtcele,erifesuacyamti,ylreporpderiaper
NOITUAC!
aniemitgnolarofnideggulptpeksielbacehtfI.htolcyrdahtiwteltuo
,erutsiomtcarttalliwgulpehtdnuoratsud,ecalpytoosrodimuh,ytsud
.erifanitluserdluochcihweruliafnoitalusniesuacdluocsihtdna
tonsitifI.ylnoreenignedeifilauqaybderiaperebtsumtnemurtsniehT
.tignisuerofebtnemurtsniehttcepsnioteruseb,snosaeryrefasroF
(7)
Safety Information
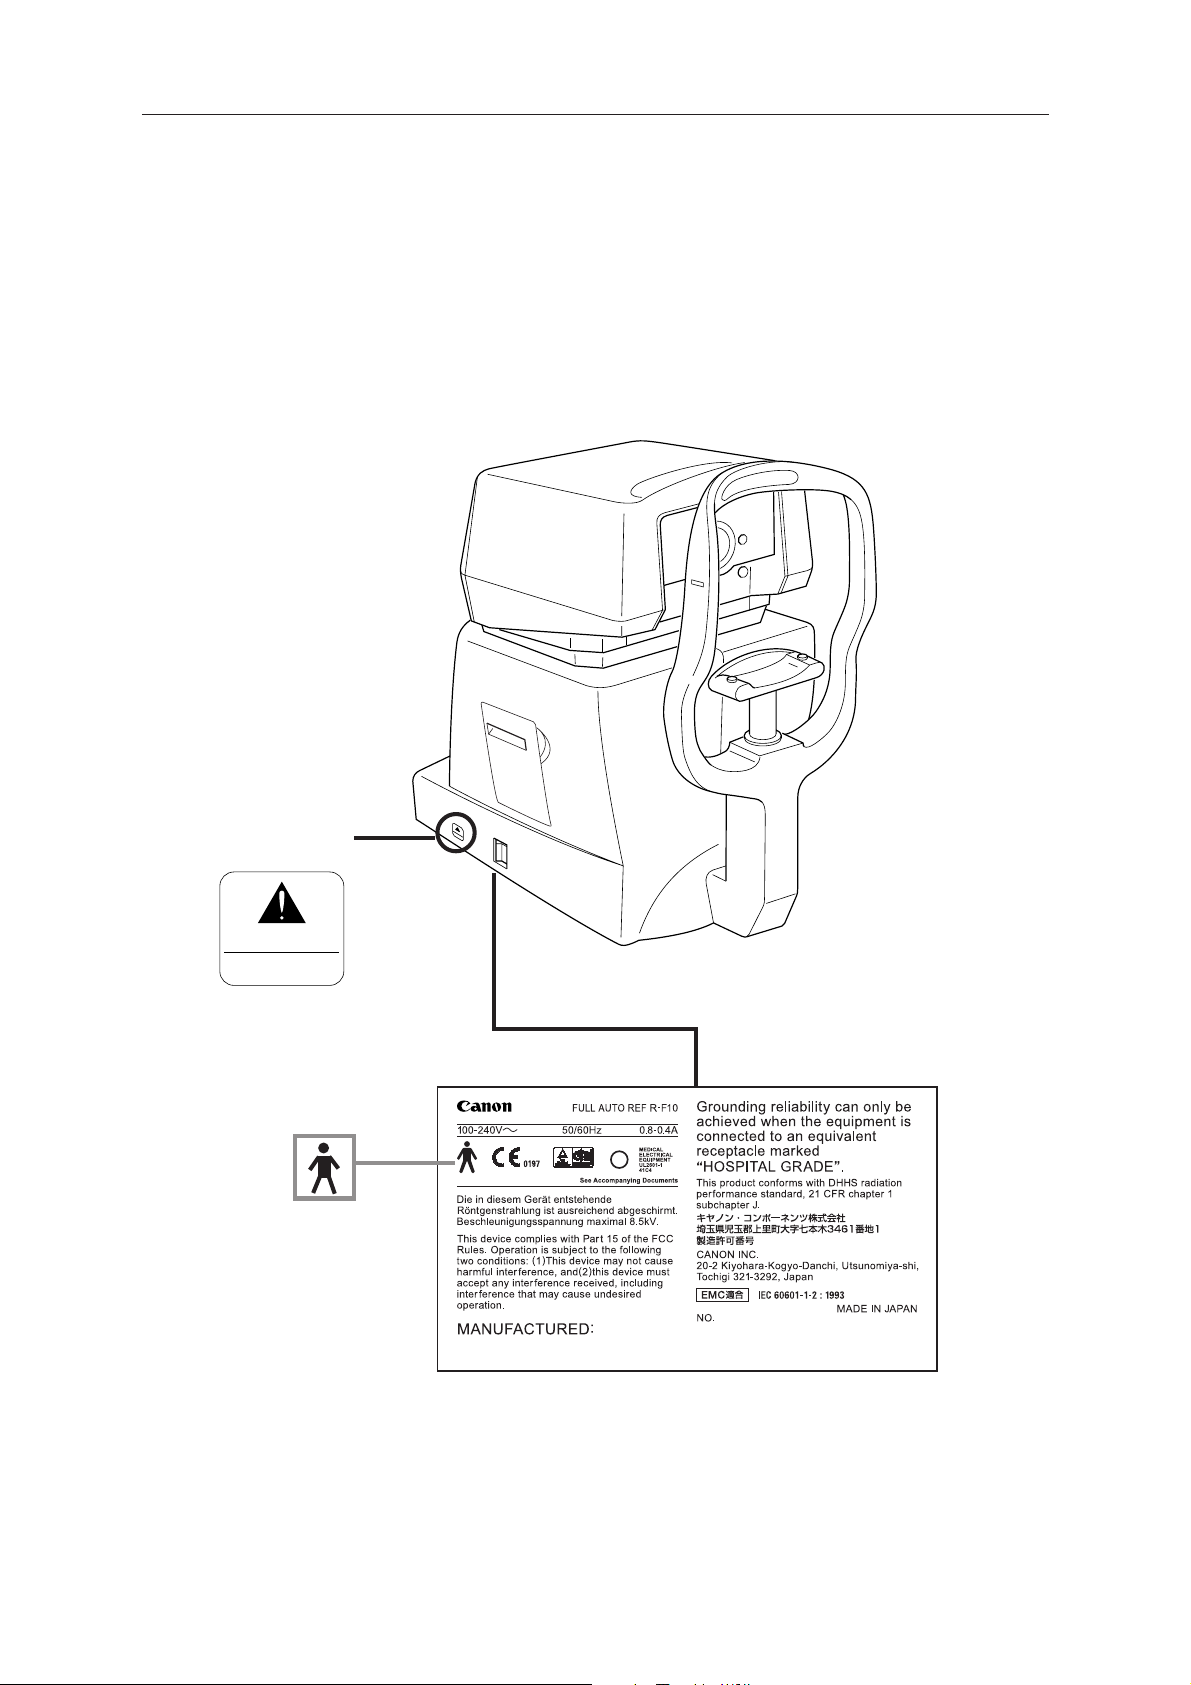
Rating Plate and Warning Label
The R-F10 has a rating plate and a warning label on it.
Contents of those and the positions where they are attached are indicated below.
Warning Label
See manual
Mirar el manual
The unit weighs 21 kg –
it may tip over if proper
care is not taken.
This mark indicates that this
is a Type B Applied Part
according to UL2601-1/
EN60601-1.
This unit can be installed in
the patient environment.
Raing Plate
(8)

Contents
Safety Information ................................................................................. (1)
1. Overview ..............................................................................................1
2. Notes for Using the Instrument ............................................................ 2
3. Description ...........................................................................................3
3.1 Main Unit...........................................................................................................3
3.2 Connectors under the Main Unit ....................................................................... 5
3.3 Operation Panel ................................................................................................6
4. Measurements .....................................................................................9
4.1 Preparation .......................................................................................................9
4.2 Measurement in FULL AUTO Mode................................................................12
4.3 Measurement in MANUAL Mode ....................................................................19
5. Measurements Stored in Memory [DISPLAY Mode] ..........................23
6. Various Settings [SET Mode] .............................................................24
6.1 Settings for Measurement (Page: 1/3) ............................................................25
6.1.1 Basic Operation .......................................................................................25
6.1.2 Items........................................................................................................25
6.2 Settings for Printing and Transfer (Page: 2/3).................................................28
6.2.1 Basic Operation .......................................................................................28
6.2.2 Items........................................................................................................29
6.3 Entering Message for Internal Printer (Page: 3/3)...........................................31
6.3.1 About the Display.....................................................................................31
6.3.2 How to Enter the Characters....................................................................32
6.3.3 How to Insert............................................................................................32
6.3.4 How to Delete ..........................................................................................33

7. Daily Inspection and Maintenance .....................................................35
7.1 Inspection........................................................................................................35
7.1.1 Before Turning ON the Power..................................................................36
7.1.2 After Turning ON the Power.....................................................................37
7.2 Before Calling a Service Person .....................................................................38
7.2.1 If Problems Such as Following Occur......................................................38
7.2.2 If Message Such as Following Appears on the Monitor ...........................39
7.3 Cleaning and Disinfection ...............................................................................43
7.3.1 Protective Glass in Measurement Window ..............................................43
7.3.2 Forehead Rest .........................................................................................4 4
7.3.3 Cover, Monitor and Roller ........................................................................44
7.3.4 Trackball ..................................................................................................45
7.4 Replacement...................................................................................................46
7.4.1 Chin Rest Paper ......................................................................................46
7.4.2 Printing Paper ..........................................................................................47
7.5 Expendable Parts List .....................................................................................49
8. Installation..........................................................................................50
8.1 Installation.......................................................................................................50
8.2 Precautions when Moving the Instrument .......................................................52
9. Service Information ............................................................................53
10. Specifications ...................................................................................54
11. Components .....................................................................................55

1. Overview
The Canon Full Auto Ref R-F10 is for performing refractometry.
The main feature of the R-F10 is that by just displaying the examinee’s eye somewhere on
the monitor and pressing the START switch, the instrument then automatically performs a
precise alignment and measurement by a three-dimensional tracking system.
Furthermore, the instrument will also measure the other eye and print out the results for both
eyes. Thus, full measurement can be done very easily in a short time.
Also, because the observation range of examinee’s eye on the monitor has been widened and
the depth of focus is deep, it is easier to check the position of the eye or whether eyelashes
are covering the pupil.
– 1 –

2. Notes for Using the Instrument
Before Use
(1) Sudden heating of the room in cold areas will cause condensation to form on the
protective glass in the measurement window and on optical parts inside the instrument.
In this case, wait until condensation disappears before performing measurement.
During Measurement
(1) Do not stain the protective glass in the measurement window with fingerprints, etc.
Otherwise, you may not be able to obtain a correct measurement.
(2) It is recommended that a hard copy of the printout be made if you wish to store it for a
long time, because printouts on thermal paper are apt to deteriorate.
After Use
(1) Turn OFF the power and place the dust cover over the instrument.
During Cleaning and Disinfection
(1) If the surface of the protective glass is wiped when dust or dirt is on it, it will be
scratched. Also, do not wipe the protective glass with ethyl alcohol or with cleaning
paper containing silicone.
Otherwise, the surface will be corroded, or will be stained. → Section 7.3.1
(2) Do not use alcohol, benzine or thinner for cleaning the cover of the instrument.
Also, never wipe the cover with ethanol or glutaraldehyde solution.
Otherwise, the coating will be corroded. → Section 7.3.3
During Installation
(1) Handle the instrument carefully, as preadjustment may be altered if the instrument
receives a strong jolt.
(2) Do not install the instrument where it will be exposed to direct sunlight.
Otherwise, it will be hard to see the monitor properly, or you may not be able to obtain
a correct measurement.
(3) Blow off the dust in the connectors of the cables with a blower before connecting them.
Otherwise, connection failure may occur.
(4) When the instrument is going to be transported, it must be protected against vibration
and shocks. Contact Canon representative or distributor for advice on the procedure for
packing it.
(5) Do not lay the instrument on its side when the power is turned ON. Otherwise, the
instrument will malfunction.
– 2 –

3. Description
3.1 Main Unit
1
2
5
6
3
4
1 Measurement Head
Unit that performs measurement.
2 Height Adjustment Mark
Align the height of the examinee’s eye with this
mark by adjusting the height of chin rest.
3 Contrast Adjuster
Adjusts contrast of monitor.
4 Brightness Adjuster
Adjusts brightness of monitor.
5 Monitor
Monitor that displays the screen for measurements and various settings.
6 Operation Panel
See section 3.3.
– 3 –
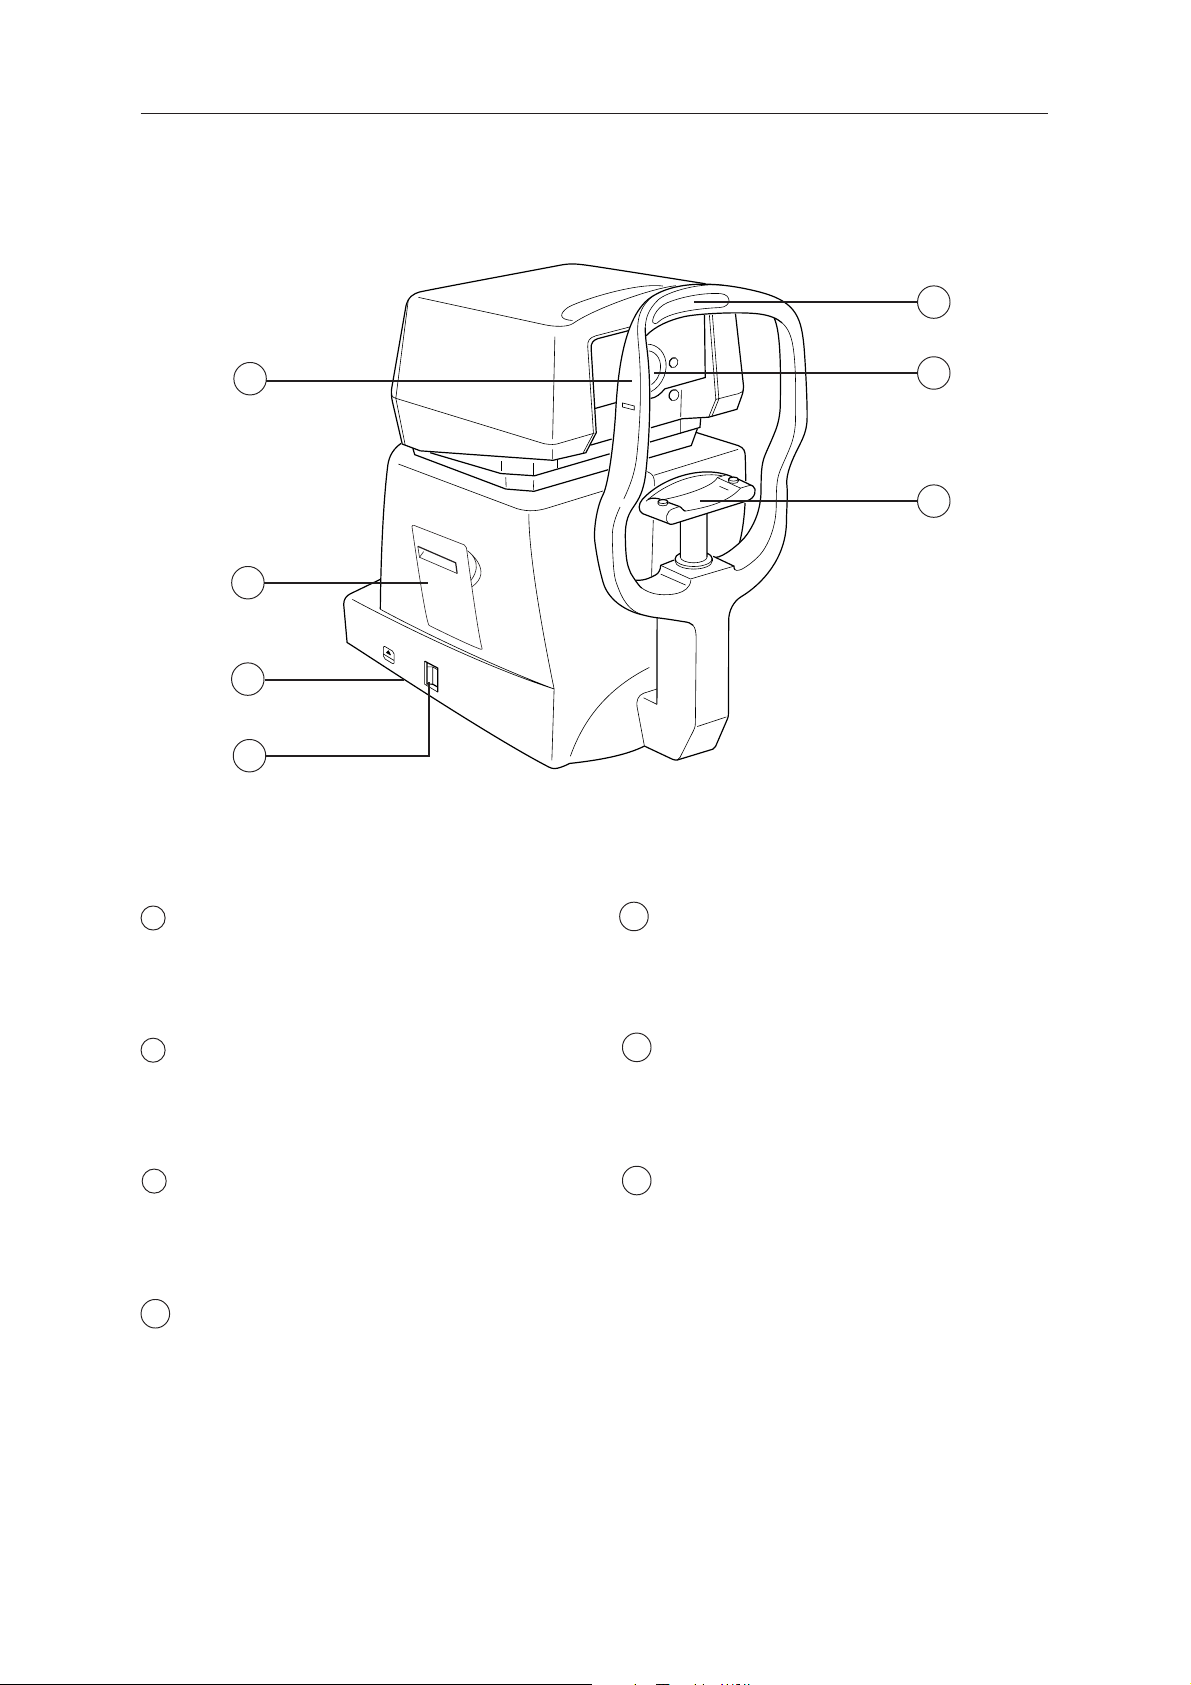
3.1 Main Unit
11
7
8
9
10
7 Face Rest
Place the examinee’s face against this rest.
12
13
11 Forehead Rest
Place the examinee’s forehead against this rest.
8 Printer
Prints measurements.
9 Rating Plate
Name of the product, rated voltage, serial
number, etc. are indicated on this plate.
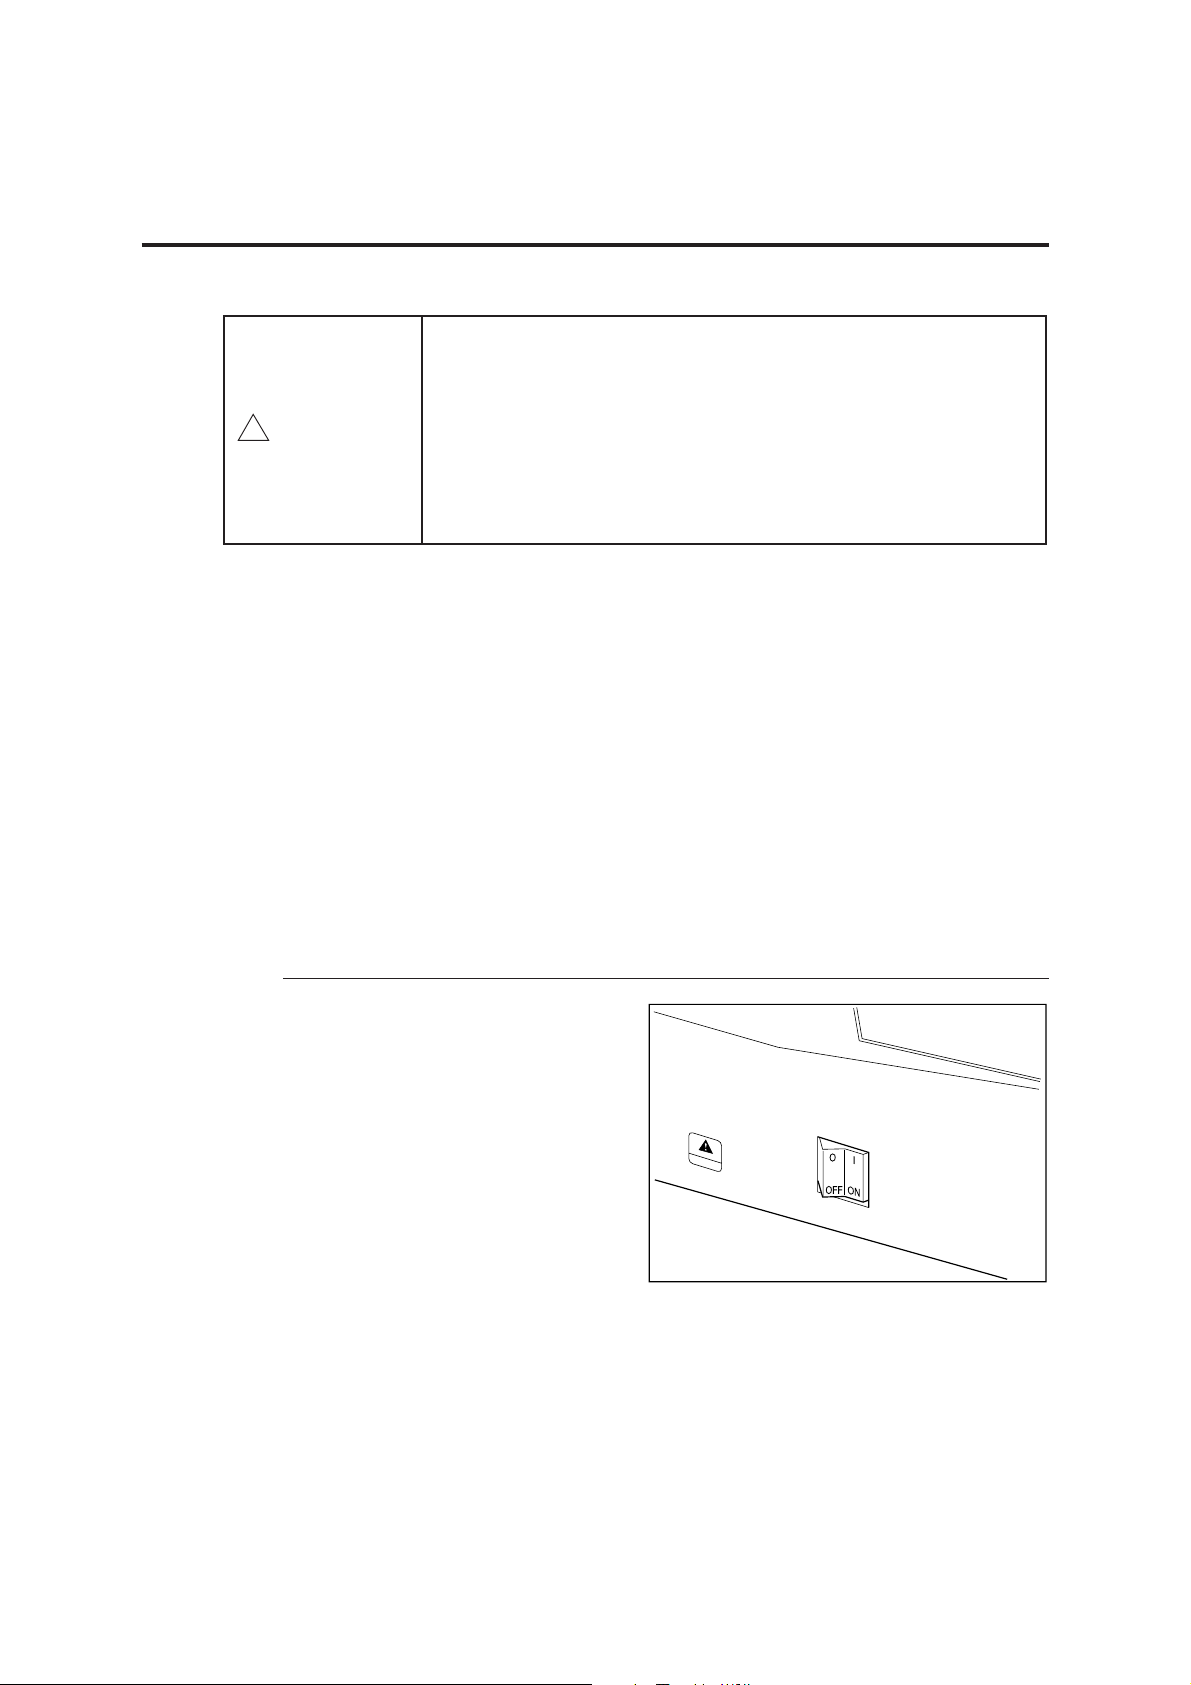
10 Power Switch
Switch for turning power ON and OFF.
12 Measurement Window
Window for the examinee to look into for
measurement.
13 Chin Rest
Place the examinee’s chin on this rest.
– 4 –
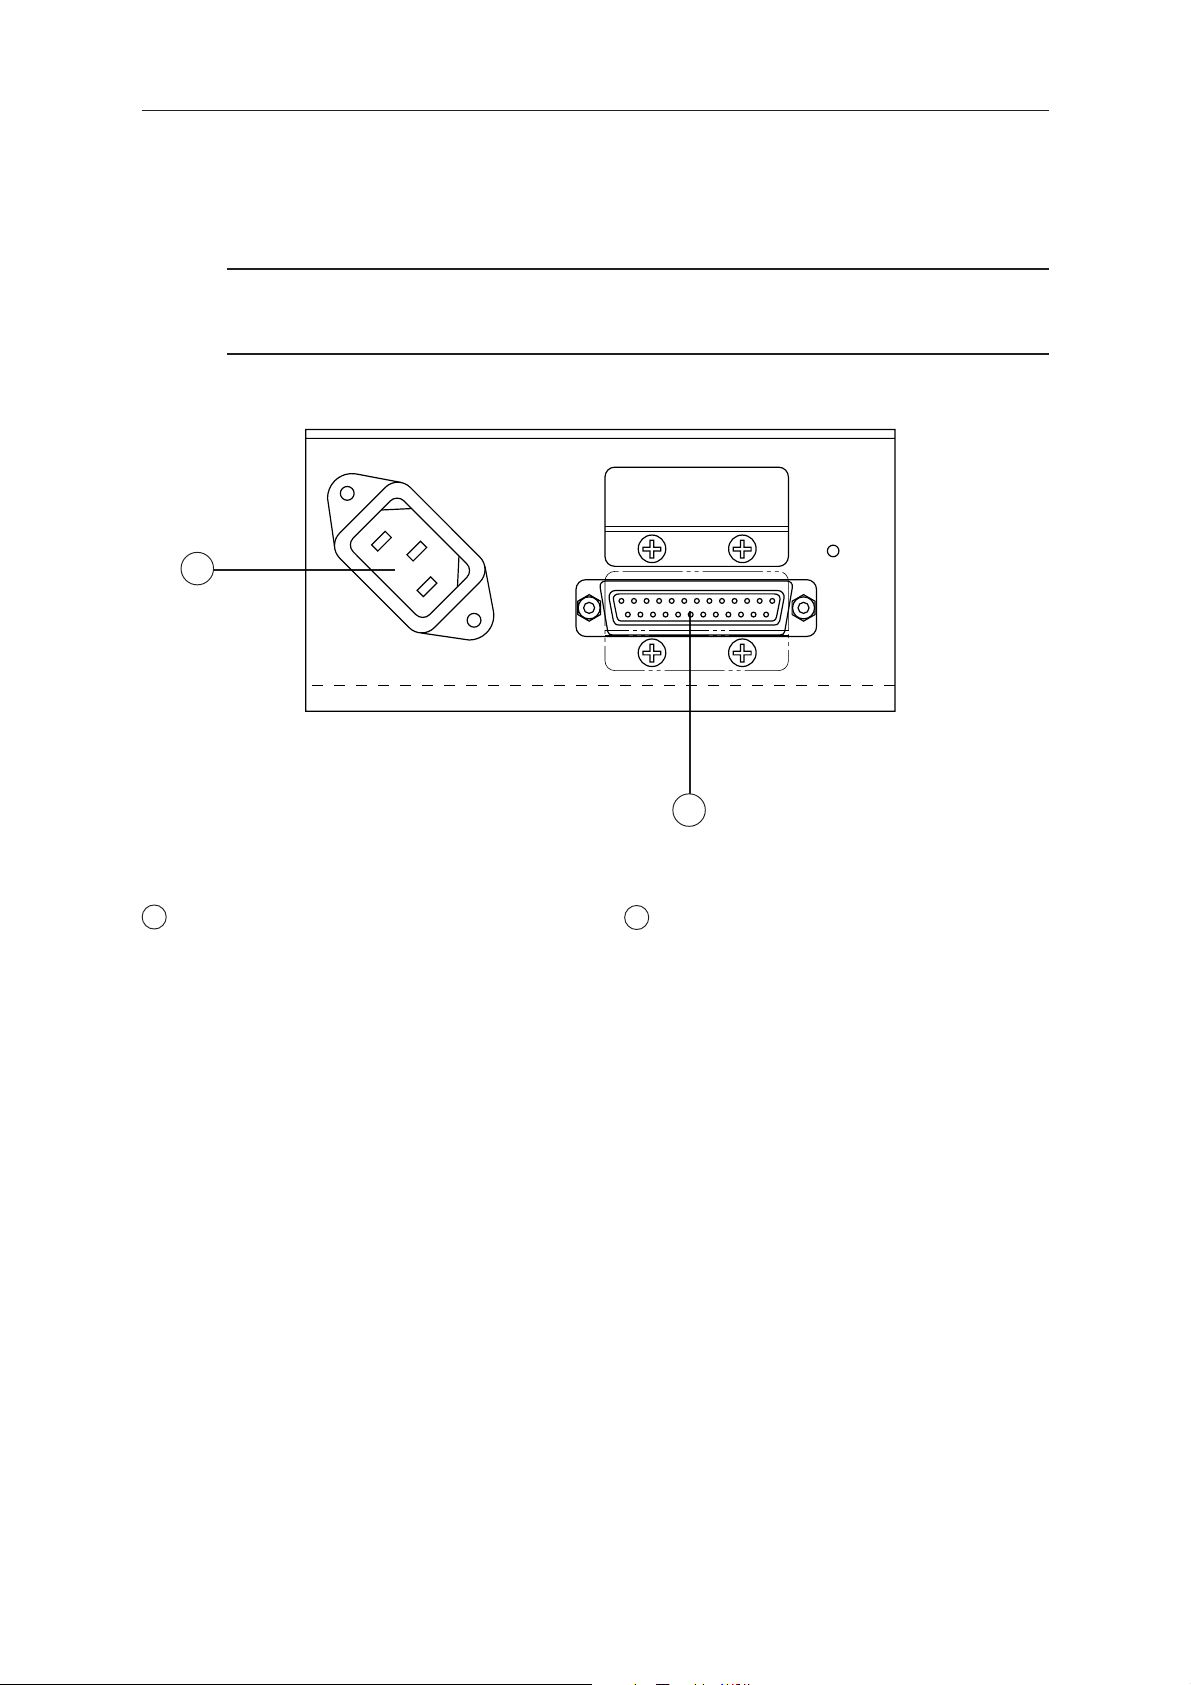
3.2 Connectors under the Main Unit
3.2 Connectors under the Main Unit
NOTE: Do not remove the cover for the RS232C connector.
Please contact Canon representative or distributor when connecting any instrument
to the R-F10.
1
1 Power Supply Connector
Connector for the power supply cable.
2
2 RS232C Connector
RS232C connector for connecting instruments
such as autophoropters.
The instrument must comply with the
IEC60601-1 standard.
– 5 –
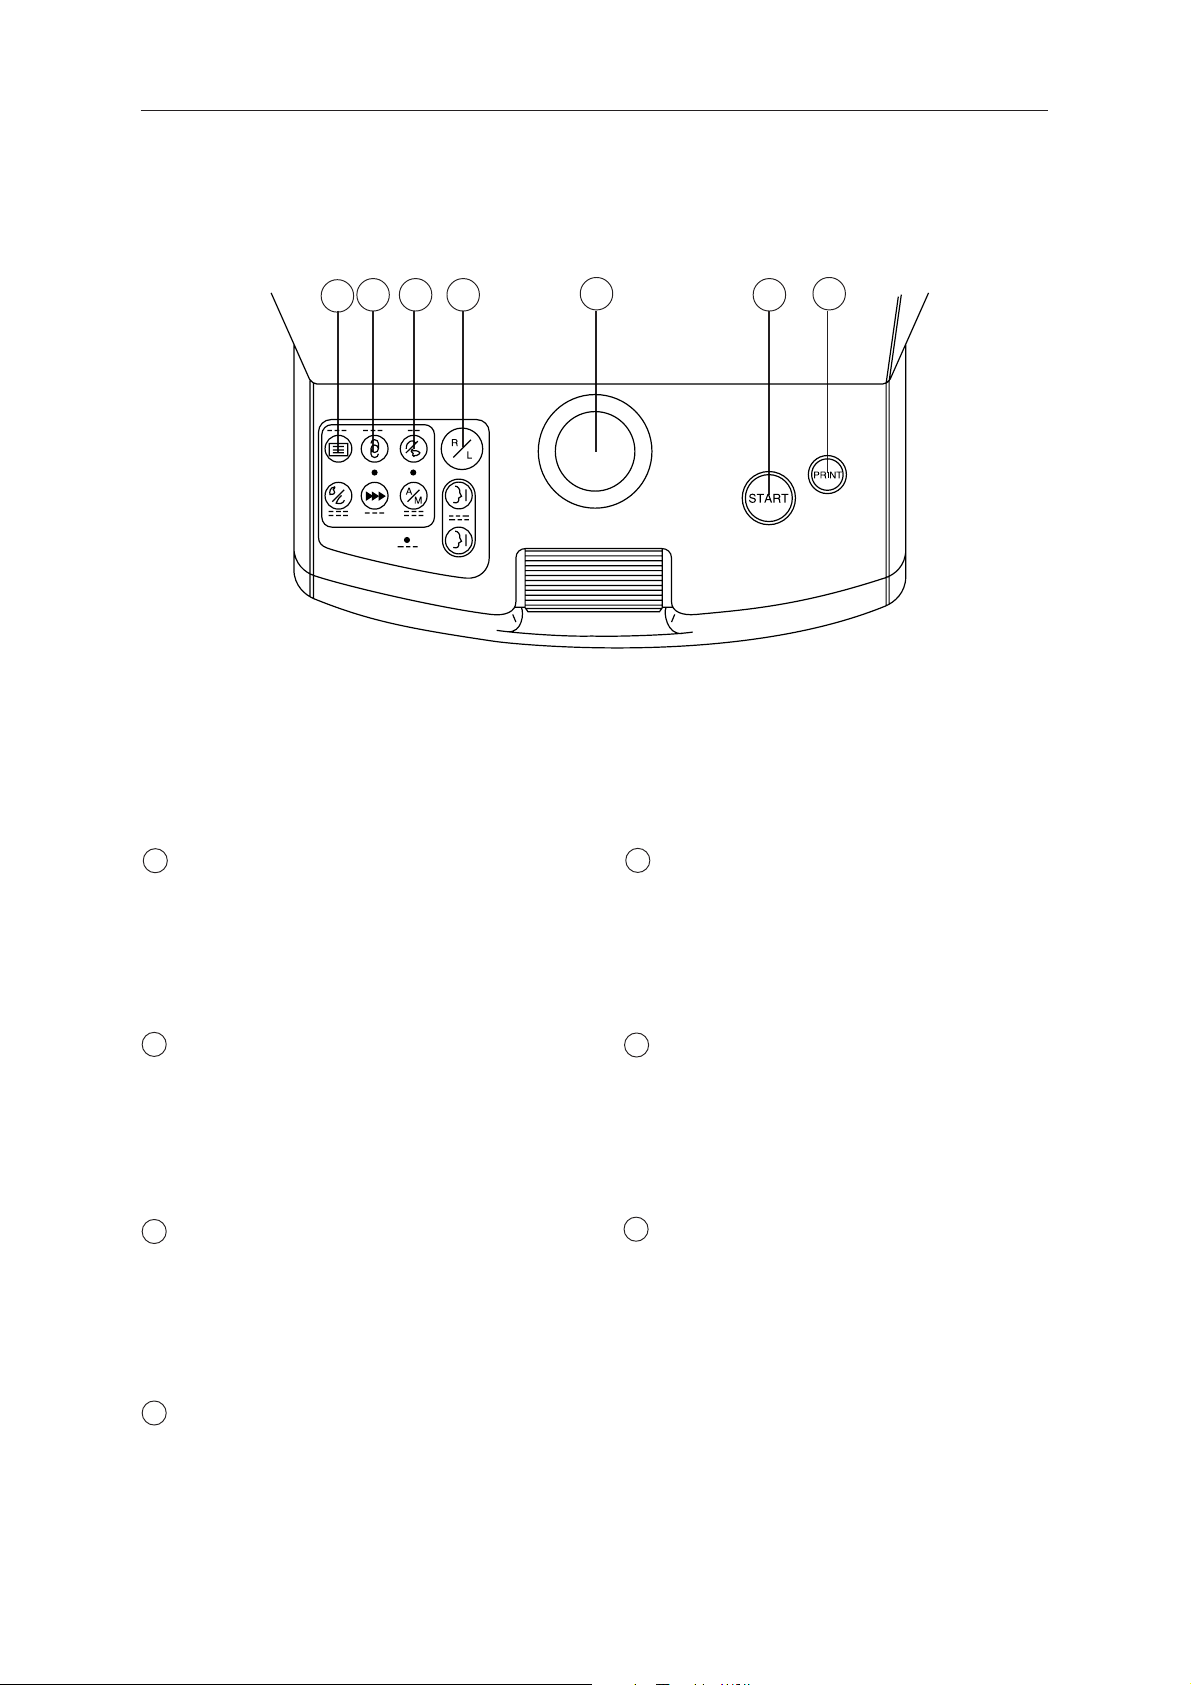
3.3 Operation Panel
3.3 Operation Panel
2 3 4
1
1 DISP Switch
Press this switch in order to enter DISPLAY
mode, where you can see measurement data
stored in memory .
5
5 Trackball
Moves the measurement head up and down,
right and left.
7
6
2 IOL Switch
Press this switch when the examinee’s eye is
difficult to measure due to cataract or for
examinee with intraocular lens (IOL). Lamp on
the switch lights when the switch is ON.
3 VD Switch
Vertex distance switches between 12.0 mm or
13.5 mm (for glasses) and 0 mm (for contact
lenses).
4 R/L Switch
Each time the switch is pressed, the measurement head moves either to the right or left eye.
6 START Switch
When this switch is pressed in automatic
measurement mode, automatic alignment and
measurement are performed. In manual measurement mode, only measurement is performed.
7 PRINT Switch
Press this switch in order to print or transfer the
measurement.
– 6 –
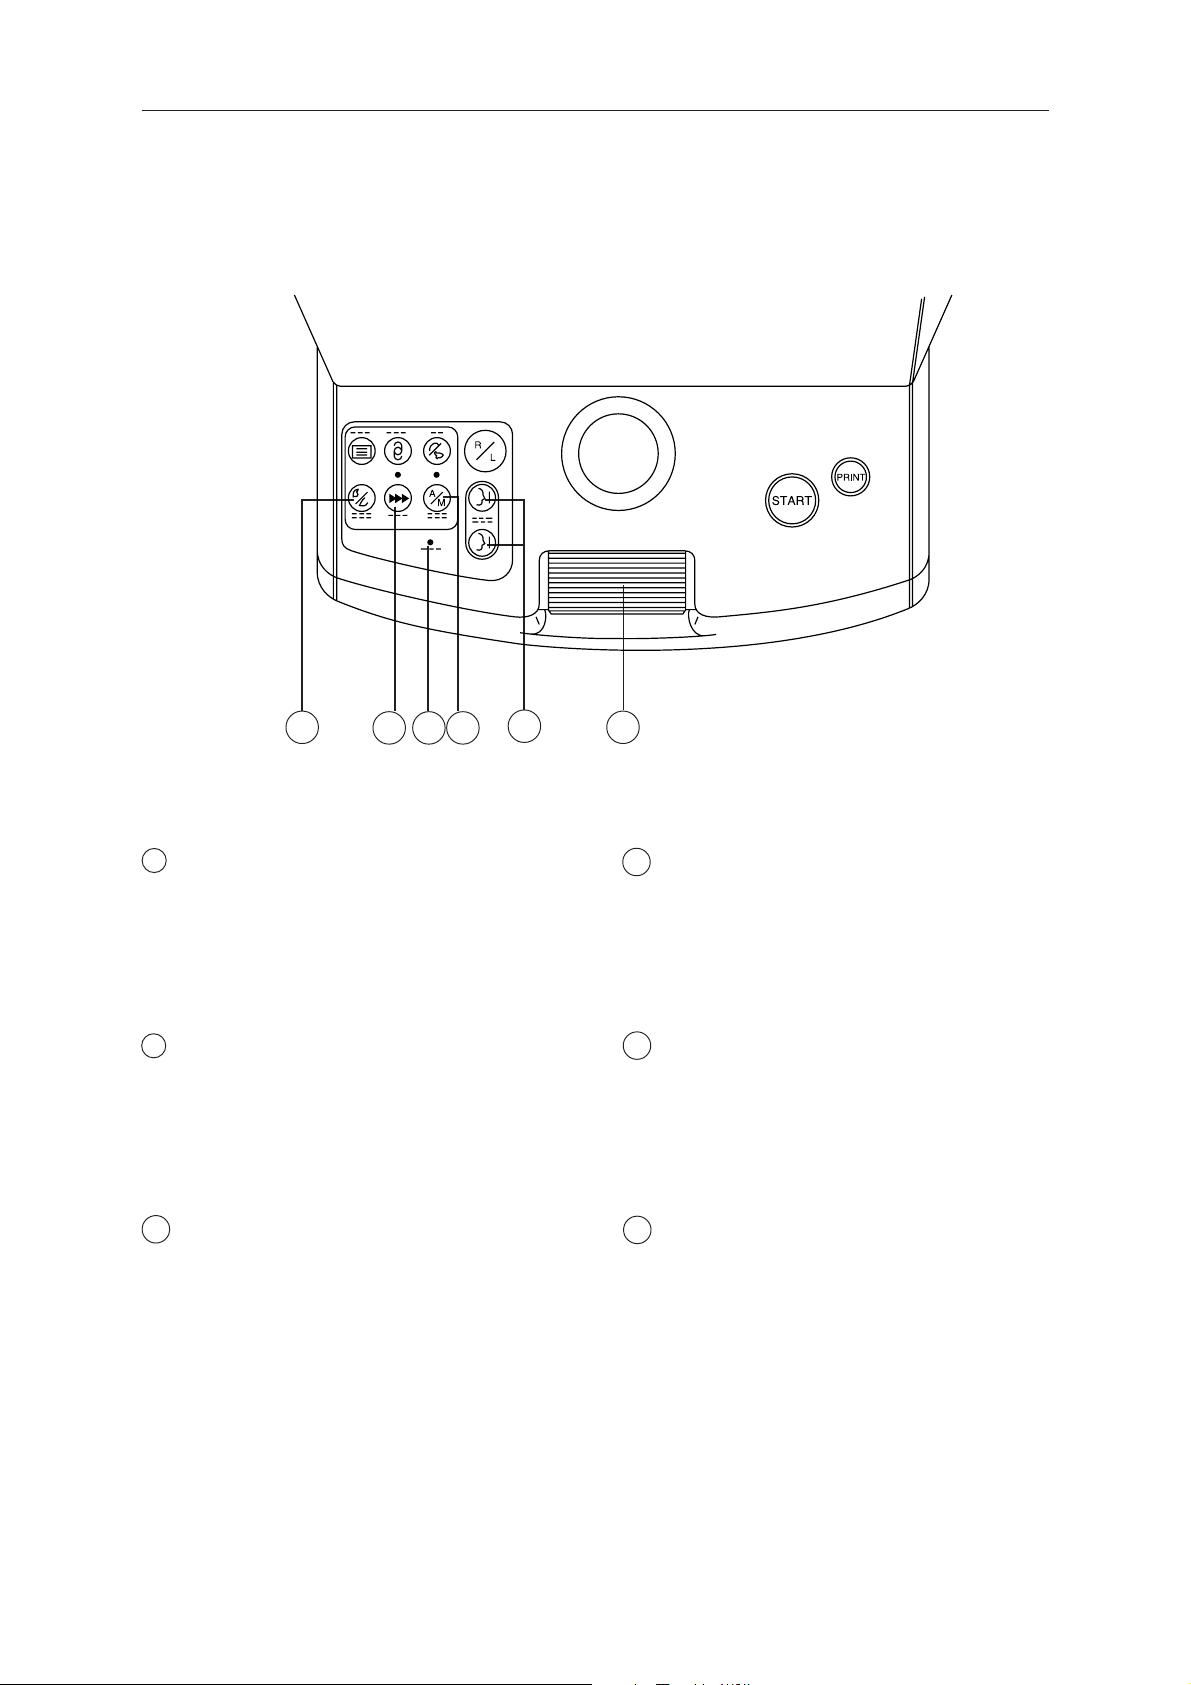
3.3 Operation Panel
10
9
12
118
8 SET Switch
Press this switch in order to enter SET mode,
where you can perform various settings concerning measurements.
9 MANU. Switch
Press this switch in order to perform manual
measurement.
10 READY Lamp
It is constantly lit when the instrument is ready
for measurement, and blinks during initial
checks and when power-saving system is
operating.
13
11 AUTO Switch
Press this switch in order to perform fully
automatic measurement.
12 CHIN REST Switches
For raising/lowering the chin rest.
13 Roller
Moves the measurement head back and forth.
– 7 –

3.3 Operation Panel
In DISPLAY and SET modes, a diagram showing the switches and their functions for the
operation will be displayed on the lower part of the monitor, because the functions differ
from that seen in the display of the switches.
The diagram corresponds to the switches on the operation panel as follows:
DISP switch
SET switch
IOL switch
MANU. switch
VD switch
AUTO switch
R/L switch
CHIN REST
switches
Trackball
Roller
PRINT switch
ST AR T switch
– 8 –
4. Measurements
GNINRAW!
- .gnineponahguorhtderetnesahstcejbo
- .degamad
When any operation has been interrupted for more than 3 minutes with the power turned
ON, power-saving system of the R-F10 operates. Buzzer sounds when the instrument is
entering or going out of this mode, and READY lamp blinks while this system is operating. Press any one of the switches in order to restore the function.
4.1 Preparation
ehtFFOnrutyletaidemmi,ruccogniwollofehtfoynadluohS
dna,teltuoCAehtmorfelbacrewopehtgulpnu,hctiwsrewop
.rotubirtsidroevitatneserpernonaCtcatnoc
.dnuoslamronbarorododdo,ekomssierehtnehW-
latemarotnemurtsniehtotnidellipsneebsahdiuqilnehW-
gnisuohstirodeppordneebsahtcudorpehtnehW-
Preparation is basically the same for measurements both in FULL AUTO and MANUAL
modes.
Turn ON the power
1
Initial checks inside the instrument
start automatically.
– 9 –
 Loading...