

Page 1

Remote UI Guide
Remote UI Guide
IMPORTANT:
Read this manual carefully before using your printer.
Save this manual for future reference.
ENG
Page 2

Remote UI Guide
Page 3

●
How This Manual Is Organized
Chapter 1
Chapter 2
Chapter 3
Before You Start
Various Functions of the Remote UI
Appendix
Notice
To view the manuals in PDF format, Adobe Reader/Adobe Acrobat Reader is
required. If Adobe Reader/Adobe Acrobat Reader is not installed on your
system, please download it from the Adobe Systems Incorporated website.
Considerable effort has been made to ensure that this manual is free of inaccuracies and omissions. However, as we are constantly improving our
•
products, if you need an exact specification, please contact Canon.
•
The GIF images on the Remote UI are created using Photoshop by Adobe Systems Incorporated.
Page 4

Contents
Preface . . . . . . . . . . . . . . . . . . . . . . . . . . . . . . . . . . . . . . . . . . . . . . . . . . . . . . . . . iv
How To Use This Manual . . . . . . . . . . . . . . . . . . . . . . . . . . . . . . . . . . . . . . . . . . . iv
Symbols Used in This Manual . . . . . . . . . . . . . . . . . . . . . . . . . . . . . . . . . . . . . . iv
Buttons Used in This Manual . . . . . . . . . . . . . . . . . . . . . . . . . . . . . . . . . . . . . . .iv
Displays Used in This Manual . . . . . . . . . . . . . . . . . . . . . . . . . . . . . . . . . . . . . . v
Abbreviations Used in This Manual . . . . . . . . . . . . . . . . . . . . . . . . . . . . . . . . . . v
Legal Notices . . . . . . . . . . . . . . . . . . . . . . . . . . . . . . . . . . . . . . . . . . . . . . . . . . . . .vi
Tr ademarks. . . . . . . . . . . . . . . . . . . . . . . . . . . . . . . . . . . . . . . . . . . . . . . . . . . . . vi
Copyright . . . . . . . . . . . . . . . . . . . . . . . . . . . . . . . . . . . . . . . . . . . . . . . . . . . . . . vi
Disclaimers. . . . . . . . . . . . . . . . . . . . . . . . . . . . . . . . . . . . . . . . . . . . . . . . . . . . vii
Chapter 1 Before You Start
Features and Benefits of the Remote UI . . . . . . . . . . . . . . . . . . . . . . . . . . . . . 1-2
System Requirements . . . . . . . . . . . . . . . . . . . . . . . . . . . . . . . . . . . . . . . . . . . . 1-5
Starting the Remote UI . . . . . . . . . . . . . . . . . . . . . . . . . . . . . . . . . . . . . . . . . . . 1-6
Starting the Remote UI. . . . . . . . . . . . . . . . . . . . . . . . . . . . . . . . . . . . . . . . . . 1-6
Logging On the Remote UI . . . . . . . . . . . . . . . . . . . . . . . . . . . . . . . . . . . . . . 1-8
Screen Layout of the Remote UI. . . . . . . . . . . . . . . . . . . . . . . . . . . . . . . . . . . 1-11
Chapter 2 Various Functions of the Remote UI
Displaying/Managing the Printer Status (Device Manager) . . . . . . . . . . . . . . 2-2
Display Procedure . . . . . . . . . . . . . . . . . . . . . . . . . . . . . . . . . . . . . . . . . . . . . 2-3
Displaying the Current Status ([Status] Page) . . . . . . . . . . . . . . . . . . . . . . . . 2-4
Displaying/Changing the Printer Information ([Information] Page). . . . . . . . 2-11
Confirming the Availabilities of the Optional Accessories ([Features] Page)
Displaying/Changing the Network Settings ([Network] Page) . . . . . . . . . . . 2-15
Displaying/Operating the Jobs (Job Manager) . . . . . . . . . . . . . . . . . . . . . . . 2-17
Displaying/Operating the Print Jobs (Pause/Resume/Delete, etc.) . . . . . . . 2-17
Displaying/Operating the Jobs Stored in a Box (Resume/Delete) . . . . . . . . 2-21
Operating Procedure . . . . . . . . . . . . . . . . . . . . . . . . . . . . . . . . . . . . . . . 2-21
Changing the Box Settings. . . . . . . . . . . . . . . . . . . . . . . . . . . . . . . . . . . 2-25
Displaying the Print Log Page . . . . . . . . . . . . . . . . . . . . . . . . . . . . . . . . . . . 2-28
Printing Files Directly (Direct Print) . . . . . . . . . . . . . . . . . . . . . . . . . . . . . . . . 2-30
Displaying/Changing the Printer Settings (Device Settings). . . . . . . . . . . . 2-31
Operating Procedure . . . . . . . . . . . . . . . . . . . . . . . . . . . . . . . . . . . . . . . . . . 2-32
Changing Date and Time . . . . . . . . . . . . . . . . . . . . . . . . . . . . . . . . . . . . . . . 2-33
ii
. . . 2-14
Page 5

Displaying/Changing the Links (Support Links) . . . . . . . . . . . . . . . . . . . . . .2-38
Display Procedure . . . . . . . . . . . . . . . . . . . . . . . . . . . . . . . . . . . . . . . . . . . . .2-38
Changing the Links . . . . . . . . . . . . . . . . . . . . . . . . . . . . . . . . . . . . . . . . . . . . 2-39
Chapter 3 Appendix
Changing the Remote UI Settings . . . . . . . . . . . . . . . . . . . . . . . . . . . . . . . . . . . 3-2
Creating/Registering/Changing a Key and Its Certificate . . . . . . . . . . . . . . . .3-4
Creating a Key and Its Certificate . . . . . . . . . . . . . . . . . . . . . . . . . . . . . . . . . . 3-6
Installing a Key/Certificate File on the Printer . . . . . . . . . . . . . . . . . . . . . . . .3-12
Registering a Key and Its Certificate in the Printer . . . . . . . . . . . . . . . . . . . . 3-14
Specifying a Key as the Default Key . . . . . . . . . . . . . . . . . . . . . . . . . . . . . . .3-16
Checking a Certificate . . . . . . . . . . . . . . . . . . . . . . . . . . . . . . . . . . . . . . . . . . 3-17
Deleting a Key and Its Certificate. . . . . . . . . . . . . . . . . . . . . . . . . . . . . . . . . .3-19
Deleting a Key/Certificate File Installed on the Printer. . . . . . . . . . . . . . . . . .3-20
Changing the Job Log Display Settings . . . . . . . . . . . . . . . . . . . . . . . . . . . . . 3-21
Printing an Encrypted Secured Print Job
(Only When the Hard Disk Is Installed) . . . . . . . . . . . . . . . . . . . . . . . . . . . . . .3-23
Index . . . . . . . . . . . . . . . . . . . . . . . . . . . . . . . . . . . . . . . . . . . . . . . . . . . . . . . . . . 3-27
iii
Page 6

Preface
Thank you for purchasing this Canon product.
Please read this manual thoroughly before operating the printer in order to familiarize
yourself with its capabilities, and to make the most of its many functions.
After reading this manual, store it in a safe place for future reference.
How To Use This Manual
Symbols Used in This Manual
The following symbols are used in this manual to indicate operational requirements
or clarification.
IMPORTANT
NOTE
Indicates operational requirements and restrictions. Be sure to read
these items carefully in order to operate the printer correctly, and to
avoid damage to the printer.
Indicates a clarification of an operation, or contains additional
explanations for a procedure. Reading these notes is highly
recommended.
Buttons Used in This Manual
The following button names are a few examples of how buttons to be pressed are
expressed in this manual:
•
Buttons on Computer Operation Screen: [Button Name]
Example: [OK]
[Change]
iv
Page 7

Displays Used in This Manual
Displays used in this manual may differ from those on your computer depending on
the system environment.
The buttons which you should press are marked with a as shown below.
When multiple buttons can be pressed on the screenshot of computer operation
screen, all buttons are marked. Select the button which suits your needs.
1
Select [Administrator Mode] or [End-User Mode].
Abbreviations Used in This Manual
In this manual, product names and model names are abbreviated as follows:
Microsoft Windows Vista operating system: Windows Vista
Microsoft Windows operating system: Windows
Click this button
for operation.
v
Page 8

Legal Notices
Trademarks
Canon, the Canon logo, and LBP are trademarks of Canon Inc.
Adobe, Adobe Acrobat, Adobe Reader, and Photoshop are trademarks of Adobe
Systems Incorporated.
Microsoft, Windows, and Windows Vista are trademarks or registered trademarks of
Microsoft Corporation in the U.S. and/or other countries.
Netscape and Netscape Navigator are trademarks of Netscape Communications
Corporation.
RSA is a trademark of RSA Security Inc.
Ethernet is a trademark of Xerox Corporation.
UNIX is a registered trademark of The Open Group in the United States and other
countries.
Other product and company names herein may be the trademarks of their
respective owners.
Copyright
Copyright 2007 by Canon Inc. All rights reserved.
No part of this publication may be reproduced or transmitted in any form or by any
means, electronic or mechanical, including photocopying and recording, or by any
information storage or retrieval system without the prior written permission of
Canon Inc.
vi
Page 9

Disclaimers
The information in this manual is subject to change without notice.
CANON INC. MAKES NO WARRANTY OF ANY KIND WITH REGARD TO THIS
MATERIAL, EITHER EXPRESS OR IMPLIED, EXCEPT AS PROVIDED HEREIN,
INCLUDING WITHOUT LIMITATION, THEREOF, WARRANTIES AS TO
MARKETABILITY, MERCHANTABILITY, FITNESS FOR A PARTICULAR
PURPOSE OF USE OR AGAINST INFRINGEMENT OF ANY PATENT. CANON
INC. SHALL NOT BE LIABLE FOR ANY DIRECT, INCIDENTAL, OR
CONSEQUENTIAL DAMAGES OF ANY NATURE, OR LOSSES OR EXPENSES
RESULTING FROM THE USE OF THIS MATERIAL.
vii
Page 10

viii
Page 11

Before You Start
CHAPTER
This chapter describes the features of the Remote UI and procedure for starting the Remote
UI.
Features and Benefits of the Remote UI . . . . . . . . . . . . . . . . . . . . . . . . . . . . . . . . . . . . .1-2
System Requirements . . . . . . . . . . . . . . . . . . . . . . . . . . . . . . . . . . . . . . . . . . . . . . . . . . .1-5
Starting the Remote UI . . . . . . . . . . . . . . . . . . . . . . . . . . . . . . . . . . . . . . . . . . . . . . . . . . . 1-6
Starting the Remote UI . . . . . . . . . . . . . . . . . . . . . . . . . . . . . . . . . . . . . . . . . . . . . . . . . . . . . . . . .1-6
Logging On the Remote UI . . . . . . . . . . . . . . . . . . . . . . . . . . . . . . . . . . . . . . . . . . . . . . . . . . . . .1-8
Screen Layout of the Remote UI. . . . . . . . . . . . . . . . . . . . . . . . . . . . . . . . . . . . . . . . . . .1-11
1
1-1
Page 12
■
Features and Benefits of the Remote UI
1
browser. By accessing the printer from the web browser via a TCP/IP network, you
can check the printer status, operate jobs, and specify various settings. The
Remote UI has the following features.
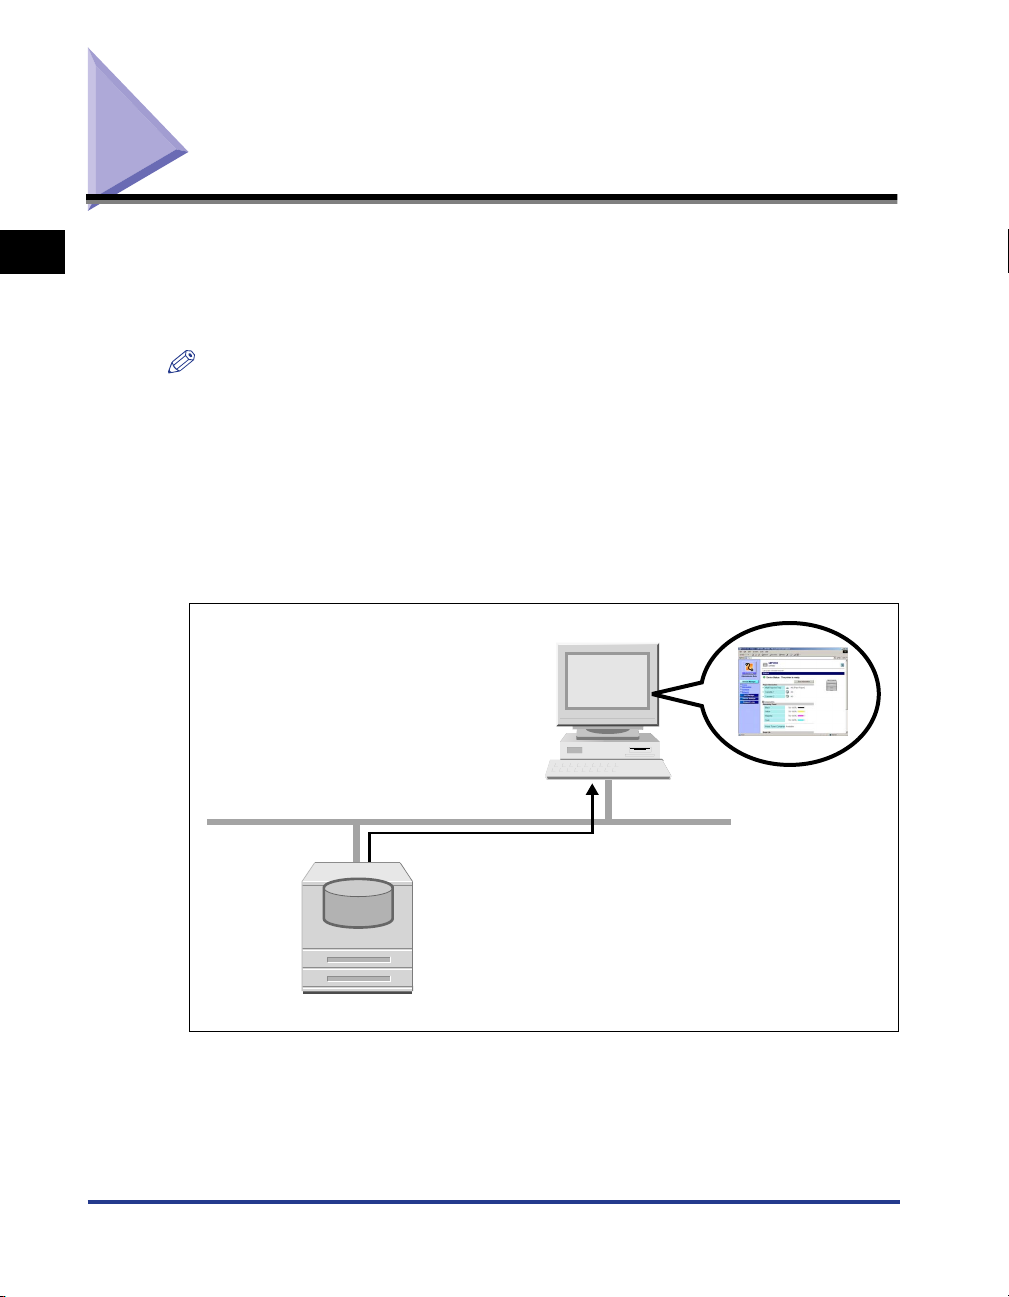
The Remote UI is software that allows you to manage the printer using a web
NOTE
Depending on the printer model or availability of the optional accessories for the printer,
Before You Start
the display screen images and the controllable or specifiable options vary. For more
details, see "Chapter 2 Various Functions of the Remote UI".
Software other than a web browser is not required.
Because the software required for using the Remote UI (a web server) is built in this
printer, you do not need to have software other than a web browser ready. Running the
web browser and specifying the IP address display the Remote UI screen and allows you
to use the Remote UI.
Web Browser
1-2
Web
Server
Remote UI
Printer
Features and Benefits of the Remote UI
TCP/IP (HTTP)
Page 13

■
You can check the printer status from a computer on the network.
The Remote UI allows you to access the printer via a network and display the current
status, various information, and job processing. You can manage the printer from a remote
computer without moving to the printer.
1
Before You Start
Features and Benefits of the Remote UI
1-3
Page 14
■
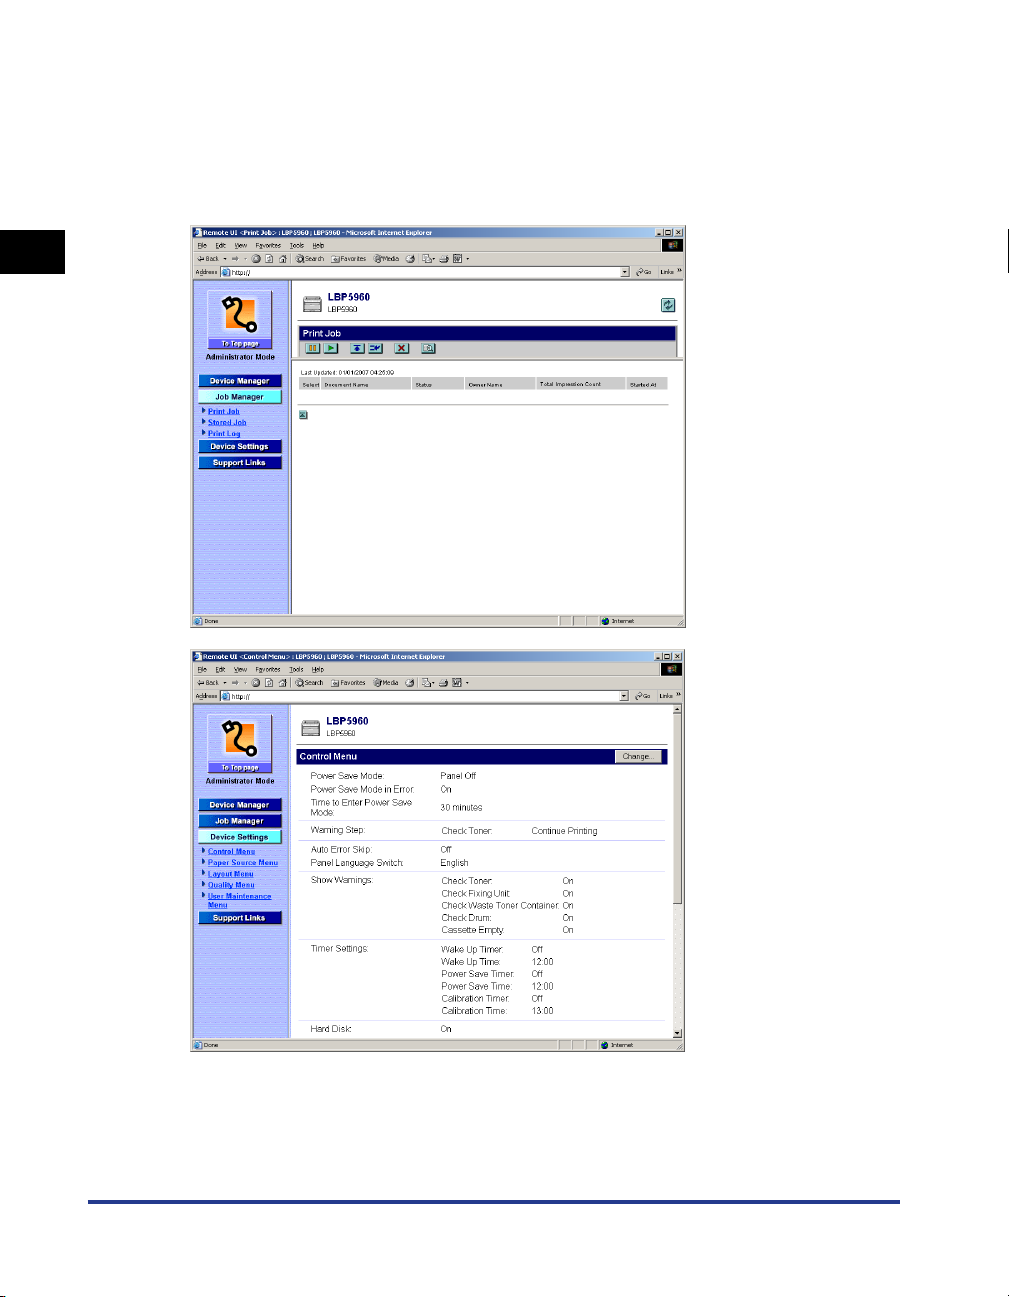
You can specify or operate various printer settings from a computer.
The Remote UI allows you to pause or resume jobs, operate the jobs in the boxes, and
specify various settings. You can operate or specify the settings for the printer from the
computer without using the printer's control panel. There are Administrator Mode and
End-User Mode, and the Administrator mode allows only the administrator to perform the
settings and operation related to the printer management.
1
Before You Start
1-4
Features and Benefits of the Remote UI
Page 15

System Requirements
Operation of the Remote UI in the following system environment is guaranteed.
Web Browser Netscape Navigator 6.0 or later
Internet Explorer 4.01SP1 or later
Operating System An operating system on which the above web browser can run
Display Resolution: 800 x 600 pixels or more
Display colors: 256 or more
NOTE
Software other than the above one, such as a web server, is not required. (A web server
is built in the printer.)
1
Before You Start
System Requirements
1-5
Page 16
Starting the Remote UI
1
Before You Start
Starting the Remote UI
Start the Remote UI using a web browser.
1
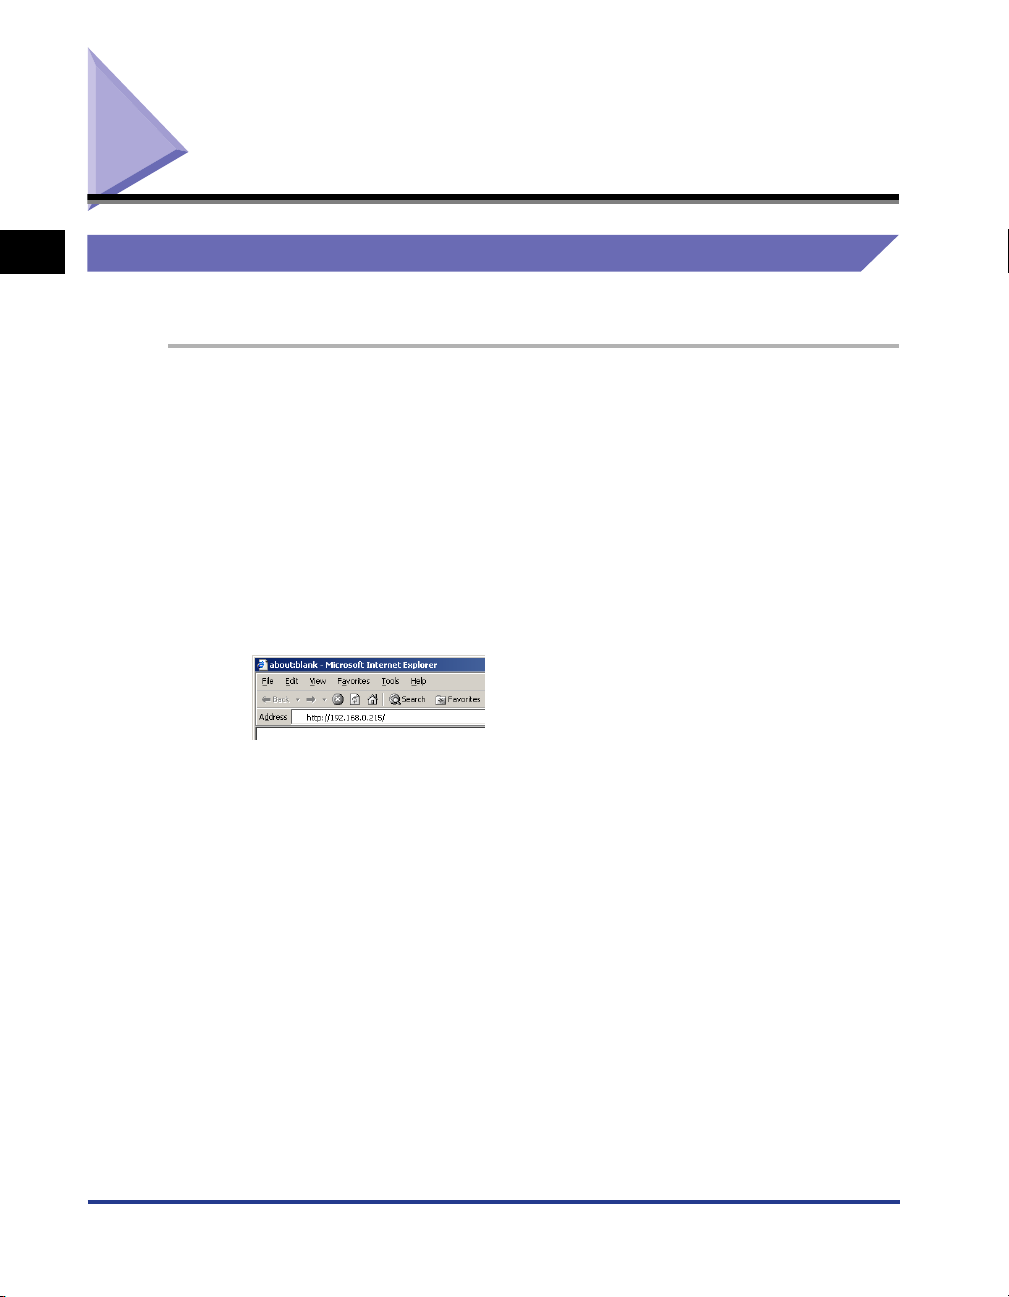
Start the web browser.
Enter the following URL in the address entry field, then press
2
the [ENTER] key on your keyboard.
http://<the IP address of this printer>/
When you want to specify the settings with the Remote UI using SSL encrypted
communication, enter "https://<the IP address or name of the printer>". If the
[Security Alert] dialog box or other dialog box appears, follow the directions in
the message.
1-6
Starting the Remote UI
Page 17
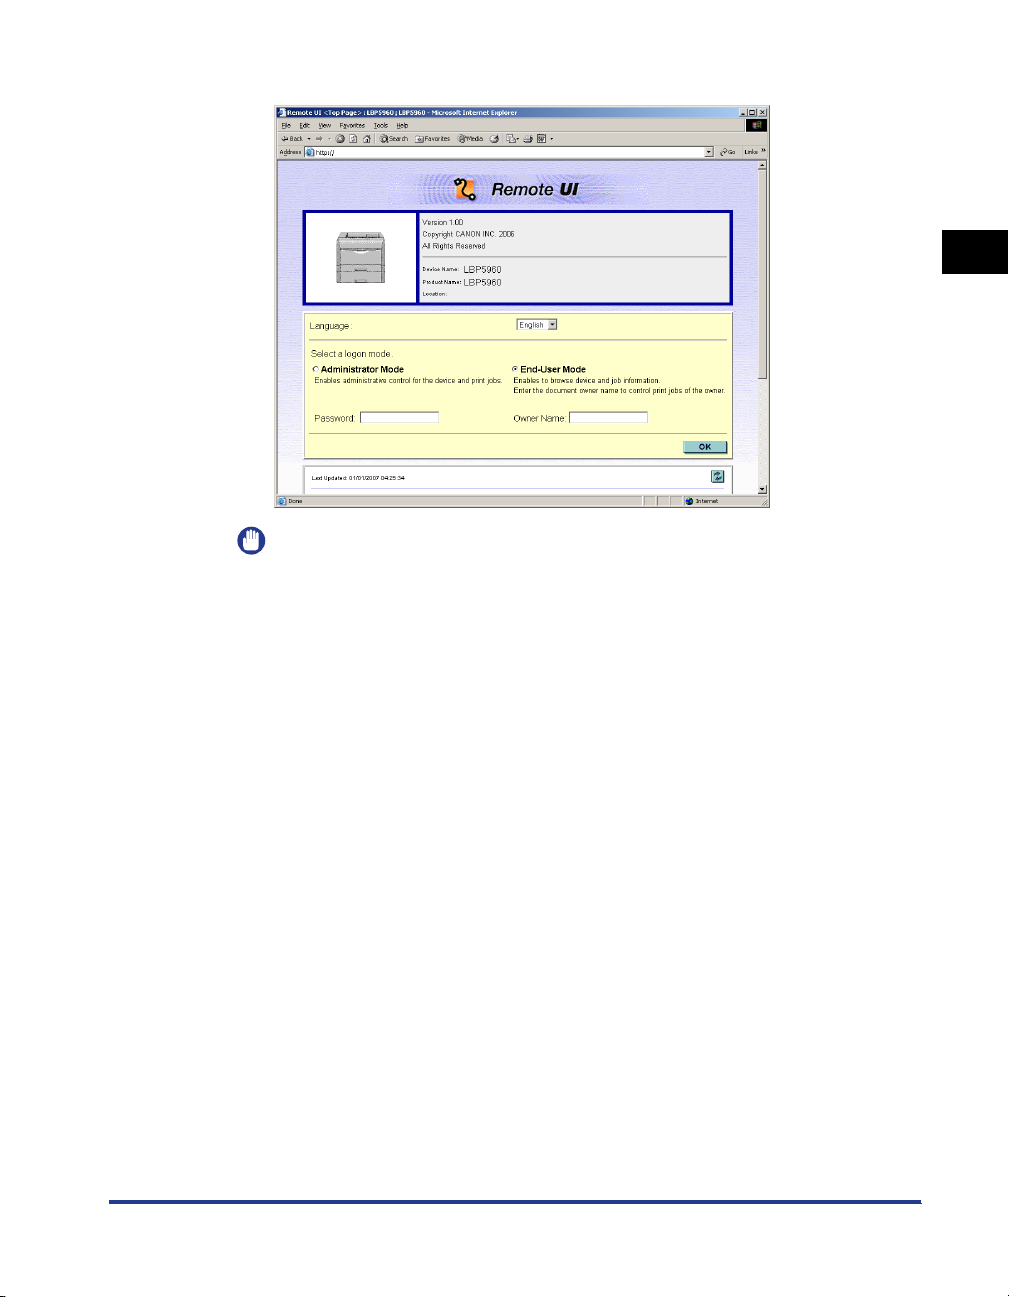
The screen of the Remote UI is displayed.
IMPORTANT
•
If you are not sure about the IP address of this printer, ask the administrator of the
printer.
•
If the host name of the printer is registered in the DNS server, you can enter
["hostname"."domain name"] instead of the IP address.
Example: http://my_printer.xy_dept.company.com/
•
If the screen of the Remote UI is not displayed, make sure that the entered IP
address or ["hostname"."domain name"] is correct. When the screen of the Remote
UI is not displayed even if the entered address is correct, consult your network
administrator.
•
SSL encrypted communication can be used only when an optional hard disk is
installed. To use SSL encrypted communication, a key and its certificate need to
have been created and the key needs to have been registered as the default key.
For details on the SSL encrypted communication function and the procedure for
registering a key, see "Creating/Registering/Changing a Key and Its Certificate," on
p. 3-4.
•
If the Remote UI does not start when SSL is enabled, there is a possibility that the
file related to key management is broken. From the control panel, select
INTERFACE MENU
NETWORK MENU ➞ REMOTE UI SET. ➞ SSL, and then
make sure that OFF is specified. After that, restart the printer, and then regenerate
the key and certificate and specify the settings for SSL from the Remote UI. After
the key management and SSL setting, restart the printer again.
•
You cannot connect the computer to the printer via a proxy server. If you are using
a proxy server, perform the following setting. (The setting varies depending on the
network environment. Consult your network administrator.)
- On the settings for the proxy server of the web browser, add the IP address of this
printer to [Exceptions] (The addresses that do not use the proxy server).
➞
1
Before You Start
Starting the Remote UI
1-7
Page 18

■
•
Configure the web browser so that you can use Cookie.
•
If multiple Remote UIs are running simultaneously, the latest setting is effective. It
is recommended that only one Remote UI should be running at a time.
Logging On the Remote UI
You log on to the Remote UI. Log on in [Administrator Mode] or in [End-User Mode].
1
Administrator Mode
By logging on in Administrator Mode, you can perform all the operations and settings of
the Remote UI. When you log on to the Remote UI, you need to enter the password
specified in [Administrator Settings] (See p. 2-13) in the [Information] page in [Device
Manager].
Before You Start
NOTE
The password is not specified by default. Log on to the Remote UI without entering a
password.
■ End-User Mode
By logging on in End-User Mode, you can check the device status, confirm the settings,
and view the jobs. Although it is possible to log on without entering any value for [Owner
Name]/[User Name], logging on by entering the owner name enables to delete the jobs of
the owner whose name corresponds with the owner name.
NOTE
The value to be entered for [Owner Name]/[User Name] is the user name you entered
when logging on to the computer.
1-8
Starting the Remote UI
Page 19
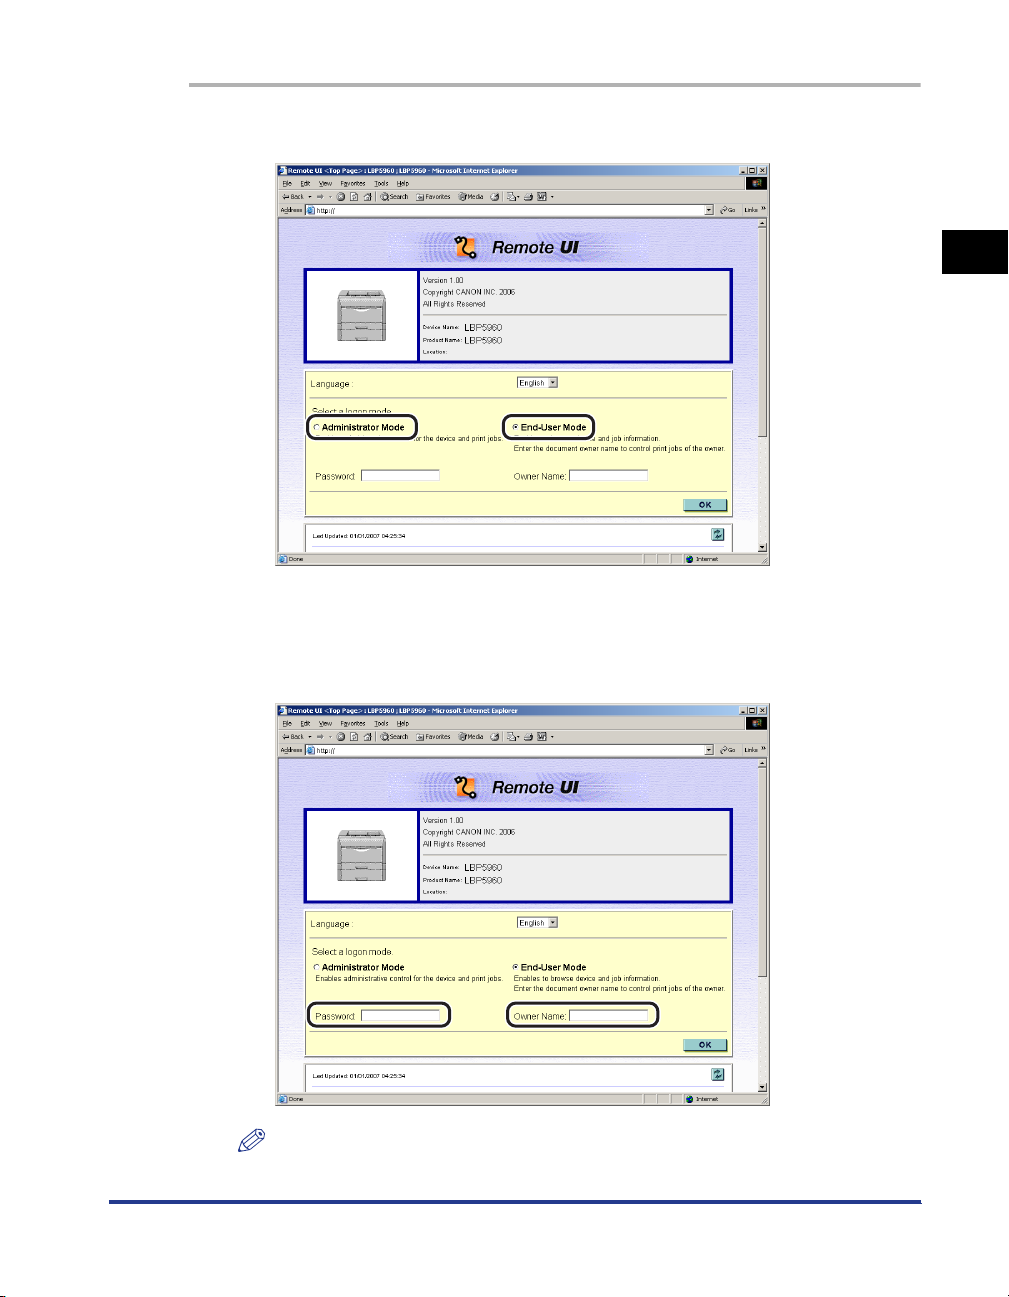
1
Select [Administrator Mode] or [End-User Mode].
2
If you select [Administrator Mode], enter the values for
[Password], and if you select [End-User Mode], enter the value
for [Owner Name]/[User Name] as needed.
1
Before You Start
NOTE
[Owner Name] is displayed as [User Name] depending on the printer model you
are using.
Starting the Remote UI
1-9
Page 20

3
Click [OK].
You log on to the Remote UI.
1
Before You Start
1-10
Starting the Remote UI
Page 21
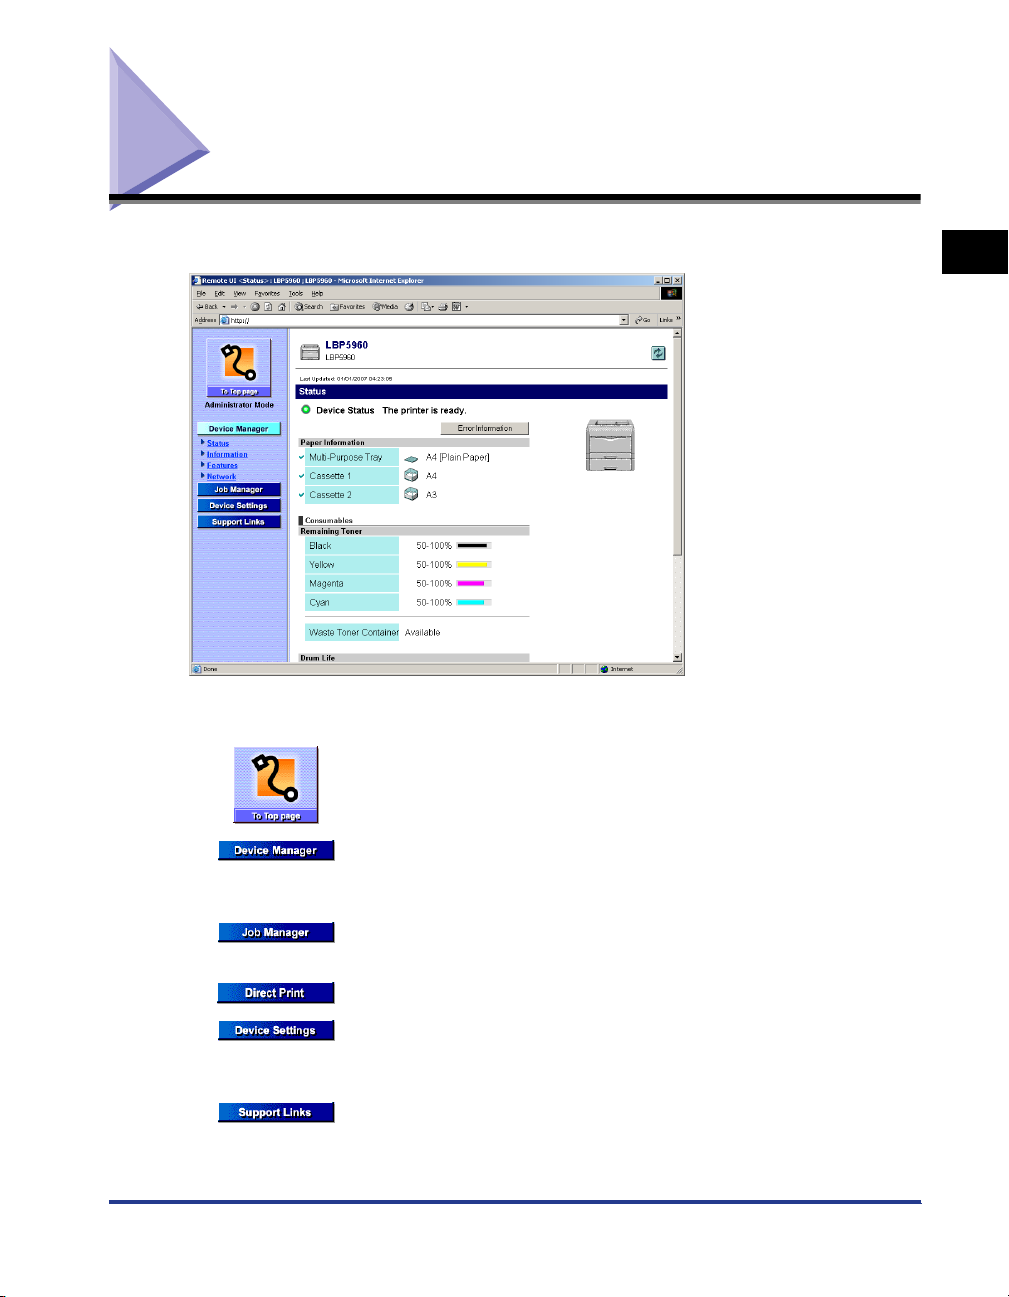
Screen Layout of the Remote UI
When you log on to the Remote UI, the following screen is displayed.
■ Buttons displayed on the left side of the screen
Goes back to the Top page (Log-on page) of the Remote UI.
1
Before You Start
Displays the [Device Manager] menu. The [Device Manager] menu
consists of the [Status], [Information], [Features], and [Network]
pages.
Displays the [Job Manager] menu. The [Job Manager] menu consists
of the [Print Job], [Stored Job]*
Displays the [Direct Print] menu*
Displays the [Device Settings] menu. The [Device Settings] menu
consists of the [Control Menu], [Paper Source Menu], [Layout Menu],
[Quality Menu], and [User Maintenance Menu] pages.
Displays the [Support Links] page.
* 1Displayed only when an optional hard disk is installed.
2
Not displayed depending on the printer model you are using.
*
1
, and [Print Log] pages.
2
.
Screen Layout of the Remote UI
1-11
Page 22
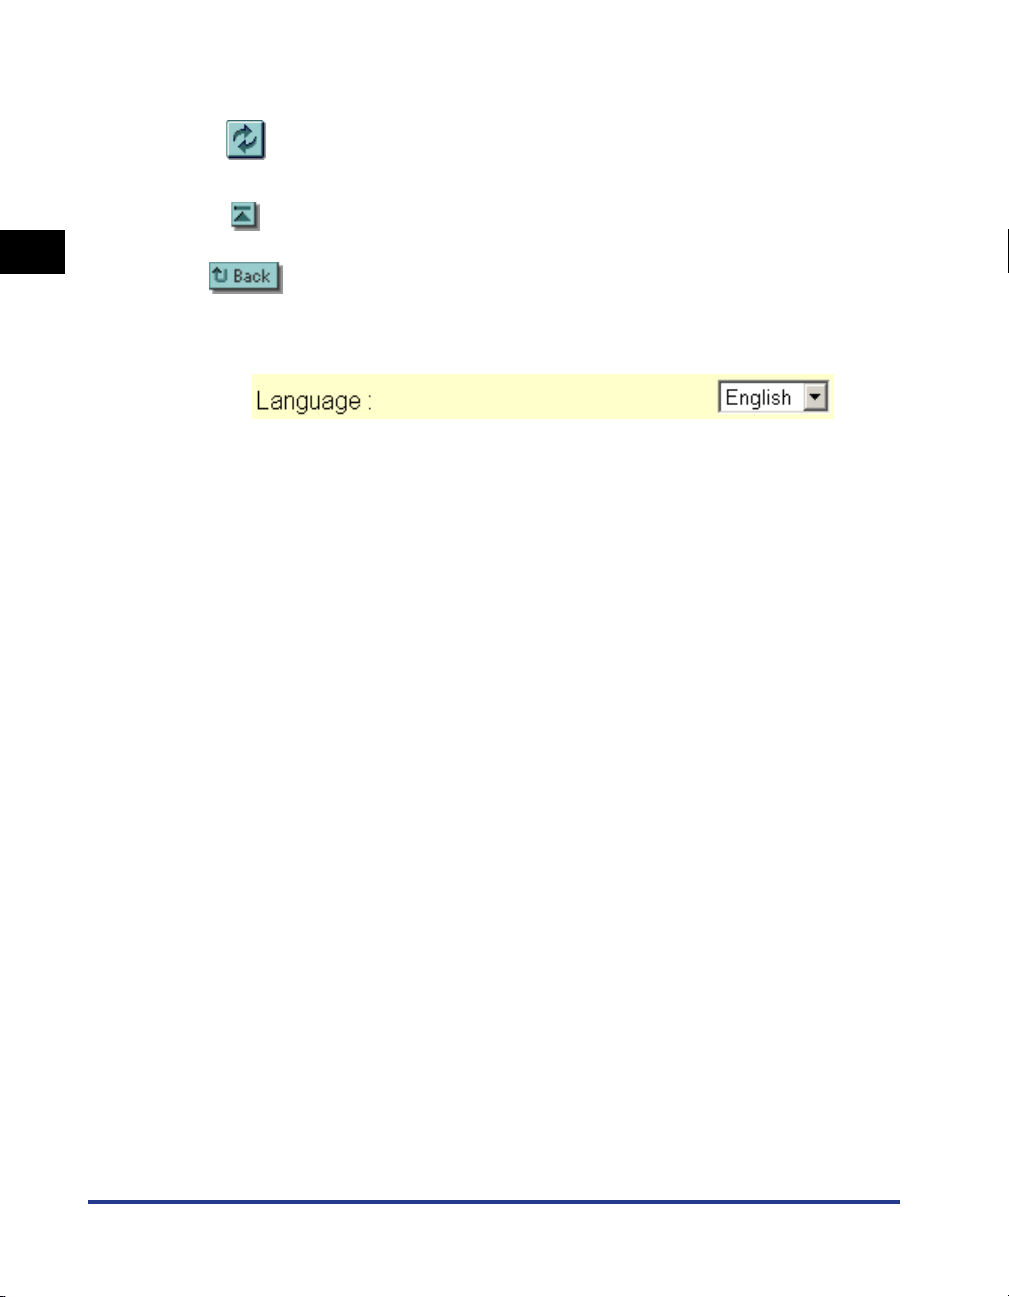
■ Buttons displayed on the right side of the screen
Updates the information in the currently displayed page to the latest one.
The currently displayed page is not updated automatically in the Remote
UI. Obtain the latest information about the device by clicking this button.
If the page is scrolled down, moves the scroll box up to the top of the
page.
1
Displays the previous page.
■ Language Switch (Top Page only)
Before You Start
You can select the display language for the Remote UI. When the Remote UI is
displayed for the first time, the display language is selected according to the display
language setting of the printer's control panel.
1-12
Screen Layout of the Remote UI
Page 23

Various Functions of the Remote UI
CHAPTER
This chapter describes the printer information that can be displayed and the options that can
be specified in the Remote UI.
Displaying/Managing the Printer Status (Device Manager) . . . . . . . . . . . . . . . . . . . . . . .2-2
Display Procedure . . . . . . . . . . . . . . . . . . . . . . . . . . . . . . . . . . . . . . . . . . . . . . . . . . . . . . . . . . . .2-3
Displaying the Current Status ([Status] Page) . . . . . . . . . . . . . . . . . . . . . . . . . . . . . . . . . . . . . . .2-4
Displaying/Changing the Printer Information ([Information] Page) . . . . . . . . . . . . . . . . . . . . . .2-11
Confirming the Availabilities of the Optional Accessories ([Features] Page) . . . . . . . . . . . . . .2-14
Displaying/Changing the Network Settings ([Network] Page) . . . . . . . . . . . . . . . . . . . . . . . . . .2-15
Displaying/Operating the Jobs (Job Manager) . . . . . . . . . . . . . . . . . . . . . . . . . . . . . . . .2-17
Displaying/Operating the Print Jobs (Pause/Resume/Delete, etc.) . . . . . . . . . . . . . . . . . . . . . .2-17
Displaying/Operating the Jobs Stored in a Box (Resume/Delete) . . . . . . . . . . . . . . . . . . . . . . .2-21
Displaying the Print Log Page . . . . . . . . . . . . . . . . . . . . . . . . . . . . . . . . . . . . . . . . . . . . . . . . . .2-28
Printing Files Directly (Direct Print). . . . . . . . . . . . . . . . . . . . . . . . . . . . . . . . . . . . . . . . . 2-30
Displaying/Changing the Printer Settings (Device Settings). . . . . . . . . . . . . . . . . . . . . . 2-31
Operating Procedure . . . . . . . . . . . . . . . . . . . . . . . . . . . . . . . . . . . . . . . . . . . . . . . . . . . . . . . . .2-32
Changing Date and Time . . . . . . . . . . . . . . . . . . . . . . . . . . . . . . . . . . . . . . . . . . . . . . . . . . . . . .2-33
Displaying/Changing the Links (Support Links) . . . . . . . . . . . . . . . . . . . . . . . . . . . . . . .2-38
Display Procedure . . . . . . . . . . . . . . . . . . . . . . . . . . . . . . . . . . . . . . . . . . . . . . . . . . . . . . . . . . .2-38
Changing the Links . . . . . . . . . . . . . . . . . . . . . . . . . . . . . . . . . . . . . . . . . . . . . . . . . . . . . . . . . .2-39
2
2-1
Page 24

Displaying/Managing the Printer Status (Device Manager)
By obtaining information from the printer, you can display the current printer status
and printer information in the Remote UI. If you have logged on in Administrator
Mode, you can perform utility work, change the settings for the security or network
2
etc. from the Remote UI. [Device Manager] consists of the following four pages.
■ [Status] Page
Displays the current printer status. You can also perform Configuration Page Print and a
soft reset.
■ [Information] Page
Displays the device name and information about the installation site and management.
You can also change the device information and management settings.
■ [Features] Page
Displays the capacity of the RAM, availability of the optional accessories, and total
number of the printed pages.
Various Functions of the Remote UI
■ [Network] Page
Displays the settings for the network. You can also change the network settings.
2-2
Displaying/Managing the Printer Status (Device Manager)
Page 25
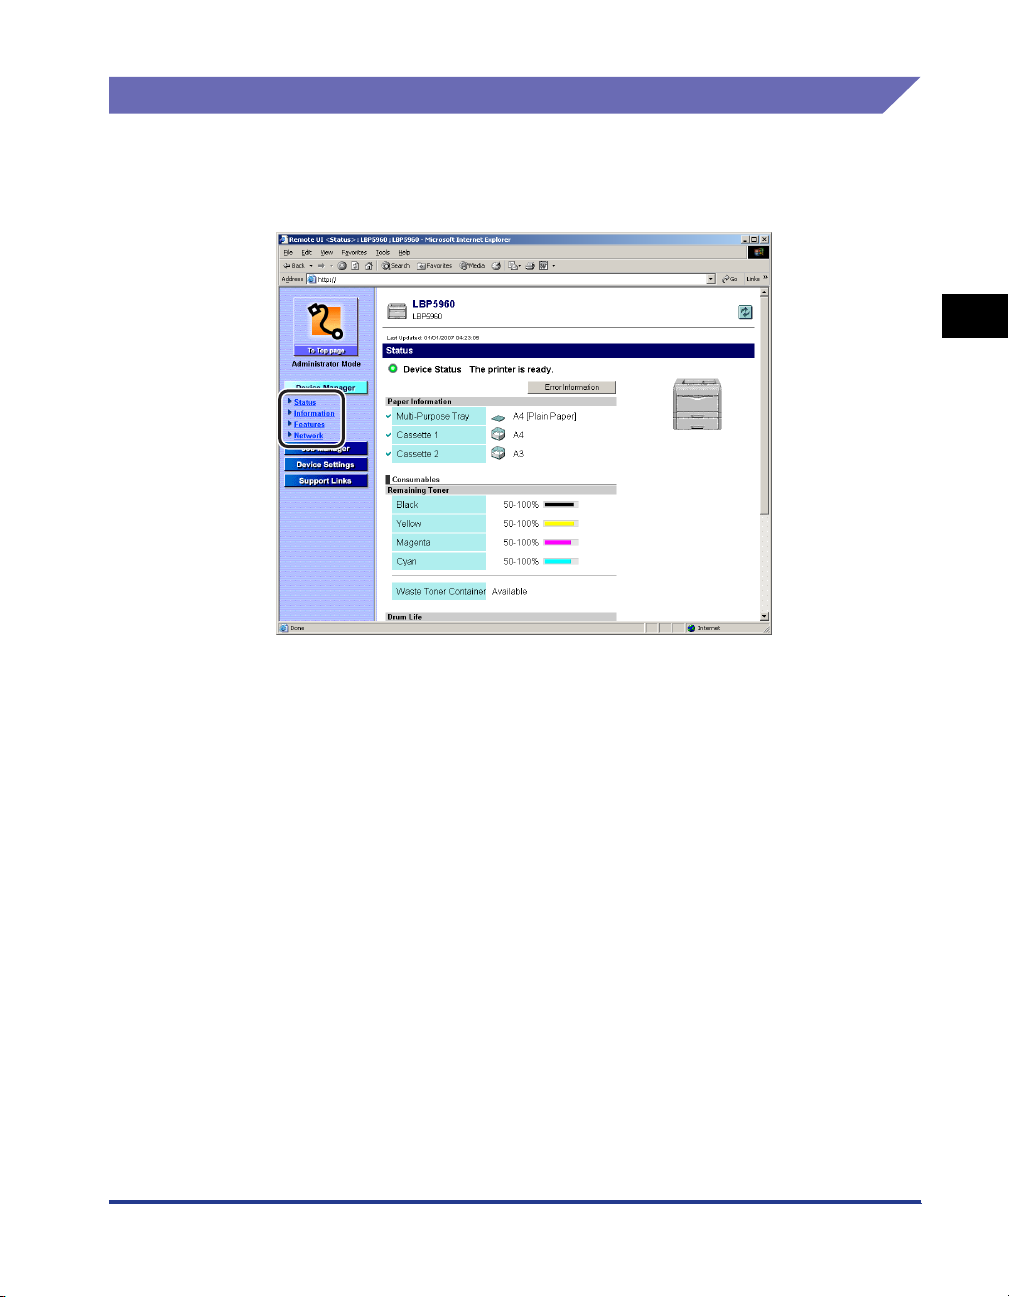
Display Procedure
1
Select any one of [Status], [Information], [Features], or
[Network] from the [Device Manager] menu.
2
Various Functions of the Remote UI
Displaying/Managing the Printer Status (Device Manager)
2-3
Page 26
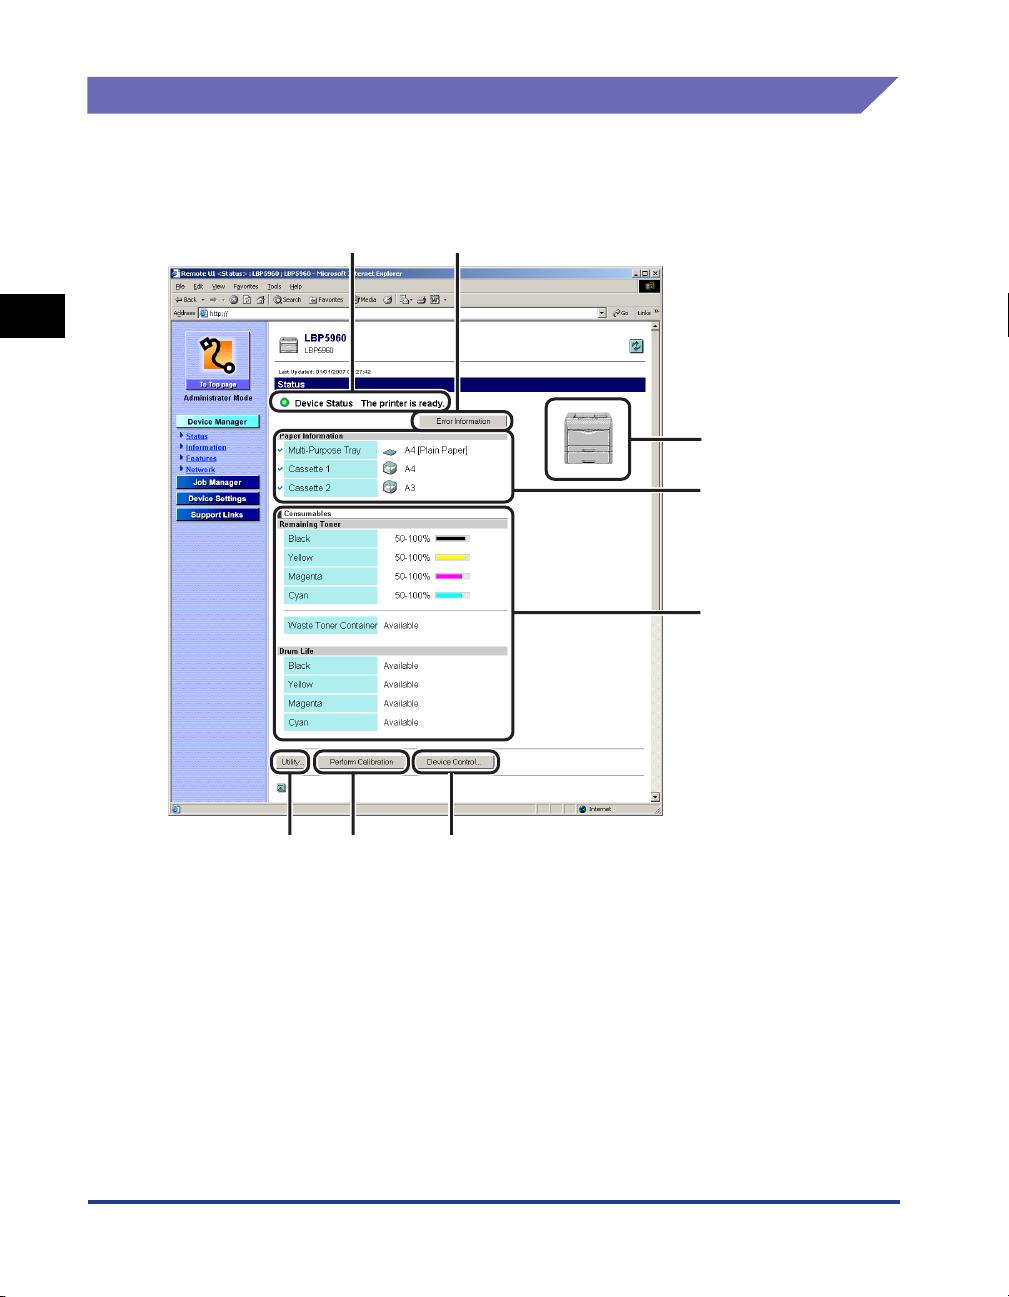
Displaying the Current Status ([Status] Page)
Displays the current printer status such as the amount of paper or toner remaining.
If you have logged on in Administrator Mode, you can perform Configuration Page
Print or a soft reset.
2
Various Functions of the Remote UI
ab
c
d
e
2-4
g fh
Displaying/Managing the Printer Status (Device Manager)
Page 27
aa
aa
[Device Status]
Displays the current printer status with the indicator and a status message. The colors of the
indicator indicate the printer status as follows.
Color of Indicator Printer Status Remedy
(Gray)
(Green)
(Yellow)
(Red)
bb
bb
[Error Information]
When clicked, displays information about the error occurring in the printer.
cc
cc
[Device Image]
Displays an image of the printer. The displayed image varies depending on the availability of the
paper source option.
dd
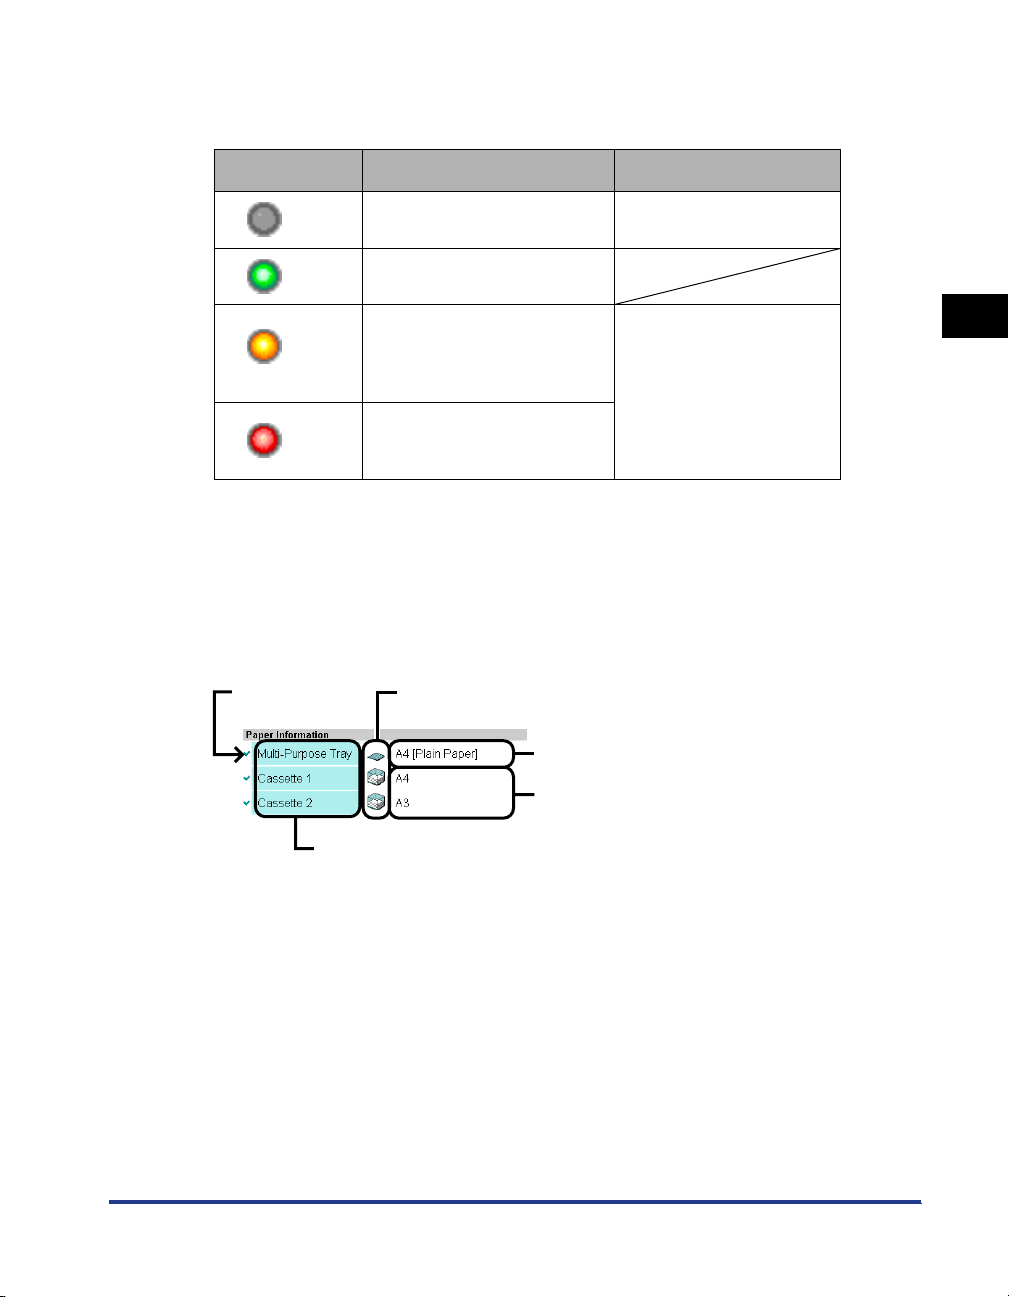
dd
[Paper Information]
Displays information about the paper source.
(A)
Offline (The printer does not
receive print data)
Normal (The printer is ready to
print)
The printer requires some
remedy although the job is not
affected. (A Warning message is
being displayed)
Cannot print for some reason
(An Error message is being
displayed)
(B)
(C)
Place the printer online and
print.
Click [Error Information], then
follow the displayed directions.
2
Various Functions of the Remote UI
(D)
(E)
(A): The available paper sources
(B): The icons that indicate the amount of paper remaining in each paper source
(C): The paper sizes and paper types*
*Depending on the system environment, paper types are not displayed.
(D): The paper sizes in each paper source on the upper; paper names on the
lower*
*The paper names are displayed only when they are specified.
(E): The names of each paper source
Displaying/Managing the Printer Status (Device Manager)
2-5
Page 28

ee
ee
[Consumables]
Displays information about the consumables.
For a black-and-white printer
(F)
(F): The status of the toner cartridge
For a color printer
2
(G)
(H)
(I)
(G): The amount of toner remaining in each cartridge
(H): The status of the waste toner container (LBP5960 only)
(I): The status of each drum (LBP5960 only)
Various Functions of the Remote UI
2-6
Displaying/Managing the Printer Status (Device Manager)
Page 29

Consumables Display Status Remedy
Toner
cartridge
(Black-andwhite printer)
<Available>
<Replacement
Needed
2
Soon>*
<Replace
Cartridge>*
2
<Insert
Cartridge>
The printer is
ready to print
The toner
cartridge
needs to be
replaced soon
The toner
cartridge has
reached the
end of its life
The toner
cartridge is not
installed
-
- The printer continues or stops
printing.*
1
- If the printer stops printing, you can
continue the job by pressing
[Online] on the printer's control
panel.
-Have ready a new toner cartridge.
- It is recommended that you replace
the toner cartridge before printing a
large amount of data. (See
"Replacing the Toner Cartridge" in
User's Guide).
- The printer stops printing, and you
cannot continue the job.
- Replace the toner cartridge with a
new one. (See "Replacing the
Toner Cartridge" in User's Guide).
Install the toner cartridge properly.
2
Various Functions of the Remote UI
Displaying/Managing the Printer Status (Device Manager)
2-7
Page 30

Consumables Display Status Remedy
2
Toner
cartridge
(Color printer)
Various Functions of the Remote UI
50-100 %
25-50 %
1-25 %
0 %
The printer is
ready to print
The toner
cartridge
needs to be
replaced soon
The toner
cartridge has
reached the
end of its life
-25-100 %
- The printer continues or stops
printing.*
- If the printer stops printing, you can
continue the job by pressing
[Online] on the printer's control
panel.
-Have ready a new toner cartridge.
- It is recommended that you replace
the toner cartridge before printing a
large amount of data. (See
"Replacing Toner Cartridges" in
User's Guide).
-When the black toner cartridge has
reached the end of its life, the
printer stops printing, and you
cannot continue the job.
-When any of the toner cartridges
(other than black) has reached the
end of its life, you can print only in
black and white.
- Replace the toner cartridge of the
indicated color with a new one.
(See "Replacing Toner Cartridges"
in User's Guide).
2-8
<Insert
Cartridge>
Displaying/Managing the Printer Status (Device Manager)
The toner
cartridge is not
installed
Install the toner cartridge properly.
Page 31

Consumables
Waste toner
container
(LBP5960
only)
Drum
Cartridge
(LBP5960
only)
Display Status Remedy
<Available>
The printer is
ready to print
When the
<Replacement
Needed
Soon>
waste toner
container
needs to be
-You can continue to print.
-Have ready a new waste toner
container.
replaced soon
- The printer stops printing.
<Replace
Container>
When the
waste toner
container is full
- Replace the waste toner container
with a new one. (See "Replacing
Waste Toner Container" in User's
Guide).
<Set
Container>
<Available>
The waste
toner container
is not installed
The printer is
ready to print
Install the waste toner container
properly.
-You can continue to print.
<Replacement
Needed
Soon>
The drum
cartridge
needs to be
replaced soon
-Have ready a new drum cartridge
of the indicated color.
- It is recommended that you replace
the drum cartridge before printing a
large amount of data.
- The printer stops printing.
- Replace the drum cartridge of the
indicated color with a new one (See
"Replacing Drum Cartridges" in
User's Guide).
<Replace
Cartridge>
The drum
cartridge has
reached the
end of its life
-
2
-
Various Functions of the Remote UI
<Insert
Cartridge>
1
*
Whether the printer continues or stops printing when the toner cartridge needs to be replaced soon depends on
the setting for WARNING STEP in the SETUP menu. For details on the settings for WARNING STEP, see the
item in "SETUP Menu Settings" in User's Guide (PDF manual).
2
When you are using LBP3360/3370, <Replacement Needed Soon> or <Replace Cartridge> does not appear
*
even if the toner cartridge needs to be replaced soon. The case where white streaks appear on printed paper in
longitudinal direction, or printed paper comes out faint or uneven can be used to estimate when the toner
cartridge will need to be replaced. (See "Replacing the Toner Cartridge" in User's Guide)
ff
ff
[Device Control]
Displays the page that allows you to perform device controls such as a soft reset. You can perform
device controls only when you have logged on in Administrator Mode.
The drum
cartridge is not
Install the drum cartridge properly.
installed
Displaying/Managing the Printer Status (Device Manager)
2-9
Page 32

gg
gg
[Perform Calibration] (Displayed only for a color printer.)
Calibrates the printer. Calibration can be performed only when the printer is online, and you have
logged on in Administrator Mode.
NOTE
Depending on the printer model you are using, the page that performs various types of
calibration of the printer, such as "Out-of-Register Colors" adjustment or print density
control, is displayed.
hh
hh
[Utility]
Displays the page that allows you to perform utility work such as Configuration Page Print. You can
2
perform utility work only when you have logged on in Administrator Mode and the printer is online.
Various Functions of the Remote UI
2-10
Displaying/Managing the Printer Status (Device Manager)
Page 33

Displaying/Changing the Printer Information ([Information] Page)
Displays the device information and management information. If you have logged
on in Administrator Mode, you can restrict the users who can request jobs.
• Screenshot from LBP5960
a
2
b
c
d
e
f
Displaying/Managing the Printer Status (Device Manager)
Various Functions of the Remote UI
2-11
Page 34

• Screenshot from LBP3370
2
Various Functions of the Remote UI
a
b
c
d
2-12
g
aaaa[Device Information]
Displays the general information of the printer. You can display the page that allows you to change
the device information by clicking [Change] on the upper right. You can change the device information
only when you have logged on in Administrator Mode. For more details, see "Chapter 3 Using the
Printer on a TCP/IP Network (Windows/UNIX)" in Network Guide.
Displaying/Managing the Printer Status (Device Manager)
Page 35

bbbb[Administrator Settings]
Displays information about the settings for the administrator password that the printer has, the job
operation permission to the end-users, and others. You can display the page that allows you to
change the administrator settings by clicking [Change] on the upper right. You can change the
administrator settings only when you have logged on in Administrator Mode. For more details, see
"Chapter 3 Using the Printer on a TCP/IP Network (Windows/UNIX)" in Network Guide.
cccc[IP Address Range]
Displays information about the users who are permitted or restricted to print or specify the settings.
By clicking [Change] on the upper right, you can display the page that allows you to change the IP
address settings that restrict the users who can print or specify the settings. You can change the IP
address range settings only when you have logged on in Administrator Mode. For more details, see
"Chapter 3 Using the Printer on a TCP/IP Network (Windows/UNIX)" in Network Guide.
dddd[Receiving Permitted MAC Address]/[Permitted Receiving MAC Address]
Displays information about the users who can access the printer. You can display the page that
allows you to change the MAC address settings that restrict the users who can access the printer by
clicking [Change] on the upper right. You can change the MAC address settings only when you have
logged on in Administrator Mode. For more details, see "Chapter 3 Using the Printer on a TCP/IP
Network (Windows/UNIX)" in Network Guide.
eeee[Remote UI] (Displayed only when an optional hard disk is installed.)
Displays whether the SSL encrypted communication function should be used for the Remote UI. You
can display the page that allows you to specify whether to use the SSL encrypted communication
function for the Remote UI by clicking [Change] on the upper right. You can change the settings for
the Remote UI only when you have logged on in Administrator Mode. For more details, see
"Changing the Remote UI Settings," on p. 3-2.
ffff[Key and Certificate] (Displayed only when an optional hard disk is installed.)
Displays information about the registered keys. Clicking displays detailed information about the
certificate. You can display the page that allows you to create, register, or change keys and
certificates by clicking [Change] on the upper right. You can create, register, or change keys and
certificates only when you have logged on in Administrator Mode. For more details, see "Creating/
Registering/Changing a Key and Its Certificate," on p. 3-4.
gggg[Job Log Display] (Not displayed depending on the printer model you are using.)
Displays information about the job log display settings. You can display the page that allows you to
change the job log display settings by clicking [Change] on the upper right. You can change the job
log display settings only when you have logged on in Administrator Mode. For details, see "Changing
the Job Log Display Settings," on p. 3-21.
2
Various Functions of the Remote UI
Displaying/Managing the Printer Status (Device Manager)
2-13
Page 36

Confirming the Availabilities of the Optional Accessories
([Features] Page)
Displays information about the availabilities of the optional accessories, the
capacity of the RAM, and [Number of Total Printed Pages].
2
Various Functions of the Remote UI
2-14
Displaying/Managing the Printer Status (Device Manager)
Page 37

Displaying/Changing the Network Settings ([Network] Page)
Allows you to confirm the network settings. If you have logged on in Administrator
Mode, you can change the network settings, etc.
a
b
d
c
2
Various Functions of the Remote UI
e
f
g
aaaa[Network Interface]
Displays information about the network interface.
Displaying/Managing the Printer Status (Device Manager)
2-15
Page 38

bbbb[Ethernet Driver Setting]
You can display the page that allows you to change the Ethernet driver setting. You can change the
Ethernet driver setting only when you have logged on in Administrator Mode.
cccc[Show Parameter List]
Displays the [Parameter List] page of the printer. You can also initialize the network settings by
clicking [Initialize Network Settings] in the [Parameter List] page. Initialization of the network settings
resets them to the default settings. You can initialize the network settings only when you have logged
on in Administrator Mode.
IMPORTANT
2
Make sure that the printer is not operating before initializing the network settings. If you
initialize the network settings while the printer is printing or receiving data, the received
data may not be printed properly, or may result in paper jams or damage to the printer.
dddd[Print Protocol]
Displays the settings for the print protocol. You can display the page that allows you to change the
protocol settings by clicking [Change] for each protocol. You can change the protocol settings only
when you have logged on in Administrator Mode. For more details, see "Network Guide".
eeee[Management Protocol]
Displays the SNMP settings. You can display the page that allows you to change the SNMP settings
by clicking [Change] for [SNMP]. You can change the SNMP settings only when you have logged on
in Administrator Mode. For more details, see "Network Guide".
NOTE
If [SNMP] is set to [Off], you may not be able to specify or browse each options for this
printer from utility software that uses SNMP to obtain information. Consult the
administrator of the printer before setting [SNMP] to [Off].
Various Functions of the Remote UI
ffff[Spooler] (Displayed only when an optional hard disk is installed.)
Displays the spooler setting. You can display the page that allows you to change the spooler setting
by clicking [Change] on the upper right. You can change the spooler setting only when you have
logged on in Administrator Mode. For more details, see "Chapter 3 Using the Printer on a TCP/IP
Network (Windows/UNIX)" in Network Guide.
gggg[Startup Time]
Displays the setting for the startup waiting time from when you turn the printer ON to when the printer
starts communication. You can display the page that allows you to change the settings for the startup
waiting time by clicking [Change] on the upper right. You can change the setting for the startup
waiting time only when you have logged on in Administrator Mode.
2-16
NOTE
•
Normally, you do not need to change the setting for startup waiting time. Specify the
setting for the startup waiting time only when the printer cannot be connected to the
network.
•
If the printer is connected to a switching hub etc., the printer may not be able to be
connected to the network even when the network settings are correct. This is because
the printer and hub cannot communicate each other immediately after the printer is
connected to the hub due to a spanning tree process.
In this case, you need to make the printer wait to start communication. For details on the
functions of a switching hub, contact the manufacturer of the switching hub.
Displaying/Managing the Printer Status (Device Manager)
Page 39

Displaying/Operating the Jobs (Job Manager)
The Remote UI allows you the job management such as checking the print job
status and pausing/resuming a job. [Job Manager] consists of the following three
pages.
■ [Print Job] Page
Allows you to check or operate jobs on the print queue or the job being printed.
■ [Stored Job] Page
(Displayed only when an optional hard disk is installed.)
Allows you to check or operate the jobs stored in a box.
■ [Print Log] Page
Displays the print job logs.
IMPORTANT
•
If you have logged on in End-User Mode, you can operate only the jobs whose [Owner
Name]/[User Name] corresponds with the name entered when logging on. However, you
cannot operate any job as long as the end-user's job operation is not permitted in [Device
Manager] ➞ the [Information] page ➞ [Administrator Settings]. If you have logged on in
Administrator Mode, you can operate all the jobs.
•
If the jog log display is disabled in [Device Manager] ➞ the [Information] page ➞ [Job Log
Display] (See p. 3-21), the [Print Log] page is not displayed depending on the printer
model you are using.
2
Various Functions of the Remote UI
Displaying/Operating the Print Jobs (Pause/Resume/ Delete, etc.)
Allows you to check or operate jobs on the print queue or the job being printed. You
can perform operations of [Pause], [Resume], [Promote], [Interrupt], and [Delete].
You can also check the jobs in detail.
Displaying/Operating the Jobs (Job Manager)
2-17
Page 40

1
Click [Print Job] from the [Job Manager] menu.
2
NOTE
A job file name of up to 32 characters can be displayed in [Document Name]. If the
Various Functions of the Remote UI
file name has more than 32 letters, the letters after the limited number are not
displayed. Also, depending on the application, the application name may be added
to the beginning of the file name.
2-18
Displaying/Operating the Jobs (Job Manager)
Page 41

2
When you want to delete any print job, click on the left of
the jobs to change the mark to , and then click the
appropriate operation button.
(Pause):
(Resume):
(Promote):
Operation Buttons
Pauses the selected job. You can delete only the jobs in
which "Printing", "Waiting to Process", "Processing", or
"Interrupted" is displayed in [Status].
Prints the paused or locked jobs. If you try to print the
locked jobs (the secured print jobs), the page to enter the
password is displayed. By entering the password
specified in the computer when printing, then clicking
[OK], the lock is released and the printer starts printing.
Prints the selected job next to the job currently being
printed.
2
Various Functions of the Remote UI
(Interrupt):
(Delete): Deletes the selected job.
NOTE
•
The job operations except for (Delete) can be performed only when an
optional hard disk is installed, and [Hard Disk] is set to [On]. Specify the setting for
[Hard Disk] in [Control Menu] Page (See p. 2-31) or on the control panel.
•
[Owner Name] is displayed as [User Name] depending on the printer model you
are using.
Pauses the job currently being printed and prints the
selected job.
Displaying/Operating the Jobs (Job Manager)
2-19
Page 42

3
When you want to display the detailed information about the
print job, click on the left of the job to change the mark to
2
NOTE
Various Functions of the Remote UI
You can delete only the jobs in which "Printing Paused" or "Locked" is displayed in
[Status].
, and then click (Details).
2-20
4
The detailed information of the print job is displayed.
Displaying/Operating the Jobs (Job Manager)
Page 43

Displaying/Operating the Jobs Stored in a Box (Resume/ Delete)
Allows you to check the jobs stored in a box. You can perform operations of
[Resume] and [Delete]. You can also check the jobs in detail.
NOTE
The stored jobs can be displayed or operated only when an optional hard disk is
installed, and [Hard Disk] is set to [On]. Specify the setting for [Hard Disk] in [Control
Menu] Page (See p. 2-31) or on the control panel.
Operating Procedure
1
Click [Stored Job] from the [Job Manager] menu.
2
Various Functions of the Remote UI
Displaying/Operating the Jobs (Job Manager)
2-21
Page 44

2
Select the number of the box in which the jobs you want to
check or operate are stored.
If a password is specified for the box, enter the password, and then click [OK].
2
3
Various Functions of the Remote UI
When you want to operate any stored job, click on the left
of the job to change the mark to , and then click the
appropriate operation button.
2-22
Operation Buttons
Displaying/Operating the Jobs (Job Manager)
Page 45

(Resume): Prints the selected job.
(Delete): Deletes the selected job.
You can display the page that
allows you to change the print
pages/copies or owner name
by clicking (Resume).
Enter the number of the print
copies/pages or owner name,
and then click [OK]. Clicking
[Cancel] displays the original
page without printing.
NOTE
•
You can display the [Change Box Settings] page that allows you to change a box
name or password by clicking [Change] on the upper right. You can change the box
settings only when you have logged in as Administrator. For more details, see
"Changing the Box Settings," on p. 2-25.
•
A job file name of up to 32 characters can be displayed in [Document Name]. If the
file name has more than 32 letters, the letters after the limited number are not
displayed. Also, depending on the application, the application name may be added
to the beginning of the file name.
•
The jobs stored in the boxes are not deleted even after being printed.
2
Various Functions of the Remote UI
Displaying/Operating the Jobs (Job Manager)
2-23
Page 46

4
When you want to display the detailed information about the
stored jobs, click on the left of the jobs to change the
mark to , and then click (Details).
2
NOTE
Various Functions of the Remote UI
You can display detailed information about only the jobs in which "Stored" is
displayed in [Status].
2-24
5
The detailed information of the stored jobs is displayed.
Displaying/Operating the Jobs (Job Manager)
Page 47

Changing the Box Settings
You can display the [Change Box Settings] page that allows you to change a box
name or password by clicking the [Change] button in the page for operating the jobs
in a box.
NOTE
You can change the box settings only when you have logged on in Administrator Mode.
1
Enter the box name in [Box Name].
NOTE
Up to 32 characters can be entered in [Box Name].
2
Various Functions of the Remote UI
Displaying/Operating the Jobs (Job Manager)
2-25
Page 48

2
Specify the password.
● When specifying a password for a box
❑ Select the [Set Password] check box.
2
❑ Enter the password that you want to specify in [Password], then enter the same
Various Functions of the Remote UI
number in [Confirm] as the one you entered in [Password].
2-26
NOTE
In [Password] and [Confirm], you can enter the number of 1 to 7 digits except for
"0".
Displaying/Operating the Jobs (Job Manager)
Page 49

● When not specifying a password for a box
❑ Clear the [Set Password] check box.
3
Clicking [OK] saves the changed settings.
Clicking [Cancel] displays the original page without changing the settings.
2
Various Functions of the Remote UI
Displaying/Operating the Jobs (Job Manager)
2-27
Page 50

Displaying the Print Log Page
Displays the print job logs.
IMPORTANT
•
If an optional hard disk is not installed, the print logs are deleted by turning the printer
OFF or performing a hard reset. If an optional hard disk is installed, they are not deleted
unless the hard disk is formatted.
•
If the jog log display is disabled in [Device Manager] ➞ the [Information] page ➞ [Job Log
2
Display] (See p. 3-21), the [Print Log] page is not displayed depending on the printer
model you are using.
NOTE
The maximum numbers of the print logs that you can check are as follows. When the
number of the jobs exceeds the maximum, the print logs are deleted starting from the
oldest one.
- If an optional hard disk is installed
- [Print Job]/[Print Job/Direct Print]: 200
- [Stored Job], [Report]: 128
- If an optional hard disk is not installed
- [Print Job]/[Print Job/Direct Print]: 48
- [Report]: 16
Various Functions of the Remote UI
2-28
1
Click [Print Log] from the [Job Manager] menu.
Displaying/Operating the Jobs (Job Manager)
Page 51

2
Select the options that you want to display.
Options to be selected
2
[Print Job]/[Print Job/Direct
Print]:
[Stored Job]*: Displays the job logs printed from a stored-job box.
[Report]: Displays the print logs of the utility print.
* Displayed only when an optional hard disk is installed.
NOTE
•
Up to 32 jobs can be displayed on one page. When there are print logs of 33 jobs
or more, are displayed on the upper right of the page. Clicking displays
the next page, and clicking displays the previous page.
•
A job file name of up to 32 characters can be displayed in [Document Name]. If the
file name has more than 32 letters, the letters after the limited number are not
displayed. Also, depending on the application, the application name may be added
to the beginning of the file name.
•
[Time] is displayed as [Start Time] and [End Time] depending on the printer model
you are using.
•
[Owner Name] is displayed as [User Name] depending on the printer model you
are using.
Displays the job logs printed from the computer.
Various Functions of the Remote UI
Displaying/Operating the Jobs (Job Manager)
2-29
Page 52

Printing Files Directly (Direct Print)
The Remote UI allows you to use the direct print function that enables you to
directly print image files by specifying them.
For details on the direct print function, see "Using the Printer" in User's Guide (PDF
2
Various Functions of the Remote UI
manual).
2-30
Printing Files Directly (Direct Print)
Page 53

Displaying/Changing the Printer Settings (Device Settings)
The Remote UI allows you to check the settings that you specify on the printer's
control panel (print settings). If you have logged on in Administrator Mode, you can
change the settings from the Remote UI. [Device Settings] consists of the following
five pages.
■ [Control Menu] Page
Allows you to specify the settings for Power Save Mode, the printer operation when an
error occurs, etc. Depending on the printer model you are using, you can also change
date and time. (See "Changing Date and Time," on p. 2-33)
■ [Paper Source Menu] Page
Allows you to specify the settings for the paper size and others when printing from the
multi-purpose tray or a paper cassette.
■ [Layout Menu] Page
Allows you to specify the layout of the print format, such as adjusting the printing position
and specifying a gutter value.
2
■ [Quality Menu] Page
Allows you to specify the print quality, such as the gradation of print data and toner density
adjustment.
■ [User Maintenance Menu] Page
Allows you to specify the settings for the printer adjustment when an error occurs, such as
the printing position adjustment from the specified paper source and recovery printing.
Displaying/Changing the Printer Settings (Device Settings)
Various Functions of the Remote UI
2-31
Page 54

Operating Procedure
1
Select the options of that you want to check or for which you
want to change the settings from the [Device Settings] menu.
2
Various Functions of the Remote UI
2
If you want to change the settings, click [Change].
2-32
Displaying/Changing the Printer Settings (Device Settings)
Page 55

NOTE
You can change the device settings only when you have logged on in Administrator
Mode.
3
After changing the device settings, click [OK].
Clicking [Cancel] displays the original page without changing the settings.
2
Various Functions of the Remote UI
NOTE
•
Depending on the web browser you are using, you may not be able to click [OK]
and [Cancel]. In this case, click [Reload] or [Refresh] in the web browser to
redisplay the page before you specify the device settings.
•
For details on the settings, see the item in "SETUP Menu Settings" in User's Guide
(PDF manual).
Changing Date and Time
The [Change Control] page is displayed by clicking [Change] in the [Control Menu]
page. You can change date and time in the [Change Control] page when the date or
time in the clock function equipped with the printer is incorrect.
NOTE
•
Depending on the printer model you are using, you cannot specify date and time.
•
Date and time are set before shipment.
•
The clock in the printer should be accurate within ± 60 seconds per month. Adjust the
clock periodically.
Displaying/Changing the Printer Settings (Device Settings)
2-33
Page 56

1
Click [Change Date and Time].
2
2
Enter date and time.
Various Functions of the Remote UI
2-34
Displaying/Changing the Printer Settings (Device Settings)
Page 57

3
Specify the daylight saving time.
NOTE
Daylight Saving Time: In some countries and regions, time is advanced throughout
the summer season. The period in which this is applied is called "Daylight Saving
Time".
● When using the daylight saving time
❑ Select the [Set Daylight Saving Time] check box.
2
Various Functions of the Remote UI
Displaying/Changing the Printer Settings (Device Settings)
2-35
Page 58

❑ Specify the period of daylight saving time and time zone.
2
[Start Date and Time]: Select the date and time when the daylight saving time
[End Date and Time]: Select the date and time when the daylight saving time
[Time Zone]: Select the time zone.
Various Functions of the Remote UI
NOTE
Time Zone: The standard time zones of the world are expressed globally in terms
of the difference in hours (± up to 12 hours) from GMT* (± 0 hours). A time zone is
a region throughout which this time difference is the same.
*The time at the Greenwich Observatory in England is called GMT (Greenwich Mean Time).
starts.
ends.
2-36
Displaying/Changing the Printer Settings (Device Settings)
Page 59

● When not using the daylight saving time
❑ Clear the [Set Daylight Saving Time] check box.
4
Clicking [OK] saves the changed settings.
Clicking [Cancel] displays the original page without changing the settings.
2
Various Functions of the Remote UI
Displaying/Changing the Printer Settings (Device Settings)
2-37
Page 60

Displaying/Changing the Links (Support Links)
The links to the sites that provide information about the printer support are supplied
in the Remote UI, and you can access the sites from the Remote UI as needed. If
you have logged on in Administrator Mode, you can change the links.
2
Display Procedure
1
Click [Support Links], then click the link that you want to visit.
Various Functions of the Remote UI
2-38
The linked website is displayed.
NOTE
•
You can display the page that allows you to change the links by clicking [Edit] on
the upper right. You can change the links only when you have logged on in
Administrator Mode. For more details, see "Changing the Links," on p. 2-39.
•
Up to 2 links can be specified.
Displaying/Changing the Links (Support Links)
Page 61

Changing the Links
You can display the page that allows you to change the links by clicking [Edit] in the
[Support Links] page. You can change [Links]/[Link], [URL], and [Comments].
NOTE
You can change the links only when you have logged on in Administrator Mode.
Clicking [OK] after changing links saves the changed
1
settings.
Clicking [Cancel] displays the original page without changing the settings.
2
Various Functions of the Remote UI
Displaying/Changing the Links (Support Links)
2-39
Page 62

2
Various Functions of the Remote UI
2-40
Displaying/Changing the Links (Support Links)
Page 63

Appendix
Changing the Remote UI Settings . . . . . . . . . . . . . . . . . . . . . . . . . . . . . . . . . . . . . . . . . . 3-2
Creating/Registering/Changing a Key and Its Certificate . . . . . . . . . . . . . . . . . . . . . . . . .3-4
Creating a Key and Its Certificate . . . . . . . . . . . . . . . . . . . . . . . . . . . . . . . . . . . . . . . . . . . . . . . .3-6
Installing a Key/Certificate File on the Printer . . . . . . . . . . . . . . . . . . . . . . . . . . . . . . . . . . . . . .3-12
Registering a Key and Its Certificate in the Printer . . . . . . . . . . . . . . . . . . . . . . . . . . . . . . . . . .3-14
Specifying a Key as the Default Key . . . . . . . . . . . . . . . . . . . . . . . . . . . . . . . . . . . . . . . . . . . . .3-16
Checking a Certificate . . . . . . . . . . . . . . . . . . . . . . . . . . . . . . . . . . . . . . . . . . . . . . . . . . . . . . . .3-17
Deleting a Key and Its Certificate . . . . . . . . . . . . . . . . . . . . . . . . . . . . . . . . . . . . . . . . . . . . . . .3-19
Deleting a Key/Certificate File Installed on the Printer . . . . . . . . . . . . . . . . . . . . . . . . . . . . . . . .3-20
Changing the Job Log Display Settings . . . . . . . . . . . . . . . . . . . . . . . . . . . . . . . . . . . . . 3-21
Printing an Encrypted Secured Print Job (Only When the Hard Disk Is Installed) . . . . . 3-23
Index . . . . . . . . . . . . . . . . . . . . . . . . . . . . . . . . . . . . . . . . . . . . . . . . . . . . . . . . . . . . . . . . 3-27
3
CHAPTER
3-1
Page 64

Changing the Remote UI Settings
If an optional hard disk is installed, clicking the [Change] button in [Remote UI] in
the [Information] page displays the [Change Remote UI Setting] page that allows
you to specify whether the SSL encrypted communication function should be used
for the Remote UI.
NOTE
3
Appendix
You can change the settings for the Remote UI only when you have logged on in
Administrator Mode.
1
Select [On] or [Off] for [SSL].
If [On] is selected, the SSL encrypted communication function is used.
If [Off] is selected, the SSL encrypted communication function is not used.
3-2
IMPORTANT
Even if a key and its certificate have been created, you cannot set [SSL] to [On]
when the key is not registered as the default key. For details on the SSL encrypted
communication function and the procedure for registering a key, see "Creating/
Registering/Changing a Key and Its Certificate," on p. 3-4.
Changing the Remote UI Settings
Page 65

2
Clicking [OK] saves the changed settings.
Clicking [Cancel] displays the original page without changing the settings.
3
Perform a hard reset or cycle the power of the printer.
After performing a hard reset or restarting the printer, the settings are effective.
3
Appendix
NOTE
For details on the procedure for performing [Hard Reset], see "User's Guide" (PDF
manual).
Changing the Remote UI Settings
3-3
Page 66

Creating/Registering/Changing a Key and Its Certificate
If an optional hard disk is installed, clicking the [Change] button in [Key and
Certificate] in the [Information] page displays the [Key and Certificate] page that
allows you to create, register, or change a key and its certificate.
To use the SSL encrypted communication function for IPP printing or the Remote
UI, the settings for the public key for encryption, private key for decryption, and
3
Appendix
certificate for the users to confirm key information are required. See the following
according to your system environment and the options that you want to specify.
■ When creating and using a key and its certificate with this printer
• Creating a Key and Its Certificate (See p. 3-6)
Newly create a key pair (the public key and private key) and its certificate.
• Specifying a Key as the Default Key (See p. 3-16)
Specify a created key to be used for SSL encrypted communication.
• Checking a Certificate (See p. 3-17)
Confirm the contents of the certificate of a created key.
• Deleting a Key and Its Certificate (See p. 3-19)
Delete a created key and its certificate.
■ When using a key/certificate file created by a device other than this printer
• Installing a Key/Certificate File on the Printer (See p. 3-12)
Install a key/certificate file created by a device other than this printer on this printer.
• Registering a Key and Its Certificate in the Printer (See p. 3-14)
Register a key pair (the public key and private key) and its certificate in a key/certificate
file installed on this printer so that you can use them in the printer.
• Specifying a Key as the Default Key (See p. 3-16)
Specify a registered key to be used for SSL encrypted communication.
• Checking a Certificate (See p. 3-17)
Check the certificate of a registered key.
• Deleting a Key and Its Certificate (See p. 3-19)
Delete a registered key and its certificate.
• Deleting a Key/Certificate File Installed on the Printer (See p. 3-20)
Delete a key/certificate file installed on this printer from this printer.
3-4
Creating/Registering/Changing a Key and Its Certificate
Page 67

IMPORTANT
•
Up to 2 keys and their certificates can be created and registered. If you want to create
and register a new key and its certificate when two keys and their certificates have
already been created and registered, delete any unnecessary key and its certificate, and
then create and register new ones.
•
Up to 2 key/certificate files can be installed. If you want to install a new key/certificate file
when two keys and their certificate files have already been installed, delete any
unnecessary key/certificate file, and then install a new one.
•
The key/certificate files that can be installed on this printer are only PKCS#12 files in
which the key's algorithm is "RSA" and the extension is ".P12".
•
You can create, register, or change keys and their certificates only when you have logged
on in Administrator Mode.
NOTE
•
The SSL encrypted communication function is a function that enables exchange of
encrypted data between this printer and a computer when performing IPP printing in
which data is printed via a network or when using the Remote UI in which you manage
the printer with the web browser. Using the SSL encrypted communication function
achieves safer printing environments by preventing theft and falsification of data.
•
SSL encrypted communication requires a key pair (the public key for encryption and
private key for decryption). By registering a key pair in this printer and opening the public
key to the users, the users can encrypt data to send to the printer, and only this printer
can decrypt the encrypted data with the private key. In this printer, a certificate is created
when a key pair is created. The users can check information about the key with the
certificate.
3
Appendix
Creating/Registering/Changing a Key and Its Certificate
3-5
Page 68

3
Appendix
Creating a Key and Its Certificate
1
Click [Generate Key and Certificate].
2
Enter the name of the key to be newly created in [Key Name].
3-6
NOTE
Up to 24 alphanumeric characters can be entered in [Key Name].
Creating/Registering/Changing a Key and Its Certificate
Page 69

3
Specify the setting for [Key Length].
Select [512bit] or [1024bit] for the key length.
NOTE
•
The setting for [Key Algorithm] is fixed at [RSA], and you cannot specify the setting.
•
Although using the longer key makes it more difficult to decode data, the
processing speed on encryption and decryption is slower. Select the key length
according to the needs of security for data communication.
3
Appendix
Creating/Registering/Changing a Key and Its Certificate
3-7
Page 70

3
Appendix
4
Specify the settings for [Start Date of Validity] and [End Date
of Validity].
Enter the effective date and expiration date of the self-sign server certificate.
NOTE
You can enter date between 1/1/2000 (1 Day 1 Month 2000 Year) and 31/12/2048
(31 Day 12 Month 2048 Year) in [Start Date of Validity] and [End Date of Validity].
3-8
5
Specify the country/region name for the self-sign server
certificate.
● When selecting a country/region name from the list of the registered
country codes
❑ Select [Select Country/Region Name].
Creating/Registering/Changing a Key and Its Certificate
Page 71

❑ Select the country/region name from the pull-down menu.
● When entering the Internet country code directly
❑ Select [Enter Internet Country Code].
❑ Enter the Internet country code with 2 or less characters.
3
Appendix
Creating/Registering/Changing a Key and Its Certificate
3-9
Page 72

3
Appendix
6
Specify the settings for [State], [City], [Organization],
[Organization Unit], and [Common Name] as needed.
Options to be entered
[State]: Enter the name of the state.
[City]: Enter the name of the city.
[Organization]: Enter the name of the organization.
[Organization Unit]: Enter the organization unit such as a section name.
[Common Name]:
Enter the IP address or FQDN (in the style of
"xyz.company.com") of this printer.
3-10
IMPORTANT
Specify the setting for at least one of the options among [Country/Region], [State],
[City], [Organization], [Organization Unit], and [Common Name]. When all the fields
are blank, the self-sign server certificate is not issued.
If you are using Windows Vista and want to use IPPS printing, be sure to enter the
IP address of this printer in [Common Name].
NOTE
You can enter up to 24 alphanumeric characters, spaces ( ), commas ( , ), periods
( . ), hyphens ( - ), slashes ( / ), quotations ( ' ), double quotations ( " ), round
brackets "(" and ")", plus marks ( + ), equal marks ( = ), and question marks ( ? ) in
[State], [City], [Organization], [Organization Unit], and [Common Name].
Creating/Registering/Changing a Key and Its Certificate
Page 73

7
Clicking [OK] starts to create a key and its certificate.
Clicking [Cancel] does not create a key and its certificate but redisplays the [Key
and Certificate] page.
If you want to perform SSL encrypted communication using the created key, see
"Specifying a Key as the Default Key" (p. 3-16) and specify the key to be used for
the SSL encrypted communication after creating the key and its certificate.
3
Appendix
Creating/Registering/Changing a Key and Its Certificate
3-11
Page 74

3
Appendix
Installing a Key/Certificate File on the Printer
1
Click [Install].
2
Enter the path of the key/certificate file in [File Path].
3-12
By clicking [Browse], you can select the path of the key/certificate file from the
dialog box for selecting a file.
Creating/Registering/Changing a Key and Its Certificate
Page 75

NOTE
Except for the extension ".P12", up to 8 characters can be entered in [File Path] for
the file name. Specify the file name so that its length is 8 characters or less.
3
Clicking [Start installation] starts to install the key/certificate
file.
Clicking [Cancel] does not install the key/certificate file but redisplays the [Key
and Certificate] page.
3
Appendix
To specify the key pair (the public key and private key) and its certificate in a key/
certificate file installed on this printer so that you can use them in the printer, see
"Registering a Key and Its Certificate in the Printer" (p. 3-14) and register the key
pair (the public key and private key) and its certificate in the printer after installing
the key/certificate file.
Creating/Registering/Changing a Key and Its Certificate
3-13
Page 76

3
Appendix
Registering a Key and Its Certificate in the Printer
1
Click [Register].
2
Enter the name of the key to be registered in [Key Name].
3-14
NOTE
Up to 24 alphanumeric characters can be entered in [Key Name].
Creating/Registering/Changing a Key and Its Certificate
Page 77

3
Enter the password specified for the private key in
[Password].
NOTE
Up to 24 alphanumeric characters can be entered in [Password].
3
Appendix
4
Clicking [OK] starts to register the key and its certificate.
Clicking [Cancel] does not register the key and its certificate but redisplays the
[Key and Certificate] page.
Creating/Registering/Changing a Key and Its Certificate
3-15
Page 78

3
Appendix
To perform SSL encrypted communication using the registered key, see
"Specifying a Key as the Default Key" (p. 3-16) and specify the key to be used for
the SSL encrypted communication after registering the key and its certificate.
Specifying a Key as the Default Key
1
Click the [Set this key as the Default Key] button for the key to
be specified as the default key.
3-16
NOTE
•
The [Set this key as the Default Key] button is displayed only when the key is not
specified as the default key.
•
When [SSL] in [Change Remote UI Setting] is set to [On], or when [SSL] for IPP
printing in [Change TCP/IP Settings] is set to [On], the [Set this key as the Default
Key] button is not displayed to prevent the settings for the key in use from being
changed.
•
If you want to specify a key as the default key, specify [Off] for the above options
before specifying the key as the default key.
2
When the message is displayed, click [OK].
The selected key is specified as the default key.
Creating/Registering/Changing a Key and Its Certificate
Page 79

Checking a Certificate
1
Click .
NOTE
is displayed only when a certificate has been issued for the created key.
3
Appendix
Creating/Registering/Changing a Key and Its Certificate
3-17
Page 80

3
Appendix
2
After confirming the contents of the certificate, click the
[Back] button.
The [Key and Certificate] page reappears.
3-18
Creating/Registering/Changing a Key and Its Certificate
Page 81

Deleting a Key and Its Certificate
1
Click [Erase] for the key and its certificate that you want to
delete.
NOTE
•
[Erase] is displayed only when the key is not specified as the default key.
•
When [SSL] in [Change Remote UI Setting] is set to [On], or when [SSL] for IPP
printing in [Change TCP/IP Settings] is set to [On], [Erase] is not displayed to
prevent the key in use from being deleted.
•
If you want to delete a key and its certificate, specify [Off] for the above options
before deleting the key and its certificate.
3
Appendix
2
When the message is displayed, click [OK].
The selected key and its certificate are deleted.
Creating/Registering/Changing a Key and Its Certificate
3-19
Page 82

3
Appendix
Deleting a Key/Certificate File Installed on the Printer
1
Click [Erase] for the installed key/certificate file that you want
to delete.
3-20
2
When the message is displayed, click [OK].
The installed key/certificate file that you selected is deleted.
Creating/Registering/Changing a Key and Its Certificate
Page 83

Changing the Job Log Display Settings
You can display the [Job Log Display] page that allows you to specify the job log
display settings by clicking [Change] in [Job Log Display] in the [Information] page.
IMPORTANT
•
You cannot specify the job log display settings depending on the printer model you are
using.
•
You can change the job log display settings only when you have logged on in
Administrator Mode.
3
1
Specify whether the printer should display the job logs.
If the [Job Log Display] check box is cleared, the [Print Log] page in the [Job
Manager] menu is not displayed.
Appendix
Changing the Job Log Display Settings
3-21
Page 84

3
Appendix
2
Select whether to permit management software to obtain job
logs.
If the [Obtain Job Log from Management Software] check box is cleared, job
logs cannot be obtained from management software (such as iW Accounting
Manager).
3-22
3
Click [OK].
Changing the Job Log Display Settings
Page 85

Printing an Encrypted Secured Print Job
(Only When the Hard Disk Is Installed)
You can print encrypted secured print jobs using the Remote UI. The encrypted
secured print function reinforces the security for data communication by specifying
the password for a print job when printing from a computer by performing SSL
encrypted communication.
IMPORTANT
SSL encrypted communication is required when printing an encrypted secured print job.
When you cannot perform SSL encrypted communication (when no key is specified or
[SSL] for [Remote UI Setting] is set to [Off]), set [SSL] for the key and Remote UI to [On],
and then restart the printer to make the settings effective before printing an encrypted
secured print job.
NOTE
•
The encrypted secured print function can be executed only when an optional hard disk is
installed, and [Hard Disk] is set to [On]. Specify the setting for [Hard Disk] in [Control
Menu] Page (See p. 2-31) or on the control panel.
•
The encrypted secured print jobs saved on the hard disk are deleted in the following
circumstances:
-When the printer is turned OFF
-When a hard reset or soft reset is performed
-When the encrypted secured print jobs are printed
-When no printing operation has been performed by the Remote UI or printer's control
panel for a fixed period
•
You can change the time interval from when no printing operation is performed by the
Remote UI or printer's control panel for a fixed period until the printer deletes encrypted
secured print jobs. For more details, see the item in "SETUP Menu Settings" in User's
Guide.
•
If you want to use the encrypted secured print function, you need to install software
required for printing encrypted secured print jobs. For details on software required for
printing encrypted secured print jobs, see "Driver Guide". For the procedure for installing
the software, see Readme.txt in "Encrypted Secured Print Driver Add-in For Client PC",
the CD-ROM supplied with the optional hard disk.
3
Appendix
Printing an Encrypted Secured Print Job (Only When the Hard Disk Is Installed)
3-23
Page 86

3
Appendix
1
Print an encrypted secured print job in the printer driver on
the computer.
NOTE
For the procedure for printing encrypted secured print jobs, see Online Help of the
Encrypted Secured Print Driver Add-in For Client PC.
You can display the Online Help from the Encrypted Secured Print Driver Add-in
For Client PC after installing the printer driver.
2
Start the Remote UI using SSL encrypted communication,
then click [Print Job] from the [Job Manager] menu.
3-24
NOTE
•
For the procedure for starting the Remote UI, see "Starting the Remote UI," on p.
1-6.
•
A job file name of up to 32 characters can be displayed in [Document Name]. If the
file name has more than 32 letters, the letters after the limited number are not
displayed. Also, depending on the application, the application name may be added
to the beginning of the file name.
Printing an Encrypted Secured Print Job (Only When the Hard Disk Is Installed)
Page 87

3
Click on the left of the target encrypted secured print jobs
to change the mark to , and then click (Resume).
When you cannot perform SSL encrypted communication (when no key is
specified or [SSL] for the Remote UI setting is set to [Off]), the following screen is
displayed. Click [OK] to cancel printing the encrypted secured print job, set [SSL]
for the key settings and the Remote UI settings to [On], and then restart the
printer to make the settings effective.
3
Appendix
When the printer is restarted, the encrypted secured print jobs are deleted. Print
the encrypted secured print jobs from the computer as needed.
Printing an Encrypted Secured Print Job (Only When the Hard Disk Is Installed)
3-25
Page 88

3
Appendix
NOTE
When SSL encrypted communication is enabled but not being performed, the SSL
encrypted communication is started automatically. If [Security Alert] dialog box or
other dialog box appears after the printer starts the SSL encrypted communication
automatically, follow the directions in the message.
4
Enter the password specified in [Password] for the encrypted
secured print job, and then click [OK].
3-26
The specified encrypted secured print job is printed.
Printing an Encrypted Secured Print Job (Only When the Hard Disk Is Installed)
Page 89

Index
A
Administrator Mode, 1-8
Administrator Settings, 2-13
C
Changing Date and Time, 2-33
Changing the Box Settings, 2-25
Changing the Job Log Display Settings, 3-21
Changing the Links, 2-39
Changing the Remote UI Settings, 3-2
Confirming the Availabilities of the Optional
Accessories, 2-14
Consumables, 2-6
Control Menu Page, 2-31
Creating/Registering/Changing a Key and Its
Certificate, 3-4
D
Device Control, 2-9
Device Image, 2-5
Device Information, 2-12
Device Status, 2-5
Displaying the Current Status, 2-4
Displaying the Print Log Page, 2-28
Displaying/Changing the Links (Support Links),
2-38
Displaying/Changing the Network Settings, 2-15
Displaying/Changing the Printer Information, 2-
11
Displaying/Changing the Printer Settings (Device
Settings), 2-31
Displaying/Managing the Printer Status (Device
Manager), 2-2
Displaying/Operating the Jobs (Job Manager), 2-
17
Displaying/Operating the Jobs Stored in a Box
(Resume/Delete), 2-21
Displaying/Operating the Print Jobs (Pause/
Resume/Delete, etc.), 2-17
E
End-User Mode, 1-8
Error Information, 2-5
Ethernet Driver Setting, 2-16
F
Features and Benefits of the Remote UI, 1-2
Features Page, 2-2
I
Information Page, 2-2
IP Address Range, 2-13
K
Key and Certificate, 2-13
L
Layout Menu Page, 2-31
Log On, 1-8
Logging On the Remote UI, 1-8
3
Appendix
Index
3-27
Page 90

M
Management Protocol, 2-16
N
Network Interface, 2-15
Network Page, 2-2
P
3
Paper Information, 2-5
Paper Source Menu Page, 2-31
Parameter List, 2-16
Perform Calibration, 2-10
Appendix
Permitted Receiving MAC Address, 2-13
Print Job Page, 2-17
Print Log Page, 2-17
Print Protocol, 2-16
Printing an Encrypted Secured Print Job (Only
When the Hard Disk Is Installed), 3-23
Printing Files Directly (Direct Print), 2-30
Deleting a Key/Certificate File Installed on the
Printer, 3-20
Installing a Key/Certificate File on the Printer,
3-12
Newly Creating a Key and Its Certificate, 3-6
Registering a Key and Its Certificate in the
Printer, 3-14
Specifying a Key as the Default Key, 3-16
Spooler, 2-16
Startup Time, 2-16
Status Page, 2-2
Stored Job Page, 2-17
System Requirements, 1-5
U
Utility, 2-10
Q
Quality Menu Page, 2-31
R
Receiving Permitted MAC Address, 2-13
Remote UI, 2-13
S
Screen Layout, 1-11
Screen Layout of the Remote UI, 1-11
Setting a Key and Its Certificate
Checking a Certificate, 3-17
Deleting a Key and Its Certificate, 3-19
3-28
Index
Page 91

USRM1-2488 (00) © CANON INC. 2007
 Loading...