

Page 1

User’s Guide
Table of Contents
Introduction 2
Before Using Your Machine 10
Copying 23
Sending Faxes 24
Receiving Faxes 33
Printing from Your Computer 42
Settings and Activity Reports 44
Routine Maintenance 50
Troubleshooting 60
Specifications 79
Appendix 81
Page 2

Model Name
K10334 (JX210P)
About Consumables
Consumables (ink tanks / FINE Cartridges) are available for 5 years after production has stopped.
International ENERGY STAR® Program
As an ENERGY STAR Partner, Canon Inc. has determined that this product
meets the ENERGY STAR guidelines for efficiency.
Depending on your application program, operations may differ. For details, refer to the instruction
manual of your application. The steps described in this manual are in Windows Vista operating
system Ultimate Edition (hereafter referred to as “Windows Vista”).
Trademark Notices
z Microsoft is a registered trademark of Microsoft Corporation.
z Windows is a trademark or registered trademark of Microsoft Corporation in the U.S. and/or
other countries.
z Windows Vista is a trademark or registered trademark of Microsoft Corporation in the U.S. and/
or other countries.
z Macintosh is a trademark of Apple Inc., registered in the U.S. and other countries.
© CANON INC. 2009
All rights reserved. No part of this publication may be transmitted or copied in any form
whatsoever without the express written permission.
IMPORTANT SAFETY INSTRUCTIONS
When using your telephone equipment, basic safety precautions should always be followed to
reduce the risk of fire, electric shock and injury to persons, including the following:
1. Do not use this product near water, for example, near a bath tub, wash bowl, kitchen sink or
laundry tub, in a wet basement or near a swimming pool.
2. Avoid using this product during an electrical storm. There may be a remote risk of electric shock
from lightning.
3. Do not use this product to report a gas leak in the vicinity of the leak.
SAVE THESE INSTRUCTIONS
Caution
To reduce the risk of fire, use only No. 26 AWG or larger telecommunication line cord.
1
Page 3

Introduction
Useful Information
z Replacing a FINE Cartridge
When the ink in the FINE Cartridge starts to run out, the machine will switch to memory reception
of faxes.
See “Printing a Document in Memory” on page 39
See “Replacing a FINE Cartridge” on page 52
See “Aligning the FINE Cartridge” on page 55
z One-touch and Coded Dial Numbers
You can register One-touch and Coded Dial numbers in your fax machine to make sending faxes
easier and faster.
See “Registering One-touch Speed Dialing Numbers and Names” on page 18
See “Registering Coded Speed Dialing Numbers and Names” on page 19
z Different Ways to Receive Faxes
There are several different ways to receive faxes using this machine. Select the one that most
suits your needs.
See “Setting the Receive Mode” on page 34
z Deleting Faxes from the Memory
When the ink level is low faxes will be received into the memory. Once 30 transmissions have
been received reception will no longer be possible, so be sure to print out and delete
unnecessary faxes from the memory.
See “Printing All Unprinted Documents in Memory” on page 40
See “Deleting All Printed Documents from Memory” on page 41
z Clearing Documents and Paper Jams
In the unlikely event that your machine jams you will need to remove the jammed paper.
See “Paper Jams” on page 60
z Setting the Telephone Line Type
To use a fax or make a telephone call, you need to set the telephone line type setting properly on
the machine. If you are unsure of your telephone line type, contact your telephone company.
See “Setting the Telephone Line Type” on page 14
z Receiving to Memory Temporarily (<AUTO PRINT OFF>)
You can configure not to print received faxes automatically. Set the <AUTO PRINT> setting to
<OFF> to store received faxes in the machine’s memory.
See “Receiving to Memory Temporarily” on page 37
2 Introduction
Page 4

Reading the Documentation
This guide provides detailed information on how to set up, operate, maintain, and troubleshoot your
fax.
Please read the list below to become familiar with the symbols, terms, and abbreviations used in this
guide.
Warning
Indicates a warning concerning operations that may lead to death or injury to persons if not
performed correctly. In order to use the machine safely, always pay attention to these warnings.
Caution
Indicates a caution concerning operations that may lead to injury to persons or damage to property if not
performed correctly. In order to use the machine safely, always pay attention to these cautions.
Important
Indicates operational warnings and restrictions. Be certain to read these items to operate the machine
correctly and to avoid damage to the machine.
Note
Indicates notes for operation or additional explanations. Reading these is highly recommended.
(see page xx) Indicates a page number that you can refer to for more information on the
default A setting that remains in effect unless you change it.
document The original sheet(s) of paper you send, receive, or copy with your fax.
menu A list of settings from which you select an item to set up or change. A
[{] and [}] buttons Used to select an item in a menu. Press [}] to select the next item, and
transaction number When you send or receive a document, your fax automatically assigns the
TX/RX NO. TX/RX NO. is the abbreviation used for “transaction number.”
TX Denotes Transmission.
RX Denotes Reception.
TRANSMITTING OK
In addition, this guide uses brackets to identify the buttons you press when performing different
functions: [Stop/Reset].
topic of the previous sentence or paragraph.
menu has a title which appears on the LCD.
press [{] to select the previous item.
document a unique transaction number. A transaction number is a fourdigit number that will help you keep track of documents you send and
receive.
LCD display. The contents of the LCD display may vary depending on the
current settings.
Note
Please note that the illustrations of the fax in this guide may differ from your model.
3Introduction
Page 5

Safety Precautions
Please read the safety warnings and cautions provided in this manual to ensure that you use the
machine safely. Do not attempt to use the machine in any way not described in this manual.
Warning
z This product emits low level magnetic flux. If you use a cardiac pacemaker and feel abnormalities,
please move away from this product and consult your doctor.
z You may cause an electric shock, fire, or damage the machine if you ignore any of these safety
precautions.
Choosing a location Do not place the machine close to flammable solvents such as alcohol or thinners.
Power supply Never attempt to plug in or unplug the machine from the power supply when your hands are
Cleaning the machine Use a damp cloth to clean the machine. Never use flammable solvents such as alcohol,
Maintaining the machine Do not attempt to disassemble or modify the machine. There are no user serviceable parts
Working around the
machine
wet.
Always push the plug all the way into the power outlet.
Never damage, modify, stretch or excessively bend or twist the power cord. Do not place
heavy objects on the power cord.
Never plug the machine into a power socket that is shared with other equipment (extension
lead/cord, 2- or 3-way adapter, etc.).
Never use the machine if the power cord is bundled or knotted.
If you detect smoke, unusual smells or strange noises around the machine, immediately
unplug the machine at the power supply and call for service.
Periodically, unplug the machine and use a dry cloth to wipe off any dust or dirt collected on
the plug and the power outlet.
If the machine is placed at a location exposed to a lot of dust, smoke, or high humidity, the
dust collected on the plug absorbs moisture and may cause insulation failure and fire.
If you hear thunder, disconnect the power supply of the machine and refrain from using it.
Leaving the machine plugged in may cause fire, electric shock, or damage to the machine,
depending on the thunder storm.
Never use a power supply source other than the one rated for the machine in the country of
where you purchased the machine.
AC 100-240 V, 50/60 Hz
benzene or thinners.
If flammable solvents come in contact with electrical components inside the machine, it
could cause a fire or electric shock.
Always unplug the machine from the power outlet before cleaning the machine.
If you accidentally switch the machine on while cleaning it, you could injure yourself or
damage the machine.
inside the machine.
The machine contains high-voltage components. Never attempt any maintenance
procedure not described in this guide.
Do not use highly flammable sprays near the machine.
This could cause a fire or electric shock if the spray comes into contact with electrical
components inside the machine.
4 Introduction
Page 6
Caution
You may cause injury or damage the machine if you ignore any of these safety precautions.
Choosing a location Do not install the machine in a location that is unstable or subject to excessive vibration.
Do not install the machine in locations that are very humid or dusty, in direct sunlight,
outdoors, or close to a heating source.
To avoid the risk of fire or electric shocks, install the machine in a location with an ambient
temperature range of 41°F to 95°F (5°C to 35°C) and humidity of 10% to 90%
(condensation free).
Do not place the machine on a thick rug or carpet.
Do not place the machine with its back attached to the wall.
Power supply Ensure that the area around the power outlet is kept clear at all times so you can easily
Working around the
machine
FINE Cartridge (Ink
Cartridge)
unplug the power cord if necessary.
Never remove the plug by pulling on the cord.
Do not use an extension lead/cord.
Never put your hands or fingers in the machine while it is printing.
Do not place any object on the machine.
Do not place metal objects (paper clips, staples, etc.) or containers of flammable solvents
(alcohol, thinners, etc.) on top of the machine.
If any foreign object (metal or liquid) fall into the machine, unplug the power cord and call
for service.
Do not transport or store the machine on a slant, vertically or upside-down, as the ink may
leak and damage the machine.
Keep FINE Cartridges (Ink Cartridges) out of the reach of children.
In case ink is accidentally licked or swallowed, rinse out mouth or give one or two glasses of
water to drink.
If irritation or discomfort occurs, obtain medical advice immediately.
In case ink gets in contact with eyes, rinse with water immediately.
In case ink gets in contact with skin, wash with soap and water immediately.
If irritation to eyes or skin persists, obtain medical advice immediately.
Never touch the electrical contacts on a FINE Cartridge (Ink Cartridge) after printing. The
metal parts may be very hot and could cause burns.
Do not throw FINE Cartridges (Ink Cartridges) into fire.
Legal Limitations
It may be unlawful to make copies of, scan, print, or use reproductions of the following documents.
The list provided is non-exhaustive. When in doubt, check with a legal representative in your
jurisdiction.
z
Paper money
z
Money orders
z
Certificates of deposit
z
Postage stamps (canceled or uncanceled)
z
Identifying badges or insignias
z
Selective service or draft papers
z
Checks or drafts issued by governmental
agencies
z
Motor vehicle licenses and certificates of title
z
Traveler’s checks
z
Food stamps
z
Passports
z
Immigration papers
z
Internal revenue stamps (canceled or uncanceled)
z
Bonds or other certificates of indebtedness
z
Stock certificates
z
Copyrighted works/works of art without
permission of copyright owner
5Introduction
Page 7
How to Use the Documentation Provided
Setup Sheet
Be sure to read this sheet first.
This sheet includes instructions for setting up your machine and getting it ready
for use.
User’s Guide (This guide)
Read this guide when starting to use the machine.
After following instructions in your setup sheet, we recommend you read this
guide to familiarize yourself with the basic operation of some of the main
functions that can be performed on your machine.
On-screen Manual
Read this guide when printing from your computer.
Please refer to the On-screen Manual for full instructions on printing a document
from your computer, and printer driver setting. This manual can be installed from
the Setup CD-ROM.
Preparing the Machine
Be sure to read your setup sheet first for setting up your machine and getting it ready for use.
Unpack the machine
Please confirm the included items against the illustration printed on the lid of the packing box.
Important
A USB cable is necessary to connect the machine with your computer.
1 Connect the telephone line and the power cord.
Be sure to use the bundled telephone line cable.
If you connect the telephone line, see your setup sheet.
Remove the Telephone connector protective tape to connect the external device.
Important
Be sure to remove the tapes and protective material before you turn on the machine.
Note
The tape or the protective material position is subject to change.
2 Turn on the machine.
Note
If an unintended language is displayed on the LCD, press [Stop/Reset], then change it into your
desired language. See “Selecting the Language for the LCD” on page 8.
6 Introduction
Page 8
3 Prepare the FINE Cartridge.
Caution
z Do not touch internal parts other than the Holder.
z Do not drop or shake FINE Cartridge as this may cause the ink to leak out and stain your
clothes and hands.
Important
z Do not touch the electrical contacts or Print Head Nozzles on a FINE Cartridge. The machine
may not print out properly if you touch it.
z Do not reattach the protective tape once it has been removed.
z Handle the removed protective tape carefully to avoid getting your hands dirty or staining
surrounding work area.
4 Install the FINE Cartridge.
Important
z Make sure that the FINE Cartridge is installed in the correct position. The machine cannot be
used unless the FINE Cartridge is installed.
z If the Cover is left open for more than 10 minutes, the Holder moves to the right side. Close and
reopen the Cover to return the Holder to the left.
z Once you have installed the FINE Cartridge, <CART. RETURN> is displayed on the LCD. Wait
until the standby screen is displayed before proceeding. It takes about one to two minutes.
Note
z The machine may make some operating noises when preparing to print. This is normal
operation.
z An error message will be displayed on the LCD if a FINE Cartridge is not installed properly.
Open the Cover and make sure that position of the FINE Cartridge is appropriate.
Select the receive mode according to your needs. See “Different ways to receive a document” on
page 33.
z Receiving both documents and telephone calls automatically:
<Fax/Tel Mode>/<DRPD>
z Receiving documents manually:
<MANUAL MODE>
z Receiving documents with an answering machine:
<ANS.MACHINE MODE>
z Receiving documents automatically and disconnects telephone calls:
<FAX ONLY MODE>
Note
To use a fax, you need to set the telephone line type setting properly on the machine. For details on how
to confirm and change this setting, see “Setting the Telephone Line Type” on page 14.
If you are unsure of your telephone line type, contact your telephone company.
7Introduction
Page 9

Selecting the Language for the LCD
If an unintended language is displayed on the LCD, change it into your desired language
following the procedure below.
1 Press [Menu].
2 Press [}] once, then press [Start/Copy].
3 Press [}] five times, then press [Start/Copy].
4 Press [}] twice, then press [Start/Copy].
The currently selected language name is displayed in the language itself.
5 Press [}] once, then press [Start/Copy].
Each time you press [}], the display cycles through:
<ENGLISH>, <GERMAN>, <FRENCH>, <ITALIAN>, <SPANISH>, <DUTCH>,
<PORTUGUESE>, <NORWEGIAN>, <SWEDISH>, <DANISH>, <FINNISH>, <RUSSIAN>,
<CZECH>, <HUNGARIAN>, <POLISH>, <SLOVENE>, and <CHINESE>.
6 If your desired language is displayed, press [Stop/Reset].
Setting ends and the fax returns to standby mode.
If your desired language is not displayed, press [{] once, press [Start/Copy], then repeat
from step 5 again.
8 Introduction
Page 10
Installing the Printer Driver
Important
The machine is not compatible with Macintosh computers.
Notes on the Installation Process
z Quit all running applications before installation.
z Log into a user account with the administrator privilege.
z Do not switch users during the installation process.
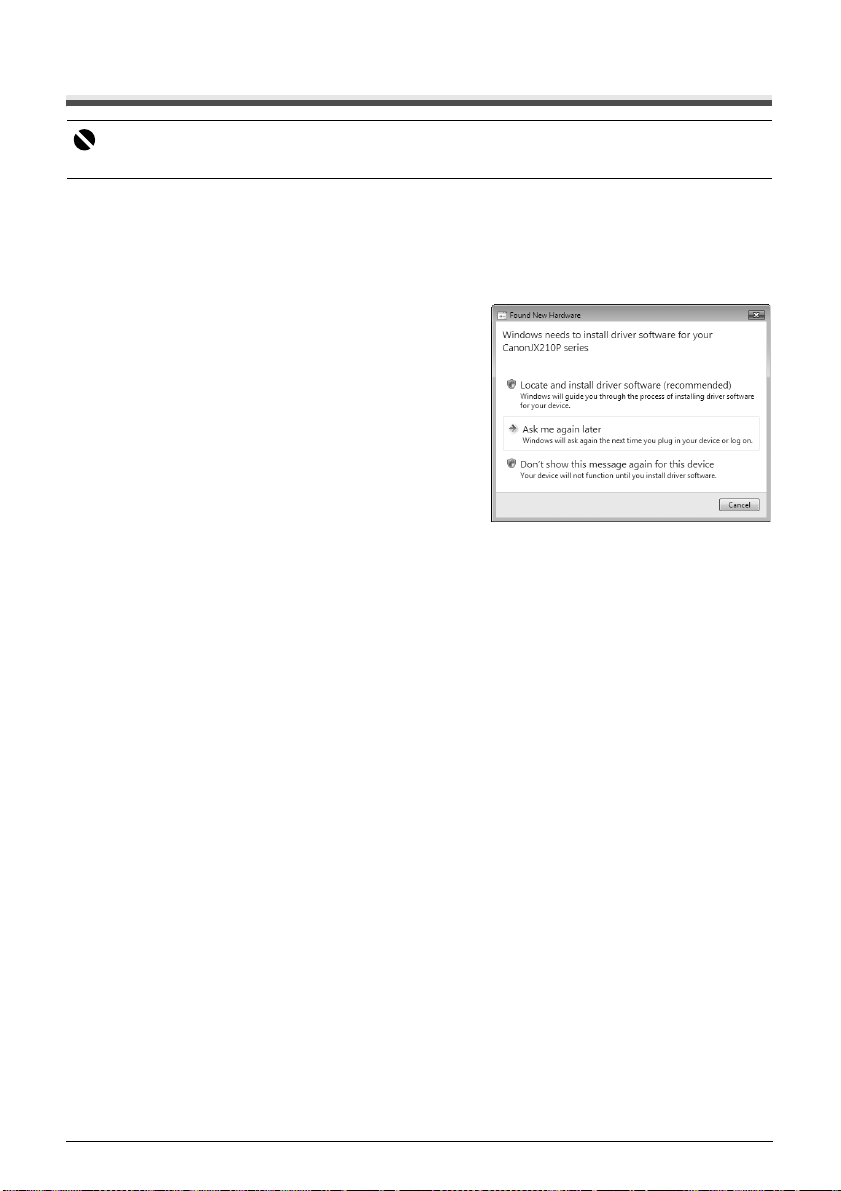
z If the Found New Hardware or Found New
Hardware Wizard screen appears automatically,
remove the USB cable connected to your
computer. (In Windows XP and Windows 2000,
remove the USB cable connected to your computer
and click Cancel to quit the screen.) Then turn off
the machine and start the installation process
again. For details on the installation process, refer
to your setup sheet.
z If installation does not start automatically when the
Setup CD-ROM is inserted into your computer’s
disc drive, click Start then Computer. (In Windows
XP, click Start then My Computer. In Windows 2000, double-click the My Computer icon on
the desktop.) And double-click the CD-ROM icon on the displayed window. If the contents of
the CD-ROM are displayed, double-click MSETUP4.EXE.
z If the AutoPlay screen appears, click Run Msetup4.exe. In Windows XP and Windows 2000,
this screen will not appear.
z If the User Account Control screen appears, click Continue. In Windows XP and Windows
2000, this screen will not appear.
z There are two ways of installing the printer driver and On-screen Manual:
Easy Install: the items included on the Setup CD-ROM are installed automatically
Custom Install: you can select particular items to install
z A message asking for your confirmation to restart your computer may appear during the
installation process. If this message is displayed, follow the on-screen instructions and click OK.
The installation resumes from where it left off when your computer has been restarted. While
restarting, do not remove the Setup CD-ROM.
z If the connection is not recognized, refer to “Cannot Install the Printer Driver” on page 67.
z We would appreciate it if you would take part in the Extended Survey Program regarding the
use of Canon printers. If Do not agree is clicked, the Extended Survey Program will not be
installed but you can use the machine normally.
z Remove the Setup CD-ROM after installation is completed, then keep it in a safe place in
case you need to reinstall the printer driver.
Notes on the Print Head Alignment
z If the straight line is misaligned or print quality is not satisfactory after installing the printer
driver, you may need to align the Print Head. Refer to “Aligning the FINE Cartridge” on
page 55.
9Introduction
Page 11

Before Using Your Machine
Main Components and Their Functions
(1)
(2)
(3)
(4)
(5)
(6)
(7)
(8)
(9)
(10)
(11)
(12)
(1) Document Cover
(2) Paper Support
(3) Rear Tray
(4) ADF
(5) Document Guide
(6) Paper Guide
(7) Handset
(8) Operation Panel
(9) Cover
(10) Holder
10 Before Using Your Machine
(13)
(14)
(15)
(11) External Device Jack
(12) Telephone Line Jack
(13) USB Port
(14) Handset Jack
(15) Power Cord Connector
Page 12
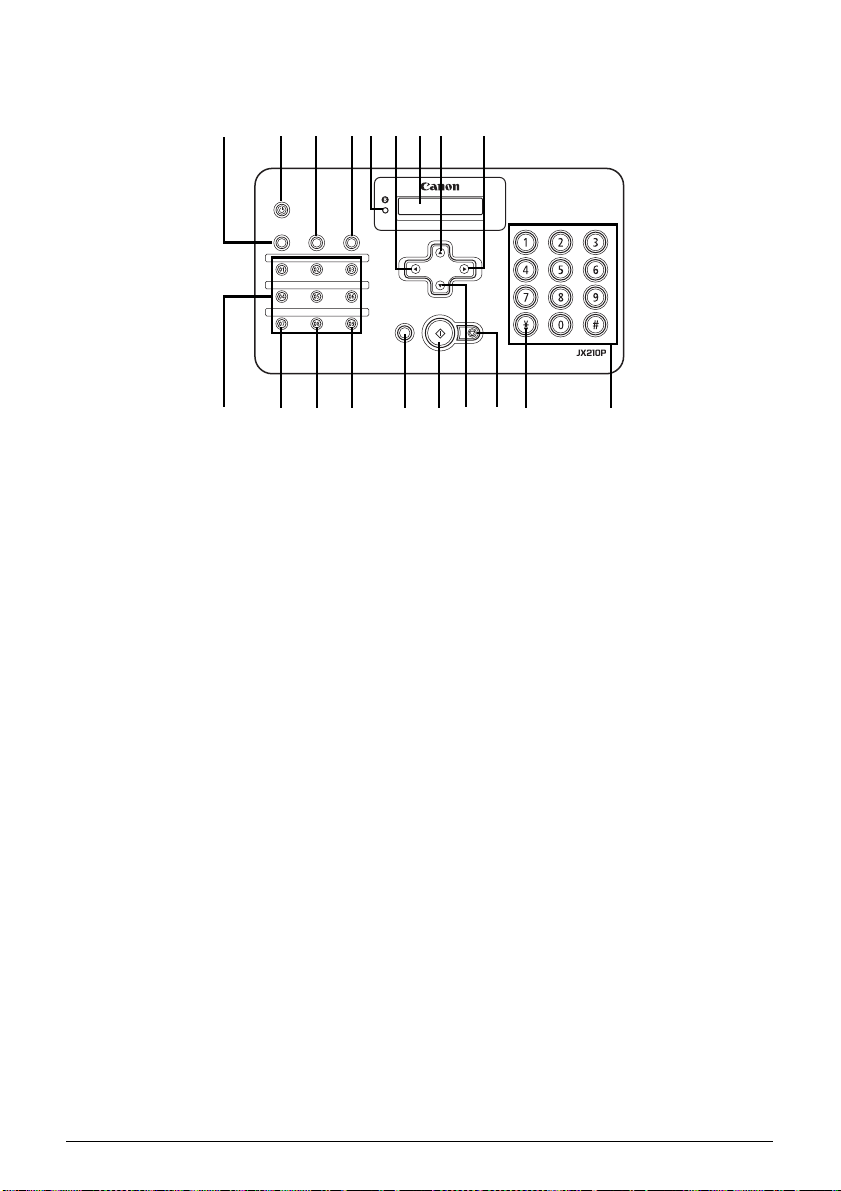
Operation Panel
(2)(1) (3) (4)(5) (6) (7)(8) (9)
(12)(10) (13) (15)(16) (17) (19)(11) (14)
(1) [Maintenance] (see page 50)
(2) [ON] (see page 12)
(3) [Receive Mode/Resolution] (see
page 23, page 25, page 34)
(4) [Menu] (see page 14)
(5) Ink Lamp (see page 50)
(6) [Caller History] (see page 28)
(7) LCD (Liquid Crystal Display)
(8) [Coded] (see page 19)
(9) [Redial] (see page 29)
(18)
(10) One-Touch Speed Dialing button
(see page 18)
(11) [Pause] (see page 28)
(12) [Space] (see page 13)
(13) [Clear] (see page 14)
(14) [Hook] (see page 24)
(15) [Start/Copy]
(16) [Directory] (see page 27)
(17) [Stop/Reset]
(18) Tone (see page 13, page 28)
(19) Numeric buttons (see page 13)
11Before Using Your Machine
Page 13
Turning the Machine ON and OFF
Turn on the machine before using.
Turning on the Machine
Before turning on the machine, confirm that the FINE Cartridge is set into place.
Note
If preparatory operations are not yet finished, follow your setup sheet to complete them.
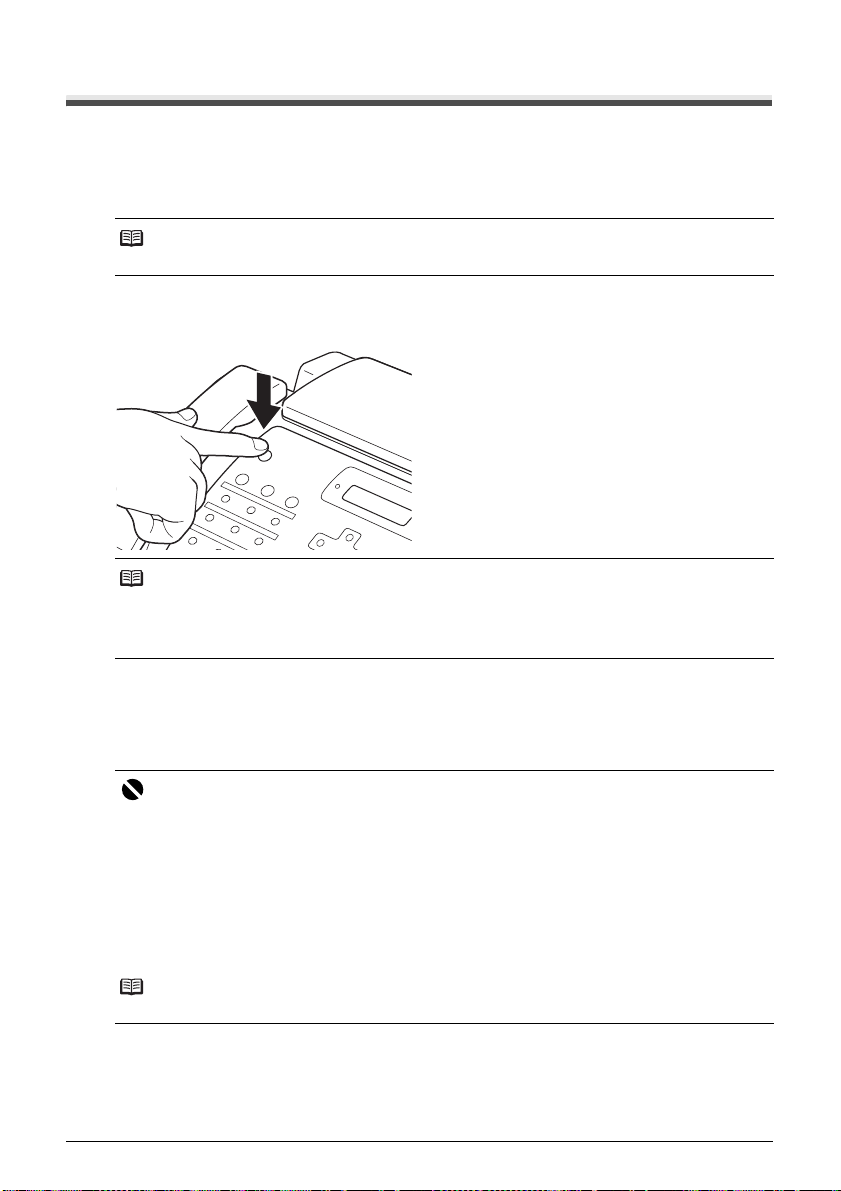
1 To turn on the machine, press [ON].
[ON] flashes green for a while, and then turns on.
Note
z If an error message is displayed on the LCD, see “LCD Messages” on page 73.
z When the machine is left inactive for more than 4 minutes 30 seconds, the LCD goes off
automatically and the machine enters the power saver mode. Press any button on the
Operation Panel except for [ON] to restore the display.
Turning off the Machine
1 To turn off the machine, press [ON].
The machine is off after <SHUTTING DOWN...> is displayed on the LCD.
Important
z Always turn off the machine before disconnecting the power cord. This ensures the FINE
Cartridge is covered to prevent it from drying out.
z If the machine is not used for an extended period of time, we recommend making copies or
performing FINE Cartridge cleaning about once every month to prevent degradation of the FINE
Cartridge.
z The FINE Cartridge has many nozzles in order to produce high-definition prints. In the same
way that the tip of a felt-tip or marker pen will naturally dry out over time and become unusable
even with the cap in place, the nozzles might become clogged. Periodically printing or
performing FINE Cartridge cleaning can help to prevent this kind of clogging.
z If you change to another telephone line, turn off the machine before unplugging the telephone
line cable.
Note
The power cannot be turned off with [ON] while the machine is operating.
12 Before Using Your Machine
Page 14

Guidelines for Entering Numbers, Letters, and
Symbols
When you come to a step that requires you to enter a name or number, see the table below to
determine which numeric button to press for the letter you want.
Button Uppercase Letter Lowercase Letter Number Mode
Mode (:A) Mode (:a) (:1)
1
ABC
2
DEF
3
GHI
4
JKL
5
MNO
6
PQRS
7
TUV
8
WXYZ
9
0
#
Uppercase letter
mode (:A)
Lowercase letter
mode (:a)
Number mode
(:1)
Note
After 120 seconds of no operation panel input, the fax returns to standby mode and any unregistered
changes are lost.
z Entering Numbers, Letters, and Symbols
1 Press [ ] to switch between the letter and number mode.
_:A
2 Use the numeric buttons to enter characters.
z Press repeatedly until the character you want appears.
C :A
z To enter a character that is under the same button as the previous entry:
(1) Press []], then press the same numeric button.
z To enter a space:
(1) Press []] or press [Space].
13Before Using Your Machine
Page 15

z To delete a character:
(1) Use [[] or []] to move the cursor under the incorrect letter. Then press [Space].
z To delete an entire entry:
(1) Press [Clear].
3 Continue entering other letters or numbers using the numeric buttons.
4 When you have finished entering characters, press [Start/Copy] to register the
entry.
Setting the Telephone Line Type
Before using your fax, make sure it is set for the telephone line type of your telephone system. If you
are unsure of your telephone line type, check with your local telephone company.
1 Press [Menu].
2 Use [{] or [}] to select <DATA REGSTRATION>, then press [Start/Copy] twice.
The LCD displays <DATE & TIME>.
3 Use [{] or [}] to select <TEL LINE TYPE>, then press [Start/Copy]. The LCD
displays <TOUCH TONE>.
4 Use [{] or [}] to select the telephone line type, then press [Start/Copy].
You can select <TOUCH TONE> or <ROTARY PULSE>.
5 Press [Stop/Reset].
Setting ends and the fax returns to standby mode.
14 Before Using Your Machine
Page 16

Registering Sender Information
You can register sender information (Transmit Terminal Identification (TTI)) in your machine so that
your name, your fax/telephone number, and the date and time of transmission are printed in small
type at the top of each page to be received. Thus, whenever you send a fax from this machine, the
recipient receiving the fax knows who sent it, and when it was sent.
Below is an example of how your sender information would print on a fax sent from your machine:
01/25/2009 15:33 FAX 123 4 567 YOUR NAME DESTINATION ID 001
03/01/2006 15:33
(A)
(B)
Our Ref. 350/PJC/EAC
(A) Date and time of transmission
(B) Your fax/telephone number
You can select <FAX> or <TEL> to be displayed in front of the number. See <FAX/TEL No.
MARK> on page 45.
(C) Your name
(D) Displays the name of the destination when sending from one-touch or coded speed dialing.
(E) Page number
THE SLEREXE COMPANY LIMITED
SAPORS LANE•BOOLE•DORSET•BH25 8ER
TELEPHONE BOOLE (945 13) 51617 – FAX 1234567
(C) (D) (E)
Entering the Date and Time
1 Press [Menu].
2 Use [{] or [}] to select <DATA REGSTRATION>, then press [Start/Copy] three
times.
01/25/2009 13:30
3 Use the numeric buttons to enter the date and time (in 24-hour format), then press
[Start/Copy].
z Precede single digits with a zero.
z Enter only the last two digits of the year.
4 Press [Stop/Reset].
Registration ends and the fax returns to standby mode.
15Before Using Your Machine
Page 17

Registering Your Fax/Telephone Number and Name
This information appears at the top of each document you send.
1 Press [Menu].
2 Use [{] or [}] to scroll through the menus and select <DATA REGSTRATION>,
then press [Start/Copy] twice. The LCD displays <DATE & TIME>.
3 Use [{] or [}] to select <UNIT TELEPHONE #>, then press [Start/Copy].
4 Enter your fax number (up to 20 digits) using the numeric buttons, then press [Start/
Copy] twice (see page 13).
You can enter a space to make your number easier to read.
TEL= 123 xxxx
5 Enter your name (up to 24 letters) using the numeric buttons, then press [Start/
Copy] (see page 13).
CANON :A
6 Press [Stop/Reset].
Registration ends and the fax returns to standby mode.
16 Before Using Your Machine
Page 18

Setting Daylight Saving Time (Summer Time)
Some countries/regions adopt the daylight saving time (summer time) system that shifts the
clock time forward or back at certain periods of the year.
You can set your machine to automatically change the time by registering the day and time that
daylight saving time (summer time) begins and ends.
1 Press [Menu].
2 Use [{] or [}] to select <DATA REGSTRATION>, then press [Start/Copy].
3 Use [{] or [}] to select <SYSTEM SETTINGS>, then press [Start/Copy].
4 Use [{] or [}] to select <DAYLGHT SAV TIME>, then press [Start/Copy]. The LCD
displays <ON>.
5 Use [{] or [}] to select <ON> or <OFF>, then press [Start/Copy].
6 If you cancel by selecting <OFF> in step 5, press [Stop/Reset] to return to standby
mode.
If you select <ON> in step 5, use [{] or [}] to select <START DATE/TIME>, then
press [Start/Copy] twice. The LCD displays <MARCH>.
7 Use [{] or [}] to select the month in which the summer time starts, then press
[Start/Copy] twice. The LCD displays <SECOND WEEK>.
8 Use [{] or [}] to select the week in which the summer time starts, then press
[Start/Copy] twice. The LCD displays <SUNDAY>.
9 Use [{] or [}] to select the day in which the summer time starts, then press [Start/
Copy] twice.
TIME 02:00
10 Use the numeric buttons to enter the time at which the summer time will take effect,
then press [Start/Copy]. The LCD displays <END DATE/TIME>.
11 Use [{] or [}] to select <END DATE/TIME>, then press [Start/Copy] twice. The
LCD displays <NOVEMBER>.
12 Repeat steps 7 to 9 to set the month, week, the day of the week, and time when the
summer time ends.
13 Press [Stop/Reset].
Setting ends and the fax returns to standby mode.
17Before Using Your Machine
Page 19
Registering One-touch Speed Dialing Numbers and
Names
One-touch speed dialing allows you to dial a number by pressing a single button. Before you can use
one-touch speed dialing, you must register the receiving number with your fax.
You can also register the name of the party; the name appears on the printout of the ONE-TOUCH
SPEED DIAL TELEPHONE NO. LIST.
Note
It is recommended to print out a copy of the ONE-TOUCH SPEED DIAL TELEPHONE NO. LIST and keep
it for reference.
See “Activity Reports” on page 48 for details on printing the list.
1 Press [Menu].
2 Use [{] or [}] to select <TEL REGISTRATION>, then press [Start/Copy]. The LCD
displays <1-TOUCH SPD DIAL>.
3 Press [Start/Copy]. The LCD displays <01=>.
4 Use [{] or [}] to select the number of the one-touch speed dialing button (01-09)
under which you want to register the number, then press [Start/Copy] twice.
If a number is already registered under this one-touch speed dialing button, the number is
displayed on the LCD.
5 Enter the party’s number (up to 40 digits) using the numeric buttons, then press
[Start/Copy] twice.
TEL=250xxx_
6 Enter the party’s name (up to 16 letters) using the numeric buttons, then press
[Start/Copy] to register the name (see page 13).
CANON :A
Note
To delete the name and number registered under the one-touch speed dialing button, press [Clear]
and [Start/Copy] after you perform steps 1 to 4.
7 To assign additional one-touch speed dialing numbers, repeat from step 4.
To finish, press [Stop/Reset].
18 Before Using Your Machine
Page 20
Registering Coded Speed Dialing Numbers and
Names
Use coded speed dialing to dial a fax number at the press of three buttons. A fax/telephone number
can be registered under each two-digit speed dialing code and you can register up to 60 locations.
You can also register the name of the party the name appears on the printout of the CODED SPEED
DIAL TELEPHONE NO. LIST.
Note
It is recommended to print out a copy of the CODED SPEED DIAL TELEPHONE NO. LIST and keep it for
reference.
See “Activity Reports” on page 48 for details on printing the list.
1 Press [Menu].
2 Use [{] or [}] to select <TEL REGISTRATION>, then press [Start/Copy]. The LCD
displays <1-TOUCH SPD DIAL>.
3 Use [{] or [}] to select <CODED SPEED DIAL>, then press [Start/Copy]. The
LCD displays < 00=>.
4 Use [{] or [}] to select the two-digit code (00-59) under which you want to register
the number, then press [Start/Copy] twice.
If a number is already registered under this coded speed dialing code, the number is
displayed on the LCD.
5 Enter the party’s number and name the same way you registered them for one-
touch speed dialing.
See steps 5 to 6, “Registering One-touch Speed Dialing Numbers and Names” on page 18.
TEL=250xxx_
6 To assign additional coded speed dialing numbers, repeat from step 4.
To finish, press [Stop/Reset].
Note
To delete the name and number registered under the coded speed dialing code, press [Clear] and
[Start/Copy] after you perform steps 1 to 4.
19Before Using Your Machine
Page 21
Document Requirements
Types of Document You Can Scan
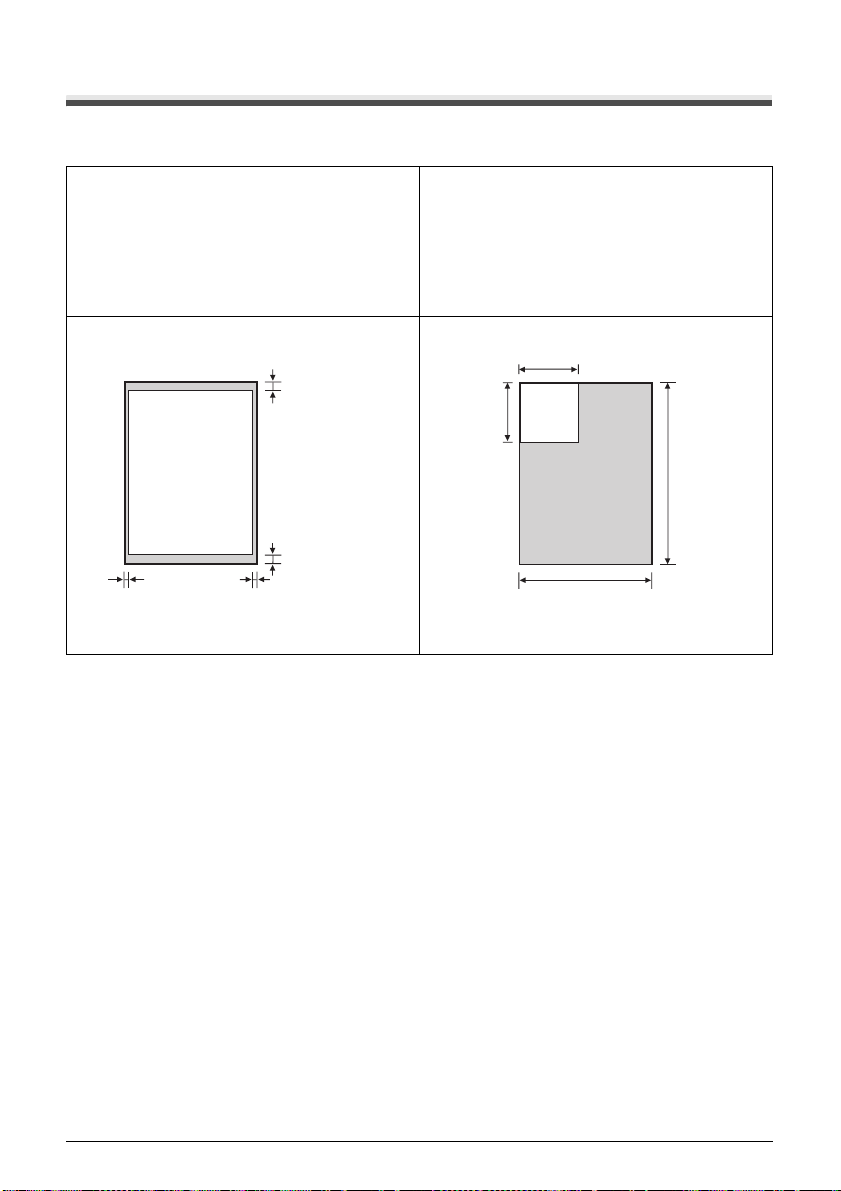
z Scanned Area
The actual area scanned by the fax is
shown below.
0.12 ±0.12 in.
(3.0 ±3.0 mm)
LTR/LGL
0.08 ±0.08 in.
(2.0 ±2.0 mm)
0.08 ±0.14 in.
(2.0 ±3.5 mm)
0.08 ±0.14 in.
(2.0 ±3.5 mm)
z Size
You can load documents larger than 4.2 in.
(105 mm) wide and 4.2 in. (105 mm) long.
The maximum size of document that can be
loaded is 8.5 in. (216 mm) wide by 15.8 in.
(400 mm) long.
Min. 4.2 in.
(105 mm)
Min. 4.2 in.
(105 mm)
Max. 15.8 in.
(400 mm)
Max. 8.5 in. (216 mm)
Problem Documents
z To prevent document jams in the ADF, do not attempt to load the following types of
documents into the fax:
- Wrinkled or creased paper
- Torn paper
- Coated paper or glossy paper
- Thick paper
z Remove all staples, paper clips, etc. before loading the document into the ADF.
z Make sure any glue, ink, or correction fluid on the paper is completely dry before loading the
document into the ADF.
z Make a photocopy of any document that will not feed into the fax so that you can then load the
copy into the ADF.
- Curled or rolled paper
- Carbon paper or carbon-backed paper
- Onion skin or thin paper
- Envelopes
20 Before Using Your Machine
Page 22

Paper Requirements
Your fax supports A4-, letter-, and legal-size paper in portrait orientation. You can use regular copier
paper, cotton bond paper, or typical letterhead. Your fax does not require special ink jet paper.
Always use paper without curls, folds, staples, or damaged edges. Look at the label on the package
to see if the paper has a preferred side for printing.
Note
Be sure to test paper before purchasing large quantities.
Printable Area
The shaded area below shows the printable area of letter- and legal-size paper. Be sure to print
within this area.
0.2 in. (5 mm)
FEED
DIRECTION
LTR/LGL
0.12 ±0.06 in.
(3.0 ±1.5 mm)
0.25 ±0.06 in.
(6.4 ±1.5 mm)
0.25 in. ~
(6.4 mm~)
21Before Using Your Machine
Page 23
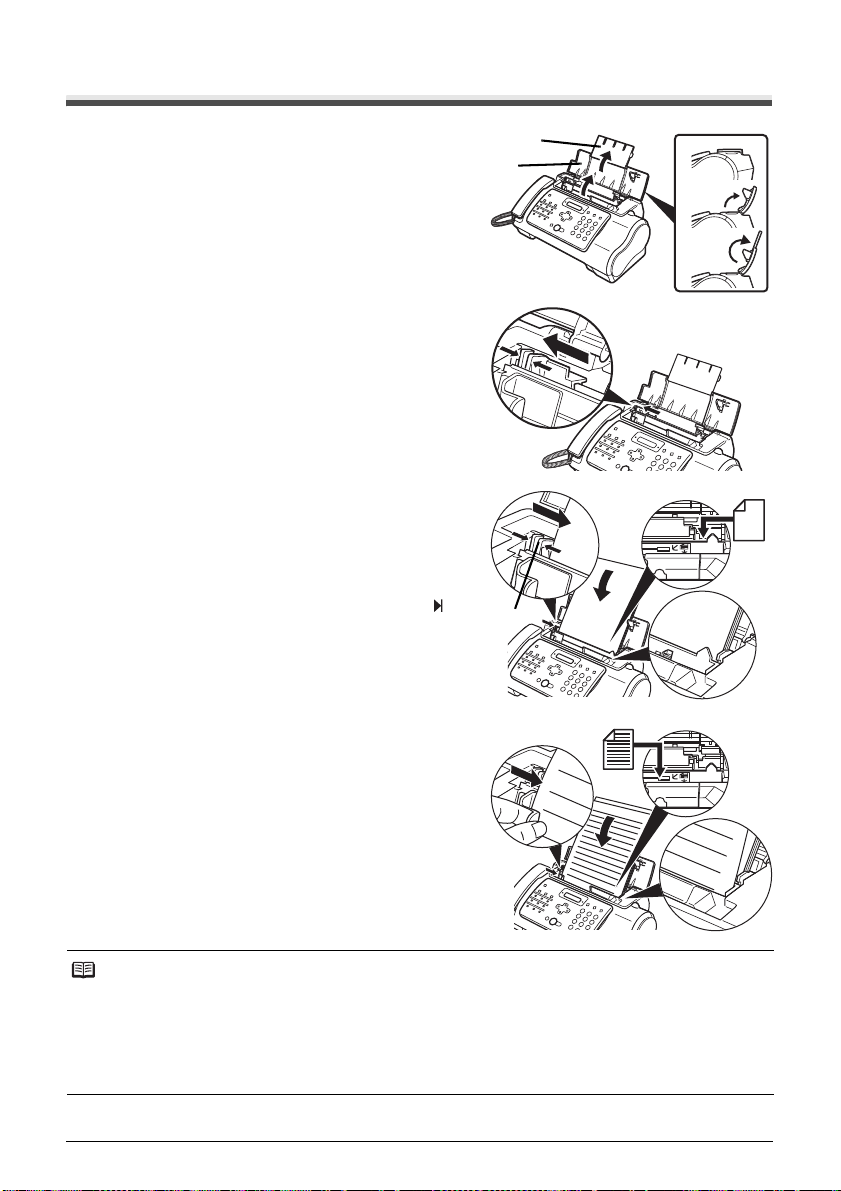
Loading Documents and Paper
1
Open the Document Cover (1) and extend the
Paper Support (2) to support the paper.
2 Squeeze, then slide the Paper Guide to the
left.
3 Insert the stack face up into the Rear Tray (1),
and align the right edge of the stack with the
right side of the Rear Tray. Then slide the
Paper Guide (2) snugly against the left edge
of the stack.
z Do not load higher than the paper limit mark ( ).
z Be careful not to press the Paper Guide strongly
against the stack, or the paper will not be fed
properly.
(1)
(2)
(2)
(1)
(2)
(1)
4 Gently insert the top of the document face up
into the ADF until you hear a beep, adjust the
Document Guide to the width of the
document.
z To avoid feeding problems, make sure the
document meets the document requirements (see
page 20).
Note
z For a multipage document, the pages are fed one by one from the top of the stack.
z Wait until all pages of your document have been scanned before starting a new job.
z Make sure you follow the procedure to load documents into the ADF. If the document is not loaded into
the ADF correctly, it may not be fed into the fax properly; resulting in a jam, or in pages not being sent.
z If you want to send a document with more than 20 A4- and letter-size (10 legal-size) pages, divide the
document into sections and send each section in a separate transmission.
z For multipage documents, tap the stack on a flat surface to even the edges before loading.
22 Before Using Your Machine
Page 24

Copying
Making Copies
One of the convenient features of the fax is its ability to make high quality copies. You can make up
to 99 copies of one document at a time.
If you make copies of multiple documents at a time, the number of pages the fax can scan into
memory is as follows:
z <COPY STANDARD>/<COPY FINE>/<COPY DRAFT> = 10 pages
Note
z The number of pages the fax can scan into memory is not affected by the scanning resolutions (see
page 25).
z <COPY STANDARD> and <COPY FINE> result in the same resolution when making copies.
z If <MEMORY FULL> appears on the LCD when making multiple copies, see “Copying Problems” on
page 65.
z If paper jams, see “Troubleshooting” on page 60.
1 Load the document face up into the ADF.
See “Loading Documents and Paper” on page 22.
2 Press [Start/Copy]. The LCD displays <COPY PAGE 01>.
3 Press [Receive Mode/Resolution].
You can select <COPY STANDARD>, <COPY FINE>, or <COPY DRAFT>.
4 Enter the number of copies (up to 99) using the numeric buttons, then press [Start/
Copy].
To make a correction to the number of copies, press [Clear] and re-enter the number.
To stop copying anytime, press [Stop/Reset]. If the document does not eject, press [Start/
Copy] for a few seconds, then the fax will feed out the document. See “Jams in the ADF” on
page 60.
23Copying
Page 25
Sending Faxes
Sending Documents
Before you send a document, see “Document Requirements” on page 20, and “Loading Documents
and Paper” on page 22.
Note
z If paper jams, see “Troubleshooting” on page 60.
z You can send up to 20 A4- and letter-size (10 legal-size) pages at a time (based on the Canon FAX
Standard Chart No.1, standard resolution). You cannot add pages while the fax is sending.
z The fax stores the document temporally in memory when sending a document, however, when memory
is full, it will send the document as it scans the document without storing document in memory.
Direct Sending
1 Load the document face up into the ADF.
See “Loading Documents and Paper” on page 22.
You can set the scanning resolution and contrast (see page 25).
2 Dial the receiving party’s fax number.
Use one of the dialing methods described in this chapter.
TEL= 3456xxxx
3 Press [Start/Copy].
The fax begins sending.
Note
z If an error occurs during sending, the fax beeps intermittently for a few seconds and an error
message appears on the LCD. If this happens, correct the problem and then press [Stop/Reset],
then try sending the document again. See “LCD Messages” on page 73.
z The fax automatically redials if the receiving party does not answer or if the line is busy. (You
can specify the number of times it redials; see <AUTO REDIAL> on page 46.)
Manual Sending
If you would like to first speak with the person you are sending the document to, use manual
sending.
1 Load the document face up into the ADF.
See “Loading Documents and Paper” on page 22.
You can set the scanning resolution and contrast (see page 25).
2 Pick up the Handset or press [Hook] and dial the receiving party’s fax number.
Use one of the dialing methods described in this chapter.
TEL= 3456xxxx
24 Sending Faxes
Page 26

3 If a person answers, converse normally, then ask them to press the start button on
their fax. Press [Start/Copy] and hang up.
If you hear a high pitch tone, press [Start/Copy] and hang up.
Note
z If you pressed [Hook] in step 2, you need to pick up the Handset when a person answers the
phone.
z The fax will beep if the Handset is not hang up properly. Make sure the Handset is seated
properly in its cradle. If you do not want the fax to beep, disable the <OFFHOOK ALARM>
setting (see page 45).
z If an error occurs during sending, the fax beeps intermittently for a few seconds and an error
message appears on the LCD. If this happens, correct the problem then try sending the
document again. See “LCD Messages” on page 73.
Canceling Sending
1 Press [Stop/Reset].
Note
z When you cancel sending, you may need to press and hold [Start/Copy] for a few seconds to
feed out the document.
z You can set whether or not the fax prints the TX REPORT (see page 45).
Adjusting the Quality of Your Documents
z Setting the Scanning Resolution
Resolution is a measure of the fineness or clarity of a printout. Low resolutions may cause text
and graphics to have a jagged appearance, while higher resolutions provide smoother curves
and lines, crisp text and graphics, and a better match to traditional typeface designs.
Note
Using a higher resolution will increase the output quality, but will slow down the scanning speed.
1 Load the document face up into the ADF.
See “Loading Documents and Paper” on page 22.
2 Press [Receive Mode/Resolution] to select the resolution.
You can select <FAX STANDARD>, <FAX FINE> or <FAX PHOTO>.
Note
You cannot change the resolution setting while the machine is sending a fax or after it starts
scanning.
z Setting the Scanning Contrast
Contrast is the difference in brightness between the lightest and darkest parts of a printed
document. You can adjust the contrast your fax uses to send or copy documents, according to
how light or dark your document is.
1 Press [Menu].
2 Use [{] or [}] to select <DATA REGSTRATION>, then press [Start/Copy] twice.
The LCD displays <DATE & TIME>.
25Sending Faxes
Page 27

3 Use [{] or [}] to select <SCAN CONTRAST>, then press [Start/Copy]. The LCD
displays <STANDARD>.
4 Use [{] or [}] to adjust the scanning contrast, then press [Start/Copy].
You can select <STANDARD>, <DARKER> or <LIGHTER>.
5 Press [Stop/Reset].
Setting ends and the fax returns to standby mode.
Automatic Dialing
Sending a Document Using One-Touch Speed Dialing or Coded Speed
Dialing Numbers
To use this feature you must first register numbers for one-touch speed dialing (see page 18) or
coded speed dialing (see page 19).
1 Load the document face up into the ADF.
See “Loading Documents and Paper” on page 22.
You can set the scanning resolution and the contrast (see page 25).
2 Press the one-touch speed dialing button under which the number you wish to fax
is registered.
01=CANON
-orPress [Coded] and enter the appropriate two-digit coded speed dialing code.
The registered name and number appear.
If you make a mistake, press [Stop/Reset]. Then press the correct one-touch speed dialing
button or press [Coded] and re-enter the code.
01=CANON
3 Press [Start/Copy].
The fax begins sending.
-orAfter about 10 seconds of no operation panel input, the fax starts sending automatically.
26 Sending Faxes
Page 28

Sending a Document Using Directory Dialing
This feature is convenient when you know the other party’s name but cannot recall the one-touch
speed dialing button or the code for coded speed dialing where the number is registered.
This procedure can also be used to look up the other party’s name and retrieve the number for
dialing.
1 Load the document face up into the ADF.
See “Loading Documents and Paper” on page 22.
You can set the scanning resolution and the contrast (see page 25).
2 Press [Directory].
3 Press a numeric button to enter the first letter of the name of the party you are
searching for.
01=Canon CANADA
4 Press [{] or [}] to display the other names and numbers registered for the button
letter group.
z The names for one-touch speed dialing numbers are prefixed with two digits and the names
for coded speed dialing numbers are prefixed with an asterisk ( ) and two digits.
z When you reach the last name and number registered for the letter group, you will return to
the first name and number in the group.
z If the LCD does not change after you press [{] or [}], this means only one name and
number is registered for the button you just pressed.
z Press [Redial] to switch between the name and number on the LCD.
5 With the telephone number you want to dial displayed, press [Start/Copy] to start
the document transmission.
27Sending Faxes
Page 29

Special Dialing
Sending a Document Using Caller History
If the <CALLER ID> setting is set to <ON>, the caller’s name and phone/fax number appear on
the LCD when you receive a call (see page 48). The fax keeps up to 20 latest caller IDs in
memory.
Note
The caller history feature uses the Telcordia or the ETSI EN 300 778-1 protocol. Contact your local
telephone company for detailed information.
1 Press [Caller History], then wait for 2 seconds or press any button.
The numbers, names, and date and time from which you have received calls recently will be
displayed on the LCD.
01: 3456XXXX
z Press [Redial] or [Caller History] to switch between the date and time, name, and phone/fax
number on the LCD.
CANON 01/25/2009 13:30
]
]
2 Use [{] or [}] to select the receiving party, then press [Start/Copy].
The fax begins calling the number.
Switching Temporarily to Tone Dialing
Many information services for banks, airline reservations, hotel reservations, etc. require tone
dialing for their services. If your machine is connected to a rotary pulse line, you can set the
machine to temporarily switch to tone dialing.
1 Press [Hook] or lift the Handset.
2 Use the numeric buttons to dial the number of the information service.
3 When the recorded message of the information service answers, press [Tone] ([ ])
to switch to tone dialing.
If you pressed [Hook] in step 1 and wish to talk to the other party, lift the Handset.
4 Use the numeric buttons to enter the numbers requested by the information
service.
5 When you have finished using the service, press [Hook] or hang up the Handset.
Long-Distance Dialing
When you register a long-distance number, you may have to insert a pause within or after the
number. For long-distance dialing, the location and length of the pause may differ depending on
the telephone system. To enter a pause, press [Pause]. The length of this pause can be
adjusted. See <PAUSE TIME> on page 46. A pause at the end of a number is fixed at 10
seconds.
28 Sending Faxes
Page 30

Redialing When the Line is Busy
There are two methods of redialing: manual redialing and automatic redialing. This section explains
these two methods.
Manual Redialing
Press [Redial] to dial the last number you dialed with the numeric buttons*. (This starts redialing
regardless of whether automatic redialing is enabled.)
*This setting is only available when you dialed with the numeric buttons.
z Canceling Manual Redialing
To cancel manual redialing, press [Stop/Reset]. You may then need to press [Start/Copy] for a
few seconds to feed out the document. See “Jams in the ADF” on page 60.
Automatic Redialing
z What is Automatic Redialing?
When you are sending a document and the receiving party’s line is busy, the fax waits the
specified time and then dials the same number again. You can set the fax to redial several times
if previous attempts fail because of a busy signal.
Automatic redialing can be turned off and on. The number of redialing attempts and the time
interval between attempts can also be adjusted (see page 46).
If all redialing attempts are unsuccessful, the fax will cancel the transmission. You can set the fax
to print the ERROR TX REPORT to remind you that the transmission was not completed (see
page 45).
When automatic redialing is in use, the LCD displays <AUTO REDIAL> while it is waiting to
redial.
z Canceling Automatic Redialing
1 Press [Stop/Reset].
Note
If you want to cancel a memory-sending transmission while the fax is waiting to redial, you will
have to delete the document from memory (see page 40).
z Setting the Options for Automatic Redialing
You can set the following options for automatic redialing:
z Whether or not the fax redials automatically.
z The number of times the fax attempts to redial.
z The time interval between redialing attempts.
1 Press [Menu].
2 Use [{] or [}] to select <DATA REGSTRATION>, then press [Start/Copy]. The
LCD displays <USER SETTINGS>.
3 Use [{] or [}] to select <TX SETTINGS>, then press [Start/Copy]. The LCD
displays <ECM TX>.
29Sending Faxes
Page 31

4 Use [{] or [}] to select <AUTO REDIAL>, then press [Start/Copy]. The LCD
displays <ON>.
z To disable automatic redialing, use [{] or [}] to select <OFF>, then press [Start/Copy].
Press [Stop/Reset] to return to standby mode.
z To enable automatic redialing, use [{] or [}] to select <ON> and continue with the steps
below.
5 Press [Start/Copy] twice. The LCD displays <2TIMES>.
6 Use the numeric buttons, or [{] or [}] to enter the number of times you want the
fax to redial, then press [Start/Copy] twice. The LCD displays <2MIN.>.
7 Use the numeric buttons, or [{] or [}] to enter the time interval between redialing
attempts, then press [Start/Copy].
8 Press [Stop/Reset].
The fax returns to standby mode.
Delayed Sending
Your fax can send a document automatically at a preset time. This allows you to take advantage of
lower late-night long-distance rates offered by some telephone companies.
The fax can only register one preset sending operation at a time.
1 Load the document face up into the ADF.
See “Loading Documents and Paper” on page 22.
You can set the scanning resolution and contrast (see page 25).
2 Press [Menu].
3 Use [{] or [}] to select <FAX OPTIONS>, then press [Start/Copy].
4 Use [{] or [}] to select <DELAYED TX>, then press [Start/Copy].
SET TIME 15:00
5 Enter the desired sending time (in 24-hour clock format) using the numeric buttons.
z Precede single digits with a zero.
z Press [Clear] if you need to re-enter the time.
z You can also use [[] or []] to move the cursor.
6 Press [Start/Copy].
7 Enter the receiving party’s fax number.
z You can enter the receiving party’s fax number by using the numeric buttons, one-touch
speed dialing, coded speed dialing, or directory dialing (see page 26).
z If you use the numeric buttons, press [Start/Copy] after entering the number to register it.
30 Sending Faxes
Page 32

8 Press [Start/Copy].
z Press [Start/Copy] when using directory dialing.
z The fax scans the document into memory.
Note
If <MEMORY FULL> appears on the LCD during scanning, delete unnecessary documents from
the memory (see page 40), then rescan your fax.
9 The fax will automatically dial at the programmed time.
Sending Other Documents While the Fax is Set for Delayed Sending
You can send, receive, and copy other documents even when the fax is set for sending at a
preset time.
To send or copy other documents after setting the fax for delayed sending, simply send or copy
using any other sending procedure in this guide.
Note
Delayed sequential broadcasting is applicable for sending one document to more than one location
at a later time when multiple fax numbers are dialed (see page 32).
Canceling Delayed Sending
1 Press [Menu].
2 Use [{] or [}] to select <MEMORY REFERENCE>, then press [Start/Copy].
3 Use [{] or [}] to select <DELETE DOCUMENT>, then press [Start/Copy].
TX/RX NO. 0001
4 Use [{] or [}] to select the transaction number (<TX/RX NO.>) of the document
you want to delete, then press [Start/Copy]. The LCD displays <YES=( ) NO=(#)>.
z If the LCD does not change after you press [{] or [}], this means only one transaction is
stored in memory.
z If you are unsure of the transaction number (<TX/RX NO.>), print the MEMORY LIST (see
page 39).
5 Press [ ] to delete the document.
If you want to continue sending, press [#].
6 Press [Stop/Reset].
The fax returns to standby mode.
31Sending Faxes
Page 33

Sequential Broadcasting
Sending a Document to More Than One Location
Sequential broadcasting sends one document to more than one location.
You can send to a total of 70 locations as follows:
z One-touch speed dialing
z Coded speed dialing
z Regular dialing (Numeric buttons dialing)
You can enter the one-touch speed dialing and coded speed dialing locations in any order. You
simply press the one-touch speed dialing button, or press [Coded] or [Directory] followed by the
two-digit code.
You can also include one location using regular dialing. Remember that when using regular
dialing, you must press [Start/Copy] after entering the number.
Note
z You must press each button within 10 seconds of the preceding one. The fax begins the
operation approximately 10 seconds after you press the last button.
z The regular dialing number must be entered last.
= 9 locations
= 60 locations
= 1 location
1 Load the document face up into the ADF.
See “Loading Documents and Paper” on page 22.
You can set the scanning resolution and contrast (see page 25).
2 Dial the receiving party’s fax numbers as you need.
You can also press [Redial] to redial the last number dialed with the numeric buttons.
TEL= 3456xxxx
3 Press [Start/Copy].
z The fax reads the document into memory and begins sending.
z To cancel a transmission, press [Stop/Reset] during dialing or transmission. All
transmissions in the sequence are canceled.
32 Sending Faxes
Page 34

Receiving Faxes
Different ways to receive a document
Your fax provides you with several modes for receiving documents. To determine which mode best
suits your requirements, see the table below.
<Fax/Tel Mode>/<DRPD>
Automatically switches between fax
and voice calls. Receives documents
automatically and rings for voice calls
(see page 34).
<DRPD>:
The fax rings differently depending on
whether a call is a fax or voice call.
Subscribe to a DRPD service. Handset
or extension phone connected to the
fax (see page 36).
Rings for every call, regardless of
whether the call is a fax call or a voice
call. For a fax call, you have to
manually activate reception of the fax
(see page 35).
INCOMING CALL ...
<MANUAL MODE>
INCOMING CALL ...
Ring
Ring
RECEIVE
AX
INCOMING CALL ...
Ring
Ring
F
Pick up the Handset to answer
the call. You can not answer
with your external device.
FA X
RECEIVE
<ANS.MACHINE MODE>
INCOMING CALL ...
Ring
Ring
<FAX ONLY MODE>
INCOMING CALL...
LINE
RECEIVE
IN USE
X
FA
Receives documents automatically
and routes voice calls to the answering
machine. Connect an answering
machine to your fax (see page 35).
Answers all calls as fax calls. Receives
documents automatically and
disconnects voice calls. Separate
telephone line for fax use only. If you
FA X
want to be alerted when a fax call is
received, enable the <INCOMING
RING> setting (see page 46).
33Receiving Faxes
Page 35

Setting the Receive Mode
Once you have decided which mode is suitable for your needs, set the mode by pressing [Receive
Mode/Resolution].
1 Press [Receive Mode/Resolution].
Every time you press [Receive Mode/Resolution], the mode changes cyclically.
Receiving Faxes: <FAX ONLY MODE>
Note
z If paper jams, see “Troubleshooting” on page 60.
z If the Ink Lamp lights up faxes will be received to memory.
Receiving Both Documents and Telephone Calls Automatically: <Fax/
Tel M ode>
If you set <Fax/Tel Mode>, you can control precisely how the fax handles incoming calls by
adjusting the following settings:
z Adjust the time the fax takes to check whether a call is from a fax machine or a telephone
(<RING START TIME> setting).
z Adjust the length of time the fax rings when the call is a voice call (<TEL RING TIME>
setting).
z Set whether the fax switches to receive mode after the ring time set in <TEL RING TIME> has
elapsed (<DEFAULT ACTION> setting).
1 Press [Menu].
2 Use [{] or [}] to select <DATA REGSTRATION>, then press [Start/Copy]. The
LCD displays <USER SETTINGS>.
3 Use [{] or [}] to select <RX SETTINGS>, then press [Start/Copy]. The LCD
displays <ECM RX>.
4 Use [{] or [}] to select <FAX/TEL AUTO SW>, then press [Start/Copy]. The LCD
displays <RING START TIME>.
5 Press [Start/Copy].
8SEC
6 Use the numeric buttons, or [{] or [}] to enter the time the fax waits before ringing
when it receives a call, then press [Start/Copy] twice.
22SEC
7 Use the numeric buttons, or [{] or [}] to enter the time the fax rings while waiting
for someone to pick up the Handset, then press [Start/Copy] twice. The LCD
displays <RECEIVE>.
34 Receiving Faxes
Page 36

8 Use [{] or [}] to select <RECEIVE> or <DISCONNECT>, then press [Start/Copy].
This setting tells the fax what to do if the Handset is not picked up within the specified ring
time set in step 6.
9 Press [Stop/Reset].
Setting ends and the fax returns to standby mode.
Receiving Documents Manually: <MANUAL MODE>
1 Check that <Manual> is displayed on the LCD (see page 34).
15:00 Manual
2 When you hear the fax or extension phone ring, pick up the Handset.
3 If you hear a person’s voice:
Start your conversation. If the caller wants to send a document after talking to you,
ask them to press the start button on their fax machine.
When you hear a slow beep, press [Start/Copy] on the fax to begin receiving the
document. Hang up the Handset.
z If the extension phone is located away from the fax, dial 25 (the remote receiving ID) on the
extension phone and hang up.
z The fax begins receiving the document.
If you hear a slow beep tone:
Someone is trying to send you a document.
z Press [Start/Copy] and replace the Handset.
z If the extension phone is located away from your fax, dial 25 (the remote receiving ID) on
the extension phone and hang up.
z The fax begins receiving the document.
Note
Be sure to replace the Handset after you press [Start/Copy] otherwise the call will be disconnected.
Receiving Documents with an Answering Machine: <ANS.MACHINE
MODE>
Connecting an answering machine to your fax allows you to receive documents and telephone
messages while you are out.
z Using Your Fax with an Answering Machine
Follow these guidelines when using your fax with an answering machine.
z Set the answering machine to answer on the first or second ring.
z When recording an outgoing message on the answering machine, the entire message must
be no longer than 15 seconds.
35Receiving Faxes
Page 37

Receiving with a DRPD (Distinctive Ring Pattern Detection) service:
<DRPD>
DRPD service assigns two or more telephone numbers with distinctive ring patterns to a single
telephone line, allowing you to have both a fax number(s) and a telephone number(s) using only
one telephone line. Your fax will automatically monitor incoming calls and based on the ring
pattern, will let you know if the call is a fax or voice call. Follow the procedure below to set the fax
ring pattern that matches the pattern assigned by your telephone company.
Note
Contact your local telephone company for detailed information on this service.
1 Press [Menu].
2 Use [{] or [}] to select <DATA REGSTRATION>, then press [Start/Copy]. The
LCD displays <USER SETTINGS>.
3 Use [{] or [}] to select <RX SETTINGS>, then press [Start/Copy]. The LCD
displays <ECM RX>.
4 Use [{] or [}] to select <DRPD:SELECT FAX>, then press [Start/Copy]. The LCD
displays <DOUBLE RING>.
5 Use [{] or [}] to select the ring pattern that your telephone company assigned to
your fax number, then press [Start/Copy].
You can select <DOUBLE RING>, <SHORT-SHORT-LONG>, <SHORT-LONG-SHORT>,
<OTHER RING TYPE>, or <NORMAL RING>.
6 Press [Stop/Reset].
Setting ends and the fax returns to standby mode.
Canceling Receiving
1
Press [Stop/Reset].
Other Features
Saving Ink
You can enable/disable ink-saving feature by selecting <INK SAVER> when [Menu] is pressed.
Note
By enabling this feature, print quality will be reduced. For highest print quality, disable this feature.
1 Press [Menu].
2 Use [{] or [}] to select <DATA REGSTRATION>, then press [Start/Copy].
3 Use [{] or [}] to select <PRINTER SETTINGS>, then press [Start/Copy].
36 Receiving Faxes
Page 38

4 Use [{] or [}] to select <INK SAVER>, then press [Start/Copy].
5 Use [{] or [}] to select <ON> or <OFF>, then press [Start/Copy].
6 Press [Stop/Reset].
Setting ends and the fax returns to standby mode.
Receiving to Memory Temporarily
You can enable/disable memory receiving feature temporarily by selecting <AUTO PRINT>
when [Menu] is pressed.
1 Press [Menu].
2 Use [{] or [}] to select <DATA REGSTRATION>, then press [Start/Copy].
3 Use [{] or [}] to select <PRINTER SETTINGS>, then press [Start/Copy].
4 Use [{] or [}] to select <AUTO PRINT>, then press [Start/Copy].
5 Use [{] or [}] to select <ON> or <OFF>, then press [Start/Copy].
6 Press [Stop/Reset].
Setting ends and the fax returns to standby mode.
z If you select <ON> in step 5, received faxes will be printed automatically.
z If you select <OFF> in step 5, the fax starts receiving documents in memory. The LCD
displays <AUTO PRINT OFF>.
Note
If the <AUTO PRINT> setting is set to <OFF>, the following will not be printed automatically:
ACTIVITY REPORT, TX REPORT, RX REPORT, MULTI TX REPORT and MEMORY CLEAR
REPORT.
Changing Calling Volume
1 Press [Menu].
2 Use [{] or [}] to select <DATA REGSTRATION>, then press [Start/Copy].
3 Use [{] or [}] to select <USER SETTINGS>, then press [Start/Copy].
4 Use [{] or [}] to select <VOLUME CONTROL>, then press [Start/Copy].
5 Use [{] or [}] to select <CALLING VOLUME>, then press [Start/Copy].
6 Use [{] or [}] to change the volume, then press [Start/Copy].
7 Press [Stop/Reset].
Setting ends and the fax returns to standby mode.
37Receiving Faxes
Page 39

Changing Receiving Volume of Handset
1 Press [Menu].
2 Use [{] or [}] to select <DATA REGSTRATION>, then press [Start/Copy].
3 Use [{] or [}] to select <USER SETTINGS>, then press [Start/Copy].
4 Use [{] or [}] to select <VOLUME CONTROL>, then press [Start/Copy].
5 Use [{] or [}] to select <HANDSET VOLUME>, then press [Start/Copy].
6 Use [{] or [}] to change volume, then press [Start/Copy].
7 Press [Stop/Reset].
Setting ends and the fax returns to standby mode.
Receiving Documents in Memory While Performing Another Task or
When a Problem Occurs
If your fax is performing another task or encounters a problem when receiving a document, it
automatically stores the unprinted pages in memory, and the LCD displays <REC’D IN
MEMORY> as well as one or more messages. For an explanation of the message(s) and details
on the action to take, see page 76.
Note
Once the pages are printed, they are deleted from memory.
Polling to Receive Documents
The polling feature allows you to request a document to be faxed to you from another fax
machine. The sending party only needs to make sure the document is on a fax machine and
ready to be sent. Thus, when your fax polls the other fax machine, the document is sent
automatically. The fax can poll any fax machine that supports polling.
Note
z Before attempting to poll a fax machine, make sure that the other fax machine supports polling.
z Your fax cannot do polling transmissions.
1 Press [Menu].
2 Use [{] or [}] to select <FAX OPTIONS>, then press [Start/Copy].
3 Use [{] or [}] to select <POLLING RX>, then press [Start/Copy].
4 Dial the fax number of the fax machine you wish to poll.
Use one of the dialing methods described.
TEL= 3456xxxx
5 Press [Start/Copy].
Your fax begins receiving the document.
38 Receiving Faxes
Page 40

Setting Caller ID
If the <CALLER ID> setting is set to <ON>, the caller’s name and phone/fax number appear on the
LCD when you receive a call.
Note
z To use this feature, you will need to subscribe for a caller ID service. The <CALLER ID> feature uses
the Telcordia or the ETSI EN 300 778-1 protocol. Contact your local telephone company for detailed
information on this service.
z If the <CALLER ID> setting is set to <ON>, the machine will not enter the power saver mode (see
page 12).
1 Press [Menu].
2 Use [{] or [}] to select <DATA REGSTRATION>, then press [Start/Copy].
3 Use [{] or [}] to select <CALLER ID>, then press [Start/Copy]. The LCD displays
<OFF>.
4 Use [{] or [}] to select <ON> to enable the <CALLER ID> feature, then press
[Start/Copy].
To disable the <CALLER ID> feature, use [{] or [}] to select <OFF>, then press
[Start/Copy].
5 Press [Stop/Reset].
Setting ends and the fax returns to standby mode.
Documents Stored in Memory
Printing the MEMORY LIST
Your fax can print a list of documents stored in memory, along with the transaction number (<TX/
RX NO.>) of each document. Once you know the transaction number of a document in memory,
you can print it or delete it.
1 Press [Menu].
2 Use [{] or [}] to select <MEMORY REFERENCE>, then press [Start/Copy].
3 Use [{] or [}] to select <DOC. MEMORY LIST>, then press [Start/Copy].
Printing a Document in Memory
1 Press [Menu].
2 Use [{] or [}] to select <MEMORY REFERENCE>, then press [Start/Copy].
3 Use [{] or [}] to select <PRINT DOCUMENT>, then press [Start/Copy].
TX/RX NO. 0001
39Receiving Faxes
Page 41

4 Use [{] or [}] to select the transaction number (<TX/RX NO.>) of the document
you want to print, then press [Start/Copy]. The LCD toggles between <1ST PAGE
ONLY?> and <YES=( ) NO=(#)>.
If you are unsure of the transaction number (<TX/RX NO.>), print the MEMORY LIST (see
page 39).
5 Press [ ] to print the first page only, or press [#] to print all pages of the document.
The fax prints the document.
Printing All Unprinted Documents in Memory
1 Press [Menu].
2 Use [{] or [}] to select <MEMORY REFERENCE>, then press [Start/Copy].
3 Use [{] or [}] to select <PRINT ALL NEW RX>.
4 Press [Start/Copy].
The fax prints the documents one at a time, after each the reception number is displayed on
the LCD.
5 After printing, the LCD displays <YES=( ) NO=(#)>.
6 Press [ ] to delete the previous printed documents.
If you want to keep the documents in memory, press [#].
Deleting a Document from Memory
1 Press [Menu].
2 Use [{] or [}] to select <MEMORY REFERENCE>, then press [Start/Copy].
3 Use [{] or [}] to select <DELETE DOCUMENT>, then press [Start/Copy].
TX/RX NO. 0001
4 Use [{] or [}] to select the transaction number (<TX/RX NO.>) of the document
you want to delete, then press [Start/Copy]. The LCD displays <YES=( ) NO=(#)>.
z If the LCD does not change after you press [{] or [}], this means only one transaction is
stored in memory.
z If you are unsure of the transaction number (<TX/RX NO.>), print the MEMORY LIST (see
page 39).
5 Press [ ] to delete the document.
If you want to keep the document in memory, press [#].
6 To continue deleting other documents in memory, repeat the procedure from step 4.
To finish, press [Stop/Reset].
40 Receiving Faxes
Page 42

Deleting All Printed Documents from Memory
1 Press [Menu].
2 Use [{] or [}] to select <MEMORY REFERENCE>, then press [Start/Copy].
3 Use [{] or [}] to select <DEL. PRINTED RX>, then press [Start/Copy]. The LCD
displays <YES=( ) NO=(#)>.
4 Press [ ] to delete all printed documents.
If you want to keep the documents in memory, press [#]. Press [Stop/Reset] to return to
standby mode.
41Receiving Faxes
Page 43

Printing from Your Computer
Printing from Your Computer
This section describes procedure for basic printing.
Important
Before printing from your computer, install the printer driver to the computer to connect the machine and
the computer. Refer to your setup sheet or “Installing the Printer Driver” on page 9.
Note
z Only plain paper can be used for this machine.
z Custom sized paper can also be loaded as well as A4, Letter, and LGR-sized. For details, refer to the
On-screen Manual.
1 Create a document or open a file to print using an appropriate application software.
2 Select Print on the application software’s File menu.
3 Make sure that your machine’s name is
selected in Select Printer, and click
Preferences (or Properties).
4 Specify the required settings and click OK.
Note
For details on the printer driver functions, click Help or
Instructions to view the online help or the On-screen
Manual. Instructions is only displayed when the Onscreen Manual is installed.
5 Click Print (or OK).
Note
If straight lines are misaligned or print quality is not satisfactory after installing the printer driver, you may
need to align the Print Head. Refer to “Aligning the FINE Cartridge” on page 55.
42 Printing from Your Computer
Page 44

Reading the On-screen Manual
For detailed instructions on installing the On-screen Manual, refer to your setup sheet.
You can view the On-screen Manual in the following way:
To view the On-screen Manual, double-click the XXX On-screen Manual shortcut icon on the
desktop, or click Start > All Programs (or Programs) > Canon XXX Manual > XXX On-screen
Manual (where “XXX” is your machine’s name).
System Requirements
Browser: Easy Guide Viewer
Note
z Microsoft Internet Explorer 6.0 or later must be installed.
z The On-screen Manual may not be displayed properly depending on your operating system or Internet
Explorer version. We recommend that you keep your system up to date with Windows Update.
43Printing from Your Computer
Page 45

Settings and Activity Reports
Selecting a Menu
The <USER SETTINGS>, <REPORT SETTINGS>, <TX SETTINGS>, <RX SETTINGS>,
<PRINTER SETTINGS>, <SYSTEM SETTINGS>, and <CALLER ID> menus allow you to customize
the way your fax works. Each menu contains settings that control different functions of your fax.
1 Press [Menu].
2 Use [{] or [}] to select <DATA REGSTRATION>, then press [Start/Copy]. The
LCD displays <USER SETTINGS>.
3 Use [{] and [}] to scroll through the menus and select the menu you want.
You can select the <USER SETTINGS>, <REPORT SETTINGS>, <TX SETTINGS>, <RX
SETTINGS>, <PRINTER SETTINGS>, <SYSTEM SETTINGS> or <CALLER ID> menu (see
page 45).
4 Press [Start/Copy] to access the settings under the menu you selected.
5 See the tables on the following pages (see page 45) for guidelines on selecting and
registering settings.
z Use [{] and [}] to scroll through the settings.
z To register a setting or access a sub-setting, press [Start/Copy].
z To return to a previous level, press [Menu].
6 Press [Stop/Reset].
Setting ends and the fax returns to standby mode.
Note
z If at any stage you want to return to standby mode, press [Stop/Reset].
z If you pause for more than 120 seconds while accessing a menu, the fax will automatically
return to standby mode.
44 Settings and Activity Reports
Page 46

USER SETTINGS
Name Description Settings
DATE & TIME Set the date and time (24-hour clock) using the numeric
UNIT TELEPHONE # Enter your fax number using the numeric buttons. –
UNIT NAME This is the name that appears at the top of each fax page you
TX TERMINAL ID This option sets the parameters for the identification header
FAX/TEL No. MARK Select the icon for the fax number. FAX/TEL
TTI POSITION Select the position of the TTI. OUTSIDE IMAGE/
SCAN CONTRAST Set the density of the reproduction. STANDARD/
OFFHOOK ALARM Enable/disable the off hook alarm. The alarm alerts you that
VOLUME CONTROL Set the volume of the fax sounds. –
CALLING VOLUME Set the volume of the ring sound. 0 (off)/1/2/3
LINE MONITOR VOL Set the volume of the line monitor (sound during dialing). 0 (off)/1/2/3
ALARM VOLUME Set the volume of the error alarm sound. 0 (off)/1/2/3
KEYPAD VOLUME Set the volume of the keypad. 0 (off)/1/2/3
HANDSET VOLUME Set the volume of the Handset. This setting can be changed
RX CALL LEVEL Set the ring tone. STANDARD/HIGH
TEL LINE TYPE Set the dialing method the fax uses to match the type of
COPY RATIO Set the enlargement and reduction and ratio for copying. 100% AS IS/
DIAL SECURITY Enable/disable the dial security. When it is ON, it will ask you
buttons.
send (see page 15).
that appears on every page you send.
the Handset is not seated properly in its cradle.
during a call, with [{] or [}].
phone line you have.
to dial the number twice to prevent dialing the wrong number.
The fax will dial the number after confirming the number you
dialed in twice are matched.
–
–
ON/OFF
INSIDE IMAGE
DARKER/ LIGHTER
ON/OFF
1/2
TOUCH TONE/
ROTARY PULSE
94% A4JLTR /
50% MIN/200% MAX/
183%/156%
ON/OFF
REPORT SETTINGS
Name Description Settings
TX REPORT Enable/disable automatic printing of the transmission report.
PRINT ERROR ONLY: Print only when an error occurs during sending. -
ATTACH TX IMAGE: Print a transmission report attaching its
image.
OUTPUT YES: Set the fax to print a transmission report every time you send
OUTPUT NO: Turn off the transmission report feature. -
RX REPORT Enable/disable automatic printing of the reception report. PRINT ERROR ONLY/
a document.
ATTACH TX IMAGE: Print a transmission report attaching its
image.
YES/NO
YES/NO
OUTPUT YES/
OUTPUT NO
45Settings and Activity Reports
Page 47

Name Description Settings
ACTIVITY REPORT Enable/disable automatic printing of the ACTIVITY REPORT. –
AUTO PRINT When you set ON, your fax is set to print the ACTIVITY
TX/RX SEPARATE Divide the activity management report into sent and received
REPORT for every 20 transactions (sending and receiving).
transactions.
ON/OFF
ON/OFF
TX SETTINGS
Name Description Settings
ECM TX Enable/disable error correction during transmission. ON/OFF
PAUSE TIME Set the length of the pause you insert into a dialing sequence. 1 to 9 seconds
AUTO REDIAL Determine whether the fax will redial a number if it fails to get
REDIAL TIMES Set the number of retries. 1 to 10 times
REDIAL INTERVAL Set the period of time between redialing attempts. 2 to 99 minutes
DIAL TONE DETECT Set whether to send faxes after detecting the dial tone. This
a response on the first attempt.
function may not work correctly with some telephone lines.
ON/OFF
ON/OFF
RX SETTINGS
Name Description Settings
ECM RX Enable/disable error correction during reception. ON/OFF
FAX/TEL AUTO SW This feature is used to answer calls, and if no fax tone is
RING START TIME Set the duration that the fax listens for a fax tone before
TEL RING TIME Set the length of time the fax will ring to alert you of an
DEFAULT ACTION Select the action taken after the TEL RING TIME expires. DISCONNECT/
INCOMING RING Set the fax to ring when it receives a call. ON/OFF
RING COUNT Set the number of incoming rings before the fax answers. 2 to 30 times
MAN/AUTO SWITCH Determine if the fax switches to document receive mode after
RING TIME Set the amount of time the fax will ring before switching to
REMOTE RX Enable/disable remote receiving. ON/OFF
REMOTE RX ID If you set REMOTE RX to ON, you can select the remote
SAVE RX IMAGE Set whether to save images received. ON/OFF
OPTION SETTINGS Set whether the fax prints out received documents even
DRPD:SELECT FAX If you select DRPD as the receive mode, select the ring
detected, the fax rings to alert you of an incoming call.
starting to ring.
incoming call.
the fax rings for a specified time when the fax is in the manual
receive mode.
document receive mode.
receiving ID.
when the ink level is low. Faxes will be deleted from memory
after printing. If there is no ink left, the information contained
in the fax will be lost.
This setting will be retained even if the FINE cartridge is
replaced with a new cartridge.
pattern for the fax.
–
0 to 20 seconds
10 to 45 seconds
RECEIVE
ON/OFF
1 to 60 seconds
00 to 99
ON/OFF
DOUBLE RING/
SHORT-SHORT-LONG/
SHORT-LONGSHORT/
OTHER RING TYPE/
NORMAL RING
46 Settings and Activity Reports
Page 48

PRINTER SETTINGS
Name Description Settings
RX REDUCTION Enable/disable reduction for received documents. ON/OFF
REDUCE DIMENSION Select reduction in height only or both width and height. VERTICAL ONLY/
PAPER SIZE Select the size of the loaded fax paper. LTR/LGL/A4
INK SAVER Set the ink saver mode. ON/OFF
AUTO PRINT Set whether to print received faxes, ACTIVITY REPORT, TX
REPORT, RX REPORT, MULTI TX REPORT and MEMORY
CLEAR REPORT automatically.
HORIZ & VERTICAL
ON/OFF
SYSTEM SETTINGS
Name Description Settings
RX RESTRICTION Enable/disable the direct mail preventive function. ON/OFF
RX CONDITION WITH SENDER INFO: The fax only receives documents that
DATE DISPLAY Set the date format. MM/DD/YYYY
SELECT LANGUAGE Set the language of the LCD messages. ENGLISH/GERMAN/
TX START SPEED Set the speed at which the fax starts transmitting. Set this to a
RX START SPEED Set the speed at which the fax starts receiving. Set this to a
contain TTI information.
REGISTERED SENDR: The fax only receives documents
that contain TTI information. Also, the phone/fax numbers on
the TTI must be registered under one-touch/coded speed
dialing on your fax.
lower speed if you have difficulties connecting over long
distance or noisy lines.
lower speed if you have difficulties connecting over long
distance or noisy lines.
WITH SENDER INFO/
REGISTERED SENDR
DD/MM YYYY
YYYY MM/DD
FRENCH/ITALIAN/
SPANISH/DUTCH/
PORTUGUESE/
NORWEGIAN/
SWEDISH/DANISH/
FINNISH/RUSSIAN/
CZECH/HUNGARIAN/
POLISH/SLOVENE/
CHINESE
14400bps/9600bps/
7200bps/4800bps
14400bps/9600bps/
7200bps/4800bps
47Settings and Activity Reports
Page 49

Name Description Settings
DAYLGHT SAV TIME Enable/disable the summer time system. ON/OFF
START DATE/TIME Set the beginning of the summer time period. –
END DATE/TIME Set the end of the summer time period. –
MONTH: Set the beginning/end month. MARCH/APRIL/MAY/
WEEK: Set the beginning/end week. SECOND WEEK/
DAY: Set the beginning/end day of the week. SUNDAY/MONDAY/
TIME: Set the beginning/end time. –
JUNE/JULY/AUGUST/
SEPTEMBER/
OCTOBER/
NOVEMBER/
DECEMBER/
JANUARY/FEBRUARY
THIRD WEEK/
FOURTH WEEK/
LAST WEEK/
FIRST WEEK
TUESDAY/
WEDNESDAY/
THURSDAY/FRIDAY/
SATURDAY
CALLER ID
Name Description Settings
CALLER ID Determine if the fax displays the caller’s name and phone/fax
number when receiving a call.
ON/OFF
Activity Reports
Your fax keeps track of most of its sending and receiving operations. These operations can be
printed out in the form of activity reports that can help you check the dates and times of fax
transmissions and whether or not each transaction was successful.
How to Print a Report
Depending on the type of report, you can have the fax print the report automatically, or you can
print it directly. The TX REPORT, RX REPORT, MULTI TX REPORT, and MEMORY CLEAR
REPORT (see page 73) can only be printed automatically. See <REPORT SETTINGS>
(page 45) on how and when reports are printed automatically.
Note
If the <AUTO PRINT> setting is set to <OFF>, the following will not be printed automatically:
ACTIVITY REPORT, TX REPORT, RX REPORT, MULTI TX REPORT and MEMORY CLEAR
REPORT. Refer to “Receiving to Memory Temporarily” on page 37.
1 Press [Menu].
2 Use [{] or [}] to select <REPORT>, then press [Start/Copy].
3 Use [{] or [}] to display the type of report you want to print, then press [Start/
Copy].
You can select <ACTIVITY REPORT>, <1-TOUCH LIST>, <CODED DIAL LIST>, or <USER
DATA LIST>.
48 Settings and Activity Reports
Page 50

ACTIVITY REPORT
Summarizes the information for the sending and receiving activities of your fax after 20
transactions. For automatic printing, see <ACTIVITY REPORT> on page 46.
Transactions in the ACTIVITY REPORT are listed chronologically.
ONE-TOUCH SPEED DIAL TELEPHONE NO. LIST
Lists the numbers and names registered under one-touch speed dialing buttons.
CODED SPEED DIAL TELEPHONE NO. LIST
Lists the numbers and names registered under coded speed dialing codes.
USER’S DATA LIST
Lists the current settings of the fax and the registered sender information.
MEMORY LIST
Lists the documents currently stored in the fax’s memory (see page 39).
TX REPORT (Transmission Report)
Normally the fax does not print an activity report for transmitting, but you can set the fax to print
an activity report every time you send a document. See <TX REPORT> on page 45.
You can set the fax to print an activity report only when an error occurs during transmitting. See
<TX REPORT> on page 45.
RX REPORT (Reception Report)
Normally the fax does not print an activity report for receiving, but you can set the fax to print an
activity report every time you receive a document. See <RX REPORT> on page 45.
You can set the fax to print an activity report only when an error occurs during receiving. See
<RX REPORT> on page 45.
MULTI TX REPORT (Multi Transmission Report)
Lists the result of a sequential broadcasting.
If you set the fax to print the TX REPORT and then use sequential broadcasting, the MULTI TX
REPORT will be printed instead of the TX REPORT. See <TX REPORT> on page 45.
Note
The MEMORY CLEAR REPORT is printed automatically when power is restored after a power
failure. See “MEMORY CLEAR REPORT” on page 73.
49Settings and Activity Reports
Page 51

Routine Maintenance
Maintenance Menus
The table below shows the available maintenance menus when you press [Maintenance].
Menus
<CS CLEANING> (see page 57)
<NOZZLE CHECK> (see page 53)
<CLEANING> (see page 54)
<DEEP CLEANING> (see page 54)
<ALIGN PRINT HEAD> (see page 55)
<HEAD ALIGN VALUE> (see page 55)
<ROLLER CLEANING> (see page 58)
<BOTTOM CLEANING> (see page 58)
Note
You can also perform the maintenance operation from your computer. For details, refer to the On-screen
Manual.
Replacing a FINE Cartridge
If there is no improvement with the quality of printing following such maintenance as FINE Cartridge
Cleaning, the FINE Cartridge is probably empty. Replace the empty FINE Cartridge with a new one.
When replacing a FINE Cartridge, check the model number very carefully.
Knowing When to Replace a FINE Cartridge
z When Ink is Low
When the ink level is low, <RECOMEND NEW CRT> is displayed on the LCD and the Ink Lamp
lights up. In this state the FAX will receive documents to memory (up to 30 transactions or 60
pages) to prevent the information contained in the FAX from being lost if the ink runs out
completely. You need to print out received faxes manually from the <MEMORY REFERENCE>
menu.
After printing, delete unnecessary faxes from the memory. For more details, see “Documents
Stored in Memory” on page 39.
z When Ink is Empty
When the ink is almost empty, <RECOMEND NEW CRT> is displayed on the LCD and the Ink
Lamp blinks. When this occurs it may not be possible to clearly print received faxes from
memory. When the ink is empty, <NO INK> is displayed on the LCD. Replace the FINE Cartridge
with new one. For more details, see “Replacing a FINE Cartridge” on page 52.
Printing will resume as soon as the FINE Cartridge is replaced.
z Press [Stop/Reset] to cancel the current print job.
Replace the empty ink cartridge immediately after the printing. The resulting print quality is not
satisfactory, if printing is continued under the ink out condition.
50 Routine Maintenance
Page 52

Note
z The resulting print quality may not be satisfactory, if printing is continued under this condition.
z When the ink level is low, the print quality may become poor, and the machine will start storing
incoming fax data in the memory.
z The FAX cannot detect whether or not the received data are clearly printed on the paper.
z The FAX automatically deletes the received fax data in the memory after printing them. We
recommend you to set <SAVE RX IMAGE> to <ON> (see page 46). You can store the received
fax data in the memory for no more than 30 transactions. Delete them before the memory
becomes full.
z Setting Automatic Printing
When the ink is low, you can set the receiving fax either automatic printing or storing in memory.
1 Press [Menu].
2 Use [{] or [}] to select <DATA REGSTRATION>, then press [Start/Copy]. The
LCD displays <USER SETTINGS>.
3 Use [{] or [}] to select <RX SETTINGS>, then press [Start/Copy]. The LCD
displays <ECM RX>.
4 Use [{] or [}] to select <OPTION SETTINGS>, then press [Start/Copy]. The LCD
displays <OFF>.
z To disable ink low automatic printing, use [{] or [}] to select <OFF>.
z To enable automatic printing, use [{] or [}] to select <ON>.
5 Press [Start/Copy].
6 Press [Stop/Reset].
The fax returns to standby mode.
What is a Low Ink Warning?
The machine counts the amount of ink used and when the remaining level reaches a preset level
the Low Ink Warning lamp beside the LCD display lights up to advise you that the FINE Cartridge
is running out of ink.
z When <RECOMEND NEW CRT>, or <NO INK> appears on the LCD.
RECOMEND NEW CRT
The ink level of the FINE Cartridge showing <RECOMEND NEW CRT> is low. The ink level
of the FINE Cartridge showing <NO INK> is empty. You should ensure you have a new FINE
Cartridge.
z When <INK VOL UNKNOWN> appears on the LCD.
INK VOL UNKNOWN
If you install the FINE Cartridge that was once empty, <INK VOL UNKNOWN> appears in the
LCD. The function for detecting the remaining ink level will be disabled since the ink level
cannot be correctly detected.
If you want to continue printing without this function, press [Stop/Reset] for at least 5 seconds.
NO INK
]
51Routine Maintenance
Page 53

However, the error detection function is disabled after the error indication is canceled, therefore,
Low Ink Warning message does not appear later on. When you install a new FINE Cartridge, the
Low Ink Warning is enabled automatically.
Replacing a FINE Cartridge
Note
z Do not replace the FINE Cartridge while the fax is printing or performing another operation.
z If you need to unplug the fax, wait until it returns to standby mode (time and receive mode
displayed on the LCD). Otherwise the Holder may not be in its home position, causing the FINE
Cartridge to remain uncapped and dry out.
1 Make sure the fax is turned on.
2 Open the Cover until it locks into place securely at the second bump.
Caution
z Do not try to manually move or stop the Holder.
z Do not touch the metallic parts or other parts inside the machine.
3 Remove the empty FINE Cartridge.
(1) Push down the FINE Cartridge.
(2) Remove the FINE Cartridge.
Important
z Handle FINE Cartridges carefully to avoid
staining your clothes or surrounding area.
z Discard empty FINE Cartridges according to local
laws and disposal regulations.
(1)
(2)
4 Prepare a replacement FINE Cartridge.
(1) Unpack a new FINE Cartridge and remove the
Protective Tape (A) gently.
Important
z Shaking FINE Cartridge may cause ink to spill out
and stain clothing or the surrounding area.
Handle FINE Cartridge carefully.
z Be careful not to stain your clothes and hands
with ink on the removed protective tape.
z Do not reattach the Protective Tape once you
have removed it.
z Once the Protective Tape is removed, do not
touch the electrical contacts (B) or Print Head
Nozzles (C) on the FINE Cartridge. The machine
may not print out properly if you touch it.
52 Routine Maintenance
(C)
(A)
(B)
Page 54

5 Insert the new FINE Cartridge.
(1) Insert the new FINE Cartridge slightly slanted.
(2) Push up the FINE Cartridge until it clicks into
place.
6 Close the Cover.
(2)
(1)
Important
z Canon recommends to use new genuine Canon cartridges in order to obtain optimum qualities.
z Replace the FINE Cartridge promptly. Do not leave with the FINE Cartridge removed.
z When a FINE Cartridge runs out of ink, replace the FINE Cartridge with a new one immediately.
If you replace it with the FINE Cartridge that has previously been removed, the machine may
not print properly due to clogged FINE Cartridge nozzles. Furthermore, the Low Ink Warning
dialog box which advises when to exchange the FINE Cartridge will be inaccurate.
z To maintain optimal print quality, use up all the ink in the FINE Cartridge within six months of its
first use (We recommend that you note the date that the FINE Cartridge was installed in the
machine).
z Releasing the function for detecting the remaining ink level is memorized. Please be advised
that Canon shall not be liable for any malfunction or trouble caused by continuation of printing
under the ink out condition.
Note
z Load the paper in the Rear Tray before you replace the FINE Cartridge.
z The machine may make some operating noises when preparing to print. This is normal
operation.
Testing and Cleaning the FINE Cartridge
The print head in the FINE Cartridge contains nozzles through which ink is propelled onto the paper.
To maintain the best possible print quality, these nozzles need to be cleaned from time to time. Your
fax is equipped with a print head cleaning function that does this.
Printing the Nozzle Check Pattern
Before cleaning the print head, you may want to print the nozzle check pattern to test the print
head of the FINE Cartridge installed in the fax. This test shows if each print head nozzle is
operating properly.
1 Load paper into the Rear Tray.
For details on loading paper in the Rear Tray, see “Loading Documents and Paper” on
page 22.
2 Press [Maintenance].
53Routine Maintenance
Page 55

3 Use [{] or [}] to select <NOZZLE CHECK>, then press [Start/Copy].
The fax prints the nozzle check pattern.
(1)
Nozzle
check
pattern
4 If the pattern is broken or missing (1), clean the FINE Cartridge print head (see
page 54).
FINE Cartridge Cleaning
If the pattern is broken or missing, clean the FINE Cartridge print head.
Note
Cleaning the print head consumes a small amount of ink. Cleaning too often reduces the amount of
ink in the FINE Cartridge.
1 Press [Maintenance].
2 Use [{] or [}] to select <CLEANING>, then press [Start/Copy].
The fax cleans the print head.
Note
z You can clean the print head up to five consecutive times if necessary.
z After cleaning, print the nozzle check pattern to check if cleaning corrected the problem (see
page 53).
z If normal FINE Cartridge cleaning does not improve the print quality, perform deep FINE
Cartridge cleaning (see page 54).
FINE Cartridge Deep Cleaning
If print quality does not improve after a standard Print Head Cleaning, try Print Head Deep
Cleaning, which is a more powerful cleaning process.
Note
Print Head Deep Cleaning consumes more ink than standard Print Head Cleaning, so perform this
procedure only when necessary.
1 Press [Maintenance].
54 Routine Maintenance
Page 56

2 Use [{] or [}] to select <DEEP CLEANING>, then press [Start/Copy].
Note
z After cleaning, print the nozzle check pattern to check if cleaning corrected the problem (see
page 53).
z If cleaning does not improve print quality, replace the FINE Cartridge (see page 52).
Aligning the FINE Cartridge
If ruled lines are printed misaligned or print results are otherwise unsatisfactory, adjust the print head
position.
Print Head Alignment
1 Make sure that the machine is turned on, open the Document Cover, and extend
the Paper Support.
2 Load a sheet of A4 or Letter-sized plain paper in the Rear Tray.
3 Press [Maintenance].
4 Use [{] or [}] to select <ALIGN PRINT HEAD>, then press [Start/Copy].
The machine prints the head alignment sheet.
Note
Select <HEAD ALIGN VALUE> to print the current adjustment values.
5 Adjust the print head position.
(1) Check the printed patterns and use [[] or []] to
input the number of the pattern in column A that has
the least noticeable streaks.
}
Press [Start/Copy].
55Routine Maintenance
Page 57

(2) Repeat the procedure to input inputting the pattern number for columns B and C.
Note
If it is difficult to pick the best pattern, pick the setting that produces the least noticeable vertical
white streaks.
(A) (B)
(A) Less noticeable white streaks
(B) More noticeable white streaks
(3) When you have finished inputting all pattern numbers, the fax returns to standby mode.
Note
When you turn off the machine, be sure to press [ON] on the machine.
Otherwise, the settings made here will not be saved.
Cleaning Your Machine
Your fax requires little periodic maintenance. This section describes the necessary cleaning
procedures for the fax. Please note the following before cleaning:
z Do not use tissue paper, paper towels, or similar materials for cleaning; they can stick to the
components or generate static charges.
Caution
Never use volatile liquids such as thinners, benzene, acetone, or any other chemical cleaner to clean the
interior of the fax.
Note
There is the case that some of the data are lost when the power is turned off for cleaning. See “In Case of
a Power Failure” on page 73.
Cleaning the Exterior of the Machine
When cleaning the exterior of the machine, do not use tissue paper, rough-textured cloth, or
similar materials, as these may scratch the surface. Also, never use volatile liquids such as
thinners, benzene, acetone, or any other chemical cleaner to clean. Be sure to use a soft cloth
such as eyeglasses cleaning cloth and wipe off dirt on the surface with it gently. Smooth out
wrinkles on the cloth if necessary before cleaning.
Caution
Always unplug the machine from the power outlet before cleaning the machine. If you accidentally
switch the machine on while cleaning it, you could injure yourself.
Cleaning Inside of the Machine
To prevent ink spots and paper dust from accumulating inside the fax and affecting print quality,
clean the print area of the fax periodically.
Caution
Always unplug the machine from the power outlet before cleaning the machine. If you accidentally
switch the machine on while cleaning it, you could injure yourself.
56 Routine Maintenance
Page 58

1 Open the Cover.
Caution
Do not touch the metallic parts or other parts inside the machine.
2 Use a clean, soft, dry, lint-free cloth to remove
any ink or paper debris from the interior of the
fax, especially around the four pinch rollers
(A).
Dirt and dust particles that collect on the underside
of the Cover affect the quality of the documents you
copy or send.
Be careful not to touch the FINE Cartridge or
Holder.
(A)
3 When you are finished, close the Cover.
Be sure to close the Cover until it locks into place.
Cleaning the Scanner Components
Note
z If the scanner components are dirty, the documents you send or copy will also be dirty.
z Use a soft, lint-free cloth.
z Do not use tissue paper, paper towels, or similar materials for cleaning.
1 Press [Maintenance].
2 Use [{] or [}] to select <CS CLEANING>.
3 Press [Start/Copy].
4 Open the Cover.
5 While lifting the Scanning Unit Cover (A), with
the White Sheet (B) inside exposed, clean the
components.
Wipe with a clean, soft, lint-free cloth moistened
with water, then wipe with a clean, soft, dry, lint-free
cloth.
Note
Do not bend the white sheet (B).
6 When you are finished, close the Cover.
Be sure to close the Cover until it locks into place.
(A)
(B)
57Routine Maintenance
Page 59

Cleaning the Roller
Clean the paper feed roller if paper is not fed properly. Cleaning the paper feed roller will wear
the roller, so perform this only when necessary.
1 Ensure that the machine is turned on and there is no paper loaded in the Rear Tray.
2 Press [Maintenance].
3 Use [{] or [}] to select <ROLLER CLEANING>, then press [Start/Copy].
4 Repeat steps 2 to 3 twice.
5 Load three or more of A4- or Letter-sized paper in the Rear Tray.
6 Repeat steps 2 to 3 three times.
The sheet of paper is automatically fed in and then out of the machine.
Cleaning the Bottom Plate
If the printed paper is smudged, the inside of the machine may be dirty. Periodic cleaning of
certain parts on the inside of your machine is recommended to maintain a high standard of
printing quality.
1 Ensure that the machine is turned on and there is no paper loaded in the Rear Tray.
2 Take a sheet of A4 or Letter-sized plain paper and fold it in half widthwise. Then,
open the paper.
3 Load it into the Rear Tray with the opened side facing up.
(A)
(A) Insert the paper open side
4 Press [Maintenance].
5 Use [{] or [}] to select <BOTTOM CLEANING>.
6 Press [Start/Copy].
Inspect the discharged paper. If dust or dirt can be seen on the paper, repeat the cleaning
process.
58 Routine Maintenance
Page 60

Cleaning the Protrusions Inside the Machine
If protrusions inside the machine are stained, wipe ink off the protrusions using a swab or
something similar.
Caution
Always unplug the machine from the power outlet before cleaning the machine. If you accidentally
switch the machine on while cleaning it, you could injure yourself.
Important
Do not touch the transparent film (A), film cable (B), or any metal parts.
(B)(A)
59Routine Maintenance
Page 61

Troubleshooting
Paper Jams
Jams in the ADF
When a document jams or misfeeds in the ADF, either both <OPEN COVER> and <SEE FIG. 1>
or only <CHK PRINTER 5100>/<SEE MANUAL> are displayed on the LCD.
Note
You do not need to unplug the fax when clearing document jams.
z When <OPEN COVER> and <SEE FIG. 1> are displayed alternatively
1 Press [Stop/Reset].
Important
Do not pull out the jammed paper manually at this point.
2 Hold down [Start/Copy] for a few seconds.
z The document will be fed out automatically.
z If the document is not fed out, gently pull the document out of the fax.
z When <CHK PRINTER 5100>/<SEE MANUAL> is displayed
1 Check if any paper is jammed.
If jammed, make sure to take out all the jammed paper.
2 After taking out jammed paper, turn the fax off, then turn it back on with [ON].
Jams in the Rear Tray
If paper jams in the Rear Tray, <CLEAR PAPER JAM> is displayed on the LCD.
1 Gently pull any jammed paper out of the fax as
shown, then press [Stop/Reset].
z Pull it gently in either direction.
z If you cannot pull the paper out, proceed to step 2.
60 Troubleshooting
Page 62

2 Open the Cover.
3 Gently remove the jammed paper inside the
fax.
4 Press [Stop/Reset].
The fax returns to standby mode.
If the Power Disconnects Unexpectedly
The date and time setting on your device will be kept. All documents stored in memory will be
deleted.
If the power disconnects, the following will apply:
z You will not be able to send or receive faxes or make copies.
z If a telephone is connected to the machine, you can receive voice calls.
z Whether you are able to make voice calls or not depends on your telephone type.
Paper Feeding Problems
Paper Does Not Load
Cause Action
The Rear Tray may contain too many
sheets.
Paper may not be loaded correctly. Make sure the paper stack is loaded properly in the Rear Tray, and that the
Make sure the paper stack in the Rear Tray does not exceed the paper limit
mark ( ) (see page 22).
Paper Guide is adjusted correctly (see your setup sheet or page 22).
Paper is Loaded Skewed (Printing is Skewed)
Cause Action
Paper may not be loaded correctly.
z Make sure the paper stack is loaded properly in the Rear Tray, and that the
Paper Guide is adjusted correctly (see your setup sheet or page 22).
z Make sure the right edge of the paper stack is aligned with the right side of
the Rear Tray and the Paper Guide is aligned with the left edge of the stack
(see your setup sheet or page 22).
z Make sure the paper exit path is clear.
Multiple Sheets Load Into the Fax at the Same Time
Cause Action
Paper may not be loaded correctly. Make sure the paper stack is loaded properly in the Rear Tray, and that the
Sheets of paper may be sticking
together.
The Rear Tray may contain too many
sheets.
Paper Guide is adjusted correctly (see your setup sheet or page 22).
Be sure to tap the stack on a flat surface before loading it in the Rear Tray. This
keeps the sheets of paper from sticking together.
z Make sure the paper stack in the Rear Tray does not exceed the paper limit
mark ( ) (see page 22).
z Do not exceed the maximum loading capacity of the Rear Tray (see
page 79).
z Do not force the paper stack into the Rear Tray.
61Troubleshooting
Page 63

Cause Action
Different types of paper may be loaded
in the Rear Tray.
z Load only one type of paper.
z Make sure you load paper that meets the paper requirements for the fax (see
page 21).
Repeated Paper Jams Occur
Cause Action
The paper you are using may be
causing the jams.
z Be sure to tap the stack on a flat surface before loading it in the Rear Tray.
This keeps the sheets of paper from sticking together.
z Check that the paper you are using and your printing environment are within
the specifications of the fax (see page 21, page 79).
z Try loading a fresh stack of paper in the Rear Tray.
Faxing Problems
z Sending Problems
You Cannot Send a Document
Cause Action
The FINE Cartridge may not be
installed properly.
The fax may have overheated. Unplug the fax and let it cool for several minutes. Then plug it back in and try
The fax may not be set for the type of
telephone line in use (pulse/tone).
The document may not have been
loaded correctly into the ADF.
The one-touch speed dialing button or
coded speed dialing code you entered
may not be registered for the feature
you want to use.
You may have dialed or have been
provided with an incorrect number.
The receiving party’s fax machine may
be out of paper.
There may be other documents being
sent from memory.
An error may have occurred during
sending.
The telephone line may not be working
properly.
The receiving fax machine may not be
a G3 fax machine.
Make sure the FINE Cartridge is installed properly. Do not remove a used FINE
Cartridge except to replace it with a new one.
sending again.
Make sure the fax is set for the correct telephone line type (see page 14).
z Remove the document, stack it if necessary, and load it into the ADF
correctly (see page 22).
z Make sure the Cover is closed.
Check the one-touch speed dialing button or coded speed dialing code and
make sure it is registered correctly (see page 18).
Dial the number again, or check that you have the correct number.
Call the receiving party and ask them to make sure paper is loaded in their fax
machine.
Allow time for those documents to finish sending.
Print the ACTIVITY REPORT and check for an error (see page 48).
Make sure there is a dial tone when you press [Hook] or when you lift the
Handset. If there is no dial tone, contact your local telephone company.
Make sure the receiving fax machine is compatible with this fax machine (which
is a G3 fax machine).
Documents Sent From the Fax are Spotted or Dirty
Cause Action
The receiving fax machine may not be
working properly.
Check the fax by making a copy (see page 23). If the copy is clear, the problem
may be in the receiving fax machine. If the copy is spotted or dirty, clean the
scanner components (see page 57).
62 Troubleshooting
Page 64

Cause Action
The document may not have been
loaded correctly into the ADF.
Remove the document, stack it if necessary, and load it into the ADF correctly
(see page 22).
Cannot Send Using Error Correction Mode (ECM)
Cause Action
The receiving party’s fax machine may
not support ECM.
ECM may be disabled. Make sure ECM is on (see <ECM TX> on page 46).
If the receiving party’s fax machine does not support ECM, then the document is
sent in normal mode without error checking.
Errors Occur Frequently While Sending
Cause Action
The telephone lines may be in poor
condition, or you may have a bad
connection.
Lower the transmission speed (see <TX START SPEED> on page 47).
z Receiving Problems
Cannot Receive a Document Automatically
Cause Action
The fax may not be set to receive
automatically.
The fax may have a document stored in
memory.
An error may have occurred during
reception.
The Rear Tray may be empty. Make sure paper is loaded in the Rear Tray (see your setup sheet or page 22).
The telephone line may not be
connected properly.
The machine is under maintenance. /
The machine is sending a fax. / The
machine is printing another document.
For the fax to receive documents automatically, the receive mode must be set to
<FAX ONLY MODE>, <Fax/Tel Mode>, <DRPD>, or <ANS.MACHINE MODE>
(see page 33). If you have set <ANS.MACHINE MODE>, check that an
answering machine is connected to the fax and that it is turned on with an
outgoing message properly recorded (see page 35).
Print out any documents stored in memory (see page 39).
z Check the LCD for an error message (see page 73).
z Print the ACTIVITY REPORT and check for an error (see page 48).
Make sure all line connections are secure (see your setup sheet).
Cancel sending, printing, or maintenance as soon as possible.
The Fax Does Not Switch Automatically Between Telephone and Fax
Reception
Cause Action
The fax may not be set to switch
automatically between telephone and
fax reception.
The fax may have a document stored in
memory.
An error may have occurred during
reception.
The Rear Tray may be empty. Make sure paper is loaded in the Rear Tray (see your setup sheet or page 22).
The sending fax machine may not send
the CNG signal that tells the fax that
the incoming signal is a fax.
For the fax to switch automatically, the receive mode must be set to <Fax/Tel
Mode>, <DRPD>, or <ANS.MACHINE MODE> (see page 33). If you have set
<ANS.MACHINE MODE>, check that an answering machine is connected to
the fax and that it is turned on with an outgoing message properly recorded (see
page 35).
Print out any documents stored in memory (see page 39).
z Check the LCD for an error message (see page 73).
z Print the ACTIVITY REPORT and check for an error (see page 48).
Some fax machines cannot send the CNG signal that tells your fax the incoming
call is from a fax machine. In such cases, you will have to receive the document
manually (see page 35).
63Troubleshooting
Page 65

Cannot Receive a Document Manually
Cause Action
You may have disconnected the call by
pressing [Start/Copy] or dialing the
remote receiving ID after hanging up.
The remote receiving ID may be
incorrect.
Always press [Start/Copy] or dial the remote receiving ID before hanging up the
Handset, otherwise you will disconnect the call (see page 35).
Make sure you dialed the correct remote receiving ID (see page 35).
Print Quality is Poor
Cause Action
You may not be using the correct type
of paper.
The FINE cartridge print head may
need cleaning.
The sending fax machine may not be
functioning properly.
Error Correction Mode (ECM) may be
disabled.
Make sure you load paper that meets the paper requirements for the fax (see
page 21).
Clean the FINE cartridge print head if necessary (see page 54).
The sending fax machine usually determines the quality of the document. Call
the sender and have them make sure their fax machine is functioning properly.
Make sure ECM is on (see <ECM RX> on page 46).
Fax Does Not Print
Cause Action
The FINE Cartridge may not be
installed properly.
The FINE Cartridge print head may
need cleaning.
The FINE Cartridge may need to be
replaced.
A document may be set. Make sure a document is not set.
The machine is under maintenance. /
The machine is sending a fax. / The
machine is printing another document.
z Make sure the FINE Cartridge is installed properly (see your setup sheet or
page 50).
z Be sure to remove the protective tape from the FINE Cartridge before you
install it (see your setup sheet or page 50).
Clean the FINE Cartridge print head if necessary (see page 54).
Determine if the problem is with the FINE Cartridge and replace if necessary
(see page 50).
Cancel sending, printing, or maintenance as soon as possible.
Fax Images Print Blotched or Uneven
Cause Action
The telephone lines may be in poor
condition, or you may have a bad
connection.
The sending fax machine may not be
functioning properly.
z Error Correction Mode (ECM) sending/receiving should eliminate such
problems. However, if the telephone lines are in poor condition, you may
have to try again.
z Lower the reception speed (see <RX START SPEED> on page 47).
The sending fax machine usually determines the quality of the document. Call
the sender and have them make sure their fax machine is functioning properly.
Cannot Receive Using Error Correction Mode (ECM)
Cause Action
The sending fax machine may not
support ECM.
ECM may be disabled. Make sure ECM is on (see <ECM RX> on page 46).
If the sending fax machine does not support ECM, then the document is
received in normal mode without error checking.
64 Troubleshooting
Page 66

Errors Occur Frequently While Receiving
Cause Action
The telephone lines may be in poor
condition, or you may have a bad
connection.
The sending fax machine may not be
functioning properly.
Lower the reception speed (see <RX START SPEED> on page 47).
Call the sender and have them check that their fax machine is functioning
properly.
Copying Problems
The Fax Does Not Make a Copy
Cause Action
The FINE Cartridge may need to be
replaced.
The document may not have been
loaded correctly into the ADF.
The FINE Cartridge may not be
installed properly.
Print head nozzles are clogged. Print the nozzle check pattern (see page 53).
<MEMORY FULL> Appears on the LCD When Making Multiple Copies
Cause Action
The fax’s memory is full.
The document you are copying may
have too many graphics.
Determine if the problem is with the FINE Cartridge and replace if necessary
(see page 50).
z Remove the document, stack it if necessary, and load it face up into the ADF
correctly (see page 22).
z Make sure the Cover is closed.
Make sure the FINE Cartridge is installed properly (see your setup sheet or
page 50).
z Print or delete any documents stored in memory (see page 39) to free up
space in the fax’s memory, then start again.
z Change the scanning resolution and try copying again.
If multiple pages are being copied, separate the pages into smaller stacks. If
not, make the desired number of copies one at a time as needed.
65Troubleshooting
Page 67

Telephone Problems
You Cannot Dial
Cause Action
The telephone line may not be
connected properly.
The power cord may not be plugged in
securely.
The machine may not be switched on. Press [ON] to turn the machine on.
The fax may not be set for the type of
telephone line in use (pulse/tone).
Make sure all line connections are secure (see your setup sheet).
Check that the power cord is plugged securely into the fax and into the wall
outlet (see your setup sheet). If the fax is plugged into a power strip, make sure
the power strip is plugged in and turned on.
Make sure the fax is set for the correct telephone line type (see page 14).
The Handset, Telephone, or Extension Phone Disconnects While You
are Talking
Cause Action
The telephone line cord may not be
plugged in securely.
Check that the telephone line cord is plugged securely into the fax and into the
telephone line jack on your wall.
There is Interference on the Line
Cause Action
A mobile phone or cordless phone may
be in use near the fax.
Make sure that mobile phones and cordless phones are not used near the fax.
Print Quality Problems
The Print Quality is Not What You Expect; Print is Not Clear, is
Splashed, has Missing Dots or White Streaks
Cause Action
The paper you are using may not be
supported by the fax.
The nozzles on the FINE Cartridge
print head may be clogged.
The FINE Cartridge may not be
installed properly.
The FINE Cartridge print head may be
damaged.
Make sure you are using the recommended paper (see page 21).
Clean the FINE Cartridge print head if necessary (see page 53).
Make sure the FINE Cartridge is installed properly (see your setup sheet or
page 50).
Determine if the problem is with the FINE Cartridge print head (see page 53)
and replace the FINE Cartridge if necessary (see page 50).
The Printout Contains Blurred or Smudged Ink
Cause Action
The paper you are using may not be
supported by the fax.
Make sure you are using the recommended paper (see page 21).
66 Troubleshooting
Page 68

PC Printing Problems
z If an Error Occurs
When an error occurs in printing such as the machine is out of paper or paper is jammed, a
troubleshooting message is displayed automatically. Take the appropriate action described in the
message. The message may vary depending on the version of your operating system.
z Cannot Install the Printer Driver
Cause Action
The installer is not compatible with your
operation system.
Unable to proceed beyond the Printer
Connection screen.
Installation does not start automatically
when the Setup CD-ROM is inserted
into your computer’s disc drive.
Installation procedure not followed
correctly.
Use the machine under an environment described in “Minimum System
Requirements” on page 80.
If you are unable to proceed beyond the Printer Connection screen, make sure
that the USB cable is securely plugged into the USB port of the machine and is
connected to the computer, and then follow the procedure below to reinstall the
printer driver.
Note
In Windows Vista, “The printer is not detected. Check the connection.” may
be displayed depending on the computer you use. In this case, wait for a while.
If you still cannot proceed to the next step, follow the procedure below to
reinstall the printer driver.
(1)Click Cancel on the Printer Connection screen.
(2)Click Start Over on the Installation Failure screen.
(3)Click Back on the screen that appears next.
(4)Click Exit, then remove the CD-ROM.
(5)Turn the machine off.
(6)Restart your computer.
(7)Make sure that you have no application software running.
(8)Follow the procedure described in your setup sheet to reinstall the printer
driver.
Start the installation following the procedure below.
(1)Click Star t then Computer.
In Windows XP: Click Start then My Computer.
In Windows 2000: Double-click the My Computer icon on the desktop.
(2)Double-click the CD-ROM icon on the displayed window.
If the contents of the CD-ROM are displayed, double-click MSETUP4.EXE.
Note
If the CD-ROM icon is not displayed, try the following:
z Remove the CD-ROM from your computer, then insert it again.
z Restart your computer.
If the icon is still not displayed, try different discs and see if they are displayed. If
other discs are displayed, there is a problem with the Setup CD-ROM. In this
case, contact the service center.
Follow the procedure described in your setup sheet to reinstall the printer driver.
If the printer driver were not installed correctly, uninstall the printer driver, restart
your computer, and then reinstall the printer driver. For details, refer to the On-
screen Manual.
If you reinstall the printer driver, select Custom Install on the Setup CD-ROM.
Note
If the installer was forced to be terminated due to a Windows error, the system
may be in an unstable condition and you may not be able to install the printer
driver. Restart your computer before reinstalling.
67Troubleshooting
Page 69

z Cannot Connect to Computer Properly
Printing or Scanning Speed Is Slow / Hi-Speed USB Connection Does
Not Work / “This device can perform faster” Message Is Displayed
Cause Action
Your system environment is not fully
compatible with Hi-Speed USB.
If your system environment is not fully compatible with Hi-Speed USB, the
machine will operate at a lower speed provided under USB 1.1. In this case, the
machine operates properly but printing or scanning speed may slow down due
to communication speed.
Check the following to ensure that your system environment supports Hi-Speed
USB connection.
z The USB port on your computer supports Hi-Speed USB connection.
z The USB cable, and the USB hub if you are using one, support Hi-Speed
USB connection.
Be sure to use a certified Hi-Speed USB cable. We recommend the cable to
be no longer than around 10 feet / 3 meters.
z The operating system of your computer supports Hi-Speed USB connection.
Obtain and install the latest update for your computer.
z The Hi-Speed USB driver operates properly.
Obtain the latest version of the Hi-Speed USB driver compatible with your
hardware and install it on your computer.
Important
For details on Hi-Speed USB of your system environment, contact the
manufacturer of your computer, USB cable, or USB hub.
z Print Results Not Satisfactory
If the print result is not satisfactory due to misaligned lines, confirm the paper and print quality
settings first. For details, refer to the On-screen Manual.
z Check 1: Confirm that the paper size setting matches the loaded paper size and that the
loaded paper is plain paper.
When the paper size setting is incorrect or other than plain paper is loaded, you cannot obtain a
proper print result. Also, the printed surface may be scratched.
z Check2: Make sure that the appropriate print quality is selected.
Select a print quality option suitable for the printing data. If you notice blurs, increase the print
quality setting and try printing again.
z Check 3: If the problem is not resolved, there may be other causes.
See also the sections below:
z “Cannot Print to End of Job” on page 68
z “Lines Are Misaligned” on page 69
z “Paper Is Smudged / Printed Surface Is Scratched” on page 69
z “Back of the Paper Is Smudged” on page 70
Cannot Print to End of Job
Cause Action
Size of the print data is extremely large. Click Print Options on the Page Setup sheet. Then, select the Prevent loss of
Insufficient space on your computer’s
hard disk.
print data check box in the displayed dialog.
Delete unnecessary files to free disk space.
68 Troubleshooting
Page 70

Lines Are Misaligned
Cause Action
The paper and print quality settings are
not set properly.
Print Head is misaligned. If you did not align the Print Head after installation, straight lines may be printed
Size of the print data is extremely large. Click Print Options on the Page Setup sheet. Then, select the Prevent loss of
The Printing layout printing or Binding
margin function is being used.
Confirm the paper and print quality settings.
See “Print Results Not Satisfactory” on page 68.
misaligned.
See “Aligning the FINE Cartridge” on page 55.
print data check box in the displayed dialog.
When the Printing layout printing or Binding margin function is being used, thin
lines may not be printed. Try thickening the lines in the document.
Paper Is Smudged / Printed Surface Is Scratched
Cause Action
The paper and print quality settings are
not set properly.
Printing on inappropriate type of paper. Check to see if the paper you are printing on is suitable for your printing
Paper is curled. Turn the paper over and reload it to print on the other side.
Printing beyond the recommended
printing area.
Inside of the machine is dirty. Perform the Bottom Plate Cleaning to clean the inside of the machine.
Printed paper is taking long to dry. Doing so gives the printed surface enough time to dry so that paper smudged
The paper is scratched by other loaded
paper.
Printing graphics with the intensity
setting set too high.
Confirm the paper and print quality settings.
See “Print Results Not Satisfactory” on page 68.
purpose. See “Paper Requirements” on page 21 to make sure that the paper
you are using is suitable.
Leaving the paper loaded on the Rear Tray for a long time may cause the paper
to curl. In this case, load the paper with the other side facing up. It may resolve
the problem.
We recommend putting unused paper back into the package and keeping it on a
level surface.
If you are printing beyond the recommended printing area of your printing paper,
the lower edge of the paper may become stained with ink.
Resize your original document in your application software.
For details on recommended printing area, see “Paper Requirements” on
page 21.
For details on cleaning, see “Cleaning Your Machine” on page 56.
Note
To prevent the inside of the machine from getting stained, set the page size
correctly.
and scratched are prevented.
(1)Make sure that the machine is turned on.
(2)Open the printer properties dialog box.
Refer to the On-screen Manual.
(3)Click the Maintenance tab and then Custom Settings.
(4)Drag the Ink Drying Wait Time slide bar to set the wait time, and then click
Send.
(5)Confirm the message and click OK.
The paper may be scratched by other loaded paper when feeding from the Rear
Tray. In this case, load one sheet at a time.
If you are printing images with high intensity, the paper may absorb too much ink
and become wavy, causing paper abrasion.
Reduce the Intensity setting in the printer driver and try printing again.
(1)Open the printer properties dialog box.
Refer to the On-screen Manual.
(2)On the Main sheet, select Manual for Color/Intensity, and then click Set.
(3)Drag the Intensity slide bar on the Color Adjustment sheet to adjust the
intensity.
69Troubleshooting
Page 71

Back of the Paper Is Smudged
Cause Action
The paper and print quality settings are
not set properly.
Inside of the machine is dirty. Perform the Bottom Plate Cleaning to clean the inside of the machine.
Confirm the paper and print quality settings.
See “Print Results Not Satisfactory” on page 68.
For details on cleaning, see “Cleaning Your Machine” on page 56.
Note
To prevent the inside of the machine from getting stained, set the page size
correctly.
z Machine Does Not Start or Stops During Print Jobs
Printing Does Not Start
Cause Action
Unnecessary print jobs are left in
queue. / Computer problems.
The machine is not ready. Make sure that the power plug is securely plugged in, then turn the machine on.
The machine is not connected properly. Make sure that the USB cable is securely plugged in to the machine and the
Your machine is not selected in the
printer driver.
The printer port is not configured
appropriately.
Restart your computer if you are printing from the computer.
If there are any unnecessary print jobs, delete them.
Refer to the On-screen Manual.
While [ON] is flashing green, the machine is initializing. Wait until [ON] stops
flashing and remains lit green.
Note
When printing large data such as a photo or graphics, it may take longer to start
printing. While [ON] is flashing green, the computer is processing data and
sending it to the machine. Wait until printing starts.
computer.
z If you are using a relay device such as a USB hub, disconnect it, connect the
machine directly to the computer, and try printing again. If printing starts
normally, there is a problem with the relay device. Consult the reseller of the
relay device for details.
z There could also be a problem with the USB cable. Replace the USB cable
and try printing again.
The machine will not print properly if you are using a driver for a different printer.
Make sure that your machine’s name is selected in the Print dialog box.
Note
To make your machine the one selected by default, select Set as Default
Printer.
Check the printer port settings.
* In the following instruction, “XXX” signifies your machine’s name.
(1)Log into a user account with the administrator privilege.
(2)Click Control Panel, then Printer under Hardware and Sound.
In Windows XP: Click Control Panel, Printers and Other Hardware, then
In Windows 2000: Click Control Panel then Printers.
(3)Right-click the Canon XXX icon, then select Properties.
(4)Click the Ports tab to confirm the port settings.
Make sure that a port named USBnnn (where “n” is a number) with Canon
XXX appearing in the Printer column is selected for Print to the following
port(s).
If the setting is incorrect, reinstall the printer driver or change the printer port
to the correct one.
Printers and Faxes.
70 Troubleshooting
Page 72

Printing Stops Before It Is Completed
Cause Action
Printing documents with plenty of
photographs or illustrations.
Printing large data such as photos or graphics takes time for the machine and
the computer to process, during which the machine may appear to have
stopped operating.
In addition, when printing data that uses a large amount of ink continuously on
plain paper, the machine may pause temporarily. In either case, wait until the
process is complete.
Note
If you are printing a document with a large printing area or printing multiple
copies of a document, printing may pause to allow the ink to dry.
The machine has been printing
continuously over a long period.
If the machine has been printing continuously for a long time, the Print Head
may overheat. To protect the Print Head, the machine may stop printing at a line
break for a period of time and then resume printing.
In this case, interrupt your print session at a convenient time and turn the
machine off for at least 15 minutes.
Additionally, if the machine has been printing graphics or photos with intense
colors continuously over a period of time, the machine may stop printing to
protect the Print Head. In this case, printing will not resume automatically. Turn
the machine off for at least 15 minutes.
Caution
The Print Head and the surrounding area can become extremely hot inside the
machine. Never touch the Print Head or nearby components.
Paper may not be loaded correctly. Make sure that paper is loaded in the Rear Tray.
If the machine has run out of paper, load paper.
Printing Speed Not as Fast as Expected
Note
Printing speed may not improve noticeably by following the instructions below, depending on your
system environment.
Cause Action
Print quality is set too high. Change the print quality setting appropriately in the printer driver.
(1)Open the printer properties dialog box.
Refer to the On-screen Manual.
(2)On the Main sheet, select Standard or Draft for the Print Quality setting.
Printer Status Monitor Is Not Displayed
Cause Action
Printer status monitor is not enabled. Make sure that Enable Status Monitor is selected on the Option menu of the
printer status monitor.
(1)Open the printer properties dialog box.
Refer to the On-screen Manual.
(2)On the Maintenance sheet, click View Printer Status.
(3)Select Enable Status Monitor on the Option menu if it is not selected.
The Inkjet Printer/Scanner/Fax Extended Survey Program Screen Is
Displayed
If the Inkjet Printer/Scanner/Fax Extended Survey Program is installed, the confirmation screen
asking to send the machine usage information will be displayed three months and then six
months after the installation. After that, it will be displayed every half a year for about four years.
71Troubleshooting
Page 73

Read the instructions on the screen and follow the procedure below.
z If you agree to participate in the survey program:
Click Agree, then follow the on-screen instructions. The machine usage information will be
sent to Canon via the Internet.
Note
When sending the information, the caution screen such as an Internet security screen may be
displayed. In this case, confirm the program name is “IJPLMUI.exe”, then allow it.
z If you do not agree to participate in the survey program:
Click Do not agree. The confirmation screen will be closed, and the survey at that time is
skipped. The confirmation screen will be displayed again three months later.
z To uninstall the Inkjet Printer/Scanner/Fax Extended Survey Program:
To uninstall the Inkjet Printer/Scanner/Fax Extended Survey Program, click Uninstall. Once
the program has been uninstalled, neither the survey nor the transmission of the machine
usage information will be performed.
General Problems
The Fax has no Power
Cause Action
The power cord may not be plugged in
securely.
The power cord may not be supplying
power.
Check that the power cord is plugged securely into the fax and into the wall
outlet (see your setup sheet). If the fax is plugged into a power strip, make sure
the power strip is plugged in and turned on.
Check the power cord by substituting with another.
The Fax will not Print Reports
Cause Action
The FINE Cartridge may need to be
replaced.
Determine if the problem is with the FINE Cartridge and replace if necessary
(see page 50).
Nothing Appears on the LCD
Cause Action
The power cord may not be plugged in
securely.
The LCD/LED may be in the power
saver mode.
Check that the power cord is plugged securely into the fax and into the wall
outlet (see your setup sheet). If the fax is plugged into a power strip, make sure
the power strip is plugged in and turned on. If the LCD remains blank, unplug
the fax, wait five seconds, then plug it in again.
Press any button on the Operation Panel except for [ON] to restore the display.
Caller ID
Cause Action
The caller’s phone/fax number does
not appear on the LCD.
z See the contract details of your caller ID service.
z Check the settings of your machine. See “Setting Caller ID” on page 39.
z Depending on the line conditions, callers’ phone/fax numbers may not be
shown.
z The caller ID service may vary among countries/regions. For more
information, contact your local telephone company.
72 Troubleshooting
Page 74

In Case of a Power Failure
The user data settings and registered data for one-touch speed dialing and coded speed dialing are
saved during a power failure.
However, documents stored in the fax memory will be deleted and redial data in the extension phone
memory may be lost. If a power failure occurs or the power is turned off, the fax will automatically
print a MEMORY CLEAR REPORT as soon as the power is turned on or the power is restored. This
report includes a list of the documents that were stored in the memory at the time of power failure.
During a Power Failure
The following restrictions apply to the function of the fax during a power failure or while the
power is turned off:
z You cannot use the fax to make telephone calls. Also if your fax is connected to a telephone,
you may not be able to make telephone calls.
z You cannot send, receive, or copy documents.
z You can receive voice calls only if a telephone, or an extension phone is connected to your fax.
MEMORY CLEAR REPORT
If you experience a power failure, the documents in the fax memory will be lost.
As soon as power is restored to the fax, it will automatically print out a list of the documents that
were stored in the memory at the time of the power failure.
Note
If the cartridge is empty or there is no paper in the Rear Tray when power is restored, the
MEMORY CLEAR REPORT will not be printed even after the cartridge is replaced or paper is
loaded.
LCD Messages
The following messages are displayed on the LCD when the fax is performing a function or
encounters an error.
AUTO PRINT OFF
Cause Action
The <AUTO PRINT> setting has been
set to <OFF>.
AUTO REDIAL
Cause Action
The fax is waiting to redial the receiving
number because the line was busy or
the receiving party did not answer
when you tried to send the document.
Set the <AUTO PRINT> setting to <ON> to print received faxes, ACTIVITY
REPORT, TX REPORT, RX REPORT, MULTI TX REPORT, and MEMORY
CLEAR REPORT automatically (see page 37).
Wait for the fax to automatically redial the number. If you want to cancel
automatic redialing, press [Stop/Reset] (see page 29).
73Troubleshooting
Page 75

BUSY/NO SIGNAL
Cause Action
The telephone number you dialed is
busy.
The fax number dialed was incorrect. Check the fax number and dial again.
The other party’s fax machine is not
working.
The other party is not using a G3
machine.
The fax may not be set for the type of
telephone line in use (pulse/tone).
The receiving fax machine did not
answer within 55 seconds (after all
automatic redialing attempts).
Try sending the document at a later time.
Contact the other party and have them check their fax machine.
Contact the other party and ask them to send or receive the document using a
G3 machine.
Make sure the fax is set for the correct telephone line type (see page 14).
Contact the receiving party and have them check their fax machine. You can try
to send the document using manual sending (see page 24). For long-distance
call, add pauses to the registered number (see page 28).
CHECK DOCUMENT
Cause Action
The document is not set in the ADF, or
has jammed.
Set the document you are trying to send or copy (see page 22), or check for a
document jam and clear the jam if necessary (see page 60), and start again.
CHECK PAPER SIZE
Cause Action
The size of the paper in the Rear Tray
and that specified in the <PAPER
SIZE> setting are different.
Load the correct paper size or change the <PAPER SIZE> setting (see
page 47). Press [Stop/Reset].
CHK PRINTER 5100 / SEE MANUAL
Cause Action
Movement of the Holder is blocked. Clear the paper jam or foreign object that is preventing the Holder from moving,
There may be an obstruction that is not
allowing the Holder mechanism to
move.
The FINE Cartridge may be defective. Press [Stop/Reset]. Reinstall the FINE Cartridge (see your setup sheet or
An error requiring servicing might have
occurred.
then turn off the machine and turn it back on again.
Check for any obstruction (paper clip, small object, etc.) and also that the
protective tape are removed from the FINE Cartridge. Check also for a paper
jam and clear the jam if necessary (see page 60). Then press [Stop/Reset] and
start again.
page 50) and start again.
In either case, if the error does not clear, try unplugging the fax. Wait several
minutes, then plug it back in. Also, try replacing the FINE Cartridge with a new
one (see page 50).
Turn off the machine, and unplug the power cord of the machine from the power
supply. After a while, plug the power cord of the machine back in and turn on the
machine. If the same error occurs, contact the service center.
CHK PRINTER 5B00 / REQUIRE SERVICE
Cause Action
The ink absorber (which holds the ink
used for print head cleaning) may be
full.
Contact the service center as early as possible.
74 Troubleshooting
Page 76

CHK PRINTER B200 / REQUIRE SERVICE
Cause Action
An error requiring servicing might have
occurred.
If using the machine as phone, contact the service center, then turn off the
machine immediately.
If not using as phone, turn off the machine immediately, then contact the service
center using your phone.
CHK PRINTER nnnn / SEE MANUAL
Cause Action
An error requiring servicing might have
occurred.
Turn off the machine, and unplug the power cord of the machine from the power
supply. After a while, plug the power cord of the machine back in and turn on the
machine. If the same error occurs, contact the service center.
CLEAR PAPER JAM
Cause Action
There is a paper jam. Clear the paper jam (see page 60) and reload paper in the Rear Tray. Press
[Stop/Reset].
DOC. TOO LONG
Cause Action
The document is longer than 15.8 in.
(400 mm).
Use a copier to make a reduced copy of the document and then send the copy.
ECM RX
Cause Action
The fax is receiving a document using
Error Correction Mode (ECM).
ECM receptions may take longer than normal receptions. Turn off ECM if you
need to receive quickly, or if you know your local lines are in good condition (see
<ECM RX> on page 46).
ECM TX
Cause Action
The fax is sending a document using
Error Correction Mode (ECM).
ECM transmissions may take longer than normal transmissions. Turn off ECM if
you need to transmit quickly, or if you know your local lines are in good condition
(see <ECM TX> on page 46).
INK ABS NEAR FUL
Cause Action
The ink absorber is almost full. Printing will no longer be possible once the ink absorber is full. Contact the
service center immediately. Press [Stop/Reset] to continue printing.
INK VOL UNKNOWN
Cause Action
The remaining level of the ink cannot
be correctly detected.
A FINE Cartridge that was once empty is installed. Replace the FINE Cartridge
(see page 50).
75Troubleshooting
Page 77

MEMORY FULL
Cause Action
The fax’s memory is full because it has
received too many documents, or a
very long or detailed document.
The fax’s memory is full because you
either tried to send or copy too many
pages at once, or you tried to send or
copy a very long or detailed document,
using memory sending.
Print and delete any documents stored in memory (see page 39). Then start
again.
Free up space in the fax’s memory by printing or deleting any documents in
memory you no longer need (see page 39).
If multiple pages are loaded, separate the pages into smaller stacks. If not, try
sending the document by direct sending (see page 24).
NO INK
Cause Action
Ink has run out. Replace the FINE Cartridge (see page 50).
NO TEL #
Cause Action
The one-touch speed dialing button or
coded speed dialing code you entered
has not been registered.
Register the one-touch speed dialing button or coded speed dialing code (see
page 18).
REC’D IN MEMORY
Cause Action
The fax received the document in
memory because paper or ink ran out,
a paper jam occurred, or the incorrect
FINE Cartridge was installed.
The fax receives documents in memory
because the <AUTO PRINT> setting is
set to <OFF>.
Load paper in the Rear Tray (see your setup sheet or page 22), replace the
FINE Cartridge (see page 50) or clear the paper jam (see page 60).
Print any documents stored in memory (see page 39).
Set the <AUTO PRINT> setting to <ON>. This enables to print received faxes
automatically (see page 37).
RECOMEND NEW CRT
Cause Action
Ink is low. Replace the FINE Cartridge (see page 50).
REMOVE DOCUMENT
Cause Action
The document is set while printing. Remove the document. Press [Stop/Reset] and try printing again.
SET DOCUMENT IN CORRECT POSITION
Cause Action
The document cannot be correctly
detected or the document is too small.
Make sure the document meets the requirements and is correctly loaded. If
necessary, reload the document and press [Start/Copy]. See “Document
Requirements” on page 20 and “Loading Documents and Paper” on page 22.
TX/RX CANCELLED
Cause Action
You pressed [Stop/Reset] to cancel the
transmission.
If required, try sending again.
76 Troubleshooting
Page 78

TX/RX NO. nnnn
Cause Action
When the fax sends or receives a
document, it assigns it a unique
identification number (nnnn).
Write the number down if you will need it later.
Status Monitor Messages
The following messages are displayed on the status monitor when the machine is performing a
function or encounters an error.
Service Error 5100 Is Displayed
Cause Action
Movement of the Holder is blocked. Clear the paper jam or foreign object that is preventing the Holder from moving,
There may be an obstruction that is not
allowing the Holder mechanism to
move.
The FINE Cartridge may be defective. Press [Stop/Reset]. Reinstall the FINE Cartridge (see your setup sheet or
An error requiring servicing might have
occurred.
Service Error B200 Is Displayed
then turn off the machine and turn it back on again.
Check for any obstruction (paper clip, small object, etc.) and also that the
protective tape are removed from the FINE Cartridge. Check also for a paper
jam and clear the jam if necessary (see page 60). Then press [Stop/Reset] and
start again.
page 50) and start again.
In either case, if the error does not clear, try unplugging the printer. Wait several
minutes, then plug it back in. Also, try replacing the FINE Cartridge with a new
one (see page 50).
Turn off the machine, and unplug the power cord of the machine from the power
supply. After a while, plug the power cord of the machine back in and turn on the
machine. If the same error occurs, contact the service center.
Cause Action
An error requiring servicing might have
occurred.
If using the machine as phone, contact the service center, then turn off the
machine immediately.
If not using as phone, turn off the machine immediately, then contact the service
center using your phone.
Service Error nnnn Is Displayed
Cause Action
An error requiring servicing might have
occurred.
Turn off the machine, and unplug the power cord of the machine from the power
supply. After a while, plug the power cord of the machine back in and turn on the
machine. If the same error occurs, contact the service center.
Writing Error / Output Error / Communication Error
Cause Action
The machine is not ready. If [ON] is off, make sure that the power plug is plugged in, then turn the machine
on.
While [ON] is flashing green, the machine is initializing. Wait until [ON] stops
flashing and remains lit green.
77Troubleshooting
Page 79

Cause Action
The machine is not connected properly. Make sure that the USB cable is securely plugged into the machine and the
Printer port setting does not match the
computer’s interface connecting the
machine.
Printer driver is not installed properly. The printer driver may not be installed properly. Uninstall them following the
The printer port is not configured
appropriately.
computer.
z If you are using a relay device such as a USB hub, disconnect it, connect the
machine directly to the computer, and try printing again. If printing starts
normally, there is a problem with the relay device.
Consult the reseller of the relay device for details.
z There could also be a problem with the USB cable. Replace the USB cable
and try printing again.
Make sure that the printer port is configured appropriately in the printer driver.
* In the following instruction, “XXX” signifies your machine’s name.
(1)Log on as a user account with the administrator privilege.
(2)Click Control Panel, then Printer under Hardware and Sound.
In Windows XP: Click Control Panel, Printers and Other Hardware, then
In Windows 2000: Click Control Panel then Printers.
(3)Right-click the Canon XXX icon, then select Properties.
(4)Click the Ports tab to confirm the port settings.
Make sure that a port named USBnnn (where “n” is a number) with Canon
XXX appearing in the Printer column is selected for Print to the following
port(s).
If the port setting is not correct, reinstall the printer driver or change the port
setting according to the interface you are using.
procedure described in the On-screen Manual and reinstall them following the
procedure described in your setup sheet.
Follow the procedure below to check the status of the device.
(1)Click Control Panel, Hardware and Sound, then Device Manager.
If the User Account Control screen is displayed, follow the on-screen
instructions.
In Windows XP: Click Control Panel, Performance and Maintenance,
In Windows 2000: Click Control Panel, System, then Device Manager on
(2)Double-click Universal Serial Bus controllers then USB Printing Support.
If USB Printing Support is not displayed, make sure that the machine is
correctly connected to the computer.
See “The machine is not connected properly.” on page 78.
(3)Click the General tab and make sure that there is no indication of a problem
with the device.
If a device error is displayed, refer to Windows help to resolve the error.
Printers and Faxes.
System, then click Device Manager on the Hardware
sheet.
the Hardware sheet.
Other Error Messages
Cause Action
One of the following Windows error
messages is displayed outside the
printer status monitor.
78 Troubleshooting
If an error message is displayed outside the printer status monitor, check the
following:
z “Could not spool successfully due to insufficient disk space”
Delete any unnecessary files to increase the amount of free space on the
disk.
z “Could not spool successfully due to insufficient memory”
Quit other running applications to increase available memory.
If you still cannot print, restart your computer and retry printing.
z “Printer driver could not be found”
Uninstall the printer driver according to the procedure described in the Onscreen Manual, and then reinstall it.
z “Could not print Application name - File name”
Try printing again once the current job is complete.
Page 80

Specifications
General Specifications
Scanning sheet size Width: Max. 8.5 in. (216 mm)
Height: Max. 15.8 in. (400 mm)
Thickness: Max. 0.13 mm (105 g/m
Effective scanning size Width: LTR/LGL: 8.5 in. (214 mm)
Effective printing size Width: 8.0 in. (203 mm)
Transmission time G3 ECM MMR: Approx. 6 seconds
Scanning line density Horizontal: 8 dots/mm
Recording method Ink Jet printing
Paper tray capacity Maximum: 11 mm (100 sheets with 75 g/m
Paper type Plain cut sheet paper (Letter/A4/Legal)
Image memory Up to 60 A4-size pages
Auto dial functions One-touch speed dialing (Registration for 9 numbers)
Ink cartridges Canon FINE Cartridge PG-40, Canon FINE Cartridge PG-50 (Option)
Power source AC 100-240V, 50/60Hz
Power consumption Sleep: Approx. 1.7 W (USB connection to PC)
Operating environment Temperature: 41 to 95ºF (5 to 35ºC)
Dimensions Approx. 15.8 (W) x 10.6 (D) x 6.9 (H) inches / 400 mm (W) x 269 mm (D) x 174 mm (H)
Weight Approx. 9.1 lb. (Approx. 4.1 kg)
Interface USB Port: Hi-Speed USB
Vertical Standard: 3.85 lines/mm
Vertical Fine: 7.7 lines/mm
Paper weight: 64 g/m
Paper thickness: 0.09 mm to 0.13 mm
Coded speed dialing (Registration for 60 numbers)
Maximum: Approx. 39 W
Humidity: 10 to 90% RH (no condensation)
(with the Handset placed, with the Document Cover closed)
(with the Handset placed, with the FINE Cartridge installed)
Specifications are subject to change without notice.
*1
Based on the Canon FAX Standard Chart No.1, Standard mode.
*2
A computer that complies with Hi-Speed USB standard is required. Since the Hi-Speed USB
interface is fully upwardly compatible with USB 1.1, it can be used at USB 1.1.
Min. 4.2 in. (105 mm)
Min. 4.2 in. (105 mm)
Min. 0.06 mm (40 g/m
2
to 105 g/m
*1
(standard resolution)
*2
2
)
2
)
*1
2
paper)
2
79Specifications
Page 81

Minimum System Requirements
Note
Conform to the operating system’s requirements when higher than those given here.
Operating System
Processor
RAM
Browser Internet Explorer 6.0 or later
Hard Disk Space 150 MB
CD-ROM Drive Required
Other restrictions SVGA 800 x 600
Windows Vista, Vista SP1
1 GHz processor
512 MB
Windows XP SP2, SP3
300 MHz processor
128 MB
Windows 2000 Professional SP4
300 MHz processor
128 MB
Note: For bundled software installation.
z Operation can only be guaranteed on a PC with Windows Vista, XP or 2000 pre-installed.
z Some functions may not be available with Windows Media Center.
z To upgrade from Windows XP to Windows Vista, first uninstall software bundled with the Canon
printer.
Additional System Requirements for On-Screen Manual
Browser: Easy Guide Viewer
Note: Microsoft Internet Explorer 6.0 or later must be installed. The On-screen Manual may not be displayed properly
depending on your operating system or Internet Explorer version. We recommend that you keep your system up to date
with Windows Update.
Specifications are subject to change without notice.
80 Specifications
Page 82

Appendix
Users in the U.S.A.
Pre-Installation Requirements
Order Information
When ordering service from the telephone company for this equipment, the following may be
required.
Universal Service Order Code (USOC): RJ11C
The Facility Interface Code (FIC): 02LS2
Service Order Code (SOC): 9.0F
Connection of the Equipment
This equipment complies with Part 68 of the FCC rules and the requirements adopted by the ACTA.
On the bottom of this equipment is a label that contains, among other information, a product identifier
in the format US:AAAEQ##TXXXX. If requested, this number must be provided to the telephone
company.
The REN is used to determine the number of devices that may be connected to a telephone line.
Excessive RENs on a telephone line may result in the devices not ringing in response to an incoming
call. In most but not all areas, the sum of RENs should not exceed five (5.0). To be certain of the
number of devices that may be connected to a line, as determined by the total RENs, contact the
local telephone company. The REN for this product is part of the product identifier that has the format
US:AAAEQ##TXXXX. The digits represented by ## are the REN without a decimal point (e.g., 03 is
a REN of 0.3).
A plug and jack used to connect this equipment to the premises wiring and telephone network must
comply with the applicable FCC Part 68 rules and requirements adopted by the ACTA. A compliant
telephone cord and modular plug is provided with this product. It is designed to be connected to a
compatible modular jack that is also compliant. See installation instructions for details.
Connection to party lines is subjected to state tariffs. Contact the state public utility commission,
public service commission or corporation commission for information.
If your home has specially wired alarm equipment connected to the telephone line, ensure the
installation of this equipment does not disable your alarm equipment. If you have questions about
what will disable alarm equipment, consult your telephone company or a qualified installer.
This equipment is hearing aid compatible.
In Case of Equipment Malfunction
Should any malfunction occur which cannot be corrected by the procedures described in this guide,
disconnect the equipment from the telephone line cable, turn off the power and disconnect the power
cord. The telephone line cable should not be reconnected or the main power switch turned ON until
the problem is completely resolved. Users should contact their local authorized Canon Facsimile
Service Dealer for the servicing of equipment.
Information regarding Authorized Service Facility locations can be obtained by calling the Canon
Customer Center.
Rights of the Telephone Company
If this equipment causes harm to the telephone network, the telephone company may temporarily
disconnect service. The telephone company also retains the right to make changes in facilities and
services that may affect the operation of this equipment. When such changes are necessary, the
telephone company is required to give adequate prior notice to the user. However, if advance notice
81Appendix
Page 83

is not possible, the telephone company will notify the customer as soon as possible. Also, the
customer will be advised of his/her right to file a compliant with the FCC if he/she believes it is
necessary.
Warning
The Telephone Consumer Protection Act of 1991 makes it unlawful for any person to use a computer or
other electronic device to send any message via a telephone FAX machine unless such message clearly
contains in a margin at the top or bottom of each transmitted page, or on the first page of the transmission,
the date and time it is sent and an identification of the business or other entity, or other individual sending
the message and the telephone number of the sending machine or such business, other entity, or
individual.
In order to program this information into your FAX machine, you should complete the procedure to register
your name, unit’s telephone number, time, and date. See “Registering Sender Information” of this guide.
For California, USA only
This product contains an internal battery for backup purposes.
Included battery contains Perchlorate Material-special handling may apply.
See http://www.dtsc.ca.gov/hazardouswaste/perchlorate/ for details.
Regulatory Information
FCC Notice (U.S.A. Only)
For 120V, 60Hz model
Model Number: K10334
This device complies with Part 15 of the FCC Rules. Operation is subject to the following two
conditions: (1) This device may not cause harmful interference, and (2) this device must accept any
interference received, including interference that may cause undesired operation.
Note: This equipment has been tested and found to comply with the limits for a Class B digital
device, pursuant to Part 15 of the FCC Rules. These limits are designed to provide reasonable
protection against harmful interference in a residential installation. This equipment generates, uses
and can radiate radio frequency energy and, if not installed and used in accordance with the
instructions, may cause harmful interference to radio communications.
However, there is no guarantee that interference will not occur in a particular installation. If this
equipment does cause harmful interference to radio or television reception, which can be
determined by turning the equipment off and on, the user is encouraged to try to correct the
interference by one or more of the following measures:
z Reorient or relocate the receiving antenna.
z Increase the separation between the equipment and receiver.
z Connect the equipment into an outlet on a circuit different from that to which the receiver is
connected.
z Consult the dealer or an experienced radio/TV technician for help.
Use of a shielded cable is required to comply with Class B limits in Subpart B of Part 15 of the FCC
Rules.
Do not make any changes or modifications to the equipment unless otherwise specified in the
manual. If such changes or modifications should be made, you could be required to stop operation of
the equipment.
Canon U.S.A., Inc.
One Canon Plaza
Lake Success, NY 11042
1-516-328-5600
82 Appendix
Page 84

83
Page 85

84
Page 86

Getting Help from Canon
Email Tech Support — www.canontechsupport.com
Toll-Free Live Tech Support — (1-800-828-4040) under warranty
This option provides live telephone technical support, free of service charges, Monday-Friday (excluding
holidays), during the warranty period.
Telephone Device for the Deaf (TDD) support is available at (1-866-251-3752).
Help Us Help You Better
Before you contact Canon, please record the following information.
Serial Number (located on the inside of the product): ________________________________________
Model Number (located on the front of the product): _________________________________________
Setup CD-ROM number (located on the CD-ROM):__________________________________________
Purchase Date: ______________________________________________________________________
Ordering Information
The following FINE Cartridges are compatible with this machine.
For details on FINE Cartridge replacement, refer to “Replacing a FINE Cartridge” in this guide.
Description Order #
PG-40 Black 0615B002
PG-50 Black High-Capacity (optional) 0616B002
Call 1-800-OK-CANON to locate a dealer near you, or visit the Canon eStore at
www.canonestore.com.
CANON U.S.A. INC.
One Canon Plaza, Lake Success, NY 11042 U.S.A.
www.usa.canon.com
QT5-2227-V02 XXXXXXXX © CANON INC.2009 PRINTED IN THAILAND
 Loading...