

Page 1
Getting Started
for Mac Users
office all-in-one
series
QT10851V01
Page 2

Page 3

Contents
Getting Started Overview | 4
Prepare Your MX860 | 4
Before Starting | 4
Unpack and Set Up | 5
Set Up the Hardware | 8
Install the Print Head | 8
Install the Ink Tanks | 10
Load Paper | 11
Align the Print Head | 12
Set Up to Receive Faxes | 14
Set Up Your Fax Sender Information | 15
Set Up the Software | 15
Install the Software | 15
Connect to Your Network (optional) | 18
Choose Your Network Type | 18
Wireless Networks with a Single Access Point | 19
Wireless Networks with Multiple Airport Access Points | 23
Wired Networks | 28
Connecting Additional Computers | 33
Start Using Your MX860! | 37
Solution Menu | 37
On-Screen Manual | 37
Page 4
4
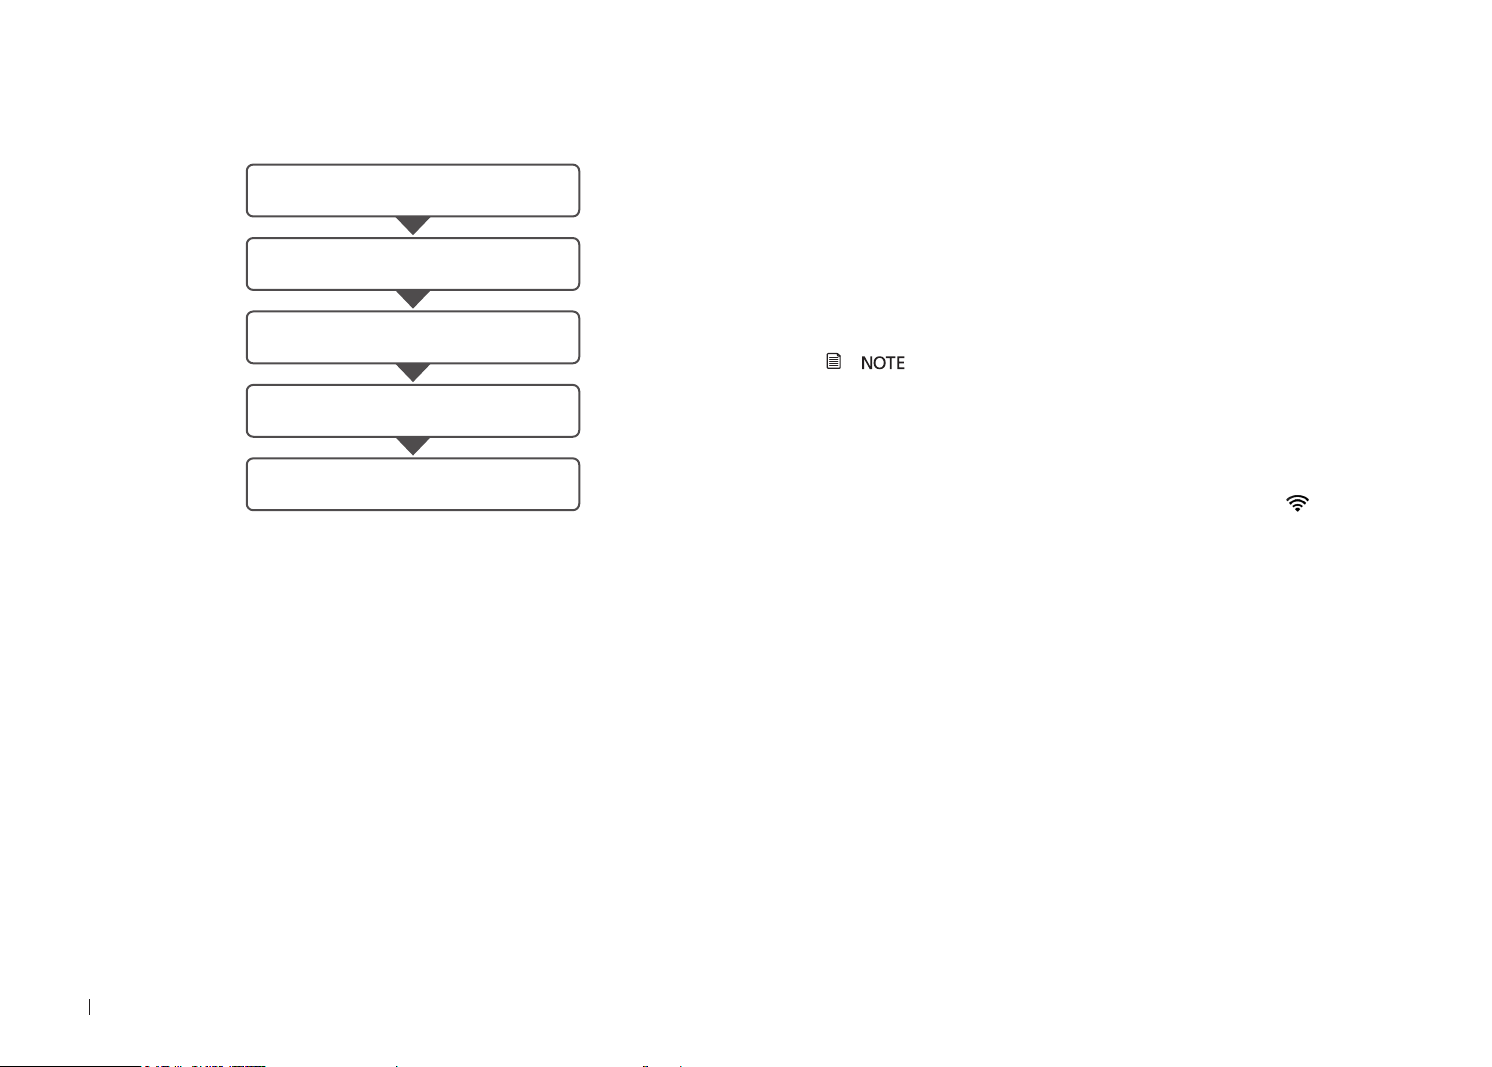
Getting Started Overview
prepare your MX860
set up the hardware
set up the software
connect to your network (optional)
start using your MX860
Prepare Your MX860
Congratulations on your new MX860. This Getting Started guide will
help you through a fast, simple setup.
There will be decision points in fax and network setup where you will
make choices. Following the steps will make these choices easy.
Before Starting
If you do not have a wireless network, skip this step.
If you are installing your MX860 to a wireless network, locate your
network name (also called SSID or Service Set Identier) and network
password (if applicable).
You can locate the wireless network name by clicking the
menu bar.
Network Name (also called SSID): ____________________________
Network Password (if applicable): ____________________________
You can also retrieve your network name and password by using the
Canon PIXMA Wireless Setup Assistant, or by following the
procedures available for download from the Canon support webpage
(www.usa.canon.com/downloadlibrary).
If you are unable to retrieve the network password or other settings,
refer to the manual of your access point or router, or contact the
manufacturer.
icon in the
Page 5
5
hardware
software
network
prepare
Unpack and Set Up
MX860
printer/copier/scanner/fax
print head
(sealed package
is packed in the
paper output tray—
open tray to remove
package)
phone cord
power cord
ink tanks
USB cable
(needed for initial
network setup
or USB connection)
setup CD
NOT SHOWN:
documentation
paper output tray
scanning unit support
print head holder
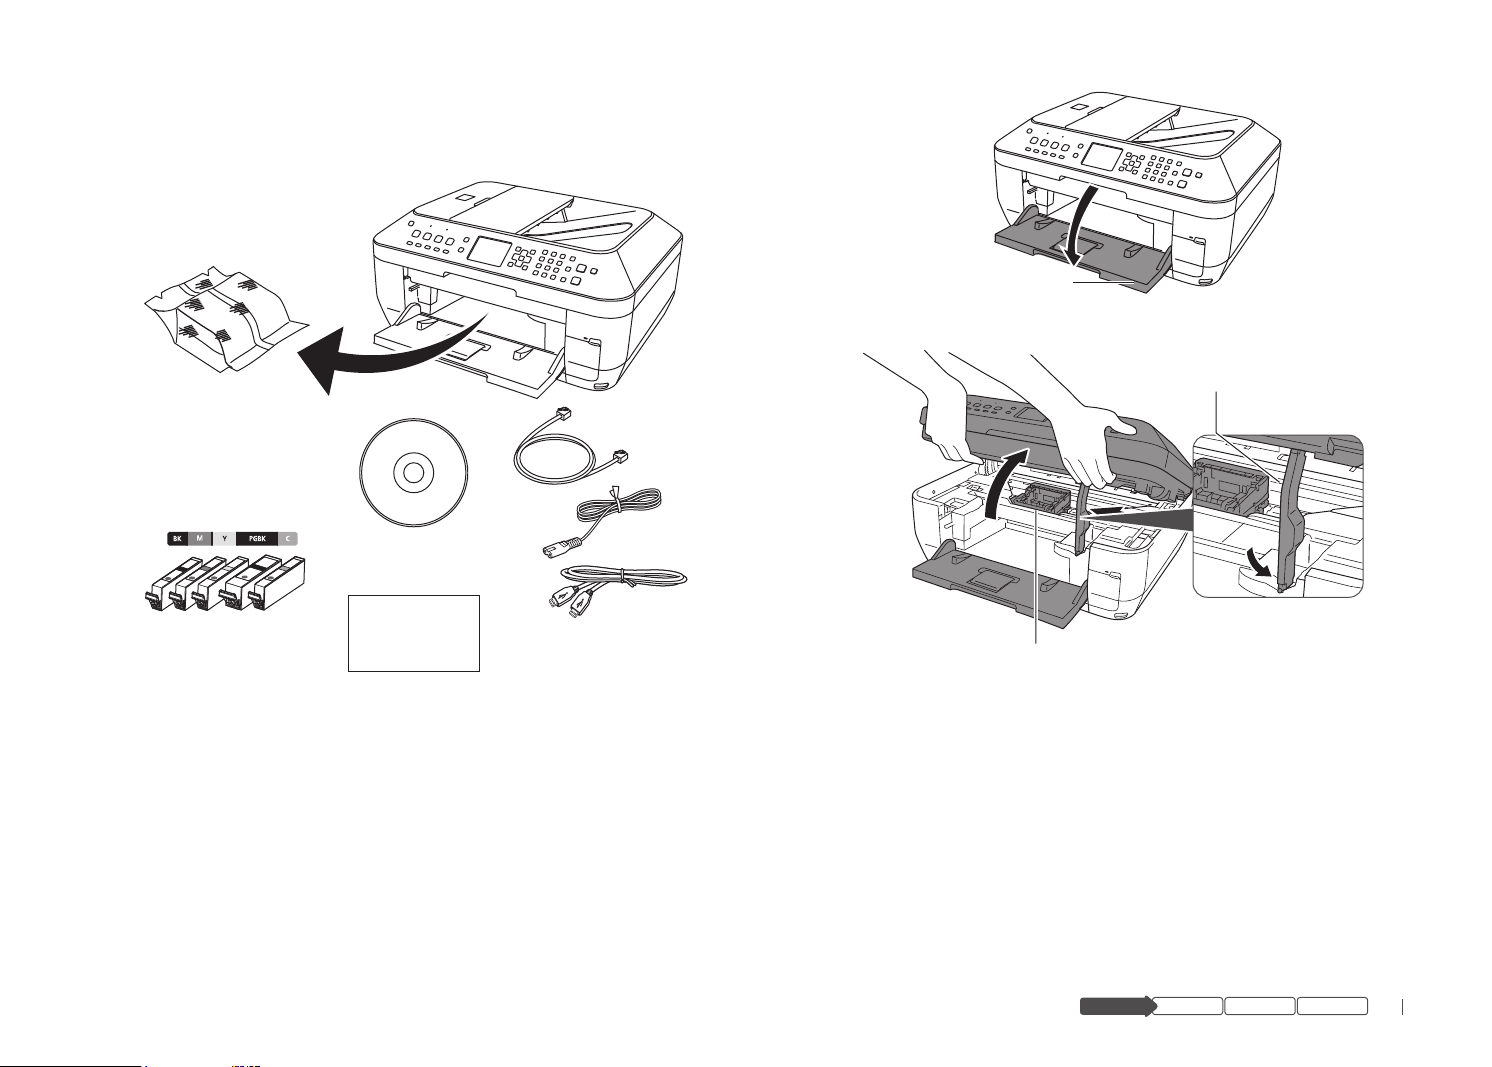
Check your box contents 1
Lift the scanning unit until the support slides into place. c
If any parts are missing, contact Canon (see back cover for contact
data).
Remove all packing materials2
Remove all tape from the outside of the MX860.a
Open the paper output tray.b
Remove all tape and packing material from inside the MX860.d
Lift the scanning unit slightly to release the support and close.e
Page 6
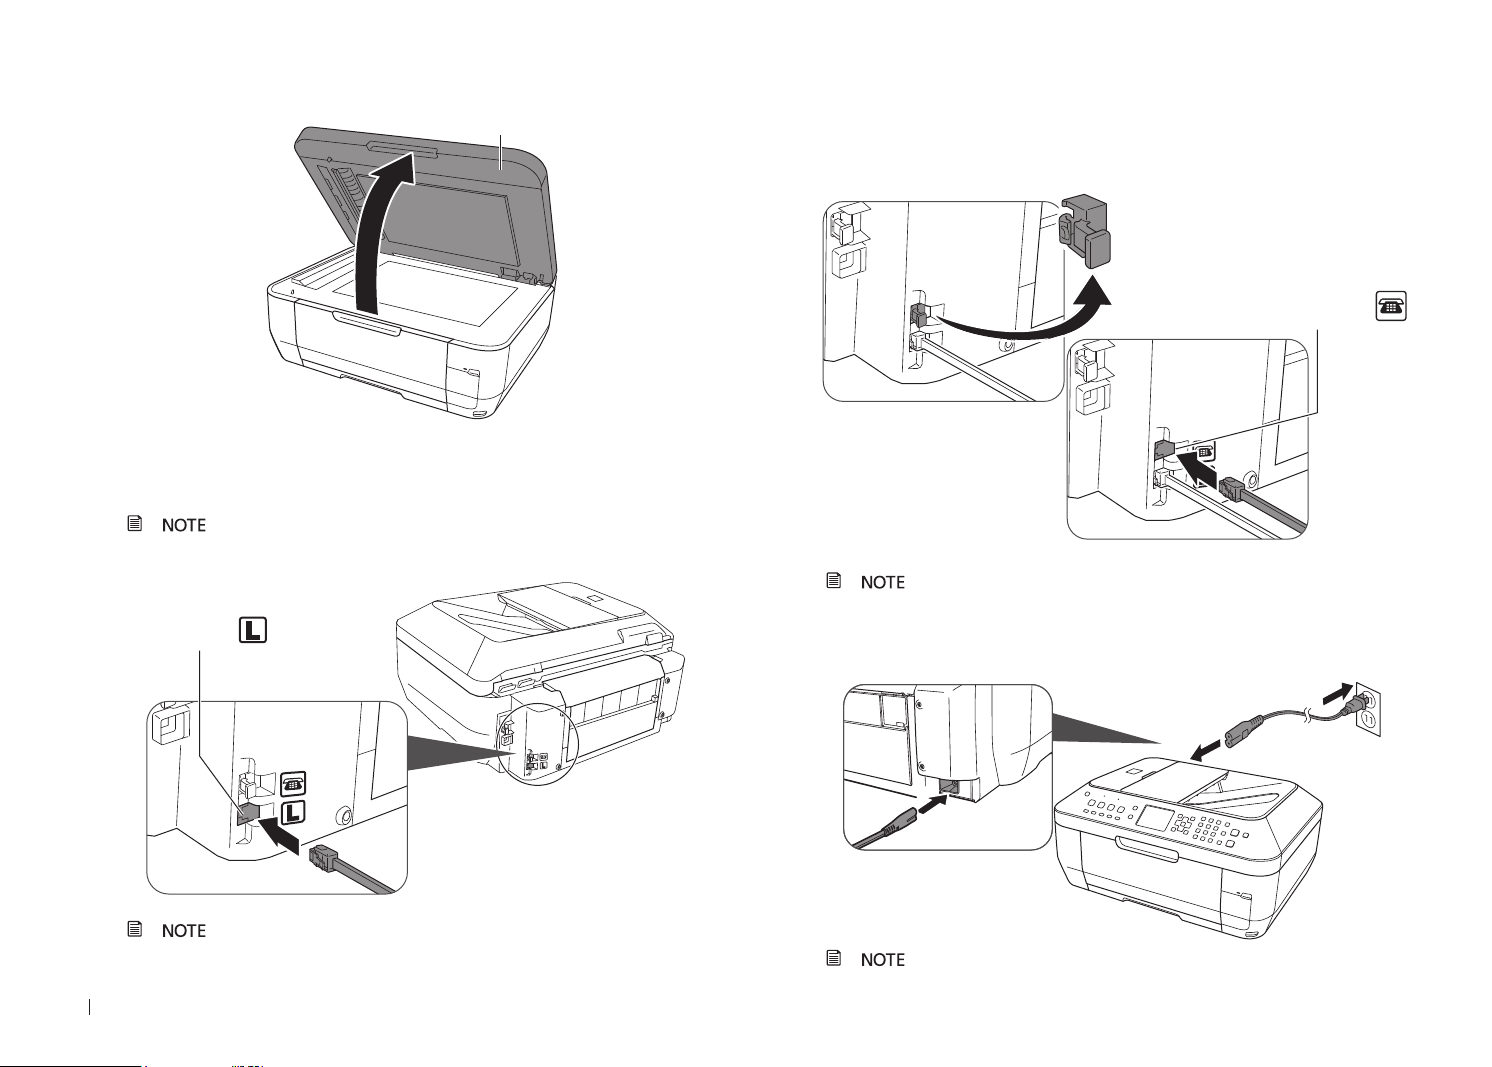
Lift the document cover and remove any packing material.f
document cover
in from
wall jack
to phone or
answering machine
Close the document cover.g
Connect the phone line for fax setup3
If you do not plan to fax from your MX860, proceed to step 5.
Connect the phone cord from the MX860 to the wall.
Connect a phone or answering machine for fax setup4
To use a phone or answering machine on the same line, remove the cap
on the top phone jack and connect the phone or answering machine to
the MX860.
Make sure you connect the phone cable into the port
shown above.
5 Connect the power cord
Connect the power cord rst to the MX860, then to a wall socket.
6
Make sure you connect the phone cable into the port
shown above.
DO NOT connect the USB cable yet.
Page 7
hardware
software
network
hardware software
network
prepare
prepare
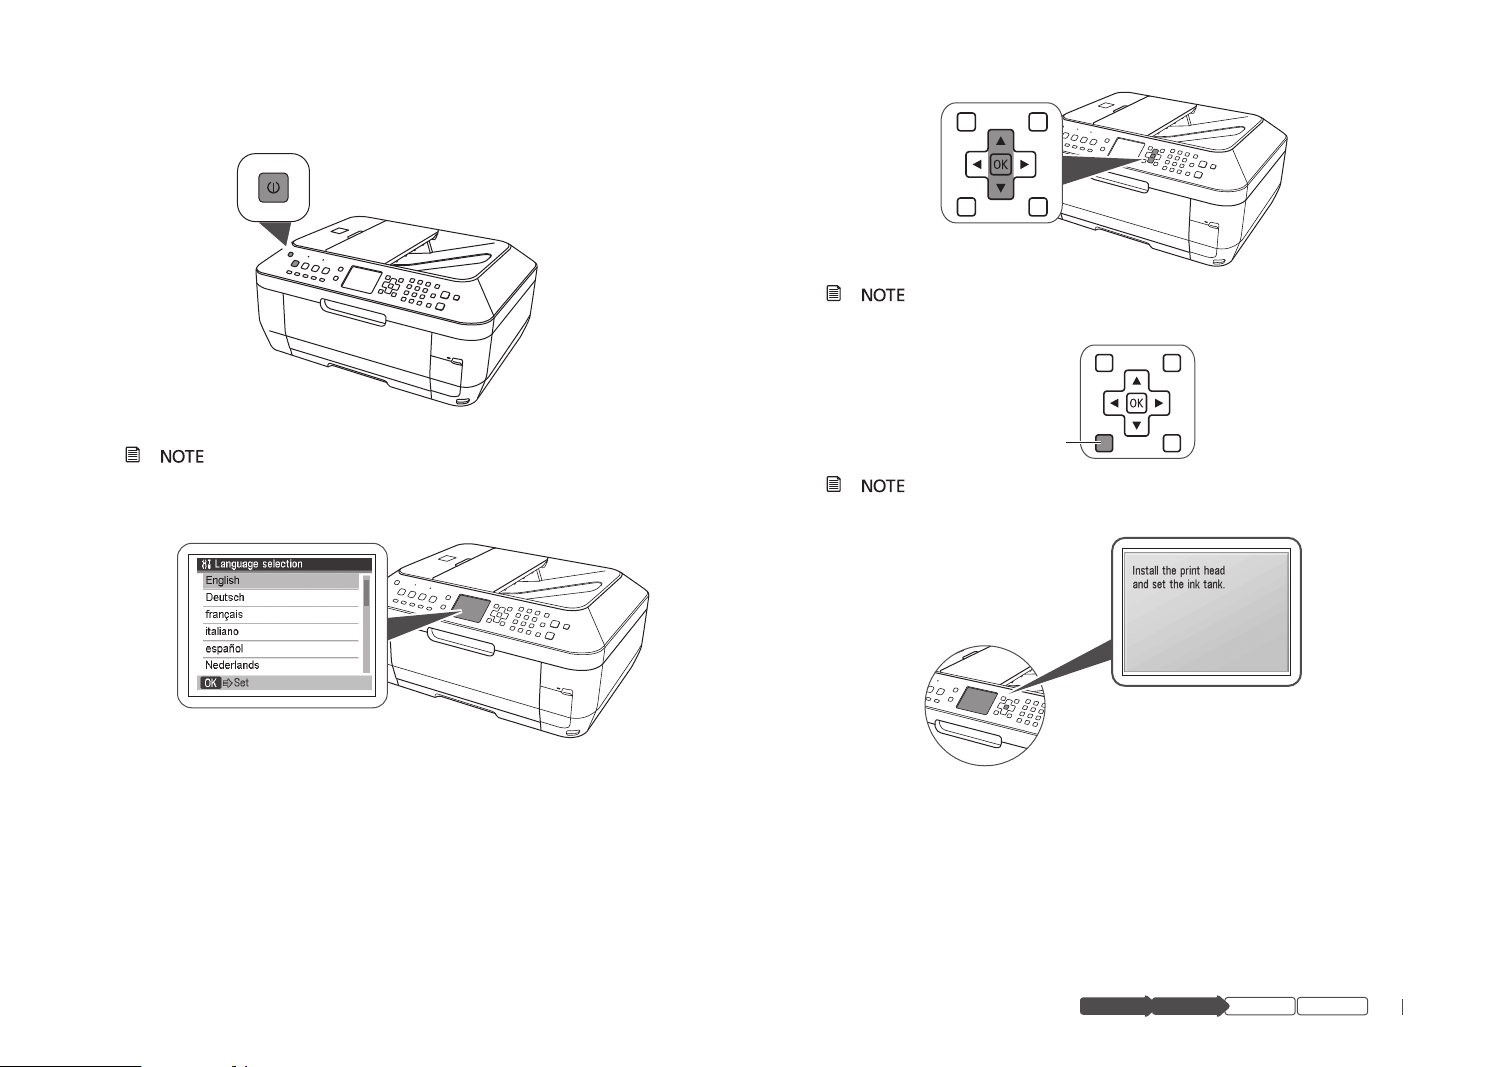
Power up6
back
Press the ON button to turn on the MX860.
Your MX860 will make sounds as it powers up. This is
normal.
Select language7
If you select a wrong language, press Back to return to
Language selection options.
Once your langage is selected, the display will prompt to
install the print head and ink tanks.
Use the ▲ and ▼ button on the operation panel to select a language for
the display, then press OK.
7
Page 8
8
Set Up the Hardware
Install the Print Head
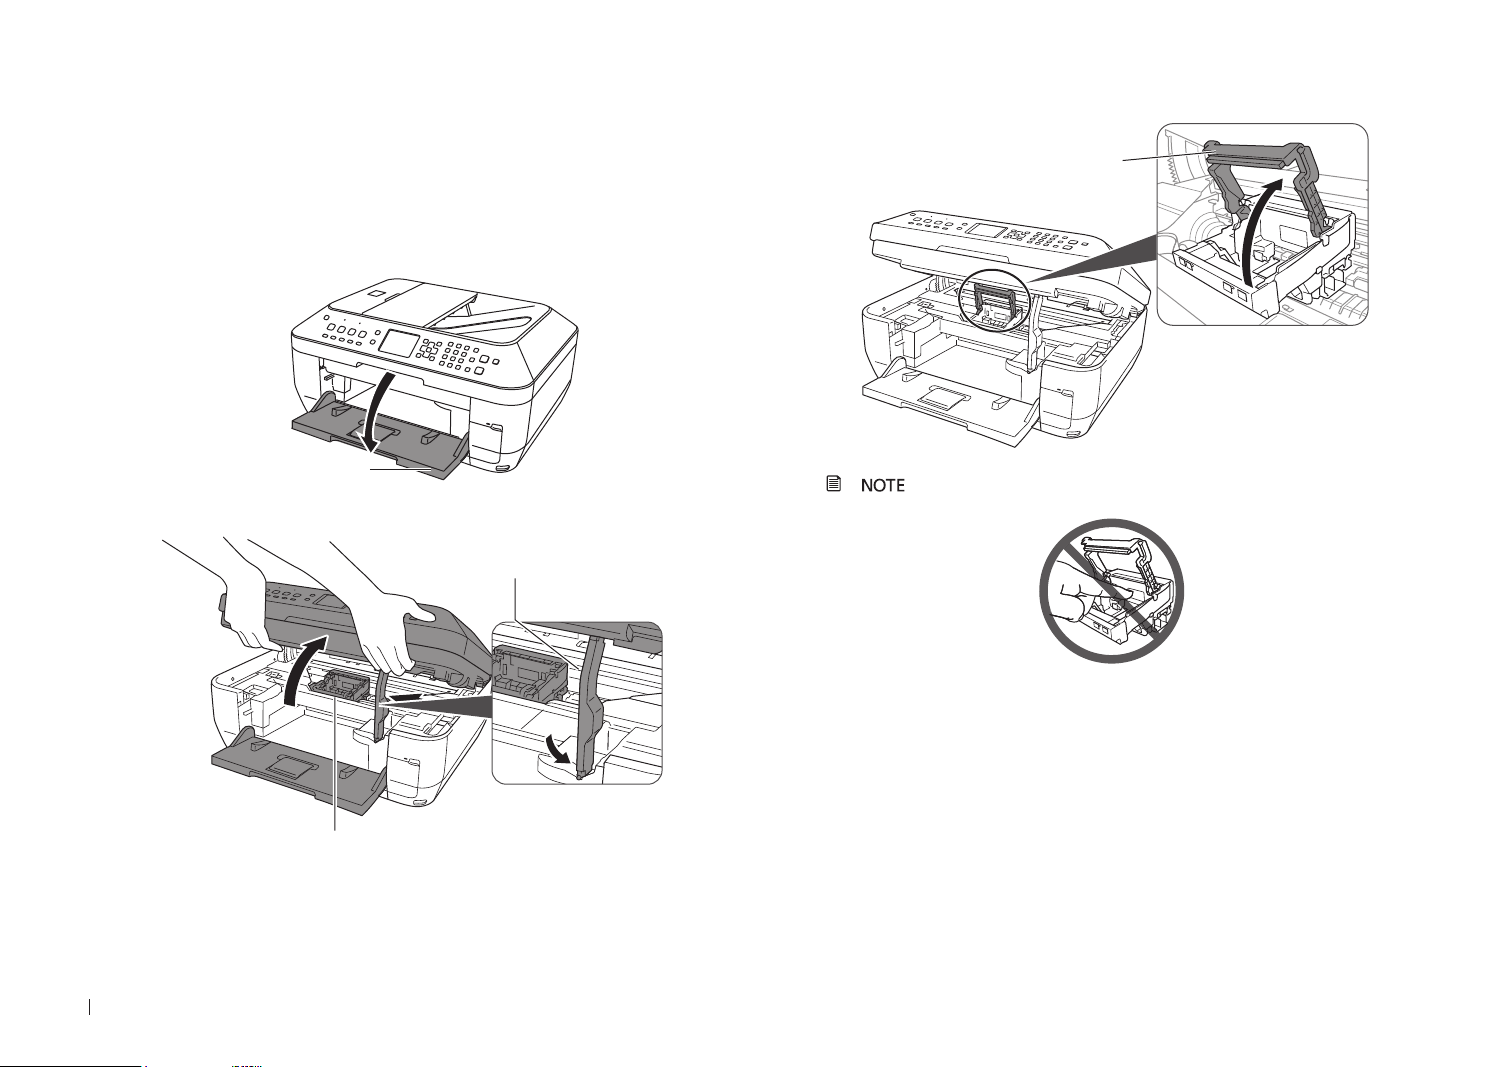
With the power on, open the paper output tray1
paper output tray
Lift the scanning unit until the support slides into place2
scanning unit support
print head holder
Raise the print head lock lever3
print head lock lever
Avoid touching the contact points in the print head holder.
Page 9
9
hardware
software
network
hardware software
network
prepare
prepare
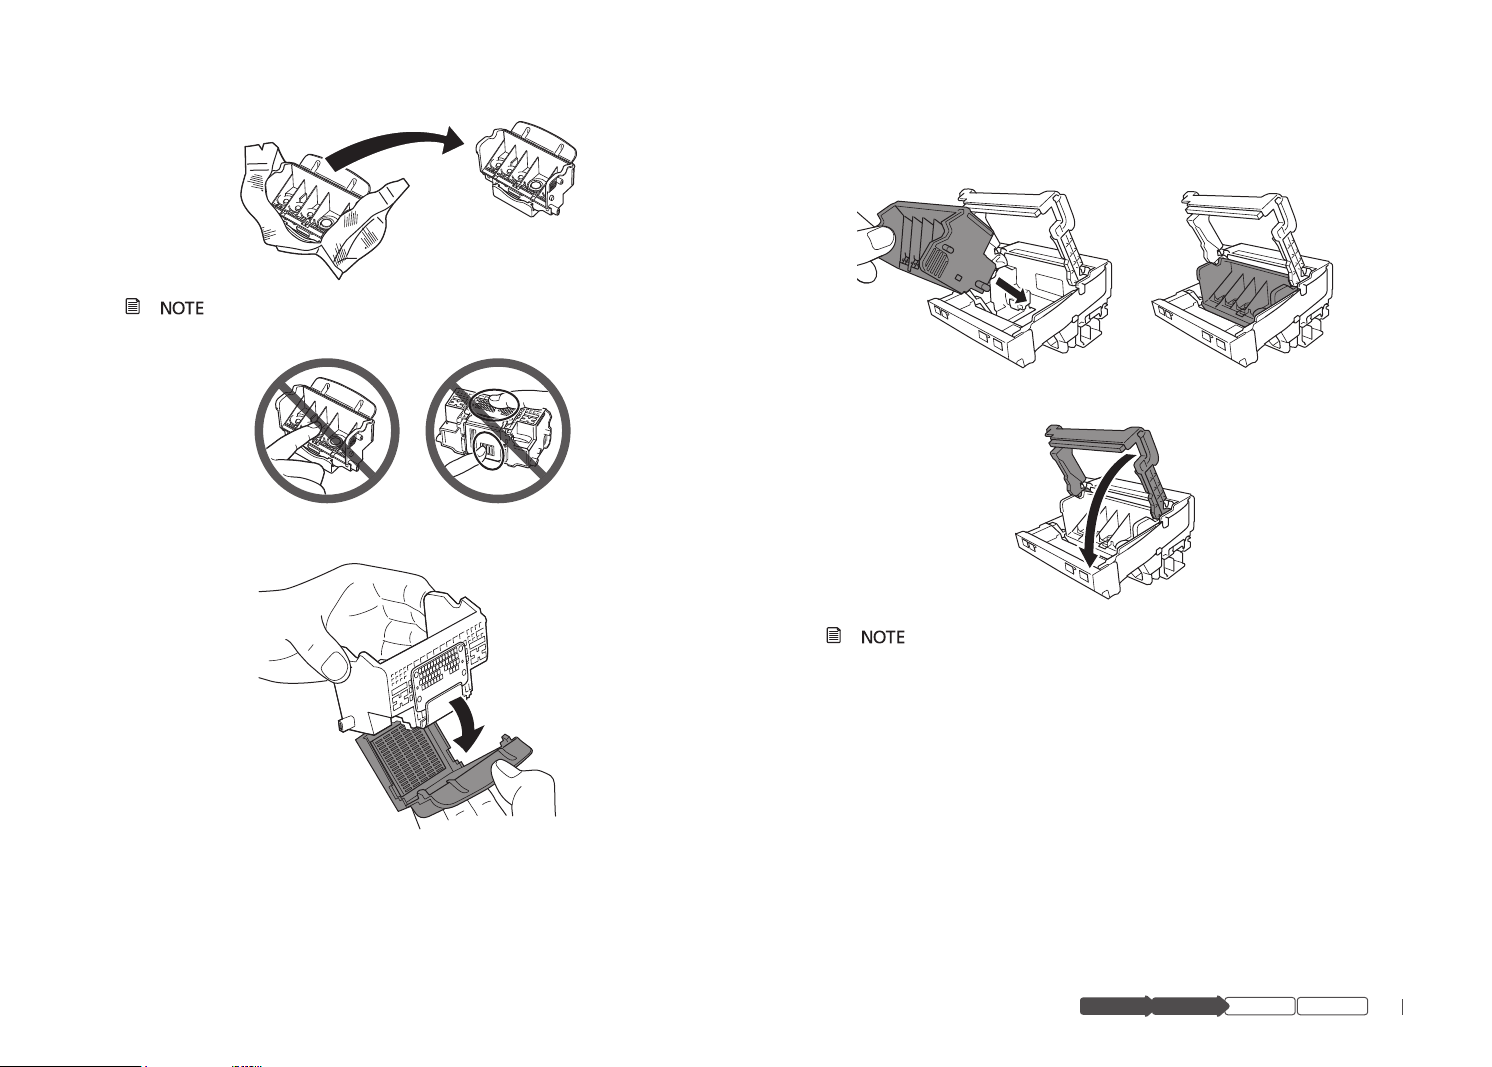
Unpackage the print head4
When handling the print head, hold it only on the sides. Do
not touch the tank seats or contact points.
Remove the protective orange cap5
Insert the print head into the print head holder6
Tilt the print head forward and place it gently into position. Do not try to
force it.
Lower the print head lever until it locks into place7
Once the print head is in place, do not remove it
unnecessarily.
Page 10
10
Install the Ink Tanks
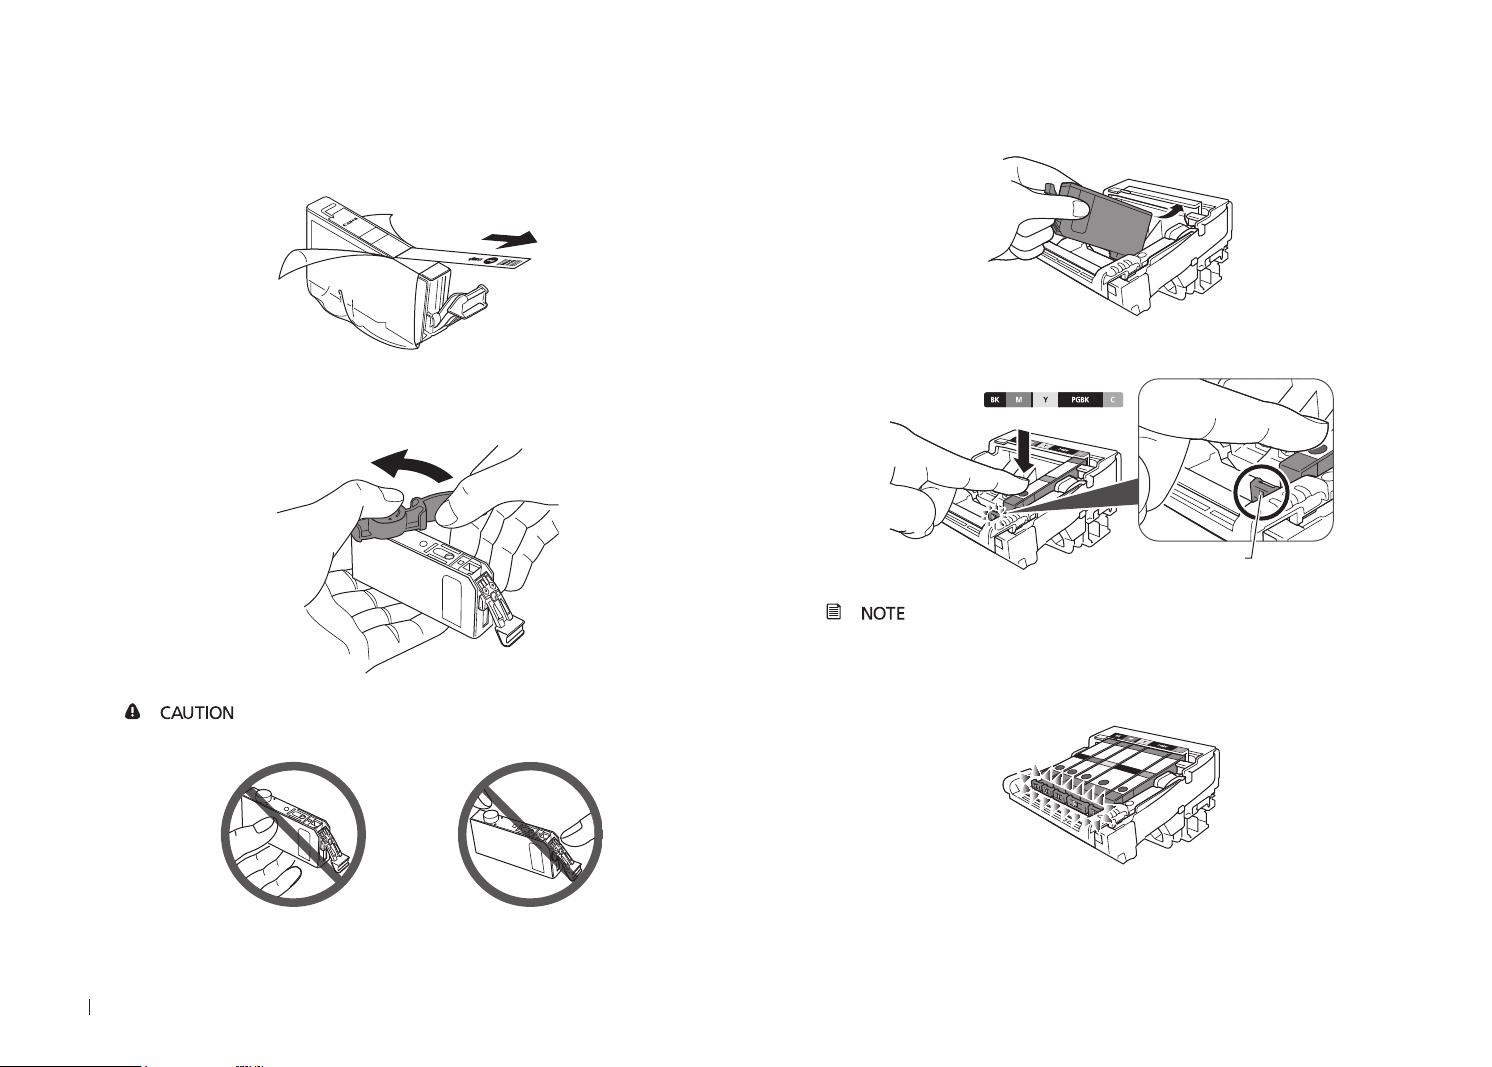
Unwrap the first ink tank1
Pull the orange tape off to remove the protective wrap.
Remove protective cap2
Hold the ink tank as shown, and twist the cap off.
Do not grip the tank with force or hold the tank on the
sides to avoid squeezing ink from the tank.
Insert the ink tank into the print head3
Slide the ink tank into the matching color slot.a
Press the PUSH mark until it clicks into place.b
ink light will turn red
Take care to match the inks with the labels in the print
head.
Repeat steps 1–3 until all remaining ink tanks are in place and all 4
ink lights are red.
Page 11
11
hardware
software
network
hardware software
network
prepare
prepare
Close the cover5
paper guide
paper guide
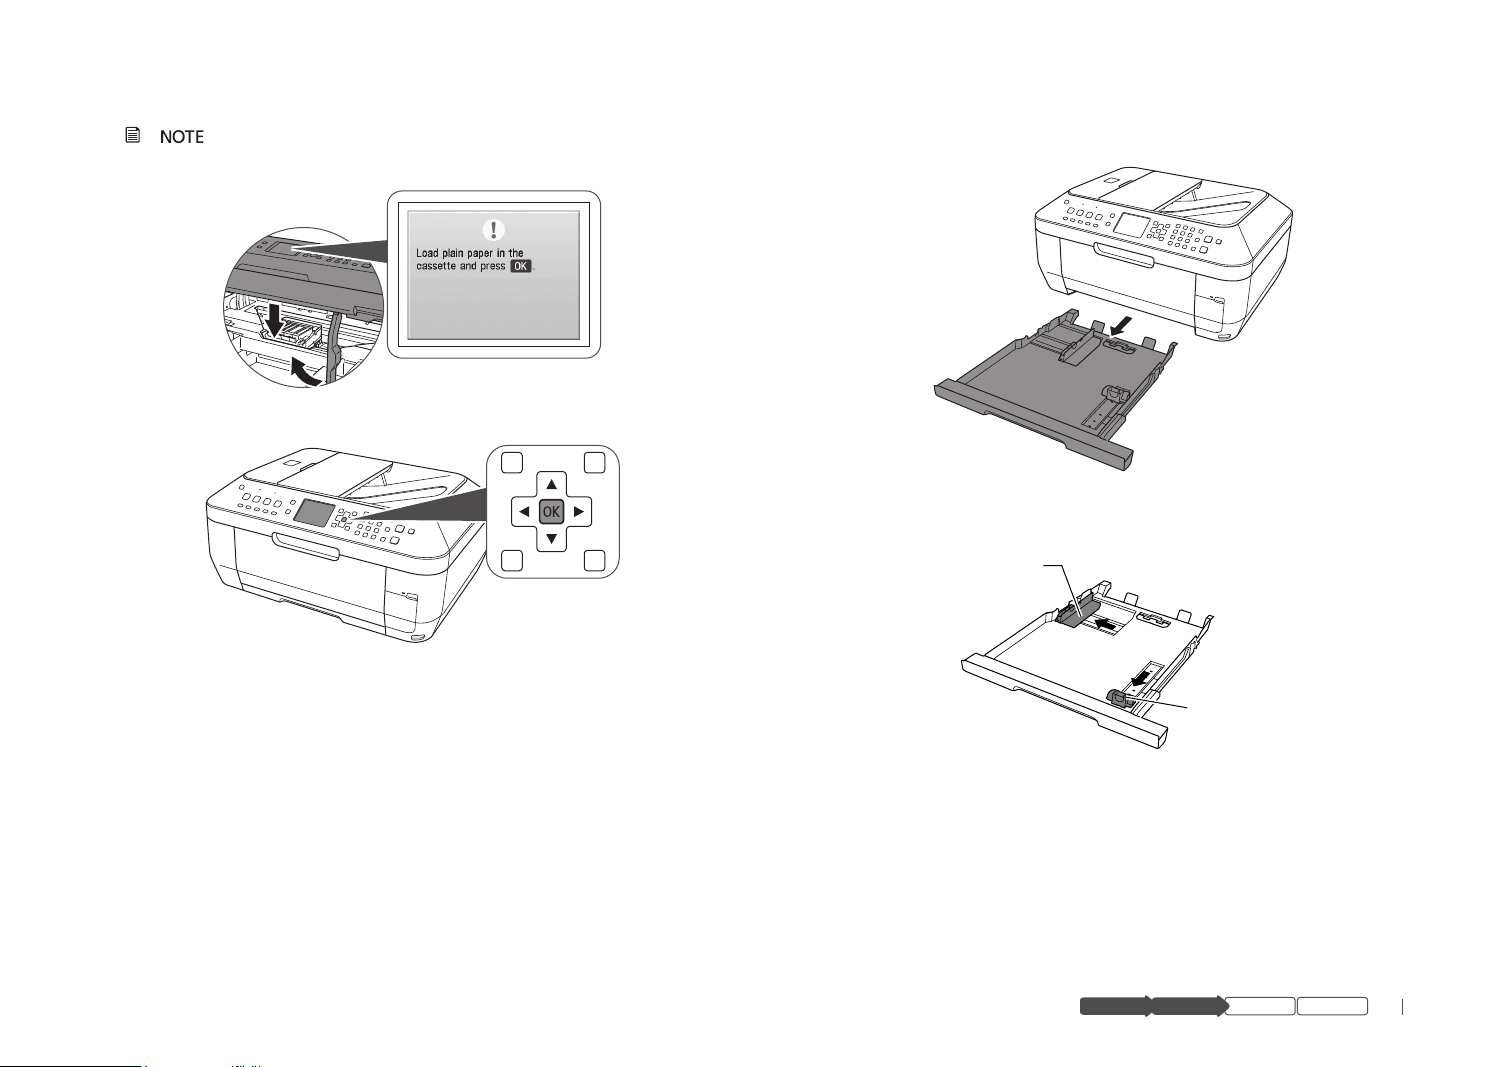
Load Paper
The printer will perform initial start up maintenance. Wait
until the “Load plain paper” screen displays before continuing setup.
Press the 6 OK button
Remove the cassette1
Load plain paper with the printing side down2
Paper should fit between the adjustable paper guides.a
Page 12

12
Insert at least 3 sheets of plain paper (the minimum needed for the b
paper stack
limit line
next action).
The cassette is for plain paper only.
Slide the guides to match the paper size 3
(A slight space between the paper guide and the paper stack is
acceptable.)
Confirm paper stack does not exceed the limit4
Slide the cassette back in until it clicks into place5
Align the Print Head
Start alignment1
Use the a ▲ and ▼ button to select Perform head align.
Page 13

13
hardware
software
network
hardware software
network
prepare
prepare
less noticeable more noticeable
Select b Yes to print the first alignment pattern, then press OK.
Select c Yes again, then OK.
Look at the first printout2
Select best pattern3
Use the ◄►▲▼ buttons to enter the number of the pattern that has the
least noticeable vertical or horizontal streaks for columns A to G, then
press the OK button.
If you are not sure which is the best pattern, pick the
setting that produces the least noticeable white streaks.
Press 4 OK again to print the second pattern
Look at the second printout5
Repeat step 3 for columns H to Q.
Press 6 OK again to print the third pattern
Page 14

14
Look at the third printout7
FAX button
Menu button
Repeat step 3 for columns a to j.
Select 3 Receive mode settings
Use the ◄ or ► button to select Receive mode settings, then press OK
Set Up to Receive Faxes
2 Menu button
Press 8 OK to complete print head alignment
The Standby screen will display when print head alignment
is complete.
If you are not using your MX860 as a fax, go to "Set Up the Software"
on page 15.
Press the 1 FAX button
Press the
Select the receive mode4
Use the ▲ or ▼ button to select a receive mode, then press the OK
button.
Select a receive mode according to your needs.
When you receive mainly faxes and sometimes voice ●
calls: Select FAX priority mode.
When you have a dedicated telephone line for fax use ●
only: Select FAX only mode.
When you receive mainly voice calls and sometimes ●
faxes: Select TEL priority mode.
When you subscribe to a ring pattern detection service provided ●
by your telephone company, and you want to receive a fax
only if the machine detects the pattern for fax: Select DRPD
(Dictinctive Ring Pattern Detection).
When the FAX menu returns, press the 5 Back button
For details on fax settings and how to change them, refer
to the on-screen manual: Basic Guide.
Page 15

15
hardware
software
network
hardware software
network
prepare
prepare
hardware software network
prepare
Set Up Your Fax Sender Information
For details on sender information, refer to "Specifying the Basic Settings
for the Machine" in the on-screen manual: Basic Guide.
Set Up the Software
Go to "Set Up the Software" on page 15.
Install the Software
Connect the USB cable to your computer1
Connect the other end to your MX8602
Page 16

16
Insert the Setup disc3
Double-click the 4 Setup icon on your screen
If the CD-ROM folder does not open automatically, double-
click the CANON_IJ icon on the desktop.
Enter your administrator password5
If you do not know your administrator name or password,
click
, then follow the on-screen instructions.
Click 6 Easy Install
The drivers, application software and on-screen manuals will install
automatically.
Follow the on-screen instructions7
Page 17

17
hardware
software
network
hardware software
network
prepare
prepare
hardware software network
prepare
If your computer is connected to the internet you will be
if you plan
to connect directly
to one computer only
by USB, leave the
default option as is
prompted to register your product. The serial number is required for
product registration. The serial number is located on the product
packaging and on the inside of the product.
Connecting to a Network
Go to "Connect to Your Network (optional)" on page 18
If you plan to connect to a network but select USB
connection by mistake you will need to reinstall the software.
Connecting with a USB Cable
After your computer restarts, the Canon IJ Network Tool dialog appears.
Click Restart8
After restarting, remove the Setup CD-ROM and keep it in a safe place.
Decide how you want to connect to your MX860.
Select 1 USB connection
Only select USB connection if you plan to connect the
MX860 directly to a single computer and not to a network.
Click 2 OK
Congratulations! You are nished with the setup.
Go to "Start Using Your MX860!" on page 37.
Page 18

18
Connect to Your Network
wired network connecting
with an Ethernet cable
wireless network with
multiple access points
(example: Airport Extreme and Airport Express)
wireless network with
a single access point
Wi-Fi router
Wi-Fi
router
Wi-Fi router
router
(optional)
Choose Your Network Type
Go to page 19. Go to page 23. Go to page 28.
The MX860 can not be used over a wireless network and a wired network at the same time.
To connect additional computers to the MX860, go to "Connecting Additional Computers" on page 33.
Page 19

19
hardware
software
network
hardware software
network
prepare
prepare
hardware software network
prepare
hardware software network
prepare
Wireless Networks with a Single Access Point
wired network connecting
with an Ethernet cable
wireless network with
multiple access points
(example: Airport Extreme and Airport Express)
wireless network with
a single access point
Wi-Fi router
Wi-Fi
router
Wi-Fi router
router
If your network has more than one wireless access point,
go to page 23.
Locate the name and password (if applicable) of your wireless 1
network
Click the icon in the menu bar and write down the network name
with the checkmark next to it.
Make sure the MX860 is ready2
Select 3 LAN connection
On the Canon IJ Network Tool dialog, select LAN connection, then
click OK.
Select printer to use4
Select a Setup in the pop-up menu.
b MX860 series in the Printers pane, then click OK.
Select
with the USB cable and is powered on.
You will need the USB cable only for the initial network
setup. Once your MX860 is connected to your network, the USB
cable is no longer needed.
The MX860 is set at the factory to connect to a wireless
(Wi-Fi) network. If your MX860 was previously set for a wired
network, set the connection type now for a wireless network. See
"Set the Network Connection Type" on page 28 for details.
Ensure the MX860 is connected to your computer
Page 20

20
Select your wireless network5
Select the network name you wrote down in step 1.a
If your network requires a password, enter it.b
Click c Connect.
The network password is case sensitive.
Complete the network setup6
When the Setup Completion dialog appears:
a
Disconnect the USB cable and place the MX860 where it will be used.
On your computer, click b Next.
If the MX860 does not connect, see section 5.6 of the
printed manual "Network Setup Troubleshooting."
Measuring Wireless Connection Performance
Click 1 Next.
The connection measurement results will display.
Page 21

21
hardware
software
network
hardware software
network
prepare
prepare
hardware software network
prepare
hardware software network
prepare
Review results2
If you see a green check mark a and the word Good, click Finish.
If the connection results are less than “Good,” move the MX860 to
b
a new location, then click Remeasurement to repeat the connection
performance test.
Add the Printer (OS X v10.5.x)
The Printer Browser window will open automatically.
Select the printer1
Click a More Printers.
Select
b MX860 series.
Click c Add.
The letters and numbers after "MX860 series" show the
MAC address for this device (Media Access Control address, a
unique identi er for any equipment connected to a network).
Add the Printer (OS X v10.4.x)
The Printer List window will open automatically.
Click 1 Add
Add the printer2
Click a More Printers.
Select
b MX860 series.
Page 22

22
Click c Add.
Add the Printer (OS X v10.3.9)
The Printer List window will open automatically.
Click 1 Add
The Printer Browser window opens.
Select
a MX860 series.
Click b Add.
Select the Scanner
The Canon IJ Network Scanner Selector dialog opens.
Select scanner1
From the pop-up menu, select a Canon MX860 series Network.
In the Network Device List pane, select the MAC address of the MX860.
b
There should be only one device listed unless you have
more than one MX860 series device connected to your network.
Click
c Apply to use the MX860 as a scanner.
Confirm that a checkmark appears next to the selected device, then
d
click Exit.
Congratulations! You are nished with the setup.
Go to "Start Using Your MX860!" on page 37 .
Page 23

23
hardware
software
network
hardware software
network
prepare
prepare
hardware software network
prepare
hardware software network
prepare
Wireless Networks with Multiple Airport Access Points
wired network connecting
with an Ethernet cable
wireless network with
multiple access points
(example: Airport Extreme and Airport Express)
Wi-Fi
router
Wi-Fi router
router
For example, Airport Extreme and Airport Express or Time Capsule
If your network has only a single access point, go to
page 19.
Locate the name and password (if applicable) of your wireless 1
network
Click the icon in the menu bar and write down the network name
with the checkmark next to it.
The MX860 is set at the factory to connect to a wireless
(Wi-Fi) network. If your MX860 has been previously set for a wired
network, ensure the connection type is set for a wireless network.
Go to "Set the Network Connection Type" on page 28 for details.
Select 3 LAN connection
On the Canon IJ Network Tool dialog, select LAN connection, then
click OK.
Select printer to use4
Select a Setup in the pop-up menu.
b MX860 series in the Printers pane.
Select
c OK.
Click
Make sure the MX860 is ready2
Ensure the MX860 is connected to your computer
with the USB cable and is powered on
setup. Once your MX860 is connected to your network, the USB
cable is no longer needed.
You will need the USB cable only for the initial network
Page 24

24
Click 5 Manual Setup
Enter network name6
Enter the name of the network (SSID) you would like the MX860 to a
join.
Choose an encryption method that matches what is in use for your
b
network.
If you do not have encryption enabled on your network,
select Do Not Use on the encryption method pop-up menu, then
click Connect. The procedure will skip directly to "Complete the
network setup" on page 25 .
Click 7 Next
Enter your network passphrase, then click 8 Next
The passphrase (password) is case sensitive.
If settings are correct, click 9 Finish
Click Back to change any settings.
Page 25

25
hardware
software
network
hardware software
network
prepare
prepare
hardware software network
prepare
hardware software network
prepare
Click 10 Connect
Complete the network setup11
When the Setup Completion dialog appears:
Disconnect the USB cable and place the MX860 where it will be used.
a
On your computer, click b Next.
If the MX860 does not connect, see section 5.6 of the
printed manual "Network Setup Troubleshooting."
Measuring Wireless Connection Performance
Click 1 Next
The connection measurement results display.
Review results2
If you see a green check mark a and the word Good, click Finish.
Page 26

26
If the connection results are less than “Good,” move the MX860 to b
a new location, then click Remeasurement to repeat the connection
performance test.
Add the Printer (OS X v10.5.x)
The Printer Browser window will open automatically.
Select the printer1
Click a More Printers.
Select
b MX860 series.
Click c Add.
The letters and numbers after "MX860 series" show the
MAC address for this device (Media Access Control address, a
unique identi er for any equipment connected to a network).
Add the Printer (OS X v10.4.x)
The Printer List window will open automatically.
Click 1 Add
Page 27

27
hardware
software
network
hardware software
network
prepare
prepare
hardware software network
prepare
hardware software network
prepare
Add the printer2
Click a More Printers.
Select
b MX860 series.
Click
c Add.
Add the Printer (OS X v10.3.9)
The Printer List window will open automatically.
Click 1 Add
The Printer Browser window opens.
Select
a MX860 series.
Click
b Add.
Select the Scanner
The Canon IJ Network Scanner Selector dialog opens.
Select scanner1
From the pop-up menu, select a Canon MX860 series Network.
In the Network Device List pane, select the MAC address of the
b
MX860.
There should be only one device listed unless you have
more than one MX860 series device connected to your network.
Click
c Apply to use the MX860 as a scanner.
Page 28

28
Confirm that a checkmark appears next to the selected device, then d
wired network connecting
with an Ethernet cable
router
click Exit.
Congratulations! You are nished with the setup.
Go to "Start Using Your MX860!" on page 37.
Wired Networks
If you will be connecting your MX860 to a wired LAN (Local Area
Network) using an Ethernet cable, follow the steps below.
Make sure the MX860 is ready1
Ensure the MX860 is connected to your computer
with the USB cable and is powered on
You will need the USB cable only for the initial network
setup. Once your MX860 is connected to your network, the USB
cable is no longer needed.
Set the Network Connection Type2
The MX860 is set at the factory to connect to a wireless (Wi-Fi) network.
To connect to a wired network using an Ethernet cable, change the
network connection type from the MX860 panel.
On the MX860, press the
a Menu button.
b ◄ or ► button to select Settings, then press the OK button.
Use the
c Device Settings, then press the OK button.
Select
Page 29

29
hardware
software
network
hardware software
network
prepare
prepare
hardware software network
prepare
hardware software network
prepare
Use the d ▲ or ▼ button to select LAN settings, then press the OK
button.
Select
e Change WLAN/LAN, then press the OK button.
f Wired LAN active),
Select the desired network connection method (
then press the OK button.
Select 3 LAN connection
On the Canon IJ Network Tool dialog, select LAN connection, then
click OK.
Select printer to use4
Select a Setup in the pop-up menu.
b MX860 series in the Printers pane.
Select
c OK.
Click
A Check Wired LAN Connection reminder appears.
Do not click Yes until after the Ethernet cable is connected
in step 5.
Page 30

30
Connect the Ethernet cable5
Remove the LAN connector cap from the back of the MX860 (located a
just above the USB connection).
Connect the MX860 to your network with an Ethernet cable (not b
included).
Click 6 Yes to close the Check Wired LAN Connection reminder
If the MX860 is not detected automatically, the Set Printer
IP Address dialog appears.
Do not attempt to connect the supplied phone cord to
the LAN port. Do not confuse the LAN port
jacks
.
with the telephone
The TCP/IP Setting of Get IP address automatically is correct for
most networks. If your network uses pre-assigned IP addresses
(also called xed or static addresses), select Use following IP
address in the pop-up menu and enter the appropriate information,
then click Connect.
Page 31

31
hardware
software
network
hardware software
network
prepare
prepare
hardware software network
prepare
hardware software network
prepare
Disconnect the USB cable, then click 7 OK.
Add the Printer (OS X v10.5.x)
The Printer Browser window will open automatically.
Select the printer1
Click a More Printers.
Select
b MX860 series.
Click
c Add.
The letters and numbers after "MX860 series" show the
MAC address for this device (Media Access Control address, a
unique identi er for any equipment connected to a network).
Page 32

32
Add the Printer (OS X v10.4.x)
The Printer List window will open automatically.
Click 1 Add
Add the printer2
Click a More Printers.
Select
b MX860 series.
Click
c Add.
Add the Printer (OS X v10.3.9)
The Printer List window will open automatically.
Click 1 Add
The Printer Browser window opens.
Select
a MX860 series.
Click
b Add.
Page 33

33
hardware
software
network
hardware software
network
prepare
prepare
hardware software network
prepare
hardware software network
prepare
Select the Scanner
The Canon IJ Network Scanner Selector dialog opens.
Select scanner1
From the pop-up menu, select a Canon MX860 series Network.
b
In the Network Device List pane, select the MAC address of the
MX860.
There should be only one device listed unless you have
more than one MX860 series device connected to your network.
c Apply to use the MX860 as a scanner.
Click
d
Confirm that a checkmark appears next to the selected device, then
click Exit.
Congratulations! You are nished with the setup.
Connecting Additional Computers
More than one networked computer can print to your MX860. Follow
the instructions in this section if one computer has already been setup
to use your MX860 on a network. (See "Connect to Your Network
(optional)" on page 18.)
A USB cable is not required for connecting additional
networked computers to your MX860.
Make sure the MX860 is on and connected to your wireless or 1
wired network
Install the software on the additional computer 2
Follow the software installation steps in a "Set Up the Software" on
page 15.
After installing the software and restarting your computer, the Canon
b
IJ Network Tool automatically starts.
Select 3 LAN connection
On the Canon IJ Network Tool dialog, select LAN connection, then
click OK.
Go to "Start Using Your MX860!" on page 37.
Page 34

34
If the Setup Preparations screen appears, confirm that preparation is 4
complete, then click OK.
Register printer5
Select a Setup in the pop-up menu.
Click
b Register Printer.
Click 6 Cancel
When the Cancel Setup screen appears, click Cancel, or if the You have no
printers available screen appears, click Cancel.
Add the Printer (OS X v10.5.x)
The Printer Browser window will open automatically.
Select the printer1
Click a More Printers.
Select
b MX860 series.
Click
c Add.
The letters and numbers after "MX860 series" show the
MAC address for this device (Media Access Control address, a
unique identi er for any equipment connected to a network).
Page 35

35
hardware
software
network
hardware software
network
prepare
prepare
hardware software network
prepare
hardware software network
prepare
Add the Printer (OS X v10.4.x)
The Printer List window will open automatically.
Click 1 Add
Add the printer2
Click a More Printers.
Select
b MX860 series.
Click
c Add.
Add the Printer (OS X v10.3.9)
The Printer List window will open automatically.
Click 1 Add
The Printer Browser window opens.2
Select a MX860 series.
Click
b Add.
Page 36

Select the Scanner
The Canon IJ Network Scanner Selector dialog opens.
Select scanner1
From the pop-up menu, select a Canon MX860 series Network.
b
In the Network Device List pane, select the MAC address of the
MX860.
There should be only one device listed unless you have
more than one MX860 series device connected to your network.
c Apply to use the MX860 as a scanner.
Click
d
Confirm that a checkmark appears next to the selected device, then
click Exit.
Congratulations! You are nished with the setup.
36
Go to "Start Using Your MX860!" on page 37.
Page 37

Start Using Your MX860!
Solution Menu
The Solution Menu provides quick access to useful functions and information
about your MX860. From here you can open various applications and onscreen manuals with a single click.
To start the Solution Menu, click the Canon Solution Menu icon on the Dock.
On-Screen Manual
To open the on-screen manual, click the Get help for your Canon product
or software button in the Solution Menu.
The on-screen manual has three parts:
Basic Guide ●
Describes basic operations, including fax setup, and gives an introduction
to other functions
Advanced Guide ●
Describes advanced operating procedures to make full use of your
MX860
Troubleshooting ●
Describes troubleshooting steps for your MX860
37
Page 38

Getting Help from Canon
For email Tech Support, please go to www.canontechsupport.com ●
For live Tech Support, please call toll-free 800-828-4040
(this option provides live technical support, free of service charges,
Monday–Friday, excluding holidays, during the warranty period)
●
Telephone Device for the Deaf (TDD) support is available at
866-251-3752
●
Ordering Information
The following ink tanks are compatible with this product:
Order #
CLI-221 Magenta 2948B001
CLI-221 Black 2946B001
PGI-220 Black 2945B001
CLI-221 Cyan 2947B001
CLI-221 Yellow 2949B001
Call 800-OK-CANON to locate a dealer near you, or visit
the Canon eStore at www.canonestore.com.
QT1-0851-V01
Canon and PIXMA are registered trademarks of Canon Inc. in the
United States and may be registered trademarks or trademarks in
other countries. IMAGEANYWARE is a trademark of Canon.
Apple, AirPort Express, AirPort Extreme, Mac, Macintosh and Time Capsule
are trademarks of Apple, Inc., registered in the U.S. and other countries. All
other product and brand names are trademarks of their respective owners.
As an ENERGY STAR
®
partner, Canon U.S.A., Inc. has determined that
this product meets the ENERGY STAR
®
guidelines for energy efficiency.
CANON U.S.A. INC.
One Canon Plaza, Lake Success, NY 11042
www.usa.canon.com
©2009 Canon U.S.A., Inc.
Model Number: K10333 (MX860)
PRINTED IN U.S.A.
 Loading...