

Canon Pull Print Service Provider Version 1.0 SE-IE-1359-V2, PullPrint Service Provider 1.0 User Manual
Page 1

User's Guide
PullPrint Service Provider
Version 1.0
ENG
Pub No. SE-IE-1359-V2
Page 2

ii
How This Manual Is Organized
Chapter 1
Start Using PullPrint Service Provider
Chapter 2
Installation and Setup
Chapter 3
Specifying PullPrint Service Provider Settings
Chapter 4
List of Error Messages
The information in this manual is subject to change without notice.
Considerable effort has been made to ensure that this manual is free of inaccuracies and
omissions. However, as we are constantly improving our products, if you need an exact
specification, please contact Canon.
The contents of this manual shall not be reproduced without the prior consent of Canon.
•
•
•
Page 3

iii
Contents
How This Manual Is Organized .....................................................................................ii
Preface............................................................................................................................ v
How To Use This Manual ..............................................................................................vi
Notations Used in This Manual ..........................................................................................................vi
Keys Used in This Manual ....................................................................................................................vi
Displays Used in This Manual ............................................................................................................vii
Abbreviations Used in This Manual .................................................................................................vii
Trademarks ................................................................................................................. viii
Chapter 1 Start Using PullPrint Service Provider
Features.......................................................................................................................1-2
Flow of Operations ............................................................................................................................1-3
System Requirements ................................................................................................1-4
Computer Requirements ..................................................................................................................1-4
MEAP Device System Resources .....................................................................................................1-4
Supported Devices ............................................................................................................................1-4
Chapter 2 Installation and Setup
Installation and Setup Flow .......................................................................................2-2
Starting and Closing SMS ...........................................................................................2-3
Starting and Logging In to SMS ...................................................................................................... 2-3
Logging Out from SMS .....................................................................................................................2-7
Installing and Uninstalling PullPrint Service Provider ............................................2-8
Installation ...........................................................................................................................................2-9
Uninstallation ...................................................................................................................................2-11
Starting and Stopping an Application ....................................................................2-13
Starting an Application ...................................................................................................................2-13
Stopping an Application ................................................................................................................2-15
Confirming Application Details ...............................................................................2-16
Confirming PullPrint Service Provider Settings .....................................................2-17
Page 4

iv
Chapter 3 Specifying PullPrint Service Provider Settings
PullPrint Service Provider Settings ...........................................................................3-2
Setting Precautions ...........................................................................................................................3-2
Specifying Settings from a Web Browser......................................................................................3-3
Specifying Settings from the Settings File ...................................................................................3-6
Setting Item List .........................................................................................................3-9
PullPrint Service Provider Settings...............................................................................................3-10
Register Allowed Print Data Sources ...........................................................................................3-12
Single Sign-on User Settings .........................................................................................................3-13
Changing a Password ...............................................................................................3-14
Changing the Display Language .............................................................................3-17
Chapter 4 List of Error Messages
List of Error Messages ................................................................................................4-2
Status Display Error Messages ........................................................................................................4-2
Management Console Error Messages .......................................................................................... 4-2
Page 5

v
Preface
Please read this manual thoroughly before operating the application to familiarize yourself with its
capabilities, and to make the most of its many functions. After reading this manual, store it in a safe
place for future reference.
Page 6
vi
How To Use This Manual
Notations Used in This Manual
The following notations are used in this manual to explain procedures and restrictions.
IMPORTANT
Indicates operational requirements and restrictions. Be sure to read these items carefully to operate
the machine correctly, and avoid damage to the machine.
NOTE
Indicates a clarification of an operation, or contains additional explanations for a procedure. Reading
these notes is highly recommended.
Keys Used in This Manual
The following button names are a few examples of how buttons to be clicked are expressed in this
manual:
Buttons on Computer Operation Screens: [Button Name]
Example:- [Setup]
[OK]
•
Page 7
vii
Displays Used in This Manual
The computer operation screenshots and Canon device touch panel display screenshots may differ
from those you actually see, depending on the system environment you are using.
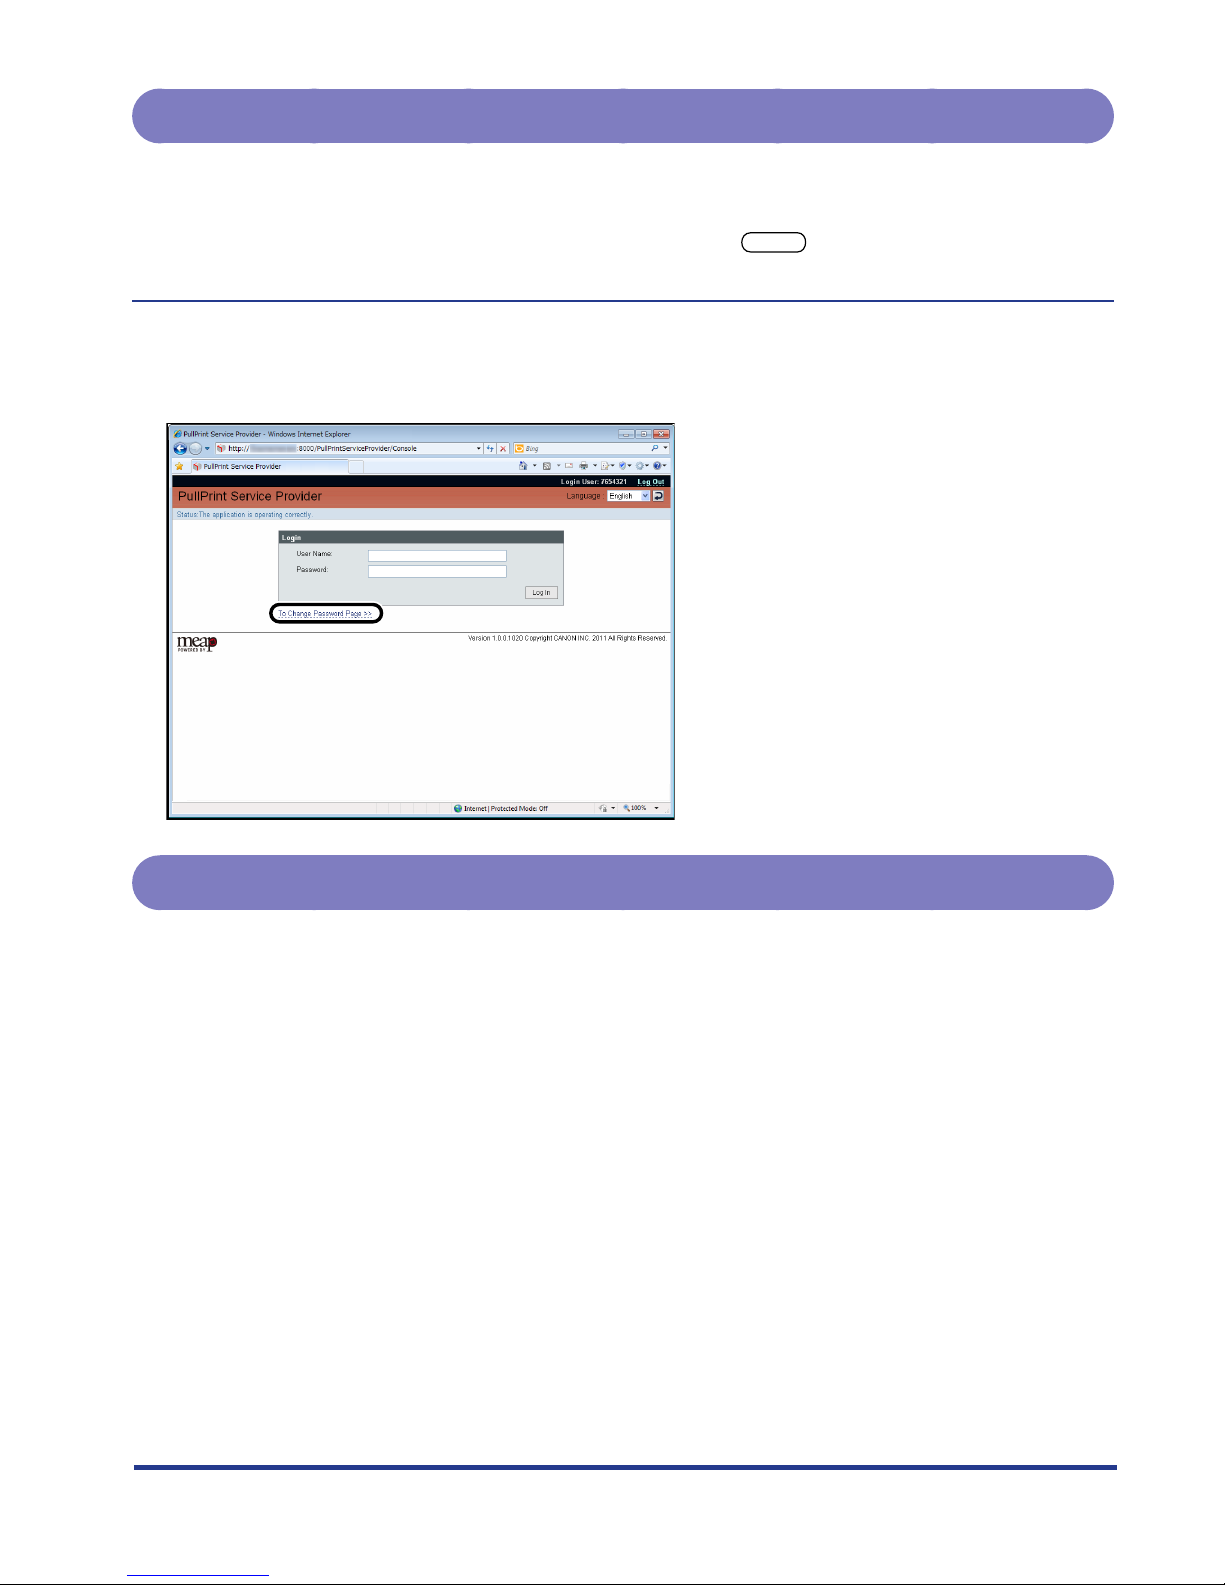
The buttons which you should click or press are marked with a , as shown below. When
multiple buttons are used for an operation, all buttons are marked.
----
1.
Click [Change Password] on the login screen.
Abbreviations Used in This Manual
In this manual, product names are abbreviated as follows:
imageRUNNER ADVANCE: iR-ADV
Page 8

viii
Trademarks
MEAP and the MEAP logo are trademarks of Canon Inc.
Windows and the Windows logo are trademarks or registered trademarks of Microsoft Corporation in
the U.S. and/or other countries.
Other product and company names herein may be the registered trademarks or trademarks of their
respective owners.
Page 9

1-1
1
$)"15&3
Start Using PullPrint Service
Provider
This chapter provides an overview of PullPrint Service Provider.
Features ........................................................................................................................................1-2
Flow of Operations .................................................................................................................................................. 1-3
System Requirements ..................................................................................................................1-4
Computer Requirements .......................................................................................................................................1-4
MEAP Device System Resources ........................................................................................................................... 1-4
Supported Devices ..................................................................................................................................................1-4
Page 10
Features
1-2
Features
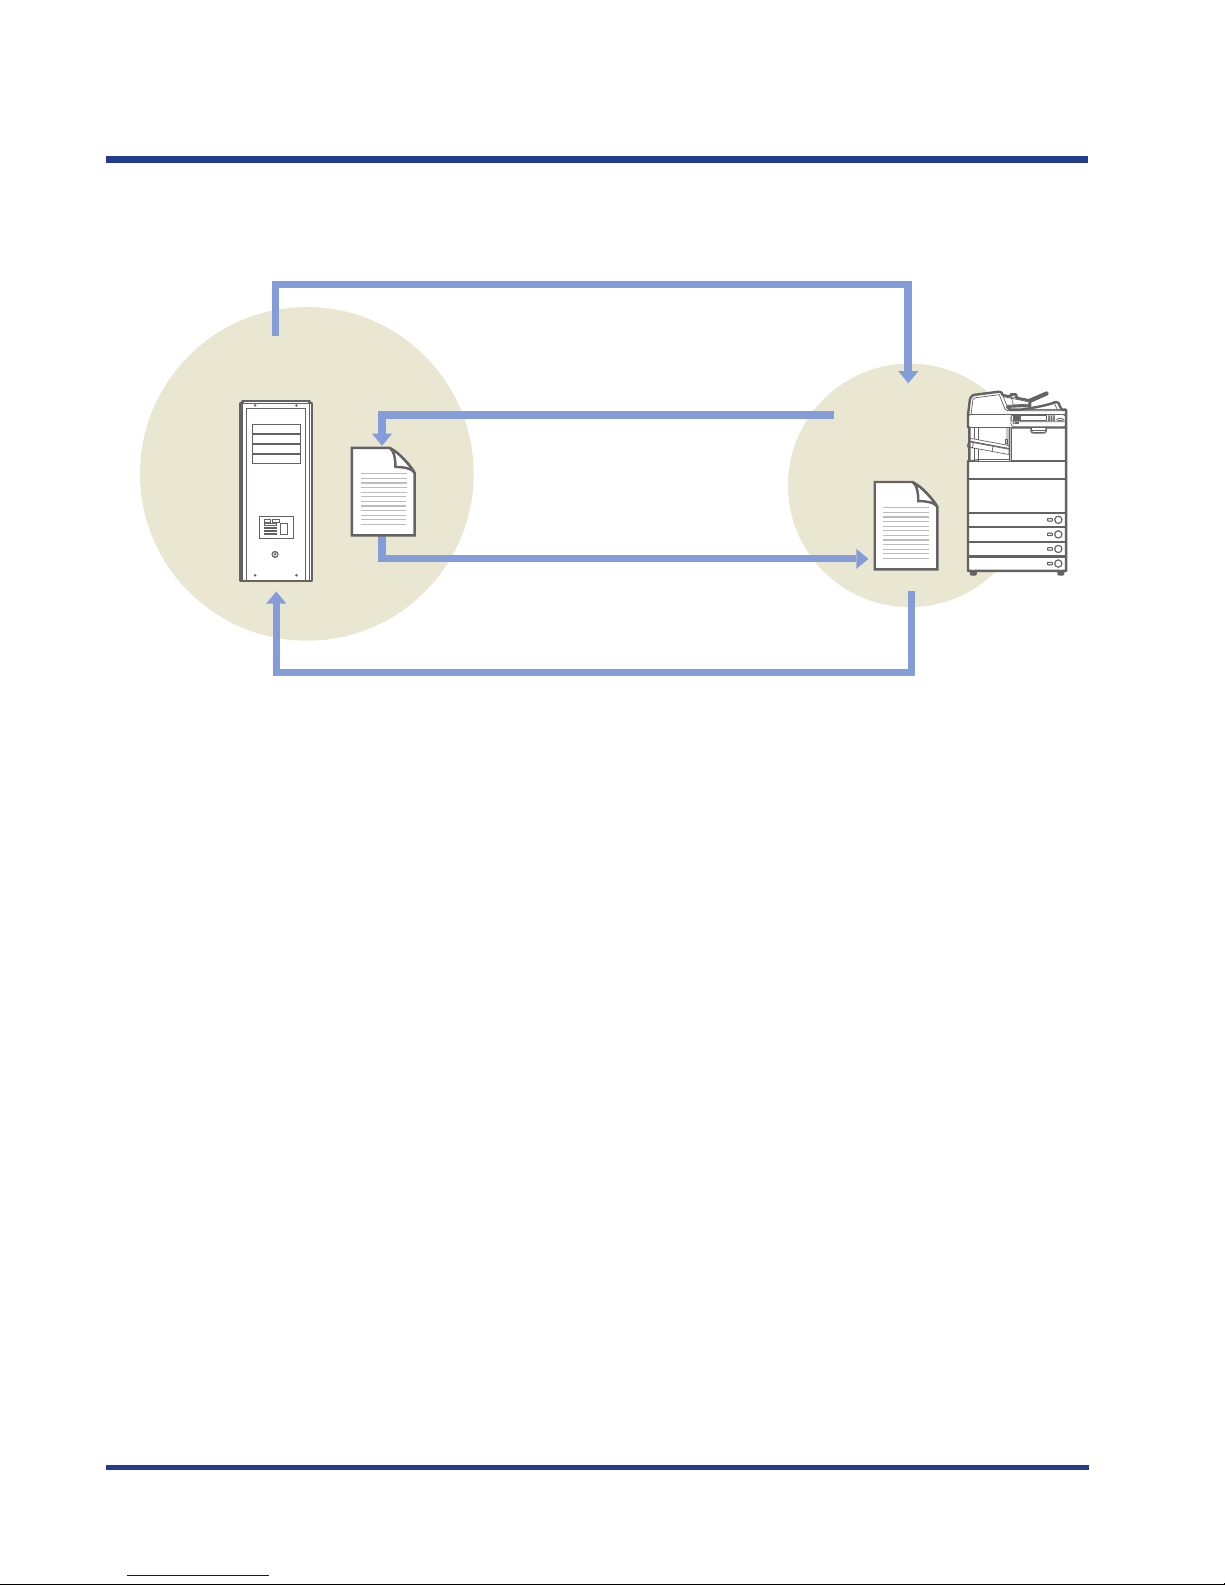
PullPrint Service Provider is an application that downloads data from the network and prints it.
PullPrint
Service
Provider
CanonBusiness
ImagingOnline
Printrequest
Printcompletionnotification
Print
Printdatadownload
1
3
Printdatadownloadrequest
2
4
5
Page 11
Features
1-3
Flow of Operations
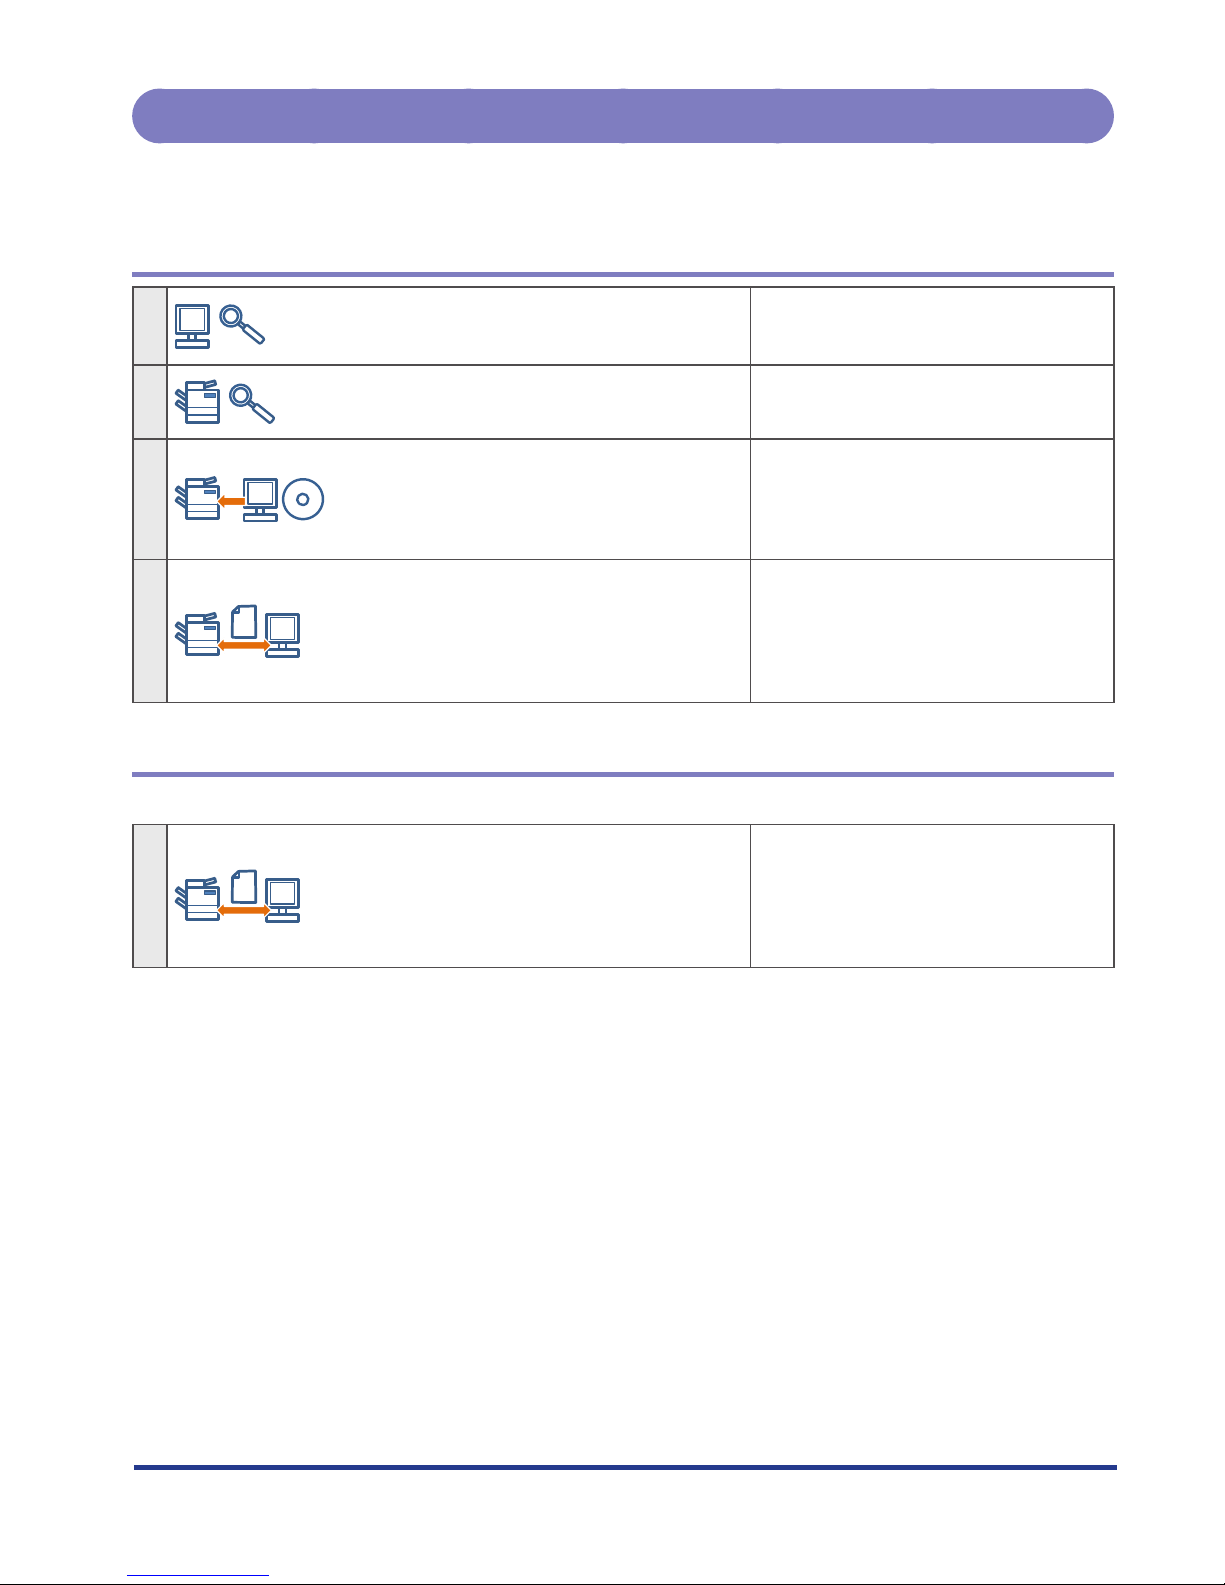
Confirm the conditions and specify the settings following the procedure below.
Setting Up PullPrint Service Provider
1
Computer Requirements (p. 1-4)
Confirm the Web browser
requirements.
2
Supported Devices (p. 1-4)
Confirm the device compatibility.
3
Installation and Setup (p. 2-1)
Starting and Logging In to SMS
Installation
Starting an Application
4
PullPrint Service Provider Settings (p. 3-2)
Changing the settings on the
Change Settings screen
Edit the settings file to change the
settings
Changing the Settings
When the application is already installed:
1
PullPrint Service Provider Settings (p. 3-2)
Changing the settings on the
Change Settings screen
Edit the settings file to change the
settings
Page 12
System Requirements
1-4
System Requirements
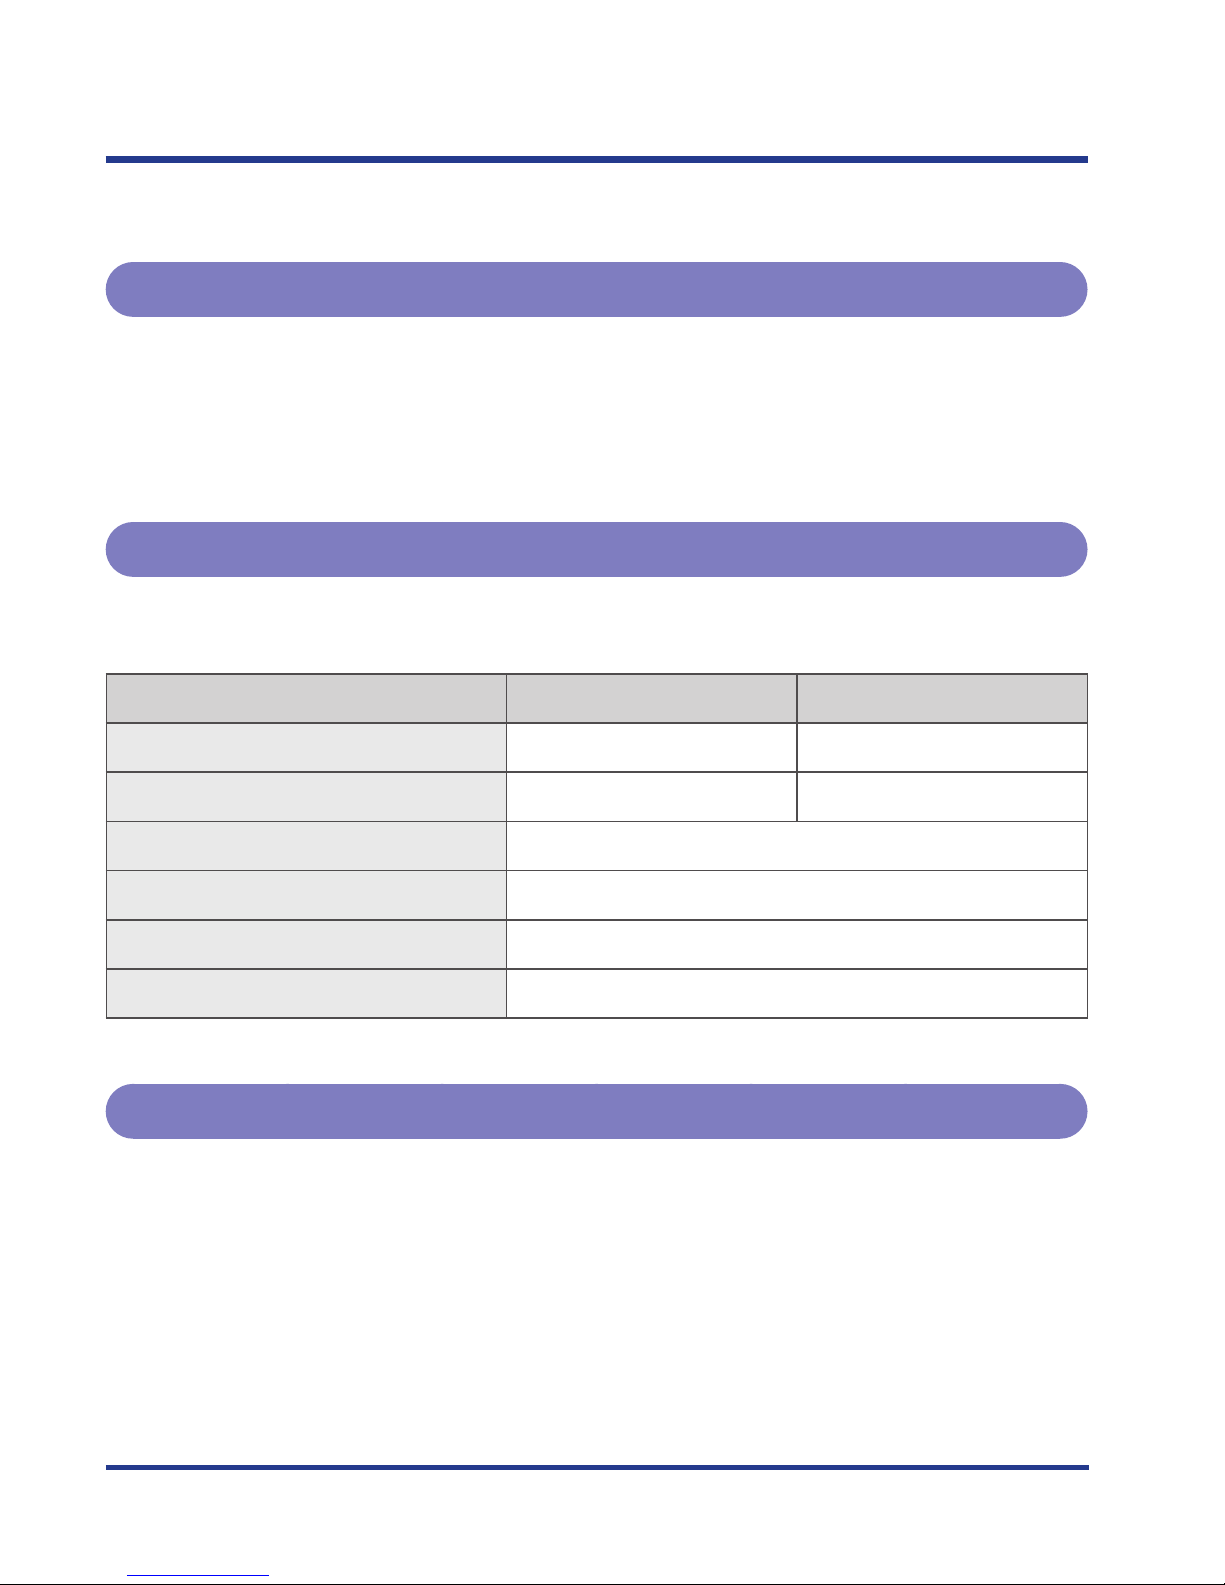
The system requirements for PullPrint Service Provider are as follows.
Computer Requirements
Web Browser
Windows Internet Explorer 7.0
Windows Internet Explorer 8.0
Windows Internet Explorer 9.0
MEAP Device System Resources
The system resources below are required in a MEAP device to install this application. The system
resources of a MEAP device can be checked from [Service Management Service].
Item iR-ADV LBP*
MEAP Spec version
5, 11 15, 62
Maximum memory use
9,200 KB 7,500 KB
Maximum hard disk (storage) use
5,500 KB
Maximum number of threads
25
Maximum number of sockets
8
Maximum number of file descriptions
13
* "LBP" refers to the device with MEAP.
Supported Devices
For information on the devices that support the operation of this application, see "Canon Homepage."
•
•
•
Page 13

2-1
2
$)"15&3
Installation and Setup
You can install PullPrint Service Provider using SMS (Service Management Service) from a Web
browser on a networked computer.
This chapter provides instructions on installing and setting up PullPrint Service Provider.
----
Installation and Setup Flow ........................................................................................................2-2
Starting and Closing SMS ............................................................................................................2-3
Starting and Logging In to SMS ............................................................................................................................2-3
Logging Out from SMS ...........................................................................................................................................2-7
Installing and Uninstalling PullPrint Service Provider ..............................................................2-8
Installation ................................................................................................................................................................2-9
Uninstallation .........................................................................................................................................................2-11
Starting and Stopping an Application......................................................................................2-13
Starting an Application ........................................................................................................................................2-13
Stopping an Application ......................................................................................................................................2-15
Confirming Application Details ................................................................................................2-16
Confirming PullPrint Service Provider Settings.......................................................................2-17
Page 14
Installation and Setup Flow
2-2
Installation and Setup Flow
The flow of installing and setting up PullPrint Service Provider is as follows.
1. Starting and Logging In to SMS (p. 2-3)
2.
Installation (p. 2-9)
3.
Starting an Application (p. 2-13)
4.
Confirming PullPrint Service Provider Settings (p. 2-17)
Page 15
Starting and Closing SMS
2-3
Starting and Closing SMS
You must log in to SMS (Service Management Service) to install PullPrint Service Provider.
SMS is software that can access the printer via the network from your Web browser, enabling you to
install and manage PullPrint Service Provider.
NOTE
The default password is 'MeapSmsLogin' (case sensitive).
This password helps prevent unauthorized printer operations.
In order to prevent erroneous usage, the administrator should change the password when
usage begins. For information on changing the password, see the manual accompanying your
device.
Make sure that you do not forget your password. Otherwise, you will not be able to access SMS.
If you forget your password, contact your local authorized Canon dealer.
The appearance of the SMS screen differs depending on the model of the machine. For more
information on SMS, see the manual accompanying your device.
•
•
•
•
•
•
Starting and Logging In to SMS
Log in to SMS to install PullPrint Service Provider. The login procedure is as follows.
IMPORTANT
Before starting SMS, set the IP address of the printer.
Multiple users cannot log in to SMS at the same time.
The default login method is set to using the shared password for SMS. To log in using the user
name and password for the SDL, SSO, or SSO-H login service, the login method must be started.
For more information on starting a login method, see the manual accompanying your device.
•
•
•
Page 16
Starting and Closing SMS
2-4
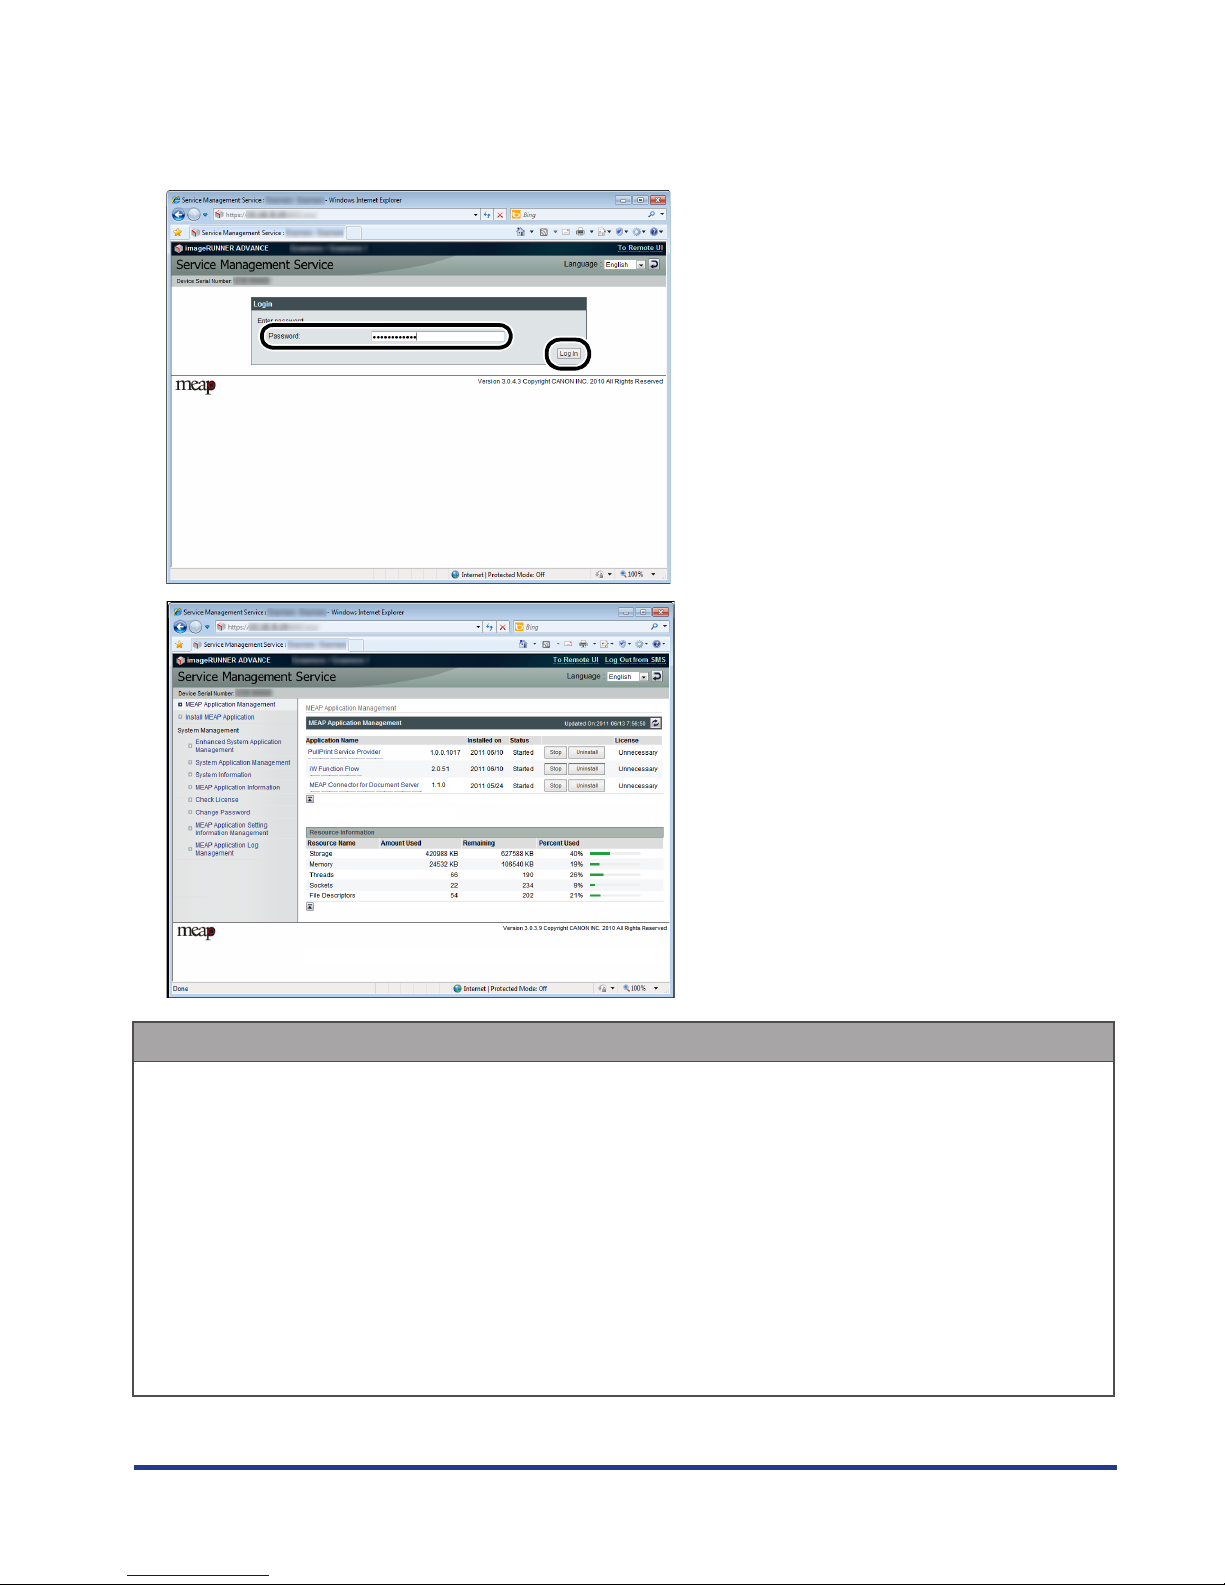
Logging In Using the Shared Password for SMS
You can access SMS by logging in from the SMS login page using the password set in SMS.
----
1.
Enter the URL below in the address bar of the Web browser.
http://<IP address of the device>:<HTTP port number>/sms
IMPORTANT
If you do not know the IP address of the printer, consult your administrator.
You cannot connect via a proxy server. If your system environment has a proxy server, perform
the following setting. (As settings vary according to the system environment, consult your
network administrator.)
Enter the IP address of the printer into [Exceptions] in the Web browser proxy server
settings.
Set your Web browser to enable all cookies and use JavaScript.
•
•
-
•
NOTE
The default HTTP port number is 8000. If the HTTP port number has been changed in the
printer's protocol settings, enter the new HTTP port number. If you do not know the HTTP port
number, consult your administrator.
The device's eight digit serial number is displayed on the SMS Login screen. This serial number is
necessary when obtaining a license file from the License Management System.
A drop-down list for switching the displayed language is displayed on the top right of the
screen. Select the display language as necessary.
•
•
•
Page 17
Starting and Closing SMS
2-5
2.
Enter the password → click [Log In].
IMPORTANT
If you cannot log in because the password is incorrect, a message prompting you to re-enter the
password is displayed. Enter the correct password and click [Log In] again.
If SMS is idle for longer than five minutes, it times out and you are automatically logged out. If
this happens, log in again from the [Login] page.
If you do not log in within five minutes of displaying the Login page, you cannot log in even if
you enter the correct password. Re-enter the password according to the message displayed on
the screen.
If a message is displayed and you cannot log in even though you entered the correct password
within five minutes of displaying the Login page, confirm whether your Web browser settings
meet the SMS operating conditions.
For more information on SMS, see the manual accompanying your device.
•
•
•
•
•
Page 18
Starting and Closing SMS
2-6
Logging In Using a User Name and Password for Canon Device
Login
You can access SMS by logging in using a user name and password used for the SDL, SSO, or SSO-H
login service.
Only users registered as administrators can log in.
----
1.
Enter the URL below in the address bar of the Web browser.
http://<IP address of the device>:8000/sms/rls/
The [Login] page of the selected login service is displayed.
2.
Enter or select each item → click [Log In].
If SDL is set as the login service
Enter the user name and password for a user registered as an SDL administrator → click [Log In].
If SSO or SSO-H is set as the login service
Enter the user name and password for a user registered as an SSO or SSO-H administrator →
select the login destination → click [Log In].
NOTE
If you cannot log in to SDL, SSO, or SSO-H because the user name or password is incorrect, a
message prompting you to re-enter the user name or password is displayed.
For more information on logging in using a user name and password, see the manual
accompanying your device.
•
•
☐
☐
Page 19
Starting and Closing SMS
2-7
Logging Out from SMS
Log out to finish the operation.
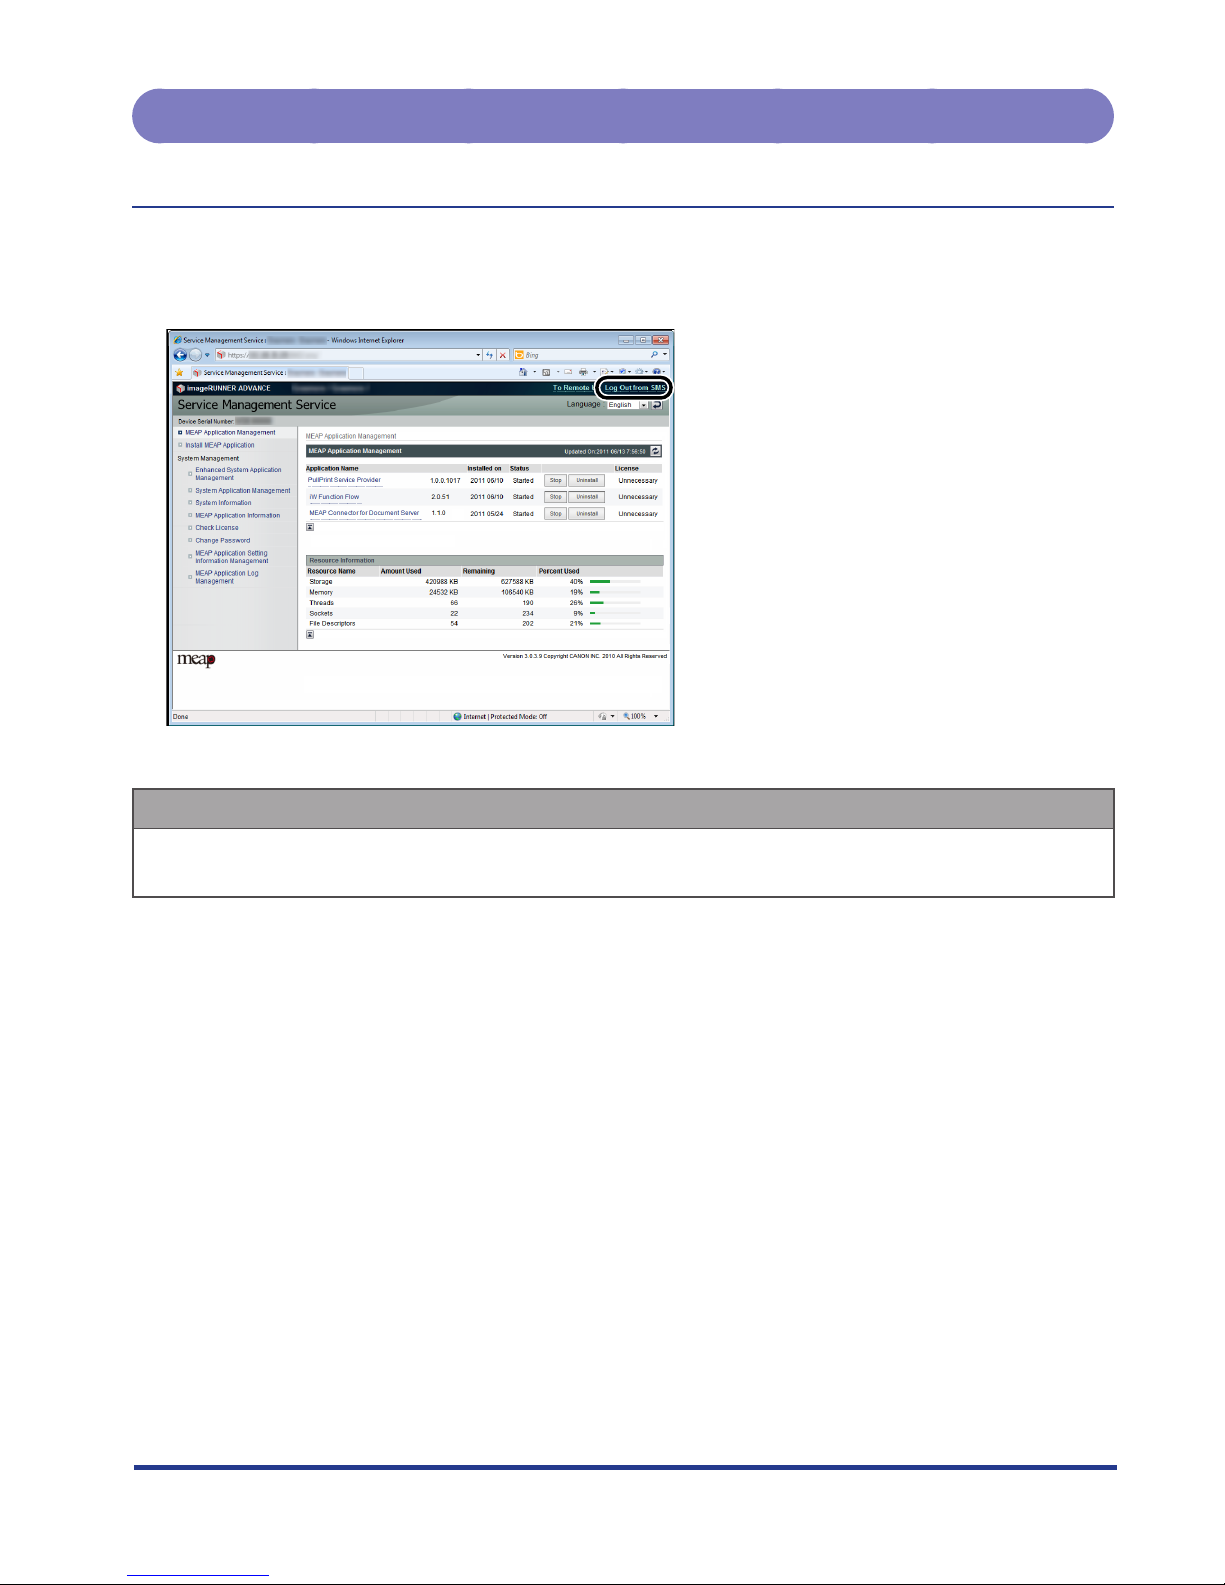
----
1.
Click [Log Out from SMS].
The [Login] page is displayed.
IMPORTANT
When you finish using SMS, make sure you log out. If you close the Web browser without logging
out, SMS becomes temporarily inaccessible.
Page 20

Installing and Uninstalling PullPrint Service Provider
2-8
Installing and Uninstalling PullPrint Service
Provider
Install PullPrint Service Provider and the license file.
IMPORTANT
A valid license file is required to install a MEAP application.
If your application comes with a License Access Number, you must access the License
Management System at the following URL to obtain your license file:
http://www.canon.com/meap/
After accessing the License Management System, follow the directions displayed on the
screen to obtain your license file. You must have your License Access Number and Device
Serial Number available in order to complete the license generation process.
If your application does not come with a License Access Number, your license file will be
provided by your MEAP Application provider.
The maximum number of MEAP applications that can be installed is 19 (one of these is the
portal service that is installed by default).
If you update an existing version, you can retain the previous settings for PullPrint Service
Provider.
•
-
-
•
•
Page 21
Installing and Uninstalling PullPrint Service Provider
2-9
Installation
Install PullPrint Service Provider.
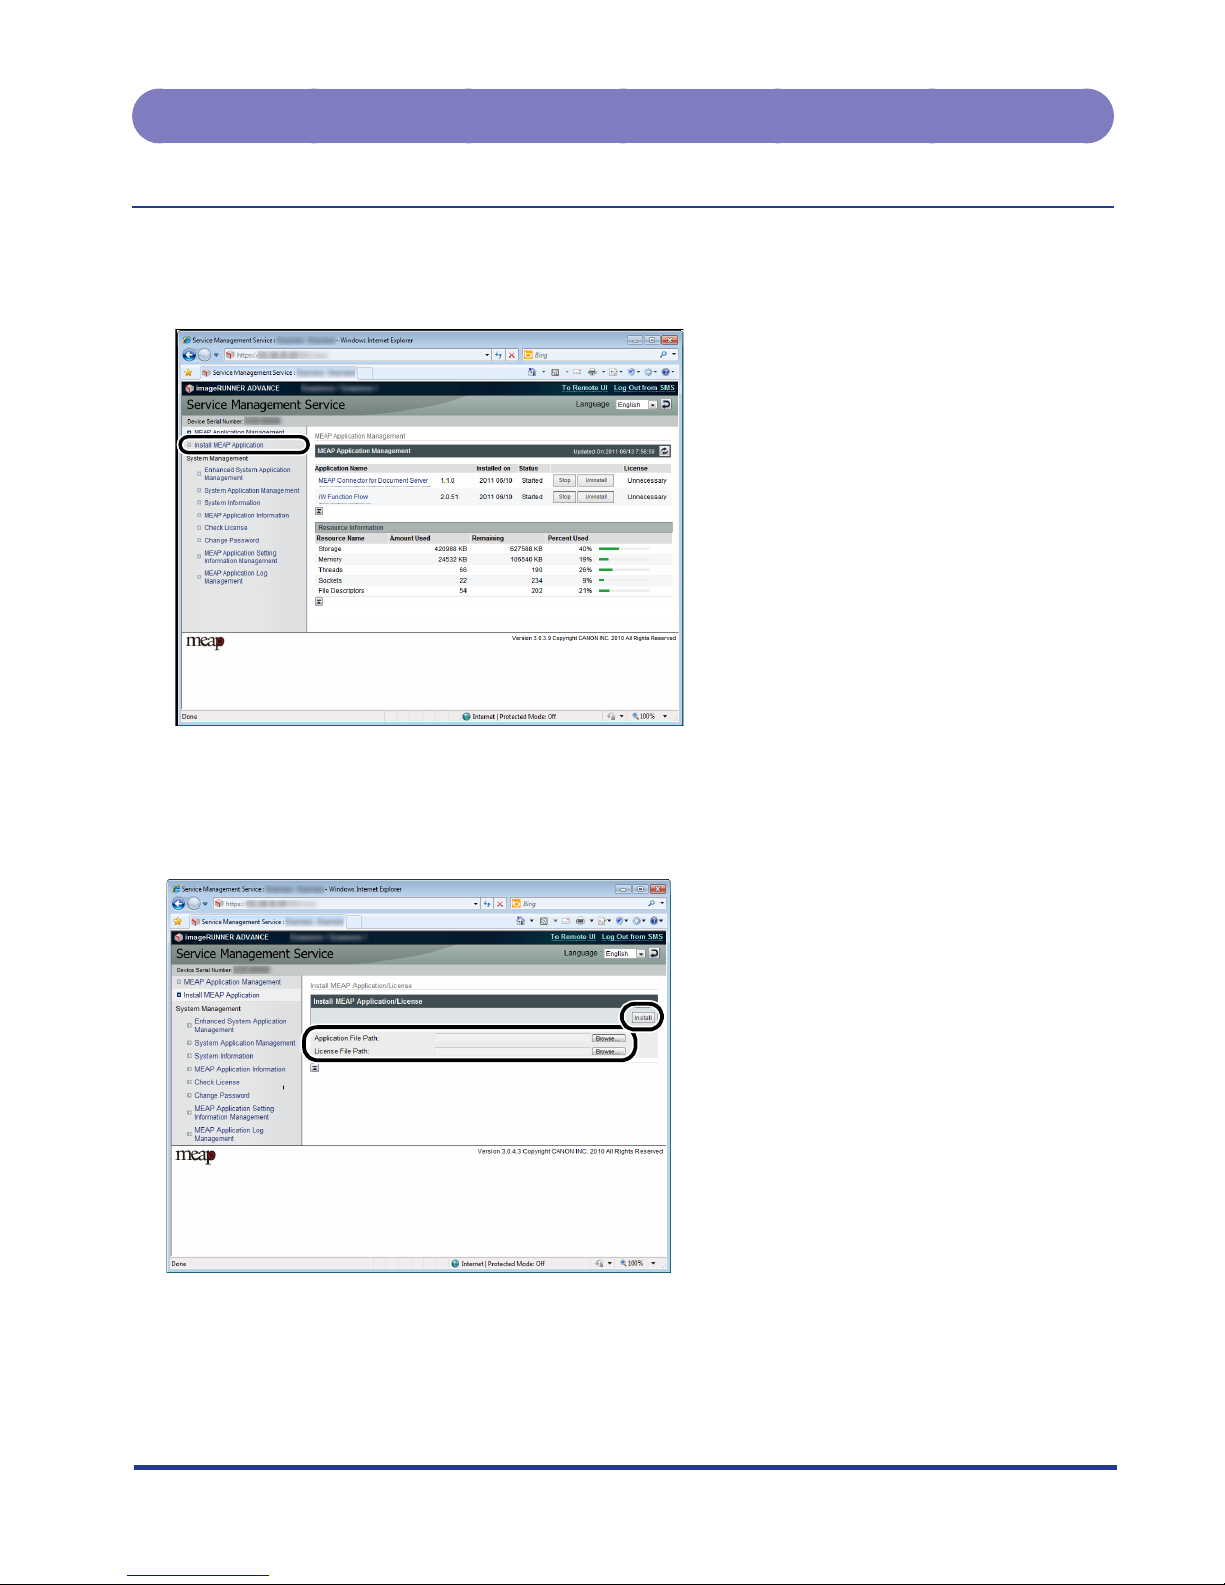
----
1.
Click [Install MEAP Application].
The [MEAP Application Management] page is displayed.
2.
Click [Browse] → select the application file and license file to install → click [Install].
Application file: A file with the 'jar' extension.
License file: A file with the 'lic' extension.
Page 22

Installing and Uninstalling PullPrint Service Provider
2-10
IMPORTANT
You cannot install only a license file.
When installing an application, make sure you specify the license file. You cannot install the
application without specifying the license file.
To update an existing application, first stop the application before installing the new application
and license file. You cannot update the application without first stopping it. For instructions on
stopping an application, see "Stopping an Application," on p. 2-15.
To add a license for an application that is already installed, add a license file. For more
information on adding a license file, see the manual accompanying your device.
•
•
•
•
3.
Confirm the information displayed on the installation confirmation page → click [Yes].
If you click [No], the application is not installed and you are returned to the [MEAP Application
Management] page.
4.
When the [Licence Agreement] page is displayed during the installation, review the
licence terms, and click [I Accept] to resume installation.
After installation is complete, the installation complete screen is displayed.
Page 23
Installing and Uninstalling PullPrint Service Provider
2-11
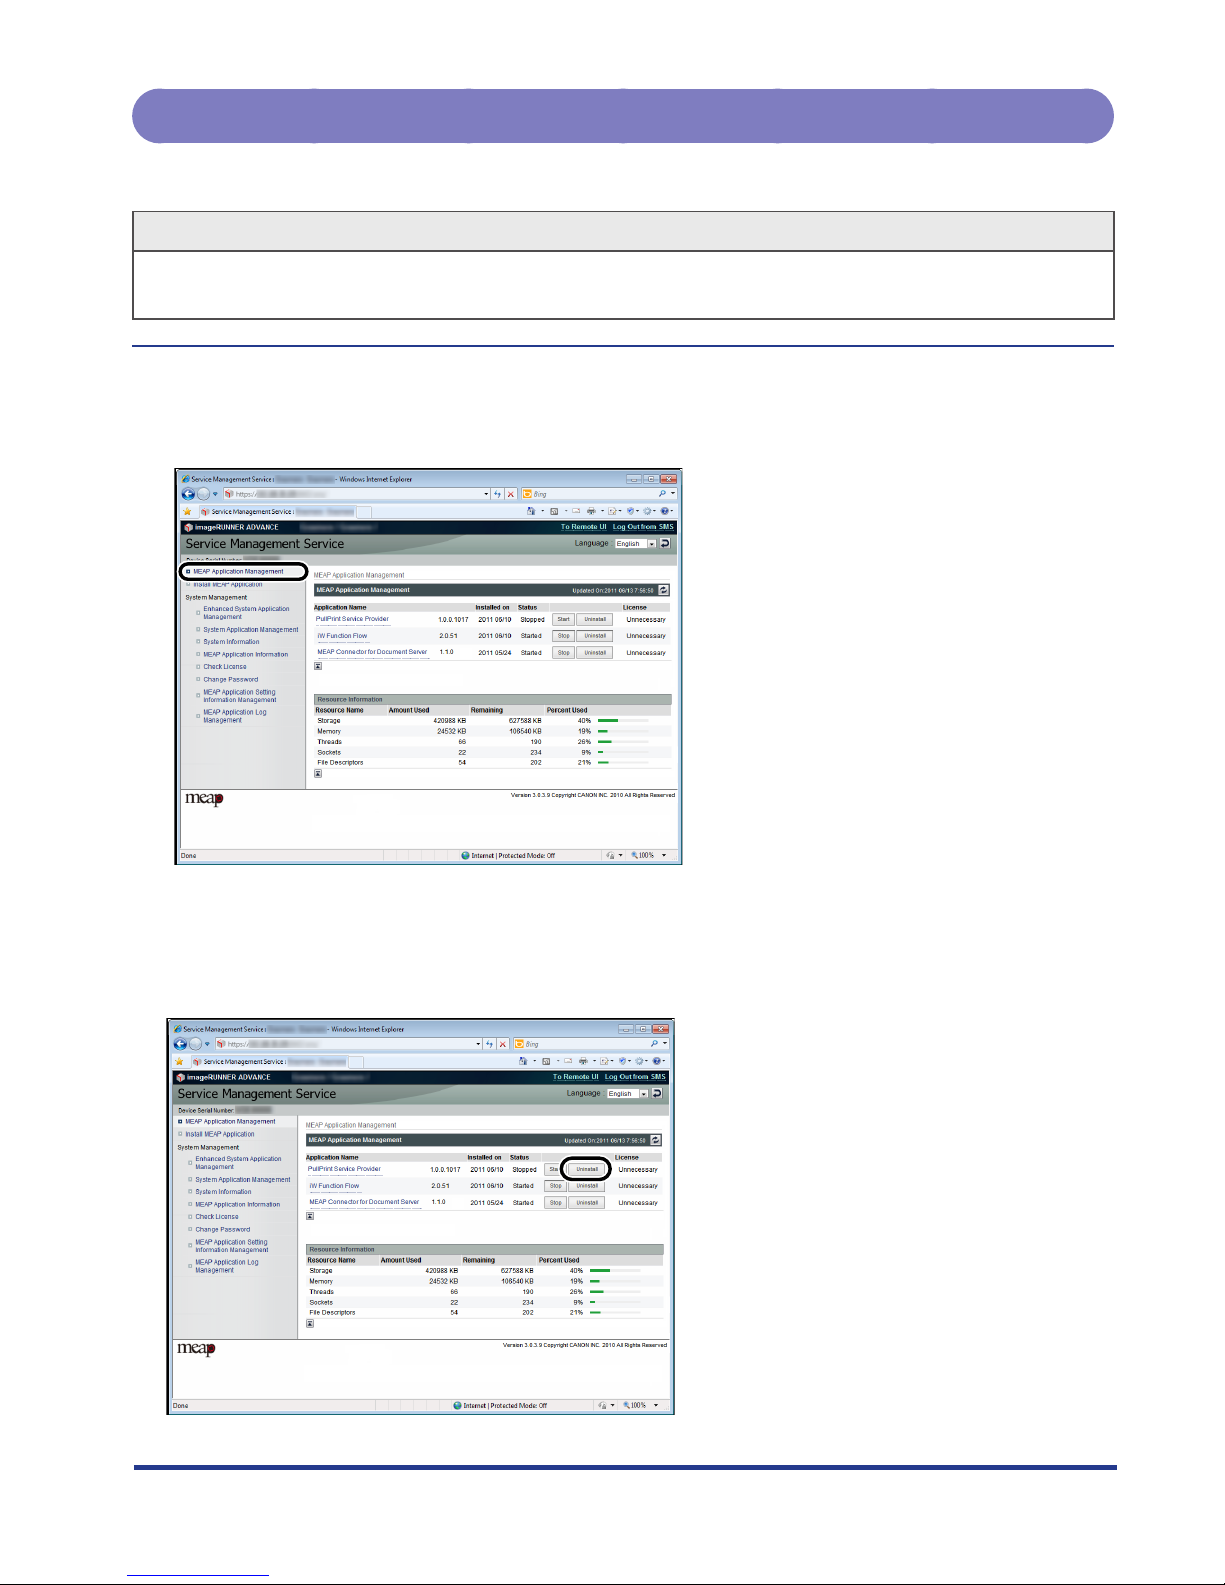
Uninstallation
Uninstall the installed PullPrint Service Provider.
NOTE
The license files must be disabled before uninstalling PullPrint Service Provider. For more
information on disabling a license file, see the manual accompanying your device.
----
1.
Click [MEAP Application Management].
The [MEAP Application Management] page is displayed.
2.
Click [Uninstall] for the application you want to uninstall.
Page 24

Installing and Uninstalling PullPrint Service Provider
2-12
3.
Click [Yes] on the displayed screen.
If you click [No], the application is not uninstalled and you are returned to the [MEAP Application
Management] page.
IMPORTANT
If the application to uninstall is linked with another application, the confirmation message <A
package exported from this application cannot be used.> may be displayed. If you uninstall
such applications, you may not be able to use other applications.
You can only uninstall applications for which a license is not installed. To uninstall an application
with a different license status, disable the license file on the [License File Management] page
before uninstalling the application. For more information on disabling a license file, see the
manual accompanying your device.
To disable a license file, the application must be stopped. For instructions on stopping an
application, see "Stopping an Application," on p. 2-15.
Modified settings are retained after uninstallation of PullPrint Service Provider if you are using a
device with Configuration service.
If the device you are using does not support Configuration service and you uninstall PullPrint
Service Provider, the modified settings are discarded. Even if you reinstall PullPrint Service
Provider, the default settings are applied.
If you update an existing version without uninstalling, you can retain the previous settings for
PullPrint Service Provider.
•
•
•
•
•
Page 25
Starting and Stopping an Application
2-13
Starting and Stopping an Application
You can start or stop the installed PullPrint Service Provider.
IMPORTANT
Even if installation is complete, you cannot use PullPrint Service Provider on your system until you
start the application.
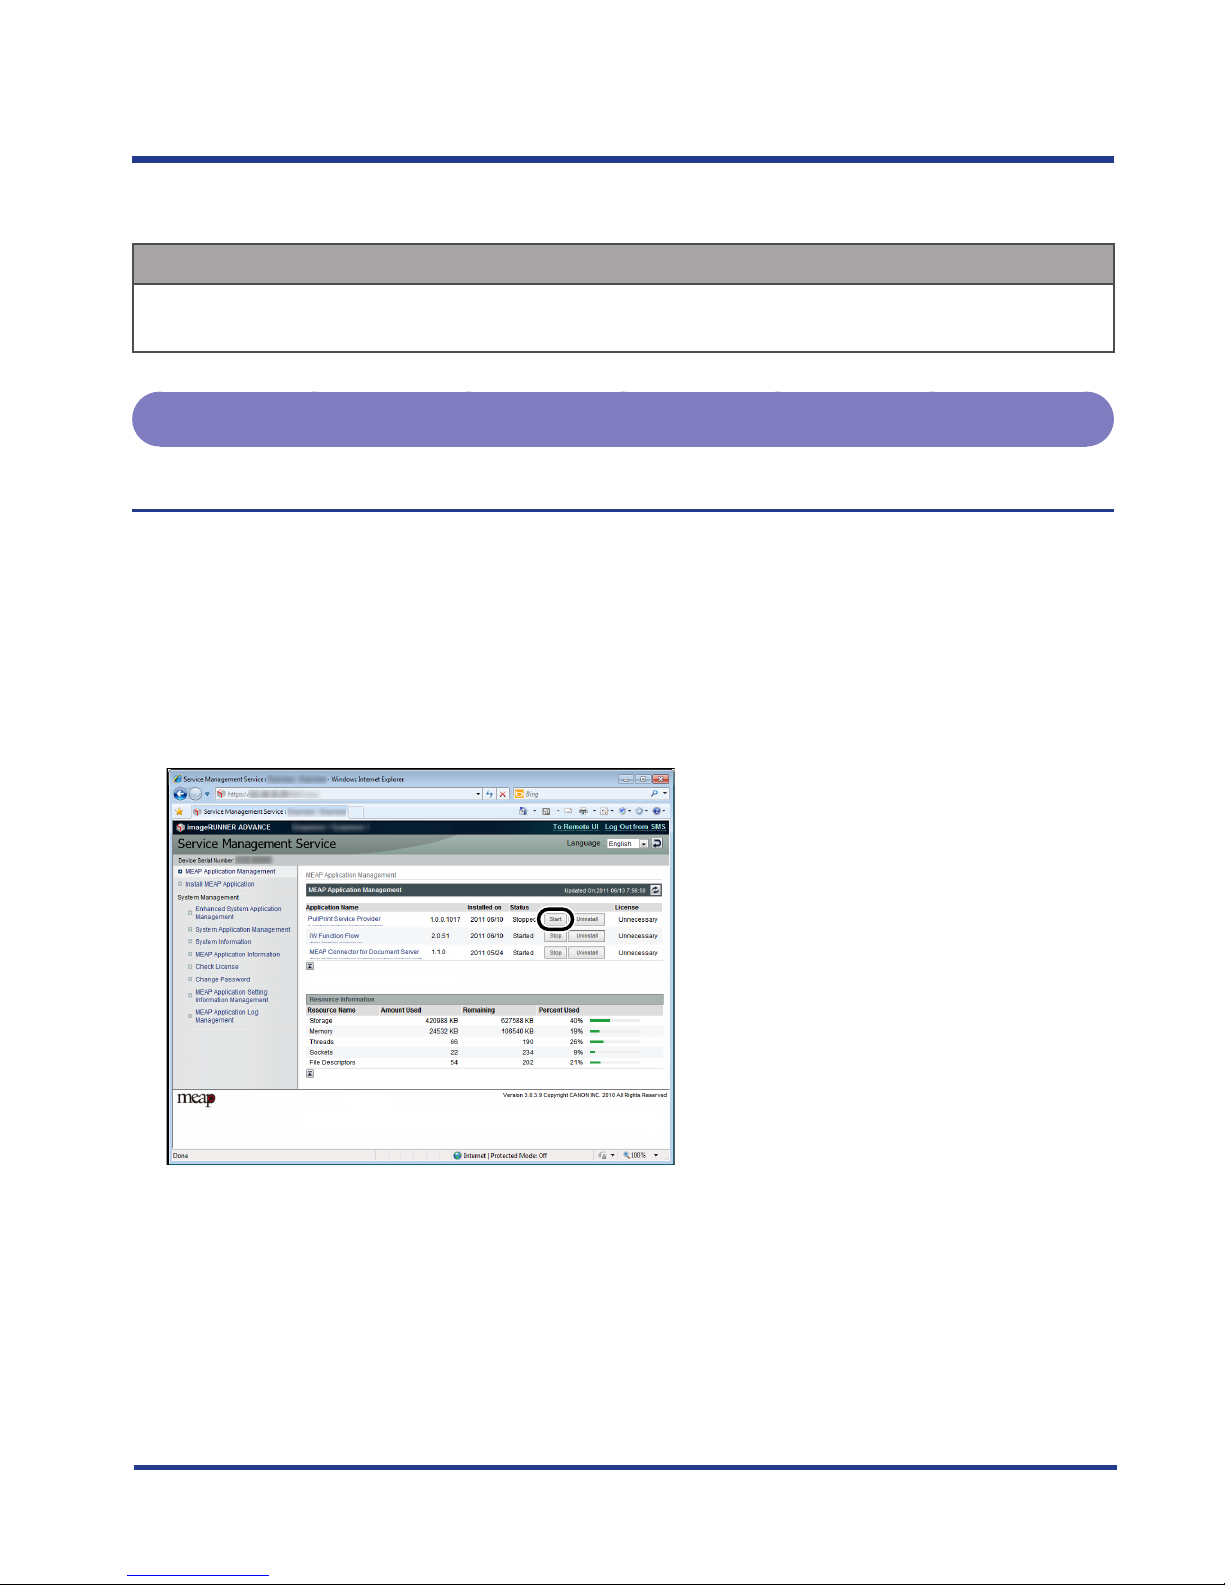
Starting an Application
Start PullPrint Service Provider.
----
1.
Click [MEAP Application Management].
The [MEAP Application Management] page is displayed.
2.
Click [Start] for the application you want to start.
The application is started.
Page 26

Starting and Stopping an Application
2-14
IMPORTANT
For more information on the application status, license status, and resource information
displayed on the [MEAP Application Management] page, see the manual accompanying your
device.
You cannot start applications whose required license file has not been installed.
When the resources required for memory, threads, sockets, or file descriptors has run out, the
application will not start, even if you click [Start].
•
•
•
Page 27
Starting and Stopping an Application
2-15
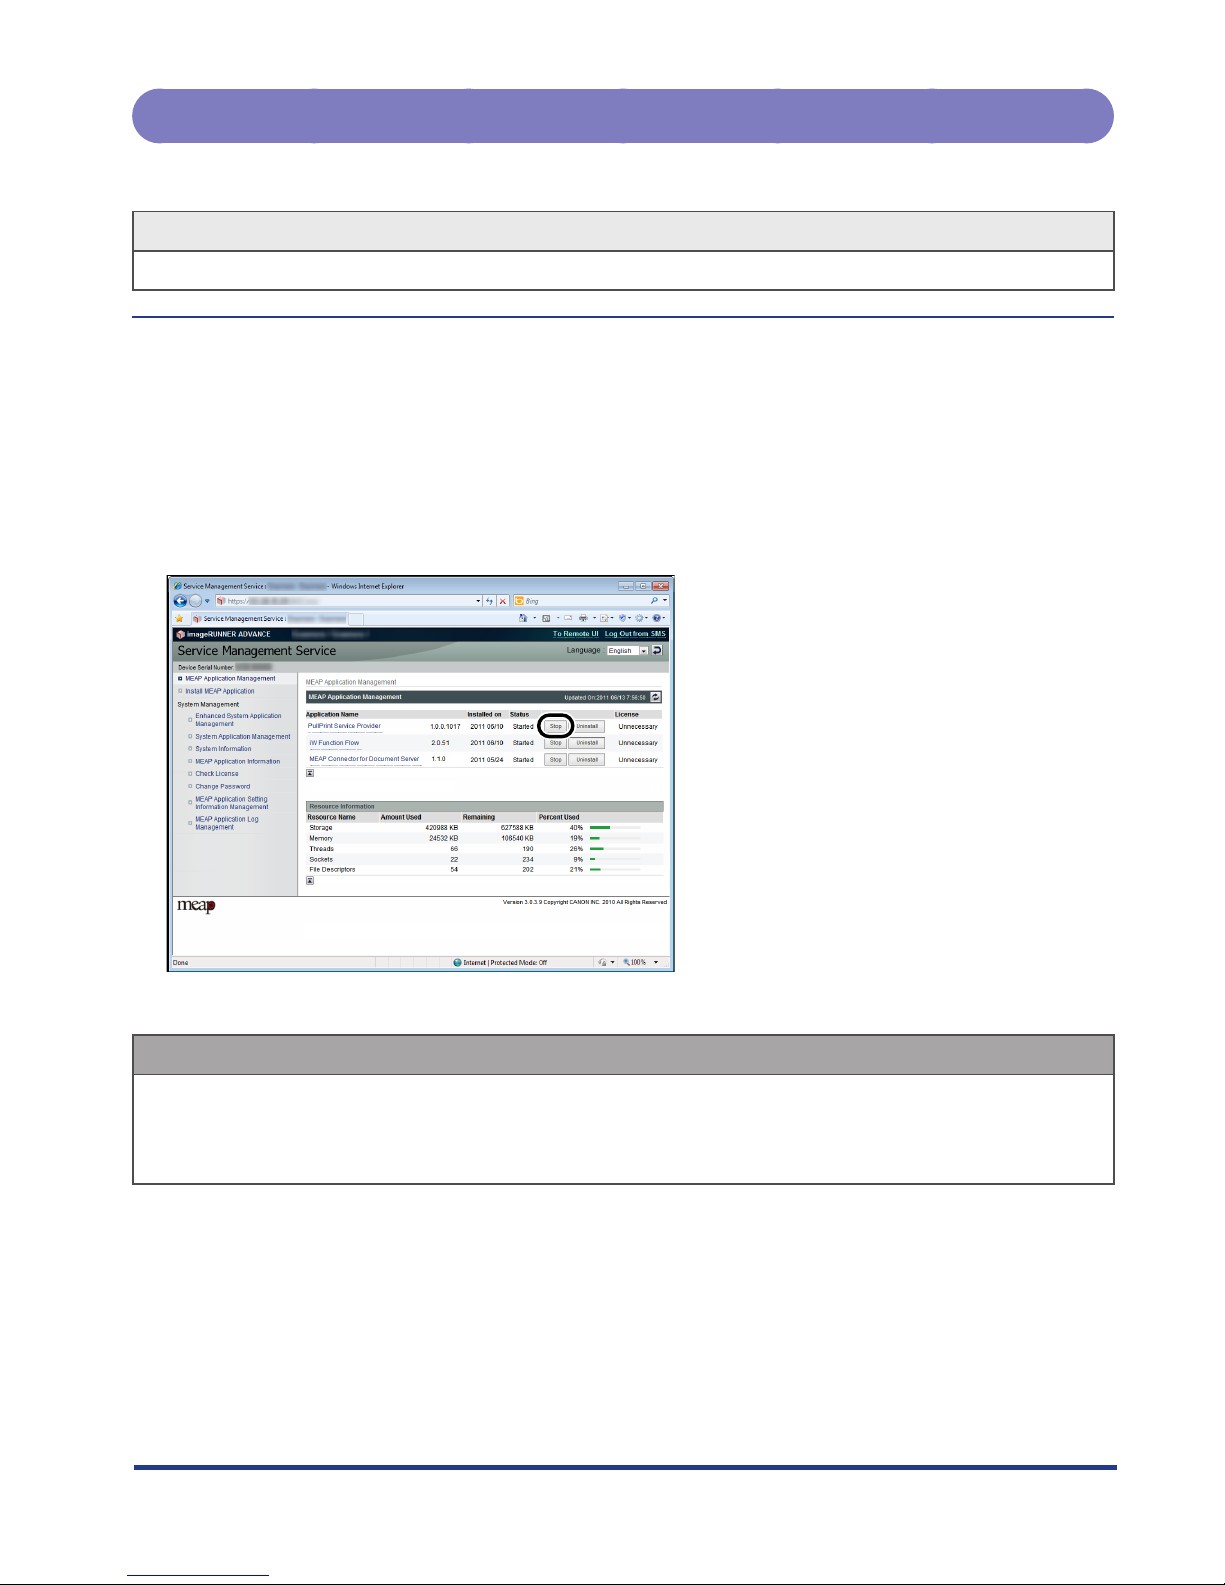
Stopping an Application
Stop PullPrint Service Provider.
NOTE
To update an application, you must close the application you want to update.
----
1.
Click [MEAP Application Management].
The [MEAP Application Management] page is displayed.
2.
Click [Stop] for the application you want to stop.
The application is stopped.
IMPORTANT
Even if you stop an application, the following information remains:
Settings changed with the Change Settings function
Log files
•
•
Page 28
Confirming Application Details
2-16
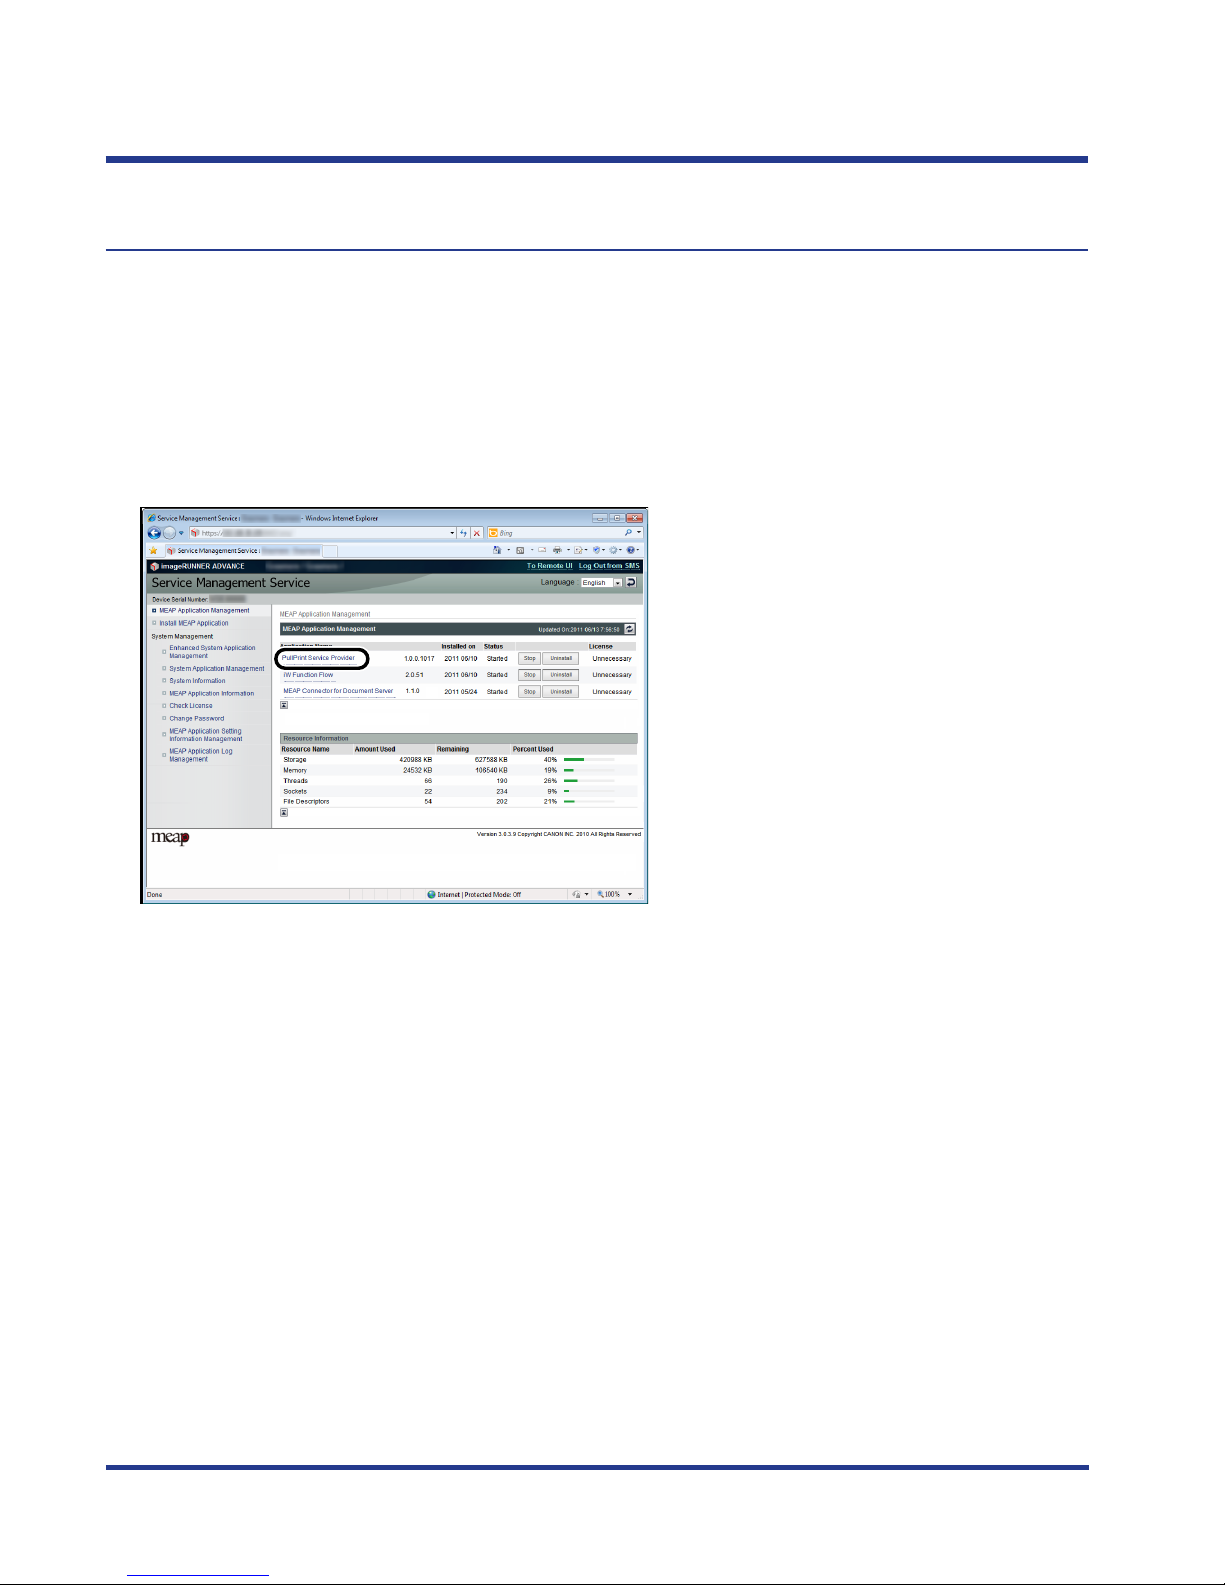
Confirming Application Details
You can confirm the details of PullPrint Service Provider.
----
1.
Click [MEAP Application Management].
The [MEAP Application Management] page is displayed.
2.
Click [PullPrint Service Provider] displayed in [Application Name].
The [Application/License Information] page is displayed.
3.
Confirm the application details.
Page 29
Confirming PullPrint Service Provider Settings
2-17
Confirming PullPrint Service Provider
Settings
To use PullPrint Service Provider after installing it in a MEAP-compatible Canon device, you must
correctly specify PullPrint Service Provider settings.
You can use the Management Console to confirm PullPrint Service Provider settings.
IMPORTANT
Even if PullPrint Service Provider has been started, the settings must be correctly set to use it on
your system.
----
1.
Log in to the Management Console of PullPrint Service Provider.
The Change Settings screen is displayed.
NOTE
For instructions on logging in to the Management Console, see "Specifying Settings from a Web
Browser," on p. 3-3.
2.
Confirm that the settings are correct.
NOTE
For more information on the settings, see "Setting Item List," on p. 3-9.
If the settings are not correct, they must be changed. For more information on changing the
settings, see "PullPrint Service Provider Settings," on p. 3-2.
•
•
Page 30

Confirming PullPrint Service Provider Settings
2-18
Page 31

3-1
3
$)"15&3
Specifying PullPrint Service
Provider Settings
This chapter provides instructions on specifying PullPrint Service Provider settings.
----
PullPrint Service Provider Settings .............................................................................................3-2
Setting Precautions ................................................................................................................................................. 3-2
Specifying Settings from a Web Browser ...........................................................................................................3-3
Specifying Settings from the Settings File .........................................................................................................3-6
Setting Item List ...........................................................................................................................3-9
PullPrint Service Provider Settings ....................................................................................................................3-10
Register Allowed Print Data Sources .................................................................................................................3-12
Single Sign-on User Settings ...............................................................................................................................3-13
Changing a Password ................................................................................................................3-14
Changing the Display Language ...............................................................................................3-17
Page 32

PullPrint Service Provider Settings
3-2
PullPrint Service Provider Settings
The following methods are available for specifying PullPrint Service Provider settings:
Specifying Settings from a Web Browser (p. 3-3)
Specifying Settings from the Settings File (p. 3-6)
Setting Precautions
Web browser:
Do not use the Web browser's [Back] or [Forward] button. The settings may not be reflected if you
use these buttons.
If the browser is idle for five minutes, you are logged out and must log in again.
Settings file:
Do not edit settings other than those prescribed in the settings file.
•
•
•
•
•
Page 33
PullPrint Service Provider Settings
3-3
Specifying Settings from a Web Browser
The procedure for specifying settings from a Web browser is as follows.
1.
Enter the URL below in the address bar of the Web browser.
http://<IP address of the device>:8000/PullPrintServiceProvider/Console
or
https://<IP address of the device>:8443/PullPrintServiceProvider/Console
2.
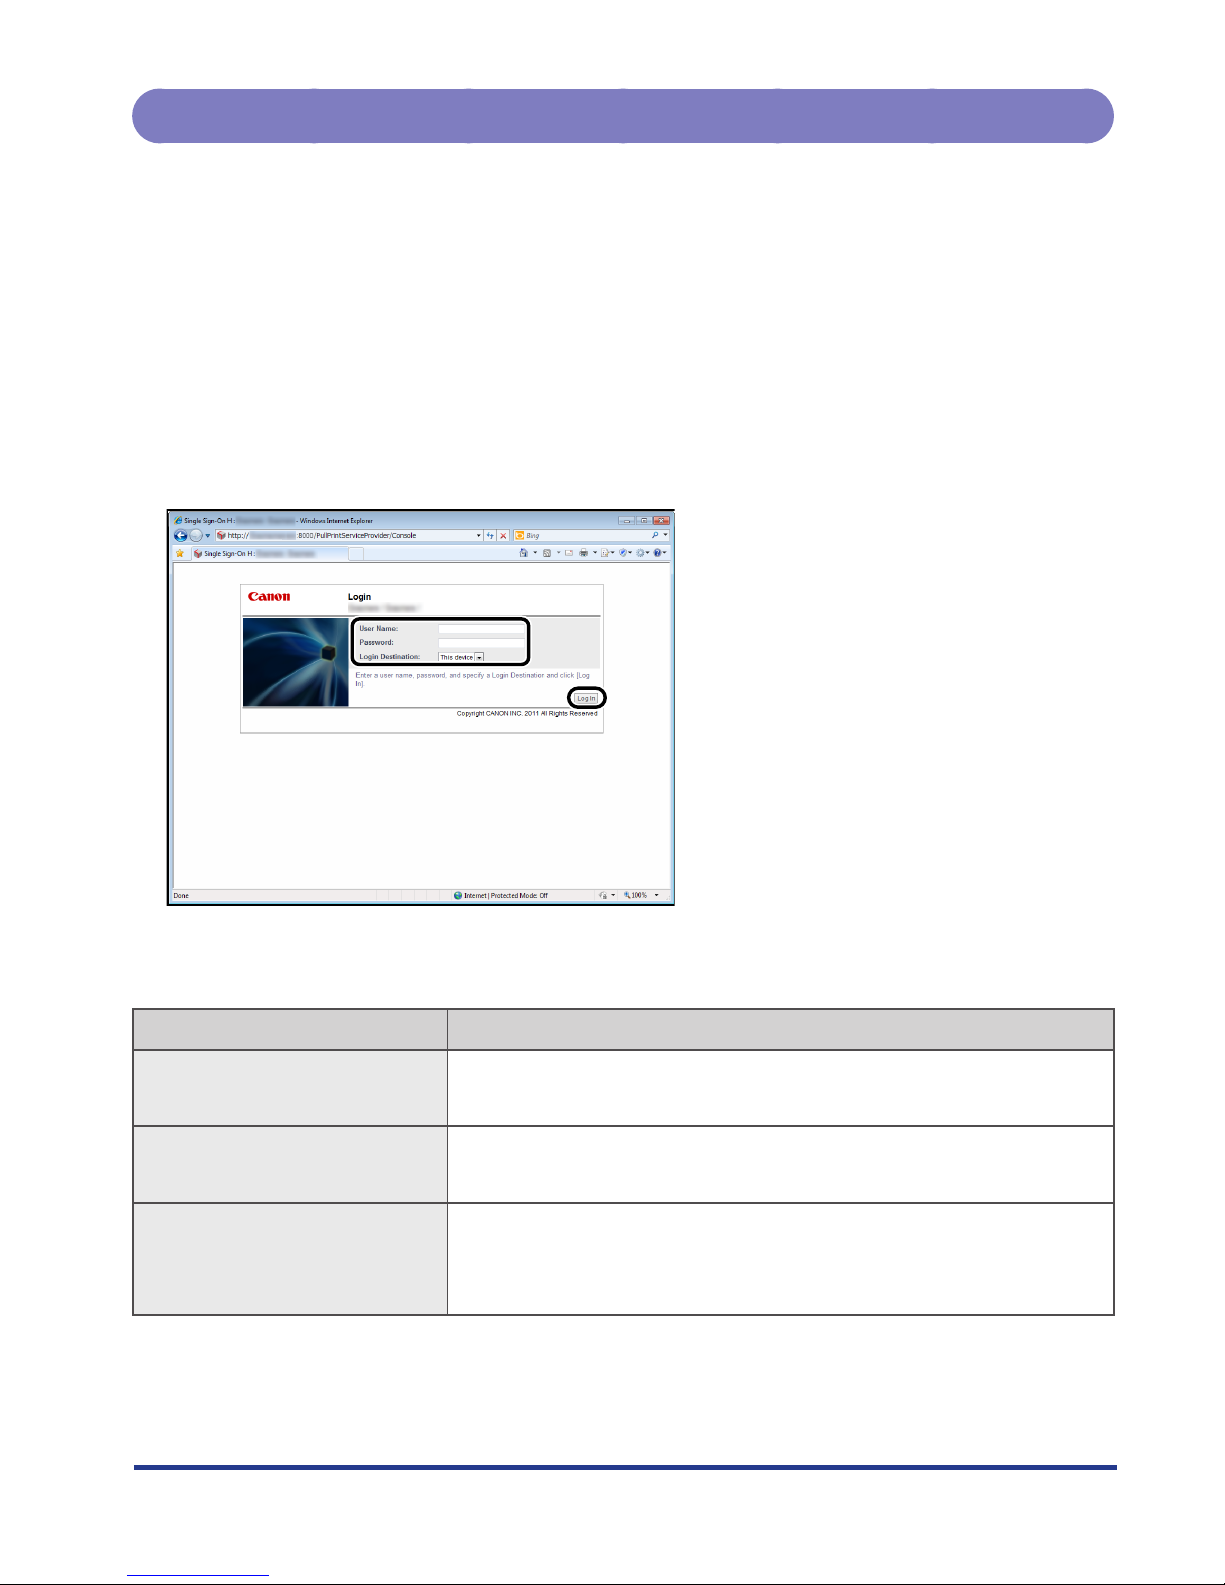
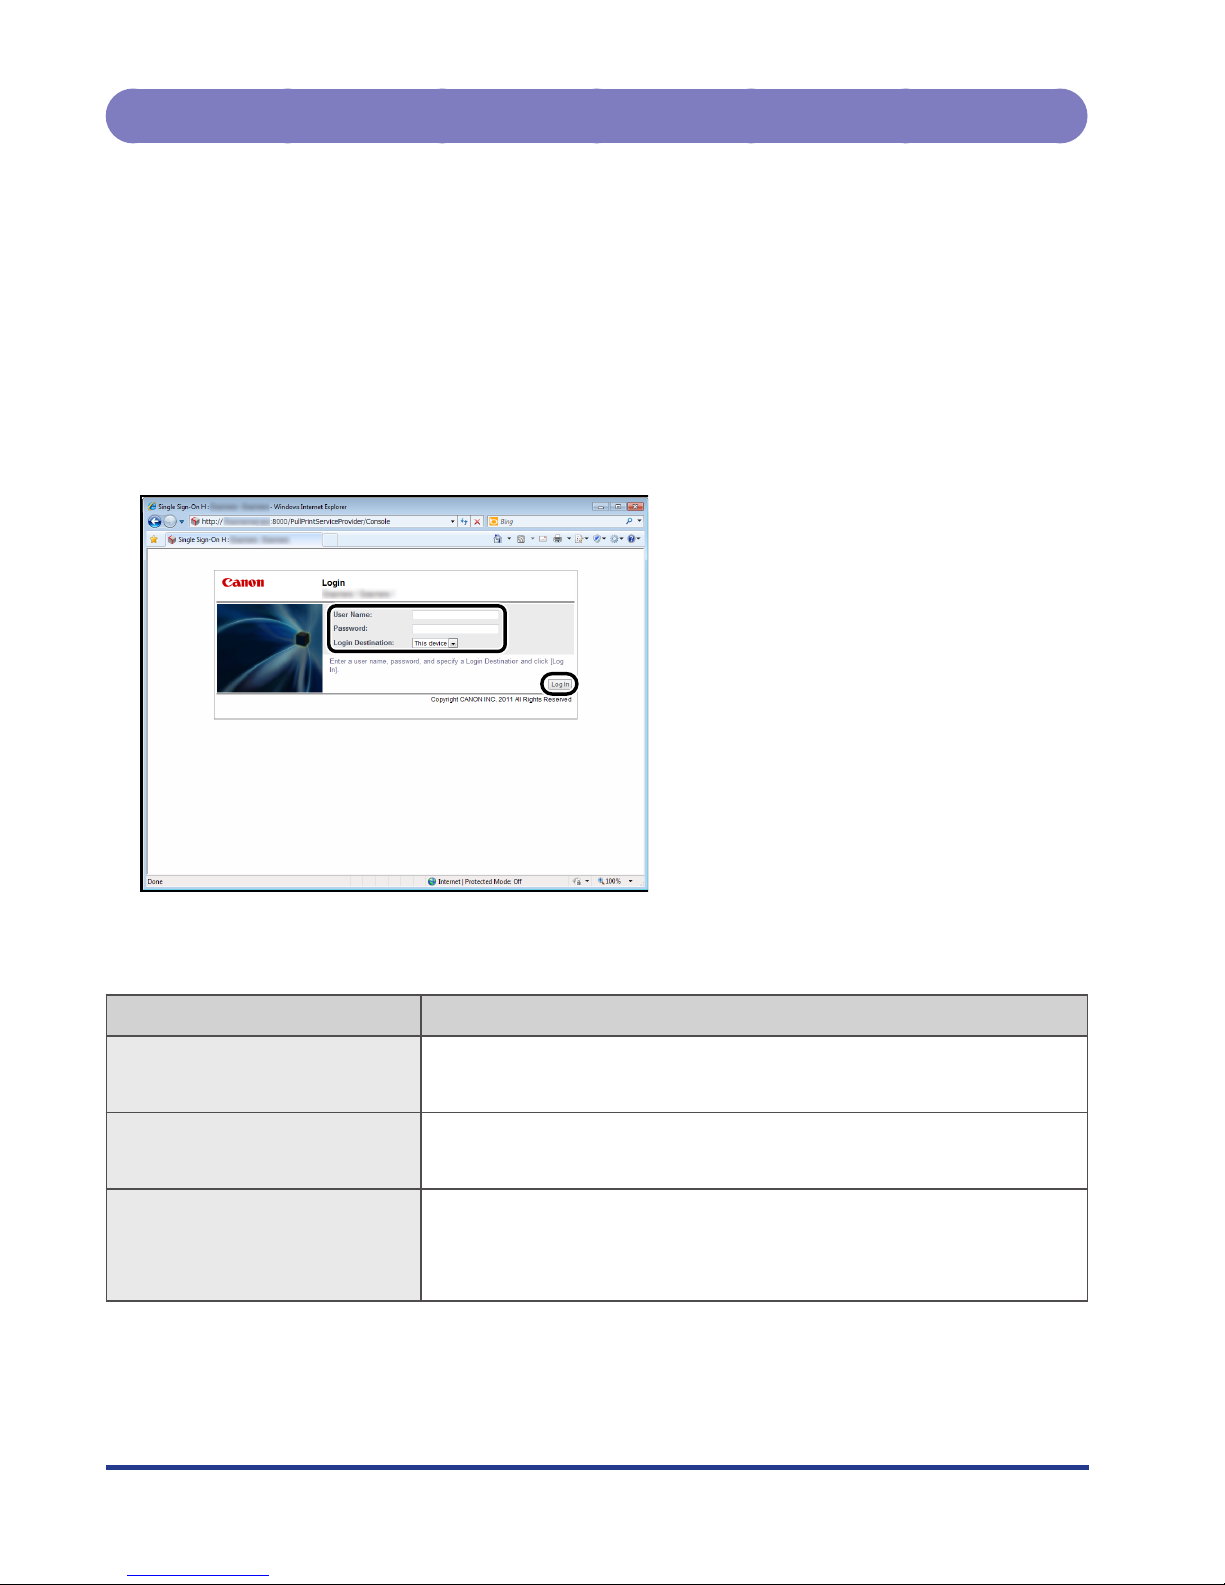
Enter the login ID and password.
You are logged in to the device.
Enter or select the necessary items according to the set login service.
Set Login Service Operation
Department ID Management 1. Enter a Department ID and PIN.
2. Click [Log In].
SDL
Single Domain SSO
1. Enter a user name and password.
2. Click [Log In].
Multi Domain SSO
SSO-H
1. Enter a user name and password.
2. Select the login destination.
3. Click [Log In].
For more information on login services, see the manual accompanying your device.
Page 34
PullPrint Service Provider Settings
3-4
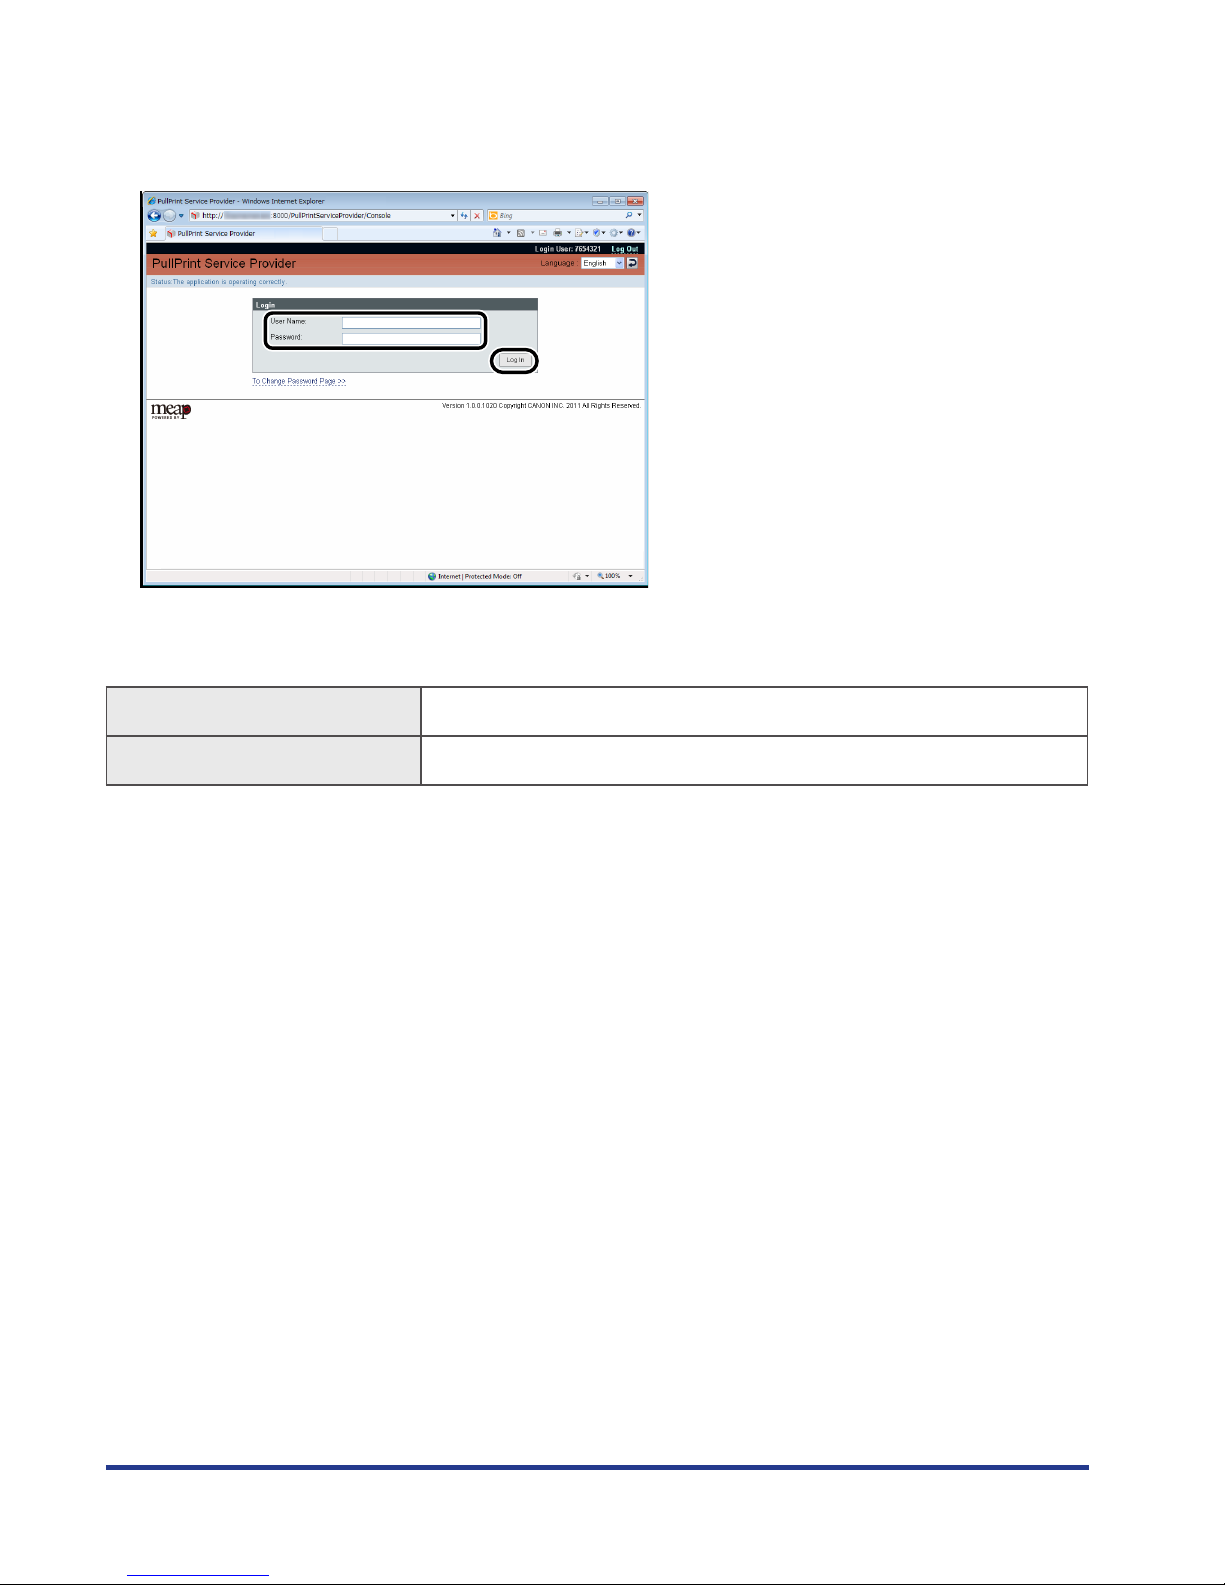
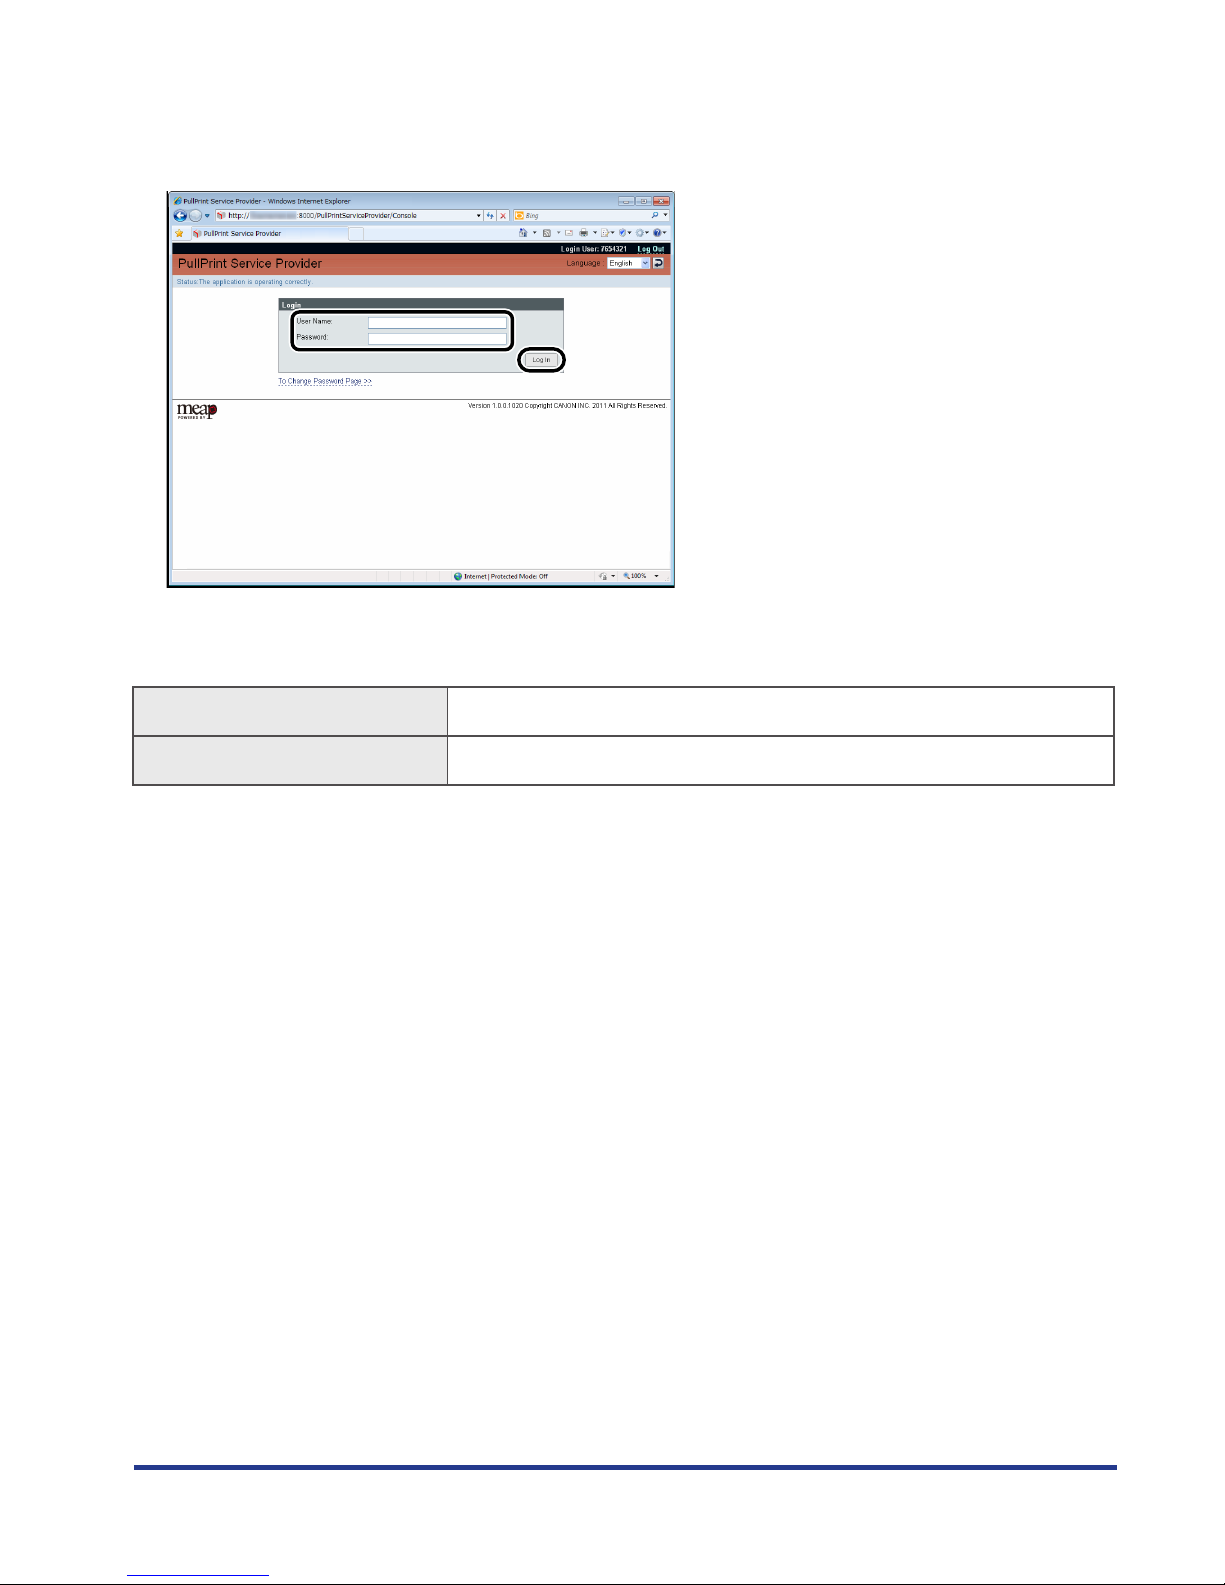
3.
Enter the user name and password → click [Log In].
You are logged in to PullPrint Service Provider.
The default user name and password are as follows:
User name pullprintserviceprovider
Password pullprintserviceprovider
For instructions on changing the password, see "Changing a Password," on p. 3-14.
4.
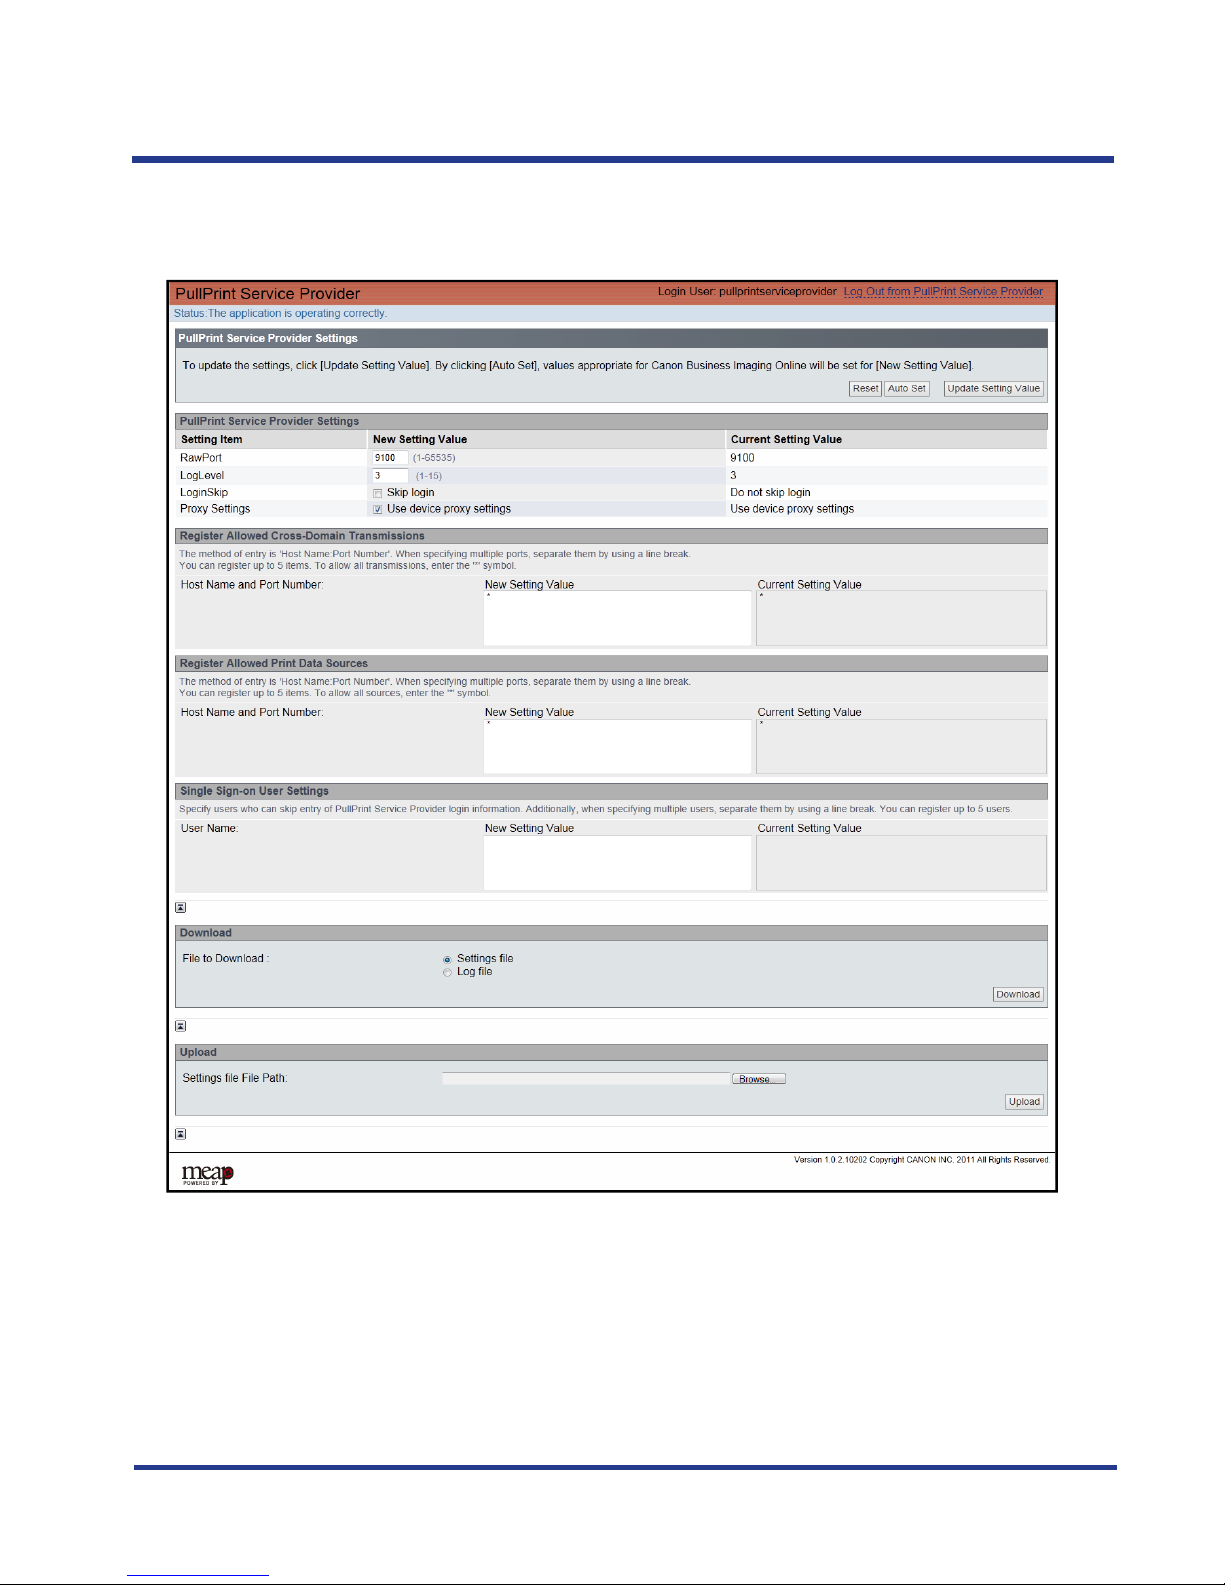
Click [Auto Set].
If you click [Auto Set], enter the settings required when you use Canon Business Imaging Online in
[Register Allowed Cross-Domain Transmissions] and [Register Allowed Print Data Sources].
5.
Click [Update Setting Value].
Page 35
PullPrint Service Provider Settings
3-5
6.
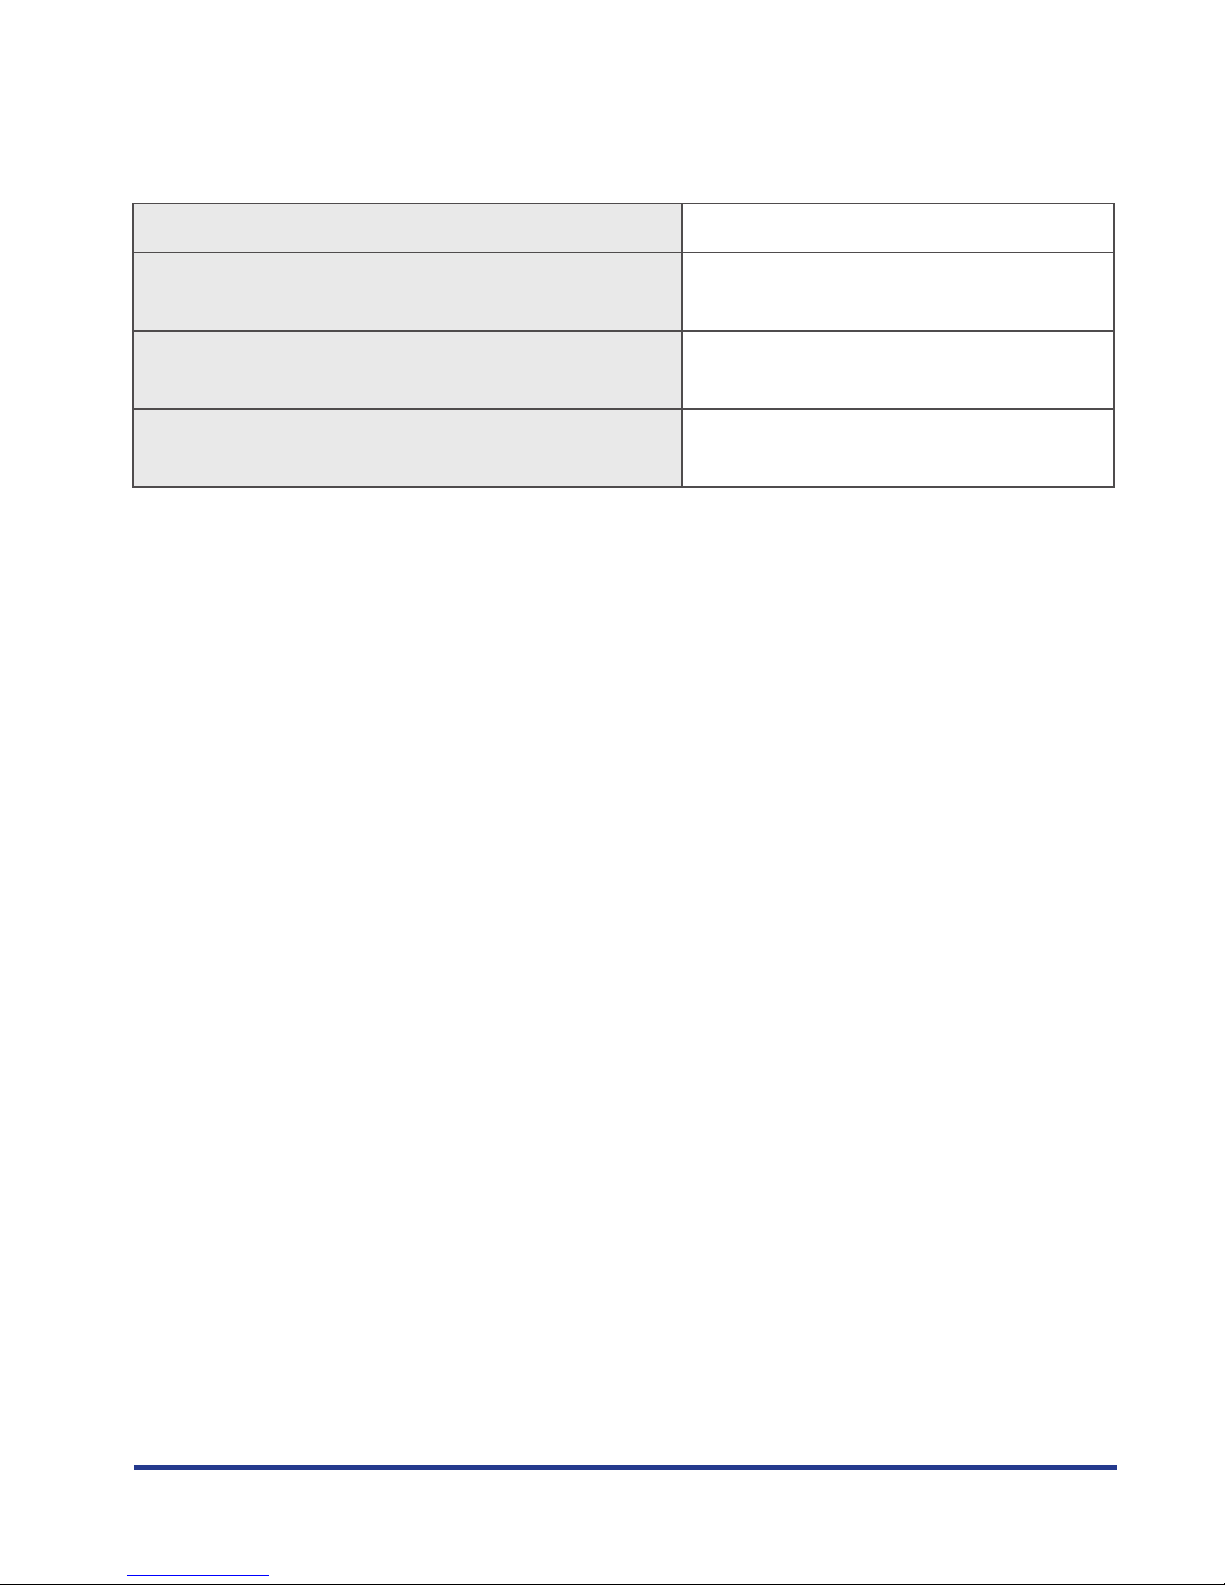
Specify the settings below, as necessary.
PullPrint Service Provider Settings (p. 3-10) Various PullPrint Service Provider settings
Register Allowed Cross-Domain Transmissions (p. 3-11) Host name and port number settings for
cloud services or other service to add
Register Allowed Print Data Sources (p. 3-12) Host name and port number settings for
cloud services or other service to add
Single Sign-on User Settings (p. 3-13) Management Console SSO User/
Department ID settings
7.
Click [Update Setting Value] again.
8.
Log out from the Management Console.
9.
Restart PullPrint Service Provider in SMS.
The settings are now complete.
Page 36
PullPrint Service Provider Settings
3-6
Specifying Settings from the Settings File
The procedure for downloading the settings file and specifying the settings is as follows.
1.
Enter the URL below in the address bar of the Web browser.
http://<IP address of the device>:8000/PullPrintServiceProvider/Console
or
https://<IP address of the device>:8443/PullPrintServiceProvider/Console
2.
Enter the login ID and password.
You are logged in to the device.
Enter or select the necessary items according to the set login service.
Set Login Service Operation
Department ID Management 1. Enter a Department ID and PIN.
2. Click [Log In].
SDL
Single Domain SSO
1. Enter a user name and password.
2. Click [Log In].
Multi Domain SSO
SSO-H
1. Enter a user name and password.
2. Select the login destination.
3. Click [Log In].
For more information on login services, see the manual accompanying your device.
Page 37
PullPrint Service Provider Settings
3-7
3.
Enter the user name and password → click [Log In].
You are logged in to PullPrint Service Provider.
The default user name and password are as follows:
User name pullprintserviceprovider
Password pullprintserviceprovider
For instructions on changing the password, see "Changing a Password," on p. 3-14.
4.
Select the settings file → click [Download].
5.
Download the file.
Save the PSP.ini file in the desired location.
6.
Open the file → specify the settings.
For the setting values in the PSP.ini file, see "Setting Item List," on p. 3-9.
7.
Upload.
Click [Browse] → select the settings file → click [Upload] to upload to the device.
8.
Log out from the Management Console.
Page 38

PullPrint Service Provider Settings
3-8
9.
Restart PullPrint Service Provider in SMS.
The settings are now complete.
Page 39
Setting Item List
3-9
Setting Item List
Management Console setting items and setting content are described below.
If you change the settings, it is necessary to restart PullPrint Service Provider in SMS.
Page 40
Setting Item List
3-10
PullPrint Service Provider Settings
Various PullPrint Service Provider settings
RawPort
Setting
Raw Print Port Number for device
Set within range of 1 to 65535
•
•
Default Value
9100
Settings file name
ServiceProvider.RawPort
LogLevel
Setting
Log output level
Set within range of 1 to 15
•
•
Default Value
3
Settings file name
Common.LogLevel
LoginSkip
Setting
Skip the Login screen of PullPrint Service Provider
Not selected: Display login screen (0)
Selected: Skip login screen (1)
Default Value
Display login screen (0)
Settings file name
Common.LoginSkip
Page 41

Setting Item List
3-11
Proxy Settings
Setting
Using device proxy
Not selected: Do not use device proxy settings (0)
When not using a proxy, a DNS server address must be set in the device
settings.
Selected: Use device proxy settings (1)
When using a proxy, proxy settings must be set in the device settings.
There is no need to set a DNS server address in the device settings.
Default Value
Use device proxy settings (1)
Settings file name
ServiceProvider.UseProxy
Register Allowed Cross-Domain Transmissions
To print from a Web browser, cross-domain transmissions must be allowed with the setting below.
For Canon Business Imaging Online, you must allow prnwm.a01.c-aas.com:443.
Host Name and Port Number
Setting
Host Name: Port Number
Separate with line break(enter \r\n breaks in the settings file)
Enter up to 1,024 characters for the host name, and set the port number
within the range of 1 to 65535
Maximum number of settings: 5
•
•
•
•
Example
Host name:
Abc.com:8000
IP address:
123.123.123.123:8000
Separation method:
Abc1.com:8000
Abc2.com:8000
Abc3.com:8000
Abc4.com:8000
Abc5.com:8000
•
•
•
Settings file name
ServiceProvider.CrossDomain
Page 42

Setting Item List
3-12
Register Allowed Print Data Sources
This setting allows the connection destination when PullPrint Service Provider retrieves print data.
For Canon Business Imaging Online, you must allow prnpprv.a01.c-aas.com:443.
Host Name and Port Number
Setting
Host Name: Port Number
Separate with line break (enter \r\n breaks in the settings file)
Enter up to 1,024 characters for the host name, and set the port number
within the range of 1 to 65535
Maximum number of settings: 5
•
•
•
•
Example
Host name:
Abc.com:8000
IP address:
123.123.123.123:8000
Separation method:
Abc1.com:8000
Abc2.com:8000
Abc3.com:8000
Abc4.com:8000
Abc5.com:8000
•
•
•
Settings file name
ServiceProvider.PullPrintAddress
Page 43

Setting Item List
3-13
Single Sign-on User Settings
Register the user names or Department IDs that skip the Login screen of the Management Console.
Separate each user with a comma (",") when specifying multiple users.
User Name
Setting
User Name or Department ID
Separate with line break (enter \r\n breaks in the settings file)
Maximum number of settings: 5
Restrictions
Enter a seven digit number starting with "0" for the Department ID
•
•
•
•
-
Example
User name:
Administrator
Department ID:
0000001
Separation method:
0000001
0000002
0000003
•
•
•
Settings file name
Common.ConsoleLogin
Page 44
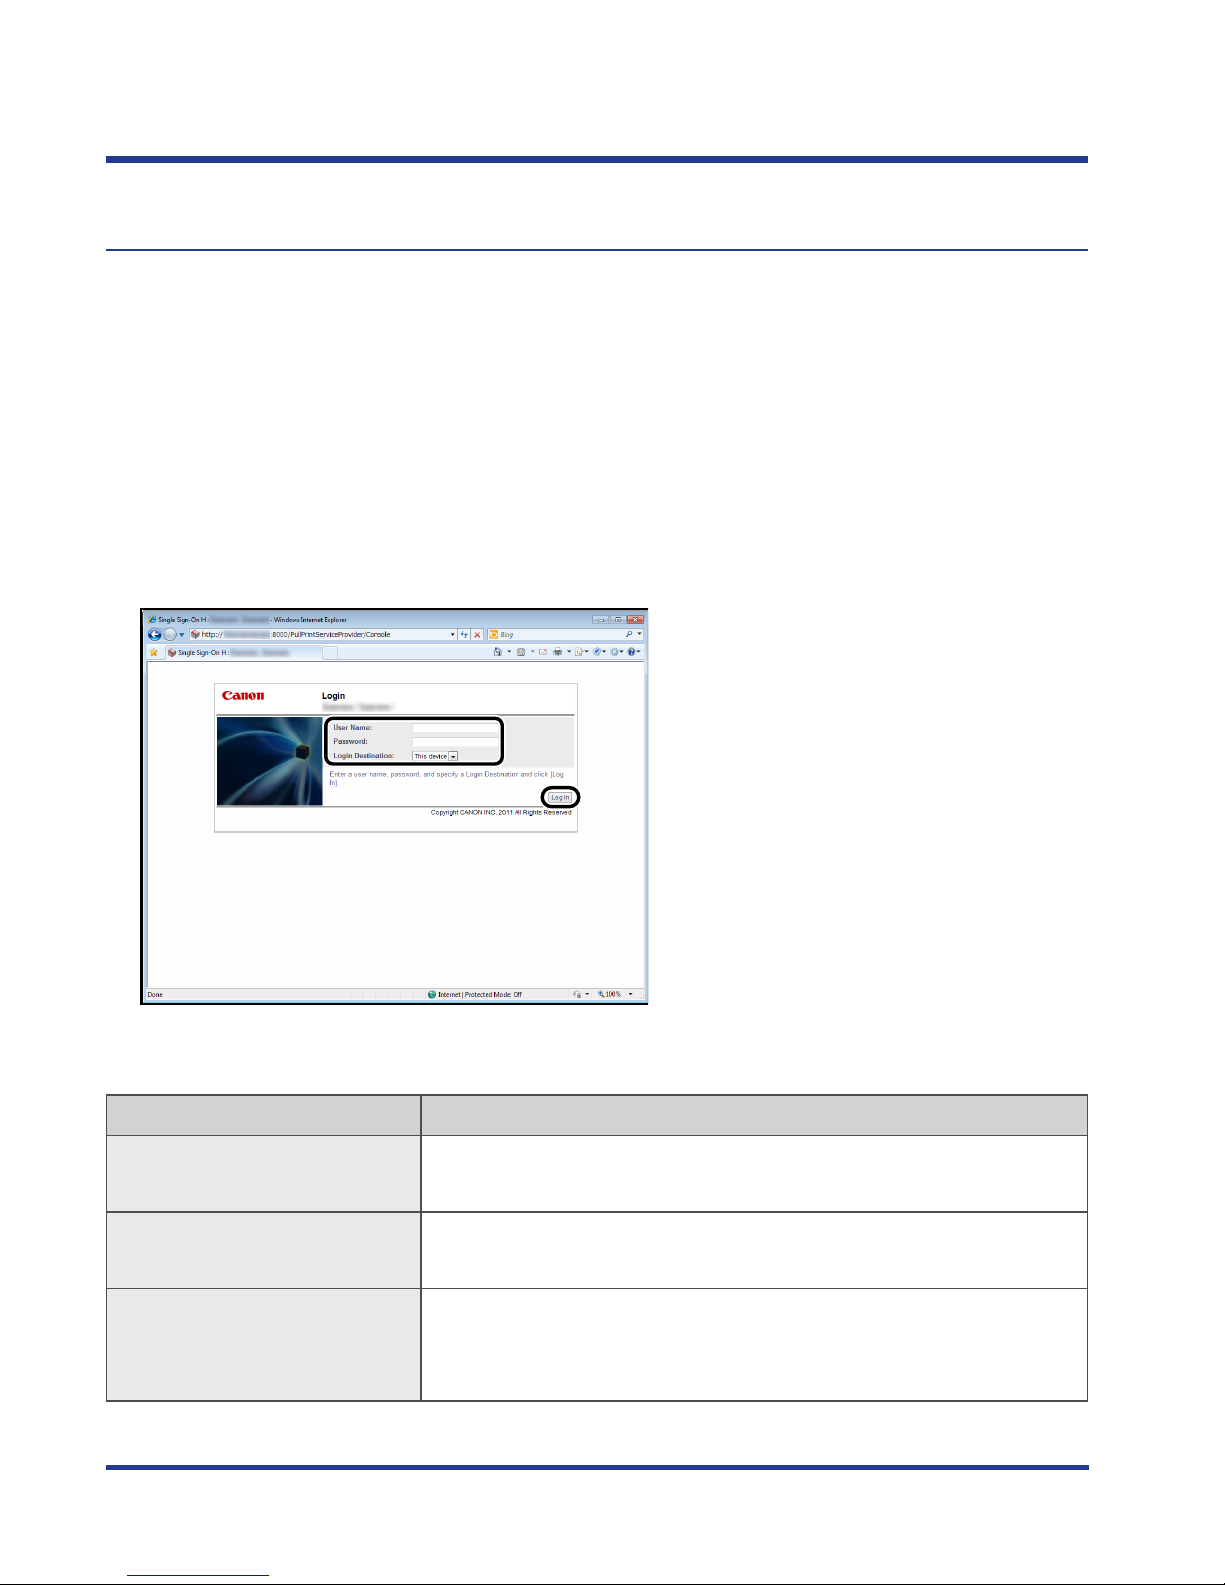
Changing a Password
3-14
Changing a Password
The procedure for changing the password for a PullPrint Service Provider login account is as follows.
----
1.
Enter the URL below in the address bar of the Web browser.
http://<IP address of the device>:8000/PullPrintServiceProvider/Console
or
https://<IP address of the device>:8443/PullPrintServiceProvider/Console
2.
Select or enter the necessary items according to the device model and login service you
are using.
You are logged in to the device.
Enter or select the necessary items according to the set login service.
Set Login Service Operation
Department ID Management 1. Enter a Department ID and PIN.
2. Click [Log In].
SDL
Single Domain SSO
1. Enter a user name and password.
2. Click [Log In].
Multi Domain SSO
SSO-H
1. Enter a user name and password.
2. Select the login destination.
3. Click [Log In].
For more information on login services, see the manual accompanying your device.
Page 45
Changing a Password
3-15
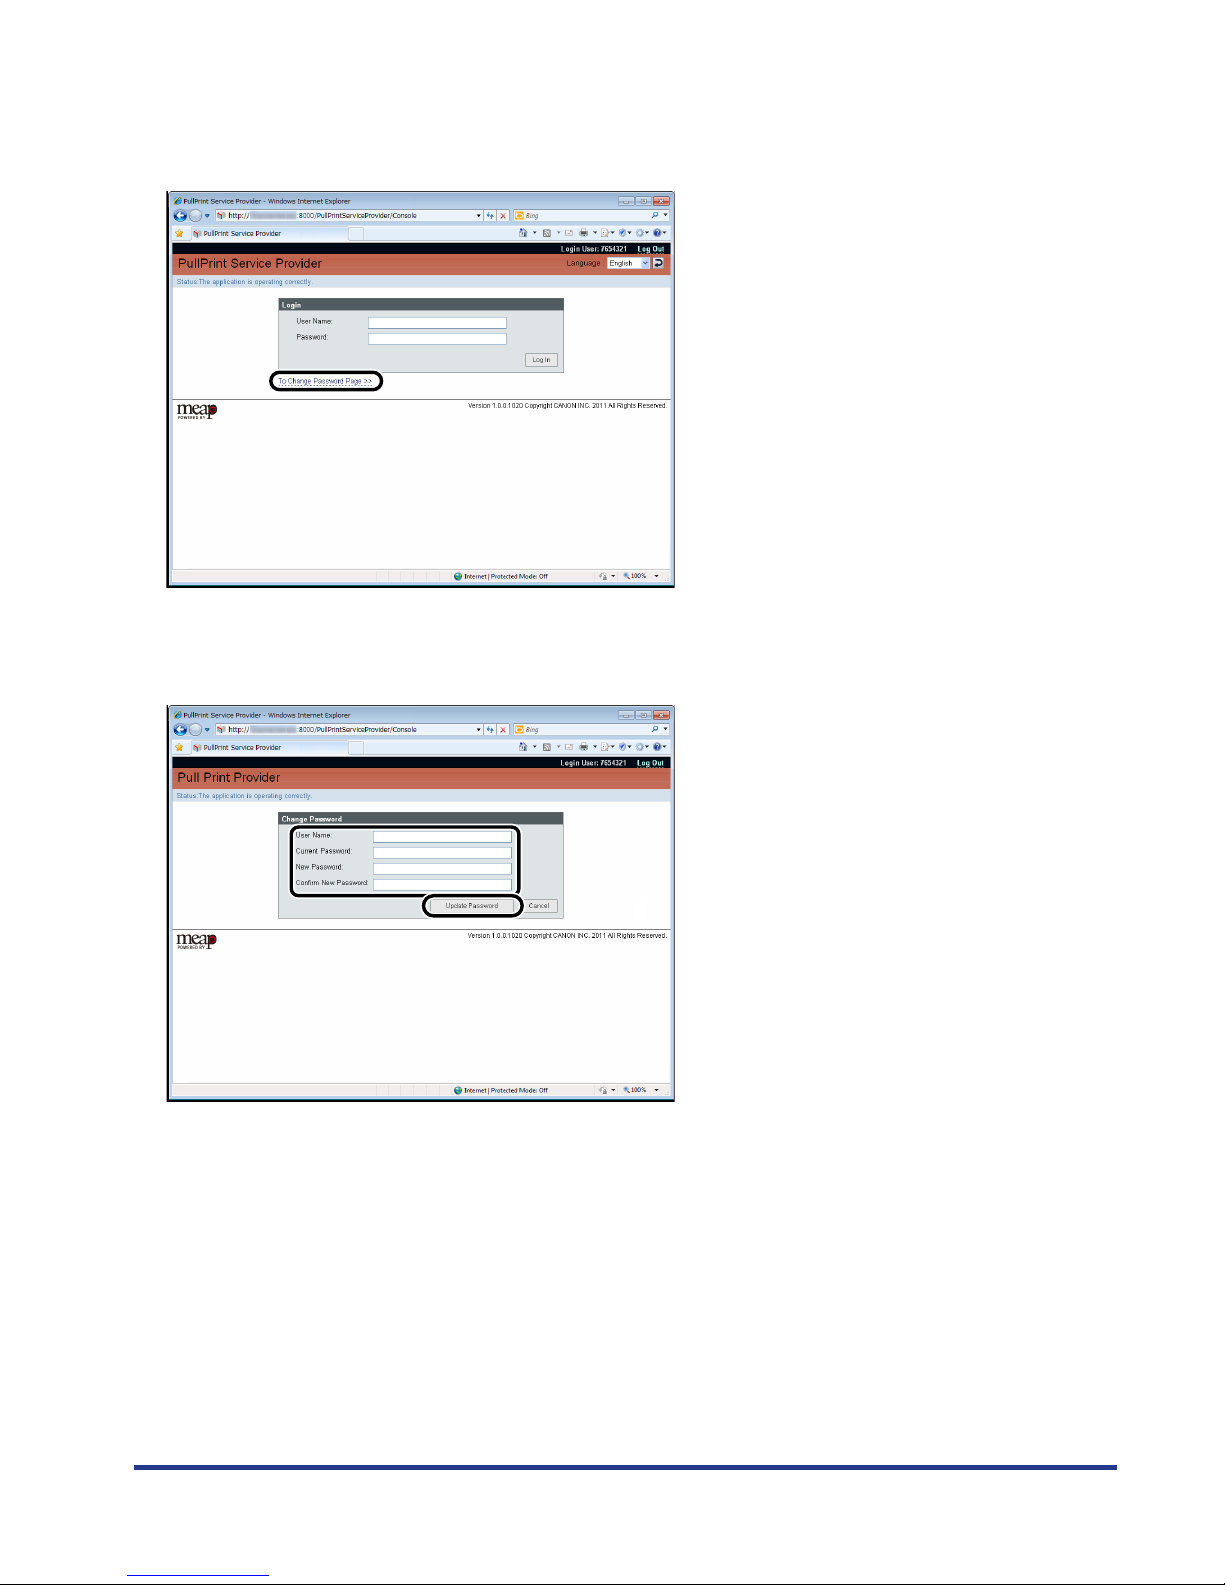
3.
Click [To Change Password Page] on the login screen.
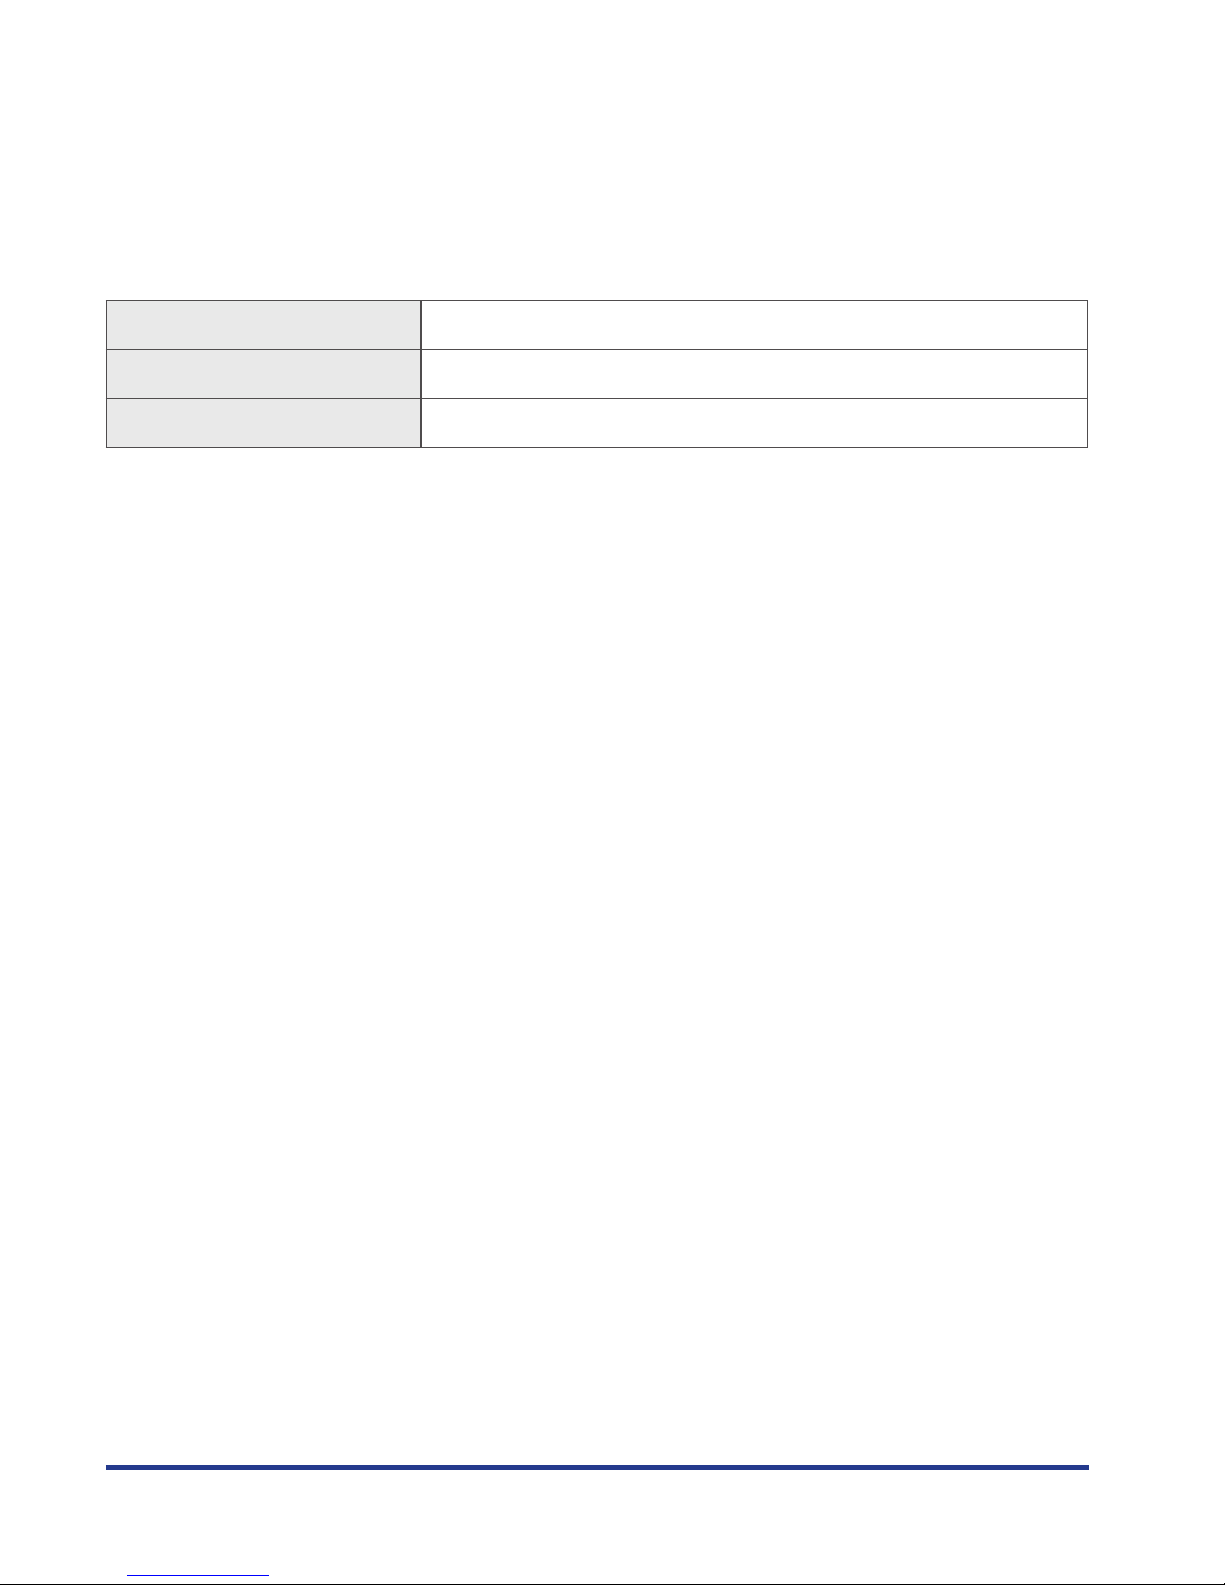
4.
Enter the current password and new password.
Page 46
Changing a Password
3-16
5.
Click [Update Password].
The password is changed.
Password restrictions
Number of characters 8 to 32 alphanumeric characters
Uninstallation Returns the password to the default password
Update Retains the password
Page 47
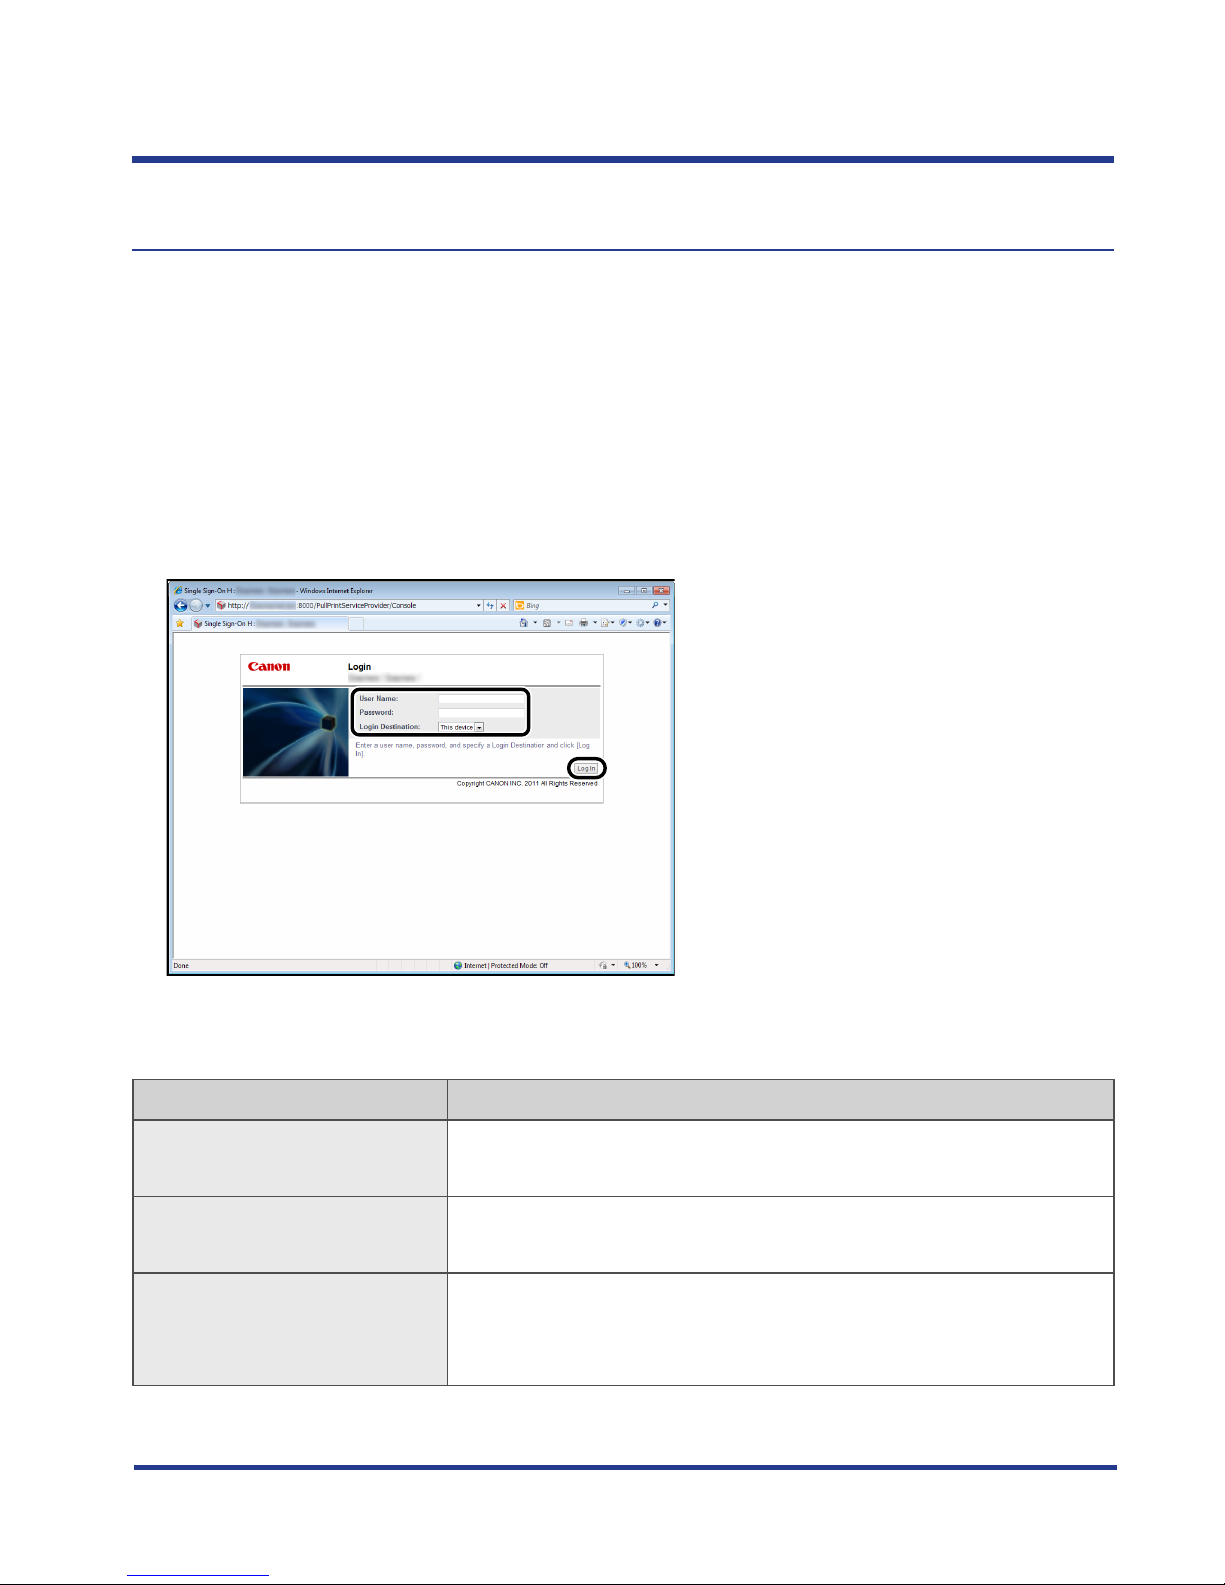
Changing the Display Language
3-17
Changing the Display Language
The procedure for changing the display language of the Management Console is as follows.
1.
Enter the URL below in the address bar of the Web browser.
http://<IP address of the device>:8000/PullPrintServiceProvider/Console
or
https://<IP address of the device>:8443/PullPrintServiceProvider/Console
2.
Enter the login ID and password.
You are logged in to the device.
Enter or select the necessary items according to the set login service.
Set Login Service Operation
Department ID Management 1. Enter a Department ID and PIN.
2. Click [Log In].
SDL
Single Domain SSO
1. Enter a user name and password.
2. Click [Log In].
Multi Domain SSO
SSO-H
1. Enter a user name and password.
2. Select the login destination.
3. Click [Log In].
For more information on login services, see the manual accompanying your device.
Page 48
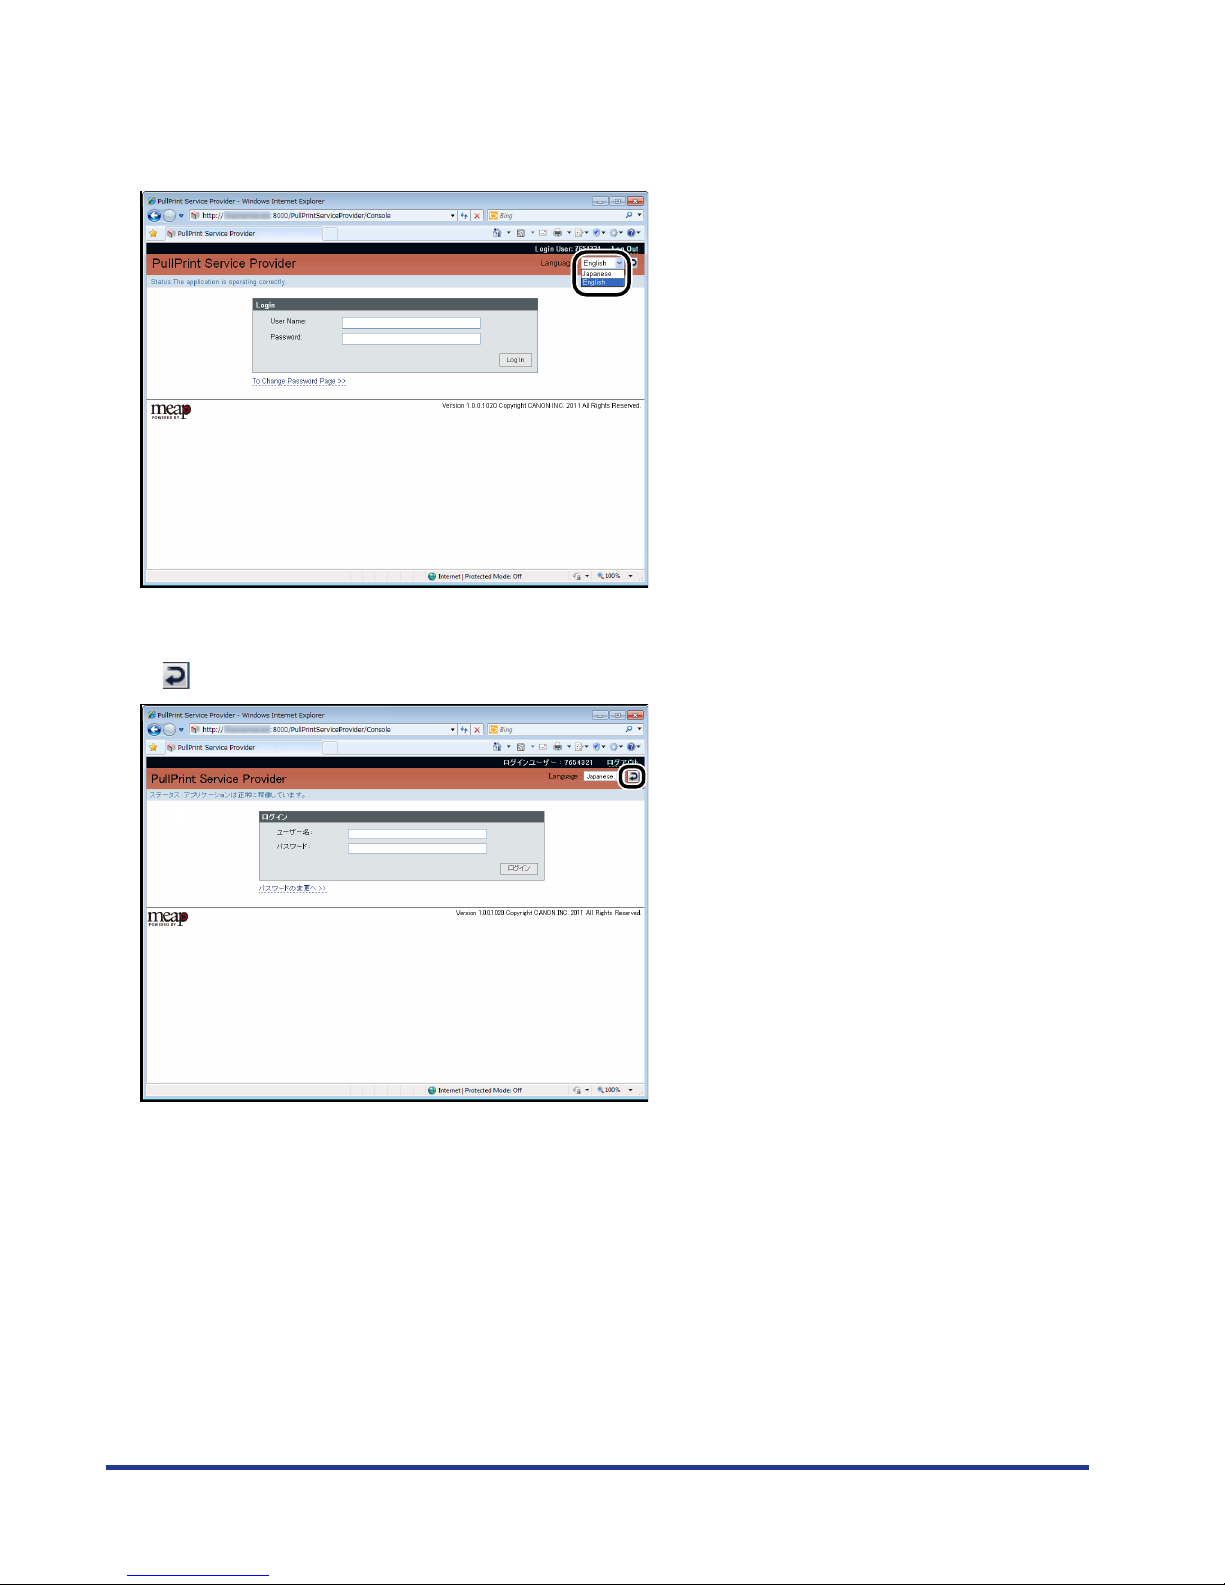
Changing the Display Language
3-18
3.
Select a language from [Language] on the login screen.
4.
Click .
If you skip the login screen, you can also change the display language on the screen for changing
settigs..
Page 49

4-1
4
$)"15&3
List of Error Messages
This chapter describes the error messages for PullPrint Service Provider.
List of Error Messages ..................................................................................................................4-2
Status Display Error Messages ..............................................................................................................................4-2
Management Console Error Messages ................................................................................................................4-2
Page 50
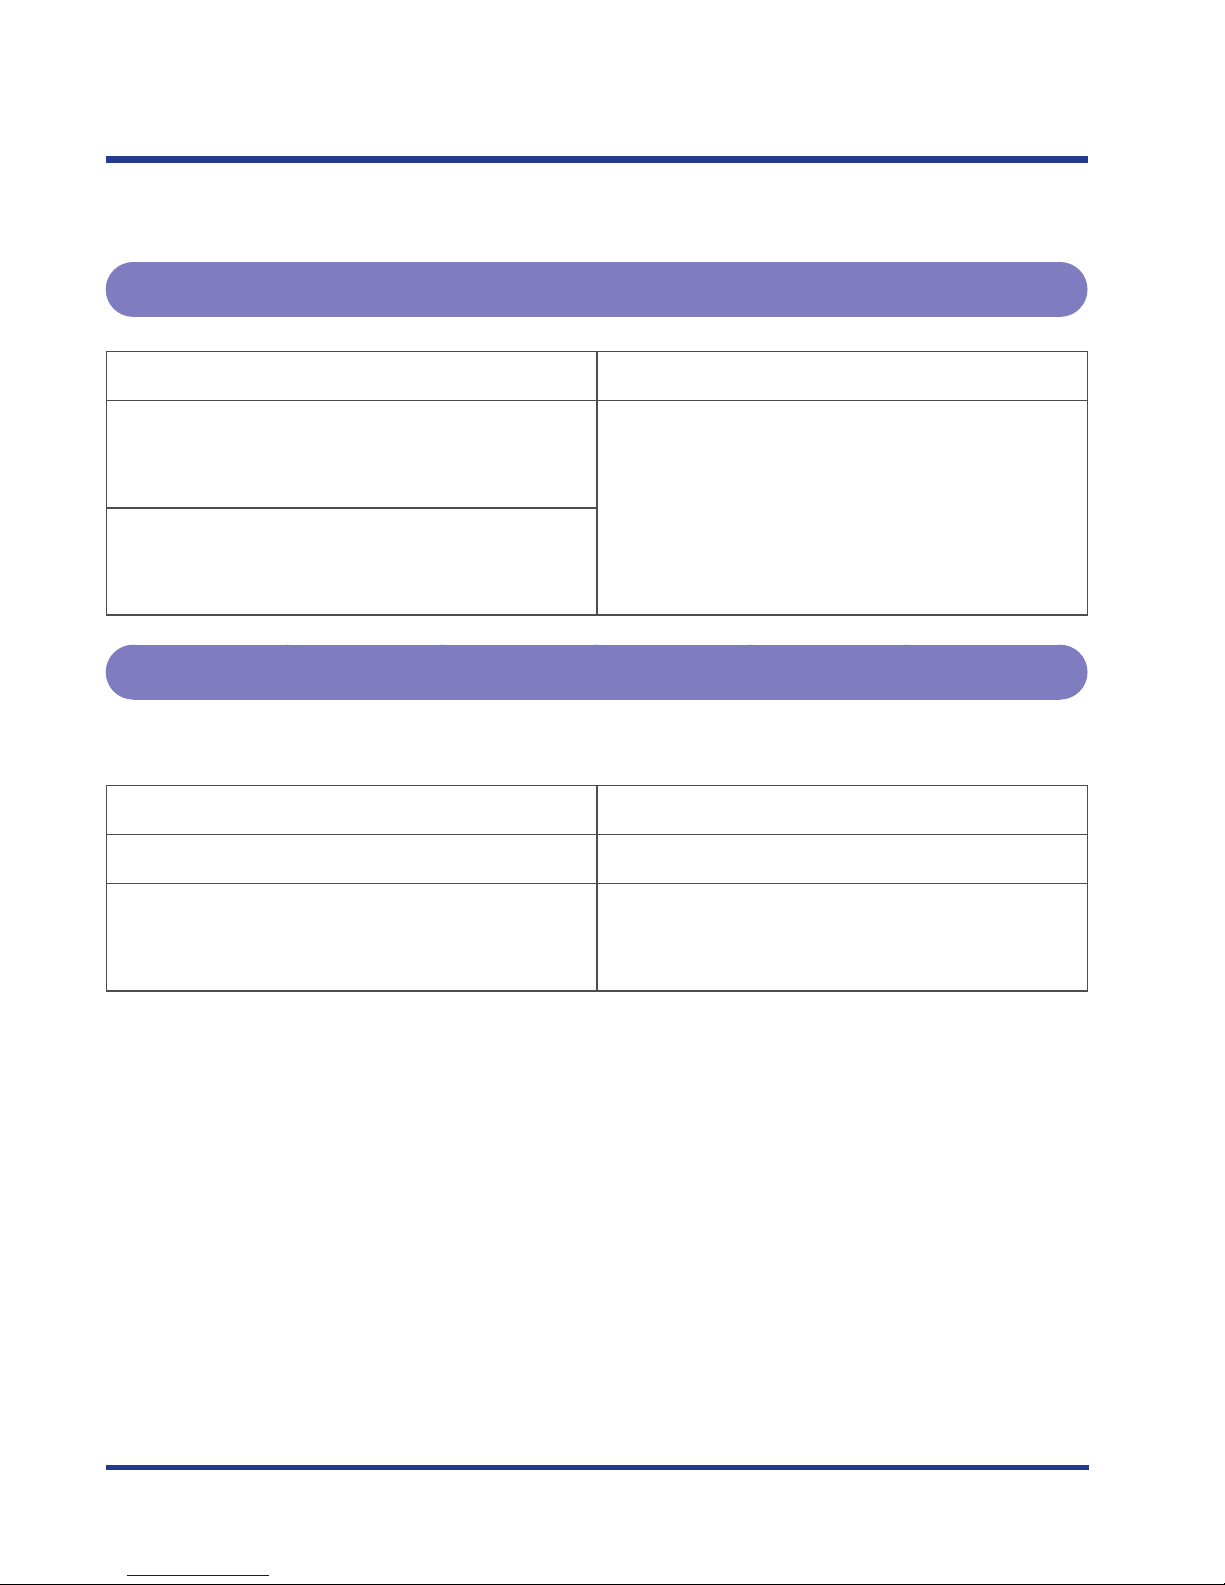
List of Error Messages
4-2
List of Error Messages
This section lists the PullPrint Service Provider error messages and their remedies.
Status Display Error Messages
Error Message Remedy
The application has stopped because device
event subscription could not be executed.
Restart the device.
Restart the device.
The application has stopped because
initialization with the device could not be
executed. Restart the device.
Management Console Error Messages
Login Screen
Error Message Remedy
Your [User Name] or [Password] is incorrect. Enter the correct user name and password.
Cannot use the application because another user
is currently logged in. Wait a while, and then log
in again.
Log in again after the other user logs out.
Page 51

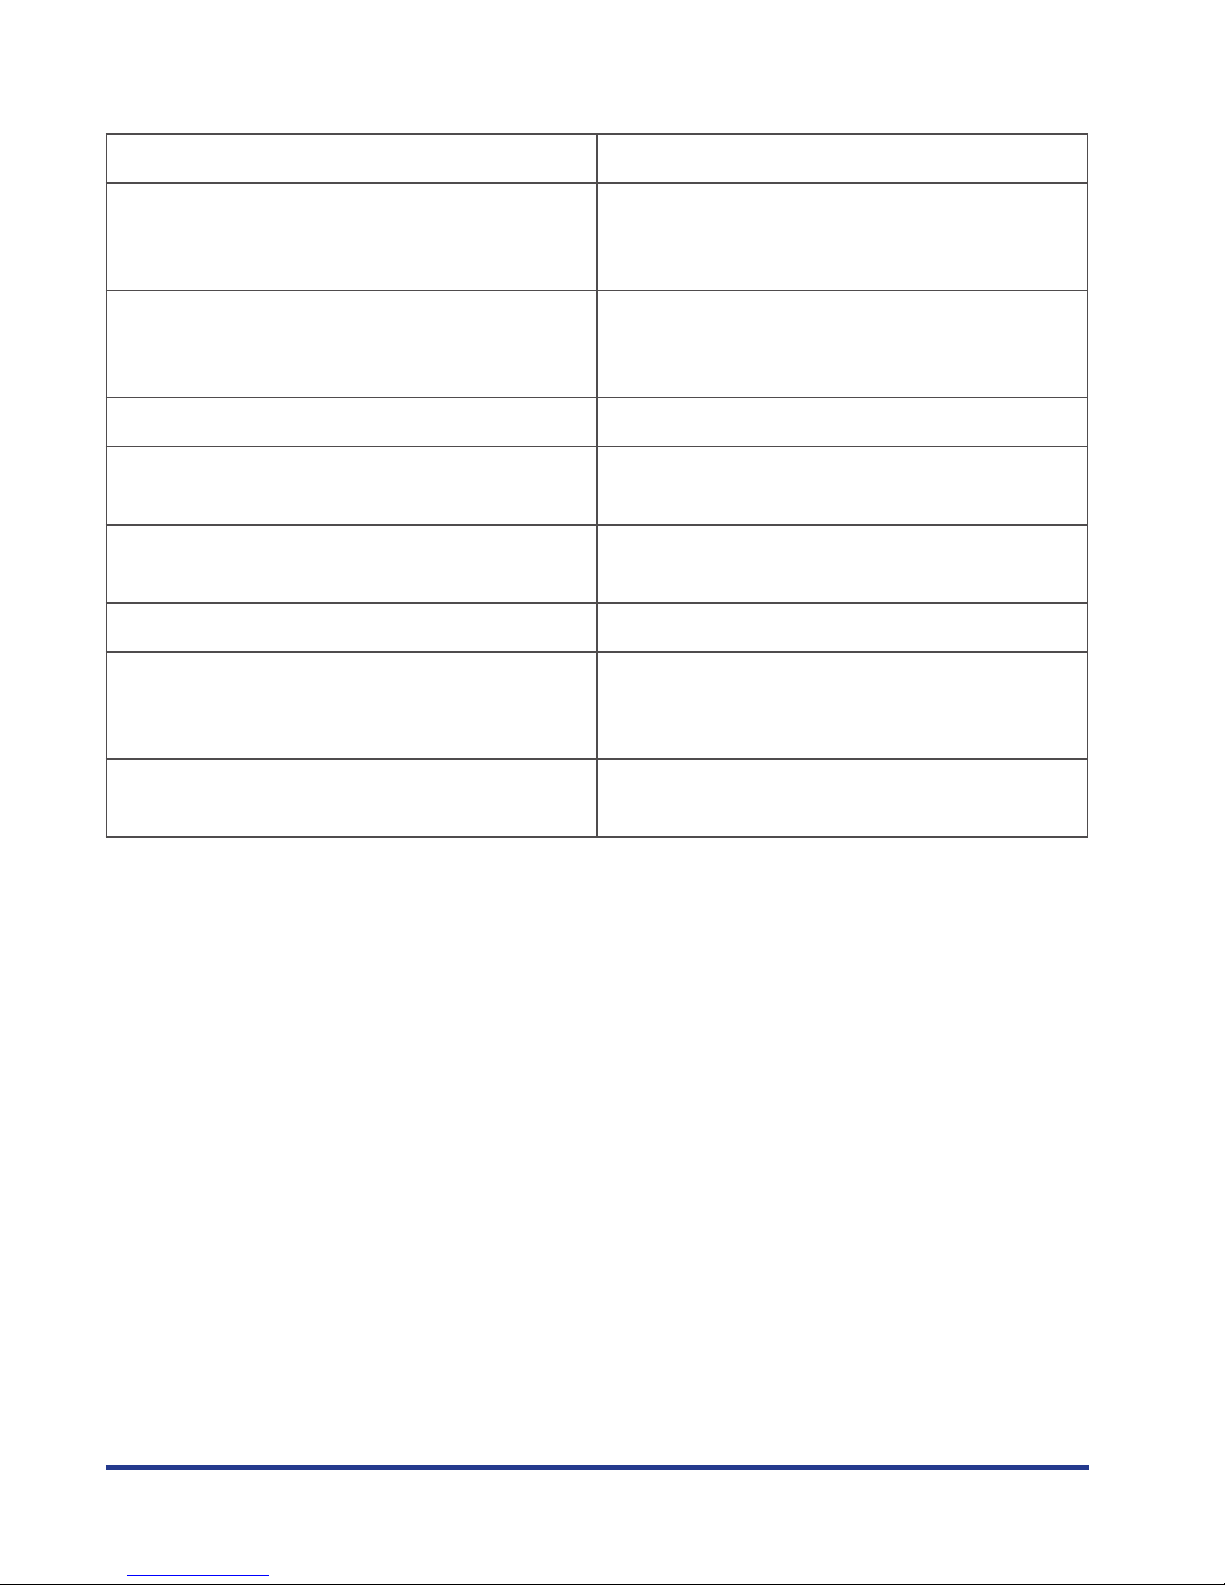
List of Error Messages
4-3
Change Settings Screen
Error Message Remedy
The entered value is incorrect. Enter the value
again.
Enter the correct value for the item in which the
error occurred.
Specify the file to upload. Enter a file path in the file path entry field.
An error occurred while uploading. Upload a file with valid properties set.
If recovery fails, restart PullPrint Service Provider.
If the error persists, reinstall PullPrint Service
Provider.
The extension of the specified file is incorrect. Enter a file with the correct extension in the file
path entry field.
The specified file cannot be found. Enter a correct file path in the file path entry field.
Change Password Screen
Error Message Remedy
Your [User Name] or [Current Password] is
incorrect.
Enter the correct user name and password.
Characters that cannot be used have been
entered for the [New Password]. Enter the [New
Password] again.
Enter a new password using only characters valid
for a password.
Set the [New Password] with 8 to 32 characters. Enter the new password in 8 to 32 alphanumeric
characters.
[New Password] and [Confirm New Password] do
not match. Enter [New Password] and [Confirm
New Password] again.
Enter the same password in [Confirm New
Password] as entered for [New Password].
Page 52
List of Error Messages
4-4
Error Screen
Error Message Remedy
You have been disconnected from the server
because you are not logged in, or due to
inactivity. Log in again.
Log in again.
The application cannot be used because another
user is currently logged in. Wait a while, and then
log in again.
Log in again after the other user logs out.
Cannot download because an error occurred. Perform the operation again.
Could not upload because an error occurred.
Upload the file again.
Perform the operation again.
The application has quit. Restart the Web browser, and log in to PullPrint
Service Provider Servlet again.
The specified URL is incorrect. Specify the correct URL.
An error occurred. Start the application again. Restart PullPrint Service Provider. If the error
persists, uninstall PullPrint Service Provider, and
then reinstall it.
An error occurred. Contact the system
administrator.
Contact your System Manager.
Page 53

Page 54

© CANON INC.
 Loading...