

Page 1
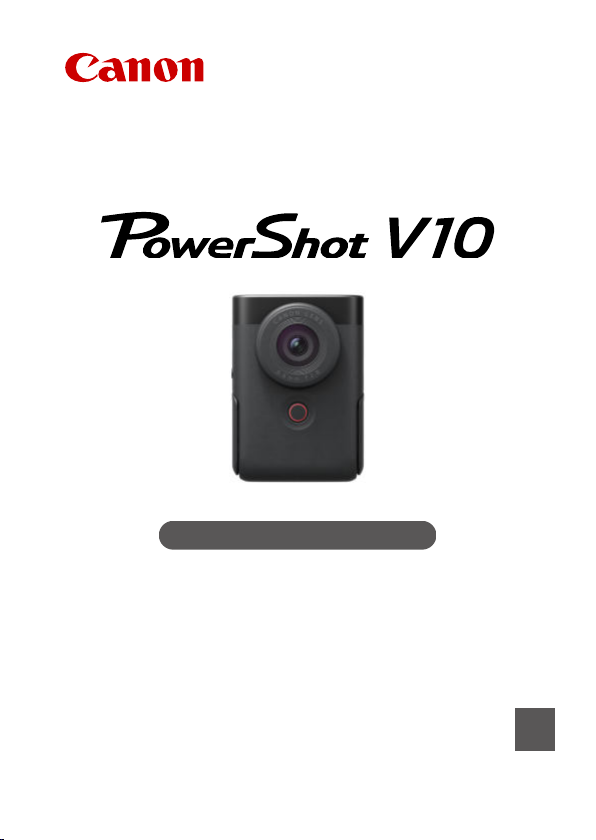
Advanced User Guide
E
CT2-D251-A
© CANON INC. 2023
Page 2

Contents
Introduction. . . . . . . . . . . . . . . . . . . . . . . . . . . . . . . . . . . . . . . . . . . . . . . . 6
Package Contents. . . . . . . . . . . . . . . . . . . . . . . . . . . . . . . . . . . . . . . . . . . . . . . 7
Supplemental Information. . . . . . . . . . . . . . . . . . . . . . . . . . . . . . . . . . . . . . . . . 8
Compatible Accessories. . . . . . . . . . . . . . . . . . . . . . . . . . . . . . . . . . . . . . . . . . . 9
Instruction Manuals. . . . . . . . . . . . . . . . . . . . . . . . . . . . . . . . . . . . . . . . . . . . . 10
Quick Start Guide. . . . . . . . . . . . . . . . . . . . . . . . . . . . . . . . . . . . . . . . . . . . . . . 11
About This Guide. . . . . . . . . . . . . . . . . . . . . . . . . . . . . . . . . . . . . . . . . . . . . . . 14
Compatible Cards. . . . . . . . . . . . . . . . . . . . . . . . . . . . . . . . . . . . . . . . . . . . . . 16
Safety Instructions. . . . . . . . . . . . . . . . . . . . . . . . . . . . . . . . . . . . . . . . . . . . . . 17
Handling Precautions. . . . . . . . . . . . . . . . . . . . . . . . . . . . . . . . . . . . . . . . . . . . 20
Part Names. . . . . . . . . . . . . . . . . . . . . . . . . . . . . . . . . . . . . . . . . . . . . . . . . . . 22
Preparation and Basic Operations. . . . . . . . . . . . . . . . . . . . . . . . . . . . . 25
Charging the Camera. . . . . . . . . . . . . . . . . . . . . . . . . . . . . . . . . . . . . . . . . . . . 26
Inserting/Removing Cards. . . . . . . . . . . . . . . . . . . . . . . . . . . . . . . . . . . . . . . . 27
Using the Screen and Stand. . . . . . . . . . . . . . . . . . . . . . . . . . . . . . . . . . . . . . 30
Turning on the Power. . . . . . . . . . . . . . . . . . . . . . . . . . . . . . . . . . . . . . . . . . . . 31
Basic Operations. . . . . . . . . . . . . . . . . . . . . . . . . . . . . . . . . . . . . . . . . . . . . . . 33
Menu Operations and Settings. . . . . . . . . . . . . . . . . . . . . . . . . . . . . . . . . . . . . 37
Quick Control. . . . . . . . . . . . . . . . . . . . . . . . . . . . . . . . . . . . . . . . . . . . . . . . . . 42
Touch-Screen Operation. . . . . . . . . . . . . . . . . . . . . . . . . . . . . . . . . . . . . . . . . 45
Shooting and Recording. . . . . . . . . . . . . . . . . . . . . . . . . . . . . . . . . . . . . 47
Movie Recording. . . . . . . . . . . . . . . . . . . . . . . . . . . . . . . . . . . . . . . . . . . . . . . 48
Still Photo Shooting. . . . . . . . . . . . . . . . . . . . . . . . . . . . . . . . . . . . . . . . . . . . . 51
Tab Menus: Movie Recording. . . . . . . . . . . . . . . . . . . . . . . . . . . . . . . . . . . . . 52
Tab Menus: Still Photo Shooting. . . . . . . . . . . . . . . . . . . . . . . . . . . . . . . . . . . 54
Shooting Mode. . . . . . . . . . . . . . . . . . . . . . . . . . . . . . . . . . . . . . . . . . . . . . . . . 55
Movie Recording Size. . . . . . . . . . . . . . . . . . . . . . . . . . . . . . . . . . . . . . . . . . . 61
Sound Recording. . . . . . . . . . . . . . . . . . . . . . . . . . . . . . . . . . . . . . . . . . . . . . . 66
Movie ISO Speed Settings. . . . . . . . . . . . . . . . . . . . . . . . . . . . . . . . . . . . . . . . 69
Movie Auto Slow Shutter. . . . . . . . . . . . . . . . . . . . . . . . . . . . . . . . . . . . . . . . . 70
Page 3

ND Filter. . . . . . . . . . . . . . . . . . . . . . . . . . . . . . . . . . . . . . . . . . . . . . . . . . . . . . 72
White Balance. . . . . . . . . . . . . . . . . . . . . . . . . . . . . . . . . . . . . . . . . . . . . . . . . 73
Autofocus Method. . . . . . . . . . . . . . . . . . . . . . . . . . . . . . . . . . . . . . . . . . . . . . 77
Movie Self-Timer. . . . . . . . . . . . . . . . . . . . . . . . . . . . . . . . . . . . . . . . . . . . . . . 82
IS Settings. . . . . . . . . . . . . . . . . . . . . . . . . . . . . . . . . . . . . . . . . . . . . . . . . . . . 83
Movie Auto Level
Grid. . . . . . . . . . . . . . . . . . . . . . . . . . . . . . . . . . . . . . . . . . . . . . . . . . . . . . . . . 86
Recording Emphasis. . . . . . . . . . . . . . . . . . . . . . . . . . . . . . . . . . . . . . . . . . . . 87
Aspect Marker. . . . . . . . . . . . . . . . . . . . . . . . . . . . . . . . . . . . . . . . . . . . . . . . . 88
Reverse Display. . . . . . . . . . . . . . . . . . . . . . . . . . . . . . . . . . . . . . . . . . . . . . . . 89
Standby: Low Resolution. . . . . . . . . . . . . . . . . . . . . . . . . . . . . . . . . . . . . . . . . 90
Display During HDMI Connection. . . . . . . . . . . . . . . . . . . . . . . . . . . . . . . . . . 91
Image Quality. . . . . . . . . . . . . . . . . . . . . . . . . . . . . . . . . . . . . . . . . . . . . . . . . . 93
Still Image Aspect Ratio. . . . . . . . . . . . . . . . . . . . . . . . . . . . . . . . . . . . . . . . . . 94
Touch Shutter. . . . . . . . . . . . . . . . . . . . . . . . . . . . . . . . . . . . . . . . . . . . . . . . . . 95
Review Duration. . . . . . . . . . . . . . . . . . . . . . . . . . . . . . . . . . . . . . . . . . . . . . . . 97
General Movie Recording Precautions. . . . . . . . . . . . . . . . . . . . . . . . . . . . . . 98
General Still Photo Shooting Precautions. . . . . . . . . . . . . . . . . . . . . . . . . . . 102
. . . . . . . . . . . . . . . . . . . . . . . . . . . . . . . . . . . . . . . . . . . . . . . 85
Playback. . . . . . . . . . . . . . . . . . . . . . . . . . . . . . . . . . . . . . . . . . . . . . . . 103
Tab Menus: Playback. . . . . . . . . . . . . . . . . . . . . . . . . . . . . . . . . . . . . . . . . . . 104
Movie Playback. . . . . . . . . . . . . . . . . . . . . . . . . . . . . . . . . . . . . . . . . . . . . . . 105
Image Playback. . . . . . . . . . . . . . . . . . . . . . . . . . . . . . . . . . . . . . . . . . . . . . . 108
Playback on a TV Set. . . . . . . . . . . . . . . . . . . . . . . . . . . . . . . . . . . . . . . . . . . 112
Protecting Images. . . . . . . . . . . . . . . . . . . . . . . . . . . . . . . . . . . . . . . . . . . . . 114
Erasing Images. . . . . . . . . . . . . . . . . . . . . . . . . . . . . . . . . . . . . . . . . . . . . . . 118
Rotating Still Photos. . . . . . . . . . . . . . . . . . . . . . . . . . . . . . . . . . . . . . . . . . . . 125
Changing Movie Orientation Information. . . . . . . . . . . . . . . . . . . . . . . . . . . . 127
Rating Images. . . . . . . . . . . . . . . . . . . . . . . . . . . . . . . . . . . . . . . . . . . . . . . . 129
Resuming from Previous Playback. . . . . . . . . . . . . . . . . . . . . . . . . . . . . . . . 134
Wireless Features. . . . . . . . . . . . . . . . . . . . . . . . . . . . . . . . . . . . . . . . 135
Tab Menus: Wireless Features. . . . . . . . . . . . . . . . . . . . . . . . . . . . . . . . . . . 136
Connecting to a Smartphone or Tablet. . . . . . . . . . . . . . . . . . . . . . . . . . . . . 138
Page 4

Connecting to a Wireless Remote Control. . . . . . . . . . . . . . . . . . . . . . . . . . . 150
Uploading Images to image.canon. . . . . . . . . . . . . . . . . . . . . . . . . . . . . . . . . 154
Live Streaming. . . . . . . . . . . . . . . . . . . . . . . . . . . . . . . . . . . . . . . . . . . . . . . . 160
Advanced Connections. . . . . . . . . . . . . . . . . . . . . . . . . . . . . . . . . . . . . . . . . 168
GPS Settings. . . . . . . . . . . . . . . . . . . . . . . . . . . . . . . . . . . . . . . . . . . . . . . . . 171
Basic Communication Settings. . . . . . . . . . . . . . . . . . . . . . . . . . . . . . . . . . . 175
Reconnecting via Wi-Fi/Bluetooth. . . . . . . . . . . . . . . . . . . . . . . . . . . . . . . . . 196
Editing/Deleting Devices for Connections. . . . . . . . . . . . . . . . . . . . . . . . . . . 198
Airplane Mode. . . . . . . . . . . . . . . . . . . . . . . . . . . . . . . . . . . . . . . . . . . . . . . . 201
Wi-Fi Settings. . . . . . . . . . . . . . . . . . . . . . . . . . . . . . . . . . . . . . . . . . . . . . . . . 202
Bluetooth Settings. . . . . . . . . . . . . . . . . . . . . . . . . . . . . . . . . . . . . . . . . . . . . 204
Camera Name. . . . . . . . . . . . . . . . . . . . . . . . . . . . . . . . . . . . . . . . . . . . . . . . 205
Error Details. . . . . . . . . . . . . . . . . . . . . . . . . . . . . . . . . . . . . . . . . . . . . . . . . . 206
Resetting Communication Settings. . . . . . . . . . . . . . . . . . . . . . . . . . . . . . . . 207
Virtual Keyboard Operations. . . . . . . . . . . . . . . . . . . . . . . . . . . . . . . . . . . . . 208
Responding to Error Messages. . . . . . . . . . . . . . . . . . . . . . . . . . . . . . . . . . . 209
Wireless Communication Precautions. . . . . . . . . . . . . . . . . . . . . . . . . . . . . . 216
Security. . . . . . . . . . . . . . . . . . . . . . . . . . . . . . . . . . . . . . . . . . . . . . . . . . . . . 218
Checking Network Settings. . . . . . . . . . . . . . . . . . . . . . . . . . . . . . . . . . . . . . 219
Wireless Communication Status. . . . . . . . . . . . . . . . . . . . . . . . . . . . . . . . . . 220
Set-up. . . . . . . . . . . . . . . . . . . . . . . . . . . . . . . . . . . . . . . . . . . . . . . . . . 222
Tab Menus: Set-up. . . . . . . . . . . . . . . . . . . . . . . . . . . . . . . . . . . . . . . . . . . . . 223
Folder Settings. . . . . . . . . . . . . . . . . . . . . . . . . . . . . . . . . . . . . . . . . . . . . . . . 225
File Numbering. . . . . . . . . . . . . . . . . . . . . . . . . . . . . . . . . . . . . . . . . . . . . . . . 228
Card Formatting. . . . . . . . . . . . . . . . . . . . . . . . . . . . . . . . . . . . . . . . . . . . . . . 233
Auto Rotate. . . . . . . . . . . . . . . . . . . . . . . . . . . . . . . . . . . . . . . . . . . . . . . . . . 235
Adding Orientation Information to Movies. . . . . . . . . . . . . . . . . . . . . . . . . . . 237
Date/Time/Zone. . . . . . . . . . . . . . . . . . . . . . . . . . . . . . . . . . . . . . . . . . . . . . . 238
Language. . . . . . . . . . . . . . . . . . . . . . . . . . . . . . . . . . . . . . . . . . . . . . . . . . . . 241
Video System. . . . . . . . . . . . . . . . . . . . . . . . . . . . . . . . . . . . . . . . . . . . . . . . . 242
Beeps. . . . . . . . . . . . . . . . . . . . . . . . . . . . . . . . . . . . . . . . . . . . . . . . . . . . . . . 243
Volume. . . . . . . . . . . . . . . . . . . . . . . . . . . . . . . . . . . . . . . . . . . . . . . . . . . . . . 244
Power Saving. . . . . . . . . . . . . . . . . . . . . . . . . . . . . . . . . . . . . . . . . . . . . . . . . 245
Page 5

Screen Brightness. . . . . . . . . . . . . . . . . . . . . . . . . . . . . . . . . . . . . . . . . . . . . 247
HDMI Resolution. . . . . . . . . . . . . . . . . . . . . . . . . . . . . . . . . . . . . . . . . . . . . . 248
Communication/Multi-Access Button Function (in Movie Mode). . . . . . . . . . 249
App Selection for USB Connections. . . . . . . . . . . . . . . . . . . . . . . . . . . . . . . 250
Resetting the Camera. . . . . . . . . . . . . . . . . . . . . . . . . . . . . . . . . . . . . . . . . . 251
Copyright Information. . . . . . . . . . . . . . . . . . . . . . . . . . . . . . . . . . . . . . . . . . . 252
Other Information. . . . . . . . . . . . . . . . . . . . . . . . . . . . . . . . . . . . . . . . . . . . . . 255
Reference. . . . . . . . . . . . . . . . . . . . . . . . . . . . . . . . . . . . . . . . . . . . . . . 256
Troubleshooting Guide. . . . . . . . . . . . . . . . . . . . . . . . . . . . . . . . . . . . . . . . . . 257
Error Codes. . . . . . . . . . . . . . . . . . . . . . . . . . . . . . . . . . . . . . . . . . . . . . . . . . 263
Information Display. . . . . . . . . . . . . . . . . . . . . . . . . . . . . . . . . . . . . . . . . . . . 264
Specifications. . . . . . . . . . . . . . . . . . . . . . . . . . . . . . . . . . . . . . . . . . . . . . . . . 272
Before Disposal. . . . . . . . . . . . . . . . . . . . . . . . . . . . . . . . . . . . . . . . . . . . . . . 283
Trademarks and Licensing. . . . . . . . . . . . . . . . . . . . . . . . . . . . . . . . . . 286
Page 6

Introduction
Before starting to shoot, be sure to read the following
To avoid shooting problems and accidents, first read the
Precautions. Also read this Advanced User Guide carefully to ensure that you use the
camera correctly.
Take some test shots, and understand about product liability
After shooting, play images back and check whether they have been properly recorded. If
the camera or memory card is faulty and images cannot be recorded or transferred to a
computer, Canon cannot be held liable for any loss or inconvenience caused.
Copyrights
Unauthorized public use of images captured with the camera that include copyrighted
subjects is prohibited by law. Also be aware that certain public performances, exhibitions,
etc. may prohibit photography even for private enjoyment.
•
Package Contents
• Supplemental Information
• Compatible Accessories
• Instruction Manuals
• Quick Start Guide
• About This Guide
• Compatible Cards
• Safety Instructions
• Handling Precautions
• Part Names
Safety Instructions and Handling
6
Page 7
Package Contents
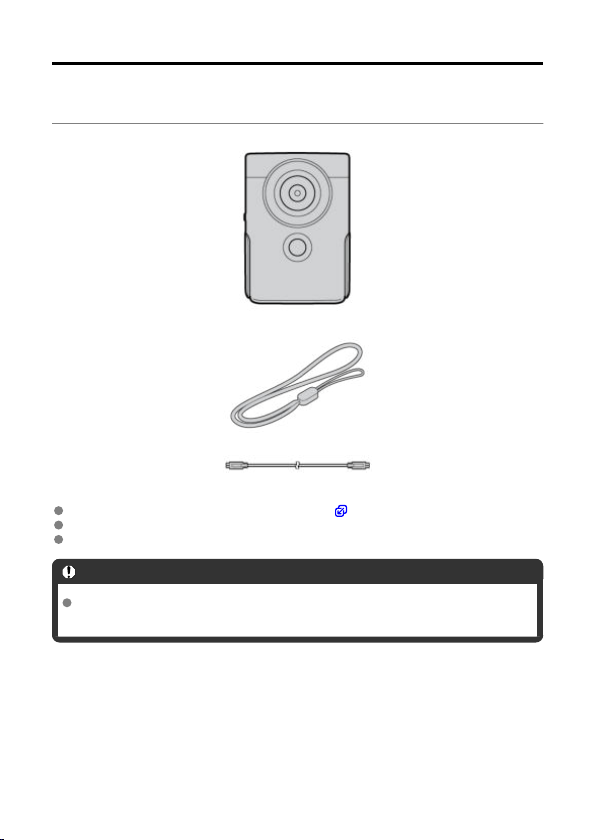
Before use, make sure the following items are included in the package. If anything is
missing, contact your dealer.
Camera
Wrist strap
Interface cable
The camera does not come with a memory card ( ).
The battery is built into the camera.
Be careful not to lose any of these items.
Caution
The transmission rate with the included interface cable is equivalent to Hi-Speed
USB (USB 2.0).
7
Page 8
Supplemental Information
Check the following website for supplemental information about the camera.
https://cam.start.canon/H001/
8
Page 9
Compatible Accessories
Check the following website for details on compatible accessories.
https://cam.start.canon/H002/
9
Page 10
Instruction Manuals
Instruction Manual (included with the camera)
Provides basic camera instructions.
Advanced User Guide
Complete instructions are provided in this Advanced User Guide.
For the latest Advanced User Guide, refer to the following website.
https://cam.start.canon/C014/
10
Page 11
Quick Start Guide
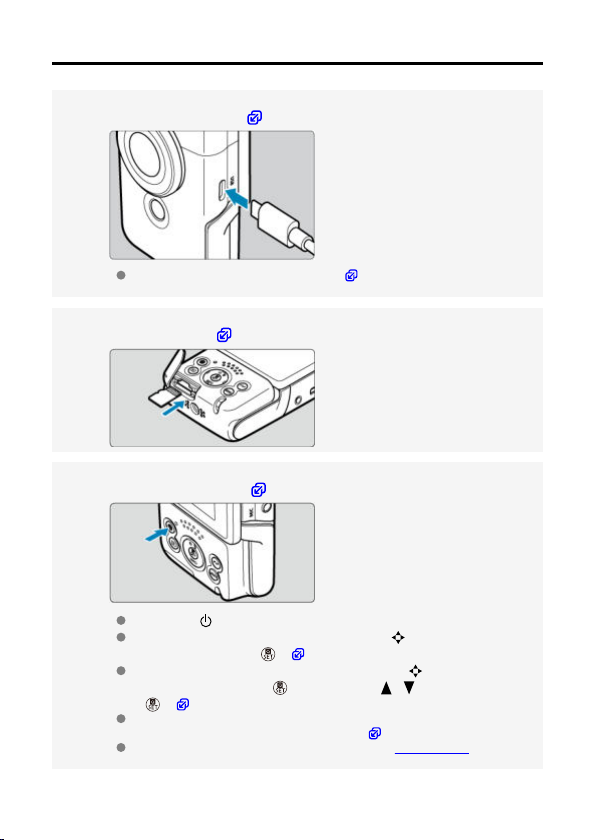
Charge the camera (
1.
Charge the camera initially before use ( ).
Insert the card (
2.
Turn the camera on ( ).
3.
Press the < > button.
If the language selection screen appears, use < > to select the
language, then press <
If the date/time/zone setting screen appears, use < > to select a
setting item, then press <
<
> ( ).
After the [Welcome] screen appears, follow the on-screen instructions
to connect the camera to your smartphone (
In areas where the TV video system is PAL, see Video System.
).
).
> ( ).
>. Set with the < / > keys, then press
).
11
Page 12
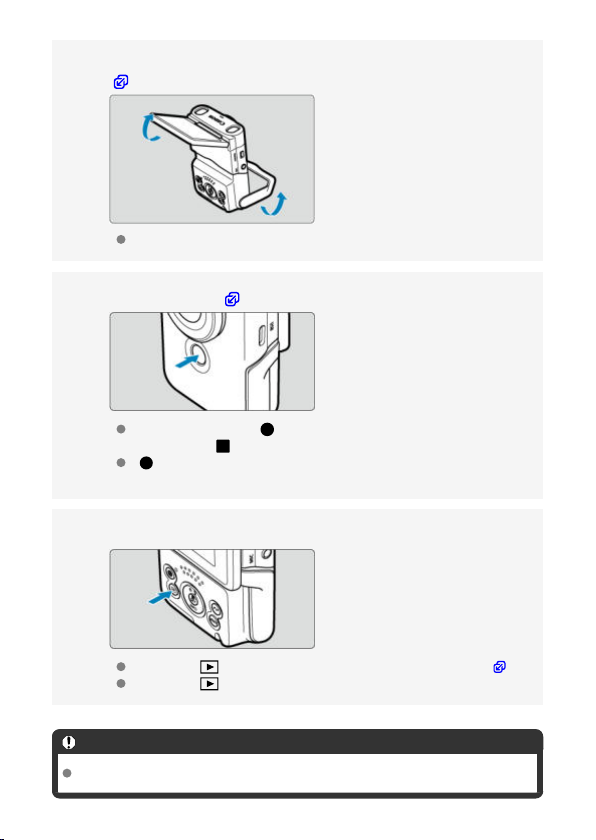
Flip out the screen and stand, then set the camera down
4.
).
(
You can also use the camera in handheld shooting and recording.
Record a movie (
5.
To start recording, tap [ ] or press the Start/Stop button. To stop
recording, tap [
[ REC] is displayed in the upper left while movie recording is in
progress, and a blinking red frame is displayed around the screen.
Review the recorded movie.
6.
Press the < > button to play the recorded movie on the screen ( ).
Press the < > button again to return to the shooting screen.
Caution
Avoid pinching your fingers when opening or closing the stand.
).
] or press the Start/Stop button again.
12
Page 13
Note
To stream video, see Live Streaming.
13
Page 14
About This Guide
Icons in This Guide
Basic Assumptions for Operational Instructions and Sample Photos
Icons in This Guide
<
> < >
<
< >
In addition to the above, the icons and symbols used on the camera's buttons and
displayed on the screen are also used in this guide when discussing relevant operations
and functionality.
Indicates the Quick Control/Set button.
Links to pages with related topics.
Warning to prevent shooting problems.
Supplemental information.
Tips or advice for better shooting.
Troubleshooting advice.
Indicates the direction to press the cross keys <
> < >
>.
14
Page 15

Basic Assumptions for Operational Instructions and
Sample Photos
Instructions apply to the camera with the power on ( ).
It is assumed that all menu settings are set to defaults.
Sample photos in this guide are only for illustration.
15
Page 16

Compatible Cards
In this guide, all supported memory cards are simply referred to as “the card.”
The following cards can be used with the camera regardless of capacity. If the card is new
or was previously formatted (initialized) by another camera or computer, format the
card with this camera (
microSD / microSDHC / microSDXC memory cards
* SD speed class compatible
* UHS speed class compatible
* UHS-I compatible
Cards That Can Record Movies
).
When recording movies, use a card with ample performance (fast enough writing and
reading speeds) for the movie recording quality (
).
16
Page 17
Safety Instructions
Be sure to read these instructions in order to operate the product safely.
Follow these instructions to prevent injury or harm to the operator of the product or others.
WARNING:
Keep the product out of the reach of young children.
A strap wrapped around a person's neck may result in strangulation.
The parts or provided items of cameras or accessories are dangerous if swallowed. If
swallowed, seek immediate medical assistance.
Use only power sources specified in this Advanced User Guide for use with the product.
Do not disassemble or modify the product.
Do not expose the product to strong shocks or vibration.
Do not touch any exposed internal parts.
Stop using the product in any case of unusual circumstances such as the presence of
smoke or a strange smell.
Do not use organic solvents such as alcohol, benzine or paint thinner to clean the
product.
Do not get the product wet. Do not insert foreign objects or liquids into the product.
Do not use the product where flammable gases may be present.
This may cause electric shock, explosion or fire.
Do not touch the product connected to a power outlet during lightning storms.
This may cause electric shock.
Observe the following instructions when using a battery charger or AC adapter.
• Periodically remove any dust buildup from the power plug and power outlet using a
dry cloth.
• Do not plug in or unplug the product with wet hands.
• Do not use the product if the power plug is not fully inserted into the power outlet.
• Do not expose the power plug and terminals to dirt or let them come into contact
with metallic pins or other metal objects.
• Do not touch the battery charger or AC adapter connected to a power outlet during
lightning storms.
Do not place heavy objects on the power cord. Do not damage, break or modify the
power cord.
Do not wrap the product in cloth or other materials when in use or shortly after use when
the product is still warm in temperature.
Do not unplug the product by pulling the power cord.
Do not leave the product connected to a power source for long periods of time.
Do not charge batteries/battery packs at temperatures outside the range of 5 - 40 °C (41
- 104 °F).
This may cause electric shock, explosion or fire.
Denotes the risk of serious injury or death.
17
Page 18

Do not allow the product to maintain contact with the same area of skin for extended
periods of time during use.
This may result in low-temperature contact burns, including skin redness and blistering,
even if the product does not feel hot. The use of a tripod or similar equipment is
recommended when using the product in hot places and for people with circulation problems
or less sensitive skin.
Follow any indications to turn off the product in places where its use is forbidden.
Not doing so may cause other equipment to malfunction due to the effect of electromagnetic
waves and even result in accidents.
18
Page 19
CAUTION:
Follow the cautions below. Otherwise
physical injury or property damage may
result.
Do not look at the screen or through the viewfinder for prolonged periods of time.
This may induce symptoms similar to motion sickness. In such a case, stop using the
product immediately and rest for a while before resuming use.
Do not leave the product in places exposed to extremely high or low temperatures.
The product may become extremely hot/cold and cause burns or injury when touched.
Strap is intended for use on the body only. Hanging the strap with any product attached
on a hook or other object may damage the product. Also, do not shake the product or
expose the product to strong impacts.
Do not apply strong pressure on the lens or allow an object to hit it.
This may cause injury or damage to the product.
Do not carry the product when it is mounted on a tripod.
This may cause injury or may result in an accident.
Do not touch any parts inside the product.
This may cause injury.
If any abnormal skin reaction or irritation occurs during or following the use of this
product, refrain from further use and get medical advice/attention.
19
Page 20

Handling Precautions
Camera care
This camera is a precision instrument. Do not drop it or subject it to physical shock.
The camera is not waterproof and cannot be used underwater. If the camera gets wet,
contact a Canon Service Center immediately. Wipe off any water droplets with a clean,
dry cloth, and if the camera is exposed to salty air, wipe it off with a clean, well-wrung
wet cloth.
Never leave the camera near anything having a strong magnetic field such as a magnet
or electric motor. Also, avoid using or leaving the camera near anything emitting strong
radio waves, such as a large antenna. Strong magnetic fields can cause camera
malfunction or destroy image data.
Do not leave the camera in excessive heat, such as in a car in direct sunlight. High
temperatures can cause the camera to malfunction.
The camera contains precision electronic circuitry. Never attempt to disassemble the
camera yourself.
If the camera is suddenly brought in from the cold into a warm room, condensation may
form on the camera and internal parts. To prevent condensation, first put the camera in
a sealed plastic bag and let it adjust to the warmer temperature before taking it out of
the bag.
If condensation forms on the camera, to avoid damage, do not use the camera or
remove the card. Turn the camera off and wait until the moisture has fully evaporated
before resuming use. Even after the camera is completely dry, if it is still internally cold,
do not remove the card until the camera has adjusted to the ambient temperature.
Condensation may form inside the camera lens if you record 4K movies in [Smooth
skin movie] mode in humid environments. Keep the camera off until the moisture has
evaporated before resuming use. If the condensation does not dissipate, try changing
the recording mode or setting the camera to an option other than 4K movies.
If the camera will not be used for an extended period, store it in a cool, dry, well-
ventilated location. Record occasionally during storage to make sure the camera is still
working correctly.
Avoid storing the camera where there are chemicals that result in rust and corrosion
such as in a chemical lab.
If the camera has not been used for an extended period, test all its functions before
using it. If you have not used the camera for some time or if there is an important shoot
such as a foreign trip coming up, have the camera checked by your nearest Canon
Service Center or check the camera yourself and make sure it is working properly.
The camera may become hot after repeated continuous shooting or still photo/movie
shooting over an extended period. This is not a malfunction.
If there is a bright light source inside or outside the image area, ghosting may occur.
When shooting with backlighting, keep the sun sufficiently away from the angle of view.
Always keep intense light sources such as the sun, lasers, and other intense artificial
light sources out of the image area and not near it. Concentrated intense light may
cause smoke or damage the image sensor or other internal components.
20
Page 21

Screen
The following does not affect images captured by the camera.
Although the screen is produced under extremely high-precision manufacturing
conditions and more than 99.99% of the pixels meet design specifications, 0.01% or
fewer pixels may be defective or appear as red or black dots. This is not a malfunction.
If the screen is left on for a prolonged period, screen burn-in may occur where you see
remnants of what was displayed. However, this is only temporary and will disappear
when the camera is left unused for a few days.
The screen display may seem slightly slow in low temperatures or may look black in
high temperatures. It will return to normal at room temperature.
Cards
To protect the card and its recorded data, note the following:
Do not drop, bend, or wet the card. Do not subject it to excessive force, physical shock,
or vibration.
Do not touch the card's electronic contacts with your fingers or anything metallic.
Do not affix any stickers, etc. on the card.
Do not store or use the card near anything that has a strong magnetic field, such as a
television, speakers, or magnets. Also avoid places prone to having static electricity.
Do not leave the card in direct sunlight or near a heat source.
Store the card in a case.
Do not store the card in hot, dusty, or humid locations.
Cards may become hot after long sessions of repeated continuous shooting or still photo
shooting/movie recording. This is not a malfunction.
21
Page 22
Part Names
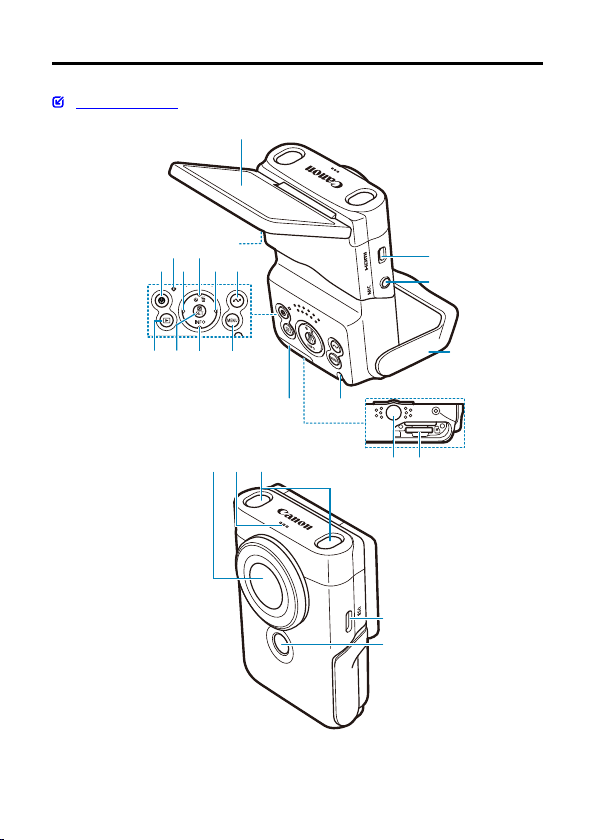
(3)
(4)
(2)
(1)
(5)(6)
(7)
(8)
(11)
(12)(13)
(14)(15)(16) (17)
(19)(18)
(9)
(10)
(20) (21) (22)
(23)
(24)
Attaching the Strap
22
Page 23
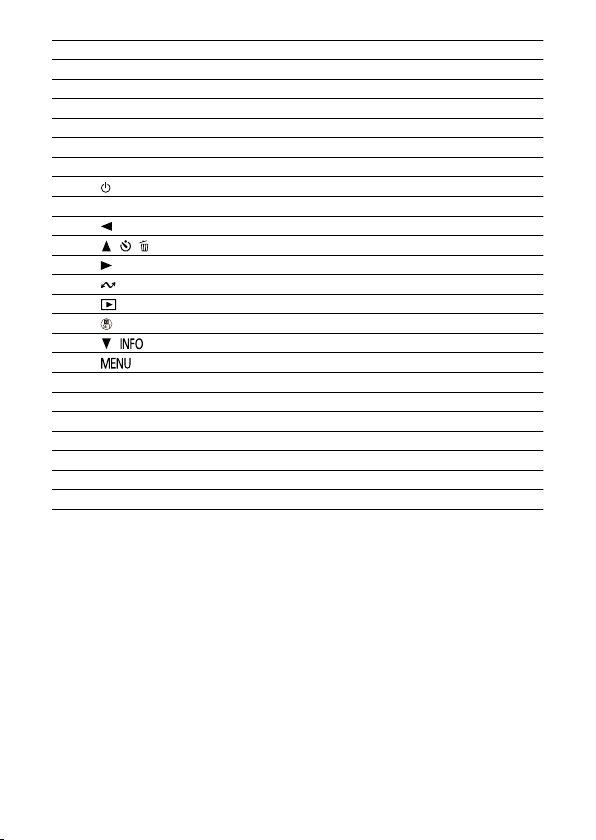
(1) Screen
(2) HDMI terminal
(3) External microphone IN terminal
(4) Stand
(5) Strap mount
(6) Card slot cover
(7) Serial number
(8) <
> Power button
(9) Indicator
(10) <
(11) <
(12) <
(13) <
(14) <
(15) <
(16) <
(17) <
> Left button
/ / > Up/Self-timer/Erase button
> Right button
> Comm/Multi-access button
> Playback button
> Quick Control/Set button
/ > Down/Info button
> Menu button
(18) Tripod socket
(19) Card slot
(20) Lens
(21) Speaker
(22) Stereo microphone
(23) Digital terminal
(24) Start/Stop button
23
Page 24
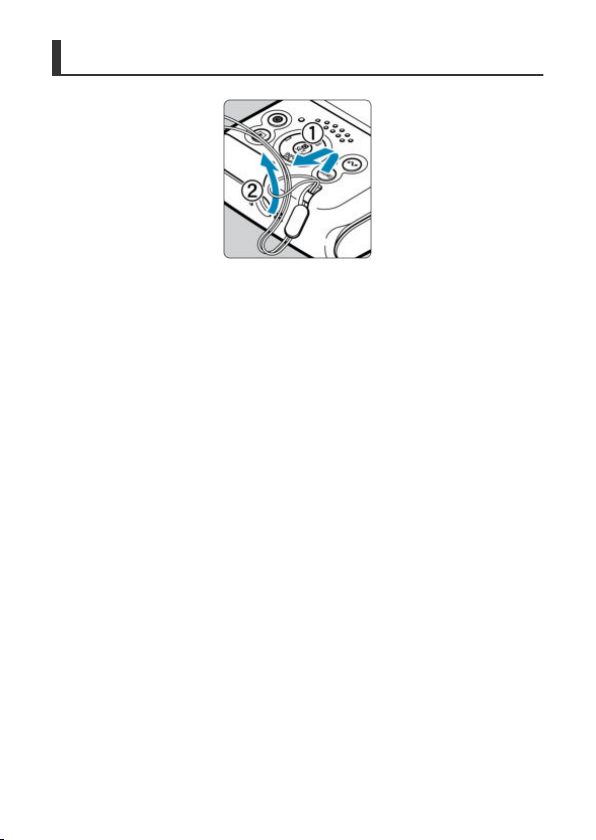
Attaching the Strap
Attach the included wrist strap to the camera strap mount.
24
Page 25

Preparation and Basic Operations
This chapter describes preparatory steps before you start shooting and the basic camera
operations.
•
Charging the Camera
• Inserting/Removing Cards
• Using the Screen and Stand
• Turning on the Power
• Basic Operations
• Menu Operations and Settings
• Quick Control
• Touch-Screen Operation
25
Page 26
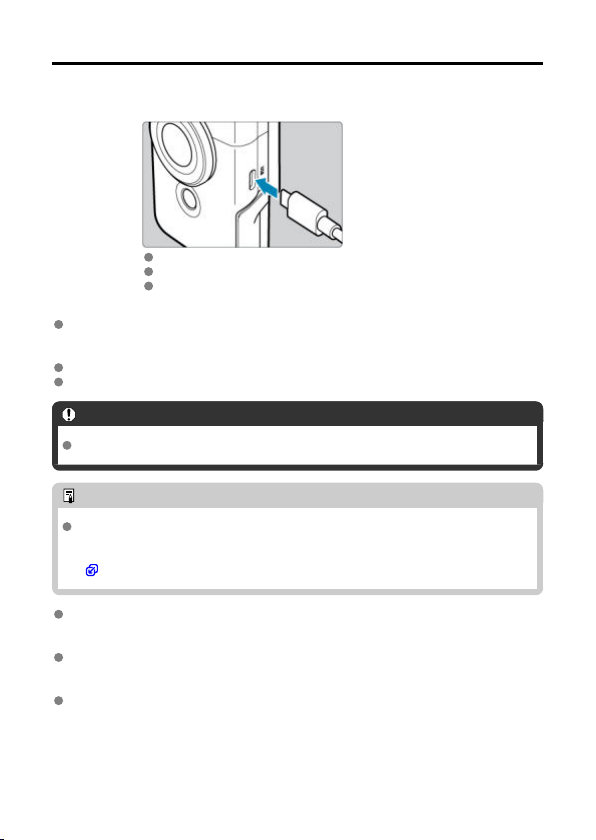
Charging the Camera
Charge the camera.
1.
Charge the camera over a USB connection with the included cable.
After charging begins, the indicator turns orange.
The indicator goes off after the camera is fully charged.
Charging the camera when it is fully depleted takes approx. 1 hr. and 50 min. at
room temperature (23°C/73°F). The time required to charge the battery will vary greatly
depending on the ambient temperature and the battery's remaining capacity.
For safety, charging in low temperatures (5–10°C/41–50°F) takes longer.
The camera can also be used while plugged in for charging.
Caution
Charging may stop if the camera becomes hot.
Note
For charging and powering the camera, an optional USB Power Adapter PD-E1 is
recommended. Some commercially available power adapters (USB Type-C) have
also been confirmed to work with the camera. For details, check the Canon website
(
).
Upon purchase, the built-in battery is not fully charged.
Charge the battery before use.
Charge the camera on the day you will use it or the day before.
The built-in battery will gradually lose its charge, even if it is not used.
Use the camera where the temperature is 0–35°C (32–95°F).
For optimal camera performance, use where the ambient temperature is 0–35°C (32–
95°F). Lower temperatures may temporarily reduce the performance and life of the built-
in battery. Higher temperatures may prevent continuous shooting if the camera becomes
hot.
26
Page 27
Inserting/Removing Cards
Insertion
Removal
Caution
Use of memory cards other than microSD / microSDHC / microSDXC cards is not
supported.
Insertion
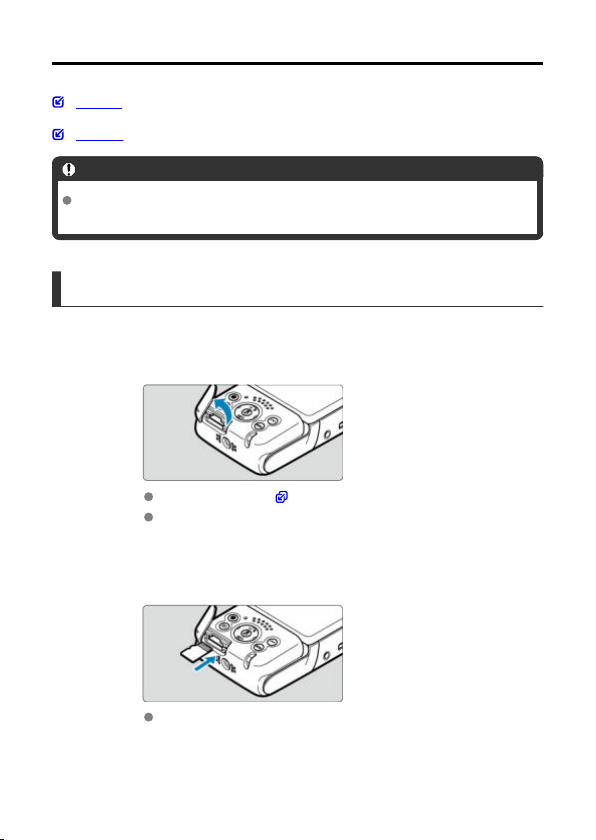
Open the cover.
1.
Turn the camera off ( ).
After making sure the indicator is off, open the cover and rotate it
out of the way.
Insert the card.
2.
Insert the card with the label face-down. Inserting cards the wrong
way may damage the camera.
27
Page 28
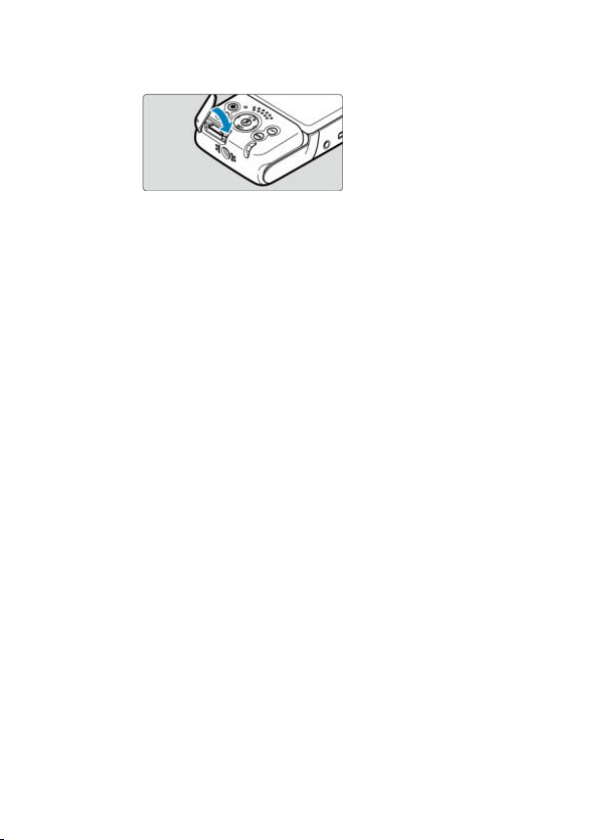
Close the cover.
3.
28
Page 29
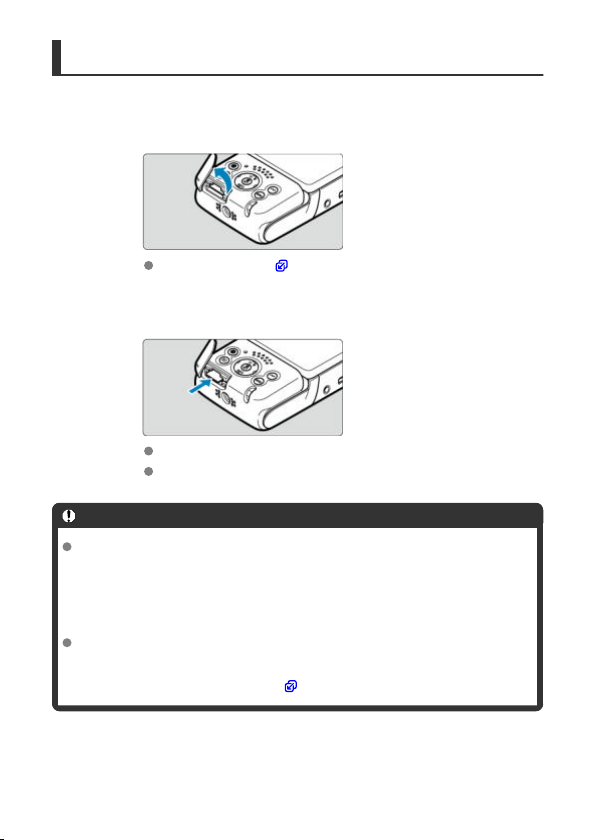
Removal
Open the cover.
1.
Turn the camera off ( ).
Remove the card.
2.
Press the card in to eject it.
Pull the card straight out, then close the cover.
Caution
A lit indicator indicates that the camera is writing to, reading from, erasing
from, or transferring data to the card. Do not open the card slot cover during
this time. To avoid image data corruption and damage to cards or the
camera, never do any of the following while the indicator is lit.
• Removing the card
• Shaking or striking the camera
If a card-related error message is displayed on the screen, remove and reinsert the
card. If the error persists, use a different card.
If you can transfer images on the card to a computer, transfer all the images and
then format the card with the camera (
). The card may then return to normal.
29
Page 30
Using the Screen and Stand
You can change the direction and angle of the screen.
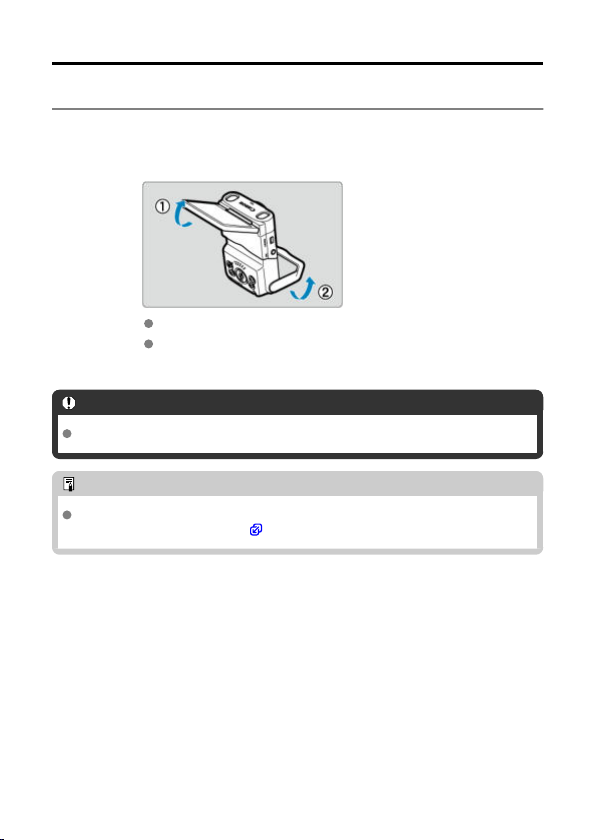
Flip out the screen and stand.
1.
The screen lifts upward and opens to about 180°.
Using the stand, you can set up the camera tilting downward in a range
of –30° to –10° or upward in a range of 10° to 30°.
Caution
Avoid forcing the screen too far open, which puts undue pressure on the hinge.
Note
A mirror image (right/left reversed) of subjects is displayed when the screen faces
subjects in front of the camera (
).
30
Page 31

Turning on the Power
Battery Level Indicator
To turn the camera on, press the < > button. Press it again to turn the camera off.
Changing the interface language
A language selection screen is displayed on initial startup.
To change the interface language, see
Setting the date, time, and time zone
If the date/time/zone setting screen appears when you turn the camera on, see
Zone.
Changing the video system
The video system is set to NTSC.
Change it to PAL in areas where the TV video system is PAL.
To change the video system, see
Language.
Video System.
Date/Time/
31
Page 32
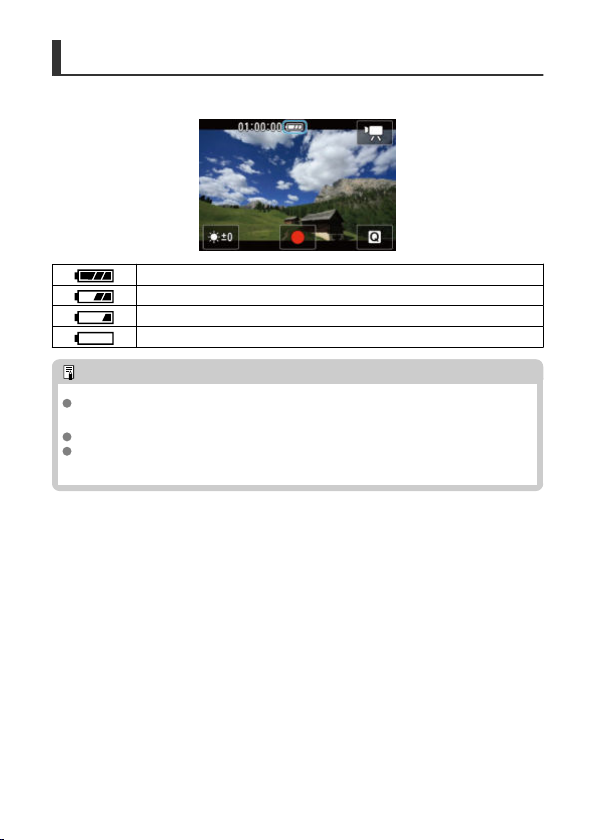
Battery Level Indicator
The battery level indicator appears when the camera is turned on.
Battery level is sufficient.
Battery level is low, but the camera can still be used.
Battery will be depleted soon (blinks).
Charge the battery.
Note
Doing the following will deplete the battery faster:
• Using the Wi-Fi function or Bluetooth function.
Less recording time may be available depending on the actual shooting conditions.
In low ambient temperatures, shooting may not be possible even with a sufficient
battery level.
32
Page 33
Basic Operations
Start/Stop Button
< / > Down/Info Button
< > Comm/Multi-Access Button
Indicator Display
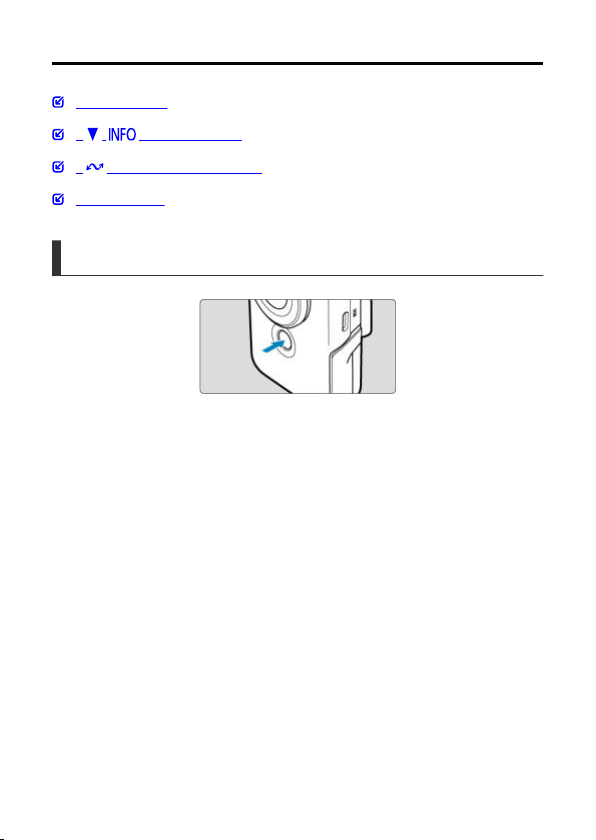
Start/Stop Button
Press the Start/Stop button in Movie mode to start recording. Press it again to stop
recording.
Press the Start/Stop button in still photo mode to take one picture.
33
Page 34
< / > Down/Info Button
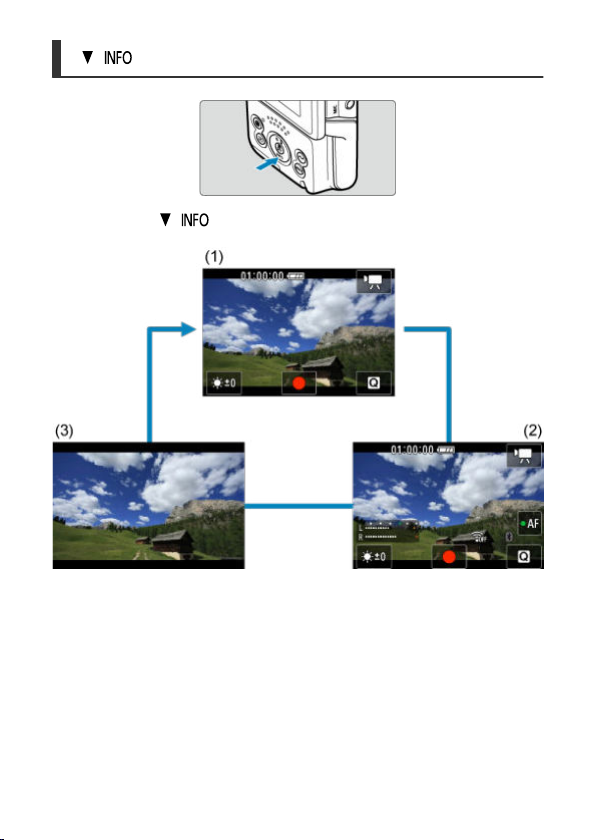
Each press of the < / > Down/Info button changes the information shown.
The following sample screens are for movie recording.
34
Page 35
< > Comm/Multi-Access Button
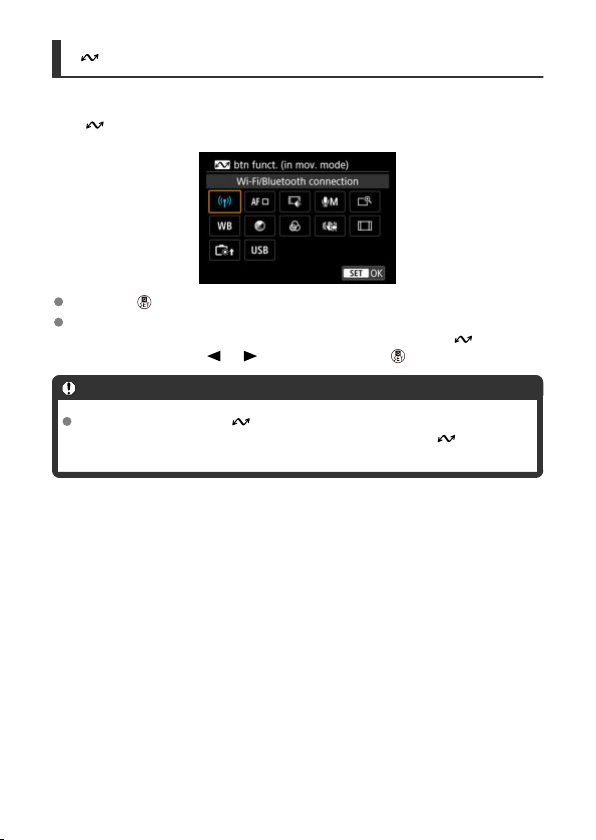
Shows wireless communication features.
> button can also be assigned to frequently used Movie mode functions. To view
The <
the setting screen for this button, press and hold the button on the movie recording screen.
Press the < > button to set it.
During playback, you can send images to a smartphone or tablet (collectively referred to
as “smartphones
Select images with the <
Caution
Functions assigned to the < > button may not be available in some recording
modes. In this case, a message is displayed when you press the <
indicate that it is not available.
”) connected to the camera via Wi-Fi by pressing the <
> < > keys, then press the < > button.
> button.
> button to
35
Page 36
Indicator Display
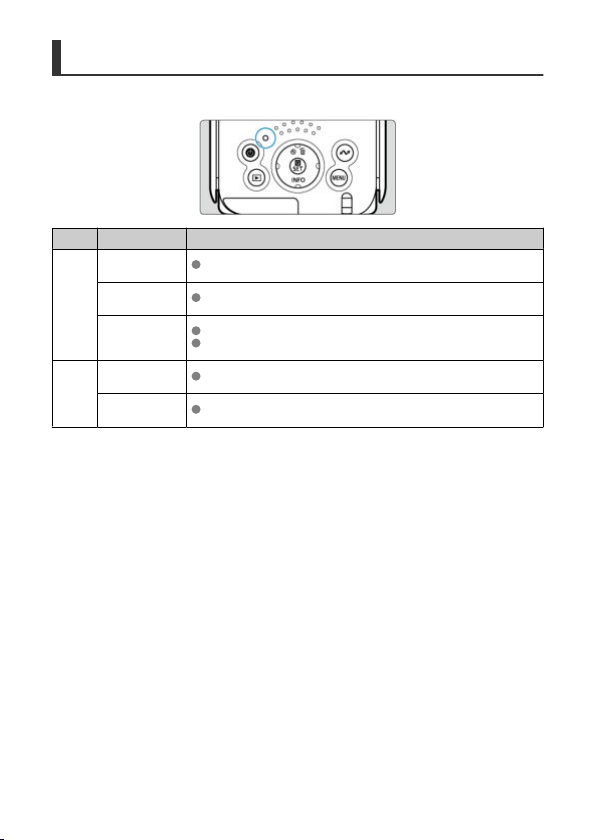
Indicator display varies depending on the camera status.
Color Indicator Status Camera Status
Recording stills to the memory card, or reading stills from the card
Display off
Recording movies to the memory card, or reading movies from the card
Transmitting via Wi-Fi
Charging via USB
USB charging error
Green
Orange
Turned on
Slow blinking
Blinking
Turned on
Blinking
36
Page 37

Menu Operations and Settings
Menu Screen
Menu Setting Procedure
Dimmed Menu Items
37
Page 38
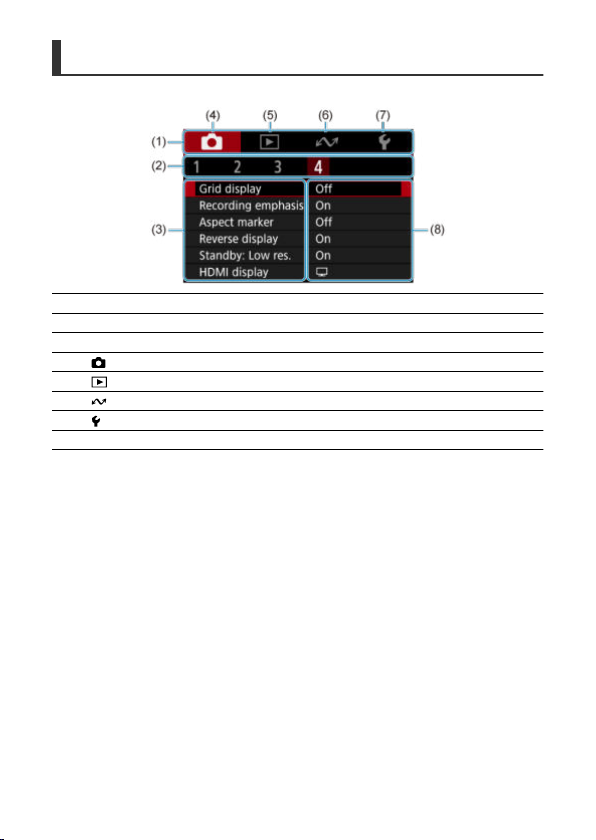
Menu Screen
(1) Main tabs
(2) Secondary tabs
(3) Menu items
: Shooting
(4)
(5)
: Playback
: Wireless communication
(6)
: Set-up
(7)
(8) Menu settings
* Some tabs, menu items, and setting options may not be displayed, depending on the recording
mode.
38
Page 39
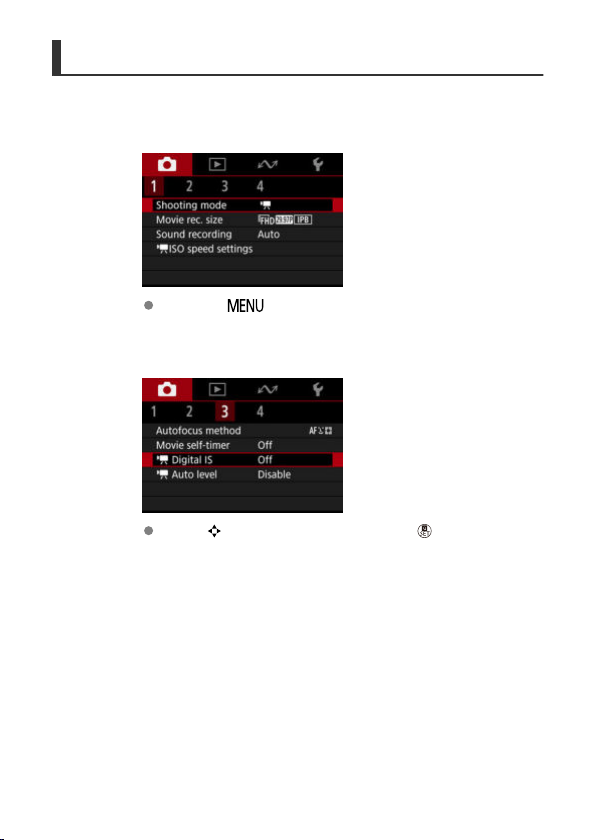
Menu Setting Procedure
Display the menu screen.
1.
Press the < > button to display the menu screen.
Select an item.
2.
Press < > to select an item, then press the < > button.
39
Page 40
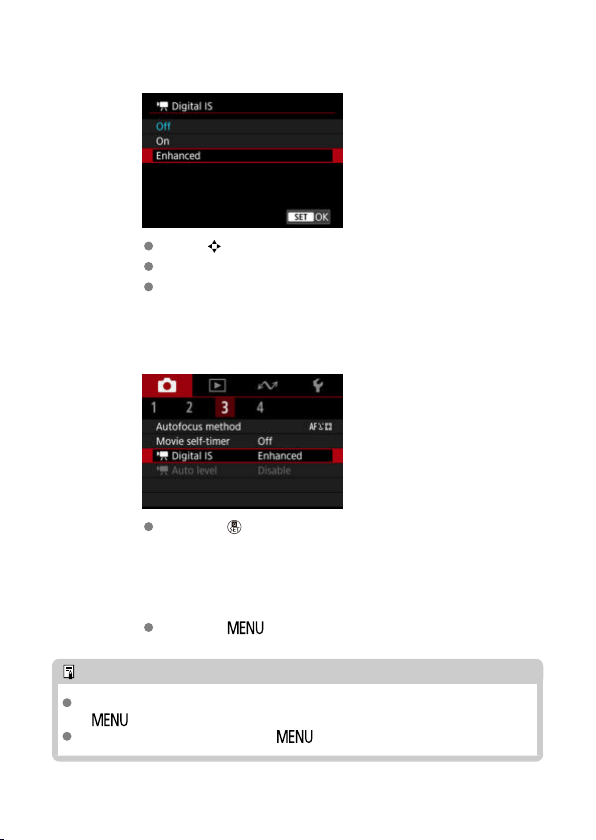
Select an option.
3.
Press < > to select an option.
The current setting is indicated in blue.
For some setting items, a standby screen is displayed. Select an option
to configure the setting.
Set the option.
4.
Press the < > button to set it.
Exit the setting.
5.
Press the < > button.
Note
The description of menu functions hereafter assumes that you have pressed the
<
> button to display the menu screen.
To cancel the operation, press the < > button.
40
Page 41
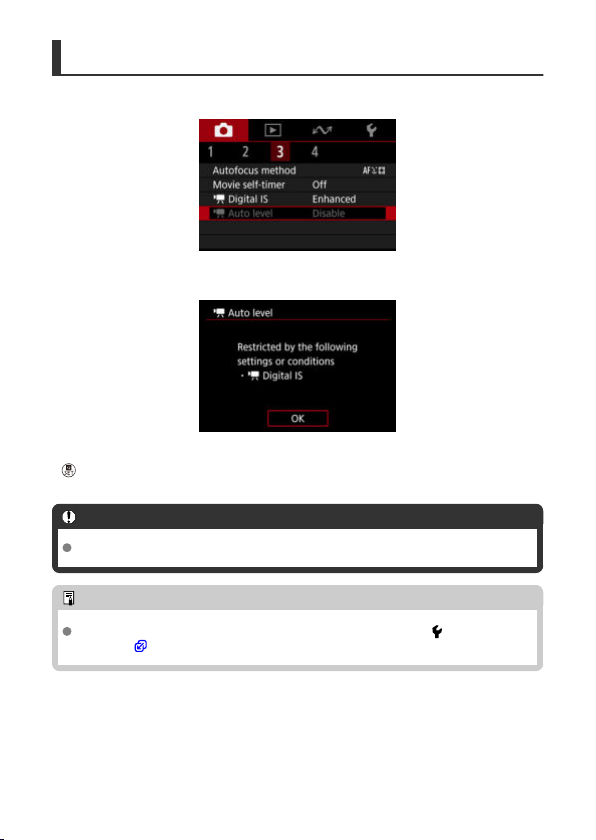
Dimmed Menu Items
Example: With the Digital IS setting set to [Enhanced]
Dimmed menu items cannot be set. The menu item is dimmed if another function setting is
overriding it.
You can see the overriding function by selecting the dimmed menu item and pressing the
<
> button.
If you cancel the overriding function's setting, the dimmed menu item will become settable.
Caution
You may not be able to see the overriding function for certain dimmed menu items.
Note
You can reset menu functions to the default settings by selecting [ : Reset
camera] (
).
41
Page 42
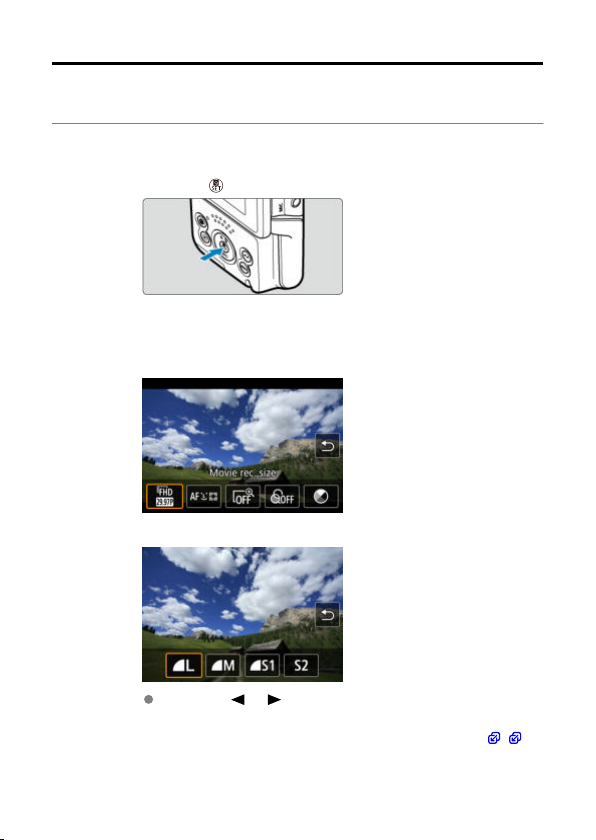
Quick Control
You can directly and intuitively select and set the settings displayed.
Available setting items vary by shooting mode.
1.
Press the <
Select a setting item and set your preferred option.
2.
Movie recording mode
Still photo shooting mode
> button.
Press the < > < > keys to select an item.
You can also set [Movie rec. size] and [Autofocus method] from menu screens (
42
, ).
Page 43
Digital zoom
You can shoot with up to approx. 3× digital zoom.
Caution
[ : Digital IS] is fixed to [Off] and [ : Autofocus method] to
[Specified frame AF].
Images look grainier at higher magnifications, because Movie digital zoom
applies digital image processing. Noise or dots of light may also become
noticeable.
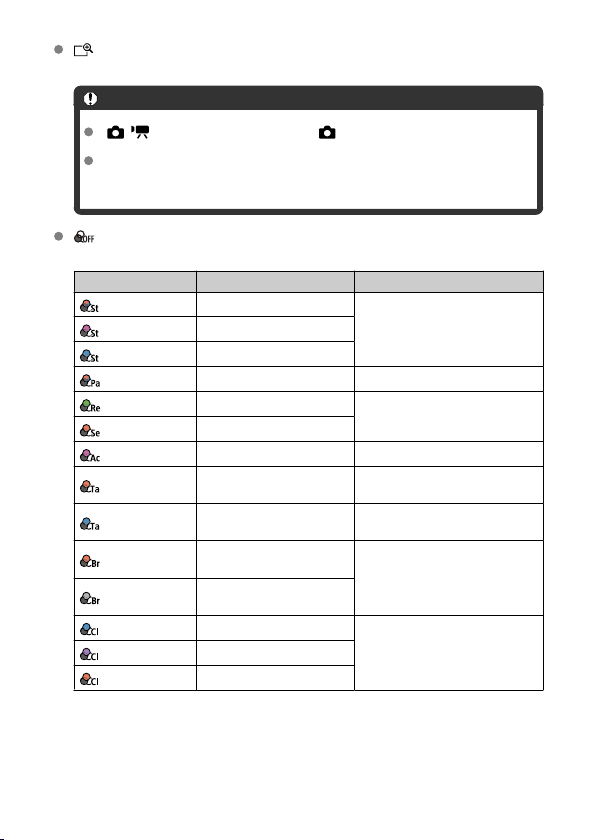
Color filter
You can adjust colors as you watch the screen.
Filter Effect Recommended Scenes
StoryTeal&Orange
StoryMagenta
StoryBlue
PaleTeal&Orange
RetroGreen
Sepiatone
AccentRed
TastyWarm
TastyCool
BrightAmber
BrightWhite
ClearLightBlue
ClearPurple
ClearAmber
Matte with teal shadows and
amber highlights
Matte with a magenta filter
effect overall
Matte with a blue filter effect
overall
Teal shadows and amber
highlights
Faded with a green filter effect
overall
Faded with a sepia filter effect
overall
All colors except reds are faded
High saturation and bright
midtones, with warm colors
overall
High saturation and bright
midtones, with cool colors
overall
Low contrast, light shadows
while keeping the ambiance
dark, and warm colors
Low contrast, light shadows
while keeping the ambiance
dark, and cool colors
Low contrast, bright shadows,
with light blue overall
Low contrast, bright shadows,
with light purple overall
Low contrast, bright shadows,
with light amber overall
High-contrast daytime scenes and
other scenes with contrast, such as
well-lit rooms
Scenes with contrast that include some
amber or yellowish colors
Old buildings, cityscapes
Scenes that include some reddish
colors
Scenes that include food or beverages
in warm tones
Scenes that include food or beverages
in cool tones
Dimly lit scenes with warm-toned light
sources
Bright evening cityscapes, indoor
scenes
43
Page 44

Caution
Color filters may prevent images from being rendered with smooth gradation
and may result in image noise.
Some camera settings or subjects may prevent you from obtaining your
expected colors.
Color tone
Press to shift color tones toward Blue or Amber, and press the <
toward Magenta or Green.
> button to shift
44
Page 45
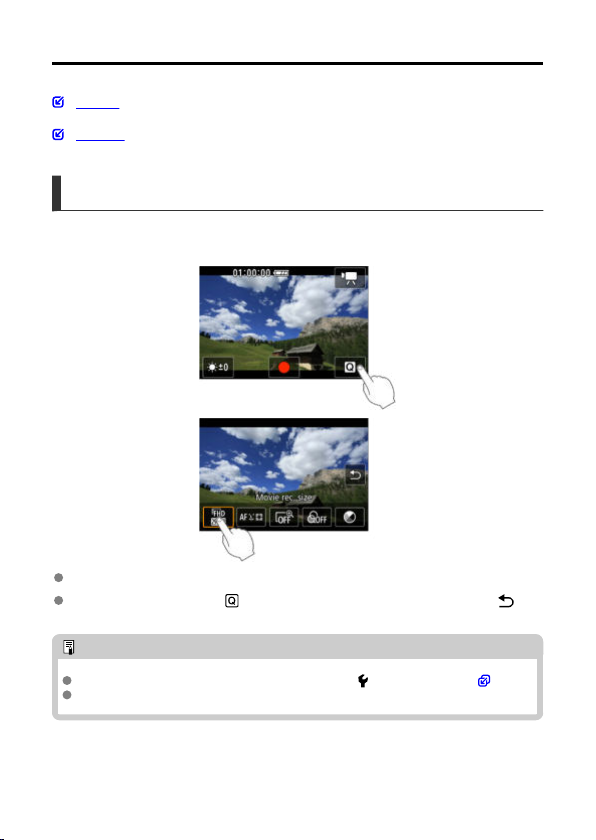
Touch-Screen Operation
Tapping
Dragging
Tapping
Sample screen (Quick Control)
Use your finger to tap (touch briefly and then remove your finger from) the screen.
For example, when you tap [ ], the Quick Control screen appears. By tapping [ ],
you can return to the preceding screen.
Note
To have the camera beep for touch operations, set [ : Beep] to [Enable] ( ).
By default, beeping volume for touch operations is set to [0].
45
Page 46
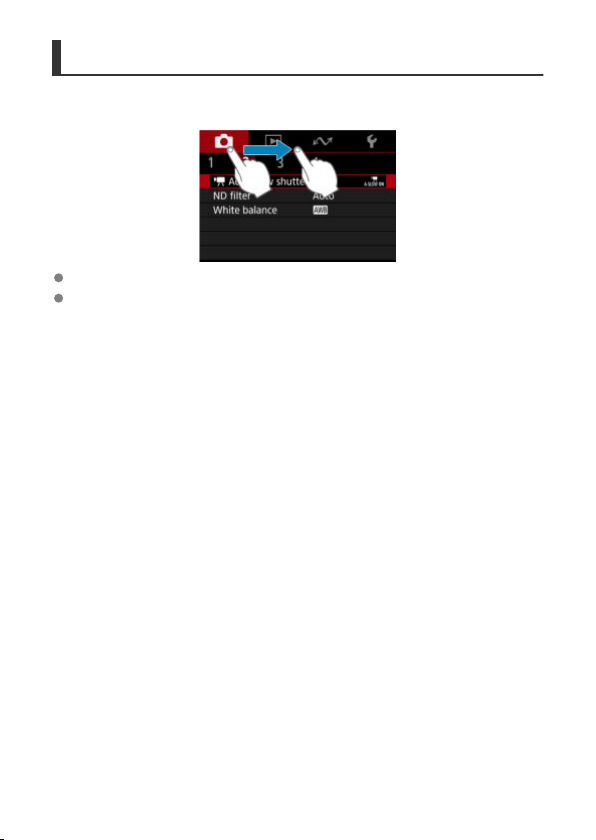
Dragging
Sample screen (Menu screen)
Slide your finger while touching the screen.
For example, drag on the main tabs to move to a different tab.
46
Page 47

Shooting and Recording
This chapter describes shooting and recording and introduces menu settings on the
shooting [
] tab.
Movie Recording
•
• Still Photo Shooting
• Tab Menus: Movie Recording
• Tab Menus: Still Photo Shooting
• Shooting Mode
• Movie Recording Size
• Sound Recording
• Movie ISO Speed Settings
• Movie Auto Slow Shutter
• ND Filter
• White Balance
• Autofocus Method
• Movie Self-Timer
• IS Settings
• Movie Auto Level
• Grid
• Recording Emphasis
• Aspect Marker
• Reverse Display
• Standby: Low Resolution
• Display During HDMI Connection
• Image Quality
• Still Image Aspect Ratio
• Touch Shutter
• Review Duration
• General Movie Recording Precautions
• General Still Photo Shooting Precautions
47
Page 48
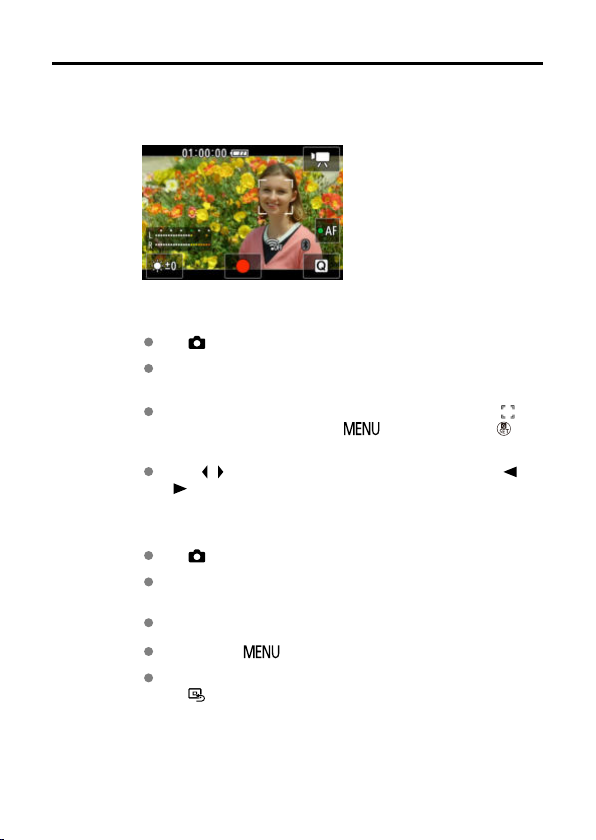
Movie Recording
Focus on the subject.
1.
Tracking a subject to focus on it
Set [ : Autofocus method] to [Face tracking AF].
An AF point is displayed over a person's face or other subject, which
the camera keeps in focus.
To focus on a different subject, tap it. The AF point changes to [ ]. To
exit subject selection, press the <
button again to return to the shooting screen.
When [ ] [ ] is displayed around an AF point, you can use the < >
<
Focusing on subjects in a specific position
Set [ : Autofocus method] to [Specified frame AF].
Tap a position to focus on, then move the AF point on the AF point
screen.
Align the AF point with the subject.
Pressing the < > button returns the AF point to the center.
Tapping [SET] returns to the shooting screen. To center the AF point,
tap [
> button. Press the < >
> keys to change the subject to focus on.
].
48
Page 49
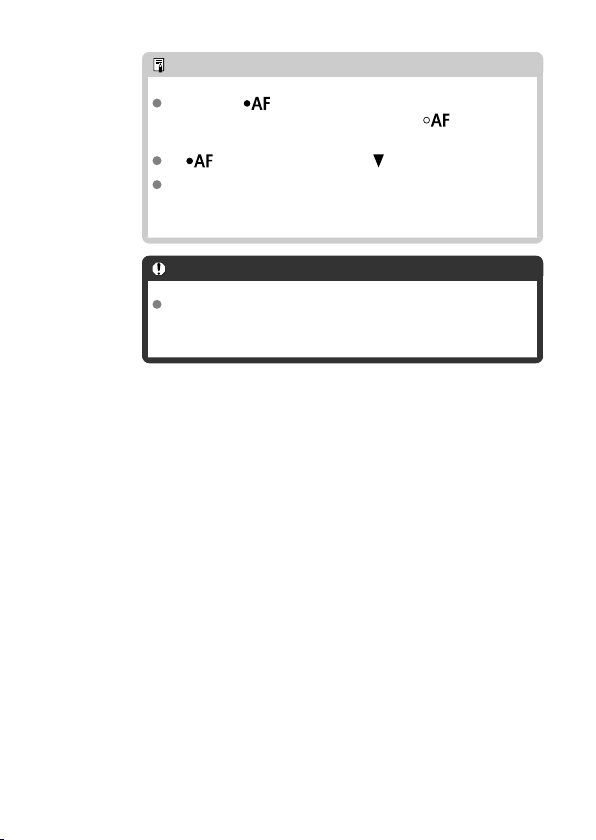
Note
You can tap [ ] to activate autofocus during standby, after
which focusing is locked. The icon changes to [
focusing, tap it again.
]. To unlock
If [ ] is not displayed, press the < > key.
A green frame appears once the subject is in focus. A yellow
frame is displayed with [!] when the camera cannot focus on
subjects.
Caution
If you perform camera operations during movie recording, the
camera's built-in microphone may also record sounds of the
camera operations.
49
Page 50
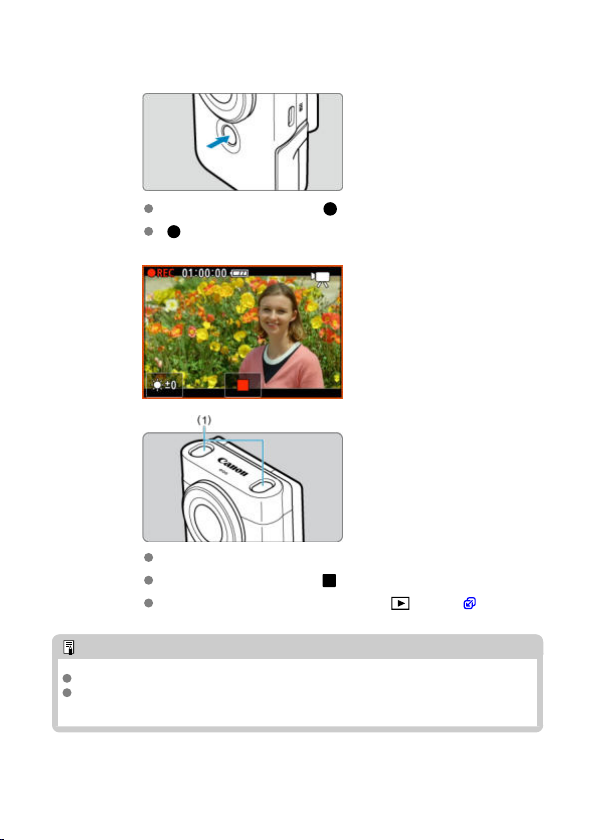
Record the movie.
2.
To start movie recording, tap [ ] or press the Start/Stop button.
[ REC] is displayed in the upper left while movie recording is in
progress, and a blinking red frame is displayed around the screen.
Sound is recorded by the microphone (1).
To stop movie recording, tap [ ] or press the Start/Stop button.
To review the recorded movie, press the < > button ( ).
Note
Audio is recorded in stereo.
The microphone picks up sound in front of and behind the camera, on the left and
right, and above it.
50
Page 51
Still Photo Shooting
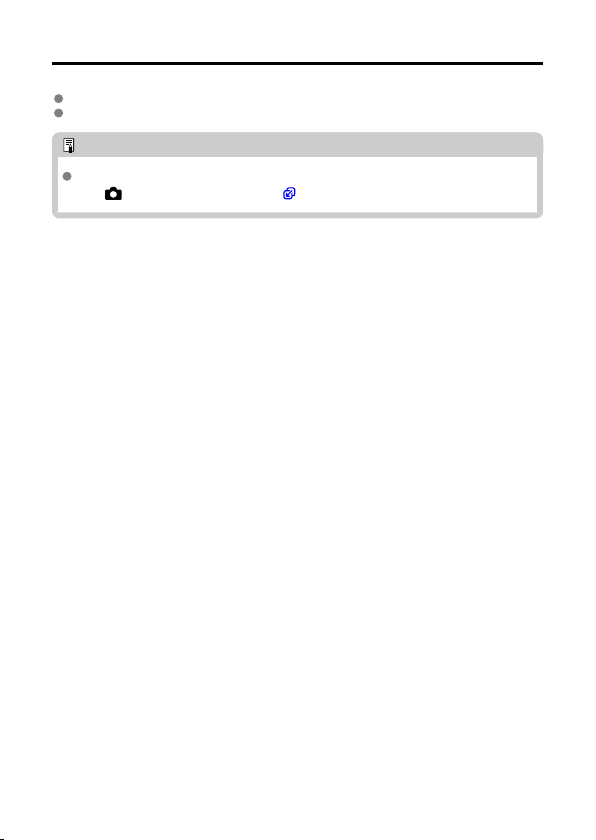
To focus, tap a subject you want to capture. Press the Start/Stop button to shoot.
A yellow frame is displayed when the camera cannot focus on subjects.
Note
For fully automatic operation from focusing to shooting, simply by tapping a subject,
set [
: Touch Shutter] to [Enable] ( ).
51
Page 52
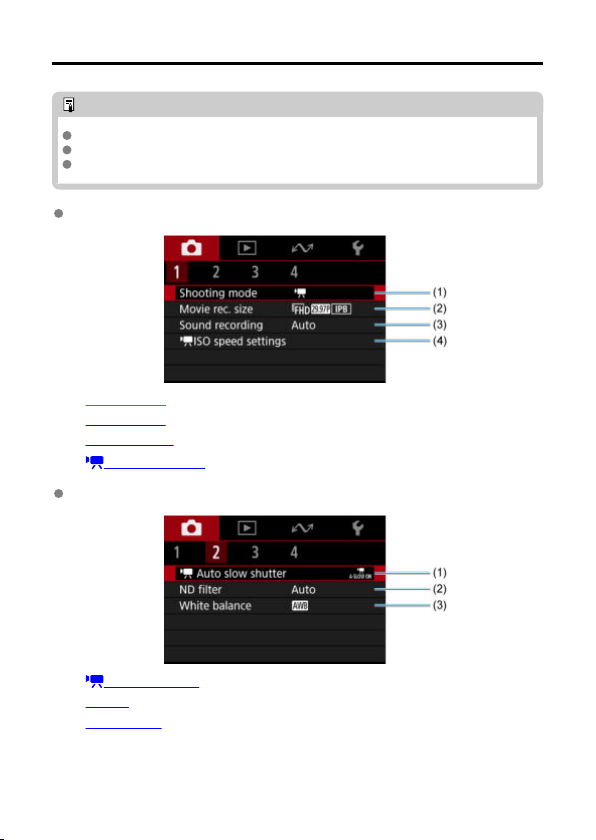
Tab Menus: Movie Recording
Note
*1 Not displayed in [Smooth skin movie] mode or [Movie IS mode].
*2 Available only in [Auto movie] or [Manual exposure movie] mode.
*3 Not displayed in [Smooth skin movie] mode.
Shooting 1
(1) Shooting mode
(2) Movie rec. size
(3) Sound recording
(4) ISO speed settings*
Shooting 2
2
(1) Auto slow shutter*
(2) ND filter
(3) White balance*
1
1
52
Page 53
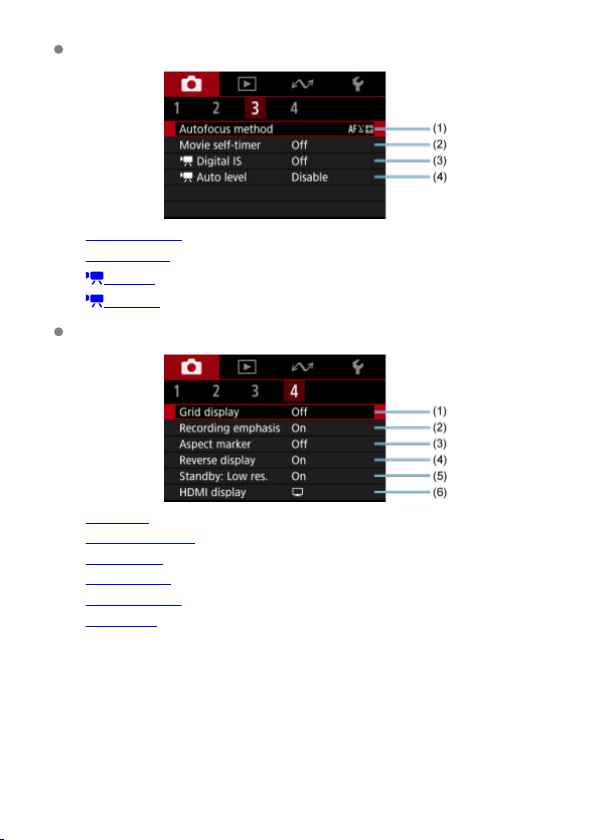
Shooting 3
(1) Autofocus method
(2) Movie self-timer
(3) Digital IS
(4) Auto level
Shooting 4
(1) Grid display
(2) Recording emphasis
(3) Aspect marker
(4) Reverse display
(5) Standby: Low res.*
(6)
HDMI display*
1
3
53
Page 54
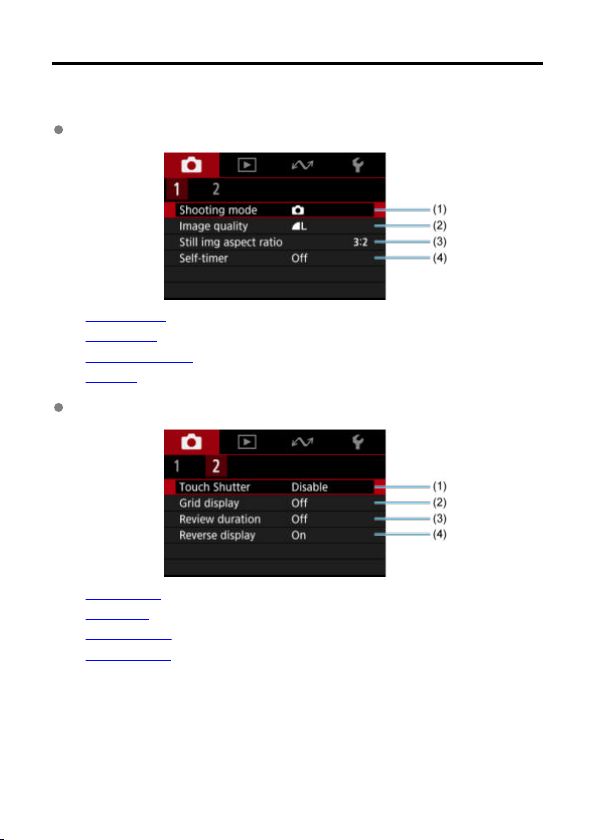
Tab Menus: Still Photo Shooting
For still photo shooting, set the shooting mode to [Auto photo].
Shooting 1
(1) Shooting mode
(2) Image quality
(3) Still img aspect ratio
(4) Self-timer
Shooting 2
(1) Touch Shutter
(2) Grid display
(3) Review duration
(4) Reverse display
54
Page 55
Shooting Mode
Auto Movie
Smooth Skin Movie
Movie IS Mode
Manual Exposure Movie
Auto Photo
You can change the recording mode to suit the scene.
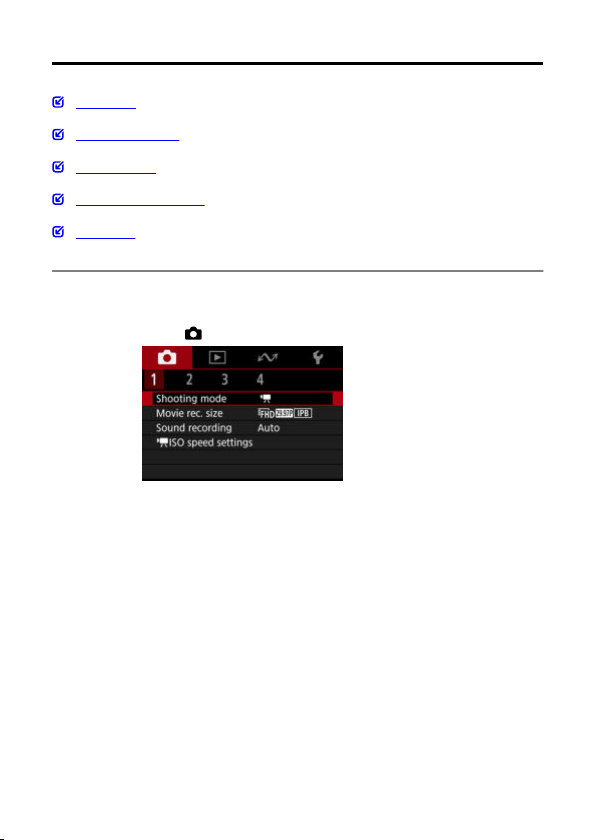
1.
Select [
: Shooting mode].
55
Page 56
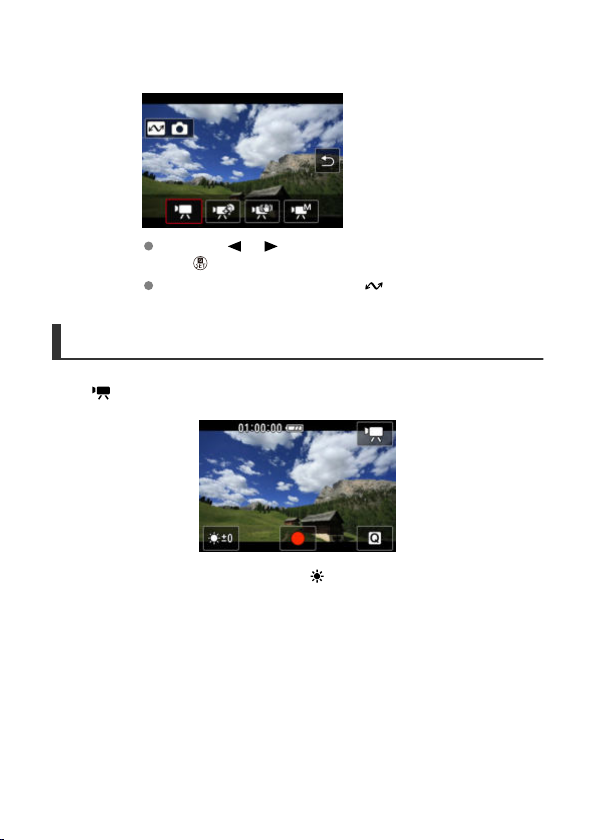
Select a shooting mode.
2.
Press the < > < > keys to select the recording mode, then press
the <
> button.
To switch to Photo mode, press the < > button.
Auto Movie
].
Select [
Exposure is controlled automatically to suit the brightness.
Screen brightness can be adjusted by selecting [ ].
56
Page 57
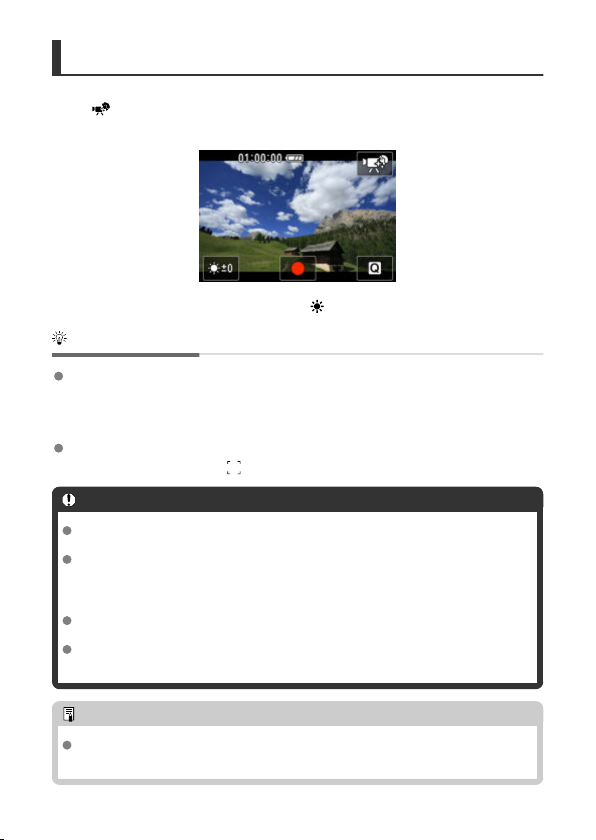
Smooth Skin Movie
Select [
].
Image processing makes skin look smoother.
The level of this effect can be set in [Smooth skin effect] on the Quick Control screen.
Screen brightness can be adjusted by selecting [ ].
Shooting tips
Enable the camera to detect faces.
Frames are displayed around any main subjects detected for skin smoothing. For more
effective skin smoothing, you can move closer to or farther from the subject so that the
frame is displayed on the subject's face.
Focus on the face.
Before shooting, make sure [
Caution
Areas other than people's skin may be modified, depending on the shooting
conditions.
If the smooth skin effect is too strong, images may not look as expected. Take
some test shots in advance and check the results.
4K movie recording precautions
Image quality on the standby screen may differ from image quality on the screen
during movie recording.
Briefly when you start recording movies, image display may remain on the current
frame instead of being updated.
] appears on the subject's face when you are focusing.
Note
The [Smooth skin effect] setting is retained even if you change shooting modes or
turn the camera off.
57
Page 58
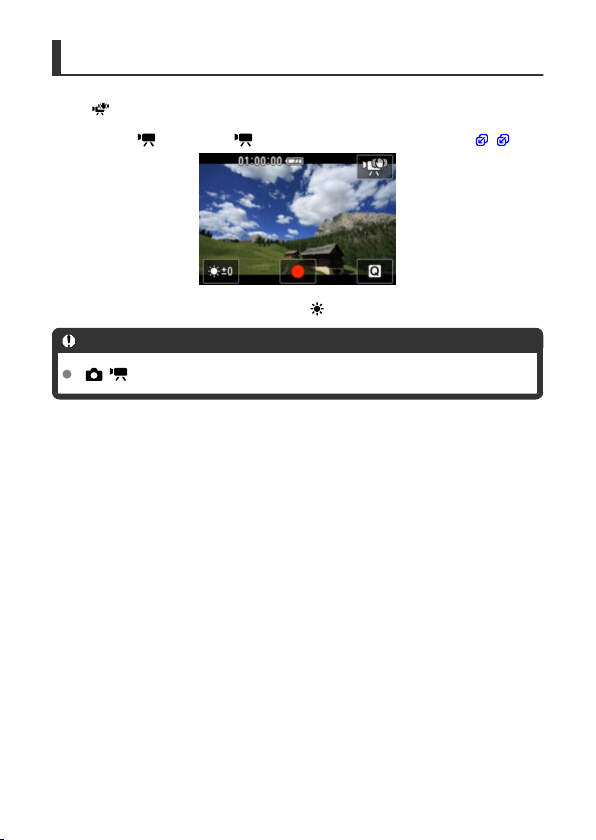
Movie IS Mode
Select [
].
Enables movie recording with reduced camera shake.
You can select [
Screen brightness can be adjusted by selecting [ ].
Caution
[ : Digital IS] is set to [Off] when you have specified digital zoom.
Digital IS] or [ Auto level] on the Quick Control screen ( , ).
58
Page 59
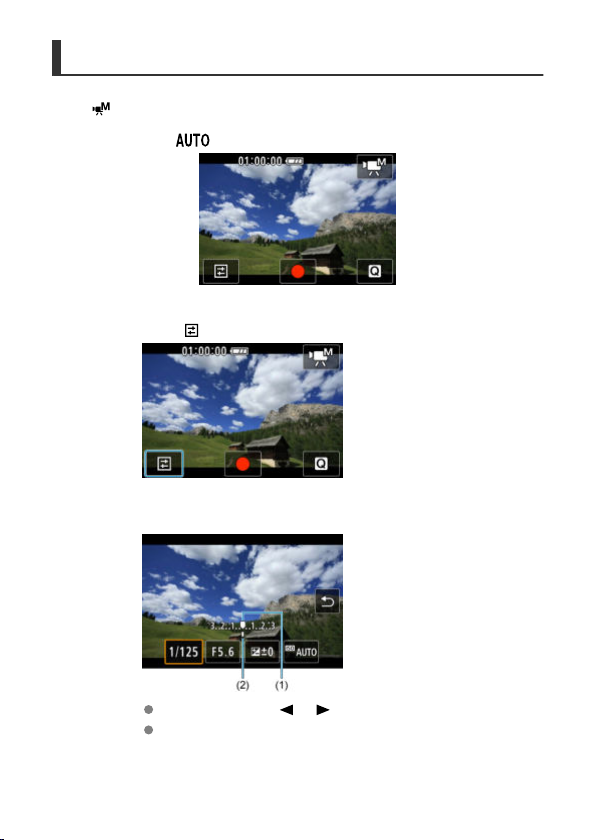
Manual Exposure Movie
Select [
].
Enables you to set the shutter speed, aperture value, and ISO speed.
With ISO speed set to [
], you can set exposure compensation.
1.
2.
].
Select [
Select an item.
Set by pressing the < > < > keys.
Check the exposure level mark (2) to see how far the current exposure
level is from the standard exposure level (1).
59
Page 60
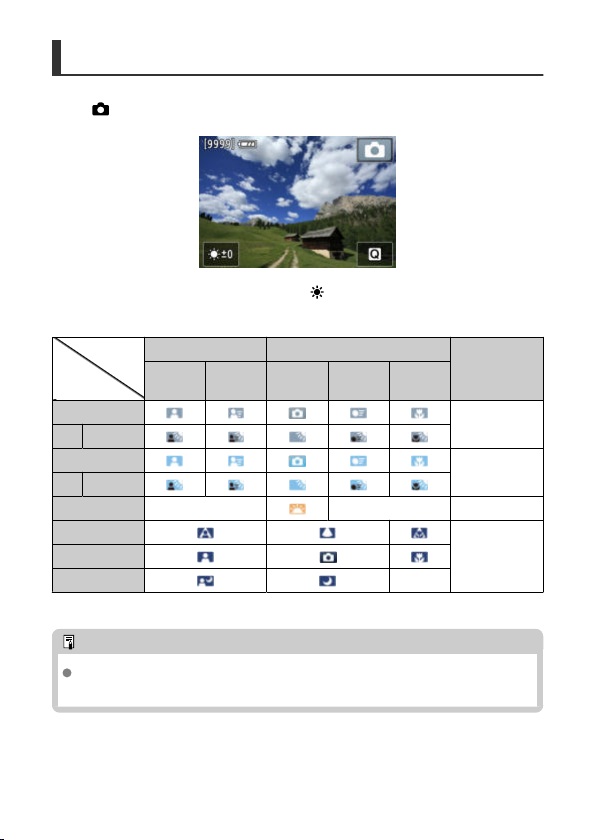
Auto Photo
].
Select [
The camera analyzes the scene and sets the optimum settings automatically.
Screen brightness can be adjusted by selecting [ ].
An icon representing the type of scene detected appears in the upper right of the screen
during shooting.
Subject
Background
Bright
Backlit
Blue Sky Included
Backlit
Sunset
Spotlight
Night Scenes
* 1: Icons of scenes selected from those that can be detected are displayed.
Note
For certain scenes or shooting conditions, the icon displayed may not match the
actual scene.
People Subjects Other Than People
Nature/
Outdoor
Scene
In Motion Close
1
*
1
*
In Motion
1
*
Background Color
Gray
Light blue
Orange
Dark blueDark
60
Page 61
Movie Recording Size
4K Movie Recording
Cards That Can Record Movies
Movie Recording Time Limit
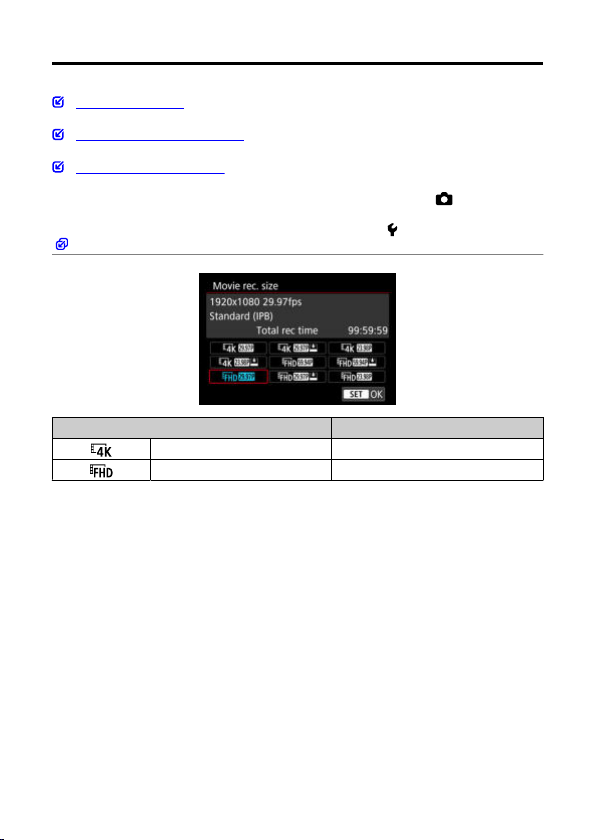
You can set the recording size, frame rate, and compression method in [ : Movie rec.
size].
Note that the frame rate is updated automatically to match the [
).
(
Image Size Aspect Ratio
3840×2160 16:9
1920×1080 16:9
: Video system] setting
61
Page 62
Frame rate (fps: frames per second)
[ ] 59.94 fps / [ ] 29.97 fps
For areas using the NTSC TV system, such as North America, Japan, South Korea, and
Mexico.
[ ] 50.00 fps / [ ] 25.00 fps
For areas using the PAL TV system, such as Europe, Russia, China, and Australia.
[ ] 23.98 fps
Mainly for cinematic purposes. Available when [
: Video system] is set to [For NTSC].
Compression method
[ ] IPB (Standard)
Compresses multiple frames at a time efficiently for recording.
[ ] IPB (Light)
Since the movie is recorded at a bit rate lower than with IPB (Standard), the file size will
be smaller than with IPB (Standard) and the playback compatibility will be higher. This
will make the available recording time longer than with IPB (Standard) (with a card of the
same capacity).
Movie recording format
[ ] MP4
All movies you record with the camera are recorded as movie files in MP4 format (file
extension “.MP4”).
Caution
If you change the [ : Video system] setting, also set [ : Movie rec. size] again.
Normal playback of files such as 4K or / movies may not be possible
on other devices, because playback is processing-intensive.
Image quality (sense of resolution, noise, etc.) varies slightly depending on the
movie recording size setting.
Note
To obtain better performance with the card, formatting the card with the camera
before recording movies is recommended (
Movies cannot be recorded in HD or VGA quality.
).
62
Page 63

4K Movie Recording
Recording 4K movies requires a stable card with a fast writing speed. For details, see
Cards That Can Record Movies.
4K movie recording greatly increases the processing load, which may increase the
internal camera temperature faster or higher than for regular movies. If a white
[
] or red [ ] icon appears during movie recording, the card may be
hot, so stop recording the movie and let the camera cool down before removing
the card. (Do not remove the card immediately.)
Condensation may form inside the camera lens if you record 4K movies in [Smooth
skin movie] mode in humid environments.
63
Page 64
Cards That Can Record Movies
See
Card performance requirements for details on cards supporting all movie recording
sizes.
Test cards by recording a few movies to make sure they can record correctly at your
specified size (
Caution
If you use a slow-writing card when recording movies, the movie may not be
recorded properly. Also, if you play back a movie on a card with a slow reading
speed, the movie may not be played back properly.
When recording movies, use high-performance cards with a writing speed
sufficiently higher than the bit rate.
When movies cannot be recorded properly, format the card and try again. If
formatting the card does not resolve the problem, refer to the card manufacturer's
website, etc.
Note
To obtain better performance with the card, formatting the card with the camera
before recording movies is recommended (
To check the card's writing/reading speed, refer to the card manufacturer's website,
etc.
).
).
64
Page 65

Movie Recording Time Limit
The maximum recording time per movie is 1 hr. Once 1 hr. is reached, recording stops
automatically. You can start recording a movie again by pressing the Start/Stop button
(which records the movie as a new file).
Caution
The camera's internal temperature may rise and less recording time may be
available after extended movie playback/Live View display.
65
Page 66
Sound Recording
Sound Recording/Sound-Recording Level
Wind Filter
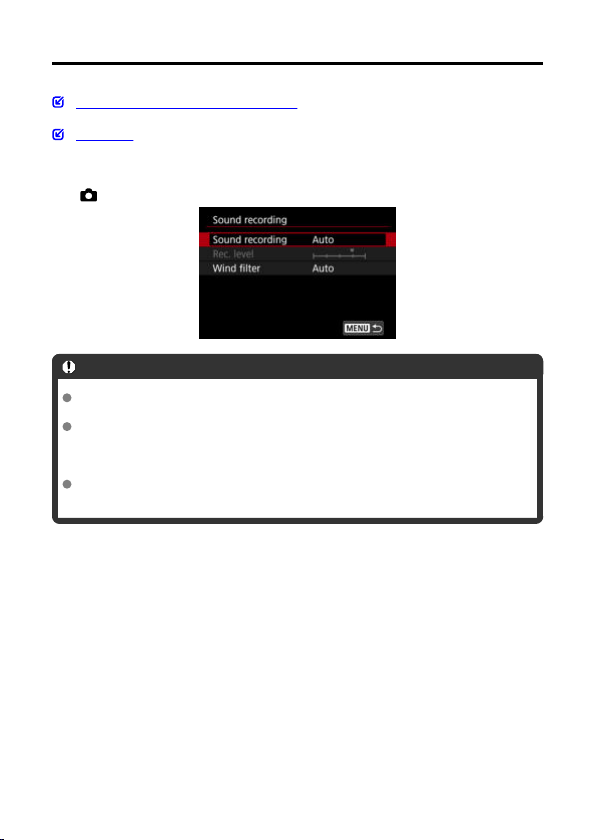
You can record movies while recording sound with the built-in stereo microphone or an
external stereo microphone. You can also freely adjust the sound-recording level.
Use [
: Sound recording] to set sound recording functions.
Caution
Sounds from Wi-Fi operations may be captured with built-in or external
microphones. For best results, avoid using wireless features when recording.
If you perform camera operations during movie recording, the camera's built-in
microphone may also record sounds of lens or camera operations. If so, it may help
reduce these sounds if you use an external microphone equipped with an output
plug and position it away from the camera.
Do not connect anything other than an external microphone to the camera's
external microphone IN terminal.
66
Page 67
Note
Audio is also output when the camera is connected to televisions via HDMI, unless
[Sound recording] is set to [Disable]. In case of feedback from television audio
output, move the camera away from the television or turn down the volume.
The volume balance between L/R (left/right) cannot be adjusted.
Sound Recording/Sound-Recording Level
Auto
The sound-recording level is adjusted automatically. Auto level control will take effect
automatically in response to the sound level.
Manual
You can adjust the sound-recording level as needed. Select [Rec. level] and press the
<
> < > keys while looking at the level meter to adjust the sound-recording level.
Look at the peak hold indicator, and adjust so that the level meter sometimes lights up
on the right of the “12” (–12 dB) mark for the loudest sounds. If it exceeds “0,” the sound
will be distorted.
You can adjust the recording level during recording by tapping [
].
Disable
Sound will not be recorded.
67
Page 68

Wind Filter
Set to [Auto] to reduce audio distortion in windy outdoor scenes. Disabled when external
microphone is connected to the external microphone IN terminal. When the wind filter
function takes effect, part of the low bass sounds will also be reduced.
68
Page 69
Movie ISO Speed Settings
ISO speed
You can set your preferred ISO speed. Select [ISO speed] to access the ISO speed
setting screen. Set by pressing the <
pressing the <
Max for ISO speed
Enables you to set the maximum value for [ISO speed] used for Full HD movie
recording.
Max for
Enables you to set the maximum value for [ISO speed] used for 4K movie recording.
Caution
[Max for ISO speed] and [Max for ] do not determine the maximum value for
ISO Auto.
> button.
> < > keys. You can also select ISO Auto by
69
Page 70
Movie Auto Slow Shutter
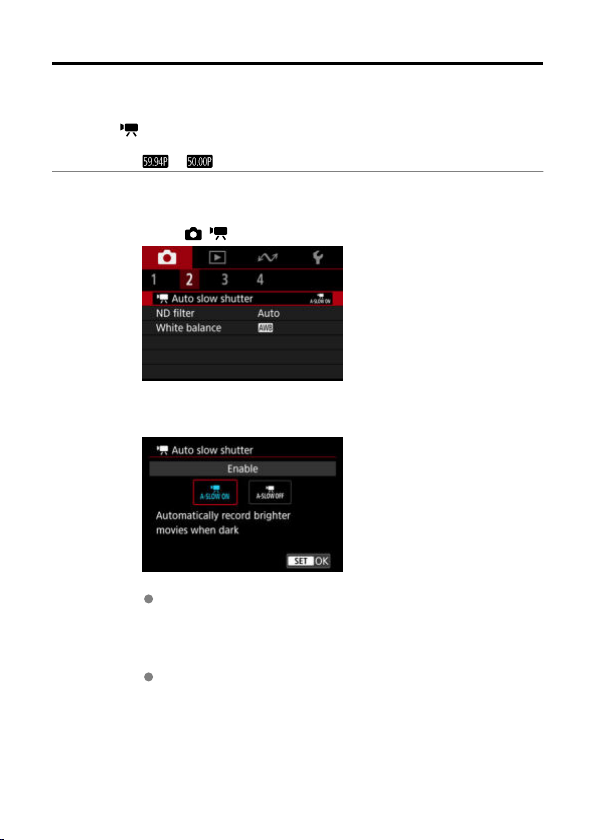
You can choose whether to record movies that are brighter and less affected by image noise
than when set to [Disable] by automatically slowing the shutter speed under low light.
Available in [
and with [Smooth skin movie], to [Disable]. Applies when the frame rate of the movie
recording size is
] recording mode. With [Movie IS mode], this feature is fixed to [Enable],
or .
1.
Select [
: Auto slow shutter].
Select an option.
2.
Disable
Enables you to record movies with smoother, more natural movement,
less affected by subject shake than when set to [Enable]. Note that
under low light, movies may be darker than when set to [Enable].
Enable
Enables you to record brighter movies than when set to [Disable] by
automatically reducing the shutter speed to 1/30 sec. (NTSC) or 1/25
sec. (PAL) under low light.
70
Page 71
Note
Setting to [Disable] is recommended when recording moving subjects under low
light, or when afterimages such as trails may occur.
71
Page 72
ND Filter
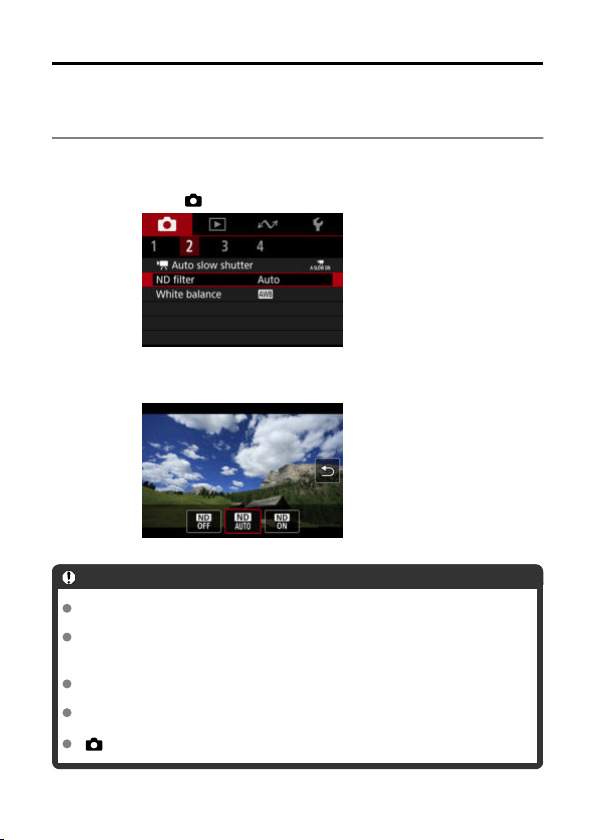
For optimal brightness in the scenes you shoot, Auto ND filter reduces light intensity to 1/8
the actual level, by an amount equivalent to three stops. Besides [Auto], you can also select
[Off] or [On].
1.
2.
Caution
Selecting [On] or [Auto] makes it more likely that image noise will occur, even in
bright scenes, because it is easier for the ISO speed to increase.
ND: Neutral Density
Precaution on using Auto ND filter
ND filter status does not change once recording begins for movie recording or
streaming, even when [Auto] is set.
For best results, set to [Off] if you will go from a bright to a dark environment while
recording movies.
[ : ND filter] is set to [Off] when the camera is used as webcam.
: ND filter].
Select [
Select an option.
72
Page 73
White Balance
[ ] Auto White Balance
[ ] Color Temperature
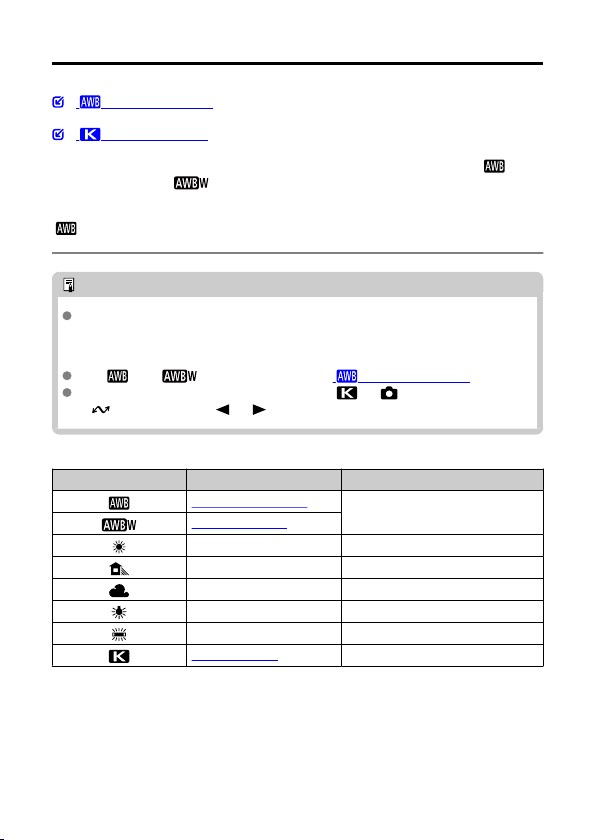
White balance (WB) is for making the white areas look white. Normally, the Auto [ ]
(Ambience priority) or [
natural-looking colors cannot be obtained with Auto, you can select a white balance
corresponding to the light source.
] (Ambience priority) is set automatically for [Smooth skin movie], [Movie IS mode], or
[
[Auto photo] modes.
Note
The human eye adapts to changes in lighting so that white objects look white under
all kinds of lighting. Cameras determine white from the color temperature of lighting
and, based on this, apply image processing to make color tones look natural in
your shots.
For [ ] and [ ] setting instructions, see [ ] Auto White Balance.
To set your preferred color temperature, select [ ] in [ : White balance], press
>, then press the < > < > keys.
<
Display Mode Color Temperature (K: Kelvin)
] (White priority) setting will obtain the correct white balance. If
Auto (Ambience priority)
Auto (White priority)
Daylight 5200
Shade 7000
Cloudy, twilight, sunset 6000
Tungsten light 3200
White fluorescent light 4000
Color temperature 2500–10000
3000–7000
(Approx.)
73
Page 74
[ ] Auto White Balance
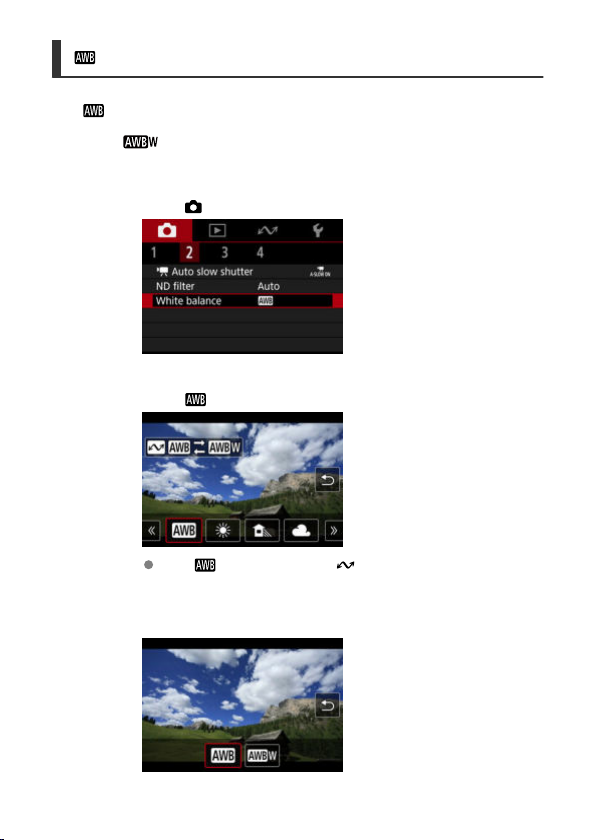
With [
] (Ambience priority), you can slightly increase the intensity of the image's warm
color cast when shooting a tungsten-light scene.
If you select [
cast.
] (White priority), you can reduce the intensity of the image's warm color
1.
Select [
: White balance].
2.
Select [
Select an option.
3.
].
With [ ] selected, press the < > button.
74
Page 75
Caution
Precautions when set to [ ] (White priority)
The warm color cast of subjects may fade.
When multiple light sources are included in the scene, the warm color cast of the
picture may not be reduced.
75
Page 76
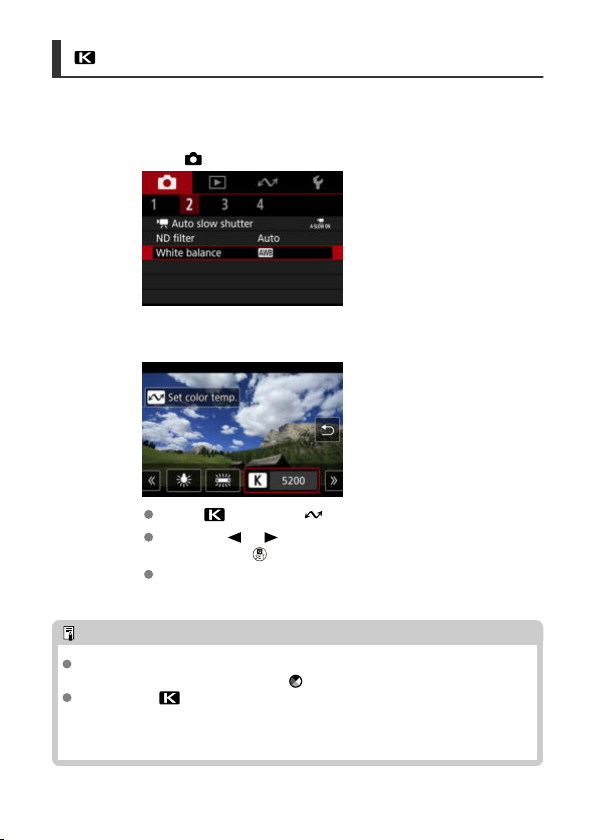
[ ] Color Temperature
A value can be set representing the white balance color temperature.
1.
Select [
: White balance].
Set the color temperature.
2.
Select [ ], then press < >.
Press the < > < > keys to set your preferred color temperature,
then press the <
The color temperature can be set from approx. 2500K to 10000K in
100K increments.
Note
When setting the color temperature for an artificial light source, correct the white
balance (toward magenta or green) in [
When setting [ ] to a value measured with a commercially available color
temperature meter, take some test shots in advance and adjust the setting as
needed to compensate for any difference between the color temperature meter and
the camera.
> button.
] on the Quick Control screen as needed.
76
Page 77
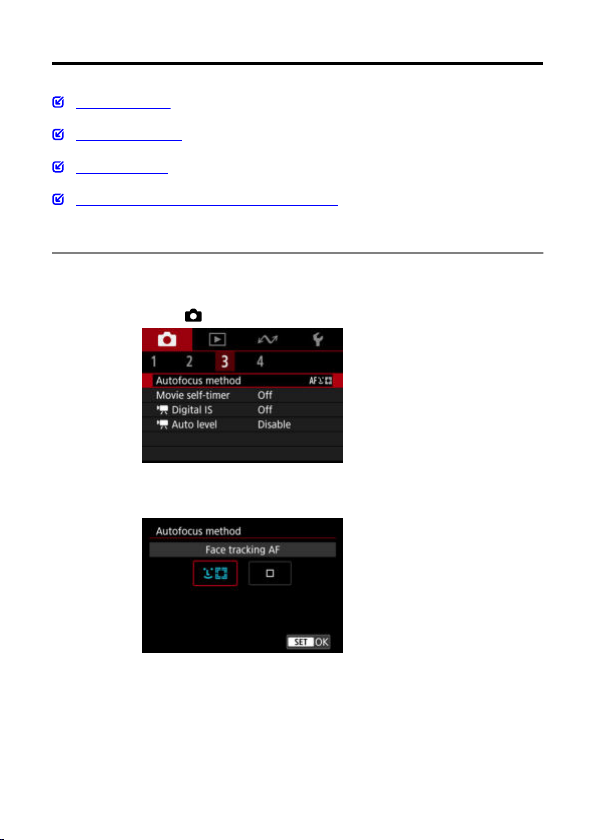
Autofocus Method
Face Tracking AF
Specified Frame AF
AF Shooting Tips
Shooting Conditions That Make Focusing Difficult
You can change the method of autofocusing (autofocus method) to suit the subject and
scene you are shooting.
1.
2.
: Autofocus method].
Select [
Select an autofocus method.
77
Page 78
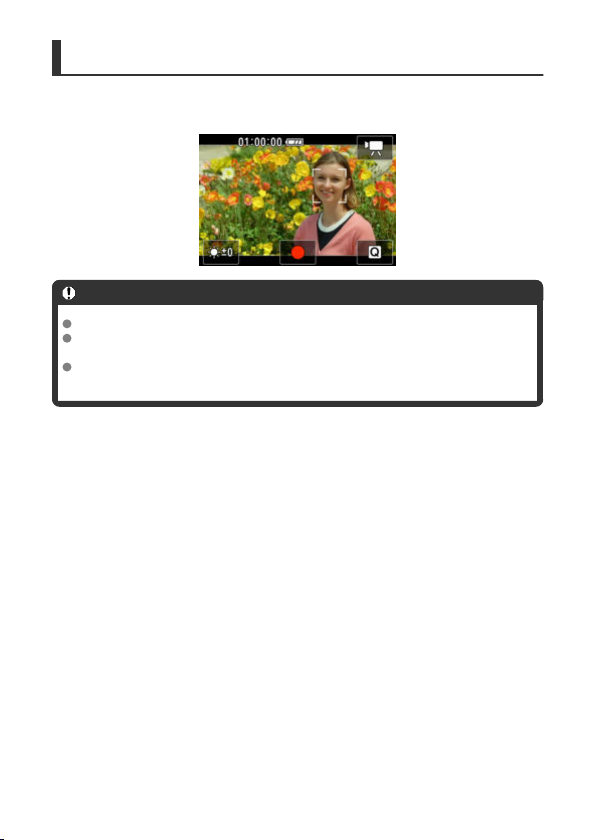
Face Tracking AF
The camera detects and focuses on people's faces.
When no face is detected, focusing areas are determined automatically.
Caution
An object other than a human face may be detected as a face.
The camera may not detect faces that are very small or large in the picture, too
bright or dark, or partly hidden.
AF may not detect subjects or people's faces at the edges of the screen.
Recompose the shot to center the subject or bring the subject closer to the center.
78
Page 79
Specified Frame AF
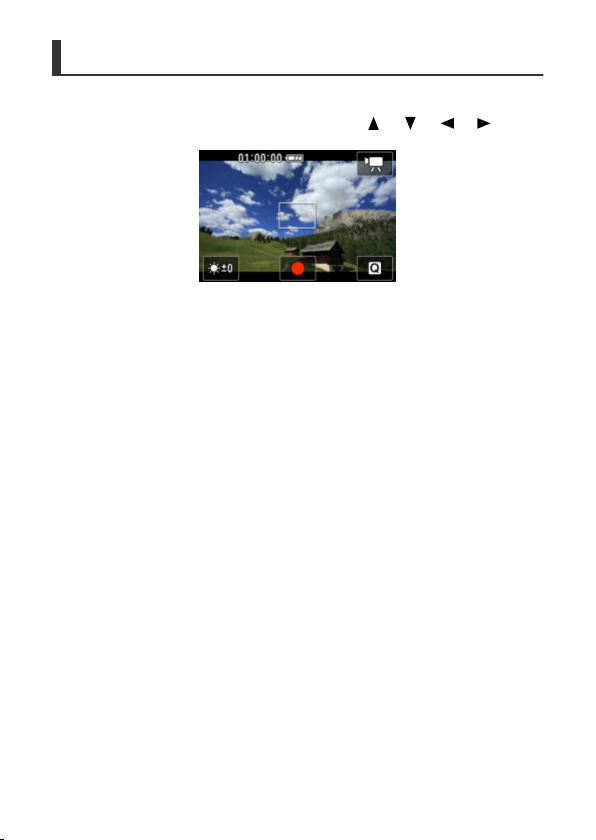
The camera focuses in a single AF point that you specify. You can move the AF point to
your preferred position by tapping, dragging, or using the <
after tapping the screen to display the AF point selection screen.
> < > < > < > keys
79
Page 80

AF Shooting Tips
It may take some time to focus, depending on the subject and shooting conditions.
The available autofocus range varies depending on the aspect ratio, image stabilization,
and other settings.
80
Page 81

Shooting Conditions That Make Focusing Difficult
Subjects with low contrast, such as a blue sky or flat surfaces in solid colors, or other
cases when highlight or shadow details are clipped.
Subjects in low light.
Stripes and other patterns where there is contrast only in the horizontal direction.
Fine lines and subject outlines.
Under light sources with constantly changing brightness, colors, or patterns.
Night scenes or points of light.
The image flickers under fluorescent or LED lighting.
Extremely small subjects.
Subjects at the edge of the screen.
Strongly backlit or reflective subjects (Example: Car with a highly reflective surfaces,
etc.).
Near and distant subjects covered by an AF point (Example: Animal in a cage, etc.).
Subjects that keep moving within the AF point and will not stay still due to camera shake
or subject blur.
Performing AF when the subject is very far out of focus.
Noise (dots of light, banding, etc.) appears on the screen during AF.
81
Page 82
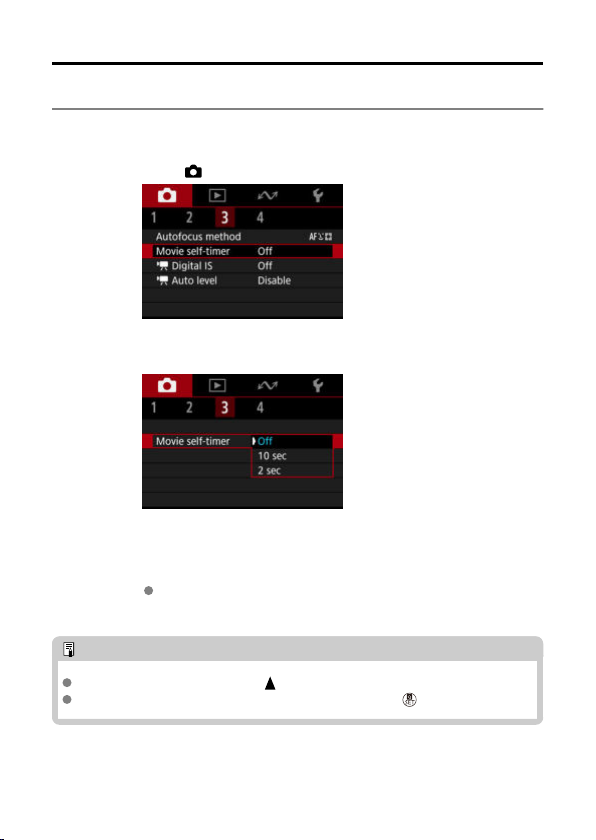
Movie Self-Timer
Recording can be started by the self-timer.
1.
Select [
: Movie self-timer].
Select an option.
2.
Record the movie.
3.
After you press the Start/Stop button, the camera beeps and displays
number of seconds left before recording.
Note
Can also be set by pressing the < > key on the shooting screen.
To cancel the self-timer, either tap the screen or press the < > button.
82
Page 83
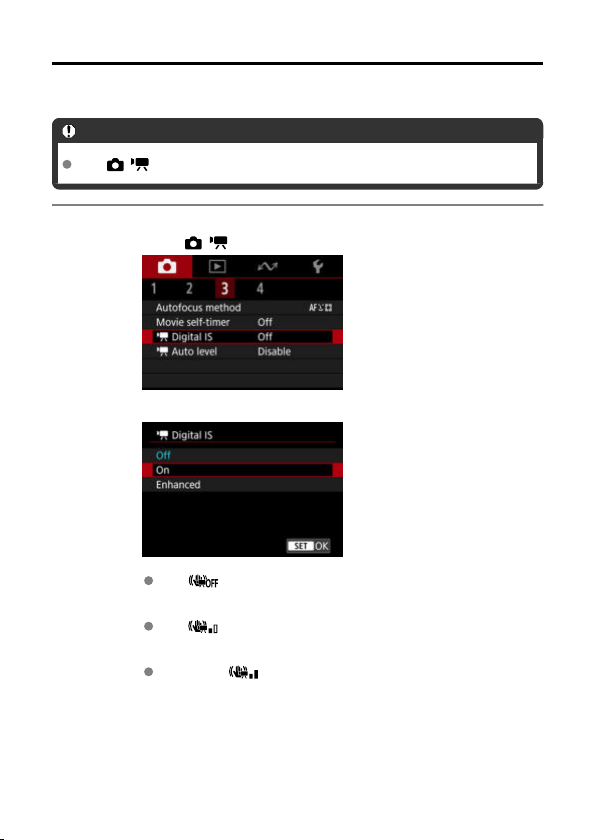
IS Settings
You can reduce camera shake as movies are recorded.
Caution
Set [ : Auto level] to [Disable].
1.
Select [
: Digital IS].
Select an option.
2.
Off ( )
Deactivates image stabilization.
On ( )
Camera shake will be corrected. The image will be slightly magnified.
Enhanced ( )
Compared to when [On] is set, stronger camera shake can be
corrected. The image will be more magnified.
83
Page 84

Caution
Stabilization from the Digital IS setting may be less effective at some movie
recording sizes.
Consider setting to [Off] when using a tripod.
Depending on the subject and shooting conditions, subject blur may be noticeable
(subjects may look out of focus momentarily) due to the effect of the Digital IS
setting.
Images look more grainy due to the Digital IS setting, which magnifies images.
Noise, dots of light, etc. may also become noticeable.
84
Page 85
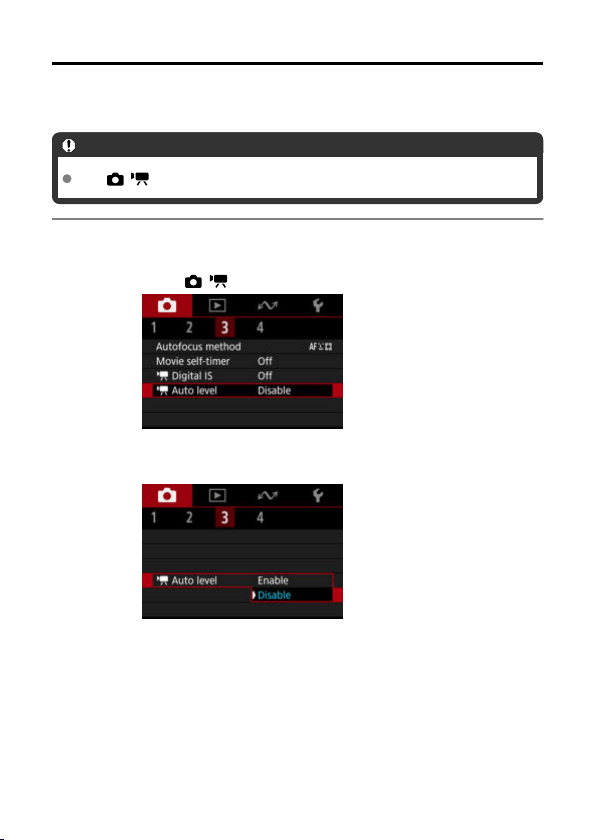
Movie Auto Level
Auto leveling helps keep movies straight as you record them. With this feature set, the
display area may narrow, and subjects may be enlarged.
Caution
Set [ : Digital IS] to [Off].
1.
Select [
: Auto level].
Select an option.
2.
85
Page 86
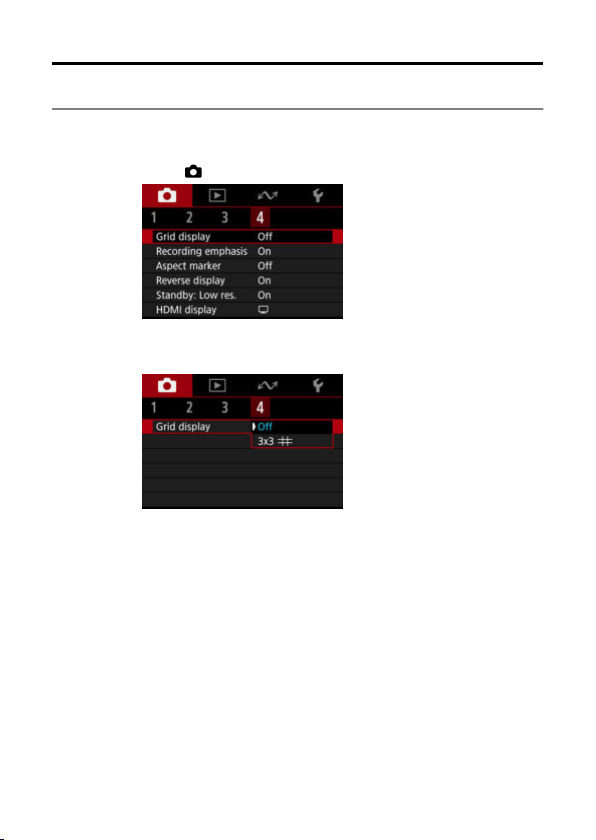
Grid
A grid can be displayed on the screen.
1.
Select [
: Grid display].
Select an option.
2.
86
Page 87
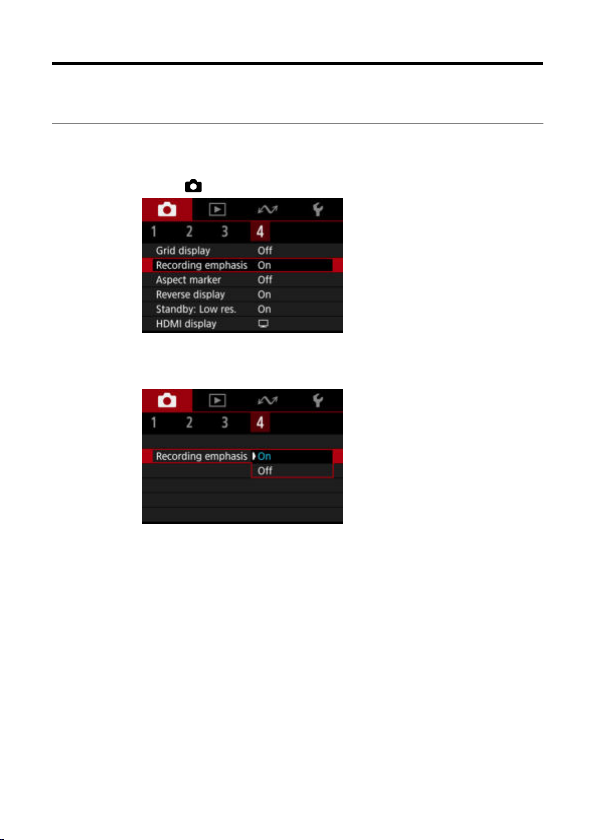
Recording Emphasis
Displays a blinking red frame around the screen during movie recording. This makes it easy
to see at a glance that recording is in progress.
1.
Select [
: Recording emphasis].
Select [On].
2.
87
Page 88
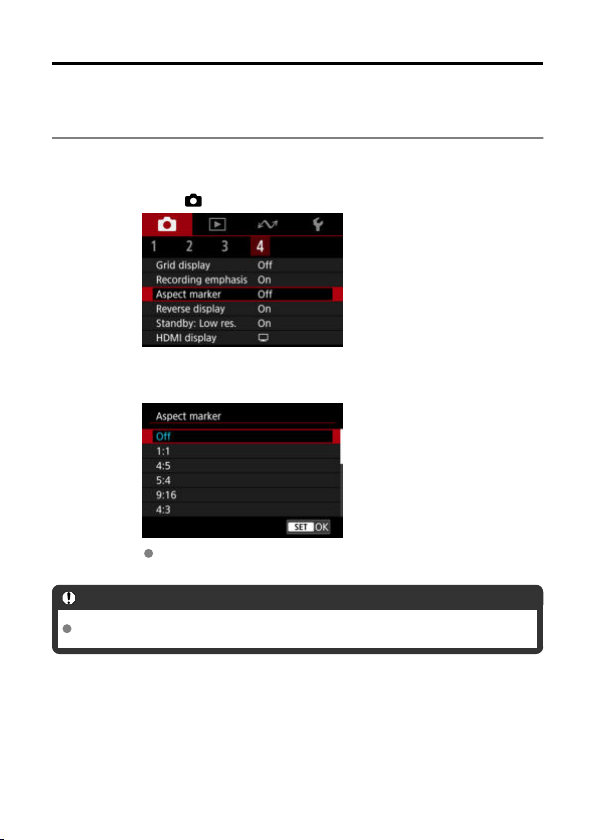
Aspect Marker
If you will change the image aspect ratio when editing the recorded movie, you can display
aspect markers on the movie recording screen (during standby and recording) to be aware
of the final angle of view after editing.
1.
2.
Caution
Markers are not included in recorded movies.
: Aspect marker].
Select [
Select an option.
To hide the markers, select [Off].
88
Page 89
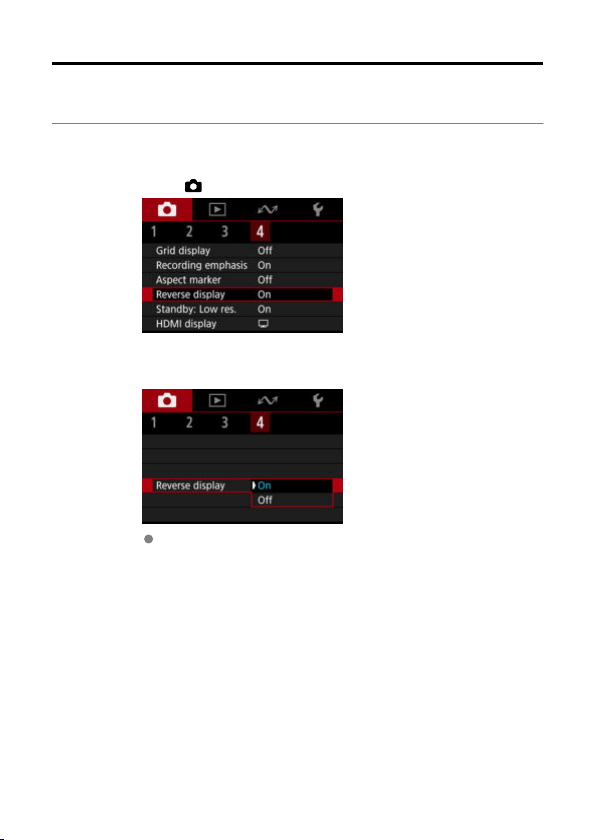
Reverse Display
A mirror image can be displayed when you shoot with the screen rotated toward the subject
(toward the front of the camera).
1.
Select [
: Reverse display].
Select [On].
2.
Select [Off] if you prefer not to reverse display when the screen is
facing the subject.
89
Page 90
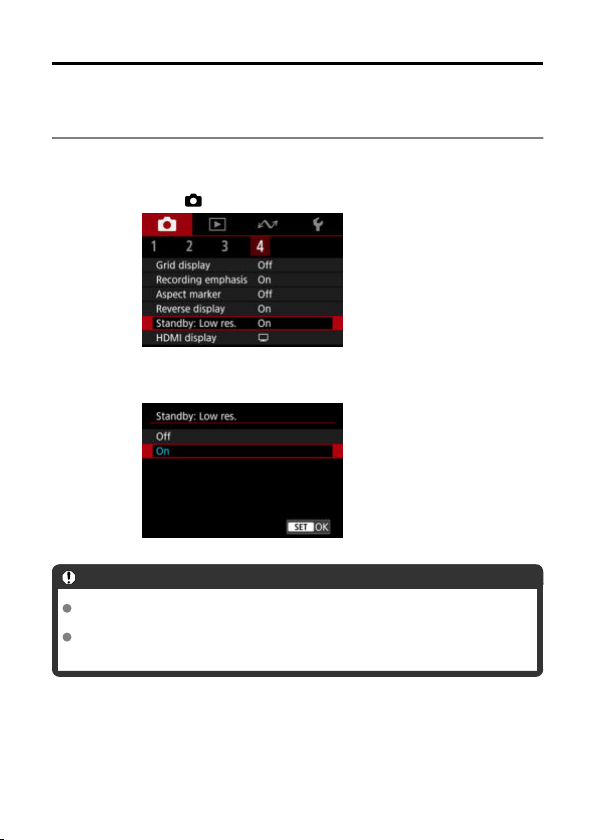
Standby: Low Resolution
Set to [On] to conserve battery power and control the rise of camera temperature during
standby.
As a result, it may enable you to record movies over a longer period.
1.
2.
Caution
Image quality on the standby screen may differ from image quality on the screen
during movie recording.
Briefly when you start recording movies, image display may remain on the current
frame instead of being updated.
Select [
Select [On].
: Standby: Low res.].
90
Page 91
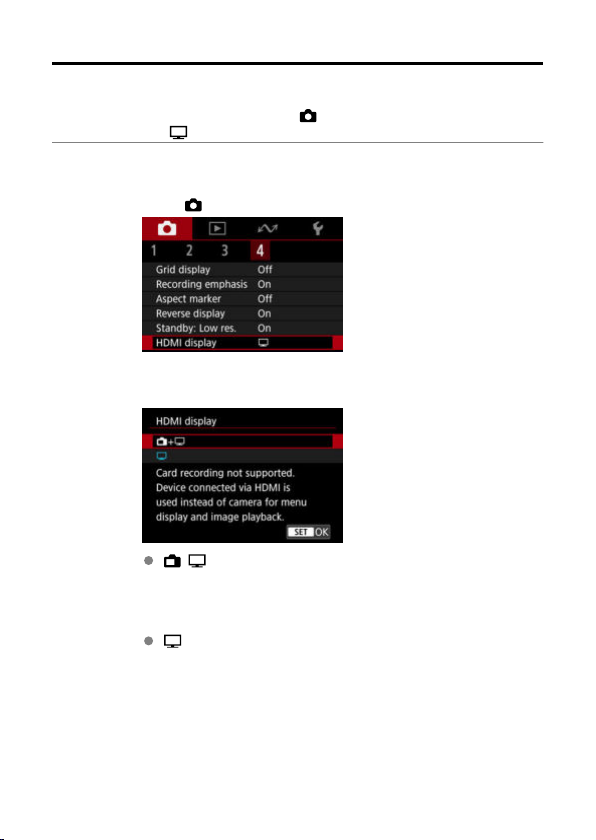
Display During HDMI Connection
You can specify how movies are displayed as they are recorded via HDMI to an external
device. Movie output itself corresponds to the [
The default setting is [
].
: Movie rec. size] setting.
1.
2.
: HDMI display].
Select [
Select an option.
+
Enables movie display both on the camera screen and on the other
device, via HDMI output.
Camera operations such as image playback or menu display are
shown on the other device via HDMI, not on the camera screen.
Deactivates the camera screen during output via HDMI, so that the
screen is blank.
Shooting information, AF points, and other information is shown in the
HDMI video output.
91
Page 92
Caution
Card recording is not performed with [HDMI display] set to [ + ]. Camera
menus and image playback are only displayed on the screen connected via HDMI.
The HDMI output resolution and frame rate are automatically adjusted to suit the
movie recording size.
For longer HDMI output
To continue HDMI output for longer than 30 min., select [ + ], then set [Auto power
off] in [
: Power saving] to [Disable] ( ). HDMI output will continue after the camera
screen turns off when the time set in [Screen off] elapses.
Caution
HDMI output without information prevents display of warnings about the card
space, battery level, or high internal temperature (
During HDMI output, display of the next image may take some time if you switch
between movies of different recording sizes or frame rates.
Avoid operating the camera when recording movies to external devices, which may
cause information to be displayed in the HDMI video output.
Brightness and color of movies recorded with the camera may look different from
those of HDMI video output recorded by external devices, depending on the
viewing environment.
Note
By pressing the < > button, you can change the information displayed.
Audio is also output via HDMI, except when set to [Sound recording: [Disable].
) via HDMI.
92
Page 93
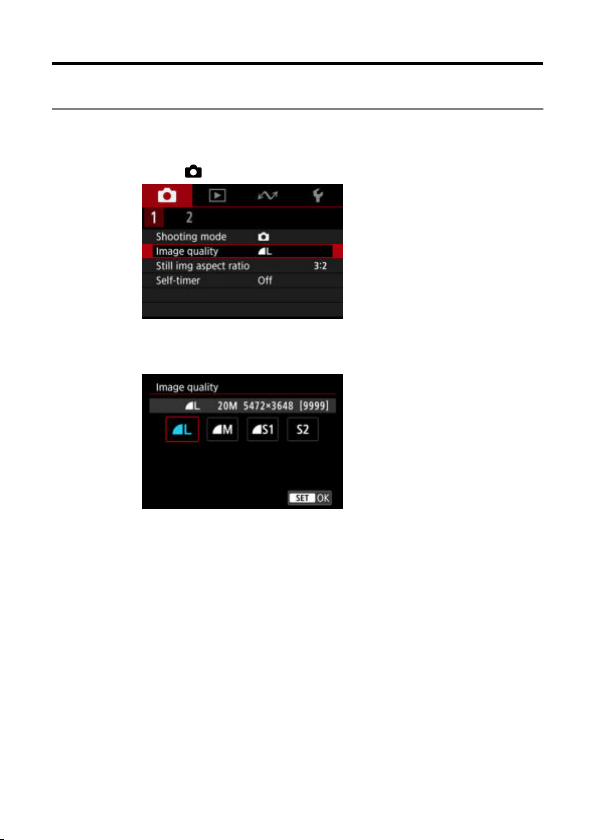
Image Quality
You can select the pixel count and the image quality.
1.
Select [
: Image quality].
Select an option.
2.
93
Page 94
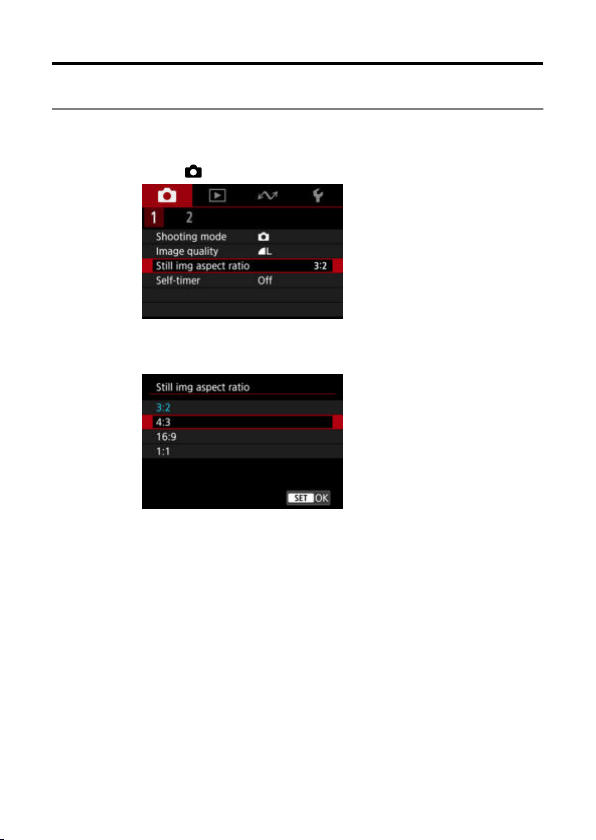
Still Image Aspect Ratio
You can change the image's aspect ratio.
1.
Select [
: Still img aspect ratio].
Select an option.
2.
94
Page 95
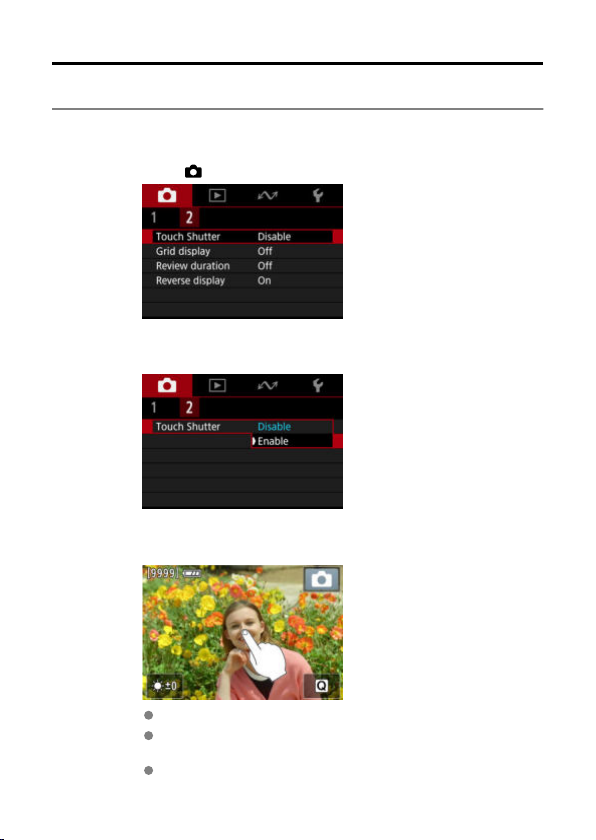
Touch Shutter
Just by tapping the screen, you can focus and take the picture automatically.
1.
Select [
: Touch Shutter].
Select [Enable].
2.
Tap the screen to shoot.
3.
Tap the face or subject on the screen.
After the camera focuses, the AF point turns green and a picture is
taken automatically.
The AF point turns yellow if the camera cannot focus, but a picture is
still taken.
95
Page 96

Caution
When shooting by tapping with [ : Review duration] set to [Hold], you can take
the next shot by tapping [
].
96
Page 97
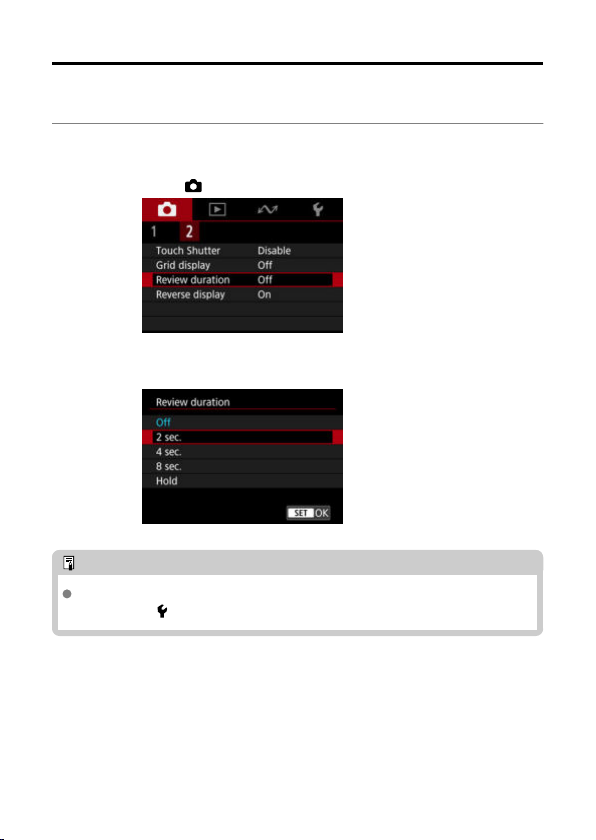
Review Duration
To keep the image displayed immediately after you shoot, set to [Hold], and if you prefer not
to have the image displayed, set to [Off].
1.
Select [
: Review duration].
Select an option.
2.
Note
When [Hold] is set, images are displayed as long as the time set in the [Screen
off] option of [
: Power saving].
97
Page 98
General Movie Recording Precautions
Guidance Display Before Movie Recording
Warning Indicator Display in Movie Recording
Warning Icon for Low-Temperature Contact Burns
Other Precautions
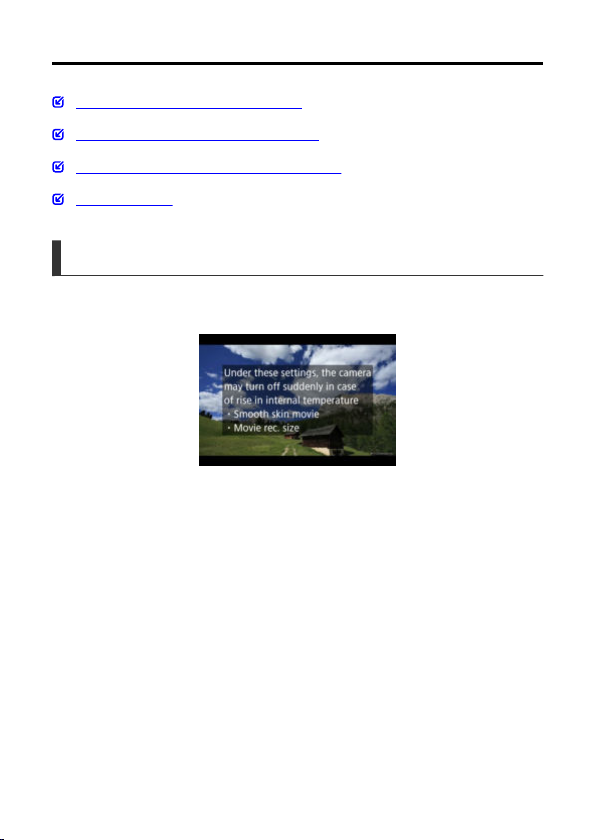
Guidance Display Before Movie Recording
Guidance may be displayed when the camera starts up, after settings are adjusted, or in
other situations.
The guidance warns that the camera may become hot internally if movies are recorded
under the current settings, and that if you continue recording, the camera may turn off
automatically.
If you will record over an extended period, consider changing the setting indicated by the
guidance, so that you can record without the camera displaying guidance.
If you prefer to record without changing the settings, note any warning indicators displayed
as you record.
98
Page 99
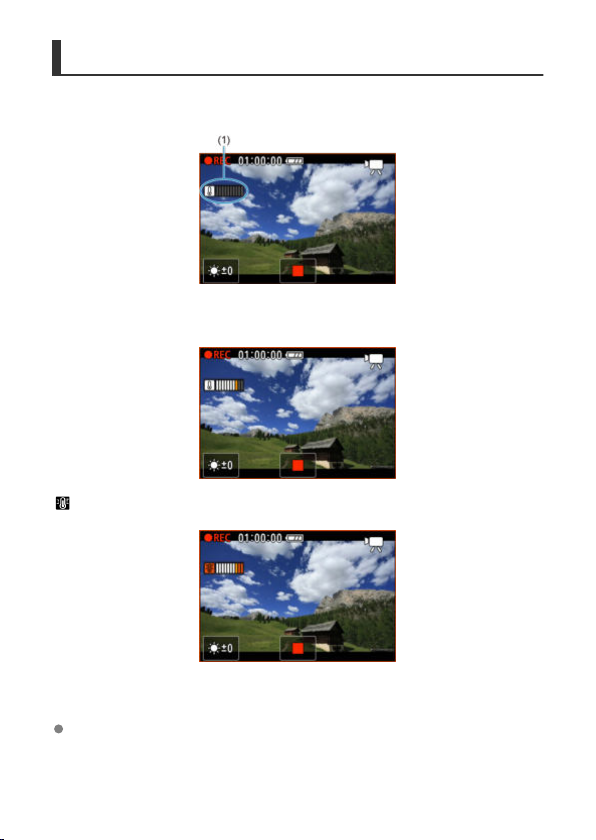
Warning Indicator Display in Movie Recording
A 10-level indicator (1) is displayed during movie recording in case of excessive internal
camera temperature.
As the internal temperature rises, the level on the indicator extends to the right. How fast the
level increases will depend on shooting conditions. Levels 1–7 are marked in white, but once
the temperature reaches level 8, the color changes.
[ ] flashes in red if you continue recording after the indicator reaches level 9, marked in
orange. A flashing icon indicates that the camera will soon turn off automatically.
A message is displayed if you continue to record while the icon is flashing, and the camera
automatically turns off.
Subsequent recording
To keep recording under the same settings, leave the camera off and let it cool down a
while. Note that the camera may overheat again after you resume recording.
99
Page 100
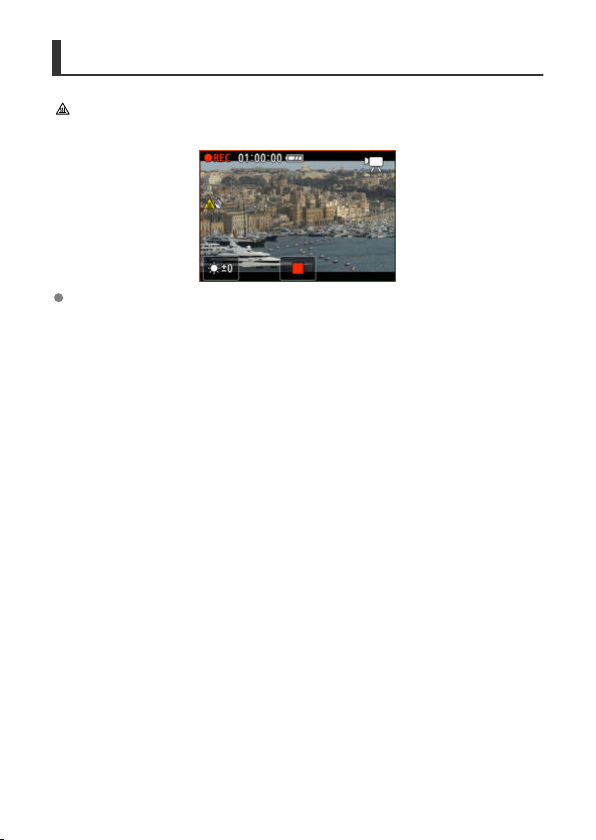
Warning Icon for Low-Temperature Contact Burns
[
] is displayed if the camera becomes warm during streaming or during image output to
external devices. To avoid low-temperature contact burns at this time, do not touch the
camera over an extended period.
The camera may turn off automatically if communication or an external device
connection is lost.
100
 Loading...