

Page 1
Page 2
Page 3
Page 4
Page 5
Page 6
Page 7
Page 8
Page 9
Page 10
Page 11
Page 12
Page 13
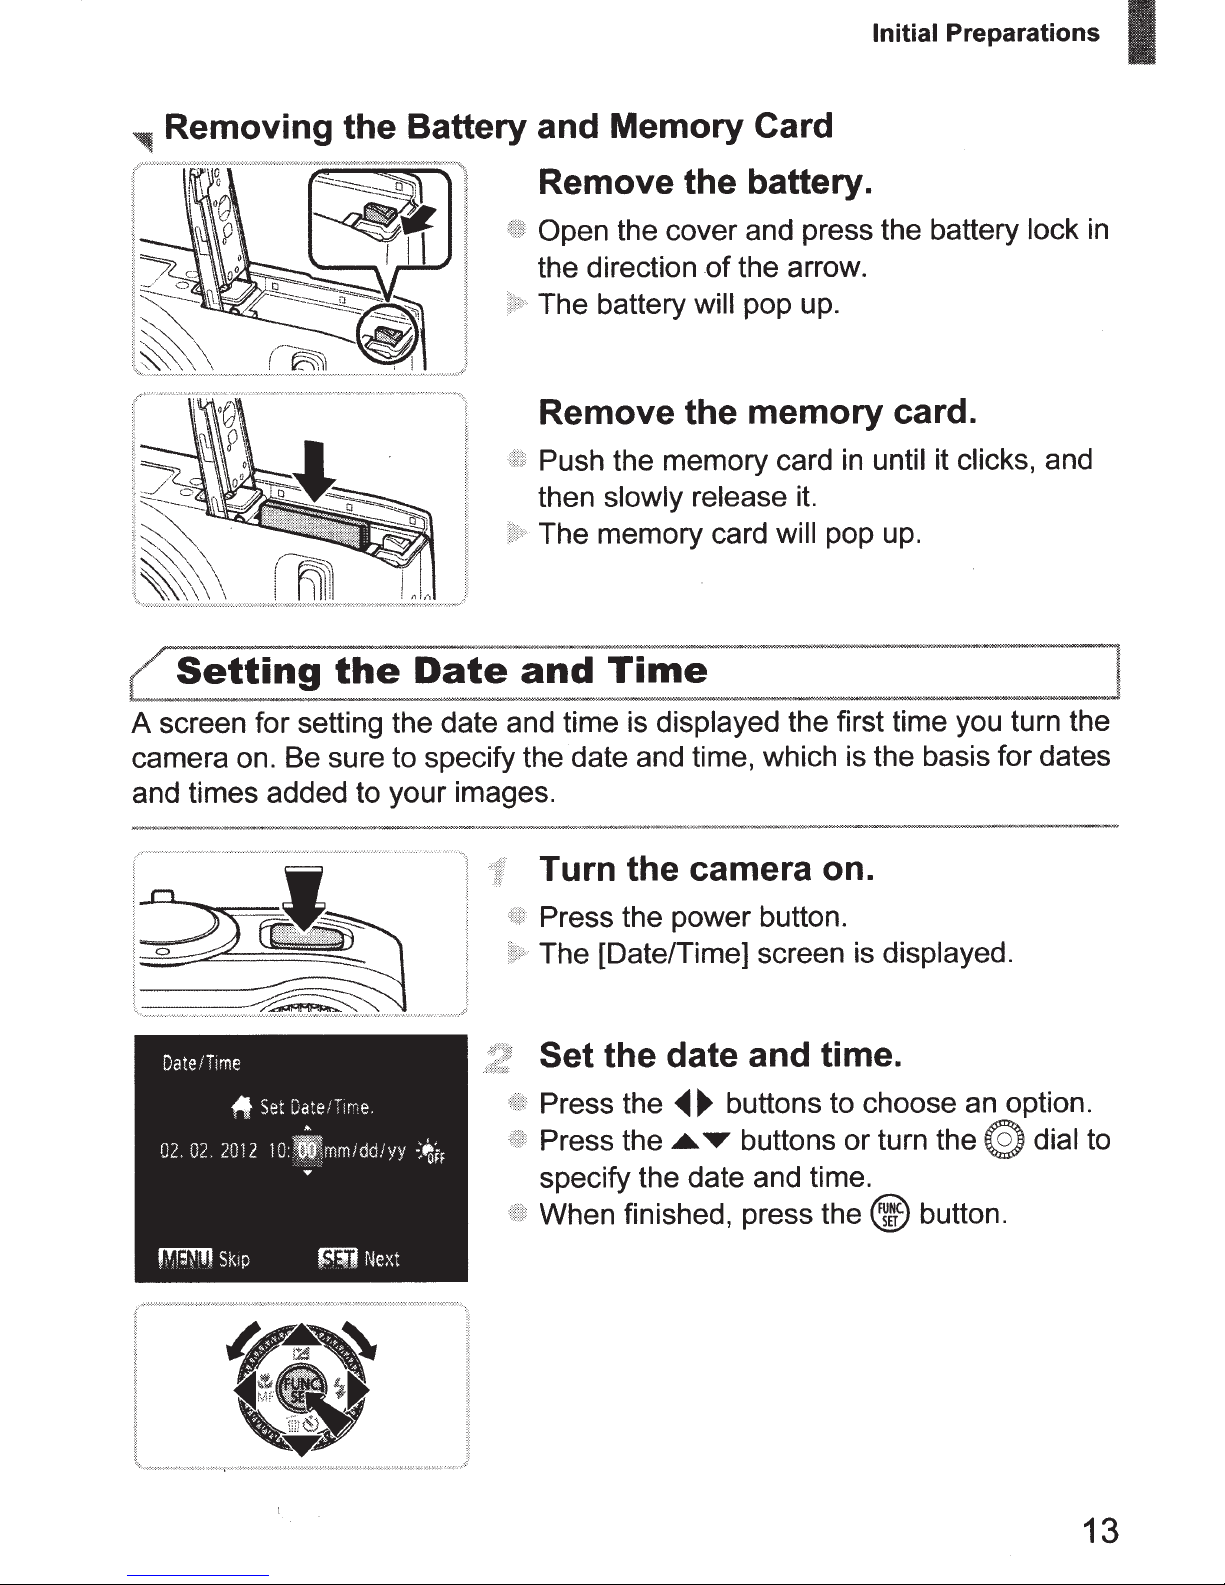
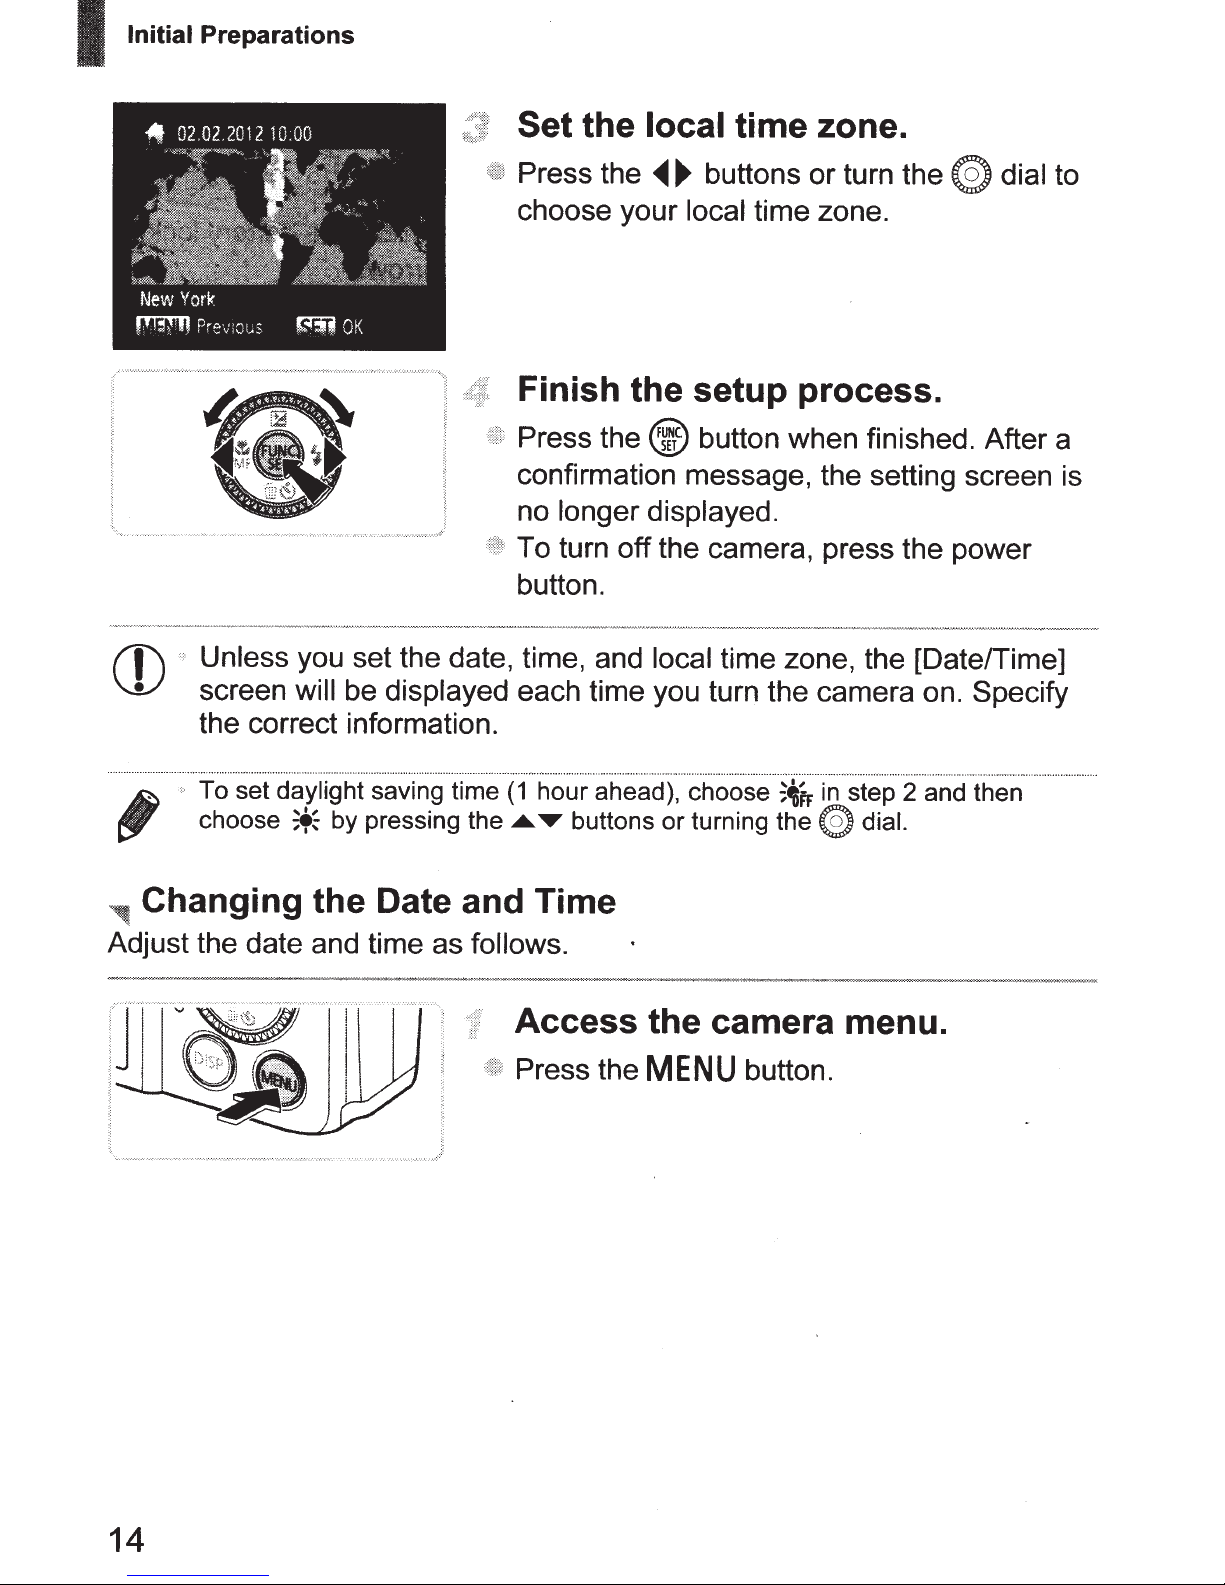
Page 14
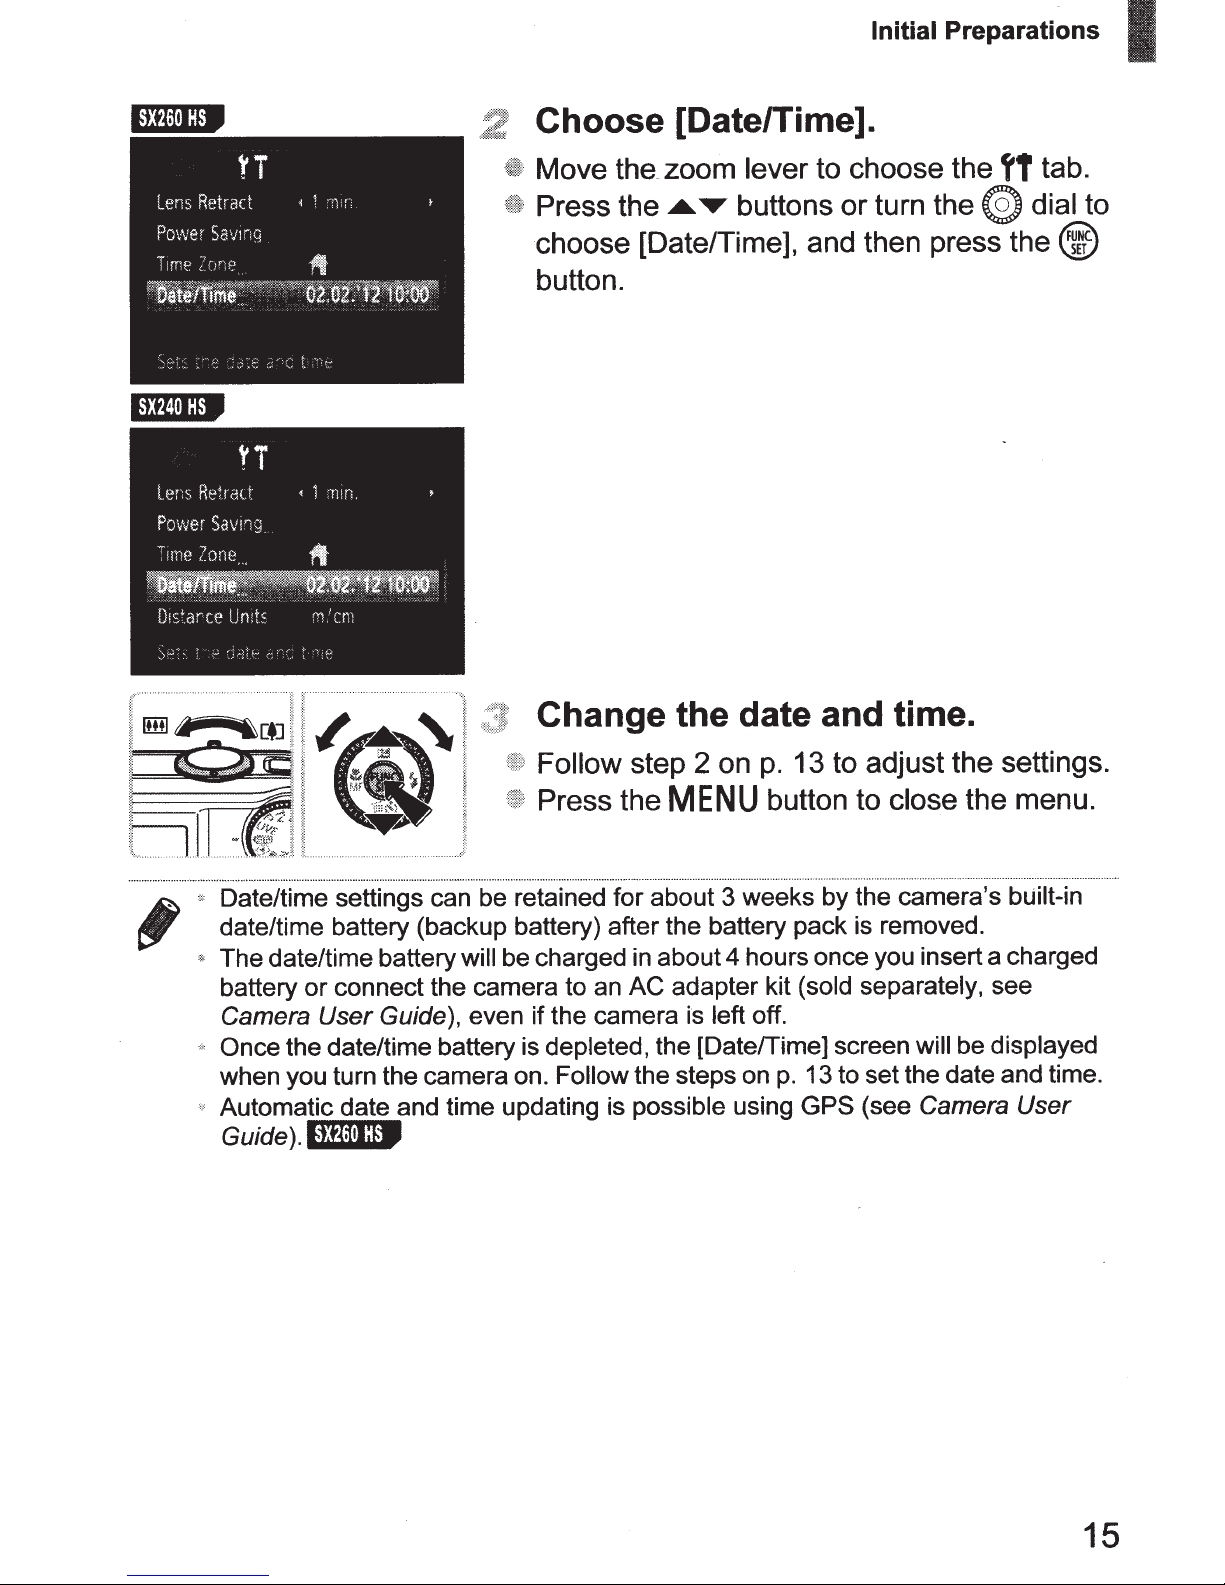
Page 15
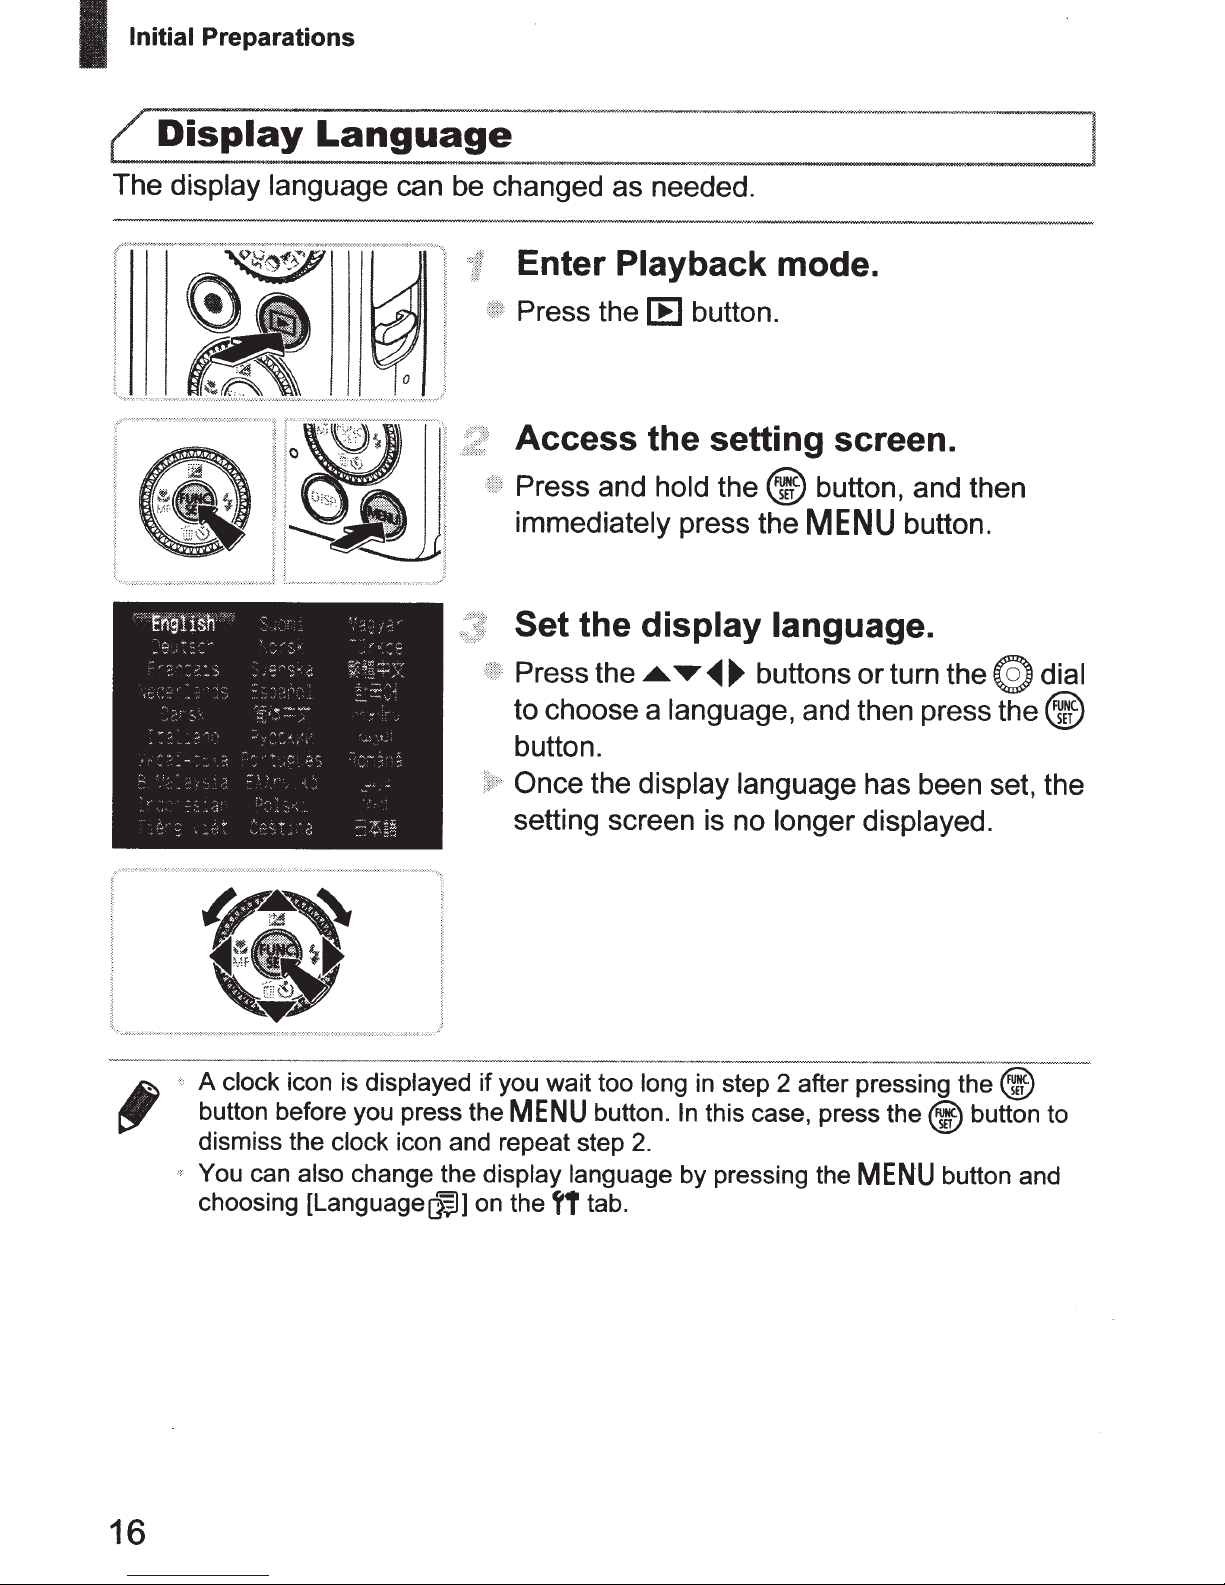
Page 16
Page 17
Page 18

Page 19
Page 20
Page 21
Page 22
Page 23
Page 24
Page 25
Page 26
Page 27
Page 28
Page 29
Page 30
Page 31
Page 32
Page 33
Page 34
Page 35
Page 36
Page 37
Camera User Guide
ENGLISH
• Before use, be sure to read this guide, including the
safety precautions.
• This guide will familiarize you with how to use the camera
correctly.
• Keep the guide handy for future reference.
Page 38
2
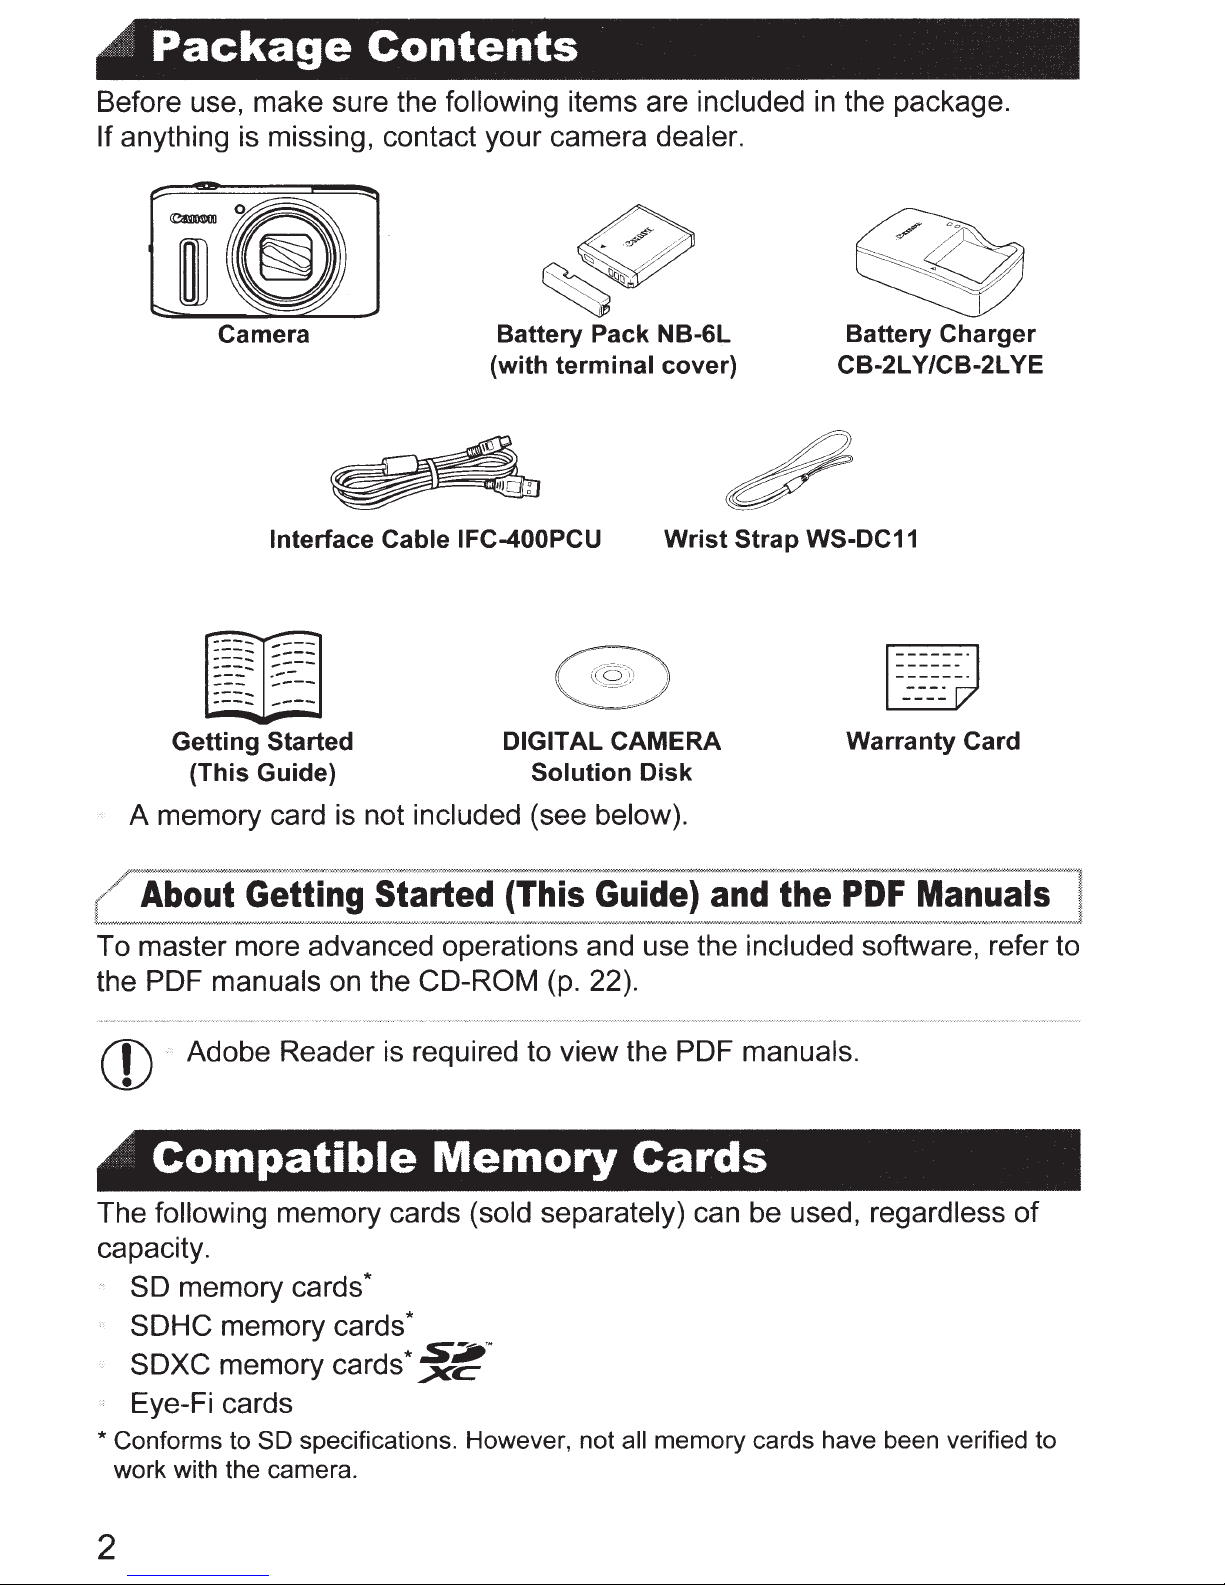
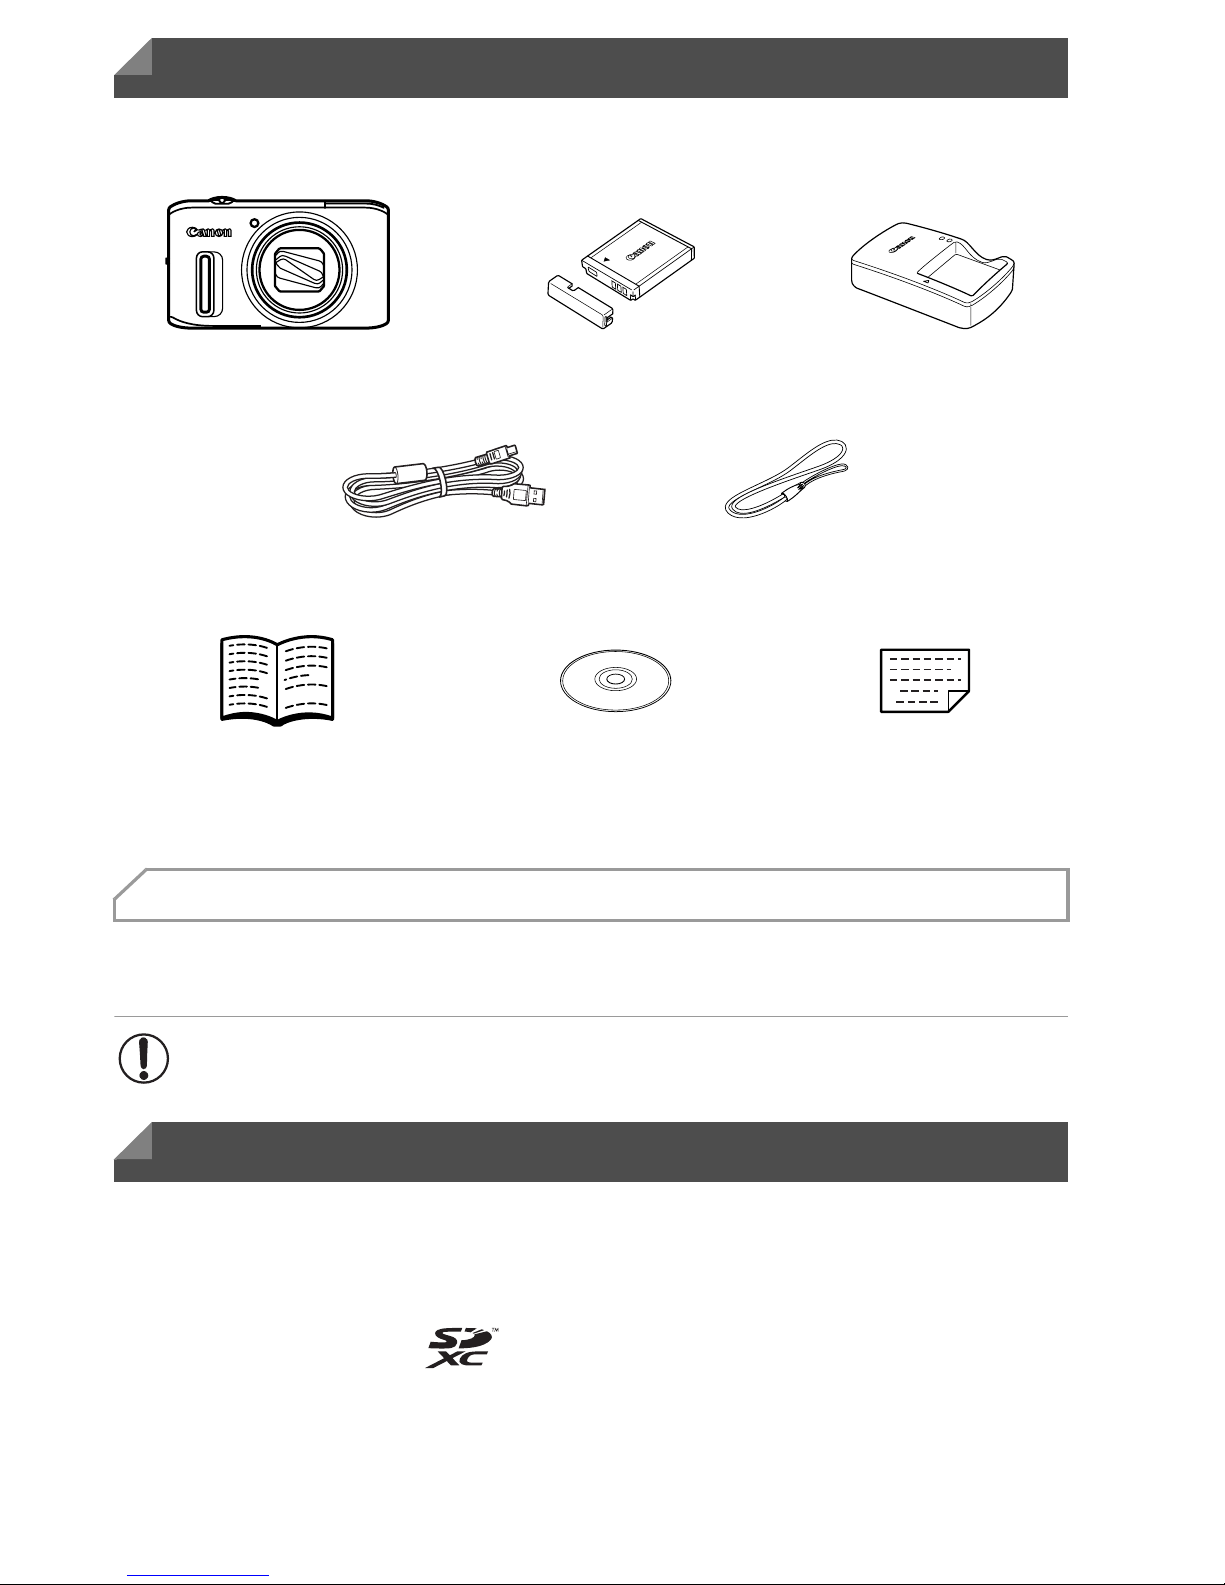
Before use, make sure the following items are included in the package.
If anything is missing, contact your camera dealer.
• A memory card is not included (see below).
For information about the included software, refer to the ImageBrowser EX
User Guide, in PDF format (p. 26).
The following memory cards (sold separately) can be used, regardless of
capacity.
• SD memory cards
*
• SDHC memory cards
*
• SDXC memory cards
*
• Eye-Fi cards
* Conforms to SD specifications. However, not all memory cards have been verified to
work with the camera.
Package Contents
PDF Manuals
• Adobe Reader is required to view the PDF manuals.
Compatible Memory Cards
Camera Battery Pack NB-6L
(with terminal cover)
Battery Charger
CB-2LY/CB-2LYE
Interface Cable IFC-400PCU Wrist Strap WS-DC11
Warranty CardGetting Started DIGITAL CAMERA
Solution Disk
Page 39

Preliminary Notes and Legal Information
3
This product is not guaranteed to support Eye-Fi card functions (including
wireless transfer). In case of an issue with an Eye-Fi card, please check with
the card manufacturer.
Also note that an approval is required to use Eye-Fi cards in many countries
or regions. Without approval, use of the card is not permitted. If it is unclear
whether the card has been approved for use in the area, please check with
the card manufacturer.
• Take and review some test shots initially to make sure the images were
recorded correctly. Please note that Canon Inc., its subsidiaries and
affiliates, and its distributors are not liable for any consequential damages
arising from any malfunction of a camera or accessory, including memory
cards, that results in the failure of an image to be recorded or to be
recorded in a way that is machine readable.
• Images recorded by the camera are intended for personal use. Refrain
from unauthorized recording that infringes on copyright law, and note that
even for personal use, photography may contravene copyright or other
legal rights at some performances or exhibitions, or in some commercial
settings.
• The camera warranty is valid only in the area of purchase. In case of
camera problems while abroad, return to the area of purchase before
contacting a Canon Customer Support Help Desk.
• Although the LCD monitor is produced under extremely high-precision
manufacturing conditions and more than 99.99% of the pixels meet design
specifications, in rare cases some pixels may be defective or may appear
as red or black dots. This does not indicate camera damage or affect
recorded images.
• The LCD monitor may be covered with a thin plastic film for protection
against scratches during shipment. If covered, remove the film before
using the camera.
• When the camera is used over an extended period, it may become warm.
This does not indicate damage.
About Eye-Fi Cards
• Always confirm beforehand that memory cards are supported on other devices
such as card readers and computers (including the current version of your
operating system).
Preliminary Notes and Legal Information
Page 40
4
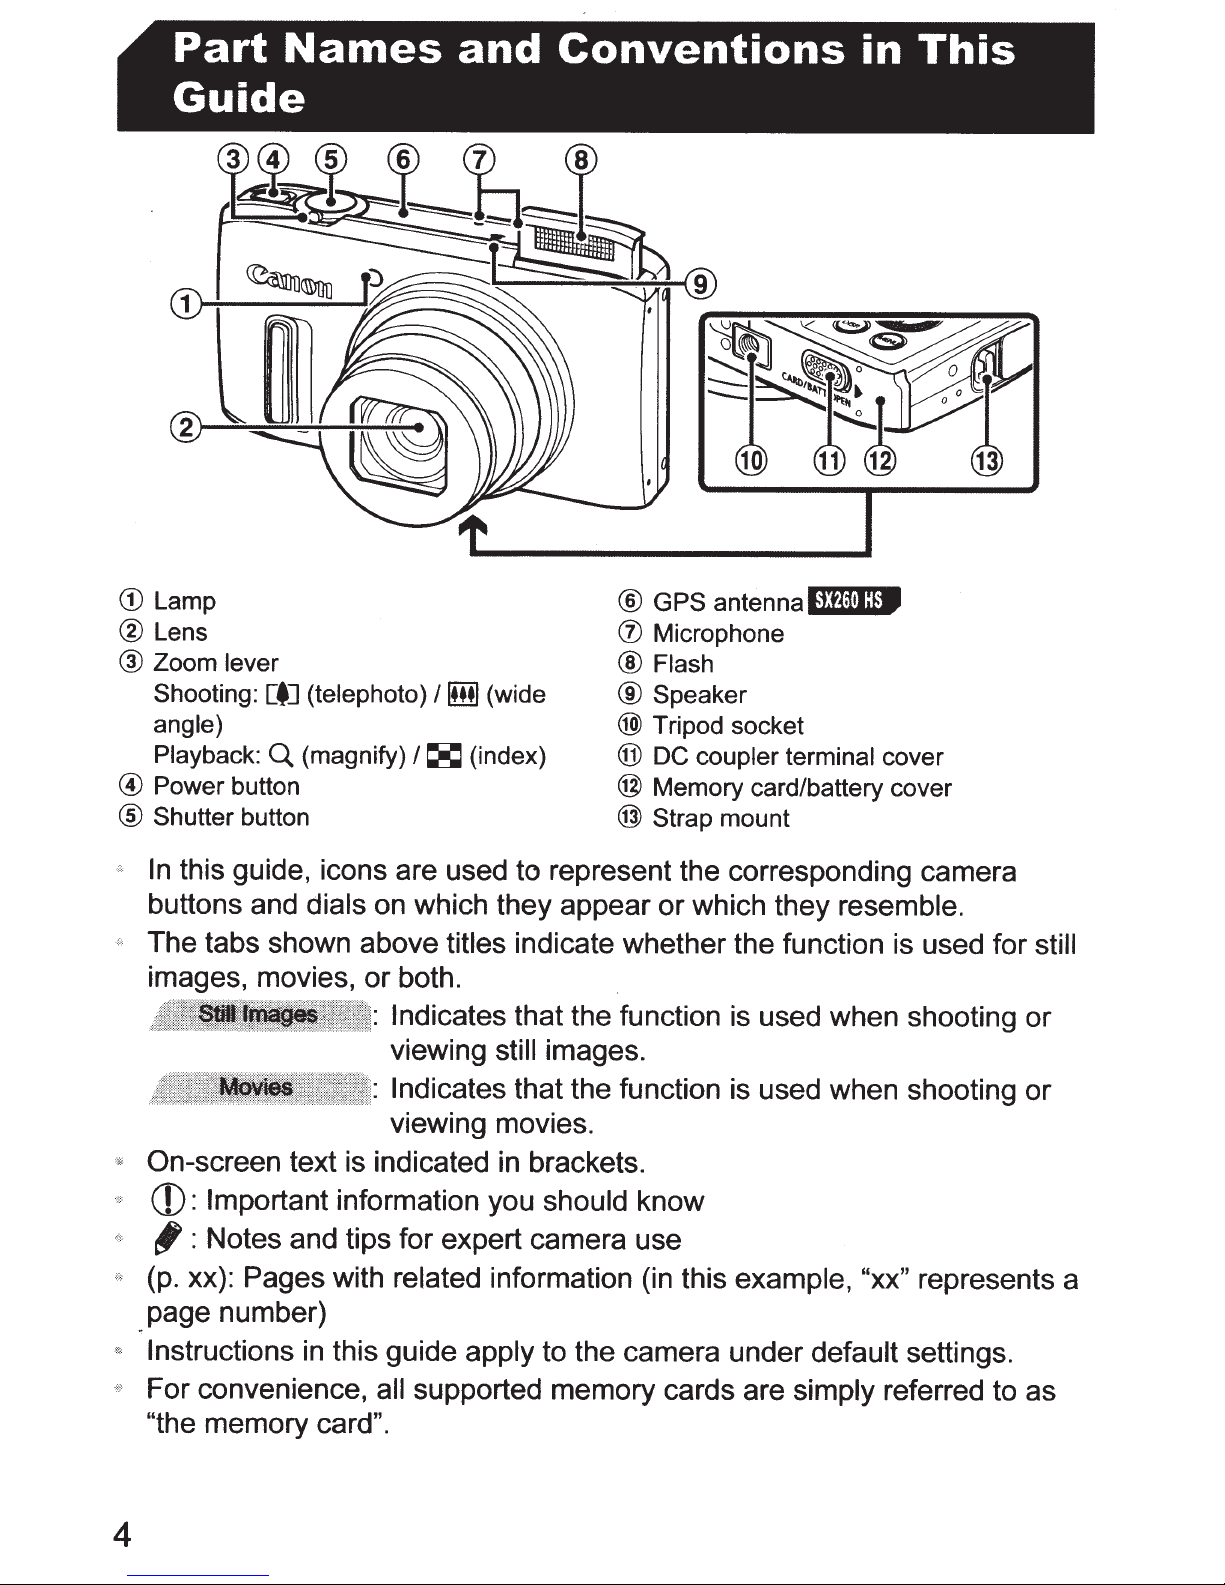
• In this guide, icons are used to represent the corresponding camera
buttons and dials on which they appear or which they resemble.
• The tabs shown above titles indicate whether the function is used for still
images, movies, or both.
: Indicates that the function is used when shooting or
viewing still images.
: Indicates that the function is used when shooting or
viewing movies.
• On-screen text is indicated in brackets.
• : Important information you should know
• : Notes and tips for expert camera use
• (p. xx): Pages with related information (in this example, “xx” represents a
page number)
• Instructions in this guide apply to the camera under default settings.
• For convenience, all supported memory cards are simply referred to as
“the memory card”.
Part Names and Conventions in This
Guide
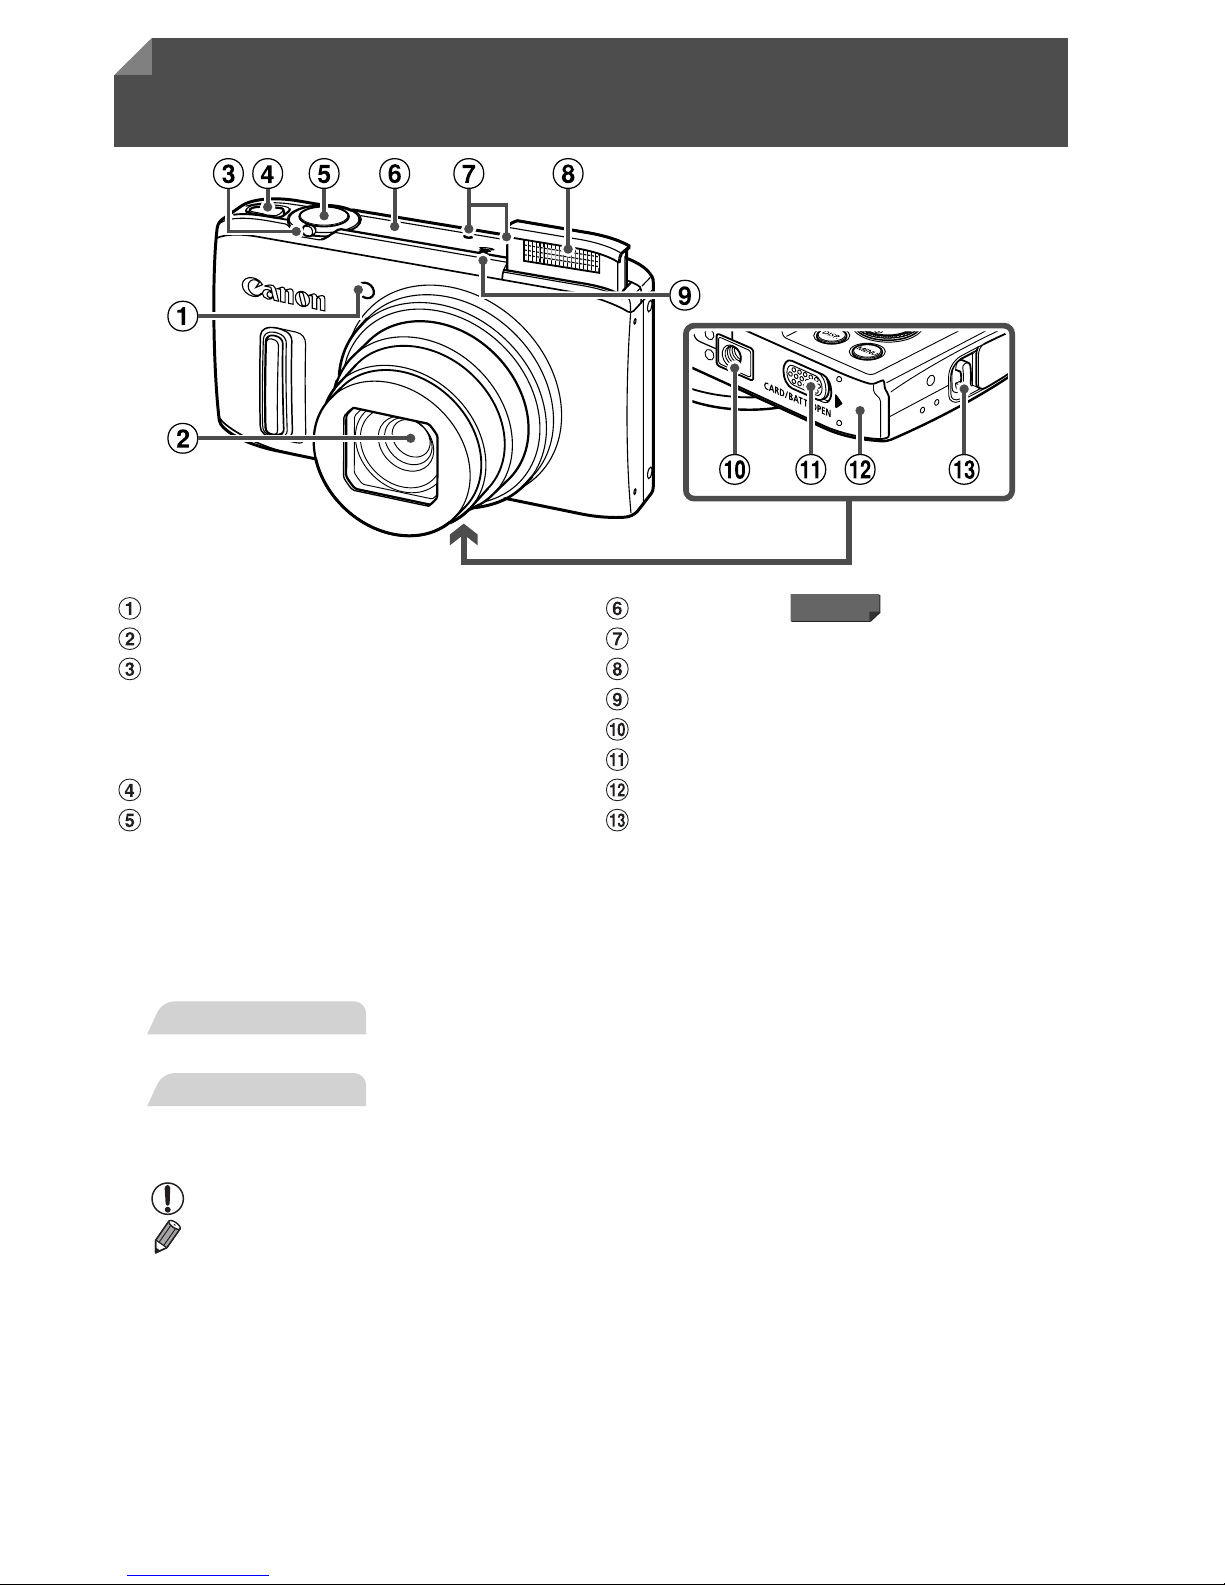
Lamp
Lens
Zoom lever
Shooting: i (telephoto) / j (wide
angle)
Playback: k (magnify) / g (index)
Power button
Shutter button
GPS antenna
Microphone
Flash
Speaker
Tripod socket
DC coupler terminal cover
Memory card/battery cover
Strap mount
SX260 HS
Still Images
Movies
Page 41
Part Names and Conventions in This Guide
5
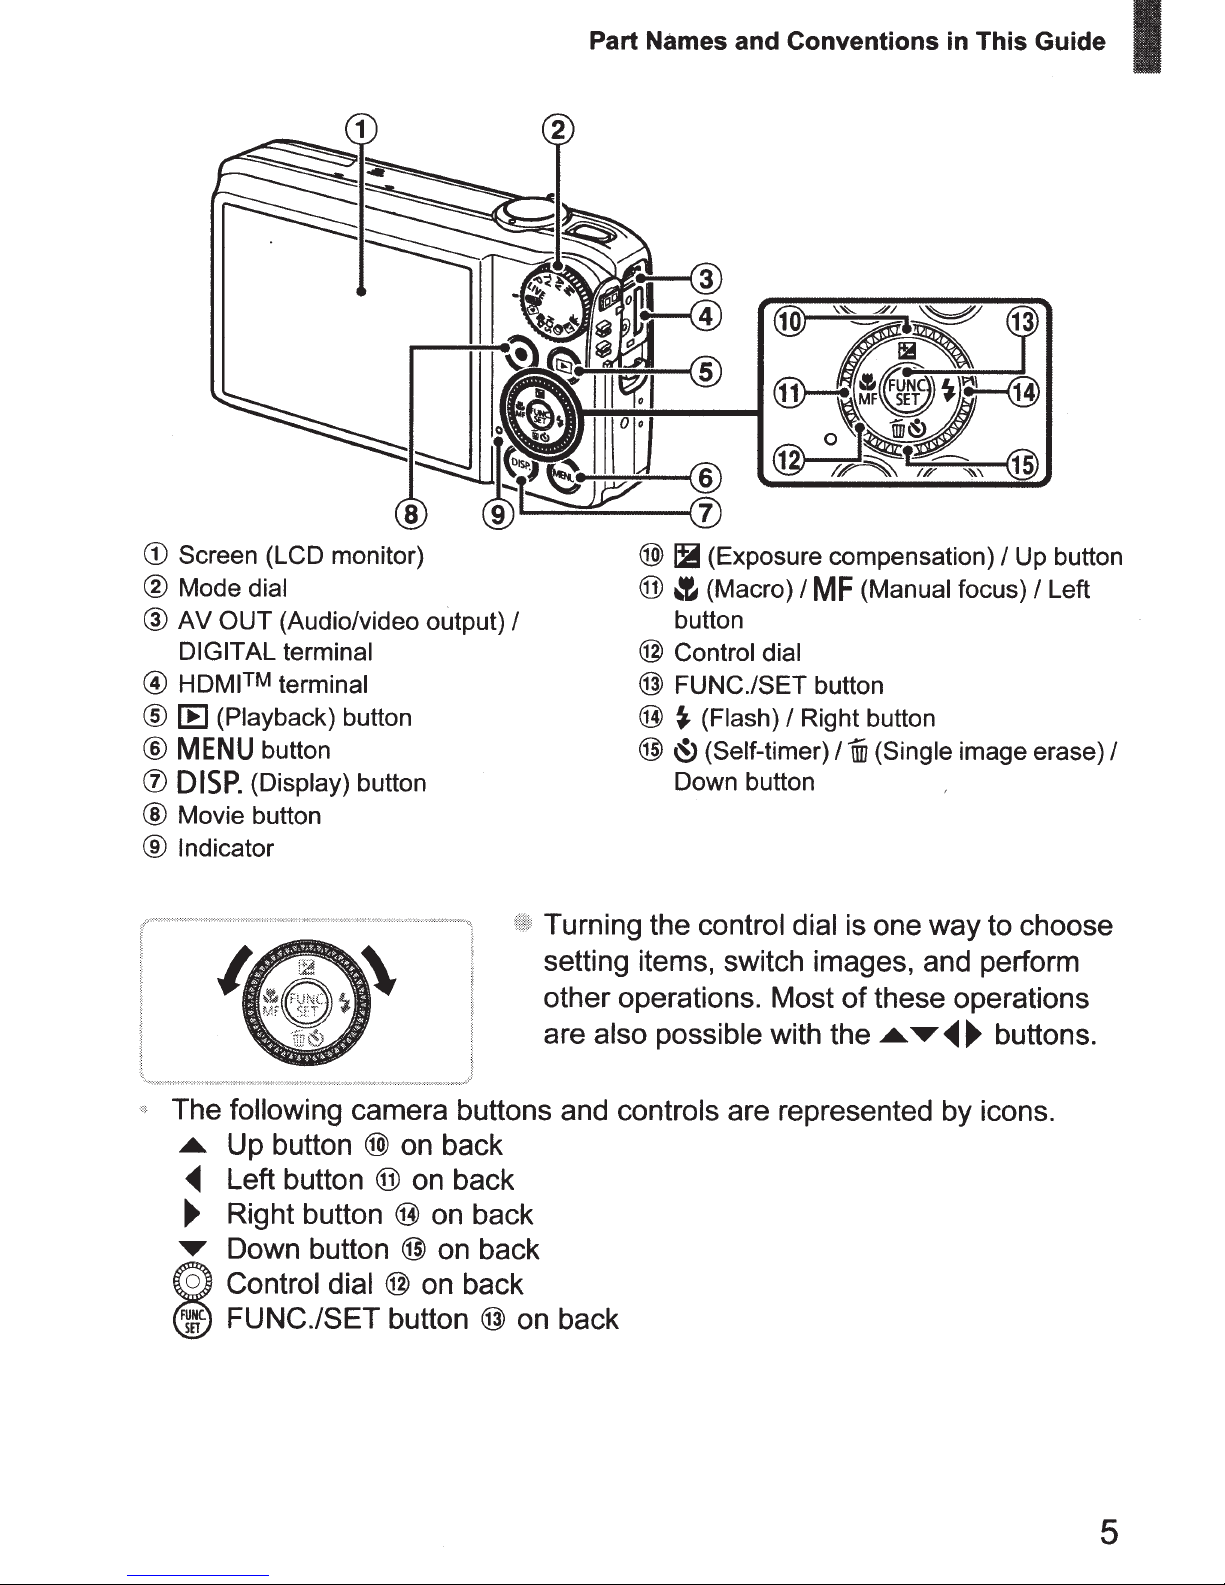
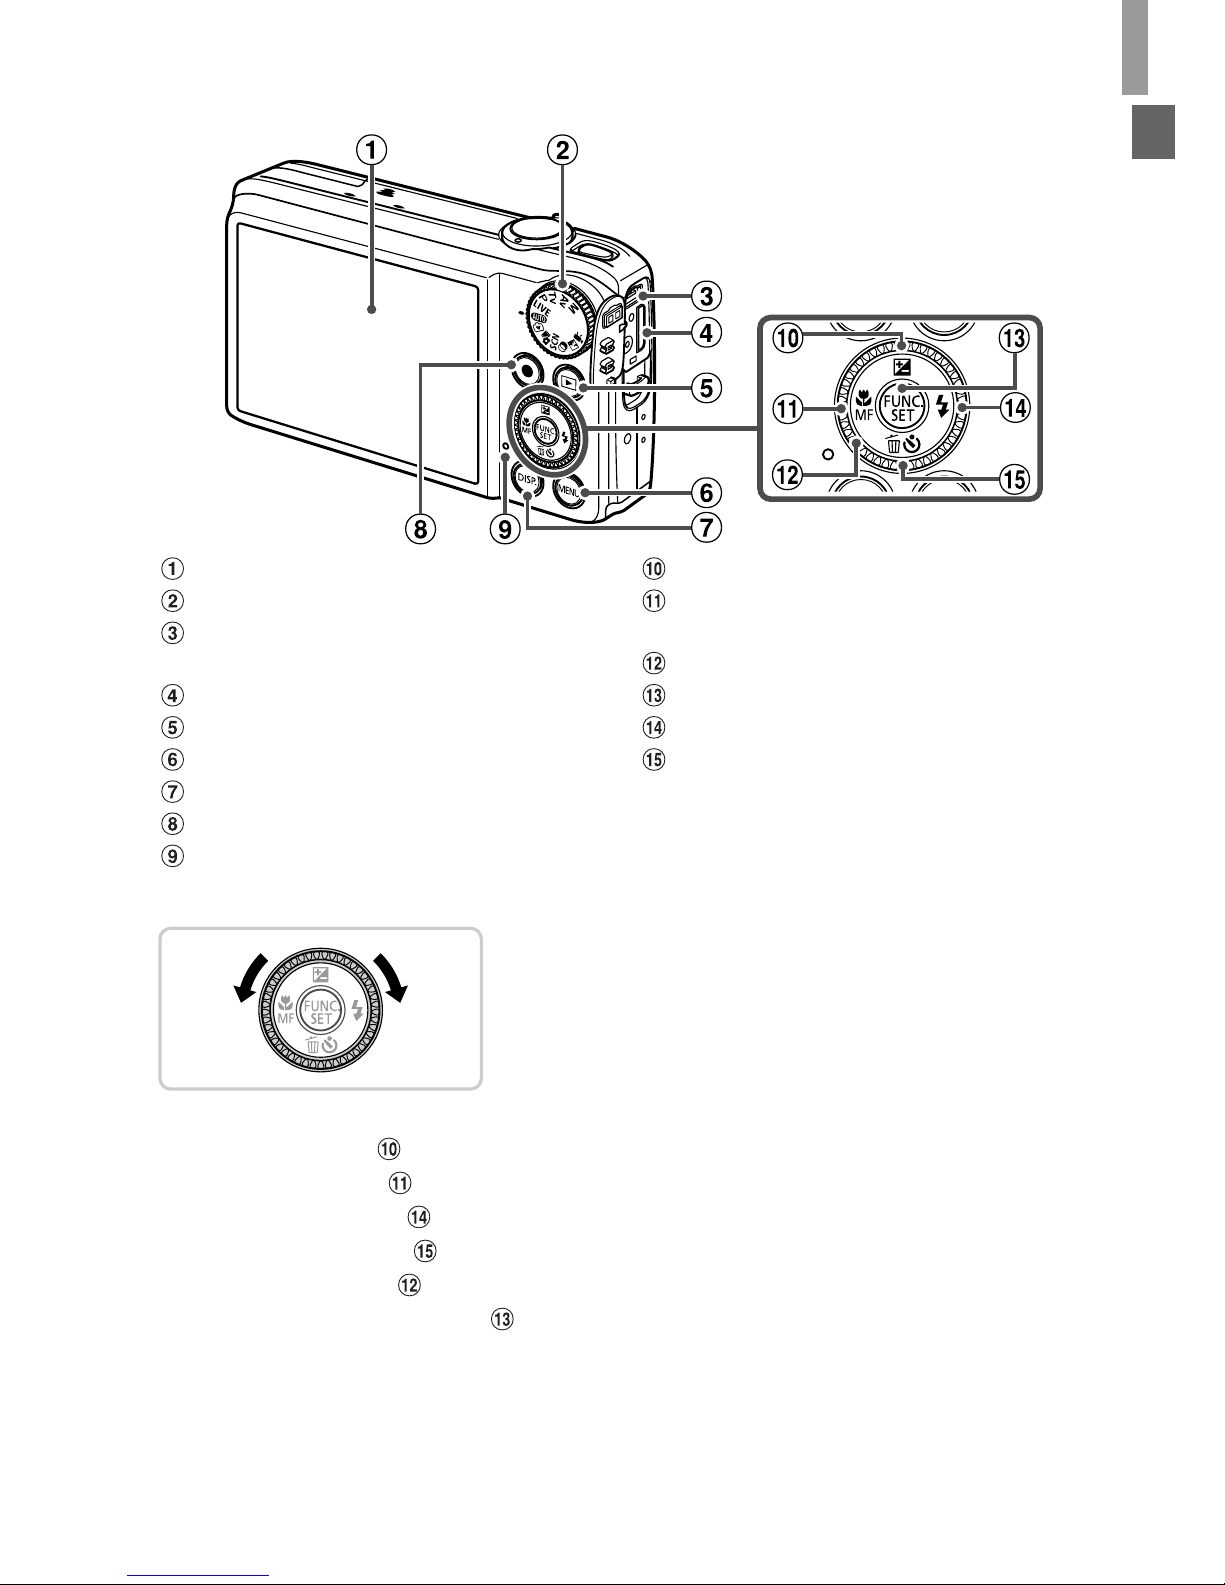
z Turning the control dial is one way to choose
setting items, switch images, and perform
other operations. Most of these operations
are also possible with the opqr buttons.
• The following camera buttons and controls are represented by icons.
o Up button on back
q Left button on back
r Right button on back
p Down button on back
5
Control dial on back
m
FUNC./SET button on back
Screen (LCD monitor)
Mode dial
AV OUT (Audio/video output) /
DIGITAL terminal
HDMI
TM
terminal
1 (Playback) button
n button
l (Display) button
Movie button
Indicator
b (Exposure compensation) / Up button
e (Macro) / f (Manual focus) / Left
button
Control dial
FUNC./SET button
h (Flash) / Right button
Q (Self-timer) / a (Single image erase) /
Down button
Page 42

6
Package Contents .............................2
Compatible Memory Cards ................2
Preliminary Notes and Legal
Information.......................................3
Part Names and Conventions in This
Guide ...............................................4
Contents ............................................6
Contents: Basic Operations ...............8
Safety Precautions...........................10
Initial Preparations ...........................14
Trying the Camera Out ....................21
Included Software, PDF Manuals ....25
Accessories .....................................32
1
Camera Basics .................35
On/Off ..............................................36
Shutter Button..................................37
Shooting Modes...............................38
Shooting Display Options ................38
FUNC. Menu....................................39
n..............................................40
Indicator Display ..............................41
Clock................................................41
2
Using GPS
Function ...............43
Using GPS Function ........................44
3
Smart Auto Mode .............53
Shooting in Smart Auto Mode ......... 54
Common, Convenient Features ...... 63
Using Face ID ................................. 69
Image Customization Features ....... 78
Helpful Shooting Features............... 84
Customizing Camera Operation...... 87
4
Other Shooting Modes.....89
Brightness/Color Customization (Live
View Control) ................................ 90
Easy Mode ...................................... 91
Auto Clip Recording
(Movie Digest) ............................... 92
Specific Scenes............................... 93
Image Effects (Creative Filters)..... 103
Discreet Mode ............................... 110
Shooting Various Movies .............. 111
5
G mode ...........................115
Shooting in Program AE Mode (G
Mode).......................................... 116
Image Brightness (Exposure
Compensation)............................ 116
Color and Continuous Shooting .... 120
Shooting Range and Focusing...... 125
Flash ............................................. 134
Other Settings ............................... 137
6
Tv, Av, and M Mode........139
Specific Shutter Speeds
(Tv Mode).................................... 140
Specific Aperture Values
(Av Mode) ................................... 141
Specific Shutter Speeds and Aperture
Values (M Mode)......................... 142
Contents
SX260 HS
Page 43

Contents
7
7
Playback Mode ...............145
Viewing ......................................... 146
Browsing and Filtering Images...... 151
Editing Face ID Information .......... 154
Image Viewing Options ................. 156
Protecting Images......................... 159
Erasing Images............................. 163
Rotating Images............................ 165
Image Categories.......................... 167
Editing Still Images ....................... 172
Editing Movies............................... 178
8
Setting Menu ..................181
Adjusting Basic Camera
Functions .................................... 182
9
Accessories....................195
Tips on Using Included
Accessories ................................ 196
Optional Accessories .................... 197
Using Optional Accessories.......... 199
Printing Images............................. 204
Using an Eye-Fi Card.................... 216
10
Appendix.........................219
Troubleshooting ............................ 220
On-Screen Messages ................... 224
On-Screen Information.................. 226
Functions and Menu Tables.......... 230
Handling Precautions.................... 240
Index ............................................. 241
Page 44
8
4 Shoot
z Use camera-determined settings (Auto Mode) ............................. 54
z Follow simple camera instructions (Easy Mode) .......................... 91
z Where sound and flash are not allowed (Discreet Mode)........... 110
z While adjusting image settings (Live View Control)...................... 90
z Focus on faces ................................................... 54, 72, 93, 96, 129
z Without using the flash (Flash Off) ............................................... 66
z With myself in the shot (Self-Timer)........................................ 64, 99
z Add the shooting date and time (Date Stamp).............................. 67
z Movie clips and photos together (Movie Digest)................... 92, 153
z Use Face ID.......................................................................... 69, 154
Contents: Basic Operations
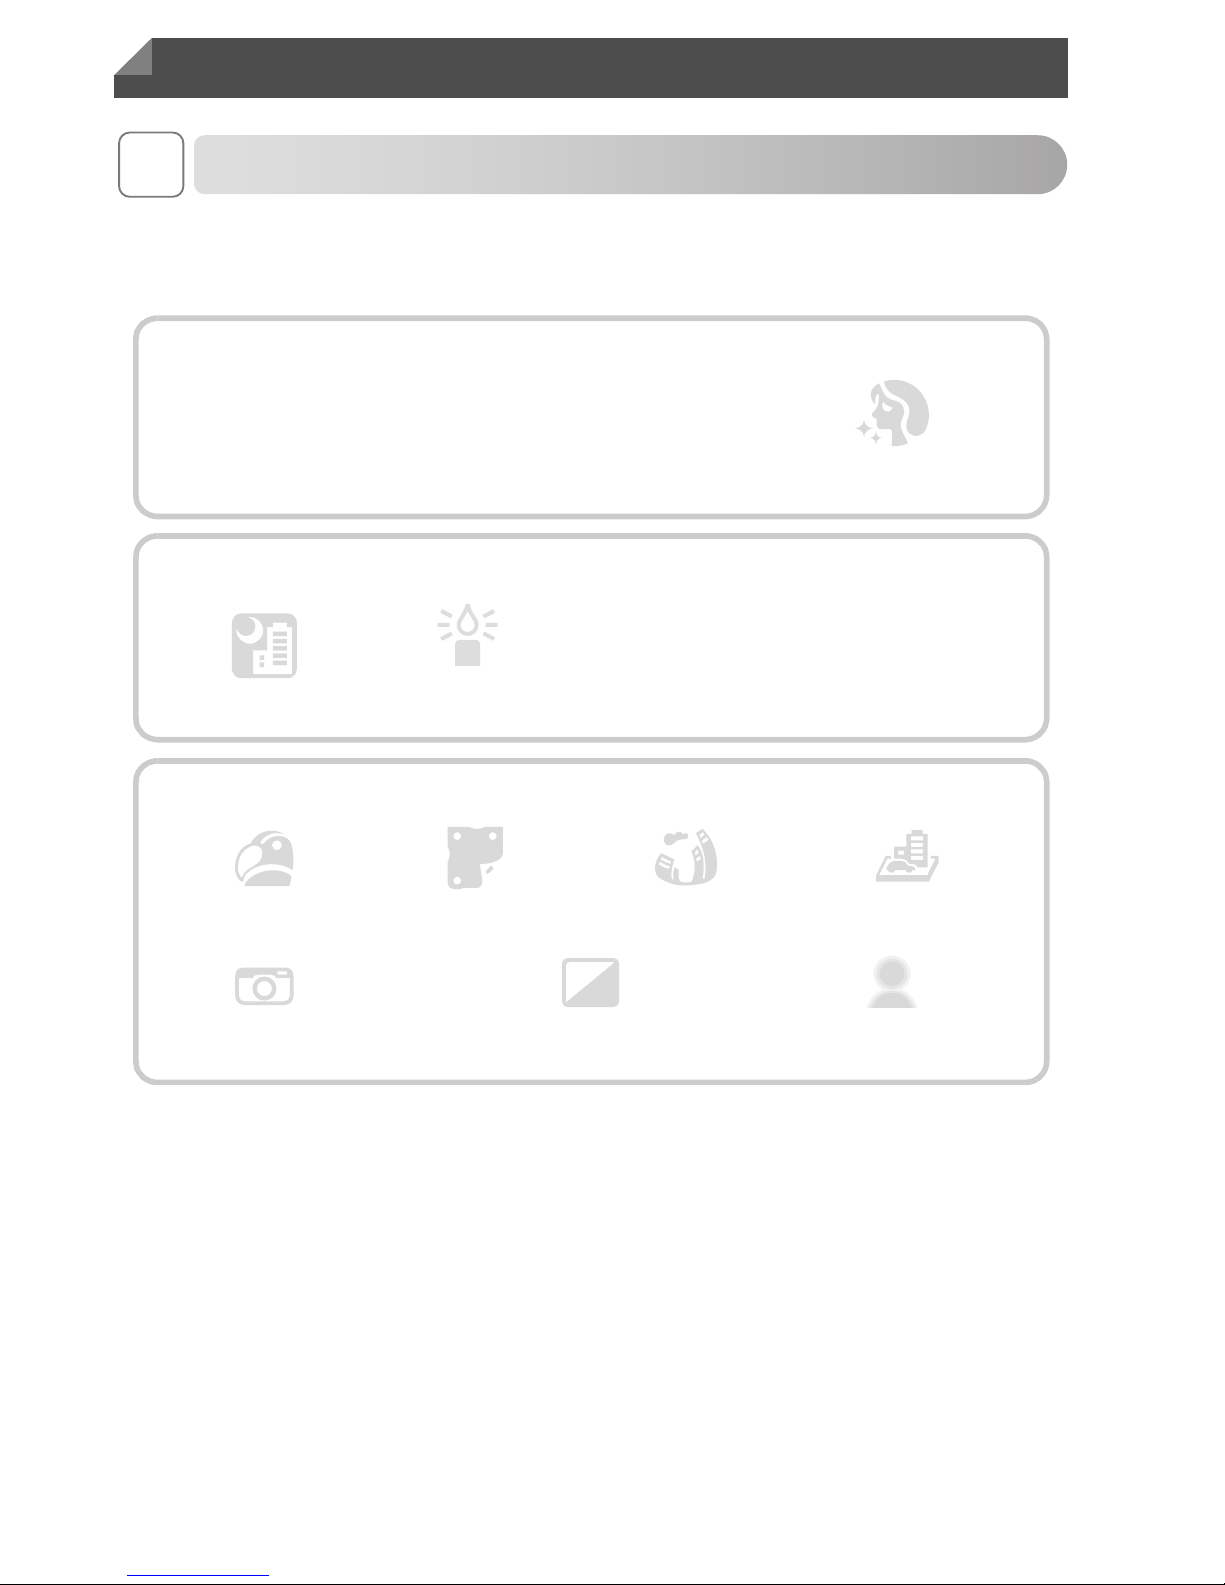
Monochrome (p. 107)
Fish-Eye Effect
(p. 104)
IP
Against Snow (p. 94)Portraits (p. 93)
Shooting people well
Matching specific scenes
tS
Applying special effects
Low Light (p. 94) Fireworks (p. 94)Under Water
(p. 94)
Miniature Effect
(p. 104)
Toy Camera Effect
(p. 106)
Night Scenes
(p. 93)
Vivid Colors
(p. 103)
Poster Effect
(p. 103)
Smooth Skin (p. 96)
Soft Focus (p. 106)
Page 45
Contents: Basic Operations
9
1 View
z View images (Playback Mode) ................................................... 146
z Follow simple camera instructions (Easy Mode) .......................... 91
z Automatic playback (Slideshow)................................................. 156
z On a TV ...................................................................................... 199
z On a computer.............................................................................. 26
z Browse through images quickly.................................................. 151
z Erase images.............................................................................. 163
E Shoot/View Movies
z Shoot movies........................................................................ 54, 111
z View movies ............................................................................... 146
z Fast-moving subjects, slow-motion playback ............................. 112
c Print
z Print pictures............................................................................... 204
Save
z Save images to a computer.......................................................... 26
Page 46

10
• Before using the product, please ensure that you read the safety precautions described
below. Always ensure that the product is used correctly.
• The safety precautions noted on the following pages are intended to prevent injuries to
yourself and other persons, or damage to the equipment.
• Be sure to also check the guides included with any separately sold accessories you
use.
Safety Precautions
Warning
Denotes the possibility of serious injury or death.
• Do not trigger the flash in close proximity to people’s eyes.
Exposure to the intense light produced by the flash could damage eyesight. In particular,
remain at least one meter (39 inches) away from infants when using the flash.
• Store this equipment out of the reach of children and infants.
Strap: Putting the strap around a child’s neck could result in asphyxiation.
• Use only recommended power sources.
• Do not attempt to disassemble, alter or apply heat to the product.
• Avoid dropping or subjecting the product to severe impacts.
• To avoid the risk of injury, do not touch the interior of the product if it has been
dropped or otherwise damaged.
• Stop using the product immediately if it emits smoke, a strange smell, or
otherwise behaves abnormally.
• Do not use organic solvents such as alcohol, benzine, or thinner to clean the
product.
• Do not let the product come into contact with water (e.g. sea water) or other
liquids.
• Do not allow liquids or foreign objects to enter the camera.
This could result in electrical shock or fire.
If liquids or foreign objects come into contact with the camera interior, immediately turn
the camera off and remove the battery.
If the battery charger becomes wet, unplug it from the outlet and consult your camera
distributor or a Canon Customer Support Help Desk.
Page 47
Safety Precautions
11
• Use only the recommended battery.
• Do not place the battery near or in direct flame.
• Unplug the power cord periodically, and using a dry cloth, wipe away any dust
and dirt that has collected on the plug, the exterior of the power outlet, and the
surrounding area.
• Do not handle the power cord with wet hands.
• Do not use the equipment in a manner that exceeds the rated capacity of the
electrical outlet or wiring accessories. Do not use if the power cord or plug are
damaged, or not fully plugged into the outlet.
• Do not allow dirt or metal objects (such as pins or keys) to contact the terminals
or plug.
The battery may explode or leak, resulting in electrical shock or fire. This could cause
injury and damage the surroundings. In the event that a battery leaks and the battery
electrolyte contacts eyes, mouth, skin or clothing, immediately flush with water.
• Turn the camera off in places where camera use is prohibited.
The electromagnetic waves emitted by the camera may interfere with the operation of
electronic instruments and other devices. Exercise adequate caution when using the
camera in places where use of electronic devices is restricted, such as inside airplanes
and medical facilities.
• Do not play the supplied CD-ROM(s) in any CD player that does not support data
CD-ROMs.
It is possible to suffer hearing loss from listening with headphones to the loud sounds of
a CD-ROM played on an audio CD player (music player). Additionally, this could damage
the speakers.
Caution
Denotes the possibility of injury.
• When holding the camera by the strap, be careful not to bang it, subject it to
strong impacts or shocks, or let it get caught on other objects.
• Be careful not to bump or push strongly on the lens.
This could lead to injury or damage the camera.
• Be careful not to subject the screen to strong impacts.
If the screen cracks, injury may result from the broken fragments.
• When using the flash, be careful not to cover it with your fingers or clothing.
This could result in burns or damage to the flash.
• Avoid using, placing or storing the product in the following places:
- Places subject to strong sunlight
- Places subject to temperatures above 40 °C (104 °F)
- Humid or dusty areas
These could cause leakage, overheating or an explosion of the battery, resulting in
electrical shock, fire, burns or other injuries.
High temperatures may cause deformation of the camera or battery charger casing.
Page 48
Safety Precautions
12
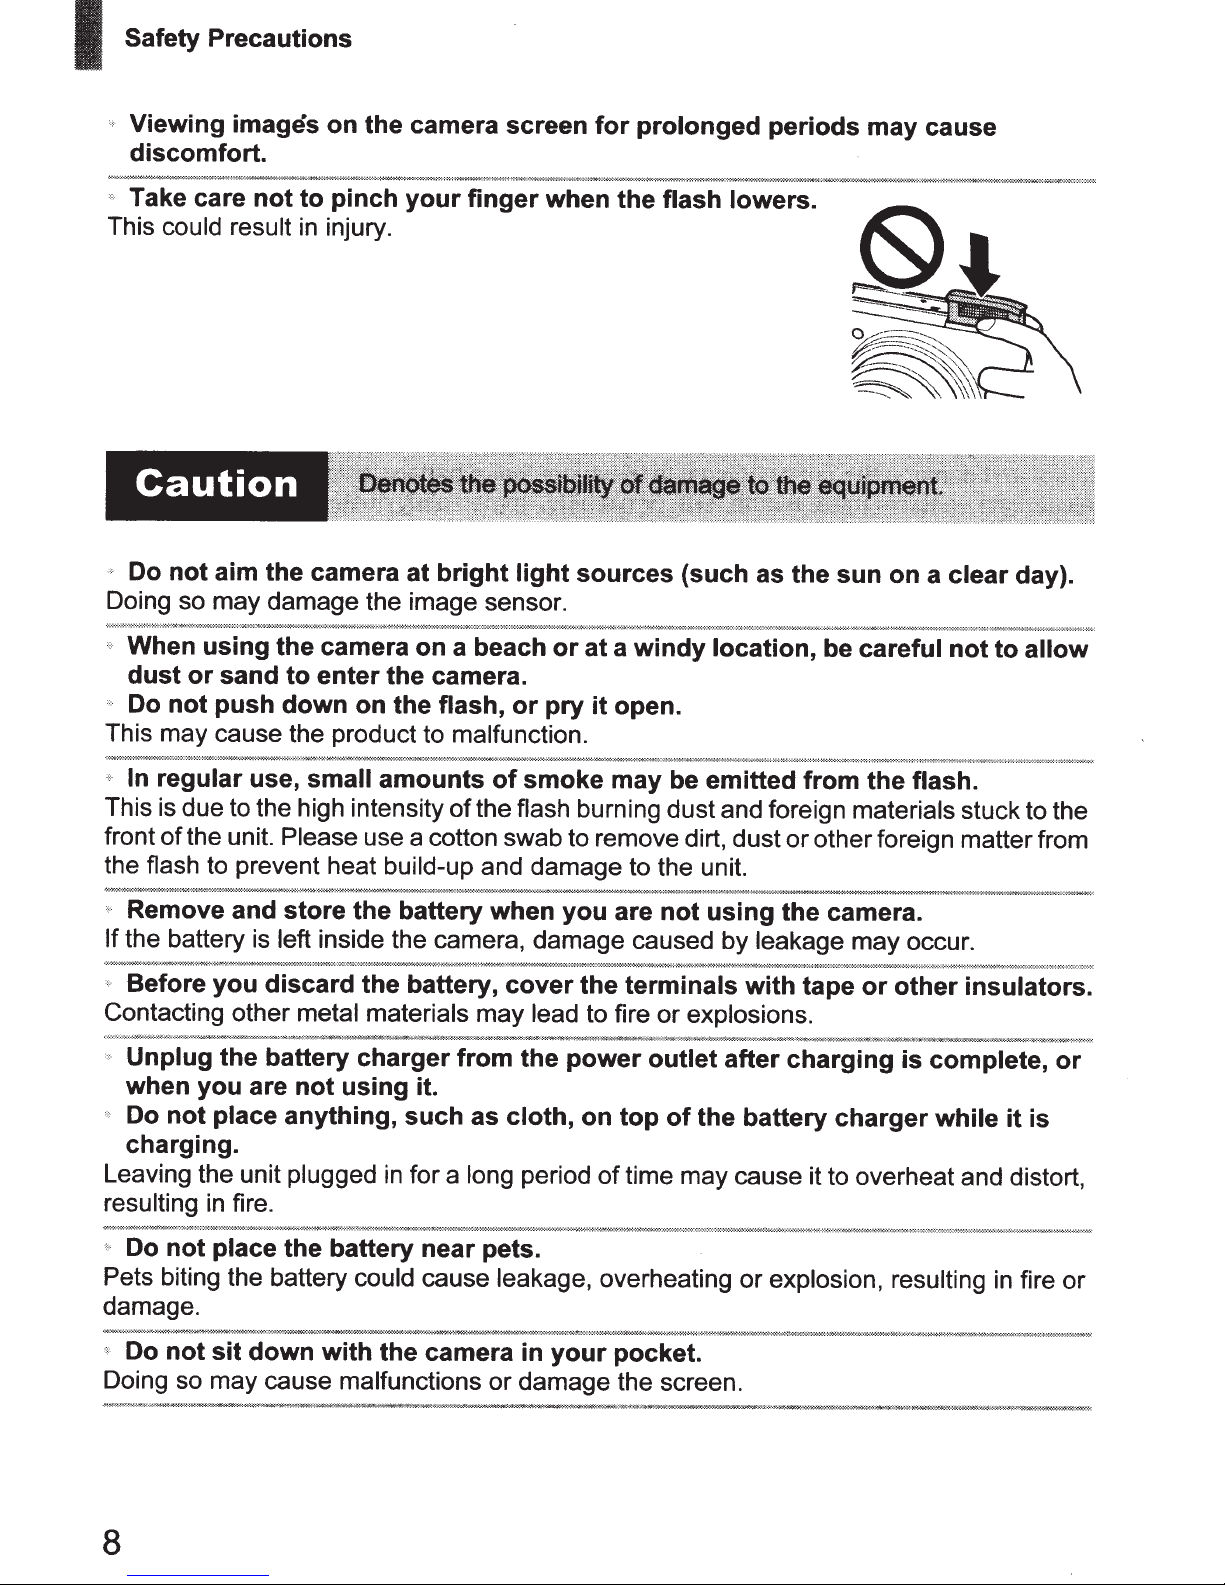
• Viewing images on the camera screen for prolonged periods may cause
discomfort.
• Take care not to pinch your finger when the flash lowers.
This could result in injury.
Caution
Denotes the possibility of damage to the equipment.
• Do not aim the camera at bright light sources (such as the sun on a clear day).
Doing so may damage the image sensor.
• When using the camera on a beach or at a windy location, be careful not to allow
dust or sand to enter the camera.
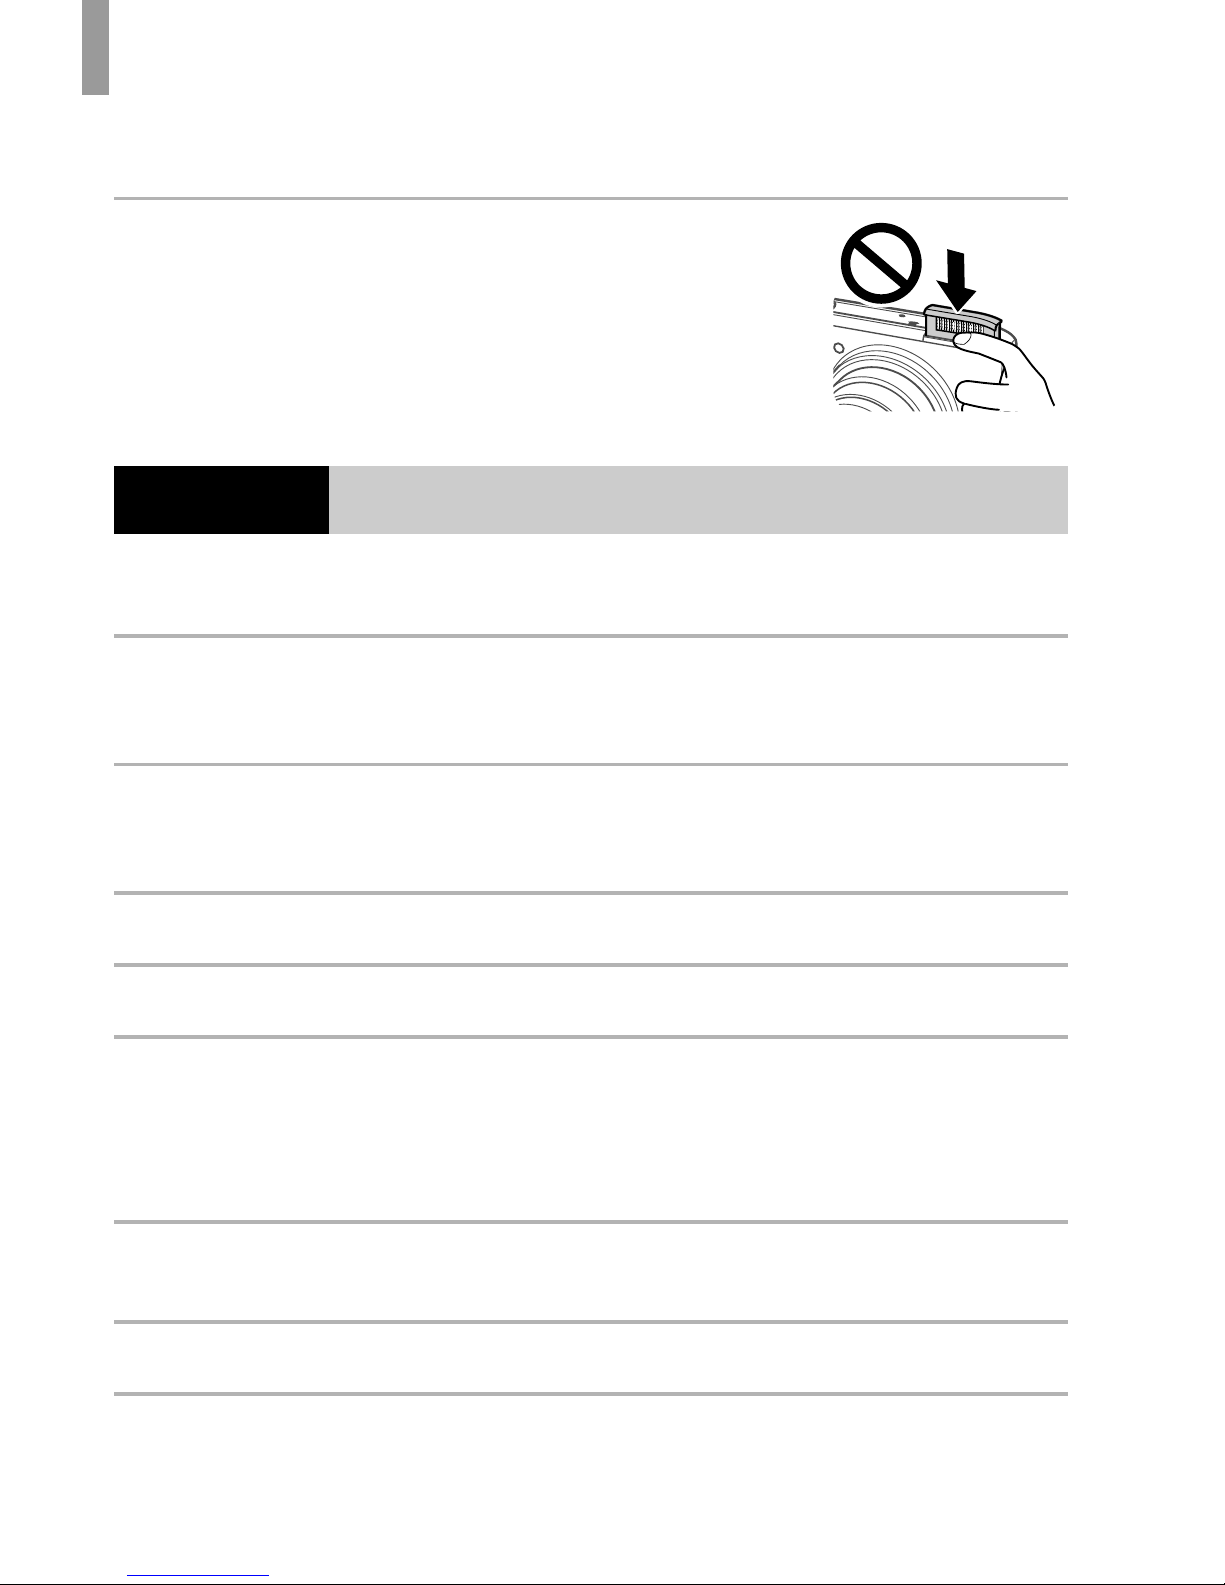
• Do not push down on the flash, or pry it open.
This may cause the product to malfunction.
• In regular use, small amounts of smoke may be emitted from the flash.
This is due to the high intensity of the flash burning dust and foreign materials stuck to the
front of the unit. Please use a cotton swab to remove dirt, dust or other foreign matter from
the flash to prevent heat build-up and damage to the unit.
• Remove and store the battery when you are not using the camera.
If the battery is left inside the camera, damage caused by leakage may occur.
• Before you discard the battery, cover the terminals with tape or other insulators.
Contacting other metal materials may lead to fire or explosions.
• Unplug the battery charger from the power outlet after charging is complete, or
when you are not using it.
• Do not place anything, such as cloth, on top of the battery charger while it is
charging.
Leaving the unit plugged in for a long period of time may cause it to overheat and distort,
resulting in fire.
• Do not place the battery near pets.
Pets biting the battery could cause leakage, overheating or explosion, resulting in fire or
damage.
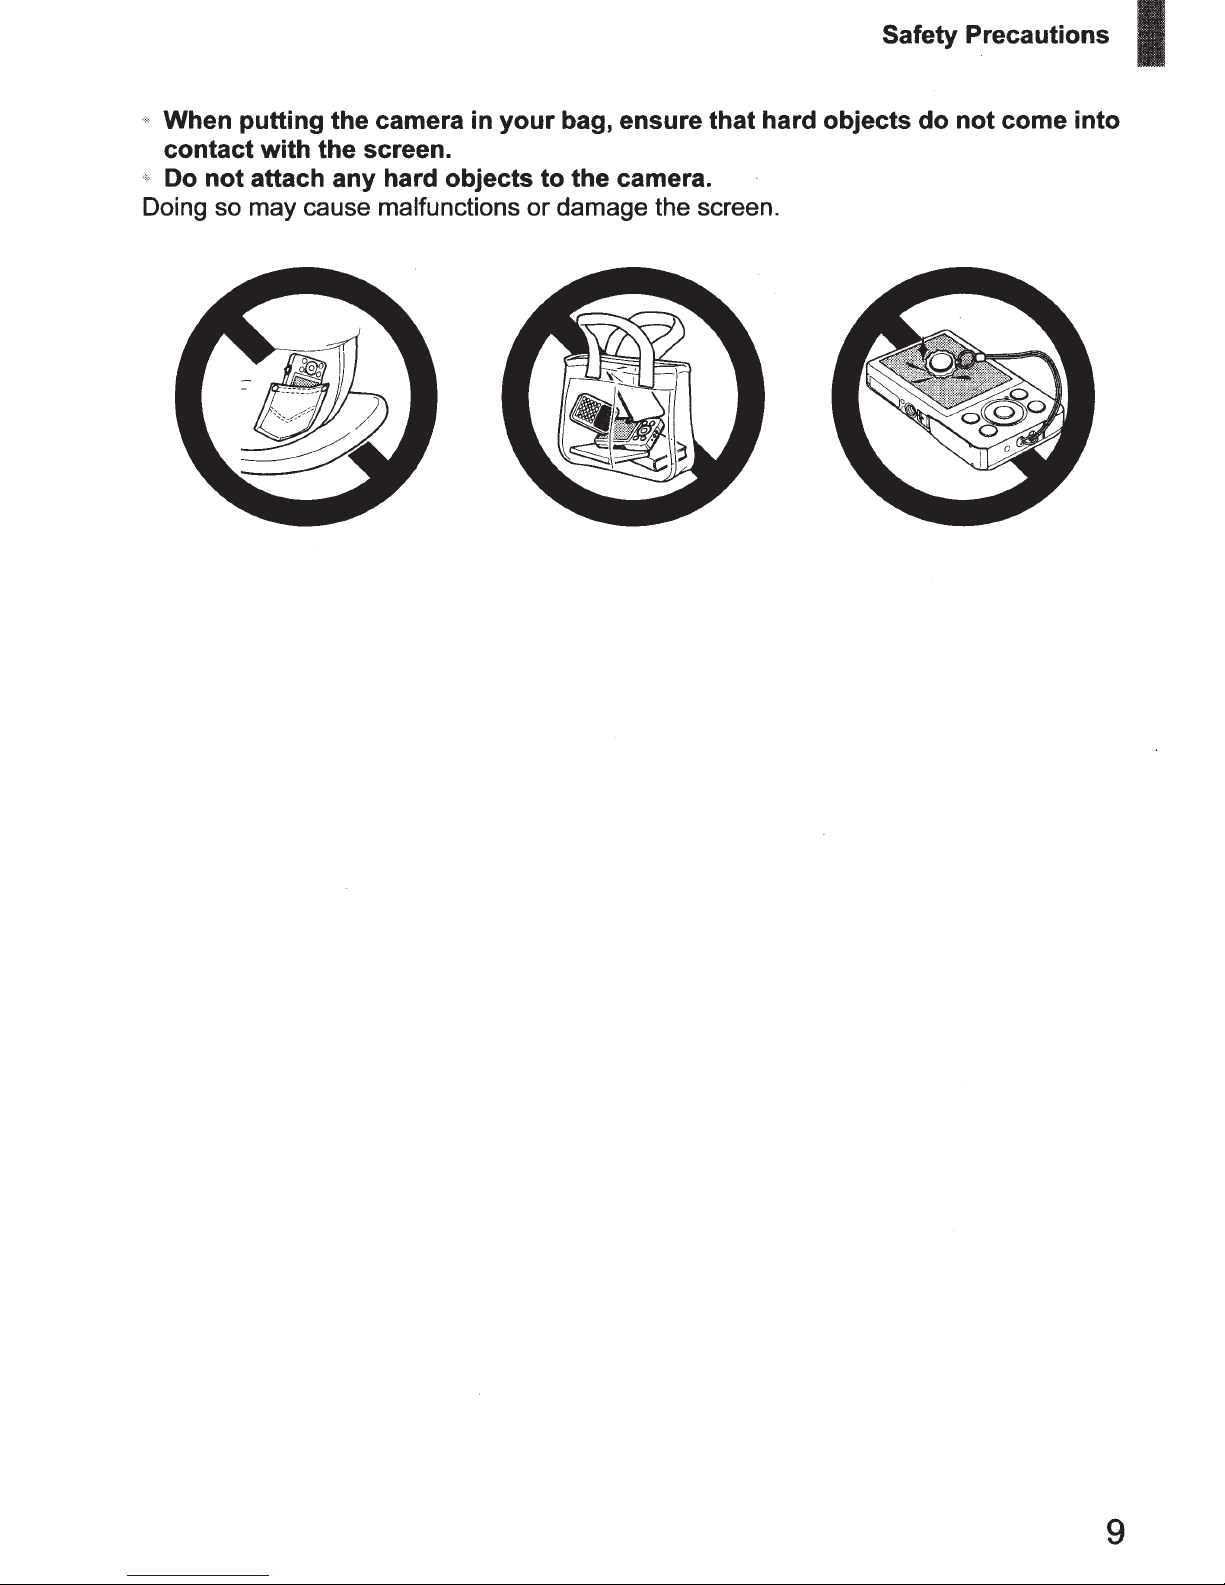
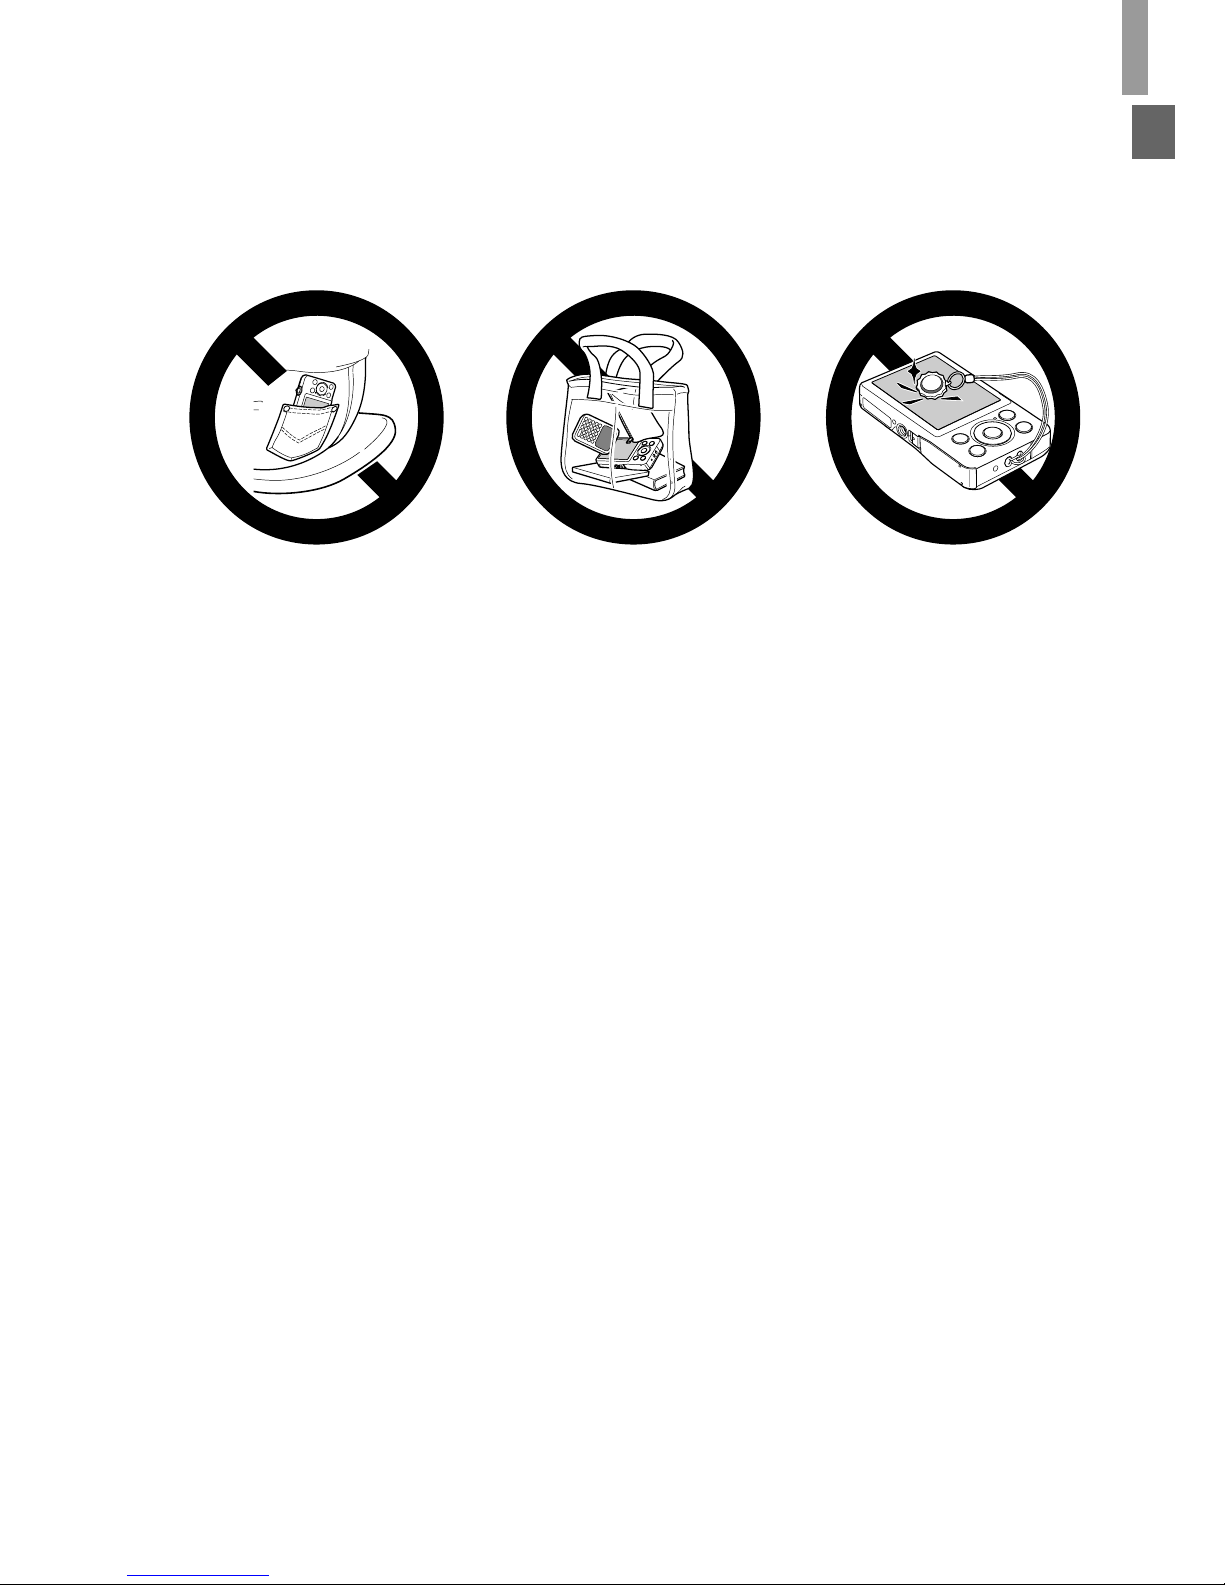
• Do not sit down with the camera in your pocket.
Doing so may cause malfunctions or damage the screen.
Page 49
Safety Precautions
13
• When putting the camera in your bag, ensure that hard objects do not come into
contact with the screen.
• Do not attach any hard objects to the camera.
Doing so may cause malfunctions or damage the screen.
Page 50
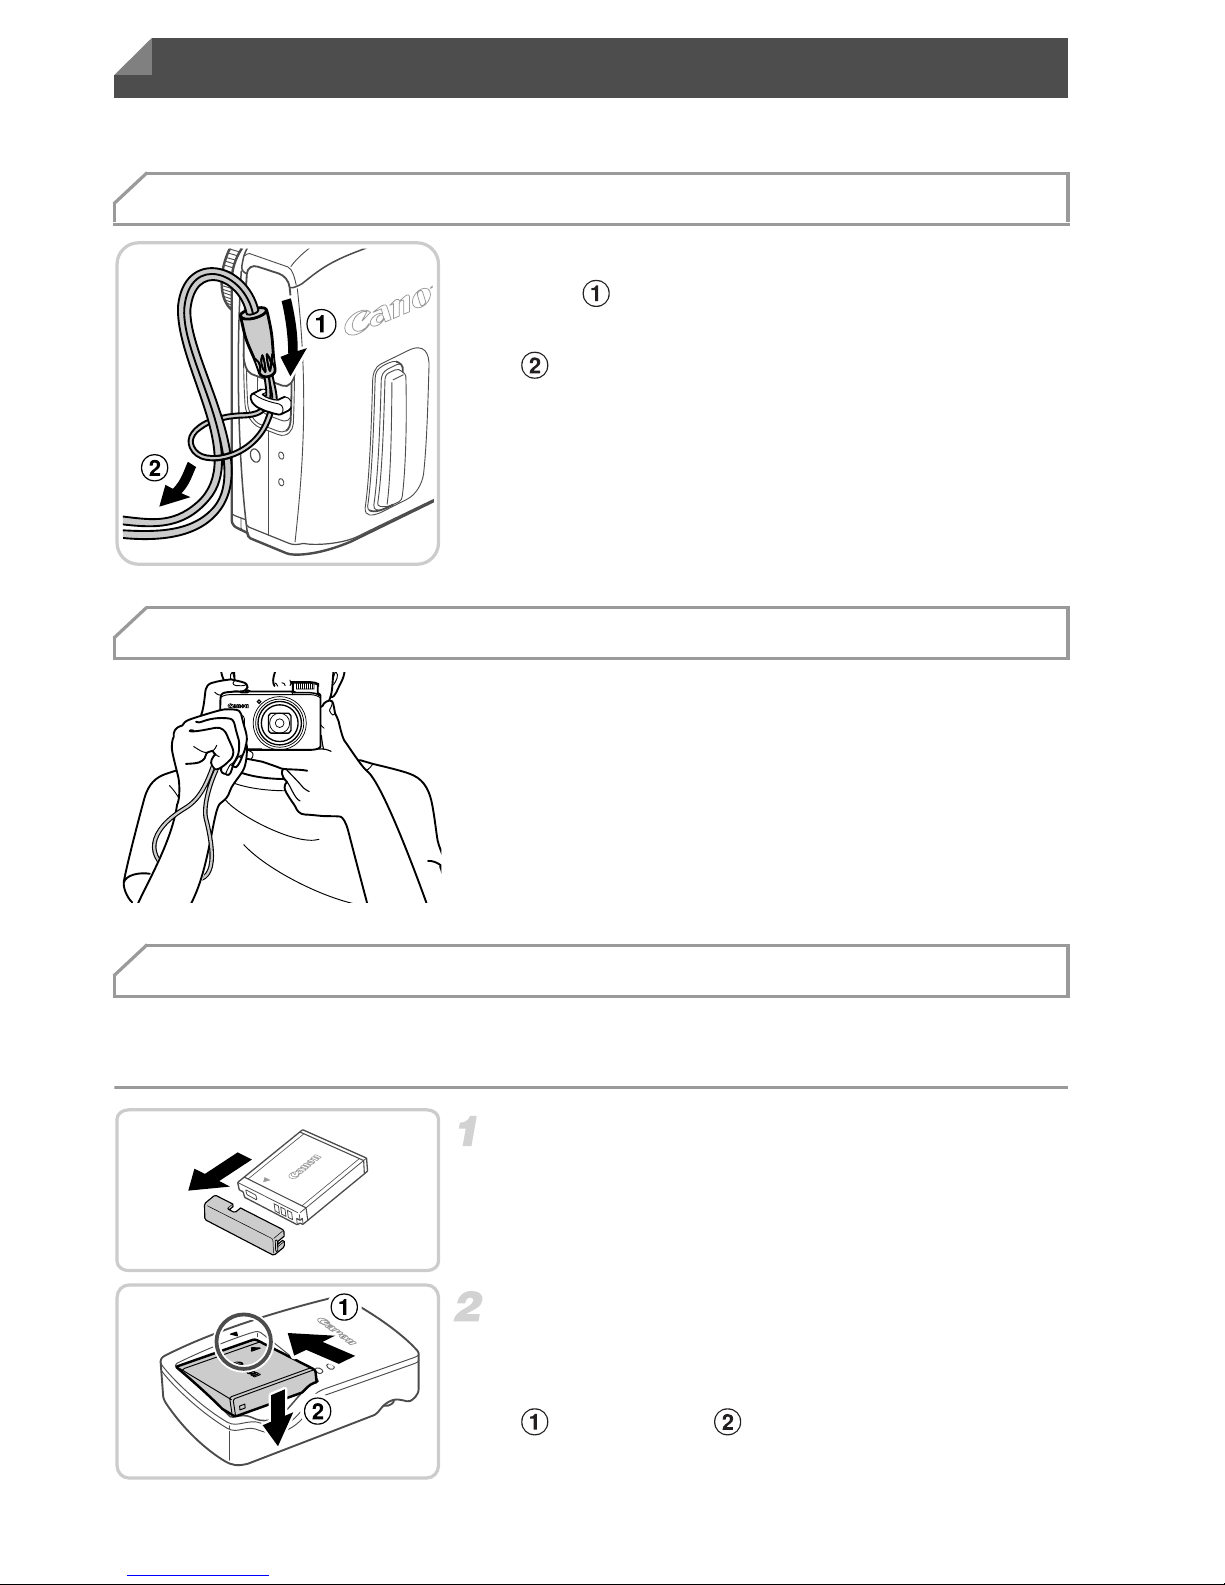
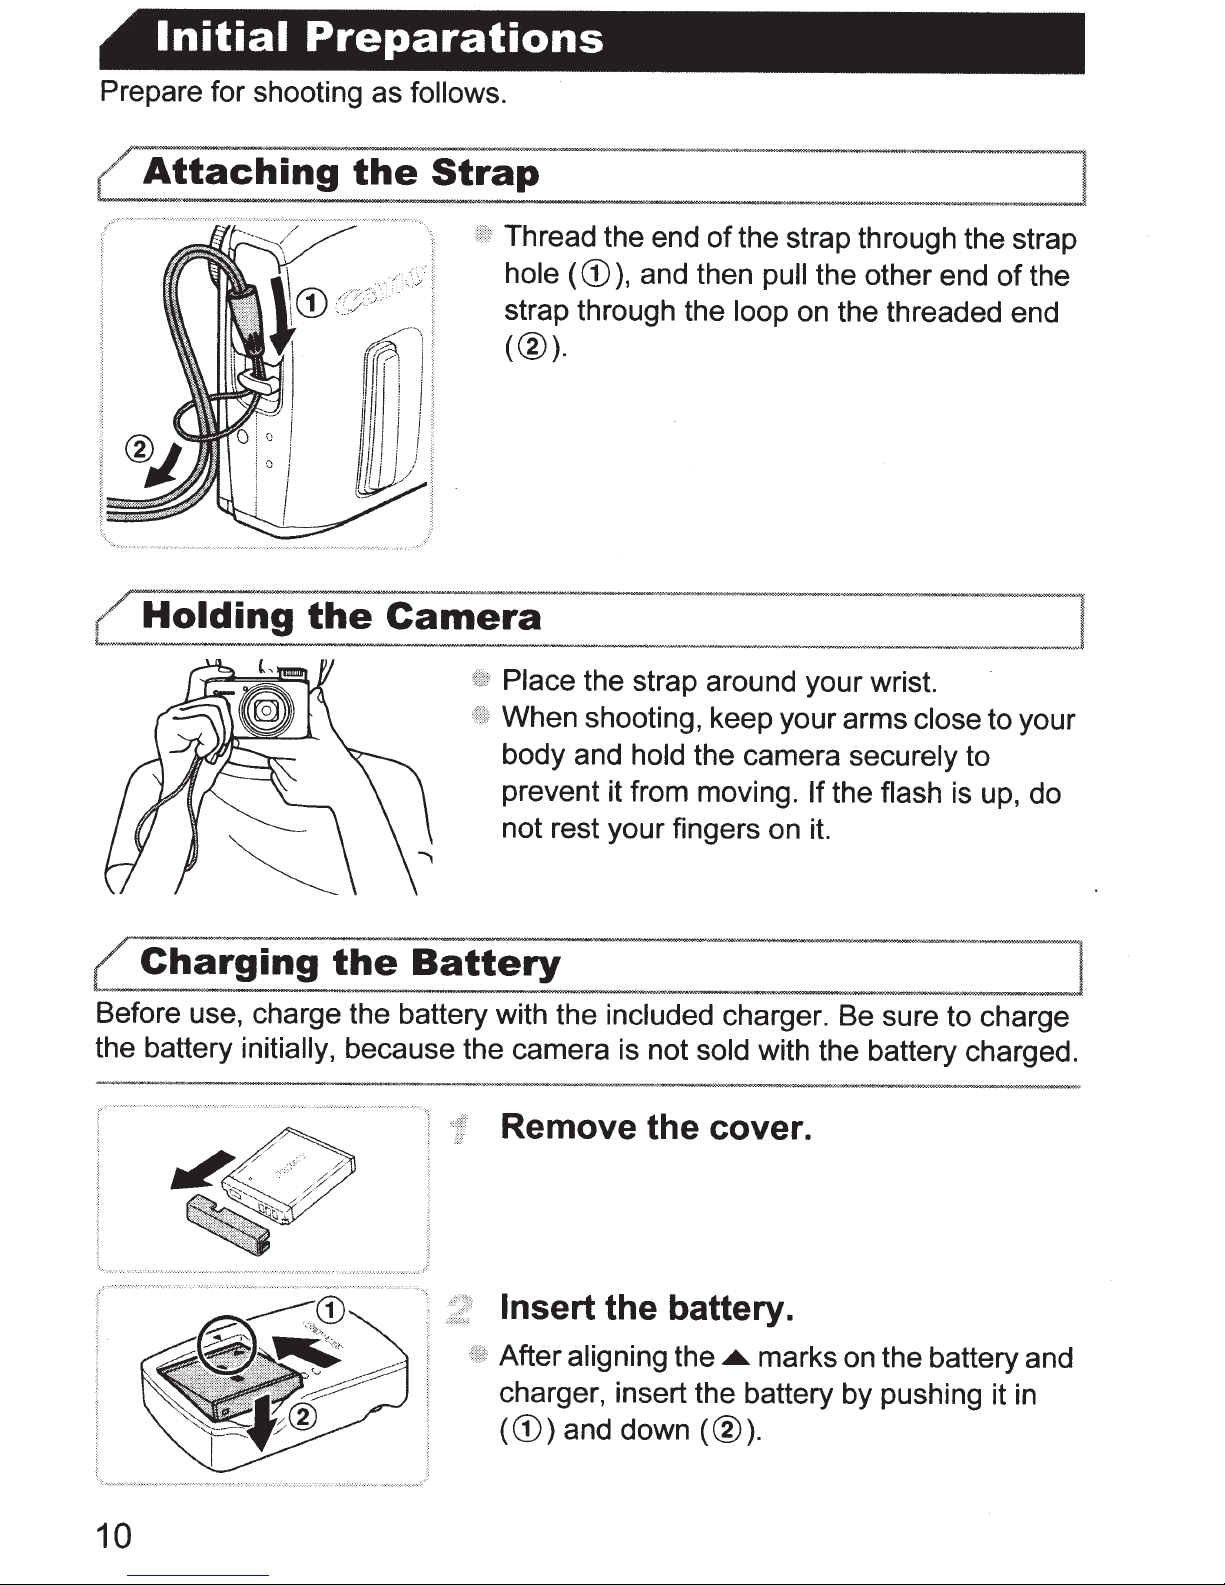
14
Prepare for shooting as follows.
z Thread the end of the strap through the strap
hole ( ), and then pull the other end of the
strap through the loop on the threaded end
().
z Place the strap around your wrist.
z When shooting, keep your arms close to your
body and hold the camera securely to
prevent it from moving. If the flash is up, do
not rest your fingers on it.
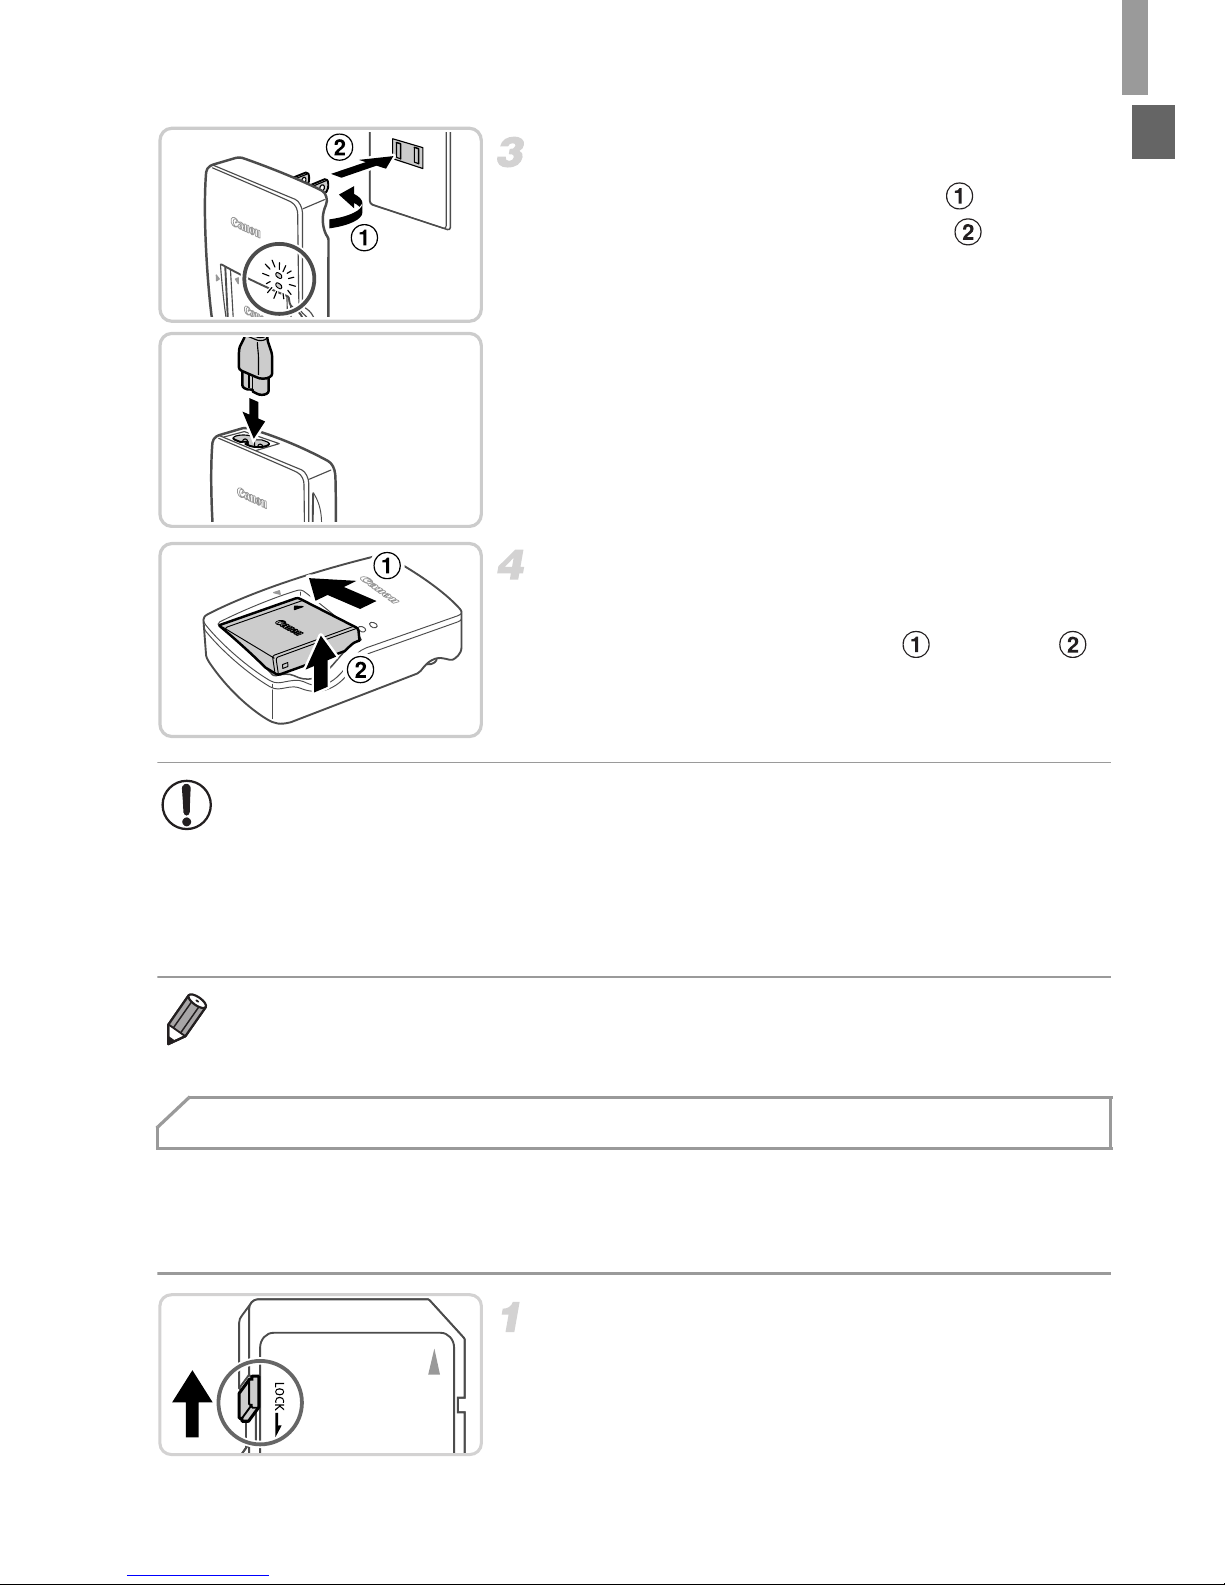
Before use, charge the battery with the included charger. Be sure to charge
the battery initially, because the camera is not sold with the battery charged.
Remove the cover.
Insert the battery.
z After aligning the o marks on the battery and
charger, insert the battery by pushing it in
( ) and down ( ).
Initial Preparations
Attaching the Strap
Holding the Camera
Charging the Battery
Page 51
Initial Preparations
15
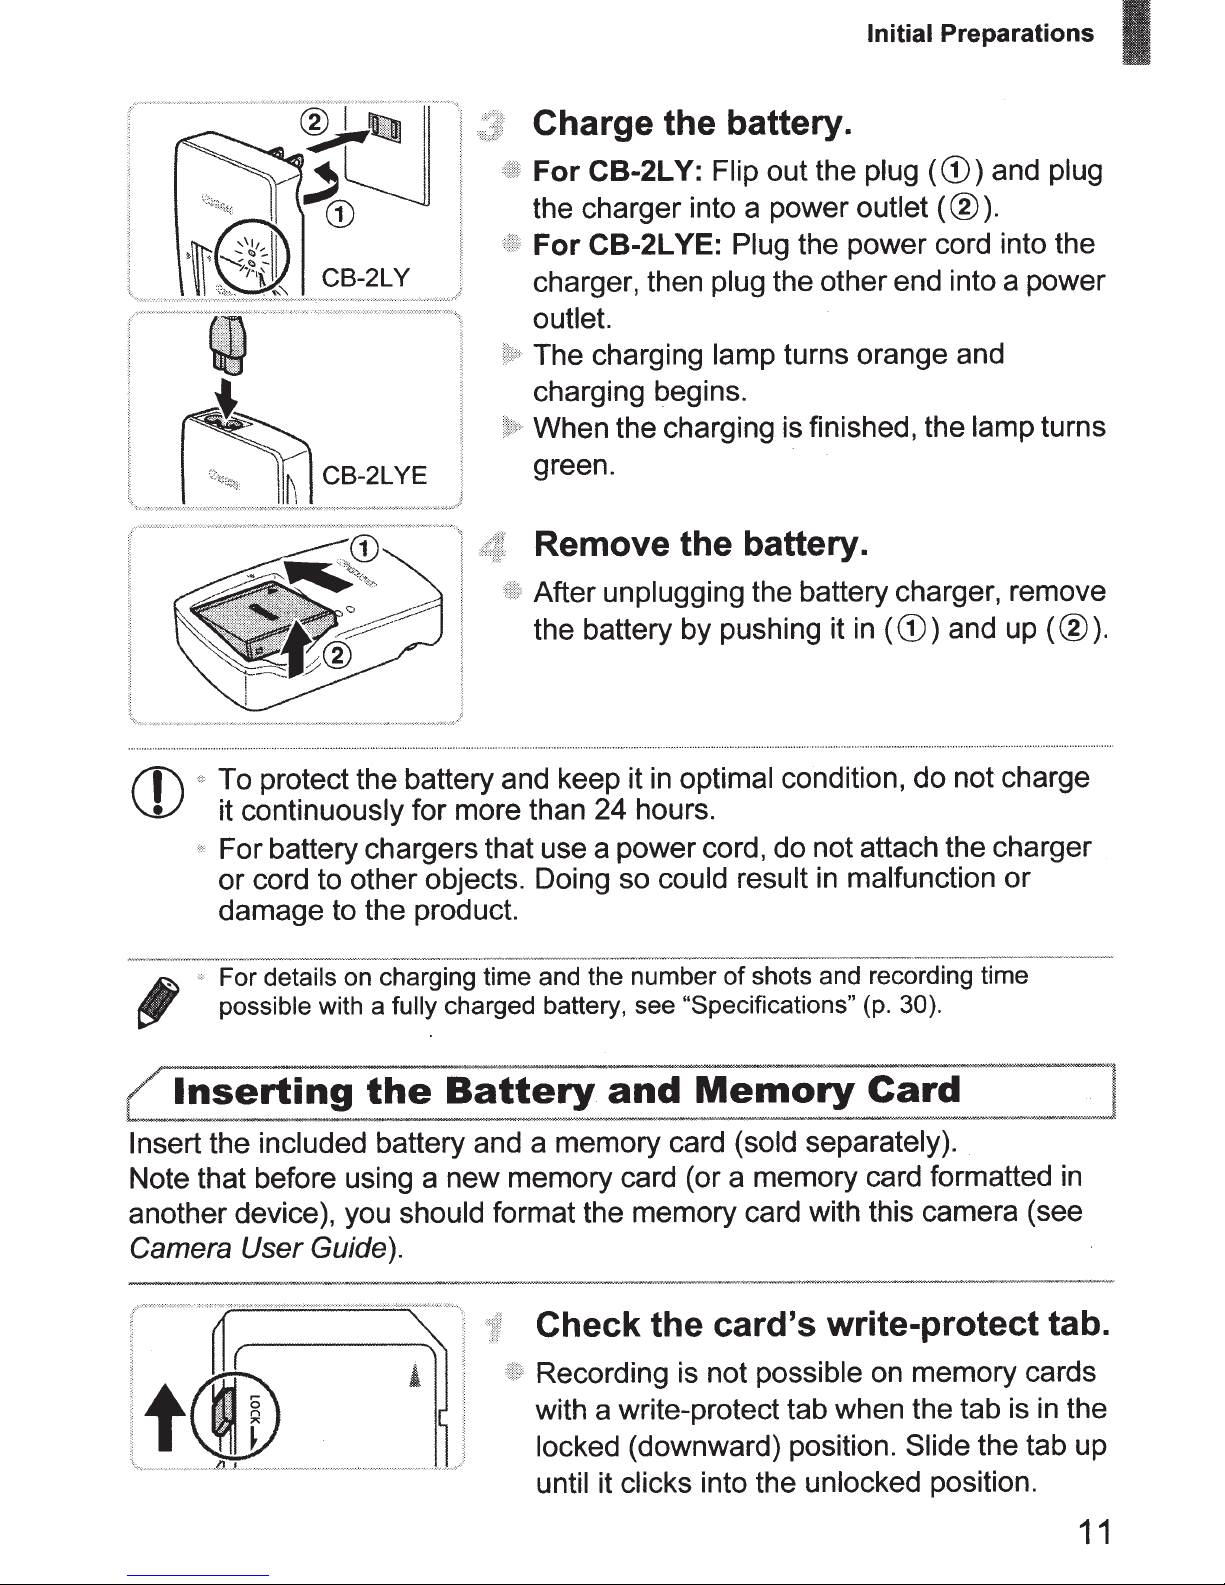
Charge the battery.
z For CB-2LY: Flip out the plug ( ) and plug
the charger into a power outlet ( ).
z For CB-2LYE: Plug the power cord into the
charger, then plug the other end into a power
outlet.
X The charging lamp turns orange and
charging begins.
X When the charging is finished, the lamp turns
green.
Remove the battery.
z After unplugging the battery charger, remove
the battery by pushing it in ( ) and up ( ).
Insert the included battery and a memory card (sold separately).
Note that before using a new memory card (or a memory card formatted in
another device), you should format the memory card with this camera (p. 185).
Check the card’s write-protect tab.
z Recording is not possible on memory cards
with a write-protect tab when the tab is in the
locked (downward) position. Slide the tab up
until it clicks into the unlocked position.
CB-2LY
CB-2LYE
• To protect the battery and keep it in optimal condition, do not charge
it continuously for more than 24 hours.
• For battery chargers that use a power cord, do not attach the charger
or cord to other objects. Doing so could result in malfunction or
damage to the product.
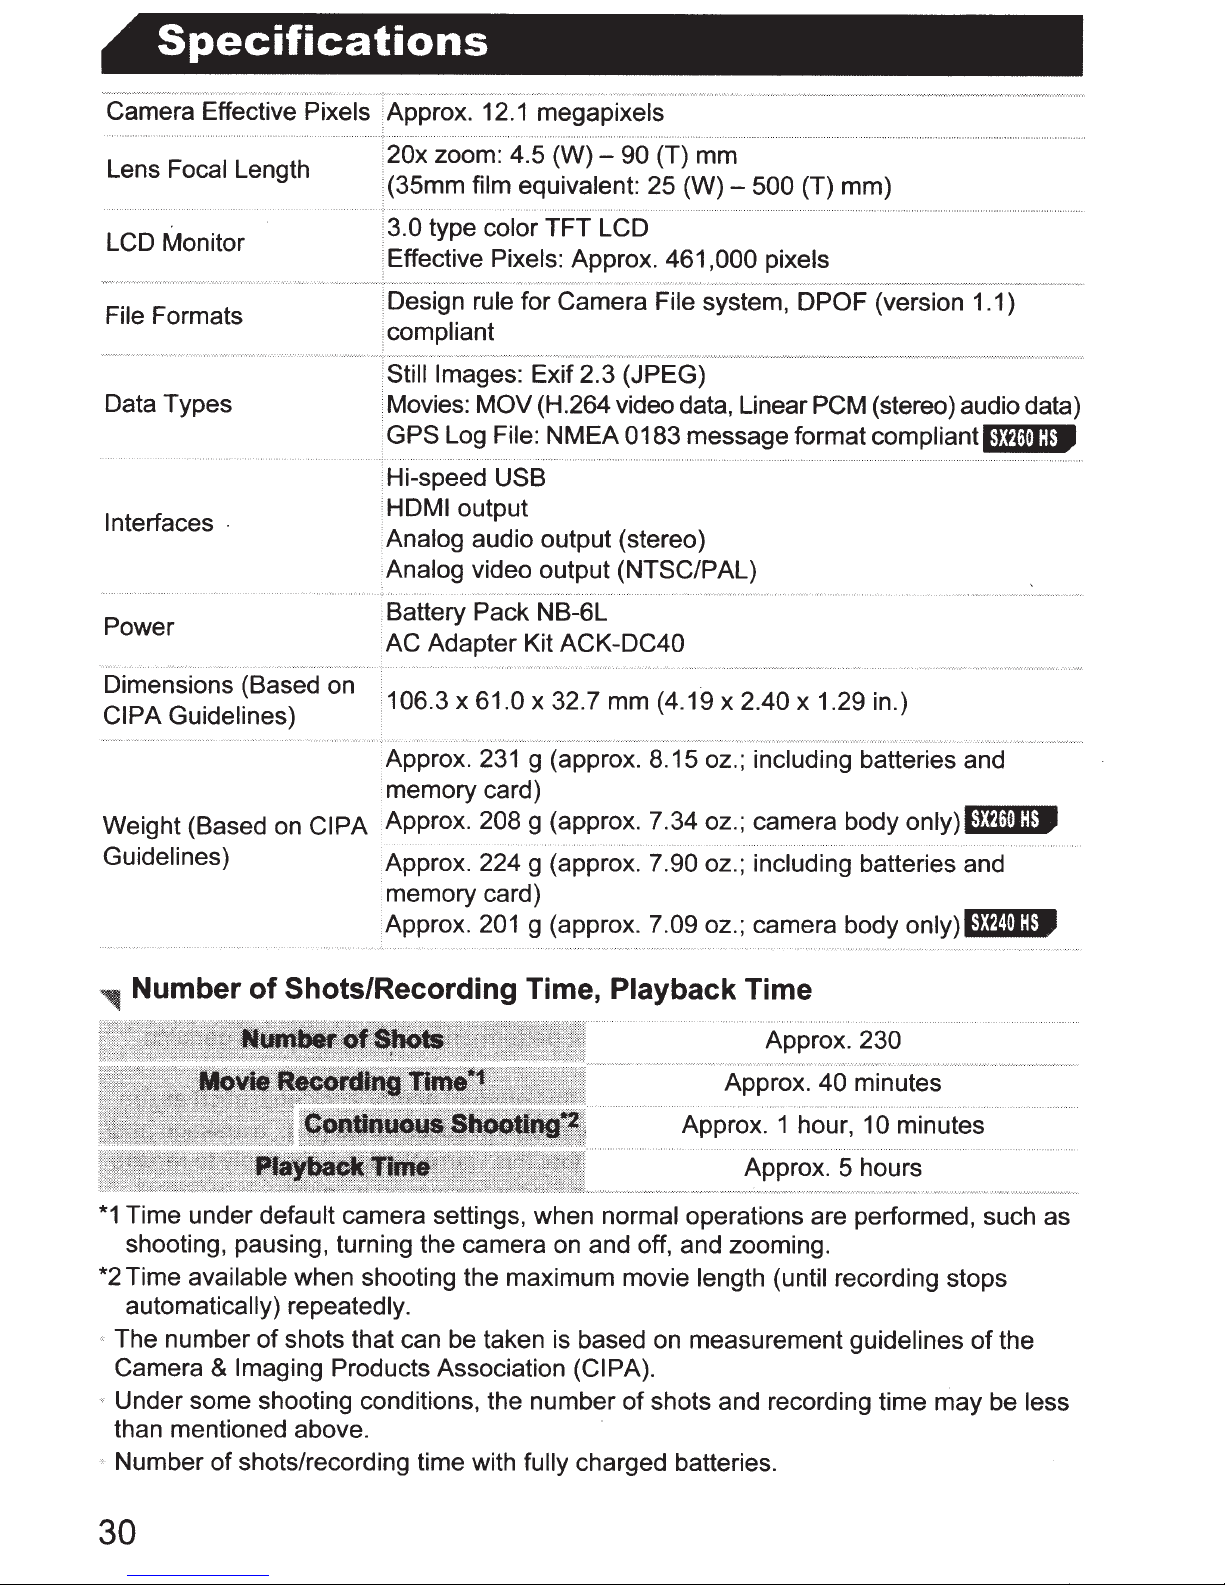
• For details on charging time and the number of shots and recording time
possible with a fully charged battery, see “Specifications” in the Getting Started
guide.
Inserting the Battery and Memory Card
Page 52
Initial Preparations
16
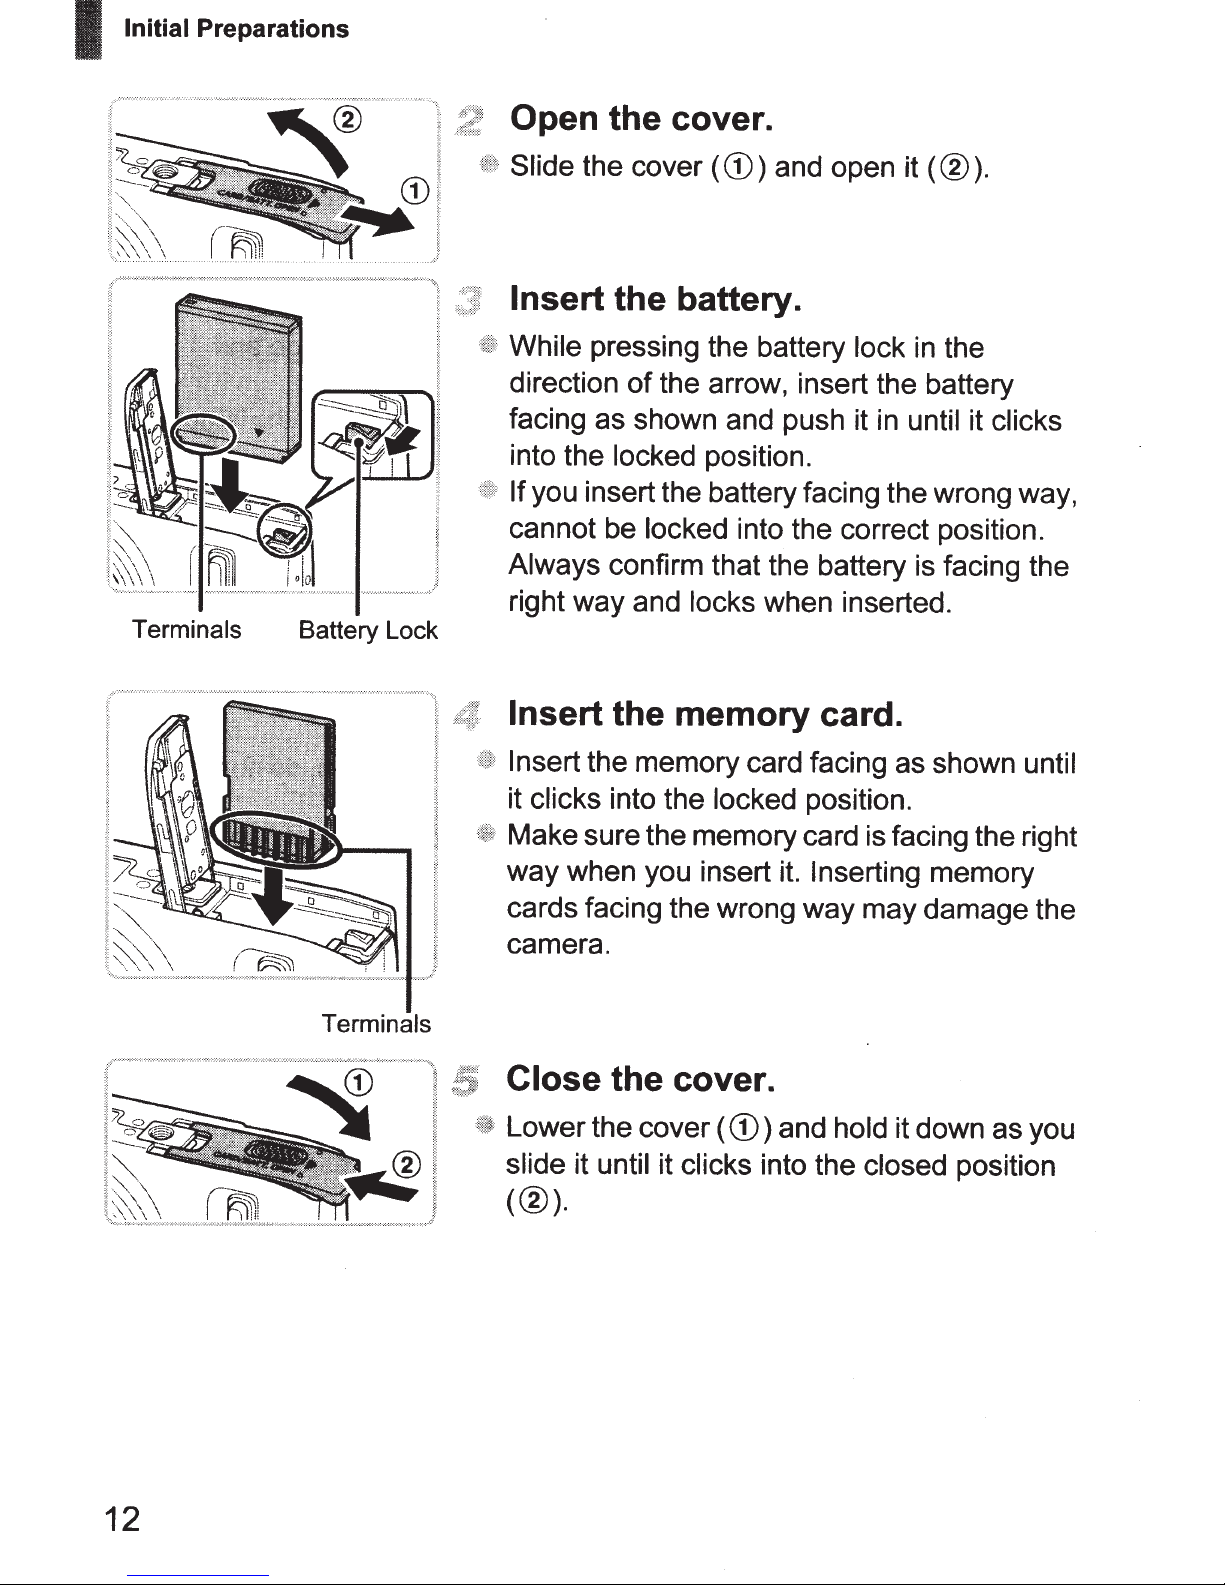
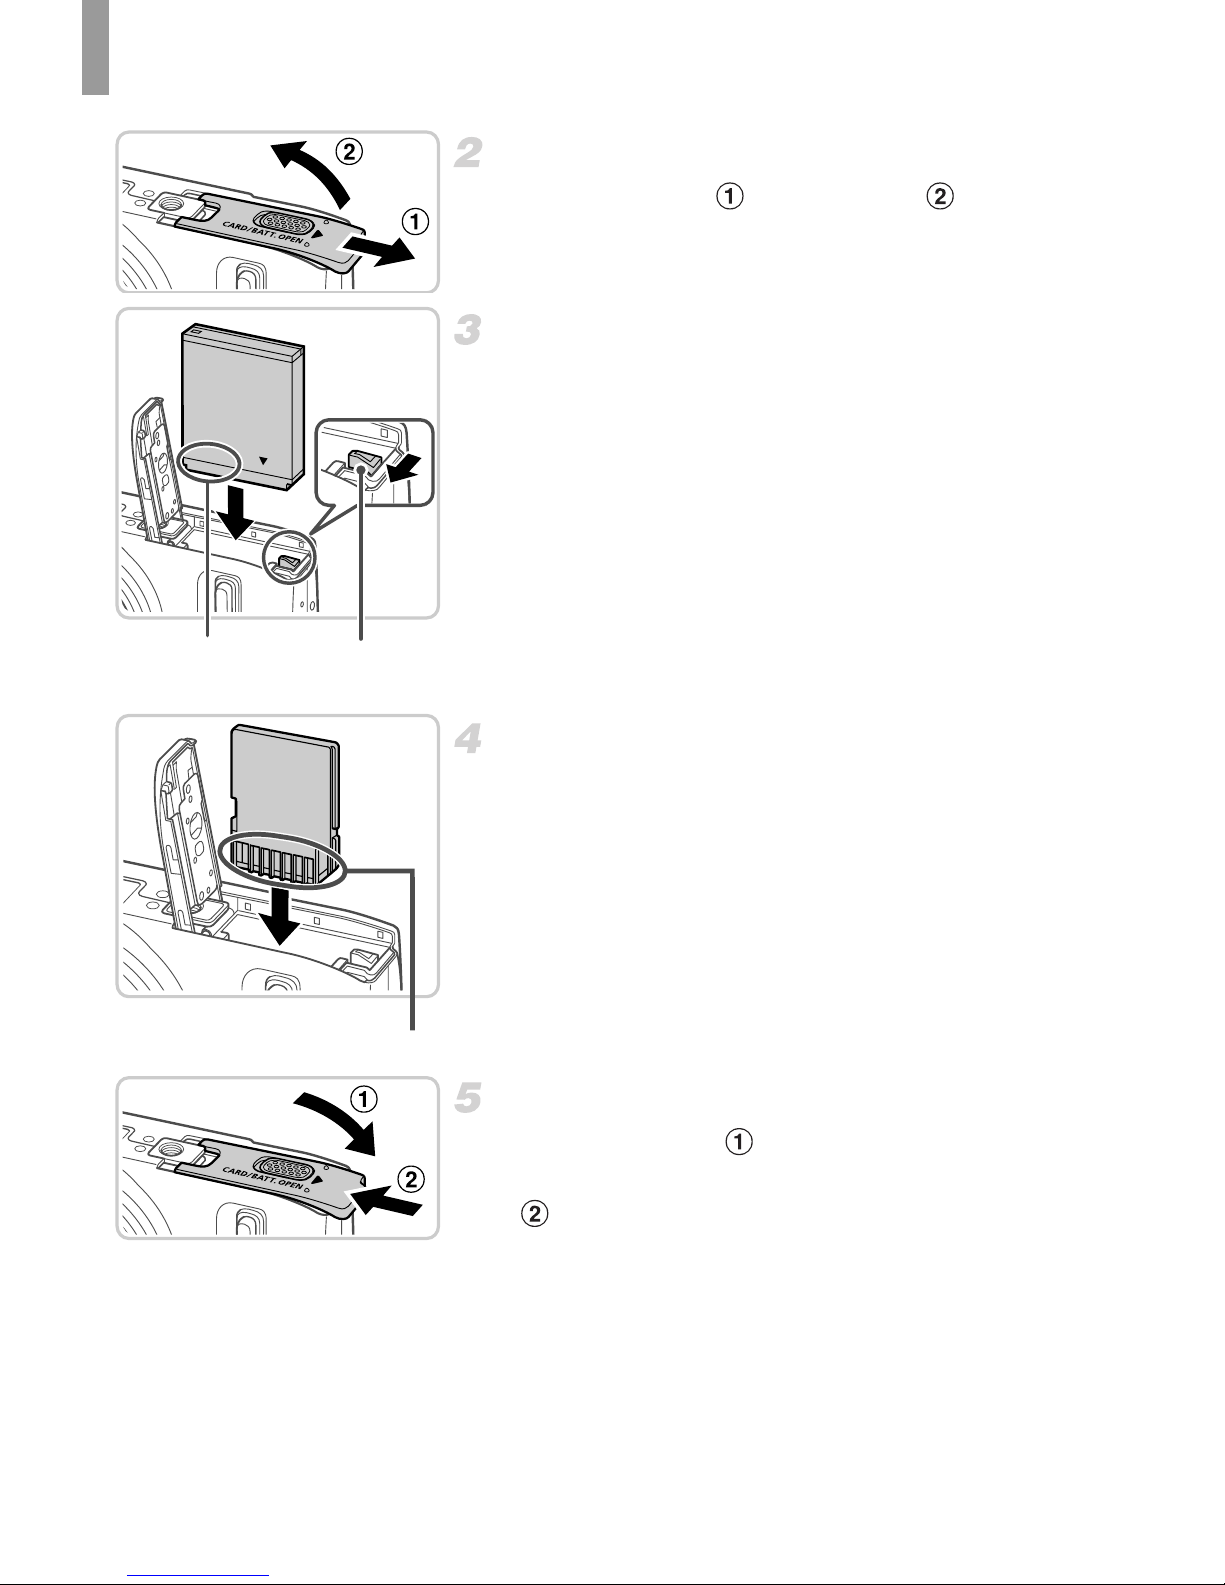
Open the cover.
z Slide the cover ( ) and open it ( ).
Insert the battery.
z While pressing the battery lock in the
direction of the arrow, insert the battery
facing as shown and push it in until it clicks
into the locked position.
z If you insert the battery facing the wrong way,
cannot be locked into the correct position.
Always confirm that the battery is facing the
right way and locks when inserted.
Insert the memory card.
z Insert the memory card facing as shown until
it clicks into the locked position.
z Make sure the memory card is facing the right
way when you insert it. Inserting memory
cards facing the wrong way may damage the
camera.
Close the cover.
z Lower the cover ( ) and hold it down as you
slide it until it clicks into the closed position
().
Terminals Battery Lock
Terminals
Page 53
Initial Preparations
17
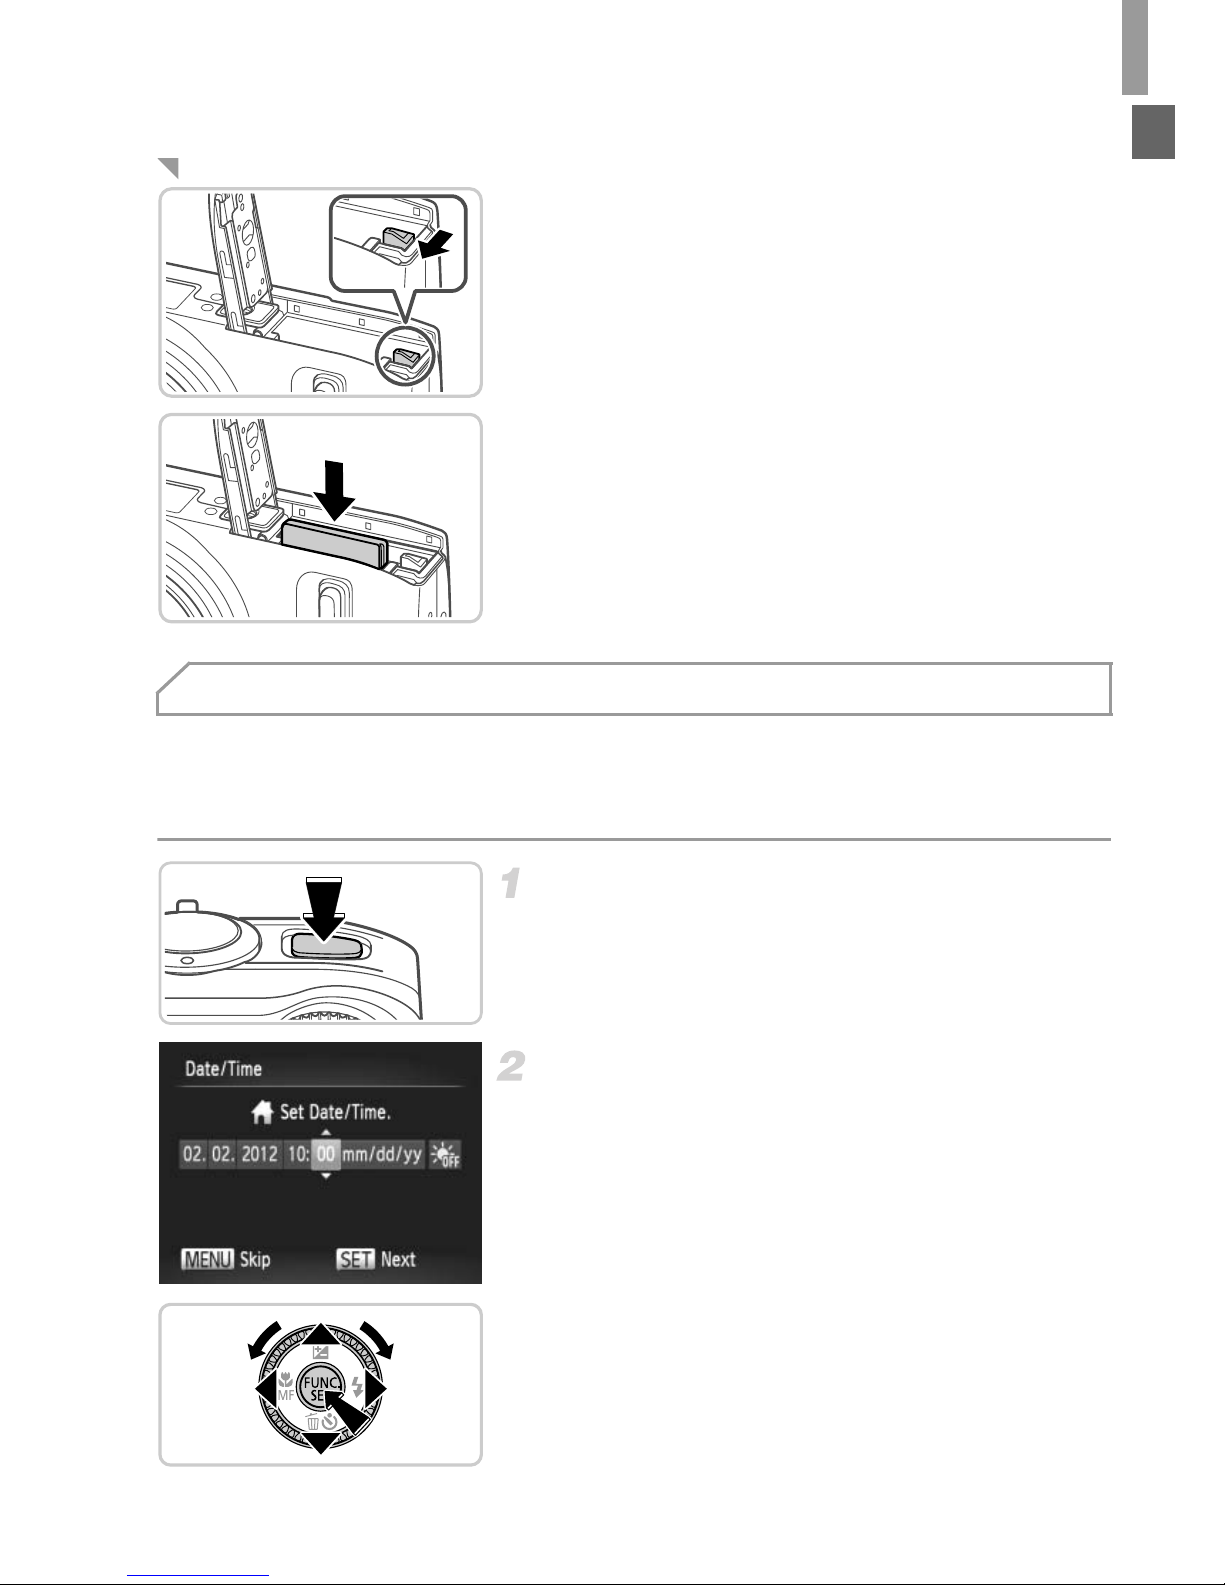
Remove the battery.
z Open the cover and press the battery lock in
the direction of the arrow.
X The battery will pop up.
Remove the memory card.
z Push the memory card in until it clicks, and
then slowly release it.
X The memory card will pop up.
A screen for setting the date and time is displayed the first time you turn the
camera on. Be sure to specify the date and time, which is the basis for dates
and times added to your images.
Turn the camera on.
z Press the power button.
X The [Date/Time] screen is displayed.
Set the date and time.
z Press the qr buttons to choose an option.
z Press the op buttons or turn the 5 dial to
specify the date and time.
z When finished, press the m button.
Removing the Battery and Memory Card
Setting the Date and Time
Page 54
Initial Preparations
18
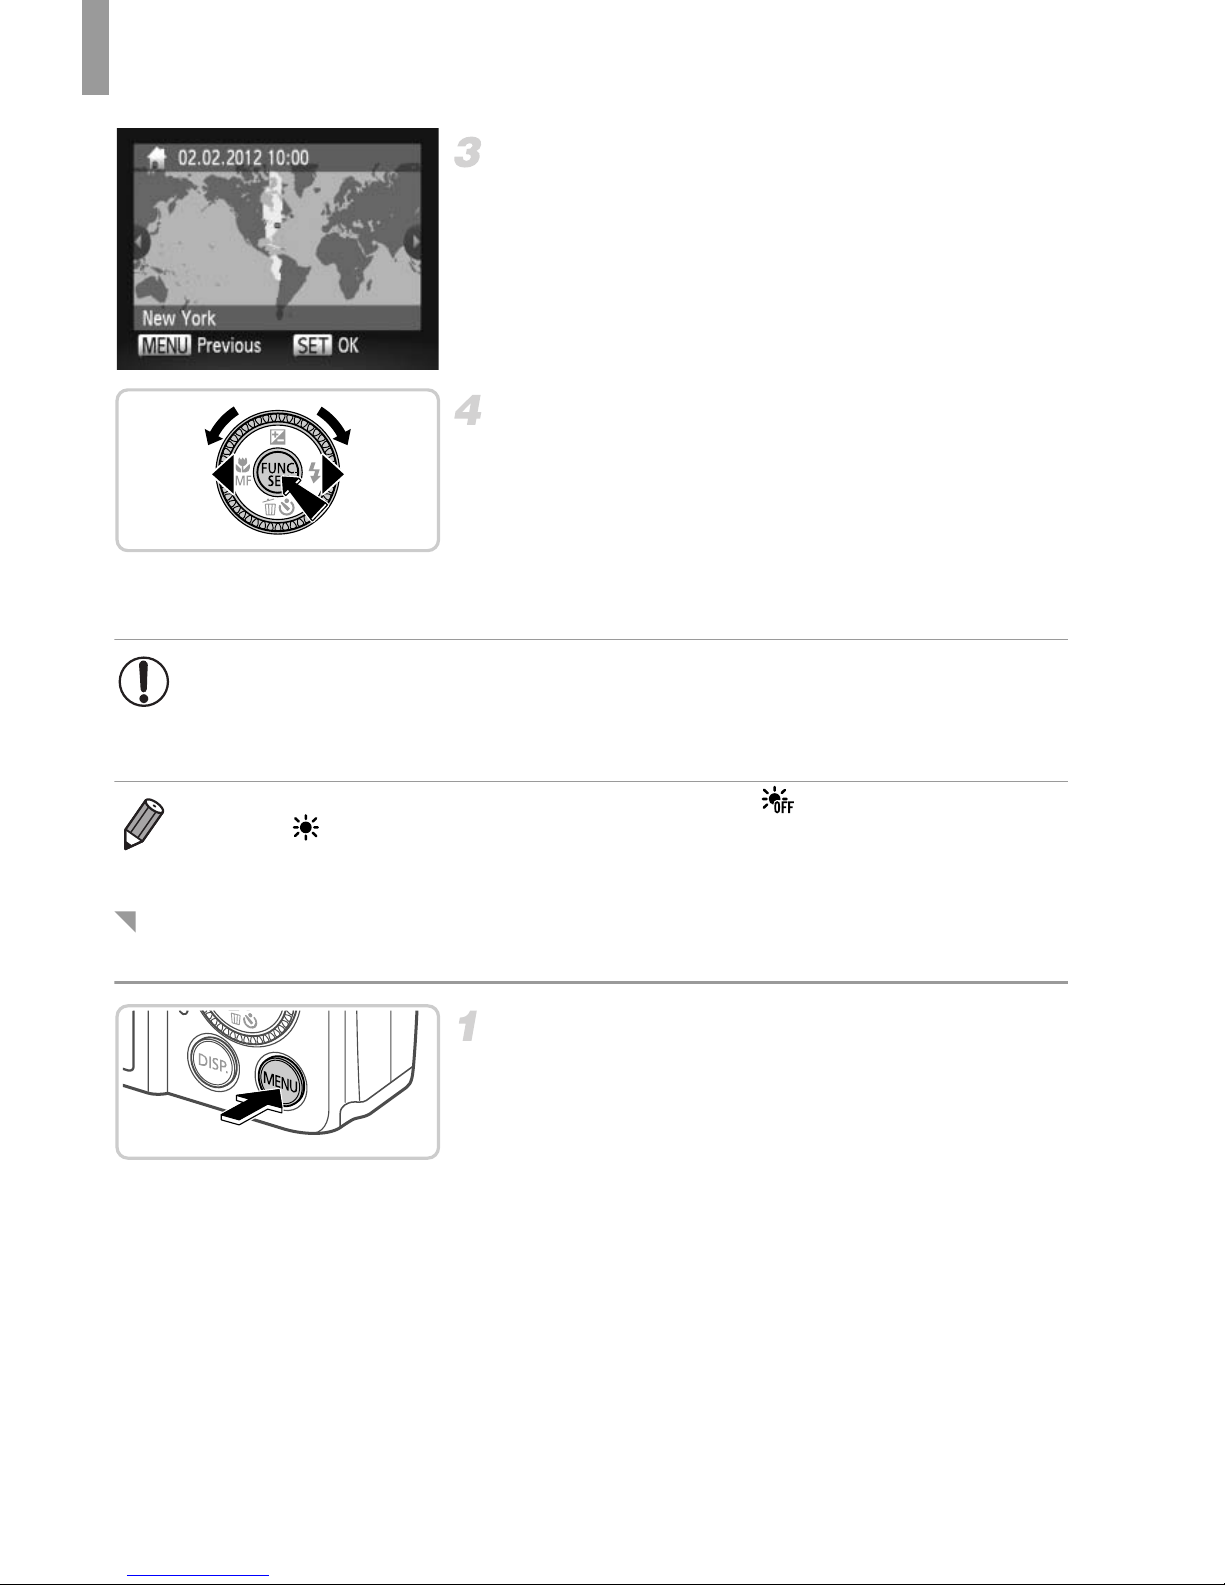
Set the local time zone.
z Press the qr buttons or turn the 5 dial to
choose your local time zone.
Finish the setup process.
z Press the m button when finished. After a
confirmation message, the setting screen is
no longer displayed.
z To turn off the camera, press the power
button.
Adjust the date and time as follows.
Access the camera menu.
z Press the n button.
• Unless you set the date, time, and local time zone, the [Date/Time]
screen will be displayed each time you turn the camera on. Specify
the correct information.
• To set daylight saving time (1 hour ahead), choose in step 2 and then
choose by pressing the op buttons or turning the 5 dial.
Changing the Date and Time
Page 55
Initial Preparations
19
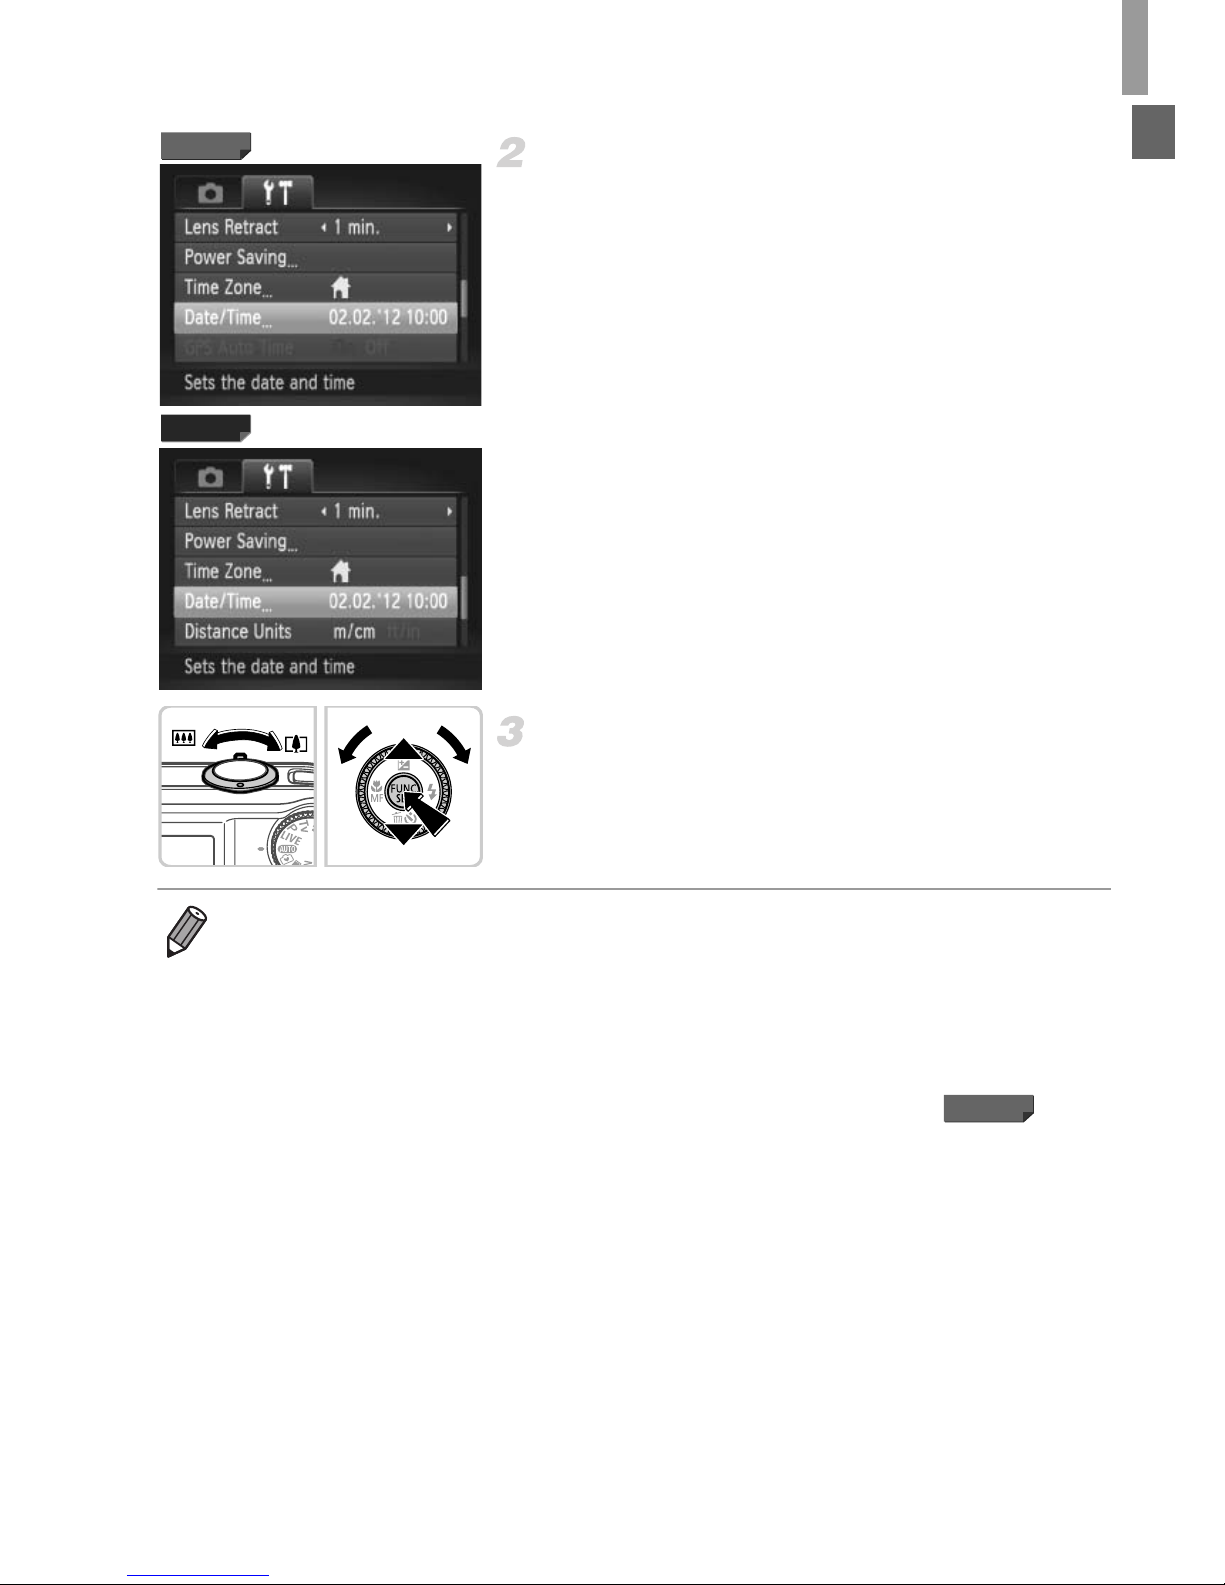
Choose [Date/Time].
z Move the zoom lever to choose the 3 tab.
z Press the op buttons or turn the 5 dial to
choose [Date/Time], and then press the m
button.
Change the date and time.
z Follow step 2 on p. 17 to adjust the settings.
z Press the n button to close the menu.
SX260 HS
SX240 HS
• Date/time settings can be retained for about 3 weeks by the camera’s built-in
date/time battery (backup battery) after the battery pack is removed.
• The date/time battery will be charged in about 4 hours once you insert a charged
battery or connect the camera to an AC adapter kit (sold separately, p. 197),
even if the camera is left off.
• Once the date/time battery is depleted, the [Date/Time] screen will be displayed
when you turn the camera on. Follow the steps on p. 17 to set the date and time.
• Automatic date and time updating is possible using GPS (p. 51).
SX260 HS
Page 56
Initial Preparations
20
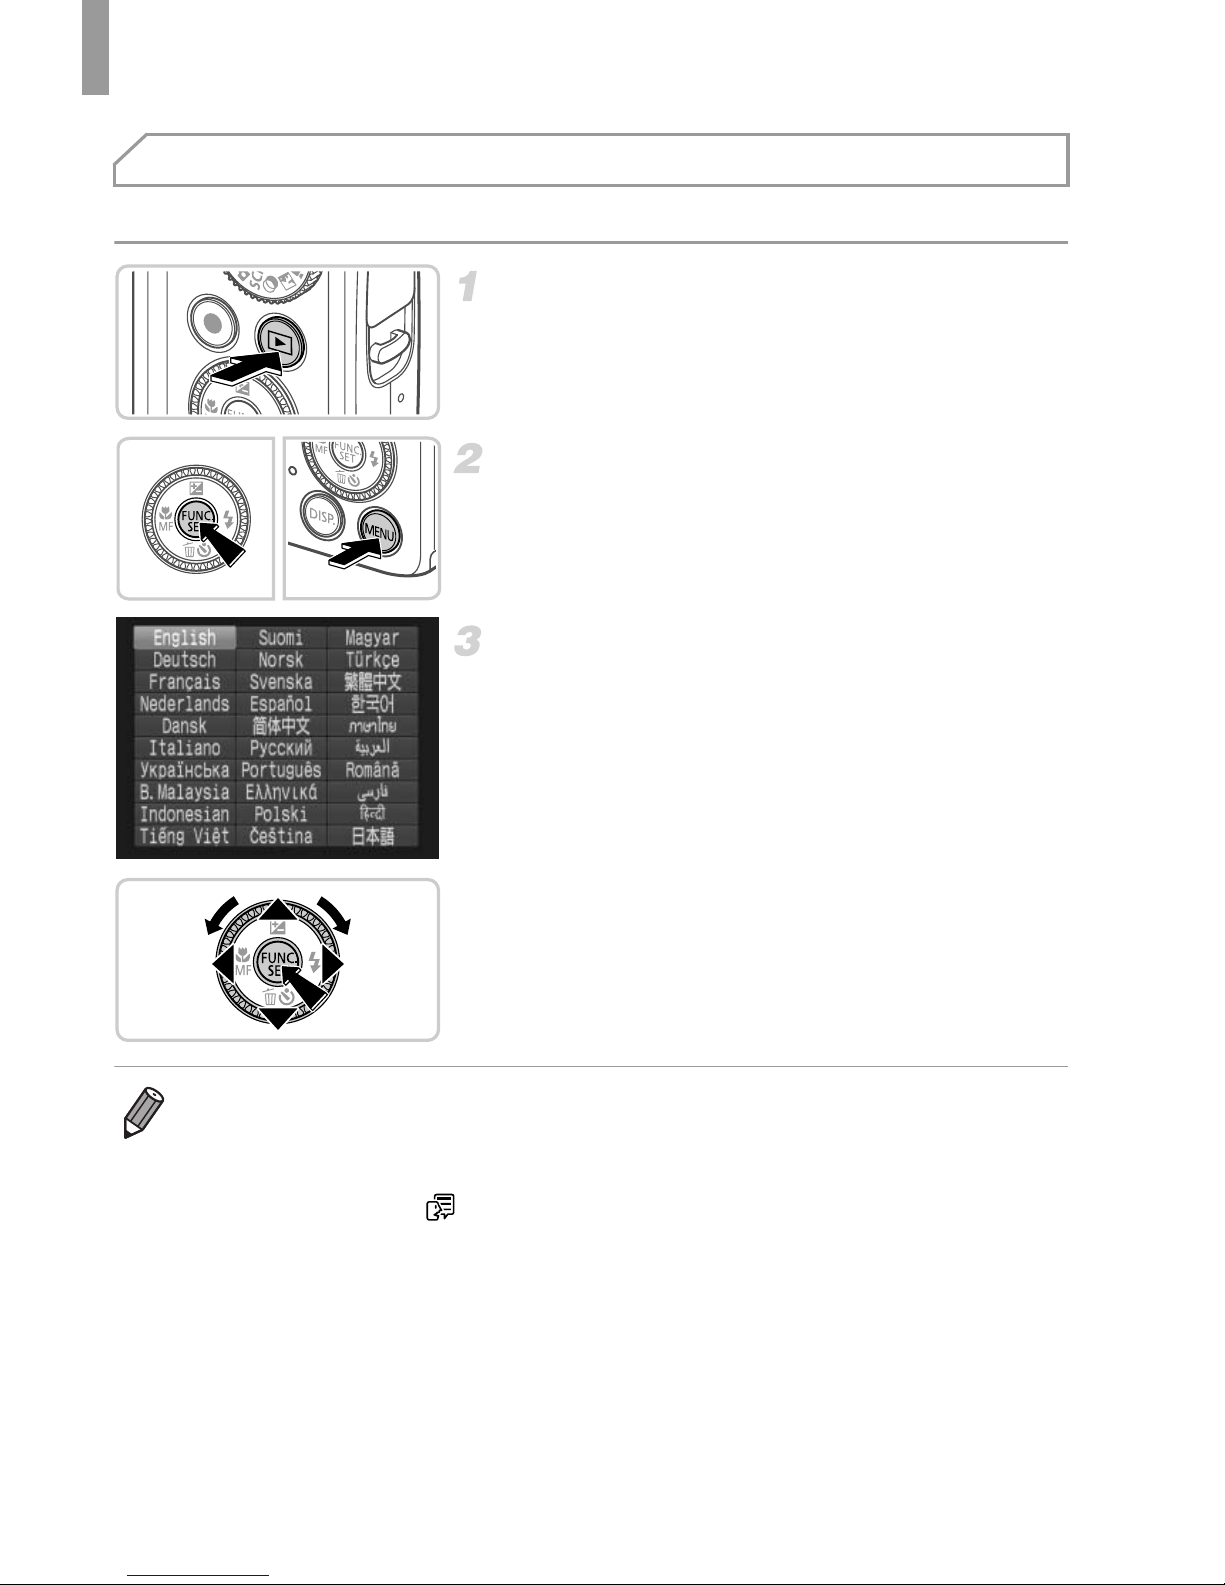
The display language can be changed as needed.
Enter Playback mode.
z Press the 1 button.
Access the setting screen.
z Press and hold the m button, and then
immediately press the n button.
Set the display language.
z Press the opqr buttons or turn the 5 dial
to choose a language, and then press the m
button.
X Once the display language has been set, the
setting screen is no longer displayed.
Display Language
• A clock icon is displayed if you wait too long in step 2 after pressing the m
button before you press the n button. In this case, press the
m
button to
dismiss the clock icon and repeat step 2.
• You can also change the display language by pressing the n button and
choosing [Language ] on the 3 tab.
Page 57
21
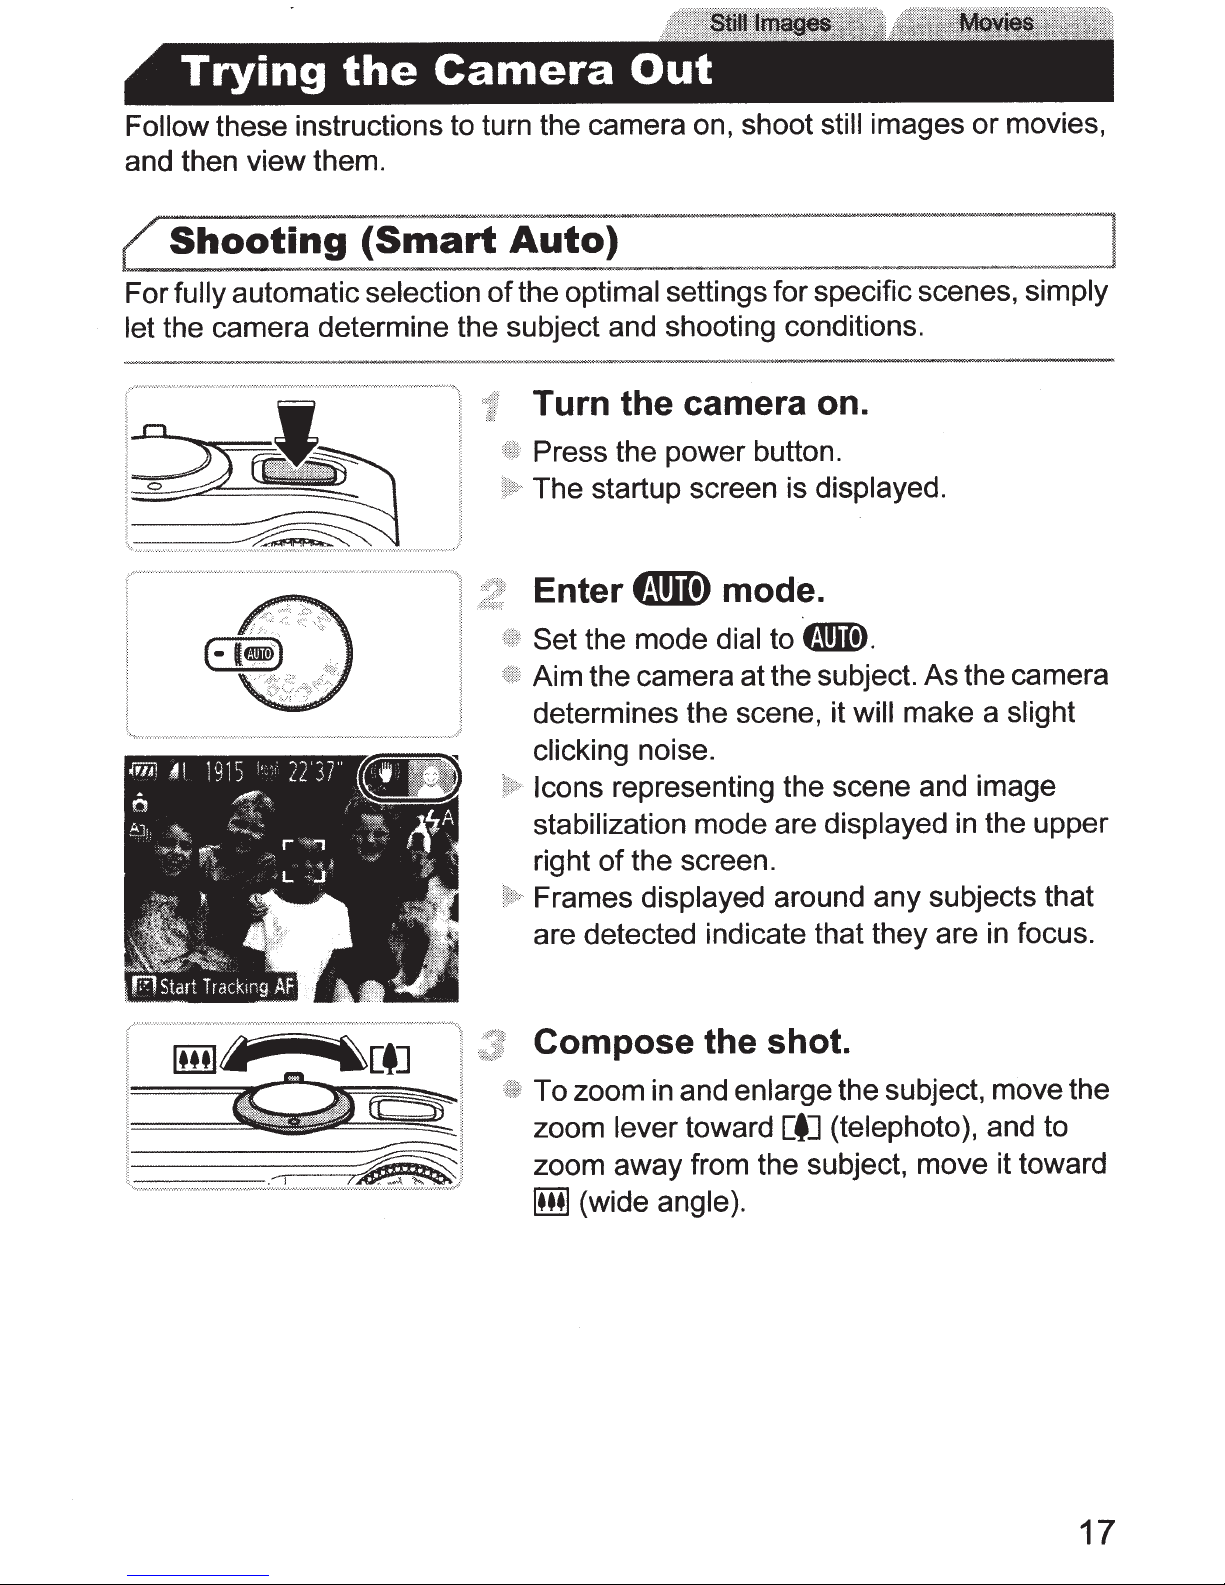
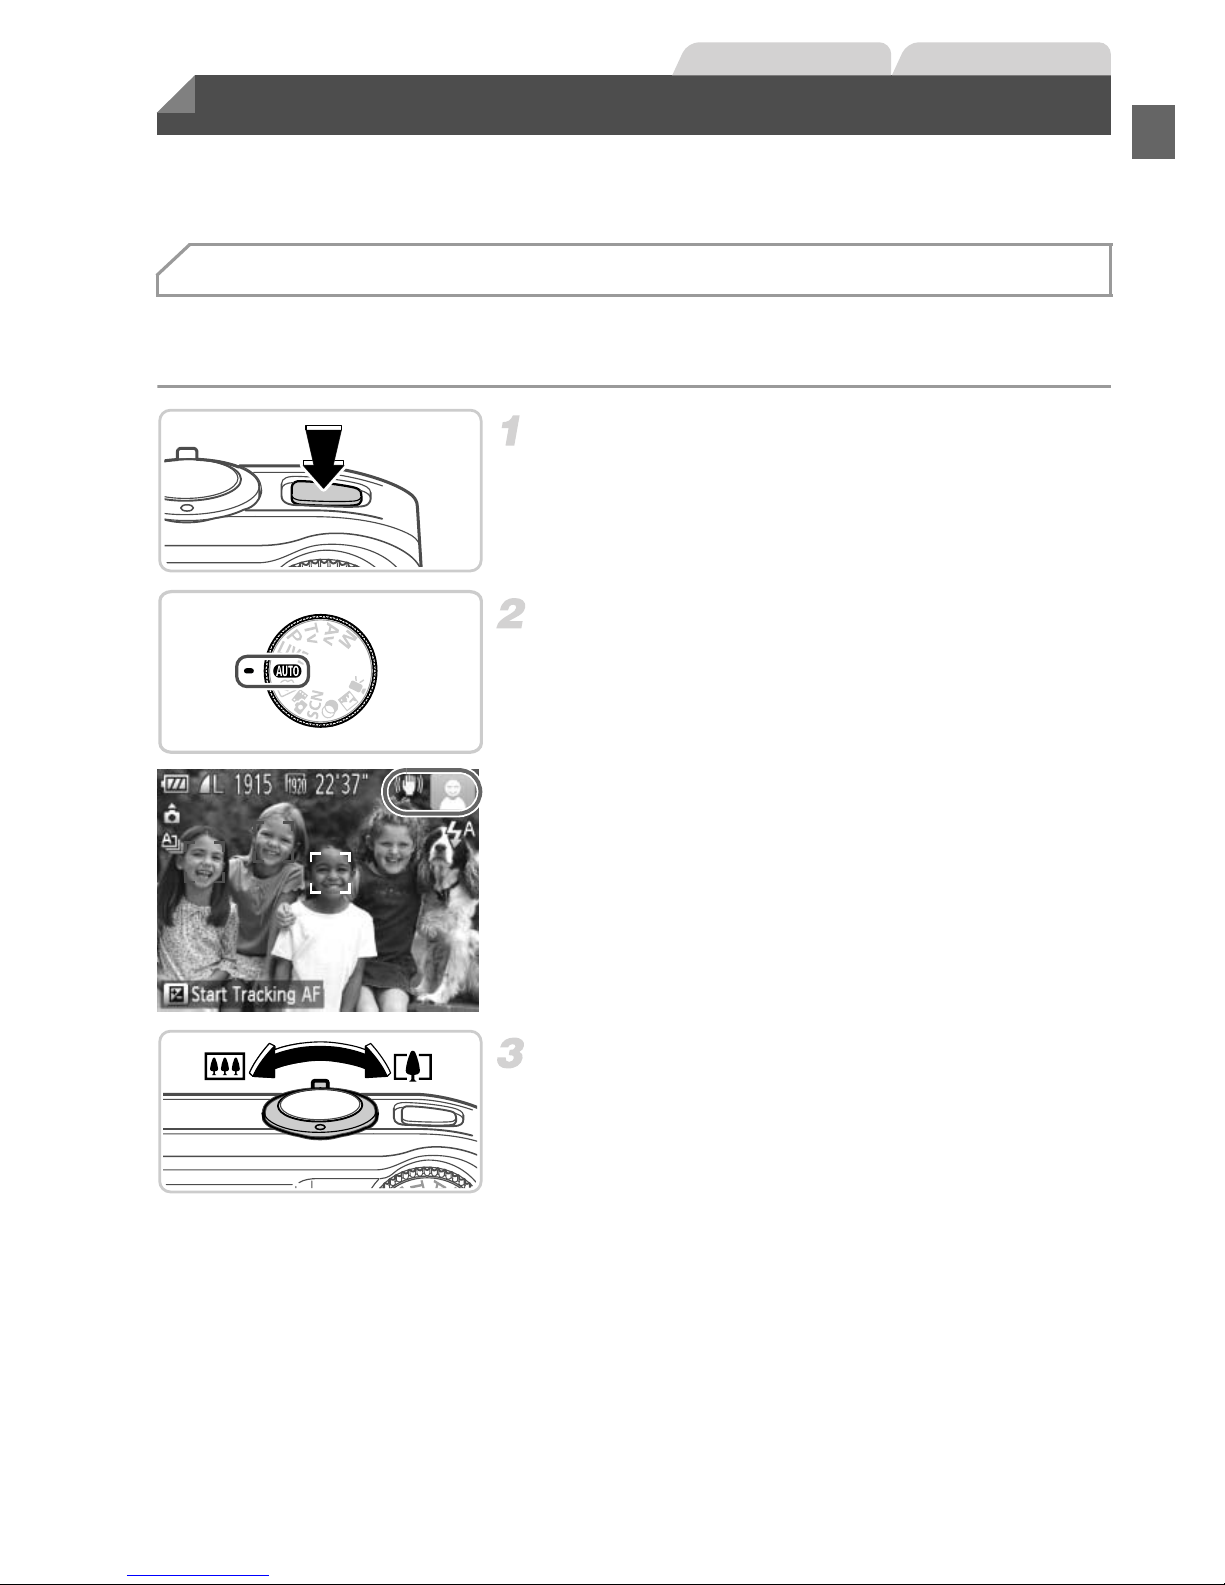
Follow these instructions to turn the camera on, shoot still images or movies,
and then view them.
For fully automatic selection of the optimal settings for specific scenes, simply
let the camera determine the subject and shooting conditions.
Turn the camera on.
z Press the power button.
X The startup screen is displayed.
Enter A mode.
z Set the mode dial to A.
z Aim the camera at the subject. As the camera
determines the scene, it will make a slight
clicking noise.
X Icons representing the scene and image
stabilization mode are displayed in the upper
right of the screen.
X Frames displayed around any subjects that
are detected indicate that they are in focus.
Compose the shot.
z To zoom in and enlarge the subject, move the
zoom lever toward i (telephoto), and to
zoom away from the subject, move it toward
j (wide angle).
Trying the Camera Out
Shooting (Smart Auto)
Still Images Movies
Page 58
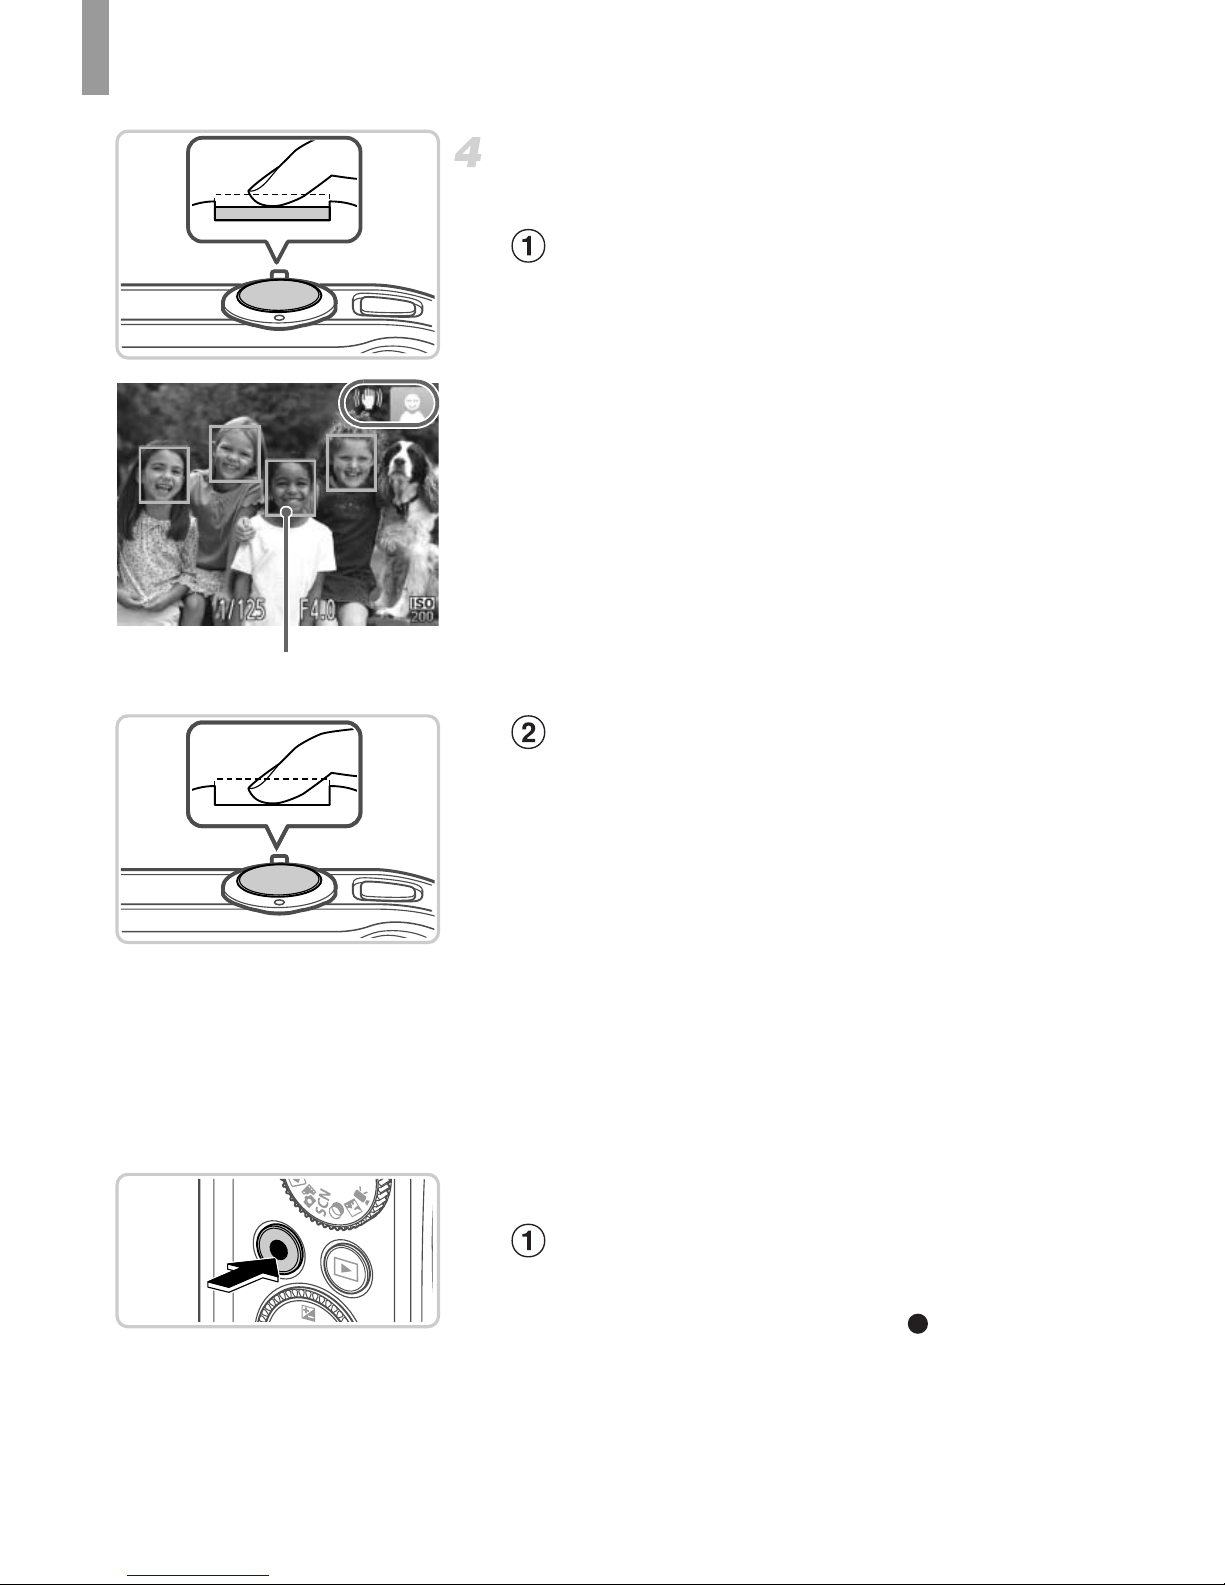
Trying the Camera Out
22
Shoot.
Shooting Still Images
Focus.
z Press the shutter button lightly, halfway
down. The camera beeps twice after
focusing, and AF frames are displayed to
indicate image areas in focus.
X The flash automatically rises in low-light
conditions.
Shoot.
z Press the shutter button all the way down.
X As the camera shoots, a shutter sound is
played, and in low-light conditions, the flash
fires automatically.
z Keep the camera still until the shutter sound
ends.
X Your shot remains displayed on the screen
for about two seconds.
z Even while the shot is displayed, you can
take another shot by pressing the shutter
button again.
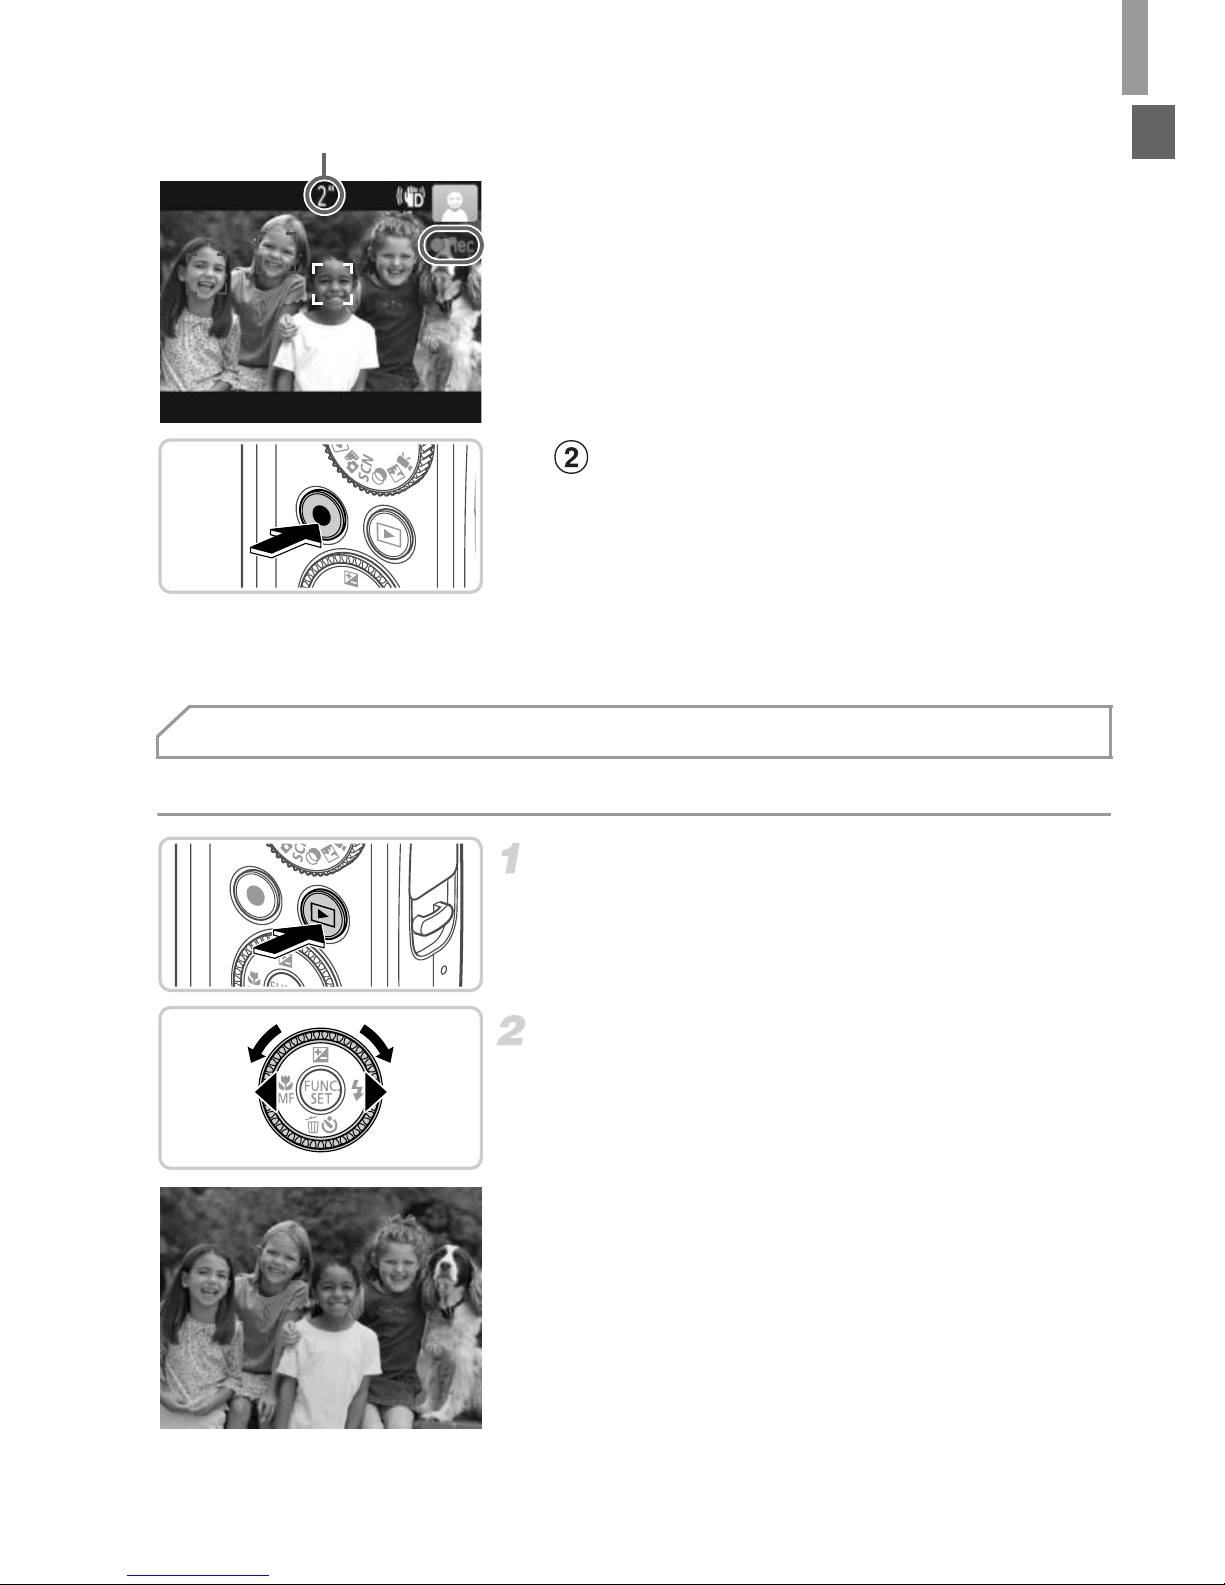
Shooting Movies
Start shooting.
z Press the movie button. The camera beeps
once as recording begins, and [ Rec] is
displayed with the elapsed time.
AF Frames
Page 59
Trying the Camera Out
23
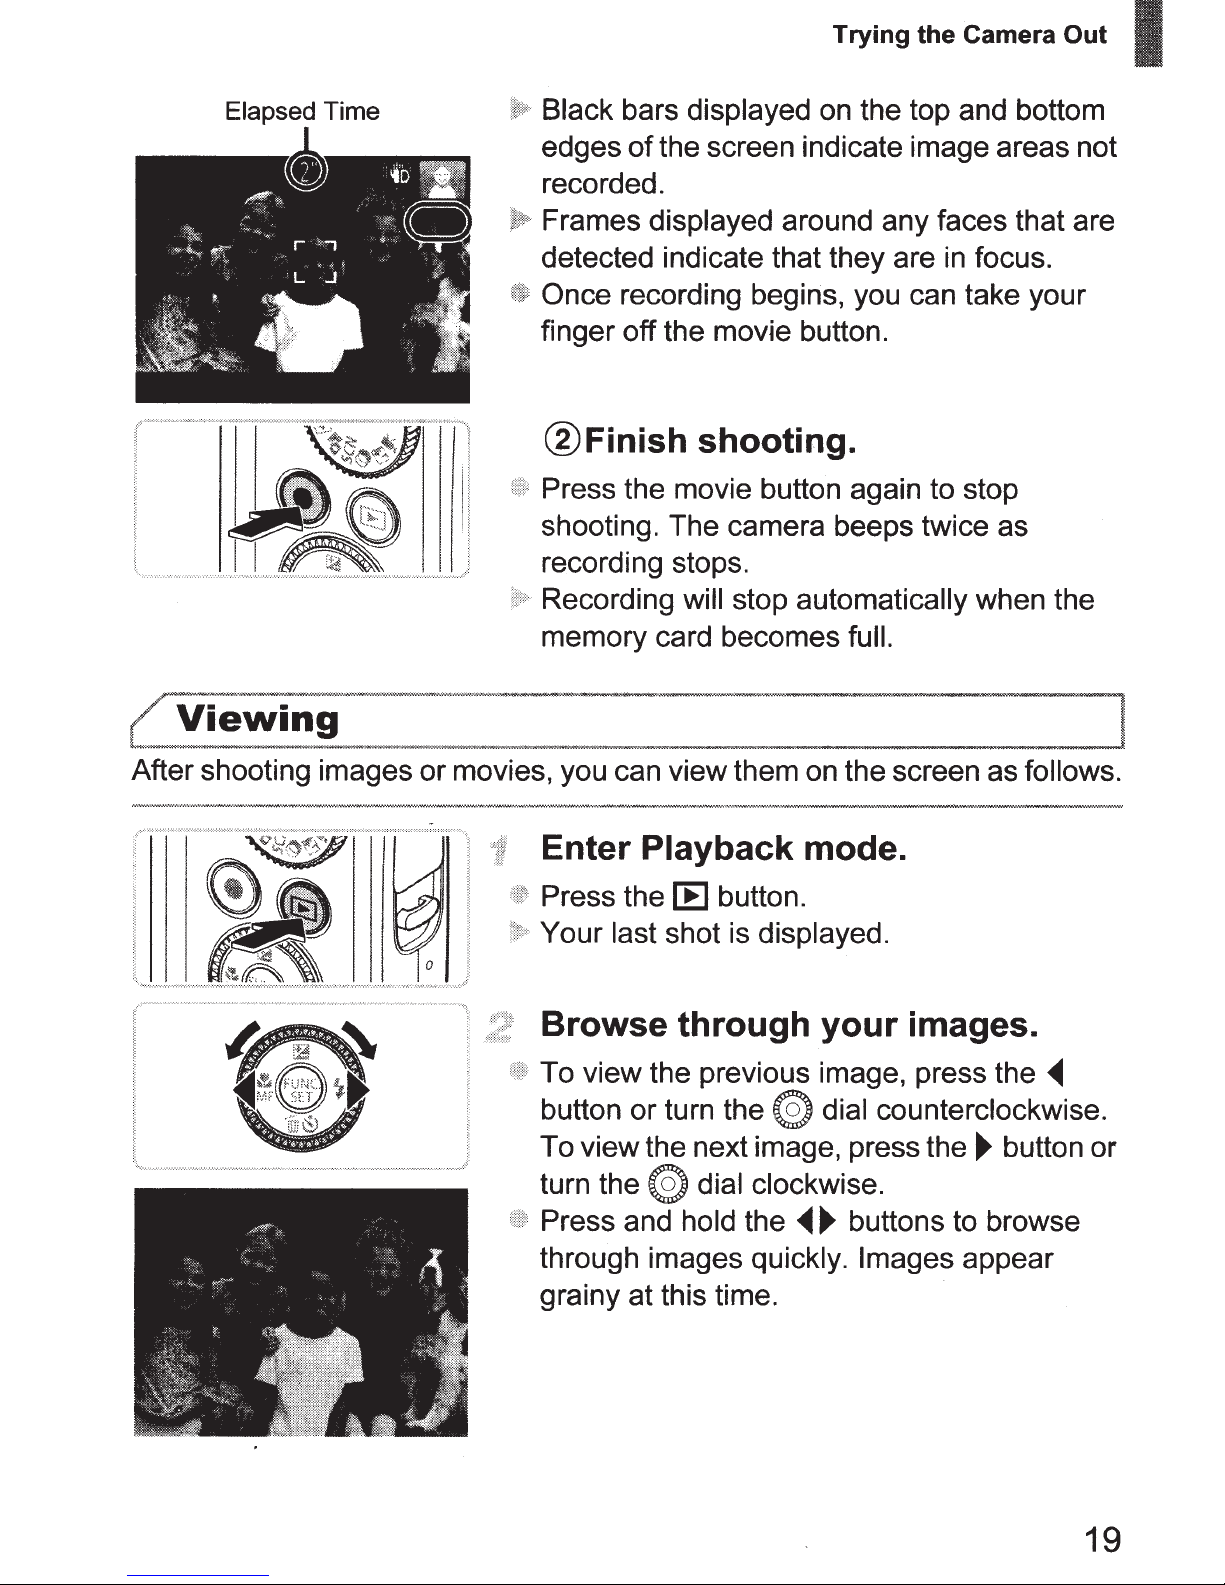
X Black bars displayed on the top and bottom
edges of the screen indicate image areas not
recorded.
X Frames displayed around any faces that are
detected indicate that they are in focus.
z Once recording begins, you can take your
finger off the movie button.
Finish shooting.
z Press the movie button again to stop
shooting. The camera beeps twice as
recording stops.
X Recording will stop automatically when the
memory card becomes full.
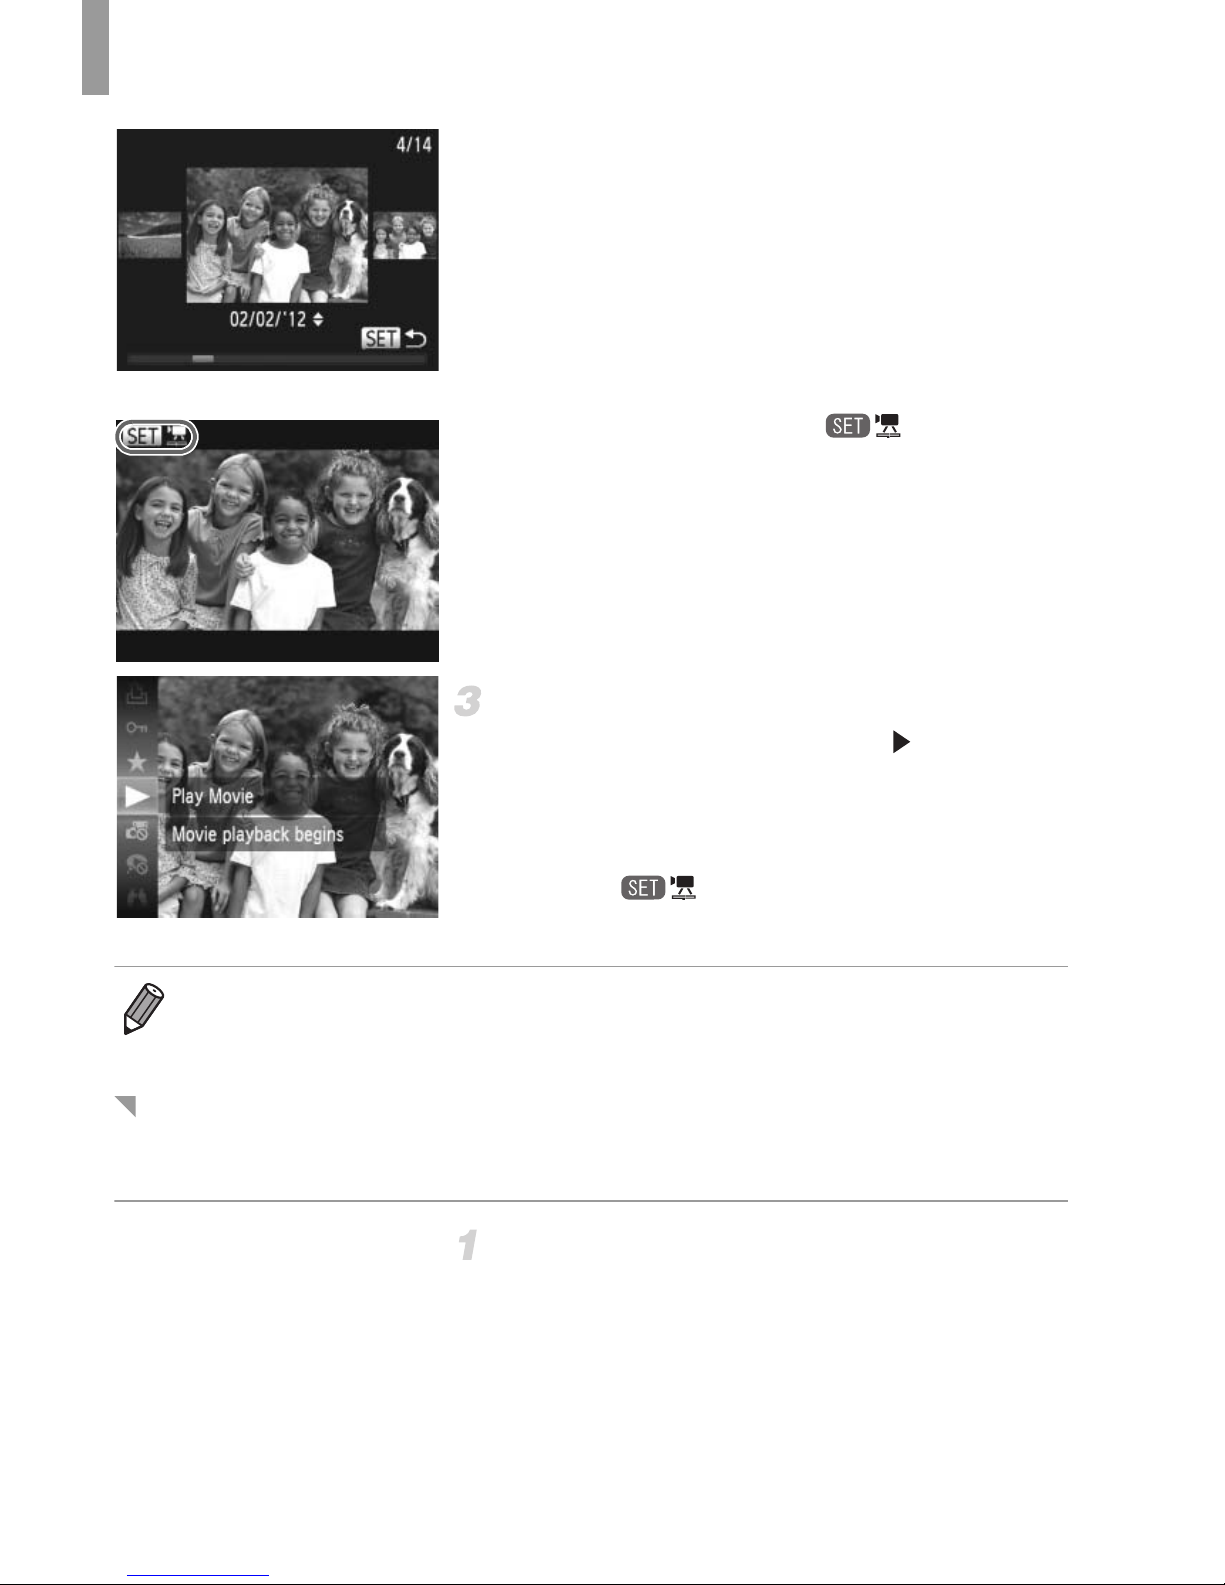
After shooting images or movies, you can view them on the screen as follows.
Enter Playback mode.
z Press the 1 button.
X Your last shot is displayed.
Browse through your images.
z To view the previous image, press the q
button or turn the 5 dial counterclockwise.
To view the next image, press the r button or
turn the 5 dial clockwise.
z Press and hold the qr buttons to browse
through images quickly. Images appear
grainy at this time.
Elapsed Time
Viewing
Page 60
Trying the Camera Out
24
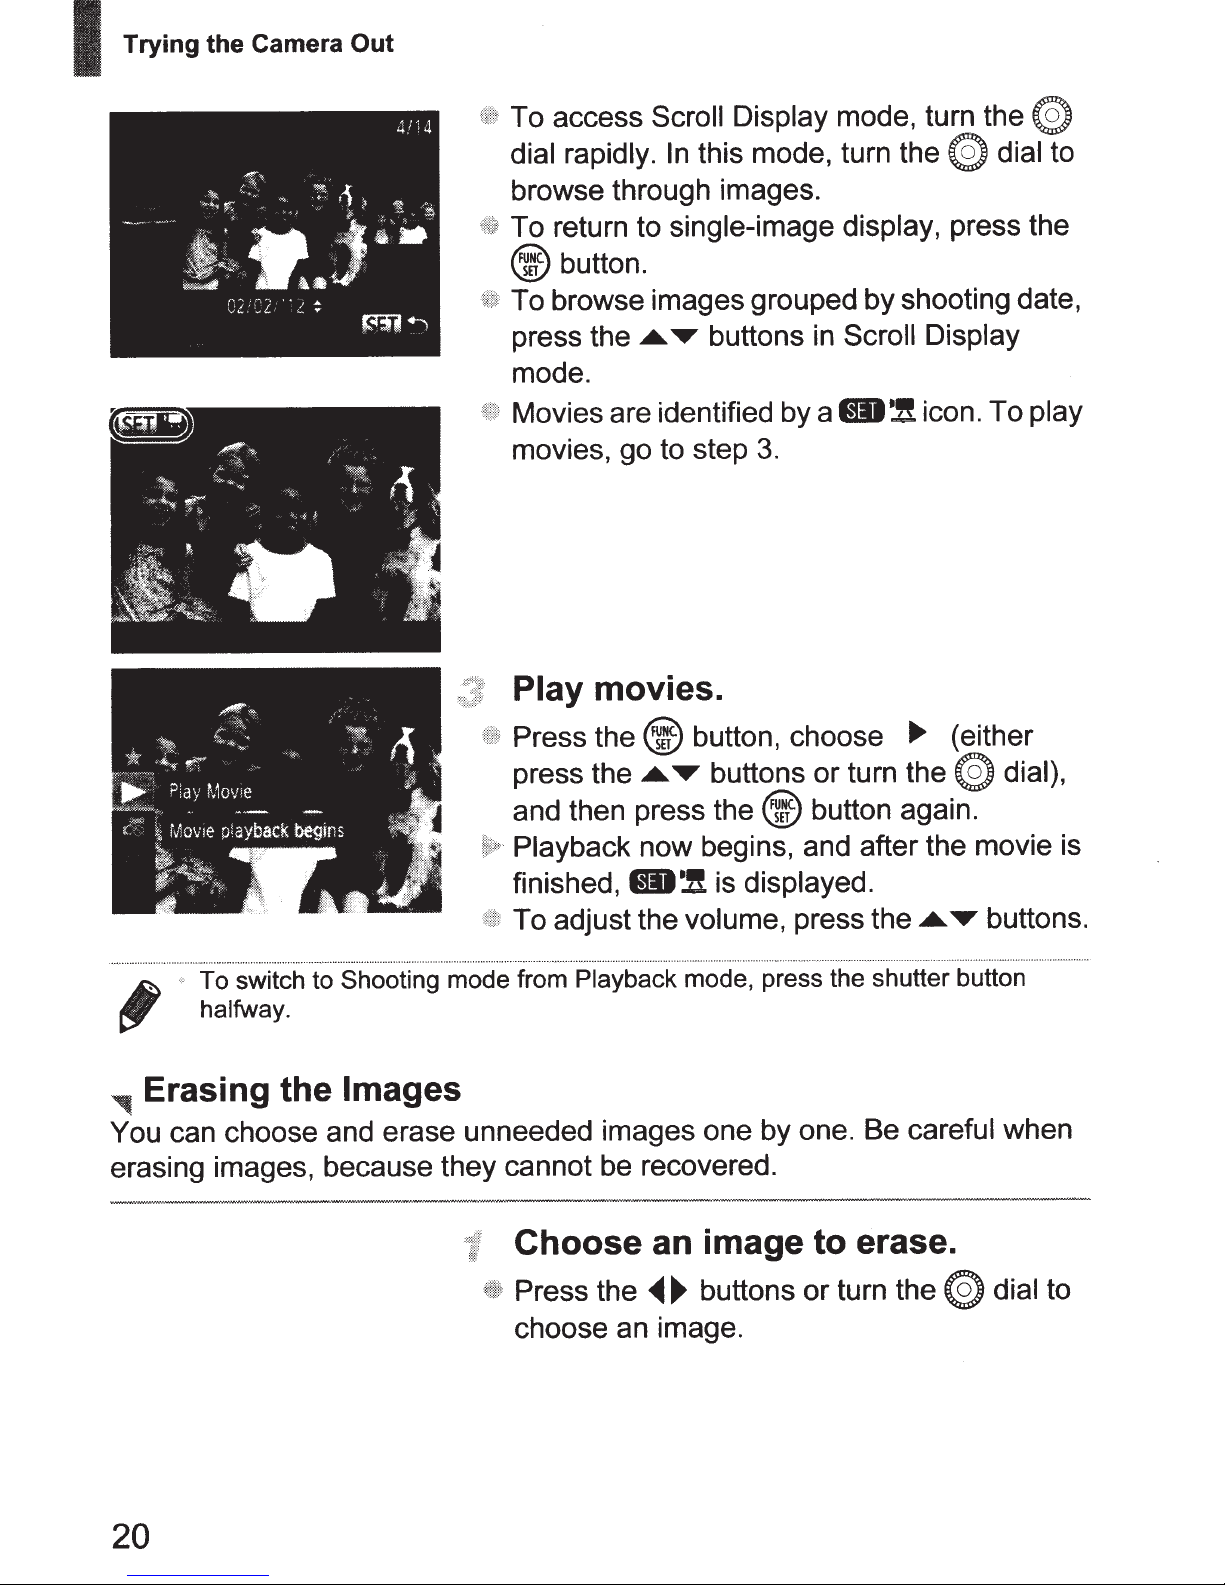
z To access Scroll Display mode, turn the 5
dial rapidly. In this mode, turn the 5 dial to
browse through images.
z To return to single-image display, press the
m button.
z To browse images grouped by shooting date,
press the op buttons in Scroll Display
mode.
z Movies are identified by a icon. To play
movies, go to step 3.
Play movies.
z Press the m button, choose (either
press the op buttons or turn the 5 dial),
and then press the m button again.
X Playback now begins, and after the movie is
finished, is displayed.
z To adjust the volume, press the op buttons.
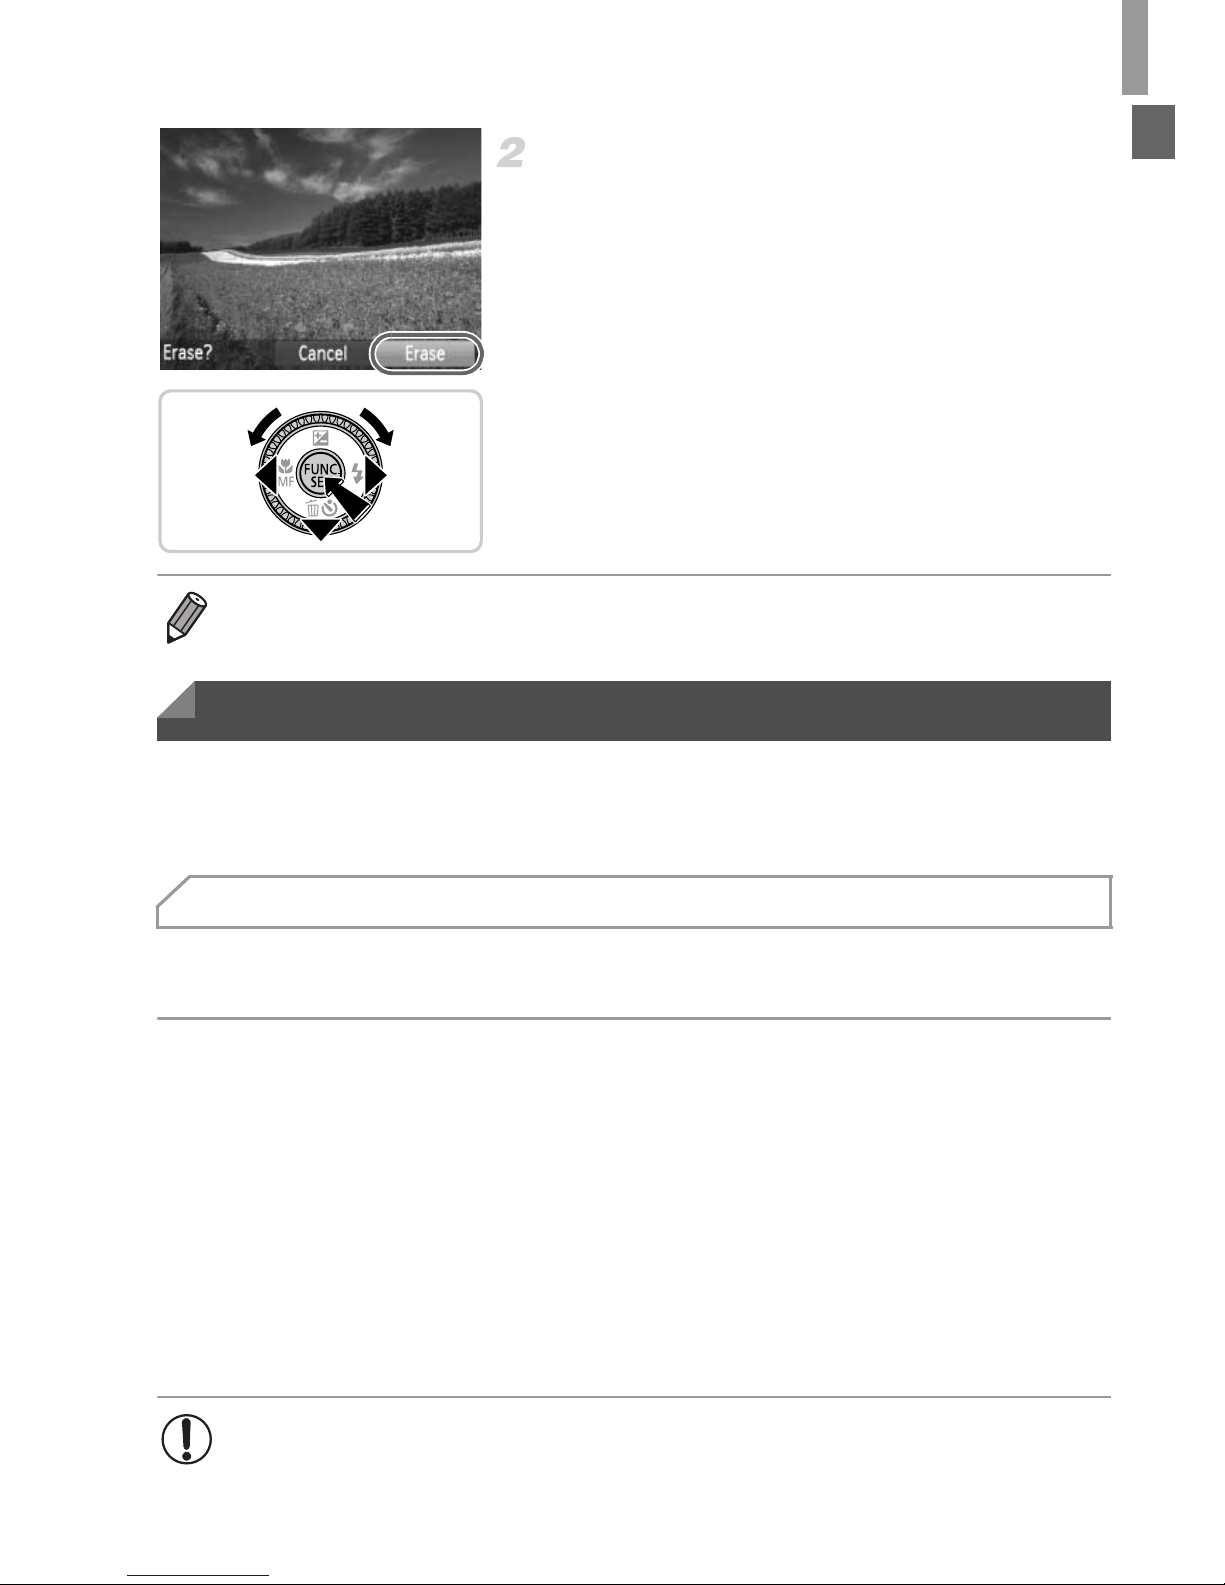
You can choose and erase unneeded images one by one. Be careful when
erasing images, because they cannot be recovered.
Choose an image to erase.
z Press the qr buttons or turn the 5 dial to
choose an image.
• To switch to Shooting mode from Playback mode, press the shutter button
halfway.
Erasing the Images
Page 61
Included Software, PDF Manuals
25
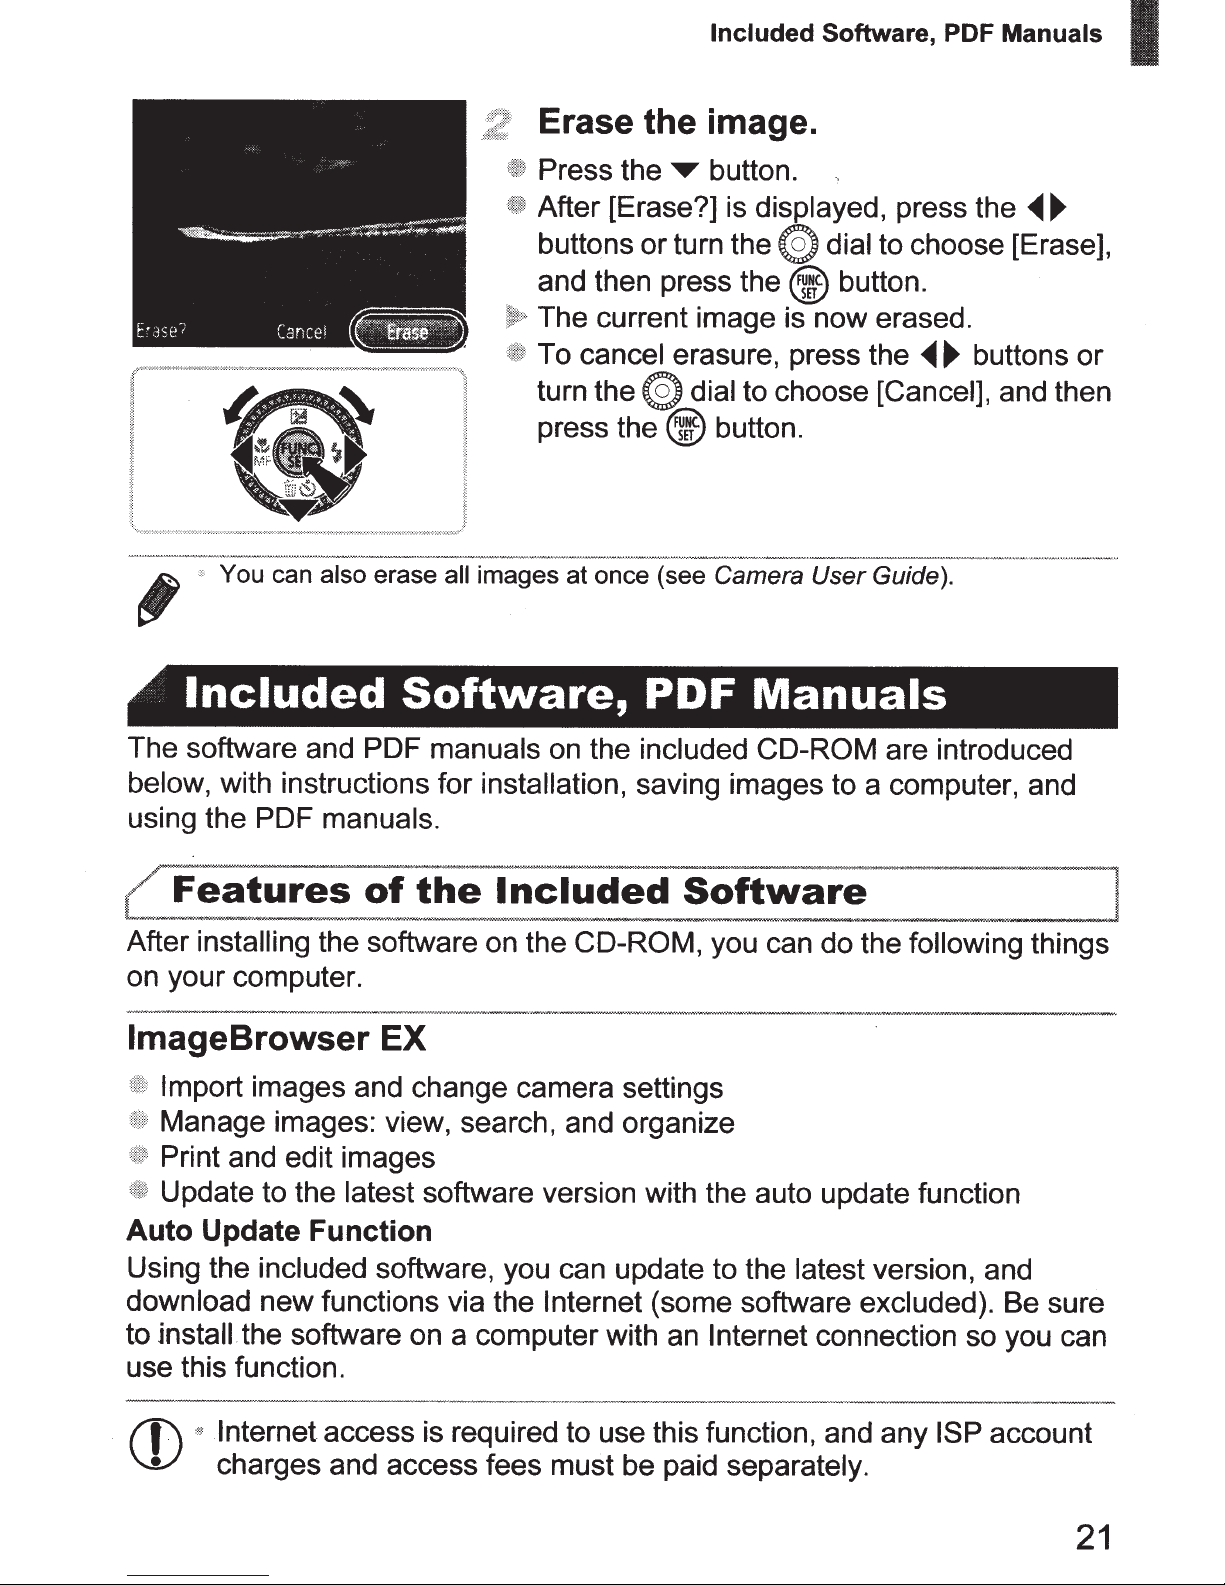
Erase the image.
z Press the p button.
z After [Erase?] is displayed, press the qr
buttons or turn the 5 dial to choose [Erase],
and then press the
m
button.
X The current image is now erased.
z To cancel erasure, press the qr buttons or
turn the 5 dial to choose [Cancel], and then
press the m button.
The software and PDF manuals on the included CD-ROM are introduced
below, with instructions for installation, saving images to a computer, and
using the PDF manuals.
After installing the software on the CD-ROM, you can do the following things
on your computer.
ImageBrowser EX
z Import images and change camera settings
z Manage images: view, search, and organize
z Print and edit images
z Update to the latest software version with the auto update function
Auto Update Function
Using the included software, you can update to the latest version, and
download new functions via the Internet (some software excluded). Be sure
to install the software on a computer with an Internet connection so you can
use this function.
• You can also erase all images at once (p. 163).
Included Software, PDF Manuals
Features of the Included Software
• Internet access is required to use this function, and any ISP account
charges and access fees must be paid separately.
Page 62
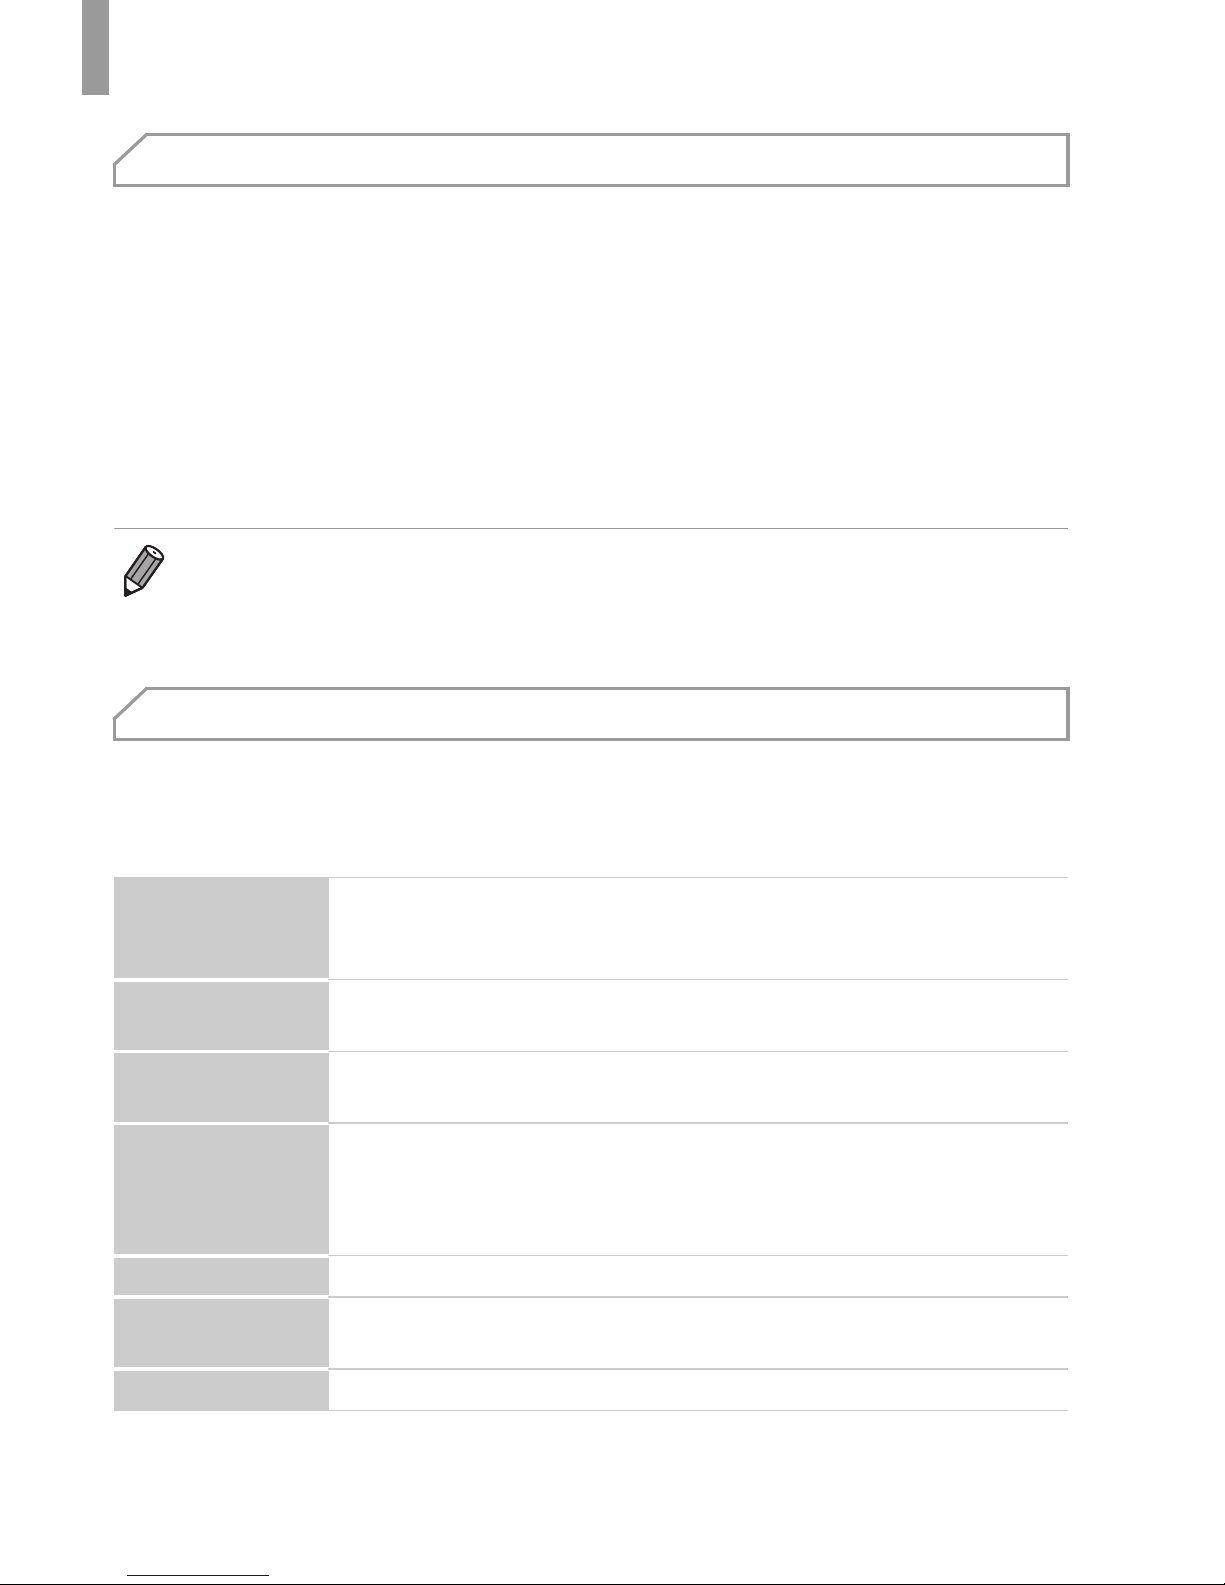
Included Software, PDF Manuals
26
Installing the software on the CD-ROM will also install the following PDF
manuals on your computer.
The included software can be used on the following computers. Adobe
Reader is required to view the PDF manuals.
Windows
* In Windows XP, Microsoft .NET Framework 3.0 or later (max. 500 MB) must be installed.
Installation may take some time, depending on computer performance.
PDF Manuals
Camera User Guide
Once you are familiar with the information in Getting Started, refer to this guide for a
more in-depth understanding of camera operation.
ImageBrowser EX User Guide
Refer to this guide when using the included software.
This guide can be referenced from the ImageBrowser EX Help function.
• Depending on the country or region where you purchased your camera, the
ImageBrowser EX User Guide may not be accessible from the Help function. In
such cases, it will either be included on the CD-ROM bundled with your camera,
or you can download the latest version from the Canon website.
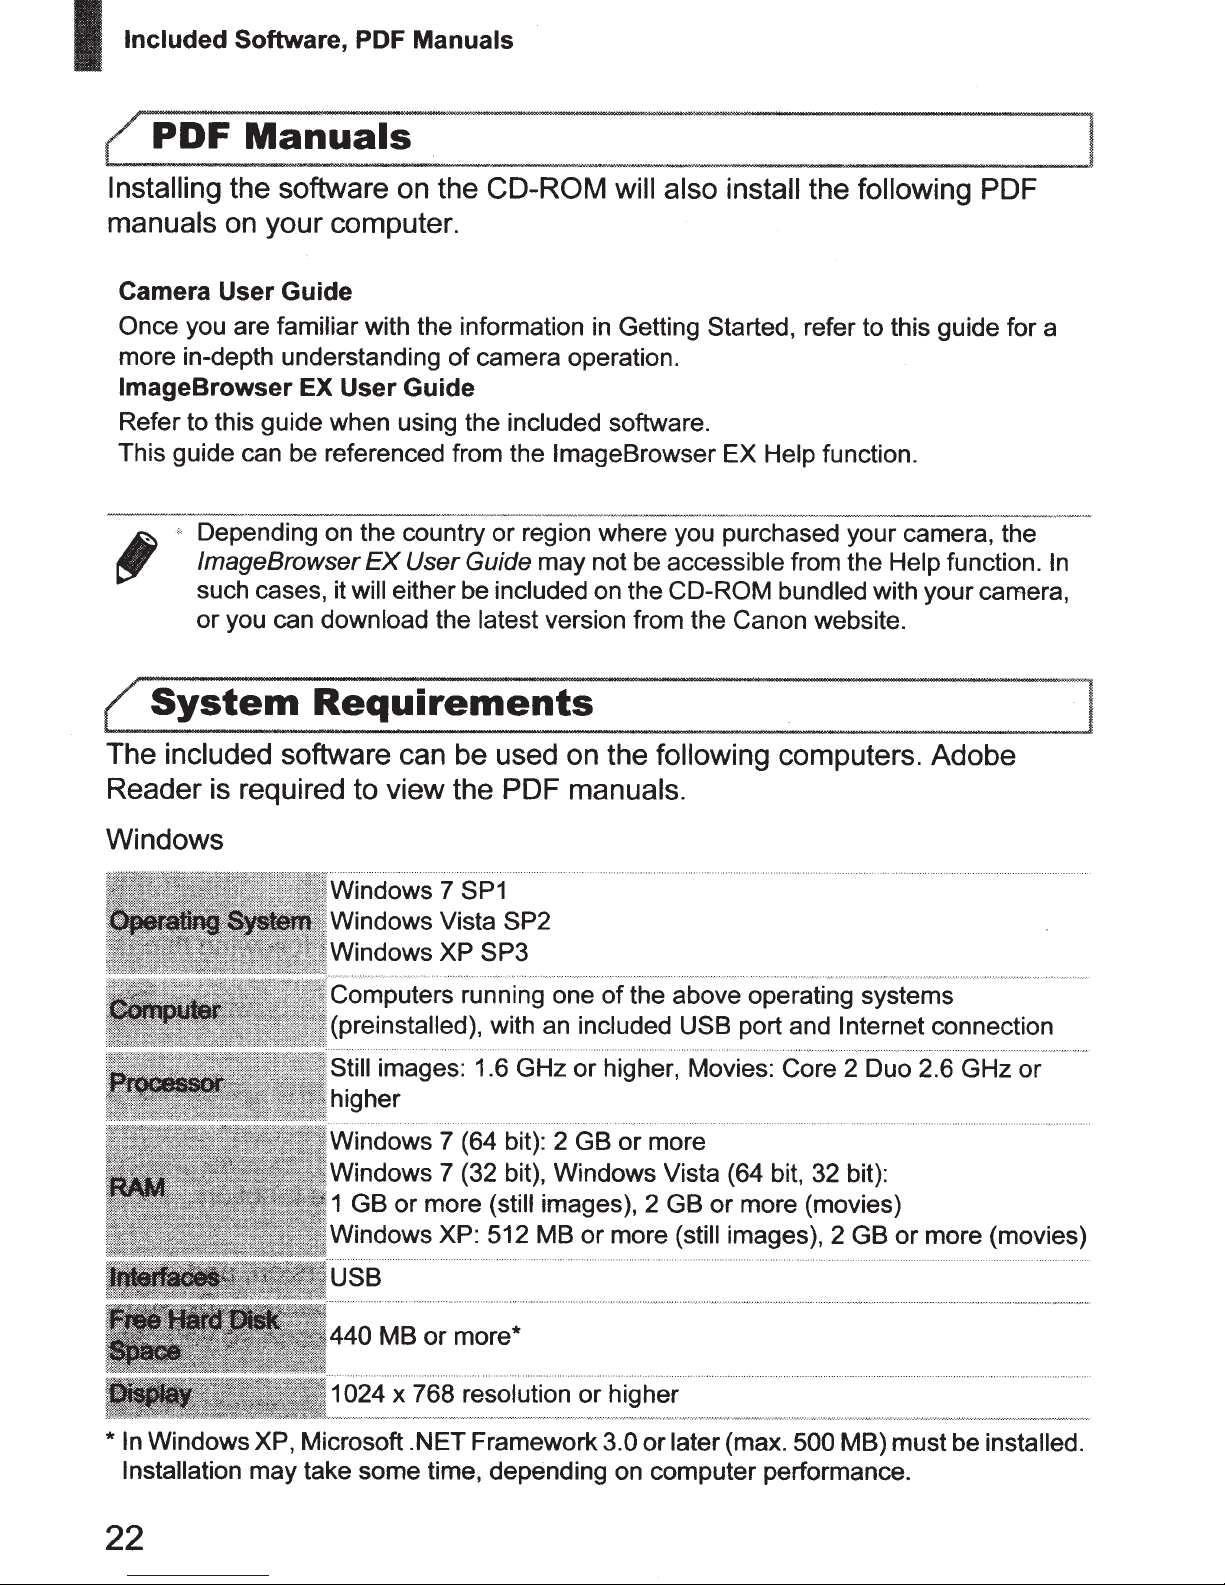
System Requirements
Operating System
Windows 7 SP1
Windows Vista SP2
Windows XP SP3
Computer
Computers running one of the above operating systems
(preinstalled), with an included USB port and Internet connection
Processor
Still images: 1.6 GHz or higher, Movies: Core 2 Duo 2.6 GHz or
higher
RAM
Windows 7 (64 bit): 2 GB or more
Windows 7 (32 bit), Windows Vista (64 bit, 32 bit):
1 GB or more (still images), 2 GB or more (movies)
Windows XP: 512 MB or more (still images), 2 GB or more (movies)
Interfaces USB
Free Hard Disk
Space
440 MB or more*
Display 1024 x 768 resolution or higher
Page 63
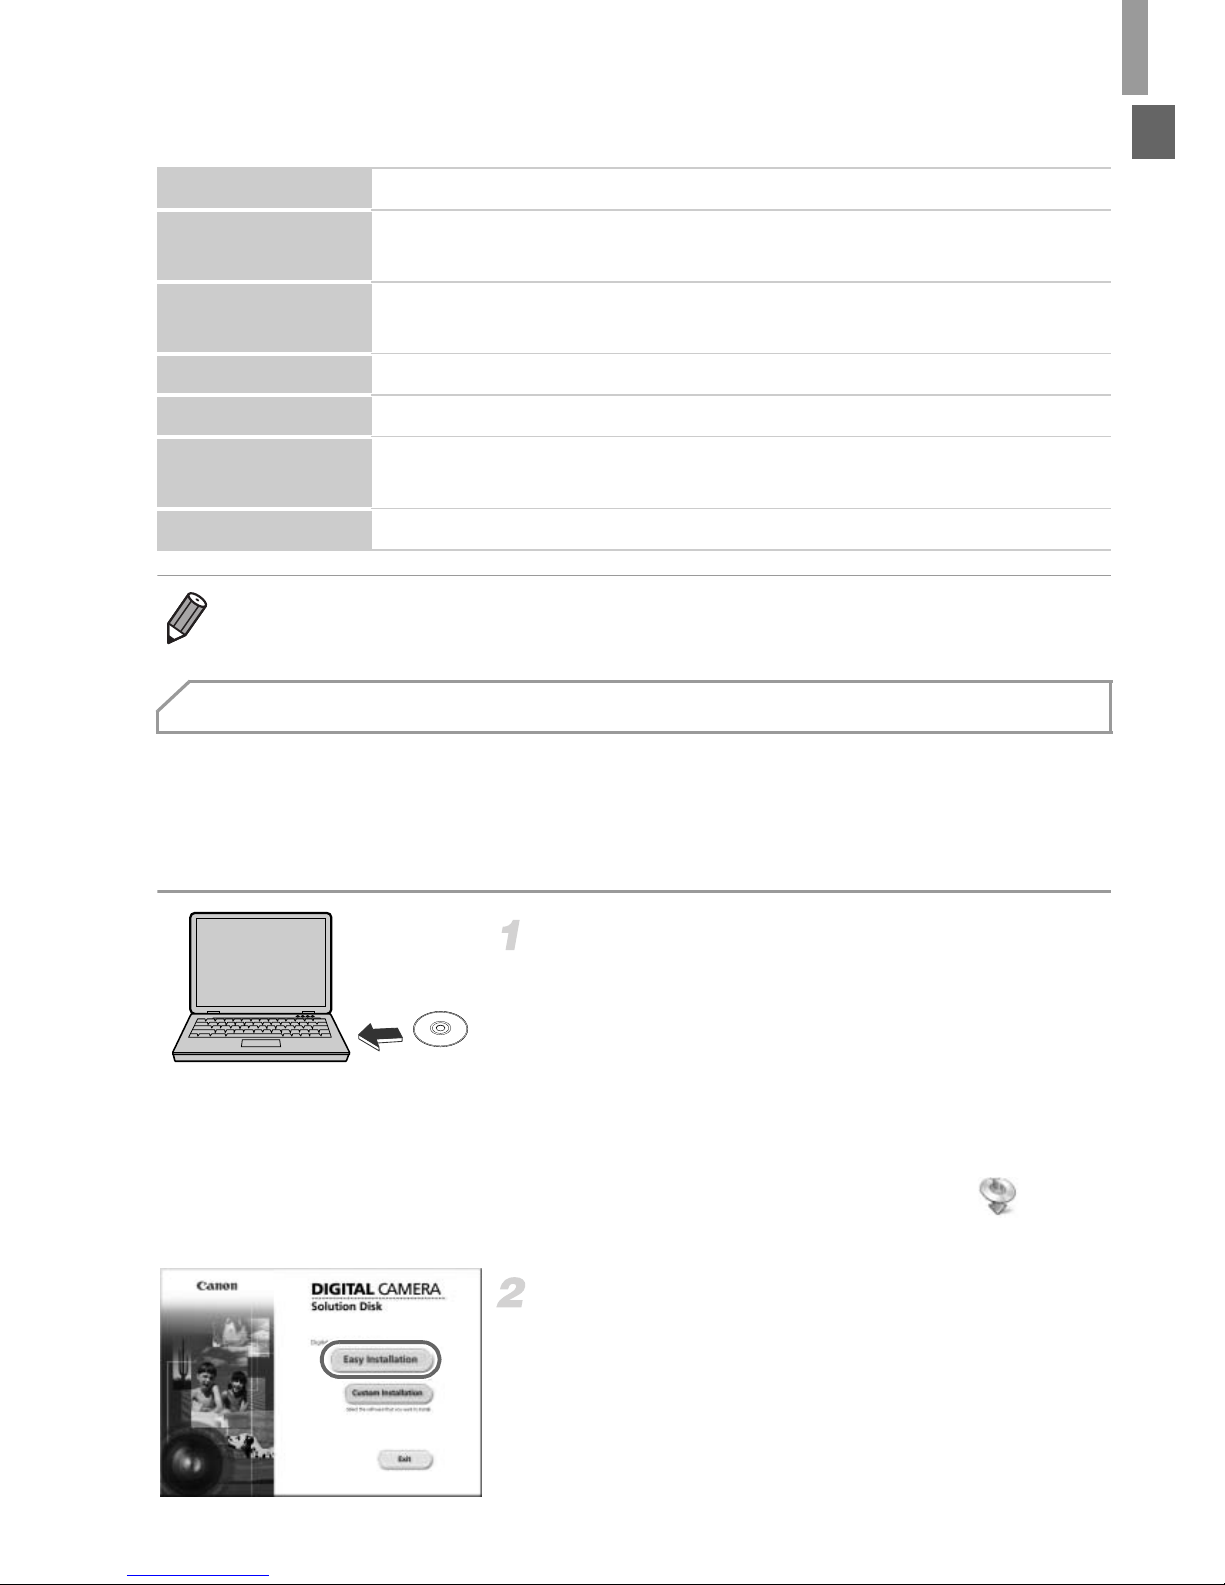
Included Software, PDF Manuals
27
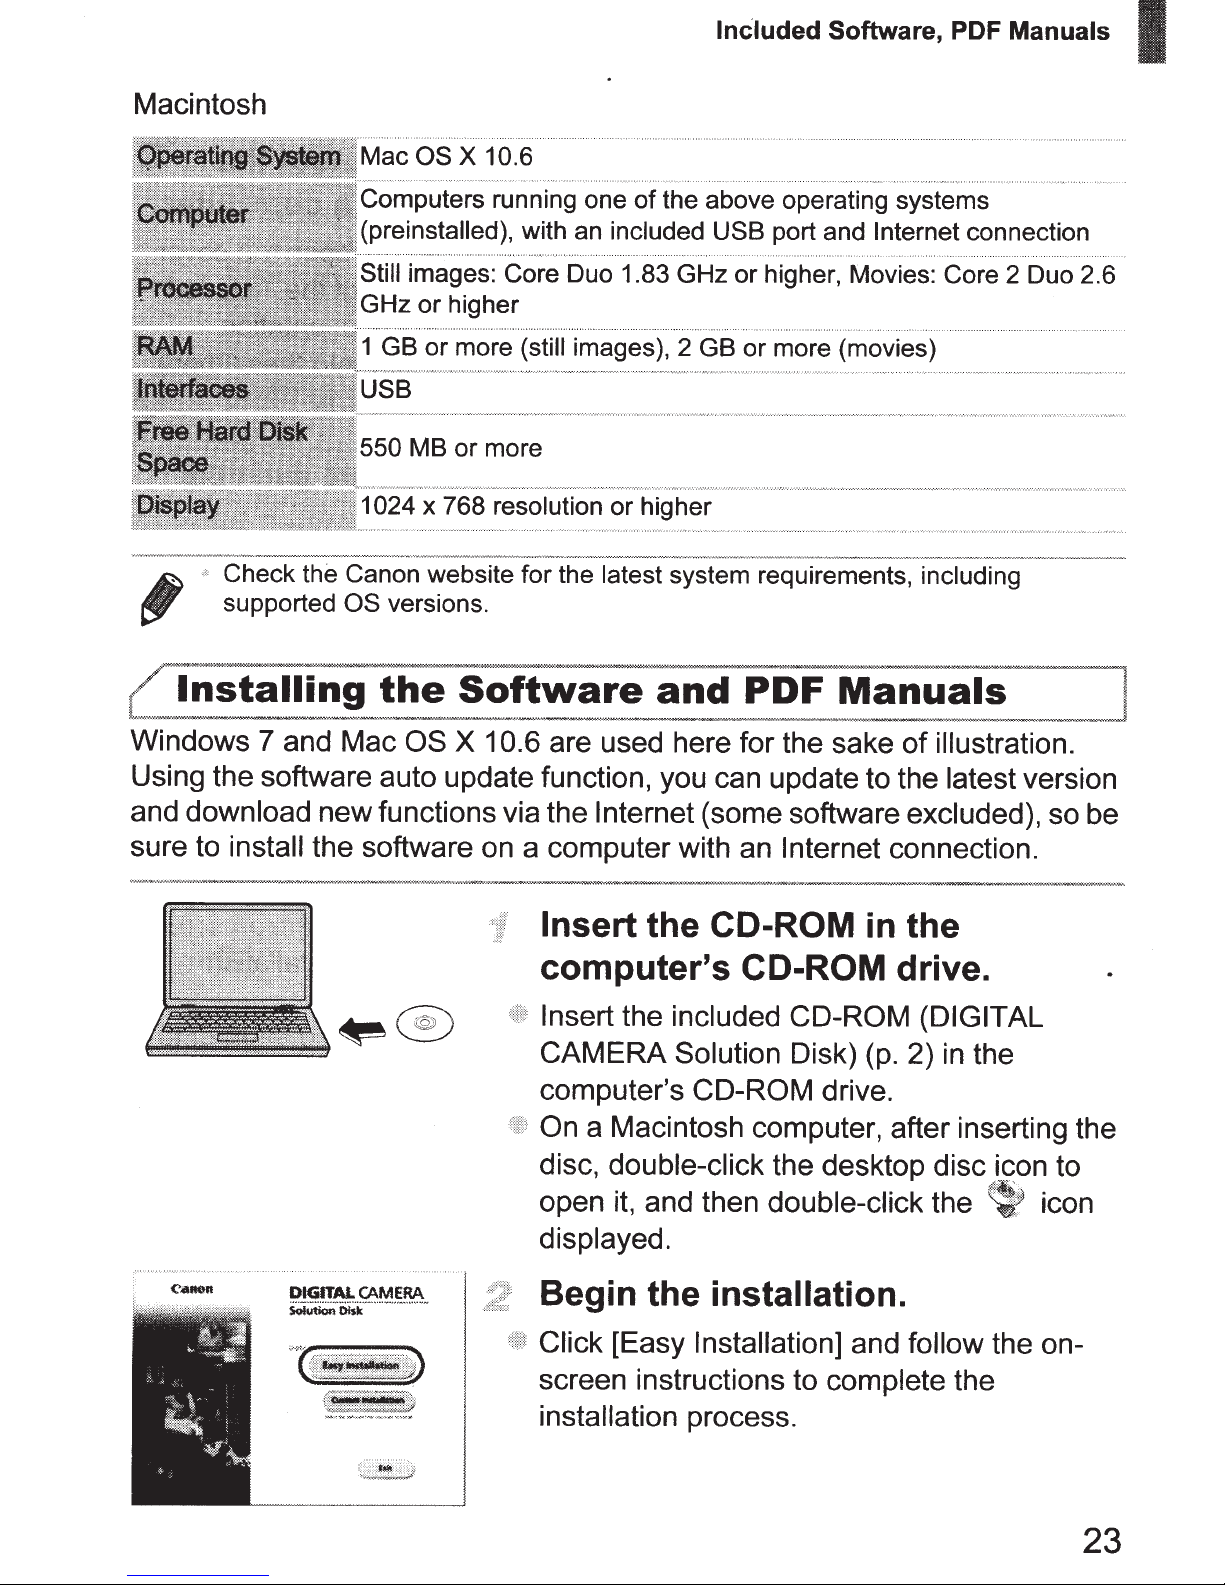
Macintosh
Windows 7 and Mac OS X 10.6 are used here for the sake of illustration.
Using the software auto update function, you can update to the latest version
and download new functions via the Internet (some software excluded), so be
sure to install the software on a computer with an Internet connection.
Insert the CD-ROM in the
computer’s CD-ROM drive.
z Insert the included CD-ROM (DIGITAL
CAMERA Solution Disk) (p. 2) in the
computer’s CD-ROM drive.
z On a Macintosh computer, after inserting the
disc, double-click the desktop disc icon to
open it, and then double-click the icon
displayed.
Begin the installation.
z Click [Easy Installation] and follow the on-
screen instructions to complete the
installation process.
Operating System Mac OS X 10.6
Computer
Computers running one of the above operating systems
(preinstalled), with an included USB port and Internet connection
Processor
Still images: Core Duo 1.83 GHz or higher, Movies: Core 2 Duo
2.6 GHz or higher
RAM 1 GB or more (still images), 2 GB or more (movies)
Interfaces USB
Free Hard Disk
Space
550 MB or more
Display 1024 x 768 resolution or higher
• Check the Canon website for the latest system requirements, including
supported OS versions.
Installing the Software and PDF Manuals
Page 64
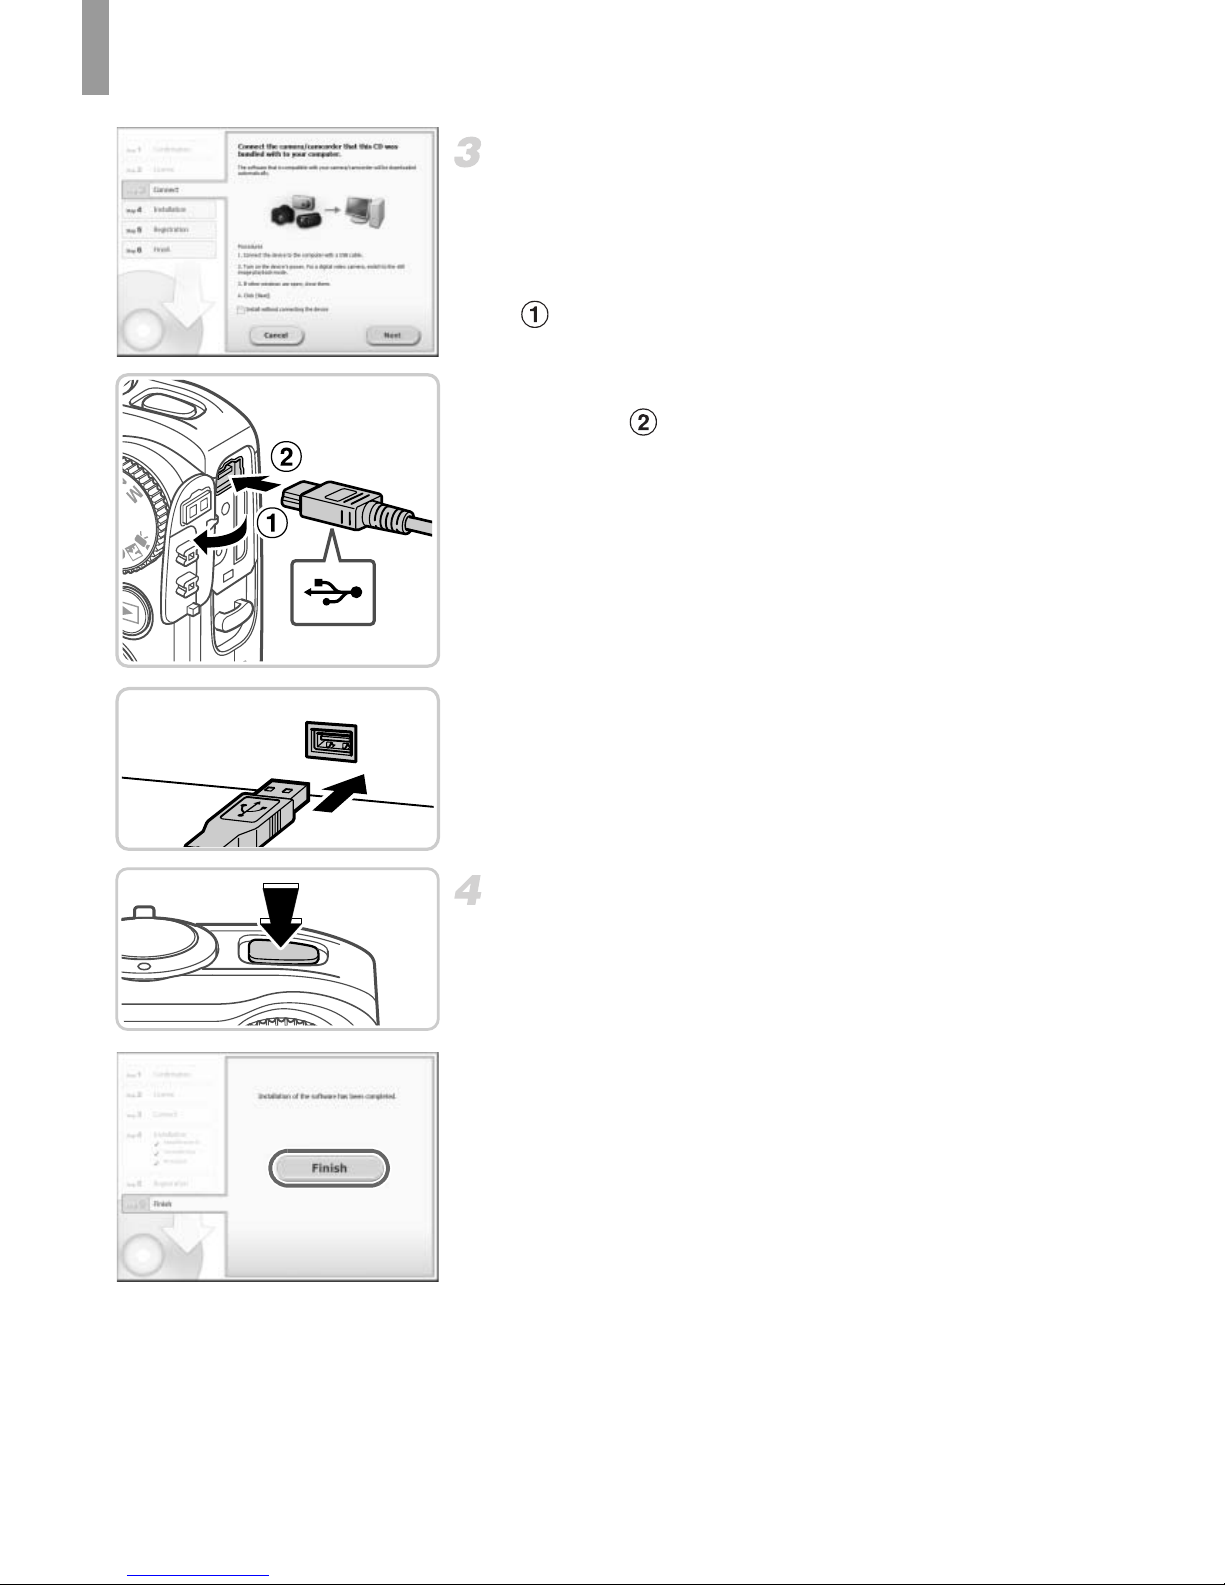
Included Software, PDF Manuals
28
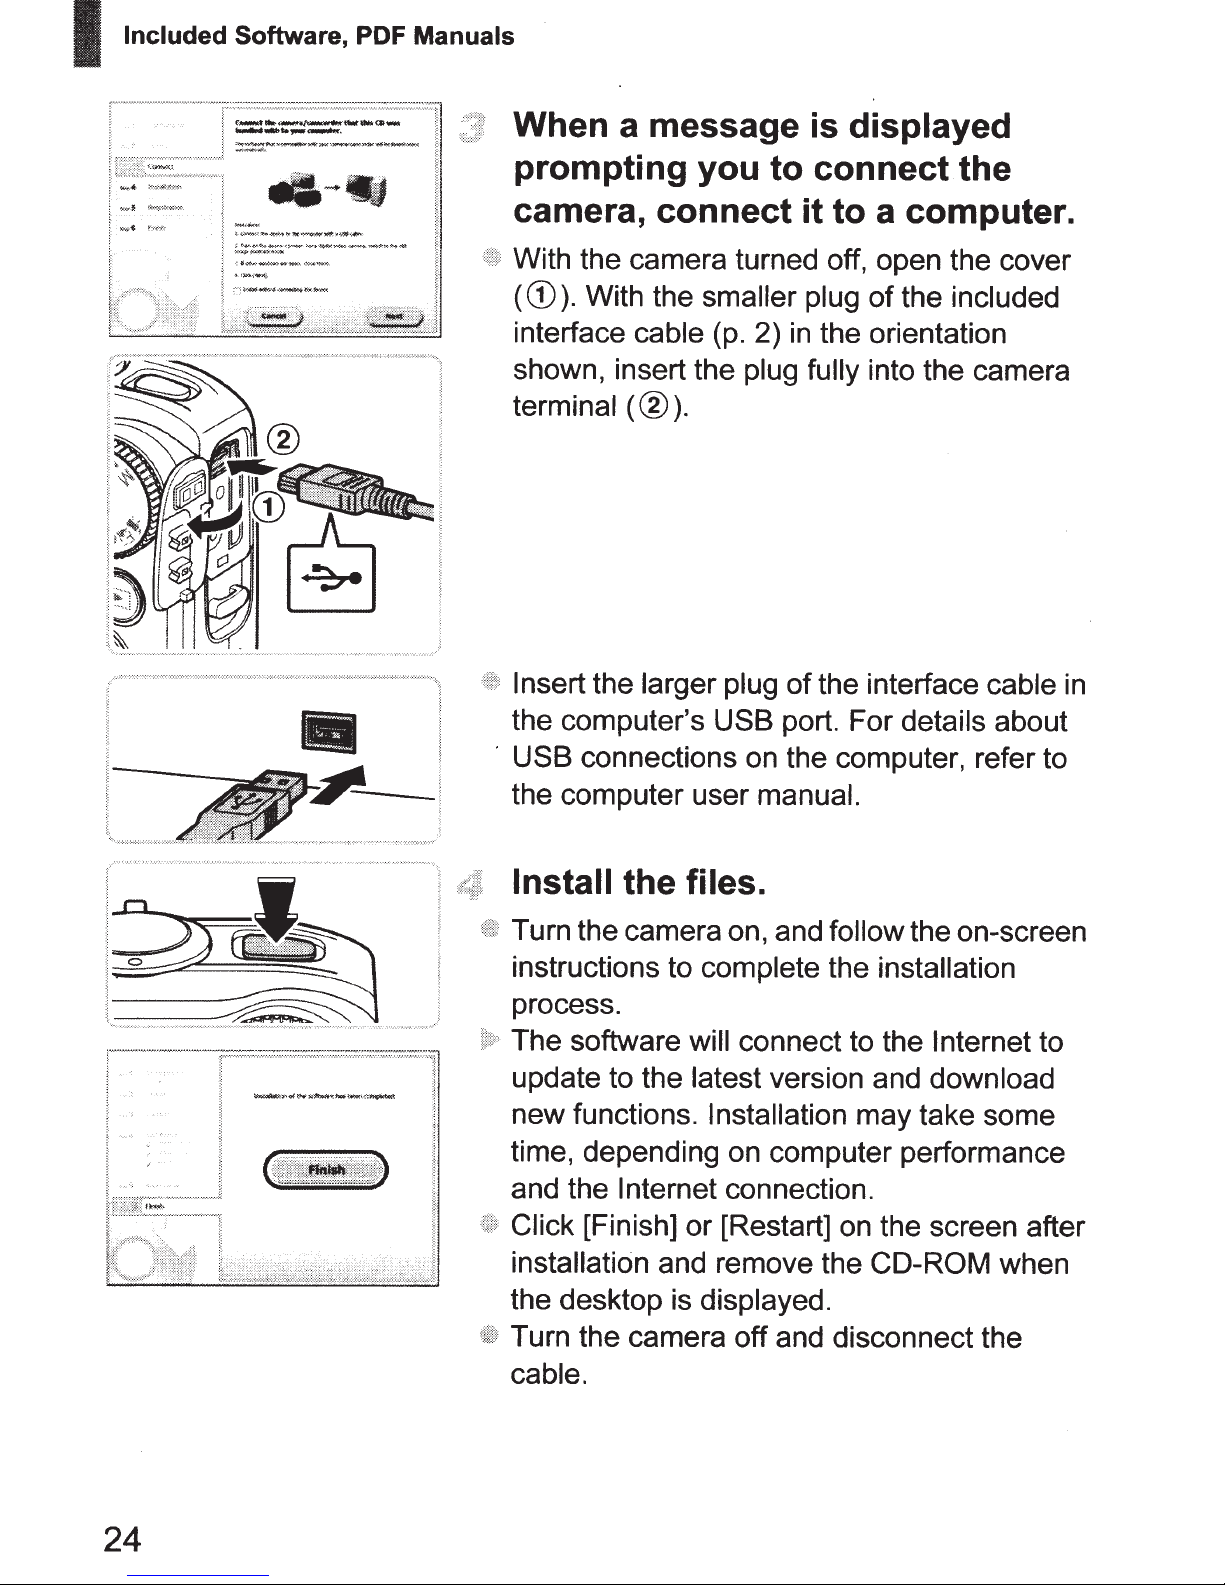
When a message is displayed
prompting you to connect the
camera, connect it to a computer.
z With the camera turned off, open the cover
( ). With the smaller plug of the included
interface cable (p. 2) in the orientation
shown, insert the plug fully into the camera
terminal ( ).
z Insert the larger plug of the interface cable in
the computer’s USB port. For details about
USB connections on the computer, refer to
the computer user manual.
Install the files.
z Turn the camera on, and follow the on-screen
instructions to complete the installation
process.
X The software will connect to the Internet to
update to the latest version and download
new functions. Installation may take some
time, depending on computer performance
and the Internet connection.
z Click [Finish] or [Restart] on the screen after
installation and remove the CD-ROM when
the desktop is displayed.
z Turn the camera off and disconnect the
cable.
Page 65
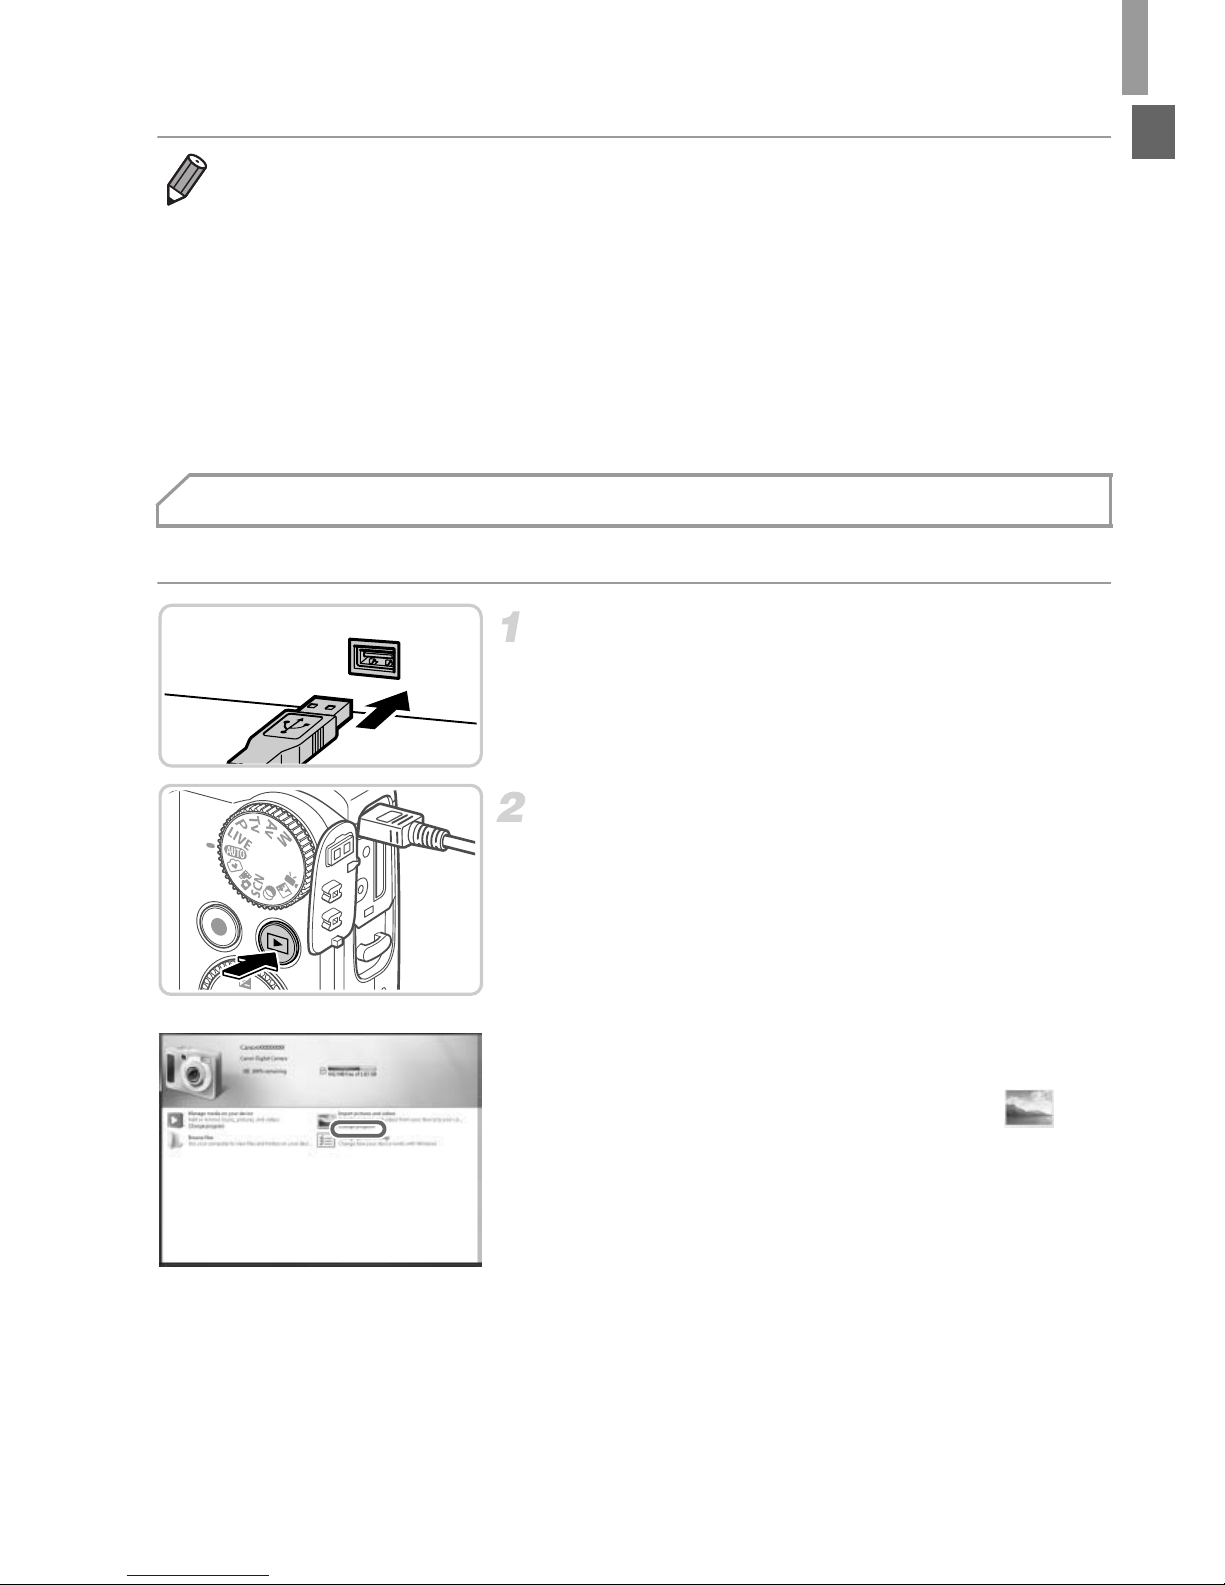
Included Software, PDF Manuals
29
Windows 7 and Mac OS X 10.6 are used here for the sake of illustration.
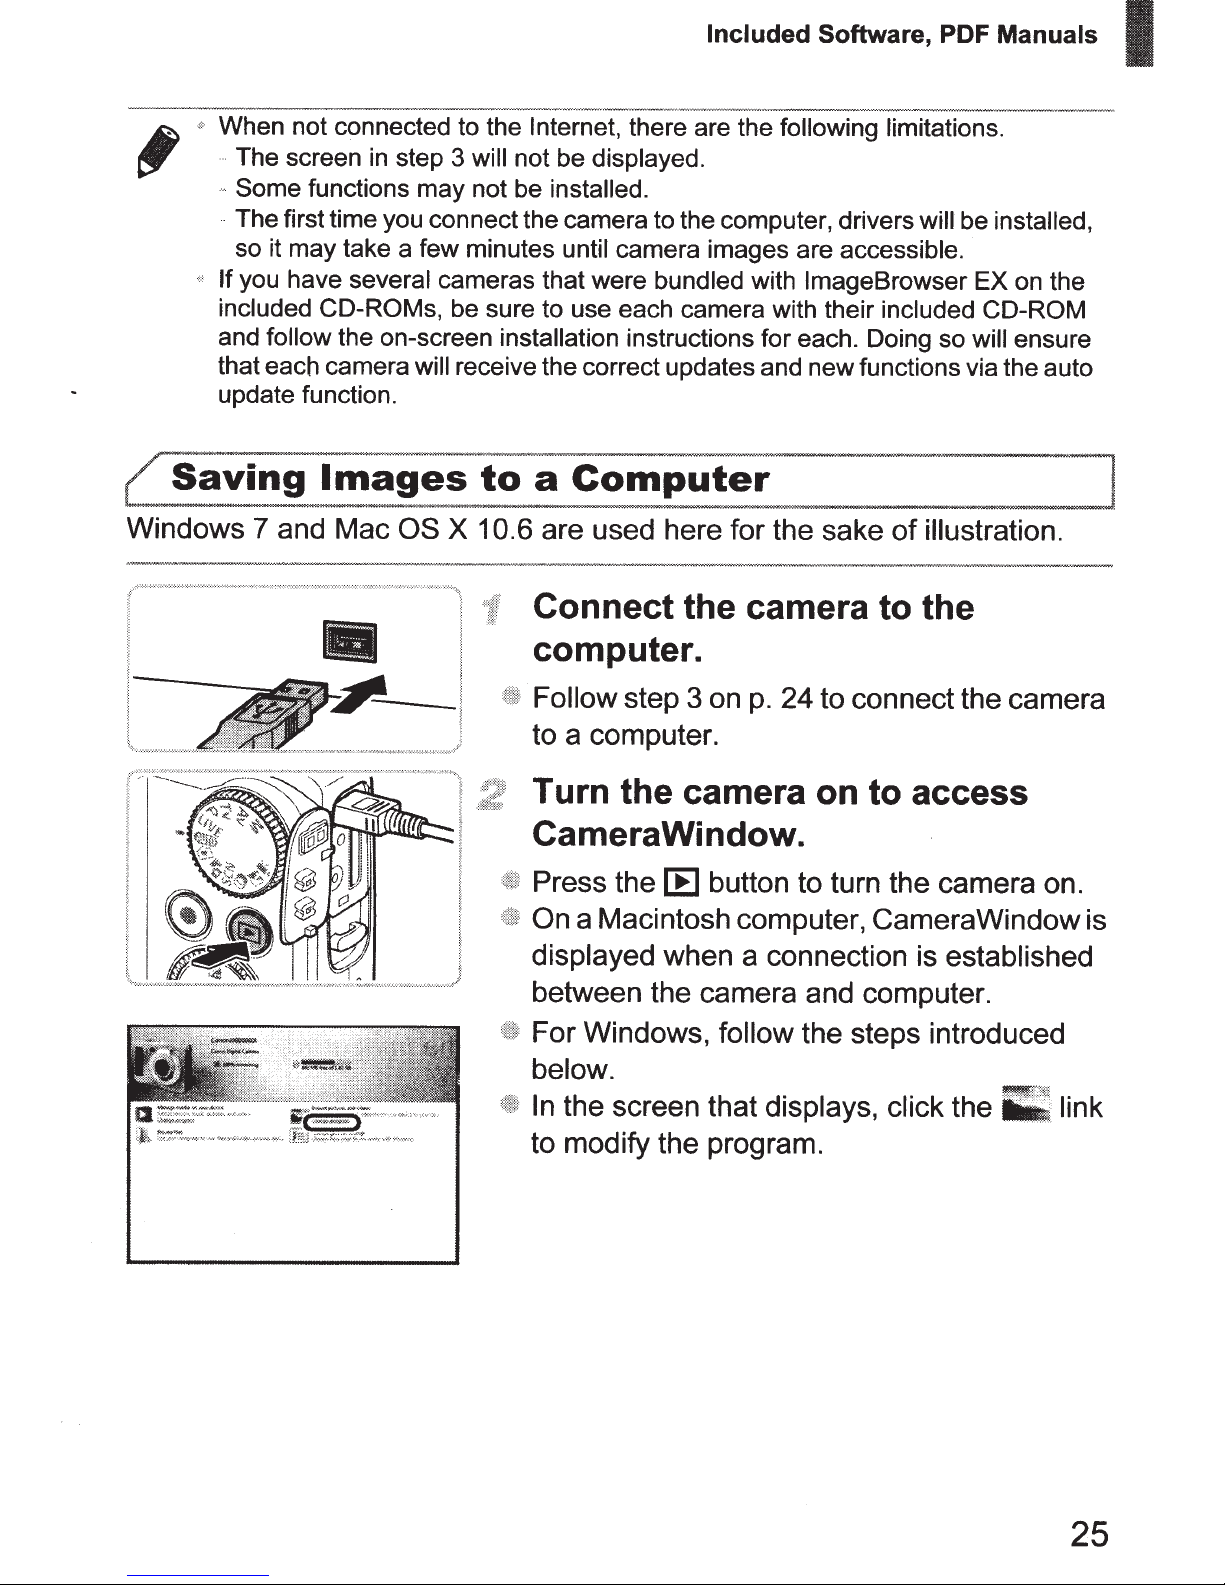
Connect the camera to the
computer.
z Follow step 3 on p. 28 to connect the camera
to a computer.
Turn the camera on to access
CameraWindow.
z Press the 1 button to turn the camera on.
z On a Macintosh computer, CameraWindow is
displayed when a connection is established
between the camera and computer.
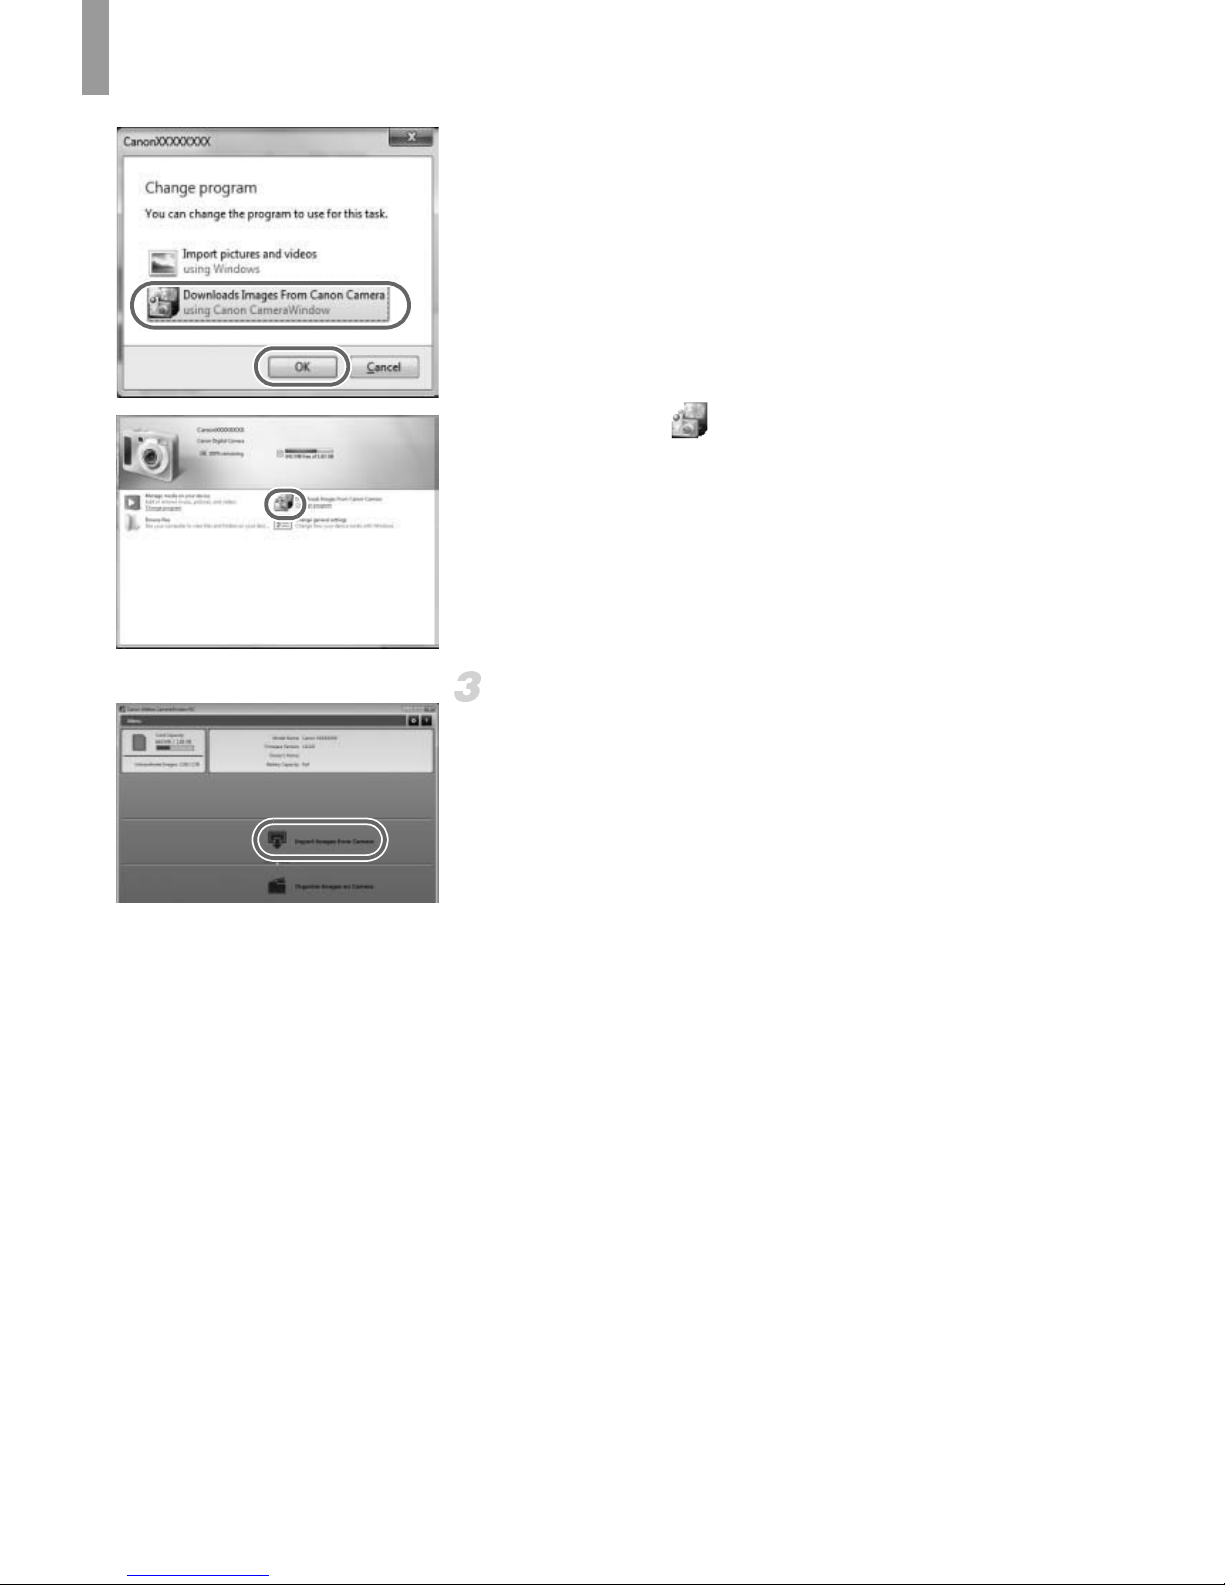
z For Windows, follow the steps introduced
below.
z In the screen that displays, click the link
to modify the program.
• When not connected to the Internet, there are the following limitations.
- The screen in step 3 will not be displayed.
- Some functions may not be installed.
- The first time you connect the camera to the computer, drivers will be installed,
so it may take a few minutes until camera images are accessible.
• If you have several cameras that were bundled with ImageBrowser EX on the
included CD-ROMs, be sure to use each camera with their included CD-ROM
and follow the on-screen installation instructions for each. Doing so will ensure
that each camera will receive the correct updates and new functions via the auto
update function.
Saving Images to a Computer
Page 66
Included Software, PDF Manuals
30
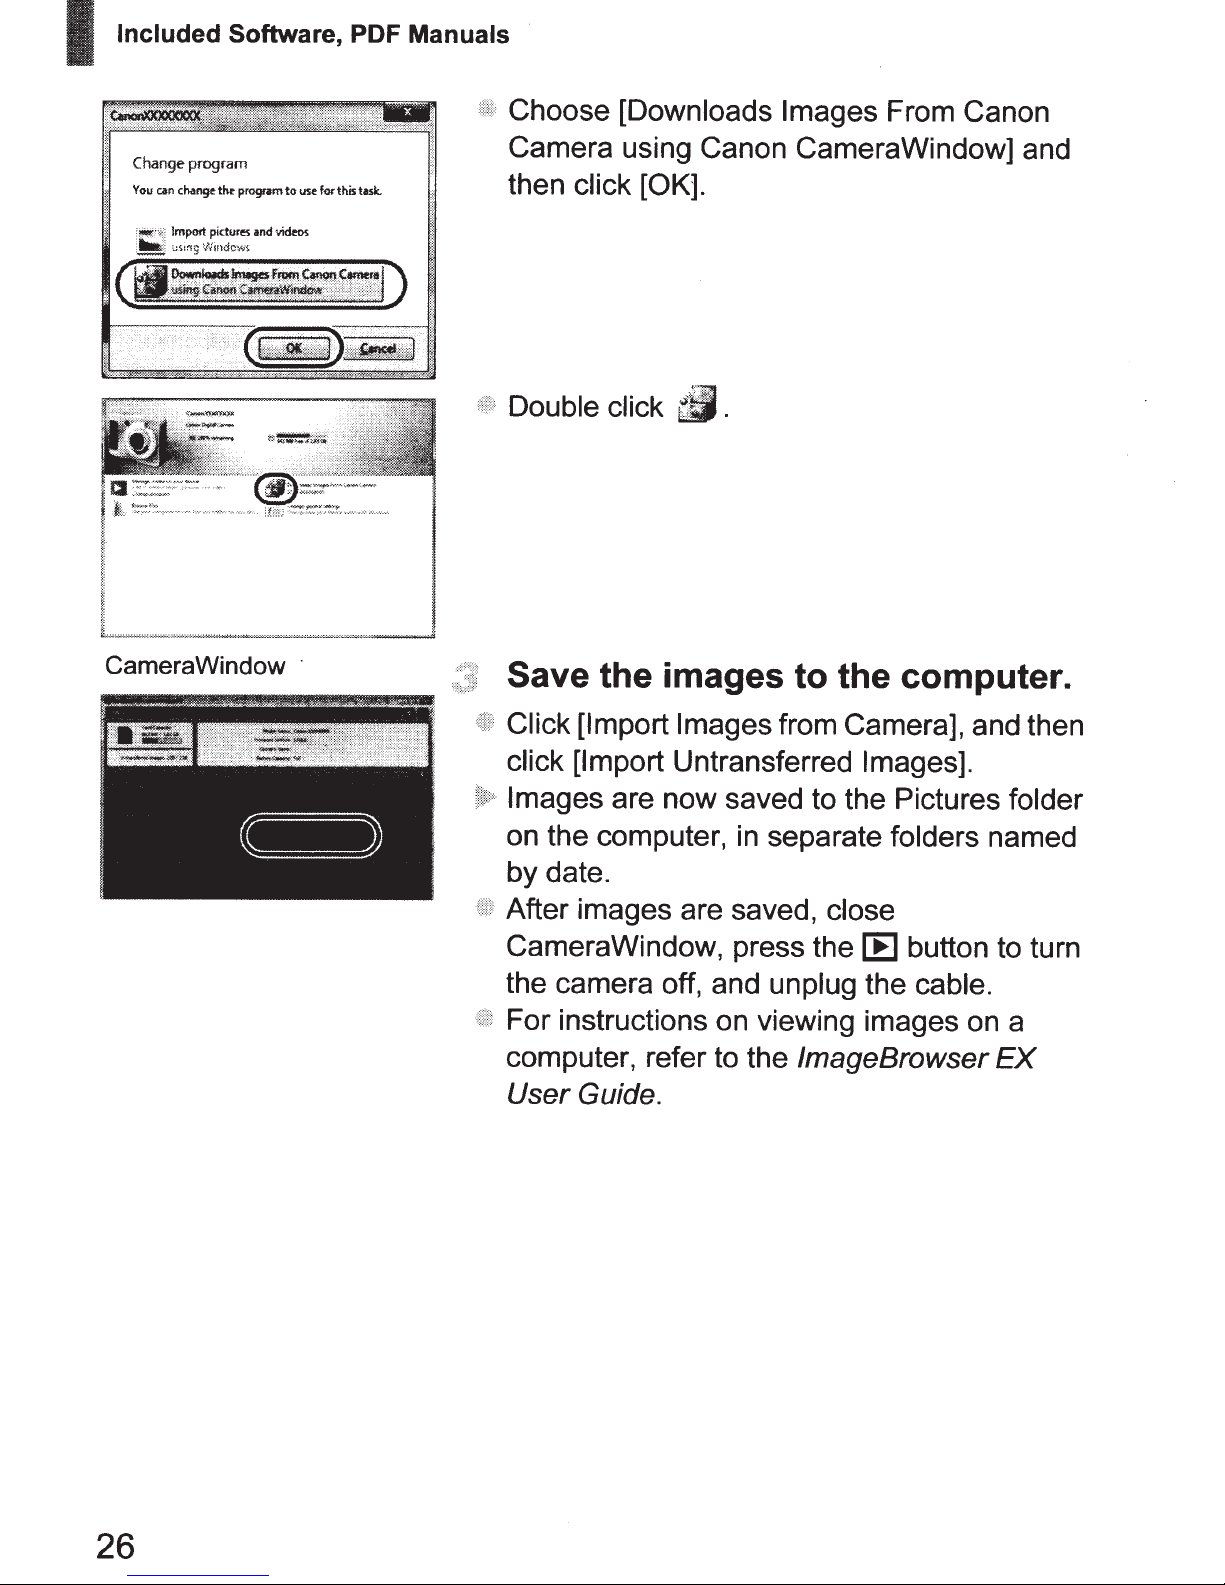
z Choose [Downloads Images From Canon
Camera using Canon CameraWindow] and
then click [OK].
z Double click .
Save the images to the computer.
z Click [Import Images from Camera], and then
click [Import Untransferred Images].
X Images are now saved to the Pictures folder
on the computer, in separate folders named
by date.
z After images are saved, close
CameraWindow, press the 1 button to turn
the camera off, and unplug the cable.
z For instructions on viewing images on a
computer, refer to the ImageBrowser EX
User Guide.
CameraWindow
Page 67
Included Software, PDF Manuals
31
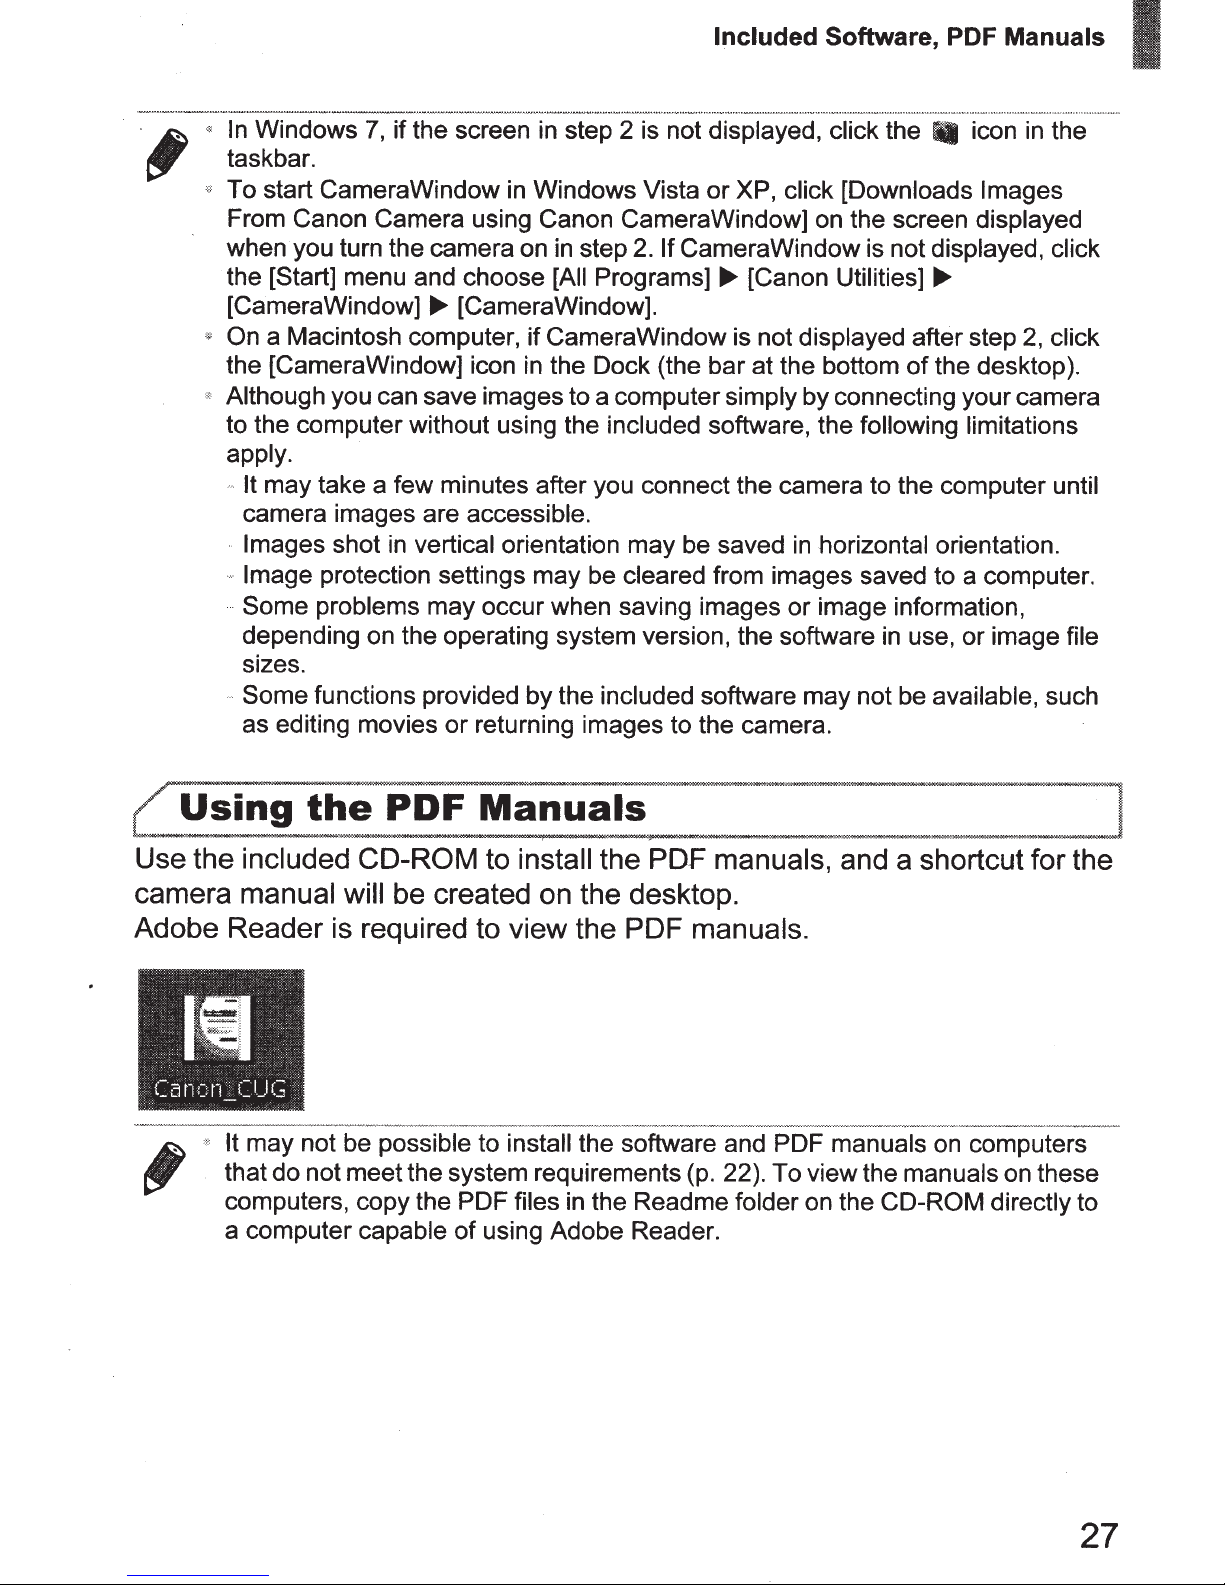
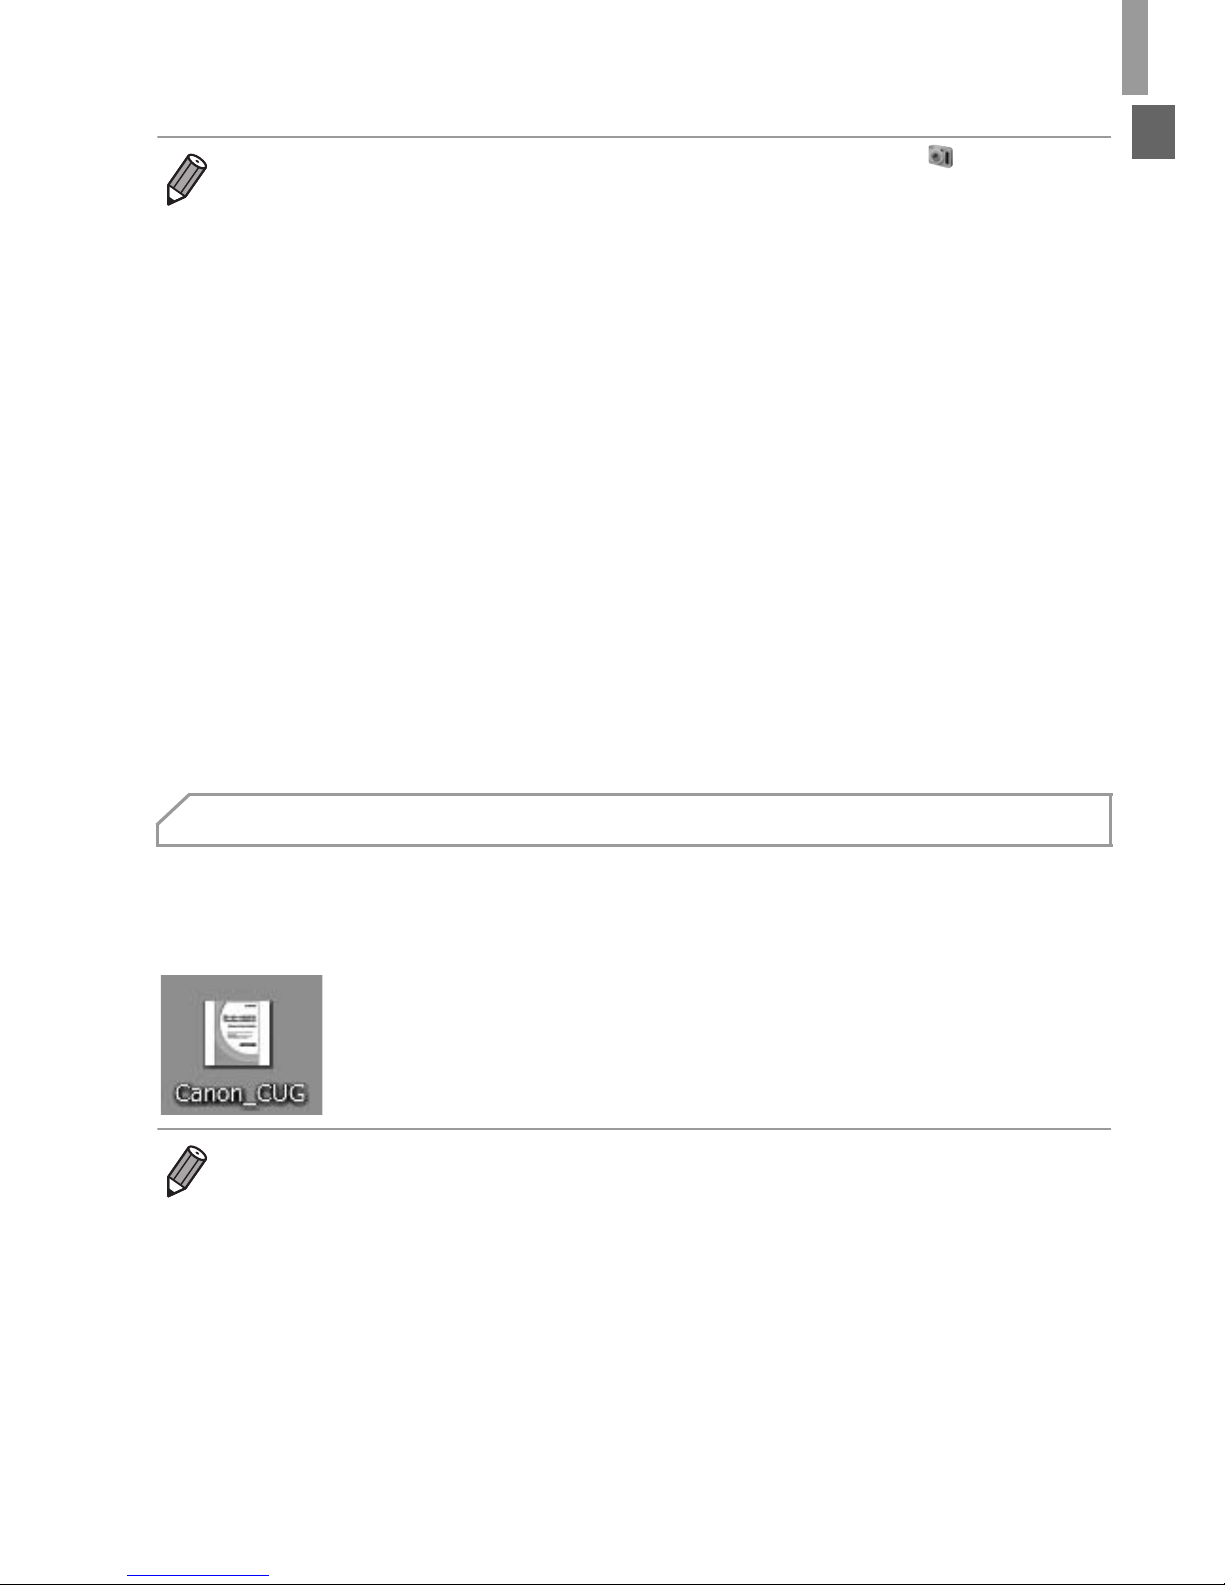
Use the included CD-ROM to install the PDF manuals, and a shortcut for the
camera manual will be created on the desktop.
Adobe Reader is required to view the PDF manuals.
• In Windows 7, if the screen in step 2 is not displayed, click the icon in the
taskbar.
• To start CameraWindow in Windows Vista or XP, click [Downloads Images
From Canon Camera using Canon CameraWindow] on the screen displayed
when you turn the camera on in step 2. If CameraWindow is not displayed, click
the [Start] menu and choose [All Programs] X [Canon Utilities] X
[CameraWindow] X [CameraWindow].
• On a Macintosh computer, if CameraWindow is not displayed after step 2, click
the [CameraWindow] icon in the Dock (the bar at the bottom of the desktop).
• Although you can save images to a computer simply by connecting your camera
to the computer without using the included software, the following limitations
apply.
- It may take a few minutes after you connect the camera to the computer until
camera images are accessible.
- Images shot in vertical orientation may be saved in horizontal orientation.
- Image protection settings may be cleared from images saved to a computer.
- Some problems may occur when saving images or image information,
depending on the operating system version, the software in use, or image file
sizes.
- Some functions provided by the included software may not be available, such
as editing movies or returning images to the camera.
Using the PDF Manuals
• It may not be possible to install the software and PDF manuals on computers
that do not meet the system requirements (p. 26). To view the manuals on these
computers, copy the PDF files in the Readme folder on the CD-ROM directly to
a computer capable of using Adobe Reader.
Page 68
32
Accessories
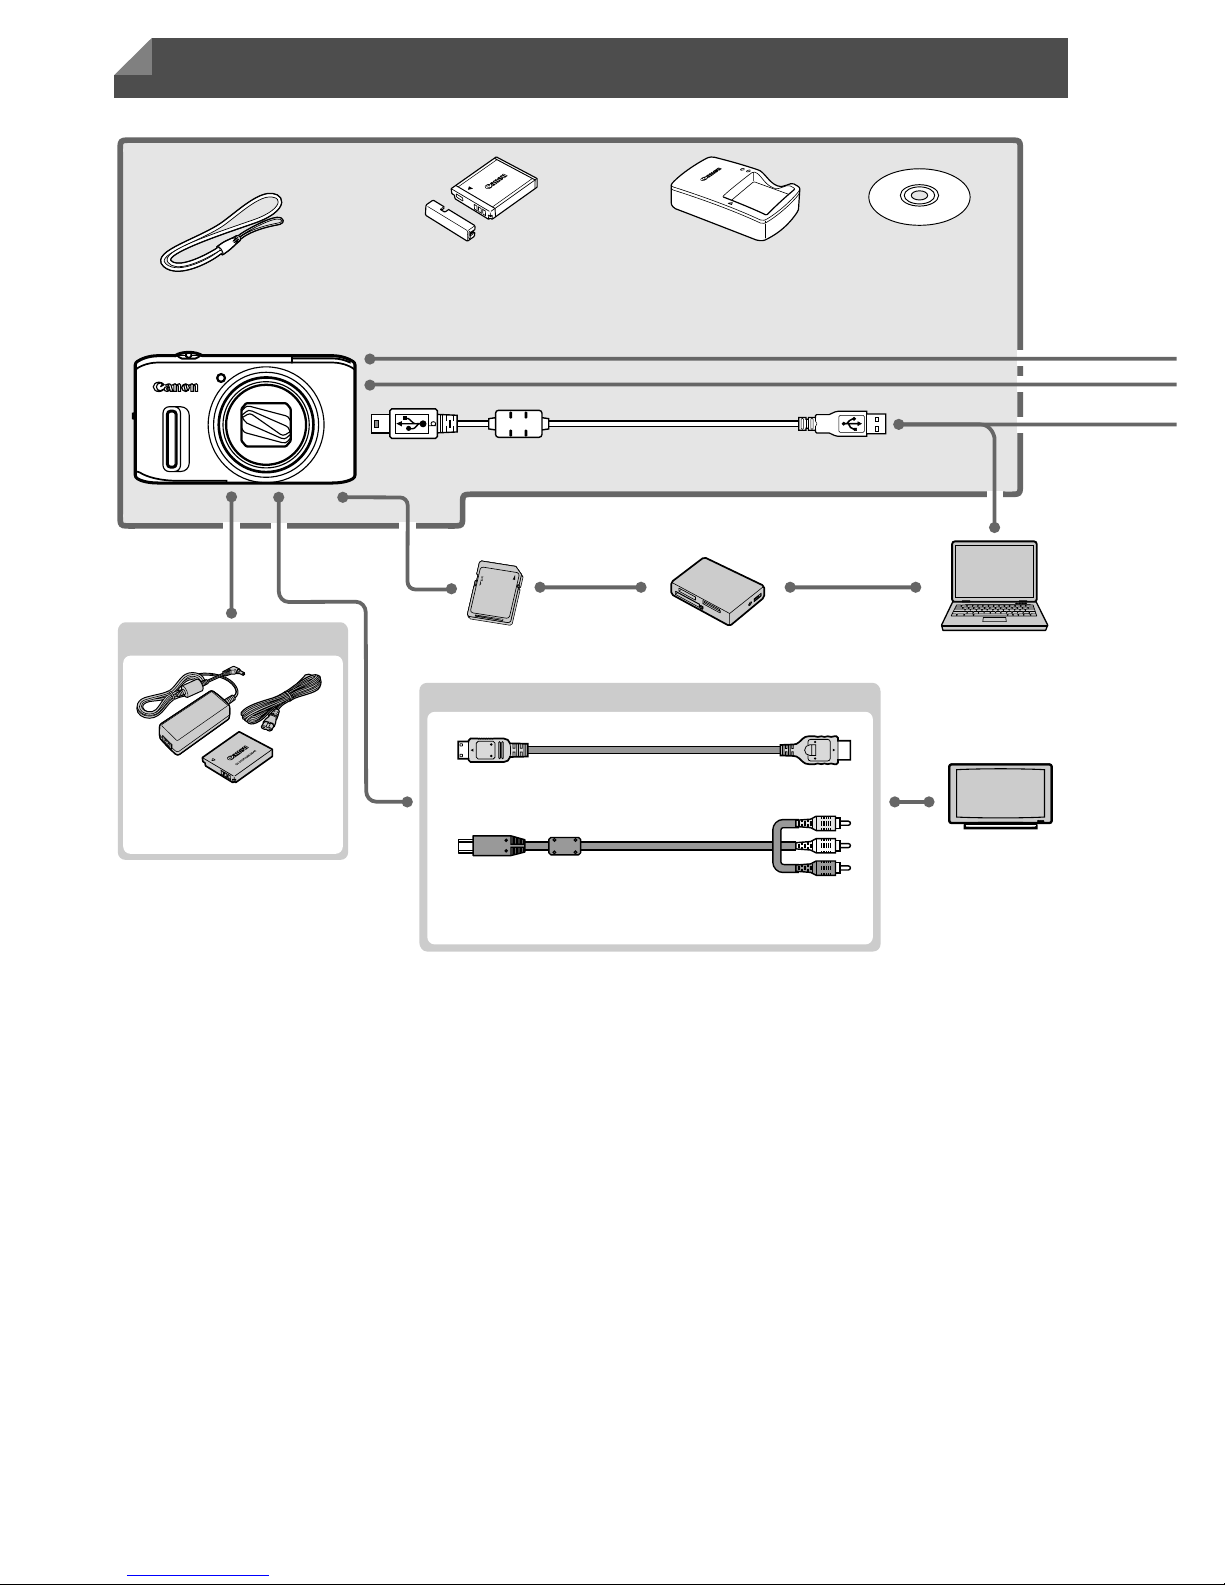
Stereo AV Cable AVC-DC400ST
Cable
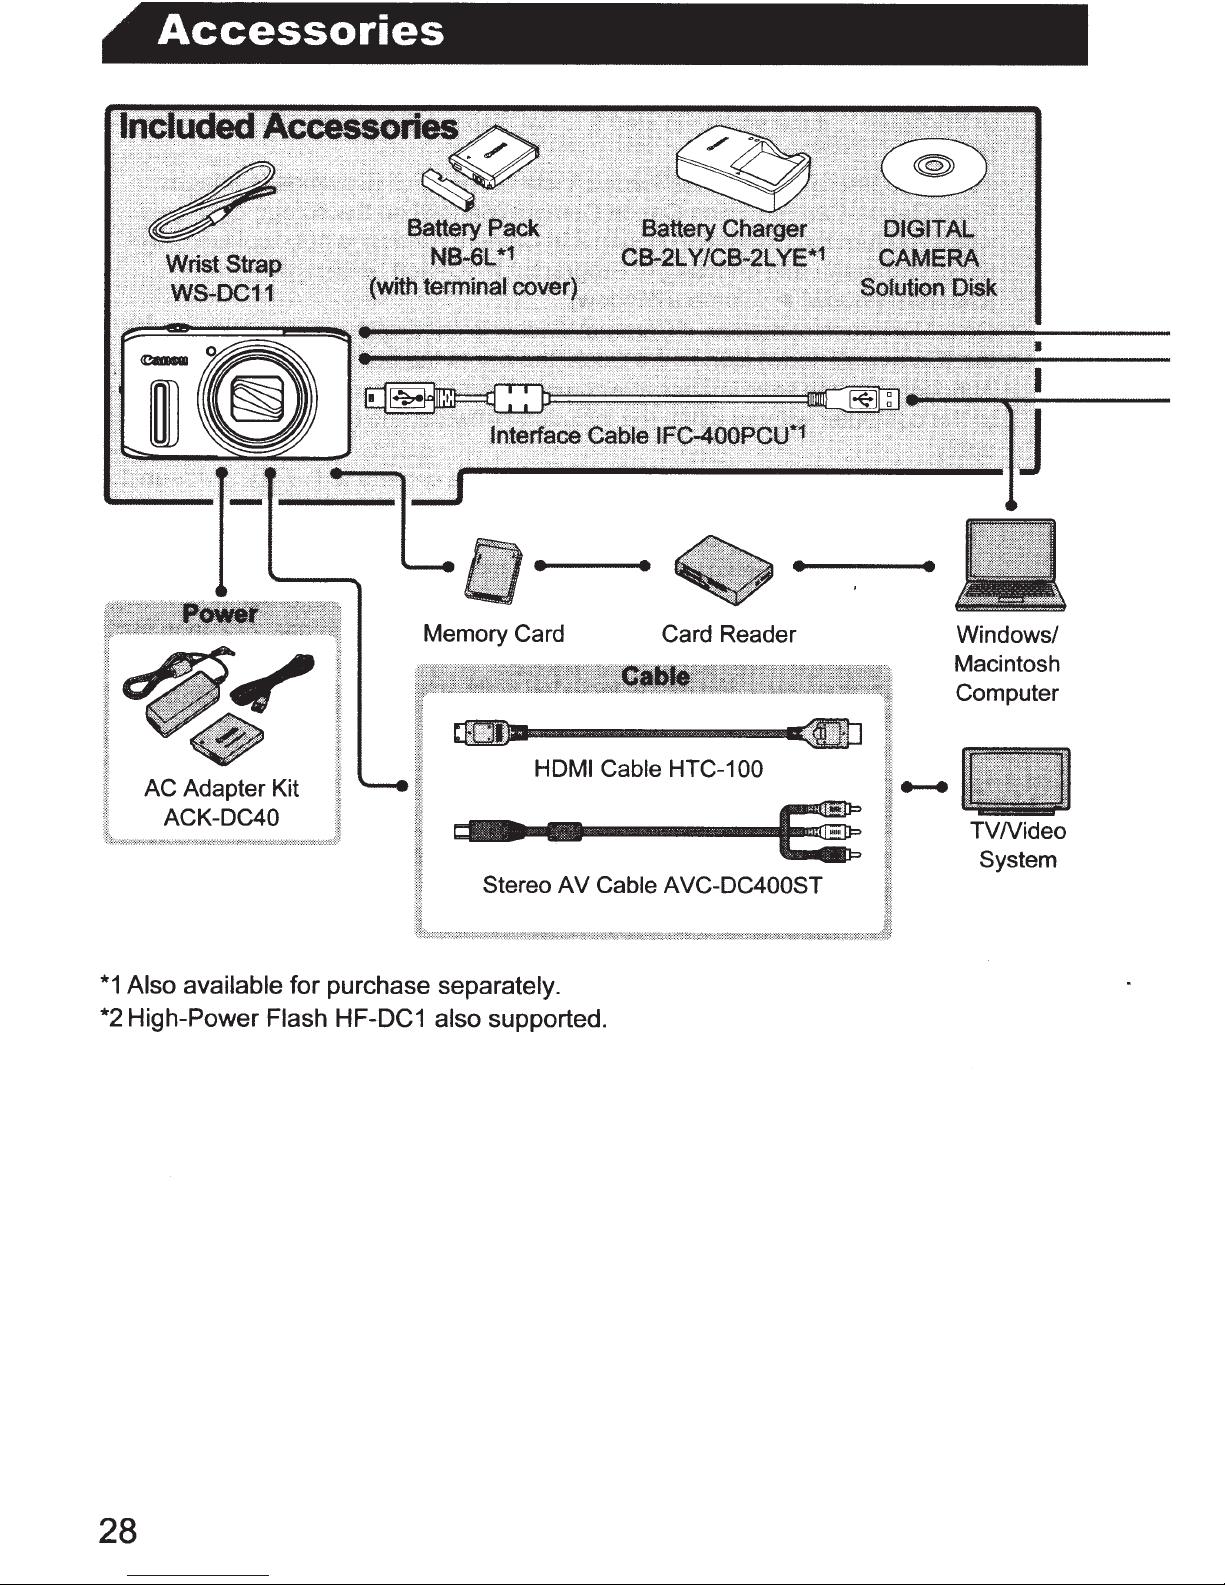
Included Accessories
TV/Video
System
Memory Card Card Reader Windows/
Macintosh
Computer
Interface Cable IFC-400PCU
*1
Wrist Strap
WS-DC11
DIGITAL
CAMERA
Solution Disk
Battery Pack
NB-6L*1
(with terminal cover)
HDMI Cable HTC-100
Battery Charger
CB-2LY/CB-2LYE*
1
Power
AC Adapter Kit
ACK-DC40
*1 Also available for purchase separately.
*2 High-Power Flash HF-DC1 also supported.
Page 69
Accessories
33
Use of genuine Canon accessories is recommended.
This product is designed to achieve excellent performance when used with genuine
Canon accessories.
Canon shall not be liable for any damage to this product and/or accidents such as fire,
etc., caused by the malfunction of non-genuine Canon accessories (e.g., a leakage and/
or explosion of a battery pack). Please note that this warranty does not apply to repairs
arising out of the malfunction of non-genuine Canon accessories, although you may
request such repairs on a chargeable basis.
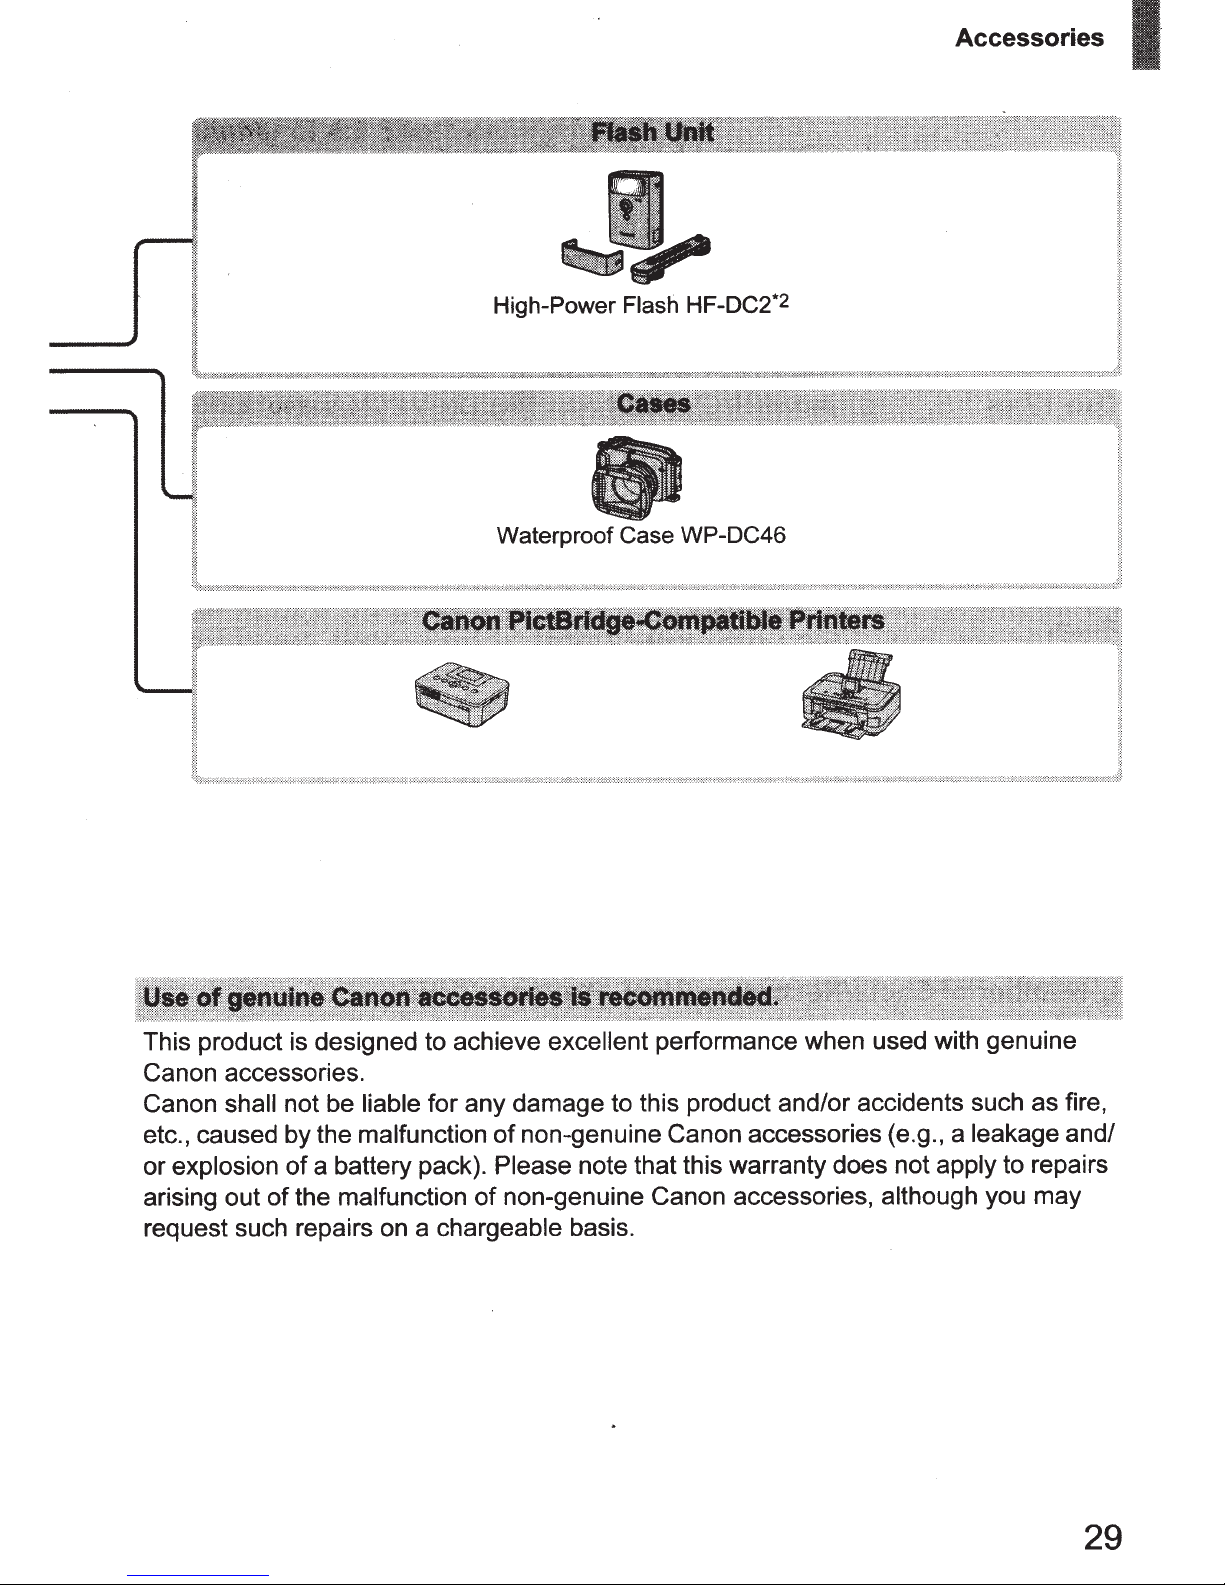
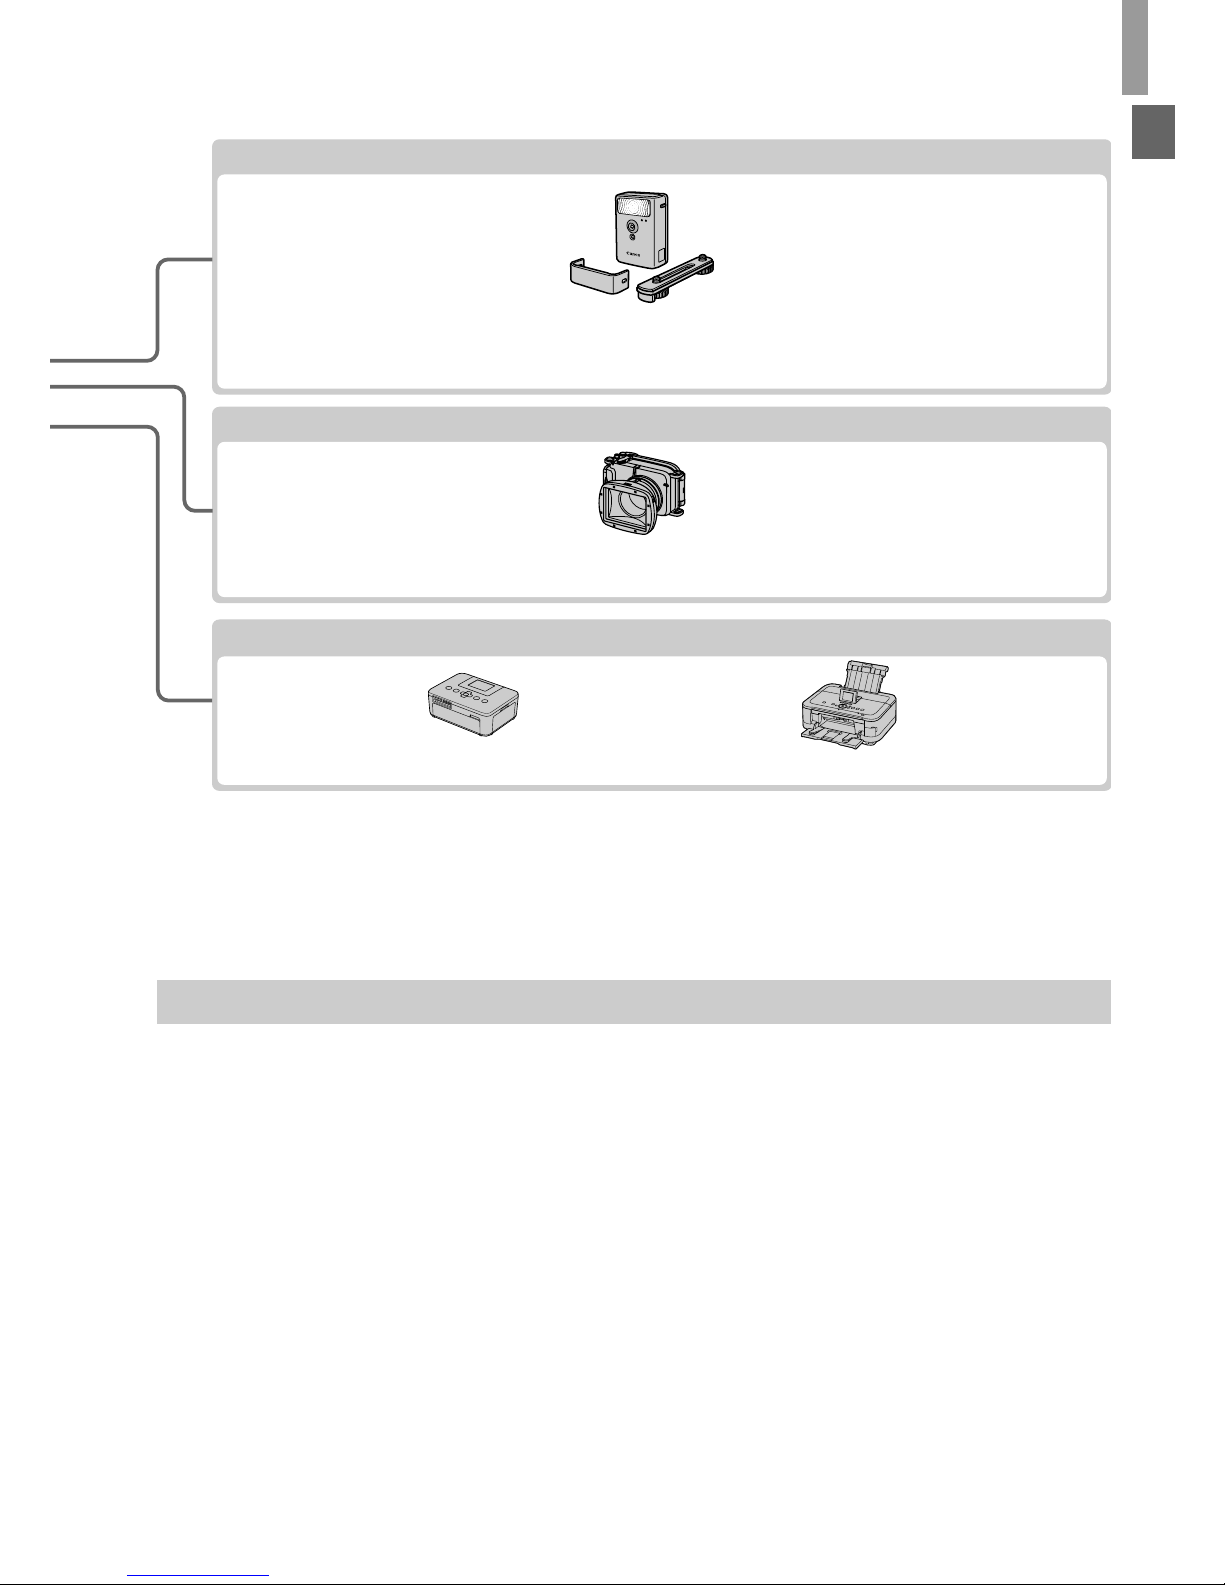
Cases
Flash Unit
High-Power Flash HF-DC2
*2
Canon PictBridge-Compatible Printers
Waterproof Case WP-DC46
Page 70

34
Page 71

35
Camera Basics
Basic camera operations and features
1
Page 72
36
Shooting Mode
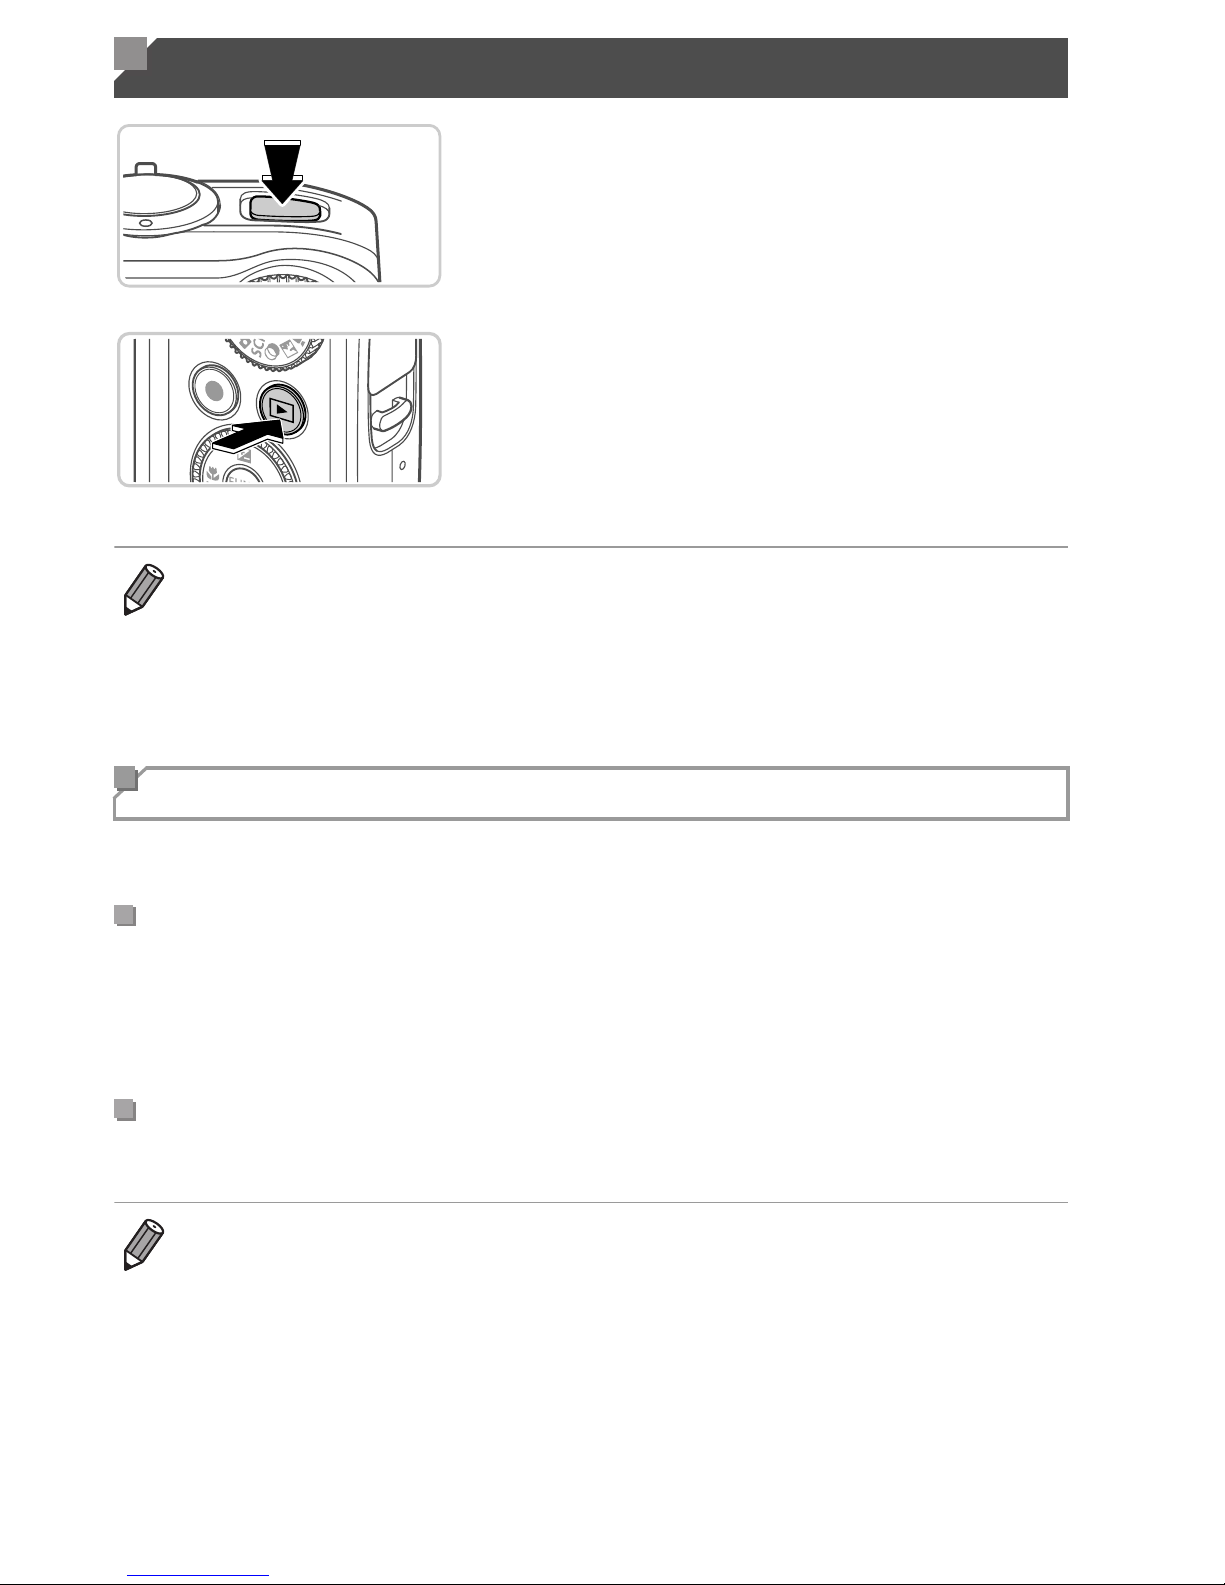
z Press the power button to turn the camera on
and prepare for shooting.
z To turn the camera off, press the power
button again.
Playback Mode
z Press the 1 button to turn the camera on
and view your shots.
z To turn the camera off, press the 1 button
again.
As a way to conserve battery power, the camera automatically deactivates
the screen and then turns itself off after a specific period of inactivity.
The screen is automatically deactivated after about one minute of inactivity.
In about two more minutes, the lens is retracted and the camera turns itself
off. To activate the screen and prepare for shooting when the screen is off but
the lens is still out, press the shutter button halfway (p. 37).
The camera turns itself off automatically after about five minutes of inactivity.
On/Off
• To switch to Playback mode from Shooting mode, press the 1 button.
• To switch to Shooting mode from Playback mode, press the shutter button
halfway (p. 37).
• The lens will be retracted after about one minute, once the camera is in
Playback mode, and the flash will be lowered if it was up. You can turn the
camera off when the lens is retracted by pressing the 1 button.
Power-Saving Features (Auto Power Down)
Power Saving in Shooting Mode
Power Saving in Playback Mode
• You can deactivate these power-saving features if you prefer (p. 189).
• You can also adjust the timing of screen deactivation (p. 189).
Page 73
37
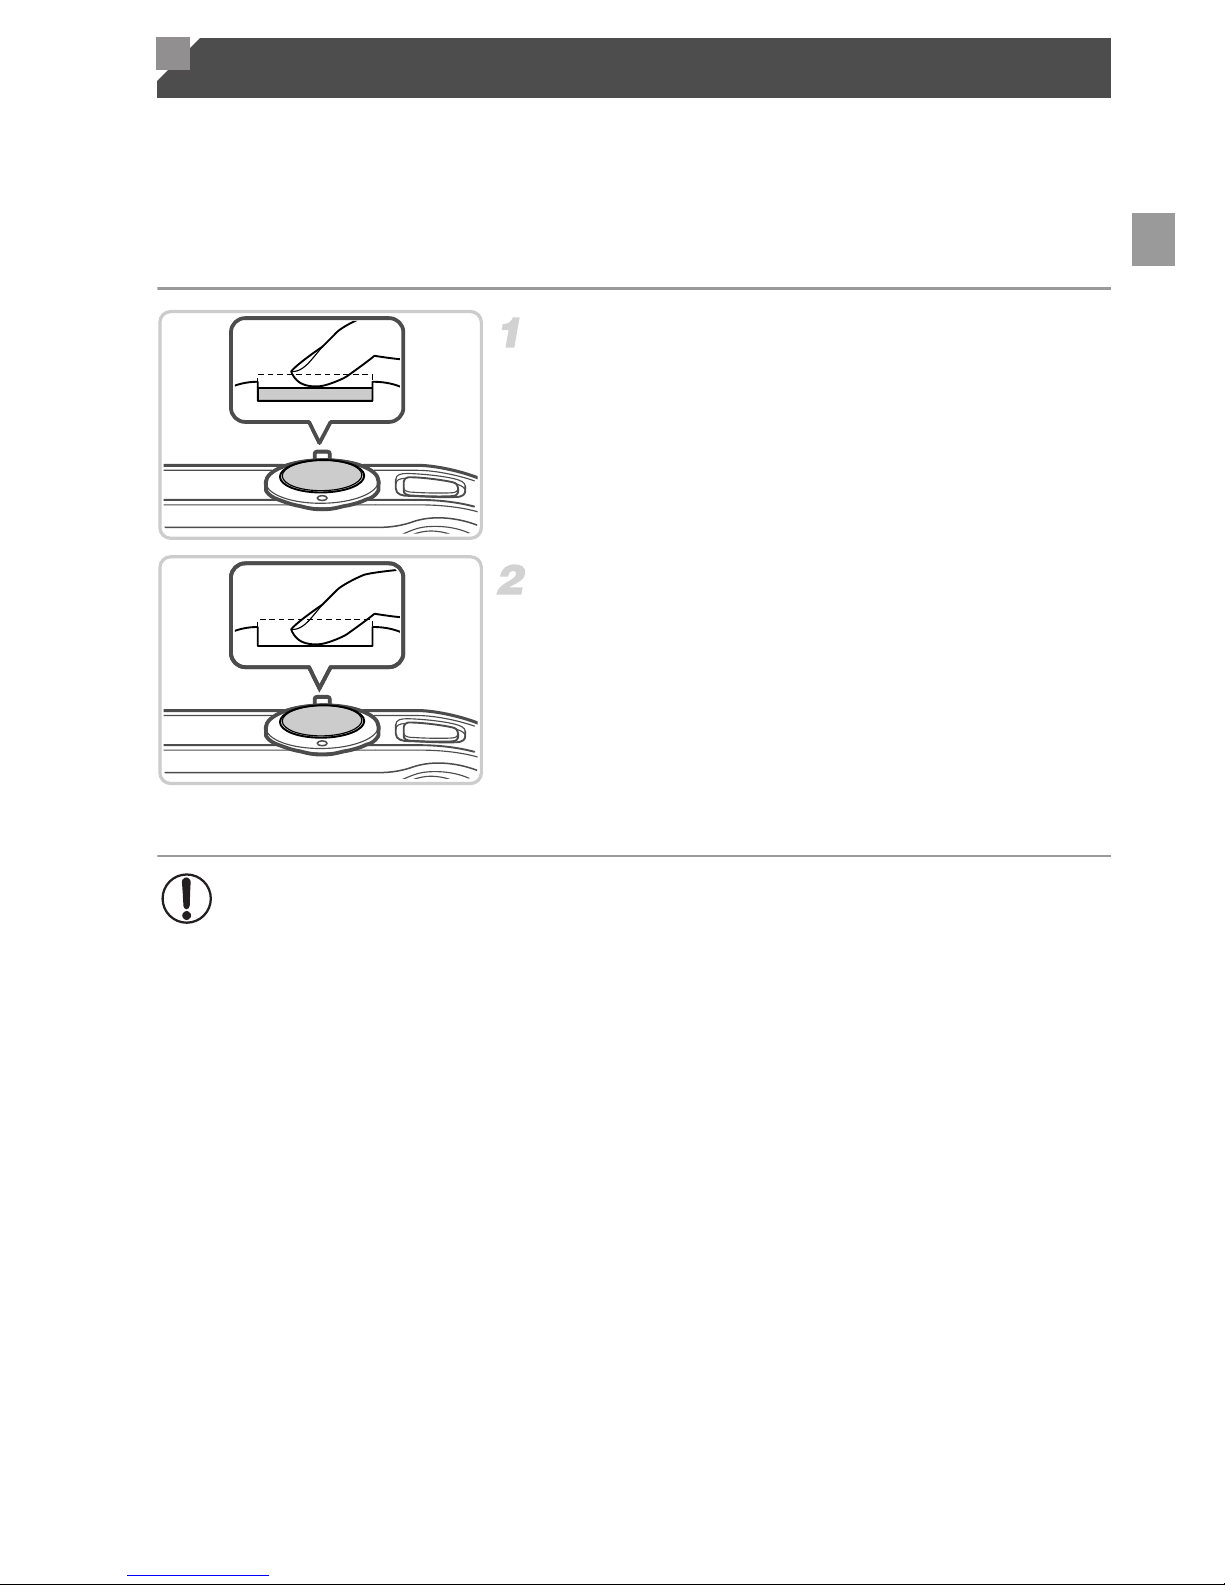
To ensure your shots are in focus, always press the shutter button lightly
(halfway) initially. Once the subject is in focus, press the button all the way
down to shoot.
In this manual, shutter button operations are described as pressing the button
halfway or all the way down.
Press halfway. (Press lightly to
focus.)
z Press the shutter button halfway. The camera
beeps twice, and AF frames are displayed
around image areas in focus.
Press all the way down. (From the
halfway position, press fully to
shoot.)
X The camera shoots, as a shutter sound is
played.
z Keep the camera still until the shutter sound
ends.
Shutter Button
• Images may be out of focus if you shoot without initially pressing the
shutter button halfway.
• Length of shutter sound playback varies depending on the time
required for the shot. It may take longer in some shooting scenes,
and images will be blurry if you move the camera (or the subject
moves) before the shutter sound ends.
Page 74
38
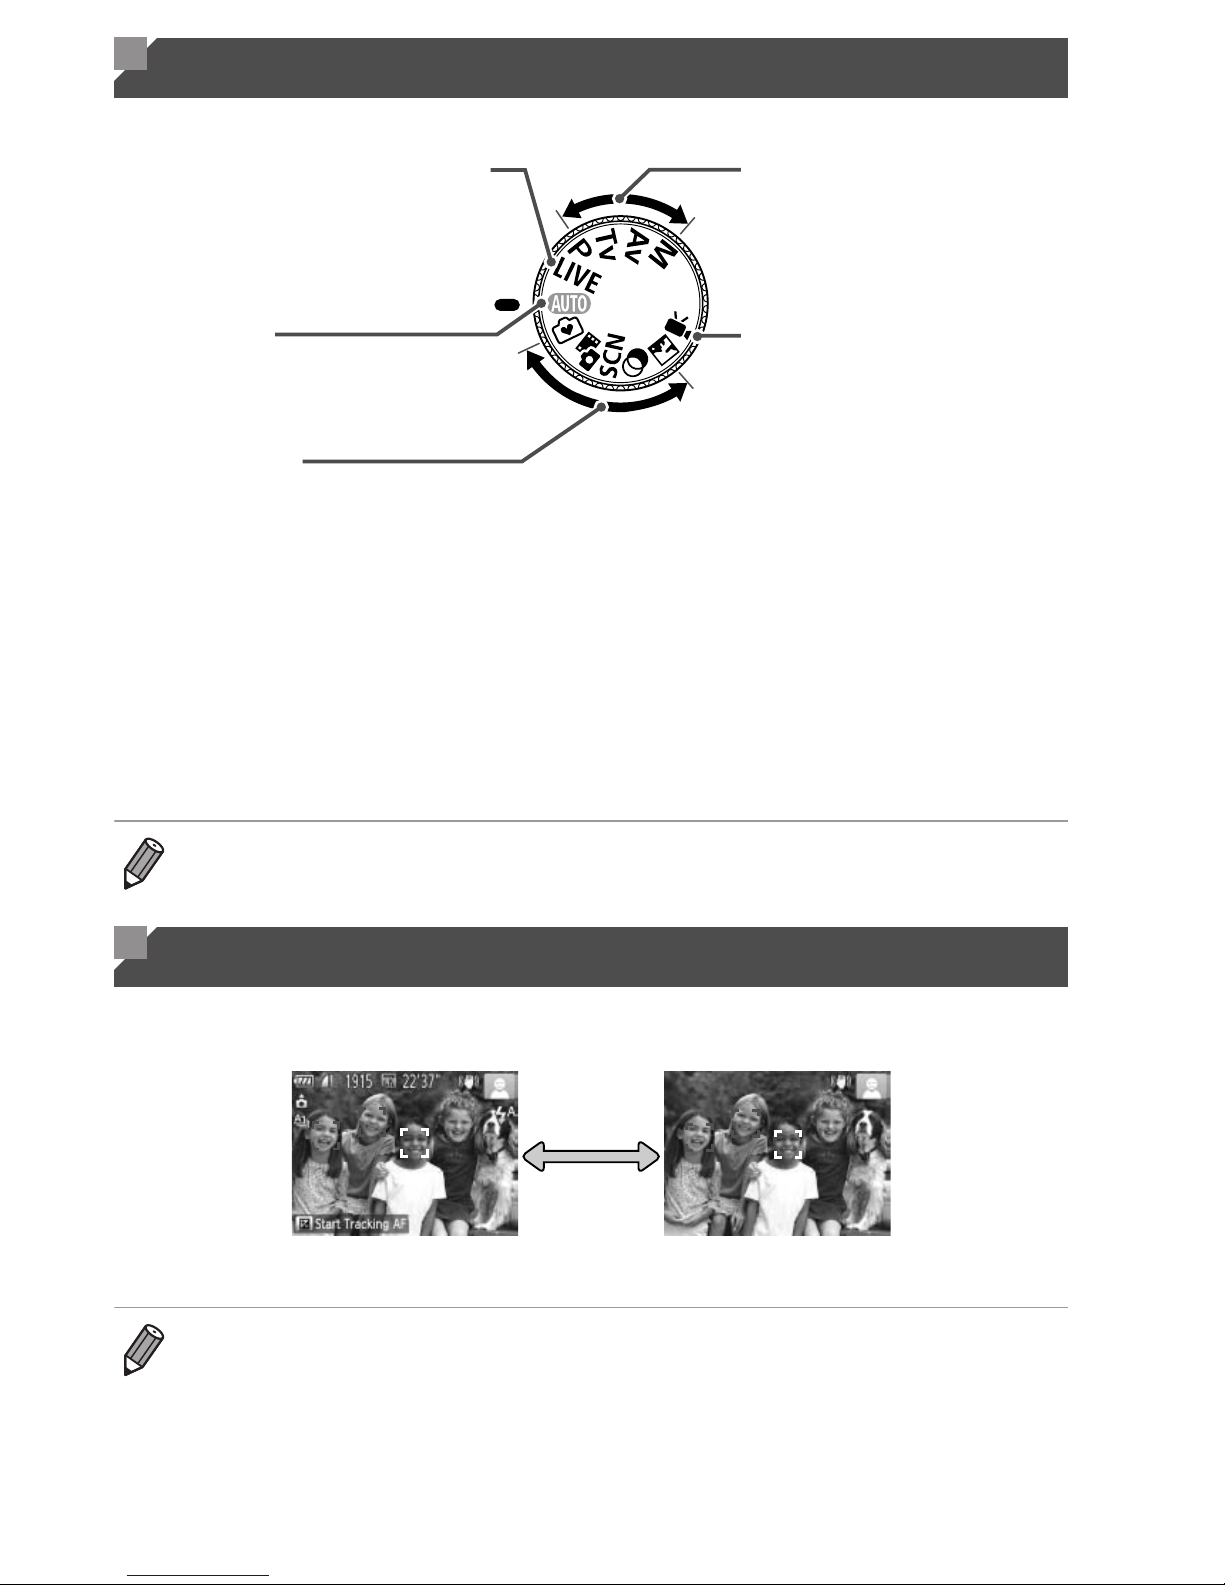
Use the mode dial to access each shooting mode.
Press the l button to view other information on the screen, or to hide the
information. For details on the information displayed, see p. 226.
Shooting Modes
• You can turn the mode dial to switch to Shooting mode from Playback mode.
Shooting Display Options
Movie Mode
For shooting movies (p. 111).
You can also shoot movies
when the mode dial is not set
to Movie mode, simply by
pressing the movie button.
Easy Mode
Convenient shooting, simply by pressing the
shutter button (p. 91).
Movie Digest Mode
Automatically compile clips captured before
each shot that day into a short movie (pp. 92,
153).
Special Scene Mode
Shoot with optimal settings for specific scenes
(p. 93).
Live View Control Mode
Customize image brightness or colors
when shooting (p. 90).
Auto Mode
Fully automatic shooting, with cameradetermined settings (pp. 21, 54).
Creative Filters Mode
Add a variety of effects to images when
shooting (p. 103).
Discreet Mode
Shoot without the flash or camera sounds
(p. 110).
P, Tv, Av, and M Modes
Take a variety of shots using
your preferred settings
(pp. 115, 139).
Information is displayed No information is displayed
• Screen brightness is automatically increased by the night display function when
you are shooting under low light, making it easier to check how shots are
composed. However, on-screen image brightness may not match the
brightness of your shots. Note that any on-screen image distortion or jerky
subject motion will not affect recorded images.
• For playback display options, see p. 148.
Page 75
39
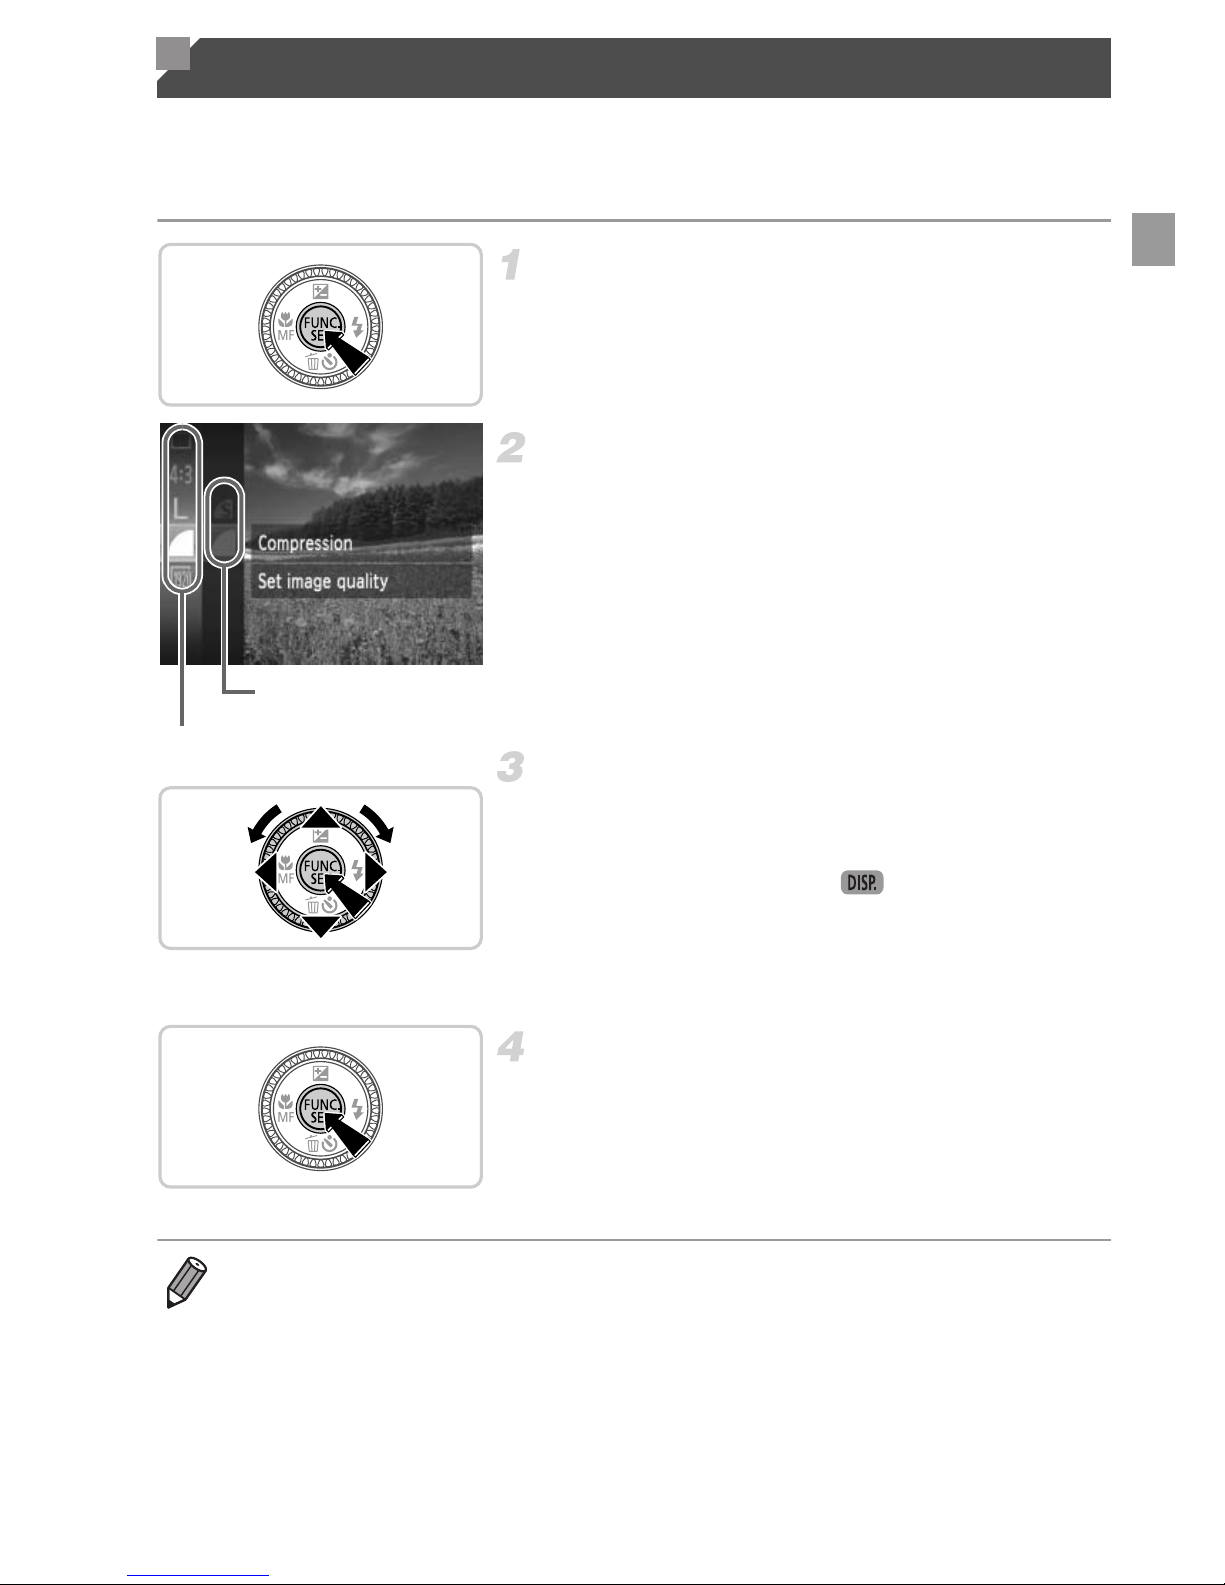
Configure commonly used functions through the FUNC. menu as follows.
Note that menu items and options vary depending on the shooting mode
(pp. 232 – 233) or playback mode (p. 239).
Access the FUNC. menu.
z Press the m button.
Choose a menu item.
z Press the op buttons or turn the 5 dial to
choose a menu item, and then press the m
or r button.
z In some menu items, functions can be
specified simply by pressing the m or r
button, or another screen is displayed for
configuring the function.
Choose an option.
z Press the op buttons or turn the 5 dial to
choose an option.
z Options labeled with a icon can be
configured by pressing the l button.
z To return to the menu items, press the q
button.
Finish the setup process.
z Press the m button.
X The screen before you pressed the m button
in step 1 is displayed again, showing the
option you configured.
FUNC. Menu
Menu Items
Options
• To undo any accidental setting changes, you can restore the camera’s default
settings (p. 193).
Page 76
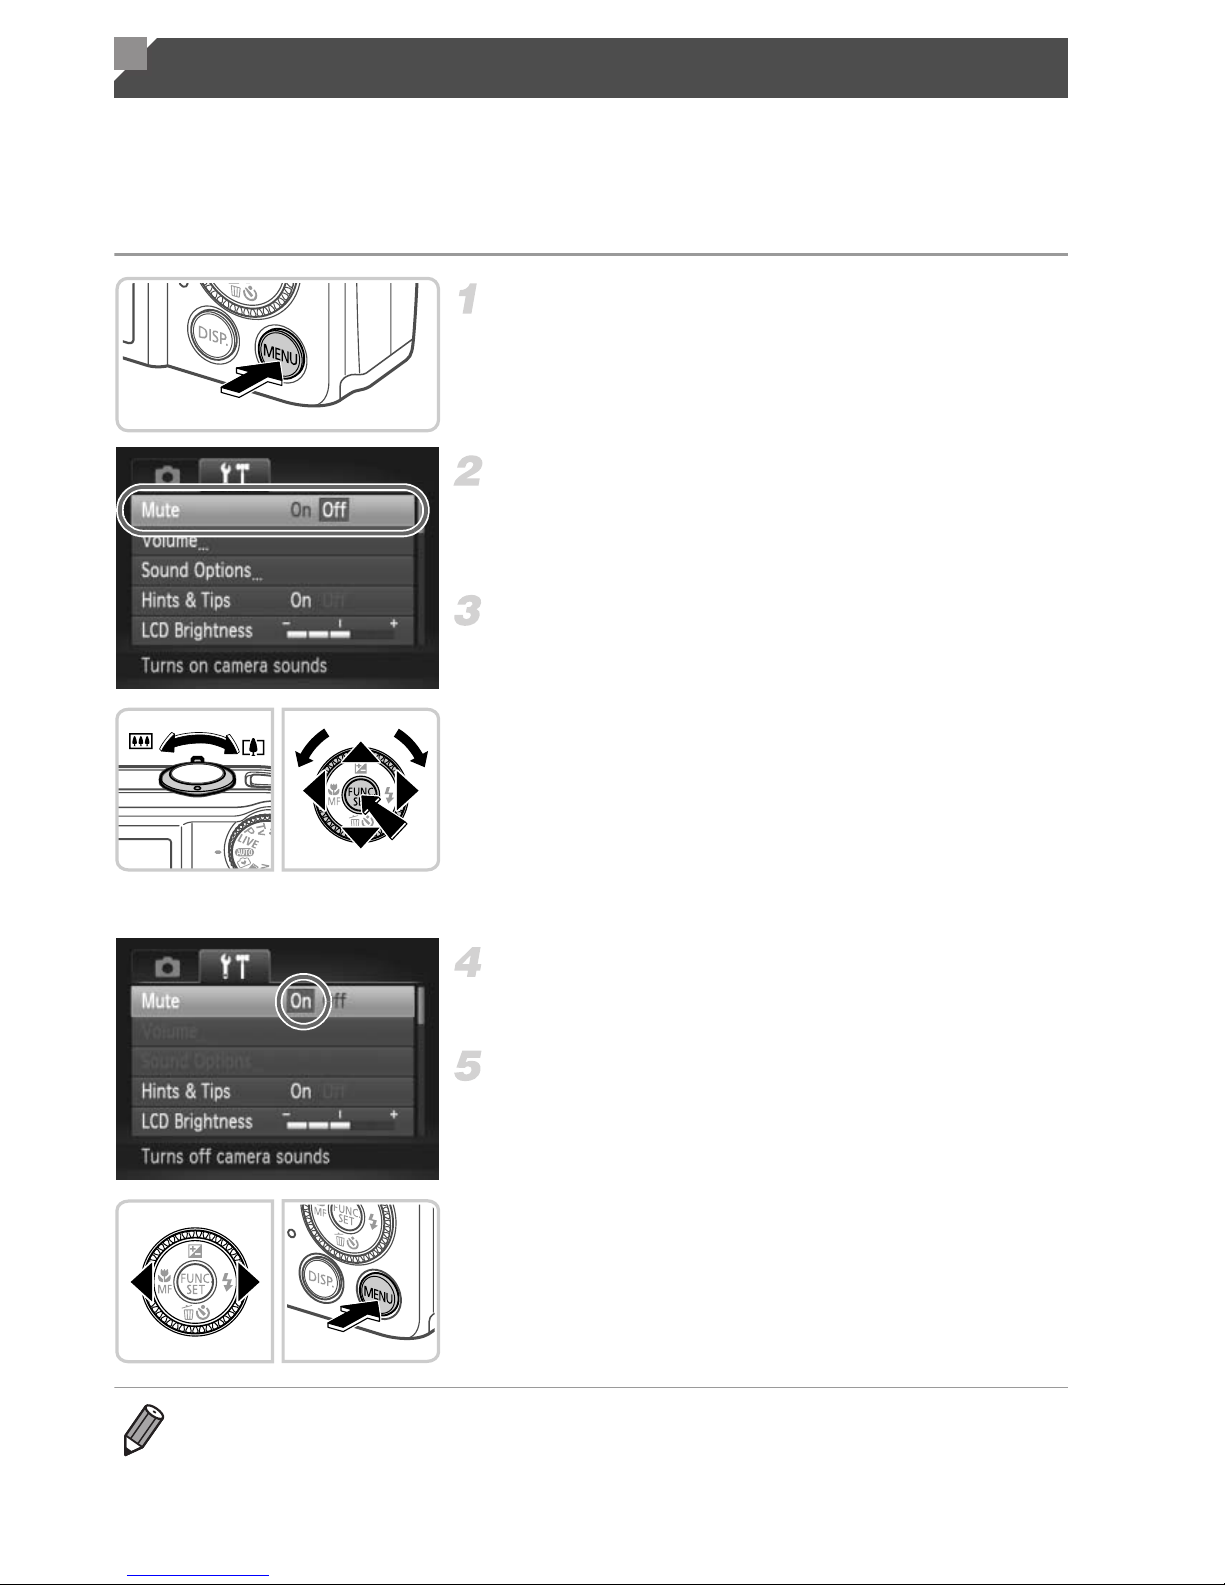
40
Configure a variety of camera functions through other menus as follows.
Menu items are grouped by purpose on tabs, such as shooting (4), playback
(1), and so on. Note that available settings vary depending on the selected
shooting or playback mode (pp. 234 – 239).
z Press the n button.
Choose a tab.
z Move the zoom lever or press the qr buttons
to choose a tab.
Choose a setting.
z Press the op buttons or turn the 5 dial to
choose a setting.
z To choose settings with options not shown,
first press the m or r button to switch
screens, and then either press the op
buttons or turn the 5 dial to select the setting.
z Press the n button to restore the
previous screen.
Choose an option.
z Press the qr buttons to choose an option.
Finish the setup process.
z
Press the
n
button to return to the screen
displayed before you pressed the
n
button in step 1.
n
• To undo any accidental setting changes, you can restore the camera’s default
settings (p. 193).
Page 77
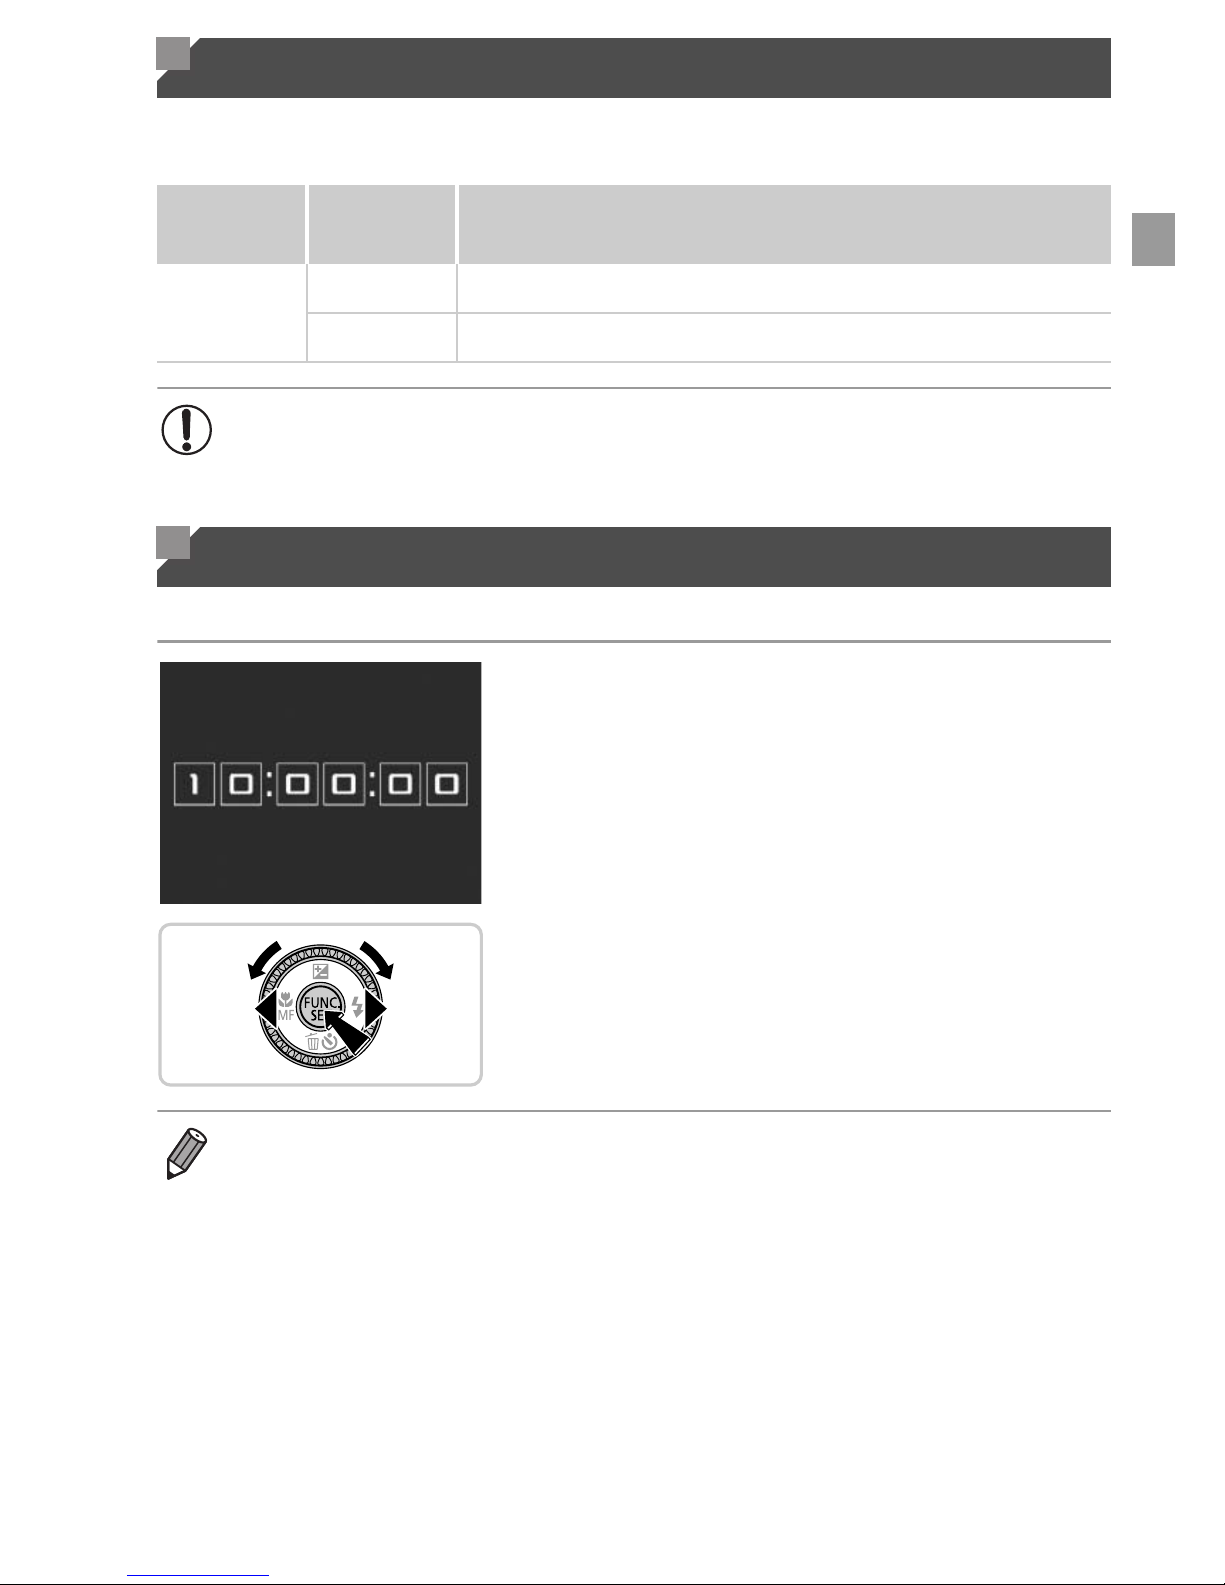
41
The indicator on the back of the camera (p. 5) lights up or blinks depending
on the camera status.
You can check the current time.
z Press and hold the m button.
X The current time appears.
z If you hold the camera vertically while using
the clock function, it will switch to vertical
display. Press the qr buttons or turn the 5
dial to change the display color.
z
Press the m button again to cancel the clock
display.
Indicator Display
Color
Indicator
Status
Camera Status
Green
On Connected to a computer (p. 29), or display off
Blinking Starting up, recording/reading/transmitting images
• When the indicator blinks green, never turn the camera off, open the
memory card/battery cover, or shake or jolt the camera, which may
corrupt images or damage the camera or memory card.
Clock
• When the camera is off, press and hold the m button, then press the power
button to display the clock.
Page 78

42
Page 79

43
Using GPS Function
Basic GPS operations and features
2
SX260 HS
Page 80
44
Camera location information (latitude, longitude, and elevation) based on
acquired GPS signals can be added to the still images and movies you shoot,
or this information can be logged separately. In addition to geotagging, the
camera clock can be updated automatically.
Before using GPS functions, make sure the date, time, and local time zone
on the camera are set correctly, as described in “Setting the Date and Time”
(p. 17).
GPS: Global Positioning System
z Use the camera outside, where there is an
unobstructed view of the sky. (GPS functions
will not work correctly indoors or in other
areas away from GPS coverage (p. 45).)
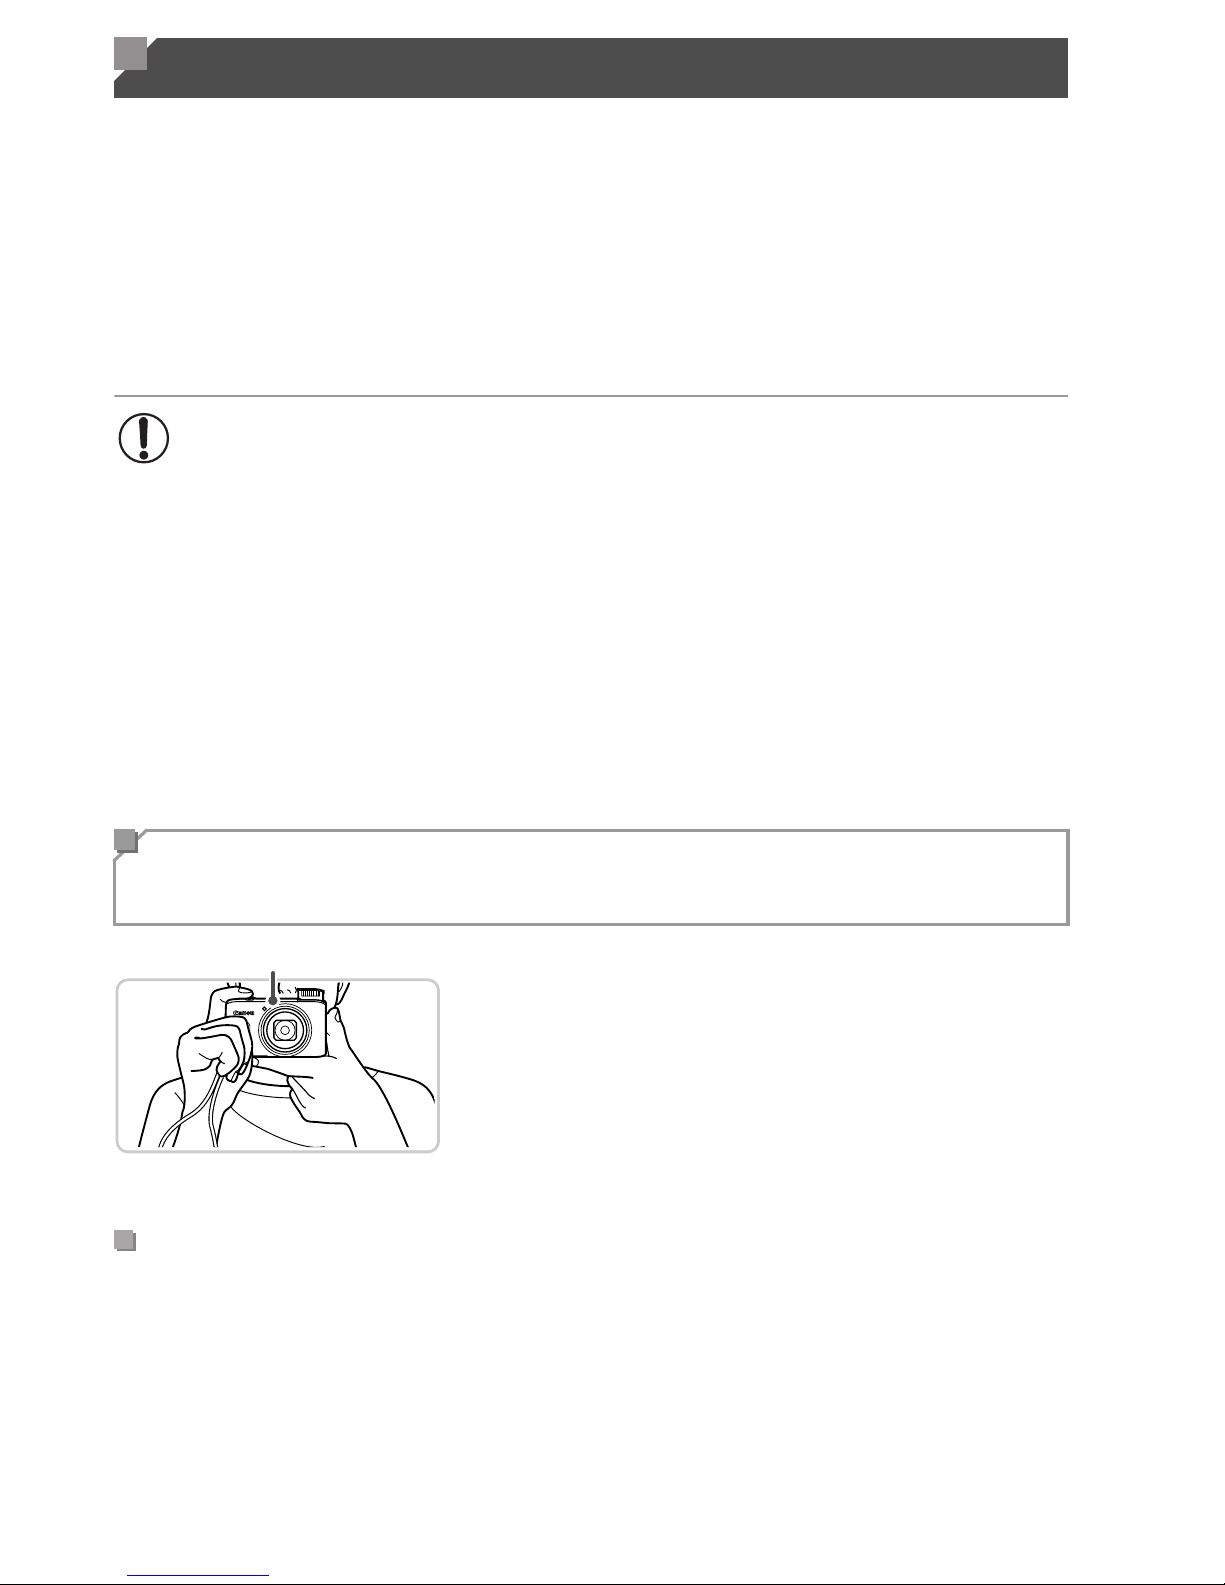
z Hold the camera correctly, as shown, for
easier GPS signal reception.
z Keep your fingers or other objects off the
GPS antenna.
For better GPS signal reception, try to keep the GPS antenna pointing up,
toward the sky. When carrying the camera in a bag, put it in the bag with the
GPS antenna pointing up, and try to put the camera in an outer section of bag.
Using GPS Function
When using GPS functions, keep the following points in mind.
• In certain countries and regions, the use of GPS may be restricted.
Therefore, be sure to use GPS in accordance with the laws and
regulations of your country or region. Be particularly careful when
traveling outside your home country.
• Be careful about using GPS features where the operation of electronic
devices is restricted, because the camera will receive GPS signals.
•
Others may be able to locate or identify you by using location data in
your geotagged still images or movies. Be careful when sharing these
images or GPS log files with others, as when posting images online
where many others can view them.
Where to Use GPS, and How to Hold the
Camera
GPS Antenna
How to Carry the Camera When Using the Logger
Function
Page 81
Using GPS Function
45
• Location information may not be recorded, or inaccurate information may
be recorded where GPS signal coverage is poor, such as in the following
places.
zIndoors zunderground znear buildings or in valleys zin tunnels or
forests znear high-voltage power lines or mobile phones operating on the
1.5 GHz band zinside a bag or suitcase zunderwater (when the camera
is used in an optional waterproof case (p. 198)) zwhen traveling across
great distances zwhen traveling through different environments
• GPS satellite movement may interfere with recording of location
information, or the recorded position may differ from the actual position
even in situations other than those mentioned above.
you have not used GPS functions for some time.
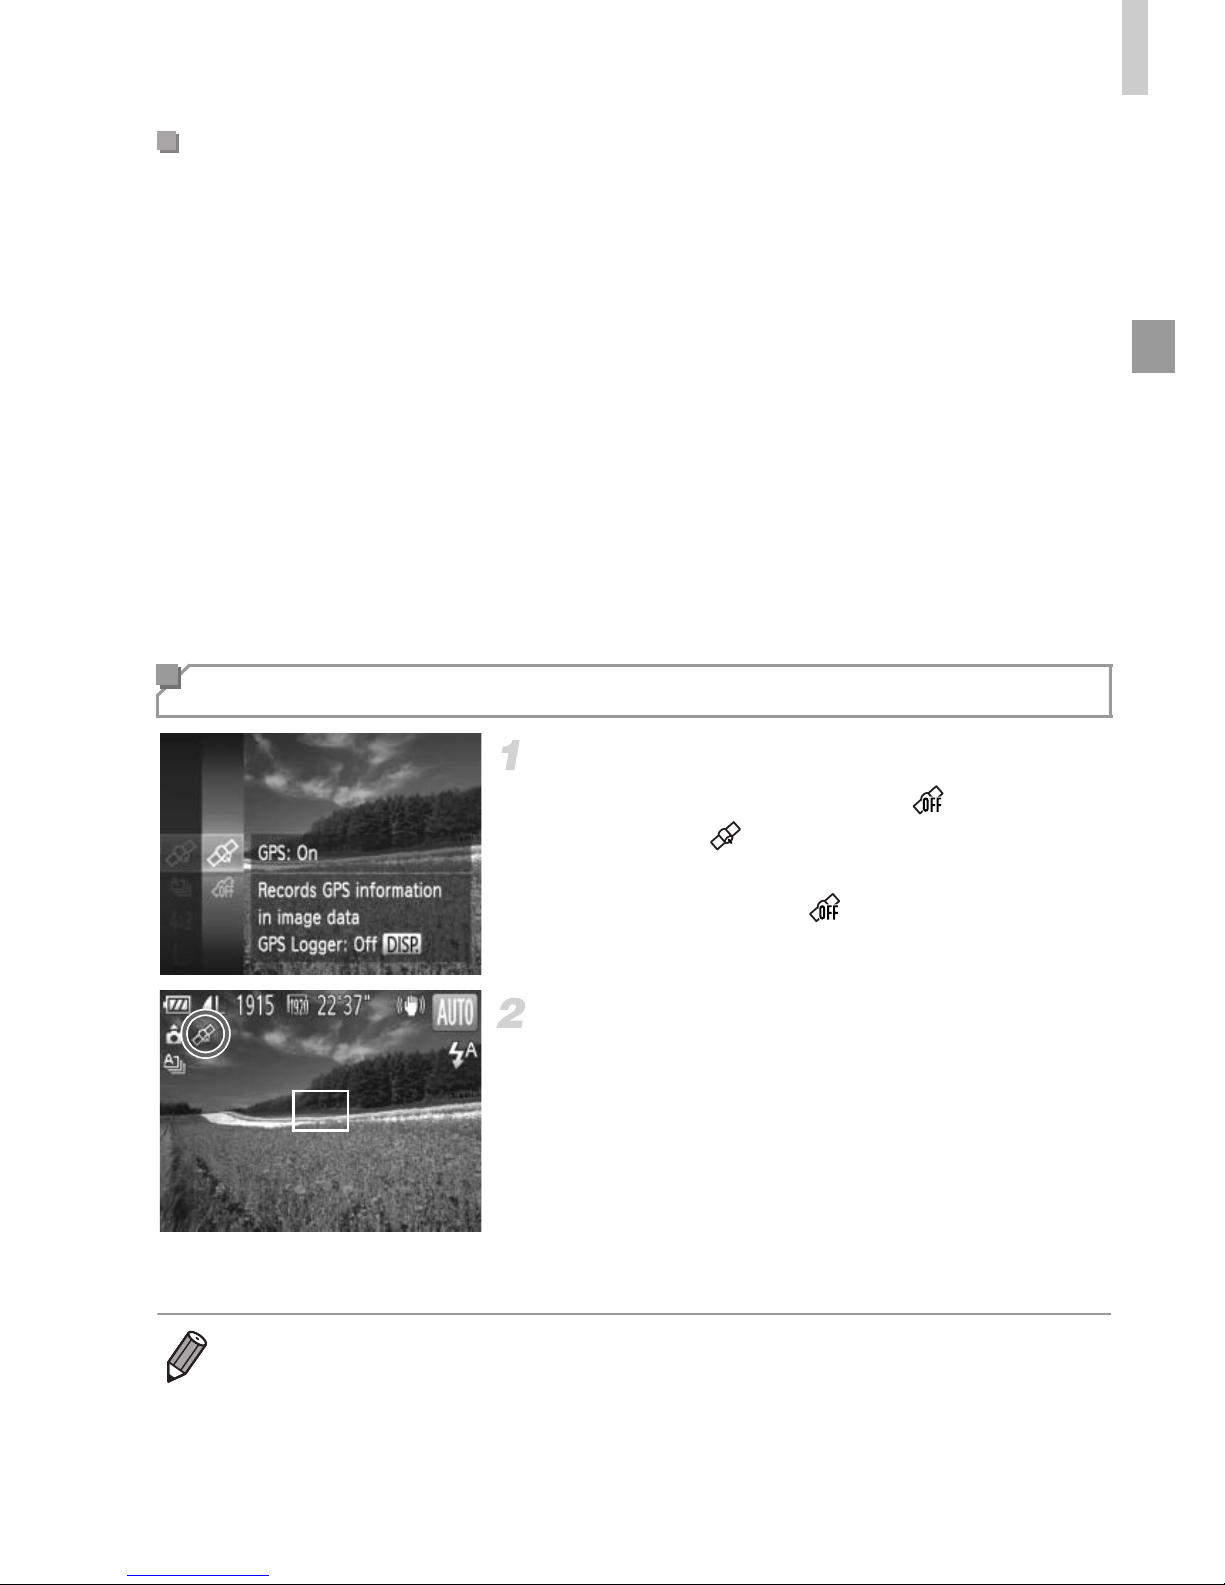
Configure the setting.
z Press the m button, choose in the menu,
and choose .
z To restore the original setting, repeat this
process but choose .
Check the reception status.
z Use the camera outside, where there is an
unobstructed view of the sky. (GPS functions
will not work correctly indoors or in other
areas away from GPS coverage (see
above).)
z Check GPS reception status as shown on the
screen.
Places With Poor GPS Coverage
Activating GPS Functions
• You can also activate GPS by pressing the n button, choosing [GPS
Settings] on the 3 tab, pressing the
m
button, and setting [GPS] to [On].
Page 82
Using GPS Function
46
* Logger function is [On] (p. 48).
• When GPS signal reception is not possible indoors or in other places away
from coverage (p. 45), try going outside where there is an unobstructed
view of the sky. Hold the camera correctly (p. 44) and point the GPS
antenna up at the sky.
• will normally be displayed within a few minutes when the camera is
used in areas with ample GPS coverage, such as outdoor areas with an
unobstructed view of the sky. If is not displayed, move to an area
without obstructions (such as buildings) between the camera and GPS
satellites and wait a few minutes until it appears.
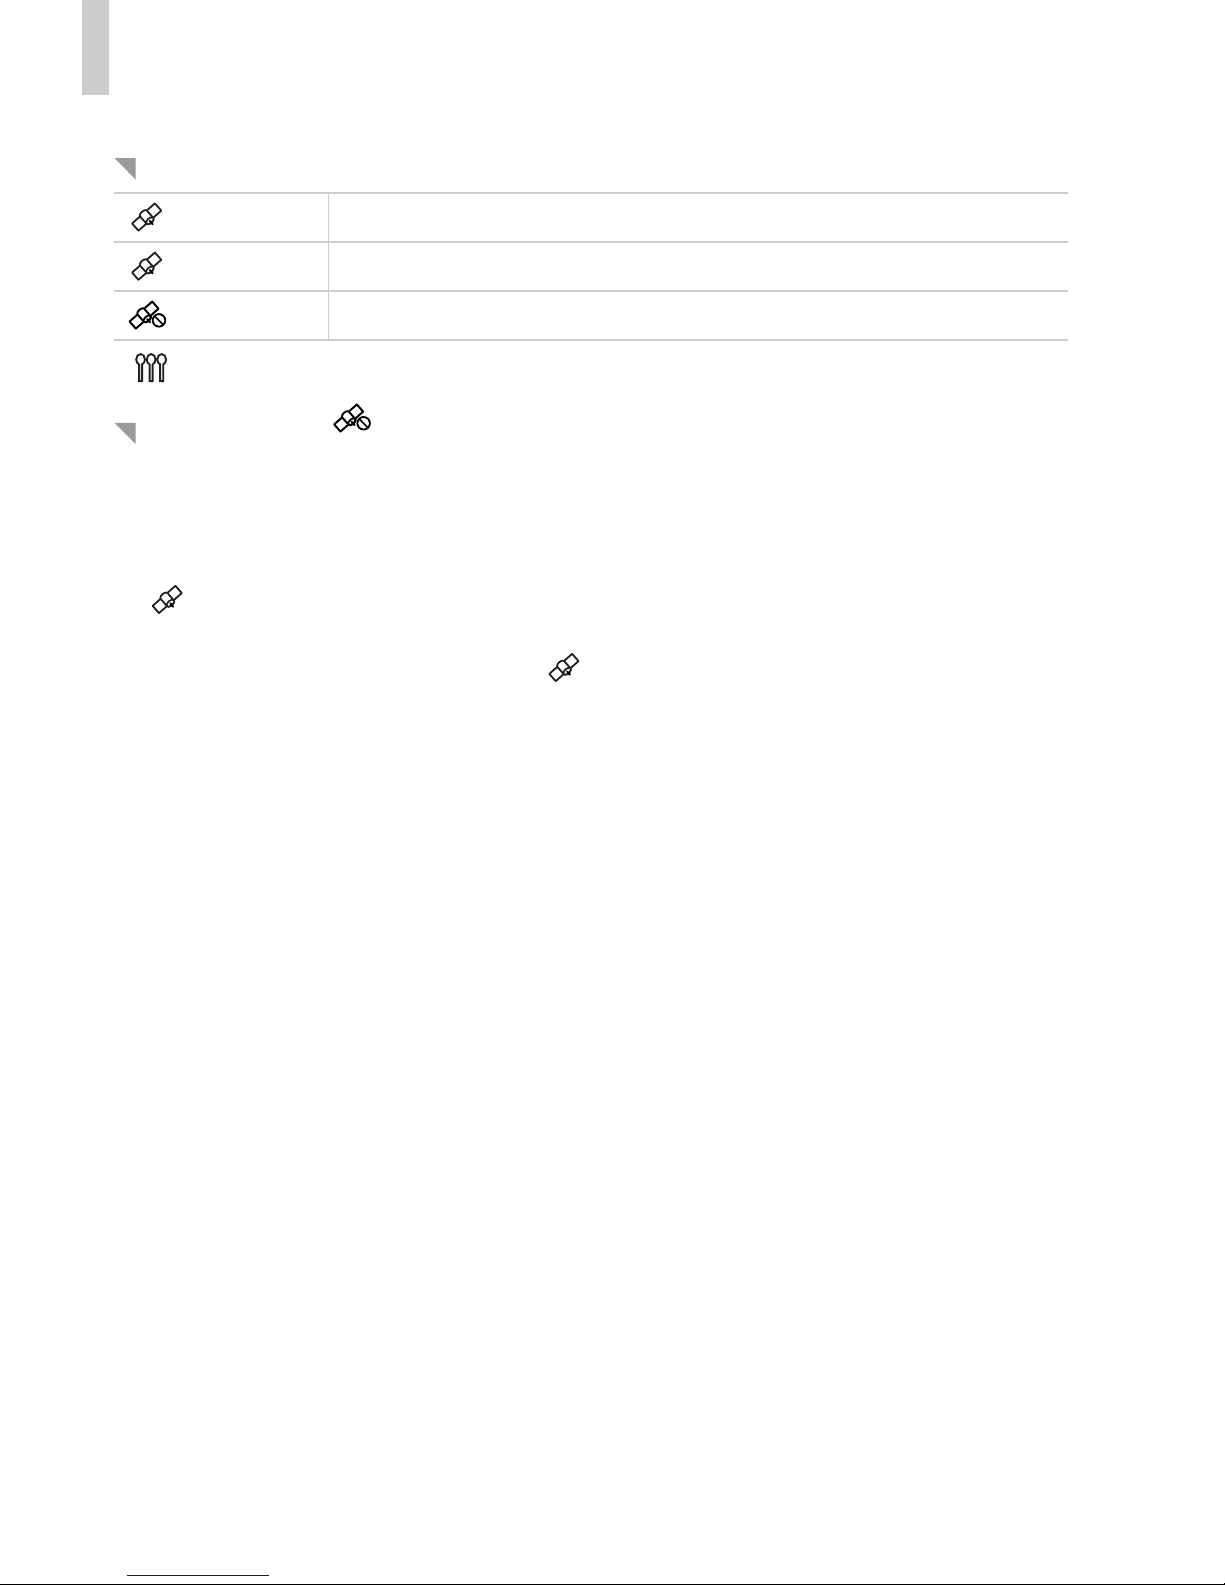
Reception Status Display
(on) GPS signal received. Location can be recorded.*
(blinking) Looking for GPS signal.*
(on) No GPS signal.
Tips When is Displayed
Page 83
Using GPS Function
47
Camera location information (latitude, longitude, and elevation) can be added
as you shoot, for later reference (p. 149). This information also enables you
to see the shooting location of your still images and movies on a map, when
you use the included software (p. 2).
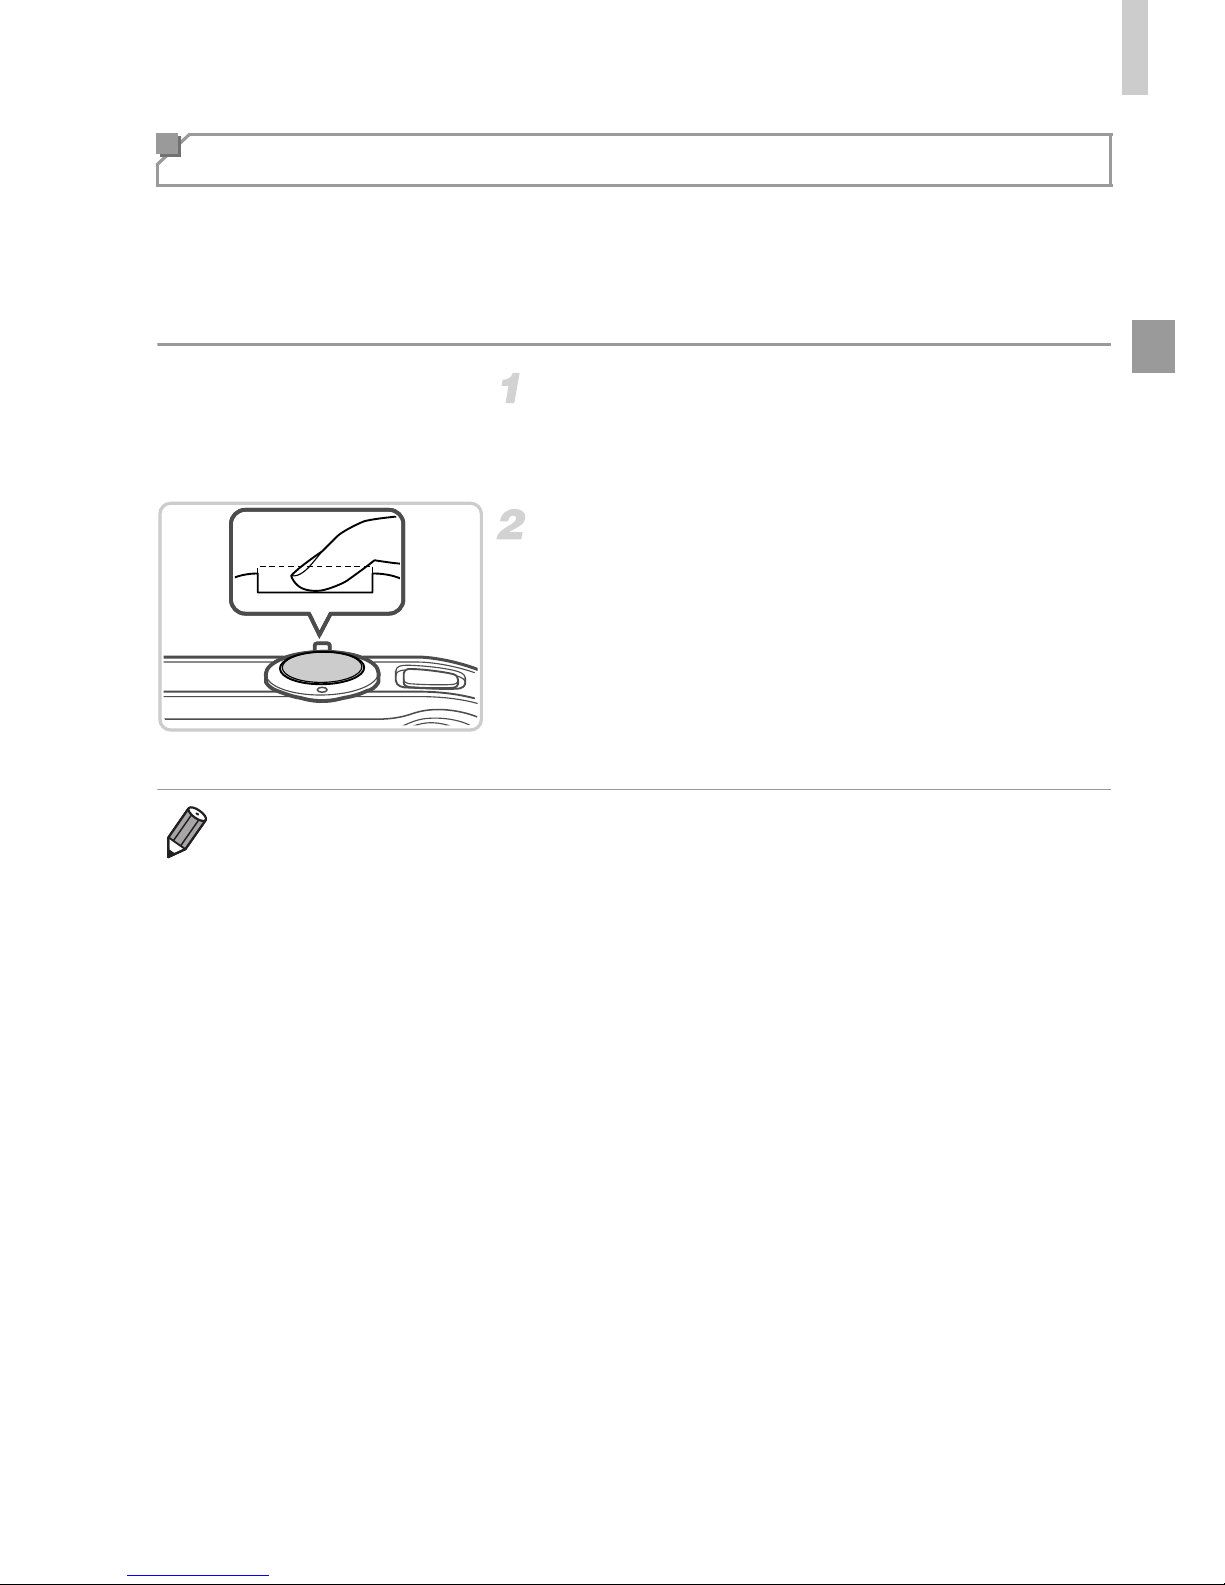
Set [GPS] to [On].
z Follow steps 1 – 2 on p. 45 to configure the
setting.
Shoot.
X The still images and movies you shoot will
now be geotagged.
z To review the location information (latitude,
longitude, and elevation) of your geotagged
still images or movies, see “GPS Information
Display” (p. 149).
Geotagging Images While Shooting
• The shooting date and time can be recorded when you have selected [GPS
Auto Time: On].
• Geotagging applies the initial camera location and shooting date and time, as
acquired when you begin shooting a movie.
• For movies made by using Movie Digest (p. 92), geotagging applies the initial
camera location and shooting date and time, as acquired for the first movie shot
that day.
Page 84
Using GPS Function
48
You can keep a record of where the camera was taken by using location
information acquired from GPS satellite signals over a period of time. Daily
location data based on acquired GPS signals is logged to a file, separate from
image data. This log file can be loaded into the included software (p. 2) to
trace the route taken with the camera on a map.
Since the date will be updated, and information location will be logged
continually whether or not the camera is on, battery life will be reduced even
when the camera is off. You may find the battery to be nearly depleted when
turning the camera on. Charge the battery as needed, or keep a spare
charged battery with you.
Activate GPS.
z Follow step 1 on p. 45 to configure the
setting.
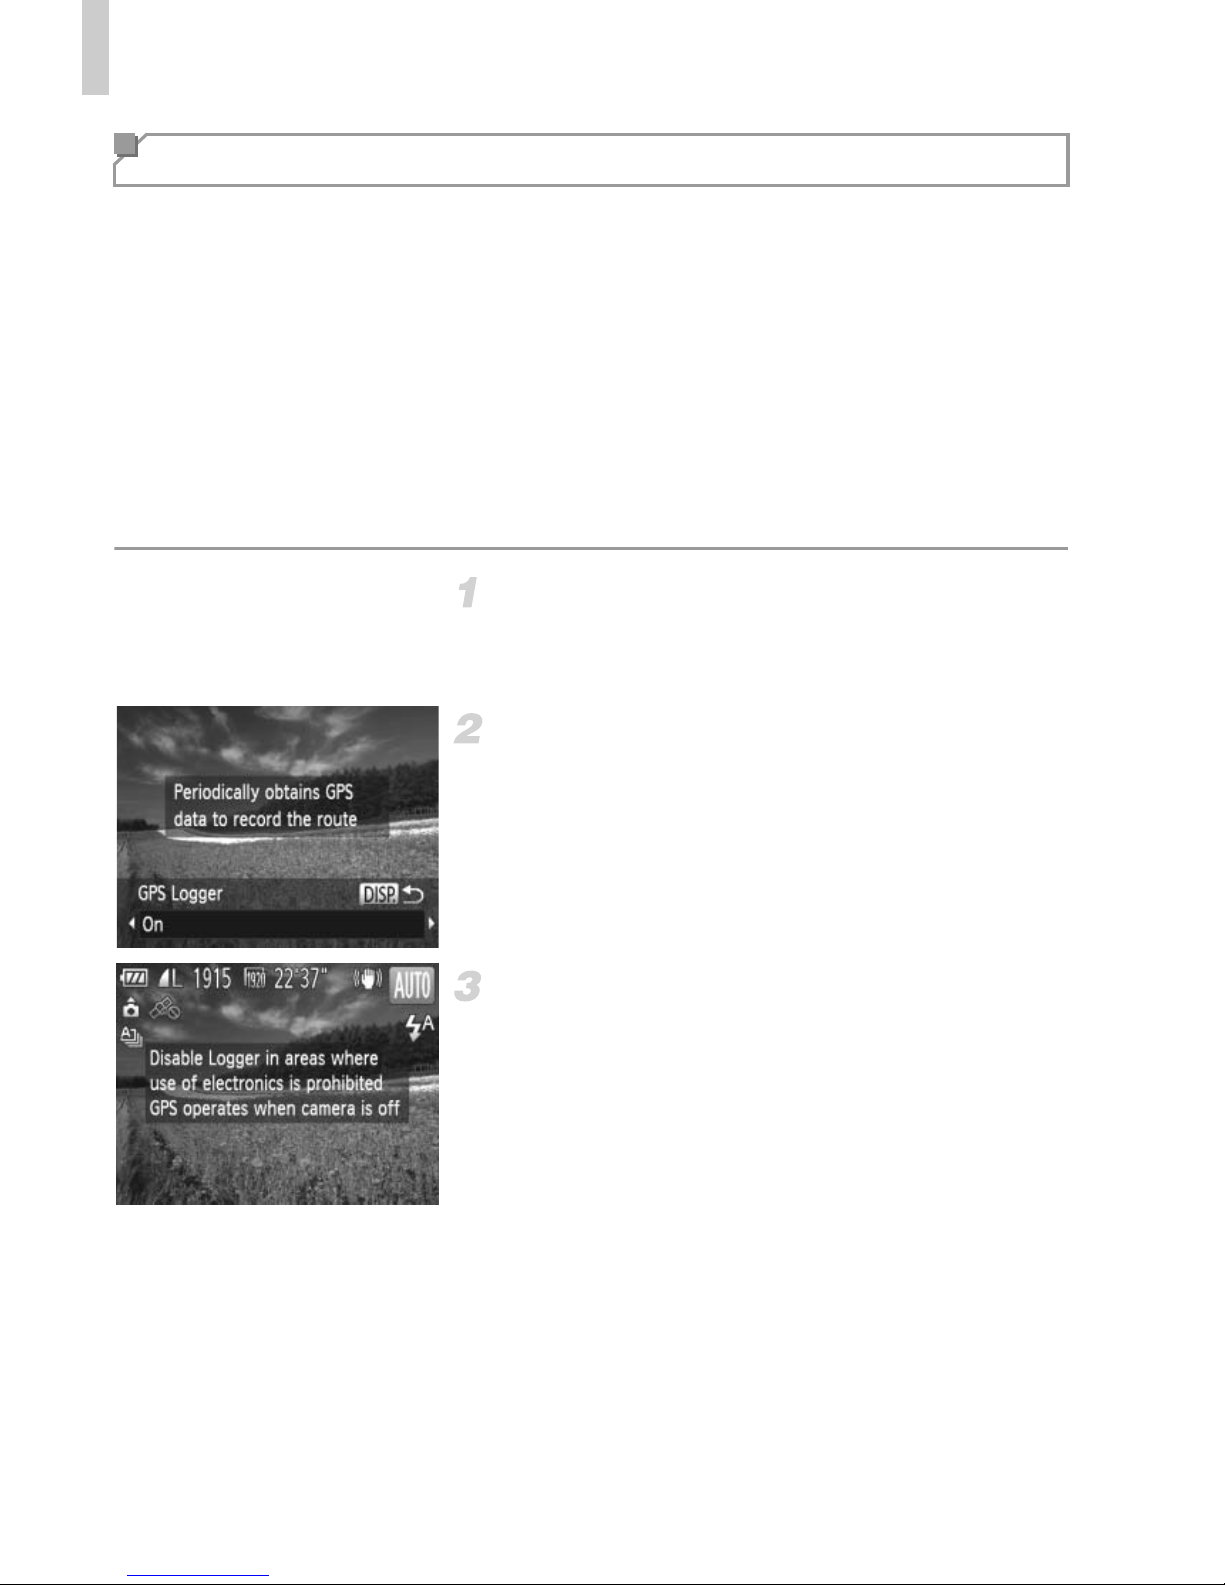
Configure the setting.
z Press the l button, and press the qr
buttons or turn the 5 dial to choose [On].
z To restore the original setting, repeat this
process but choose [Off].
Finish the setup process.
z When you press the m button, a message
about the logger is displayed. Be sure to read
the message.
X The logger function will operate, and the
date, time and location information based on
signals acquired from GPS satellites will be
logged to the camera.
z The logger will continue to function even
when the camera is turned off.
Logging Camera Location Data
Page 85

Using GPS Function
49
Save the GPS log files to the
memory card.
z When you turn off the camera, a message
about the logger is displayed. The location
information, date and time will be saved to the
memory card. This information will not remain
on the camera.
z If the camera is off and you want to remove
the memory card when the logger is being
used, turn the camera on, then turn it off
again before removing the memory card.
X The location information, date and time will
be saved to the memory card when you do
any of the following things.
-Display the log files.
-Display the date/time setting screen.
-Display the time zone setting screen.
Page 86
Using GPS Function
50
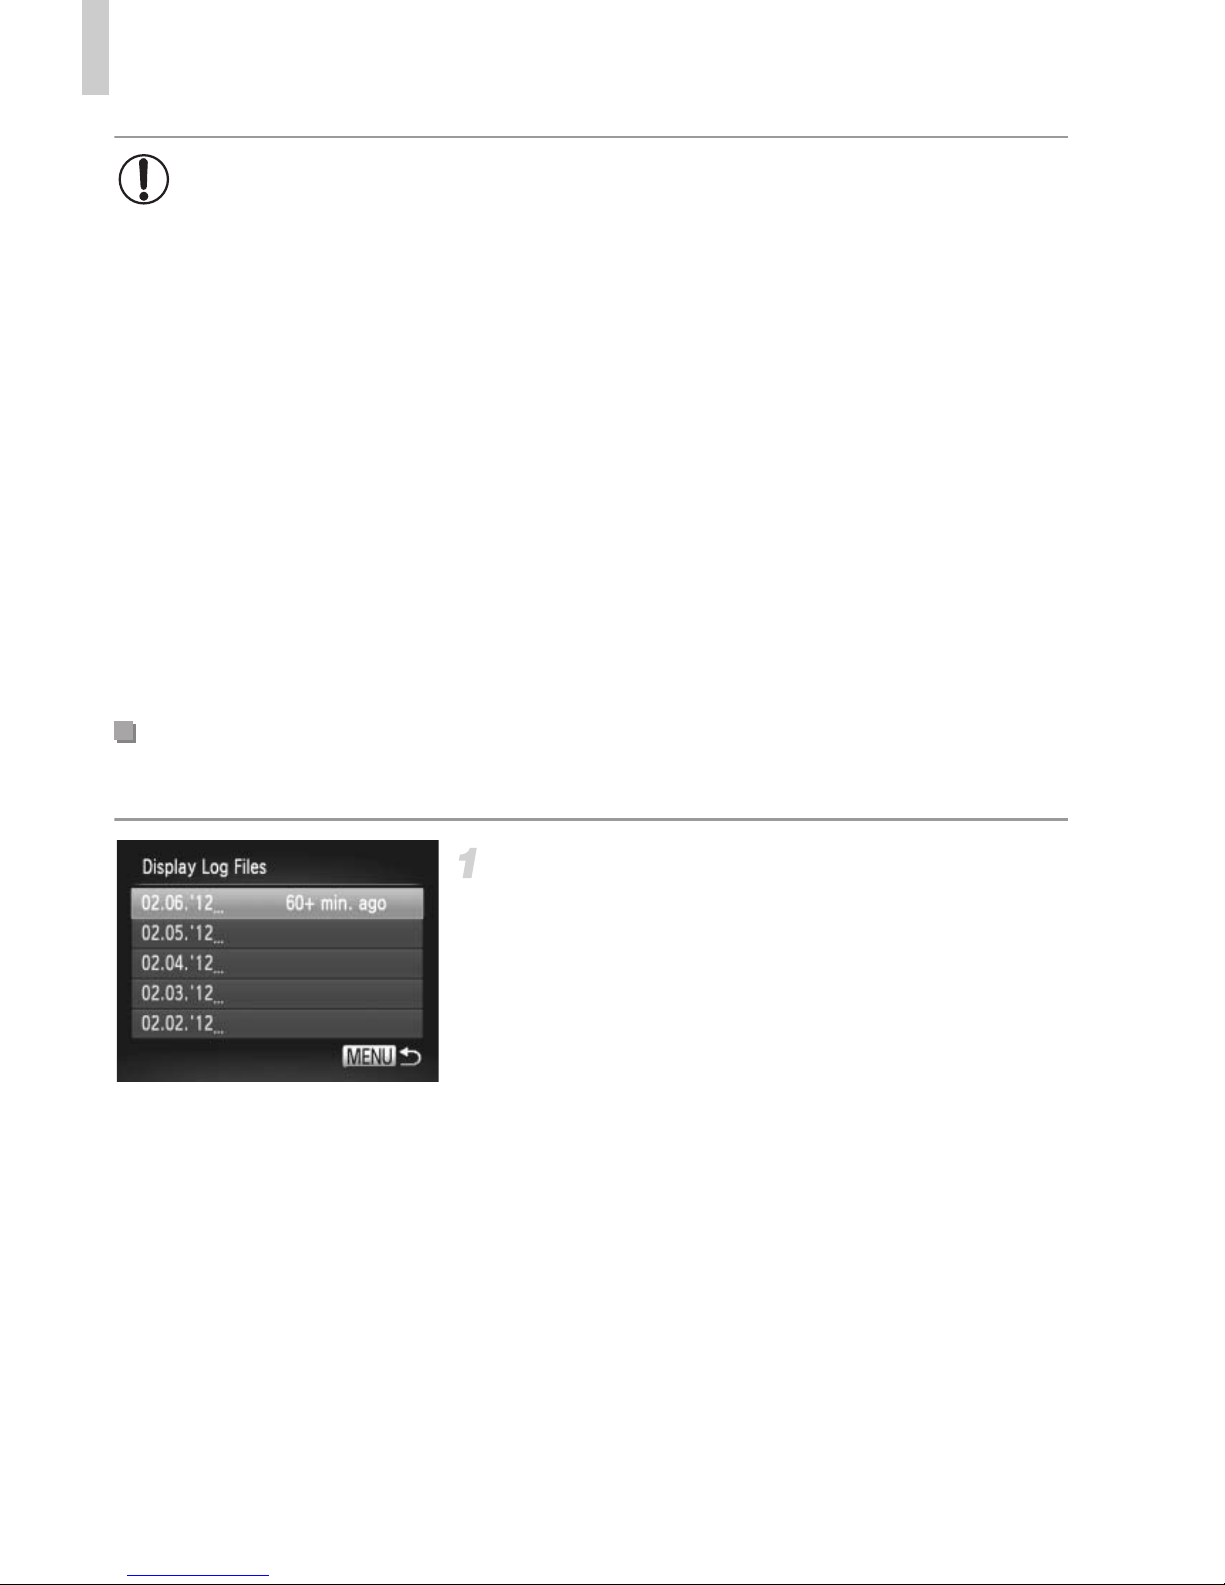
You can check the GPS log files saved to a memory card on the camera.
Display the log files.
z Press the n button, choose [GPS
Settings] on the 3 tab, and then press the
m button (p. 40).
z Choose [Display Log Files] and press the m
button to display the files (p. 40).
X To the right of today’s date, the time elapsed
from the last time location information was
recorded is displayed.
• Removing the battery after step 4 will deactivate the logger. To
reactivate the logger after battery replacement, turn the camera on
and then off again.
• GPS log files cannot be saved when write-protected memory cards
are in the camera.
• Location information, date and time will be saved to the memory card
when the camera is turned off or when displaying log files (see
below). For this reason, if the camera is off and you want to remove
the memory card when the logger is being used, turn the camera on,
then turn it off again before removing the memory card.
• When using the logger function, exercise caution when turning the
camera over to another person, as the date and time, and logged
location information will remain on the camera until it is saved to a
memory card (even if the battery is nearly depleted).
• Be careful when formatting memory cards (p. 185), because the GPS
log file will also be erased.
Checking the GPS Log Files
Page 87
Using GPS Function
51
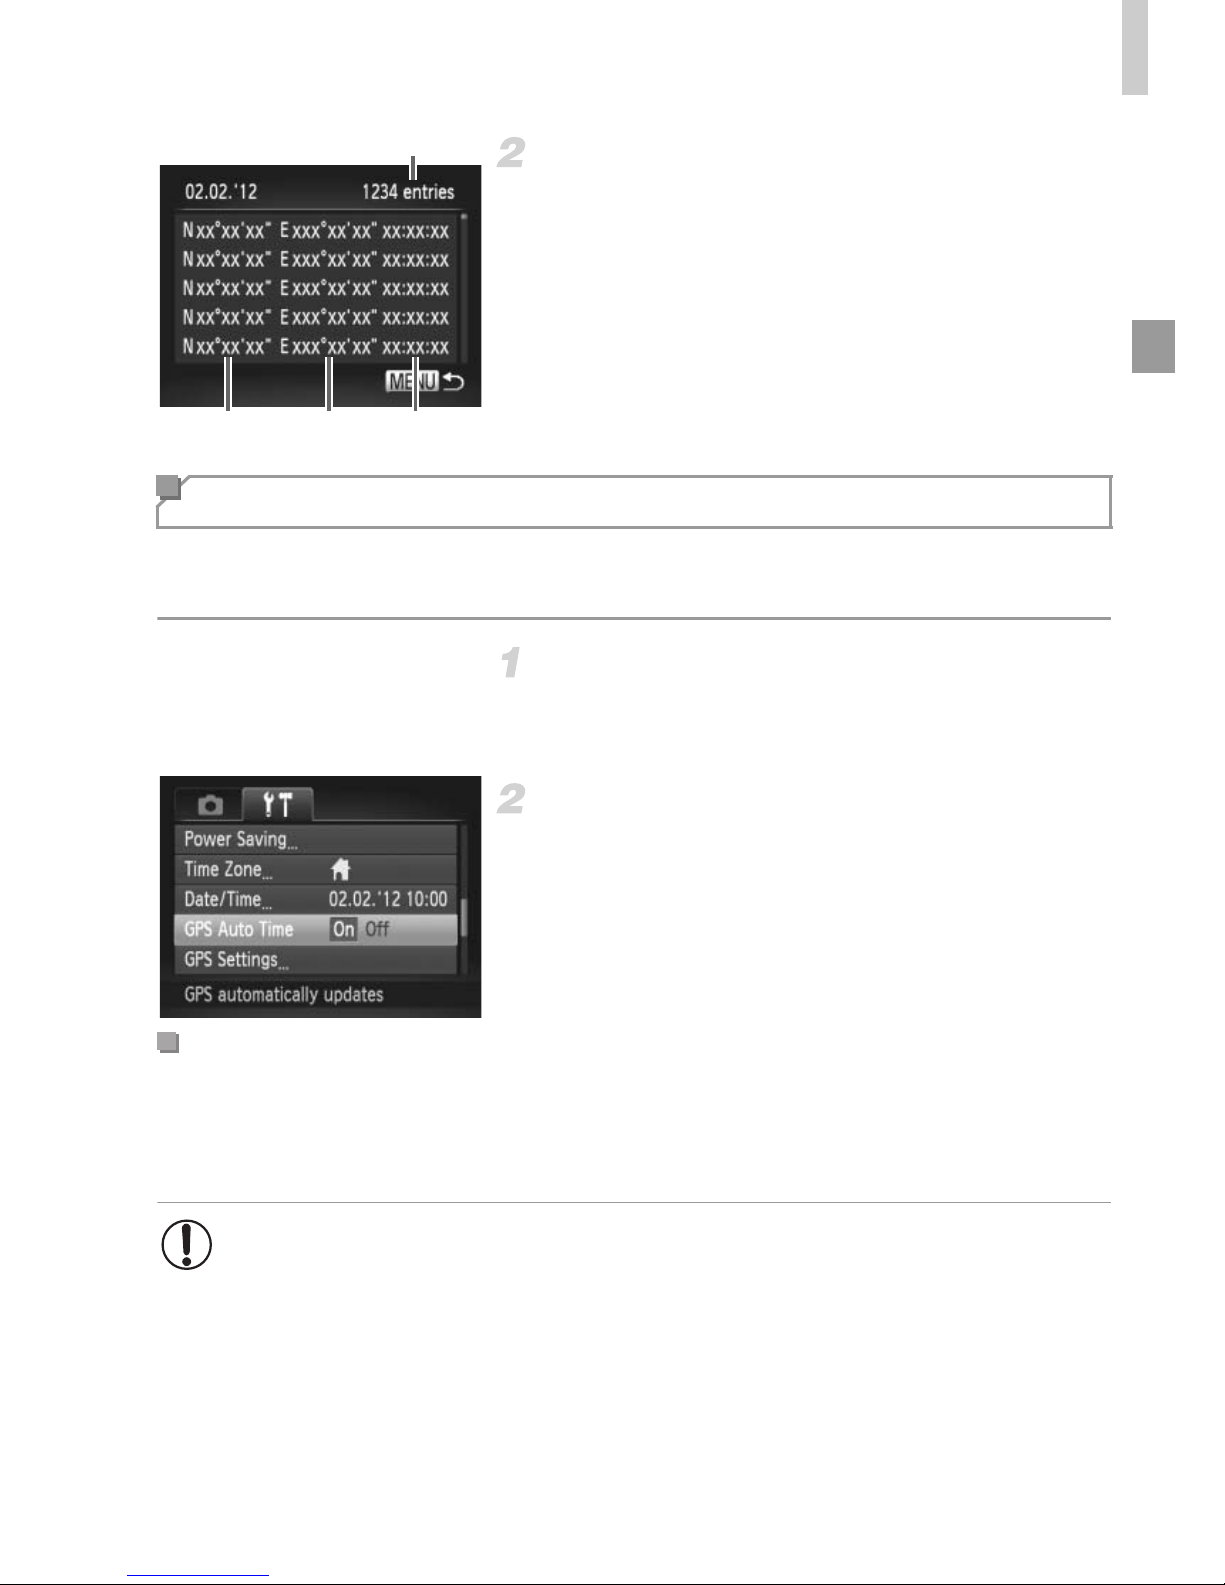
Check the GPS log files.
z Choose a date and press the m button. The
recorded latitude, longitude, time, and
number of logs acquired on that date are
displayed.
You can have the date and time for the configured time zone (pp. 17, 189)
automatically updated when the camera receives GPS signals.
Set [GPS] to [On].
z Follow steps 1 – 2 on p. 45 to configure the
setting.
Configure the setting.
z Press the n button, choose [GPS Auto
Time] on the 3 tab, and then choose [On]
(p. 40).
z To set daylight saving time, follow the steps
on p. 189.
[Update completed] is shown on the [Date/Time] screen in step 2 on p. 17
after the date and time are automatically updated. [GPS Auto Time: On] is
shown if a GPS signal has not been received yet.
Number of Logs Acquired
Latitude Longitude Time
Automatically Updating the Date and Time
Confirming Automatic Time Updating
• When [GPS Auto Time] is set to [On], you cannot change the date
and time by accessing the [Date/Time] screen as described on p. 18,
because this information will be updated automatically.
Page 88

52
Page 89

53
Smart Auto Mode
Convenient mode for easy shots with greater control
over shooting
3
Page 90
54
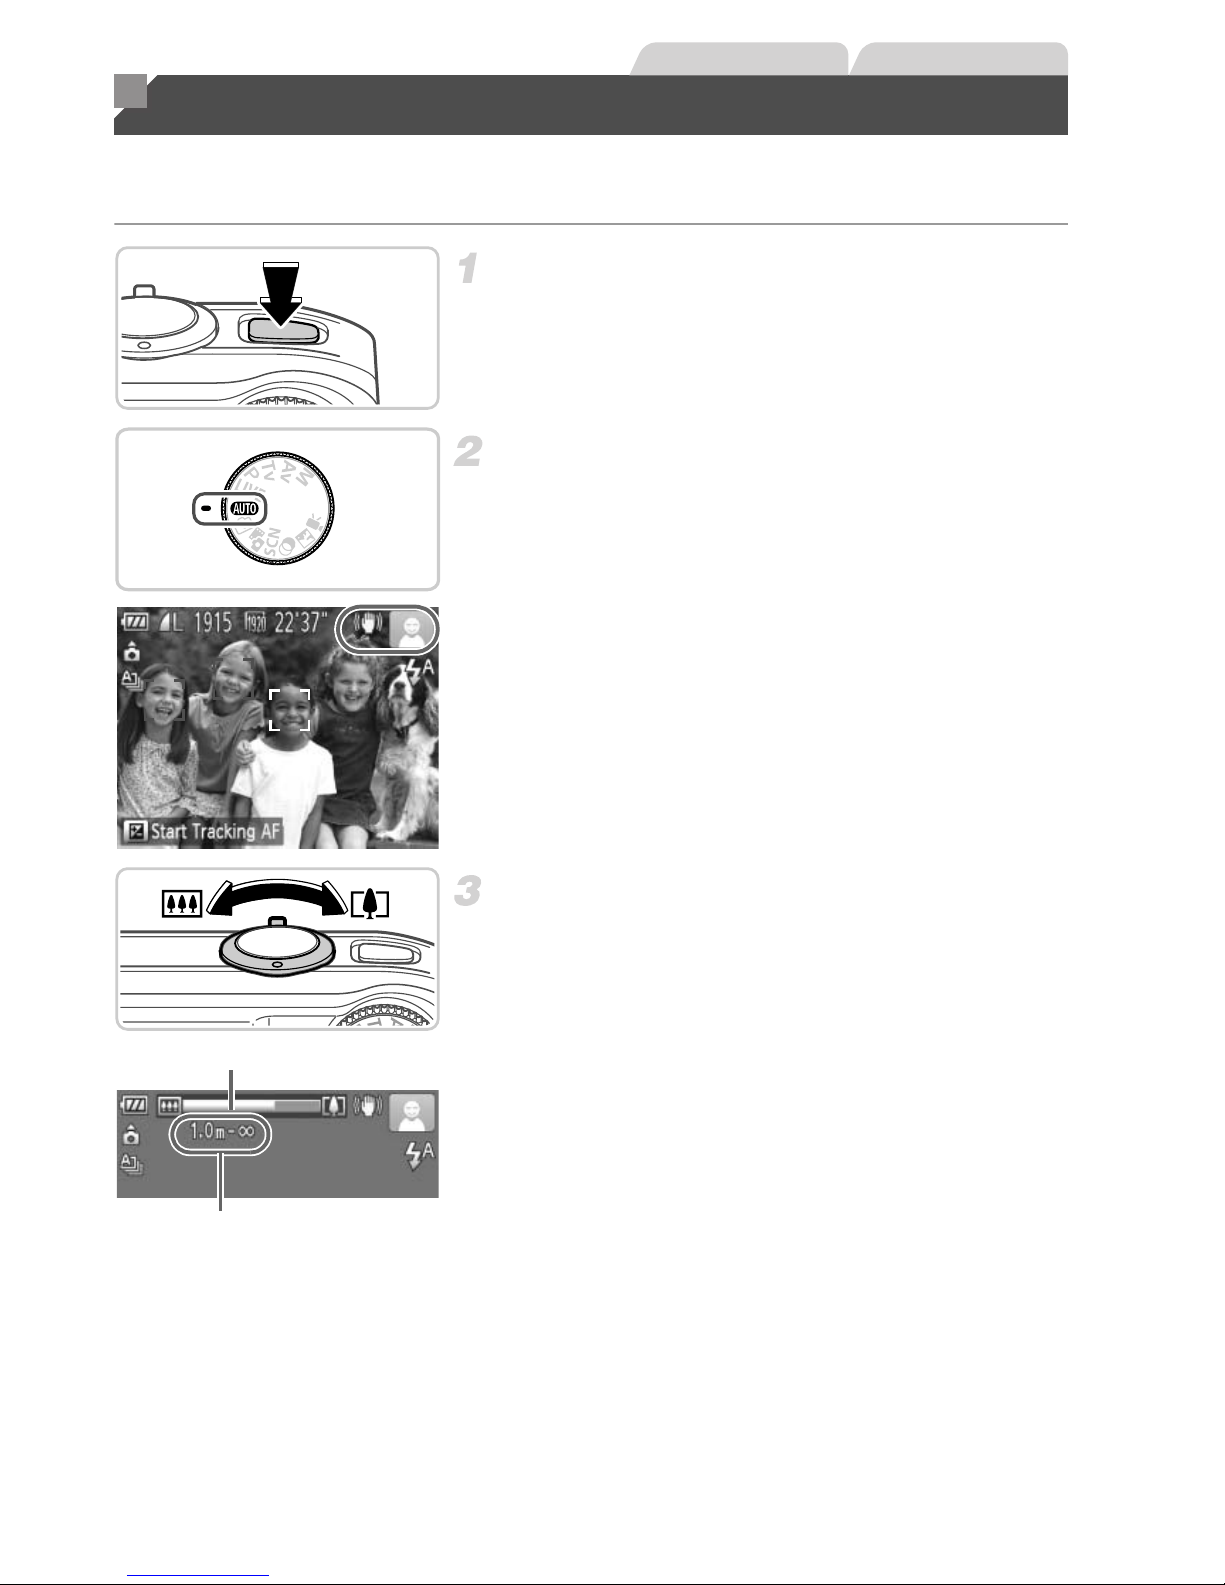
For fully automatic selection at optimal settings for specific scenes, simply let
the camera determine the subject and shooting conditions.
Turn the camera on.
z Press the power button.
Enter A mode.
z Set the mode dial to A.
z Aim the camera at the subject. The camera
will make a slight clicking noise as it
determines the scene.
X Icons representing the scene and image
stabilization mode are displayed in the upper
right of the screen (pp. 59, 61).
X Frames displayed around any detected
subjects indicate that they are in focus.
Compose the shot.
z To zoom in and enlarge the subject, move the
zoom lever toward i (telephoto), and to
zoom away from the subject, move it toward
j (wide angle). (A zoom bar showing the
zoom position is displayed.)
Shooting in Smart Auto Mode
Still Images Movies
Zoom Bar
Focus Range (approx.)
Page 91
Shooting in Smart Auto Mode
55
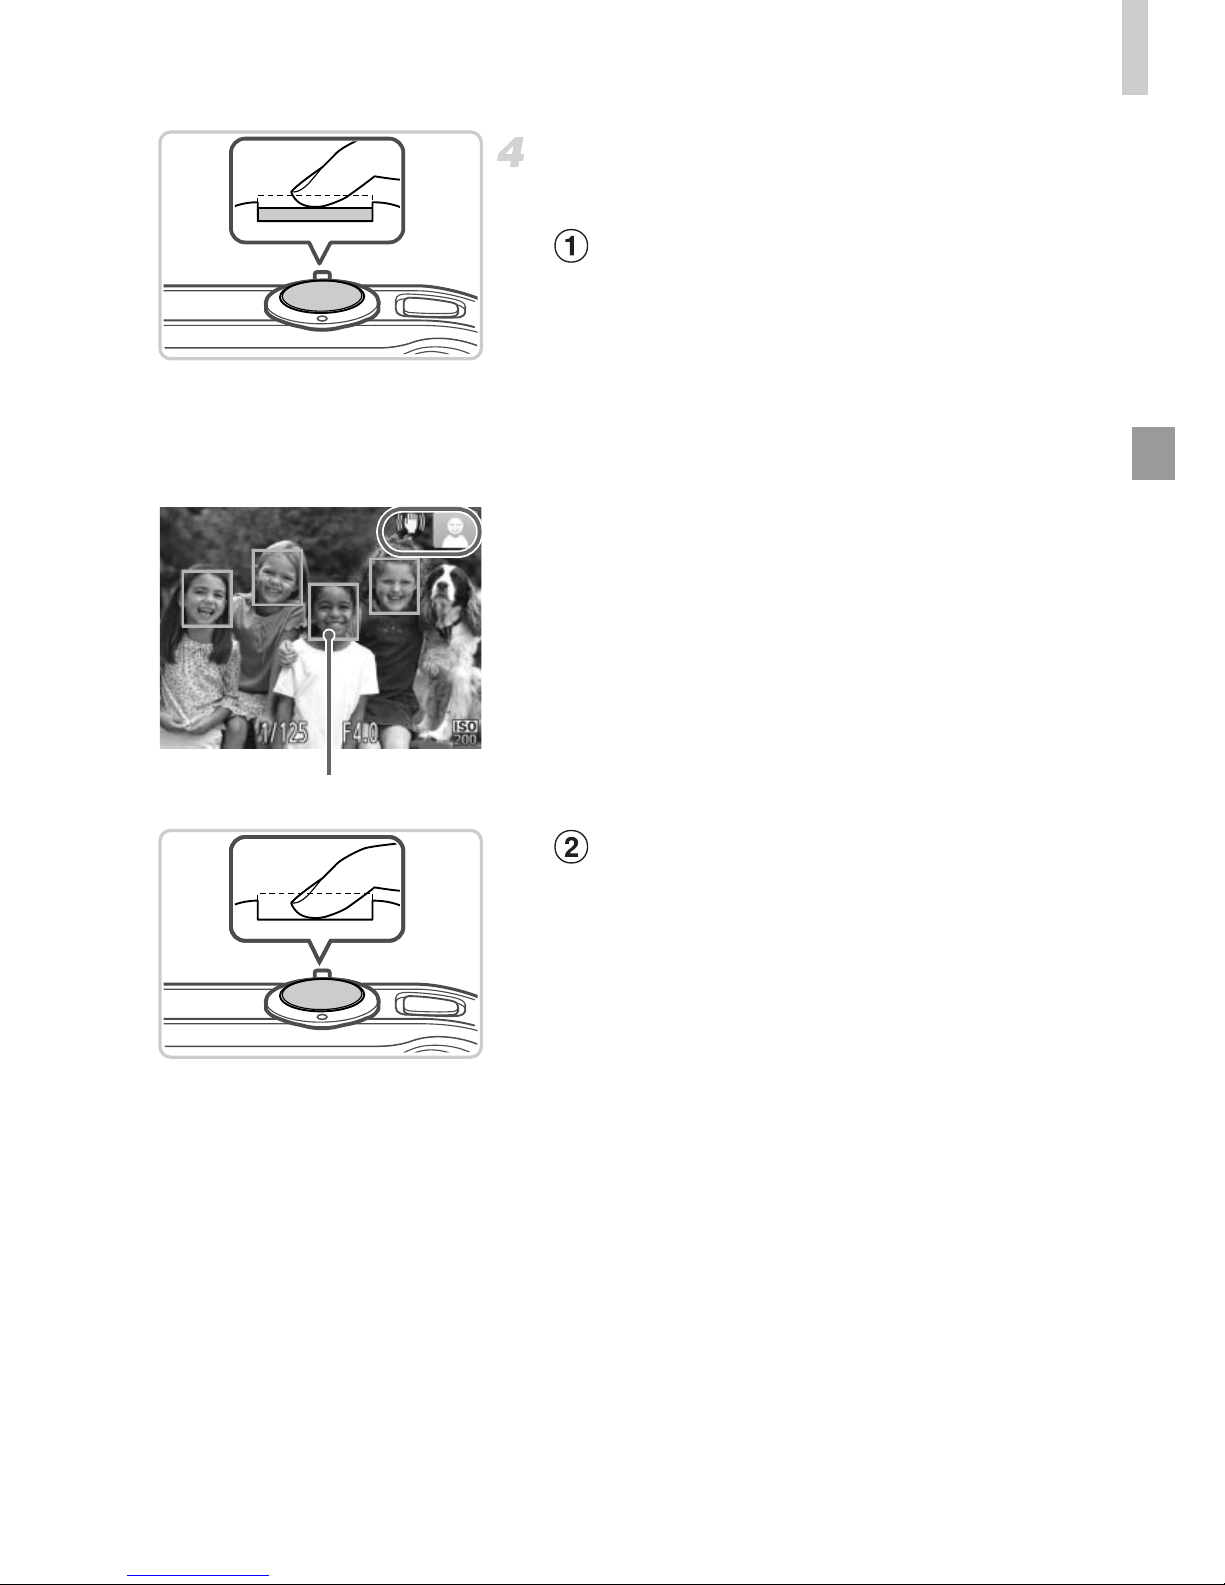
Shoot.
Shooting Still Images
Focus.
z Press the shutter button halfway. The camera
beeps twice after focusing, and AF frames
are displayed to indicate image areas in
focus.
z Several AF frames are displayed when
multiple areas are in focus.
X The flash automatically rises in low-light
conditions.
Shoot.
z Press the shutter button all the way down.
X As the camera shoots, a shutter sound is
played, and in low-light conditions when the
flash is up, it fires automatically.
z Keep the camera still until the shutter sound
ends.
X Your shot remains displayed on the screen
for about two seconds.
z Even while the shot is displayed, you can
take another shot by pressing the shutter
button again.
AF Frames
Page 92
Shooting in Smart Auto Mode
56
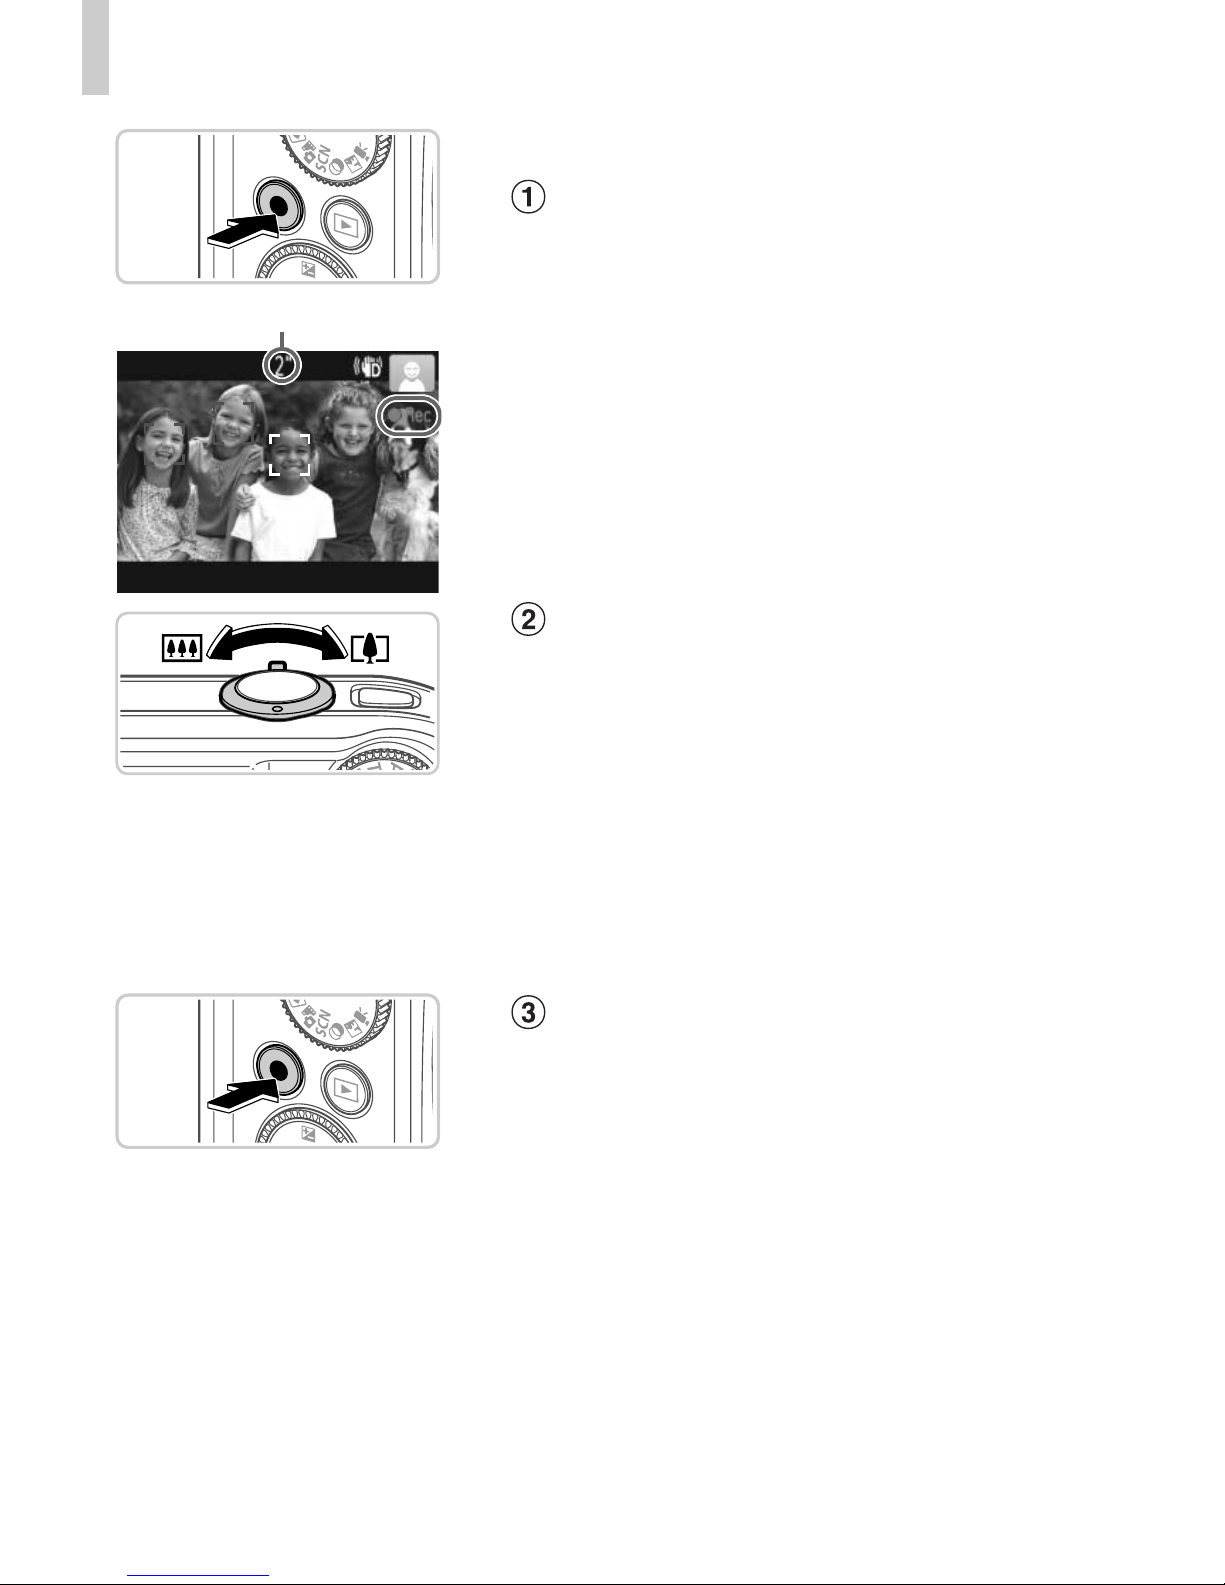
Shooting Movies
Start shooting.
z Press the movie button. The camera beeps
once as recording begins, and [zRec] is
displayed with the elapsed time.
X Black bars displayed on the top and bottom
edges of the screen indicate image areas not
recorded.
X Frames displayed around any faces that are
detected indicate that they are in focus.
z Once recording begins, you can take your
finger off the movie button.
Resize the subject and
recompose the shot as needed.
z To resize the subject, do the same thing as in
step 3 on p. 54.
However, note that movies shot at zoom
factors shown in blue will be grainy, and the
sound of camera operations will be recorded.
z When you recompose shots, the focus,
brightness, and colors will be automatically
adjusted.
Finish shooting.
z Press the movie button again to stop
shooting. The camera beeps twice as
recording stops.
z Recording will stop automatically when the
memory card becomes full.
Elapsed Time
Page 93
Shooting in Smart Auto Mode
57
Still Images/Movies
• To activate the screen when the camera is on but the screen is blank,
press the l button.
• To restore camera sound if you have accidentally deactivated it (by
holding the l button down while turning the camera on), press
the n button and choose [Mute] on the 3 tab, and then press
the qr buttons to choose [Off].
• The camera makes a slight noise if shaken, but this is the sound of
the lens moving and does not indicate mechanical damage.
Still Images
• A flashing icon warns that images are more likely to be blurred
by camera shake. In this case, mount the camera on a tripod or take
other measures to keep it still.
• If your shots are dark despite the flash firing, move closer to the
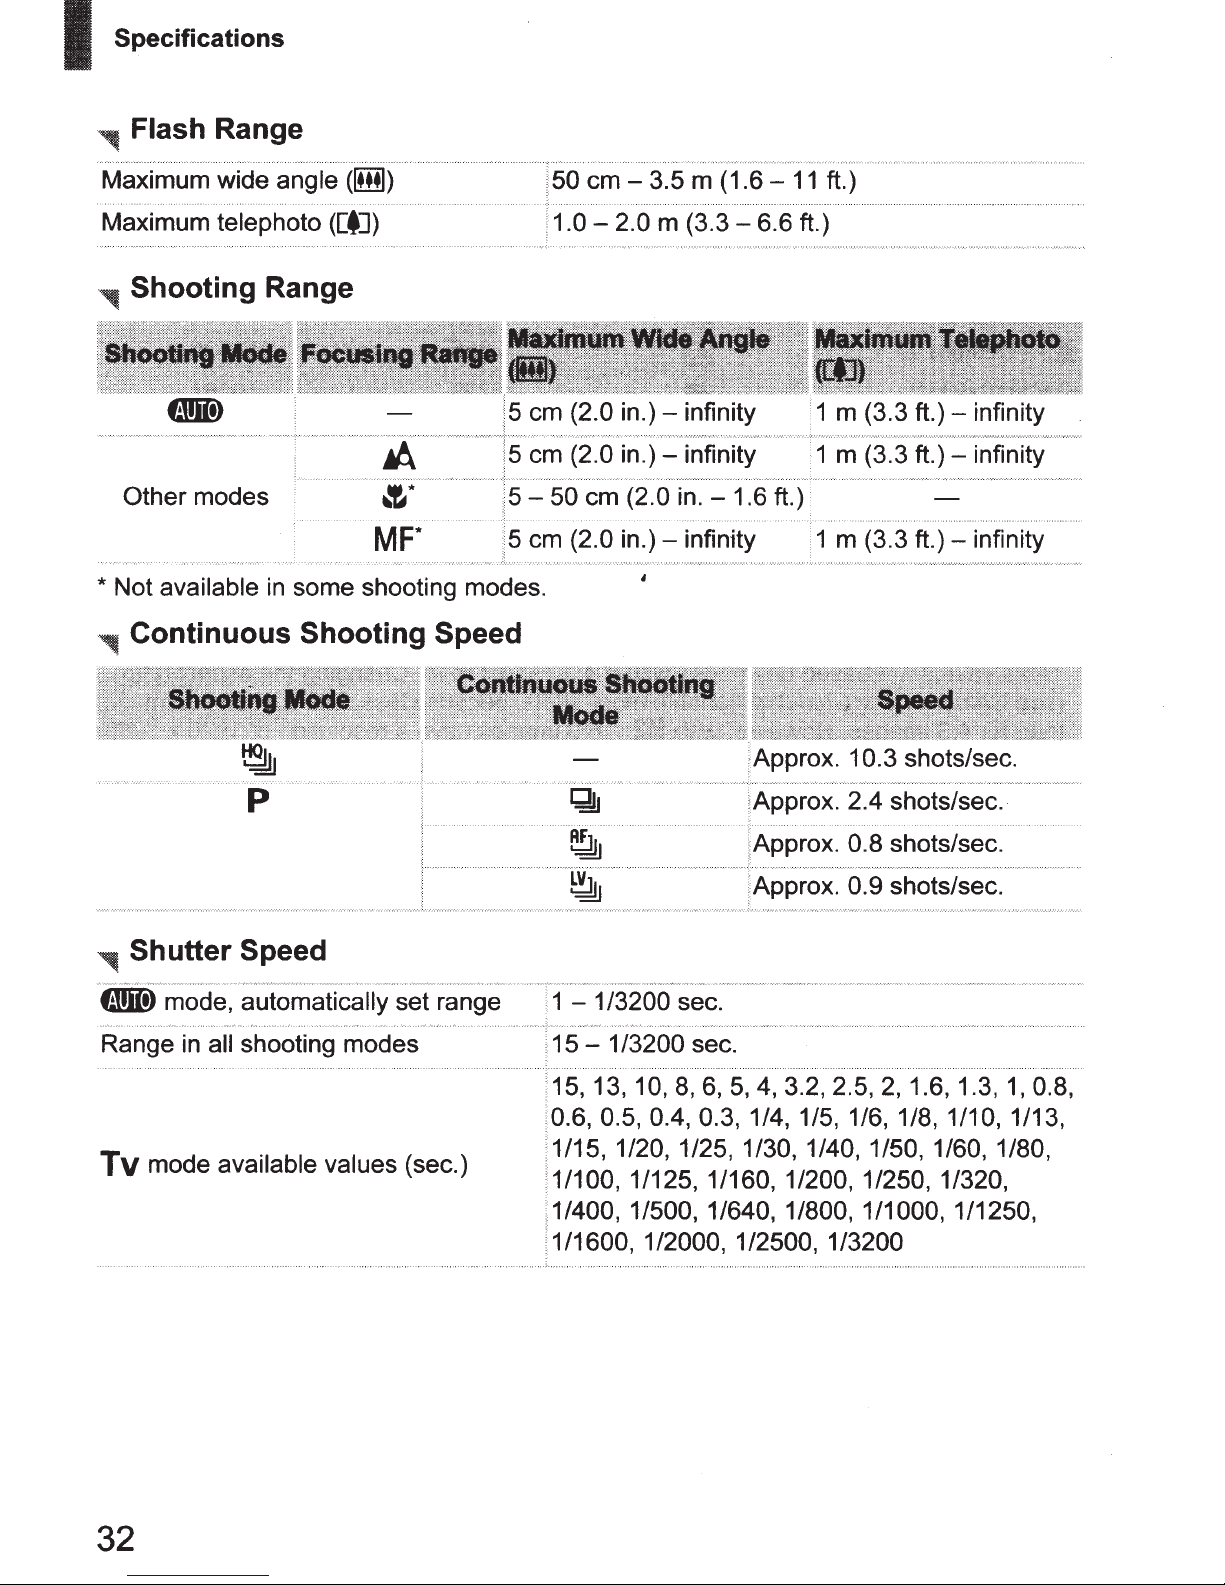
subject. For details on the flash range, see “Specifications” in the
Getting Started guide.
• The subject may be too close if the camera only beeps once when
you press the shutter button halfway. For details on the focusing
range (shooting range), see “Specifications” in the Getting Started
guide.
• To reduce red-eye and to assist in focusing, the lamp may be
activated when shooting in low-light conditions.
• A blinking h icon displayed when you attempt to shoot indicates that
shooting is not possible until the flash has finished recharging.
Shooting can resume as soon as the flash is ready, so either press
the shutter button all the way down and wait, or release it and press
it again.
• Restart the camera if the message [Wrong flash position. Restart the
camera] displayed, which indicates that your finger or some other
object is obstructing the movement of the flash.
• The flash firing during shots indicates that the camera has automatically
attempted to ensure optimal colors in the main subject and background (Multiarea White Balance).
• The shutter sound will not be played when the Sleeping and Babies (Sleeping)
icons (p. 59) are displayed.
Page 94
Shooting in Smart Auto Mode
58
Movies
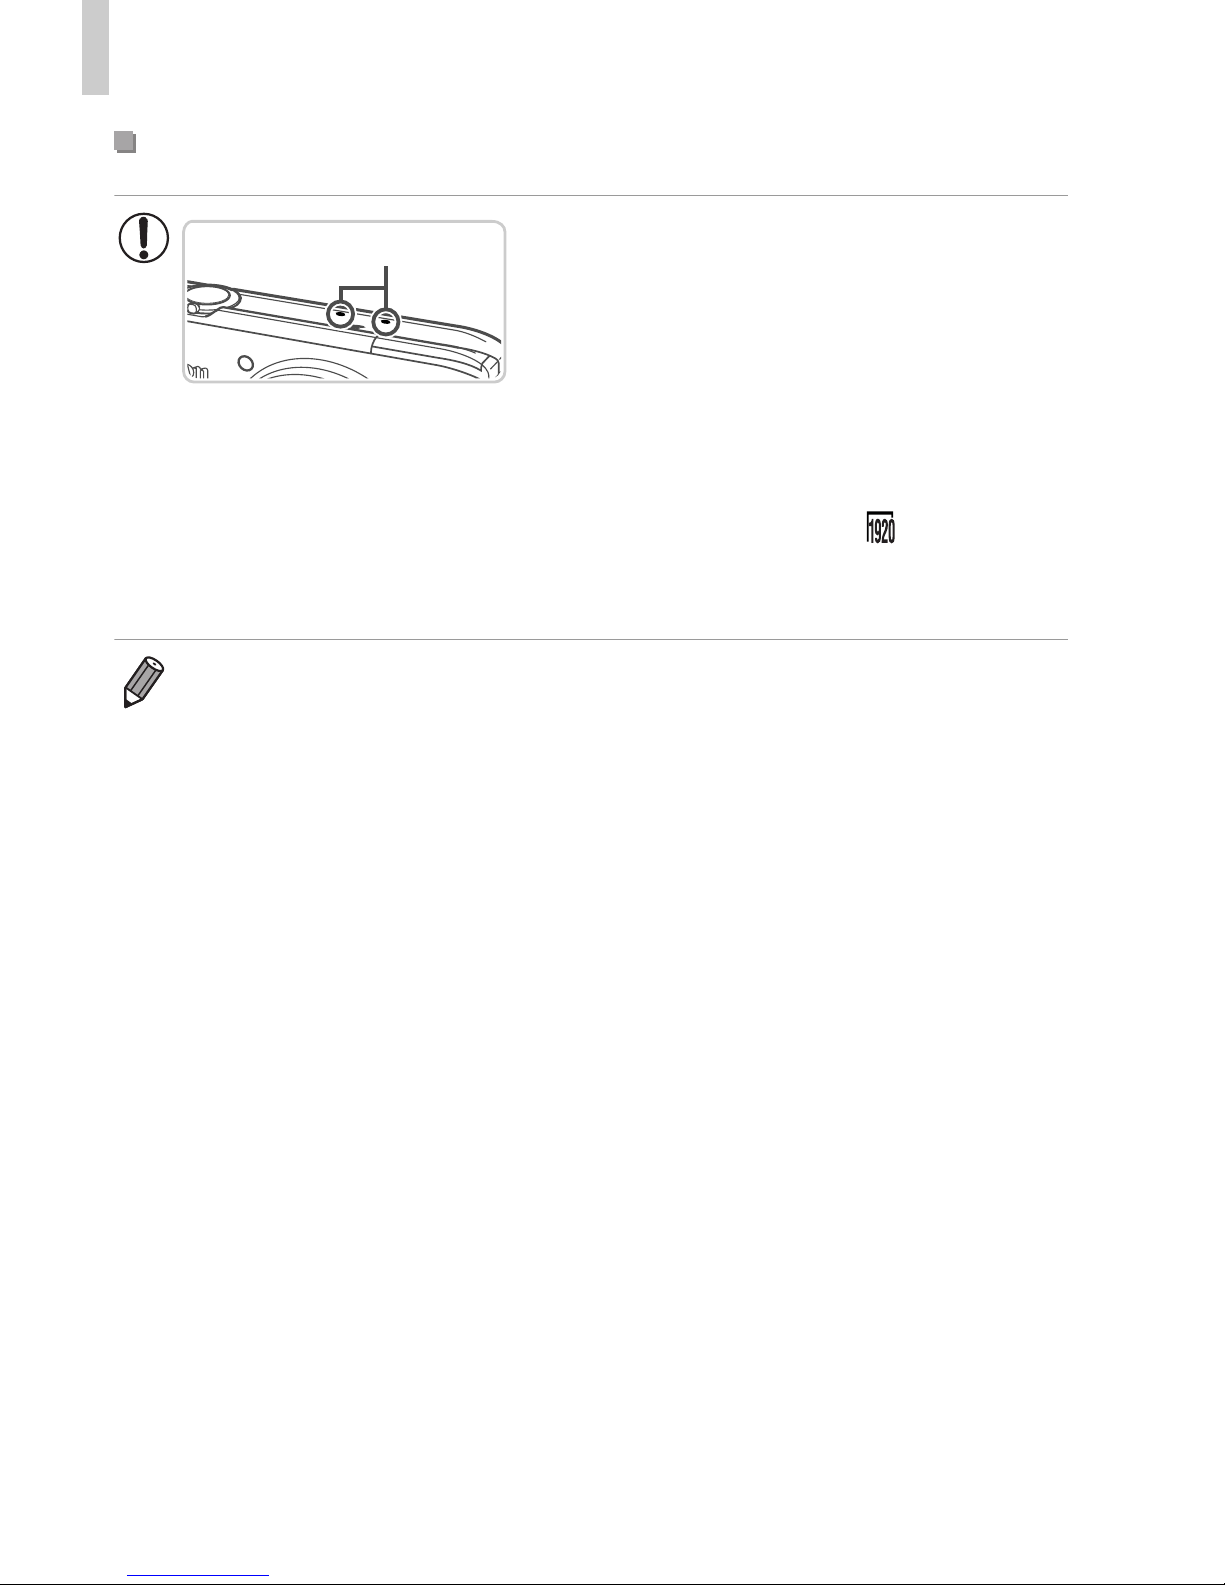
• Keep your fingers away from the
microphone while shooting movies.
Blocking the microphone may prevent
audio from being recorded or may cause
the recording to sound muffled.
• Avoid touching camera controls other than the movie button when
shooting movies, because sounds made by the camera will be
recorded.
• To correct suboptimal image color that may occur in movie
shooting (p. 82) after you recompose shots, press the movie button
to stop recording, and then press it again to resume recording.
• Audio is recorded in stereo.
Microphone
Page 95
Shooting in Smart Auto Mode
59
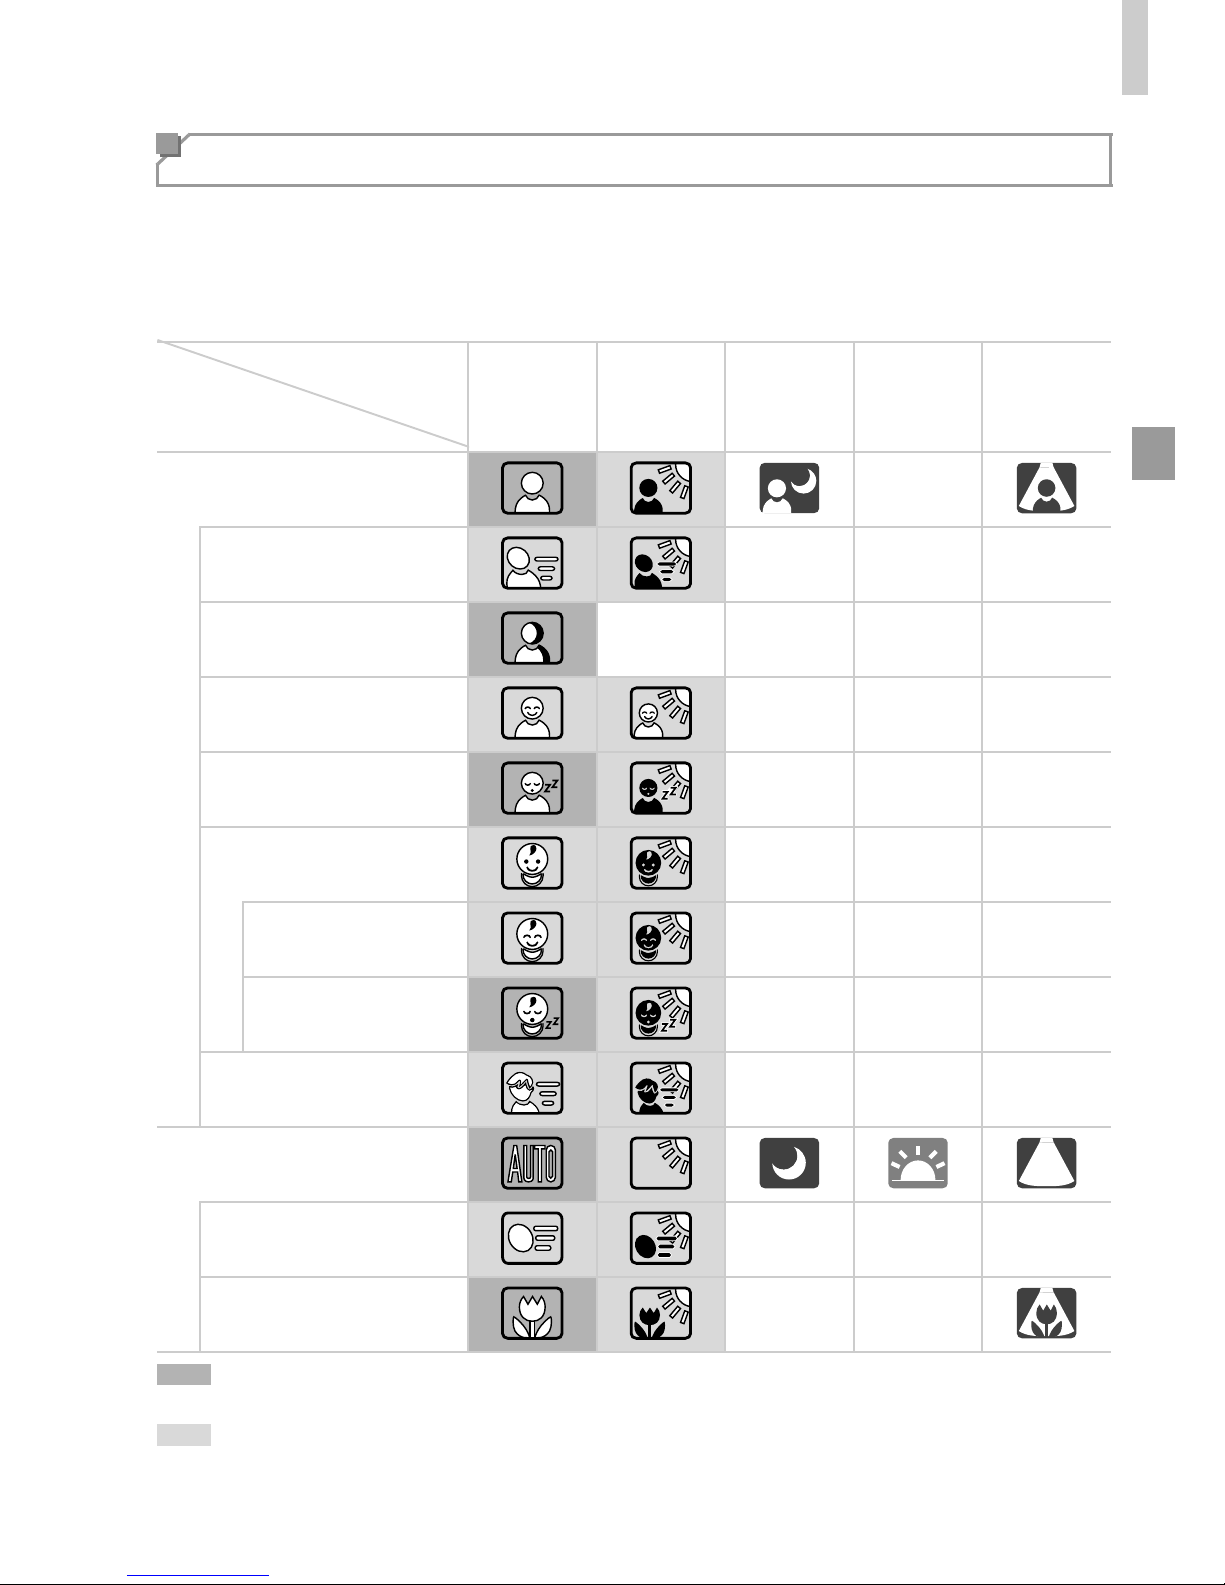
In A mode, shooting scenes determined by the camera are indicated by
the icon displayed, and corresponding settings are automatically selected for
optimal focusing, subject brightness, and color. Depending on the scene,
continuous images may be shot (p. 60).
The background color of icons is light blue when the background is a blue sky, dark
blue when the background is dark, and gray for all other backgrounds.
The background color of icons is light blue when the background is a blue sky, and
gray for all other backgrounds.
Scene Icons
Background
Normal Backlit
Night
Scene
Sunsets Spotlights
Subject
People
—
In Motion
———
Shadows on Face
————
Smiling
———
Sleeping
———
Babies
———
Smiling
———
Sleeping
———
Children (In Motion)
———
Other Subjects
In Motion ———
At Close Range
——
Page 96
Shooting in Smart Auto Mode
60
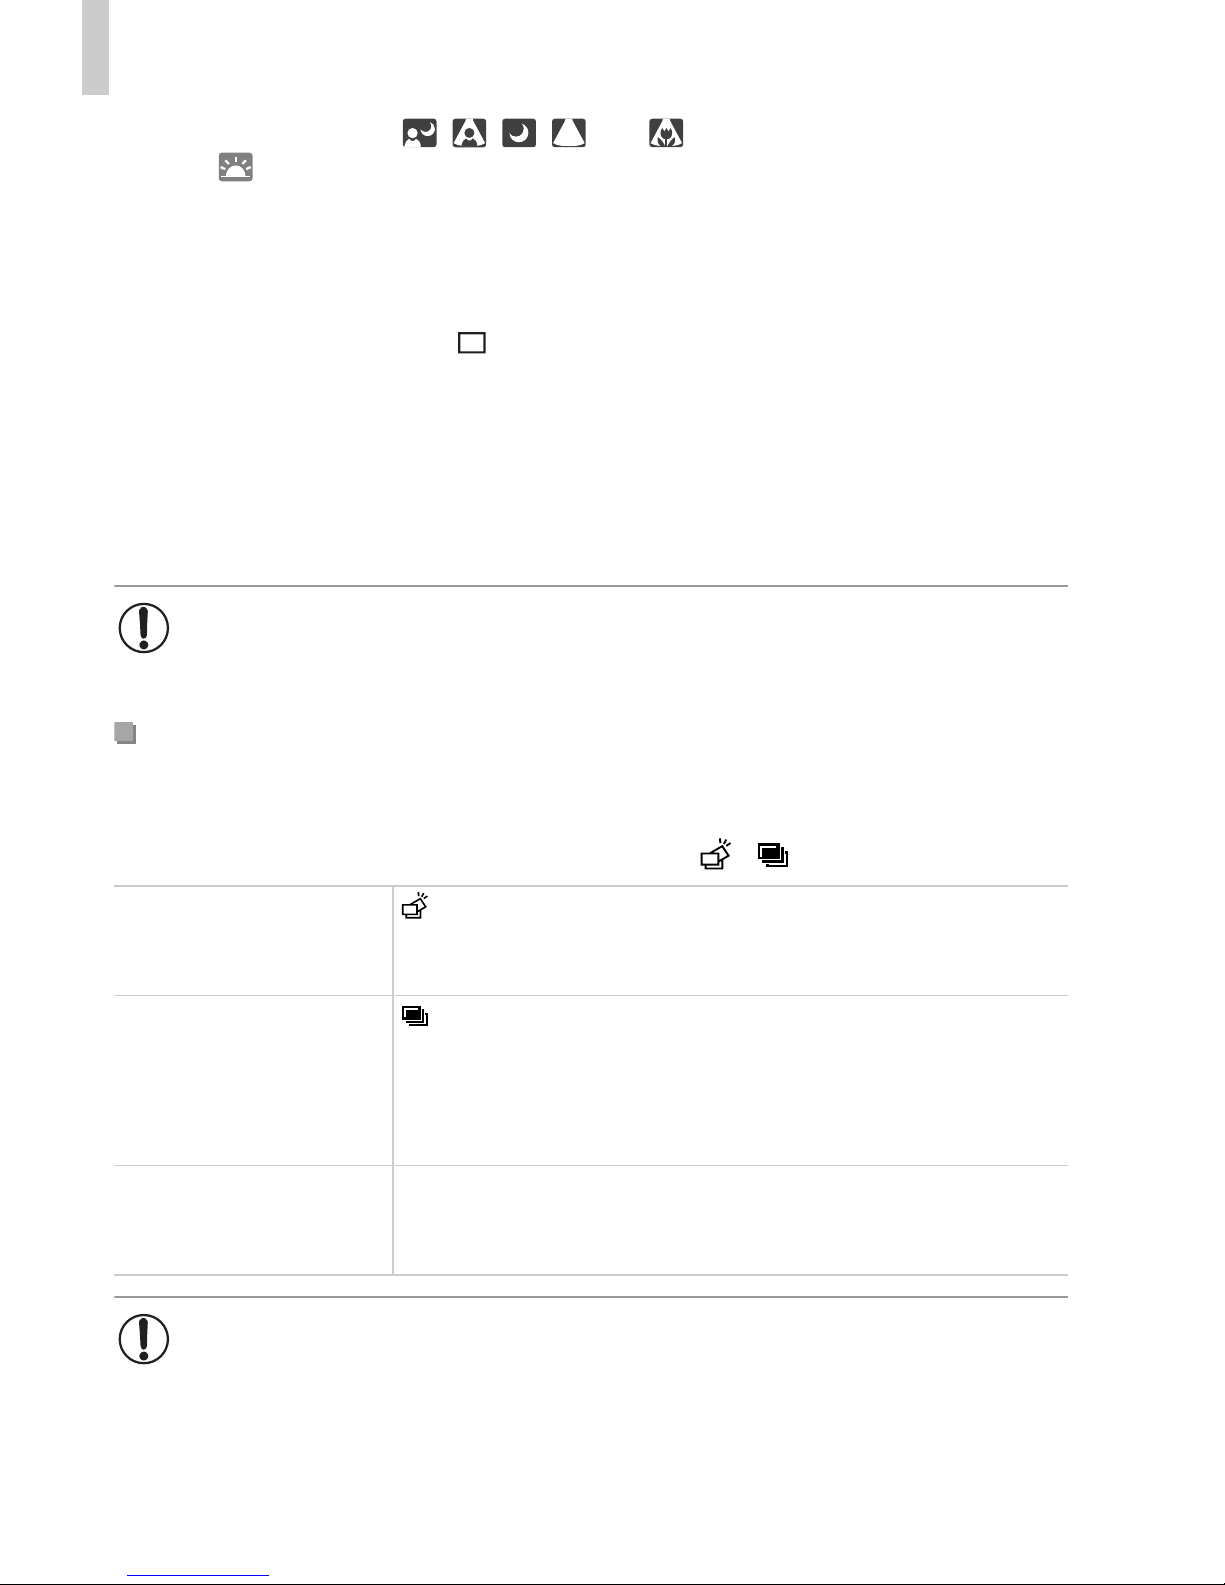
• The background color of , , , , and is dark blue, and the background
color of is orange.
• When shooting movies, only People, Other Subjects, and At Close Range icons will be
displayed.
• When shooting with the self-timer, People (In Motion), Smiling, Sleeping, Babies
(Smiling), Babies (Sleeping), Children, Other Subjects (In Motion) icons will not be
displayed.
• When the drive mode is set to (p. 124), and when [Hg Lamp Corr.] is set to [On] and
scenes are automatically corrected (p. 81), Smiling, Sleeping, Babies (Smiling), Babies
(Sleeping), and Children icons will not be displayed.
• If the flash is set to !, the Backlit icons for Smiling and Children will not be displayed.
• Babies, Babies (Smiling), Babies (Sleeping), and Children icons will be displayed when
[Face ID] is set to [On], and the face of a registered baby (under two years old) or child
(from two to twelve years old) is detected (p. 71). Confirm beforehand that the date and
time are correct (p. 17).
If you press the shutter button halfway when one of the icons in the table
below is displayed, one of the following icons will be displayed to inform you
that the camera will shoot continuous images: , , or W.
• Try shooting in G mode (p. 115) if the scene icon does not match
actual shooting conditions, or if it is not possible to shoot with your
expected effect, color, or brightness.
Continuous Shooting Scenes
Smiling (including
Babies)
: Consecutive images are captured, and the camera
analyzes details such as facial expressions to save the
image determined to be the best.
Sleeping (including
Babies)
: Beautiful shots of sleeping faces, created by combining
consecutive shots to reduce camera shake and image
noise.
The AF assist beam will not light up, the flash will not fire,
and the shutter sound will not be played.
Children
W : So you don’t miss a photo opportunity of children who
move around, the camera will capture three consecutive
images for each shot.
• In some scenes, expected images may not be saved, and images
may not look as expected.
• Focus, image brightness, and color are determined by the first shot.
Page 97
Shooting in Smart Auto Mode
61
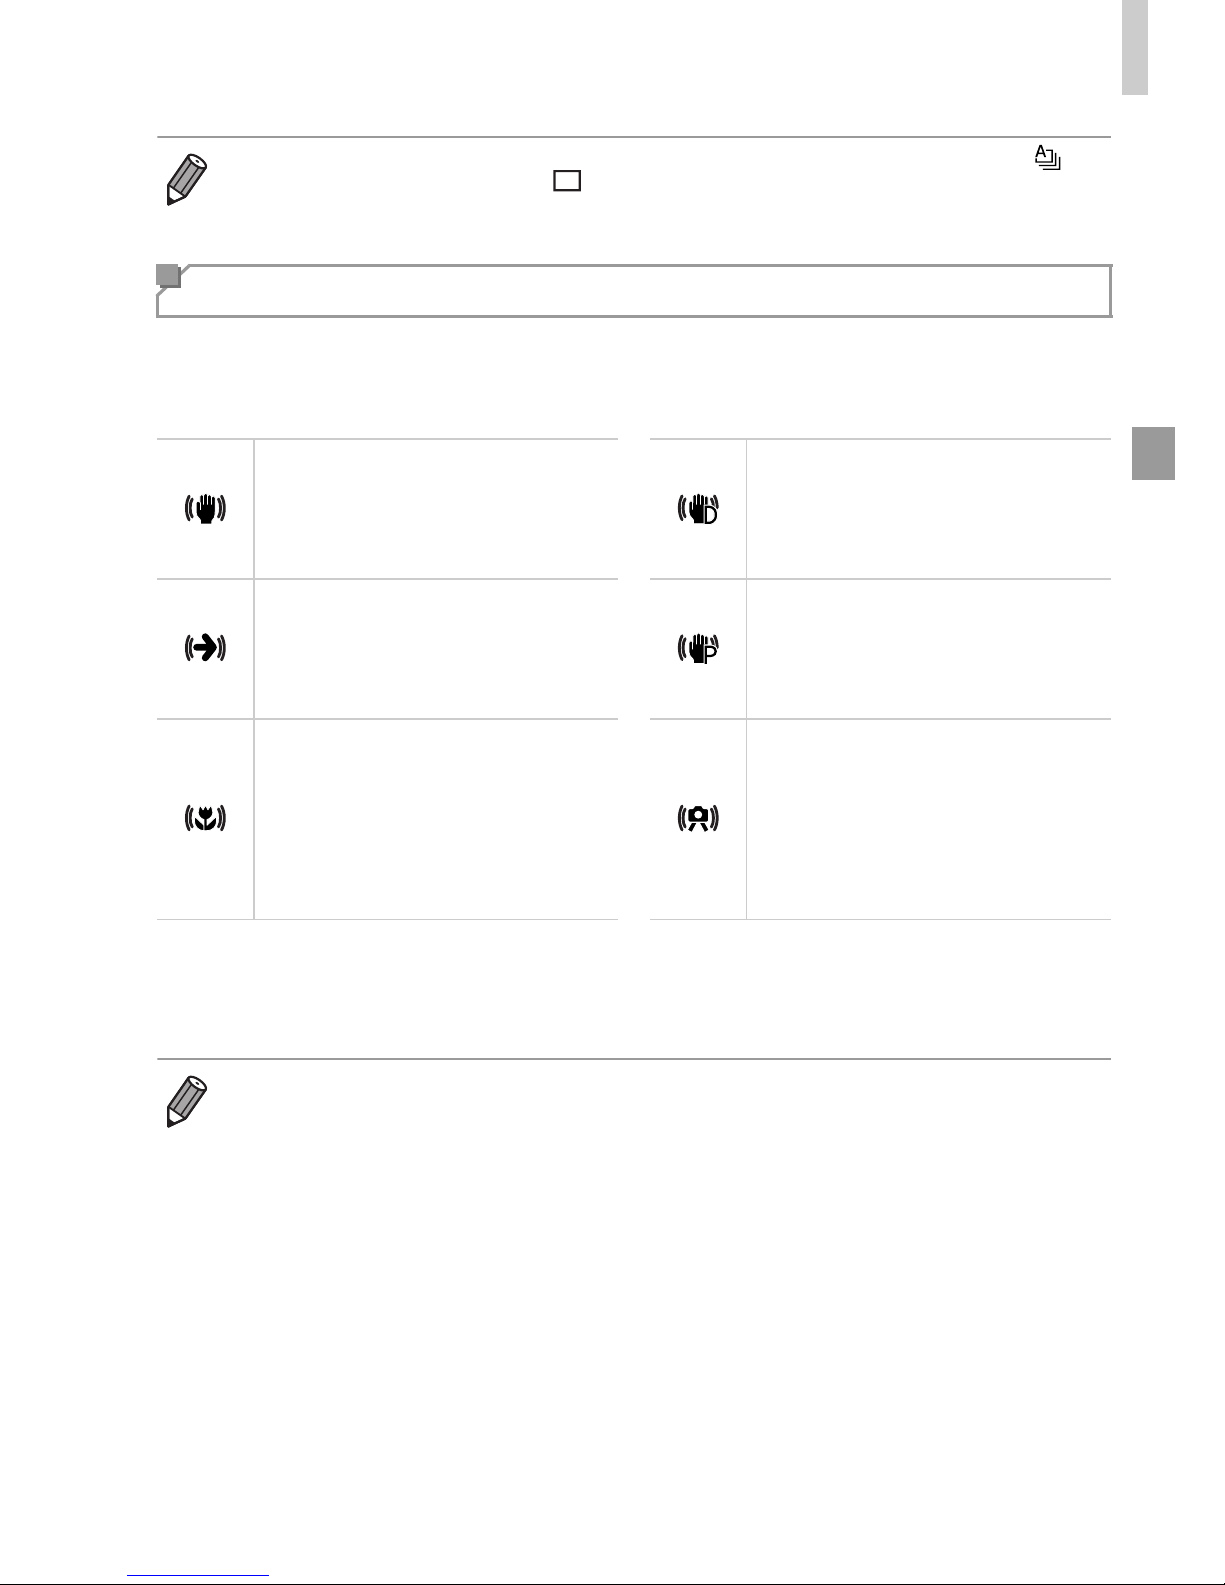
Optimal image stabilization for the shooting conditions is automatically
applied (Intelligent IS). Additionally, the following icons are displayed in A
mode.
* Displayed when you pan, following moving subjects with the camera. When you follow
subjects moving horizontally, image stabilization only counteracts vertical camera
shake, and horizontal stabilization stops. Similarly, when you follow subjects moving
vertically, image stabilization only counteracts horizontal camera shake.
• When you want to shoot single images only, press the m button, choose in
the menu, and then choose .
Image Stabilization Icons
Image stabilization for still
images
Image stabilization for movies,
reducing strong camera shake,
as when shooting while walking
(Dynamic IS)
Image stabilization for still
images, when panning
*
Image stabilization for subtle
camera shake, such as when
shooting movies at telephoto
(Powered IS)
Image stabilization for macro
shots (Hybrid IS)
No image stabilization, because
the camera is mounted on a
tripod or held still by other
means. However, some shooting
conditions will activate image
stabilization
• To cancel image stabilization, set [IS Mode] to [Off] (p. 137). In this case, an IS
icon is not displayed.
Page 98
Shooting in Smart Auto Mode
62
A variety of frames are displayed once the camera detects subjects you are
aiming the camera at.
• A white frame is displayed around the subject (or person’s face)
determined by the camera to be the main subject, and gray frames are
displayed around other detected faces. Frames follow moving subjects
within a certain range to keep them in focus.
However, if the camera detects subject movement, only the white frame
will remain on the screen.
• When you are pressing the shutter button halfway and the camera detects
subject movement, a blue frame is displayed, and the focus and image
brightness are constantly adjusted (Servo AF).
On-Screen Frames
• Try shooting in G mode (p. 115) if no frames are displayed, if frames
are not displayed around desired subjects, or if frames are displayed
on the background or similar areas.
Page 99
63
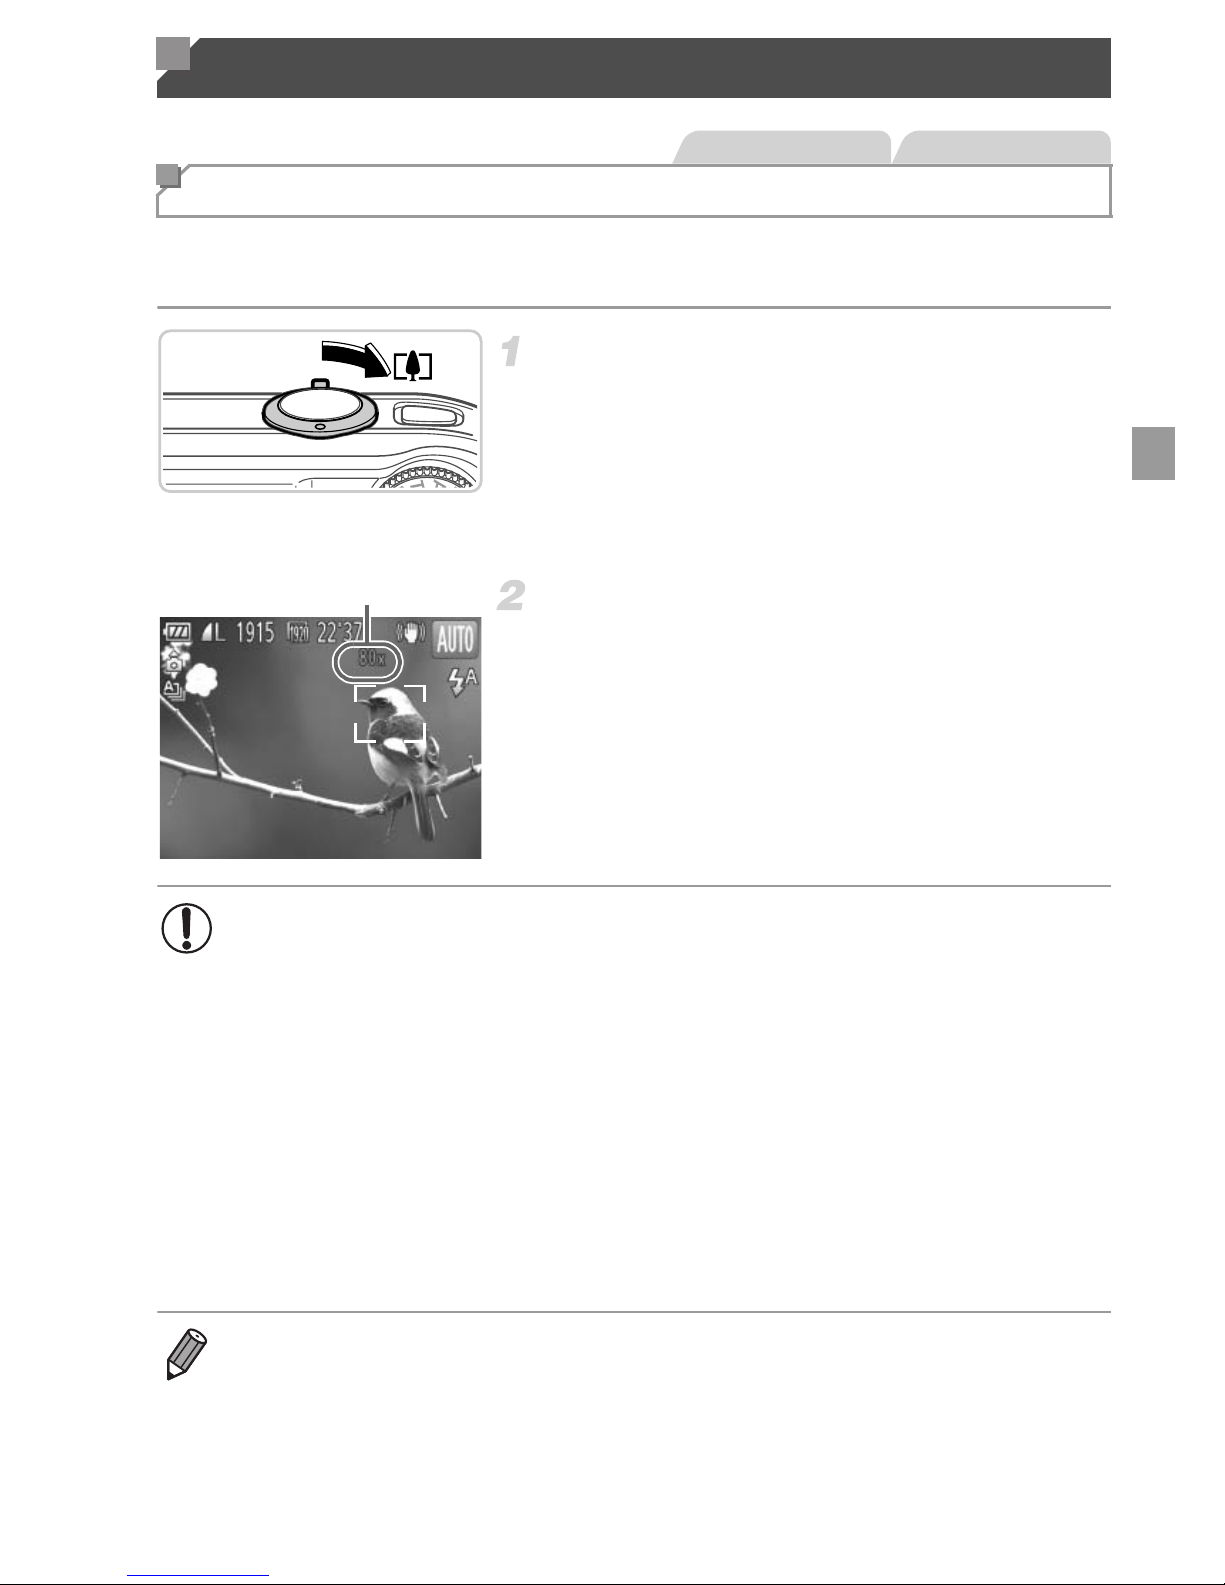
When distant subjects are too far away to enlarge using the optical zoom, use
digital zoom for up to about 80x enlargement.
Move the zoom lever toward i.
z Hold the lever until zooming stops.
X Zooming stops at the largest possible zoom
factor (where the image is not noticeably
grainy), which is displayed when you release
the zoom lever.
Move the zoom lever toward i
again.
X To continue magnifying the subject, keep
zooming.
Common, Convenient Features
Zooming In Closer on Subjects (Digital Zoom)
Still Images Movies
Zoom Factor
• Moving the zoom lever will display the zoom bar (which indicates the
zoom position). The color of the zoom bar will change depending on
the zoom range.
- White range: optical zoom range where the image will not appear
grainy.
- Yellow range: digital zoom range where the image is not noticeably
grainy (ZoomPlus)
- Blue range: digital zoom range where the image will appear grainy.
Because the blue range will not be available at some resolution
settings (p. 79) the maximum zoom factor can be achieved by
following step 1.
• Focal length when optical and digital zoom are combined is as follows (35mm
film equivalent).
4.5 – 90.0 mm (25 – 500 mm with optical zoom alone)
• To deactivate digital zoom, press the n button, choose [Digital Zoom] on
the 4 tab, and then choose [Off].
Page 100
Common, Convenient Features
64
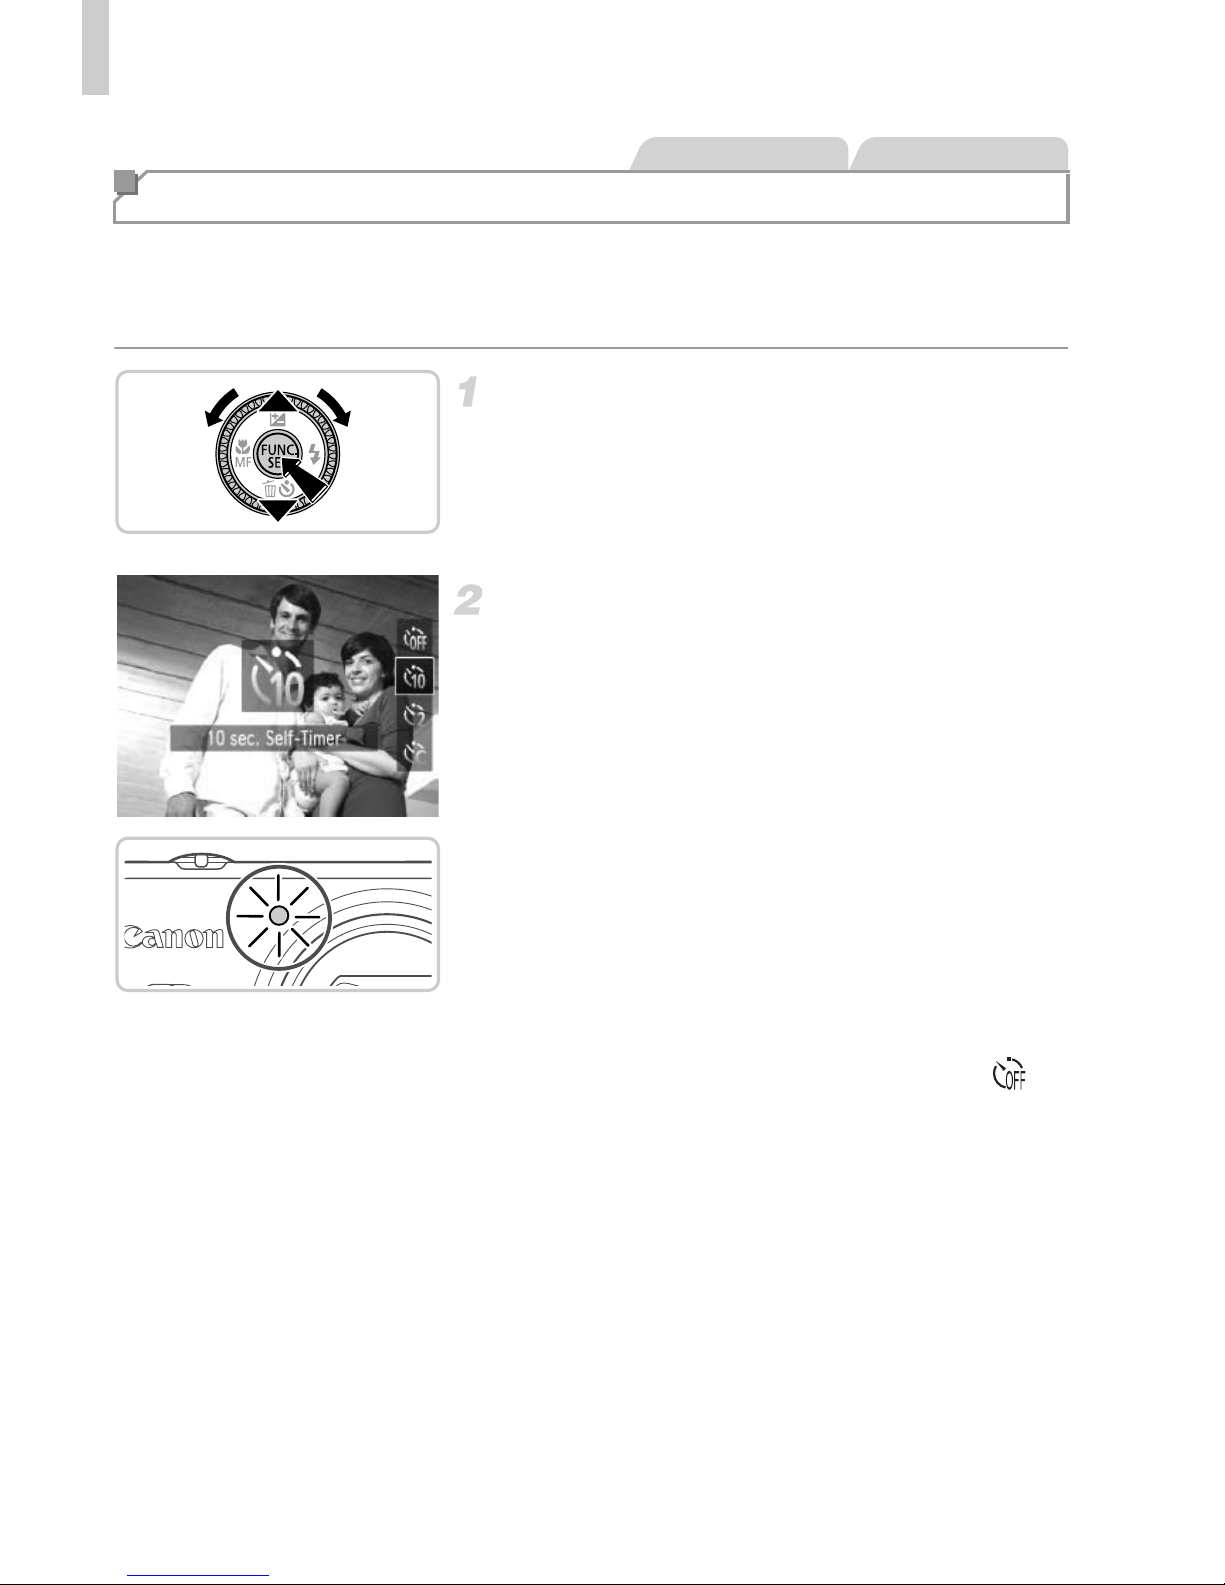
With the self-timer, you can include yourself in group photos or other timed
shots. The camera will shoot about 10 seconds after you press the shutter
button.
Configure the setting.
z Press the p button, choose ] (either press
the op buttons or turn the 5 dial), and
then press the m button.
X Once the setting is complete, ] is displayed.
Shoot.
z For Still Images: Press the shutter button
halfway to focus on the subject, and then
press it all the way down.
z For Movies: Press the movie button.
X Once you start the self-timer, the lamp will
blink and the camera will play a self-timer
sound.
X Two seconds before the shot, the blinking
and sound will speed up. (The lamp will
remain lit in case the flash fires.)
z To cancel shooting after you have triggered
the self-timer, press the n button.
z To restore the original setting, choose in
step 1.
Using the Self-Timer
Still Images Movies
 Loading...