

Canon POWERSHOT SD790IS, DIGITAL ELPH, PowerShot SD790 IS Digital ELPH, Digital IXUS 90 IS User Manual
C&flOfl
CDI-E353-010 XXXXXXX © CANON INC. 2008 PRINTED IN JAPAN
-I
I-"
at
m
¢)
3
t_
c
!
63
Q.
C&flOfl
IIIIIIIIIIIIIIIIII
CDI-E353
_wer_hot _D790 _
Di G ITJ_.L (E_LPH
DIG |T_I_
I;,'US90 IS
Camera User Guide
7
H_ _I_ _i._i ¸ E_f_A_
PRIN_ _,l IjT _r_o
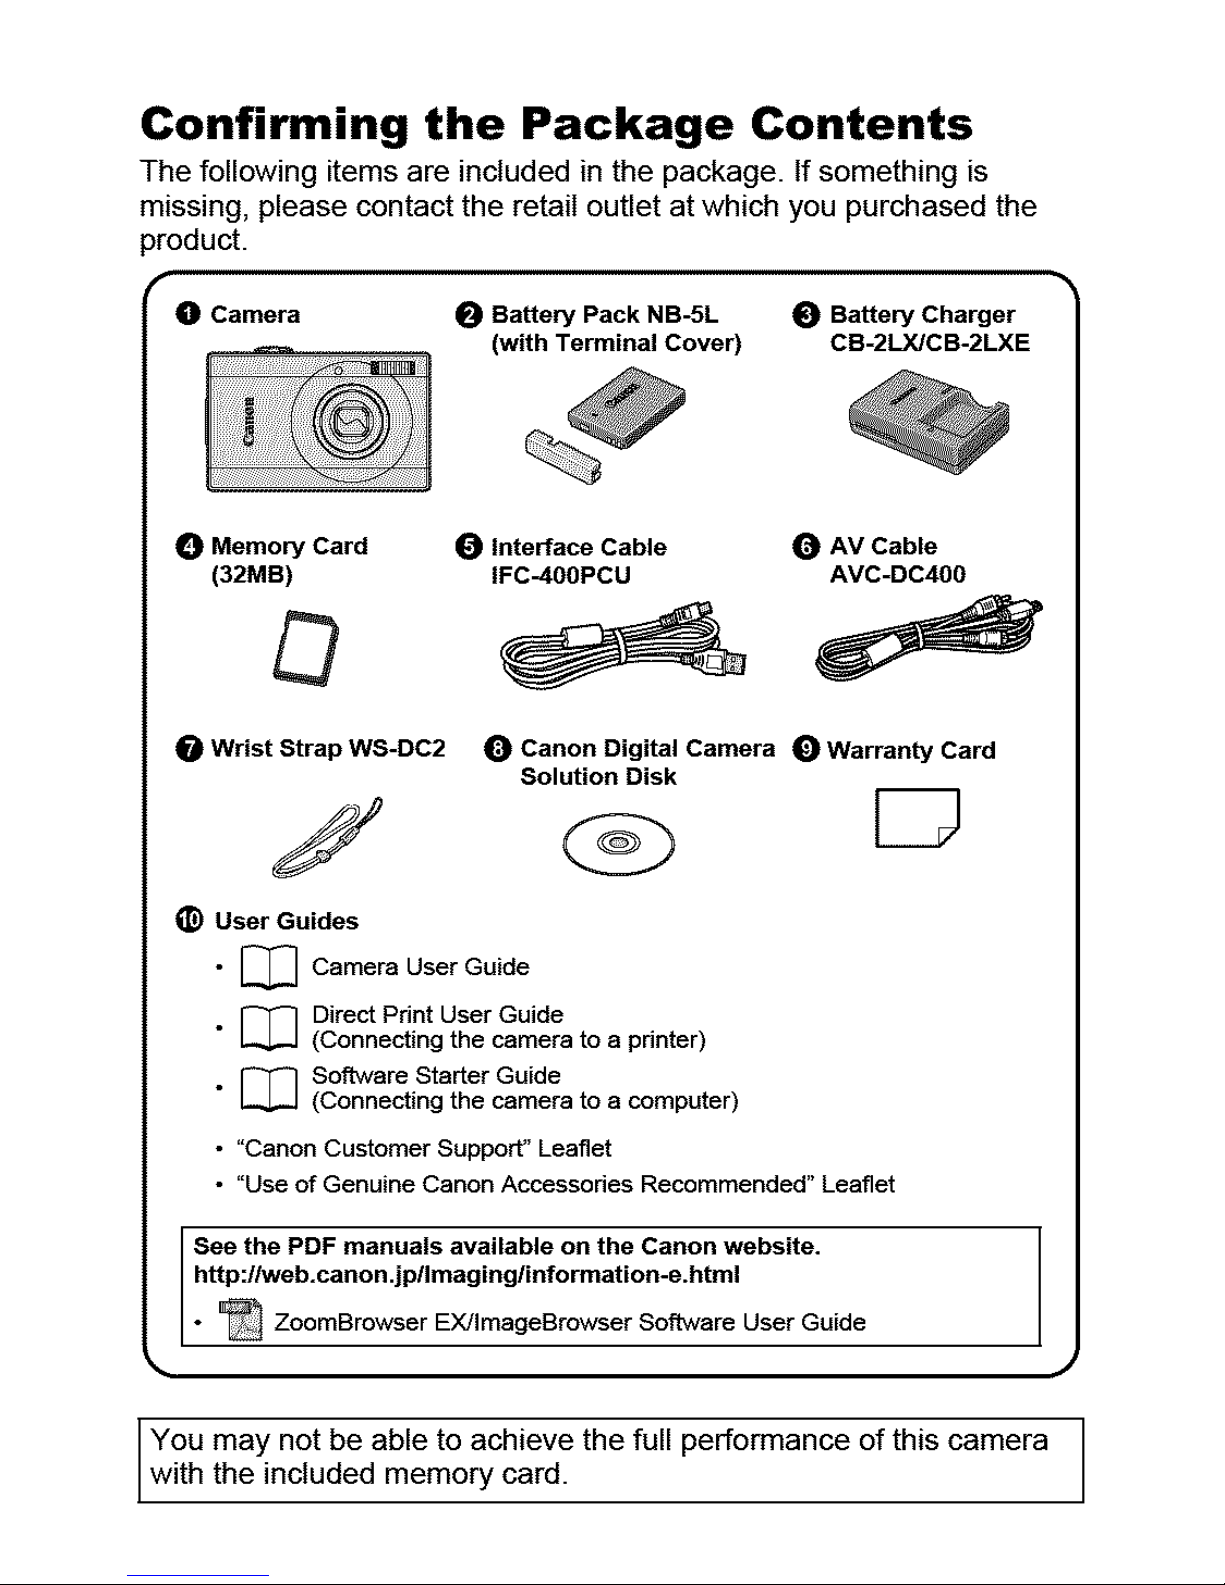
Confirming the Package Contents
The following items are included in the package. If something is
missing, please contact the retail outlet at which you purchased the
3roduct.
101Camera O Battery Pack NB-5L _ Battery Charger
(with Terminal Cover) CB-2LX/CB-2LXE
O Memory Card _ Inte#ace Cable O AV Cable
(32MB) IFC400PCU AVC-DC400
Wrist Strap WS-DC2
Solution Disk
J
_) User Guides
• _ Camera User Guide
• _ Direct Print User Guide
(Connecting the camera to a printer)
• _ Software Starter Guide
L4,.J (Connecting the camera to a computer)
• "Canon Customer Support" Leaflet
• "Use of Genuine Canon Accessories Recommended" Leaflet
Canon Digital Camera _ Warranty Card
I See the PDF manuals available on the Canon website.
http:/Iweb.canon.jpllmaging/information-e.html
- _ ZoomBrowser EX]lmageBrowser Software User Guide
You may not be able to achieve the full per[ormance of this camera ]
with the included memory card.
Let's Get Started! I
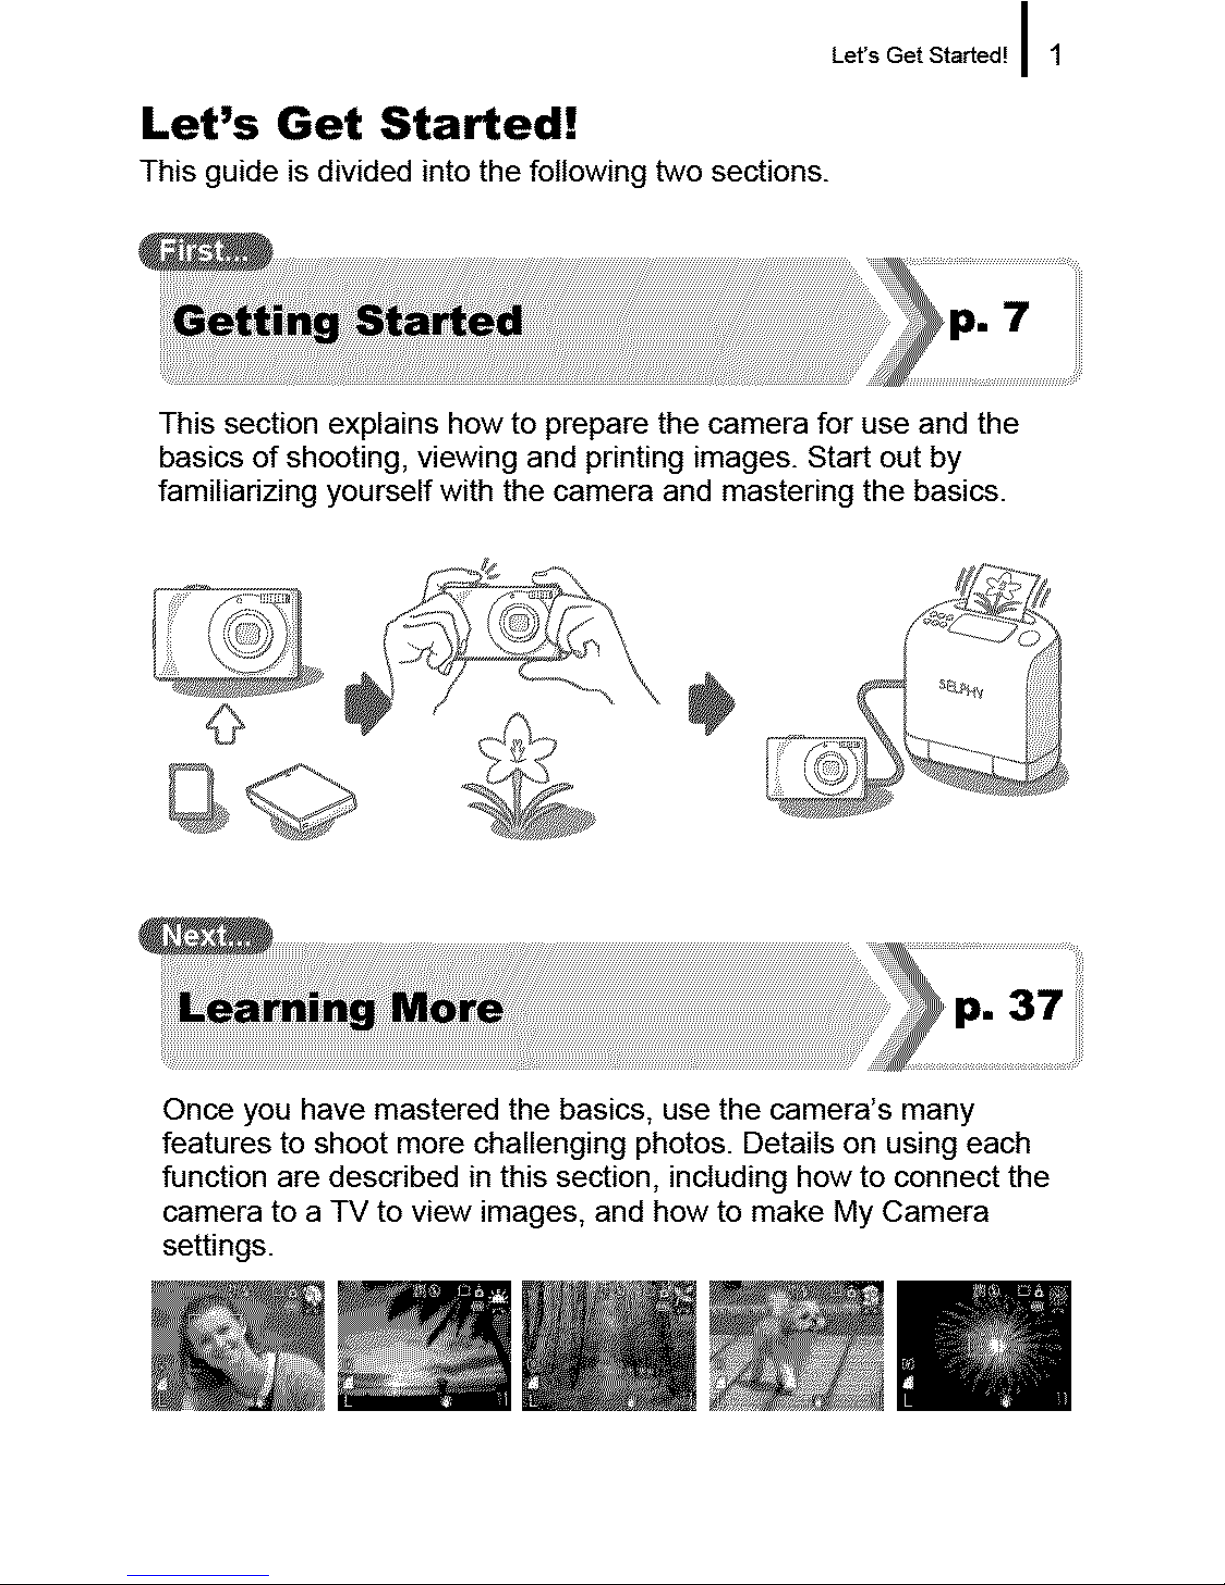
Let's Get Started!
This guide is divided into the following two sections.
_p. 7
This section explains how to prepare the camera for use and the
basics of shooting, viewing and printing images. Star out by
familiarizing yourself with the camera and mastering the basics.
÷
p. 37
Once you have mastered the basics, use the camera's many
features to shoot more challenging photos. Details on using each
function are described in this section, including how to connect the
camera to a TV to view images, and how to make My Camera
settings.
2I Table of Contents
Table of Contents
Items marked with a ,_ are lists or charts that summarize camera
functions or procedures.
Please Read ........................................... 6
Preparations ....................................... 8
Shooting Still Images ([_ Auto Mode) ................... 14
Viewing Still Images ................................ 16
Erasing .......................................... 17
Printing .......................................... 18
Embedding the Date in the Image Data ................. 20
Shooting Movies (1_3 Standard Mode) ................... 22
Viewing Movies .................................... 24
Downloading Images to a Computer ................... 25
System Map ...................................... 32
Components Guide 38
Control Dial ...................................... 41
Using the [] Button ................................ 42
How to Use the Mode Switch ........................ 43
Indicator ........................................ 44
Basic Operations 46
_, Menus and Settings ............................... 46
Information Displayed on the LCD Monitor and Menus .... 48
Using the LCD Monitor ............................. 58
Commonly Used Shooting Functions 60
[] 1-03Shooting with the Optical Zoom ................ 60
Using the Digital Zoom/Digital Tele-Converter ........... 60
Magnified Close-Up Shooting (Digital Macro) ............ 63
_- Using the Flash ................................ 64
all, Shooting Close-Ups/Infinity Shot ................ 64
_) Using the Self-Timer ............................ 66
Changing the Recording Pixels (Still Images) ............ 68
I
Table of Contents I 3
Changing the Compression (Still Images) ............... 69
Setting the Image Stabilizer Function .................. 70
I_ Adjusting the ISO Speed ........................ 71
Various Shooting Methods 73
Shooting in Modes for Special Conditions .............. 73
Shooting in Manual Mode ........................... 76
Continuous Shooting ............................ 76
Setting the Flash .................................. 77
',_, Movie Shooting ................................ 79
Shooting Panoramic Images (Stitch Assist) ............. 84
Checking the Focus and Peoples' Expressions
(Focus Check) ..................................... 86
Switching between Focusing Modes ................... 89
Selecting the Face to Focus On (Face Select and Track) .. 92
Shooting Hard-to-Focus Subjects (Focus Lock, AF Lock) .. 94
Locking the Exposure Setting (AE Lock) ................ 95
Locking the Flash Exposure Setting (FE Lock) ........... 96
Adjusting the Exposure Compensation ................. 97
Switching between Metering Modes ................... 98
Setting the Shutter Speed (Long Shutter Mode) .......... 99
Adjusting the Tone (White Balance) .................. 100
Shooting in a My Colors Mode ...................... 103
Changing Colors ................................. 105
Setting the Display Overlays ........................ 110
Categorizing Images Automatically (Auto Category) ..... 111
_, Registering Settings to the Print/Share Button ...... 112
Playback/Erasing 114
O, Viewing Magnified Images ...................... 114
:-: Viewing Images in Sets of Nine (Index Playback) ..... 115
Checking the Focus and Peoples' Expressions
(Focus Check Display) ............................ 116
Jumping to Images ............................ 118
Organizing Images by Category (My Category) ......... 120
Trimming a Portion of an Image ..................... 123
Viewing Movies .................................. 125
Editing Movies ................................... 127
Rotating Images in the Display ...................... 129
Playback with Transition Effects ..................... 130
I
4 I Table of Contents
Automated Playback (Slide Shows) .................. 131
Red-Eye Correction Function ....................... 136
Adding Effects with the My Colors Function ............ 140
Resizing Images ................................. 142
Attaching Sound Memos to Images .................. 144
Sound-Only Recording (Sound Recorder) ............. 146
Protecting Images ................................ 147
Erasing All Images ............................... 151
Registering Functions to the [] Button ................ 155
Print Settings/Transfer Settings 157
Setting the DPOF Print Settings ..................... 157
Setting the DPOF Transfer Settings .................. 163
Configuring the Camera 165
Setting the Power Saving Function ................... 165
Setting the World Clock ............................ 166
Formatting Memory Cards ......................... 168
Resetting the File Number ......................... 170
Creating an Image Destination (Folder) ............... 172
Setting the Auto Rotate Function .................... 174
Resetting Settings to Their Default Values ............. 175
Connecting to a TV 176
Shooting/Playback Using a TV ...................... 176
Customizing the Camera (My Camera Settings) 177
Changing My Camera Settings ...................... 177
Registering My Camera Settings .................... 178
Troubleshooting 180
List of Messages 190
Appendix 194
Safety Precautions ............................... 194
Handling Precautions ............................. 198
Using an AC Adapter Kit (Sold Separately) ............ 202
Using an Externally Mounted Flash (Sold Separately) .... 203
Camera Care and Maintenance ..................... 205
Specifications ................................... 206
Index
_r Functions Available in Each Shooting Mode
I
Table of Contents I 5
216
222
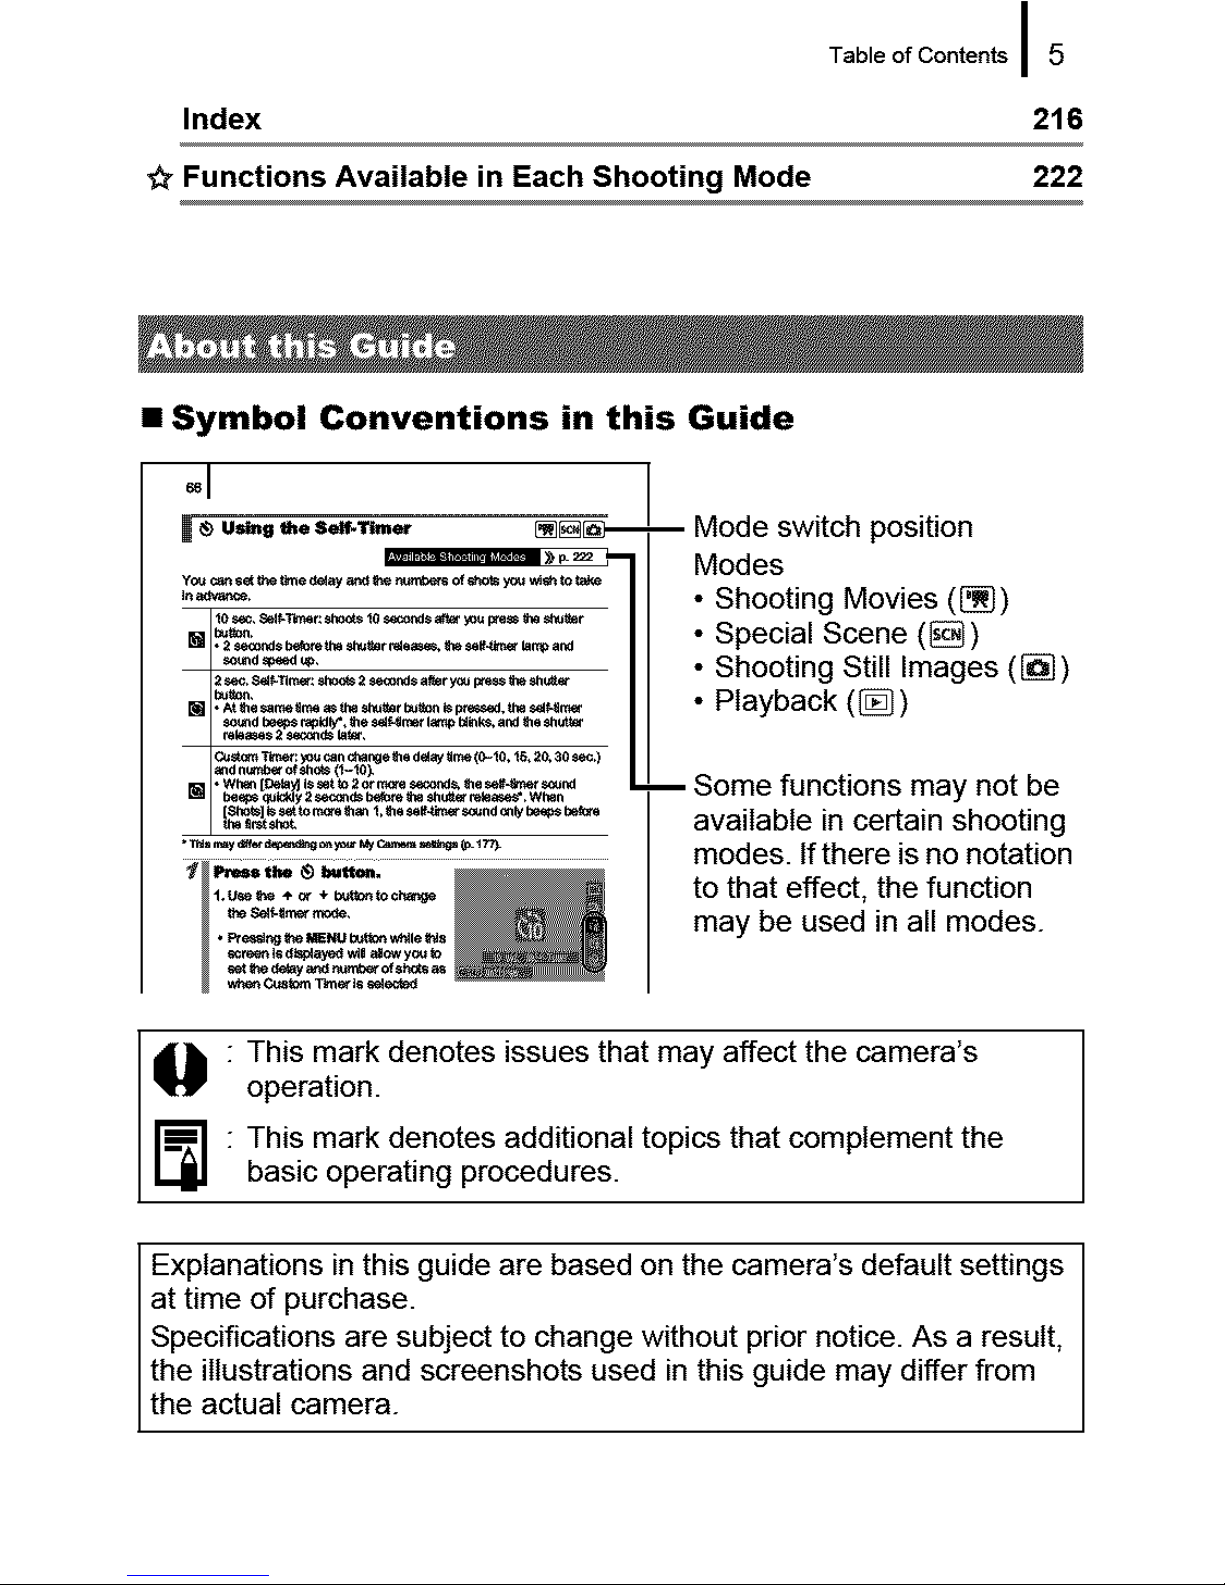
• Symbol Conventions in this Guide
k® Usthg the Set_TIme_ [][]_
10_, _Ter_r_ 10se_0_sa_ you_e_ _ _:_eer
•2eeo_* _tet_ _e_r _ae_ee._ _e_oet _tm a0_
-- Mode switch position
Modes
• Shooting Movies ([_)
• Special Scene (_)
• Shooting Still Images ([_)
• Playback (_)
Some functions may not be
available in certain shooting
modes, tfthere is no notation
to that effect, the function
may be used in all modes.
O: This mark denotes issues that may affect the camera's
operation.
: his mark denotes additional topics that complement the
basic operating procedures.
I Explanations in this guide are based on the camera's default settings
at time of purchase.
Specifications are subject to change without prior notice. As a result,
the illustrations and screenshots used in this guide may differ from
the actual camera.
6 I Please Read
Please Read
Test Shots
Before you try to photograph important subjects, we highly recommend that
you shoot several trial images to confirm that the camera is operating and
being operated correctly.
Please note that Canon Inc., its subsidiaries and affiliates, and its
distributors are not liable for any consequential damages arising from any
malfunction of a camera or accessory, including memory cards, that results
in the failure of an image to be recorded or to be recorded in away that is
machine readable.
Warning Against Copyright Infringement
Please note that Canon digital cameras are intended for personal use and
should never be used ina manner that infringes upon or contravenes
international or domestic copyright laws and regulations. Please be advised
that in certain cases the copying of images from performances, exhibitions,
or commercial properties by means of a camera or other device may
contravene copyright or other legal rights even if the image was shot for
personal use.
Warranty Limitations
This camera's warranty is only effective in the country ofsale. If a problem
arises while the camera is in use abroad, please convey it back to the
countryof sale before proceeding with a warranty claimto a Canon
Customer Support Help Desk.
For Canon Customer Support contacts, please see the customer
support list supplied with your camera.
Please set the camera's video signal format to the one used inyour region
before using it with a TV monitor.
Language Setting
Please see Setting the Display Language (p. 13) to change the language
setting.
Getting Started
®Shooting Still Images
®Viewing Still Images
®Embedding the Date in the Image Data
®Shooting Movies
®Viewing Movies
®Downloading Images to a Computer
®System Map
m_'_ TM
rm_
You can use SD memory cards, SDHC (SD High
Capacity) memory cards, MultiMediaCards,
MMCplus cards and HC MMCplus cards in this
camera. These cards are collectively referred to
as memory cards in this guide.
ili!i! !! ili i!ili!i!i!!
i_ii_i_i_ii_ii_

8 I Preparations
i Charging the Battery
"!. Insert the battery into the battery charger.
_ Align these symbols
2_ Plug the battery charger (CB-2LX) into a power outlet,
or attach the power cord to the battery charger (CB-
2LXE) and plug it into a power outlet.
• Batter,/charger model names and types vary by region.
Charge Indicator
For CB-2LX For CB-2LXE
3. Remove the battery after charging is complete.
• Chargingtakesapproximately 2hours 5minutes.
Chargelndicator @ _
• • To protectthe batteryand prolong its !ife, do notcharge it for
_,f longerthan 24 hours continuously.
Preparations I 9
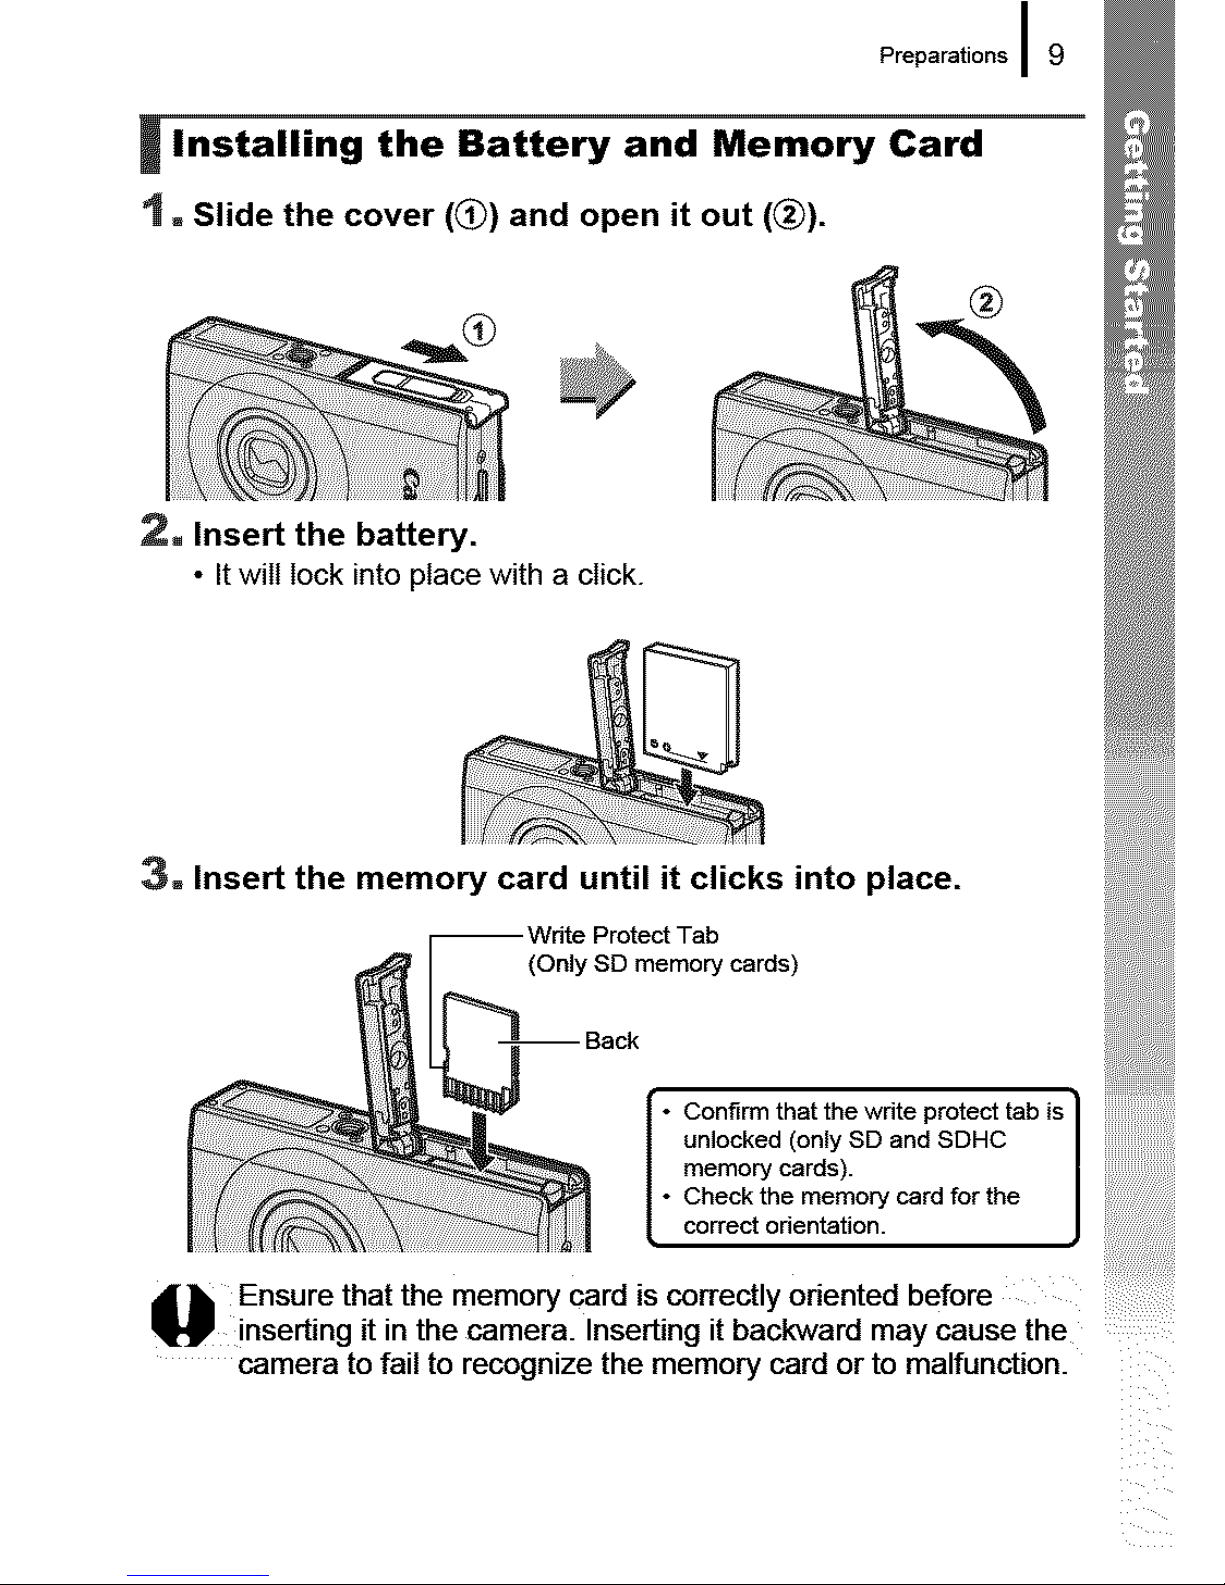
i Installing the Battery and Memory Card
t. Slide the cover (_) and open it out (_).
2, Insert the battery.
• Itwill lock into place with a click.
3. Insert the memory card until it clicks into place.
(OnlySDmemorycards)
If Confirm that thewdte protect tab is
unlocked (only SD and SDHC I
memory cards). I
Check the memory card for the
correct odentation. J
lill Ensure that the memory card is correctly oriented before
inserting it in the camera. Inserting it backward may cause the ....
camera to fail to recognize the memory card or to malfunction.
10 I Preparations
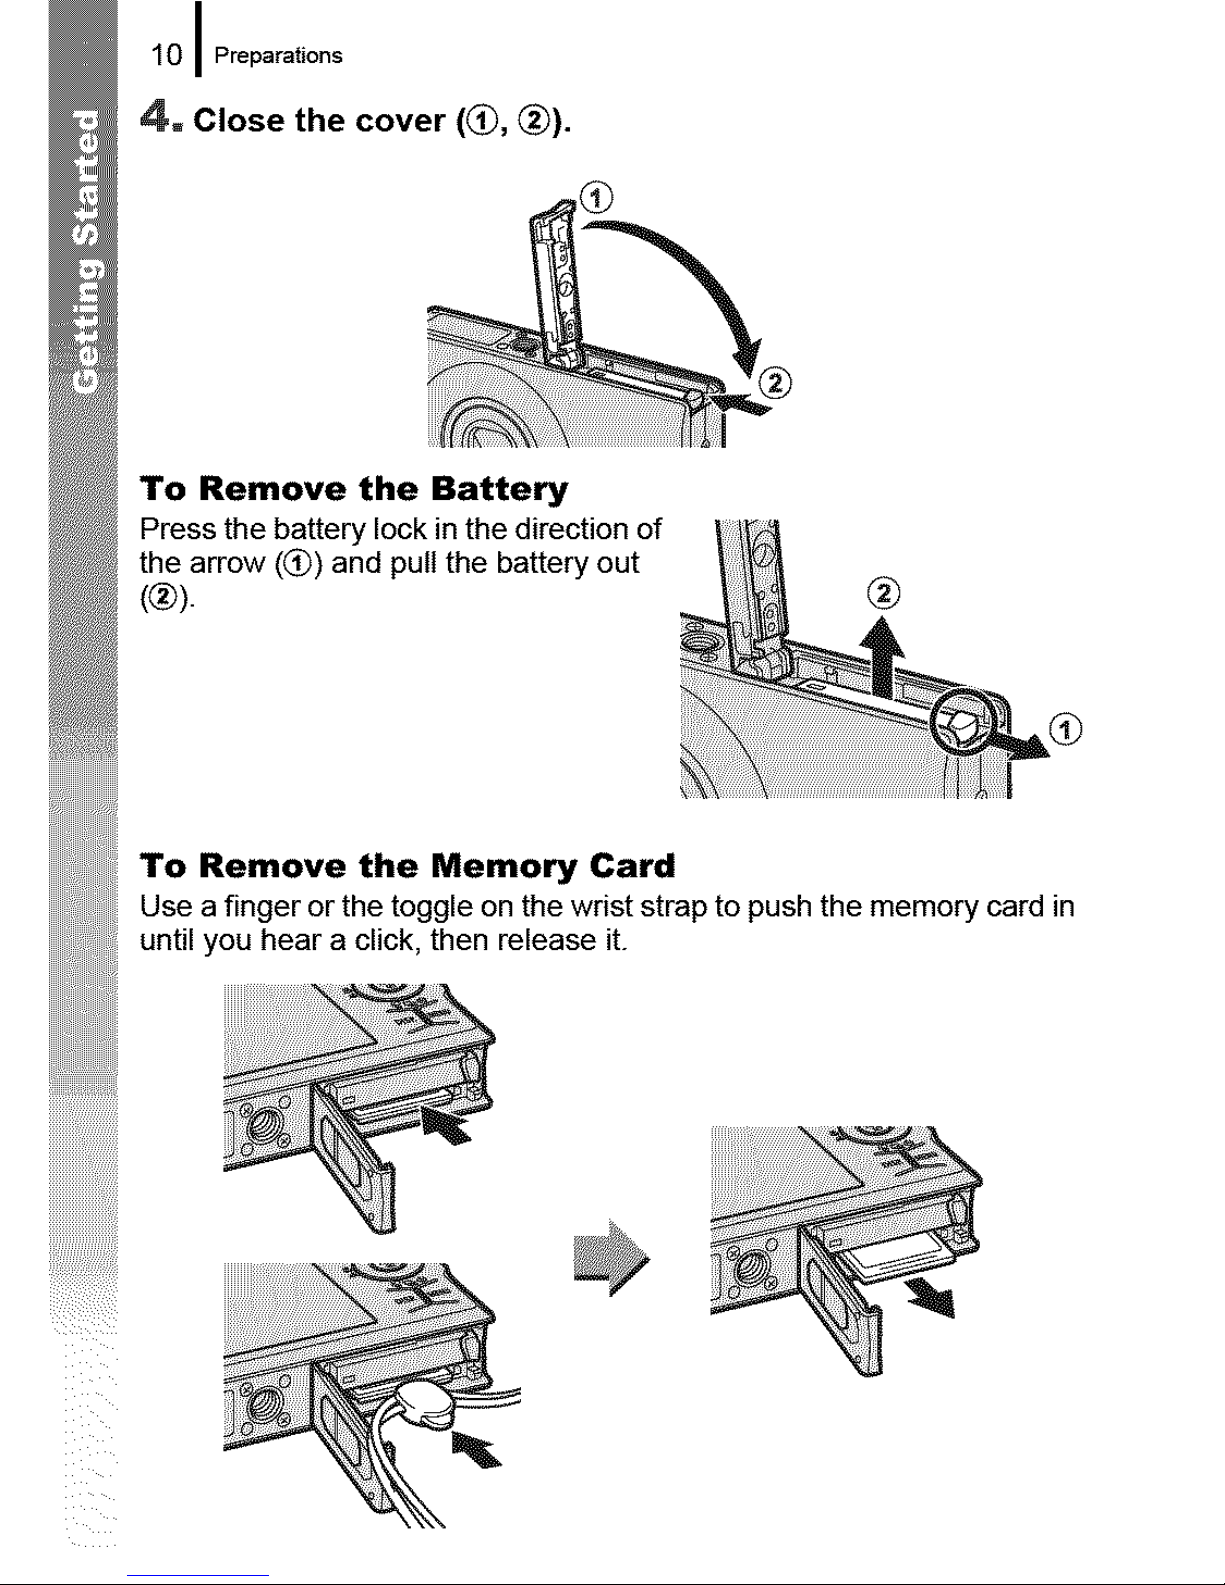
4. Close the cover (_, _).
To Remove the Battery
Press the battery lock in the direction of
the arrow (_)) and pull the battery out
(®).
®
To Remove the Memory Card
Use a finger or the toggle on the wrist strap to push the memory card in
until you hear a click, then release it.

I
Preparations I 11
Attaching the Wrist Strap
Use the wrist strap when using the camera to prevent yourself from
accidentally dropping the camera.
Toggle
You can change its position on the strap. The
toggle can be used to open the AN OUT and
DIGITAL terminal cover and when inserting or
removing memory cards.
Use the Wrist Strap to Open the Terminal Cover
Hook your fingernail or the wrist
strap toggle under the bottom edge
of the ,tVV OUT and DIGITAL
terminal cover to open it.
12 I Preparations
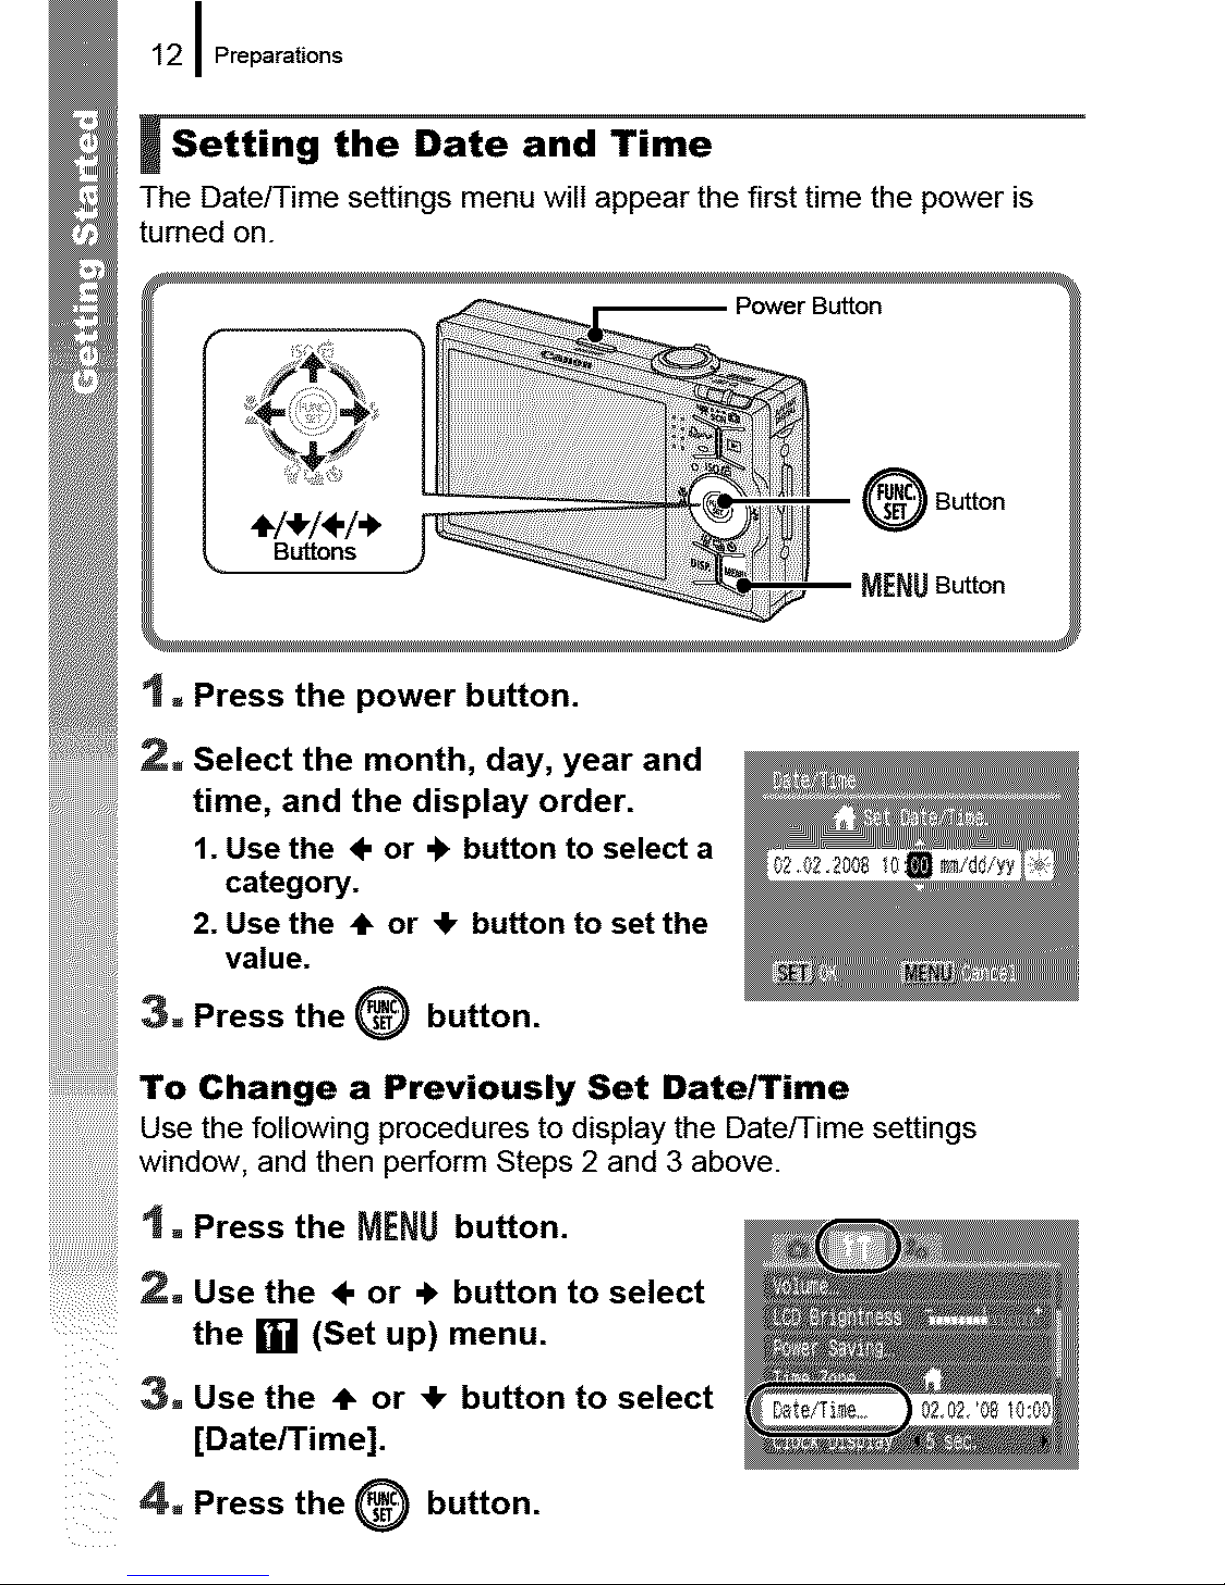
t Setting the Date and Time
The Date/Time settings menu willappear the first time the power is
turned on.
value.
Press the _ button.
3.
To Change a Previously Set Date/Time
Use the following procedures todisplay the Date/Time settings
window, andthen perform Steps 2 and 3 above.
'1, Press the MENU button.
2, Use the <-or .I, button to select
the [] (Set up) menu.
3, Use the + or ,Ik button to select
[Date/Time].
4, Press the _ button.
Preparations I 13
I_] • A rechargeable lithium battery is built into the camera to
save such settings as the date/time. Insert a charged battery
into the camera. Or if you use the separately sold AC
Adapter Kit ACK-DC30, the battery will charge in about four
hours. It will charge even if the camera is turned off.
• The date/time settings may be lost after approximately three
weeks ifyou remove the main battery. Reset the date/time
settings if this occurs.
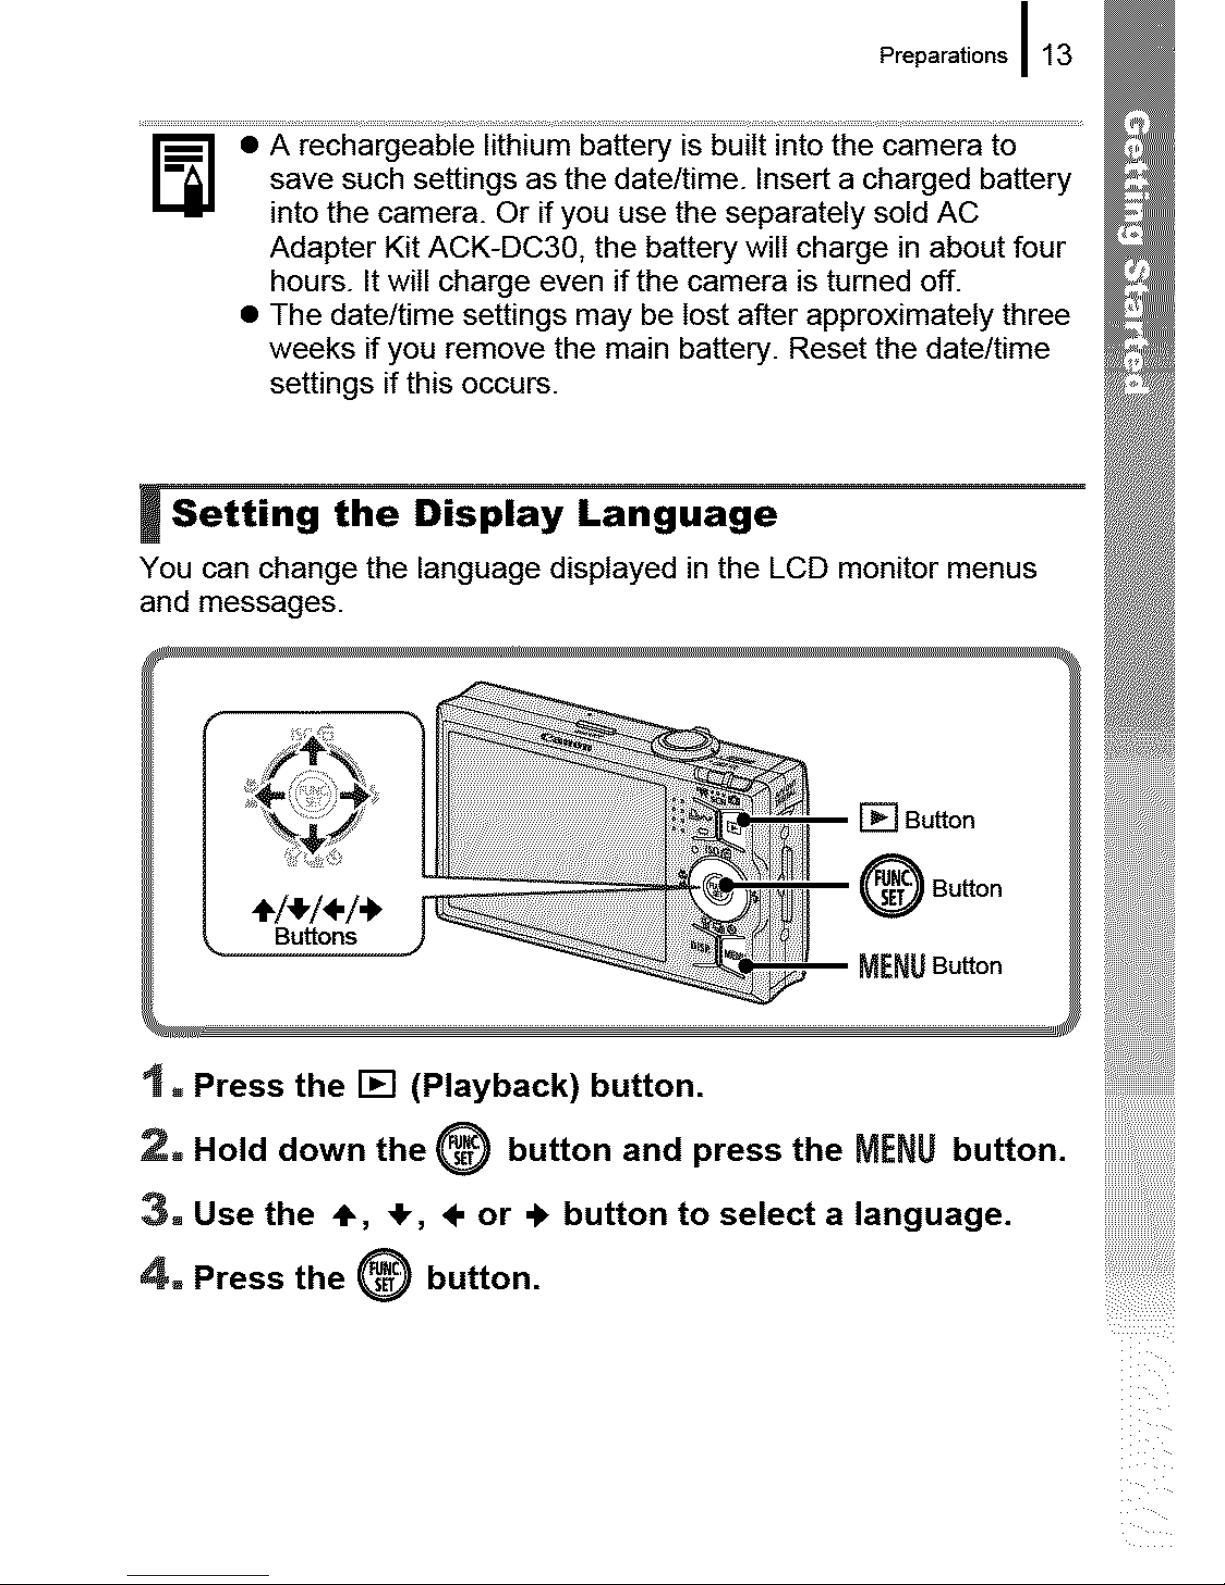
I Setting Display Language
the
You can change the language displayed in the LCD monitor menus
and messages.
t ,, Press the [] (Playback) button.
2,, Hold down the @ button and press the MENU button.
3. Use the ,1% ,I,, 4" or 4" button to select a language.
4,. Press the @ button.
iiiiiiiiiiiiiiiiiiiiiiiiiiiii!ii!i!i!!ill

14 I Shooting Still Images
'1 mPress the power button.
• The start-up sound will play and the start-up image will display in
the LCD monitor.
• Pressing the power button again turns the power off.
2. Select a shooting mode.
1. Set the mode switch to a
(Shooting).
2. Turn the control dial to select []
(Auto).
3. Aim the camera at the subject.
Avoiding Camera Shake
Keep your arms tight against your body while
holding the camera firmly by the sides. Using
a tripod is also effective.
_ se the wriststrap to avoid dropping
the camera during use
Wrist Strap
4, Press the shutter button lightly (press halfway) to set
the focus.
• When the camera focuses, it beeps twice and the indicator lights
green (orange when the flash fires).

I
Shooting Still Images I 15
5. Without changing anything else, press the shutter
button all the way (press fully) to shoot.
• The shutter sound will play once and the image will record.
• Recorded images are displayed on the LCD monitor for
approximately 2 seconds immediately alter shooting (Rec.
review). Shooting is possible while the image is displayed.
• Holding down the shutter button alter taking a shot will continue
displaying the image.
• The indicator will blink green and the file will record to the
memory card.
To Shoot Images in Focus
The camera automatically sets the focus when you press the shutter
button halfway*.
* The shutter button has a two-stage action. Pressing it down to the first stage is
referred as "pressing halfway".
.......................................................................................Correct ........................................................................ X Incorrect
<
Pressfull"t: j+
focus
...... A ................................................
AF frames will display in
green on the LCD monitor
at the points of focus.
(orang
16 I Viewing Still Images
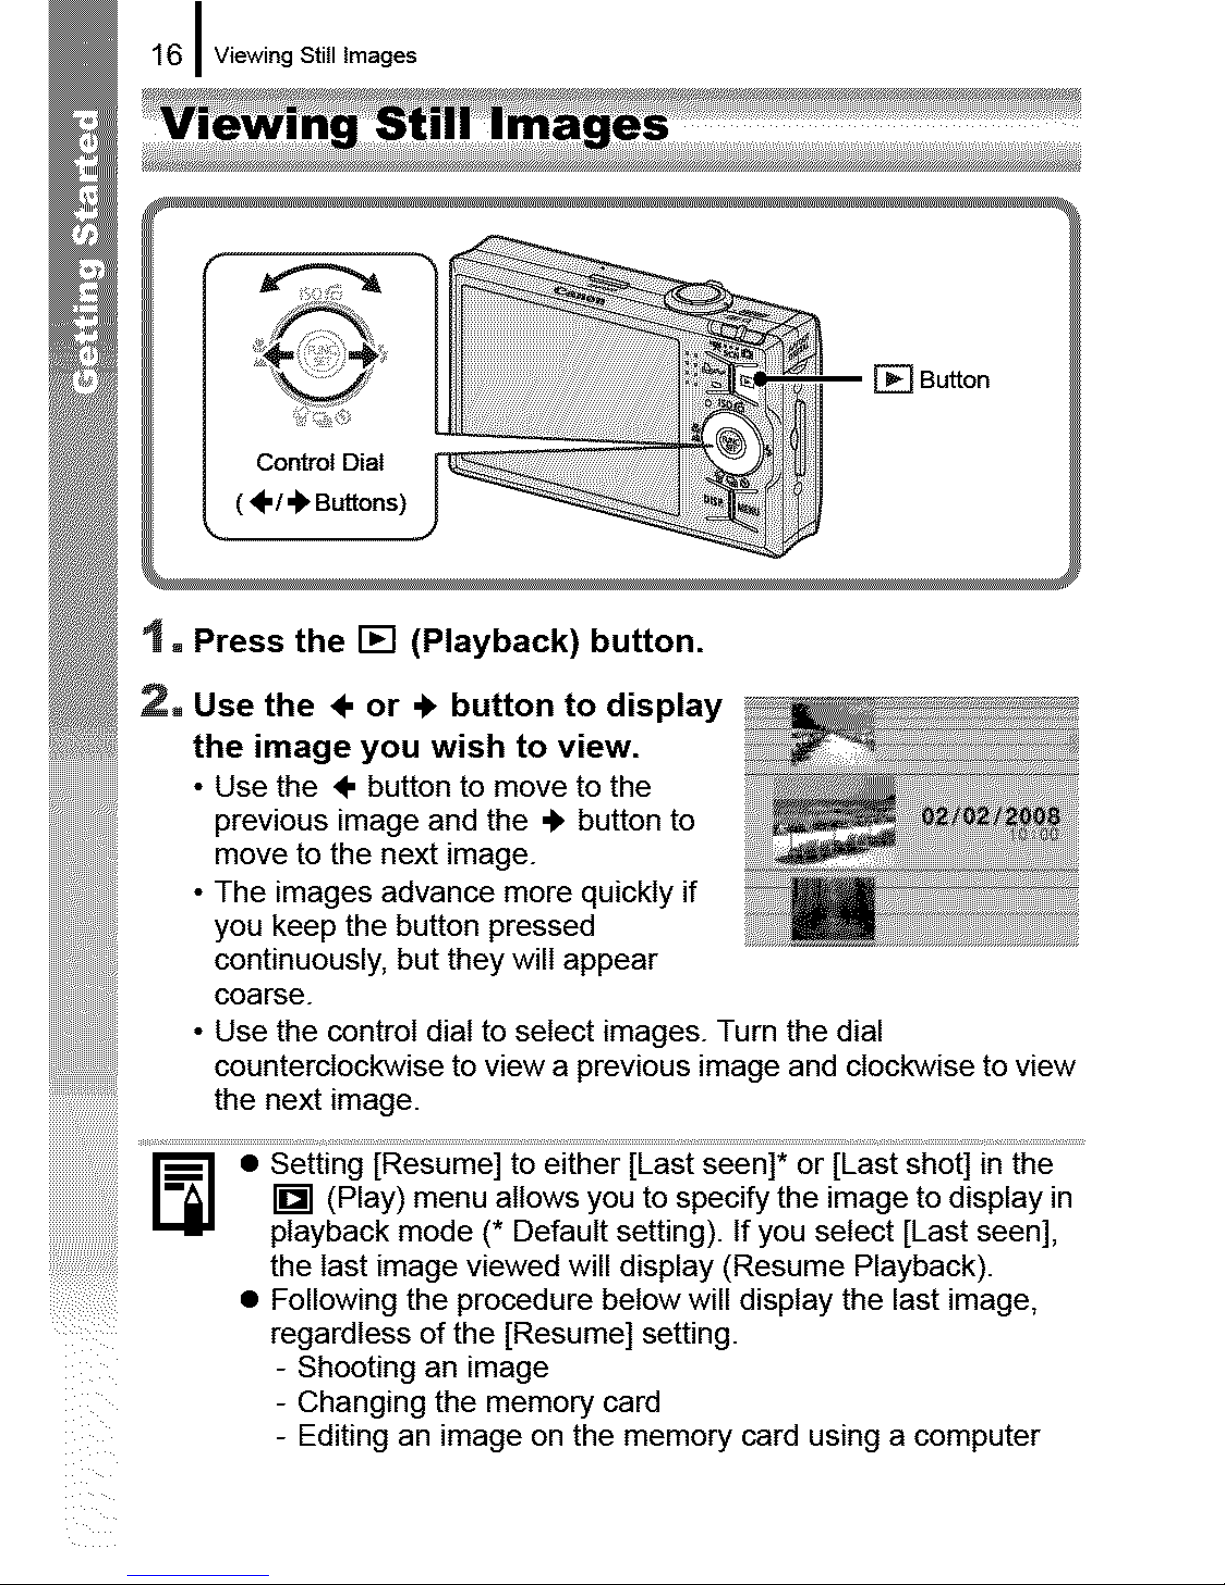
'1, Press the [] (Playback) button.
2, Use the <. or "I, button to display
the image you wish to view.
• Use the 4- button to move to the
previous image and the 'l, button to
move to the next image.
• The images advance more quickly if
you keep the button pressed
continuously, but they will appear
coarse.
• Use the control dial to select images. Turn the dial
counterclockwise to view a previous image and clockwise to view
the next image.
...........................................eii;_i_e__ eii_e iE_ _ __giii_ .........
I_ [] (Play) menu allows you to specify the image to display in
playback mode (* Default setting). If you select [Last seen],
the last image viewed will display (Resume Playback).
• Following the procedure below will display the last image,
regardless of the [Resume] setting.
- Shooting an image
- Changing the memory card
- Editing an image on the memory card using a computer
Erasing I 17
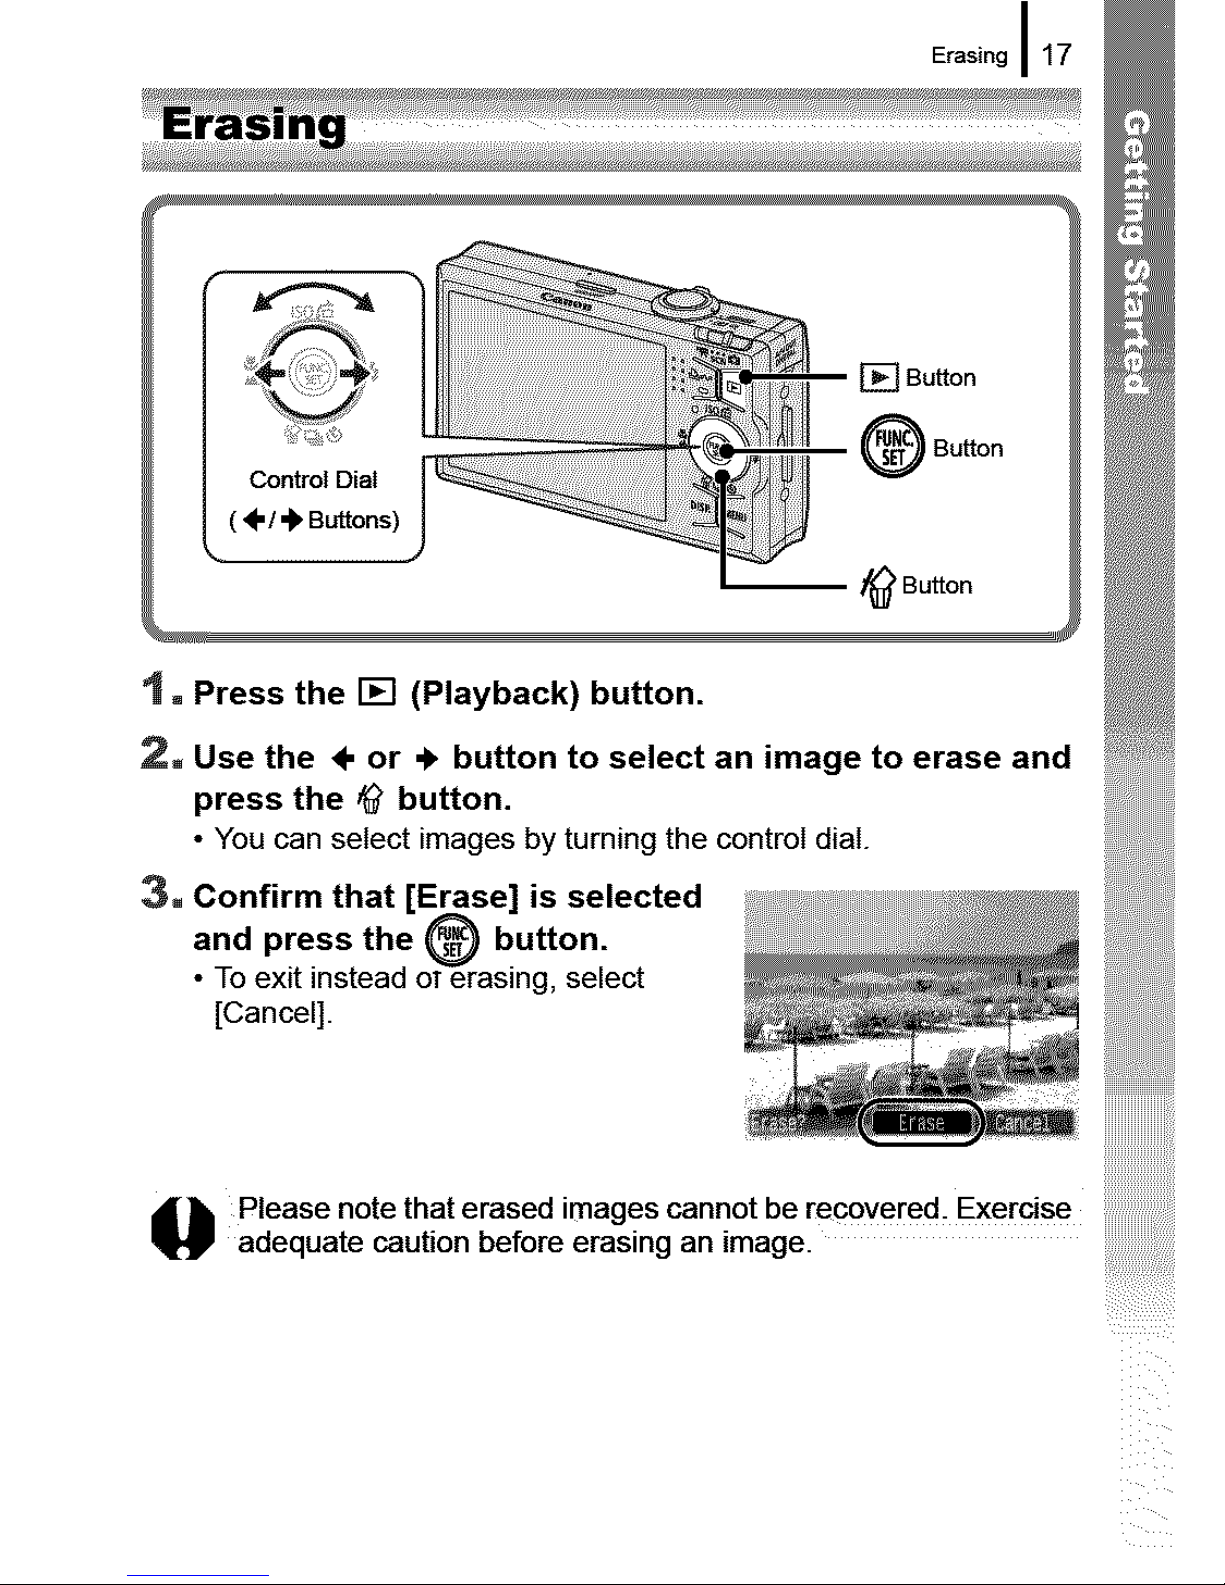
"1, Press the [] (Playback) button.
2. Use the ÷ or ._ button to select an image to erase and
press the ,_ button.
• You can select images by turning the control dial.
3, Confirm that [Erase] is selected
and press the _ button.
• To exit instead ot erasing, select
[Cancel].
Please note that erased images cannot be [ec0vered_ Exercise
adequate caution before erasing an image.
18 I Printing
.....: ....... [] Button
o.out,oo
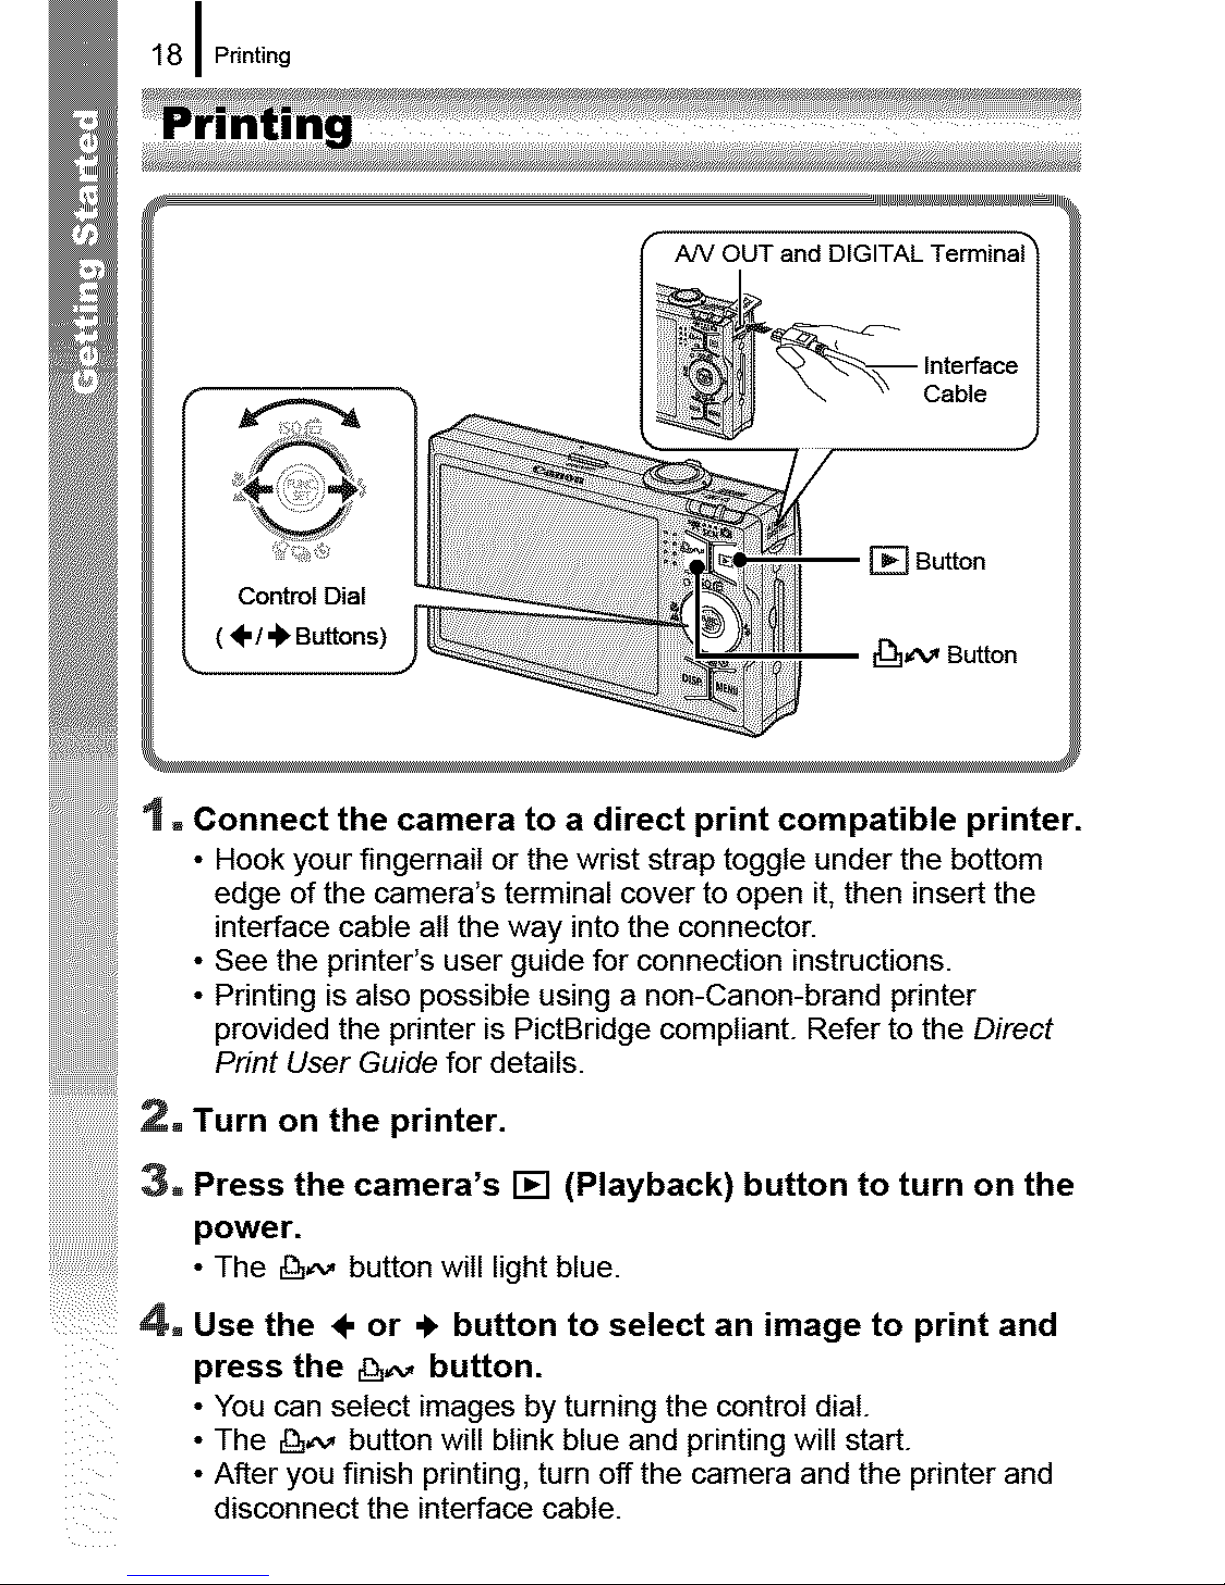
t, Connect the camera to a direct print compatible printer.
• Hook your fingernail or the wrist strap toggle under the bottom
edge of the camera's terminal cover to open it, then insert the
interface cable all the way into the connector.
• See the printer's user guide for connection instructions.
• Printing is also possible using a non-Canon-brand printer
provided the printer is PictBridge compliant. Refer to the Direct
Print User Guide for details.
2. Turn on the printer.
3= Press the camera's [] (Playback) button to turn on the
power.
•Thebuttonwilllightblue
4_ Use the ÷ or ._ button to select an image to print and
press the _,v button.
• You can select images by turning the control dial.
• The _,_ button will blink blue and printing will start.
• After you finish printing, turn off the camera and the printer and
disconnect the interface cable.
Printing I 19
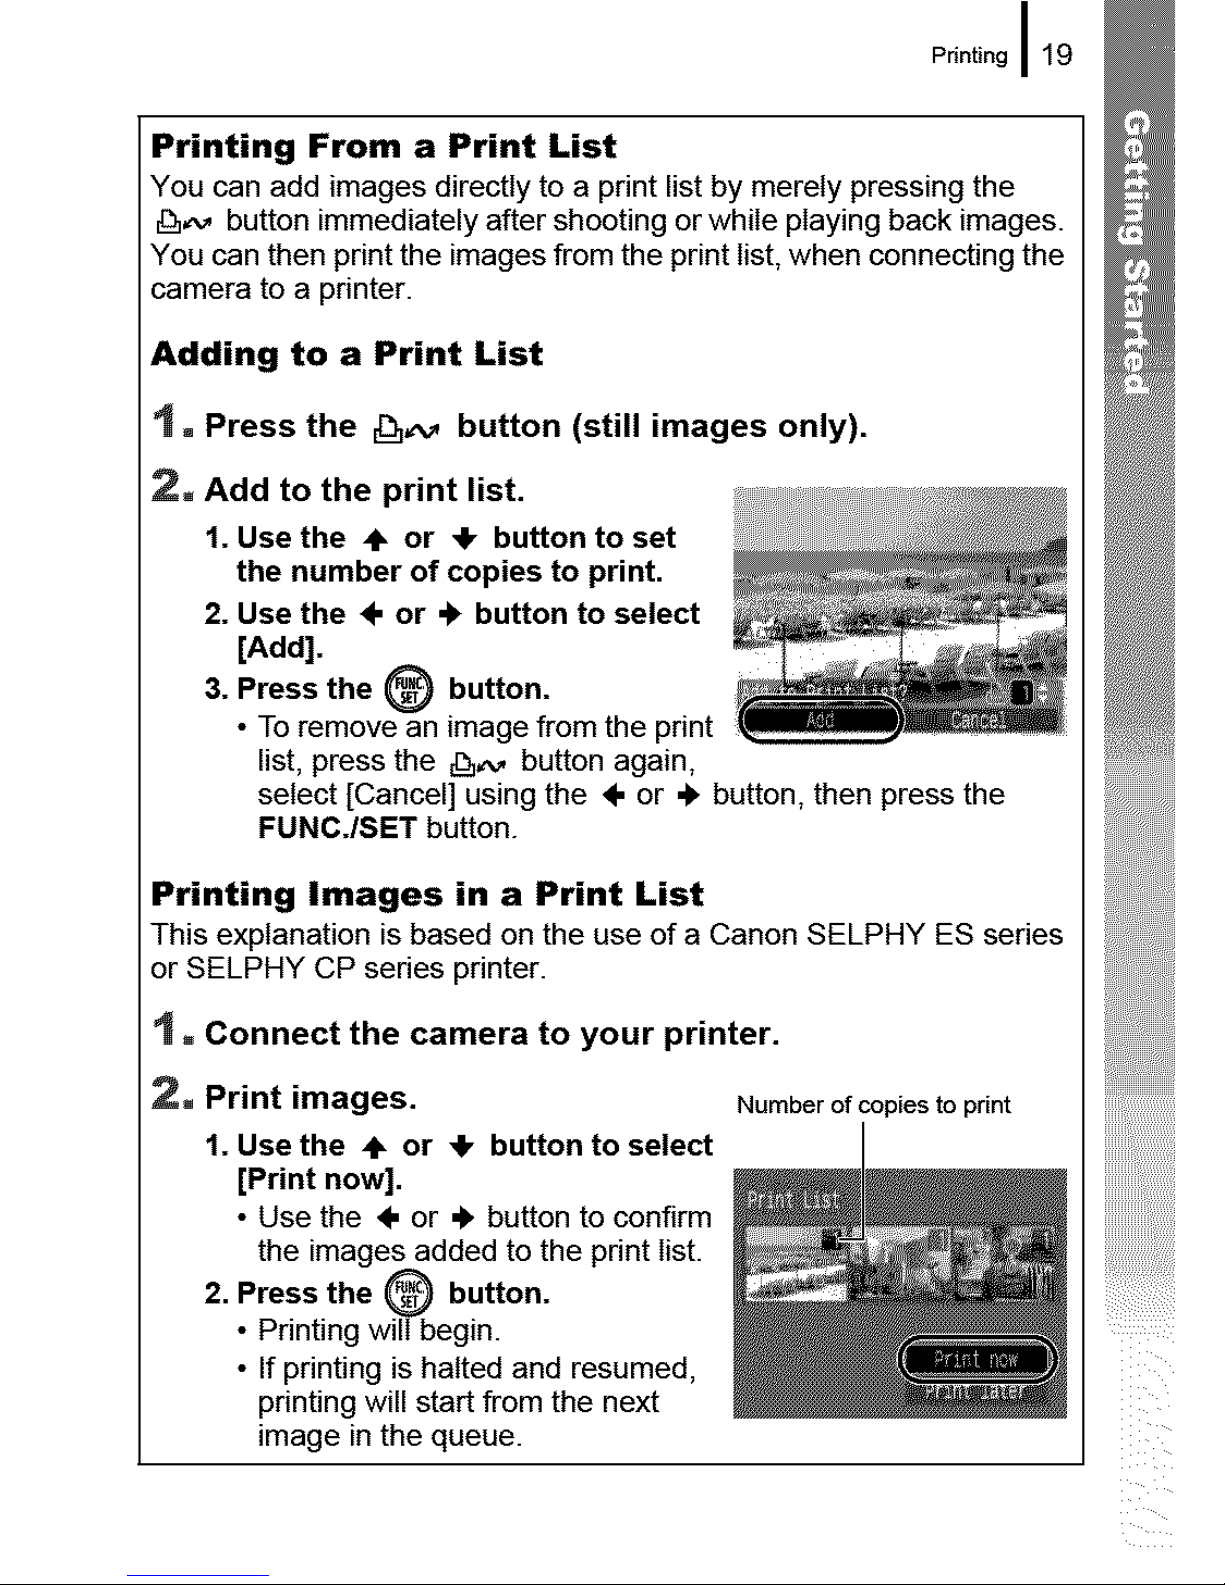
Printing From a Print List
You can add images directly to a print list by merely pressing the
,D,,_ button immediately after shooting or while playing back images.
You can then print the images from the print list, when connecting the
camera to a printer.
Adding to a Print List
"!, Press the _,v button (still images only).
2_ Add to the print list.
1. Use the 4, or ,Ik button to set
the number of copies to print.
2. Use the 4" or "k button to select
[Add].
3. Press the _J_) button.
• To remove an image from the print
list, press the _,_, button again,
select [Cancel] using the 4" or 4" button, then press the
FUNC./SET button.
Printing Images in a Print List
This explanation is based on the use of a Canon SELPHY ES series
or SELPHY CP series printer.
. Connect the camera to your printer.
2, Print images. Number of copies to print
1. Use the ÷ or _1, button to select
[Print now].
• Use the 4, or 4, button to confirm
the images added to the print list.
2. Press the _,_ button.
• Printing will begin.
• If printing is halted and resumed,
printing will start from the next
image in the queue.
20J Embedding the Date in the Image Data
Mode
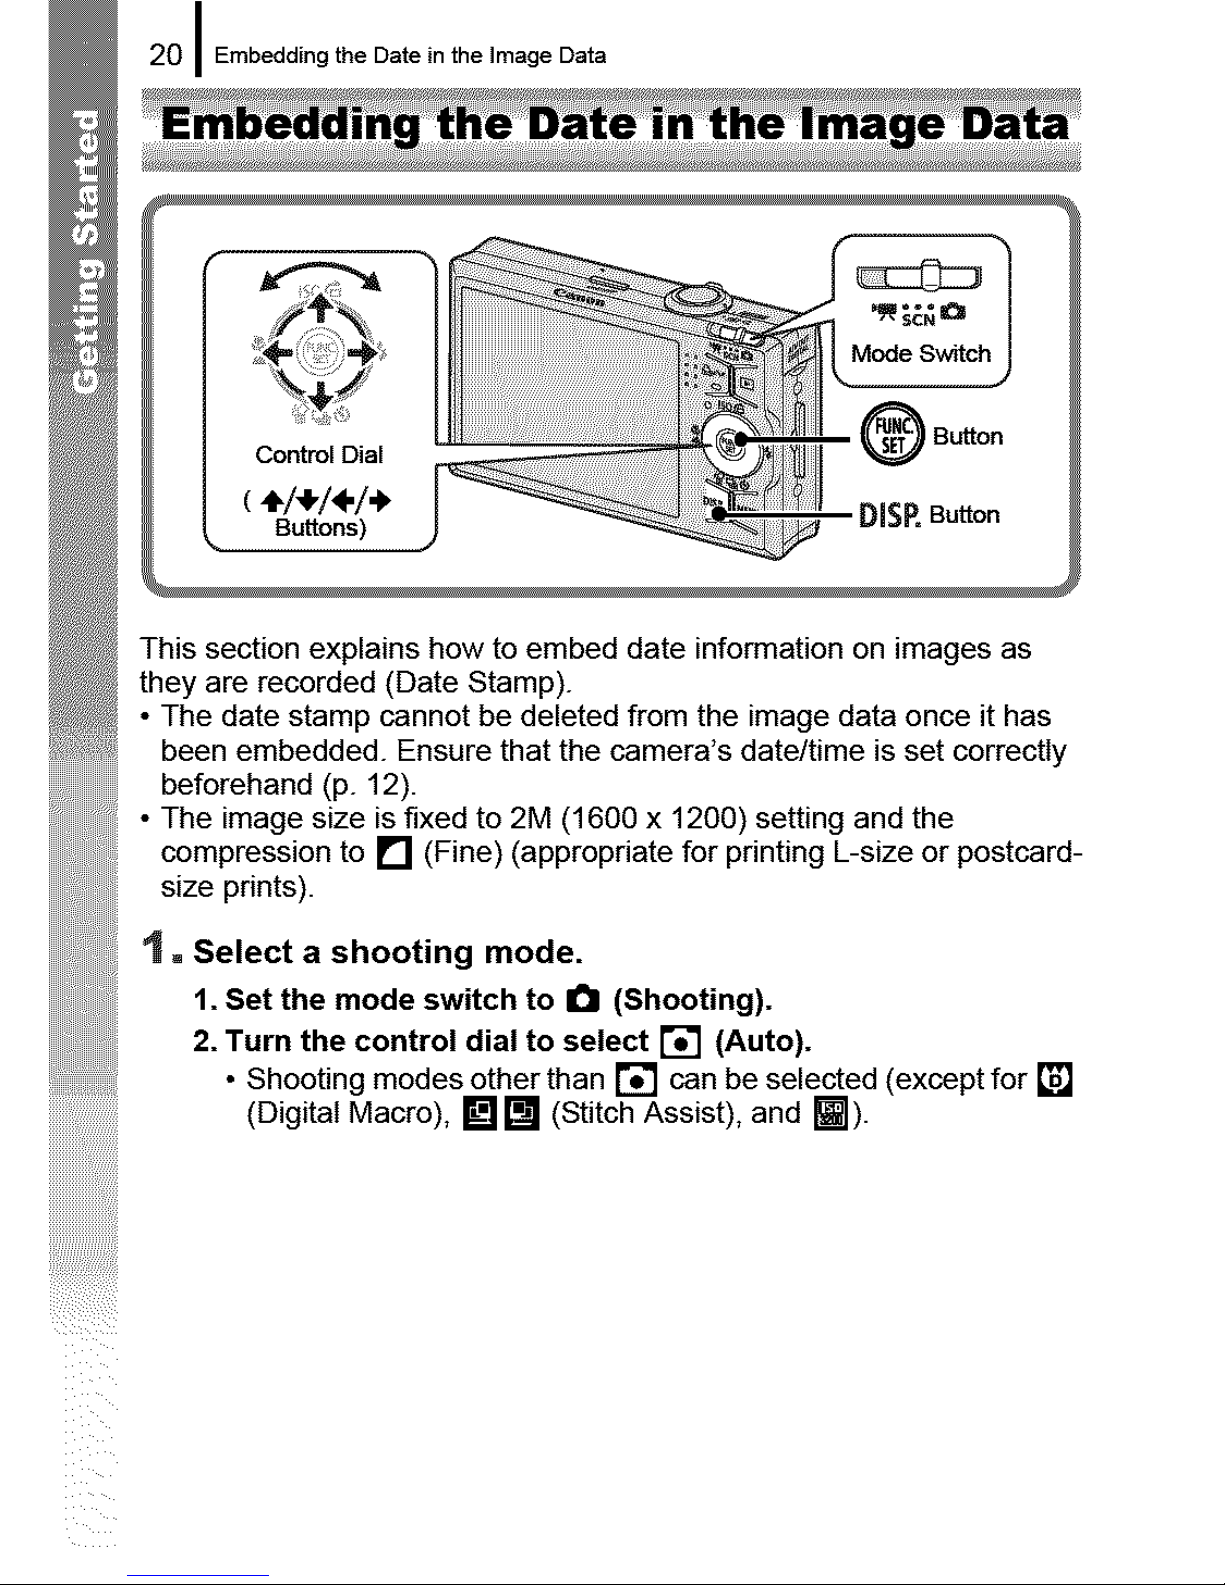
This section explains how to embed date information on images as
they are recorded (Date Stamp).
• The date stamp cannot be deleted from the image data once it has
been embedded. Ensure that the camera's date/time is set correctly
beforehand (p. 12).
• The image size is fixed to 2M (1600 x 1200) setting and the
compression to [] (Fine) (appropriate for printing L-size or postcard-
size prints).
'1. Select a shooting mode.
1. Set the mode switch to I_1 (Shooting).
2. Turn the control dial to select [] (Auto).
• Shooting modes other than [] can be selected (except for []
(Digital Macro), [] [] (Stitch Assist), and _i]).
I
Embedding the Date in the Image Data I 21
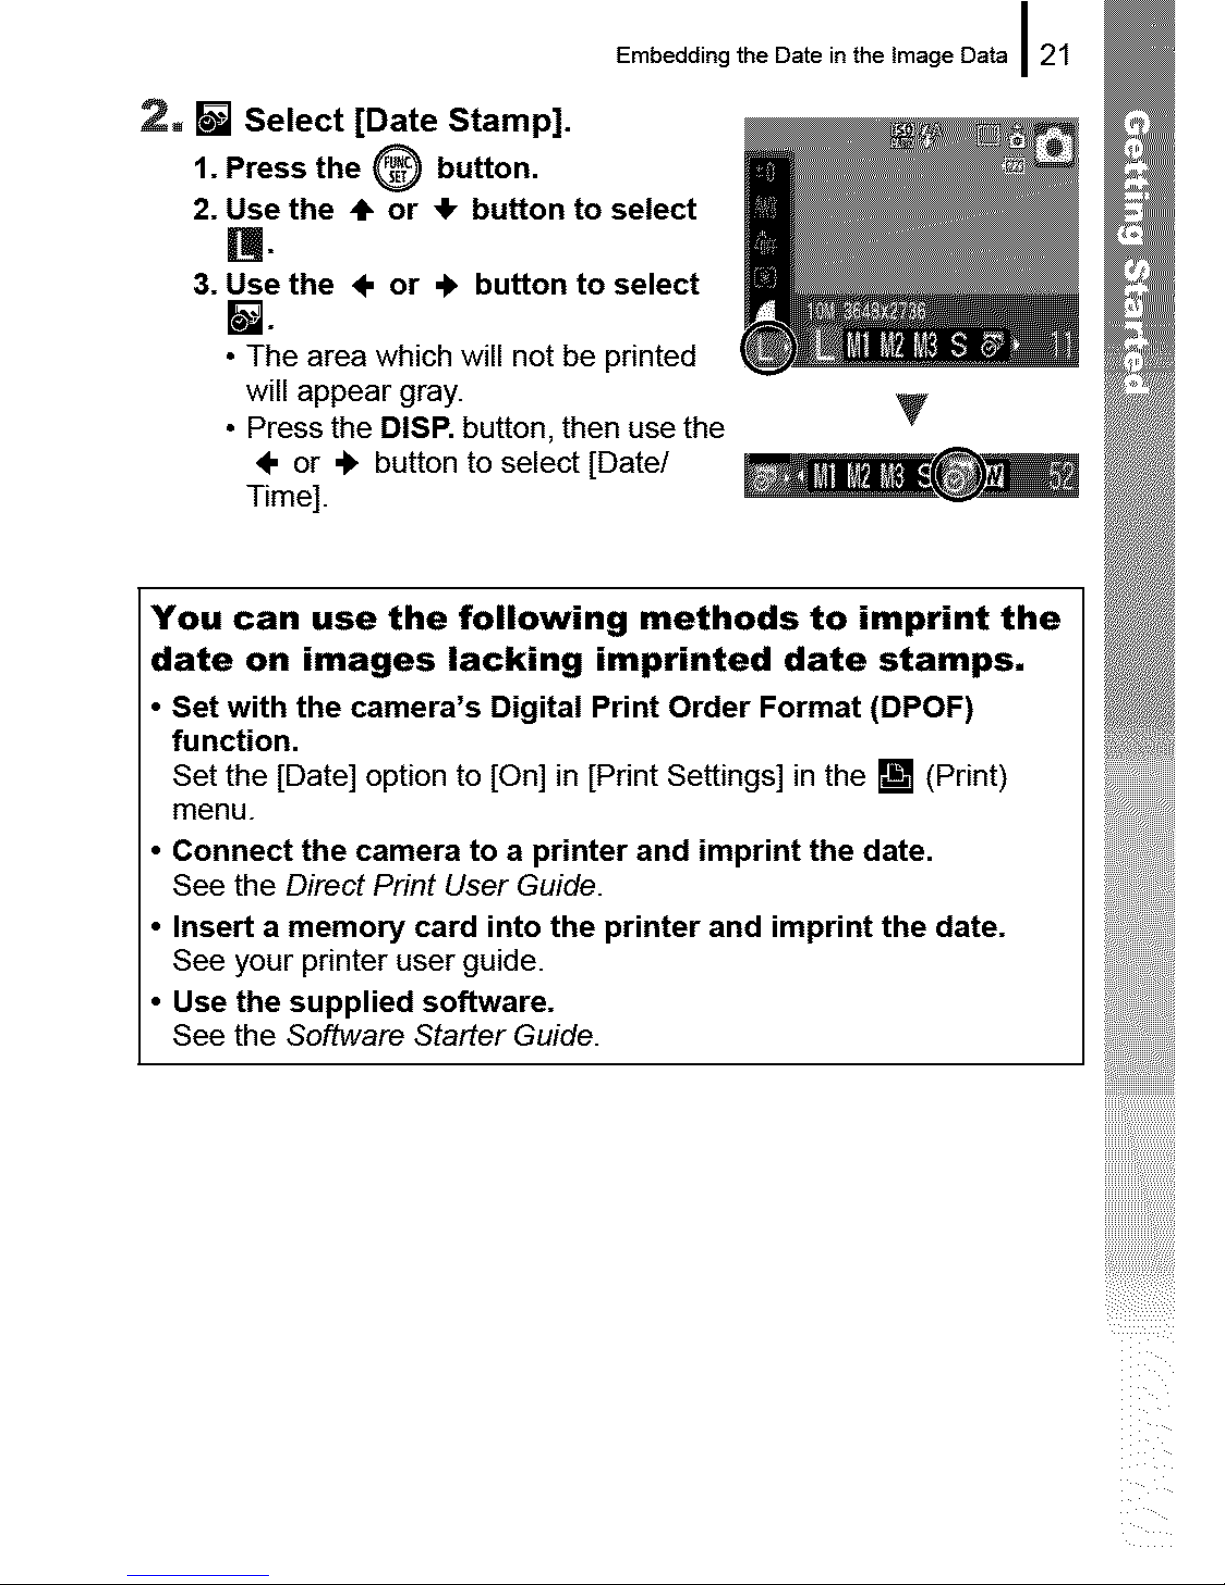
2. [] Select [Date Stamp].
1. Press the _ button.
2. Use the ,1_or _1,button to select
[].
3. Use the 4- or "k button to select
[].
• The area which will not be printed
will appear gray.
• Press the DISP. button, then use the V
÷ or ._ button to select [Date/
Time].
You can use the following methods to imprint the
date on images lacking imprinted date stamps.
Set with the camera's Digital Print Order Format (DPOF)
function.
Set the [Date] option to [On] in [Print Settings] in the [] (Print)
menu.
Connect the camera to a printer and imprint the date.
See the Direct Print User Guide.
Insert a memory card into the printer and imprint the date.
See your printer user guide.
Use the supplied software.
See the Software Starter Guide.
iiiiiiiiiiiiiiiiiiiiiiiiiiiii!ii!i!i!!ill
22 I ShootingMovies
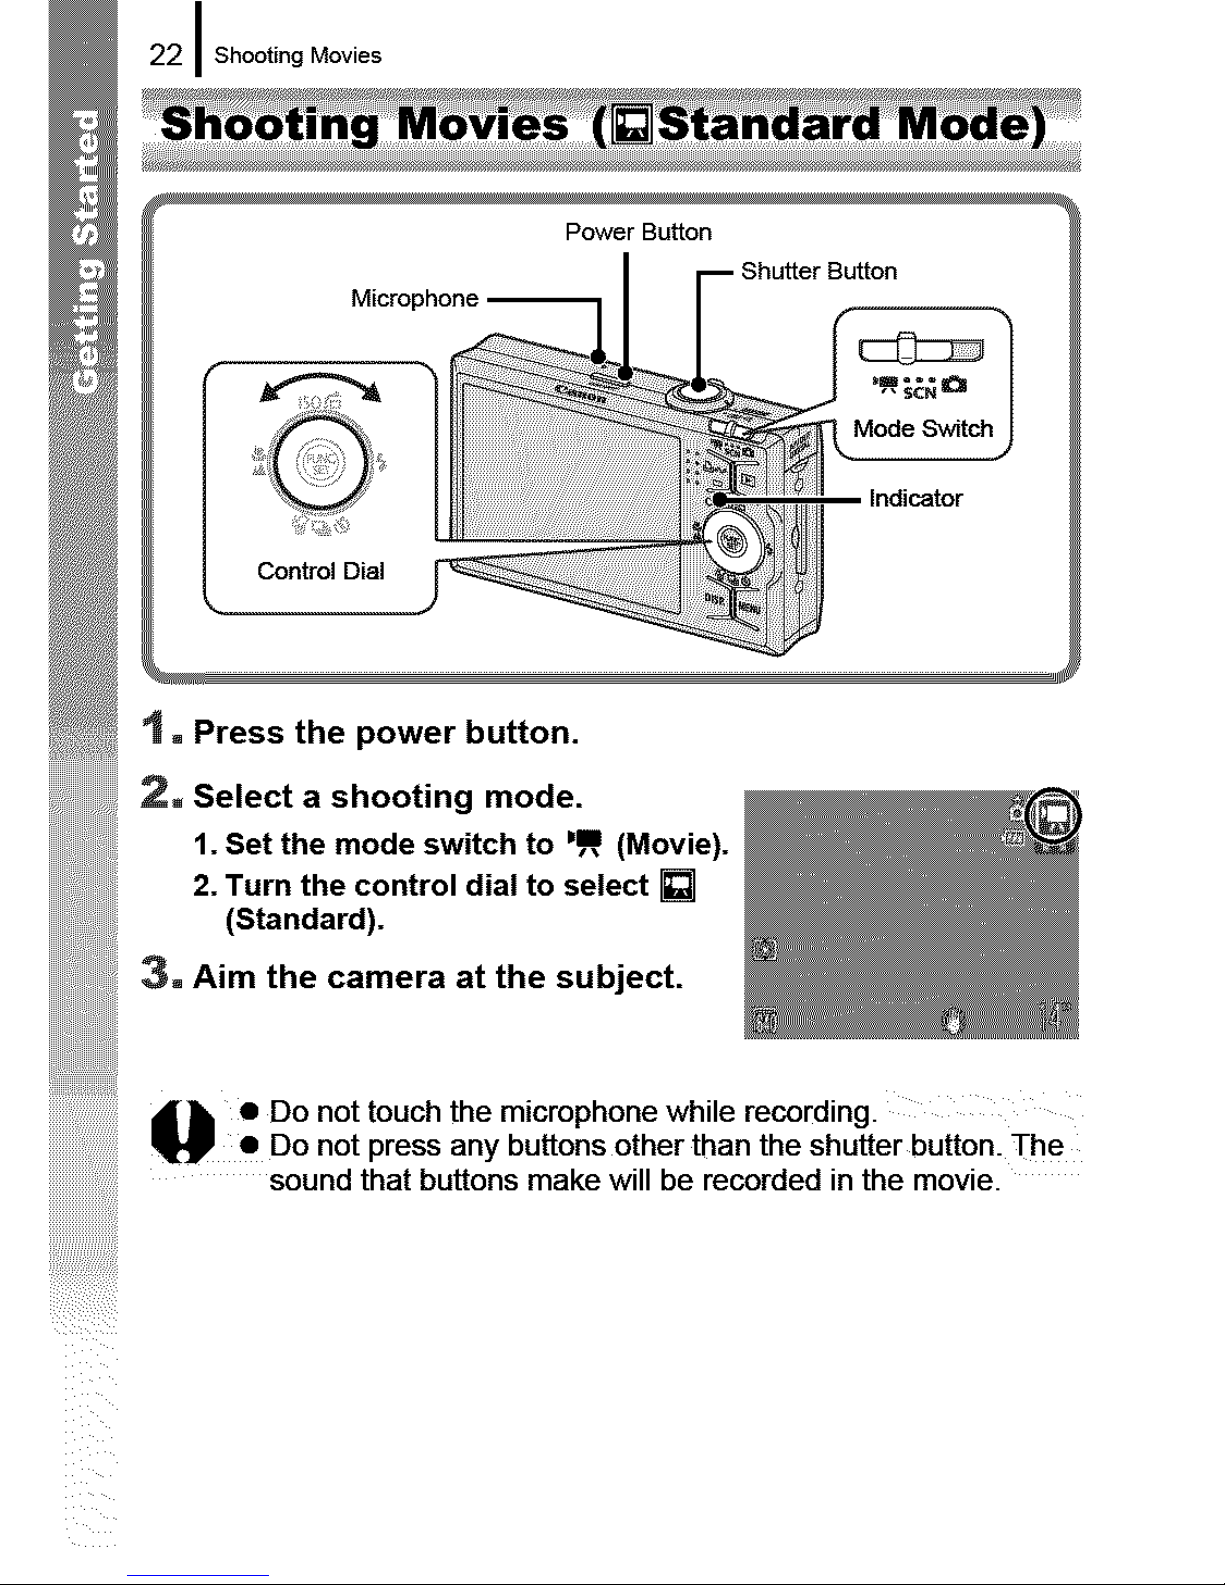
t. Press the power button.
2. Select a shooting mode.
1. Set the mode switch to =m (Movie).
2. Turn the control dial to select []
(Standard).
3. Aim the camera at the subject.
• Do not touch the microphone while recording.
• Do not press any buttons other than the shutter button. The
sound that buttons make will be recorded in the movie.

4, Press the shutter button lightly
(press halfway) to set the focus.
• An electronic beep will sound twice
and the indicator will light green when
the camera focuses.
• The exposure, focus and white
balance are automatically set when
you press the button halfway.
5, Without changing anything else,
press the shutter button all the
way (press fully) to shoot.
• Recordingstarts.
I
Shooting Movies I 23
• During the recording, the elapsed
recording time and [@Rec.] will display
in the LCD monitor.
6, Press the shutter button again
(press fully) to stop recording.
• The indicator will blink green and the
data will be recorded onto the memory
card.
• Recording will stop automatically when
the maximum recording time elapses,
or the built-in memory or memory card
become full.
I
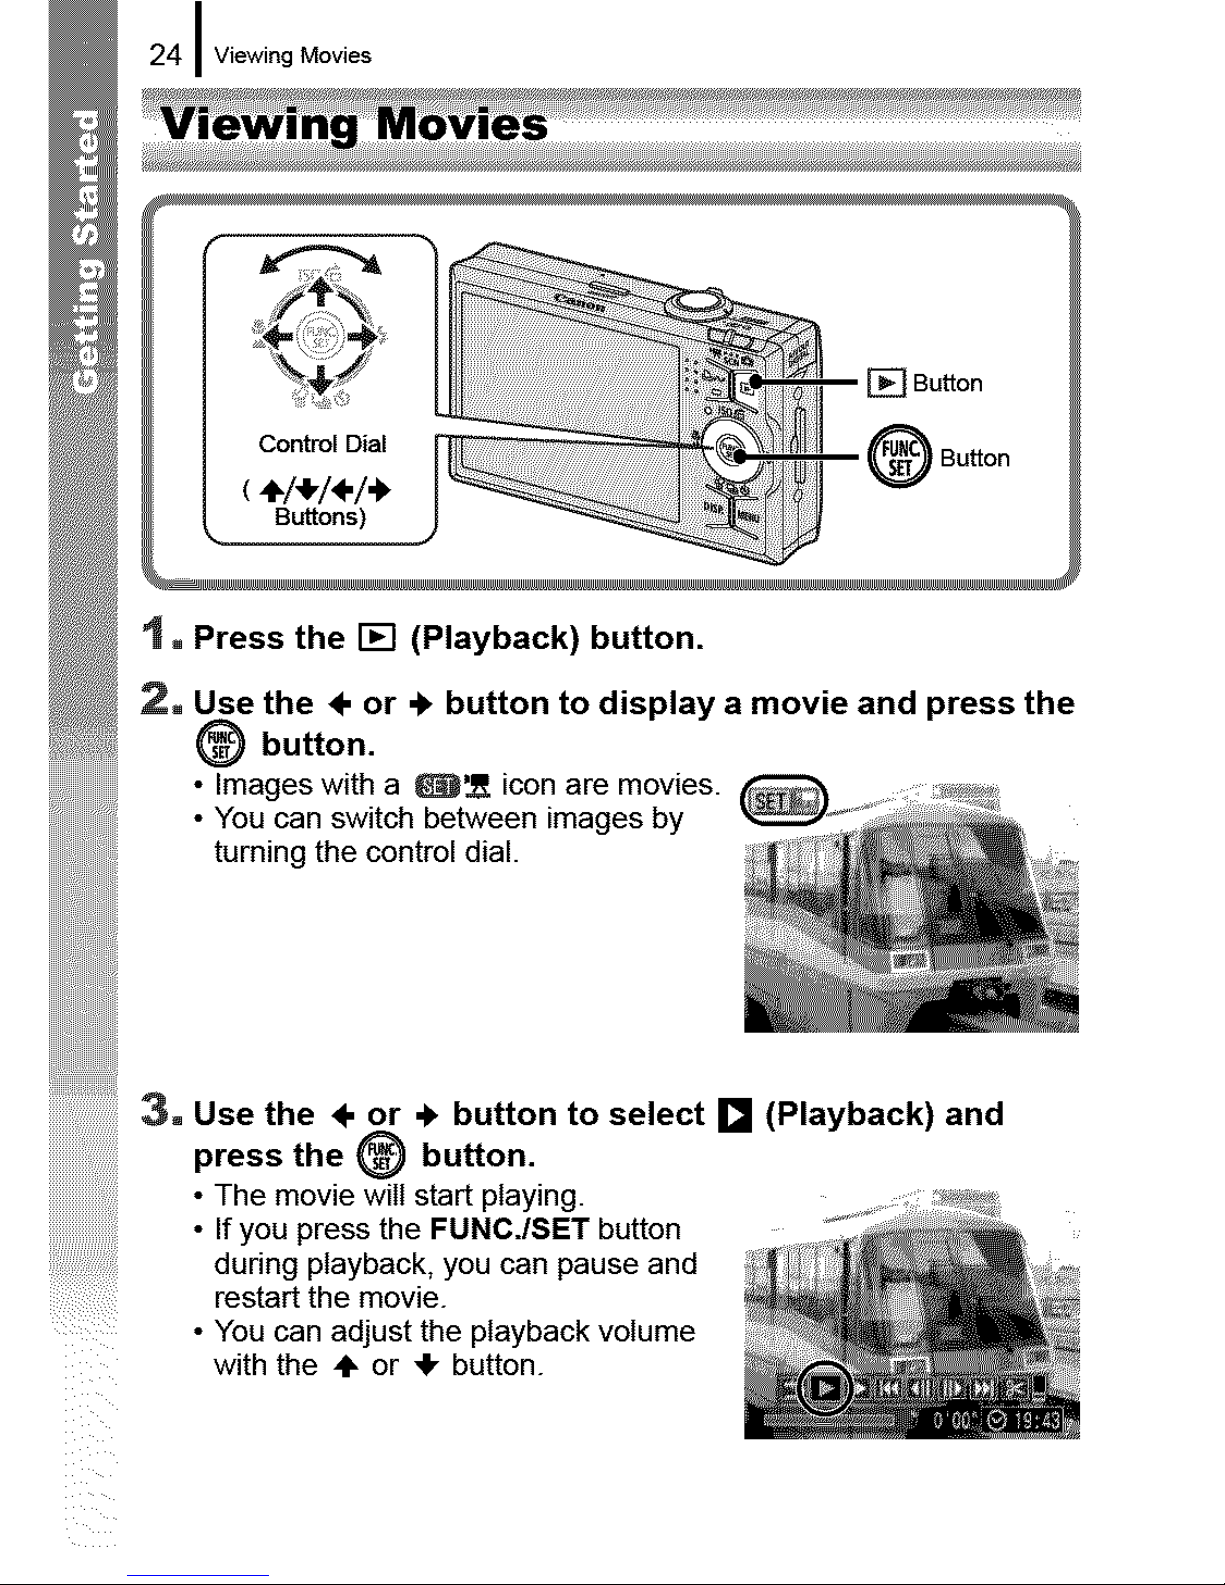
24 I ViewingMovies
'1, Press the [] (Playback) button.
2, Use the ÷ or ._ button to display a movie and press the
_) button.
• Images with a !_'_ icon are movies.
• You can switch between images by
turning the control dial.
:3. Use the ÷ or .I, button to select [] (Playback) and
the (_ button.
press
• The movie will start playing.
.....................• If you press the FUNC.ISET button
duringptayback,youcanpauseand
restart the movie.
• You can adjust the playback volume
with the ,IF or ,Ik button.
Downloading images to a Computer I 25
You are recommended to use the supplied software to download
images to your computer.
Items to Prepare
• Camera and computer
• Canon Digital Camera Solution Disk supplied with the camera
• Interface cable supplied with the camera
System Requirements
Please install the software on a computer meeting the following
minimum requirements.
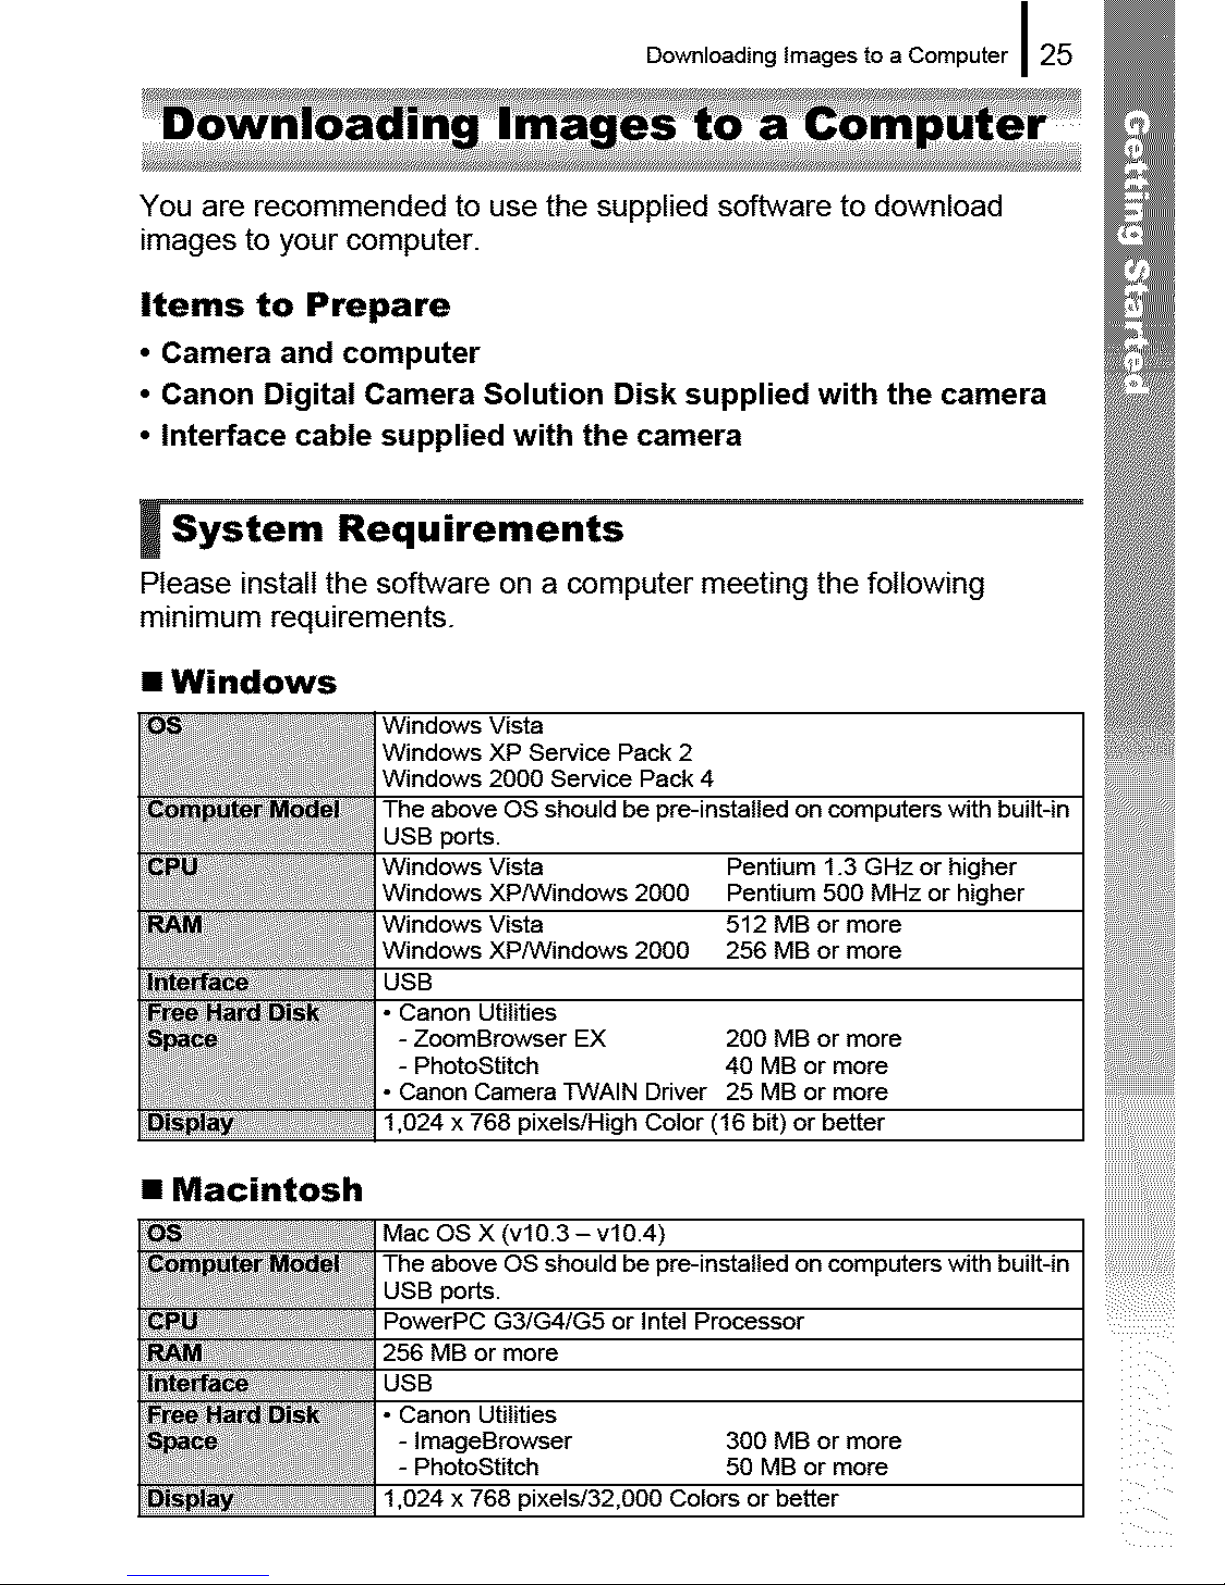
• Windows
Windows Vista
Windows XP Service Pack 2
Windows 2000 Service Pack 4
The above OS should be pre-installed on computers with built-in
USB ports.
Windows Vista Pentium 1.3 GHz or higher
Windows XP/Windows 2000 Pentium 500 MHz or higher
Windows Vista 512 MB or more
Windows XP/Windows 2000 256 MB or more
USB
• Canon Utilities
- ZoomBrowser EX 200 MB or more
- PhotoStitch 40 MB or more
• Canon Camera TWAIN Driver 25 MB or more
1,024 x 768 pixels/High Color (16 bit) or better
• Macintosh
; / Mac OS X (vl 0.3 - vl 0.4)
The above OS should be pre-installed on computers with buUt-in
USB ports.
PowerPC G3/G4/G5 or Intel Processor
256 MB or more
USB
• Canon Utilities
- ImageBrowser 300 MB or more
- PhotoStitch 50 MB or more
1,024 x 768 pixels!32,000 Colors or better
26 I Downloading Images to a Computer
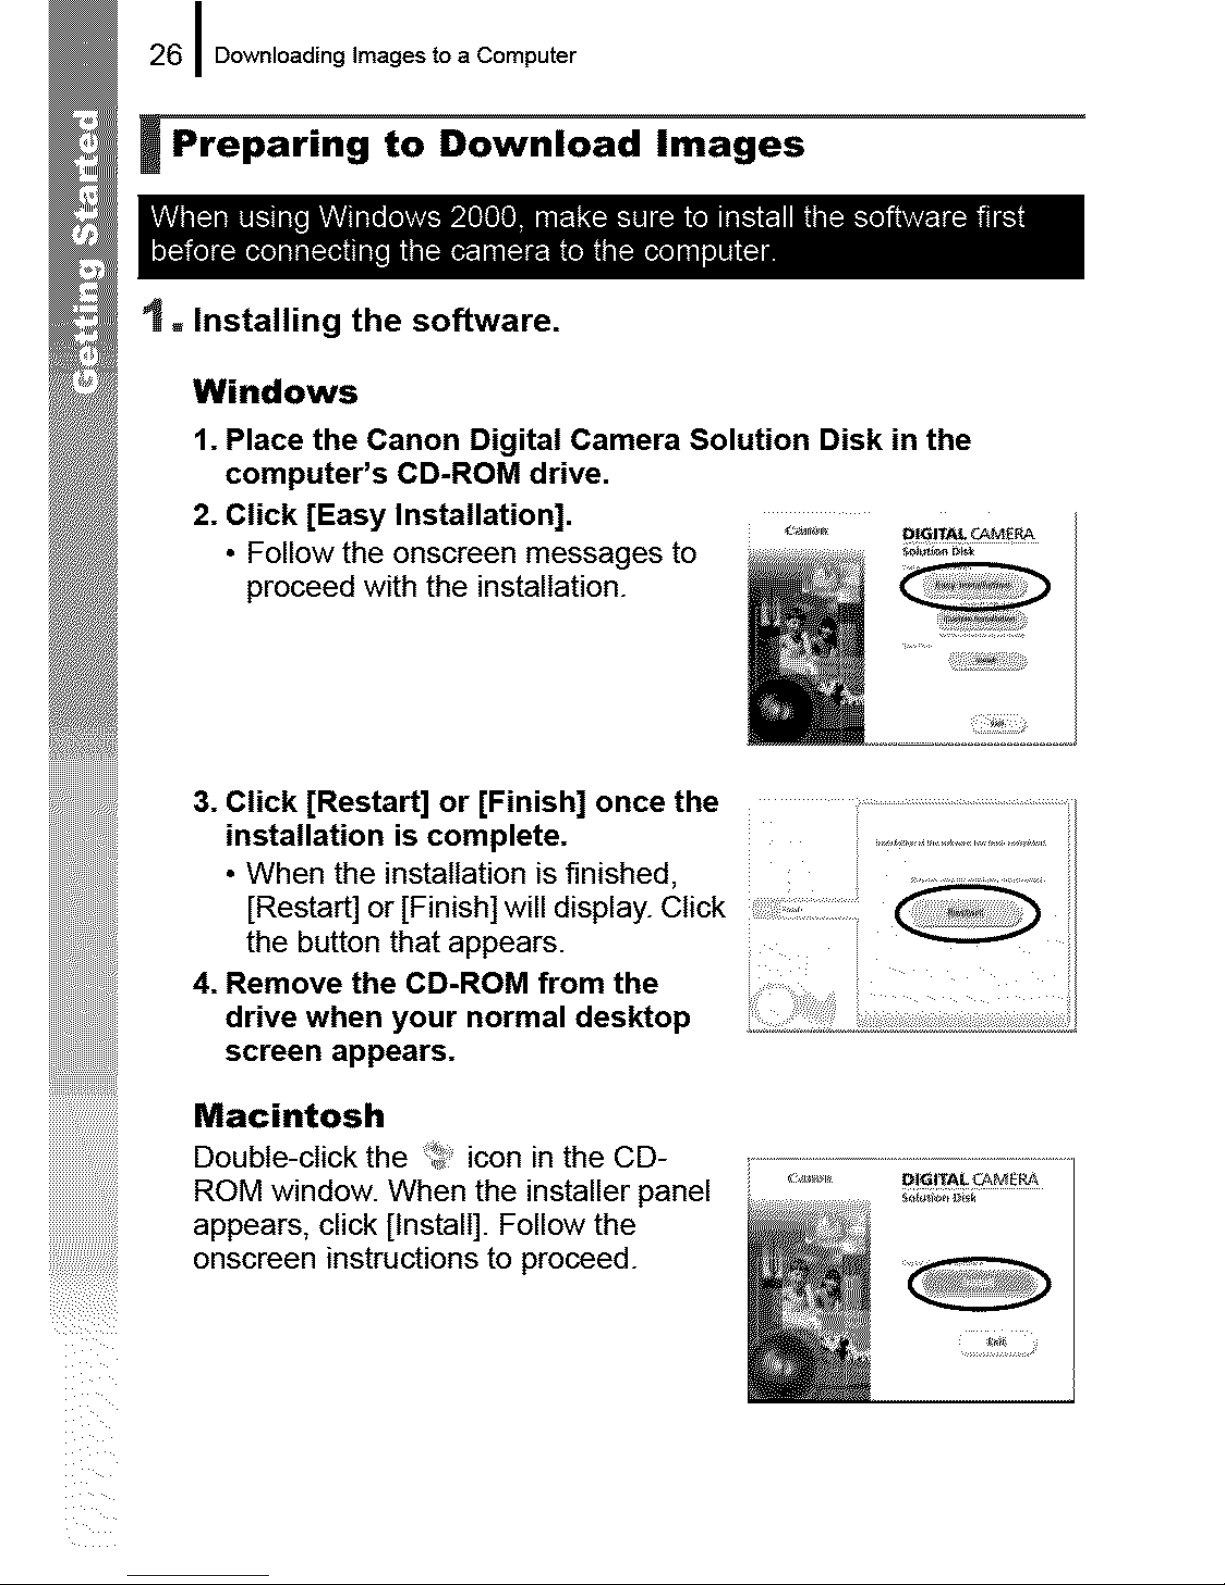
l Preparing to Download Images
"1. Installing the software.
Windows
1. Place the Canon Digital Camera Solution Disk in the
computer's CD-ROM drive.
2. Click [Easy Installation].
• Follow the onscreen messages to
proceed with the installation.
3. •installationClicktheWhen[Restart]button[Restart]theorinstallationthatis[Finish]complete,orappears.[Finish]willisdisplay,finished,once Clickthe _
4. Remove the CD-ROM from the
drive when your normal desktop _.__._i__
screen appears.
Macintosh
Double-click the _ icon in the CD-
ROM window. When the installer panel
appears, click [Install]. Follow the
onscreen instructions to proceed.
I
Downloading images to a Computer I 27
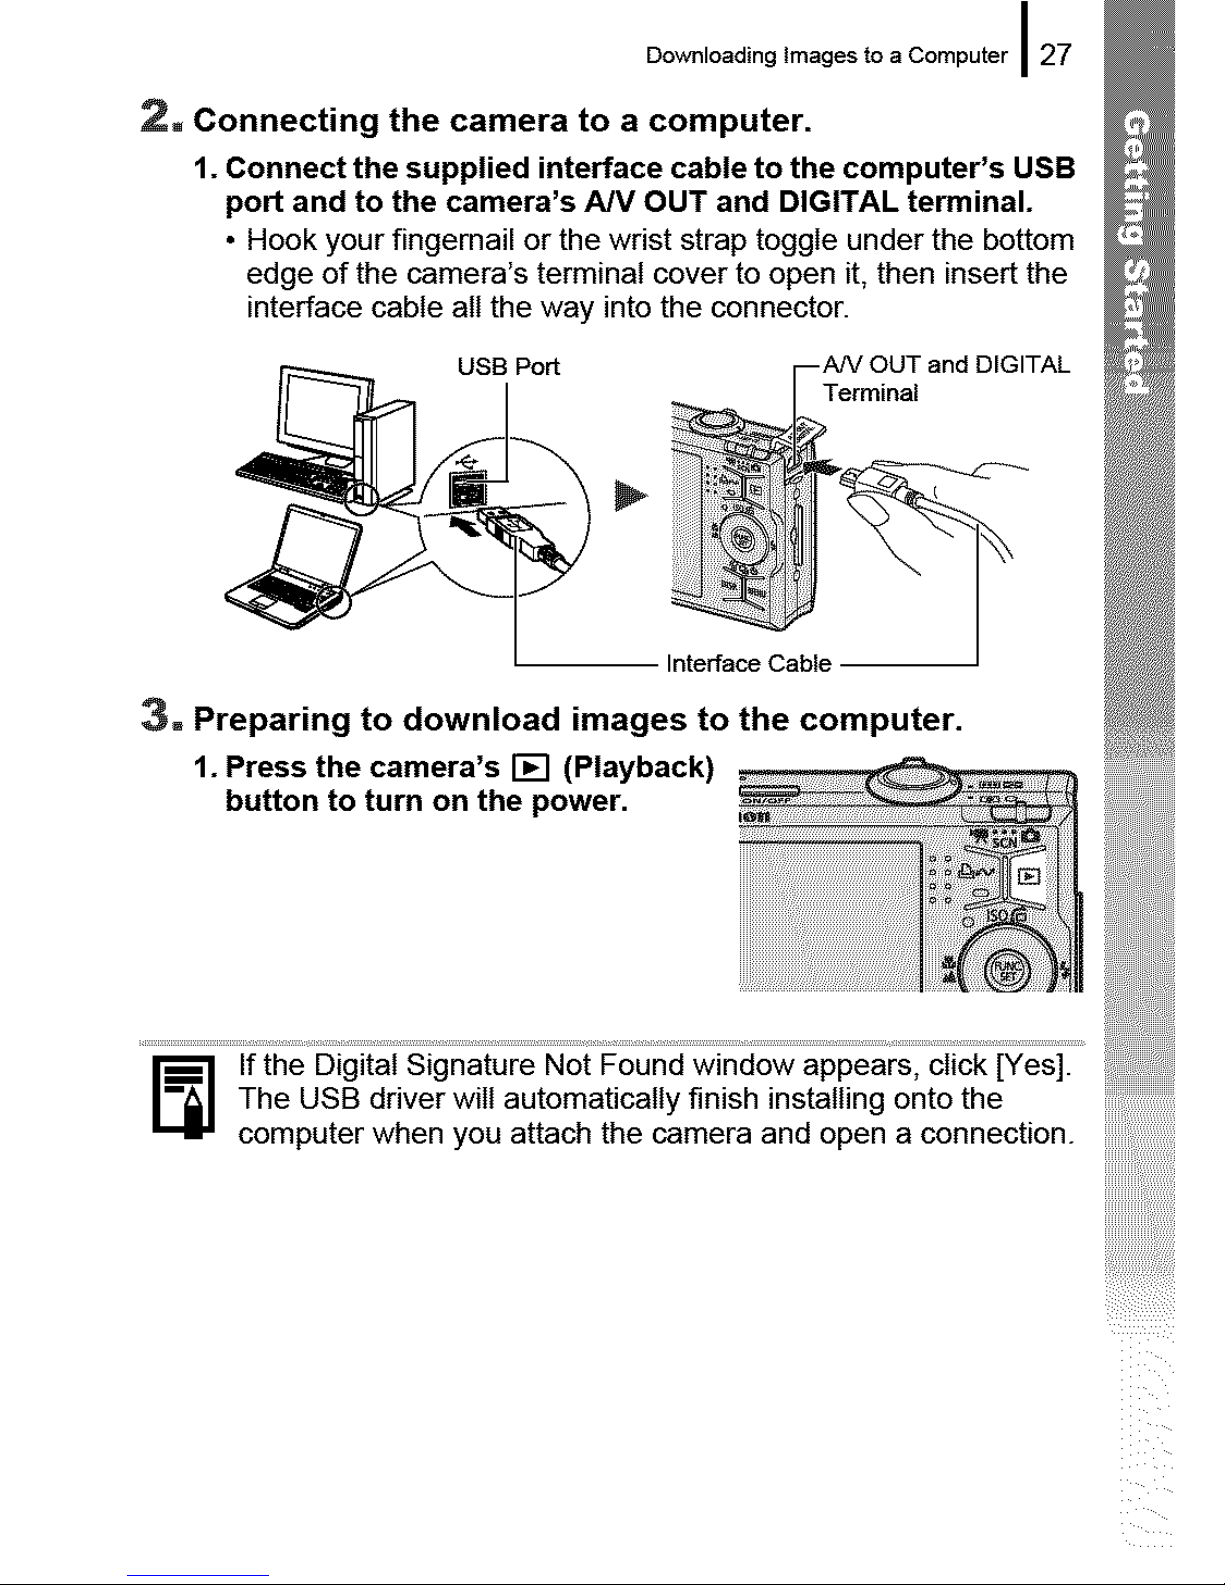
2. Connecting the camera to a computer.
1. Connect the supplied interface cable to the computer's USB
port and to the camera's NV OUT and DIGITAL terminal.
• Hook your fingernail or the wrist strap toggle under the bottom
edge of the camera's terminal cover to open it, then insert the
interface cable all the way into the connector.
oso To, %T°n O,G,TA,
Interface Cable
3. Preparing to download images to the computer.
1. Press the camera's [] (Playback)
button to turn on the power.
I_] f the Digital Signature Not Found window appears, click [Yes].
The USB driver will automatically finish installing onto the
computer when you attach the camera and open a connection.
I
28 I Downloading Images to a Computer
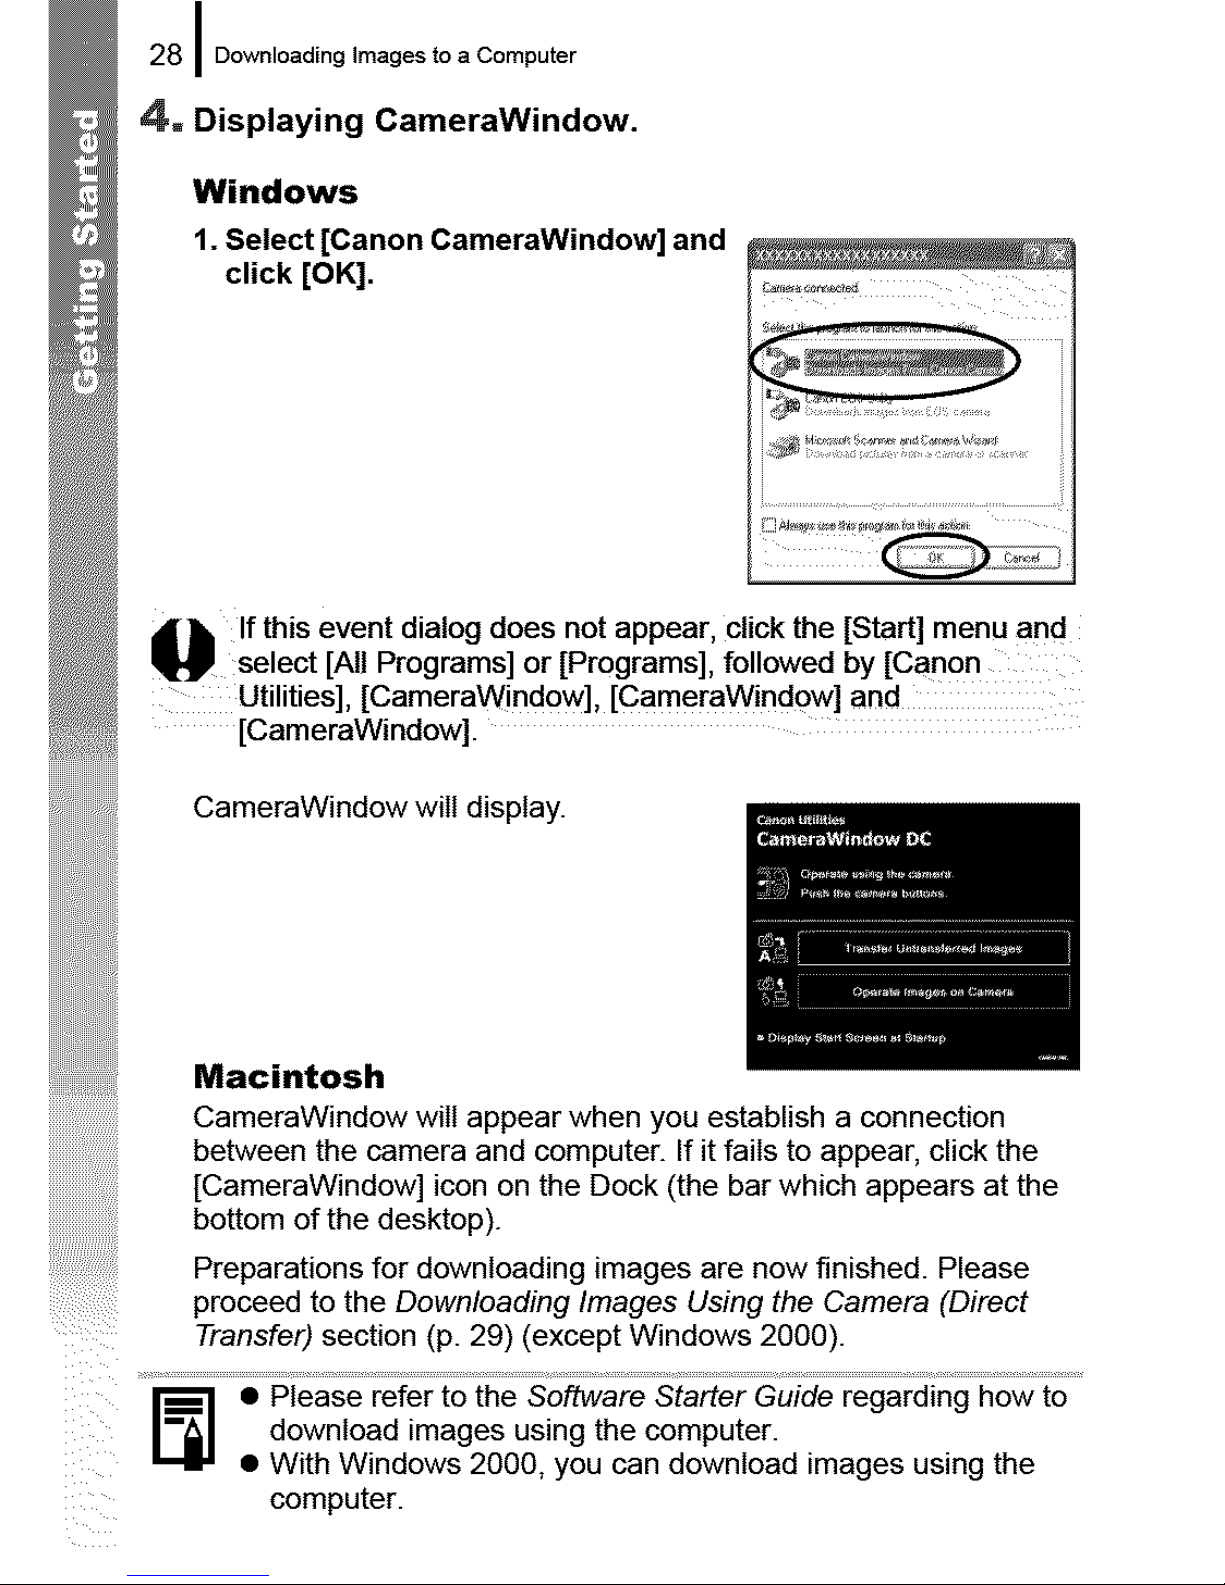
4. Displaying CameraWindow.
Windows
1. Select [Canon CameraWindow] and
click [OK].
If this event dialog does not appear, click the [Start] menu and
select [All Programs] or [Programs], followed by [cano n
Utilities], [CameraWind0w] , [CameraWind0 w] and
[CameraWindow].
CameraWindow will display.
Macintosh
CameraWindow will appear when you establish a connection
between the camera and computer. If it fails to appear, click the
[CameraWindow] icon on the Dock (the bar which appears at the
bottom of the desktop).
Preparations for downloading images are now finished. Please
proceed to the Downloading Images Using the Camera (Direct
Transfer) section (p. 29) (except Windows 2000).
_] • Please refer to the Software Starter Guide regarding how to
download images using the computer.
• With Windows 2000, you can download images using the
computer.
 Loading...