

Canon Powershot SD40 Digital ELPH, Digital IXUS i7 zoom User Manual

Camera User Guide
ENGLISH
Basic
The Components Guide
Preparations
Shooting
Playback/Erasing
Menus and Settings
Printing
Downloading Images
to a Computer
CDI-E297-010 XX06XXX
Please Read This First
This guide explains how to prepare the camera and use its basic features.
© 2006 CANON INC. PRINTED IN JAPAN
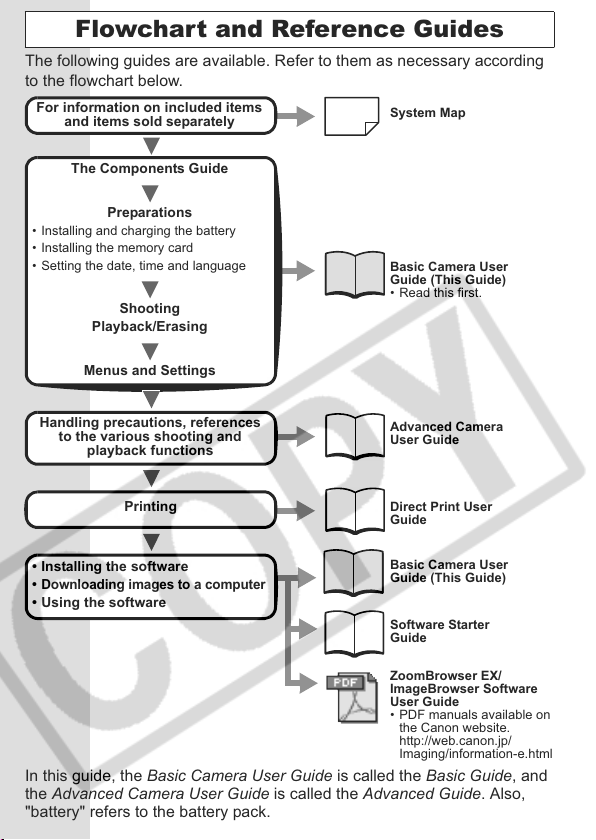
Flowchart and Reference Guides
The following guides are available. Refer to them as necessary according
to the flowchart below.
For information on included items
and items sold separately
The Components Guide
System Map
• Installing and charging the battery
• Installing the memory card
• Setting the date, time and language
Basic Camera User
Guide (This Guide)
• Read this first.
Shooting
Playback/Erasing
Menus and Settings
Preparations
Handling precautions, references
to the various shooting and
playback functions
Printing
• Installing the software
• Downloading images to a computer
Advanced Camera
User Guide
Direct Print User
Guide
Basic Camera User
Guide (This Guide)
• Using the software
Software Starter
Guide
ZoomBrowser EX/
ImageBrowser Software
User Guide
• PDF manuals available on
the Canon website.
http://web.canon.jp/
Imaging/information-e.html
In this guide, the Basic Camera User Guide is called the Basic Guide, and
the Advanced Camera User Guide is called the Advanced Guide. Also,
"battery" refers to the battery pack.
7
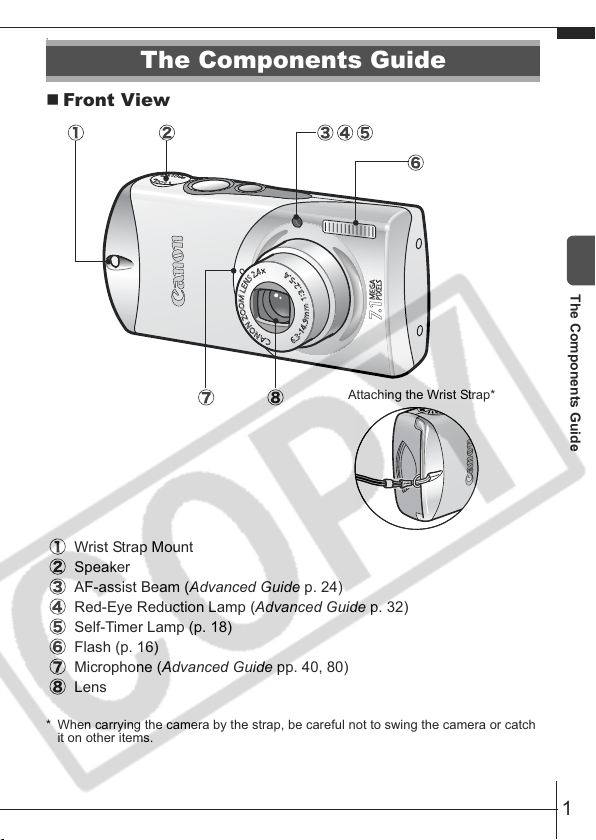
The Components Guide
Front View
Wrist Strap Mount
Speaker
AF-assist Beam (Advanced Guide p. 24)
Red-Eye Reduction Lamp (Advanced Guide p. 32)
Self-Timer Lamp (p. 18)
Flash (p. 16)
Microphone (Advanced Guide pp. 40, 80)
Lens
The Components Guide
Attaching the Wrist Strap*
* When carrying the camera by the strap, be careful not to swing the camera or catch
it on other items.
1
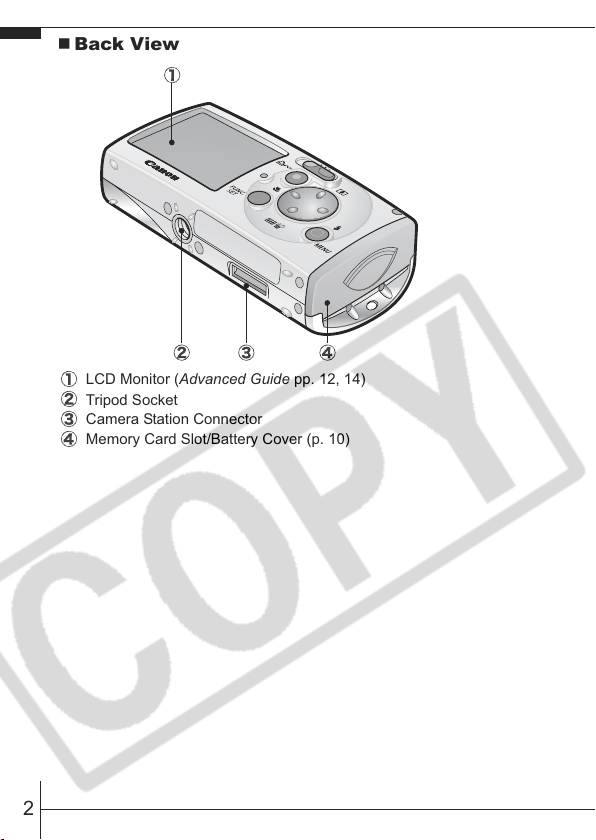
Back View
LCD Monitor (Advanced Guide pp. 12, 14)
Tripod Socket
Camera Station Connector
Memory Card Slot/Battery Cover (p. 10)
2
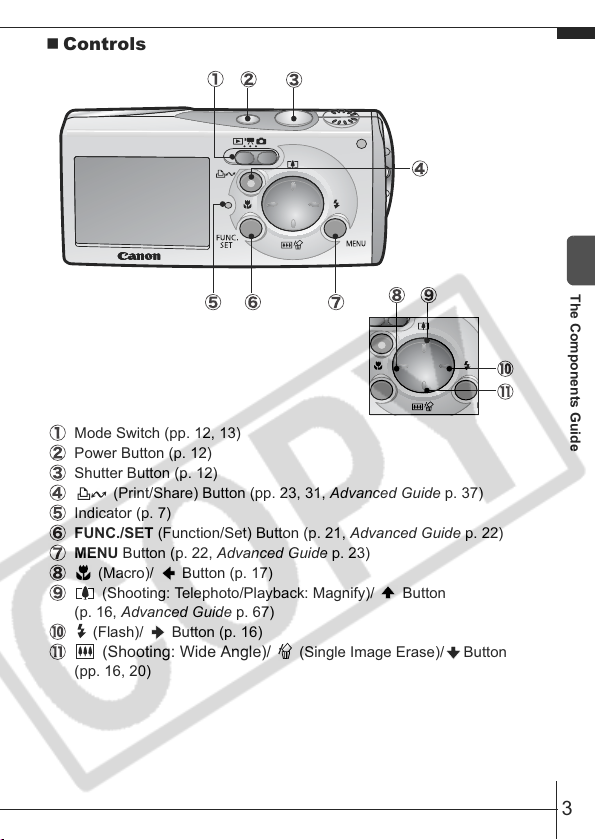
Controls
Mode Switch (pp. 12, 13)
Power Button (p. 12)
Shutter Button (p. 12)
(Print/Share) Button (pp. 23, 31, Advanced Guide p. 37)
Indicator (p. 7)
FUNC./SET (Function/Set) Button (p. 21, Advanced Guide p. 22)
MENU Button (p. 22, Advanced Guide p. 23)
(Macro)/ Button (p. 17)
(Shooting: Telephoto/Playback: Magnify)/ Button
(p. 16, Advanced Guide p. 67)
(Flash)/ Button (p. 16)
(Shooting: Wide Angle)/ (Single Image Erase)/ Button
(pp. 16, 20)
The Components Guide
3
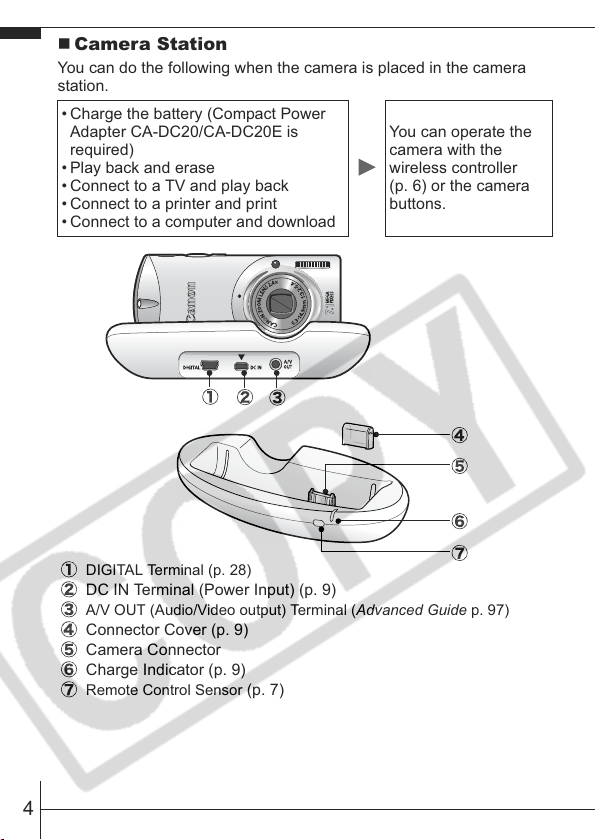
Camera Station
You can do the following when the camera is placed in the camera
station.
• Charge the battery (Compact Power
Adapter CA-DC20/CA-DC20E is
required)
• Play back and erase
• Connect to a TV and play back
• Connect to a printer and print
• Connect to a computer and download
DIGITAL Terminal (p. 28)
DC IN Terminal (Power Input) (p. 9)
A/V OUT (Audio/Video output) Terminal (Advanced Guide p. 97)
Connector Cover (p. 9)
Camera Connector
Charge Indicator (p. 9)
Remote Control Sensor (p. 7)
You can operate the
camera with the
wireless controller
(p. 6) or the camera
buttons.
4
• Always put the connector cover back on the camera con-
nector when the camera station is being carried or not in
use.
•The bottom of the camera station has non-slip rubber feet.
- The rubber feet are covered with a thin orange plastic
film. Carefully peel the film off before use.
- If dirt adheres to the rubber feet, lightly wipe them with a
slightly dampened cloth.
• Always turn off the camera power before placing the cam-
era in the camera station or removing it. Placing or remov-
ing the camera with the power on will abruptly turn the
camera off.
• When the camera is turned on in the camera station, it will
always start up in the playback mode regardless of the
setting selected with the mode switch.
• Compact Power Adapter CA-DC20/CA-DC20E is recom-
mended for powering the camera when the camera is
used in the camera station.
The Components Guide
5
Using the Wireless Controller
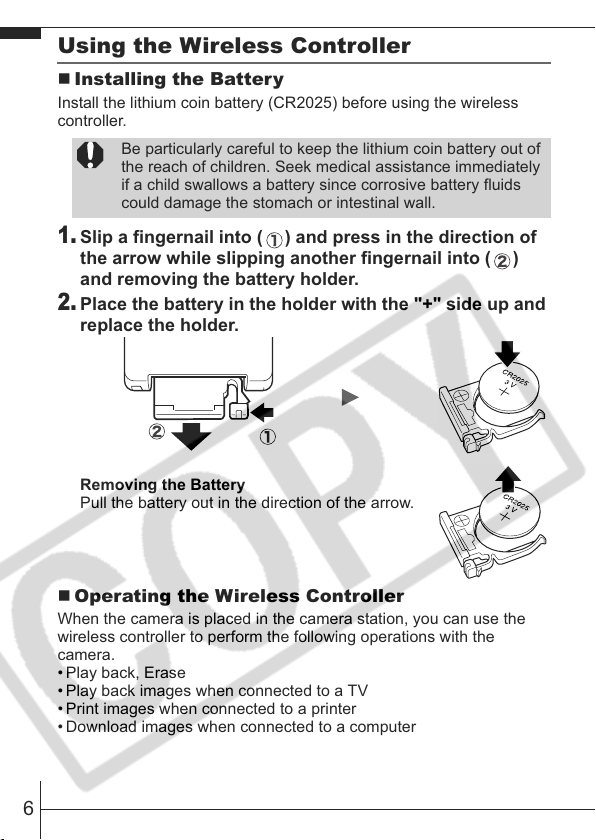
Installing the Battery
Install the lithium coin battery (CR2025) before using the wireless
controller.
Be particularly careful to keep the lithium coin battery out of
the reach of children. Seek medical assistance immediately
if a child swallows a battery since corrosive battery fluids
could damage the stomach or intestinal wall.
1.
Slip a fingernail into ( ) and press in the direction of
the arrow while slipping another fingernail into ( )
and removing the battery holder.
2.
Place the battery in the holder with the "+" side up and
replace the holder.
Removing the Battery
Pull the battery out in the direction of the arrow.
Operating the Wireless Controller
When the camera is placed in the camera station, you can use the
wireless controller to perform the following operations with the
camera.
• Play back, Erase
• Play back images when connected to a TV
• Print images when connected to a printer
• Download images when connected to a computer
6
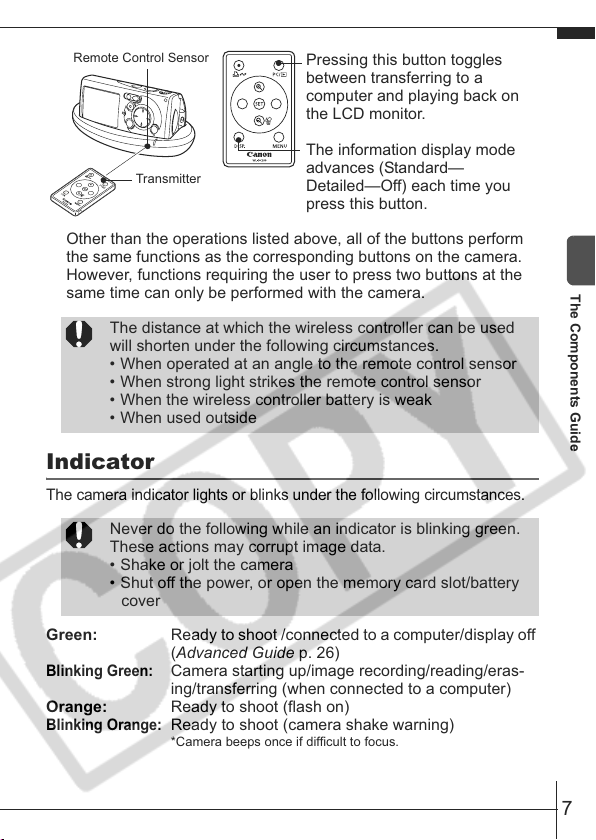
Remote Control Sensor
Pressing this button toggles
between transferring to a
computer and playing back on
the LCD monitor.
The information display mode
Transmitter
advances (Standard—
Detailed—Off) each time you
press this button.
Other than the operations listed above, all of the buttons perform
the same functions as the corresponding buttons on the camera.
However, functions requiring the user to press two buttons at the
same time can only be performed with the camera.
The distance at which the wireless controller can be used
will shorten under the following circumstances.
• When operated at an angle to the remote control sensor
• When strong light strikes the remote control sensor
• When the wireless controller battery is weak
• When used outside
Indicator
The camera indicator lights or blinks under the following circumstances.
Never do the following while an indicator is blinking green.
These actions may corrupt image data.
• Shake or jolt the camera
• Shut off the power, or open the memory card slot/battery
cover
Green: Ready to shoot /connected to a computer/display off
Blinking Green:
Orange: Ready to shoot (flash on)
Blinking Orange:
(Advanced Guide p. 26)
Camera starting up/image recording/reading/eras-
ing/transferring (when connected to a computer)
Ready to shoot (camera shake warning)
*Camera beeps once if difficult to focus.
The Components Guide
7
Preparations
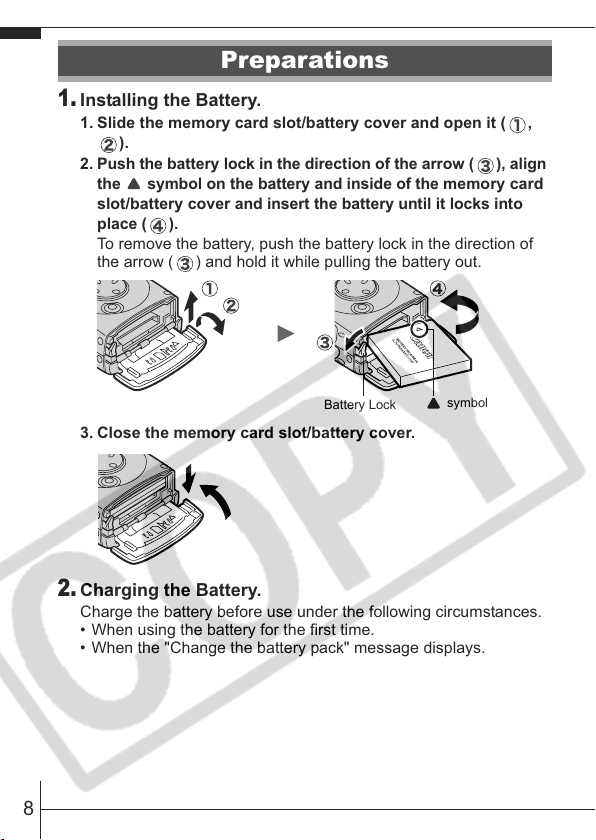
1.
Installing the Battery.
1. Slide the memory card slot/battery cover and open it ( ,
).
2. Push the battery lock in the direction of the arrow (), align
the symbol on the battery and inside of the
slot/battery cover
place (
To remove the battery, push the battery lock in the direction of
the arrow ( ) and hold it while pulling the battery out.
)
.
and insert the battery until it locks into
memory card
Battery Lock
3. Close the memory card slot/battery cover.
2.
Charging the Battery.
Charge the battery before use under the following circumstances.
• When using the battery for the first time.
• When the "Change the battery pack" message displays.
8
symbol
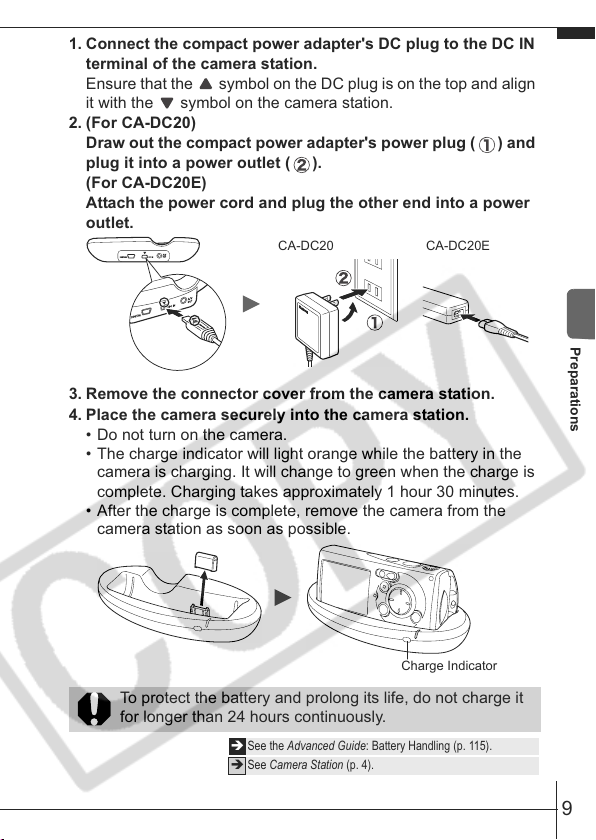
1. Connect the compact power adapter's DC plug to the DC IN
terminal of the camera station.
Ensure that the symbol on the DC plug is on the top and align
it with the symbol on the camera station.
2. (For CA-DC20)
Draw out the compact power adapter's power plug ( ) and
plug it into a power outlet ( ).
(For CA-DC20E)
Attach the power cord and plug the other end into a power
outlet.
CA-DC20 CA-DC20E
3. Remove the connector cover from the camera station.
4. Place the camera securely into the camera station.
• Do not turn on the camera.
• The charge indicator will light orange while the battery in the
camera is charging. It will change to green when the charge is
complete. Charging takes approximately 1 hour 30 minutes.
• After the charge is complete, remove the camera from the
camera station as soon as possible.
Preparations
Charge Indicator
To protect the battery and prolong its life, do not charge it
for longer than 24 hours continuously.
Î See the Advanced Guide: Battery Handling (p. 115).
Î See Camera Station (p. 4).
9
 Loading...