

Canon POWERSHOT SD400 DIGITAL ELPH, DIGITAL IXUS 50, DIGITAL ELPH User Manual
iltllillIItIt111IIIIIIIl!lllllIIll
CDI-E180
D IG JT_L ELPH
DIGICII
PictBridge
DIRECT
PRINT
C_mera
Pleasereadthe ReadThisFirst section(p, 6)_
Pleasealso readtheSoftware Starter Guideandthe Direct Print User
Guide,
BUBBLEJET
DIRECT
@B_
ExifPrint
DPOF
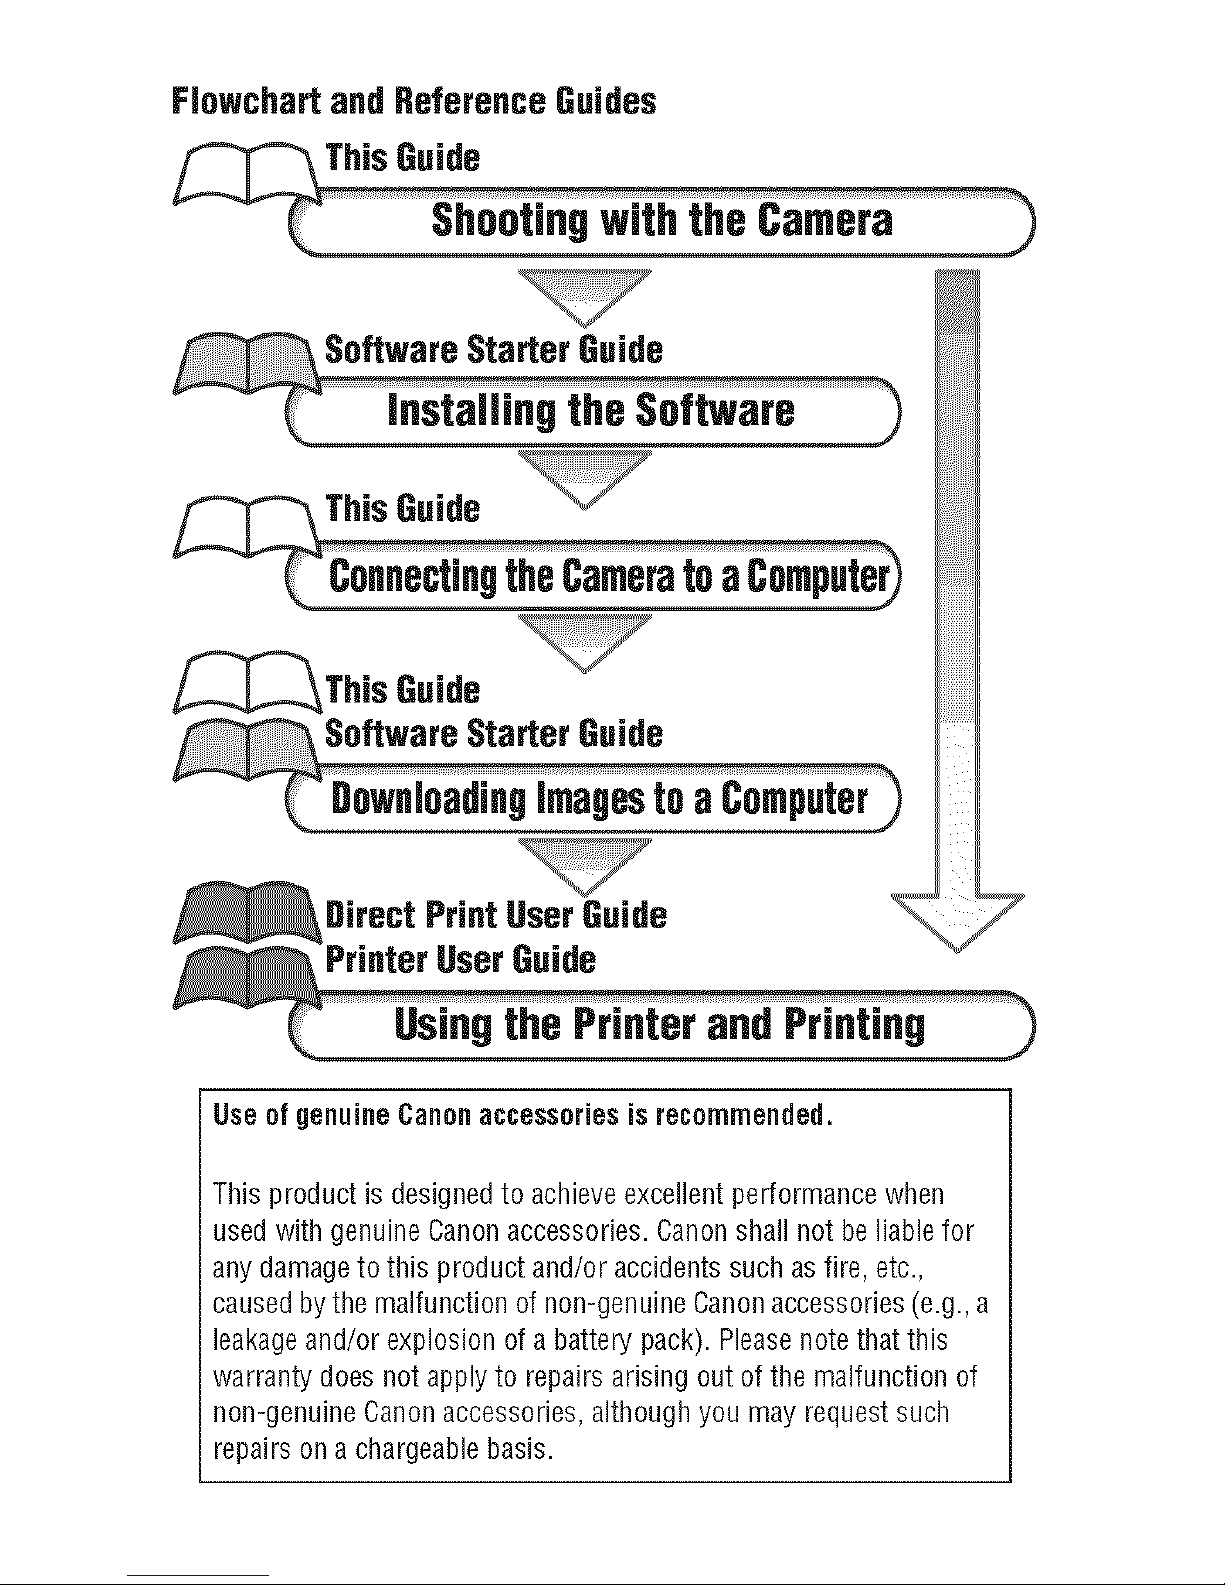
Flowchartand ReferenceGuides
_This Guide
Usin9the PrinterandPrintin9
Useof genuine Canonaccessoriesis recommended.
This product is designed to achieve excellent performance when
used with genuine Canonaccessories. Canon shall not beliable for
any damageto this product and/or accidents such as fire, etc.,
causedbythe malfunction of non-genuine Canonaccessories (e.g., a
leakageand/or explosion of a battery pack). Pleasenote that this
warranty does not applyto repairs arising out of the malfunction of
non-genuine Canon accessories, although you may request such
repairs ona chargeablebasis.
CameraBodyTemperature
Ifyour camera is usedfor prolonged periods, the camera body may become
warm. Please beaware ofthis and take carewhen operating the camera for
an extended period.
Aboutthe LCBMonitor
The LCDmonitor is produced with extremely high-precision manufacturing
techniques. More than 99.99% ofthe pixels operateto specification. Less
than 0.01% ofthe pixels may occasionally misfire or appearas redor black
dots. This has no effect on the recorded imageand does not constitute a
malfunction.
VideoFormat
Pleaseset the camera's videosignal format to the one used in your region
before using it with aTV monitor (p. 156).
Charoin9the Bate/TimeBattery
* Thecamera has abuilt-in rechargeaHelithium-ion battery that maintains
thedate, time and other camera settings. This battery recharges whenthe
main battery pack is inserted into the camera. When you first purchasethe
camera, placea charged battery pack in itfor at least 4 hours to charge
thedate/time battery. It will charge evenwhen the camera power is turned
off.
* If the Date/Time menu appears whenthe camera power is turned on, it
meansthat the date/time battery charge is depleted. Recharge it as
described above.
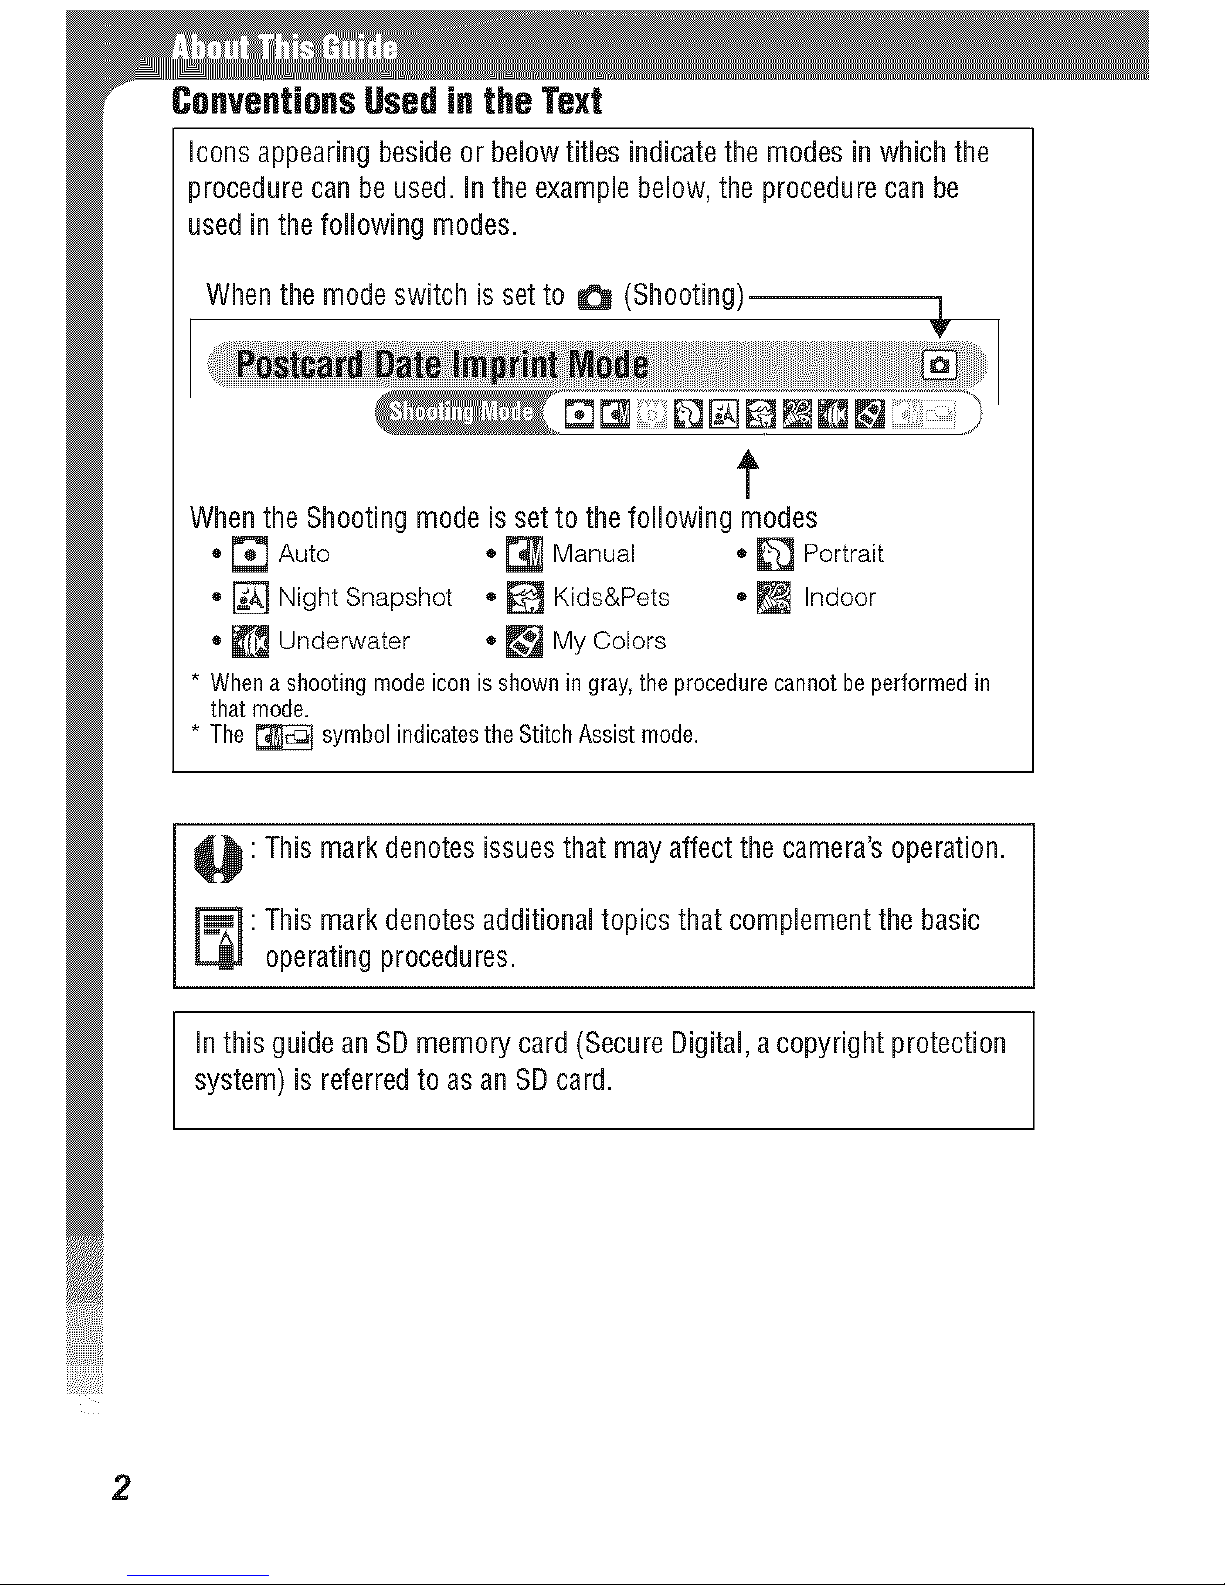
ConventionsUsedin the Text
icons appearing beside or below titles indicate the modes in which the
procedure can beused. in the example below, the procedure can be
used in the following modes.
When the modeswitch is set to _ (Shooting) .L
Y
t
When the Shooting mode is set to the following modes
®_ Auto ®_ Manual , _ Portrait
®[] Night Snapshot ®_ Kids&Pets o_ Indoor
®_ Underwater ®_ MyColors
* Whenashootingmodeiconisshowningray,theprocedurecannotbeperformedin
thatmode.
* The_ symbolindicatestheStitchAssistmode.
: This mark denotes issues that may affect the camera's operation.
: his mark denotes additional topics that complement the basic
operating procedures.
in this guide an SDmemory card (Secure Digital, acopyright protection
system) is referred to as an SD card.
2
items marked with are lists or charts that summarize camera functions
or procedures.
PleaseRead......................................................................................... 6
SafetyPrecautions .............................................................................. 7
Preventing Malfunctions ................................................................... 12
Components Guide............................................................................ 13
Charging the Battery Pack................................................................. 18
Installing the Battery Pack................................................................. 21
Installing the SD Card....................................................................... 23
Settingthe Dateand Time................................................................. 28
Settingthe Language........................................................................ 31
Turning the Power On....................................................................... 34
Switching BetweenShooting/Playback.............................................. 36
Usingthe LCDMonitor ...................................................................... 37
LCDMonitor Brightness.................................................................... 39
information Displayed on the LCDMonitor ....................................... 40
Usingthe Viewfinder ......................................................................... 44
Usingthe Zoom................................................................................. 45
Pressing the Shutter Button .............................................................. 46
Sdecting Menus and Settings ........................................................... 48
Menu Settings and Factory Defaults.................................................. 53
ResettingSettings to Their Default Values ........................................ 59
Shooting inAuto Mode..................................................................... 61
Reviewing an ImageRight After Shooting ......................................... 62
ChangingResolution/Compression Settings ..................................... 64
_. Usingthe Flash............................................................................. 66
Selectinga Shooting Mode ............................................................... 68
Auto .............................................................................................. 68
Manual.......................................................................................... 68
Digital Macro................................................................................. 68
Portrait.......................................................................................... 68
NightSnapshot..............................................................................68
Kids&Pets......................................................................................68
Indoor............................................................................................68
Underwater....................................................................................68
MyColors......................................................................................68
ShootingCIose-Ups/_t,infinityShots......................................71
MagnifiedClose-UpShooting(DigitalMacro)...................................73
UsingtheDigitalZoom......................................................................74
ContinuousShooting...................................................................75
PostcardDateImprintMode..............................................................76
QUsingtheSelf-timer.....................................................................78
J_ShootingaMovie........................................................................81
ShootingPanoramicimages(StitchAssist)......................................86
SwitchingbetweenFocusingModes..................................................89
ShootingHard-to-FocusSubjects(FocusLock,AFLock)..................90
LockingtheExposureSetting(AELock)............................................92
LockingtheFlashExposureSetting(FELock)...................................93
SwitchingbetweenMeteringModes...........................................94
AdjustingtheExposureCompensation..............................................95
ShootinginLongShutterMode.........................................................96
AdjustingtheTone(WhiteBalance)...................................................98
ChangingthePhotoEffect...............................................................101
ShootinginaMyColorsMode........................................................102
AdjustingtheISOSpeed..................................................................109
SettingtheAutoRotateFunction.....................................................110
ResettingtheFileNumber...............................................................111
DisplayingImagesindividually........................................................113
O.Magnifyingimages....................................................................114
ViewingImagesinSetsofNine(IndexPlayback)....................115
JUMPJumpingtoImages...............................................................117
ViewingMovies...............................................................................118
EditingMovies.................................................................................121
RotatingimagesintheDisplay........................................................123
AttachingSoundMemostoImages.................................................124
AutomatedPlayback(SlideShows).................................................126
ProtectingImages...........................................................................130
4
/_ ErasingSingle images............................................................... 131
ErasingAll Images .......................................................................... 132
About Printing ................................................................................. 134
Settingthe DPOFPrint Settings ...................................................... 136
Selecting images for Transferring ................................................... 142
Connecting the Camerato a Computer............................................ 146
Computer System Requirements ................................................ 146
Downloading Images by Direct Transfer ......................................... 152
Connecting the Camerato the Computerto Download ImagesWithout
Installing Software ................................................................... 154
Downloading from an SD Card........................................................ 154
Viewing Images ona TVset ............................................................ 155
ChangingMy CameraSettings ........................................................ 157
Registering My CameraSettings ..................................................... 159
List of Messages............................................................................. 162
Troubleshooting .............................................................................. 164
Usingan AC Adapter Kit (Sold Separately)...................................... 169
Usingan Externally Mounted Flash(Sold Separately)..................... 170
CameraCare andMaintenance........................................................ 172
Specifications.................................................................................. 173
Photo Tips and Information ............................................................. 181
Index ............................................................................................... 183
_" Functions Available in EachShooting Mode.................................... 192
TestShots
Beforeyou try to photograph important subjects, we HghJyrecommendthat
you shoot several trial images to confirm that the camera is operating and
being operated correctly.
Pleasenotethat Canon inc., its subsidiaries and affiliates, and its
distributors are not liablefor any consequential damagesarising from any
malfunction of acamera or accessory, including SD memory cards, that
results inthe failure of an imageto be recorded or to be recorded in a way
that is machine readaNe.
Warning AgainstCopyrightinfringement
Pleasenotethat Canon digital camerasare intended for personal use and
should neverbe used in a manner that infringes upon or contravenes
international or domestic copyright lawsand regulations. Pleasebe advised
that in certain cases thecopying of imagesfrom performances, exhibitions,
or commercial properties by means of a camera or other device may
contravene copyright or other legal rights even if the image was shot for
personal use.
WarrantyLimitations
This camera's warranty is only effective in the country of sale. If a problem
arises while the camera is in useabroad, pleaseconvey it backto the
country of salebefore proceeding with awarranty claim to aCanon
Customer Support Help Desk.
ForCanonCustomerSupped contacts,please see the CanonLimited
Warranty suppliedwith yourcamera.
6
Beforeusing the camera, pleaseensure that you readand understand the
safety precautions described below. Always ensure that the camera is
operatedcorrectly.
Thesafety precautions noted onthe following pages are intended to
instruct you in the safe andcorrect operation of the camera and its
accessoriesto prevent injuries or damage to yourself, other persons and
equipment.
In the next few pages,the term equipment refers primarily to the camera
and its power supply accessories, such as the battery charger and
separately sold compact power adapter. Seethe System Mapfor power
supply accessory details.
StoringSDcards
Store the SD memory cardout of the reachof children and infants.
It may beswallowed accidentally. Ifthis occurs, consult adoctor
immediately.
Warnings
• Do notaim the camera directly into the sun or at other intense light
sourcesthat coulddamage your eyesight.
• Do nottrigger the flash in close proximityto humanoranimal eyes.
Exposureto the intense light produced bythe flash may damageeyesight.
In particular, remain at least one meter (39 inches) awayfrom infants
when using the flash.
• Store this equipment out ofthe reach of childrenand infants. Accidental
damage to the camera or battery packby a child could result in serious
injury. Inaddition, placement of the strap around the child's neckcould
result in asphyxiation.
- Do not attempt to disassemble or alter any part of the equipmentthat is
notexpresslydescribed in fhis guide. Disassemblyor alteration may
result in high-voltage electrical shock. Internal inspections, alterations and
repairs should beconducted by qualified service personnel authorized by
your camera distributor or aCanon Customer Support Help Desk.
* Toavoid the risk ofhigh-voltage electrical shock,do nottouchthe flash
portionof the camera if it has been damaged. Similarly, never touch
internal portions ofthe equipment that become exposed as a result of
damage. There is a risk of high-voltage electrical shock. Pleasetake the
first opportunity to consult your camera distributor or the closest Canon
Customer Support Help Desk.
* Stop operating the equipmentimmediately if it emits smoke or noxious
fumes. Failureto do so may result infire or electrical shock. Immediately
turn the camera power off, remove the battery pack or unplug the battery
charger from the power outlet. Confirm that smoke or fume emissions
have ceased. Pleaseconsult your camera distributor or the closest Canon
Customer Support Help Desk.
* Stop operating the equipment if it is droppedor the casingis damaged.
Failure to do so may result in fire or electrical shock. Immediately turn the
camera power off, remove the battery packor unplug the power cable
from the power outlet. Pleaseconsult your camera distributor or the
closest CanonCustomer Support Help Desk.
* Do notallow the equipment to come intocontactwith, or become
immersedin, water or other liquids. Do not allow liquids to enter the
interior. Thecamera has not beenwaterproofed. If the exterior comes into
contact with liquids or salt air, wipe it dry with asoft, absorbent cloth. If
water or other foreign substancesenter the interior, immediately turn the
camera power off and remove the camera battery pack or unplug the
power cordfrom the power outlet. Continued use of the equipment may
result in fire or electrical shock. Pleaseconsult your camera distributor or
the closest CanonCustomer Support Help Desk.
* Do notuse substances containingalcohol, benzene,thinners or other
flammable substances to clean or maintain the equipment.The use of
these substances may leadto fire.
* Removethe power cordon a regular periodic basis dud wipe away tile
dust and dirt that collectsonthe plug, the exterior of the power outlet
dud the surrounding area. In dusty, humid or greasy environments, the
dust that collects around the plug over long periods of time may become
saturated with humidity and short-circuit, leading to fire.
8
• Do notcut, damage, alter or place heavy items on the power cord.
Any of these actions may cause anelectrical short circuit, which may lead
to fire or electrical shock.
• Do nothandlethe power cordif yourhandsare wet. Handling it with wet
hands may lead to electrical shock. When unplugging thecable, ensure
thatyou hold the solid portion ofthe plug. Pulling on theflexible portion of
the cable may damage or exposure the wire and insulation, creating the
potential for fires or electrical shocks.
• Use only recommendedpower accessories.Use of power sources not
expressly recommended for this equipment may leadto overheating,
distortion of the equipment, fire, electrical shock or other hazards.
• Do notplace the battery packnear a heat source or expose itto direct
flame or heat. Neither should you immerse it in water. Suchexposure
may damage the battery packand leadto the leakageof corrosive liquids,
fire, electrical shock, explosion or serious injury.
• Do notattempt to disassemble, alter or apply heat to the battery pack.
There is serious risk of injury due to an explosion. Immediately flush with
water any area of the body - including the eyes andmouth, or clothing -
that comes into contact with the inner contents of a battery. Ifthe eyes or
mouth contact these substances, immediately flush with water and seek
medical assistance.
• Avoiddropping or subjectingthe batterypackto severe impacts that
coulddamage the casings. It could leadto leakageand injury.
• Do notshort-circuit the batteryterminals with metallic objects, suchas
keyholders. It could leadto overheating, burns and other injuries. Use
thesupplied terminal cover to transport or store the battery pack.
Before yondiscard a battery, cover the terminals withtape or other
insulatorsto preventdirect contact with other objects. Contact with the
metallic components of other materials in waste containers may lead to
fire or explosions. Discard the battery pack in specializedwaste facilities if
availablein your area.
• Use only recommendedbattery packand accessories. Use of battery
pack not expressly recommendedfor this equipment may cause
explosions or leaks, resulting in fire, injury anddamage to the
surroundings.
* Use the specified batterycharger to charge Battery Pack NB-4L. Useof
other chargers may leadto overheating, distortionofthe equipment, fire
or electrical shock.
* Disconnectthe battery chargerand compactpower adapter from both
the camera and the poweroutlet after recharging andwhen they are not
inuseto avoid fire and otherhazards. Continuous use over a long period
may cause aunit to overheatand distort, resulting in fire.
* The battery chargerand compact power adapter are designedfor
exclusive use with yenr camera. Donot use it with other products or
batteries. There is a risk offire andother hazards.
Cautionabout magneticfields
Keepobjects that are sensitive to magnetic fields (such as credit cards)
away from the speakerof the camera (p. 14). Such items may lose data
or stop working.
10
Cautions
* Avoidusing, placing or storingthe equipment in places subject to
strongsunlight or high temperatures, suchas the dashboardor trunk
(boot) of a car. Exposure to intense sunlight and heatmay cause the
batteries to leak, overheat or explode, resulting in fire, burns or other
injuries. High temperatures mayalso cause deformation of the casing.
Ensurethat there is good ventilation when using the battery charger to
charge the battery pack.
, Do notstorethe equipment in humidor dusty areas. Storage in such
areas could leadto fire, electrical shock or other damage.
- Becareful notto bangthe camera or subject it to strongimpactsor
shocksthat could lead to injury or damage the equipment when
wearing or holdingit by the strap.
Becareful notto coverthe flash with your fingers or clothingwhen
shooting.The flash may bedamaged and emit smoke or noise. In
addition, do not touch the surface ofthe flash after taking several pictures
in rapid succession. Either action could result in burns.
Do notoperatethe flash with dirt, dust or other items stuckto its lens.
The resulting heatbuild-up could damagethe flash.
Ensure that the battery charger is pluggedintoa poweroutlet ofthe
specified rating, notoverthe specified rating. The plug of the battery
charger varies according to region.
- Do not use the battery chargeror compact power adapter if the plugor
cable is damaged, or if the plugis notfully inserted intothe power
outlet.
= Do notallow metal objects (such as pins or keys)or dirt to contactthe
chargerterminals or plug.
, If your camera is used for prolongedperiods, the camera bodymay
becomewarm. Pleasetake care when operating the camerafor extended
periods as your hands may experience a burning sensation.
11
AvoidStrongMagnetic FieJds
Neverplace the camera in close proximity to electric motors or other
equipment generating strong electromagnetic fields. Exposureto strong
magnetic fields may causemalfunctions or corrupt imagedata.
Avoid CondensationRelatedProblems
Moving the equipment rapidly between hot and cold temperatures may
cause condensation (water droplets) to form on its external and internal
surfaces. You can avoid this by placing the equipment in anairtight,
resealaNeplastic bag and letting it adjust to temperature changes slowly
before removing it from the bag.
if CondensationFormsInside the Camera
Stop using the camera immediately ifyou detect condensation. Continued
use may damagethe equipment. Removethe SDcard and battery packor
compact power adapterfrom the camera and wait until the moisture
evaporates completely before resuming use.
ExtendedStorage
When not using the camera for extended periods of time, remove the
battery packfrom the camera or battery chargerand store the equipment in
a safe place. Storing the camerafor extended periods with a battery pack
installed will run down the battery pack. Howeverthe date,time and other
camera settings may reset to default settings if the battery pack has been
removed for more than three weeks.
12
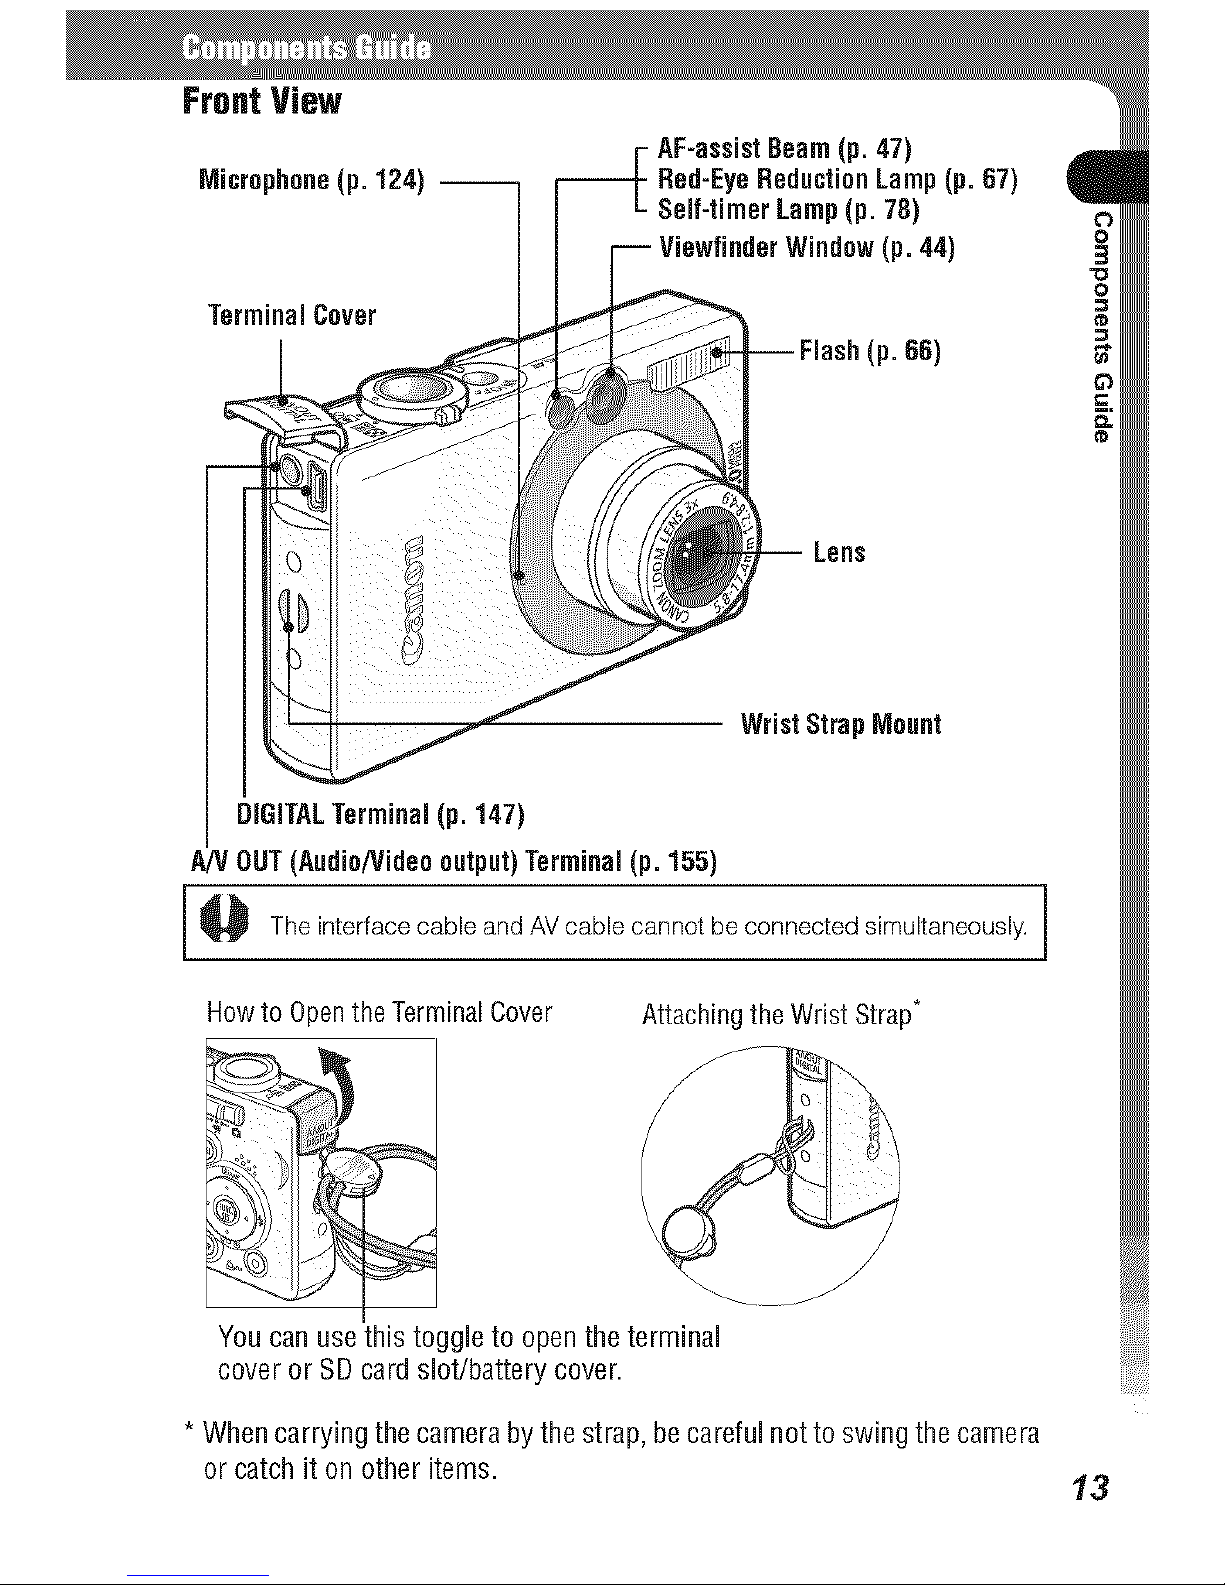
FrontView
Microphone(p.124) --
TerminalCover
AF-assistBeam(p. 47)
Red-EyeReductionLamp(p. 67)
Self-timer Lamp(p.78)
(p. 44)
(p.66)
Lens
WristStropMount
DiGiTALTerminal(p. 147)
A/V OUT(Audio/Videooutput)Terminal(p.155)
The interfacecable andAVcablecannotbeconnectedsimultaneously.
Howto OpentheTerminalCover
Attachingthe WristStrap*
You can use this toggle to open the terminal
cover or SDcard slot/battery cover.
* Whencarryingthecamerabythestrap,becarefulnottoswingthecamera
or catchit onotheritems. 13
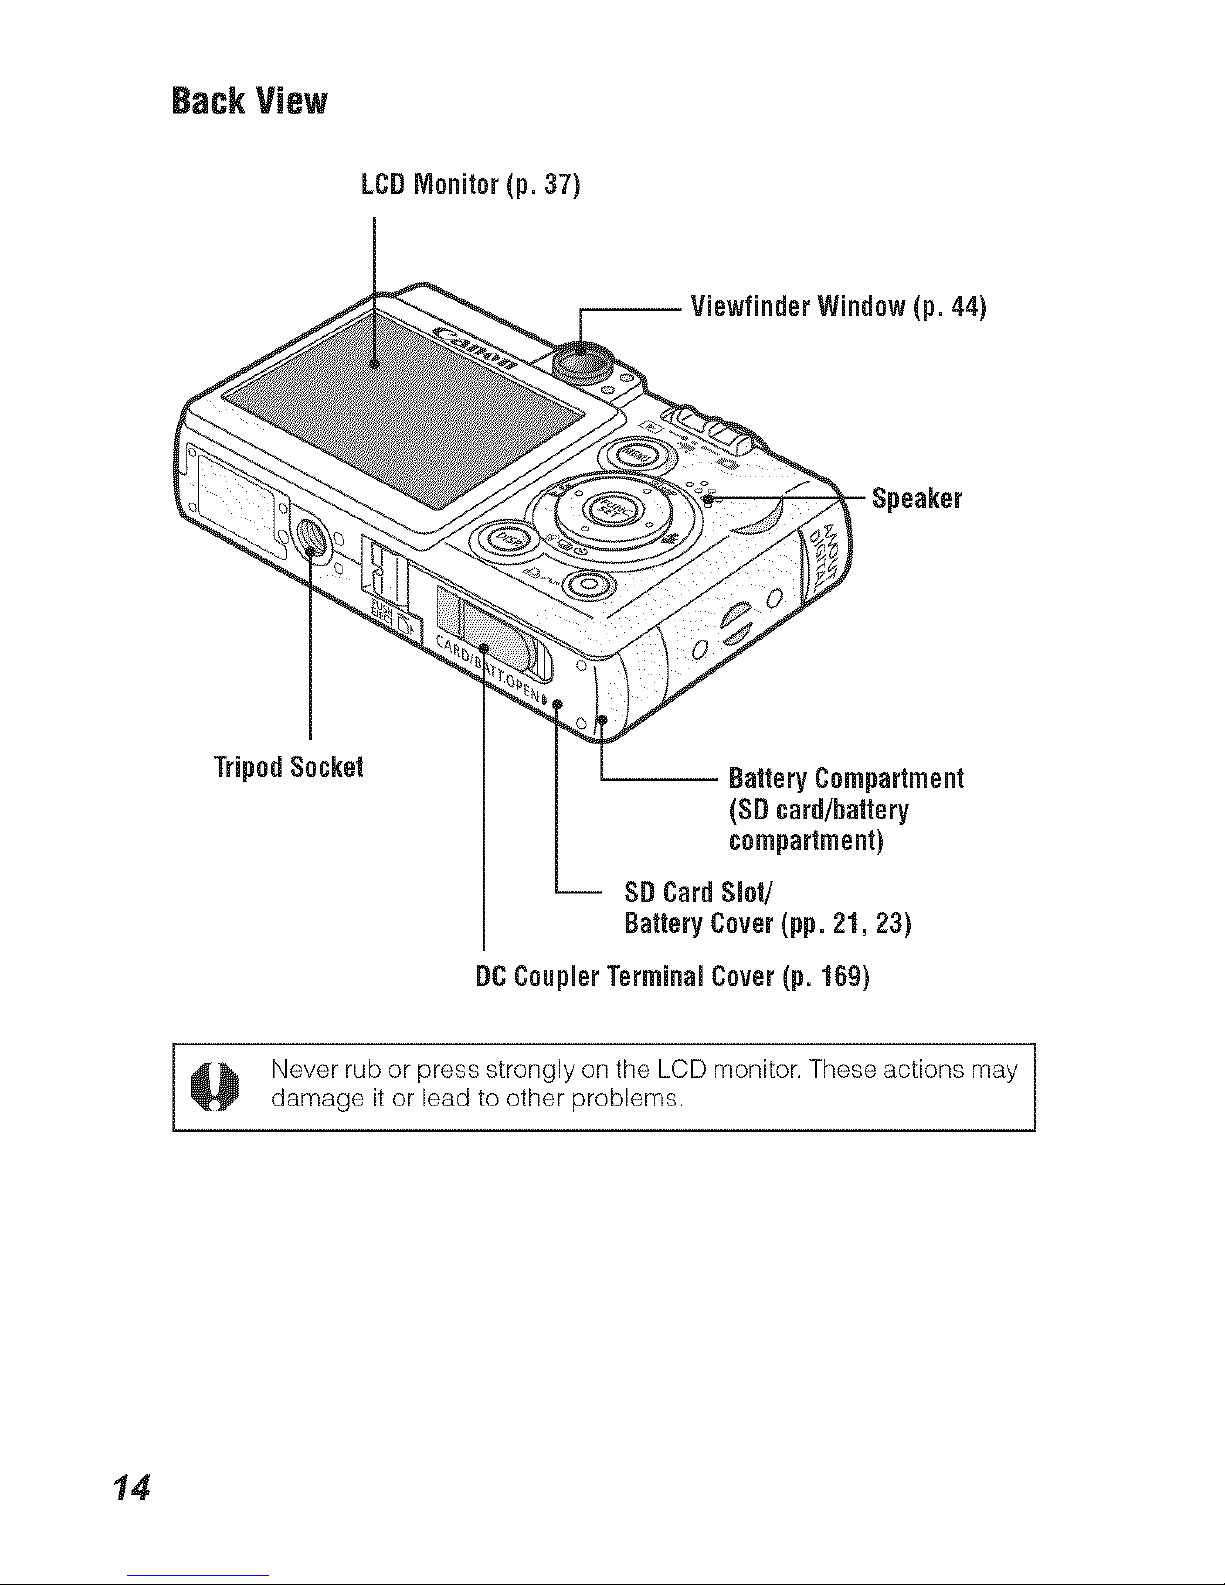
BackView
LCDMonitor (p. 37)
Window(p. 44)
Speaker
_ipod Socket
-- BatteryCompartment
(SDcard/battery
compartment)
SDCardSlot/
BatteryCover(pp.21, 23)
DCCouplerTerminal Cover(p.169)
@ Never rub or press strongly on the LCD monitor. These actions may
damage it or lead to other problems.
14
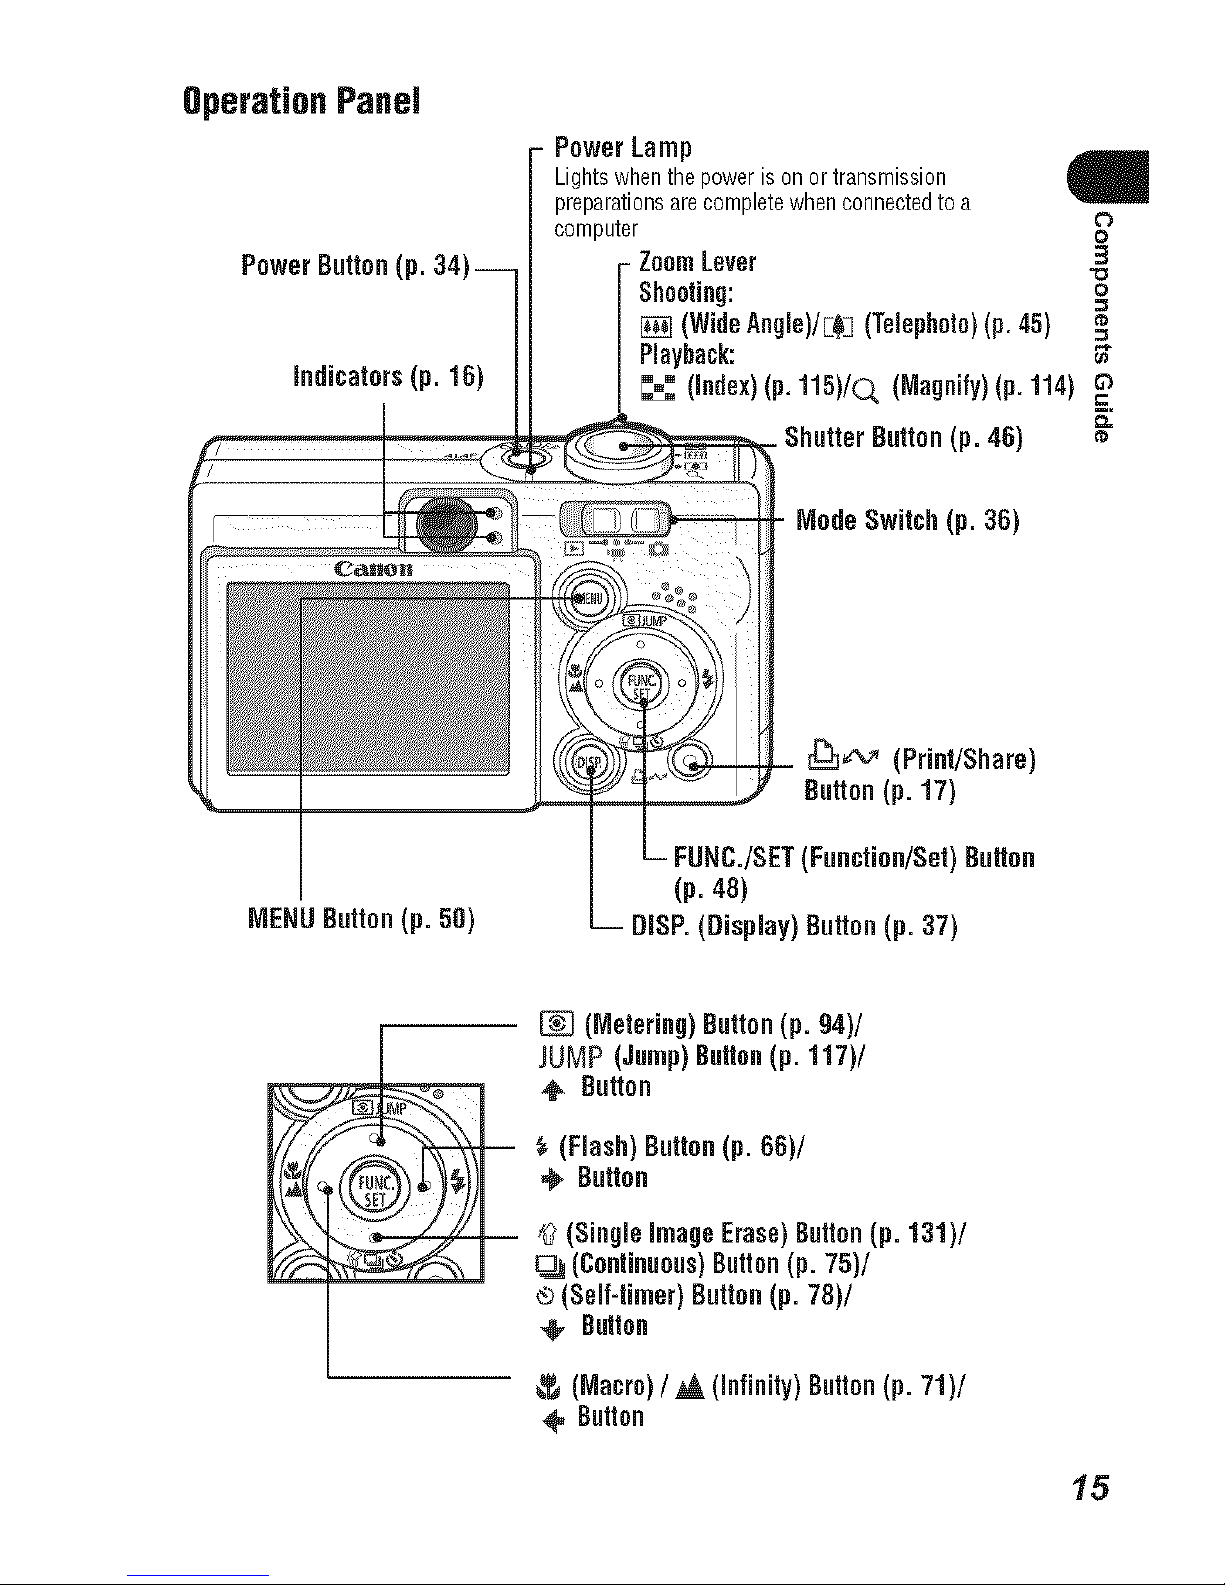
Operation Panel
PowerButton(p.
indicators(p. 16)
PowerLamp
Lightswhenthepowerisonortransmission
preparationsarecompletewhenconnectedtoa
'lJemz
computer o°
- ZoomLever 3
"o
Shooting: o
_] (WideAngie)/E_ (Telephoto)(p.45) =_
Playback: _"
_,_ (index)(p. 115)/0, (Magnify)(p.114)
Button(p. 46)
ModeSwitch (p. 36)
_¢v (Print/Share)
Button(p. 17)
/SET (Function/Set)Button
(p. 48)
DISP.(Display) Button(p. 37)
m (Metering)Button(p. 94)/
JUMP (Jump)Button(p. 117)/
@ Button
$ {Flash)Button(p. BB)/
@ Button
,_'(Single imageErase)Button(p. 131)/
D=3 (Continuous)Button(p. 75)/
® (Self4imer) Button(p. 78)/
@ Button
(Macro)/ _, (infinity) Button(p. 71)/
@ Button
15
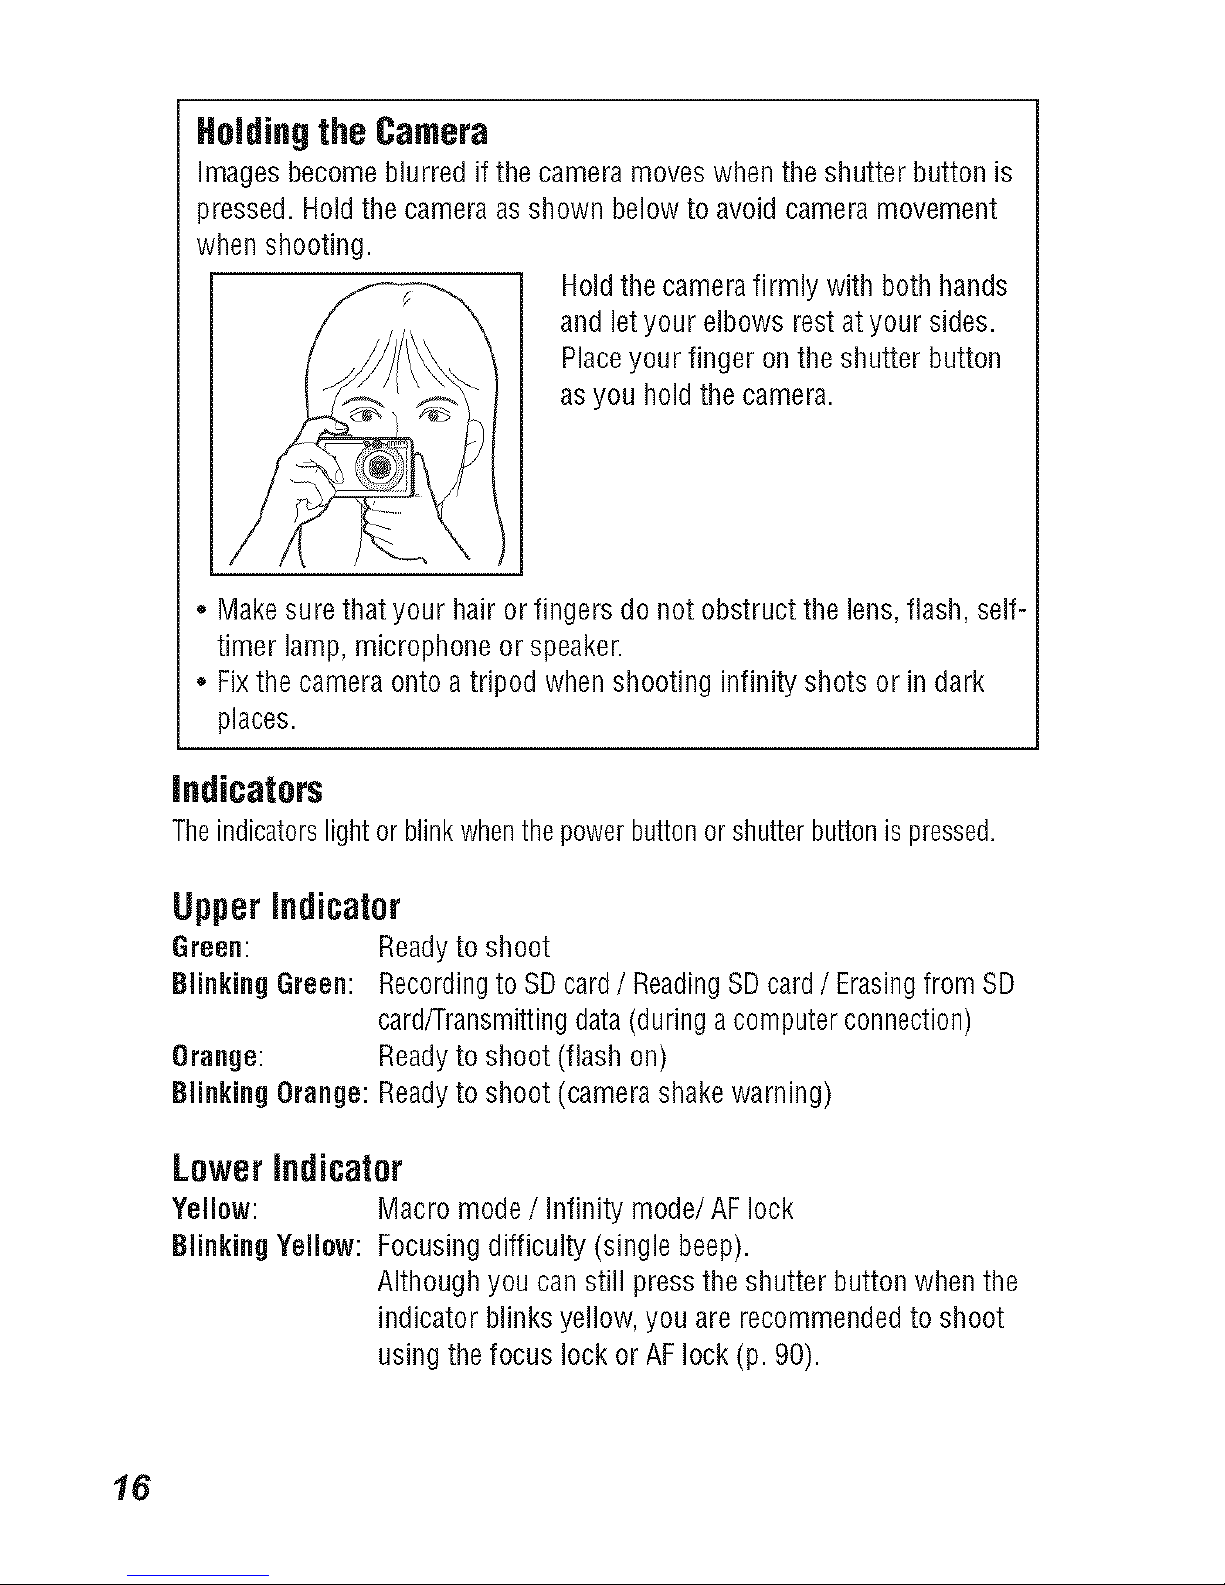
Holdingthe Camera
Imagesbecome blurred ifthe camera moves when the shutter button is
pressed. Holdthe camera asshown below to avoid camera movement
when shooting.
Hold thecamera firmly with both hands
and letyour elbows rest at your sides.
Placeyour finger on the shutter button
as you hold the camera.
Makesure that your hair or fingers do not obstruct the lens, flash, self-
timer lamp, microphone or speaker.
Fixthe camera onto atripod when shooting infinity shots or in dark
places.
Indicators
Theindicatorslightor brinkwhenthepowerbuttonor shutterbuttonispressed.
Upperindicator
Green: Readyto shoot
Blinking Green: Recordingto SDcard / ReadingSDcard / Erasingfrom SD
card/Transmittingdata(during acomputer connection)
Orange: Readyto shoot (flash on)
Blinking Orange: Readyto shoot (camerashakewarning)
Lowerindicator
Yellow: Macro mode / infinity mode/AF lock
Blinking Yellow: Focusing difficulty (single beep).
Although you can still press the shutter button whenthe
indicator blinks yellow, you are recommendedto shoot
using the focus lockor AFlock (p. 90).
16
Thefollowing operations are accessiblethrough one easy press of the
_ (Print/Share) button.
* Printing: Seethe Direct Print User Guide(supplied with the camera)
* Downloading images: Seep.145 ofthis guide and the Software Starter
Guide(supplied withthe camera)
The indicator blinks or lights during a printer or computer connection.
Blue: Readyto print/Ready to transfer images
Blinking blue: Printing/Transferring
The following cablesare usedto connectthe camera to a computeror
printer.
Computer(p. 145)
Interface CableIFC-4OOPCU(supplied with the camera)
Direct PrintCompatible Printers (Sold Separately)
* Compact Photo Printer (SELPHYCPseries)/Card Photo Printer
Interface Cable IFC-4OOPCU(supplied with thecamera) or the Direct
InterfaceCableDIF-IO0(suppliedwith the printer).
* Bubble Jet Printers (PIXMA sefies/SELPHYDSseries)
- PictBridge Compliant Printers:
Interface Cable IFC-4OOPCU(supplied with the camera)
- BubbleJet Direct Compatible Printers:
Pleaserefer to your Bubble Jet printer user guide.
* PictBridge Compliant Non-Canon Printers
Interface Cable IFC-4OOPCU(supplied with the camera)
Please referto the SystemMaporthe Direct PrintUserGuidesupplied
withthe camerafor direct printcompatible printerinformation.
q|
17
18
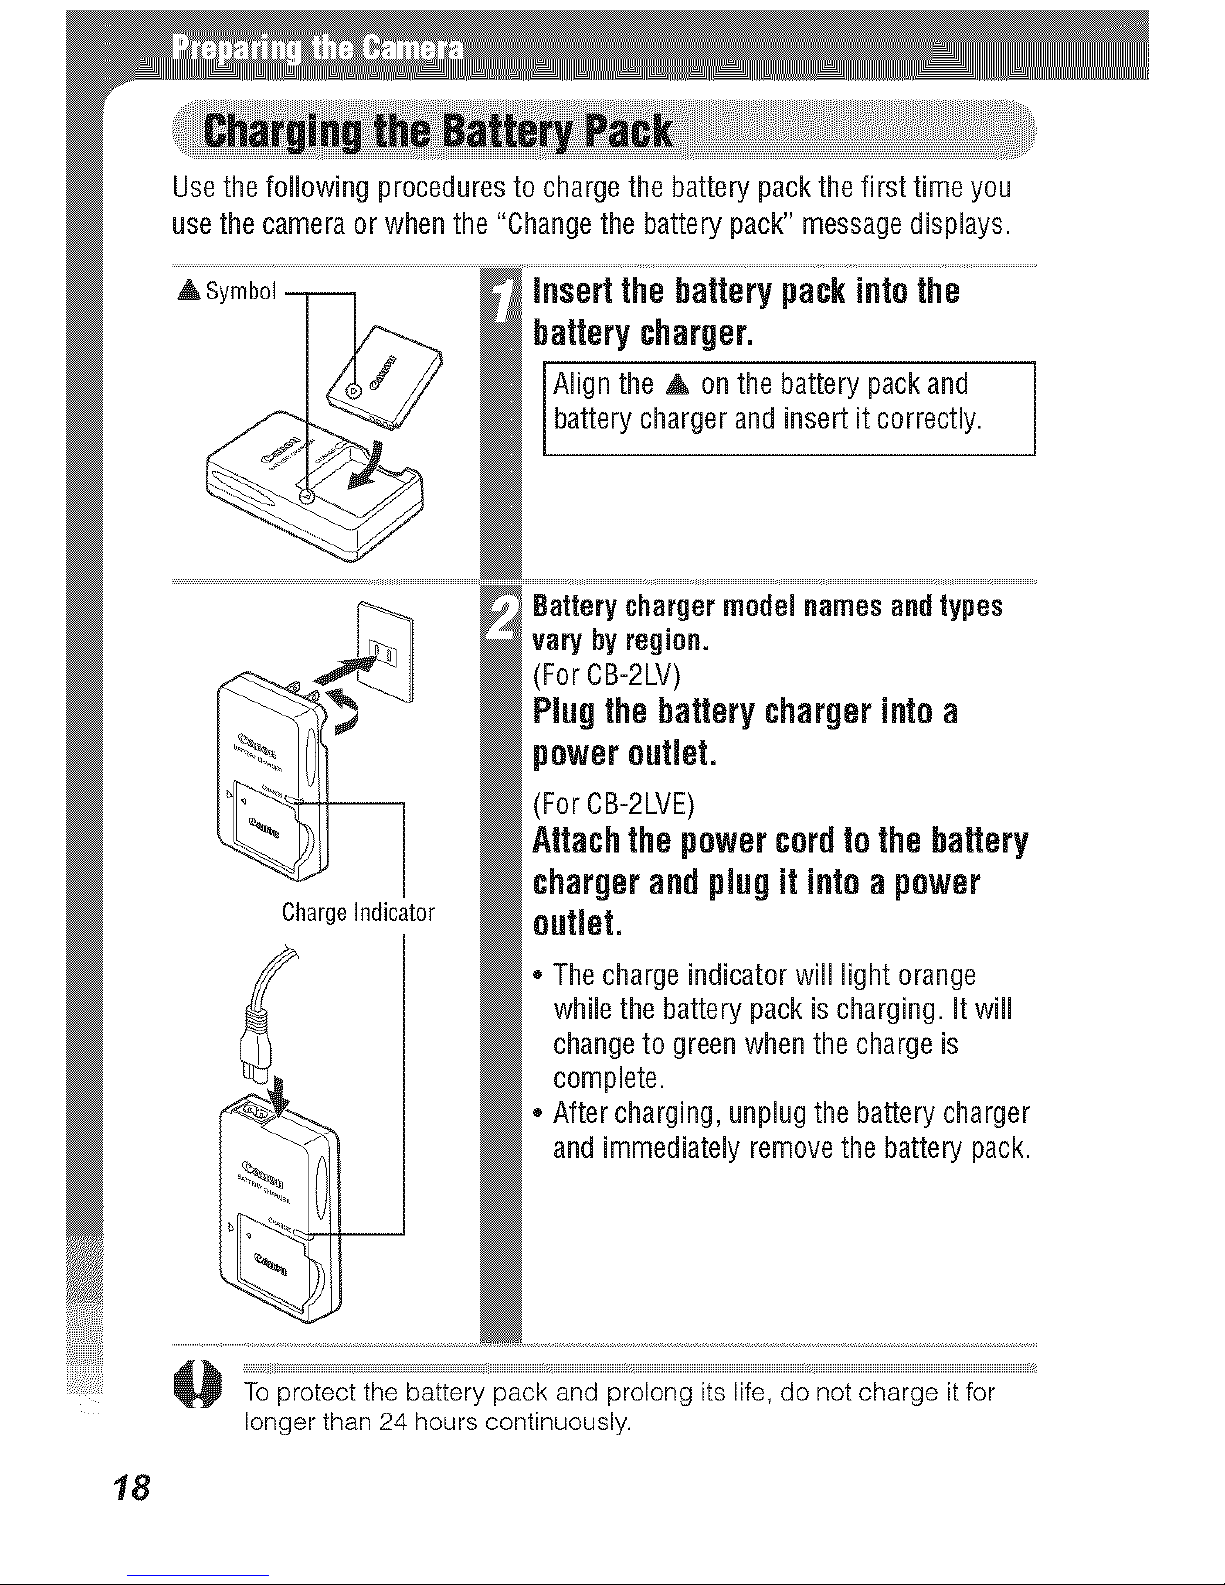
Usethe following procedures to charge the battery pack the first time you
usethe camera or when the "Changethe battery pack" message displays.
ChargeIndicator
insert thebatterypackintothe
batterycharger.
Nign the A on the battery packand
battery charger and insert it correctly.
Battery charger model namesand types
vary byregion.
(For CB-2LV)
Plugthebattery chargerintoa
poweroutlet.
(For CB-2LVE)
Attachthepowercordto the battery
chargerandplugitintoapower
outlet.
The charge indicator will light orange
while the battery packis charging, itwill
change to green when the charge is
complete.
After charging, unplug the battery charger
and immediately removethe battery pack.
longer than24 hours continuously.
_t_ii_i_¸_j_IIIIIIIIIIIIIIIIIIIIIIIIIIIII_IIIIIIIIIIIIIIIIIIIIIIIIId_j_j_IIIIIIIIIIIIIIIIIIIIIIIIIIIIIIIIIIII_H_
', Sincethis is a lithium-ion battery pack, you need not completely
discharge it before recharging. Itcan be recharged atany point.
However,since the maximum number of charge cycles is
approximately 300times (battery life based on Canon's testing
standards), you are recommended to charge the battery pack after
having discharged it completely to prolong battery life.
,, Ittakes approximately 90 minutes to fully charge the battery pack
froma fully discharged state (based onCanon'stesting standards). _"u
Charging it within a temperature range of5° to 40 °C(41° to 104°F)
is recommended. _'
,, Charge times may vary according to theambient temperature and _"
the battery pack's charge state.
,, Youmay hear a noise during charging. This is nota malfunction.
,, See Battery Capacity (Battery Pack NB-4L (Fully charged)) (p. 177). 0
Battery PackHandlingPrecautions
eKeepthebattery packterminals ((_) cleanatalltimes. Dirty
terminals maycausepoor contact betweenthe batterypack andcamera.
Polishtheterminals with a soft cottonswab beforechargingor usingthe
batterypack.
oDo not rapidlyoverturn or wavethe batterychargeraroundwhen it
containsthe batterypack.Thebatterypackcouldfly out.
eAt low temperatures,batterypackperformancemaybereducedandthe
low batteryicon mayappearearlierthan usual.Undertheseconditions,
resuscitatethe batterypackbywarming it in apocket immediatelybefore
use.However,ensurethatthereare nometallicitemsin thepocketthat
couldcausea short circuit, suchas akeyholder,etc.
oDo not placeanything, suchastablecloths,carpets,beddingor cushions,
ontopof thebattery chargerwhileit is charging.Heatwill buildup and
couldresultin afire.
oDo not chargebatteriesotherthan BatteryPackNB-4Lin this charger.
oThe batterypackcontinuesto dischargea minimalportion of its power
while installedinthe camera,evenwith thepoweroff, or in thecharger.
This will shortenbattery life.
/9

oDo not allowany metalobjectssuch as keyrings totouch the _ and (_
terminals (Fig.A), asthis candamagethebatterypack.Tocarrythe battery
packor store it duringperiodsofdisuse,alwaysreplacetheterminal cover
(Fig.B).Youmay beableto checkthechargestatewhenBatteryPack
NB-4Lis useddependingupon howthe terminalcover isattached
(Fig.C,D).
.............. i i[ ..............
iN NNN:ble; ; N:N N:_!_
oEven chargedbatterypackscontinueto dischargenaturally.Youare
advisedto chargethe batteryonthe dayof use,or one daybefore,to
ensureafull charge.
oSince storingafully chargedbatterypackfor long periodsoftime (about
oneyear) mayshortenits life cycleor affect its performance,youare
recommendedto useit in thecamerauntil it is completelydischargedand
to store it in anindoor locationwith low relativehumidityand betweenthe
temperaturesof0to 30 °C(32to 86 °F).If youdo not usethebatterypack
for long periodsoftime, chargeit fully anddischargeit fully in the camera
aboutonceayear beforereturningit to storage.
elf theperformanceofthe battery packdiminishessubstantiallyevenwhenit
isfully charged,itslife has beenexceededandit should bereplaced.
2O
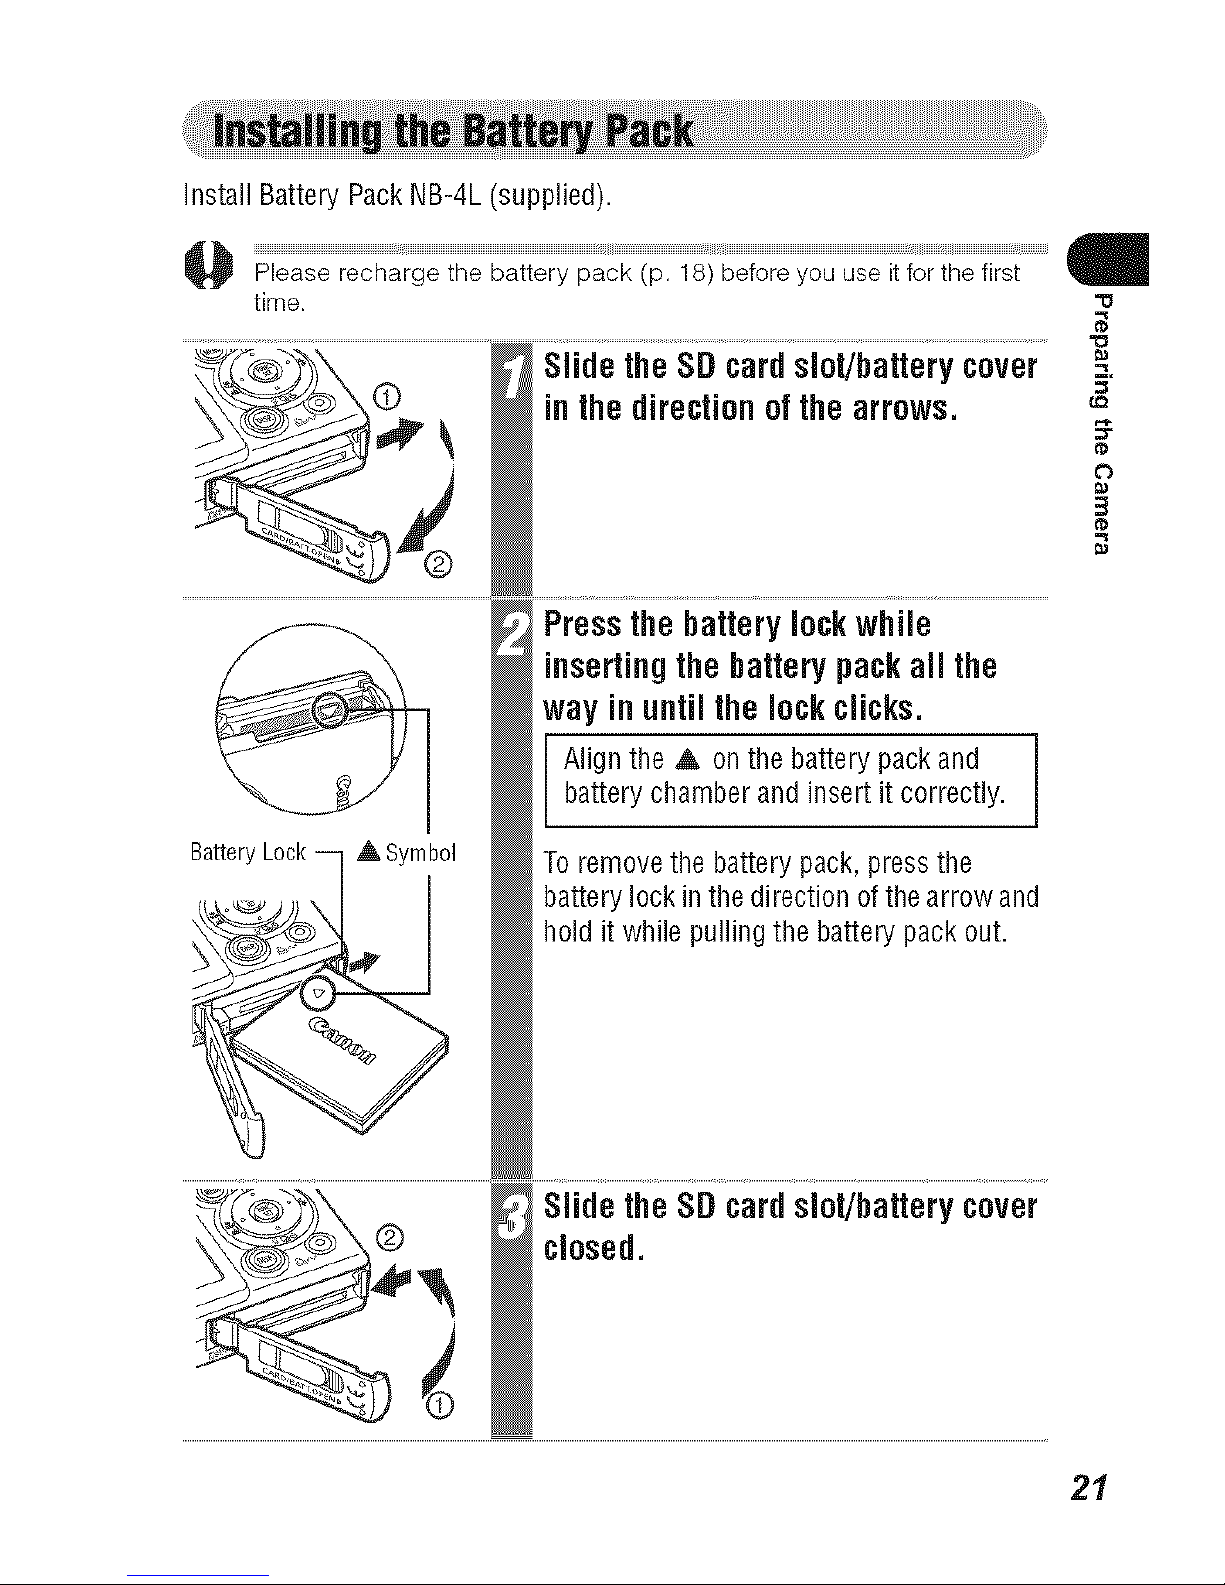
Install Battery Pack NB-4L (supplied).
time. "u
BatteryLock-- ASymbol
Slide theSDcardslot/batterycover
inthedirection ofthe arrows.
Pressthebatterylockwhile
insertingthe batterypackall the
way inuntilthelockclicks.
Align the & on the battery packand
battery chamber and insert it correctly.
To remove the battery pack, press the
battery lock in the direction of thearrow and
hold it while pulling the battery pack out.
Slide theSDcardslot/batterycover
closed.
"o
LQ
21
• Please watch the loading slot area carefully as you insert and
remove the battery pack.
• Do not turn off the power or open the SD card slot/battery cover
while the indicator blinks green. The camera is writing, reading,
erasing or transmitting an image to or from the SD card.
• Remove the battery pack when the camera is not in use. Please
note, however, that the date, time and other camera settings may be
lost if the battery pack has been removed for more than three weeks.
Please use an AC Adapter Kit ACK-DCIO (sold separately) for
extended use of the camera (p. 169).
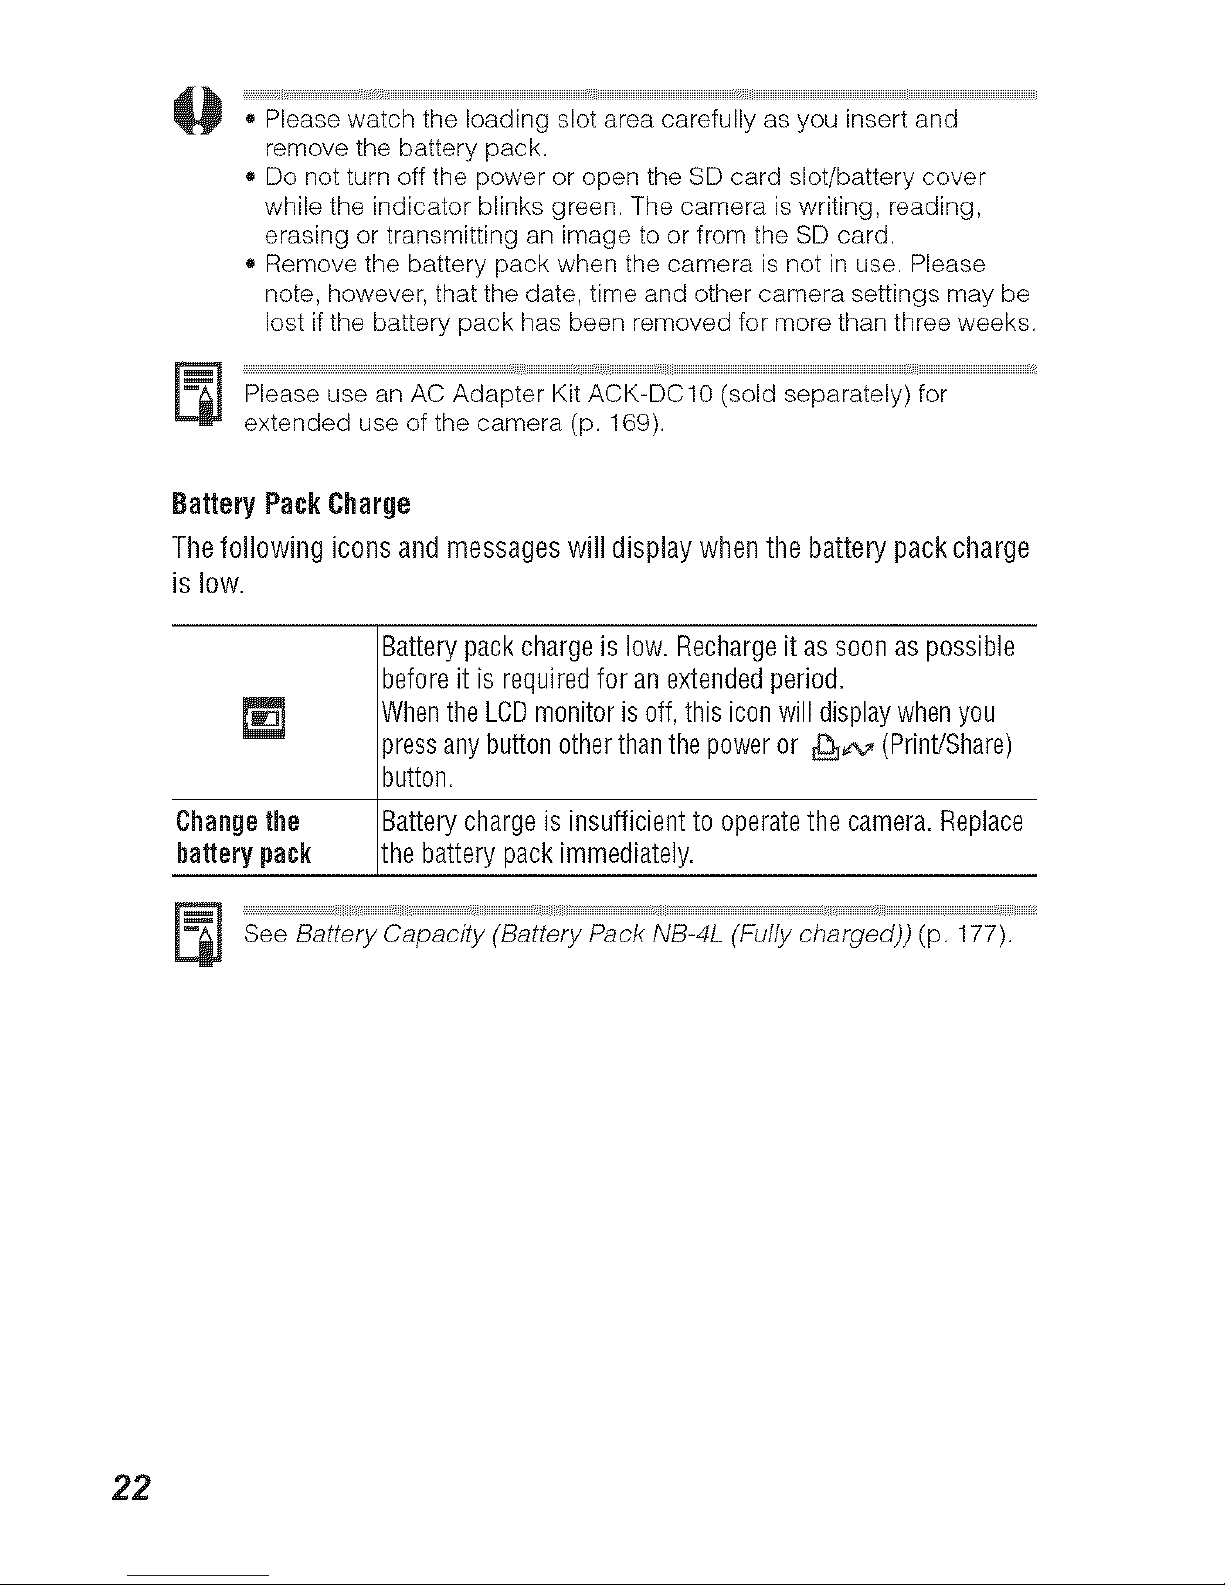
BatteryPackCharge
Thefollowing icons and messageswill display when the battery pack charge
is low.
Batterypackchargeis low. Rechargeitas soonas possible
beforeit isrequiredfor an extendedperiod.
WhentheLCDmonitoris off,this iconwill displaywhenyou
pressanybuttonotherthanthepoweror _,,_ (Print/Share)
button.
Changethe Batterychargeis insufficienttooperatethe camera.Replace
bakerypack the battery packimmediately.
See Battery Capacity (Battery Pack NB-4L (Fully charged)) (p. 177).
22
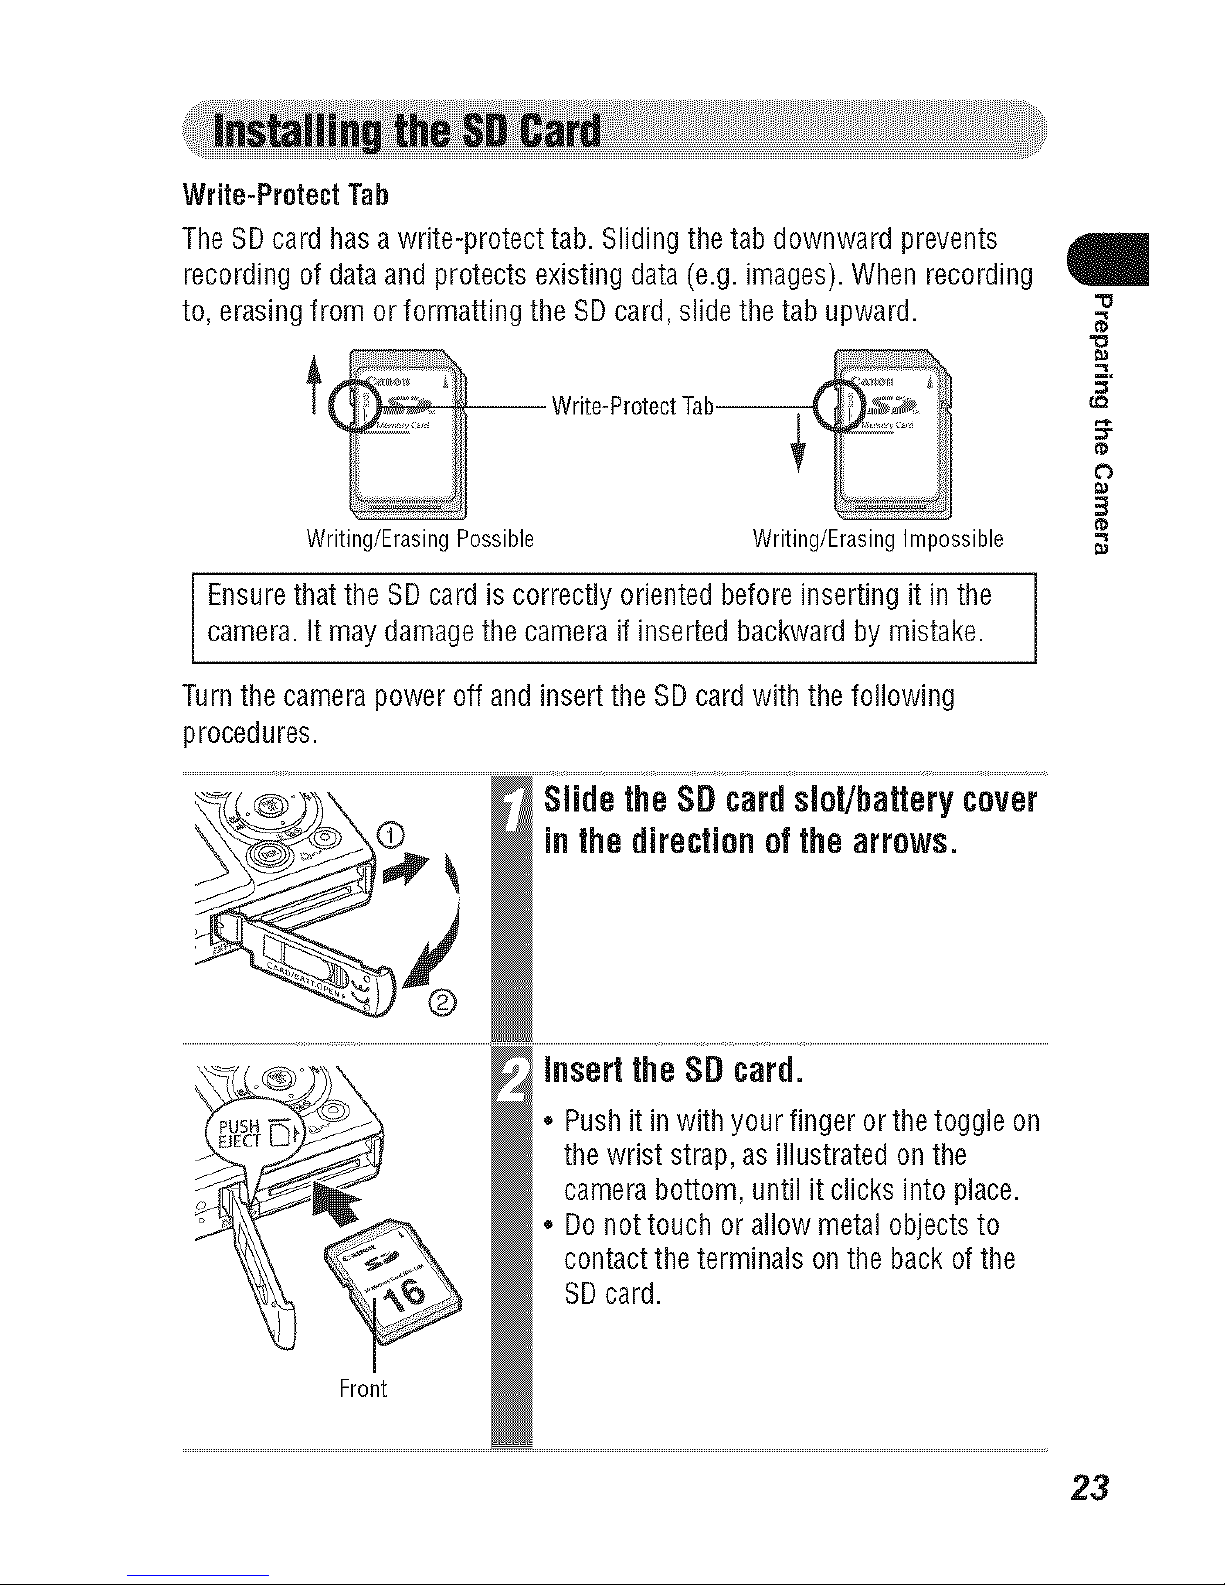
Write-ProtectTab
TheSDcardhasawrite-protecttab.Slidingthetabdownwardprevents
recordingofdataandprotectsexistingdata(e.g.images).Whenrecording
to,erasingfrom orformattingtheSDcard,slidethetabupward.
Writing/ErasingPossible Writing/ErasingImpossible
Ensure that the SDcard is correctly oriented before insertingit inthecamera. It may damagethe camera if inserted backward by mistake.
Turn the camerapower off and insert the SD cardwith the following
procedures.
Slide theSDcardslot/batterycover
inthedirectionofthe arrows.
/
Pushit in with your finger or thetoggle on
the wrist strap,as illustrated on the
camera bottom, until it cricks into place.
Donot touch or allow metal objects to
contact the terminals onthe back of the
SDcard.
Front
/
o
23
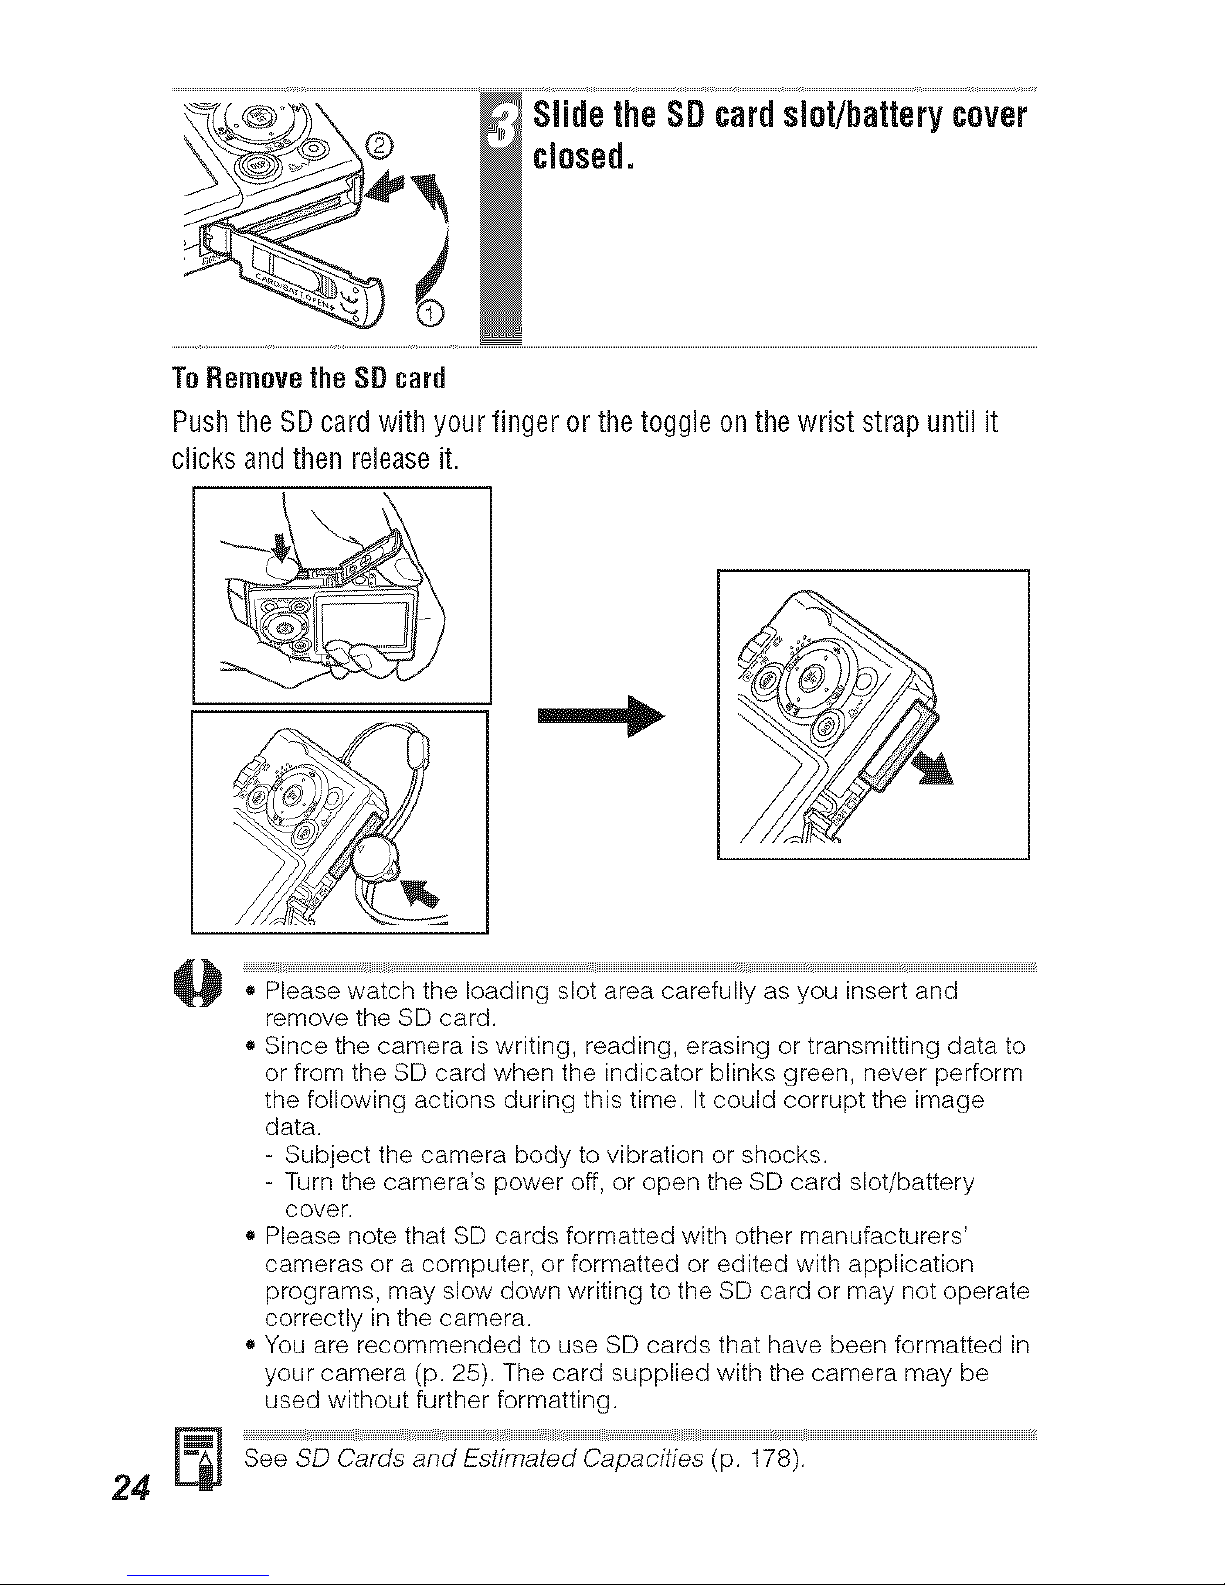
Slide theSDcardslot/batterycover
closed.
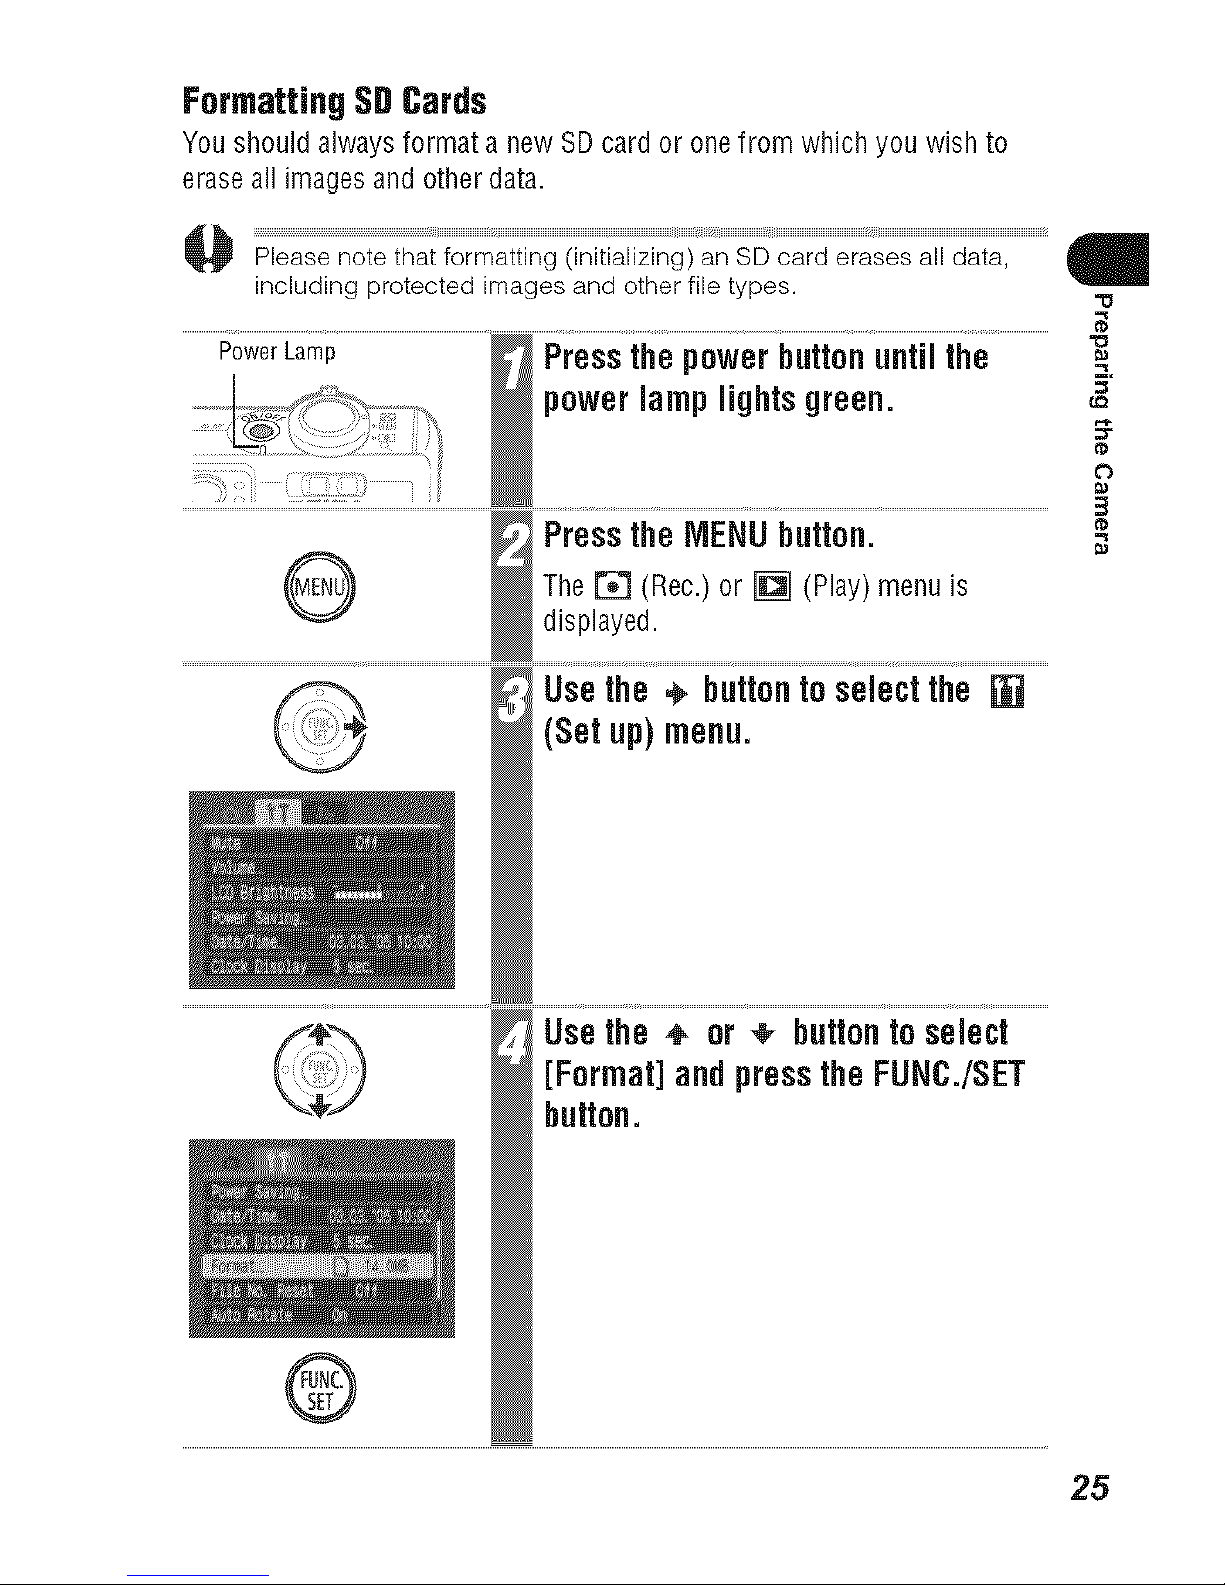
To Removethe SD card
Pushthe SD card with your finger or the toggle on the wrist strap until it
clicks and then releaseit.
', Please watch the loading slot area carefully as you insert and
remove the SD card.
,, Since the camera is writing, reading, erasing or transmitting data to
or from the SD card when the indicator blinks green, never perform
the following actions during this time. It could corrupt the image
data.
- Subject the camera body to vibration or shocks.
- Turn the camera's power off, or open the SD card slot/battery
cover.
', Please note that SD cards formatted with other manufacturers'
cameras or a computer, or formatted or edited with application
programs, may slow down writing to the SD card or may not operate
correctly in the camera.
,, You are recommended to use SD cards that have been formatted in
your camera (p. 25). The card supplied with the camera may be
used without further formatting.
tt t t,
See SD Cards and Estimated Capacities (p. 178).
24
FormattingSDCards
You should always format a new SDcard or one from which you wish to
erase all images and other data.
including protected images and other file types. "u
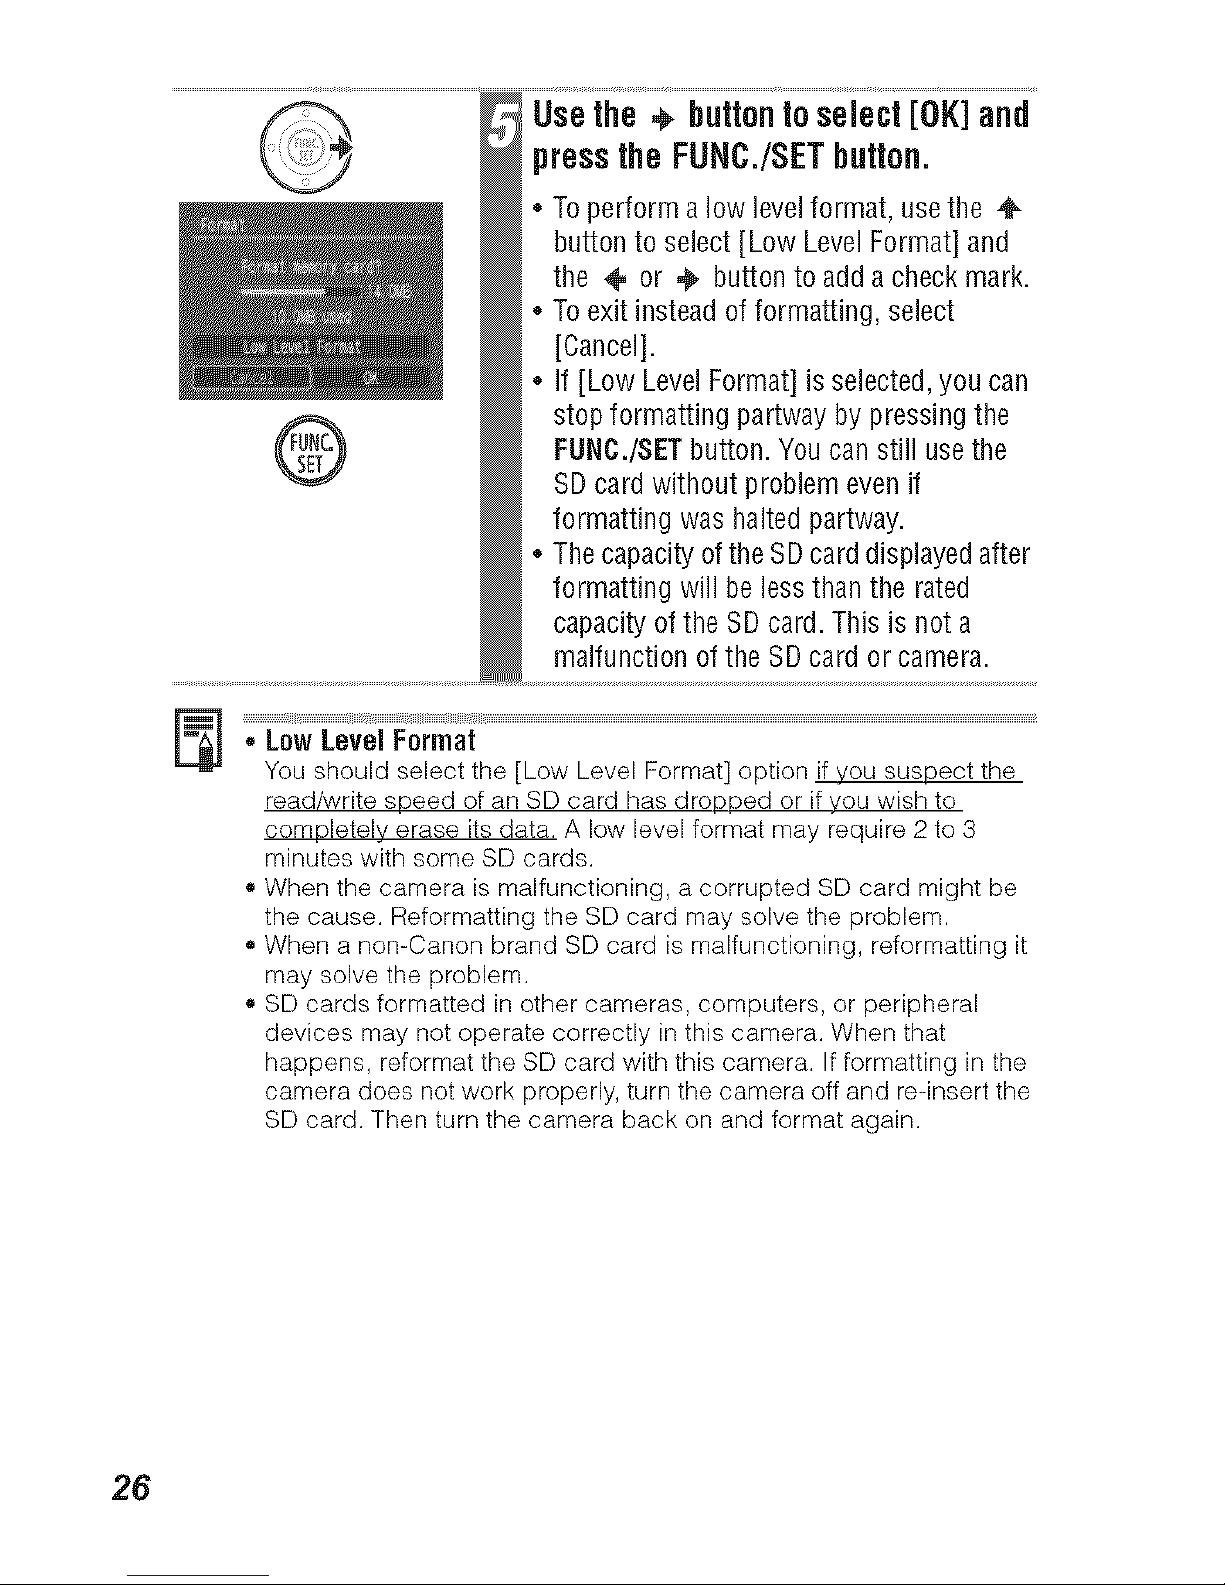
PowerLamp thepowerbutton untilthe
power lamp lights green, g
PresstheiVlENUbutton.
(Rec.) or (Play) menu
The r_
[]
is
displayed.
@
[Usethe ÷ buttonto selectthe
(Setup)menu.
Usethe + or ÷ button to select
[Format]and pressthe FUNC./SET
button.
25
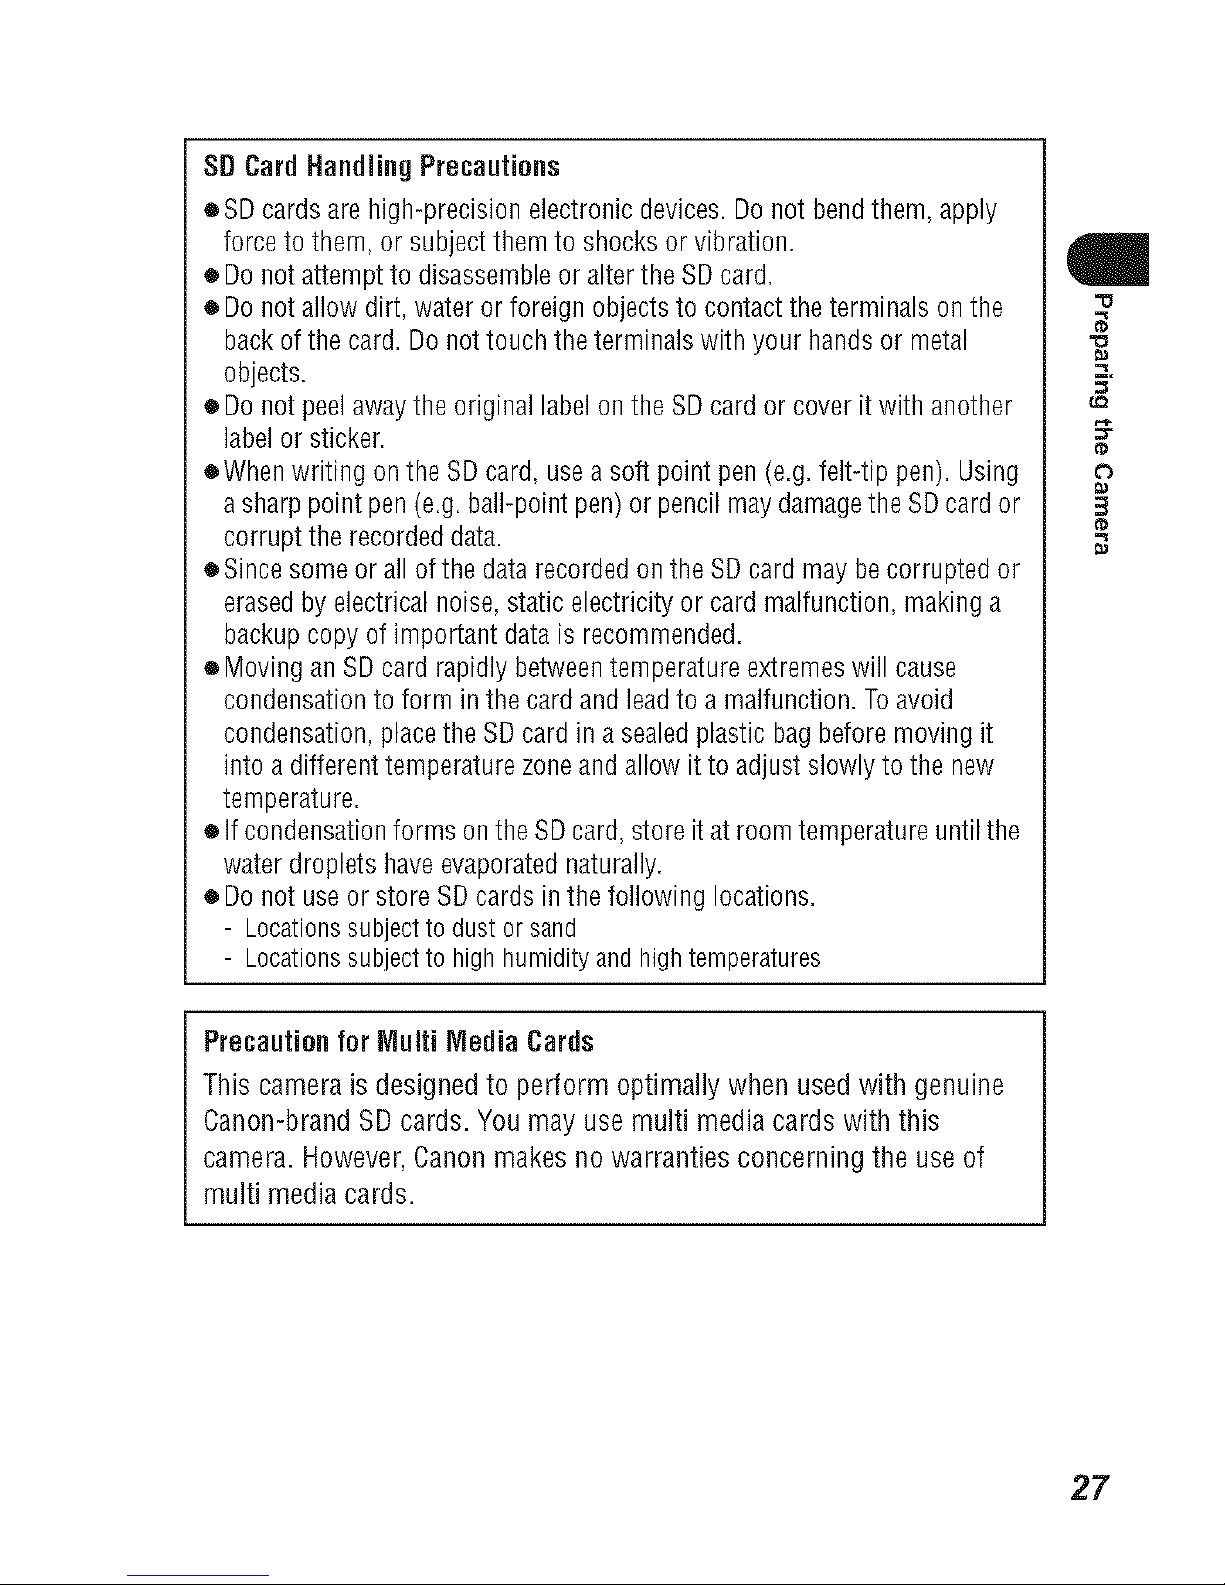
Usethe ÷ buttontoselect[OK]and
pressthe FUNC./SETbutton.
* To perform a low level format, use the
button to select [Low Level Format] and
the ÷ or €_ button to add a check mark.
To exit instead of formatting, select
[Cancel].
If [Low Level Format] is selected, you can
stop formatting partway by pressing the
FUNC./SET button. You can still use the
SD card without problem even if
formatting was halted partway.
The capacity of the SD card displayed after
formatting will be less than the rated
capacity of the SD card. This is not a
malfunction of the SD card or camera.
_""_e'_'i""F_'_'_"at _'_'_¸'¸.........................................................................................................................................................................................................................................................................................................................
You should select the [Low Level Format] option if you suspect the
read/write speed of an SD card has dropped or if you wish to
completely erase its data. A low level format may require 2 to 3
minutes with some SD cards.
• When the camera is malfunctioning, a corrupted SD card might be
the cause. Reformatting the SD card may solve the problem.
• When a non-Canon brand SD card is malfunctioning, reformatting it
may solve the problem.
• SD cards formatted in other cameras, computers, or peripheral
devices may not operate correctly in this camera. When that
happens, reformat the SD card with this camera. If formatting in the
camera does not work properly, turn the camera off and re-insert the
SD card. Then turn the camera back on and format again.
26
SDCardHandling Precautions
eSD cardsare high-precisionelectronicdevices.Donot bendthem, apply
forceto them, or subjectthemto shocksor vibration.
• Donotattemptto disassembleor alterthe SDcard.
• Donotallow dirt,wateror foreign objectsto contacttheterminals onthe
backofthe card. Donottouchtheterminals with your handsor metal
objects.
• Donotpeelawaytheoriginallabel ontheSD cardor cover it with another
labelor sticker.
eWhenwriting ontheSDcard, usea soft point pen (e.g.felt-tip pen).Using
asharp point pen(e.g.ball-pointpen)or pencilmaydamagetheSDcard or
corrupttherecordeddata.
oSince someor allofthe datarecordedonthe SDcard maybe corruptedor
erasedby electricalnoise,staticelectricityor cardmalfunction,makinga
backupcopyofimportant datais recommended.
• Movingan SDcardrapidly betweentemperatureextremeswill cause
condensationtoform in thecard and leadto amalfunction.Toavoid
condensation,placethe SDcard in asealedplasticbagbeforemovingit
into adifferenttemperaturezoneandallow itto adjustslowly tothe new
temperature.
• Ifcondensationforms onthe SDcard, store it atroomtemperatureuntilthe
water dropletshaveevaporatednaturally.
• Donot useorstore SDcardsin thefollowing locations.
- Locationssubjectto dustor sand
- Locationssubjectto highhumidityandhightemperatures
Precautionfor Multi Media Cards
This camera is designed to perform optimally when usedwith genuine
Canon-brand SD cards. You may use multi media cards with this
camera. However,Canonmakesno warranties concerning the use of
multi media cards.
q
27
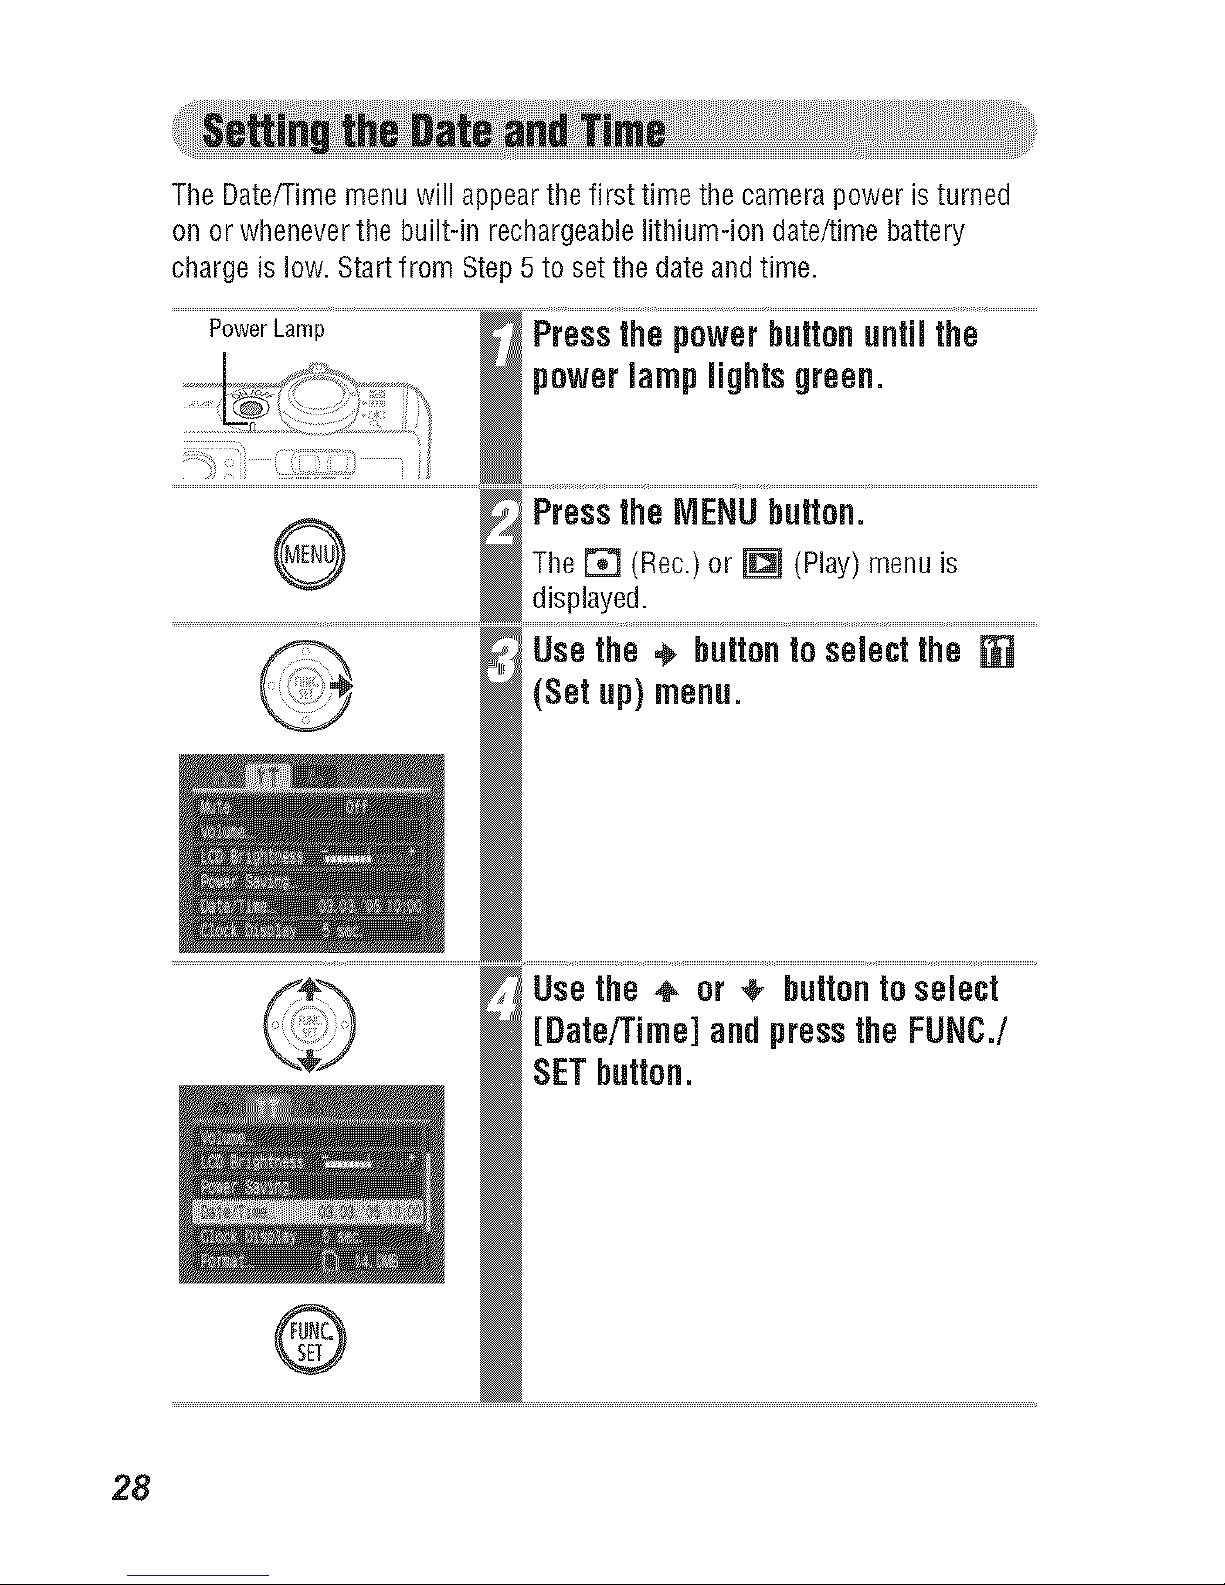
The Date/rime menu will appearthe first time the camera power is turned
on or whenever the built-in rechargeable lithium-ion date/time battery
charge is low. Start from Step 5 to setthe date andtime.
PowerLamp Pressthe powerbuttonuntil the
powerlamplightsgreen.
@
Pressthe MENUbutton.
The _ (Rec.) or [] (Play) menu is
displayed.
Usethe ÷ buttonto selectthe
(Setup) menu.
Usethe ÷ or _ buttontoselect
[Date/Time]andpressthe FUNC./
SETbutton.
®
28
 Loading...