

Canon Digital IXUS i5, Powershot SD20 Digital ELPH Quick Start Manual
Mode Switch
CDI-E156-010 XXXXXXX © 2004 CANON INC. PRINTED IN JAPAN
Direct Print
User Guide
Printer User Guide
Supplied with a
printer
Contents
of This Guide
Included accessories and
separately sold
equipment information.
2.
Shoot images
with the camera.
3.
Play back the
images.
4.
Erase any
unwanted
images.
Learn the names
of camera
components.
5.
Print the images.
6.
Install the
software.
Connect the
camera to a
computer.
7.
Download the
images to a
computer.
What you can do
with the software
The various ways
of using the
software
The following manuals are supplied with your
camera. Please refer to them as need be.
Reference Guides
System Map
Quick Start Guide
This Guide
Camera User Guide
• Camera User
Guide
• Software
Starter Guide
• ZoomBrowser
EX Software
User Guide
• ImageBrowser
Software User
Guide
These PDF format
manuals are
available on the
Canon website.
Please download
them from the
following URL:
http://web.canon.jp/
Imaging/
information-e.html
1.
Install the battery
pack and the SD
card.
Battery Lock
Charge Indicator
➜ Camera User Guide
○○○○○○○○○○○○○○○○○○○○○○○○○○○○○○○○○○
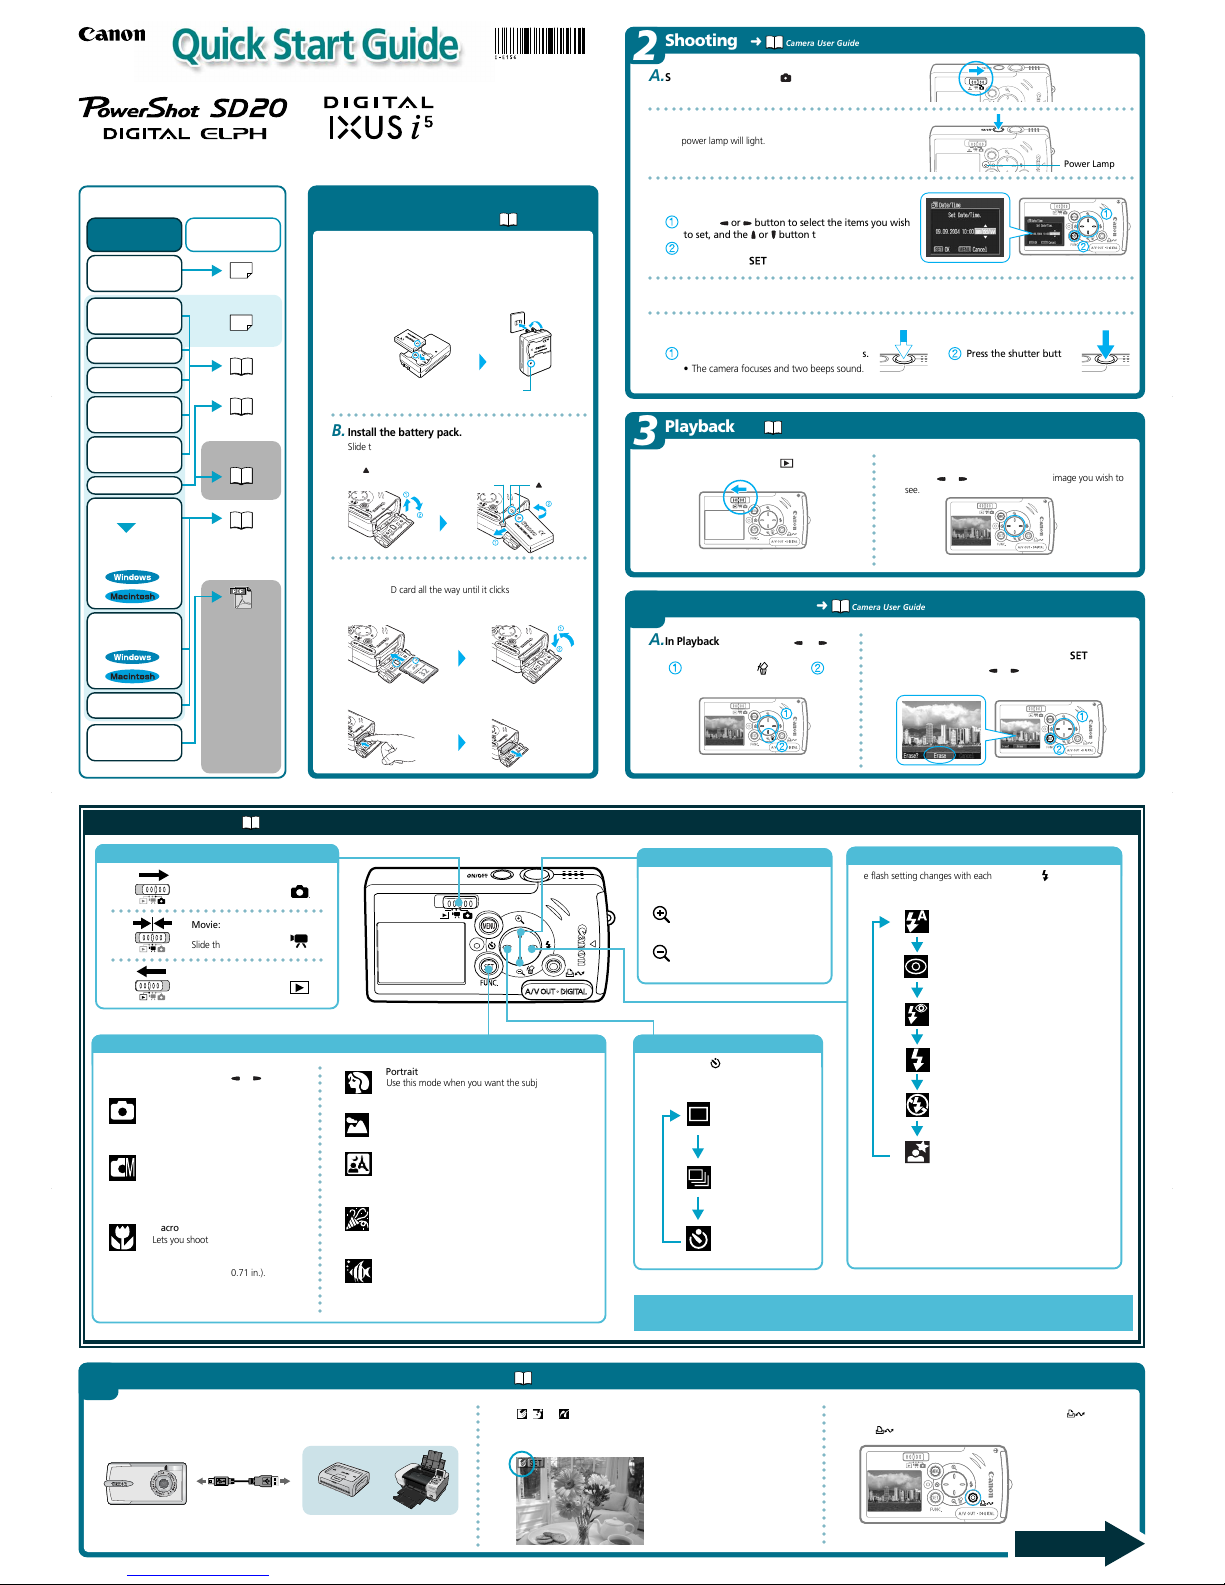
B.
Install the battery pack.
Slide the SD card slot/battery cover open. Push the battery
lock in the direction of the arrow and hold it while aligning
the
on the battery pack and camera back to insert the
battery pack.
1
Preparing the Camera
• Battery charger model names and types var y by region.
○○○○○○○○○○○○○○○○○○○○○○○○○○○○○○○○○○
C.
Install the SD card.
Insert the SD card all the way until it clicks.
Slide the SD card slot/battery cover closed.
A.
Charge the battery pack.
Place the battery pack in the battery charger and plug the
charger into a power outlet. The charge indicator lights red
while charging and changes to green when the battery pack
is charged.
Charging the battery pack takes
approximately 95 minutes.
To remove the SD card
Push in the SD card until you hear it click, then release it.
○○○○○○○○○○○○○○○○○○○○○○○○○○○○○○○○○○○○○○○○○○○○○○○○○○○○○○○○○○○○○○○○
C.Set the date and time (first time the camera is
powered on).
Use the or button to select the items you wish
to set, and the
or button to change the value.
Check that the date and time shown are correct,
then press the
button.
○○○○○○○○○○○○○○○○○○○○○○○○○○○○○○○○○○○○○○○○○○○○○○○○○○○○○○○○○○○○○○○○
D.
Aim the camera at the subject you wish to capture and compose the image.
○○○○○○○○○○○○○○○○○○○○○○○○○○○○○○○○○○○○○○○○○○○○○○○○○○○○○○○○○○○○○○○○
E.
Focus and shoot.
Press the shutter button halfway to focus.
• The camera focuses and two beeps sound.
Press the shutter button
all the way to shoot.
○○○○○○○○○○○○○○○○○○○○○○○○○○○○○○○○○○○○○○○○○○○○○○○○○○○○○○○○○○○○○○○○
B.Press the ON/OFF button to turn the camera on.
The power lamp will light.
Power Lamp
➜ Camera User Guide
2
Shooting
A.
Set the mode switch to (Shooting).
➜ Camera User Guide
A.
Set the mode switch to (Playback).
B.
Play back the images.
Use the or button to display the image you wish to
see.
○○○○○○○○○○○○○○○
3
Playback
➜ Camera User Guide
A.
In Playback mode, use the or
button to select an image to delete
( ) and press the button ( ).
B.
When the confirmation screen appears, check
that [Erase] is selected and press the button.
Select [Cancel] using the or button to cancel without
erasing.
○○○○○○○○○○○○○○○○○○
4
Erasing an Image
Shooting:
Slide the mode switch to .
Movie:
Slide the mode switch to
.
Playback:
Slide the mode switch to
.
○○○○○○○○○○○○○○○○○○○○○○○○○○○○
○○○○○○○○○○○○○○○○○○○○○○○○○○○○
Shooting Modes
Press the SET/FUNC. button once.
Select a shooting mode using the
or button.
Auto
Lets the camera select settings.
Manual
Lets you set settings such as the
exposure, the white balance and the
photo effect.
Macro
Lets you shoot a subject that is 3 to 10
cm from the lens tip. At the closest
range, the image area is approximately
24 x 18 mm (0.94 x 0.71 in.).
Portrait
Use this mode when you want the subject to appear
sharp and the background blur.
Landscape
Use this to record landscapes.
Night Snapshot
Use this to capture people against twilight or night
backgrounds. It reduces the effects of camera shake
when shooting without a tripod.
Indoor
Use this under fluorescent or tungsten lighting. It
captures the subject’s colors faithfully while reducing
the effects of camera shake.
○○○○○○○○○○○○○○○○○○○○○○○○○○○○○○○○○
Digital Zoom
Images can be digitally magnified up to
approximately 6.5x
Press this button for a telephoto
shot.
The subject will appear larger.
Press this button for a wide-angle
shot.
The subject will appear smaller.
Continuous Shooting, Self-timer
Each press of the button cycles
between the following settings.
Single Shot
Continuous Shooting
Self-timer
Auto
Auto with Red-eye reduction
Flash on
Flash off
Slow-synchro
Flash
The flash setting changes with each push of the button.
*The flash cannot be set in some shooting modes.
Recordable area: 30 cm to 2.0 m (1.0- 6.6 ft.)
Red-eye reduction: This feature reduces the effect of light
reflecting back from the eyes and
making them appear red.
Slow Synchro: The flash timing is adjusted to a slow
shutter speed, allowing you to shoot
night sceneries.
In addition, there are functions that can be set in each shooting mode.
For details, see “Functions Available in Each Shooting Mode” at the end of the Camera User Guide.
5
Printing with a Direct Print Compatible Printer
➜ Direct Print User Guide
A.
Connect the camera to the printer and turn on the printer’s power.
Set the camera to playback mode and turn the power on.
B.
, or appears* in the upper left corner of the camera’s
LCD monitor, indicating that the printer is ready to print.
* The displayed icon may vary depending on the printer model.
C.
Display an image for printing and press the button.
The button will flash blue and the printing will start.
Camera
Interface Cable
Printers
○○○○○○○○○○○○○○○○○○○
○○○○○○○○○○○○○○○○○○
Please turn over
Flash on with Red-eye reduction
Quick Reference
➜ Camera User Guide
symbol
Underwater
Appropriate for shooting images with the All Weather
Case AW-DC10 (sold separately). This mode uses an
optimal white balance setting to reduce bluish tones
and record images with natural hues.
6
Preparing to Download Images to a Computer
➜ Camera User Guide, Software Starter Guide
Never connect the camera to the computer before the
software is installed.
List of Things to Prepare
• Camera and Computer
• Canon Digital Camera Solution Disk provided with the
camera
• Interface Cable (use the cable provided with the camera)
○○○○○○○○○○○○○○○○○○○○○○○○○○○○○○○○○○○○
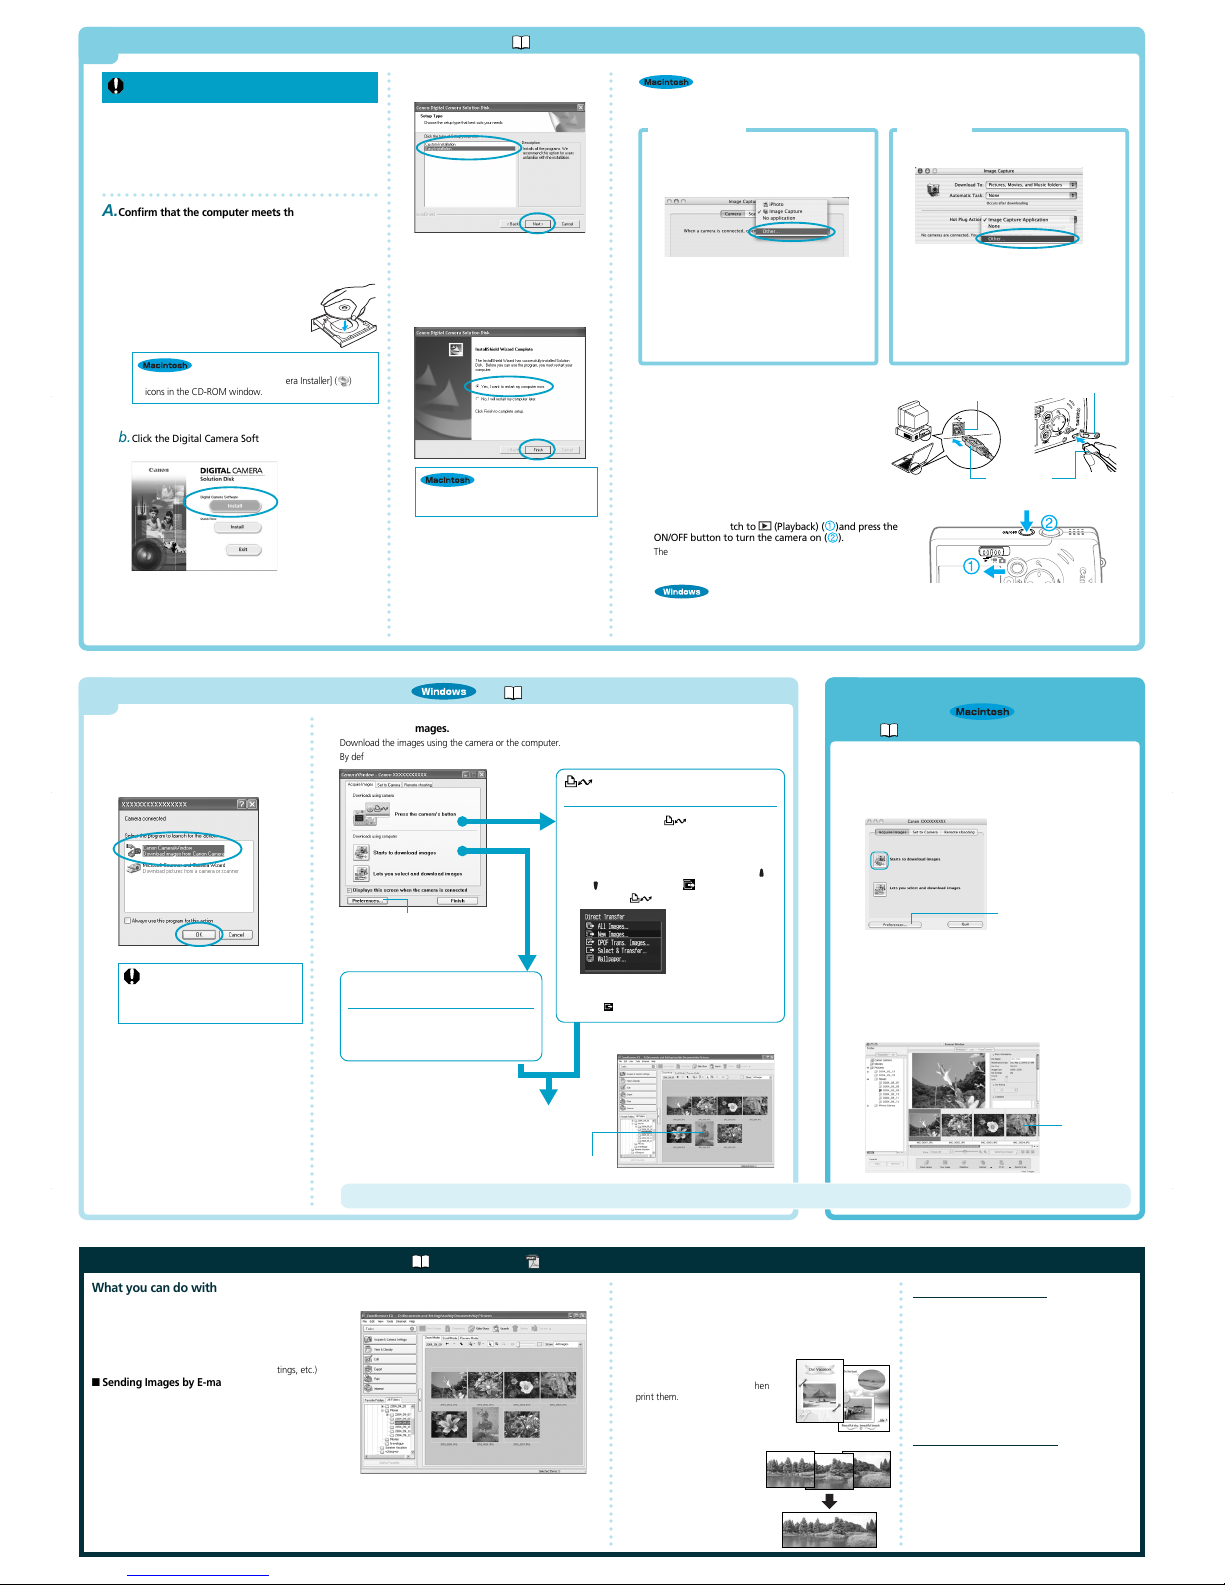
A.
Confirm that the computer meets the system
requirements.
See the Camera User Guide.
B.Install the software.
a.
Place the Canon Digital Camera Solution
Disk into your computer’s CD-ROM drive.
○○○○○○○○○○○○○○○○○○○○○○○○○○○○○○○○○○○○○○○○○○○○○○○○○○○○○○○○○○○○○○○○○○○○○○○○○○○
• Double-click the [Canon Digital Camera Installer] ( )
icons in the CD-ROM window.
b.
Click the Digital Camera Software [Install] button
and click [Next].
c.
Select [Easy Installation] and click
[Next].
Proceed with the installation while reviewing
installation settings.
d.
When the installation is complete,
select [Yes, I want to restart my
computer now.] as shown in the screen
below, and click [Finish].
Once the installation is complete, click
[Quit].
C.
Connect the camera to the computer.
a.
Connect the supplied interface cable to the
computer’s USB port and the camera’s DIGITAL
terminal.
1. Open the terminal cover by slipping a fingernail under
the left edge.
2. Insert the cable until it clicks into place.
○○○○○○○○○○○○○○○○○○○○○○○○○○○○○○○○○○○○○○○○○○○○○○○○○○○○○○○○○○○○○○○○○○○○○○○○○○○
e.
Remove the disk from the CD-ROM
drive after restarting.
USB port
Interface cable
Terminal cover
b.
Set the mode switch to (Playback) ( )and press the
ON/OFF button to turn the camera on (
).
The camera and computer will be ready to communicate with
each other.
If the Digital Signature Not Found window appears, click [Yes].
The USB driver will automatically finish installing onto the computer when you attach the camera and open a connection.
7
Downloading Images to a Computer
➜ Camera User Guide, Software Starter Guide
○○○○○○○○○○○○○○○○○○○○○○○○○○○○○○○○○○○○○○○○○○○○○○○○○○○○○○○○○○○○○○○○○
If the window shown above does not
appear, click the [Start] menu, then select
[Programs] or [All Programs], followed by
[Canon Utilities], [CameraWindow] and
[CameraWindow].
B.
Download the images.
Download the images using the camera or the computer.
By default, the downloaded images are saved into the [My Pictures] folder.
Downloading Images Using
Camera Operations (Direct Transfer)
C. Confirm that the button lights
blue.
D.
When the Direct Transfer menu appears
in the camera’s LCD monitor, use the
or button to select (All Images) and
press the button.
You can adjust the settings, such as the
type of image downloaded and the
destination folder, by clicking [Preferences].
Downloading Images Using
Computer Operations
C.
Click [Starts to download images].
By default, all the images that have yet to
be downloaded will download.
By default, the downloaded images will appear as thumbnails
(tiny versions) in the main window of ZoomBrowser EX.
Downloaded images are saved in separate folders according
to the date on which they were shot.
7
Downloading Images to a
Computer
➜ Software Starter Guide
The following window will display when the camera and computer are set
to the correct mode for communicating.
Double-click the [Canon CameraWindow] icon on the desktop if the
window does not appear.
A.
Click [Starts to download images].
By default, all the images that have yet to be downloaded will
download to the [Pictures] folder.
Also, when downloading is complete, the thumbnails (tiny versions)
of the downloaded images display in ImageBrowser’s Browser
Window.
The downloaded images will be saved into folders according to their
shooting date.
Image download is complete.
Getting the Most out of the Software
➜ Software Starter Guide, ZoomBrowser EX / ImageBrowser Software User Guide
○○○○○○○○○○○○○○○○○○○○○○○○○○○○○○○○○○○
What you can do with other software
You can use this software in even more advanced ways by linking it
with other software.
■ Printing Images with Different Layouts
With PhotoRecord (Windows)/
ImageBrowser (Macintosh), you can
lay out images as desired and then
print them.
○○○○○○○○○○○○○○○○○○○○○○○○○○○○○○○○○○○
What you can do with ZoomBrowser EX (Windows) / ImageBrowser (Macintosh)
■ Downloading Images to a Computer
You can easily download images saved in the camera to a
computer.
■ Checking Images
You can magnify images and check the information on them
(the shooting date and time, the shooting settings, etc.)
■ Sending Images by E-mail
You can start your e-mail program from ZoomBrowser EX
(Windows) / ImageBrowser (Macintosh) and attach images to
e-mail messages that you send.
■ Editing Movies
You can create and edit movies: link movies and stills that
have been downloaded to your computer, add background
music, superimpose titles and other text, and apply various
effects to the movies.
■ Using the My Camera Settings
Your favorite images and sounds can be registered as
startup-up images and sounds with My Camera Settings.
■ Stitching Panoramic Images
With PhotoStitch, you can
connect or “stitch” multiple
images together into a
seamless panoramic view.
A Guide to the Manuals
■ Basic Methods: Software Starter Guide
■ Advanced Methods: PDF Manuals
The manuals in PDF format shown below are available
on the Canon website. Please download them from
the following URL:
http://web.canon.jp/Imaging/information-e.html
• ZoomBrowser EX Software User Guide (Windows)
• ImageBrowser Software User Guide (Macintosh)
Viewing the PDF Manuals
The software application Adobe Reader or Adobe
Acrobat Reader is required to view the PDF manuals.
If one of these applications is not already installed on
your computer, download it from the following website.
http://www.adobe.com/products/acrobat/readstep2.html
All the images on the camera's memory card
will download. To selectively download images,
select
(Select & Transfer).
Thumbnail
To DIGITAL terminal
Set the ImageBrowser auto start settings before you connect the camera to the computer for the first time.
ImageBrowser Auto Start Settings
OS X (v10.2/v10.3)
1. Start Image Capture, click the [Image Capture]
menu and select [Preferences].
2. In the next menu, click the [When a camera is
connected, open:] list box and select [Other].
The window will appear slightly different in v10.2.
3. Select [CameraWindow] in the program
selection window.
CameraWindow is generally installed into the folder
opened by selecting the [Applications], [Canon
Utilities] and [CameraWindow] folders.
4. Click [OK] and then close Image Capture.
OS X (v10.1)
1. Start Image Capture and select [Other] from
the Hot Plug Action list box.
2. Select [CameraWindow] in the program
selection window.
CameraWindow is generally installed into the folder
opened by selecting the [Applications], [Canon
Utilities] and [CameraWindow] folders.
3. Close Image Capture.
A dialog allowing you to set the default
settings will display when you attach the
camera and open a connection.
A.
Select [Canon CameraWindow] and
click [OK] (first time only).
You can set the type of
image to download and the
destination folder by clicking
[Preferences].
Thumbnail
 Loading...