

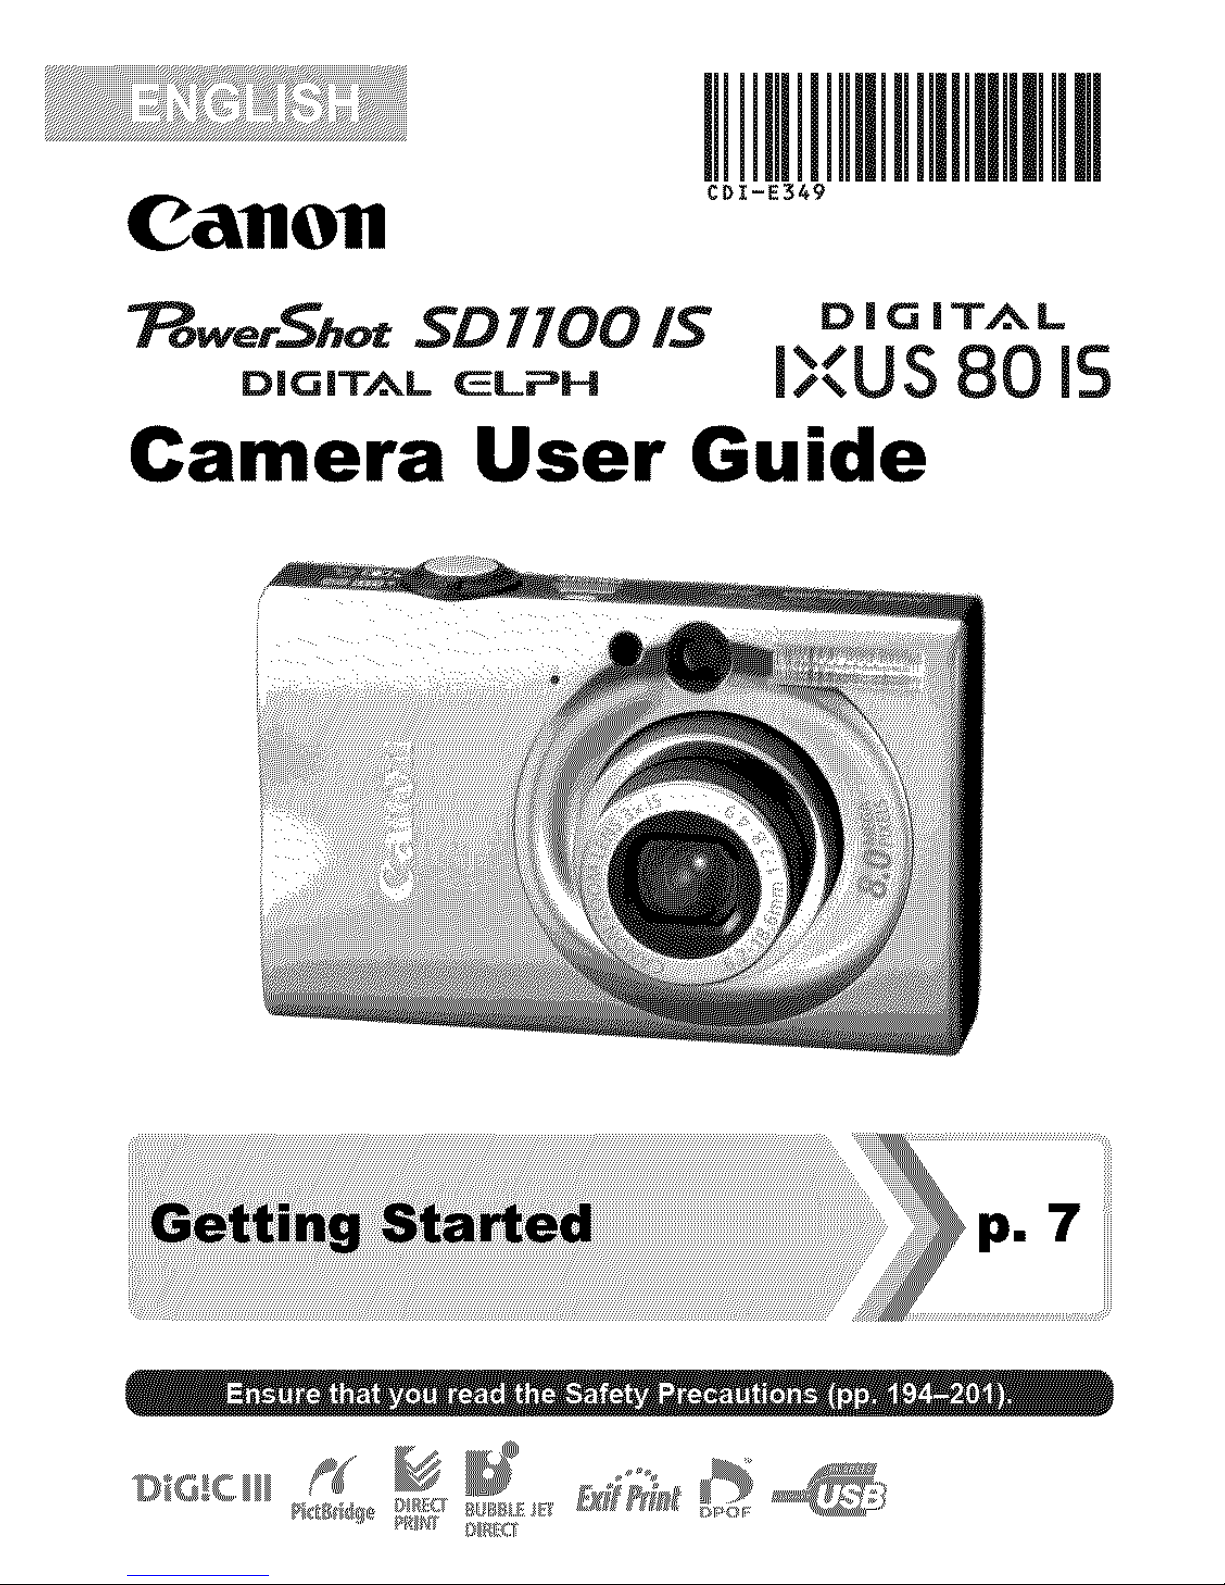
Canon DIGITAL IXUS80 IS, POWERSHOT SD1100 IS DIGITAL ELPH, DIGITAL ELPH User Manual
C&flOfl
I
CDI-E349
7_we.Sh_ SD 1100 IS o |(J|T_ L
D,O,T_.L_,__,. i;.-.US8015
Camera User Guide
7
H_ _l_ _1._1 ¸ E_f_Zi_ iI
2I Table of Contents
Table of Contents
Items marked with a _ are lists or charts that summarize camera
functions or procedures.
Please Read ........................................... 6
Preparations ....................................... 8
Shooting Still Images ([_ Auto Mode) ................... 14
Viewing Still Images ................................ 16
Erasing .......................................... 17
Printing .......................................... 18
Embedding the Date in the Image Data ................. 20
Shooting Movies (1_3 Standard Mode) ................... 22
Viewing Movies .................................... 24
Downloading Images to a Computer ................... 25
System Map ...................................... 32
Components Guide 40
How to Use the Mode Switch ........................ 43
Indicators ........................................ 44
Basic Operations 46
Menus and Settings ............................... 46
Information Displayed on the LCD Monitor and Menus .... 48
Using the LCD Monitor ............................. 58
Commonly Used Shooting Functions 60
[] I-$3 Shooting with the Optical Zoom ................ 60
Using the Digital Zoom/Digital Tete-Converter ........... 60
Magnified Close-Up Shooting (Digital Macro) ............ 63
_- Using the Flash ................................ 64
_t_ _1, Shooting Close-Ups/Infinity Shot ................ 64
_) Using the Self-Timer ............................ 66
Changing the Recording Pixels (Still Images) ............ 68
Changing the Compression (Still Images) ............... 69
I
Table of Contents I 3
Setting the Image Stabilizer Function .................. 70
Adjusting the ISO Speed ........................ 71
Various Shooting Methods 73
Shooting in Modes for Special Conditions .............. 73
Shooting in Manual Mode ........................... 76
Continuous Shooting ............................ 76
Setting the Flash .................................. 77
,n Movie Shooting ................................ 79
Shooting Panoramic Images (Stitch Assist) ............. 84
Checking the Focus and Peoples' Expressions
(Focus Check) ..................................... 86
Switching between Focusing Modes ................... 89
Selecting the Face to Focus On (Face Select and Track) .. 92
Shooting Hard-to-Focus Subjects (Focus Lock, AF Lock) .. 94
Locking the Exposure Setting (AE Lock) ................ 95
Locking the Flash Exposure Setting (FE Lock) ........... 96
Adjusting the Exposure Compensation ................. 97
Switching between Metering Modes ................... 98
Setting the Shutter Speed (Long Shutter Mode) .......... 99
Adjusting the Tone (White Balance) .................. 100
Shooting in a My Colors Mode ...................... 103
Changing Colors ................................. 105
Setting the Display Overlays ........................ 110
Categorizing Images Automatically (Auto Category) ..... 111
_,_, Registering Settings to the Print/Share Button ...... 112
Playback/Erasing 114
O, Viewing Magnified Images ...................... 114
:-: Viewing Images in Sets of Nine (Index Playback) ..... 115
Checking the Focus and Peoples' Expressions
(Focus Check Display) ............................ 116
Jumping to Images ............................ 118
Organizing Images by Category (My Category) ......... 120
Trimming a Portion of an Image ..................... 123
Viewing Movies .................................. 125
Editing Movies ................................... 127
Rotating Images in the Display ...................... 129
Playback with Transition Effects ..................... 130
Automated Playback (Slide Shows) .................. 131
I
4 I Table of Contents
Red-Eye Correction Function ....................... 136
Adding Effects with the My Colors Function ............ 140
Resizing Images ................................. 142
Attaching Sound Memos to Images .................. 144
Sound-Only Recording (Sound Recorder) ............. 146
Protecting Images ................................ 147
Erasing All Images ............................... 151
Print Settings/Transfer Settings 156
Setting the DPOF Print Settings ..................... 156
Setting the DPOF Transfer Settings .................. 163
Configuring the Camera 165
Setting the Power Saving Function ................... 165
Setting the World Clock ............................ 166
Formatting Memory Cards ......................... 168
Resetting the File Number ......................... 170
Creating an Image Destination (Folder) ............... 172
Setting the Auto Rotate Function .................... 174
Resetting Settings to Their Default Values ............. 175
Connecting to a TV 176
Shooting/Playback Using a TV ...................... 176
Customizing the Camera (My Camera Settings) 177
Changing My Camera Settings ...................... 177
Registering My Camera Settings .................... 178
Troubleshooting 180
List of Messages 190
Appendix 194
Safety Precautions ............................... 194
Handling Precautions ............................. 198
Using an AC Adapter Kit (Sold Separately) ............ 202
Using an Externally Mounted Flash (Sold Separately) .... 203
Camera Care and Maintenance ..................... 205
Specifications ................................... 206
Index 216
,_ Functions Available in Each Shooting Mode 222
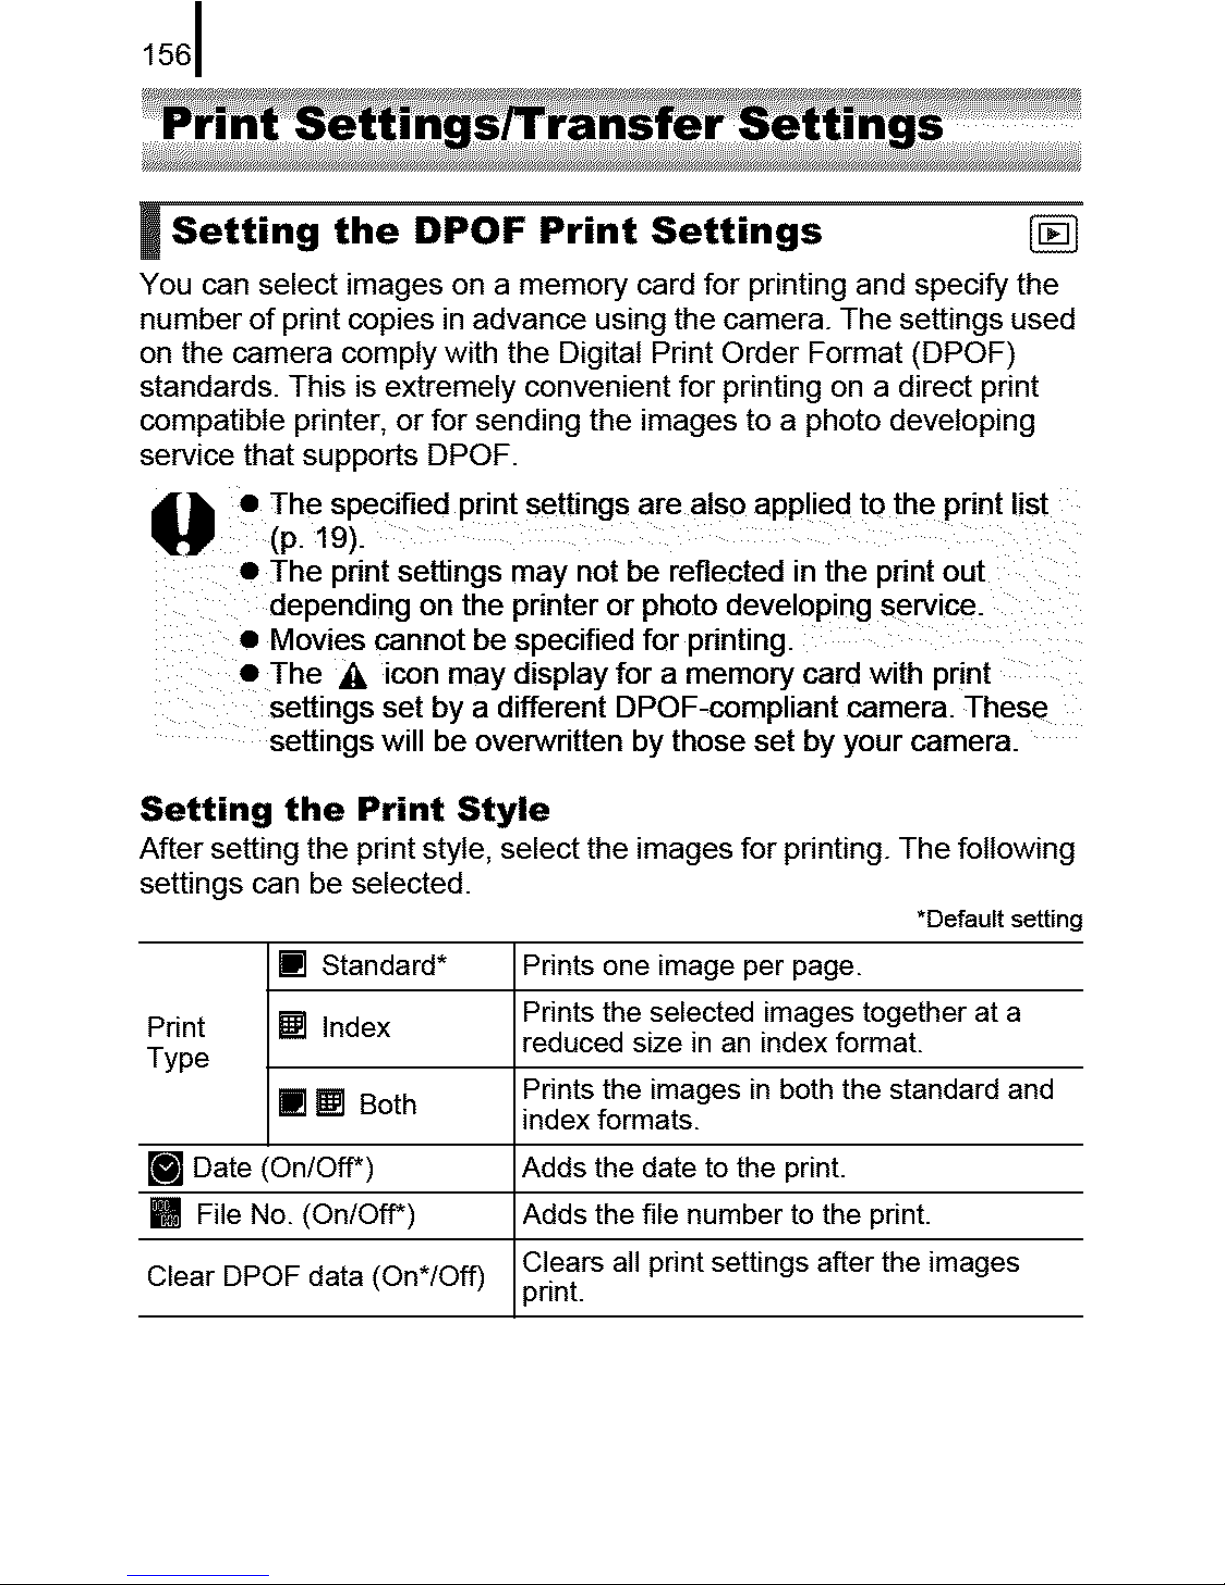
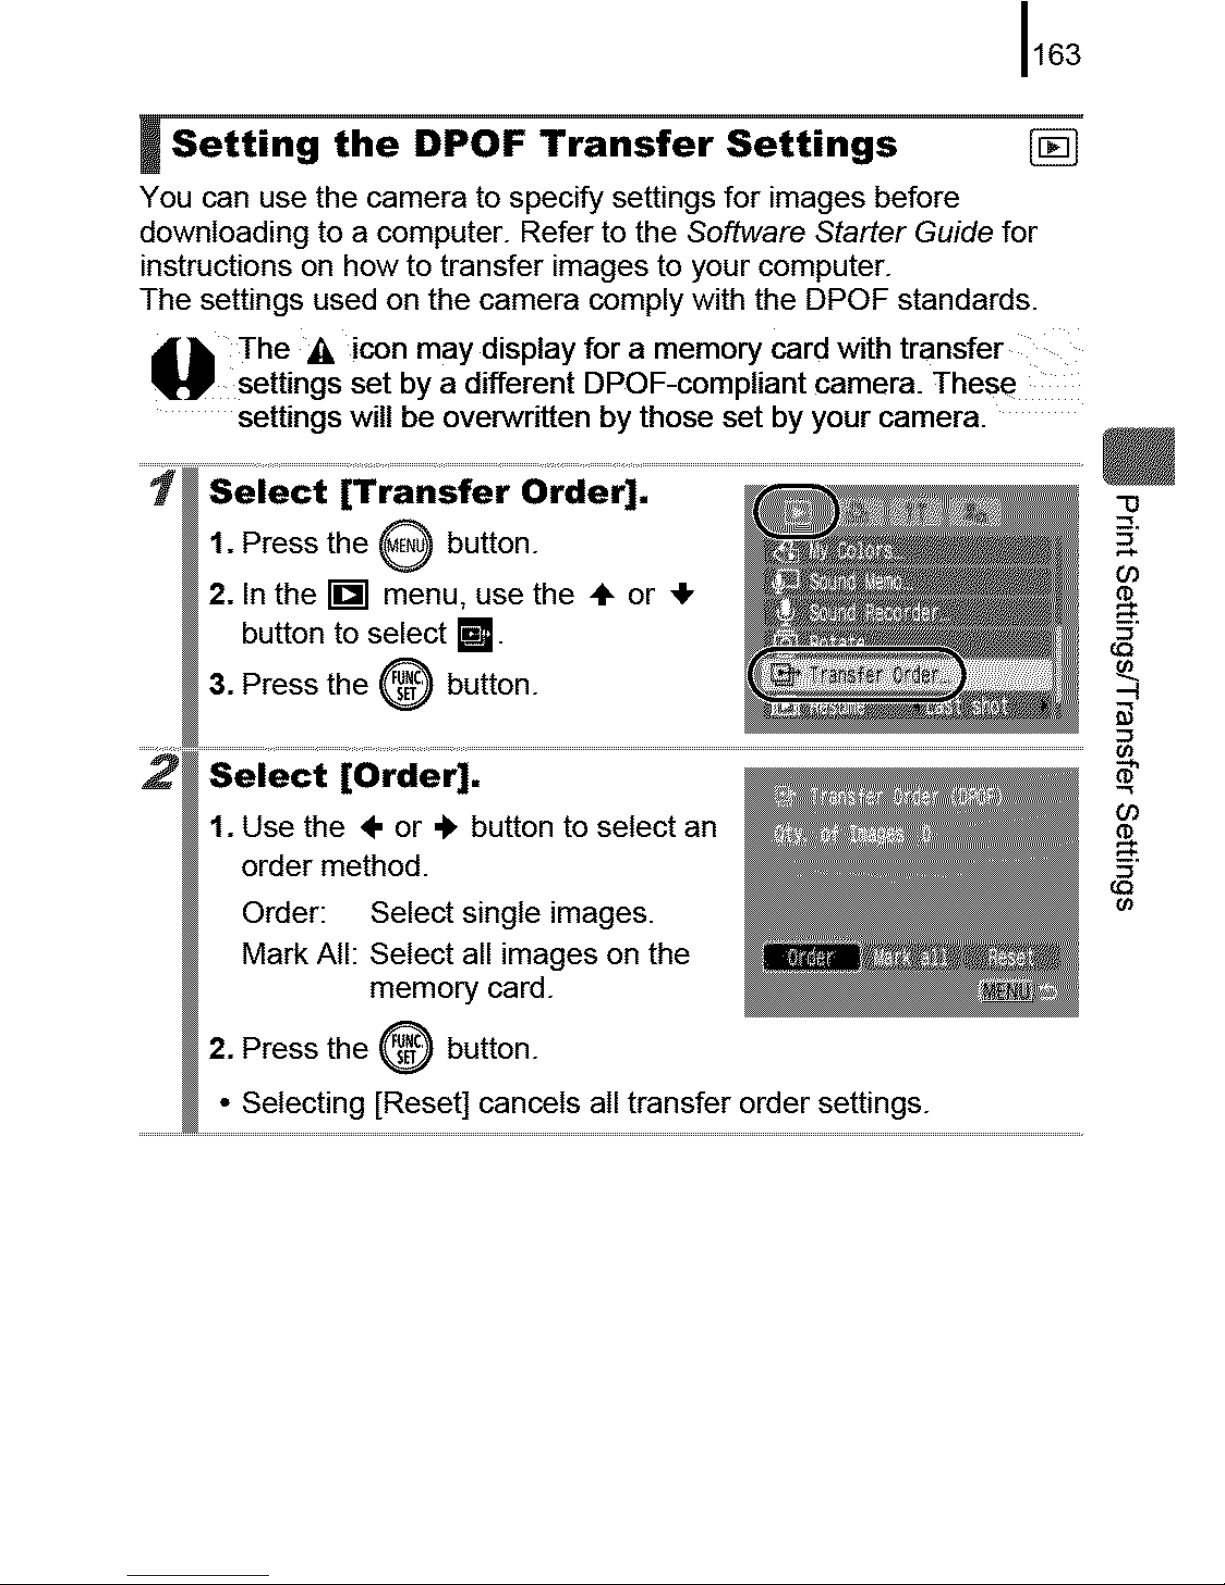
_ Setting the DPOF Print
Settings
You can select images on a memory card for printing and specify the
number of print copies in advance using the camera. The settings used
on the camera comply with the Digital Print Order Format (DPOF)
standards. This is extremely convenient for printing on a direct print
compatible printer, or for sending the images to a photo developing
service that supports DPOF.
i_1 • The specified print settings are also applied to the print I st
P (p. 19).
• The print settings may not be reflected in the print out
depending on the printer or photo developing service.
• Movies cannot be specified for printing.
eThe .4Licon may display for a memory card with print
settings set by a different DPOF-cempliant camera. These
settings will be overwritten by those set by your camera.
Setting the Print Style
After setting the print style, select the images for printing. The following
settings can be selected.
*Default setting
[] Standard* Prints one image per page.
[] Index Prints the selected images together at a
Print reduced size in an index format.
Type
[] [] Both indexPrintSformats.theimages in both the standard and
[] Date (On/Off) Adds the date to the print.
[] File No. (On/Off) Adds the file number to the print.
Clears all print settings after the images
Clear DPOF data (On*/Off) _rint.

157
"0
• The Date and File No. settings change ac_rding io ihe Prini "_
Type as follows.
- [Index]
[Date] and [File No.] cannot be set to [On] at the same time.
- [Standard] or [Both]
[Date] and [File No.] can be set to [On] at the same time,
however, the printable information may vary between
printers.
• Images dated using [] (Date Stamp) (p. 20) are always
printed with the date, regardless of the [Date] setting. As a
result, some printers may print the date twice on these
images if [Date] is also set to [On].
• Dates are printed in the style specified in [Date/Time] in the
[] menu (p. 12).
1581
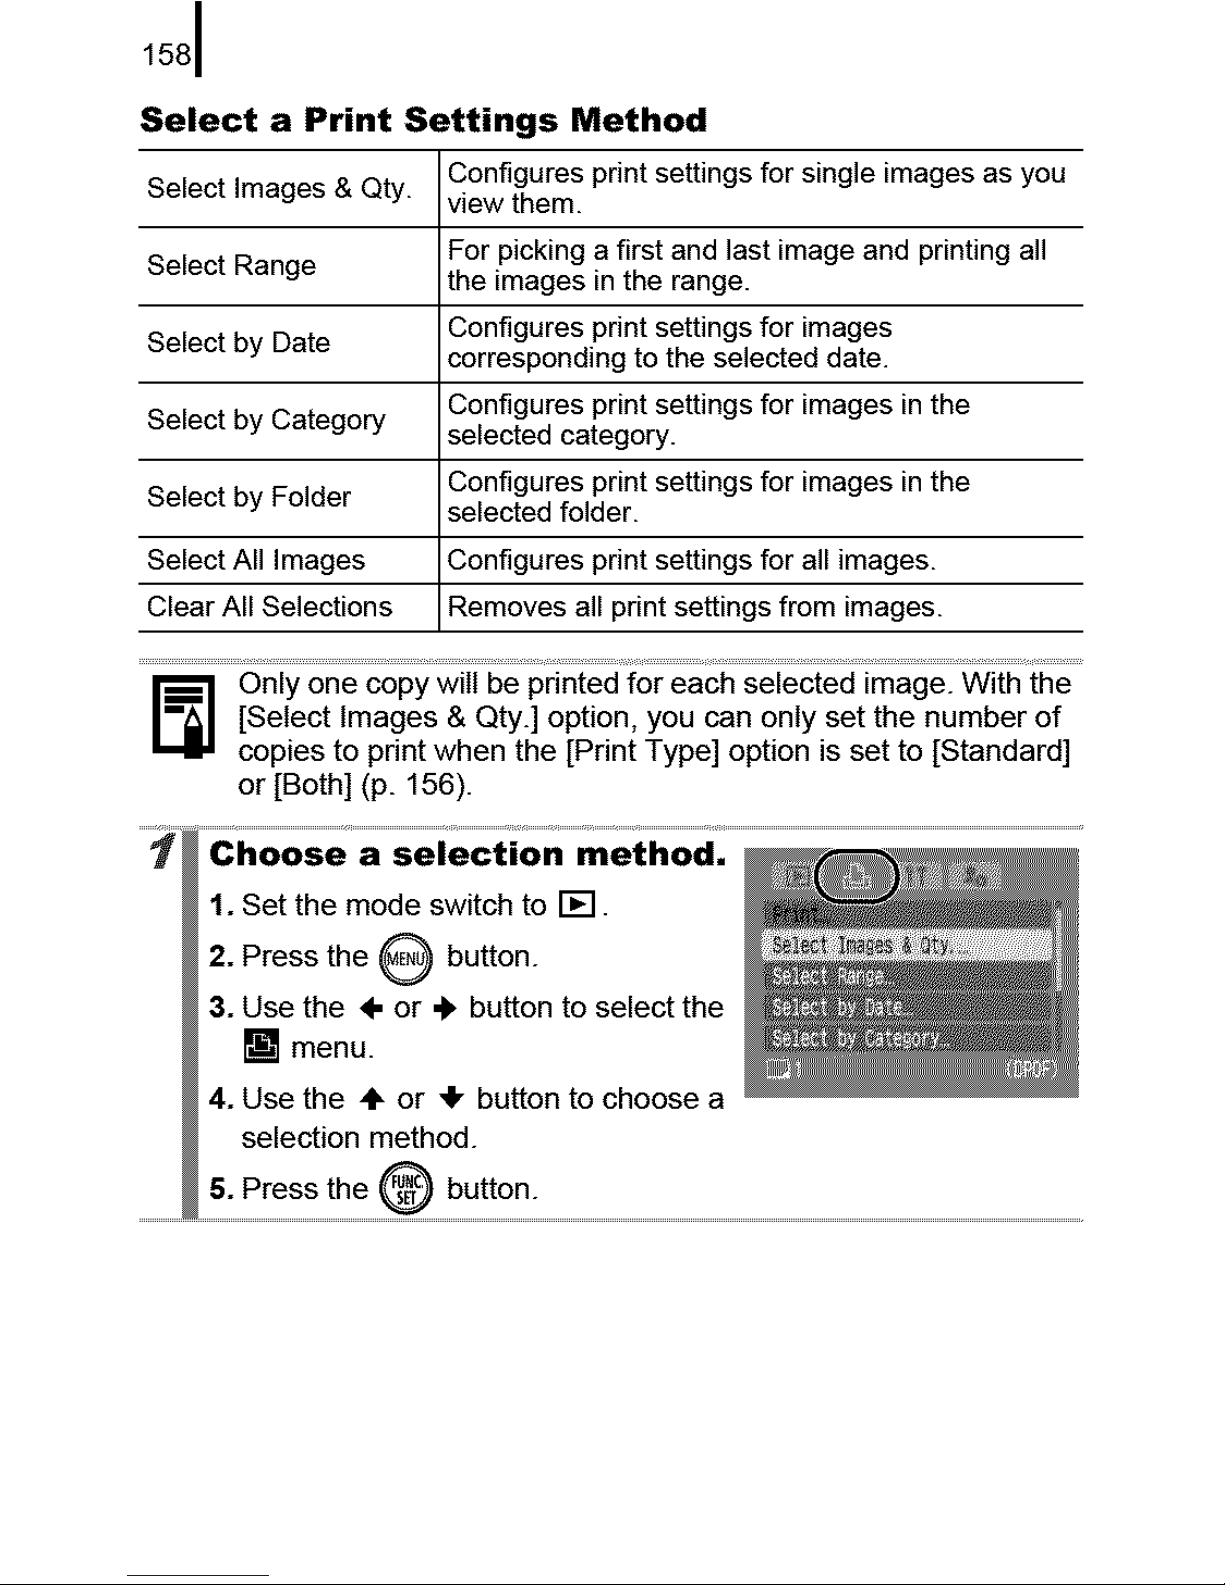
Select a Print Settings Method
Configures print settings for single images as you
Select Images & Qty. view them.
For picking a first and last image and printing all
Select Range the images in the range.
Configures print settings for images
Select by Date corresponding to the selected date.
Configures print settings for images in the
Select by Category selected category.
Configures print settings for images in the
Select by Folder selected folder.
Select All Images Configures print settings for all images.
Clear All Selections Removes all print settings from images.
_] nly one copy will be printed for each selected image. With the
[Select Images & Qty.] option, you can only set the number of
copies to print when the [Print Type] option is set to [Standard]
or [Both] (p. 156).
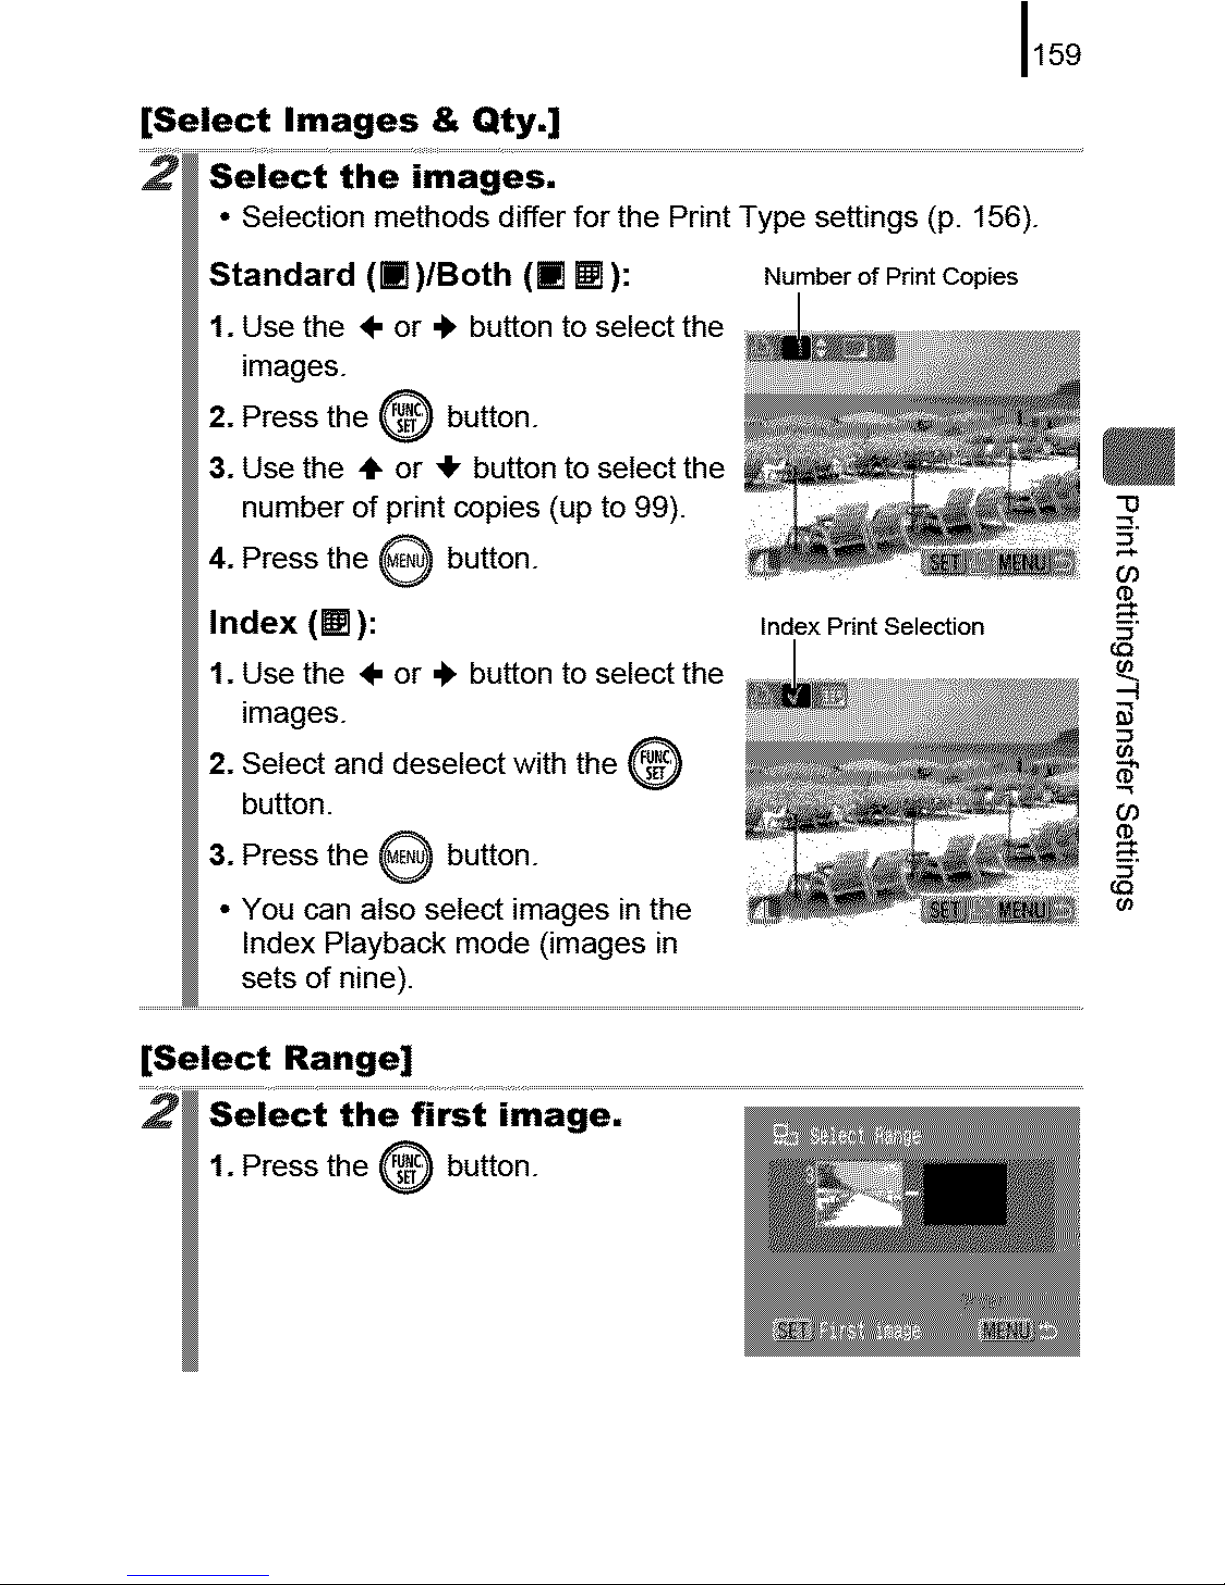
[Select Images & Qty.]
159
5"
2_R
69
[Select Range]
2
1. Press the 0 button.
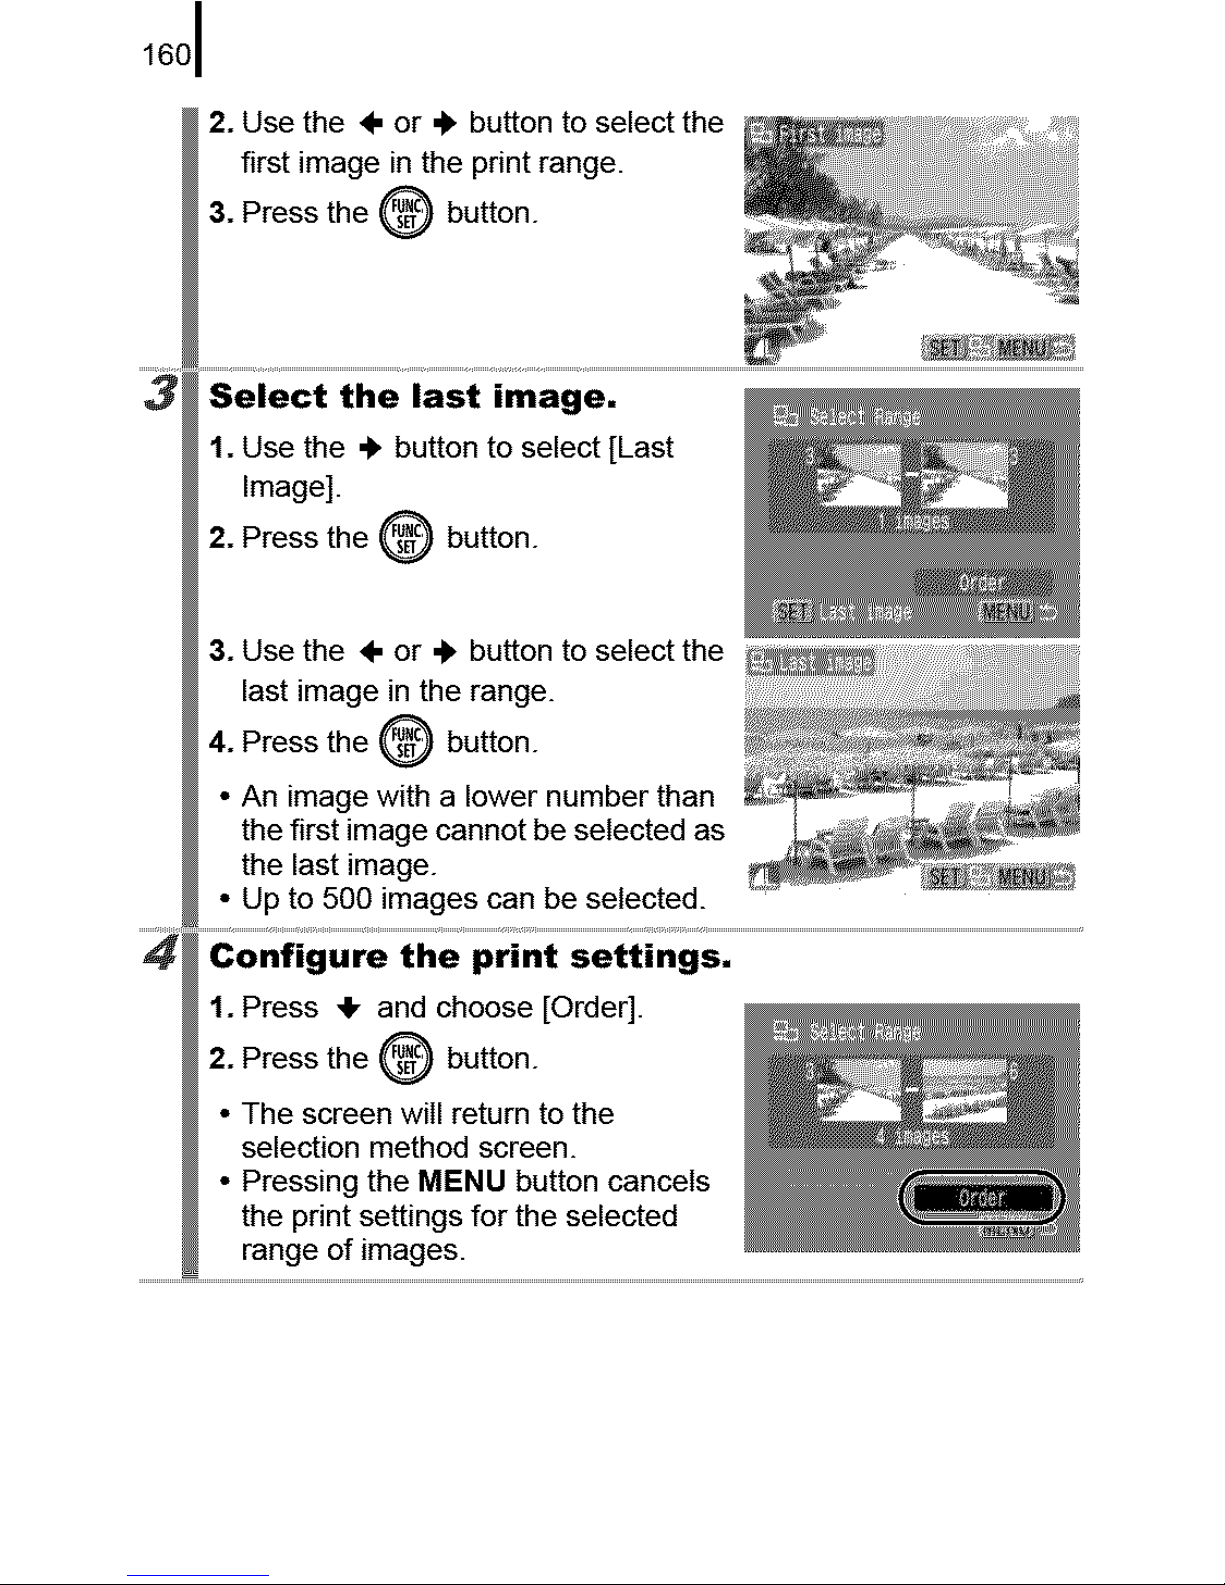
1601
2. Use the 4. or .). button to select the
first image in the print range.
3. Press the _ button.
A
j .......................................................................................................................................................................................................................
1. Use the ,_ button to select [Last
Image].
2. Press the _ button.
8. Use the ÷ or "I, button to select the
last image in the range.
4. Press the _ button.
A
• An image with a lower number than
the first image cannot be selected as
• the last image.
Up to 500 images can be selected.
€onfigUre the print setiings, ..................................................................................................................................................................
1. Press _1,and choose [Order].
2. Press the _ button.
• The screen wilI return to the
selection method screen.
• Pressing the MENU button cancels
the print settings for the selected
range of images.

161
[Select by Date]/[Select by Category]/[Select by
Folder]
2
[OK].
2. Press the _ button.
• The screen will return to the
selection method screen.
• Selecting [Cancel] cancels print
settings of the selected image.
1. Use the ÷ or ,l!, button to select a
date/category/folder to print.
2. Press the O button.
A ,/will appear on selected images.
• Pressing the FUNC./SET button
• again cancels the setting.
You can select multiple dates,
• categories or folders.
Use the ÷ or + button to confirm each date, category or folder o_
image.
3. Press the _ button. _"
Configure the print settings,
1. Use the ÷ or ,_ button to select _,
69
[Select All Images]
1. Use the ÷ or + button to select
[OK].
2. Press the _ button.
• The screen will return to the
selection method screen.
• Selecting [Cancel] cancels the
operation and returns to Step 1.
1621
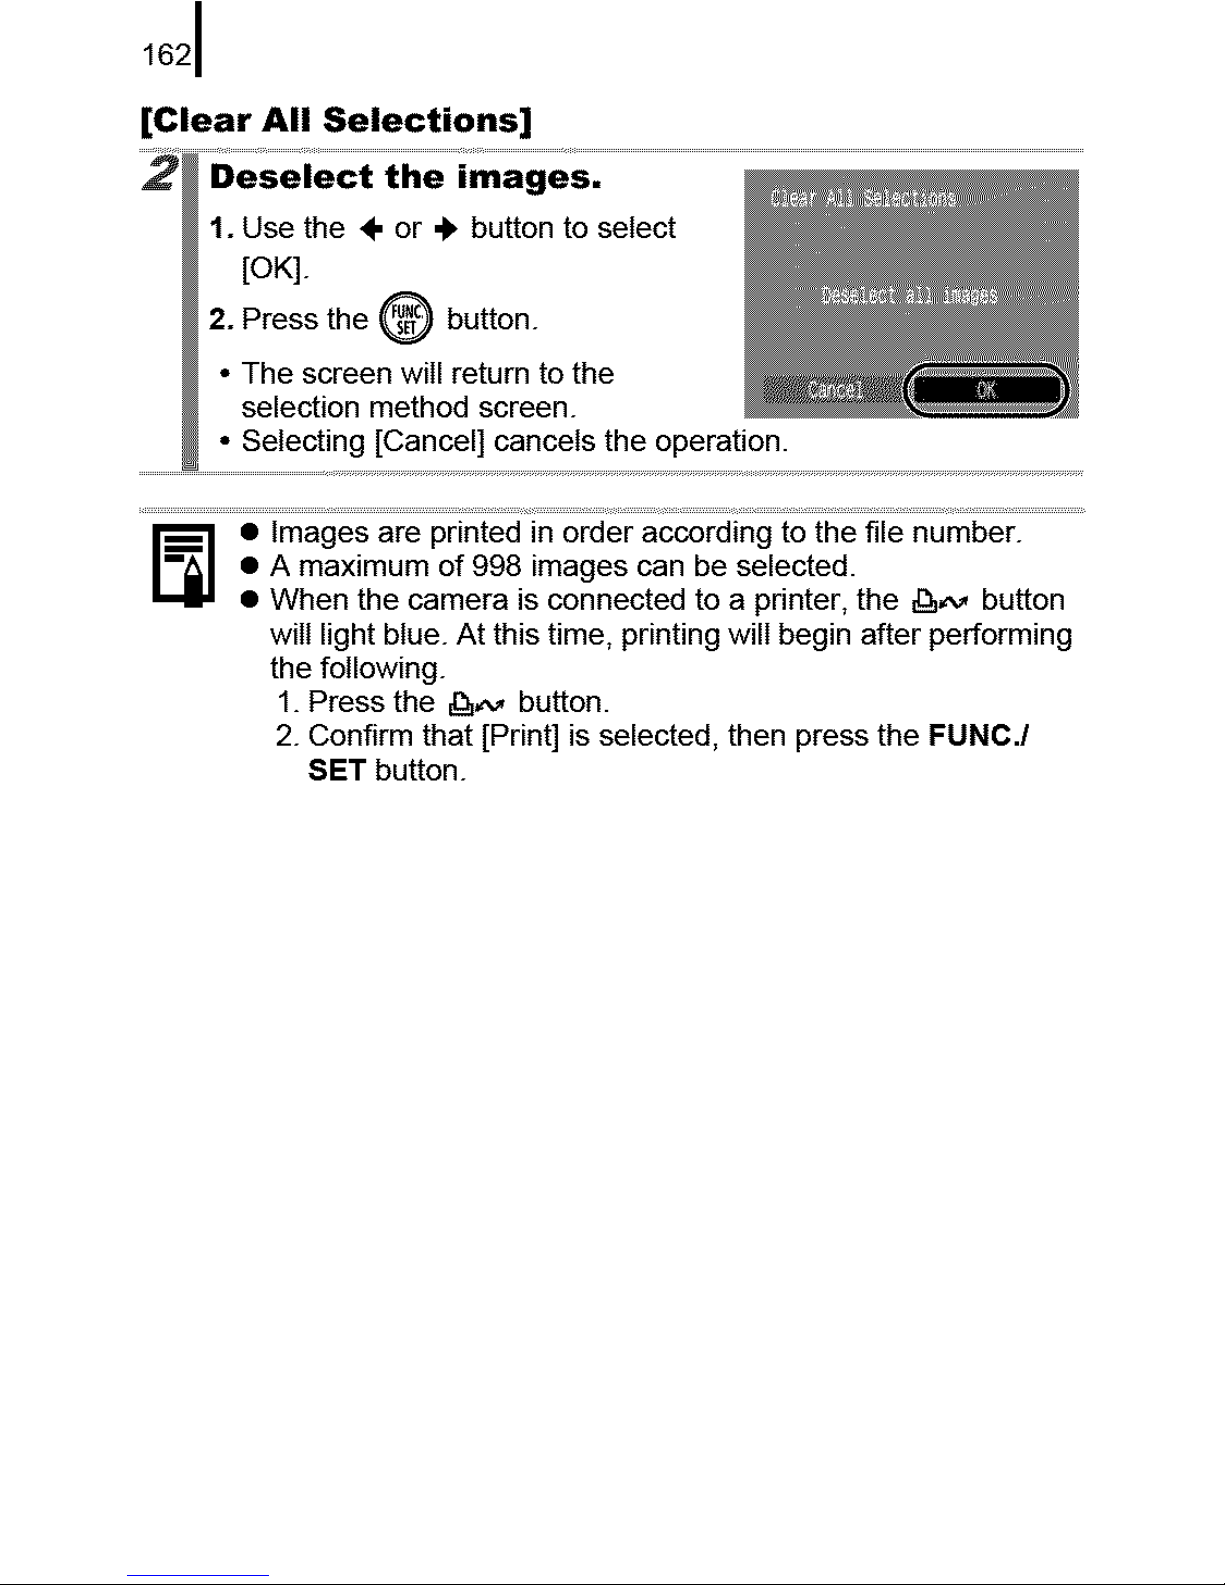
[Clear All Selections]
1. Use the ÷ or 4. button to select
[OK].
2. Press the @ button.
A
• The screen will return to the
selection method screen.
• Selecting [Cancel] cancels the operation.
_] • Images are printed in order according to the file number.
• A maximum of 998 images can be selected.
• When the camera is connected to a printer, the ,B,,_ button
will light blue. At this time, printing will begin after performing
the following.
1. Press the ,1_,,_,button.
2. Confirm that [Print] is selected, then press the FUNC./
SET button.
163
i Setting the DPOF Transfer
Settings
You can use the camera to specify settings for images before
downloading to a computer. Refer to the Software Starter Guide for
instructions on how to transfer images to your computer.
The settings used on the camera comply with the DPOF standards.
The _k icon may display for a memory card with transfer
settings set by a different DPOF-compUant camera. These
settings will be overwritten by those set by your camera.
69
4
69
1641
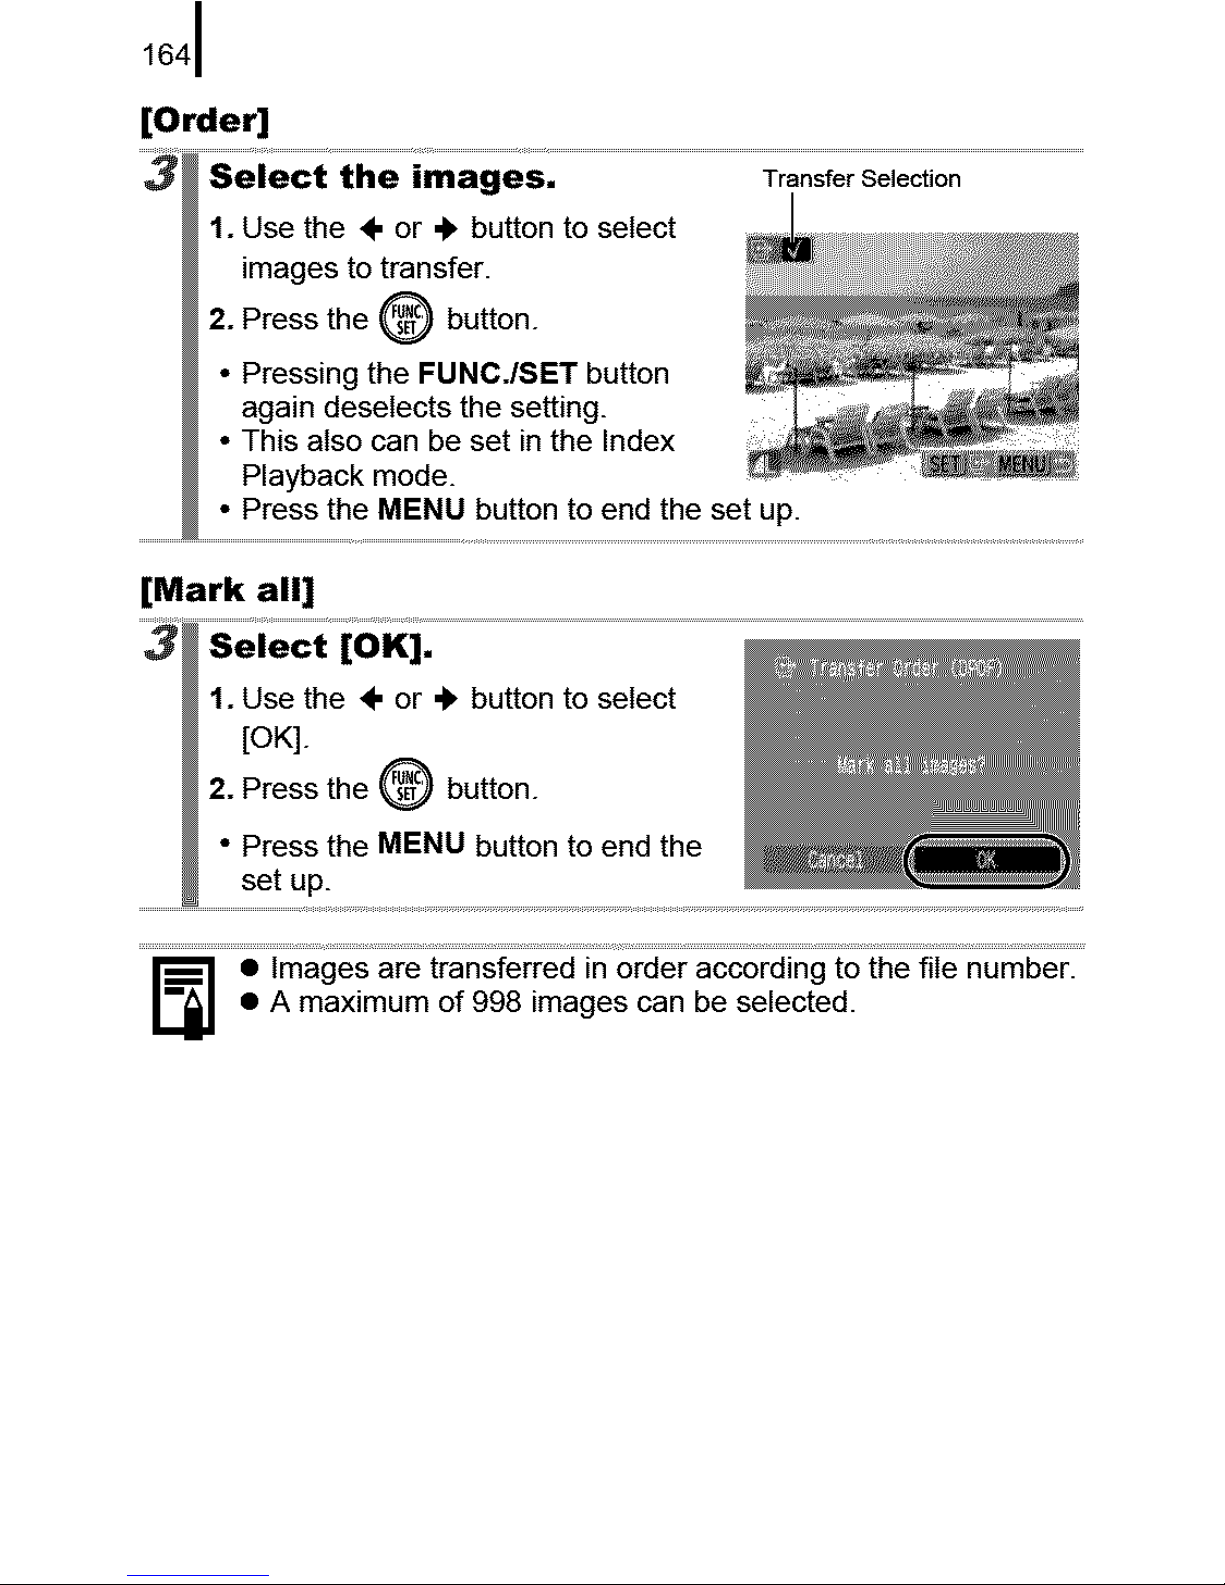
[Order]
[Mark all]
Select [OK],
1. Use the ÷ or ,_ button to select
[OK].
2. Press the _ button.
• Press the MENU button to end the
set up.
_] • Images are transferred in order according to the file number.
• A maximum of 998 images can be selected.
165
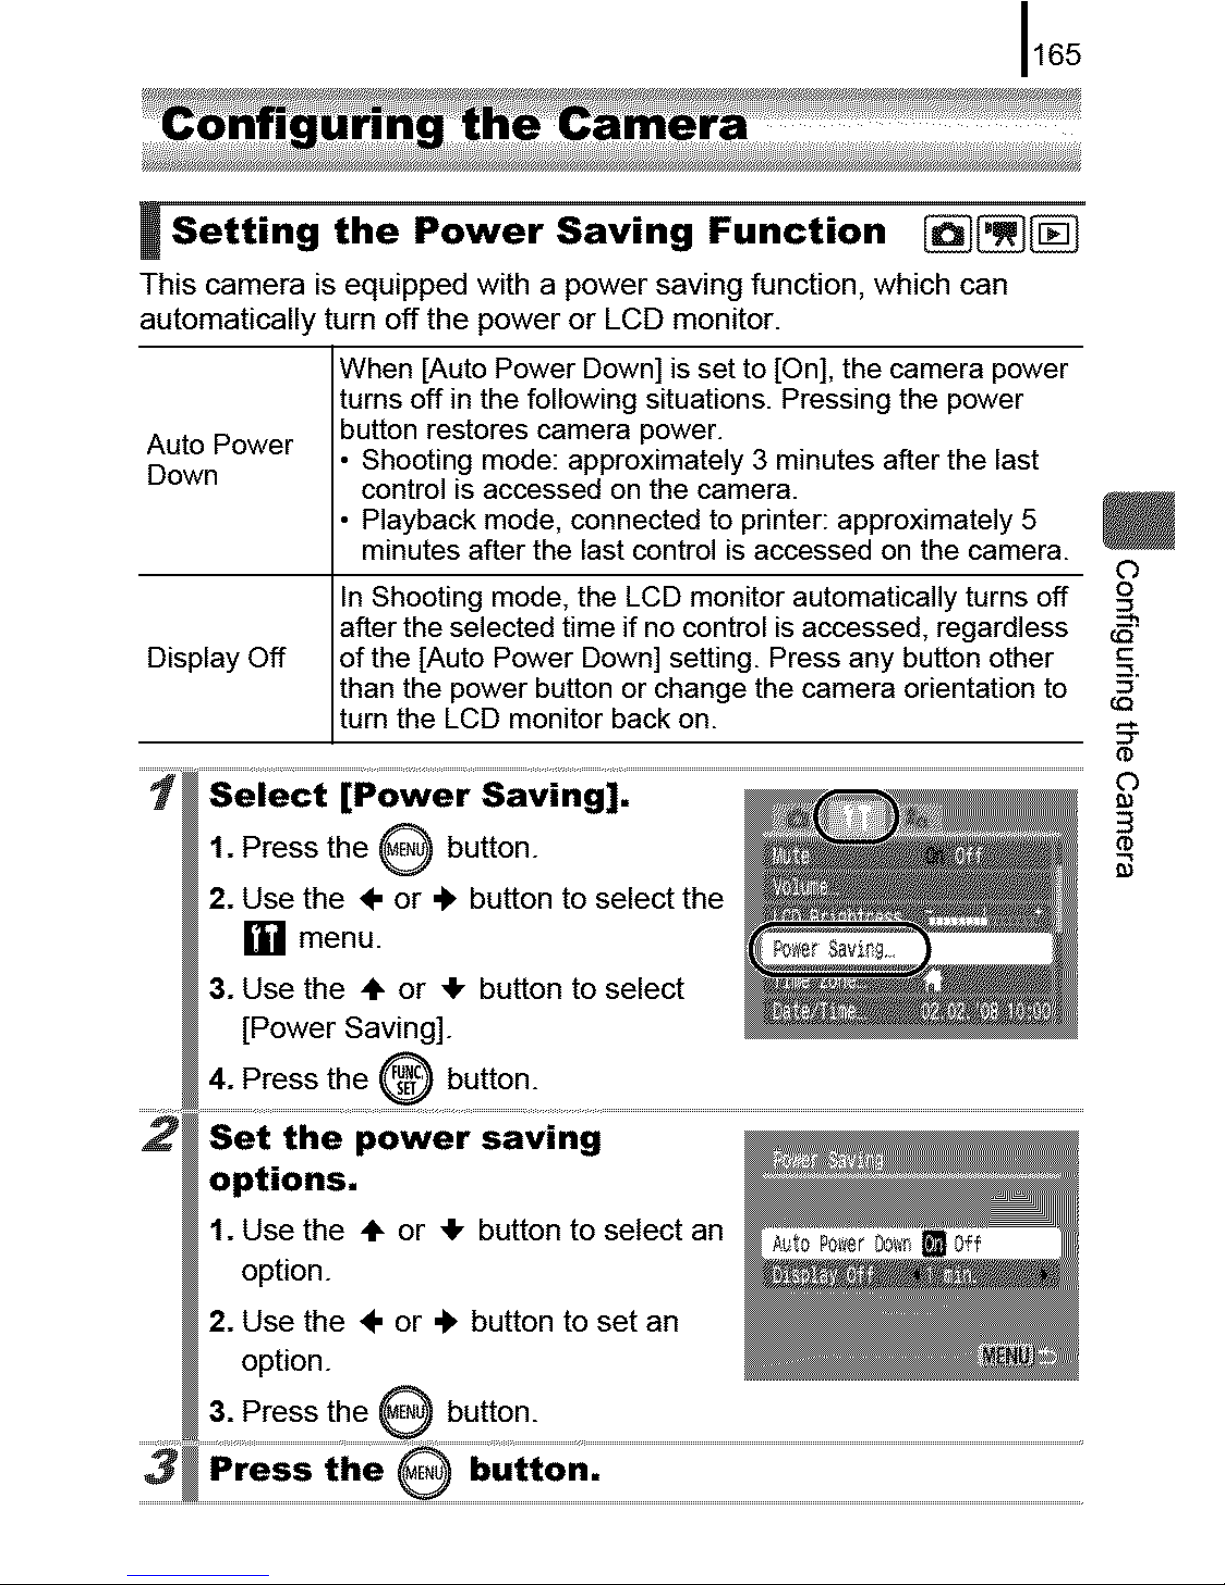
I Setting the Power Saving Function _
This camera is equipped with a power saving function, which can
automatically turn off the power or LCD monitor.
When [Auto Power Down] is set to [On], the camera power
turns off in the following situations. Pressing the power
button restores camera power.
Auto Power
Down • Shooting mode: approximately 3 minutes after the last
control is accessed on the camera.
• Playback mode, connected to printer: approximately 5
minutes after the last control is accessed on the camera.
In Shooting mode, the LCD monitor automatically turns off
after the selected time if no control is accessed, regardless
Display Off of the [Auto Power Down] setting. Press any button other
than the power button or change the camera orientation to
turn the LCD monitor back on.
o
c
2
1661
The power saving function activate during a slide sho w
will not
or while the camera is connected to a computer.
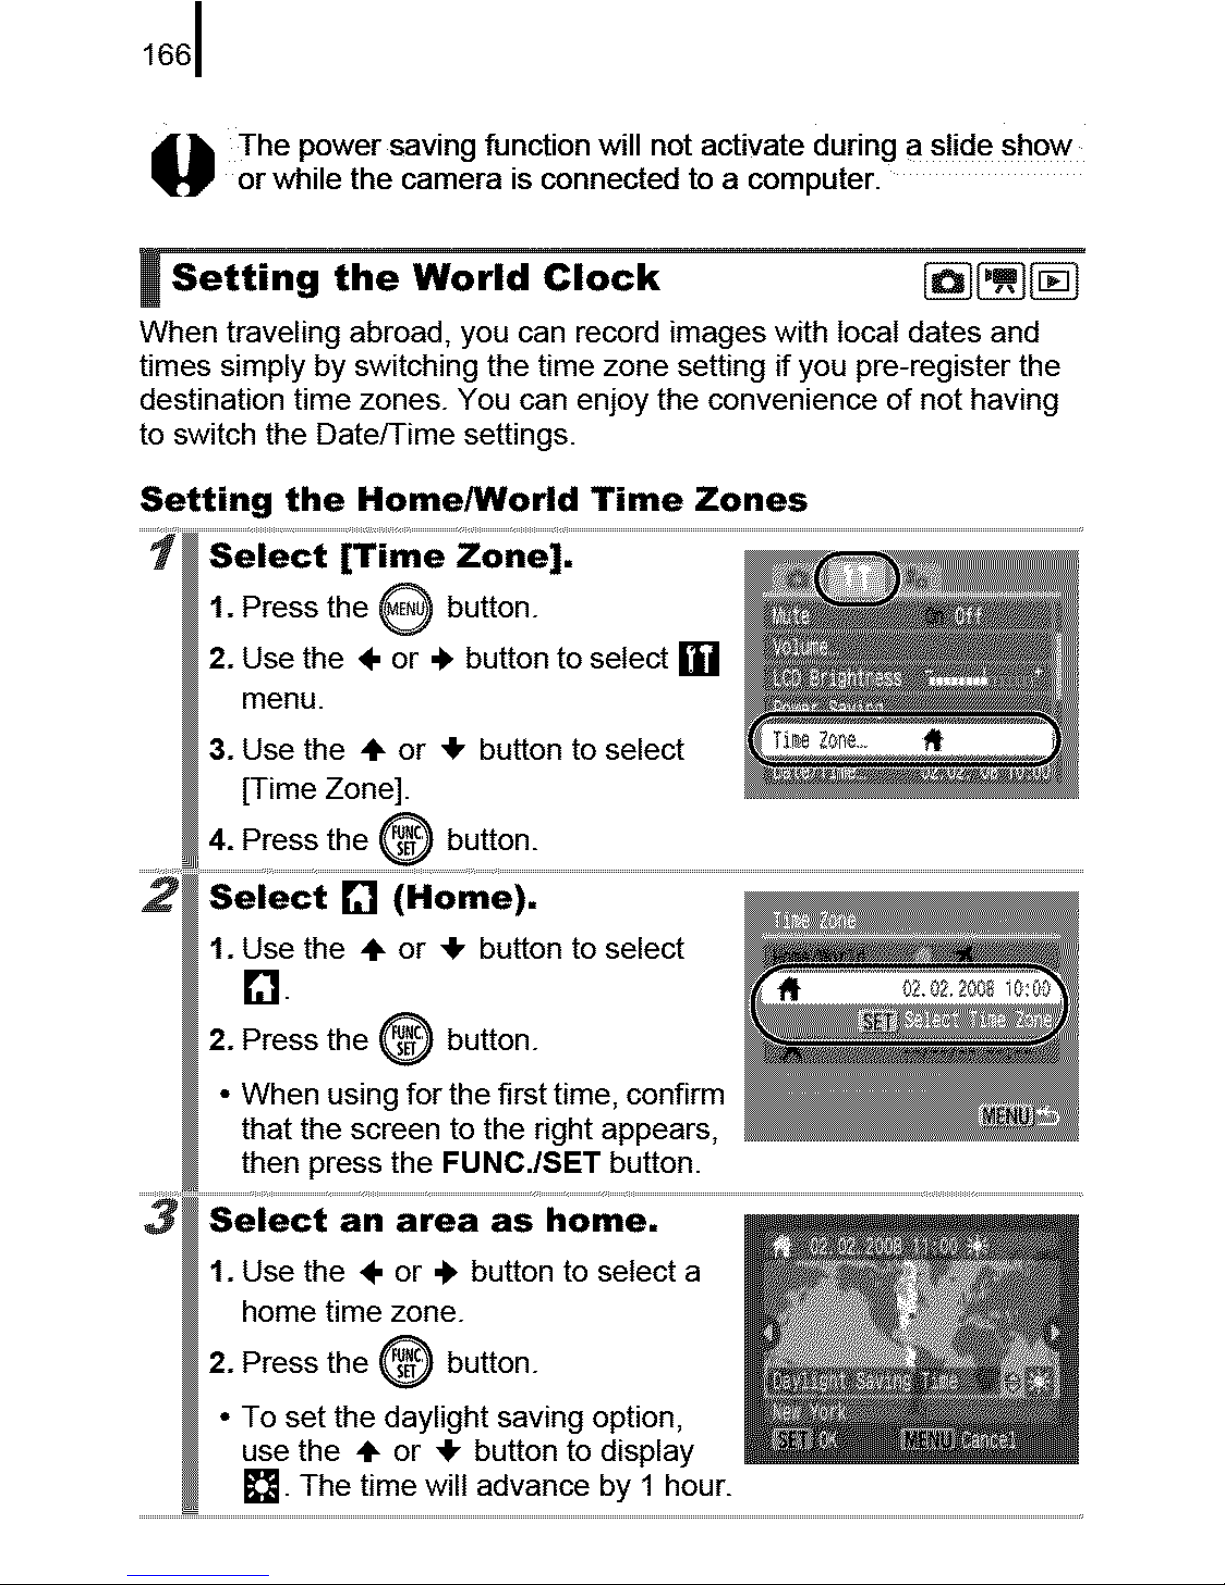
l Setting the World Clock
When traveling abroad, you can record images with local dates and
times simply by switching the time zone setting if you pre-register the
destination time zones. You can enjoy the convenience of not having
to switch the Date/Time settings.
Setting the Home/World Time Zones
....._ select [Time z0ne]. ..........................................................................................................................................................................................................................................
1. Press the _ button.
2. Use the 4. or .l, button to select []
menu.
3. Use the ÷ or 4" button to select _ _n_:
[Time Zone]. _
4. Press the _ button.
X
2 s;i;ci i";m;i: .................................................................................................
1. U,_sethe ÷ or 4, button to select
El
2. Press the 0 button.
When using for the first time, confirm
that the screen to the right appears, "....
then press the FMNC./SET button.
Select an area as home,
1. Use the ÷ or 4, button to select a
home time zone.
2. Press the O button.
• To set the daylight saving option,
use the ÷ or 4, button to display
_. The time will advance by 1 hour.

167
Switching to the Destination Time Zone
3
_1.Pressthe@button.
2. Use the 4- or 4. button to select []
.ume:t e.or.Ou ooto e,ect
[Time Zone].
...._4:_!ess!"e@ bu!t°n:
2iSe'ect_ (Wor,a):
I1. Use the ÷ or 4. button to select k"_.
_ 2. Press the @ button two times.
To change the destination time
o zone, use the FUNC./SET button.
When you switch to the destination _ '_
time zone, [] will display on the
mon!!o!
o
9.1
168[
_] f you change the date and time when the World option is
selected, the Home date and time will also change
automatically.
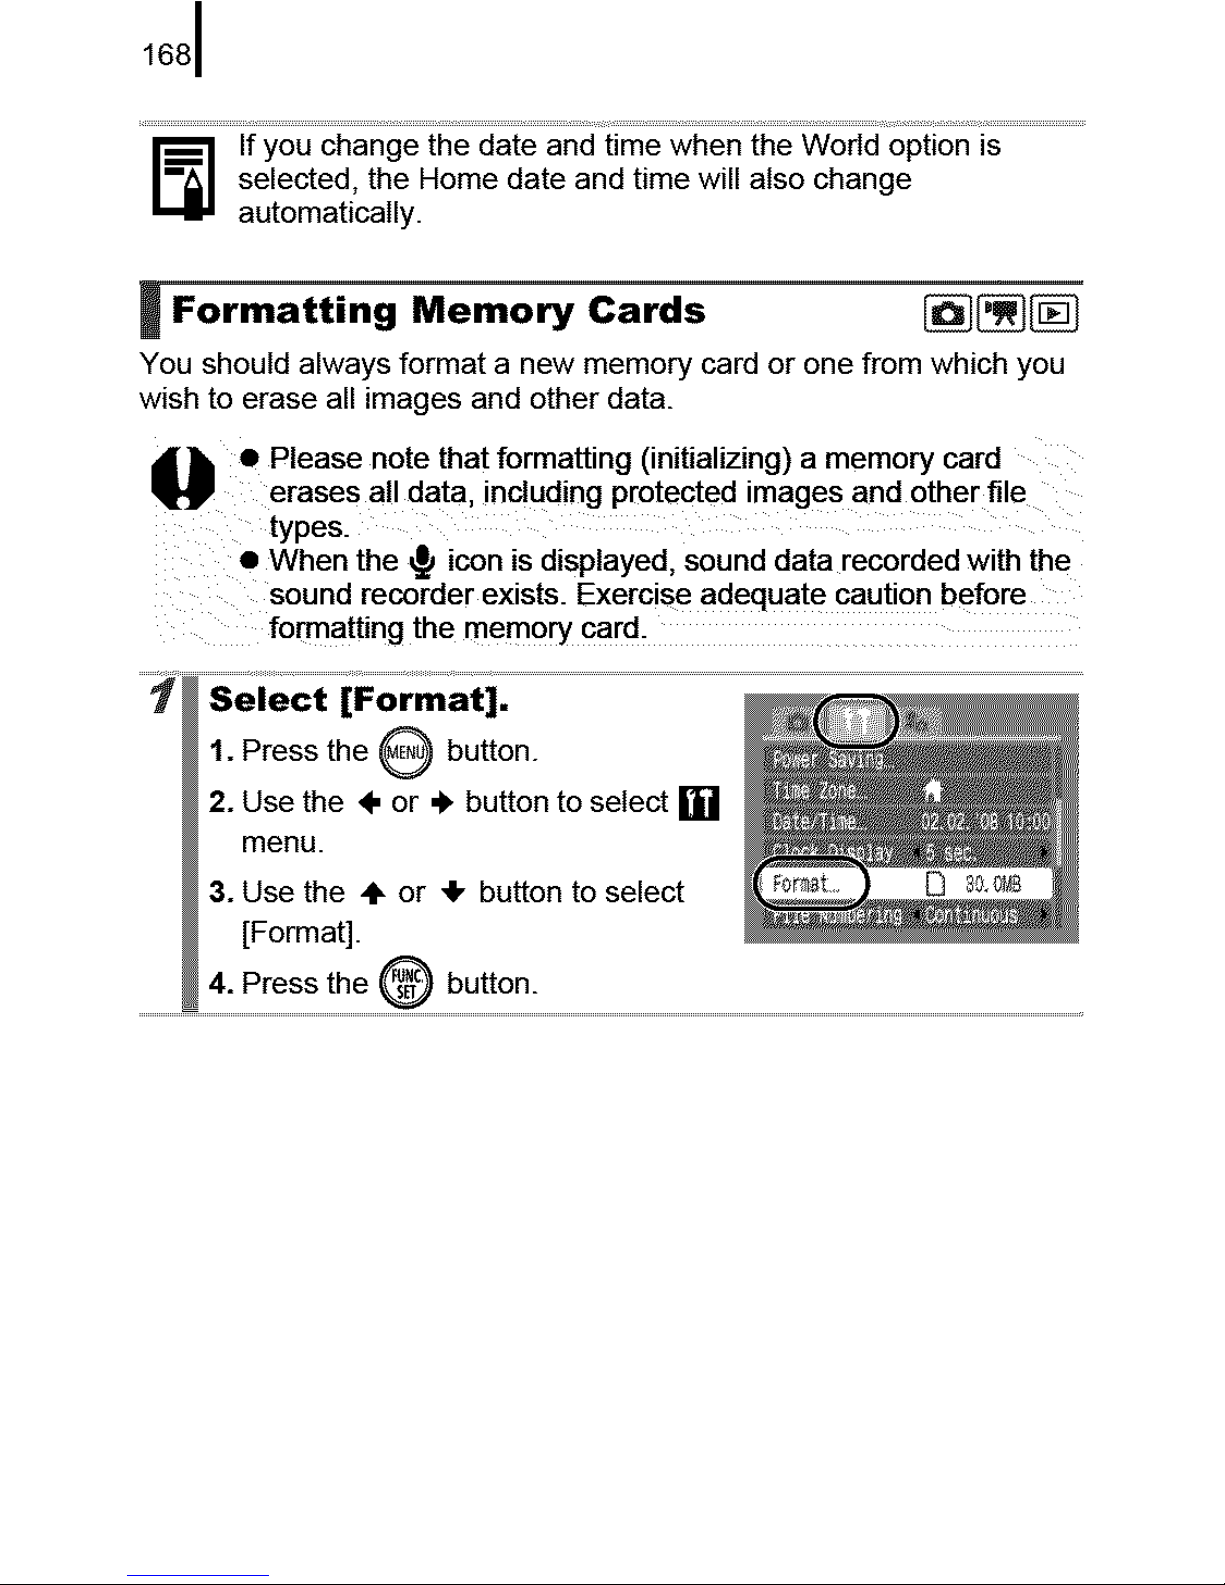
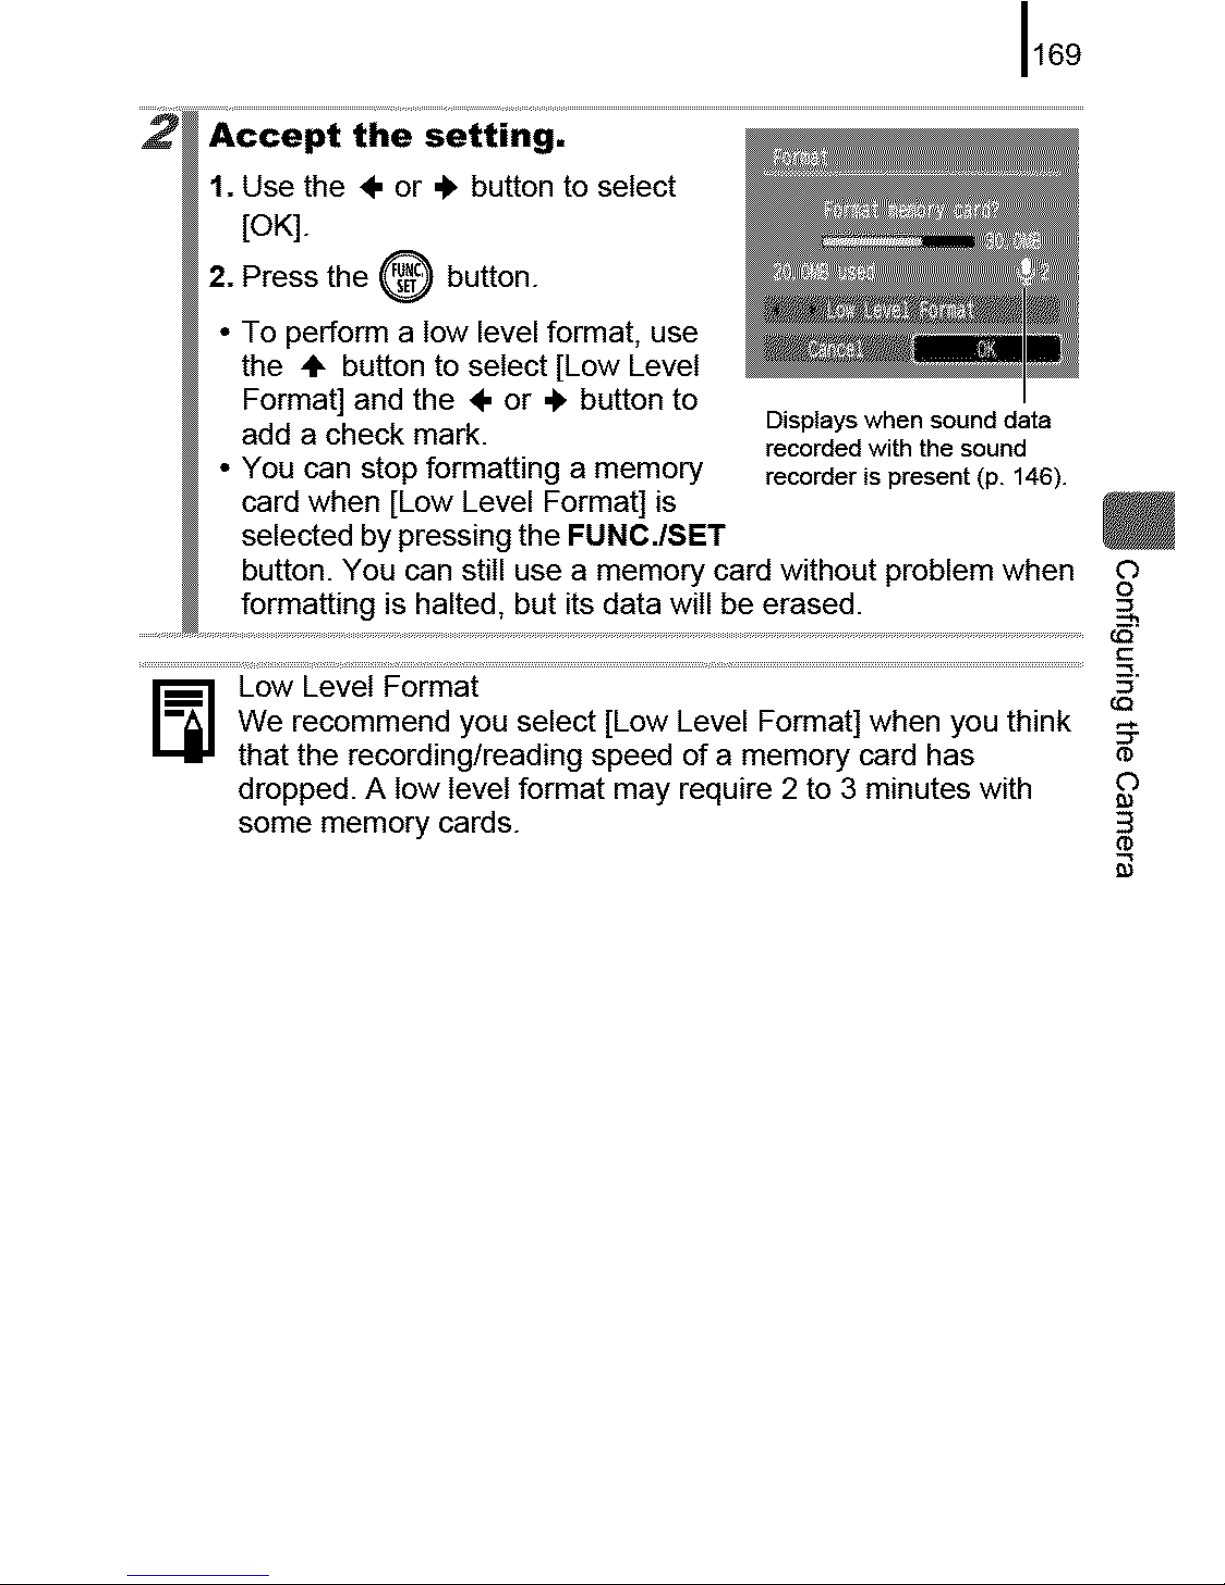
[ Formatting Memory Cards _
You should always format a new memory card or one from which you
wish to erase all images and other data.
i_ • Please note that formatting (initializing) a memory card
erases all data, including protected images and other file
types.
• When the _ icon is displayed, sound data recorded with the
sound recorder exists. Exercise adequat e caution before
fo_atting the memory card_
1. Press the _ button.
2. Use the 4. or 4" button to select []
menu.
3. Use the 4, or 41,button to select D 8_._3
[Format].
169
O
o
_] Low Level Format 5"
We recommend you select [Low Level Format] when you think __
that the recording/reading speed of a memory card has •
dropped. A low level format may require 2 to 3 minutes with O
some memory cards. 3
@

1701
i Resetting the File Number _
The images you shoot are automatically assigned file numbers. You
can select how the file number is assigned.
A number one higher than the last one recorded is assigned
to the next image. This is convenient for managing all your
images together on a computer because you avoid file
Continuous name duplication when changing folders or memory cards.*
* When a blank memory card is used. If a memory card with recorded
data is used, the 7-digit number for the last recorded folder and
image is compared with the last one on the memory card, and the
larger of the two is utilized as the basis for new images.
The image and folder number are reset to the starting value
(100-0001).* This is convenient for managing images on a
folder-by-folder basis.
Auto Reset * When a blank memory card is used. If a memory card with recorded
data is used, the number following the 7_ligit number for the last
recorded folder and image on the memory card is utilized as the
basis for new images.

171
File and Folder Numbers
Recorded images are assigned consecutive file numbers starting with
0001 and ranging up to 9999, while folders are assigned numbers
starting with 100 and ranging up to 999. Up to 2000 images can be
saved into a single folder.
New Folder Created
MemoryCard1
Continuous
MemoryCard1
Auto Reset
Memory Card Exchanged for
Another
MemoryCard1 MemoryCard2
MemoryCardI MemoryCard2
• Images may be saved to a new folder when there is insufficient free
space even if the total number of images in a folder is less than 2000
because the following types of images are always saved together into
the same folder.
- Images from continuous shooting
- Self-timer images (custom)
- Stitch Assist mode images
- Still images shot in Color Accent/Color Swap mode with the [Save
Original] category set to [On].
• Images cannot be played back when the folder numbers are
duplicated or image numbers are duplicated within folders.
• Please refer to the Software Starter Guide for information regarding
folder structures or image types.
?
c
o

1721
Creating an Image Destination (Folder)
You can create a new folder at any time and the recorded images will
be automatically saved to that folder.
Create New Creates a new folder the next time you shoot images. To
Folder create an additional folder, insert the check mark again.
You can also specify a date and time ifyou wish to create
Auto Create a new folder using a shooting time after the specified
date and t me.
Creating a Folder the Next Time You Shoot
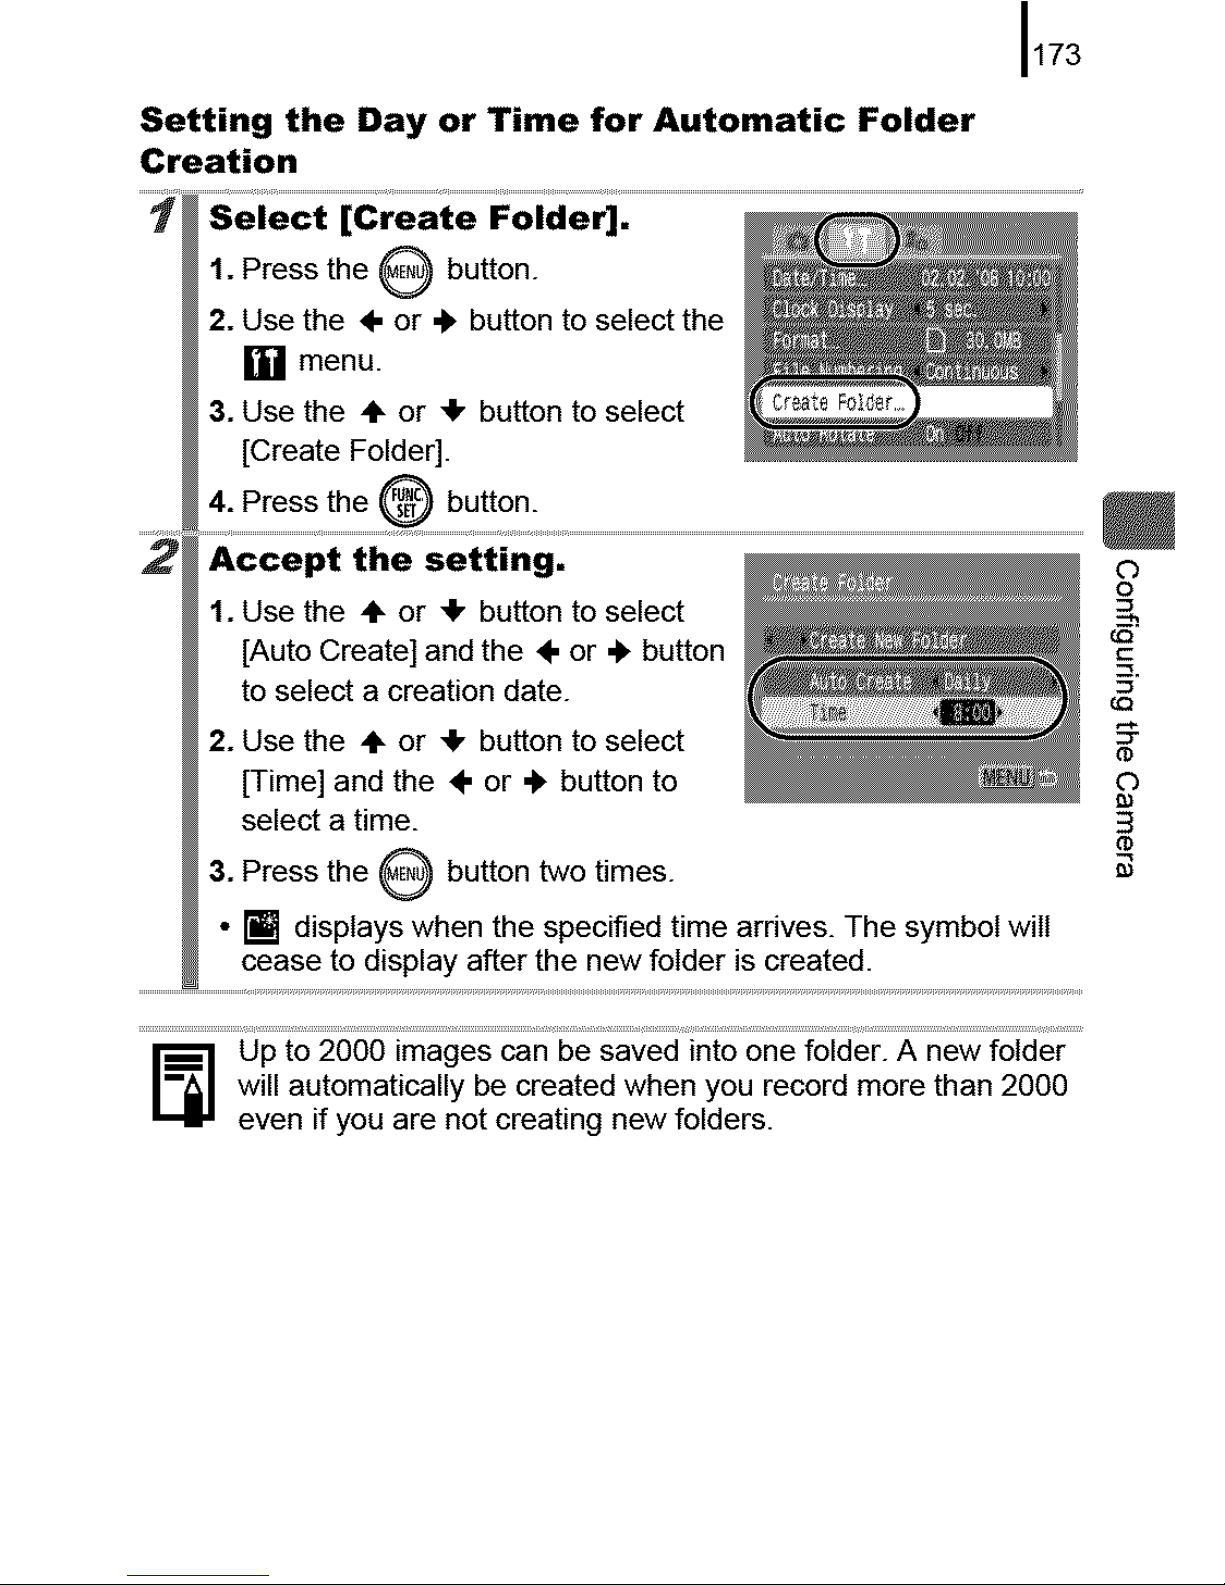
173
_] Up to 2000 images can be saved into one folder. A new folder
will automatically be created when you record more than 2000
even if you are not creating new folders.
1741
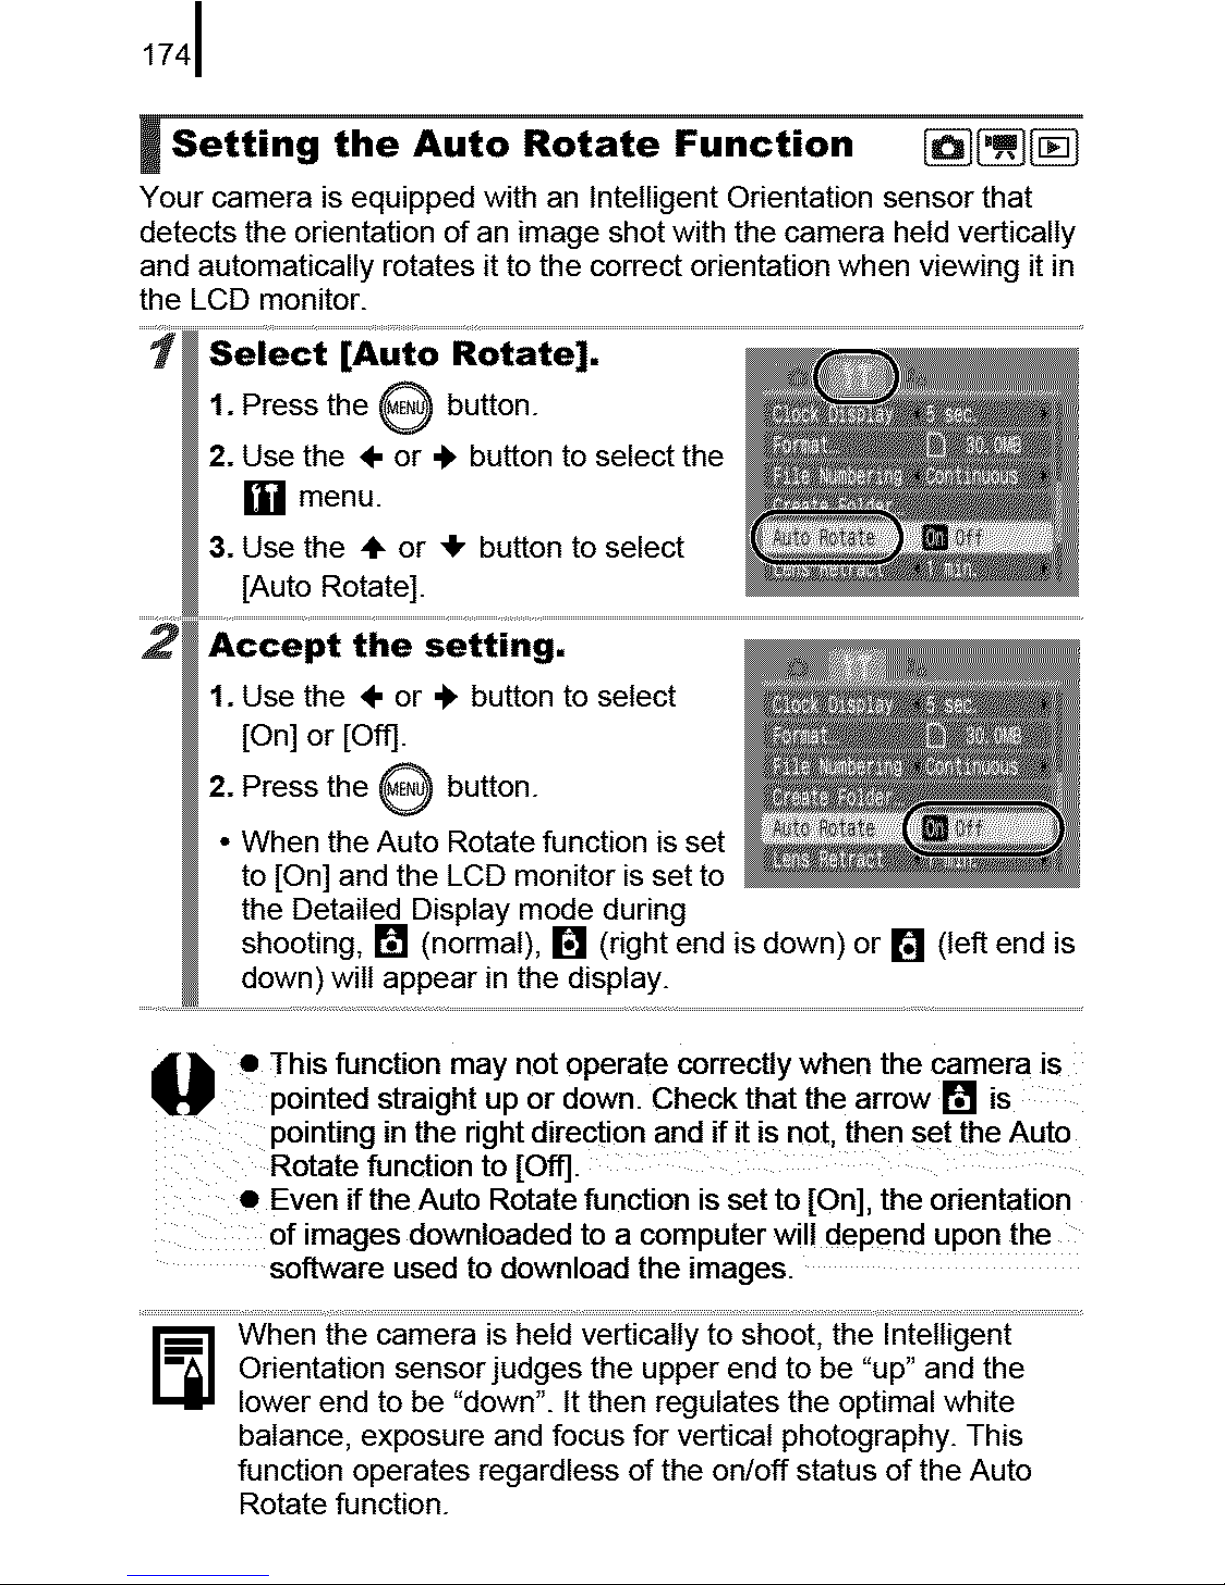
i Setting the Auto Rotate Function _
Your camera is equipped with an Intelligent Orientation sensor that
detects the orientation of an image shot with the camera held vertically
and automatically rotates it to the correct orientation when viewing it in
the LCD monitor.
• This function may not operate correctly when the camera is
pointed straight up or down. Check that the arrow [] is
pointing in the right direction and if it is not, then set the Auto
Rotate function to [Off].
• Even if the Auto Rotate function is set to [On], the orientation
of images downloaded to a computer wil! depend upon the
software used to download the images.
_] When the camera is held vertically to shoot, the Intelligent
Orientation sensor judges the upper end to be "up" and the
lower end to be "down". tt then regulates the optimal white
balance, exposure and focus for vertical photography. This
function operates regardless of the on/off status of the Auto
Rotate function.
 Loading...