

Page 1

TS5300 series
Online Manual
English
Page 2

Contents
Using Online Manual. . . . . . . . . . . . . . . . . . . . . . . . . . . . . . . . . . . . . . . . . . . . . . . 9
Symbols Used in This Document. . . . . . . . . . . . . . . . . . . . . . . . . . . . . . . . . . . . . . . . . . . . 10
Touch-enabled Device Users (Windows). . . . . . . . . . . . . . . . . . . . . . . . . . . . . . . . . . . . . . 11
Trademarks and Licenses. . . . . . . . . . . . . . . . . . . . . . . . . . . . . . . . . . . . . . . . . . . . . . . . . 12
Basic Operation. . . . . . . . . . . . . . . . . . . . . . . . . . . . . . . . . . . . . . . . . . . . . . . . . . 27
Printing Photos from a Computer. . . . . . . . . . . . . . . . . . . . . . . . . . . . . . . . . . . . . . . . . . . . 28
Printing Photos from a Smartphone/Tablet. . . . . . . . . . . . . . . . . . . . . . . . . . . . . . . . . . . . . 33
Copying. . . . . . . . . . . . . . . . . . . . . . . . . . . . . . . . . . . . . . . . . . . . . . . . . . . . . . . . . . . . . . . . 36
Network. . . . . . . . . . . . . . . . . . . . . . . . . . . . . . . . . . . . . . . . . . . . . . . . . . . . . . . . 40
Restrictions. . . . . . . . . . . . . . . . . . . . . . . . . . . . . . . . . . . . . . . . . . . . . . . . . . . . . . . . . . . . . 42
Network Connection Tips. . . . . . . . . . . . . . . . . . . . . . . . . . . . . . . . . . . . . . . . . . . . . . . . . . 44
Default Network Settings. . . . . . . . . . . . . . . . . . . . . . . . . . . . . . . . . . . . . . . . . . . . . . . . . . . . . . . . . . . . . 45
Detect Same Printer Name. . . . . . . . . . . . . . . . . . . . . . . . . . . . . . . . . . . . . . . . . . . . . . . . . . . . . . . . . . . 47
Connects to Another Computer via LAN/Changes from USB to LAN Connection. . . . . . . . . . . . . . . . . . 48
Printing Network Settings. . . . . . . . . . . . . . . . . . . . . . . . . . . . . . . . . . . . . . . . . . . . . . . . . . . . . . . . . . . . . 49
Reconfiguration Method of Wi-Fi Connection. . . . . . . . . . . . . . . . . . . . . . . . . . . . . . . . . . . . . . . . . . . . . 54
IJ Network Device Setup Utility (macOS). . . . . . . . . . . . . . . . . . . . . . . . . . . . . . . . . . . . . . 55
IJ Network Device Setup Utility. . . . . . . . . . . . . . . . . . . . . . . . . . . . . . . . . . . . . . . . . . . . . . . . . . . . . . . . 56
Starting Up IJ Network Device Setup Utility. . . . . . . . . . . . . . . . . . . . . . . . . . . . . . . . . . . . . . . . . . . . . . . 57
Diagnosing and Repairing Network Settings. . . . . . . . . . . . . . . . . . . . . . . . . . . . . . . . . . . . . . . . . . . . . . 58
List of Models Which Does Not Support Diagnosis and Repair Function. . . . . . . . . . . . . . . . . . . . . . . . 59
Handling Paper, Originals, FINE Cartridges, etc.. . . . . . . . . . . . . . . . . . . . . . . . 60
Loading Paper. . . . . . . . . . . . . . . . . . . . . . . . . . . . . . . . . . . . . . . . . . . . . . . . . . . . . . . . . . 61
Paper Sources. . . . . . . . . . . . . . . . . . . . . . . . . . . . . . . . . . . . . . . . . . . . . . . . . . . . . . . . . . . . . . . . . . . . . 62
Loading Paper in the Rear Tray. . . . . . . . . . . . . . . . . . . . . . . . . . . . . . . . . . . . . . . . . . . . . . . . . . . . . . . . 63
Loading Paper in the Cassette. . . . . . . . . . . . . . . . . . . . . . . . . . . . . . . . . . . . . . . . . . . . . . . . . . . . . . . . . 68
Loading Envelopes in Rear Tray. . . . . . . . . . . . . . . . . . . . . . . . . . . . . . . . . . . . . . . . . . . . . . . . . . . . . . . 73
Loading Originals. . . . . . . . . . . . . . . . . . . . . . . . . . . . . . . . . . . . . . . . . . . . . . . . . . . . . . . . 77
Loading Originals on Platen. . . . . . . . . . . . . . . . . . . . . . . . . . . . . . . . . . . . . . . . . . . . . . . . . . . . . . . . . . . 78
Supported Originals. . . . . . . . . . . . . . . . . . . . . . . . . . . . . . . . . . . . . . . . . . . . . . . . . . . . . . . . . . . . . . . . . 80
How to Detach / Attach the Document Cover. . . . . . . . . . . . . . . . . . . . . . . . . . . . . . . . . . . . . . . . . . . . . 81
Page 3

Replacing a FINE Cartridge. . . . . . . . . . . . . . . . . . . . . . . . . . . . . . . . . . . . . . . . . . . . . . . . 83
Replacing a FINE Cartridge. . . . . . . . . . . . . . . . . . . . . . . . . . . . . . . . . . . . . . . . . . . . . . . . . . . . . . . . . . . 84
Checking Ink Status on the LCD. . . . . . . . . . . . . . . . . . . . . . . . . . . . . . . . . . . . . . . . . . . . . . . . . . . . . . . 89
Ink Tips. . . . . . . . . . . . . . . . . . . . . . . . . . . . . . . . . . . . . . . . . . . . . . . . . . . . . . . . . . . . . . . . . . . . . . . . . . 90
If Printing Is Faint or Uneven. . . . . . . . . . . . . . . . . . . . . . . . . . . . . . . . . . . . . . . . . . . . . . . 91
Maintenance Procedure. . . . . . . . . . . . . . . . . . . . . . . . . . . . . . . . . . . . . . . . . . . . . . . . . . . . . . . . . . . . . . 92
Printing the Nozzle Check Pattern. . . . . . . . . . . . . . . . . . . . . . . . . . . . . . . . . . . . . . . . . . . . . . . . . . . . . . 95
Examining the Nozzle Check Pattern. . . . . . . . . . . . . . . . . . . . . . . . . . . . . . . . . . . . . . . . . . . . . . . . . . . 96
Cleaning the Print Head. . . . . . . . . . . . . . . . . . . . . . . . . . . . . . . . . . . . . . . . . . . . . . . . . . . . . . . . . . . . . . 98
Deep Print Head Cleaning. . . . . . . . . . . . . . . . . . . . . . . . . . . . . . . . . . . . . . . . . . . . . . . . . . . . . . . . . . . 100
Aligning the Print Head. . . . . . . . . . . . . . . . . . . . . . . . . . . . . . . . . . . . . . . . . . . . . . . . . . . . . . . . . . . . . 102
Aligning the Print Head Manually. . . . . . . . . . . . . . . . . . . . . . . . . . . . . . . . . . . . . . . . . . . . . . . . . . . . . . 104
Performing Maintenance Functions from Your Computer (macOS). . . . . . . . . . . . . . . . . 108
Opening Remote UI for Maintenance. . . . . . . . . . . . . . . . . . . . . . . . . . . . . . . . . . . . . . . . . . . . . . . . . . 109
Cleaning the Print Heads. . . . . . . . . . . . . . . . . . . . . . . . . . . . . . . . . . . . . . . . . . . . . . . . . . . . . . . . . . . . 110
Adjusting Print Head Position. . . . . . . . . . . . . . . . . . . . . . . . . . . . . . . . . . . . . . . . . . . . . . . . . . . . . . . . 112
Checking Ink Status from Your Computer. . . . . . . . . . . . . . . . . . . . . . . . . . . . . . . . . . . . . . . . . . . . . . . 113
Cleaning. . . . . . . . . . . . . . . . . . . . . . . . . . . . . . . . . . . . . . . . . . . . . . . . . . . . . . . . . . . . . . 114
Cleaning Paper Feed Rollers. . . . . . . . . . . . . . . . . . . . . . . . . . . . . . . . . . . . . . . . . . . . . . . . . . . . . . . . . 115
Cleaning Inside the Printer (Bottom Plate Cleaning). . . . . . . . . . . . . . . . . . . . . . . . . . . . . . . . . . . . . . . 117
Overview. . . . . . . . . . . . . . . . . . . . . . . . . . . . . . . . . . . . . . . . . . . . . . . . . . . . . . 120
Safety. . . . . . . . . . . . . . . . . . . . . . . . . . . . . . . . . . . . . . . . . . . . . . . . . . . . . . . . . . . . . . . . 121
Safety Precautions. . . . . . . . . . . . . . . . . . . . . . . . . . . . . . . . . . . . . . . . . . . . . . . . . . . . . . . . . . . . . . . . . 122
Regulatory Information. . . . . . . . . . . . . . . . . . . . . . . . . . . . . . . . . . . . . . . . . . . . . . . . . . . . . . . . . . . . . . 125
WEEE (EU&EEA). . . . . . . . . . . . . . . . . . . . . . . . . . . . . . . . . . . . . . . . . . . . . . . . . . . . . . . . . . . . . . . . . 127
Handling Precautions. . . . . . . . . . . . . . . . . . . . . . . . . . . . . . . . . . . . . . . . . . . . . . . . . . . . 138
Legal Restrictions on Scanning/Copying. . . . . . . . . . . . . . . . . . . . . . . . . . . . . . . . . . . . . . . . . . . . . . . . 139
Printer Handling Precautions. . . . . . . . . . . . . . . . . . . . . . . . . . . . . . . . . . . . . . . . . . . . . . . . . . . . . . . . . 140
Transporting Your Printer. . . . . . . . . . . . . . . . . . . . . . . . . . . . . . . . . . . . . . . . . . . . . . . . . . . . . . . . . . . . 141
When Repairing, Lending, or Disposing of the Printer. . . . . . . . . . . . . . . . . . . . . . . . . . . . . . . . . . . . . . 143
Keeping Print Quality High. . . . . . . . . . . . . . . . . . . . . . . . . . . . . . . . . . . . . . . . . . . . . . . . . . . . . . . . . . . 144
Main Components and Their Use. . . . . . . . . . . . . . . . . . . . . . . . . . . . . . . . . . . . . . . . . . . 145
Main Components. . . . . . . . . . . . . . . . . . . . . . . . . . . . . . . . . . . . . . . . . . . . . . . . . . . . . . . . . . . . . . . . . 146
Page 4

Front View. . . . . . . . . . . . . . . . . . . . . . . . . . . . . . . . . . . . . . . . . . . . . . . . . . . . . . . . . . . . . . . . . . . 147
Rear View. . . . . . . . . . . . . . . . . . . . . . . . . . . . . . . . . . . . . . . . . . . . . . . . . . . . . . . . . . . . . . . . . . . 149
Inside View. . . . . . . . . . . . . . . . . . . . . . . . . . . . . . . . . . . . . . . . . . . . . . . . . . . . . . . . . . . . . . . . . . 150
Operation Panel. . . . . . . . . . . . . . . . . . . . . . . . . . . . . . . . . . . . . . . . . . . . . . . . . . . . . . . . . . . . . . . 151
Power Supply. . . . . . . . . . . . . . . . . . . . . . . . . . . . . . . . . . . . . . . . . . . . . . . . . . . . . . . . . . . . . . . . . . . . . 152
Checking that Power Is On. . . . . . . . . . . . . . . . . . . . . . . . . . . . . . . . . . . . . . . . . . . . . . . . . . . . . . 153
Turning the Printer On and Off. . . . . . . . . . . . . . . . . . . . . . . . . . . . . . . . . . . . . . . . . . . . . . . . . . . 154
Checking the Power Plug/Power Cord. . . . . . . . . . . . . . . . . . . . . . . . . . . . . . . . . . . . . . . . . . . . . 156
Unplugging the Printer. . . . . . . . . . . . . . . . . . . . . . . . . . . . . . . . . . . . . . . . . . . . . . . . . . . . . . . . . . 157
LCD and Operation Panel. . . . . . . . . . . . . . . . . . . . . . . . . . . . . . . . . . . . . . . . . . . . . . . . . . . . . . . . . . . 158
Entering Numbers, Letters, and Symbols. . . . . . . . . . . . . . . . . . . . . . . . . . . . . . . . . . . . . . . . . . . . . . . 161
Changing Settings. . . . . . . . . . . . . . . . . . . . . . . . . . . . . . . . . . . . . . . . . . . . . . . . . . . . . . 163
Changing Printer Settings from Your Computer (macOS). . . . . . . . . . . . . . . . . . . . . . . . . . . . . . . . . . . 164
Managing the Printer Power. . . . . . . . . . . . . . . . . . . . . . . . . . . . . . . . . . . . . . . . . . . . . . . . . . . . . 165
Changing the Printer Operation Mode. . . . . . . . . . . . . . . . . . . . . . . . . . . . . . . . . . . . . . . . . . . . . . 166
Changing Settings from Operation Panel. . . . . . . . . . . . . . . . . . . . . . . . . . . . . . . . . . . . . . . . . . . . . . . 167
Changing Settings from Operation Panel. . . . . . . . . . . . . . . . . . . . . . . . . . . . . . . . . . . . . . . . . . . 168
Setting Items on Operation Panel. . . . . . . . . . . . . . . . . . . . . . . . . . . . . . . . . . . . . . . . . . . . . . . . . 170
Print settings. . . . . . . . . . . . . . . . . . . . . . . . . . . . . . . . . . . . . . . . . . . . . . . . . . . . . . . . . . . . . . . . . 171
LAN settings. . . . . . . . . . . . . . . . . . . . . . . . . . . . . . . . . . . . . . . . . . . . . . . . . . . . . . . . . . . . . . . . . 172
Other device settings. . . . . . . . . . . . . . . . . . . . . . . . . . . . . . . . . . . . . . . . . . . . . . . . . . . . . . . . . . . 177
Language selection. . . . . . . . . . . . . . . . . . . . . . . . . . . . . . . . . . . . . . . . . . . . . . . . . . . . . . . . . . . . 178
Firmware update. . . . . . . . . . . . . . . . . . . . . . . . . . . . . . . . . . . . . . . . . . . . . . . . . . . . . . . . . . . . . . 179
Reset setting. . . . . . . . . . . . . . . . . . . . . . . . . . . . . . . . . . . . . . . . . . . . . . . . . . . . . . . . . . . . . . . . . 180
Feed settings. . . . . . . . . . . . . . . . . . . . . . . . . . . . . . . . . . . . . . . . . . . . . . . . . . . . . . . . . . . . . . . . . 181
Web service setup. . . . . . . . . . . . . . . . . . . . . . . . . . . . . . . . . . . . . . . . . . . . . . . . . . . . . . . . . . . . . 182
ECO settings. . . . . . . . . . . . . . . . . . . . . . . . . . . . . . . . . . . . . . . . . . . . . . . . . . . . . . . . . . . . . . . . . 183
Quiet setting. . . . . . . . . . . . . . . . . . . . . . . . . . . . . . . . . . . . . . . . . . . . . . . . . . . . . . . . . . . . . . . . . . 185
System information. . . . . . . . . . . . . . . . . . . . . . . . . . . . . . . . . . . . . . . . . . . . . . . . . . . . . . . . . . . . 186
Specifications. . . . . . . . . . . . . . . . . . . . . . . . . . . . . . . . . . . . . . . . . . . . . . . . . . . . . . . . . . 187
Information about Paper. . . . . . . . . . . . . . . . . . . . . . . . . . . . . . . . . . . . . . . . . . 190
Supported Media Types. . . . . . . . . . . . . . . . . . . . . . . . . . . . . . . . . . . . . . . . . . . . . . . . . . 191
Paper Load Limit. . . . . . . . . . . . . . . . . . . . . . . . . . . . . . . . . . . . . . . . . . . . . . . . . . . . . . . . . . . . . . . . . . 194
Unsupported Media Types. . . . . . . . . . . . . . . . . . . . . . . . . . . . . . . . . . . . . . . . . . . . . . . . 196
Page 5

Handling Paper. . . . . . . . . . . . . . . . . . . . . . . . . . . . . . . . . . . . . . . . . . . . . . . . . . . . . . . . . 197
Printing. . . . . . . . . . . . . . . . . . . . . . . . . . . . . . . . . . . . . . . . . . . . . . . . . . . . . . . 198
Printing from Computer. . . . . . . . . . . . . . . . . . . . . . . . . . . . . . . . . . . . . . . . . . . . . . . . . . . 199
Printing from Application Software (macOS AirPrint). . . . . . . . . . . . . . . . . . . . . . . . . . . . . . . . . . . . . . . 200
Printing. . . . . . . . . . . . . . . . . . . . . . . . . . . . . . . . . . . . . . . . . . . . . . . . . . . . . . . . . . . . . . . . . . . . . . 201
Perform Borderless Printing. . . . . . . . . . . . . . . . . . . . . . . . . . . . . . . . . . . . . . . . . . . . . . . . . . . . . . 204
Printing on Postcards. . . . . . . . . . . . . . . . . . . . . . . . . . . . . . . . . . . . . . . . . . . . . . . . . . . . . . . . . . . 206
Adding Printer. . . . . . . . . . . . . . . . . . . . . . . . . . . . . . . . . . . . . . . . . . . . . . . . . . . . . . . . . . . . . . . . 208
How to Open Printer Settings Screen. . . . . . . . . . . . . . . . . . . . . . . . . . . . . . . . . . . . . . . . . . . . . . 209
Displaying the Printing Status Screen. . . . . . . . . . . . . . . . . . . . . . . . . . . . . . . . . . . . . . . . . . . . . . 210
Deleting the Undesired Print Job. . . . . . . . . . . . . . . . . . . . . . . . . . . . . . . . . . . . . . . . . . . . . . . . . . 211
Removing Printer That Is No Longer Required from List of Printers. . . . . . . . . . . . . . . . . . . . . . . 212
Printing Using Canon Application Software. . . . . . . . . . . . . . . . . . . . . . . . . . . . . . . . . . . . . . . . . . . . . . 213
Printing from Smartphone/Tablet. . . . . . . . . . . . . . . . . . . . . . . . . . . . . . . . . . . . . . . . . . . 214
Printing/Scanning with Wireless Direct. . . . . . . . . . . . . . . . . . . . . . . . . . . . . . . . . . . . . . . . . . . . . . . . . 215
Paper Settings. . . . . . . . . . . . . . . . . . . . . . . . . . . . . . . . . . . . . . . . . . . . . . . . . . . . . . . . . 220
Copying. . . . . . . . . . . . . . . . . . . . . . . . . . . . . . . . . . . . . . . . . . . . . . . . . . . . . . . 224
Making Copies. . . . . . . . . . . . . . . . . . . . . . . . . . . . . . . . . . . . . . . . . . . . . . . . . . . . . . . . . 225
Setting Items for Copying. . . . . . . . . . . . . . . . . . . . . . . . . . . . . . . . . . . . . . . . . . . . . . . . . . . . . . . . . . . . 226
Scanning. . . . . . . . . . . . . . . . . . . . . . . . . . . . . . . . . . . . . . . . . . . . . . . . . . . . . . 228
Scanning from Computer (macOS). . . . . . . . . . . . . . . . . . . . . . . . . . . . . . . . . . . . . . . . . 229
Scanning According to Item Type or Purpose (IJ Scan Utility Lite). . . . . . . . . . . . . . . . . . . . . . . . . . . . 230
IJ Scan Utility Lite Features. . . . . . . . . . . . . . . . . . . . . . . . . . . . . . . . . . . . . . . . . . . . . . . . . . . . . . 231
Scanning Easily (Auto Scan). . . . . . . . . . . . . . . . . . . . . . . . . . . . . . . . . . . . . . . . . . . . . . . . . . . . . 233
Scanning Documents and Photos. . . . . . . . . . . . . . . . . . . . . . . . . . . . . . . . . . . . . . . . . . . . . . . . . 235
Scanning Tips. . . . . . . . . . . . . . . . . . . . . . . . . . . . . . . . . . . . . . . . . . . . . . . . . . . . . . . . . . . . . . . . . . . . 236
Positioning Originals (Scanning from Computer). . . . . . . . . . . . . . . . . . . . . . . . . . . . . . . . . . . . . . 237
Frequently Asked Questions. . . . . . . . . . . . . . . . . . . . . . . . . . . . . . . . . . . . . . . 242
Network Settings and Common Problems. . . . . . . . . . . . . . . . . . . . . . . . . . . . . . . . . . . . 244
Network Communication Problems. . . . . . . . . . . . . . . . . . . . . . . . . . . . . . . . . . . . . . . . . 246
Cannot Find Printer on Network. . . . . . . . . . . . . . . . . . . . . . . . . . . . . . . . . . . . . . . . . . . . . . . . . . . . . . . 247
Page 6

Cannot Find Printer on Check Printer Settings Screen During Setup (Windows). . . . . . . . . . . . . 248
Cannot Find Printer on Check Printer Settings Screen During Wi-Fi Setup (Windows)-Checking
Power Status. . . . . . . . . . . . . . . . . . . . . . . . . . . . . . . . . . . . . . . . . . . . . . . . . . . . . . . . . . . . . 249
Cannot Find Printer on Check Printer Settings Screen During Wi-Fi Setup (Windows)-Checking
PC Network Connection. . . . . . . . . . . . . . . . . . . . . . . . . . . . . . . . . . . . . . . . . . . . . . . . . . . . 250
Cannot Find Printer on Check Printer Settings Screen During Wi-Fi Setup (Windows)-Checking
Printer's Wi-Fi Settings. . . . . . . . . . . . . . . . . . . . . . . . . . . . . . . . . . . . . . . . . . . . . . . . . . . . . 251
Cannot Find Printer on Check Printer Settings Screen During Wi-Fi Setup (Windows)-Checking
Wi-Fi Environment. . . . . . . . . . . . . . . . . . . . . . . . . . . . . . . . . . . . . . . . . . . . . . . . . . . . . . . . . 252
Cannot Find Printer on Check Printer Settings Screen During Wi-Fi Setup (Windows)-Checking
Printer's IP Address. . . . . . . . . . . . . . . . . . . . . . . . . . . . . . . . . . . . . . . . . . . . . . . . . . . . . . . . 254
Cannot Find Printer on Check Printer Settings Screen During Wi-Fi Setup (Windows)-Checking
Security Software Settings. . . . . . . . . . . . . . . . . . . . . . . . . . . . . . . . . . . . . . . . . . . . . . . . . . . 255
Cannot Find Printer on Check Printer Settings Screen During Wi-Fi Setup (Windows)-Checking
Wireless Router Settings. . . . . . . . . . . . . . . . . . . . . . . . . . . . . . . . . . . . . . . . . . . . . . . . . . . . 256
Cannot Proceed beyond Printer Connection Screen. . . . . . . . . . . . . . . . . . . . . . . . . . . . . . . . . . . 257
Cannot Find Printer while Using Wi-Fi. . . . . . . . . . . . . . . . . . . . . . . . . . . . . . . . . . . . . . . . . . . . . . 259
Network Connection Problems. . . . . . . . . . . . . . . . . . . . . . . . . . . . . . . . . . . . . . . . . . . . . . . . . . . . . . . 262
Printer Suddenly Stopped Working for Some Reason. . . . . . . . . . . . . . . . . . . . . . . . . . . . . . . . . . 263
Network Key (Password) Unknown. . . . . . . . . . . . . . . . . . . . . . . . . . . . . . . . . . . . . . . . . . . . . . . . 268
Printer Cannot Be Used After Replacing Wireless Router or Changed Router Settings. . . . . . . . 270
Other Network Problems. . . . . . . . . . . . . . . . . . . . . . . . . . . . . . . . . . . . . . . . . . . . . . . . . . . . . . . . . . . . 272
Checking Network Information. . . . . . . . . . . . . . . . . . . . . . . . . . . . . . . . . . . . . . . . . . . . . . . . . . . . 273
Restoring to Factory Defaults. . . . . . . . . . . . . . . . . . . . . . . . . . . . . . . . . . . . . . . . . . . . . . . . . . . . 276
Problems while Printing/Scanning from Smartphone/Tablet. . . . . . . . . . . . . . . . . . . . . . 277
Cannot Print/Scan from Smartphone/Tablet. . . . . . . . . . . . . . . . . . . . . . . . . . . . . . . . . . . . . . . . . . . . . 278
Printing Problems. . . . . . . . . . . . . . . . . . . . . . . . . . . . . . . . . . . . . . . . . . . . . . . . . . . . . . . 282
Printer Does Not Print. . . . . . . . . . . . . . . . . . . . . . . . . . . . . . . . . . . . . . . . . . . . . . . . . . . . . . . . . . . . . . 283
Ink Does Not Come Out. . . . . . . . . . . . . . . . . . . . . . . . . . . . . . . . . . . . . . . . . . . . . . . . . . . . . . . . . . . . . 286
Printer Does Not Pick up or Feed the Paper/"No Paper" Error. . . . . . . . . . . . . . . . . . . . . . . . . . . . . . . 288
Printout Results Are Unsatisfactory. . . . . . . . . . . . . . . . . . . . . . . . . . . . . . . . . . . . . . . . . . . . . . . . . . . . 290
Printouts Are Blank/Blurry or Fuzzy/Inaccurate or Bleeding Colors/Streaks or Lines. . . . . . . . . . 292
Colors Are Unclear. . . . . . . . . . . . . . . . . . . . . . . . . . . . . . . . . . . . . . . . . . . . . . . . . . . . . . . . . . . . 295
Lines Are Misaligned/Distorted. . . . . . . . . . . . . . . . . . . . . . . . . . . . . . . . . . . . . . . . . . . . . . . . . . . 297
Paper Is Smudged / Printed Surface Is Scratched. . . . . . . . . . . . . . . . . . . . . . . . . . . . . . . . . . . . 298
Vertical Line Next to Image. . . . . . . . . . . . . . . . . . . . . . . . . . . . . . . . . . . . . . . . . . . . . . . . . . . . . . 302
Page 7

Scanning Problems (macOS). . . . . . . . . . . . . . . . . . . . . . . . . . . . . . . . . . . . . . . . . . . . . . 303
Scanning Problems. . . . . . . . . . . . . . . . . . . . . . . . . . . . . . . . . . . . . . . . . . . . . . . . . . . . . . . . . . . . . . . . 304
Scanner Does Not Work. . . . . . . . . . . . . . . . . . . . . . . . . . . . . . . . . . . . . . . . . . . . . . . . . . . . . . . . 305
Scanner Driver Does Not Start. . . . . . . . . . . . . . . . . . . . . . . . . . . . . . . . . . . . . . . . . . . . . . . . . . . 306
Error Message Is Displayed. . . . . . . . . . . . . . . . . . . . . . . . . . . . . . . . . . . . . . . . . . . . . . . . . . . . . . 307
Scanning Does Not Start / Scanning Does Not Complete. . . . . . . . . . . . . . . . . . . . . . . . . . . . . . . 308
Items Cannot Be Scanned Correctly. . . . . . . . . . . . . . . . . . . . . . . . . . . . . . . . . . . . . . . . . . . . . . . 309
Mechanical Problems. . . . . . . . . . . . . . . . . . . . . . . . . . . . . . . . . . . . . . . . . . . . . . . . . . . . 310
Printer Does Not Turn On. . . . . . . . . . . . . . . . . . . . . . . . . . . . . . . . . . . . . . . . . . . . . . . . . . . . . . . . . . . 311
Printer Turns Off Unexpectedly or Repeatedly. . . . . . . . . . . . . . . . . . . . . . . . . . . . . . . . . . . . . . . . . . . 312
USB Connection Problems. . . . . . . . . . . . . . . . . . . . . . . . . . . . . . . . . . . . . . . . . . . . . . . . . . . . . . . . . . 314
Cannot Communicate with Printer via USB. . . . . . . . . . . . . . . . . . . . . . . . . . . . . . . . . . . . . . . . . . . . . . 315
Wrong Language Appears in LCD. . . . . . . . . . . . . . . . . . . . . . . . . . . . . . . . . . . . . . . . . . . . . . . . . . . . . 316
Installation and Download Problems. . . . . . . . . . . . . . . . . . . . . . . . . . . . . . . . . . . . . . . . 317
Failed to MP Drivers Installation (Windows). . . . . . . . . . . . . . . . . . . . . . . . . . . . . . . . . . . . . . . . . . . . . 318
Updating MP Drivers in Network Environment (Windows). . . . . . . . . . . . . . . . . . . . . . . . . . . . . . . . . . . 319
Errors and Messages. . . . . . . . . . . . . . . . . . . . . . . . . . . . . . . . . . . . . . . . . . . . . . . . . . . . 320
When Error Occurred. . . . . . . . . . . . . . . . . . . . . . . . . . . . . . . . . . . . . . . . . . . . . . . . . . . . . . . . . . . . . . . 321
Message (Support Code) Appears. . . . . . . . . . . . . . . . . . . . . . . . . . . . . . . . . . . . . . . . . . . . . . . . . . . . 323
List of Support Code for Error. . . . . . . . . . . . . . . . . . . . . . . . . . . . . . . . . . . . . . 326
List of Support Code for Error (Paper Jams). . . . . . . . . . . . . . . . . . . . . . . . . . . . . . . . . . 328
1300. . . . . . . . . . . . . . . . . . . . . . . . . . . . . . . . . . . . . . . . . . . . . . . . . . . . . . . . . . . . . . . . . . . . . . . . . . . . 329
1303. . . . . . . . . . . . . . . . . . . . . . . . . . . . . . . . . . . . . . . . . . . . . . . . . . . . . . . . . . . . . . . . . . . . . . . . . . . . 331
1304. . . . . . . . . . . . . . . . . . . . . . . . . . . . . . . . . . . . . . . . . . . . . . . . . . . . . . . . . . . . . . . . . . . . . . . . . . . . 332
1313. . . . . . . . . . . . . . . . . . . . . . . . . . . . . . . . . . . . . . . . . . . . . . . . . . . . . . . . . . . . . . . . . . . . . . . . . . . . 333
Paper Is Jammed inside Printer. . . . . . . . . . . . . . . . . . . . . . . . . . . . . . . . . . . . . . . . . . . . . . . . . . . . . . . 334
Removing Jammed Paper from Rear Side. . . . . . . . . . . . . . . . . . . . . . . . . . . . . . . . . . . . . . . . . . 337
1000. . . . . . . . . . . . . . . . . . . . . . . . . . . . . . . . . . . . . . . . . . . . . . . . . . . . . . . . . . . . . . . . . 341
Paper is Not in the Cassette (1003). . . . . . . . . . . . . . . . . . . . . . . . . . . . . . . . . . . . . . . . . 342
1200. . . . . . . . . . . . . . . . . . . . . . . . . . . . . . . . . . . . . . . . . . . . . . . . . . . . . . . . . . . . . . . . . 343
1401. . . . . . . . . . . . . . . . . . . . . . . . . . . . . . . . . . . . . . . . . . . . . . . . . . . . . . . . . . . . . . . . . 344
1430. . . . . . . . . . . . . . . . . . . . . . . . . . . . . . . . . . . . . . . . . . . . . . . . . . . . . . . . . . . . . . . . . 345
1485. . . . . . . . . . . . . . . . . . . . . . . . . . . . . . . . . . . . . . . . . . . . . . . . . . . . . . . . . . . . . . . . . 346
Page 8

1682. . . . . . . . . . . . . . . . . . . . . . . . . . . . . . . . . . . . . . . . . . . . . . . . . . . . . . . . . . . . . . . . . 347
1686. . . . . . . . . . . . . . . . . . . . . . . . . . . . . . . . . . . . . . . . . . . . . . . . . . . . . . . . . . . . . . . . . 348
1687. . . . . . . . . . . . . . . . . . . . . . . . . . . . . . . . . . . . . . . . . . . . . . . . . . . . . . . . . . . . . . . . . 349
1688. . . . . . . . . . . . . . . . . . . . . . . . . . . . . . . . . . . . . . . . . . . . . . . . . . . . . . . . . . . . . . . . . 350
Shipping Tape etc. Are Still Attached (1890). . . . . . . . . . . . . . . . . . . . . . . . . . . . . . . . . . 351
2110. . . . . . . . . . . . . . . . . . . . . . . . . . . . . . . . . . . . . . . . . . . . . . . . . . . . . . . . . . . . . . . . . 352
2113. . . . . . . . . . . . . . . . . . . . . . . . . . . . . . . . . . . . . . . . . . . . . . . . . . . . . . . . . . . . . . . . . 355
2114. . . . . . . . . . . . . . . . . . . . . . . . . . . . . . . . . . . . . . . . . . . . . . . . . . . . . . . . . . . . . . . . . 358
4103. . . . . . . . . . . . . . . . . . . . . . . . . . . . . . . . . . . . . . . . . . . . . . . . . . . . . . . . . . . . . . . . . 361
5011. . . . . . . . . . . . . . . . . . . . . . . . . . . . . . . . . . . . . . . . . . . . . . . . . . . . . . . . . . . . . . . . . 362
5012. . . . . . . . . . . . . . . . . . . . . . . . . . . . . . . . . . . . . . . . . . . . . . . . . . . . . . . . . . . . . . . . . 363
5100. . . . . . . . . . . . . . . . . . . . . . . . . . . . . . . . . . . . . . . . . . . . . . . . . . . . . . . . . . . . . . . . . 364
5200. . . . . . . . . . . . . . . . . . . . . . . . . . . . . . . . . . . . . . . . . . . . . . . . . . . . . . . . . . . . . . . . . 365
5B02. . . . . . . . . . . . . . . . . . . . . . . . . . . . . . . . . . . . . . . . . . . . . . . . . . . . . . . . . . . . . . . . . 366
6000. . . . . . . . . . . . . . . . . . . . . . . . . . . . . . . . . . . . . . . . . . . . . . . . . . . . . . . . . . . . . . . . . 367
C000. . . . . . . . . . . . . . . . . . . . . . . . . . . . . . . . . . . . . . . . . . . . . . . . . . . . . . . . . . . . . . . . . 368
Page 9

Using Online Manual
Operating Environment
Symbols Used in This Document
Touch-enabled Device Users (Windows)
Printing Online Manual
Trademarks and Licenses
Screenshots in This Manual
9
Page 10

Symbols Used in This Document
Warning
Instructions that, if ignored, could result in death, serious personal injury, or property damage caused by
incorrect operation of the equipment. These must be observed for safe operation.
Caution
Instructions that, if ignored, could result in personal injury or property damage caused by incorrect
operation of the equipment. These must be observed for safe operation.
Important
Instructions including important information that must be observed to avoid damage and injury or
improper use of the product. Be sure to read these instructions.
Note
Instructions including notes for operation and additional explanations.
Basics
Instructions explaining basic operations of your product.
Note
• Icons may vary depending on your product.
10
Page 11

Touch-enabled Device Users (Windows)
For touch actions, you need to replace "right-click" in this document with the action set on the operating
system. For example, if the action is set to "press and hold" on your operating system, replace "right-click"
with "press and hold."
11
Page 12

Trademarks and Licenses
• Microsoft is a registered trademark of Microsoft Corporation.
• Windows is a trademark or registered trademark of Microsoft Corporation in the U.S. and/or other
countries.
• Windows Vista is a trademark or registered trademark of Microsoft Corporation in the U.S. and/or other
countries.
• Internet Explorer is a trademark or registered trademark of Microsoft Corporation in the U.S. and/or
other countries.
• Mac, Mac OS, macOS, OS X, AirPort, App Store, AirPrint, the AirPrint logo, Safari, Bonjour, iPad,
iPhone and iPod touch are trademarks of Apple Inc., registered in the U.S. and other countries.
• IOS is a trademark or registered trademark of Cisco in the U.S. and other countries and is used under
license.
• Google Cloud Print, Google Chrome, Chrome OS, Chromebook, Android, Google Drive, Google Apps
and Google Analytics are either registered trademarks or trademarks of Google Inc. Google Play and
Google Play Logo are trademarks of Google LLC.
• Adobe, Acrobat, Flash, Photoshop, Photoshop Elements, Lightroom, Adobe RGB and Adobe RGB
(1998) are either registered trademarks or trademarks of Adobe Systems Incorporated in the United
States and/or other countries.
• Bluetooth is a trademark of Bluetooth SIG, Inc., U.S.A. and licensed to Canon Inc.
• Autodesk and AutoCAD are registered trademarks or trademarks of Autodesk, Inc., and/or its
subsidiaries and/or affiliates in the USA and/or other countries.
• USB Type-C™ is a trademark of USB Implementers Forum.
Note
• The formal name of Windows Vista is Microsoft Windows Vista operating system.
Copyright (c) 2003-2015 Apple Inc. All rights reserved.
Redistribution and use in source and binary forms, with or without modification, are permitted provided
that the following conditions are met:
1. Redistributions of source code must retain the above copyright notice, this list of conditions and the
following disclaimer.
2. Redistributions in binary form must reproduce the above copyright notice, this list of conditions and
the following disclaimer in the documentation and/or other materials provided with the distribution.
3. Neither the name of Apple Inc. ("Apple") nor the names of its contributors may be used to endorse or
promote products derived from this software without specific prior written permission.
THIS SOFTWARE IS PROVIDED BY APPLE AND ITS CONTRIBUTORS "AS IS" AND ANY EXPRESS
OR IMPLIED WARRANTIES, INCLUDING, BUT NOT LIMITED TO, THE IMPLIED WARRANTIES OF
MERCHANTABILITY AND FITNESS FOR A PARTICULAR PURPOSE ARE DISCLAIMED. IN NO
EVENT SHALL APPLE OR ITS CONTRIBUTORS BE LIABLE FOR ANY DIRECT, INDIRECT,
INCIDENTAL, SPECIAL, EXEMPLARY, OR CONSEQUENTIAL DAMAGES (INCLUDING, BUT NOT
LIMITED TO, PROCUREMENT OF SUBSTITUTE GOODS OR SERVICES; LOSS OF USE, DATA, OR
PROFITS; OR BUSINESS INTERRUPTION) HOWEVER CAUSED AND ON ANY THEORY OF
LIABILITY, WHETHER IN CONTRACT, STRICT LIABILITY, OR TORT (INCLUDING NEGLIGENCE OR
OTHERWISE) ARISING IN ANY WAY OUT OF THE USE OF THIS SOFTWARE, EVEN IF ADVISED OF
THE POSSIBILITY OF SUCH DAMAGE.
12
Page 13

Apache License
Version 2.0, January 2004
http://www.apache.org/licenses/
TERMS AND CONDITIONS FOR USE, REPRODUCTION, AND DISTRIBUTION
1. Definitions.
"License" shall mean the terms and conditions for use, reproduction, and distribution as defined by
Sections 1 through 9 of this document.
"Licensor" shall mean the copyright owner or entity authorized by the copyright owner that is granting
the License.
"Legal Entity" shall mean the union of the acting entity and all other entities that control, are controlled
by, or are under common control with that entity. For the purposes of this definition, "control" means
(i) the power, direct or indirect, to cause the direction or management of such entity, whether by
contract or otherwise, or (ii) ownership of fifty percent (50%) or more of the outstanding shares, or (iii)
beneficial ownership of such entity.
"You" (or "Your") shall mean an individual or Legal Entity exercising permissions granted by this
License.
"Source" form shall mean the preferred form for making modifications, including but not limited to
software source code, documentation source, and configuration files.
"Object" form shall mean any form resulting from mechanical transformation or translation of a Source
form, including but not limited to compiled object code, generated documentation, and conversions to
other media types.
"Work" shall mean the work of authorship, whether in Source or Object form, made available under
the License, as indicated by a copyright notice that is included in or attached to the work (an example
is provided in the Appendix below).
"Derivative Works" shall mean any work, whether in Source or Object form, that is based on (or
derived from) the Work and for which the editorial revisions, annotations, elaborations, or other
modifications represent, as a whole, an original work of authorship. For the purposes of this License,
Derivative Works shall not include works that remain separable from, or merely link (or bind by name)
to the interfaces of, the Work and Derivative Works thereof.
"Contribution" shall mean any work of authorship, including the original version of the Work and any
modifications or additions to that Work or Derivative Works thereof, that is intentionally submitted to
Licensor for inclusion in the Work by the copyright owner or by an individual or Legal Entity
authorized to submit on behalf of the copyright owner. For the purposes of this definition, "submitted"
means any form of electronic, verbal, or written communication sent to the Licensor or its
representatives, including but not limited to communication on electronic mailing lists, source code
control systems, and issue tracking systems that are managed by, or on behalf of, the Licensor for
the purpose of discussing and improving the Work, but excluding communication that is
conspicuously marked or otherwise designated in writing by the copyright owner as "Not a
Contribution."
"Contributor" shall mean Licensor and any individual or Legal Entity on behalf of whom a Contribution
has been received by Licensor and subsequently incorporated within the Work.
13
Page 14

2. Grant of Copyright License. Subject to the terms and conditions of this License, each Contributor
hereby grants to You a perpetual, worldwide, non-exclusive, no-charge, royalty-free, irrevocable
copyright license to reproduce, prepare Derivative Works of, publicly display, publicly perform,
sublicense, and distribute the Work and such Derivative Works in Source or Object form.
3. Grant of Patent License. Subject to the terms and conditions of this License, each Contributor hereby
grants to You a perpetual, worldwide, non-exclusive, no-charge, royalty-free, irrevocable (except as
stated in this section) patent license to make, have made, use, offer to sell, sell, import, and
otherwise transfer the Work, where such license applies only to those patent claims licensable by
such Contributor that are necessarily infringed by their Contribution(s) alone or by combination of
their Contribution(s) with the Work to which such Contribution(s) was submitted. If You institute patent
litigation against any entity (including a cross-claim or counterclaim in a lawsuit) alleging that the
Work or a Contribution incorporated within the Work constitutes direct or contributory patent
infringement, then any patent licenses granted to You under this License for that Work shall terminate
as of the date such litigation is filed.
4. Redistribution. You may reproduce and distribute copies of the Work or Derivative Works thereof in
any medium, with or without modifications, and in Source or Object form, provided that You meet the
following conditions:
1. You must give any other recipients of the Work or Derivative Works a copy of this License; and
2. You must cause any modified files to carry prominent notices stating that You changed the files;
and
3. You must retain, in the Source form of any Derivative Works that You distribute, all copyright,
patent, trademark, and attribution notices from the Source form of the Work, excluding those
notices that do not pertain to any part of the Derivative Works; and
4. If the Work includes a "NOTICE" text file as part of its distribution, then any Derivative Works that
You distribute must include a readable copy of the attribution notices contained within such
NOTICE file, excluding those notices that do not pertain to any part of the Derivative Works, in at
least one of the following places: within a NOTICE text file distributed as part of the Derivative
Works; within the Source form or documentation, if provided along with the Derivative Works; or,
within a display generated by the Derivative Works, if and wherever such third-party notices
normally appear. The contents of the NOTICE file are for informational purposes only and do not
modify the License. You may add Your own attribution notices within Derivative Works that You
distribute, alongside or as an addendum to the NOTICE text from the Work, provided that such
additional attribution notices cannot be construed as modifying the License.
You may add Your own copyright statement to Your modifications and may provide additional or
different license terms and conditions for use, reproduction, or distribution of Your modifications,
or for any such Derivative Works as a whole, provided Your use, reproduction, and distribution of
the Work otherwise complies with the conditions stated in this License.
5. Submission of Contributions. Unless You explicitly state otherwise, any Contribution intentionally
submitted for inclusion in the Work by You to the Licensor shall be under the terms and conditions of
this License, without any additional terms or conditions. Notwithstanding the above, nothing herein
shall supersede or modify the terms of any separate license agreement you may have executed with
Licensor regarding such Contributions.
6. Trademarks. This License does not grant permission to use the trade names, trademarks, service
marks, or product names of the Licensor, except as required for reasonable and customary use in
describing the origin of the Work and reproducing the content of the NOTICE file.
14
Page 15

7. Disclaimer of Warranty. Unless required by applicable law or agreed to in writing, Licensor provides
the Work (and each Contributor provides its Contributions) on an "AS IS" BASIS, WITHOUT
WARRANTIES OR CONDITIONS OF ANY KIND, either express or implied, including, without
limitation, any warranties or conditions of TITLE, NON-INFRINGEMENT, MERCHANTABILITY, or
FITNESS FOR A PARTICULAR PURPOSE. You are solely responsible for determining the
appropriateness of using or redistributing the Work and assume any risks associated with Your
exercise of permissions under this License.
8. Limitation of Liability. In no event and under no legal theory, whether in tort (including negligence),
contract, or otherwise, unless required by applicable law (such as deliberate and grossly negligent
acts) or agreed to in writing, shall any Contributor be liable to You for damages, including any direct,
indirect, special, incidental, or consequential damages of any character arising as a result of this
License or out of the use or inability to use the Work (including but not limited to damages for loss of
goodwill, work stoppage, computer failure or malfunction, or any and all other commercial damages
or losses), even if such Contributor has been advised of the possibility of such damages.
9. Accepting Warranty or Additional Liability. While redistributing the Work or Derivative Works thereof,
You may choose to offer, and charge a fee for, acceptance of support, warranty, indemnity, or other
liability obligations and/or rights consistent with this License. However, in accepting such obligations,
You may act only on Your own behalf and on Your sole responsibility, not on behalf of any other
Contributor, and only if You agree to indemnify, defend, and hold each Contributor harmless for any
liability incurred by, or claims asserted against, such Contributor by reason of your accepting any
such warranty or additional liability.
END OF TERMS AND CONDITIONS
---- Part 1: CMU/UCD copyright notice: (BSD like) -----
Copyright 1989, 1991, 1992 by Carnegie Mellon University
Derivative Work - 1996, 1998-2000
Copyright 1996, 1998-2000 The Regents of the University of California
All Rights Reserved
Permission to use, copy, modify and distribute this software and its documentation for any purpose and
without fee is hereby granted, provided that the above copyright notice appears in all copies and that both
that copyright notice and this permission notice appear in supporting documentation, and that the name of
CMU and The Regents of the University of California not be used in advertising or publicity pertaining to
distribution of the software without specific written permission.
CMU AND THE REGENTS OF THE UNIVERSITY OF CALIFORNIA DISCLAIM ALL WARRANTIES
WITH REGARD TO THIS SOFTWARE, INCLUDING ALL IMPLIED WARRANTIES OF
MERCHANTABILITY AND FITNESS. IN NO EVENT SHALL CMU OR THE REGENTS OF THE
UNIVERSITY OF CALIFORNIA BE LIABLE FOR ANY SPECIAL, INDIRECT OR CONSEQUENTIAL
DAMAGES OR ANY DAMAGES WHATSOEVER RESULTING FROM THE LOSS OF USE, DATA OR
PROFITS, WHETHER IN AN ACTION OF CONTRACT, NEGLIGENCE OR OTHER TORTIOUS ACTION,
ARISING OUT OF OR IN CONNECTION WITH THE USE OR PERFORMANCE OF THIS SOFTWARE.
---- Part 2: Networks Associates Technology, Inc copyright notice (BSD) -----
Copyright (c) 2001-2003, Networks Associates Technology, Inc
All rights reserved.
15
Page 16

Redistribution and use in source and binary forms, with or without modification, are permitted provided
that the following conditions are met:
* Redistributions of source code must retain the above copyright notice, this list of conditions and the
following disclaimer.
* Redistributions in binary form must reproduce the above copyright notice, this list of conditions and the
following disclaimer in the documentation and/or other materials provided with the distribution.
* Neither the name of the Networks Associates Technology, Inc nor the names of its contributors may be
used to endorse or promote products derived from this software without specific prior written permission.
THIS SOFTWARE IS PROVIDED BY THE COPYRIGHT HOLDERS AND CONTRIBUTORS ``AS IS''
AND ANY EXPRESS OR IMPLIED WARRANTIES, INCLUDING, BUT NOT LIMITED TO, THE IMPLIED
WARRANTIES OF MERCHANTABILITY AND FITNESS FOR A PARTICULAR PURPOSE ARE
DISCLAIMED. IN NO EVENT SHALL THE COPYRIGHT HOLDERS OR CONTRIBUTORS BE LIABLE
FOR ANY DIRECT, INDIRECT, INCIDENTAL, SPECIAL, EXEMPLARY, OR CONSEQUENTIAL
DAMAGES (INCLUDING, BUT NOT LIMITED TO, PROCUREMENT OF SUBSTITUTE GOODS OR
SERVICES; LOSS OF USE, DATA, OR PROFITS; OR BUSINESS INTERRUPTION) HOWEVER
CAUSED AND ON ANY THEORY OF LIABILITY, WHETHER IN CONTRACT, STRICT LIABILITY, OR
TORT (INCLUDING NEGLIGENCE OR OTHERWISE) ARISING IN ANY WAY OUT OF THE USE OF
THIS SOFTWARE, EVEN IF ADVISED OF THE POSSIBILITY OF SUCH DAMAGE.
---- Part 3: Cambridge Broadband Ltd. copyright notice (BSD) -----
Portions of this code are copyright (c) 2001-2003, Cambridge Broadband Ltd.
All rights reserved.
Redistribution and use in source and binary forms, with or without modification, are permitted provided
that the following conditions are met:
* Redistributions of source code must retain the above copyright notice, this list of conditions and the
following disclaimer.
* Redistributions in binary form must reproduce the above copyright notice, this list of conditions and the
following disclaimer in the documentation and/or other materials provided with the distribution.
* The name of Cambridge Broadband Ltd. may not be used to endorse or promote products derived from
this software without specific prior written permission.
THIS SOFTWARE IS PROVIDED BY THE COPYRIGHT HOLDER ``AS IS'' AND ANY EXPRESS OR
IMPLIED WARRANTIES, INCLUDING, BUT NOT LIMITED TO, THE IMPLIED WARRANTIES OF
MERCHANTABILITY AND FITNESS FOR A PARTICULAR PURPOSE ARE DISCLAIMED. IN NO
EVENT SHALL THE COPYRIGHT HOLDER BE LIABLE FOR ANY DIRECT, INDIRECT, INCIDENTAL,
SPECIAL, EXEMPLARY, OR CONSEQUENTIAL DAMAGES (INCLUDING, BUT NOT LIMITED TO,
PROCUREMENT OF SUBSTITUTE GOODS OR SERVICES; LOSS OF USE, DATA, OR PROFITS; OR
BUSINESS INTERRUPTION) HOWEVER CAUSED AND ON ANY THEORY OF LIABILITY, WHETHER
IN CONTRACT, STRICT LIABILITY, OR TORT (INCLUDING NEGLIGENCE OR OTHERWISE) ARISING
IN ANY WAY OUT OF THE USE OF THIS SOFTWARE, EVEN IF ADVISED OF THE POSSIBILITY OF
SUCH DAMAGE.
---- Part 4: Sun Microsystems, Inc. copyright notice (BSD) -----
Copyright c 2003 Sun Microsystems, Inc., 4150 Network Circle, Santa Clara, California 95054, U.S.A. All
rights reserved.
16
Page 17

Use is subject to license terms below.
This distribution may include materials developed by third parties.
Sun, Sun Microsystems, the Sun logo and Solaris are trademarks or registered trademarks of Sun
Microsystems, Inc. in the U.S. and other countries.
Redistribution and use in source and binary forms, with or without modification, are permitted provided
that the following conditions are met:
* Redistributions of source code must retain the above copyright notice, this list of conditions and the
following disclaimer.
* Redistributions in binary form must reproduce the above copyright notice, this list of conditions and the
following disclaimer in the documentation and/or other materials provided with the distribution.
* Neither the name of the Sun Microsystems, Inc. nor the names of its contributors may be used to
endorse or promote products derived from this software without specific prior written permission.
THIS SOFTWARE IS PROVIDED BY THE COPYRIGHT HOLDERS AND CONTRIBUTORS ``AS IS''
AND ANY EXPRESS OR IMPLIED WARRANTIES, INCLUDING, BUT NOT LIMITED TO, THE IMPLIED
WARRANTIES OF MERCHANTABILITY AND FITNESS FOR A PARTICULAR PURPOSE ARE
DISCLAIMED. IN NO EVENT SHALL THE COPYRIGHT HOLDERS OR CONTRIBUTORS BE LIABLE
FOR ANY DIRECT, INDIRECT, INCIDENTAL, SPECIAL, EXEMPLARY, OR CONSEQUENTIAL
DAMAGES (INCLUDING, BUT NOT LIMITED TO, PROCUREMENT OF SUBSTITUTE GOODS OR
SERVICES; LOSS OF USE, DATA, OR PROFITS; OR BUSINESS INTERRUPTION) HOWEVER
CAUSED AND ON ANY THEORY OF LIABILITY, WHETHER IN CONTRACT, STRICT LIABILITY, OR
TORT (INCLUDING NEGLIGENCE OR OTHERWISE) ARISING IN ANY WAY OUT OF THE USE OF
THIS SOFTWARE, EVEN IF ADVISED OF THE POSSIBILITY OF SUCH DAMAGE.
---- Part 5: Sparta, Inc copyright notice (BSD) -----
Copyright (c) 2003-2012, Sparta, Inc
All rights reserved.
Redistribution and use in source and binary forms, with or without modification, are permitted provided
that the following conditions are met:
* Redistributions of source code must retain the above copyright notice, this list of conditions and the
following disclaimer.
* Redistributions in binary form must reproduce the above copyright notice, this list of conditions and the
following disclaimer in the documentation and/or other materials provided with the distribution.
* Neither the name of Sparta, Inc nor the names of its contributors may be used to endorse or promote
products derived from this software without specific prior written permission.
THIS SOFTWARE IS PROVIDED BY THE COPYRIGHT HOLDERS AND CONTRIBUTORS ``AS IS''
AND ANY EXPRESS OR IMPLIED WARRANTIES, INCLUDING, BUT NOT LIMITED TO, THE IMPLIED
WARRANTIES OF MERCHANTABILITY AND FITNESS FOR A PARTICULAR PURPOSE ARE
DISCLAIMED. IN NO EVENT SHALL THE COPYRIGHT HOLDERS OR CONTRIBUTORS BE LIABLE
FOR ANY DIRECT, INDIRECT, INCIDENTAL, SPECIAL, EXEMPLARY, OR CONSEQUENTIAL
DAMAGES (INCLUDING, BUT NOT LIMITED TO, PROCUREMENT OF SUBSTITUTE GOODS OR
SERVICES; LOSS OF USE, DATA, OR PROFITS; OR BUSINESS INTERRUPTION) HOWEVER
CAUSED AND ON ANY THEORY OF LIABILITY, WHETHER IN CONTRACT, STRICT LIABILITY, OR
17
Page 18

TORT (INCLUDING NEGLIGENCE OR OTHERWISE) ARISING IN ANY WAY OUT OF THE USE OF
THIS SOFTWARE, EVEN IF ADVISED OF THE POSSIBILITY OF SUCH DAMAGE.
---- Part 6: Cisco/BUPTNIC copyright notice (BSD) -----
Copyright (c) 2004, Cisco, Inc and Information Network Center of Beijing University of Posts and
Telecommunications.
All rights reserved.
Redistribution and use in source and binary forms, with or without modification, are permitted provided
that the following conditions are met:
* Redistributions of source code must retain the above copyright notice, this list of conditions and the
following disclaimer.
* Redistributions in binary form must reproduce the above copyright notice, this list of conditions and the
following disclaimer in the documentation and/or other materials provided with the distribution.
* Neither the name of Cisco, Inc, Beijing University of Posts and Telecommunications, nor the names of
their contributors may be used to endorse or promote products derived from this software without specific
prior written permission.
THIS SOFTWARE IS PROVIDED BY THE COPYRIGHT HOLDERS AND CONTRIBUTORS ``AS IS''
AND ANY EXPRESS OR IMPLIED WARRANTIES, INCLUDING, BUT NOT LIMITED TO, THE IMPLIED
WARRANTIES OF MERCHANTABILITY AND FITNESS FOR A PARTICULAR PURPOSE ARE
DISCLAIMED. IN NO EVENT SHALL THE COPYRIGHT HOLDERS OR CONTRIBUTORS BE LIABLE
FOR ANY DIRECT, INDIRECT, INCIDENTAL, SPECIAL, EXEMPLARY, OR CONSEQUENTIAL
DAMAGES (INCLUDING, BUT NOT LIMITED TO, PROCUREMENT OF SUBSTITUTE GOODS OR
SERVICES; LOSS OF USE, DATA, OR PROFITS; OR BUSINESS INTERRUPTION) HOWEVER
CAUSED AND ON ANY THEORY OF LIABILITY, WHETHER IN CONTRACT, STRICT LIABILITY, OR
TORT (INCLUDING NEGLIGENCE OR OTHERWISE) ARISING IN ANY WAY OUT OF THE USE OF
THIS SOFTWARE, EVEN IF ADVISED OF THE POSSIBILITY OF SUCH DAMAGE.
---- Part 7: Fabasoft R&D Software GmbH & Co KG copyright notice (BSD) -----
Copyright (c) Fabasoft R&D Software GmbH & Co KG, 2003 [email protected]
Author: Bernhard Penz <[email protected]>
Redistribution and use in source and binary forms, with or without modification, are permitted provided
that the following conditions are met:
* Redistributions of source code must retain the above copyright notice, this list of conditions and the
following disclaimer.
* Redistributions in binary form must reproduce the above copyright notice, this list of conditions and the
following disclaimer in the documentation and/or other materials provided with the distribution.
* The name of Fabasoft R&D Software GmbH & Co KG or any of its subsidiaries, brand or product names
may not be used to endorse or promote products derived from this software without specific prior written
permission.
THIS SOFTWARE IS PROVIDED BY THE COPYRIGHT HOLDER ``AS IS'' AND ANY EXPRESS OR
IMPLIED WARRANTIES, INCLUDING, BUT NOT LIMITED TO, THE IMPLIED WARRANTIES OF
MERCHANTABILITY AND FITNESS FOR A PARTICULAR PURPOSE ARE DISCLAIMED. IN NO
EVENT SHALL THE COPYRIGHT HOLDER BE LIABLE FOR ANY DIRECT, INDIRECT, INCIDENTAL,
18
Page 19

SPECIAL, EXEMPLARY, OR CONSEQUENTIAL DAMAGES (INCLUDING, BUT NOT LIMITED TO,
PROCUREMENT OF SUBSTITUTE GOODS OR SERVICES; LOSS OF USE, DATA, OR PROFITS; OR
BUSINESS INTERRUPTION) HOWEVER CAUSED AND ON ANY THEORY OF LIABILITY, WHETHER
IN CONTRACT, STRICT LIABILITY, OR TORT (INCLUDING NEGLIGENCE OR OTHERWISE) ARISING
IN ANY WAY OUT OF THE USE OF THIS SOFTWARE, EVEN IF ADVISED OF THE POSSIBILITY OF
SUCH DAMAGE.
---- Part 8: Apple Inc. copyright notice (BSD) -----
Copyright (c) 2007 Apple Inc. All rights reserved.
Redistribution and use in source and binary forms, with or without modification, are permitted provided
that the following conditions are met:
1. Redistributions of source code must retain the above copyright notice, this list of conditions and the
following disclaimer.
2. Redistributions in binary form must reproduce the above copyright notice, this list of conditions and
the following disclaimer in the documentation and/or other materials provided with the distribution.
3. Neither the name of Apple Inc. ("Apple") nor the names of its contributors may be used to endorse or
promote products derived from this software without specific prior written permission.
THIS SOFTWARE IS PROVIDED BY APPLE AND ITS CONTRIBUTORS "AS IS" AND ANY EXPRESS
OR IMPLIED WARRANTIES, INCLUDING, BUT NOT LIMITED TO, THE IMPLIED WARRANTIES OF
MERCHANTABILITY AND FITNESS FOR A PARTICULAR PURPOSE ARE DISCLAIMED. IN NO
EVENT SHALL APPLE OR ITS CONTRIBUTORS BE LIABLE FOR ANY DIRECT, INDIRECT,
INCIDENTAL, SPECIAL, EXEMPLARY, OR CONSEQUENTIAL DAMAGES (INCLUDING, BUT NOT
LIMITED TO, PROCUREMENT OF SUBSTITUTE GOODS OR SERVICES; LOSS OF USE, DATA, OR
PROFITS; OR BUSINESS INTERRUPTION) HOWEVER CAUSED AND ON ANY THEORY OF
LIABILITY, WHETHER IN CONTRACT, STRICT LIABILITY, OR TORT (INCLUDING NEGLIGENCE OR
OTHERWISE) ARISING IN ANY WAY OUT OF THE USE OF THIS SOFTWARE, EVEN IF ADVISED OF
THE POSSIBILITY OF SUCH DAMAGE.
---- Part 9: ScienceLogic, LLC copyright notice (BSD) -----
Copyright (c) 2009, ScienceLogic, LLC
All rights reserved.
Redistribution and use in source and binary forms, with or without modification, are permitted provided
that the following conditions are met:
* Redistributions of source code must retain the above copyright notice, this list of conditions and the
following disclaimer.
* Redistributions in binary form must reproduce the above copyright notice, this list of conditions and the
following disclaimer in the documentation and/or other materials provided with the distribution.
* Neither the name of ScienceLogic, LLC nor the names of its contributors may be used to endorse or
promote products derived from this software without specific prior written permission.
THIS SOFTWARE IS PROVIDED BY THE COPYRIGHT HOLDERS AND CONTRIBUTORS "AS IS" AND
ANY EXPRESS OR IMPLIED WARRANTIES, INCLUDING, BUT NOT LIMITED TO, THE IMPLIED
WARRANTIES OF MERCHANTABILITY AND FITNESS FOR A PARTICULAR PURPOSE ARE
DISCLAIMED. IN NO EVENT SHALL THE COPYRIGHT HOLDERS OR CONTRIBUTORS BE LIABLE
19
Page 20

FOR ANY DIRECT, INDIRECT, INCIDENTAL, SPECIAL, EXEMPLARY, OR CONSEQUENTIAL
DAMAGES (INCLUDING, BUT NOT LIMITED TO, PROCUREMENT OF SUBSTITUTE GOODS OR
SERVICES; LOSS OF USE, DATA, OR PROFITS; OR BUSINESS INTERRUPTION) HOWEVER
CAUSED AND ON ANY THEORY OF LIABILITY, WHETHER IN CONTRACT, STRICT LIABILITY, OR
TORT (INCLUDING NEGLIGENCE OR OTHERWISE) ARISING IN ANY WAY OUT OF THE USE OF
THIS SOFTWARE, EVEN IF ADVISED OF THE POSSIBILITY OF SUCH DAMAGE.
LEADTOOLS
Copyright (C) 1991-2009 LEAD Technologies, Inc.
CMap Resources
-----------------------------------------------------------
Copyright 1990-2009 Adobe Systems Incorporated.
All rights reserved.
Copyright 1990-2010 Adobe Systems Incorporated.
All rights reserved.
Redistribution and use in source and binary forms, with or
without modification, are permitted provided that the
following conditions are met:
Redistributions of source code must retain the above
copyright notice, this list of conditions and the following
disclaimer.
Redistributions in binary form must reproduce the above
copyright notice, this list of conditions and the following
disclaimer in the documentation and/or other materials
provided with the distribution.
Neither the name of Adobe Systems Incorporated nor the names
of its contributors may be used to endorse or promote
products derived from this software without specific prior
written permission.
THIS SOFTWARE IS PROVIDED BY THE COPYRIGHT HOLDERS AND
CONTRIBUTORS "AS IS" AND ANY EXPRESS OR IMPLIED WARRANTIES,
INCLUDING, BUT NOT LIMITED TO, THE IMPLIED WARRANTIES OF
MERCHANTABILITY AND FITNESS FOR A PARTICULAR PURPOSE ARE
DISCLAIMED. IN NO EVENT SHALL THE COPYRIGHT HOLDER OR
CONTRIBUTORS BE LIABLE FOR ANY DIRECT, INDIRECT, INCIDENTAL,
SPECIAL, EXEMPLARY, OR CONSEQUENTIAL DAMAGES (INCLUDING, BUT
NOT LIMITED TO, PROCUREMENT OF SUBSTITUTE GOODS OR SERVICES;
LOSS OF USE, DATA, OR PROFITS; OR BUSINESS INTERRUPTION)
HOWEVER CAUSED AND ON ANY THEORY OF LIABILITY, WHETHER IN
CONTRACT, STRICT LIABILITY, OR TORT (INCLUDING NEGLIGENCE OR
OTHERWISE) ARISING IN ANY WAY OUT OF THE USE OF THIS
SOFTWARE, EVEN IF ADVISED OF THE POSSIBILITY OF SUCH DAMAGE.
-----------------------------------------------------------
20
Page 21

MIT License
Copyright (c) 1998, 1999, 2000 Thai Open Source Software Center Ltd
Permission is hereby granted, free of charge, to any person obtaining a copy of this software and
associated documentation files (the "Software"), to deal in the Software without restriction, including
without limitation the rights to use, copy, modify, merge, publish, distribute, sublicense, and/or sell copies
of the Software, and to permit persons to whom the Software is furnished to do so, subject to the following
conditions:
The above copyright notice and this permission notice shall be included in all copies or substantial
portions of the Software.
THE SOFTWARE IS PROVIDED "AS IS", WITHOUT WARRANTY OF ANY KIND, EXPRESS OR
IMPLIED, INCLUDING BUT NOT LIMITED TO THE WARRANTIES OF MERCHANTABILITY, FITNESS
FOR A PARTICULAR PURPOSE AND NONINFRINGEMENT. IN NO EVENT SHALL THE AUTHORS OR
COPYRIGHT HOLDERS BE LIABLE FOR ANY CLAIM, DAMAGES OR OTHER LIABILITY, WHETHER
IN AN ACTION OF CONTRACT, TORT OR OTHERWISE, ARISING FROM, OUT OF OR IN
CONNECTION WITH THE SOFTWARE OR THE USE OR OTHER DEALINGS IN THE SOFTWARE.
Copyright 2000 Computing Research Labs, New Mexico State University
Copyright 2001-2015 Francesco Zappa Nardelli
Permission is hereby granted, free of charge, to any person obtaining a copy of this software and
associated documentation files (the "Software"), to deal in the Software without restriction, including
without limitation the rights to use, copy, modify, merge, publish, distribute, sublicense, and/or sell copies
of the Software, and to permit persons to whom the Software is furnished to do so, subject to the following
conditions:
The above copyright notice and this permission notice shall be included in all copies or substantial
portions of the Software.
THE SOFTWARE IS PROVIDED "AS IS", WITHOUT WARRANTY OF ANY KIND, EXPRESS OR
IMPLIED, INCLUDING BUT NOT LIMITED TO THE WARRANTIES OF MERCHANTABILITY, FITNESS
FOR A PARTICULAR PURPOSE AND NONINFRINGEMENT. IN NO EVENT SHALL THE COMPUTING
RESEARCH LAB OR NEW MEXICO STATE UNIVERSITY BE LIABLE FOR ANY CLAIM, DAMAGES OR
OTHER LIABILITY, WHETHER IN AN ACTION OF CONTRACT, TORT OR OTHERWISE, ARISING
FROM, OUT OF OR IN CONNECTION WITH THE SOFTWARE OR THE USE OR OTHER DEALINGS IN
THE SOFTWARE.
Written by Joel Sherrill <[email protected]>.
COPYRIGHT (c) 1989-2000.
On-Line Applications Research Corporation (OAR).
Permission to use, copy, modify, and distribute this software for any purpose without fee is hereby
granted, provided that this entire notice is included in all copies of any software which is or includes a
copy or modification of this software.
THIS SOFTWARE IS BEING PROVIDED "AS IS", WITHOUT ANY EXPRESS OR IMPLIED WARRANTY.
IN PARTICULAR, THE AUTHOR MAKES NO REPRESENTATION OR WARRANTY OF ANY KIND
21
Page 22

CONCERNING THE MERCHANTABILITY OF THIS SOFTWARE OR ITS FITNESS FOR ANY
PARTICULAR PURPOSE.
(1) Red Hat Incorporated
Copyright (c) 1994-2009 Red Hat, Inc. All rights reserved.
This copyrighted material is made available to anyone wishing to use, modify, copy, or redistribute it
subject to the terms and conditions of the BSD License. This program is distributed in the hope that it will
be useful, but WITHOUT ANY WARRANTY expressed or implied, including the implied warranties of
MERCHANTABILITY or FITNESS FOR A PARTICULAR PURPOSE. A copy of this license is available at
http://www.opensource.org/licenses. Any Red Hat trademarks that are incorporated in the source code or
documentation are not subject to the BSD License and may only be used or replicated with the express
permission of Red Hat, Inc.
(2) University of California, Berkeley
Copyright (c) 1981-2000 The Regents of the University of California.
All rights reserved.
Redistribution and use in source and binary forms, with or without modification, are permitted provided
that the following conditions are met:
* Redistributions of source code must retain the above copyright notice, this list of conditions and the
following disclaimer.
* Redistributions in binary form must reproduce the above copyright notice, this list of conditions and the
following disclaimer in the documentation and/or other materials provided with the distribution.
* Neither the name of the University nor the names of its contributors may be used to endorse or promote
products derived from this software without specific prior written permission.
THIS SOFTWARE IS PROVIDED BY THE COPYRIGHT HOLDERS AND CONTRIBUTORS "AS IS" AND
ANY EXPRESS OR IMPLIED WARRANTIES, INCLUDING, BUT NOT LIMITED TO, THE IMPLIED
WARRANTIES OF MERCHANTABILITY AND FITNESS FOR A PARTICULAR PURPOSE ARE
DISCLAIMED. IN NO EVENT SHALL THE COPYRIGHT OWNER OR CONTRIBUTORS BE LIABLE FOR
ANY DIRECT, INDIRECT, INCIDENTAL, SPECIAL, EXEMPLARY, OR CONSEQUENTIAL DAMAGES
(INCLUDING, BUT NOT LIMITED TO, PROCUREMENT OF SUBSTITUTE GOODS OR SERVICES;
LOSS OF USE, DATA, OR PROFITS; OR BUSINESS INTERRUPTION) HOWEVER CAUSED AND ON
ANY THEORY OF LIABILITY, WHETHER IN CONTRACT, STRICT LIABILITY, OR TORT (INCLUDING
NEGLIGENCE OR OTHERWISE) ARISING IN ANY WAY OUT OF THE USE OF THIS SOFTWARE,
EVEN IF ADVISED OF THE POSSIBILITY OF SUCH DAMAGE.
The FreeType Project LICENSE
----------------------------
2006-Jan-27
Copyright 1996-2002, 2006 by
David Turner, Robert Wilhelm, and Werner Lemberg
Introduction
============
22
Page 23

The FreeType Project is distributed in several archive packages; some of them may contain, in addition to
the FreeType font engine, various tools and contributions which rely on, or relate to, the FreeType Project.
This license applies to all files found in such packages, and which do not fall under their own explicit
license. The license affects thus the FreeType font engine, the test programs, documentation and
makefiles, at the very least.
This license was inspired by the BSD, Artistic, and IJG (Independent JPEG Group) licenses, which all
encourage inclusion and use of free software in commercial and freeware products alike. As a
consequence, its main points are that:
o We don't promise that this software works. However, we will be interested in any kind of bug reports.
(`as is' distribution)
o You can use this software for whatever you want, in parts or full form, without having to pay us.
(`royalty-free' usage)
o You may not pretend that you wrote this software. If you use it, or only parts of it, in a program, you
must acknowledge somewhere in your documentation that you have used the FreeType code. (`credits')
We specifically permit and encourage the inclusion of this software, with or without modifications, in
commercial products.
We disclaim all warranties covering The FreeType Project and assume no liability related to The
FreeType Project.
Finally, many people asked us for a preferred form for a credit/disclaimer to use in compliance with this
license. We thus encourage you to use the following text:
"""
Portions of this software are copyright © <year> The FreeType
Project (www.freetype.org). All rights reserved.
"""
Please replace <year> with the value from the FreeType version you actually use.
Legal Terms
===========
0. Definitions
--------------
Throughout this license, the terms `package', `FreeType Project', and `FreeType archive' refer to the set
of files originally distributed by the authors (David Turner, Robert Wilhelm, and Werner Lemberg) as the
`FreeType Project', be they named as alpha, beta or final release.
`You' refers to the licensee, or person using the project, where `using' is a generic term including
compiling the project's source code as well as linking it to form a `program' or `executable'.
This program is referred to as `a program using the FreeType engine'.
This license applies to all files distributed in the original FreeType Project, including all source code,
binaries and documentation, unless otherwise stated in the file in its original, unmodified form as
distributed in the original archive.
If you are unsure whether or not a particular file is covered by this license, you must contact us to verify
this.
23
Page 24

The FreeType Project is copyright (C) 1996-2000 by David Turner, Robert Wilhelm, and Werner Lemberg.
All rights reserved except as specified below.
1. No Warranty
--------------
THE FREETYPE PROJECT IS PROVIDED `AS IS' WITHOUT WARRANTY OF ANY KIND, EITHER
EXPRESS OR IMPLIED, INCLUDING, BUT NOT LIMITED TO, WARRANTIES OF MERCHANTABILITY
AND FITNESS FOR A PARTICULAR PURPOSE. IN NO EVENT WILL ANY OF THE AUTHORS OR
COPYRIGHT HOLDERS BE LIABLE FOR ANY DAMAGES CAUSED BY THE USE OR THE INABILITY
TO USE, OF THE FREETYPE PROJECT.
2. Redistribution
-----------------
This license grants a worldwide, royalty-free, perpetual and irrevocable right and license to use, execute,
perform, compile, display, copy, create derivative works of, distribute and sublicense the FreeType Project
(in both source and object code forms) and derivative works thereof for any purpose; and to authorize
others to exercise some or all of the rights granted herein, subject to the following conditions:
o Redistribution of source code must retain this license file (`FTL.TXT') unaltered; any additions, deletions
or changes to the original files must be clearly indicated in accompanying documentation. The copyright
notices of the unaltered, original files must be preserved in all copies of source files.
o Redistribution in binary form must provide a disclaimer that states that the software is based in part of
the work of the FreeType Team, in the distribution documentation. We also encourage you to put an URL
to the FreeType web page in your documentation, though this isn't mandatory.
These conditions apply to any software derived from or based on the FreeType Project, not just the
unmodified files. If you use our work, you must acknowledge us. However, no fee need be paid to us.
3. Advertising
--------------
Neither the FreeType authors and contributors nor you shall use the name of the other for commercial,
advertising, or promotional purposes without specific prior written permission.
We suggest, but do not require, that you use one or more of the following phrases to refer to this software
in your documentation or advertising materials: `FreeType Project', `FreeType Engine', `FreeType library',
or `FreeType Distribution'.
As you have not signed this license, you are not required to accept it. However, as the FreeType Project
is copyrighted material, only this license, or another one contracted with the authors, grants you the right
to use, distribute, and modify it.
Therefore, by using, distributing, or modifying the FreeType Project, you indicate that you understand and
accept all the terms of this license.
4. Contacts
-----------
There are two mailing lists related to FreeType:
24
Page 25

Discusses general use and applications of FreeType, as well as future and wanted additions to the library
and distribution.
If you are looking for support, start in this list if you haven't found anything to help you in the
documentation.
Discusses bugs, as well as engine internals, design issues, specific licenses, porting, etc.
Our home page can be found at
http://www.freetype.org
--- end of FTL.TXT ---
The TWAIN Toolkit is distributed as is. The developer and distributors of the TWAIN Toolkit expressly
disclaim all implied, express or statutory warranties including, without limitation, the implied warranties of
merchantability, noninfringement of third party rights and fitness for a particular purpose. Neither the
developers nor the distributors will be liable for damages, whether direct, indirect, special, incidental, or
consequential, as a result of the reproduction, modification, distribution or other use of the TWAIN Toolkit.
JSON for Modern C++
Copyright (c) 2013-2017 Niels Lohmann
Permission is hereby granted, free of charge, to any person obtaining a copy of this software and
associated documentation files (the "Software"), to deal in the Software without restriction, including
without limitation the rights to use, copy, modify, merge, publish, distribute, sublicense, and/or sell copies
of the Software, and to permit persons to whom the Software is furnished to do so, subject to the following
conditions:
The above copyright notice and this permission notice shall be included in all copies or substantial
portions of the Software.
THE SOFTWARE IS PROVIDED "AS IS", WITHOUT WARRANTY OF ANY KIND, EXPRESS OR
IMPLIED, INCLUDING BUT NOT LIMITED TO THE WARRANTIES OF MERCHANTABILITY, FITNESS
FOR A PARTICULAR PURPOSE AND NONINFRINGEMENT. IN NO EVENT SHALL THE AUTHORS OR
COPYRIGHT HOLDERS BE LIABLE FOR ANY CLAIM, DAMAGES OR OTHER LIABILITY, WHETHER
IN AN ACTION OF CONTRACT, TORT OR OTHERWISE, ARISING FROM, OUT OF OR IN
CONNECTION WITH THE SOFTWARE OR THE USE OR OTHER DEALINGS IN THE SOFTWARE.
Copyright (c) 2011 - 2015 ARM LIMITED
All rights reserved.
Redistribution and use in source and binary forms, with or without modification, are permitted provided
that the following conditions are met:
- Redistributions of source code must retain the above copyright notice, this list of conditions and the
following disclaimer.
- Redistributions in binary form must reproduce the above copyright notice, this list of conditions and the
following disclaimer in the documentation and/or other materials provided with the distribution.
- Neither the name of ARM nor the names of its contributors may be used to endorse or promote products
derived from this software without specific prior written permission.
25
Page 26

THIS SOFTWARE IS PROVIDED BY THE COPYRIGHT HOLDERS AND CONTRIBUTORS "AS IS" AND
ANY EXPRESS OR IMPLIED WARRANTIES, INCLUDING, BUT NOT LIMITED TO, THE IMPLIED
WARRANTIES OF MERCHANTABILITY AND FITNESS FOR A PARTICULAR PURPOSE ARE
DISCLAIMED. IN NO EVENT SHALL COPYRIGHT HOLDERS AND CONTRIBUTORS BE LIABLE FOR
ANY DIRECT, INDIRECT, INCIDENTAL, SPECIAL, EXEMPLARY, OR CONSEQUENTIAL DAMAGES
(INCLUDING, BUT NOT LIMITED TO, PROCUREMENT OF SUBSTITUTE GOODS OR SERVICES;
LOSS OF USE, DATA, OR PROFITS; OR BUSINESS INTERRUPTION) HOWEVER CAUSED AND ON
ANY THEORY OF LIABILITY, WHETHER IN CONTRACT, STRICT LIABILITY, OR TORT (INCLUDING
NEGLIGENCE OR OTHERWISE) ARISING IN ANY WAY OUT OF THE USE OF THIS SOFTWARE,
EVEN IF ADVISED OF THE POSSIBILITY OF SUCH DAMAGE.
The following applies only to products supporting Wi-Fi.
(c) 2009-2013 by Jeff Mott. All rights reserved.
Redistribution and use in source and binary forms, with or without modification, are permitted provided
that the following conditions are met:
* Redistributions of source code must retain the above copyright notice, this list of conditions, and the
following disclaimer.
* Redistributions in binary form must reproduce the above copyright notice, this list of conditions, and the
following disclaimer in the documentation or other materials provided with the distribution.
* Neither the name CryptoJS nor the names of its contributors may be used to endorse or promote
products derived from this software without specific prior written permission.
THIS SOFTWARE IS PROVIDED BY THE COPYRIGHT HOLDERS AND CONTRIBUTORS "AS IS,"
AND ANY EXPRESS OR IMPLIED WARRANTIES, INCLUDING, BUT NOT LIMITED TO, THE IMPLIED
WARRANTIES OF MERCHANTABILITY AND FITNESS FOR A PARTICULAR PURPOSE, ARE
DISCLAIMED. IN NO EVENT SHALL THE COPYRIGHT HOLDER OR CONTRIBUTORS BE LIABLE
FOR ANY DIRECT, INDIRECT, INCIDENTAL, SPECIAL, EXEMPLARY, OR CONSEQUENTIAL
DAMAGES (INCLUDING, BUT NOT LIMITED TO, PROCUREMENT OF SUBSTITUTE GOODS OR
SERVICES; LOSS OF USE, DATA, OR PROFITS; OR BUSINESS INTERRUPTION) HOWEVER
CAUSED AND ON ANY THEORY OF LIABILITY, WHETHER IN CONTRACT, STRICT LIABILITY, OR
TORT (INCLUDING NEGLIGENCE OR OTHERWISE) ARISING IN ANY WAY OUT OF THE USE OF
THIS SOFTWARE, EVEN IF ADVISED OF THE POSSIBILITY OF SUCH DAMAGE.
26
Page 27

Basic Operation
Printing Photos from a Computer
Printing Photos from a Smartphone/Tablet
Copying
27
Page 28
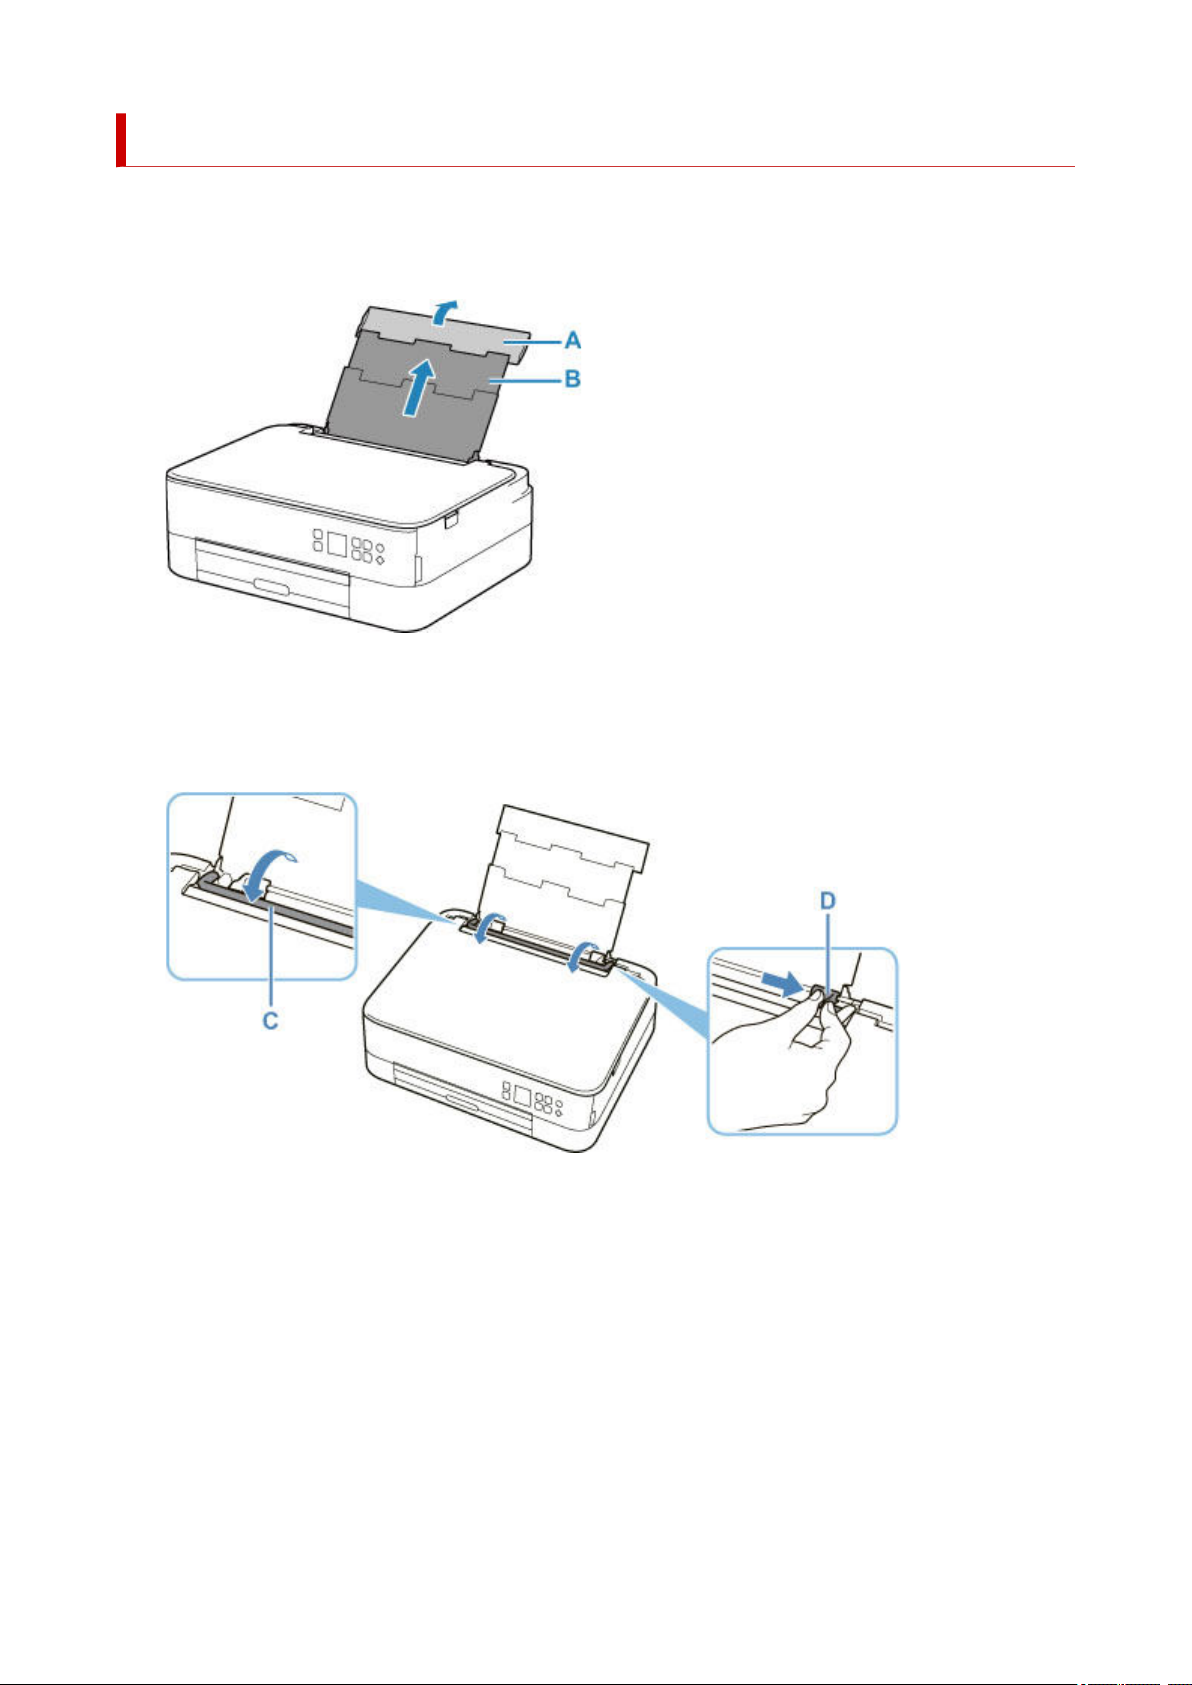
Printing Photos from a Computer
This section describes how to print photos with Easy-PhotoPrint Editor.
1. Open rear tray cover (A). Pull straight up and fold back paper support (B).
2. Open the feed slot cover (C).
3. Slide right paper guide (D) to open both paper guides.
4. Load photo paper in portrait orientation WITH PRINT SIDE FACING UP.
28
Page 29
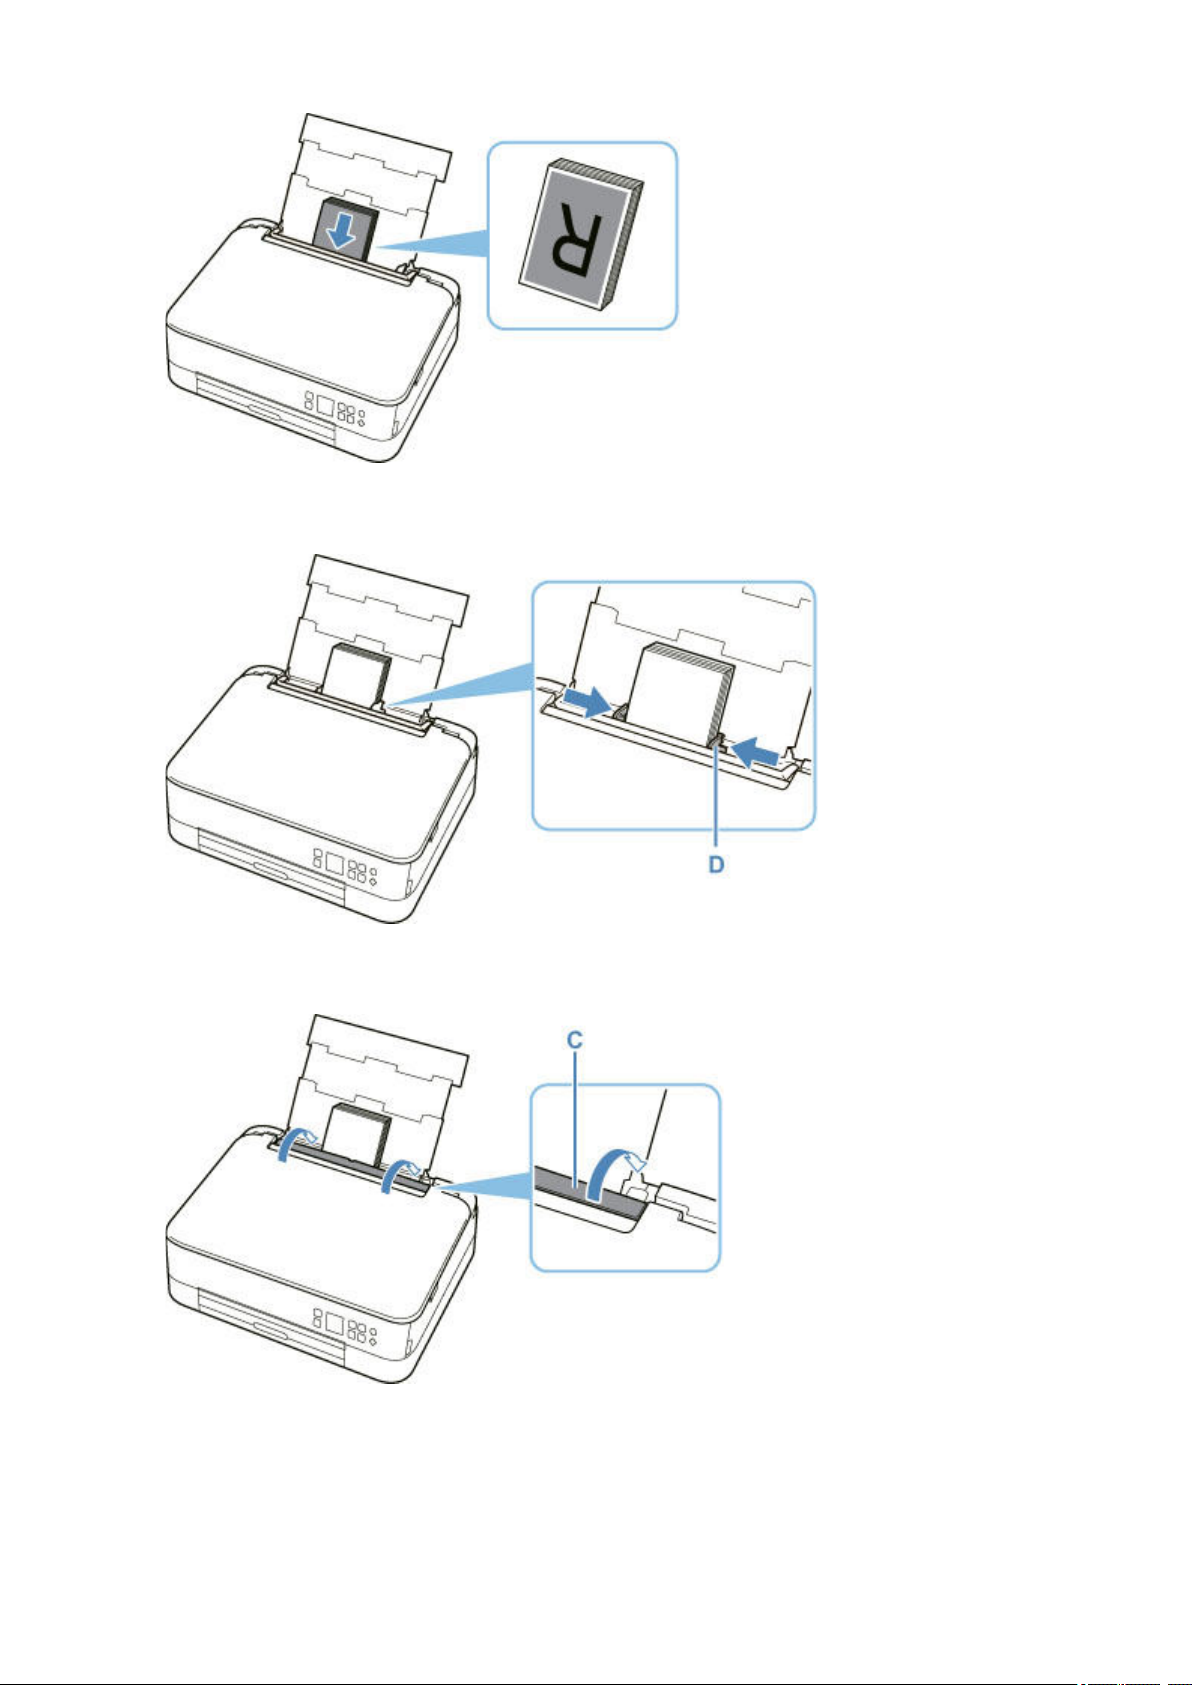
5. Slide right paper guide (D) to align with both sides of paper stack.
6. Close feed slot cover (C) gently.
After closing the feed slot cover, the paper setting confirmation screen for the rear tray appears on the
LCD.
29
Page 30
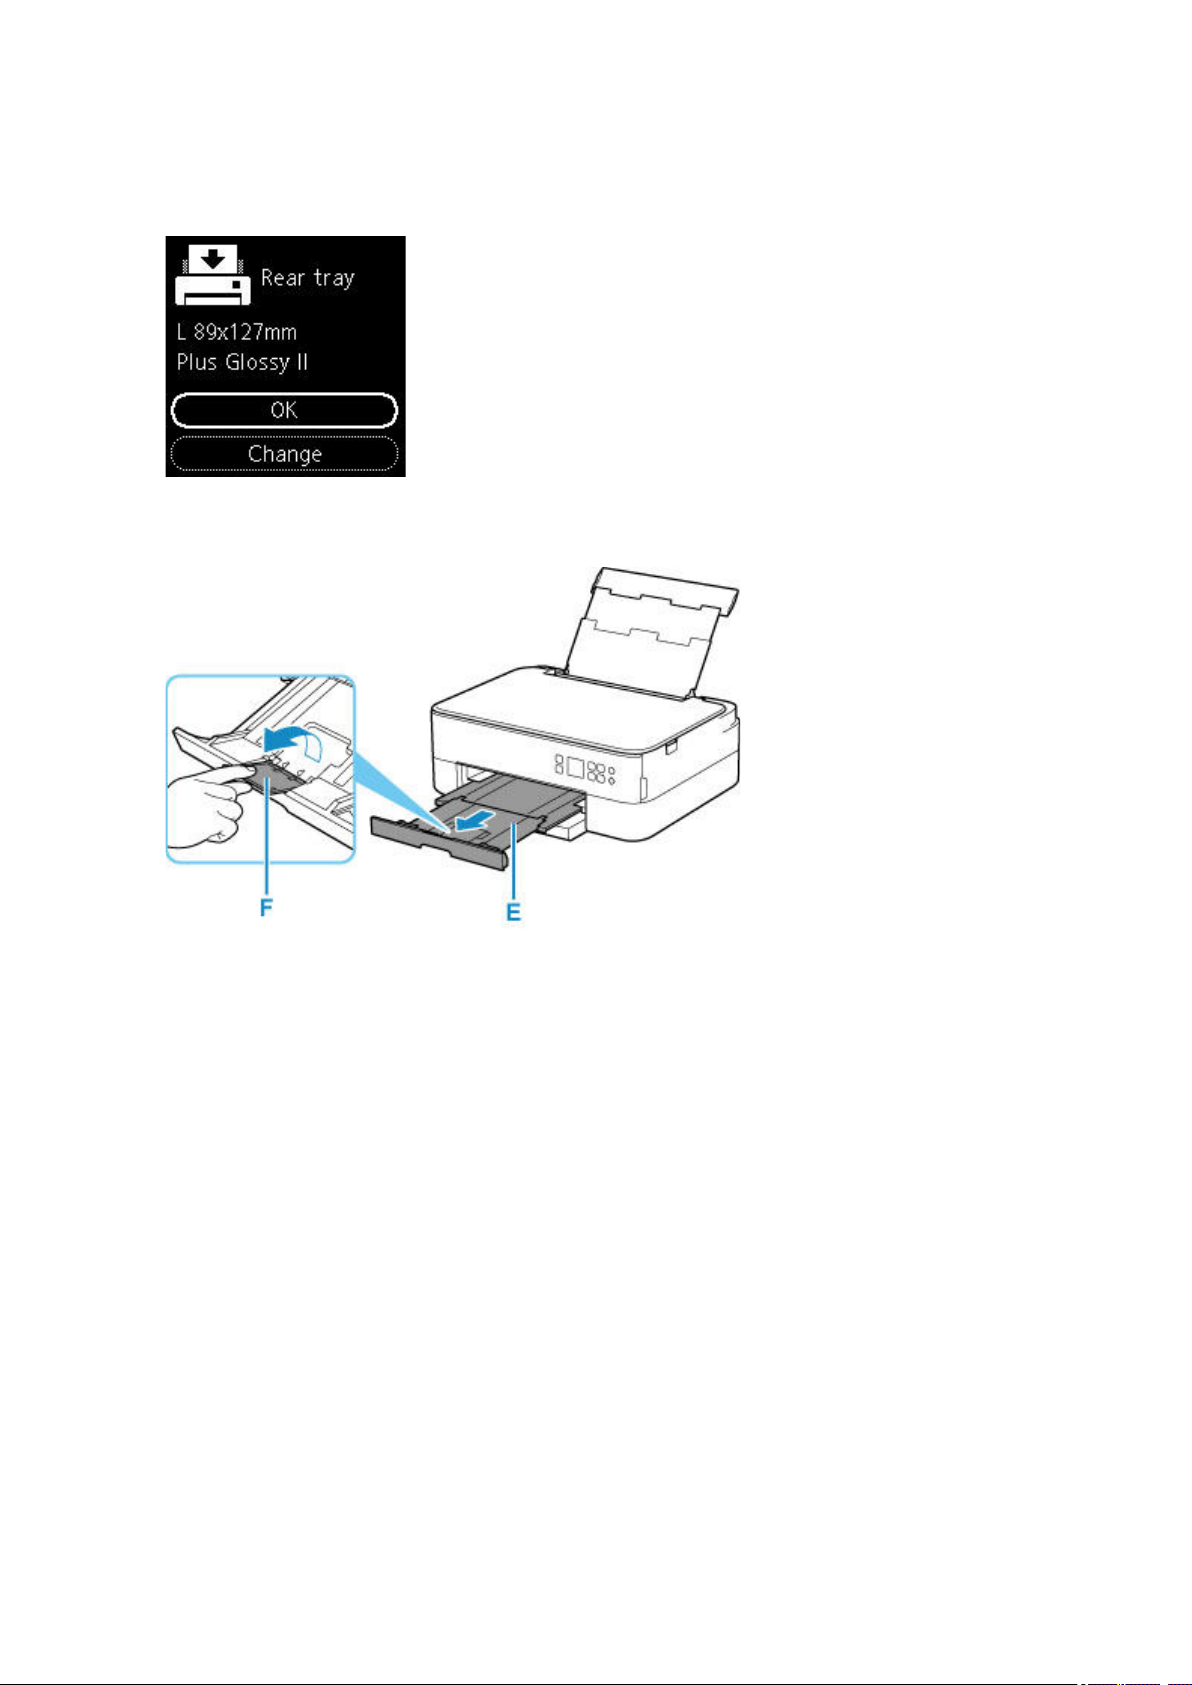
7. If page size and media type on LCD match size and type of paper loaded in rear tray, select
OK.
If not, select Change to change the settings in accordance with the size and type of the loaded paper.
8. Pull out the paper output tray (E) and open the paper output support (F).
9. Start Easy-PhotoPrint Editor.
For Windows:
The procedure below is for a computer running the Windows 10 operating system.
From the Start menu, select (All apps >) Canon Utilities > Easy-PhotoPrint Editor.
For macOS:
From the Go menu in Finder, select Application and double-click the Canon Utilities folder, the EasyPhotoPrint Editor folder, and then the Easy-PhotoPrint Editor icon.
10. Click Photos icon (G).
30
Page 31
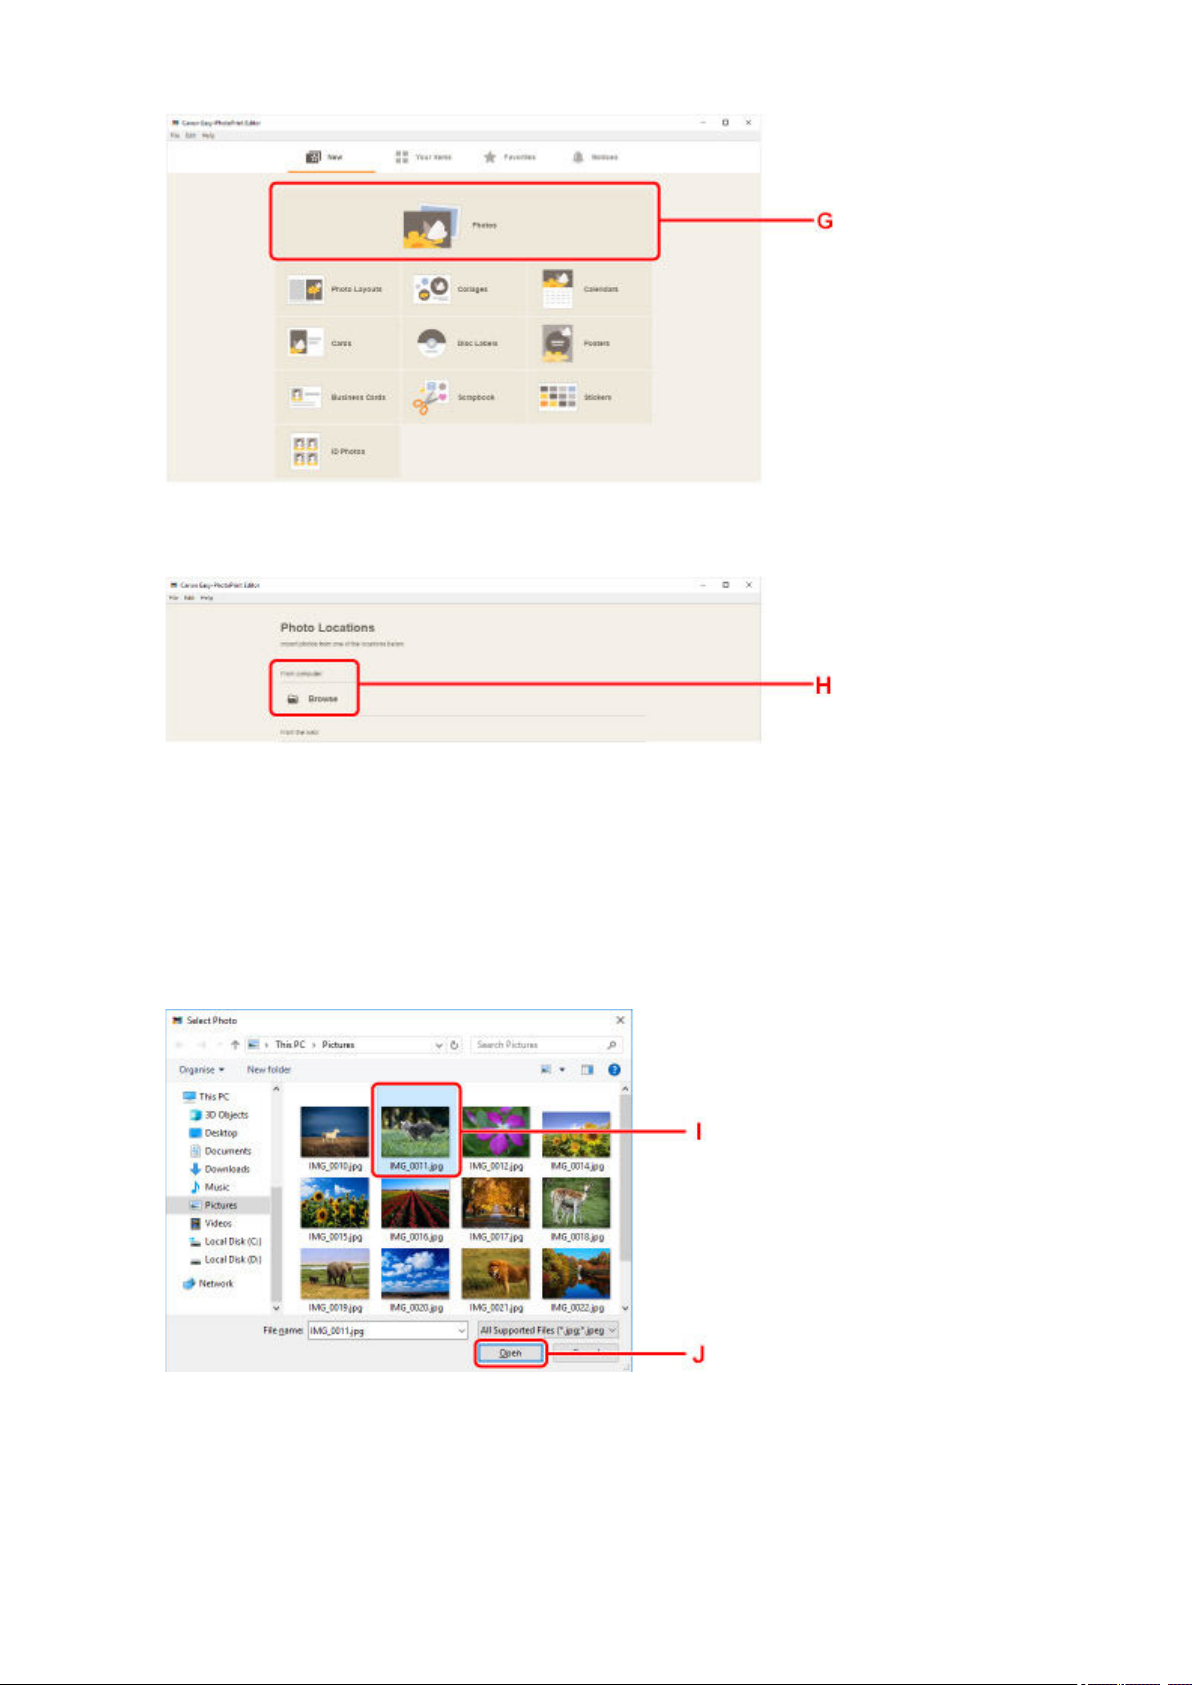
11. Click Browse (H) in Computer: and select folder with photos you want to print.
12. Click photos (I) you want to print and select Open (J).
For Windows:
To select two or more photos at a time, click photos while pressing the Ctrl key.
For macOS:
To select two or more photos at a time, click photos while pressing the command key.
13. Specify number of copies and other options under Print Settings (K).
For Windows:
Specify the number of copies, your model name, the paper size, and other options.
31
Page 32
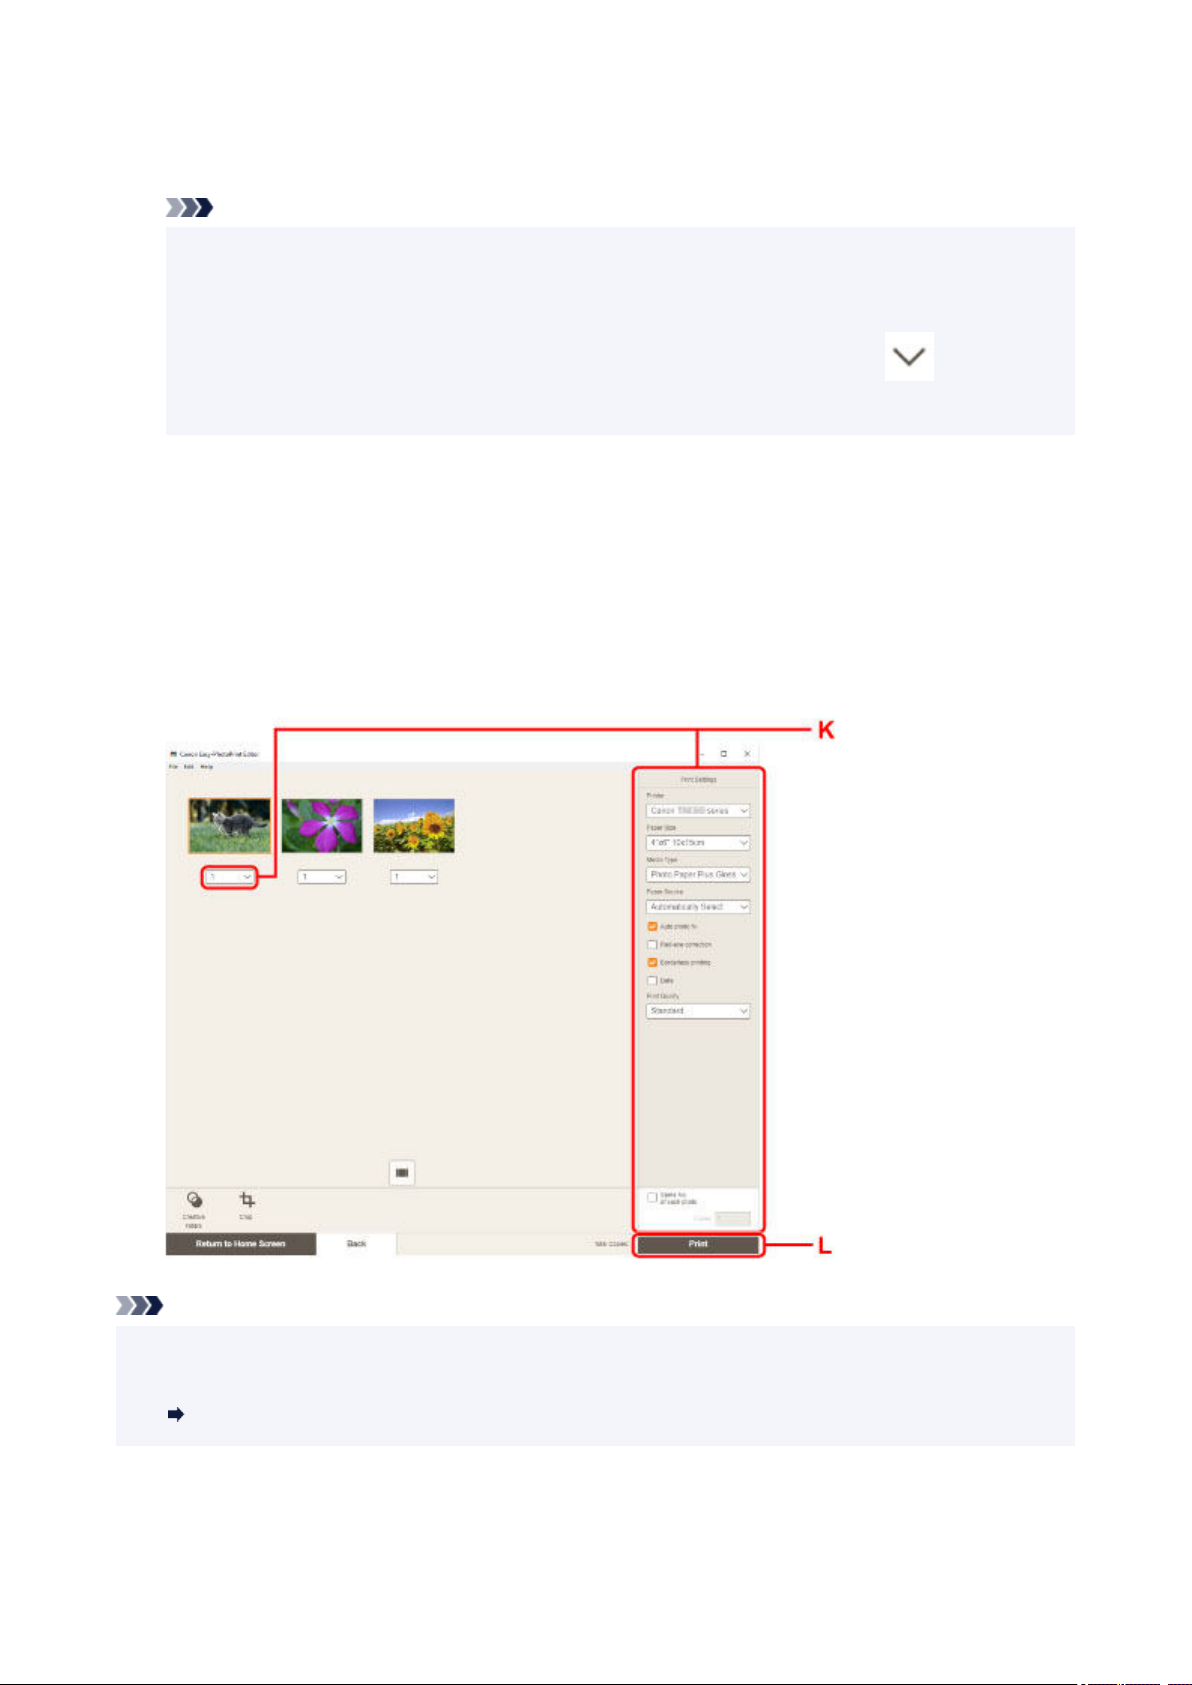
For macOS:
Specify the number of copies, the paper size, and other options.
Note
• Selecting Same No. of each photo enables you to specify the number of copies for all photos
with a single setting.
• Selecting Same No. of each photo disables the number-of-copies setting specified for each
photo. When unchecked, the previous settings for each copy are re-enabled.
the number of copies is also re-enabled.
for specifying
14. Start printing.
For Windows:
Click Print (L).
For macOS:
Click Next. When the Print dialog appears, specify your model name, paper, and other options, and then
click Print.
Note
• Easy-PhotoPrint Editor lets you easily create and print original collages, cards, or calendars using your
favorite photos.
Easy-PhotoPrint Editor Guide
32
Page 33
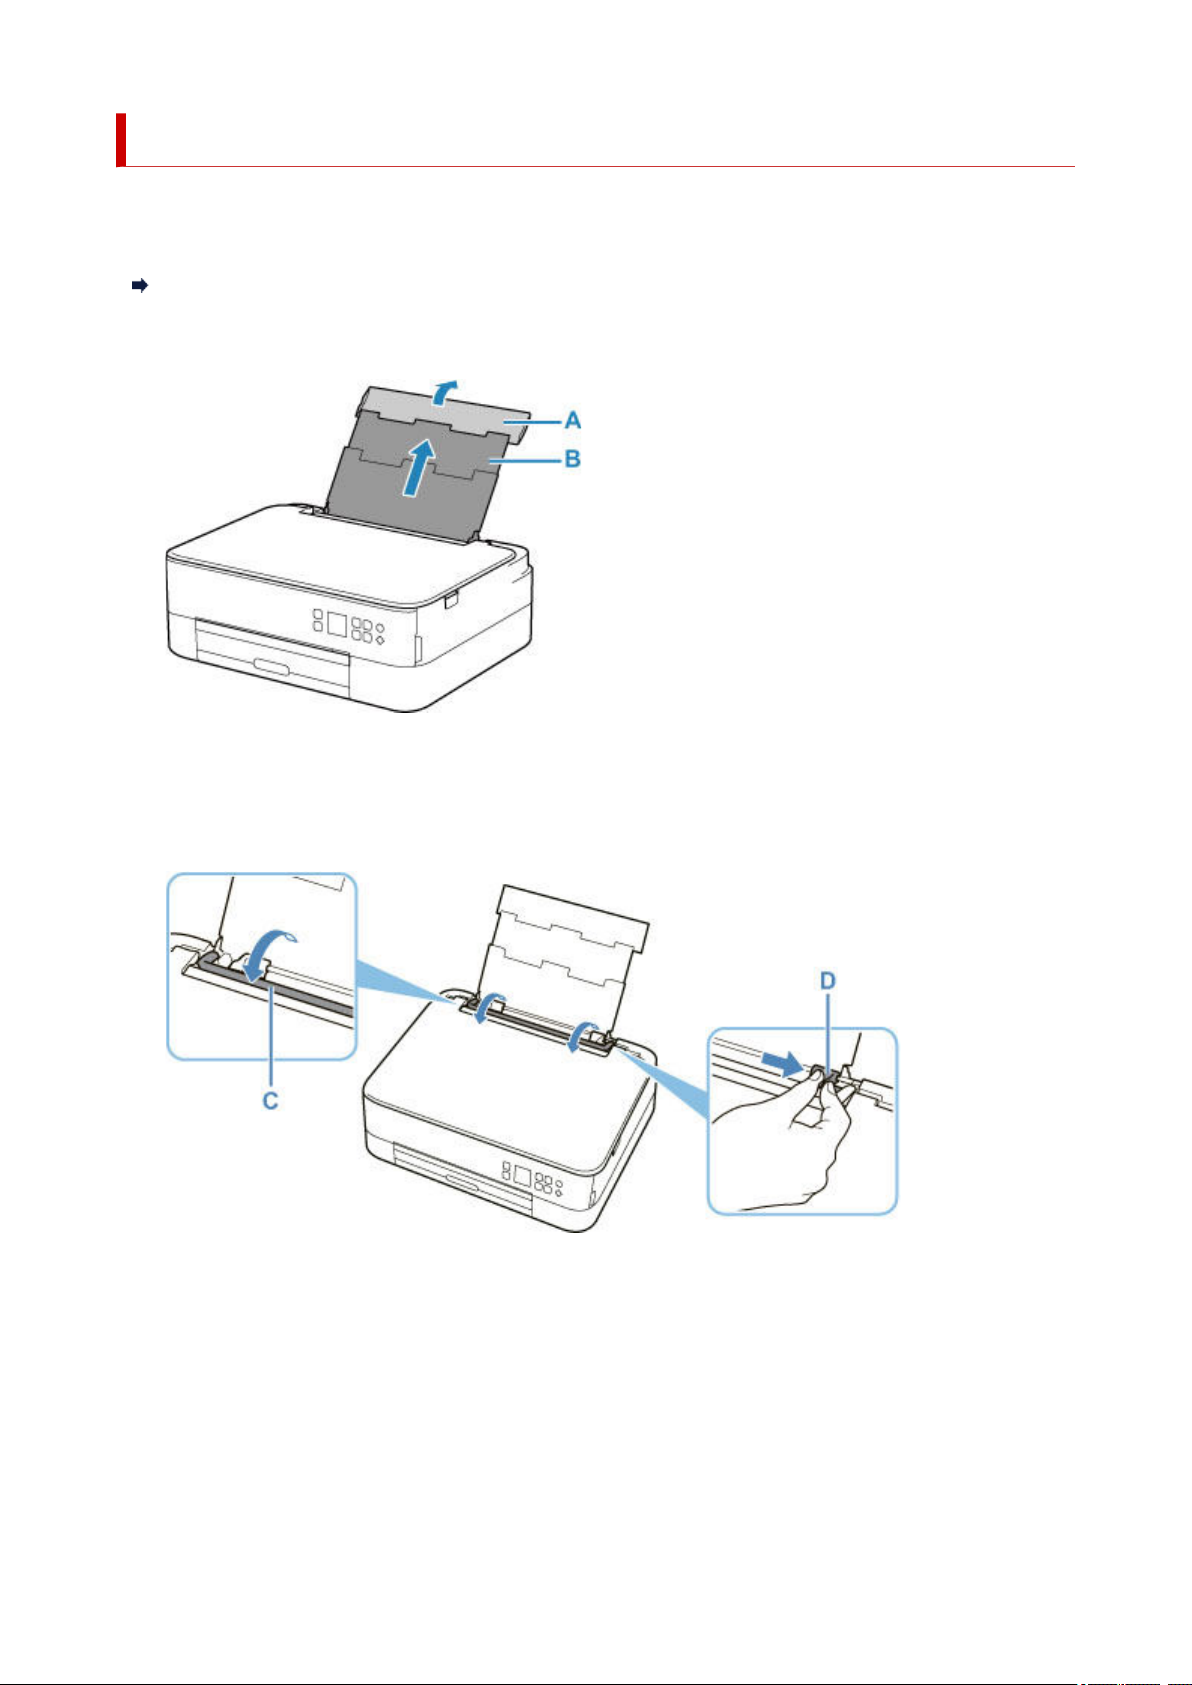
Printing Photos from a Smartphone/Tablet
This section describes how to print photos with Canon PRINT Inkjet/SELPHY.
For details on how to download Canon PRINT Inkjet/SELPHY, see below.
Print Photos from Your Smartphone
1. Open rear tray cover (A). Pull straight up and fold back paper support (B).
2. Open the feed slot cover (C).
3. Slide right paper guide (D) to open both paper guides.
4. Load photo paper in portrait orientation WITH PRINT SIDE FACING UP.
33
Page 34
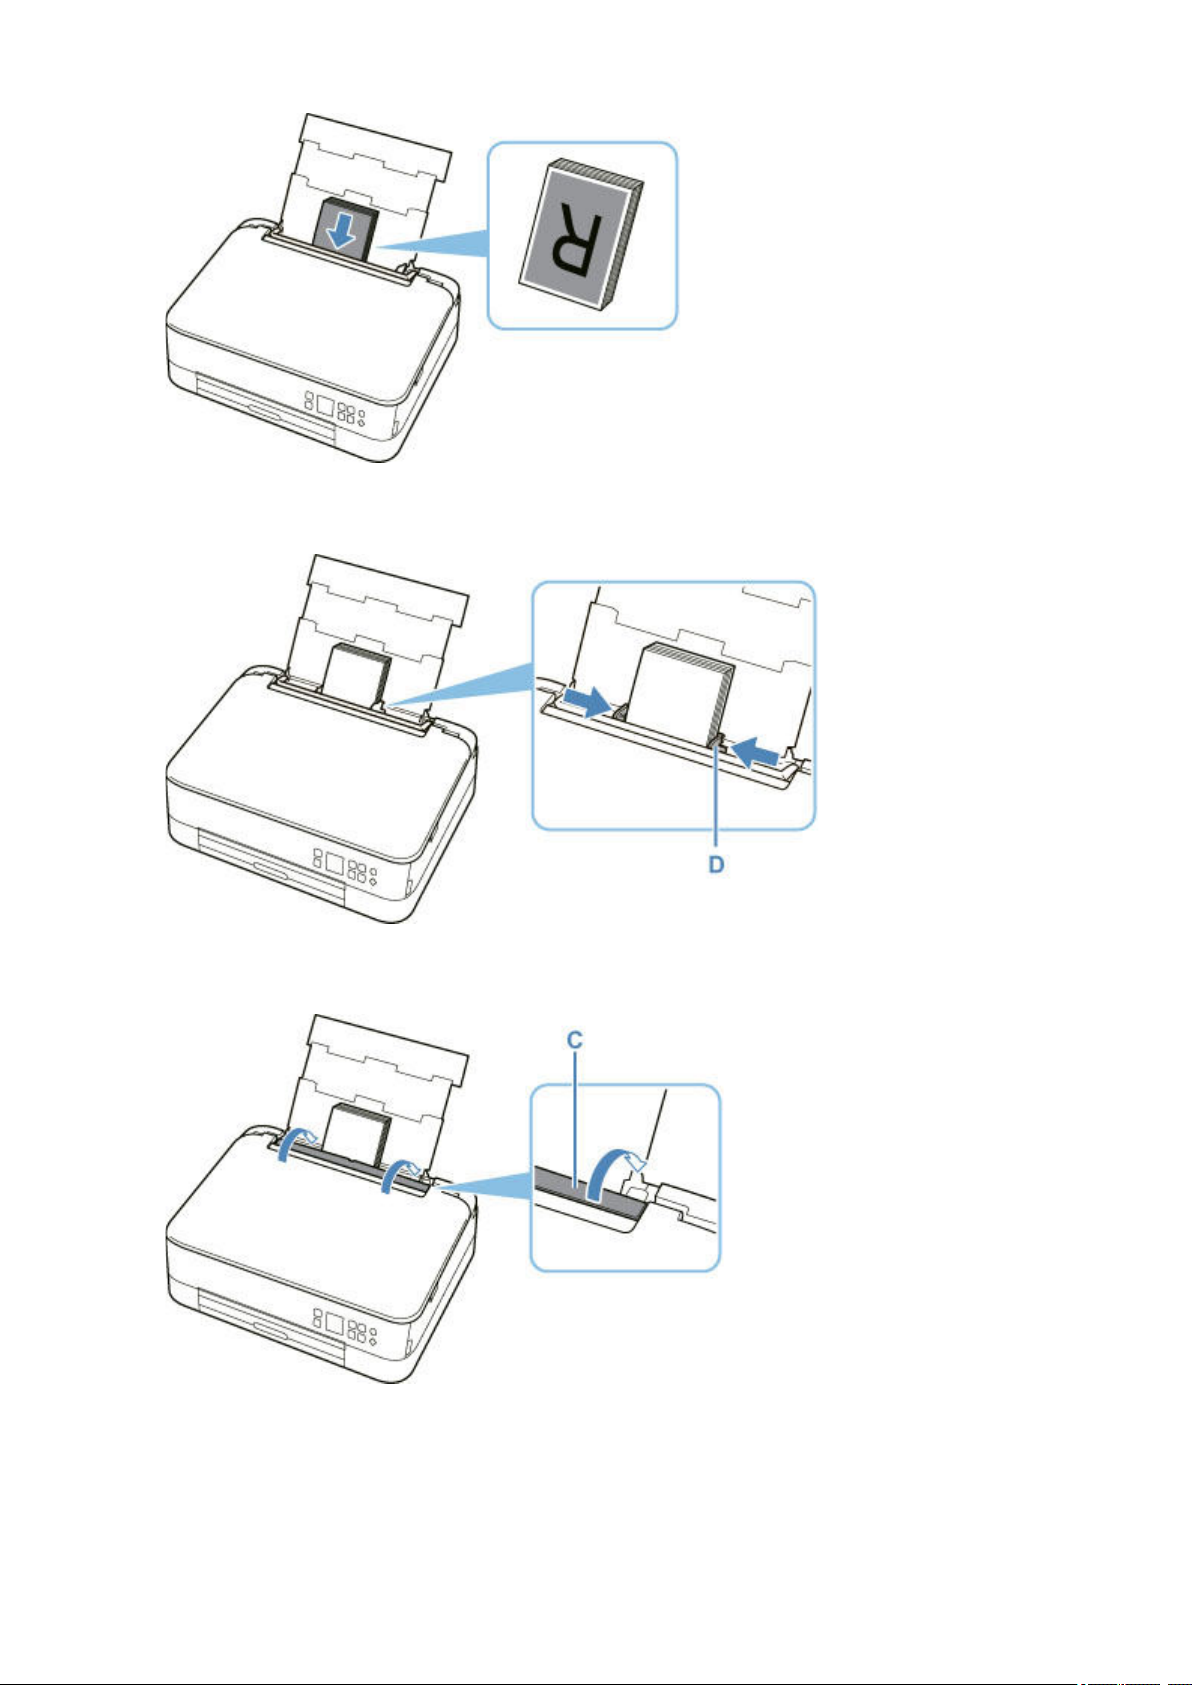
5. Slide right paper guide (D) to align with both sides of paper stack.
6. Close feed slot cover (C) gently.
After closing the feed slot cover, the paper setting confirmation screen for the rear tray appears on the
LCD.
34
Page 35
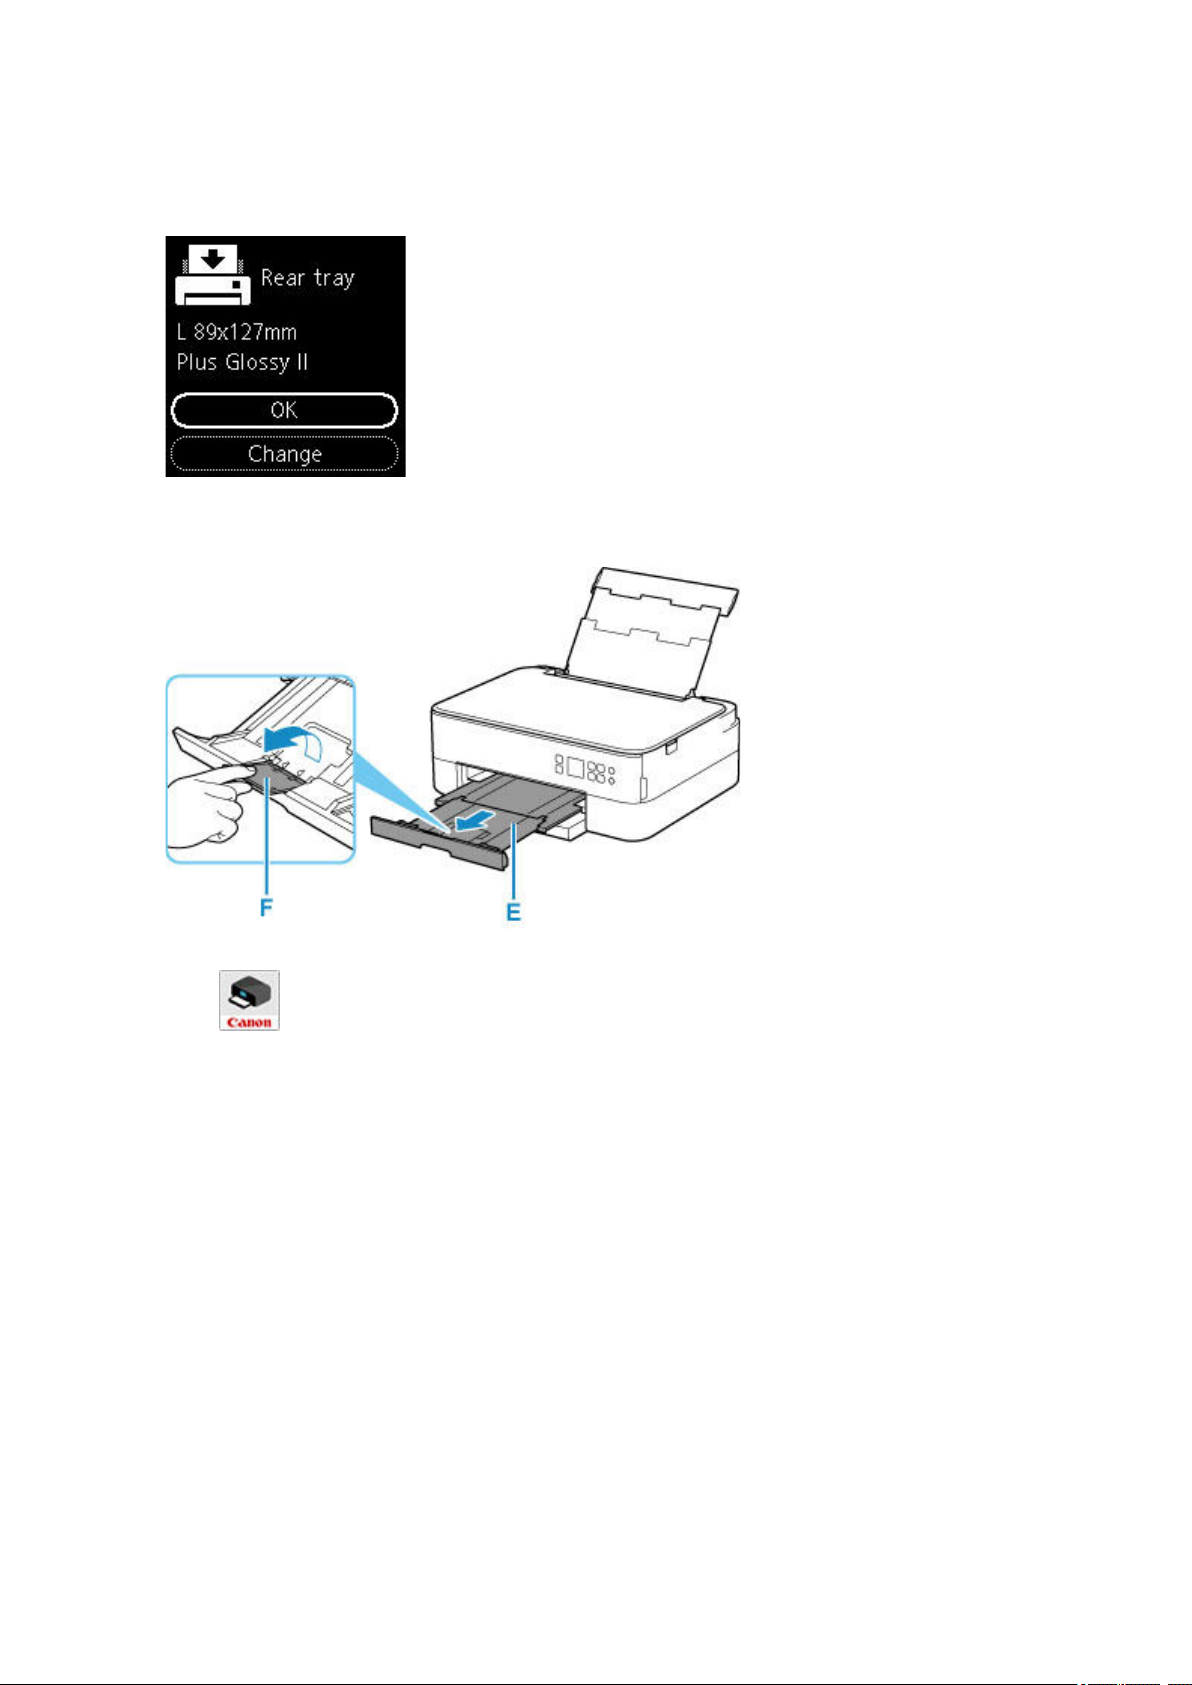
7. If page size and media type on LCD match size and type of paper loaded in rear tray, select
OK.
If not, select Change to change the settings in accordance with the size and type of the loaded paper.
8. Pull out the paper output tray (E) and open the paper output support (F).
9. Start (Canon PRINT Inkjet/SELPHY) from your smartphone/tablet.
10. Select Photo Print on Canon PRINT Inkjet/SELPHY.
The list of photos saved on your smartphone/tablet is displayed.
11. Select a photo.
You can also select multiple photos at once.
12. Specify the number of copies, paper size, etc.
13. Start printing.
35
Page 36
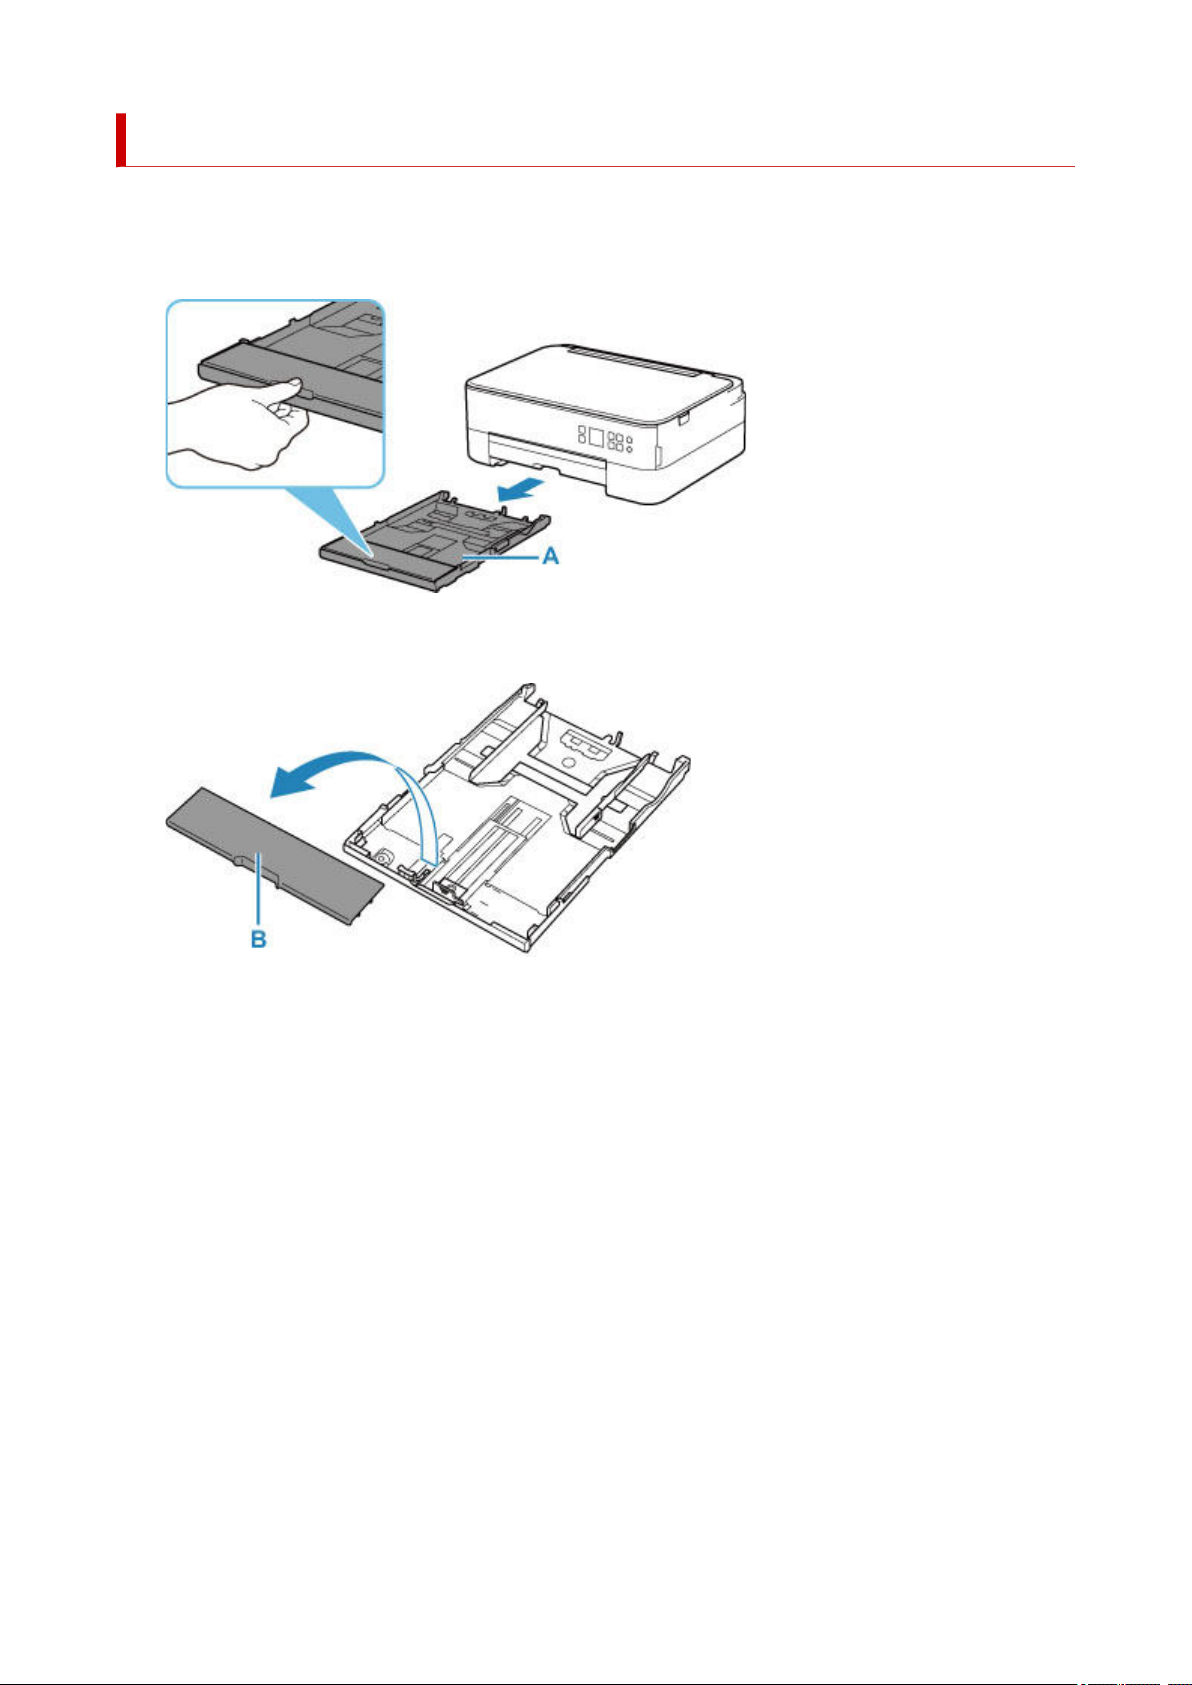
Copying
This section describes how to load originals and copy them to plain paper loaded in the cassette.
1. Pull out the cassette (A) from the printer.
2. Remove the cassette cover (B).
3. Slide paper guides (C) in front and (D) on right to open guides.
4. Load plain paper in portrait orientation WITH PRINT SIDE FACING DOWN.
36
Page 37
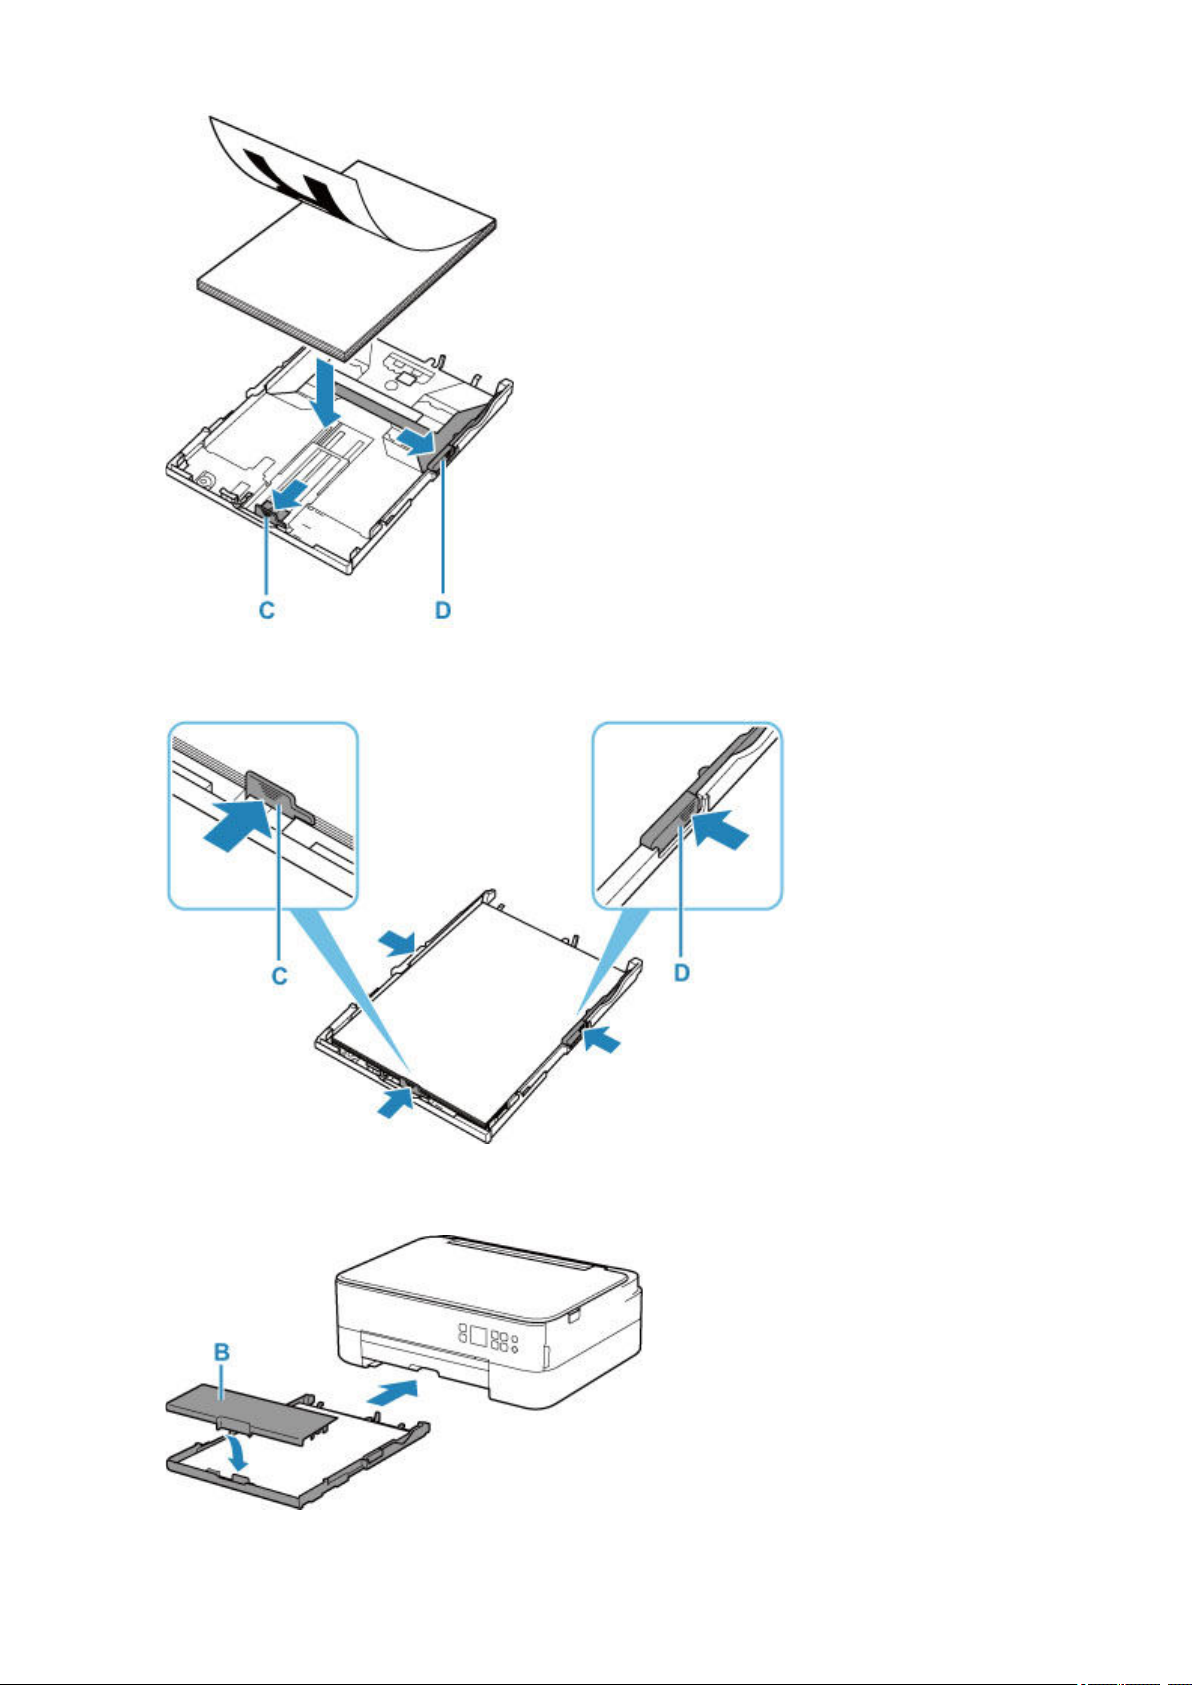
5. Align paper guides (C) in front and (D) on right with paper length and width.
6. Mount cassette cover (B) and insert cassette into printer.
37
Page 38
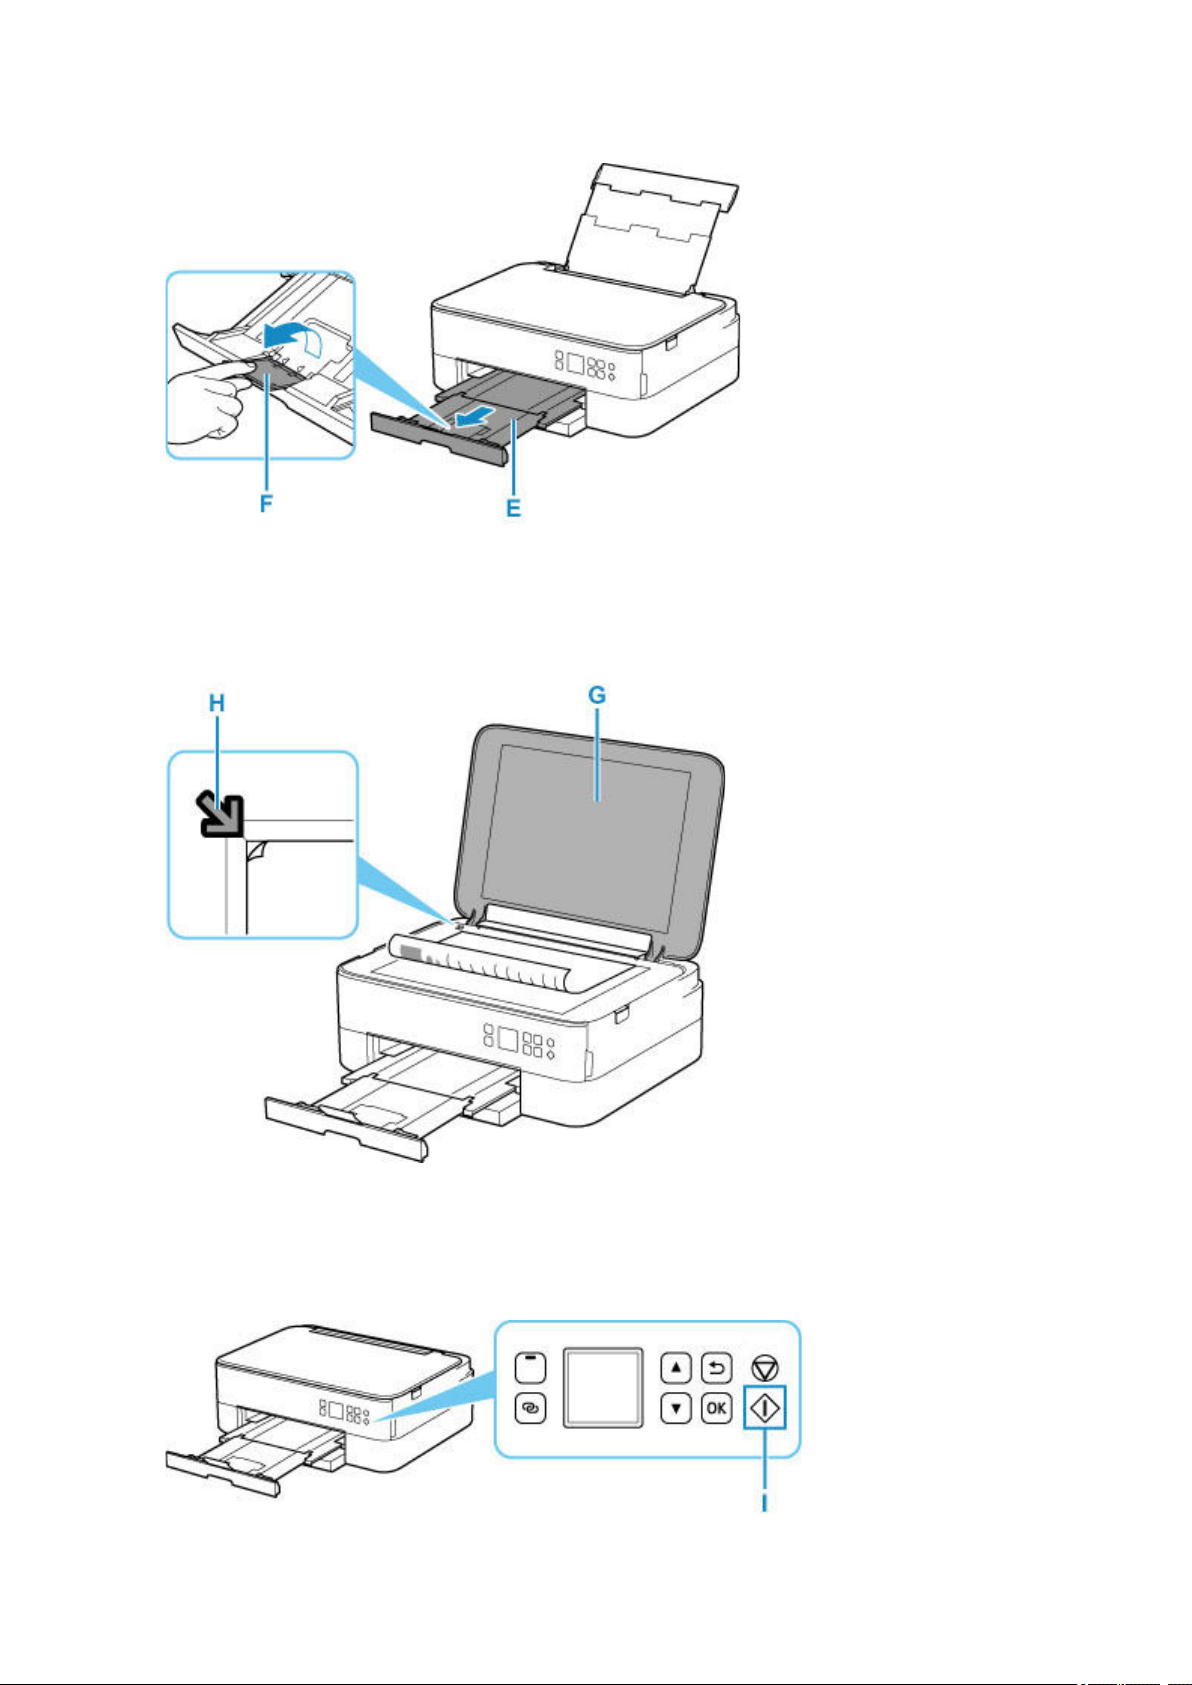
7. Pull out the paper output tray (E) and open the paper output support (F).
8. Open document cover (G).
9. Load original WITH SIDE TO COPY FACING DOWN and align it with alignment mark (H).
10. Close the document cover.
11. Check paper settings and press Start button (I).
38
Page 39

Important
• Do not open the document cover until copying is complete.
Note
• Your printer is equipped with many other convenient copy features.
Copying
39
Page 40
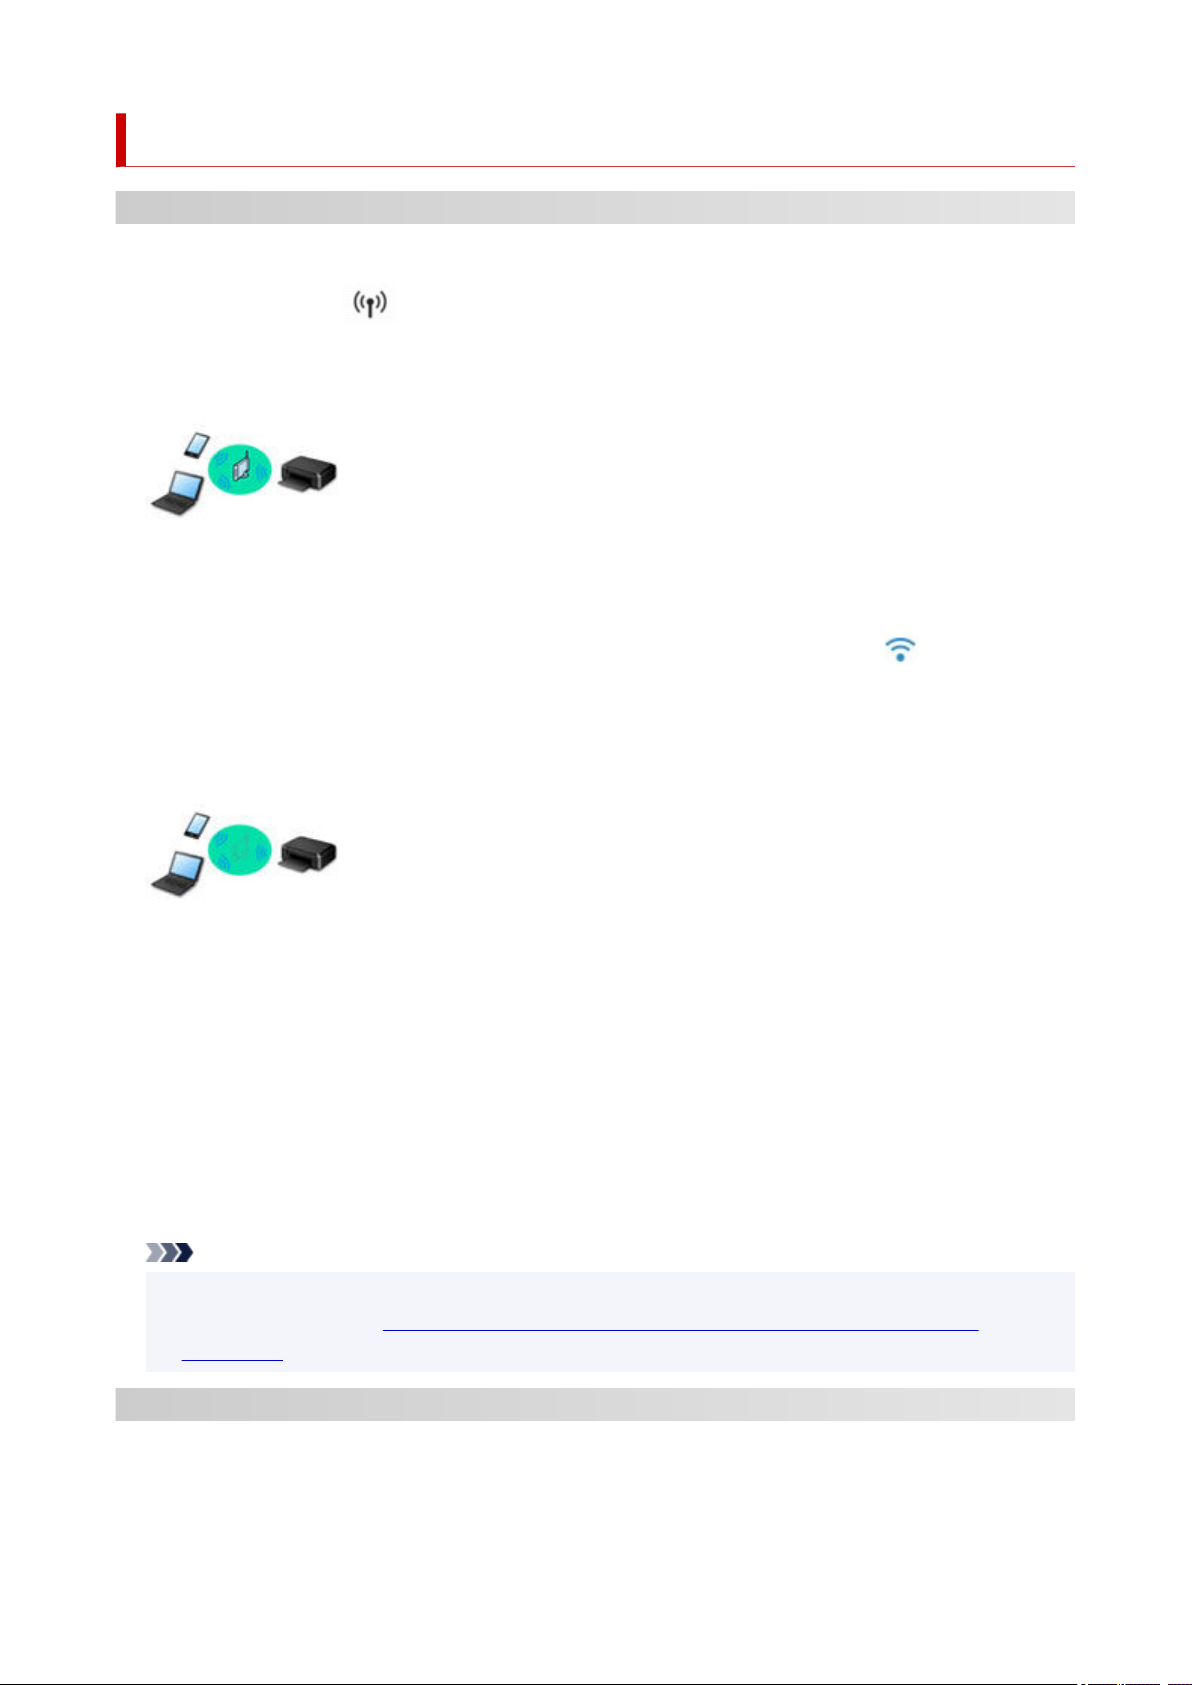
Network
Available Connection Methods
The following connection methods are available on the printer.
• Wireless Connection
Connect the printer and devices (e.g. computer/smartphone/tablet) using a wireless router.
If you have a wireless router, we recommend you use one for wireless connection.
◦ Connection methods vary depending on the wireless router type.
◦ You can change network settings such as the network name (SSID) and security protocol on the
printer.
◦ When the connection between a device and a wireless router is completed and
displayed in the device's screen, you can connect the device to the printer using the wireless router.
• Wireless Direct
Connect the printer and devices (e.g. computer/smartphone/tablet) without using a wireless router.
◦ While you are using the printer with Wireless Direct, Internet connection from the printer becomes
unavailable. In that case, web services for the printer cannot be used.
◦ If you connect a device connected to the Internet via a wireless router to the printer that is in the
Wireless Direct, the connection between the device and wireless router will be disabled. In that case,
the connection of the device may switch to a mobile data connection automatically depending on
your device. Transmission fees for connecting to the Internet using a mobile data connection apply.
◦ In the Wireless Direct, you can connect up to five devices at the same time. If you try to connect a
sixth device while five devices are already connected, an error will appear. If an error appears,
disconnect a device you do not use and configure settings again.
◦ Network settings such as the network name (SSID) and security protocol are specified automatically.
(Wi-Fi icon) is
Note
• You can connect the printer and computer using a USB cable (USB connection). Prepare a USB
cable. For details, see
Connection.
Network Connection Settings/Setup
Perform connection setup for the printer and computer/smartphone/tablet.
For more on setup procedure, click here.
Connects to Another Computer via LAN/Changes from USB to LAN
40
Page 41

Changing Network Settings
See below for changing connection settings for the printer and computer/smartphone/tablet.
• To change network connection method:
Reconfiguration Method of Wi-Fi Connection
Changing the Connection Mode
• To add computer/smartphone/tablet to the printer:
Connects to Another Computer via LAN/Changes from USB to LAN Connection
• To use Wireless Direct temporarily:
Printing/Scanning with Wireless Direct
IJ Network Device Setup Utility
IJ Network Device Setup Utility checks or diagnoses the settings of the printer and those of computer and
restores the status of them if anything is wrong with network connection. Select either link below to download
IJ Network Device Setup Utility.
Checking Printer Connection Status Using IJ Network Device Setup Utility
• Performing/Changing Network Settings (Windows)
For Windows, you can perform network settings using IJ Network Device Setup Utility.
IJ Network Device Setup Utility (Windows)
• Diagnosing and Repairing Network Settings (Windows/macOS)
You can diagnose or repair network settings using IJ Network Device Setup Utility.
◦ For Windows:
IJ Network Device Setup Utility (Windows)
◦ For macOS:
IJ Network Device Setup Utility (macOS)
Network Connection Tips
See below for tips on using the printer via network connection.
Network Connection Tips
Handling Printer Configuration using the Web Browser
Countermeasures against Unauthorized Access
Troubleshooting
See Network Settings and Common Problems for troubleshooting on network connection.
Notice/Restriction
See below for details.
• Restrictions on network settings:
Restrictions
• Notices when printing using web service:
Notice for Web Service Printing
41
Page 42

Restrictions
When connecting another device while a device (such as a computer) is already connected to the printer,
connect it using the same connection method as the connected device.
If you connect using a different connection method, the connection to the device in use will be disabled.
Connect via wireless router
• Make sure your device and the wireless router are connected. For details on checking these settings,
see the manual supplied with the wireless router or contact its manufacturer.
As for a device already connected to the printer without using a wireless router, reconnect it via a
wireless router.
• Configuration, router functions, setup procedures and security settings of wireless routers vary
depending on the system environment. For details, see the manual for your wireless router or contact
its manufacturer.
• This printer does not support IEEE802.11ac, IEEE802.11a, or IEEE802.11n (5 GHz). Check if your
device supports IEEE802.11n (2.4 GHz), IEEE802.11g or IEEE802.11b.
• If your device is set to the "IEEE802.11n only" mode, WEP or TKIP cannot be used as a security
protocol. Change the security protocol for your device to something other than WEP and TKIP or
change the setting to something other than "IEEE802.11n only."
The connection between your device and the wireless router will be temporarily disabled while the
setting is changed. Do not proceed to the next screen of this guide until setup is complete.
• For office use, consult your network administrator.
• Note that if you connect to a network with no security protection, your personal information could be
disclosed to a third party.
Wireless Direct
Important
• If a device is connected to the Internet via a wireless router, and you then connect it to a printer in
Wireless Direct mode, the existing connection between the device and wireless router will be
disabled. In that case, the connection of the device may switch to a mobile data connection
automatically depending on your device. When you connect to the Internet using a mobile data
connection, charges may apply depending on your contract.
When you connect a device and the printer using Wireless Direct, the connection information
will be saved to Wi-Fi settings. The device may be connected to the printer automatically even
after disconnecting it or connecting it to another wireless router.
To prevent automatic connection to the printer in Wireless Direct mode, change the connection
mode after using the printer, or set not to connect automatically in the Wi-Fi settings of the
device.
For details on changing the settings of your device, see the manual supplied with the device or
contact its manufacturer.
• If you connect a device and the printer using Wireless Direct, Internet connection may become
unavailable depending on your environment. In that case, web services for the printer cannot be used.
42
Page 43

• In Wireless Direct mode, you can connect up to five devices at the same time. If you try to connect a
sixth device while five devices are already connected, an error will appear.
If an error appears, disconnect a device that does not use the printer, then configure settings again.
• Devices connected to the printer using Wireless Direct cannot communicate with each other.
• Firmware updates for the printer are not available while using Wireless Direct.
• When a device has been connected to the printer without using a wireless router and you want to set
it up again using the same connection method, disconnect it first. Disable the connection between the
device and printer in the Wi-Fi setting screen.
43
Page 44

Network Connection Tips
Default Network Settings
Detect Same Printer Name
Connects to Another Computer via LAN/Changes from USB to LAN Connection
Printing Network Settings
Reconfiguration Method of Wi-Fi Connection
44
Page 45

Default Network Settings
LAN Connection Defaults
Item Default
Enable/Disable LAN Disable LAN
Network name(SSID) BJNPSETUP
Wi-Fi security Disable
IP address (IPv4) Auto setup
IP address (IPv6) Auto setup
Set printer name* XXXXXXXXXXXX
Enable/disable IPv6 Enable
Enable/disable WSD Enable
Timeout setting 15 min.
Enable/disable Bonjour Enable
Service name Canon TS5300 series
LPR protocol setting Enable
RAW protocol Enable
LLMNR Enable
PictBridge communication (Enable/disable communication) Enable
("XX" represents alphanumeric characters.)
* Default value depends on printer. To check value, use operation panel.
LAN settings
Wireless Direct Defaults
Item Default
SSID/device name DIRECT-abXX-TS5300series *1
Password YYYYYYYYYY *2
Wi-Fi security WPA2-PSK (AES)
Connection request confirmation Displayed
45
Page 46

*1 "ab" is specified at random and "XX" represents last two digits of printer's MAC address. (The value is
specified when the printer is turned on for the first time.)
*2 The password is specified automatically when the printer is turned on for the first time.
46
Page 47

Detect Same Printer Name
When the printer is detected during setup, plural printers with the same name may appear on the results
screen.
Select a printer with checking the printer settings against those on detection result screen.
• For Windows:
Check the printer's MAC address or serial to select the correct printer from the results.
• For macOS:
The printer names appear with the MAC address added at the end or as the printer name specified by
Bonjour.
Check identifiers such as the MAC address, the printer name specified by Bonjour, and the printer's
serial number to select the printer from among those that appear.
Note
• Serial number may not appear on result screen.
To check the printer's MAC address and the serial number, print out the network settings information.
Printing Network Settings
Note
• You can check the printer's MAC address and the serial number by displaying on the LCD.
System information
47
Page 48

Connects to Another Computer via LAN/Changes from USB to
LAN Connection
To connect an additional computer to the printer via LAN, or to change from USB to LAN connection, click
here and perform setup.
48
Page 49
Printing Network Settings
Use the operation panel to print the printer's current network settings.
Important
• The network settings printout contains important information about your network. Handle it with care.
1.
Check that printer is turned on.
2. Load three sheets of A4 or Letter-sized plain paper.
3. Press OK button on HOME screen.
4. Select Device settings and press OK button.
5. Select LAN settings and press OK button.
6. Select Print details and press OK button.
7. Select Yes and press OK button.
The printer starts printing the network setting information.
The following information on the printer's network setting is printed out. (Some setting values are not
displayed depending on the printer settings.)
Item Number
1 Product Information Product information –
1-1 Product Name Product name XXXXXXXX
1-2 ROM Version ROM version XXXXXXXX
1-3 Serial Number Serial number XXXXXXXX
2 Network Diagnostics Network diagnostics –
2-1 Diagnostic Result Diagnostic result XXXXXXXX
2-2 Result Codes Result codes XXXXXXXX
2-3 Result Code Details Result code details http://canon.com/ijnwt
Item Description Setting
3 Wireless LAN Wireless LAN Enable/Disable
3-2 Infrastructure Infrastructure Enable/Disable
3-2-1 Signal Strength Signal strength 0 to 100 [%]
49
Page 50

3-2-2 Link Quality Link quality 0 to 100 [%]
3-2-3 Frequency Frequency XX (GHz)
3-2-4 MAC Address MAC address XX:XX:XX:XX:XX:XX
3-2-5 Connection Connection status Active/Inactive
3-2-6 SSID SSID Wireless LAN network name (SSID)
3-2-7 Channel Channel XX (1 to 13)
3-2-8 Encryption Encryption method None/WEP/TKIP/AES
3-2-9 WEP Key Length WEP key length (bits) Inactive/128/64
3-2-10 Authentication Authentication method None/auto/open/shared/WPA-PSK/WPA2-PSK
3-2-11 TCP/IPv4 TCP/IPv4 Enable
3-2-12 IP Address IP address XXX.XXX.XXX.XXX
3-2-13 Subnet Mask Subnet mask XXX.XXX.XXX.XXX
3-2-14 Default Gateway Default gateway XXX.XXX.XXX.XXX
3-2-15 TCP/IPv6 TCP/IPv6 Enable/Disable
3-2-16 Link Local Address Link local address XXXX:XXXX:XXXX:XXXX
XXXX:XXXX:XXXX:XXXX
3-2-17 Link Local Prefix
Length
3-2-18 Stateless Address1 Stateless address 1 XXXX:XXXX:XXXX:XXXX
3-2-19 Stateless Prefix
Length1
3-2-20 Stateless Address2 Stateless address 2 XXXX:XXXX:XXXX:XXXX
3-2-21 Stateless Prefix
Length2
3-2-22 Stateless Address3 Stateless address 3 XXXX:XXXX:XXXX:XXXX
Link local prefix length XXX
XXXX:XXXX:XXXX:XXXX
Stateless prefix length1XXX
XXXX:XXXX:XXXX:XXXX
Stateless prefix length2XXX
XXXX:XXXX:XXXX:XXXX
3-2-23 Stateless Prefix
Length3
3-2-24 Stateless Address4 Stateless address 4 XXXX:XXXX:XXXX:XXXX
Stateless prefix length3XXX
XXXX:XXXX:XXXX:XXXX
50
Page 51

3-2-25 Stateless Prefix
Length4
3-2-26 Default Gateway1 Default gateway 1 XXXX:XXXX:XXXX:XXXX
3-2-27 Default Gateway2 Default gateway 2 XXXX:XXXX:XXXX:XXXX
3-2-28 Default Gateway3 Default gateway 3 XXXX:XXXX:XXXX:XXXX
3-2-29 Default Gateway4 Default gateway 4 XXXX:XXXX:XXXX:XXXX
3-2-33 IPsec IPsec setting Active
3-2-34 Security Protocol Security method ESP/ESP & AH/AH
Stateless prefix length4XXX
XXXX:XXXX:XXXX:XXXX
XXXX:XXXX:XXXX:XXXX
XXXX:XXXX:XXXX:XXXX
XXXX:XXXX:XXXX:XXXX
3-3 Wireless Direct Operation mode for
Wireless Direct
3-3-1 MAC Address MAC address XX:XX:XX:XX:XX:XX
3-3-2 Connection Connection status Active/Inactive
3-3-3 SSID SSID Wireless Direct network name (SSID)
3-3-4 Password Password Wireless Direct password (10 alphanumeric characters)
3-3-5 Channel Channel 3
3-3-6 Encryption Encryption method AES
3-3-7 Authentication Authentication method WPA2-PSK
3-3-8 TCP/IPv4 TCP/IPv4 Enable
3-3-9 IP Address IP address XXX.XXX.XXX.XXX
3-3-10 Subnet Mask Subnet mask XXX.XXX.XXX.XXX
3-3-11 Default Gateway Default gateway XXX.XXX.XXX.XXX
Enable/Disable
3-3-12 TCP/IPv6 TCP/IPv6 Enable/Disable
3-3-13 Link Local Address Link local address XXXX:XXXX:XXXX:XXXX
XXXX:XXXX:XXXX:XXXX
3-3-14 Link Local Prefix
Length
3-3-15 IPsec IPsec setting Active
3-3-16 Security Protocol Security method –
Link local prefix length XXX
51
Page 52

5 Other Settings Other settings –
5-1 Printer Name Printer name Printer name (Up to 15 alphanumeric characters)
5-2 Wireless Direct Dev-
Name
5-4 WSD Printing WSD printing setting Enable/Disable
5-5 WSD Timeout Timeout 1/5/10/15/20 [min]
5-6 LPD Printing LPD printing setting Enable/Disable
5-7 RAW Printing RAW printing setting Enable/Disable
5-9 Bonjour Bonjour setting Enable/Disable
5-10 Bonjour Service Name Bonjour service name Bonjour service name (Up to 52 alphanumeric characters)
5-11 LLMNR LLMNR setting Enable/Disable
5-12 SNMP SNMP setting Enable/Disable
5-13 PictBridge Commun. PictBridge Communica-
5-14 DNS Server Obtain DNS server ad-
Device name for wireless direct
tion
dress automatically
Device name for wireless direct (Up to 32 alphanumeric
characters)
Enable/Disable
Auto/Manual
5-15 Primary Server Primary server address XXX.XXX.XXX.XXX
5-16 Secondary Server Secondary server ad-
dress
5-17 Proxy Server Proxy server setting Enable/Disable
5-18 Proxy Address Proxy address XXXXXXXXXXXXXXXXXXXX
5-19 Proxy Port Proxy port specification 1 to 65535
5-20 Cert. Fingerprt(SHA-1) Certificate finger-
print(SHA-1)
5-21 Cert. Fin-
gerprt(SHA-256)
6 Bluetooth Bluetooth settings –
6-1 Bluetooth Setting Bluetooth Enable/Disable
6-3 Bluetooth Device Ad-
dress
Certificate fingerprint(SHA-256)
Bluetooth device address of the printer
XXX.XXX.XXX.XXX
xxxxxxxx xxxxxxxx xxxxxxxx
xxxxxxxx xxxxxxxx
xxxxxxxx xxxxxxxx xxxxxxxx xxxxxxxx
xxxxxxxx xxxxxxxx xxxxxxxx xxxxxxxx
XXXXXXXX
6-5 Bluetooth Device Name Bluetooth device name
of the printer
52
XXXXXXXX
Page 53

7 Web Services Web Services –
7-1 Unsent Usage Logs Number of unsent us-
age logs
7-2 Usage Log Last Sent Last date when usage
log was sent
7-3 Web Service Status Registration status Not set/Disabled/Registration pending/Registered
7-4 Log Transmission Sta-
tus
Transmission result Not activated/Processing/Server error/Connection error/
0 to 200
XXXXXXXX
Timeout error/Error/Awaiting server response/Active
("XX" represents alphanumeric characters.)
53
Page 54

Reconfiguration Method of Wi-Fi Connection
Follow either procedure below to change Wi-Fi connection method (infrastructure or Wireless Direct).
• For Windows:
◦ Click here and redo setup.
◦ Perform settings on the Network Settings screen on IJ Network Device Setup Utility.
Important
• Before you perform settings using IJ Network Device Setup Utility, turn on Easy wireless
connect mode on the printer following the procedure below.
1.
Check that printer is turned on.
2. Press and hold (Wireless connect) button for 3 seconds.
LCD and Operation Panel
3. Follow instructions on your smartphone or tablet.
4. If message saying setup is completed appears, press OK button.
• For macOS:
Click here and redo setup.
54
Page 55

IJ Network Device Setup Utility (macOS)
IJ Network Device Setup Utility
Starting Up IJ Network Device Setup Utility
Diagnosing and Repairing Network Settings
List of Models Which Does Not Support Diagnosis and Repair Function
55
Page 56

IJ Network Device Setup Utility
If anything is wrong with connection, IJ Network Device Setup Utility diagnoses the settings of the printer
and those of computer on which it is installed. In addition, IJ Network Device Setup Utility restores the status
of the printer and computer.
Important
• To use the printer over LAN, make sure you have the equipment necessary for the connection type,
such as a wireless router or a LAN cable.
• When you install IJ Network Device Setup Utility, disable block function of firewall.
56
Page 57
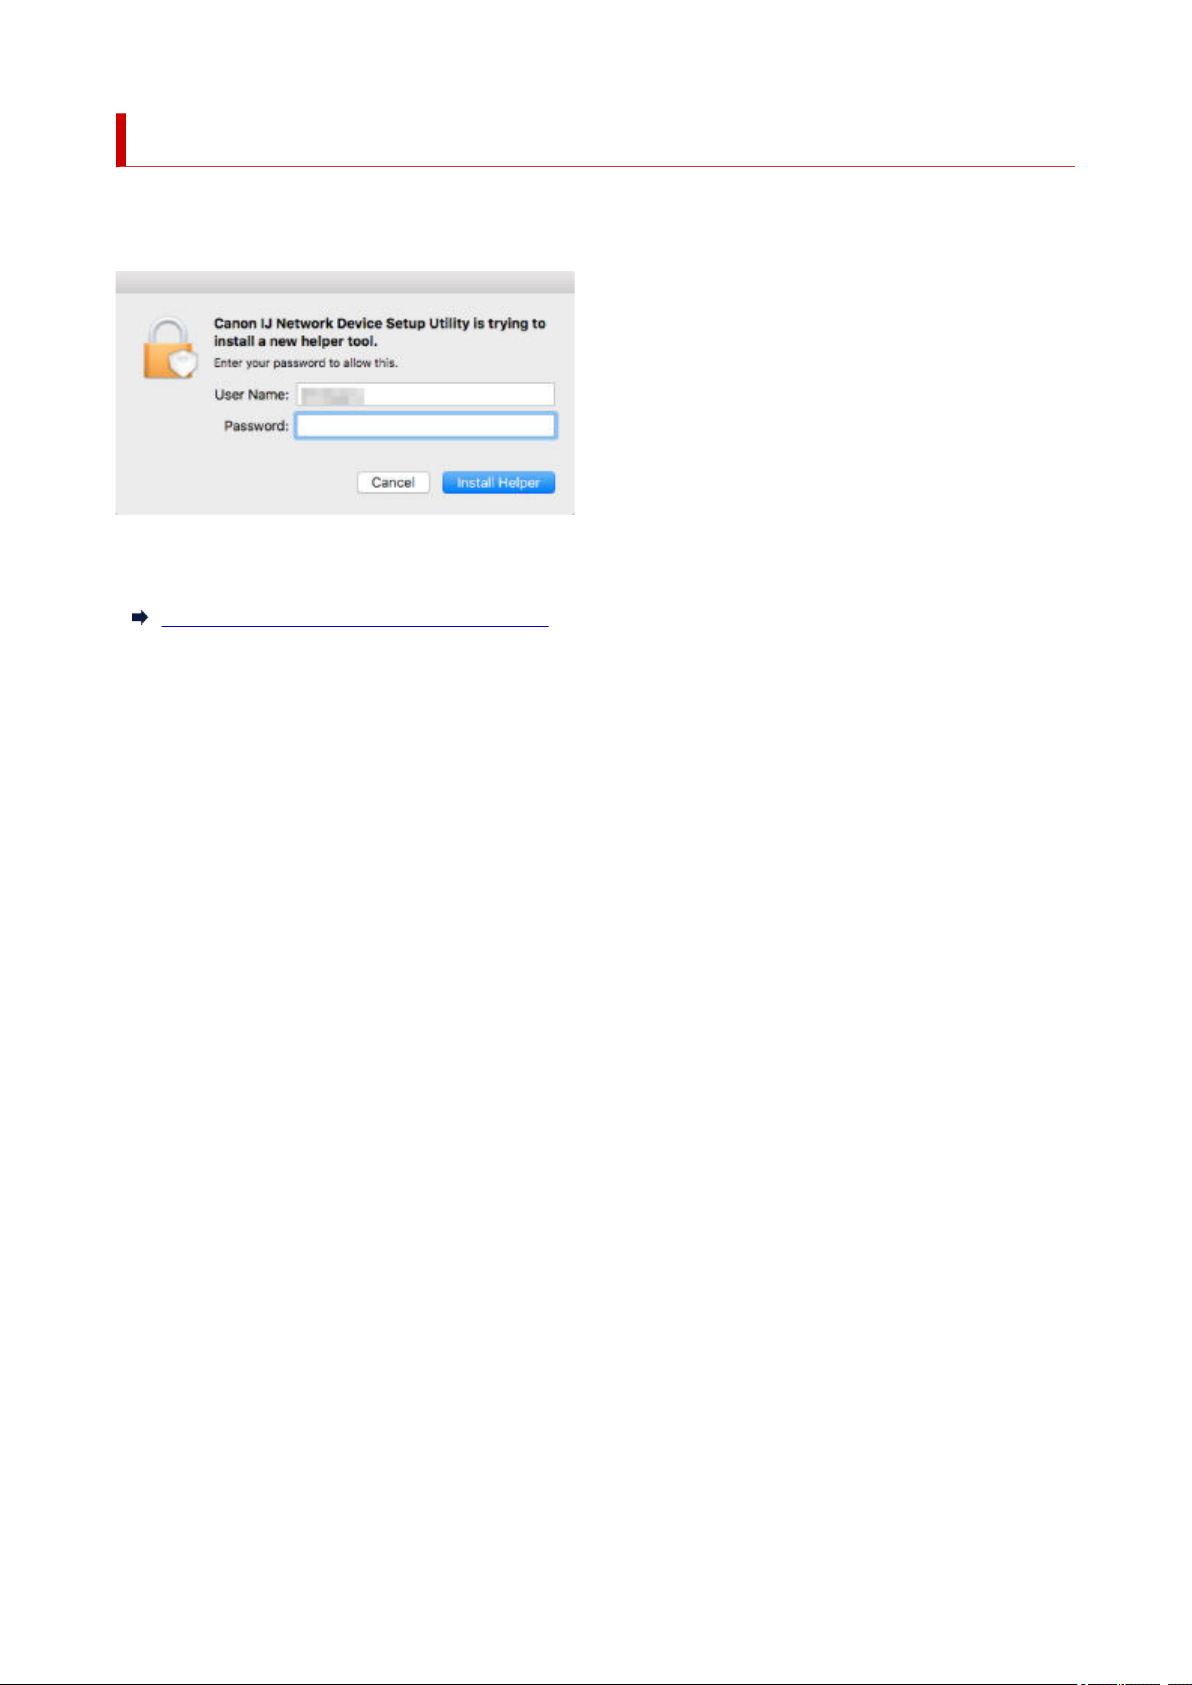
Starting Up IJ Network Device Setup Utility
Start up Launchpad, select Canon Utilities, and then select IJ Network Device Setup Utility.
When you start up IJ Network Device Setup Utility, the screen below appears.
Enter the password specified for your computer and select Install Helper. IJ Network Device Setup Utility
starts diagnosis and repair of network.
Diagnosing and Repairing Network Settings
57
Page 58

Diagnosing and Repairing Network Settings
IJ Network Device Setup Utility diagnoses and repairs computer settings or connection between the
computer and printer when a problem (e.g. cannot print from a printer on the network) occurs.
Important
• Some models do not support diagnosis and repair function.
For details:
List of Models Which Does Not Support Diagnosis and Repair Function
IJ Network Device Setup Utility starts checking the computer settings when it starts up. Perform operations
following the instructions on the screen.
Note
• This function checks the following items:
whether the computer is connected to the router
whether the printer can be detected on the network
whether the signal strength or communication level is sufficient (when using Wi-Fi)
whether the printer port setting matches with the network setting
58
Page 59

List of Models Which Does Not Support Diagnosis and Repair
Function
The following models does not support "Diagnose and Repair" function of IJ Network Device Setup Utility.
• G4000 series
• PRO-500 series
• PRO-1000 series
• MB2100 series
• MB2700 series
• MB5100 series
• MB5400 series
• iB4000 series
• PRO-520
• PRO-540
• PRO-560
• PRO-540S
• PRO-560S
• PRO-2000
• PRO-4000
• PRO-6000
• PRO-4000S
• PRO-6000S
• TS9000 series
• TS8000 series
• TS6000 series
• TS5000 series
• MG3000 series
• E470 series
59
Page 60

Handling Paper, Originals, FINE Cartridges, etc.
Loading Paper
Loading Originals
Replacing a FINE Cartridge
60
Page 61

Loading Paper
Paper Sources
Loading Paper in the Rear Tray
Loading Paper in the Cassette
Loading Envelopes in Rear Tray
61
Page 62
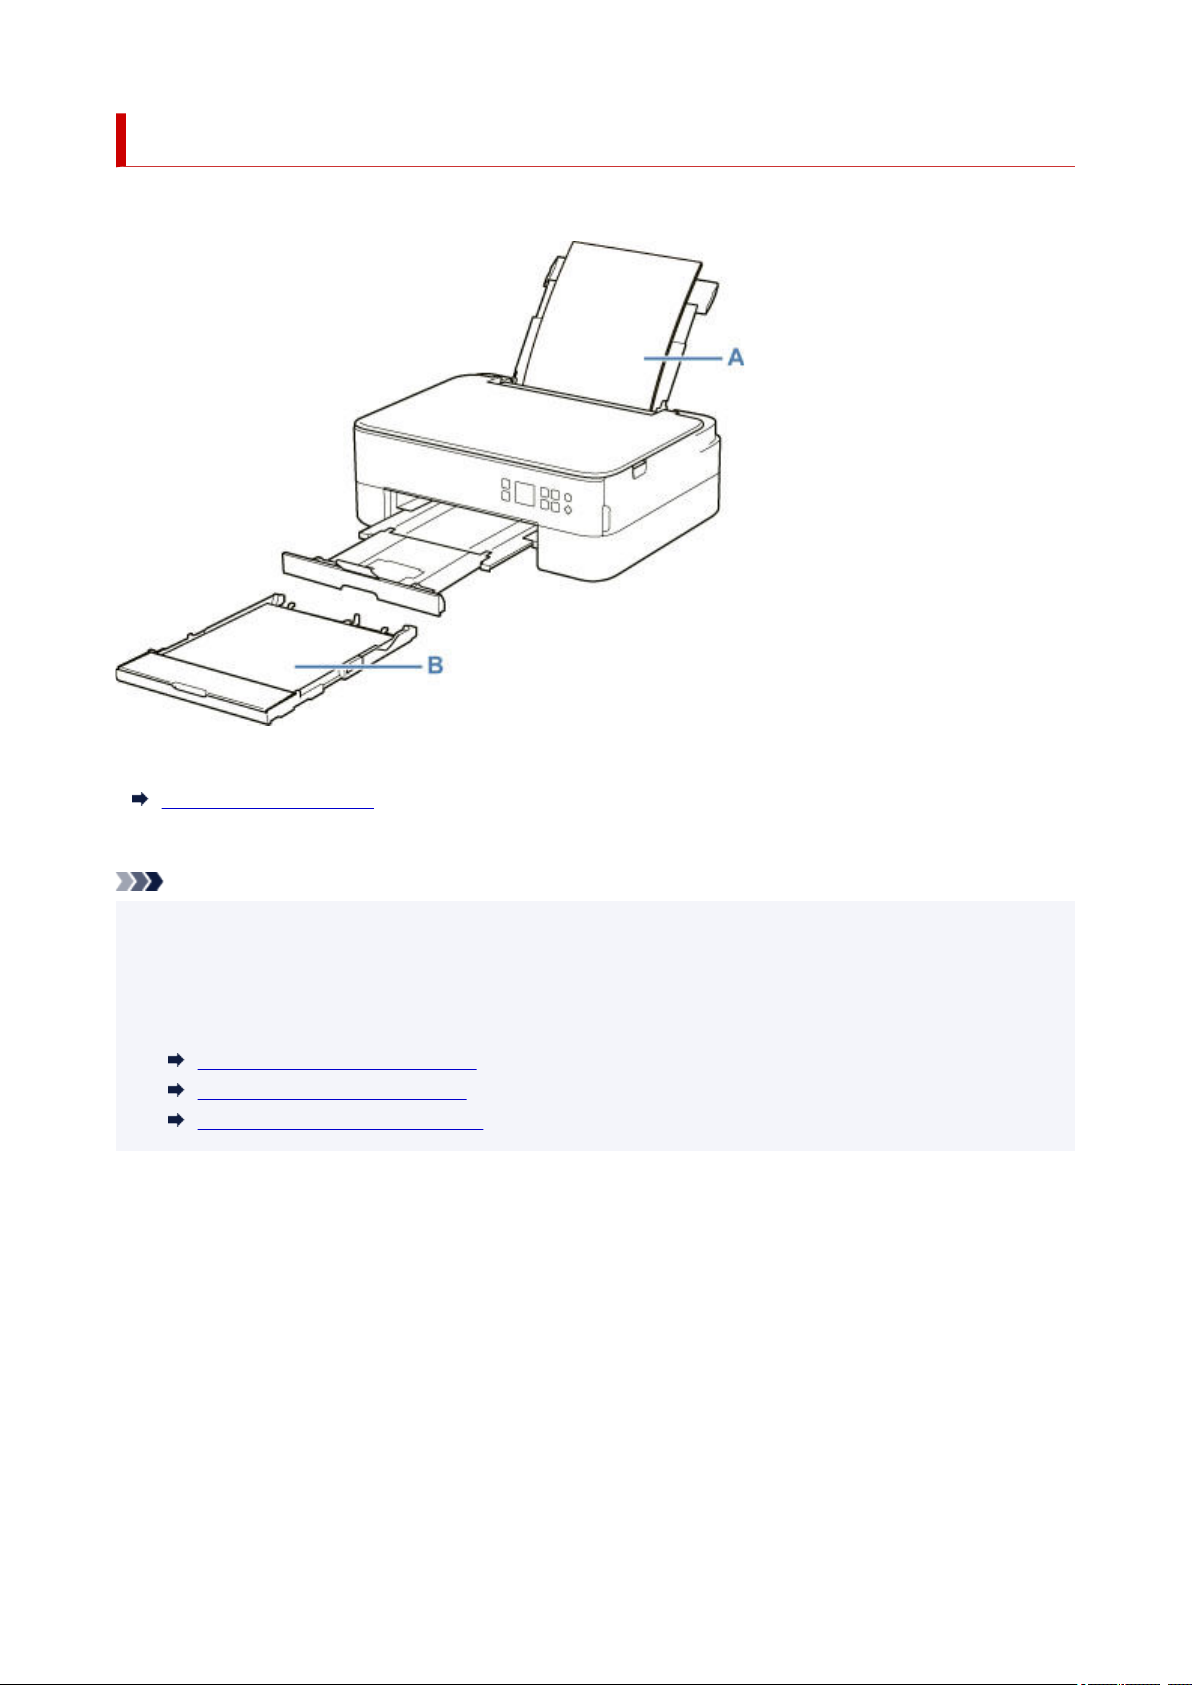
Paper Sources
The printer has two paper sources for feeding paper, the rear tray (A) and cassette (B).
You can load all supported paper on the rear tray.
Supported Media Types
You can load A4, B5, A5, or Letter-sized plain paper in the cassette.
Note
• When printing, select the correct page size and media type. If you select the wrong page size or media
type, the printer may feed paper from the wrong paper source or may not print with the proper print
quality.
For details on how to load paper in each paper source, see below.
Loading Paper in the Rear Tray
Loading Paper in the Cassette
Loading Envelopes in Rear Tray
62
Page 63
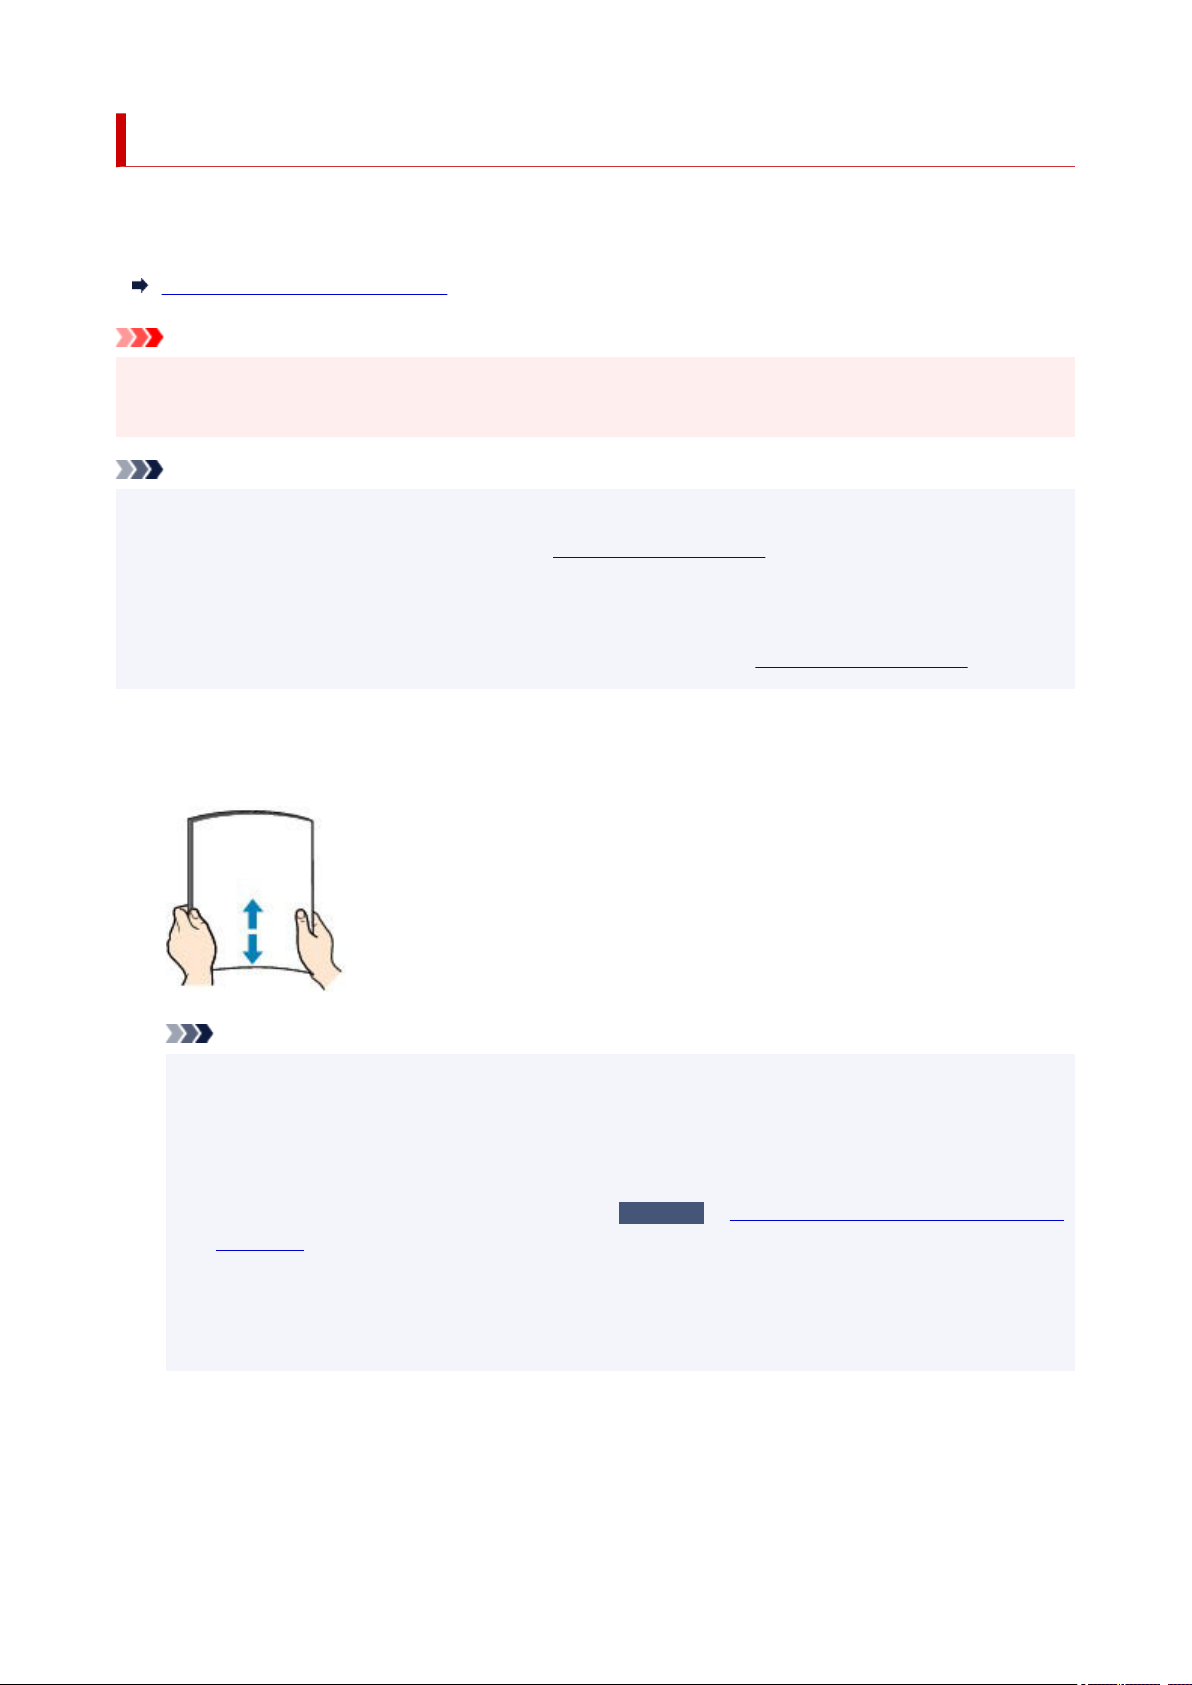
Loading Paper in the Rear Tray
You can load plain paper or photo paper.
You can also load envelopes on the rear tray.
Loading Envelopes in Rear Tray
Important
• If you cut plain paper to a size of 5" x 7" (13 x 18 cm) or smaller to perform a trial print, it may cause a
paper jam.
Note
• We recommend Canon genuine photo paper for printing photos.
For details on the Canon genuine paper, see
• You can use general copy paper or Canon Red Label Superior WOP111/Canon Océ Office Colour
Paper SAT213.
For the page size and paper weight you can use for this printer, see Supported Media Types.
Supported Media Types.
1. Prepare paper.
Align the edges of paper. If paper is curled, flatten it.
Note
• Align the edges of paper neatly before loading. Loading paper without aligning the edges may
cause paper jams.
• If paper is curled, hold the curled corners and gently bend them in the opposite direction until the
paper becomes completely flat.
For details on how to flatten curled paper, see
Scratched.
• When using Photo Paper Plus Semi-gloss SG-201, even if the sheet is curled, load one sheet at a
time as it is. If you roll up this paper to flatten, this may cause cracks on the surface of the paper
and reduce the print quality.
Check3
in Paper Is Smudged / Printed Surface Is
2. Open rear tray cover (A). Pull straight up and fold back paper support (B).
63
Page 64
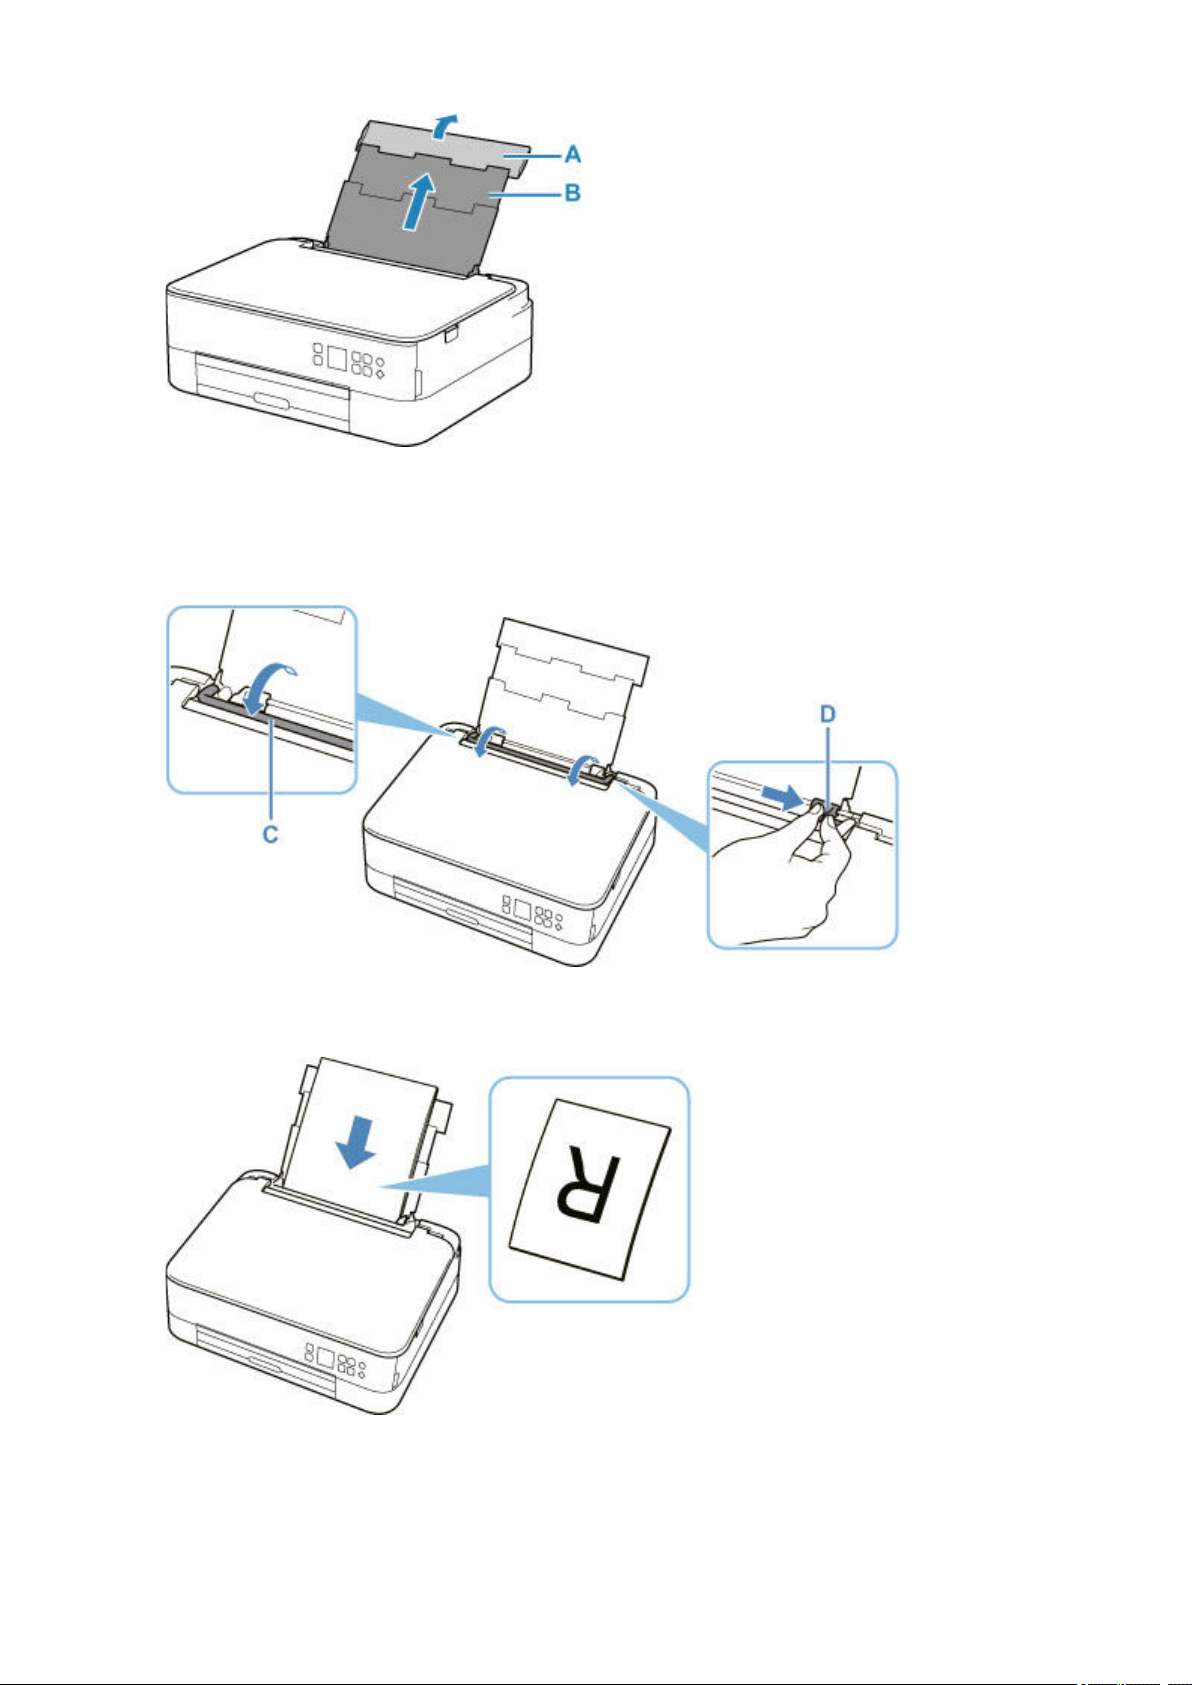
3. Open the feed slot cover (C).
4. Slide right paper guide (D) to open both paper guides.
5. Load paper stack in portrait orientation WITH PRINT SIDE FACING UP.
6. Slide right paper guide (D) to align with both sides of paper stack.
Do not slide the paper guides too hard against the paper. The paper may not be fed properly.
64
Page 65
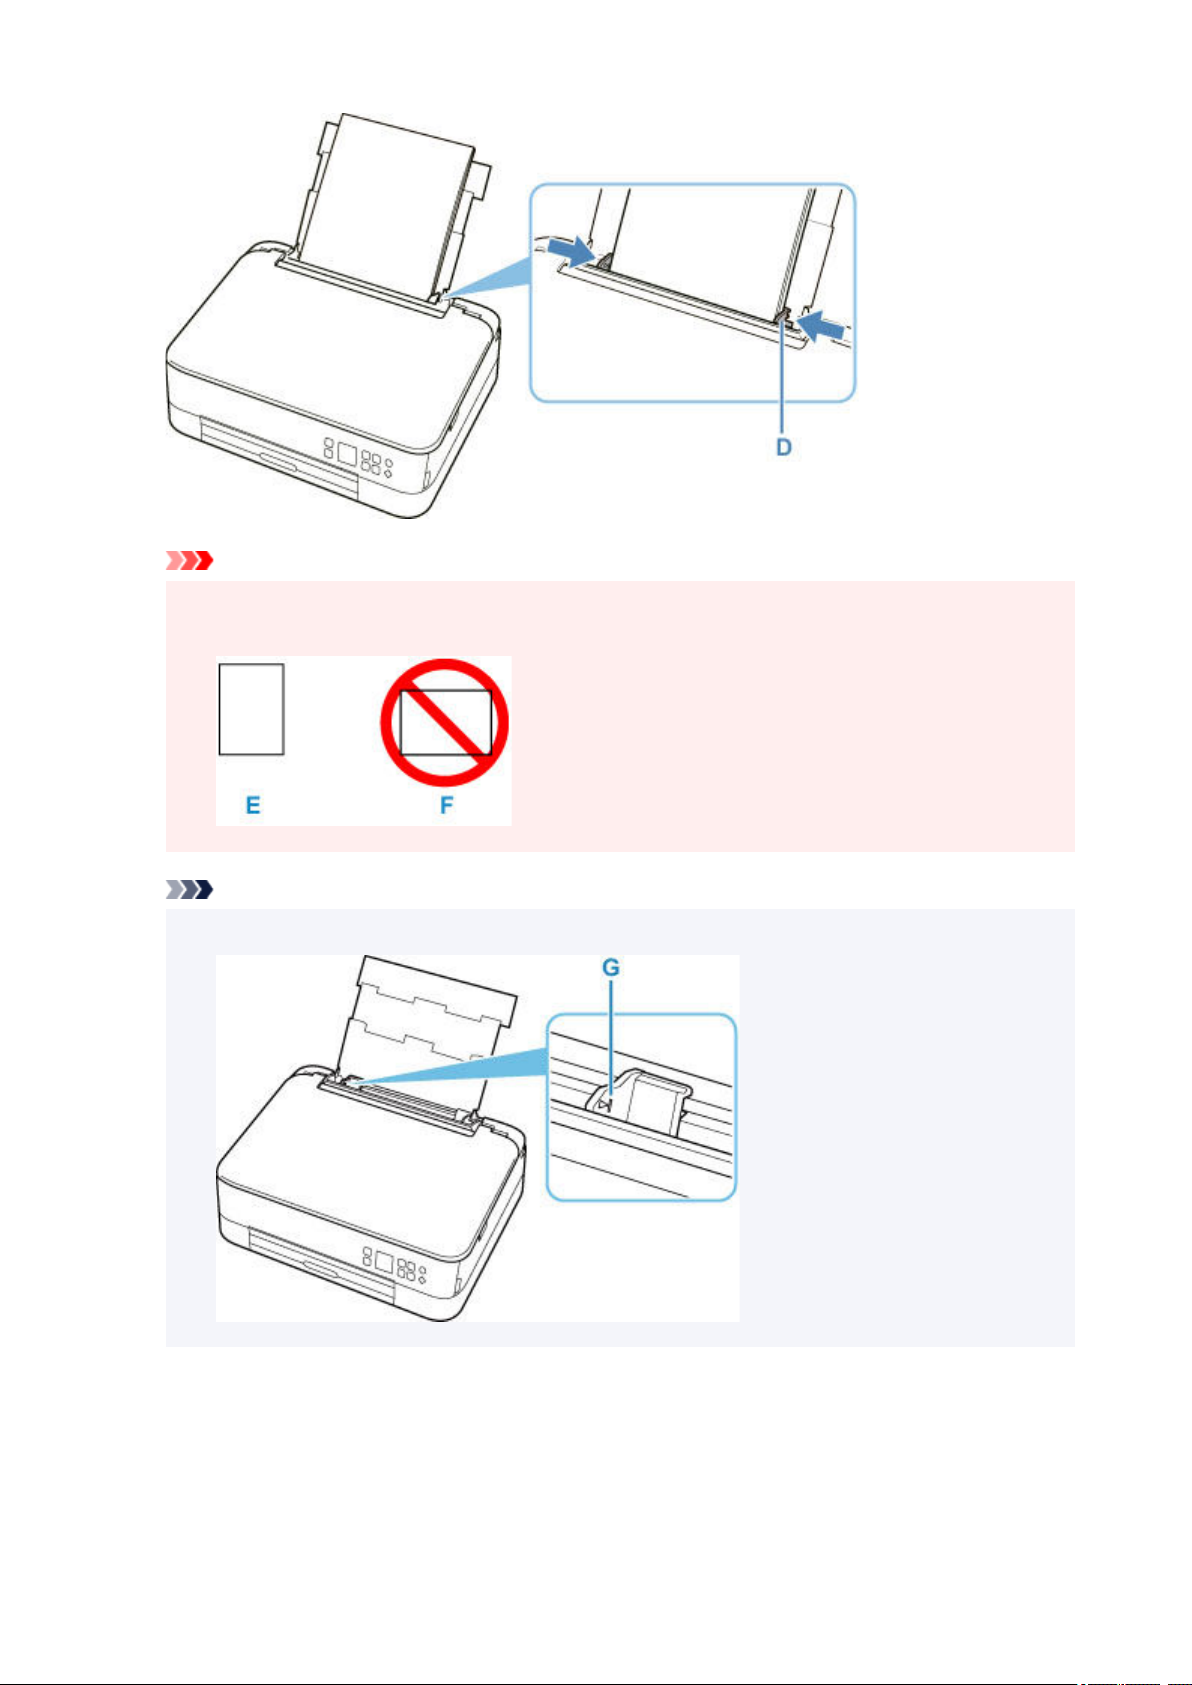
Important
• Always load paper in portrait orientation (E). Loading paper in landscape orientation (F) can cause
paper jams.
Note
• Do not load sheets of paper higher than the load limit mark (G).
7. Close feed slot cover (C) gently.
65
Page 66
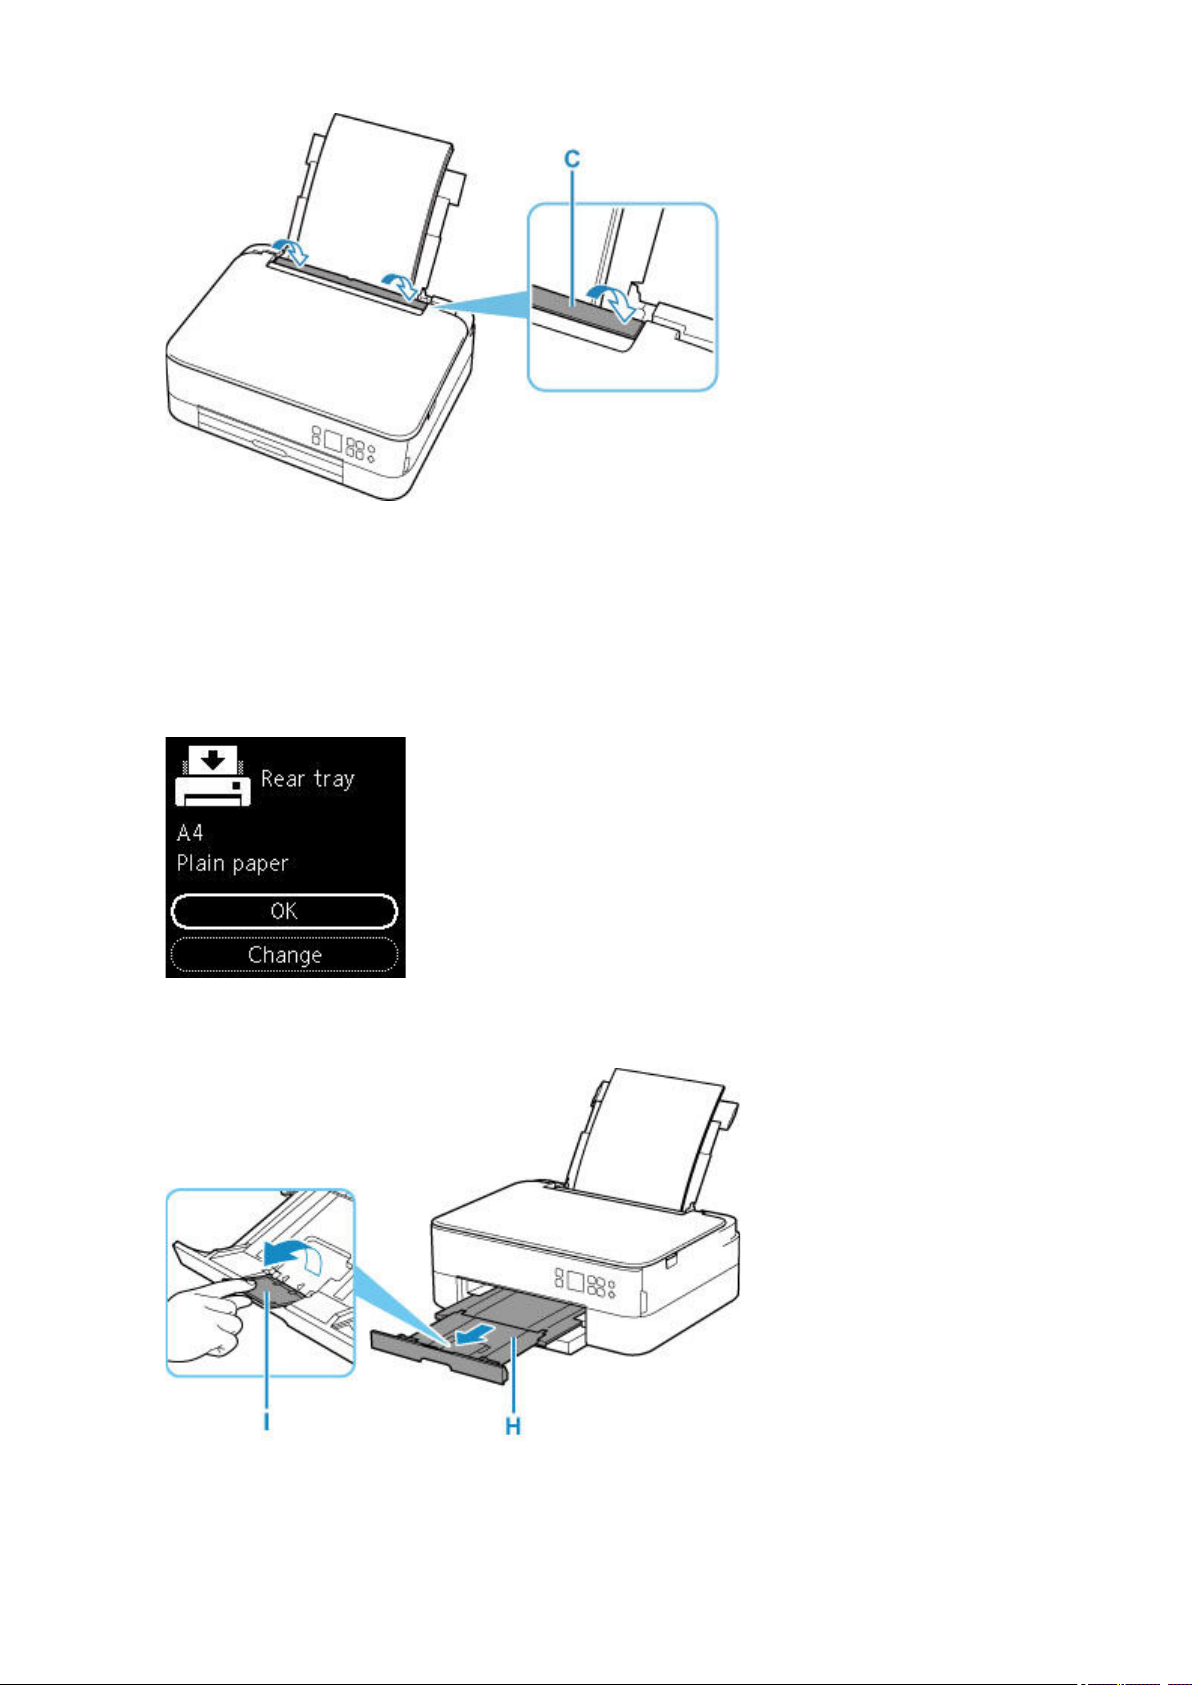
After closing the feed slot cover, the paper setting confirmation screen for the rear tray appears on the
LCD.
8. If page size and media type on LCD match size and type of paper loaded in rear tray, select
OK.
If not, select Change to change the settings in accordance with the size and type of the loaded paper.
9. Pull out the paper output tray (H) and open the paper output support (I).
66
Page 67

Note
• There are various types of paper, such as paper with a special surface coating for printing photos at
optimal quality and paper suitable for documents. Each media type has specific preset settings (how ink
is used and sprayed, distance from nozzles, etc.), that allow you to print to that type with optimal image
quality. The wrong paper settings may cause poor printout color quality or scratches on the printed
surface. If you notice blurring or uneven colors, increase the print quality setting and try printing again.
• To prevent incorrect printing, this printer has a function that detects whether the settings for the paper
loaded on the rear tray matches the paper settings. Before printing, make print settings in accordance
with the paper settings. When this function is enabled, an error message is displayed if these settings
do not match to prevent incorrect printing. When this error message is displayed, check and correct the
paper settings.
67
Page 68
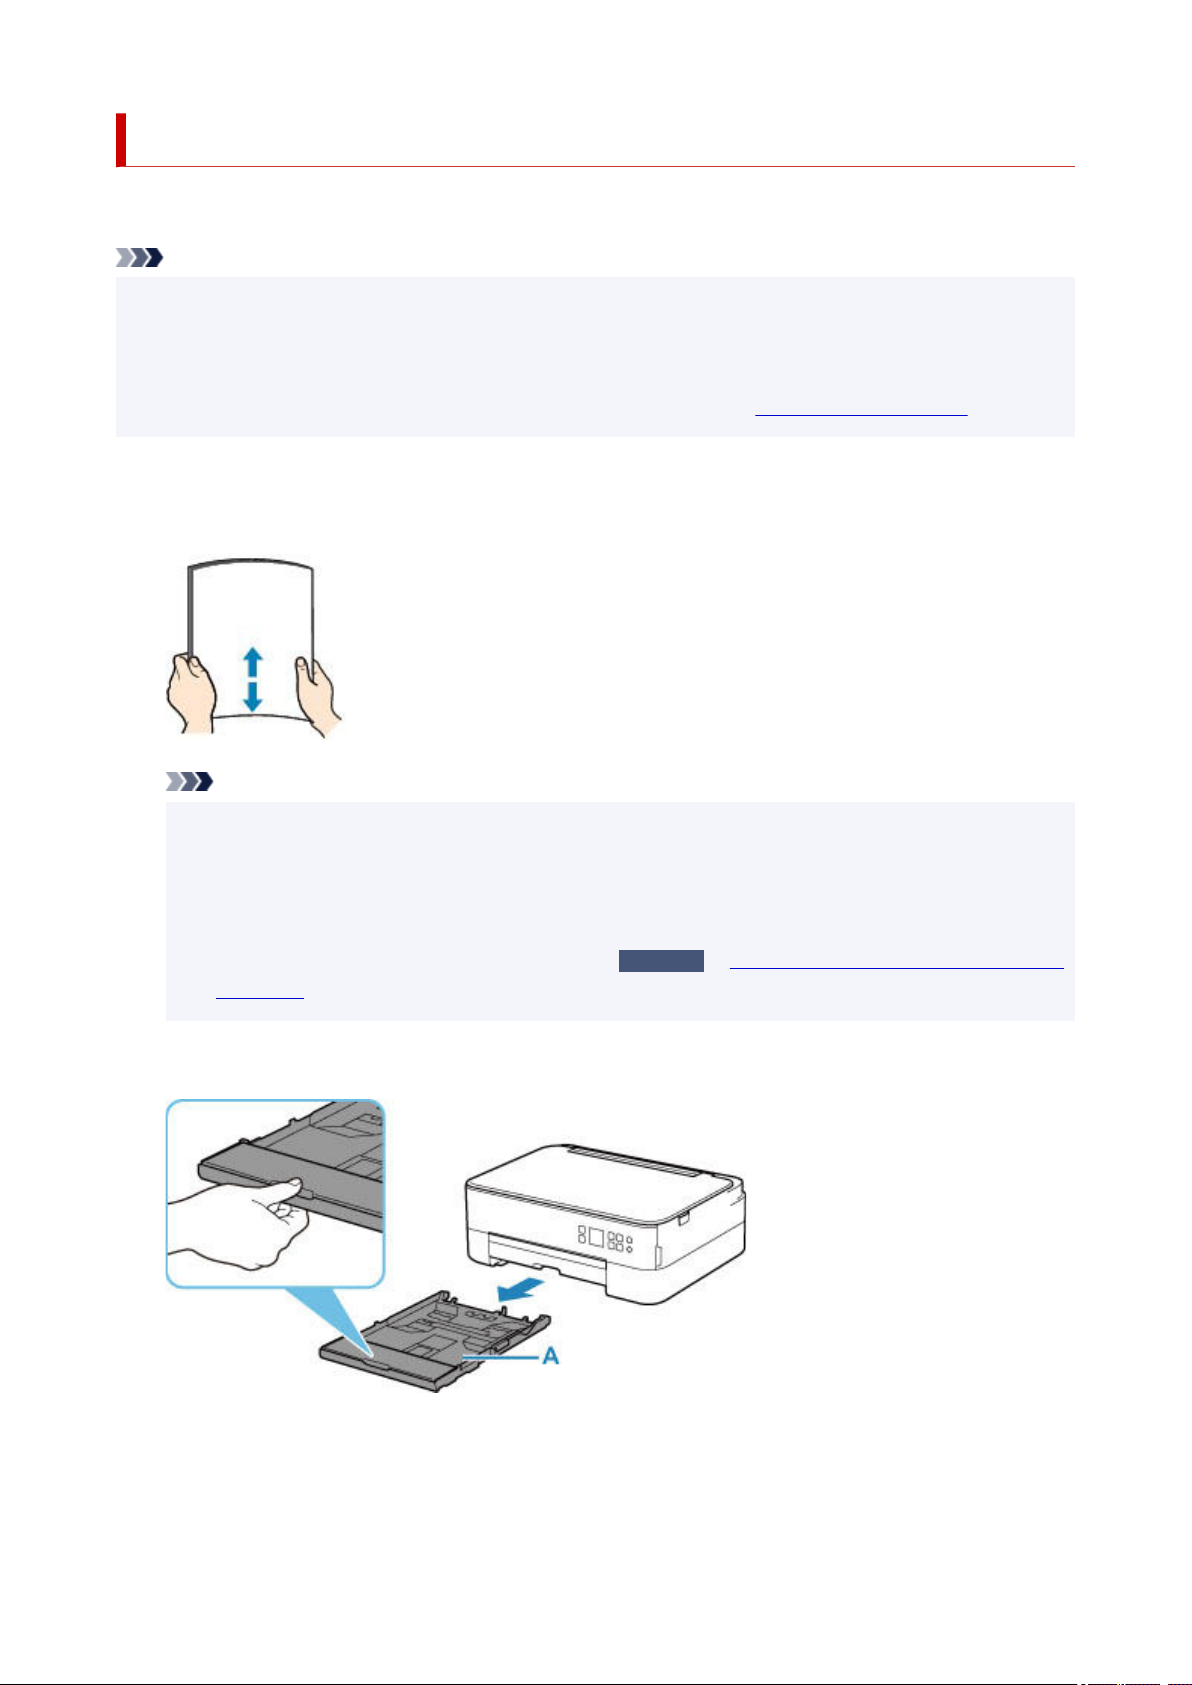
Loading Paper in the Cassette
You can load A4, B5, A5, or Letter-sized plain paper in the cassette.
Note
• In the cassette, be sure to load only plain paper.
• You can use general copy paper or Canon Red Label Superior WOP111/Canon Océ Office Colour
Paper SAT213.
For the page size and paper weight you can use for this printer, see
1. Prepare paper.
Align the edges of paper. If paper is curled, flatten it.
Note
• Align the edges of paper neatly before loading. Loading paper without aligning the edges may
cause paper jams.
• If paper is curled, hold the curled corners and gently bend them in the opposite direction until the
paper becomes completely flat.
For details on how to flatten curled paper, see
Scratched.
Check3
in Paper Is Smudged / Printed Surface Is
Supported Media Types.
2. Pull out the cassette (A) from the printer.
3. Remove the cassette cover (B).
68
Page 69
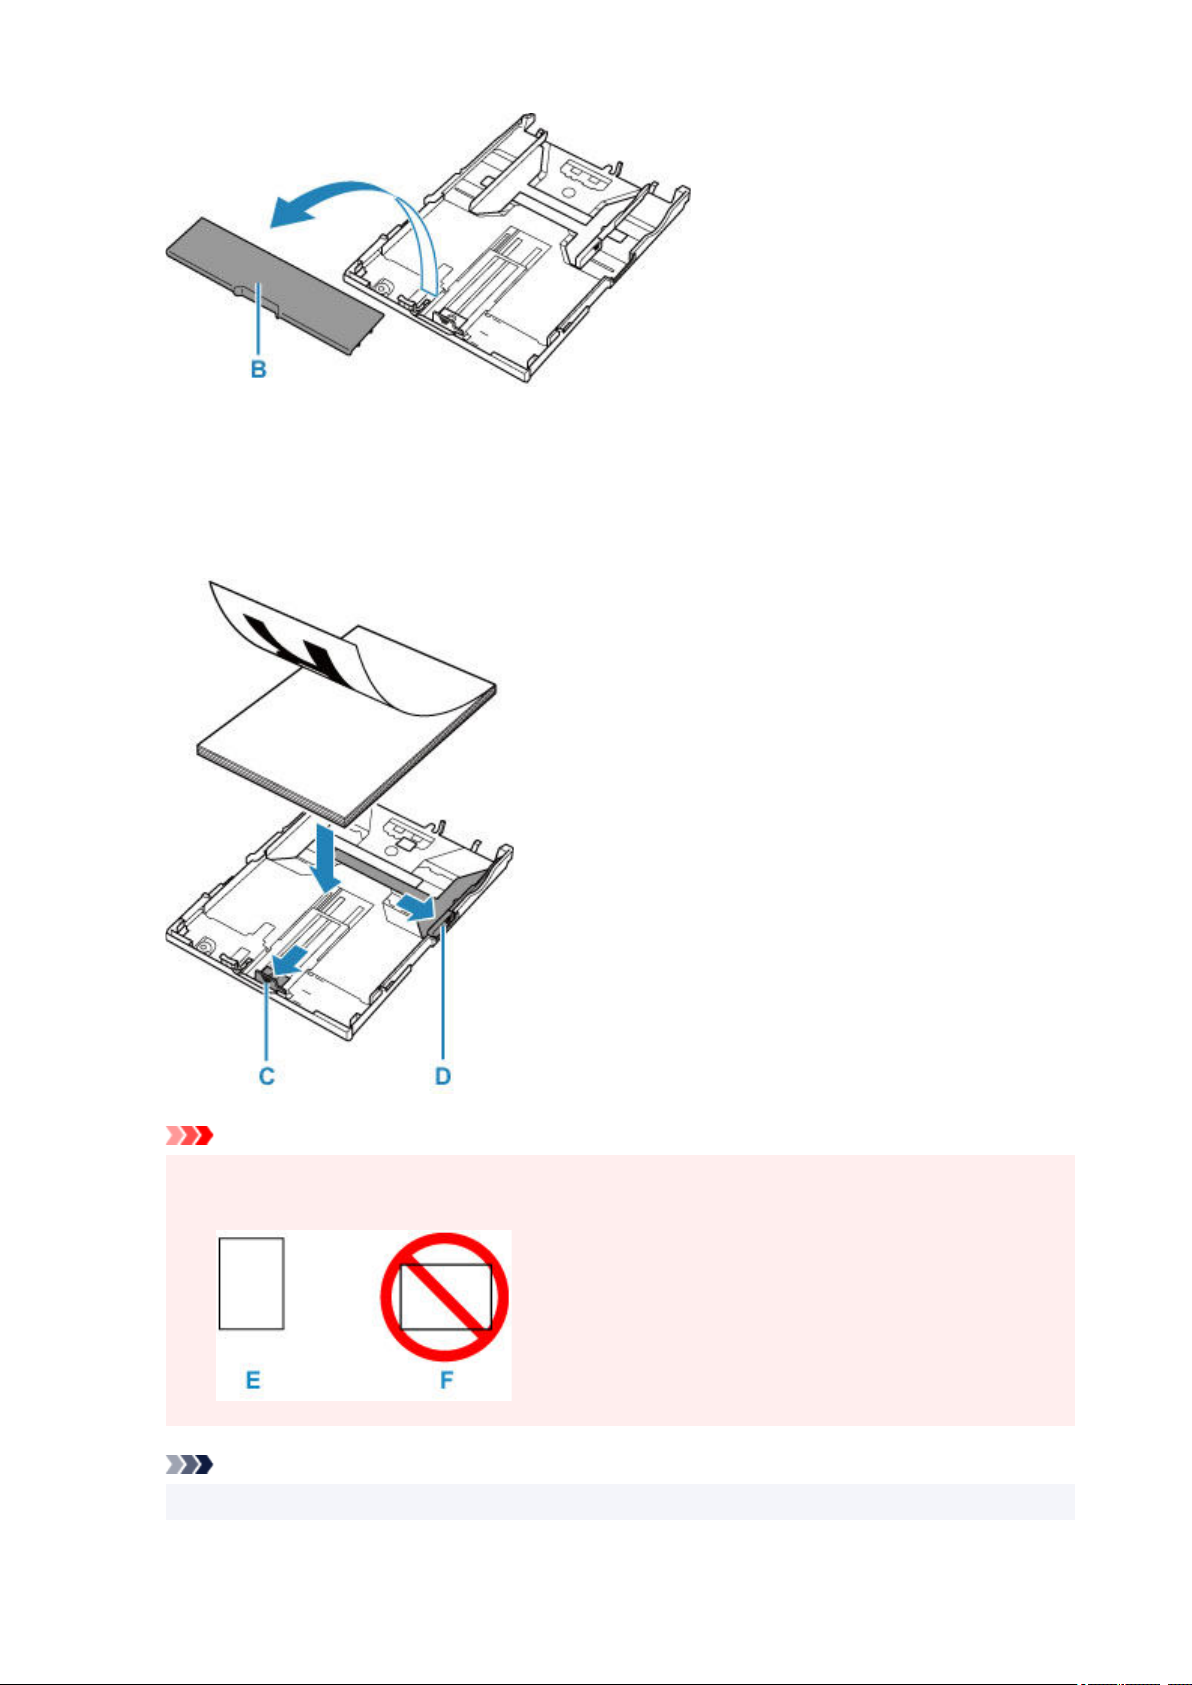
4. Slide paper guides (C) in front and (D) on right to open guides.
5. Load paper stack in portrait orientation WITH PRINT SIDE FACING DOWN, and place it in
center of cassette.
Important
• Always load paper in portrait orientation (E). Loading paper in landscape orientation (F) can cause
paper jams.
Note
• Align the paper stack with the edge of the cassette as shown in the figure below.
69
Page 70
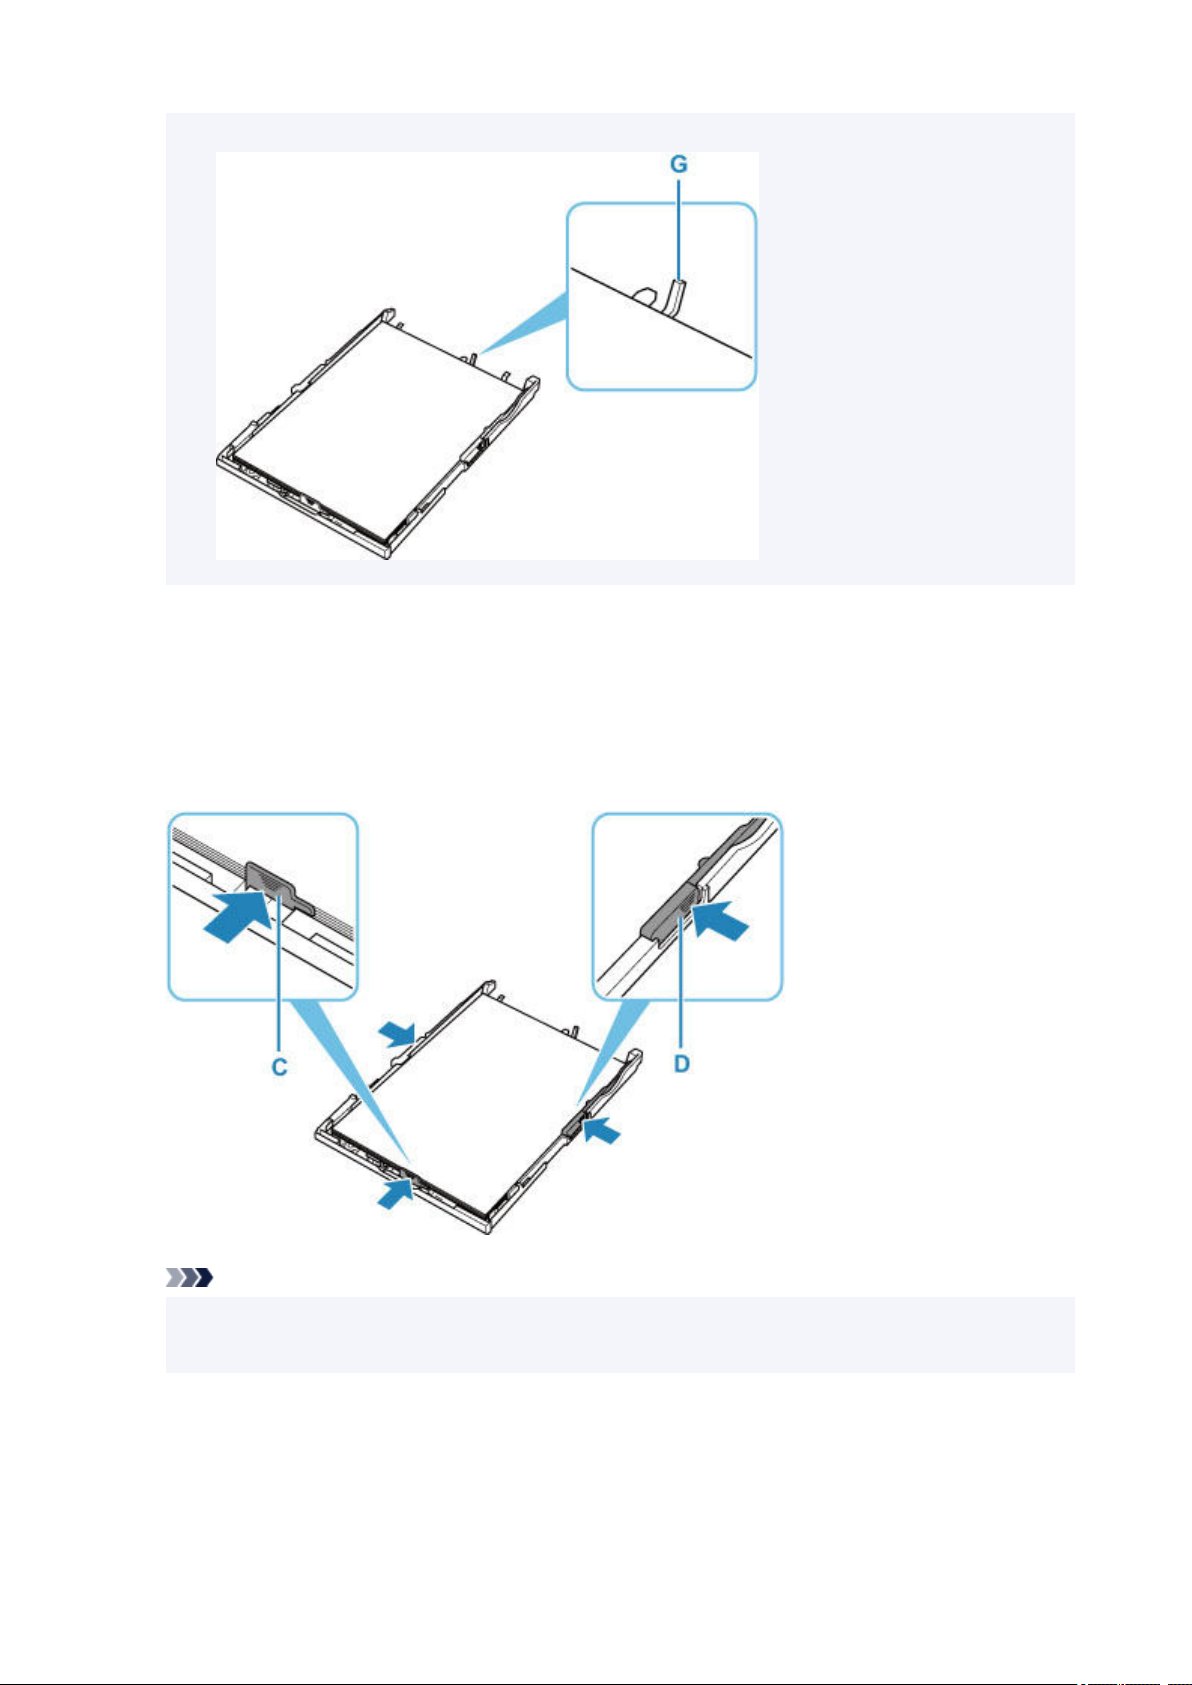
If the paper stack is in contact with the protrusion (G), the paper may not be fed properly.
6. Slide front paper guide (C) to align it with paper stack.
Align paper guide with where it clicks into place.
7. Slide right paper guide (D) to align it with paper stack.
Do not slide the paper guide too hard against the paper. The paper may not be fed properly.
Note
• Do not load sheets of paper higher than the load limit mark (H).
• Keep the paper stack height below the tabs (I) of the paper guides.
70
Page 71
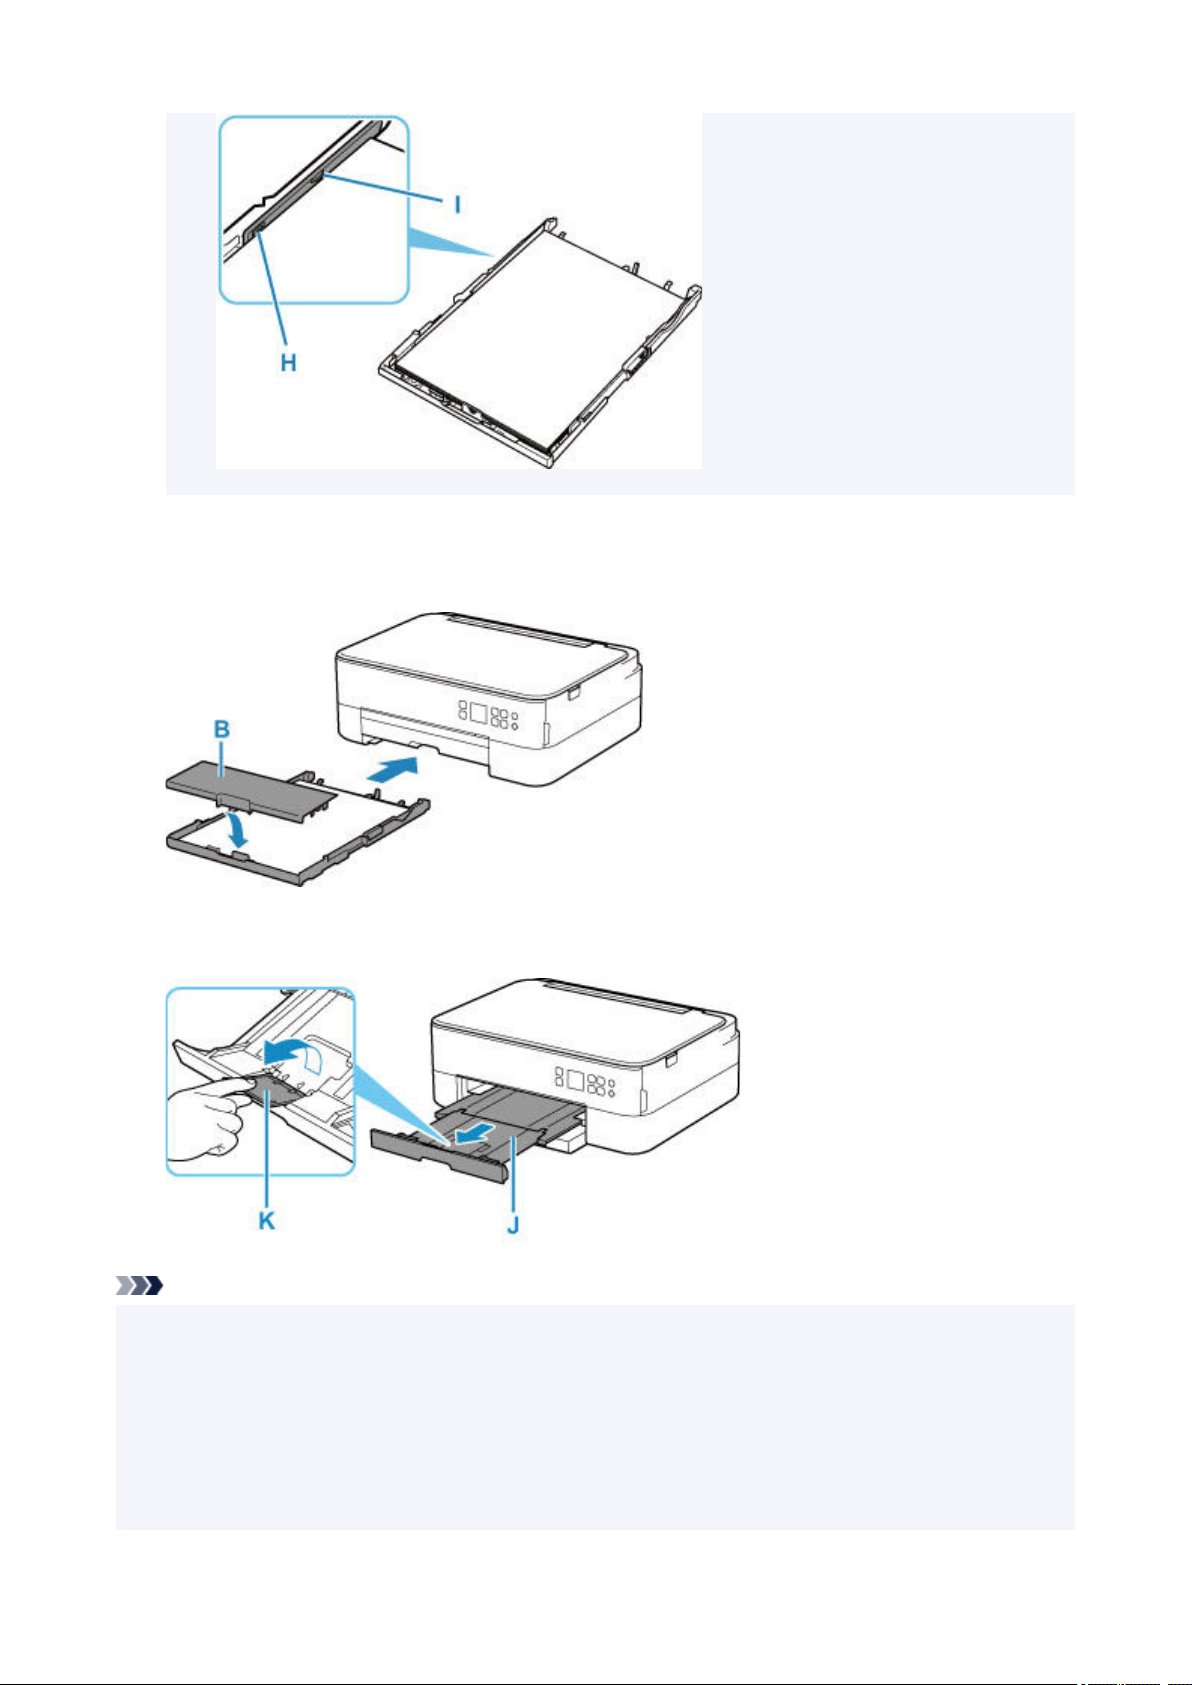
8. Mount cassette cover (B) and insert cassette into printer.
Push the cassette into the printer until it stops.
9. Pull out the paper output tray (J) and open the paper output support (K).
Note
• To prevent incorrect printing, this printer has a function that detects whether the settings for the paper
loaded in the cassette matches the paper settings. Before printing, make print settings in accordance
with the paper settings. When this function is enabled, an error message is displayed if these settings
do not match to prevent incorrect printing. When this error message is displayed, check and correct the
paper settings.
• When the cassette is pulled out, it automatically extends. To shorten the extended cassette, push it in
while pulling lever (L).
71
Page 72
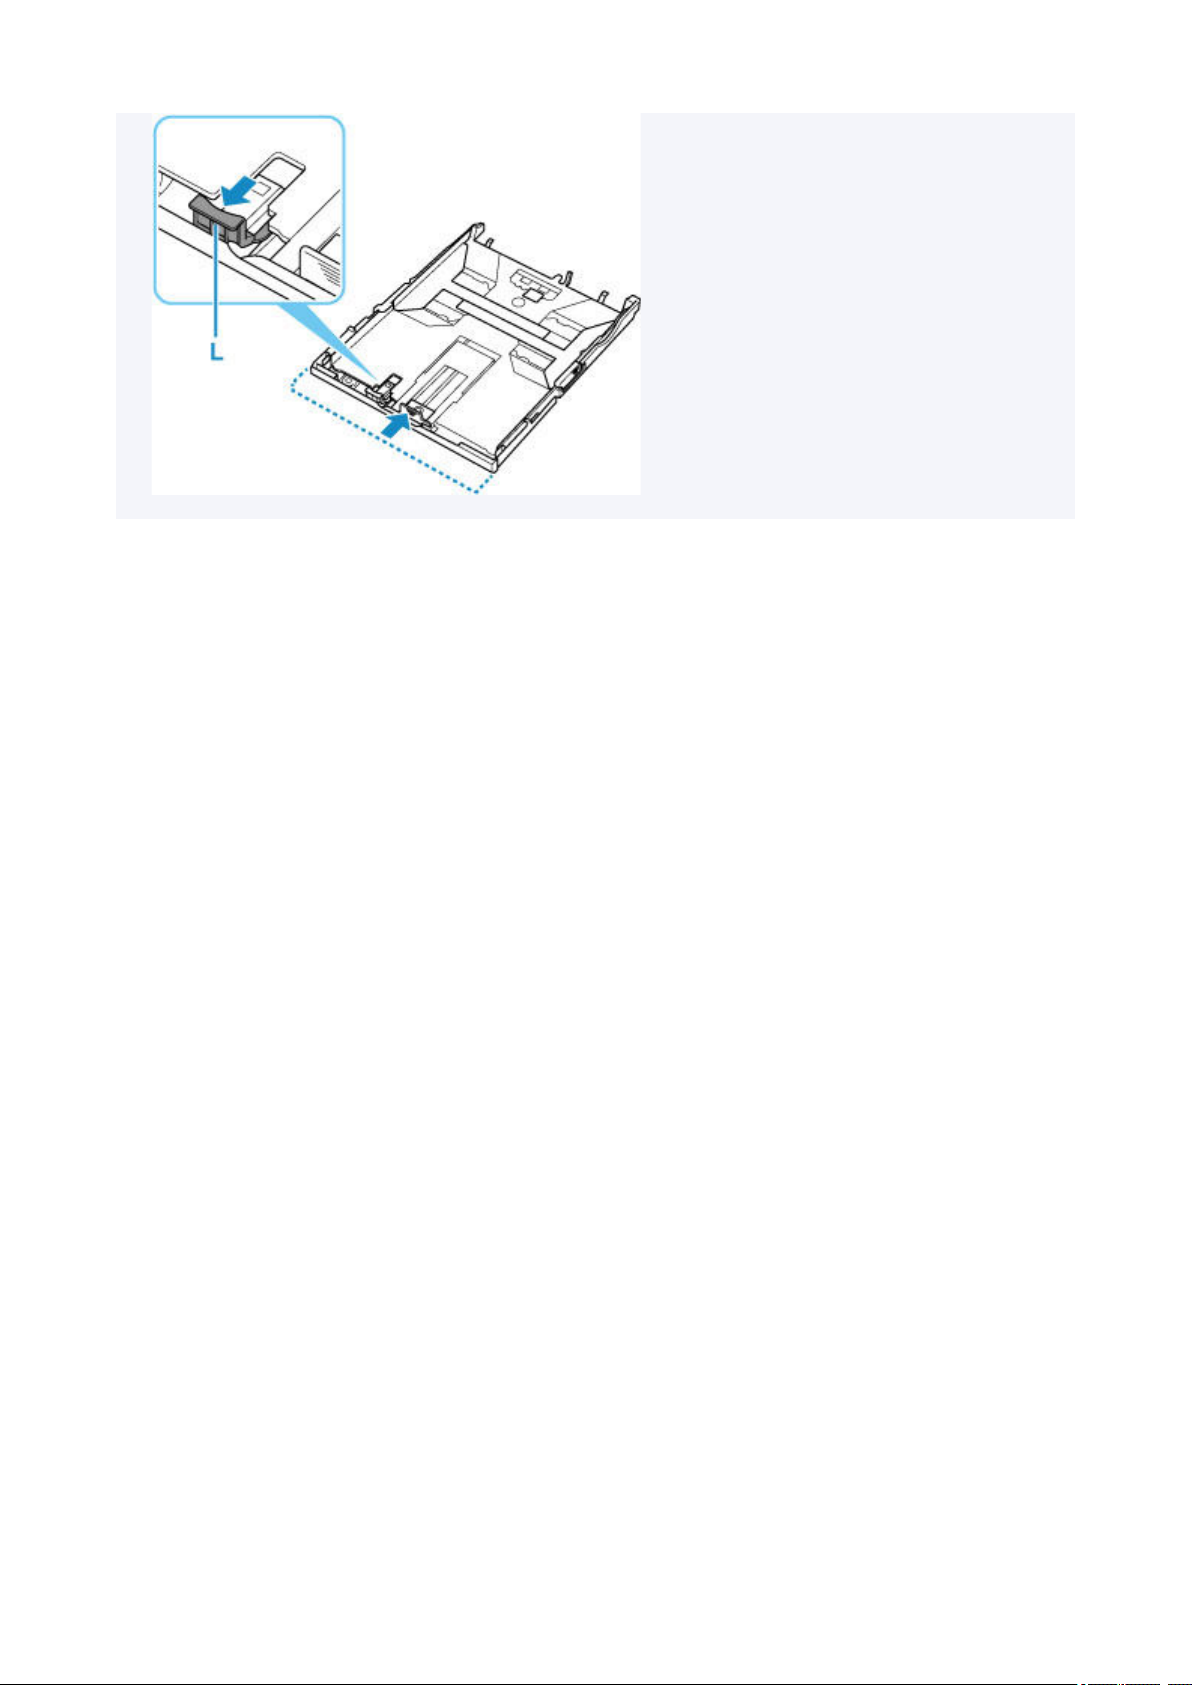
72
Page 73
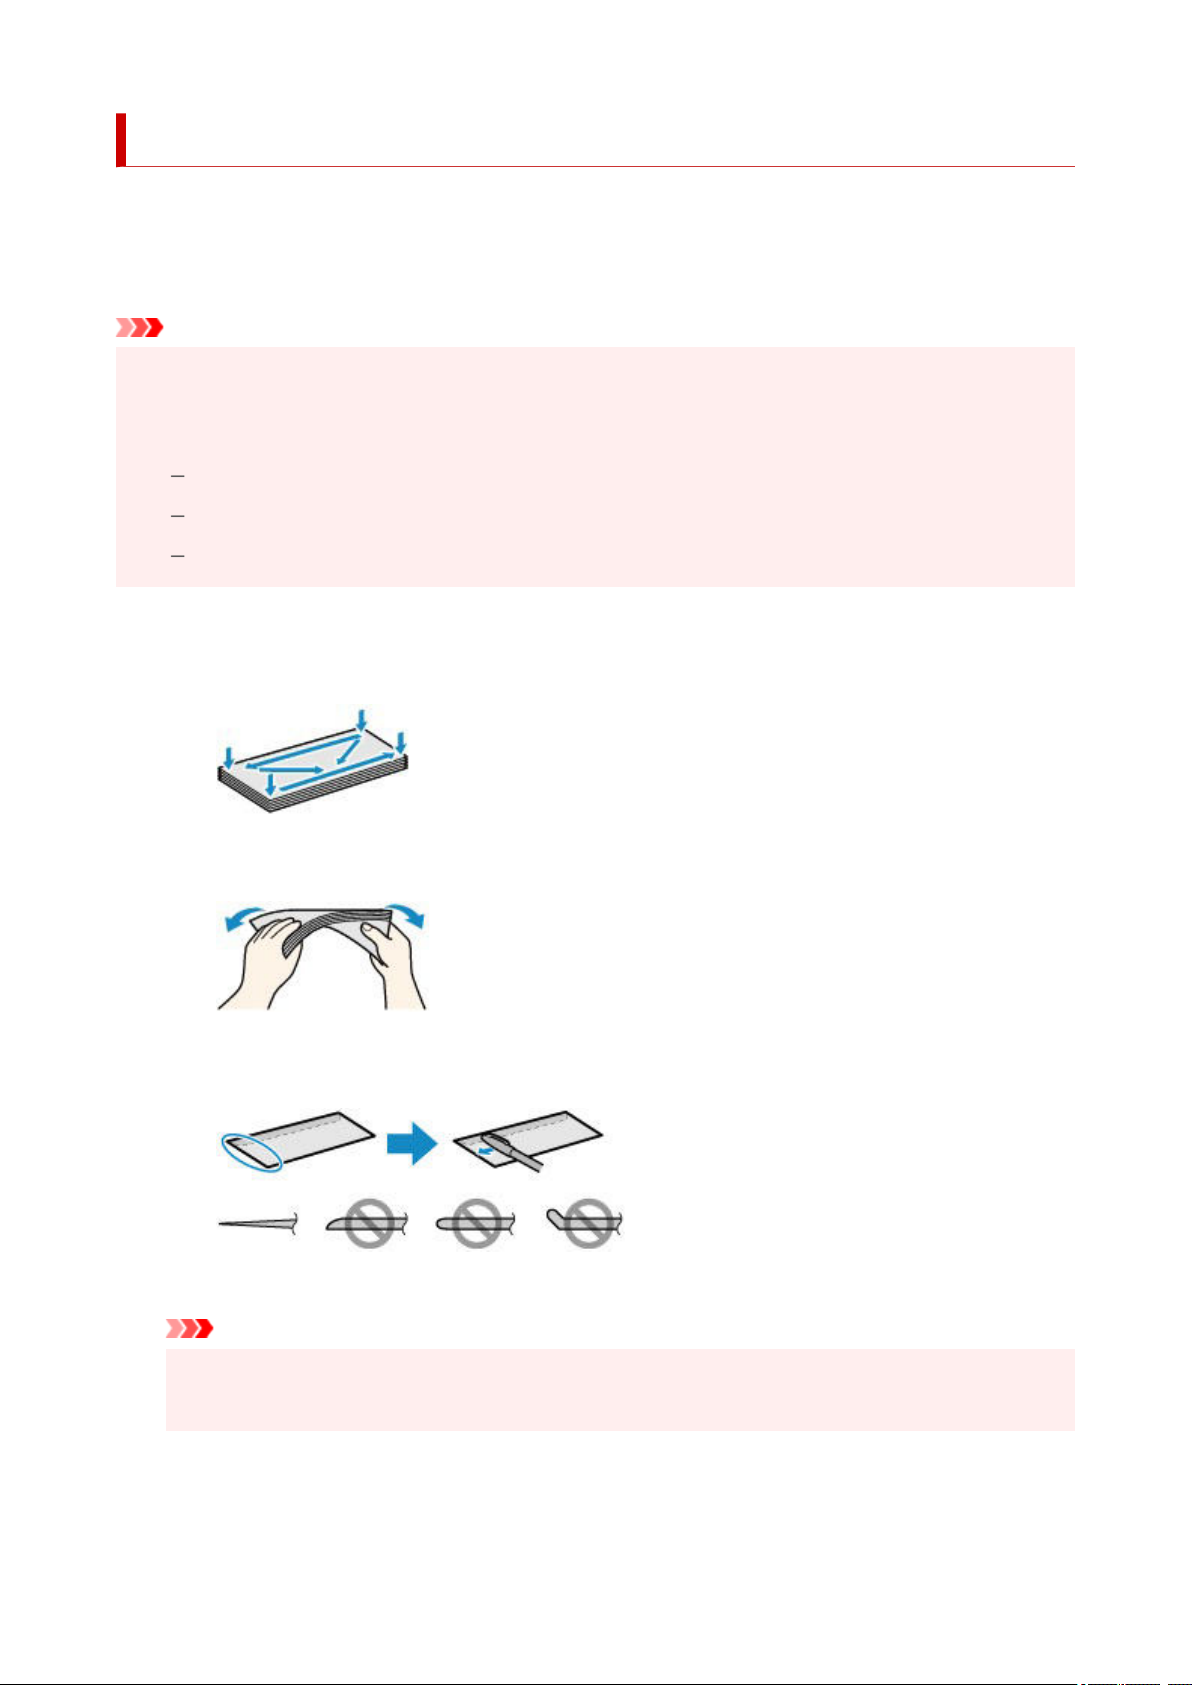
Loading Envelopes in Rear Tray
You can load Envelope DL and Envelope Com 10 on the rear tray.
The address is automatically rotated and printed according to the envelope's direction by specifying with the
printer driver properly.
Important
• Printing of envelopes from the operation panel or from a PictBridge (Wi-Fi) compliant device is not
supported.
• Do not use the following envelopes. They could jam in the printer or cause the printer to malfunction.
Envelopes with an embossed or treated surface
Envelopes with a double flap
Envelopes whose gummed flaps are already moistened and adhesive
1. Prepare envelopes.
• Press down on all four corners and edges of the envelopes to flatten them.
• If the envelopes are curled, hold the opposite corners and gently twist them in the opposite
direction.
• If the corner of the envelope flap is folded, flatten it.
• Use a pen to press the leading edge in the inserting direction flat and sharpen the crease.
The figures above show a side view of the leading edge of the envelope.
Important
• The envelopes may jam in the printer if they are not flat or the edges are not aligned. Make sure
that no curl or puff exceeds 0.12 in. (3 mm).
2. Open rear tray cover (A). Pull straight up and fold back paper support (B).
73
Page 74
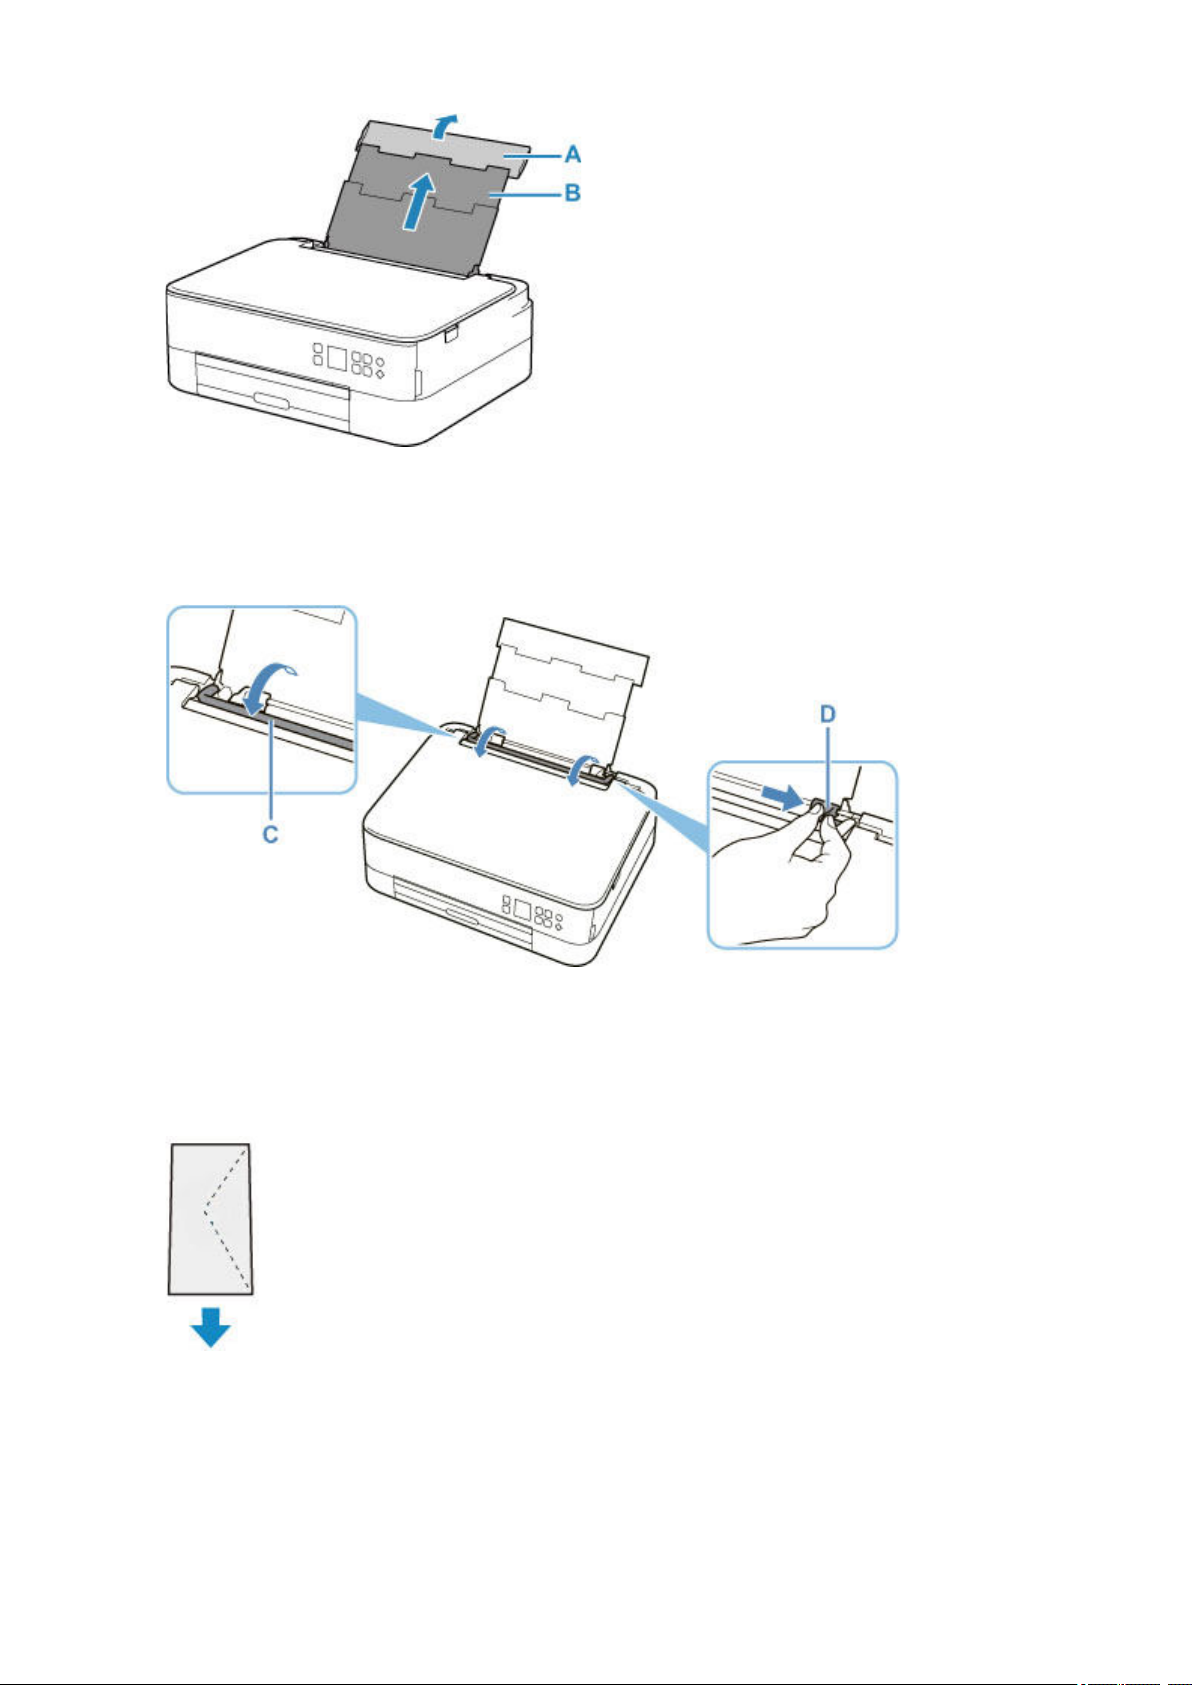
3. Open the feed slot cover (C).
4. Slide right paper guide (D) to open both paper guides.
5. Load envelopes in portrait orientation WITH PRINT SIDE FACING UP.
Up to 10 envelopes can be loaded at once.
Fold flap of the envelope and load the envelope in portrait orientation with the address side facing up.
6. Slide right paper guide (D) to align with both sides of envelopes.
Do not slide the paper guides too hard against the envelopes. The envelopes may not be fed properly.
74
Page 75
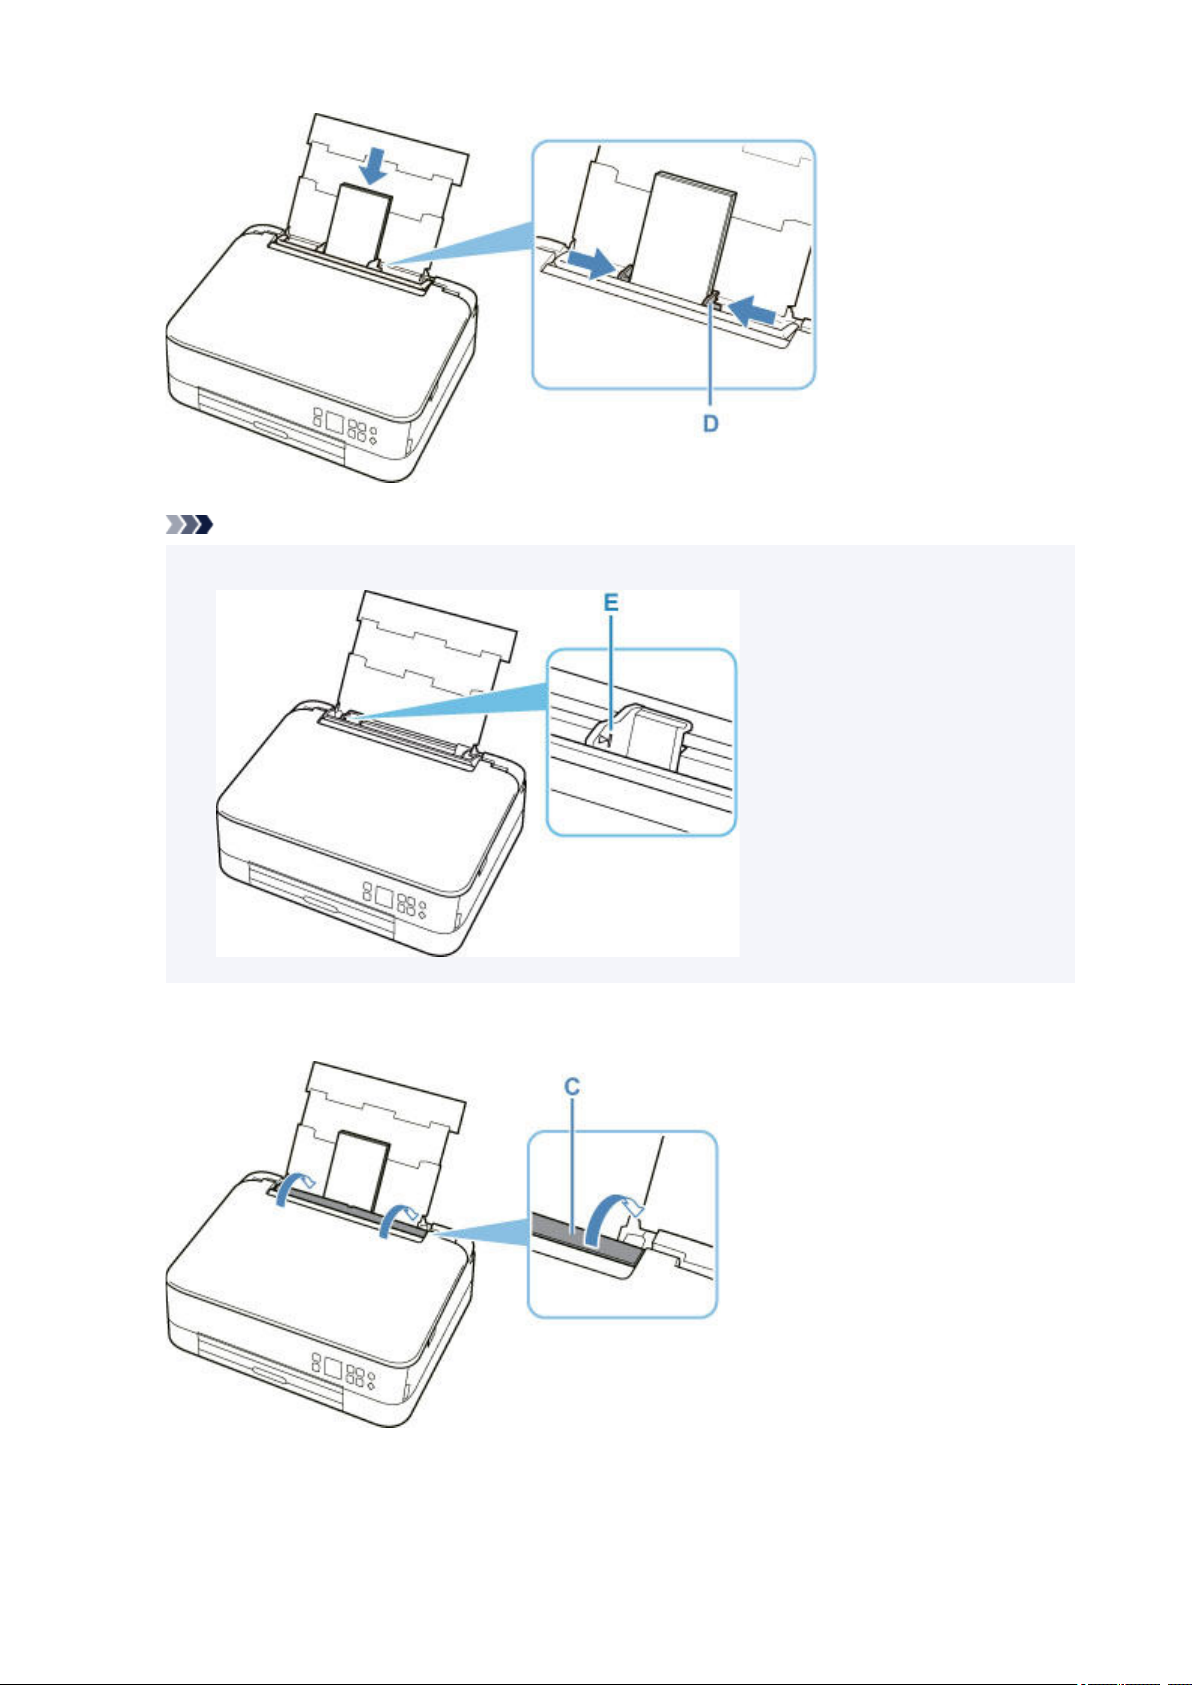
Note
• Do not load envelopes higher than the load limit mark (E).
7. Close feed slot cover (C) gently.
After closing the feed slot cover, the paper setting confirmation screen for the rear tray appears on the
LCD.
75
Page 76
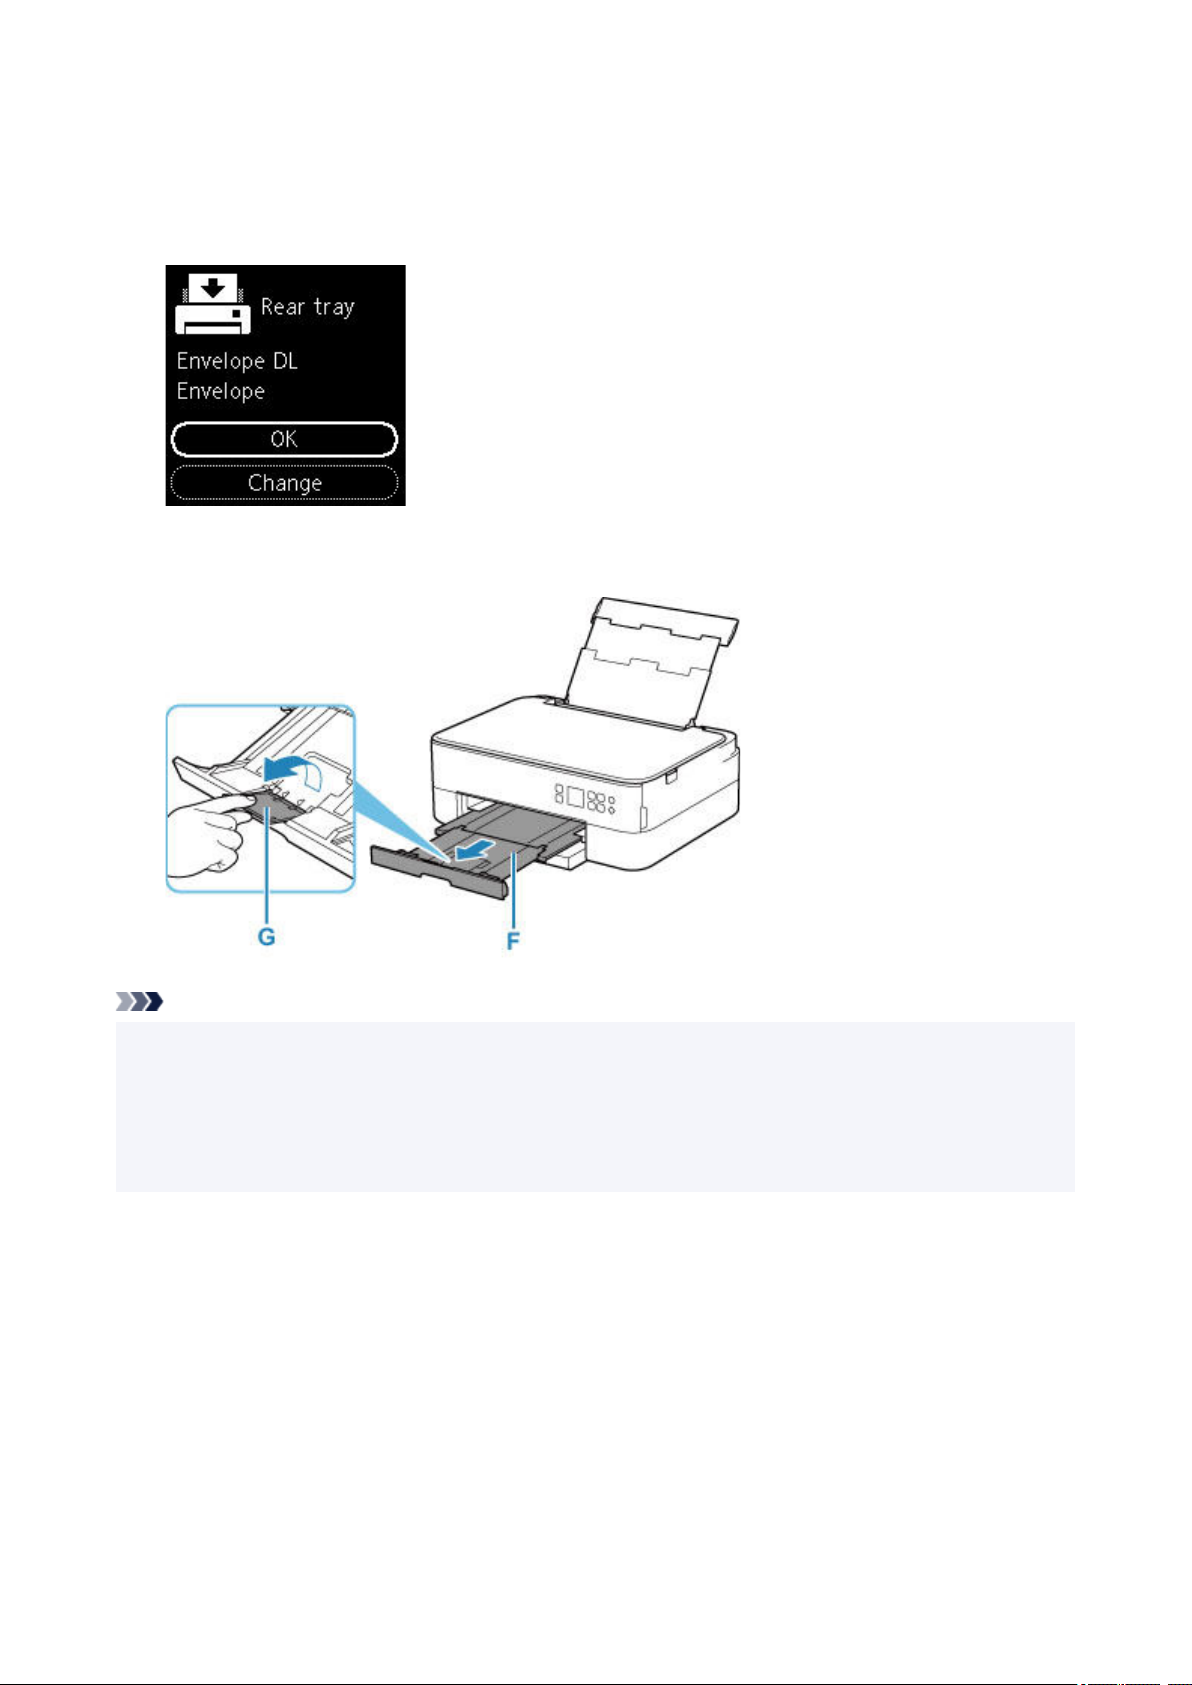
8. If page size and media type shown on LCD match size and type of envelopes loaded in rear
tray, select OK.
If not, select Change to change the settings in accordance with the size and type of the loaded
envelopes.
9. Pull out the paper output tray (F) and open the paper output support (G).
Note
• To prevent incorrect printing, this printer has a function that detects whether the settings for the paper
loaded on the rear tray matches the paper settings. Before printing, make print settings in accordance
with the paper settings. When this function is enabled, an error message is displayed if these settings
do not match to prevent incorrect printing. When this error message is displayed, check and correct the
paper settings.
76
Page 77

Loading Originals
Loading Originals on Platen
Supported Originals
How to Detach / Attach the Document Cover
77
Page 78
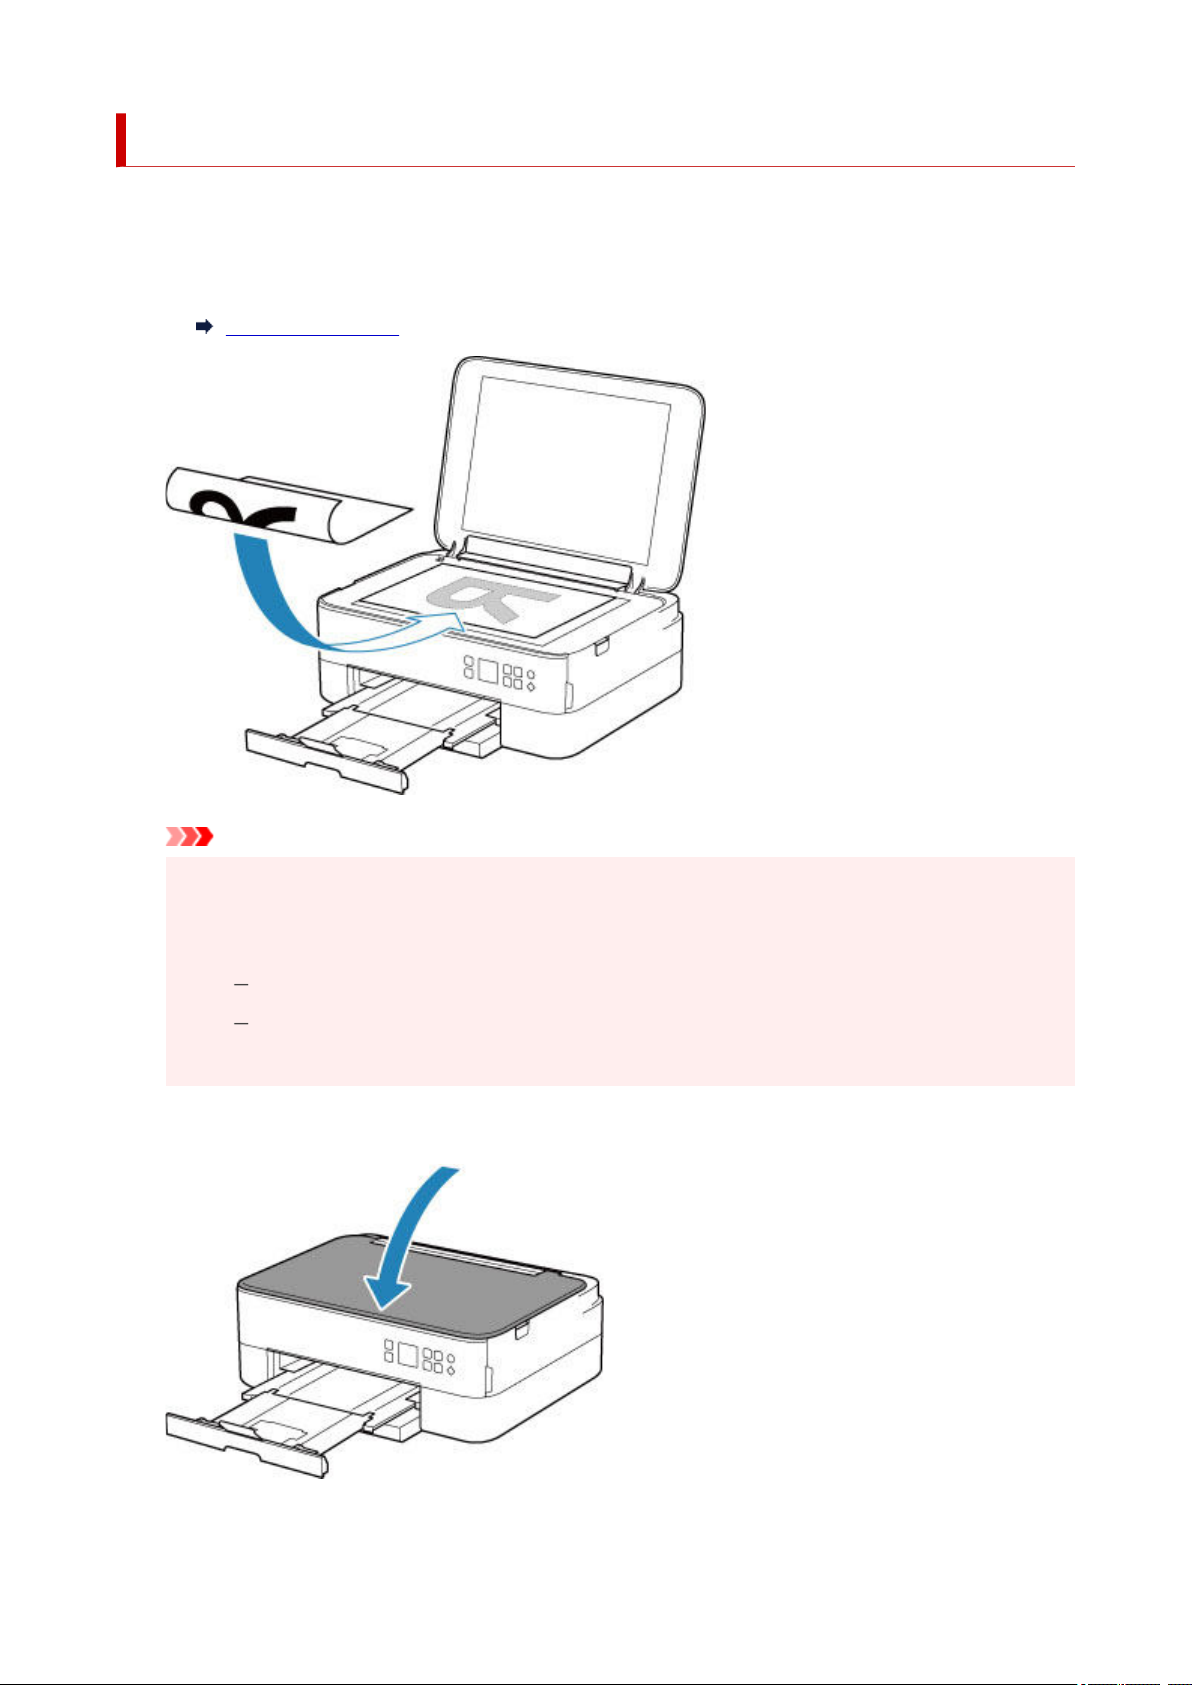
Loading Originals on Platen
1. Open the document cover.
2. Load original WITH SIDE TO SCAN FACING DOWN on platen.
Supported Originals
Important
• Be sure to observe the following when loading the original on the platen.
Failure to observe the following may cause the scanner to malfunction or the platen glass to
break.
Do not place any objects weighing 4.4 lb (2.0 kg) or more on the platen glass.
Do not put any pressure of 4.4 lb (2.0 kg) or more on the platen glass, such as pressing
down the original.
3. Close the document cover gently.
78
Page 79

Important
• After loading the original on the platen, be sure to close the document cover before starting to copy or
scan.
79
Page 80
Supported Originals
Item Details
Types of originals • Text document, magazine, or newspaper
• Printed photo, postcard, business card, or disc (BD/DVD/CD, etc.)
Size (width x height) Max. 8.5 x 11.7 in. (216 x 297 mm)
Note
• When loading a thick original such as a book on the platen, you can load it by removing the document
cover from the printer.
How to Detach / Attach the Document Cover
80
Page 81
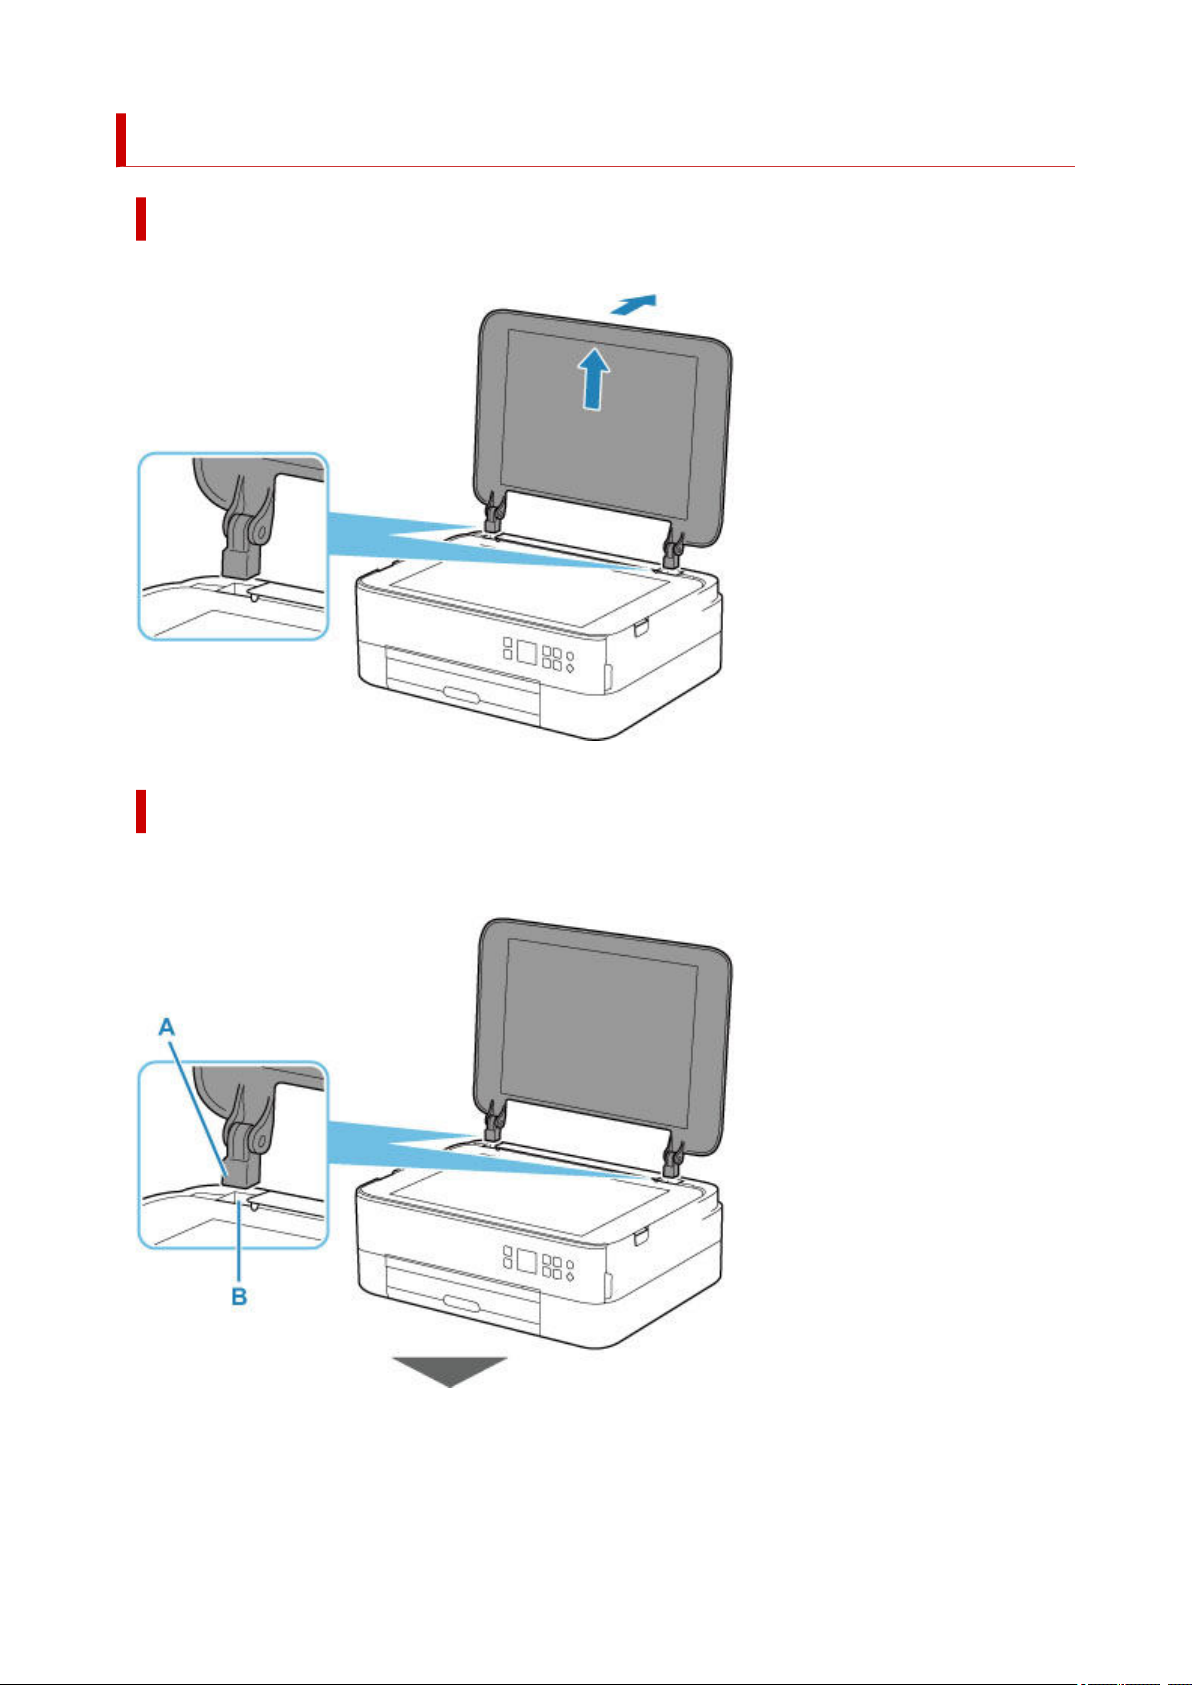
How to Detach / Attach the Document Cover
Detaching the document cover:
Hold up the document cover in portrait orientation and then tip it back.
Attaching the document cover:
Fit both hinges (A) of the document cover into the holder (B) and insert both hinges of the document cover
vertically as illustrated below.
81
Page 82
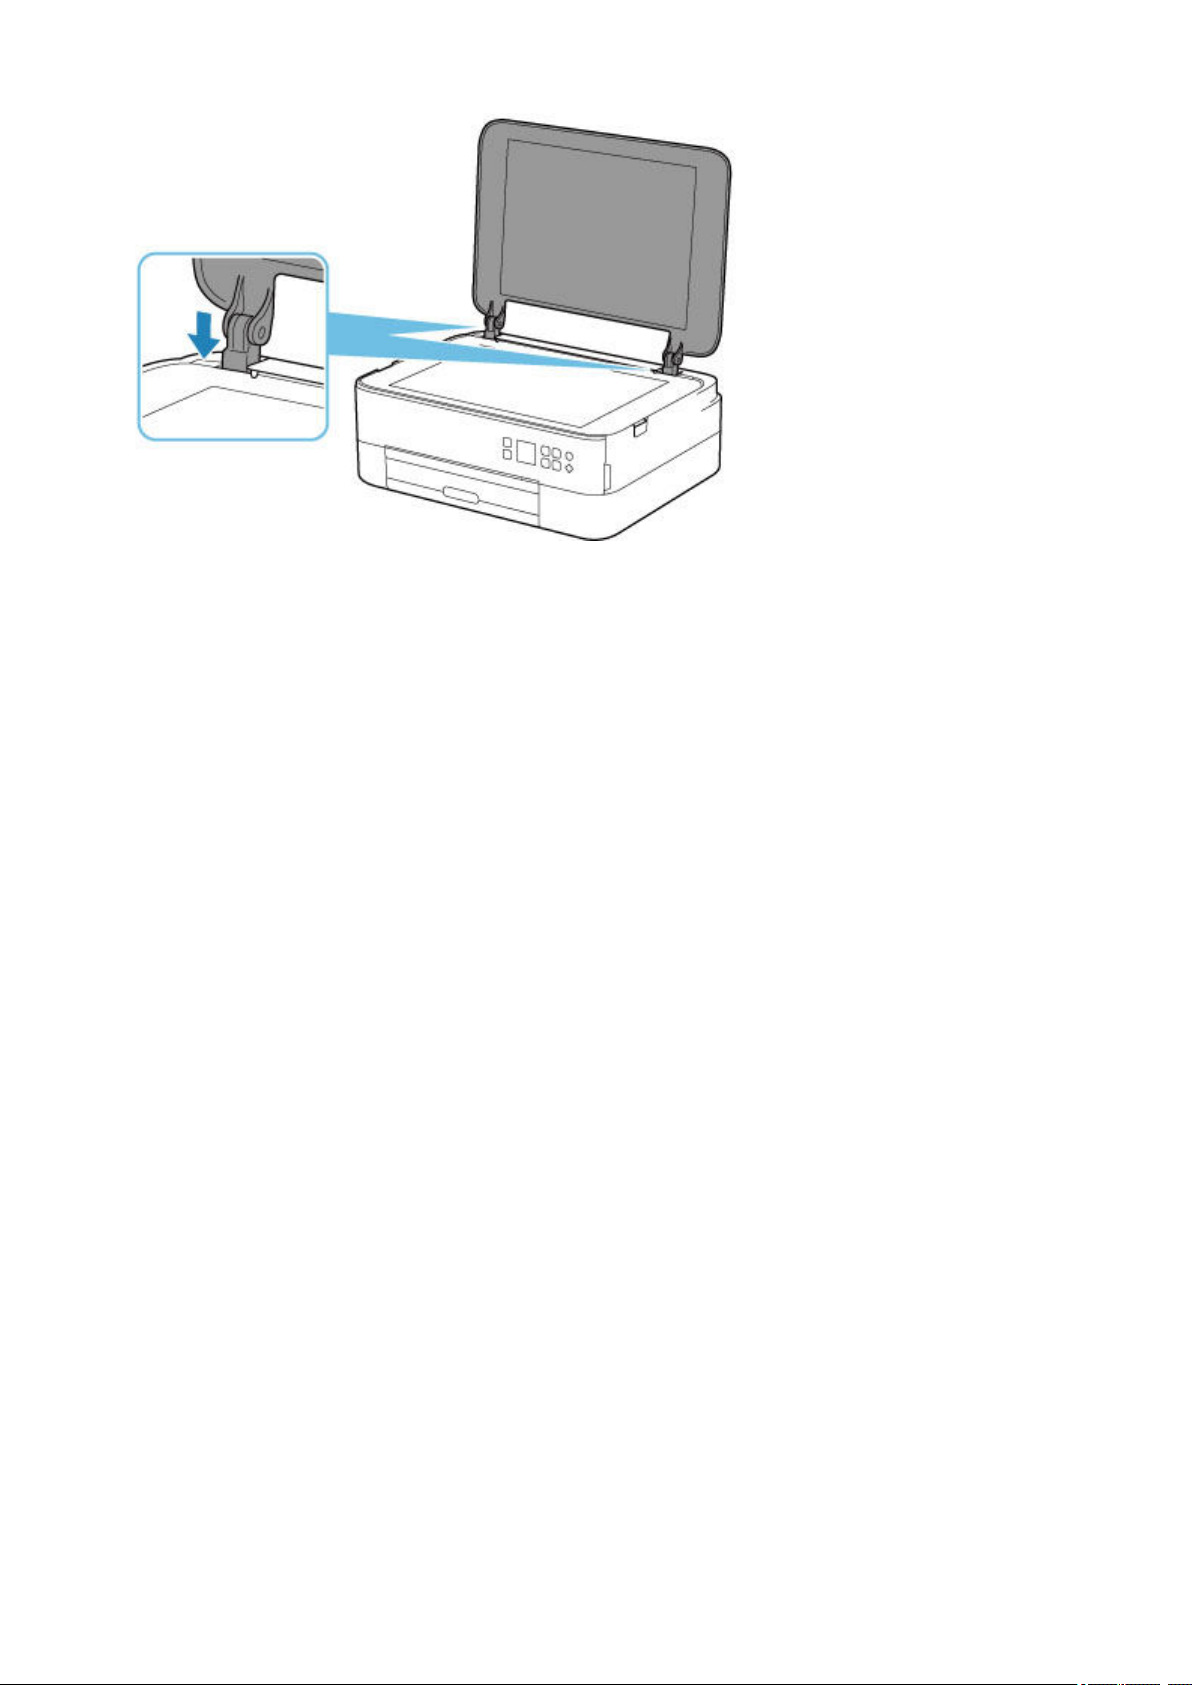
82
Page 83

Replacing a FINE Cartridge
Replacing a FINE Cartridge
Checking Ink Status on the LCD
Ink Tips
83
Page 84
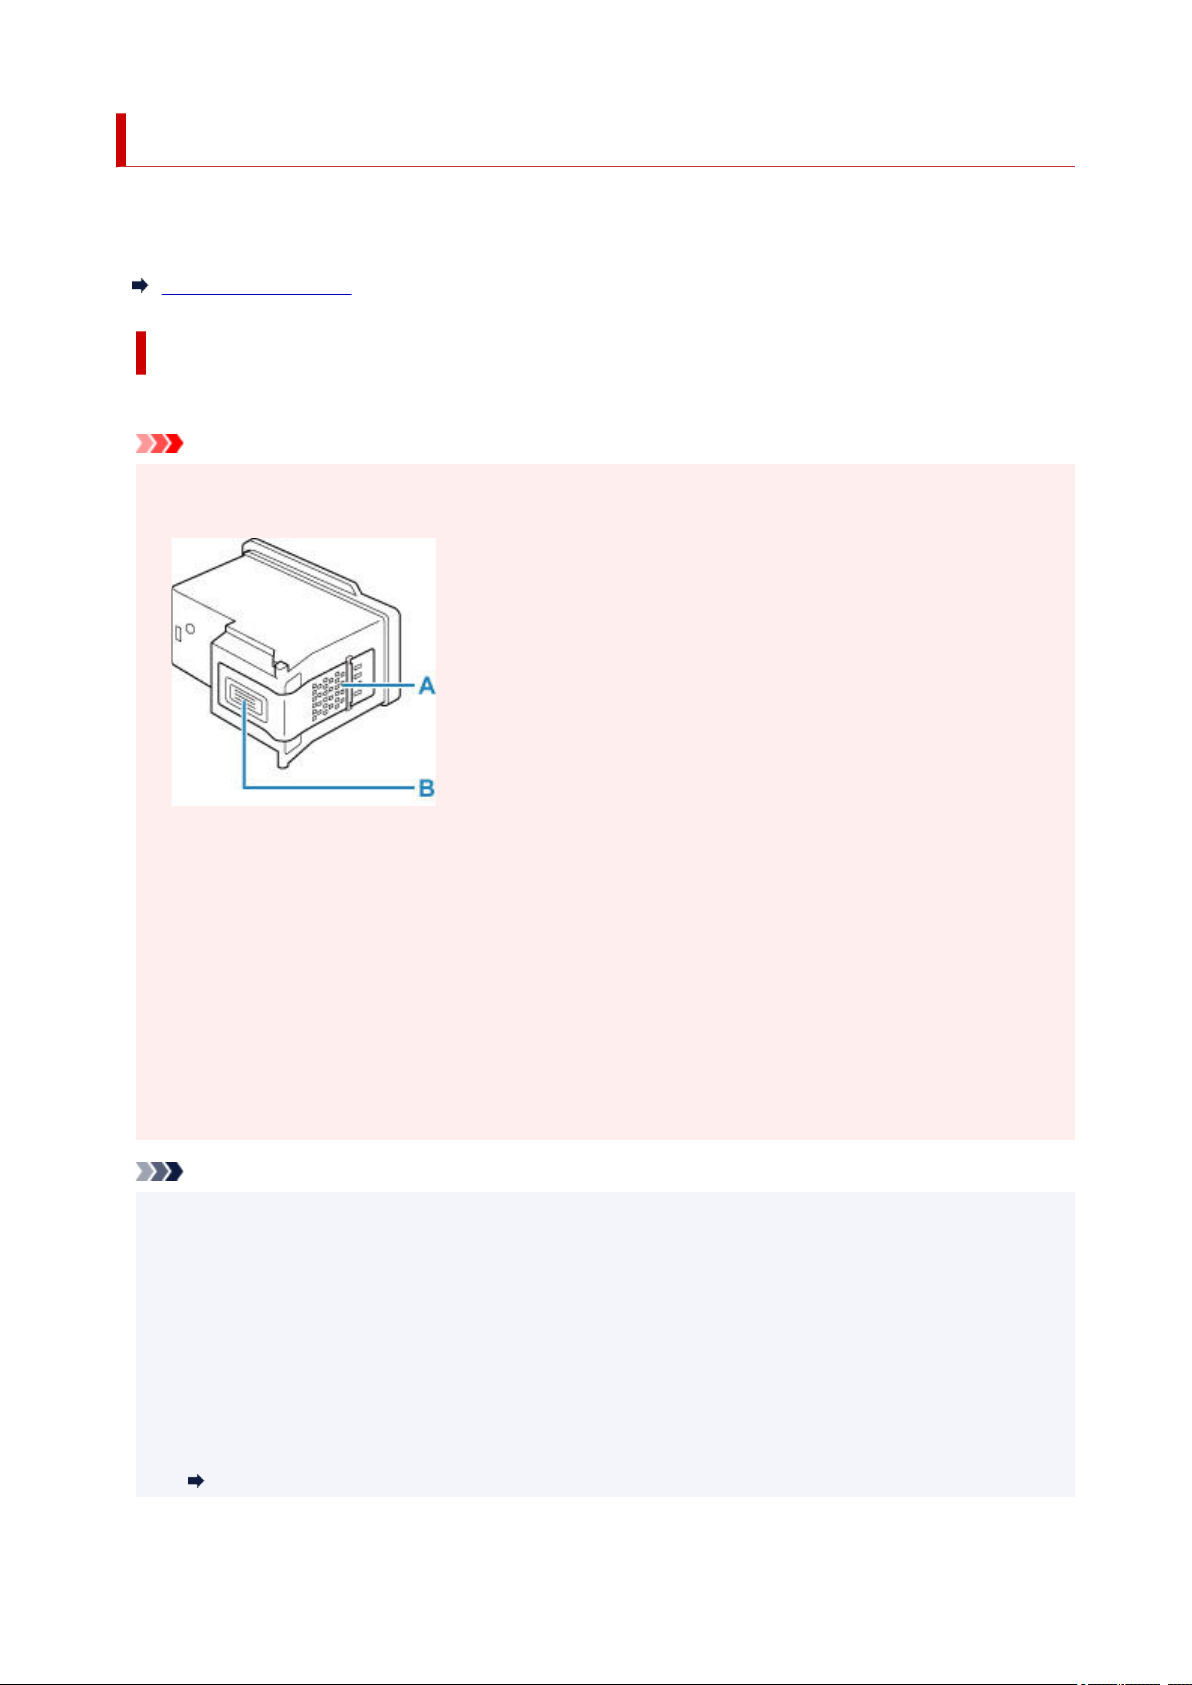
Replacing a FINE Cartridge
When remaining ink cautions or errors occur, the error message will appear on the LCD to inform you of the
error. In this state, the printer cannot print or scan. Check the error message and take appropriate action.
When Error Occurred
Replacing Procedure
When you need to replace a FINE cartridge, follow the procedure below.
Important
• Do not touch the electrical contacts (A) or print head nozzle (B) on a FINE cartridge. The printer may
not print properly if you touch them.
• If you remove a FINE cartridge, replace it immediately. Do not leave the printer with the FINE
cartridge removed.
• Use a new FINE cartridge for replacement. Installing a used FINE cartridge may cause the nozzles to
clog.
Furthermore, with such a FINE cartridge, the printer will not be able to inform you when to replace the
FINE cartridge properly.
• Once a FINE cartridge has been installed, do not remove it from the printer and leave it out in the
open. This will cause the FINE cartridge to dry out, and the printer may not operate properly when it
is reinstalled. To maintain optimal printing quality, use a FINE cartridge within six months of first use.
Note
• For Windows, if a FINE cartridge runs out of ink, you can print with either color or black FINE
cartridge, in whichever ink remains, only for a while. However the print quality may be reduced
compared to when printing with both cartridges. We recommend to use a new FINE cartridge in order
to obtain optimum qualities.
Even when printing with one ink only, print with leaving the empty FINE cartridge installed. If either of
the color FINE cartridge or black FINE cartridge is not installed, an error occurs and the printer
cannot print.
For information on how to configure this setting, see below.
Setting the Ink to be Used
84
Page 85
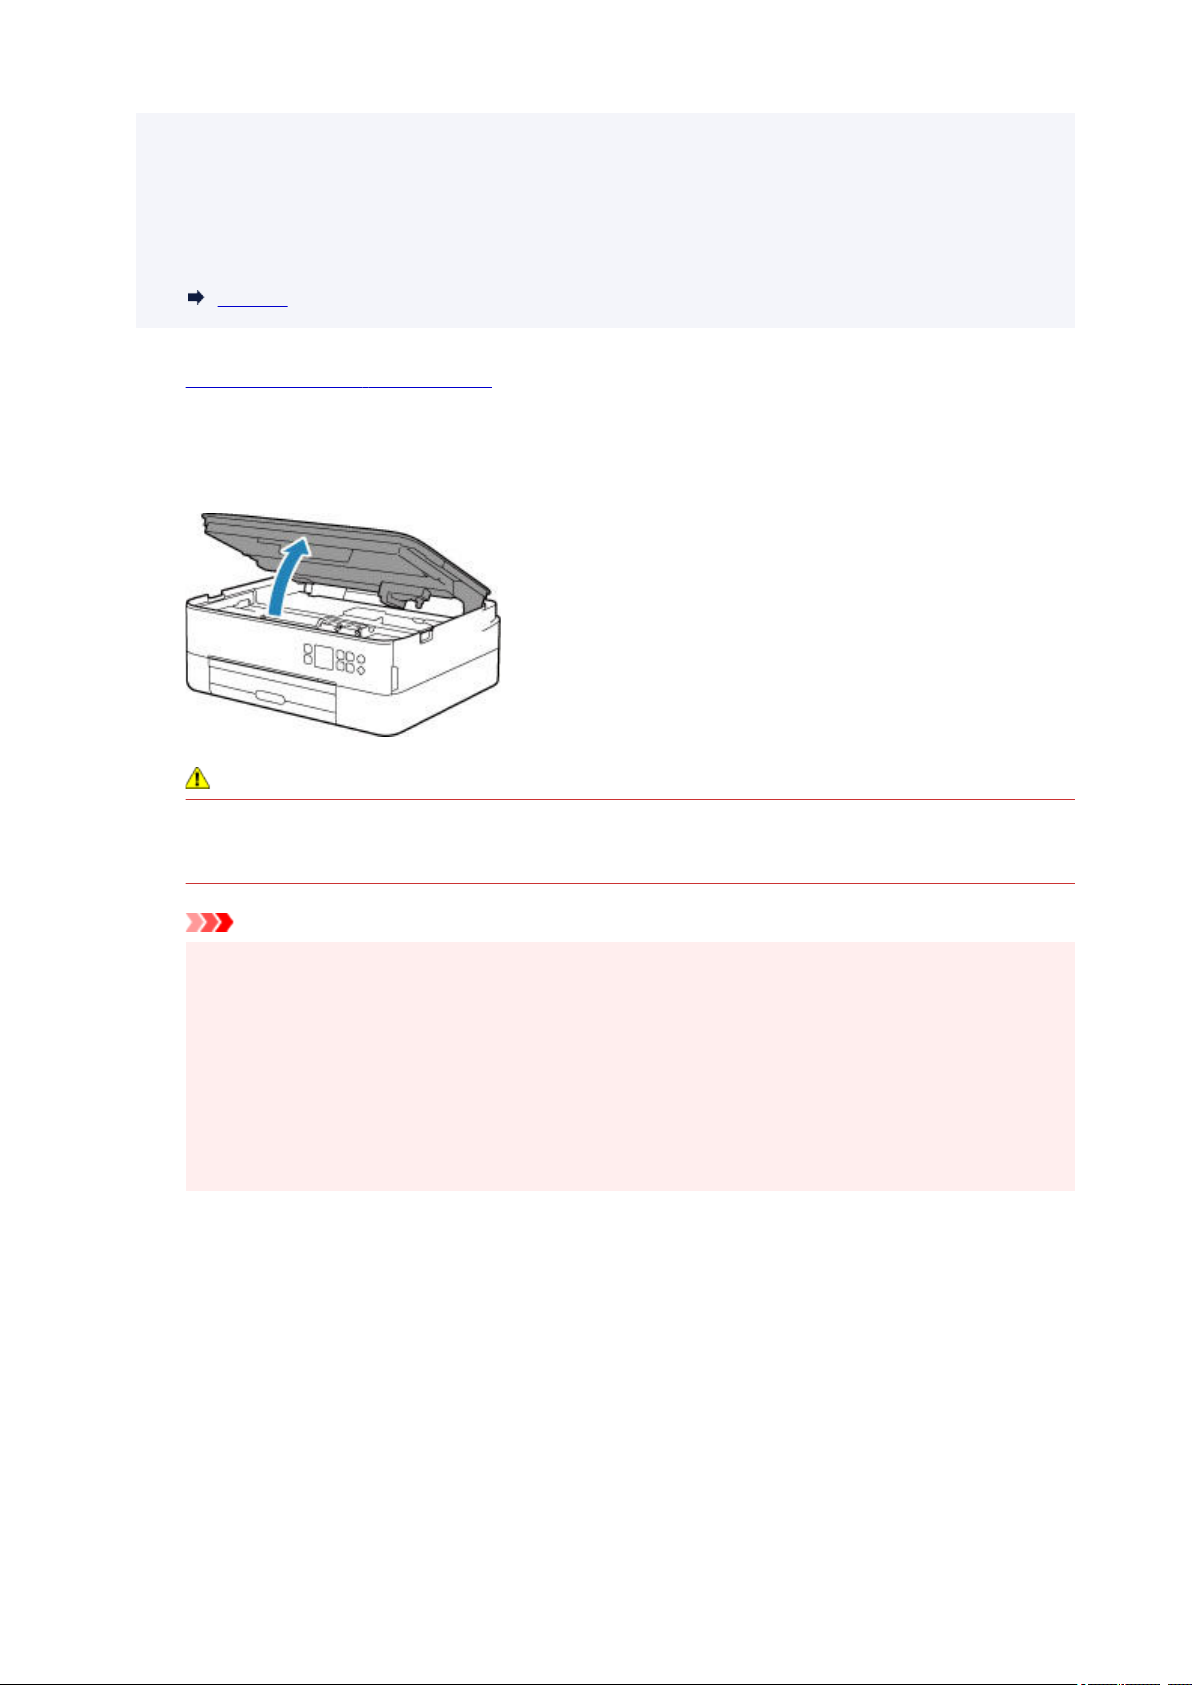
• Color ink may be consumed even when printing a black-and-white document or when black-andwhite printing is specified.
Both color ink and black ink are also consumed in the standard cleaning and deep cleaning of the
print head, which may be necessary to maintain the performance of the printer. When ink runs out,
replace the FINE cartridge immediately with a new one.
Ink Tips
1. Check that printer is turned on.
2. Open the scanning unit / cover.
The FINE cartridge holder moves to the replacement position.
Caution
• Do not hold the FINE cartridge holder to stop or move it forcibly. Do not touch the FINE
cartridge holder until it stops completely.
Important
• The inside of the printer may be stained with ink. Be careful not to stain your hands or clothing
when replacing the FINE cartridge. You can easily wipe off the ink from the inside of the printer
with tissue paper or the like.
• Do not touch the metallic parts or other parts inside the printer.
• If the scanning unit / cover is left open for more than 10 minutes, the FINE cartridge holder may
move and the Alarm lamp may light. In this case, close the scanning unit / cover, and then
open it again.
3. Remove the empty FINE cartridge.
1. Pick up the ink cartridge locking cover to open it.
85
Page 86
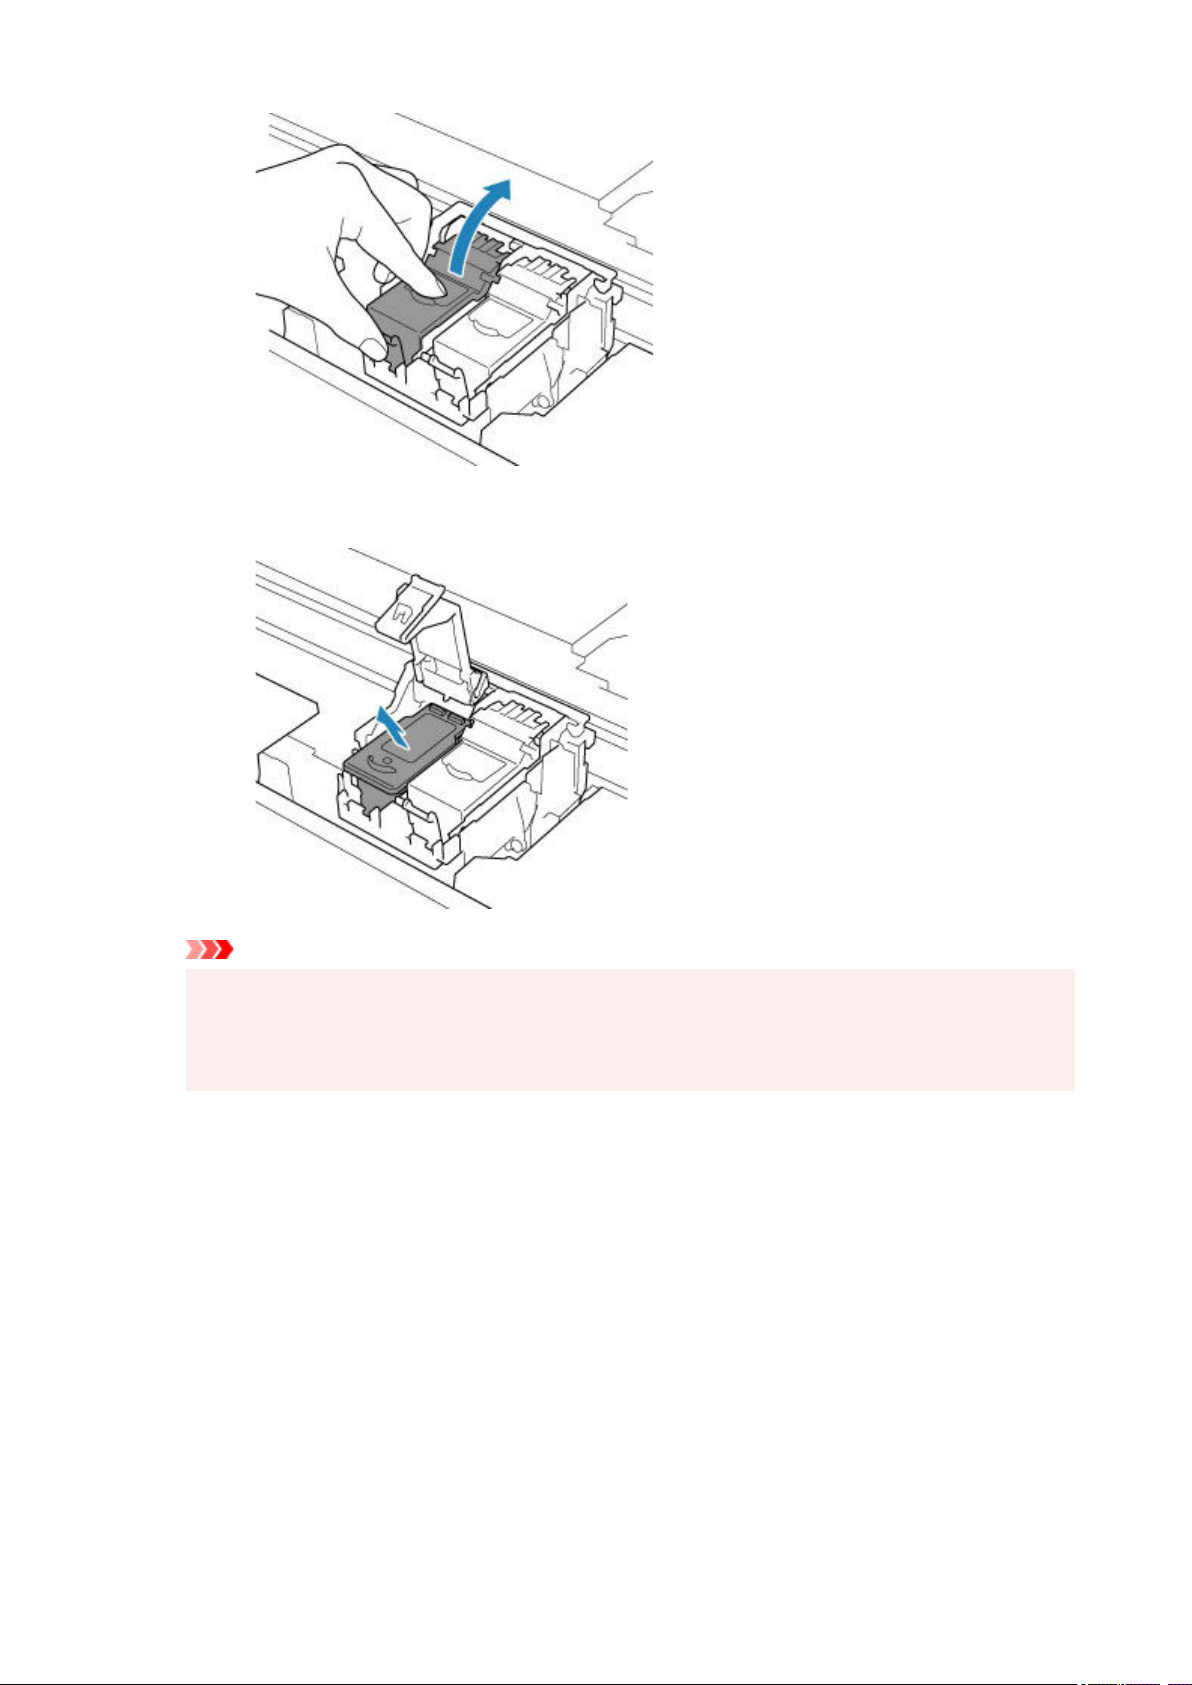
2. Remove the FINE cartridge.
Important
• Handle the FINE cartridge carefully to avoid staining of clothing or the surrounding area.
• Discard the empty FINE cartridge according to the local laws and regulations regarding disposal
of consumables.
4. Prepare a new FINE cartridge.
1. Take new FINE cartridge out of its package and remove protective tape (C) gently.
86
Page 87
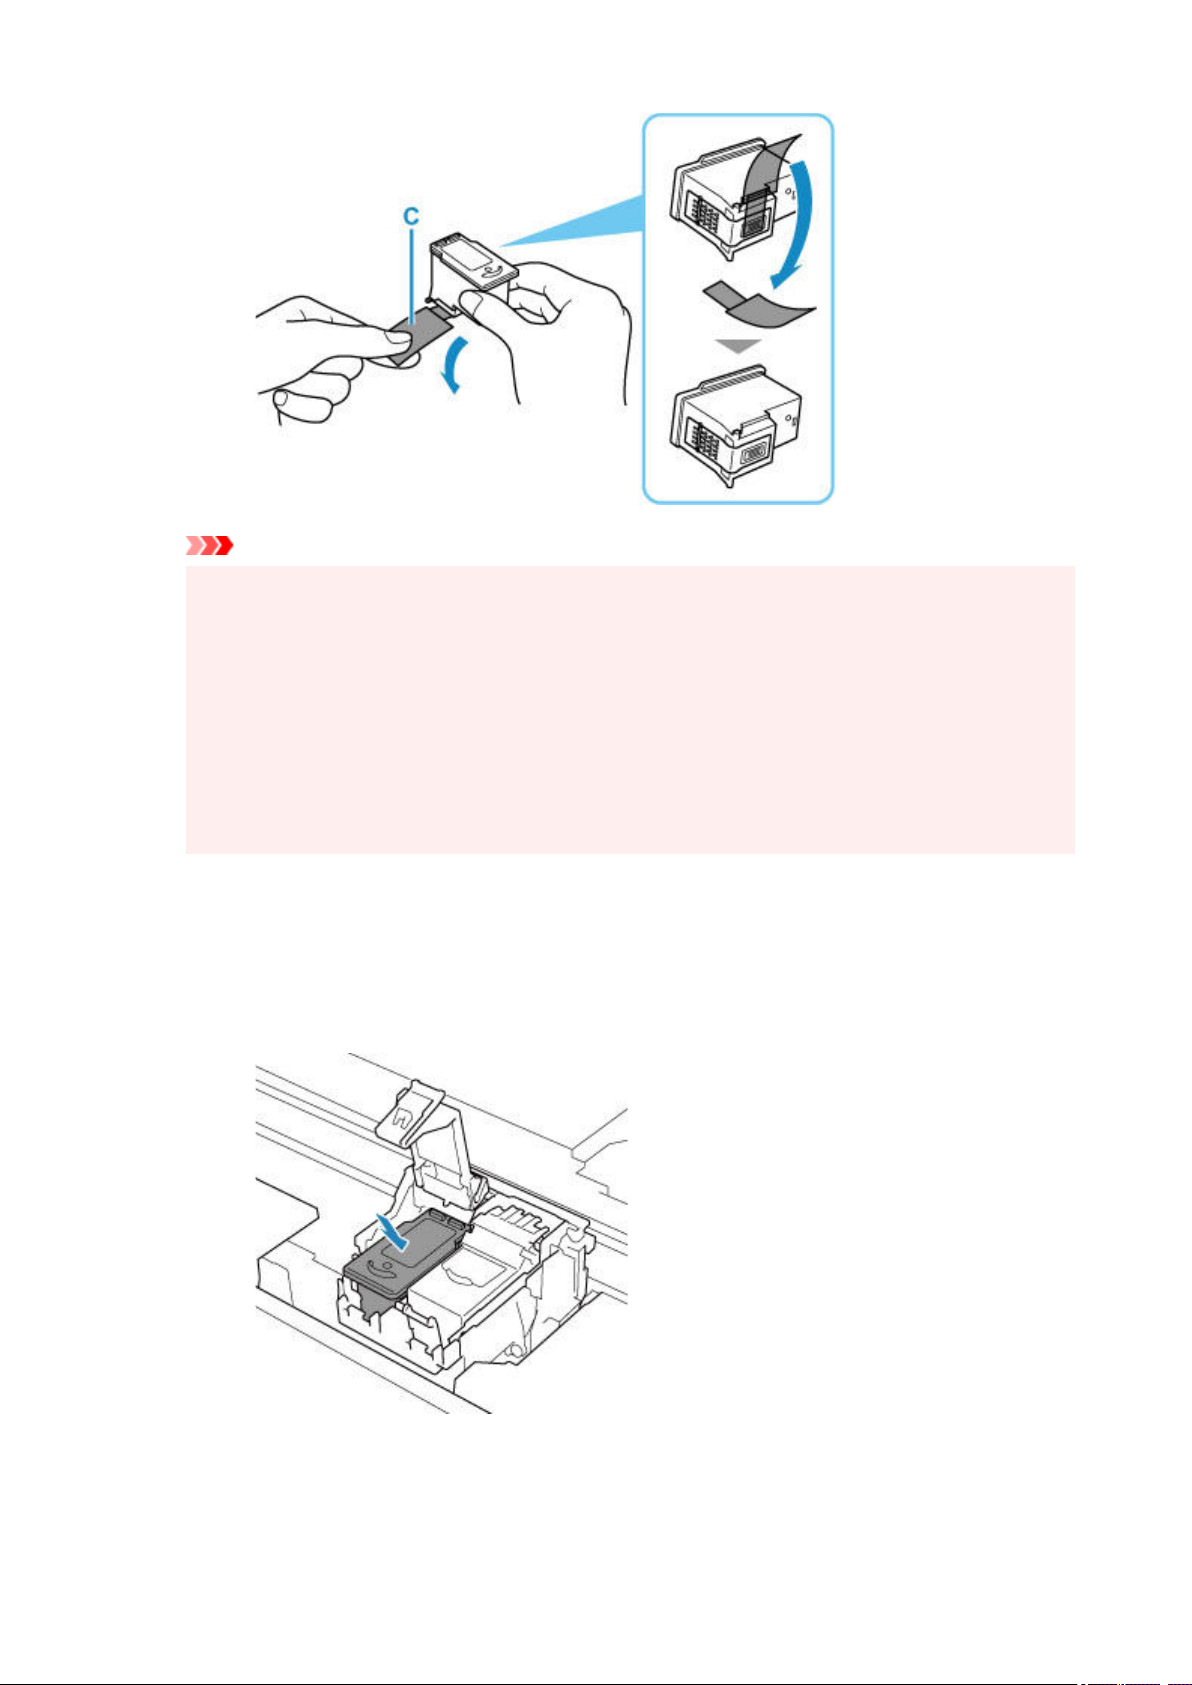
Important
If you shake a FINE cartridge, ink may spill out and stain your hands and the surrounding area.
•
Handle a FINE cartridge carefully.
• Be careful not to stain your hands and the surrounding area with ink on the removed protective
tape.
• Do not reattach the protective tape once you have removed it. Discard it according to the local
laws and regulations regarding disposal of consumables.
• Do not touch the electrical contacts or print head nozzle on a FINE cartridge. The printer may
not print properly if you touch them.
5. Install the FINE cartridge.
1. Insert the new FINE cartridge into the FINE cartridge holder.
The color FINE cartridge should be installed into the left slot and the black FINE cartridge should be
installed into the right slot.
2. Close the ink cartridge locking cover to secure theFINE cartridge.
Push the ink cartridge locking cover fully until a "click" sound is heard.
87
Page 88
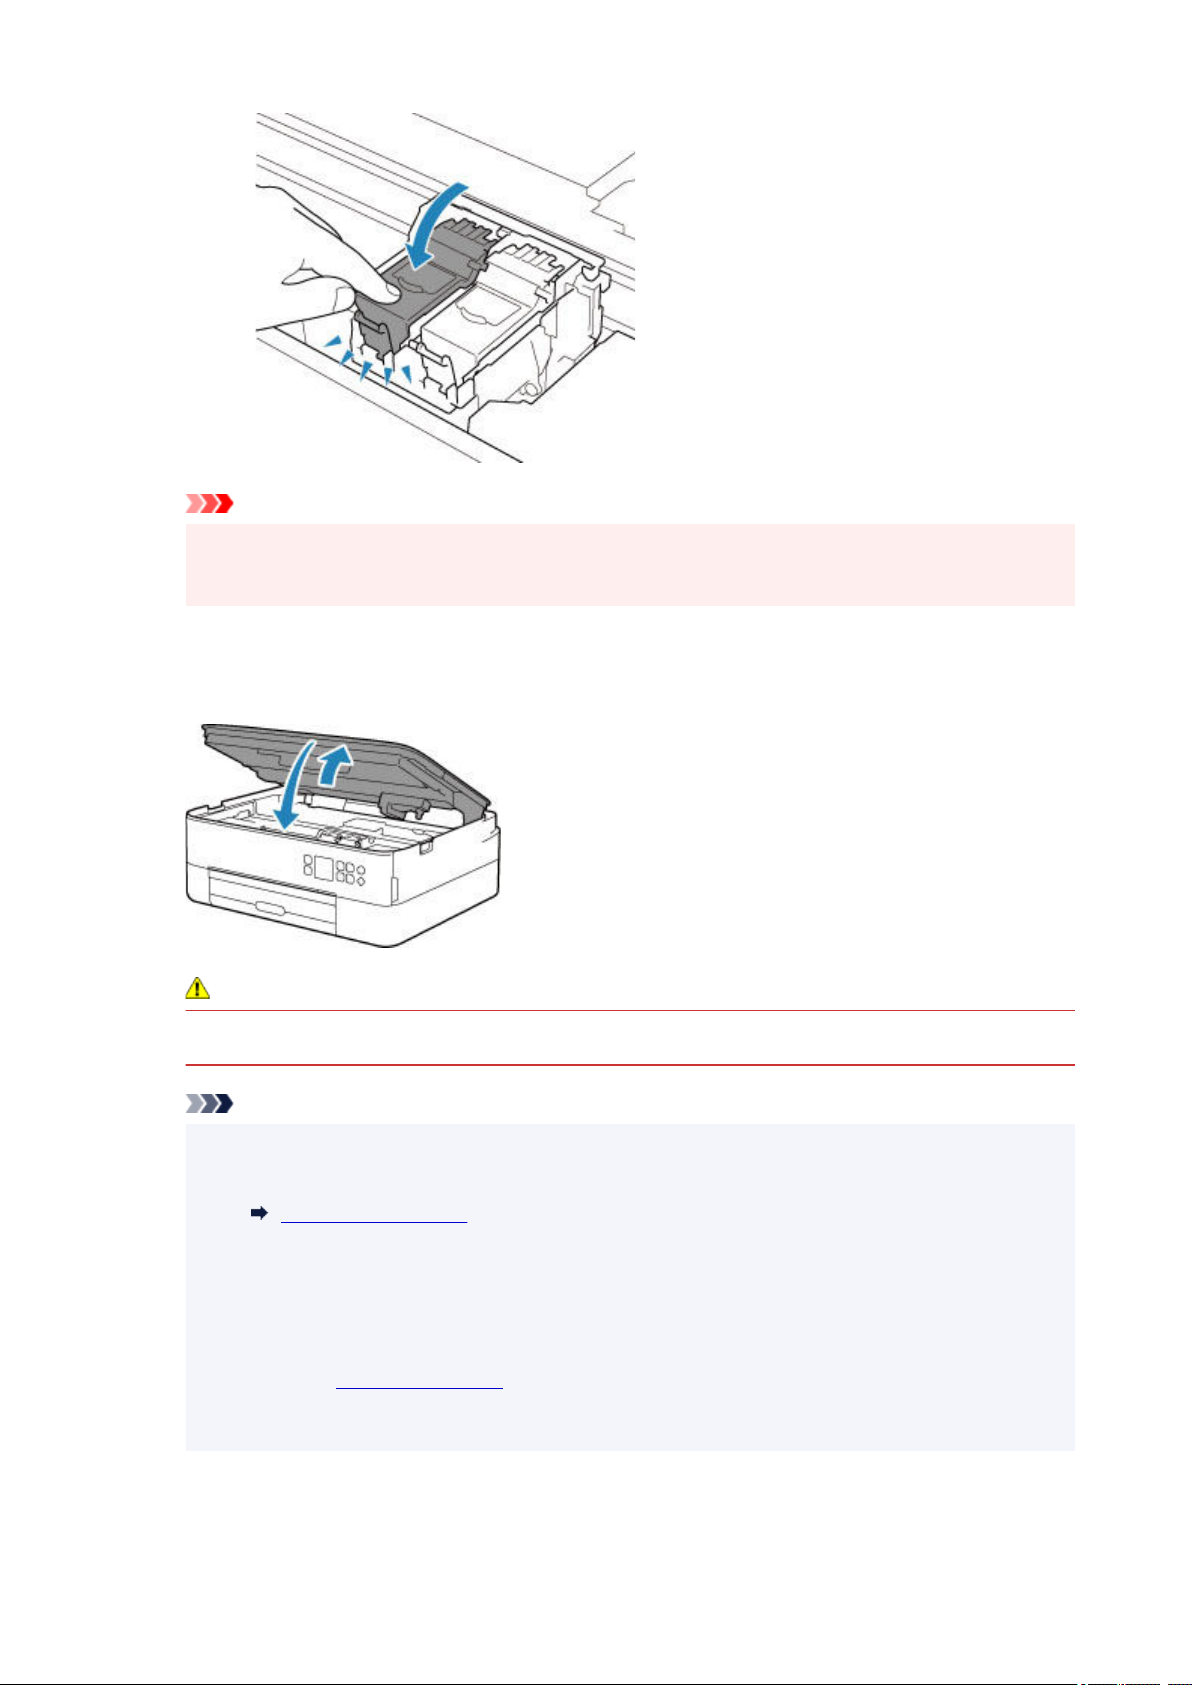
Important
The printer cannot print unless both the color FINE cartridge and black FINE cartridge are
•
installed. Be sure to install both cartridges.
6. Close the scanning unit / cover.
To close the scanning unit / cover, hold it up once, then take it down gently.
Caution
• When closing the scanning unit / cover, be careful not to get your fingers caught.
Note
• If the error message appears on the LCD after the scanning unit / cover is closed, take
appropriate action.
When Error Occurred
• When you start printing after replacing the FINE cartridge, the printer starts cleaning the print
head automatically. Do not perform any other operations until the printer completes the cleaning
of the print head.
•
If the print head is out of alignment, as indicated by misaligned printed ruled lines or similar
symptoms,
• The printer may make noise during operation.
align the print head.
88
Page 89
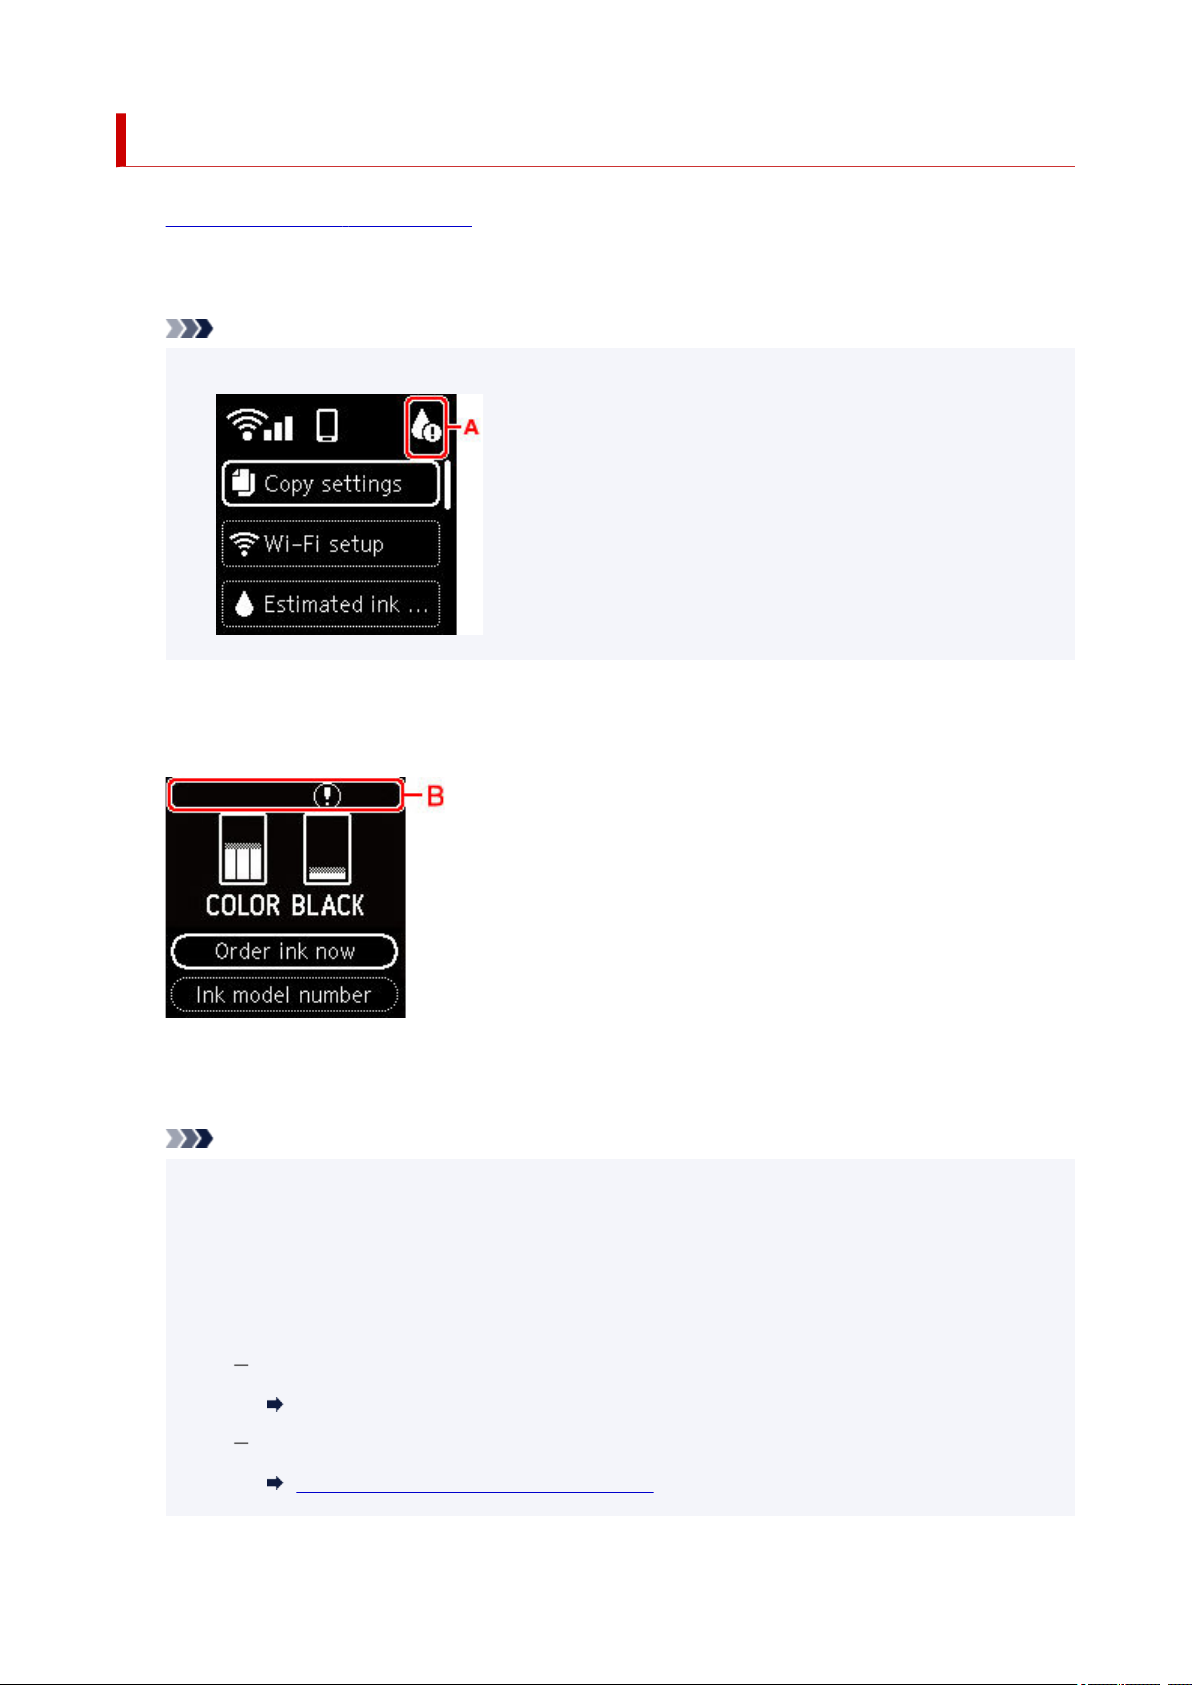
Checking Ink Status on the LCD
1.
Check that printer is turned on.
2. Press the OK button.
Note
• A symbol appears in the area A if there is any information about the remaining ink level.
3. Select Estimated ink levels.
A symbol is displayed on top of the FINE Cartridge (area B) where there is a notification.
The ink is running low. Prepare a new ink cartridge.
The resulting print quality may not be satisfactory, if printing is continued under this condition.
Note
• The above screen shows estimated ink levels.
• Select Order ink now and press the QR button to display the QR code and access the ink
purchasing site. Cost of connecting to Internet is to be born by the customer.
• You can check the model number of the FINE cartridge by selecting Ink model number.
• You can also check the ink status on the computer screen.
For Windows:
Checking Ink Status from Your Computer
For macOS:
Checking Ink Status from Your Computer
89
Page 90

Ink Tips
How is ink used for various purposes other than printing?
Ink may be used for purposes other than printing. It is used for cleaning to keep the printing clean. To
keep printer's performance, Canon printer performs cleaning automatically according to its condition. A
small amount of ink is consumed when cleaning.
Does black-and-white printing use color ink?
Black-and-white printing may use ink other than black ink depending on the type of printing paper or the
settings of the printer driver. So, color ink is consumed even when printing in black-and-white.
90
Page 91

If Printing Is Faint or Uneven
Maintenance Procedure
Printing the Nozzle Check Pattern
Examining the Nozzle Check Pattern
Cleaning the Print Head
Deep Print Head Cleaning
Aligning the Print Head
Aligning the Print Head Manually
91
Page 92
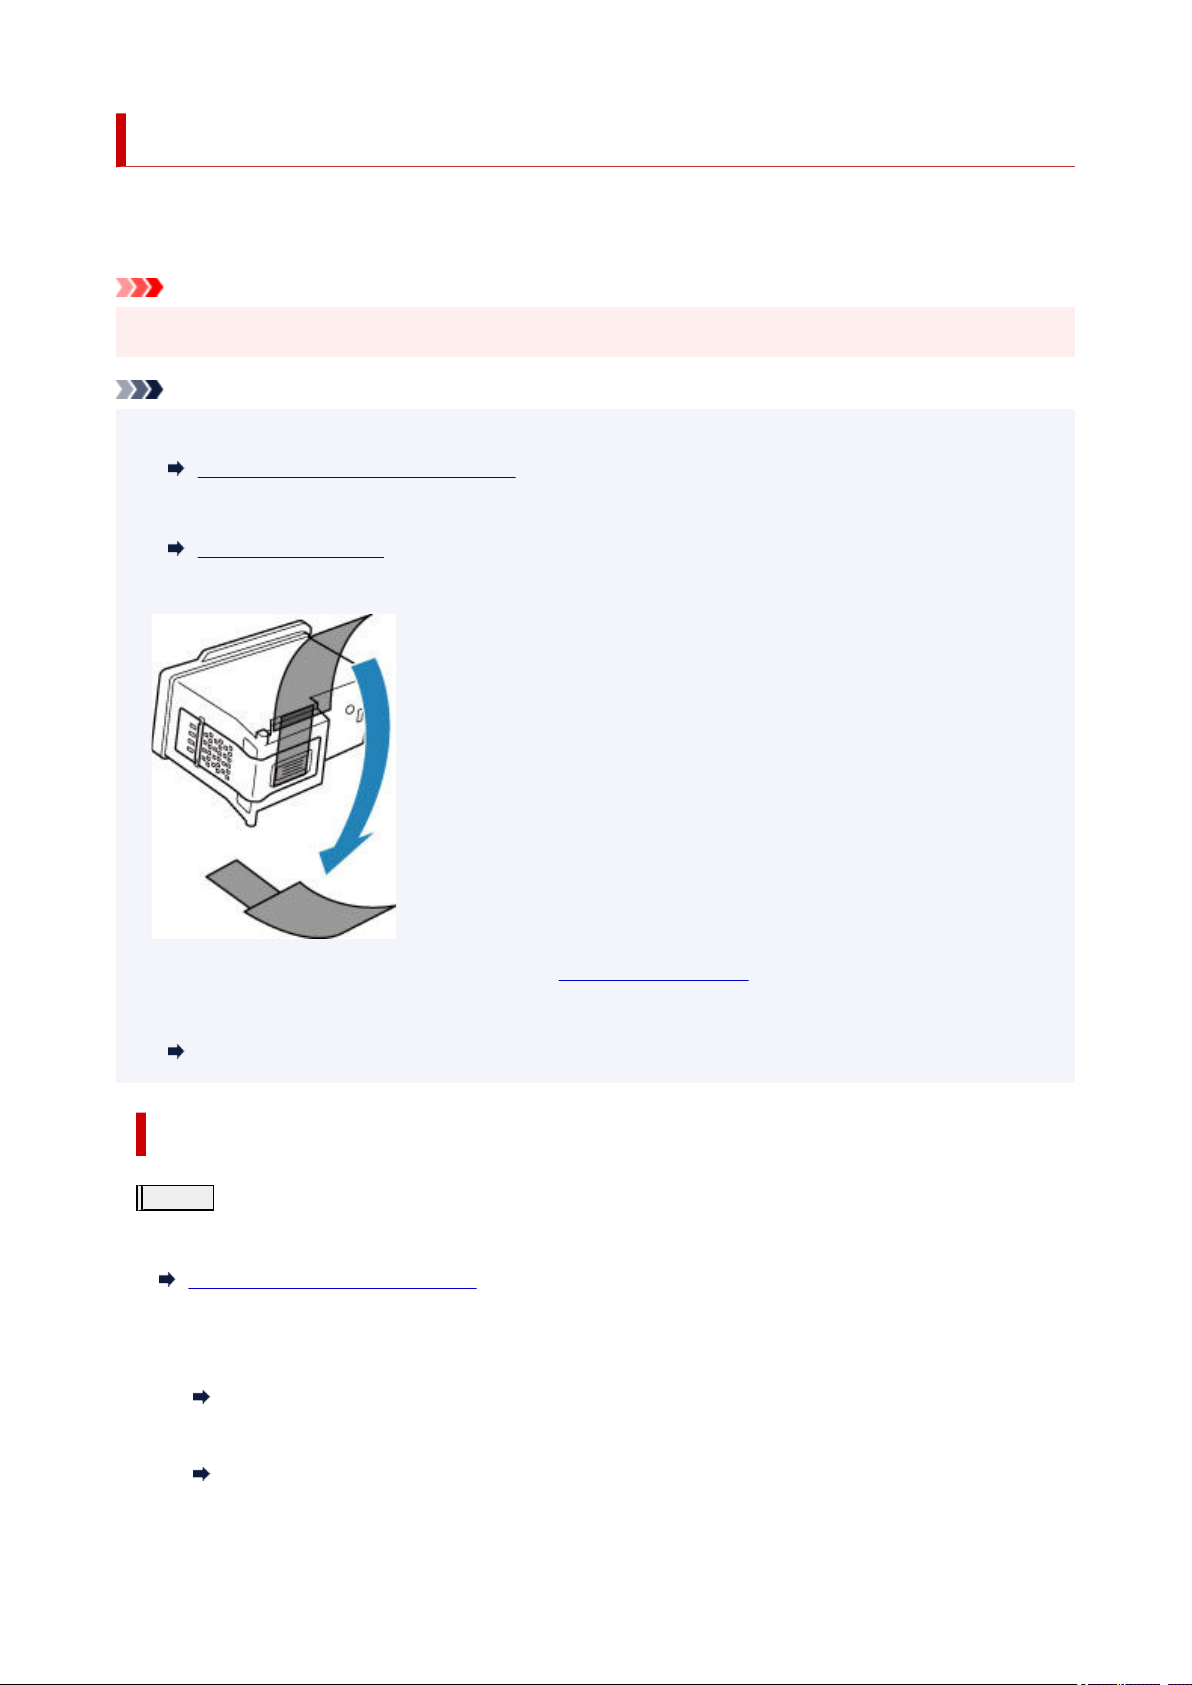
Maintenance Procedure
If print results are blurred, colors are not printed correctly, or print results are unsatisfactory (e.g. misaligned
printed ruled lines), perform the maintenance procedure below.
Important
• Do not rinse or wipe the FINE cartridge. This can cause trouble with the FINE cartridge.
Note
• Check if ink remains in the FINE cartridge.
Checking the Ink Status on the LCD
• Check if the FINE cartridge is installed correctly.
Replacing Procedure
Also check if the protective tape on the bottom of the FINE cartridge is removed.
• If an error message appears on the LCD, see When Error Occurred.
• For Windows, increasing the print quality in the printer driver settings may improve the print result.
Changing the Print Quality and Correcting Image Data
When the Print Results Are Blurred or Uneven:
Step1
From the printer
From the computer
Print the nozzle check pattern.
Printing the Nozzle Check Pattern
• For Windows:
Printing a Nozzle Check Pattern
• For macOS:
Printing a Nozzle Check Pattern
92
Page 93

Step2
If there are missing lines or horizontal white streaks in the pattern:
Examine the nozzle check pattern.
Step3
From the printer
From the computer
After cleaning the print head, print and examine the nozzle check pattern: Step1
If the problem is not resolved after performing from step 1 to step 3 twice:
Step4
From the printer
Clean the print head.
Cleaning the Print Head
• For Windows:
Cleaning the Print Heads
• For macOS:
Cleaning the Print Heads
Clean the print head deeply.
Deep Print Head Cleaning
From the computer
• For Windows:
Cleaning the Print Heads
• For macOS:
Cleaning the Print Heads
If the problem is not resolved, turn off the power and clean the print head deeply again after 24 hours. Do not
unplug the power cord when turning off the power.
If the problem is still not resolved:
Step5
Replace the FINE cartridge.
Replacing a FINE Cartridge
Note
• If the problem is still not resolved after replacing the FINE cartridge, contact your nearest Canon
service center to request a repair.
93
Page 94

When the Print Results Are Not Even such as the Ruled Lines Are
Misaligned:
Step
Align the print head.
From the printer
Aligning the Print Head
From the computer
• For Windows:
Adjusting Print Head Position Automatically
• For macOS:
Adjusting Print Head Position
94
Page 95
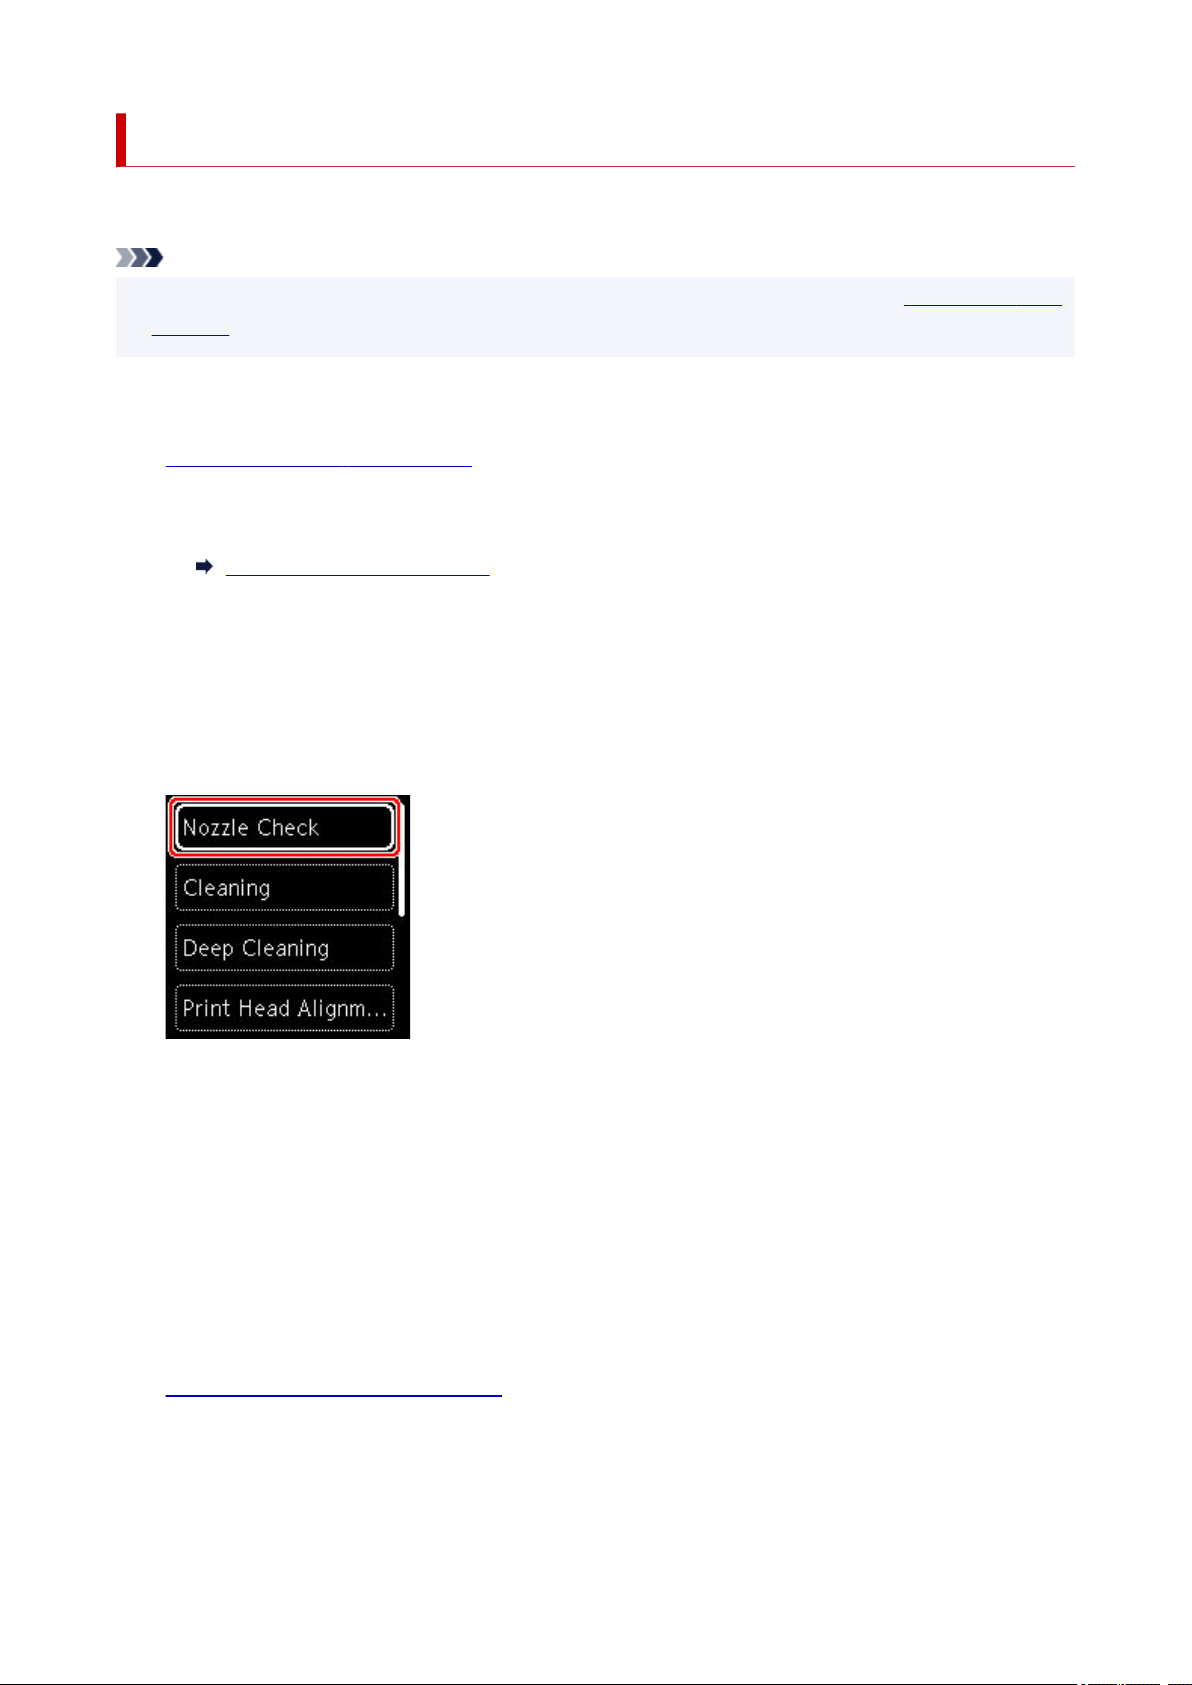
Printing the Nozzle Check Pattern
Print the nozzle check pattern to determine whether the ink ejects properly from the print head nozzle.
Note
• If the remaining ink level is low, the nozzle check pattern will not be printed correctly.
cartridge whose ink is low.
You need to prepare: a sheet of A4 or Letter-sized plain paper
Check that printer is turned on.
1.
2. Load a sheet of A4 or Letter-sized plain paper in the cassette.
Loading Paper in the Cassette
3. Press the OK button.
4. Select Maintenance.
5. Select Nozzle Check.
Replace the FINE
The confirmation screen will appear.
6. Select Yes.
7. Press the OK button.
The nozzle check pattern will be printed and two pattern confirmation screens will appear on the LCD.
8. Select Next.
9. Examine the nozzle check pattern.
95
Page 96
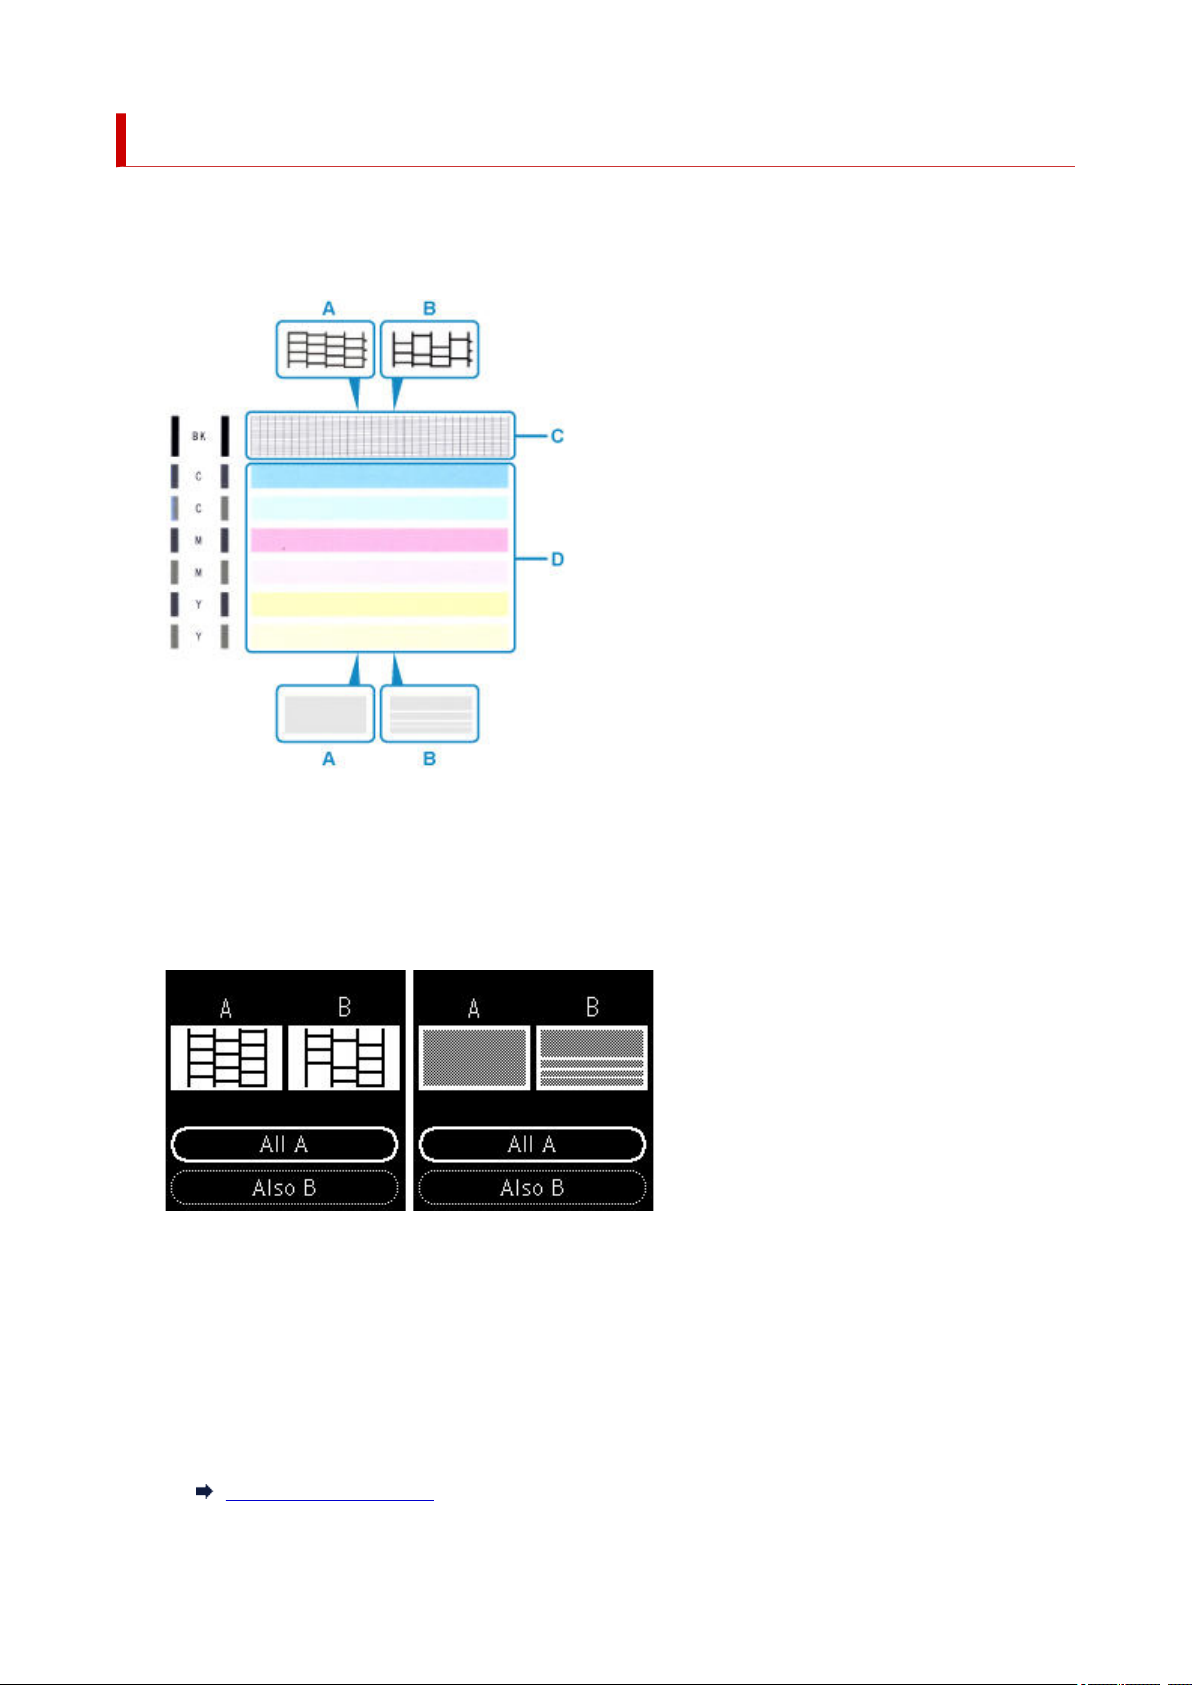
Examining the Nozzle Check Pattern
Examine the nozzle check pattern, and clean the print head if necessary.
1. Check if there are missing lines in the pattern C or horizontal white streaks in the pattern D.
A: No missing lines/No horizontal white streaks
B: Lines are missing/Horizontal white streaks are present
2. Select the pattern that is closer to the printed nozzle check pattern on the confirmation
screen.
For A (no missing lines or no horizontal white streaks) in both the pattern C and pattern D:
The cleaning is not required. Select All A, confirm the message, then select OK.
For B (lines are missing or horizontal white streaks are present) in the pattern C or pattern D, or
in both patterns:
The cleaning is required. Select Also B, then select Yes on the cleaning confirmation screen.
The printer starts cleaning the print head.
Cleaning the Print Head
96
Page 97

If the pattern D or any color in the pattern C is not printed:
(Example: Magenta pattern is not printed)
The cleaning is required. Select Also B, then select Yes on the cleaning confirmation screen.
The printer starts cleaning the print head.
Cleaning the Print Head
97
Page 98
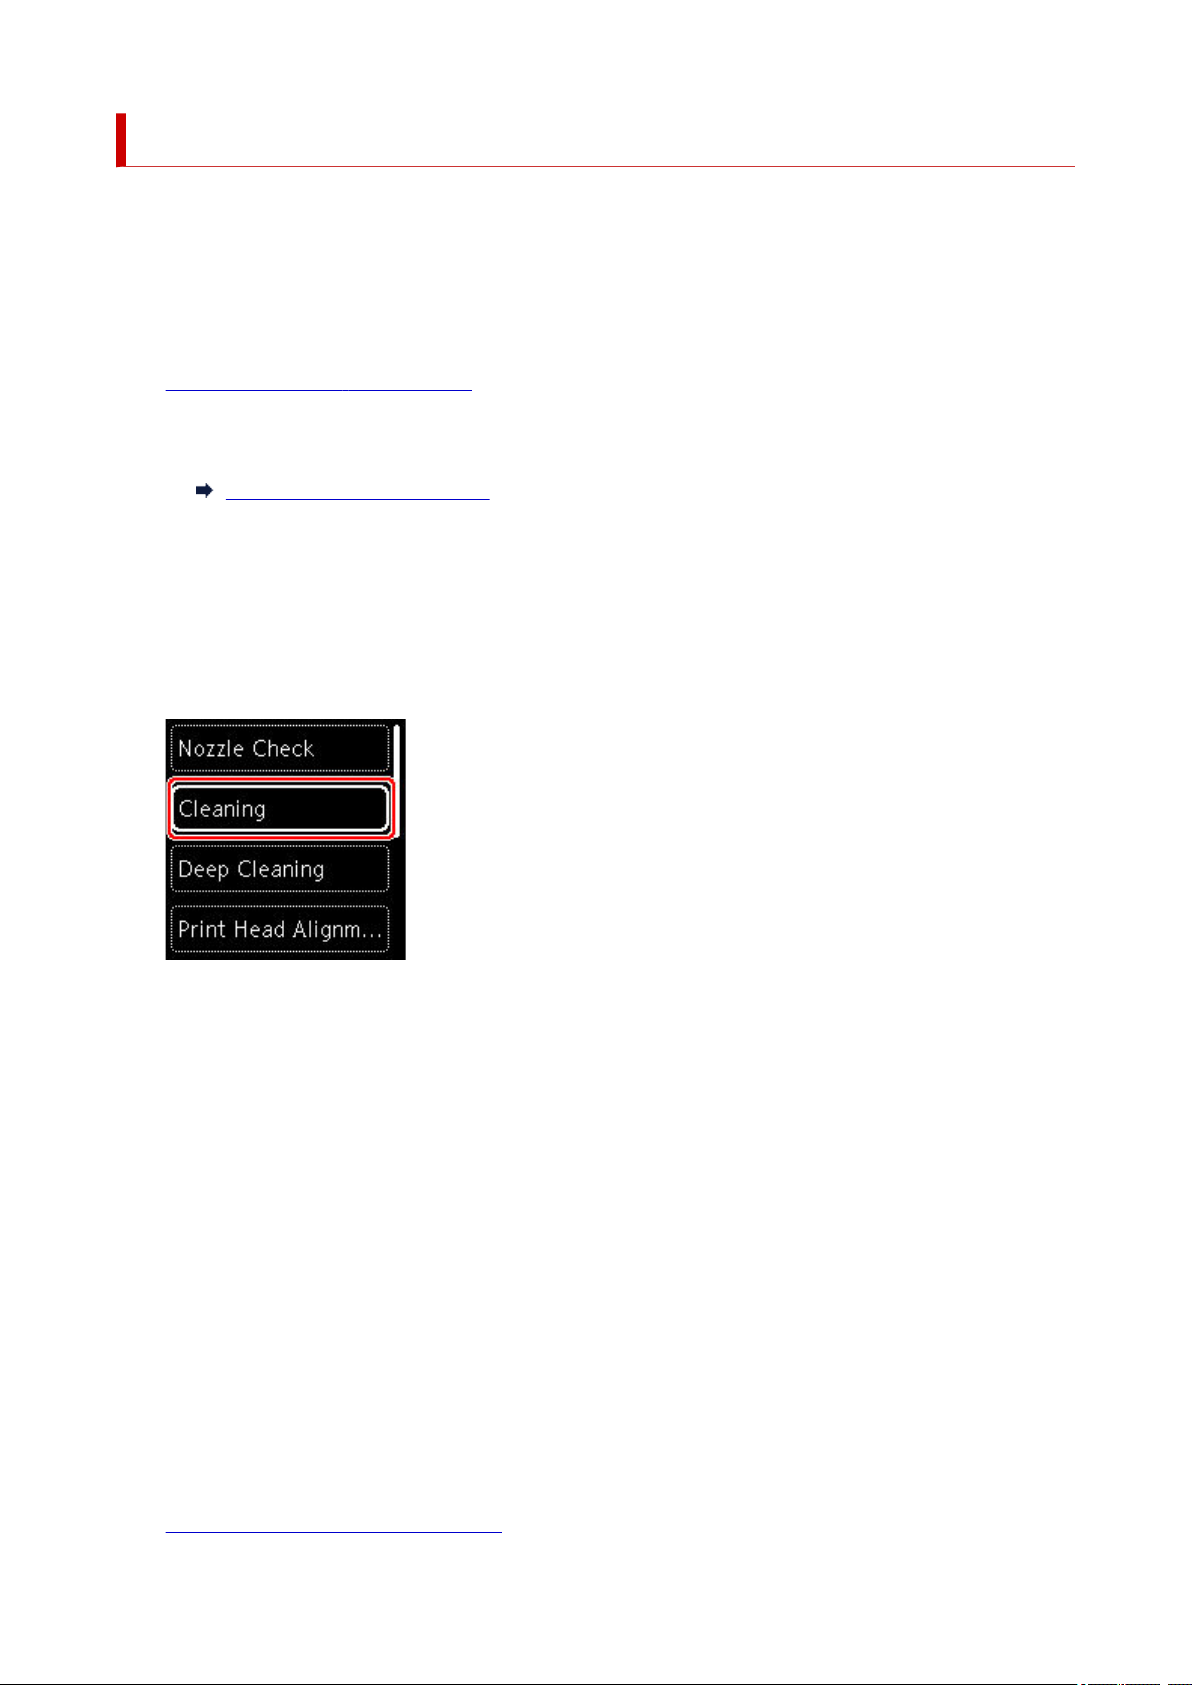
Cleaning the Print Head
Clean the print head if lines are missing or if horizontal white streaks are present in the printed nozzle check
pattern. Cleaning unclogs the nozzles and restores the print head condition. Cleaning the print head
consumes ink, so clean the print head only when necessary.
You need to prepare: a sheet of A4 or Letter-sized plain paper
1.
Check that printer is turned on.
2. Load a sheet of A4 or Letter-sized plain paper in the cassette.
Loading Paper in the Cassette
3. Press the OK button.
4. Select Maintenance.
5. Select Cleaning.
The confirmation screen will appear.
6. Select Yes.
The printer starts cleaning the print head.
Do not perform any other operations until the printer completes the cleaning of the print head. This takes
about 2 minutes.
The pattern print confirmation screen will appear.
7. Select Yes.
8. Press the OK button.
The nozzle check pattern will be printed.
9. Select Next.
Examine the nozzle check pattern.
10.
98
Page 99

Note
• If the problem is not resolved after cleaning the print head twice,
clean the print head deeply.
99
Page 100
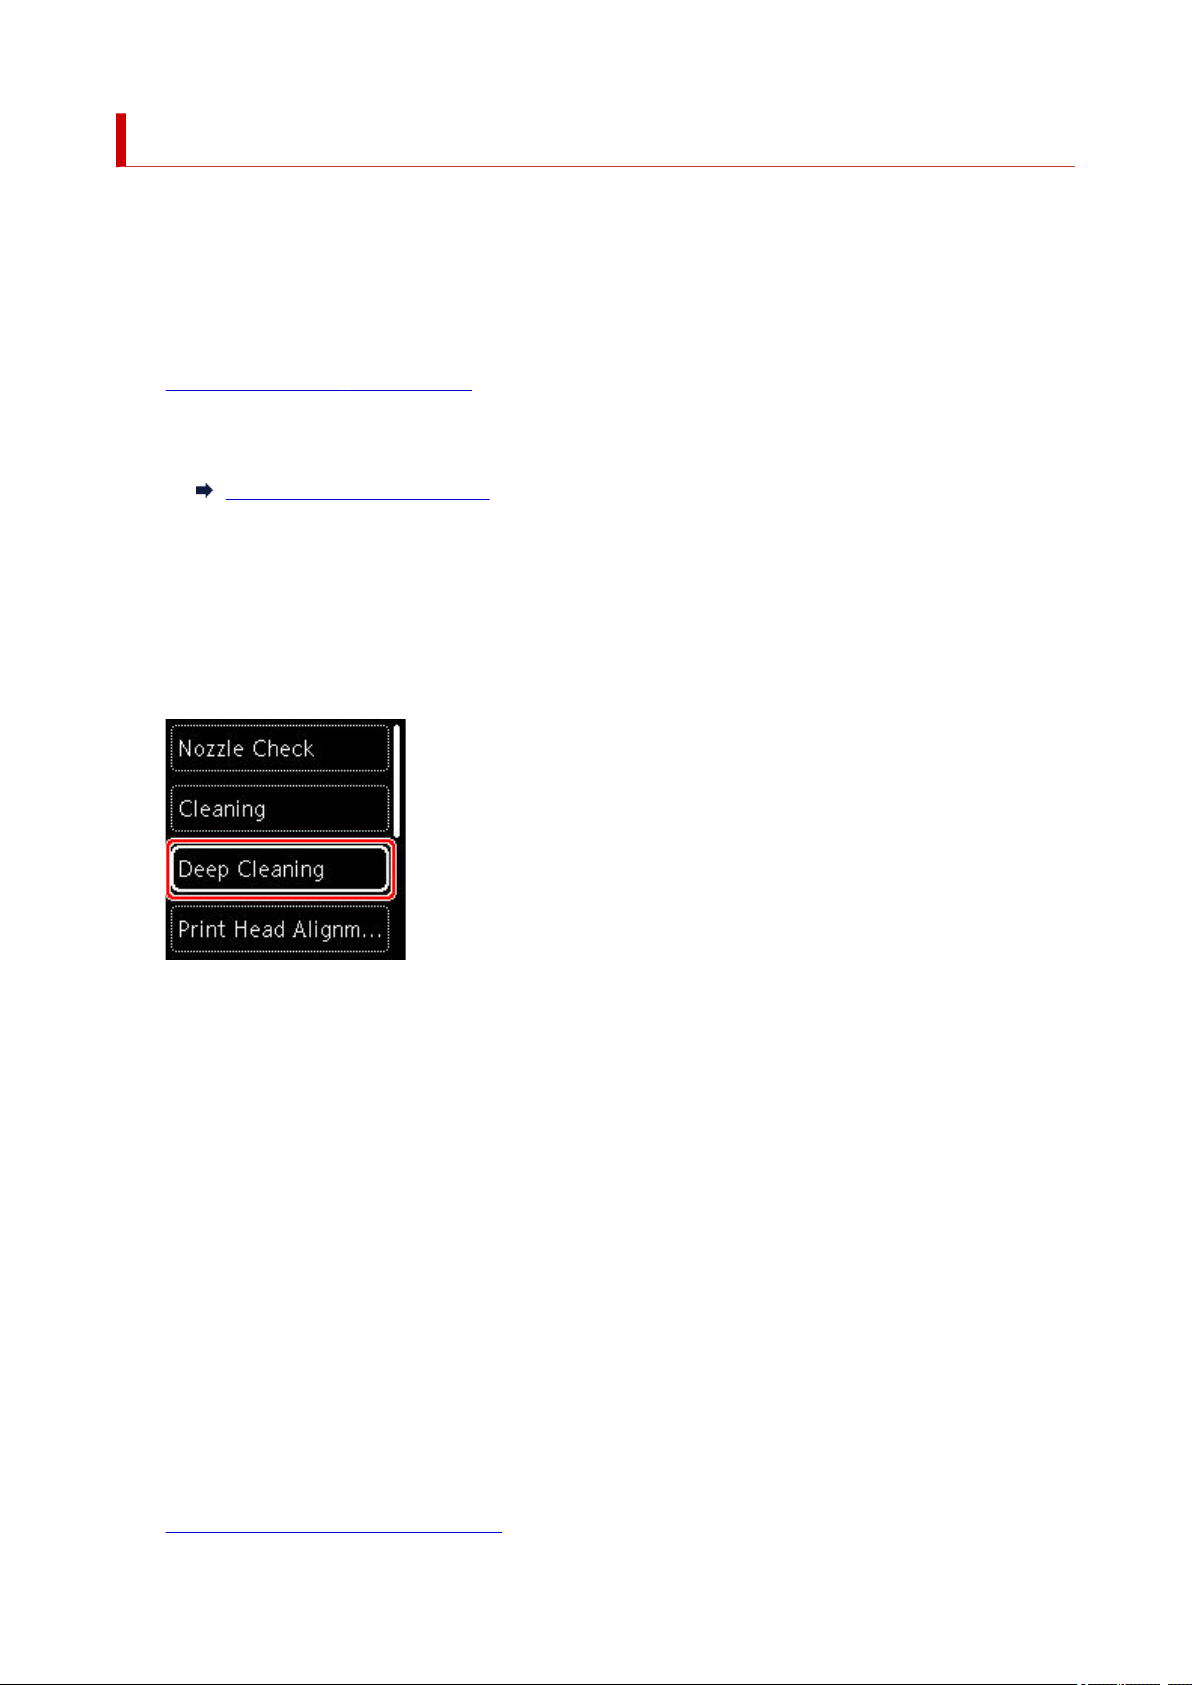
Deep Print Head Cleaning
If print quality does not improve by the standard cleaning of the print head, clean the print head deeply.
Cleaning the print head deeply consumes more ink than the standard cleaning of the print head, so clean
the print head deeply only when necessary.
You need to prepare: a sheet of A4 or Letter-sized plain paper
1.
Check that printer is turned on.
2. Load a sheet of A4 or Letter-sized plain paper in the cassette.
Loading Paper in the Cassette
3. Press the OK button.
4. Select Maintenance.
5. Select Deep Cleaning.
The confirmation screen will appear.
6. Select Yes.
The printer starts cleaning the print head deeply.
Do not perform any other operations until the printer completes the deep cleaning of the print head. This
takes about 1 to 2 minutes.
The pattern print confirmation screen will appear.
7. Select Yes.
8. Press the OK button.
The nozzle check pattern will be printed.
9. When the completion message appears, select OK.
Examine the nozzle check pattern.
10.
100
 Loading...