

Page 1

Copyright
This manual is copyrighted by Canon Computer Systems, Inc. (CCSI)
with all rights reserved. Under the copyright laws,this manual may not
be reproduced in any form, in whole or part, without prior w ritten
consent of CCSI.
©1998 Canon Computer Systems,Inc.
Disclaimer
Canon Computer Systems,Inc. has reviewed this manual thoroughly in
order to make it an easy to use guide for your Canon MultiPASS C5500
system.All statements,technical information,and recommendations in
this manual and in any guides or related documents are believed reliable,
but the accuracy and completeness thereof are not guaranteed or
warranted, and they are not intended to be,nor should they be
understood to be,representations or warranties concerning the products
described.
Your MultiPASS C5500 and the software media included with your
system have been sold to you subject to the limited warranties set for th
in the warranty and license agreement enclosed with the respective
products.All software is licensed AS IS, as described in the license
agreement enclosed with the software media. Further,CCSI reserves the
right to make changes in the specifications of the products described in
this manual at any time without notice and without obligation to notify
any person of such changes.
Trademarks
Canon and BJ are registered trademarks and BCI, Bubble Jet,MultiPASS,
and UHQ are trademarks and SelectExchange is a service mark of
Canon Inc.
All other product and brand names are registered trademarks,
trademarks or service marks of their respective owners.
E
NERGY STAR
As an ENERGY STAR® Partner, Canon U.S.A.,Inc. has determined that
this product meets the ENERGY STAR® guidelines for energy efficiency.
ii
®
COMPLIANT
Page 2

USERS IN U.S.A.
PRE-INSTALLATION REQUIREMENTS FOR CANON
FACSIMILE EQUIPMENT
A. Location
Supply a suitable table, cabinet,or desk.See Appendix A for the unit’s
dimensions and weight.
B. Order Information
1. Only a single line, touch-tone or rotary telephone set is to be used.
2. Order an RJ11-C modular jack (USOC code),which should be
installed by the phone company. If the RJ11-C jack is not present,
installation cannot occur.
3. Order a normal business line from your telephone company’s business
representative.The line should be a regular voice grade line or
equivalent. Use one line per unit.
DDD (DIRECT DISTANCE DIAL) LINE
or
IDDD (INTERNATIONAL DIRECT DISTANCE DIAL) LINE IF YOU
COMMUNICATE OVERSEAS
Canon recommends an individual line following industry standards [e.g., the
N
2500 (touch-tone) or 500 (rotary/pulse dial) telephones].A dedicated extension
off a PBX unit without “Call Waiting”can be used with your MultiPASS C5500.
Key telephone systems are not recommended because they send non-standard
signals to individual telephones for ringing and special codes, which may cause
a fax error.
C. Power Requirements
This equipment should be connected to a standard 120 volt AC, three-wire
grounded outlet only.Do not connect this unit to an outlet or power line
shared with other appliances that cause “electrical noise.”Air conditioners,
electric typew riters, copiers, and machines of this sort generate noise which
often interferes with communications equipment and the sending and
receiving of documents.
CONNECTION OF THE EQUIPMENT
This equipment complies with Part 68 of the FCC rules. On the rear panel of
this equipment is a label that contains,among other information, the FCC
Registration Number and Ringer Equivalence Number (REN) for this
equipment. If requested,this information must be given to the telephone
company. This equipment may not be used on coin service provided by the
telephone company. Connection to party lines is subject to state tariffs.
iii
Page 3

N
IN CASE OF EQUIPMENT MALFUNCTION
Should any malfunction occur which cannot be corrected by the procedures
described in this User’s Manual, disconnect the equipment from the telephone
line or unplug the power cord.The telephone line should not be reconnected or
the power cord plugged in until the problem is completely resolved.Users
should contact Canon Author ized Serv ice Facilities for serv icing of equipment.
Information regarding Authorized Ser v ice Facility locations can be obtained by
calling the Canon Computer Systems Customer Care Center. (See page 1-4 for
details.)
RIGHTS OF THE TELEPHONE COMPANY
Should the equipment cause harm to the telephone network,the telephone
company may temporarily disconnect service. The telephone company also
retains the right to make changes in facilities and services which may affect the
operation of this equipment. When such changes are necessary, the telephone
company is required to g ive adequate prior notice to the user.
WARNING
Do not make any changes or modifications to the equipment unless otherwise
specified in the manual. If such changes or modifications should be made,you
could be required to stop operation of the equipment.
This equipment has been tested and found to comply with the limits for a Class
B digital device, pursuant to Part 15 of the FCC Rules.These limits are designed
to provide reasonable protection against harmful interference in a residential
installation. This equipment generates, uses and can radiate radio frequency
energy and, if not installed, and used in accordance with the instructions, may
cause harmful interference to radio communications.
However, there is no guarantee that interference will not occur in a particular
installation. If this equipment does cause harmful interference to r adio or
television reception, which can be determined by turning the equipment off
and on, the user is encouraged to tr y to correct the interference by one of the
following measures:
● Reorient or relocate the receiving antenna.
● Increase the separation between the equipment and receiver.
● Connect the equipment into an outlet on a circuit different from that to
which the receiver is connected.
● Consult the dealer or an experienced radio/TV technician for help.
The Telephone Consumer Protection Act of 1991 makes it unlawful for any
person to use a computer or other electronic device to send any message via a
telephone fax machine unless such message clearly contains in a margin at the
top or bottom of each transmitted page or on the first page of the transmission,
the date and time it is sent and an identification of the business or other entity,
or other individual sending the message and the telephone number of the
sending machine or such business,other entity, or individual.
To automatically enter this information into your MultiPASS C5500, follow the
instructions in your Quick Start Guide.
iv
Page 4

USERS IN CANADA
PRE-INSTALLATION REQUIREMENTS FOR CANON
FACSIMILE EQUIPMENT
A. Location
Supply a suitable table, cabinet, or desk. See Appendix A for the unit’s
dimensions and weight.
B. Order Information
1. Provide only a single-line to touch-tone or rotary telephone set
terminated with a standard 4-pin modular phone plug. ( Touch-tone is
recommended if available in your area.)
2. Order an RJ11-C modular jack (USOC code),which should be
installed by the phone company. If the RJ11-C jack is not present,
installation cannot occur.
3. Order a normal business line from your telephone company’s business
representative.The line should be a regular voice grade line or
equivalent. Use one line per unit.
DDD (DIRECT DISTANCE DIAL) LINE
or
IDDD (INTERNATIONAL DIRECT DISTANCE DIAL) LINE IF YOU
COMMUNICATE OVERSEAS
N
Canon recommends an individual line following industry standards [e.g., the
2500 (touch-tone) or 500 (rotary/pulse dial) telephones].A dedicated extension
off a PBX unit without “Camp On” signals is also permissible with your
MultiPASS C5500. Key telephone systems are not recommended because they
send non-standard signals to individual telephones for ringing and special
codes, which may cause a fax error.
C. Power Requirements
The power outlet should be a three-prong grounded receptacle (Single or
Duplex). It should be independent from copiers, heaters, air conditioners,
or any electric equipment that is thermostatically controlled.The rated
value is 120 volts and 15 amperes.The RJ11-C modular jack should be
relatively close to the power outlet to facilitate installation.
NOTICE
The Industry Canada label identifies certified equipment. This certification
means that the equipment meets telecommunications network protective,
operational and safety requirements as prescribed in the appropriate Terminal
Equipment Technical Requirements document(s).The Department does not
guarantee the equipment will operate to the user’s satisfaction.
v
Page 5

Before installing this equipment,users should ensure that it is permissible to be
connected to the facilities of the local telecommunications company. The
equipment must also be installed using an acceptable method of connection.
The customer should be aware that compliance with the above conditions may
not prevent degradation of serv ice in some situations.
Repairs to certified equipment should be coordinated by a representative
designated by the supplier.Any repairs or alterations made by the user to this
equipment, or equipment malfunctions, may give the telecommunications
company cause to request the user to disconnect the equipment.
Users should ensure for their own protection that the elect rical g round
connections of the power utility,telephone lines and internal metallic water
pipe system, if present,are connected together. This precaution may be
particularly important in rural areas.
CAUTION
Users should not attempt to make such connections themselves, but should
contact the appropriate electric inspection authority,or electrician, as
appropriate.
The Ringer Equivalence Number (REN) assigned to each terminal device
provides an indication of the maximum number of terminals allowed to be
connected to a telephone interface.The termination on an interface may consist
of any combination of devices subject only to the requirement that the sum of
the Ringer Equivalence Numbers of all the de vices does not exceed 5.
CANON CANADA INC.
1-800-263-1121
24 HOURS A DAY, SEVEN DAYS A WEEK
vi
Page 6

Using Your Documentation
The following documentation is supplied with the MultiPASS C5500 to
help you use your new Canon multi-talented color printer.
Quick Start Guide
This booklet describes how you unpack,set up, and start using your
MultiPASS C5500. It includes how to install the software that comes
with the MultiPASS C5500, including the MultiPASS Desktop Manager
for Windows®, ScanGear for MultiPASS, and the MultiPASS Printer
Driver. This software enables you to use all the features of the MultiPASS
C5500—color printing, color scanning, color copying, and PC faxing.
User’s Manual
This manual offers detailed information on how to operate your
MultiPASS C5500. It includes how to use the MultiPASSC5500 as a
monochrome or color printer, stand-alone plain paper fax, PC fax, color
scanner,and color copier. It also includes maintenance, troubleshooting,
and specifications.
Conventions
This User’s Manual uses the following conventions to alert you to
information that will help you operate the MultiPASS C5500 correctly
and safely.
N
C
Notes provide advice or suggestions regarding the use of the
MultiPASS C5500.
Cautions alert you to operations that could cause damage to your
hardware or software,or cause injury to yourself.
vii
Page 7

Distinctive typefaces identify the buttons you press,the lights on the
operator panel, and any commands you enter at your computer.
❍ The buttons you press appear in this typeface: START/COPY.
❍ The names of lights you see appear in this ty peface: ALARM.
❍ What you see in the LCD display appears in this typeface:
REGISTRATION.
❍ When you t y pe something on your computer,it appears in this
typeface: DIR/P.
viii
Page 8

Contents
1 Introduction
Supplies and Accessories...................................................................................... 1-2
BJ Cartridges and BJ Tanks........................................................................... 1-2
Canon Specialty Papers................................................................................. 1-3
Getting Help From Canon .................................................................................. 1-4
Servicing the MultiPASS C5500 .................................................................. 1-5
Important Safety Instructions............................................................................. 1-5
Main Components of the MultiPASS C5500 ..................................................... 1-7
Front View .................................................................................................... 1-7
Back View ...................................................................................................... 1-8
Inside the Printer Area ................................................................................. 1-8
Using the Operator Panel ................................................................................... 1-9
Special Function Buttons .............................................................................. 1-11
Loading Paper in the Sheet Feeder ..................................................................... 1-12
Preparing Documents for Faxing,Copying , or Scanning ................................ 1-13
Loading the Document ................................................................................ 1-14
Adding Pages to the Document ................................................................... 1-16
Setting the Document Feed Lever ............................................................... 1-16
Identifying Your Documents............................................................................... 1-17
Copying Documents............................................................................................ 1-18
Miscellaneous ...................................................................................................... 1-21
If the Power Goes Out ................................................................................. 1-21
Using Switch Boxes ....................................................................................... 1-21
2 Printing With the MultiPASS C5500
Paper Handling ................................................................................................... 2-2
Selecting Paper ............................................................................................. 2-2
Paper Guidelines ........................................................................................... 2-4
Installing a Printer Driver ................................................................................... 2-5
Printing a Document .......................................................................................... 2-5
Printer Setup Within Windows .......................................................................... 2-7
Opening the Printer Properties Dialog Box in Windows 98/95 ................ 2-7
Using the Printer Driver in Windows 98/95 ............................................... 2-7
Using the Windows Tabs .............................................................................. 2-8
Specifying Your Printing Options ............................................................... 2-10
Recommended Graphics Settings ................................................................ 2-11
Using the Setup Analyzer ............................................................................. 2-12
ix
Page 9

Printing Speed Versus Color ............................................................................... 2-13
For Quick Color Printing ............................................................................ 2-13
For High Quality Color Printing ................................................................. 2-13
For Monochrome Printing .......................................................................... 2-14
Other Ways to Improve Print Speed in Windows ...................................... 2-14
Setting the Paper Thickness Lever ..................................................................... 2-16
Printer Settings for Various Print Media ........................................................... 2-18
Loading Paper ...................................................................................................... 2-19
Automatically Feeding Paper ....................................................................... 2-19
Auto Feed Guidelines ................................................................................... 2-21
Manually Feeding Paper .............................................................................. 2-23
Printing On Envelopes ........................................................................................ 2-25
Using Canon’s Specialty Papers .......................................................................... 2-28
Specialty Paper Guidelines ........................................................................... 2-28
Canon’s High Resolution Paper HR-101 .................................................... 2-30
Fabric Sheet FS-101 ...................................................................................... 2-33
Printing On Banner Paper .................................................................................. 2-36
3 Using the MultiPASS Desktop Manager
Starting the MultiPASS Desktop Manager ......................................................... 3-2
Exploring the MultiPASS Desktop Manager Window ...................................... 3-3
Using the Desktop Manager Folders .................................................................. 3-6
System-defined Folders ................................................................................ 3-6
User-defined Folders .................................................................................... 3-7
Viewing Documents in the Desktop Manager .................................................. 3-9
Document View ............................................................................................ 3-9
List View ........................................................................................................ 3-10
Setting Up the Address Book .............................................................................. 3-12
Opening the Address Book .......................................................................... 3-12
Working With Address Book Entries .......................................................... 3-13
Sorting the Address Book ............................................................................ 3-13
Adding and Editing an Individual Address ................................................ 3-14
Adding and Editing a Group Address ......................................................... 3-16
Printing the Address Book ........................................................................... 3-17
Importing an Address Book ........................................................................ 3-18
Exporting the Address Book ........................................................................ 3-19
4 Sending Faxes With the MultiPASS C5500
Sending a Document .......................................................................................... 4-2
Regular Dialing ............................................................................................. 4-2
Automatic Dialing ........................................................................................ 4-4
Sending a Document Using Group Dialing ............................................... 4-6
Redialing ....................................................................................................... 4-7
Resending a Fax After an Er ror ................................................................... 4-8
Manual Sending ............................................................................................ 4-9
Cancel Sending ............................................................................................. 4-10
x
Page 10

Sending a Document to More Than One Location
(Sequential Broadcasting) ............................................................................. 4-11
Transmitting the Document ........................................................................ 4-11
Adjusting the Quality of Your Faxes .................................................................. 4-13
Setting the Resolution .................................................................................. 4-13
Setting the Contrast ..................................................................................... 4-15
Sending PC Faxes ................................................................................................ 4-16
Specifying Send Fax Information ................................................................ 4-16
Creating a Fax Memo ................................................................................... 4-22
Sending a PC Fax From a Windows Application ....................................... 4-23
Using the Send Fax Manager .............................................................................. 4-25
Fax Status ...................................................................................................... 4-26
Stopping an Active Job ................................................................................. 4-28
Sending a Scheduled, Held,Failed, or Stopped PC Fax ............................. 4-28
Viewing a Job ................................................................................................ 4-29
Deleting a Job ............................................................................................... 4-29
Using the Fax Log ................................................................................................ 4-29
Displaying the Fax Log.................................................................................. 4-30
Designing a Fax Cover Page ............................................................................... 4-31
Opening the MultiPASS Cover Page Desig ner ........................................... 4-31
Using the Cover Page Designer ................................................................... 4-32
Creating a New Cover Page ......................................................................... 4-34
Modifying a Predefined Fax Cover Page ..................................................... 4-42
Adding Additional Annotations to Your Cover Page ................................. 4-49
Reverting to the Last Saved Version ............................................................ 4-51
Renaming a Cover Page ............................................................................... 4-51
Printing a Cover Page ................................................................................... 4-52
Deleting a Cover Page .................................................................................. 4-52
5 Receiving Faxes
Receiving Documents ......................................................................................... 5-1
Receiving Documents Automatically—Fax Only Mode ............................ 5-2
Receiving Both Documents and Telephone Calls Automatically—
Fax/Tel Mode ............................................................................................ 5-2
Receiving Documents Manually—Manual Mode ...................................... 5-3
Using an Answer ing Machine—Ans. Machine Mode ................................ 5-4
Printing Documents Received in Memory ........................................................ 5-5
Receiving While Copying, Printing , or Registering .......................................... 5-6
Receiving Faxes to the MultiPASS Desktop Manager ....................................... 5-6
Receiving a Fax Into the In Box ................................................................... 5-7
Printing a Received Fax When Your Computer Is Off ............................... 5-8
Using the Distinctive Ring Pattern Detection (DRPD) Feature ....................... 5-9
Ty pes of Ring Patterns ................................................................................. 5-9
How DRPD Responds to Calls .................................................................... 5-10
Communicating Using the Distinctive Ring Pattern Detection
(DRPD) Feature ....................................................................................... 5-10
xi
Page 11

6 Scanning With the MultiPASS C5500
Exploring the ScanGear Window ....................................................................... 6-2
Displaying Information About the Scan Driver ......................................... 6-3
Scanning With the Desktop Manager ................................................................ 6-3
Scanning From a Windows Application ............................................................ 6-4
Setting the Preview Scan Options ...................................................................... 6-5
Setting the Scan Mode ................................................................................. 6-5
Setting the Scan Resolution ......................................................................... 6-6
Setting Preferences ....................................................................................... 6-7
Setting Paper Size ......................................................................................... 6-8
Setting Black and White Options ................................................................ 6-9
Adjusting the Preview Image for Final Scan ..................................................... 6-9
Clearing the Preview Area ........................................................................... 6-9
Adjusting the Preview Image View .............................................................. 6-10
Adjusting the Selection Size ......................................................................... 6-10
Moving an Image ......................................................................................... 6-11
Reversing the Image Tone ............................................................................ 6-12
Mirroring an Image ...................................................................................... 6-12
Rotating an Image ........................................................................................ 6-12
Scaling the Image Output Size .................................................................... 6-12
Adjusting the Tone of the Preview Image .......................................................... 6-13
Exploring the Tone Tab ................................................................................ 6-13
Auto Tone ..................................................................................................... 6-14
Adjusting Contrast and Brightness ............................................................. 6-15
Changing Gamma Curve Values ................................................................. 6-16
Adjusting Histogram Tone Levels ............................................................... 6-17
Using Tone Curves ....................................................................................... 6-19
Adjusting Conrast/Brightness for Black and White Scan Mode ............... 6-21
7 Working With Documents in The Desktop Manager
Managing Your Documents in the Desktop Manager ...................................... 7-1
Selecting Documents in the Desktop Manager .......................................... 7-1
Printing a Document in the Desktop Manager .......................................... 7-3
Creating a Folder .......................................................................................... 7-4
Moving a Document .................................................................................... 7-4
Copying a Document ................................................................................... 7-5
Renaming a Document or Folder ................................................................ 7-5
Deleting a Document or Folder .................................................................. 7-6
Restoring a Deleted Document ................................................................... 7-7
Emptying the Trash Folder .......................................................................... 7-8
Importing a Document ................................................................................ 7-8
Exporting a Document ................................................................................ 7-9
Attaching a Document to Electronic Mail (E-mail) .................................. 7-9
Manipulating a Document in Document View .......................................... 7-10
Merging a Document ................................................................................... 7-12
Indexing and Searching for Documents ..................................................... 7-12
xii
Page 12

Modifying a Document ...................................................................................... 7-22
Exploring the MultiPASS Viewer Window ................................................. 7-23
Adjusting the Size and View of a Document .............................................. 7-25
Editing the Base Image ................................................................................. 7-29
Adding Annotations to Your Document ..................................................... 7-30
Revising Your Annotations .......................................................................... 7-36
Selecting One or More Annotations ........................................................... 7-37
Reverting to the Last Saved Version ............................................................ 7-38
Printing the Document ....................................................................................... 7-38
Previewing the Document Before Printing ................................................ 7-39
Adjusting the MultiPASS Viewer Default Options ............................................ 7-39
8 Setup and Other Utilities in the Desktop Manager
Fax Setup ............................................................................................................. 8-2
Setting Up Fax Preferences .......................................................................... 8-3
Setting Up Send Fax Options ...................................................................... 8-4
Setting Up Advanced Send Fax Fax Options .............................................. 8-5
Setting Up Receive Fax Options .................................................................. 8-7
Setting Up Advanced Receive Fax Options ................................................. 8-9
Setting Up Speed Dial Assignments ............................................................ 8-12
System Setup ........................................................................................................ 8-14
Launcher Setup ................................................................................................... 8-15
Editing a Launcher Application ................................................................... 8-17
Using the Launcher ...................................................................................... 8-17
Making a Phone Call From the Desktop Manager ........................................... 8-18
Placing a Phone Call .................................................................................... 8-18
Using the MultiPASSSer ver ............................................................................... 8-19
Using the Minimized MultiPASS Server ..................................................... 8-20
Using the MultiPASS Server Window ......................................................... 8-20
Status Messages ............................................................................................. 8-21
Closing the MultiPASS Server ............................................................................ 8-22
Removing the MultiPASS Ser ver From StartUp ......................................... 8-23
Restarting the MultiPASS Server ................................................................. 8-23
Adding the MultiPASS Ser ver to Startup .................................................... 8-24
Disconnecting the MultiPASS ............................................................................ 8-24
Uninstalling the Desktop Manager .................................................................... 8-25
Removing the Printer and Fax Drivers ....................................................... 8-25
Uninstalling the Desktop Manager ............................................................. 8-25
Uninstalling the Scan Software (ScanGear) ................................................ 8-26
Completing the Uninstall Process ............................................................... 8-26
Reinstalling the Desktop Manager .............................................................. 8-26
9 Maintaining the MultiPASS C5500
MultiPASS Guidelines ......................................................................................... 9-2
Routine Maintenance .......................................................................................... 9-3
Cleaning Inside the MultiPASS .......................................................................... 9-3
Cleaning the Scanner Components.............................................................. 9-4
xiii
Page 13

Printing the Nozzle Check .................................................................................. 9-7
Cleaning the BJ Cartridge Print Head ............................................................... 9-8
BJ Cartridge Guidelines ...................................................................................... 9-9
BJ Cartridge and BJ Tank Maintenance ...................................................... 9-10
Using Ink ....................................................................................................... 9-11
Replacing the BJ Cartridge ................................................................................. 9-11
Replacing a BJ Tank in the BC-21e Color BJ Cartridge .................................... 9-16
Storing a BJ Cartridge ......................................................................................... 9-19
Transporting the MultiPASS ............................................................................... 9-20
10 Troubleshooting
Paper Jams ........................................................................................................... 10-3
Jams in the Automatic Document Feeder (ADF) ....................................... 10-3
Jams in the Sheet Feeder .............................................................................. 10-5
LCDMessages ...................................................................................................... 10-6
Printing Problems ...............................................................................................10-11
Print Quality Problems ........................................................................................ 10-14
Color Printing and Copying Problems............................................................... 10-16
Paper Feeding Problems ......................................................................................10-17
Faxing Problems ..................................................................................................10-19
Telephone Problems ............................................................................................ 10-23
Copying Problems ...............................................................................................10-23
General Problems ................................................................................................10-24
Technical Notes ...................................................................................................10-25
Using Other Bi-directional Devices ............................................................10-25
MultiPASS Hardware Cannot Initialize ......................................................10-25
Memory Clear Report ......................................................................................... 10-26
Appendix A Specifications
Printing Specifications ........................................................................................ A-1
BJ Cartridges ....................................................................................................... A-4
Facsimile .............................................................................................................. A-5
Copier .................................................................................................................. A-7
Scanner ................................................................................................................ A-7
MultiPASS Desktop Manager for Windows ...................................................... A-9
General Specifications ......................................................................................... A-10
Receiving Faxes and Phone Calls Automatically—Fax/Tel Mode .................... A-12
Appendix B Using the MultiPASS C5500 as a Stand-alone Fax
LCDMenu System .............................................................................................. B-1
Entering Information in the MultiPASS ............................................................ B-2
Entering Your User Information ................................................................. B-2
Glossary ....................................................................................................................... G-1
Index ............................................................................................................................ I-1
xiv
Page 14
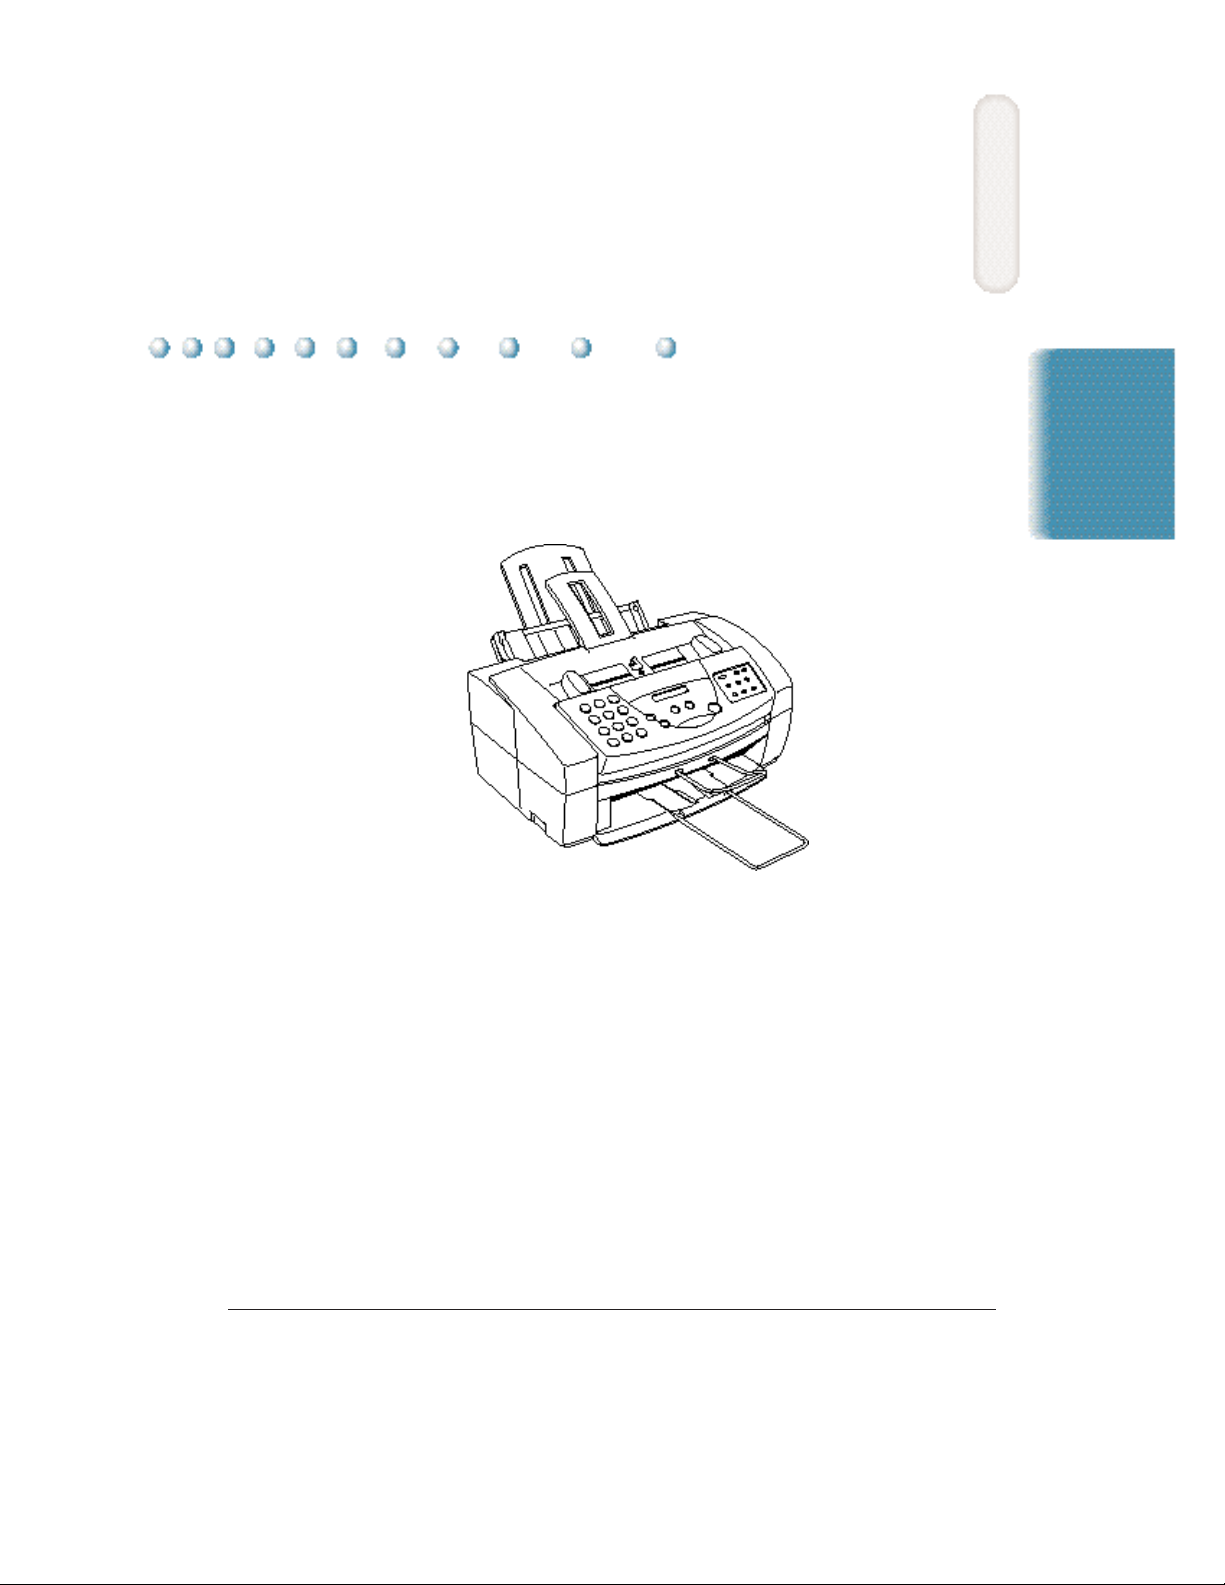
Introduction
Thank you for purchasing the Canon MultiPASS C5500—the multitalented color printer for your home office and the whole family. We
are sure that your MultiPASS C5500 will provide all you need in one
machine: Color Bubble Jet printer, color scanner, color copier, plain
paper fax, and PC fax.
1
Introduction
This chapter introduces you to the MultiPASS C5500. It includes:
❍ Supplies and accessories
❍ Getting help from Canon
❍ Important safety instructions
❍ Examining the main components of the unit
❍ Using the operator panel
❍ Loading paper in the sheet feeder
❍ Preparing documents for faxing,copying, or scanning
❍ Identifying your documents
❍ Copying documents
Chapter 1 Introduction 1-1
MPC-5500—USERS MANUAL/V000/08-98
Page 15

Supplies and Accessories
Your MultiPASS C5500 supports excellent and unique print media
options that will allow you to produce dazzling,professional, and fun
presentations.All of these print media are specially designed and
manufactured to work with your Canon MultiPASS C5500 so you can
produce the finest output possible.
Canon has an extensive dealer network equipped to offer you supplies as
you need them.To find a dealer near you,call the Canon Referral
Service at 1-800-848-4123.
If supplies are not available from your local dealer,you can order
directly from Canon by calling 1-800-385-2155.
BJ Cartridges and BJ Tanks
Your MultiPASS C5500 comes with:
❍ One BC-21e Color BJ®Cartridge
❍ One SB-21 Ink Cartridge Storage Box
❍ One extra BCI-21 Black BJ Tank
You can also purchase the following BJ cartridges for use with the
MultiPASS C5500:
❍ BC-20 Black BJ Cartridge
❍ BC-22e Photo BJ Cartridge
❍ BC-29F Neon BJCar tridge
You can purchase the following BJ tanks for use in the BC-21e Color
BJ Cartridge:
❍ BCI-21 Black BJ Tank (one extra BJ tank comes with the printer)
❍ BCI-21 Color BJ Tank
1-2 Introduction Chapter 1
Page 16

N
BJ cartridges contain the Bubble Jet print head and ink, while BJ tanks
contain ink only. Some BJ car tridges, like the BC-21e Color BJ
Cartridge, contain replaceable BJ tanks; when you run out of ink,you
can replace the empty tank. Some BJ car tr idges, like the BC-20 Black
BJ Cartridge, contain both the print head and ink; when you run out of
ink, you replace the entire BJ cartridge.See Chapter 9, Maintaining the
MultiPASS C5500, for details on replacing BJ car tridges and BJ tanks.
Canon has more engineers dedicated to creating quality ink for
N
providing the best results for output on Bubble Jet products than any
other organization. Canon does not prohibit the use of third-part y inks
and the use of third-par ty inks does not invalidate the product’s limited
warranty.However, Canon cannot guar antee the quality or performance
of your MultiPASS C5500 when you are using inks from other suppliers.
Canon’s limited warranty does not cover damage caused to Canon’s
Bubble Jet products that is attributable to the use of third party par ts or
supplies, including inks. The limited warranty remains in effect for its
life once that particular damage has been properly repaired.
For optimum printing results,Canon recommends that you use only
Canon ink cartridges.
Canon Specialty Papers
Canon manufactures numerous specialty papers,including:
❍ Glossy Photo Paper GP-201
❍ Banner Paper
❍ Brilliant White Paper
❍ High Resolution Paper HR-101
❍ T-Shir t Transfers TR-101
❍ Greeting Cards GC-101
❍ Bubble Jet Paper LC-301 (water resistant)
❍ Fabric Sheet FS-101
❍ Transparencies CF-102
❍ Back Print Film BF-102
❍ High Gloss Film HG-101
Introduction
See Chapter 2,Pr inting With the MultiPASS C5500, for details on
Canon’s Specialty Papers.
Chapter 1 Introduction 1-3
Page 17

You can also purchase the optional Canon BC-22e Photo Kit,which
includes everything you need to produce photo-realistic images:
❍ BC-22e Photo BJ Cartridge
❍ SB-21 Ink Cartridge Storage Box
❍ Canon High Resolution Paper HR-101 (60 sheets)
Getting Help From Canon
Canon Computer Systems,Inc. offers a full range of customer technical
support* options including:
❍
24-hour,7-day-a-week, toll-free automated support for troubleshooting
issues on most current products (1-800-423-2366)
❍ Speak to a technician free of service charge (currently Monday–
Friday, 8:00 A.M.–10:00 P.M. EST, excluding holidays) for products
still under warranty** (1-757-413-2848)
❍ Speak to a technician for a service charge (currently $24.99 per
call) during holidays and days/hours not listed above regarding
urgent product questions or for products no longer under warranty
(1-800-423-2366)
Or for a charge of $2.50 per minute, to a maximum of $25.00 per
call (1-900-246-1200)
❍ E-mail support via the Canon Computer Systems,Inc. Web site
(www.ccsi.canon.com)
❍ 24-hour, toll-free Fax Retrieval System (1-800-526-4345)
❍ To download the latest drivers using your modem,24-hour Bulletin
Board Service (1-757-420-2000)
*Support program specifics subject to change without notice.
**Refer to individual product information for warranty details.
Canon Canada
Within Canada,24 hours a day,7 days a week (1-800-263-1121)
In other countries, please contact your Canon dealer.
1-4 Introduction Chapter 1
Page 18

Servicing the MultiPASS C5500
The Canon MultiPASS C5500 is designed with the latest technology
to provide trouble-free operation.The warrant y card that comes with
your MultiPASS describes Canon’s limited warranty. Be sure to read the
warranty information to find out about the different service options
available to you.
Save your sales receipt for proof of purchase.In the event that your
N
printer needs service, you will need your proof of purchase to obtain
warranty serv ice.
Be sure to fill out the Registration card and send it in.This will help
Canon give you better support service.
If you seem to have a problem,t r y to solve it by referring to the
troubleshooting information in Chapter 10.If you cannot solve the
problem,contact the Canon Computer Systems Customer Care Center
(see previous page for details).
If you feel your MultiPASS needs servicing , contact Canon on the World
Wide Web to locate the Canon Authorized Service Facility (ASF) nearest
you.If you do not have access to the Web, you can call Canon (see
previous page for details).
Important Safety Instructions
Read these safety instructions and refer to them later if you have any
questions.
Except as explained in this manual,do not attempt to service the
C
MultiPASS C5500 yourself.Opening and removing interior covers may
expose you to dangerous voltage points or other r isks. Refer all servicing
to a Canon Author ized Serv ice Facility (ASF). Call the Customer Care
Center for details.
Introduction
❍ Follow all warnings and instructions marked on the MultiPASS and
inside the printer cover.
❍ Place the MultiPASS on a sturdy level surface. Do not place it on an
unstable cart, stand, or table. If the unit falls,it could be seriously
damaged.
Chapter 1 Introduction 1-5
Page 19

❍ Do not use the MultiPASS near water.If you spill liquid on
or into the unit, unplug it immediately and call the Customer Care
Center.
❍ Slots and openings in the cabinet and the back or bottom are
provided for ventilation.To ensure reliable operation of the
MultiPASS and to protect it from overheating , do not block or cover
these openings. Do not block the openings by placing the unit on a
bed, sofa, rug, or other similar surface. Do not place the unit near a
radiator,nor in a closet or built-in cabinet unless proper ventilation
is provided.
❍ Operate the MultiPASS only from the ty pe of power source
indicated on the unit’s label. If you are not sure of the type of power
available,consult your dealer or local power company.
❍ Do not allow anything to rest on the power cord,and do not locate
the MultiPASS where the cord will be walked on.Make sure the
power cord is not knotted or kinked.
❍ Do not push metal objects of any kind into the slots or openings on
the cabinet. This could result in a risk of fire or electric shock.
❍ Do not allow small objects (such as pins,paper clips, or staples) to
fall into the MultiPASS. If something does fall into it that you
cannot remove,unplug the unit immediately and call the Customer
Care Center.
❍ Unplug this product from the wall outlet and call the Customer Care
Center if any of the following conditions exist:
The power cord or plug is damaged or frayed.
•
Liquid is spilled into the unit, or if the unit is exposed to rain
•
or water.
Smoke,unusual noises, or odors come from the unit.
•
The unit has been dropped or the cabinet has been damaged.
•
The unit does not operate normally when you have followed the
•
operating instructions. Adjust only those controls that are
covered by the operating instructions in the Quick Start Guide
and this User’s Manual. Improper adjustment of other controls
may result in damage and may require extensive work by a
qualified technician to restore the product to normal operation.
1-6 Introduction Chapter 1
Page 20
Main Components of the MultiPASS C5500
Before using the MultiPASS C5500, it’s a good idea to familiarize
yourself with the components and understand their functions.
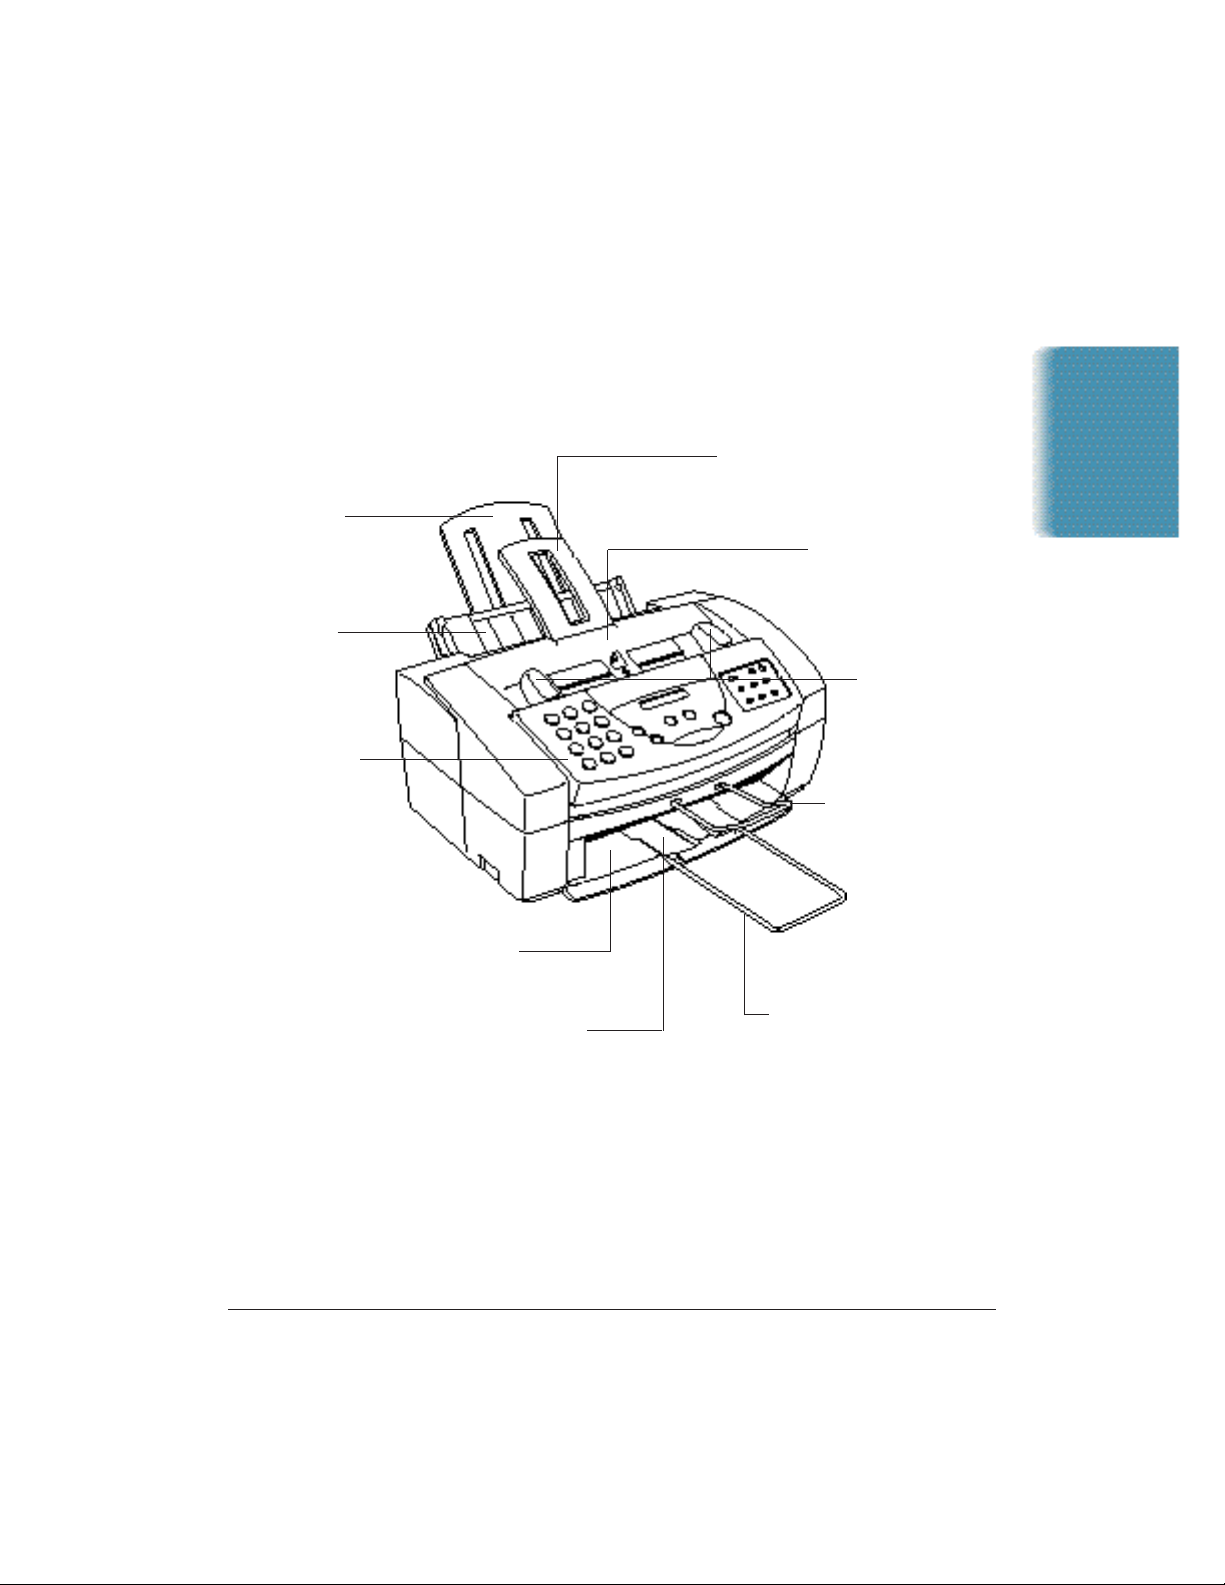
Front View
SENDING DOCUMENT SUPPORT
HOLDS DOCUMENTS AS THEY FEED
INTO ADF
PAPER REST
SUPPORTS PAPER
STACKED IN THE
SHEET FEEDER
SHEET FEEDER
HOLDS 100 SHEETS
OF PLAIN PAPER
OPERATOR PANEL
USE TO CONTROL
THE MultiPASS C5500
AUTOMATIC DOCUMENT
FEEDER (ADF) AND
PRINTER COVER
HOLDS DOCUMENTS
TO BE SCANNED (UP
TO 30 SHEETS)
PAPER GUIDES
ADJUST TO WIDTH
OF DOCUMENT TO
BE SCANNED
DOCUMENT SUPPORT
HOLDS SCANNED
DOCUMENTS AS
THEY EXIT THE
MultiPASS C5500
Introduction
OUTPUT TRAY
HOLDS PRINTED DOCUMENTS AS
THEY EXIT THE MultiPASS C5500
PAPER OUTPUT GUIDES
HOLD HIGH RESOLUTION
PAPER WHEN USING THE
BC-22e PHOTO BJ CARTRIDGE
OUTPUT TRAYEXTENSION
HOLDS PRINTED DOCUMENTS AS
THEY EXIT THE MultiPASS C5500
Chapter 1 Introduction 1-7
Page 21
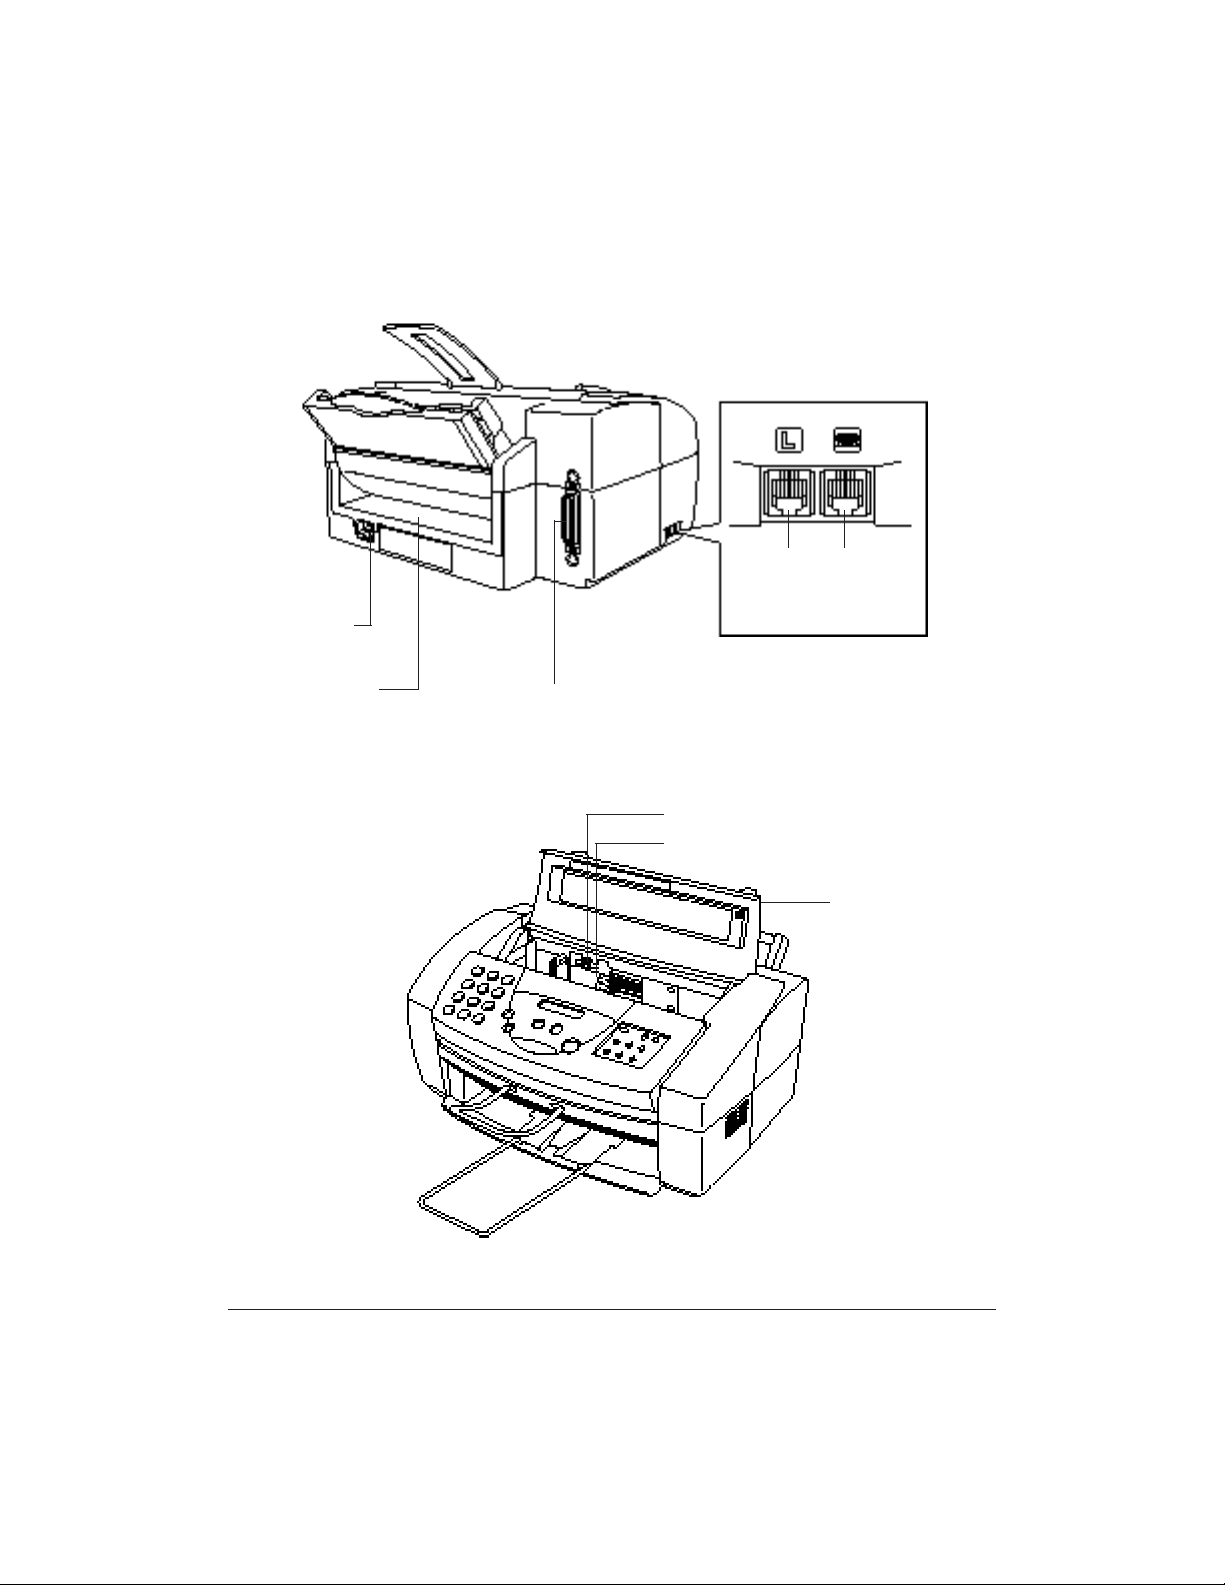
Back View
POWER CORD
CONNECTOR
MANUAL FEED
SLOT
Inside the Printer Area
PARALLELCABLE
CONNECTOR
LINE JACK
PAPER THICKNESS LEVER
CARTRIDGE HOLDER
TELEPHONE/
ANSWERING
MACHINE/
MODEM
JACK
PRINTER COVER
1-8 Introduction Chapter 1
Page 22
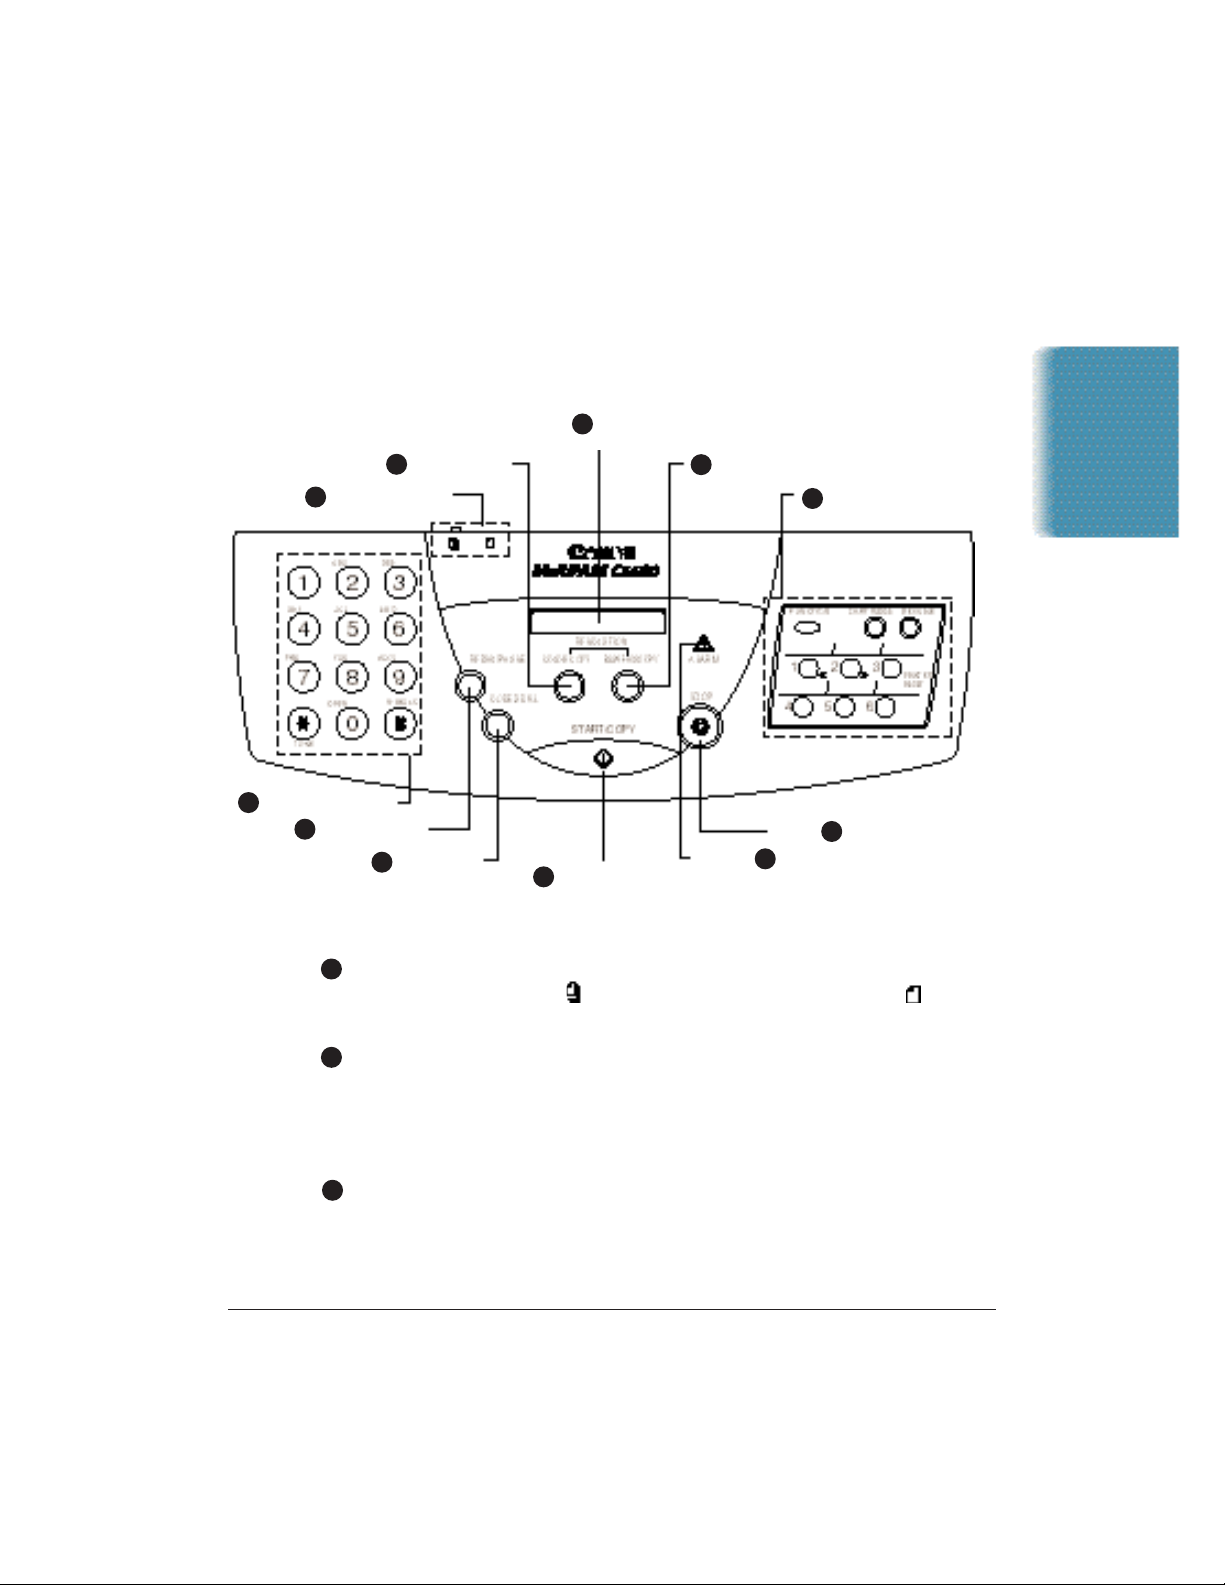
Using the Operator Panel
This section presents a brief descr iption of the operator panel on the
MultiPASS C5500.
LCD
3
DISPLAY
2
COLOR COPY
1
DOCUMENT FEED
LEVER
11
NUMBER BUTTONS
REDIAL/PAUSE
10
CODED DIAL
9
START/COPY
8
4
B&W FAX/COPY
ALARM
7
ONE-TOUCH SPEED DIAL/
5
FUNCTION BUTTONS
6
STOP
Introduction
1
Document feed lever
Set this lever to the left ( ) for automatic feed or to the right ( ) for
manual document feed.
2
COLOR COPY button
Use this button to change the resolution when making color copies
using the operator panel. This button has no function during fax
transmissions. For color scanning, change the resolution from your
software.
3
LCD display
Displays messages and prompts during operation.Displays selections,
text,numbers, and names when registering information.
Chapter 1 Introduction 1-9
Page 23

4
B&W FAX/COPY button
Use this button when sending faxes or making copies in black and white
only. For black and white scanning,set the resolution from the
MultiPASS Desktop Manager.
5
One-touch Speed Dial/Function buttons
Use for one-touch speed dialing,entering user information, printing
documents stored in memory,and cleaning the print head. (See the next
page for details.)
6
STOP button
Press to cancel sending,receiving, or any other operation.
7
ALARM light
Flashes when an error occurs,when the MultiPASS is out of paper or
ink, or when received faxes are stored in memory.
8
START/COPY button
Press to begin sending,receiving, copying, or other oper ations, or to
select functions when registering information.
9
CODED DIAL button
Press this button (followed by a two-digit code) to dial a number that
you have registered for coded speed dialing.
10
REDIAL/PAUSE button
Press to redial the last number that was dialed using the number
buttons,or to enter pauses between digits when dialing fax numbers.
11
Number buttons
Use these buttons to enter numbers and names when registering
information, and to dial fax/telephone numbers that are not registered
for automatic dialing.
1-10 Introduction Chapter 1
Page 24

Special Function Buttons
FUNCTION button
Use to register user settings,to run the print head cleaning process, or to
print faxes stored in the MultiPASS’s memory.
CARTRIDGE button
Press to move the BJ cartridge holder to the center of the unit when
installing or replacing the cartridge. (Press again after installing the
cartridge to move the holder back to its home position on the right.)
RESUME button
Press when you want to form-feed paper when printing.
PRINTER RESET button
Press to reset the MultiPASS to Standby mode if the LCD displays
PRINTER MODE.
Arrow buttons
Use to scroll through menu selections, or to move the cursor when
registering data.
Introduction
Chapter 1 Introduction 1-11
Page 25
Loading Paper in the Sheet Feeder
The paper you load in the sheet feeder is used for printing documents
or for incoming faxes.For printing documents, you can use any of
the Canon Specialty Papers described in Chapter 2,Printing With the
MultiPASS C5500. For receiving faxes,use plain paper (such as copier
paper).
When the message
add paper to the sheet feeder. T he sheet feeder holds approximately 100
sheets of plain paper.
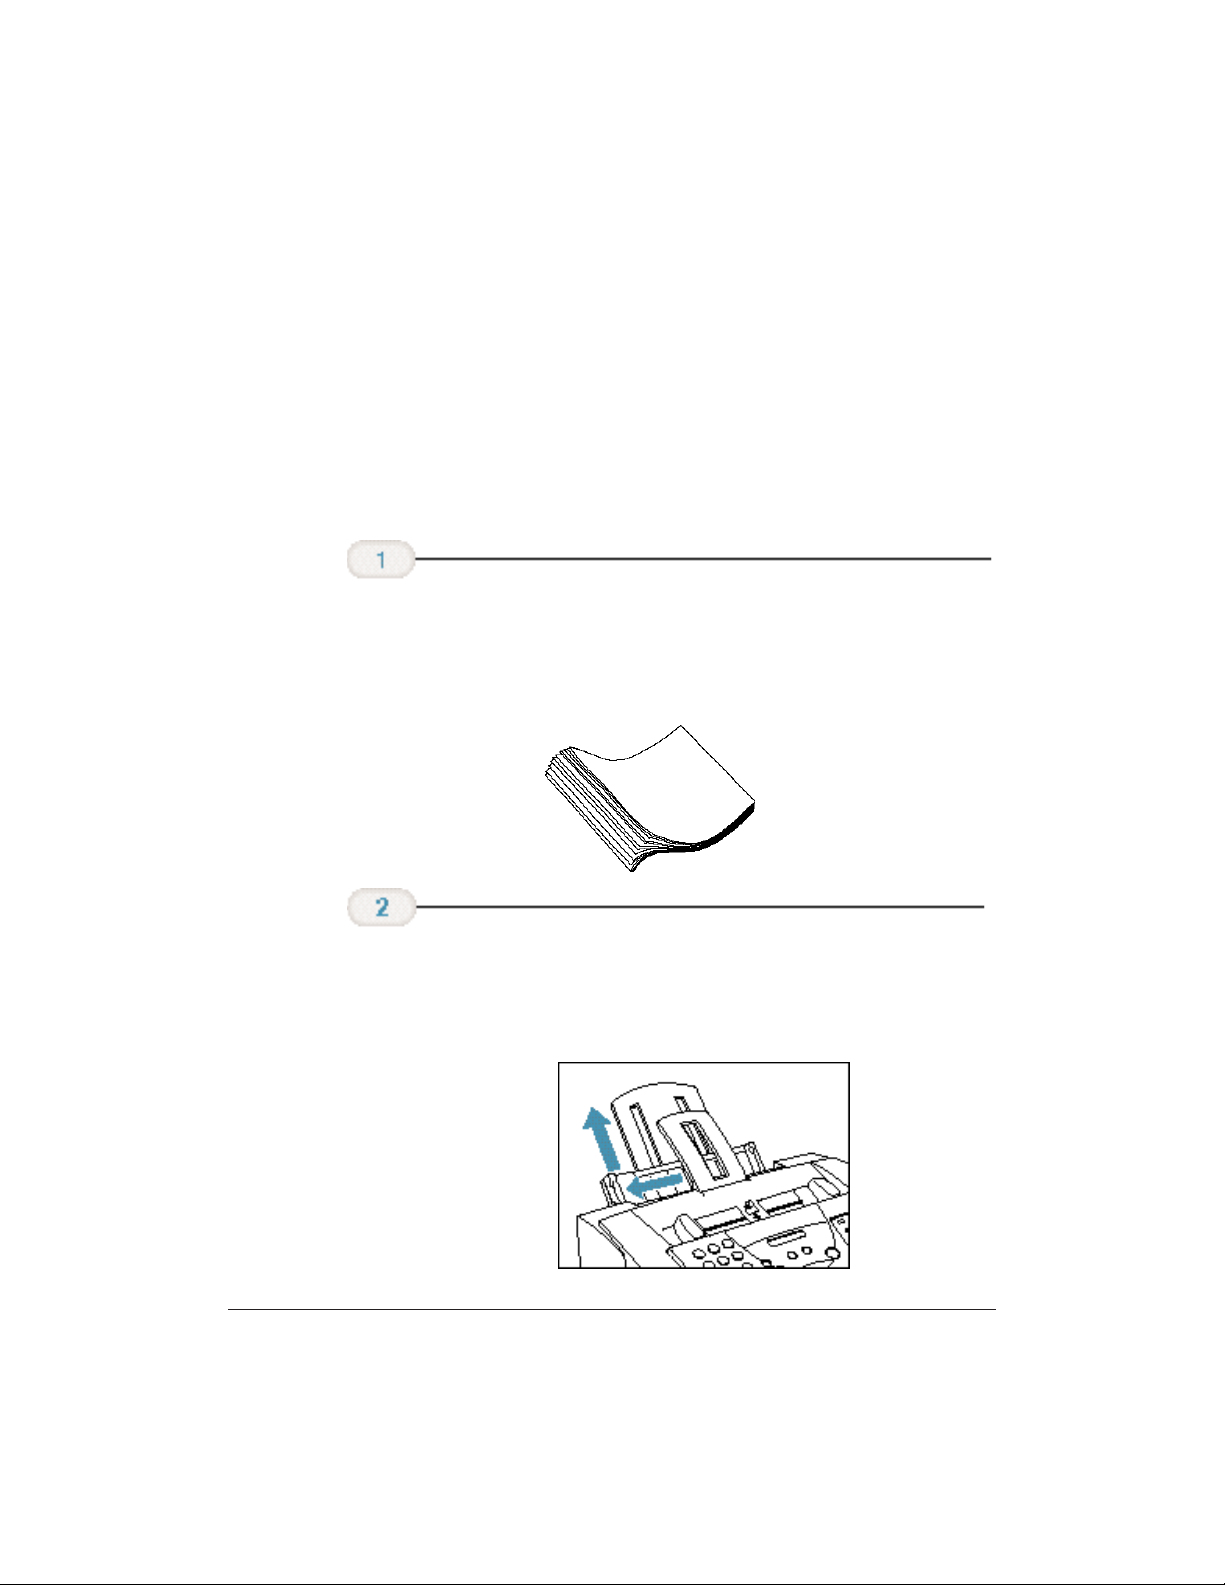
Fan the paper.
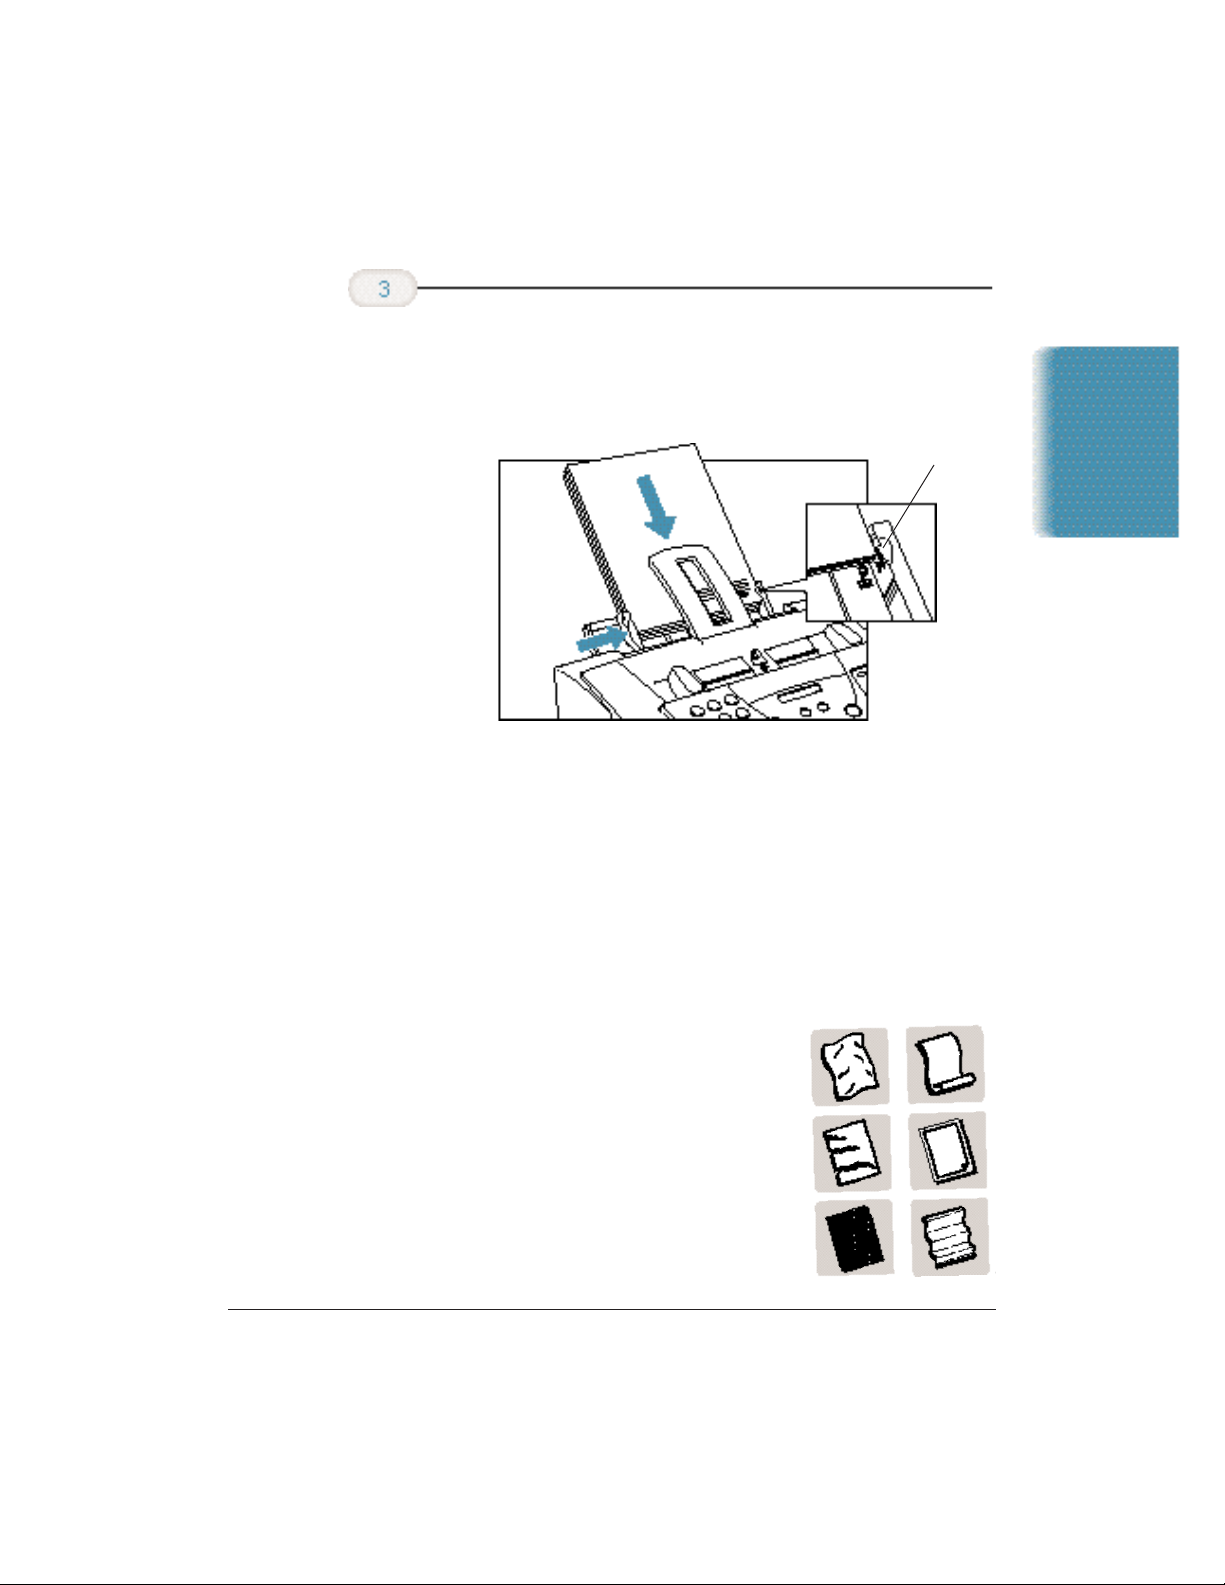
Make sure the
paper rest
is extended.
LOAD PAPER appears in the LCD display,you need to
❍ For best results,fan the paper before loading it.
❍ Always fan a stack of paper along the edge that will feed
into the MultiPASS first.
❍ Pull the paper rest up until it stops.
❍ Move the paper guide to the left to match the size of
your paper.
1-12 Introduction Chapter 1
Page 26
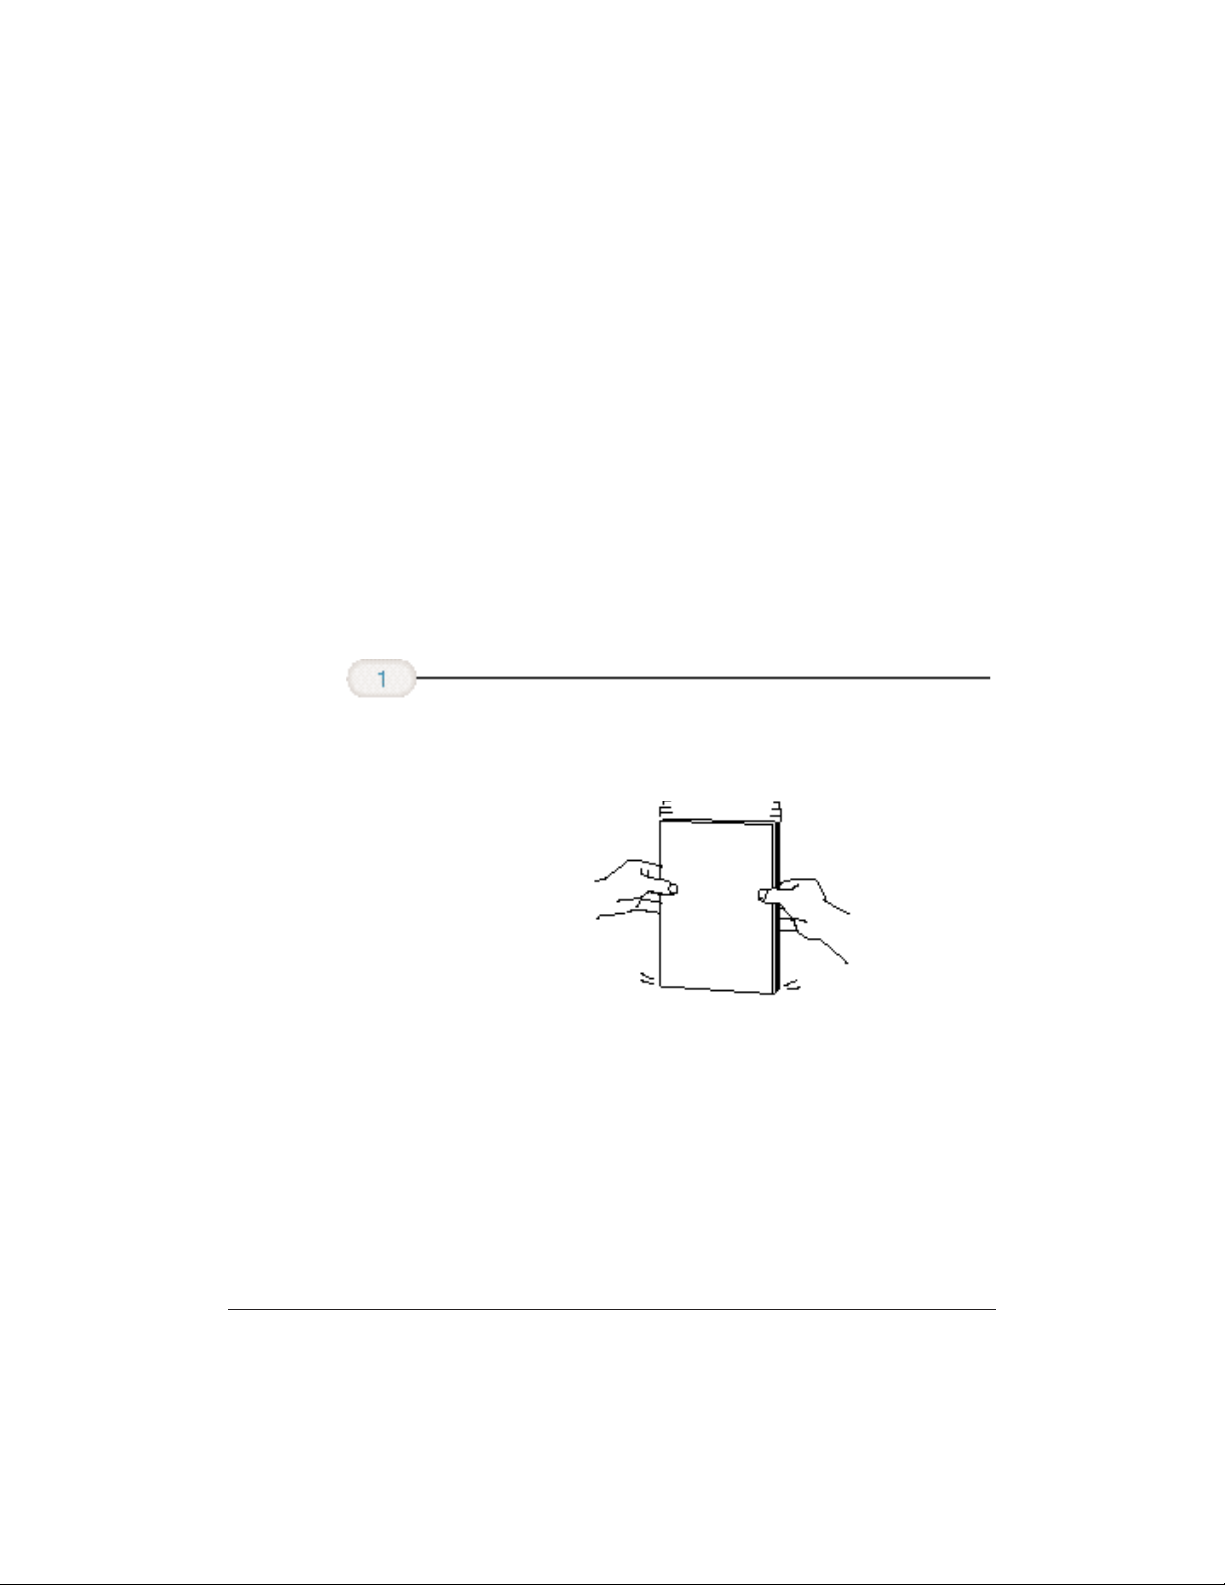
Slide the stack of
paper into the
sheet feeder
until it stops.
❍ Align the edge of the paper w ith the rig ht edge of the
sheet feeder.
❍ Secure the stack with the paper guide.
Preparing Documents for Faxing, Copying, or Scanning
You can use the MultiPASS to fax, copy, or scan documents that are
printed on standard letter, legal, or A4 size paper.Follow these guidelines
to prepare your documents.
TAB
Introduction
❍ Do not attempt to feed the following types of documents into the
MultiPASS:
wrinkled or creased paper
•
curled or rolled paper
•
torn paper
•
carbon-paper or carbon-backed paper
•
coated paper
•
onion skin or thin paper
•
Chapter 1 Introduction 1-13
Page 27
❍ Remove all staples, paper clips, and the like before feeding the
document.
❍ Make sure any glue, ink, or correction fluid on the paper is
completely dry before feeding the document.
❍ Make a photocopy of any document that will not feed into the
MultiPASS.You can then feed the copy.
❍ Do not feed documents with pages that are different sizes or of
different thicknesses.
Loading the Document
You can load up to 30 letter or A4 size sheets and up to 10 legal size
sheets at a time into the Automatic Document Feeder (ADF).
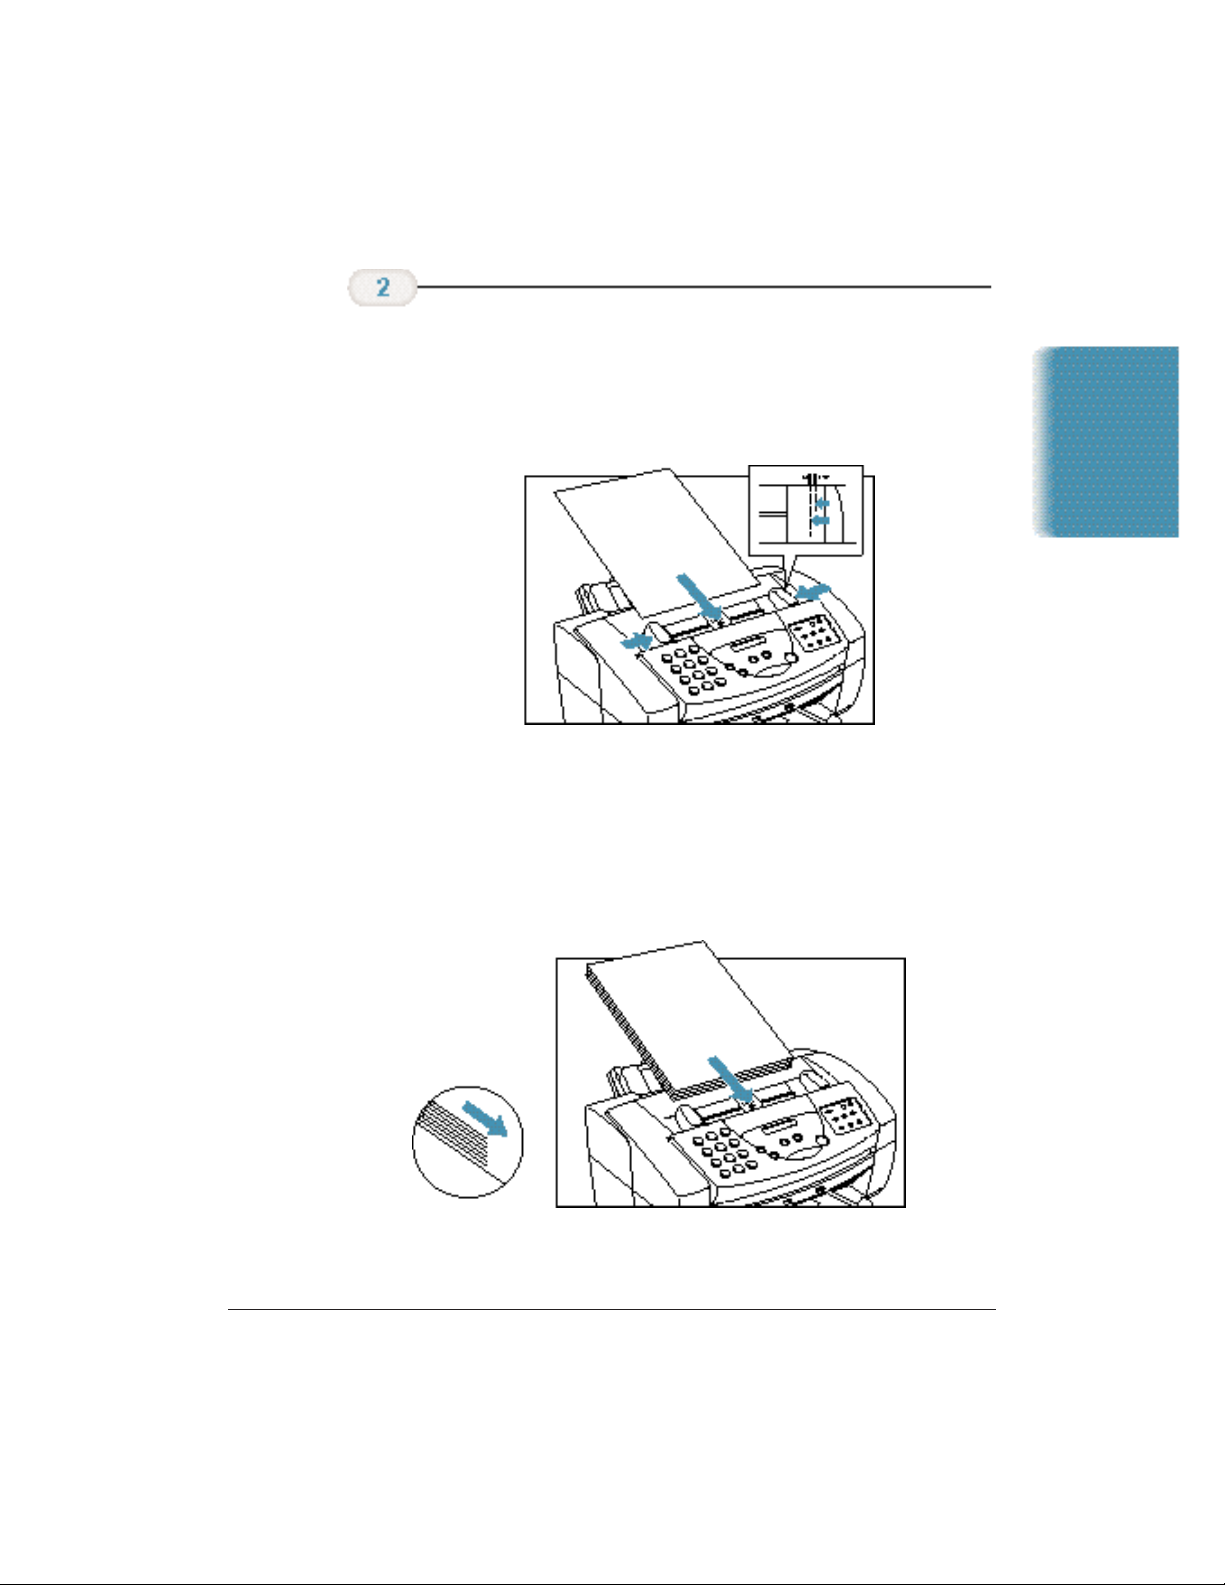
Stack your
documents.
❍ For a multiple-page document,fan the sheets and tap the
document on a flat surface to even the stack.
1-14 Introduction Chapter 1
Page 28
Feed the
document.
❍ Insert the document face down (letterhead first) into the
ADF until you hear a beep.
❍ Adjust the document guides to the width of the
document.
The MultiPASS automatically feeds the pages one by one from the
bottom.
If you have problems feeding multiple-page documents,inser t the pages
one at a time into the ADF. This stacks the pages on a slant so they feed
correctly into the ADF.(Do not attempt to stack more than 30 sheets in
the ADF.)
Introduction
Chapter 1 Introduction 1-15
Page 29

Adding Pages to the Document
If you want to add pages while the MultiPASS is sending a document,
wait until the last page is feeding into the unit and then insert the new
sheets. Insert the first new page so it overlaps the last page by about one
inch (2.5 cm).
Always wait until the last page is being fed into the MultiPASS before
you add new pages.
Setting the Document Feed Lever
You use the document feed lever on the ADF to select multiple
documents ( ) or single sheets ( ).
DOCUMENT FEED LEVER
Always set the document feed lever to single sheets and manually feed
the following types of documents:
❍ Thick paper
❍ Thin paper
❍ Small documents (postcards,business cards)
❍ Documents with uneven surfaces
❍ Photographs
❍ Special types of paper
1-16 Introduction Chapter 1
Page 30
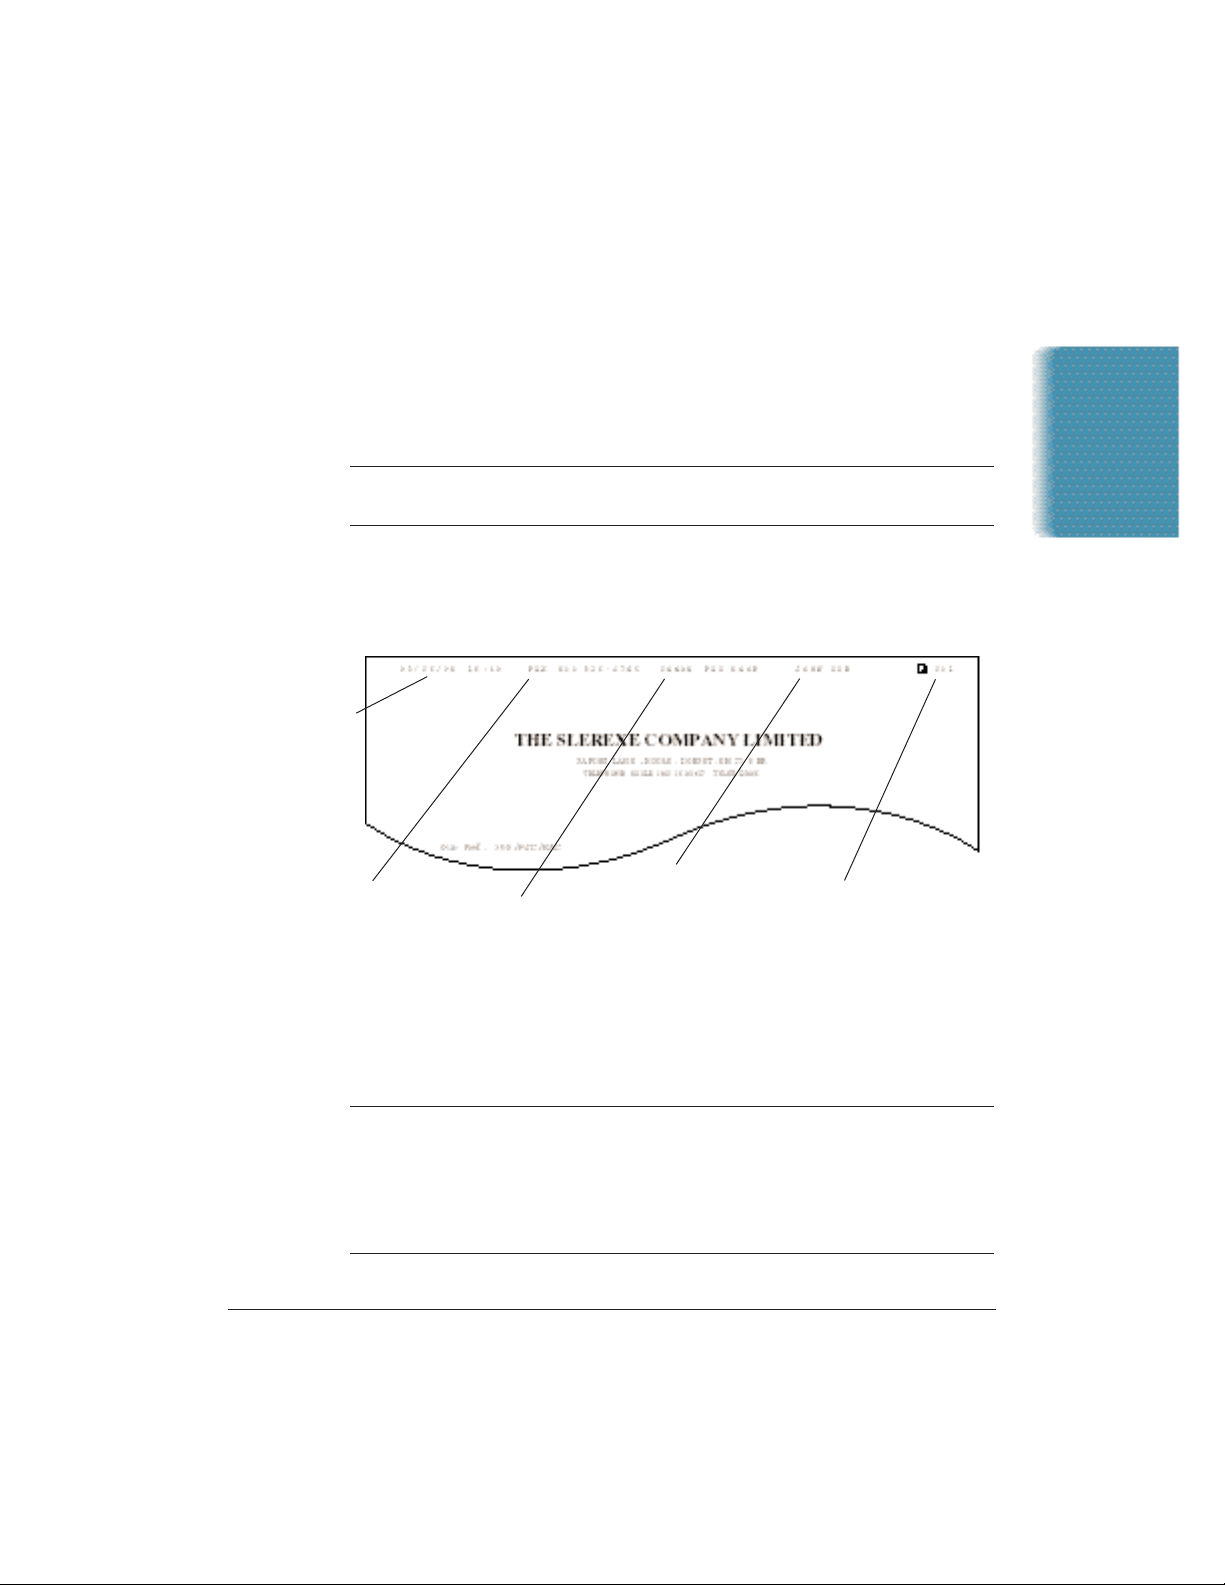
Identifying Your Documents
When sending a document,the following information is pr inted out
by the receiving fax: your fax number, your name, and the current date
and time. This information is called your TTI (Transmit Terminal
Identification) and appears at the top of the faxed document in small
type.
N
THE DATE AND
TIME YOU SENT
THE DOCUMENT
In the United States, you are required by FCC regulations to include this
information every time you send a fax.
By identifying the documents you send,the receiving part y w ill
recognize your fax messages at a glance.The illustration below shows a
sample document with the identifying information.
YOUR FAX/
TELEPHONE
NUMBER
The top line includes the name of the receiving party if you send the
document using one-touch speed dialing, coded speed dialing, or group
dialing and you registered the party’s name.It also includes the page
number.
YOUR NAME OR
COMPANY NAME
THE NAME OF THE
PARTYWHO IS
RECEIVING THE
DOCUMENT
THE PAGE NUMBER
Introduction
You entered your fax header information during the MultiPASS
N
Chapter 1 Introduction 1-17
installation procedure.If you followed the installation procedure, this
information will be printed on the top of your outgoing faxes. If you did
not install the MultiPASS Desktop Manager, see Appendix B,Using the
MultiPASS C5500 as a Stand-alone Fax,for details on how to enter
this information.
Page 31

Copying Documents
One of the convenient features of the MultiPASS is its abilit y to make
high-quality copies. Copying in black and white, you can make up to
99 copies of one document at a time.
It’s a good idea to use the optional BC-20 Black BJ Cartr idge when you
N
make black and white copies.
You can use the BC-21e Color BJ Cartridge or the optional BC-22e
Photo Color BJ Cartridge to make color copies.
Feed the
document.
Press
START/COPY.
❍ Place the document face down in the ADF. The LCD
displays these messages:
MEMORY USED 0%
FAX FINE
DOCUMENT READY
COPY 100% 01
❍ The display shows the size of the copy (the default is
100%) and the number of copies (the default is 1).
1-18 Introduction Chapter 1
Page 32

Change the
resolution if
necessary.
❍ To change the resolution for color copying, press the
COLOR COPY
button.
COLOR FINE
N
COLOR DRAFT
COLOR SNAPSHOT
❍ To change the copying resolution for black and white
copying, press the
When copying in color:
Use
•
•
•
When copying in black and white:
•
•
COLOR FINE
better quality reproduction,but takes longer than other settings.
Use
COLOR DRAFT
Use
COLOR SNAPSHOT
a letter-size page.
Use
B&W TEXT
Use
B&W PHOTO
photographs. This scans areas of the document that contain photos
with 256 levels of gray, and results in a much better reproduction of
the photograph.
resolution for 360 × 360 dpi; this results in a much
resolution for 180 × 360 dpi.
resolution for copying most text documents.
resolution when copying documents that contain
B&W FAX/COPY
B&W TEXT
B&W PHOTO
when scanning photos that are less wide than
button.
Introduction
When copying in color:
You can specify plain paper or High Resolution paper using the LCD
•
menu system.Press
SETTINGS
COPY MEDIA
PAPER
selection; press
Chapter 1 Introduction 1-19
; press
; press
or
HIGH RES PAPER
FUNCTION
START/COPY
START/COPY
to exit the
STOP
; press < or > until you see
; press < or > until you see
; press < or > to display
; press
START/COPY
FUNCTION
to make your
menu.
USER
COLOR
PLAIN
Page 33

Miscellaneous
If the Power Goes Out
If power to the MultiPASS is cut off, any documents stored in its fax
memory will be lost. Because of this, be sure to print documents stored
in memory or resend them as soon as possible. (The MultiPASS
automatically prints a Memory Clear Report when power is restored.
See page 10-26.)
While the power is out,the MultiPASS will receive telephone calls if a
telephone is attached.However,you cannot send or receive faxes. (If you
are using a cordless phone,you will not be able to make or receive calls.)
Avoid unplugging the MultiPASS unless absolutely necessar y.This is the
same as a power outage.
Using Switch Boxes
Canon does not recommend using a switch box with the MultiPASS.To
use more than one printer, it’s a good idea to add a second parallel port
to your computer.
Introduction
Chapter 1 Introduction 1-21
Page 34

Select
Reduction mode
if necessary.
Enter the
number
of copies.
❍ To reduce the size of the copies, use the < or > buttons to
select the reduction percentage you want (70%,80%,
90%, or 100%):
COPY 80% 01
COPY 100% 02
❍ To make multiple copies (in black and white), use the
number buttons to enter the number of copies (up to 99).
Press
START/COPY.
❍ To stop copying at any time,press
lift the operator panel to remove the document (see page
10-3 for details).
❍ If an error occurs and the LCD displays
reload the document and start copying again.
If the LCD displays
N
1-20 Introduction Chapter 1
of a document, do not use the multiple copy feature for copying the
document. Make single copies of the document instead (as many times
as required).
You may be able to make multiple copies if you first print out any faxes
that are stored in memory (see page 5-5).
MEMORY FULL
COPY
STOP
.You may need to
START AGAIN
while making multiple copies
,
Page 35

1-22 Introduction Chapter 1
Page 36

Printing With the
MultiPASS C5500
This chapter describes how to use the MultiPASS C5500 to print your
documents. Once you have installed the MultiPASS Desktop Manager,
you can use the MultiPASS C5500 for all your printing needs.
This chapter describes:
❍ Paper handling
❍ Installing a printer driver
❍ Printing a document
❍ Printer setup within Windows
❍ Printing speed versus color
❍ Setting the paper thickness lever
❍ Printer settings for various print media
2
Printing
❍ Loading paper
❍ Printing on envelopes
❍ Printing on Canon Specialty Papers
Chapter 2 Printing With the MultiPASS C5500 2-1
Page 37

Paper Handling
One of the most impor tant things you can do to assure the best possible
printing performance of your MultiPASS is to select the correct paper.
Your MultiPASS produces letter quality print on most plain bond
papers, including cotton bond and photocopying papers;it does not
require special ink jet papers.However, the print quality varies with
different paper types. Be sure to test a type of paper before you purchase
a large quantity.
Selecting Paper
Plain Paper
The MultiPASS supports paper sizes of letter, legal, and A4 in portrait
orientation.You can use regular copier paper,cotton bond papers, and
typical letterhead. Always use paper without curls, folds, staples, or
damaged edges. Copier paper has a preferred side for printing. Look at
the label on the package to see which side to print on.
Glossy Photo Paper
Canon Glossy Photo Paper GP-201 is a high gloss, thicker paper that
produces the look and feel of a photograph. Use this paper with the
BC-22e Photo BJ Cartridge to produce photo-realistic prints from your
printer.(Select Glossy Paper in the printer driver when you have this
paper loaded.)
Banner Paper
This paper is specifically designed for printing one continuous sheet in a
banner format. The connected sheets are divided by a perforation.You
can print from two to six sheets at one time.Canon’s Banner Paper is
specially designed for use with Bubble Jet printers and to produce bright
and vivid color images. (In your printer driver, select Plain Paper for
Media and Letter Banner for Size when you load this paper.)
Brilliant White Paper
Canon’s unique paper formulation gives you a bright white printing
surface that produces incredibly brilliant colors and dark,crisp black
text.This paper works great for proposals, color presentations, color
charts/graphs, flyers, and newsletters.You can print on both sides of
the sheet. (In your printer driver, select Plain Paper for Media when
you load this paper.)
2-2 Printing With the MultiPASS C5500 Chapter 2
Page 38

High Resolution Paper
The Canon High Resolution Paper HR-101 is designed to produce
photo-realistic quality output with sharp and vivid graphics. For best
results,use the optional BC-22e Photo BJ Car tridge to produce images
comparable to your favor ite photographs.
T-Shirt Transfers
Use Canon’s popular T-Shirt Transfers TR-101 to create and personalize
T-shirts,sweatshirts, aprons, tablecloths, napkins, tote bags, and
anything else your imagination allows! Use on any cotton or cotton/poly
blend fabric.Your image is pr inted in mirror image (when you use
T-Shirt Transfer mode through the MultiPASS printer driver for
Windows) so when you iron it onto the T-shirt, the image is viewed
correc tly.
Greeting Cards
Get the most out of your Canon Creative or other card-making software
with Canon Greeting Cards GC-101.These cards give your unique,
personalized cards the look and feel of professional cards.You can create
cards,invitations, announcements, and more.
Bubble Jet Paper (water resistant)
The Canon Bubble Jet Paper LC-301 has been developed for high quality
printing with minimal or no smearing or running when in contact with
water or damp surfaces,making it a good choice for damp or rainy
environments.The paper is specially coated and printable on both sides.
(Select Plain Paper in the printer driver when you load this paper.)
Printing
Fabric Sheets
Use Fabric Sheet FS-101 for Canon Bubble Je t products to print pillow
covers,scarves, flags, and other textile items. Use these sheets for
appliqués and other craft and sewing projects. Fabric sheets are
9.5 × 14 inches.
Back Print Film
Canon Back Print Film BF-102 has been specially developed for Canon
Color Bubble Jet printers and MultiPASS products.The film is designed
to deliver brilliant,high-intensity color images suitable for business
presentations, design work, or professional reports. Back print film is
printed on the back (nonglossy) side of the film in mirror image and
then viewed from the front (glossy) side using a backlighting device. For
more details, ask a Canon Author ized Dealer for information or refer to
the manual supplied with the film.
Chapter 2 Printing With the MultiPASS C5500 2-3
Page 39

High Gloss Film
The Canon High Gloss Film HG-101 features a bright white finish that
lends striking visual power to charts, graphs, and photographic images.
Use this film to make your presentation materials and graphics look
professional.
Transparencies
CF-102 Transparencies from Canon are recommended.These
transparencies produce excellent contrast, sharpness, and color.
Assorted Paper Starter Kit
If you would like to try some of the papers described above,look
for Canon’s Starter Kit (SK-102). It contains an assortment of five
paper types.
Paper Guidelines
When selecting or loading paper, please remember the following:
❍ Attempting to pr int on damp, curled, wrinkled, or torn paper can
cause paper jams and poor print quality.
❍ Use cut-sheet paper only.You cannot use multipart paper.
❍ When using graph paper, the lines may not match because the
1/6-inch line spacing of the pr inter is slightly less than that of
graph paper.
❍ If the print density of your page is very high, light paper stock may
curl slightly due to the large amount of ink.If you need to pr int
dense graphics, try pr inting on heavier stock.
❍ Do not use thicker paper than meets the specifications for this
printer.Printing with a paper that is thick enough to come in
contact with the print head nozzles may damage the BJ cartridge.
2-4 Printing With the MultiPASS C5500 Chapter 2
Page 40

Make sure the
Canon MultiPASS
C5500 Printer is
selected as your
default printer.
❍ Choose Print or Print Setup from the File menu.
❍ You will see a screen similar to this:
❍ Click on the Properties (or Setup) button if you want to
make any adjustments as appropriate for printing your
document. (See Printer Setup Within Windows on the
following page for details.)
❍ After making any necessary changes to the printing
parameters, select OK to start the print job.
2-6 Printing With the MultiPASS C5500 Chapter 2
Page 41

Installing a Printer Driver
Before you can use any type of printer with your computer,you must
install a printer driver. The pr inter driver tells the computer what kind
of a pr inter you are using. The printer driver also controls the various
settings, such as print quality and paper type. You define these settings
within the printer driver,and the printer driver then communicates the
settings to both the computer and the printer.
You must install the MultiPASS Printer Driver for Windows and the
MultiPASS Desktop Manager before you can use the MultiPASS C5500
as a printer for your computer. If you followed the instr uctions in your
Quick Start Guide,you have already installed the necessary software. If
not, see your Quick Start Guide for details on how to install this
software.
Printing a Document
This procedure describes the general steps required for printing from
various Windows applications.The exact steps for printing a document
may vary depending on the application program (such as Microsoft
Word) you are using. Refer to your software application’s documentation
for the exact printing procedure.
Start your
application.
❍ Start the program you are using to create the document,
and open the document you want to print.
Printing
Chapter 2 Printing With the MultiPASS C5500 2-5
Page 42

Printer Setup Within Windows
You can use the MultiPASS with all your Windows 98 and Windows 95
applications. Be sure to set the MultiPASS as the default printer for all
your Windows operations.
Most of your printing operations are controlled by your software
application. The following sections describe how you set certain options
directly from the printer driver; you only need this information if your
application does not control printing.
Opening the Printer Properties Dialog Box in Windows 98/95
You can open the Properties dialog box in one of the following ways:
❍ From within any Windows application, you can select the Print or
Print Setup command.
❍ From the Pr inters folder,you can select the printer and then select
the Properties command from the File menu.
❍ From the Printers folder,you can select the printer,click the right
mouse button,and then select Proper t ies from the drop down list.
Using the Printer Driver in Windows 98/95
The printing options are displayed on these Windows 98/95 tabs:
General, Details, Paper, Graphics, and Setting. See Using the Windows
Tabs on the next page for details.
For detailed information on any of the printing options, you can use the
N
Windows 98/95 online Help in the following ways:
❍ Use the right mouse button to click an item on the screen; then
click the What’s This? command.
❍ Click the question mark ? in the upper right corner and then click
an item.
❍ Press F1.
Printing
Chapter 2 Printing With the MultiPASS C5500 2-7
Page 43

Using the Windows Tabs
The MultiPASS Printer Driver for Windows has several tabs from which
you can select your printing options and learn about your printer driver
as well as your MultiPASS C5500.
❍ General
This tab allows you to add comments regarding the printer driver
and print a test page or a separator page. (You see this tab when
you open the Properties dialog box from the Printers folder,but you
do not see it when you open the Properties dialog box from w ithin a
Windows application.)
ADD COMMENTS
HERE
PRINT A
SEPARATOR
PAGE
PRINT A TEST PAGE
❍ Details
This tab allows you to specify printer port settings,spool settings,
and time-out settings. (You see this tab when you open the
Properties dialog box from the Pr inters folder,but you do not see it
when you open the Properties dialog box from w ithin a Windows
application.)
DEFINE THE
PRINTER’S PORT
SPECIFY THE
PRINTER DRIVER
SPECIFY TIMEOUT
SETTINGS
SPECIFY SPOOL
SETTINGS
2-8 Printing With the MultiPASS C5500 Chapter 2
SPECIFY PORT
SETTINGS
Page 44

❍ Paper
This tab allows you to specify page orientation,paper size, and ty pe
of print media.
SPECIFY PAGE
ORIENTATION
SPECIFY SIZE
OF PAPER
SPECIFY TYPE
SPECIFY
PAPER FEED
METHOD
OF PAPER
❍ Graphics
This tab allows you to specify print quality, color model, and print
model.
Printing
SPECIFY PRINT
QUALITY
SELECT A COLOR
MODEL (THE
COLOR MODEL
YOU SELECT
DEPENDS ON THE
BJ CARTRIDGE
INSTALLED; BE
SURE TO CHANGE
THIS SETTING
WHEN YOU
CHANGE
CARTRIDGES.)
SELECT A
PRINT MODEL
ENABLE OR
DISABLE IMAGE
COLOR MATCHING
ENABLE OR
DISABLE FINE
MODE
ENABLE OR
DISABLE IMAGE
OPTIMIZER
Chapter 2 Printing With the MultiPASS C5500 2-9
Page 45

❍
Setting
This tab allows you to turn on or off the Setup Analyzer. It also
allows you to save up to four custom print settings.
ENABLE OR
DISABLE SETUP
ANALYZER
Specifying Your Printing Options
Be sure to use your online help to find out about the settings available
for each printing option.
❍ To move between the Windows tabs, click on any of the tabs.
SAVE YOUR
CUSTOM PRINT
SETTINGS
❍ To select the settings and exit,click the OK button.
❍ To cancel your setting selections on a tab, click the Cancel button.
❍ To save your setting s without exiting , click the Apply button.
❍ To access helpful information about the MultiPASS and the printer
driver, click on the Help button.
❍ To find out about a setting, click the question mark ? in the upper
right corner.Move the larger question mark to the setting you are
interested in and click again.
2-10 Printing With the MultiPASS C5500 Chapter 2
Page 46

Recommended Graphics Settings
You can select the following printing options from the Graphics tab to
achieve the specified results.
Driver settings
To achieve Print Quality Color Model Results
Fastest B&W Draft Monochrome Uses less ink.Output
output possible 180 × 180 dpi quality is draft.
Fast letter quality Standard Monochrome Slightly slower than
output 360 × 360 dpi draft. Quality is standard.
Fast B&W photograph Standard and Monochrome Slower than B&W but
and graphic output Fine On better grayscale quality.
360 × 360 dpi
High quality High and Monochrome Produces hig hest
output Fine Off resolution output.
720 × 360 dpi
High quality High and Monochrome Slower than Standard but
photograph and Fine On optimizes B&W grayscale
graphic output 720 × 360 dpi quality.
Fast color output Draft Color Uses less ink.Output
180 × 180 dpi quality is draft.
Color output Standard Color Fast color printing but
360 × 360 dpi quality is not optimized.
High quality High and Color Uses Drop Modulation
color output Fine On Technology to optimize
720 × 360 dpi color print quality but the
print speed is slower.
Photo-realistic Standard Photo Color Produces photo-realistic
color printing 360 × 360 dpi color printing. (Requires
BC-22e Photo BJ Cartridge
and High Resolution
Paper HR-101 or Glossy
Photo Paper GP-201.)
True photo High Photo Color Uses Drop Modulation
quality printing 360 × 360 dpi Technology™ to produce
true photo quality.
(Requires BC-22e Photo
BJ Cartridge and High
Resolution Paper HR-101
or Glossy Photo Paper
GP-201.)
Printing
Chapter 2 Printing With the MultiPASS C5500 2-11
Page 47

Using the Setup Analyzer
The Setup Analyzer allows the printer driver to evaluate your choice of
printing settings. On the Setting tab, you click on the green ✔ to enable
the Setup Analyzer. Click on the red symbol to disable it.
When you exit the printer driver and accept your printing settings by
clicking the OK button,the Setup Analyzer (if enabled) checks to see if
any of your settings are contrary to the recommended settings. If there
are inconsistencies,a dialog box similar to this appears:
The inconsistencies appear with check boxes. You can use the dialog box
buttons to select or deselect the inconsistencies and to fix or ignore the
inconsistencies.
2-12 Printing With the MultiPASS C5500 Chapter 2
Page 48

Printing Speed Versus Color
The MultiPASS Printer Driver for Windows can interpret and translate
the full spectrum of colors,up to 16.7 million colors.When printing
color, there is a significant increase in the amount of information that
the driver has to interpret and translate.When printing black ink only,
the driver has only one color to interpret.
By decreasing the amount of colors that the printer driver has to
interpret, you can significantly decrease the time needed to translate the
information. This will speed up the overall printing process.
You select the settings described below using the Windows tabs of the
N
MultiPASS Printer Driver. See Using the Windows Tabsstar ting on page
2-8 for details.
For Quick Color Printing
In the MultiPASS Printer Driver for Windows, choose the following
printing operations. These selections allow the printer driver to interpret
and translate 256 colors, which will increase your printing speed.
However, your print quality will not be optimized.
❍ Media Type—Plain Paper
❍ Print Quality—Standard; Fine is off
❍ Color Model—Color
❍ Print Model—Custom
❍ Color Selection—Fast Color
For High Quality Color Printing
For the MultiPASS, select the printing options shown below to allow the
printer driver to interpret and translate up to 16.7 million colors.Keep
in mind that your print speed will be slower than with other setting
combinations.
❍ Print Quality—High; Fine mode is on
Printing
❍ Color Model—Color
❍ Print Model—Automatic
Chapter 2 Printing With the MultiPASS C5500 2-13
Page 49

For Monochrome Printing
Use the optional BC-20 Black BJ Cartridge to optimize the printer’s
performance when you are printing black text and graphics only.
In the printer driver, choose the following printing options to tell your
MultiPASS to print using black ink only.
❍ Media Type—Plain Paper
❍ Print Quality—Standard
❍ Color Model—Monochrome
❍ Print Model—Automatic
Other Ways to Improve Print Speed in Windows
To improve printing speed,you can tr y the following:
Avoid diffusion halftones
In the Custom Settings dialog box, choose Diffusion for halftoning only
when printing final output or photographic images. Choosing Fine
allows documents to print as much as 20% faster because the computer
does not need to compute to “best possible position”for each dot.
Avoid screen matched color
In the Custom Settings dialog box, avoid Match as the Color Adjustment
setting. The screen matching feature takes longer to process in the
computer because it requires special information.
Avoid automatic settings
Although the automatic settings are easy to use,the computer must
interpret the printed page. This takes more time than if you select each
setting.
Free up your memory
Use only one software program at a time and unload any screen saving
utilities or programs stored in Windows background; this frees up more
memory for Windows processing.
2-14 Printing With the MultiPASS C5500 Chapter 2
Page 50

Use Monochrome when possible
If you will be printing text in black ink only,choose a Color Selection
of Black and White rather than Grayscale. Print draft documents in
Monochrome rather than Color, or use Draft print quality when
printing color.
Limit the number of colors on each page
The computer will need to calculate and transmit fewer dots per inch
(dpi). Too many colors can make the image confusing and less effective
as well as cause the print speed to slow down.
Use primary colors when printing presentation graphics
Use black,cyan, yellow,magenta, blue, green, and red when possible.
The computer will need to calculate and transfer less dot information.
Use the Draft print quality
The printer will need to image fewer dots.
Use Plain Paper as the Media Type
The print head will make only one pass for each printed line.
Use smaller graphics and more white space in your documents
The computer will be able to prepare the print file faster.
Add RAM to your computer
The computer will be able to prepare the print file faster.
Use a computer with a faster processor
The computer will be able to prepare the print file faster.
Printing
Chapter 2 Printing With the MultiPASS C5500 2-15
Page 51

Setting the Paper Thickness Lever
To ensure trouble-free paper handling,you’ll want to set the paper
thickness lever before loading paper.
❍ Center for color BJ cartridges
❍ Left for black BJ cartridges
❍ Right for heavier-weight print media or envelopes
DO NOT TOUCH THE
GUIDE RAIL
DO NOT TOUCH THE
RIBBON CABLE
DO NOT TOUCH THE
ROUND SHAFT
Be sure to check this lever when you change BJ cartridges, and before
N
printer cover by
paper guides
and lifting up.
2-16 Printing With the MultiPASS C5500 Chapter 2
and after printing on heavier-weight print media or envelopes.
Open the
grasping the
Page 52

Press the
CARTRIDGE
button to move
the cartridge
holder to the
center of the unit.
CARTRIDGE
BUTTON
Set the paper
thickness lever.
Complete the
operation.
❍ Set the paper thickness lever to left,center,or right
according to the BJ cartridge and paper type. See
page 2-16 for details.
❍ Press
CARTRIDGE
again to move the cartridge holder
back to its home position.
❍ Close the printer cover.
Printing
Chapter 2 Printing With the MultiPASS C5500 2-17
Page 53

Printer Settings for Various Print Media
Paper
thickness lever
Paper
output
Paper feed
Media BC-21e BC-20 guides Method Limit (Sheets)
Plain paper Center Left Down Auto Approx.100
(0.4
" or 10 mm stack)
Glossy Photo Paper Center Up Auto or 1
GP-201 Manual
Banner Paper Right Up Auto 1 (2 to 6)
Brilliant White Paper Center Left Down Auto Approx.100
High Resolution Center Up Auto Approx.80
Paper HR-101 (0.4" or 10 mm stack)
T-Shirt Transfers Right Down Auto or 1
TR-101 Manual
Greeting Cards Right Down Manual 1
GC-101
Bubble Jet Paper Center Left Dow n Auto Approx. 100
LC-301 (0.4" or 10 mm stack)
Fabric sheet Right Down Auto or 1
FS-101 Manual
Transparencies Center Down Auto 50
CF-102
Back Print Film Center Down Auto 10
BF-102
High Gloss Film Center Down Manual 1
HG-101
Other heavier-weight Right Down Manual 1
print media
Envelopes
Single Right Down Manual 1
Stack Right Down Auto 15
2-18 Printing With the MultiPASS C5500 Chapter 2
Page 54

Loading Paper
You can stack paper in the sheet feeder to load it automatically, or you
can manually feed one sheet at a time through the manual feed slot.
You can place approximately 100 sheets of plain paper (20 lb or
75 g/m2) in the sheet feeder at a time.
You can stack approximately 50 sheets of transparency film or 10 sheets
of back pr int film in the sheet feeder. However, these special media may
not advance correctly under unusual env ironmental conditions (such as
extreme temperatures or humidity).If you have trouble with special
papers becoming skewed or feeding multiple sheets,do not stack them
in the sheet feeder.Load them one sheet at a time.
Automatically Feeding Paper
Printing
Set the paper
thickness lever.
❍ Center for color BJ cartridges.
❍ Left for black BJ cartridges.
Chapter 2 Printing With the MultiPASS C5500 2-19
Page 55

Pull the paper
support up
until it stops.
❍ Move the paper guide to the left to match your paper size.
Fan the paper.
❍ For best results,fan the paper before loading it.
❍ Always fan a stack of paper along the edge that will feed
into the printer first.
2-20 Printing With the MultiPASS C5500 Chapter 2
Page 56

Slide the stack
of paper into
the sheet feeder
until it stops.
❍ Align the edge of the paper w ith the rig ht edge of the
sheet feeder.
❍ Secure the stack with the paper guide.
❍ Start your print operation.
Auto Feed Guidelines
When automatically feeding stacks of paper,follow these guidelines:
❍ Do not leave paper stacked in the pr inter for long periods of time;
longer sheets of paper may become bent or curled over time. This
may cause the paper to misfeed or jam.
Printing
❍ If your printed page contains lots of g raphics, the ink on the page
may be damp due to the print density. Remove the page right away
and allow the ink to dry.
❍ The capacity of the paper output tr ay is 30 sheets of paper. To
reduce paper jams,remove paper from the output tray before the
count reaches 30.
❍ If paper curls after printing, remove it immediately; otherw ise, paper
jams may occur.
Chapter 2 Printing With the MultiPASS C5500 2-21
Page 57

❍ The platen (a roller on the inside of the printer) may become inked
if you print data be yond the width of the page.If this happens, clean
the platen with a soft cloth. (For details on cleaning the platen,see
page 9-4.)
❍ Depending on the density of your printed pages, the ink may need
time to dry.Within two to three seconds,the ink becomes smudge
resistant.After dry ing for several minutes, the ink becomes water
resistant.
❍ Do not try to load paper into the sheet feeder beyond the paper
D
limit mark ( ) or the tab on the right side of the sheet feeder;
stacking too much paper may cause paper feeding or printing
problems.
PAPER LIMIT
MARK
NO GAP HERE
NO GAP HERE
❍ Make sure there are no gaps between the stack of paper and the
paper guide or the right edge of the sheet feeder.
2-22 Printing With the MultiPASS C5500 Chapter 2
Page 58

Manually Feeding Paper
You use the manual feed function when printing on heavier-weight print
media (24 lb to 28 lb or 90 g/m2to 105 g/m2).
You cannot receive faxes when paper is loaded in the manual feed slot.
N
Check the paper
thickness lever.
Start your
print operation.
❍ If you are manually feeding heavier-weight print media,
set the paper thickness lever to the right.
Printing
DO NOT TOUCH
THE GUIDE RAIL
DO NOT TOUCH
THE RIBBON
CABLE
❍ If you are using Windows, you must select Manual Feed
in the MultiPASS Printer Driver for the printer to accept
manually fed paper.
❍ You will see this screen:
❍ Remove any paper in the sheet feeder and click Continue.
Chapter 2 Printing With the MultiPASS C5500 2-23
Page 59

When you are
prompted, insert
the single sheet.
❍ You see this screen approximately 5 seconds after clicking
Continue.
❍ Make sure the pr int side is facing up.
❍ Align the sheet with the left edge of the manual feed slot,
and keep the leading edge of the paper perpendicular to
the left edge.
❍ Slide the paper into the manual feed slot in the back of
the printer until it stops.
❍ Hold the sheet for about two seconds until it feeds
automatically.
❍ The printer will automatically load the paper into
position.
❍ When ready,click Continue in the Add Paper dialog box.
After printing on thick paper or envelopes,set the paper thickness lever
(inside the printer) back to the left or center position before printing on
other paper types.
2-24 Printing With the MultiPASS C5500 Chapter 2
Page 60

Printing On Envelopes
You can stack up to 10 envelopes in the sheet feeder or you can manually
feed envelopes one at a time.
U.S.Commercial number 10 (COM10) envelopes and European DL
envelopes are recommended. You may be able to stack envelopes of
other sizes in the sheet feeder; however,Canon cannot guarantee
consistent performance on envelope sizes other than COM10 and DL.
The following envelopes are not recommended because they may cause
jams or smears, or may damage your printer.
❍ Envelopes with windows, holes, perforations, cutouts, and
double flaps.
❍ Envelopes made with special coated paper or deeply
embossed paper.
❍ Envelopes using peel-off sealing strips.
❍ Envelopes in which letters have been enclosed.
When you are ready to print on envelopes, follow these steps to stack
envelopes in the sheet feeder. (You can also manually feed envelopes one
at a time.)
Printing
Make sure the
paper thickness
lever is set to the
right (A).
DO NOT TOUCH
THE GUIDE RAIL
DO NOT TOUCH
THE RIBBON
CABLE
❍ Close the printer cover.
Chapter 2 Printing With the MultiPASS C5500 2-25
Page 61

Prepare the
envelopes.
❍ Arrange the stack of envelopes on a firm surface and
press down firmly on the edges to make the folds crisp.
❍ Press all the way around the envelopes to remove any
curls and expel air from inside the envelopes.
PRESS DOWN FIRMLY ON
THE EDGES OF THE FLAP
❍ Remove any curling from the envelopes by holding the
edge of the envelopes diagonally and bending them
gently.
❍ Make sure the flaps of the envelopes are flat and not
curled.
2-26 Printing With the MultiPASS C5500 Chapter 2
Page 62

Insert the
envelopes.
❍ Slide a stack of envelopes into the sheet feeder until it
stops.
❍ Align the edge of the paper guide w ith the left edge of the
stack of envelopes.
❍ Insert the envelopes with the print side up.
❍ Feed the top of the envelope (return address portion)
into the sheet feeder first.
❍ Make sure the back flap is toward the sheet feeder.
Printing
Now you can start your print operation.
Chapter 2 Printing With the MultiPASS C5500 2-27
Page 63

Using Canon’s Specialty Papers
This section provides guidelines for printing on Canon’s Specialty Papers
and describes special procedures required for High Resolution Paper,
Fabric Sheets, and Banner Paper.
Specialty Paper Guidelines
Be sure to read any instructions that come with your Canon Specialty
N
Paper. These instructions provide important infor mation regarding how
to achieve the highest print quality with these papers.
Follow these guidelines:
❍ When automatically feeding transparencies or back print film,
remove each sheet after it is delivered. Do not allow film sheets to
stack up.
❍ Let the printed sheets of film or paper dr y completely before storing
them.
Paper type Drying time
Canon High Gloss Film HG-101 10 minutes
Canon Glossy Photo Paper GP-201 10 minutes
Canon Fabric Sheet FS-101 1 hour
Canon Transparencies CF-102 15 minutes
Canon Back Print Film BF-102 15 minutes
❍ When your output has dr ied completely,cover its printed side
with a sheet of plain (not coated) paper before storing it; this is
recommended even if you place the sheets of film in a clear file or
plastic holder.
2-28 Printing With the MultiPASS C5500 Chapter 2
Page 64

❍ When loading transparencies or back print film,insert one sheet of
plain paper as the last sheet in the stack.
❍ Do not leave the film in the sheet feeder for long periods of time.
Dust and dirt may accumulate on the film resulting in spotty
printing.
❍ To avoid smudging caused by fingerprints,use a pair of thin cloth
gloves while loading and handling the film.
❍ To avoid fading,do not expose the printed film to prolonged
sunlight.
❍ Store unused papers and films flat.Do not remove papers from their
protective packaging until you are ready to use them.
❍ Store unused film at temperatures between 59°F to 86°F (15°C to
30°C). The relative humidity should be between 10% and 70%.
Uncurling Back Print Film
If Back Print Film becomes curled, follow these steps to uncurl it:
Cover the
nonglossy side
of the film
with a sheet
of plain paper.
Printing
Roll the film
and paper up in
the direction
opposite the curl.
Chapter 2 Printing With the MultiPASS C5500 2-29
❍ Do not roll the film too tight.
❍ The film and paper rolled together should be about one
inch (2.5 cm) in diameter.
Page 65

Keep the film
rolled up for
about five
minutes.
❍ You may want to fasten the roll w ith a small piece of tape.
Canon’s High Resolution Paper HR-101
Using the Paper Output Guides
The output tray on your MultiPASS is equipped w ith paper output
guides.When using the optional BC-22e Photo BJ Cartridge or BC-29F
Neon BJ Cartridge to print on Canon’s High Resolution Paper HR-101,
lift the paper output guides on both sides of the output t ray.
These guides help support the document as it exits the MultiPASS. The
guides keep the sheet from sagging as it exits and pulling through the
unit, which can lead to poor print quality.
❍ Lift both paper output guides until they are vertical.Always lift both
output guides.
2-30 Printing With the MultiPASS C5500 Chapter 2
Page 66

❍ When the output guides are raised,the output tray can hold a
maximum of 30 sheets.
❍ When you finish using the BC-22e Photo or BC-29F Neon
BJ Cartridge with High Resolution Paper, lower the output
guides to their original position.
❍ Always lower the paper guides when using the MultiPASS as a
fax machine. The guides may cause paper to pile up and jam.
Using the Cleaning Sheet
Canon’s High Resolution Paper HR-101 is designed for hig h quality
printing. This paper is specially coated to produce delicate color output.
After using a package of High Resolution Paper (200 sheets),you need
to use the cleaning sheet enclosed with the paper to remove paper dust
from the printer’s rollers; this will help prevent paper feed problems.
Printing
Set up
the printer.
Chapter 2 Printing With the MultiPASS C5500 2-31
❍ Make sure the paper thickness le ver is to the center.
Page 67

Remove the two
pieces of tape
from the sheet.
Insert the
cleaning sheet.
❍ Insert the sheet with the sticky side out (toward you) and
down (going into the sheet feeder).
❍ Adjust the paper guide to the edge of the cleaning sheet.
2-32 Printing With the MultiPASS C5500 Chapter 2
Page 68

To feed the sheet,
press FUNCTION
on the onetouch speed
dial keypad.
FUNCTION
❍ Press the < or > button until
ROLLER CLEANING
❍ Press START/COPY.
The cleaning sheet feeds through the
unit and ejects.
ROLLER CLEANING
appears.
Fabric Sheet FS-101
Fabric Sheet FS-101 for Canon printers comes with a booklet that
describes special handling procedures.Be sure to look through this
booklet for special information regarding the Fabric Sheet.T his section
describes specific steps for using Fabric Sheets with the Canon Bubble
Jet products.
Be sure to follow these guidelines:
❍ To avoid paper jams,smearing, and other problems, do not open the
printer’s cover during pr inting.
❍ Do not touch newly printed fabric sheets until the ink is completely
dry.This takes about one hour.
Do not use the fixing agent that comes with the Fabric Sheet FS-101. This
N
agent is NOT needed when printing with the MultiPASS C5500.
Printing
Chapter 2 Printing With the MultiPASS C5500 2-33
Page 69

Printing On a Fabric Sheet
Set up
the printer.
Insert the
fabric sheet.
❍ Make sure the paper thickness le ver is to the right
position.
❍ Make sure the paper suppor t and paper output tr ay are
extended.
DO NOT TOUCH
THE GUIDE RAIL
DO NOT TOUCH
THE RIBBON
CABLE
❍ Insert the sheet with the cloth side out (toward you) and
the open end up (away from the sheet feeder).
❍ Adjust the paper guide to the edge of the fabric sheet.
OPEN END AT THE TOP
2-34 Printing With the MultiPASS C5500 Chapter 2
Page 70

Set up
the MultiPASS
Printer Driver
for Windows.
❍ In the Paper tab, select A4 for the Paper Size and select
Fabric Sheet for the Print Media.
❍ In the Graphics tab,select High for the Print Quality.You
may also want to select Fine mode.
❍ Start the print operation from your Windows application.
Dry and
then wash the
fabric sheet.
❍ Let the printed fabric sheet set for about one hour to
allow the ink to completely dry.
❍ When dry, peel the film backing from the printed fabric
sheet.
❍ Wash the printed fabric sheet for about three minutes
under lukewarm running water to remove extr a ink.
❍ Hang the fabric sheet up to dry it again.
❍ Iron the dried fabric sheet with a clothes iron.
❍ See the booklet that comes with Fabric Sheet FS-101 for
details on drying and washing.
Printing
Chapter 2 Printing With the MultiPASS C5500 2-35
Page 71

Printing On Banner Paper
Banner paper is a continuous sheet of paper with perfor ations at equal
distances along its length where it can be cut to the length required.For
best results,use Canon’s Banner Paper.
To set up a print job on banner paper,you must decide on the number
of sheets you need. You can print banners from 2 to 6 sheets in length.
Always leave an extra sheet at the end of the banner—just in case the
type runs over.
N
The shaded portions of the drawing below illustrate the maximum
recommended printing area of banner paper.
Printing on banner paper requires quite a bit of ink. If you think your
BJ cartridge may run out of ink,use a new BJ car tridge.
N
For best print results on banner paper, use light desig n patterns.
To prevent ink from running over the edges of the sheet, print within
the margins shown in the previous illustration.
2-36 Printing With the MultiPASS C5500 Chapter 2
Page 72

Position the
MultiPASS.
❍ Place the MultiPASS near the edge of a table so that the
paper can flow over the edge as it exits the unit.
❍ Make sure the paper rest is extended.
Printing
Set the paper
thickness lever.
❍ Press the
holder to the center of the unit.
CARTRIDGE
button to move the cartridge
❍ Open the printer cover by grasping the document guides
and lifting.
❍ Set the paper thickness lever.
Set it to the center if you are using the BC-21e Color
•
BJ cartridge.
Set it to the left if you are using the BC-20 Black
•
BJ cartridge.
DO NOT TOUCH THE RIBBON CABLE
DO NOT TOUCH THE GUIDE RAIL
DO NOT TOUCH THE ROUND SHAFT
❍ Close the printer cover.
Chapter 2 Printing With the MultiPASS C5500 2-37
Page 73

Adjust the
paper output
tray.
❍ Raise both output guides on the paper output tray.
Cut the banner
paper along
one of the
perforations to
the length
required.
❍ Your banner can be up to 6 sheets (66 in./1676 mm) long.
2-38 Printing With the MultiPASS C5500 Chapter 2
Page 74

Place the paper
behind the
MultiPASS on a
flat surface.
Gently fold along
the perforations
between the first
and second sheets.
Printing
Chapter 2 Printing With the MultiPASS C5500 2-39
Page 75

Insert the first
sheet into the
sheet feeder until
it stops.
❍ Make sure the sheets behind the unit are also aligned w ith
the sheet feeder.
Slide the paper
guide against the
edge of the sheet.
❍ Leave a 0.04 inch (1 mm) gap between the paper guide
and the edge of the sheet.
❍ Make sure the sheet is under the tabs on the sheet feeder
and paper guide.
2-40 Printing With the MultiPASS C5500 Chapter 2
Page 76

Open the
Windows
application you
will be using.
Allow the paper to flow over the edge of the table as it exits the
MultiPASS.
❍ From the File menu, select Print.
❍ Use the MultiPASS C5500 Pr inter Driver to select the
print options.
Select Auto Feeder for the Paper Feed method.
•
Select Banner for the Media Type.
•
❍ Select other options according to your software and
operating system. See your software instructions for
details.
Enter 1 for the number of copies.Selecting any other
•
number may print the sheets in the wrong order.
For the number of sheets, enter the number of sheets
•
you are printing.
❍ Click OK or PRINT to begin printing.
Printing
Chapter 2 Printing With the MultiPASS C5500 2-41
Page 77

2-42 Printing With the MultiPASS C5500 Chapter 2
Page 78

Using the MultiPASS
Desktop Manager
The MultiPASS Desktop Manager is a full-featured Windows application
that enables you to use your MultiPASS C5500 from your computer.The
MultiPASS Desktop Manager coordinates the printing,PC faxing, and
scanning functions of the MultiPASS C5500. Its features include:
❍ Printing,PC faxing , and scanning control functions
❍ Manipulating and editing the faxed or scanned documents
❍ Folders that hold your faxes and scanned documents
❍ An Address Book where you store the names and fax numbers for
individuals and groups to whom you repeatedly send faxes
This chapter describes:
❍ Starting the MultiPASS Desktop Manager
❍ Exploring the MultiPASS Desktop Manager window
3
❍ Using the Desktop Manager folders
❍ Viewing documents in the Desktop Manager
❍ Setting up the Address Book
Your MultiPASS C5500 is designed to be used with the MultiPASS
N
Chapter 3 Using the MultiPASS Desktop Manager 3-1
Desktop Manager. To use all the outstanding features of the MultiPASS
C5500 requires use of the Desktop Manager.To use the unit as a standalone fax machine, see Appendix B.
MultiPASS
Desktop Manager
Page 79

Starting the MultiPASS Desktop Manager
When you start Windows, the MultiPASS Server is automatically
started as well. The MultiPASS Server enables and monitors the
communication between the Desktop Manager and the MultiPASS
C5500. The MultiPASS Server must be open before you can open
the Desktop Manager.
Once installed, you select the MultiPASS Desktop Manager from the
Programs list.
❍ Click the Start button and point to Programs.
❍ Point to Canon MultiPASS Desktop Manager 3.0 and then click
Canon MultiPASS Desktop Manager.
When you exit the Desktop Manager, you close only the Desktop
Manager window.Any documents you have set up to PC fax or print
remain active.The MultiPASS Server and the Send Fax Manager,which
tracks the progress of your active jobs, remain open and active.
3-2 Using the MultiPASS Desktop Manager Chapter 3
Page 80

Exploring the MultiPASS Desktop
Manager Window
When you start the MultiPASS Desktop Manager, you see a screen
similar to this:
MENU BAR
FOLDERS
LIST
WORK
AREA
COMMAND
BAR
STATUS BAR
Menu Bar
The menu bar contains the commands that enable you to perfor m the
various Desktop Manager tasks.Many of the commands can also be
accessed using their corresponding button on the toolbar.
ACTION TOOLBAR
DOCUMENT TOOLBAR
MultiPASS
Desktop Manager
Document Toolbar
The document toolbar provides quick access to certain tasks with a
selected document.When a task is unavailable, the toolbar button
appears dimmed.
MANUAL
INDEXING
EDIT
KEYWORDS
SHOW
SEARCH
RESULTS
MERGE
DOCUMENT
VIEW
LIST VIEW
SEARCH
SELECT
ALL
DUPLICATE
ARRANGE
REMOVE
PAGE
SPLIT
Chapter 3 Using the MultiPASS Desktop Manager 3-3
Page 81

Action Toolbar
The action toolbar provides quick access to certain Desktop Manager
tasks.When a task is unavailable, the toolbar button appears dimmed.
FAX
MEMO
IMPORT
FAX LOG
ADDRESS
BOOK
MANAGE
COVER
PAGES
COVER
PAGE
DESIGNER
FAX
SETUPSCAN
SEND FAX
MANAGER
HELP
CONTENTS
DELETE
Like any Windows toolbar, you can move either the action or document
toolbar anywhere on the Desktop Manager workspace to suit your own
working habits.
ToolTips are also available,providing descriptions of the toolbar
buttons.To display a ToolTip, pause the mouse pointer when it is
directly over a button.
Folders List
The folders list contains folders that store your documents (sorted in
alphabetical order).The list conains both system-defined folders, which
were automatically created when you installed the software, and userdefined folders, which you create as you need them.As you add folders
to the folder Cabinet, notice that the list displays similar to Windows
Explorer, in a hier archical view.
Work Area
The work area appears to the right of the folders list and displays the
documents contained in the open folder. The documents are displayed
either as a graphic thumbnail of each document (Document View) or a
list of the documents (List v iew).
The width of the work area can be adjusted by dragging the border (the
split bar) between the work area and folders list.
3-4 Using the MultiPASS Desktop Manager Chapter 3
Page 82

Command Bar
The command bar is located at the bottom of the work area and
contains buttons that perform key processing tasks.In most cases, you
simply drag a document from the work area onto the command bar
button for the task you want to perform.
EXPORT
PRINT
VIEW
E-MAIL
FAX
LAUNCH
APPLICATIONS
You can also launch other Windows applications such as your e-mail
program, Paint,or WordPad. Microsoft Paint is automatically placed on
the Process toolbar. See page 8-16 for deails on how to add other
programs to the Launcher.
A Phone button displays in the command bar if you connect a
telephone to your MultiPASS and you check the “Telephone Attached
to Unit” option in the Desktop Manager Setup Options dialog box.
(See Chapter 8,Se tup and Other Utilities in the D esktop Manager.)
You use the process toolbar buttons as follows:
❍ Drag a document to the process button—For example,you can drag
a document from a folder or from the work area to the Print button
in order to print the document.
If a document is dragged to a button that cannot perform the
task, the mouse pointer displays as a “No”icon (a circle with a
diagonal bar drawn through it ).
MultiPASS
Desktop Manager
❍ Highlight a document in a folder and then click a process toolbar
button—This method activates the command for the selected
document, as though the document had been dragged to the button.
❍ Double-click a launching icon—This starts the application as if it
were started from the Windows desktop.
Status Bar
The status bar displays information about the selected document or
folder,or a description of the currently selected menu or toolbar
command.It also displays the current date and time. The information is
for display only and cannot be edited.
Chapter 3 Using the MultiPASS Desktop Manager 3-5
Page 83

Using the Desktop Manager Folders
The Desktop Manager stores and organizes documents in folders.Only
one folder can be open at a time.When you open another folder,the
current folder automatically closes.
You can organize your documents in any manner you want,placing
documents in folders, or folders within folders as may be desirable.
As previously mentioned, the organization of the folders list is much
like Windows Explorer,which means you have great flexibility in
determining how best to store your documents.
System-defined Folders
When you installed the Desktop Manager, a number of system-defined
folders were automatically created—In Box, Sent Fax, Scan, Trash, and
Cabinet (which contains the folders you create).You can tell which
folder is open by the folder icon—it will look open or closed.
You cannot add new folders or documents to the system-defined folders.
The system-defined folders are reserved for use by the Desktop Manager
in the following ways:
❍ With the exception of the Tr ash folder,only the Desktop Manager
can place documents in system-defined folders,based on faxes sent
or received,or images scanned. Generally,you can only rename,
copy, move, or delete documents from these folders.
❍ The system-defined folders,including the Trash folder, cannot be
deleted or renamed.
❍ A document remains in a system-defined folder until you move it to
a user-defined folder, or delete it.
In Box Folder
The In Box folder is automatically open each time you star t the Desktop
Manager (even if it is empty). It stores all incoming faxes that were sent
to you by other fax machines,received by your MultiPASS,and then
uploaded to your PC.
3-6 Using the MultiPASS Desktop Manager Chapter 3
Page 84

Each received fax is displayed using a system-assigned name (for
example, Untitled 0001).You can change the name to something more
descriptive by highlighting the document, and choosing the Rename
command from the Edit menu,or by clicking the right mouse button
and choosing Rename.In the Rename dialog box,ty pe the new name
and click OK. Documents which have not been viewed in the In Box
folder display in bold.
Scan Folder
The Scan folder stores all images you scan with the MultiPASS from the
Desktop Manager. Each document displays with a system-assigned
name, which you can change.
Sent Fax Folder
The Sent Fax folder contains all documents that have been successfully
sent as PC faxes and that you requested not to be deleted after sending.
Each sent fax displays with the name “Untitled”,which you can change.
Trash Folder
The Trash folder stores all the documents you remove from the folders
list or work area.You move a document to the Trash folder by dragging
it onto the Trash icon, or by highlighting the document and then using
the Delete key (on your keyboard),the Delete command from the Edit
menu (or by clicking the right mouse button), or the Delete toolbar
icon.
Once you move a document to the Trash folder, it remains there until
you choose the Empty Trash command from the File menu.The Empt y
Trash command permanently removes all items in the Trash folder.
MultiPASS
Desktop Manager
User-defined Folders
You can create an unlimited number of folders for your own use in the
file Cabinet; the Cabinet acts as your “root directory.”You cannot place
documents directly into the file Cabinet; you must place them in folders
within the file Cabinet.
Chapter 3 Using the MultiPASS Desktop Manager 3-7
Page 85

Creating a New Folder
1. Click the Cabinet icon, or the folder within which you want to store
the new folder.
2. Choose the New Folder command from the File menu,or click the
right mouse button and choose New Folder.
3. In the MultiPASS Create Folder dialog box,ty pe a name for the
folder and click OK.
If you create multiple folders or place folders within folders, you can
navigate among your folders and documents just like you do in
Windows Explorer.To display the contents of a folder, either doubleclick it or click the (+) next to the folder name.To collapse an open
folder tree, double-click it or click the (-) next to the folder name.
3-8 Using the MultiPASS Desktop Manager Chapter 3
Page 86

Viewing Documents in the Desktop Manager
When you open a folder, you can view the documents which are
contained in that folder in a List View or a Document View.
When you first open the Desktop Manager, documents are automatically
displayed in List View. However,you can change to Document View at
any time by clicking the Document View button on the toolbar,or by
choosing the Document View command from the View menu.
If the number of documents within a folder exceeds the available work
area,hor izontal and/or vertical scroll bars display.You can use them to
scroll the work area to view all the documents.
To open a folder,click the desired folder in the folders list.
Document View
Document View displays each individual document as a thumbnail titled
with the document name. For multiple page documents, the thumbnail
also displays the page count,as well as scroll arrows at the bottom and a
scroll box at the right side.The scroll arrows and scroll box enable you
to page through a multi-page document,displaying each page in turn or
moving to a particular page in the document.
Chapter 3 Using the MultiPASS Desktop Manager 3-9
MultiPASS
Desktop Manager
Page 87

List View
Document View allows you to work with an individual document at the
page level: scrolling pages, removing a page,splitting a document, or
merging two or more documents into a single document.You can
rearrange the document thumbnails within the work area as needed by
simply dragging them to the desired location. To equally align
thumbnails, choose the Arrange command from the View menu.
To view documents in a folder as thumbnails, make sure the folder is
open. Then choose the Document View command from the View menu
or click the Document View toolbar button on the Document toolbar.
List View displays documents within the open folder as a list. Each
document in the list displays an icon representing the document type,
along with other pertinent information about the document (such as its
name, page count,disk storage size, date and time of creation,and its
origin). If the document is a fax,the connection number and ID are
displayed.
The icon designates the document type as fax, scan, or modified. A
modified document is a document where the fax cover page has been
removed,a scanned document that has been annotated, or a multi-page
document that has been split into multiple documents.
3-10 Using the MultiPASS Desktop Manager Chapter 3
Page 88

Documents displayed in List View cannot be manipulated as in
Document View,such as splitting a document or merging two or more
documents.You can however,duplicate a document by highlighting it
and choosing the Duplicate command from the Edit menu,or by
clicking the right mouse button and choosing Duplicate.
To view documents in a folder as a list, make sure the folder is open.
Then choose the List View command from the View menu or click the
List View button from the Document toolbar.
Sorting Documents in the List
You can change the order of the listed documents using any of the
column labels displayed at the top of the list—type, name, number of
pages, size, and date—by simply clicking on the column label.You can
also select Sort By options from the View menu, or by clicking the rightmouse button in the work area.Sorting by page, size, or date and time
displays documents with the largest document or most current
document last. The list will display in the selected order each time you
open the folder unless you change the sort option.
To change the order of the list, click the title of the appropriate column
at the top of the list. To return the sor t to its prev ious order,click the
column again.
Viewing Documents
To view a document, double-click it, or choose the Open Document
command from the File menu.The MultiPASS Viewer will be launched
and will display the selected page.
Chapter 3 Using the MultiPASS Desktop Manager 3-11
MultiPASS
Desktop Manager
Page 89

Setting Up the Address Book
One of the first thing s you'll want to do in the Desktop Manager is set
up your Address Book. Setting up an Address Book creates an easily
accessible list of names and fax/phone/e-mail numbers for all of your
business and personal contacts.Using the entries from the Address Book
makes sending a PC fax quick and easy.
Opening the Address Book
On the Tools menu or toolbar,click Address Book.
You see a screen similar to this:
ADDRESS BOOK
ENTRIES
STATUS BAR
COMMAND
BUTTONS
3-12 Using the MultiPASS Desktop Manager Chapter 3
Page 90

Address Book Entries
Address Book entries are listed alphabetically by last name,displaying
both group and individual names, company name,phone, fax, and
e-mail information.You can sor t Address Book entries by any column
description by simply clicking on the column title.To retur n the sort
to its previous state, click the column title again.
Status Bar
The status bar displays additional information for a selected Address
Book entry,based on whether the selected entr y is an individual entr y
(title, street address,and comments) or group entr y (comments about
the group).
Command Buttons
Use the command buttons to perform various tasks while working with
the Address Book,such as editing an entry,deleting an entry,creating a
new entry or group, or importing/exporting information.
To close the Address Book,simply click OK.
To print the Address Book entries,click Print.
Working With Address Book Entries
There are two types of Address Book entries:
Individual
An individual entry allows you to identify each individual to whom you
frequently send PC faxes.Once entered, you can quickly specify the
recipient of a PC fax by selecting them from the Address Book.
MultiPASS
Desktop Manager
Group
A group entry identifies two or more individual Address Book entries to
whom you repeatedly send the same PC fax.For example, you may want
to set up a group to include those individuals involved in a particular
business project.When you specify the group entry as the fax recipient
on your PC fax,the PC fax is sent to each individual in the group.
Sorting the Address Book
The Address Book is,by default, sorted alphabetically by last name. You
can change the sort by clicking on any column title.To return the sort to
its previous state, click the column title again.
Chapter 3 Using the MultiPASS Desktop Manager 3-13
Page 91

Adding and Editing an Individual Address
When setting up an individual Address Book entr y, at a minimum, you
must specify the contact’s first or last name, and their fax number.
Optionally, if you want infor mation available to include on a fax cover
page, you can enter the contact’s phone number, title, company name,
and address.You can also enter a comment to provide an internal
reference about the recipient,and an e-mail address.
1. With the Address Book open,click the desired command to add or
edit an individual entry.
To add a new individual, click New Individual.
•
To edit an individual record,highlig ht the entr y in the list, then
•
click Edit.
2. In the Individual Entr y dialog box, enter or change this information.
First Name,Last Name
•
Phone number, Fax number, and E-mail address
•
Whether your primary preference is to use this listing for faxing
•
(the default selection) or e-mail
Title,Company name, and Address (if you want the information
•
available for a fax cover page)
Comments (as an internal reference)
•
Use Outside Dialing Prefix (if you need to use a prefix to access
•
an outside line)
3-14 Using the MultiPASS Desktop Manager Chapter 3
Page 92

3. Save your entry.
If adding a new entry,click Ad d.
•
If editing an existing entr y, click Replace.
•
To cancel without saving any entry/changes which may have
•
been made, click Cancel.
Entering Fax Numbers, Phone Numbers, and
E-mail Addresses
When you enter the fax or phone number,or an e-mail address, you use
the actual numeric characters plus any valid characters that separate the
different segments of the number. For example,you can use 0 through 9,
dash (-), parentheses (),and the @ sy mbol. The following characters are
valid in the Desktop Manager:
Character Description
0 to 9 * # + Dialing digits
, p Pause
P Last Pause
T Tone switch over function
- ( ) Space Display-only characters; Space cannot be
used at the beginning of a number
MultiPASS
Desktop Manager
If your phone system requires a prefix number to access an outside
N
Chapter 3 Using the MultiPASS Desktop Manager 3-15
phone line, do not include it here. If required, define a prefix number
in the Desktop Manager Setup Options dialog box (see page 8-4).
Page 93

Adding and Editing a Group Address
A group address consists of previously set up addresses, either
individual(s) or other group(s).When adding a new group, you
assign a name to the group,then select previously defined addresses
from the Address Book to include in the new group. When editing
an existing group address,you can add additional addresses or delete
addresses from the group.
1. With the Address Book open,click the applicable command to add
or edit a group entry.
To add a new group,click New Group.
•
To edit a group,hig hlight the entry in the Address Book,then
•
click Edit.
2. In the Group Name box,enter or change the name you want to
assign to this group.
In the Address Book list box, click the individual entr y you want
•
to add to the group,then click Add. Repeat this step for each
individual or group you want to add to this group.
To remove an entry from the group,click the name in the Group
•
list on the right, then click Rem o ve.
Enter any desired internal reference comments for the group in
•
the Comments box.
3-16 Using the MultiPASS Desktop Manager Chapter 3
Page 94

3. Save your entry.
If adding a new g roup, click Create.
•
If editing an existing group, click Replace.
•
To cancel without saving any entry/changes which have been
•
made, click Cancel.
Using a Group Address
If you specify a group address when sending a fax, the address for each
individual contained in the group is listed.If you specify more than one
group address for a fax,any duplicate addresses are automatically
removed.Separate fax jobs are created for each recipient in the group.
Deleting an Address Book entry
You delete an Address Book entry when it is no longer needed.
To delete an entry,click the name in the Address Book,then click
Delete, or press the Delete key on your keyboard.If prompted,confirm
that you want to delete the entry.
Printing the Address Book
If you want a hard copy of the Address Book, you can print it as follows:
1. With the Address Book open,click Print.
2. In the Print dialog box, specify your print options and click OK.
This report provides you with a hard copy of your Address Book
information.
Chapter 3 Using the MultiPASS Desktop Manager 3-17
MultiPASS
Desktop Manager
Page 95

Importing an Address Book
If you have an existing address book created in another application,you
can import it into the Desktop Manager. You can also specify which
fields you want to include.
Any ASCII text file containing information that is separated by a comma
or tab can be imported into the Desktop Manager Address Book.
❍ If the address information in the text file is separated by a comma,
the text file extension must be .CSV.
❍ If the address information in the text file is separated by a tab,the
text file extension must be .TXT.
You must save your text file as a comma or tab separated text file before
you import it into the Desktop Manager. If you attempt to import
information from an improperly formatted text file,an error message
displays alerting you to a problem and the import process stops.
For procedures on sav ing a text file in the correct format, refer to the
applicable application’s user documentation.
Importing Addresses From a Text File
1. With the Address Book open,click Impo rt.
2. Select the file t y pe.
In the Import Address Book dialog box, select whether you are
•
importing a .CSV file or a .TXT file from the Files of Type list.
Highlight the file you want to import, then click Open.
•
3-18 Using the MultiPASS Desktop Manager Chapter 3
Page 96

3. In the Import/Expor t File Fields dialog box, select the address fields
you wish to import from the Address Book Fields list.
Highlight the field, then click Add.
•
To remove a field,in the File Fields list box, click the field, then
•
click Remove.
To rearrange the order of the fields,highlight the field you want
•
to move,then click Move Up or Move Down.
Once you have the fields in the desired order, click OK.
•
Exporting the Address Book
You can export the Address Book from the Desktop Manager as an
ASCII text file.Expor ted address information can be separated by either
commas or tabs.
❍ If you want to have address information separated by commas,
choose to export to the .CSV file format.
❍ If you want to have the address information in the text file separated
by tabs, choose to export to the .TXT file format.
Address Book information can only be exported for individual entries.
N
Chapter 3 Using the MultiPASS Desktop Manager 3-19
Group addresses cannot be exported.
MultiPASS
Desktop Manager
Page 97

1. With the Address Book open,click Export.
A message displays informing you that Group addresses cannot
•
be exported. Click Yes to close the message.
2. In the Expor t Address Book dialog box,select whether you are
exporting a .CSV file or a .TXT file from the Files of Type list.
Specify the location where you want to export the file,ty pe a file
•
name for the file in the File Name box,then click Open.The
Import/Export dialog box displays.
3. Select the address fields you want to export from the Address Book
Fields list box.
Highlight the field, then click Add.
•
To remove a field,in the File Fields list box, click the field, then
•
click Remove.
To rearrange the order of the fields,highlight the field you want
•
to move,then click Move Up or Move Down.
Once you have the fields in the desired order, click OK.
•
3-20 Using the MultiPASS Desktop Manager Chapter 3
Page 98

Sending Faxes With
the MultiPASS C5500
You can use the MultiPASS C5500 to send paper faxes or PC faxes.
PC faxing is the ability to send a fax from an application without first
printing the document. Using the MultiPASS C5500 and the MultiPASS
Desktop Manager, you can PC fax documents from any Windows
application that supports printing.
You can also set up an Address Book,containing fax and e-mail
information for people to whom you often send faxes,and design your
own fax cover page.To assist you in managing your faxes,a Fax Log
maintains a record of every fax you send or receive.
You can also customize your MultiPASS printer by changing the factory
default user settings. This might include the date format that displays on
your faxed documents,or how many times the MultiPASS calls another
fax unit if the other par t y’s line is initially busy. You can also register
one-touch/coded speed dial and group numbers using the Desktop
Manager and then download them to the MultiPASS.For details on
changing setup options, refer to Chapter 8,Setup and Other Utilities in
the Desktop Manager.
This chapter describes:
4
❍ Sending a document
❍ Sending a document to more than one location
❍ Adjusting the quality of your faxes
❍ Sending PC faxes
❍ Using the Send Fax Manager
❍ Using the Fax Log
❍ Designing a fax cover page
Because the MultiPASS is a multitasking device, you can send a fax and
N
Chapter 4 Sending Faxes With the MultiPASS C5500 4-1
print a document at the same time.
Sending Faxes
Page 99

Sending a Document
The MultiPASS starts sending a document while it is being scanned into
memory.When scanning a multipage document,the unit calls the other
party after the first page is scanned. Once connection is made, the
MultiPASS begins to transmit the information while the remaining pages
are being scanned.This is called Memory Se nding.
Regular Dialing
Feed the
document.
Dial the other
party’s fax
number.
❍ Place the document face down in the Automatic
Document Feeder (ADF).See page 1-14.
❍ The LCD display shows how much of the unit’s memory
is in use, then displays the current resolution,and then
the message
❍ Change the resolution if necessary.See page 4-13.
❍ Use the numer ic buttons to dial the number.
DOCUMENT READY
MEMORY USED 0%
FAX STANDARD
DOCUMENT READY
.
TEL= 555 7899
4-2 Sending Faxes With the MultiPASS C5500 Chapter 4
Page 100

Press START/COPY.
The MultiPASS begins scanning the
document, and dials the number.
TX
❍ After a few seconds,the display shows the transaction
number for the fax. This is a unique number the
MultiPASS assigns to the document and uses to identify
the document in transaction reports:
TX/RX NO. 0001
SCANNING P.001
CALLING
11234567899
The MultiPASS continues to show these displays in order
while the fax is being scanned.
❍ After the document is scanned in,the MultiPASS shows
these displays while the fax is being sent:
TX/RX NO. 0001
CANON FAX BACK
11234567899
ECM TX P.001
Chapter 4 Sending Faxes With the MultiPASS C5500 4-3
Sending Faxes
 Loading...