

Page 1

User’s Guide
Page 2

ii Preface
Copyright
Copyright © 2000 by Canon, Inc. All rights reserved. No part of this publication may be
reproduced, transmitted, transcribed, stored in a retrieval system, or translated into any
language or computer language in any form or by any means, electronic, mechanical,
magnetic, optical, chemical, manual, or otherwise, without the prior written permission
of Canon, Inc.
Trademarks
Canon and BJ are registered trademarks. BCI, Bubble Jet, MultiPASS, and UHQ are
trademarks of Canon Inc.
All other product and brand names are registered trademarks, trademarks or service
marks of their respective owners.
As an
ENERGY STAR
®
Partner, Canon has determined that the
MultiPASS C100 meets the ENERGY STAR®guidelines for energy
efficiency.
Super G3 is a phrase used to describe the new generation of fax
units that use ITU-T V.34 standard 33.6 Kbps* modems. Super G3
High Speed Fax units allow transmission time of approximately
three seconds* per page which results in reduced telephone line
charges.
*Approximately three seconds per page document transmission time based on Canon FAX Standard Chart
No. 1 (Standard Mode) at 33.6 Kbps modem speed. The Public Switched Telephone Network (PSTN)
currently supports 28.8 Kbps modem speeds or lower, depending on telephone line conditions.
This equipment is in conformity with essential requirements of
EC Directive 1999/5/EC.
We declare the product is in conformity with the EMC
requirements of EC Directive1999/5/EC at nominal mains input
230 V, 50 Hz although the rated input of the product is
200–240 V, 50–60 Hz.
(For Europe Only)
Page 3

Preface iii
For Your Safety (Australia Only)
To ensure safe operation the three-pin plug supplied must be inserted only into a
standard three-pin power point which is effectively earthed through the normal
household wiring.
Extension cords used with the equipment must be three-core and be correctly wired to
provide connection to earth. Wrongly wired extension cords are a major cause of
fatalities.
The power point shall be located near the equipment and shall be easily accessible.
The fact that the equipment operates satisfactorily does not imply that the power point
is earthed and the installation is completely safe. For your safety, if in any doubt about
the effective earthing of the power point, consult a qualified electrician.
Caution (New Zealand Only)
1. This equipment may not necessarily provide for the effective hand-over of a call to or
from a telephone connected to the same line.
2. The operation of this equipment on the same line as telephone or other equipment
with audible warning devices or automatic ring detectors will give rise to bell tinkle or
noise and may cause false tripping of the ring detector. Should such problems occur,
the user is not to contact Telecom faults service.
3. Should this equipment become physically damaged, disconnect immediately from
the Telecom connection and power source and contact your nearest service agent.
4. To relocate this equipment please.
1) Disconnect the equipment from the Telecom connection.
2) Disconnect the equipment from the power source.
3) Reconnect the equipment to the power source.
4) Reconnect the equipment to the Telecom connection.
5. If the supply cord of this equipment is damaged, it must be replaced by the special
cord (Parts No.: HH2-1910).
6. Not all standard telephones will respond to incoming ringing when connected to the
extension socket.
7. This device may be subject to bell tinkle, or mistakenly enter receive mode when
calls are made from another device on the same line. If this occurs, the problem
should not be referred to the Telecom Faults service.
8. Please note when you connect an extension phone to this device, if you use an
extension phone which has features such as “last number redial”, redial memory
numbers may be lost.
Page 4

iv Preface
Contents
Chapter 1: Introduction
Using Your Documentation....................................................................................1-2
Type Conventions Used in This Guide..............................................................1-2
Customer Support..................................................................................................1-3
Important Safety Instructions.................................................................................1-4
Chapter 2: Setting Up
Unpacking the MultiPASS ......................................................................................2-2
Removing Shipping Materials............................................................................2-4
Assembling the MultiPASS....................................................................................2-5
Making Connections..............................................................................................2-6
Connecting the Telephone Line and an External Device ..................................2-6
Connecting the MultiPASS to Your PC..............................................................2-8
Connecting the Power Cord ..............................................................................2-9
Main Components of the MultiPASS ...................................................................2-10
Operation Panel...............................................................................................2-11
One-Touch Speed Dialling/Special Function Buttons..................................2-12
Installing the BJ Cartridge ...................................................................................2-13
Guidelines........................................................................................................2-13
Installing the BJ Cartridge in the MultiPASS...................................................2-14
Loading Paper .....................................................................................................2-17
Paper Guidelines.............................................................................................2-17
Loading Paper in the Multi-Purpose Tray ........................................................2-19
Testing the MultiPASS .........................................................................................2-20
Chapter 3: Registering Information
Methods of Registering Information in the MultiPASS...........................................3-2
Guidelines for Entering Numbers, Letters, and Symbols ......................................3-3
Correcting a Mistake..........................................................................................3-5
Registering Sender Information.............................................................................3-6
What is Sender Information?.............................................................................3-6
Entering the Date and Time...............................................................................3-7
Registering Your MultiPASS Number and Name...............................................3-7
Printing a List to Check Information Registered in Your MultiPASS..................3-9
Setting the Telephone Line Type.........................................................................3-10
Dialling Through a Switchboard...........................................................................3-11
Registering the R Button..................................................................................3-11
Page 5

Preface v
Chapter 4: Document Handling
Document Requirements.......................................................................................4-2
Scanned Area of a Document...........................................................................4-3
Loading Documents...............................................................................................4-4
Problems With Multipage Documents ...............................................................4-6
Adding Pages to the Document.........................................................................4-6
Chapter 5: Paper Handling
Print Media Requirements.....................................................................................5-2
Printable Areas ..................................................................................................5-3
Selecting Print Media .............................................................................................5-4
Setting the Paper Thickness Lever........................................................................5-6
Loading Paper .......................................................................................................5-6
Loading Envelopes................................................................................................5-7
Using Canon Specialty Print Media.......................................................................5-9
Specialty Print Media Guidelines .......................................................................5-9
Printing on High Resolution Paper..................................................................5-10
Using the Cleaning Sheet............................................................................5-10
Printing on Banner Paper................................................................................5-12
Chapter 6: Speed Dialling
What is Speed Dialling? ........................................................................................6-2
Speed Dialling Methods.....................................................................................6-2
One-Touch Speed Dialling.....................................................................................6-3
Registering Numbers for One-Touch Speed Dialling .........................................6-3
Using One-Touch Speed Dialling.......................................................................6-5
Coded Speed Dialling............................................................................................6-6
Registering Numbers for Coded Speed Dialling................................................6-6
Using Coded Speed Dialling..............................................................................6-8
Group Dialling........................................................................................................6-9
Creating Groups ................................................................................................6-9
Using Group Dialling........................................................................................6-12
Speed Dialling Lists.............................................................................................6-13
Printing Speed Dialling Lists ............................................................................6-13
Chapter 7: Sending Faxes
Preparing to Send a Fax........................................................................................7-2
Documents You Can Fax...................................................................................7-2
Adjusting the Quality of Your Faxes ..................................................................7-2
Setting Colour or Black & White Transmission..............................................7-2
Setting the Scanning Resolution ...................................................................7-3
Setting the Scanning Contrast.......................................................................7-4
Dialling Methods................................................................................................7-5
Page 6

vi Preface
Sending Methods...................................................................................................7-6
Memory Sending................................................................................................7-6
Manual Sending Via the Handset......................................................................7-7
Cancelling Sending................................................................................................7-9
Redialling When the Line is Busy........................................................................7-10
Manual Redialling............................................................................................7-10
Cancelling Manual Redialling......................................................................7-10
Automatic Redialling........................................................................................7-10
What is Automatic Redialling?.....................................................................7-10
Cancelling Automatic Redialling ..................................................................7-1 1
Setting the Options for Automatic Redialling...............................................7-11
Sequential Broadcasting......................................................................................7-13
Sending a Document to More Than One Destination .....................................7-13
Sending a Document Using Group Dialling .....................................................7-15
Delayed Sending .................................................................................................7-15
Sending Other Documents While the MultiPASS is Set for
Delayed Sending..........................................................................................7-15
Documents Stored in Memory.............................................................................7-16
Printing a List of Documents in Memory .........................................................7-16
Printing a Document in Memory......................................................................7-17
Deleting a Document From Memory ...............................................................7-19
Chapter 8: Receiving Faxes
Different Ways to Receive a Fax...........................................................................8-2
Receiving Faxes Automatically: FAX ONLY MODE ..........................................8-3
Setting FAX ONLY MODE.............................................................................8-3
Receiving Both Faxes and Telephone Calls Automatically: Fax/Tel Mode ........8-5
Setting Fax/Tel Mode.....................................................................................8-5
Setting the Options for Fax/Tel Mode............................................................8-6
Receiving Faxes Manually: MANUAL MODE....................................................8-8
Setting MANUAL MODE................................................................................8-8
Receiving a Fax Manually .............................................................................8-8
Receiving With an Answering Machine: ANS.MACHINE MODE ....................8-10
Setting ANS.MACHINE MODE....................................................................8-10
Using the MultiPASS With an Answering Machine......................................8-10
Receiving Faxes to the MultiPASS Suite.........................................................8-11
When Your PC is Off ....................................................................................8-11
Receiving in Colour..............................................................................................8-12
Setting Colour Reception.................................................................................8-12
Receiving While Performing Other Tasks............................................................8-13
Receiving Faxes in Memory When a Problem Occurs........................................8-13
Cancelling Receiving...........................................................................................8-13
Page 7

Preface vii
Telstra FaxStream™Duet (Australia Only)...........................................................8-14
Setting the MultiPASS for Network Switch......................................................8-14
Network Switch System Operation..................................................................8-15
Telecom FaxAbility (New Zealand Only)..............................................................8-16
Setting the MultiPASS for Network Switch......................................................8-16
Network Switch System Operation..................................................................8-17
Chapter 9: Special Features
Special Dialling......................................................................................................9-2
Dialling an Overseas Number (With Pauses) ....................................................9-2
Switching Temporarily to Tone Dialling..............................................................9-4
Confirming a Dial Tone ......................................................................................9-5
Restricting Use of Your MultiPASS........................................................................9-6
Enabling Restriction of Your MultiPASS............................................................9-6
Cancelling Restriction of Your MultiPASS..........................................................9-7
Chapter 10: Making Copies
Documents You Can Copy ..................................................................................10-2
Copying Documents ............................................................................................10-2
Setting the Length of the Bottom Margin .............................................................10-4
Chapter 11: Reports and Lists
Summary of Lists and Reports ............................................................................11-2
ACTIVITY REPORT.............................................................................................11-3
TX (Transmission) REPORT................................................................................11-4
MULTI TX/RX (Transaction) REPORT.............................................................11-5
RX (Reception) REPORT ....................................................................................11-5
Chapter 12: Maintenance
Periodic Cleaning.................................................................................................12-2
Cleaning the MultiPASS’ Exterior ....................................................................12-2
Cleaning the MultiPASS’ Interior......................................................................12-3
Cleaning Inside the Printer Cover ...............................................................12-3
Cleaning the Scanner Components ............................................................12-5
Cleaning the Rollers....................................................................................12-6
BJ Cartridge.........................................................................................................12-7
BJ Cartridges and BJ Tanks............................................................................12-7
When to Replace a BJ Cartridge or BJ Tank...................................................12-8
Testing and Cleaning the BJ Cartridge Print Head........................................12-10
Printing the Nozzle Check Pattern ............................................................12-10
Cleaning the BJ Cartridge Print Head .......................................................12-11
Replacing the BJ Cartridge............................................................................12-12
Aligning the Print Head ..................................................................................12-16
Replacing a BJ Tank......................................................................................12-18
Page 8

viii Preface
Chapter 13: Troubleshooting
If You Cannot Solve the Problem ........................................................................13-2
Clearing Jams......................................................................................................13-3
Jams in the ADF..............................................................................................13-3
Jams in the Multi-Purpose Tray.......................................................................13-4
LCD Messages....................................................................................................13-5
Paper Feeding Problems...................................................................................13-13
Faxing Problems................................................................................................13-14
Sending Problems .........................................................................................13-14
Receiving Problems .......................................................................................13-16
Copying Problems .............................................................................................13-19
Telephone Problems..........................................................................................13-20
Print Quality Problems.......................................................................................13-20
Printing Problems ..............................................................................................13-22
General Problems..............................................................................................13-24
If a Power Cut Occurs .......................................................................................13-26
Chapter 14: Summary of Settings
Understanding the Menu System........................................................................14-2
Accessing the Menus ......................................................................................14-2
User Settings Menu.............................................................................................14-4
Report Settings Menu..........................................................................................14-5
TX (Transmission) Settings Menu.......................................................................14-6
RX (Reception) Settings Menu............................................................................14-7
Printer Settings Menu..........................................................................................14-8
System Settings Menu .........................................................................................14-9
Appendix A: Specifications
General Specifications ..........................................................................................A-2
Facsimile ...............................................................................................................A-2
Copier....................................................................................................................A-3
Telephone..............................................................................................................A-3
Printer....................................................................................................................A-3
BJ Cartridges.........................................................................................................A-4
Scanner.................................................................................................................A-4
Appendix B: Options
Optional Handset...................................................................................................B-2
Package Contents.............................................................................................B-2
Attaching the Handset to Your MultiPASS ........................................................B-3
Maintaining Your Handset.................................................................................B-4
Index.....................................................................................................................I-1
Page 9

Chapter 1 Introduction 1-1
Introduction
Chapter 1
Introduction
Using Y our Documentation......................................................................1-2
Type Conventions Used in This Guide ...................................................1-2
Customer Support....................................................................................1-3
Important Safety Instructions .................................................................1-4
Page 10

1-2 Introduction Chapter 1
Using Your Documentation
Your MultiPASS includes the following documentation:
• MultiPASS C100 User’s Guide (this guide): Provides detailed information on how to
set up, operate, maintain, and troubleshoot your MultiPASS.
• MultiPASS Suite for Windows®Software User’s Guide: This guide, included in the
CD-ROM, describes how to use your MultiPASS to fax, print, and scan from within
your PC’s Windows®environment.
Type Conventions Used in This Guide
Please read the list below of symbols, terms, and abbreviations used in this guide.
c
Cautions tell you how to avoid actions that could injure you or damage your
MultiPASS. In order to use your unit safely, always observe these cautions.
n
Notes provide advice on using the MultiPASS more effectively, describe operating
restrictions, and tell you how to avoid minor difficulties. Reading these is recommended to
make the most of your unit and its functions.
(1 p. n-nn) A number preceded by an arrow and enclosed in parenthesis
references a page number in this guide which contains more
information on the topic of the previous sentence.
1 MultiPASS Suite Refer to the MultiPASS Suite for Windows
®
Software User’s
User’s Guide Guide (included in the CD-ROM) for details on the topic of the
previous sentence.
default A setting that remains in effect unless you change it.
document or fax The original sheet(s) of paper you send or receive with the unit.
menu A list of settings from which you select an item to set up or
change. Amenu has a title which appears in the LCD.
d and u buttons Used to select an item in a menu. Press d to select the next
item, and press u to select the previous item.
transaction number When you send or receive a document, your unit automatically
assigns the document a unique transaction number. A
transaction number is a four-digit number that will help you
keep track of documents you send and receive.
Page 11

Chapter 1 Introduction 1-3
Introduction
TX/RX NO. TX/RX NO. is the abbreviation used for Transaction number.
TX Denotes Sending.
RX Denotes Receiving.
In addition, this guide uses distinctive typefaces to identify buttons and information in
the LCD:
• The buttons you press appear in this typeface: Stop.
• Information in the LCD appears in this typeface: USER SETTINGS.
Customer Support
Your MultiPASS is designed with the latest technology to provide trouble-free operation.
If you encounter a problem with the unit’s operation, try to solve it by using the
information in Chapter 13. If you cannot solve the problem or if you think your
MultiPASS needs servicing, contact your local authorised Canon dealer or the Canon
help line.
Page 12
1-4 Introduction Chapter 1
Important Safety Instructions
Read these safety instructions thoroughly before using your MultiPASS.
c
Except as specifically described in this guide, do not attempt to service the
MultiPASS yourself. Never attempt to disassemble the unit: opening and removing
its interior covers will expose you to dangerous voltages and other risks. For all
service, contact your local authorised Canon dealer or the Canon help line.
■ Handling and Maintenance
• Follow all warnings and instructions marked on the MultiPASS.
• Do not subject the MultiPASS to strong physical shock or vibration.
• Always unplug the MultiPASS before moving or cleaning it.
• To avoid paper jams, never unplug the power cord, open the printer cover, or remove
paper from the multi-purpose tray while printing.
• When transporting the MultiPASS, be sure to remove the BJ cartridge from the unit.
Store the BJ cartridge in the BJ cartridge container provided with your unit.
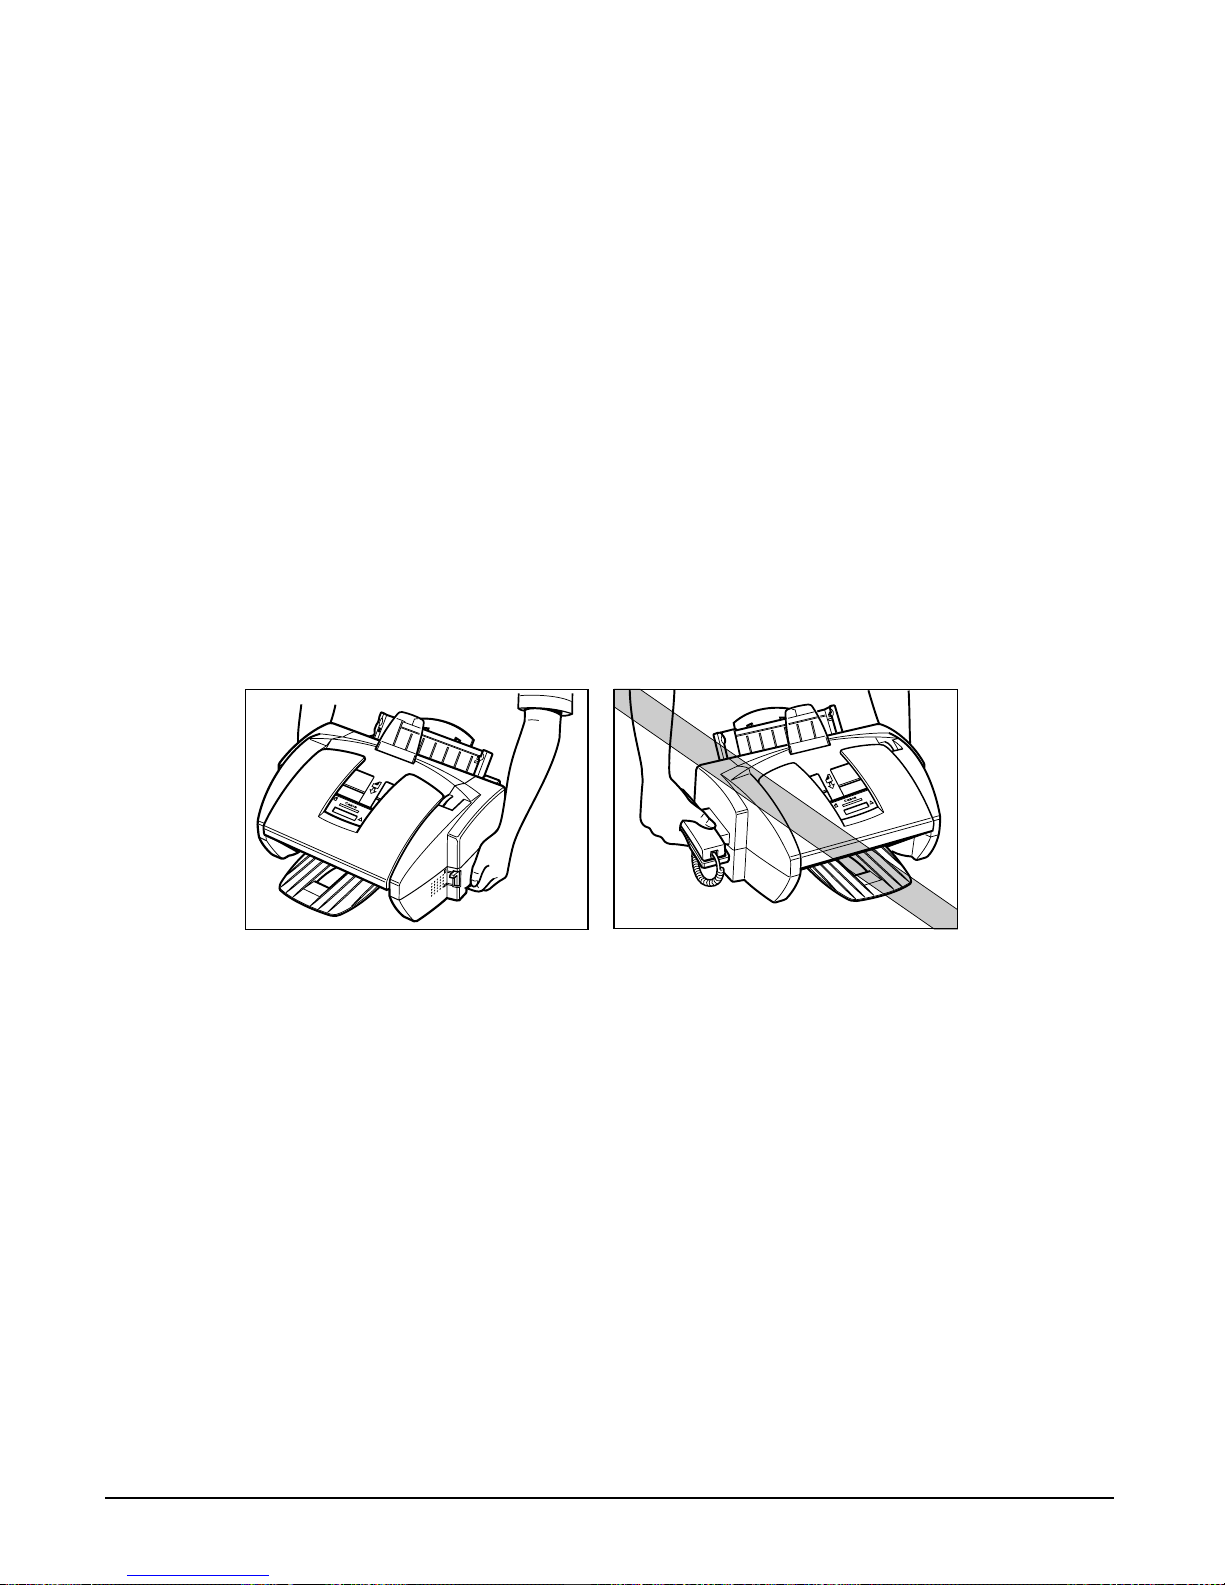
• Always lift the MultiPASS as shown below. Never lift it by any of its attachments.
• Do not push objects of any kind into the slots or openings on the cabinet as they may
touch dangerous voltage points or short out parts. This could result in fire or electric
shock.
• Do not allow small objects (such as pins, paper clips, or staples) to fall into the
MultiPASS. If something does fall into it, unplug the unit immediately and contact your
local authorised Canon dealer or the Canon help line.
• To avoid spillage in or around the unit, do not eat or drink near the unit. If you spill
liquid or if any substance falls into the unit, unplug the unit immediately and contact
your local authorised Canon dealer or the Canon help line.
• Keep the MultiPASS clean. Dust accumulation can prevent the unit from operating
properly.
Page 13

Chapter 1 Introduction 1-5
Introduction
• Unplug the MultiPASS from the wall outlet and refer service to qualified personnel
under the following conditions:
– When the power cord or plug is damaged or frayed.
– If liquid has spilled into the unit.
– If the unit has been exposed to rain or water.
– If the unit does not operate normally when you have followed the instructions in this
guide. Adjust only those controls that are covered by the instructions in this guide.
Improper adjustment of other controls may result in damage and may require
extensive work by a qualified technician to restore the product to normal operation.
– If the unit has been dropped or the cabinet has been damaged.
– If the unit exhibits a distinct change in performance, indicating a need for servicing.
■ Location
• Place the MultiPASS on a flat, stable, vibration-free surface that is strong enough to
support its weight (approx. 6.6 kg).
• Place the MultiPASS in a cool, dry, clean, well ventilated place.
– Make sure the area is free from dust.
– Make sure the location is not affected by extreme temperature changes, and always
stays between 10° and 32.5°C.
– Make sure the area’s relative humidity is always between 20% and 85%.
• Keep the MultiPASS away from direct sunlight as this can damage it. If you have to
place it near a window, install heavy curtains or blinds.
• Do not use the MultiPASS near water. Make sure that no wet or humid objects come
into contact with the unit.
• Do not use or store the MultiPASS outdoors.
• Do not install the MultiPASS near devices that contain magnets or generate magnetic
fields, such as speakers.
• If possible, place the MultiPASS near an existing telephone outlet to avoid the
expense of installing a new one.
• Place the MultiPASS near a standard 200–240 V AC power outlet.
• Place the MultiPASS near the PC you will be connecting it to, and make sure you can
reach it easily.
Page 14

1-6 Introduction Chapter 1
• To ensure reliable operation of the MultiPASS and to protect it from overheating (which
can cause it to operate abnormally and create a fire risk), do not block the exhaust
vent and never block or cover any openings on the unit by placing it on a bed, sofa,
rug, or other similar surface. Do not place the unit in a cupboard or built-in installation,
or near a radiator or other heat source unless proper ventilation is provided. Install the
unit approximately 10 cm away from walls and other equipment. For the dimensions of
the MultiPASS, 1 p. A-2.
• Do not stack boxes or furniture around the power outlet. Keep the area free so you
can reach the outlet quickly. If you notice anything unusual (smoke, strange odours,
noises) around the MultiPASS, unplug the unit immediately. Contact your local
authorised Canon dealer or the Canon help line.
• Do not allow anything to rest on the power cord, and do not place the unit where the
cord will be walked on. Make sure the cord is not knotted or kinked.
■ Power Supply
• During electrical storms, disconnect the power cord from the power outlet. (Please
note that any documents stored in the unit’s memory will be deleted when you unplug
the unit.)
• Whenever you unplug the MultiPASS, wait at least five seconds before you plug it in
again.
c
This product emits low level magnetic flux.
If you use a cardiac pacemaker and feel abnormalities, please move away from this
product and consult your doctor.
Page 15

Chapter 2 Setting Up 2-1
Setting Up
Chapter 2
Setting Up
Unpacking the MultiPASS........................................................................2-2
Removing Shipping Materials.................................................................2-4
Assembling the MultiPASS......................................................................2-5
Making Connections ................................................................................2-6
Connecting the Telephone Line and an External Device .......................2-6
Connecting the MultiPASS to Your PC...................................................2-8
Connecting the Power Cord...................................................................2-9
Main Components of the MultiPASS ....................................................2-10
Operation Panel ....................................................................................2-11
One-Touch Speed Dialling/Special Function Buttons.......................2-12
Installing the BJ Cartridge.....................................................................2-13
Guidelines.............................................................................................2-13
Installing the BJ Cartridge in the MultiPASS........................................2-14
Loading Paper.........................................................................................2-17
Paper Guidelines..................................................................................2-17
Loading Paper in the Multi-Purpose Tray .............................................2-19
Testing the MultiPASS............................................................................2-20
Page 16
2-2 Setting Up Chapter 2
Unpacking the MultiPASS
Before unpacking your MultiPASS, be sure to choose a suitable location for your unit.
(1 p. 1-5)
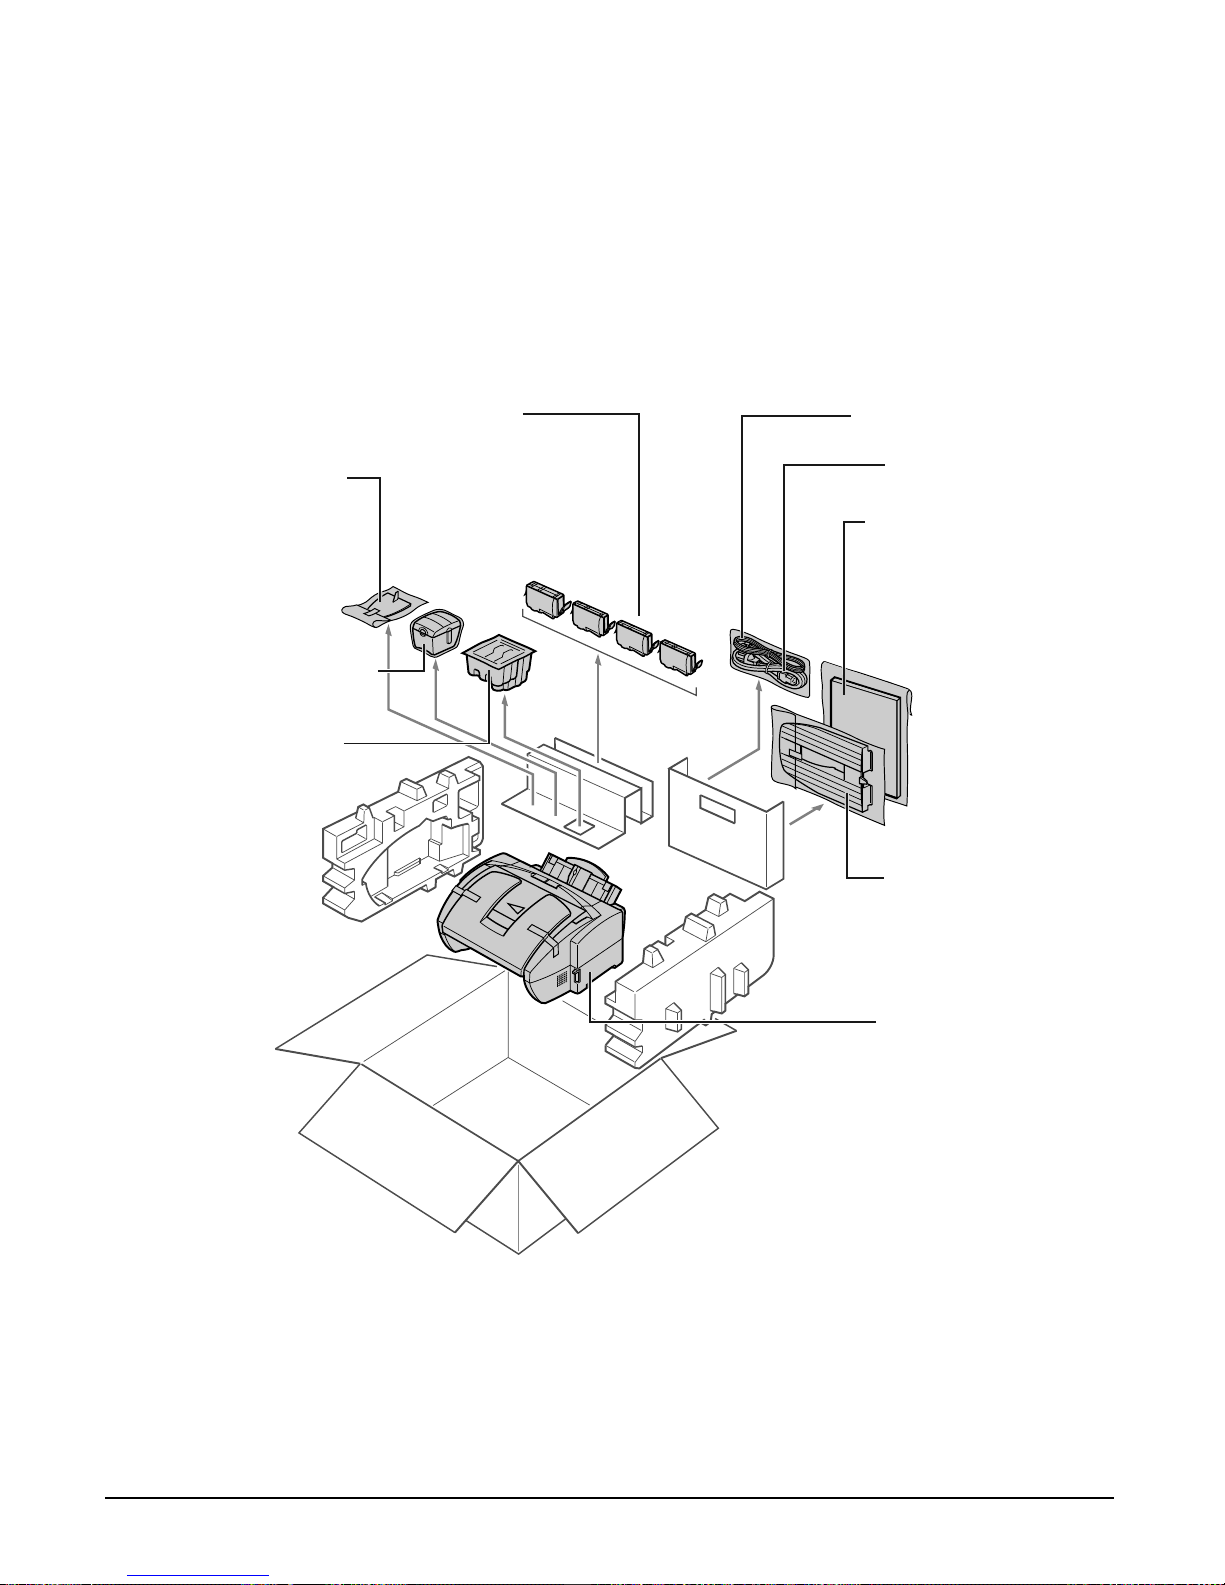
Carefully remove all items from the box. You should have someone help by holding the
box while you lift the MultiPASS and its protective packaging out of the box. Save the
carton and packaging in case you need to transport the MultiPASS in the future.
Make sure you have the following items:
n
• The actual packaging may differ in shape, quantity, and position from the one shown
above.
• Please note that the items included with your MultiPASS may vary depending on the
country of purchase.
e DOCUMENT
SUPPORT
w BJ CARTRIDGE
CONTAINER
q COLOUR BJ
CARTRIDGE
(BC-33e)
o MultiPASS C100
UNIT
y POWER CORD
t TELEPHONE LINE
i OUTPUT TRA Y
u MultiPASS C100
USER’S GUIDE
(This guide)
MultiPASS SUITE
SOFTWARE
PACKAGE
r BJ TANKS
(BCI-3eBK
/ BCI-3eC /
BCI-3eM / BCI-3eY)
Page 17

Chapter 2 Setting Up 2-3
Setting Up
You should also have the following:
• B.T. adaptor*
• Limited warranty card**
• If any items are damaged or missing, notify your local authorised Canon dealer or the
Canon help line immediately.
• In addition to the items shipped with your MultiPASS, you will need to purchase a
printer cable to connect your MultiPASS to a PC. (1 p. 2-8)
• Important! Save your sales receipt for proof of purchase in case your unit requires
warranty service.
*This item is only available for the UK.
**This item is only included in some countries.
Page 18
2-4 Setting Up Chapter 2
Removing Shipping Materials
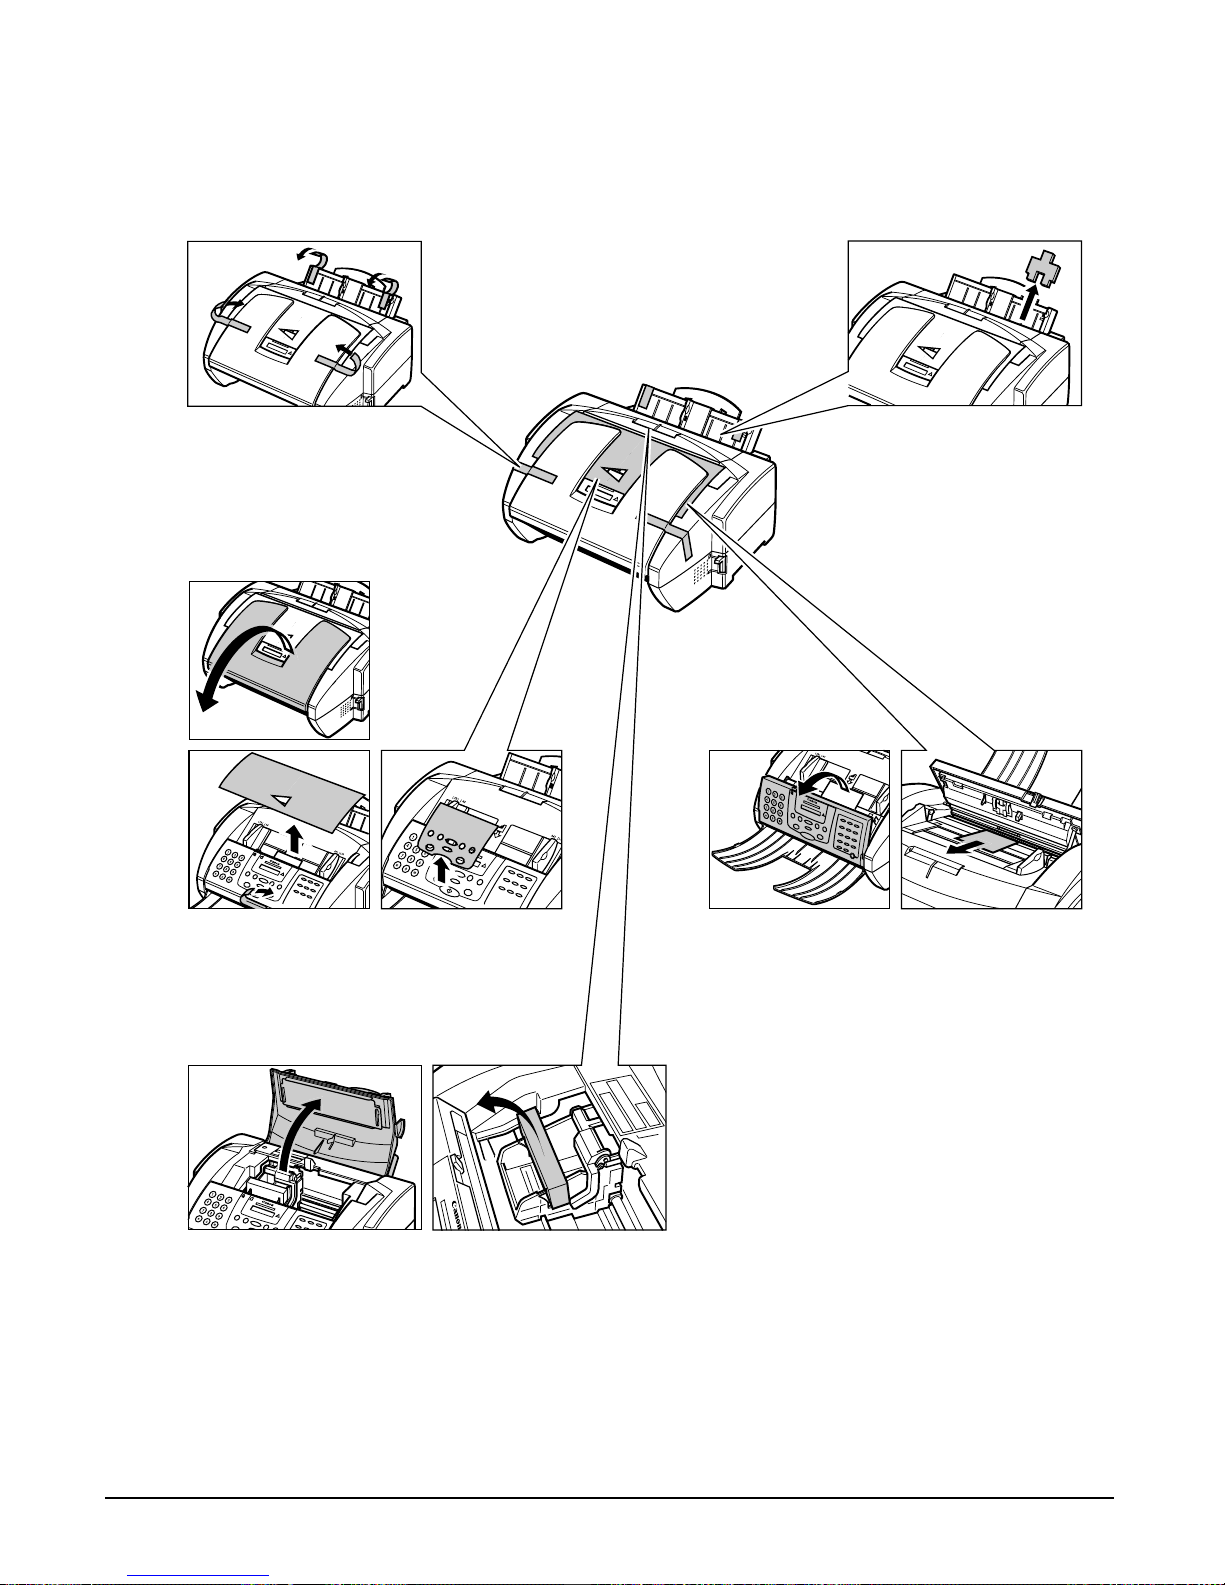
Follow this procedure to remove the shipping materials. Keep them in case you need to
transport the unit in the future:
n
The actual shipping materials may differ in shape, quantity, and position from the ones
shown above.
1
Remove all
shipping tapes
from the
MultiPASS.
2
Remove the
protective piece
from the multipurpose tray.
3
Open the document tray, then
remove the shipping tape and
protective sheets.
4
Open the operation panel
partially by gently pulling it
towards you (it only opens
slightly). Then remove the
protective sheet from the ADF.
Close the operation panel by
pressing it down from the
centre until it locks into place.
5
Open the printer cover, then remove the
protective piece from the cartridge
holder.
Close the printer cover and document
tray.
Page 19
Chapter 2 Setting Up 2-5
Setting Up
Assembling the MultiPASS
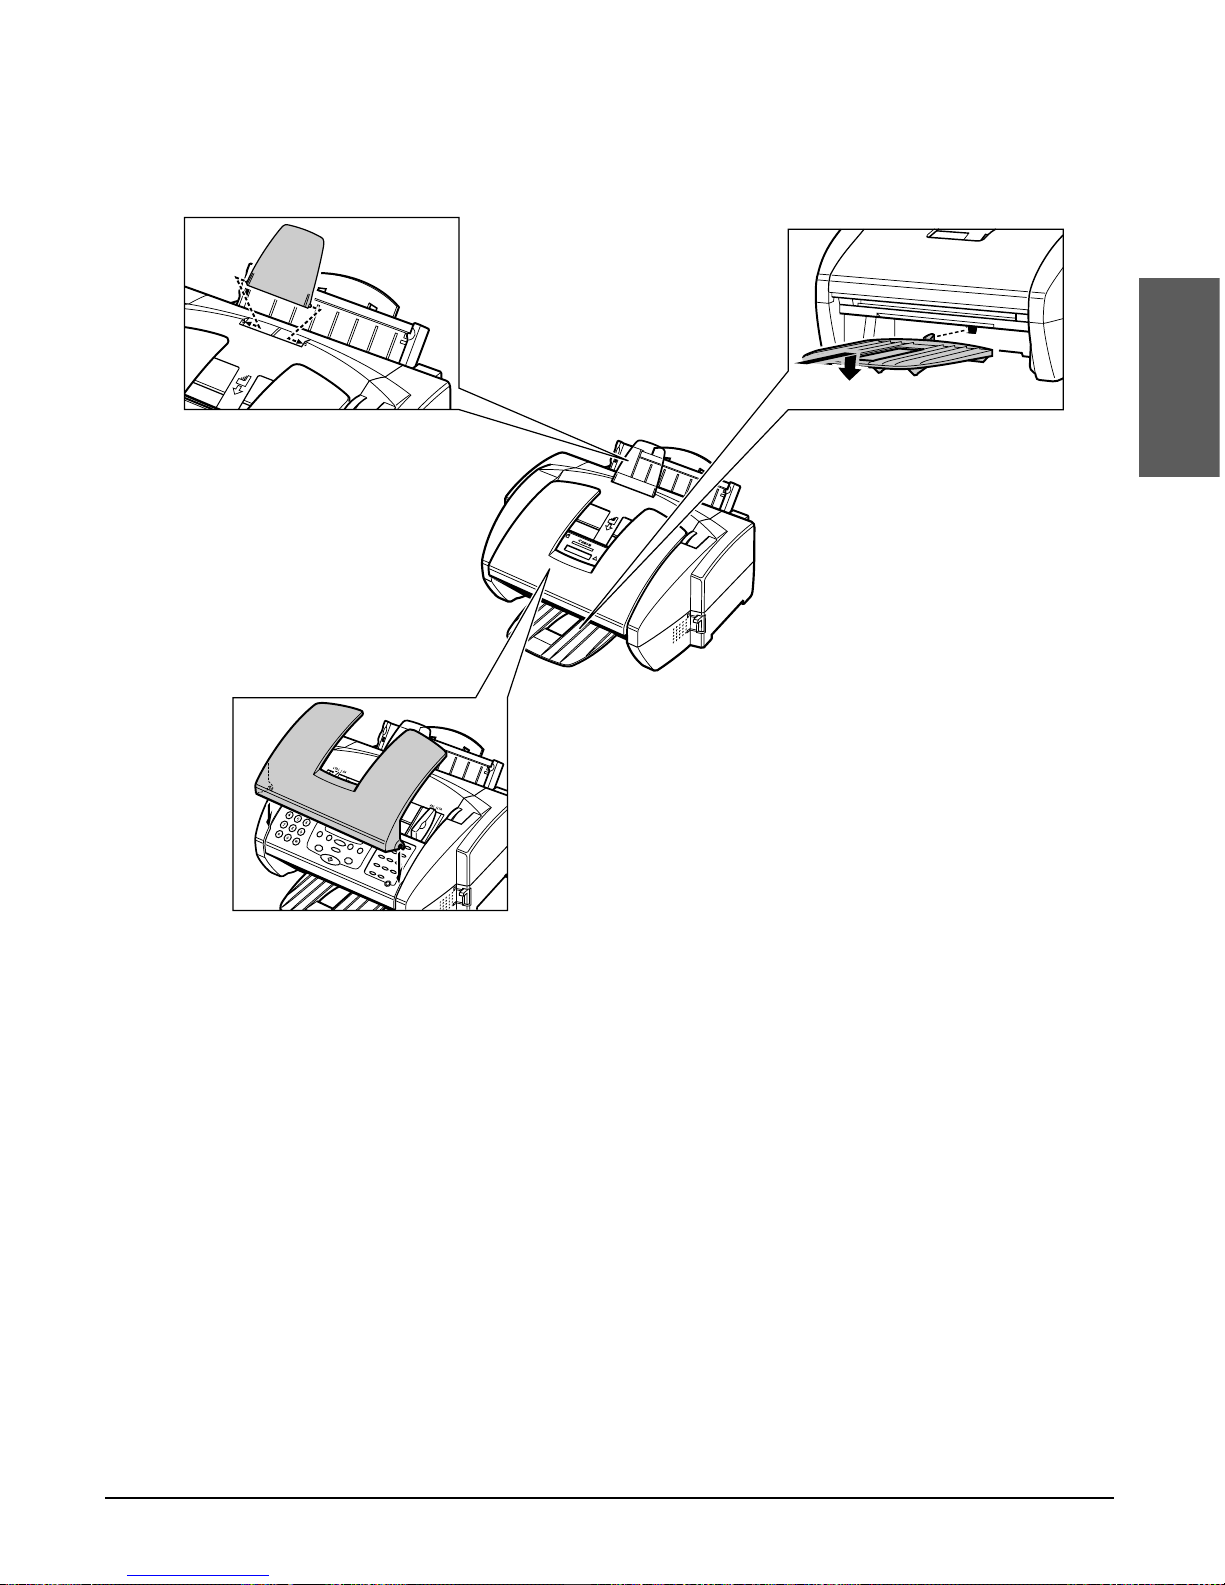
Follow this procedure to assemble your MultiPASS:
n
• To see how the MultiPASS looks fully assembled, 1 p. 2-10.
• For details on attaching the optional handset to your MultiPASS, 1 Appendix B.
3
The MultiPASS comes
with the document
tray already attached.
However, if you
accidentally remove
the tray, attach it by
fitting the slots on the
tray into the tabs on
the unit.
2
Hook the tab on the
output tray to the
opening on the
MultiPASS.
1
Hold the document
support so that it
curves towards the
back of the unit and
fit the tabs of the
support into the
slots above the ADF.
Page 20
2-6 Setting Up Chapter 2
Making Connections
Connecting the Telephone Line and an External
Device
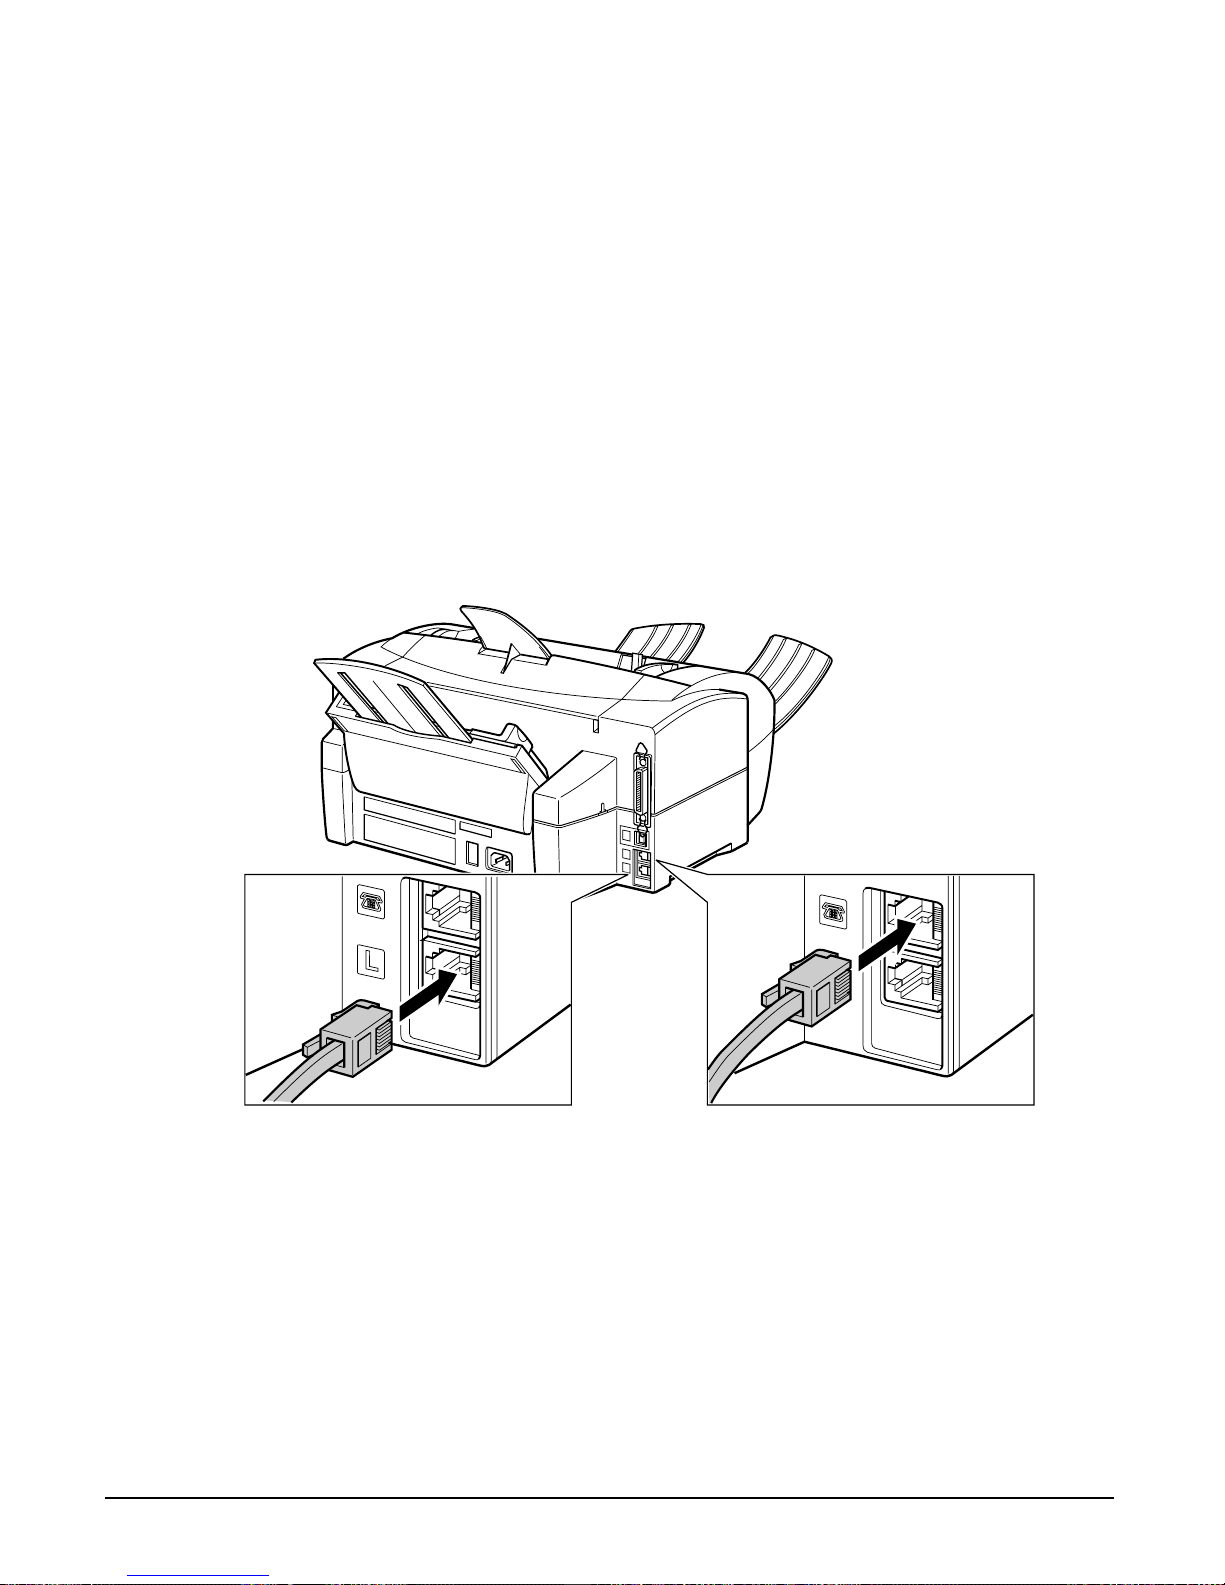
The MultiPASS has two jacks on the back for connection of the following:
• Telephone line
• Optional handset, telephone, answering machine, or data modem
If you only have one telephone line and plan to use the MultiPASS for receiving both
faxes and voice calls, you will need to connect the optional handset, a telephone, or an
answering machine to the unit.
Be sure to connect any external device before using your MultiPASS.
Follow this procedure to connect the telephone line and an external device:
1
Connect the supplied
telephone line to the L
jack, then connect the
other end of the line to the
telephone jack on your
wall.
2
Connect the line from the
optional handset,
telephone, answering
machine, or data modem
to the t jack.
Page 21
Chapter 2 Setting Up 2-7
Setting Up
n
• If you have connected an external device to the MultiPASS, be sure to select the correct
receive mode. (1 Chapter 8)
• To connect a telephone as well as an answering machine, connect the telephone to the
answering machine, and then the answering machine to the MultiPASS.
• If you connect a modem to your MultiPASS and you use it extensively or others access
your PC frequently through the modem, you may want a dedicated telephone line for
your modem.
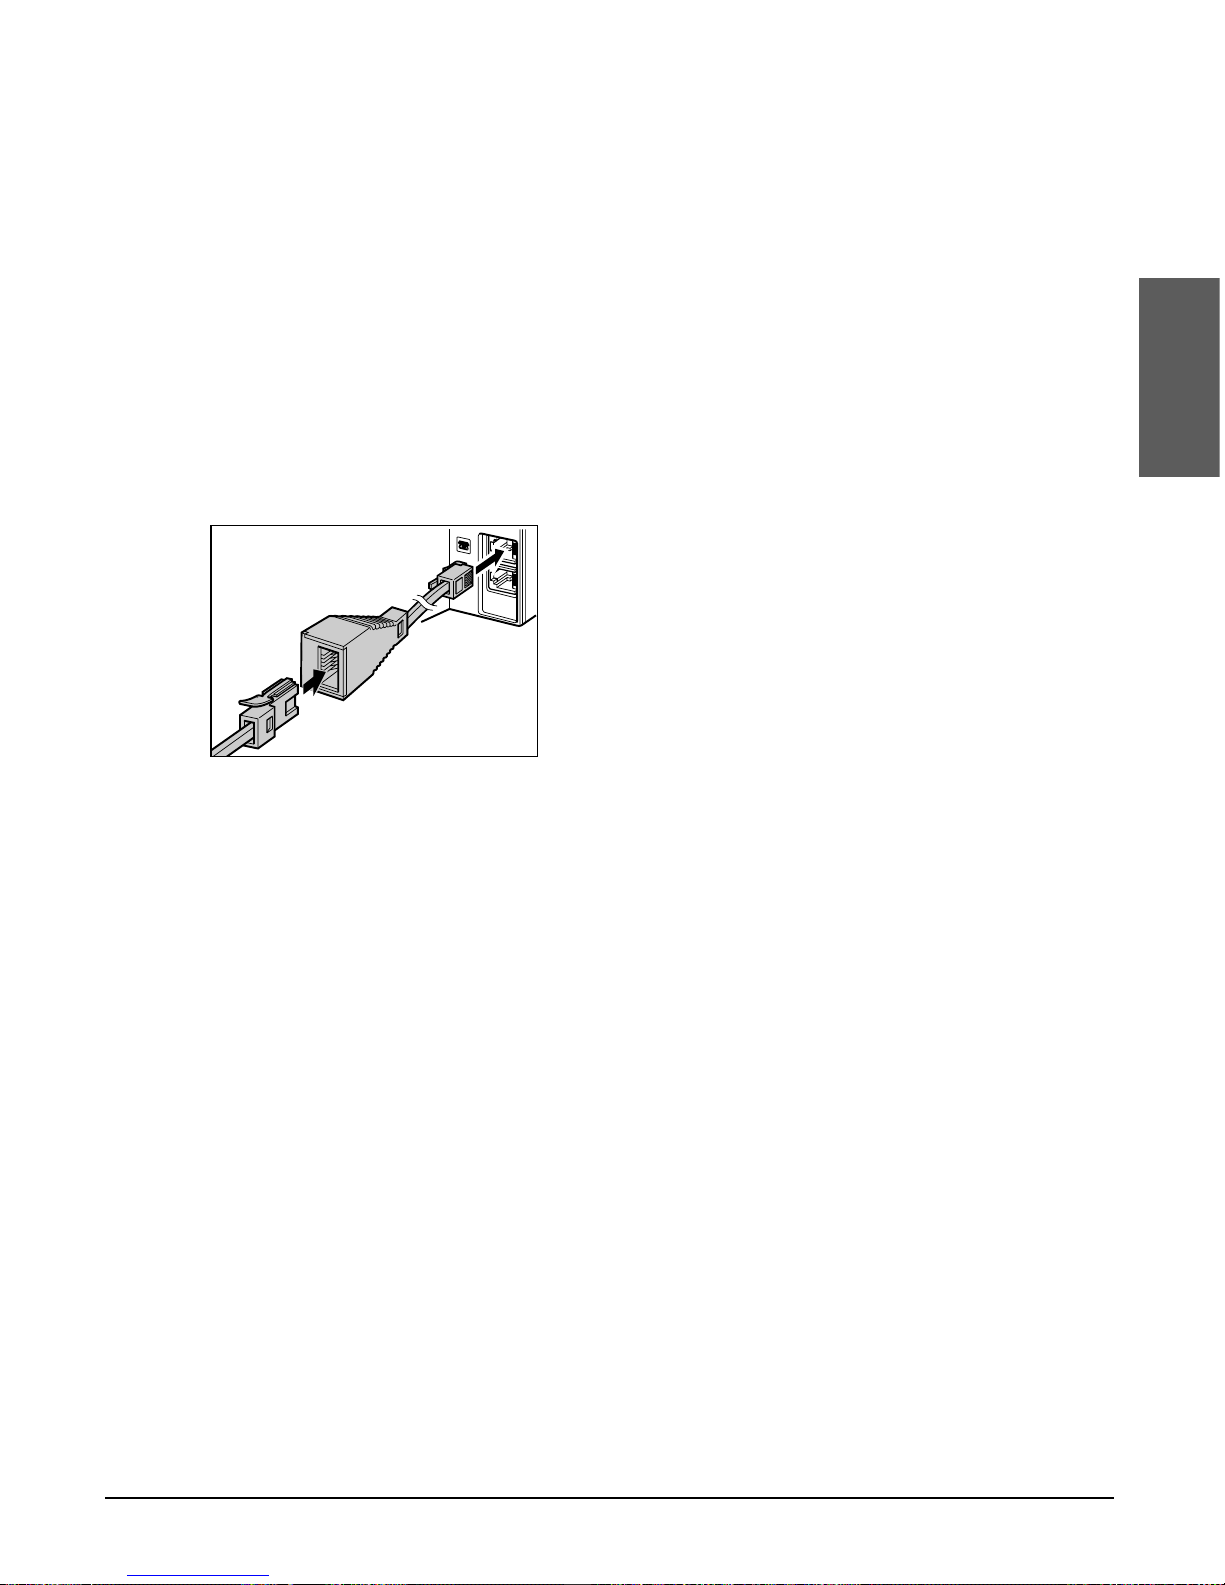
Users in the UK Only
To connect an external device to your MultiPASS, you may need to use the B.T.
adaptor provided with your unit.
Follow this procedure to connect the B.T. adaptor:
Connect the line from the
telephone, answering
machine, or data modem to
the B.T. adaptor. Then connect
the B.T. adaptor to the t jack.
Page 22
2-8 Setting Up Chapter 2
Connecting the MultiPASS to Your PC
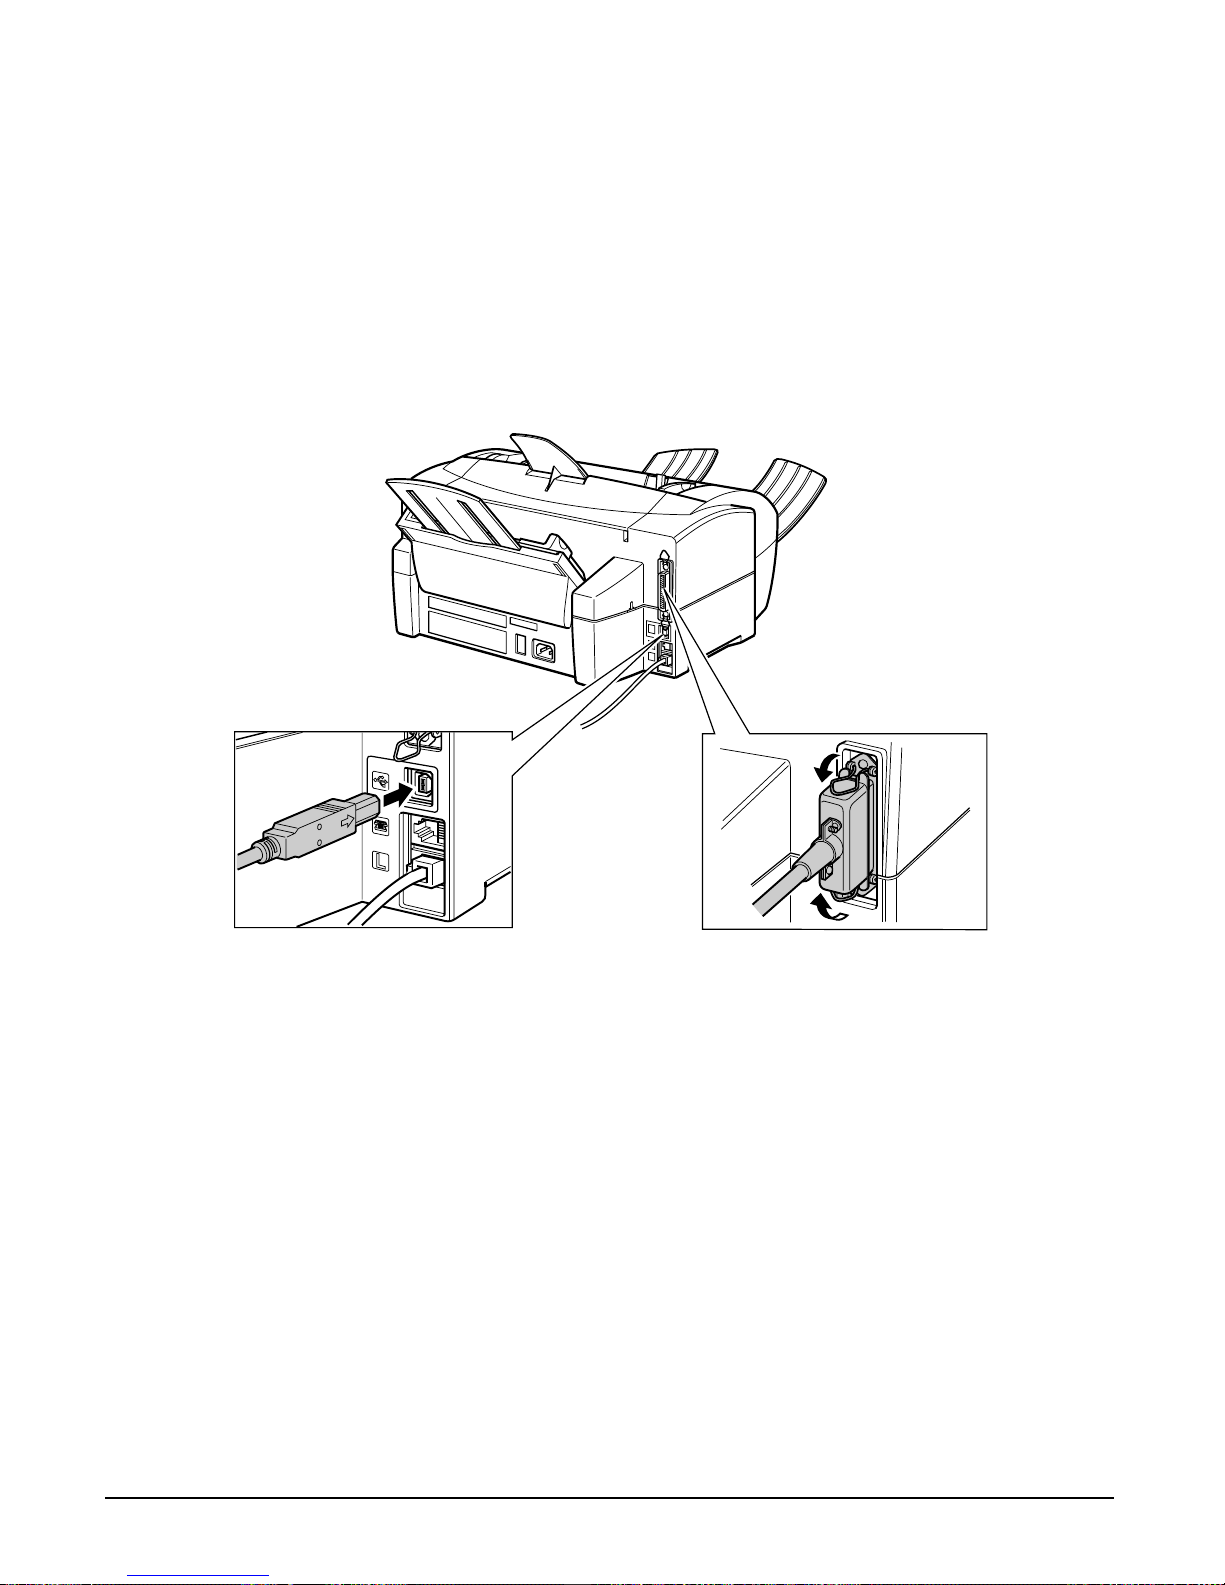
To connect the MultiPASS to your PC, you will need to purchase a printer cable that
matches the interface connector on your PC:
• A Centronics
®
-compatible parallel cable (IEEE 1284-compliant) no longer than 2 metres
-or-
• A USB cable no longer than 5 metres
You can purchase either of these cables from your local authorised Canon dealer.
Follow this procedure to connect the appropriate cable:
n
• You only need to connect one of the above cables.
• If using a USB cable, make sure your PC is running Microsoft Windows
®
98/Me or
Windows
®
2000, preinstalled by a computer manufacturer on purchase. (The USB port
operation also needs to be assured by the manufacturer.)
■ Connecting a Parallel Cable
Connect the parallel cable to
the MultiPASS and PC. Be
sure to secure the cable
connectors with the wire
clips.
■ Connecting a USB Cable
Connect the USB cable to
the MultiPASS and PC
during software installation
to ensure proper operation
of the printer driver.
(1
MultiPASS Suite User’s
Guide
)
Page 23
Chapter 2 Setting Up 2-9
Setting Up
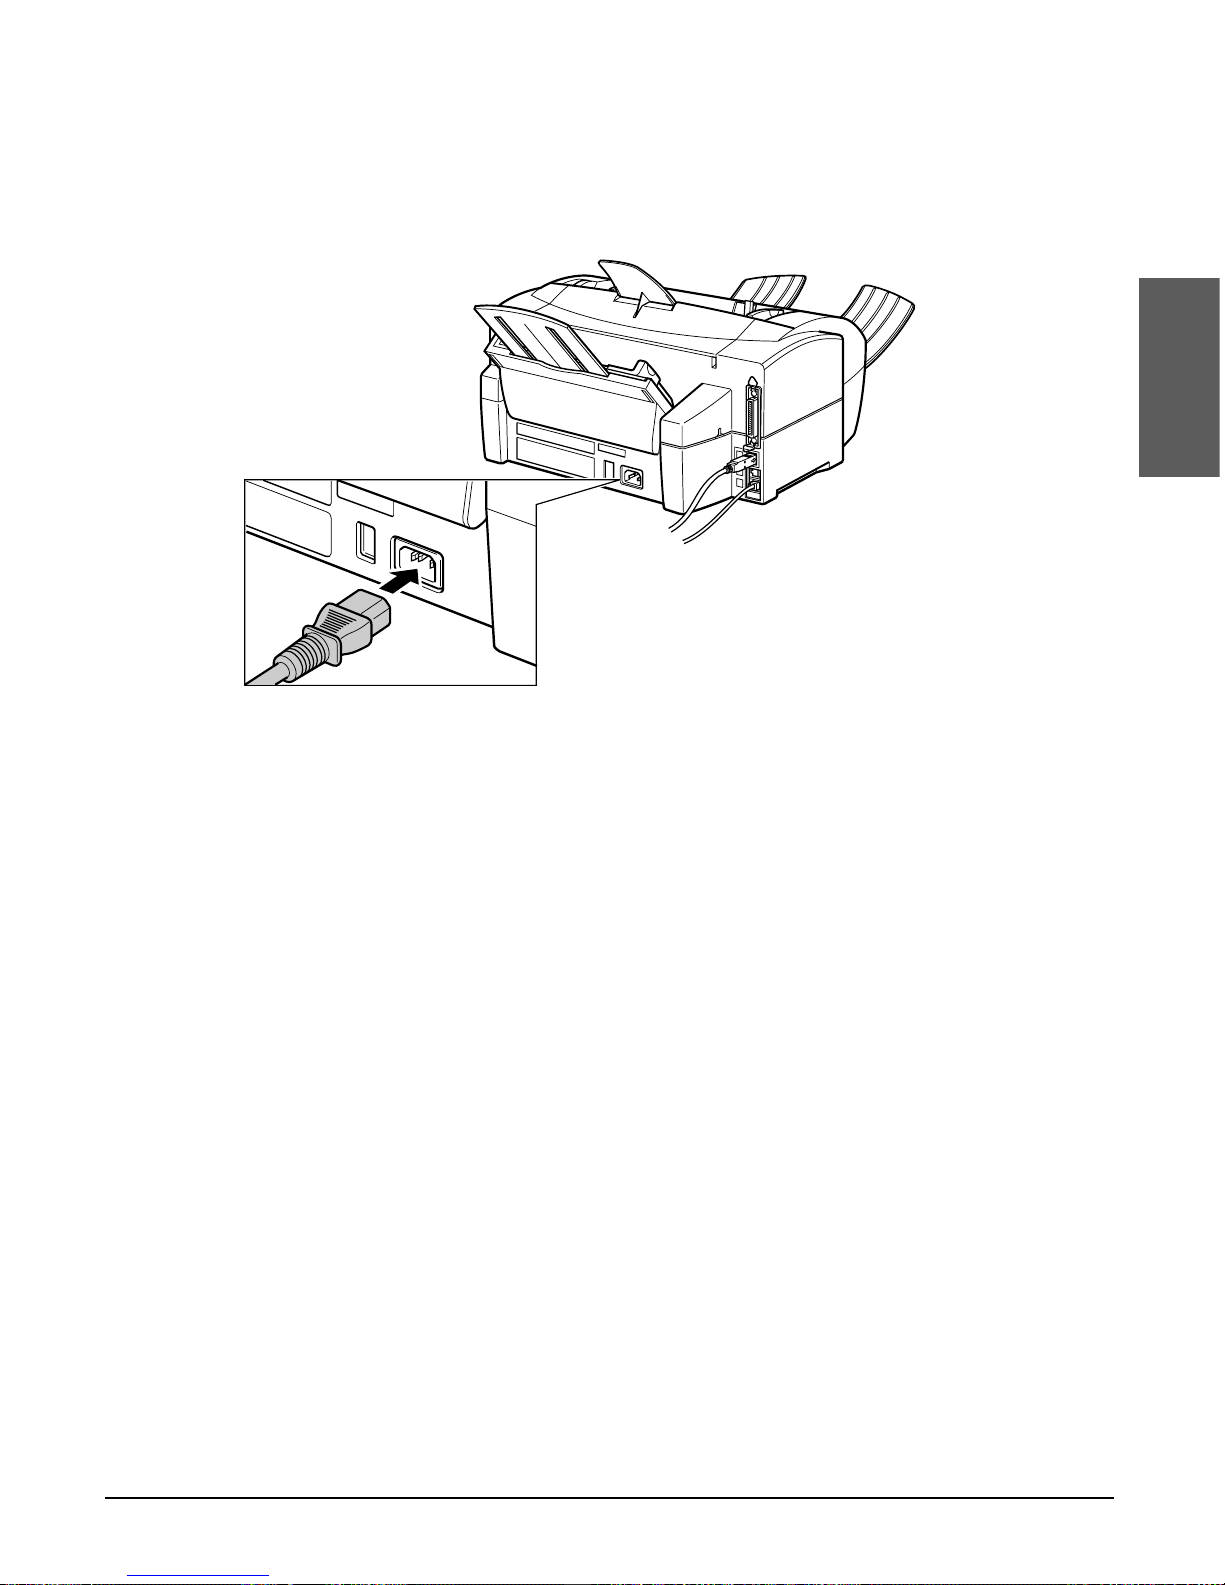
Connecting the Power Cord
Before connecting the power cord, 1 Power Supply, p. 1-6.
Follow this procedure to connect the power cord:
The MultiPASS has no power switch, so its power is on as long as it is plugged in.
Once connected, though, the unit still needs to warm up before you can use it. Wait
until the LCD no longer displays PLEASE WAIT.
n
• The MultiPASS is equipped with a three-prong, grounding-type plug provided with a third
(grounding) pin. This plug will only fit into a grounding-type outlet. This is a safety
feature. If you are unable to insert the plug into your outlet, contact an electrician to
replace your outlet. Do not defeat the safety purpose of the grounding-type plug by
breaking off the third prong or using a 3-to-2 adaptor.*
• Do not plug the MultiPASS into the same circuit as an appliance such as an air
conditioner, electric typewriter, television, or copier. Such devices generate electrical
noise that can interfere with your MultiPASS’ ability to send and receive faxes.
Connect the supplied
power cord to the power
cord connector. Then
connect the other end into
a properly grounded
200–240 V AC three-prong
outlet.*
*The shape of the plug and outlet vary depending on the country of purchase.
Page 24
2-10 Setting Up Chapter 2
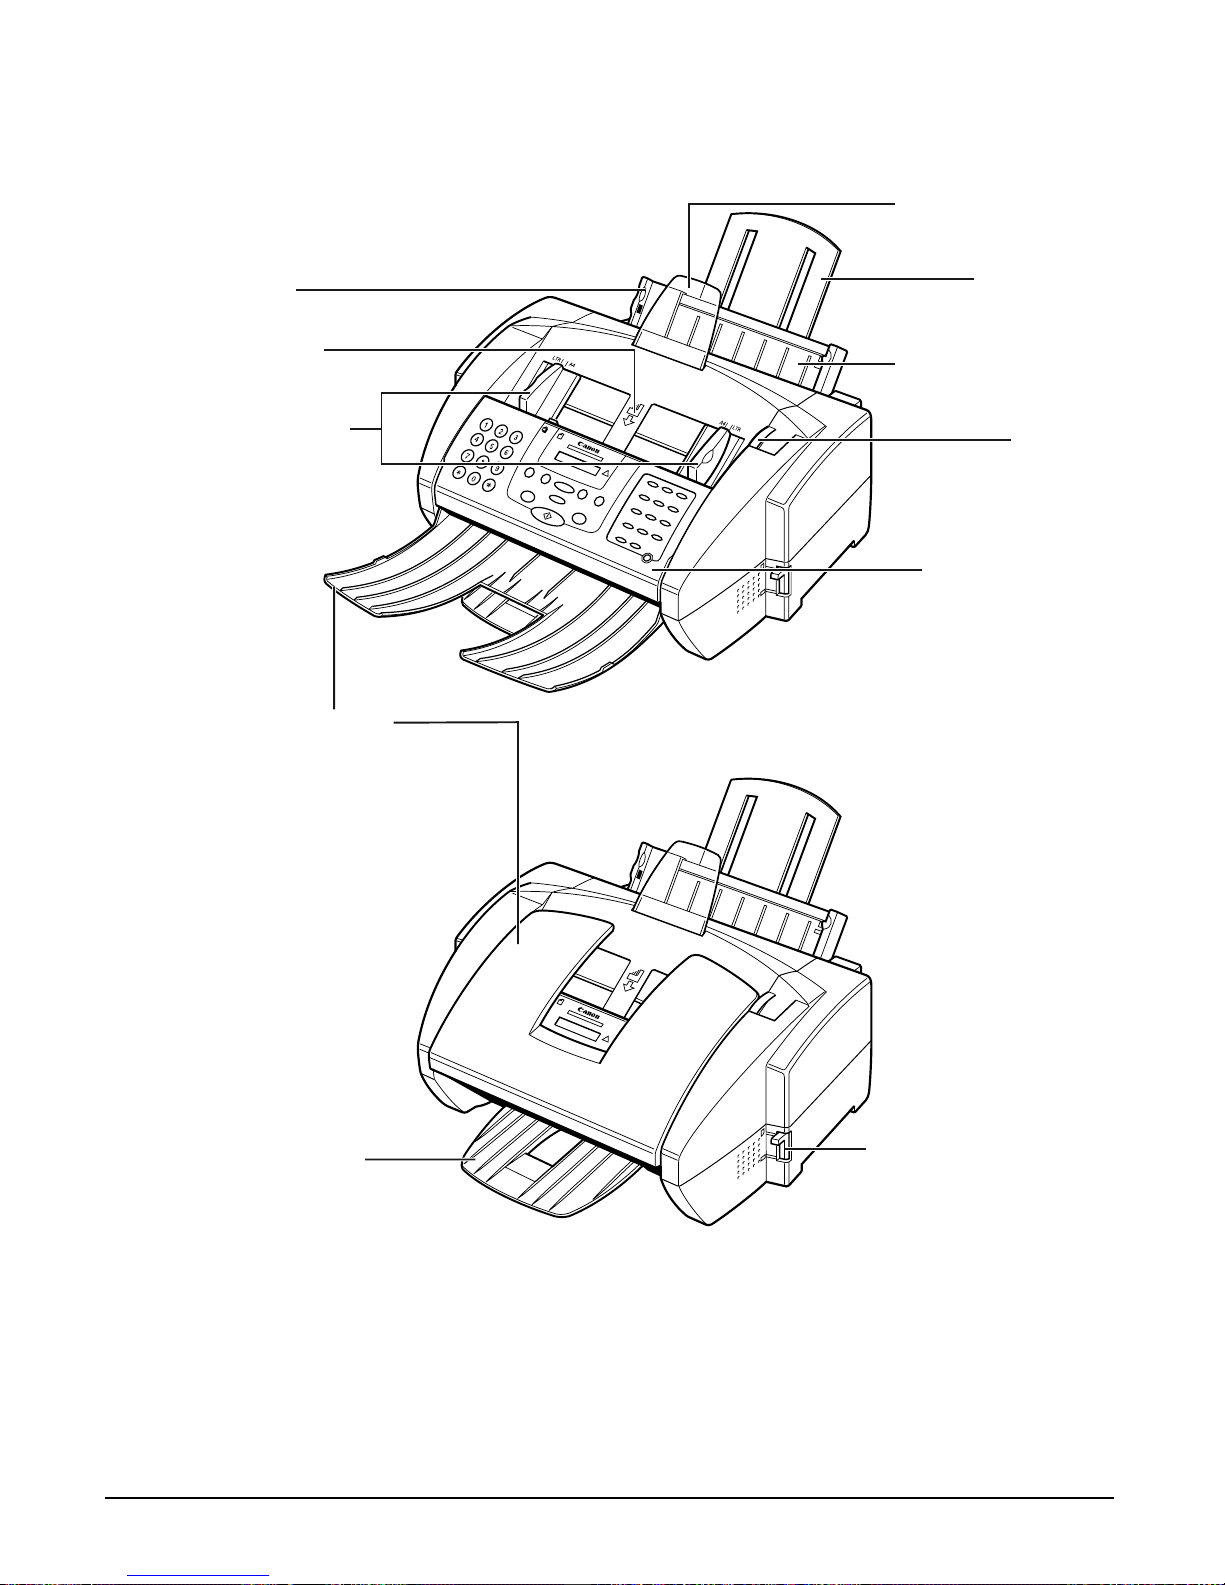
Main Components of the MultiPASS
ADF (AUTOMATIC
DOCUMENT FEEDER)
and PRINTER COVER
DOCUMENT SUPPORT
PAPER REST
MUL TI-PURPOSE TRAY
OPERATION PANEL
(1 p. 2-11)
PAPER GUIDE
DOCUMENT GUIDES
HANDLE
DOCUMENT TRA Y
OUTPUT TRA Y
P APER THICKNESS LEVER
(1 p. 5-6)
Page 25
Chapter 2 Setting Up 2-11
Setting Up
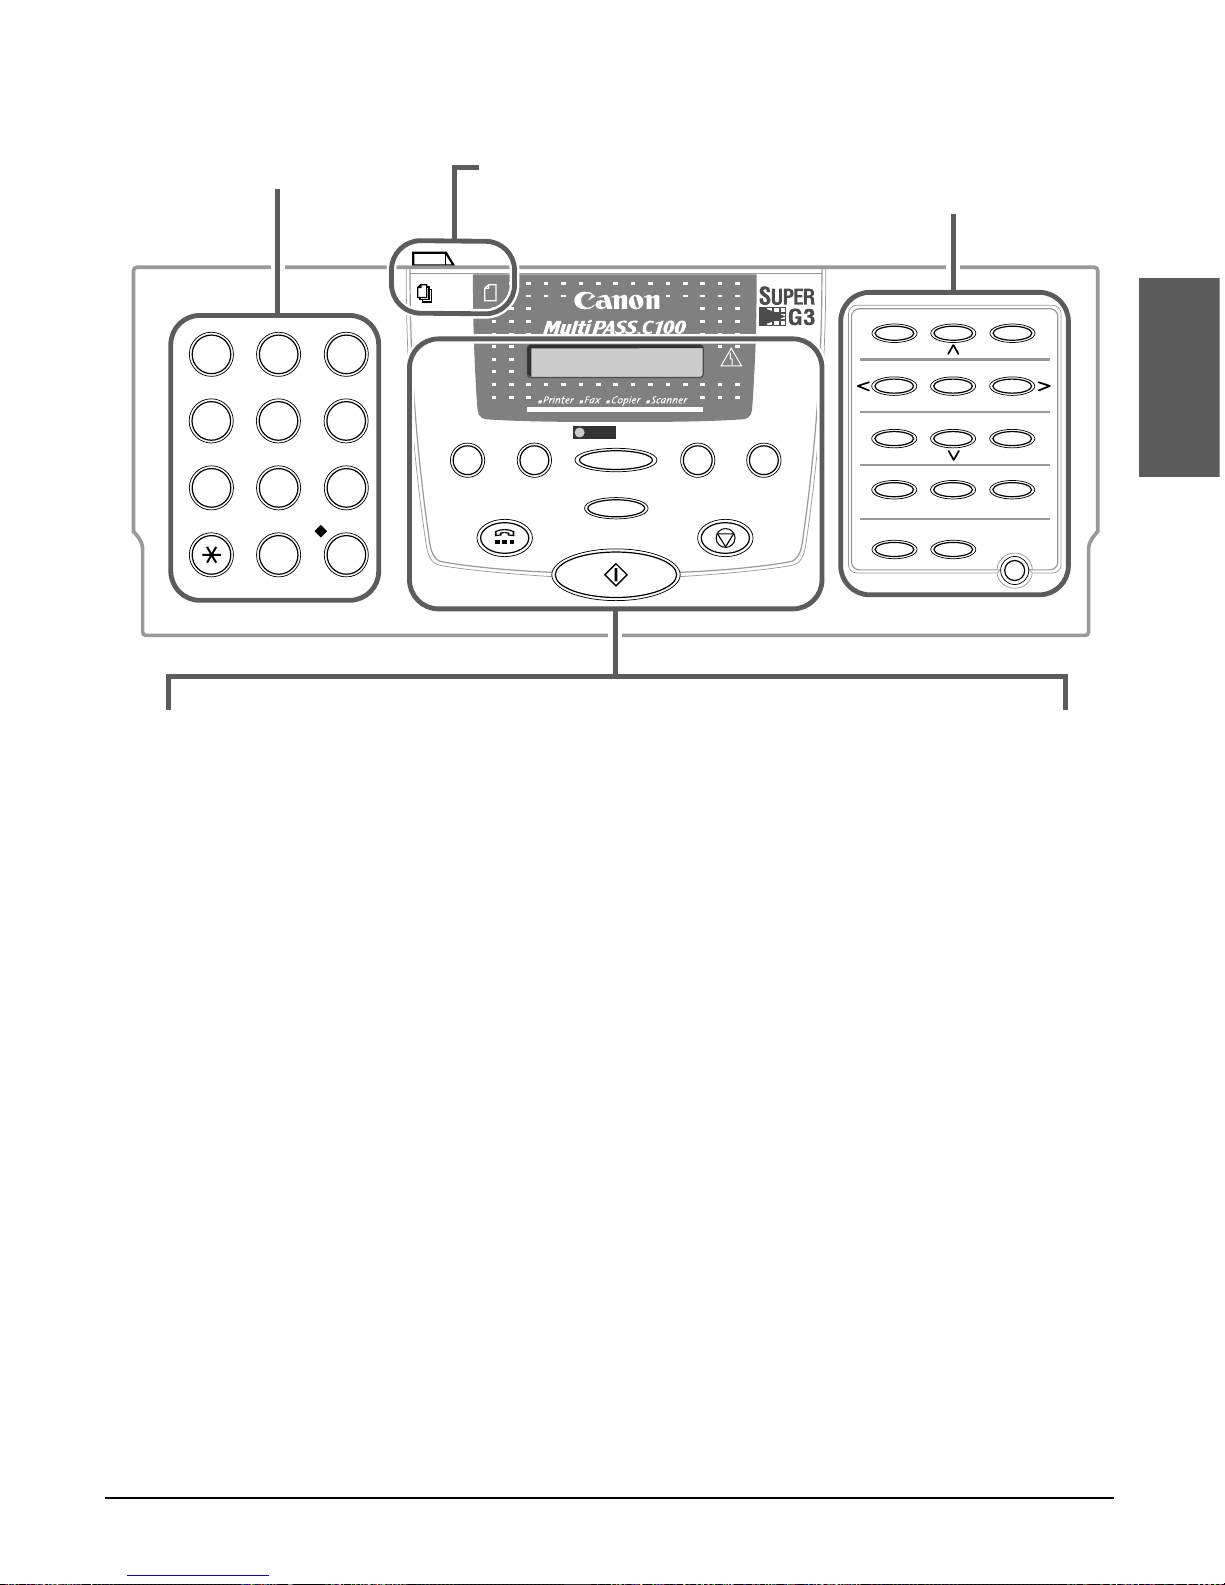
Operation Panel
GHI JKL MNO
ABC DEF
TUV
Copy
Stop
Hook
Coded Dial
Receive Mode
R/Pause
Start
Image Quality
/ B&W
12
Resume
01 02 03
04 05 06
07
08
09
10 11
Function
Data Registration
Space
Cleaning
Report
Set
Clear
Memory Reference
1
0#
7
8
9
45
6
2
3
Colour
Alarm
WXYZ
PQRS
D.T.
R
Tone/+
■ LCD
■ R (Redial)/Pause Button
(1 pp. 7-10, 9-2)
■ Coded Dial Button
(1 pp. 6-8, 6-12)
■ Colour/B&W Button
(1 pp. 7-2, 7-3, 10-2)
■ Hook Button
(1 pp. 7-8, 9-4)
■ Alarm Light
■ Receive Mode Button
(1 Chapter 8)
■ Copy Button
(1 p. 10-2)
■ Image Quality Button
(1 pp. 7-3, 10-2)
■ Stop Button
■ Start Button
■ One-Touch Speed Dialling/
Special Function Buttons
(1 p. 2-12)
■ Numeric Buttons
(1 p. 3-3)
■ Document Feed Lever
(1 p. 4-2)
Page 26
2-12 Setting Up Chapter 2
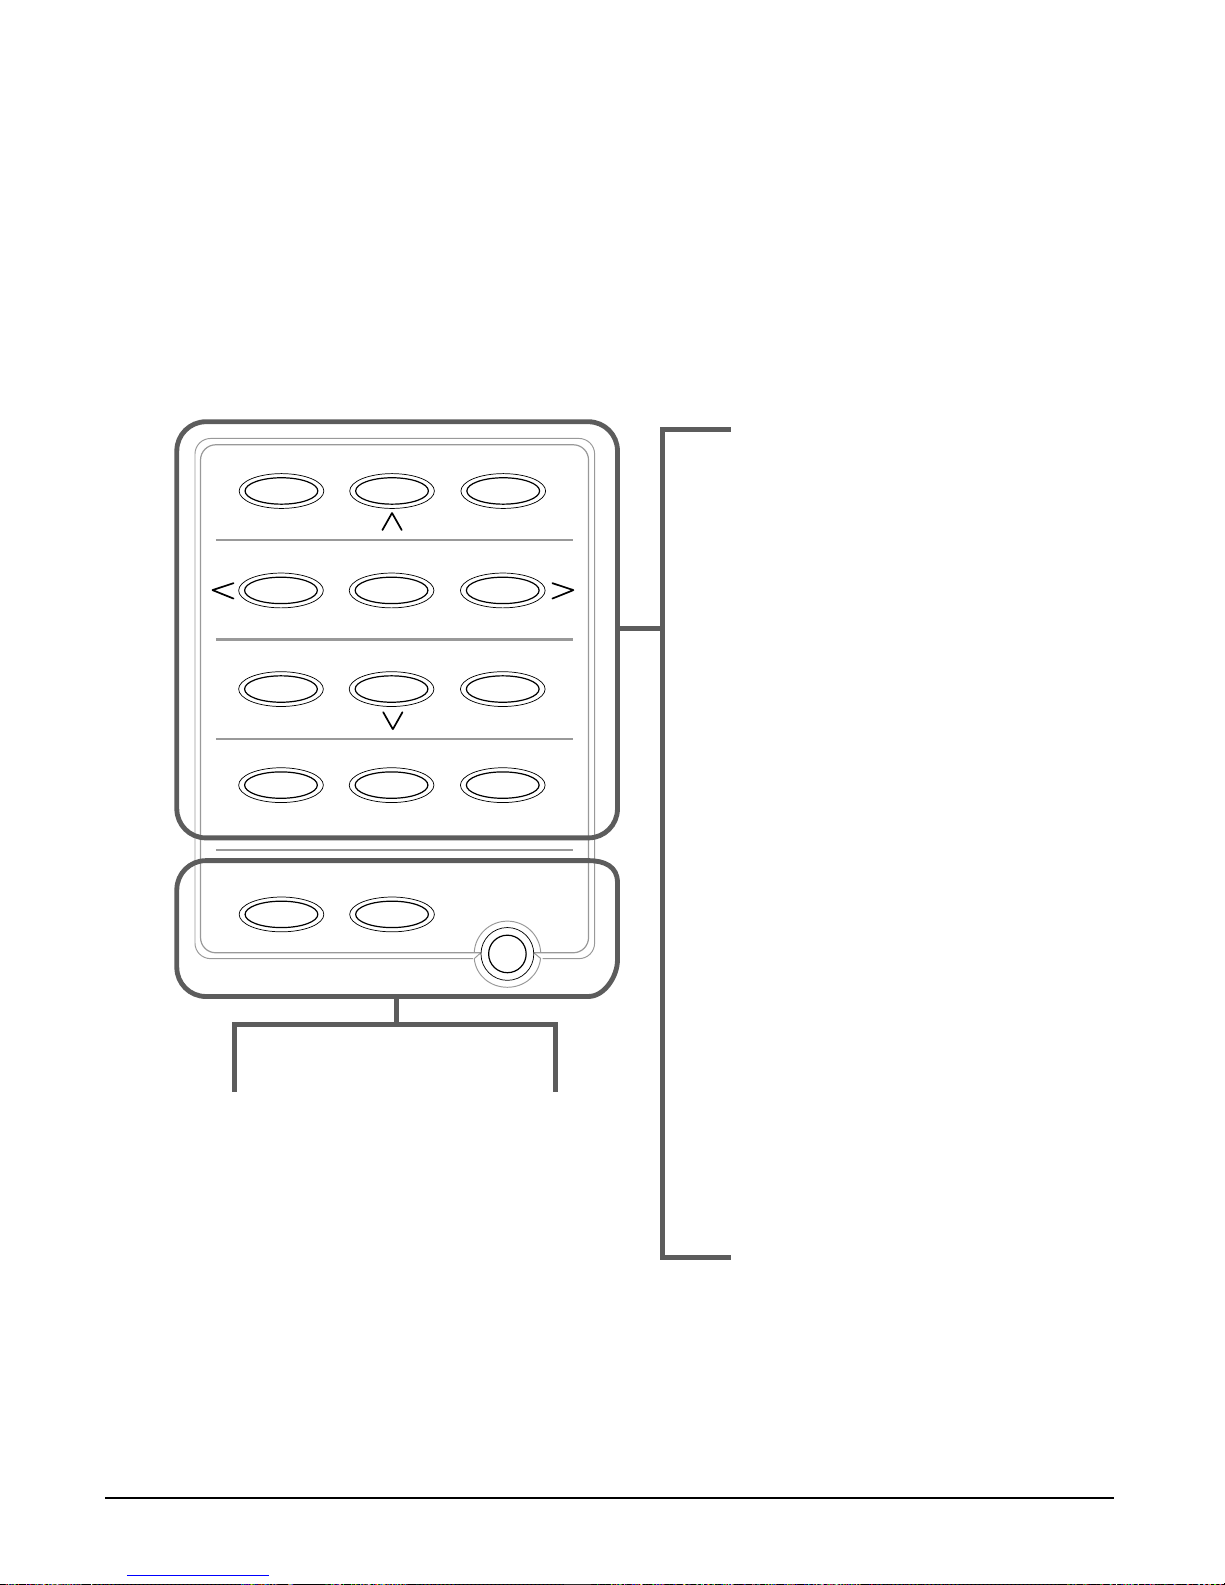
One-Touch Speed Dialling/Special Function Buttons
The buttons on the right of the operation panel have the following two functions:
• One-Touch Speed Dialling Buttons (1 pp. 6-5, 6-12)
When the Function button’s light is off, the buttons marked 01 to 12 can be used for
one-touch speed dialling.
• Special Function Buttons
When the Function button’s light is on, the special function buttons (marked under or
to the sides of the buttons) can be used.
12
Resume
01 02 03
04 05 06
07
08
09
10 11
Function
Data Registration R
Space Tone/+
Cleaning
Report
Set
Clear
D.T.
Memory Reference
■ Data Registration Button
(1 p. 14-2)
■ u, d Buttons
(1 p. 14-2)
■ R Button
(1 p. 3-11)
■ Memory Reference Button
(1 pp. 7-16, 7-17, 7-19, 8-11)
■ l, r Buttons
(1 pp. 3-4, 3-5)
■ Space Button
(1 pp. 3-4, 3-5)
■ Tone/+ Button
(1 pp. 3-8, 9-4)
■ Report Button
(1 pp. 3-9, 6-13, 11-3)
■ D.T. Button*
(1 p. 9-5)
■ Cleaning Button
(1 pp. 5-11, 12-10, 12-11, 12-16)
■ Clear Button
(1 p. 3-5)
■ Function Button/Light
(1 above)
■ Set Button
(1 p. 14-2)
■ Resume Button
(1 pp. 13-3, 13-4)
*This button is not available in the UK, Ireland, Hong Kong, Australia, New Zealand, Singapore, or
Malaysia.
Page 27
Chapter 2 Setting Up 2-13
Setting Up
Installing the BJ Cartridge
Install the BJ cartridge as explained in this section.
For additional information on BJ cartridges and tanks, and for instructions on replacing,
1 p. 12-7.
Guidelines
Follow these guidelines to ensure optimum performance of your BJ cartridges and
tanks:
• Store BJ cartridges and tanks at room temperature.
• Keep BJ cartridges in their sealed packaging until you are ready to use them.
• Once opened, use BJ tanks within six months and BJ cartridges within one year.
• Do not remove BJ cartridges and tanks from the MultiPASS unnecessarily, or the ink
in them may harden.
• Do not leave empty BJ tanks in a BJ cartridge. Remove them immediately when they
run out of ink, and replace them with new ones. Do not leave a BJ cartridge with any
of its BJ tanks missing as the ink in the BJ cartridge will dry and adversely affect print
quality.
• When changing BJ cartridges, always store the unused BJ cartridge in the BJ
cartridge container provided with your MultiPASS.
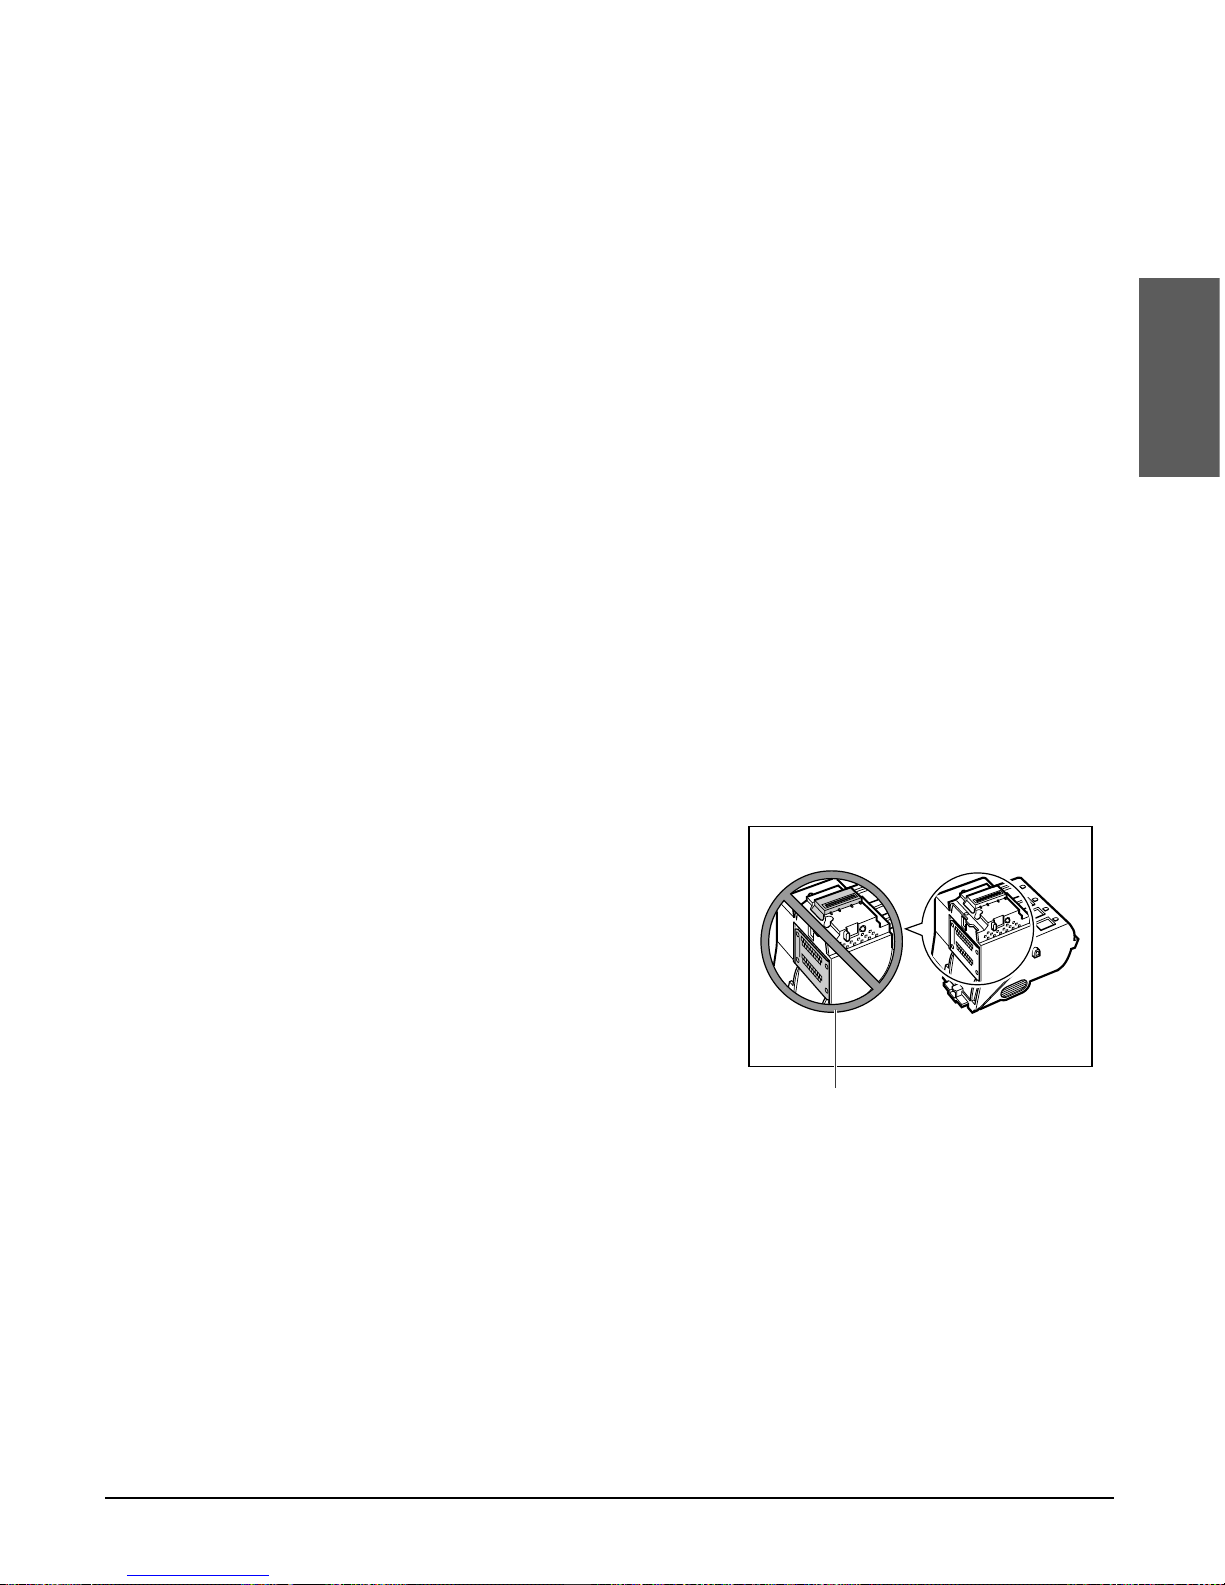
c
• Keep BJ cartridges and tanks out of
children’s reach. If a child inadvertently
ingests ink, consult a physician
immediately.
• Do not touch the precision components
on the BJ cartridge.
The ink in the BJ cartridges and tanks is difficult to clean up if spilled. Follow these
precautions when handling:
• Carefully remove packaging from BJ cartridges and tanks.
• Do not attempt to disassemble or refill BJ cartridges or tanks.
• Do not shake or drop BJ cartridges or tanks, or tip the print head downwards.
DO NOT TOUCH THIS AREA.
Page 28
2-14 Setting Up Chapter 2
Installing the BJ Cartridge in the MultiPASS
When there is no BJ cartridge installed in the MultiPASS, the LCD displays PUT IN
CARTRIDGE.
Follow this procedure to install the BJ cartridge:
1 Make sure the MultiPASS is plugged in.
2 Open the document tray.
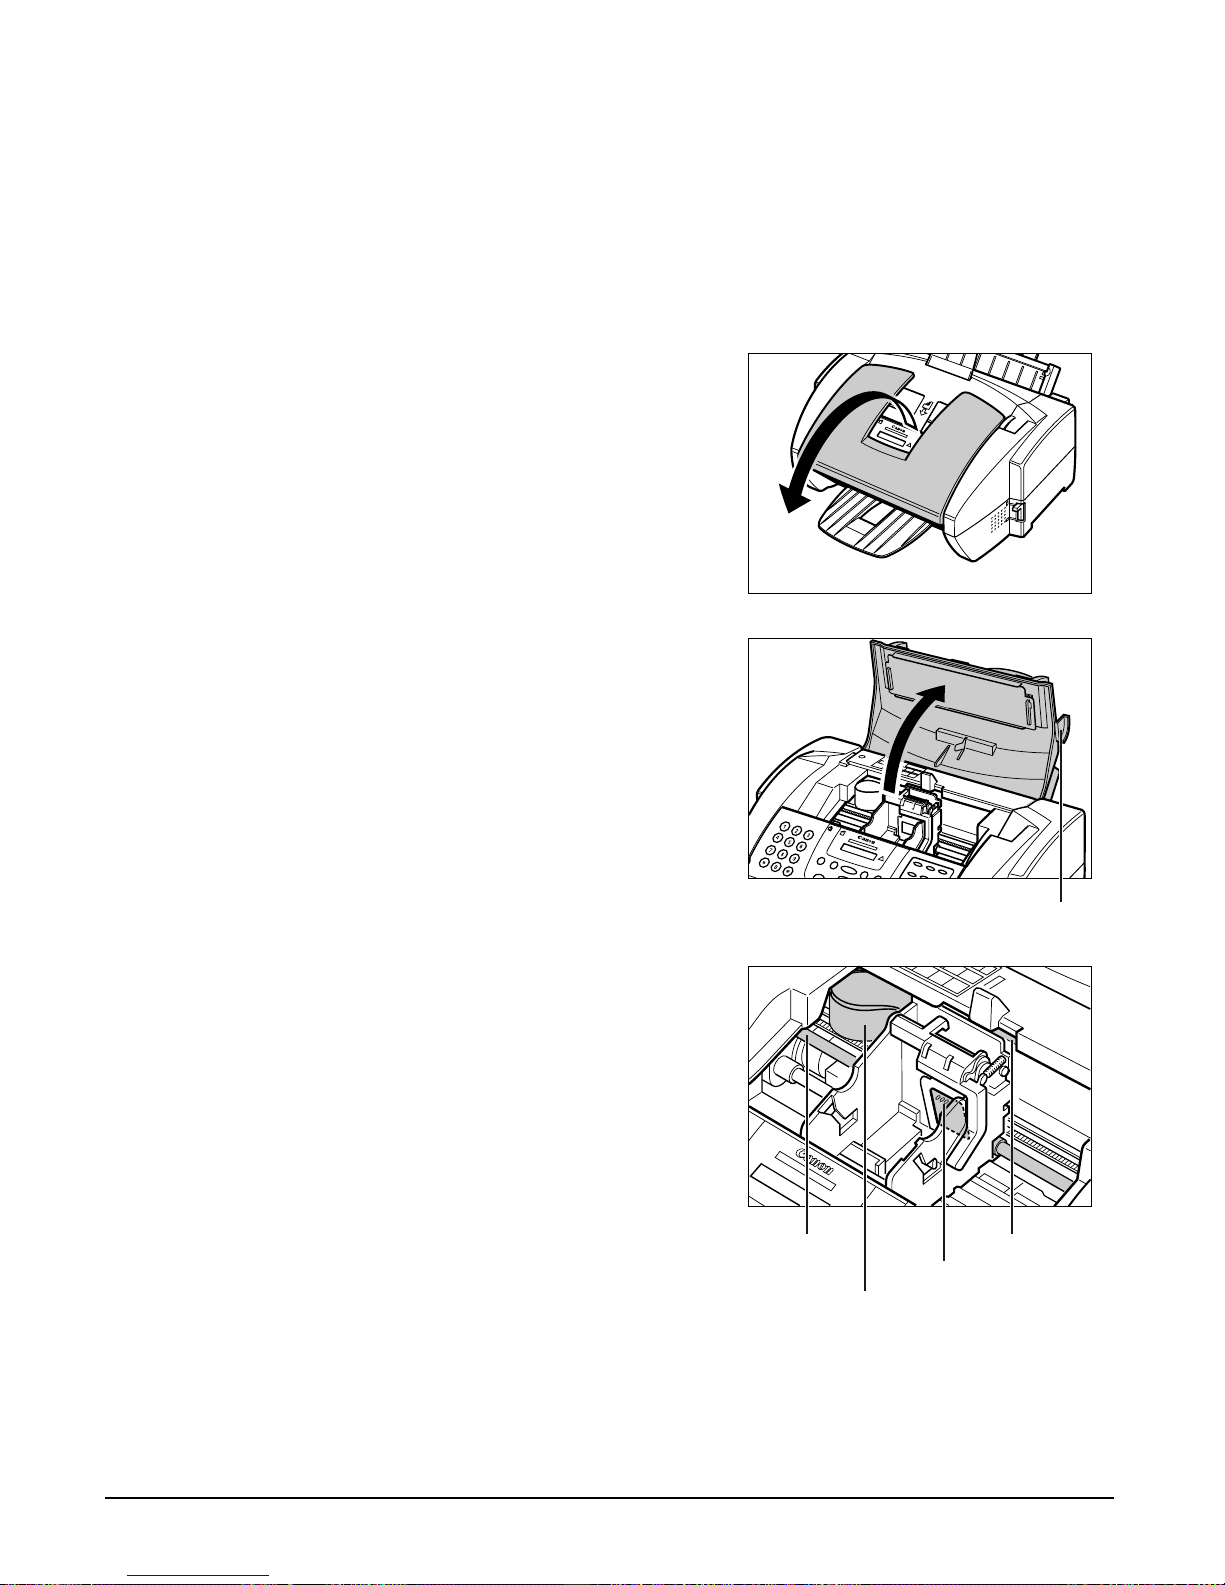
3 Lift the handle to open the printer
cover.
• The cartridge holder automatically moves
to the centre of the unit.
c
• Do not try to manually move or stop
the cartridge holder since this may
damage the unit.
• Do not touch the components
shown or any metal parts since this
may adversely affect operation of
the unit and/or affect print quality.
RIBBON CABLE
CIRCUIT BOARD
GUIDE RAIL
ROUND
SHAFT
HANDLE
Page 29
Chapter 2 Setting Up 2-15
Setting Up
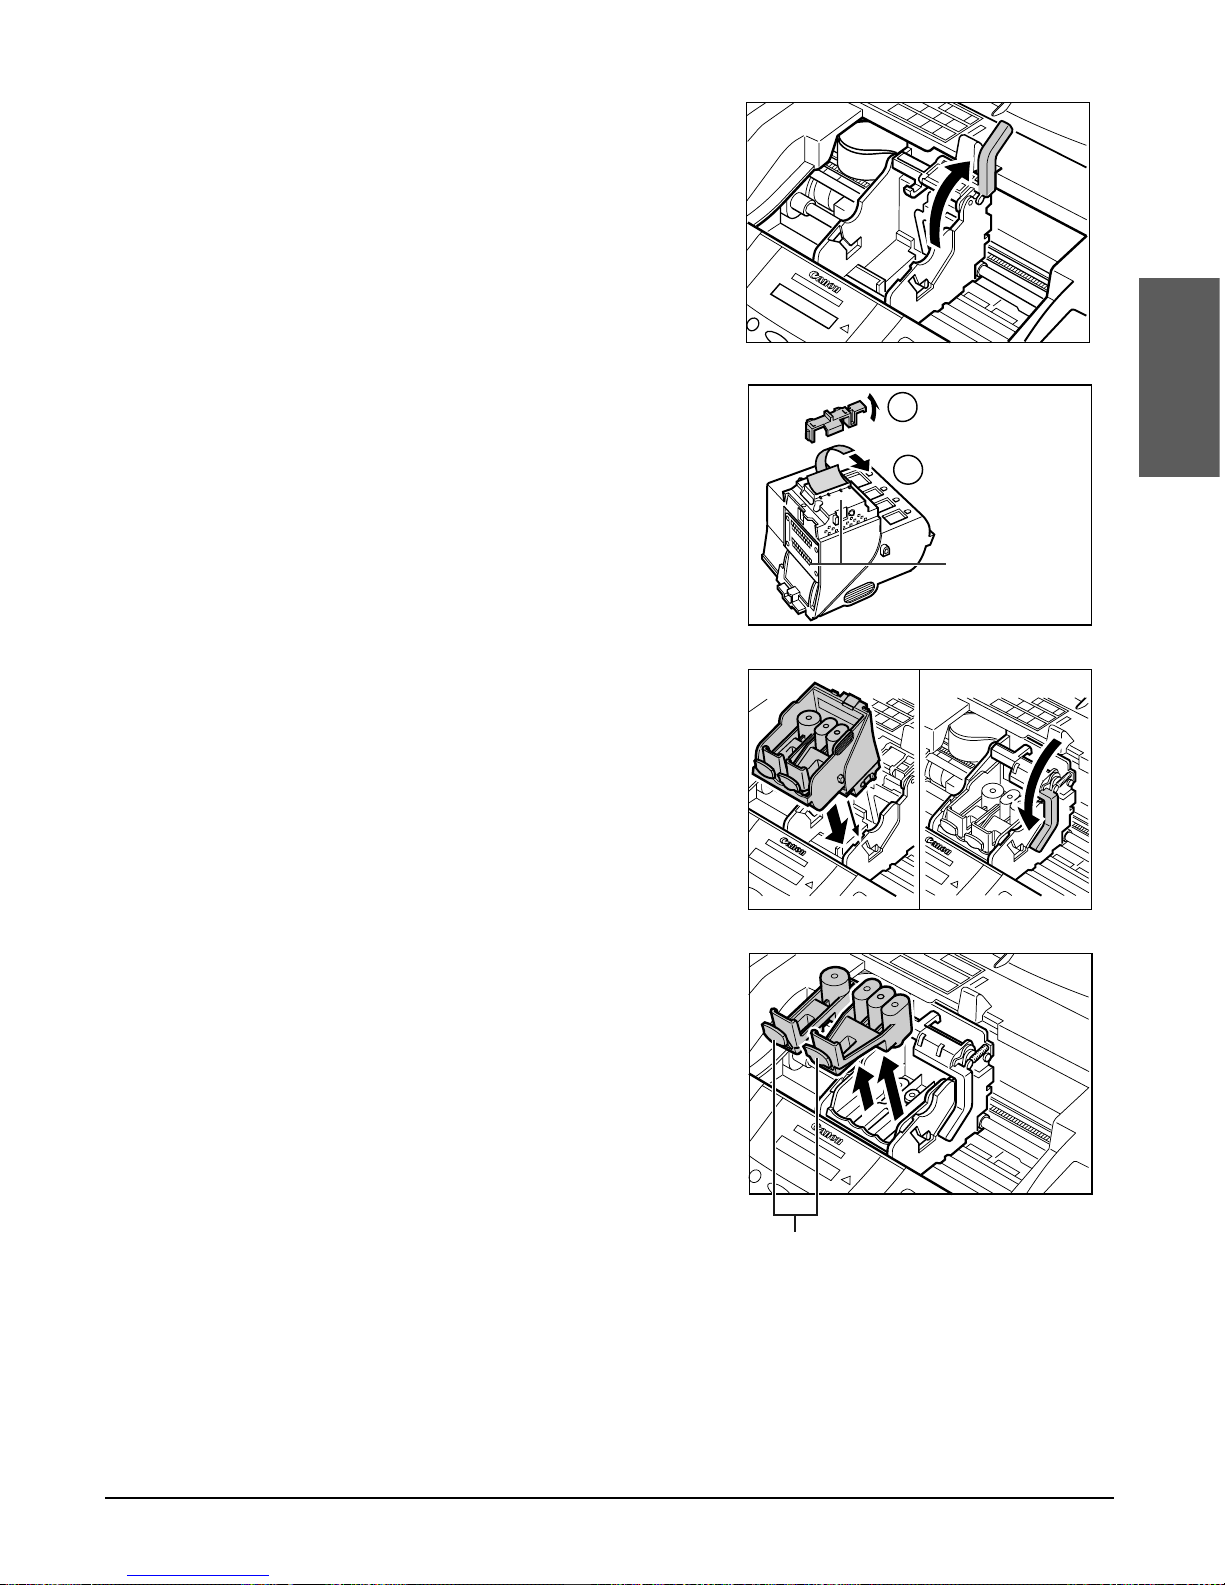
4 Raise the blue cartridge lock lever on
the cartridge holder.
5 Remove the Colour BJ cartridge from
its package, then remove the orange
protective cap q and tape w.
• Discard the cap and tape. Never attempt
to reattach them to the BJ cartridge print
head.
• Install the BJ cartridge immediately after
removing the cap and tape.
6 Insert the BJ cartridge into the cartridge
holder, then lower the blue cartridge lock
lever until it locks into position.
7 Press on the two orange tabs and
remove the two orange pieces from the
BJ cartridge.
ORANGE T ABS
1
2
DO NOT TOUCH
THESE PRECISION
COMPONENTS.
Page 30
2-16 Setting Up Chapter 2
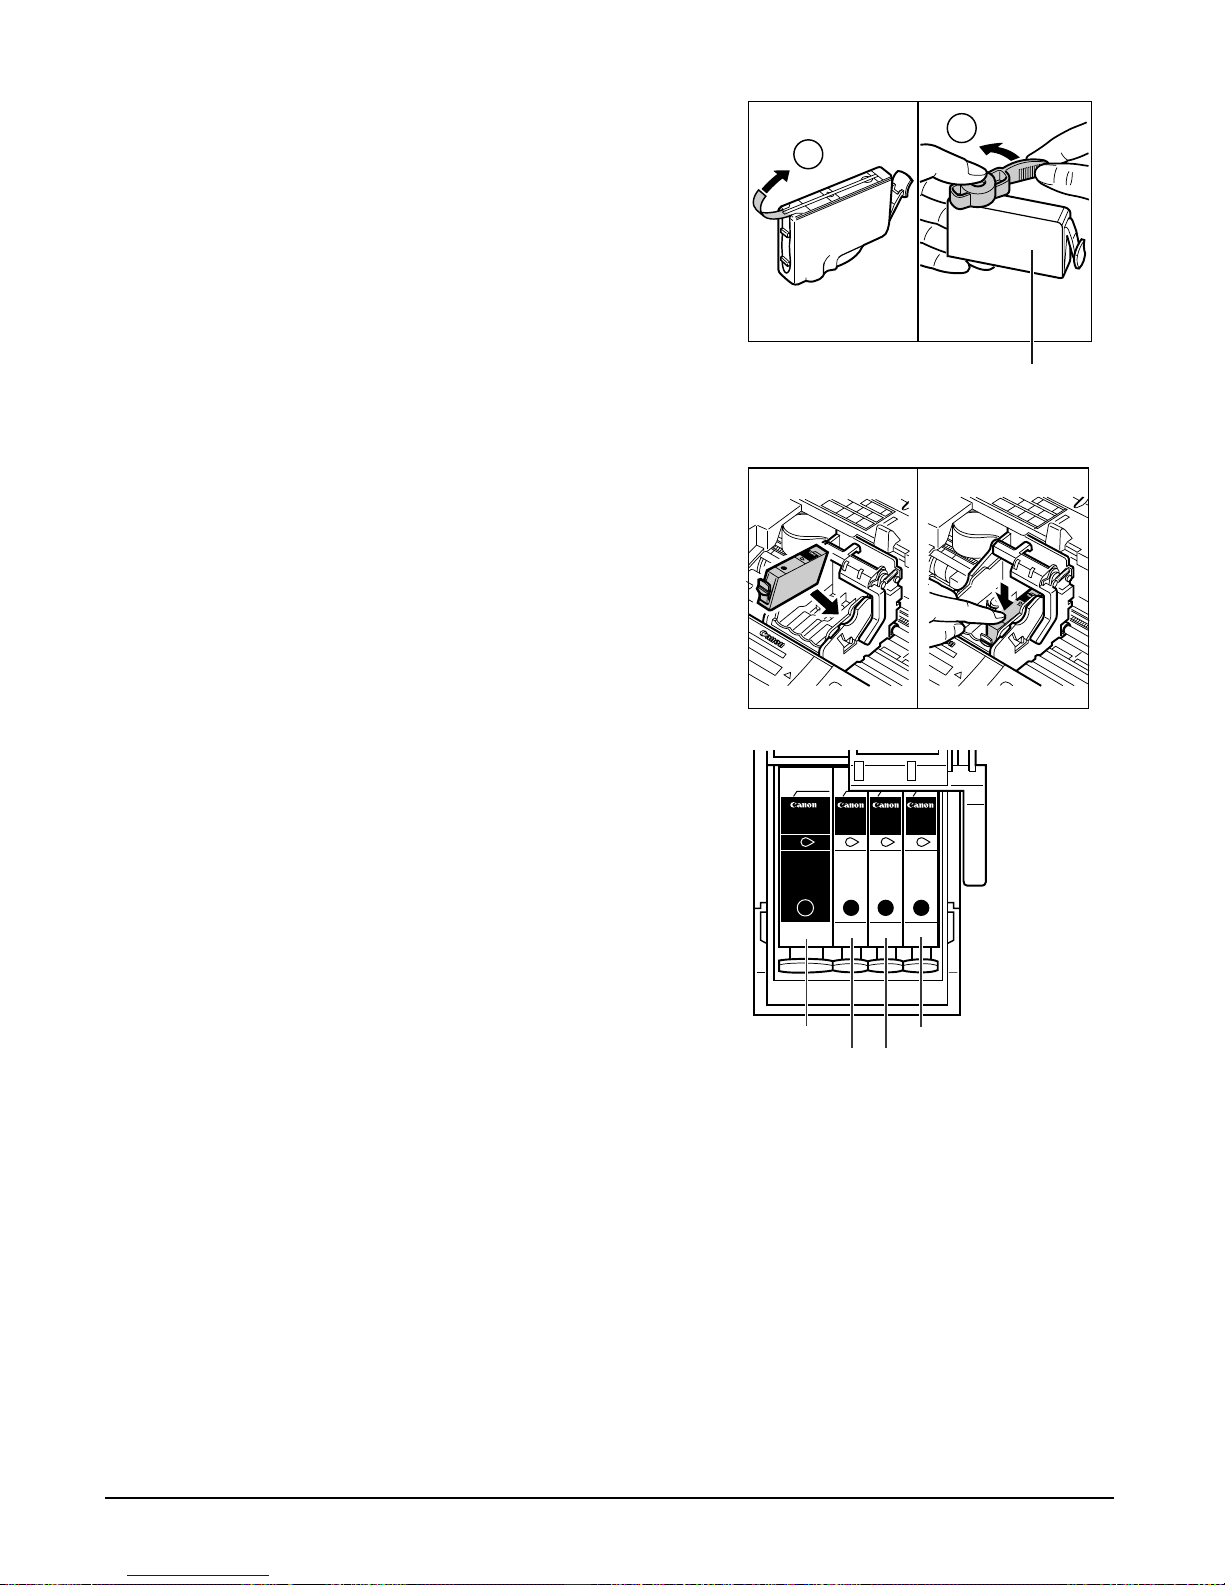
8 Start with the Yellow BJ tank.
Remove the packing film by pulling on
the orange tape q. Then grip the bottom
of the BJ tank and twist off the orange
protective cap in the direction shown w.
• Carefully remove the packing film taking care
not to remove the label from the BJ tank.
• Discard the packing film and cap. Never
attempt to reattach them to the BJ tank.
• Do not touch the ink port on the BJ tank.
• Spilled ink can stain any surface; protect
yourself and your work area.
9 Insert the Yellow BJ tank into the far
right slot on the BJ cartridge, then press
it down from the top until it clicks into
position.
10 Repeat steps 8 and 9 to install the
Magenta BJ tank, then the Cyan BJ tank,
and finally the Black BJ tank. Be sure to
install them in this order and to insert
them in the slots from right to left.
• Do not use the BJ cartridge with any of its
BJ tanks missing as this can cause the BJ
cartridge to clog.
11 Close the printer cover.
• The LCD displays CART. RETURN while the cartridge holder moves to its home position
on the right side of the unit. The MultiPASS then cleans the print head which takes about
20 seconds.
12 Close the document tray.
n
If you need to unplug the MultiPASS, wait until the unit is in standby mode (time and
receive mode displayed in the LCD). Otherwise the cartridge holder may not be in its home
position causing the BJ cartridge to remain uncapped and dry out.
Made in Japan Made in Japan Made in Japan Made in Japan
PUSH PUSHPUSH PUSH
Ink Tank
BCI-3eC
Ink Tank
BCI-3eM
Ink Tank
BCI-3eY
Ink Tank
BCI-3eBK
Black Cyan
Magenta
Yellow
YELLOW
MAGENTA
CYAN
BLACK
InkTa
BCI-
Y
ello
w
M
ade
in Jap
an
P
U
S
H
I
n
k
T
a
n
k
B
C
I
-
3
e
M
Y
e
llo
w
M
a
d
e
in
J
a
p
a
n
P
U
S
H
P
U
S
H
TO PREVENT INK SPILLS, DO NOT
PRESS THE SIDES OF THE BJ TANK.
1
2
Page 31
Chapter 2 Setting Up 2-17
Setting Up
Loading Paper
This section describes how to load plain paper in the multi-purpose tray so that you can
begin using your MultiPASS.
For complete details on the different print media you can use, and for instructions on
selecting and loading other print media, 1 Chapter 5.
Paper Guidelines
• Store all print media wrapped and on a flat surface until ready to use. Keep opened
packs in their original packaging, in a cool, dry location.
• Store paper at 18°–24°C, 40%–60% relative humidity.
• To avoid paper jams and poor print quality, do not print on damp, curled, wrinkled, or
torn paper.
• Use cut-sheet paper only, not paper that comes on a roll.
• Do not use paper thicker than can be used for the MultiPASS (1 p. 5-2). Thick paper
can cause damage to the BJ cartridge print head.
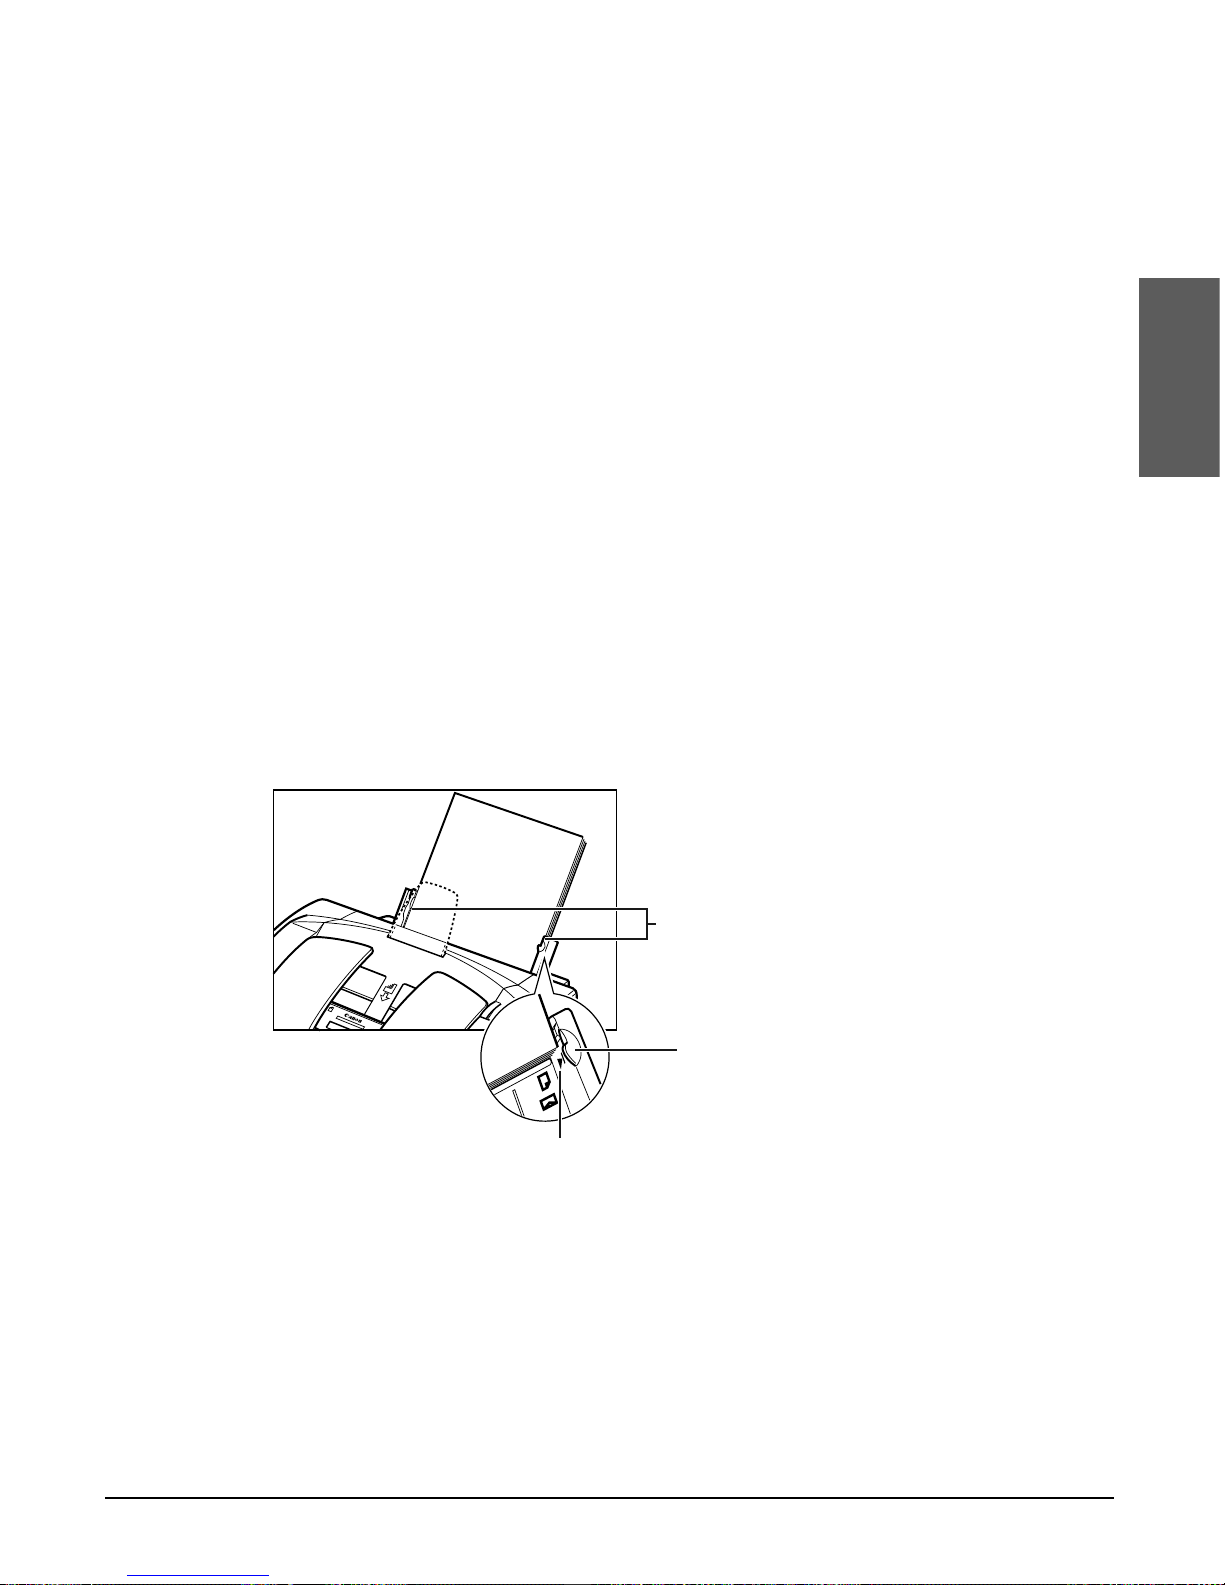
• Do not load paper beyond the paper limit mark (P) or beyond the tabs on the multi-
purpose tray. Doing so may cause problems. Also, make sure there are no gaps on
either side of the paper stack.
• If the print media has a print side, set it in the multi-purpose tray with the print side
facing upwards.
• The capacity of the output tray is 50 sheets of paper. To prevent paper jams, remove
paper from the output tray before the count reaches 50.
PAPER LIMIT MARK
NO GAPS HERE
TAB
Page 32

2-18 Setting Up Chapter 2
• Let the paper run out before refilling the multi-purpose tray. Avoid mixing new stock
with paper already loaded.
• Do not leave paper stacked in the multi-purpose tray for long periods of time since it
may bend or curl and cause problems.
• Certain environmental conditions, such as extreme temperatures or humidity, can
cause some print media to misfeed in the multi-purpose tray. If you have trouble, feed
one sheet at a time.
• Depending on the density of the printed pages, the ink may need time to dry. Within
two or three seconds, the ink becomes smudge resistant. After drying for several
minutes, the ink becomes water-resistant.
• If your printed page contains a large amount of graphics, the ink on the page may be
damp due to the print density. Leave the page in the output tray for 30 to 60 seconds
to allow the ink to dry. Then remove the page carefully without touching any surfaces.
• Printing dense graphics on light paper stock may cause the paper to curl. Try using
heavier stock.
• If paper curls after printing, remove it immediately; otherwise paper jams may occur.
• The platen (a roller inside the unit) may become inked if you print data beyond the
width of the page. If this happens, clean inside the MultiPASS. (1 p. 12-3)
Page 33
Chapter 2 Setting Up 2-19
Setting Up
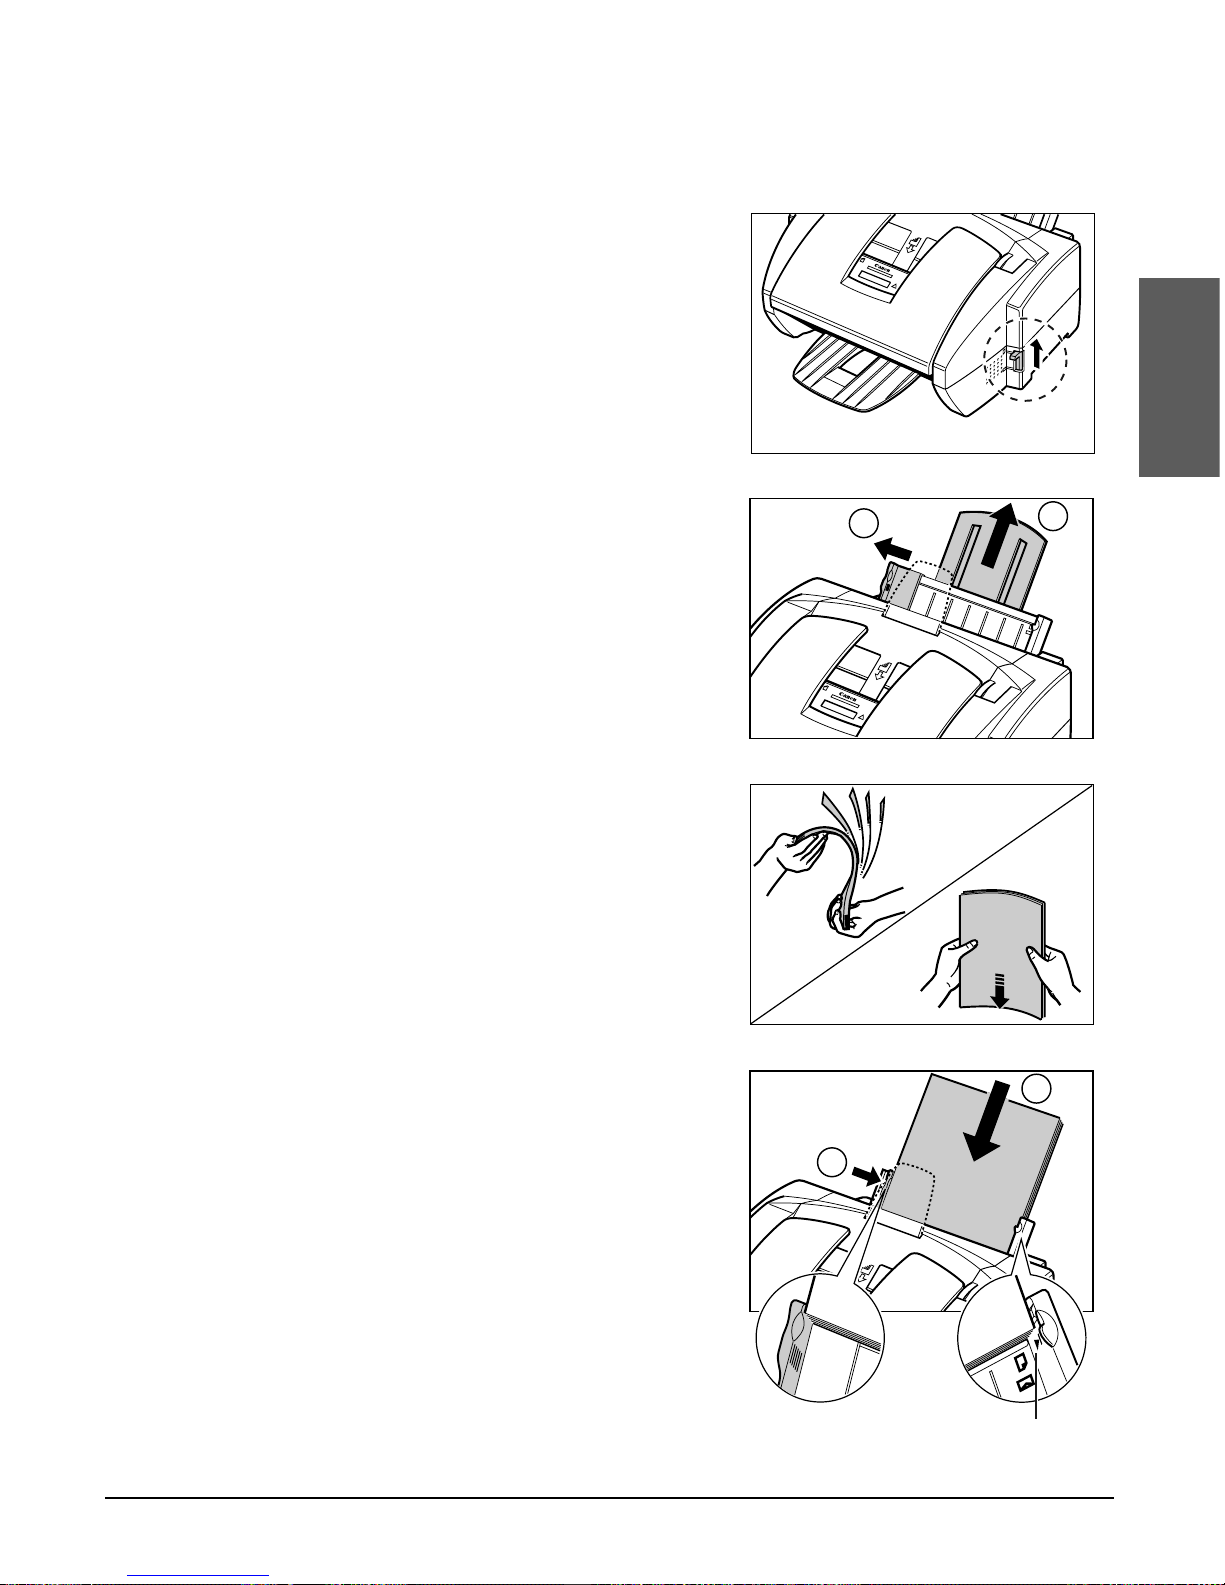
Loading Paper in the Multi-Purpose Tray
Follow this procedure to load paper in the multi-purpose tray:
1 Make sure the paper thickness lever is
set to p (up).
• For details, 1 p. 5-6.
c
Do not set the paper thickness lever
while the unit is printing since this
will cause problems.
2 Raise the paper rest until it stops q,
then move the paper guide to the left to
match the size of your paper w.
3 Prepare a stack of paper by fanning
the edge that will feed into the unit first,
and then by tapping the stack on a flat
surface to even its edges.
4 Insert the stack into the multi-purpose
tray q, and align the right edge of the
stack with the right side of the multipurpose tray. Slide the paper guide
snugly against the left edge of the
stack w.
• The multi-purpose tray holds up to 100
sheets of 75 g/m
2
plain paper.
• Make sure the stack does not exceed the
paper limit mark (P).
The MultiPASS is now ready to print.
2
1
PAPER LIMIT MARK
2
1
Page 34

2-20 Setting Up Chapter 2
Testing the MultiPASS
After you have assembled the MultiPASS, installed the BJ cartridge, and loaded the
paper, you can make sure the MultiPASS is printing properly by making several copies
of a document. (1 p. 10-2)
If you have problems printing, 1 Chapter 13.
Page 35

Chapter 3 Registering Information 3-1
Registering
Information
Chapter 3
Registering Information
Methods of Registering Information in the MultiPASS.........................3-2
Guidelines for Entering Numbers, Letters, and Symbols .....................3-3
Correcting a Mistake ..............................................................................3-5
Registering Sender Information ..............................................................3-6
What is Sender Information? ..................................................................3-6
Entering the Date and Time ...................................................................3-7
Registering Your MultiPASS Number and Name ...................................3-7
Printing a List to Check Information Registered in Your MultiPASS ......3-9
Setting the Telephone Line Type...........................................................3-10
Dialling Through a Switchboard............................................................3-11
Registering the R Button ......................................................................3-11
Page 36

3-2 Registering Information Chapter 3
Methods of Registering Information in the
MultiPASS
To customise the MultiPASS to your particular needs, you can adjust the general
operation, sending, receiving, printing, system settings, and speed dialling settings.
There are two methods of adjusting these settings:
■ Method 1: Using the MultiPASS operation panel
You can adjust settings directly via the operation panel of the MultiPASS. Detailed
instructions are described in this guide. Adjusting settings through the operation panel
is convenient when you do not have your MultiPASS connected to a PC.
■ Method 2: Using the MultiPASS Suite Software
You can adjust settings using the MultiPASS Suite software included with your
MultiPASS. For instructions, 1 MultiPASS Suite User’s Guide.
Before adjusting any settings, decide whether you prefer to make changes from the
operation panel or from the MultiPASS Suite. Using both—the operation panel and
the MultiPASS Suite—may cause confusion. Changes made to settings through the
operation panel will not be displayed in the MultiPASS Suite, and changes made in
the MultiPASS Suite will override any corresponding settings made through the
operation panel.
n
If your MultiPASS is connected to a PC, we recommend using the MultiPASS Suite to
adjust settings.
Page 37
Chapter 3 Registering Information 3-3
Registering
Information
Guidelines for Entering Numbers, Letters,
and Symbols
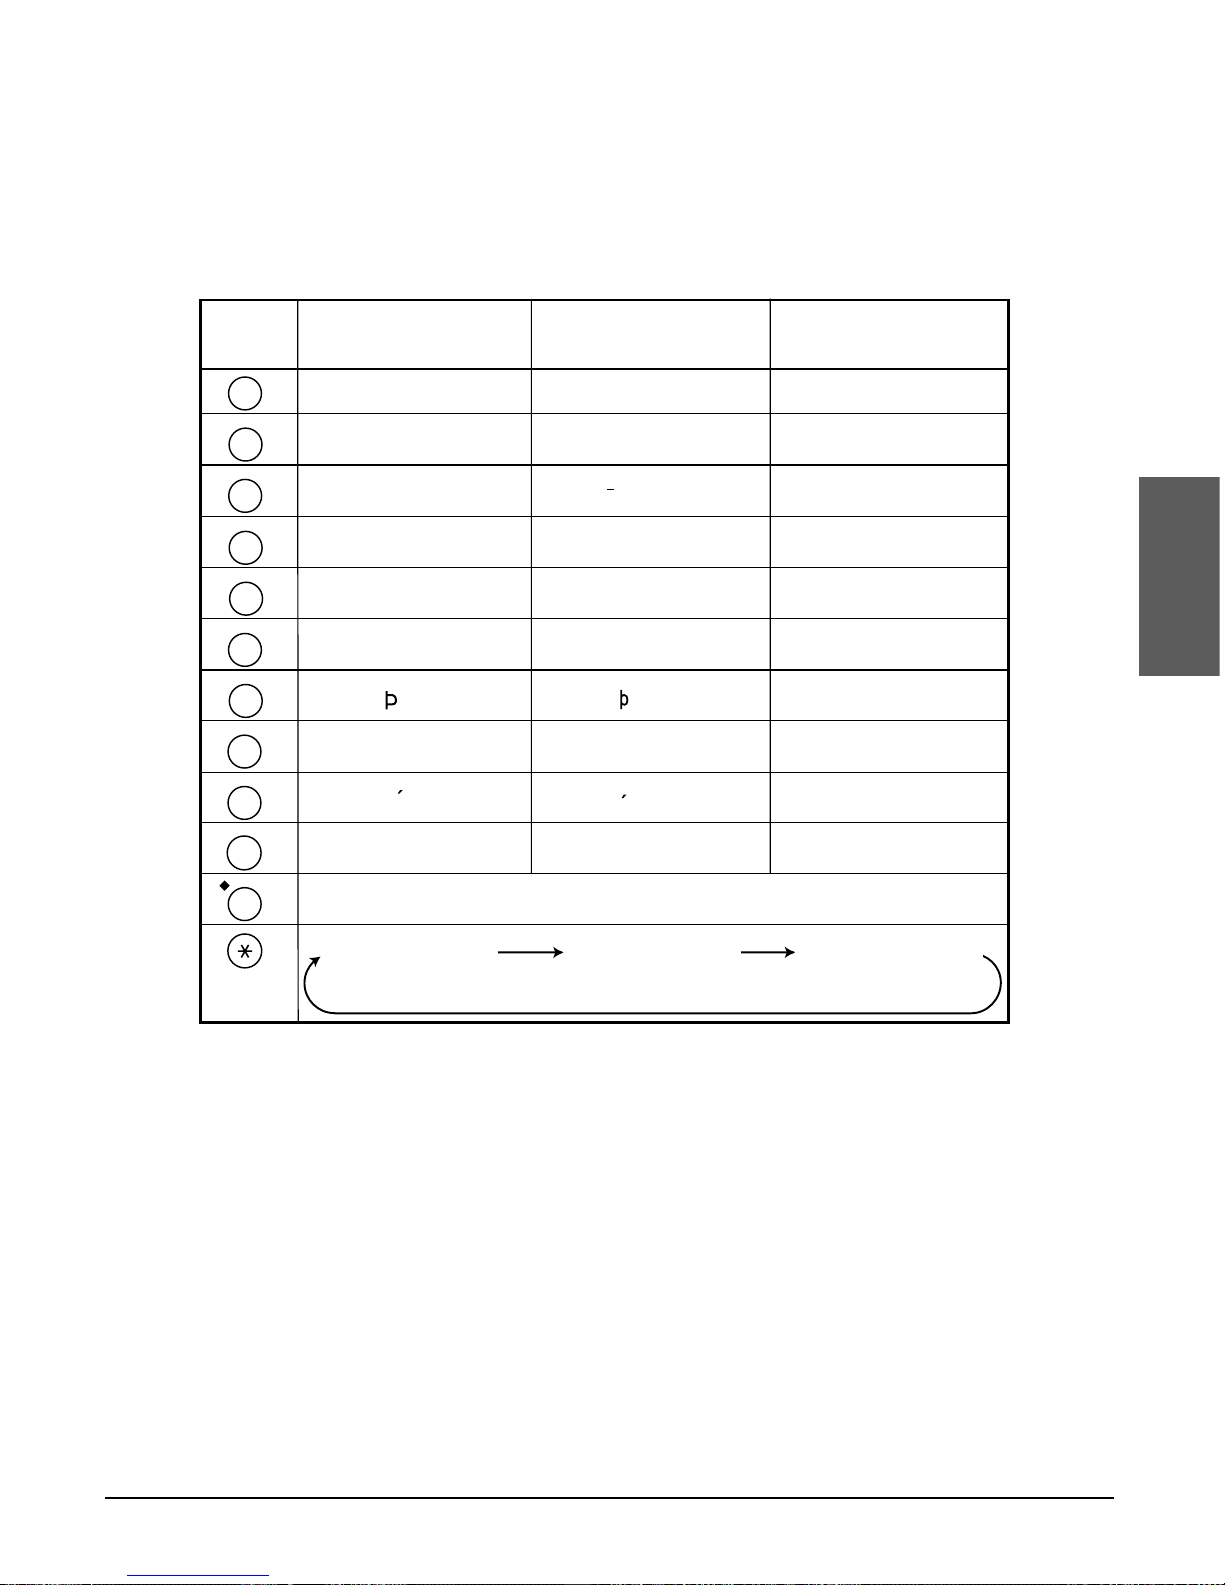
When you come to a step that requires you to enter a name or number, refer to the
table below to determine which numeric button to press for the character you want:
n
If you pause for more than 60 seconds between entering data, the unit will automatically
return to standby mode.
Button Uppercase Letter Lowercase Letter Number Mode
Mode (:A) Mode (:a)(:1)
0
ABCЕДБАГВЖЗ abcедбагвжз 2
WXYZY wxyzy 9
TUVÜÚÙÛ tuvüúùû 8
PQRS pqrs 7
MNOСШЦУТХФ mnoсшцутхф 6
JKL jkl 5
GHIÏÍÌÎ ghiïíìî 4
DEF-DËÉÈÊ defdëéèê 3
1
1
PQRS
7
TUV
8
WXYZ
9
GHI
4
JKL
5
MNO
6
ABC
2
DEF
3
0
–.A #!",;:^`_=⁄|'?$@%&+()[]{}<>
#
Uppercase Letter
Mode (:A)
Lowercase Letter
Mode (:a)
Number Mode (:1)
Page 38
3-4 Registering Information Chapter 3
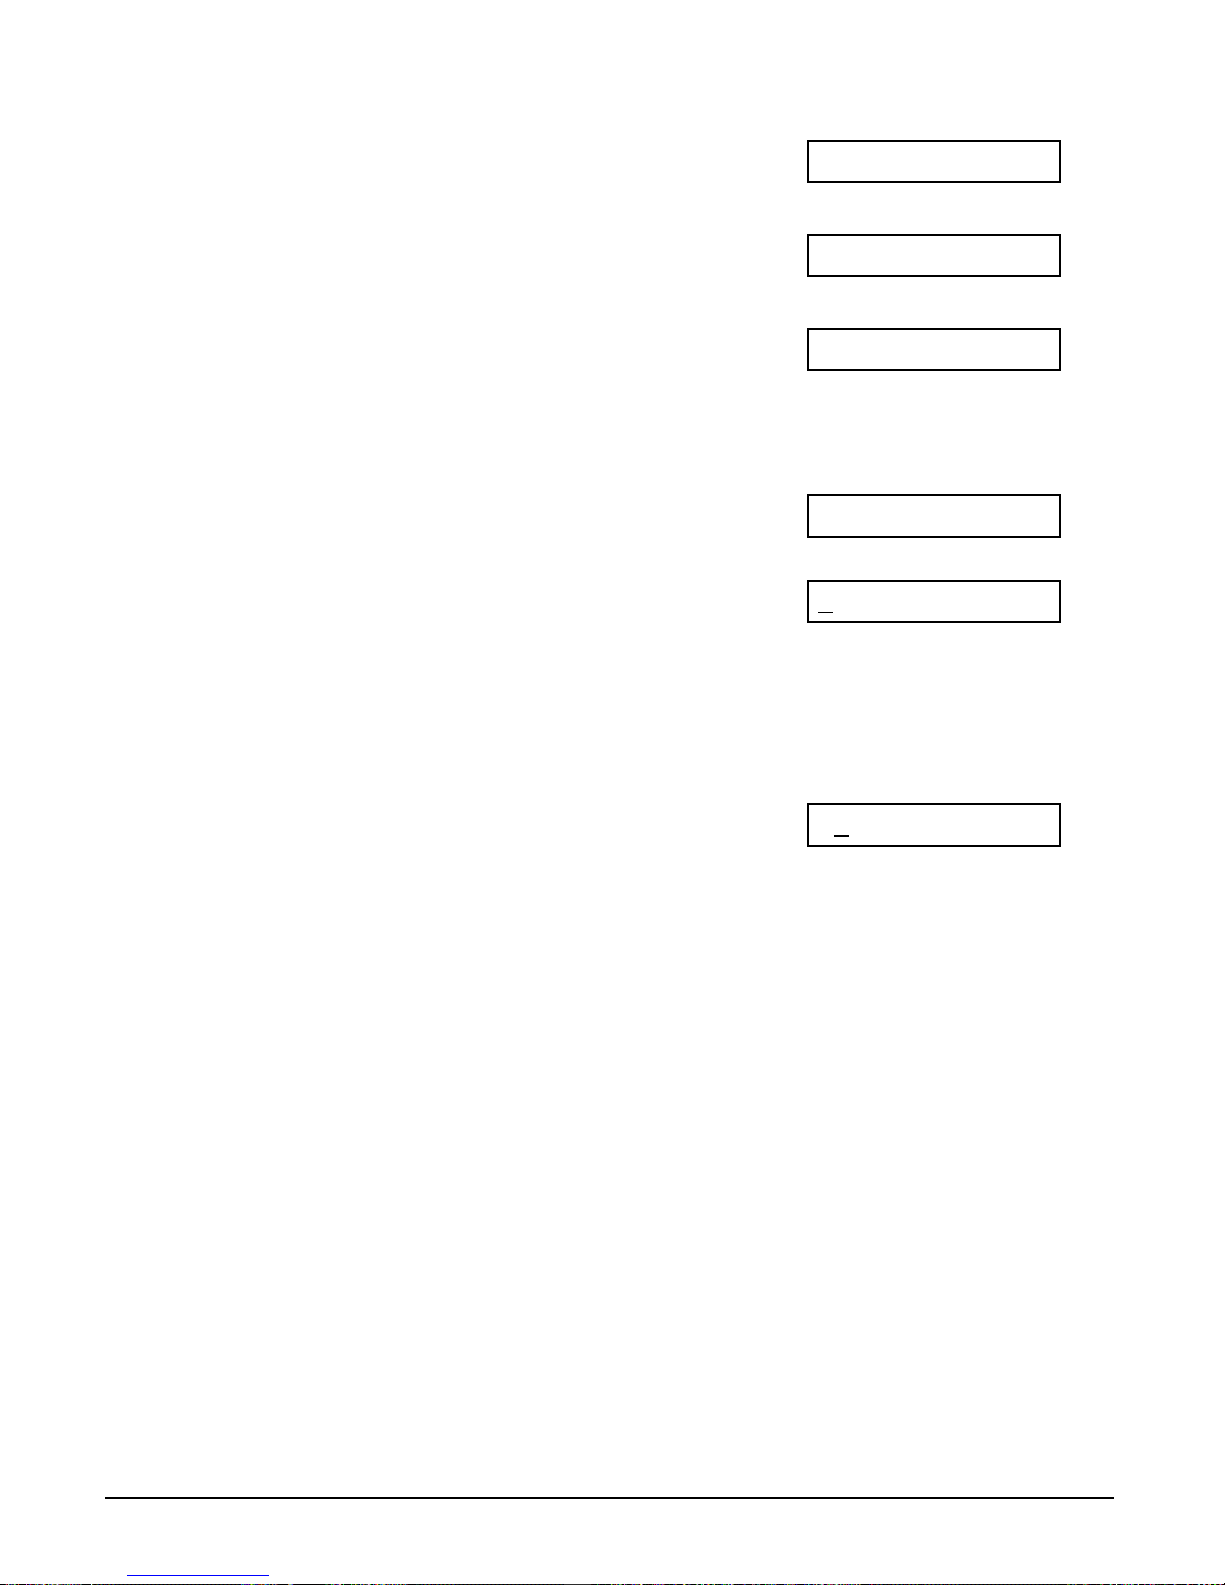
■ Changing Between Number and Letter Modes
Press T to select number mode (:1), uppercase
letter mode (:A), or lowercase letter mode (:a).
(Number mode)
(Uppercase letter mode)
(Lowercase letter mode)
■ Entering Letters
1 Press T to switch to uppercase letter mode
Ex:
(:A) or lowercase letter mode (:a).
2 Press the numeric button that contains the
Ex:
letter you want.
• Press repeatedly until the letter you want
appears. Each button cycles through the
letters it contains.
• If you are unsure which button to press for the
letter you want, 1 p. 3-3.
3 Continue entering other letters using the
Ex:
numeric buttons.
• If the next letter you want to enter is under a
different numeric button, simply press that
button until the letter you want appears.
-orIf the next letter you want to enter is under the
same numeric button you pressed in step 2,
press r to move the cursor to the right. Then
press that same numeric button repeatedly
until the letter you want appears.
• To enter a space, press Space.
CA
:A
C :A
_:A
_:a
_:A
_:1
Page 39
Chapter 3 Registering Information 3-5
Registering
Information
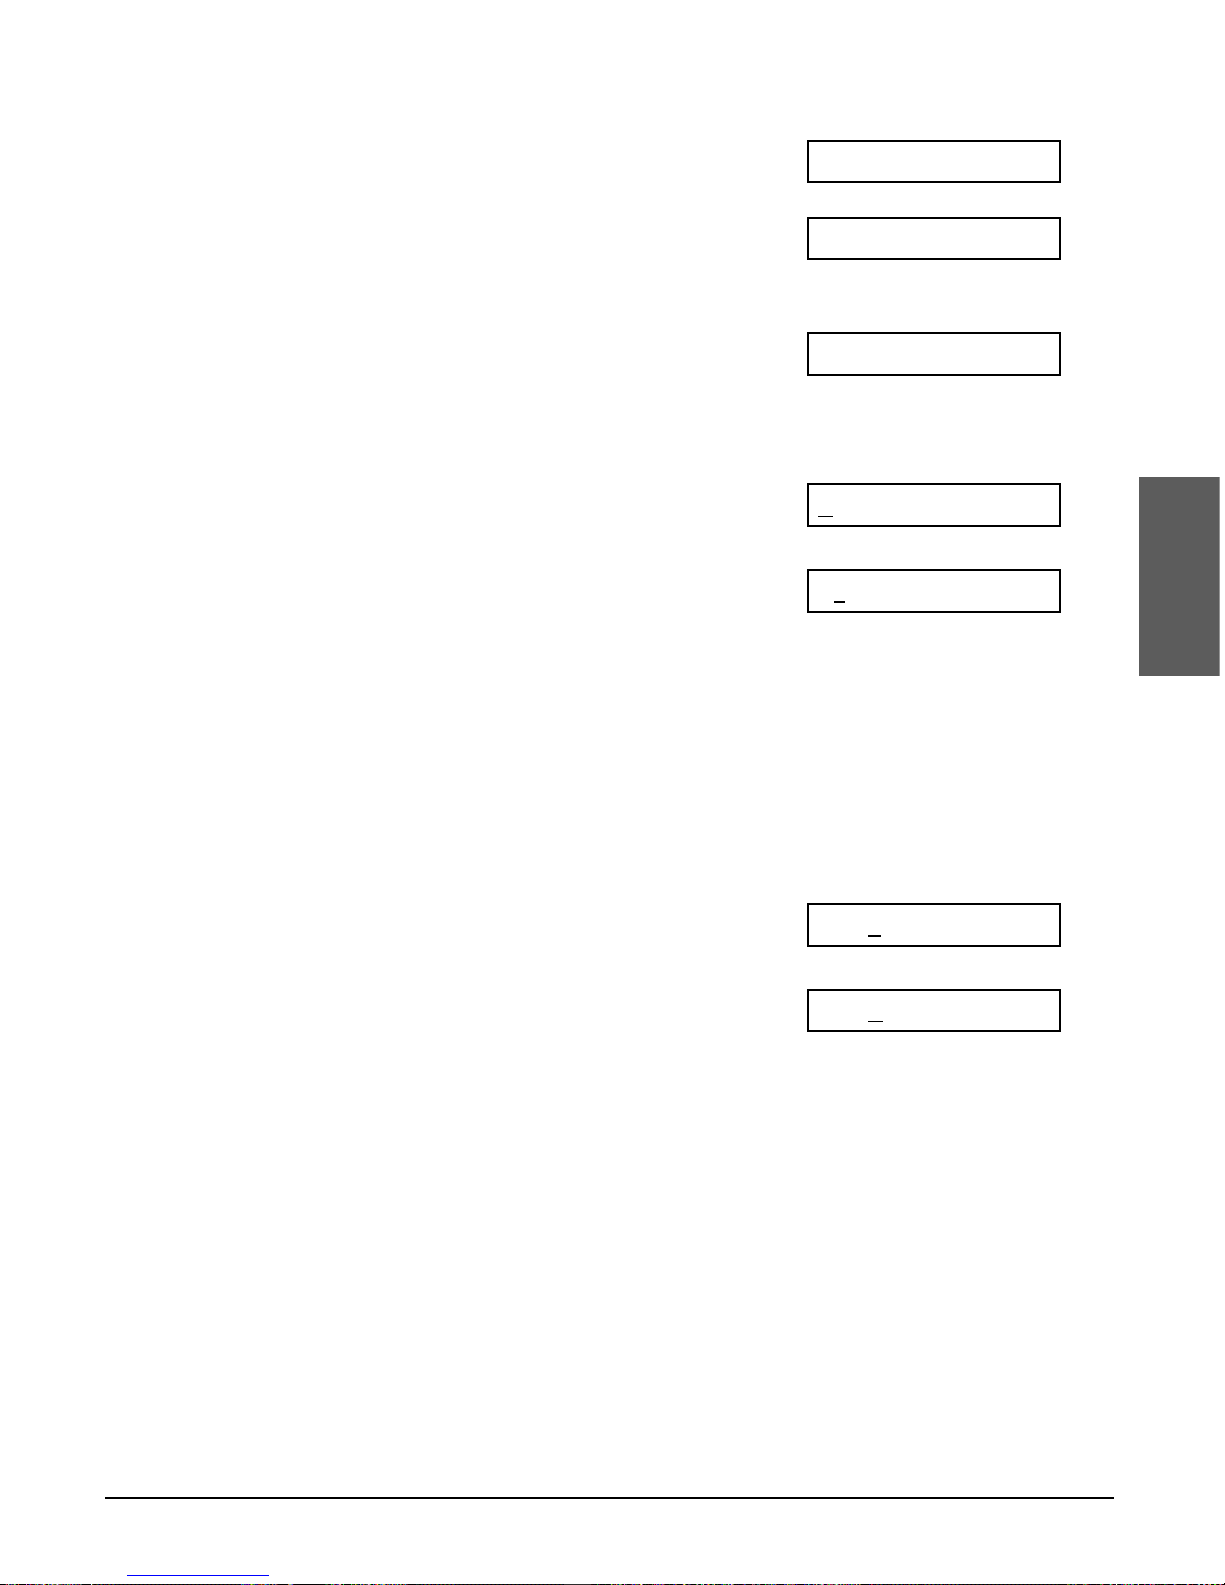
■ Entering Numbers
1 Press T to switch to number mode (:1).
2 Press the numeric button that contains the
Ex:
number you want.
• To enter a space, press Space.
3 Continue entering other numbers using the
Ex:
numeric buttons.
■ Entering Symbols
1 Press # repeatedly until the symbol
Ex:
you want appears.
2 If you want to enter another symbol, press
Ex:
r to move the cursor to the right, then
press # repeatedly until the symbol you
want appears.
Correcting a Mistake
You can clear an entire entry by pressing Clear. Alternatively, follow this procedure to
correct individual characters:
1 Use l or r to move the cursor under the
Ex:
incorrect character.
2 Use the numeric buttons to enter the correct
Ex:
character over the incorrect character.
3 When you have finished making corrections,
press Set to register your new entry.
CANON:A
CANEN:A
#– :1
# :1
10_ :1
1_ :1
_:1
Page 40
3-6 Registering Information Chapter 3
Registering Sender Information
What is Sender Information?
When you receive a fax, the name of the person or company who sent you the fax,
their fax/telephone number, and the date and time of transmission may be printed in
small type at the top of each page. This information is called the Sender information or
the Transmit Terminal Identification (TTI). Similarly, you can register your details in your
MultiPASS so that whenever you send a fax, the other party knows who sent it, and
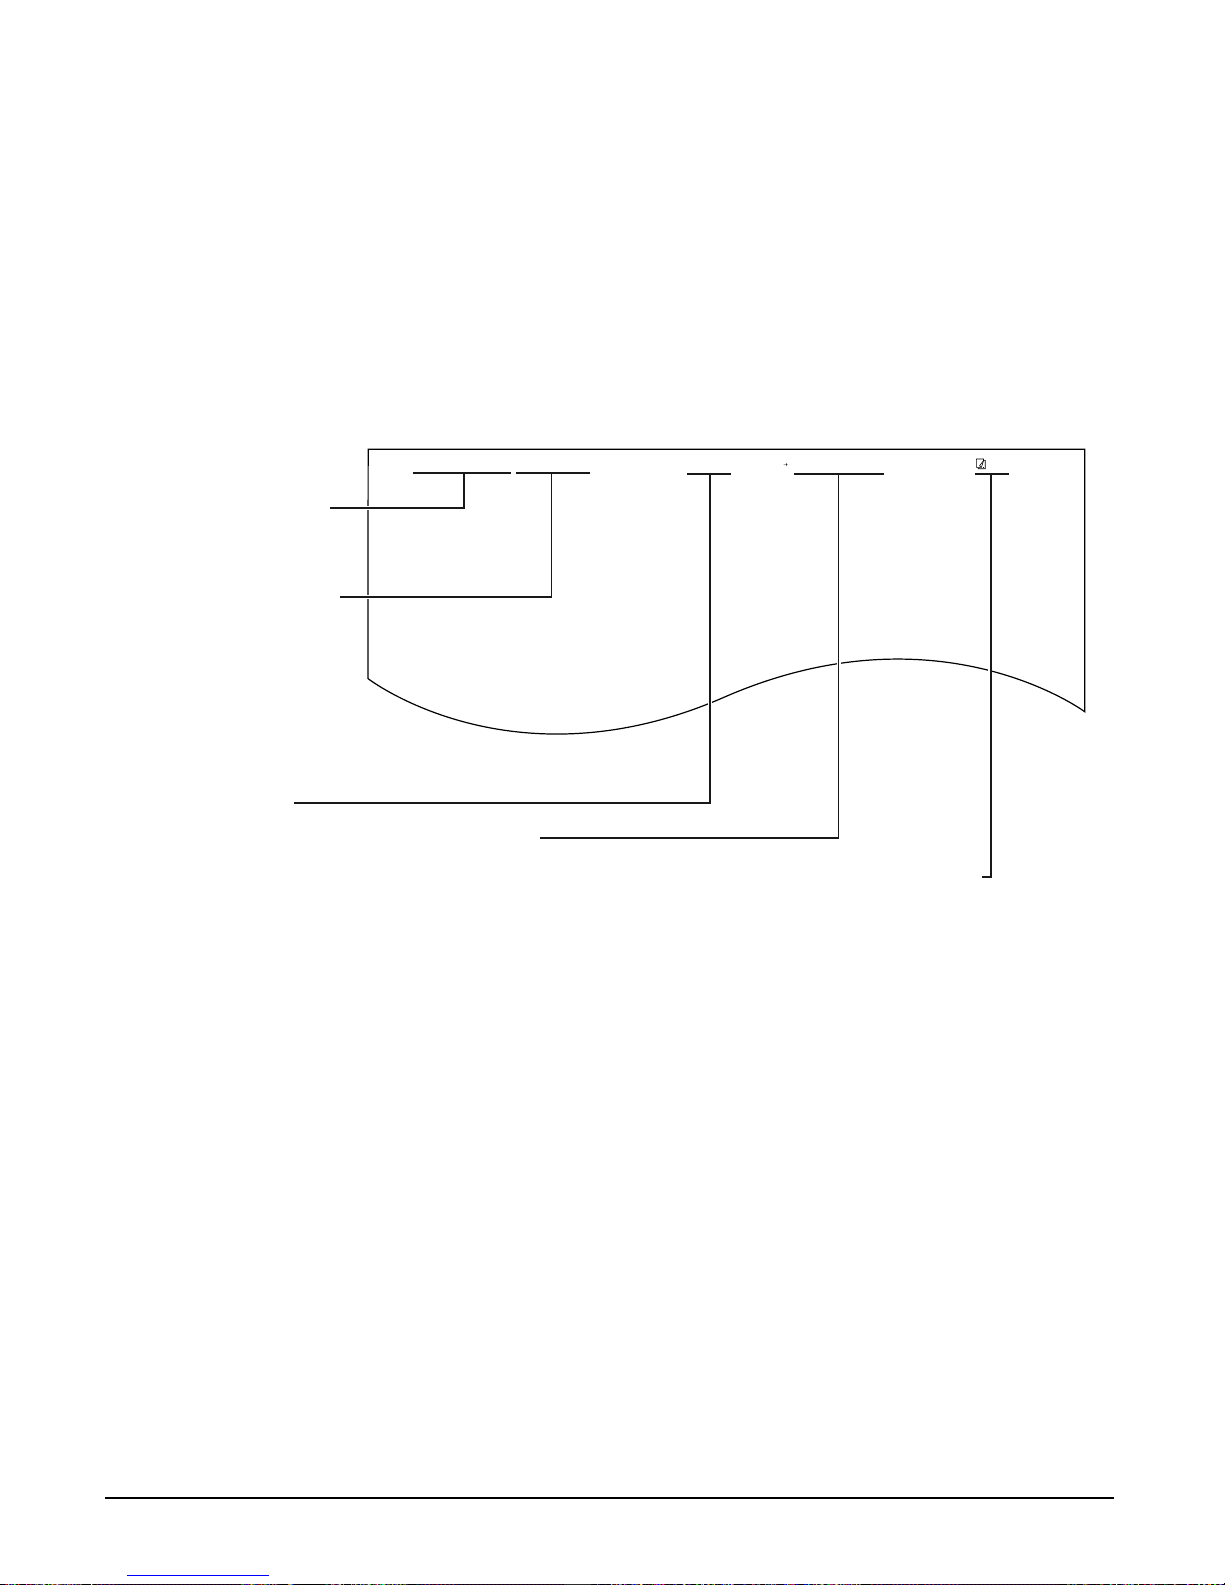
when it was sent. Below is an example of how your sender information would print on a
fax sent from your MultiPASS:
n
• You can set the sender information to print inside or outside the image area.
(1 TTI POSITION, p. 14-4)
• You can enter the sender information from the operation panel (1 p. 3-7) or from the
MultiPASS Suite. (1 MultiPASS Suite User’s Guide)
27/12 2001 10:12 FAX 123 4567 CANON CANON CANADA 001
THE SLEREXE COMPANY LIMITED
SAPORS LANE•BOOLE•DORSET•BH25 8ER
TELEPHONE BOOLE (945 13) 51617 – FAX 123456
Our Ref. 350/PJC/EAC
DATE AND TIME
Date and time of
transmission.
FAX/TELEPHONE
NUMBER
Your fax/telephone
number.
You can select FAX or
TEL to be displayed in
front of the number.
(1 TELEPHONE #
MARK, p. 14-4)
UNIT NAME
Your name or
company name.
DESTINATION
If you used memory sending and
dialled the fax number using
speed dialling, the other party’s
name appears here.
PAGE NUMBER
The page number
of the fax.
Page 41
Chapter 3 Registering Information 3-7
Registering
Information
Entering the Date and Time
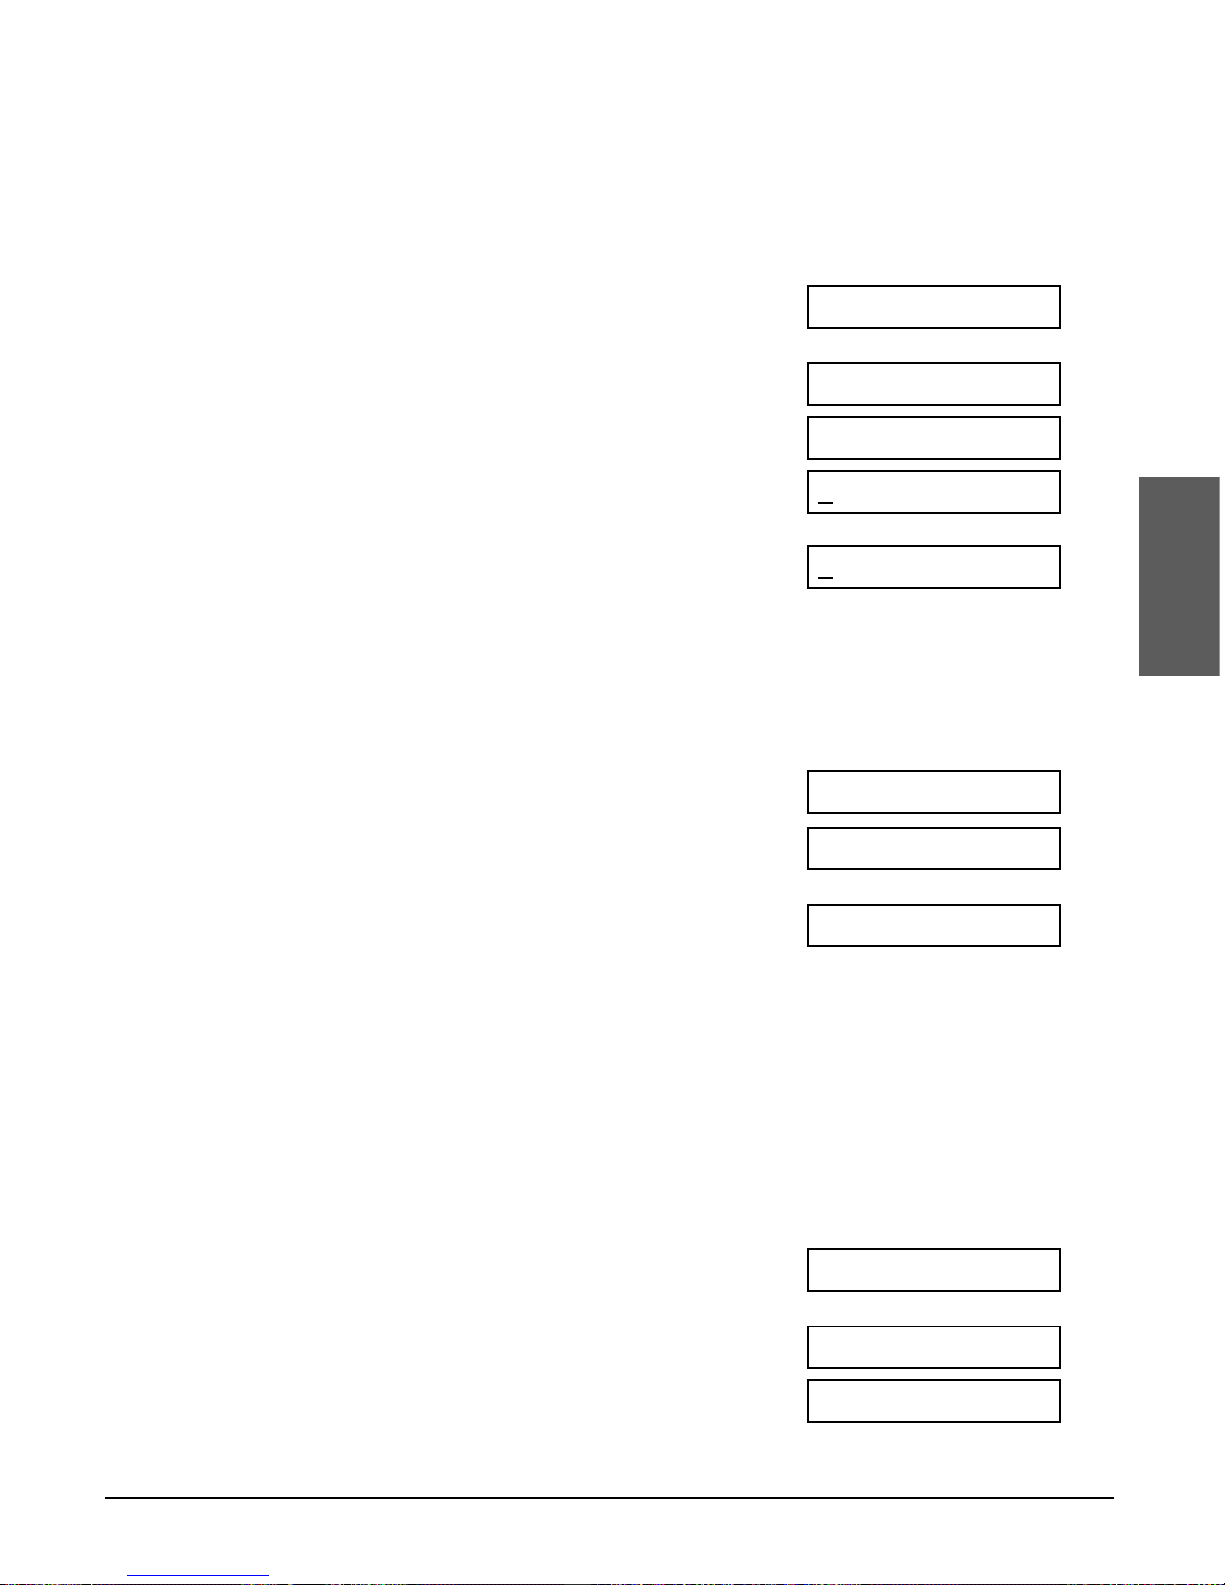
Follow this procedure to set the current date and time:
1 Press Function.
2 Press Data Registration.
3 Press Set three times.
• The date and time currently set for the unit
are displayed.
Ex:
4 Use the numeric buttons to enter the correct
Ex:
day, month, year, and time in this order.
• Enter only the last two digits of the year.
• Use the 24-hour format for the time (e.g.
1:00 p.m. as 13:00).
• If you make a mistake, press Clear and re-
enter the date and time.
5 Press Set.
6 Press Stop to return to standby mode.
Ex:
Registering Your MultiPASS Number and Name
Follow this procedure to register the fax/telephone number for your MultiPASS, and
your name or company name:
1 Press Function.
2 Press Data Registration.
3 Press Set twice.
DATE & TIME
USER SETTINGS
DATA REGSTRATION
15:00 FaxOnly
UNIT TELEPHONE #
DATA ENTRY OK
27/12 2001 15:00
20/12 2001 13:30
DATE & TIME
USER SETTINGS
DATA REGSTRATION
Page 42
3-8 Registering Information Chapter 3
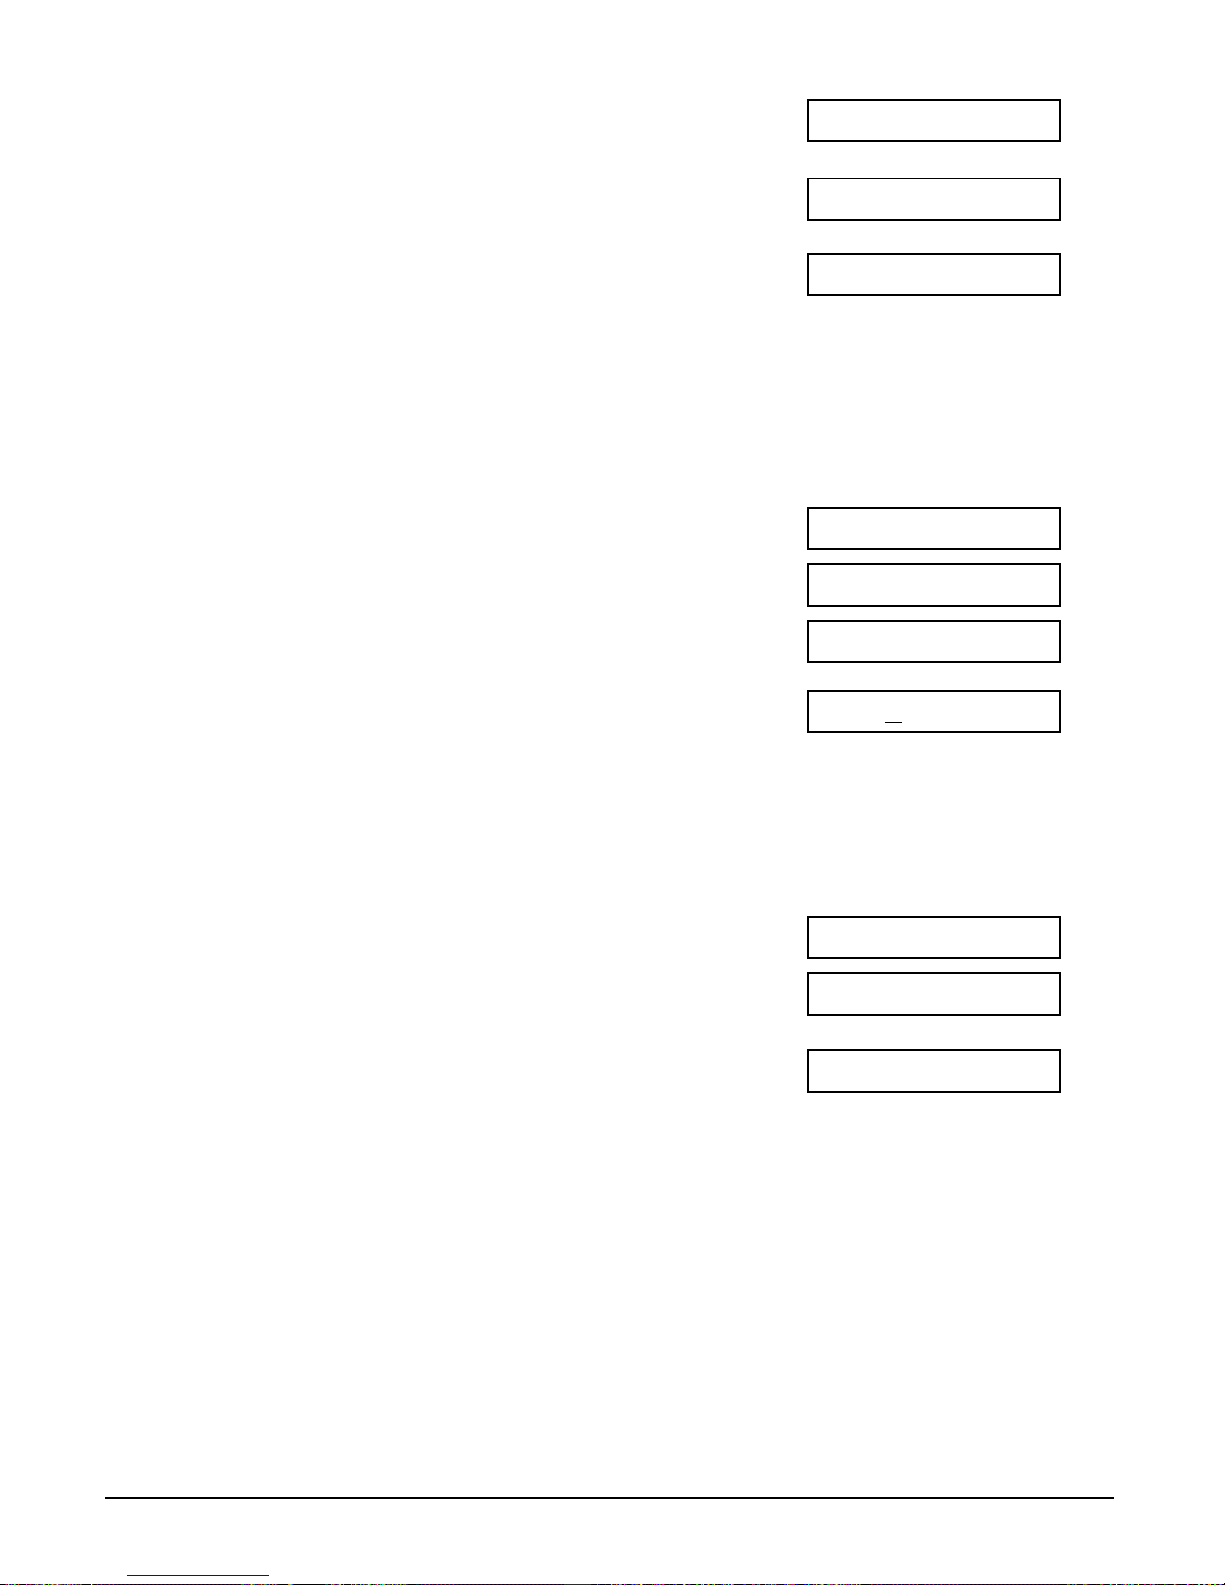
4 Use d or u to select UNIT TELEPHONE #.
5 Press Set.
6 Use the numeric buttons to enter your fax/
Ex:
telephone number (max. 20 digits, including
spaces).
• To enter a space, press Space.
• To enter a plus sign (+) before the number,
press Tone/+.
• If you make a mistake, press Clear and reenter the number.
7 Press Set twice.
8 Use the numeric buttons to enter your name
Ex:
or company name (max. 24 characters,
including spaces).
• If you are unsure how to enter characters,
1 p. 3-3.
• If you make a mistake, press Clear and reenter the name.
9 Press Set.
10 Press Stop to return to standby mode.
Ex:
15:00 FaxOnly
TX TERMINAL ID
DATA ENTRY OK
CAN0N :A
_:A
UNIT NAME
DATA ENTRY OK
TEL= 123 4567
TEL=
UNIT TELEPHONE #
Page 43
Chapter 3 Registering Information 3-9
Registering
Information
Printing a List to Check Information Registered in
Your MultiPASS
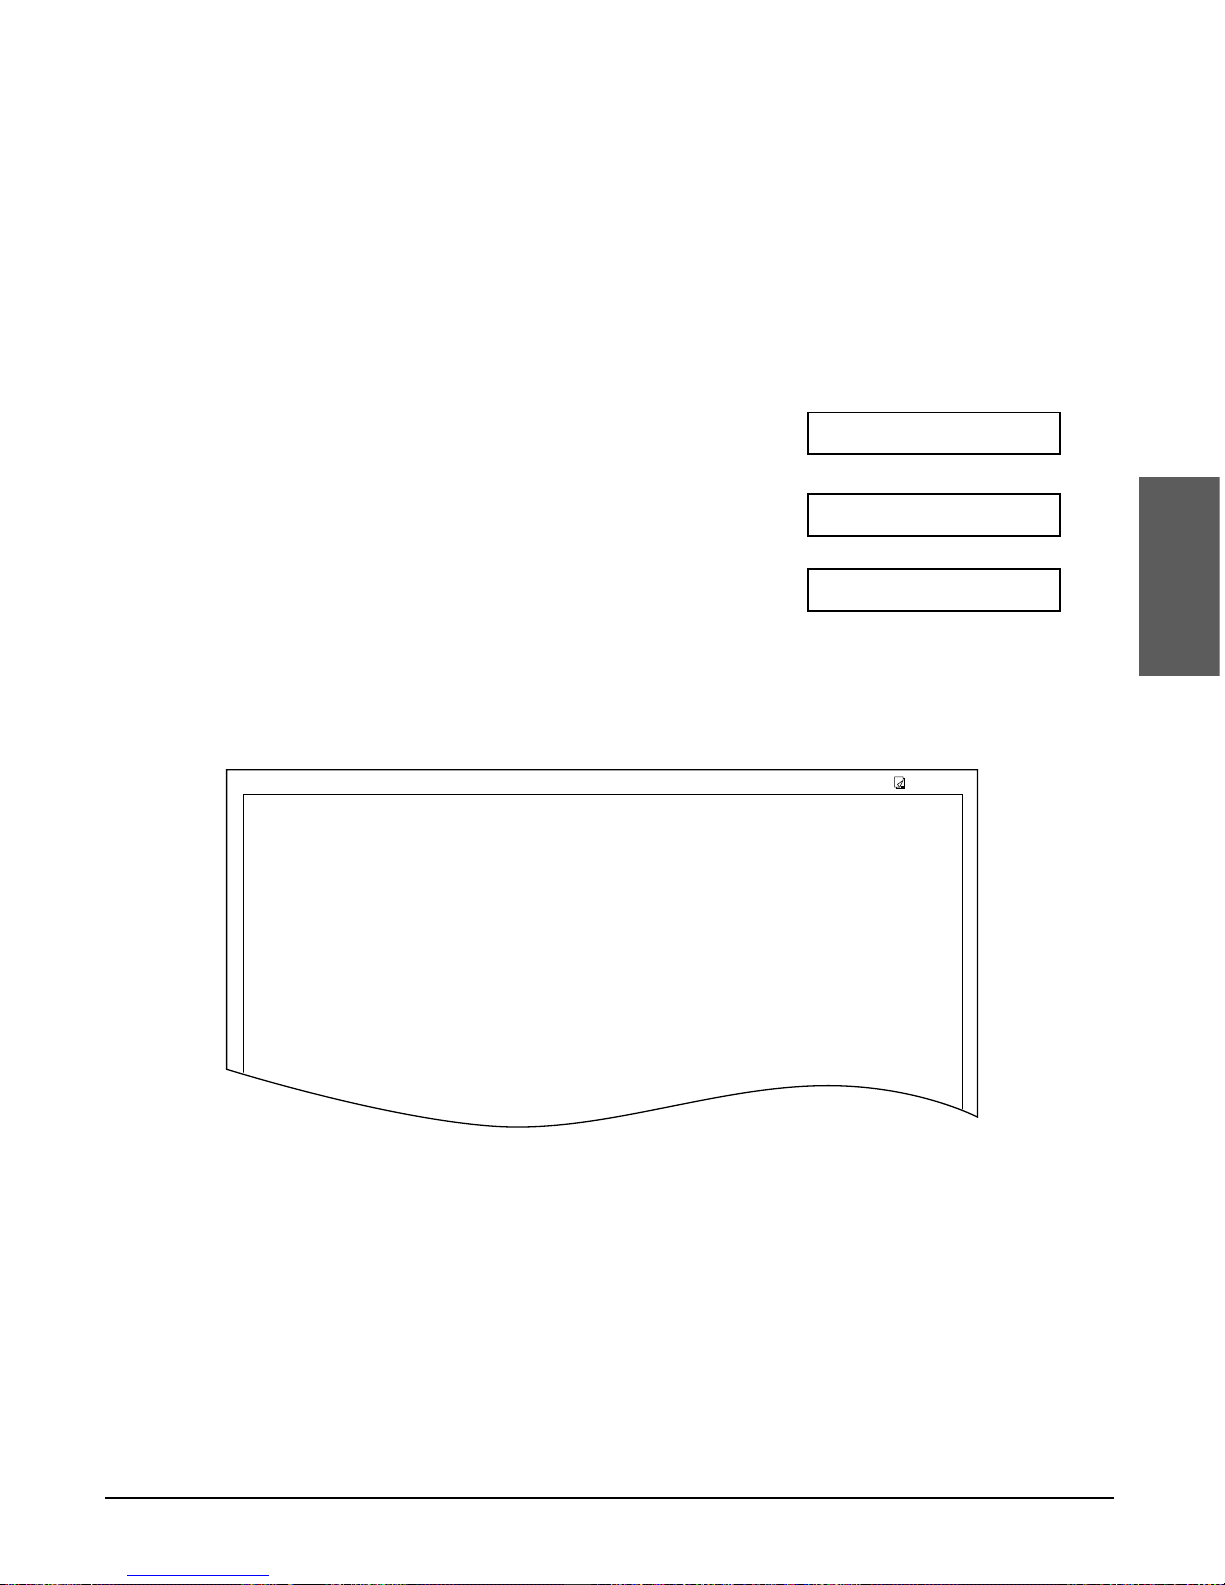
You can print the USER’S DATA LIST to check the sender information and current
settings of your MultiPASS.
Follow this procedure to print the USER’S DATA LIST:
1 Press Function.
2 Press Report.
3 Use d or u to select USER DATA LIST.
4 Press Set.
• The MultiPASS prints the USER’S DATA LIST.
The sender information is shown at the beginning of the list. The current settings of the
MultiPASS are listed after this.
****************************
****************************
*** ***
USER’S DATA LIST
1.USER SETTINGS
UNIT TELEPHONE # 123 4567
UNIT NAME CANON
TX TERMINAL ID ON
TTI POSITION OUTSIDE IMAGE
TELEPHONE # MARK FAX
SCANNING CONTRAST STANDARD
OFFHOOK ALARM ON
VOLUME CONTROL
CALLING VOLUME 2
KEYPAD VOLUME 2
ALARM VOLUME 2
LINE MONITOR VOL. 2
RX CALL LEVEL HIGH
TEL LINE TYPE TOUCH TONE
27/12 2001 17:23 FAX 123 4567 CANON 001
PRINTING REPORT
USER DATA LIST
ACTIVITY REPORT
Page 44
3-10 Registering Information Chapter 3
Setting the Telephone Line Type
Before using your MultiPASS, you need to make sure it is set for your telephone line
type*. If you are unsure of your telephone line type, check with your local telephone
company.
Follow this procedure if you need to change the telephone line type setting:
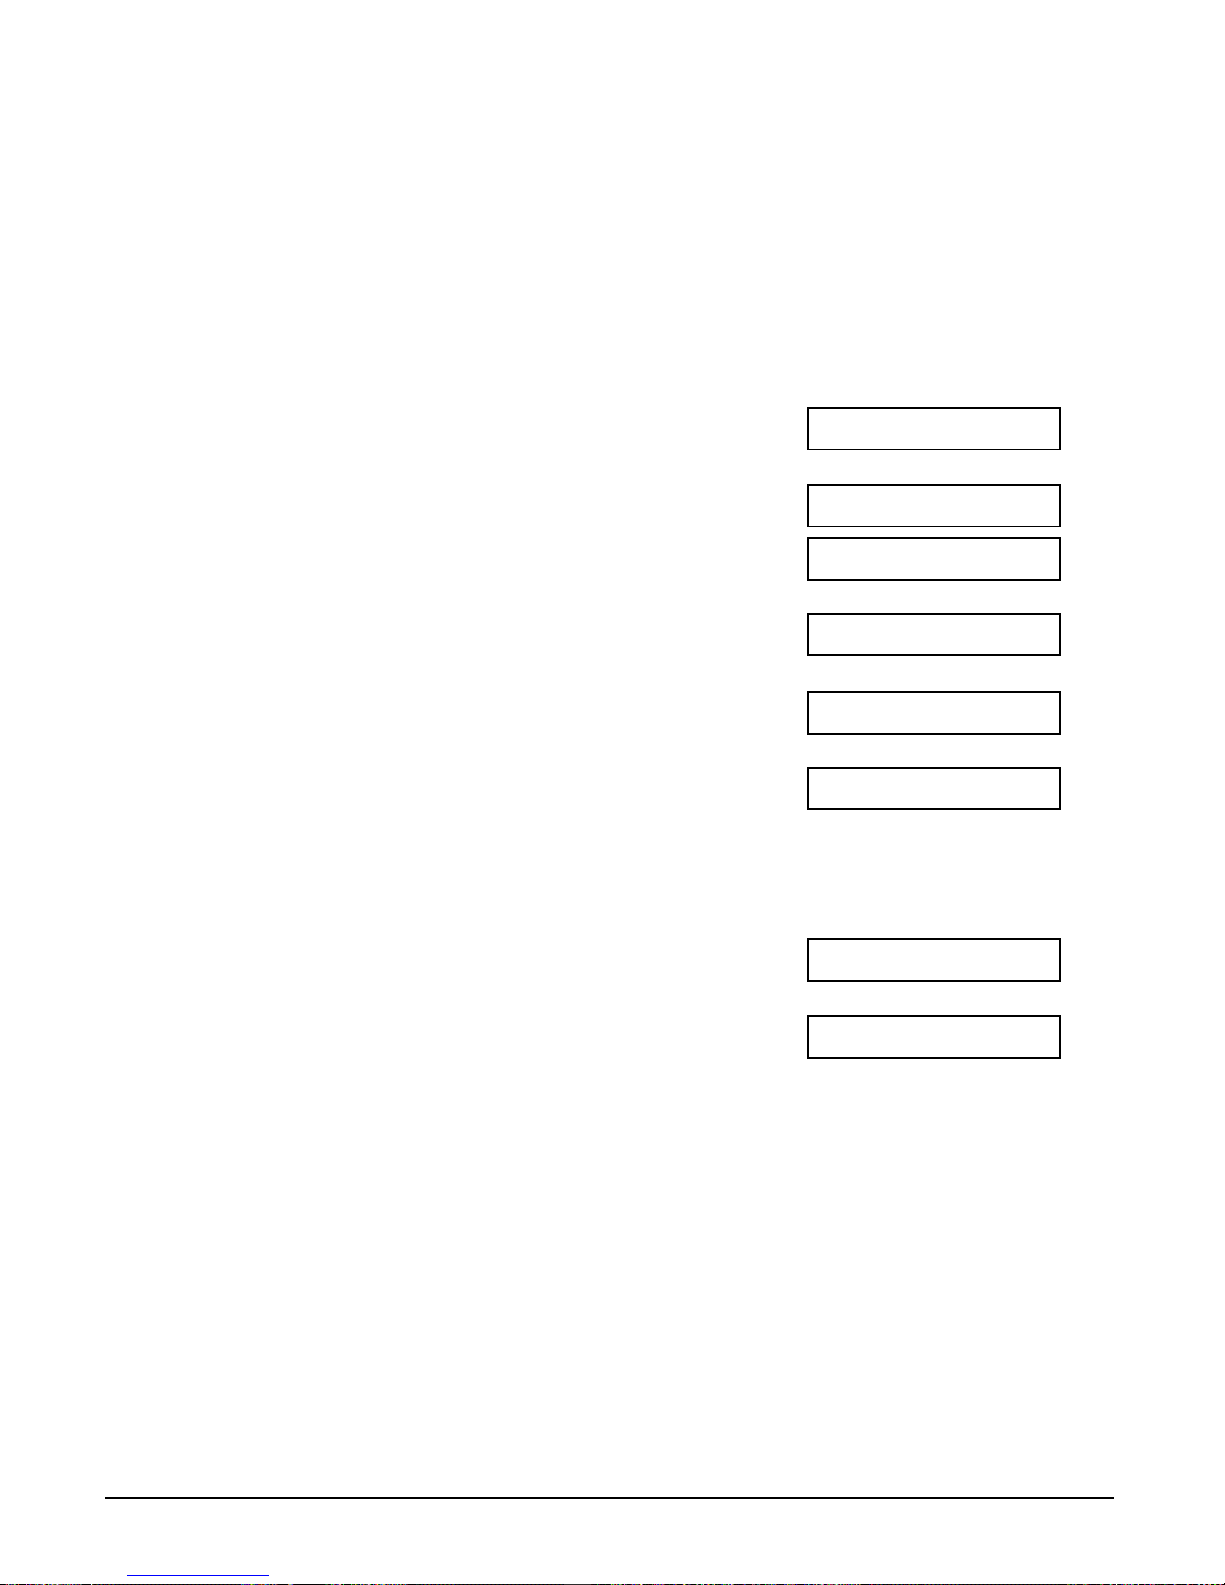
1 Press Function.
2 Press Data Registration.
3 Press Set twice.
4 Use d or u to select TEL LINE TYPE.
5 Press Set.
Ex:
6 Use d or u to select the telephone line
Ex:
type setting you want.
• You can select from the following:
– ROTARY PULSE
– TOUCH TONE
7 Press Set.
8 Press Stop to return to standby mode.
Ex:
15:00 FaxOnly
R-KEY SETTING
ROTARY PULSE
TOUCH TONE
TEL LINE TYPE
DATE & TIME
USER SETTINGS
DATA REGSTRATION
*The default setting for the UK, Australia, New Zealand, and Singapore is TOUCH TONE.
The default setting for Ireland, Hong Kong, and Malaysia is ROTARY PULSE.
Page 45
Chapter 3 Registering Information 3-11
Registering
Information
Dialling Through a Switchboard
A PBX (Private Branch Exchange) is an on-site telephone switchboard. If your
MultiPASS is connected through a PBX or other telephone switching system, you have
to dial the outside line access number first, and then the number of the party you are
calling.
To facilitate this procedure, you can register the access type and the outside line
access number under the R button so that you only need to press Function and R
before dialling the fax/telephone number you want to reach. This is explained below.
Registering the R Button
Follow this procedure to register the access type and outside line access number under
the R button:
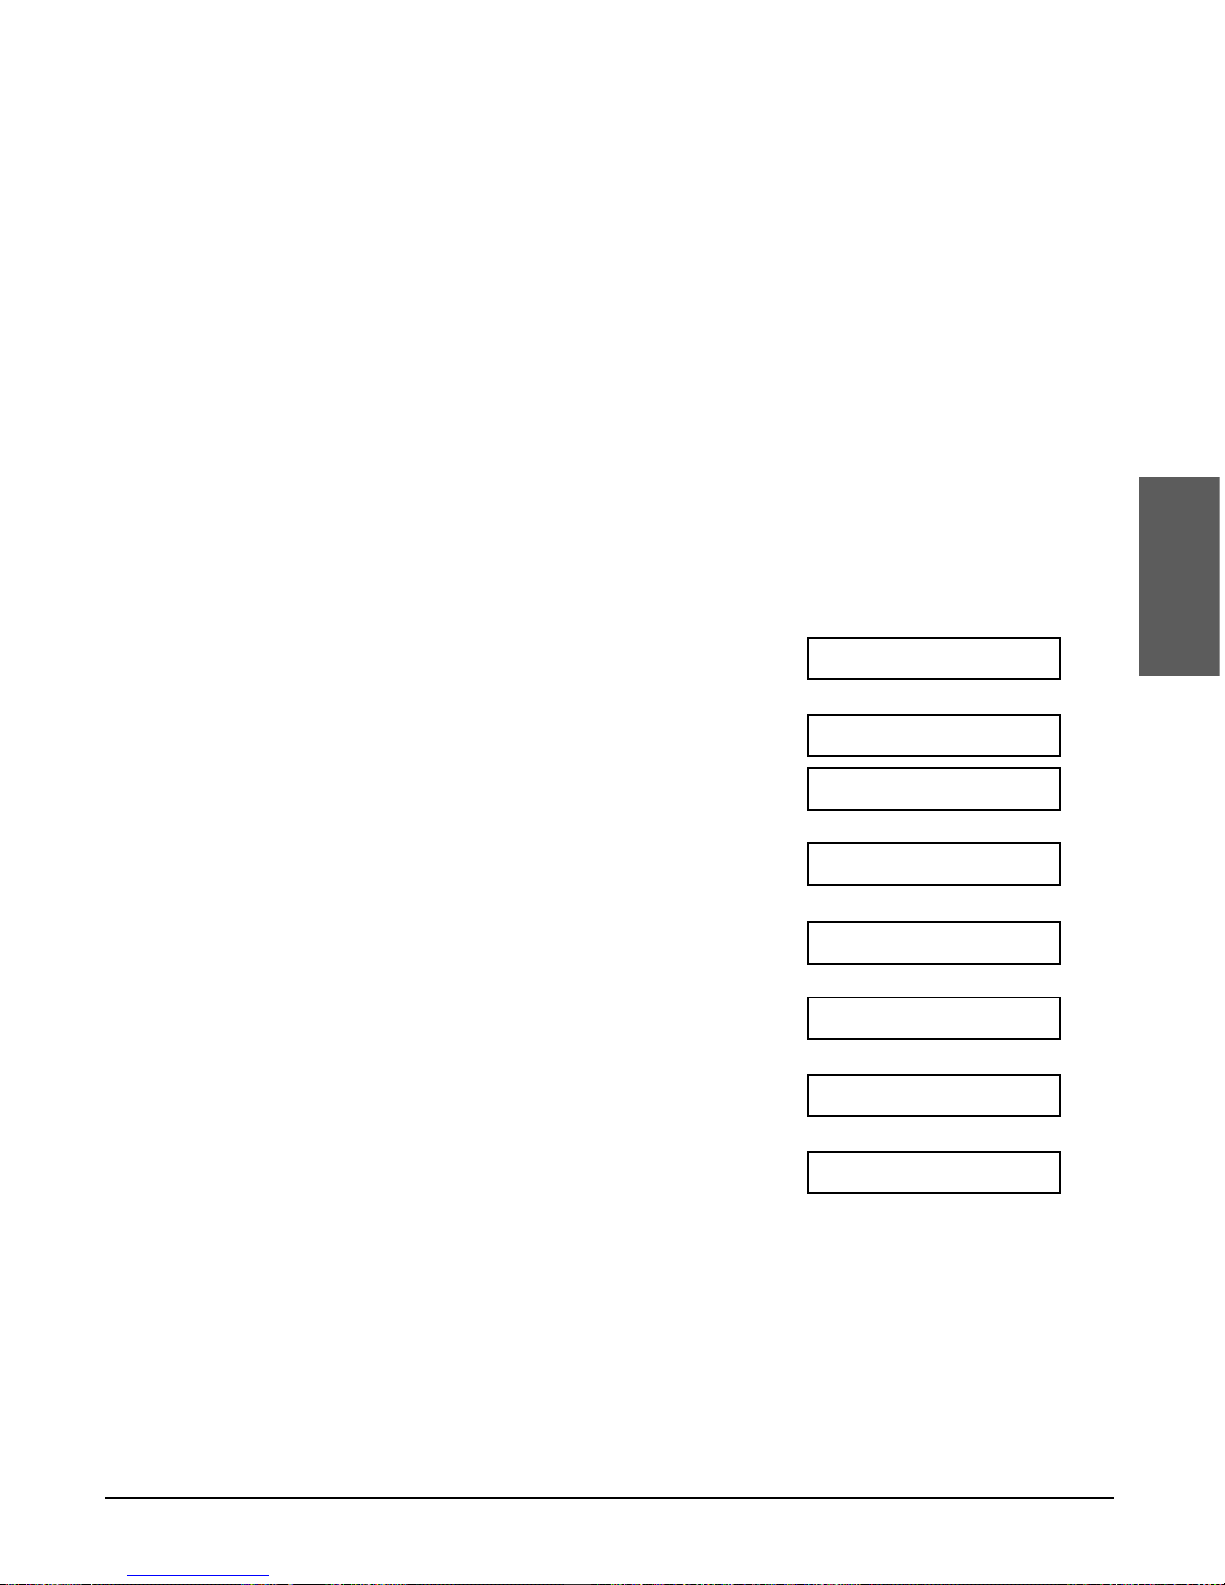
1 Press Function.
2 Press Data Registration.
3 Press Set twice.
4 Use d or u to select R-KEY SETTING.
5 Press Set.
6 Use d or u to select PBX.
7 Press Set.
Ex:
8 Use d or u to select the access type of
Ex:
your switching system.*
• You can select from the following:
– PREFIX
– HOOKING
– EARTH CONNECTION**
PREFIX
EARTH CONNECTION
PBX
PSTN
R-KEY SETTING
DATE & TIME
USER SETTINGS
DATA REGSTRATION
*The default setting for the UK and Ireland is EARTH CONNECTION.
The default setting for Australia, New Zealand, Hong Kong, Malaysia, and Singapore is HOOKING.
**EARTH CONNECTION is not available in Australia, New Zealand, Hong Kong, Malaysia, or Singapore.
Page 46
3-12 Registering Information Chapter 3
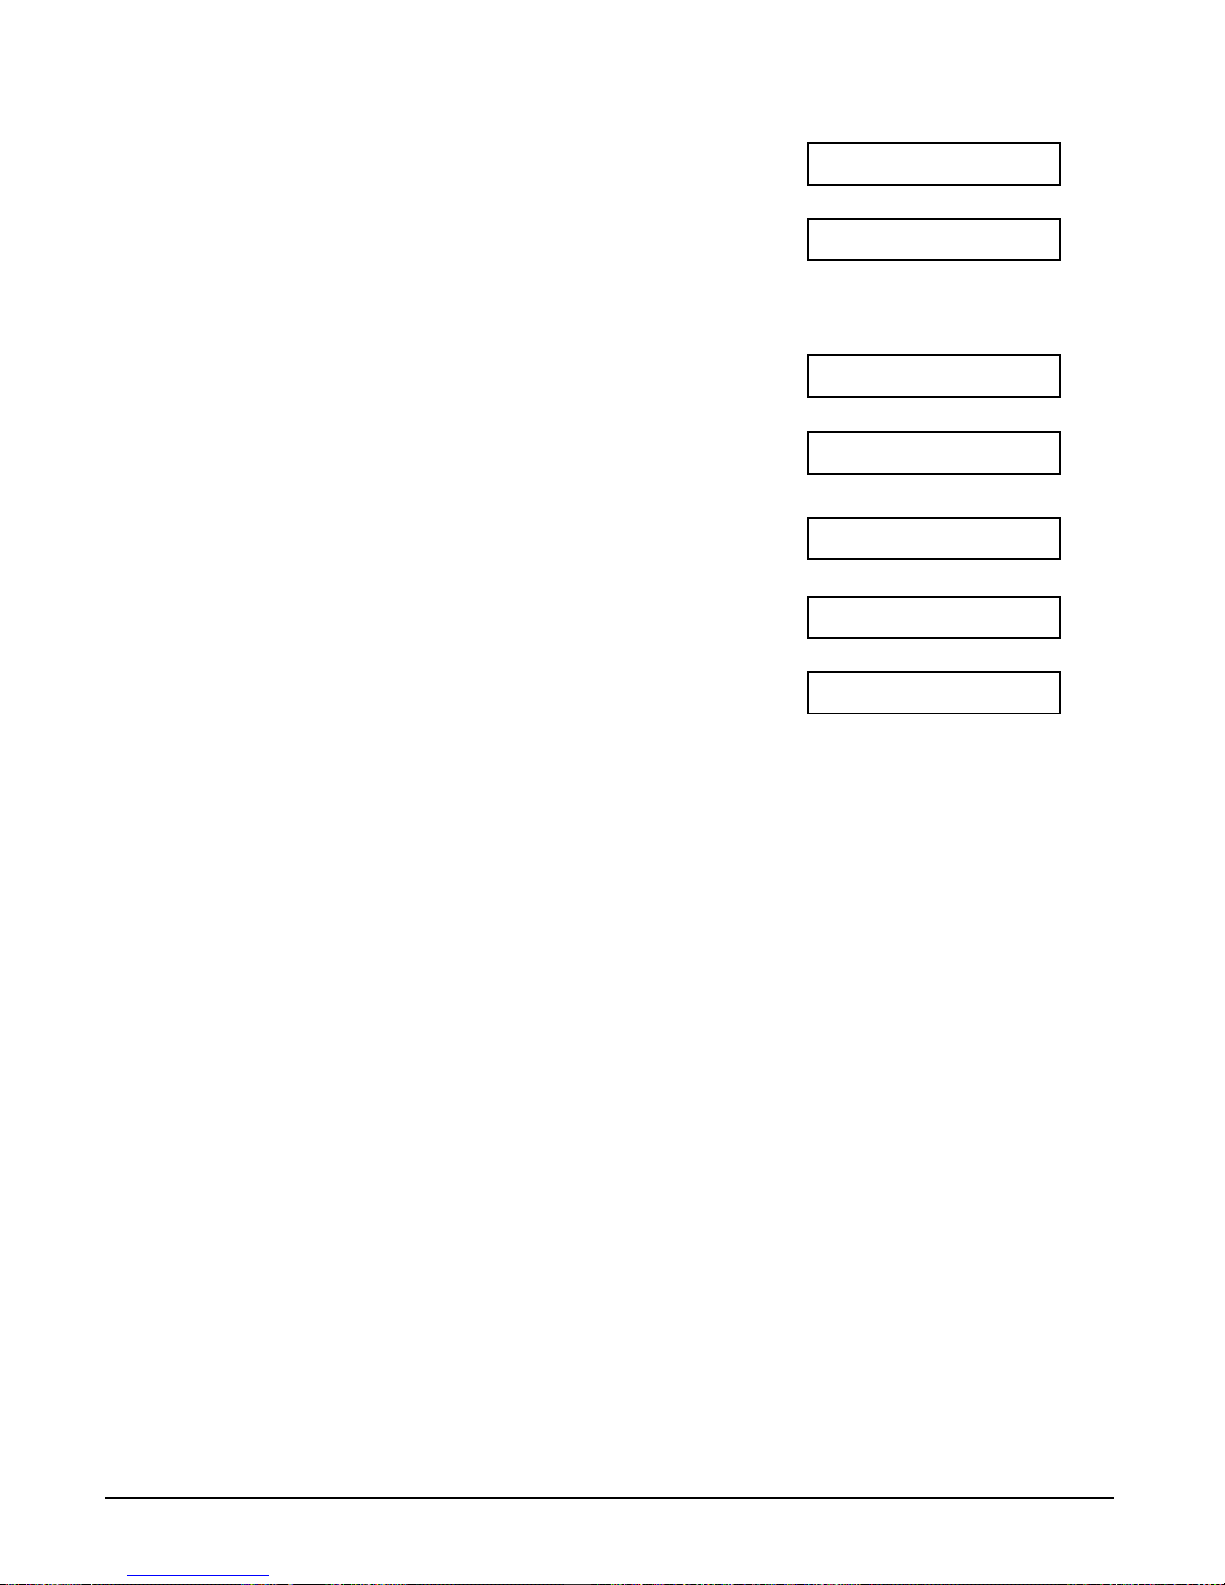
■ If you selected HOOKING or EARTH CONNECTION in step 8:
9 Press Set.
Ex:
10 Press Stop to return to standby mode.
Ex:
■ If you selected PREFIX in step 8:
9 Press Set.
10 Use the numeric buttons to enter the
Ex:
outside line access number (max. 20 digits).
11 Press R/Pause to enter a pause.
Ex:
12 Press Set.
Ex:
13 Press Stop to return to standby mode.
Ex:
15:00 FaxOnly
REPORT SETTINGS
123456P
123456
15:00 FaxOnly
REPORT SETTINGS
Page 47

Chapter 4 Document Handling 4-1
Document
Handling
Chapter 4
Document Handling
Document Requirements.........................................................................4-2
Scanned Area of a Document................................................................4-3
Loading Documents.................................................................................4-4
Problems With Multipage Documents....................................................4-6
Adding Pages to the Document .............................................................4-6
Page 48
4-2 Document Handling Chapter 4
Document Requirements
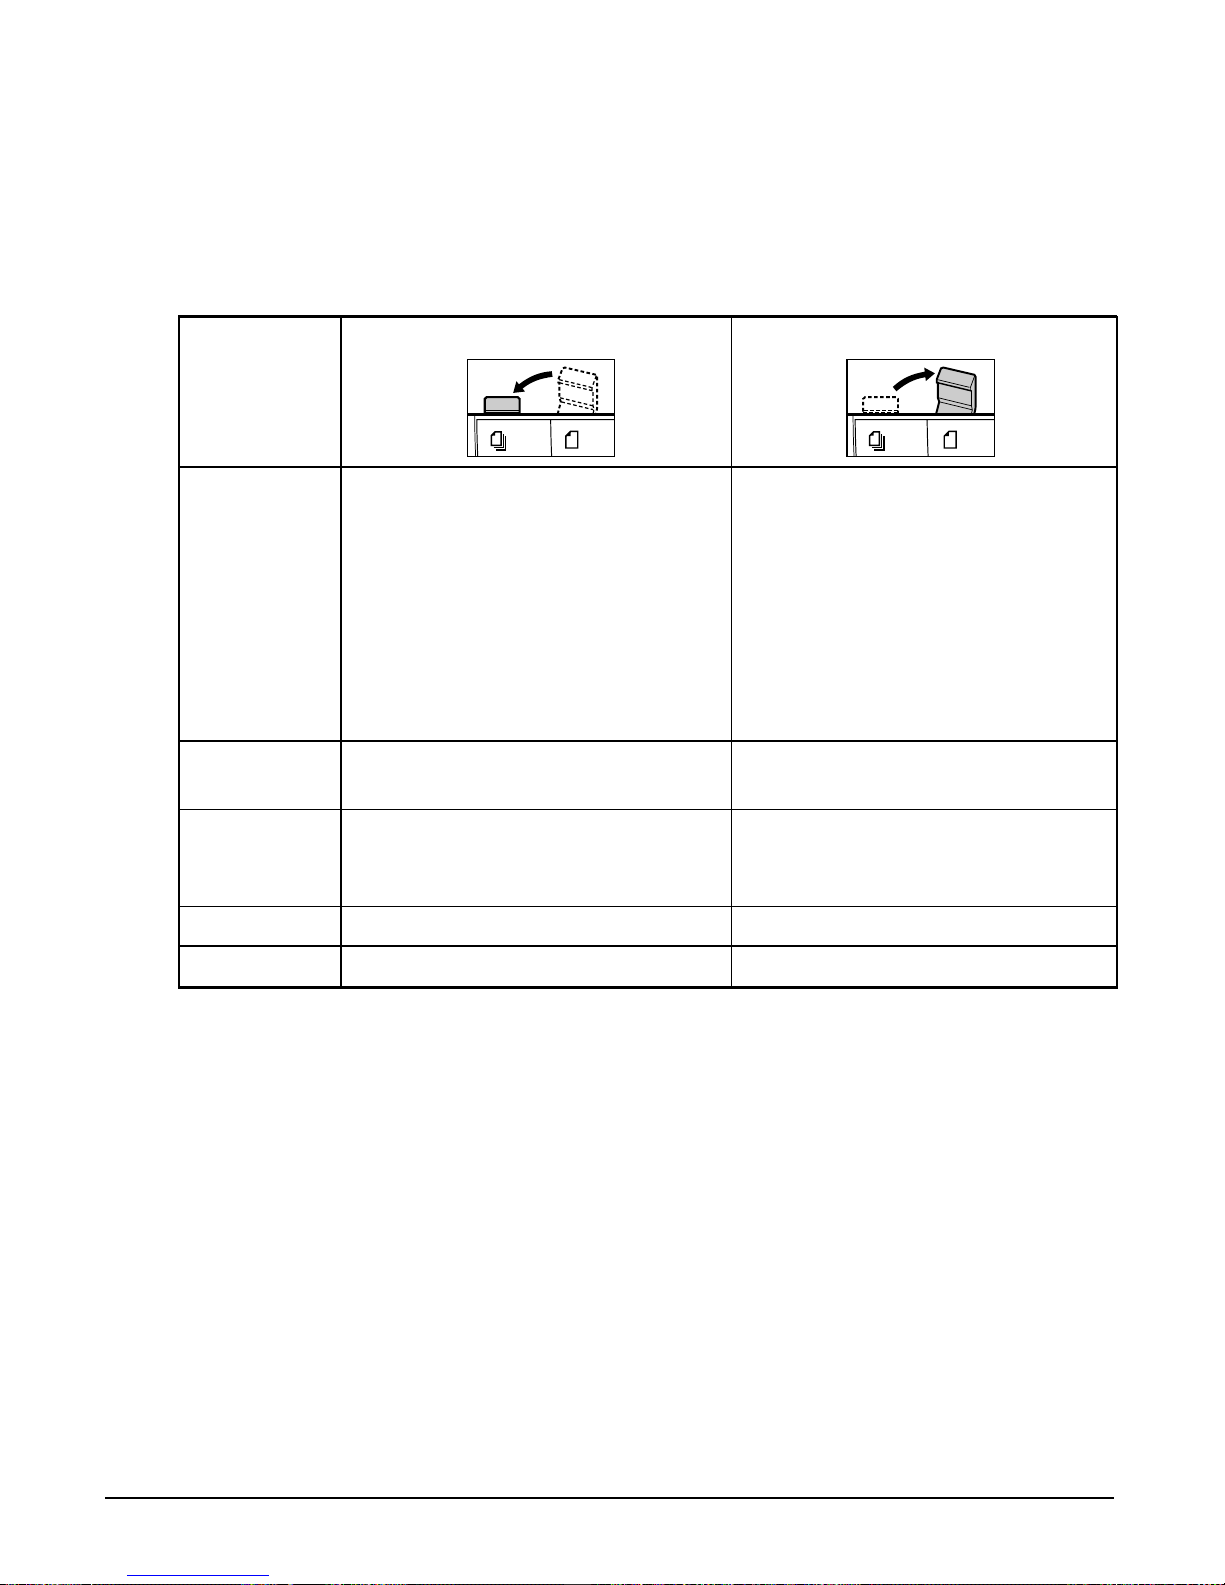
The documents you load into the ADF for sending, copying, and scanning must meet
the requirements shown in the table below.
Depending on your document, select automatic or manual document feed with the
document feed lever located at the top of the operation panel.
a (Automatic Document Feed) m (Manual Document Feed)
Type of Multipage documents of the same • Thick paper
document thickness and weight. • Documents with uneven surfaces
• Photographs
• Small documents (e.g. business
cards, postcards)
• Special types of paper
(Use of a carrier sheet is
recommended to avoid scratching
the surface of documents.)
Size Max. 218 mm × Approx. 1 m Max. 218 mm × Approx. 1 m
(W × L) Min. 80 × 45 mm Min. 80 × 45 mm
Quantity Max. 20 A4- or letter-size sheets* 1 sheet
Max. 10 legal-size sheets*
1 sheet for sizes other than these.
Thickness 0.06 to 0.13 mm 0.06 to 0.43 mm
Weight 40 to 90 g/m
2
40 to 340 g/m
2
*75 g/m2paper
Page 49

Chapter 4 Document Handling 4-3
Document
Handling
■ Problem Documents
• To prevent document jams in the ADF, do not use any of the following:
– Wrinkled or creased paper – Carbon paper or carbon-backed paper
– Curled or rolled paper – Coated paper
– Torn paper – Onion skin or thin paper
• Remove all fasteners (staples, paper clips, etc.) before loading the document into the
ADF.
• Make sure any glue, ink, or correction fluid on the document is completely dry before
loading it into the ADF.
• If you have a document that will not feed properly into the ADF, make a photocopy of
the document and load the copy instead.
Scanned Area of a Document
The shaded area in the illustration below shows the scanned area of a document.
Make sure your document’s text and graphics are within this area.
MAX. 4.5 mm
MAX. 4.0 mm
MAX. 4.0 mm
COLOUR FAX: MAX. 6.0 mm
MAX. 4.5 mm
A4
Page 50
4-4 Document Handling Chapter 4
Loading Documents
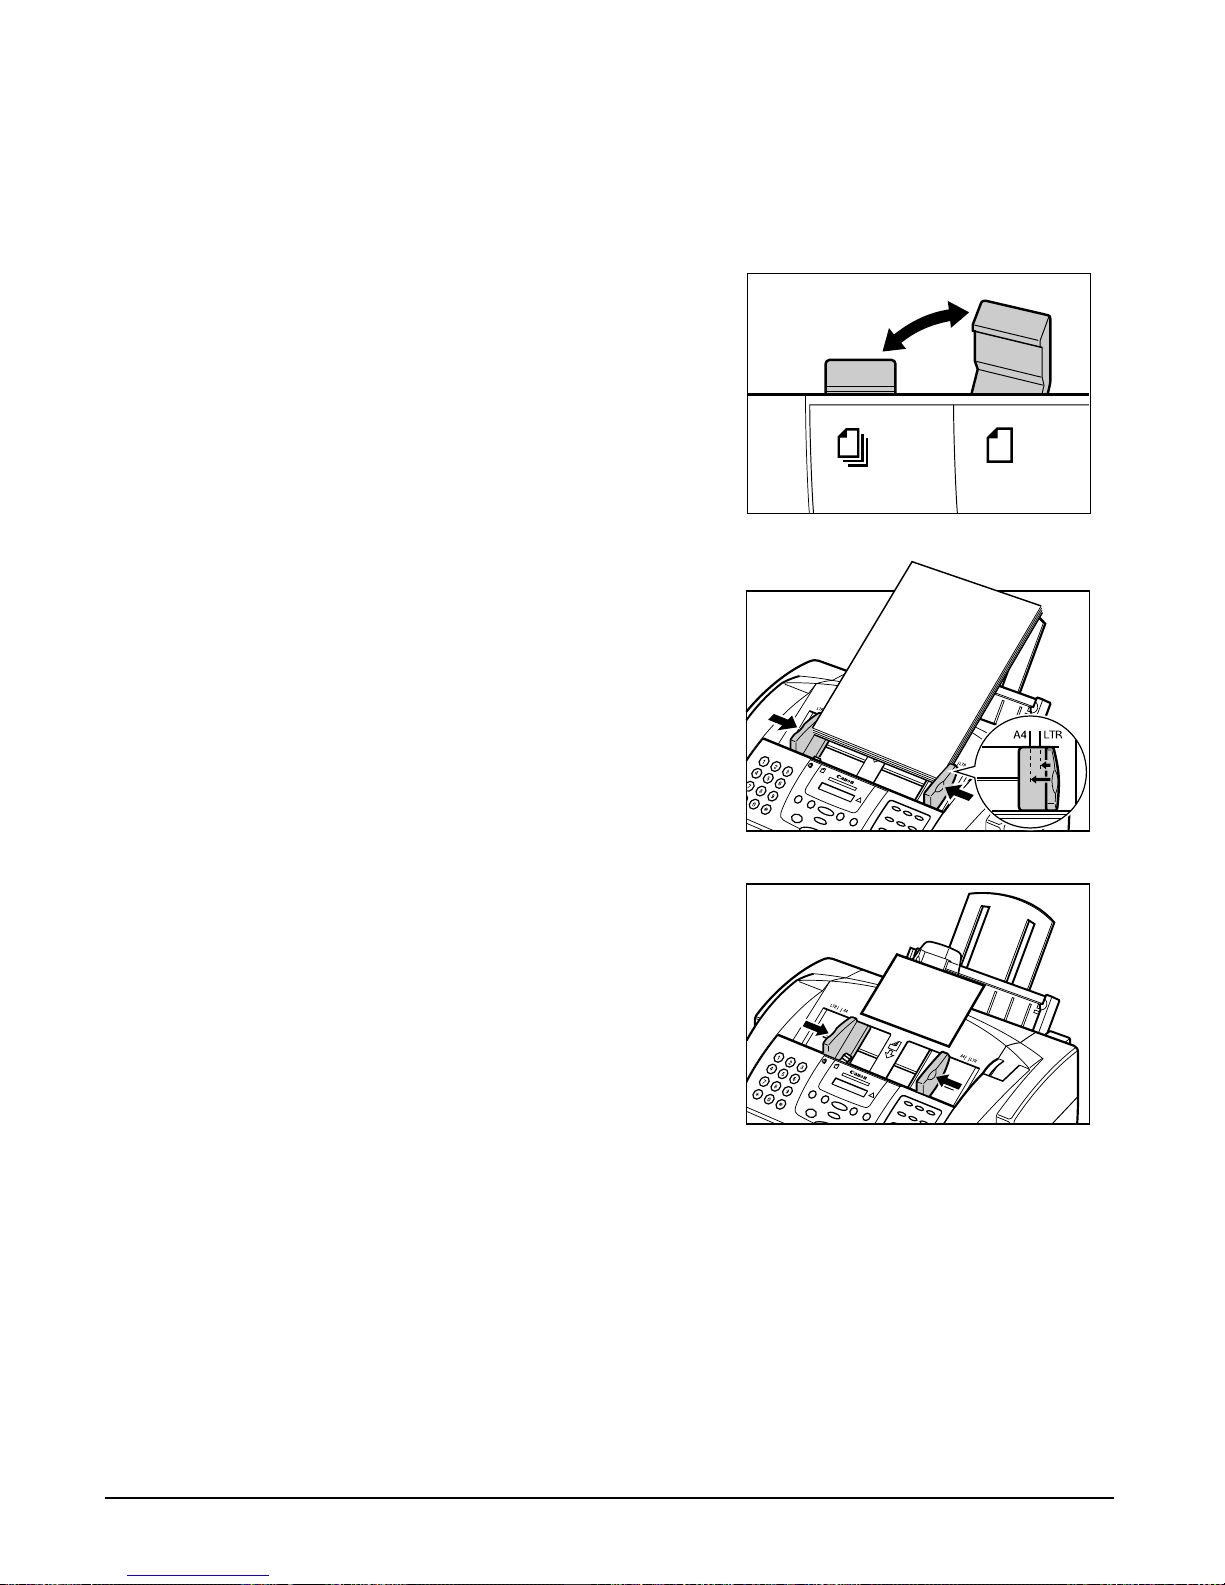
Follow this procedure to load documents into the ADF:
1 Open the document tray.
2 Set the document feed lever to
a (automatic) or m (manual) document
feed.
• If you are unsure which to select, 1 p. 4-2.
3 Adjust the document guides to the
width of the document.
(Manual document feed)
(Automatic document feed)
Page 51
Chapter 4 Document Handling 4-5
Document
Handling
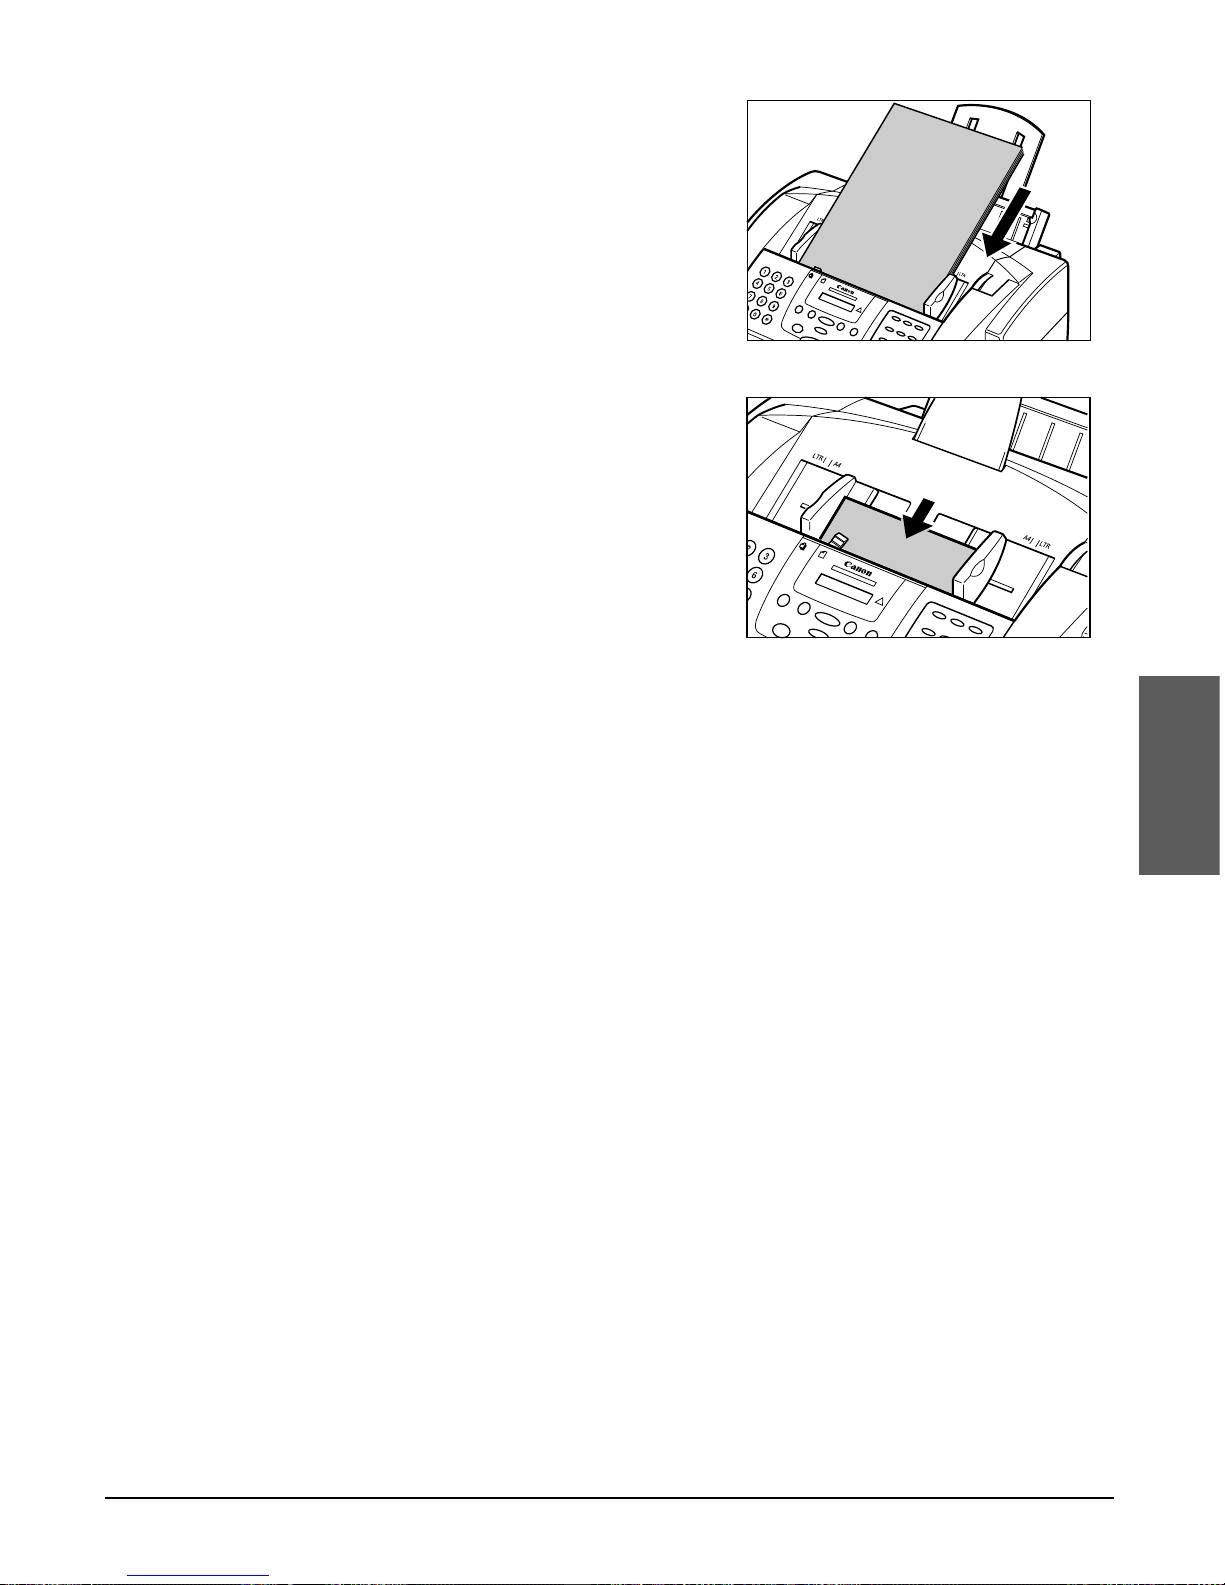
4 Gently insert the top of the document,
face down, into the ADF until you hear a
beep.
• Tap multipage documents on a flat surface
to even the edges before inserting them
into the ADF.
The document is now ready for scanning.
• For a multipage document, the pages are fed one by one from the bottom of the stack.
• Wait until all pages of your document have been scanned before starting a new job.
(Manual document feed)
(Automatic document feed)
Page 52
4-6 Document Handling Chapter 4
Problems With Multipage Documents
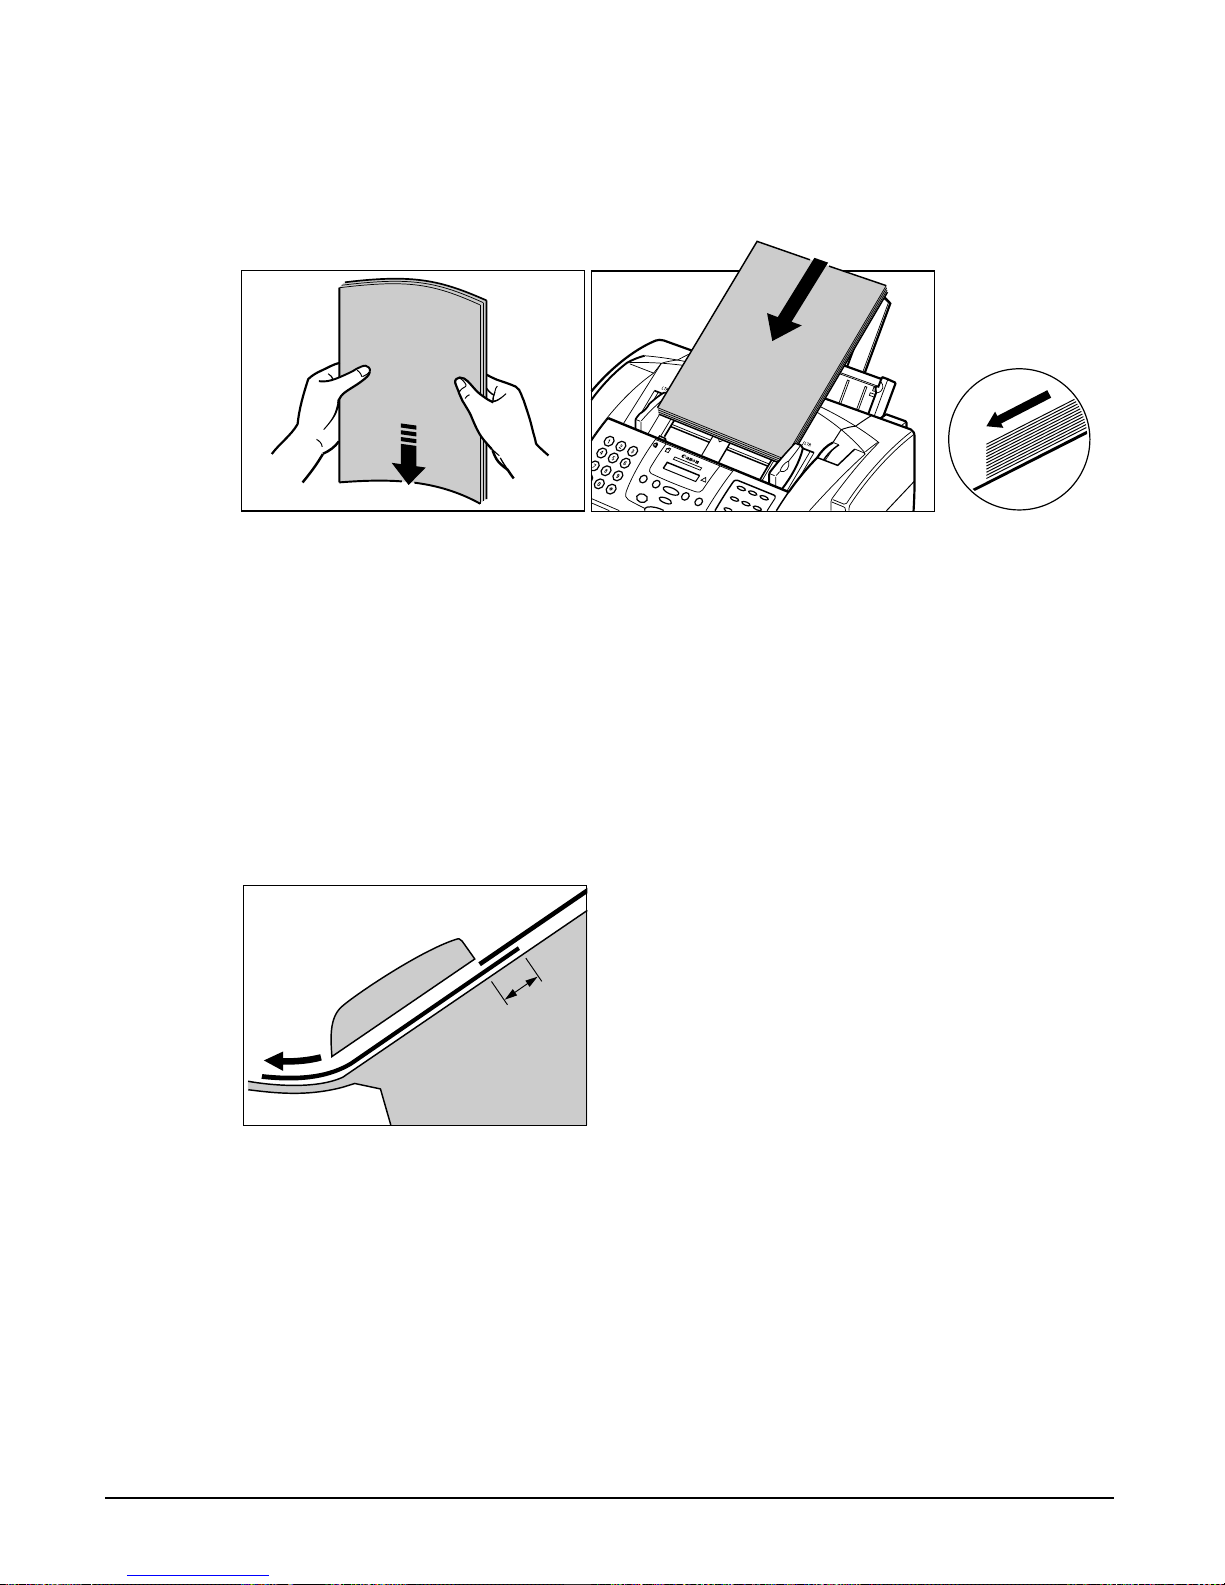
If you have trouble feeding multipage documents into the ADF, remove the stack and
tap it on a flat surface to even the edges. Then “slant” the stack so that its front edge is
bevelled, and insert the stack into the ADF.
n
To avoid feeding problems, make sure the document meets the document requirements.
(1 p. 4-2)
Adding Pages to the Document
If you are using automatic document feed and you need to add pages to your
document in the ADF, wait until the last page starts feeding, then load up to 20
additional pages (10 legal size). The last and first page should overlap by about
2.5 cm.
2.5 cm
Page 53

Chapter 5 Paper Handling 5-1
Paper Handling
Chapter 5
Paper Handling
Print Media Requirements.......................................................................5-2
Printable Areas.......................................................................................5-3
Selecting Print Media...............................................................................5-4
Setting the Paper Thickness Lever.........................................................5-6
Loading Paper...........................................................................................5-6
Loading Envelopes...................................................................................5-7
Using Canon Specialty Print Media........................................................5-9
Specialty Print Media Guidelines............................................................5-9
Printing on High Resolution Paper.......................................................5-10
Using the Cleaning Sheet ................................................................5-10
Printing on Banner Paper.....................................................................5-12
Page 54

5-2 Paper Handling Chapter 5
Print Media Requirements
You can stack the following media in the multi-purpose tray:
Paper Thickness
Print Media Size Weight Quantity Lever Position
Plain paper A4 64–105 g/m2Approx. 100 sheets* p (Up)
(210 × 297 mm/ (Max. 10 mm stack)
8.27 × 11.69 in.)
Letter
(215.9 × 279.4 mm/
8.5 × 11 in.)
Legal
(215.9 × 355.6 mm/
8.5 × 14 in.)
Envelopes European DL 10 envelopes
e (Down)
(220 × 110 mm/
8.66 × 4.33 in.)
U.S. Commercial
No. 10
(241.3 × 104.1 mm/
9.5 × 4.1 in.)
Glossy photo A4, Letter 10 sheets p (Up)
paper
Banner paper 210 × 297 mm 2 to 6 sheets (joined)
e (Down)
Max. length:
1782 mm
High resolution A4, Letter Approx. 80 sheets p (Up)
paper
Bubble Jet A4, Letter Approx. 100 sheets p (Up)
paper (10 mm stack)
Transparencies A4, Letter 30 sheets p (Up)
Back print film A4, Letter 10 sheets p (Up)
High gloss A4, Letter 1 sheet p (Up)
photo film
Glossy photo 1 card p (Up)
cards
*75 g/m2paper
Page 55
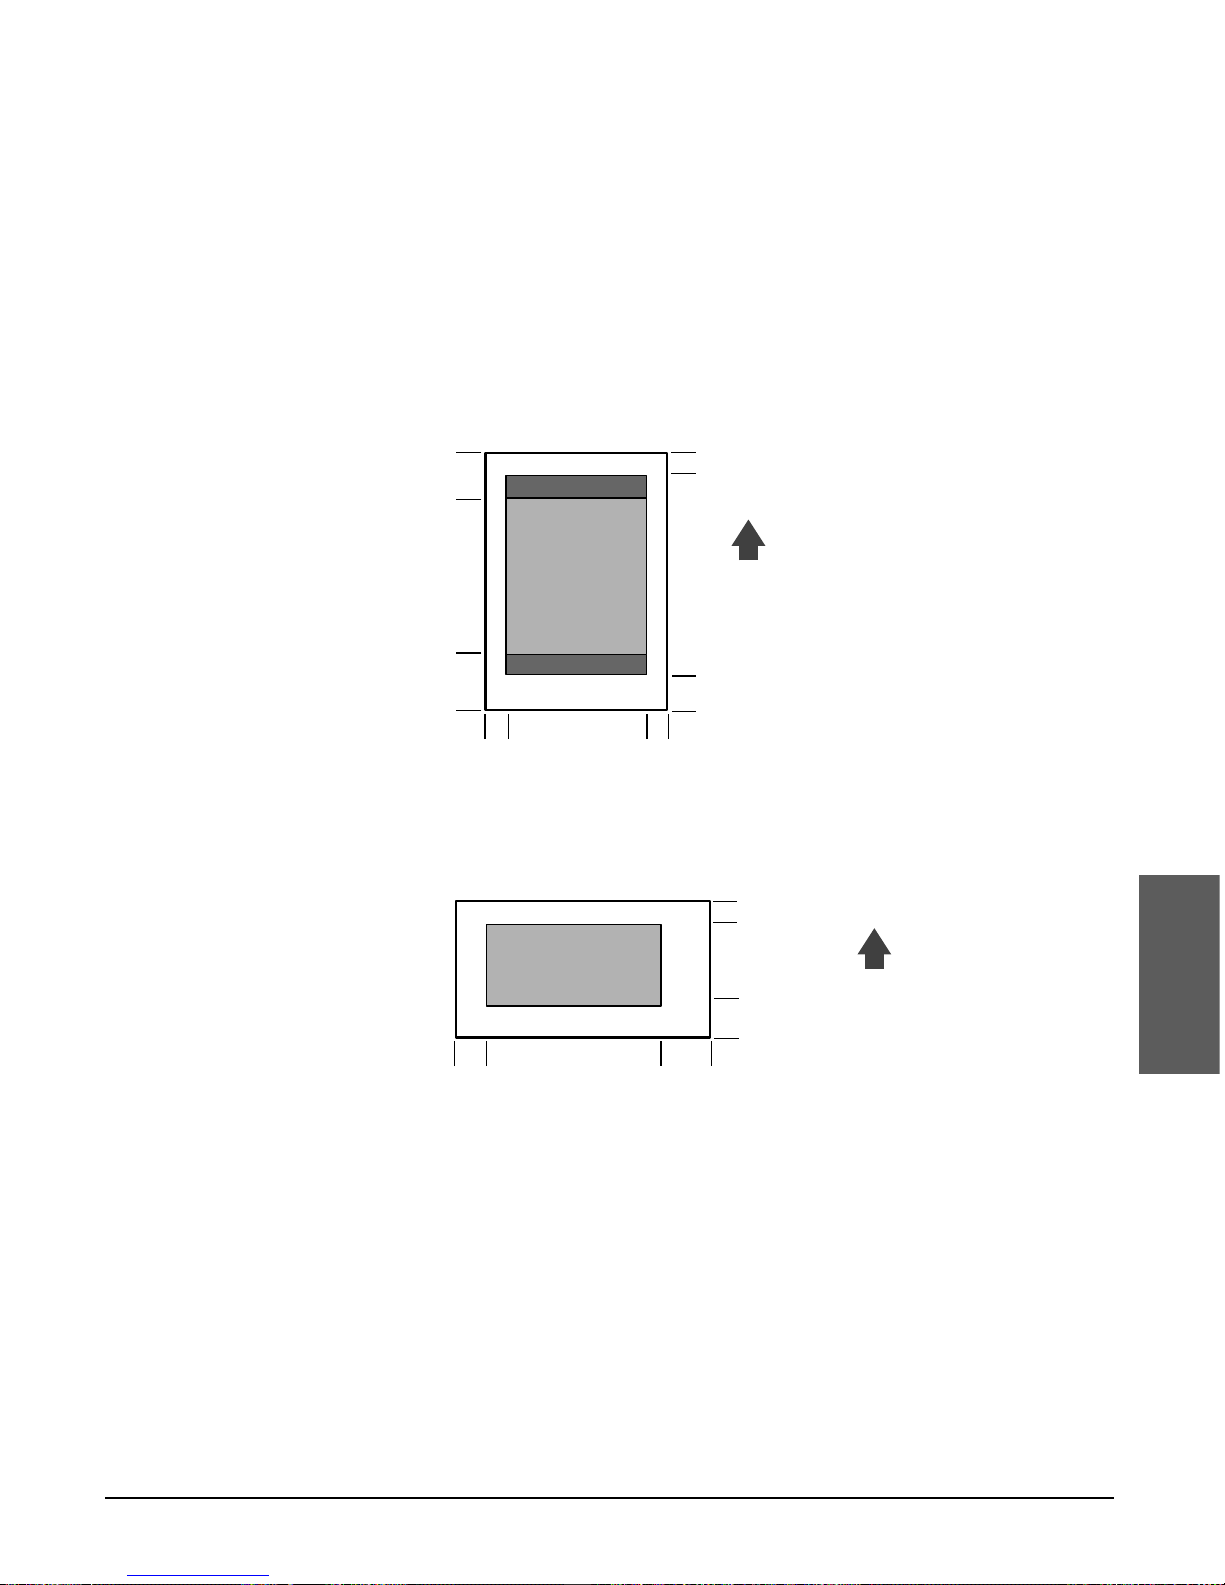
Chapter 5 Paper Handling 5-3
Paper Handling
Printable Areas
■ Paper
Please note that the term “printing area” represents both the recommended area for
optimum print quality and the entire area where the MultiPASS can technically print.
Printing area (light shade): Canon recommends that you print within this area.
Printable area (dark shade): The area in which it is possible to print. However,
printing in this area can adversely affect the print quality
or the paper feed precision.
■ Envelope
7 mm
10.4 mm
6.4 mm
FEED
DIRECTION
EUROPEAN DL
3 mm
32 mm
26 mm
3 mm
7 mm
3.4 mm
3.4 mm
FEED
DIRECTION
A4
Page 56

5-4 Paper Handling Chapter 5
Selecting Print Media
This section describes the different print media you can use with your MultiPASS. To
achieve the best possible printing performance of your MultiPASS, be sure to select the
correct print media.
n
• Be sure to test print media before purchasing large quantities.
• For Canon print media, be sure to purchase the recommended print media types.
(1 below)
■ Plain Paper
The MultiPASS supports A4-, letter-, and legal-size paper in portrait orientation. You can
use regular copier paper, cotton bond paper, or typical letterhead. Your unit does not
require special ink jet paper. Always use paper without curls, folds, staples, or damaged
edges. Look at the label on the package to see if the paper has a preferred side for
printing.
■ Envelopes
The MultiPASS can print on European DL and U.S. Commercial No. 10 envelopes. You
may be able to load other sizes, but Canon cannot guarantee consistent performance
on these.
Do not use the following types of envelopes since they may cause problems:
• Envelopes with windows, holes, perforations, cutouts, and double flaps.
• Envelopes made with special coated paper or deeply embossed paper.
• Envelopes with peel-off sealing strips.
• Envelopes with letters enclosed.
■ Glossy Photo Paper GP-301
A high gloss, thick paper that produces the look and feel of a photograph. Use this
paper with the Photo BJ cartridge to print photo-realistic images.
■ Banner Paper
Specifically designed for printing one continuous sheet in a banner format. The
connected sheets are divided by perforations and you can print from two to six sheets
at a time.
■ High Resolution Paper HR-101/HR-101N
Designed to produce near-photographic quality print output with sharp and vivid
graphics. For best results, use this paper with the Photo BJ cartridge.
Page 57

Chapter 5 Paper Handling 5-5
Paper Handling
■ Bubble Jet Paper LC-301
Developed for high quality printing with minimal or no smearing when in contact with
water or damp surfaces. This specially coated paper produces bright and vivid colours
and stands up to normal office highlighters.
■ Back Print Film BF-102
A unique mylar-based translucent sheet, designed to deliver sharp, brilliant, highintensity colour images suitable for business presentations, design work, or
professional reports. Back print film is printed on the back (non-glossy) side of the film
in mirror image and then viewed from the front (glossy) side using a backlit device,
such as a light box.
■ High Gloss Photo Film HG-201
A bright white finish film that lends striking visual power to charts, graphs, and
photographic images. It creates a sharper and more vivid colour output than is possible
with coated paper.
■Transparencies CF-102
Produce excellent contrast, sharpness, and colour, creating crisp and professional
overhead presentations.
Do not use normal transparencies in the MultiPASS as they do not absorb ink and may
cause ink to run.
■ Glossy Photo Cards FM-101
Made from the same stock as Glossy Photo Paper, these cards allow you to print
images over the entire area of the card. Print the image so that it extends beyond the
perforations and then trim off the unwanted white margins.
Page 58
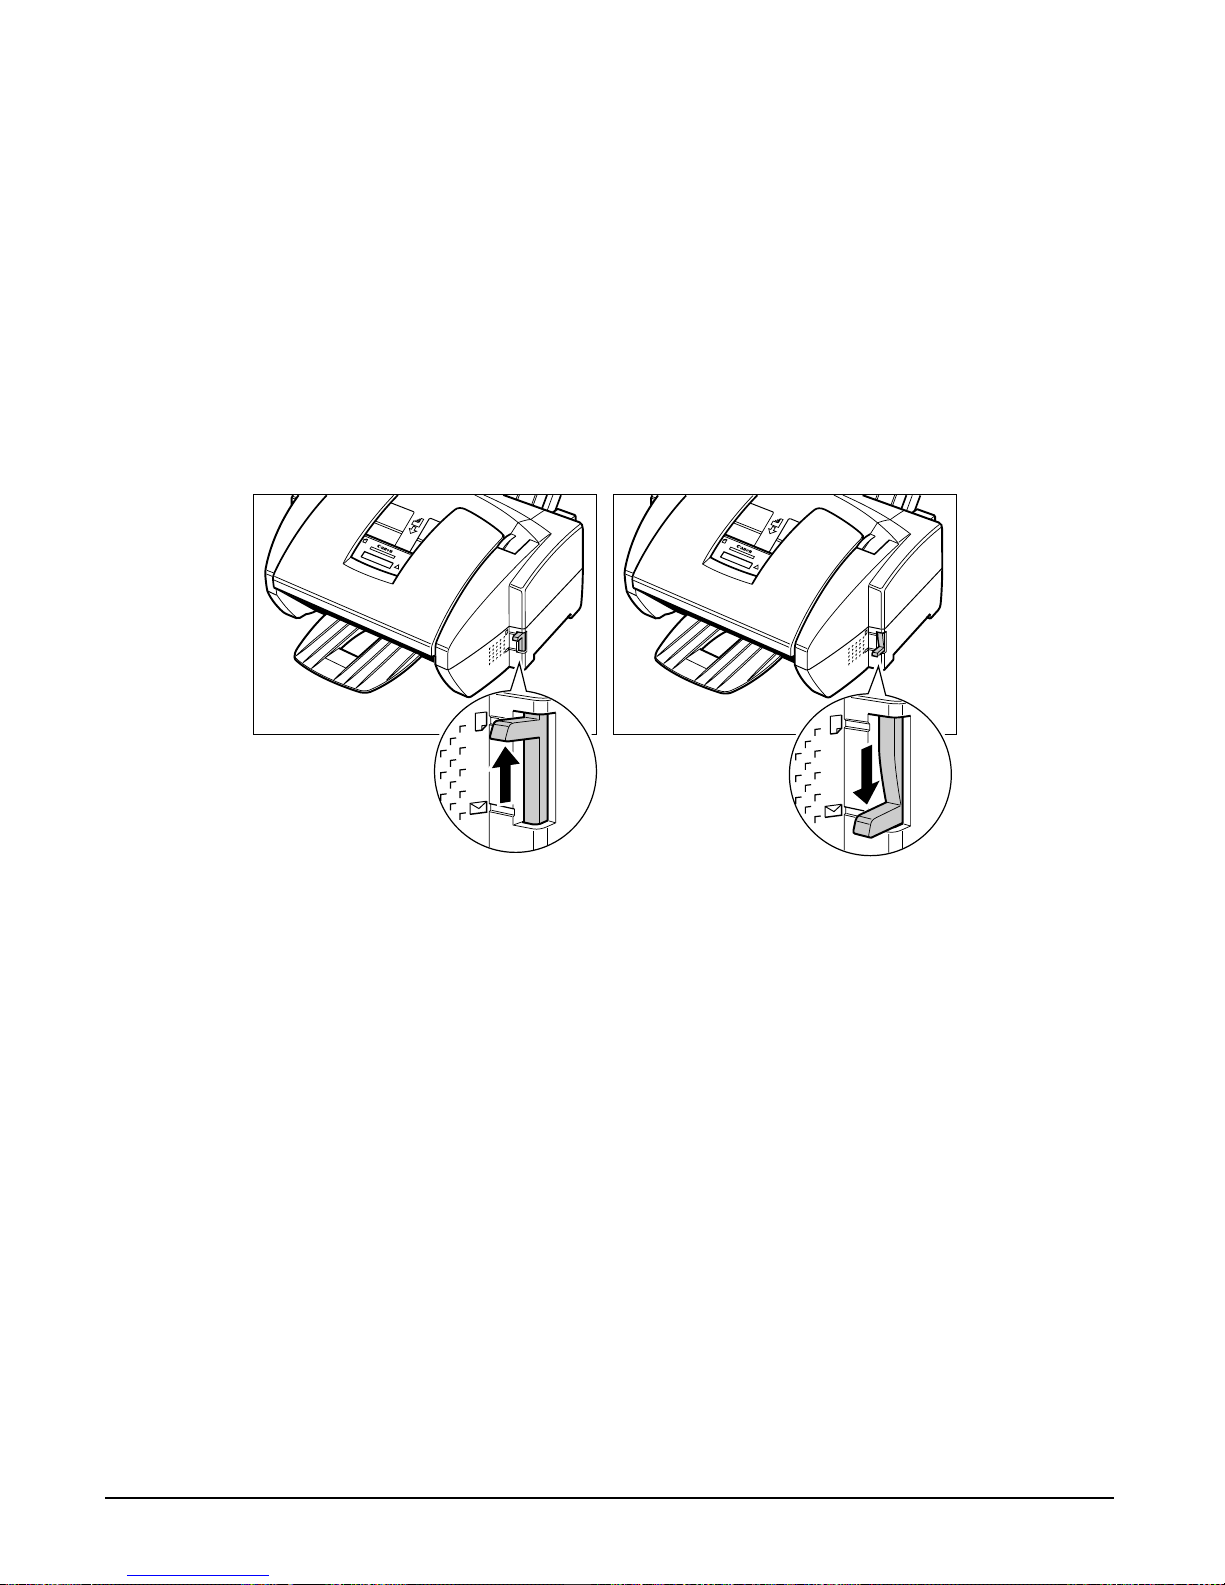
5-6 Paper Handling Chapter 5
Setting the Paper Thickness Lever
The paper thickness lever adjusts the gap between the BJ cartridge print head and the
print media to suit the print media’s thickness. Before printing, be sure to set the paper
thickness lever.
For details on which position to set the paper thickness lever for the print media you
are using, 1 p. 5-2.
n
If the paper thickness lever is not set correctly before printing, poor print quality may occur.
The paper thickness lever is located on the right side of the unit.
Loading Paper
For details on loading paper in the multi-purpose tray, 1 p. 2-19.
You can also load other types of print media in the multi-purpose tray. (1 This chapter)
p (UP) POSITION e (DOWN) POSITION
Page 59
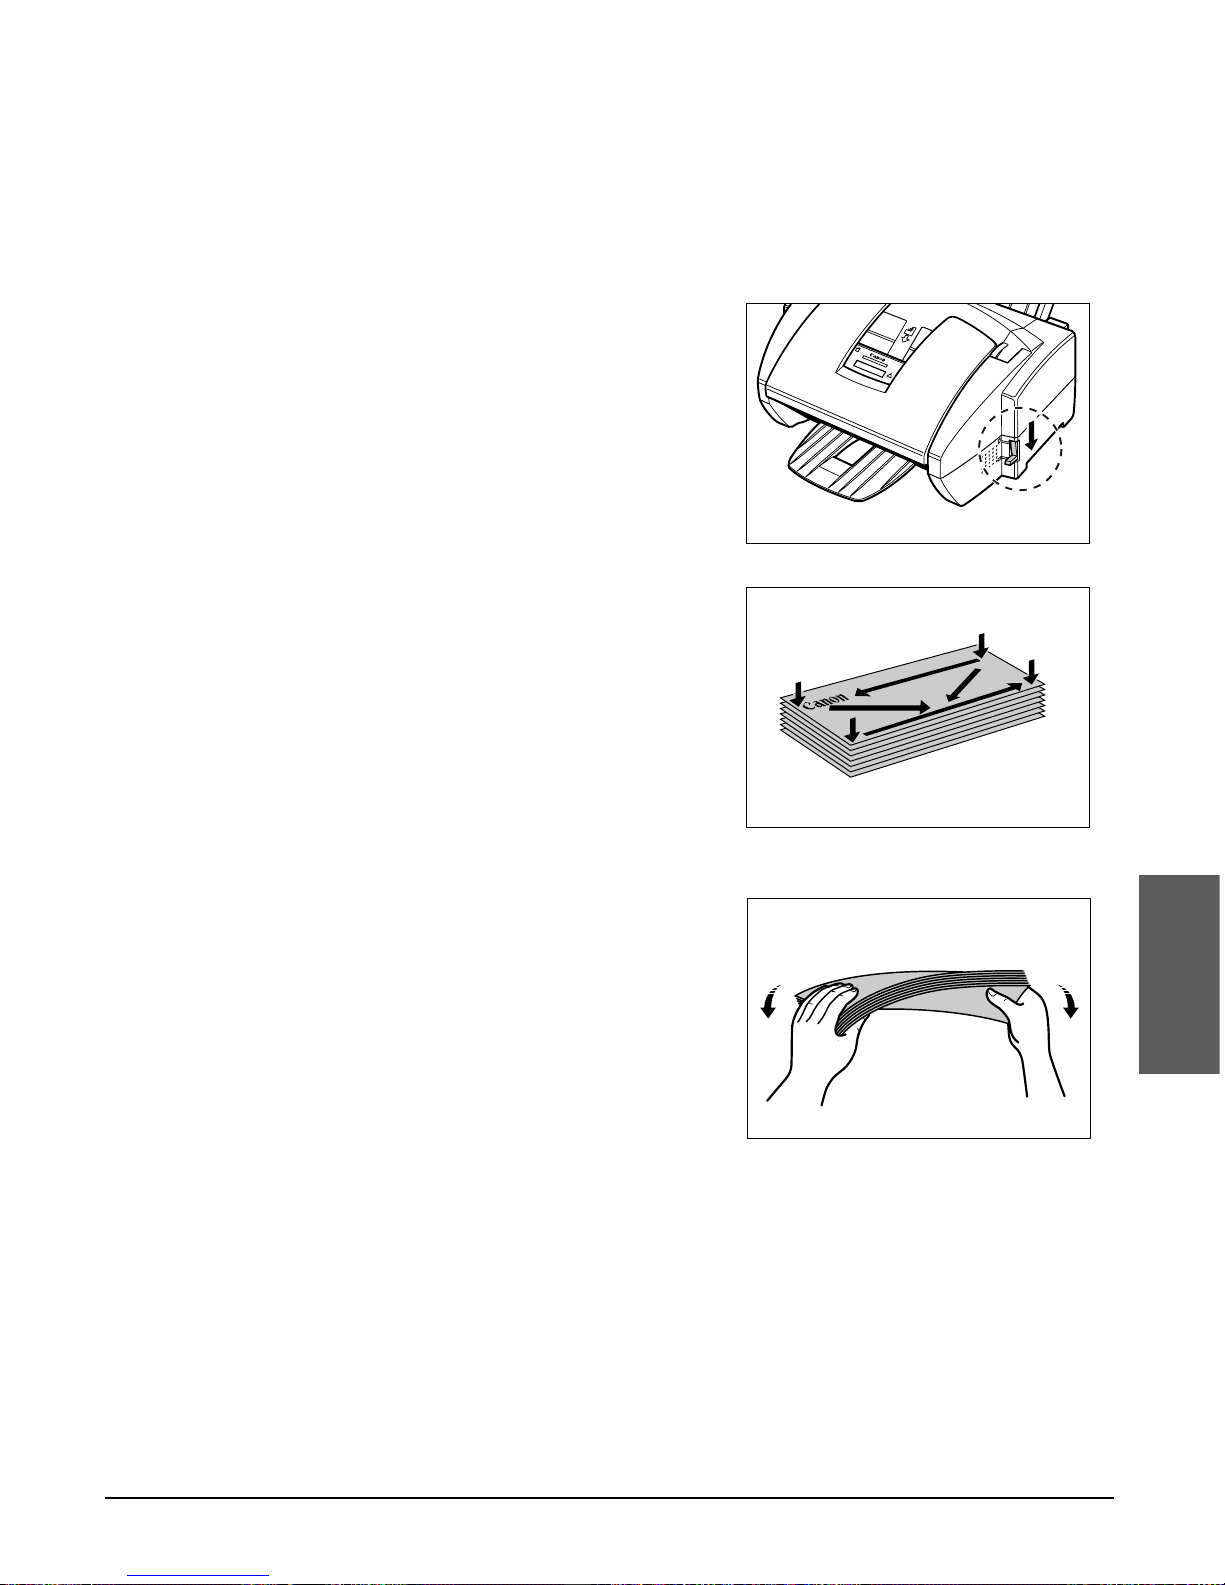
Chapter 5 Paper Handling 5-7
Paper Handling
Loading Envelopes
You can load up to 10 envelopes in the multi-purpose tray. For details on the types of
envelopes you can load, 1 pp. 5-2, 5-4.
Follow this procedure to load envelopes in the multi-purpose tray:
1 Make sure the paper thickness lever is
set to e (down).
• For details, 1 p. 5-6.
c
Do not set the paper thickness lever
while the unit is printing since this
will cause problems.
2 Prepare the envelopes as follows:
❚ Arrange the stack of envelopes on a
firm, clean surface, and press down
firmly on the edges to make the folds
crisp.
• Press all the way around the envelopes to
remove any curls and expel air from inside
the envelopes. Also, press firmly on the
area that corresponds to the edges of the
back flap.
❚ Remove any curling from the
envelopes by holding the edges
diagonally and bending them gently.
Page 60
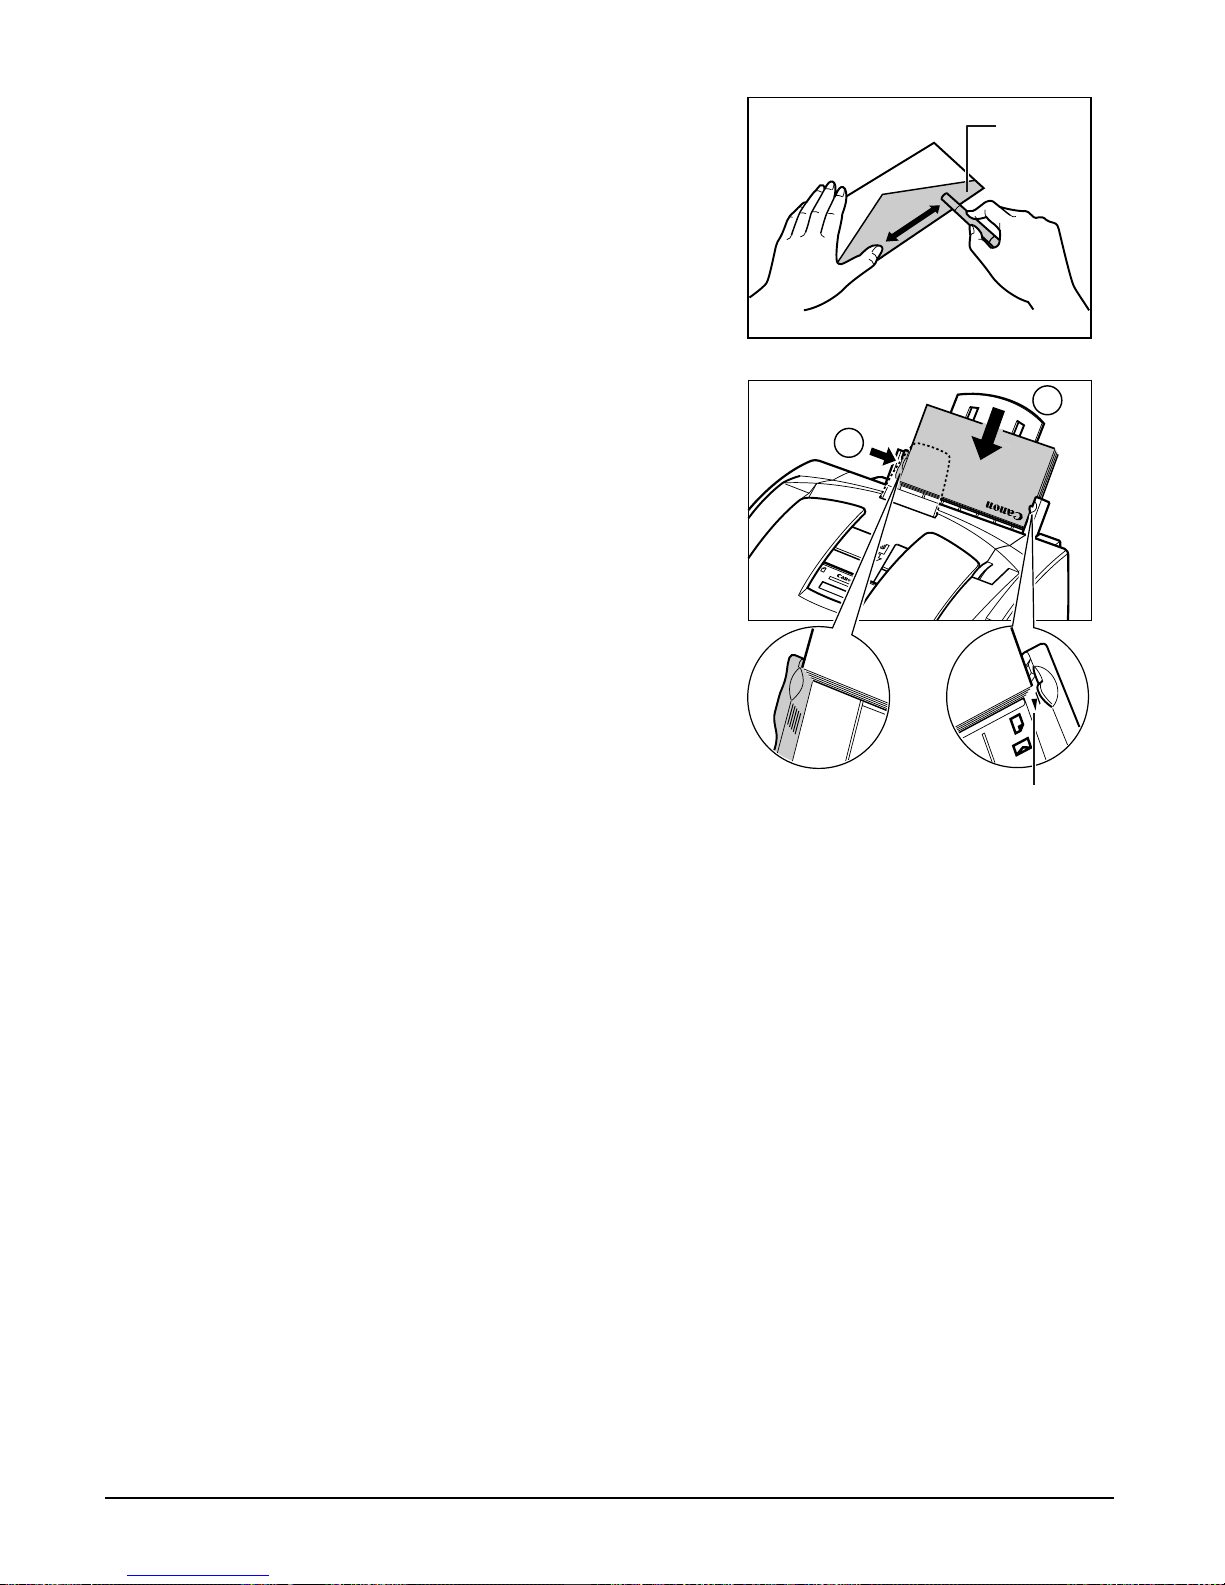
5-8 Paper Handling Chapter 5
❚ Run a pen or other rounded object
along the back flaps to flatten them.
• The flaps should not bulge more than
5 mm.
3 Insert the stack of envelopes into the
multi-purpose tray q, and align the right
edge of the stack with the right side of
the multi-purpose tray. Slide the paper
guide snugly against the left edge of the
stack w.
• Insert the envelopes with the print side up
(flaps should not be visible).
• Feed the top of the envelope (return address
portion) into the multi-purpose tray first.
• Make sure the stack does not exceed the
paper limit mark (P).
The MultiPASS is now ready to print.
2
1
PAPER LIMIT MARK
FLAP
Page 61
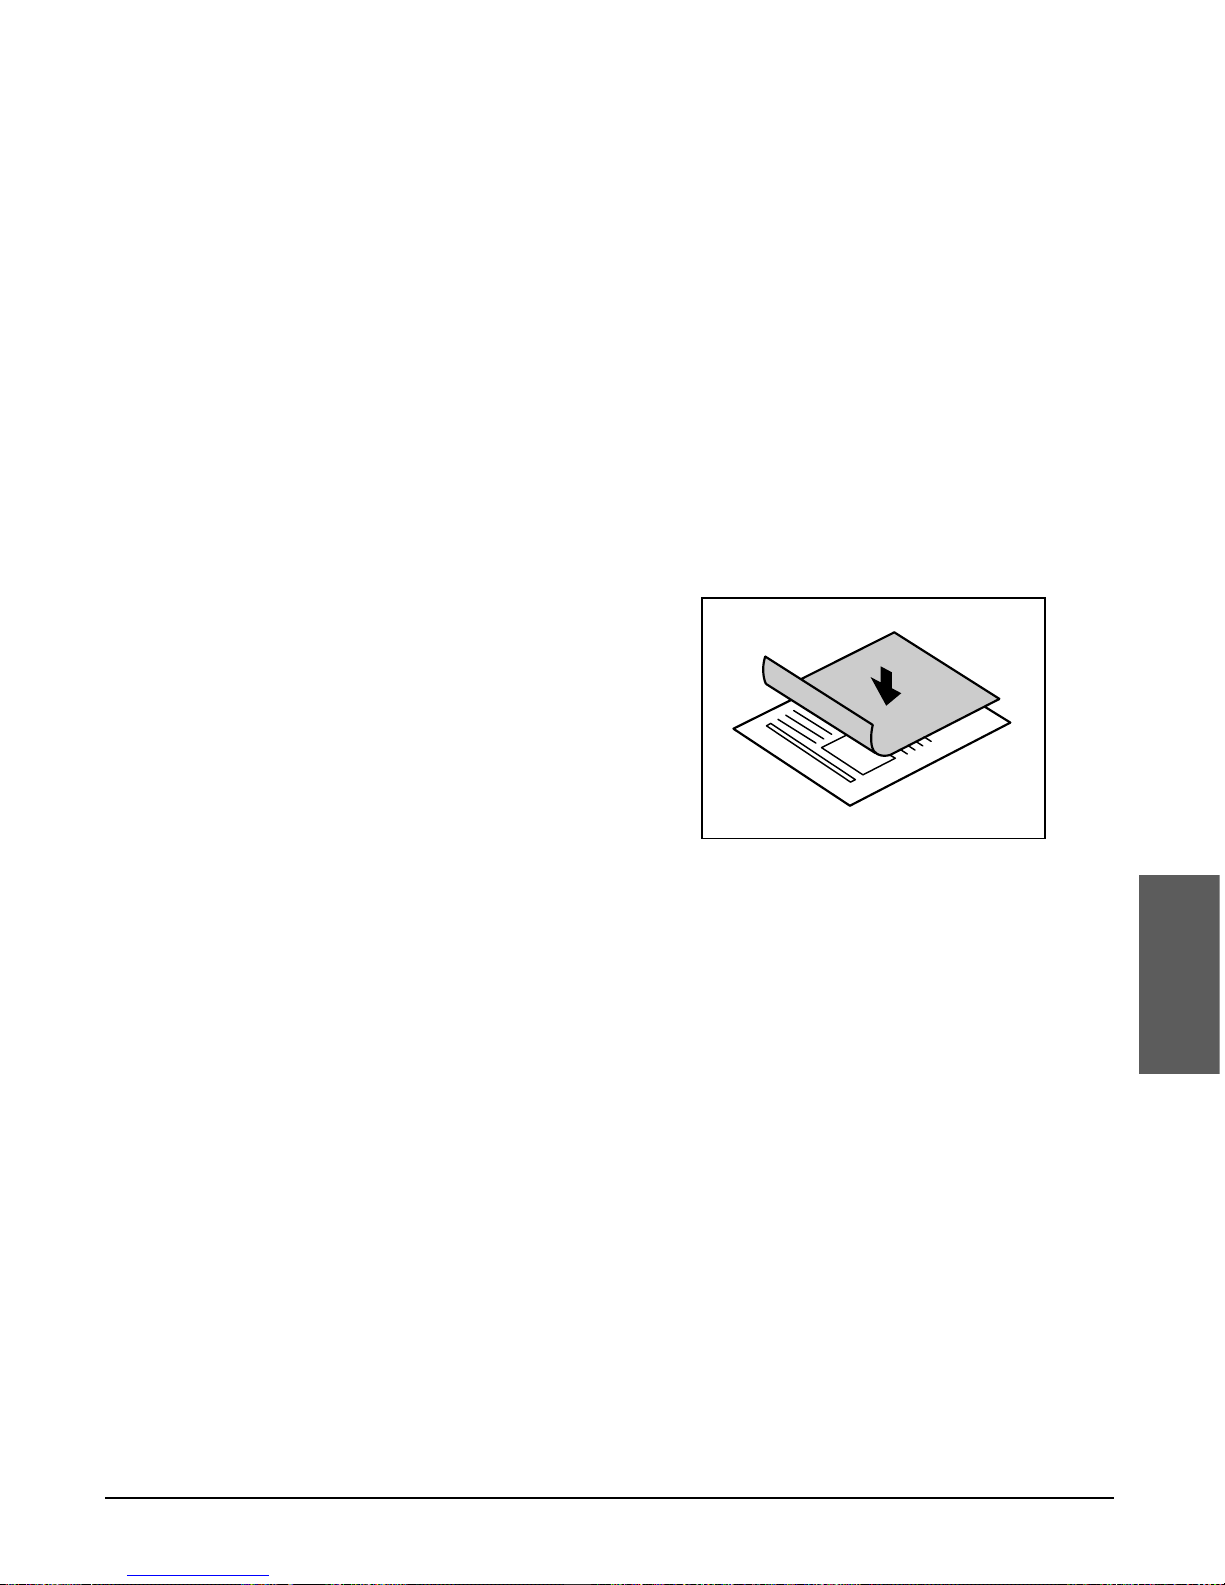
Chapter 5 Paper Handling 5-9
Paper Handling
Using Canon Specialty Print Media
Specialty Print Media Guidelines
n
Be sure to read any instructions that come with your Canon specialty print media, as these
provide important information on how to achieve the highest print quality.
Follow these guidelines:
• When feeding transparencies or back print film, remove each sheet after it is
delivered, being careful not to touch any surfaces. Do not allow film sheets to stack
up in the output tray.
• Let the printed sheets of film or paper dry completely before storing them.
Drying time:
–Canon High Gloss Photo Film HG-201, Canon Glossy Photo Paper GP-301,
Canon Glossy Photo Cards FM-101: 2 minutes
–Canon Transparencies CF-102, Canon Back Print Film BF-102: 15 minutes
• When your printed sheets of film have
dried completely, cover the printed sides
with a sheet of plain (not coated) paper
before storing. This is recommended even if
you place the sheets in a clear file or plastic
holder.
• When loading transparencies or back print film, insert one sheet of plain paper as the
last sheet in the stack.
• Do not leave film in the multi-purpose tray for long periods of time. Dust and dirt may
accumulate on the film resulting in spotty printing.
• To avoid smudging caused by fingerprints, use a pair of thin cloth gloves while loading
and handling film.
• To avoid fading, do not expose printed film to prolonged sunlight.
• Store all print media flat. Do not remove them from their protective packaging until
you are ready to use them.
• Store unused film at temperatures between 15° and 30°C. The relative humidity
should be between 10% and 70%.
Page 62
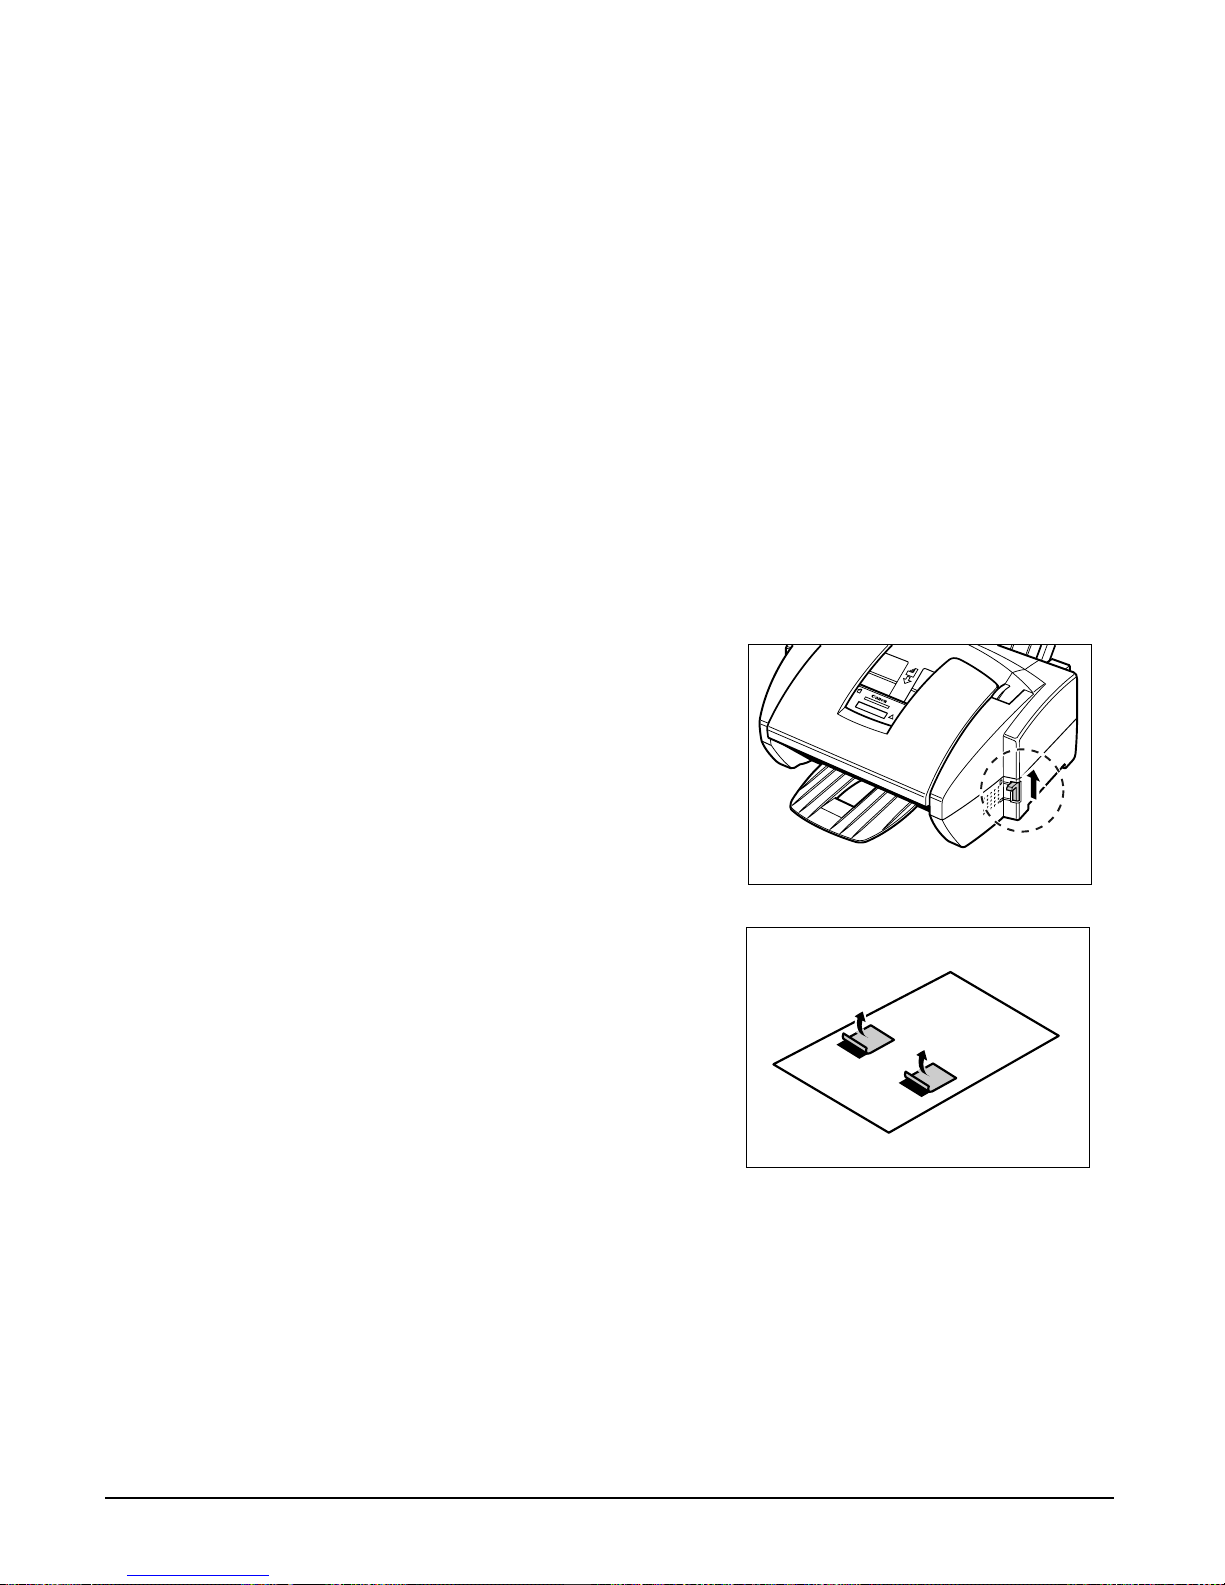
5-10 Paper Handling Chapter 5
Printing on High Resolution Paper
To load high resolution paper in the MultiPASS, follow the same procedure as for
loading paper in the multi-purpose tray. (1 p. 2-19)
Some types of high resolution paper require you to clean the MultiPASS’ rollers after
using a package of this paper. Refer to the instructions included with the high resolution
paper. If you need to clean the rollers, 1 below.
Using the Cleaning Sheet
Read the instructions provided with the high resolution paper to see if you are required
to clean the MultiPASS’ rollers after using a package of this paper. A cleaning sheet
may be included with the high resolution paper.
The cleaning sheet removes paper dust from the unit’s rollers helping to prevent paper
feeding problems.
Follow this procedure to load and use the cleaning sheet:
1 Make sure the paper thickness lever is
set to p (up).
• For details, 1 p. 5-6.
c
Do not set the paper thickness lever
while the unit is printing since this
will cause problems.
2 Remove the backings from the two tapes
on the cleaning sheet.
Page 63
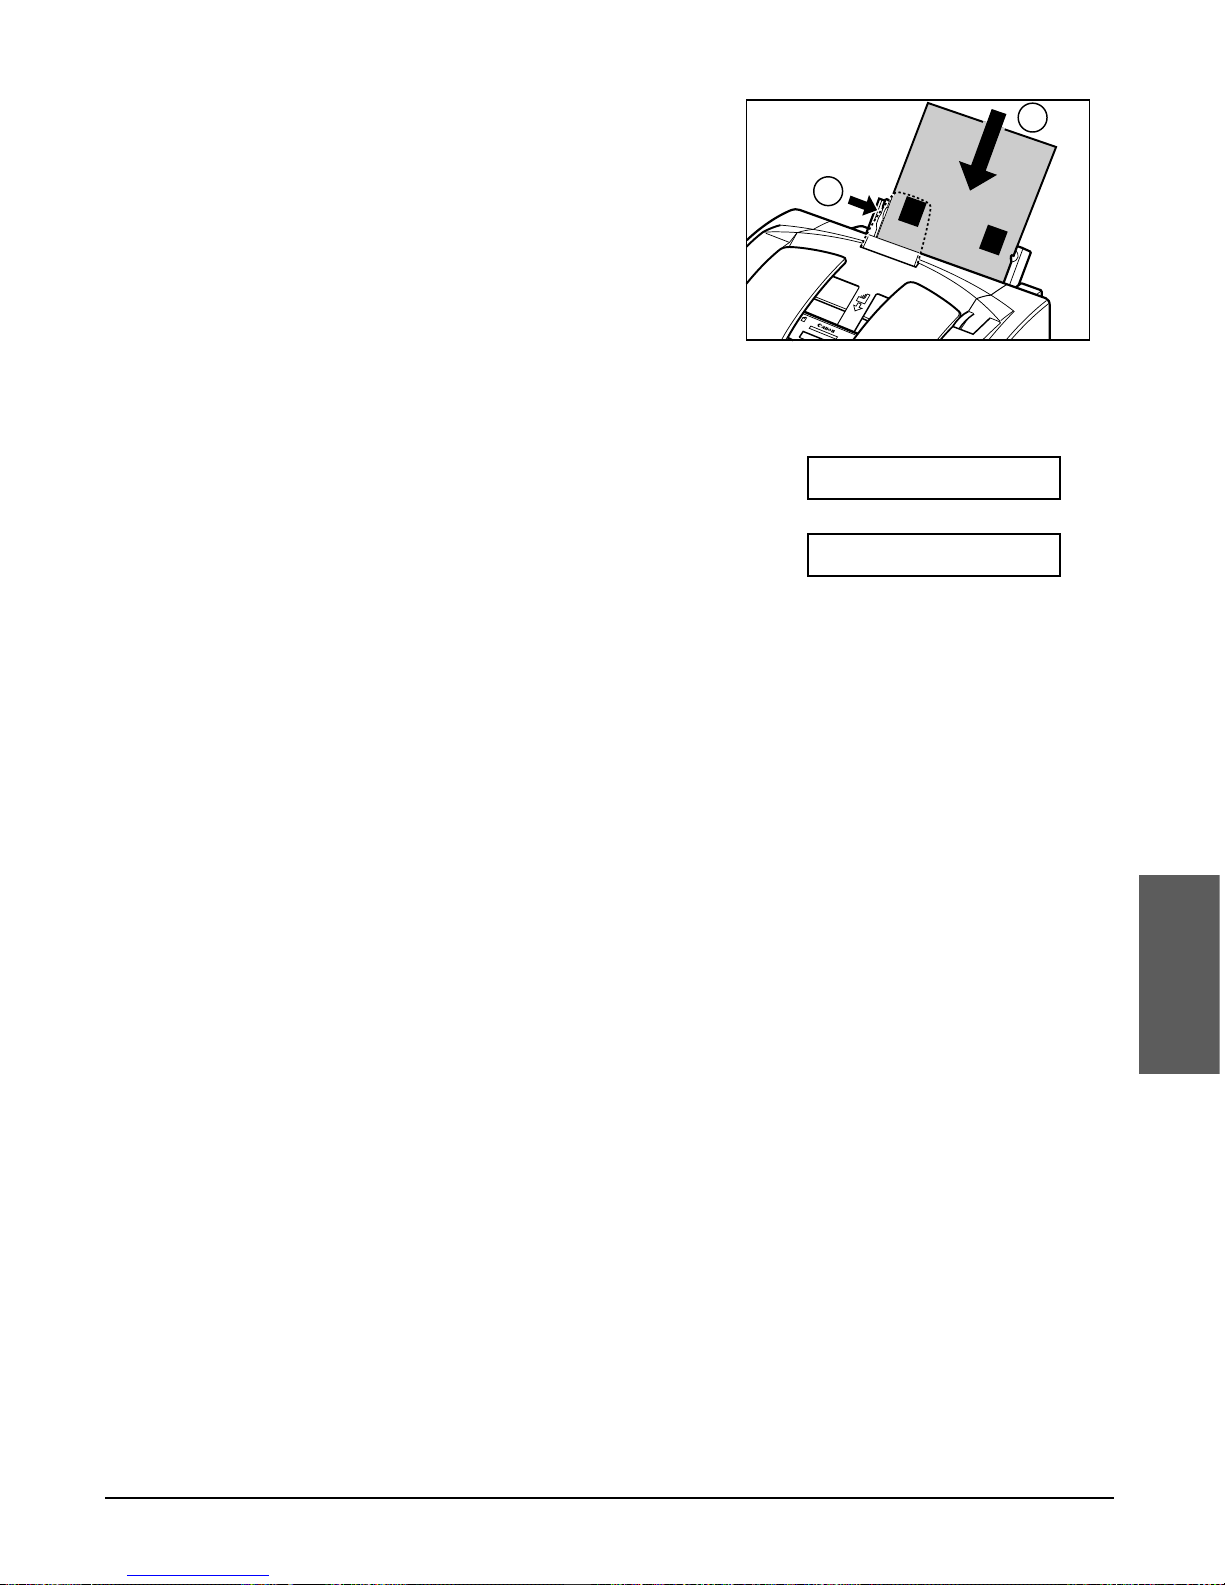
Chapter 5 Paper Handling 5-11
Paper Handling
3 With the sticky side towards you and
going into the multi-purpose tray first,
insert the cleaning sheet into the
multi-purpose tray q, and align the right
edge of the sheet with the right side of
the multi-purpose tray. Slide the paper
guide snugly against the left edge of the
sheet w.
4 Press Function.
5 Press Cleaning.
6 Use d or u to select ROLLER CLEANING.
7 Press Set.
• The MultiPASS feeds the cleaning sheet
into the unit and cleans the rollers.
ROLLER CLEANING
NOZZLE CHECK
2
1
Page 64
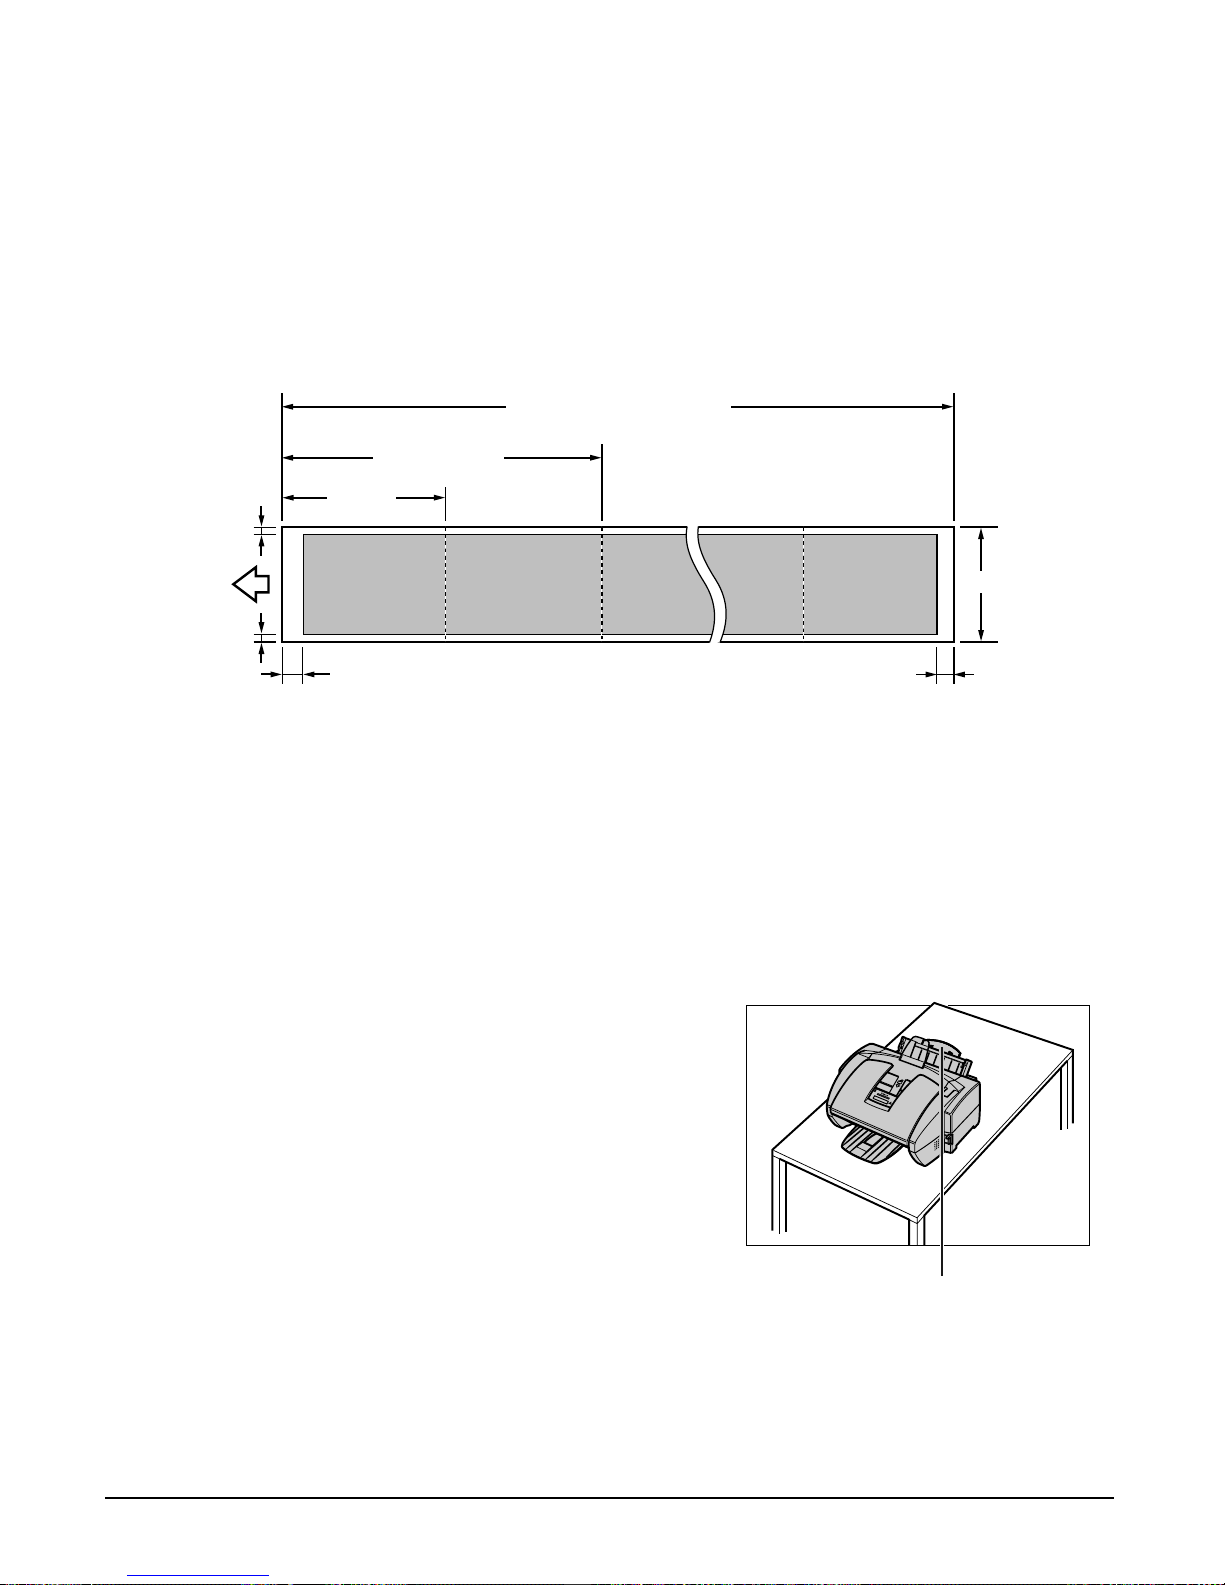
5-12 Paper Handling Chapter 5
Printing on Banner Paper
Banner paper is a continuous sheet of paper with perforations at equal distances along
its length, where it can be cut to the length required. For best results, use Canon
Banner Paper. You can print banners from two to six sheets in length.
n
Always leave an extra sheet at the end of the banner—just in case the type runs over.
The shaded portion of the illustration below shows the maximum recommended printing
area of banner paper.
n
• To prevent ink from running over the edges of the sheet, print within the margins shown
above.
• Printing on banner paper may require considerable amounts of ink, so use new BJ tanks
if necessary.
• For best print results on banner paper, use light design patterns.
Follow this procedure to load banner paper in the multi-purpose tray:
1 Place the MultiPASS near the edge of a
table so that the paper can flow over the
edge as it exits the unit.
• Make sure the paper rest is lowered.
PAPER REST
297 mm
26 mm32 mm
2 SHEETS MIN.
1782 mm (6 SHEETS MAX.)
3.4 mm
3.4 mm
210 mm
Page 65
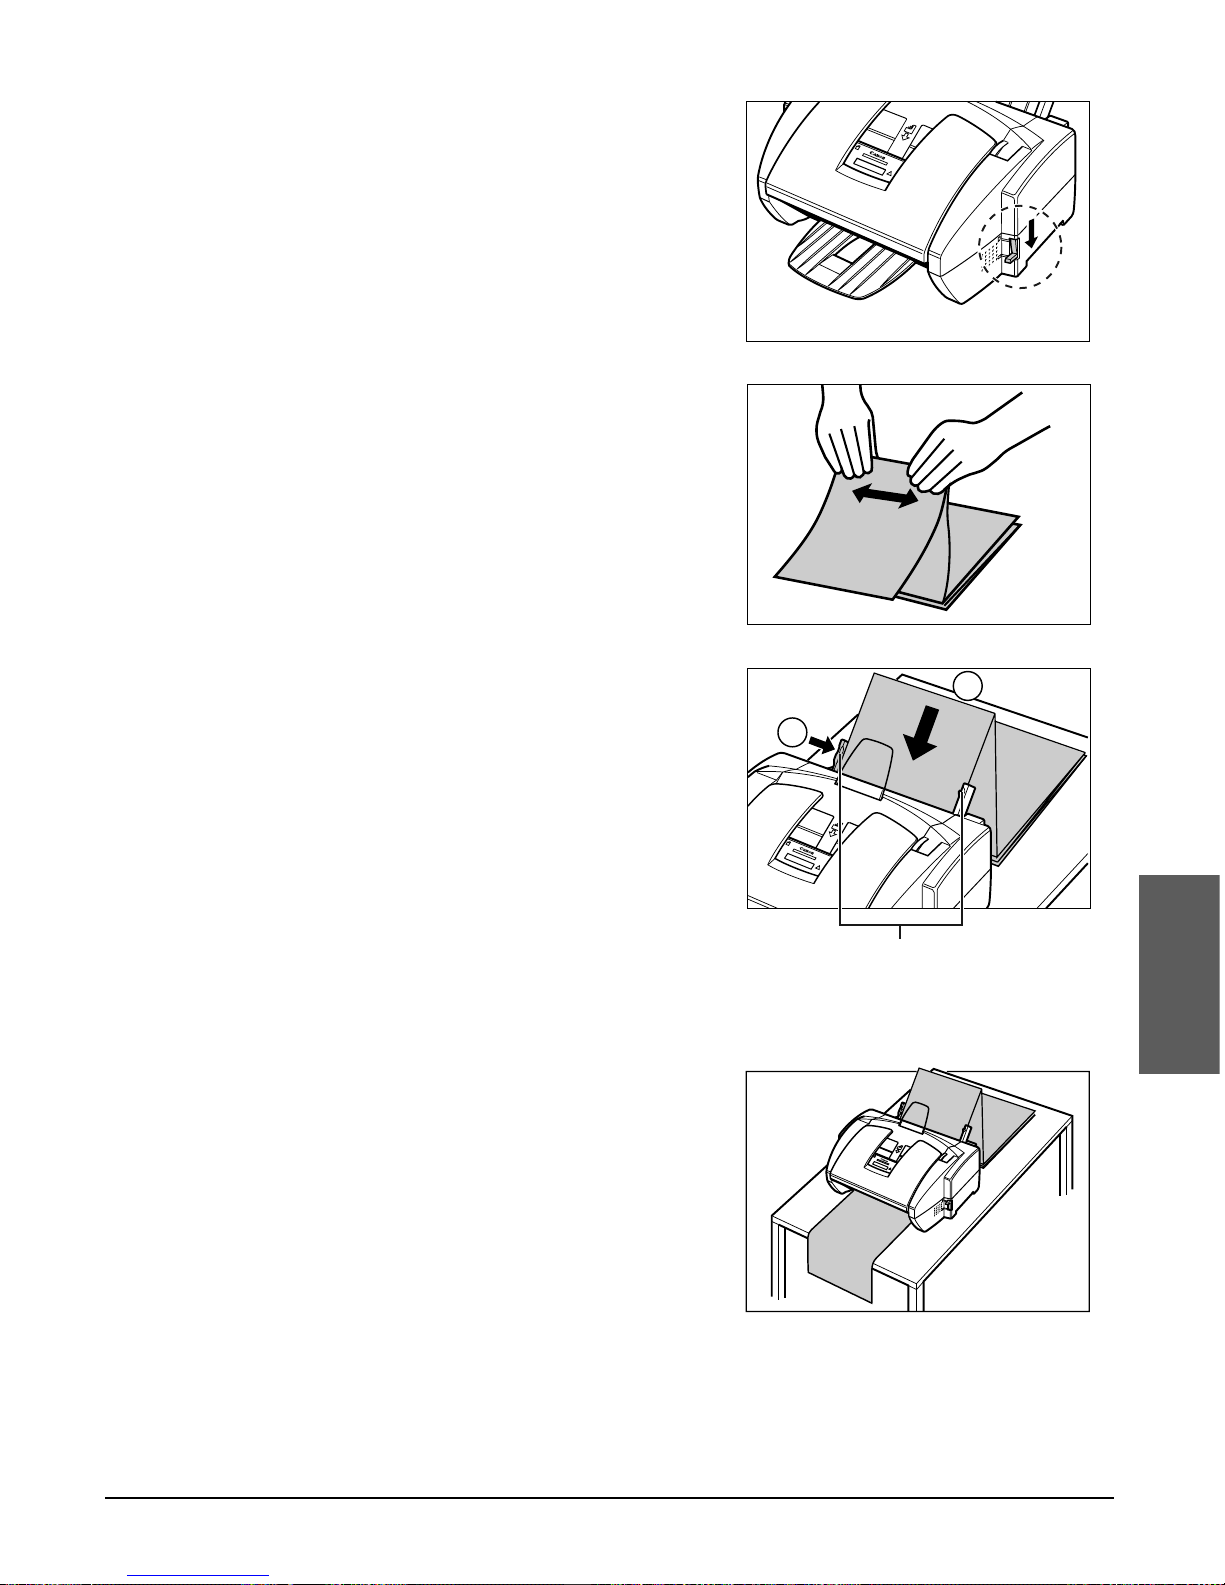
Chapter 5 Paper Handling 5-13
Paper Handling
2 Make sure the paper thickness lever is
set to e (down).
• For details, 1 p. 5-6.
c
Do not set the paper thickness lever
while the unit is printing since this
will cause problems.
3 Cut the banner paper along one of the
perforations to the length required. Then
gently fold along the perforations
between the first and second sheets.
• Your banner can be up to six sheets
(1782 mm) long.
4 Place the banner paper behind the unit
on a flat surface. Then insert the first
sheet into the multi-purpose tray q, and
align the right edge of the sheet with the
right side of the multi-purpose tray. Slide
the paper guide against the left edge of
the sheet, leaving a 1 mm gap between
the paper guide and the edge of the
sheet w.
• Make sure the sheet is under the tabs on
the multi-purpose tray.
• Make sure the sheets behind the unit are
aligned with the multi-purpose tray.
5 Your MultiPASS is now ready to print.
Set your PC to print on the banner paper.
• Allow the paper to flow over the edge of the
table as it exits the MultiPASS.
2
1
TABS
Page 66

5-14 Paper Handling Chapter 5
Page 67

Chapter 6 Speed Dialling 6-1
Speed Dialling
Chapter 6
Speed Dialling
What is Speed Dialling?...........................................................................6-2
Speed Dialling Methods .........................................................................6-2
One-Touch Speed Dialling.......................................................................6-3
Registering Numbers for One-Touch Speed Dialling .............................6-3
Using One-Touch Speed Dialling ...........................................................6-5
Coded Speed Dialling...............................................................................6-6
Registering Numbers for Coded Speed Dialling ....................................6-6
Using Coded Speed Dialling ..................................................................6-8
Group Dialling...........................................................................................6-9
Creating Groups.....................................................................................6-9
Using Group Dialling ............................................................................6-12
Speed Dialling Lists ...............................................................................6-13
Printing Speed Dialling Lists.................................................................6-13
Page 68

6-2 Speed Dialling Chapter 6
What is Speed Dialling?
Speed dialling allows you to simplify dialling procedures by registering a fax/telephone
number(s) and name under a button or code. You can then dial that number by
pressing only one or a few buttons.
Speed Dialling Methods
The three speed dialling methods available with your MultiPASS are as follows:
■ One-Touch Speed Dialling (2 p. 6-3)
Allows you to dial a fax or telephone number by pressing only one button. You can
register up to 12 destinations for one-touch speed dialling.
■ Coded Speed Dialling (2 p. 6-6)
Allows you to dial a fax or telephone number by pressing Coded Dial followed by a
two-digit code of your choice. While coded speed dialling requires you to press more
buttons, you can register up to 100 different destinations.
■ Group Dialling (2 p. 6-9)
Allows you to dial a group of registered one-touch and/or coded speed dialling fax
numbers. By registering a group for one-touch or coded speed dialling, you press only
one or three buttons to send a same document to several destinations.
The following pages describe how to register numbers for speed dialling and how to
send using speed dialling.
n
• You can also register numbers for speed dialling from the MultiPASS Suite.
(1 MultiPASS Suite User’s Guide)
• Any settings adjusted from the MultiPASS operation panel will not be displayed in the
MultiPASS Suite.
• Settings changed from the MultiPASS Suite will override any settings made from the
operation panel.
Page 69
Chapter 6 Speed Dialling 6-3
Speed Dialling
One-Touch Speed Dialling
Registering Numbers for One-Touch Speed Dialling
One-touch speed dialling allows you to dial a fax/telephone number at the press of one
button. You can register up to 12 fax/telephone numbers; one for every one-touch
speed dialling button on the operation panel.
n
You can also register fax/telephone numbers for one-touch speed dialling from the
MultiPASS Suite. (1 MultiPASS Suite User’s Guide)
Follow this procedure to register numbers and names for one-touch speed dialling:
1 Press Function.
2 Press Data Registration.
3 Use d or u to select TEL REGISTRATION.
4 Press Set twice.
5 Use d or u to select a one-touch
Ex:
speed dialling button (01 to 12).
• If a one-touch speed dialling button has
already been registered, the number
registered under that button appears.
• If a group is already registered under a onetouch speed dialling button, GROUP DIAL
appears.
6 Press Set twice.
TEL=_
TELEPHONE NUMBER
04=
01=
1-TOUCH SPD DIAL
TEL REGISTRATION
DATA REGSTRATION
Page 70
6-4 Speed Dialling Chapter 6
7 Use the numeric buttons to enter the fax/
Ex:
telephone number you want to register (max.
120 digits, including spaces and pauses).
• To enter a space, press Space. Spaces are
optional and are ignored during dialling.
• To enter a pause, press R/Pause.
• To correct a mistake in the number, press l to
delete the rightmost digit.
• To delete an entire entry or to change a
previous entry, press Clear.
• If you have already registered a number and
you only want to change the name, ignore this
step.
• To cancel one-touch speed dialling for the
button you selected, press Clear then Set.
Press Stop to return to standby mode. The
fax/telephone number and name registered
under that button will be deleted.
8 Press Set twice.
9 Use the numeric buttons to enter the name
Ex:
that goes with the number (max. 16 characters,
including spaces).
• If you are unsure how to enter characters,
1 p. 3-3.
• If you have already registered a name and
want to keep the same name, ignore this step.
10 Press Set.
Ex:
11 To continue registering other one-touch
speed dialling buttons, repeat the procedure
from step 5.
-orPress Stop to return to standby mode.
Ex:
n
You can print the 1-TOUCH SPD DIAL LIST showing all the numbers and names
registered for one-touch speed dialling (1 p. 6-13). Keep this list near your MultiPASS so
you can refer to it when dialling.
15:00 FaxOnly
05=
DATA ENTRY OK
Canon EUROPA
:A
_:A
NAME
DATA ENTRY OK
TEL=20 545 8545_
Page 71

Chapter 6 Speed Dialling 6-5
Speed Dialling
Using One-Touch Speed Dialling
To use this feature, you must first register a number for one-touch speed dialling.
(1 p. 6-3)
Follow this procedure to send documents using one-touch speed dialling:
1 Open the document tray.
2 Adjust the document feed lever for the
document you are loading. (1 p. 4-2)
3 Prepare the document and load it, face
down, in the ADF. (1 p. 4-4)
• For colour sending, press Colour/B&W to
(Currently used memory)
turn on its light. (1 p. 7-2)
• To adjust the resolution and contrast,
1 pp. 7-3, 7-4.
(Standby to scan)
4 Press the one-touch speed dialling button
Ex:
assigned to the number you wish to fax.
• The number registered under that one-touch
speed dialling button is displayed.
• If you press the wrong button, press Stop,
then press the correct button.
• NO TEL # appears if no fax number is
assigned to the one-touch speed dialling
button you pressed.
5 Press Start to begin scanning for sending,
or wait a few seconds for the MultiPASS to
begin scanning automatically.
• If you prefer the MultiPASS never to scan a
document automatically after a few seconds,
disable the TIME OUT setting. (1 p. 14-6)
n
• You can also use one-touch speed dialling to send a document to more than one
destination at a time. (1 p. 7-13)
• To dial a telephone number registered for one-touch speed dialling, simply lift the
handset and press the one-touch speed dialling button.
TEL=905 795 1111
DOCUMENT READY
MEMORY USED 0%
Page 72
6-6 Speed Dialling Chapter 6
Coded Speed Dialling
Registering Numbers for Coded Speed Dialling
Coded speed dialling allows you to dial a fax/telephone number by pressing only three
buttons. First you press Coded Dial and then you enter a two-digit code under which
you have registered a fax/telephone number. You can register up to 100 different
fax/telephone numbers for coded speed dialling.
n
You can also register fax/telephone numbers for coded speed dialling from the MultiPASS
Suite. (1 MultiPASS Suite User’s Guide)
Follow this procedure to register numbers and names for coded speed dialling:
1 Press Function.
2 Press Data Registration.
3 Use d or u to select TEL REGISTRATION.
4 Press Set.
5 Use d or u to select CODED SPEED
DIAL.
6 Press Set.
7 Use d or u to select a coded speed
Ex:
dialling code (00 to 99).
• If a coded speed dialling code has already
been registered, the number registered under
that code appears.
• If a group is already registered under a coded
speed dialling code, GROUP DIAL appears.
8 Press Set twice.
TEL=_
TELEPHONE NUMBER
A01=
A00=
CODED SPEED DIAL
1-TOUCH SPD DIAL
TEL REGISTRATION
DATA REGSTRATION
Page 73
Chapter 6 Speed Dialling 6-7
Speed Dialling
9 Use the numeric buttons to enter the fax/
Ex:
telephone number you want to register (max.
120 digits, including spaces and pauses).
• To enter a space, press Space. Spaces are
optional and are ignored during dialling.
• To enter a pause, press R/Pause.
• To correct a mistake in the number, press l to
delete the rightmost digit.
• To delete an entire entry or to change a
previous entry, press Clear.
• If you have already registered a number and
you only want to change the name, ignore this
step.
• To cancel coded speed dialling for the code
you selected, press Clear then Set. Press
Stop to return to standby mode. The
fax/telephone number and the name
registered under that code will be deleted.
10 Press Set twice.
11 Use the numeric buttons to enter the name
Ex:
that goes with the number (max. 16 characters,
including spaces).
• If you are unsure how to enter characters,
1 p. 3-3.
• If you have already registered a name and
want to keep the same name, ignore this step.
12 Press Set.
Ex:
13 To continue registering other coded speed
dialling codes, repeat the procedure from
step 7.
-orPress Stop to return to standby mode.
Ex:
n
You can print the CODED SPEED DIAL LIST showing all the numbers and names
registered for coded speed dialling (1 p. 6-13). Keep this list near your MultiPASS so you
can refer to it when dialling.
15:00 FaxOnly
A02=
DATA ENTRY OK
Canon Inc.
:a
_:A
NAME
DATA ENTRY OK
TEL=3 3758 2111_
Page 74

6-8 Speed Dialling Chapter 6
Using Coded Speed Dialling
To use this feature, you must first register a number for coded speed dialling.
(1 p. 6-6)
Follow this procedure to send documents using coded speed dialling:
1 Open the document tray.
2 Adjust the document feed lever for the
document you are loading. (1 p. 4-2)
3 Prepare the document and load it, face
down, in the ADF. (1 p. 4-4)
• For colour sending, press Colour/B&W to
(Currently used memory)
turn its light. (1 p. 7-2)
• To adjust the resolution and contrast,
1 pp. 7-3, 7-4.
(Standby to scan)
4 Press Coded Dial.
5 Use the numeric buttons to enter the two-digit
Ex:
code assigned to the number you wish to fax.
• The number registered under that coded
Ex:
speed dialling code is displayed.
• If you enter the wrong code, press Stop. Then
press Coded Dial and enter the correct code.
• NO TEL # appears if no fax number is
assigned to the coded speed dialling code you
entered.
6 Press Start to begin scanning for sending,
or wait a few seconds for the MultiPASS to
begin scanning automatically.
• If you prefer the MultiPASS never to scan a
document automatically after a few seconds,
disable the TIME OUT setting. (1 p. 14-6)
n
• You can also use coded speed dialling to send a document to more than one destination
at a time. (1 p. 7-13)
• To dial a telephone number registered for coded speed dialling, simply lift the handset,
press Coded Dial, and enter the two-digit code.
TEL=03 3758 2111
A01
A
DOCUMENT READY
MEMORY USED 0%
Page 75
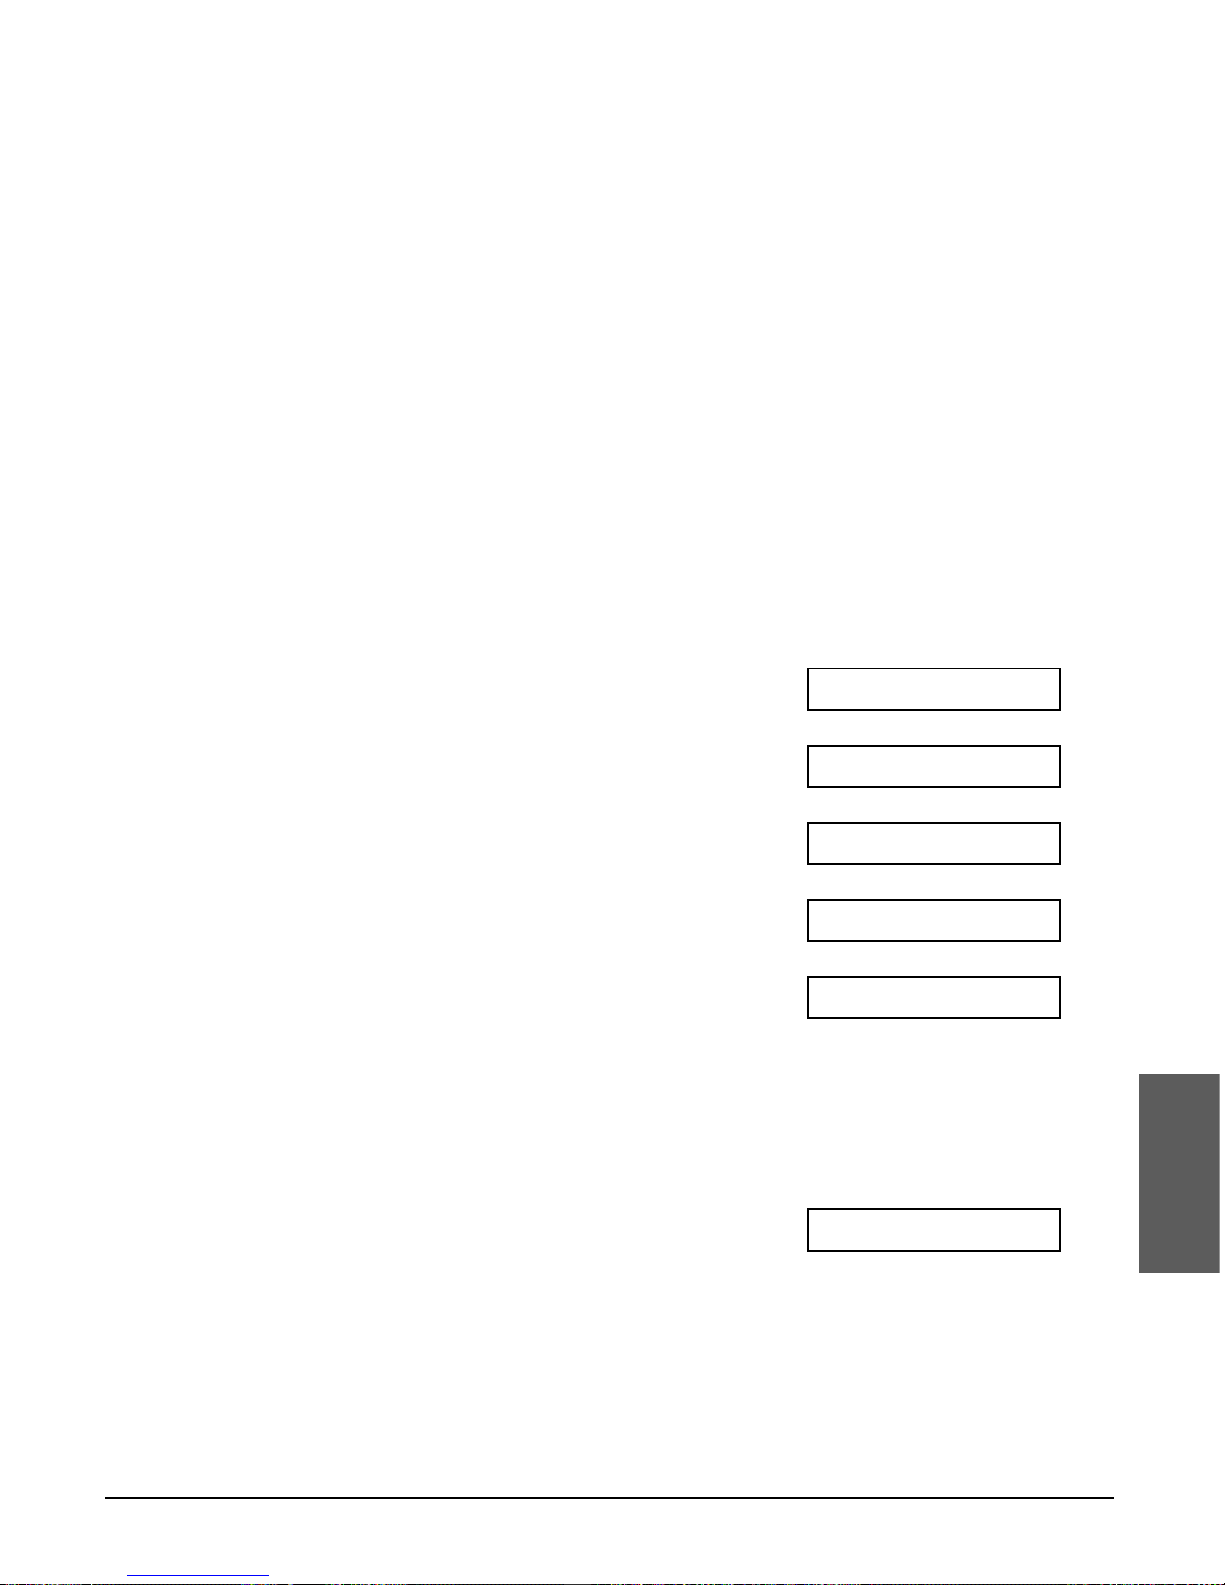
Chapter 6 Speed Dialling 6-9
Speed Dialling
Group Dialling
Creating Groups
If you frequently send documents to a same group of fax numbers, you can create a
group of these numbers and register them under a speed dialling button or code. This
enables you to press a single one-touch speed dialling button, or press Coded Dial
and enter a two-digit code to send the same document to all the fax numbers in the
group.
n
• You can only group numbers that have already been registered for one-touch or coded
speed dialling.
• A group can contain up to 111 destinations.
• You can also create groups from the MultiPASS Suite. (1 MultiPASS Suite User’s Guide)
Follow this procedure to create groups:
1 Press Function.
2 Press Data Registration.
3 Use d or u to select TEL REGISTRATION.
4 Press Set.
5 Use d or u to select GROUP DIAL.
6 Press Set.
Ex:
7 Select a one-touch speed dialling button or
coded speed dialling code under which you
want to register the group.
❚ To register a group under a one-touch
speed dialling button:
Use d or u to select the button under
Ex:
which you want to register the group
(01 to 12).
• If a one-touch speed dialling button has
already been registered, 1-TOUCH SPD or
GROUP DIAL appears.
03=
01=1-TOUCH SPD
GROUP DIAL
1-TOUCH SPD DIAL
TEL REGISTRATION
DATA REGSTRATION
Page 76

6-10 Speed Dialling Chapter 6
❚ To register a group under a coded speed
dialling code:
Press Coded Dial, then use the numeric
Ex:
buttons to enter the code under which you
want to register the group (00 to 99).
• If a coded speed dialling code has already
been registered, CODED SPEED or GROUP
DIAL appears.
n
If you wish to register a group under a
button or code already registered for
speed dialling, or you want to re-enter a
group, you must delete the previous
information first. (1 pp. 6-3, 6-6)
8 Press Set twice.
9 Enter the one-touch and/or coded speed
dialling numbers you want to register in the
group.
❚ To enter a destination registered for one-
touch speed dialling:
Press Function, then press the one-touch
Ex:
speed dialling button(s) assigned to the
number(s) you want to register in the
group. Then press Function again.
❚ To enter a destination registered for coded
speed dialling:
Press Coded Dial, then use the numeric
Ex:
buttons to enter the two-digit code
assigned to the number you want to
register in the group. Repeat for other
codes.
• The number registered under the button or
code you enter appears, or GROUP DIAL
appears if you select a group.
• You cannot enter numbers not registered for
one-touch or coded speed dialling (i.e. with
the numeric buttons).
• You can enter buttons or codes that have
groups registered under them.
A01=03 3758 2111
01=905 795 1111
TEL=
TELEPHONE NUMBER
A21=
Page 77
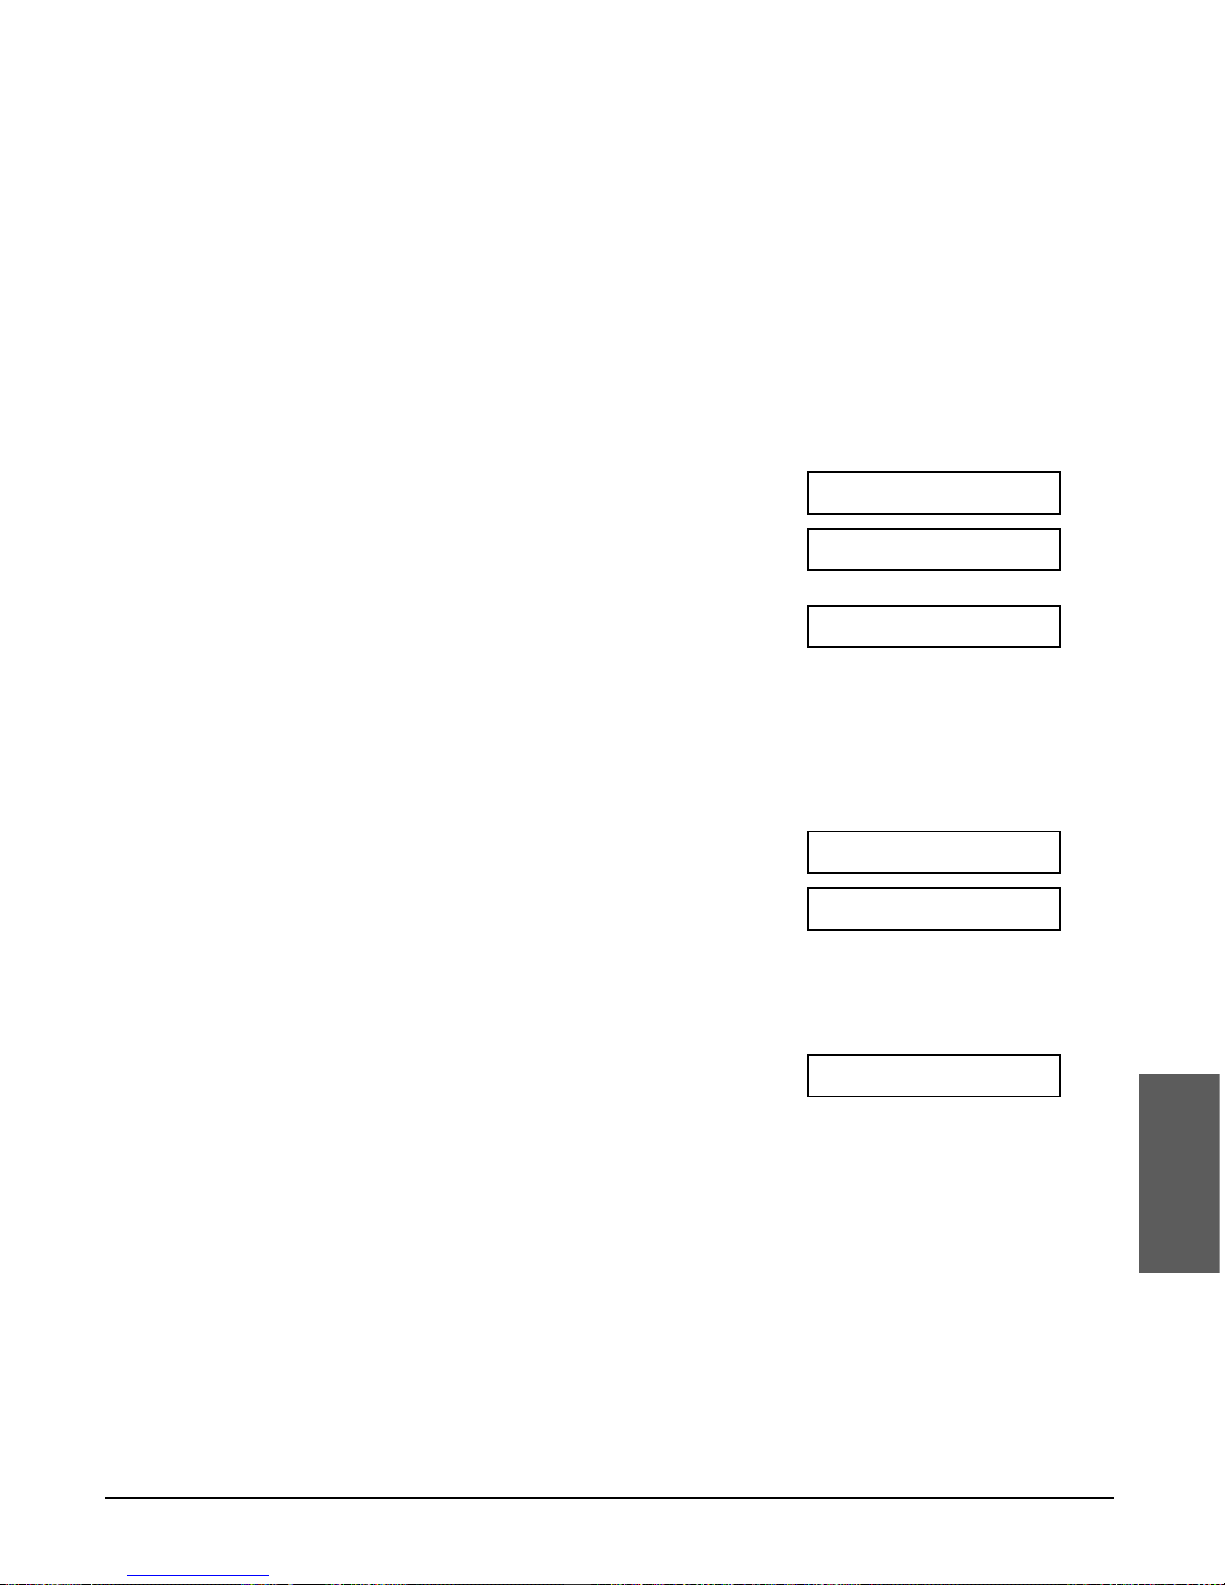
Chapter 6 Speed Dialling 6-11
Speed Dialling
• To add destinations to a group already
registered, simply enter them as explained in
this step.
• If you enter the wrong destination, or if you
want to delete a destination already registered
in a group, use d or u to select that entry,
then press Clear.
• To cancel group dialling for the button or code
you selected, press Clear until all entries are
deleted, then press Set. Press Stop to return
to standby mode. All fax numbers and the
name of the group registered under that button
or code will be deleted.
10 Press Set twice.
11 Use the numeric buttons to enter a name for
Ex:
the group (max.16 characters, including
spaces).
• If you are unsure how to enter characters,
1 p. 3-3.
• If you have already registered a name and
want to keep the same name, ignore this step.
12 Press Set.
Ex:
13 To continue registering other groups, repeat
the procedure from step 7.
-orPress Stop to return to standby mode.
Ex:
n
You can print the GROUP DIAL LIST showing all the numbers and names registered for
group dialling (1 p. 6-13). Keep this list near your MultiPASS so you can refer to it when
dialling.
15:00 FaxOnly
04=1-TOUCH SPD
DATA ENTRY OK
Canon GROUP 2_ :1
_:A
NAME
Page 78

6-12 Speed Dialling Chapter 6
Using Group Dialling
To use this feature, you must first register a group of fax numbers for one-touch or
coded speed dialling. (1 p. 6-9)
Follow this procedure to send a document to a group of destinations registered under a
one-touch speed dialling button or coded speed dialling code:
1 Open the document tray.
2 Adjust the document feed lever for the
document you are loading. (1 p. 4-2)
3 Prepare the document and load it, face
down, in the ADF. (1 p. 4-4)
• For colour sending, press Colour/B&W to
(Currently used memory)
turn on its light. (1 p. 7-2)
• To adjust the resolution and contrast,
1 pp. 7-3, 7-4.
(Standby to scan)
4 Enter the group registered under a one-
touch speed dialling button or coded speed
dialling code.
❚ To enter a group registered under a one-
touch speed dialling button:
Press the one-touch speed dialling button
assigned to the group you wish to fax.
• If you press the wrong button, press Stop,
then press the correct button.
❚ To enter a group registered under a coded
speed dialling code:
Press Coded Dial, then use the numeric
Ex:
buttons to enter the two-digit code assigned
to the group you wish to fax.
• If you enter the wrong code, press Stop.
Then press Coded Dial and enter the correct
code.
5 Press Start to begin scanning for sending,
or wait a few seconds for the MultiPASS to
begin scanning automatically.
• If you prefer the MultiPASS never to scan a
document automatically after a few seconds,
disable the TIME OUT setting. (1 p. 14-6)
TEL=GROUP DIAL
A21=
TEL=GROUP DIAL
DOCUMENT READY
MEMORY USED 0%
Page 79
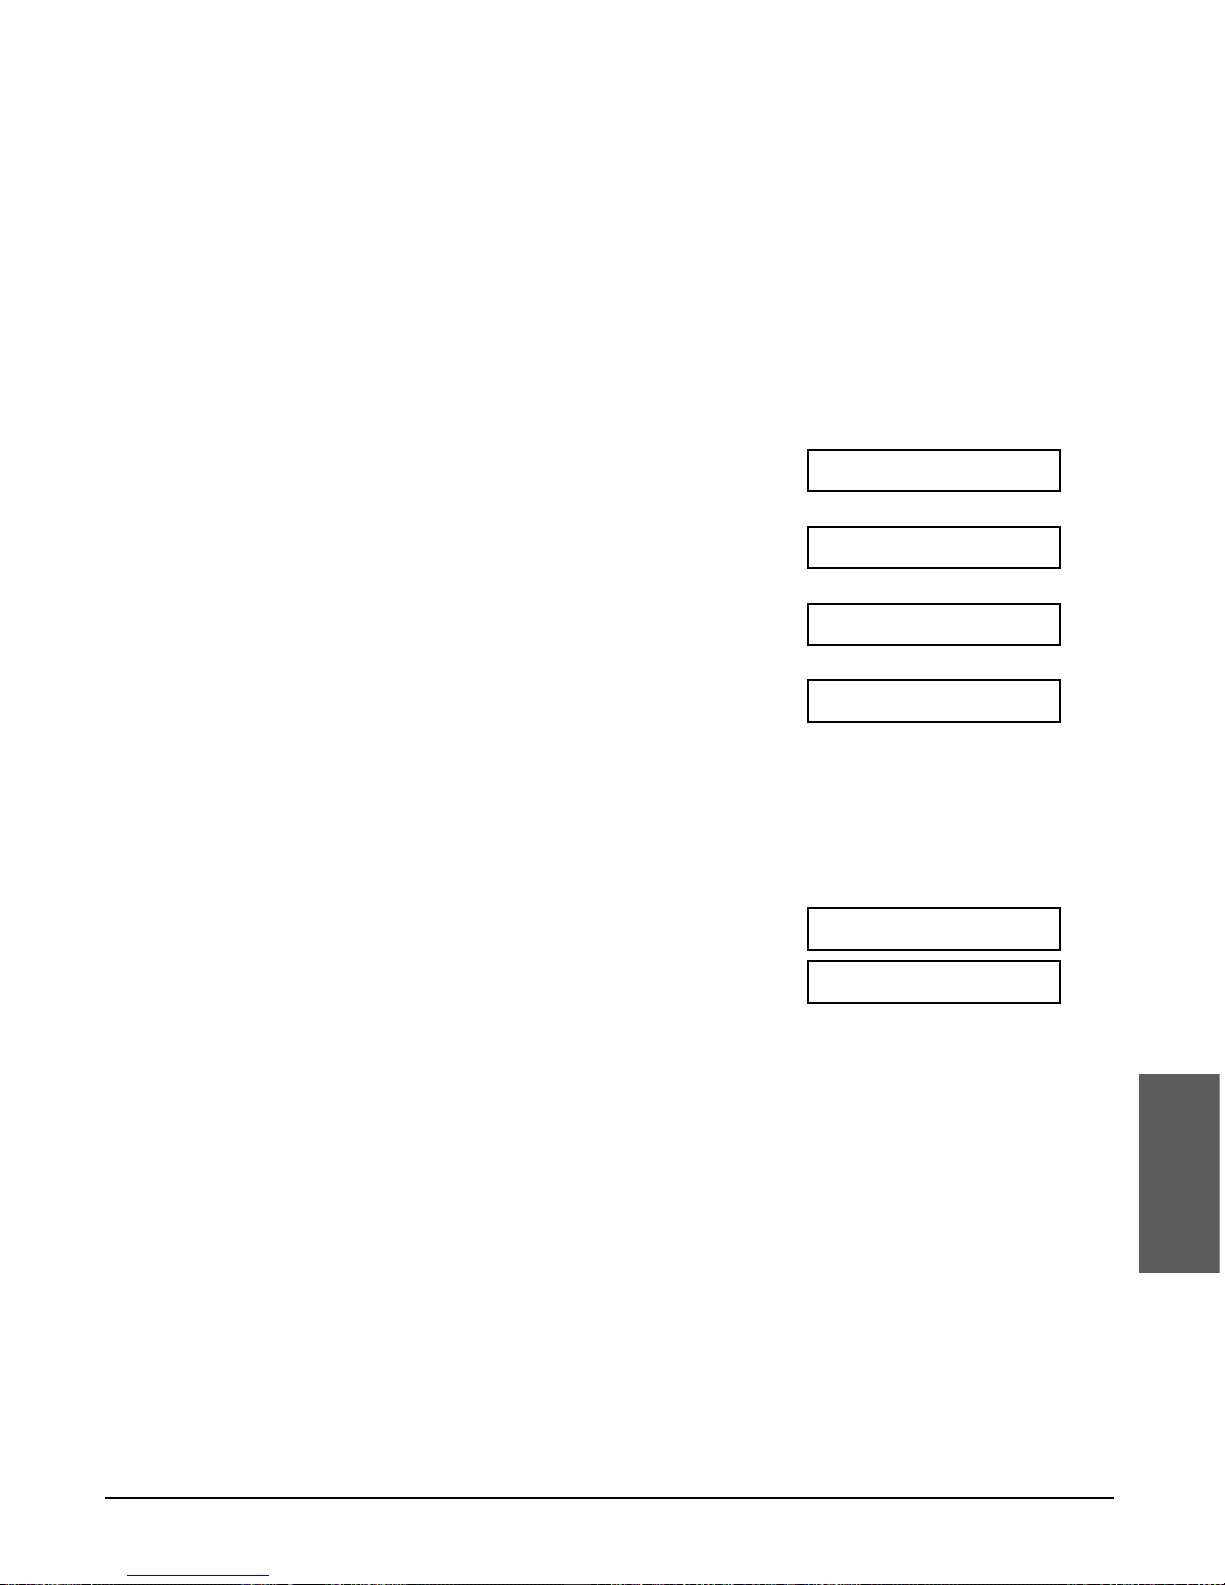
Chapter 6 Speed Dialling 6-13
Speed Dialling
Speed Dialling Lists
You can print lists of fax/telephone numbers registered for speed dialling. Keep these
lists near your MultiPASS so you can refer to them when dialling.
Printing Speed Dialling Lists
Follow this procedure to print speed dialling lists:
1 Press Function.
2 Press Report.
3 Use d or u to select SPEED DIAL LIST.
4 Press Set.
5 Use d or u to select the list you want
Ex:
to print.
• You can select from the following:
– 1-TOUCH LIST
– CODED DIAL LIST
– GROUP DIAL LIST
6 Press Set.
• If you selected 1-TOUCH LIST or CODED DIAL
LIST above, select in what order you want the
destinations to be printed:
Press T to print the list with the names of the
destinations in alphabetical order.
-orPress # to print the list in code or button order.
• The MultiPASS prints the list.
Samples of the lists are shown on the following page.
YES=(A) NO=(#)
SORTED OUTPUT
CODED DIAL LIST
1-TOUCH LIST
SPEED DIAL LIST
ACTIVITY REPORT
Page 80
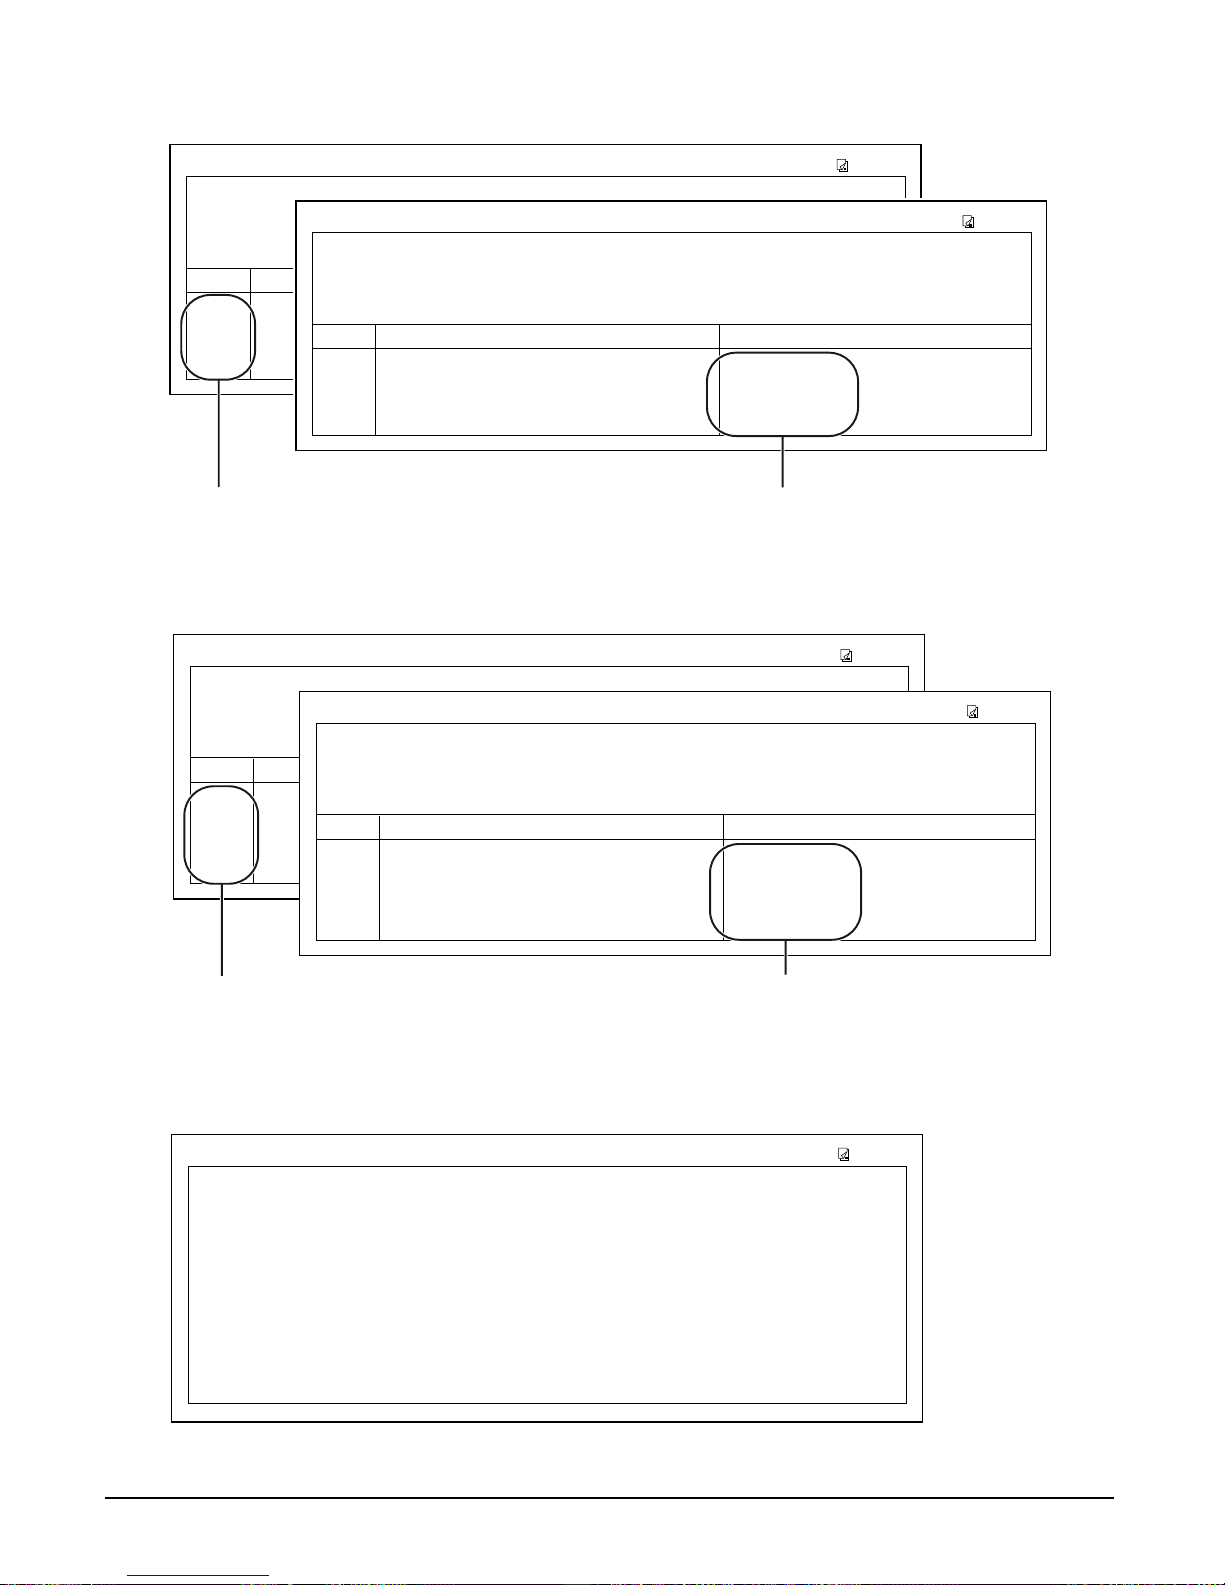
6-14 Speed Dialling Chapter 6
■ 1-TOUCH SPD DIAL LIST
■ CODED SPEED DIAL LIST
■ GROUP DIAL LIST
***************************
***************************
*** ***
GROUP DIAL LIST
[ 03] Canon GROUP 2 [ 04] 2 50921 Canon ITALIA
[A 00] 2131 1250 Canon DEUTSCH.
[A 02] 1 49 39 25 25 Canon FRANCE
[A 32] 81 773 3173 Canon UK
[
A 21] Canon GROUP 1 [ 01] 905 795 1111 Canon CANADA
[A 03] 516p488 6700 Canon U.S.A.
27/12 2001 17:23 FAX 123 4567 CANON 001
************************************
************************************
*** ***
CODED SPEED DIAL LIST
NO. CONNECTION TEL CONNECTION ID
[
A 00] 2131 1250 Canon DEUTSCH.
[
A 01] 03 3758 2111 Canon TOKYO
[
A 02] 1 49 39 25 25 Canon FRANCE
[
A 03] 516p488 6700 Canon U.S.A.
[
A 21] GROUP DIAL Canon GROUP 1
[
A 32] 81 773 3173 Canon UK
27/12 2001 17:23 FAX 123 4567 CANON 001
*********************************
*********************************
*** ***
CODED SPEED DIAL LIST
NO. CONNECTION TEL CONNECTION ID
[
A 00] 2131 1250 Canon DEUTSCH.
[
A 02] 1 49 39 25 25 Canon FRANCE
[
A 21] GROUP DIAL Canon GROUP 1
[
A 01] 03 3758 2111 Canon TOKYO
[
A 03] 516p488 6700 Canon U.S.A.
[
A 32] 81 773 3173 Canon UK
27/12 2001 17:23 FAX 123 4567 CANON 001
SORTED LIST:DESTINATIONS LISTED IN
ALPHABETICAL ORDER.
UNSORTED LIST:DESTINATIONS LISTED
IN CODE ORDER.
NO. CONNECTION TEL CONNECTION ID
[ 01] 905 795 1111 Canon CANADA
[ 03] GROUP DIAL Canon EUROPA
[ 04] 2 50921 Canon ITALIA
[ 05] 1 432 2060 Canon OPTICS
[ 12] 2 887 0166 Canon AUSTRALIA
27/12 2001 17:23 FAX 123 4567 CANON 001
***********************************
***********************************
*** ***
1-TOUCH SPD DIAL LIST
*********************************
*********************************
*** ***
1-TOUCH SPD DIAL LIST
NO. CONNECTION TEL CONNECTION ID
[ 12] 2 887 0166 Canon AUSTRALIA
[ 01] 905 795 1111 Canon CANADA
[ 03] GROUP DIAL Canon EUROPA
[ 04] 2 50921 Canon ITALIA
[ 05] 1 432 2060 Canon OPTICS
27/12 2001 17:23 FAX 123 4567 CANON 001
SORTED LIST:DESTINATIONS LISTED IN
ALPHABETICAL ORDER.
UNSORTED LIST:DESTINATIONS LISTED
IN BUTTON ORDER.
Page 81

Chapter 7 Sending Faxes 7-1
Sending Faxes
Chapter 7
Sending Faxes
Preparing to Send a Fax..........................................................................7-2
Documents You Can Fax........................................................................7-2
Adjusting the Quality of Your Faxes .......................................................7-2
Setting Colour or Black & White Transmission ..................................7-2
Setting the Scanning Resolution........................................................7-3
Setting the Scanning Contrast ...........................................................7-4
Dialling Methods.....................................................................................7-5
Sending Methods......................................................................................7-6
Memory Sending ....................................................................................7-6
Manual Sending Via the Handset...........................................................7-7
Cancelling Sending ..................................................................................7-9
Redialling When the Line is Busy.........................................................7-10
Manual Redialling.................................................................................7-10
Cancelling Manual Redialling...........................................................7-10
Automatic Redialling .............................................................................7-10
What is Automatic Redialling?..........................................................7-10
Cancelling Automatic Redialling.......................................................7-11
Setting the Options for Automatic Redialling....................................7-11
Sequential Broadcasting .......................................................................7-13
Sending a Document to More Than One Destination..........................7-13
Sending a Document Using Group Dialling..........................................7-15
Delayed Sending.....................................................................................7-15
Sending Other Documents While the MultiPASS is Set for
Delayed Sending...............................................................................7-15
Documents Stored in Memory ..............................................................7-16
Printing a List of Documents in Memory..............................................7-16
Printing a Document in Memory...........................................................7-17
Deleting a Document From Memory....................................................7-19
Page 82

7-2 Sending Faxes Chapter 7
Preparing to Send a Fax
Documents You Can Fax
For information on the types of documents you can fax, their requirements, and details
on loading documents, 1 Chapter 4.
Adjusting the Quality of Your Faxes
Canon’s Ultra High Quality (UHQ™) imaging technology enables you to send documents
that are very close to the quality of the original. The MultiPASS allows you to send a
document in colour or black & white, and to adjust the resolution and contrast to best
suit your particular document.
Setting Colour or Black & White Transmission
Your MultiPASS can send faxes in black & white. It can also send faxes in colour to fax
machines with colour capability. Before sending a document, you need to adjust
whether the document will be sent in colour, or in black & white only.
■ To send in black & white:
Make sure the Colour/B&W button’s light is off. If not, press Colour/B&W to turn it off.
■ To send in colour (to fax machines that support colour fax
reception):
Press Colour/B&W to turn on its light.
n
If you attempt to send a colour document to a fax machine that does not support colour
faxing, the document will not be sent and the LCD will display TRY AGAIN IN B&W. Try
sending again in black & white. Alternatively, you can enable the COLOUR DIRECT TX
setting (1 p. 14-6) that converts colour faxes to black & white if the other party’s fax
machine does not support colour faxing, thus enabling you to send colour documents to
any fax machine without an error occurring.
Page 83

Chapter 7 Sending Faxes 7-3
Sending Faxes
Setting the Scanning Resolution
Resolution is a measure of the fineness or clarity of a printout. Low resolutions may
cause text and graphics to have a jagged appearance, while higher resolutions provide
smoother curves and lines, crisp text and graphics, and a better match to traditional
typeface designs.
n
The higher the resolution, the higher the output quality, but the slower the scanning speed.
■ For black & white sending, set the resolution as follows:
1 Make sure the light above Colour/B&W is
turned off.
• If not, press Colour/B&W to turn it off.
2 Press Image Quality to select the resolution
Ex:
setting you want.
• You can select from the following:
– FAX STANDARD
Suitable for most text-only documents.
– FAX FINE
Suitable for fine-print documents.
– FAX PHOTO
Suitable for documents that contain images
such as photos. With this setting, areas of
the document that contain photos are
automatically scanned with 64 levels of grey,
rather than just two (black & white).
After about 10 seconds, the LCD returns to standby mode.
■ For colour sending, set the resolution as follows:
1 Press Colour/B&W to turn on its light.
2 Press Image Quality to select the resolution
Ex:
setting you want.
• You can select from the following:
– FAX STANDARD
Provides standard colour resolution.
– FAX FINE
Provides a higher quality colour resolution.
After about 10 seconds, the LCD returns to standby mode.
n
You can change the resolution setting while the document is being scanned for sending.
However, please note that your new setting will only be effective from the next page
scanned.
FAX FINE
FAX PHOTO
Page 84
7-4 Sending Faxes Chapter 7
Setting the Scanning Contrast
Contrast is the difference in brightness between the lightest and darkest parts of a
printed document. You can adjust the contrast the MultiPASS uses to send or copy
black & white documents. Adjust according to how light or dark your document is.
n
You can also set the scanning contrast for sending from the MultiPASS Suite.
(1 MultiPASS Suite User’s Guide)
Follow this procedure to set the scanning contrast:
1 Press Function.
2 Press Data Registration.
3 Press Set twice.
4 Use d or u to select SCAN CONTRAST.
5 Press Set.
Ex:
6 Use d or u to select the scanning contrast
Ex:
you want.
• You can select from the following:
– STANDARD
Adequate for most documents.
– DARKER
Suitable for light documents.
– LIGHTER
Suitable for dark documents.
7 Press Set.
8 Press Stop to return to standby mode.
Ex:
15:00 FaxOnly
OFFHOOK ALARM
DARKER
STANDARD
SCAN CONTRAST
DATE & TIME
USER SETTINGS
DATA REGSTRATION
Page 85

Chapter 7 Sending Faxes 7-5
Sending Faxes
Dialling Methods
There are several ways of dialling the number of the party you want to send to. They
are as follows:
• Regular Dialling
Dial a fax number by using the numeric buttons, just like dialling a telephone number.
• One-Touch Speed Dialling
Dial a fax number by pressing the one-touch speed dialling button (01 to 12) that the
number is assigned to. For details on registering and using one-touch speed dialling,
1 pp. 6-3, 6-5.
• Coded Speed Dialling
Dial a fax number by pressing Coded Dial followed by the two-digit code (00 to 99)
that the number is assigned to. For details on registering and using coded speed
dialling, 1 pp. 6-6, 6-8.
• Group Dialling
Send a document to a predefined group of fax numbers. (The numbers must already
be registered under one-touch speed dialling buttons or coded speed dialling codes.)
For details on creating groups and using group dialling, 1 pp. 6-9, 6-12.
• PC Dialling
Dial a fax number from your PC using the MultiPASS Suite. (1 MultiPASS Suite
User’s Guide)
Page 86

7-6 Sending Faxes Chapter 7
Sending Methods
This section describes the methods and advantages of the two main sending methods:
Memory sending and Manual sending via the handset.
Memory Sending
Memory sending is a quick and easy way to send a document. As the first page of a
multipage document is being scanned into the MultiPASS’ memory, the unit begins
calling the other party and transmitting the information even as the remaining pages are
being scanned.
Since the MultiPASS is multitasking, you can even scan a document into memory while
performing other tasks.
The MultiPASS has enough memory to store up to approximately 416 pages* (fewer if
the document contains many graphics or particularly dense text).
Follow this procedure for memory sending:
1 Open the document tray.
2 Adjust the document feed lever for the
document you are loading. (1 p. 4-2)
3 Prepare the document and load it, face
down, in the ADF. (1 p. 4-4)
• For colour sending, press Colour/B&W to
(Currently used memory)
turn on its light. (1 p. 7-2)
• To adjust the resolution and contrast,
1 pp. 7-3, 7-4.
(Standby to scan)
• You may be unable to use memory sending if
the percentage shown in the LCD is close to
100%. Use manual sending via the handset
instead. (1 p. 7-7)
4 Dial the other party’s fax number.
Ex:
• For dialling methods, 1 p. 7-5.
• If you enter the wrong number, press Stop,
then enter the correct number.
• If you must first dial a digit to get an outside
line (“9”, for example), add a pause after that
digit by pressing R/Pause.
TEL= 9p7654321
DOCUMENT READY
MEMORY USED 0%
*Based on Canon FAX Standard Chart No. 1, standard mode.
Page 87

Chapter 7 Sending Faxes 7-7
Sending Faxes
5 Press Start to begin scanning for sending, or if
you used speed dialling, wait a few seconds for
the MultiPASS to begin scanning automatically.
• If you prefer the MultiPASS never to scan a
document automatically after a few seconds,
disable the TIME OUT setting. (1 p. 14-6)
• To cancel sending once dialling has started,
press Stop then T. (1 p. 7-9)
n
• You can scan up to 30 different documents for memory sending.
• When an error occurs during sending, the document is automatically deleted from
memory, even if it was not sent completely.
• If you attempt to send a colour document to a fax machine that does not support colour
faxing, the document will not be sent and the LCD will display TRY AGAIN IN B&W. Try
sending again in black & white. Alternatively, you can enable the COLOUR DIRECT TX
setting (1 p. 14-6) that converts colour faxes to black & white if the other party’s fax
machine does not support colour faxing, thus enabling you to send colour documents to
any fax machine without an error occurring.
Manual Sending Via the Handset
Manual sending via the handset allows you to talk to the other party before sending a
document. This method is useful if the other party must manually set their fax machine
to receive before they can receive a fax.
Follow this procedure for manual sending via the handset:
n
For this mode, you need to connect the optional handset or a telephone to your unit.
(1 p. 2-6)
1 Open the document tray.
2 Adjust the document feed lever for the
document you are loading. (1 p. 4-2)
3 Prepare the document and load it, face
down, in the ADF. (1 p. 4-4)
• For colour sending, press Colour/B&W to
(Currently used memory)
turn on its light. (1 p. 7-2)
• To adjust the resolution and contrast,
1 pp. 7-3, 7-4.
(Standby to scan)
DOCUMENT READY
MEMORY USED 0%
Page 88

7-8 Sending Faxes Chapter 7
4 Press Hook.
• You can also lift the handset instead of
pressing Hook.
5 Dial the other party’s fax/telephone number.
Ex:
• For dialling methods, 1 p. 7-5.
• If you make a mistake during dialling, press
Hook or hang up the handset and start again
from step 4.
6 When you hear the other party answer the
call, pick up the handset to start talking.
• If you pressed Hook in step 4 instead of lifting
the handset, you will hear the other party’s
voice but they will not be able to hear you
through the speaker. Pick up the handset to
talk to the other party.
• If you hear a high-pitched signal instead of the
other party’s voice, press Start. If you picked
up the handset to dial, press Start and hang
up the handset. The MultiPASS will begin
sending the document.
7 When you are ready to send the document,
ask the other party to press the start button
on their fax unit.
8 When you hear the high-pitched signal of
the other party’s fax unit press Start on the
MultiPASS and then hang up the handset.
• The MultiPASS begins sending the document.
n
• Be sure to hang up the handset after you press Start on the MultiPASS; otherwise the
call will be disconnected.
• The unit will beep if the handset is not hung up properly. Make sure the handset is
seated properly in its cradle. If you do not want the unit to beep, disable the OFFHOOK
ALARM setting. (1 p. 14-4)
• If you attempt to send a colour document to a fax machine that does not support colour
faxing, the document will not be sent and the LCD will display TRY AGAIN IN B&W. Try
sending again in black & white. Alternatively, you can enable the COLOUR DIRECT TX
setting (1 p. 14-6) that converts colour faxes to black & white if the other party’s fax
machine does not support colour faxing, thus enabling you to send colour documents to
any fax machine without an error occurring.
TEL= 7654321
TEL=
Page 89

Chapter 7 Sending Faxes 7-9
Sending Faxes
Cancelling Sending
Follow this procedure if you want to stop sending a document before transmission is
completed:
■ Cancel manual sending via the handset as follows:
1 Press Stop.
• The transmission is cancelled.
• The MultiPASS prints an ERROR TX REPORT.
(1 p. 11-4)
■ Cancel memory sending as follows:
1 Press Stop.
• The MultiPASS asks you to confirm that you
want to cancel sending.
2 Press T to cancel sending.
• Sending is not cancelled until you press T.
• If you change your mind and want to continue
sending, press #.
• To cancel transmission of a document waiting
to be sent, you will have to delete it from
memory. (1 p. 7-19)
• The MultiPASS prints an ERROR TX REPORT.
(1 p. 11-4)
n
When you cancel sending, you may need to open the operation panel to remove the
document from the ADF. (1 p. 13-3)
YES=(A) NO=(#)
CANCEL? AYES #NO
Page 90

7-10 Sending Faxes Chapter 7
Redialling When the Line is Busy
There are two methods of redialling: Manual redialling and Automatic redialling. This
section explains these two methods.
Manual Redialling
Press R/Pause to dial the last number you dialled with the numeric buttons. (This
starts redialling regardless of whether automatic redialling is enabled.)
Cancelling Manual Redialling
To cancel manual redialling, press Stop.
Automatic Redialling
What is Automatic Redialling?
When you are sending a document using memory sending and the other party’s line is
busy, the unit waits the specified time and then dials the same number again. You can
set the MultiPASS to redial several times if previous attempts fail because of a busy
signal. This feature is called Automatic redialling.
After the initial dial attempt, the MultiPASS is factory-set to wait two minutes and then
try to dial again. If the second attempt fails because the line was busy, the MultiPASS
will again wait for two minutes and make a final attempt to complete the call.
Automatic redialling can be turned off and on. The number of redialling attempts and
the time interval between attempts can also be adjusted. (1 p. 7-11)
If all redialling attempts are unsuccessful, the MultiPASS will cancel the transmission
and print an ERROR TX REPORT to remind you that the transmission was not
completed. (1 p. 11-4)
n
You can also set the automatic redialling feature from the MultiPASS Suite. (1 MultiPASS
Suite User’s Guide)
When automatic redialling is in use, the LCD alternately displays AUTO REDIAL and
the transaction number (TX/RX NO.) while it is waiting to redial.
Page 91
Chapter 7 Sending Faxes 7-11
Sending Faxes
Cancelling Automatic Redialling
Automatic redialling cannot be cancelled with the Stop button while the unit is waiting
to redial.
Follow this procedure to cancel automatic redialling:
1 Wait until the MultiPASS begins redialling.
2 Press Stop.
• The MultiPASS asks you to confirm that you
want to cancel.
3 Press T to cancel redialling.
• Redialling is not cancelled until you press T.
• If you change your mind and want to continue
redialling, press #.
• The MultiPASS prints an ERROR TX REPORT.
(1 p. 11-4)
n
If you want to cancel a transmission while the unit is waiting to redial, you will have to
delete the document from memory. (1 p. 7-19)
Setting the Options for Automatic Redialling
You can set the following options for automatic redialling:
• Whether or not the MultiPASS redials automatically.
• The number of times the MultiPASS attempts to redial.
• The time interval between redialling attempts.
Follow this procedure to adjust the automatic redialling settings:
1 Press Function.
2 Press Data Registration.
3 Press Set.
4 Use d or u to select TX SETTINGS.
5 Press Set.
ECM TX
TX SETTINGS
USER SETTINGS
DATA REGSTRATION
YES=(A) NO=(#)
CANCEL? AYES #NO
DIALING
Page 92
7-12 Sending Faxes Chapter 7
6 Use d or u to select AUTO REDIAL.
7 Press Set.
Ex:
• To disable automatic redialling, use d or u to
select OFF, then press Set. Press Stop to
return to standby mode.
• To enable automatic redialling, use d or u to
select ON. Continue with the steps below.
8 Press Set twice.
Ex:
9 Use the numeric buttons to enter the
Ex:
number of times you want the unit to
redial.
• You can select from 1 to 10 times.*
• The default setting is twice.
10 Press Set twice.
Ex:
11 Use the numeric buttons to enter the time
Ex:
interval between rediallings.
• You can select from 1 to 99 minutes.**
• The default setting is 2 minutes.
12 Press Set.
13 Press Stop to return to standby mode.
Ex:
15:00 FaxOnly
TIME OUT
5MIN.
2MIN.
REDIAL INTERVAL
5TIMES
2TIMES
REDIAL TIMES
ON
AUTO REDIAL
*Australia: 1 to 2 times, New Zealand: 1 to 5 times, Malaysia: 1 to 15 times, Hong Kong: 1 to 3 times.
**Singapore: 2 to 99 minutes.
Page 93

Chapter 7 Sending Faxes 7-13
Sending Faxes
Sequential Broadcasting
Sending a Document to More Than One Destination
This feature allows you to scan a document once and send it to several destinations.
You can send the document to a maximum of 113 destinations using a combination of
the following dialling methods:
• One-touch speed dialling: up to 12 destinations
• Coded speed dialling: up to 100 destinations
• Regular dialling (using the numeric buttons): one destination
You can enter the destinations in any order. (Be sure to press Set after your entry with
the numeric buttons.)
n
If you frequently send documents to the same group of destinations, you can group them
and register these numbers for group dialling. You can register up to 111 fax numbers with
group dialling and send the same document to these numbers at the press of one or three
buttons. (1 p. 6-9)
Follow this procedure to send a document to more than one destination:
1 Open the document tray.
2 Adjust the document feed lever for the
document you are loading. (1 p. 4-2)
3 Prepare the document and load it, face
down, in the ADF. (1 p. 4-4)
• For colour sending, press Colour/B&W to
(Currently used memory)
turn on its light. (1 p. 7-2)
• To adjust the resolution and contrast,
1 pp. 7-3, 7-4.
(Standby to scan)
4 Enter up to 113 fax numbers using any of
the following methods:
❚ One-touch speed dialling:
Press the desired one-touch speed dialling
Ex:
button(s).
❚ Coded speed dialling:
Press Coded Dial, then use the numeric
Ex:
buttons to enter the two-digit code. Repeat
for other codes.
Ex:
• Be sure to press Coded Dial before each
code.
TEL=03 3758 2111
A01
TEL=905 795 1111
DOCUMENT READY
MEMORY USED 0%
Page 94

7-14 Sending Faxes Chapter 7
❚ Regular dialling:
Use the numeric buttons to enter the fax
Ex:
number, then press Set.
• You can only enter one fax number this way.
n
• If you enter an incorrect destination,
press Function, then Clear. Then
press Function again, and enter the
correct destination.
• You must enter the second fax number
within five seconds of entering the first
one. All subsequent fax numbers must
be entered within 10 seconds. If you
wait longer than these times, the
MultiPASS automatically begins
scanning the document for sending. If
you prefer the MultiPASS not to do this,
disable the TIME OUT setting.
(1 p. 14-6)
• If you want to review the numbers you
entered, press Function and use d or
u to scroll through the numbers.
5 Press Start to begin scanning for sending,
or wait a few seconds for the MultiPASS to
begin scanning automatically.
• The MultiPASS will first send the document to
the one-touch speed dialling destinations, then
the coded speed dialling destinations, and
finally to the destination dialled using regular
dialling.
• If you prefer the MultiPASS never to scan a
document automatically after a few seconds,
disable the TIME OUT setting. (1 p. 14-6)
• To cancel sending, press Stop then T.
Sending to all destinations you specified in
step 4 will be cancelled (you cannot cancel
only one destination), and the MultiPASS will
print a MULTI TX/RX REPORT. (1 p. 11-5)
n
• If a number is busy, the unit will continue sending to the other destinations and then
redial the number that was busy.
• If the MultiPASS’memory becomes full while scanning your document, MEMORY FULL
will appear in the LCD. If this happens, remove the remainder of the document from the
ADF (you may need to open the operation panel to do so), then divide the document into
several sections and send each section separately.
• If you attempt to send a colour document to a fax machine that does not support colour
faxing, the document will not be sent, the LCD will display TRY AGAIN IN B&W, and
transmission to that destination will be cancelled. Try sending again in black & white.
(This occurs even if the COLOUR DIRECT TX setting is enabled.)
TEL=2 887 0166
Page 95

Chapter 7 Sending Faxes 7-15
Sending Faxes
Sending a Document Using Group Dialling
If you frequently send faxes to the same group of fax numbers, you can create a group
of these numbers. Groups are stored under one-touch speed dialling buttons or coded
speed dialling codes. For details, 1 p. 6-9.
Delayed Sending
You can use your MultiPASS to send faxes at a preset time. This feature is called
Delayed sending or Timer sending. By using this feature, you can take advantage of
lower long distance rates at night, for example.
n
• You can only set this feature from the MultiPASS Suite. (1 MultiPASS Suite User’s
Guide)
• To use this feature, your PC must be turned on and connected to the MultiPASS.
Sending Other Documents While the MultiPASS is Set
for Delayed Sending
The MultiPASS is a multitasking unit, so you can perform other tasks even when you
have set the MultiPASS for delayed sending.
To print, copy, scan, or send other documents after setting the MultiPASS for delayed
sending, simply follow the procedures described in this guide or in the MultiPASS Suite
User’s Guide.
Page 96
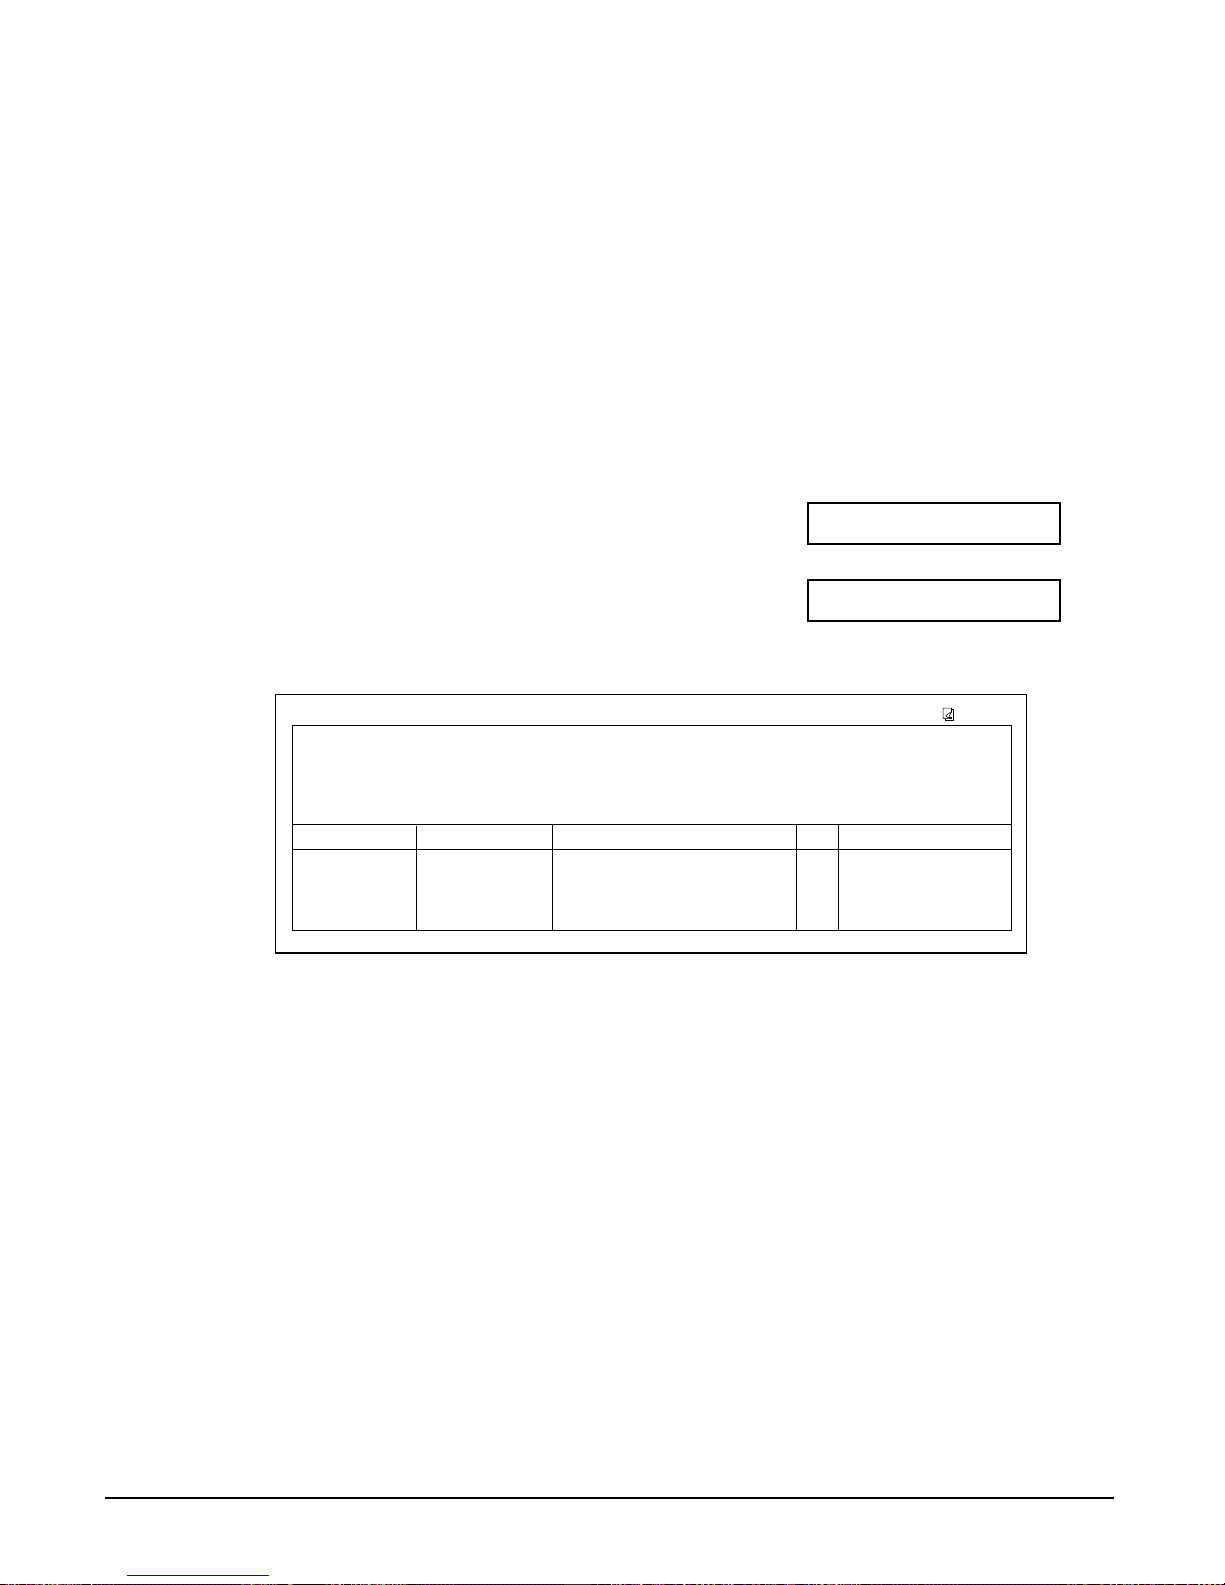
7-16 Sending Faxes Chapter 7
Documents Stored in Memory
Printing a List of Documents in Memory
The MultiPASS can print a list of documents stored in memory, along with the
transaction number (TX/RX NO.) of each document. Once you know the transaction
number of a document in memory, you can print it or delete it. These procedures are
described later in this chapter.
Follow this procedure to print a list of documents in memory:
1 Press Function.
2 Press Memory Reference.
3 Press Set.
• The MultiPASS prints the DOC. MEMORY
LIST.
0046 TRANSMIT [A 01] Canon TOKYO 3 27/12 23:24
0047 TRANSMIT COL [ 04] Canon ITALIA 2 27/12 23:26
0048 B’CAST [ 01] Canon CANADA 1 27/12 23:38
[A 02] Canon FRANCE
0049 B’CAST [ 03] Canon GROUP 2 1 27/12 23:39
DOC. MEMORY LIST
TX/RX NO MODE CONNECTION TEL/ID PGS. SET TIME
****************************
****************************
*** ***
27/12 2001 23:42 FAX 123 4567 CANON 001
PRINTING REPORT
DOC. MEMORY LIST
Page 97

Chapter 7 Sending Faxes 7-17
Sending Faxes
Printing a Document in Memory
Before printing a document, make sure you have the correct BJ cartridge installed.
Black & White Colour Document
Document in Memory in Memory
Colour BJ cartridge Printing possible. Printing possible.
Black BJ cartridge Printing possible. Printing possible
if converted to black
& white.
Photo BJ cartridge Printing possible. Printing possible.
Follow this procedure to print a document stored in memory:
1 Press Function.
2 Press Memory Reference.
3 Use d or u to select PRINT DOCUMENT.
4 Press Set.
Ex:
5 Use d or u to select the transaction
Ex:
number (TX/RX NO.) of the document you
want to print.
• The marks before the transaction number
(TX/RX NO.) mean the following:
– (No mark): Black & white document
– A: Colour document
– #: Black & white document being sent or
printed
– &: Colour document being sent or printed
• If you are unsure of the transaction number
(TX/RX NO.), print the DOC. MEMORY LIST.
(1 p. 7-16)
• Use l or r to display details of the
transaction (destination, for example).
TX/RX NO. A0
003
TX/RX NO. 0001
PRINT DOCUMENT
DOC. MEMORY LIST
Page 98

7-18 Sending Faxes Chapter 7
6 Press Set.
7 Press T to print the first page only, or press
# to print all pages of the document.
• The MultiPASS prints the document.
• If you are printing a colour document and
have the Black BJ cartridge installed, these
messages alternate in the LCD:
Press T to print the document in black & white
with the Black BJ cartridge, or press # to cancel
printing. The unit returns to step 5.
8 To continue printing other documents in
memory, repeat the procedure from step 5.
-orPress Stop to return to standby mode.
Ex:
15:00 FaxOnly
YES=(A) NO=(#)
CONVERT CLR>B&W?
YES=(A) NO=(#)
1ST PG ONLY?
Page 99
Chapter 7 Sending Faxes 7-19
Sending Faxes
Deleting a Document From Memory
Follow this procedure to delete a document from memory:
1 Press Function.
2 Press Memory Reference.
3 Use d or u to select DELETE DOCUMENT.
4 Press Set.
Ex:
5 Use d or u to select the transaction
Ex:
number (TX/RX NO.) of the document you
want to delete.
• The marks before the transaction number
(TX/RX NO.) mean the following:
– (No mark): Black & white document
– A: Colour document
– #: Black & white document being sent or
printed
– &: Colour document being sent or printed
• If you are unsure of the transaction number
(TX/RX NO.), print the DOC. MEMORY LIST.
(1 p. 7-16)
• Use l or r to display details of the
transaction (destination, for example).
6 Press Set.
• The MultiPASS asks you to confirm that you
want to delete the document.
7 Press T to delete the document.
• If you change your mind and want to keep the
document in memory, press #.
• The MultiPASS deletes the document.
8 To continue deleting other documents in
memory, repeat the procedure from step 5.
-orPress Stop to return to standby mode.
Ex:
15:00 FaxOnly
ERASING END
YES=(A) NO=(#)
OK TO DELETE?
TX/RX NO. A0004
TX/RX NO. 0001
DELETE DOCUMENT
DOC. MEMORY LIST
Page 100

7-20 Sending Faxes Chapter 7
 Loading...