

Page 1

Installing Your Multifunction
to Your Network for the First Time
MAXIFY MB2320
Windows OS
Wireless Setup Using Standard Setup
1
Page 2

Installing Your Multifunction
to Your Network for the First Time
MAXIFY MB2320
Windows OS
Preparing to Connect My Multifunction to My Network 3
Network Requirements 3
Notes on Wireless Connection 4
Setting up the Network Connection 5
2
Page 3
Preparing to Connect the Multifunction
To the Network
Network Requirements
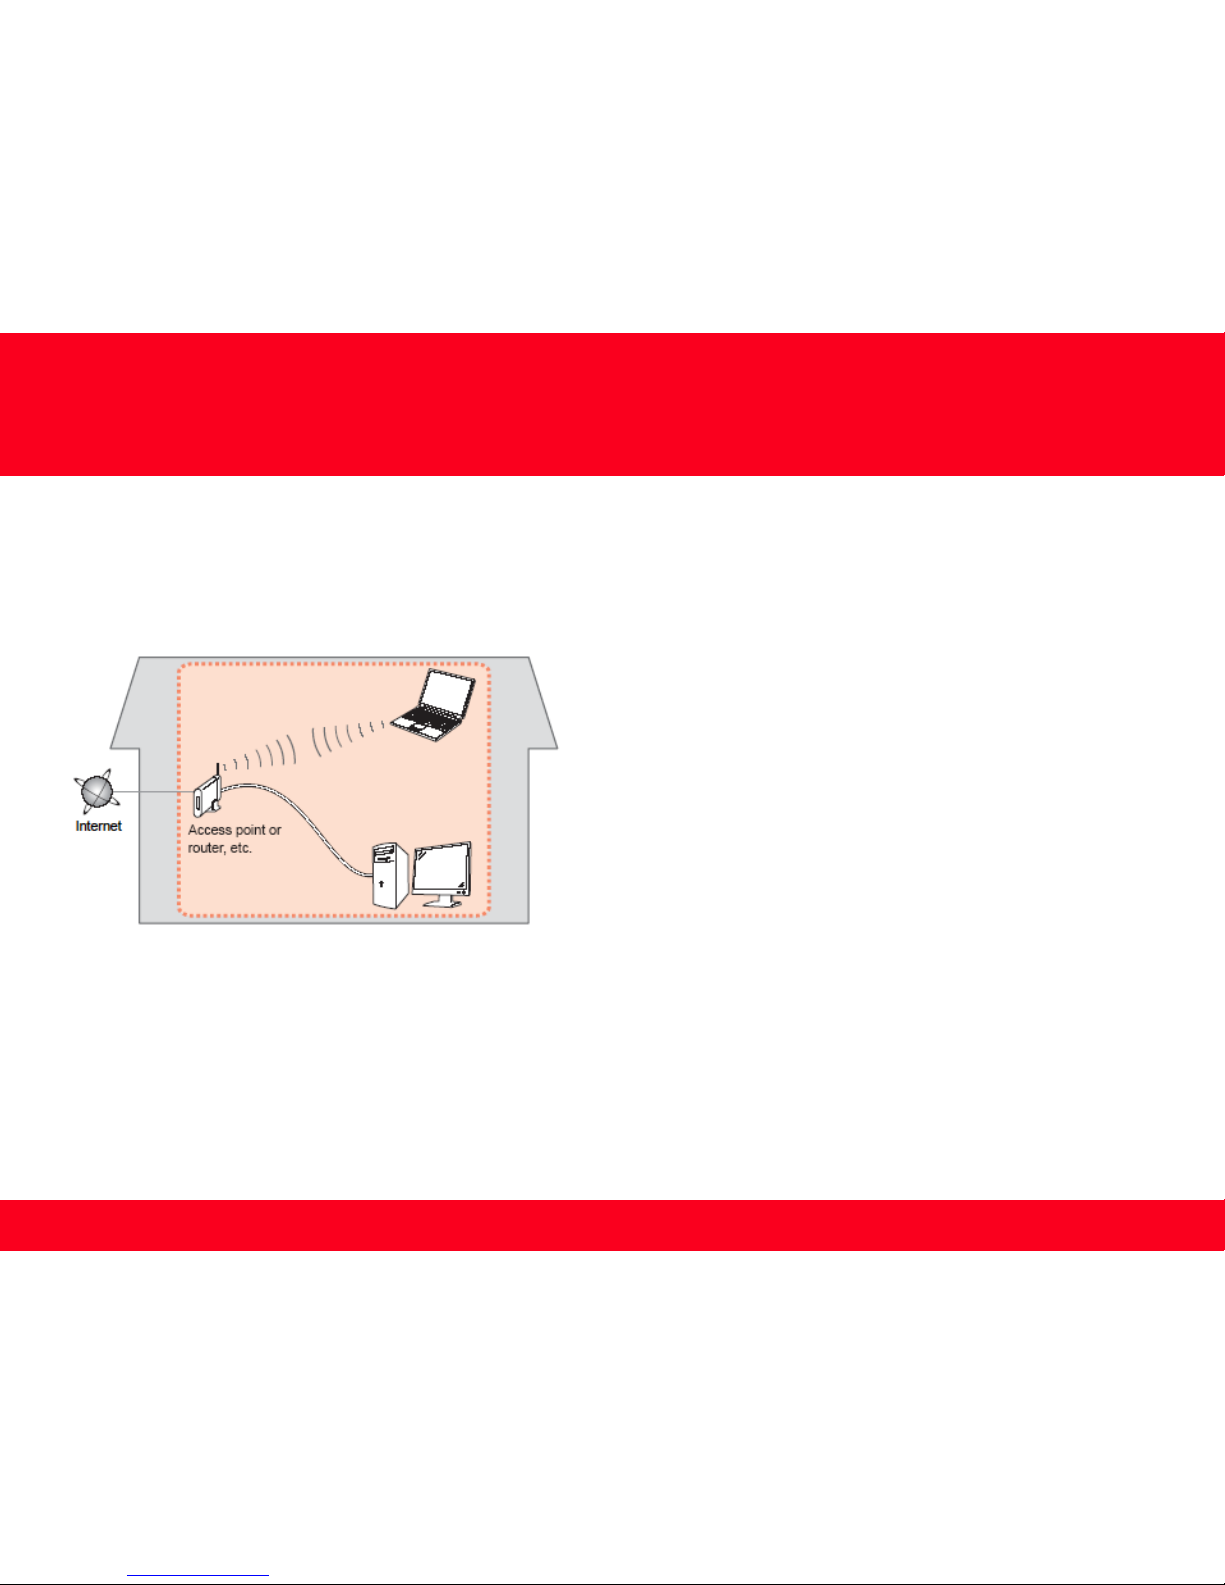
Before connecting the machine to the network, make sure that configuration of the computer and access point or router is
complete, and that the computer is connected to the network.
Wireless Connection
Before connecting the machine to the network, the computer needs to be connected to the network. Make sure that
configuration of the computer and access point or router is complete.
3
Page 4
Preparing to Connect the Multifunction
To the Network
4
Notes on Network Connection
• The configuration, router functions, setup procedures and security settings of
the network device vary depending on your system environment. For details,
refer to your device's instruction manual or contact its manufacturer.
• In an office setup, consult your network administrator
• If you connect to a network that is not protected with security measures, there
is a risk of disclosing data such as your personal information to a third party.
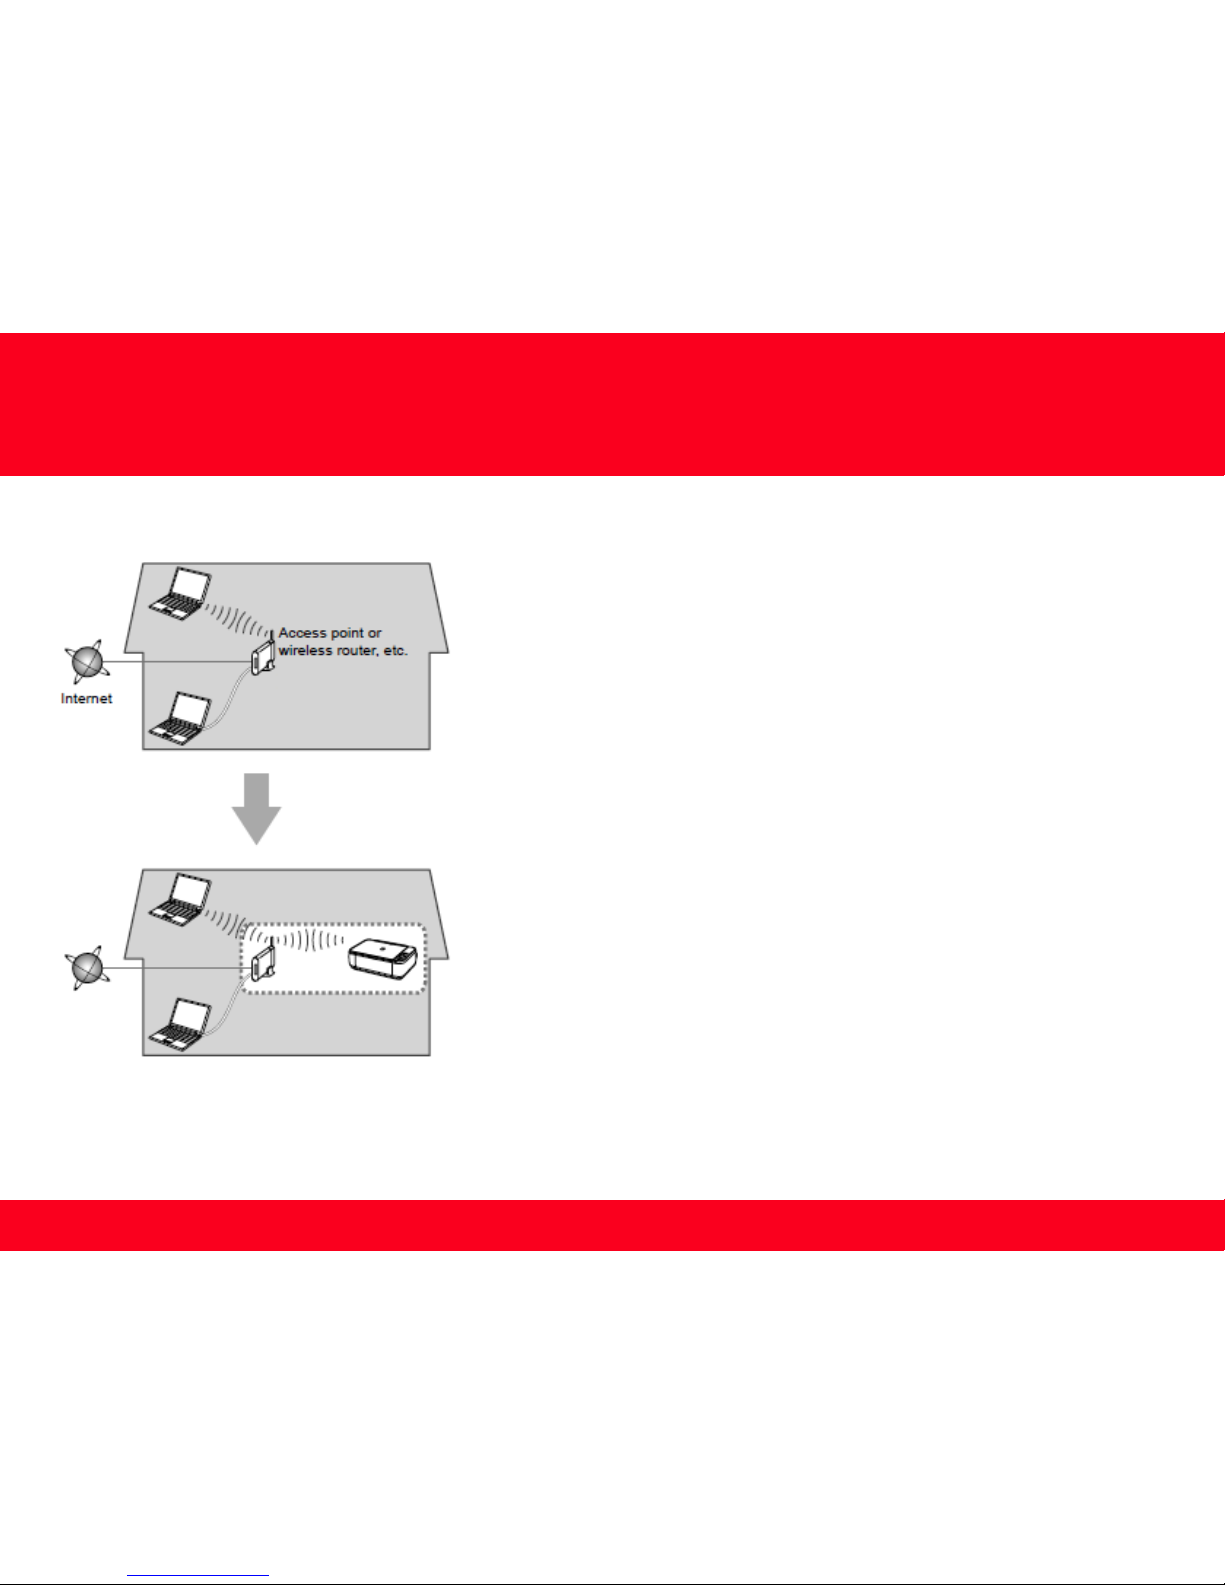
• Place the machine and computer on the same network segment.
Page 5

Software Installation
To use the machine by connecting it to a computer, software including the drivers needs to be copied (installed) to the computer's hard disk.
Installation time varies depending on the computer environment or the number of application software to be installed.
Setting up the Network Connection
5
IMPORTANT
• Log on as the administrator (or a member of the Administrators group).
• Quit all running applications before installation.
• Do not switch users during the installation process.
• Internet connection may be required during the installation. Connection fees may apply. Consult the internet service provider.
• It may be necessary to restart your computer during the installation process. Follow the on-screen instructions and do not remove the
Setup CD-ROM during restarting. The installation resumes once your computer has restarted.
• If the firewall function of your security software is turned on, a warning message may appear that Canon software is attempting to access
the network. If such a warning message appears, set the security software to always allow access.
Page 6
Setting up the Network Connection
6
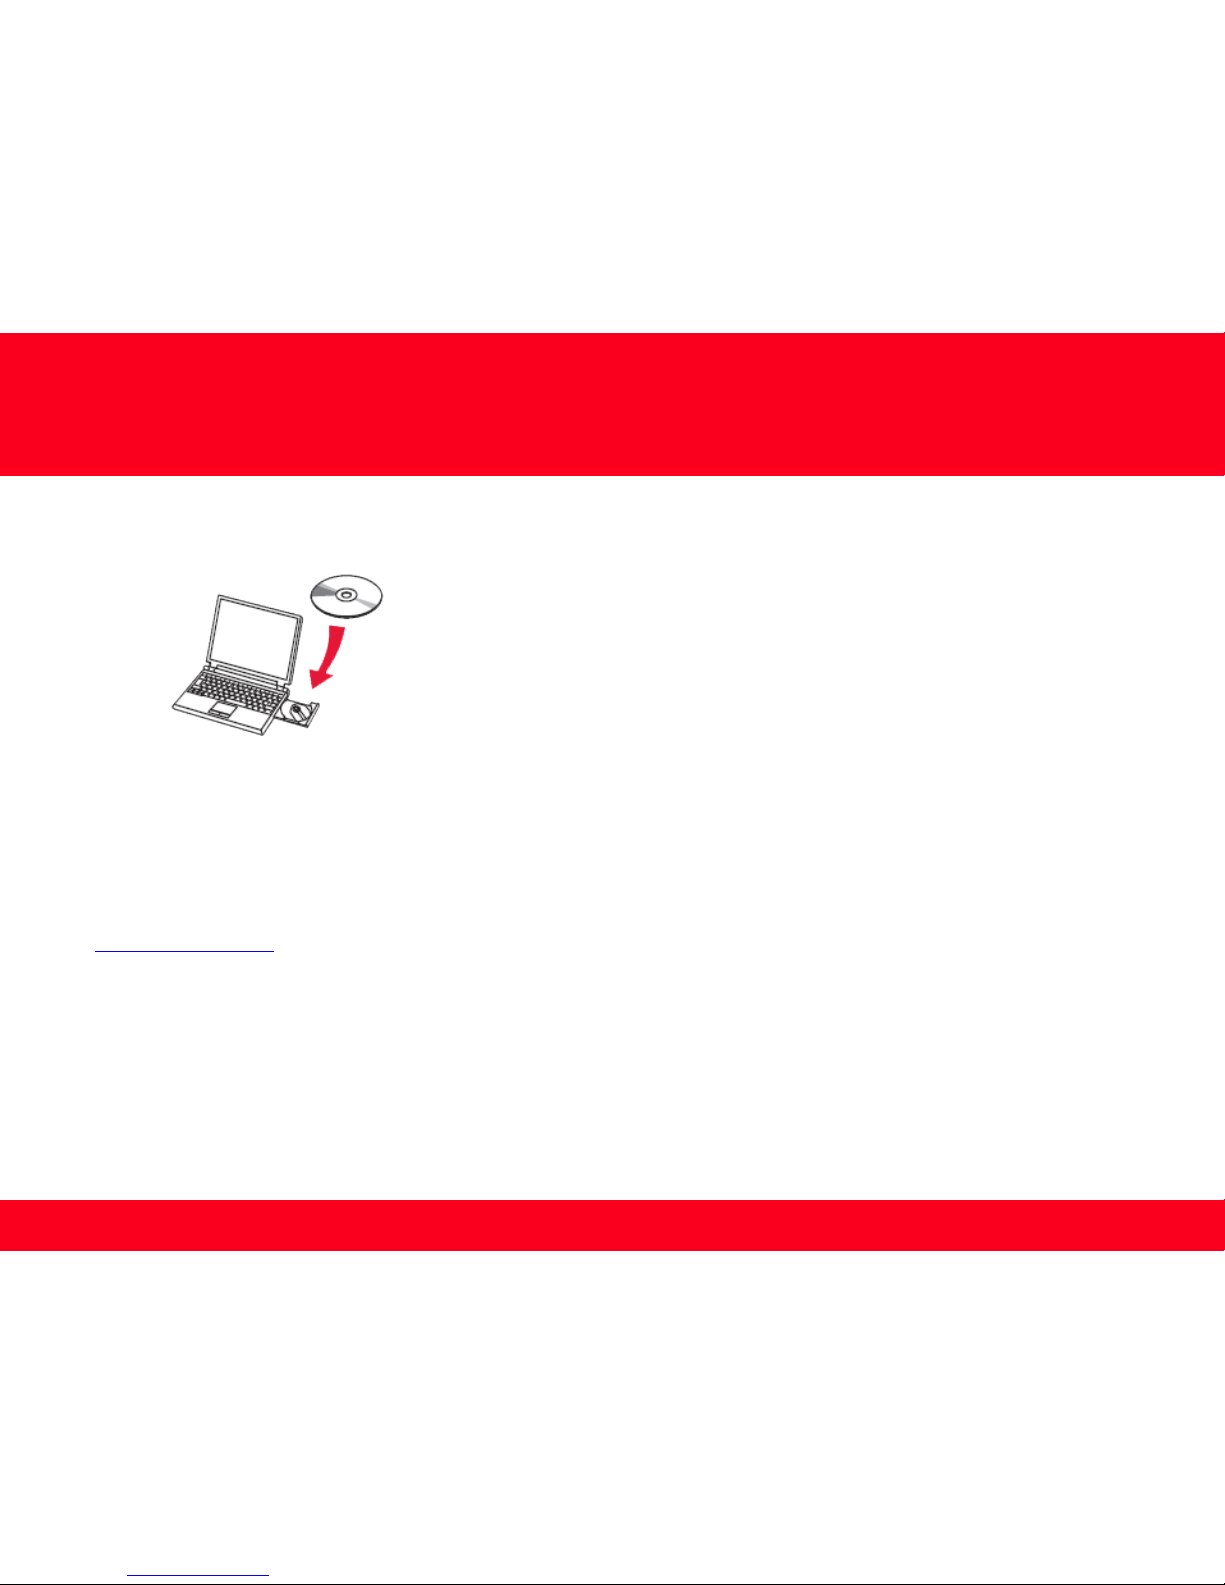
To begin setup of your MAXIFY MB2320 on your wireless network, insert the Setup CD-ROM* in your computer.
The setup program will start automatically. The setup instructions presented in this document describe the “ Standard Setup ” . This setup
method is used if your computer’s operating system is Windows XP or the printer is not detected using other methods.
*If you don’t have or cannot use the Setup CD-ROM, follow the steps below to start the setup.
• Download the s
oftware (click the link to download)
•
Double-click the downloaded .exe file.
If the User Account Control dialog box appears during the setup, click Yes or Continue.
Page 7
Setting Up the Network Connection
7 7
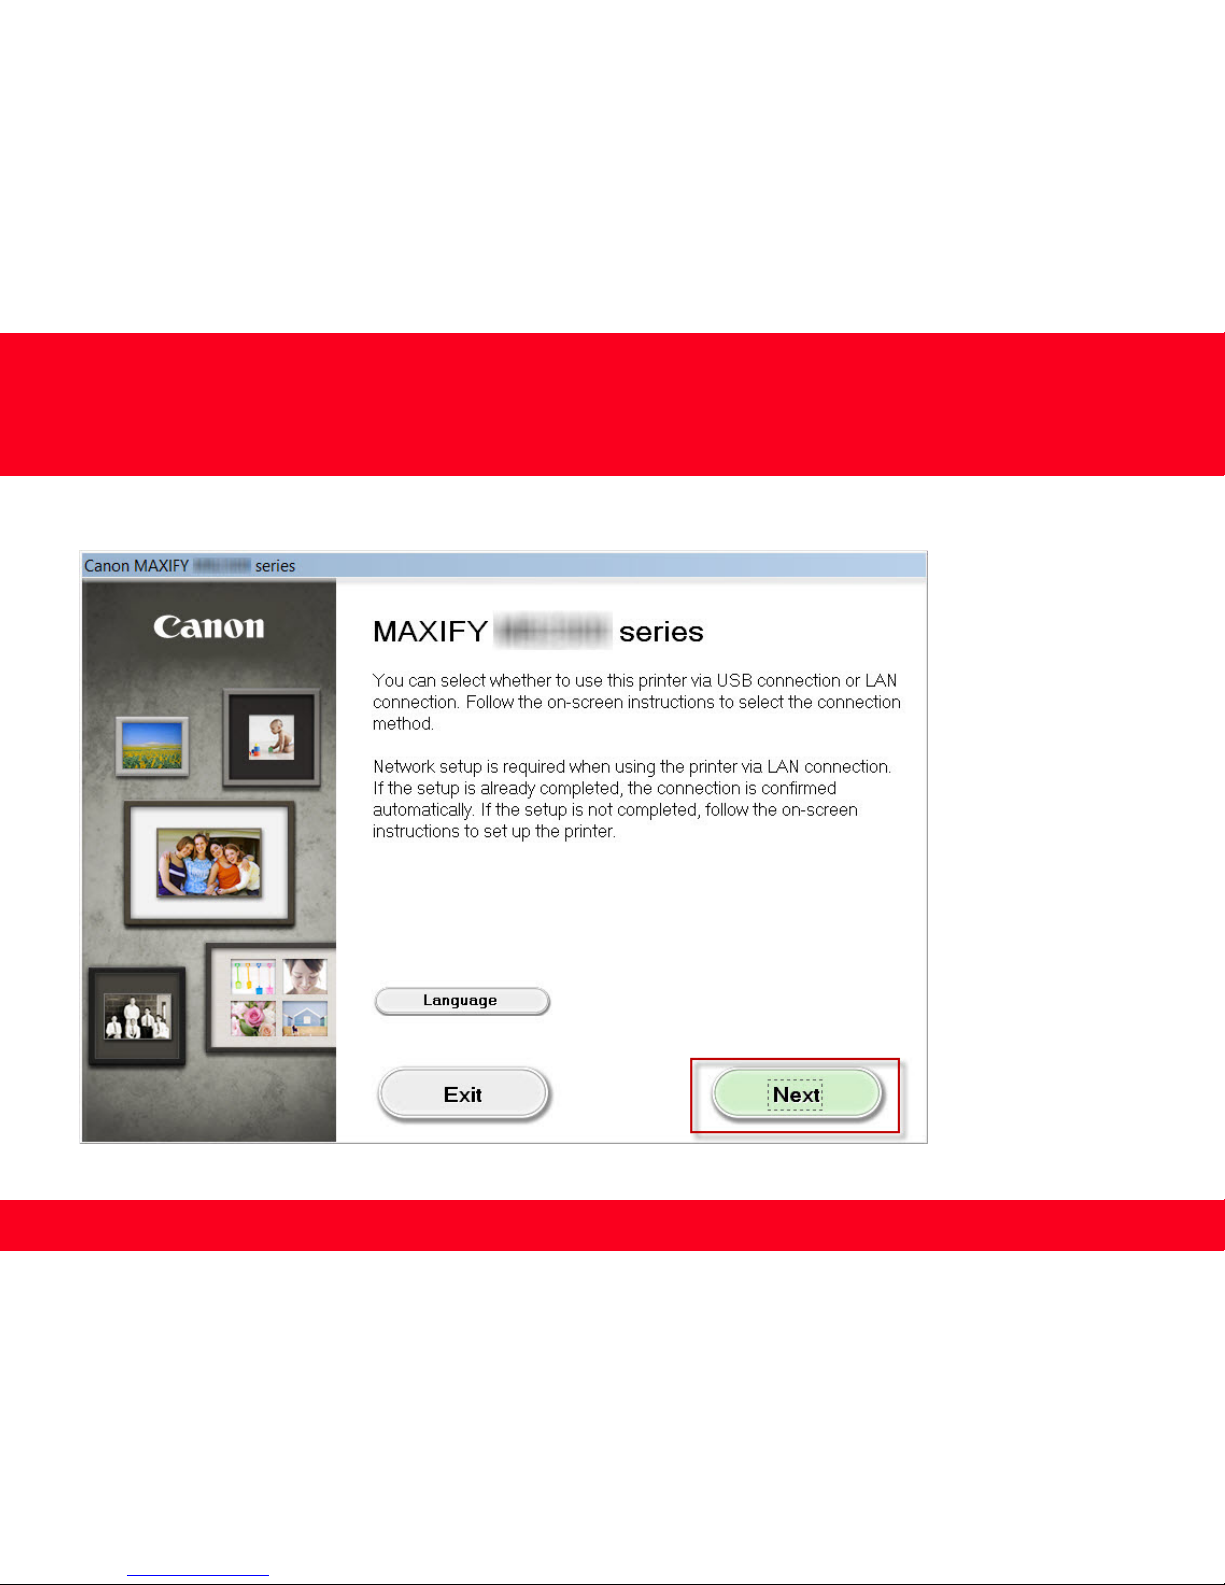
Click Next on the initial screen.
Page 8
Setting Up the Network Connection
8 8
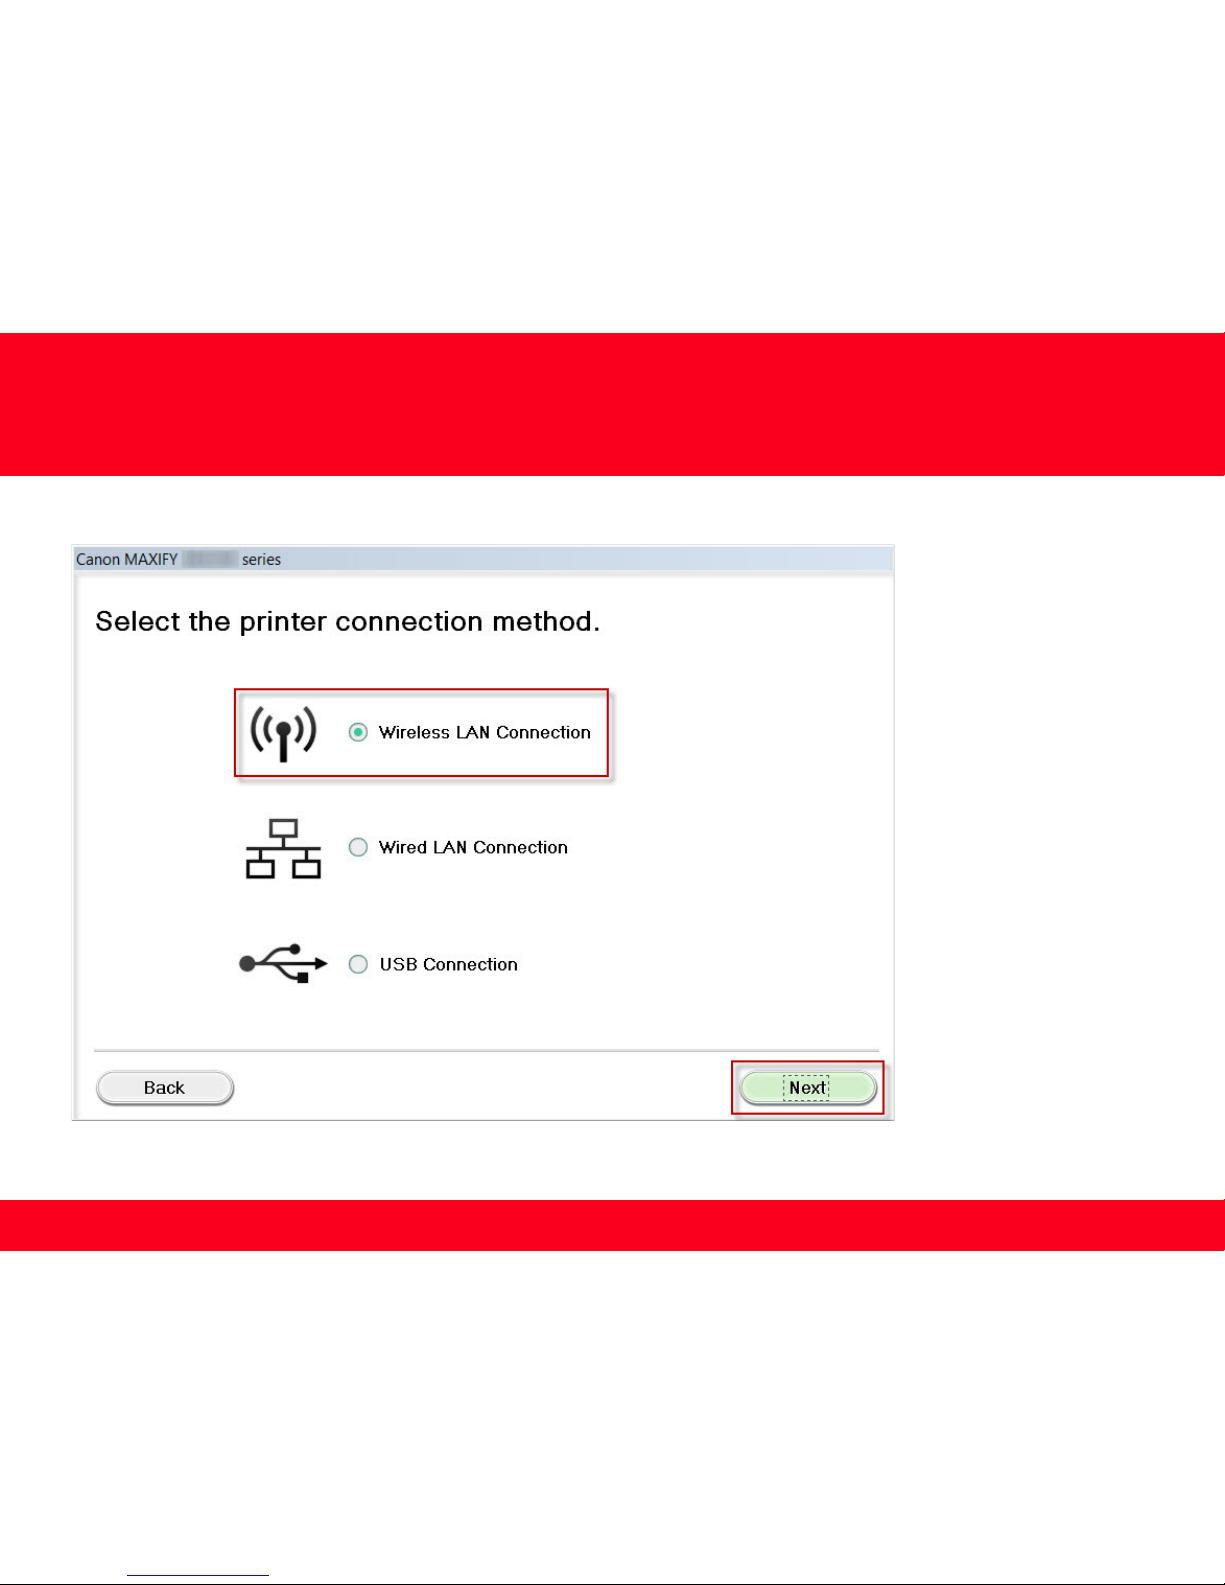
On the following screen, select Wireless LAN Connection, then click Next.
Page 9
Setting Up the Network Connection
9 9
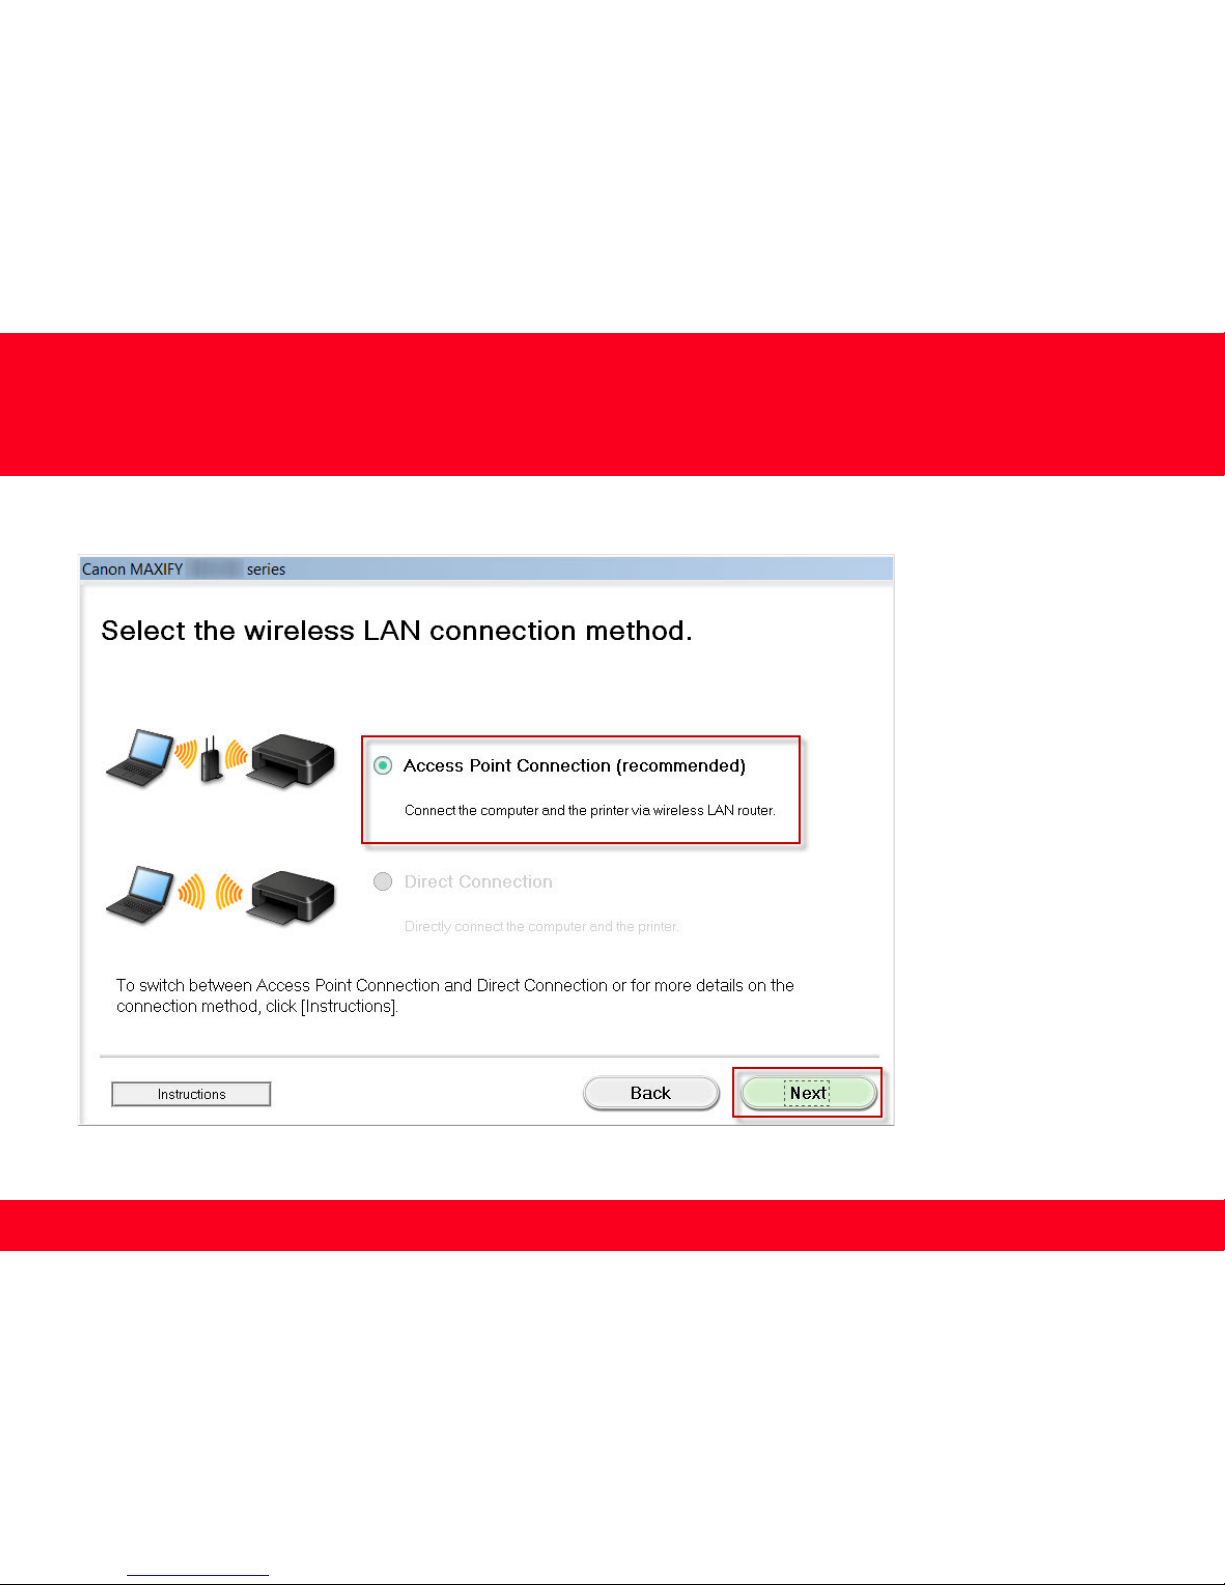
On the following screen, select Access Point Connection, then click Next.
Page 10
Setting Up the Network Connection
10 10
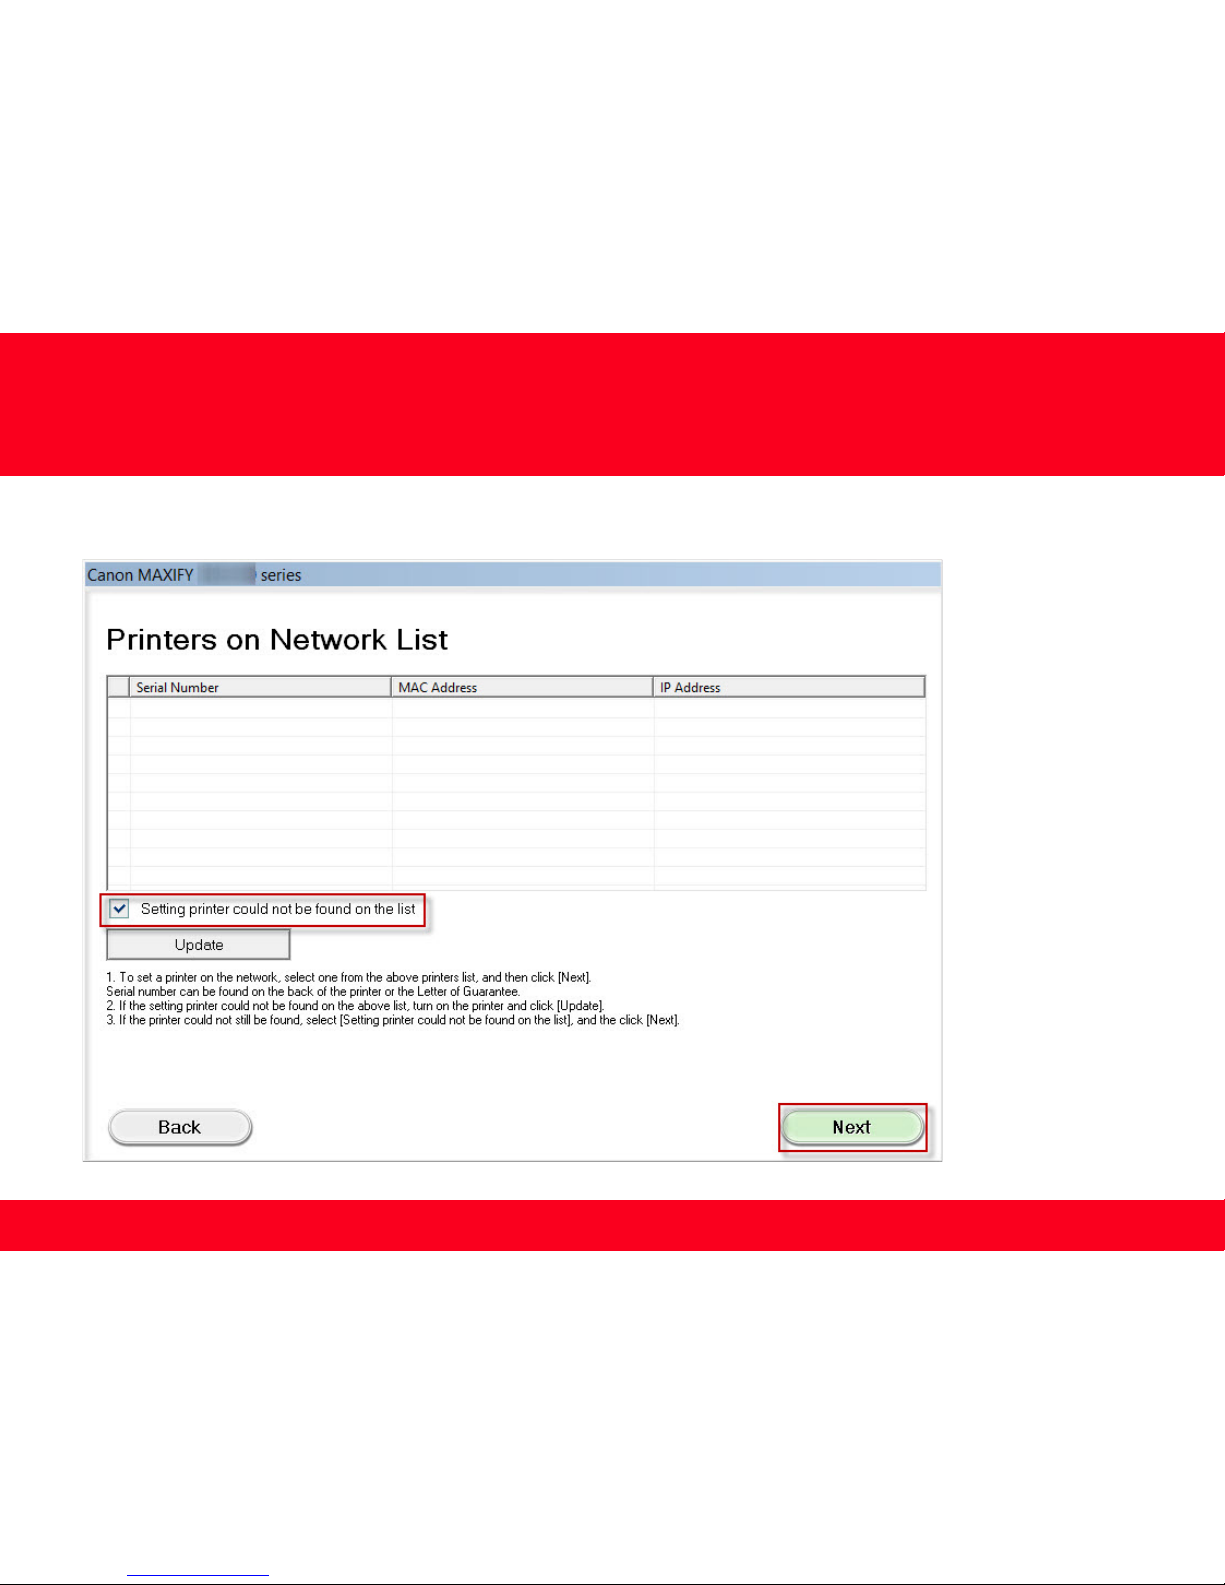
Continue following on-screen instructions. On the Printers on Network List screen, check the Setting printer could not be found on the
list checkbox and click Next.
Page 11
Setting Up the Network Connection
11 11
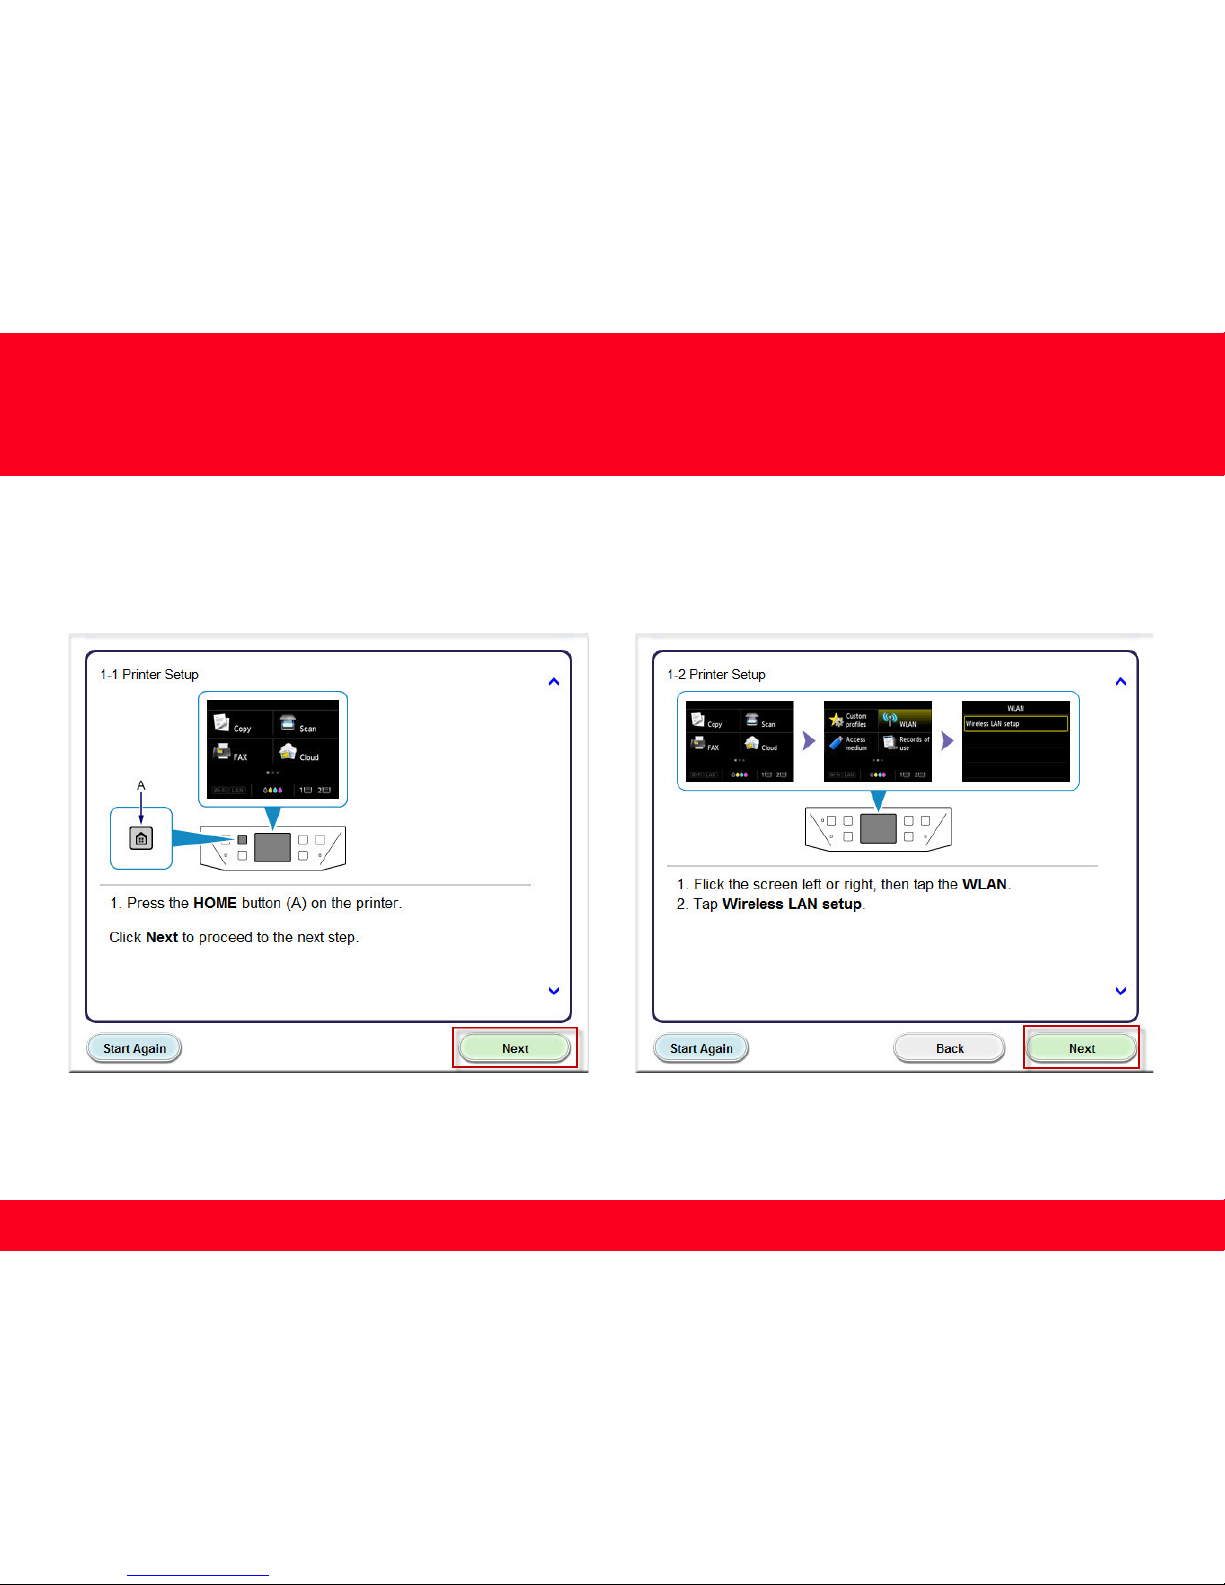
Follow the instructions on the Printer Setup screens (1-1 and 1-2) to select Wireless LAN setup.
Page 12
Setting Up the Network Connection
12 12
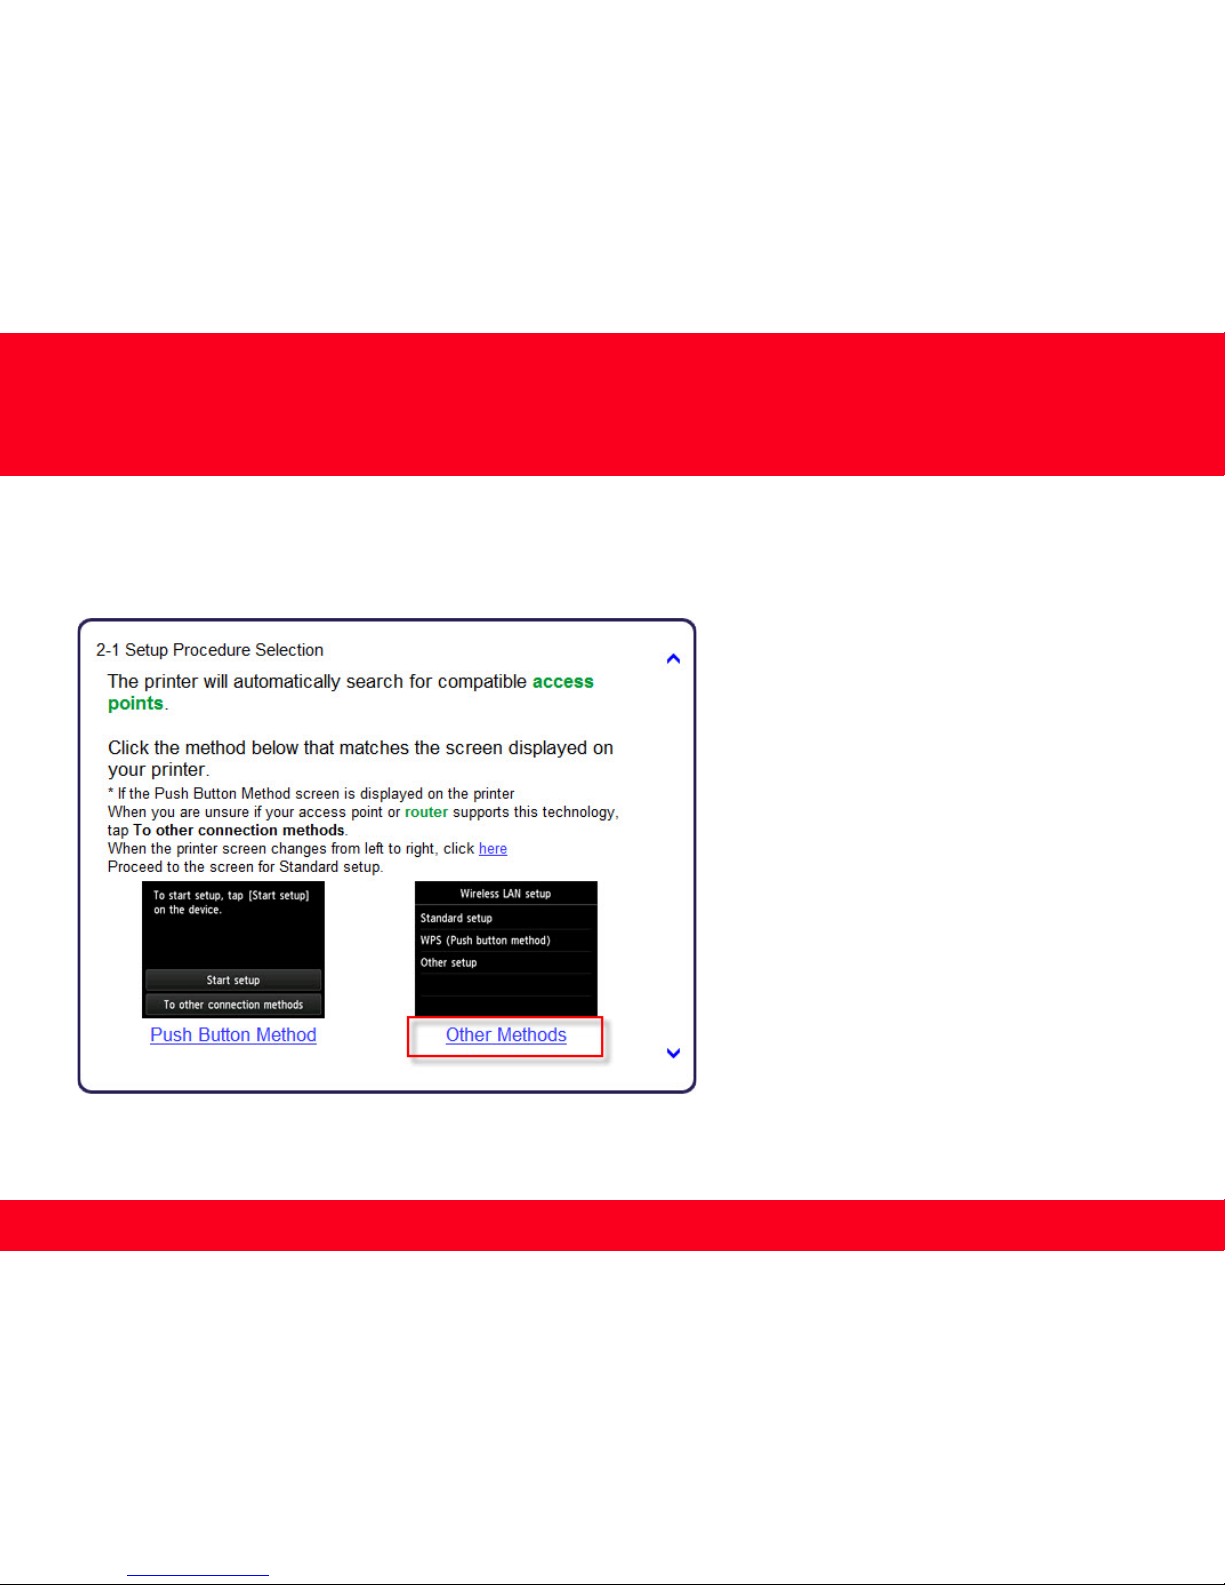
Continue to follow on-screen instructions.
Select Other Methods on the Setup Procedure Selection screen (2-1).
*Note: If your printer’s display looks like the
screen shown above Push Button Method in
the Setup Procedure Selection screen (2-1), tap
To other connection methods before
proceeding to the next instruction
Page 13
Setting Up the Network Connection
13 13
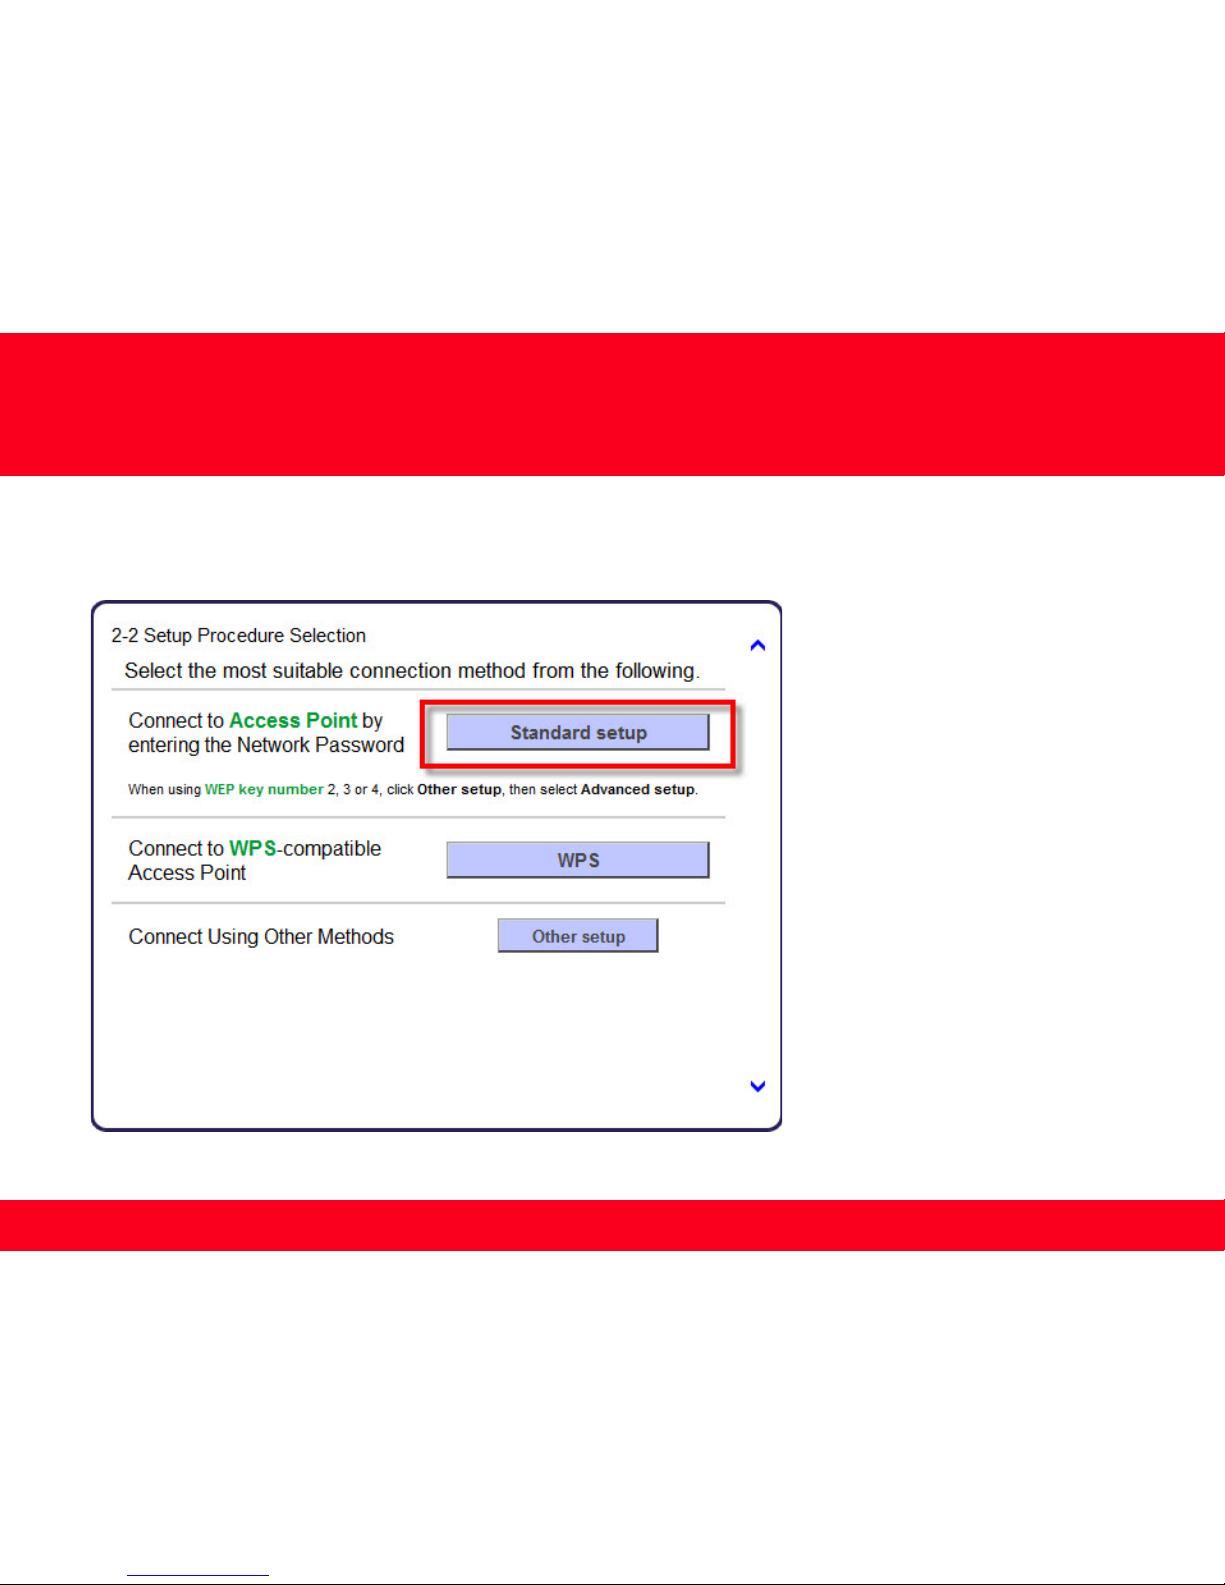
Continue to follow on-screen instructions.
Select Standard setup on the Setup Procedure Selection screen (2-2).
Page 14
Setting Up the Network Connection
14 14
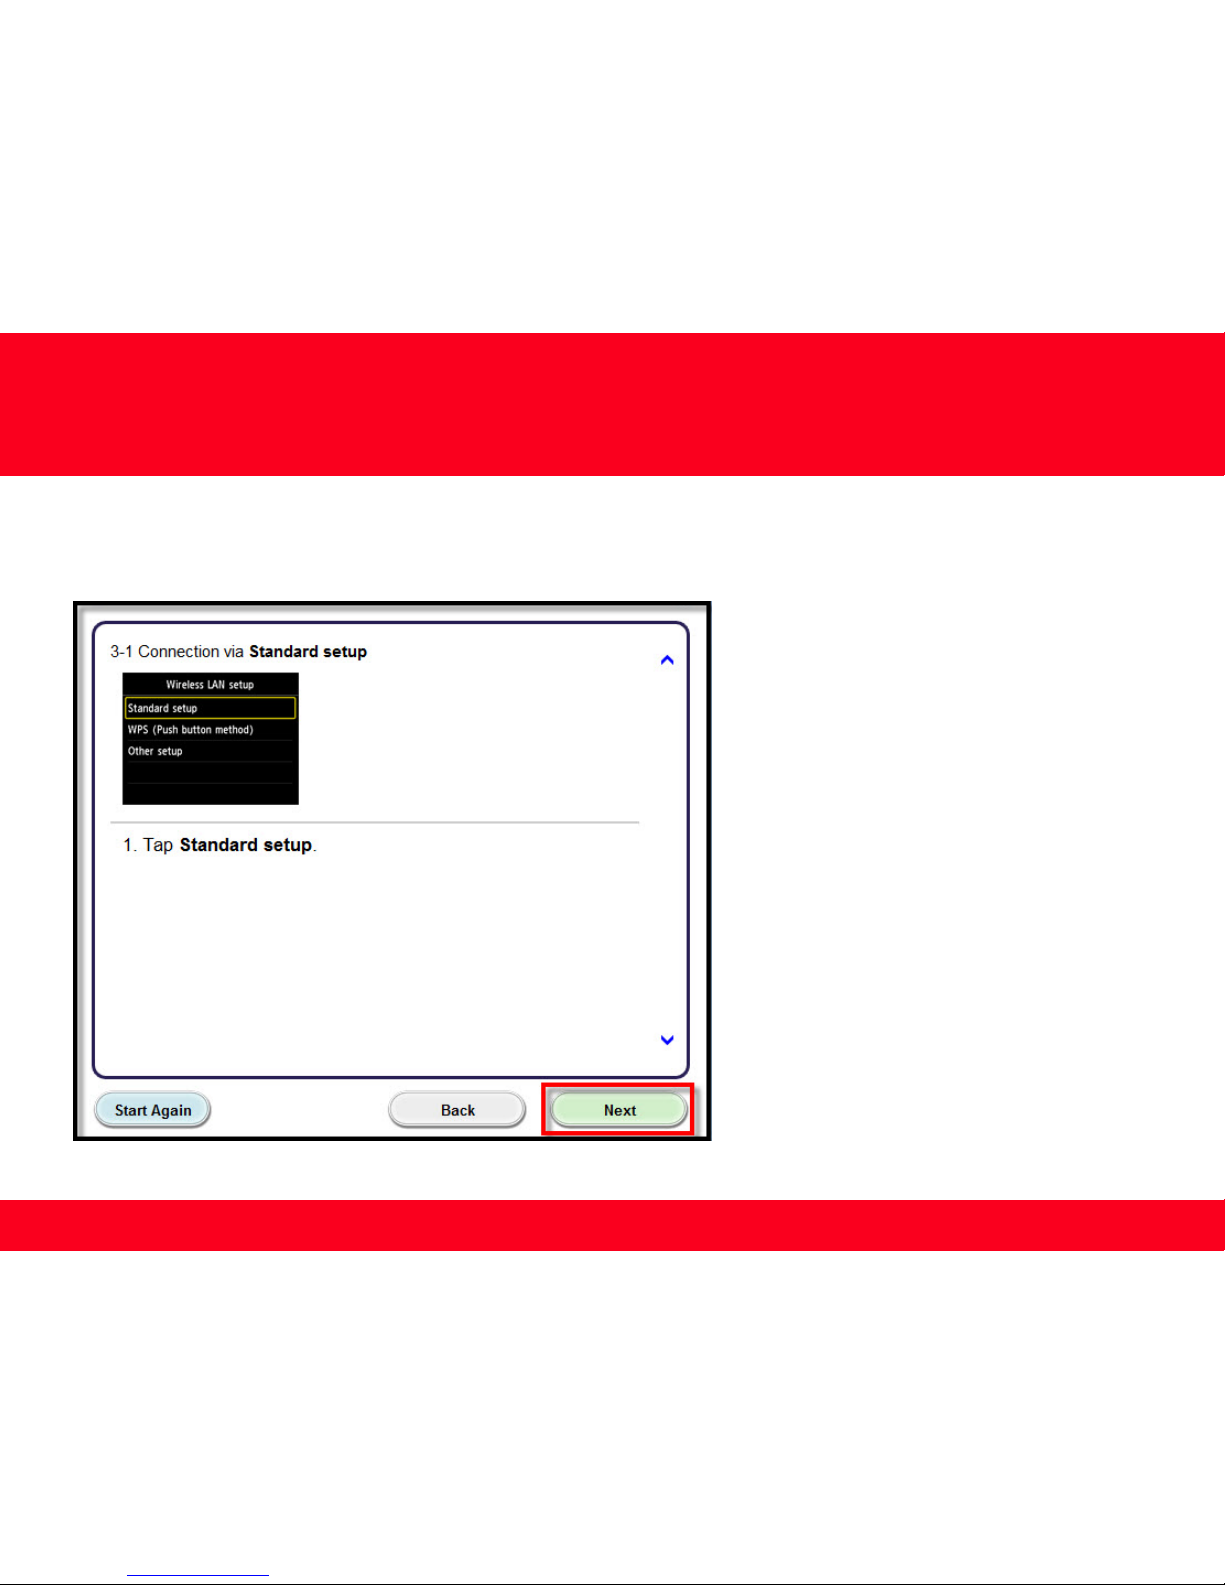
Continue to follow on-screen instructions.
Tap Standard setup on the printer’s touchscreen. Click Next on the Setup Procedure Selection screen (2-2).
Page 15
Setting Up the Network Connection
15
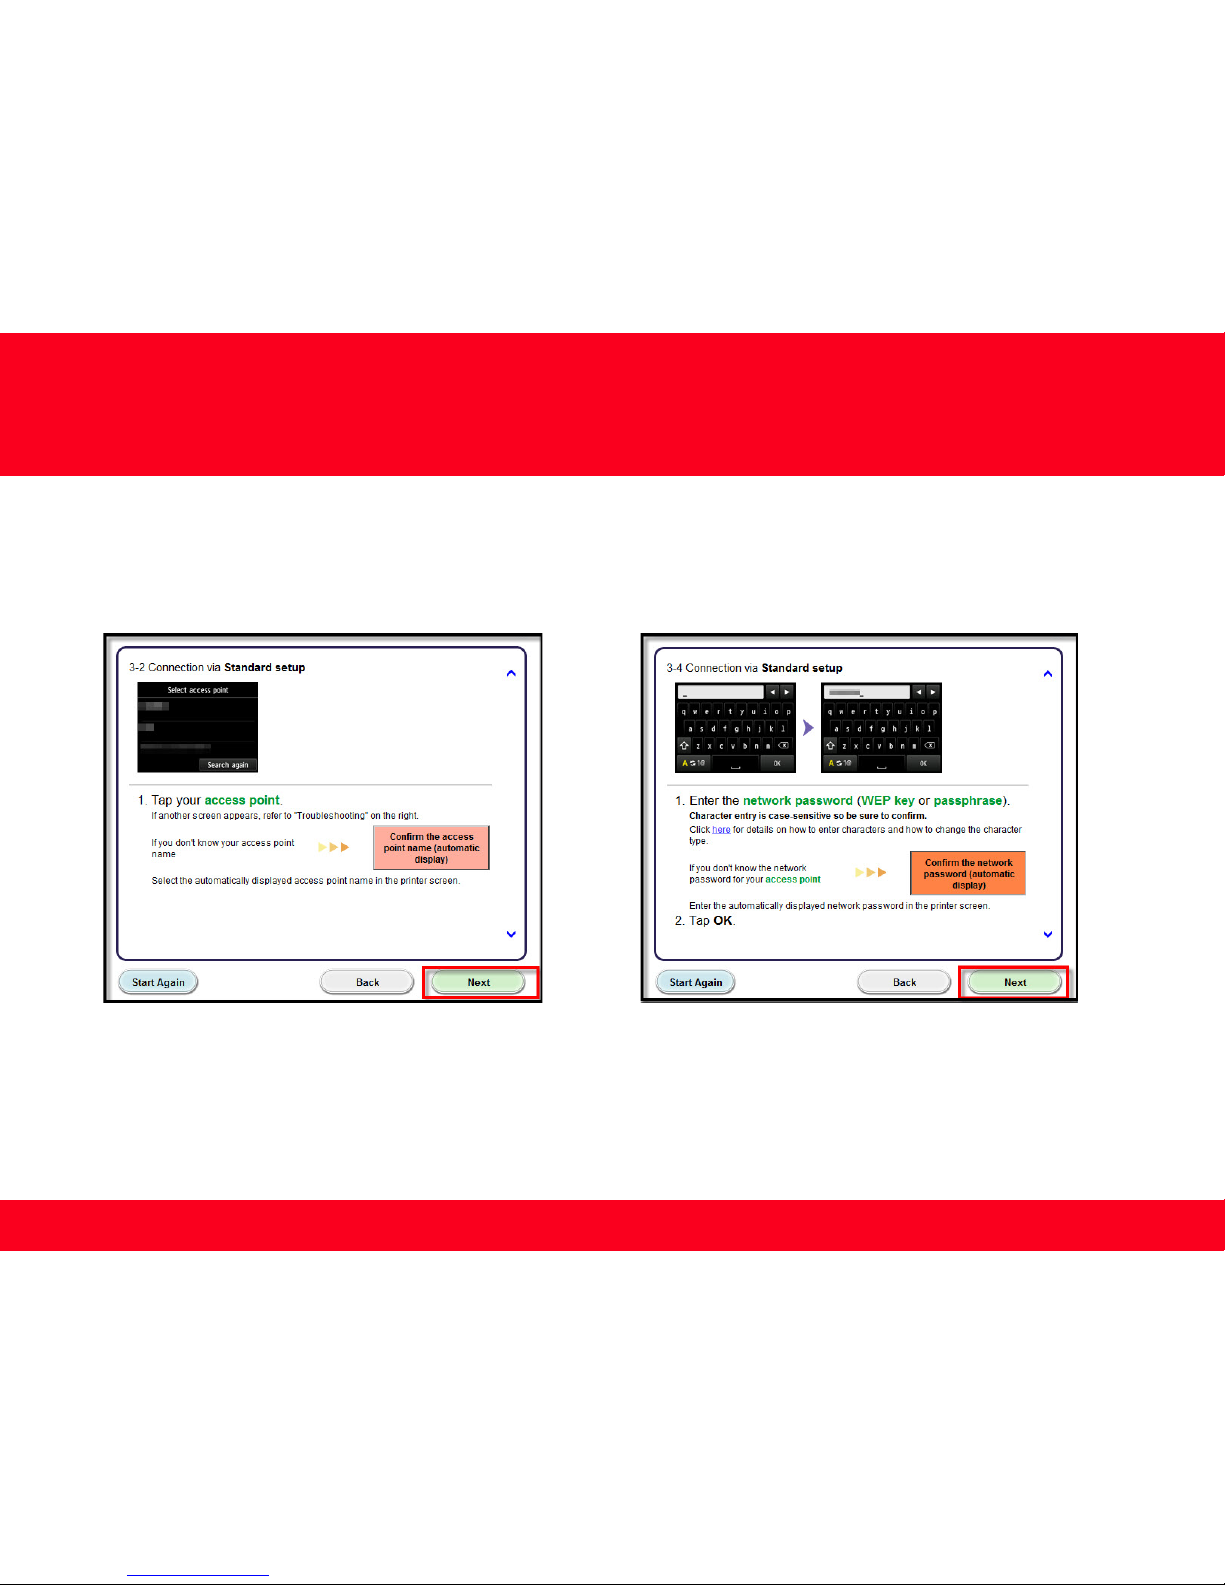
Follow On-screen instructions. When you get to Step 3-2 and later in Step 3-4 ( screens shown below) you will need to know your Access
Point and password information*
Step 3-2
Step 3-4
*Unless you are absolutely certain of this information, please continue to the next page for information on locating /
verifying this information before entering on the machine.
C
ontinue to follow the on-screen instructions.
Page 16
Setting Up the Network Connection
16
<< Previous Next >>
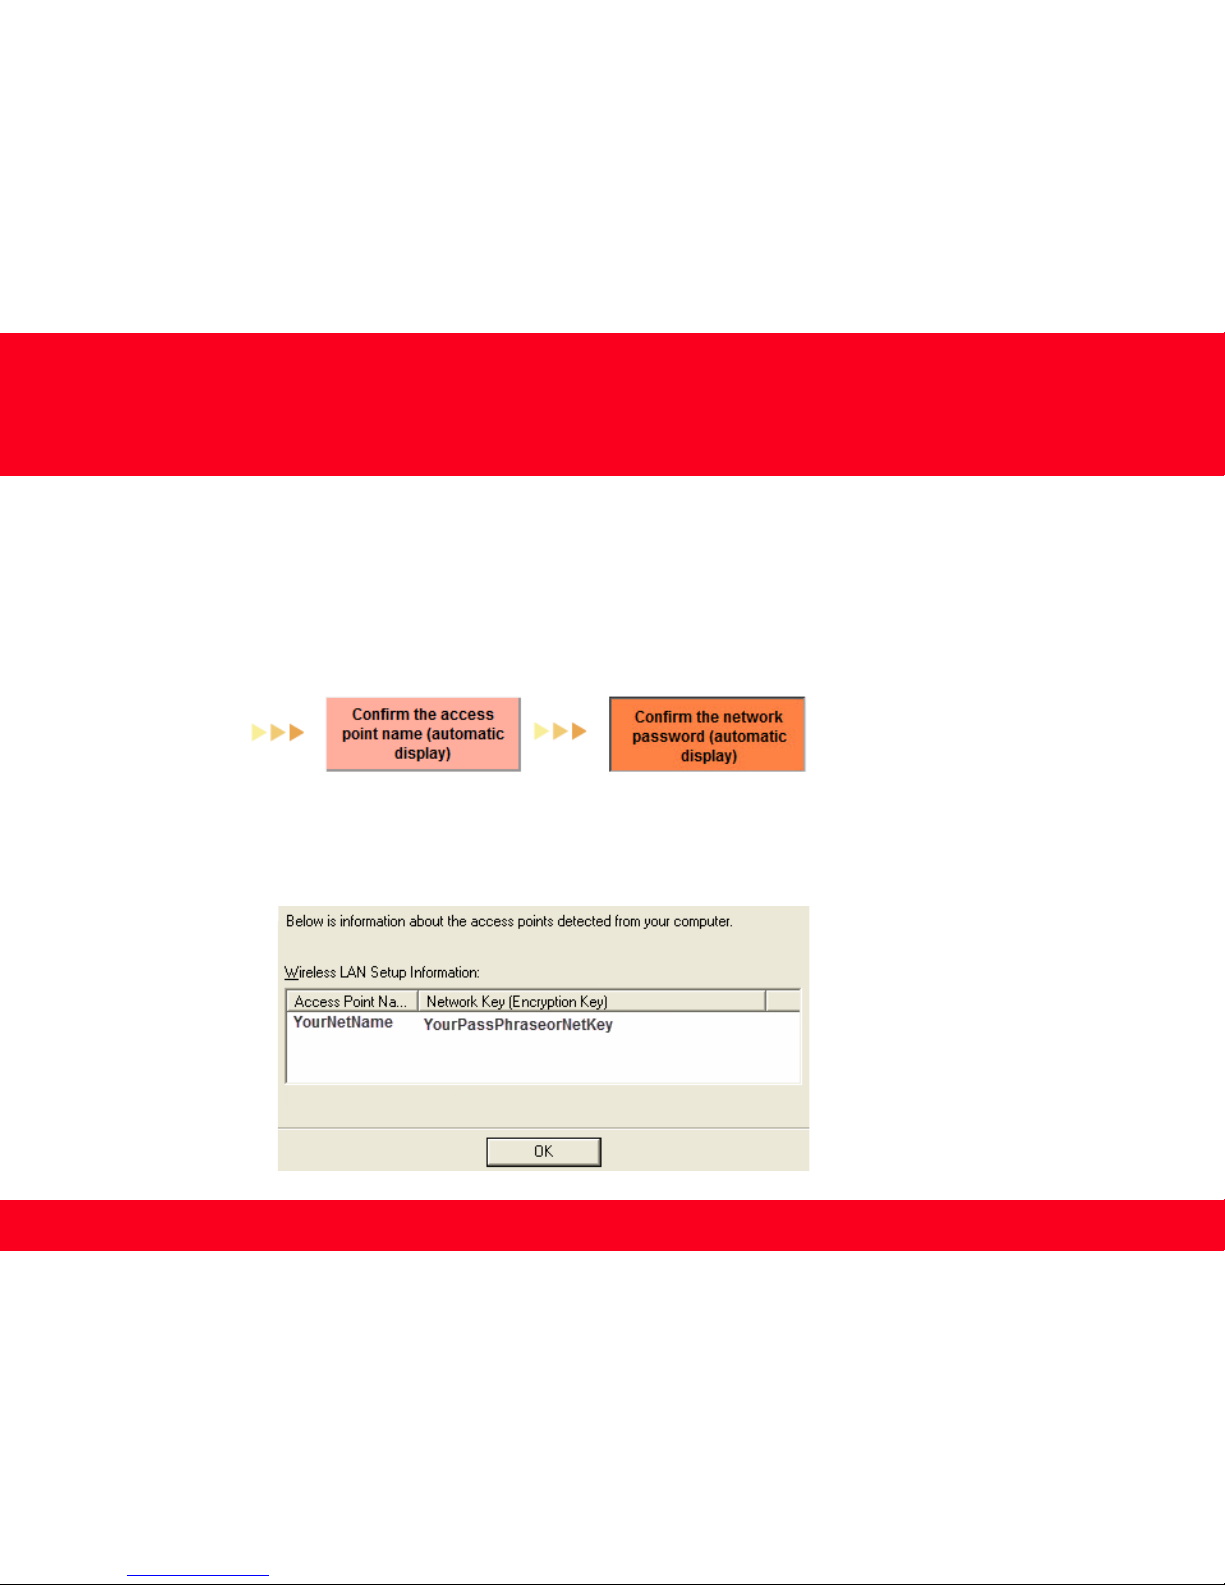
If you don't know your Access Point / Router name, or the Network password for your wireless network, you can find this information during
Standard setup using the Setup CD-ROM or the downloaded file.
L
ook for the Confirm the access point name or the Confirm the network password (automatic display) buttons during the setup procedure.
Clicking either of these buttons will give the needed information. On a Mac OS X system you may need to click 'Allow' on one or more
windows after clicking either of the above buttons. See example below of the Wireless Lan Setup Information window. (appearance varies
depending on Operating System). Use the provided information when selecting the Access Point / Router and for entering the Network
Password (Steps 3-2 and 3-4 on the previous page).
Page 17
Installing the Drivers & Software
17 17
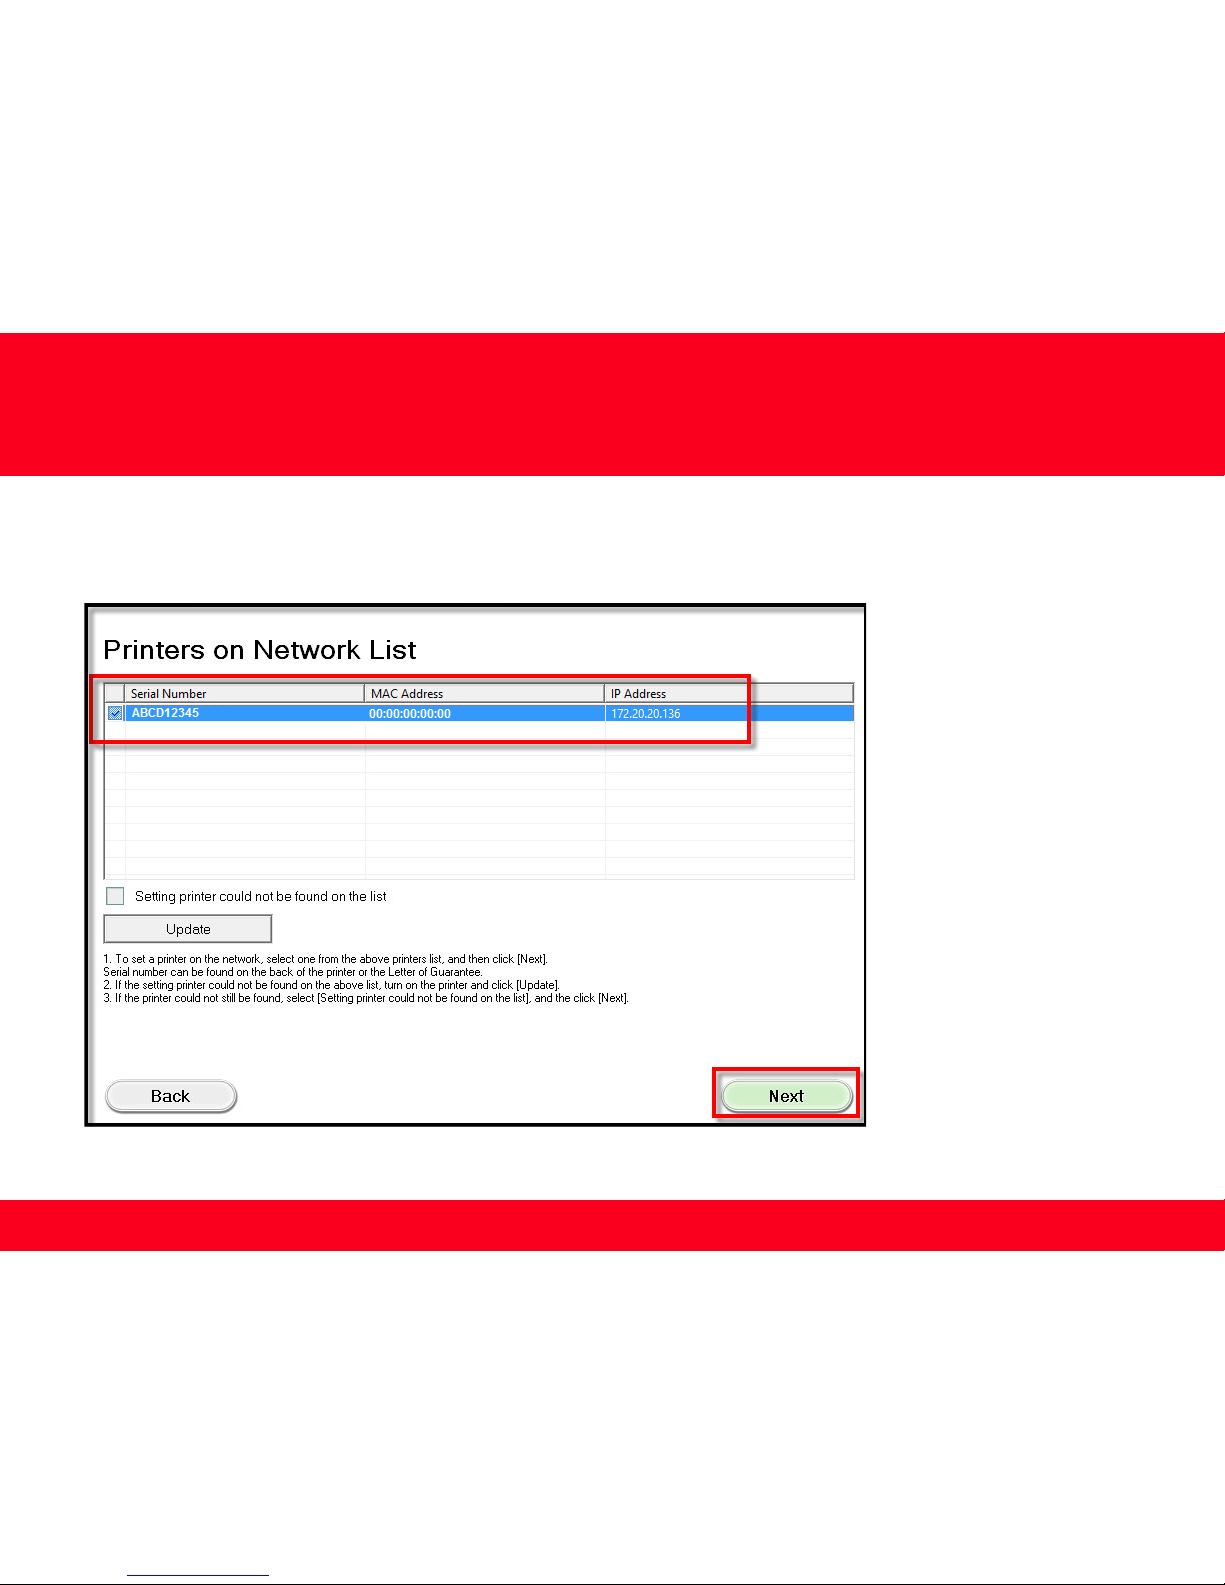
Continue following on-screen instructions. When you get to the Printers on Network List, verify that your printer’s Serial Number is
listed and the box to the left of the serial number is checked. Click Next.
Page 18
Setting Up the Network Connection
18 18
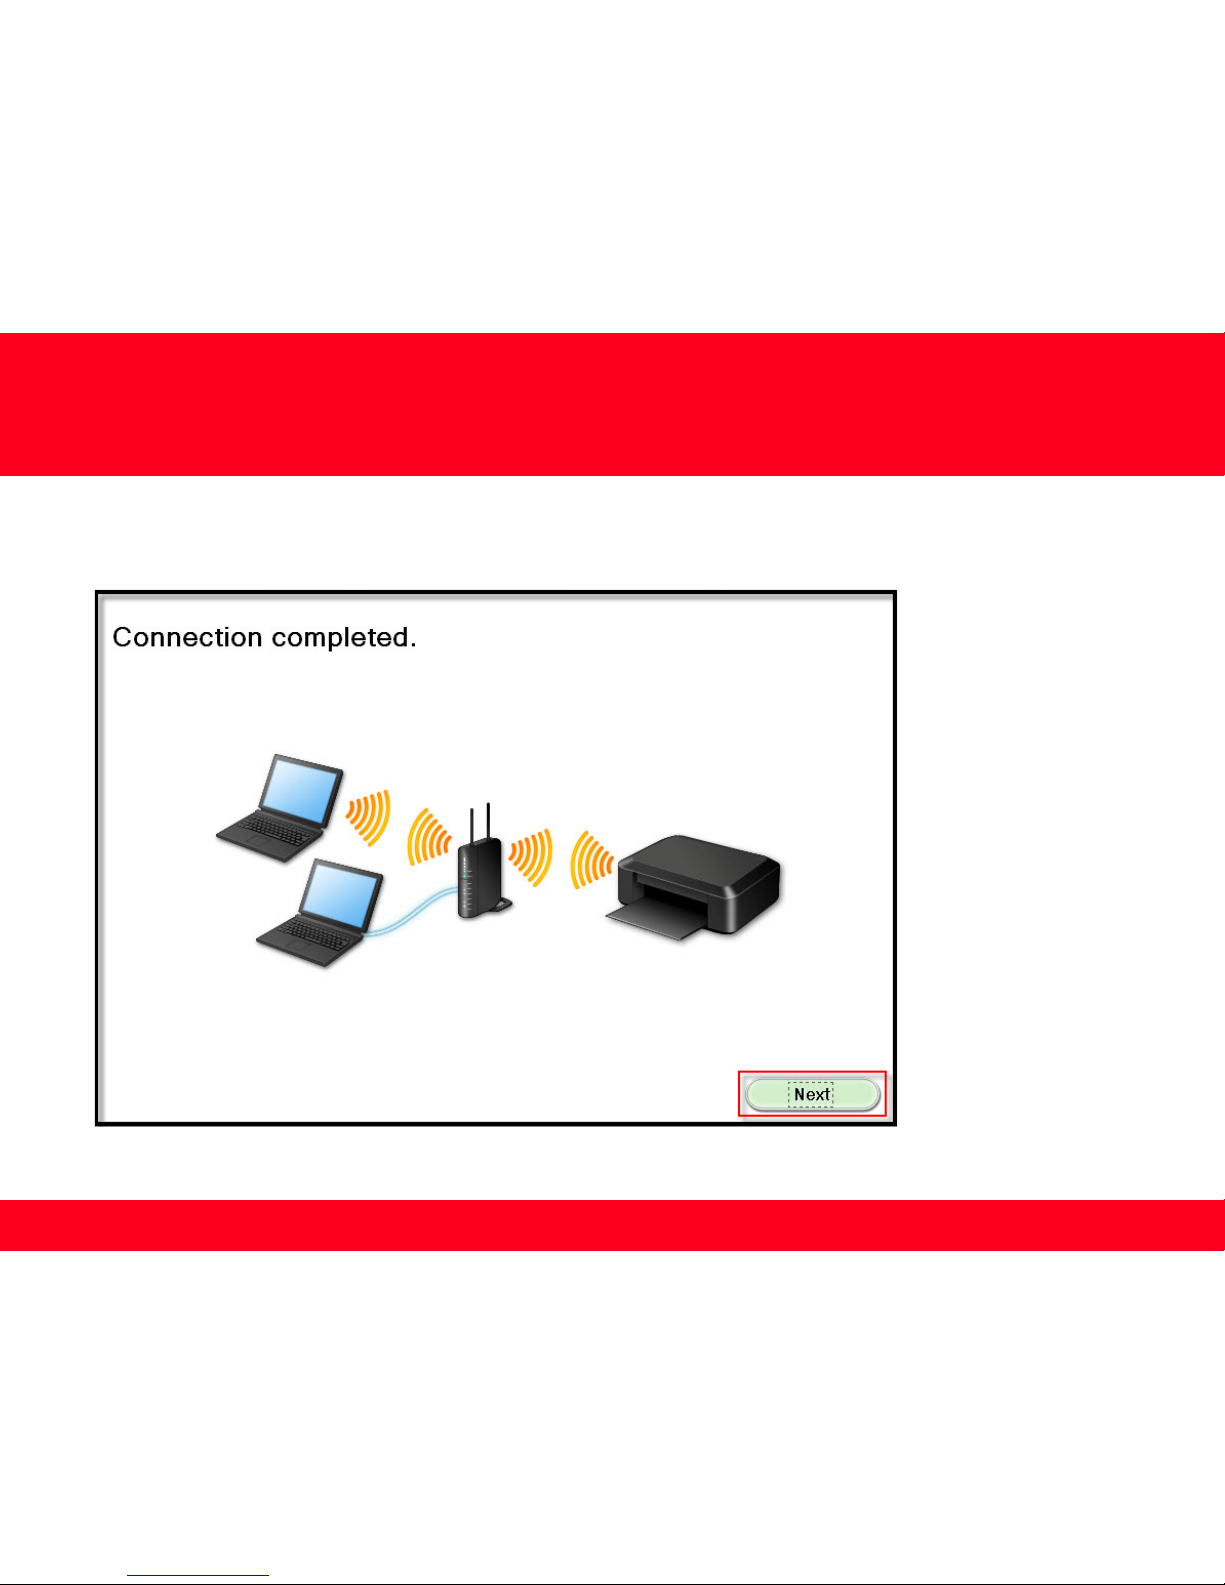
Click Next on the Connection completed screen.
Page 19
Installing the Drivers & Software
19 19
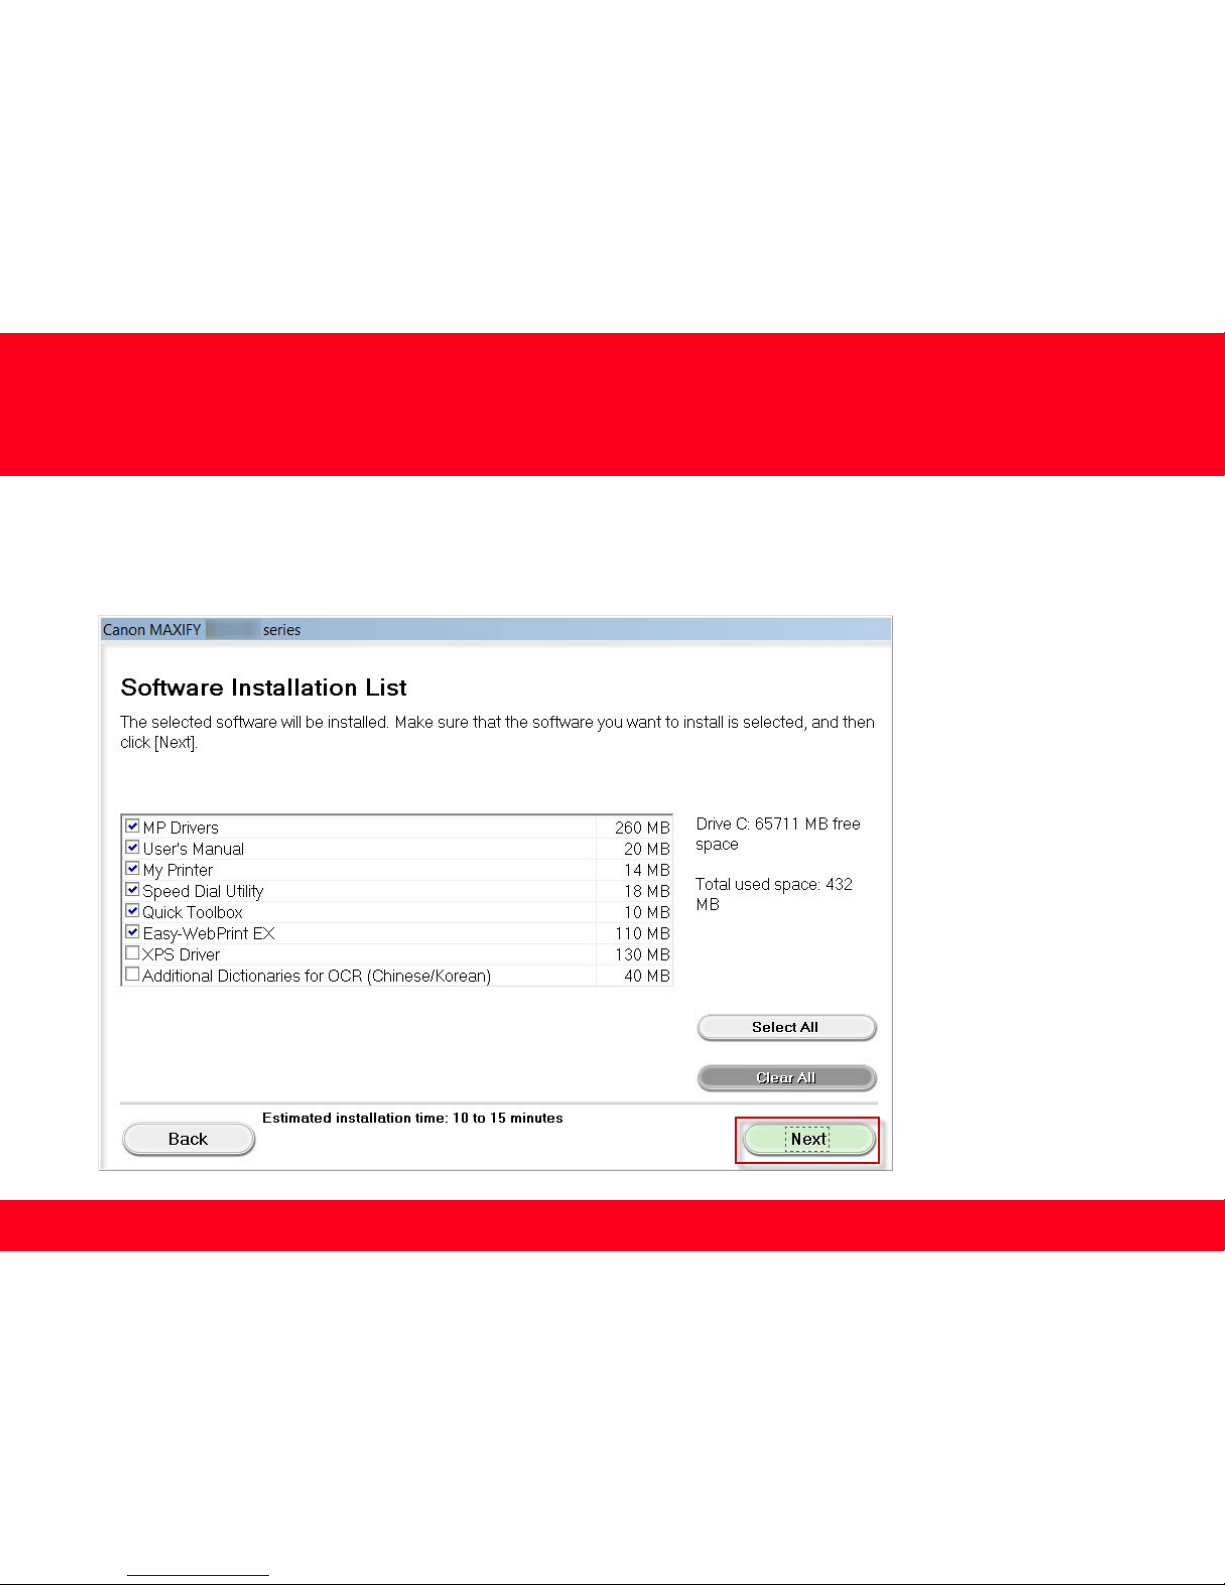
Continue following on-screen instructions. On the Software Installation List, select *software to install and click Next.
*MP Drivers is required and cannot be deselected. We recommend installing Quick Toolbox to take full advantage of the printer’s
features.
Page 20
Installing the Drivers & Software
20 20
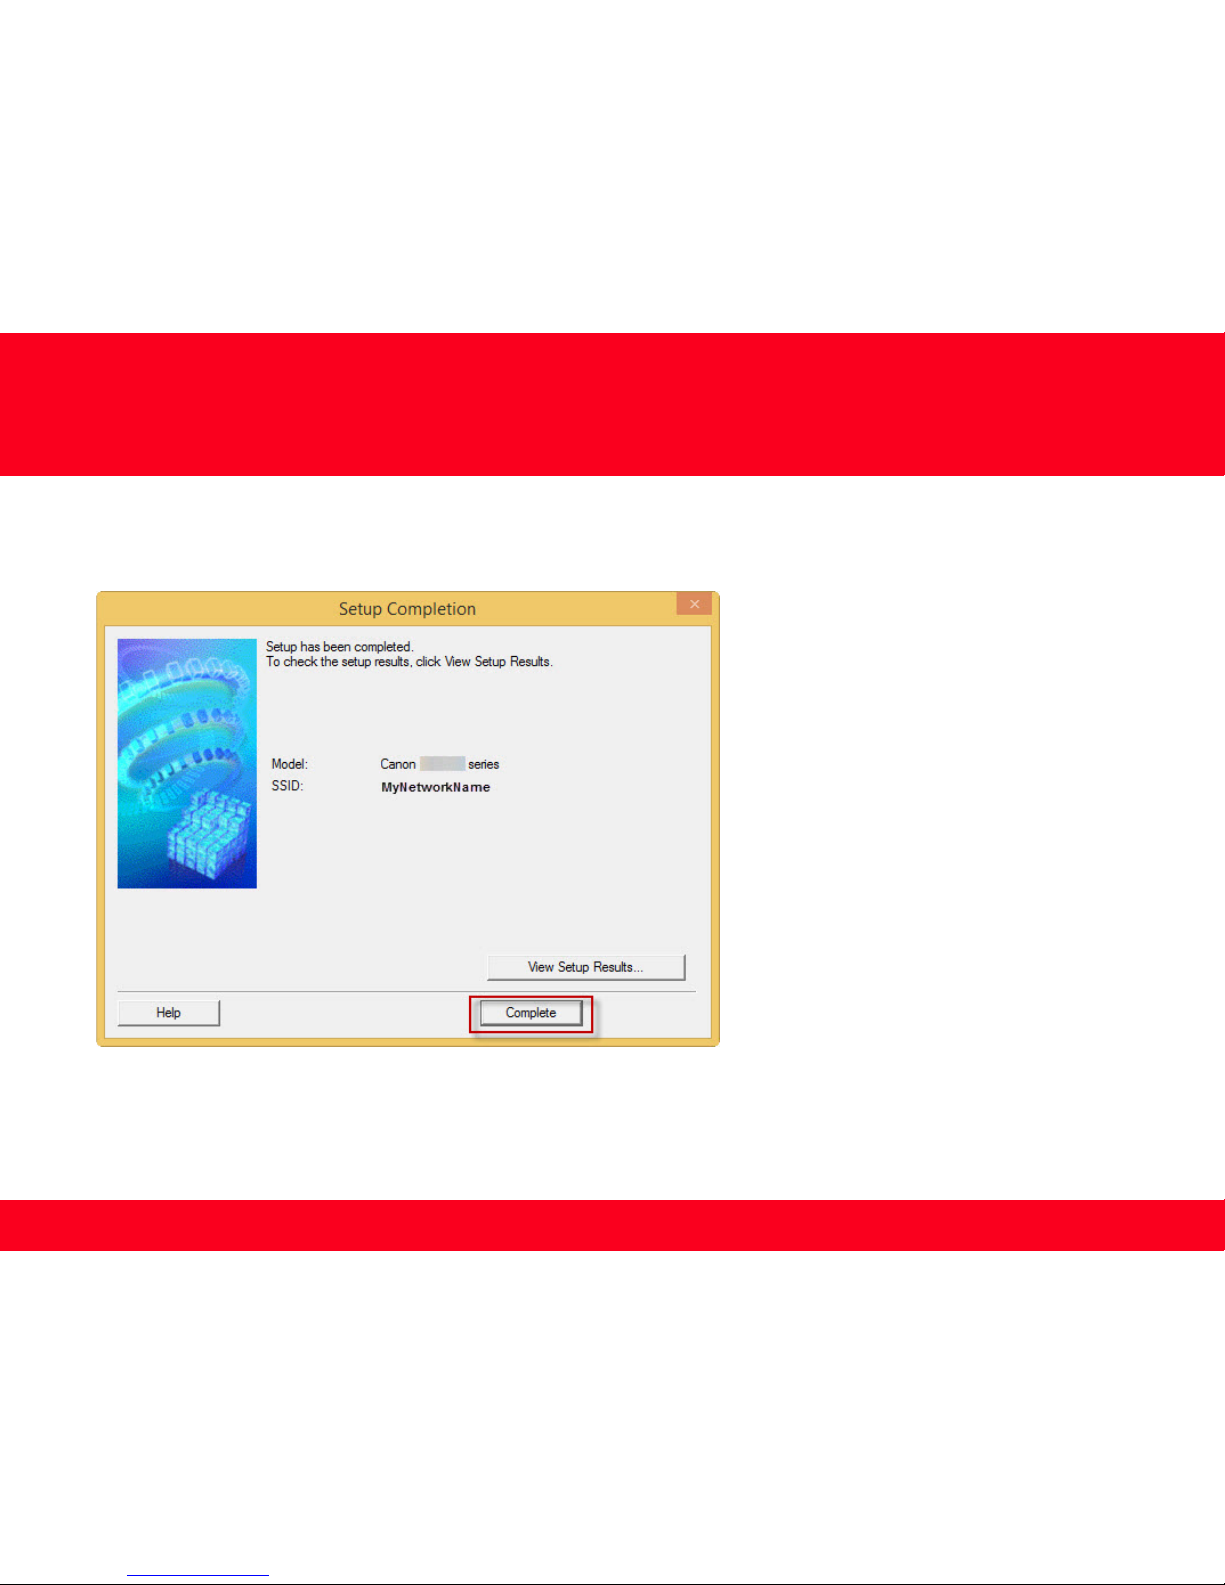
Continue following on-screen instructions.
W
hen the Setup Completion dialog box appears, click Complete.
A
t this point, setup of the printer and network is complete. Continue to follow any remaining on-screen instructions to finish and exit
the setup program.
 Loading...