

Page 1
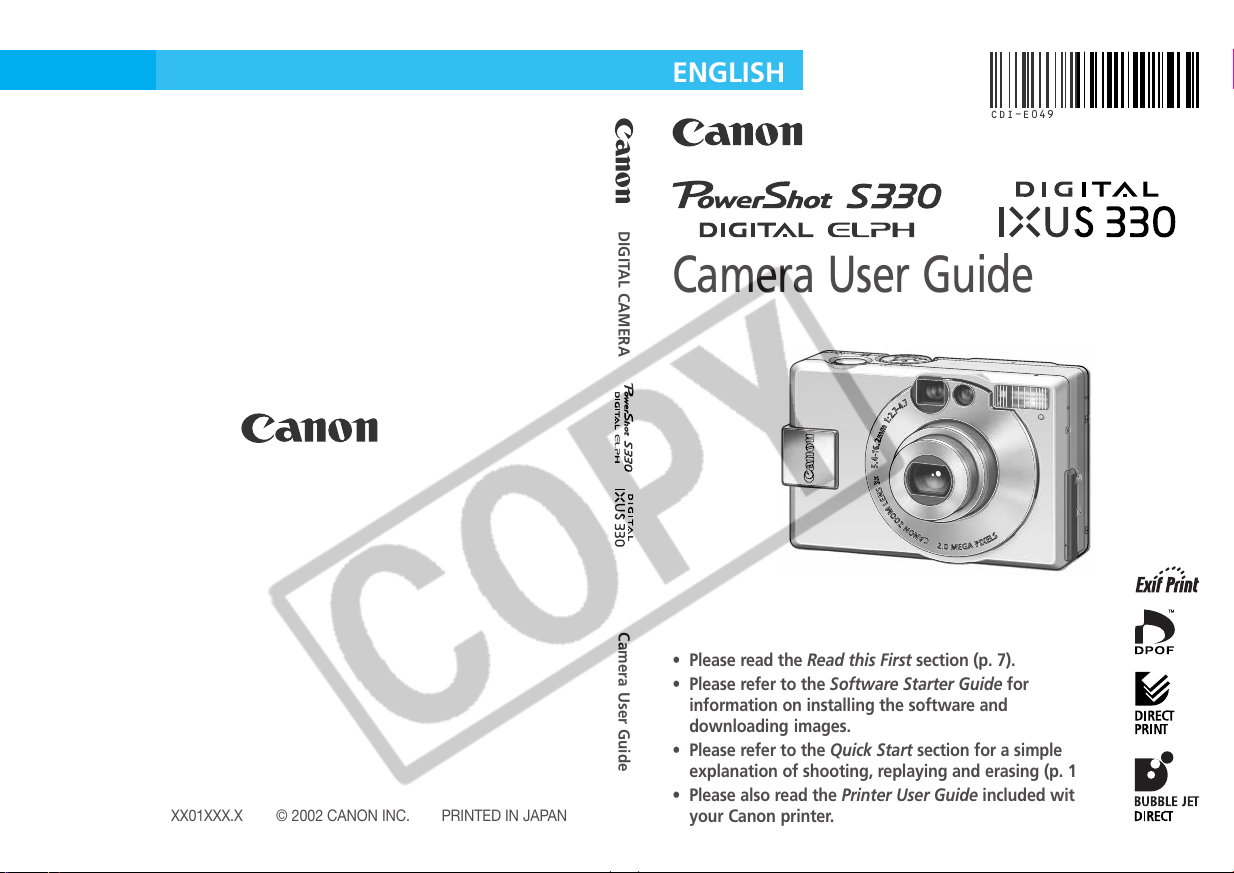
ENGLISH
CDI-E049
DIGITAL CAMERA
Camera User Guide
Camera User Guide
CDI-E049-010 XX01XXX.X © 2002 CANON INC. PRINTED IN JAPAN
• Please read the Read this First section (p. 7).
• Please refer to the Software Starter Guide for
information on installing the software and
downloading images.
• Please refer to the Quick Start section for a simple
explanation of shooting, replaying and erasing (p. 12).
• Please also read the Printer User Guide included with
your Canon printer.
Page 2
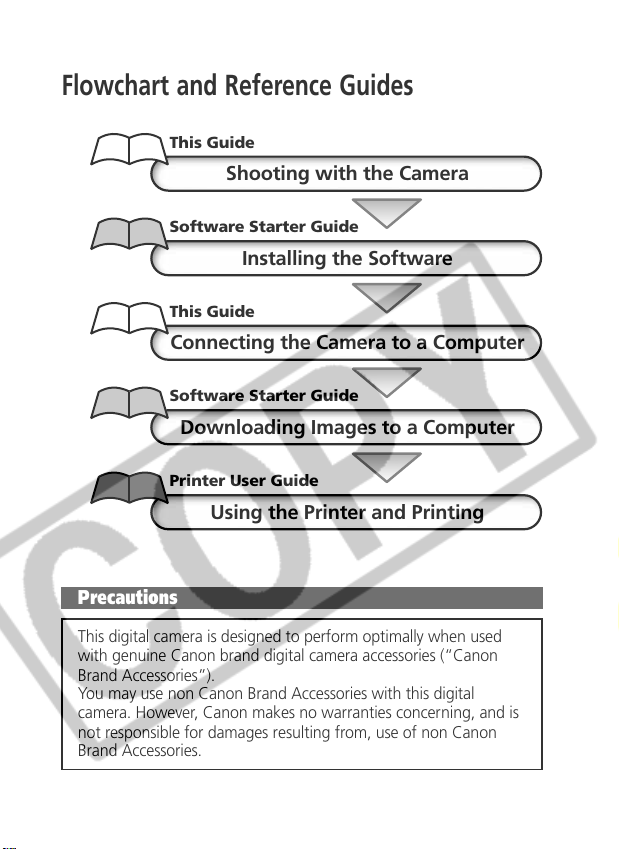
Flowchart and Reference Guides
This Guide
Shooting with the Camera
Software Starter Guide
Installing the Software
This Guide
Connecting the Camera to a Computer
Software Starter Guide
Downloading Images to a Computer
Printer User Guide
Using the Printer and Printing
Precautions
This digital camera is designed to perform optimally when used
with genuine Canon brand digital camera accessories (“Canon
Brand Accessories”).
You may use non Canon Brand Accessories with this digital
camera. However, Canon makes no warranties concerning, and is
not responsible for damages resulting from, use of non Canon
Brand Accessories.
Page 3
Camera Body Temperature
If your camera is used for prolonged periods, the camera body may
become warm. Please be aware of this and take care when operating
the camera for an extended period.
About the LCD Monitor
The LCD monitor is produced with extremely high-precision manufac-
turing techniques. More than 99.99% of the pixels operate to
specification. Less than 0.01% of the pixels may occasionally misfire
or appear as red or black dots. This has no effect on the recorded
image and does not constitute a malfunction.
Video Format
Please set the camera’s video signal format to the one used in your
region before using it with a TV monitor (p. 118).
Charging the Date/Time Battery
• The camera has a built-in rechargeable lithium battery that
maintains the date, time and other camera settings. This battery
recharges when the main battery pack is inserted into the camera.
When you first purchase the camera, place a charged battery pack
in it or use the AC adapter kit (sold separately) for at least 4 hours
to charge the date/time battery. It will charge even when the
camera power is set to Off.
• If the Set Date/Time menu appears when the camera power is
turned on, it means that the date / time battery charge is depleted.
Recharge it as described above.
1
Page 4
2
About this Guide
Symbols Used
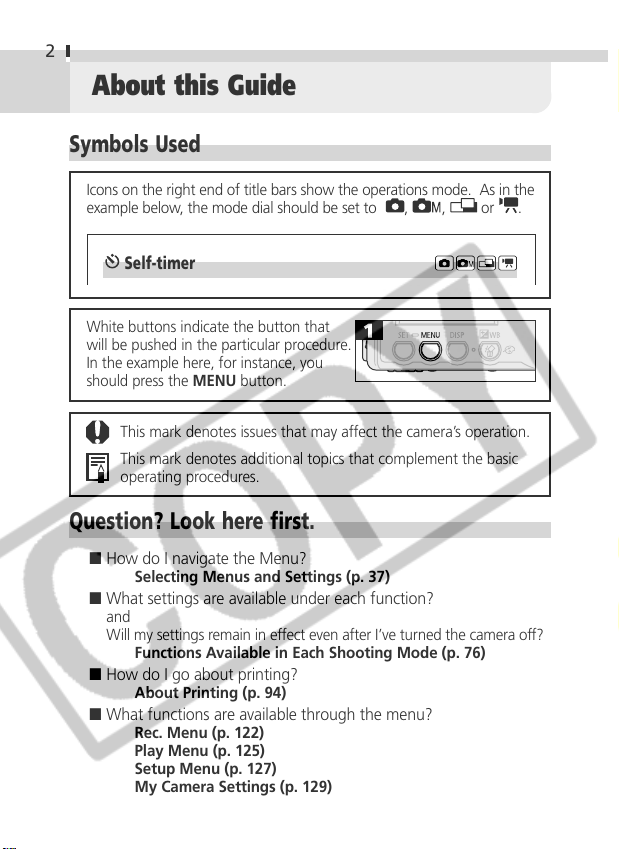
Icons on the right end of title bars show the operations mode. As in the
example below, the mode dial should be set to , ,
Self-timer
White buttons indicate the button that
will be pushed in the particular procedure.
In the example here, for instance, you
should press the MENU button.
This mark denotes issues that may affect the camera’s operation.
This mark denotes additional topics that complement the basic
operating procedures.
Question? Look here first.
■ How do I navigate the Menu?
Selecting Menus and Settings (p. 37)
■ What settings are available under each function?
and
Will my settings remain in effect even after I’ve turned the camera off?
Functions Available in Each Shooting Mode (p. 76)
■ How do I go about printing?
About Printing (p. 94)
■ What functions are available through the menu?
Rec. Menu (p. 122)
Play Menu (p. 125)
Setup Menu (p. 127)
My Camera Settings (p. 129)
or .
Page 5
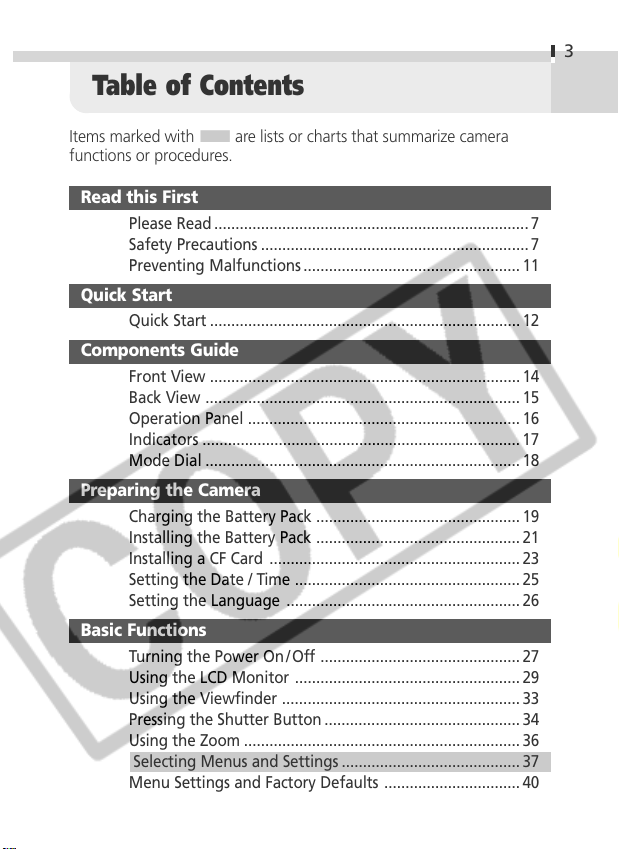
Table of Contents
Items marked with ■ are lists or charts that summarize camera
functions or procedures.
Read this First
Please Read .......................................................................... 7
Safety Precautions ............................................................... 7
Preventing Malfunctions ................................................... 11
Quick Start
Quick Start .........................................................................12
Components Guide
Front View .........................................................................14
Back View .......................................................................... 15
Operation Panel ................................................................ 16
Indicators ........................................................................... 17
Mode Dial .......................................................................... 18
Preparing the Camera
Charging the Battery Pack ................................................ 19
Installing the Battery Pack ................................................ 21
Installing a CF Card ........................................................... 23
Setting the Date / Time ..................................................... 25
Setting the Language ....................................................... 26
Basic Functions
Turning the Power On/ Off ............................................... 27
Using the LCD Monitor ..................................................... 29
Using the Viewfinder ........................................................ 33
Pressing the Shutter Button .............................................. 34
Using the Zoom .................................................................36
Selecting Menus and Settings ..........................................37
Menu Settings and Factory Defaults ................................ 40
3
Page 6
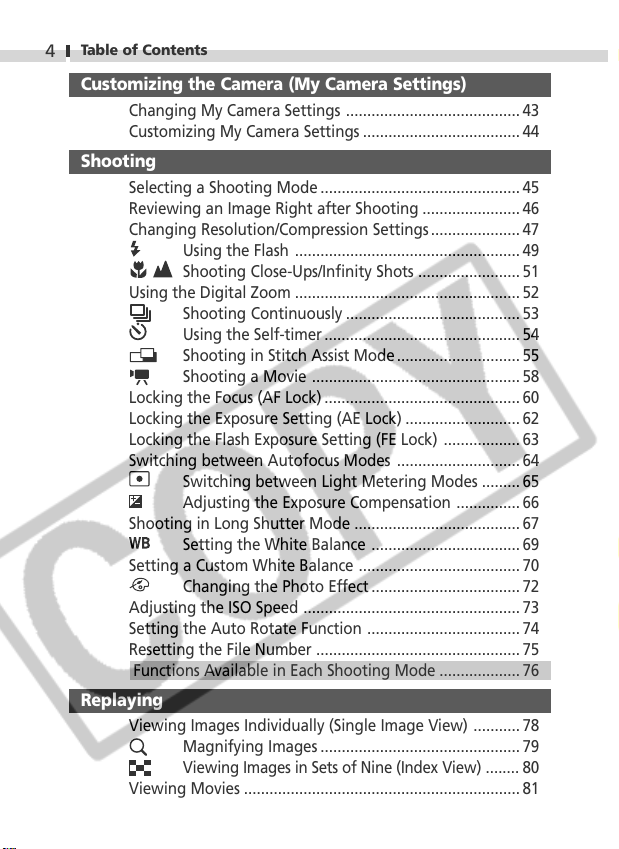
Table of Contents
4
Customizing the Camera (My Camera Settings)
Changing My Camera Settings ......................................... 43
Customizing My Camera Settings .....................................44
Shooting
Selecting a Shooting Mode ............................................... 45
Reviewing an Image Right after Shooting .......................46
Changing Resolution/Compression Settings ..................... 47
Using the Flash ..................................................... 49
Shooting Close-Ups/Infinity Shots ........................ 51
Using the Digital Zoom ..................................................... 52
Shooting Continuously ......................................... 53
Using the Self-timer .............................................. 54
Shooting in Stitch Assist Mode ............................. 55
Shooting a Movie ................................................. 58
Locking the Focus (AF Lock) .............................................. 60
Locking the Exposure Setting (AE Lock) ...........................62
Locking the Flash Exposure Setting (FE Lock) .................. 63
Switching between Autofocus Modes ............................. 64
Switching between Light Metering Modes ......... 65
Adjusting the Exposure Compensation ............... 66
Shooting in Long Shutter Mode ....................................... 67
Setting the White Balance ................................... 69
Setting a Custom White Balance ...................................... 70
Changing the Photo Effect ................................... 72
Adjusting the ISO Speed ................................................... 73
Setting the Auto Rotate Function .................................... 74
Resetting the File Number ................................................ 75
Functions Available in Each Shooting Mode ...................76
Replaying
Viewing Images Individually (Single Image View) ........... 78
Magnifying Images ............................................... 79
Viewing Images in Sets of Nine (Index View) ........
Viewing Movies .................................................................81
80
Page 7
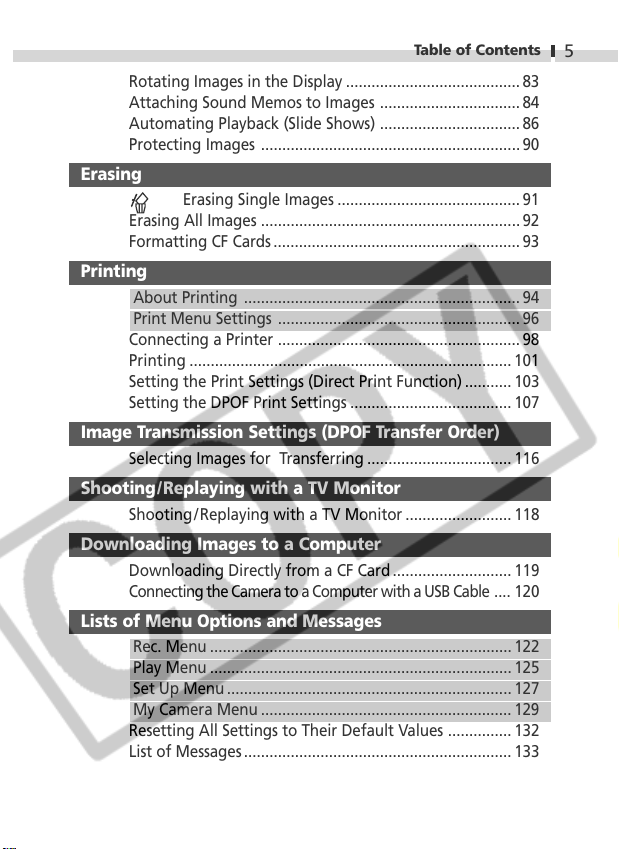
Table of Contents
Rotating Images in the Display .........................................83
Attaching Sound Memos to Images ................................. 84
Automating Playback (Slide Shows) ................................. 86
Protecting Images ............................................................. 90
Erasing
Erasing Single Images ...........................................91
Erasing All Images ............................................................. 92
Formatting CF Cards .......................................................... 93
Printing
About Printing ................................................................. 94
Print Menu Settings ......................................................... 96
Connecting a Printer ......................................................... 98
Printing ............................................................................101
Setting the Print Settings (Direct Print Function) ........... 103
Setting the DPOF Print Settings ......................................107
Image Transmission Settings (DPOF Transfer Order)
Selecting Images for Transferring ..................................116
Shooting/Replaying with a TV Monitor
Shooting/Replaying with a TV Monitor ......................... 118
Downloading Images to a Computer
Downloading Directly from a CF Card ............................ 119
Connecting the Camera to a Computer with a USB Cable ....
Lists of Menu Options and Messages
Rec. Menu .......................................................................122
Play Menu .......................................................................125
Set Up Menu ................................................................... 127
My Camera Menu ........................................................... 129
Resetting All Settings to Their Default Values ............... 132
List of Messages ............................................................... 133
5
120
Page 8
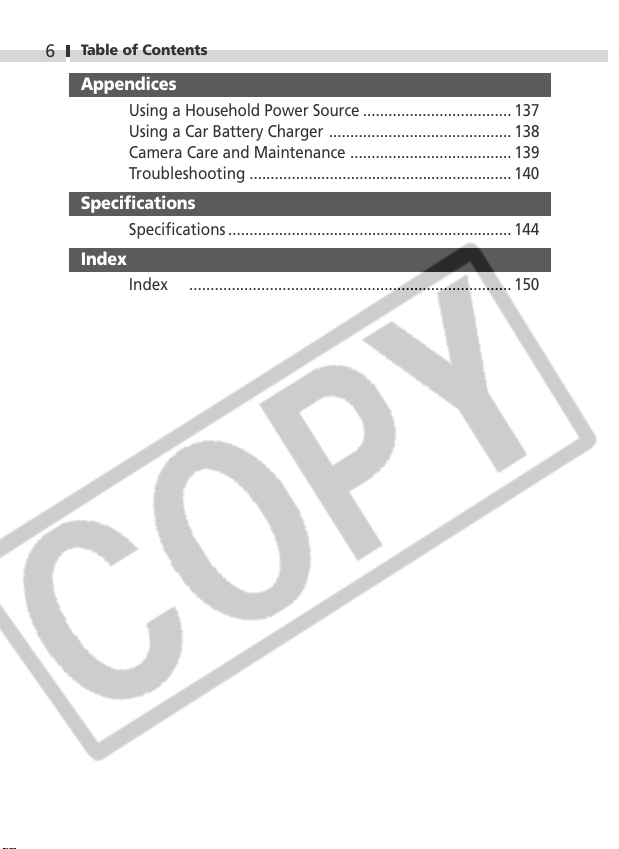
Table of Contents
6
Appendices
Specifications
Index
Using a Household Power Source ...................................137
Using a Car Battery Charger ........................................... 138
Camera Care and Maintenance ...................................... 139
Troubleshooting .............................................................. 140
Specifications ................................................................... 144
Index ............................................................................ 150
Page 9
Read this First
Please Read
Test Shots
Before you try to photograph important subjects, we highly recommend
that you shoot several trial images to confirm that the camera is operating
and being operated correctly. Please note that Canon, its subsidiaries and
affiliates, and its distributors are not liable for any consequential damages
arising from any malfunction of a camera or accessory, including
CompactFlash™ cards, that results in the failure of an image to be recorded
or to be recorded in a format that is machine readable.
Warning Against Copyright Infringement
Please note that Canon digital cameras are intended for personal use and
should never be used in a manner that infringes upon or contravenes
international or domestic copyright laws and regulations. Please be advised
that in certain cases the copying of images from performances, exhibitions, or
commercial properties by means of a camera or other device may contravene
copyright or other legal rights even if the image was shot for personal use.
Warranty Limitations
This camera’s warranty is only effective in the country of sale. If a problem
arises while the camera is in use abroad, please convey it back to the country
of sale before proceeding with a warranty claim to a Canon Customer
Support Help Desk.
For Canon Customer Support contacts, please see the Canon
Limited Warranty supplied with your camera.
Safety Precautions
• Before using the camera, please ensure that you read and understand
the safety precautions described below. Always ensure that the camera
is operated correctly.
• The safety precautions noted on the following pages are intended to
instruct you in the safe and correct operation of the camera and its
accessories to prevent injuries or damage to yourself, other persons
and equipment.
• In the next few pages, the term “equipment” refers primarily to the
camera and its power supply accessories, such as the battery charger
and optional compact power adapter or car battery charger.
7
Page 10
Read This First
8
Warnings
• Do not aim the camera directly into the sun or at other intense light
sources that could injure your eyesight.
• Do not trigger the flash in close proximity to human or animal eyes.
Exposure to the intense light produced by the flash may injure eyesight.
In particular, remain at least one meter (39 inches) away from infants
when using the flash.
• Store this equipment out of the reach of children and infants.
Accidental damage to the camera or batteries by a child could result in
serious injury. In addition, placement of the strap around the child’s
neck could result in asphyxiation.
• Do not attempt to disassemble or alter any part of the equipment that
is not expressly described in this guide. Disassembly or alteration may
result in high-voltage electrical shock. Internal inspections, alterations
and repairs should be conducted by qualified service personnel
authorized by your camera distributor or a Canon Customer Support
Help Desk.
• To avoid the risk of high-voltage electrical shock, do not touch the flash
portion of the camera if it has been damaged. Similarly, never touch
internal portions of the equipment that become exposed as a result of
damage. There is a risk of high-voltage electrical shock. Please take the
first opportunity to consult your camera distributor or the closest
Canon Customer Support Help Desk.
• Stop operating the equipment immediately if it emits smoke or noxious
fumes. Failure to do so may result in fire or electrical shock.
Immediately turn the camera’s power off, remove the camera battery
and unplug the power cord from the electrical outlet. Confirm that
smoke or fume emissions have ceased. Please consult your camera
distributor or the closest Canon Customer Support Help Desk.
• Stop operating the equipment if it is dropped or the casing is damaged.
Failure to do so may result in fire or electrical shock. Immediately turn the
camera’s power off, remove the camera battery and unplug the power
cord from the electrical outlet. Please consult your camera distributor or
the closest Canon Customer Support Help Desk.
Page 11
Read This First
• Do not allow the equipment to come into contact with, or become
immersed in, water or other liquids. Do not allow liquids to enter the
interior. The camera has not been waterproofed. If the exterior comes
into contact with liquids or salt air, wipe it dry with a soft, absorbent
cloth. If water or other foreign substances enter the interior, immedi-
ately turn the camera’s power off and remove the camera battery or
unplug the power cord from the electrical outlet. Continued use of the
equipment may result in fire or electrical shock. Please consult your
camera distributor or the closest Canon Customer Support Help Desk.
• Do not use substances containing alcohol, benzene, thinner or other
flammable substances to clean or maintain the equipment. The use of
these substances may lead to fire.
• Remove the power cord on a regular periodic basis and wipe away the
dust and dirt that collects on the plug, the exterior of the electrical
outlet and the surround area. In dusty, humid or greasy environments,
the dust that collects around the plug over long periods of time may
become saturated with humidity and short-circuit, leading to fire.
• Do not cut, damage, alter or place heavy items on the power adapter
cord. Any of these actions may cause an electrical short circuit, which
may lead to fire or electrical shock.
• Do not handle the power cord if your hands are wet. Handling it with
wet hands may lead to electrical shock. When unplugging the cord,
ensure that you hold the solid portion of the plug. Pulling on the
flexible portion of the cord may damage or expose the wire and
insulation, creating the potential for fires or electrical shocks.
• Use of power sources not expressly recommended for this equipment
may lead to overheating, distortion of the equipment, fire, electrical
shock or other hazards. Use only the recommended power accessories.
• Do not place the batteries near a heat source or expose them to direct
flame or heat. Neither should you immerse them in water. Such
exposure may damage the batteries and lead to the leakage of
corrosive liquids, fire, electrical shock, explosion or serious injury.
• Do not attempt to disassemble, alter or apply heat to the batteries.
There is serious risk of injury due to an explosion. Immediately flush
with water any area of the body - including the eyes and mouth, or
clothing - that comes into contact with the inner contents of a battery.
If the eyes or mouth contact these substances, immediately flush with
water and seek medical assistance.
9
Page 12
Read This First
10
• Avoid dropping or subjecting the batteries to severe impacts that could
damage the casings. It could lead to leakage and injury.
• Do not short-circuit the battery terminals with metallic objects, such as
key holders. It could lead to overheating, burns and other injuries. Use
the supplied terminal cover or battery case to transport or store the
battery pack.
• Before you discard a battery, cover the terminals with tape or other
insulators to prevent direct contact with other objects. Contact with
the metallic components of other materials in waste containers may
lead to fire or explosions. Discard the batteries in specialized waste
facilities if available in your area.
• Use of batteries not expressly recommended for this equipment may
cause explosions or leaks, resulting in fire, injury and damage to the
surroundings. Use only recommended batteries and accessories.
• Use the specified battery charger to charge Battery Pack NB-1LH or
NB-1L. Use of other chargers may lead to overheating, distortion of
the equipment, fire or electrical shock.
• Disconnect the battery charger and compact power adapter from both
the camera and the electrical outlet after recharging and when they are
not in use to avoid fire and other hazards. Continuous use over a long
period may cause a unit to overheat and distort, resulting in fire.
• The camera terminal of the supplied compact power cord is designed
for exclusive use with your camera. Do not use it with other products
or batteries. There is a risk of fire and other hazards.
Cautions
• Avoid using, placing or storing the equipment in places subject to
strong sunlight or high temperatures, such as the dashboard or trunk
(boot) of a car. Exposure to intense sunlight and heat may cause the
batteries to leak, overheat or explode, resulting in fire, burns or other
injuries. High temperatures may also cause deformation of the casing.
Ensure that there is good ventilation when using the compact power
adapter to charge the battery pack or power the camera.
• Do not store the equipment in humid or dusty areas. Storage in such
areas could lead to fire, electrical shock or other damage.
• Be careful not to bang the camera or subject it to strong impacts or
shocks that could lead to injury or damage the equipment when
wearing or holding it by the strap.
Page 13
Read This First
• Be careful not to cover the flash with your fingers when shooting. In
addition, do not touch the surface of the flash after taking several
pictures in rapid succession. Either action could result in burns.
• If your camera is used for prolonged periods, the camera body may
become warm. Please take care when operating the camera for
extended periods as your hands may experience a burning sensation.
Preventing Malfunctions
Avoid Strong Magnetic Fields
Never place the camera in close proximity to electric motors or other
equipment generating strong electromagnetic fields. Exposure to
strong magnetic fields may cause malfunctions or corrupt image data.
Avoid Condensation Related Problems
Moving the equipment rapidly between hot and cold temperatures
may cause condensation (water droplets) to form on its external and
internal surfaces. You can avoid this by placing the equipment in an
airtight, resealable plastic bag and letting it adjust to temperature
changes slowly before removing it from the bag.
If Condensation Forms Inside the Camera
Stop using the camera immediately if you detect condensation.
Continued use may damage the equipment. Remove the CF card and
battery or Compact Power Adapter (if connected) from the camera and
wait until the moisture evaporates completely before resuming use.
Extended Storage
When not using the camera for extended periods of time, remove the
battery pack and store the equipment in a safe place. Storing the
camera for extended periods with a battery pack installed will run
down the battery pack and may damage the camera. Please note,
however, that the date, time and other camera settings may reset to
the default settings if the battery pack has been removed for more
than three weeks. Follow the instructions in this guide to reset the
desired settings.
11
Page 14
12
Quick Start
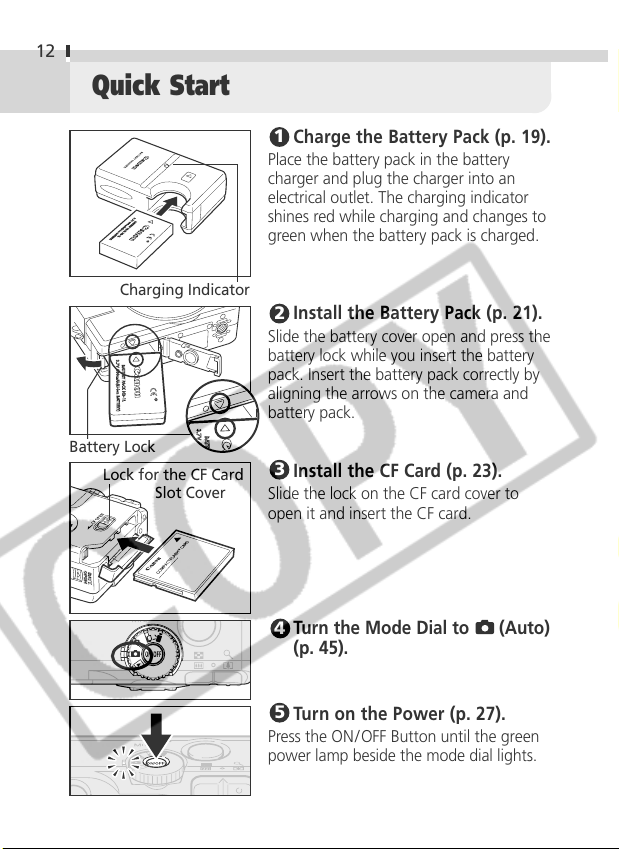
Charging Indicator
Battery Lock
Lock for the CF Card
Slot Cover
1
Charge the Battery Pack (p. 19).
Place the battery pack in the battery
charger and plug the charger into an
electrical outlet. The charging indicator
shines red while charging and changes to
green when the battery pack is charged.
2
Install the Battery Pack (p. 21).
Slide the battery cover open and press the
battery lock while you insert the battery
pack. Insert the battery pack correctly by
aligning the arrows on the camera and
battery pack.
3
Install the CF Card (p. 23).
Slide the lock on the CF card cover to
open it and insert the CF card.
4
Turn the Mode Dial to (Auto)
(p. 45).
5
Turn on the Power (p. 27).
Press the ON/OFF Button until the green
power lamp beside the mode dial lights.
Page 15
Quick Start
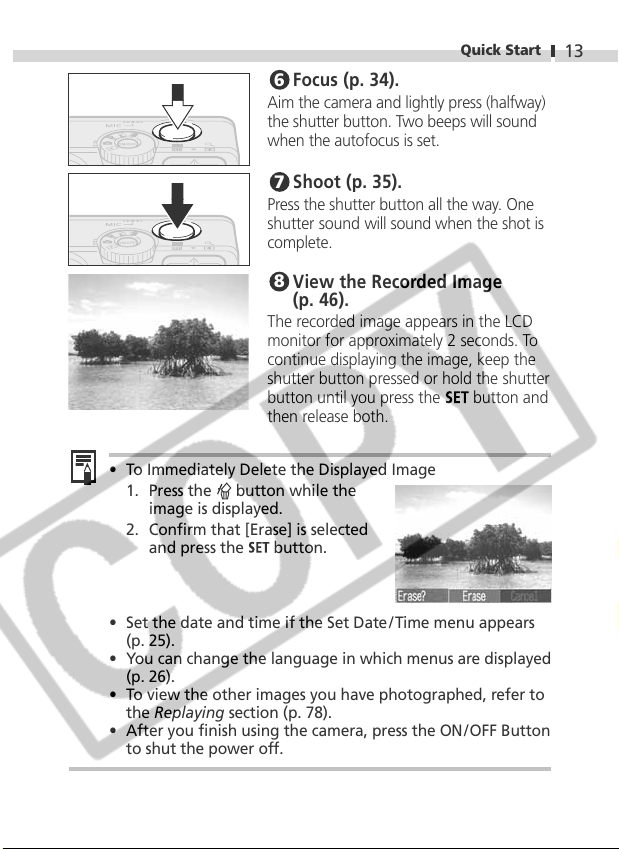
6
Focus (p. 34).
Aim the camera and lightly press (halfway)
the shutter button. Two beeps will sound
when the autofocus is set.
Shoot (p. 35).
7
Press the shutter button all the way. One
shutter sound will sound when the shot is
complete.
8
View the Recorded Image
(p. 46).
The recorded image appears in the LCD
monitor for approximately 2 seconds. To
continue displaying the image, keep the
shutter button pressed or hold the shutter
button until you press the
then release both.
• To Immediately Delete the Displayed Image
1. Press the
image is displayed.
2. Confirm that [Erase] is selected
and press the
• Set the date and time if the Set Date/Time menu appears
(p. 25).
• You can change the language in which menus are displayed
(p. 26).
• To view the other images you have photographed, refer to
the Replaying section (p. 78).
• After you finish using the camera, press the ON/ OFF Button
to shut the power off.
button while the
button.
button and
13
Page 16
14
Components Guide
Front View
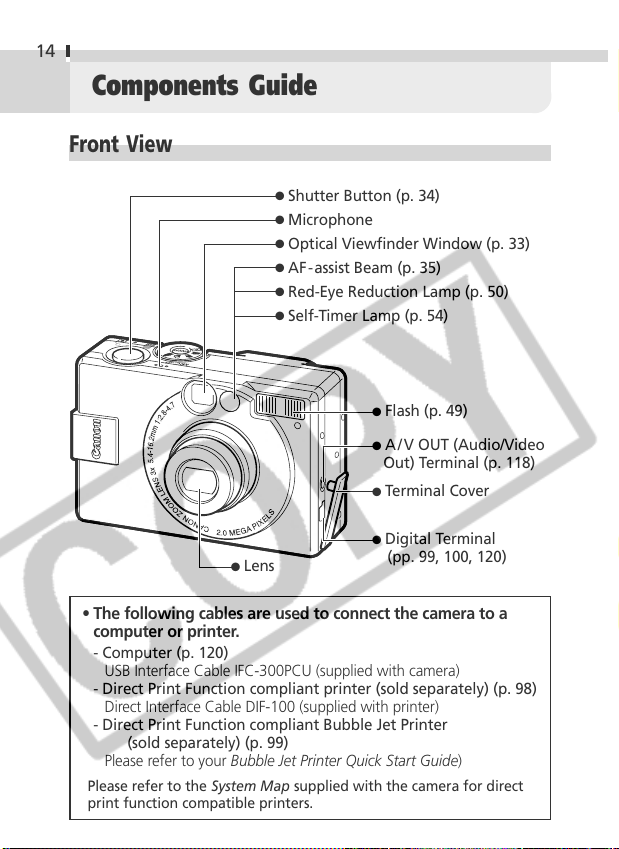
●
Shutter Button (p. 34)
●
Microphone
●
Optical Viewfinder Window (p. 33)
●
AF-assist Beam (p. 35)
●
Red-Eye Reduction Lamp (p. 50)
●
Self-Timer Lamp (p. 54)
●
Flash (p. 49)
●
A /V OUT (Audio/Video
Out) Terminal (p. 118)
●
Terminal Cover
●
Digital Terminal
●
Lens
• The following cables are used to connect the camera to a
computer or printer.
- Computer (p. 120)
USB Interface Cable IFC-300PCU (supplied with camera)
- Direct Print Function compliant printer (sold separately) (p. 98)
Direct Interface Cable DIF-100 (supplied with printer)
- Direct Print Function compliant Bubble Jet Printer
(sold separately) (p. 99)
Please refer to your Bubble Jet Printer Quick Start Guide)
Please refer to the System Map supplied with the camera for direct
print function compatible printers.
(pp. 99, 100, 120)
Page 17
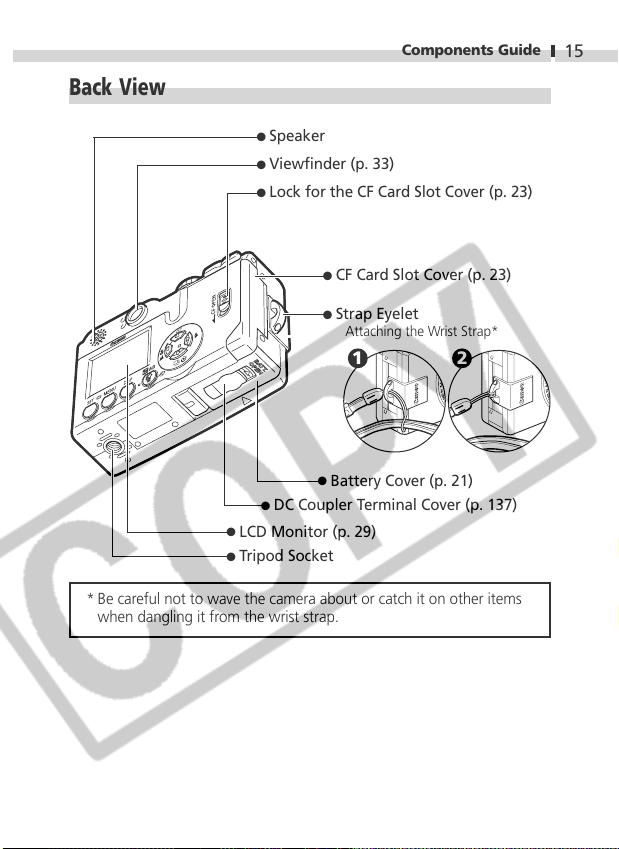
Components Guide
Back View
●
Speaker
●
Viewfinder (p. 33)
●
Lock for the CF Card Slot Cover (p. 23)
●
CF Card Slot Cover (p. 23)
●
Strap Eyelet
Attaching the Wrist Strap*
1 2
●
Battery Cover (p. 21)
●
DC Coupler Terminal Cover (p. 137)
●
LCD Monitor (p. 29)
●
Tripod Socket
* Be careful not to wave the camera about or catch it on other items
when dangling it from the wrist strap.
15
Page 18

Components Guide
16
Operation Panel
●
Indicators (p. 17)
●
(p. 91) Button
●
●
(Menu) Button (p. 37)
●
(Set) Button
●
Power Lamp
Lights when the power is on or transmission preparations
are complete when connected to a computer
●
Mode Dial (p. 18)
●
ON/OFF Button (p. 27)
●
Zoom Button
Shooting: (Telephoto)/
(Wide Angle) Button (p.
36)
Replay:
(Magnify) (p. 79)/
(Index) (p. 80) Button
●
●
(Light Metering) (p. 65)/ Button
●
(Flash) (p. 49) / Button
(Continuous) (p. 53) /
(Self-timer) (p. 54)/ Button
●
(Macro) / (Infinity) (p. 51)/ Button
(Exposure) (p. 66)/ (White Balance) (p. 69)/
(Photo Effects) (p. 72)/ (Single Image Erase)
(Display) Button (p. 29)
Page 19
Components Guide
Indicators
The indicators shine or flash when the ON /OFF Button or shutter
button is pressed.
Upper Indicator
Green: Ready to shoot
Flashing Green: Initializing camera / Recording to CF card /
Reading CF card / Erasing from CF card/
Transmitting data (during a computer connection)
Orange: Ready to shoot with slow shutter speed (flash on)
Flashing Orange: Ready to shoot but shutter speed is slow (camera
shake warning)
Lower Indicator
Yellow: Macro mode / Infinity mode/Focus lock
(Method 2, p. 60)
Flashing Yellow: Focusing difficulty (1 beep sounds).
Although you can press the shutter button, you
are recommended to use the focus lock (p. 60).
17
Page 20

Components Guide
18
Mode Dial
The mode dial is used to select shooting or replay modes.
Shooting Modes
(Auto)
• The camera selects most settings automatically (p. 45).
(Manual)
• You can set the exposure compensation, white balance and other
settings manually (p. 45).
(Stitch Assist)
• Shoot images in overlapping series to create panoramas (p. 55).
(Movie)
• Shoot movie clips (p. 58).
Replay Mode
(Replay)
• Images recorded onto the CF card can be replayed or erased
(pp. 78, 91).
• Recorded images can be printed when a printer (sold separately) is
connected (p. 94).
• Images can be downloaded to and viewed on a computer when it
is connected (p. 119).
• The or icon displays on the LCD monitor when a
connection to a printer is opened.
• The LCD monitor shuts off while a computer is connected.
Page 21
Preparing the Camera
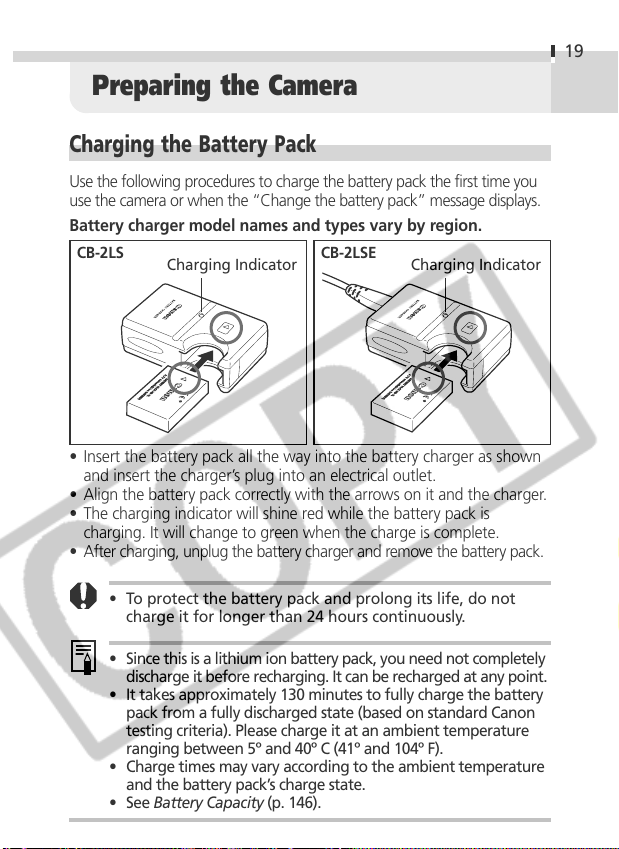
Charging the Battery Pack
Use the following procedures to charge the battery pack the first time you
use the camera or when the “Change the battery pack” message displays.
Battery charger model names and types vary by region.
CB-2LS
• Insert the battery pack all the way into the battery charger as shown
and insert the charger’s plug into an electrical outlet.
• Align the battery pack correctly with the arrows on it and the charger.
• The charging indicator will shine red while the battery pack is
charging. It will change to green when the charge is complete.
• After charging, unplug the battery charger and remove the battery pack.
Charging Indicator
• To protect the battery pack and prolong its life, do not
charge it for longer than 24 hours continuously.
CB-2LSE
Charging Indicator
19
• Since this is a lithium ion battery pack, you need not completely
discharge it before recharging. It can be recharged at any point.
• It takes approximately 130 minutes to fully charge the battery
pack from a fully discharged state (based on standard Canon
testing criteria). Please charge it at an ambient temperature
ranging between 5º and 40º C (41º and 104º F).
• Charge times may vary according to the ambient temperature
and the battery pack’s charge state.
• See Battery Capacity (p. 146).
Page 22
Preparing the Camera
20
Handling Precautions
• Keep the battery pack terminals ( ) clean at all times. Dirty
terminals may cause poor contact between the battery pack and
camera. Polish the terminals with a tissue or a dry cloth before
charging or using the battery pack.
• Do not rapidly overturn or wave the battery charger around when it
contains the battery pack. The battery pack could fly out.
• At low temperatures, battery pack performance may be reduced and
the low battery icon may appear earlier than usual. Under these
conditions, resuscitate the battery pack by warming it in a pocket
immediately before use. However, ensure that there are no metallic
items in the pocket that could cause a short circuit, such as a key
holder, etc.
• Do not place anything, such as tablecloths, carpets, bedding or
cushions, on top of the battery charger while it is charging. Heat will
build up and could result in a fire.
• Do not charge batteries other than Battery Pack NB-1LH or NB-1L in
this charger.
• The battery pack continues to discharge a minimal portion of its
power while installed in the camera, even with the power off, or in
the charger. This will shorten battery life.
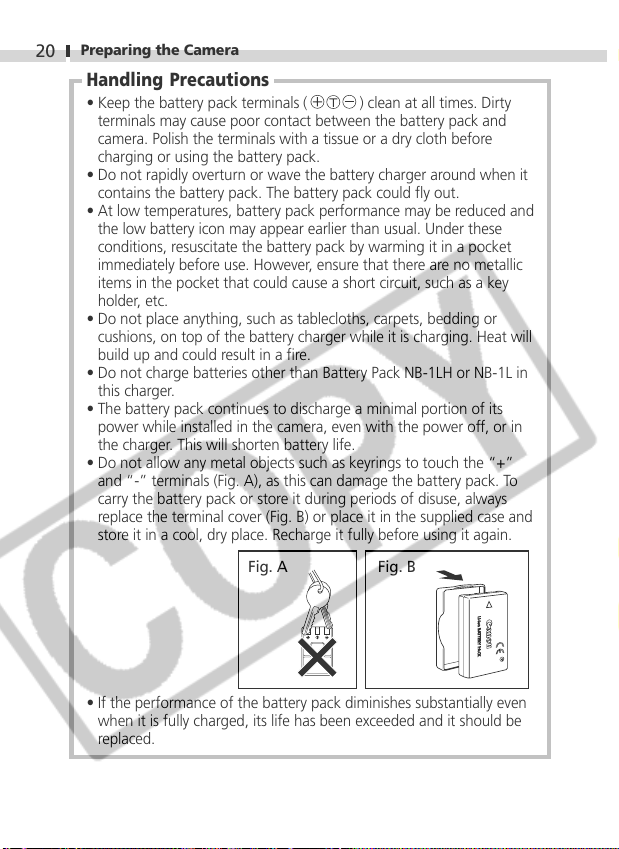
• Do not allow any metal objects such as keyrings to touch the “+”
and “-” terminals (Fig. A), as this can damage the battery pack. To
carry the battery pack or store it during periods of disuse, always
replace the terminal cover (Fig. B) or place it in the supplied case and
store it in a cool, dry place. Recharge it fully before using it again.
Fig. A Fig. B
• If the performance of the battery pack diminishes substantially even
when it is fully charged, its life has been exceeded and it should be
replaced.
Page 23
Preparing the Camera
Installing the Battery Pack
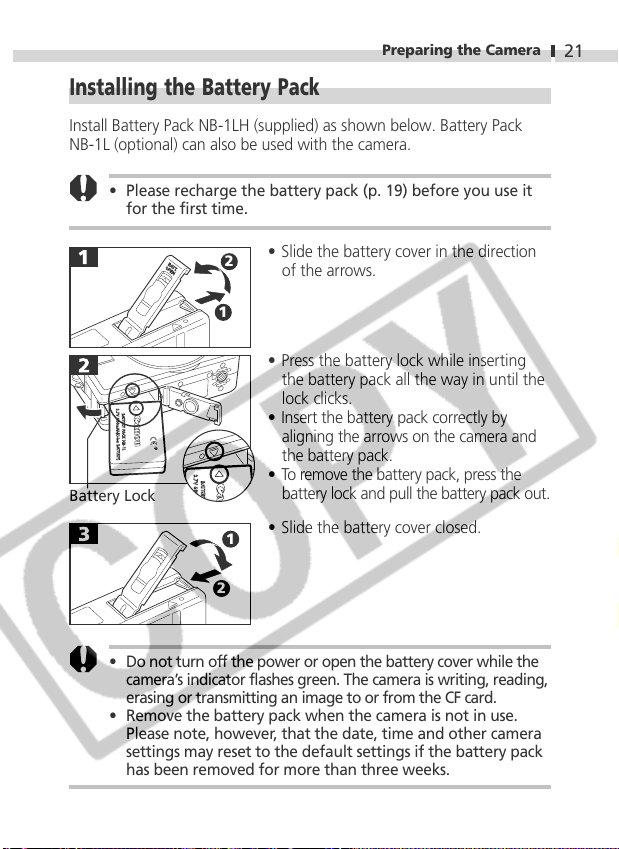
Install Battery Pack NB-1LH (supplied) as shown below. Battery Pack
NB-1L (optional) can also be used with the camera.
• Please recharge the battery pack (p. 19) before you use it
for the first time.
• Slide the battery cover in the direction
2
of the arrows.
1
• Press the battery lock while inserting
the battery pack all the way in until the
lock clicks.
• Insert the battery pack correctly by
aligning the arrows on the camera and
the battery pack.
• To remove the battery pack, press the
Battery Lock
2
battery lock and pull the battery pack out.
• Slide the battery cover closed.
1
21
• Do not turn off the power or open the battery cover while the
camera’s indicator flashes green. The camera is writing, reading,
erasing or transmitting an image to or from the CF card.
• Remove the battery pack when the camera is not in use.
Please note, however, that the date, time and other camera
settings may reset to the default settings if the battery pack
has been removed for more than three weeks.
Page 24
Preparing the Camera
22
• Please use a household power source for extended use of
the camera (p. 137).
Battery Pack Charge
The following icons and messages will display when the battery pack
charge is low.
Battery pack charge is low. Recharge it as soon as possible before
it is required for an extended period.
When the LCD monitor is off, this icon will display when you
press the , /
Change the
battery pack
Battery charge is insufficient to operate the camera. Replace
the battery pack immediately.
• See Battery Capacity (p. 146).
, / , or button ( mode).
Page 25
Preparing the Camera
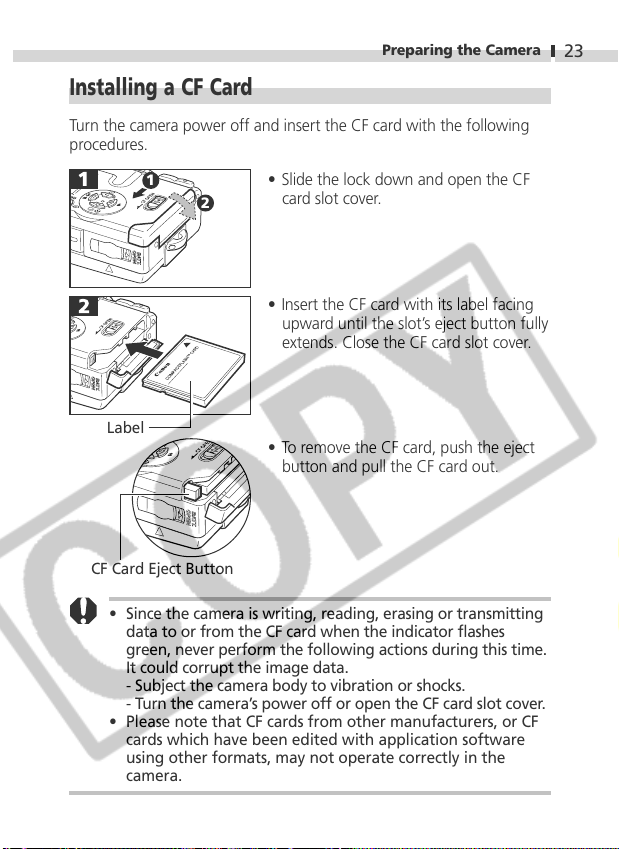
Installing a CF Card
Turn the camera power off and insert the CF card with the following
procedures.
23
1
1
2
2
• Slide the lock down and open the CF
card slot cover.
• Insert the CF card with its label facing
upward until the slot’s eject button fully
extends. Close the CF card slot cover.
Label
• To remove the CF card, push the eject
button and pull the CF card out.
CF Card Eject Button
• Since the camera is writing, reading, erasing or transmitting
data to or from the CF card when the indicator flashes
green, never perform the following actions during this time.
It could corrupt the image data.
- Subject the camera body to vibration or shocks.
- Turn the camera’s power off or open the CF card slot cover.
• Please note that CF cards from other manufacturers, or CF
cards which have been edited with application software
using other formats, may not operate correctly in the
camera.
Page 26
Preparing the Camera
24
• See CF Cards and Estimated Capacities (p. 147).
Handling Precautions for CF Cards
• CF cards are high-precision electronic devices. Do not bend them,
apply force to them, or subject them to shocks or vibration.
• Do not attempt to disassemble or alter a CF card.
• Moving a CF card rapidly between temperature extremes will cause
condensation to form in the card and lead to a malfunction. To avoid
condensation, place the CF card in a sealed plastic bag before moving
it into a different temperature zone and allow it to adjust slowly to the
new temperature. If condensation forms on the CF card, store it at
room temperature until the water droplets have evaporated naturally.
• Do not use or store CF cards in the following types of location.
- Locations subject to dust or sand
- Locations subject to high humidity and high temperatures
Page 27
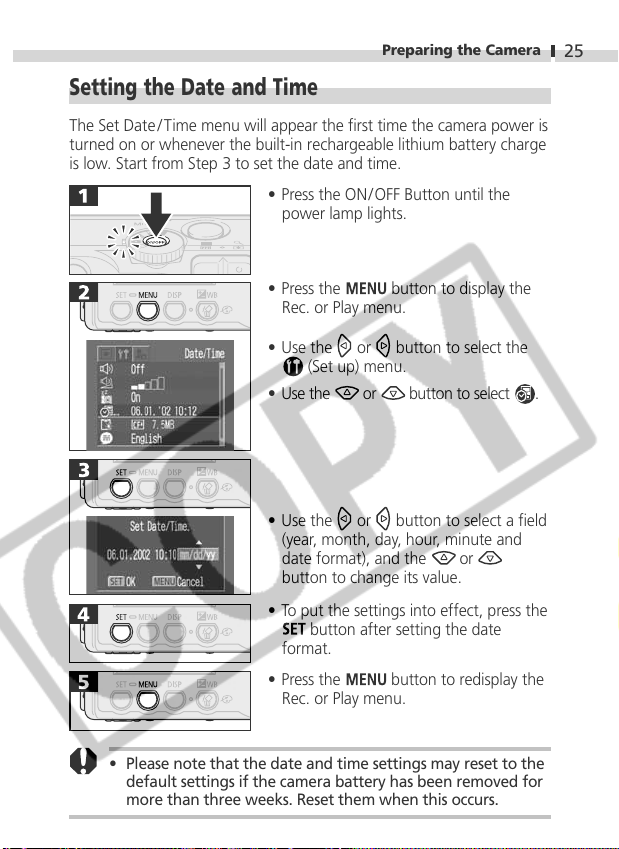
Preparing the Camera
Setting the Date and Time
The Set Date / Time menu will appear the first time the camera power is
turned on or whenever the built-in rechargeable lithium battery charge
is low. Start from Step 3 to set the date and time.
• Press the ON/ OFF Button until the
power lamp lights.
25
• Press the
Rec. or Play menu.
• Use the
(Set up) menu.
• Use the
• Use the
(year, month, day, hour, minute and
date format), and the
button to change its value.
• To put the settings into effect, press the
button after setting the date
format.
• Press the
Rec. or Play menu.
• Please note that the date and time settings may reset to the
default settings if the camera battery has been removed for
more than three weeks. Reset them when this occurs.
button to display the
or button to select the
or button to select .
or button to select a field
or
button to redisplay the
Page 28
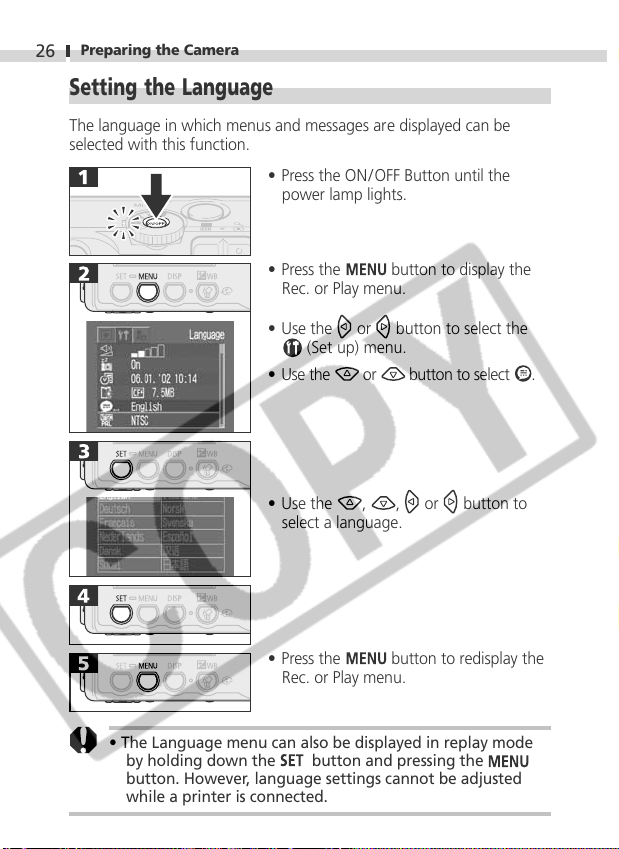
Preparing the Camera
26
Setting the Language
The language in which menus and messages are displayed can be
selected with this function.
• Press the ON/ OFF Button until the
power lamp lights.
• Press the
Rec. or Play menu.
• Use the
(Set up) menu.
• Use the
• Use the
select a language.
• Press the button to redisplay the
Rec. or Play menu.
• The Language menu can also be displayed in replay mode
by holding down the
button. However, language settings cannot be adjusted
while a printer is connected.
button and pressing the
button to display the
or button to select the
or button to select .
, , or button to
Page 29
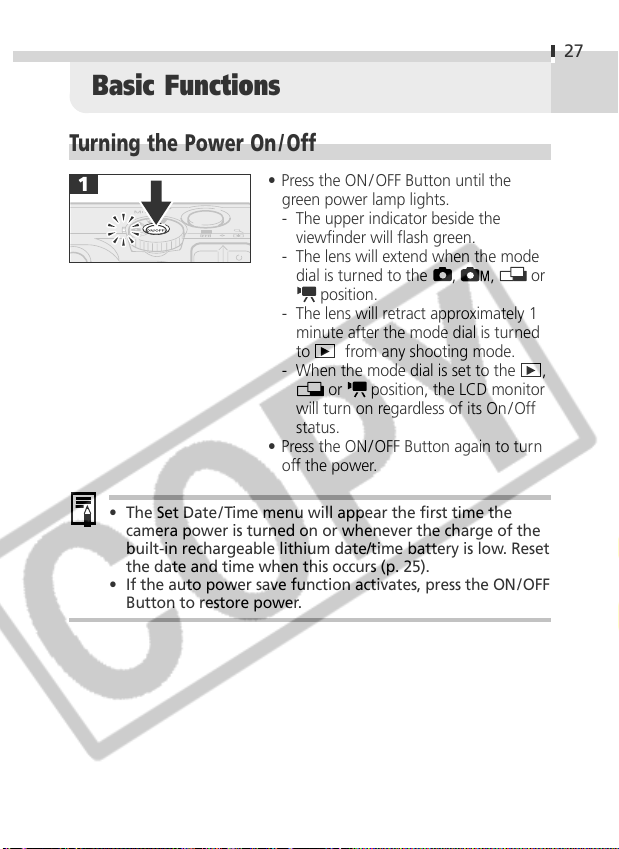
Basic Functions
Turning the Power On / Off
• Press the ON/OFF Button until the
green power lamp lights.
- The upper indicator beside the
viewfinder will flash green.
- The lens will extend when the mode
dial is turned to the
position.
- The lens will retract approximately 1
minute after the mode dial is turned
to
from any shooting mode.
- When the mode dial is set to the
or position, the LCD monitor
will turn on regardless of its On/Off
status.
• Press the ON/ OFF Button again to turn
off the power.
• The Set Date/Time menu will appear the first time the
camera power is turned on or whenever the charge of the
built-in rechargeable lithium date/time battery is low. Reset
the date and time when this occurs (p. 25).
• If the auto power save function activates, press the ON/ OFF
Button to restore power.
, ,
27
or
,
Page 30
Basic Functions
28
• Power Save Function
This camera is equipped with a power save function. The
power will automatically shut down under the following
circumstances when this function is set to On. Press the ON/
OFF Button to restore power.
Shooting Mode
Powers down approximately 3 minutes after the last
control is accessed on the camera. (The LCD monitor
automatically turns off 3 minutes after the last control is
accessed even if this function is set to Off. Press any
button except the ON/OFF Button to turn the LCD
monitor back on.)
Replay Mode
Powers down approximately 5 minutes after the last
control is accessed on the camera.
Connected to a Printer
(optional)
Powers down approximately 5 minutes after the last
control is accessed on the camera or something is
printed on a connected printer.
Connected to a Computer
A warning message displays on the computer screen
approximately 5 minutes after the last control is
accessed. Powers down approximately 1 minute later if
no control is accessed.
• The power save function will not activate during a slide
show.
• The camera’s settings can be changed to turn off the power
save function (p. 127).
Page 31
Basic Functions
Using the LCD Monitor
The LCD monitor can be used to compose images while shooting,
adjust settings menus and replay images.
• The image in the LCD monitor will darken in strong sunlight
or bright light. This does not constitute a malfunction.
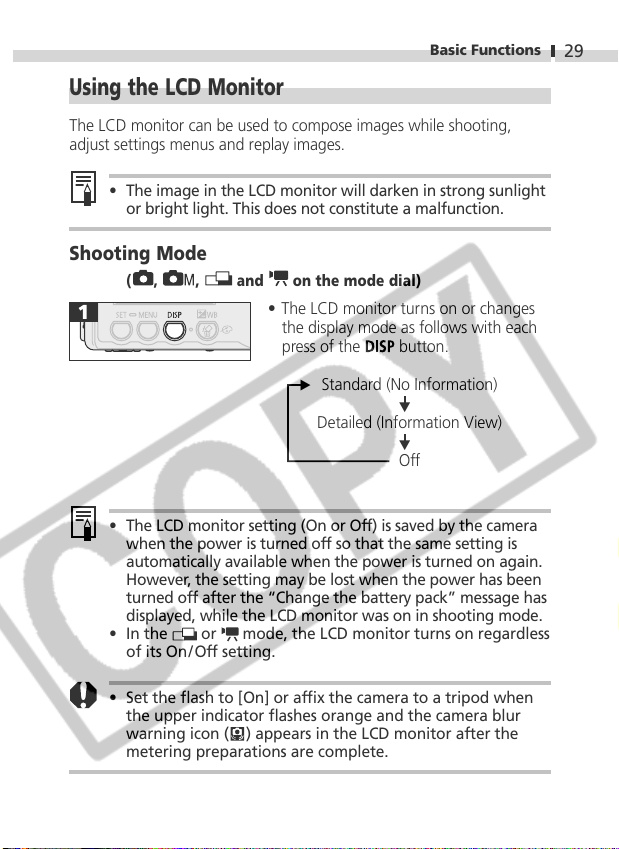
Shooting Mode
( , ,
• The LCD monitor setting (On or Off) is saved by the camera
when the power is turned off so that the same setting is
automatically available when the power is turned on again.
However, the setting may be lost when the power has been
turned off after the “Change the battery pack” message has
displayed, while the LCD monitor was on in shooting mode.
• In the
of its On/Off setting.
and on the mode dial)
• The LCD monitor turns on or changes
the display mode as follows with each
press of the
Standard (No Information)
▼
Detailed (Information View)
or mode, the LCD monitor turns on regardless
button.
▼
▼
Off
29
• Set the flash to [On] or affix the camera to a tripod when
the upper indicator flashes orange and the camera blur
warning icon (
metering preparations are complete.
) appears in the LCD monitor after the
Page 32
Basic Functions
30
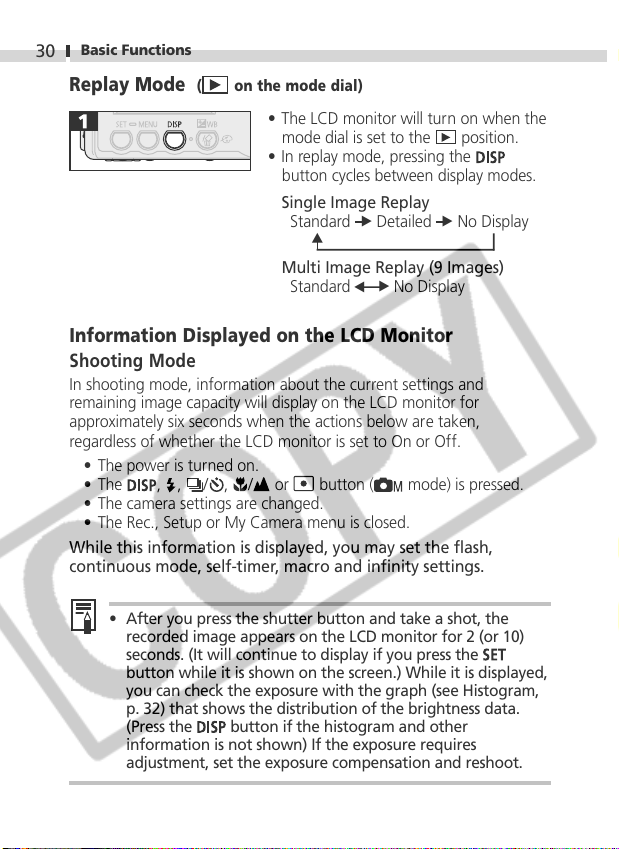
Replay Mode ( on the mode dial)
• The LCD monitor will turn on when the
mode dial is set to the
• In replay mode, pressing the
button cycles between display modes.
Single Image Replay
Standard Detailed No Display
position.
▼
▼
▼
Multi Image Replay (9 Images)
Standard No Display
▼
▼
Information Displayed on the LCD Monitor
Shooting Mode
In shooting mode, information about the current settings and
remaining image capacity will display on the LCD monitor for
approximately six seconds when the actions below are taken,
regardless of whether the LCD monitor is set to On or Off.
• The power is turned on.
• The
• The camera settings are changed.
• The Rec., Setup or My Camera menu is closed.
While this information is displayed, you may set the flash,
continuous mode, self-timer, macro and infinity settings.
, , /
• After you press the shutter button and take a shot, the
recorded image appears on the LCD monitor for 2 (or 10)
seconds. (It will continue to display if you press the
button while it is shown on the screen.) While it is displayed,
you can check the exposure with the graph (see Histogram,
p. 32) that shows the distribution of the brightness data.
(Press the
information is not shown) If the exposure requires
adjustment, set the exposure compensation and reshoot.
, / or button ( mode) is pressed.
button if the histogram and other
Page 33
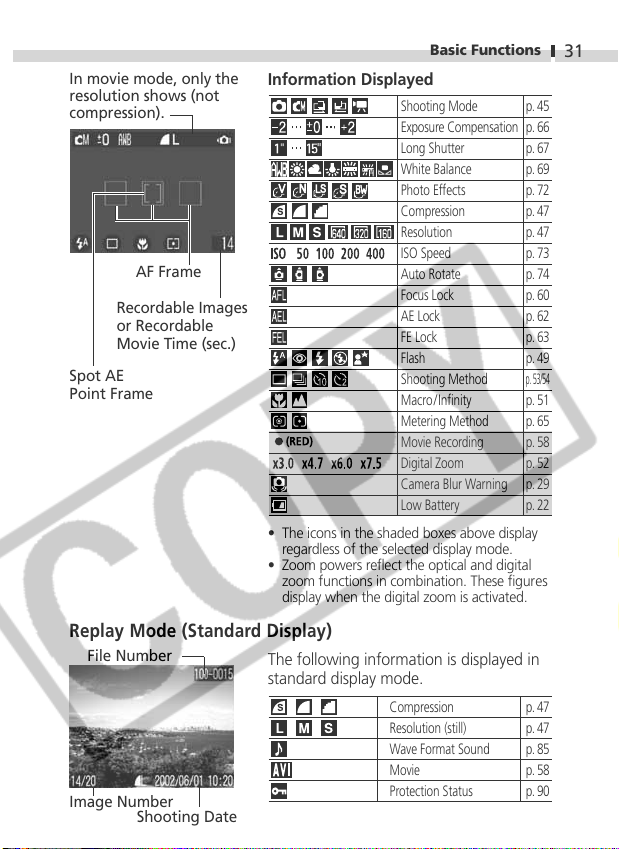
In movie mode, only the
resolution shows (not
compression).
AF Frame
Recordable Images
or Recordable
Movie Time (sec.)
Spot AE
Point Frame
Basic Functions
Information Displayed
Shooting Mode
Exposure Compensation
Long Shutter
White Balance
Photo Effects
Compression
Resolution
ISO Speed
Auto Rotate
Focus Lock
AE Lock
FE Lock
Flash
Shooting Method
Macro/Infinity
Metering Method
Movie Recording
Digital Zoom
Camera Blur Warning
Low Battery
• The icons in the shaded boxes above display
regardless of the selected display mode.
• Zoom powers reflect the optical and digital
zoom functions in combination. These figures
display when the digital zoom is activated.
p. 45
p. 66
p. 67
p. 69
p. 72
p. 47
p. 47
p. 73
p. 74
p. 60
p. 62
p. 63
p. 49
p. 53/54
p. 51
p. 65
p. 58
p. 52
p. 29
p. 22
31
Replay Mode (Standard Display)
File Number
Image Number
Shooting Date
The following information is displayed in
standard display mode.
Compression
Resolution (still)
Wave Format Sound
Movie
Protection Status
p. 47
p. 47
p. 85
p. 58
p. 90
Page 34
Basic Functions
32
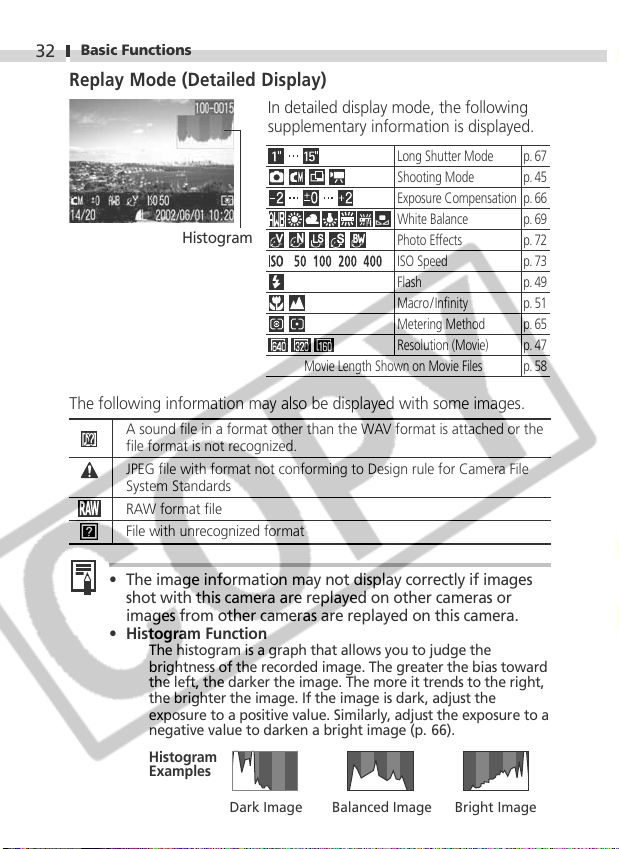
Replay Mode (Detailed Display)
In detailed display mode, the following
supplementary information is displayed.
Long Shutter Mode
Shooting Mode
Exposure Compensation
Histogram
Movie Length Shown on Movie Files
The following information may also be displayed with some images.
A sound file in a format other than the WAV format is attached or the
file format is not recognized.
JPEG file with format not conforming to Design rule for Camera File
System Standards
RAW format file
File with unrecognized format
• The image information may not display correctly if images
shot with this camera are replayed on other cameras or
images from other cameras are replayed on this camera.
• Histogram Function
The histogram is a graph that allows you to judge the
brightness of the recorded image. The greater the bias toward
the left, the darker the image. The more it trends to the right,
the brighter the image. If the image is dark, adjust the
exposure to a positive value. Similarly, adjust the exposure to a
negative value to darken a bright image (p. 66).
Histogram
Examples
White Balance
Photo Effects
ISO Speed
Flash
Macro/Infinity
Metering Method
Resolution (Movie)
p. 67
p. 45
p. 66
p. 69
p. 72
p. 73
p. 49
p. 51
p. 65
p. 47
p. 58
Dark Image Balanced Image Bright Image
Page 35
Basic Functions
Using the Viewfinder
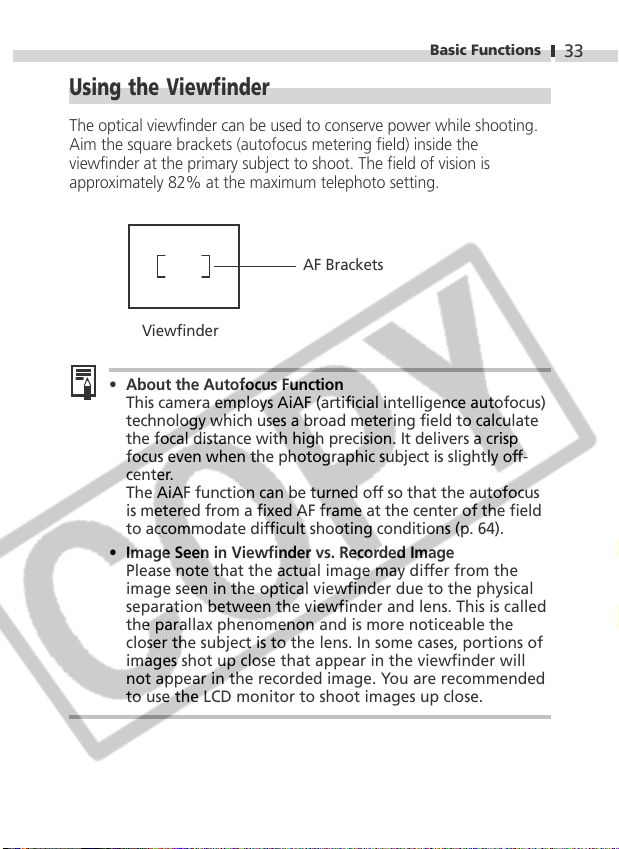
The optical viewfinder can be used to conserve power while shooting.
Aim the square brackets (autofocus metering field) inside the
viewfinder at the primary subject to shoot. The field of vision is
approximately 82% at the maximum telephoto setting.
AF Brackets
Viewfinder
• About the Autofocus Function
This camera employs AiAF (artificial intelligence autofocus)
technology which uses a broad metering field to calculate
the focal distance with high precision. It delivers a crisp
focus even when the photographic subject is slightly off-
center.
The AiAF function can be turned off so that the autofocus
is metered from a fixed AF frame at the center of the field
to accommodate difficult shooting conditions (p. 64).
• Image Seen in Viewfinder vs. Recorded Image
Please note that the actual image may differ from the
image seen in the optical viewfinder due to the physical
separation between the viewfinder and lens. This is called
the parallax phenomenon and is more noticeable the
closer the subject is to the lens. In some cases, portions of
images shot up close that appear in the viewfinder will
not appear in the recorded image. You are recommended
to use the LCD monitor to shoot images up close.
33
Page 36
Basic Functions
34
Pressing the Shutter Button
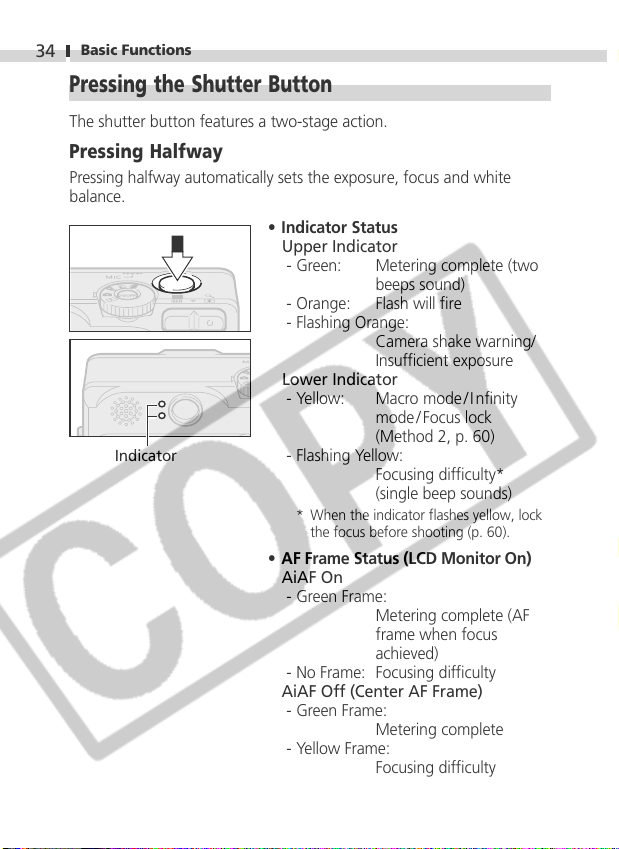
The shutter button features a two-stage action.
Pressing Halfway
Pressing halfway automatically sets the exposure, focus and white
balance.
• Indicator Status
Upper Indicator
Indicator
- Green: Metering complete (two
- Orange: Flash will fire
- Flashing Orange:
Lower Indicator
- Yellow: Macro mode / Infinity
- Flashing Yellow:
* When the indicator flashes yellow, lock
the focus before shooting (p. 60).
• AF Frame Status (LCD Monitor On)
AiAF On
- Green Frame:
- No Frame: Focusing difficulty
AiAF Off (Center AF Frame)
- Green Frame:
- Yellow Frame:
beeps sound)
Camera shake warning/
Insufficient exposure
mode / Focus lock
(Method 2, p. 60)
Focusing difficulty*
(single beep sounds)
Metering complete (AF
frame when focus
achieved)
Metering complete
Focusing difficulty
Page 37
Basic Functions
Pressing Fully
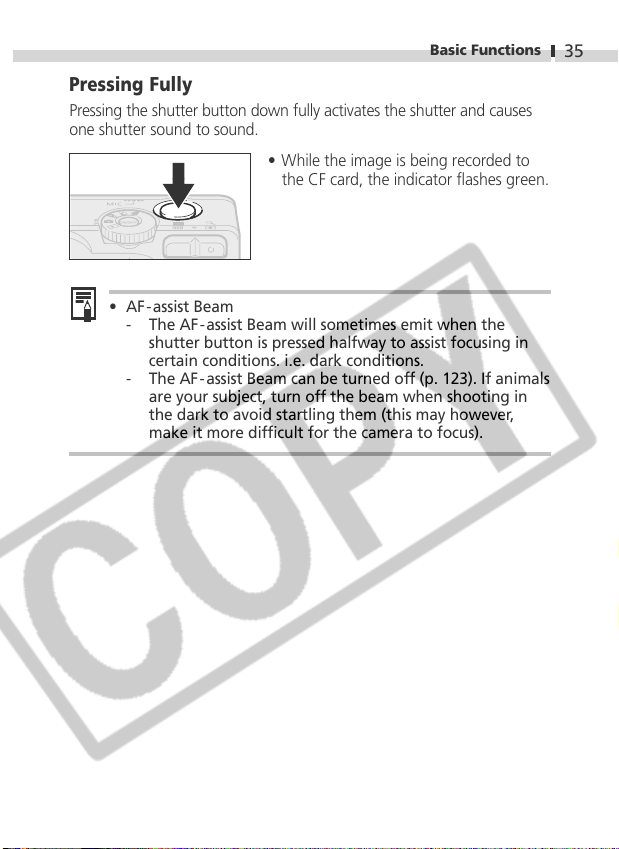
Pressing the shutter button down fully activates the shutter and causes
one shutter sound to sound.
• While the image is being recorded to
the CF card, the indicator flashes green.
• AF-assist Beam
- The AF- assist Beam will sometimes emit when the
shutter button is pressed halfway to assist focusing in
certain conditions. i.e. dark conditions.
- The AF- assist Beam can be turned off (p. 123). If animals
are your subject, turn off the beam when shooting in
the dark to avoid startling them (this may however,
make it more difficult for the camera to focus).
35
Page 38
Basic Functions
36
Using the Zoom
The zoom can be adjusted to any setting in the 35 to 105 mm range in
35 mm film equivalent terms.
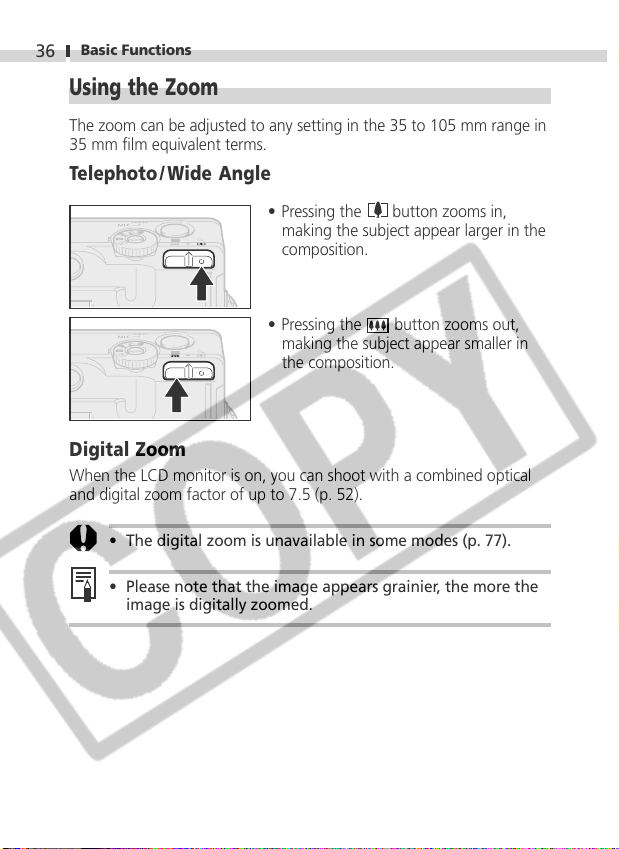
Telephoto / Wide Angle
• Pressing the button zooms in,
making the subject appear larger in the
composition.
• Pressing the
making the subject appear smaller in
the composition.
button zooms out,
Digital Zoom
When the LCD monitor is on, you can shoot with a combined optical
and digital zoom factor of up to 7.5 (p. 52).
• The digital zoom is unavailable in some modes (p. 77).
• Please note that the image appears grainier, the more the
image is digitally zoomed.
Page 39
Basic Functions
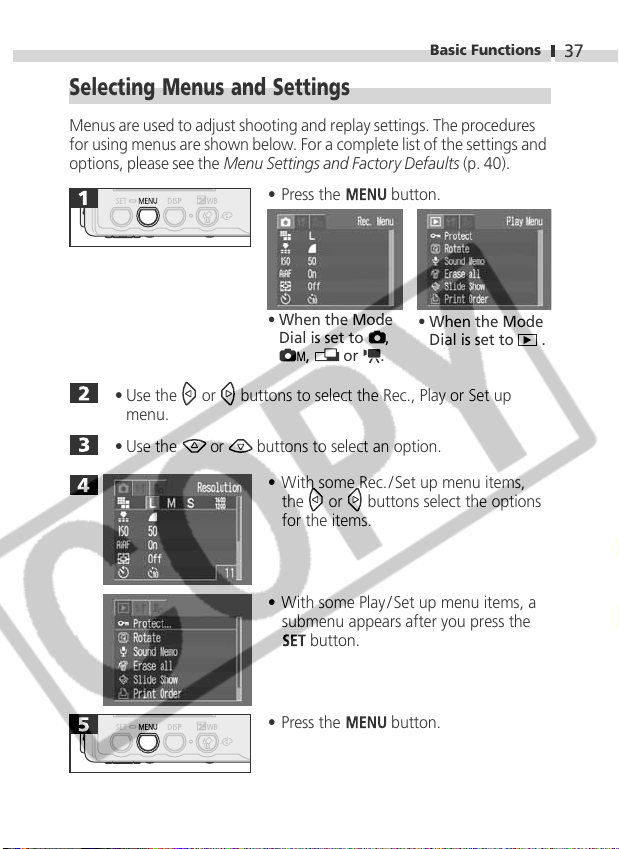
Selecting Menus and Settings
Menus are used to adjust shooting and replay settings. The procedures
for using menus are shown below. For a complete list of the settings and
options, please see the Menu Settings and Factory Defaults (p. 40).
• Press the
button.
37
• When the Mode
Dial is set to ,
, or .
• Use the
menu.
• Use the or buttons to select an option.
or buttons to select the Rec., Play or Set up
• With some Rec. /Set up menu items,
the
or buttons select the options
for the items.
• With some Play /Set up menu items, a
submenu appears after you press the
button.
• Press the
• When the Mode
Dial is set to .
button.
Page 40
Basic Functions
38
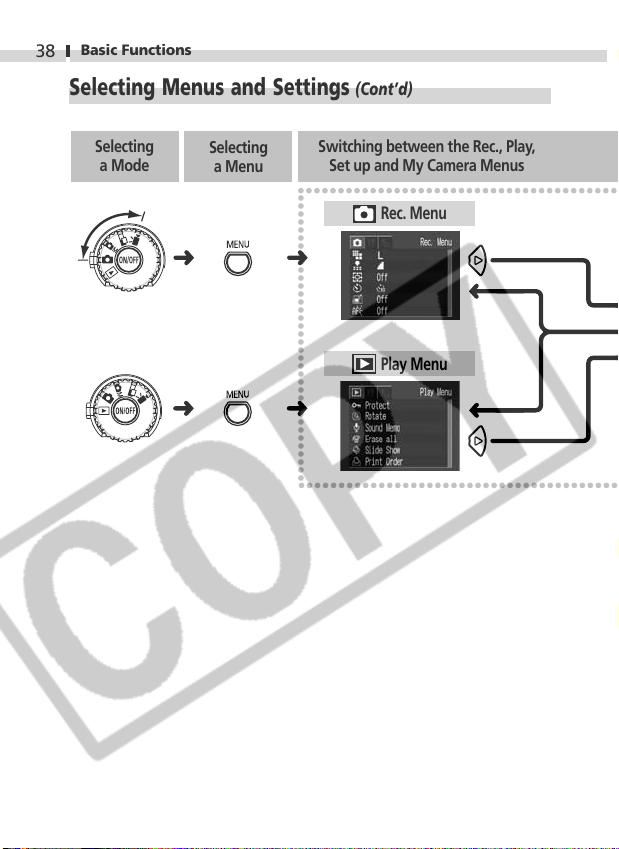
Selecting Menus and Settings (Cont’d)
Selecting
a Mode
Selecting
a Menu
Switching between the Rec., Play,
Set up and My Camera Menus
Rec. Menu
Play Menu
Page 41
Basic Functions
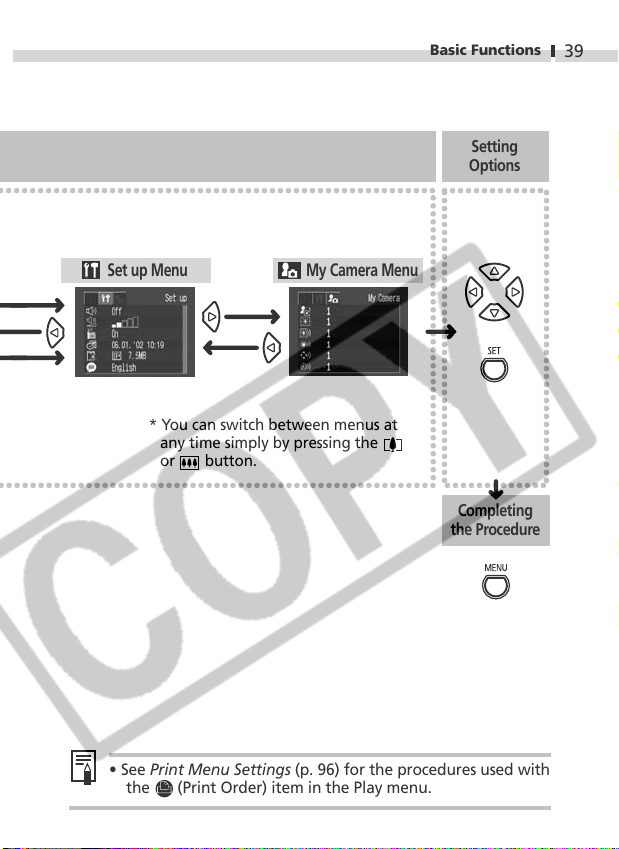
Setting
Options
39
Set up Menu
* You can switch between menus at
any time simply by pressing the
or button.
My Camera Menu
Completing
the Procedure
• See Print Menu Settings (p. 96) for the procedures used with
(Print Order) item in the Play menu.
the
Page 42
Basic Functions
40
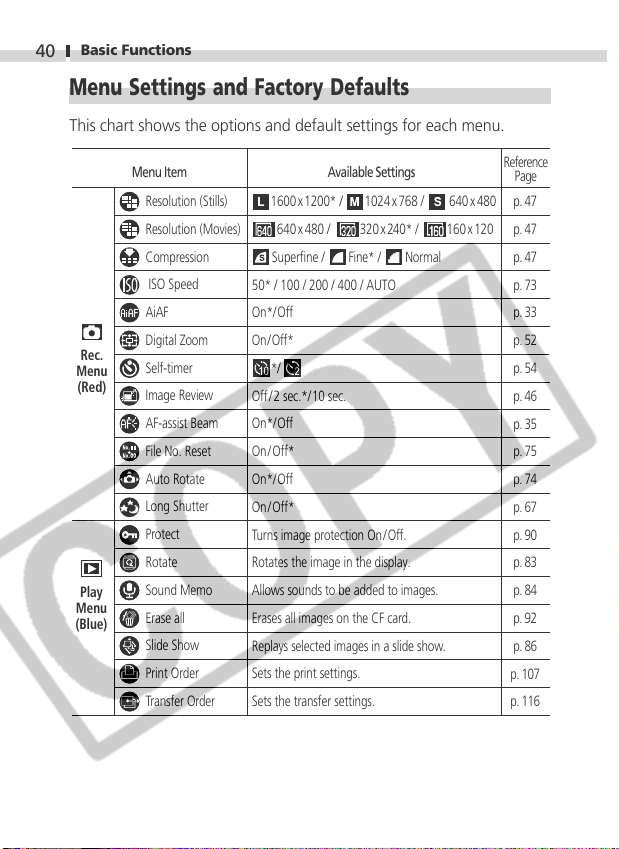
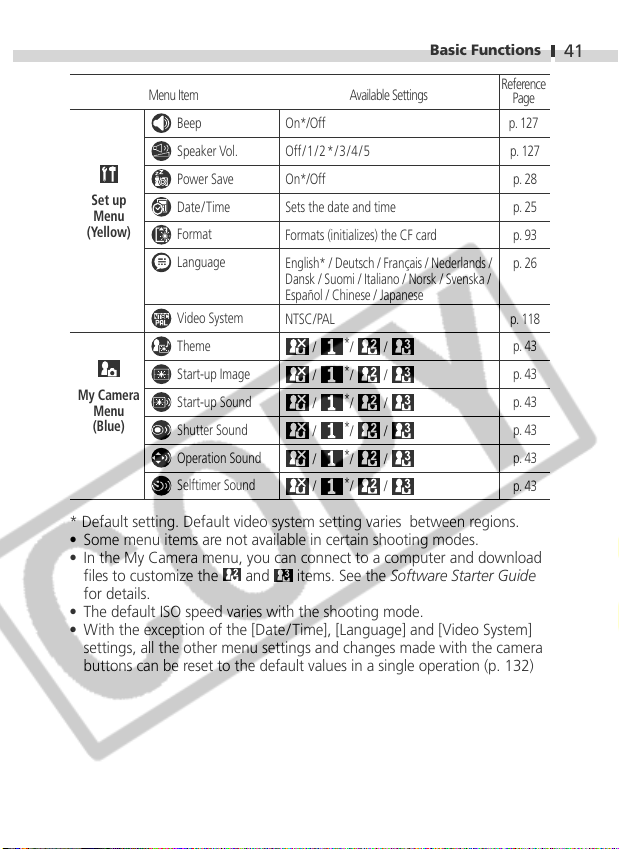
Menu Settings and Factory Defaults
This chart shows the options and default settings for each menu.
Rec.
Menu
(Red)
Play
Menu
(Blue)
Menu Item
Resolution (Stills)
Resolution (Movies)
Compression
ISO Speed
AiAF
Digital Zoom
Self-timer
Image Review
AF-assist Beam
File No. Reset
Auto Rotate
Long Shutter
Protect
Rotate
Sound Memo
Erase all
Slide Show
Print Order
Transfer Order
Available Settings
1600 x 1200* / 1024 x 768 / 640 x 480
640 x 480 / 320 x 240* / 160 x 120
Superfine / Fine* / Normal
50* / 100 / 200 / 400 / AUTO
On*/Off
On/Off*
*/
Off/2 sec.*/ 10 sec.
On*/Off
On/Off*
On*/Off
On/Off*
Turns image protection On /Off.
Rotates the image in the display.
Allows sounds to be added to images.
Erases all images on the CF card.
Replays selected images in a slide show.
Sets the print settings.
Sets the transfer settings.
Reference
Page
p. 47
p. 47
p. 47
p. 73
p. 33
p. 52
p. 54
p. 46
p. 35
p. 75
p. 74
p. 67
p. 90
p. 83
p. 84
p. 92
p. 86
p. 107
p. 116
Page 43
Basic Functions
Reference
Page
p. 127
p. 127
p. 28
p. 25
p. 93
p. 26
p. 118
p. 43
p. 43
p. 43
p. 43
p. 43
p. 43
Set up
Menu
(Yellow)
My Camera
Menu
(Blue)
Menu Item
Beep
Speaker Vol.
Power Save
Date/Time
Format
Language
Video System
Theme
Start-up Image
Start-up Sound
Shutter Sound
Operation Sound
Selftimer Sound
Available Settings
On*/Off
Off/1/2*/3/4/5
On*/Off
Sets the date and time
Formats (initializes) the CF card
English* / Deutsch / Français / Nederlands /
Dansk / Suomi / Italiano / Norsk / Svenska /
Español / Chinese / Japanese
NTSC/PAL
*
/
/*/ /
/*/ /
/*/ /
/*/ /
/*/ /
/ /
* Default setting. Default video system setting varies between regions.
• Some menu items are not available in certain shooting modes.
• In the My Camera menu, you can connect to a computer and download
files to customize the
and items. See the Software Starter Guide
for details.
• The default ISO speed varies with the shooting mode.
• With the exception of the [Date /Time], [Language] and [Video System]
settings, all the other menu settings and changes made with the camera
buttons can be reset to the default values in a single operation (p. 132)
41
Page 44
42
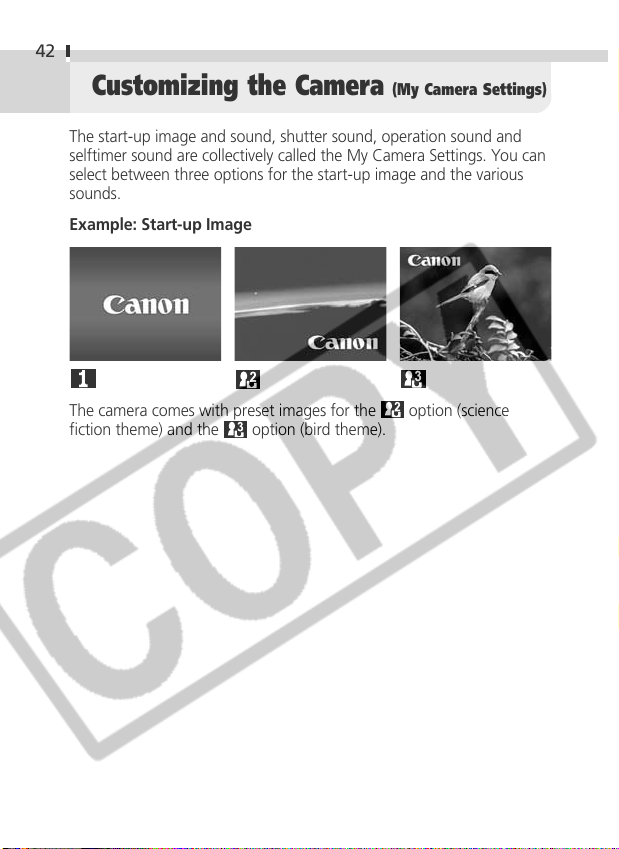
Customizing the Camera
The start-up image and sound, shutter sound, operation sound and
selftimer sound are collectively called the My Camera Settings. You can
select between three options for the start-up image and the various
sounds.
Example: Start-up Image
The camera comes with preset images for the option (science
fiction theme) and the
option (bird theme).
(My Camera Settings)
Page 45
Customizing the Camera (My Camera Settings)
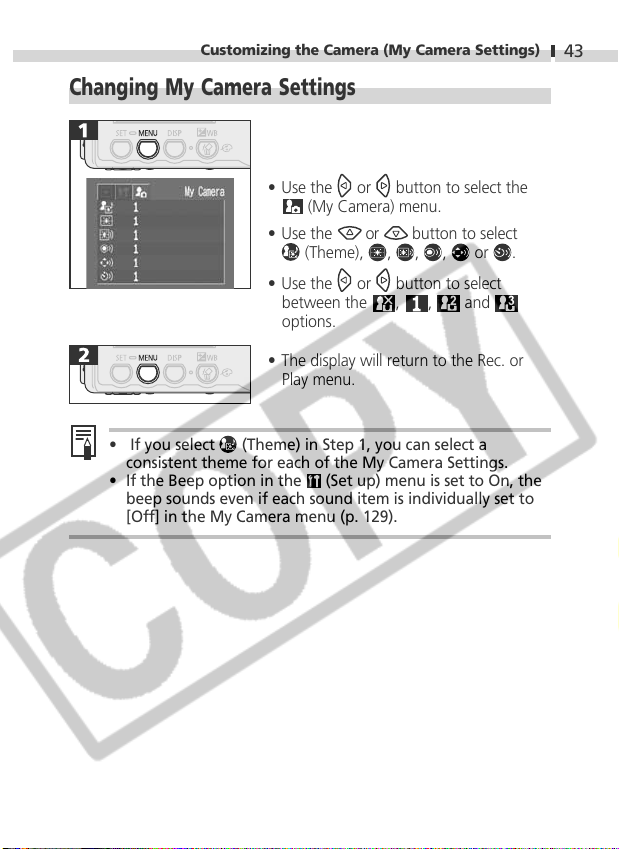
Changing My Camera Settings
• Use the or button to select the
(My Camera) menu.
• Use the
(Theme), , , , or .
• Use the
between the
options.
• The display will return to the Rec. or
Play menu.
• If you select (Theme) in Step 1, you can select a
consistent theme for each of the My Camera Settings.
• If the Beep option in the
beep sounds even if each sound item is individually set to
[Off] in the My Camera menu (p. 129).
or button to select
or button to select
, , and
(Set up) menu is set to On, the
43
Page 46
Customizing the Camera (My Camera Settings)
44
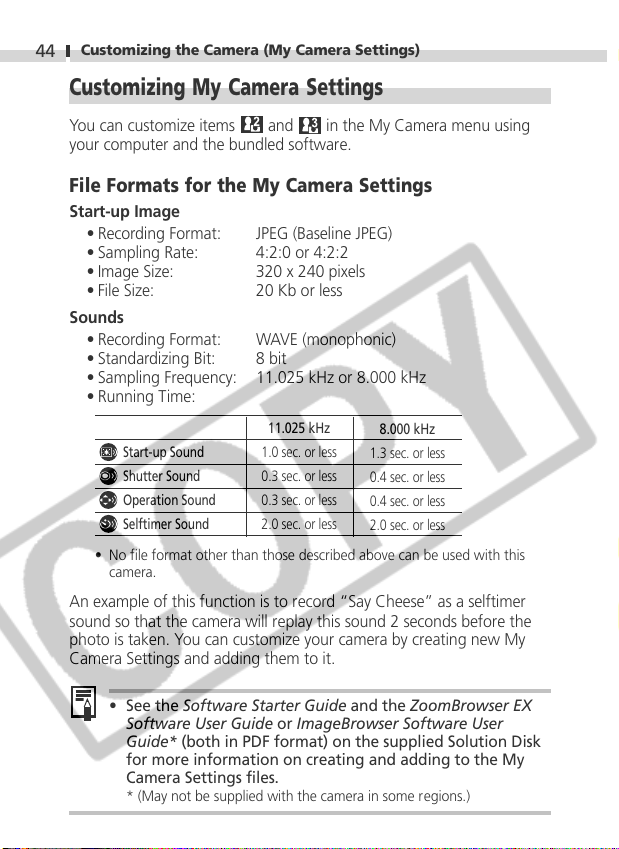
Customizing My Camera Settings
You can customize items and in the My Camera menu using
your computer and the bundled software.
File Formats for the My Camera Settings
Start-up Image
• Recording Format: JPEG (Baseline JPEG)
• Sampling Rate: 4:2:0 or 4:2:2
• Image Size: 320 x 240 pixels
• File Size: 20 Kb or less
Sounds
• Recording Format: WAVE (monophonic)
• Standardizing Bit: 8 bit
• Sampling Frequency: 11.025 kHz or 8.000 kHz
• Running Time:
11.025 kHz
Start-up Sound
Shutter Sound
Operation Sound
Selftimer Sound
• No file format other than those described above can be used with this
camera.
1.0 sec. or less
0.3 sec. or less
0.3 sec. or less
2.0 sec. or less
An example of this function is to record “Say Cheese” as a selftimer
sound so that the camera will replay this sound 2 seconds before the
photo is taken. You can customize your camera by creating new My
Camera Settings and adding them to it.
8.000 kHz
1.3 sec. or less
0.4 sec. or less
0.4 sec. or less
2.0 sec. or less
• See the Software Starter Guide and the ZoomBrowser EX
Software User Guide or ImageBrowser Software User
Guide* (both in PDF format) on the supplied Solution Disk
for more information on creating and adding to the My
Camera Settings files.
* (May not be supplied with the camera in some regions.)
Page 47
Shooting
Selecting a Shooting Mode
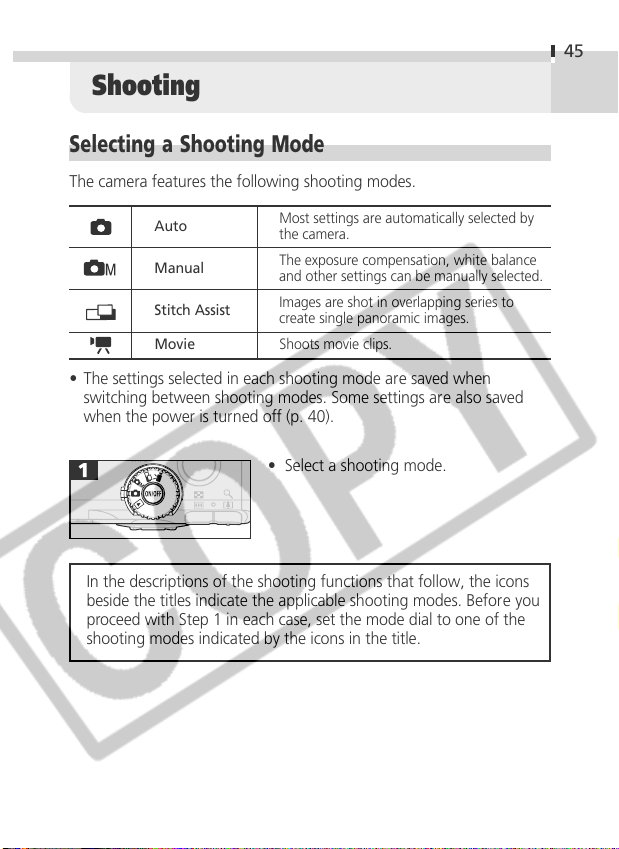
The camera features the following shooting modes.
45
Auto
Manual
Stitch Assist
Movie Shoots movie clips.
Most settings are automatically selected by
the camera.
The exposure compensation, white balance
and other settings can be manually selected.
Images are shot in overlapping series to
create single panoramic images.
• The settings selected in each shooting mode are saved when
switching between shooting modes. Some settings are also saved
when the power is turned off (p. 40).
• Select a shooting mode.
In the descriptions of the shooting functions that follow, the icons
beside the titles indicate the applicable shooting modes. Before you
proceed with Step 1 in each case, set the mode dial to one of the
shooting modes indicated by the icons in the title.
Page 48
Shooting
46
Reviewing an Image Right after Shooting
Right after a shot is taken, the image appears in the LCD monitor for 2
seconds even if you release the shutter button regardless of whether the LCD
monitor is on or off. You can also review it with the following procedures.
• By keeping the shutter button pressed after a shot.
• By pressing the
monitor. Press the shutter button halfway to stop displaying it.
• You can do the following while the image is displayed.
- Check the image brightness in the histogram (p. 32).
- Erase the image (p. 91).
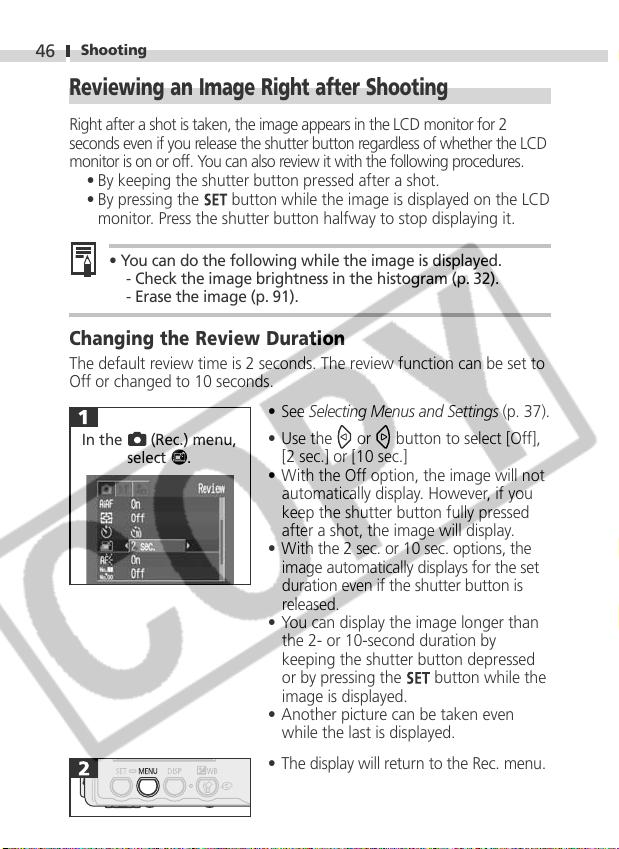
Changing the Review Duration
The default review time is 2 seconds. The review function can be set to
Off or changed to 10 seconds.
In the (Rec.) menu,
select .
button while the image is displayed on the LCD
Selecting Menus and Settings
• See
• Use the
[2 sec.] or [10 sec.]
• With the Off option, the image will not
automatically display. However, if you
keep the shutter button fully pressed
after a shot, the image will display.
• With the 2 sec. or 10 sec. options, the
image automatically displays for the set
duration even if the shutter button is
released.
• You can display the image longer than
the 2- or 10-second duration by
keeping the shutter button depressed
or by pressing the
image is displayed.
• Another picture can be taken even
while the last is displayed.
• The display will return to the Rec. menu.
or button to select [Off],
button while the
(p. 37).
Page 49
Shooting
Changing Resolution/ Compression Settings
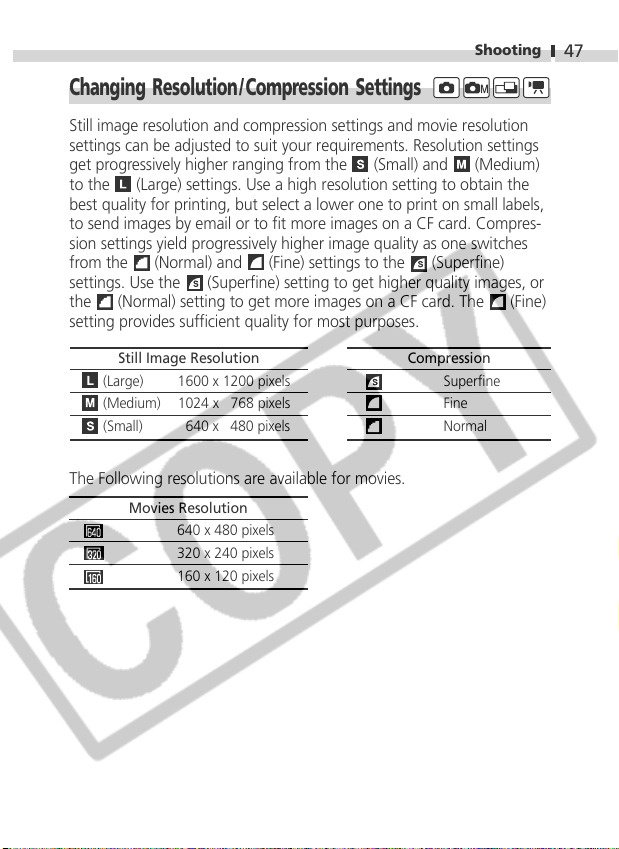
Still image resolution and compression settings and movie resolution
settings can be adjusted to suit your requirements. Resolution settings
get progressively higher ranging from the
to the
(Large) settings. Use a high resolution setting to obtain the
best quality for printing, but select a lower one to print on small labels,
to send images by email or to fit more images on a CF card. Compres-
sion settings yield progressively higher image quality as one switches
from the
settings. Use the
the
(Normal) and (Fine) settings to the (Superfine)
(Superfine) setting to get higher quality images, or
(Normal) setting to get more images on a CF card. The (Fine)
setting provides sufficient quality for most purposes.
(Small) and (Medium)
47
Still Image Resolution
(Large) 1600 x 1200 pixels
(Medium) 1024 x 768 pixels
(Small) 640 x 480 pixels
Compression
The Following resolutions are available for movies.
Movies Resolution
640 x 480 pixels
320 x 240 pixels
160 x 120 pixels
Superfine
Fine
Normal
Page 50
Shooting
48
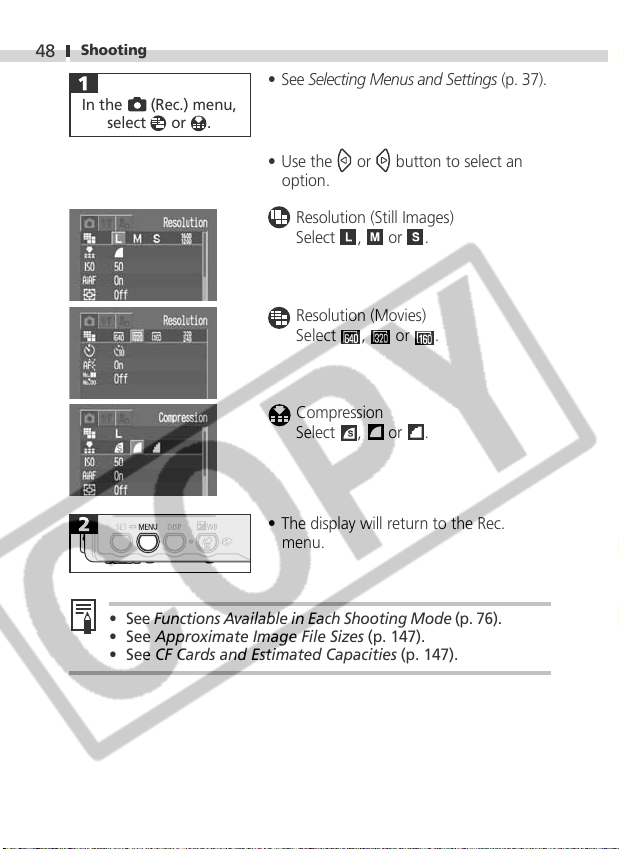
In the (Rec.) menu,
select or .
• See Selecting Menus and Settings (p. 37).
• Use the
or button to select an
option.
Resolution (Still Images)
Select
, or .
Resolution (Movies)
Select
, or .
Compression
Select
, or .
• The display will return to the Rec.
menu.
• See Functions Available in Each Shooting Mode (p. 76).
• See Approximate Image File Sizes (p. 147).
• See CF Cards and Estimated Capacities (p. 147).
Page 51
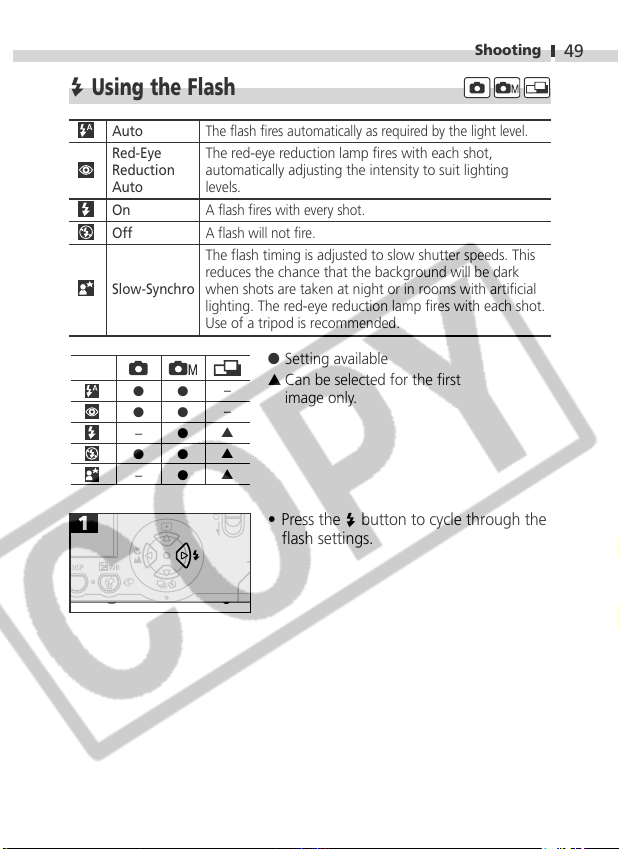
Using the Flash
Auto The flash fires automatically as required by the light level.
Red-Eye
Reduction
Auto
On A flash fires with every shot.
Off A flash will not fire.
Slow-Synchro
●
●
-
●
-
The red-eye reduction lamp fires with each shot,
automatically adjusting the intensity to suit lighting
levels.
The flash timing is adjusted to slow shutter speeds. This
reduces the chance that the background will be dark
when shots are taken at night or in rooms with artificial
lighting. The red-eye reduction lamp fires with each shot.
Use of a tripod is recommended.
● Setting available
●
-
●
▲
●
▲
●
▲
●
image only.
▲ Can be selected for the first
-
• Press the button to cycle through the
flash settings.
Shooting
49
Page 52
50
Shooting
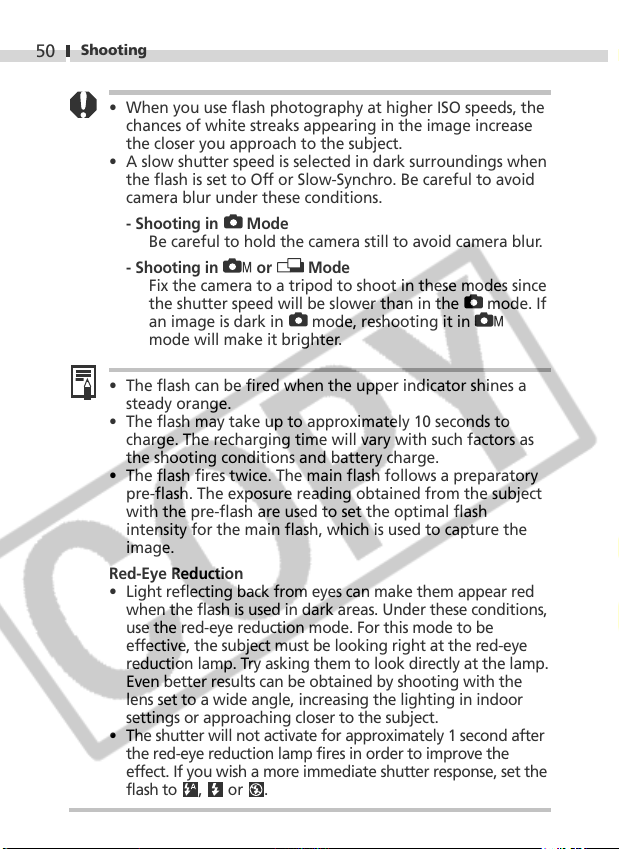
• When you use flash photography at higher ISO speeds, the
chances of white streaks appearing in the image increase
the closer you approach to the subject.
• A slow shutter speed is selected in dark surroundings when
the flash is set to Off or Slow-Synchro. Be careful to avoid
camera blur under these conditions.
- Shooting in
Be careful to hold the camera still to avoid camera blur.
- Shooting in or
Fix the camera to a tripod to shoot in these modes since
the shutter speed will be slower than in the
an image is dark in
mode will make it brighter.
• The flash can be fired when the upper indicator shines a
steady orange.
• The flash may take up to approximately 10 seconds to
charge. The recharging time will vary with such factors as
the shooting conditions and battery charge.
• The flash fires twice. The main flash follows a preparatory
pre-flash. The exposure reading obtained from the subject
with the pre-flash are used to set the optimal flash
intensity for the main flash, which is used to capture the
image.
Red-Eye Reduction
• Light reflecting back from eyes can make them appear red
when the flash is used in dark areas. Under these conditions,
use the red-eye reduction mode. For this mode to be
effective, the subject must be looking right at the red-eye
reduction lamp. Try asking them to look directly at the lamp.
Even better results can be obtained by shooting with the
lens set to a wide angle, increasing the lighting in indoor
settings or approaching closer to the subject.
• The shutter will not activate for approximately 1 second after
the red-eye reduction lamp fires in order to improve the
effect. If you wish a more immediate shutter response, set the
flash to
Mode
Mode
mode. If
mode, reshooting it in
, or .
Page 53
Shooting
/
Shooting Close-Ups / Infinity Shots
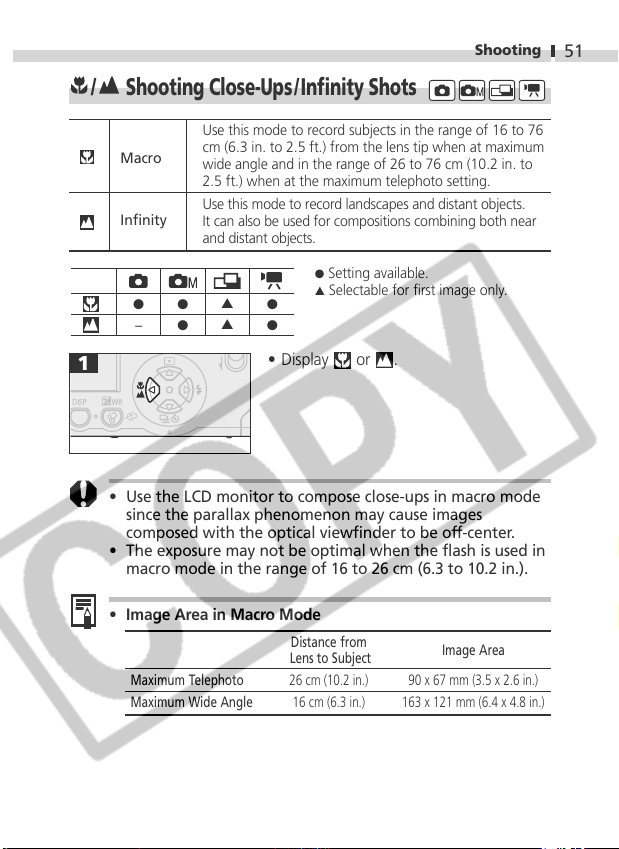
Use this mode to record subjects in the range of 16 to 76
Macro
Infinity
●-●
cm (6.3 in. to 2.5 ft.) from the lens tip when at maximum
wide angle and in the range of 26 to 76 cm (10.2 in. to
2.5 ft.) when at the maximum telephoto setting.
Use this mode to record landscapes and distant objects.
It can also be used for compositions combining both near
and distant objects.
●
Setting available.
▲
▲
▲
●
Selectable for first image only.
●
●
• Display or .
• Use the LCD monitor to compose close-ups in macro mode
since the parallax phenomenon may cause images
composed with the optical viewfinder to be off-center.
• The exposure may not be optimal when the flash is used in
macro mode in the range of 16 to 26 cm (6.3 to 10.2 in.).
• Image Area in Macro Mode
Distance from
Lens to Subject
Maximum Telephoto 26 cm (10.2 in.) 90 x 67 mm (3.5 x 2.6 in.)
Maximum Wide Angle 16 cm (6.3 in.) 163 x 121 mm (6.4 x 4.8 in.)
Image Area
51
Page 54
Shooting
52
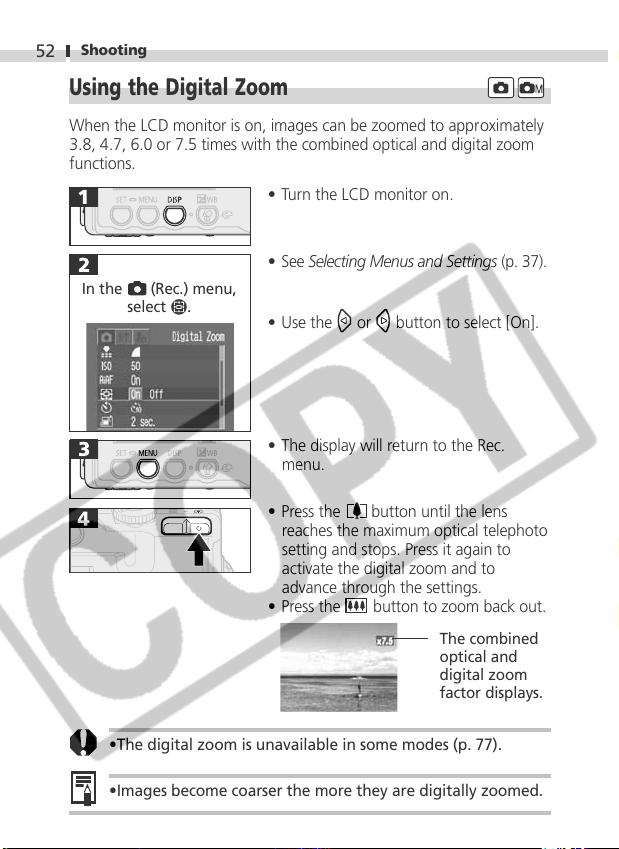
Using the Digital Zoom
When the LCD monitor is on, images can be zoomed to approximately
3.8, 4.7, 6.0 or 7.5 times with the combined optical and digital zoom
functions.
• Turn the LCD monitor on.
• See Selecting Menus and Settings (p. 37).
In the (Rec.) menu,
select
.
• Use the
or button to select [On].
• The display will return to the Rec.
menu.
• Press the
button until the lens
reaches the maximum optical telephoto
setting and stops. Press it again to
activate the digital zoom and to
advance through the settings.
• Press the
•The digital zoom is unavailable in some modes (p. 77).
•Images become coarser the more they are digitally zoomed.
button to zoom back out.
The combined
optical and
digital zoom
factor displays.
Page 55
Shooting
Shooting Continuously
In this mode, the camera shoots continuously at approximately 2.5
images per second* (Large / Fine, LCD monitor off) while the shutter
button is held down. Recording ceases when the shutter button is
released.
* This figure reflects standard shooting criteria established by Canon. Actual
figures may vary according to the subject and shooting conditions.
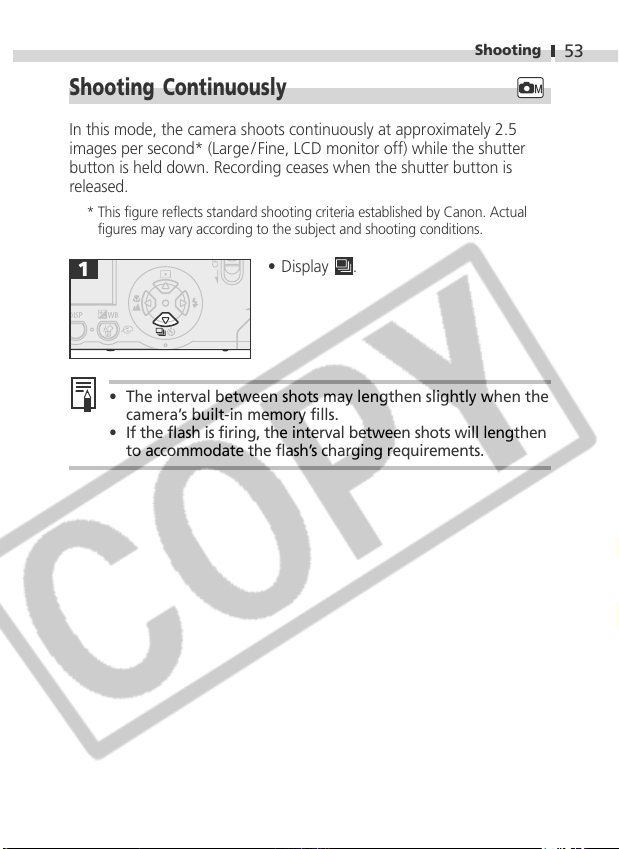
• Display .
• The interval between shots may lengthen slightly when the
camera’s built-in memory fills.
• If the flash is firing, the interval between shots will lengthen
to accommodate the flash’s charging requirements.
53
Page 56
Shooting
54
Using the Self-timer
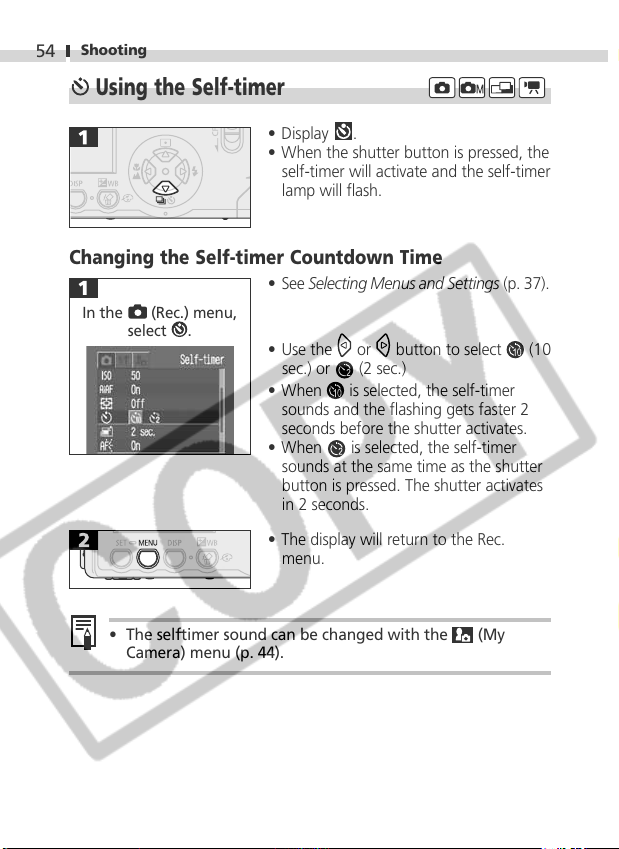
• Display .
• When the shutter button is pressed, the
self-timer will activate and the self-timer
lamp will flash.
Changing the Self-timer Countdown Time
• See Selecting Menus and Settings (p. 37).
In the (Rec.) menu,
select .
• Use the
sec.) or
• When
sounds and the flashing gets faster 2
seconds before the shutter activates.
• When
sounds at the same time as the shutter
button is pressed. The shutter activates
in 2 seconds.
• The display will return to the Rec.
menu.
or button to select (10
(2 sec.)
is selected, the self-timer
is selected, the self-timer
• The selftimer sound can be changed with the (My
Camera) menu (p. 44).
Page 57
Shooting
Shooting in Stitch Assist Mode
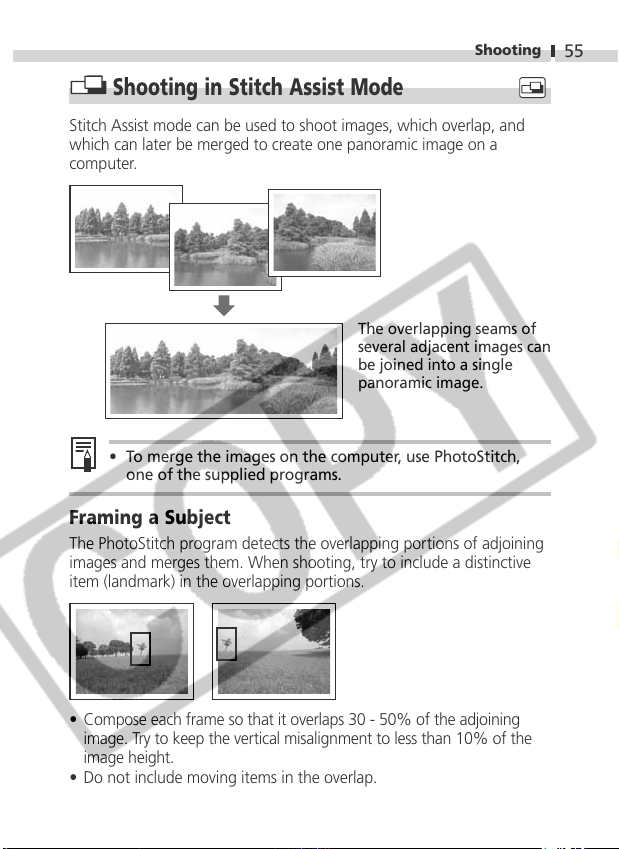
Stitch Assist mode can be used to shoot images, which overlap, and
which can later be merged to create one panoramic image on a
computer.
The overlapping seams of
several adjacent images can
be joined into a single
panoramic image.
• To merge the images on the computer, use PhotoStitch,
one of the supplied programs.
Framing a Subject
The PhotoStitch program detects the overlapping portions of adjoining
images and merges them. When shooting, try to include a distinctive
item (landmark) in the overlapping portions.
55
• Compose each frame so that it overlaps 30 - 50% of the adjoining
image. Try to keep the vertical misalignment to less than 10% of the
image height.
• Do not include moving items in the overlap.
Page 58
Shooting
56
• Do not try to stitch images that include both distant and close items.
These items may appear warped or doubled up in the merged image.
• Make the brightness in each image consistent. The final image will
appear unnatural if the contrast in brightness is too great.
• To shoot landscapes, swivel (pan) the camera around its own vertical
axis.
• To shoot close-ups, slide the camera over the subject, keeping it
parallel to the subject as you move it.
Shooting
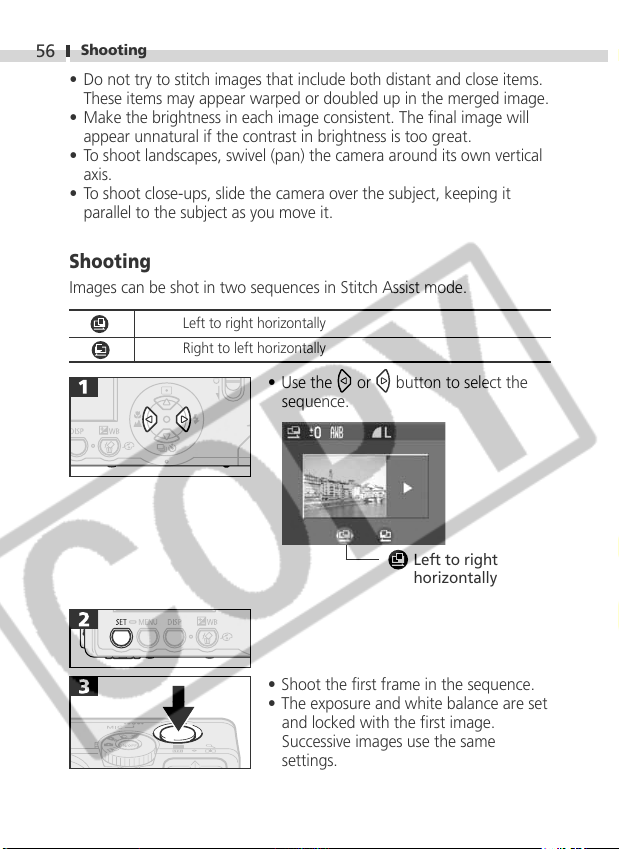
Images can be shot in two sequences in Stitch Assist mode.
Left to right horizontally
Right to left horizontally
• Use the
or button to select the
sequence.
Left to right
horizontally
• Shoot the first frame in the sequence.
• The exposure and white balance are set
and locked with the first image.
Successive images use the same
settings.
Page 59
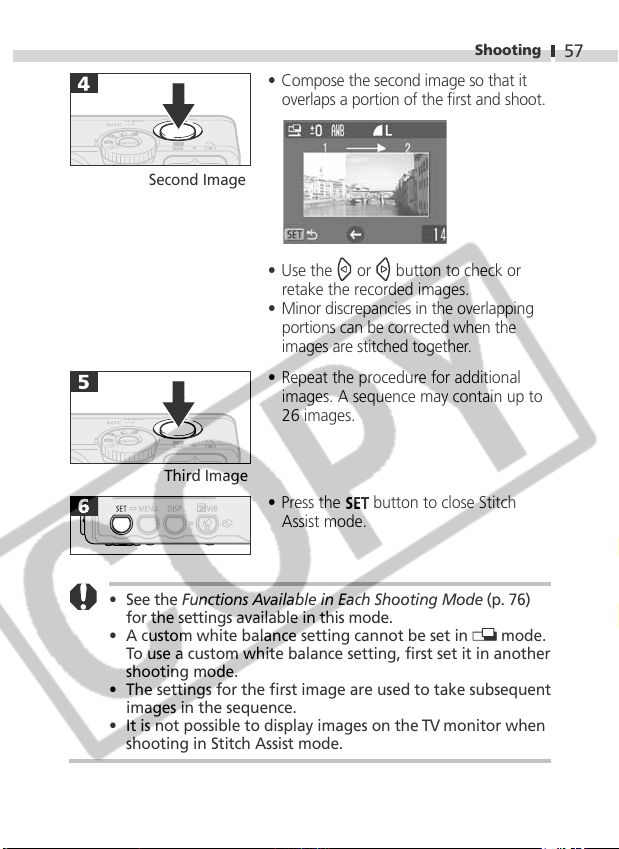
Second Image
Shooting
• Compose the second image so that it
overlaps a portion of the first and shoot.
57
• Use the
or button to check or
retake the recorded images.
• Minor discrepancies in the overlapping
portions can be corrected when the
images are stitched together.
• Repeat the procedure for additional
images. A sequence may contain up to
26 images.
Third Image
• Press the
button to close Stitch
Assist mode.
• See the Functions Available in Each Shooting Mode (p. 76)
for the settings available in this mode.
• A custom white balance setting cannot be set in
To use a custom white balance setting, first set it in another
shooting mode.
• The settings for the first image are used to take subsequent
images in the sequence.
• It is not possible to display images on the TV monitor when
shooting in Stitch Assist mode.
mode.
Page 60
Shooting
58
Shooting a Movie
Use the movie mode to shoot movie clips. Select a resolution in the
(Rec.) menu from the (640 x 480), (320 x 240) (Default) and
(160 x 120) options (p. 47).
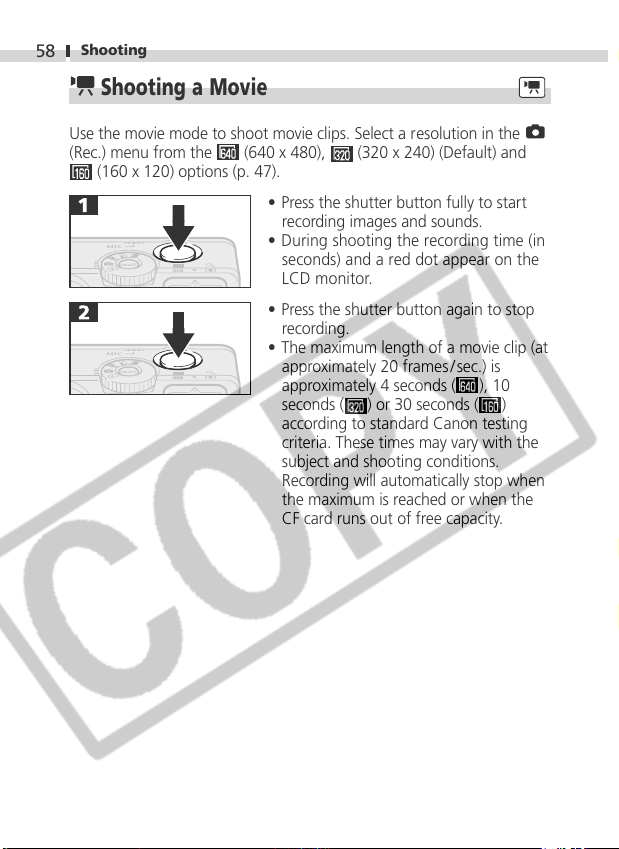
• Press the shutter button fully to start
recording images and sounds.
• During shooting the recording time (in
seconds) and a red dot appear on the
LCD monitor.
• Press the shutter button again to stop
recording.
• The maximum length of a movie clip (at
approximately 20 frames / sec.) is
approximately 4 seconds (
seconds (
according to standard Canon testing
criteria. These times may vary with the
subject and shooting conditions.
Recording will automatically stop when
the maximum is reached or when the
CF card runs out of free capacity.
) or 30 seconds ( )
), 10
Page 61
Shooting
• Be careful not to touch the microphone while recording.
• The AE, AF, white balance and zoom settings remained fixed
for subsequent frames at the values selected for the first frame.
• After a clip is shot, the upper indicator will flash green while
the clip is being written to the CF card. You cannot shoot
again until the flashing stops.
• See the Functions Available in Each Shooting Mode (p. 76)
for the settings available in this mode.
• Sound is recorded monaurally.
• The shutter sound will not sound when you fully press the
shutter button to record a movie clip.
• QuickTime 3.0 or a higher is required to replay movie files
(AVI / Motion JPEG ) on a computer. QuickTime 5.0 is
included on the Canon Digital Camera Solution Disk.
59
Page 62
Shooting
60
Locking the Focus (AF Lock)
It may be difficult to focus on the following types of subject. Use the
focus lock in these situations.
• Subjects with extremely low contrast to the surroundings
• Subjects with extremely bright objects at the center of the composition
• Subjects that are moving quickly
• Subjects through glass
Try to shoot as close to the glass as possible to reduce the chances
of light reflecting back off the glass.
Shooting with the Focus Lock
Method 1
1. Aim the camera so that an object at the same focal distance as the
main subject is centered in the AF frame in the viewfinder or LCD
monitor.
2. Press the shutter button halfway and wait until two beeps sound.
3. Re-aim the camera to compose the shot as desired and press the
shutter button all the way.
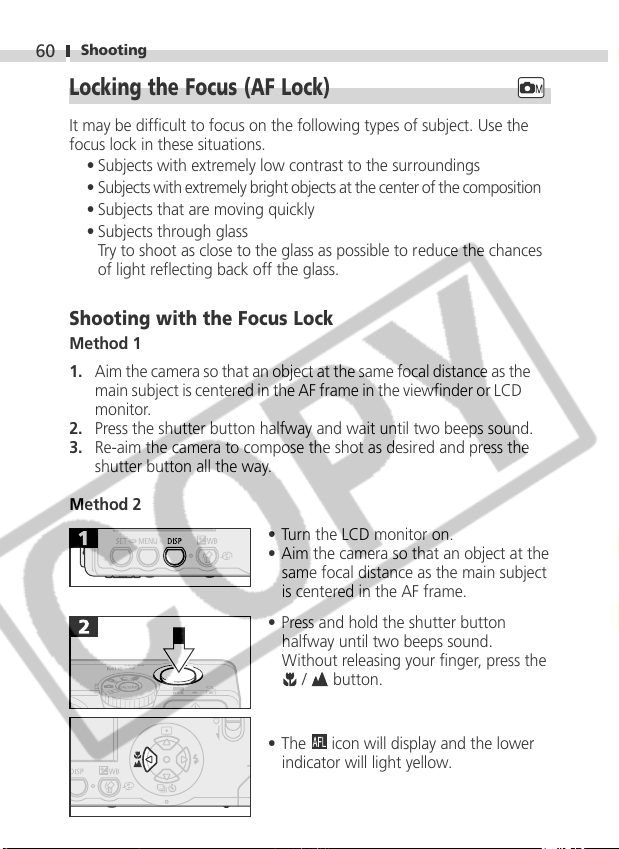
Method 2
• Turn the LCD monitor on.
• Aim the camera so that an object at the
same focal distance as the main subject
is centered in the AF frame.
• Press and hold the shutter button
halfway until two beeps sound.
Without releasing your finger, press the
/ button.
icon will display and the lower
• The
indicator will light yellow.
Page 63
Shooting
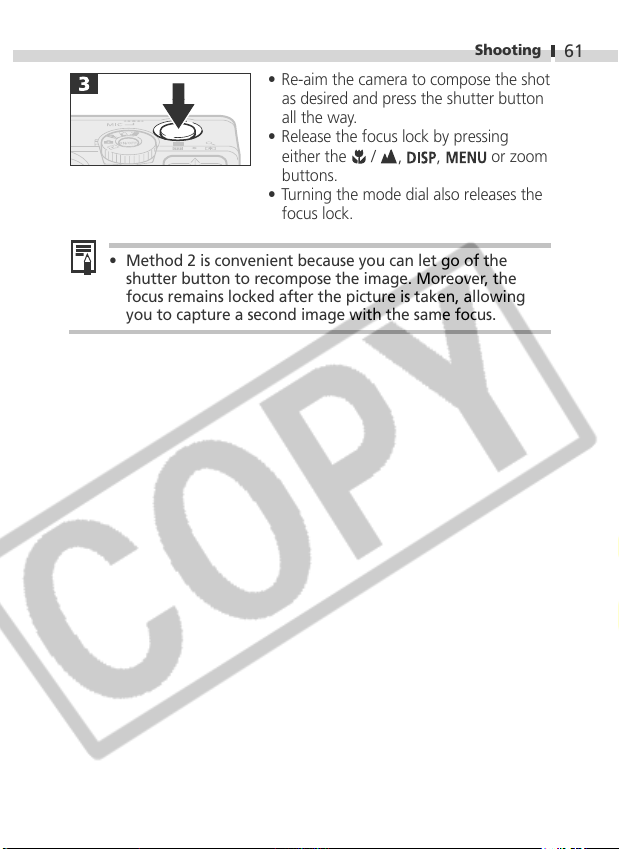
• Re-aim the camera to compose the shot
as desired and press the shutter button
all the way.
• Release the focus lock by pressing
either the
/ , , or zoom
buttons.
• Turning the mode dial also releases the
focus lock.
• Method 2 is convenient because you can let go of the
shutter button to recompose the image. Moreover, the
focus remains locked after the picture is taken, allowing
you to capture a second image with the same focus.
61
Page 64
Shooting
62
Locking the Exposure Setting (AE Lock)
You can set the exposure and focus separately. This is effective when
the contrast is too strong between the subject and background or
when a subject is backlit.
• You must set the flash to . The AE lock cannot be set if
the flash fires.
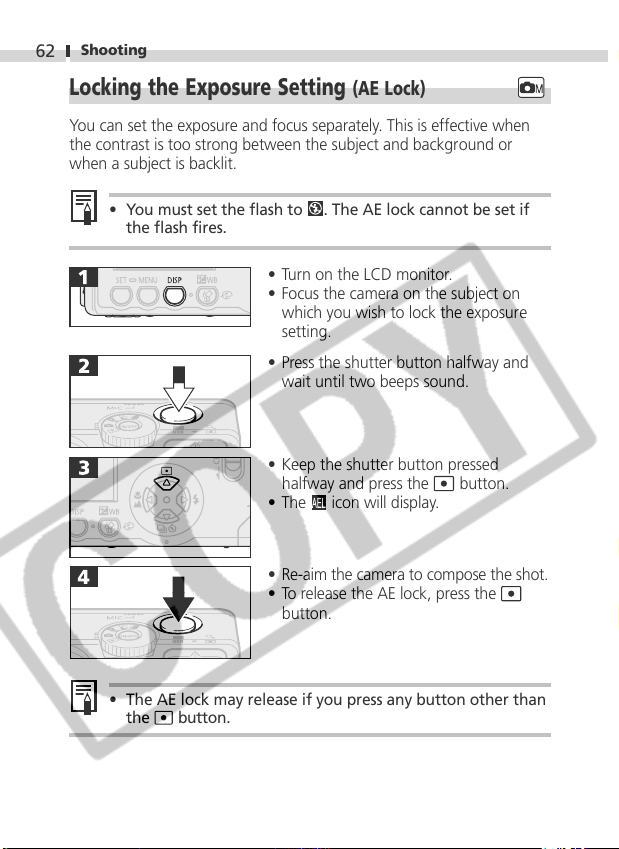
• Turn on the LCD monitor.
• Focus the camera on the subject on
which you wish to lock the exposure
setting.
• Press the shutter button halfway and
wait until two beeps sound.
• Keep the shutter button pressed
halfway and press the
•The
icon will display.
• Re-aim the camera to compose the shot.
• To release the AE lock, press the
button.
button.
• The AE lock may release if you press any button other than
the
button.
Page 65
Shooting
Locking the Flash Exposure Setting (FE Lock)
You can adjust and lock the flash output to suit a specific portion of
the subject.
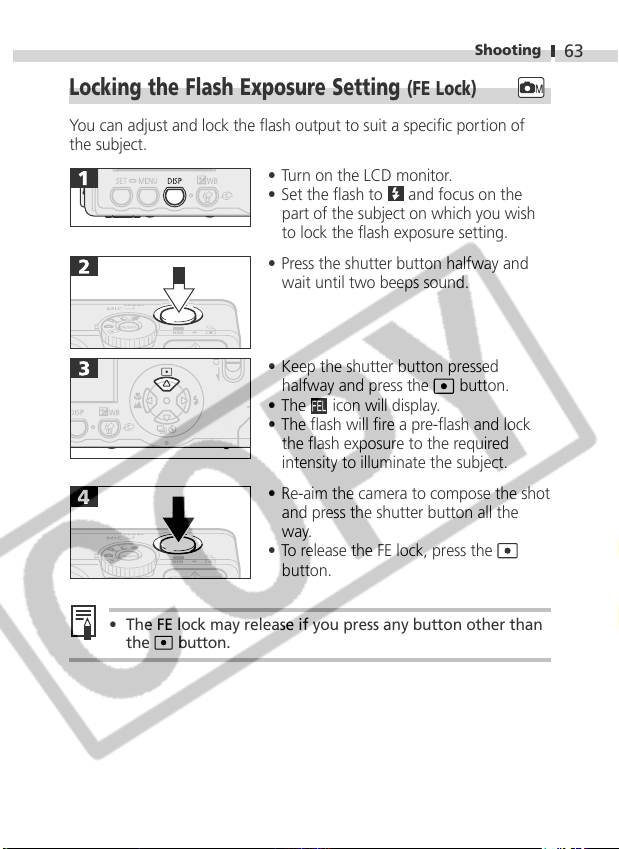
• Turn on the LCD monitor.
• Set the flash to
part of the subject on which you wish
to lock the flash exposure setting.
• Press the shutter button halfway and
wait until two beeps sound.
• Keep the shutter button pressed
halfway and press the
• The
icon will display.
• The flash will fire a pre-flash and lock
the flash exposure to the required
intensity to illuminate the subject.
• Re-aim the camera to compose the shot
and press the shutter button all the
way.
• To release the FE lock, press the
button.
and focus on the
button.
63
• The FE lock may release if you press any button other than
the
button.
Page 66
Shooting
64
Switching between Autofocus Modes
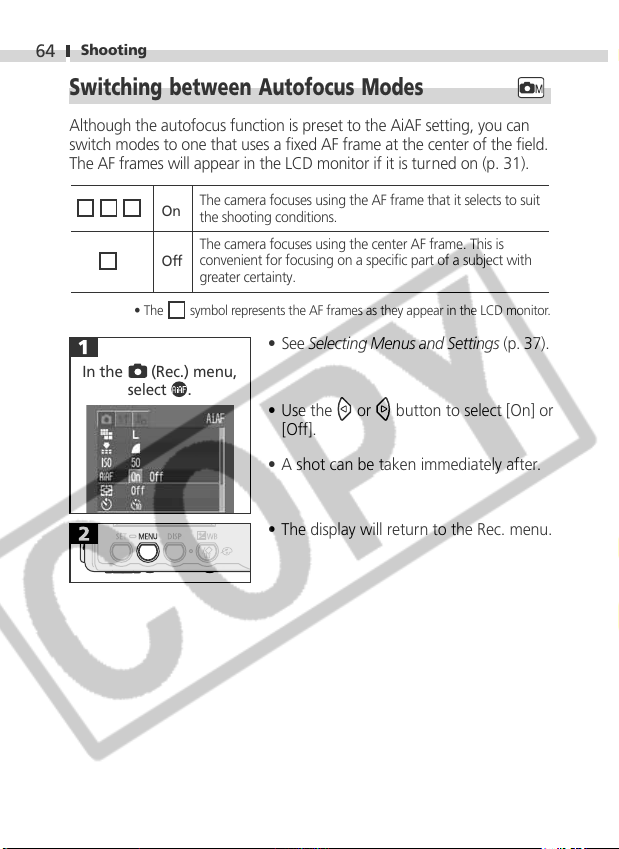
Although the autofocus function is preset to the AiAF setting, you can
switch modes to one that uses a fixed AF frame at the center of the field.
The AF frames will appear in the LCD monitor if it is turned on (p. 31).
The camera focuses using the AF frame that it selects to suit
On
the shooting conditions.
The camera focuses using the center AF frame. This is
convenient for focusing on a specific part of a subject with
Off
greater certainty.
• The symbol represents the AF frames as they appear in the LCD monitor.
• See Selecting Menus and Settings (p. 37).
In the (Rec.) menu,
select .
• Use the
[Off].
• A shot can be taken immediately after.
• The display will return to the Rec. menu.
or button to select [On] or
Page 67
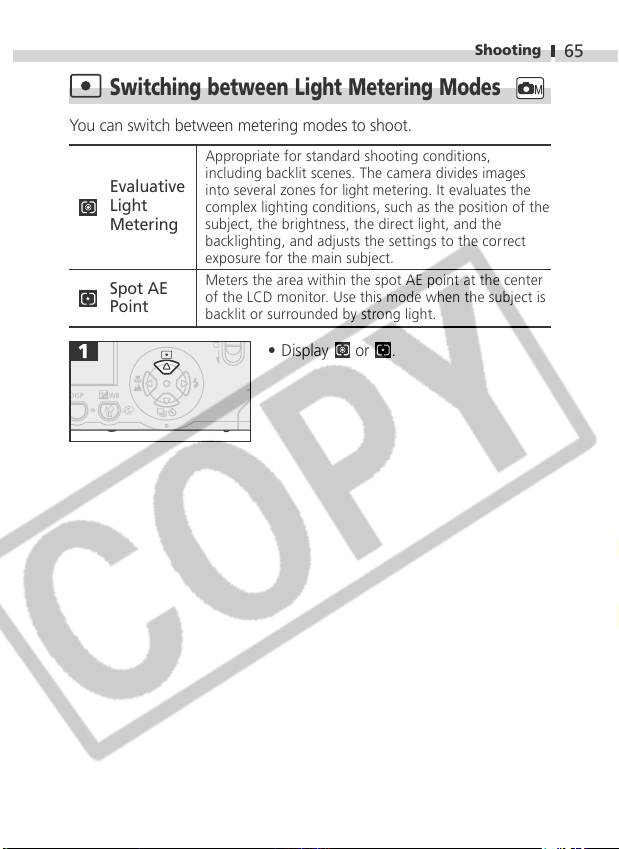
Shooting
Switching between Light Metering Modes
You can switch between metering modes to shoot.
Appropriate for standard shooting conditions,
Evaluative
Light
Metering
Spot AE
Point
including backlit scenes. The camera divides images
into several zones for light metering. It evaluates the
complex lighting conditions, such as the position of the
subject, the brightness, the direct light, and the
backlighting, and adjusts the settings to the correct
exposure for the main subject.
Meters the area within the spot AE point at the center
of the LCD monitor. Use this mode when the subject is
backlit or surrounded by strong light.
• Display or .
65
Page 68
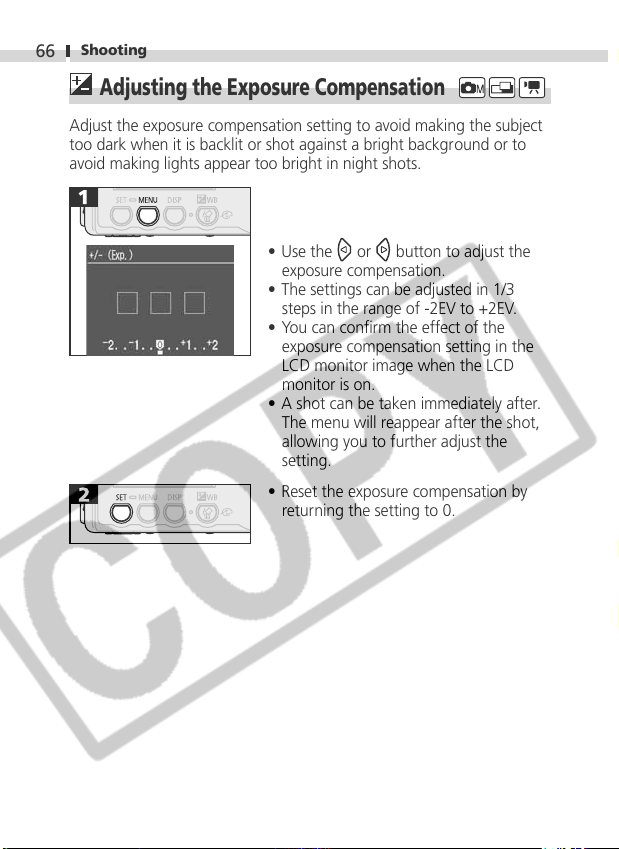
Shooting
66
Adjusting the Exposure Compensation
Adjust the exposure compensation setting to avoid making the subject
too dark when it is backlit or shot against a bright background or to
avoid making lights appear too bright in night shots.
• Use the
exposure compensation.
• The settings can be adjusted in 1/3
steps in the range of -2EV to +2EV.
• You can confirm the effect of the
exposure compensation setting in the
LCD monitor image when the LCD
monitor is on.
• A shot can be taken immediately after.
The menu will reappear after the shot,
allowing you to further adjust the
setting.
• Reset the exposure compensation by
returning the setting to 0.
or button to adjust the
Page 69
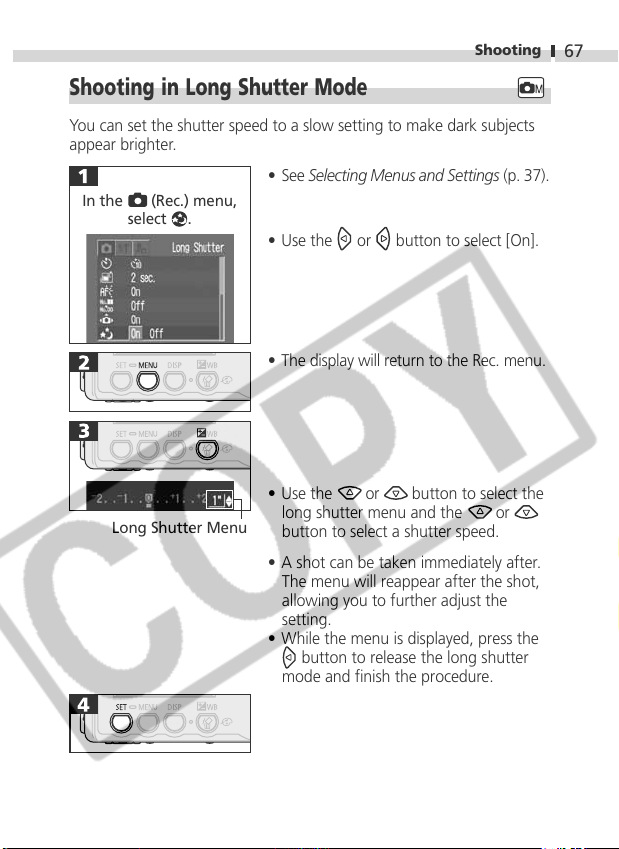
Shooting
Shooting in Long Shutter Mode
You can set the shutter speed to a slow setting to make dark subjects
appear brighter.
• See Selecting Menus and Settings (p. 37).
In the (Rec.) menu,
select .
• Use the
• The display will return to the Rec. menu.
or button to select [On].
67
Long Shutter Menu
• Use the
long shutter menu and the
button to select a shutter speed.
• A shot can be taken immediately after.
The menu will reappear after the shot,
allowing you to further adjust the
setting.
• While the menu is displayed, press the
button to release the long shutter
mode and finish the procedure.
or button to select the
or
Page 70
68
Shooting
• The nature of CCD image sensors is such that noise in the
recorded image increases at long shutter speeds. This
camera, however, applies special processing to images shot
at shutter speeds slower than 1.3 seconds to eliminate the
noise, thereby producing high-quality images.
Nevertheless, a certain amount of processing time may be
required before the next image can be shot.
• Use the LCD monitor to confirm that the image was
recorded at the desired brightness.
• Use of the flash may result in an over-exposed image. If
that occurs, shoot with the flash set to
• The following are unavailable:
- Exposure Compensation
- Light Metering
- AE Lock
- ISO speed [AUTO]
• Available Shutter Speeds
The following shutter speeds (in seconds) are available.
1, 1.3, 1.6, 2, 2.5, 3.2, 4, 5, 6, 8, 10, 13, 15
.
Page 71
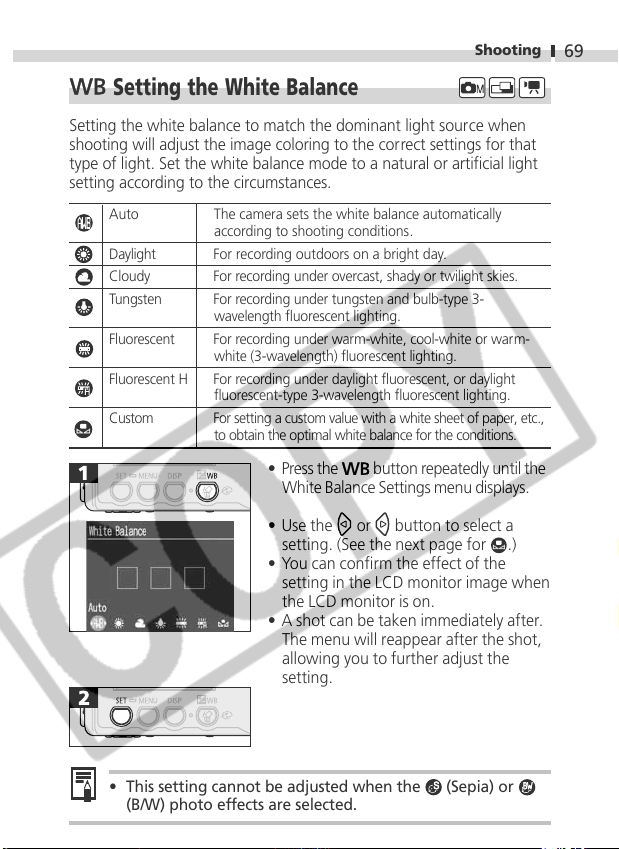
Shooting
Setting the White Balance
Setting the white balance to match the dominant light source when
shooting will adjust the image coloring to the correct settings for that
type of light. Set the white balance mode to a natural or artificial light
setting according to the circumstances.
Auto The camera sets the white balance automatically
Daylight For recording outdoors on a bright day.
Cloudy For recording under overcast, shady or twilight skies.
Tungsten For recording under tungsten and bulb-type 3-
Fluorescent For recording under warm-white, cool-white or warm-
Fluorescent H For recording under daylight fluorescent, or daylight
Custom For setting a custom value with a white sheet of paper, etc.,
according to shooting conditions.
wavelength fluorescent lighting.
white (3-wavelength) fluorescent lighting.
fluorescent-type 3-wavelength fluorescent lighting.
to obtain the optimal white balance for the conditions.
• Press the
button repeatedly until the
White Balance Settings menu displays.
69
• Use the
or button to select a
setting. (See the next page for
• You can confirm the effect of the
setting in the LCD monitor image when
the LCD monitor is on.
• A shot can be taken immediately after.
The menu will reappear after the shot,
allowing you to further adjust the
setting.
• This setting cannot be adjusted when the
(B/W) photo effects are selected.
.)
(Sepia) or
Page 72
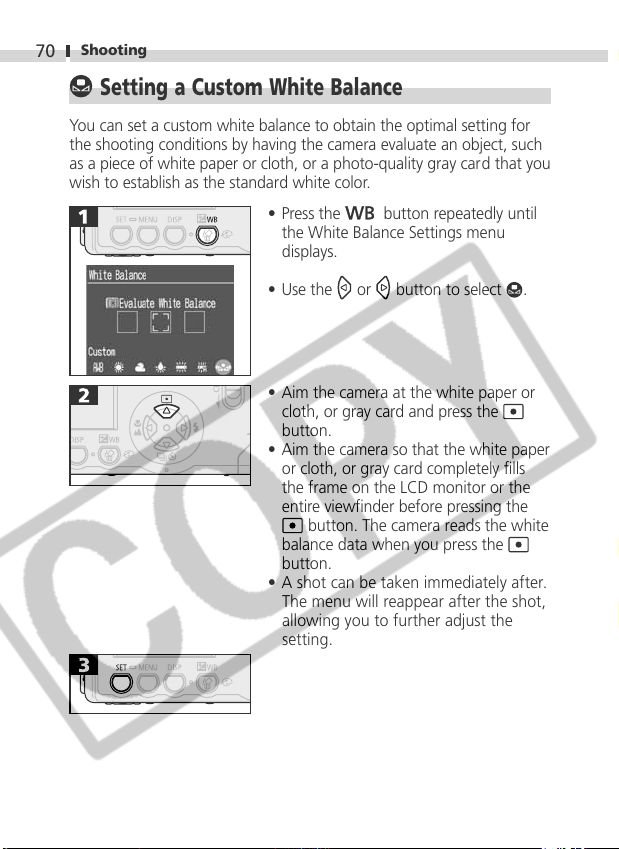
Shooting
70
Setting a Custom White Balance
You can set a custom white balance to obtain the optimal setting for
the shooting conditions by having the camera evaluate an object, such
as a piece of white paper or cloth, or a photo-quality gray card that you
wish to establish as the standard white color.
• Press the
the White Balance Settings menu
displays.
button repeatedly until
• Use the
• Aim the camera at the white paper or
cloth, or gray card and press the
button.
• Aim the camera so that the white paper
or cloth, or gray card completely fills
the frame on the LCD monitor or the
entire viewfinder before pressing the
balance data when you press the
button.
• A shot can be taken immediately after.
The menu will reappear after the shot,
allowing you to further adjust the
setting.
or button to select
button. The camera reads the white
.
Page 73
Shooting
• You are recommended to set the shooting mode to
and the exposure compensation setting to zero (±0) before
setting a custom white balance. The correct white balance
may not be obtained when the exposure setting is incorrect
(image appears completely black or white).
• It is also advisable to use the LCD monitor to compose the
shot and to zoom in to the maximum telephoto setting.
• Since the white balance data cannot be read in
preset the white balance in another shooting mode first
before selecting the
• If the flash fires when setting a custom white balance with
the flash set to
flash when you go to shoot. The correct white balance
cannot be obtained unless the flash is used consistently. To
ensure consistency, set the flash to
mode.
or , make sure that you also use the
or as appropriate.
mode,
71
Page 74
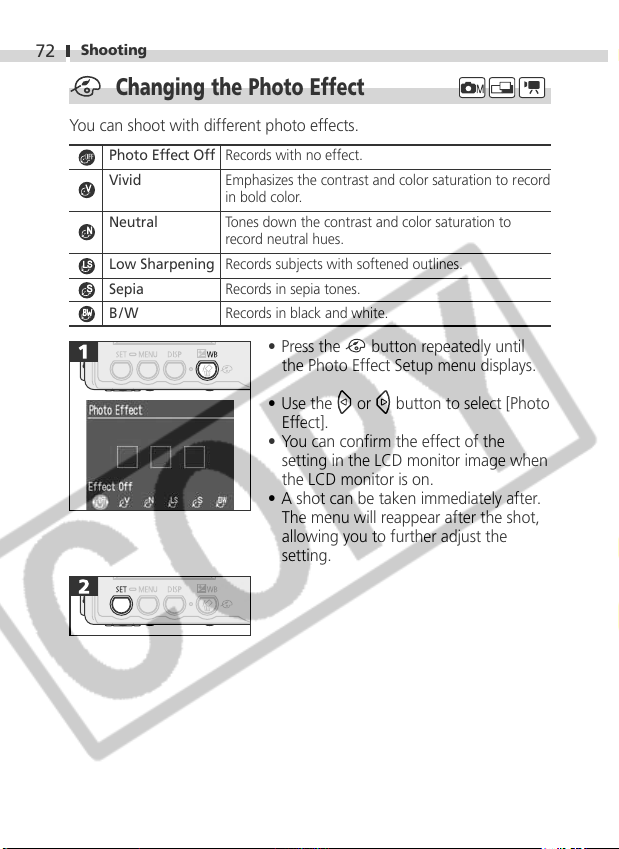
Shooting
72
Changing the Photo Effect
You can shoot with different photo effects.
Photo Effect Off Records with no effect.
Vivid Emphasizes the contrast and color saturation to record
Neutral Tones down the contrast and color saturation to
Low Sharpening Records subjects with softened outlines.
Sepia Records in sepia tones.
B/W Records in black and white.
in bold color.
record neutral hues.
• Press the
button repeatedly until
the Photo Effect Setup menu displays.
• Use the
or button to select [Photo
Effect].
• You can confirm the effect of the
setting in the LCD monitor image when
the LCD monitor is on.
• A shot can be taken immediately after.
The menu will reappear after the shot,
allowing you to further adjust the
setting.
Page 75
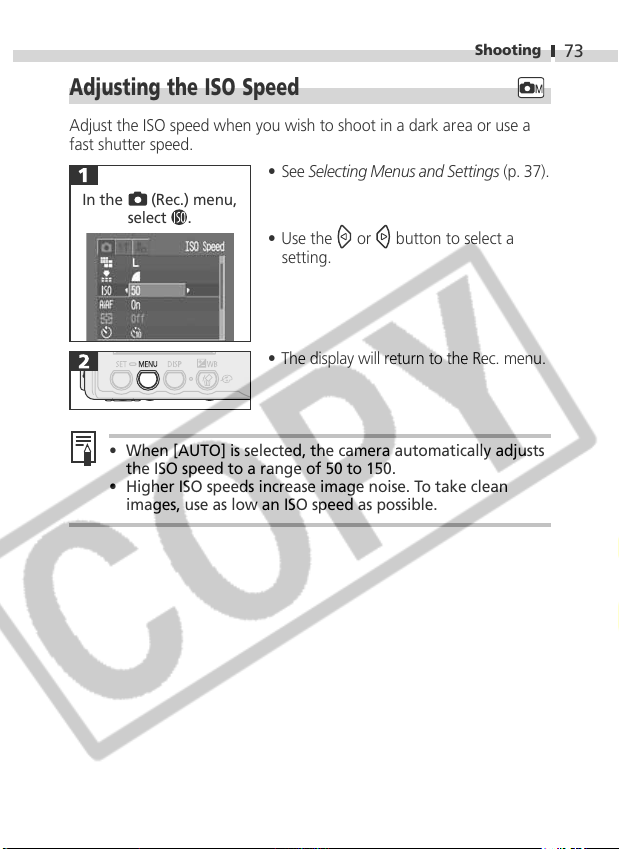
Shooting
Adjusting the ISO Speed
Adjust the ISO speed when you wish to shoot in a dark area or use a
fast shutter speed.
• See Selecting Menus and Settings (p. 37).
In the (Rec.) menu,
select .
• Use the
setting.
• The display will return to the Rec. menu.
• When [AUTO] is selected, the camera automatically adjusts
the ISO speed to a range of 50 to 150.
• Higher ISO speeds increase image noise. To take clean
images, use as low an ISO speed as possible.
or button to select a
73
Page 76
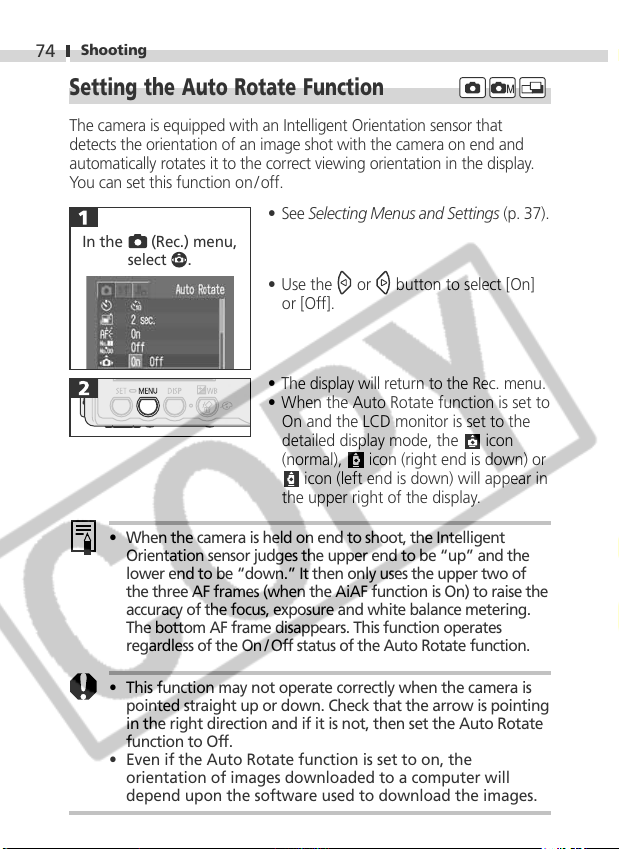
Shooting
74
Setting the Auto Rotate Function
The camera is equipped with an Intelligent Orientation sensor that
detects the orientation of an image shot with the camera on end and
automatically rotates it to the correct viewing orientation in the display.
You can set this function on / off.
• See Selecting Menus and Settings (p. 37).
In the (Rec.) menu,
select
.
• Use the
or [Off].
• The display will return to the Rec. menu.
• When the Auto Rotate function is set to
On and the LCD monitor is set to the
detailed display mode, the
(normal),
the upper right of the display.
• When the camera is held on end to shoot, the Intelligent
Orientation sensor judges the upper end to be “up” and the
lower end to be “down.” It then only uses the upper two of
the three AF frames (when the AiAF function is On) to raise the
accuracy of the focus, exposure and white balance metering.
The bottom AF frame disappears. This function operates
regardless of the On /Off status of the Auto Rotate function.
or button to select [On]
icon (right end is down) or
icon (left end is down) will appear in
icon
• This function may not operate correctly when the camera is
pointed straight up or down. Check that the arrow is pointing
in the right direction and if it is not, then set the Auto Rotate
function to Off.
• Even if the Auto Rotate function is set to on, the
orientation of images downloaded to a computer will
depend upon the software used to download the images.
Page 77
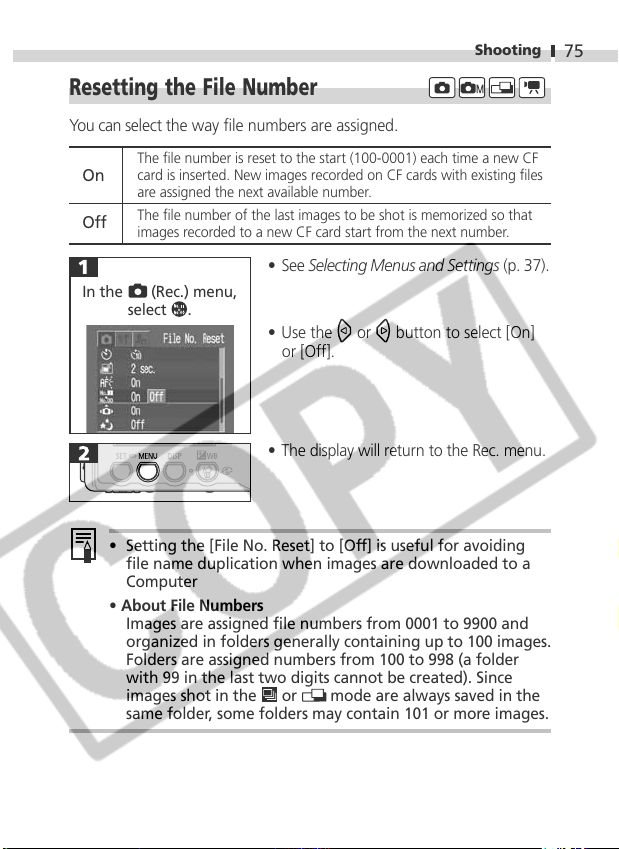
Resetting the File Number
You can select the way file numbers are assigned.
The file number is reset to the start (100-0001) each time a new CF
card is inserted. New images recorded on CF cards with existing files
On
are assigned the next available number.
The file number of the last images to be shot is memorized so that
Off
images recorded to a new CF card start from the next number.
• See Selecting Menus and Settings (p. 37).
In the (Rec.) menu,
select
.
• Use the
or [Off].
• The display will return to the Rec. menu.
• Setting the [File No. Reset] to [Off] is useful for avoiding
file name duplication when images are downloaded to a
Computer
• About File Numbers
Images are assigned file numbers from 0001 to 9900 and
organized in folders generally containing up to 100 images.
Folders are assigned numbers from 100 to 998 (a folder
with 99 in the last two digits cannot be created). Since
images shot in the
same folder, some folders may contain 101 or more images.
or mode are always saved in the
or button to select [On]
Shooting
75
Page 78
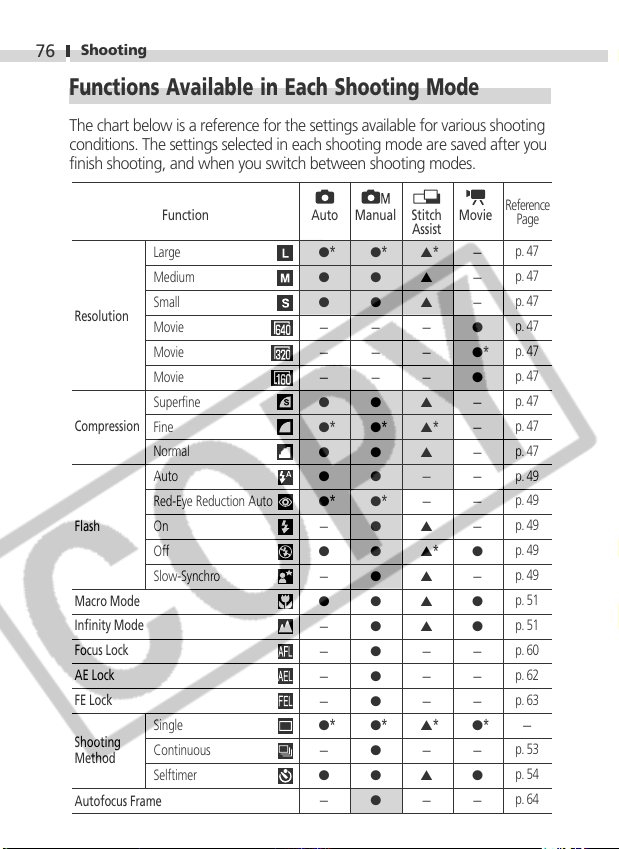
Shooting
76
Functions Available in Each Shooting Mode
The chart below is a reference for the settings available for various shooting
conditions. The settings selected in each shooting mode are saved after you
finish shooting, and when you switch between shooting modes.
Function
Large
Medium
Resolution
Small
Movie
Movie
Movie
Superfine
Compression
Fine
Normal
Auto
Red-Eye Reduction Auto
Flash
On
Off
Slow-Synchro
Macro Mode
Infinity Mode
Focus Lock
AE Lock
FE Lock
Single
Shooting
Method
Continuous
Selftimer
Autofocus Frame
Auto Manual Stitch
●
*
●
●
-
-
-
●
●
*
●
●
●
*
-
●
-
●
-
-
-
-
●
*
-
●
-
Assist
●
*
▲
●
▲
●
▲
-
-
-
-
-
-
●
▲
●
▲
*
●
▲
●
-
●
-
*
●
▲
●
▲
●
▲
●
▲
●
▲
●
-
●
-
●
-
●
*
▲
●
-
●
▲
●
-
*
*
*
*
Movie
-
-
-
●
●
*
●
-
-
-
-
-
-
●
-
●
●
-
-
-
●
*
-
●
-
Reference
Page
p. 47
p. 47
p. 47
p. 47
p. 47
p. 47
p. 47
p. 47
p. 47
p. 49
p. 49
p. 49
p. 49
p. 49
p. 51
p. 51
p. 60
p. 62
p. 63
-
p. 53
p. 54
p. 64
Page 79
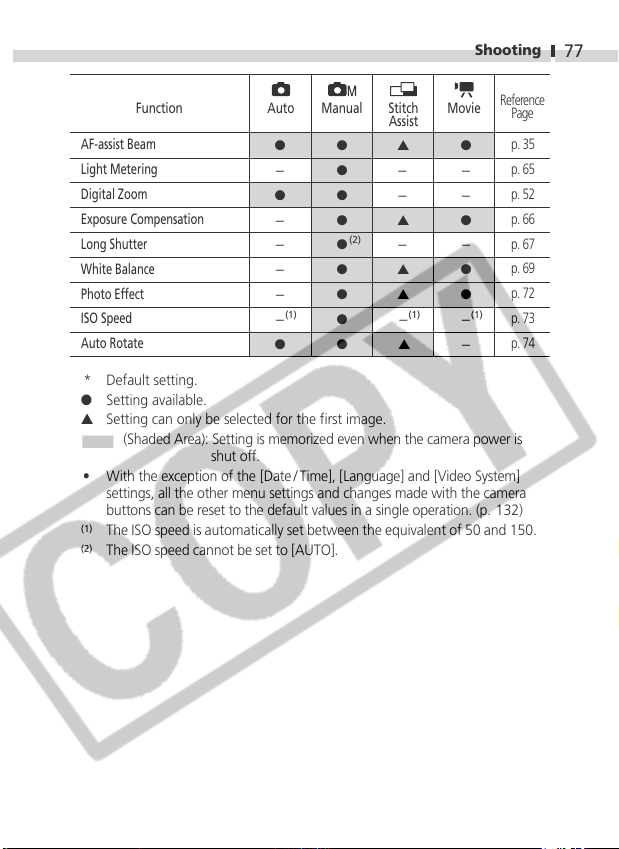
Shooting
77
Function
AF-assist Beam
Light Metering
Digital Zoom
Exposure Compensation
Long Shutter
White Balance
Photo Effect
ISO Speed
Auto Rotate
Auto Manual Stitch
●
-
●
-
-
-
-
-
●
●
●
●
●
(2)
●
●
●
(1)
●
●
Assist
▲
-
-
▲
-
▲
▲
(1)
-
▲
Movie
●
-
-
●
-
●
●
(1)
-
-
* Default setting.
● Setting available.
▲ Setting can only be selected for the first image.
(Shaded Area): Setting is memorized even when the camera power is
■
shut off.
• With the exception of the [Date/Time], [Language] and [Video System]
settings, all the other menu settings and changes made with the camera
buttons can be reset to the default values in a single operation. (p. 132)
(1)
The ISO speed is automatically set between the equivalent of 50 and 150.
(2)
The ISO speed cannot be set to [AUTO].
Reference
Page
p. 35
p. 65
p. 52
p. 66
p. 67
p. 69
p. 72
p. 73
p. 74
Page 80
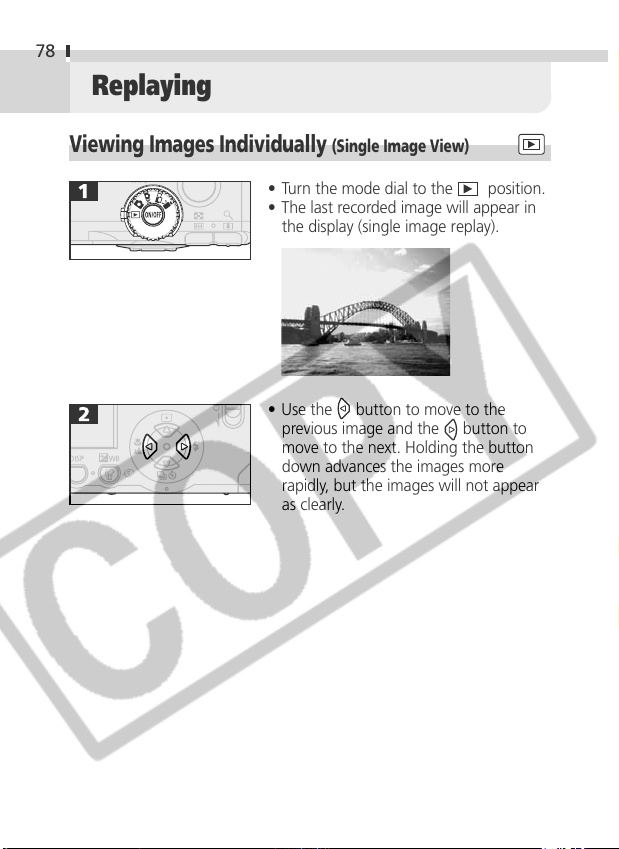
78
Replaying
Viewing Images Individually (Single Image View)
• Turn the mode dial to the position.
• The last recorded image will appear in
the display (single image replay).
• Use the
previous image and the
move to the next. Holding the button
down advances the images more
rapidly, but the images will not appear
as clearly.
button to move to the
button to
Page 81
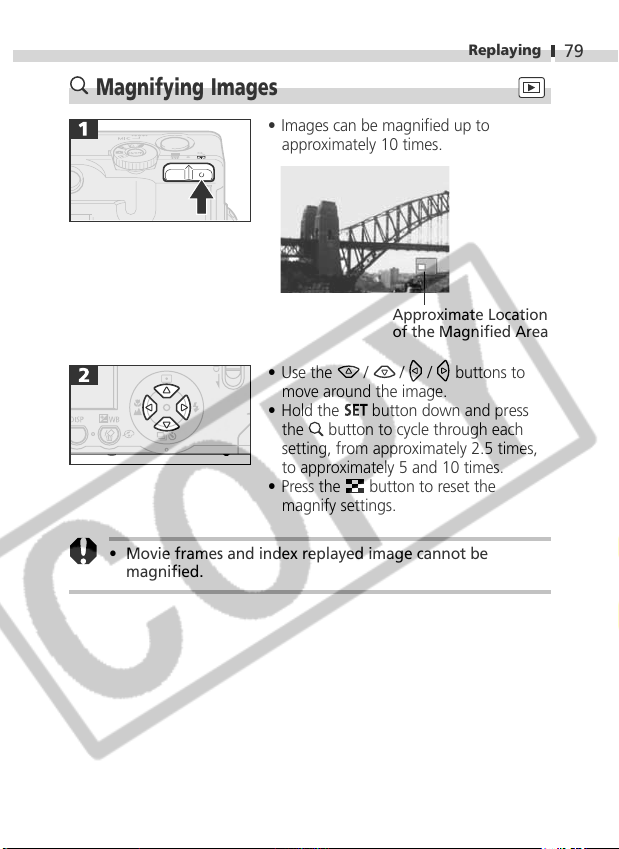
Magnifying Images
• Images can be magnified up to
approximately 10 times.
Approximate Location
of the Magnified Area
• Use the / / / buttons to
move around the image.
• Hold the
the
setting, from approximately 2.5 times,
to approximately 5 and 10 times.
• Press the
magnify settings.
• Movie frames and index replayed image cannot be
magnified.
button down and press
button to cycle through each
button to reset the
Replaying
79
Page 82
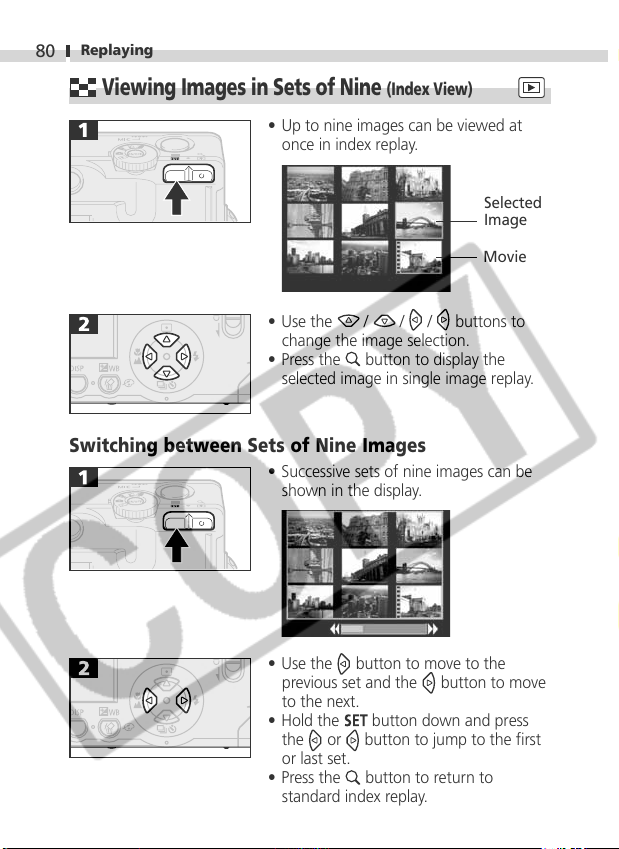
Replaying
80
Viewing Images in Sets of Nine (Index View)
• Up to nine images can be viewed at
once in index replay.
• Use the / / / buttons to
change the image selection.
• Press the
selected image in single image replay.
Switching between Sets of Nine Images
• Successive sets of nine images can be
shown in the display.
button to display the
Selected
Image
Movie
• Use the
previous set and the
to the next.
• Hold the
the
or last set.
• Press the
standard index replay.
button to move to the
button down and press
or button to jump to the first
button to return to
button to move
Page 83
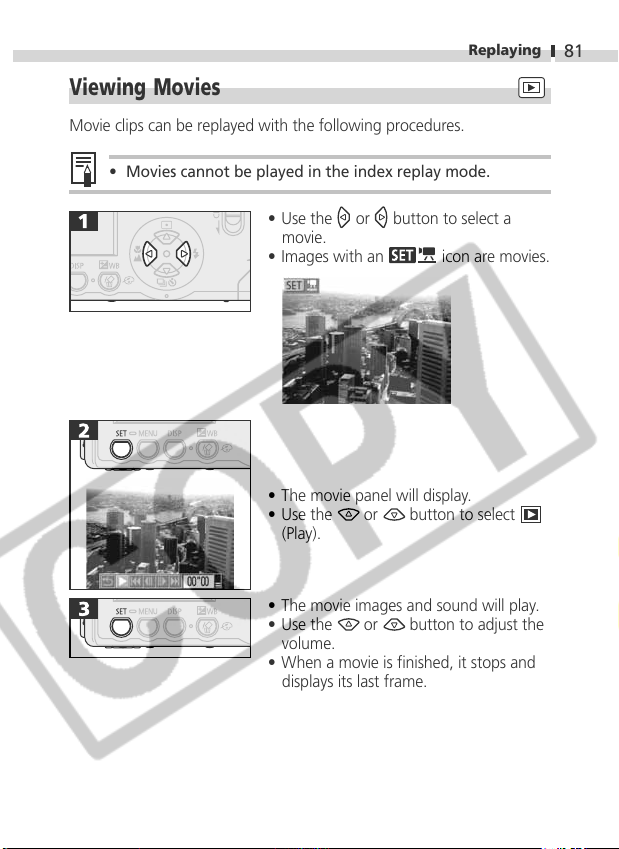
Viewing Movies
Movie clips can be replayed with the following procedures.
• Movies cannot be played in the index replay mode.
• Use the or button to select a
movie.
• Images with an
• The movie panel will display.
• Use the
(Play).
• The movie images and sound will play.
• Use the
volume.
• When a movie is finished, it stops and
displays its last frame.
or button to select
or button to adjust the
icon are movies.
Replaying
81
Page 84
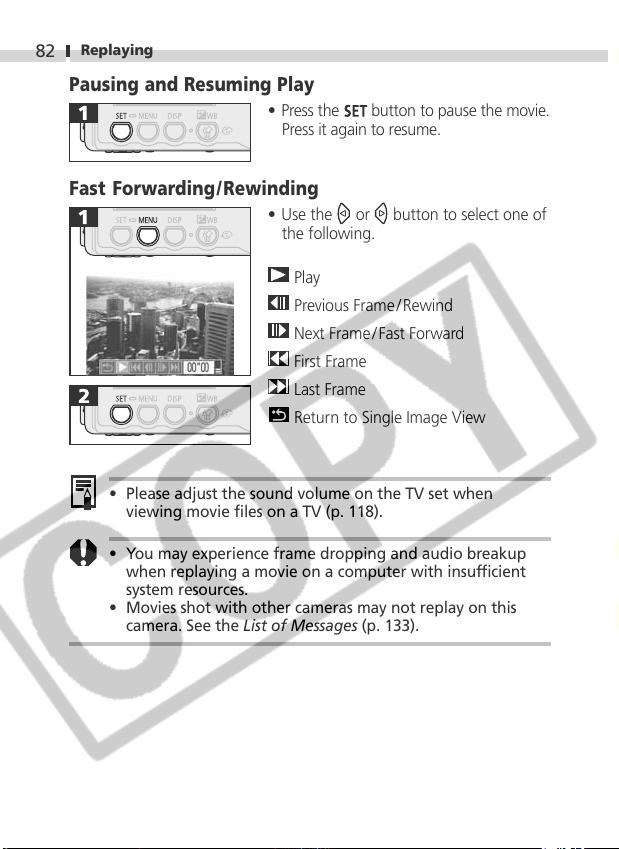
Replaying
82
Pausing and Resuming Play
• Press the button to pause the movie.
Fast Forwarding/Rewinding
• Use the or button to select one of
• Please adjust the sound volume on the TV set when
viewing movie files on a TV (p. 118).
• You may experience frame dropping and audio breakup
when replaying a movie on a computer with insufficient
system resources.
• Movies shot with other cameras may not replay on this
camera. See the List of Messages (p. 133).
Press it again to resume.
the following.
Play
Previous Frame /Rewind
Next Frame /Fast Forward
First Frame
Last Frame
Return to Single Image View
Page 85
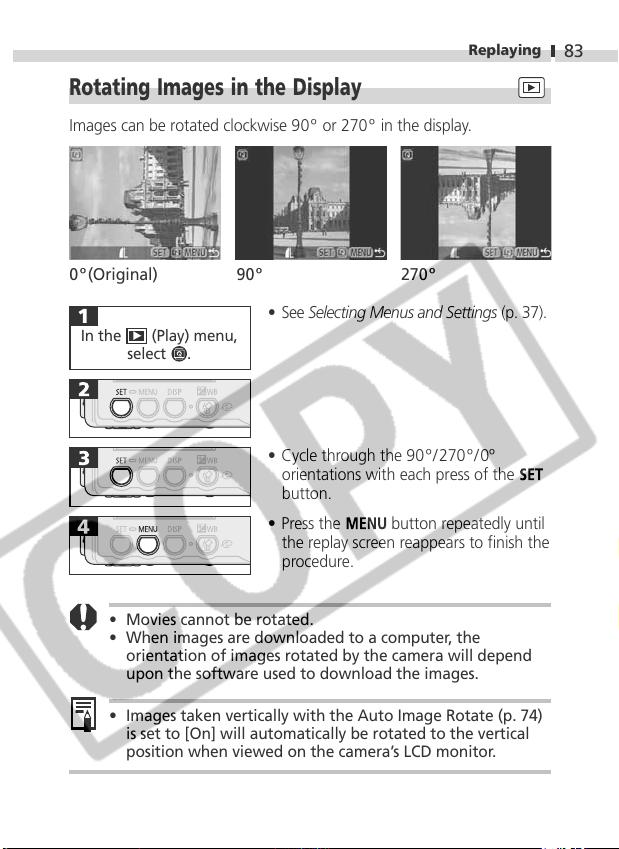
Rotating Images in the Display
Images can be rotated clockwise 90º or 270º in the display.
0º(Original) 90 º 270º
• See Selecting Menus and Settings (p. 37).
In the (Play) menu,
select .
• Cycle through the 90º/ 270º/ 0º
orientations with each press of the
button.
• Press the
the replay screen reappears to finish the
procedure.
• Movies cannot be rotated.
• When images are downloaded to a computer, the
orientation of images rotated by the camera will depend
upon the software used to download the images.
button repeatedly until
Replaying
83
• Images taken vertically with the Auto Image Rotate (p. 74)
is set to [On] will automatically be rotated to the vertical
position when viewed on the camera’s LCD monitor.
Page 86
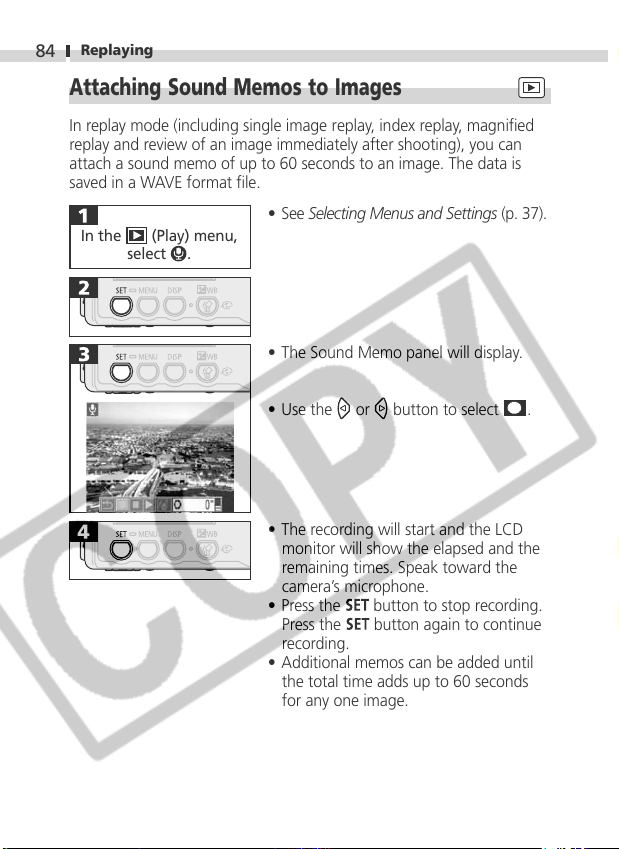
Replaying
84
Attaching Sound Memos to Images
In replay mode (including single image replay, index replay, magnified
replay and review of an image immediately after shooting), you can
attach a sound memo of up to 60 seconds to an image. The data is
saved in a WAVE format file.
• See Selecting Menus and Settings (p. 37).
In the (Play) menu,
select .
• The Sound Memo panel will display.
• Use the
• The recording will start and the LCD
monitor will show the elapsed and the
remaining times. Speak toward the
camera’s microphone.
• Press the
Press the
recording.
• Additional memos can be added until
the total time adds up to 60 seconds
for any one image.
or button to select .
button to stop recording.
button again to continue
Page 87
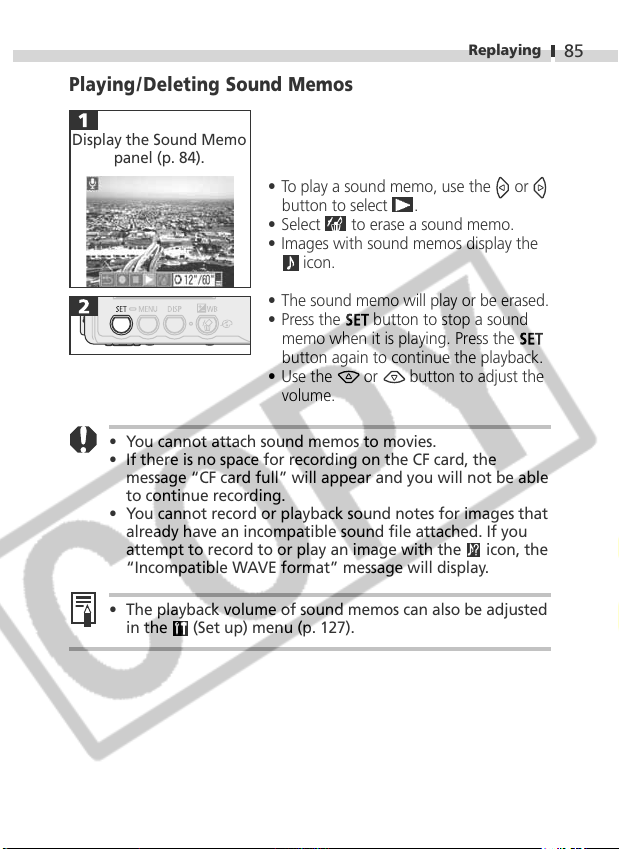
Replaying
Playing/Deleting Sound Memos
Display the Sound Memo
panel (p. 84).
• To play a sound memo, use the or
button to select .
• Select
• Images with sound memos display the
• The sound memo will play or be erased.
• Press the
memo when it is playing. Press the
button again to continue the playback.
• Use the
volume.
• You cannot attach sound memos to movies.
• If there is no space for recording on the CF card, the
message “CF card full” will appear and you will not be able
to continue recording.
• You cannot record or playback sound notes for images that
already have an incompatible sound file attached. If you
attempt to record to or play an image with the
“Incompatible WAVE format” message will display.
to erase a sound memo.
icon.
button to stop a sound
or button to adjust the
85
icon, the
• The playback volume of sound memos can also be adjusted
in the
(Set up) menu (p. 127).
Page 88
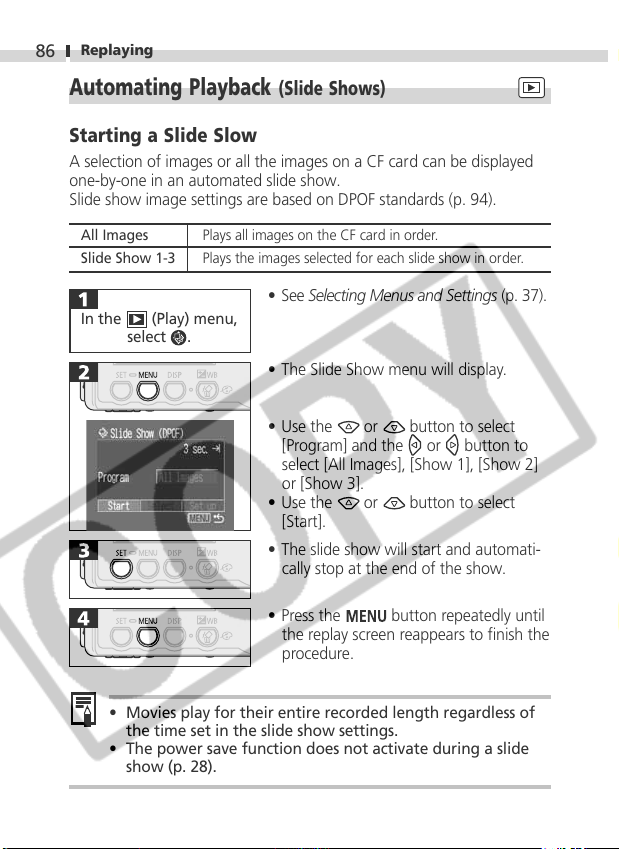
Replaying
86
Automating Playback (Slide Shows)
Starting a Slide Slow
A selection of images or all the images on a CF card can be displayed
one-by-one in an automated slide show.
Slide show image settings are based on DPOF standards (p. 94).
All Images Plays all images on the CF card in order.
Slide Show 1-3 Plays the images selected for each slide show in order.
• See Selecting Menus and Settings (p. 37).
In the (Play) menu,
select
.
• The Slide Show menu will display.
• Use the
[Program] and the
or button to select
or button to
select [All Images], [Show 1], [Show 2]
or [Show 3].
• Use the
or button to select
[Start].
• The slide show will start and automati-
cally stop at the end of the show.
• Press the
button repeatedly until
the replay screen reappears to finish the
procedure.
• Movies play for their entire recorded length regardless of
the time set in the slide show settings.
• The power save function does not activate during a slide
show (p. 28).
Page 89
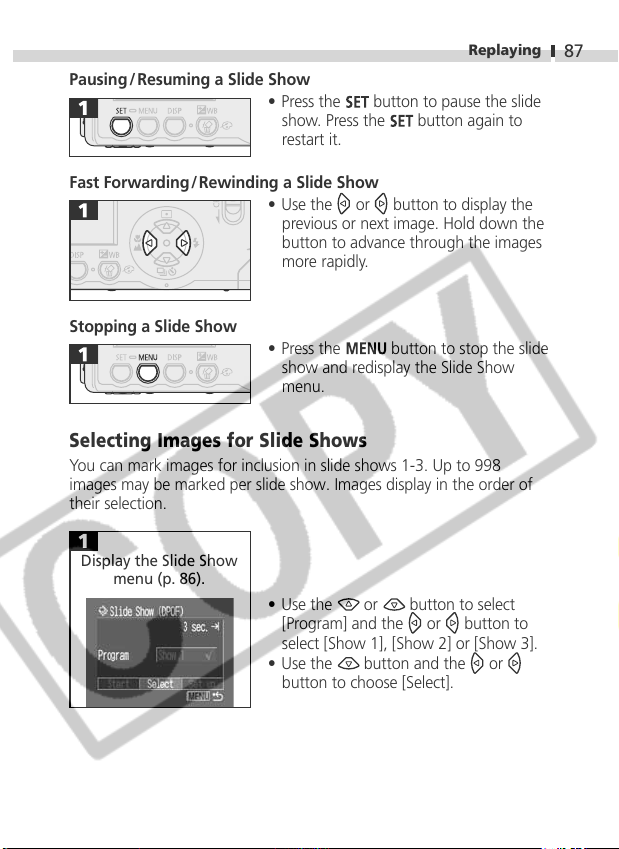
Replaying
Pausing /Resuming a Slide Show
• Press the
show. Press the
restart it.
Fast Forwarding/Rewinding a Slide Show
• Use the
previous or next image. Hold down the
button to advance through the images
more rapidly.
Stopping a Slide Show
• Press the button to stop the slide
show and redisplay the Slide Show
menu.
button to pause the slide
button again to
or button to display the
Selecting Images for Slide Shows
You can mark images for inclusion in slide shows 1-3. Up to 998
images may be marked per slide show. Images display in the order of
their selection.
Display the Slide Show
menu (p. 86).
• Use the
[Program] and the
select [Show 1], [Show 2] or [Show 3].
• Use the
button to choose [Select].
or button to select
or button to
button and the or
87
Page 90
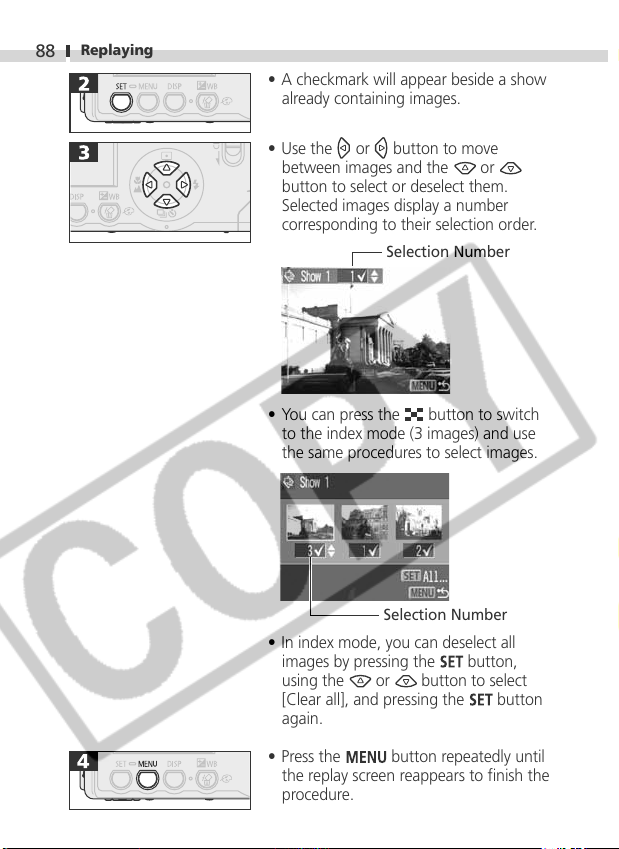
88
Replaying
• A checkmark will appear beside a show
already containing images.
• Use the
between images and the
or button to move
or
button to select or deselect them.
Selected images display a number
corresponding to their selection order.
Selection Number
• You can press the
button to switch
to the index mode (3 images) and use
the same procedures to select images.
Selection Number
• In index mode, you can deselect all
images by pressing the
using the
or button to select
[Clear all], and pressing the
button,
button
again.
• Press the
button repeatedly until
the replay screen reappears to finish the
procedure.
Page 91
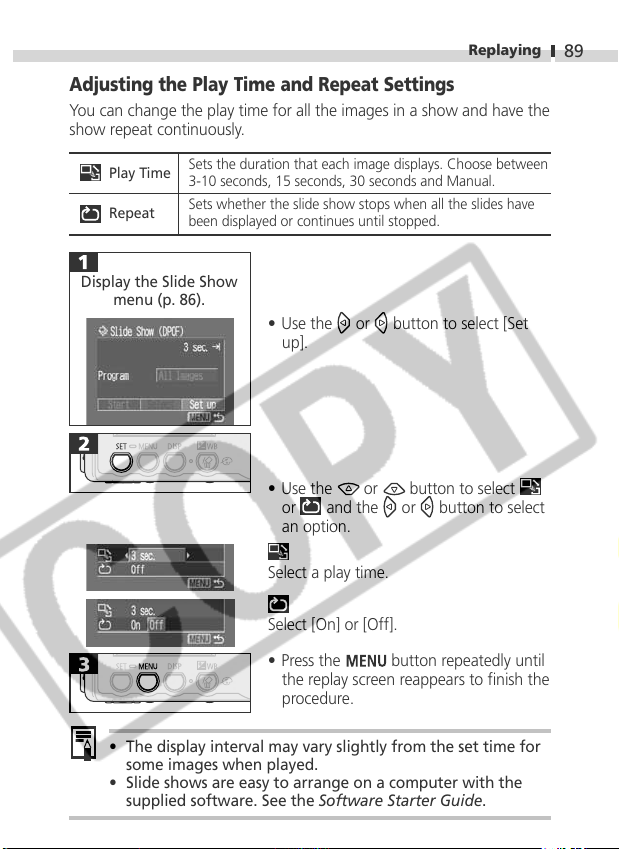
Replaying
Adjusting the Play Time and Repeat Settings
You can change the play time for all the images in a show and have the
show repeat continuously.
89
Play Time
Repeat
Display the Slide Show
menu (p. 86).
Sets the duration that each image displays. Choose between
3-10 seconds, 15 seconds, 30 seconds and Manual.
Sets whether the slide show stops when all the slides have
been displayed or continues until stopped.
• Use the or button to select [Set
up].
• Use the
or button to select
or and the or button to select
an option.
Select a play time.
Select [On] or [Off].
• Press the
button repeatedly until
the replay screen reappears to finish the
procedure.
• The display interval may vary slightly from the set time for
some images when played.
• Slide shows are easy to arrange on a computer with the
supplied software. See the Software Starter Guide.
Page 92
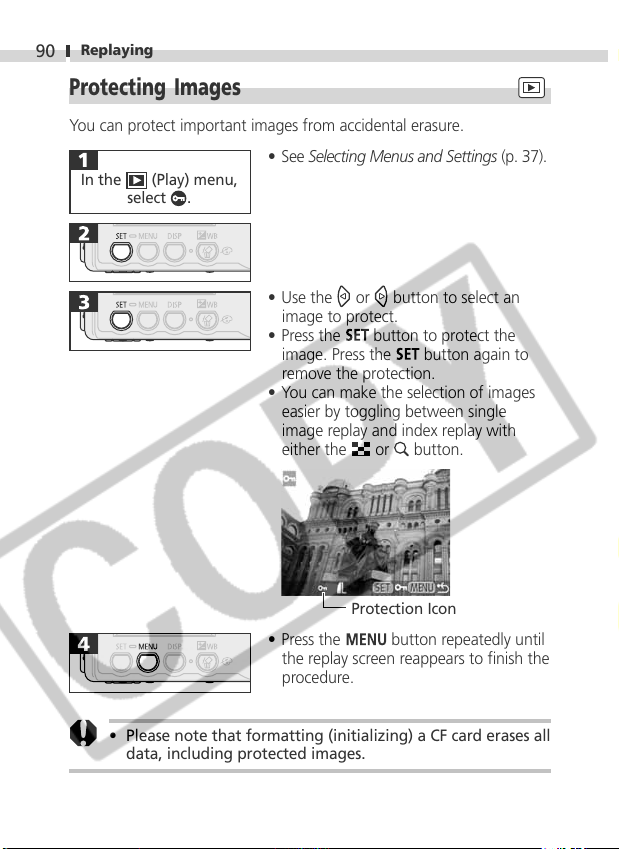
Replaying
90
Protecting Images
You can protect important images from accidental erasure.
• See Selecting Menus and Settings (p. 37).
In the (Play) menu,
select .
• Use the
image to protect.
• Press the
image. Press the
remove the protection.
• You can make the selection of images
easier by toggling between single
image replay and index replay with
either the
• Press the
the replay screen reappears to finish the
procedure.
• Please note that formatting (initializing) a CF card erases all
data, including protected images.
or button to select an
button to protect the
button again to
or
button.
Protection Icon
button repeatedly until
Page 93
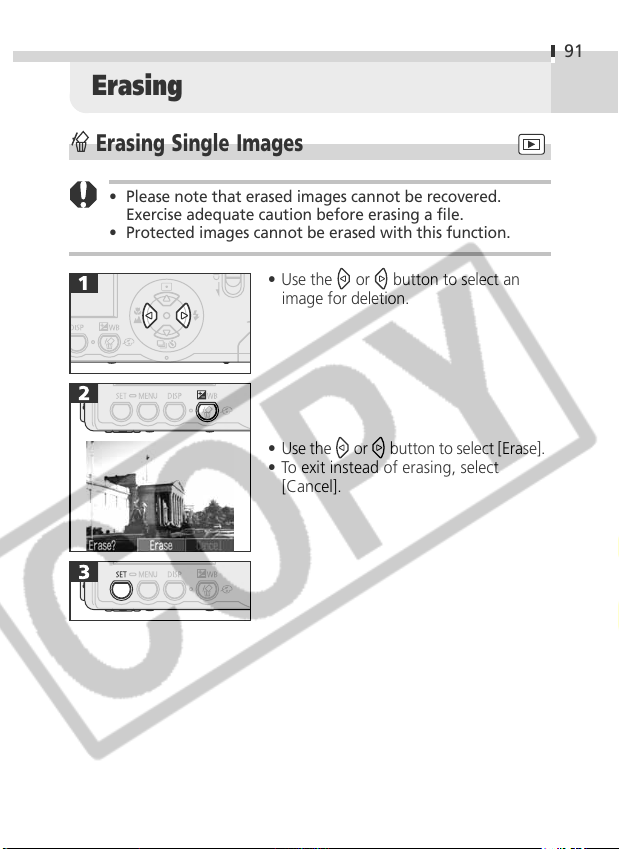
Erasing
Erasing Single Images
• Please note that erased images cannot be recovered.
Exercise adequate caution before erasing a file.
• Protected images cannot be erased with this function.
• Use the or button to select an
image for deletion.
91
• Use the
• To exit instead of erasing, select
[Cancel].
or button to select [Erase].
Page 94
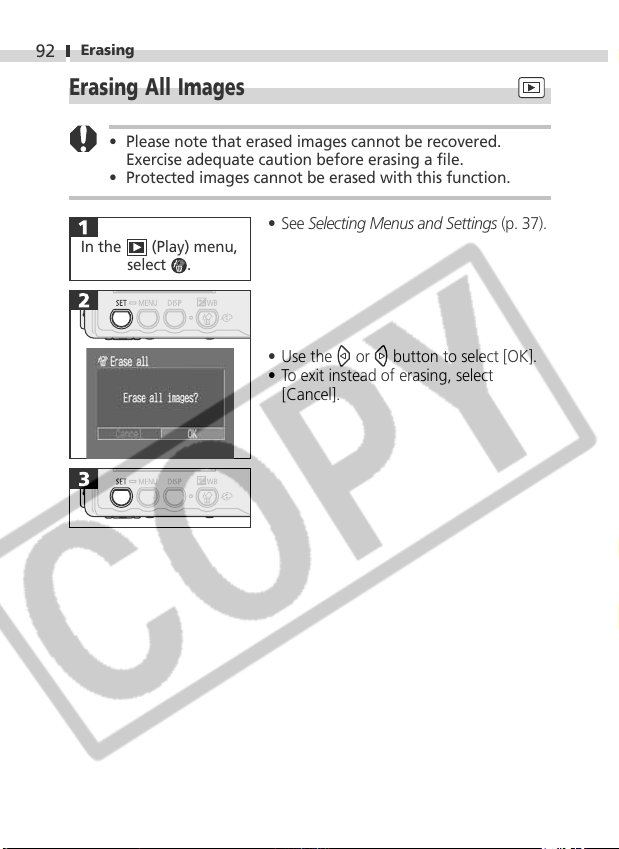
Erasing
92
Erasing All Images
• Please note that erased images cannot be recovered.
Exercise adequate caution before erasing a file.
• Protected images cannot be erased with this function.
In the (Play) menu,
select
.
• See Selecting Menus and Settings (p. 37).
• Use the
• To exit instead of erasing, select
[Cancel].
or button to select [OK].
Page 95
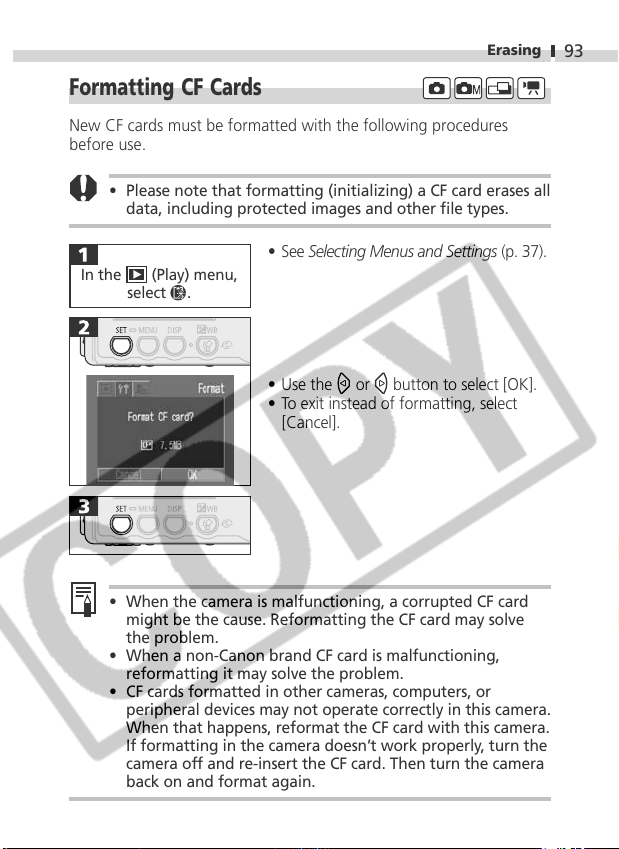
Erasing
Formatting CF Cards
New CF cards must be formatted with the following procedures
before use.
• Please note that formatting (initializing) a CF card erases all
data, including protected images and other file types.
• See Selecting Menus and Settings (p. 37).
In the (Play) menu,
select
.
93
• Use the
or button to select [OK].
• To exit instead of formatting, select
[Cancel].
• When the camera is malfunctioning, a corrupted CF card
might be the cause. Reformatting the CF card may solve
the problem.
• When a non-Canon brand CF card is malfunctioning,
reformatting it may solve the problem.
• CF cards formatted in other cameras, computers, or
peripheral devices may not operate correctly in this camera.
When that happens, reformat the CF card with this camera.
If formatting in the camera doesn’t work properly, turn the
camera off and re-insert the CF card. Then turn the camera
back on and format again.
Page 96
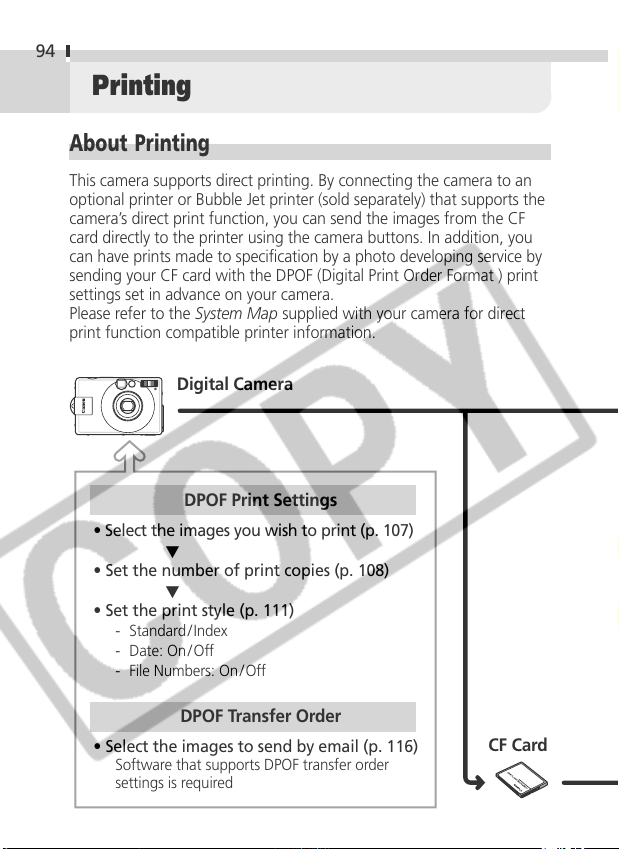
94
Printing
About Printing
This camera supports direct printing. By connecting the camera to an
optional printer or Bubble Jet printer (sold separately) that supports the
camera’s direct print function, you can send the images from the CF
card directly to the printer using the camera buttons. In addition, you
can have prints made to specification by a photo developing service by
sending your CF card with the DPOF (Digital Print Order Format ) print
settings set in advance on your camera.
Please refer to the System Map supplied with your camera for direct
print function compatible printer information.
Digital Camera
DPOF Print Settings
• Select the images you wish to print (p. 107)
• Set the number of print copies (p. 108)
• Set the print style (p. 111)
▼
▼
- Standard / Index
- Date: On / Off
- File Numbers: On / Off
DPOF Transfer Order
• Select the images to send by email (p. 116)
Software that supports DPOF transfer order
settings is required
CF Card
Page 97
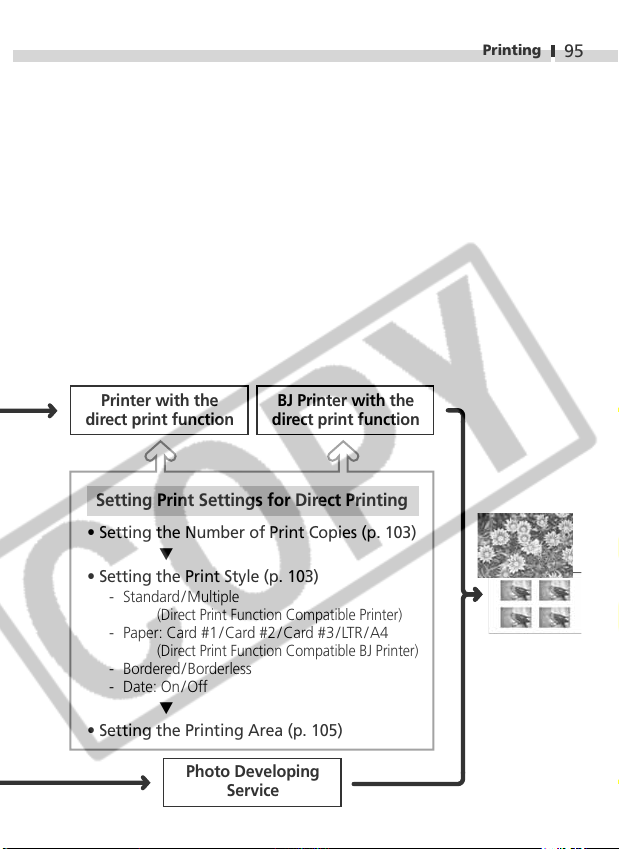
Printing
95
Printer with the
direct print function
BJ Printer with the
direct print function
Setting Print Settings for Direct Printing
• Setting the Number of Print Copies (p. 103)
▼
• Setting the Print Style (p. 103)
- Standard/Multiple
(Direct Print Function Compatible Printer)
- Paper: Card #1 /Card #2/ Card #3/LTR/A4
(Direct Print Function Compatible BJ Printer)
- Bordered /Borderless
- Date: On / Off
▼
• Setting the Printing Area (p. 105)
Photo Developing
Service
Page 98
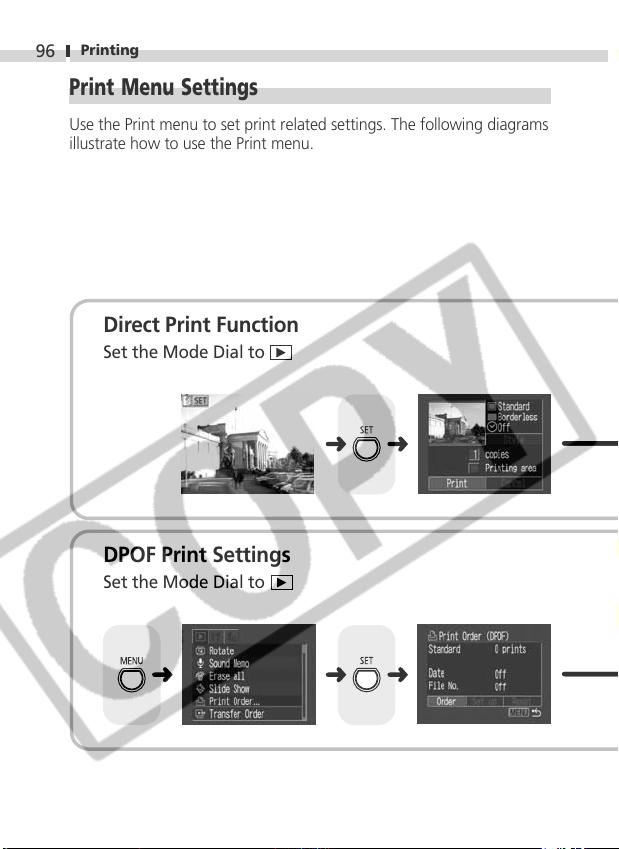
Printing
96
Print Menu Settings
Use the Print menu to set print related settings. The following diagrams
illustrate how to use the Print menu.
Direct Print Function
Set the Mode Dial to
DPOF Print Settings
Set the Mode Dial to
Page 99
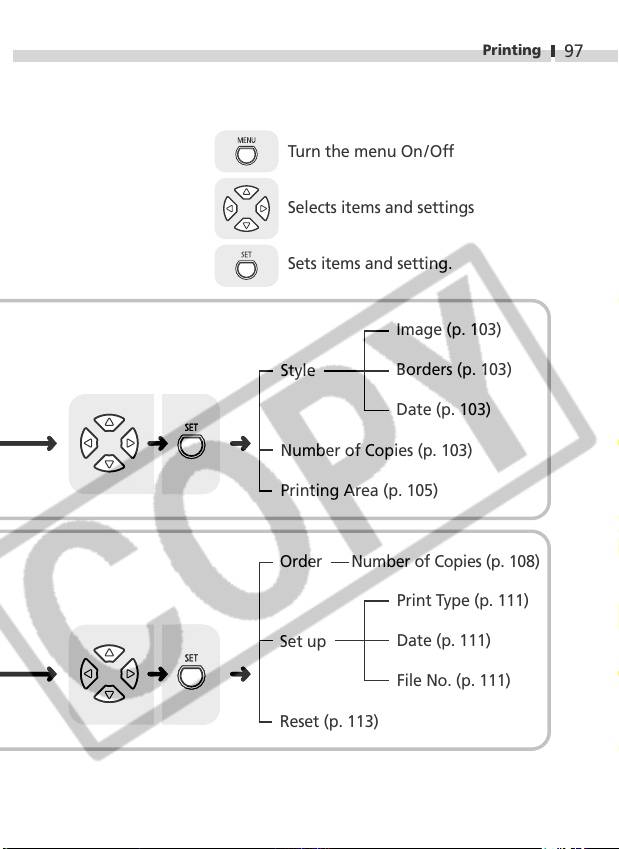
Turn the menu On/Off
Selects items and settings
Sets items and setting.
Image (p. 103)
Printing
97
Style
Borders (p. 103)
Date (p. 103)
Number of Copies (p. 103)
Printing Area (p. 105)
Order Number of Copies (p. 108)
Print Type (p. 111)
Set up
Date (p. 111)
File No. (p. 111)
Reset (p. 113)
Page 100
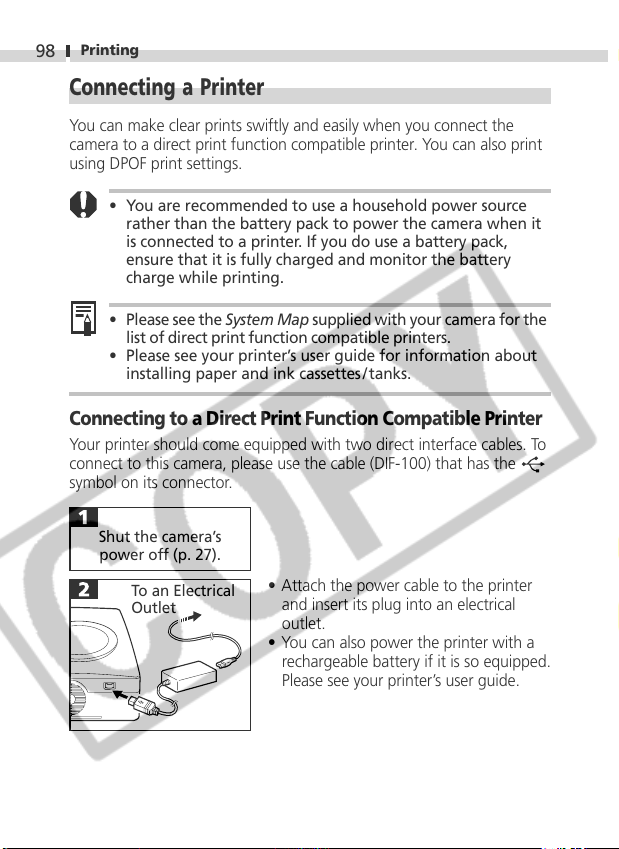
Printing
98
Connecting a Printer
You can make clear prints swiftly and easily when you connect the
camera to a direct print function compatible printer. You can also print
using DPOF print settings.
• You are recommended to use a household power source
rather than the battery pack to power the camera when it
is connected to a printer. If you do use a battery pack,
ensure that it is fully charged and monitor the battery
charge while printing.
• Please see the System Map supplied with your camera for the
list of direct print function compatible printers.
• Please see your printer’s user guide for information about
installing paper and ink cassettes/tanks.
Connecting to a Direct Print Function Compatible Printer
Your printer should come equipped with two direct interface cables. To
connect to this camera, please use the cable (DIF-100) that has the
symbol on its connector.
Shut the camera’s
power off (p. 27).
To an Electrical
Outlet
• Attach the power cable to the printer
and insert its plug into an electrical
outlet.
• You can also power the printer with a
rechargeable battery if it is so equipped.
Please see your printer’s user guide.
 Loading...