

Page 1
User's Guide
User's Guide
User's Guide
Read this guide first.
Please read this guide before operating this product.
After you finish reading this guide, store it in a safe place for future reference.
Guide de I'utilisateur
Veuillez d'abord lire ce guide.
Lire ce guide avant d'utiliser ce produit.
Après avoir pris connaissance de son contenu, le garder à portée de main à titre de référence.
Anwenderhandbuch
Bitte lesen Sie dieses Handbuch zuerst.
Bitte lesen Sie dieses Handbuch, bevor Sie mit dem Produkt arbeiten.
Nachdem Sie das Handbuch gelesen haben, bewahren Sie es zum Nachschlagen an einem sicheren Ort auf.
Guida per l'utente
Leggere questa guida.
Leggere questa guida prima di iniziare ad utilizzare il prodotto.
Dopo aver letto questa guida, conservarla in un luogo sicuro per la consultazione.
Downloaded from ManualsPrinter.com Manuals
Page 2

Downloaded from ManualsPrinter.com Manuals
Page 3

iR3045/iR3045N
iR3035/iR3035N
iR3025/iR3025N
User's Guide
Downloaded from ManualsPrinter.com Manuals
Page 4
Manuals for the Machine
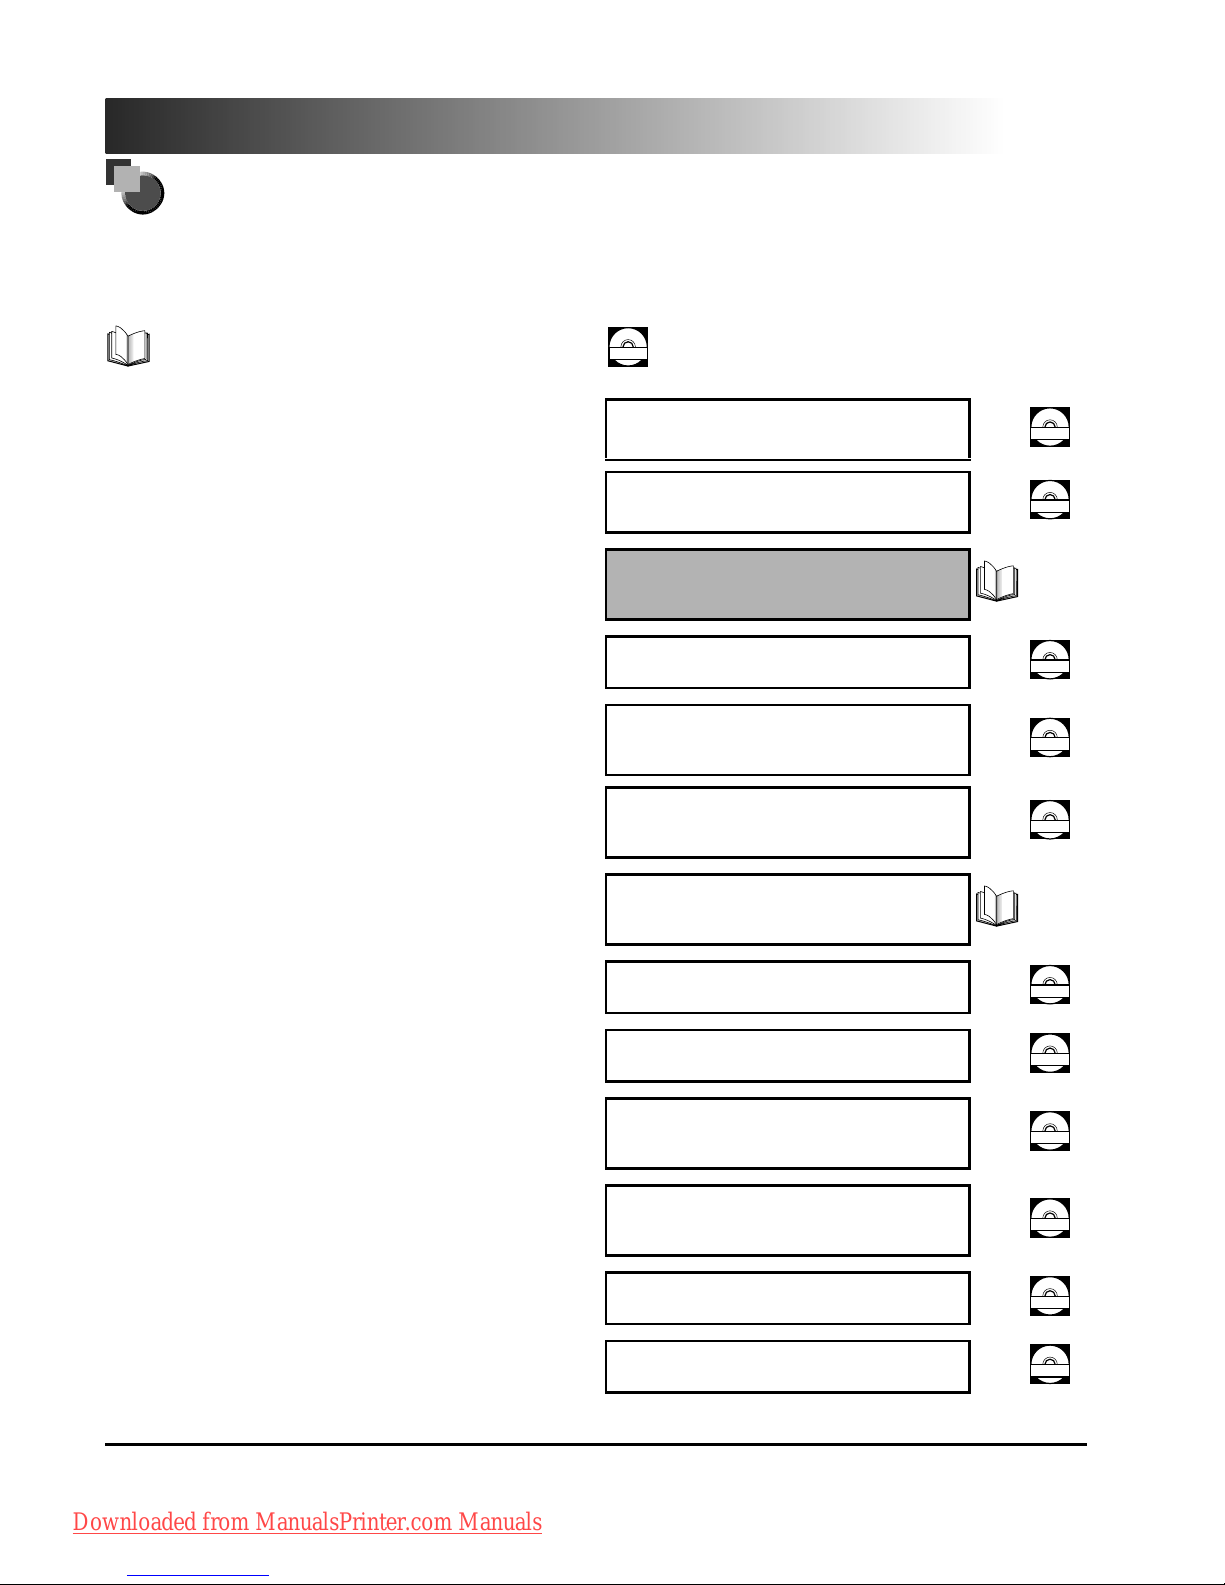
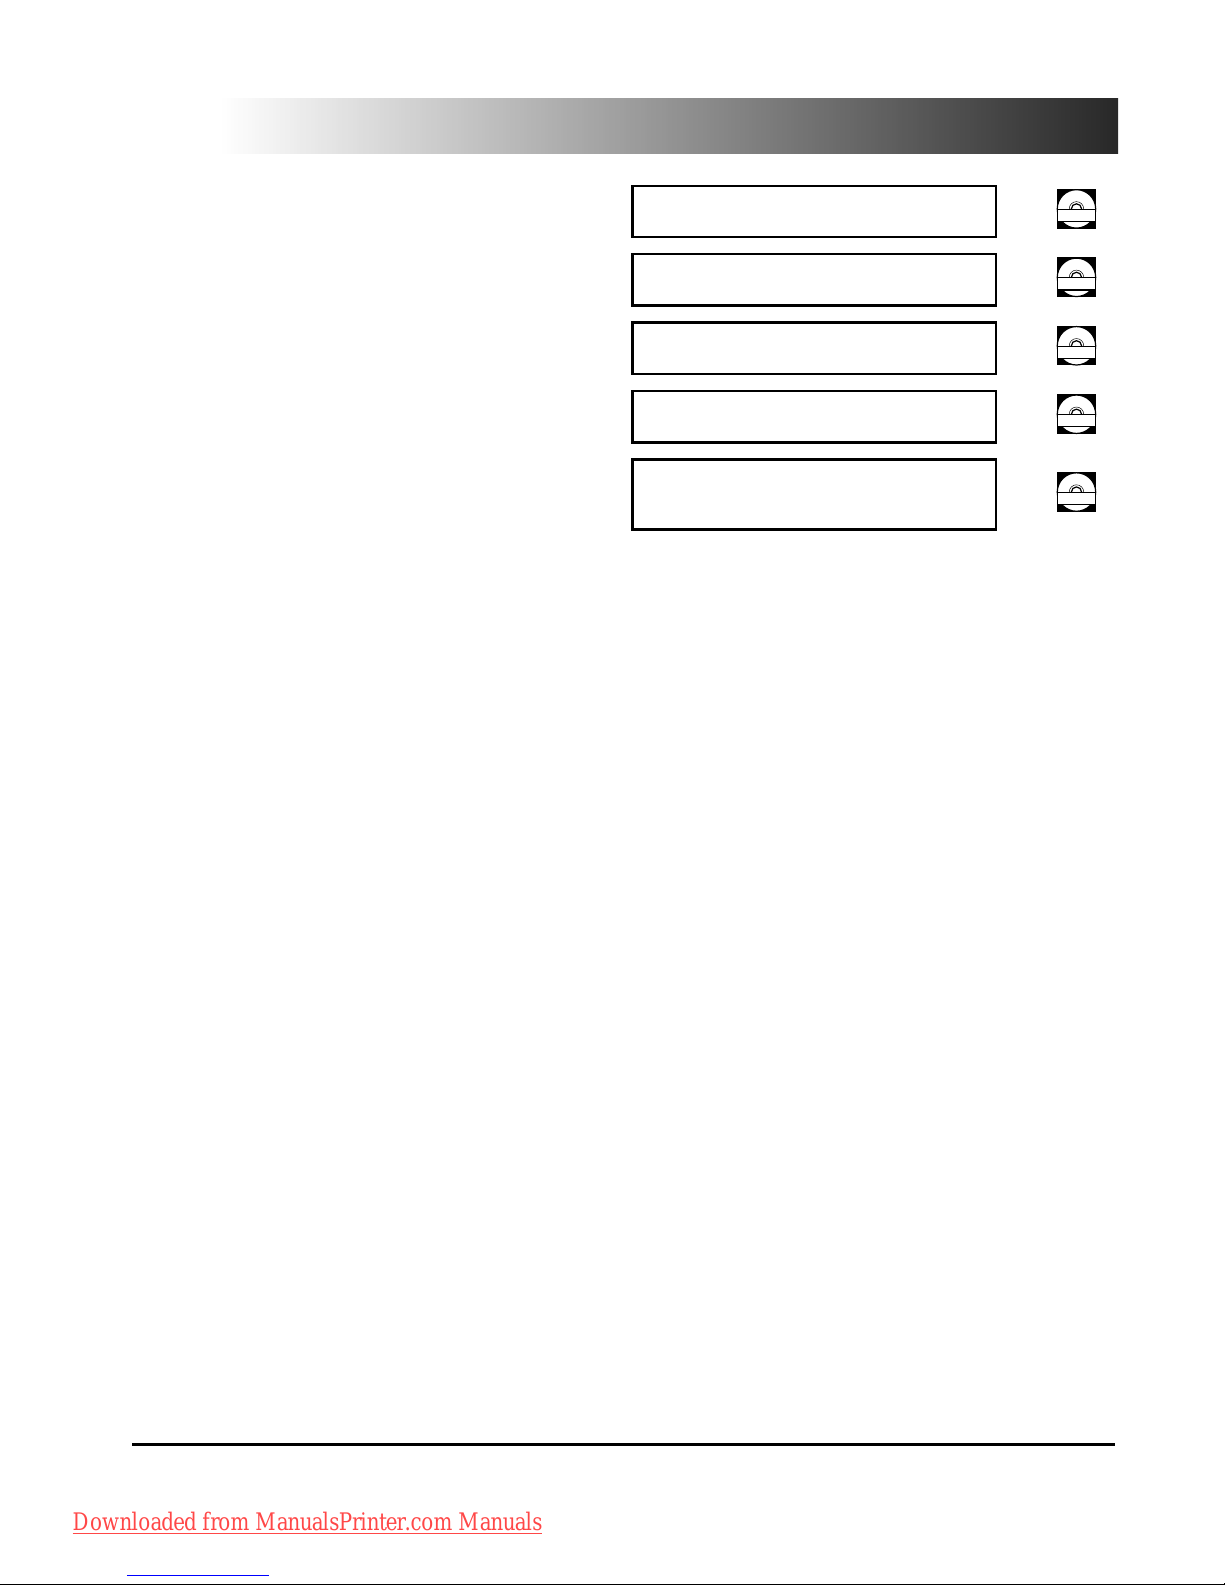
The manuals for this machine are divided as follows. Please refer to them for detailed information.
The manuals supplied with optional equipment are included in the list below. Depending on the system
configuration and product purchased, some manuals may not be needed.
Guides with this symbol are printed manuals.
CD-ROM
Guides with this symbol are PDF manuals included on the
accompanying CD-ROM.
• Quick Reference for Basic Operation
For Basic Operations ➞ Basic Features
For Additional Functions ➞ To Suit Your Needs
Easy Operation Guide
CD-ROM
• Learn how to Use Your Machine
The Tutorial CD is a teaching aid, designed to help you learn the various
functions of the machine.
Tutorial CD
CD-ROM
• Basic Information
User's Guide
(This Document)
• Basic Operations
• T
roubleshooting
Reference Guide
CD-ROM
• Copying and Mail Box Instructions
Copying and Mail Box
Guide
CD-ROM
• Sending/Fax Instructions
Sending and Facsimile
Guide
CD-ROM
• Installing the CD-ROM Software and Setting Up the
Network Connection
Network Quick Start
Guide
• Remote User Interface Instructions
Remote UI Guide
CD-ROM
• Network Connectivity and Setup Instructions
Network Guide
CD-ROM
• Network ScanGear Installation and Instructions
Network ScanGear
User's Guide
CD-ROM
• PS/PCL/UFR II Printer Instructions
PS/PCL/UFR II Printer
Guide
CD-ROM
• PCL Printer Driver Installation and Instructions
PCL Driver Guide
CD-ROM
• PS Printer Driver Installation and Instructions
PS Driver Guide
CD-ROM
Downloaded from ManualsPrinter.com Manuals
Page 5
• UFR II Printer Driver Installation and Instructions
UFR II Driver Guide
CD-ROM
• Mac OS X PS Printer Driver Installation and
Instructions
Mac PS Driver Guide
CD-ROM
• Mac OS X UFR II Printer Driver Installation and
Instructions
Mac UFR II Driver Guide
CD-ROM
• Fax Driver Installation and Instructions
Fax Driver Guide
CD-ROM
• Installing MEAP Applications and Using the Login
Service
MEAP SMS Administrator
Guide
CD-ROM
• To view the manual in PDF format, Adobe Reader/Adobe Acrobat Reader is required. If Adobe Reader/Adobe Acrobat Reader is not installed on your
system, please download it from the Adobe Systems Incorporated website.
• Considerable effort has been made to ensure that this manual is free of inaccuracies and omissions. However, as we are constantly improving our
products, if you need an exact specification, please contact Canon.
Downloaded from ManualsPrinter.com Manuals
Page 6

iv
Contents
Preface . . . . . . . . . . . . . . . . . . . . . . . . . . . . . . . . . . . . . . . . . . . . . . . . . . . . . . . . . vi
How To Use This Manual . . . . . . . . . . . . . . . . . . . . . . . . . . . . . . . . . . . . . . . . . . . . . . . . . . . vi
Symbols Used in This Manual . . . . . . . . . . . . . . . . . . . . . . . . . . . . . . . . . . . . . . . . . . . . . . vi
Legal Notices . . . . . . . . . . . . . . . . . . . . . . . . . . . . . . . . . . . . . . . . . . . . . . . . . . . . . . . . . . . . vii
Product Name . . . . . . . . . . . . . . . . . . . . . . . . . . . . . . . . . . . . . . . . . . . . . . . . . . . . . . . . . vii
EMC Requirements of EC Directive. . . . . . . . . . . . . . . . . . . . . . . . . . . . . . . . . . . . . . . . . vii
Laser Safety. . . . . . . . . . . . . . . . . . . . . . . . . . . . . . . . . . . . . . . . . . . . . . . . . . . . . . . . . . . vii
Additional Information . . . . . . . . . . . . . . . . . . . . . . . . . . . . . . . . . . . . . . . . . . . . . . . . . . . viii
WEEE Directive . . . . . . . . . . . . . . . . . . . . . . . . . . . . . . . . . . . . . . . . . . . . . . . . . . . . . . . . .ix
R&TTE Directive . . . . . . . . . . . . . . . . . . . . . . . . . . . . . . . . . . . . . . . . . . . . . . . . . . . . . . . . x
Super G3 . . . . . . . . . . . . . . . . . . . . . . . . . . . . . . . . . . . . . . . . . . . . . . . . . . . . . . . . . . . . . . x
Abbreviations Used in This Manual . . . . . . . . . . . . . . . . . . . . . . . . . . . . . . . . . . . . . . . . . . x
Trademarks . . . . . . . . . . . . . . . . . . . . . . . . . . . . . . . . . . . . . . . . . . . . . . . . . . . . . . . . . . . . xi
Copyright . . . . . . . . . . . . . . . . . . . . . . . . . . . . . . . . . . . . . . . . . . . . . . . . . . . . . . . . . . . . . . xi
Third Party Software . . . . . . . . . . . . . . . . . . . . . . . . . . . . . . . . . . . . . . . . . . . . . . . . . . . . . xi
Disclaimers. . . . . . . . . . . . . . . . . . . . . . . . . . . . . . . . . . . . . . . . . . . . . . . . . . . . . . . . . . . . xii
Legal Limitations on the Usage of Your Product and the Use of Images. . . . . . . . . . . . . xii
Important Safety Instructions . . . . . . . . . . . . . . . . . . . . . . . . . . . . . . . . . . . . . . . . . . . .xiii
Installation . . . . . . . . . . . . . . . . . . . . . . . . . . . . . . . . . . . . . . . . . . . . . . . . . . . . . . . . . . . . xiii
Power Supply . . . . . . . . . . . . . . . . . . . . . . . . . . . . . . . . . . . . . . . . . . . . . . . . . . . . . . . . . . xiv
Handling. . . . . . . . . . . . . . . . . . . . . . . . . . . . . . . . . . . . . . . . . . . . . . . . . . . . . . . . . . . . . . xv
Maintenance and Inspections . . . . . . . . . . . . . . . . . . . . . . . . . . . . . . . . . . . . . . . . . . . . xviii
Consumables . . . . . . . . . . . . . . . . . . . . . . . . . . . . . . . . . . . . . . . . . . . . . . . . . . . . . . . . . . xix
Other Warnings . . . . . . . . . . . . . . . . . . . . . . . . . . . . . . . . . . . . . . . . . . . . . . . . . . . . . . . . xix
About the Instruction Manual CD-ROM . . . . . . . . . . . . . . . . . . . . . . . . . . . . . . . . . . . . . . . xx
Contents of Instruction Manual CD-ROM. . . . . . . . . . . . . . . . . . . . . . . . . . . . . . . . . . . . . xx
Instruction Manual CD-ROM . . . . . . . . . . . . . . . . . . . . . . . . . . . . . . . . . . . . . . . . . . . xx
Super G3 FAX Board CD-ROM/Universal Send Kit CD-ROM. . . . . . . . . . . . . . . . . . xx
User Manual CD-ROM Menu . . . . . . . . . . . . . . . . . . . . . . . . . . . . . . . . . . . . . . . . . . . . . . . .xxi
System Requirements . . . . . . . . . . . . . . . . . . . . . . . . . . . . . . . . . . . . . . . . . . . . . . . . . . . xxi
Using The CD-ROM Menu . . . . . . . . . . . . . . . . . . . . . . . . . . . . . . . . . . . . . . . . . . . . . . . xxii
Periodic Inspection of the Breaker . . . . . . . . . . . . . . . . . . . . . . . . . . . . . . . . . . . . . . . . . .xxiii
Checking the Breaker. . . . . . . . . . . . . . . . . . . . . . . . . . . . . . . . . . . . . . . . . . . . . . . . . . . xxiii
Chapter 1 Before You Start Using This Machine
Installation Location and Handling. . . . . . . . . . . . . . . . . . . . . . . . . . . . . . . . . . . . . . . . . . 1-2
Installation Precautions . . . . . . . . . . . . . . . . . . . . . . . . . . . . . . . . . . . . . . . . . . . . . . . . . 1-2
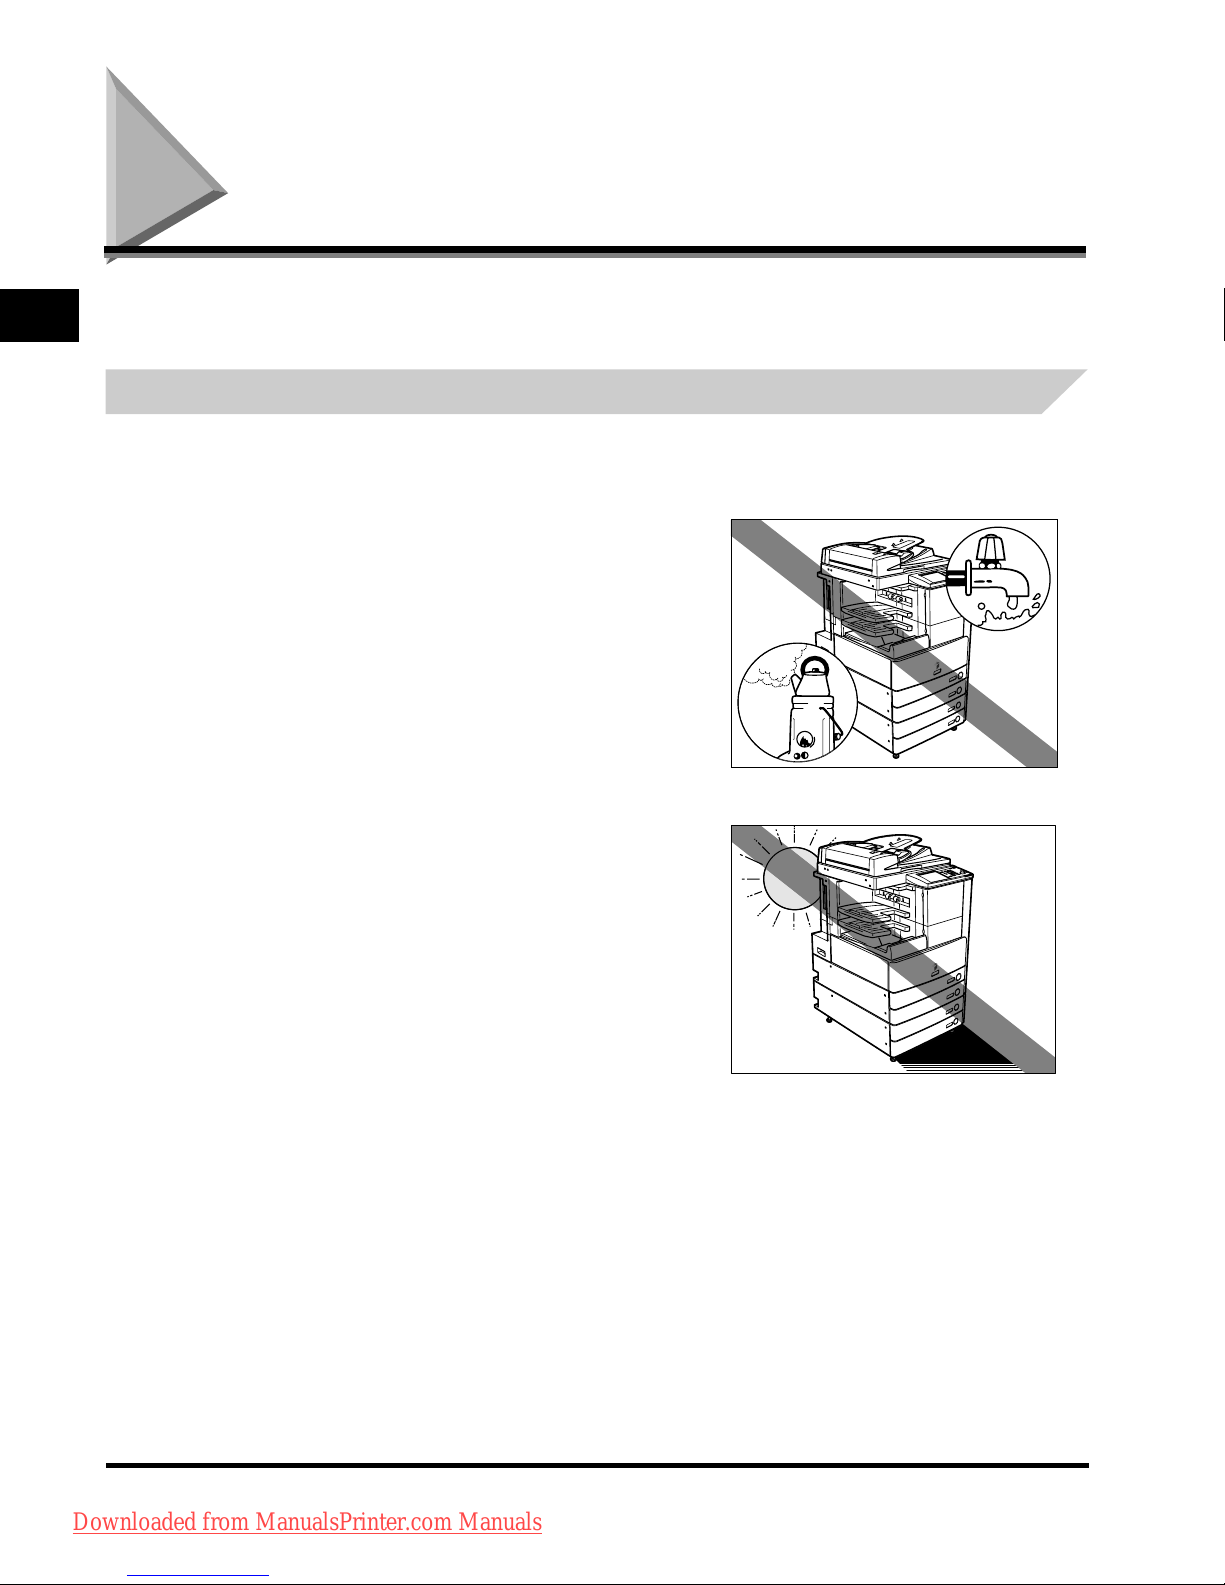
Avoid Installing the Machine in the Following Locations . . . . . . . . . . . . . . . . . . . . . 1-2
Select a Safe Power Supply. . . . . . . . . . . . . . . . . . . . . . . . . . . . . . . . . . . . . . . . . . . 1-5
Provide Adequate Installation Space. . . . . . . . . . . . . . . . . . . . . . . . . . . . . . . . . . . . 1-6
Moving the Machine. . . . . . . . . . . . . . . . . . . . . . . . . . . . . . . . . . . . . . . . . . . . . . . . . 1-7
Handling Precautions. . . . . . . . . . . . . . . . . . . . . . . . . . . . . . . . . . . . . . . . . . . . . . . . . . . 1-7
What This Machine Can Do . . . . . . . . . . . . . . . . . . . . . . . . . . . . . . . . . . . . . . . . . . . . . . . 1-10
System Configuration and Parts. . . . . . . . . . . . . . . . . . . . . . . . . . . . . . . . . . . . . . . . . . . 1-13
Downloaded from ManualsPrinter.com Manuals
Page 7

v
Optional Equipment. . . . . . . . . . . . . . . . . . . . . . . . . . . . . . . . . . . . . . . . . . . . . . . . . . . . 1-13
External View and Internal View . . . . . . . . . . . . . . . . . . . . . . . . . . . . . . . . . . . . . . . . . . 1-15
Control Panel Parts and Functions . . . . . . . . . . . . . . . . . . . . . . . . . . . . . . . . . . . . . . . . 1-17
Touch Panel Display . . . . . . . . . . . . . . . . . . . . . . . . . . . . . . . . . . . . . . . . . . . . . . . . . . . 1-18
Main Power and Control Panel Power . . . . . . . . . . . . . . . . . . . . . . . . . . . . . . . . . . . . . . . 1-21
How to Turn ON the Main Power. . . . . . . . . . . . . . . . . . . . . . . . . . . . . . . . . . . . . . . . . . 1-21
Things You Must Do Before Using This Machine . . . . . . . . . . . . . . . . . . . . . . . . . . . . . . 1-25
Selecting the Type of Telephone Line . . . . . . . . . . . . . . . . . . . . . . . . . . . . . . . . . . . . . . 1-25
Setting the Current Date and Time . . . . . . . . . . . . . . . . . . . . . . . . . . . . . . . . . . . . . . . . 1-26
Registering Your Machine's Fax Number . . . . . . . . . . . . . . . . . . . . . . . . . . . . . . . . . . . 1-27
Registering Sender Names . . . . . . . . . . . . . . . . . . . . . . . . . . . . . . . . . . . . . . . . . . . . . . 1-28
Registering the Unit's Name . . . . . . . . . . . . . . . . . . . . . . . . . . . . . . . . . . . . . . . . . . . . . 1-29
Displaying a Help Screen . . . . . . . . . . . . . . . . . . . . . . . . . . . . . . . . . . . . . . . . . . . . . . . . . 1-31
Chapter 2 Routine Maintenance
Loading Paper . . . . . . . . . . . . . . . . . . . . . . . . . . . . . . . . . . . . . . . . . . . . . . . . . . . . . . . . . . . 2-2
Replacing the Toner Cartridge . . . . . . . . . . . . . . . . . . . . . . . . . . . . . . . . . . . . . . . . . . . . . . 2-6
Chapter 3 Troubleshooting
Clearing Paper Jams . . . . . . . . . . . . . . . . . . . . . . . . . . . . . . . . . . . . . . . . . . . . . . . . . . . . . . 3-2
List of Error Messages . . . . . . . . . . . . . . . . . . . . . . . . . . . . . . . . . . . . . . . . . . . . . . . . . . . . 3-6
List of Error Codes without Messages . . . . . . . . . . . . . . . . . . . . . . . . . . . . . . . . . . . . . . 3-6
Chapter 4 Appendix
Multifunctional Operations . . . . . . . . . . . . . . . . . . . . . . . . . . . . . . . . . . . . . . . . . . . . . . . . . 4-2
Available Paper Stock . . . . . . . . . . . . . . . . . . . . . . . . . . . . . . . . . . . . . . . . . . . . . . . . . . . . . 4-4
Check Sheet for the Periodic Inspection of the Breaker . . . . . . . . . . . . . . . . . . . . . . . . . 4-6
Downloaded from ManualsPrinter.com Manuals
Page 8
vi
Preface
Thank you for purchasing the Canon iR3045/iR3045N/iR3035/iR3035N/iR3025/iR3025N. Please read
this manual thoroughly before operating the machine to familiarize yourself with its capabilities, and to
make the most of its many functions. After reading this manual, store it in a safe place for future
reference.
This paper manual contains the things you must read before using this machine and basic operations.
For the further details of the operations, please refer to the attached CD-ROM manual.
How To Use This Manual
Symbols Used in This Manual
The following symbols are used in this manual to explain procedures, restrictions, handling
precautions, and instructions that should be observed for safety.
WARNING
Indicates a warning concerning operations that may lead to death or injury to
persons if not performed correctly. To use the machine safely, always pay
attention to these warnings.
CAUTION
.
Indicates a caution concerning operations that may lead to injury to persons, or
damage to property if not performed correctly. To use the machine safely, always
pay attention to these cautions.
IMPORTANT
.
Indicates operational requirements and restrictions. Be sure to read these items
carefully operate the machine correctly, and avoid damage to the machine.
NOTE
.
Indicates a clarification of an operation, or contains additional explanations for a
procedure. Reading these notes is highly recommended.
Downloaded from ManualsPrinter.com Manuals
Page 9

Legal Notices
vii
Legal Notices
Product Name
Safety regulations require the product’s name to be registered. In some regions where this
product is sold, the following name(s) in parenthesis may be registered instead.
iR3045/iR3045N/iR3035/iR3035N/iR3045Ne (F145400)
iR3025/iR3025N/iR3025Ne (F143300)
EMC Requirements of EC Directive
This equipment conforms with the essential EMC requirements of EC Directive. We declare that
this product conforms with the EMC requirements of EC Directive at nominal mains input 230 V,
50 Hz although the rated input of the product is 220 to 240 V, 50/60 Hz.
• Use of shielded cable is necessary to comply with the technical EMC requirements of EC
Directive.
Laser Safety
This product is certified as a Class 1 laser product under IEC60825-1:2007
and EN60825-1:2007. This means that the product does not produce hazardous laser radiation.
Since radiation emitted inside the product is comple
tely confined within protective housings and
external covers, the laser beam cannot escape from the machine during any phase of user
operation. Do not remove protective housings or external covers, except as directed by the
equipment's manual.
Downloaded from ManualsPrinter.com Manuals
Page 10
Legal Notices
viii
Additional Information
When servicing or adjusting the optical system of the product, be careful not to place
screwdrivers or other shiny objects in the path of the laser beam. Also, accessories such as
watches and rings should be removed before working on the product. The reflected beam, even
though visible or invisible, can permanently damage your eyes.
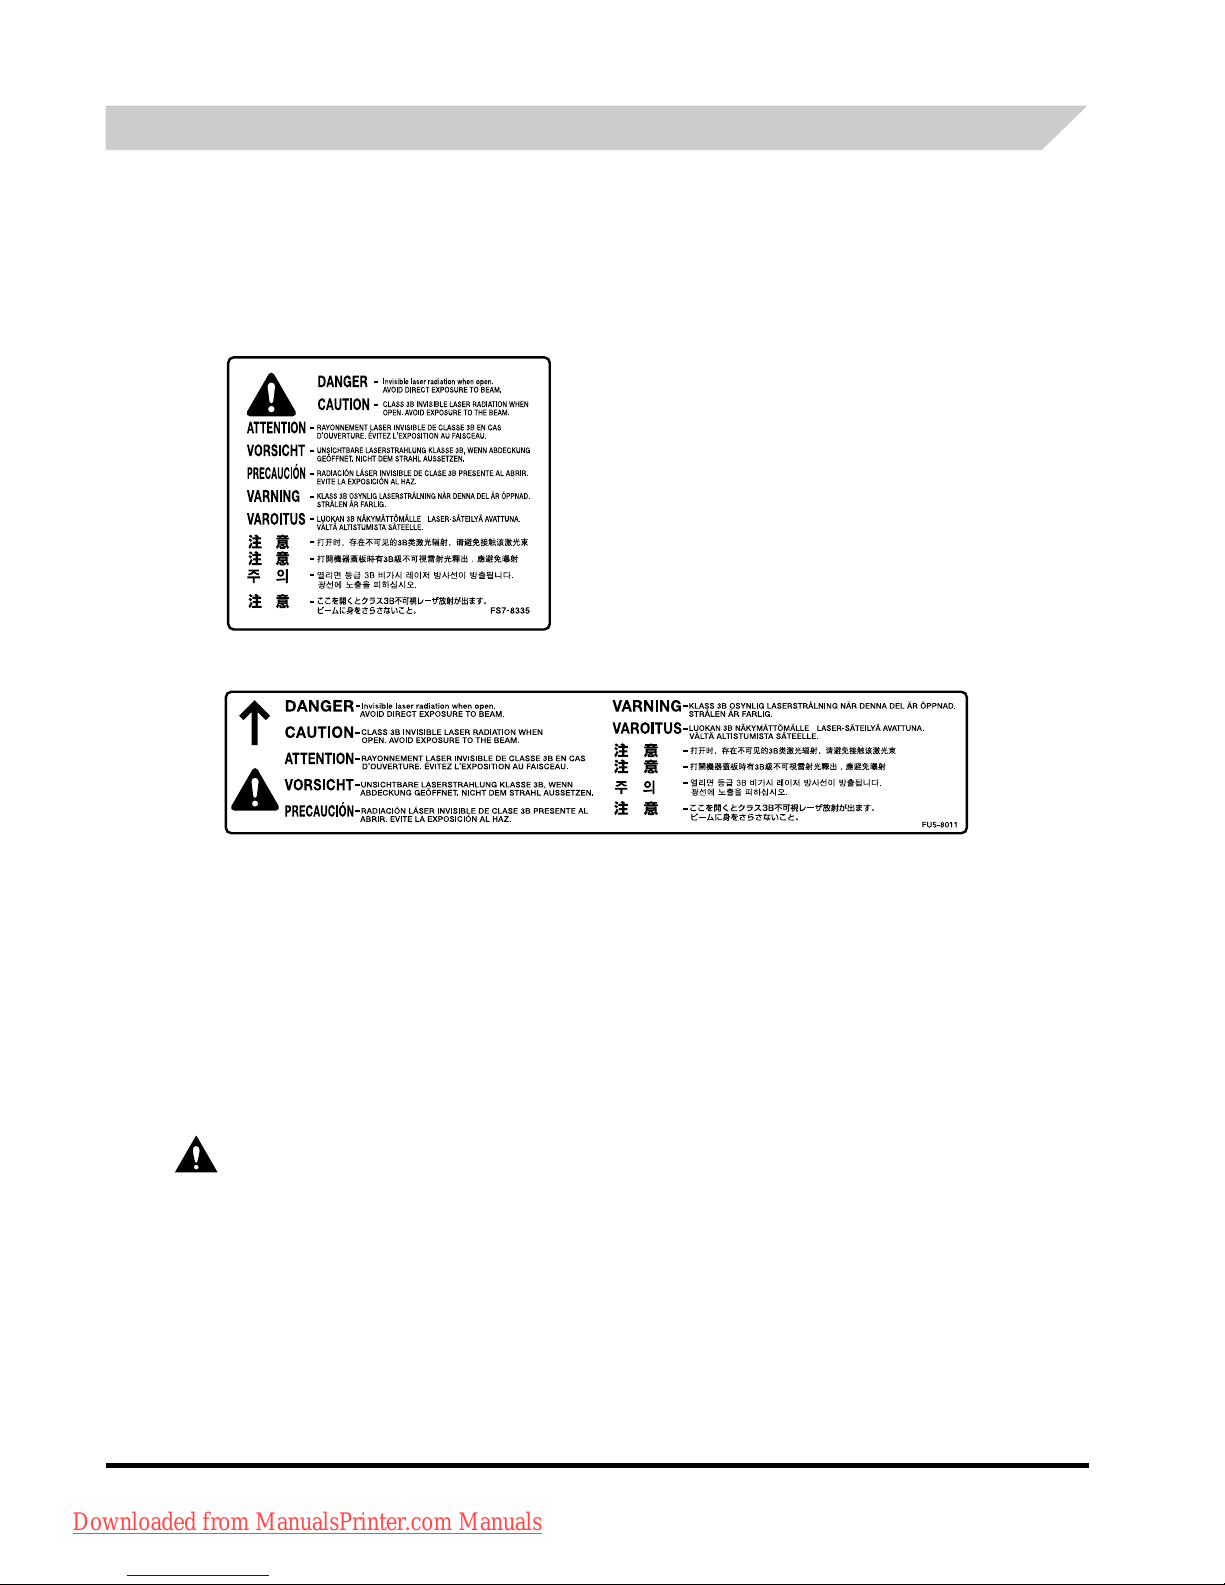
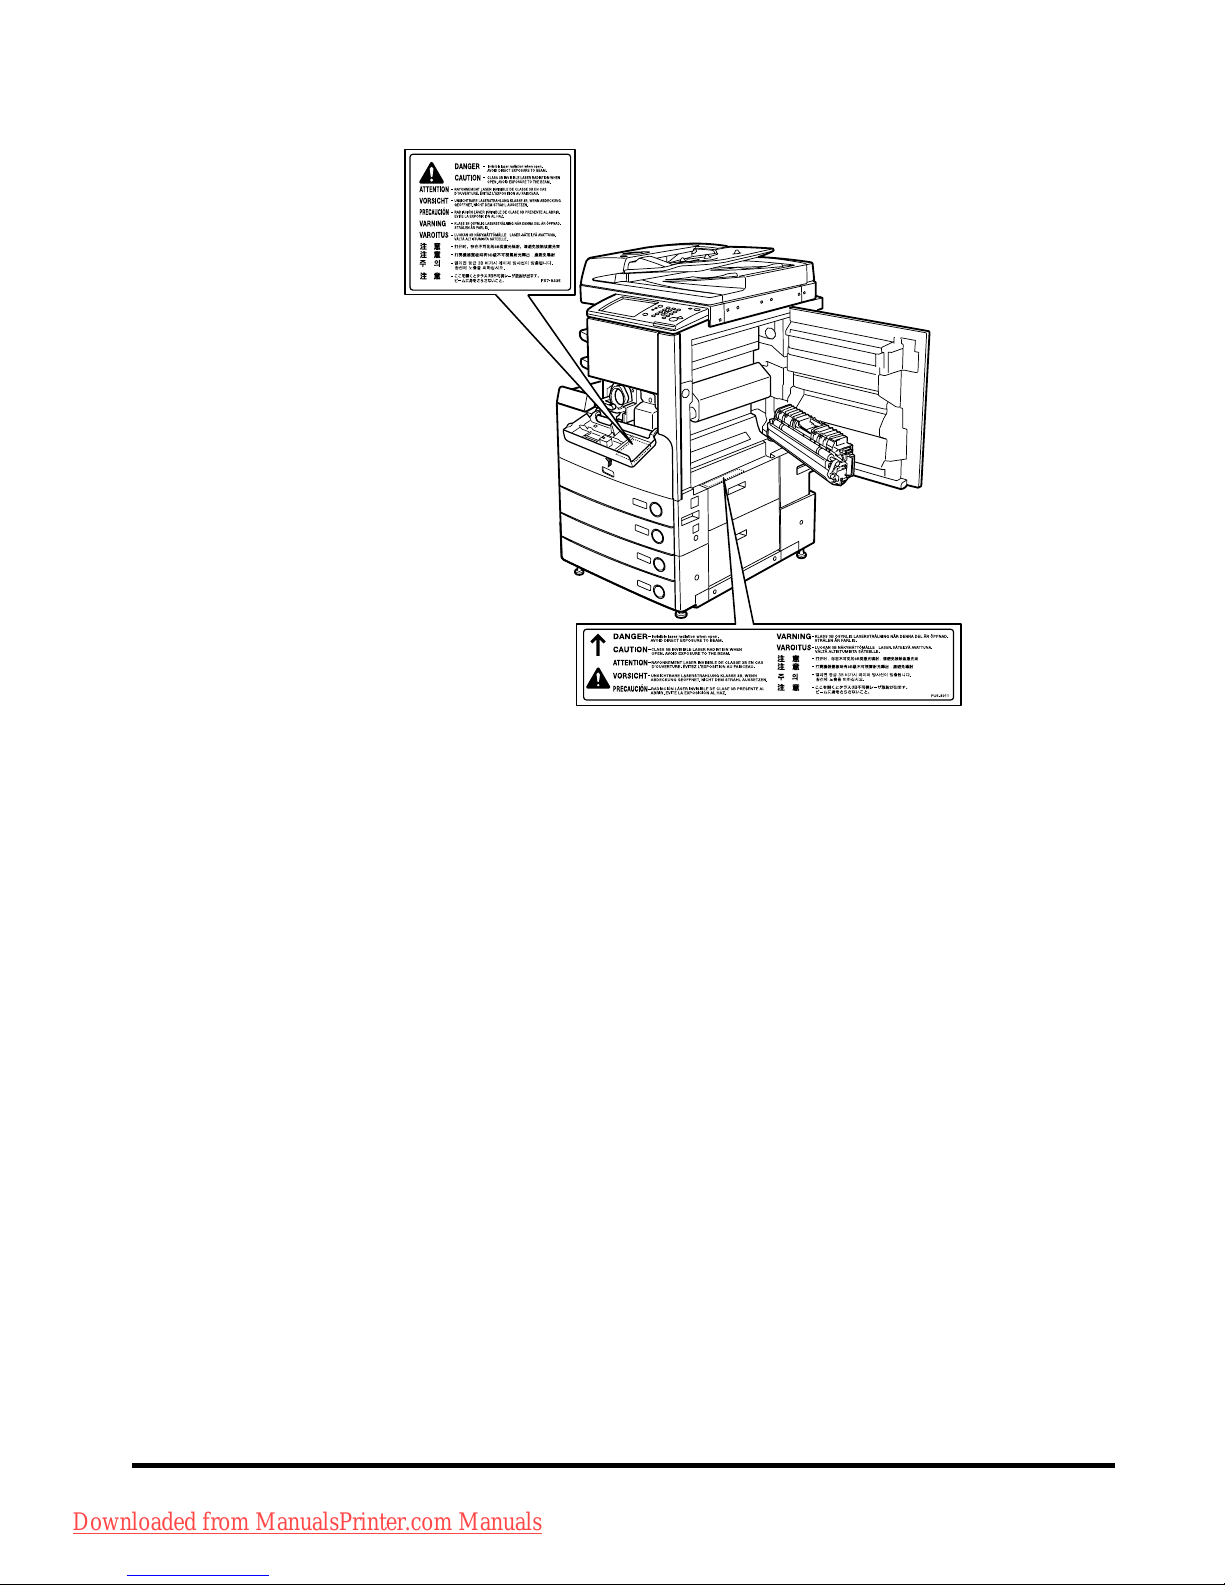
The labels shown below are attached to the Paper Drawer's Right Cover and Toner Supply Port
Cover.
This Product has been classified under IEC6082
5-1:2007 and EN60825-1:2007, which conform
to the following classes;
CLASS 1 LASER PRODUCT
LASER KLASSE 1
APPAREIL Á LASER DE CLASSE 1
APPARECCHIO LASER DI CLASSE 1
PRODUCTO LÁSER DE CLASE 1
APARELHO A LASER DE CLASSE 1
LUOKAN 1 LASER-TUOTE
LASERPRODUKT KLASS 1
CAUTION
Use of controls, adjustments, or performance of procedures other than those specified in this
manual may result in hazardous radiation exposure.
Downloaded from ManualsPrinter.com Manuals
Page 11
Legal Notices
ix
WEEE Directive
European Union (and EEA) only.
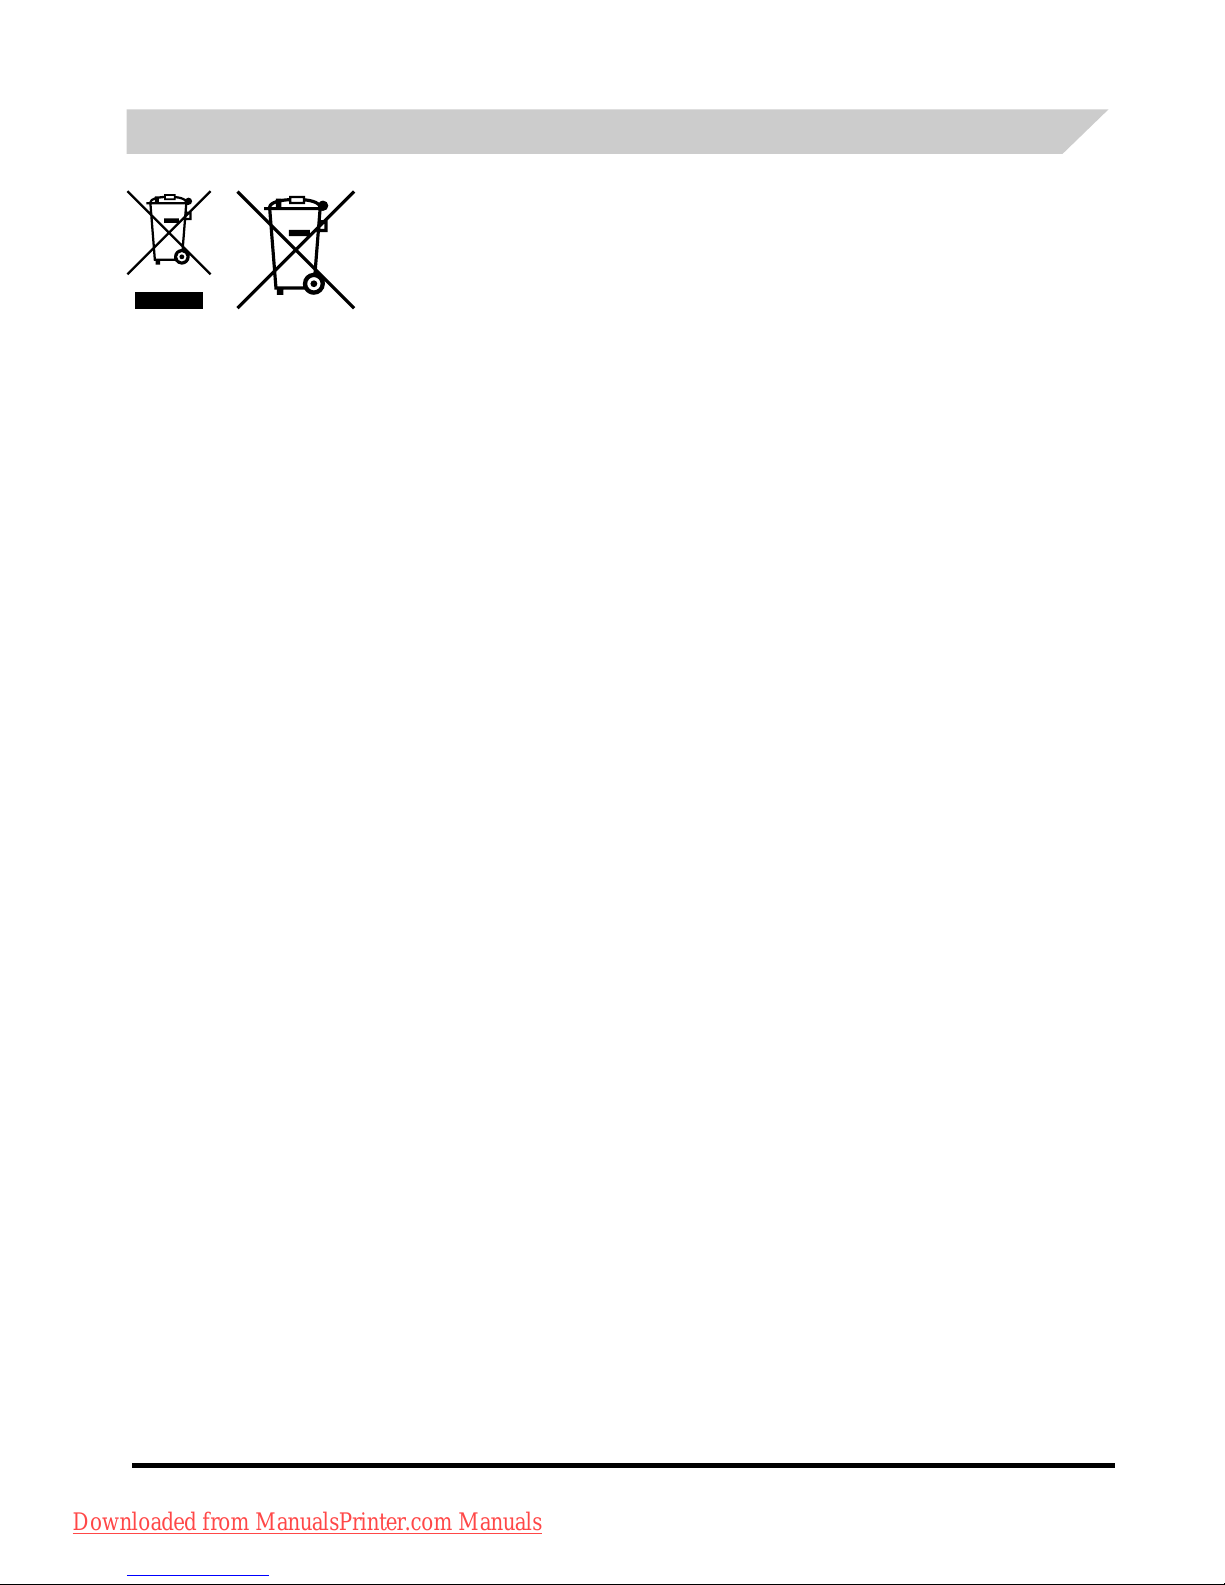
These symbols indicate that this product
is not to be disposed of with your household waste, according
to the WEEE Directive (2002/96/EC), the Battery Directive (2006/66/EC) and/or your national laws
implementing those Directives.
If a chemical symbol is printed beneath the symbol shown above, in accordance with the Directive, this
indicates that a heavy metal (Hg = Mercury, Cd = Cadmium, Pb = Lead) is present in this battery or
accumulator at a concentration above an applicable threshold specified in the Battery Directive.
This product should be handed over to a designated collection point, e.g., on an authorized one-for-one
basis when you buy a new similar product or to an authorized collection site for recycling waste
electrical and electronic equipment (EEE) and batteries and accumulators. Improper handling of this
type of waste could have a possible impact on the environment and human health due to potentially
hazardous substances that are generally associated with EEE.
Your cooperation in the correct disposal of this product will contribute to the effective usage of natural
resources.
For more information about the recycling of this product, please contact your local city office, waste
authority, approved scheme or your household waste disposal service or visit
www.canon-europe.com/environment.
(EEA: Norway, Iceland and Liechtenstein)
Downloaded from ManualsPrinter.com Manuals
Page 12

Legal Notices
x
R&TTE Directive
Super G3
Abbreviations Used in This Manual
In this manual, product names and model names are abbreviated as follows:
Microsoft® Windows® 98 operating system: Windows 98
Microsoft
®
Windows® Millennium Edition operating system: Windows Me
Microsoft
®
Windows® 2000 operating system: Windows 2000
Microsoft
®
Windows® XP operating system: Windows XP
Microsoft
®
Windows™ Server 2003 operating system: Windows Server 2003
Microsoft
®
Windows® operating system: Windows
This equipment (F145400/F143300) conforms with the essential requirements of
EC
Directive 1999/5/EC and is usable in EU. (Only for models with facsimile functionality.)
(For Europe Only)
Canon Inc./Canon Europa N.V.
Super G3 is a phrase used to describe the new generation of fax machines that use
ITU-T V.34 standard 33.6 Kbps* modems. Super G3 High Speed Fax machines allow
transmission times of approximately 3 seconds* per page which results in reduced
telephone line charges.
* Approximately 3 seconds per page fax transmission time based on CCITT/ITU-T No.1
Chart, (JBIG, Standard Mode) at 33.6 Kbps modem speed. The Public Switched
Telephone Network (PSTN) currently supports 28.8 Kbps modem speeds or slower,
depending on telephone line conditions.
Downloaded from ManualsPrinter.com Manuals
Page 13

Legal Notices
xi
Trademarks
MEAP and the MEAP logo are trademarks of Canon Inc.
This product contains the Universal Font Scaling Technology or UFST
®
under license from
Monotype Imaging, Inc. UFST® is a trademark of Monotype Imaging, Inc. registered in the
United States Patent and Trademark Office and may be registered in certain jurisdictions.
Apple, AppleTalk, EtherTalk, LocalTalk, Mac, Macin
tosh, Mac OS, and Safari are trademarks of
Apple Inc., registered in the U.S. and other countries.
Microsoft, Windows, Windows Vista, Windows Server and Internet Explorer are either
reg
istered trademarks or trademarks of Microsoft Corporation in the United States and/or other
countries.
Other product and company names herein may be the trademarks of their respective owners.
Copyright
Copyright 2013 by Canon Inc. All rights reserved.
No part of this publication may be reproduced or transmitted in any form or by any means,
electronic or mechanical, including photocopying and recording, or by any information storage
or retrieval system without the prior written permission of Canon Inc.
Third Party Software
This product includes software and/or software modules that are licensed by third parties
(LICENSORS). Use and distribution of these software and/or software modules (the
"SOFTWARE") are subject to conditions (1) through (9) below unless the other conditions
accompany the software and/or software modules. In such cases, these software and/or
software modules are subject to the other conditions.
(1) You agree that you will comply with any applicable export control laws, restrictions or
re
gulations of the countries involved in the event that the SOFTWARE is shipped,
transferred or exported into any country.
(2) LICENSORS retain in all respects the title, owne
rship and intellectual property rights in and
to the SOFTWARE. Except as expressly provided herein, no license or right, expressed or
implied, is hereby conveyed or granted by Canon's licenser to you for any intellectual
property of LICENSORS.
(3) You may use the SOFTWARE solely for use w
ith the Canon product you purchased (the
"PRODUCT").
(4) You may not assign, sublicense, market, distr
ibute, or transfer the SOFTWARE to any third
party without prior written consent of Canon and LICENSORS.
(5) Notwithstanding the foregoing, you may transf
er the SOFTWARE only when (a) you assign
all of your rights to the PRODUCT and all rights and obligations under the conditions to
transferee and (b) such transferee agrees to be bound by all these conditions.
(6) You may not decompile, reverse engineer, disassemble or otherwise reduce the code of the
SOFTWARE to human readable form.
(7) You may not modify, adapt, translate, rent, lease or loan the SOFTWARE or create
de
rivative works based on the SOFTWARE.
Downloaded from ManualsPrinter.com Manuals
Page 14

Legal Notices
xii
(8) You are not entitled to remove or make separate copies of the SOFTWARE from the
PRODUCT.
(9) The human-readable portion (the source code)
of the SOFTWARE is not licensed to you.
Disclaimers
The information in this document is subject to change without notice.
CANON INC. MAKES NO WARRANTY OF ANY KIND WITH REGARD TO THIS MATERIAL,
EITHER EXPRESS OR IMPLIED, EXCEPT AS PROVIDED HEREIN, INCLUDING WITHOUT
LIMITATION, THEREOF, WARRANTIES AS TO MARKETABILITY, MERCHANTABILITY,
FITNESS FOR A PARTICULAR PURPOSE OF USE OR NON-INFRINGEMENT. CANON INC.
SHALL NOT BE LIABLE FOR ANY DIRECT, INCIDENTAL, OR CONSEQUENTIAL DAMAGES
OF ANY NATURE, OR LOSSES OR EXPENSES RESULTING FROM THE USE OF THIS
MATERIAL.
Legal Limitations on the Usage of Your Product and the
Use of Images
Using your product to scan, print or otherwise reproduce certain documents, and the use of
such images as scanned, printed or otherwise reproduced by your product, may be prohibited
by law and may result in criminal and/or civil liability. A non-exhaustive list of these documents is
set forth below. This list is intended to be a guide only. If you are uncertain about the legality of
using your product to scan, print or otherwise reproduce any particular document, and/or of the
use of the images scanned, printed or otherwise reproduced, you should consult in advance
with your legal advisor for guidance.
• Paper Money • Checks or Drafts Issued by
Governmental Agencies
• Internal Revenue Stamps
(cancelled or uncancelled)
• Money Orders • Motor Vehicle Licenses and
Certificates of Title
• Bonds or Other Certificates of
Indebtedness
• Certificates of Deposit • Travelers Checks • Stock Certificates
• Postage Stamps
(cancelled or uncancelled)
• Food Stamps • Copyrighted Works/Works of
Art without Permission of
Copyright Owner
• Identifying Badges or
Insignias
• Passports
• Selective Service or Draft
Papers
• Immigration Papers
Downloaded from ManualsPrinter.com Manuals
Page 15
Important Safety Instructions
xiii
Important Safety Instructions
Please read these "Important Safety Instructions" thoroughly before operating the machine. As
these instructions are intended to prevent injury to the user or other persons or destruction of
property, always pay attention to these instructions. Also, since it may result in unexpected
accidents or injuries, do not perform any operation unless otherwise specified in the manual.
Improper operation or use of this machine could result in personal injury and/or damage
requiring extensive repair that may not be covered under your Limited Warranty.
Installation
WARNING
• Do not install the machine near alcohol, paint
thinner, or other flammable substances. If
flammable substances come into contact with
electrical parts inside the machine, it may result in
a fire or electrical shock.
• Do not place the following items on the machine. If
these items come into contact with a high-voltage
area inside the machine, it may result in a fire or
electrical shock.
If these items are dropped or spilled inside the
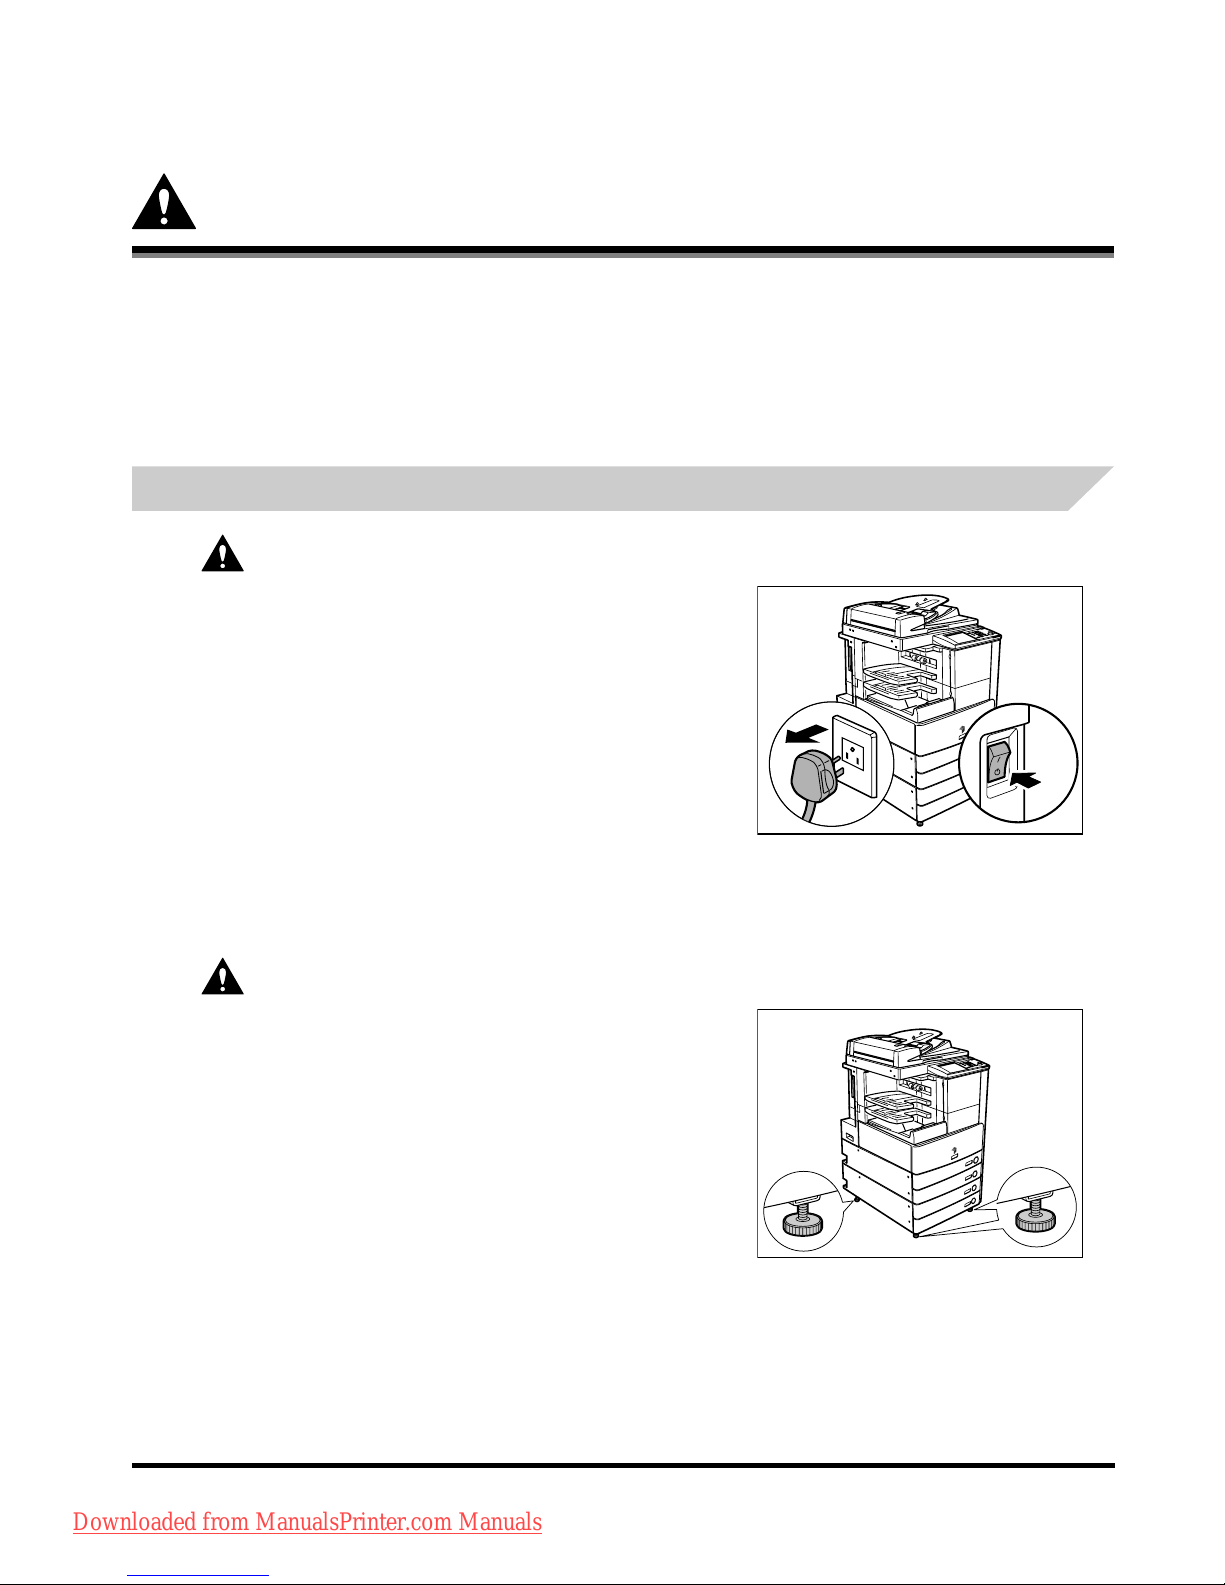
machine, immediately turn OFF the main power
switch, and disconnect the power cord from the
power outlet. Then, contact your local authorized
Canon dealer.
- Necklaces and other metal objects
- Cups, vases, flowerpots, and other containers filled with water or liquids
CAUTION
• Do not install the machine in unstable locations,
such as unsteady platforms or inclined floors, or in
locations subject to excessive vibrations, as this
may cause the machine to fall or tip over, resulting
in personal injury.
• Never block the ventilation slots and louvers on the
machine. These openings are provided for proper
ventilation of working parts inside the machine.
Blocking these openings can cause the machine to
overheat. Never place the machine on a soft
surface, such as a sofa or rug.
Downloaded from ManualsPrinter.com Manuals
Page 16
Important Safety Instructions
xiv
• Do not install the machine in the following locations:
- A damp or dusty location
- A location near water faucets or water
- A location exposed to direct sunlight
- A location subject to high temperatures
- A location near open flames
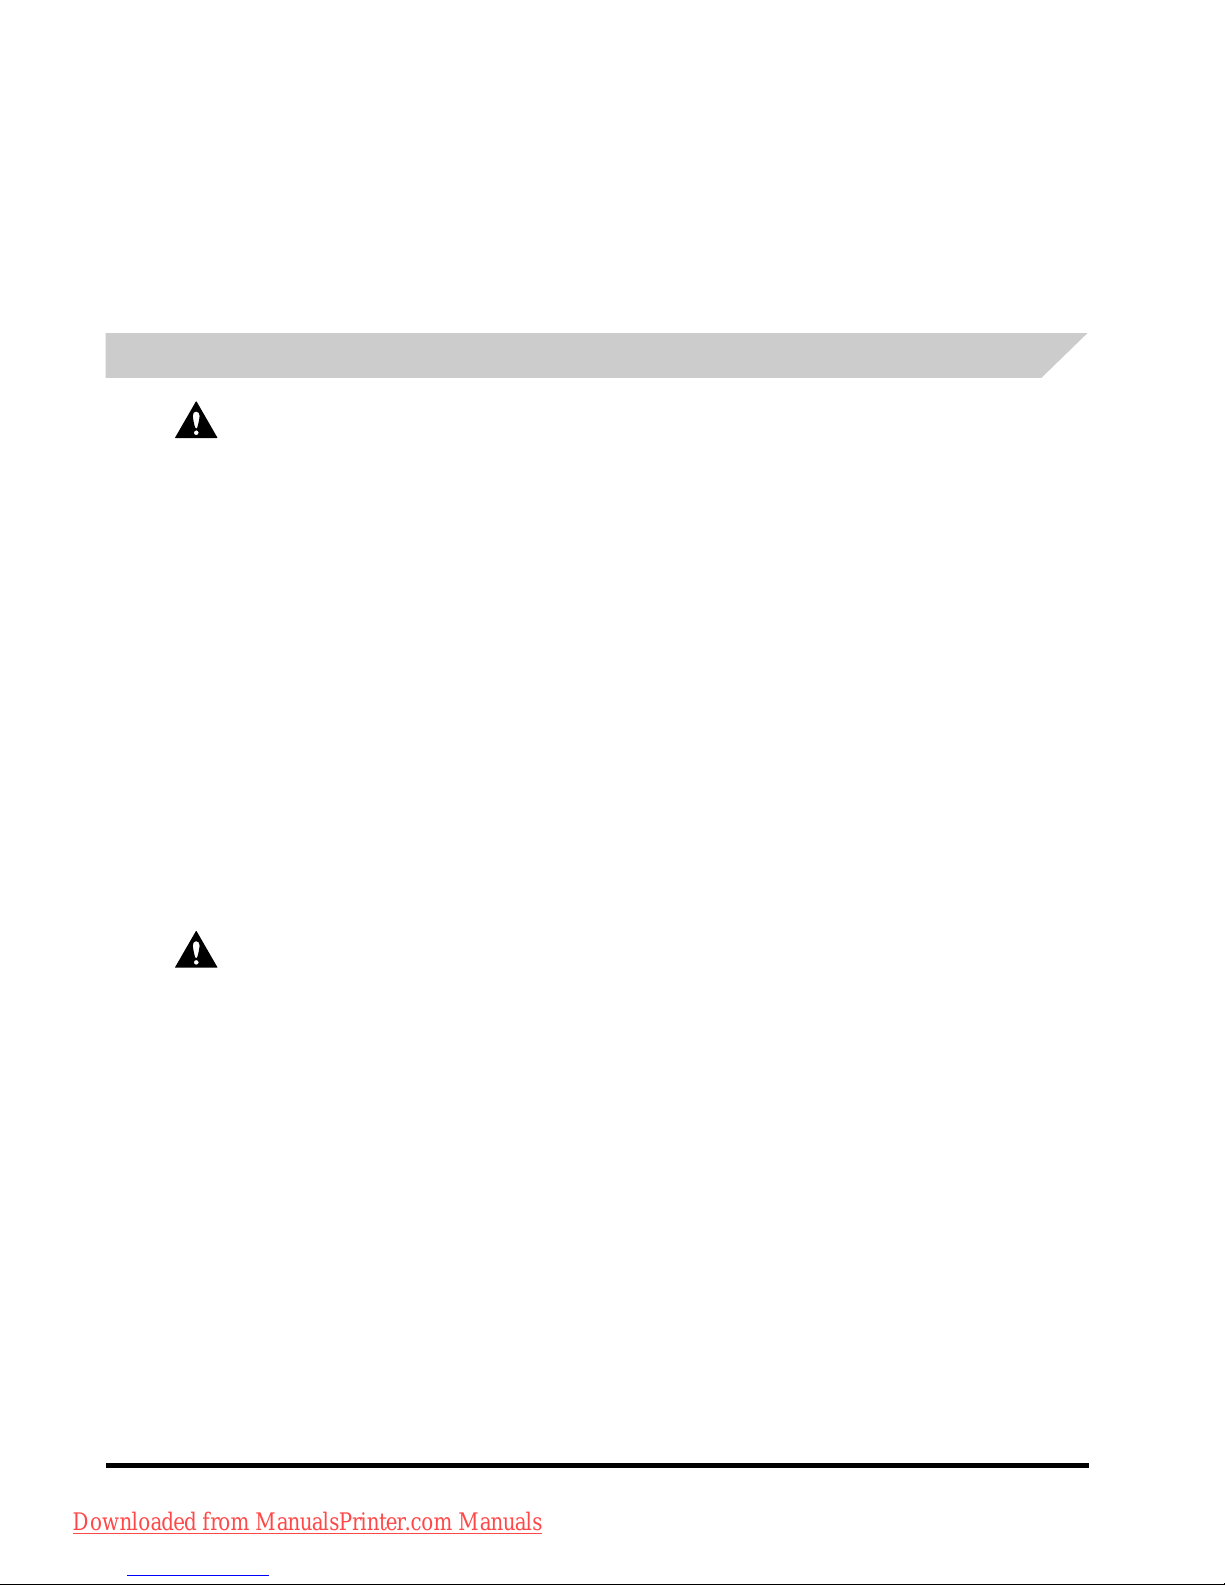
• Do not remove the machine's leveling feet after the machine has been installed, as this may
cause the machine to fall or tip over, resulting in personal injury.
Power Supply
WARNING
• Do not damage or modify the power cord. Also, do not place heavy objects on the power
cord, or pull on or excessively bend it, as this could cause electrical damage and result in a
fire or electrical shock.
• Keep the power cord away from a heat source; failure to do this may cause the power cord
coating to melt, resulting in a fire or electrical shock.
• Do
not connect or disconnect the power cord with wet hands, as this may result in electrical
shock.
• Do
not connect the power cord to a multiplug power strip, as this may cause a fire or
electrical shock.
• Do
not bundle up or tie the power cord in a knot, as this may result in a fire or electrical
shock.
• Inser
t the power plug completely into the power outlet, as failure to do so may result in a fire
or electrical shock.
• Do
not use power cords other than the power cord provided, as this may result in a fire or
electrical shock.
• As a general rule, do not use extension cords. Using an extension cord may result in a fire or
electrical shock. If an extension cord must be used, however, use one rated for voltages of
220-240 V AC and over, untie the cord binding, and insert the power plug completely into the
extension cord outlet to ensure a firm connection between the power cord and the extension
cord.
CAUTION
• Do not use power supplies with voltages other than those specified herein, as this may result
in a fire or electrical shock.
• Always grasp the power plug when disconnecting the power cord. Pulling on the power cord
may expose or snap the core wire, or otherwise damage the power cord. If the power cord is
damaged, this could cause current to leak, resulting in a fire or electrical shock.
• Le
ave sufficient space around the power plug so that it can be unplugged easily. If objects are
placed around the power plug, you will be unable to unplug it in an emergency.
Downloaded from ManualsPrinter.com Manuals
Page 17
Important Safety Instructions
xv
Handling
WARNING
• Do not attempt to disassemble or modify the machine. There are high-temperature and
high-voltage components inside the machine which may result in a fire or electrical shock.
• If the machine makes strange noises, or gives off smoke, heat, or strange smells,
immediately turn OFF the main power switch, and disconnect the power cord from the power
outlet. Then, contact your local authorized Canon dealer. Continued use of the machine in
this condition may result in a fire or electrical shock.
• Do
not use highly flammable sprays near the machine. If gas from these sprays comes into
contact with the electrical components inside the machine, it may result in a fire or electrical
shock.
• T
o avoid damage to the power cord and creating a fire hazard, always turn OFF the main
power switch, and unplug the interface cable when moving the machine. Otherwise, the
power cord or interface cable may be damaged, resulting in a fire or electrical shock.
• Do not drop paper clips, staples, or other metal objects inside the machine. Also, do not spill
water, liquids, or flammable substances (alcohol, benzene, paint thinner, etc.) inside the
machine. If these items come into contact with a high-voltage area inside the machine, it may
result in a fire or electrical shock. If these items are dropped or spilled inside the machine,
immediately turn OFF the main power switch, and disconnect the power cord from the power
outlet. Then, contact your local authorized Canon dealer.
CAUTION
• Do not place heavy objects on the machine, as they may tip over or fall resulting in personal
injury.
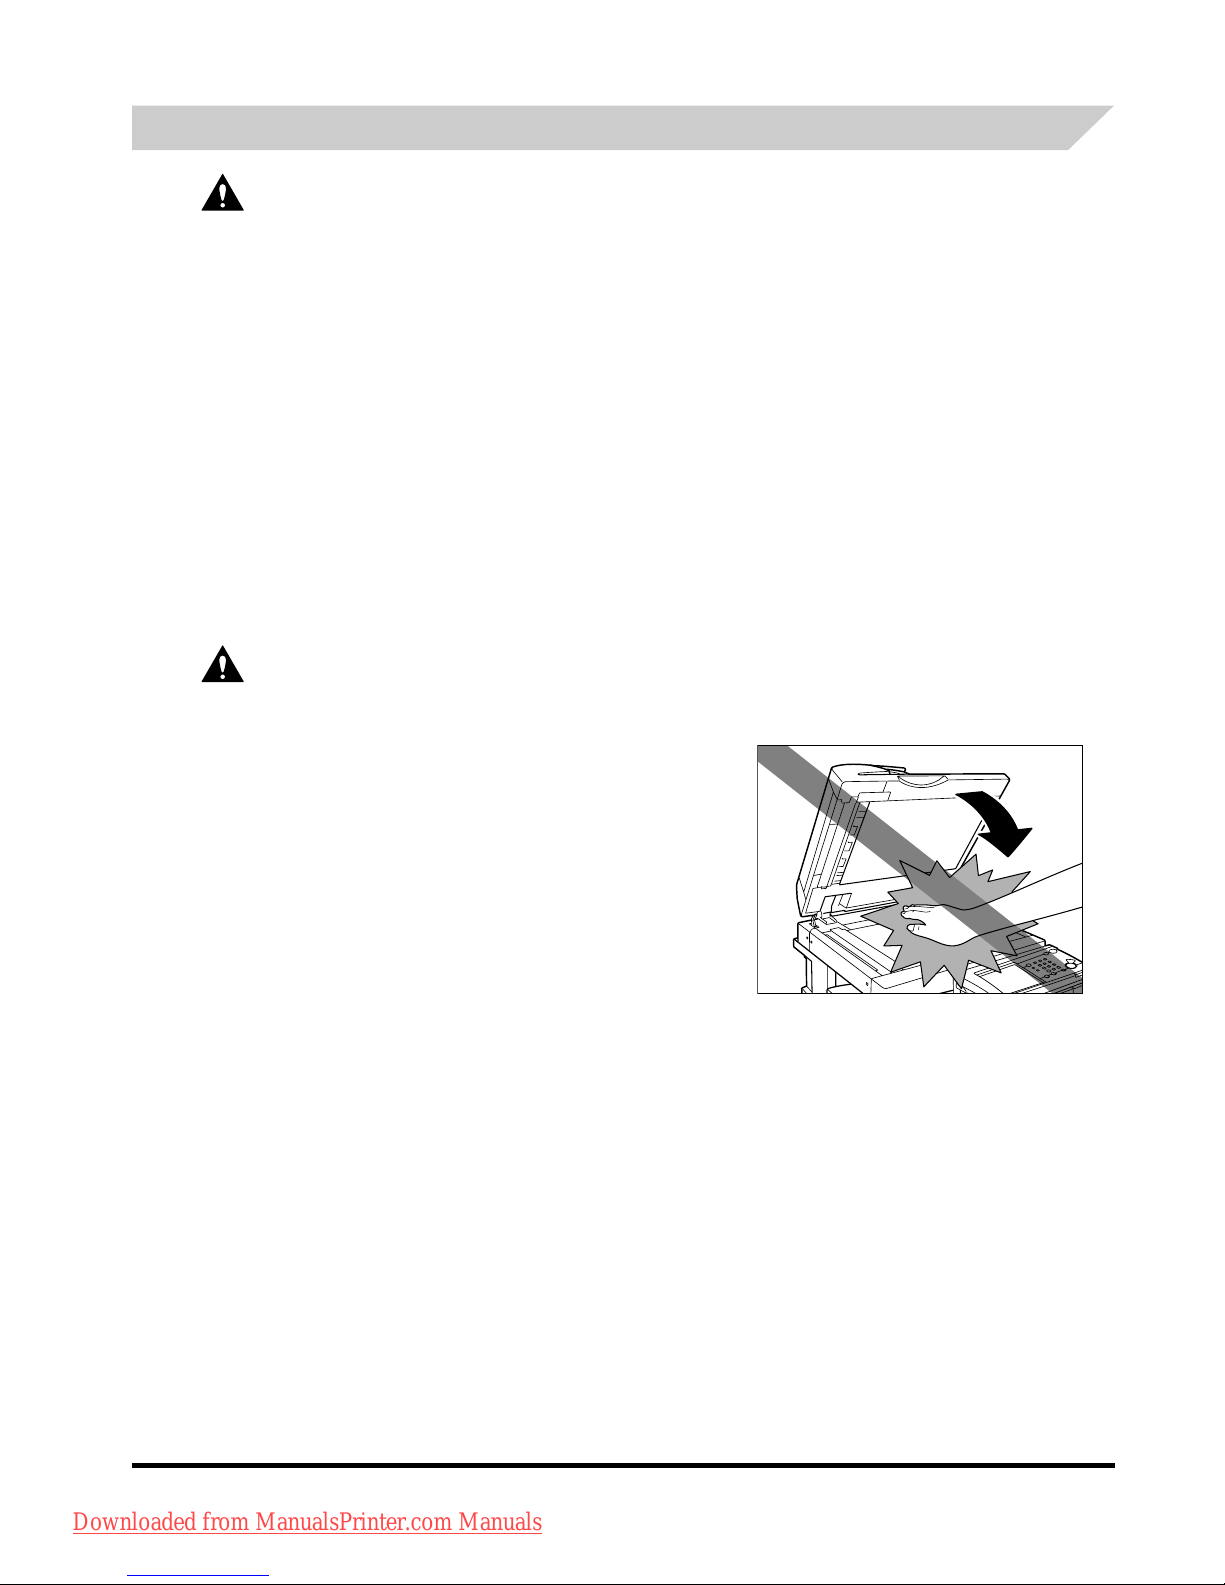
• Close the feeder gently to avoid catching your
hands, as this may result in personal injury.
• D
o not press down hard on the feeder when using
the platen glass to make copies of thick books.
Doing so may damage the platen glass and result in
personal injury.
• D
o not touch the finisher while the machine is
printing, as this may result in personal injury.
• T
urn OFF the control panel power switch for safety
when the machine will not be used for a long period
of time, such as overnight. Also, turn OFF the main
power switch, and disconnect the power cord for
safety when the machine will not be used for an
extended period of time, such as during
consecutive holidays.
Downloaded from ManualsPrinter.com Manuals
Page 18
Important Safety Instructions
xvi
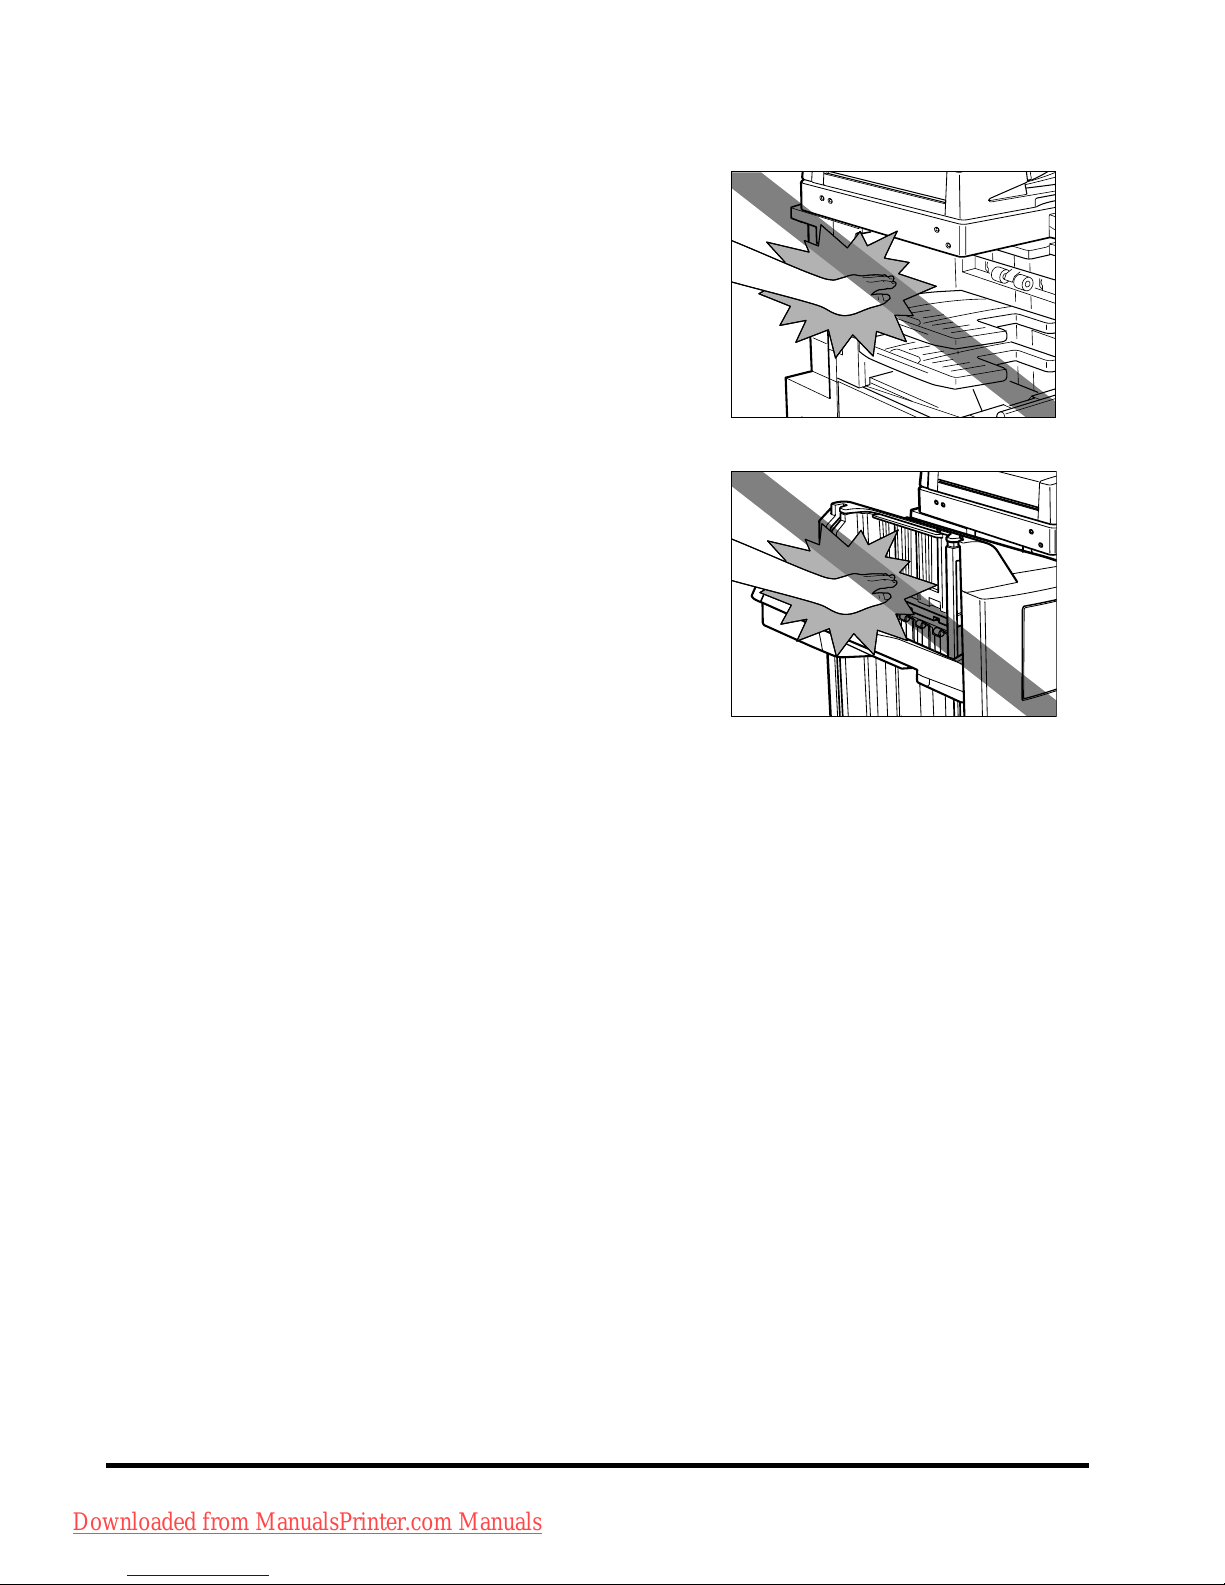
• Do not place your hands, hair, clothing, etc., near the exit and feed rollers. Even if the machine
is not in operation, your hands, hair, or clothing may get caught in the rollers, which may result
in personal injury or damage if the machine suddenly starts printing.
• D
o not place your hands in the part of the tray where
stapling is performed (near the rollers) when a
finisher is attached, as this may result in personal
injury.
• Th
e laser beam can be harmful to human bodies.
Since radiation emitted inside the product is
completely confined within protective housings and
external covers, the laser beam cannot escape from
the machine during any phase of user operation.
Read the following remarks and instructions for
safety.
• Ne
ver open covers other than those instructed in
this manual.
Finisher-S1
Finisher-AE1/Saddle Finisher-AE2
Downloaded from ManualsPrinter.com Manuals
Page 19
Important Safety Instructions
xvii
• Do not remove the following caution labels which are attached to the machine.
• Th
is product is certified as a Class 1 laser product under IEC60825-1:2007
• If
the laser beam escapes from the machine, exposure may cause serious damage to your
eyes.
• C
ontrolling, adjusting, or operating the machine in ways not mentioned in this manual may
cause dangerous radiation to escape from the machine.
Downloaded from ManualsPrinter.com Manuals
Page 20
Important Safety Instructions
xviii
Maintenance and Inspections
WARNING
• When cleaning the machine, first turn OFF the main power switch, then disconnect the power
cord. Failure to observe these steps may result in a fire or electrical shock.
• Disconnect the power cord from the power outlet regularly, and clean the area around the
base of the power plug's metal pins and the power outlet with a dry cloth to ensure that all
dust and grime is removed. If the power cord is connected for a long period of time in a damp,
dusty, or smoky location, dust can build up around the power plug and become damp. This
may cause a short circuit and result in a fire.
• Clean
the machine using a slightly dampened cloth with a mild detergent mixed with water.
Do not use alcohol, benzene, paint thinner, or other flammable substances. Check detergent
for flammability prior to use. If flammable substances come into contact with a high-voltage
area inside the machine, it may result in a fire or electrical shock.
• Th
ere are some areas inside the machine which are subject to high-voltages. When removing
jammed paper or when inspecting the inside of the machine, do not allow necklaces,
bracelets, or other metal objects to touch the inside of the machine, as this may result in
burns or electrical shock.
• Do not burn or throw used toner cartridges into open flames, as this may cause the toner
remaining inside the cartridges to ignite, resulting in burns or a fire.
CAUTION
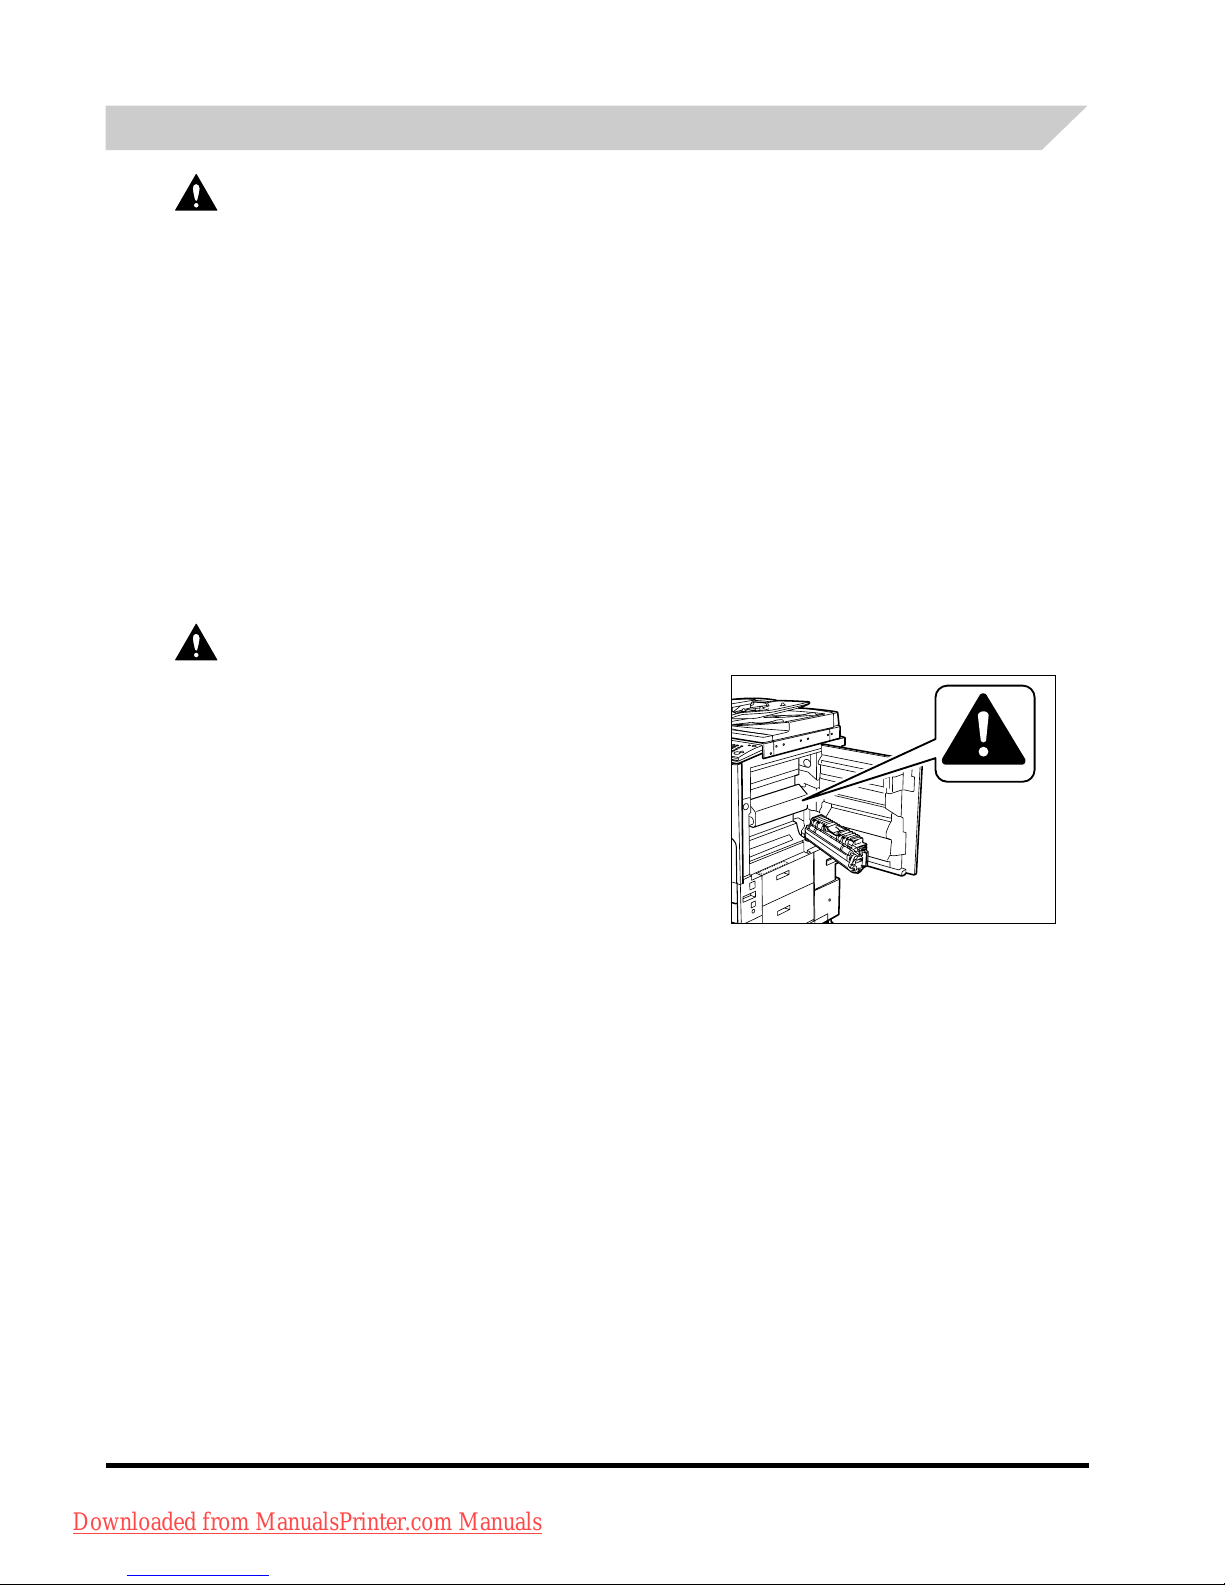
• The fixing unit and its surroundings inside the
machine may become hot during use. When
removing jammed paper or when inspecting the
inside of the machine, do not touch the fixing unit
and its surroundings, as doing so may result in
burns or electrical shock.
• When removing jammed paper or replacing the
toner cartridge, take care not to allow the toner to
come into contact with your hands or clothing, as
this will dirty your hands or clothing. If they become
dirty, wash them immediately with cold water.
Washing them with warm water will set the toner,
and make it impossible to remove the toner stains.
• Wh
en removing paper which has become jammed inside the machine, remove the jammed
paper gently to prevent the toner on the paper from scattering and getting into your eyes or
mouth. If the toner gets into your eyes or mouth, wash them immediately with cold water and
immediately consult a physician.
• Whe
n loading paper or removing jammed originals or paper, take care not to cut your hands
on the edges of the originals or paper.
• Wh
en removing a used toner cartridge, remove the cartridge carefully to prevent the toner
from scattering and getting into your eyes or mouth. If the toner gets into your eyes or mouth,
wash them immediately with cold water and immediately consult a physician.
Downloaded from ManualsPrinter.com Manuals
Page 21
Important Safety Instructions
xix
• Do not dismantle the toner cartridge, as doing so may cause toner to fly out and enter your
eyes or mouth. If the toner gets into your eyes or mouth, wash them immediately with cold
water and immediately consult a physician.
• If toner escapes from the toner cartridge, make sure not to ingest the toner or allow it to
directly touch your skin. If toner touches your skin, wash it away with soap and water. If your
skin still feels irritated after washing it, or you ingest toner, consult a doctor immediately.
Consumables
WARNING
• Do not burn or throw used toner cartridges into open flames, as this may cause the toner
remaining inside the cartridges to ignite, resulting in burns or a fire.
• Do not store toner cartridges or copy paper in places exposed to open flames, as this may
cause the toner or paper to ignite, resulting in burns or a fire.
• When discarding used toner cartridges, put the cartridges in a bag to prevent the toner
remaining inside the cartridges from scattering, and dispose of them in a location away from
open flames.
CAUTION
• Keep toner and other consumables out of the reach of small children. If these items are
ingested, consult a physician immediately.
• Do not dismantle the toner cartridge, as doing so may cause toner to fly out and enter your
eyes or mouth. If the toner gets into your eyes or mouth, wash them immediately with cold
water and immediately consult a physician.
• If toner escapes from the toner cartridge, make sure not to ingest the toner or allow it to
directly touch your skin. If toner touches your skin, wash it away with soap and water. If your
skin still feels irritated after washing it, or you ingest toner, consult a doctor immediately.
Other Warnings
WARNING
For cardiac pacemaker users:
This product generates a low level magnetic field. If you use a cardiac pacemaker and feel
abnormalities, please move away from the product and consult your doctor.
Downloaded from ManualsPrinter.com Manuals
Page 22

About the Instruction Manual CD-ROM
xx
About the Instruction Manual CD-ROM
Contents of Instruction Manual CD-ROM
Instruction Manual CD-ROM
This contains the English, French, Italian, and German versions of the following guides.
■ Easy Operation Guide
• Basic Features
Contains the basic operation instructions of the Copy, Mail Box, Send, Fax, Remote UI, and Printer
functions.
• To Suit Your Needs
Contains the basic setting
s of the Additional Functions screen.
■ Reference Guide
Contains the basic operation instructions, daily maintenance, and troubleshooting instructions.
■ Copying and Mail Box Guide
Contains the Copying and Mail Box function instructions.
■ Remote UI Guide
Contains the Remote User Interface instructions.
■ Network Guide
Contains the Network Connectivity and setup instructions.
Super G3 FAX Board CD-ROM/Universal Send Kit CD-ROM
This contains the English, French, Italian, and German versions of the following guides.
■ Sending and Facsimile Guide
Contains the Sending and Facsimile function instructions.
Downloaded from ManualsPrinter.com Manuals
Page 23
User Manual CD-ROM Menu
xxi
User Manual CD-ROM Menu
The User Manual CD-ROM Menu is software that enables you to select and view PDF Manuals
included on the CD-ROM via your computer screen. Follow the instructions below to use the
User Manual CD-ROM Menu.
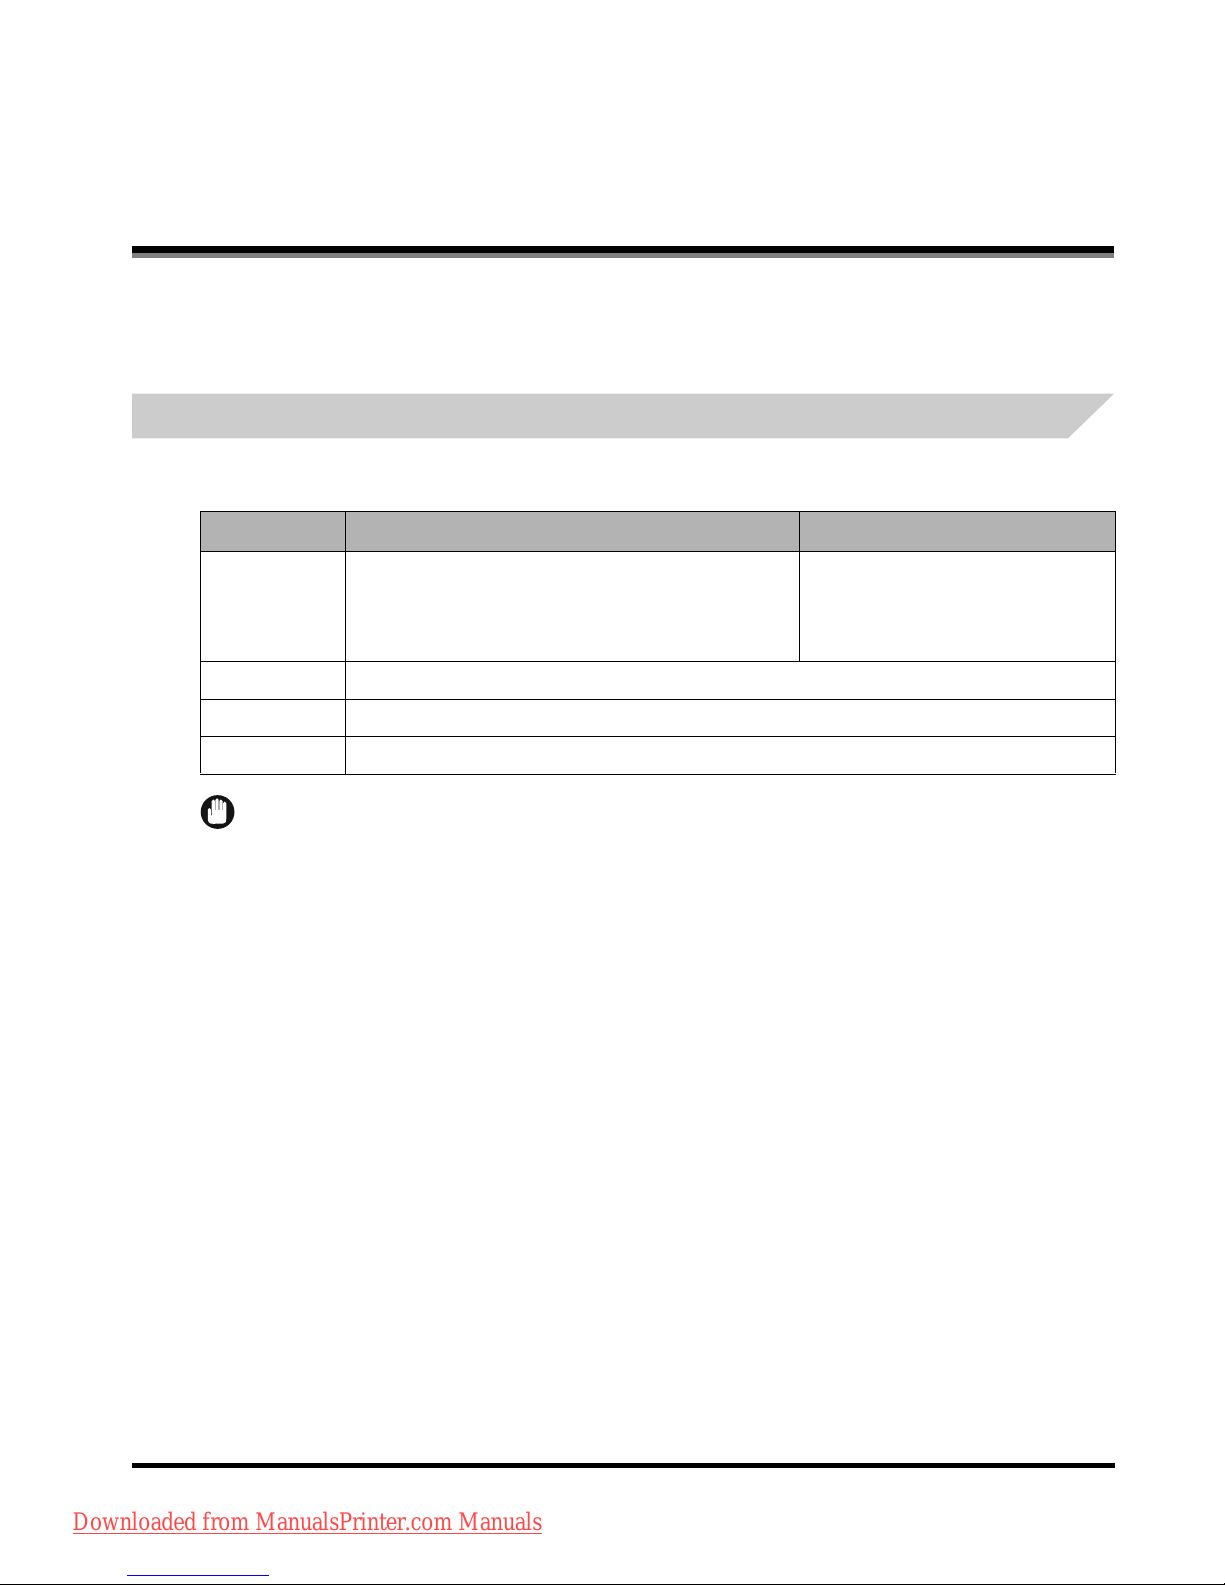
System Requirements
The User Manual CD-ROM Menu can be used in the following system environments.
IMPORTANT
Depending on the configuration of your computer, some functions may not operate correctly. If the PDF
manual does not open from the CD-ROM Menu, open the PDF file directly from the [uk_english] or
[asia-pacific_english] folder on the User Manual CD-ROM.
Windows Macintosh
OS
Windows 98/Me
Windows 2000 (Service Pack 3 or later)
Windows XP (Service Pack 1a)
Windows Server 2003
Mac OS 9.x
Mac OS X
Memory The memory required to run the above operating systems
Computer A computer that can run the above operating systems
Display
A resolution of 1024 x 768 pixels or higher
Downloaded from ManualsPrinter.com Manuals
Page 24
User Manual CD-ROM Menu
xxii
Using The CD-ROM Menu
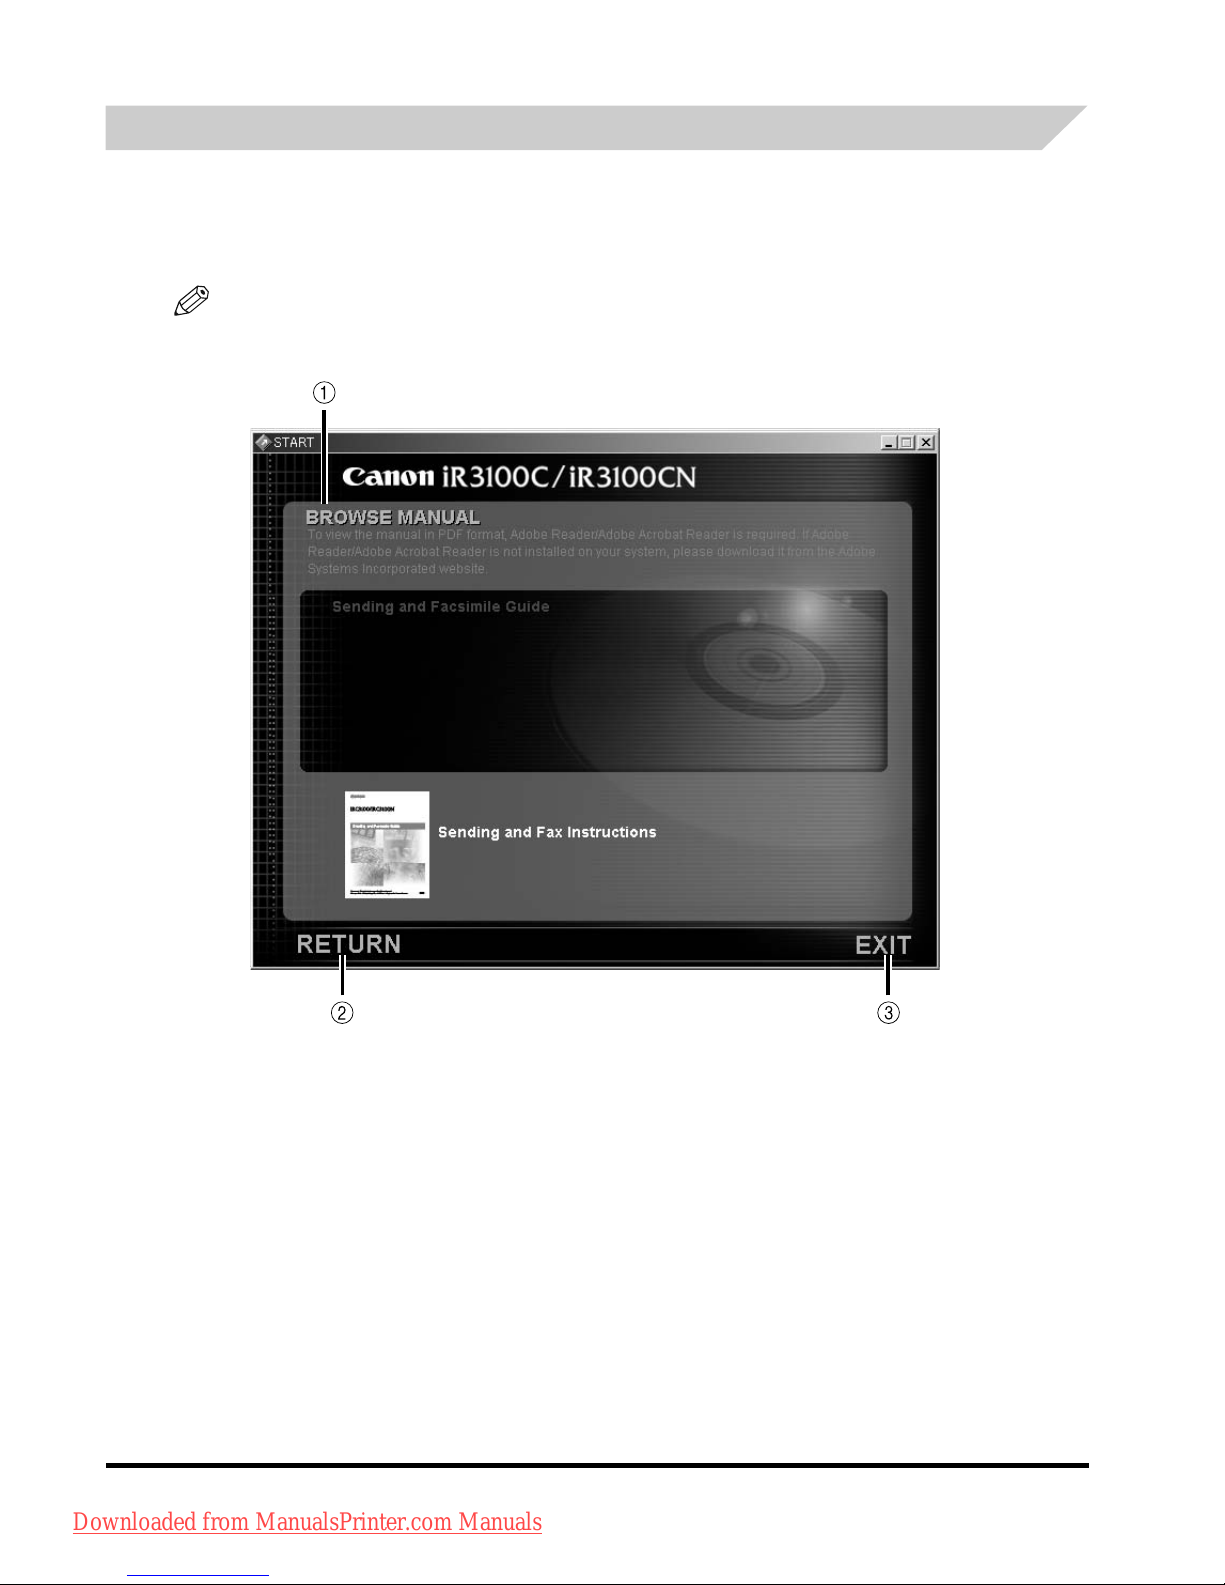
This section describes how to use the CD-ROM Menu. When you insert the User Manual
CD-ROM provided into the CD-ROM drive, the Language Selection screen is displayed.
Clicking a language on this screen displays the following menu. (The sample screenshot shown
here is for Windows users.)
NOTE
For Macintosh users, double-click the [START] icon to start the CD-ROM Menu. The Language
Selection screen is displayed.
The screen shot shown above may differ from the one you actually see, depending on the
machine you are using.
a BROWSE MANUAL
You can read any of the listed guides by clicking on the
desired guide. After clicking on the desired guide,
a PDF-reading software, such as Acrobat Reader,
starts, and the PDF manual is displayed.
b RETURN
Return to the Language Selection menu.
c EXIT
Exit the CD-ROM menu.
Downloaded from ManualsPrinter.com Manuals
Page 25

Periodic Inspection of the Breaker
xxiii
Periodic Inspection of the Breaker
This machine has a breaker that detects excess current or leakage current. Be sure to test the
breaker once or twice a month using the following procedure.
IMPORTANT
•
Make sure that the main power is turned OFF before inspecting the breaker.
•
If a malfunction occurs after an inspection, contact your local authorized Canon dealer.
Checking the Breaker
1
Push the test button with the tip of a ball-point
pen, or similar object.
IMPORTANT
Briefly push the test button.
NOTE
•
The breaker is located on the left side of the machine.
•
For more information on the location of the breaker, see
"External View and Internal View," on p. 1-15.
2
Confirm that the breaker lever is switched to the OFF (" " side) position.
IMPORTANT
•
Do not use the test button to turn the power ON and OFF.
•
If the breaker lever does not switch to the OFF (" " side) position, repeat step 1.
•
If the breaker lever does not switch to the OFF (" " side) position, despite carrying out the above
procedure two or three times, contact your local authorized Canon dealer.
1
2
Downloaded from ManualsPrinter.com Manuals
Page 26
Periodic Inspection of the Breaker
xxiv
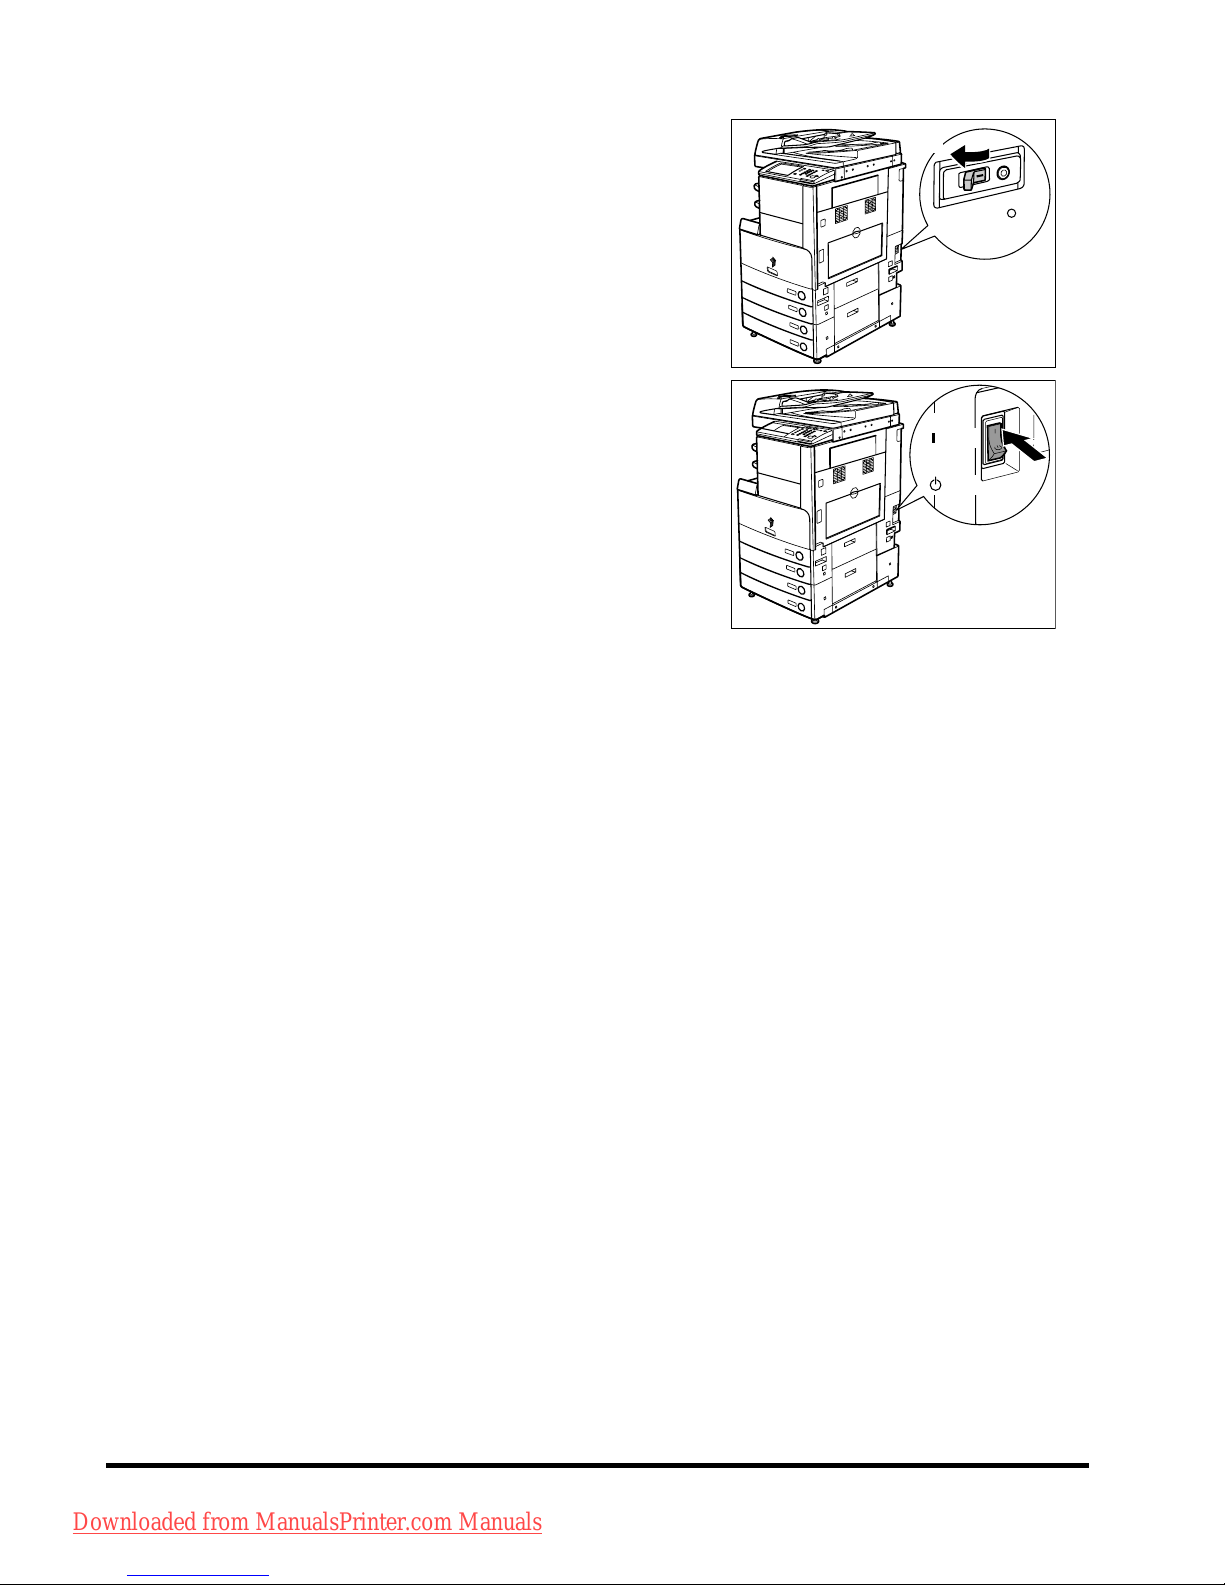
3
Switch the breaker lever to ON ("I" side).
4
Press the main power switch to the "I" side.
5
Fill in the check sheet, located on p. 4-6, to
document your periodic inspections of the
breaker.
ON
( I side)
OFF
( side)
3
( side)
( side)
Downloaded from ManualsPrinter.com Manuals
Page 27

CHAPTER
1-1
1
Before You Start Using This
Machine
This chapter describes what you should know before using this machine, such as parts and their functions,
and how to turn ON the main power.
Installation Location and Handling . . . . . . . . . . . . . . . . . . . . . . . . . . . . . . . . . . . . . . . . . . . . . . . . . . .1-2
Installation Precautions. . . . . . . . . . . . . . . . . . . . . . . . . . . . . . . . . . . . . . . . . . . . . . . . . . . . . . . . . . . . . . . . . . . . 1-2
Handling Precautions . . . . . . . . . . . . . . . . . . . . . . . . . . . . . . . . . . . . . . . . . . . . . . . . . . . . . . . . . . . . . . . . . . . . . 1-7
What This Machine Can Do . . . . . . . . . . . . . . . . . . . . . . . . . . . . . . . . . . . . . . . . . . . . . . . . . . . . . . .1-10
System Configuration and Parts . . . . . . . . . . . . . . . . . . . . . . . . . . . . . . . . . . . . . . . . . . . . . . . . . . . .1-13
Optional Equipment . . . . . . . . . . . . . . . . . . . . . . . . . . . . . . . . . . . . . . . . . . . . . . . . . . . . . . . . . . . . . . . . . . . . . 1-13
External View and Internal View . . . . . . . . . . . . . . . . . . . . . . . . . . . . . . . . . . . . . . . . . . . . . . . . . . . . . . . . . . . . 1-15
Control Panel Parts and Functions . . . . . . . . . . . . . . . . . . . . . . . . . . . . . . . . . . . . . . . . . . . . . . . . . . . . . . . . . . 1-17
Touch Panel Display . . . . . . . . . . . . . . . . . . . . . . . . . . . . . . . . . . . . . . . . . . . . . . . . . . . . . . . . . . . . . . . . . . . . . 1-18
Main Power and Control Panel Power. . . . . . . . . . . . . . . . . . . . . . . . . . . . . . . . . . . . . . . . . . . . . . . .1-21
How to Turn ON the Main Power . . . . . . . . . . . . . . . . . . . . . . . . . . . . . . . . . . . . . . . . . . . . . . . . . . . . . . . . . . . 1-21
Things You Must Do Before Using This Machine . . . . . . . . . . . . . . . . . . . . . . . . . . . . . . . . . . . . . . .1-25
Selecting the Type of Telephone Line. . . . . . . . . . . . . . . . . . . . . . . . . . . . . . . . . . . . . . . . . . . . . . . . . . . . . . . . 1-25
Setting the Current Date and Time. . . . . . . . . . . . . . . . . . . . . . . . . . . . . . . . . . . . . . . . . . . . . . . . . . . . . . . . . . 1-26
Registering Your Machine's Fax Number . . . . . . . . . . . . . . . . . . . . . . . . . . . . . . . . . . . . . . . . . . . . . . . . . . . . . 1-27
Registering Sender Names. . . . . . . . . . . . . . . . . . . . . . . . . . . . . . . . . . . . . . . . . . . . . . . . . . . . . . . . . . . . . . . .1-28
Registering the Unit's Name . . . . . . . . . . . . . . . . . . . . . . . . . . . . . . . . . . . . . . . . . . . . . . . . . . . . . . . . . . . . . . . 1-29
Displaying a Help Screen . . . . . . . . . . . . . . . . . . . . . . . . . . . . . . . . . . . . . . . . . . . . . . . . . . . . . . . . .1-31
Downloaded from ManualsPrinter.com Manuals
Page 28
Installation Location and Handling
1-2
Before You Start Using This Machine
1
Installation Location and Handling
This section describes precautions for installation location and handling. We recommend that
you read this section prior to using this machine.
Installation Precautions
Avoid Installing the Machine in the Following Locations
■ Avoid locations subject to extremes of
temperature and humidity, whether low or
high.
For example, avoid installing the machine near water
faucets, hot water heaters, humidifiers, air conditioners,
heaters, or stoves.
■ Avoid installing the machine in direct
sunlight.
If this is unavoidable, use curtains to shade the machine.
Be sure that the curtains do not block the machine's
ventilation slots or louvers, or interfere with the electrical
cord or power supply.
Downloaded from ManualsPrinter.com Manuals
Page 29
Installation Location and Handling
1-3
Before You Start Using This Machine
1
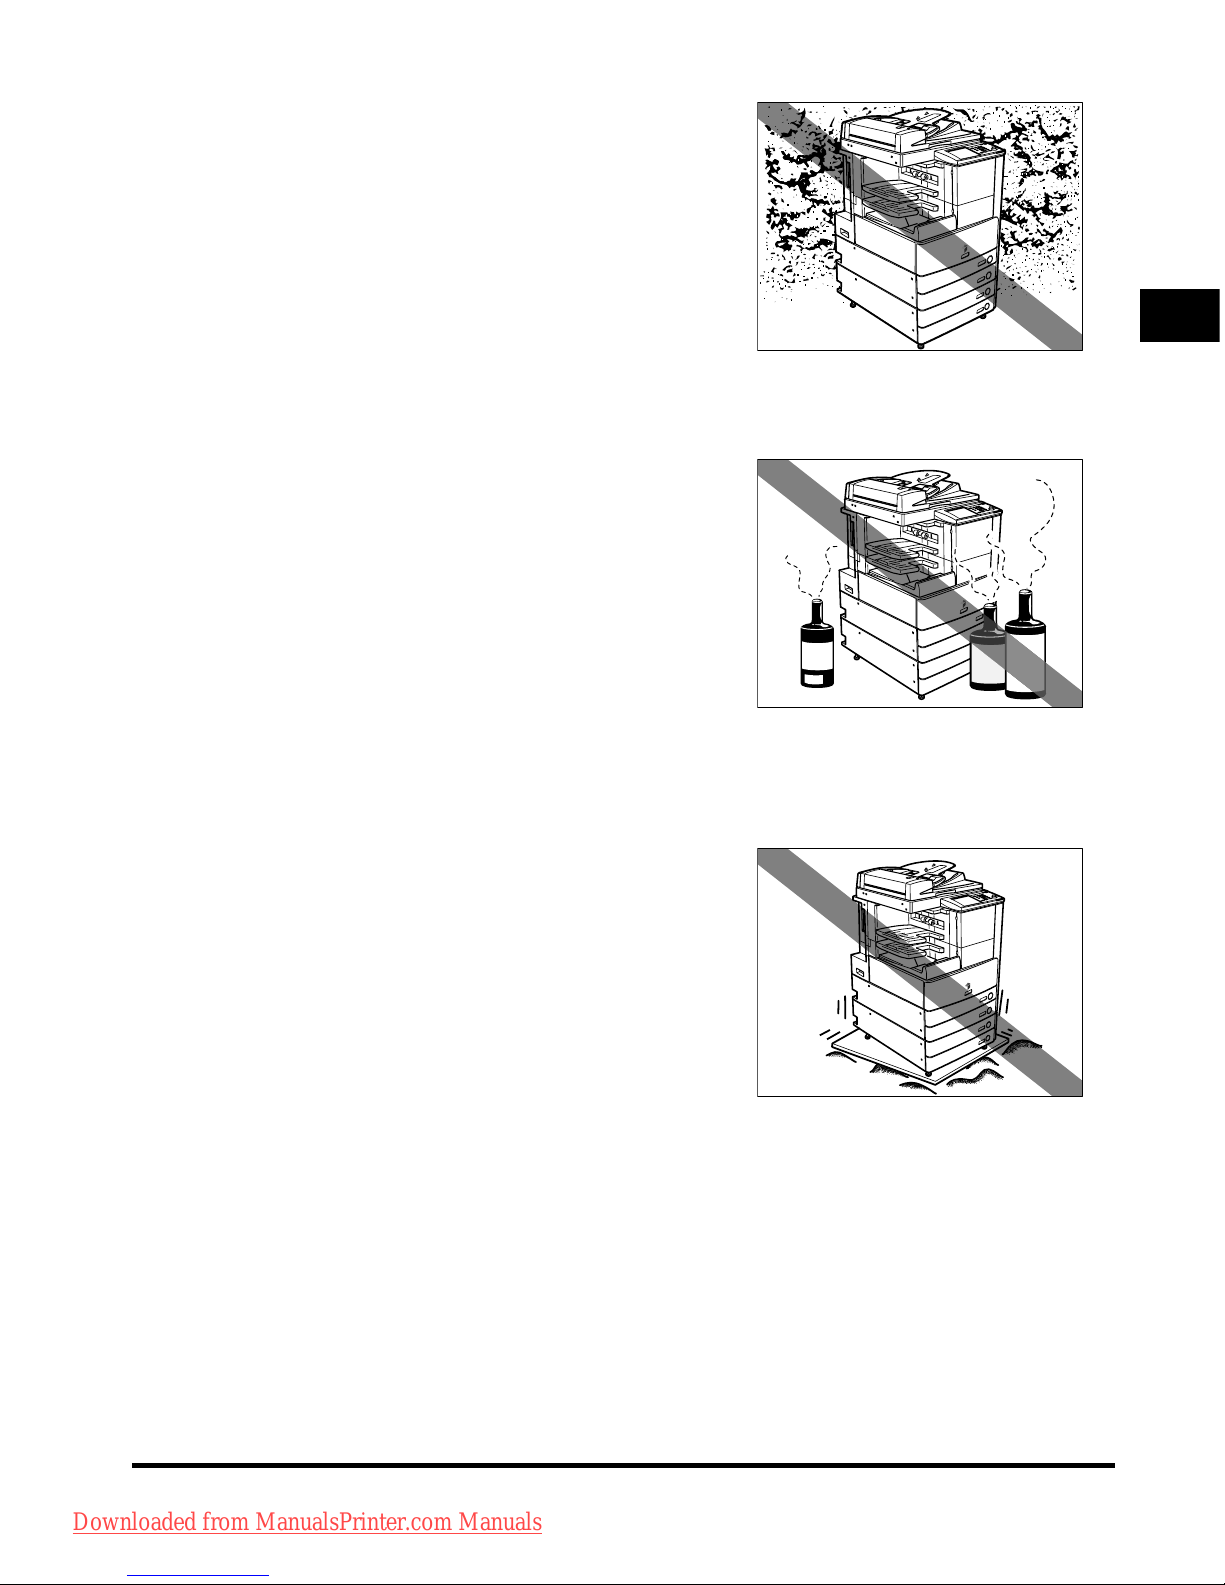
■ Avoid poorly ventilated locations.
This machine generates a slight amount of ozone during
normal use. Although sensitivity to ozone may vary, this
amount is not harmful. Ozone may be more noticeable
during extended use or long production runs, especially in
poorly ventilated rooms. It is recommended that the room
be appropriately ventilated, sufficient to maintain a
comfortable working environment, in areas of machine
operation.
■ Avoid locations where a considerable amount of dust accumulates.
■ A
void locations where ammonia gas is
emitted.
■ A
void locations near volatile or flammable materials, such as alcohol or paint
thinner.
■ A
void locations that are subject to
vibration.
For example, avoid installing the machine on unstable
floors or stands.
Downloaded from ManualsPrinter.com Manuals
Page 30
Installation Location and Handling
1-4
Before You Start Using This Machine
1
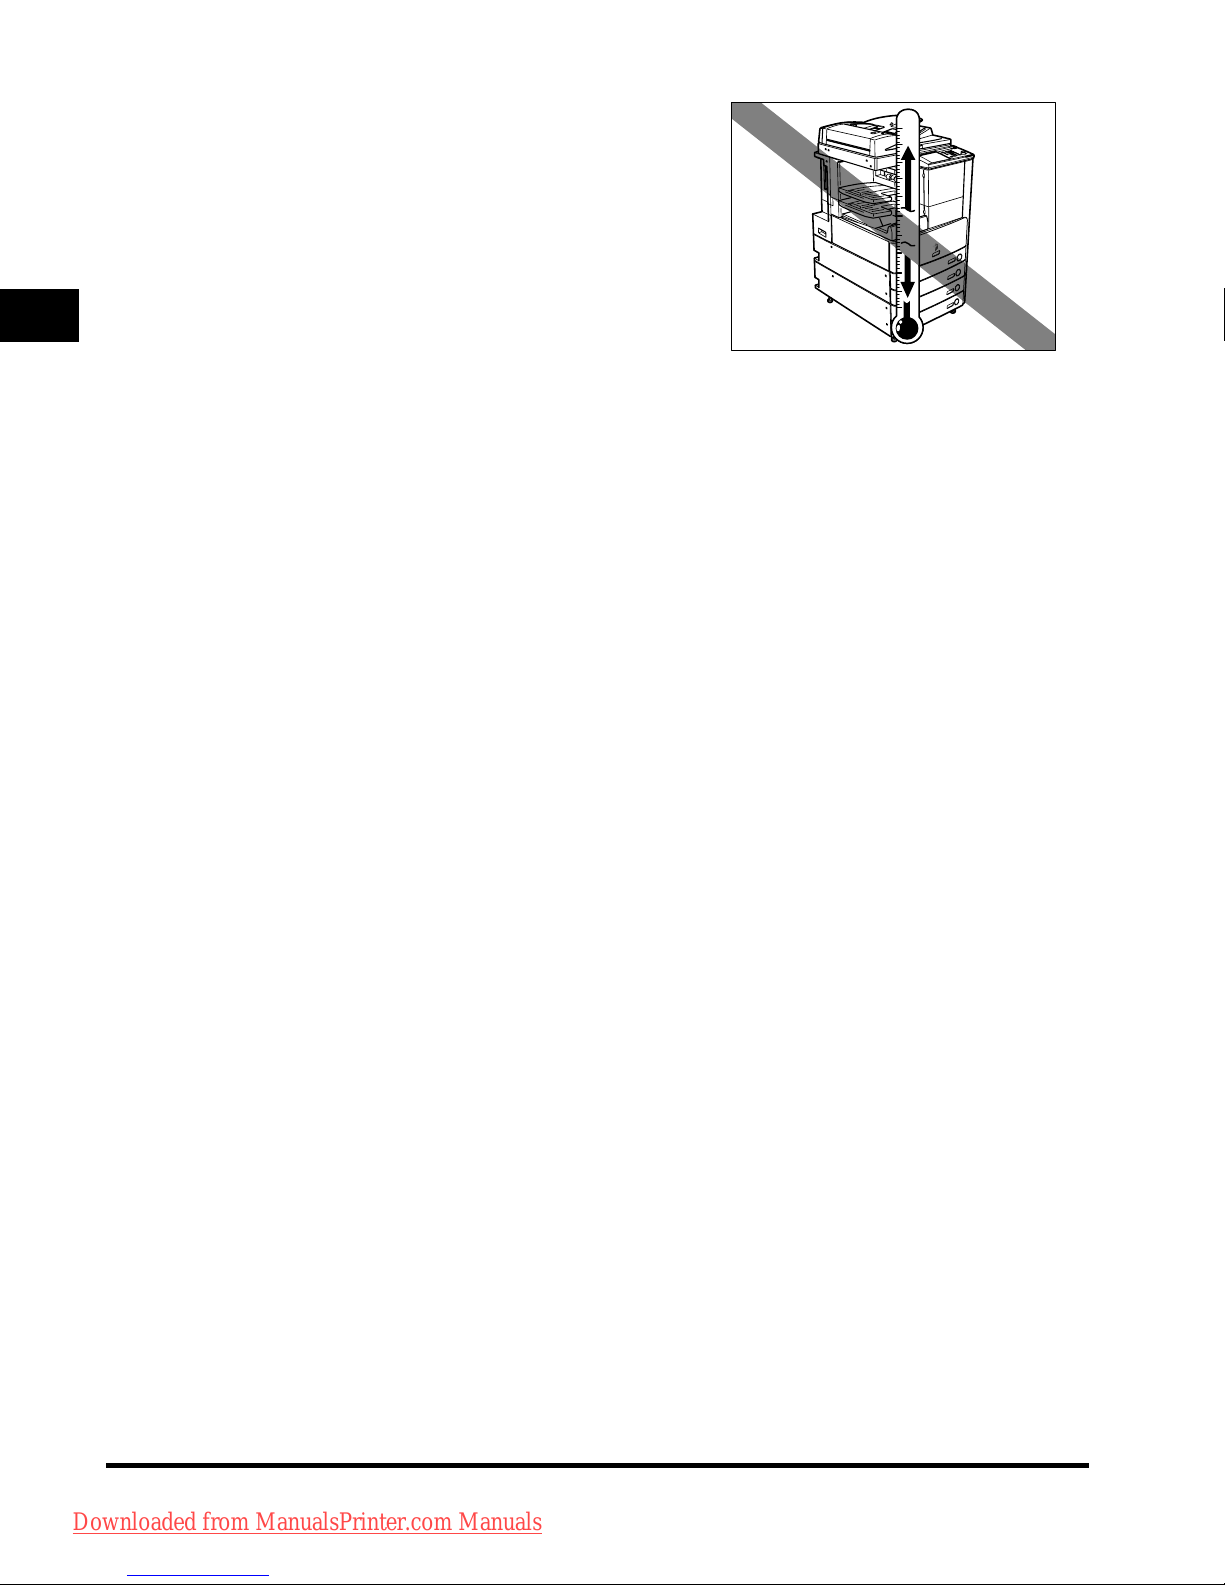
■ Avoid exposing the machine to rapid
changes in temperature.
If the room in which the machine is installed is cold but
rapidly heated, water droplets (condensation) may form
inside the machine. This may result in a noticeable
degradation in the quality of the copied image, the inability
to properly scan an original, or the copies having no
printed image at all.
■ Avoid installing the machine near computers or other precision electronic
equipment.
Electrical interference and vibrations generated by the machine during printing can adversely affect the
operation of such equipment.
■ Avoid installing the machine near televisions, radios, or similar electronic
equipment.
The machine might interfere with sound and picture signal reception. Insert the power plug into a
dedicated power outlet, and maintain as much space as possible between the machine and other
electronic equipment.
■ Do not remove the machine's leveling feet.
Do not remove the machine's leveling feet after the machine has been installed. If you put weight on the
front of the machine while the drawers or units within the machine are pulled out, the machine may fall
forward. To prevent this from happening, make sure that the machine's leveling feet are in place.
Downloaded from ManualsPrinter.com Manuals
Page 31
Installation Location and Handling
1-5
Before You Start Using This Machine
1
Select a Safe Power Supply
■ Plug the machine into a 220-240 V AC outlet.
■ Mak
e sure that the power supply for the machine is safe, and has a steady
voltage.
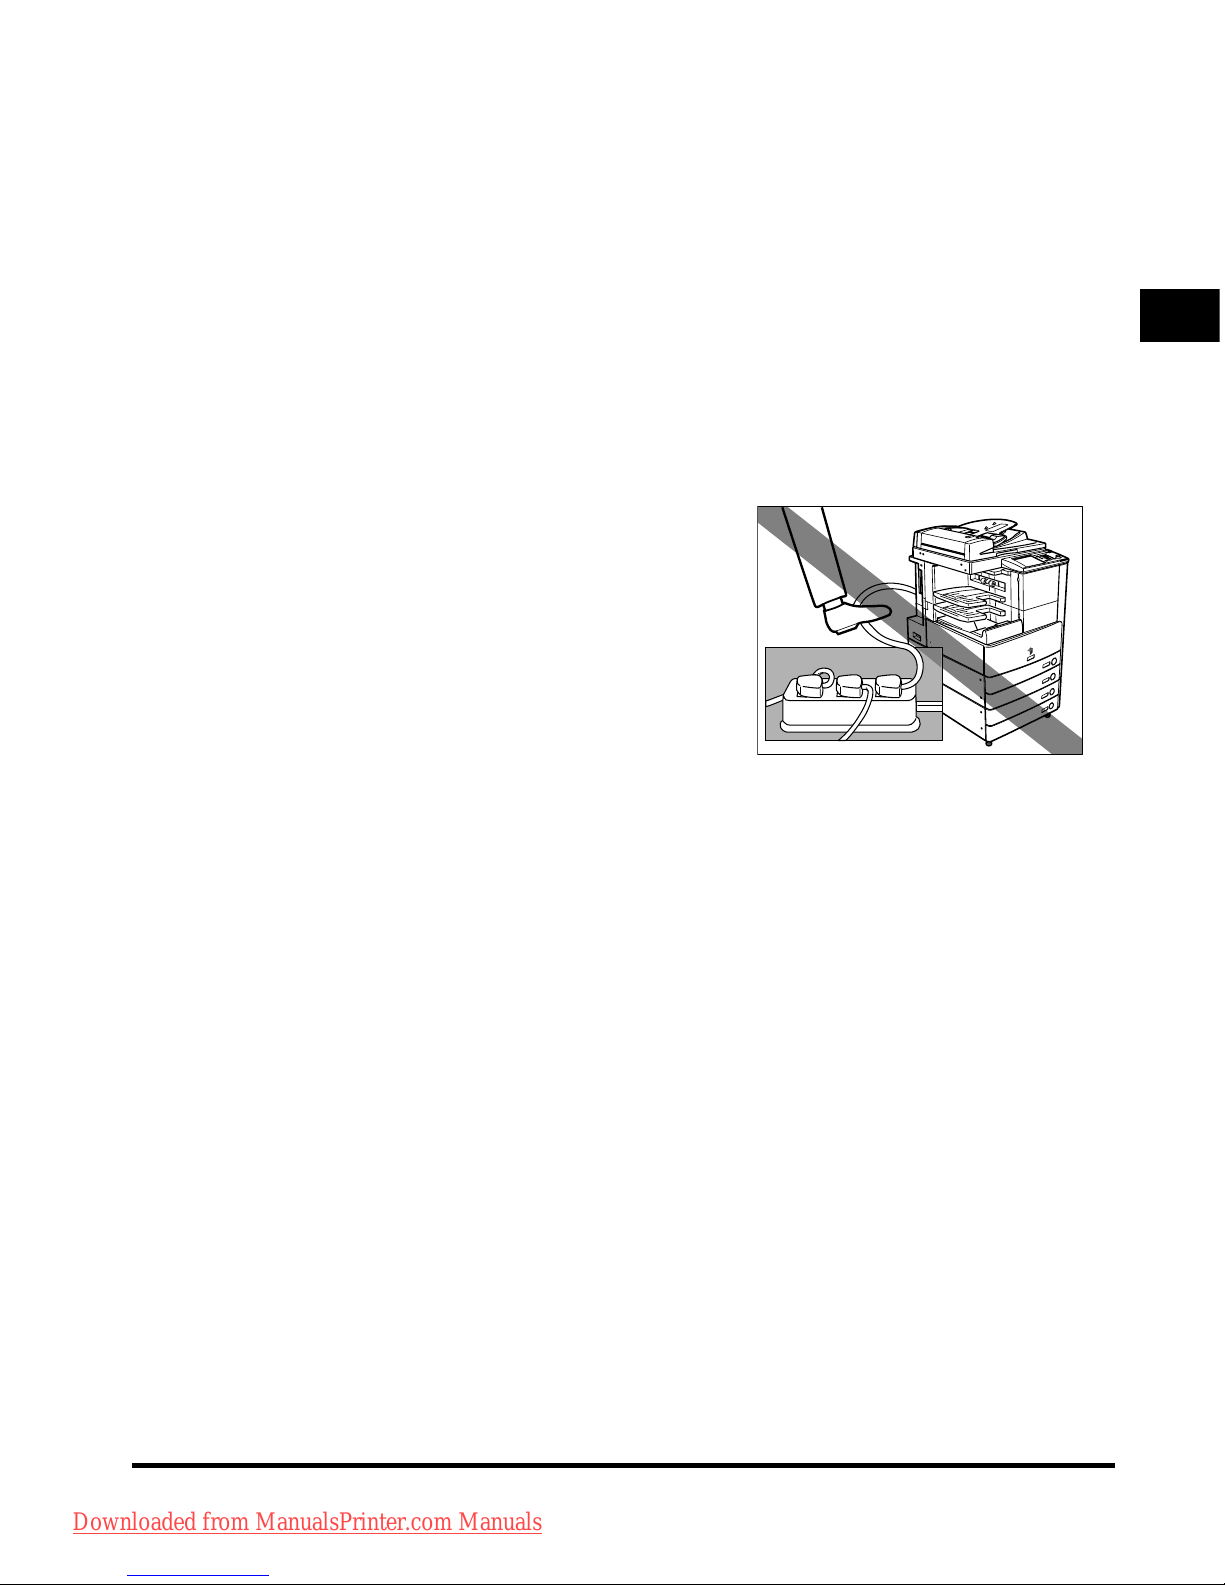
■ Do
not connect other electrical equipment to the same power outlet to which
the machine is connected.
■ Do
not connect the power cord to a multiplug power strip, as this may cause
a fire or electrical shock.
■ The
power cord may become damaged if it
is often stepped on or if heavy objects are
placed on it. Continued use of a damaged
power cord can lead to an accident, such as
a fire or electrical shock.
Downloaded from ManualsPrinter.com Manuals
Page 32
Installation Location and Handling
1-6
Before You Start Using This Machine
1
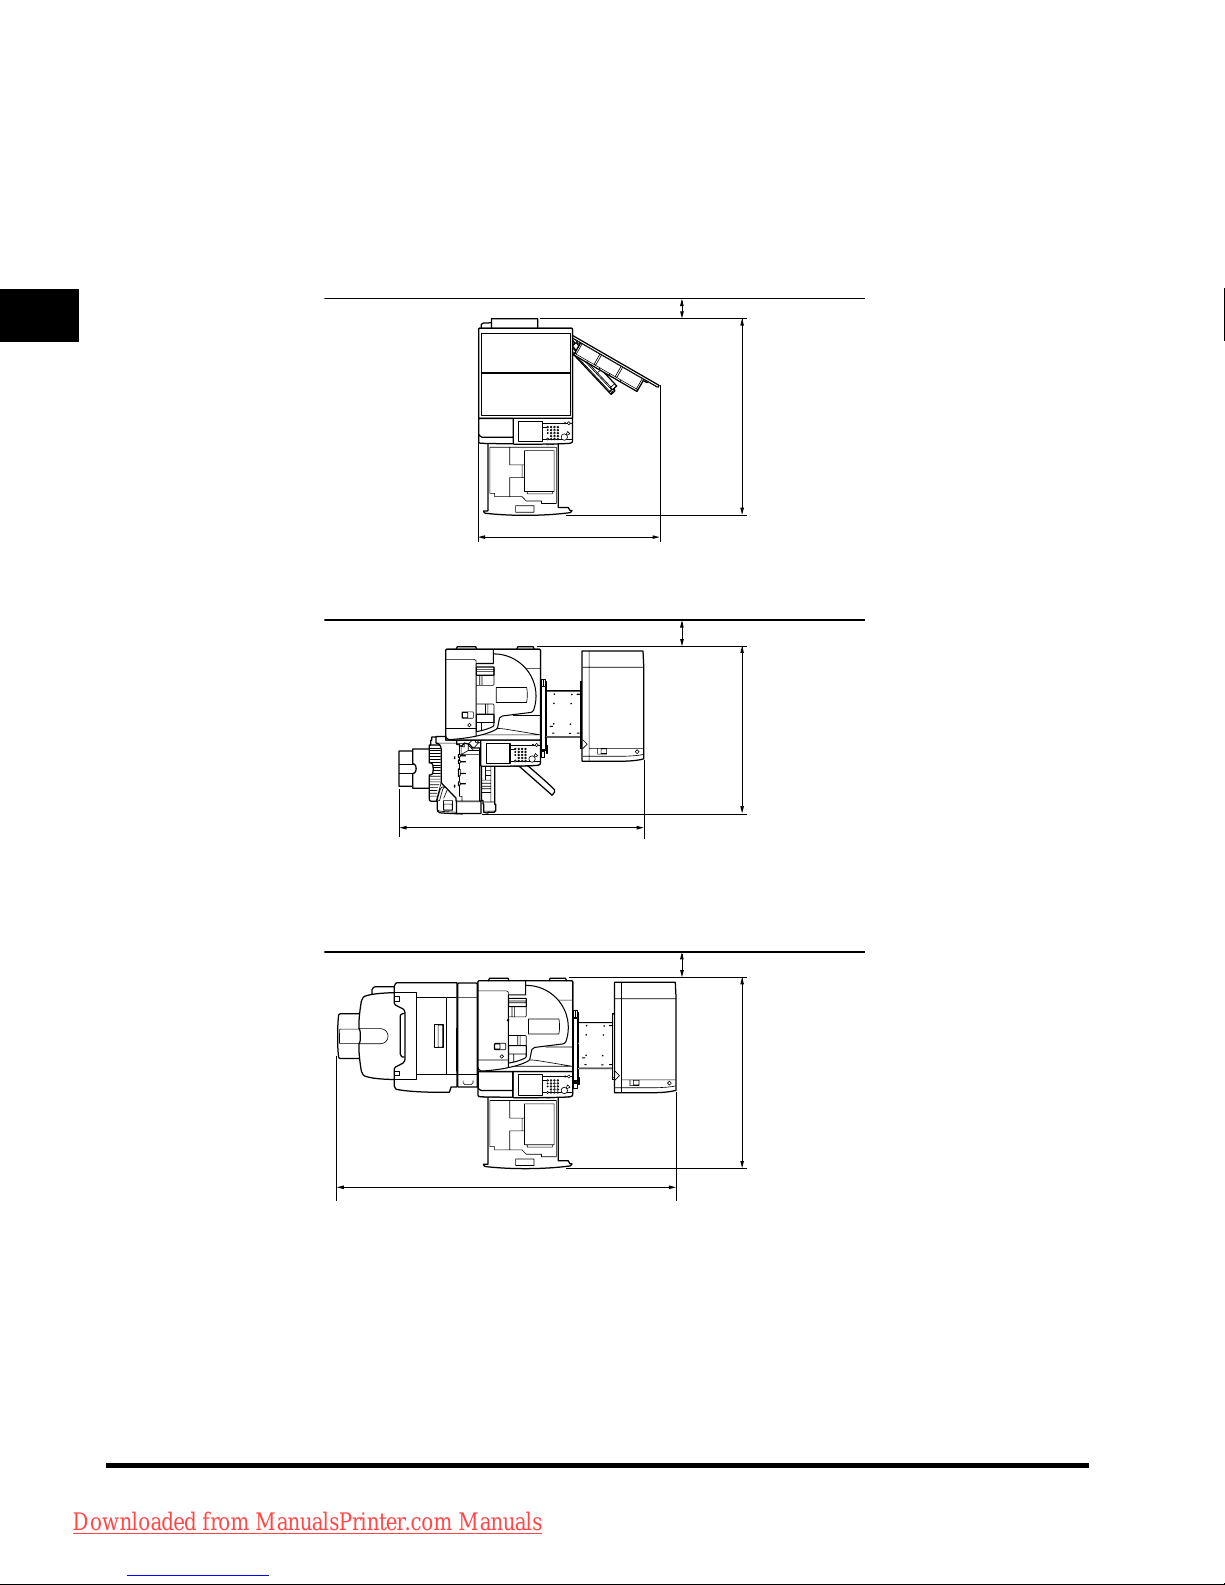
Provide Adequate Installation Space
■ Provide enough space on each side of the machine for unrestricted
operation.
No option is attached.
1,158 mm
1,035 mm
100 mm or more
The optional Feeder (DADF-N1), Finisher-S1, and Paper Deck-Q1 are attached.
1,087 mm
1,553 mm
100 mm or more
The optional Feeder (DADF-N1), Saddle Finisher-AE2, Puncher Unit-L1, Buffer Pass Unit-E2,
and Paper Deck-Q1 are attached.
1,169 mm
2,082 mm
100 mm or more
Downloaded from ManualsPrinter.com Manuals
Page 33
Installation Location and Handling
1-7
Before You Start Using This Machine
1
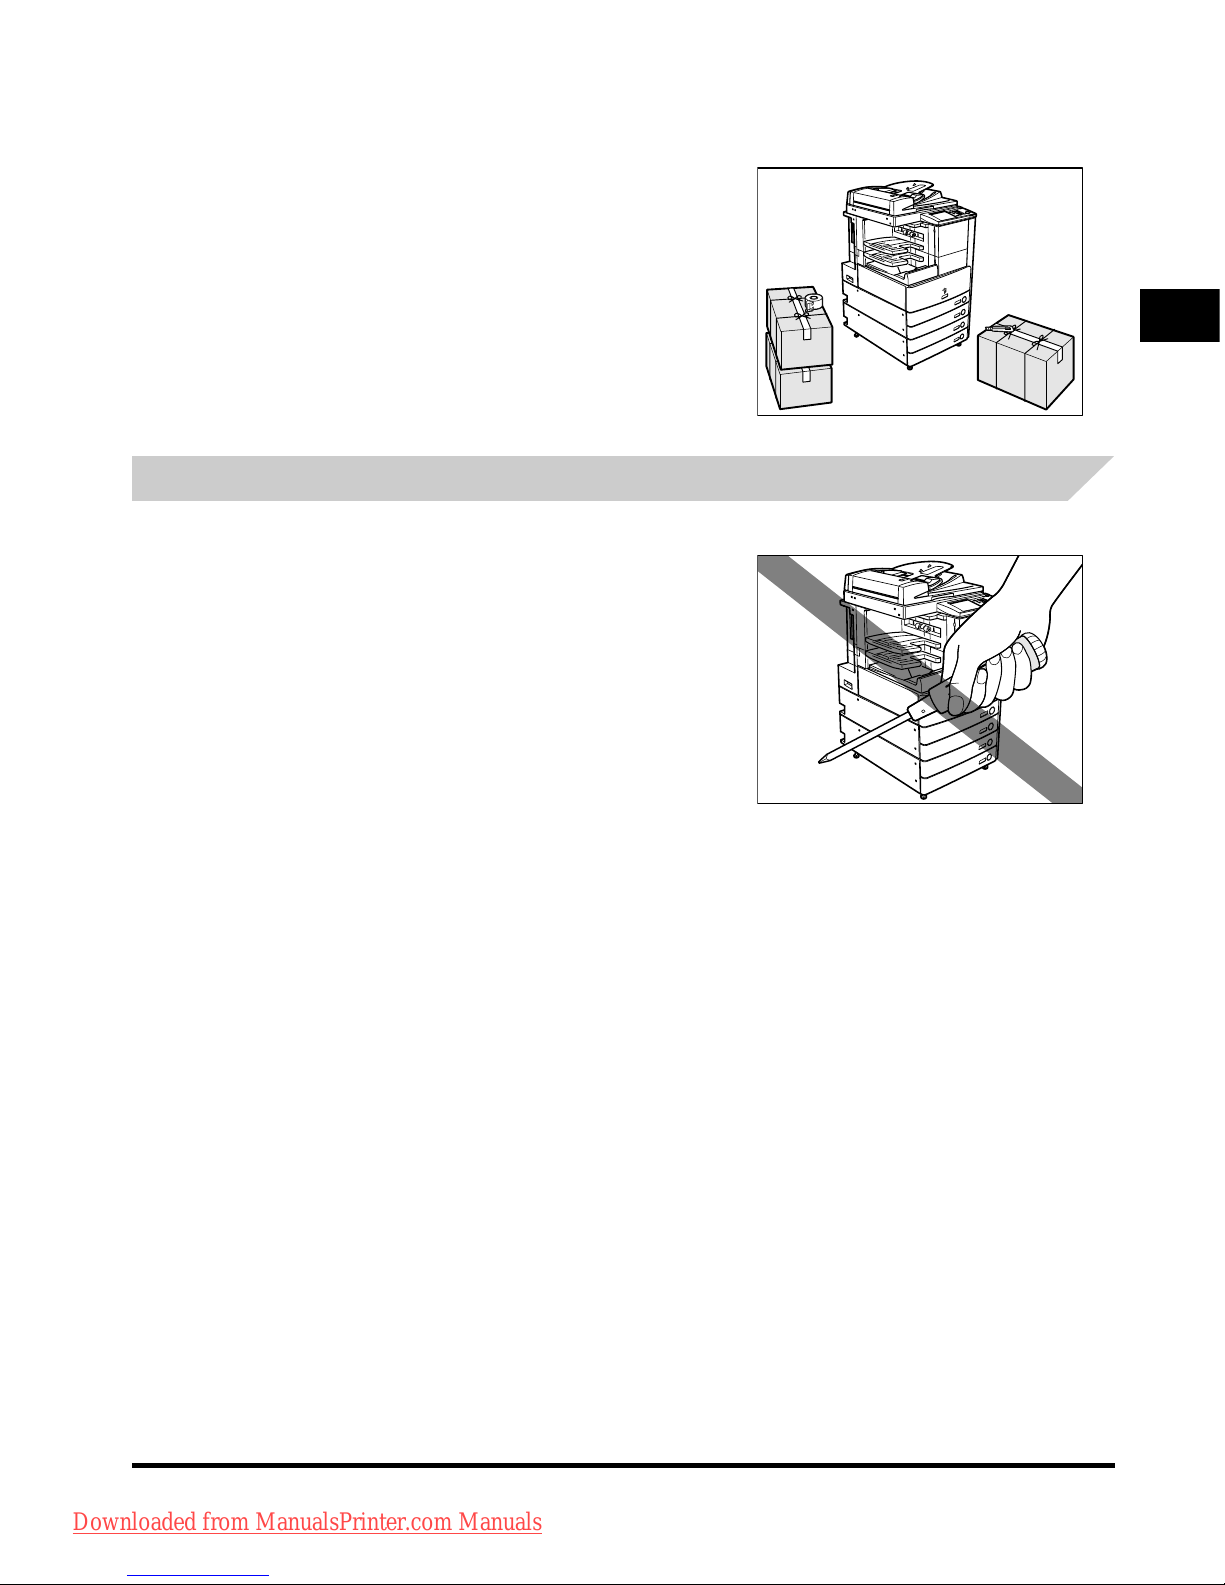
Moving the Machine
■ If you intend to move the machine, contact
your local authorized Canon dealer
beforehand. Do not attempt to move the
machine yourself.
.
Handling Precautions
■ Do not attempt to disassemble or modify
the machine.
■ Some par
ts inside the machine are subject to high-voltages and
temperatures. Take adequate precautions when inspecting the inside of the
machine. Do not carry out any inspections not described in this manual.
Downloaded from ManualsPrinter.com Manuals
Page 34
Installation Location and Handling
1-8
Before You Start Using This Machine
1
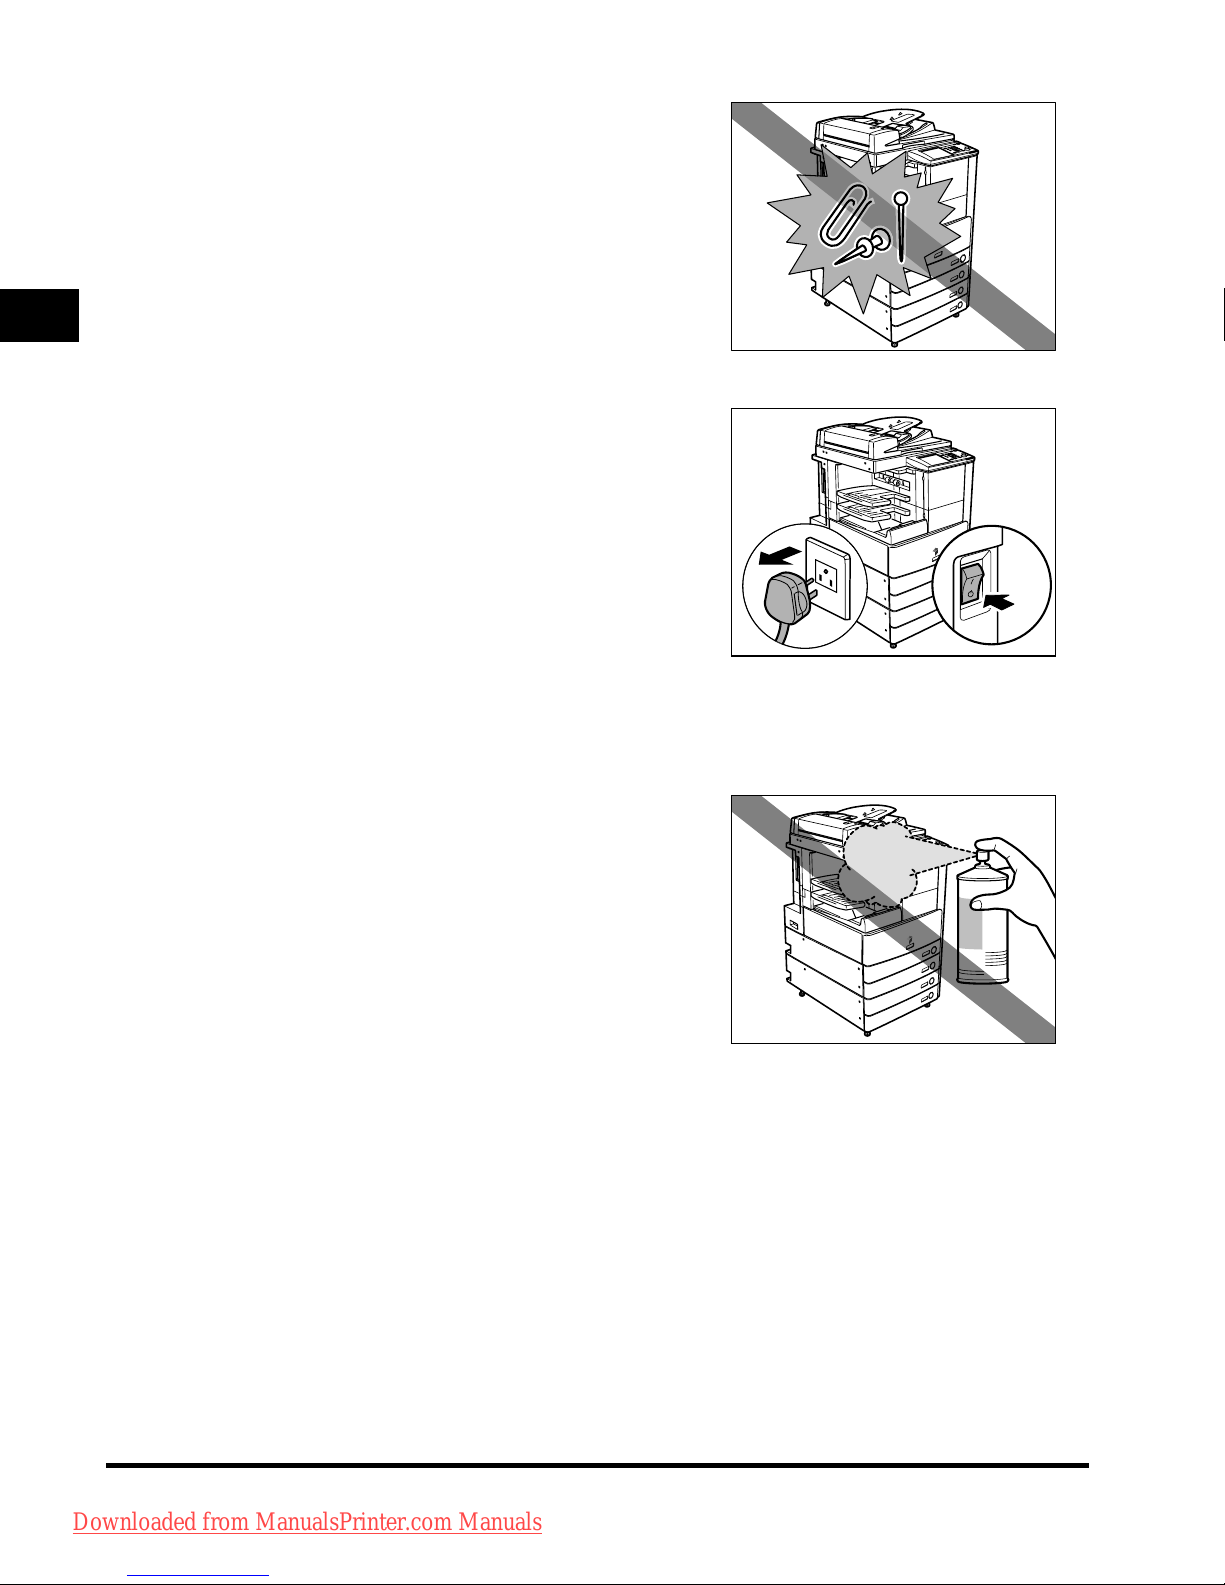
■ Be careful not to spill liquid or drop any
foreign objects, such as paper clips or
staples inside the machine. If a foreign
object comes into contact with electrical
parts inside the machine, it might cause a
short circuit and result in a fire or electrical
shock.
■ If
there is smoke, or unusual noise,
immediately turn the main power switch
OFF, disconnect the power cord from the
outlet, and call your local authorized Canon
dealer. Using the machine in this state may
cause a fire or electrical shock. Also, avoid
placing objects around the power plug so
that the machine can be disconnected
whenever necessary.
■ Do
not turn the main power switch OFF or open the front covers while the
machine is in operation. This might result in paper jams.
■ Do
not use flammable sprays, such as
spray glue, near the machine. There is a
danger of ignition.
■ Thi
s machine generates a slight amount of
ozone during normal use. Although
sensitivity to ozone may vary, this amount
is not harmful. Ozone may be more
noticeable during extended use or long
production runs, especially in poorly
ventilated rooms. It is recommended that
the room be appropriately ventilated,
sufficient to maintain a comfortable
working environment, in areas of machine
operation.
Downloaded from ManualsPrinter.com Manuals
Page 35
Installation Location and Handling
1-9
Before You Start Using This Machine
1
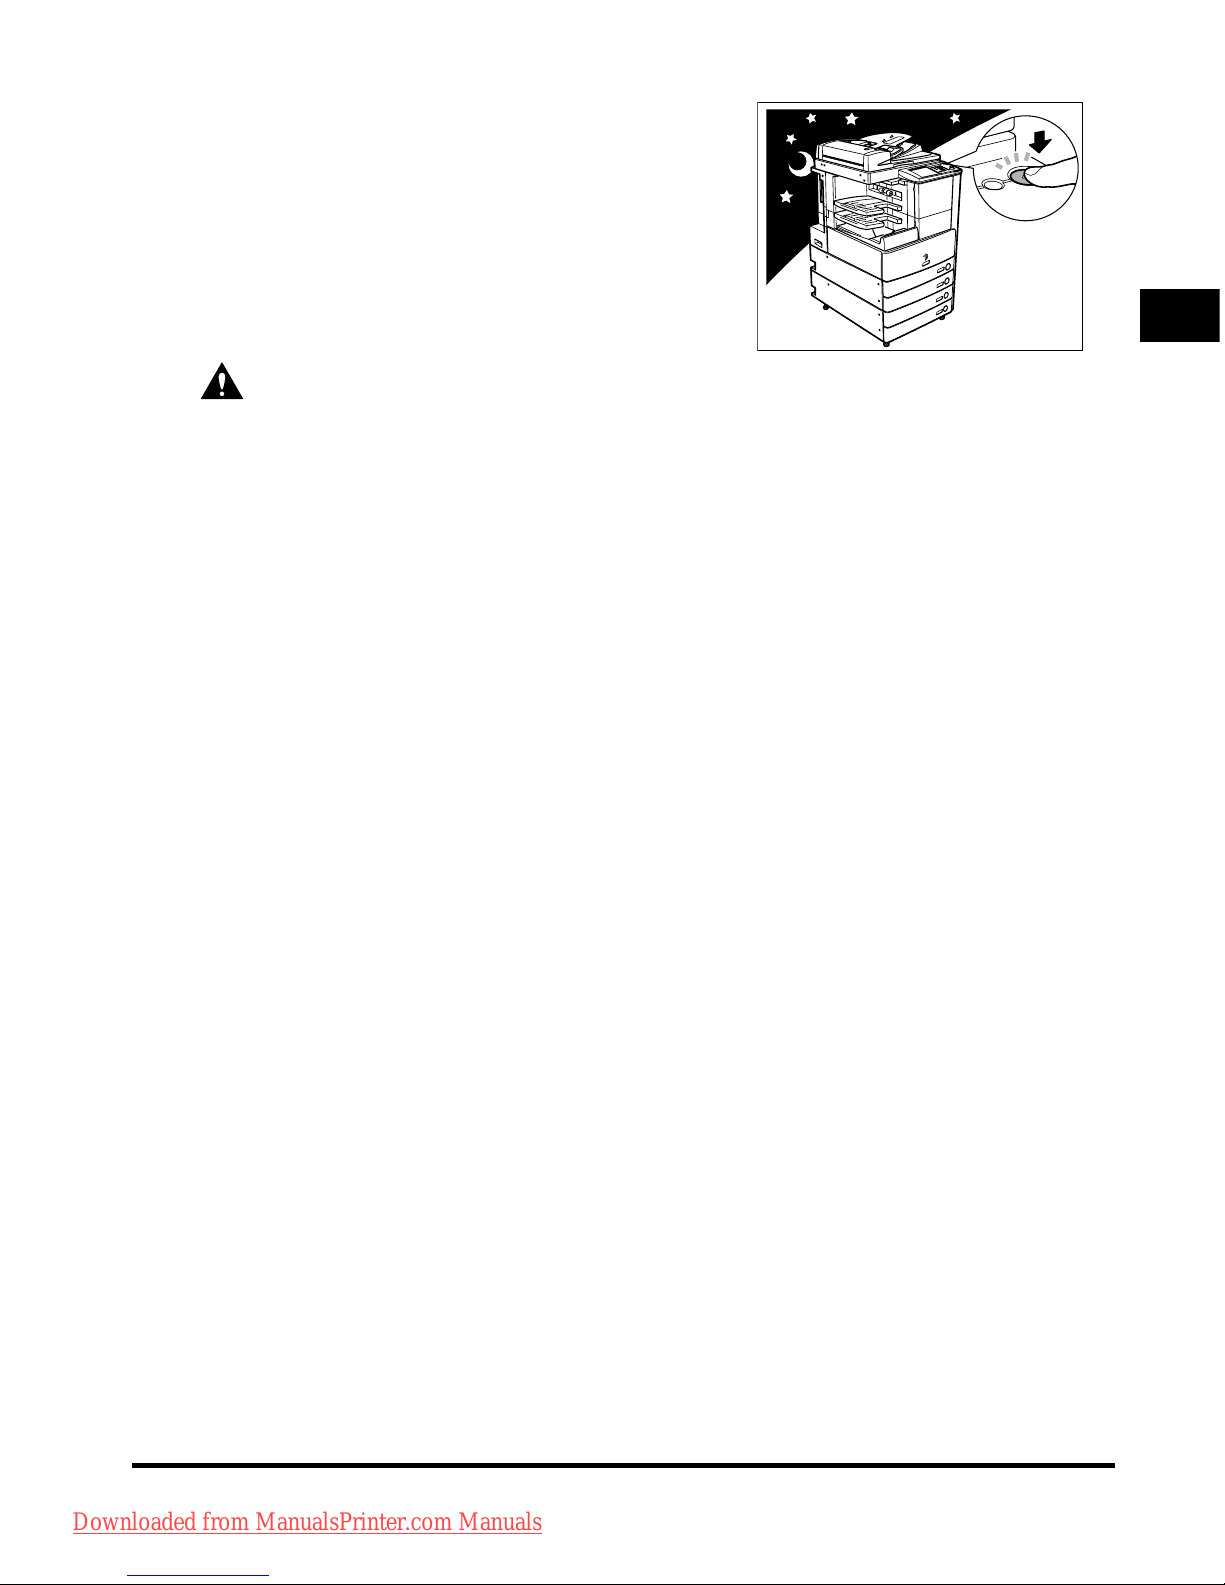
■ For safety reasons, turn OFF the control
panel power switch of the machine when it
will not be used for a long period of time,
such as overnight. As an added safety
measure, turn OFF the main power switch,
and disconnect the power cord when the
machine will not be used for an extended
period of time, such as during consecutive
holidays.
CAUTION
Canon recommends that data stored on the product's hard disk drive be duplicated or backed
up to prevent its loss in the event of failure or other malfunction of the hard disk drive.
Neither Canon nor any service provider will be liable for damages for loss of data stored on
the product's hard disk drive. (See the terms of the product's Limited Warranty for more
details.)
OFF
Downloaded from ManualsPrinter.com Manuals
Page 36
What This Machine Can Do
1-10
Before You Start Using This Machine
1
What This Machine Can Do
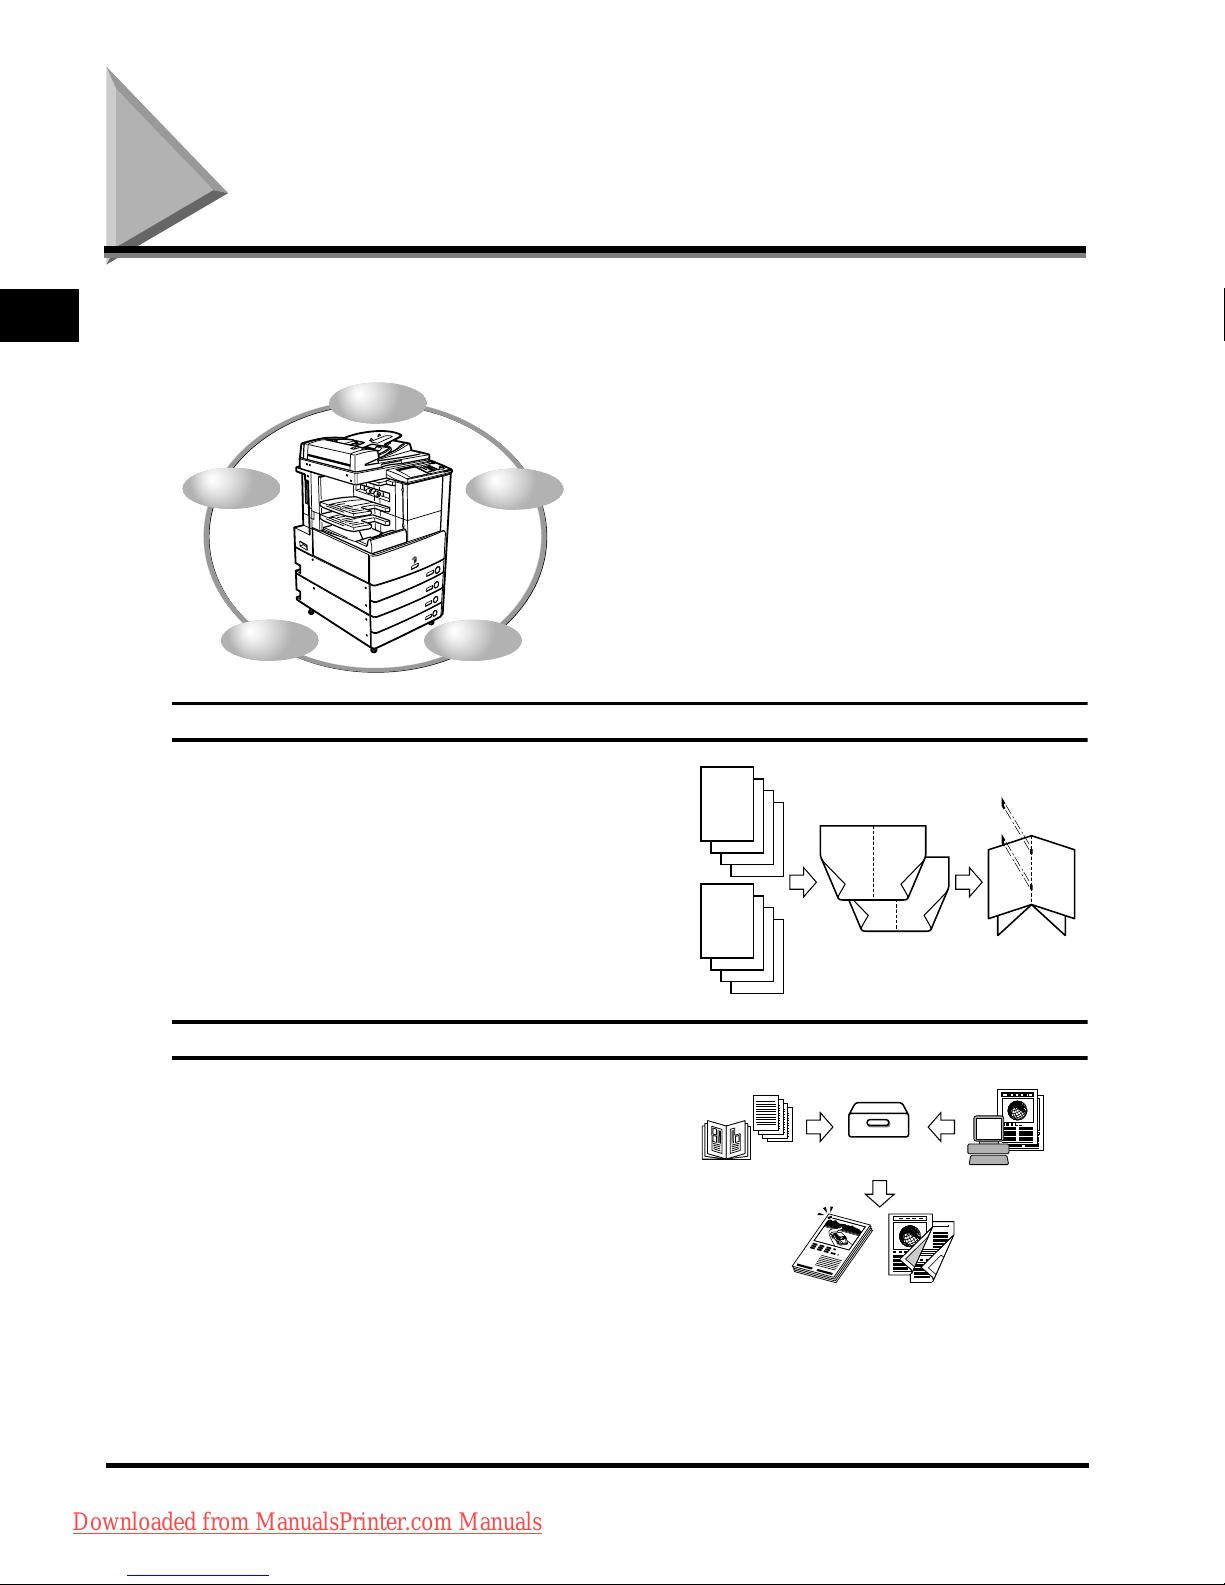
All the elements you will ever need in a digital multitasking
machine.
The iR3045/iR3045N/iR3035/iR3035N/iR3025/iR3025N
incorporates a rich array of input and output features
that can greatly enhance your efficiency. Equipped with
features that meet the needs of document work in a
digitized office, the iR3045/iR3045N/iR3035/iR3035N/
iR3025/iR3025N represents the ultimate in digital
multitasking machines.
An asterisk (*) indicates functions which require optional
equipment. For information on the optional equipment required to
use each function, and the available combinations of optional
equipment, see Chapter 3, "Optional Equipment," in the
Reference Guide.
Copying See the Copying and Mail Box Guide
In addition to normal copying functions, convenient new
functions, such as "Sample Set" which helps to avoid copy
errors, "Booklet" for making copies into booklets, and
"Different Size Originals" for copying originals of different
sizes together in one copy operation, are provided to
increase your productivity.
Mail Box Function See the Copying and Mail Box Guide
The Mail Box function enables you to save image or
document data that has been scanned from the scanner
unit, or created on a PC and sent to the machine's internal
hard disk. The saved data can be printed at a required
time, or merged with separately saved data or data
created on a PC for simultaneous processing.
Copy
Mail Box
Fax
Remote UI
Send
6
5
4
3
4
3
2
1
3
8
7
6
5
8
7
2
1
6
8
1
Scanning
various
originals
Printing merged
documents
Sending
data from
computers
1
Downloaded from ManualsPrinter.com Manuals
Page 37
What This Machine Can Do
1-11
Before You Start Using This Machine
1
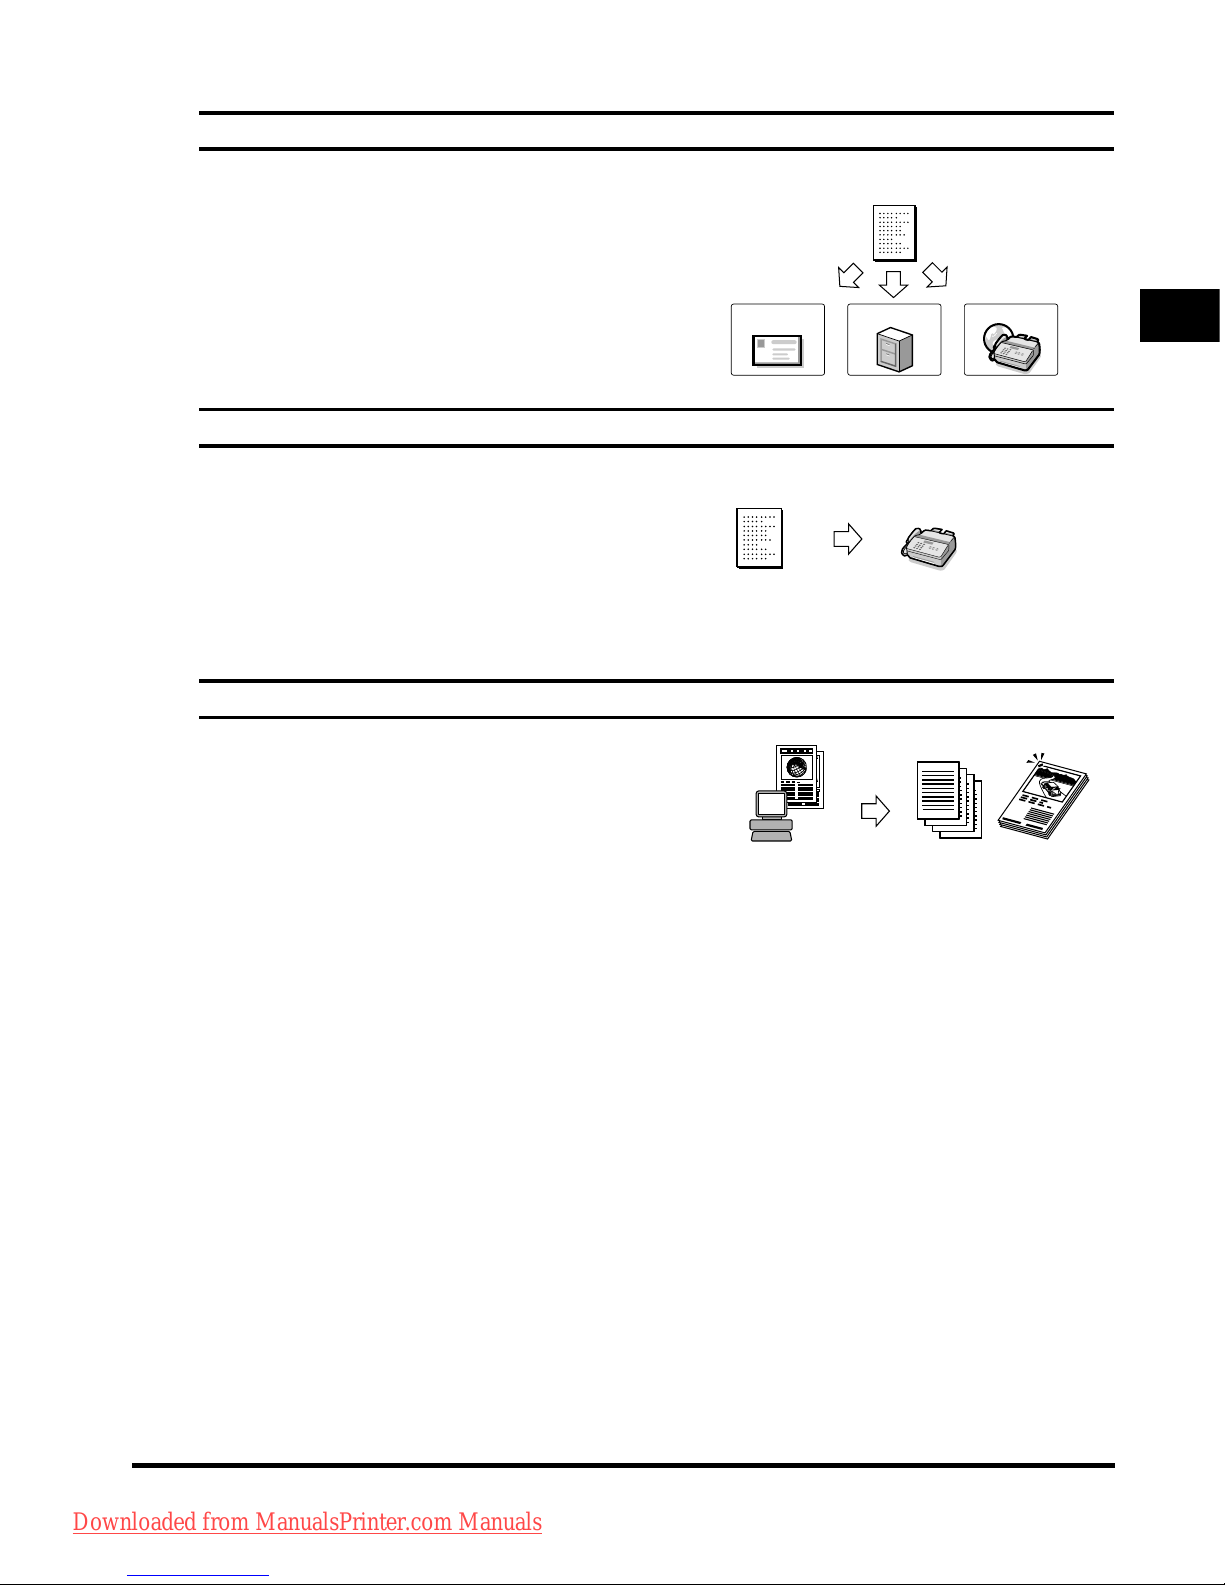
Sending Function* See the Sending and Facsimile Guide
The Send function enables you to send scanned image or
document data to file servers, or send it by e-mail or I-fax.
A variety of file formats are supported (PDF and TIFF),
which offer you greater flexibility in accommodating the
digital workplace environments.
Faxing* See the Sending and Facsimile Guide
In addition to normal facsimile functions, the machine
offers you Super G3 compatibility which enables you to
transmit documents at high speeds, greatly reducing
transmission costs as compared to conventional facsimile
machines. In a mobile environment, you can also receive
f
axes remotely from the machine outside of the office.
If the optional Super G3 FAX Board and FAX Driver are
installed, you can send facsimiles from your computer.
Printing* See the PS/PCL/UFR II Printer Guide
If the UFR II/PCL Printer Kit is activated, you can upgrade
this machine to a high-speed network printer. This kit
incorporates UFR II (Ultra Fast Rendering II) Technology,
which utilizes a newly invented printing algorithm to
minimize file processing and achieve maximum
performance. It also supports PCL at maximized speed.
Original
E-mail File I-Fax
Original Fax
Sending data
from computers
Printing
1
Downloaded from ManualsPrinter.com Manuals
Page 38
What This Machine Can Do
1-12
Before You Start Using This Machine
1
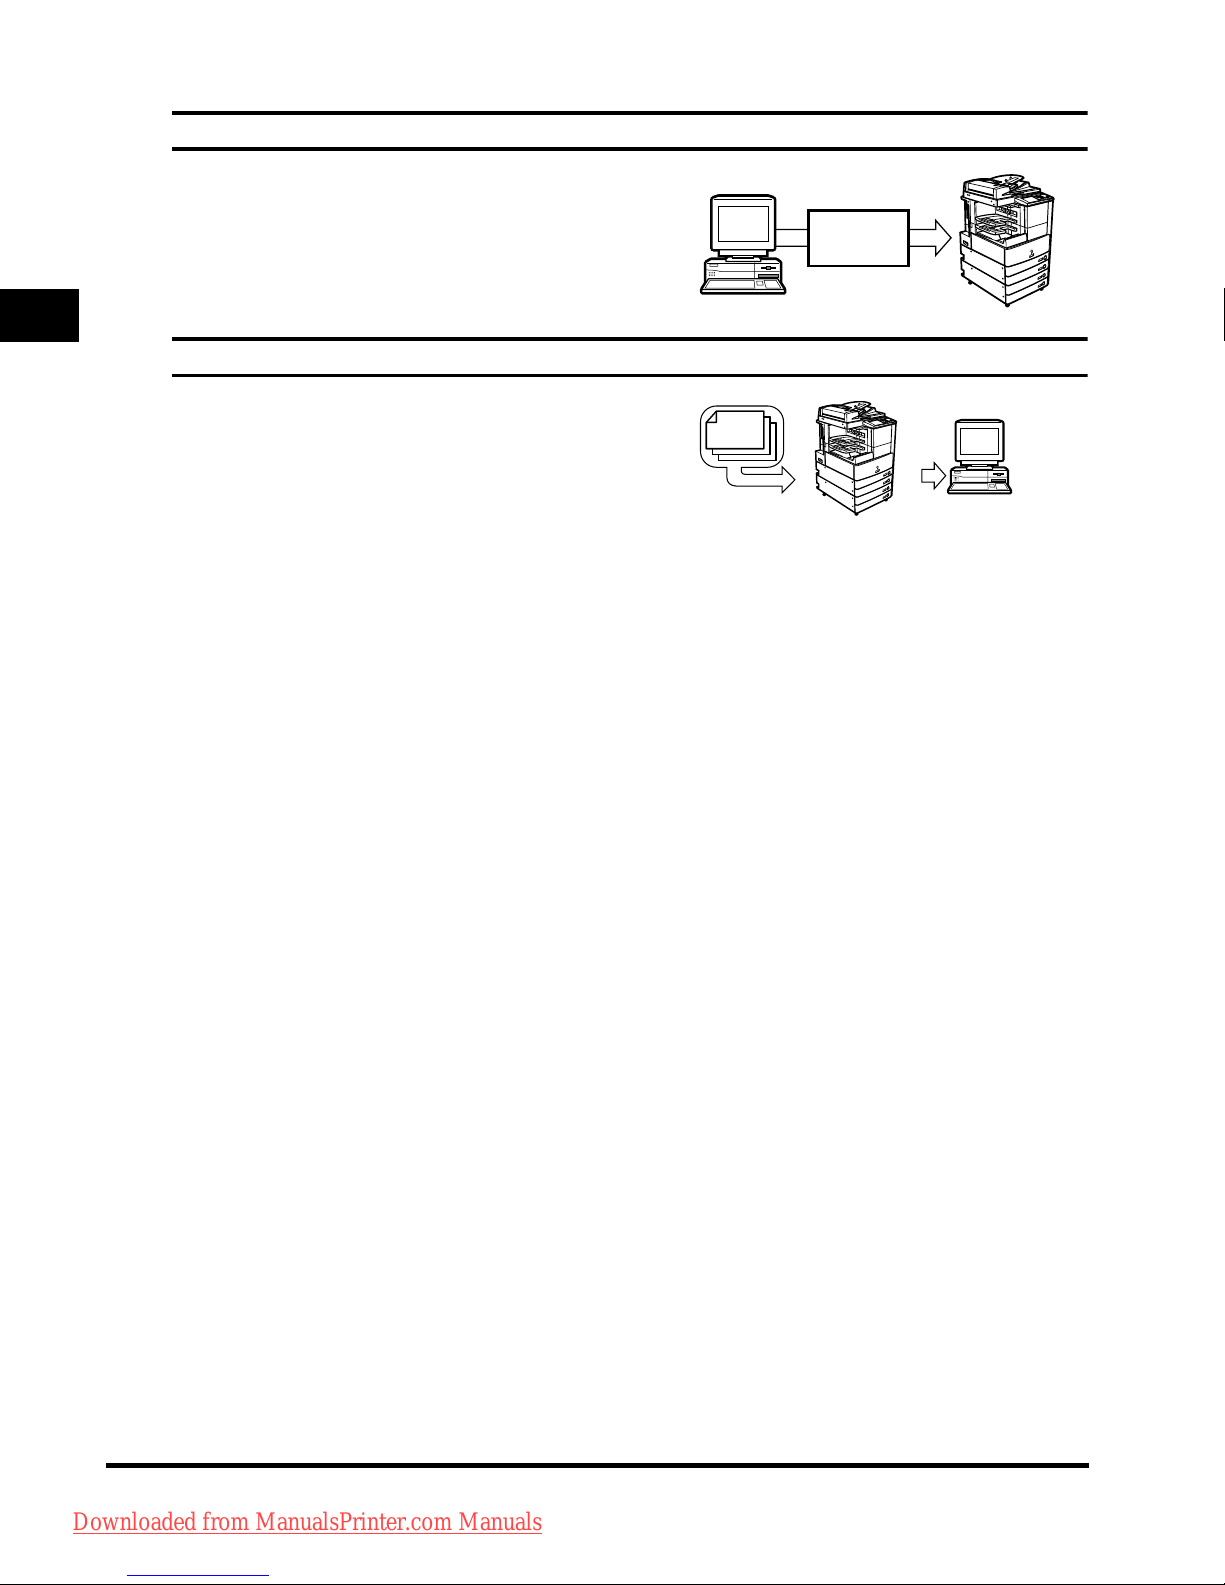
Using the Remote User Interface See the Remote UI Guide
You can control functions, such as confirming the status of
the machine, job operations, and printing instructions for
data saved in inboxes, all from your PC's web browser.
Network Scanning* See the Network ScanGear User's Guide
The Network Scan function enables you to use the
iR3045/iR3045N/iR3035/iR3035N/iR3025/iR3025N as a
conventional scanner. You can scan a document using the
machine, and read the data in an application you are using
on your computer.
To use this function, the machine is re
quired to be
connected to a network, equipped with the Printer function
(standard-equipped for the iR3045N/iR3035N/iR3025N),
and Network ScanGear to be installed on your computer.
You can scan images of up to A3 size at a resolution
of 600 x 600 dpi.
Web
Browser
Original
Exporting data
to a computer
Scanning
image data
Downloaded from ManualsPrinter.com Manuals
Page 39
System Configuration and Parts
1-13
Before You Start Using This Machine
1
System Configuration and Parts
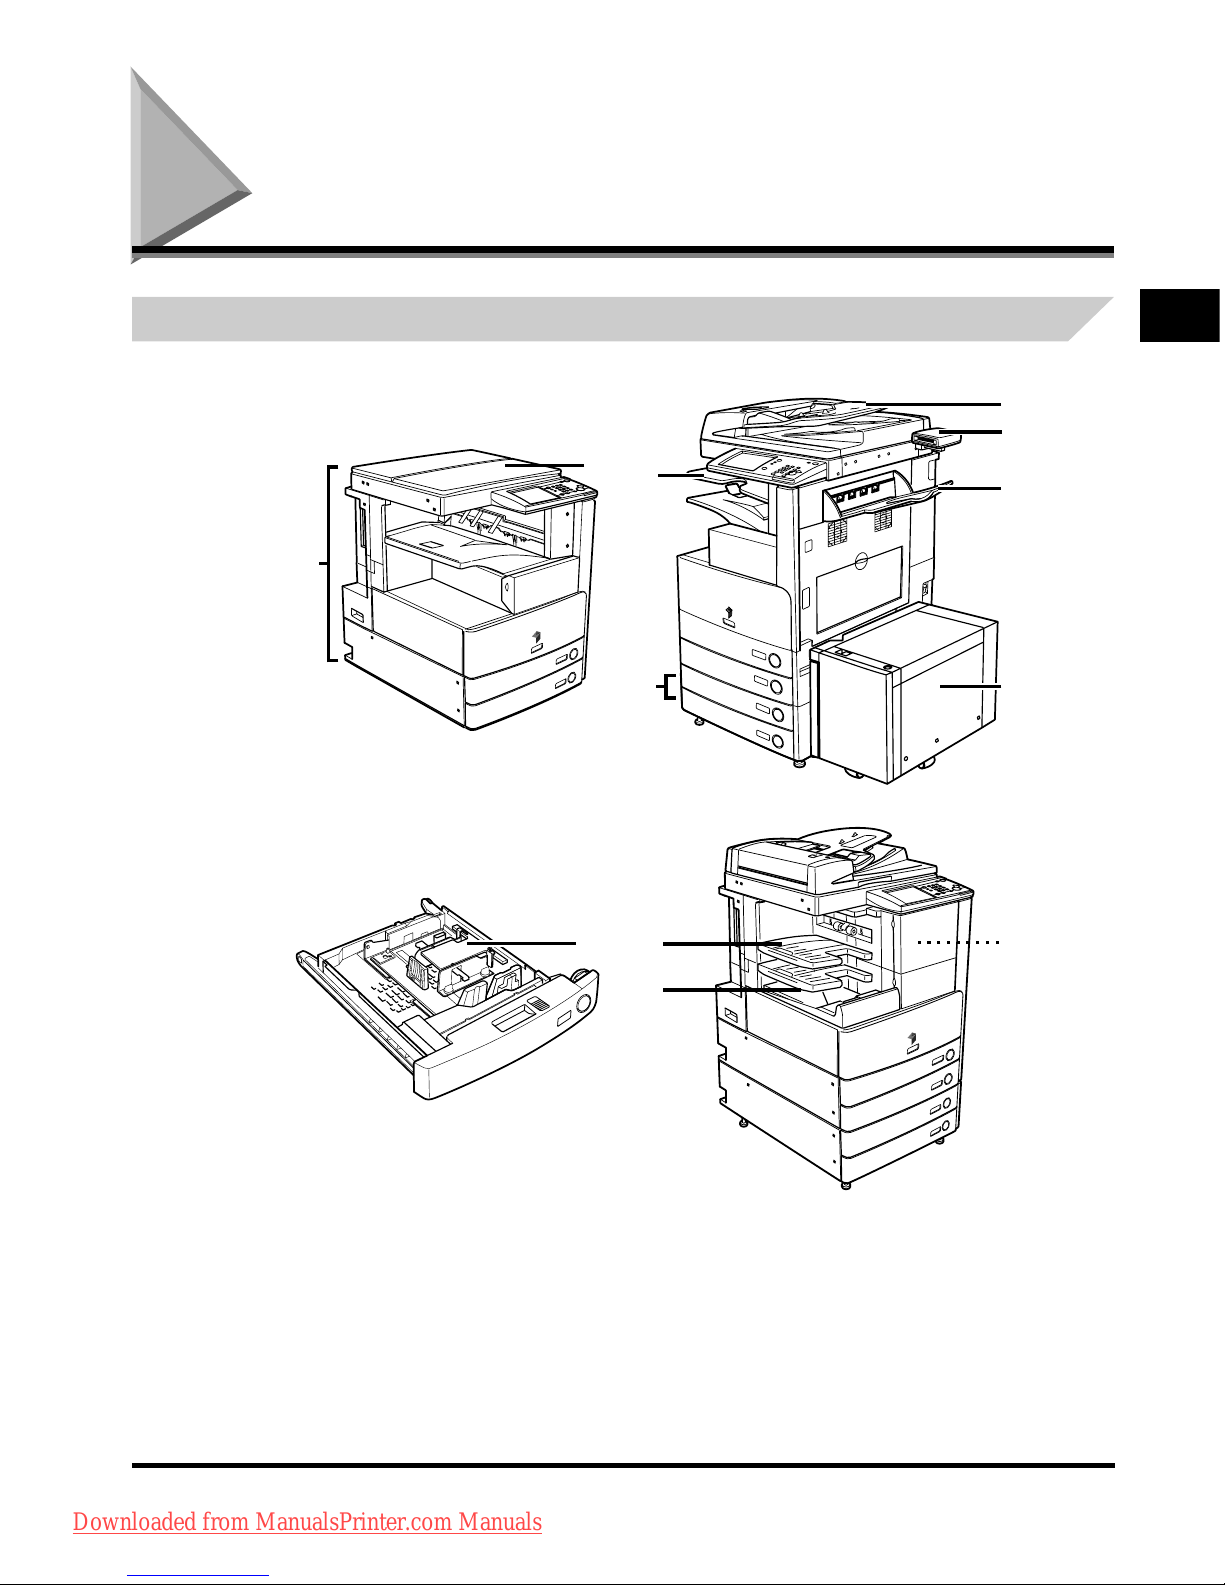
Optional Equipment
b
c
d
f
g
e
a
Main Unit
j
k
i
h
Downloaded from ManualsPrinter.com Manuals
Page 40
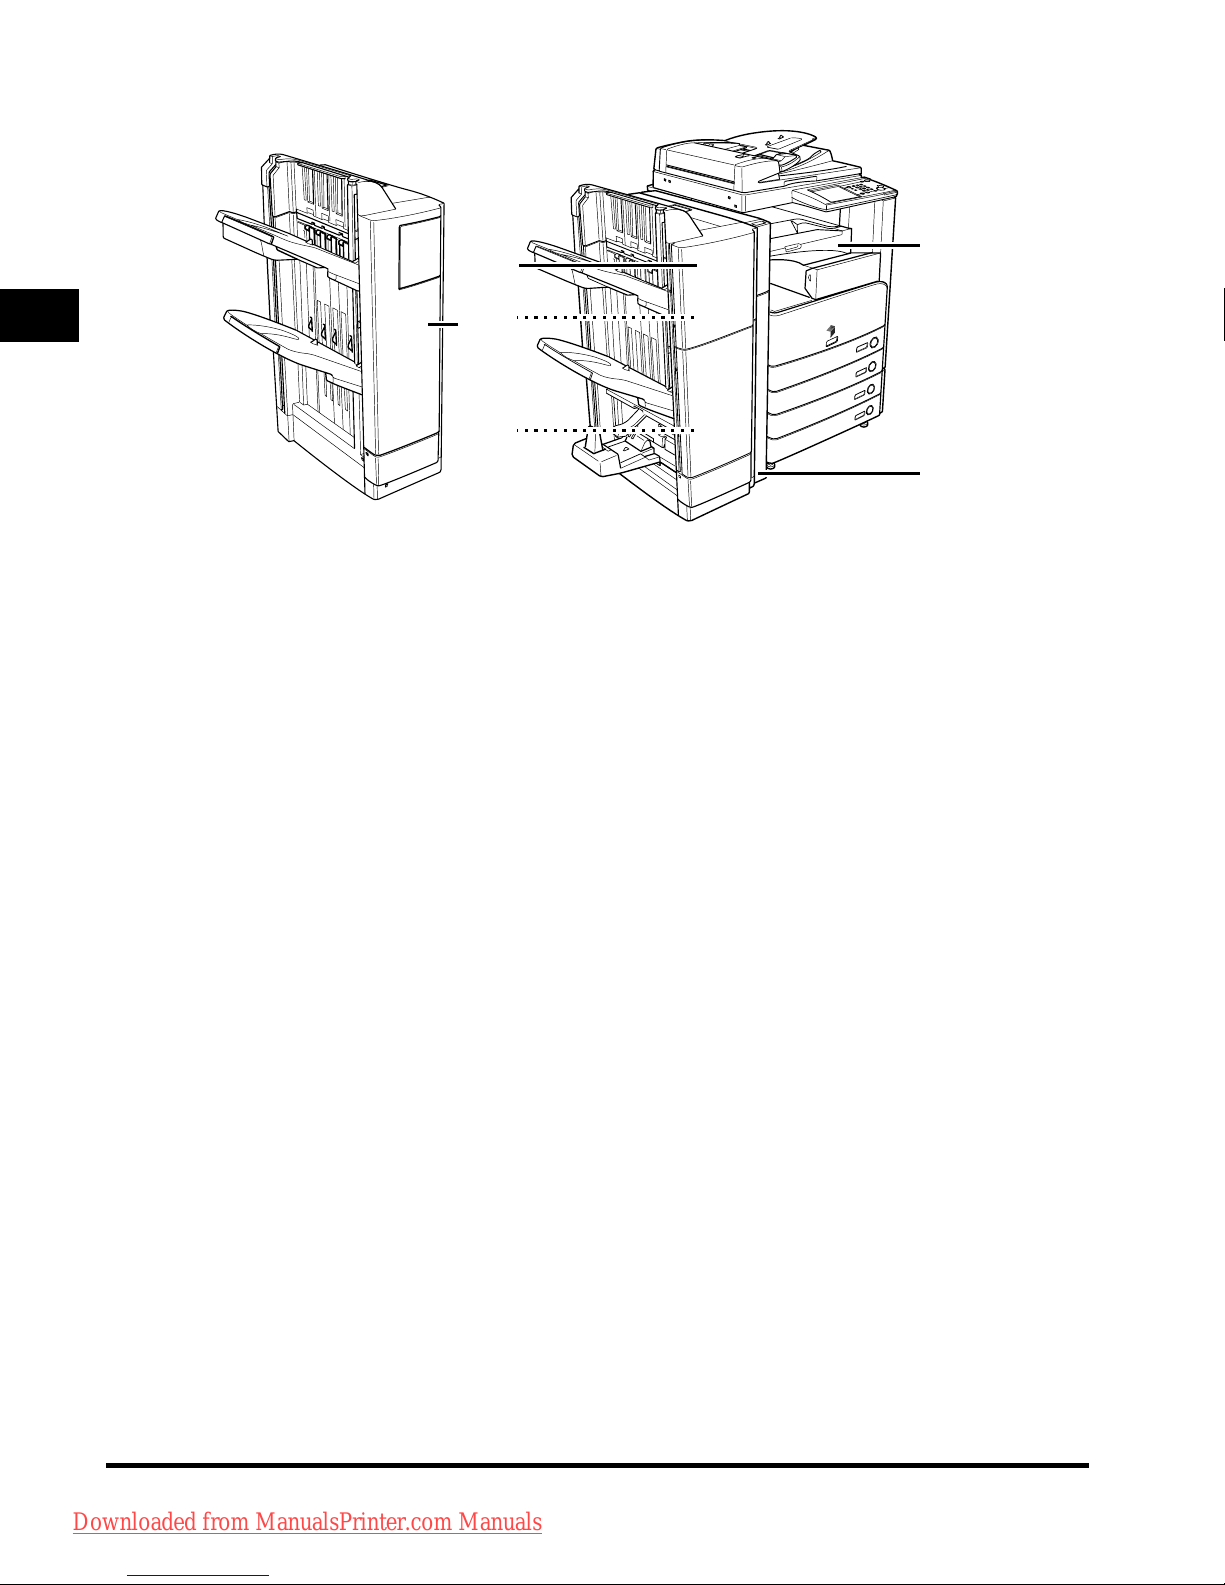
System Configuration and Parts
1-14
Before You Start Using This Machine
1
m
q
o
p
n
l
a Platen Cover Type H
b Feed
er (DADF-N1)
c Car
d Reader-C1
d Cop
y Tray-J1
e Pa
per Deck-Q1
f Cassette F
eeding Unit-Y3
g Inn
er 2 Way Tray-D1
h En
velope Feeder Attachment-C2
i Pu
ncher Unit-Q1
j Fin
isher-S1
k Ad
ditional Finisher Tray-B1
l Buff
er Pass Unit-E2
m Pu
ncher Unit-L1
n Stap
le Cartridge-D2/D3
o Staple-J1
p Sad
dle Finisher-AE
q Fin
isher-AE1
Downloaded from ManualsPrinter.com Manuals
Page 41
System Configuration and Parts
1-15
Before You Start Using This Machine
1
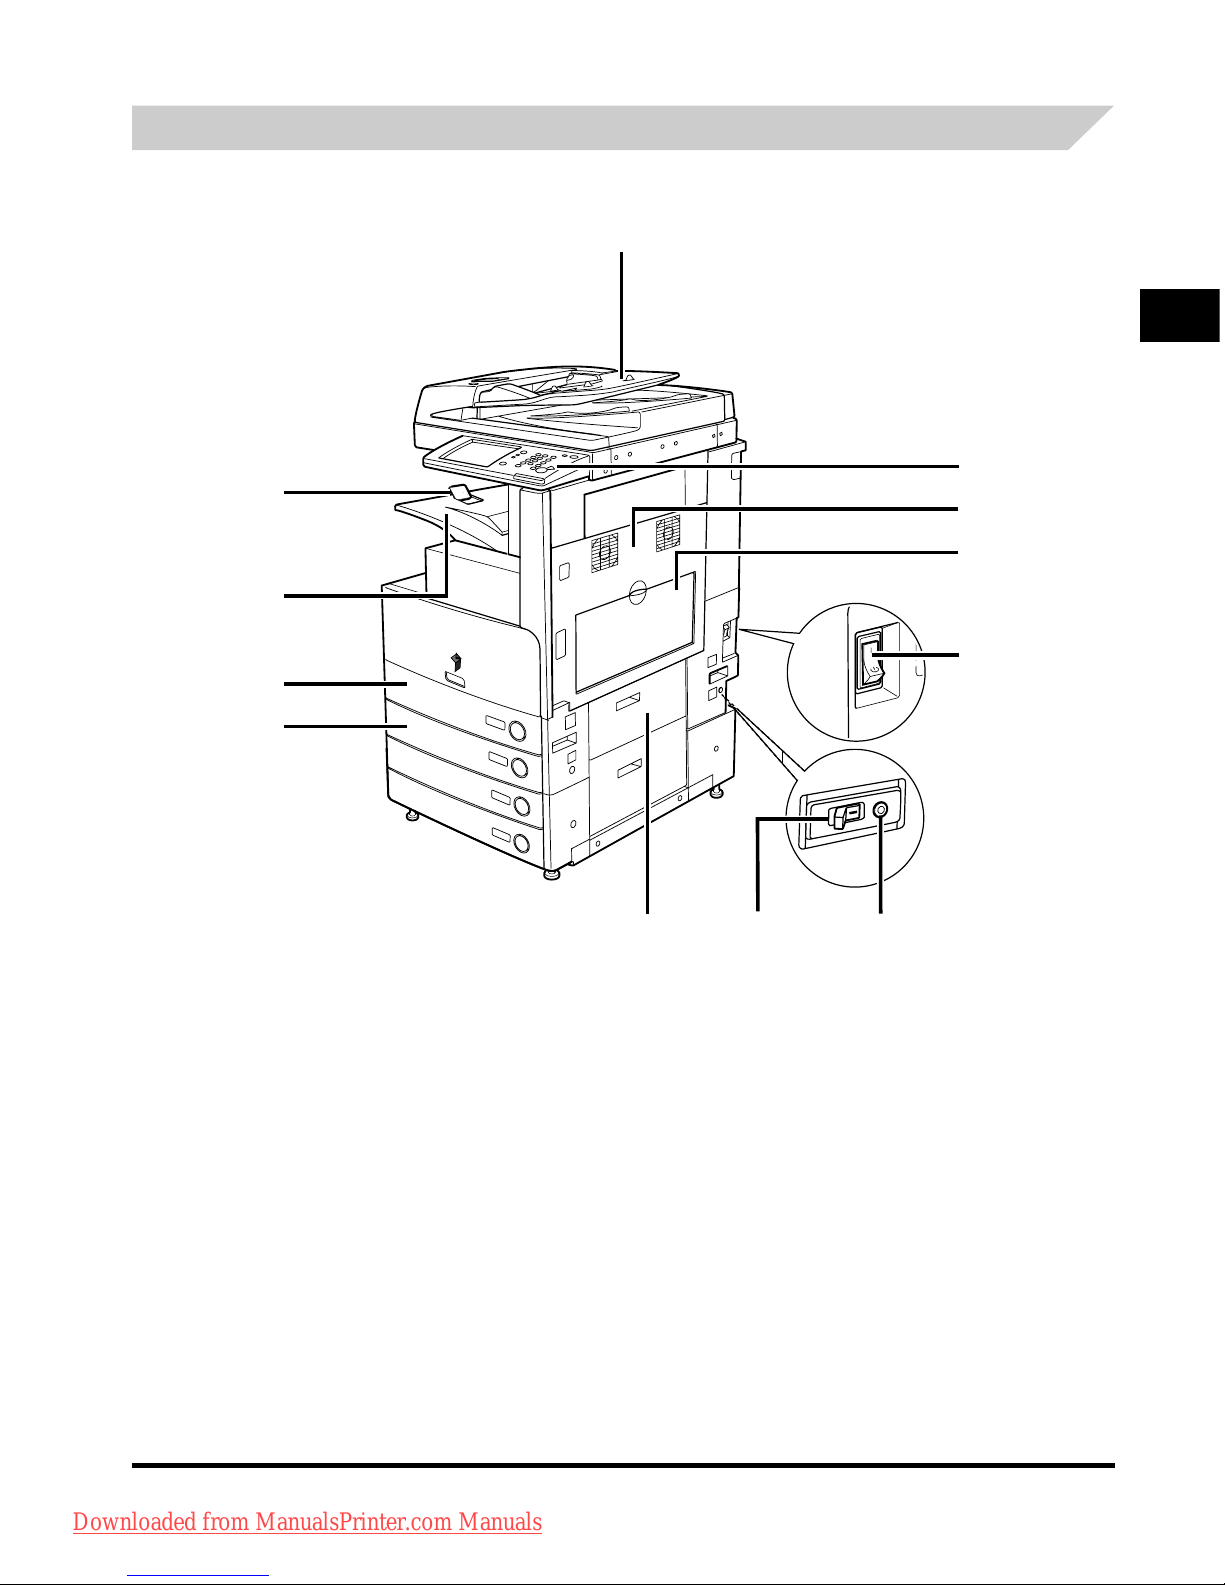
External View and Internal View
a
b
c
d
e
f
g
h
i
j
k
l
The optional Feeder (DADF-N1) and Cassette Feeding Unit-Y3 are attached.
a Feeder (DADF-N1) (Optional)
b Con
trol Panel
c Main U
nit's Upper Right Cover
d Stac
k Bypass
e Main P
ower Switch
f T
est Button
g Breaker
h P
aper Drawer's Right Cover
i Pa
per Drawer 2
j Pa
per Drawer 1
k Ou
tput Tray
l O
utput Paper Tray Guide
Downloaded from ManualsPrinter.com Manuals
Page 42
System Configuration and Parts
1-16
Before You Start Using This Machine
1
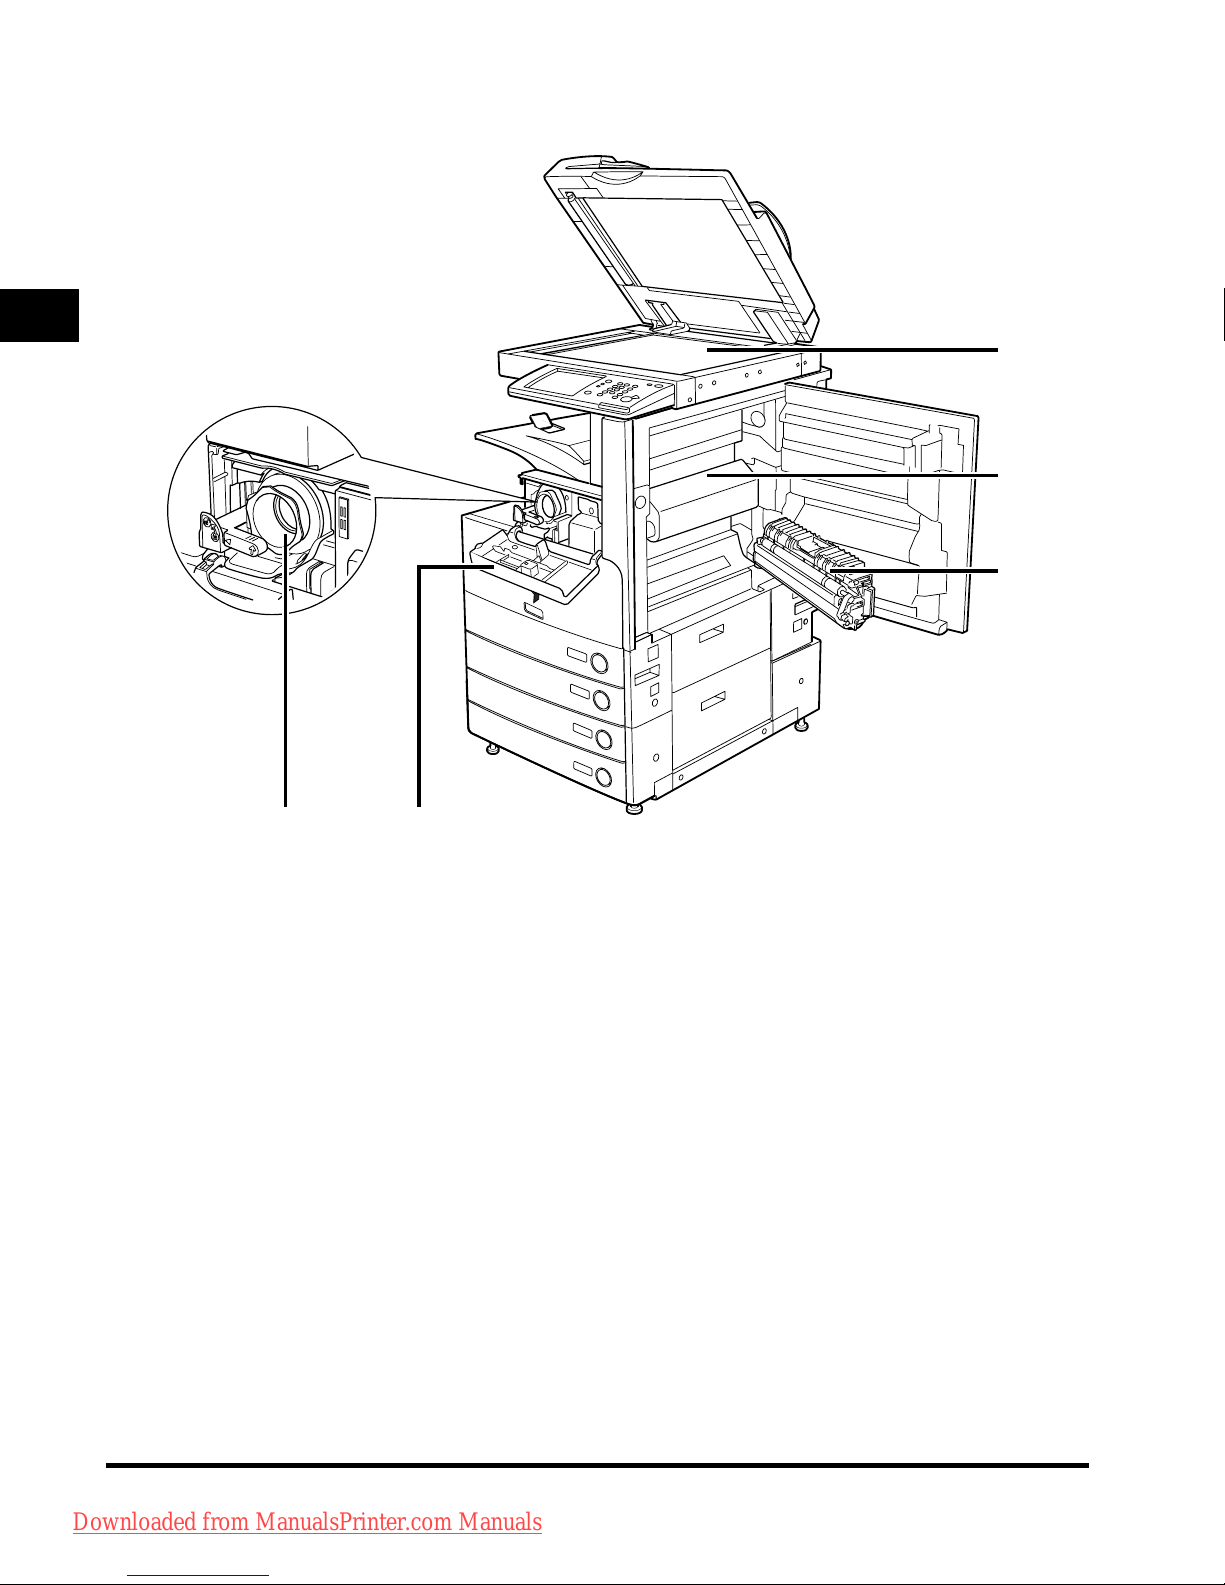
m Platen Glass
n Fixin
g Unit's Upper Cover
o Dup
lexing Unit
p T
oner Supply Port Cover
q T
oner Cartridge
m
n
o
p
q
The optional Feeder (DADF-N1) and Cassette Feeding Unit-Y3 are attached.
Downloaded from ManualsPrinter.com Manuals
Page 43
System Configuration and Parts
1-17
Before You Start Using This Machine
1
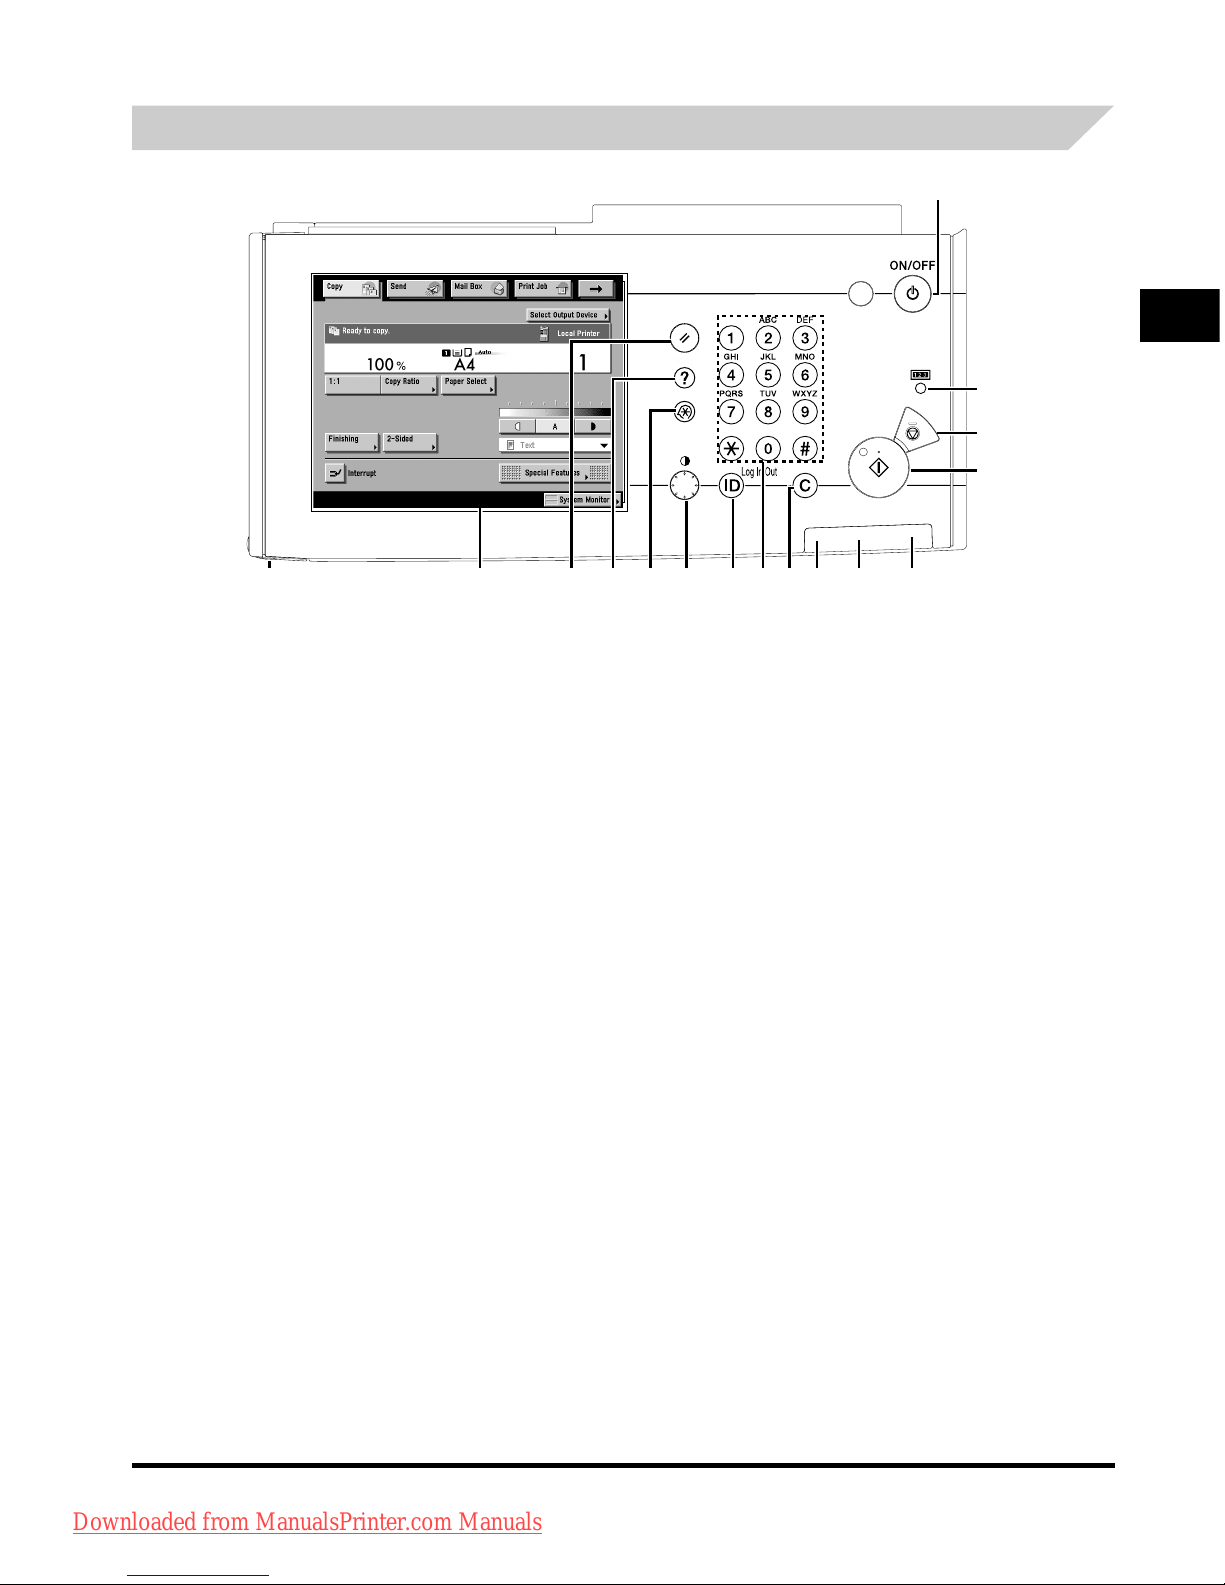
Control Panel Parts and Functions
a
b
d
c
efghijklmnpo
a Control Panel Power Switch (Sub Power Supply)
Press to turn the control panel ON or OFF. When the control
panel power switch is held for more than three seconds, it
initiates the Shutdown mode. When turned OFF, the
machine is in the Sleep mode.
b Counter Check key
Press to display the copy and print count totals on the touch
panel display.
c Stop key
Press to stop a job in progress, such as a scan, copy, or fax
(scanning only) job.
d Start key
Press to start an operation.
e Main Power Indicator
Lights when the main power is turned ON.
f Error Indicator
Flashes or lights if there is an error in the machine. When
the Error indicator flashes, follow the instructions that
appear on the touch panel display. When the Error indicator
maintains a steady red light, contact your local authorized
Canon dealer.
g Processing/Data Indicator
Flashes or blinks green when the machine is performing
operations, and maintains a steady green light when fax
data is stored in memory.
h Clear key
Press to clear entered values or characters.
i Numeric keys
Press to enter numerical values.
j ID (Log in/Out) key
Press when setting or enabling Department ID
Management.
k Display Contrast Dial
Use to adjust the brightness of the touch panel display.
l Additional Functions key
Press to specify additional functions.
m Help key
Press to display explanations and instructions of modes or
functions on the touch panel display.
n Reset key
Press to restore the standard settings of the machine.
o Touch Panel Display
The settings screen for each function is shown on this
display.
p Edit Pen
Use when operating the touch panel display, such as to
enter characters. If you lose the edit pen, contact your local
authorized Canon dealer. Do not use an object with a sharp
end on the control panel, such as a pencil or ballpoint pen,
in place of the edit pen.
Downloaded from ManualsPrinter.com Manuals
Page 44
System Configuration and Parts
1-18
Before You Start Using This Machine
1
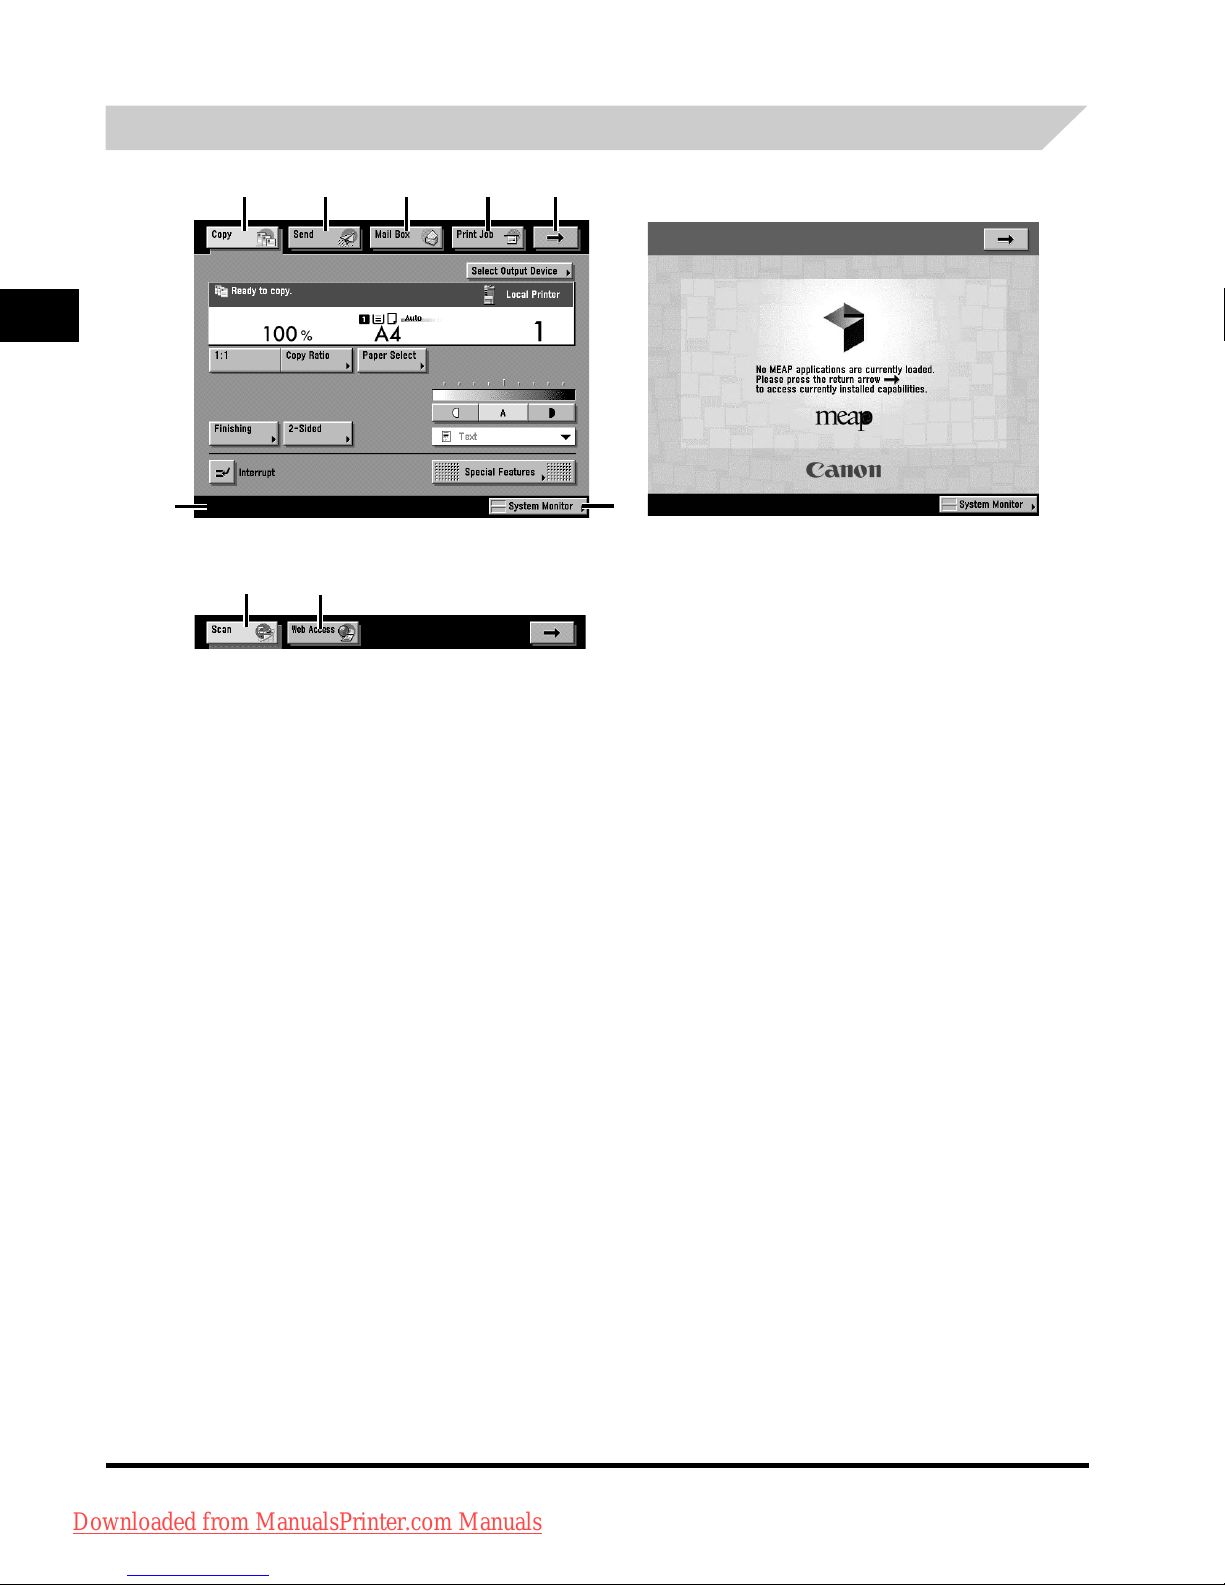
Touch Panel Display
a Copy
Press this key to access the machine's copy functions.
b Send
Press this key to access the machine's sending and
facsimile functions.
c Mail Box
Press this key to access the machine's mailbox functions.
d Print Job
Press this key to check or cancel print jobs, and to check or
print the print job log.
e ➞
Press this key to gain access to hidden function keys. The
function keys are displayed on two screens. You can also
customize the order of the function keys in Function Display
Settings in Common Settings.
f System Monitor
Press this key to change, check, or cancel jobs, and to
check or print the job log.
g Job/Print Status Display Area
The progress of jobs and copy operations, and the status of
devices and consumables are displayed here. Also,
depending on the login service you are using, the current
Department ID or user name can be displayed here.
h Scan
Press this key to use the optional network scan function.
i Web Access
Press this key to view Web pages.
MEAP Application Screen
Page 1 of the Basic
Features Screen (Group A)
Page 2 of the Basic Features Screen
(Group B)
abcde
f
g
h
i
Downloaded from ManualsPrinter.com Manuals
Page 45
System Configuration and Parts
1-19
Before You Start Using This Machine
1
NOTE
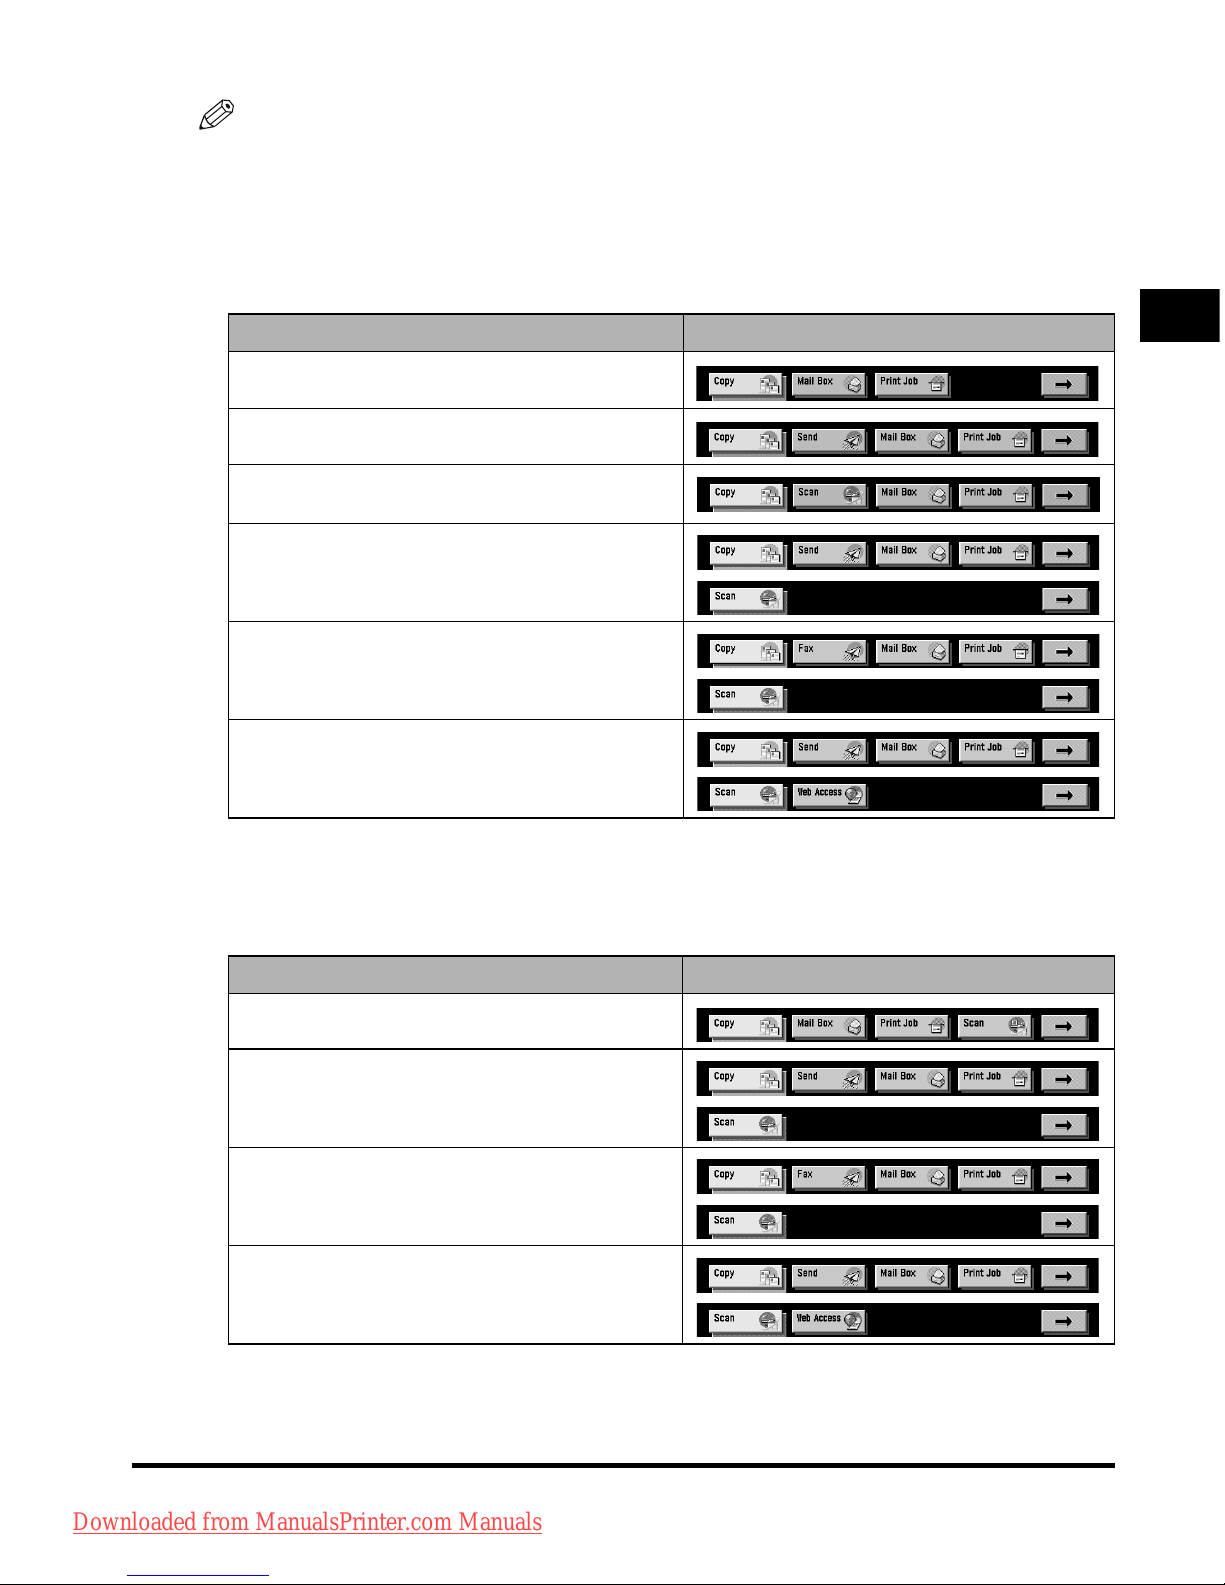
•
The top of the touch panel display may differ according to the optional equipment that is attached to the
machine.
■ For the iR3045/iR3035/iR3025
The following table indicates the various combination of function keys displayed on the touch panel
display for the iR3045/iR3035/iR3025
■ For the iR3045N/iR3035N/iR3025N
The following table indicates the various combination of function keys displayed on the touch panel
display for the iR3045N/iR3035N/iR3025N
Attached Optional Equipment Displayed Function Keys
None
Universal Send Kit
UFR II/PCL Printer Kit
Universal Send Kit and UFR II/PCL Printer Kit
Super G3 FAX Board and UFR II/PCL Printer Kit
Universal Send Kit, UFR II/PCL Printer Kit, and
Web Access Software
Attached Optional Equipment Displayed Function Keys
None
Universal Send Kit
Super G3 FAX Board
Universal Send Kit and Web Access Software
Downloaded from ManualsPrinter.com Manuals
Page 46
System Configuration and Parts
1-20
Before You Start Using This Machine
1
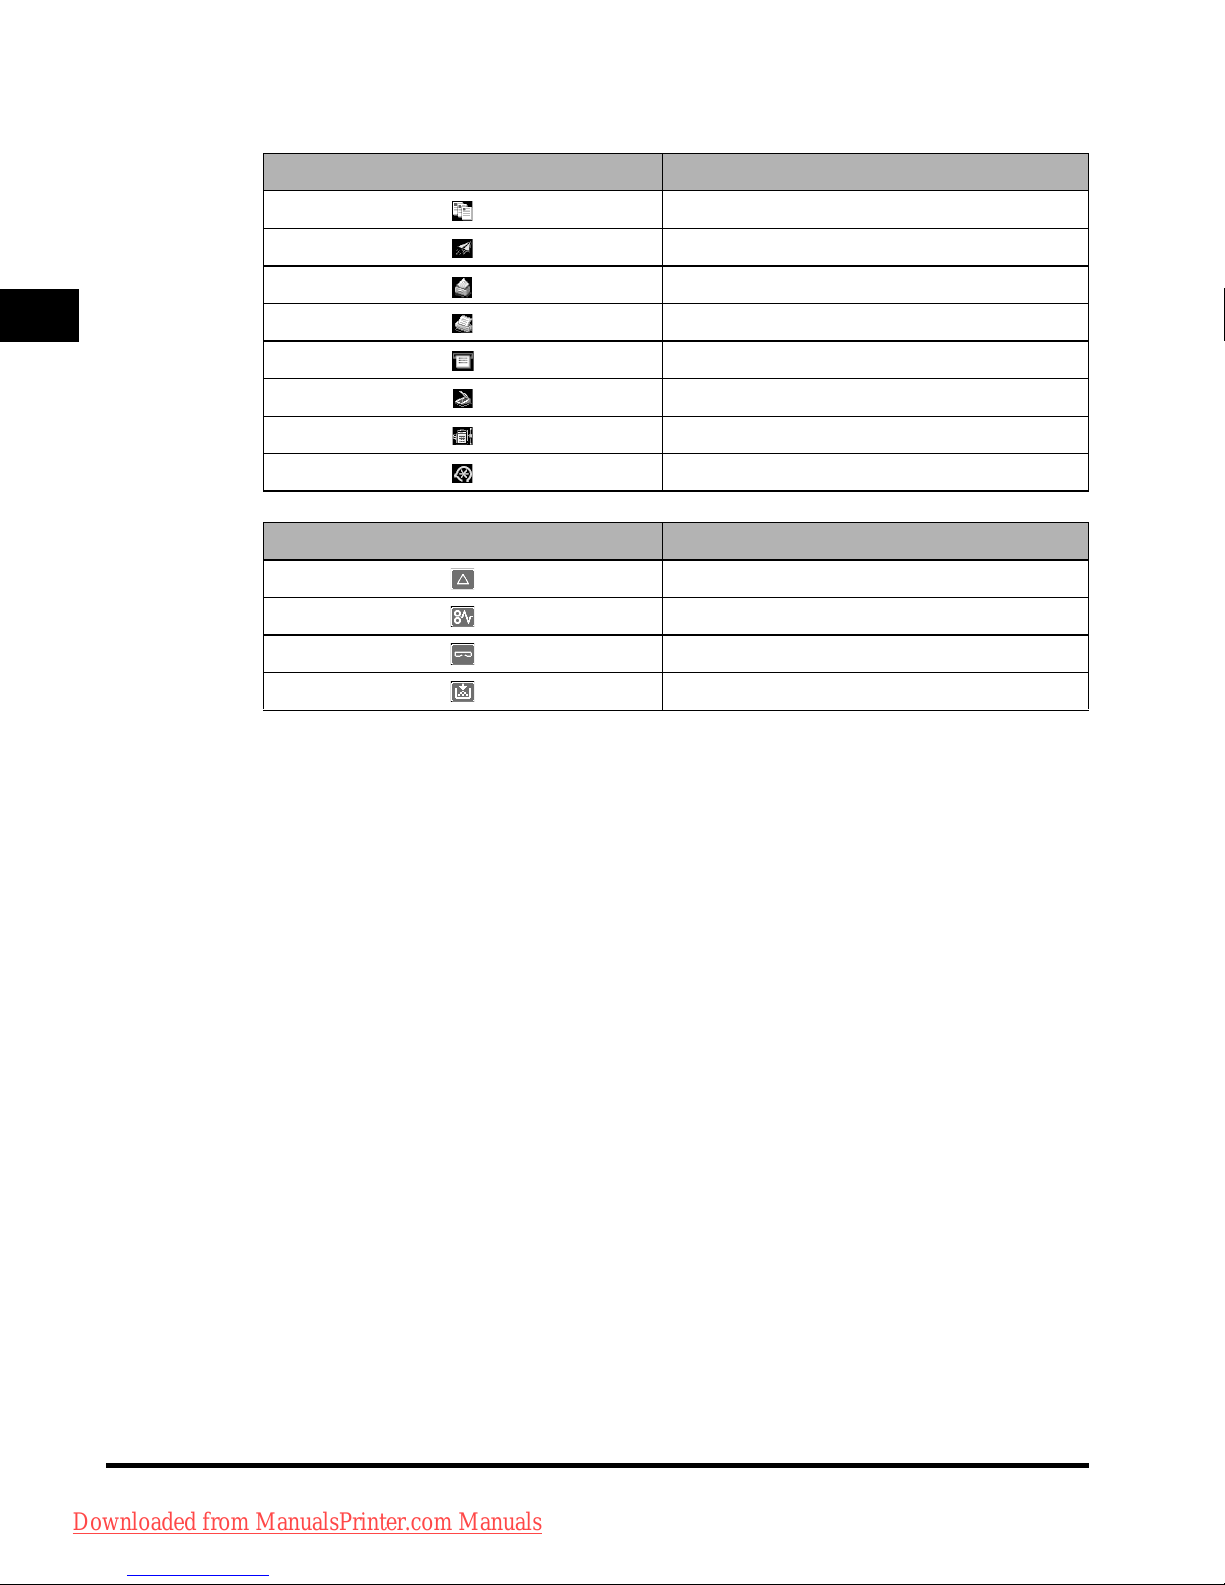
•
The meaning of the icon (type of job) that appears in the Job/Print Status Display Area (on the bottom
left of the screen) is described below:
Icon (Type of Job) Description
Copy Job
Send/Fax Job
Mail Box Job
Printer Job
Report Job
Network Scan Job
Remote Copy Job
Additional Functions Job
Icon (Machine Status) Description
Error
Paper Jam
Staple Jam
Replace Toner Cartridge
Downloaded from ManualsPrinter.com Manuals
Page 47
Main Power and Control Panel Power
1-21
Before You Start Using This Machine
1
Main Power and Control Panel Power
The machine is provided with two power switches, a main power switch and a control panel
power switch, as well as a breaker that detects excess current or leakage current.
How to Turn ON the Main Power
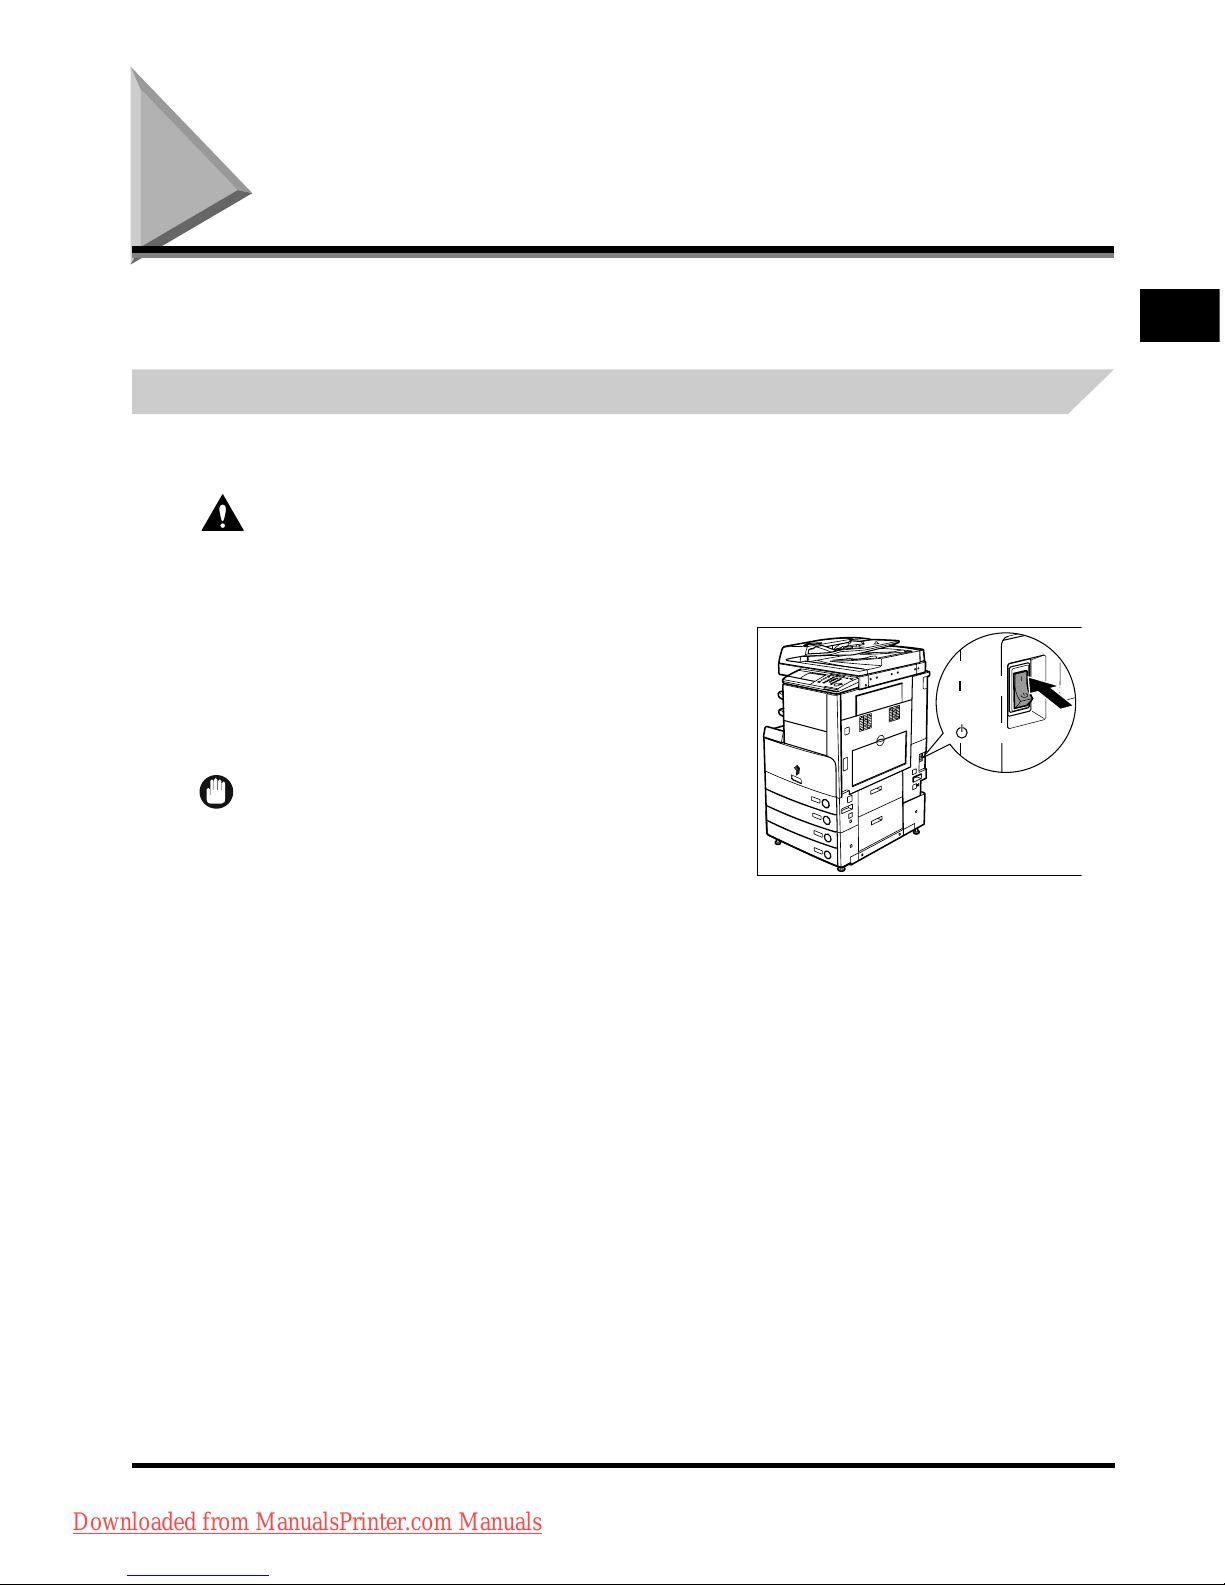
1
Make sure that the power plug is firmly inserted into the power outlet.
WARNING
Do not connect or disconnect the power cord with wet hands, as this may result in electrical
shock.
2
Press the main power switch to the "I"
side. The main power switch is located on
the back right side of the machine.
The main power indicator on the control panel lights
when the main power switch is turned ON.
IMPORTANT
If the main power indicator on the control panel does not
light even though the main power switch is ON, be sure
to check the breaker to see if it is OFF. (See "When the
Power Does Not Turn ON," in the Reference Guide.)
( side)
( side)
Downloaded from ManualsPrinter.com Manuals
Page 48
Main Power and Control Panel Power
1-22
Before You Start Using This Machine
1
3
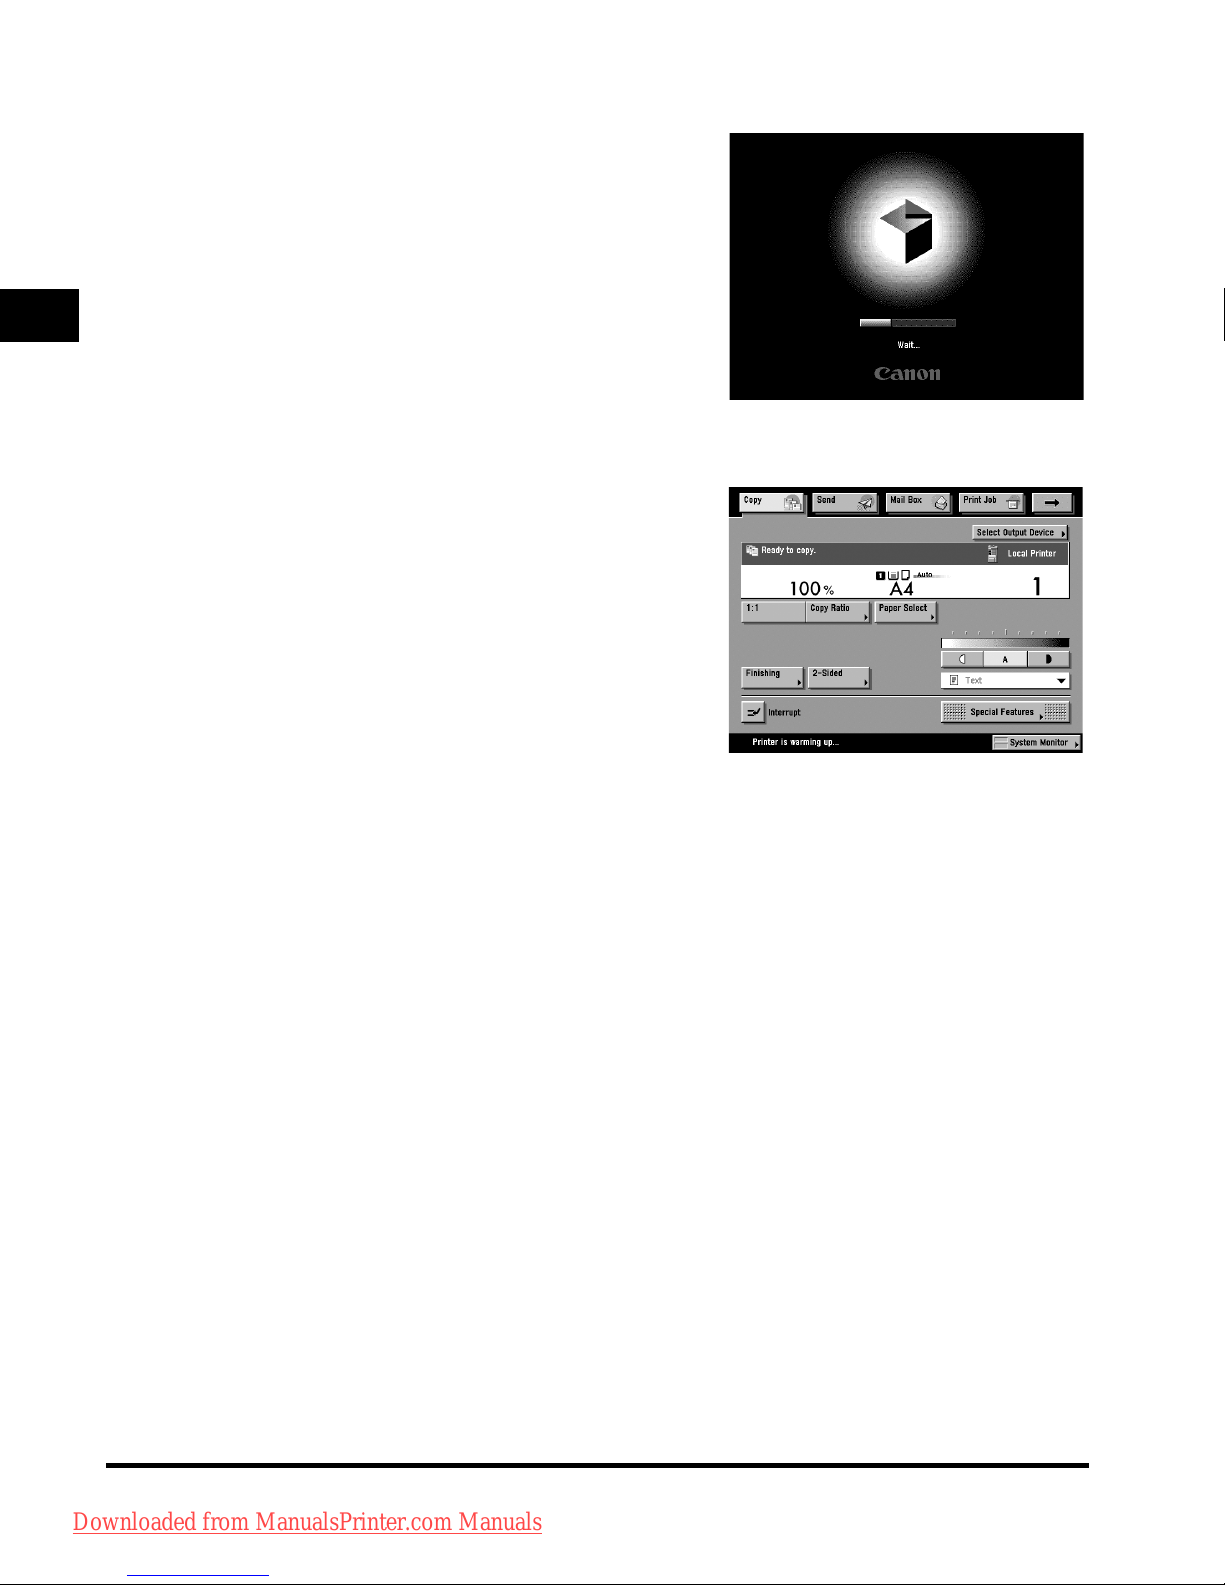
The screens on the right are displayed
while the system software is loading.
● If login authentication by a login service
(SDL (Simple Device Login) or SSO (Single
Sign-on)) is not set, and an application other
than MEAP is selected as the initial function in
Common Settings (from the Additional
Functions screen):
❑
The Start Up screen is displayed until the machine is
ready to scan.
If a message is displayed on the touch panel display,
proceed to step 4.
❑ The screen on the right is displayed when the
machine is ready to scan.
The machine is ready to scan in appro
ximately
30 seconds after the screen on the right appears.
Downloaded from ManualsPrinter.com Manuals
Page 49
Main Power and Control Panel Power
1-23
Before You Start Using This Machine
1
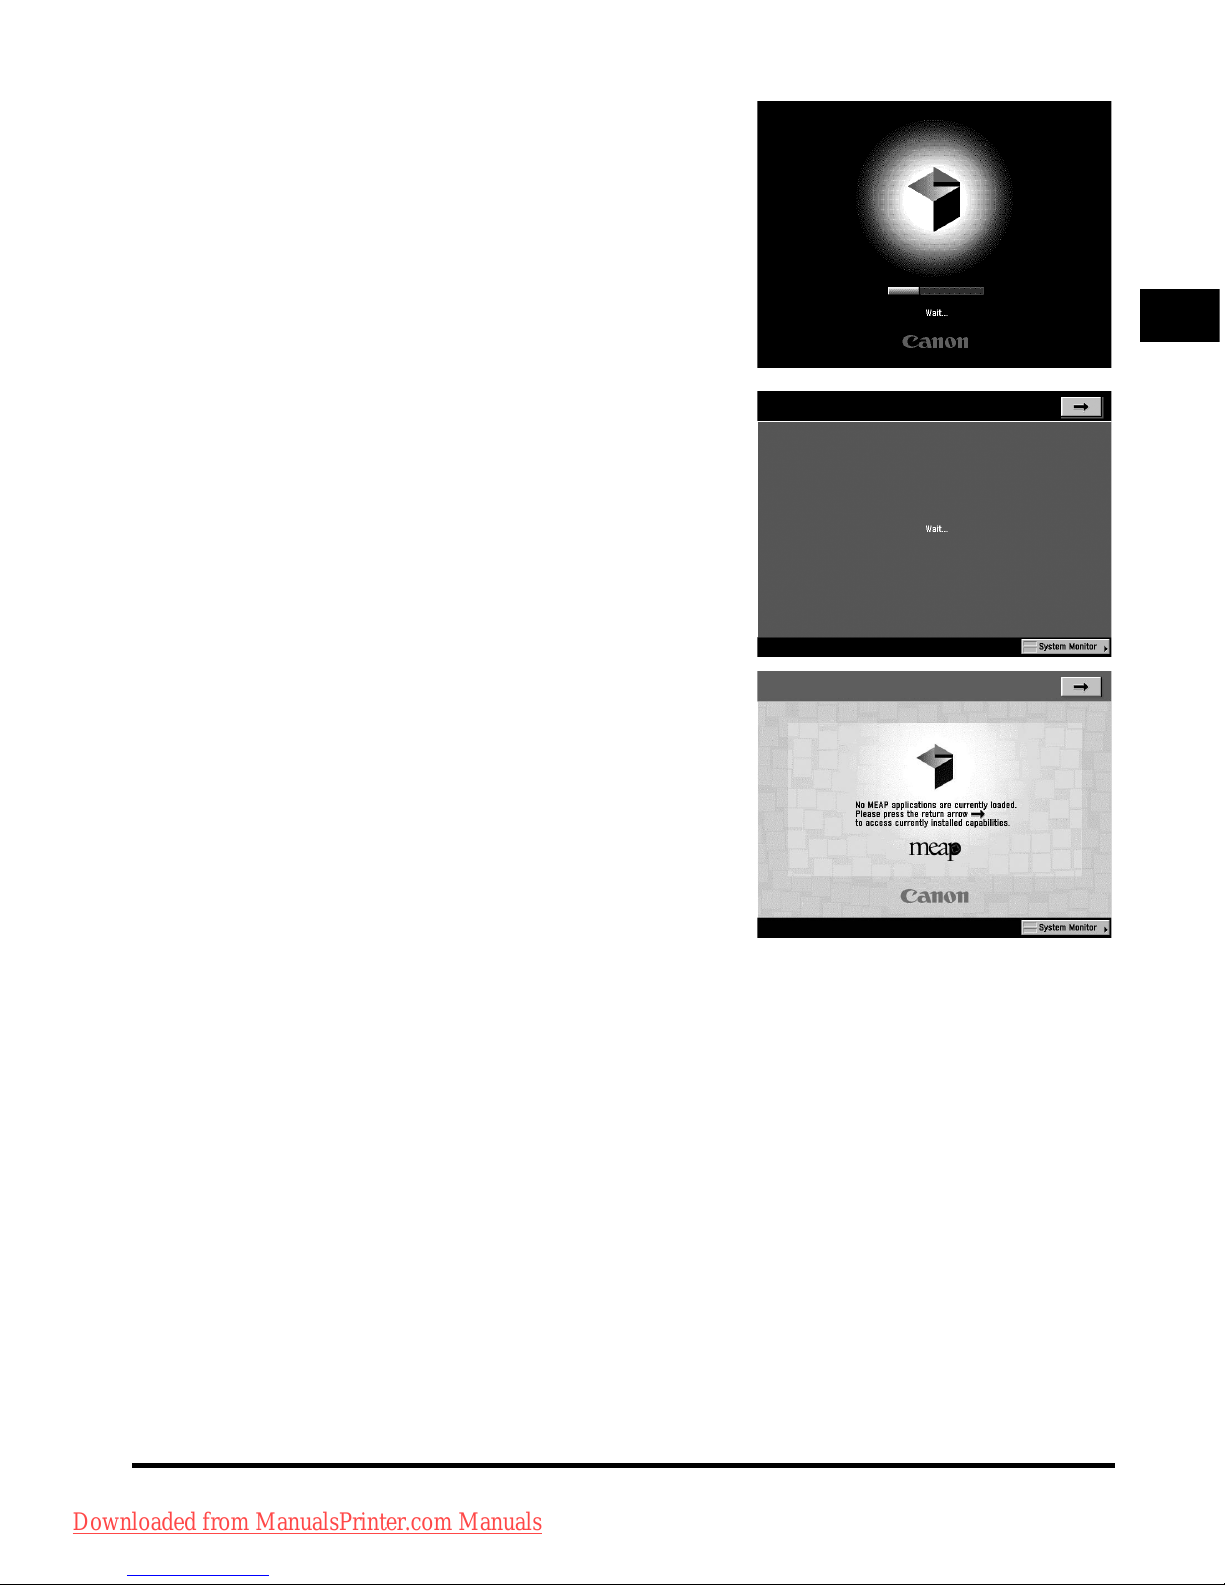
● If login authentication by the SDL or SSO
login service is not set, and MEAP is selected
as the initial function in Common Settings
(from the Additional Functions screen).
❑ The Start Up screen is displayed until the machine is
ready to scan.
❑ After the Start Up screen disappears, the MEAP
Start Up screen is displayed.
You can press [➞] to s
witch to the Copy, Mail Box,
etc. functions even if the MEAP Start Up screen is
still displayed.
❑ The MEAP Application screen is displayed.
Downloaded from ManualsPrinter.com Manuals
Page 50
Main Power and Control Panel Power
1-24
Before You Start Using This Machine
1
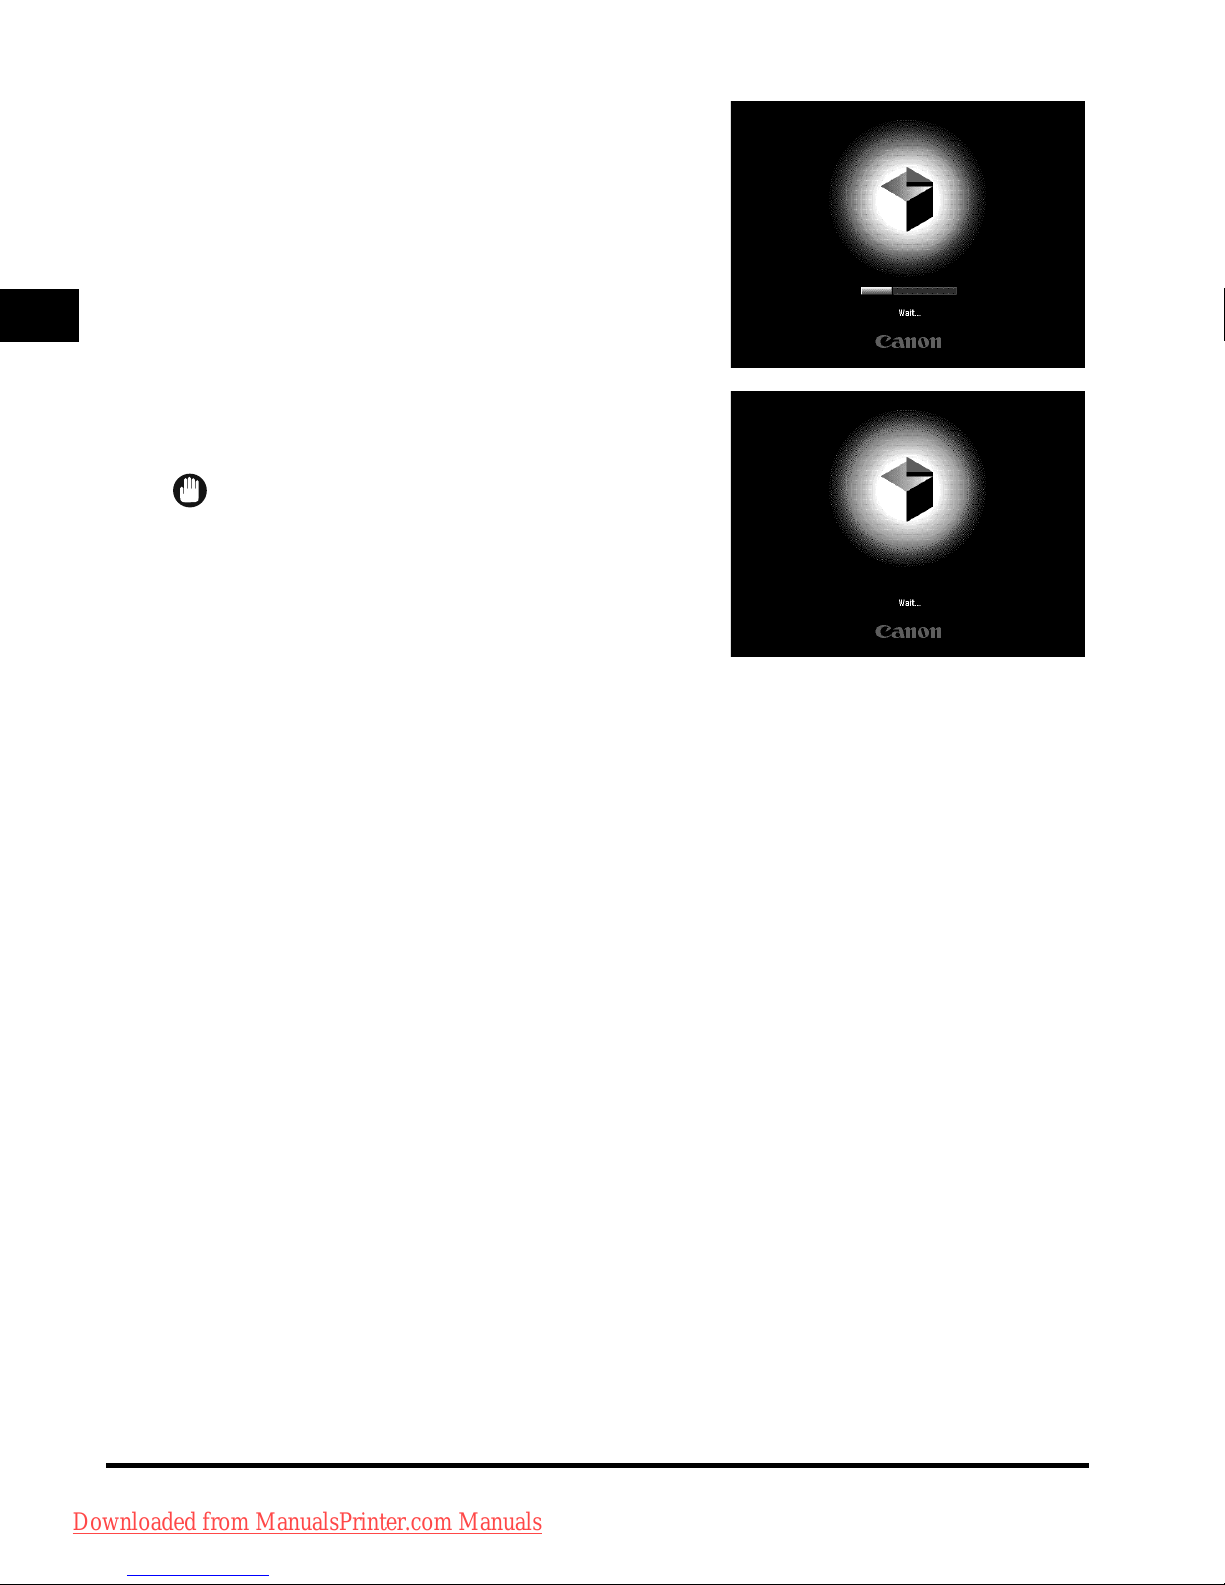
● If login authentication by the SDL or SSO
login service is set:
❑
The Start Up screen is displayed until the machine is
ready to scan.
❑ After the Start Up screen disappears, the MEAP
Start Up screen is displayed regardless of the Set as
Initial Function settings.
IMPORTANT
•
If you turn OFF the main power, wait at least 10 seconds
before turning the main power back ON.
•
Do not turn the main power OFF if you want to be able to
send or receive fax or I-fax documents. Also, do not turn
the main power OFF, if the optional Super G3 FAX Board
is installed, and you want to be able to send or receive
fax documents. Sending or receiving I-fax or fax
documents cannot be done when the power is
turned OFF.
•
If SSO or SDL is set as the login service, the machine
will take longer to become ready to scan.
4
If you are using a login service, log in using the procedure for the login
service you are using.
Downloaded from ManualsPrinter.com Manuals
Page 51
Things You Must Do Before Using This Machine
1-25
Before You Start Using This Machine
1
Things You Must Do Before Using This Machine
This section describes the important setting registrations and procedures that must be done
before the machine is used for sending operations. For the further details of the operations, see
"Things You Must Do Before Using This Machine" in the Sending and Facsimile Guide.
IMPORTANT
•
If you attempt to use the machine without registering the necessary information correctly, the machine
may not function properly.
•
Network settings have to be specified in order to send scanned documents to an e-mail address, an
I-fax address, or a file server. (See the Network Guide.)
Selecting the Type of Telephone Line
Set the type of telephone line that is connected to the machine.
If this setting is incorrect, you will be unable to communicate with other machines. Be sure to
check the type of telephone line that you are using, and make the correct setting.
NOTE
For this setting, the optional Super G3 FAX Board is required.
1
Press ➞ [Communications Settings] ➞ [User Settings] under <Fax
Settings> ➞ [Tel Line Type].
2
Select the type of telephone line ➞ press [OK].
If you do not know the telephone line type, call your telephone service provider for details.
Downloaded from ManualsPrinter.com Manuals
Page 52
Things You Must Do Before Using This Machine
1-26
Before You Start Using This Machine
1
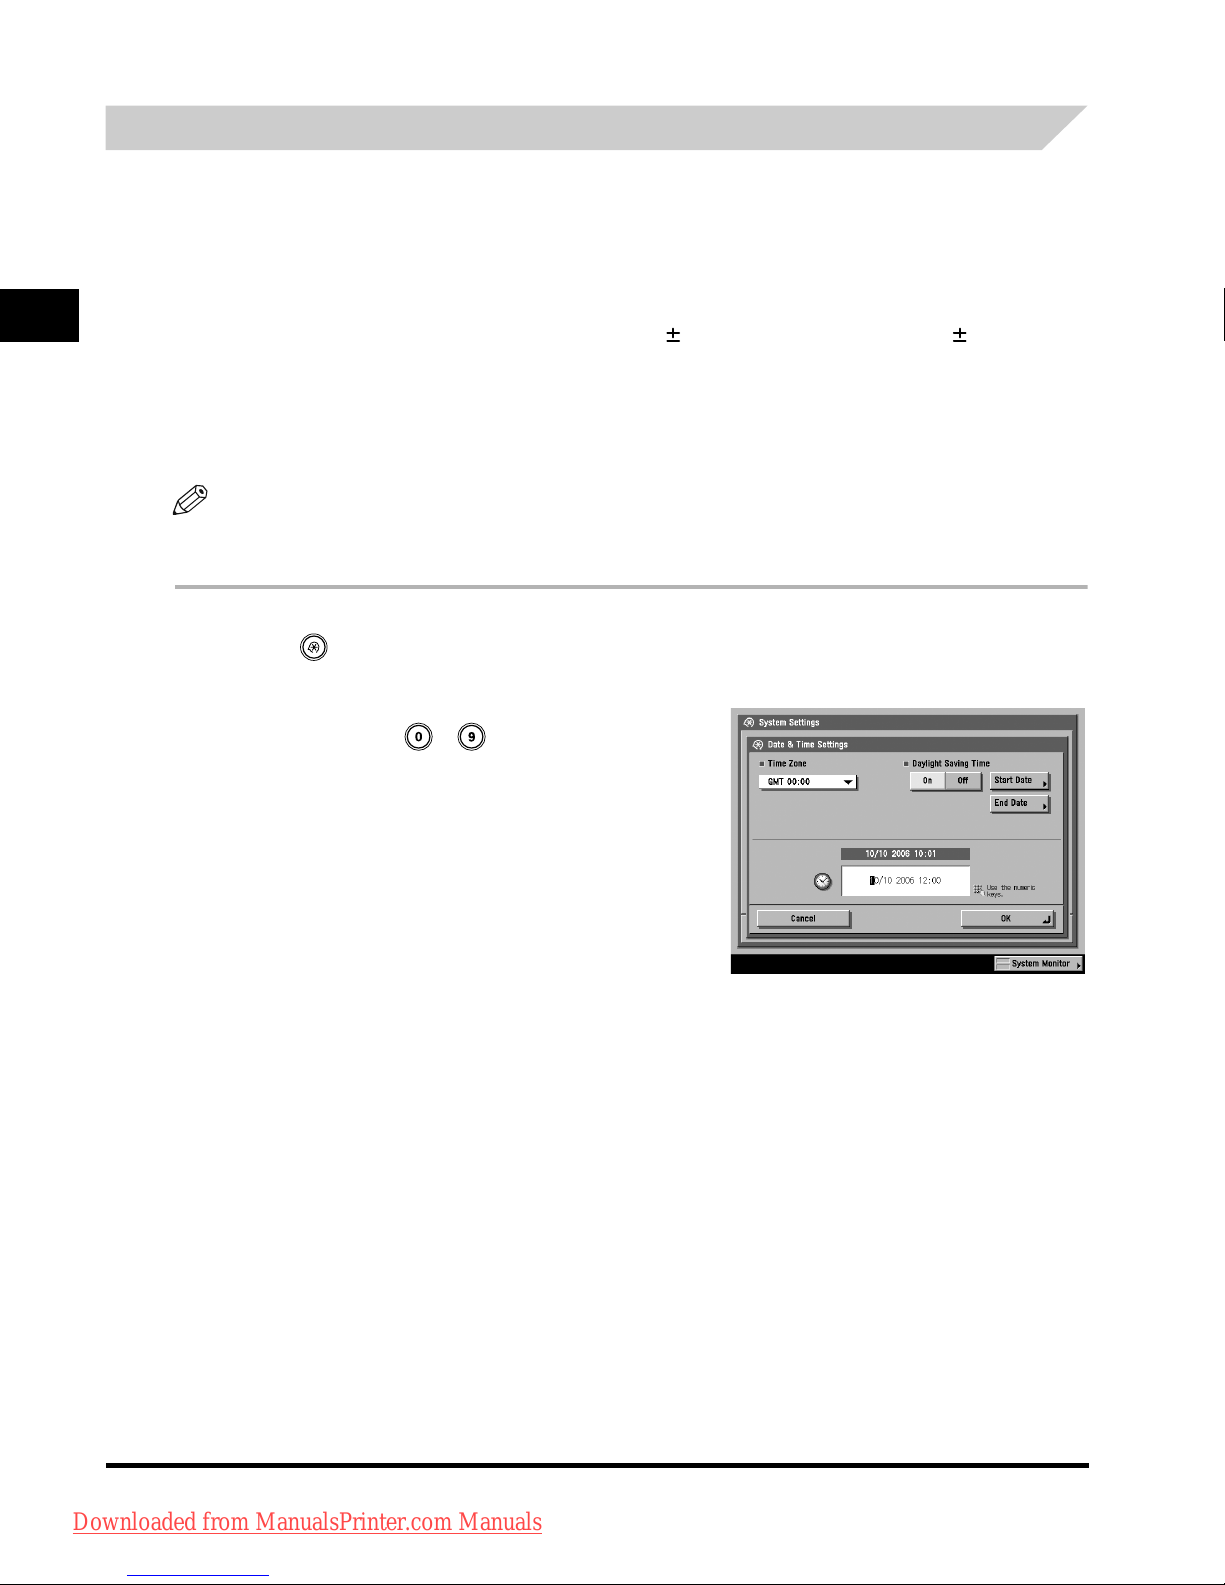
Setting the Current Date and Time
You can set the current date and time. The current date and time settings are used as standard
timer settings for functions that require them.
NOTE
You can also specify to automatically synchronize the date and time with a server on the network from
the Additional Functions screen. (See Chapter 3, "Using a TCP/IP Network," in the Network Guide.)
1
Press ➞ [System Settings] ➞ [Date & Time Settings].
2
Enter the current date (day, month, year)
and time using - (numeric keys).
Enter the month and the day using four digits (including
zeros).
Enter all four digits of the year, and the time in 24-hour
notation, as f
our digits (including zeros) without a space.
● If you are setting the Time Zone:
❑
Press the Time Zone drop-down list ➞ select the time zone where the machine is located.
•
GMT: The time at the Greenwich Observatory in England is called GMT
(Greenwich Mean Time).
• Time Zone: The standard time zones of the world are expressed globally in terms
of the difference in hours ( up to 12 hours) from GMT ( 0 hours).
A time zone is a region throughout which this time difference is the
same.
• Daylight Saving Time: In some countries, time is advanced throughout the summer season.
The period in which this is applied is called "Daylight Saving Time."
Examples: 6 May ➞ 0605
7:05 a.m. ➞ 0705
11:18 p.m. ➞ 2318
Downloaded from ManualsPrinter.com Manuals
Page 53
Things You Must Do Before Using This Machine
1-27
Before You Start Using This Machine
1
● If you are setting Daylight Saving Time:
❑
Press [On] ➞ [Start Date].
❑ Select the month and day from the Month and Day drop-down lists, respectively.
❑ Press [ ] or [+] to enter the time of day you want Daylight Saving Time to take effect ➞ press [OK].
❑ Press [End Date] ➞ make the settings in the same way as [Start Date] ➞ press [OK].
NOTE
If you set Daylight Saving Time, the machine automatically sets the standard time of the machine one
hour forward at the specified date and time.
3
Press [OK].
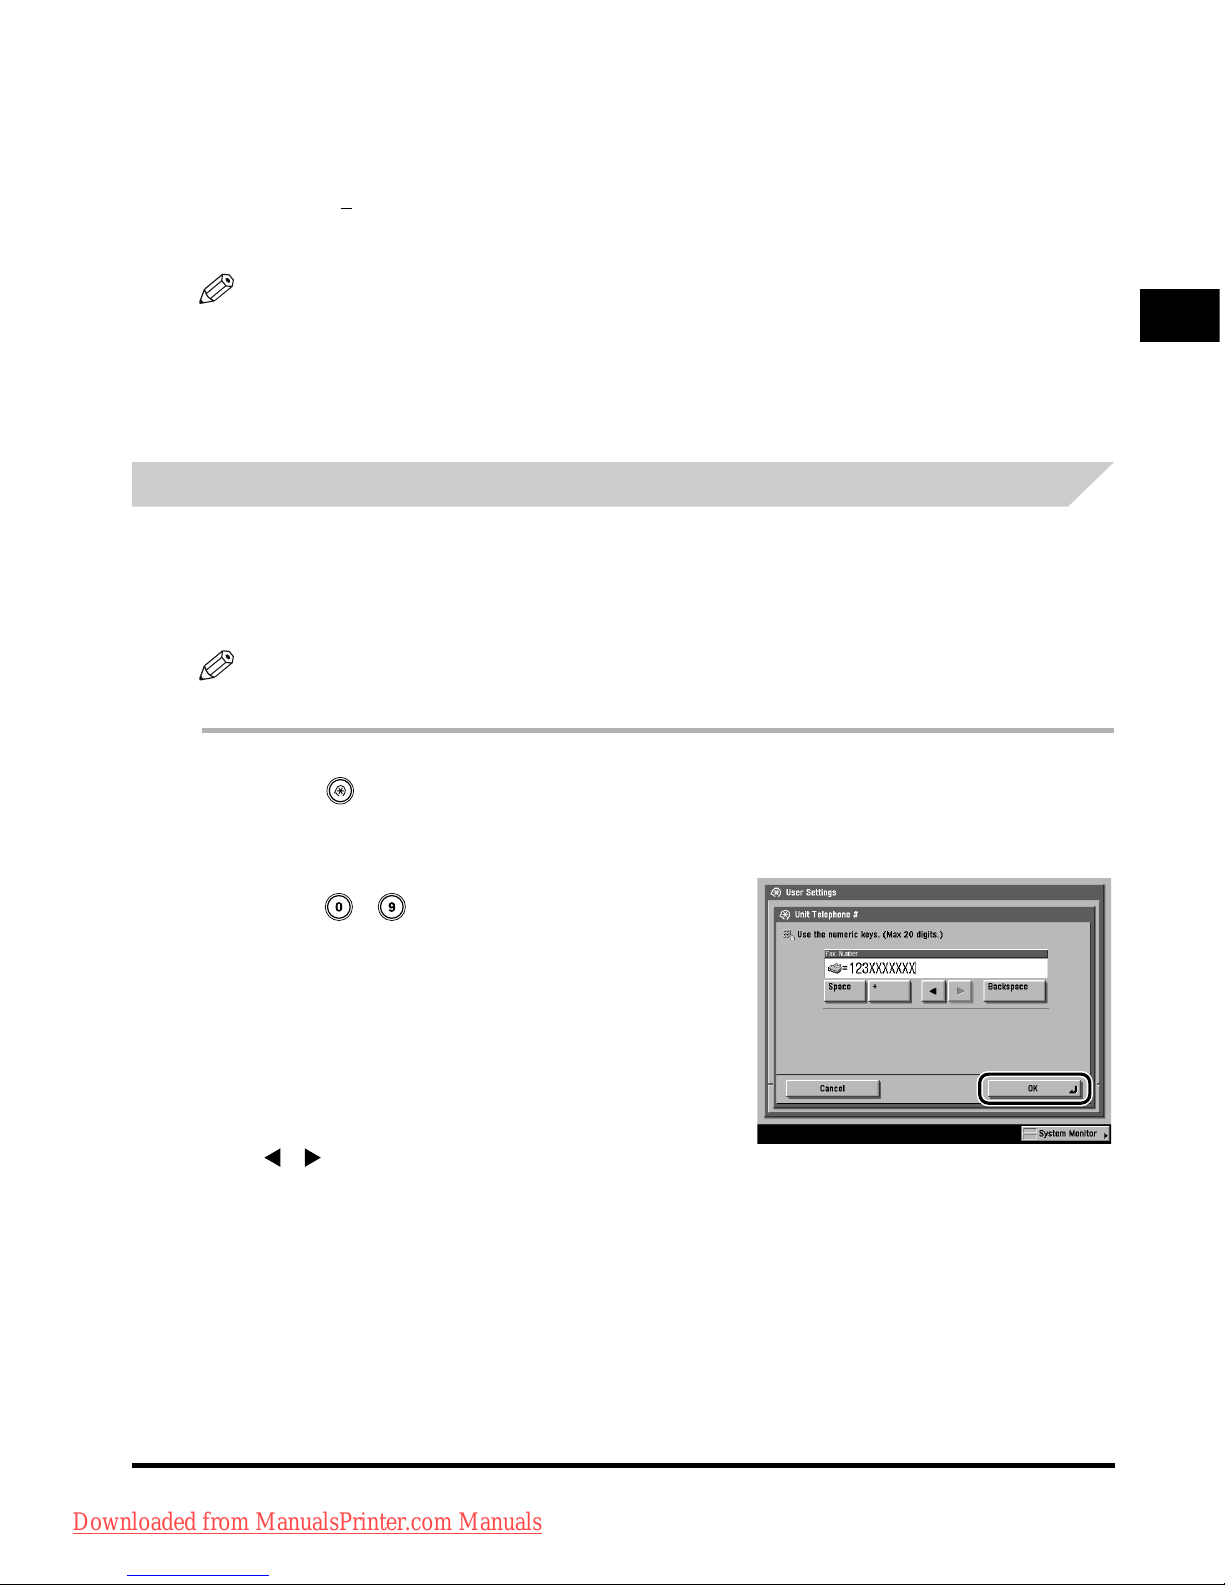
Registering Your Machine's Fax Number
You must store the machine's fax number. This number is printed on the document that you fax
to the receiving party.
The number may also be displayed on the touch panel display of the receiving party's machine,
depending on their type of machine.
NOTE
For this setting, the optional Super G3 FAX Board is required.
1
Press ➞ [Communications Settings] ➞ [User Settings] under <Fax
Settings> ➞ [Unit Telephone #].
2
Enter the unit's telephone number
using - (numeric keys) ➞
pr
ess [OK].
Details of each item are shown below.
[Space]: Press to insert a space between the area
code and the local fax number.
[+]: Use to insert a country code. Press [+] after
the countr
y code, and before the fax
number.
[ ] [ ]: Press to move the position of the cursor.
[Backspace]: Press to delete the last number entered.
Downloaded from ManualsPrinter.com Manuals
Page 54
Things You Must Do Before Using This Machine
1-28
Before You Start Using This Machine
1
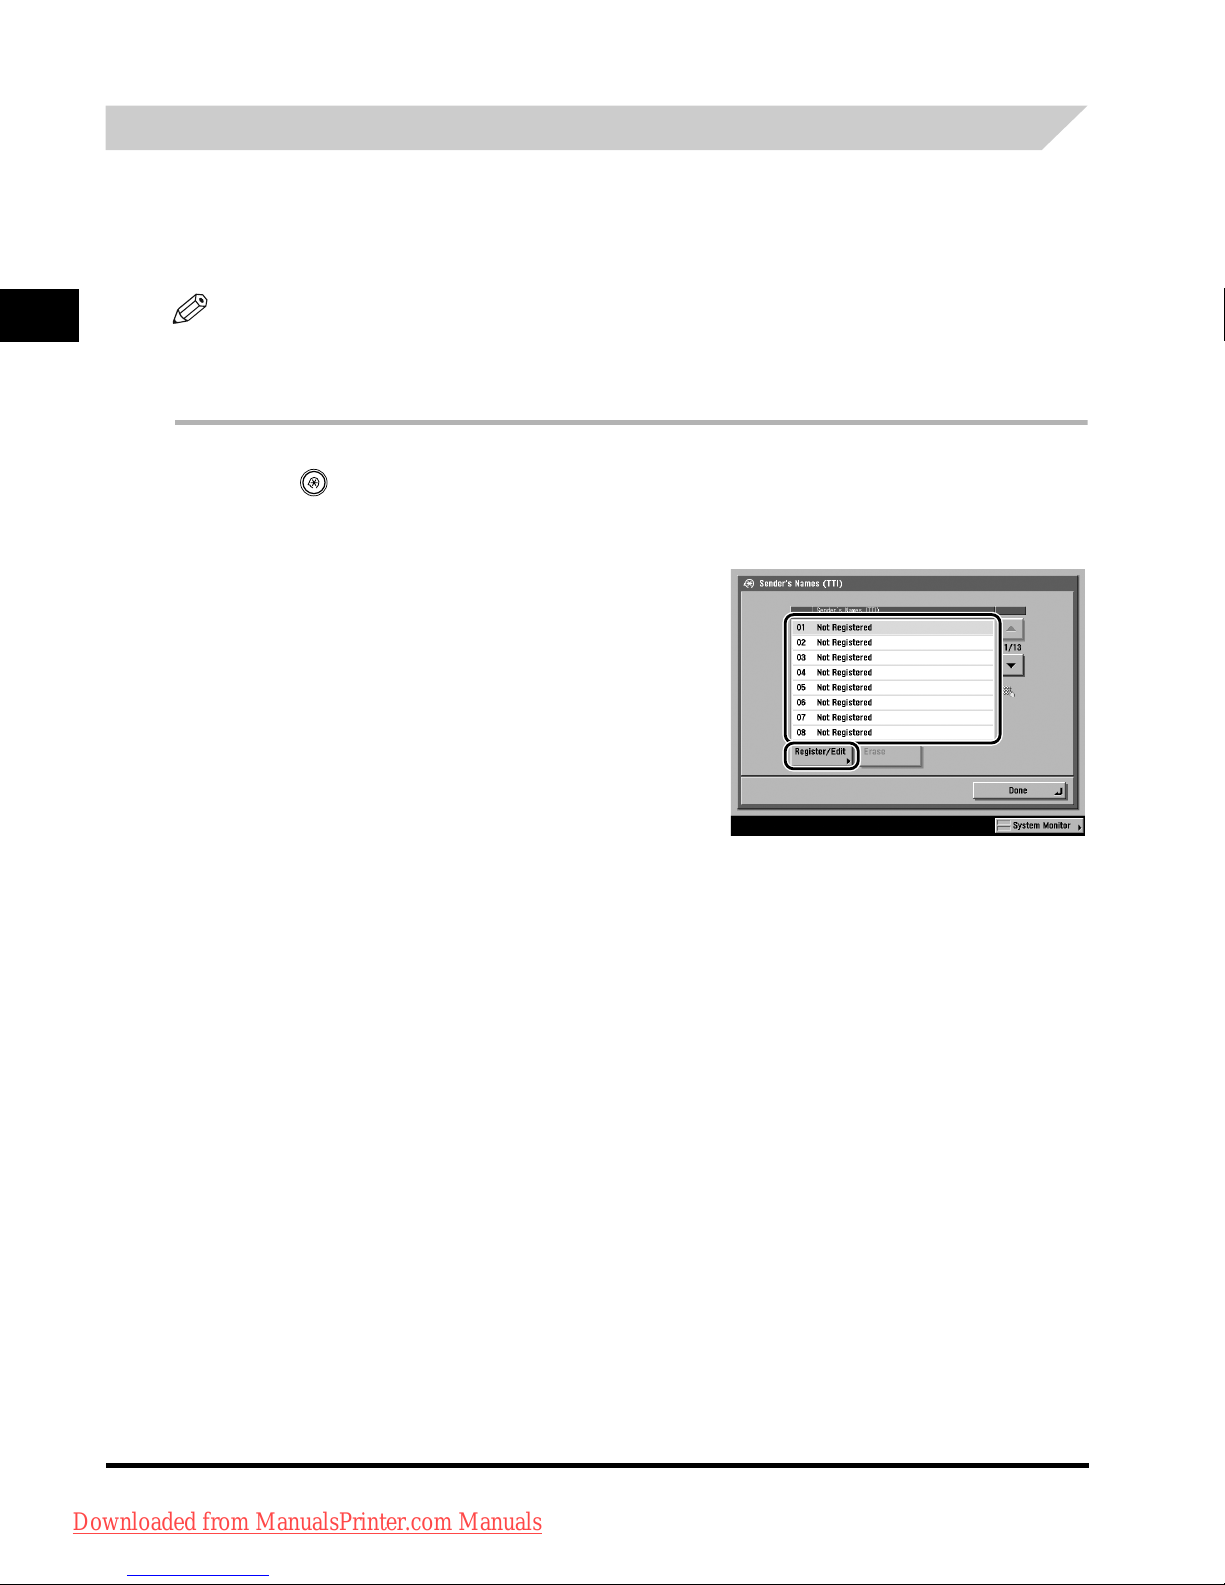
Registering Sender Names
For fax, you can register any name as the sender's name, such as the section or department's
name, or an individual's name.
The registered sender's name can be displayed on the touch panel display of the recipient's
machine and/or printed at the top of the documents that you send as the sender's information.
NOTE
•
You can set to display and print the sender's name instead of the name stored as the unit's name with
the Sender's Names setting from the Send Settings screen.
•
For this setting, the optional Super G3 FAX Board is required.
1
Press ➞ [Communications Settings] ➞ [TX Settings] under <Common
Settings> ➞ [Sender's Names (TTI)].
2
Select the number under which you want
to register the sender's name ➞ press
[Register/Edit].
You can store up to 99 sender names (01 to 99).
To delete a stored sender's name, select the number
under w
hich the name is registered ➞ press [Erase].
Only one sender name can be erased at a time.
3
Enter the sender's name ➞ press [OK].
Downloaded from ManualsPrinter.com Manuals
Page 55

Things You Must Do Before Using This Machine
1-29
Before You Start Using This Machine
1
Registering the Unit's Name
Your name or company's name must be registered as the unit's name (a department name is
optional).
When you send a document via e-mail, fax, or I-fax, the unit name that you registered is
displayed or printed as the sender's name at the recipient's machine.
Some fax models also display sender information on the touch panel display during
transmission.
NOTE
•
If the optional Super G3 FAX Board is installed, the unit name can be printed in the TX Terminal ID.
•
If SDL or the Local Device Authentication user authentication system of SSO is set as the login service
and you are sending an e-mail message:
- The e-mail address of the login user registered for SD
L or the Local Device Authentication user
authentication system of SSO is displayed in the From field on the e-mail recipient's machine, instead
of the e-mail address registered in the Device Information settings for this machine. (See "Sending an
E-Mail Message," in the Sending and Facsimile Guide.)
•
If SDL or the Local Device Authentication user authentication system of SSO is set as the login service
and you are sending an I-fax:
- The e-mail address that you registered in the Device Information settings for this machine is displayed
in the
From field on the I-fax recipient's machine, and the e-mail address of the login user registered
for SDL or the Local Device Authentication user authentication system of SSO is displayed in the
Sender field. (See "Sending an I-Fax," in the Sending and Facsimile Guide.)
•
If the Domain Authentication user authentication system of SSO (including when performing Domain
Authentication with the 'Domain Authentication + Local Device Authentication' user authentication
system) is set as the login service and you are sending an e-mail message:
- The e-mail address that you registered for Active Director
y or iW Accounting Manager displayed in the
From field on the machine, instead of the e-mail address that you registered in the Device Information
settings for this machine. (See "Sending an E-Mail Message," in the Sending and Facsimile Guide.)
•
If the Domain Authentication user authentication system of SSO (including when performing Domain
Authentication with the 'Domain Authentication + Local Device Authentication' user authentication
system) is set as the login service and you are sending an I-fax:
- The e-mail address that you registered in the Device Information settings for this machine is displayed
in the
From field, and the e-mail address that you registered for Active Directory or iW Accounting
Manager is displayed in the Sender field on the recipient's machine. (See "Sending an I-Fax," in the
Sending and Facsimile Guide.)
•
For instructions on storing your machine's e-mail address, see the Network Guide.
For example:
•Your name:
John Smith
•Company name:
Canon
•Company name and department:
Canon-Accounting Dept.
Downloaded from ManualsPrinter.com Manuals
Page 56

Things You Must Do Before Using This Machine
1-30
Before You Start Using This Machine
1
1
Press ➞ [Communications Settings] ➞ [TX Settings] under <Common
Settings> ➞ [Unit Name].
2
Enter a name ➞ press [OK].
Downloaded from ManualsPrinter.com Manuals
Page 57
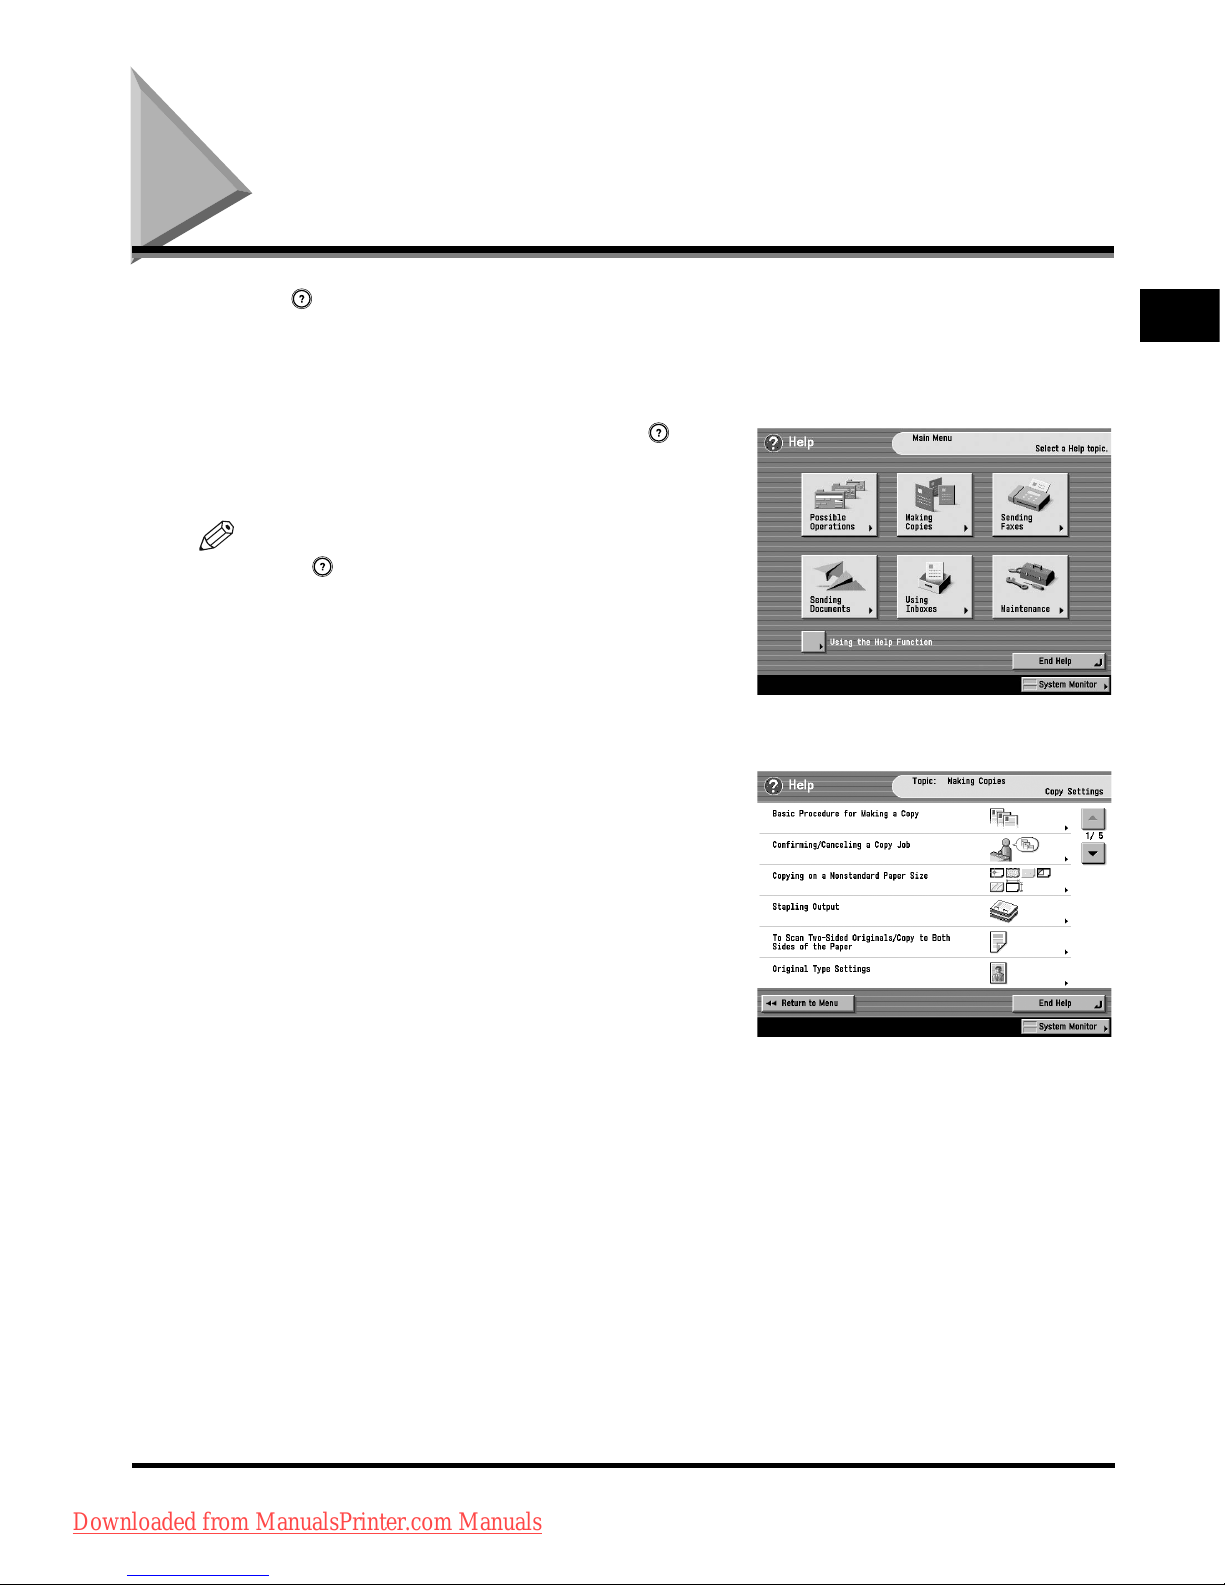
Displaying a Help Screen
1-31
Before You Start Using This Machine
1
Displaying a Help Screen
Pressing brings up a guidance screen with information about the various features that are
available with your machine. Follow the instructions on the screen to select the operation you
want to perform. An explanation of the function and how to set it is displayed.
■ Main Menu
This is the first screen displayed when you press .
Press [Using the Help Function] to display an explanation
of how to use the Help.
NOTE
Press after selecting a mode of the Copying or Mail
Box function may bring up a guidance screen with an
explanation of that mode.
■ List Screen
Displays a list of the functions selected on the main menu.
Downloaded from ManualsPrinter.com Manuals
Page 58
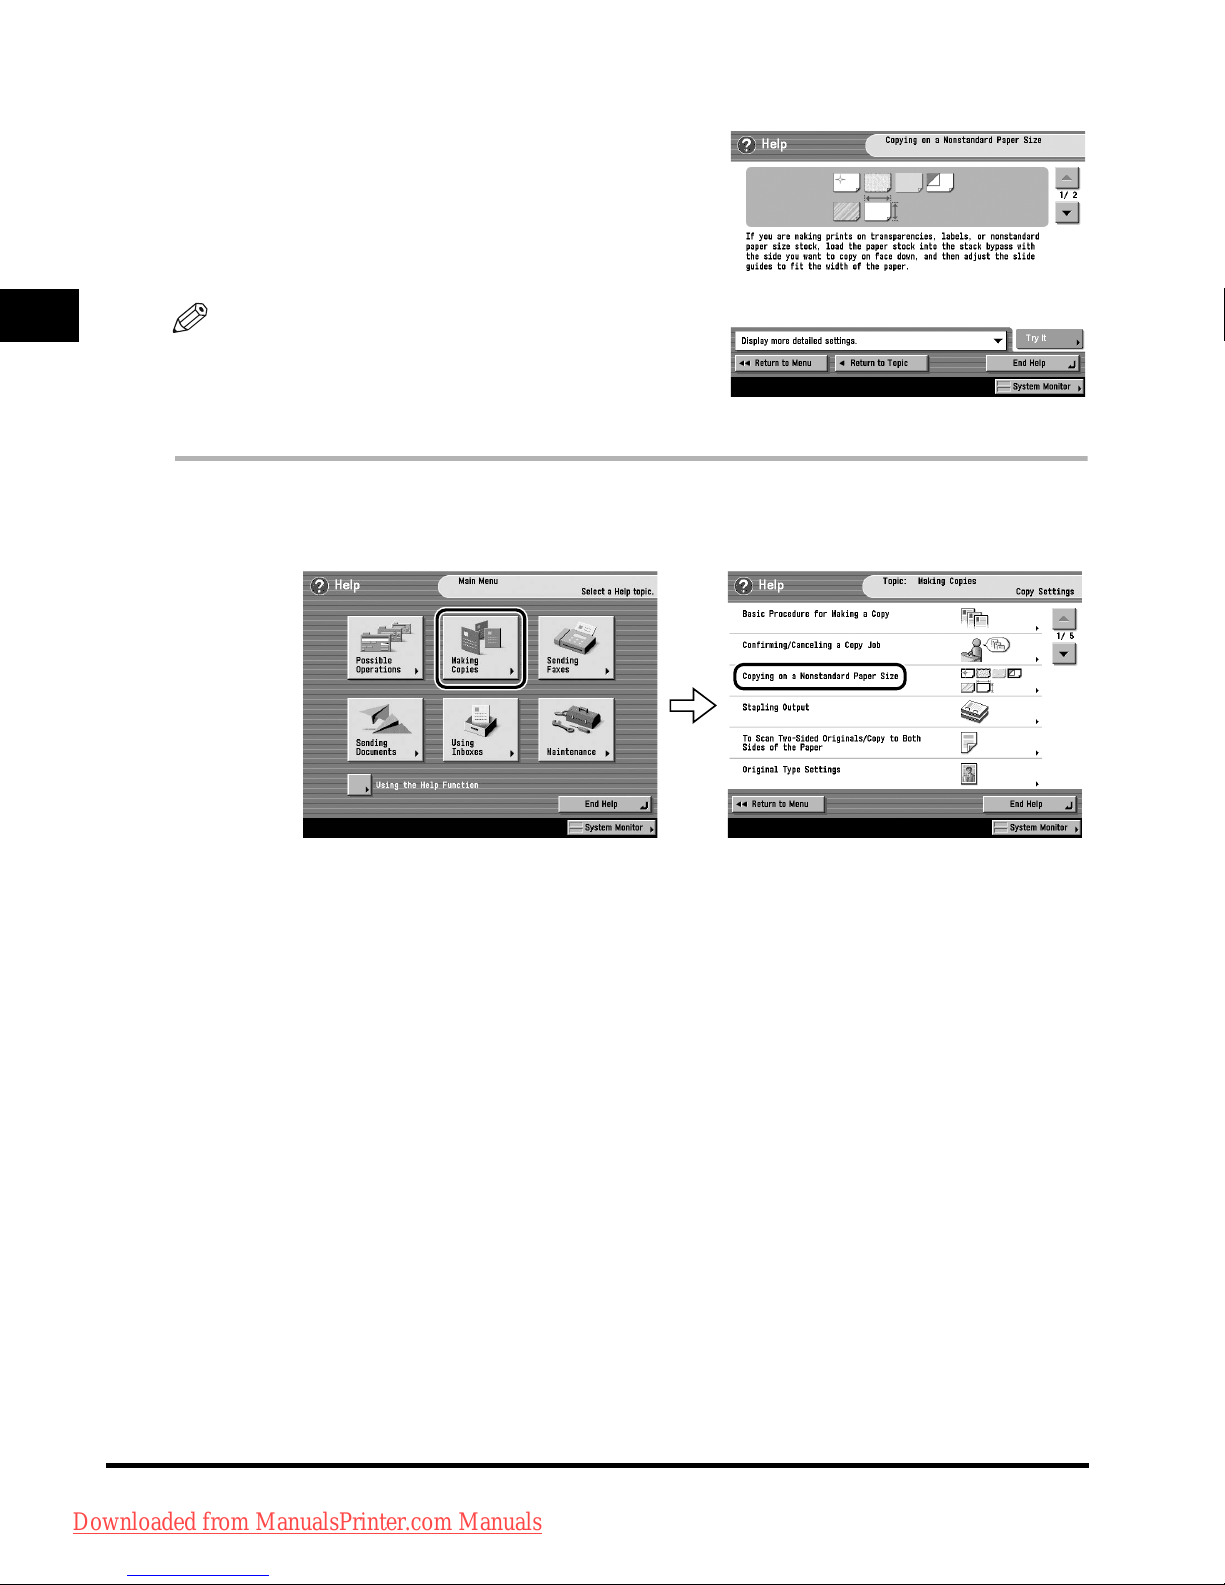
Displaying a Help Screen
1-32
Before You Start Using This Machine
1
■ Explanation Screen
Displays a detailed explanation of the function selected on
the list screen.
Press [Try It] to jump to the screen for setting the selected
function.
Press [Display more detailed settings.] to display more
detailed information and related topics.
NOTE
The [Try It] key is only displayed on the Explanation
Screen for some Copy functions.
Example: The procedure for copying on a nonstandard
paper size.
1
Press [Making Copies] ➞ [Copying on a Nonstandard Paper Size].
2
Check the detailed information for the function.
Press [Try It] ➞ [Yes] to try using the function.
Downloaded from ManualsPrinter.com Manuals
Page 59

CHAPTER
2-1
2
Routine Maintenance
This chapter describes how to load paper, and replace toner.
Loading Paper. . . . . . . . . . . . . . . . . . . . . . . . . . . . . . . . . . . . . . . . . . . . . . . . . . . . . . . . . . . . . . . . . . .2-2
Replacing the Toner Cartridge . . . . . . . . . . . . . . . . . . . . . . . . . . . . . . . . . . . . . . . . . . . . . . . . . . . . . .2-6
Downloaded from ManualsPrinter.com Manuals
Page 60
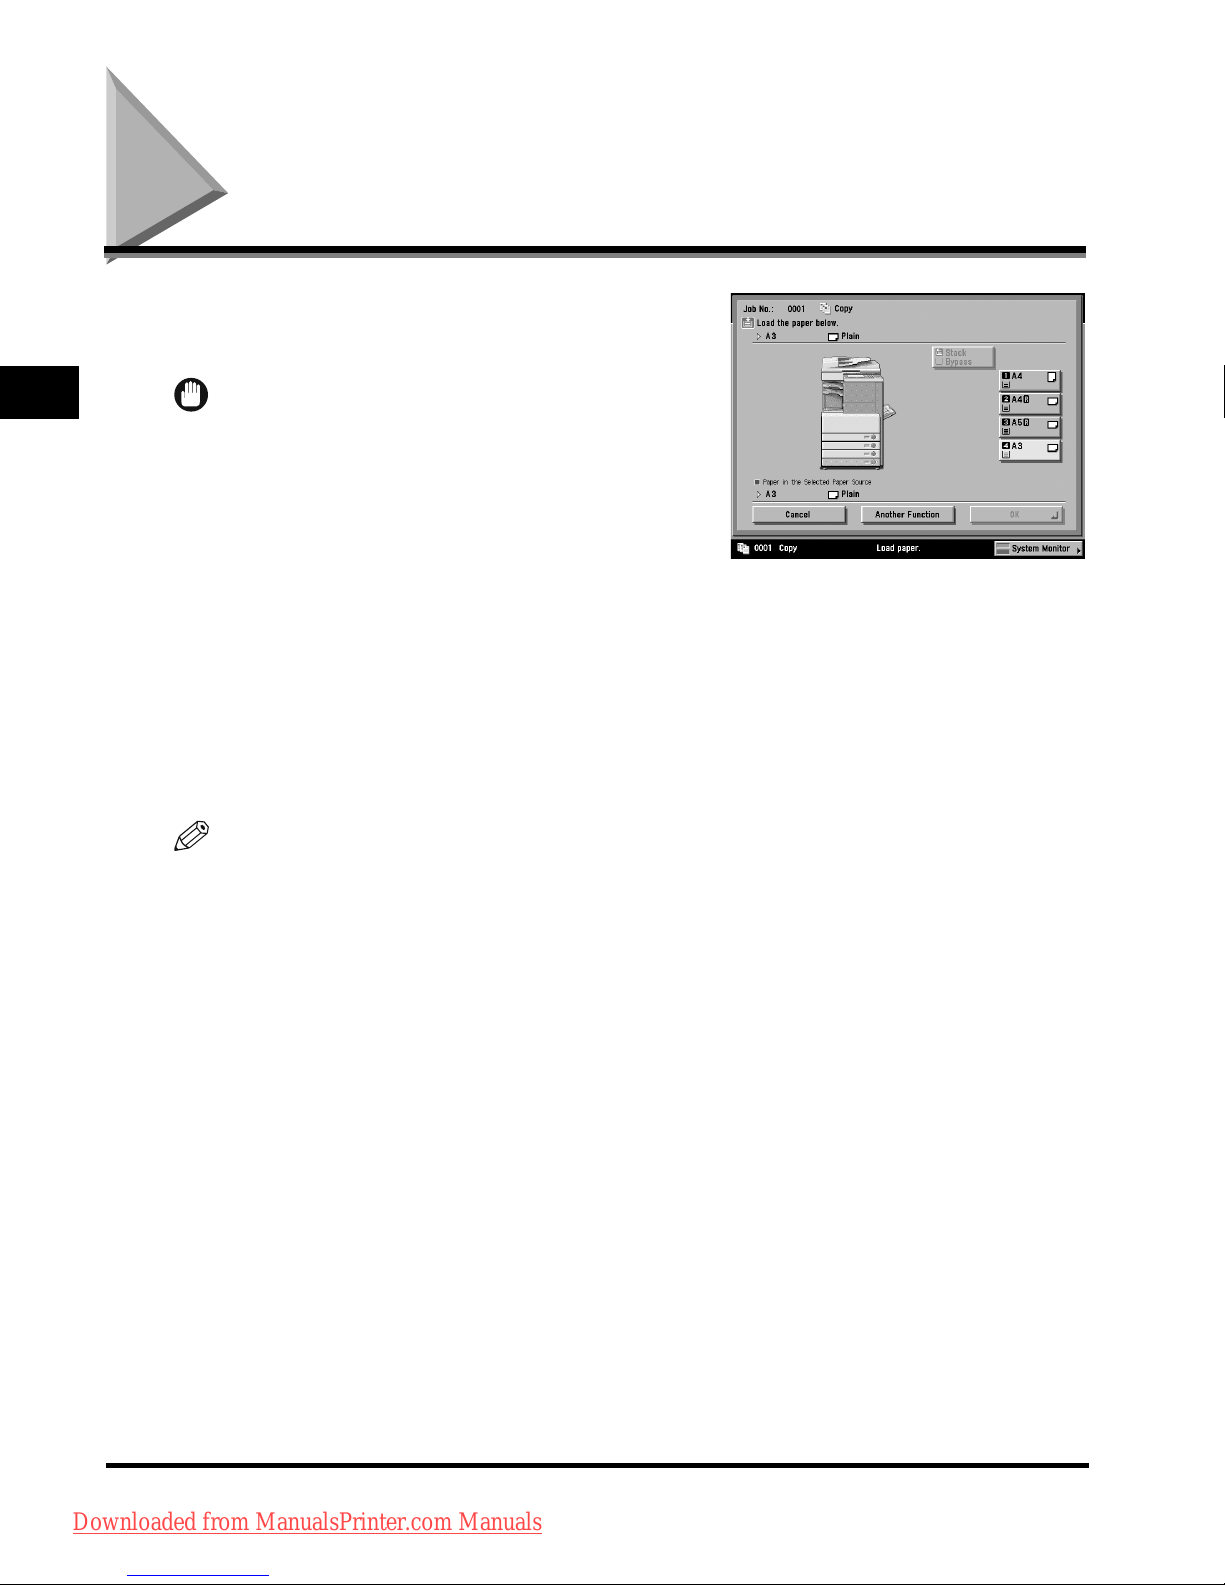
Loading Paper
2-2
Routine Maintenance
2
Loading Paper
If the selected paper has run out during printing, a
screen prompting you to load paper appears on the
touch panel display.
IMPORTANT
•
A screen prompting you to load paper also appears if the
selected paper drawer is not fully inserted into the
machine. Make sure that the paper drawer is properly in
place.
•
Do not load nonstandard paper sizes into the paper
drawers.
•
Do not load the following types of paper into the paper
drawers. Doing so may cause a paper jam.
- Severely curled or wrinkled paper
- Thin straw paper
- Transparencies
- Paper which has been printed on using a thermal transfer printer (Do not print on the reverse side of
this
paper either.)
•
Fan the stack of paper well before loading it, and align the edges of the paper stack on a flat surface.
•
Never place paper or any other items in the empty part of the drawer next to the paper stack. Doing so
may cause paper jams.
NOTE
•
If a message prompting you to load paper appears during printing, the remaining prints are
automatically made after you load the correct paper. If you select another paper drawer, the remaining
prints are made after you press [OK].
•
To cancel printing, press [Cancel].
•
To use another available function, press [Another Function] ➞ select [Copy], [Send], [Mail Box], or
[Scan]
➞
press [Done].
•
The following paper sizes can be loaded into paper drawers 1, 2, 3, and 4.
- Paper Drawer 1: A4, A4R, A5R, and envelopes
- Paper Drawers 2, 3, and 4: A3, A4, A4R, and A5R
•
For more information on available paper stock that can be loaded into the paper drawers, see "Available
Paper Stock," in the Reference Guide.
Downloaded from ManualsPrinter.com Manuals
Page 61
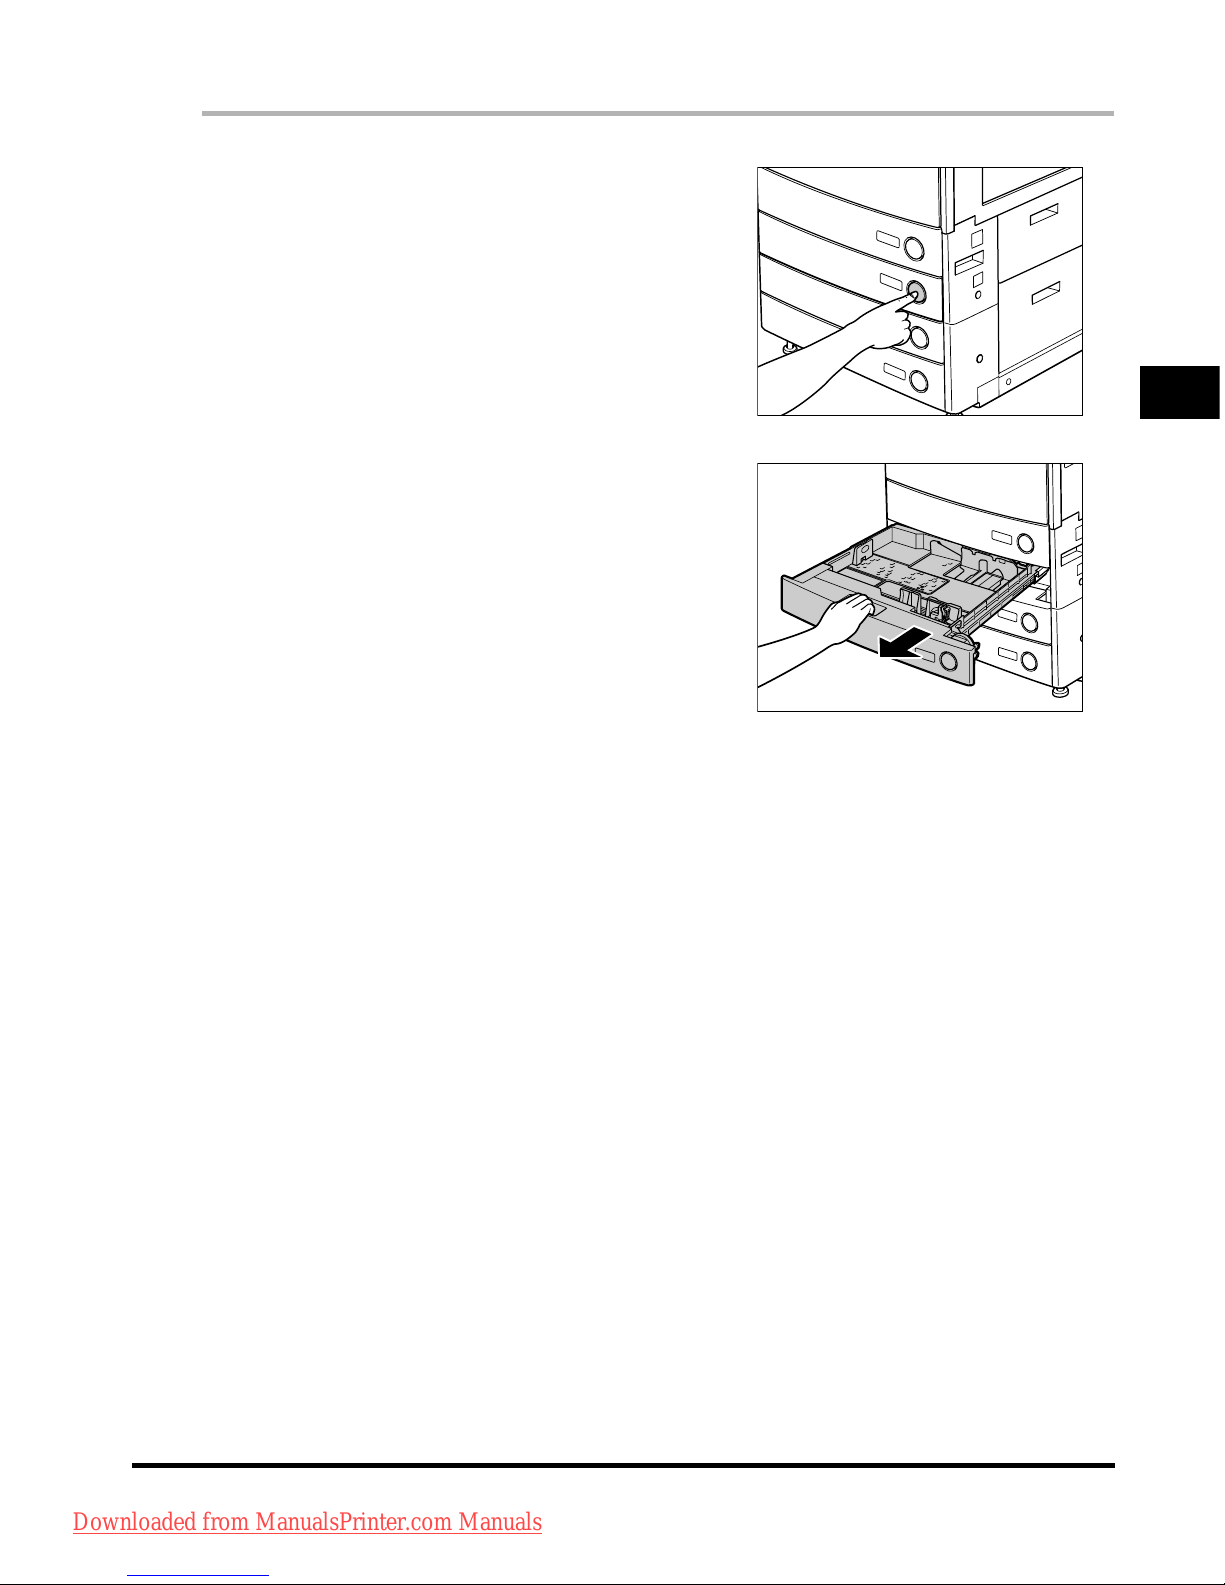
Loading Paper
2-3
Routine Maintenance
2
1
Press and release the button on the paper
drawer in which you want to load paper.
2
Grip the handle, and pull out the paper
drawer until it stops.
Downloaded from ManualsPrinter.com Manuals
Page 62
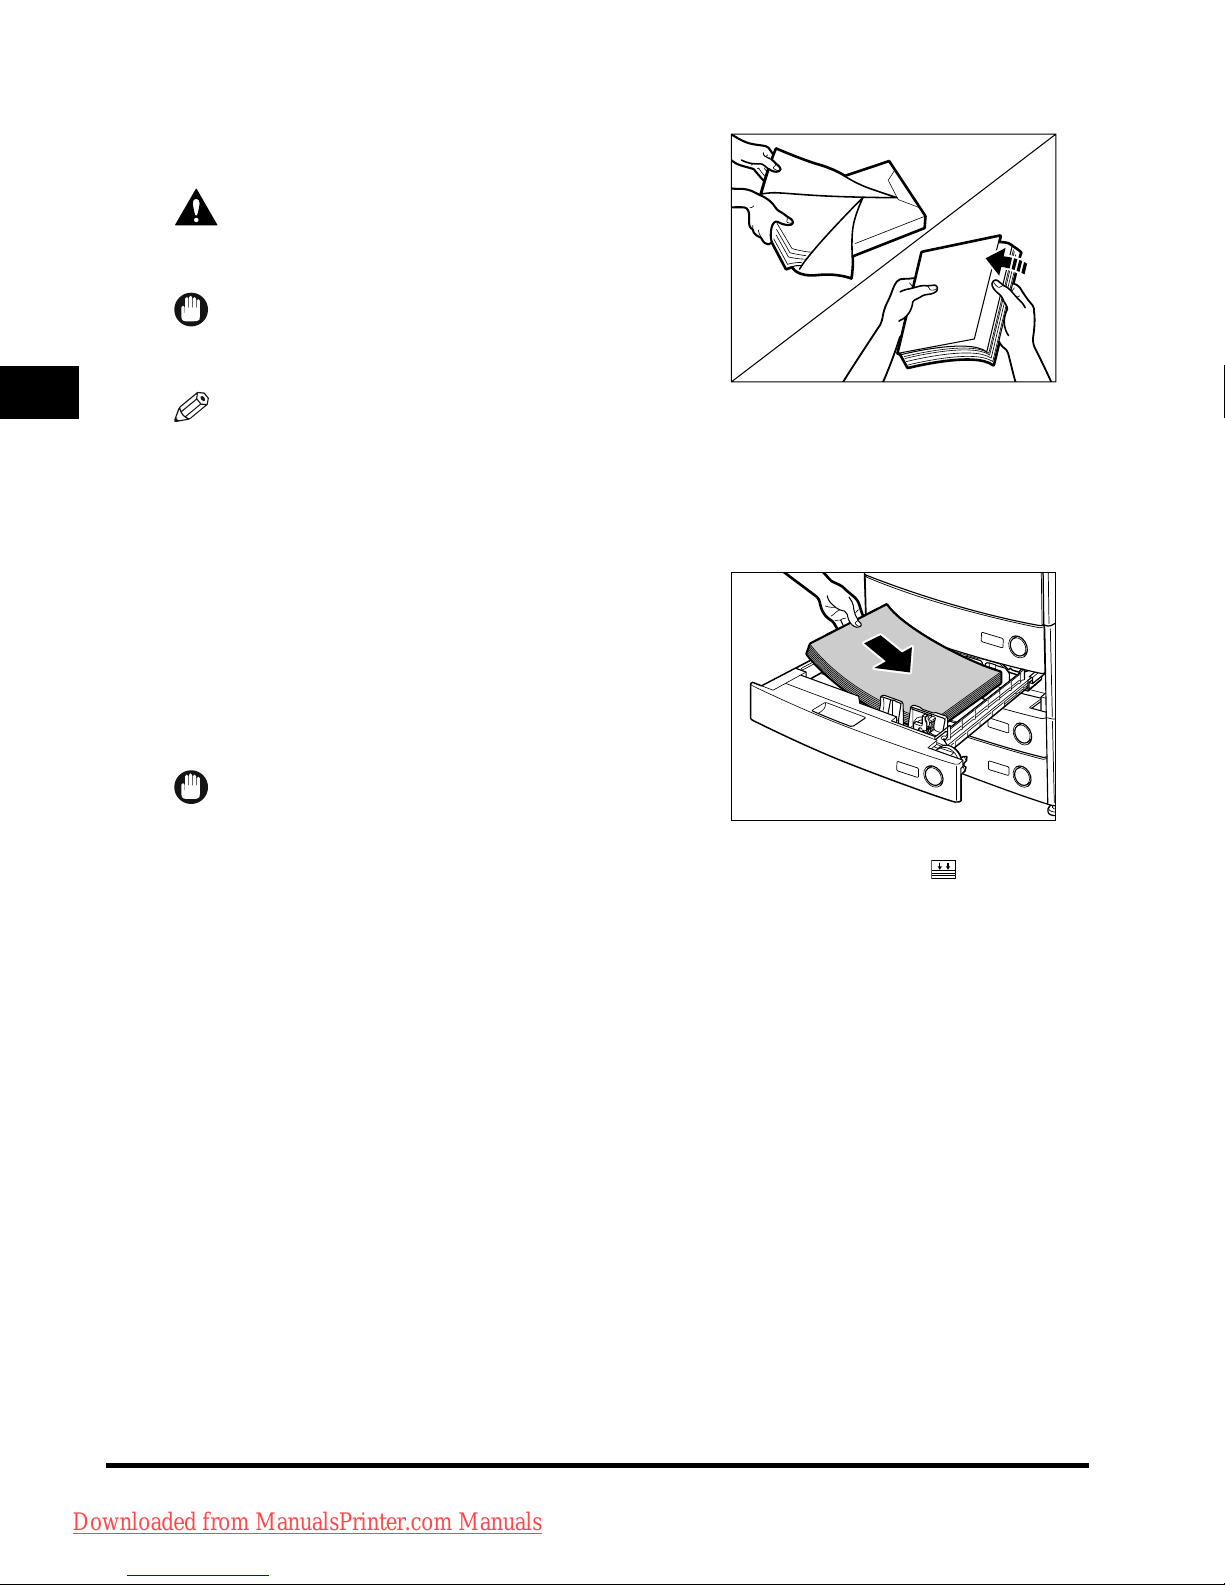
Loading Paper
2-4
Routine Maintenance
2
3
Open a package of paper, and remove the
paper stack.
CAUTION
When loading paper, take care not to cut your
hands on the edges of the paper.
IMPORTANT
Rewrap any remaining paper in its original package, and
store it in a dry place, away from direct sunlight.
NOTE
•
For high quality printouts, use paper recommended by Canon.
•
Before loading paper, always fan the sheets several times, and align the edges to facilitate feeding. Also,
you should always fan paper that has just been removed from a newly opened paper package.
4
Load the paper stack into the paper drawer.
Even out the edges of the paper stack. Load the paper
stack against the right wall of the paper drawer.
Make sure that the paper size setting on the paper
dr
awer matches the size of the paper that is loaded.
When loading paper into the paper drawer for the first
time, set the paper size dial to match the paper size
being loaded. (See "Adjusting a Paper Drawer to Hold a
Different Paper Size," in the Reference Guide.)
IMPORTANT
•
Paper which has been rolled or curled must be
straightened out prior to use.
•
Make sure that the height of the paper stack does not exceed the loading limit mark ( ) at the back of
the paper drawer.
Downloaded from ManualsPrinter.com Manuals
Page 63
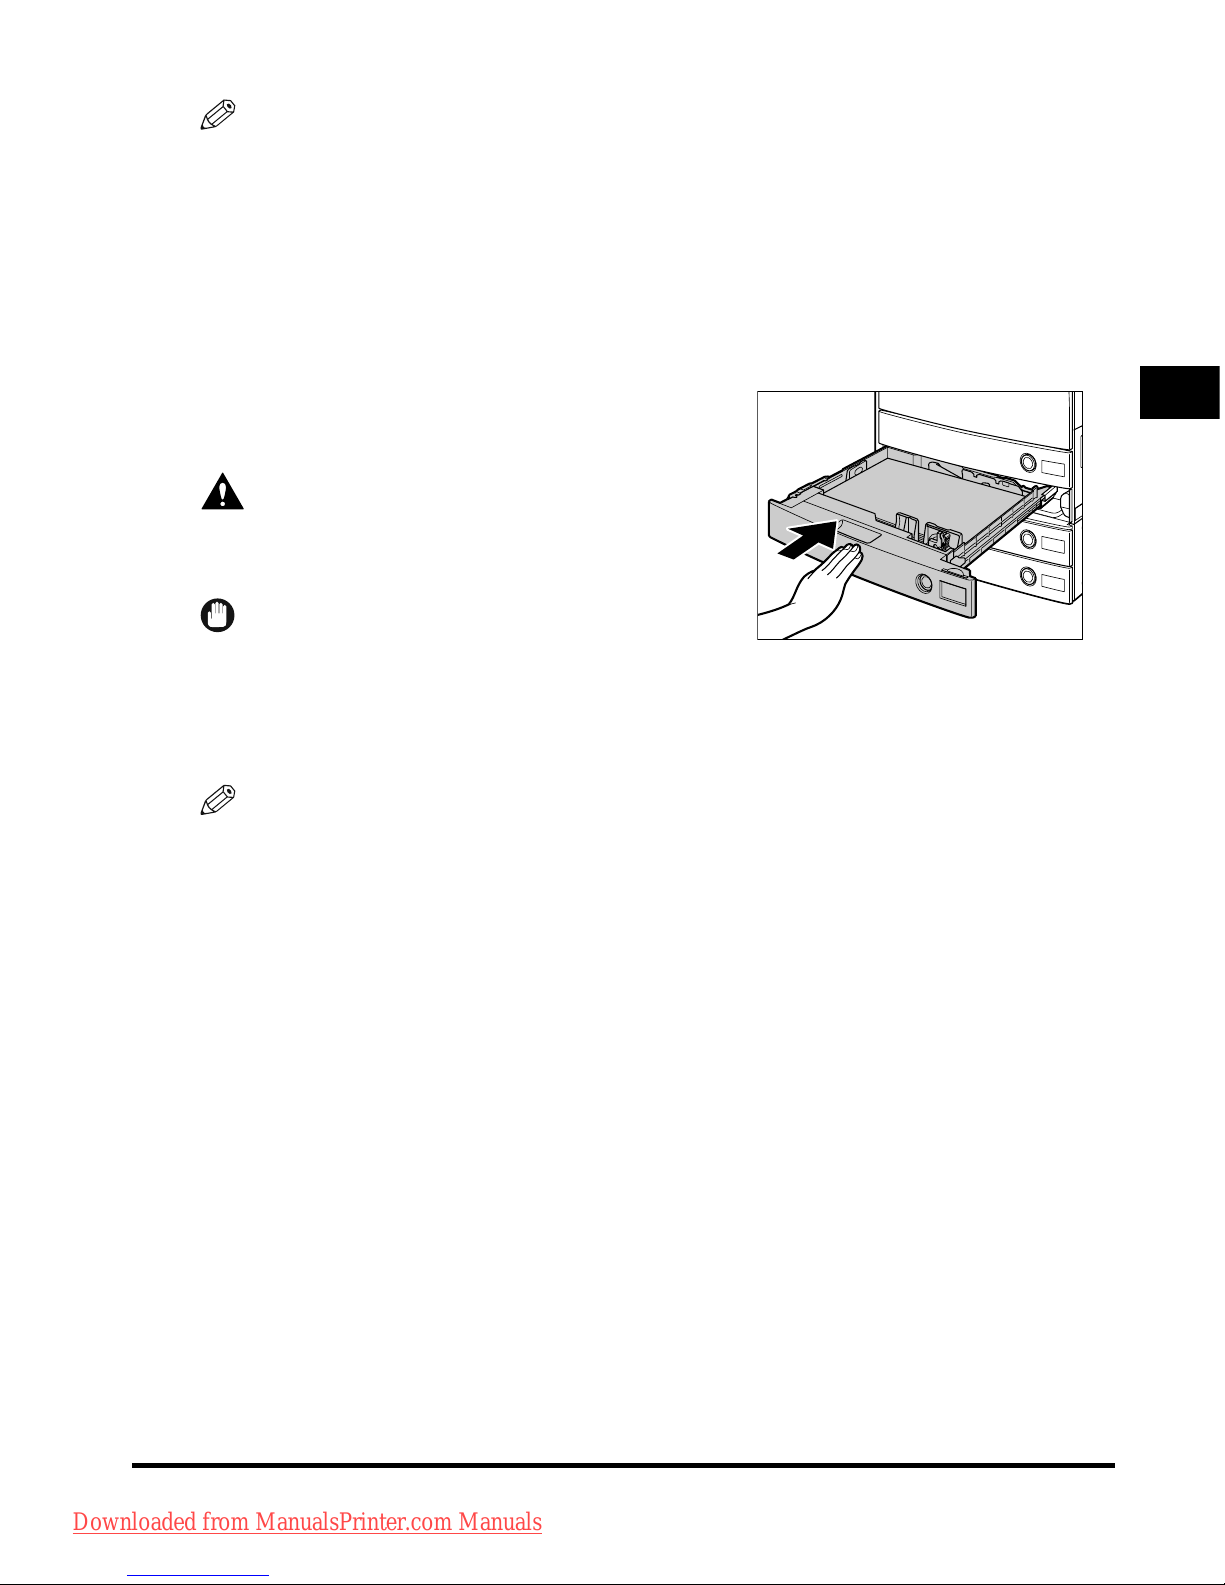
Loading Paper
2-5
Routine Maintenance
2
NOTE
•
Each paper drawer holds approximately 550 sheets of paper (80 g/m2).
•
If there are instructions on the package of paper about which side of the paper to load, follow those
instructions.
•
When the paper is loaded into the paper drawer, the side facing up is the one printed on.
•
If problems occur, such as poor print quality or paper jams, try turning the paper stack over, and reload
it.
•
For more information on the print direction of preprinted paper (paper which has logos or patterns
already printed on it), see "Relationship between Original Orientation and Preprinted Paper Output
Chart," in the Reference Guide.
5
Gently push the paper drawer back into
the machine until it clicks into place in
the closed position.
CAUTION
When returning the paper drawer to its original
position, be careful not to get your fingers caught,
as this may result in personal injury.
IMPORTANT
You will not be able to make copies or print if you load
paper that exceeds the loading limit, or if the paper
drawer is not completely pushed into the machine.
Always check that the paper drawers are in place. If a
paper drawer is overloaded, decrease the amount of
paper so that it does not exceed the loading limit.
NOTE
If paper runs out during copying or printing, load a new paper stack, and follow the instructions on the
touch panel display. The machine automatically restarts, and produces the remaining copies or prints.
Downloaded from ManualsPrinter.com Manuals
Page 64
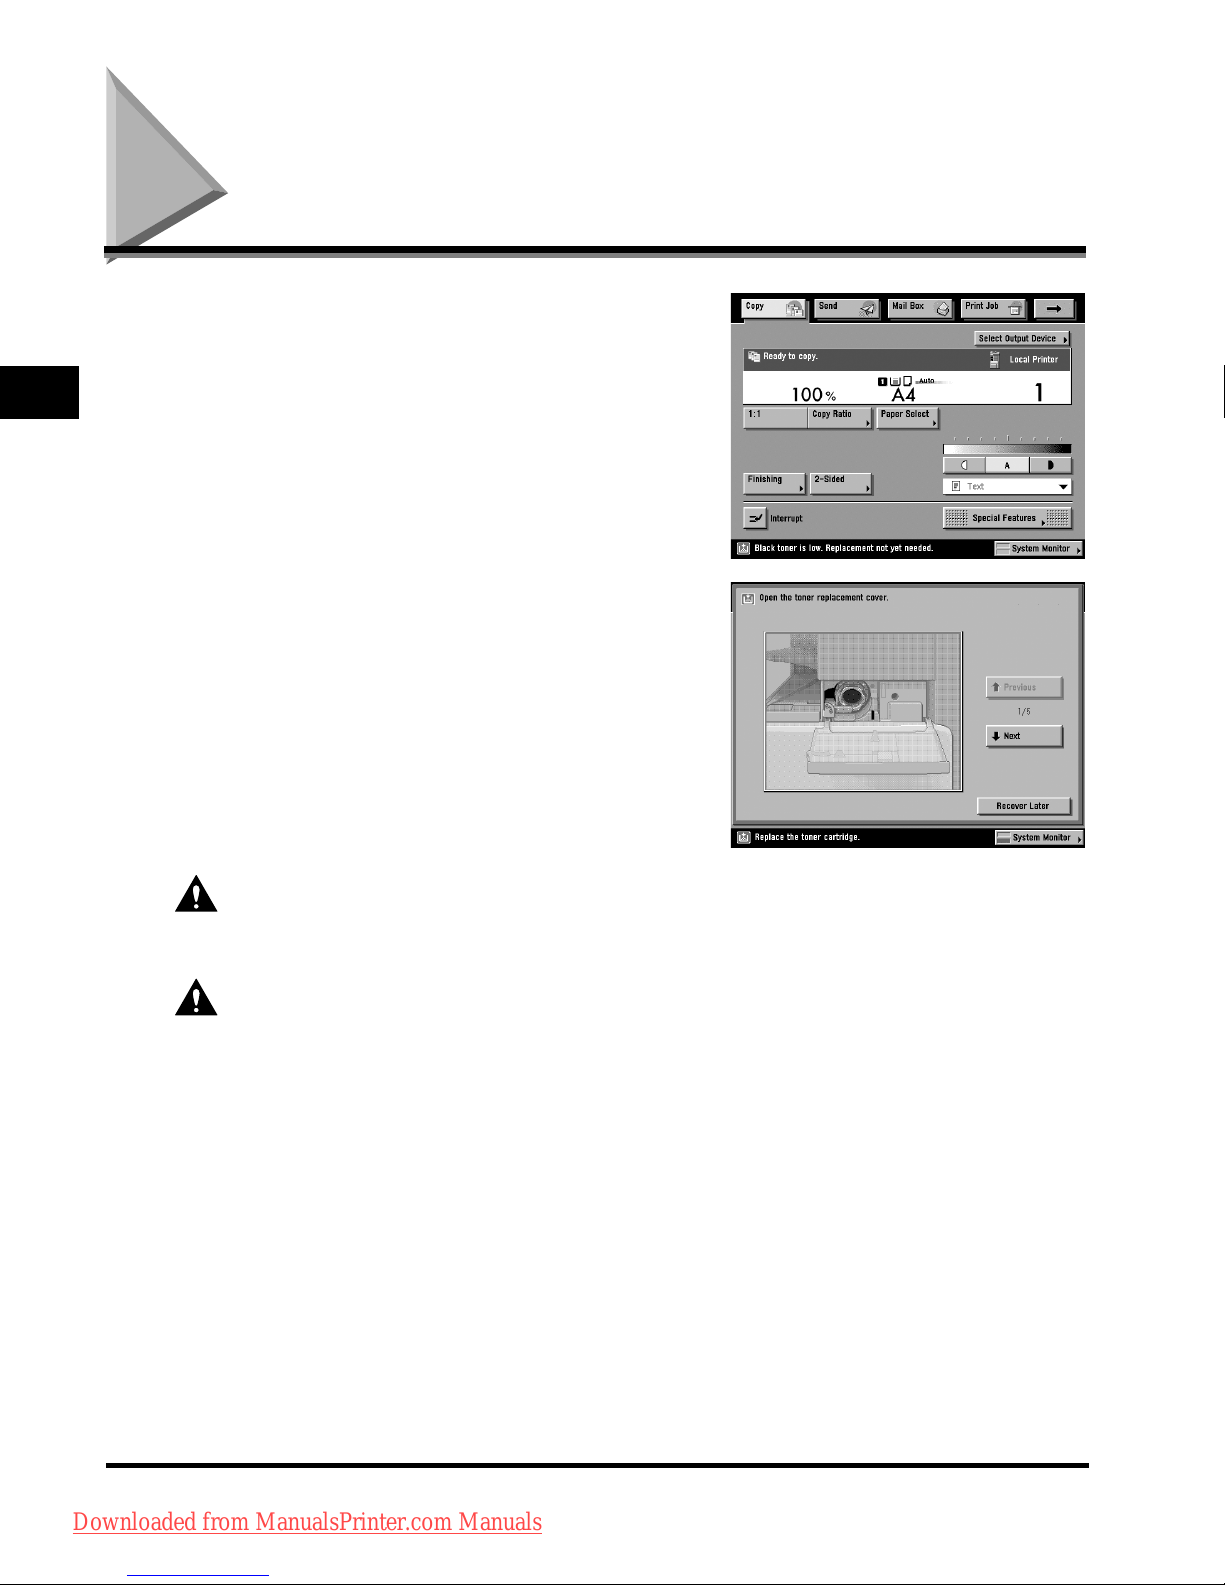
Replacing the Toner Cartridge
2-6
Routine Maintenance
2
Replacing the Toner Cartridge
When there is only a small amount of toner remaining
in the machine, the following message appears on the
touch panel display, as shown. You can continue
printing, but at this time you should purchase new toner
of the indicated colour so that you have it available
when needed.
When the toner runs out completely and prints can no
lo
nger be made, a screen with instructions on how to
replace the toner cartridge, like the one shown,
appears on the touch panel display. Follow the
instructions on the touch panel display, and the
procedure described below to help you replace the
toner cartridge.
If you press [Recover Later], you can continue certain
operations, such as setting modes and scanning
originals, even if you do not replace the toner cartridge
immediately.
WARNING
Do not burn or throw used toner cartridges into open flames, as this may cause the toner
remaining inside the cartridges to ignite, resulting in burns or fire.
CAUTION
• Keep toner out of the reach of small children. If toner is ingested, consult a physician
immediately.
• If to
ner gets onto your hands or clothing, wash it off immediately with cold water. Do not use
warm water as this may set the toner permanently, and you may not be able to remove the
toner stains.
Downloaded from ManualsPrinter.com Manuals
Page 65
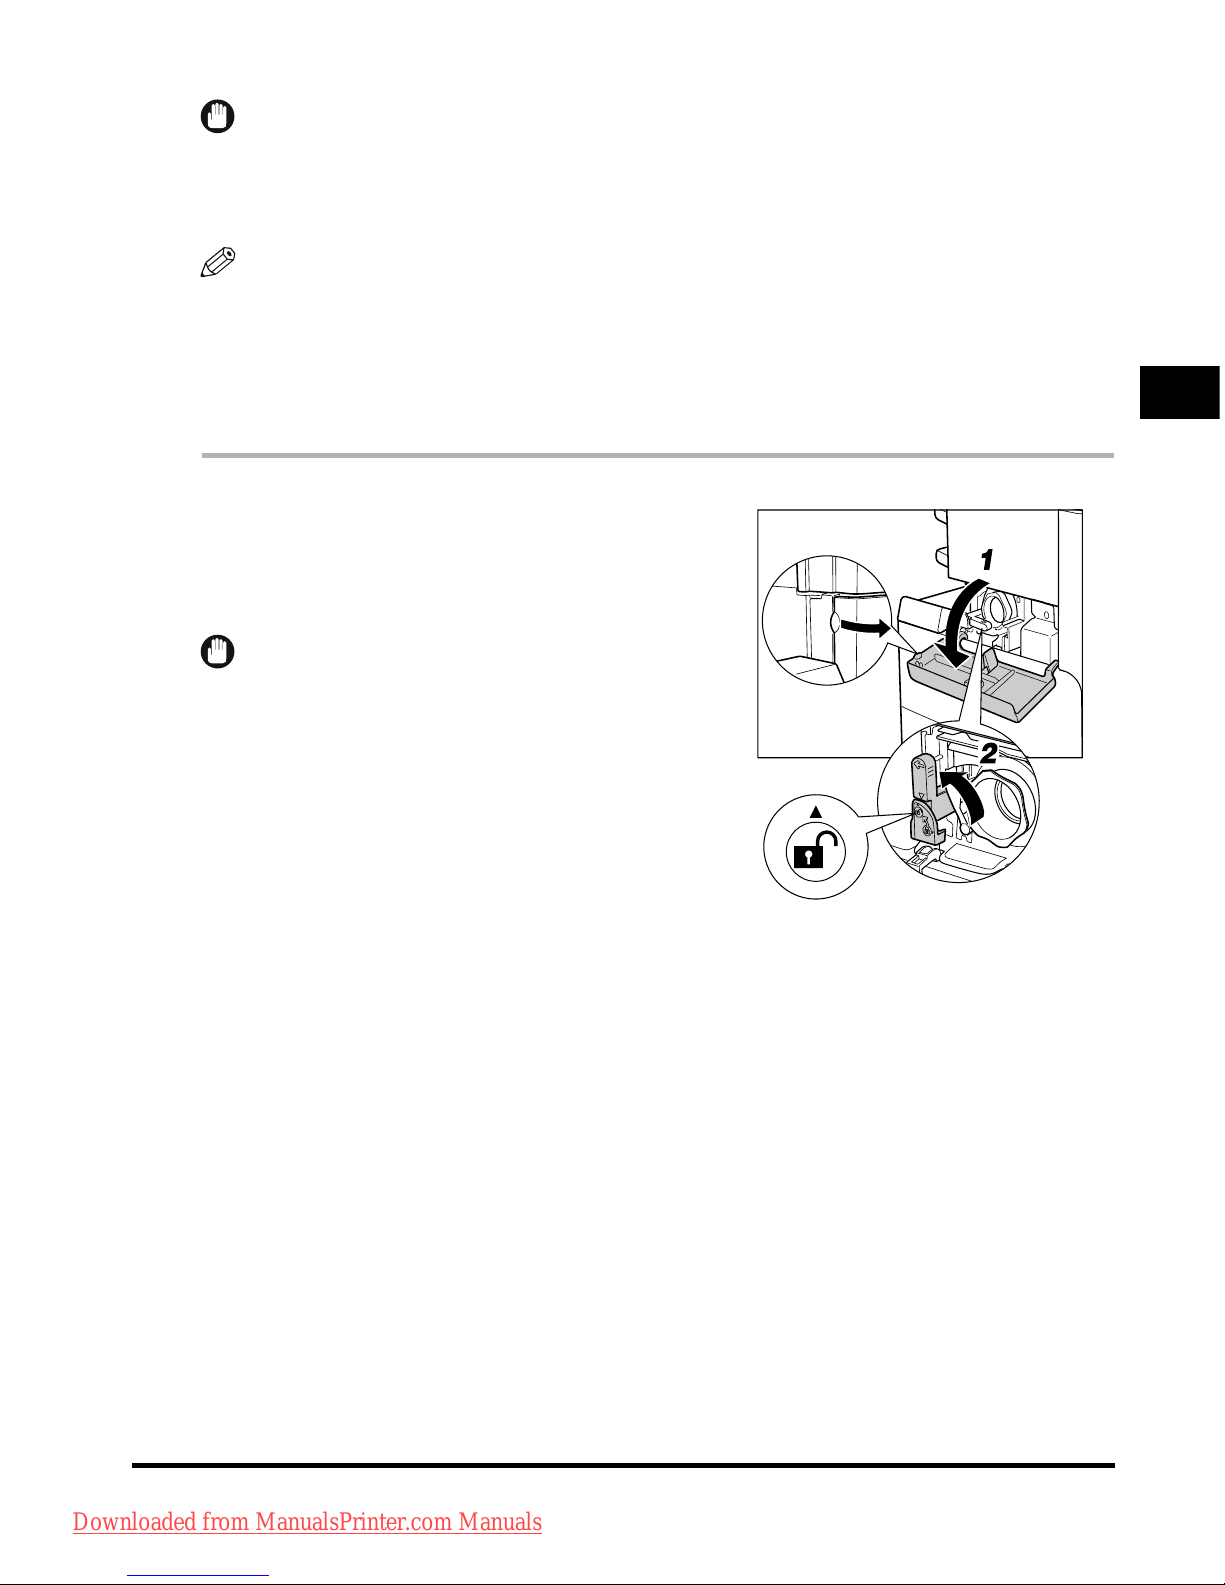
Replacing the Toner Cartridge
2-7
Routine Maintenance
2
IMPORTANT
•
Use only the toner cartridges intended for use with this machine.
•
Do not replace toner cartridges until the message prompting you to do so appears.
•
Do not attempt to replace the toner cartridge while the machien is printing.
NOTE
•
When the message <Black toner is low. Replacement not yet needed.> appears, approximately 10% of
the toner is left. It is recommended that you get a new toner cartridge ready for replacement before the
toner runs out.
•
Complete instructions on how to replace the toner cartridge can be accessed by pressing [Previous] or
[Next] on the touch panel display.
•
If toner runs out during a print job, the remaining prints are made after you replace the toner cartridge.
1
Open the toner supply port cover.
2
Lift up the locking lever until it becomes
vertical.
IMPORTANT
Make sure that the ▼ on the lever is aligned with the ▲ of
the
'
Unlock' position.
Downloaded from ManualsPrinter.com Manuals
Page 66
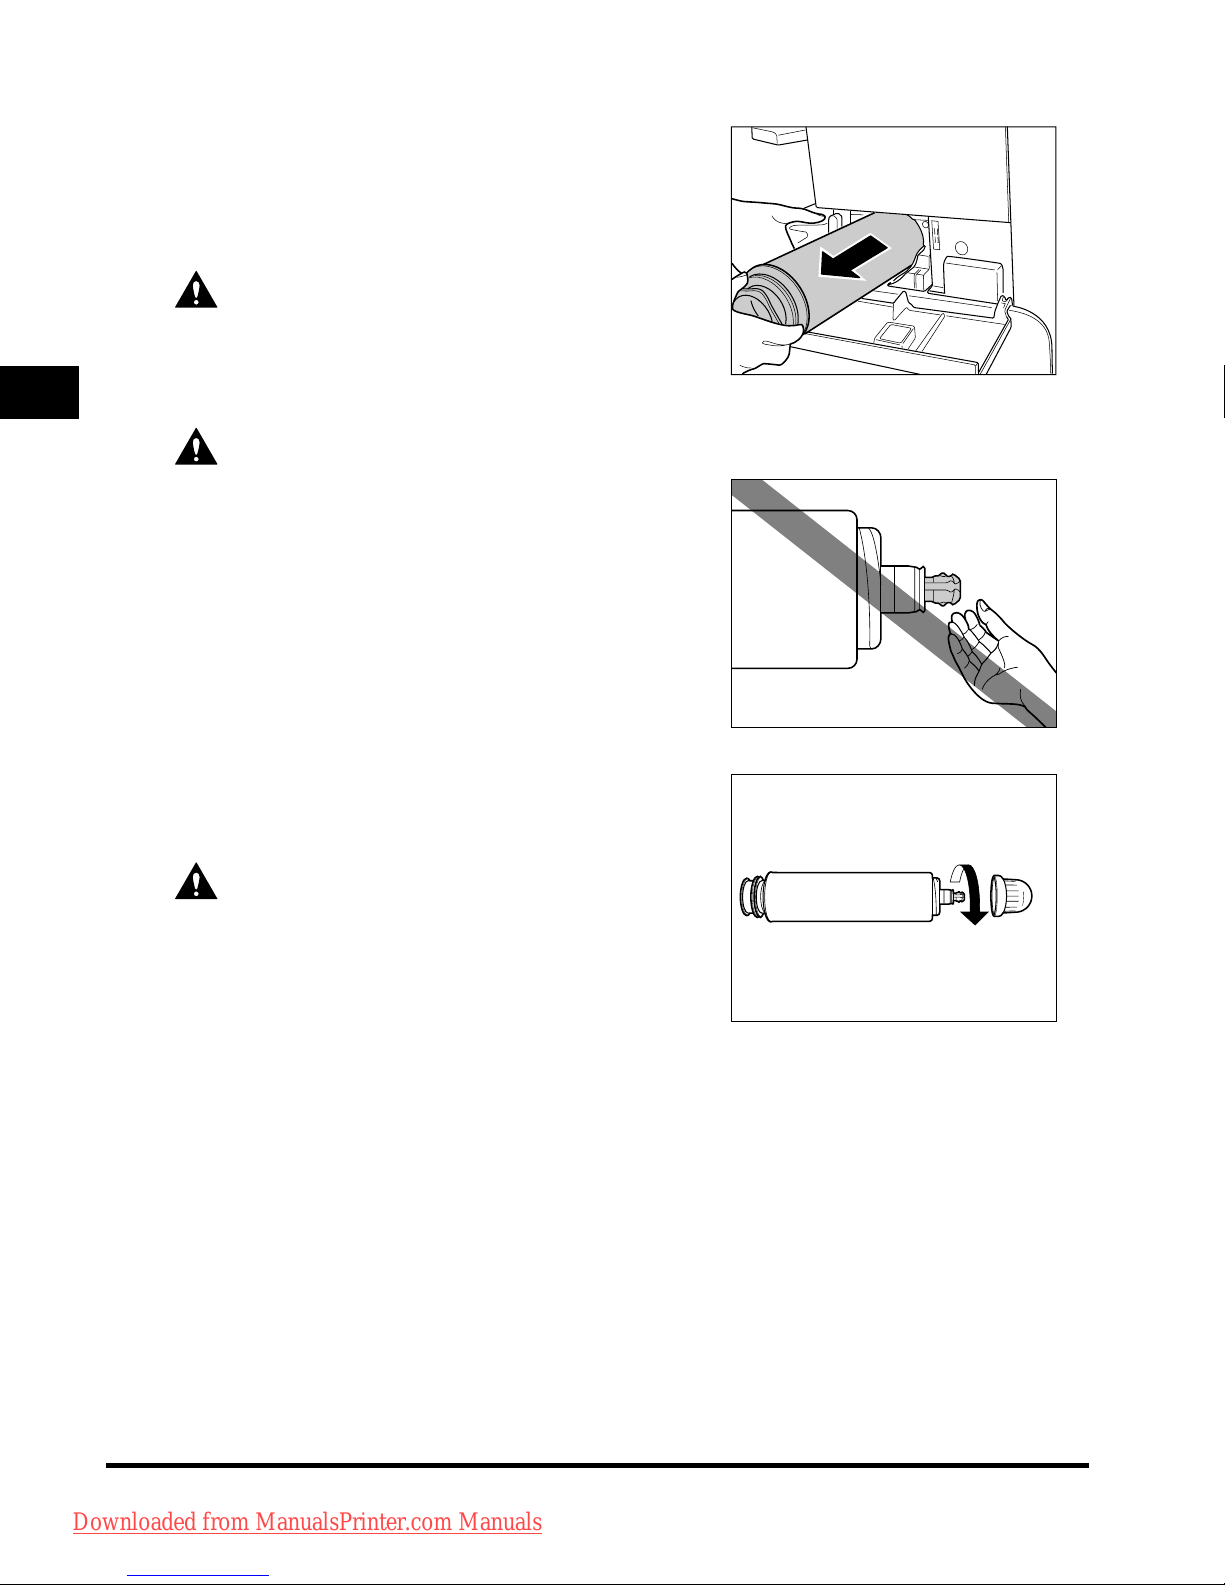
Replacing the Toner Cartridge
2-8
Routine Maintenance
2
3
Pull the toner cartridge out of the toner
supply port.
Pull the toner cartridge out halfway, then remove it
completely while supporting it with your other hand from
underneath.
WARNING
Do not burn or throw used toner cartridges into
open flames, as this may cause the toner
remaining inside the cartridges to ignite, resulting
in burns or a fire.
CAUTION
If the toner cartridge cannot be pulled out, check
that the knob is turned all the way to the
appropriate position.
4
Twist the red protective cap of the new
toner cartridge in the direction of the
arrow (counterclockwise) to remove it.
CAUTION
Do not touch the tip of the toner cartridge or
subject it to shock by hitting it. Doing so may
cause the toner cartridge to leak.
Downloaded from ManualsPrinter.com Manuals
Page 67
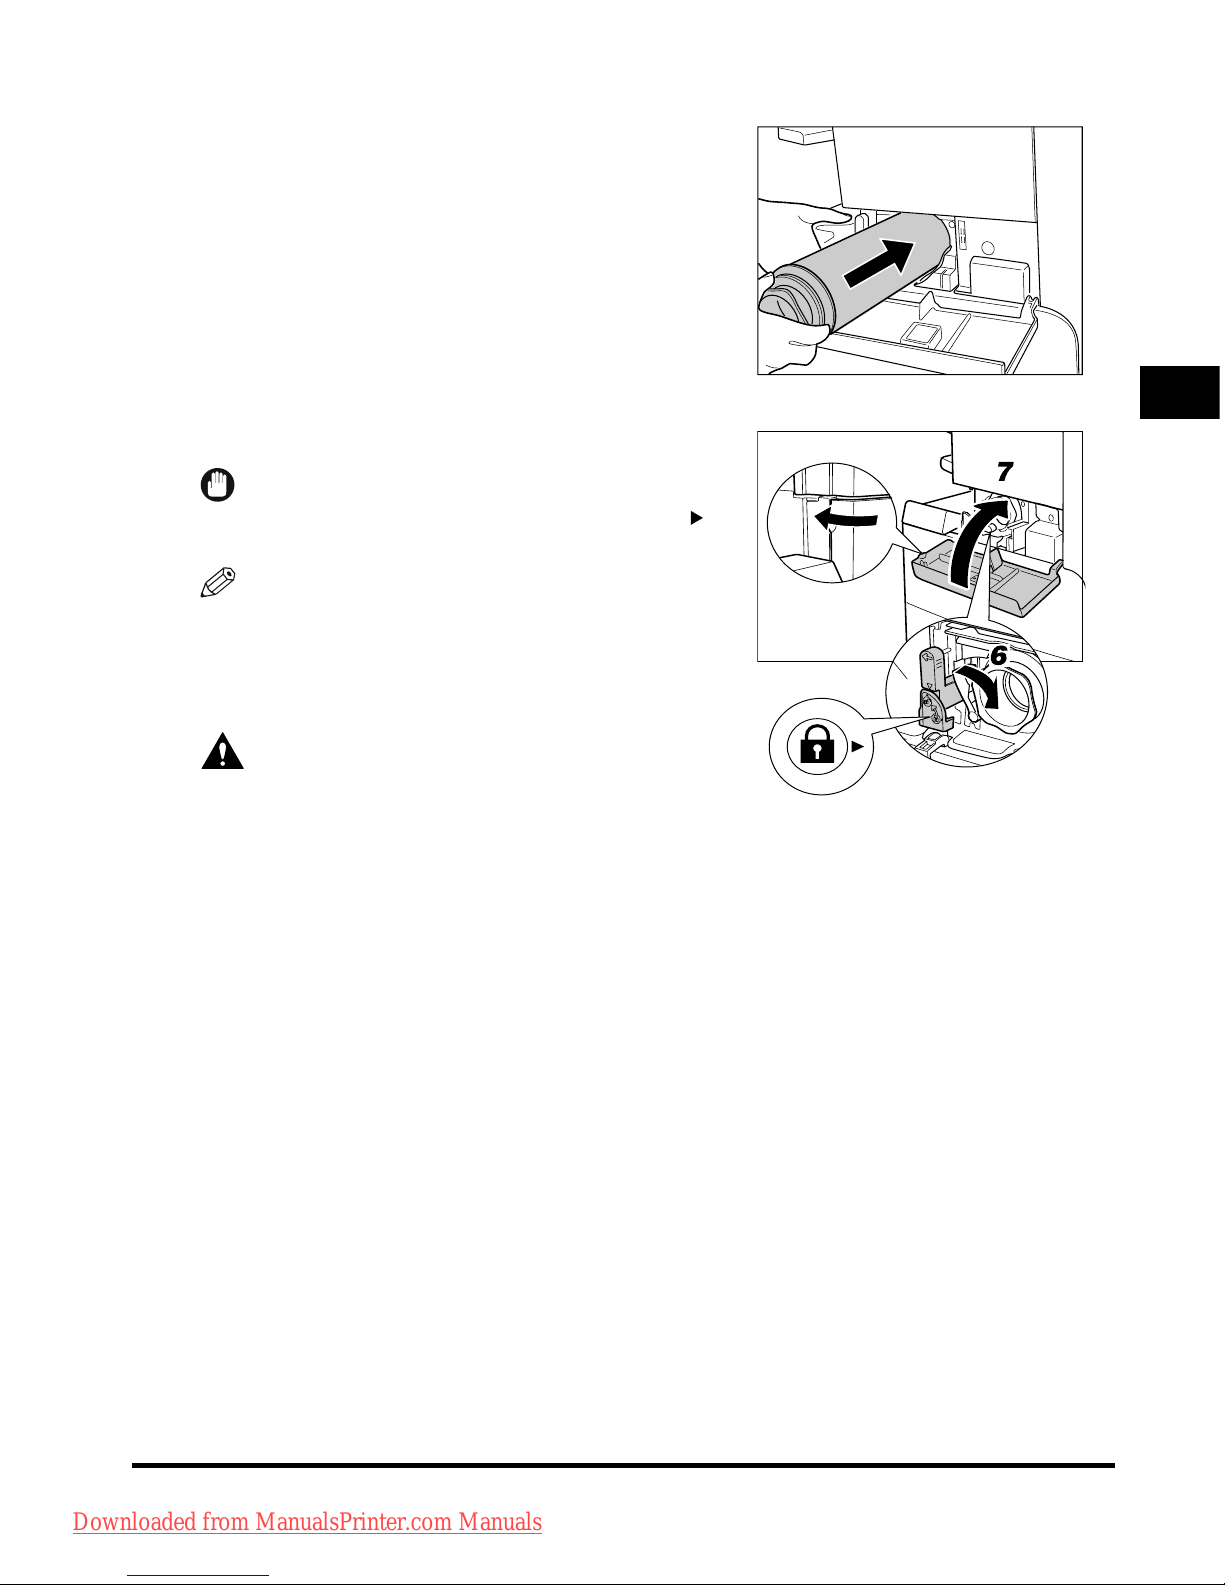
Replacing the Toner Cartridge
2-9
Routine Maintenance
2
5
Push the new toner cartridge in as far as
possible.
Support the new toner cartridge with your hand from
underneath while pushing it into the machine with your
other hand.
6
Push the locking lever down.
IMPORTANT
Make sure that the ▼ on the lever is aligned with the of
the
'
Lock' position.
NOTE
If you insert a toner cartridge intended for use in a
different machine, the locking lever will not move.
7
Close the toner supply port cover.
CAUTION
When closing the cover, be careful not to get your
fingers caught, as this may result in personal
injury.
Downloaded from ManualsPrinter.com Manuals
Page 68

Replacing the Toner Cartridge
2-10
Routine Maintenance
2
Downloaded from ManualsPrinter.com Manuals
Page 69

CHAPTER
3-1
3
Troubleshooting
This chapter explains what to do in response to a paper jam and an error message display.
Clearing Paper Jams. . . . . . . . . . . . . . . . . . . . . . . . . . . . . . . . . . . . . . . . . . . . . . . . . . . . . . . . . . . . . .3-2
List of Error Messages . . . . . . . . . . . . . . . . . . . . . . . . . . . . . . . . . . . . . . . . . . . . . . . . . . . . . . . . . . . .3-6
List of Error Codes without Messages . . . . . . . . . . . . . . . . . . . . . . . . . . . . . . . . . . . . . . . . . . . . . . . . . . . . . . . . 3-6
Downloaded from ManualsPrinter.com Manuals
Page 70
Clearing Paper Jams
3-2
Troubleshooting
3
Clearing Paper Jams
WARNING
The screen indicating the location of the paper jam and instructions on how to clear the paper
jam appears on the touch panel display. This screen repeatedly appears on the touch panel
display until the paper jam is entirely cleared.
There are some areas inside the machine which are subject to high-voltages. When removing
jammed paper or when inspecting the inside of the machine, do not allow necklaces,
bracelets, or other metal objects to touch the inside of the machine, as this may result in
burns or electrical shock.
CAUTION
• When removing jammed originals or paper, take care not to cut your hands on the edges of
the originals or paper.
• When removing jammed originals or paper, take care not to cut your hands on the inside of
the machine. If you cannot remove the paper, contact your local authorized Canon dealer.
• When
removing paper which has become jammed inside the machine, take care not to allow
the toner on the jammed paper to come into contact with your hands or clothing, as this will
dirty your hands or clothing. If they become dirty, wash them immediately with cold water.
Washing them with warm water will set the toner, and make it impossible to remove the toner
stains.
• When
removing paper which has become jammed inside the machine, remove the jammed
paper gently to prevent the toner on the paper from scattering and getting into your eyes or
mouth. If the toner gets into your eyes or mouth, wash them immediately with cold water and
immediately consult a physician.
• Th
e fixing unit and its surroundings inside the machine may become hot during use. When
removing jammed paper or when inspecting the inside of the machine, do not touch the fixing
unit and its surroundings, as doing so may result in burns or electrical shock.
• After clearing all paper jams, remove your hands from the machine immediately. Even if the
machine is not in operation, your hands, hair, or clothing may get caught in the feed rollers,
which could result in personal injury or damage if the machine suddenly starts printing.
IMPORTANT
•
If a paper jam occurs in the optional feeder, you cannot continue operating the machine. Follow the
directions on the touch panel display to clear the paper jam.
•
If the MEAP application screen is displayed, a message appears in the Job/Print Monitor area. Press
[System Monitor]
➞
follow the procedures that appear on the touch panel display to help you remove
the jammed paper.
Downloaded from ManualsPrinter.com Manuals
Page 71
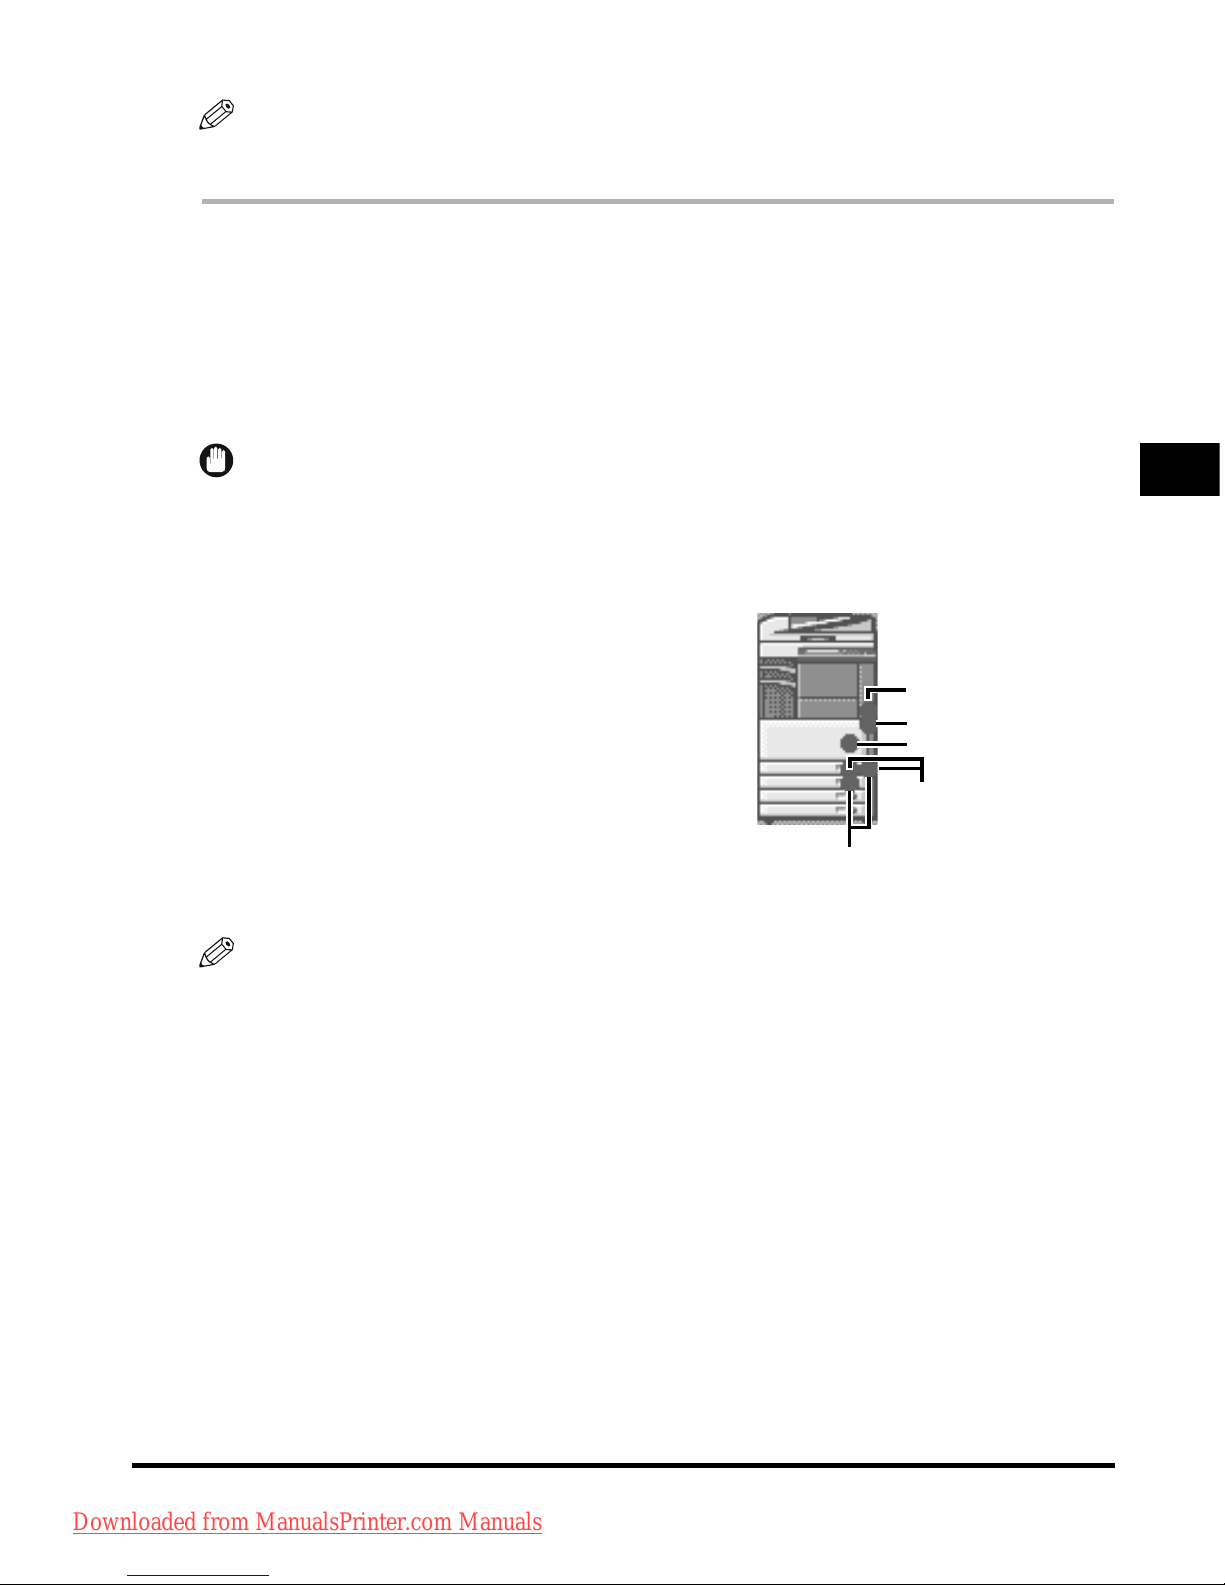
Clearing Paper Jams
3-3
Troubleshooting
3
NOTE
If paper is jammed in several locations, remove the jammed paper in the order indicated on the touch
panel display.
1
Inspect all paper jam locations indicated on the touch panel display, and
remove any jammed paper.
See the appropriate pages below for instructions on finding and removing jammed paper. Or, you can
follow the instructions on the touch panel display.
If jammed paper tears while it is being removed, be sure to remove any remaining pieces from inside
the machine.
IMPORTANT
If the machine's power is turned OFF when there is a paper jam, detection of paper jams in the paper
drawers is not possible after the power is turned back ON. Clear paper jams without turning the
power OFF.
● If a paper jam occurs inside the main unit:
❑
See the instructions on the following pages.
a Fixing Unit
(See "Fixing Unit (Inside the Main Unit)," in
the Reference Guide.)
b Duple
xing Unit (See "Duplexing Unit (Inside the Main
Unit)," in the Reference Guide.)
c S
tack Bypass (See "Stack Bypass," in the Reference
Guide.)
d P
aper Drawer 1 (See "Paper Drawer 1," in the
Reference Guide.)
e Paper Drawer 2 (See "Paper Drawer 2," in the
Reference Guide.)
NOTE
Some areas that are shown to have paper jams may not actually have paper jams. However, always
check all locations indicated on the touch panel display in the order that is given.
a
b
c
d
e
Downloaded from ManualsPrinter.com Manuals
Page 72
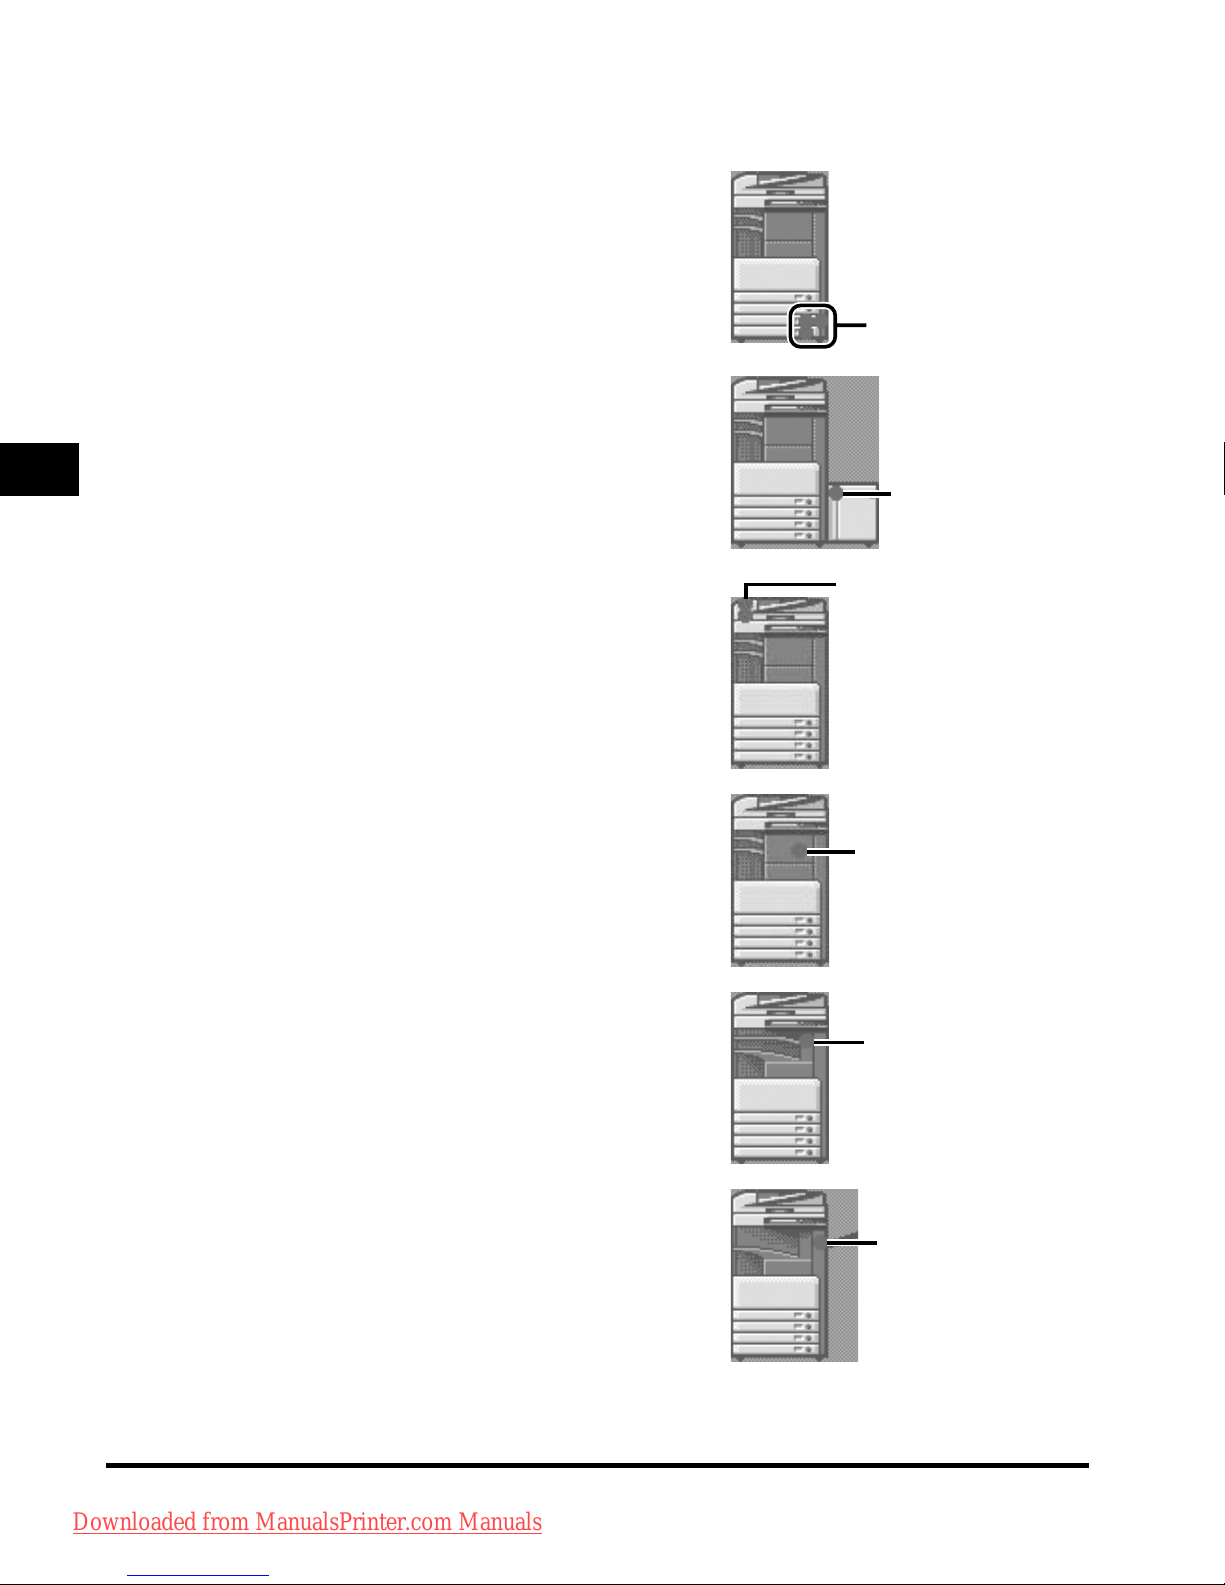
Clearing Paper Jams
3-4
Troubleshooting
3
● If a paper jam occurs inside an optional unit:
❑
See the instructions on the following pages.
a Cassette F
eeding Unit-Y3 (See "Cassette Feeding
Unit-Y3 (Optional)," in the Reference Guide.)
b P
aper Deck-Q1 (See "Paper Deck-Q1 (Optional)," in
the Reference Guide.)
c F
eeder (DADF-N1) (See "Feeder (DADF-N1)," in the
Reference Guide.)
d Finisher-S1 (See "
Finisher-S1 (Optional)," in the
Reference Guide.)
e Inner 2 W
ay Tray-D1 (See "Inner 2 Way Tray-D1
(Optional)," in the Reference Guide.)
f Cop
y Tray-J1 (See "Copy Tray-J1 (Optional)," in the
Reference Guide.)
a
b
c
d
e
f
Downloaded from ManualsPrinter.com Manuals
Page 73
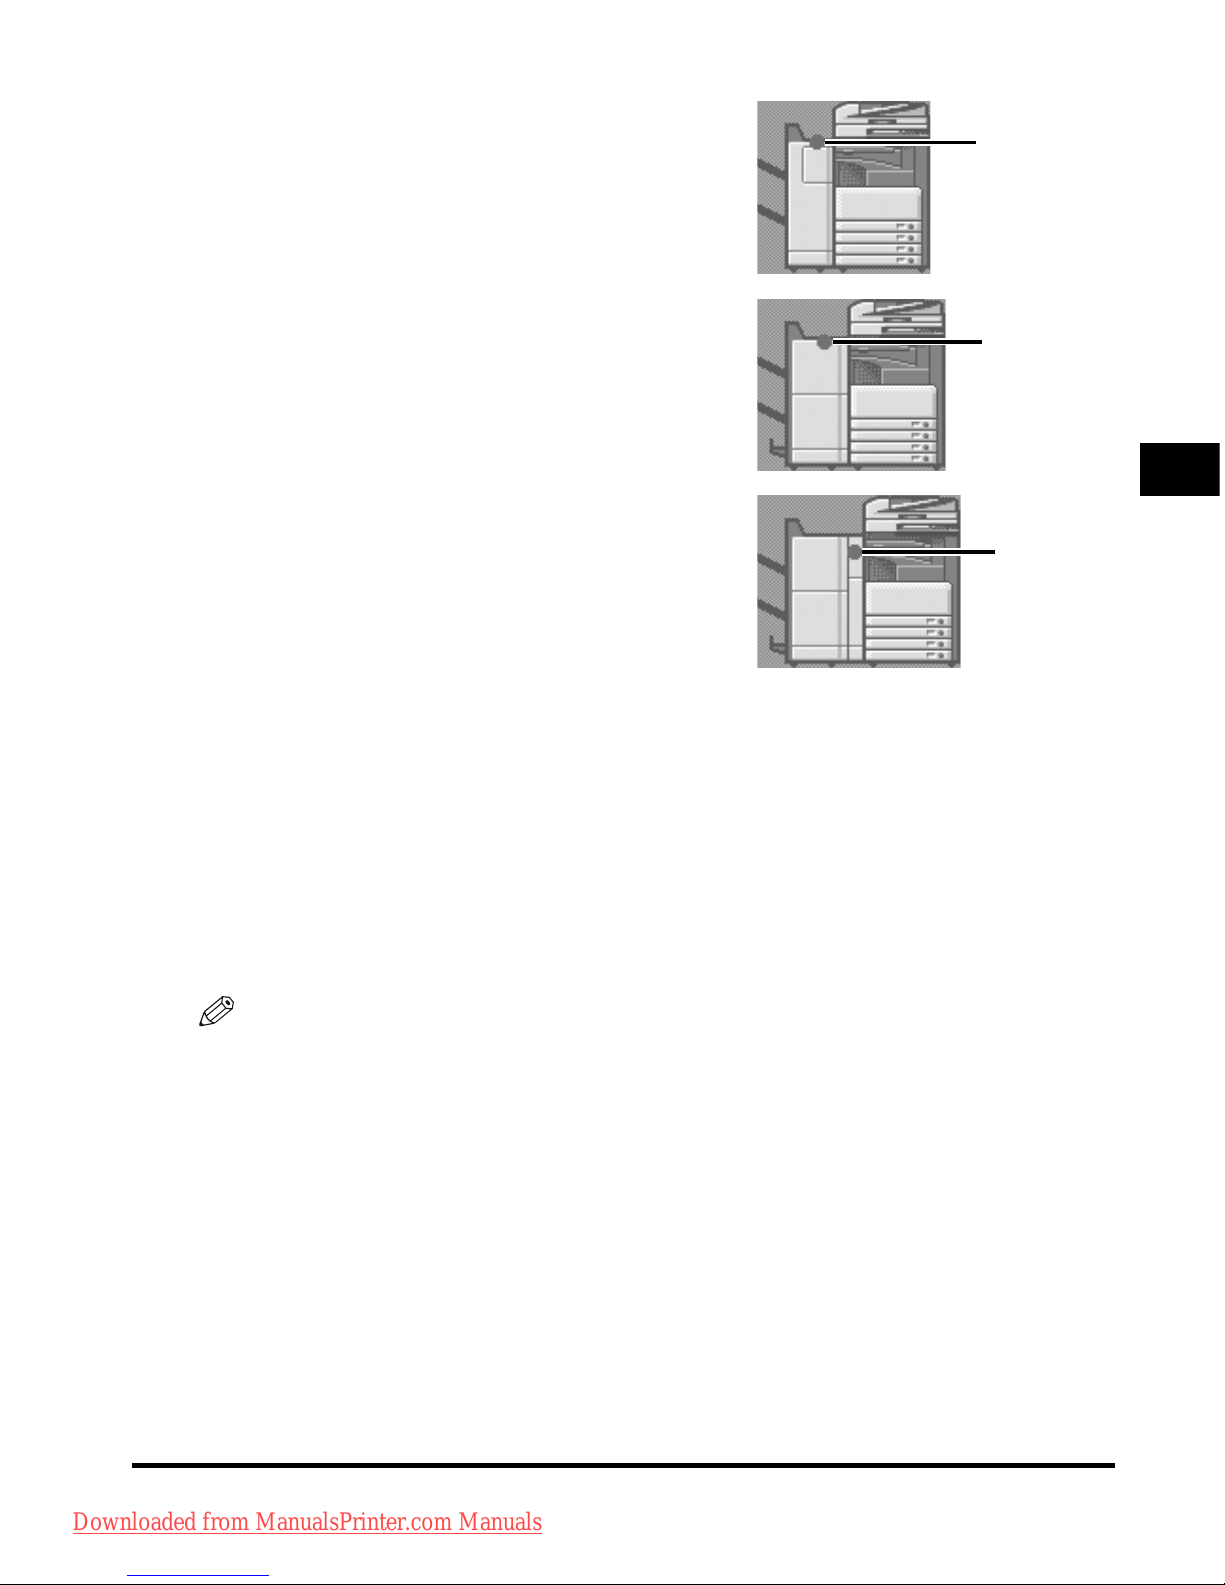
Clearing Paper Jams
3-5
Troubleshooting
3
g Finisher-AE1 (See "Inside the Top Cover of
Finisher-AE1/Saddle Finisher-AE2 (Optional)," and
"Inside the Buffer Pass Unit-E2 of the Finisher-AE1/
Saddle Finisher-AE2 (Optional)" in the Reference
Guide.)
h S
addle Finisher-AE2 (See "Inside the Top Cover of
the Finisher-AE1/Saddle Finisher-AE2 (Optional),"
"Inside the Buffer Pass Unit-E2 of the Finisher-AE1/
Saddle Finisher-AE2 (Optional)," "Inside the Front
Cover of the Saddle Finisher-AE2 (Optional)," or
"Saddle Stitcher Unit (Optional)," in the Reference
Guide.)
i P
uncher Unit-L1 (See "Puncher Unit-L1(Optional),"
in the Reference Guide.)
2
After you have removed all of the jammed paper at the locations indicated
on the touch panel display, restore all levers and covers to their original
positions.
3
Continue to follow the procedure and instructions displayed on the touch
panel display.
Once you have removed all of the jammed paper in locations other than the feeder, printing or copying
resumes.
If there is paper that still needs to be removed, a screen indicating how to clear that paper jam
appears on the touch panel display. Repeat the procedure from step 1.
NOTE
You do not have to re-enter the number of copies or prints, even if you are printing multiple sets. The
machine automatically recalculates the number of copies or prints to make based on the number of
sheets that have jammed.
g
h
i
Downloaded from ManualsPrinter.com Manuals
Page 74
List of Error Messages
3-6
Troubleshooting
3
List of Error Messages
List of Error Codes without Messages
If a job or operation does not complete successfully, check the error code, and perform the
necessary operations according to the error code displayed. You can check the error code on
the Details screen under [Log] from the System Monitor screen. (See "Job Details," in the
Reference Guide.)
If a send, receive, or fax job does not complete successfully, the error code is printed in the
Re
sults column on the Activity Report and Send Report. (See "Printing Communication
Reports," in the Sending and Facsimile Guide.)
Perform the necessary procedures according to the error code.
NOTE
If a send job is cancelled, <STOP> is printed in the Results column on the Send report.
# 001
Cause 1 Differently sized originals were scanned, and the Different Size Originals mode was not set.
Remedy Place your originals, specify the Different Size Originals mode, and try scanning again.
Cause 2 Differently sized originals were scanned in the 2-Sided mode, and the Different Size Originals
mode was not set.
Remedy Place your originals, specify the 2-Sided and Different Size Originals modes, and try
scanning again.
# 009
Cause 1 There is no paper.
Remedy Load paper. (See "Paper Drawers," in the Reference Guide.)
Cause 2 The paper drawer is not inserted correctly into the machine.
Remedy Insert the paper drawer properly. (See "Paper Drawers," in the Reference Guide.)
Downloaded from ManualsPrinter.com Manuals
Page 75
List of Error Messages
3-7
Troubleshooting
3
# 037
Cause Documents could not be received because there was insufficient memory available.
Remedy Erase unnecessary documents and documents with errors from memory to increase the
amount of available memory.
#099
Cause Copying/printing was interrupted.
Remedy Try copying/printing again.
# 701
Cause 1 The specified Department ID does not exist, or the password has changed.
Remedy Enter the correct Department ID or password using - (numeric keys) on the control
panel, and try again.
Cause 2 The Department ID or password was changed while the machine was processing a job, or
<Allow Printer Jobs with Unknown IDs> is set to 'Off'.
Remedy Contact your System Manager.
# 703
Cause The hard disk is full, and no more images can be scanned.
Remedy 1 Wait a few moments, and try scanning again after other send jobs are complete.
Remedy 2 Erase documents stored in inboxes. If the machine still does not operate normally, turn the
main power OFF, and then back ON again.
# 711
Cause The inbox memory is full.
Remedy Erase the unnecessary documents stored in the inbox.
# 712
Cause The maximum number of documents are already stored in the inbox.
Remedy Erase the unnecessary documents stored in the inbox.
Downloaded from ManualsPrinter.com Manuals
Page 76
List of Error Messages
3-8
Troubleshooting
3
# 749
Cause You could not execute the job because a service call message is being displayed.
Remedy Turn the main power OFF, wait for 10 or more seconds, and turn the main power back ON. If
the machine still does not work normally, turn the main power OFF, disconnect the machine,
and contact your local authorized Canon dealer.
# 759
Cause An error occurred while sending the URL of a User Inbox.
Remedy Contact your System Manager.
# 816
Cause Cannot print because the set page limit total has been reached.
Remedy Contact your System Manager.
# 817
Cause A communication error occurred between your machine and a remote copy printer.
Remedy Check the network connection, and try again. If communication errors continue, contact your
System Manager.
# 823
Cause Unable to connect to a remote copy printer.
Remedy Check the network connection, and try again. If the machine still does not operate normally,
contact your System Manager.
# 824
Cause A communication error occurred in a remote copy printer.
Remedy Check the network connection to the remote copy printer, and try again. If the machine still
does not communicate with the remote copy printer, contact your System Manager.
Downloaded from ManualsPrinter.com Manuals
Page 77
List of Error Messages
3-9
Troubleshooting
3
# 825
Cause 1 The Department ID and password set on the host machine do not match those registered in
the remote copy printers.
Remedy 1 Register your Department ID and password in the remote copy printers.
Remedy 2 Use a remote copy printer in which your Department ID and password are registered.
Cause 2 Reserved or current print jobs cannot be performed in the remote copy printer because the
Department ID and password have been deleted, or the password has been changed.
Remedy Contact your System Manager, or make sure that the Department ID and password set in the
host machine match the ones registered in the remote copy printer.
# 849
Cause Device information could not be delivered because the client machine is processing a job.
Remedy Try delivering device information again after the client machine finishes processing the job.
# 850
Cause Device information could not be delivered because a screen relating to the delivered device
information is being displayed.
Remedy Try delivering the device information again after the screen is cleared from the client
machine.
Downloaded from ManualsPrinter.com Manuals
Page 78
List of Error Messages
3-10
Troubleshooting
3
# 851
Cause 1 There is insufficient memory remaining in the system.
Remedy Check the system's available memory, and delete any unnecessary documents stored in
inboxes.
Cause 2 The machine's memory is full.
Remedy Erase unnecessary documents and documents with errors from memory to increase the
amount of available memory. (See Chapter 6, "Receiving Documents," in the Sending and
Facsimile Guide, and Chapter 2, "Introduction to the Mail Box Functions," in the Copying and
Mail Box Guide.)
Cause 3 The document cannot be stored because there are more than 1,500 documents in the
specified inbox.
Remedy If there are a large number of documents, delete the unnecessary ones from the specified
inbox.
# 852
Cause An error occurred because the main power switch was turned OFF while a job was being
processed.
Remedy Check to see if the main power switch is turned ON. Try processing the job again, if
necessary.
Downloaded from ManualsPrinter.com Manuals
Page 79
List of Error Messages
3-11
Troubleshooting
3
# 853
Cause 1 When trying to print a large number of pages, the job is not performed due to insufficient
memory resources.
Remedy Reduce the number of pages to print, or perform the print job again when no other jobs are
reserved.
Cause 2 The job could not be processed, because it was cancelled from the printer driver while the
print data was being sent to the machine.
Remedy Try printing again.
Cause 3 The spool memory is full when Use Spooler in Network Settings in System Settings (from the
Additional Functions screen) is set to 'On', therefore, data received from the host could not be
spooled.
Remedy Set Use Spooler in Network Settings in System Settings (from the Additional Functions
screen) to 'Off', and try sending the print data again. (See Chapter 3, "Using a TCP/IP
Network," in the Network Guide.)
Cause 4 The maximum number of receivable data exceeds the receive limit. (See Chapter 6,
"Receiving Documents," in the Sending and Facsimile Guide.)
Remedy Try printing the documents again after all current jobs are complete. If you still cannot print,
check the sent data.
Cause 5 The number of secured documents exceeded the maximum limit that can be reserved at a
time.
Remedy Print or erase the secured documents that are stored in the machine, and try printing again.
# 854
Cause Device information could not be delivered because the client machine has Restrictions for
Receiving Device Info. in Device Information Delivery Settings in System Settings (from the
Additional Functions screen) set to 'On'.
Remedy Try delivering device information again after setting Restrictions for Receiving Device Info. in
Device Information Delivery Settings in System Settings (from the Additional Functions
screen) to 'Off'.
Downloaded from ManualsPrinter.com Manuals
Page 80
List of Error Messages
3-12
Troubleshooting
3
# 855
Cause Device information could not be delivered because a language that the client machine does
not support was included in the device information.
Remedy Contact your local authorized Canon dealer.
# 856
Cause The job was cancelled because there was not enough free space on the hard disk to store
the temporary data.
Remedy Contact your System Manager.
# 857
Cause Data reception timed out, or the job was canceled at the host.
Remedy Check that the network is functioning properly, and then try printing again.
# 858
Cause There is a problem with the print data sent from an external application.
Remedy Check the settings of the data sent to the machine, make sure they are compatible with the
machine, and try sending the data again.
# 859
Cause 1 A compression error occurred with the image data.
Remedy Check the print settings, and try printing again.
Cause 2 An original was not scanned properly, or the orientation of the original was incorrect.
Remedy Check the scan settings, and try scanning again.
Downloaded from ManualsPrinter.com Manuals
Page 81
List of Error Messages
3-13
Troubleshooting
3
# 860
Cause 1 A paper jam occurred during printing.
Remedy Try printing again.
Cause 2 Recovery printing was not performed.
Remedy Try printing again.
Cause 3 You tried to print on a transparency sheet made for color copies.
Remedy Load transparencies made for black-and-white copies into the machine and then try printing
again.
# 861
Cause 1 An error occurred while processing PDL data or image data.
Remedy Confirm the print settings you made when printing from a computer.
Cause 2 Color data was sent from the external controller to the billing device as monochrome data.
Remedy Change the print data or print settings, and try printing again.
# 862
Cause 1 The saddle finisher trays have exceeded their stacking limits. (See Chapter 9, Appendix, in
the Reference Guide.)
Remedy Change the print data or print settings, and try printing again.
Cause 2 A combination of settings which is not supported was set.
Remedy Change the print data or print settings, and try printing again.
Cause 3 Image data or data which is not guaranteed to be compatible was printed.
Remedy Change the print data or print settings, and try printing again.
Downloaded from ManualsPrinter.com Manuals
Page 82
List of Error Messages
3-14
Troubleshooting
3
# 863
Cause An error occurred while processing PDL data or image data.
Remedy Check the settings, and try printing again.
# 865
Cause The Mail Box function is restricted.
Remedy Contact your System Manager.
Downloaded from ManualsPrinter.com Manuals
Page 83

CHAPTER
4-1
4
Appendix
This chapter provides other useful information.
Multifunctional Operations . . . . . . . . . . . . . . . . . . . . . . . . . . . . . . . . . . . . . . . . . . . . . . . . . . . . . . . . .4-2
Available Paper Stock . . . . . . . . . . . . . . . . . . . . . . . . . . . . . . . . . . . . . . . . . . . . . . . . . . . . . . . . . . . . .4-4
Check Sheet for the Periodic Inspection of the Breaker . . . . . . . . . . . . . . . . . . . . . . . . . . . . . . . . . . .4-6
Downloaded from ManualsPrinter.com Manuals
Page 84
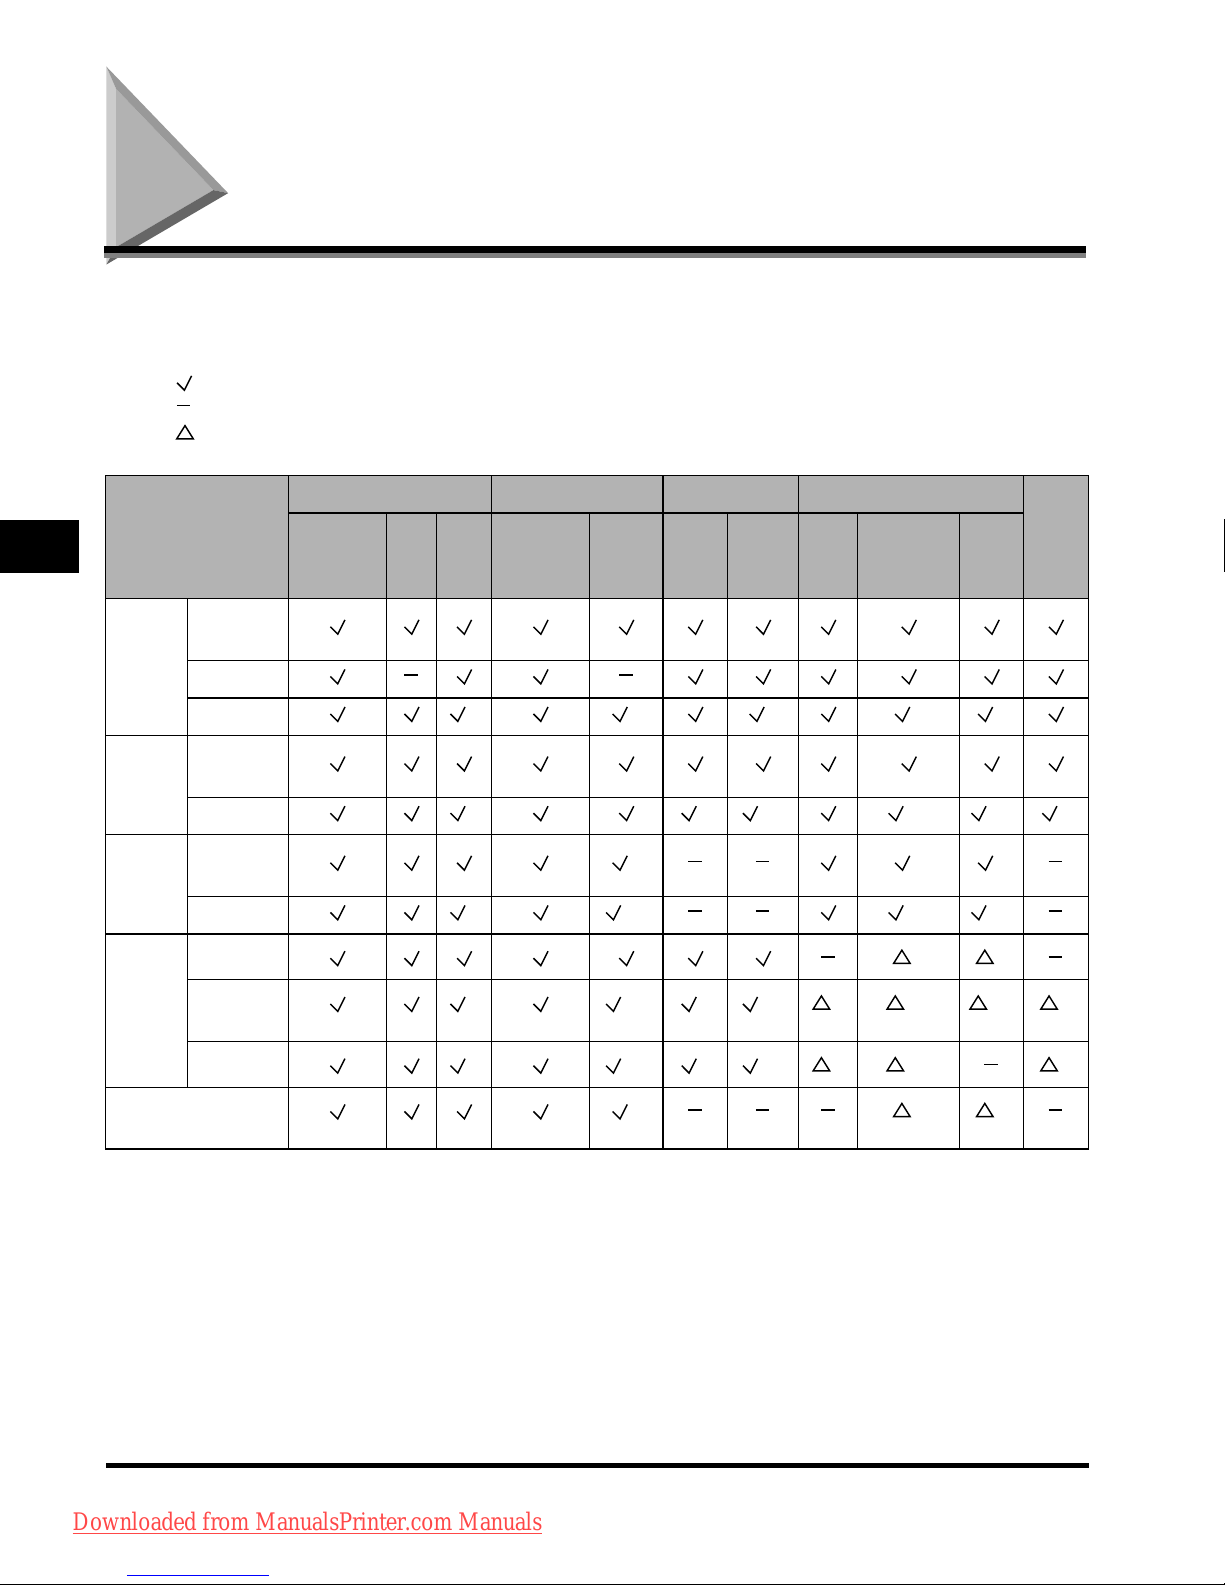
Multifunctional Operations
4-2
Appendix
4
Multifunctional Operations
The iR3045/iR3045N/iR3035/iR3035N/iR3025/iR3025N offers the user many functions, such as
printing, scanning, copying, and sending, which can be used together. The following table
provides you with the details of multifunctional operations.
: Available
: Unavailable
: Available, but with conditions
Receive Send Scan Print
Copy:
Scan
and
Print
via
Network
via
Fax
Print
Data
via
Network
via Fax
Copy/
Mail
Box
Send Copy
RX
Document
Print
Data
Receive
via
Ne
twork
via Fax
Print Data
*3 *3 *3 *3 *3
Send
via
Ne
twork
via Fax
*3 *1 *1*3 *1*3 *1*3 *1
Scan
Copy/Mail
Bo
x
*1 *1 *1
Send
*3 *1*3 *1*3 *1*3
Print
Copy
*2 *2
RX
Document
*3 *1*3 *1 *1*3
*2 *2*3 *2*3 *2
Print Data
*3 *1*3 *1 *1*3
*2 *2*3 *2
Copy:
Scan and Print
*1
*2 *2
Downloaded from ManualsPrinter.com Manuals
Page 85

Multifunctional Operations
4-3
Appendix
4
*1 The machine's performance may be affected if image processing, such as compression, enlargement/reduction, and
rotation, are carried out.
*2 The output order of competing jobs varies, dependin
g on whether an optional finisher is attached.
- When an optional finisher is attached: one set is output alternately for each job
- When an optional finisher is not attached: one page is output alternately for each job
*3 The machine's processing speed may be slower.
NOTE
•
The machine's performance may be affected if several network send and receive jobs are being carried
out at the same time.
•
The operation of printing data from an inbox is included in "Print Data" under "Print" in the table.
•
The operation of printing remote copy jobs or cascade copy jobs is included in "Copy" under "Print" in
the table.
Downloaded from ManualsPrinter.com Manuals
Page 86
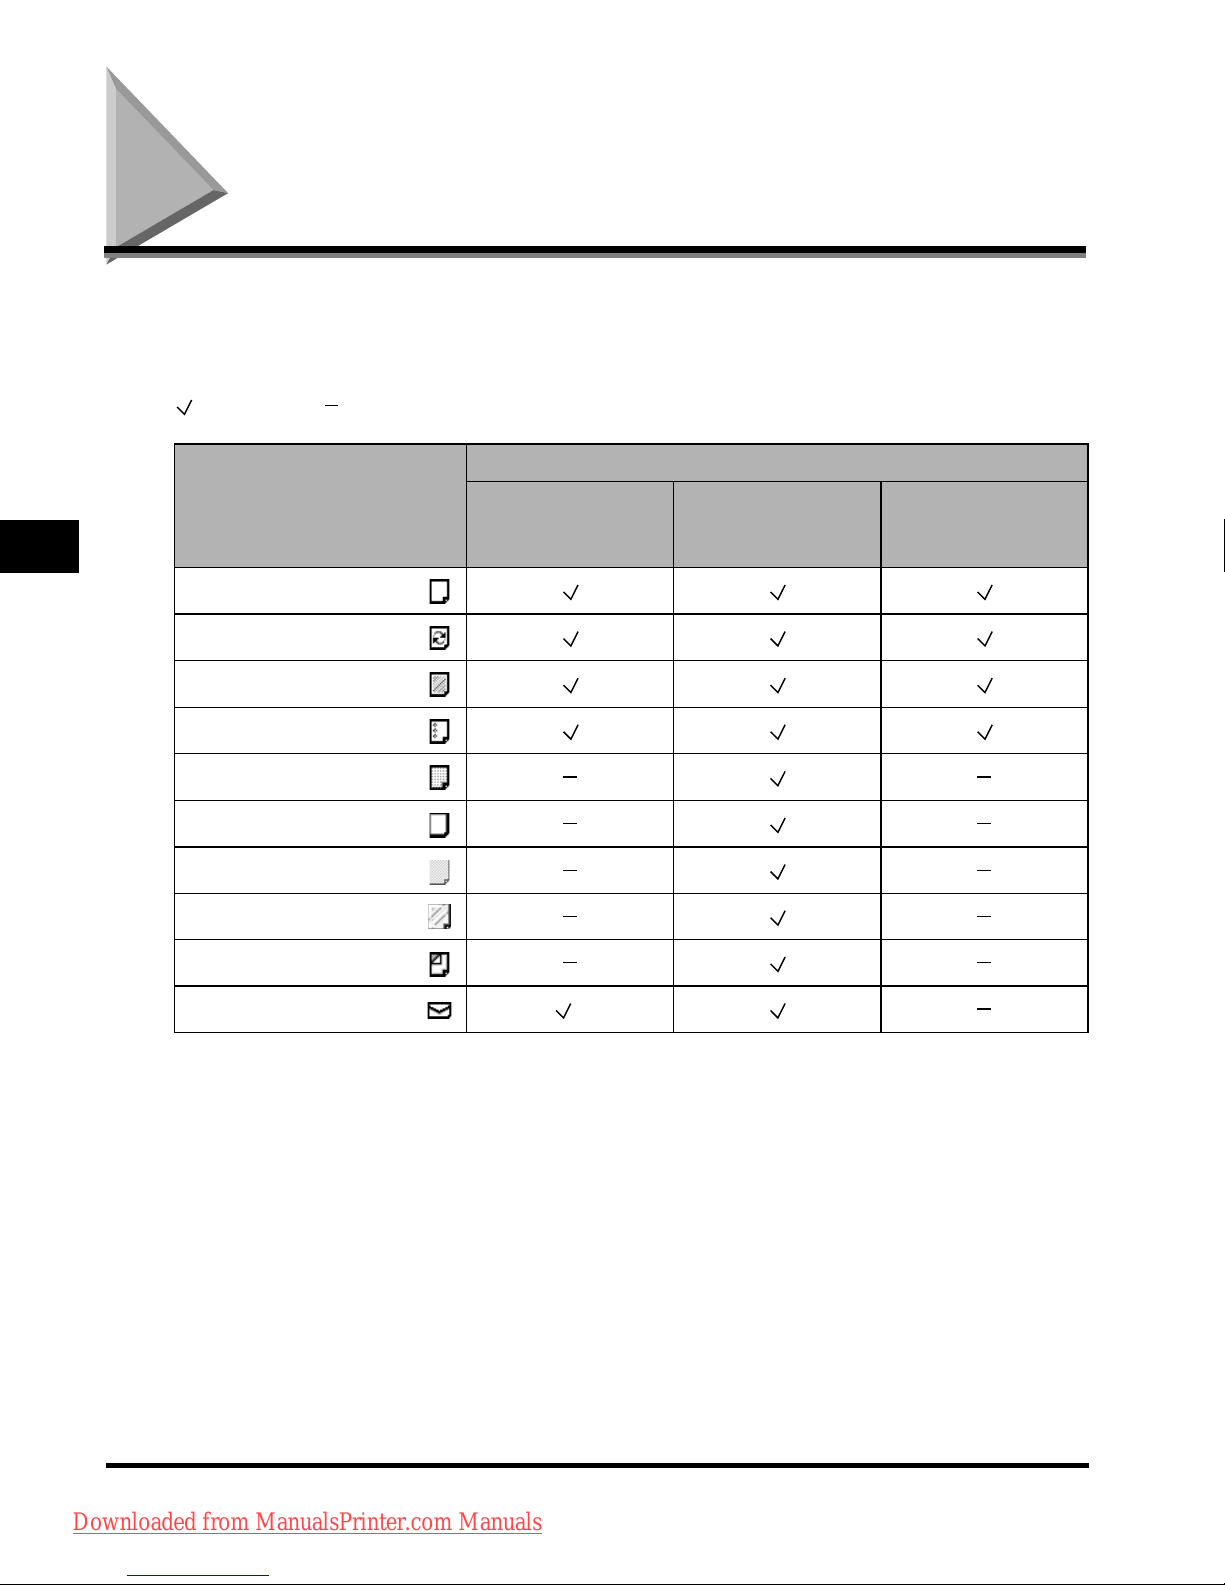
Available Paper Stock
4-4
Appendix
4
Available Paper Stock
The paper types that can be used with this machine are shown in the following table. Icons
indicating the type of paper loaded in each paper drawer can be displayed on the paper
selection screen if you store that information in the machine beforehand. (See "Identifying the
Type of Paper in a Paper Source," in the Reference Guide.)
: Available : Unavailable
*1 Plain and Recycled paper are from 64 to 90 g/m2. Load paper heavier than 90 g/m2 in the stack bypass.
*2 Heavy paper is from 91 to 128 g/m
2
.
*3 Some types of tracing paper cannot be used.
*4 Use only A4 transparencies made especia
lly for this machine.
*5 If the optional Envelope Feeder Attachment-C2 is attached to Paper Drawer 1, envelopes can be loaded.
Paper Type
Paper Source
Paper Drawer
(64 to 90 g/m
2
)
Stack Bypass
(64 to 128 g/m
2
)
Paper Deck
(optional)
(64 to 90 g/m
2
)
Plain
*1
Recycled
*1
Color
Pre-punched
Bond Paper
Heavy
*2
Tracing Paper
*3
Transparency
*4
Labels
Envelopes
*5
Downloaded from ManualsPrinter.com Manuals
Page 87
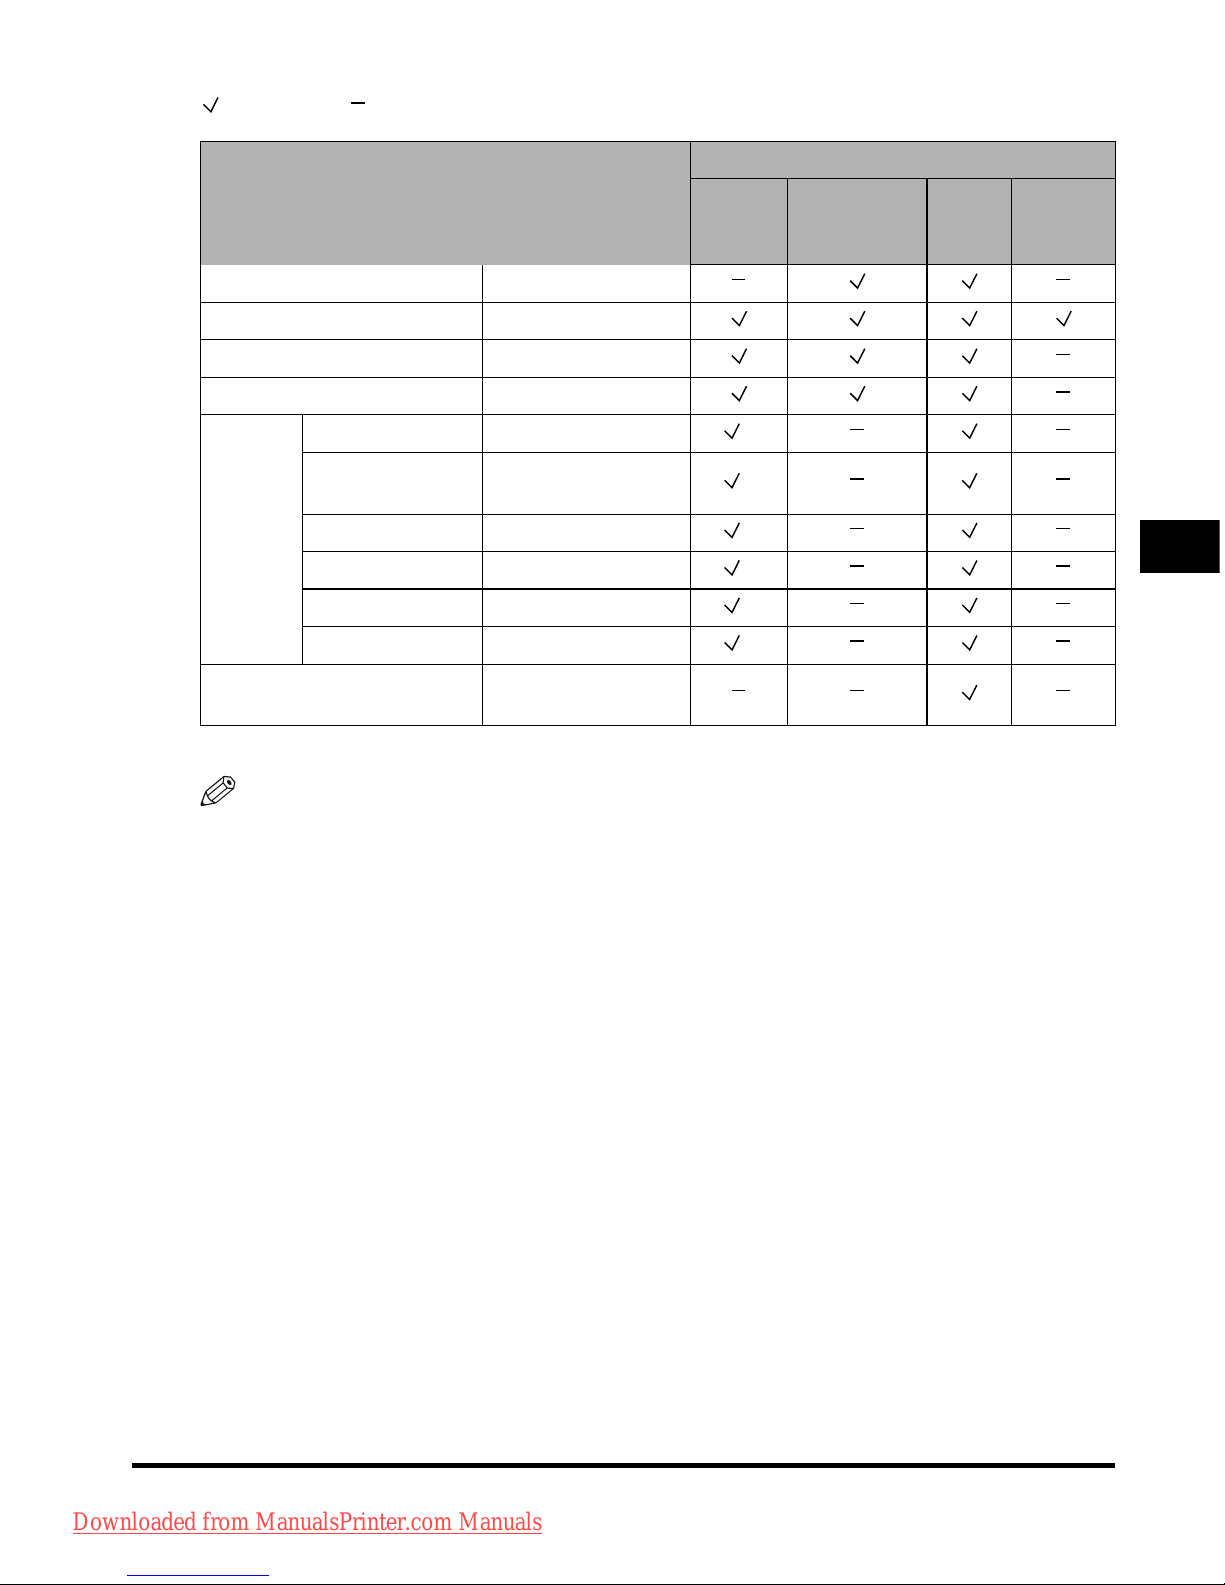
Available Paper Stock
4-5
Appendix
4
: Available : Unavailable
*1 If the optional Envelope Feeder Attachment-C2 is attached to Paper Drawer 1, envelopes can be loaded.
NOTE
•
For instructions on loading paper, see the following sections:
- Paper Drawers: "Loading Paper," in the Reference Guide
- Paper Deck: "Paper Deck-Q1 (Optional)," in the Reference Guide
- Stack Bypass: "Making Prints Using the Stack Bypass," in the Reference Guide
•
Paper Drawers 3, 4, and the Paper Deck-Q1 is optional.
Paper Size Width x Length
Paper Source
Paper
Drawer 1
Paper
Drawer 2, 3, 4
Stack
Bypass
Paper
Deck
(optional)
A3 297 mm x 420 mm
A4 297 mm x 210 mm
A4R 210 mm 297 mm
A5R 148 mm x 210 mm
Envelope
COM 10 No.10 104.7 mm x 241.3 mm
*1
Monarch: Catalog
Glove No.8
98.4 mm x 190.5 mm
*1
DL 110 mm x 220 mm
*1
ISO-B5 176 mm x 250 mm
*1
ISO-C5 162 mm x 229 mm
*1
Yougata 4 105 mm x 235 mm
*1
Irregular Size
99 mm x 140 mm to
320 mm x 457 mm
Downloaded from ManualsPrinter.com Manuals
Page 88
Check Sheet for the Periodic Inspection of the Breaker
4-6
Appendix
4
Check Sheet for the Periodic Inspection of the
Breaker
Copy this page for future use, and store it in a safe place near the machine in order to document
your periodic inspections of the breaker.
■ How to Inspect the Breaker Periodically
Follow the procedure described in "Periodic Inspection of the Breaker," on p. xxiii, once or twice a month.
■ How to Fill in This Check Sheet
Fill in the date of inspection and the name of the inspector.
When the inspection is completed successfully, write a check mark under "OK."
If not, contact your local authorized Canon dealer. (Also, write a check mark under "NG" (No Good).)
Date of
Inspection
Date of
Inspection
Inspector Inspector
Result Result
OK NG OK NG
Downloaded from ManualsPrinter.com Manuals
Page 89

iR3045/iR3045N
iR3035/iR3035N
iR3025/iR3025N
Guide de l'utilisateur
Downloaded from ManualsPrinter.com Manuals
Page 90
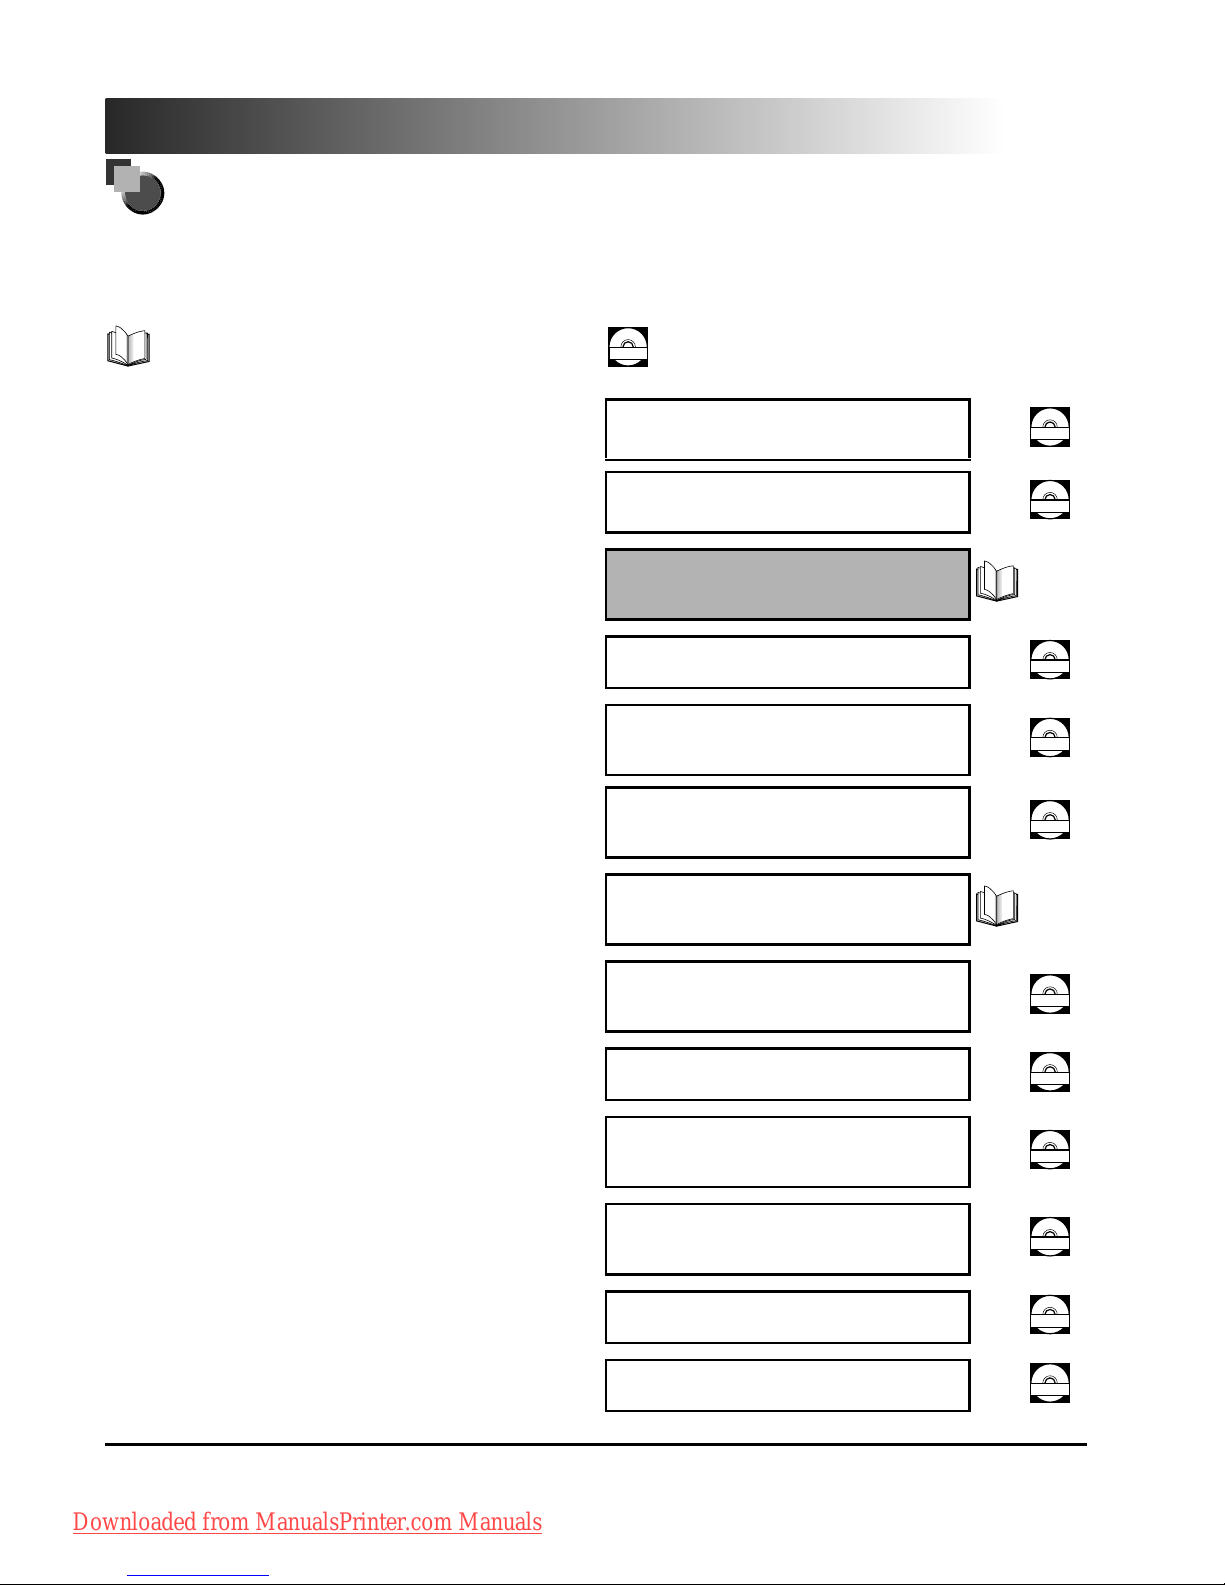
Guides de la machine
Les guides de cette machine sont les suivants. Les consulter pour obtenir des informations détaillées.
La liste ci-dessous comprend les guides accompagnant les périphériques en option. Selon la configuration système
et le produit acheté, il est possible que certains ne s'appliquent pas à cette machine.
Les guides signalés par ce symbole sont disponibles en version
imprimée.
CD-ROM
Les guides identifiés par ce symbole sont fournis au format PDF sur
le CD-ROM qui accompagne la machine.
• Référence rapide pour les opérations de base
Pour les opérations de base ➞ Fonctions de base
Pour le mode Utilisateur ➞ En fonction de vos besoins
Guide simplifié
CD-ROM
• Apprentissage de la machine
Le CD du didacticiel constitue une aide à l'apprentissage des différentes
fonctions de la machine.
CD du didacticiel
CD-ROM
• Instructions de base
Guide de l'utilisateur
(Le présent document)
• Opérations de base
• Dé
pannage
Guide de référence
CD-ROM
• Principes de la copie et de la fonction boîte aux
lettres
Guide des fonctions copie
et boîte aux lettres
CD-ROM
• Principes de l'envoi et de la télécopie
Guide des fonctions envoi
et télécopie
CD-ROM
• Configuration de la connexion réseau et
installation du logiciel du CD-ROM
Guide de prise en main du
réseau
• Utilisation de l'interface utilisateur distante
Guide du logiciel
d'administration
CD-ROM
• Connexion et configuration du réseau
Guide de mise en réseau
CD-ROM
• Installation et utilisation de Network ScanGear
Guide de l'utilisateur
Network ScanGear
CD-ROM
• Utilisation des imprimantes PS/PCL/UFR II
Guide de l'impression
PS/PCL/UFR II
CD-ROM
• Installation et utilisation du pilote
d'imprimante PCL
Guide du pilote PCL
CD-ROM
• Installation et utilisation du pilote d'imprimante PS
Guide du pilote PS
CD-ROM
Downloaded from ManualsPrinter.com Manuals
Page 91
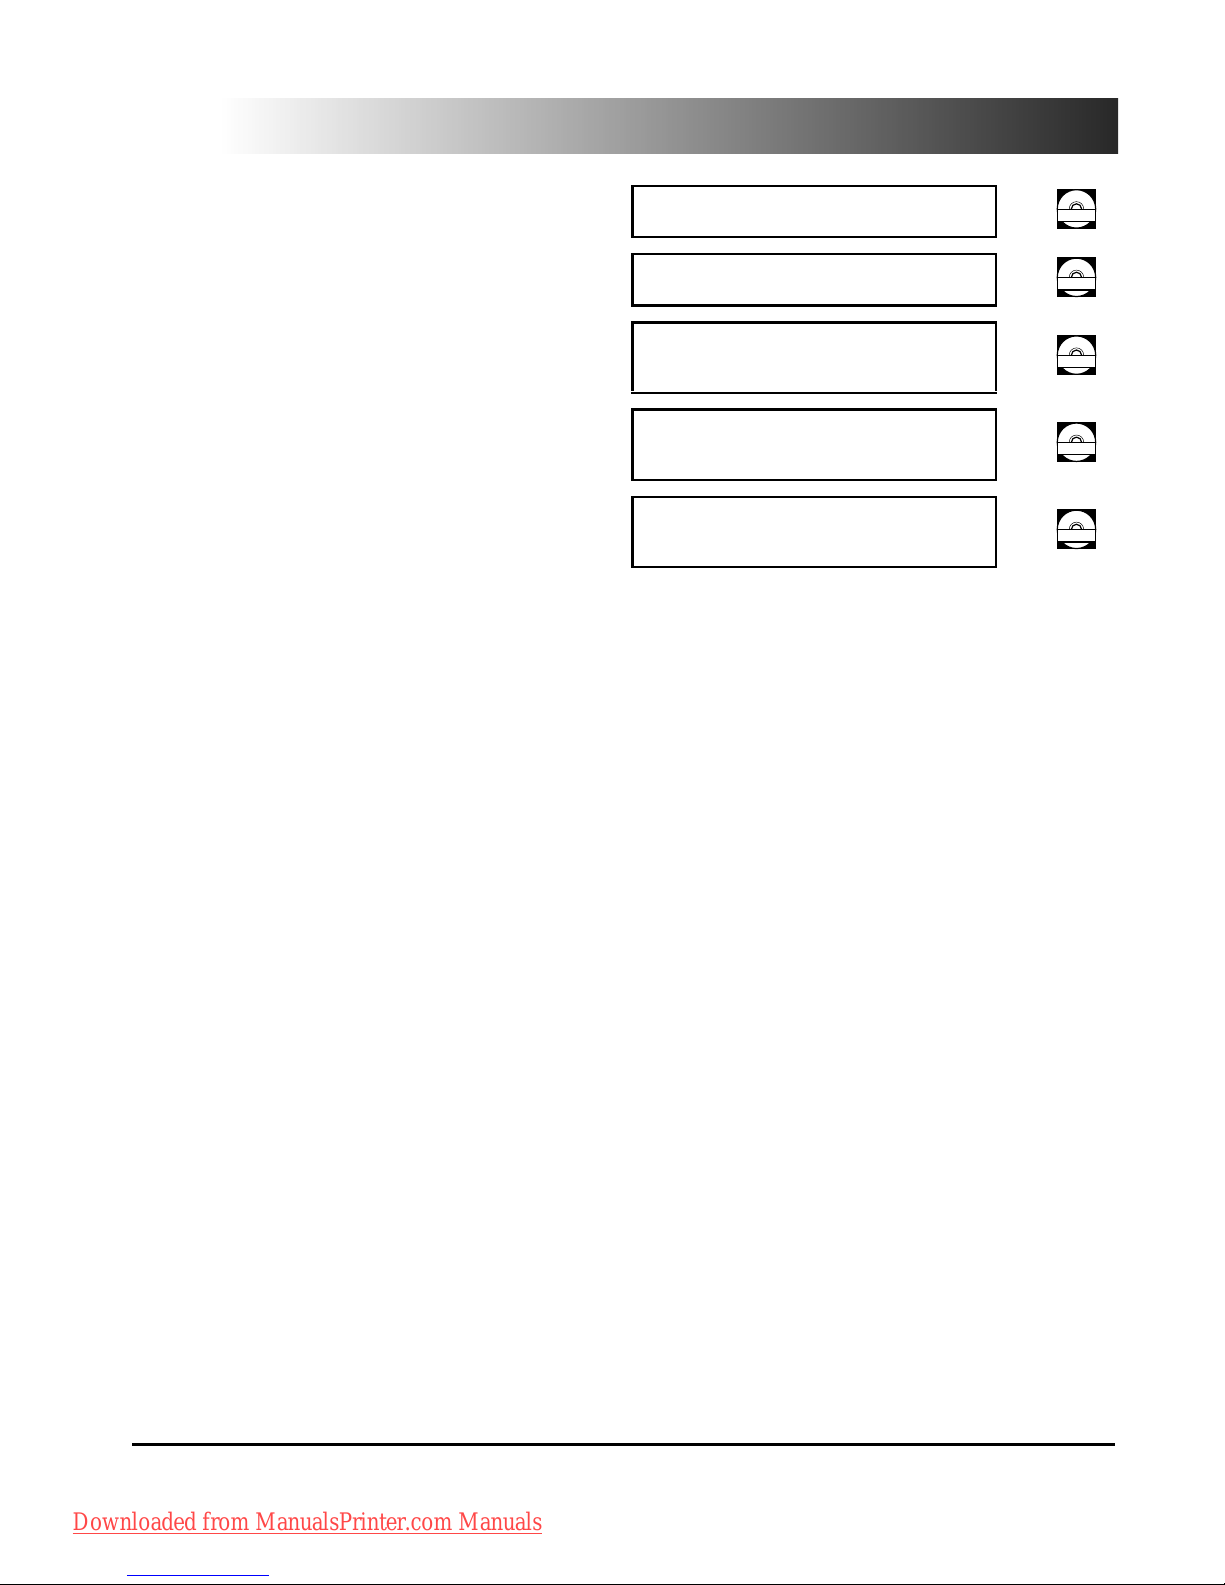
• Installation et utilisation du pilote
d'imprimante UFR II
Guide du pilote UFR II
CD-ROM
• Installation et utilisation du pilote
d'imprimante PS Mac OS X
Guide du pilote PS Mac
CD-ROM
• Installation et utilisation du pilote
d'imprimante UFR II Mac OS X
Guide du
pilote UFR II Mac
CD-ROM
• Installation et utilisation du pilote de télécopie
Guide du pilote de
télécopie
CD-ROM
• Installation d'applications MEAP et utilisation du
service de connexion
Guide de l'administrateur
MEAP SMS
CD-ROM
• Pour visualiser le manuel au format PDF, Adobe Reader/Adobe Acrobat Reader est nécessaire. Si Adobe Reader/Adobe Acrobat Reader n'est pas
installé sur votre système, Il est possible de le télécharger depuis le site Web d'Adobe Systems Incorporated.
• Un soin particulier a été apporté à la rédaction de ce guide afin d'éviter les inexactitudes ou omissions. Toutefois, du fait de notre souci constant
d'amélioration de nos produits, il est possible d'obtenir des spécifications techniques précises auprès de la société Canon.
Downloaded from ManualsPrinter.com Manuals
Page 92

iv
Table des matières
Préface . . . . . . . . . . . . . . . . . . . . . . . . . . . . . . . . . . . . . . . . . . . . . . . . . . . . . . . . . .vi
Présentation du guide . . . . . . . . . . . . . . . . . . . . . . . . . . . . . . . . . . . . . . . . . . . . . . . . . . . . . .vi
Conventions adoptées . . . . . . . . . . . . . . . . . . . . . . . . . . . . . . . . . . . . . . . . . . . . . . . . . . . . vi
Mentions légales. . . . . . . . . . . . . . . . . . . . . . . . . . . . . . . . . . . . . . . . . . . . . . . . . . . . . . . . . . vii
Nom du produit. . . . . . . . . . . . . . . . . . . . . . . . . . . . . . . . . . . . . . . . . . . . . . . . . . . . . . . . . vii
Exigences CEM de la directive européenne . . . . . . . . . . . . . . . . . . . . . . . . . . . . . . . . . . vii
Faisceau laser . . . . . . . . . . . . . . . . . . . . . . . . . . . . . . . . . . . . . . . . . . . . . . . . . . . . . . . . . vii
Informations complémentaires. . . . . . . . . . . . . . . . . . . . . . . . . . . . . . . . . . . . . . . . . . . . . viii
Directive DEEE . . . . . . . . . . . . . . . . . . . . . . . . . . . . . . . . . . . . . . . . . . . . . . . . . . . . . . . . .ix
Directive R & TTE . . . . . . . . . . . . . . . . . . . . . . . . . . . . . . . . . . . . . . . . . . . . . . . . . . . . . . . ix
Super G3 . . . . . . . . . . . . . . . . . . . . . . . . . . . . . . . . . . . . . . . . . . . . . . . . . . . . . . . . . . . . . . x
Abréviations utilisées dans ce guide . . . . . . . . . . . . . . . . . . . . . . . . . . . . . . . . . . . . . . . . . x
Marques . . . . . . . . . . . . . . . . . . . . . . . . . . . . . . . . . . . . . . . . . . . . . . . . . . . . . . . . . . . . . . . x
Copyright . . . . . . . . . . . . . . . . . . . . . . . . . . . . . . . . . . . . . . . . . . . . . . . . . . . . . . . . . . . . . . x
Logiciel de tierce partie . . . . . . . . . . . . . . . . . . . . . . . . . . . . . . . . . . . . . . . . . . . . . . . . . . . xi
Limites de responsabilité . . . . . . . . . . . . . . . . . . . . . . . . . . . . . . . . . . . . . . . . . . . . . . . . . xii
Restrictions à l'usage de votre produit et à l'utilisation des images . . . . . . . . . . . . . . . . . xii
Consignes de sécurité. . . . . . . . . . . . . . . . . . . . . . . . . . . . . . . . . . . . . . . . . . . . . . . . . .xiii
Installation . . . . . . . . . . . . . . . . . . . . . . . . . . . . . . . . . . . . . . . . . . . . . . . . . . . . . . . . . . . . xiii
Alimentation électrique. . . . . . . . . . . . . . . . . . . . . . . . . . . . . . . . . . . . . . . . . . . . . . . . . . . xiv
Manipulation. . . . . . . . . . . . . . . . . . . . . . . . . . . . . . . . . . . . . . . . . . . . . . . . . . . . . . . . . . . xv
Entretien et inspection . . . . . . . . . . . . . . . . . . . . . . . . . . . . . . . . . . . . . . . . . . . . . . . . . . xviii
Consommables . . . . . . . . . . . . . . . . . . . . . . . . . . . . . . . . . . . . . . . . . . . . . . . . . . . . . . . . xix
Autres points importants . . . . . . . . . . . . . . . . . . . . . . . . . . . . . . . . . . . . . . . . . . . . . . . . . xix
A propos du CD-ROM de documentation. . . . . . . . . . . . . . . . . . . . . . . . . . . . . . . . . . . . . . xx
Contenu du CD-ROM de documentation . . . . . . . . . . . . . . . . . . . . . . . . . . . . . . . . . . . . . xx
CD-ROM de documentation . . . . . . . . . . . . . . . . . . . . . . . . . . . . . . . . . . . . . . . . . . . xx
CD-ROM de la Carte FAX (Super G3)/CD-ROM du Kit fonctions envoi . . . . . . . . . . xx
Menu du CD-ROM de documentation utilisateur. . . . . . . . . . . . . . . . . . . . . . . . . . . . . . . .xxi
Configuration système . . . . . . . . . . . . . . . . . . . . . . . . . . . . . . . . . . . . . . . . . . . . . . . . . . . xxi
Utilisation du menu du CD-ROM . . . . . . . . . . . . . . . . . . . . . . . . . . . . . . . . . . . . . . . . . . xxii
Contrôle périodique du disjoncteur . . . . . . . . . . . . . . . . . . . . . . . . . . . . . . . . . . . . . . . . .xxiii
Contrôle du disjoncteur . . . . . . . . . . . . . . . . . . . . . . . . . . . . . . . . . . . . . . . . . . . . . . . . . xxiii
Chapitre 1 Avant de commencer à utiliser la machine
Emplacement et manipulation. . . . . . . . . . . . . . . . . . . . . . . . . . . . . . . . . . . . . . . . . . . . . . 1-2
Précautions d'installation . . . . . . . . . . . . . . . . . . . . . . . . . . . . . . . . . . . . . . . . . . . . . . . . 1-2
Eviter les conditions suivantes. . . . . . . . . . . . . . . . . . . . . . . . . . . . . . . . . . . . . . . . . 1-2
Le branchement électrique doit être sûr . . . . . . . . . . . . . . . . . . . . . . . . . . . . . . . . . 1-5
Prévoir une surface suffisante . . . . . . . . . . . . . . . . . . . . . . . . . . . . . . . . . . . . . . . . . 1-6
Avant de déménager la machine. . . . . . . . . . . . . . . . . . . . . . . . . . . . . . . . . . . . . . . 1-7
Précautions d'emploi . . . . . . . . . . . . . . . . . . . . . . . . . . . . . . . . . . . . . . . . . . . . . . . . . . . 1-7
Fonctions de la machine . . . . . . . . . . . . . . . . . . . . . . . . . . . . . . . . . . . . . . . . . . . . . . . . . 1-10
Configuration du système et nomenclature . . . . . . . . . . . . . . . . . . . . . . . . . . . . . . . . . 1-13
Downloaded from ManualsPrinter.com Manuals
Page 93

v
Périphériques en option . . . . . . . . . . . . . . . . . . . . . . . . . . . . . . . . . . . . . . . . . . . . . . . . 1-13
Vue externe et vue interne . . . . . . . . . . . . . . . . . . . . . . . . . . . . . . . . . . . . . . . . . . . . . . 1-15
Panneau de commande . . . . . . . . . . . . . . . . . . . . . . . . . . . . . . . . . . . . . . . . . . . . . . . . 1-17
Afficheur tactile . . . . . . . . . . . . . . . . . . . . . . . . . . . . . . . . . . . . . . . . . . . . . . . . . . . . . . . 1-18
Interrupteur principal et interrupteur du panneau de commande . . . . . . . . . . . . . . . . 1-21
Mise sous tension de la machine . . . . . . . . . . . . . . . . . . . . . . . . . . . . . . . . . . . . . . . . . 1-21
Avant d'utiliser cette machine . . . . . . . . . . . . . . . . . . . . . . . . . . . . . . . . . . . . . . . . . . . . . 1-25
Sélection du type de ligne téléphonique . . . . . . . . . . . . . . . . . . . . . . . . . . . . . . . . . . . . 1-25
Réglage de la date et de l'heure . . . . . . . . . . . . . . . . . . . . . . . . . . . . . . . . . . . . . . . . . . 1-26
Enregistrement du numéro de fax de la machine . . . . . . . . . . . . . . . . . . . . . . . . . . . . . 1-27
Enregistrement d'un nom d'expéditeur . . . . . . . . . . . . . . . . . . . . . . . . . . . . . . . . . . . . . 1-28
Enregistrement des informations concernant l'émetteur . . . . . . . . . . . . . . . . . . . . . . . . 1-29
Affichage d'un écran d'aide . . . . . . . . . . . . . . . . . . . . . . . . . . . . . . . . . . . . . . . . . . . . . . . 1-31
Chapitre 2 Entretien périodique
Approvisionnement en papier . . . . . . . . . . . . . . . . . . . . . . . . . . . . . . . . . . . . . . . . . . . . . . 2-2
Remplacement de la cartouche d'encre . . . . . . . . . . . . . . . . . . . . . . . . . . . . . . . . . . . . . . 2-6
Chapitre 3 Dépannage
Elimination des bourrages papier . . . . . . . . . . . . . . . . . . . . . . . . . . . . . . . . . . . . . . . . . . . 3-2
Messages d'erreur. . . . . . . . . . . . . . . . . . . . . . . . . . . . . . . . . . . . . . . . . . . . . . . . . . . . . . . .3-6
Liste des codes d'erreur sans messages . . . . . . . . . . . . . . . . . . . . . . . . . . . . . . . . . . . . 3-6
Chapitre 4 Annexe
Opérations multifonctions . . . . . . . . . . . . . . . . . . . . . . . . . . . . . . . . . . . . . . . . . . . . . . . . . 4-2
Types de papier disponibles . . . . . . . . . . . . . . . . . . . . . . . . . . . . . . . . . . . . . . . . . . . . . . . 4-4
Feuille de contrôle périodique du disjoncteur . . . . . . . . . . . . . . . . . . . . . . . . . . . . . . . . . 4-6
Downloaded from ManualsPrinter.com Manuals
Page 94
vi
Préface
Nous vous remercions d'avoir porté votre choix sur la série iR3045/iR3045N/iR3035/iR3035N/iR3025/
iR3025N de Canon. Nous vous invitons à lire attentivement ce guide avant toute manipulation, afin de
tirer le meilleur parti des avantages offerts par la machine. Nous vous prions également de le
conserver avec soin pour pouvoir le consulter en cas de besoin.
Ce guide imprimé contient tout ce qu'il faut savoir avant d'utiliser cette machine et les opérations de
base. Pour plus d'informations sur le fonctionnement, se reporter aux manuels qui se trouvent sur le
CD-ROM joint.
Présentation du guide
Conventions adoptées
Des symboles sont utilisés dans ce guide pour attirer l'attention sur les procédures, restrictions,
précautions d'emploi et consignes de sécurité à observer.
AVERTISSEMENT
Point pouvant présenter un danger pour l'utilisateur si les instructions ne sont pas
respectées. Ces recommandations sont à respecter rigoureusement.
ATTENTION
.
Point important pour la sécurité de l'utilisateur ou qui doit être respecté pour éviter
les dommages matériels. Ces avertissements doivent être pris en considération.
REMARQUE
.
Point important concernant le fonctionnement. A lire attentivement pour bien
utiliser la machine et éviter de l'endommager.
NOTE
.
Informations complémentaires concernant le fonctionnement ou les procédures. Il
est conseillé de lire ces informations.
Downloaded from ManualsPrinter.com Manuals
Page 95

Mentions légales
vii
Mentions légales
Nom du produit
Conformément aux règlements en matière de sécurité, le nom du produit doit être déposé.
Dans certaines des zones de commercialisation du produit, il se peut que le nom déposé soit
celui indiqué entre parenthèses cidessous.
iR3045/iR3045N/iR3035/iR3035N/iR3045Ne (F145400)
iR3025/iR3025N/iR3025Ne (F143300)
Exigences CEM de la directive européenne
Cet équipement est conforme aux principales exigences CEM de la directive européenne. Ce
produit est conforme aux spécifications CEM de la directive européenne pour une alimentation
secteur nominale de 230 V, 50 Hz, avec une tension nominale de 220 V – 240 V, 50/60 Hz.
• L'utilisation de câble blindé est nécessaire pour satisfaire aux exigences techniques CEM de
la directive européenne.
Faisceau laser
Canon certifie que ce produit est un produit laser de Classe 1, d'après les normes
IEC60825-1:2007 et EN60825-1:2007. ce qui signifie qu'il n'émet pas de rayonnements laser
dangereux.
Le système optique étant conçu de sorte que les rayonnements émis demeurent captifs des
capots de protection et des portes externes, à aucun moment du cycle de fonctionnement le
faisceau laser ne risque de rayonner hors de la machine. Ne pas retirer les capots de protection
et les portes externes, sauf indication expresse du guide d'utilisation de la machine.
Downloaded from ManualsPrinter.com Manuals
Page 96
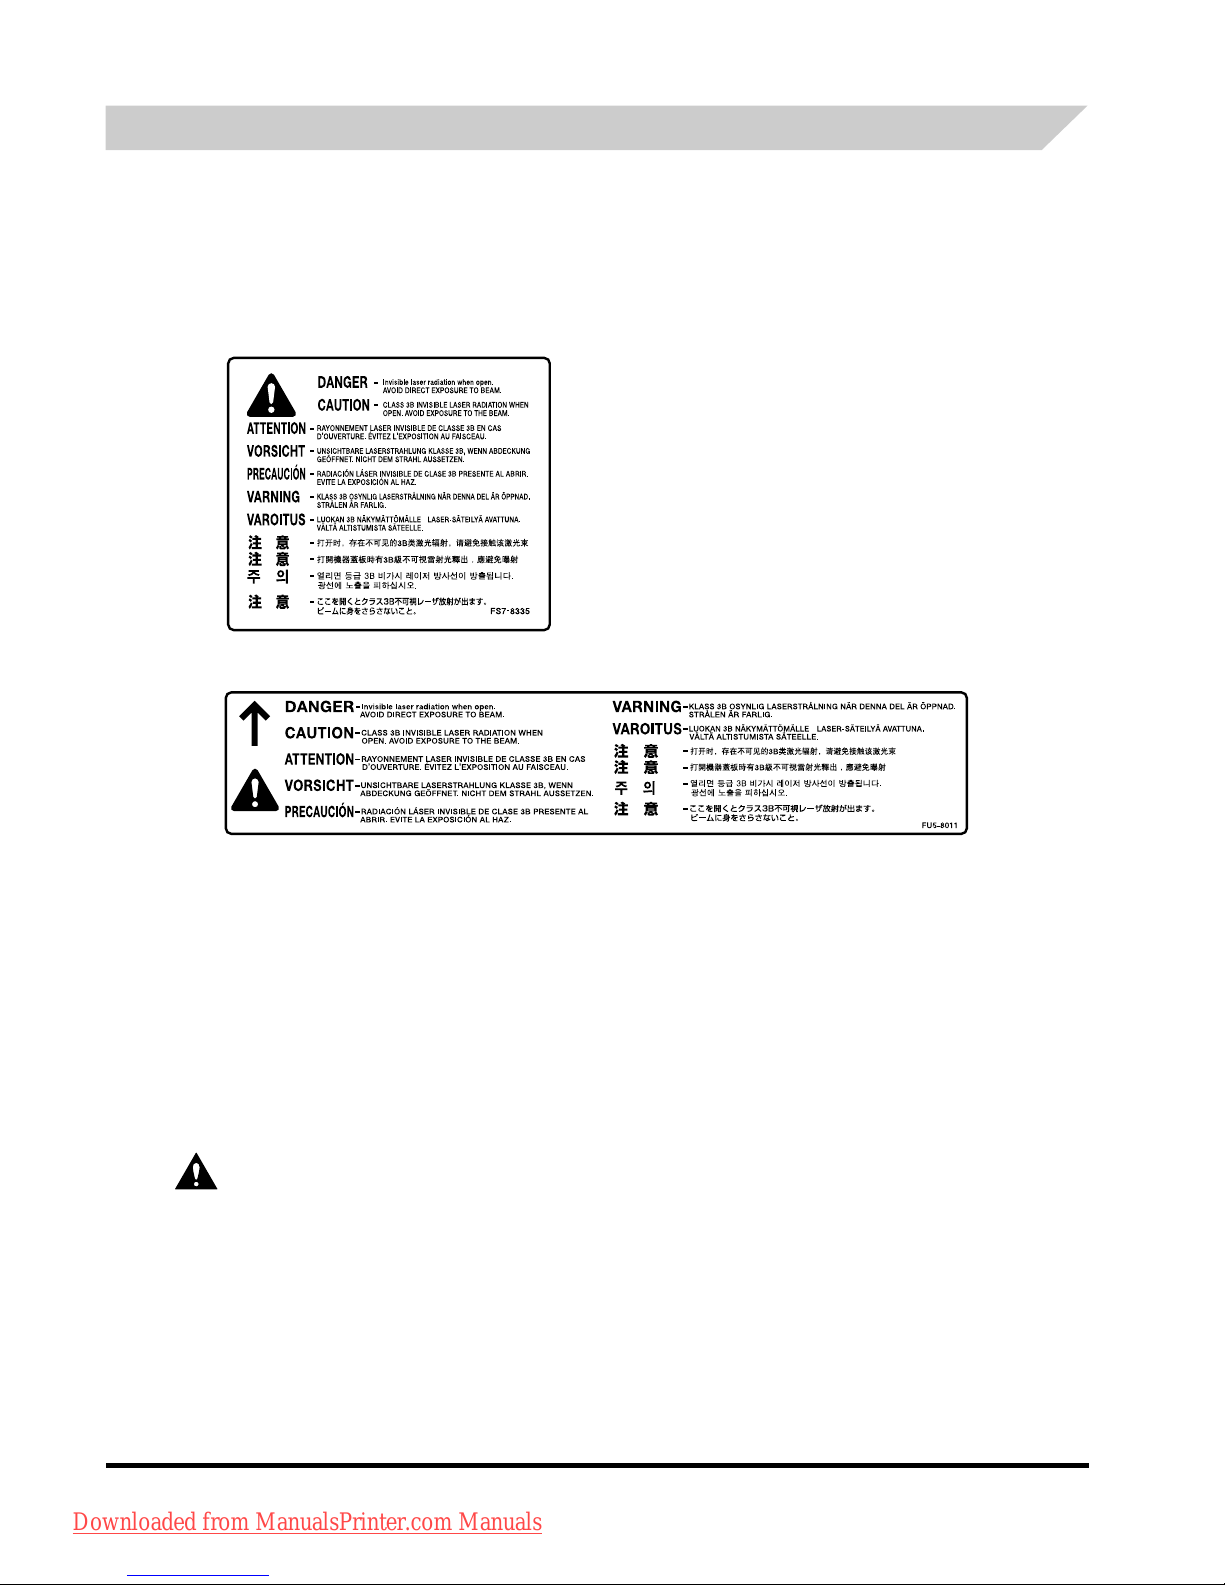
Mentions légales
viii
Informations complémentaires
Lors de l'entretien ou du réglage du système optique du produit, veiller à ne placer aucun objet
brillant (tournevis, etc.) sur le trajet du faisceau laser. En outre, les objets personnels, tels que
montres, alliances, etc., doivent être enlevés, car ils sont susceptibles de réfléchir le faisceau
qui, visible ou invisible, peut occasionner des lésions oculaires permanentes.
Les étiquettes illustrées ci-dessous figurent à l'intérieur du capot droit de la cassette et du
couvercle d'approvisionnement d'encre.
D'après les normes IEC60825-1:2007 et EN6082
5-1:2007, ce produit correspond aux
catégories suivantes :
CLASS 1 LASER PRODUCT
LASER KLASSE 1
APPAREIL Á LASER DE CLASSE 1
APPARECCHIO LASER DI CLASSE 1
PRODUCTO LÁSER DE CLASE 1
APARELHO A LASER DE CLASSE 1
LUOKAN 1 LASER-TUOTE
LASERPRODUKT KLASS 1
ATTENTION
L'utilisation de commandes ou réglages, ou l'exécution de procédures autres que celles
spécifiées dans le présent guide peuvent être cause d'exposition à un rayonnement
dangereux.
Downloaded from ManualsPrinter.com Manuals
Page 97
Mentions légales
ix
Directive DEEE
Directive R & TTE
Union européenne (et Espace économique européen) uniquement.
Ces symboles indiquent que ce produit ne doit pas être mis au rebut avec les ordures ménagères,
comme le
spécifient la Directive européenne DEEE (2002/96/EC), la Directive européenne relative à
l'élimination des piles et des accumulateurs usagés (2006/66/EC) et les lois en vigueur dans votre
pays, appliquant ces directives.
Si un symbole de toxicité chimique est imprimé sous le symbole illustré ci-dessus conformément à la
Directive relative aux piles et aux accumulateurs, il indique la présence d'un métal lourd (Hg = mercure,
Cd = cadmium, Pb = plomb) dans la pile ou l'accumulateur à une concentration supérieure au seuil
applicable spécifié par la Directive.
Ce produit doit être confié à un point de collecte désigné, par exemple, chaque fois que vous achetez
un produit similaire neuf, ou à un point de collecte agréé pour le recyclage équipements électriques ou
électroniques (EEE) et des piles et accumulateurs. Le traitement inapproprié de ce type de déchet
risque d'avoir des répercussions sur l'environnement et la santé humaine, du fait de la présence de
substances potentiellement dangereuses généralement associées aux équipements électriques ou
électroniques.
Votre coopération envers la mise au rebut correcte de ce produit contribuera à l'utilisation efficace des
ressources naturelles.
Pour de plus amples informations sur le recyclage de ce produit, veuillez contacter vos services
municipaux, votre éco-organisme ou les autorités locales. Vous pouvez également vous rendre sur le
site www.canon-europe.com/environment.
(Espace économique européen : Norvège, Islande et Liechtenstein)
Cet équipement (F145400/F143300) est conforme aux exigences de la directive
européenne 1999/5/CE et peut être utilisé dans l'Union européenne. (Uniquement pour les
modèles dotés d'une fonctionnalité de télécopie.)
(Europe uniquement)
Canon Inc./Canon Europa N.V.
Downloaded from ManualsPrinter.com Manuals
Page 98
Mentions légales
x
Super G3
Abréviations utilisées dans ce guide
Dans ce guide, les noms de produits et les noms de modèles sont abrégés de la manière
suivante :
Système d'exploitation Microsoft® Windows® 98 : Windows 98
Système d'exploitation Microsoft
®
Windows® Millennium Edition : Windows Me
Système d'exploitation Microsoft
®
Windows® 2000 : Windows 2000
Système d'exploitation Microsoft
®
Windows® XP : Windows XP
Système d'exploitation Microsoft
®
Windows™ Server 2003 : Windows Server 2003
Système d'exploitation Microsoft® Windows® : Windows
Marques
MEAP et le logo MEAP sont des marques de Canon Inc.
Ce produit contient la technologie Universal Font Scaling Technology ou UFST
®
sous licence de
Monotype Imaging, Inc. UFST® est une marque déposée de Monotype Imaging, Inc. auprès du
United States Patent and Trademark Office et elle peut être déposée dans certains pays.
Apple, AppleTalk, EtherTalk, LocalTalk, Mac, Macintosh, Mac
OS et Safari sont des marques de
Apple Inc., déposées aux Etats-Unis et dans d'autres pays.
Microsoft, Windows, Windows Vista, Windows Serve
r et Internet Explorer sont des marques
commerciales ou déposées de Microsoft Corporation aux Etats-Unis et/ou dans d'autres pays.
Les autres noms de produits ou de sociétés cités dans le présent guide peuvent être des
marques de leurs propriétaires respectifs.
Copyright
Copyright 2013 Canon Inc. Tous droits réservés.
Aucune partie de ce document ne peut être reproduite ou transmise sous quelque forme et par
quelque moyen que ce soit, électronique ou mécanique, notamment par photocopie ou
enregistrement, ou par tout système de stockage ou d'extraction d'informations, sans le
consentement écrit préalable de la société Canon Inc.
L'expression Super G3 qualifie la nouvelle génération de télécopieurs utilisant des
modems 33 600 bps* conformes à la norme UIT-T V.34. Les télécopieurs Super G3
à grande vitesse permettent d'obtenir des durées d'émission d'environ 3 secondes par
page, ce qui se traduit par une réduction des frais de téléphone.
* Temps de transmission d'environ 3 secondes par page avec un modem 33,6 Kbps, basé
sur la mire n° 1 du CCITT/UIT-T (JBIG, mode standard). Le réseau téléphonique public
commuté (RTPC) autorise actuellement des vitesses de transmission de 28,8 Kbps ou
moins, selon l'état des lignes téléphoniques.
Downloaded from ManualsPrinter.com Manuals
Page 99

Mentions légales
xi
Logiciel de tierce partie
Ce produit comprend un logiciel et/ou des modules logiciels sous licence de tierces parties
(CONCÉDANTS DE LICENCE). L'utilisation et la distribution de ces logiciels et/ou modules
logiciels (le "LOGICIEL") sont soumises aux conditions (1) à (9) ci-dessous à moins que
d'autres conditions n'accompagnent le logiciel et/ou les modules logiciels. Le cas échéant, ces
logiciels et/ou modules logiciels sont soumis aux autres conditions.
(1) Vous acceptez de vous conformer aux lois sur le contrôle des exportations, restrictions ou
ré
glementations en vigueur dans les pays impliqués dans le cas où le LOGICIEL est
expédié, transféré ou exporté dans un pays quelconque.
(2) Les CONCÉDANTS DE LICENCE conservent à tous égards le titre, la propriété et les droits
de propriété intellectuelle relatifs au LOGICIEL. Sauf lorsque expressément stipulé dans ce
document, aucune licence ou droit explicite ou implicite, ne vous est transmis ou accordé
par la présente par le concédant de licence de Canon pour toute propriété intellectuelle des
CONCÉDANTS DE LICENCE.
(3) Vous pouvez utiliser le LOGICIEL exclusivement avec le produit Canon que vous avez
acheté (le "PRODUIT").
(4) Vous ne pouvez attribuer, concéder en sous-licence, commercialiser, distribuer ou transférer
l
e LOGICIEL à un tiers, sans le consentement écrit préalable de Canon et des
CONCÉDANTS DE LICENCE.
(5) Nonobstant ce qui précède, vous pouvez transférer le LOGICIEL uniquement lorsque (a)
v
ous attribuez tous vos droits au PRODUIT et tous les droits et obligations sous les
conditions au cessionnaire et (b) le dit cessionnaire accepte d'être lié par toutes ces
conditions.
(6) Vous ne pouvez décompiler, désosser, désassembler ou autrement restituer le code du
L
OGICIEL sous une forme lisible par un humain.
(7) Vous ne pouvez modifier, adapter, traduire, louer, louer à bail ou prêter le LOGICIEL ou
créer
des travaux dérivés à partir de celui-ci.
(8) Vous n'êtes pas autorisé à retirer le LOGICIEL du PRODUIT ou à en faire des copies
sé
parées.
(9) Vous ne recevez pas en licence la portion lisible par un humain (le code source) du
LO
GICIEL.
Downloaded from ManualsPrinter.com Manuals
Page 100

Mentions légales
xii
Limites de responsabilité
Les informations contenues dans ce document sont susceptibles de modification sans préavis.
A L'EXCEPTION DES GARANTIES STIPULEES ICI, CANON INC. EXCLUT TOUTE
GARANTIE, EXPLICITE OU IMPLICITE, RELATIVE AU PRESENT MATERIEL, NOTAMMENT
CELLES AYANT TRAIT A L'APTITUDE A ETRE COMMERCIALISE, A LA QUALITE
MARCHANDE, A L'ADAPTATION A UN USAGE PARTICULIER ET A L'ABSENCE DE
CONTREFACON. CANON INC. NE POURRA EN AUCUN CAS ETRE TENU RESPONSABLE
DES DOMMAGES DIRECTS, INDIRECTS OU ACCESSOIRES DE QUELQUE NATURE QUE
CE SOIT, NI DES PERTES OU DEPENSES RESULTANT DE L'UTILISATION DU PRESENT
MATERIEL.
Restrictions à l'usage de votre produit et à l'utilisation
des images
L'utilisation de votre produit pour numériser, imprimer ou reproduire de quelque manière que ce
soit certains documents, ainsi que l'utilisation des images numérisées, imprimées ou
reproduites par votre produit, peuvent être interdites par la loi et peuvent engager votre
responsabilité civile et/ou pénale. Vous trouverez ci-dessous une liste non exhaustive des
documents dont la reproduction peut être interdite. Cette liste a uniquement vocation à vous
servir de guide. Si vous avez un doute sur la légalité de l'utilisation de votre produit pour
numériser, imprimer ou reproduire de quelque manière que ce soit un document particulier et/
ou sur la légalité de l'utilisation des images ainsi numérisées, imprimées ou reproduites, nous
vous recommandons de prendre préalablement les conseils juridiques nécessaires.
• Billets de banque • Effets de commerce, lettres
de change, billets à ordre et
chèques
• Timbres fiscaux
(oblitérés ou non)
• Mandats, ordres de
paiement
• Titres de propriété • Certificats de valeurs
mobilières (actions,
obligations, ...) et de parts
sociales
• Bons de caisse et certificats
de dépôt
• Chèques de voyage • Certificats d'action
• Timbres postaux
(oblitérés ou non)
• Titres de restauration • Dans certains cas,
documents faisant l'objet d'un
droit de propriété
intellectuelle sans
l'autorisation de leur titulaire.
• Badges d'identification ou
insignes
• Passeports, pièces
d'identité et permis de
conduire
• Papiers militaires • Documents d'immigration
Downloaded from ManualsPrinter.com Manuals
 Loading...