

Canon imagerunner advance 4551, imagerunner advance 4545, imagerunner advance 4551i, imagerunner advance 4535, imagerunner advance 4525i Faq Manual
...
FAQ Guide
/ / /
/ / /
Please read "Important Safety Instructions" before
operating this product. ⇒P.38
After you finish reading this guide, store it in a safe
place for future reference.
The information in this document is subject to change
without notice.
You can access canon.com/oip-manual
to read the User's Guide that describes all
functions of this machine.
What is
Your Question?
Contents
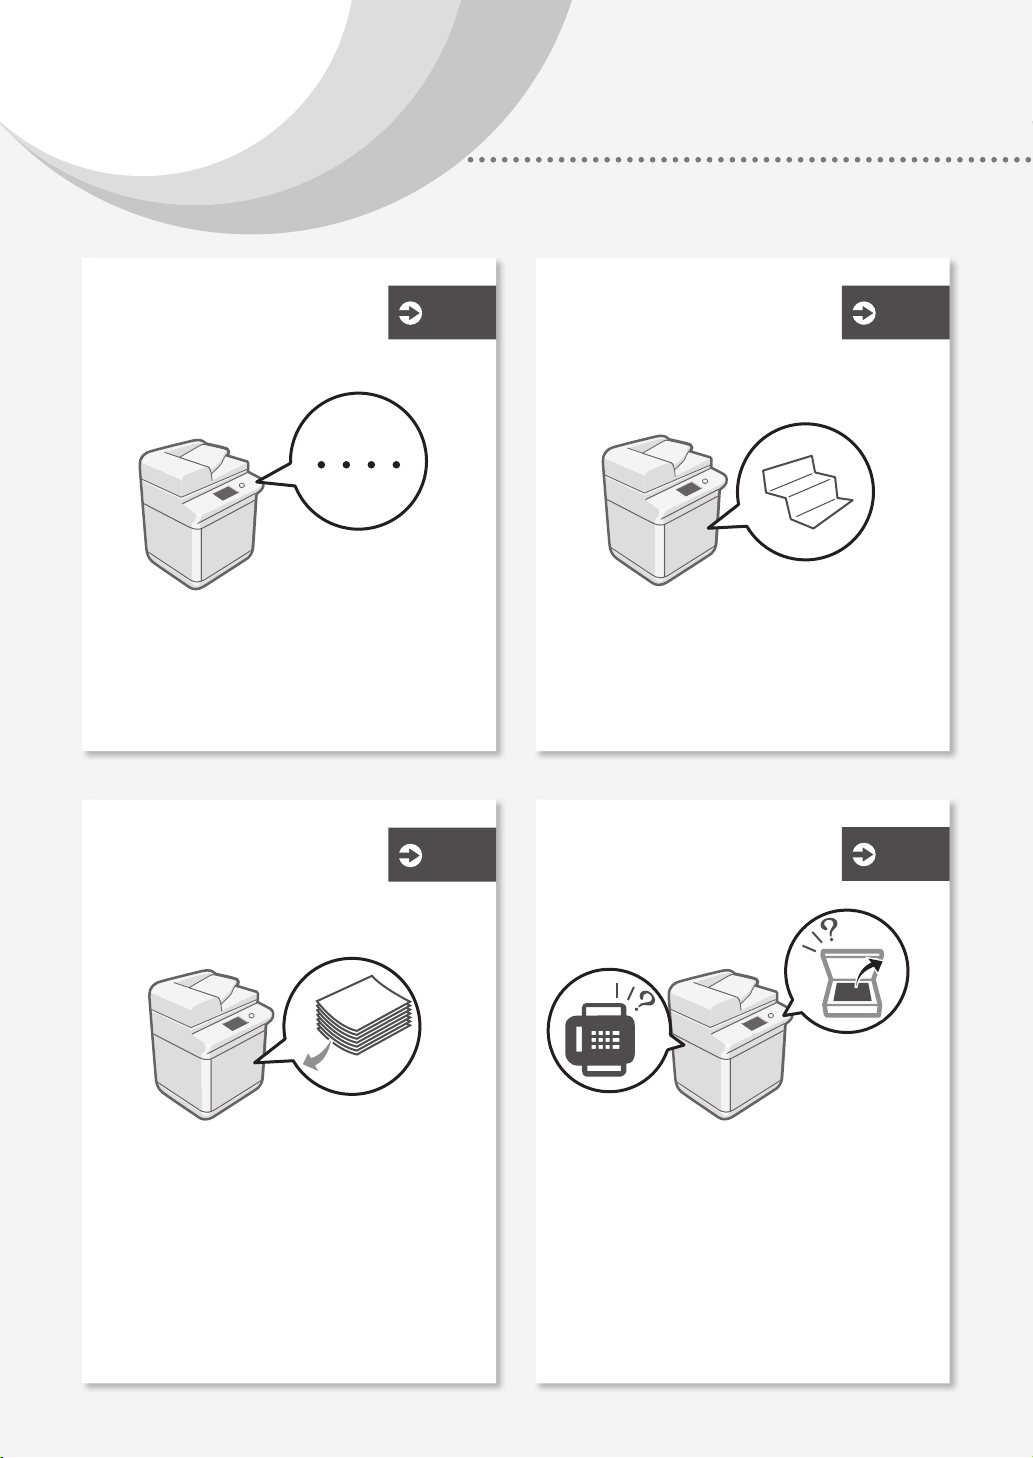
What's Your Problem?
The Machine Does Not
Operate
Check the Following First . . . . . . . . . . . . . . 4
The Machine Does Not Respond to the
Computer . . . . . . . . . . . . . . . . . . . . . . . . . . . . . . . . . . . . . 5
The Authentication Screen (Logon Screen) Is
Displayed and You Cannot Go Further . . . . . . . . . 5
How to Load Paper
P.4
P.
6
If Paper Jams Occur
Paper Jams Occur . . . . . . . . . . . . . . . . . . . . . . . . . . . . . 17
Paper Jams Occur Frequently . . . . . . . . . . . . . . . . . . 18
Scan/Fax Cannot Be
Performed Successfully
P.
P.
17
24
2
Loading Paper in the Paper Drawer . . . . . . . . . . . . . 6
When You Have Loaded a Different Type of
Paper than the Preset One . . . . . . . . . . . . . . . . . . . . 7
Loading Paper in the Multi-Purpose Tray . . . . . . . . 8
Loading Paper with Printed Logos . . . . . . . . . . . . . 10
Loading Envelopes . . . . . . . . . . . . . . . . . . . . . . . . . . . . 11
If You Cannot Send Documents to a Server Using
[Scan and Send] . . . . . . . . . . . . . . . . . . . . . . . . . . . . . . 24
Stopping Scanning/Faxing. . . . . . . . . . . . . . . . . . . . . 24
Scanned Documents Cannot Be E-Mailed . . . . . . 25
If You Cannot Send/Forward Faxes . . . . . . . . . . . . . 26
If You Cannot Receive Faxes . . . . . . . . . . . . . . . . . . . 27
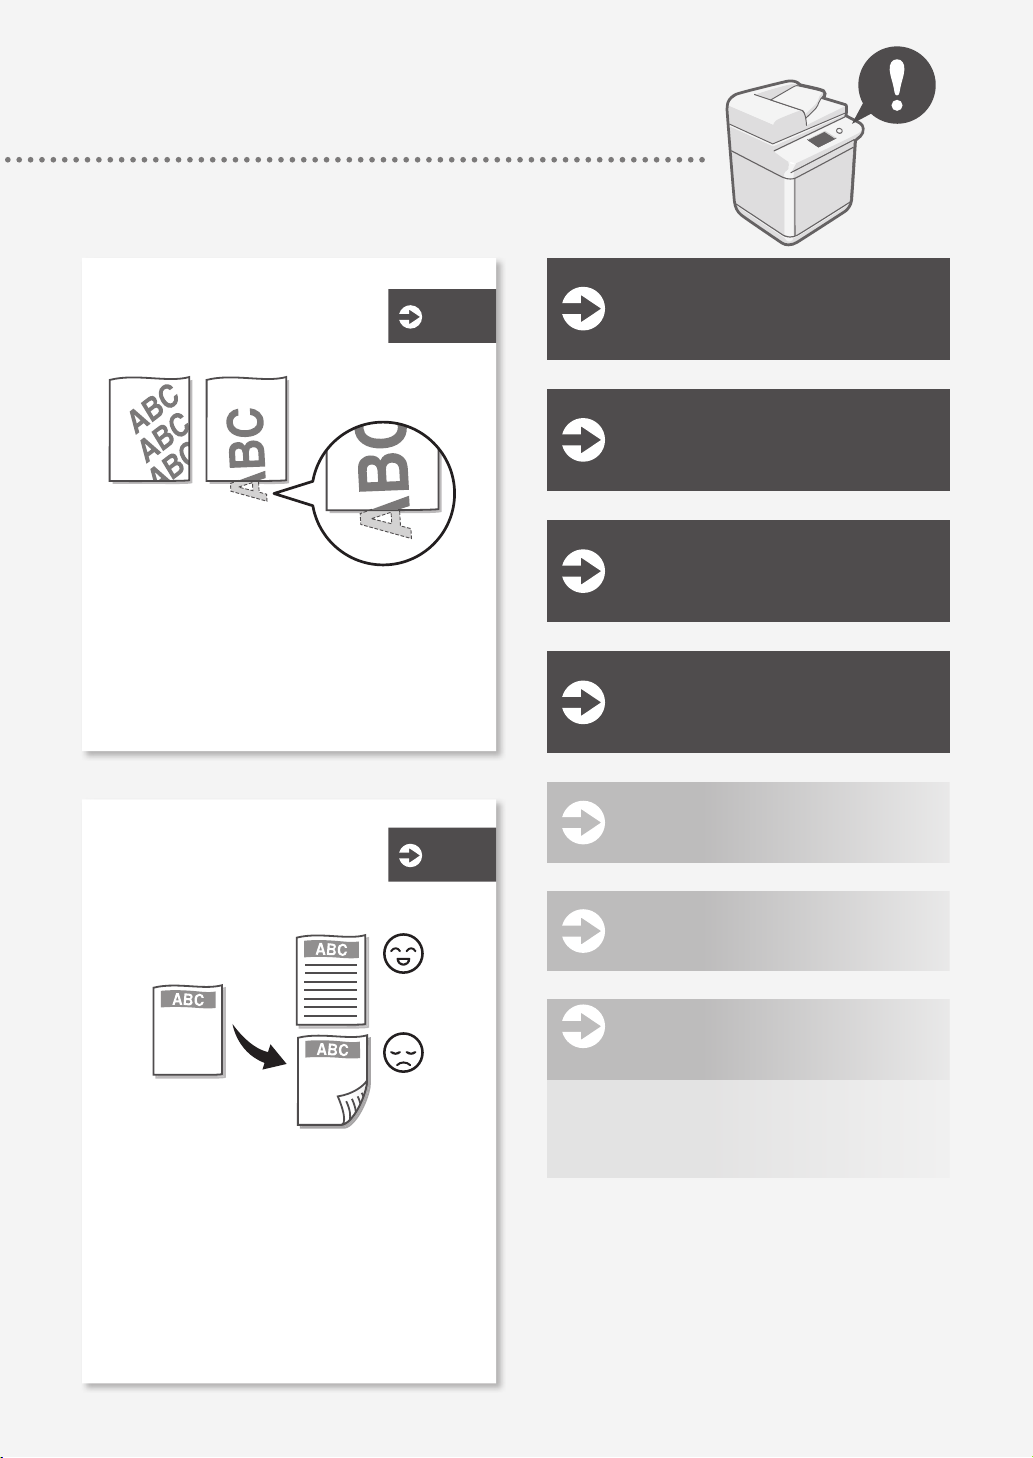
Printing Results Are
Not Satisfactory
P.
13
Canceling Copy/
Print Jobs
P.28
Images Are Shifted/Slanted . . . . . . . . . . . . . . . . . . . . 13
Irregularities Appear in Images/
Images Are Faint . . . . . . . . . . . . . . . . . . . . . . . . . . . . . 13
Black Streaks Appear in Images . . . . . . . . . . . . . . . . 14
Bleed-through Occurs . . . . . . . . . . . . . . . . . . . . . . . . . 16
Loading Paper or Paper
Settings Cannot Be Done
P.
Successfully
19
Installing the
Printer Driver
Replacement Parts
An Error Screen is
Displayed
Illustrated Index
Appendix
P.29
P.30
P.32
P.34
P.38
Paper Is Not Fed . . . . . . . . . . . . . . . . . . . . . . . . . . . . . . . 19
If the "Load paper." Message Is Displayed . . . . . . 20
Printing Cannot Be Performed on the Expected
Side of Paper . . . . . . . . . . . . . . . . . . . . . . . . . . . . . . . . . 22
Printing Cannot Be Performed with the
Expected Size . . . . . . . . . . . . . . . . . . . . . . . . . . . . . . . . 22
In Two-Sided Printing, the Print Direction Differs
between the Front and Back Sides of the
Paper . . . . . . . . . . . . . . . . . . . . . . . . . . . . . . . . . . . . . . . . 23
Do You Want to
P.43
Know More?
You Can Consult the User's Guide! . . . . . . . .43
If You Notice a Search Number . . . . . . . . . . . .43
3
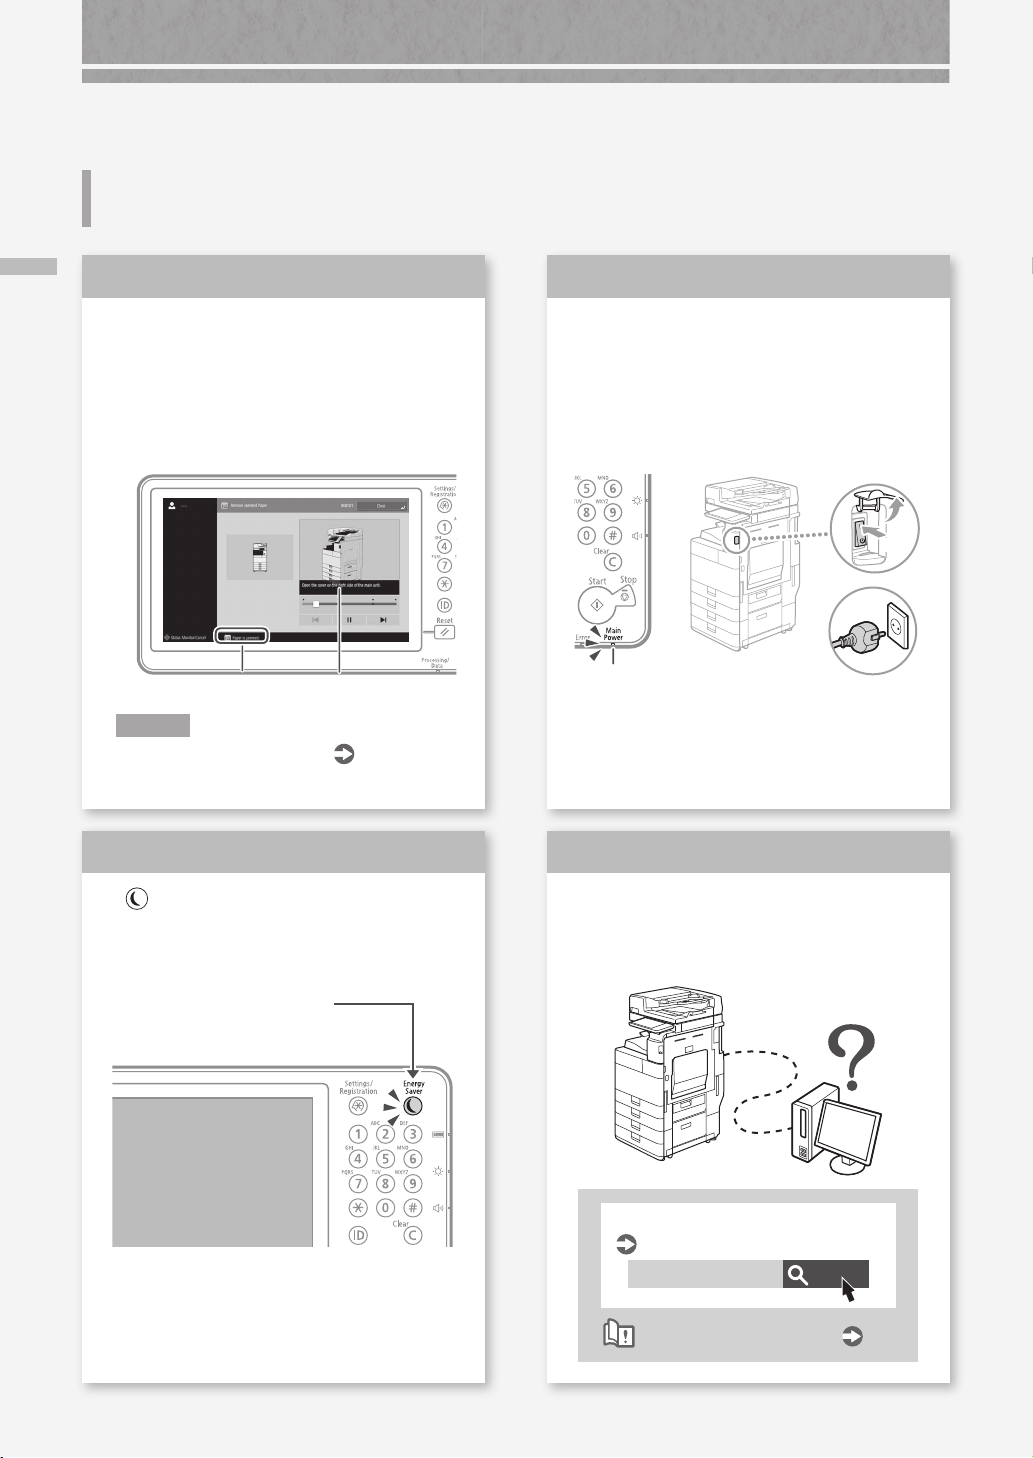
The Machine Does Not Operate
Check the Following First
Check the Following First
Check
1
Is a message displayed on the touch
panel display?
Check
3
Is the main power indicator O?
If the main power indicator does not light
when you turn the main power ON, check
the power plug.
I(ON)
Simple Message
N OT E
If an error message is displayed
Check
2
Is lit?
Press this to cancel the
Sleep mode.
Message
P.32
Main power
indicator
Check
4
Is the machine correctly connected to
the computer?
Check the network connection.
Setting the network environment
User's Guide
10H4-0JS
Search
4
How to use the search number
P.43

The Machine Does Not Respond to the Computer
Solution
1
Restart the machine.
Press the main power switch to turn off the
1.
machine.
CAUTION!
Note that turning OFF the machine deletes the
data that is waiting to be printed.
Solution
3
The Machine Does Not Respond to the Computer / The Authentication Screen (Logon Screen) Is Displayed and You Cannot Go Further
Set the IP address again.
Setting the IP address
User's Guide
10H4-00K
How to use the search number
Search
P.43
The Authentication Screen (Logon Screen) Is Displayed and You Cannot Go Further
Check that the main power indicator has turned
2.
off.
Press the power switch again.
3.
Solution
2
Install the printer driver again.
N OT E
For more information
P.29
Solution
Log on to the machine using a
registered user ID.
To continue the operation when the
authentication screen (logon screen) is
displayed, it is necessary to log on with a
registered user ID.
Logging on to the Machine
User's Guide
10H4-022
How to use the search number
Search
P.43
5

How to Load Paper
Loading Paper in the Paper Drawer
1
Loading Paper in the Paper Drawer
2
Slide the light blue knobs to adjust the positions
of the paper guides.
Align the protrusion to the
appropriate paper size marking.
4
Place the paper drawer back into the machine.
CAUTION!
Be careful not to get your ngers caught
between the paper drawer and the machine.
PO IN T
When you have changed the paper size, replace
the paper size label with an appropriate one, as
necessary.
When you have loaded a different type of paper
than the preset one, be sure to change the paper
type setting.
P.34
P.7
6
3
First fan the paper stack well and then load it.
Make sure that
this line is not
exceeded.
The print side face up
Paper Orientation
Paper
A4 A4R
Paper
Drawer
For available paper, see the following.
Specifications
10H4-0KL
Search
When You Have Loaded a Dierent
Type of Paper than the Preset One
How to use the search number
P.43
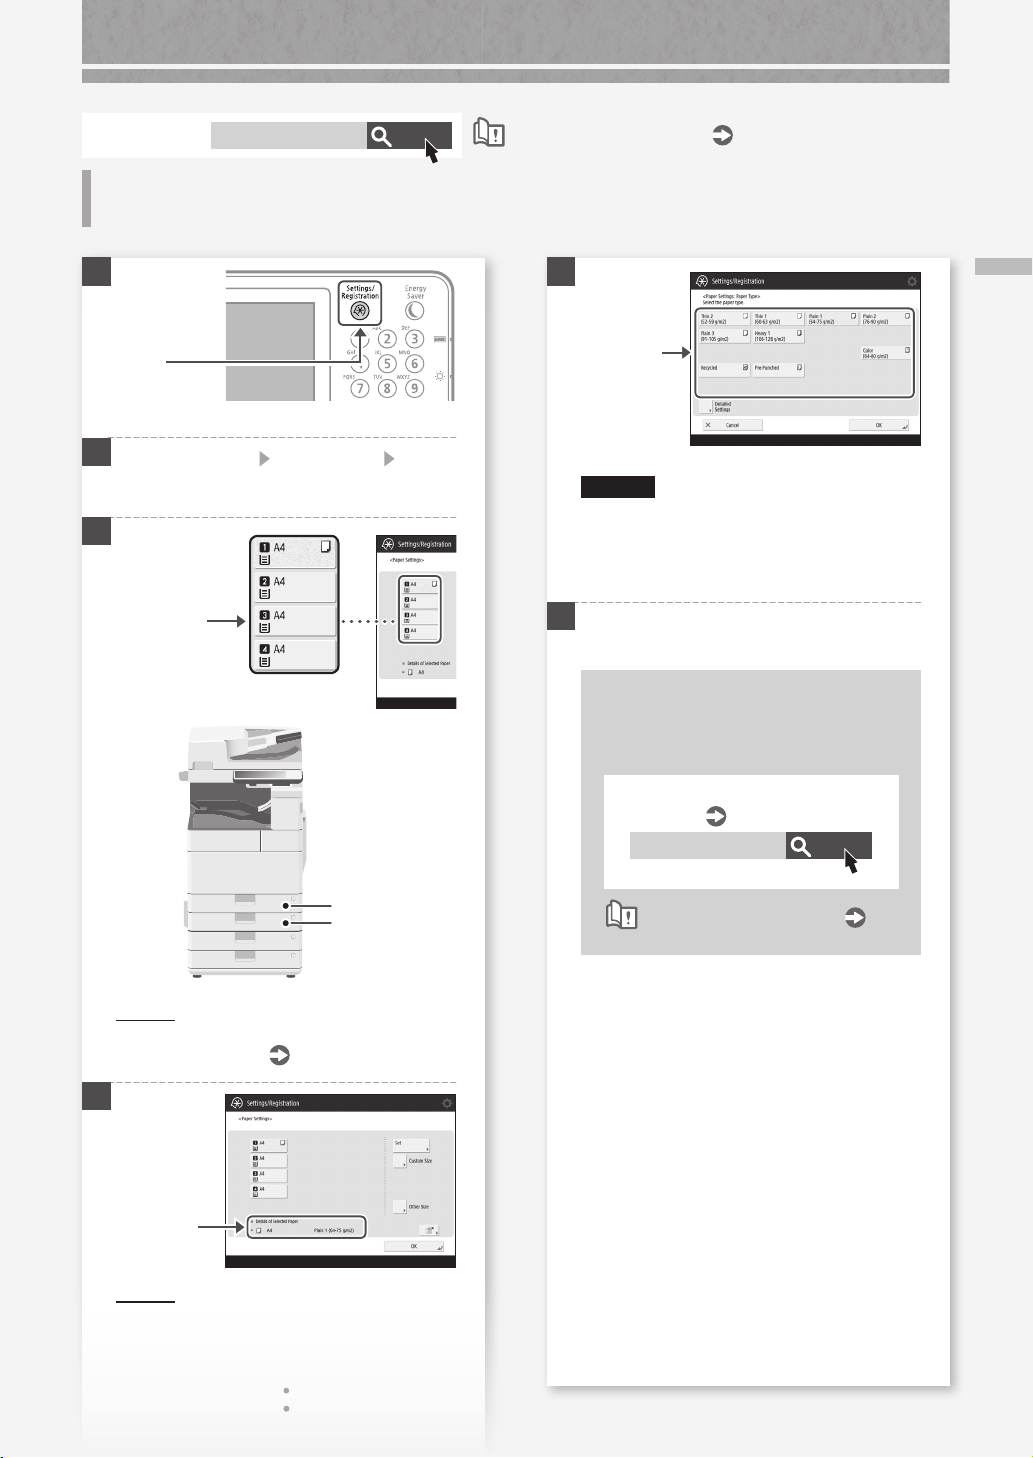
1
Press
2
Press [Preferences] [Paper Settings] [Paper
Settings] on the touch panel display.
3
Select the
paper source.
5
Select the
1.
paper type.
CAUTION!
Make sure to select paper type that matches the
basis weight of the loaded paper.
Press [OK].
2.
6
Press [OK].
When You Have Loaded a Dierent Type of Paper than the Preset One
When you have loaded custom size
paper
Specify the paper size manually.
Specifying free size paper (custom
size paper)
10H4-02C
User's Guide
Search
1
2
PO IN T
Any paper source other than
For more information
4
Check the
1.
paper size.
PO IN T
If the displayed paper size is different from the
loaded paper size, adjust the paper guides.
Press [Set].
2.
1 and 2
User's Guide
is optional.
How to use the search number
P.43
7
How to Load Paper
Loading Paper in the MultiPurpose Tray
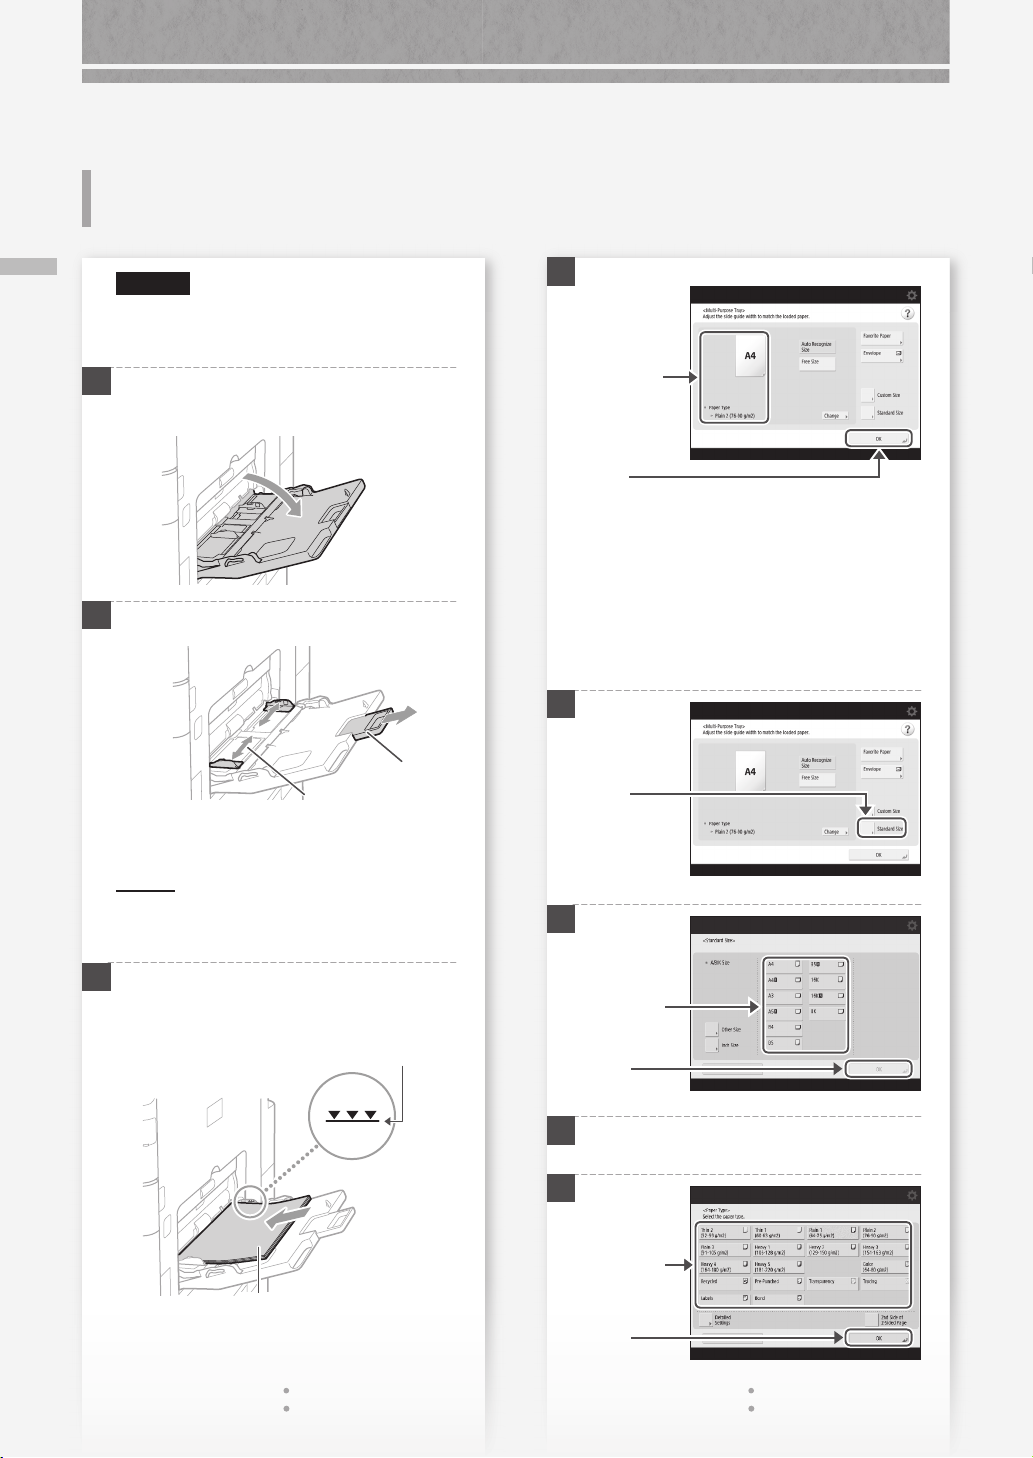
Loading Paper in the Multi-Purpose Tray
CAUTION!
When using coated paper or paper that does
not feed well, load one sheet at a time.
1
2
Adjust the position of the paper guides.
4
Check the
1.
paper size/
type.
Press
2.
If the paper size/type setting does not
match the paper you have loaded
In the screen for this step 4, change the setting
manually.
Tray extension
Align the paper
guides to the paper
size markings.
PO IN T
Pull out the tray extension when loading largesized paper.
3
Fan the paper stack well, align the edges on a
flat surface, and then load it.
Make sure that this line is not exceeded.
The print side face down
1
Press
2
Select the
1.
paper size.
Press
2.
3
Press [Change] in [Paper Type].
4
Select the
1.
paper type.
Press
2.
8
For available paper, see the following.
Specifications
10H4-0KL
Search
How to use the search number
P.43
When you have loaded custom size
paper
Specify the paper size manually.
Specifying free size paper (custom
size paper)
10H4-02E
How to use the search number
User's Guide
Search
P.43
Printing on the back side of printed
paper
1. Load paper in the multi-purpose tray the
print side face down.
2. In the [Paper Type] selection screen,
press [2nd Side of 2-Sided Page].
CAUTION!
For this operation, paper can only be loaded
in the multi-purpose tray.
PO IN T
You can use only paper printed with this
machine.
Loading Paper in the Multi-Purpose Tray
9
How to Load Paper
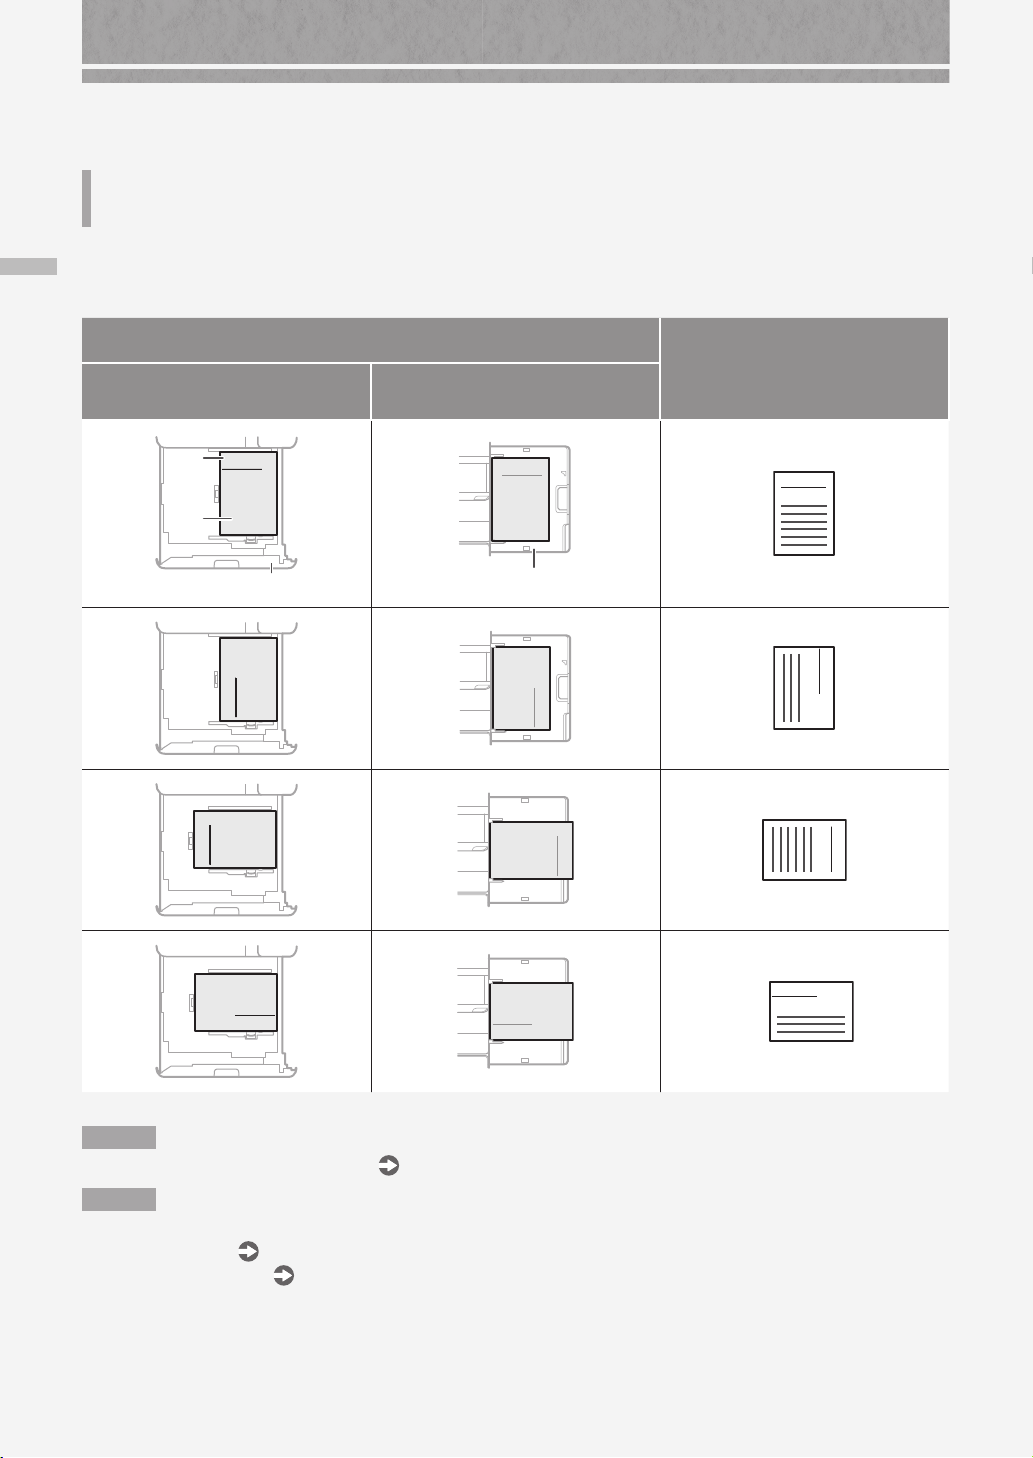
Loading Paper with Printed Logos
Refer to the table below to load paper with printed logos.
Loading Paper with Printed Logos
Example: When printing on A4 size paper
Orientation
Paper Drawer Multi-Purpose Tray
Logo
Co. Ltd
Paper
Printing result
Co. Ltd.
Co. Ltd.
A B C
Paper Drawer
Co. Ltd
Co. Ltd
Co. Ltd
N OT E
When copying to paper with printed logos
Multi-Purpose Tray
User's Guide
Co. Ltd.
Co. Ltd.
A B C
Co. Ltd.
Co. Ltd.
A B C
Co. Ltd.
Co. Ltd.
A B C
N OT E
Basic Paper Loading Operations
• For paper drawer
• For multi-purpose tray
10
P.6
P.8
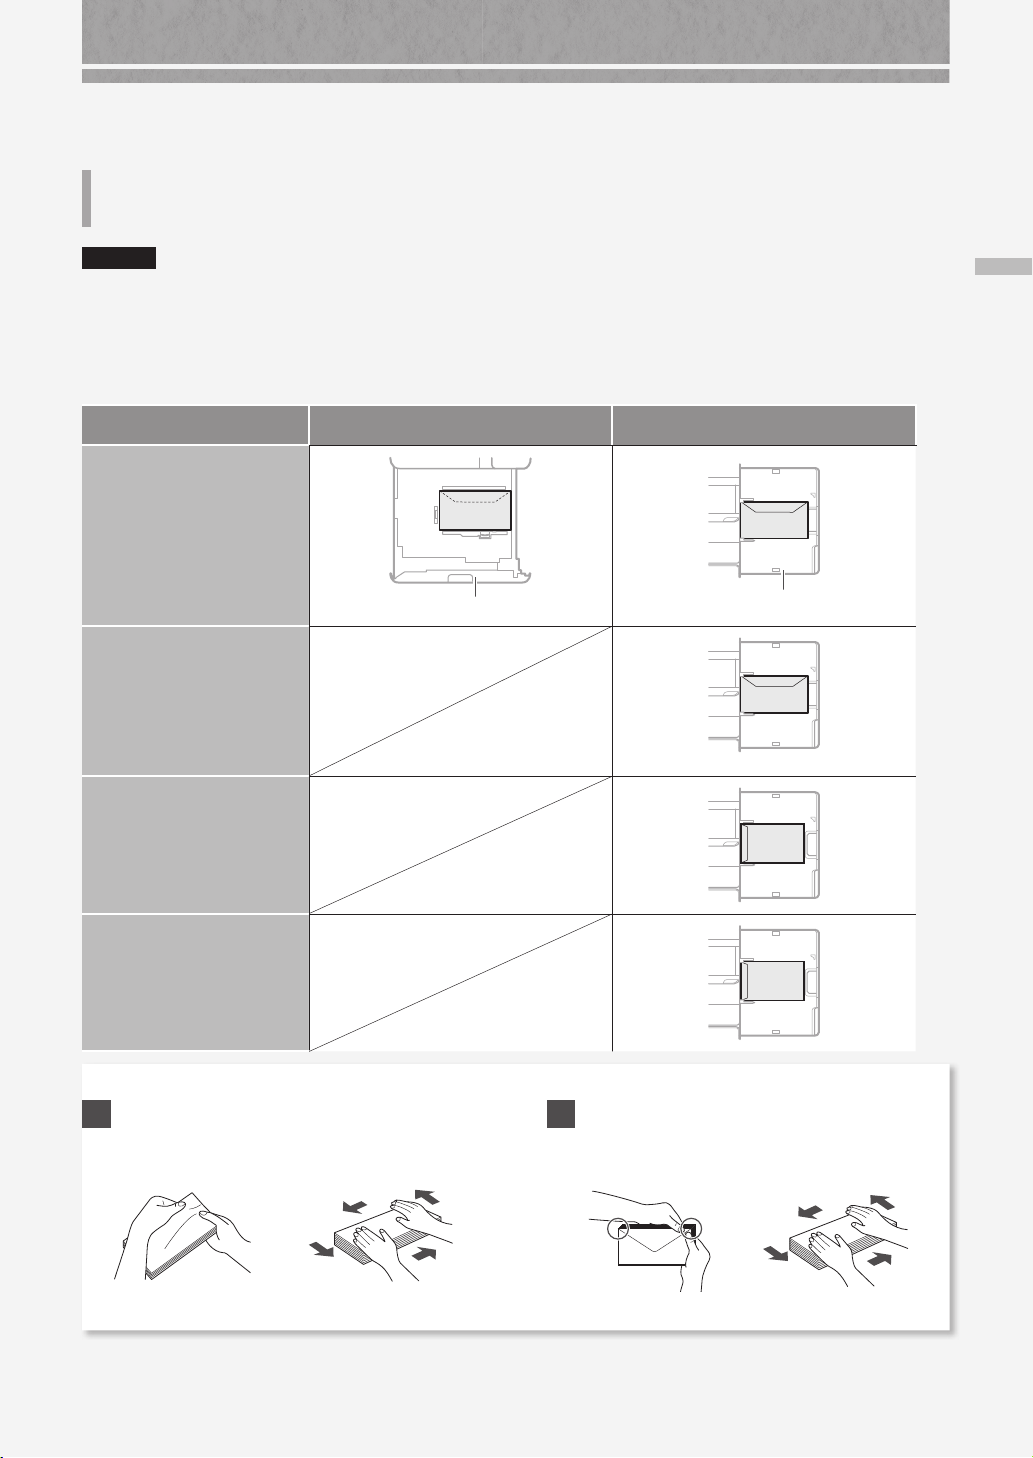
Loading Envelopes
CAUTION!
• You can load envelopes in the paper drawer 2 or multi-purpose tray.
• Do not use envelopes that have glue attached to their aps, as the glue may melt due to the heat and pressure of
the xing unit.
• Do not print on the reverse side of the envelopes (the side with the glued areas).
• For the paper drawer 2, load envelopes the front side face up, and for the multi-purpose tray, load them the front
side face down. For the loading orientation, see the table below.
Paper Drawer 2 Multi-Purpose Tray
ISO-C5
Monarch
COM10 No.10
DL
Paper Drawer 2
Yougatanaga 3
Multi-Purpose Tray
Loading Envelopes
Nagagata 3
Kakugata 2
Preparation before Loading Envelopes
1
Take five or so pieces of envelopes, fan them well
to eliminate curls, and level the stack flat.
Press the stack along
the four side edges.
2
To prevent the sealing edge of the seal flap from
floating from the body of the envelope, press the
envelope in the four corners and expel the air.
11
How to Load Paper
Loading Envelopes
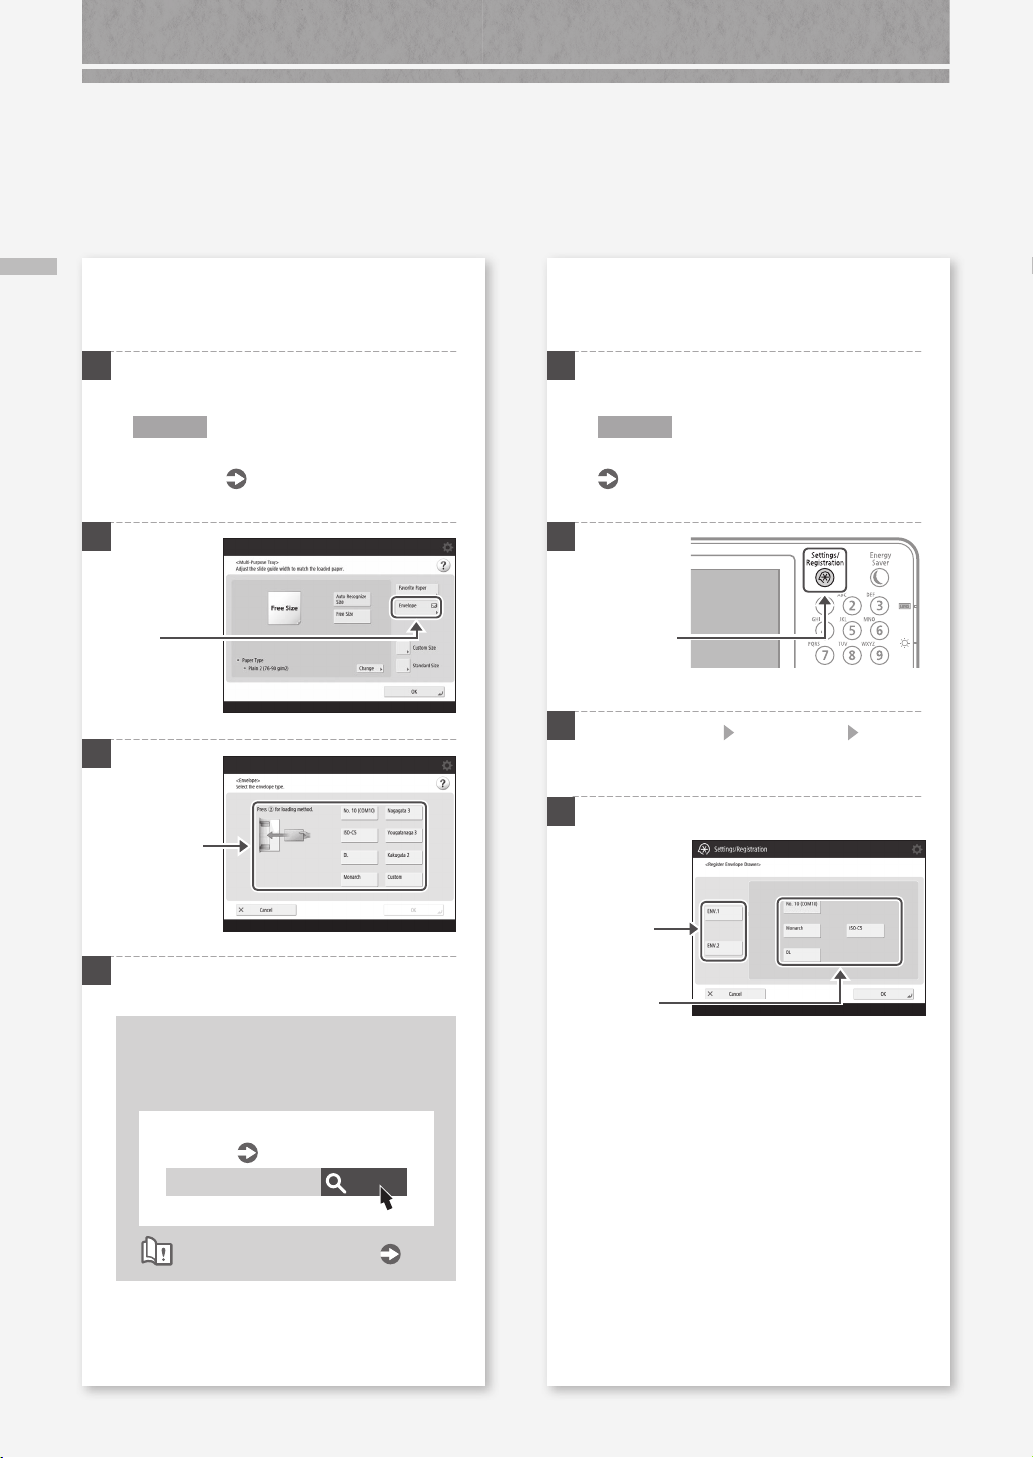
When loading envelopes in the multipurpose tray
1
Check the orientation of the stack of envelopes,
and load it in the multi-purpose tray.
N OT E
Basic Handling Operations for the Multi-
P.8
2
3
Press
Select the
type of
envelopes.
Purpose Tray
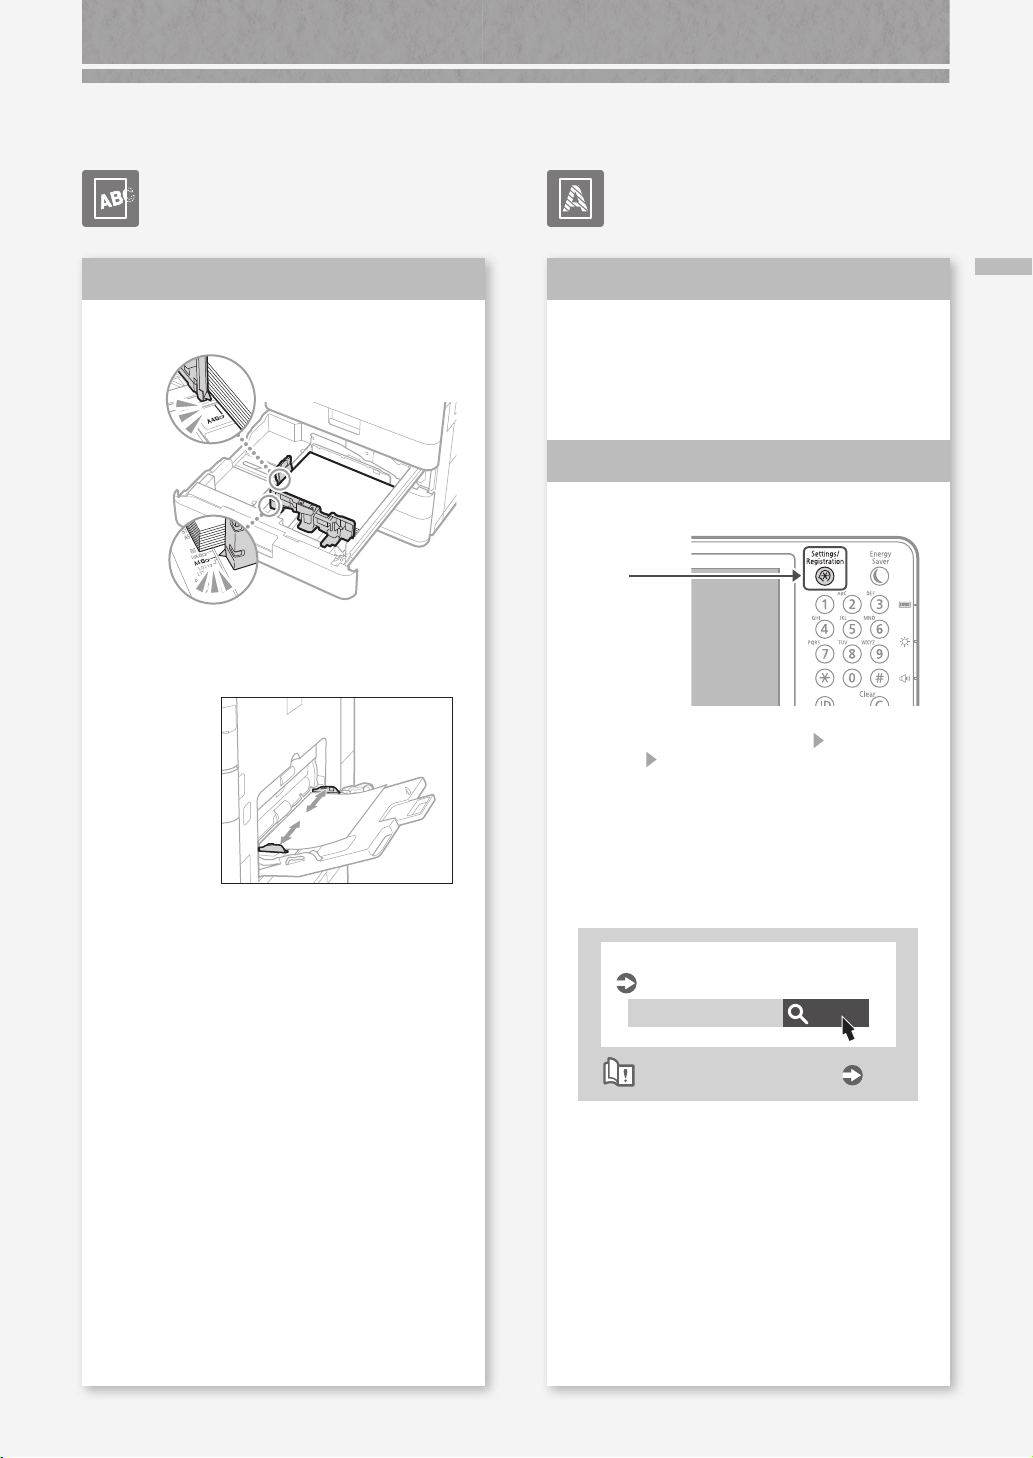
When loading envelopes in the paper
drawer 2
1
Check the orientation of the stack of envelopes,
and load it in the paper drawer 2.
N OT E
Envelope Feeder Attachment-D1
User's Guide
2
Press
3
Press [Preferences] [Paper Settings] [Register
Envelope Drawer].
4
12
4
Press [OK].
Loading custom size envelopes
You can load custom size envelopes only in
the multi-purpose tray.
Making Settings for Custom Size
Envelopes
User's Guide
10H4-02E
How to use the search number
Search
P.43
1. Select
[ENV.1] or
[ENV.2].
2. Select the
envelope
type.
Printing Results Are Not Satisfactory
Images Are Shifted/Slanted
Solution
Adjust the paper guides.
Adjust the guide exactly.
Multi-purpose tray
Irregularities Appear in Images/Images Are Faint
Solution
The paper may have absorbed
moisture. Replace it with paper that
has not absorbed moisture.
Solution
Perform gradation adjustment.
Press
1.
Press [Adjustment/Maintenance] [Adjust Image
2.
Quality]
panel display.
1
2
[Auto Adjust Gradation] on the touch
Images Are Shifted/Slanted/Irregularities Appear in Images/Images Are Faint
Follow the instructions in the screen to
perform gradation adjustment.
For more information, see the User's Guide
Adjusting gradation
User's Guide
10H4-0HR
How to use the search number
Search
P.43
13

Printing Results Are Not Satisfactory
Black Streaks Appear in Images
Wipe the original scanning area.
Black Streaks Appear in Images
Solution
Clean the document feed scanning
areas.
If the Single Pass DADF-A1 is attached:
Turn OFF the machine, and unplug the power
1.
plug from the AC power outlet.
Open the feeder, and clean the lower side
2.
document feed scanning area using the
supplied glass-cleaning sheet.
5.
Close the cover and inner cover
6.
Close the feeder.
7.
Insert the power plug into the power outlet, and
8.
turn the power ON.
Wipe the thin and
long glass area.
Open the cover.
3.
Open the inner cover.
4.
2
1
14
 Loading...