

Page 1
Printer Guide
IMPORTANT:
Read this manual carefully.
Use this manual when you need quick reference help for the printer feature of your machine.
Page 2

ii
Manuals for the Machine
Your machine includes the following documentation. This documentation has been designed so
that you can easily use your machine to suit your particular needs.
• The 1510 model is not supported by CAPT in USA.
Setting up the machine...................................
Setting up paper ............................................
Quick guide for making copies......................
Quick guide for sending faxes.......................
Installing the CAPT software........................
Document and paper handling......................
Making copies .................................................
Maintenance....................................................
Troubleshooting feed and copy issues...........
Sending and receiving faxes ..........................
Speed dialing...................................................
Troubleshooting fax issues.............................
Printing with CAPT .......................................
Checking the Status of a Print Job ...............
Troubleshooting CAPT issues .......................
Quick Start Guide
Reference Guide
Facsimile Guide
Printer Guide
Page 3

iii
How This Manual Is Organized
Considerable effort has been made to ensure that this manual is free of inaccuracies and omissions. However, as we are constantly improving our products, if you need an
exact specification, please contact Canon.
Before You Start
Installing Canon Advanced Printing Technology (CAPT)
Printer Properties
Checking the Status of a Print Job
Troubleshooting
Appendix
Chapter 1
Chapter 2
Chapter 3
Chapter 4
Chapter 5
Chapter 6
Page 4

iv
Legal Notices
Trademarks
Canon, the Canon Logo, and imageRUNNER are trademarks of Canon Inc.
Microsoft
®
, Windows®, and Windows NT® are registered trademarks or trademarks of
Microsoft Corporation in the United States and other countries.
Other brand and product names are trademarks or registered trademarks of their respective
companies.
In this manual, Microsoft
®
, Microsoft® Windows®, and Microsoft® Windows NT® are
referred to as Microsoft, Windows, and Windows NT respectively.
Copyright
Copyright ©2004 Canon Inc. All rights reserved.
No part of this publication may be reproduced, transmitted, transcribed, stored in a retrieval
system, or translated into any language or computer language, in any form or by any means,
electronic, mechanical, magnetic, optical, chemical, manual, or otherwise, without the prior
written permission of Canon Inc.
Notice
The information in this document is subject to change without notice.
Disclaimer
CANON INC. MAKES NO WARRANTY OF ANY KIND WITH REGARD TO THIS
MATERIAL, EITHER EXPRESS OR IMPLIED, EXCEPT AS PROVIDED HEREIN,
INCLUDING WITHOUT LIMITATION, THEREOF, WARRANTIES AS TO
MARKETABILITY, MERCHANTABILITY, FITNESS FOR A PARTICULAR PURPOSE
OF USE OR AGAINST INFRINGEMENT OF ANY PATENT. CANON INC. SHALL NOT
BE LIABLE FOR ANY DIRECT, INCIDENTAL, OR CONSEQUENTIAL DAMAGES OF
ANY NATURE, OR LOSSES OR EXPENSES RESULTING FROM THE USE OF THIS
MATERIAL.
Page 5

v
Contents
Chapter 1: Before You Start
Introduction . . . . . . . . . . . . . . . . . . . . . . . . . . . . . . . . . . . . . . . . . 1-2
System Requirements . . . . . . . . . . . . . . . . . . . . . . . . . . . . . . . . 1-2
Where to Find Help . . . . . . . . . . . . . . . . . . . . . . . . . . . . . . . . . . 1-3
Chapter 2: Installing Canon Advanced Printing Technology (CAPT)
What is CAPT ? . . . . . . . . . . . . . . . . . . . . . . . . . . . . . . . . . . . . . 2-2
Installing CAPT . . . . . . . . . . . . . . . . . . . . . . . . . . . . . . . . . . . . . . 2-2
Windows 95/98/Me . . . . . . . . . . . . . . . . . . . . . . . . . . . . . . . . . . . 2-3
Windows NT/2000/XP/Server 2003 . . . . . . . . . . . . . . . . . . . . . 2-12
Network Users . . . . . . . . . . . . . . . . . . . . . . . . . . . . . . . . . . . . . 2-38
Canon iR1510-1670 Group . . . . . . . . . . . . . . . . . . . . . . . . . . . 2-52
Printing with CAPT . . . . . . . . . . . . . . . . . . . . . . . . . . . . . . . . . . 2-53
Chapter 3: Printer Properties
Windows 95/98/Me Printer Properties . . . . . . . . . . . . . . . . . . . . 3-2
Windows NT/2000/XP/Server 2003 Printer Properties and Default
Document Properties . . . . . . . . . . . . . . . . . . . . . . . 3-16
Chapter 4: Checking the Status of a Print Job
Opening the Status Window . . . . . . . . . . . . . . . . . . . . . . . . . . . . 4-2
Using the Canon iR1510-1670 Status Window . . . . . . . . . . . . . 4-3
Network Printer Status . . . . . . . . . . . . . . . . . . . . . . . . . . . . . . . 4-12
The Status Window Icon . . . . . . . . . . . . . . . . . . . . . . . . . . . . . 4-13
Closing the Status Window . . . . . . . . . . . . . . . . . . . . . . . . . . . 4-13
Messages . . . . . . . . . . . . . . . . . . . . . . . . . . . . . . . . . . . . . . . . . 4-13
Chapter 5: Troubleshooting
Finding Information . . . . . . . . . . . . . . . . . . . . . . . . . . . . . . . . . . . 5-1
Printer Problems . . . . . . . . . . . . . . . . . . . . . . . . . . . . . . . . . . . . . 5-2
CAPT Problems . . . . . . . . . . . . . . . . . . . . . . . . . . . . . . . . . . . . . 5-4
CAPT Messages . . . . . . . . . . . . . . . . . . . . . . . . . . . . . . . . . . . . 5-6
Using the Trouble Shooter . . . . . . . . . . . . . . . . . . . . . . . . . . . . . 5-9
Uninstalling CAPT . . . . . . . . . . . . . . . . . . . . . . . . . . . . . . . . . . 5-11
Chapter 6: Appendix
Printer Specifications . . . . . . . . . . . . . . . . . . . . . . . . . . . . . . . . . 6-2
Optional AXIS 1610 Print Server . . . . . . . . . . . . . . . . . . . . . . . . 6-3
Glossary . . . . . . . . . . . . . . . . . . . . . . . . . . . . . . . . . . . . . . . . . . . 6-4
Index . . . . . . . . . . . . . . . . . . . . . . . . . . . . . . . . . . . . . . . . . . . . . 6-13
Page 6

vi
How to Use This Manual
■ Symbols Used in This Manual
Please read the list below of symbols, terms, and abbreviations used in this guide.
■
References and Cross-References
Your new machine has many advanced features, including CAPT (Canon Advanced Printing
Technology). CAPT gives you instant access to printer information. In this documentation,
CAPT is also referred to as the Canon iR1510-1670, as this appears on your screen after it has
been installed.
W
ARNING
Indicates a warning concerning operations that may lead to death or injury to
persons if not performed correctly. In order to use the machine safely, always pay
attention to these warnings.
CAUTION
Indicates a caution concerning operations that may lead to injury to persons or damage
to property if not performed correctly. In order to use the machine safely, always pay
attention to these cautions.
IMPORT ANT
Indicates an operational warning or restriction. Be certain to read these items to operate
the machine correctly, and to avoid damage to the machine.
NOTE
Indicates a note for operation or an additional explanation. Reading these is highly
recommended.
( p. n-nn)
A number preceded by an arrow and enclosed in parenthesis refers to a
page number in this guide which contains more information on the
topic of the previous sentence.
Quick Start Guide
Refer to the Quick Start Guide for details on the topic of the previous
sentence.
Reference Guide
Refer to the Reference Guide for details on the topic of the previous
sentence.
machine The word “machine” refers to imageRUNNER 1670F/1630/1610
models.
default A setting that remains in effect unless you change it.
Page 7
vii
■ Keys Used in This Manual
A button is referred to as follows in this manual:
A button on the screen ...........................................Finish
■
Displays Used in This Manual
Screenshots of computer operation screens used in this manual may differ from the ones you
actually see, depending on the model or options that come with your machine.
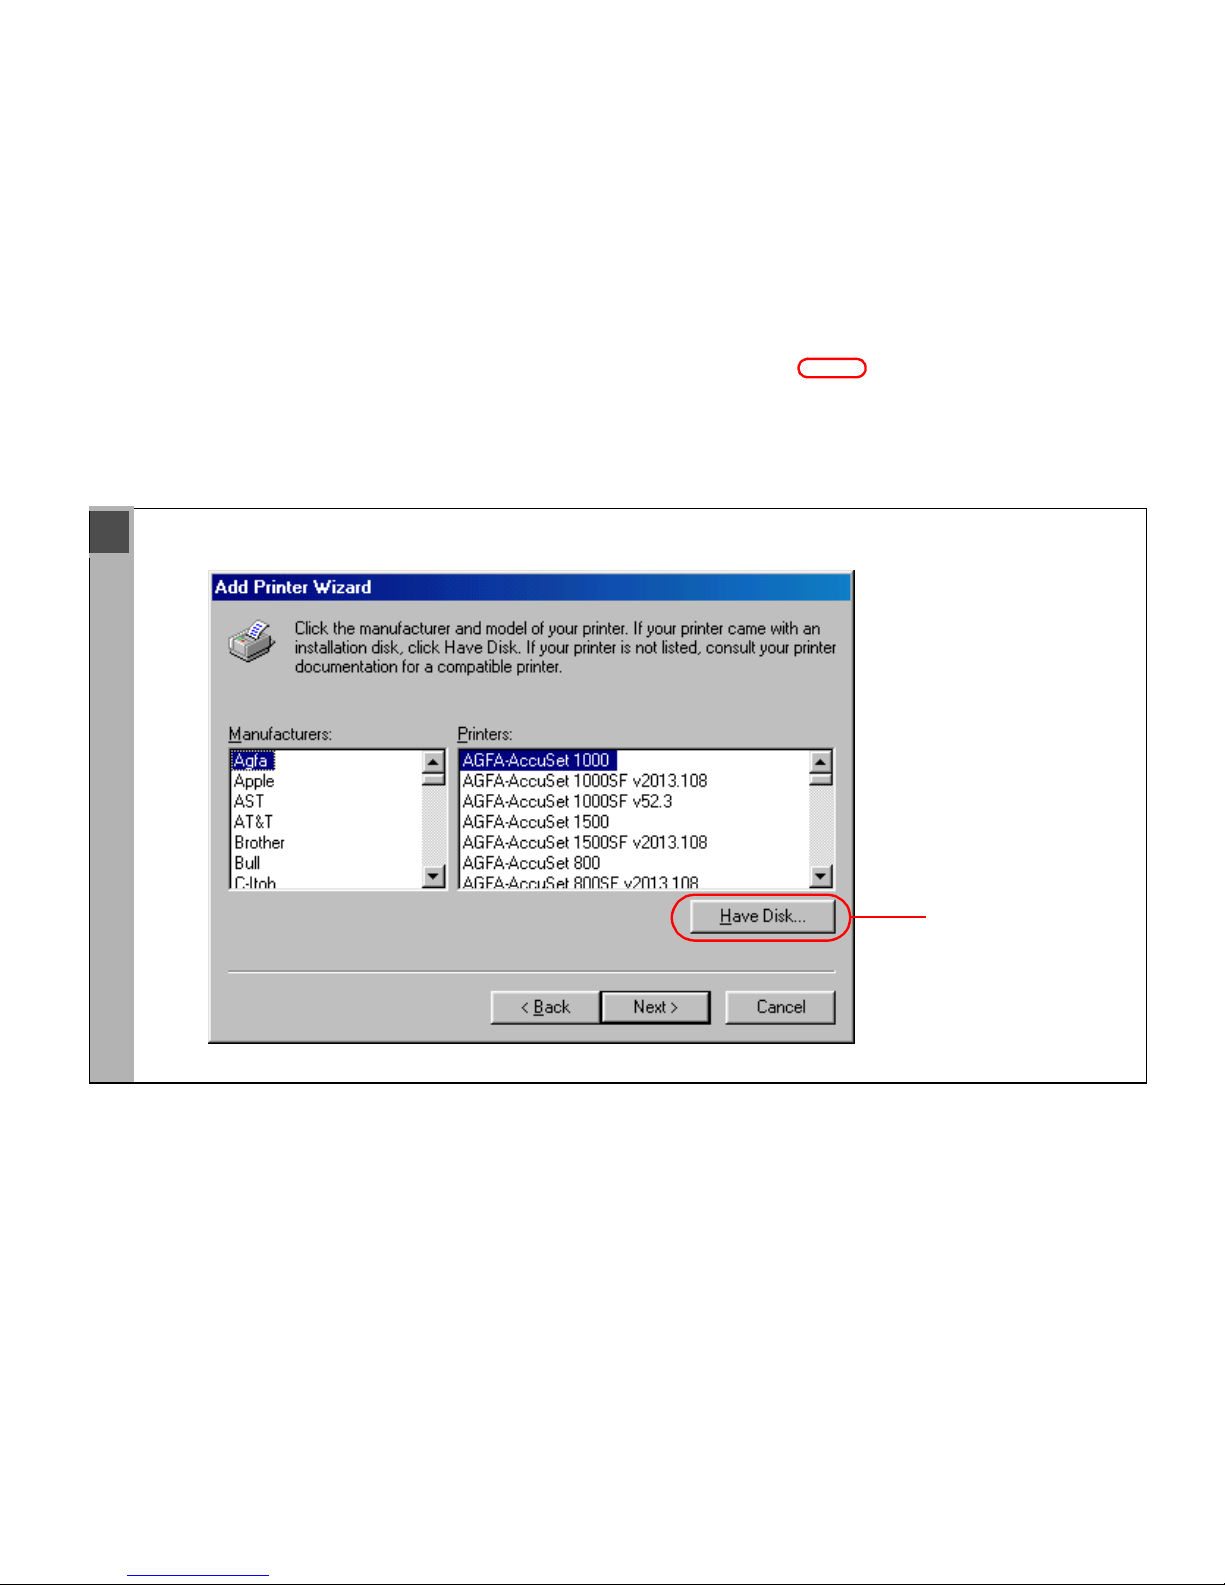
The keys or buttons which you should press are marked with , as shown below. When
multiple buttons or keys can be pressed, they will be highlighted and mentioned in the order in
which they should be pressed.
4 The Wizard displays a list of available printers. Click Have Disk.
Click this button
for operation
Page 8

viii
■ Abbreviations Used in This Manual
In this manual, product names and model names are abbreviated as follows:
Microsoft
®
Windows® 95 operating system: Windows 95
Microsoft® Windows® 98 operating system: Windows 98
Microsoft
®
Windows® Millennium Edition operating system: Windows Me
Microsoft
®
Windows NT® 4.0 operating system: Windows NT
Microsoft
®
Windows® 2000 operating system: Windows 2000
Microsoft® Windows® XP operating system: Windows XP
Microsoft
®
Windows® Server 2003® operating system: Windows Server 2003
Microsoft
®
Windows® operating system: Windows
Page 9

1-1
1
Before You Start
CHAPTER
1
Before You Start
This chapter provides an explanation of the system environments required for using CAPT
(Canon Advanced Printing Technology). It also explains where to find help and information
regarding the installation and use of this software.
Introduction ............................................................................................................................ 1-2
System Requirements.............................................................................................................1-2
Where to Find Help................................................................................................................ 1-3
Page 10

1-2
CAPT (Canon Advanced Printing Technology) gives users of Microsoft Windows 95,
Windows 98, Windows Millennium Edition, Windows NT, Windows 2000, Windows XP, or
Windows Server 2003 (hereafter called Windows 95/98/Me/NT/2000/XP/Server 2003)
operating systems the ability to make full use of the printer. CAPT enables you to print from
any Windows application to your machine.
You can acquire information about Canon products and update your software on the Canon
internet home page (http://www.usa.canon.com).
The printer driver for Windows 95/98/Me/NT/2000/XP/Server 2003 can be used in the following
system environments:
Operating System Software
Microsoft Windows 95, Microsoft Windows 98, Microsoft Windows Me, Microsoft
Windows NT, Microsoft Windows 2000, Microsoft Windows XP (x86 architecture), or
Windows Server 2003.
Computer
Any computer on which Microsoft Windows 95, Microsoft Windows 98, Microsoft
Windows Me, Microsoft Windows NT, Microsoft Windows 2000, Microsoft Windows
XP, or Windows Server 2003 runs properly (Quick Start Guide).
Introduction
System Requirements
Page 11

1-3
1
Before You Start
Here’s where to get immediate help if you are having problems installing or using the
software.
README.TXT file
Any hints, enhancements, limitations, and restrictions you need to be aware of when installing
and using your printer driver are included in the README.TXT file provided with the
software. The README.TXT file is located in the /English/ folder of the software CD-ROM.
Online Help
You can locate additional help for questions you may have regarding your printer in the Online
Help file provided with the software. In the printer’s Properties dialog box, you can click
Help to display additional information about every feature and option in the CAPT. You can
also click (Help) in the upper right corner of most dialog boxes, and then click a specific
item in the dialog box for help with that item; or right-click a specific item and choose Help to
access the same help information for the item. See the Online Help for detailed information on
specifying CAPT options.
Canon Authorized Dealers or Service Providers
If the Online Help file does not provide the information you need, contact your local
authorized Canon dealer or authorized Canon service provider.
Where to Find Help
Page 12

1-4
Page 13

2-1
2
Installing Canon Advanced Printing Technology (CAPT)
CHAPTER
2
Installing Canon Advanced
Printing Technology (CAPT)
This chapter describes CAPT (Canon Advanced Printing Technology). It includes the
following information:
What is CAPT ?...................................................................................................................... 2-2
Installing CAPT...................................................................................................................... 2-2
Windows 95/98/Me ................................................................................................................2-3
USB Users ........................................................................................................................ 2-3
Parallel Port Users ............................................................................................................ 2-7
Windows NT/2000/XP/Server 2003 .................................................................................... 2-12
USB Users ...................................................................................................................... 2-12
Parallel Port Users .......................................................................................................... 2-17
Network Users...................................................................................................................... 2-38
Connecting to the imageRUNNER 1670F/1630/1610 Already on Your Network ........ 2-38
Printer Sharing................................................................................................................ 2-41
Connecting the imageRUNNER 1670F/1630/1610 as a Network Printer ..................... 2-42
Canon iR1510-1670 Group .................................................................................................. 2-52
Printing with CAPT ..............................................................................................................2-53
Page 14

2-2
Canon Advanced Printing Technology (CAPT)
This is a software that extends the power of the Windows operating system to a printer to
speed up and simplify printing. Canon Advanced Printing Technology provides more printing
control and bidirectional communication between the printer and a computer running a
Windows application.
If you are using the imageRUNNER 1670F/1630/1610 machine as a local printer (connected
directly to your computer), use the following steps.
If the imageRUNNER 1670F/1630/1610 is already on your network, and you want to start
using it, follow the steps in “Connecting to the imageRUNNER 1670F/1630/1610 Already on
Your Network,” on page 2-38.
If you want to install the imageRUNNER 1670F/1630/1610 as a network printer, follow the
steps in “Connecting the imageRUNNER 1670F/1630/1610 as a Network Printer,” on
page 2-42.
What is CAPT ?
Installing CAPT
IMPORT ANT
If there are any printer drivers of previous versions installed on your computer, be sure
to delete
those drivers from your computer before installing the Canon iR1510-1670
driver.
Page 15
2-3
2
Installing Canon Advanced Printing Technology (CAPT)
For installation instructions using the CD-ROM menu, please refer to the Quick Start Guide.
■
Windows 98/Me Plug and Play
The following is the installation procedure of Plug and Play using a USB port, under Windows
98.
Before you install the software, make sure you do the following:
• Connect the machine to your computer ( Quick Start Guide).
• Turn on the machine ( Quick Start Guide).
• Start up Windows 98/Me.
Windows 95/98/Me
USB Users
NOTE
Using a USB Port (USB Cable)
• In order to use the printer via USB, your computer must be equipped with a USB port.
• If the USB class driver is already installed in your computer, proceed to step8.
• USB is not available for Windows 95.
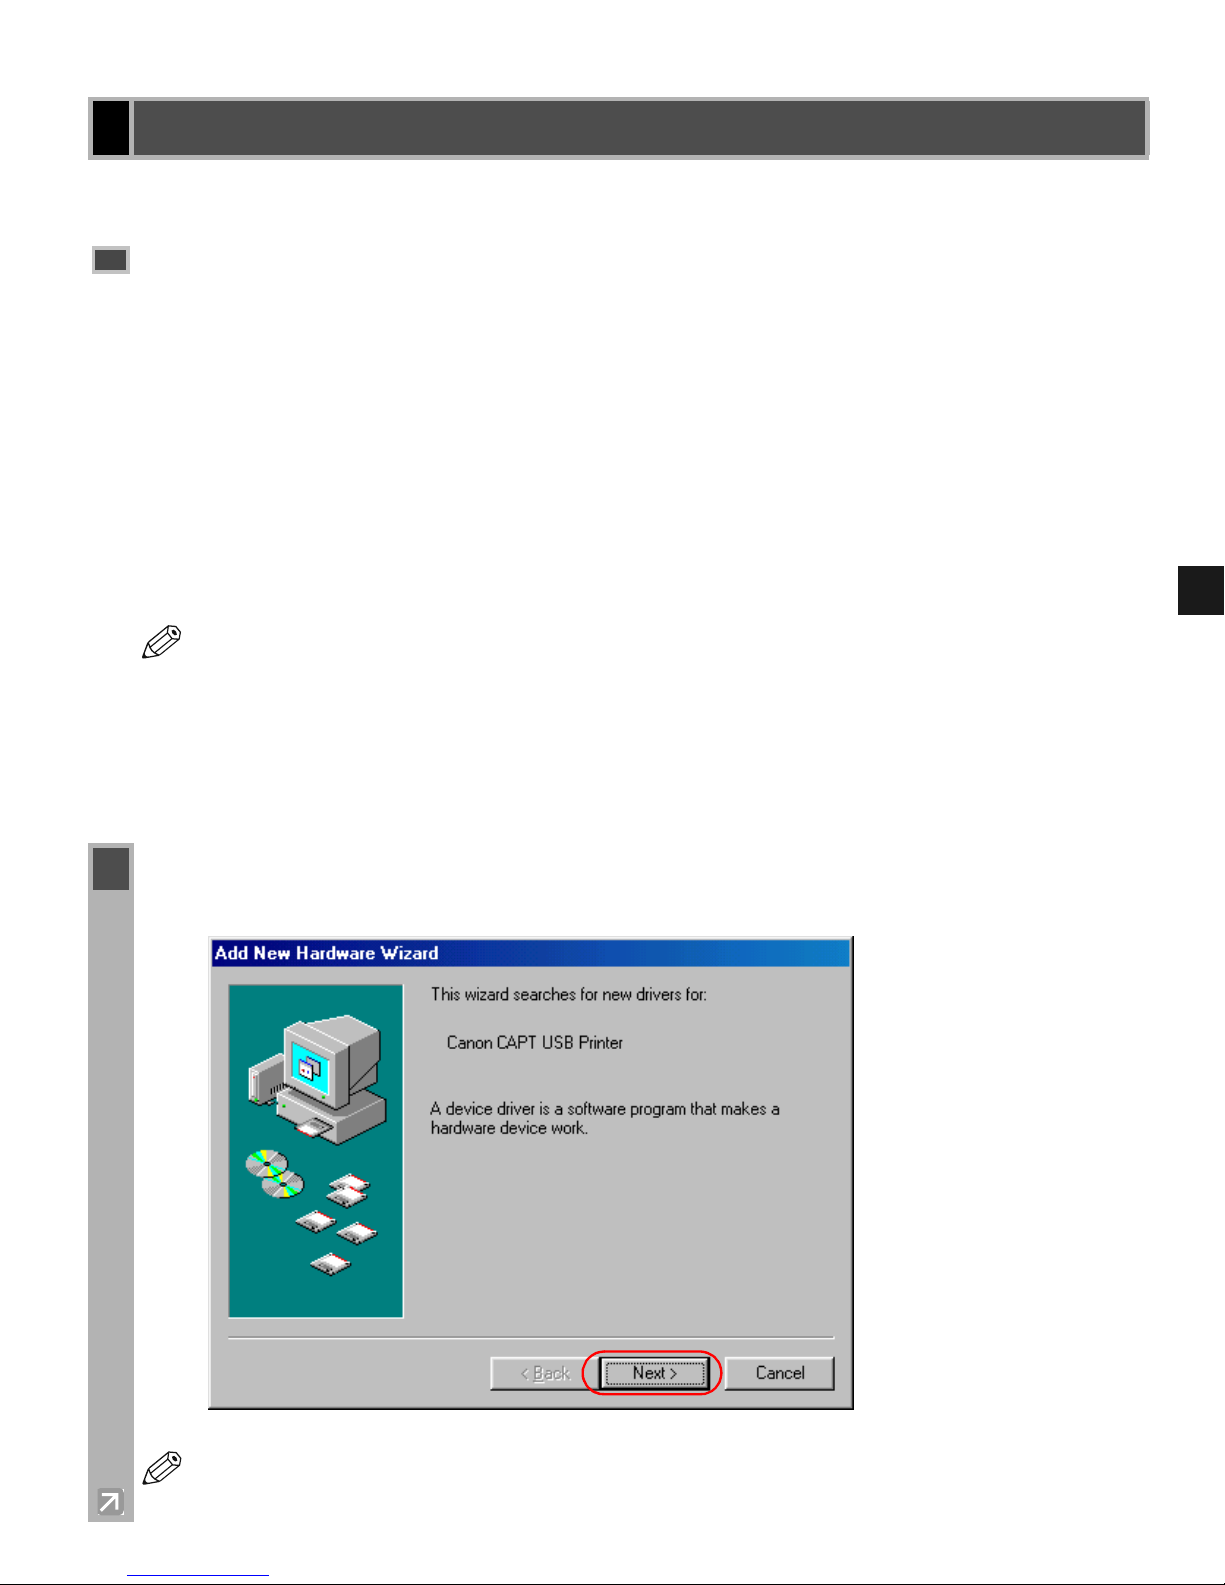
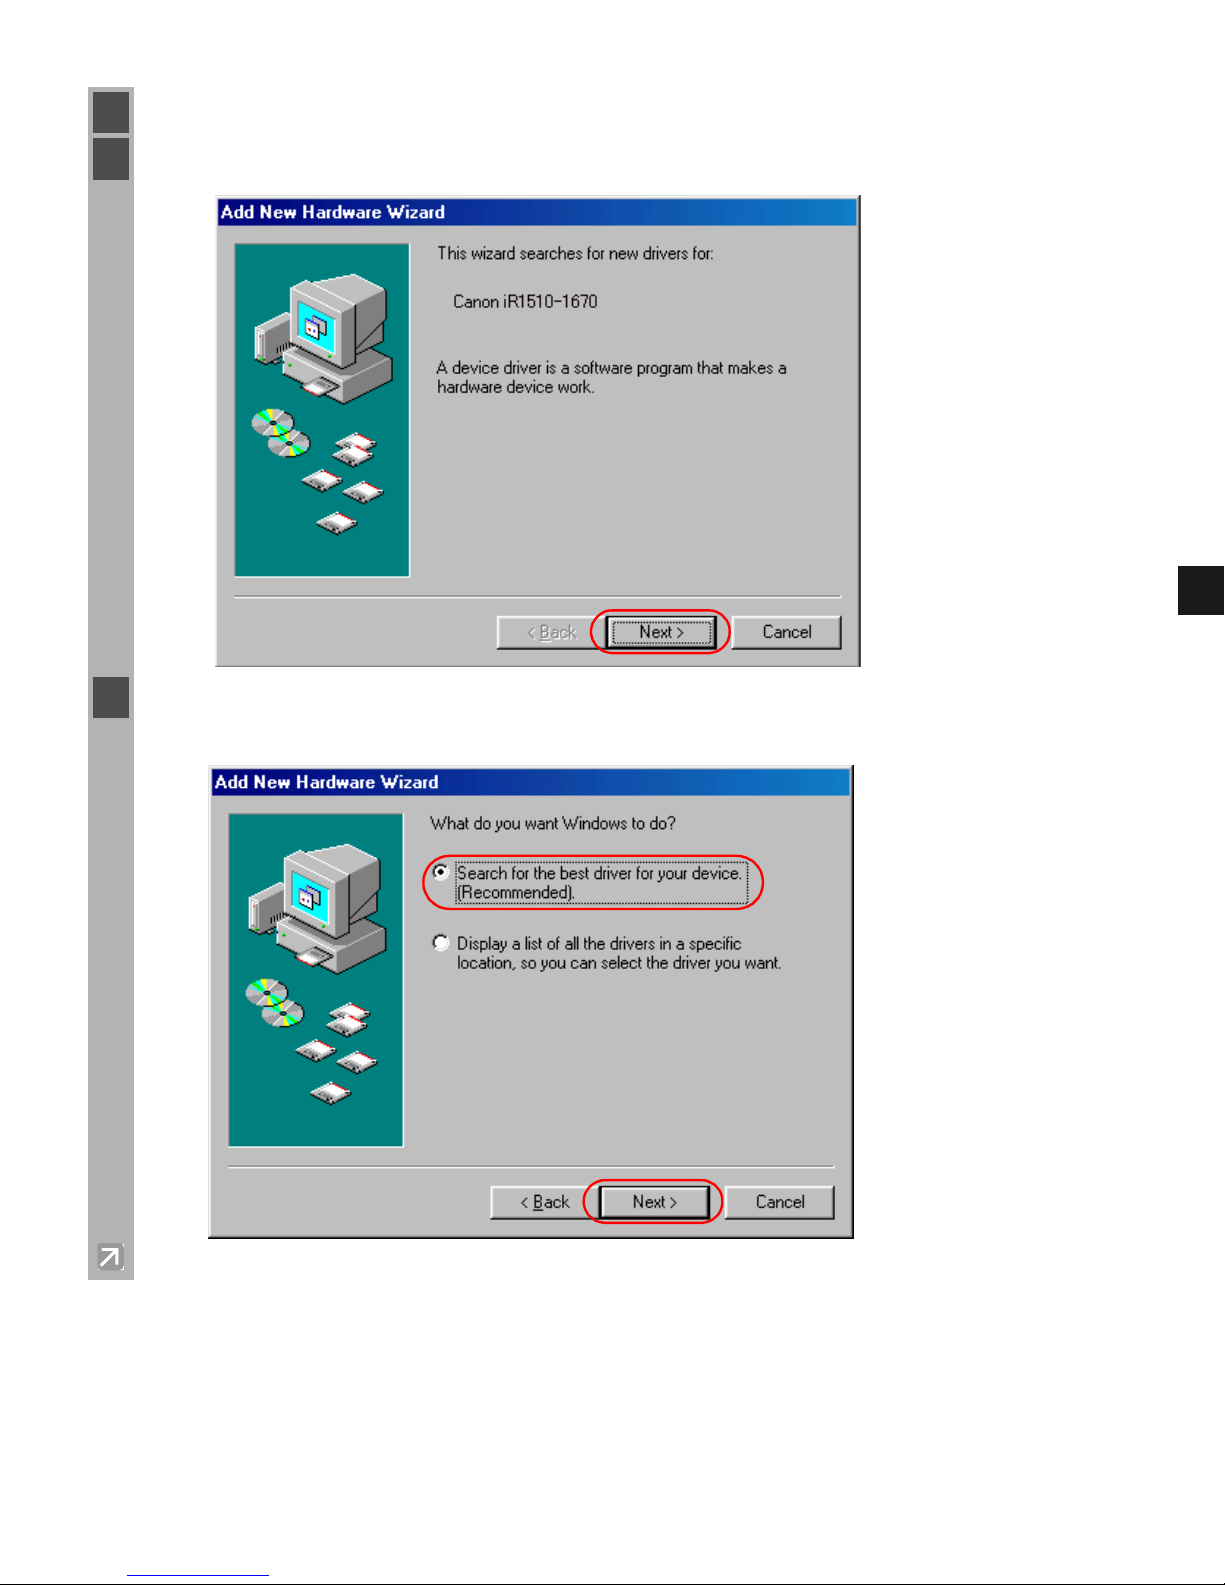
1 Plug and Play is being carried out and the Add New Hardware Wizard dialog box appears.
Click Next.
NOTE
“Unknown” may be displayed as the name of the device.
Page 16
2-4
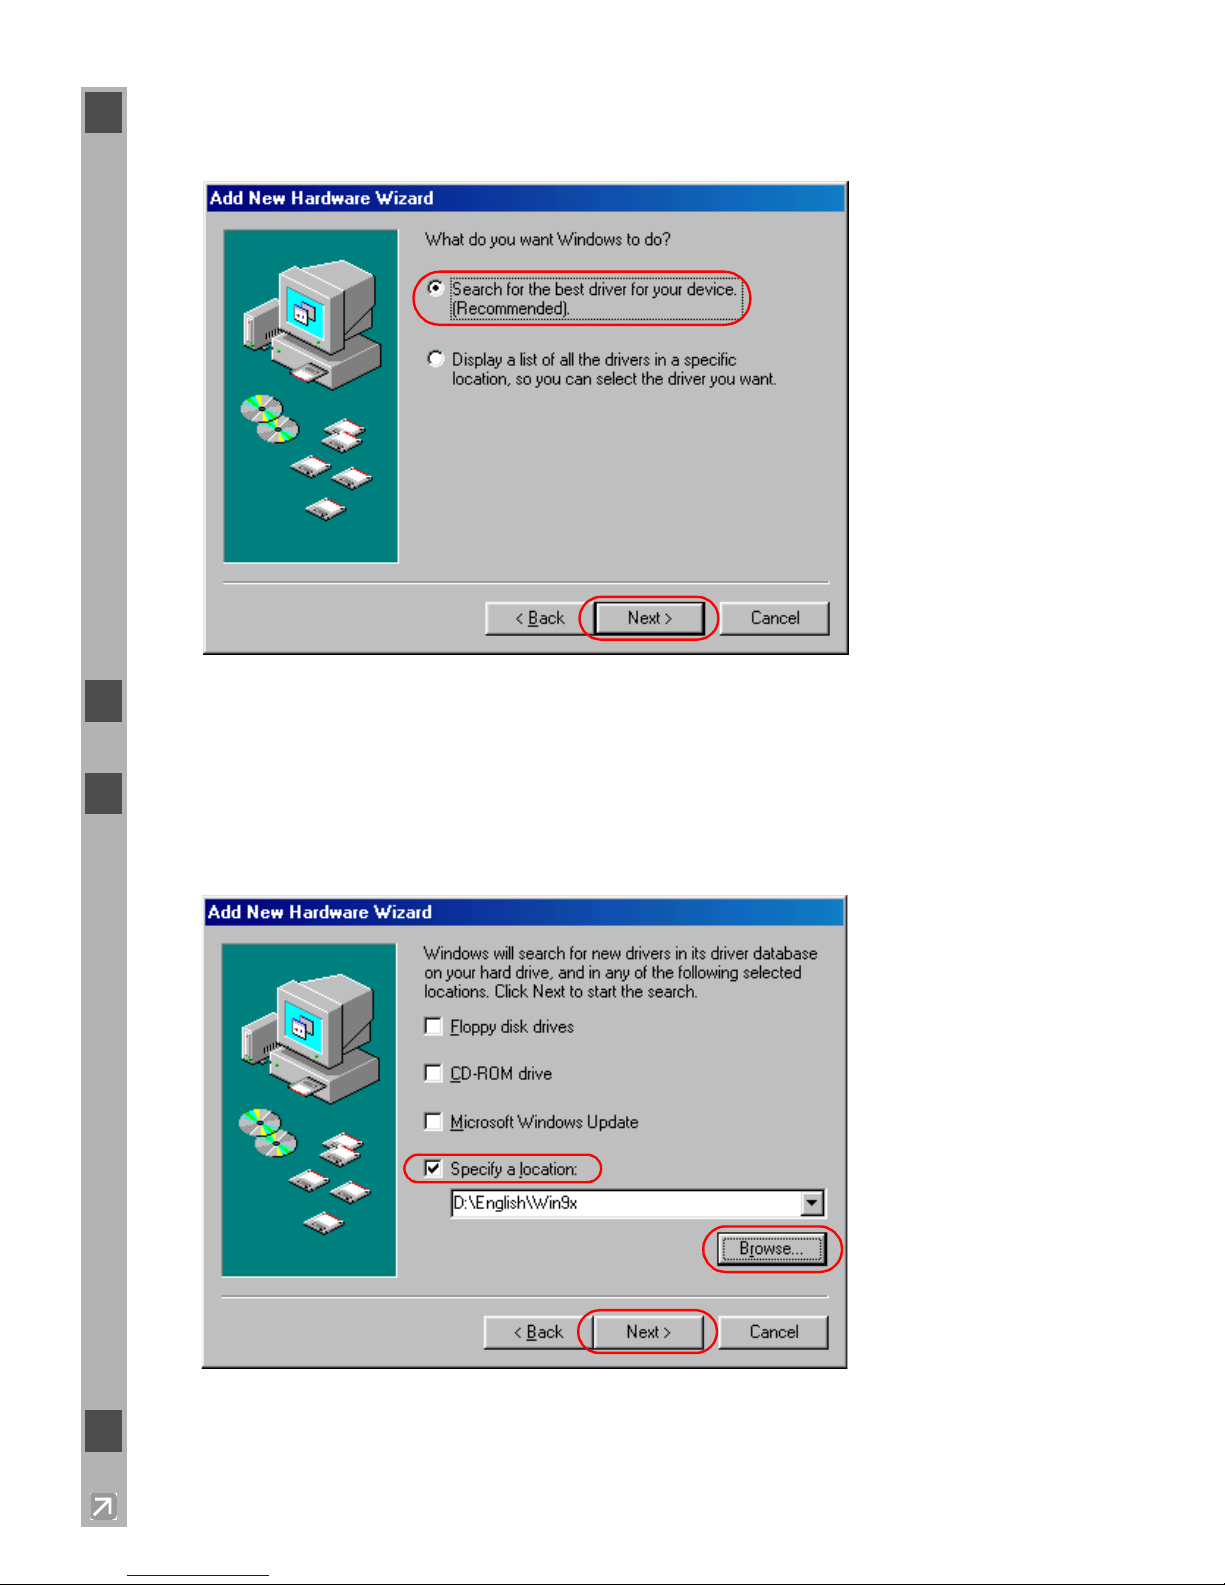
2 Select Search for the best driver for your device (Recommended) in the Add New
Hardware Wizard click Next.
3 Place the CD-ROM into the CD-ROM drive.
4 Select Specify a location click Browse to select the driver in the language that you want
to install. For example, if your CD-ROM drive is drive “D:”, browse to
“D:\English\Win9x(WinMe)” click OK Next.
5 Click Next on Windows driver files search for the device.
Page 17
2-5
2
Installing Canon Advanced Printing Technology (CAPT)
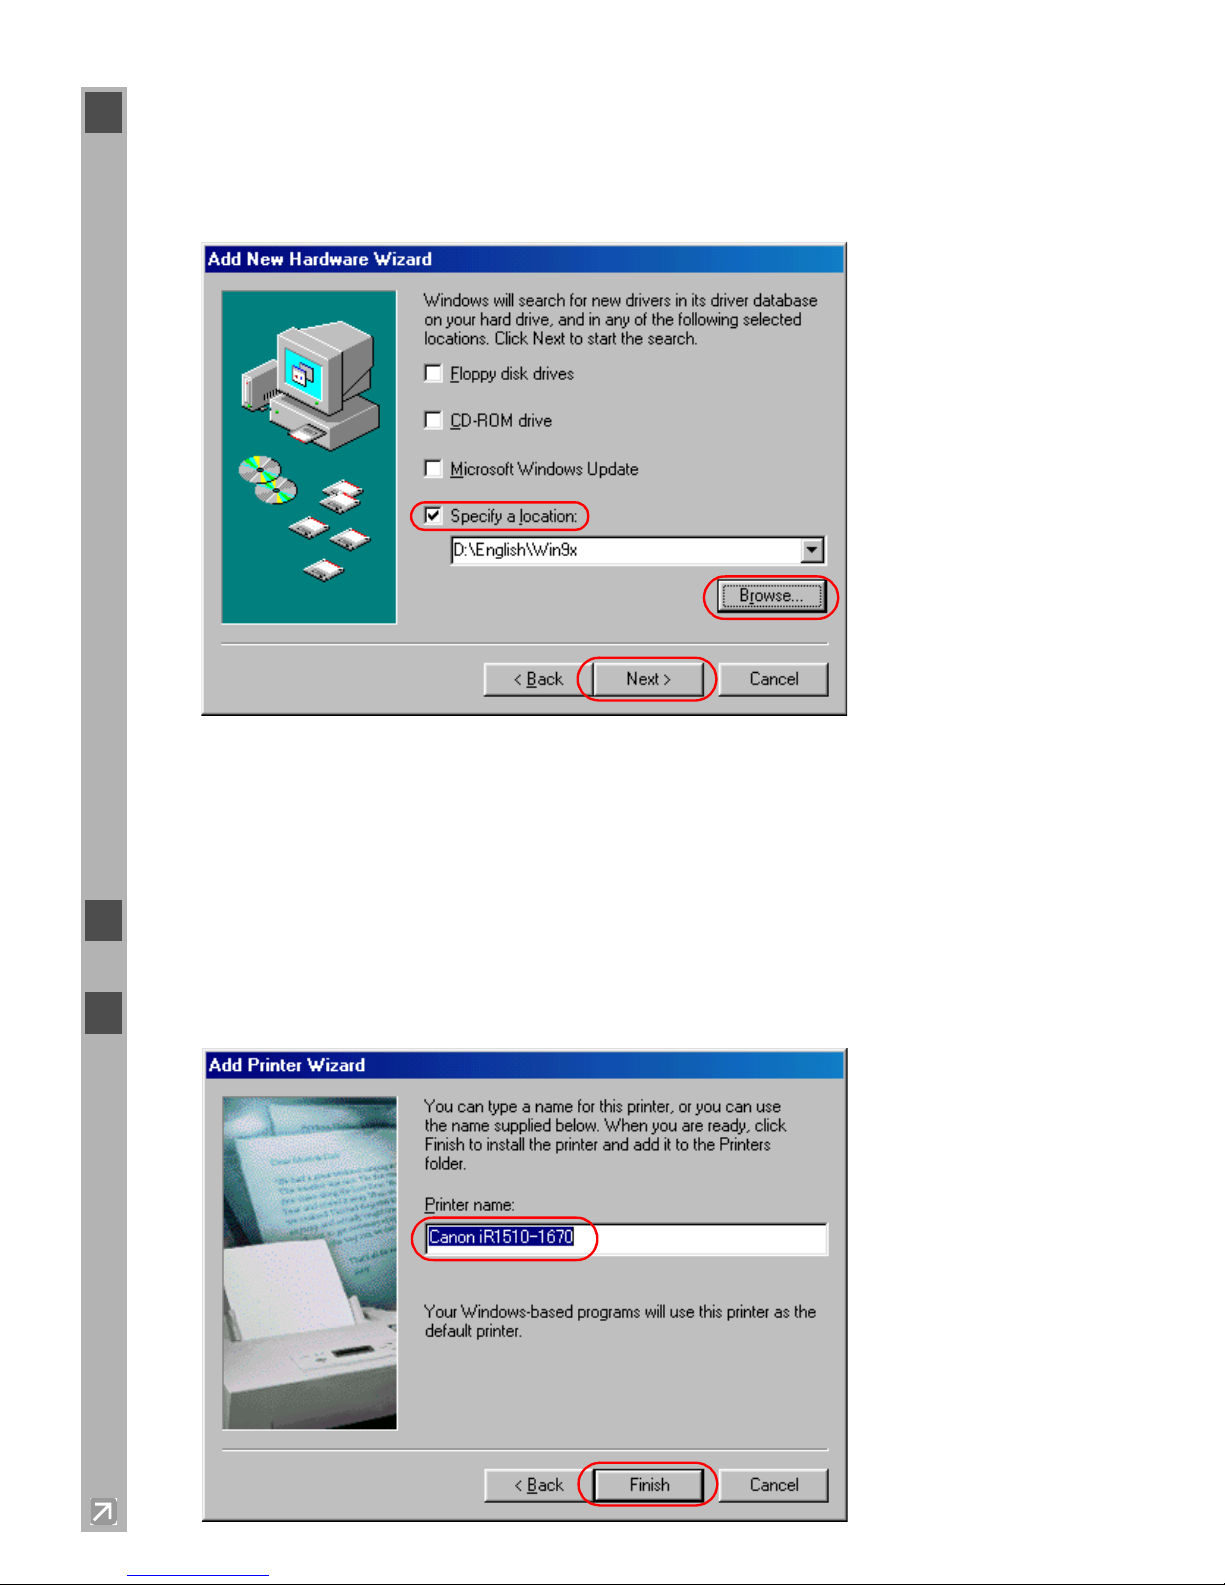
6 Enter the printer name you wish to use click Finish.
7 The Add New Hardware Wizard (Canon iR1510-1670) appears. Click Next.
8 Select Search for the best driver for your device (Recommended) in the Add New
Hardware Wizard click Next.
Page 18
2-6
9 Click only Specify a location and Browse to select the driver in the language that you want
to insttall. For example, if your CD-ROM drive is drive “D:”, browse to “D:\English\Win9x”
and click OK.
Confirm that the folder to browse is selected under Specify a location, the click Next.
For Windows Me, select Specify the location of the driver (Advanced) as D:\English\Win
Me click Next in the Add New Hardware Wizard.
Click only Specify the location then click Browse to select the driver you want to install.
For example, if your CD-ROM drive is drive “D:”, browse to “D:\English\Win9x(WinMe)”
and click OK.
10 The screen displays the selected driver file. Click Next.
11 Enter the name you wish to use, then click Finish.
Page 19
2-7
2
Installing Canon Advanced Printing Technology (CAPT)
Before you install the software, make sure you do the following:
• Connect the machine to your computer ( Quick Start Guide).
• Turn on the machine ( Quick Start Guide).
• Start up Windows 98/Me.
■
Windows 98/Me Plug and Play
The Plug and Play installation of the printer driver for a parallel port under Windows 98/Me
follows the same procedure used in USB installation. Refer to the steps to in the
procedure using a USB port ( Page 2-5).
■
Add Printer Wizard
To install the CAPT on a local computer using Windows 95/98/Me, you can use the Windows
95/98/Me Add Printer Wizard.
The following is the installation procedure using a parallel port, under Windows 98.
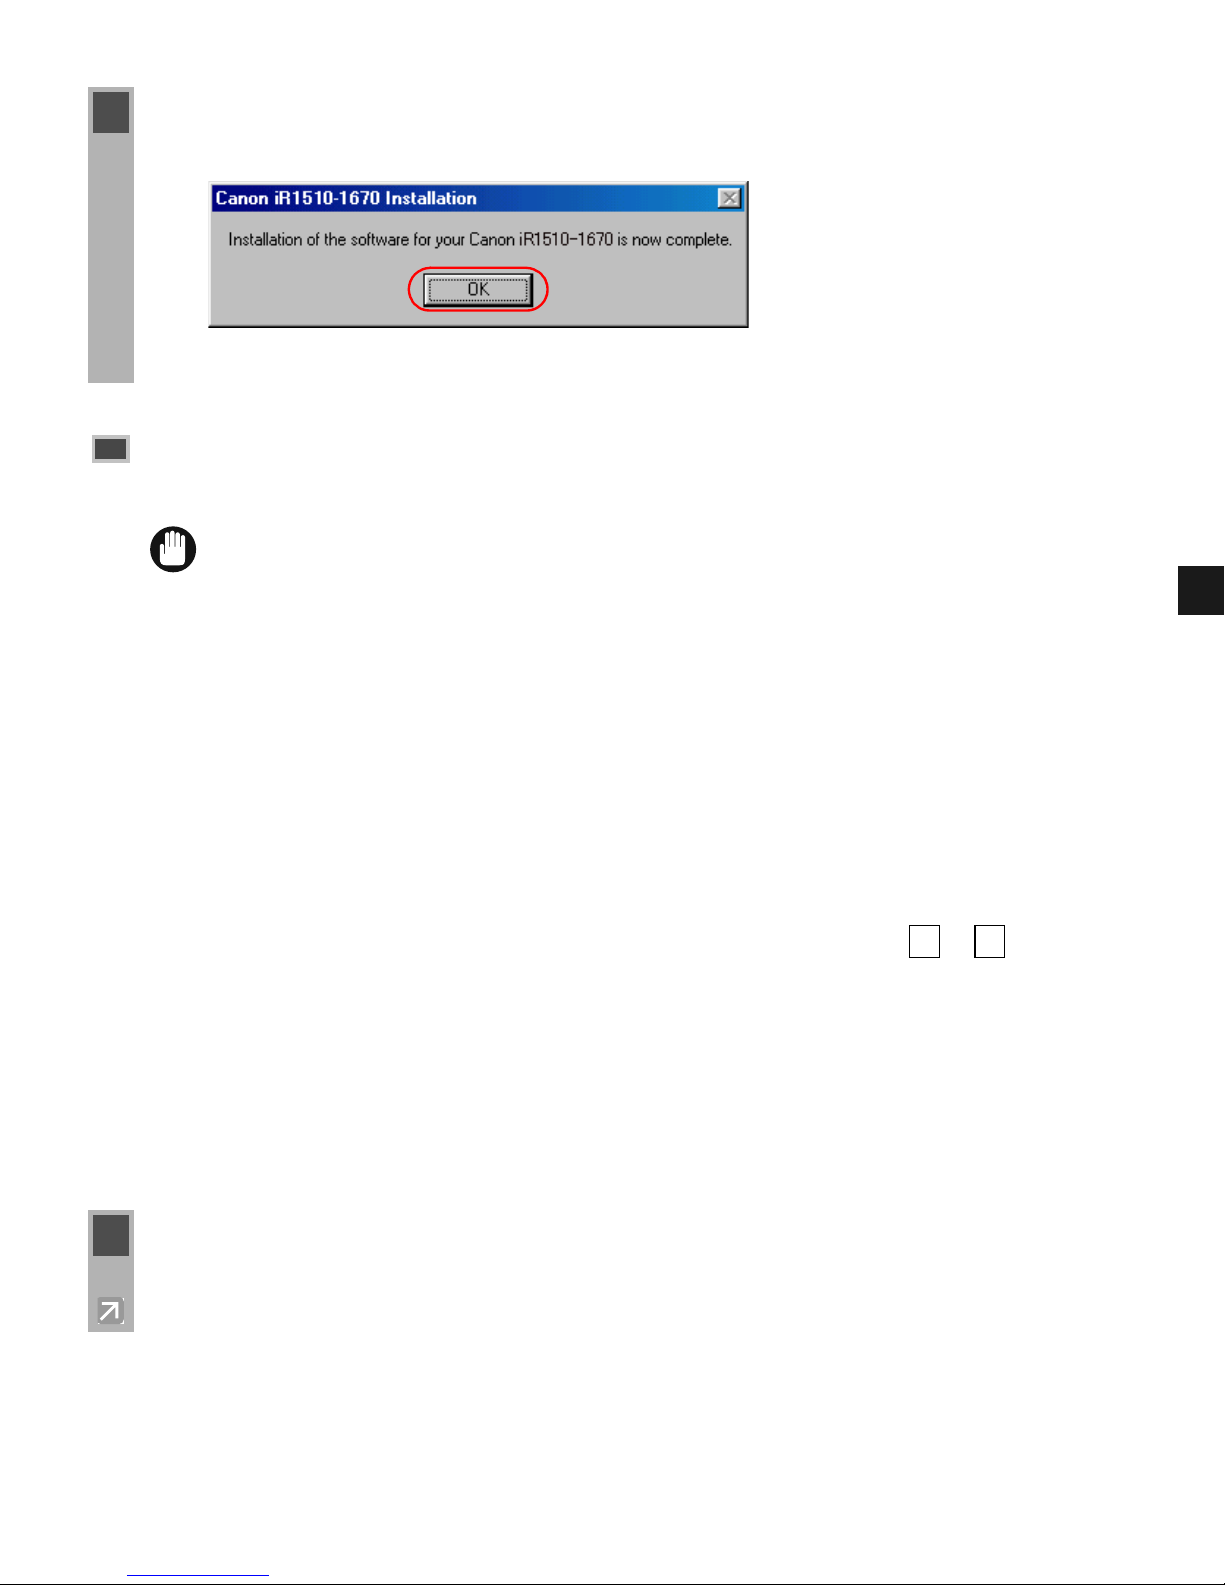
12 When the installation is complete, the following dialog box appears.
To close the dialog box, click OK. Click Finish on the Add New Hardware Wizard.
Parallel Port Users
IMPORT ANT
If other printer drivers are already installed on the parallel port (LPT 1, etc.) of the
computer connected to this printer, uninstall those drivers, or select FILE in the port
selection dialog to set them for file output, before installing Canon iR1510-1670.
1 From the Start menu, select Settings click Printers. The Printers folder appears.
7 12
Page 20
2-8
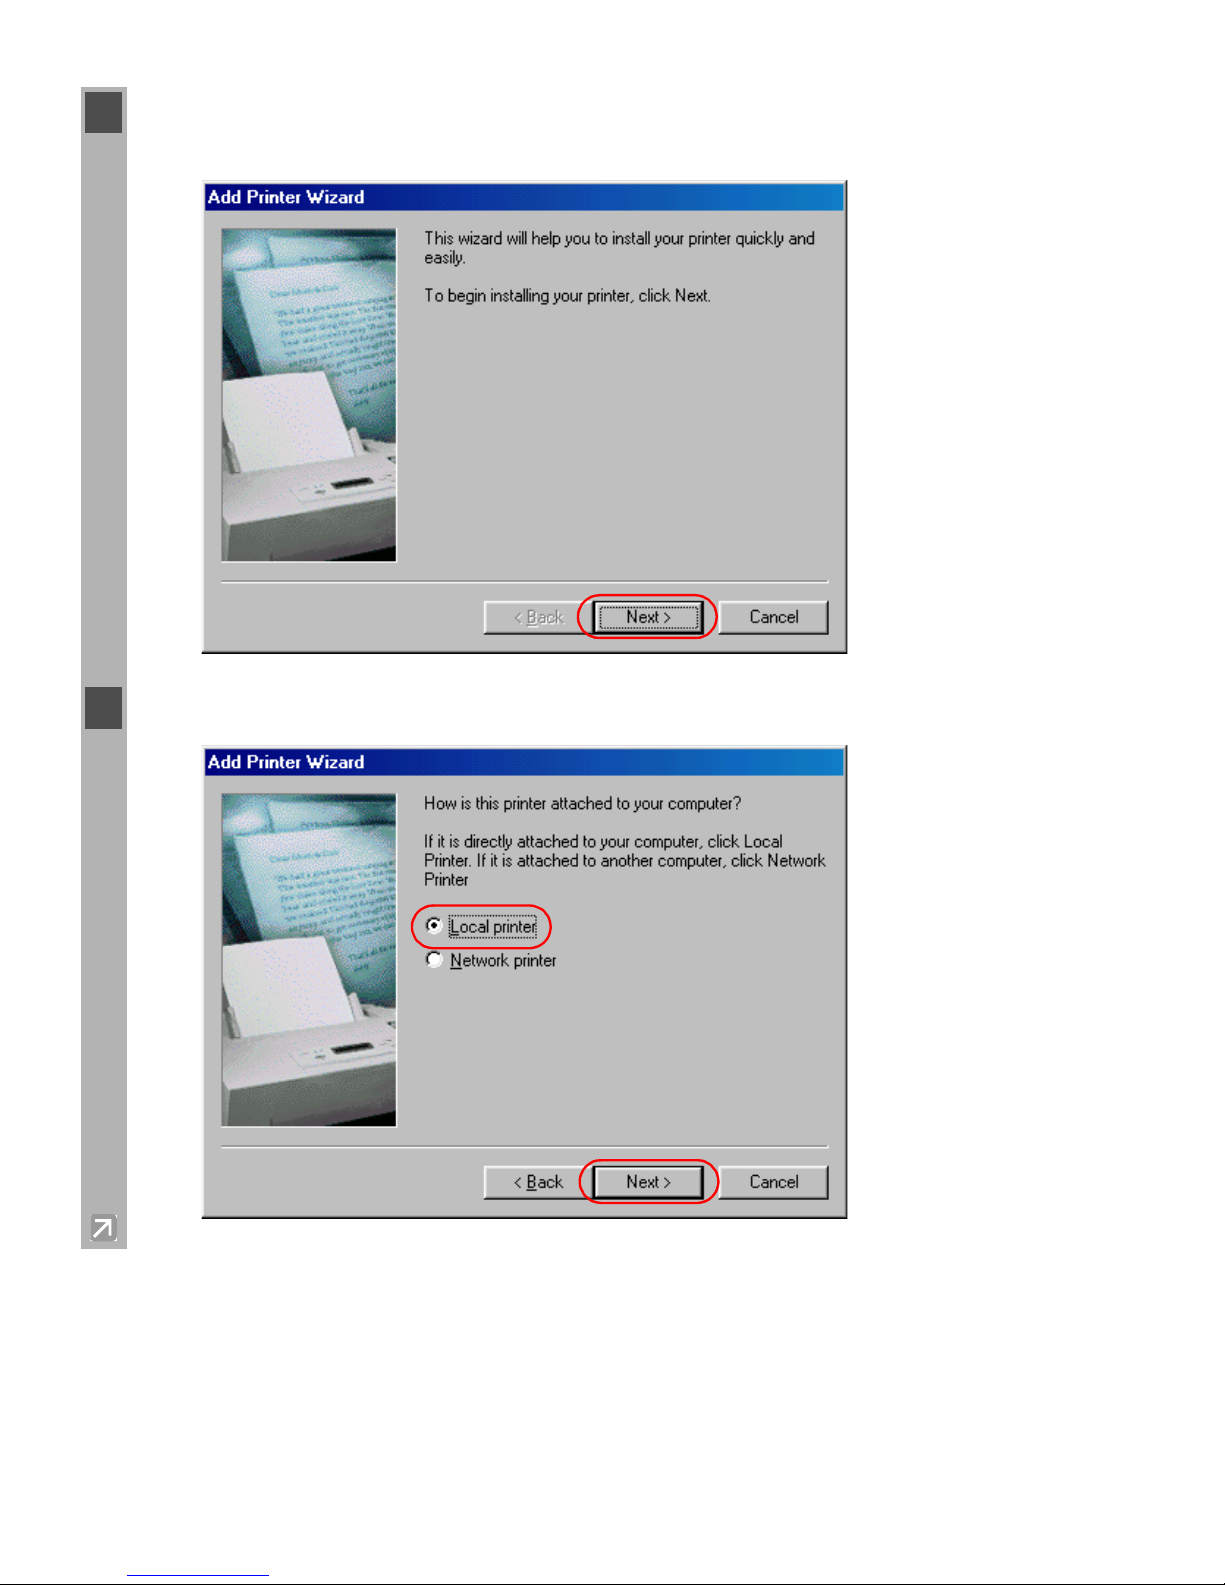
2 Double-click the Add Printer icon. The Add Printer Wizard dialog box appears. Click
Next.
3 Select Local printer click Next.
Page 21
2-9
2
Installing Canon Advanced Printing Technology (CAPT)
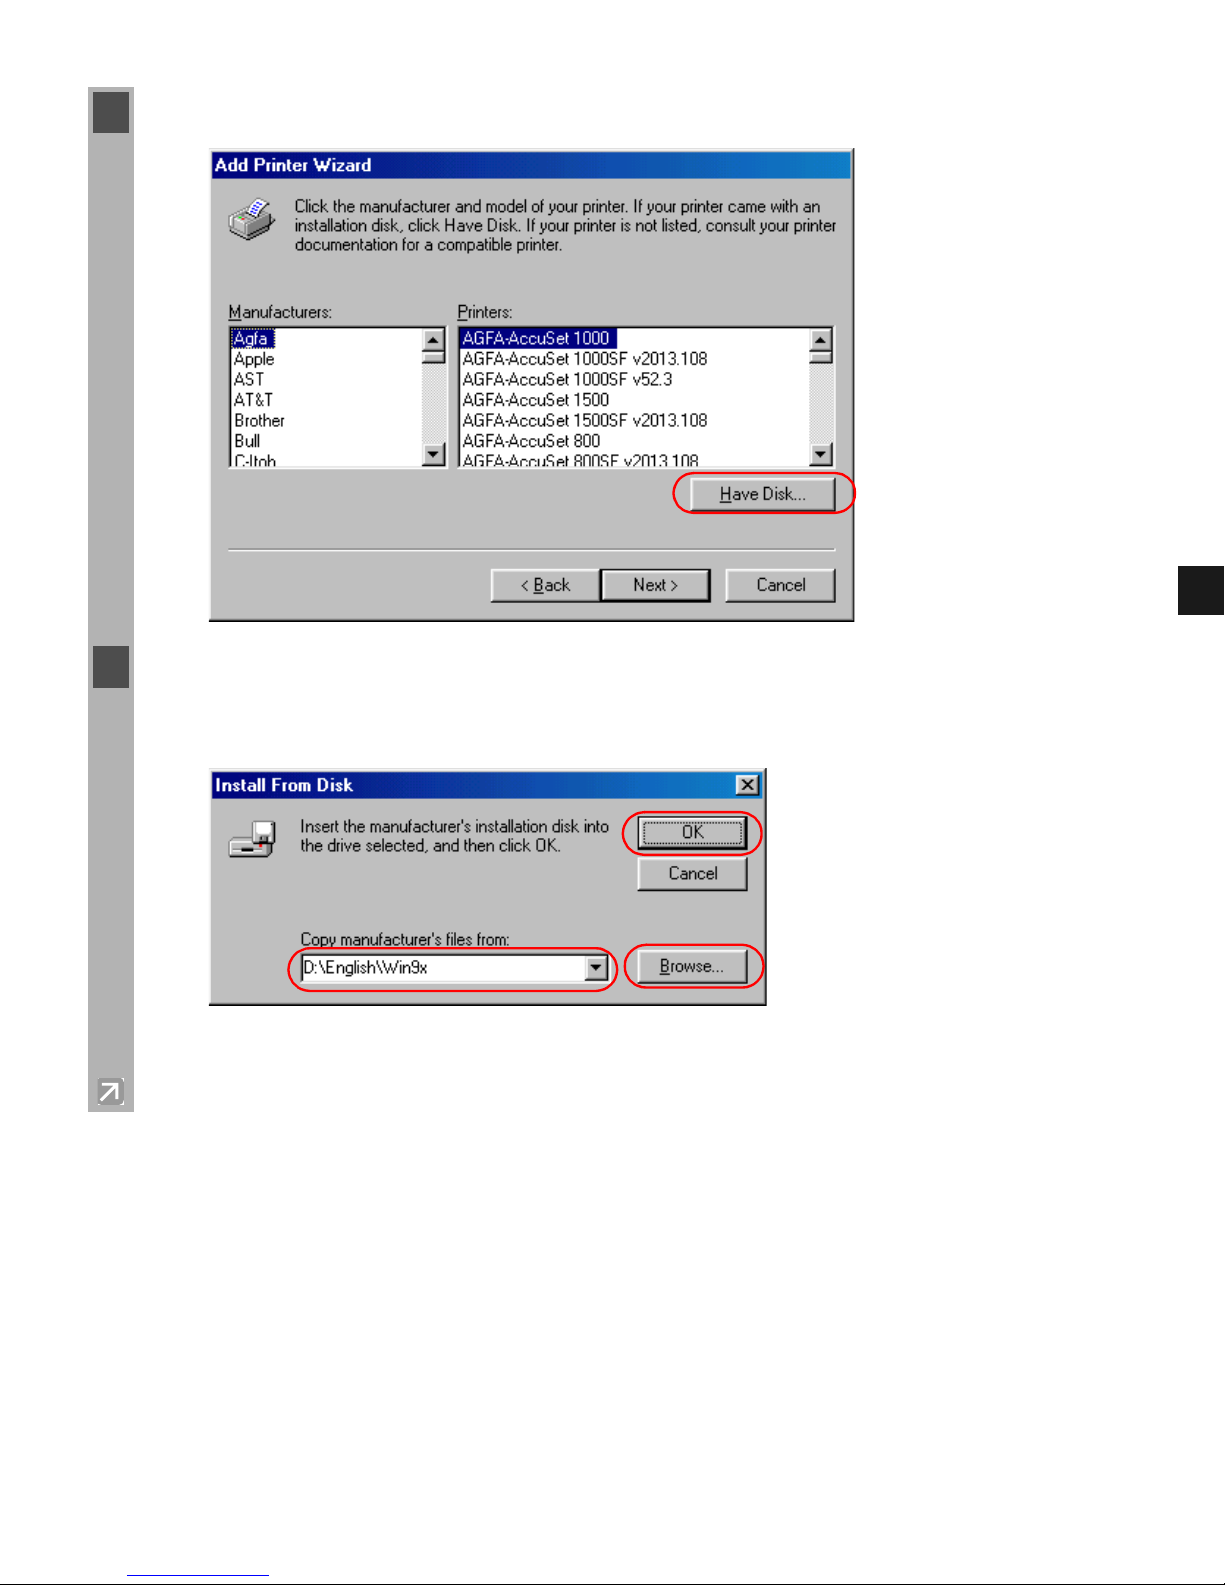
4 The Wizard displays a list of available printers. Click Have Disk.
5 The Install From Disk dialog box appears. Place the CD-ROM into the CD-ROM drive.
Use Browse to select the directory or enter the path name that contains the CAPT software
click OK OK.
For example, if you are using the CD-ROM to install the CAPT software, and your CD-ROM
drive is drive “D:”, the path name would be “D:\English\Win9x(WinMe)”.
Page 22
2-10
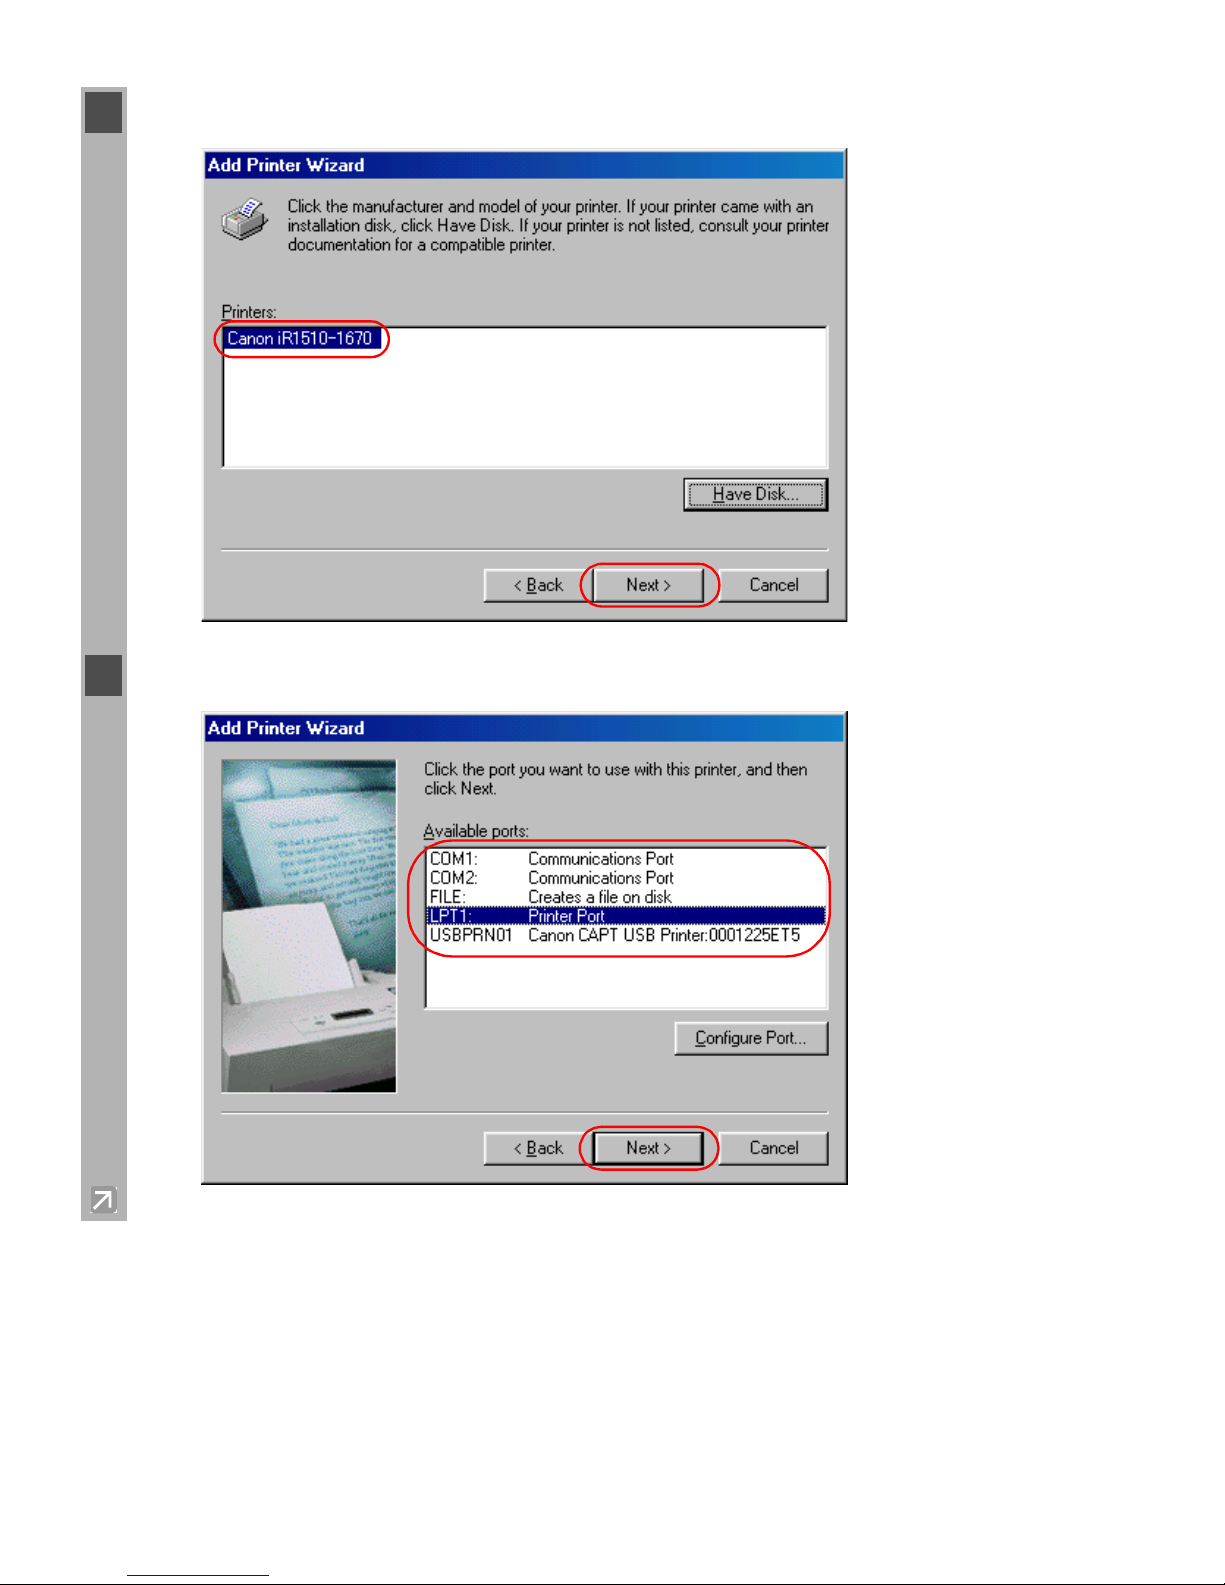
6 Select the printer click Next.
7 Select the printer’s port click Next.
Page 23
2-11
2
Installing Canon Advanced Printing Technology (CAPT)
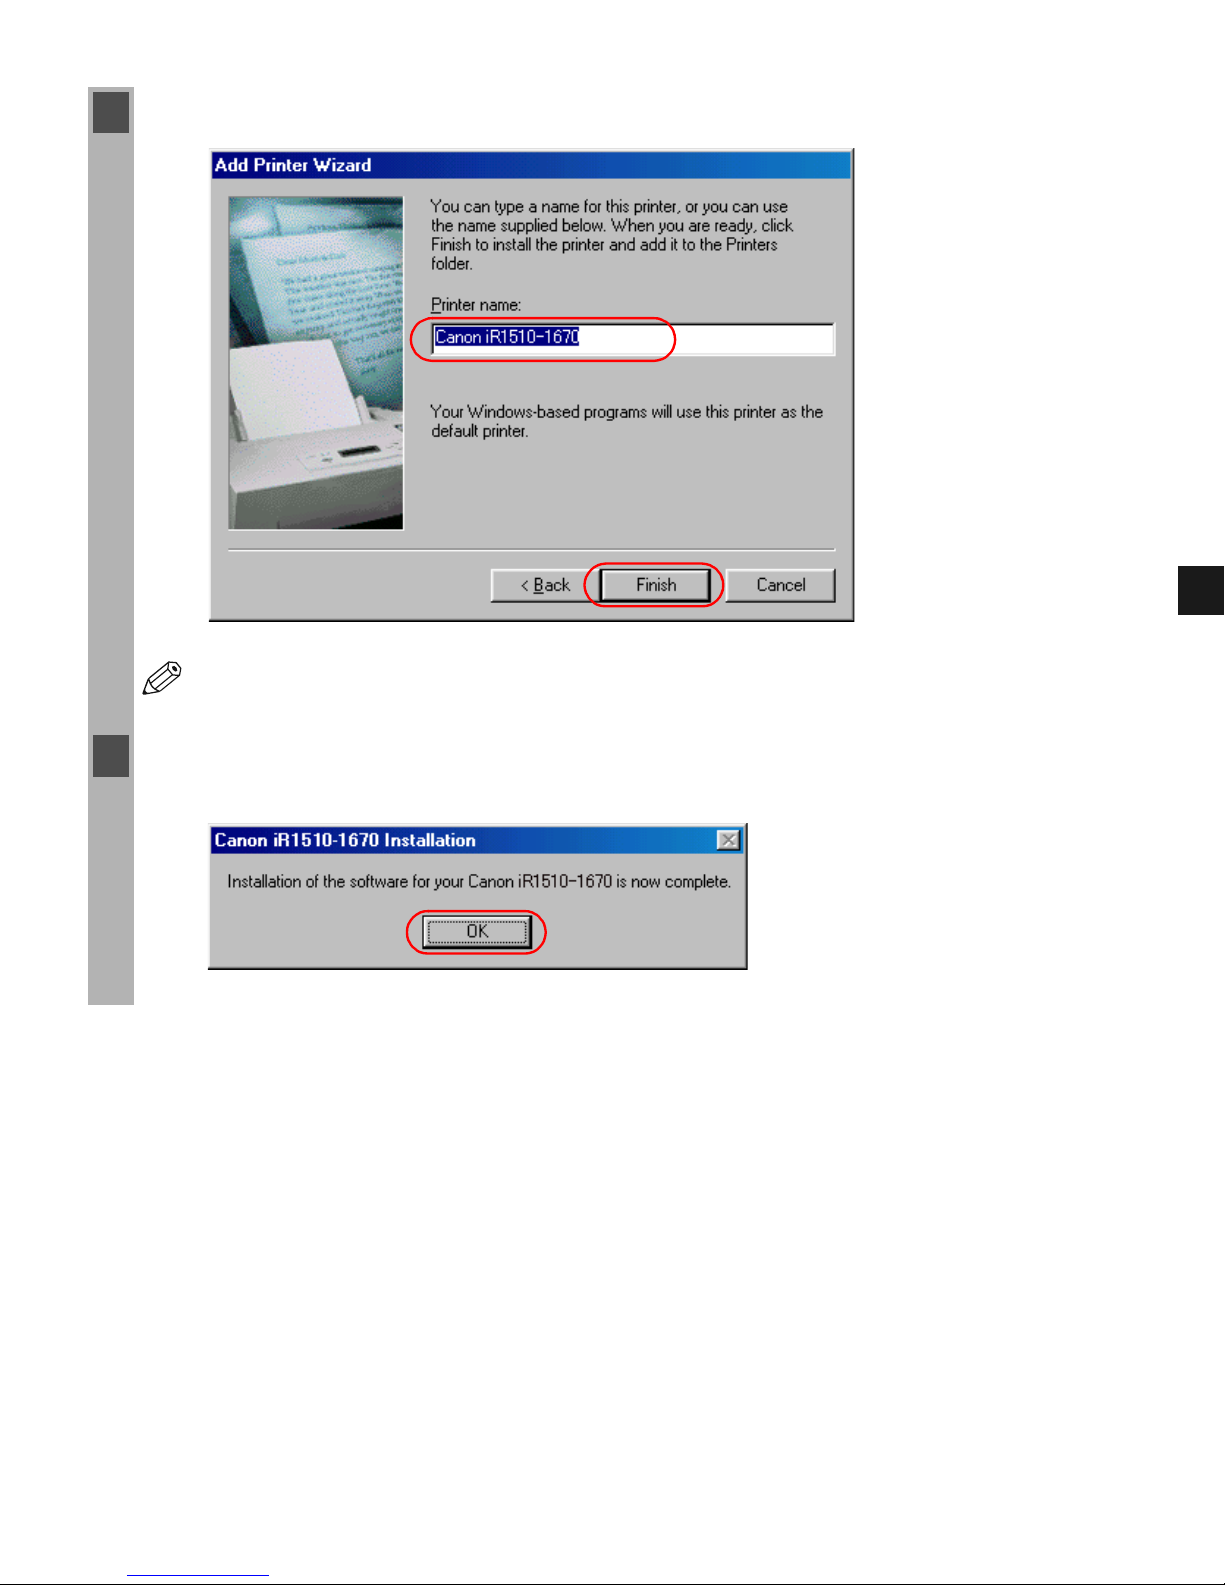
8 Enter the printer name you wish to use click Finish.
NOTE
If you already have another printer installed, you will be asked whether to use this
printer as the default.
9 When the installation is complete, the following dialog box appears. To close the dialog box,
click OK.
Page 24

2-12
■ Windows 2000 Plug and Play
The following is the installation procedure of Plug and Play using a USB port, under Windows
2000.
Before you install the software, make sure you do the following:
• Connect the machine to your computer ( Quick Start Guide).
• Turn on the machine ( Quick Start Guide).
• Start up Windows 2000.
Windows NT/2000/XP/Server 2003
USB Users
NOTE
Using a USB Port (USB Cable)
• In order to use the printer via USB, your computer must be equipped with a USB port.
• USB is not available for Windows NT.
1 Log on as a member of Administrators. The full control access right for the printer is
necessary for installation of CAPT.
2 Plug and Play is being carried out, and the USB class driver and USB printing support is
automatically detected and installed.
Page 25
2-13
2
Installing Canon Advanced Printing Technology (CAPT)
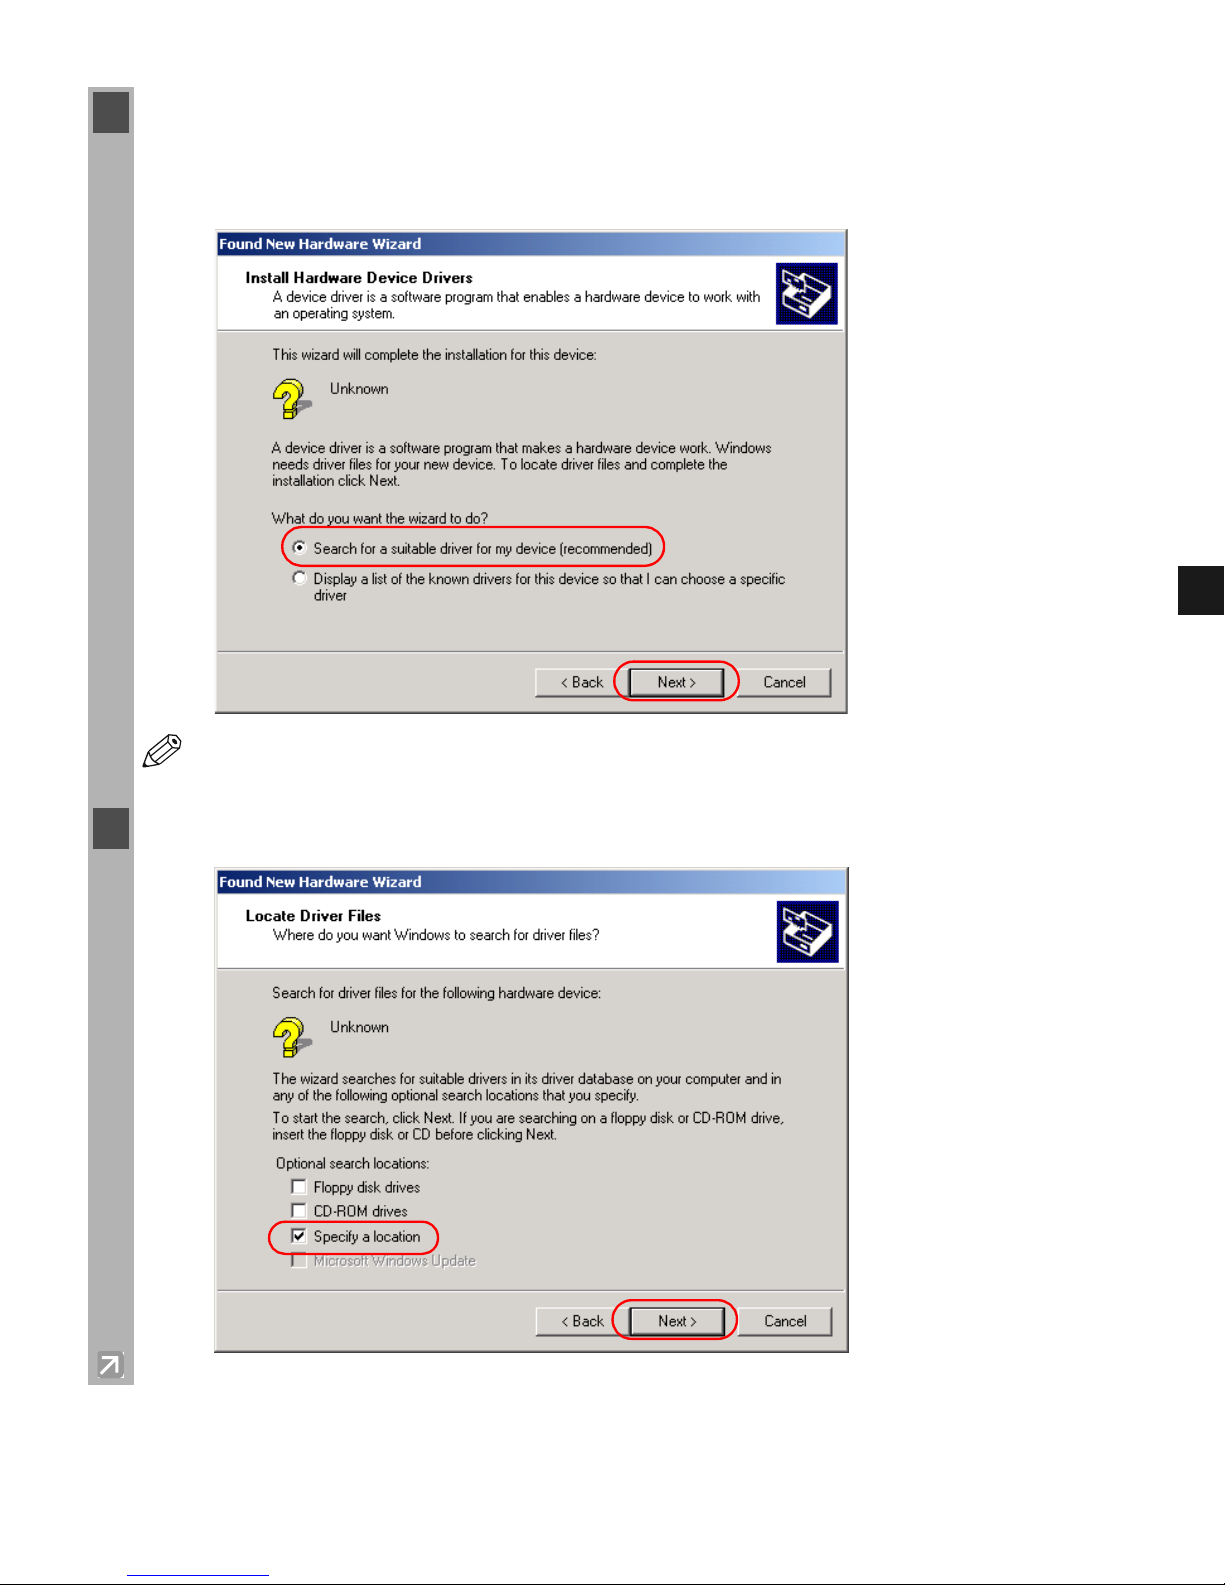
3 The Found New Hardware Wizard dialog box appears. Click Next.
Select Search for a suitable driver for my device (recommended) in the Found New
Hardware Wizard click Next.
NOTE
“Unknown” may be displayed as the name of the device.
4 Select Specify a location click Next.
Page 26
2-14
■ Windows XP/Server 2003 Plug and Play
The following is the installation procedure of Plug and Play using a USB port under Windows
XP.
Before you install the software, make sure you do the following:
• Connect the machine to your computer ( Quick Start Guide).
• Turn on the machine ( Quick Start Guide).
• Start up Windows XP/Server 2003.
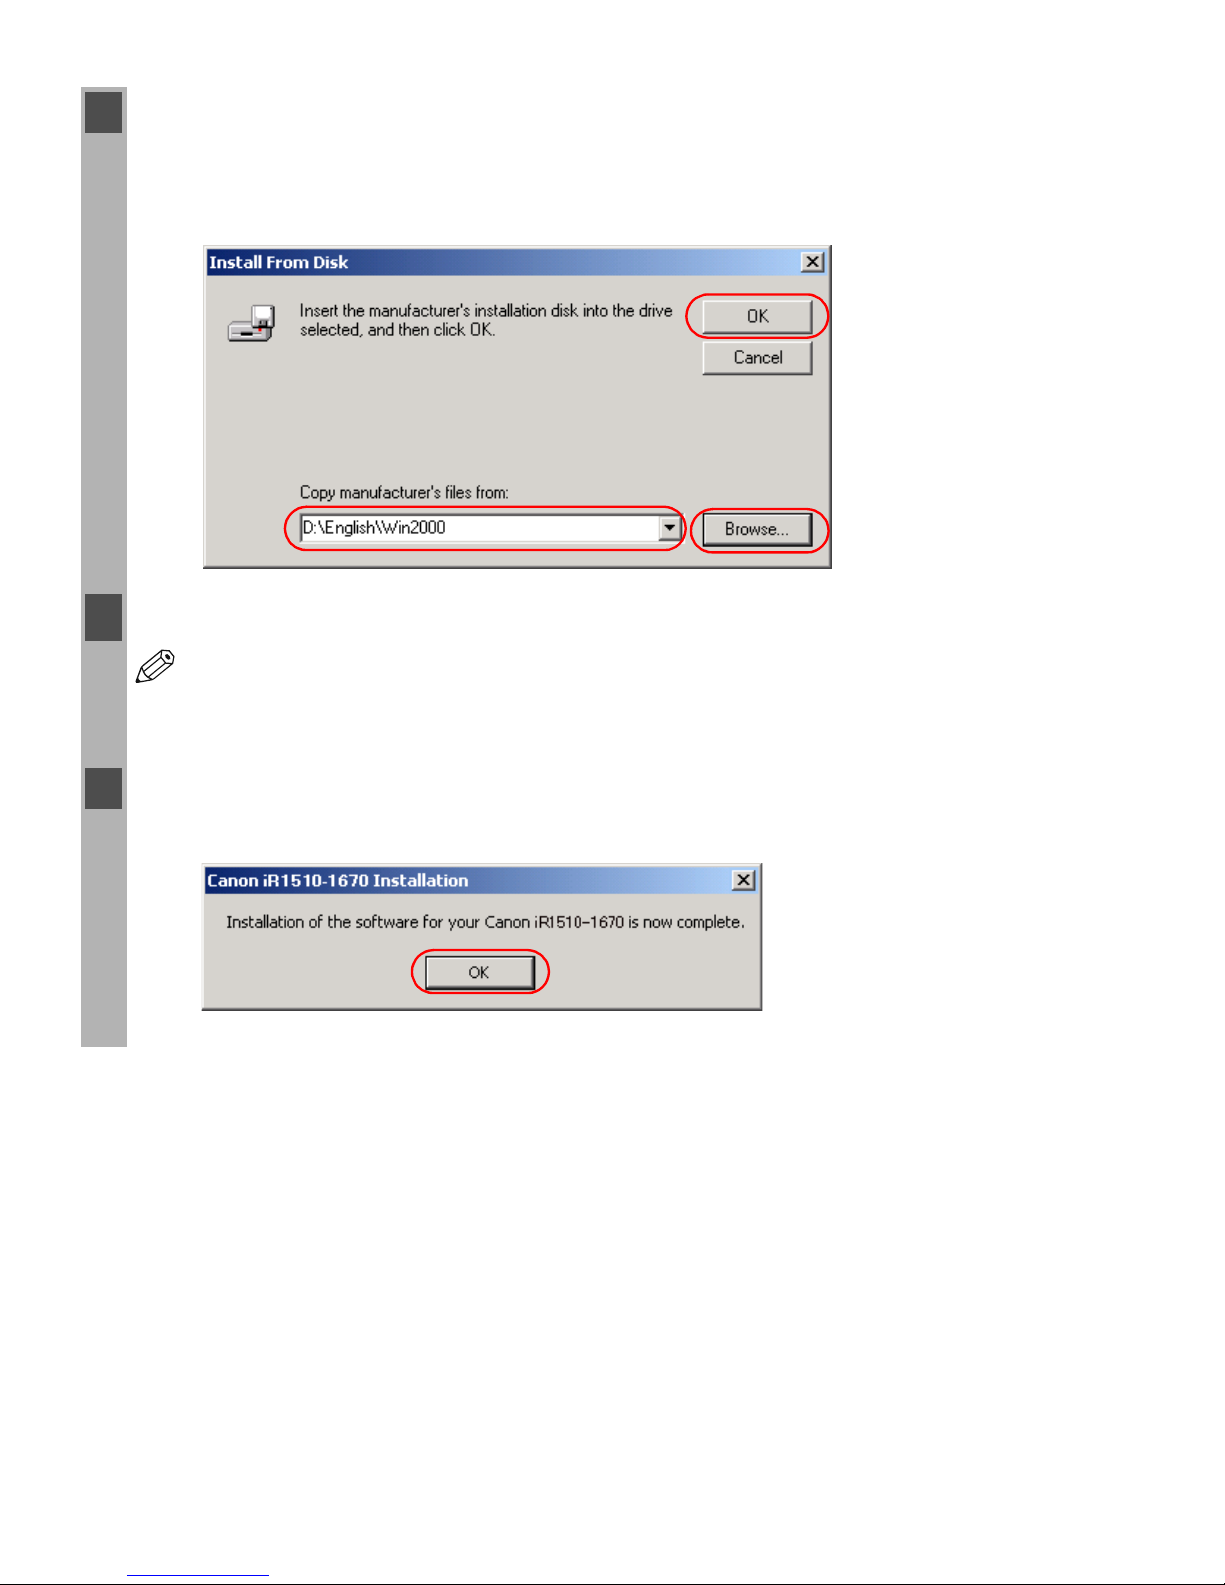
5 The Found New Hardware Wizard dialog box appears. Place the CD-ROM into the CD-
ROM drive. Click Browse to select the driver in the language that you want to install. For
example, if your CD-ROM drive is drive “D:”, browse to “D:\English\Win2000” click
Open OK.
6 Click Next on Driver Files Search Results.
NOTE
•Click Ye s if the Digital Signature Not Found dialog box appears.
•Click Continue Anyway if the Hardware Installation dialog box (saying that the
software you are installing has not passed Windows Logo testing) appears.
7 When the installation is complete, the following dialog box appears. Click OK to close the
dialog box. Click Finish on the Found New Hardware Wizard.
Page 27
2-15
2
Installing Canon Advanced Printing Technology (CAPT)
NOTE
Using a USB Port (USB Cable)
• In order to use the printer via USB, your computer must be equipped with a USB port.
• USB is not available for Windows NT.
1 Log on as a member of Administrators. The full control access right for the printer is
necessary
for installation of CAPT.
2 Plug and Play is being carried out, and the USB class driver and USB Printing Support is
automatically detected and installed.
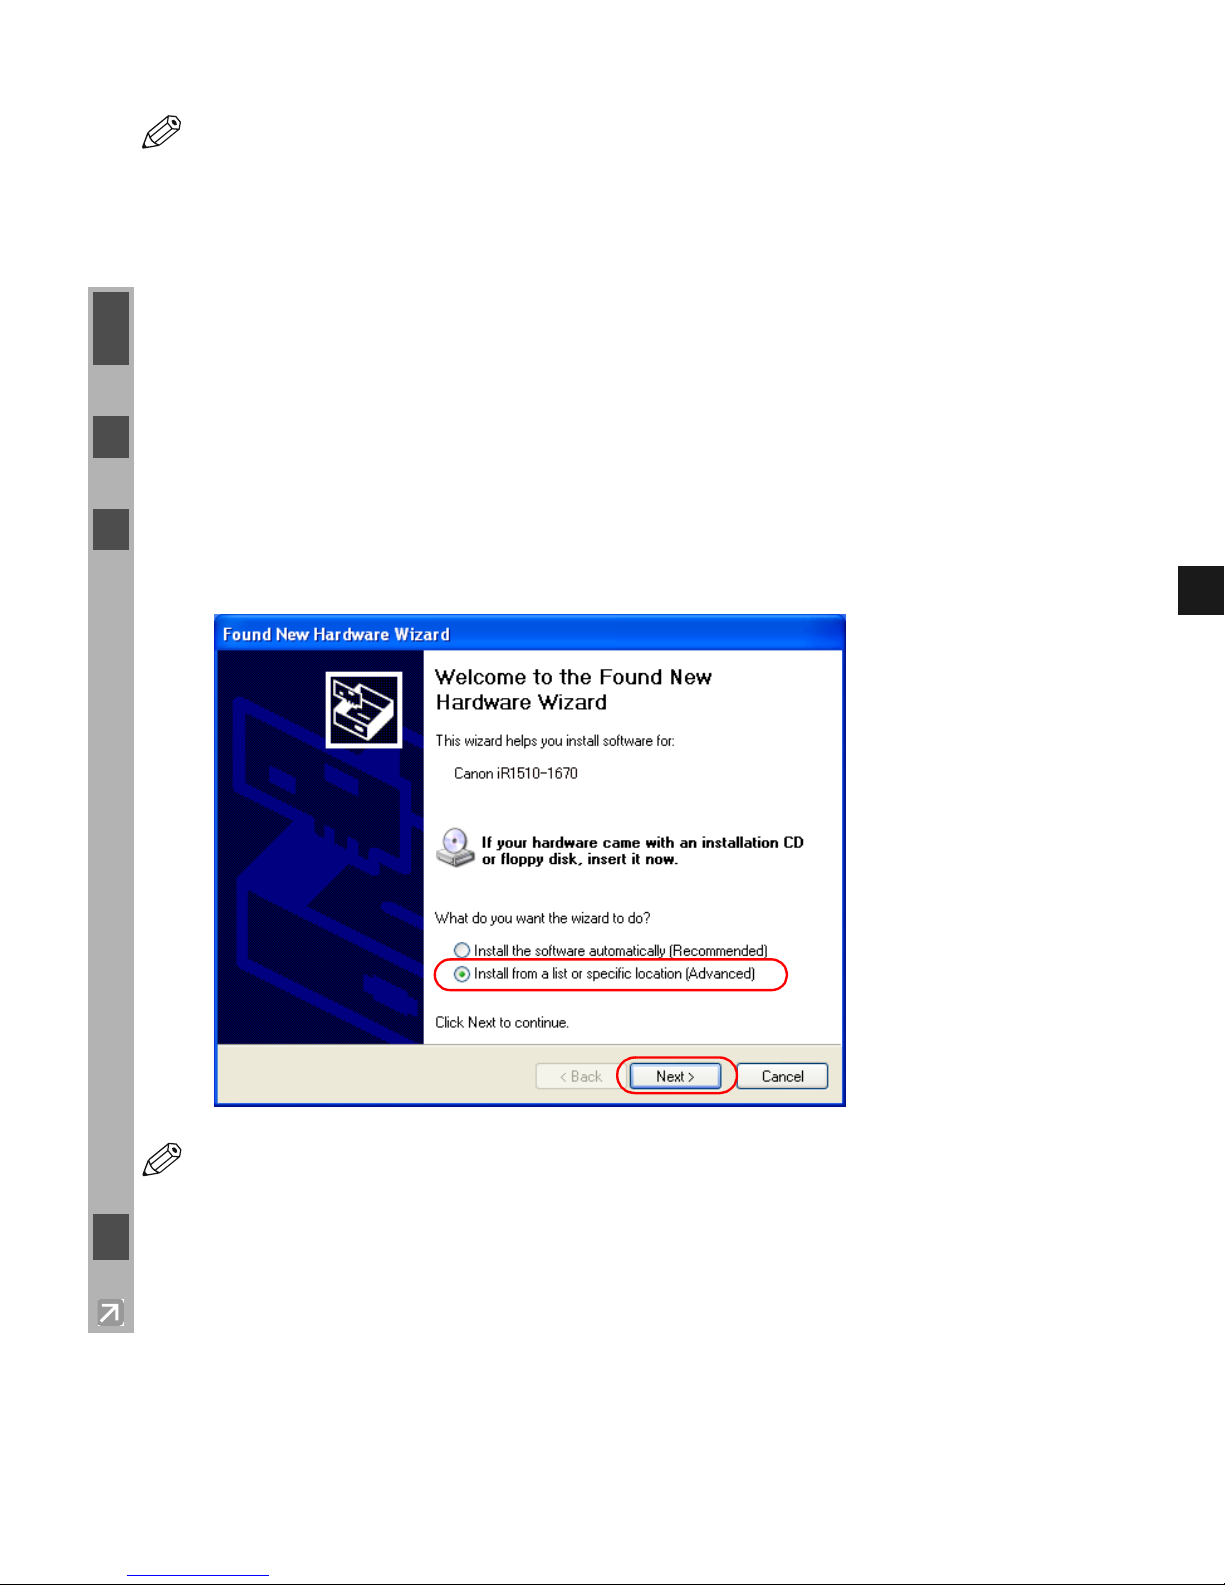
3 The Found New Hardwere Wizard appears and prompts you to insert the CD-ROM. Select
Install from a list or specific location (Advanced) and click Next.
NOTE
“Unknown” may be displayed as the name of the device.
4 Uncheck the Search removable media (floppy, CD-ROM...) check box.
Page 28
2-16
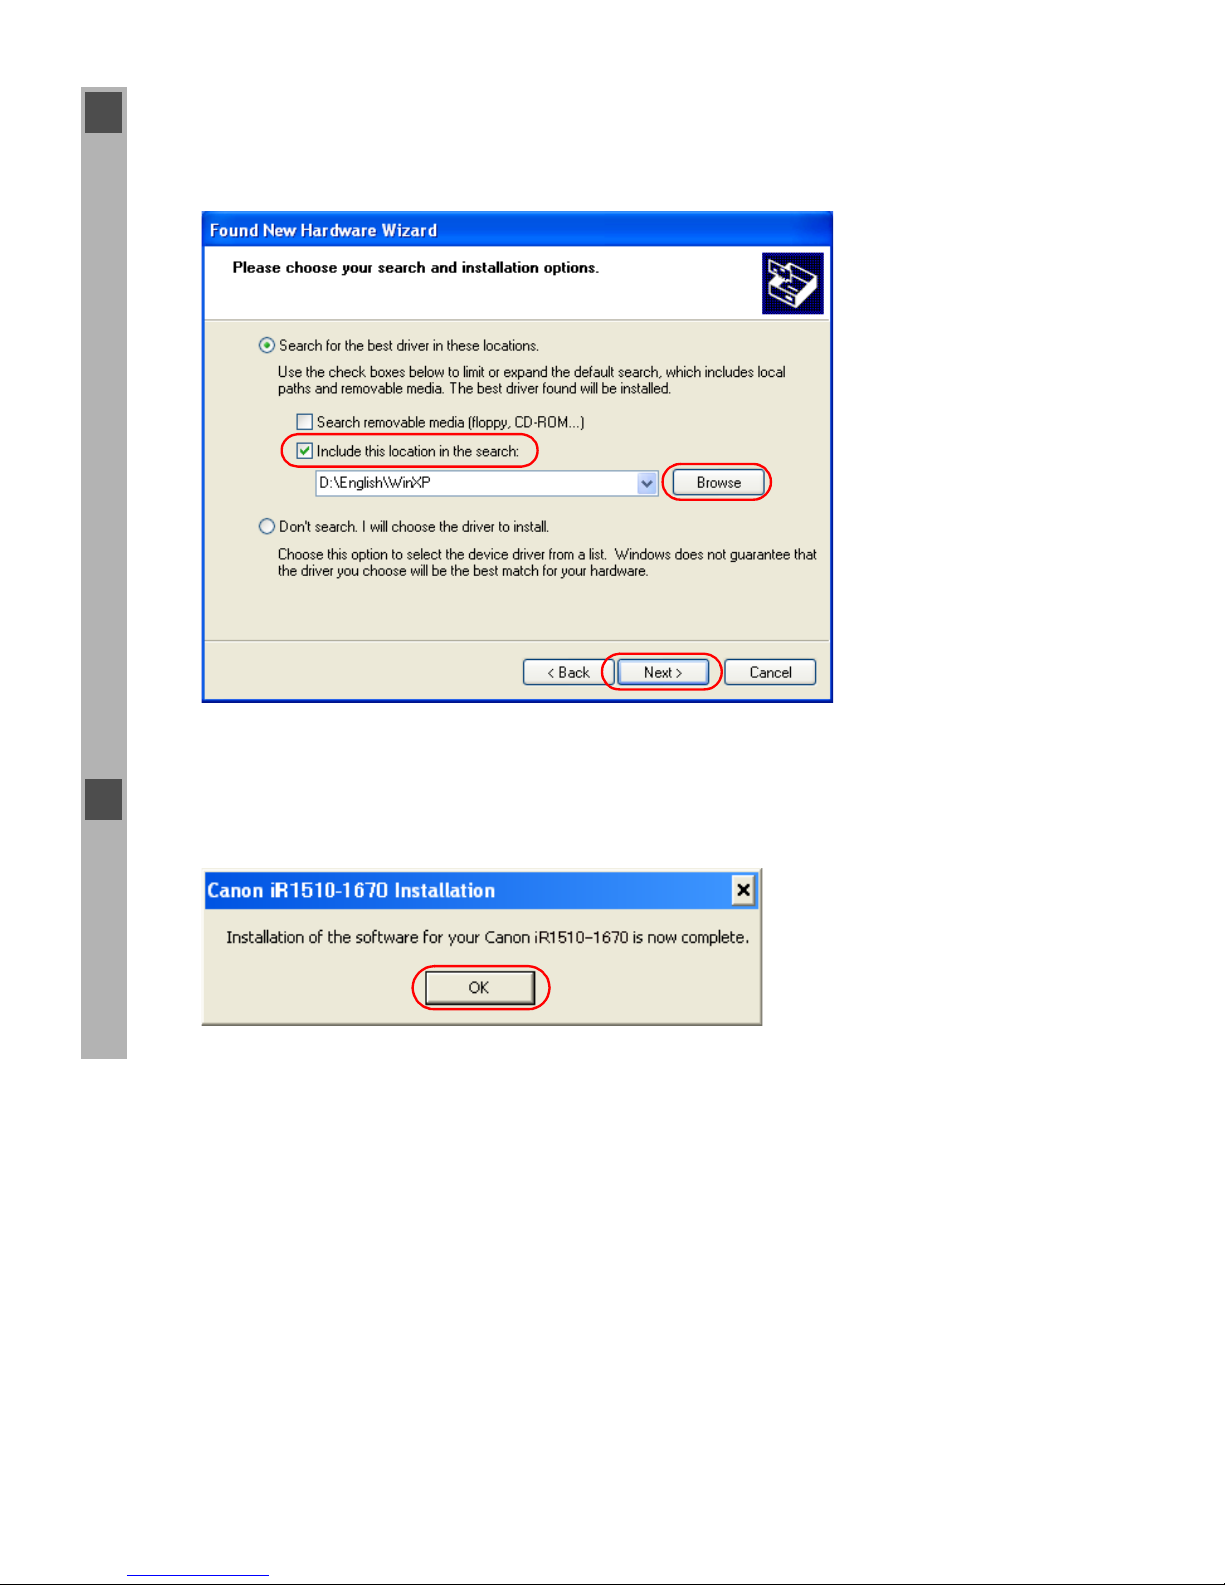
5 Select Include this location in the search: click Browse to select the driver in the
language that you want to install. For example, if your CD-ROM drive is drive “D:”, browse
to “D:\English\WinXP” click Next.
Click Continue Anyway if the Hardware Installation dialog box appears.
6 When the installation is complete, the following dialog box appears. Click OK to close the
box. Click Finish on the Found New Hardware Wizard.
Page 29
2-17
2
Installing Canon Advanced Printing Technology (CAPT)
■ Windows 2000 Plug and Play
The following is the installation procedure of Plug and Play using a parallel port, under
Windows 2000.
Before you install the software, make sure you do the following:
• Connect the machine to your computer ( Quick Start Guide).
• Turn on the machine ( Quick Start Guide).
• Start up Windows 2000.
.
Parallel Port Users
IMPORT ANT
If other printer drivers are already installed on the parallel port (LPT 1, etc.) of the
computer connected to this printer, uninstall those drivers, or select FILE in the port
selection dialog to set them for file output, before installing Canon iR1510-1670.
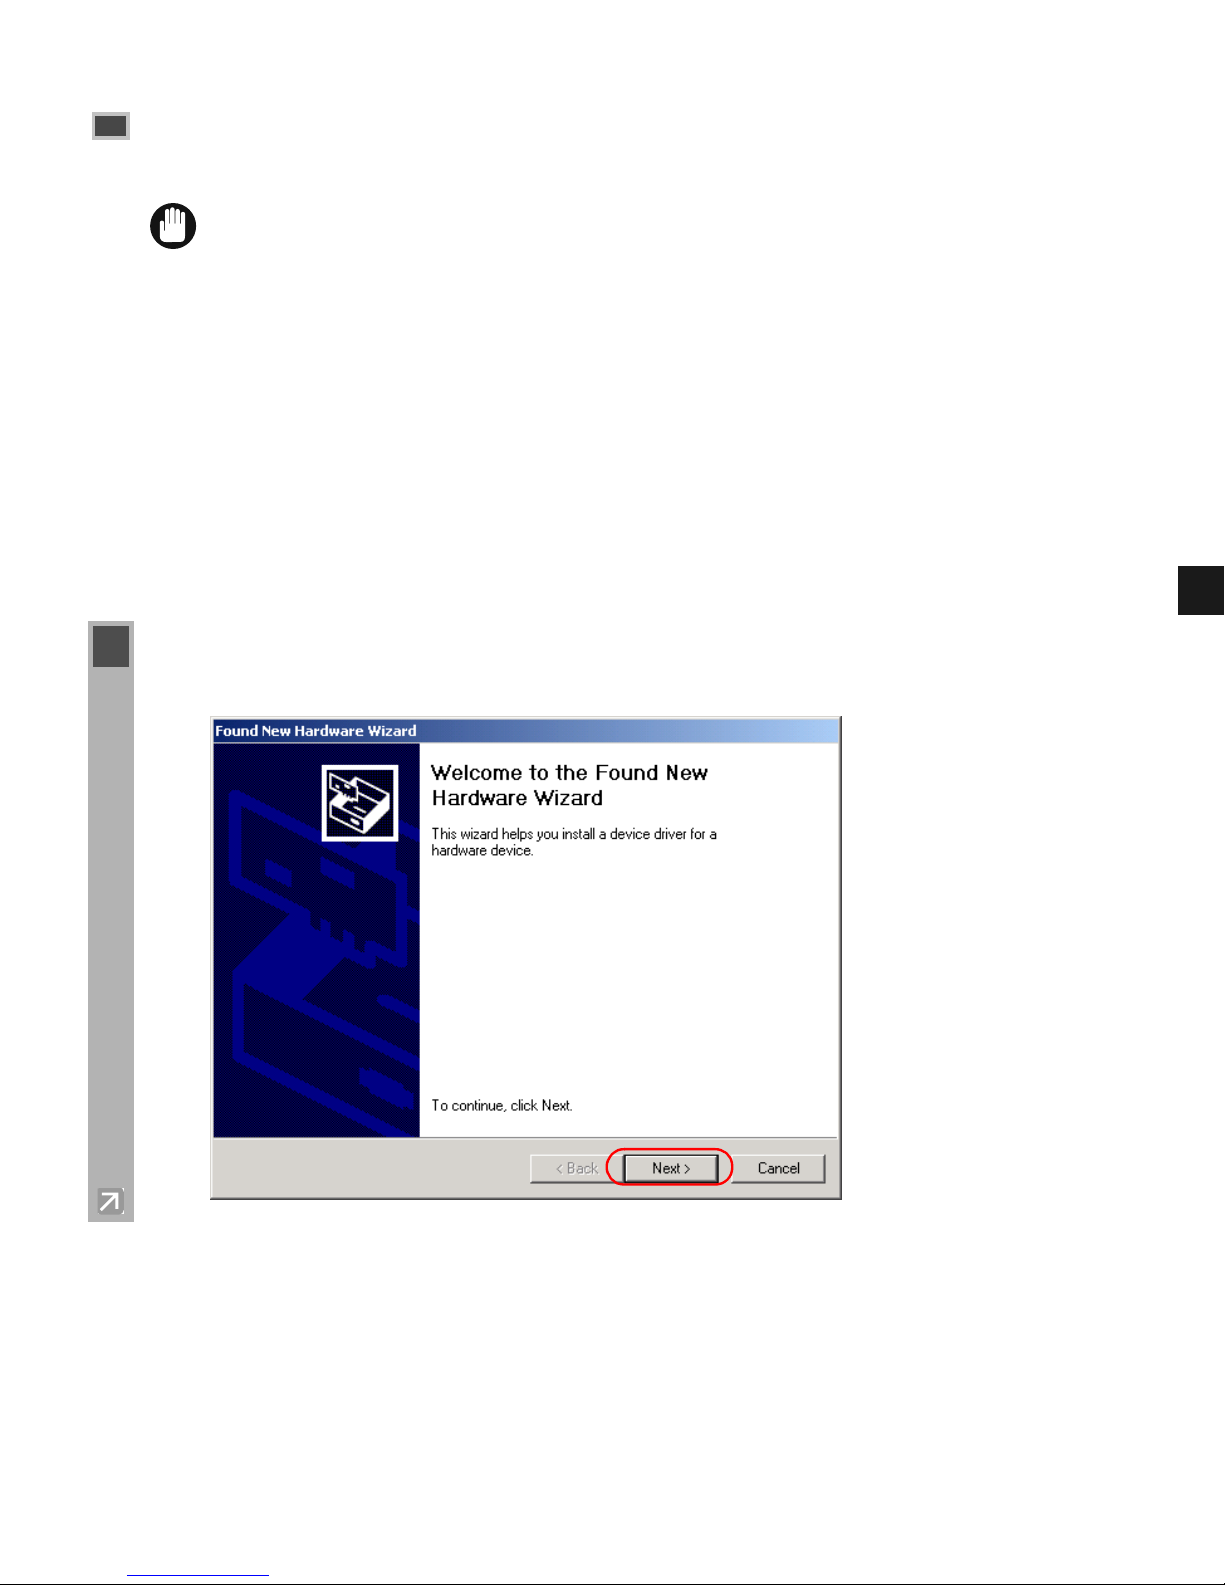
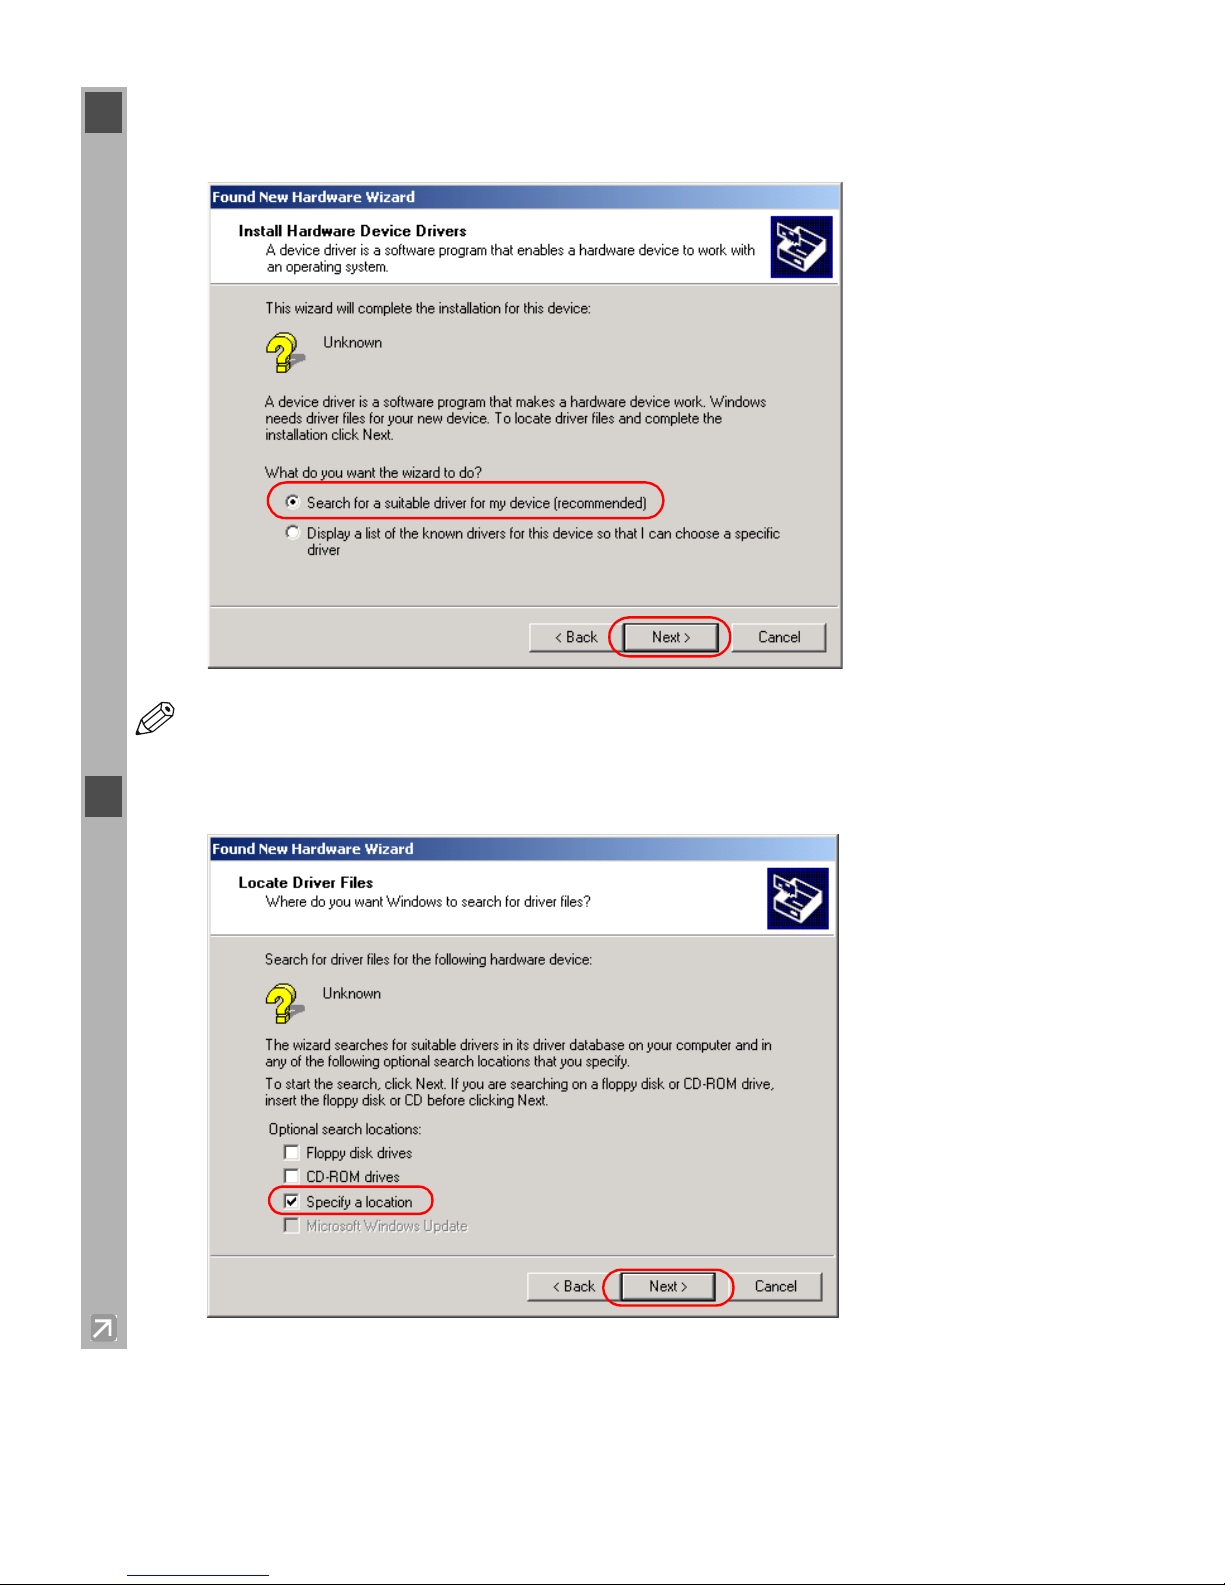
1 Plug and Play is being carried out and the Found New Hardware Wizard dialog box
appears. Click Next.
Page 30
2-18
2 Select Search for a suitable driver for my device (recommended) in the Found New
Hardware Wizard click Next.
NOTE
“Unknown” may be displayed as the name of the device.
3 Select Specify a location click Next.
Page 31
2-19
2
Installing Canon Advanced Printing Technology (CAPT)
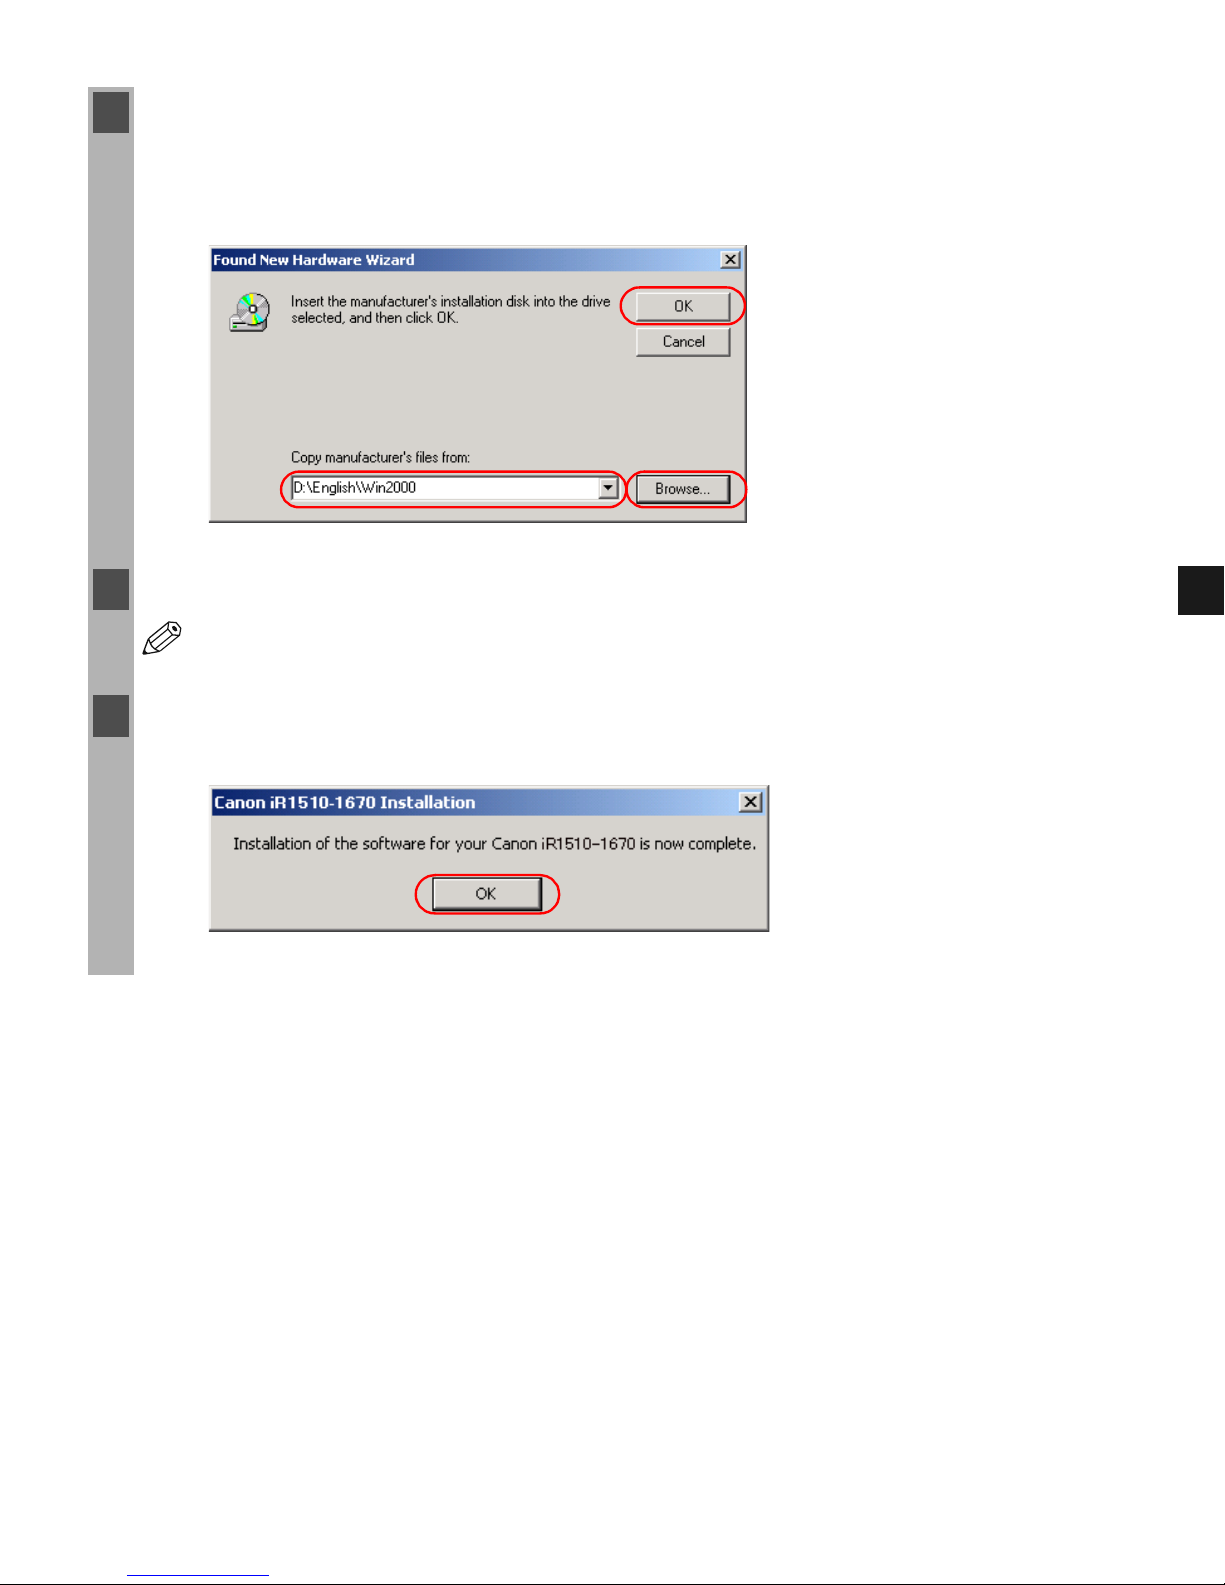
4 The Found New Hardware Wizard dialog box appears. Place the CD-ROM into the CD-
ROM drive. Click Browse to select the driver in the language that you want to install. For
example, if your CD-ROM drive is drive “D:”, browse to “D:\English\Win2000” click
Open OK.
5 Click Next on Driver Files Search Results.
NOTE
Click Yes if the Digital Signature Not Found dialog box appears.
6 When the installation is complete, the following dialog box appears. Click OK to close the
dialog box. Click Finish on the Found New Hardware Wizard.
Page 32
2-20
■ Windows XP/Server 2003 Plug and Play
The following is the installation procedure of Plug and Play using a parallel port, under
Windows XP.
Before you install the software, make sure you do the following:
• Connect the machine to your computer ( Quick Start Guide).
• Turn on the printer ( Quick Start Guide).
• Start up Windows XP/Server 2003.
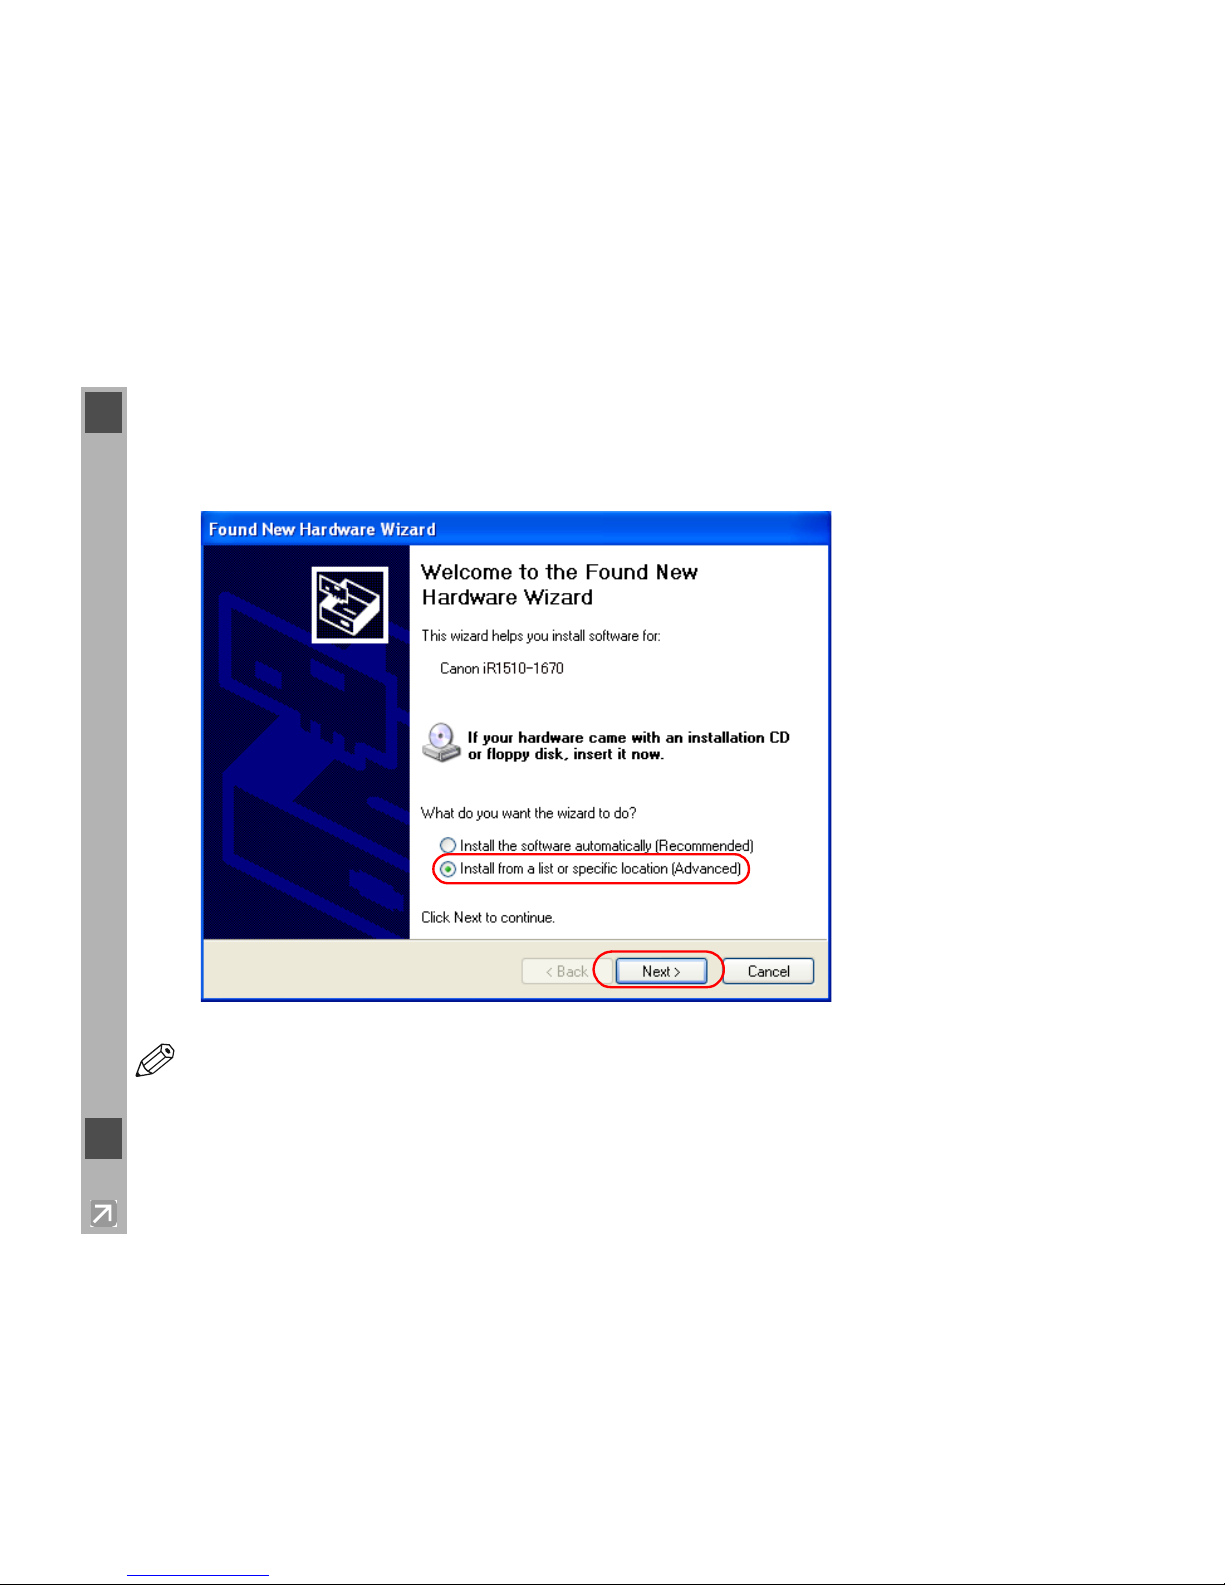
1 Plug and Play is being carried out and the Found New Hardware Wizard dialog box
appears.
Select Install from a list or specific location (Advanced) click Next.
NOTE
“Unknown” may be displayed as the name of the device.
2 Uncheck the Search removable media (floppy, CD-ROM) check box.
Page 33
2-21
2
Installing Canon Advanced Printing Technology (CAPT)
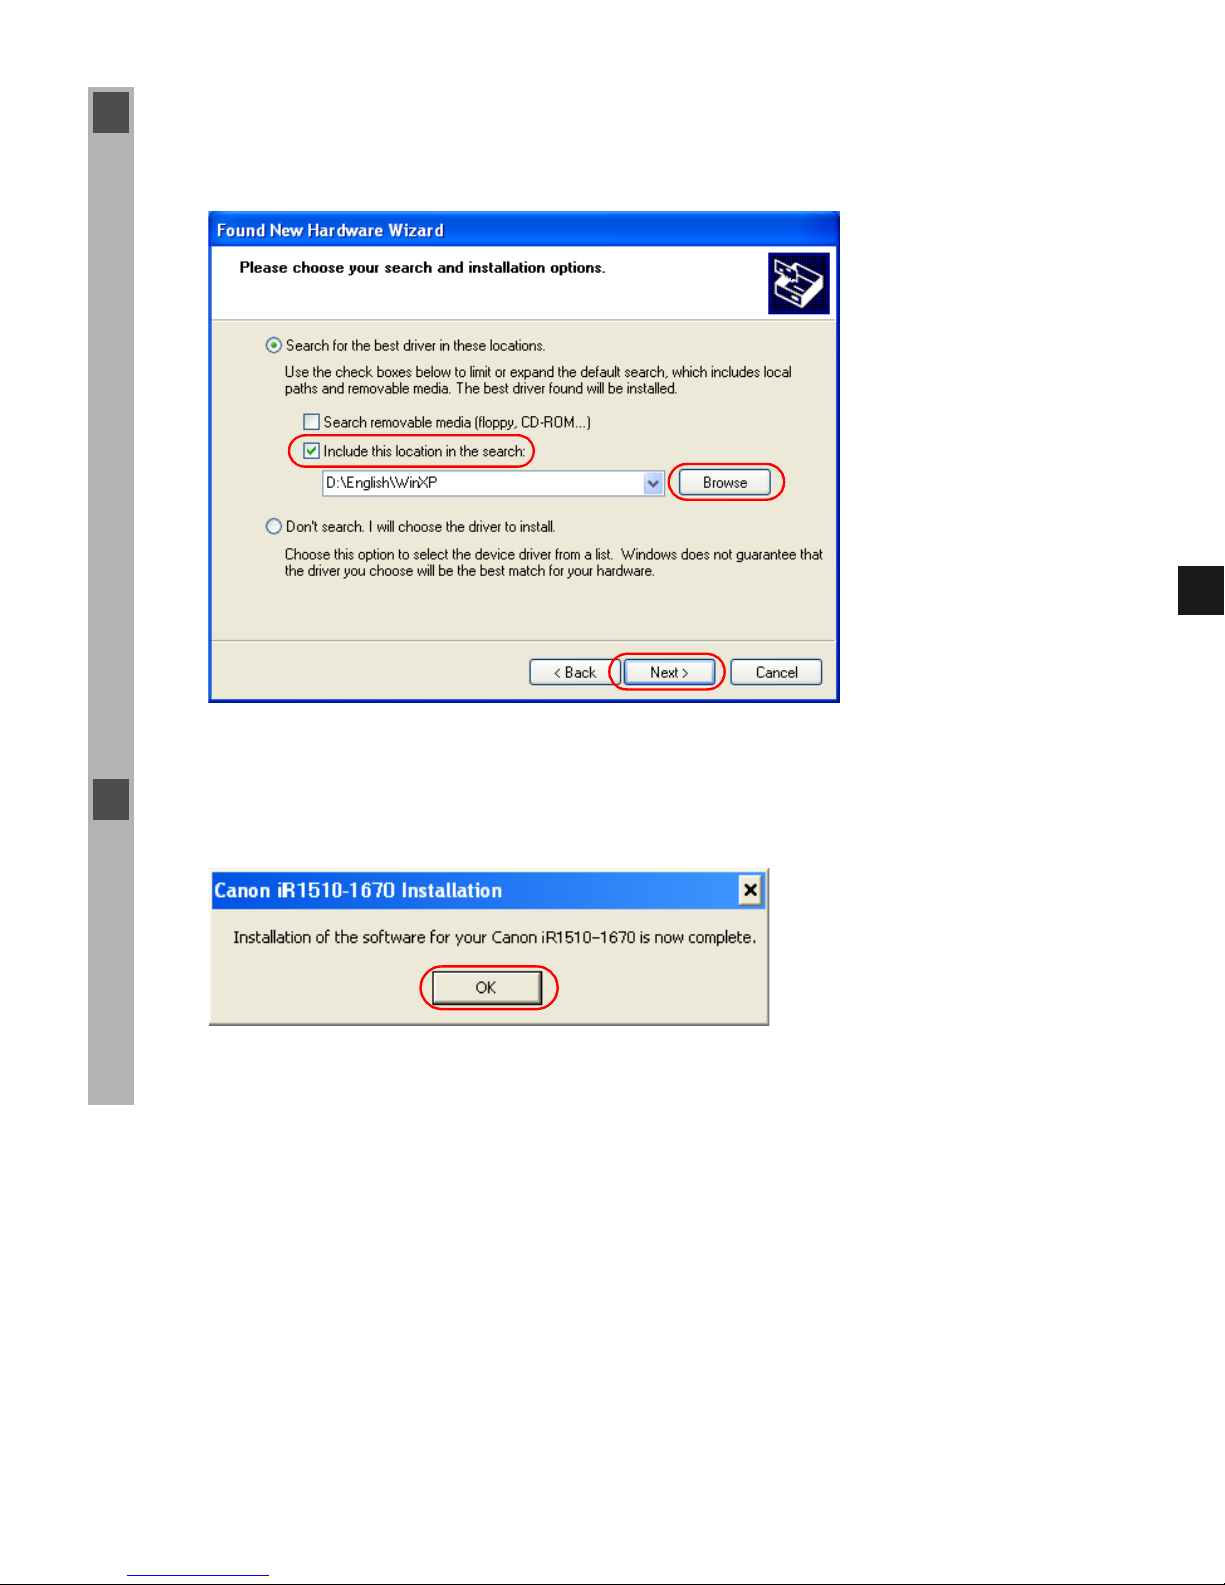
3 Select Include this location in the search: click Browse to select the driver in the
language that you want to install. For example, if your CD-ROM drive is drive “D:”, browse
to “D:\English\WinXP” click Next.
Click Continue Anyway if the Hardware Installation dialog box appears.
4 When the installation is complete, the following dialog box appears. Click OK to close the
box. Click Finish on the Found New Hardware Wizard.
Page 34
2-22
■ Windows NT Add Printer Wizard
To install CAPT on a local computer using Windows NT, you can use the Windows NT Add
Printer Wizard.
1 Log on as a member of Administrators. The full control access right for the printer is
necessary for the installation of CAPT.
2 From the Start menu, select Settings click Printers. The Printers folder appears.
3 Double-click the Add Printer icon. The Add Printer Wizard dialog box appears.
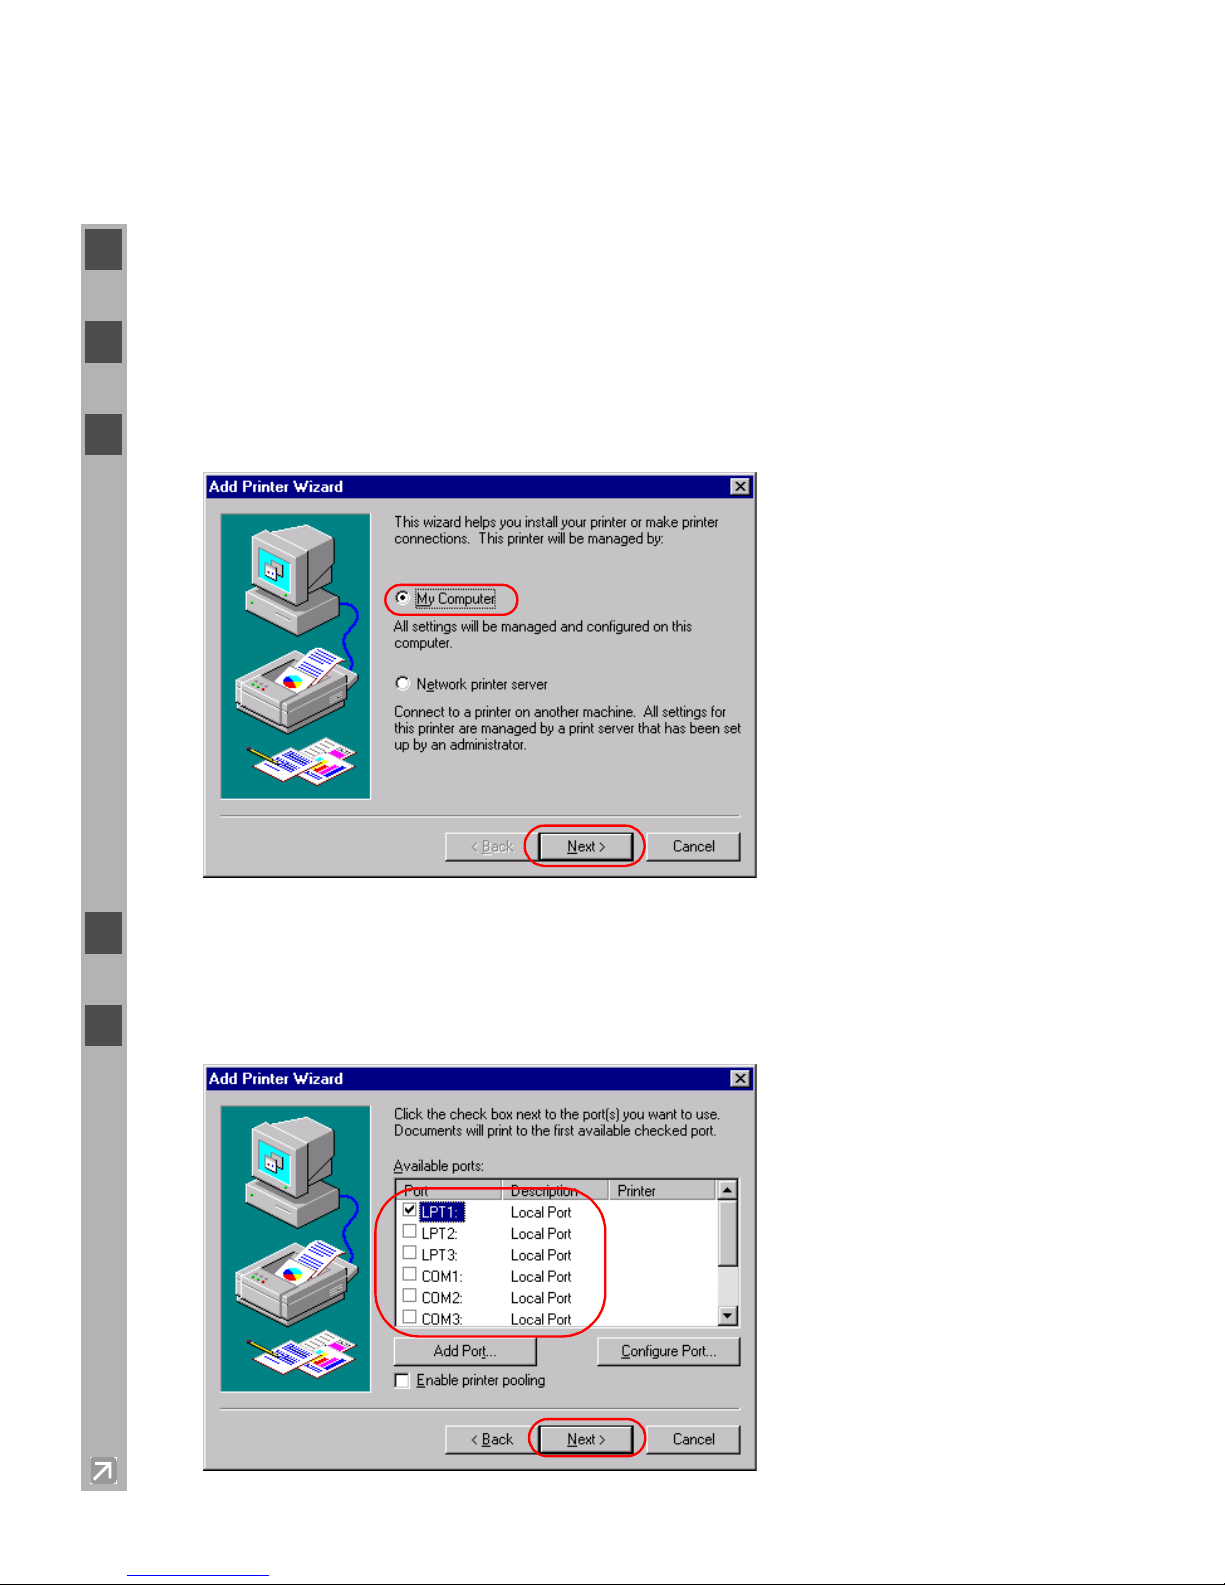
4 Select My Computer click Next.
5 Select the printer port or ports you want to use click Next.
Page 35
2-23
2
Installing Canon Advanced Printing Technology (CAPT)
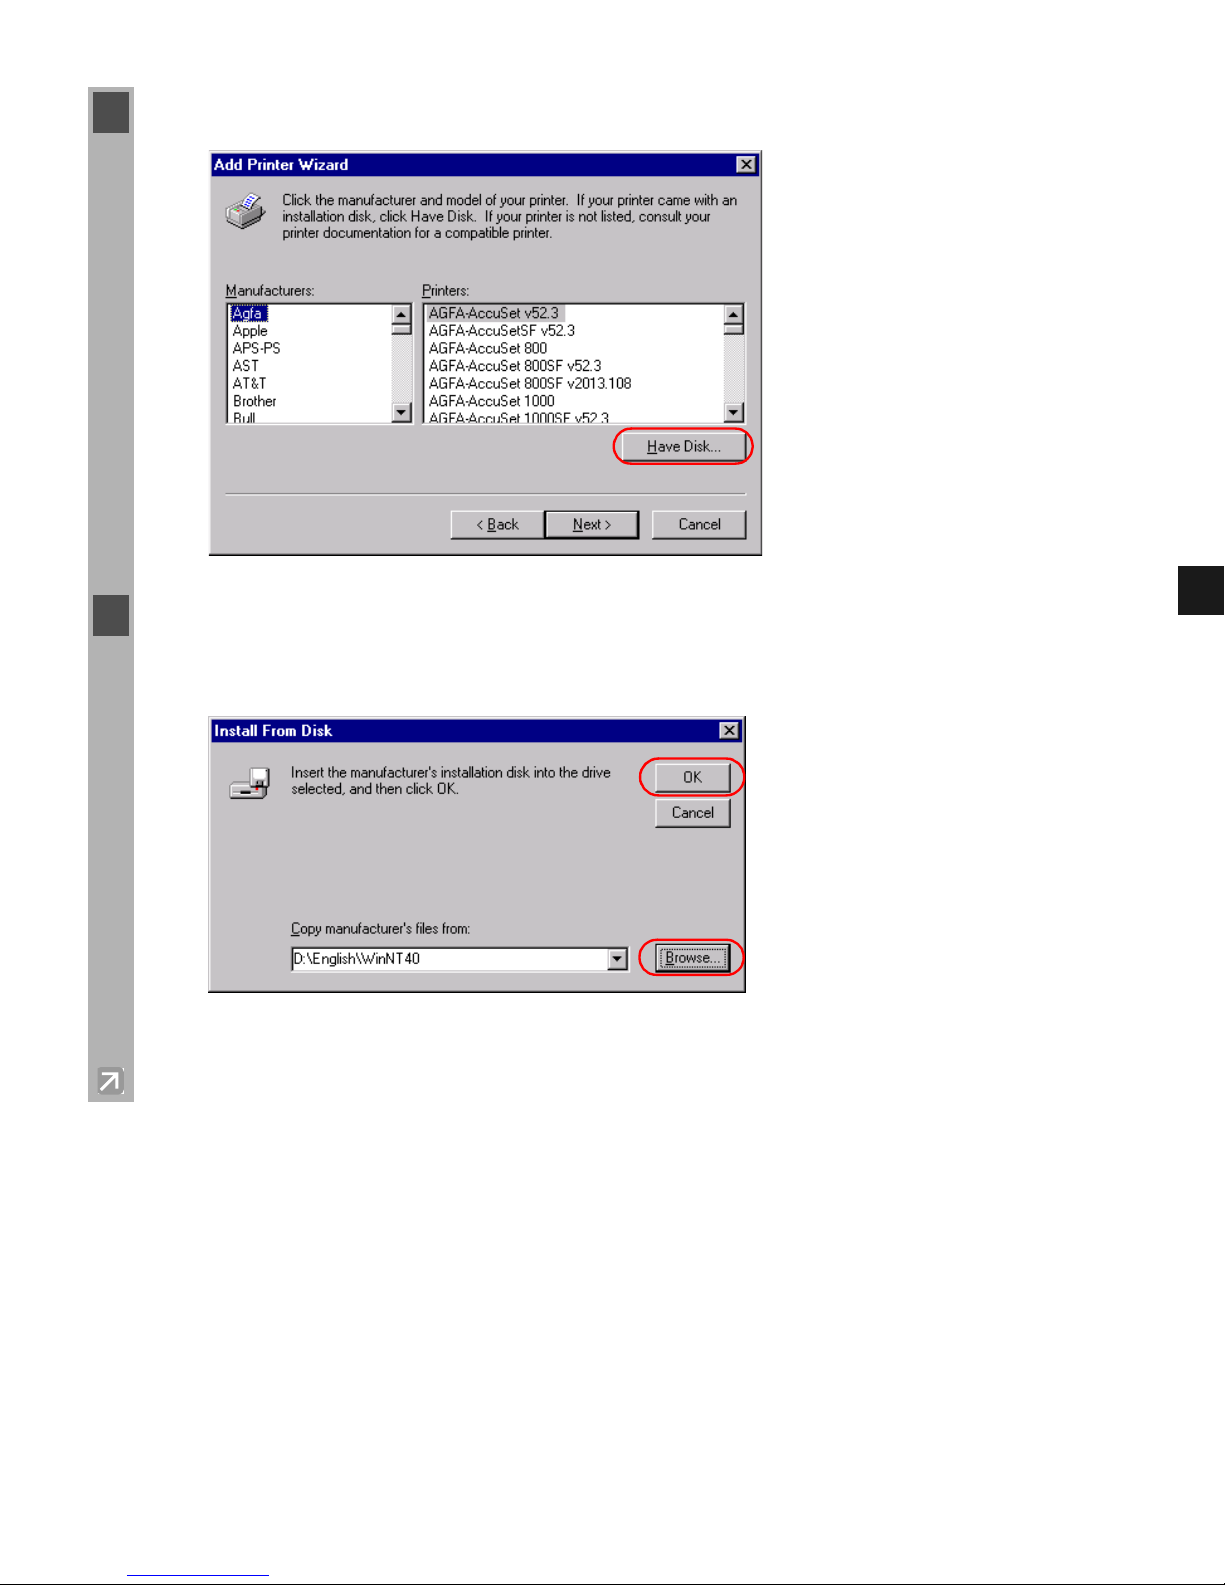
6 Click Have Disk in the Manufacturers/Printers dialog box.
7 The Install From Disk dialog box appears. Place the CD-ROM into the CD-ROM drive.
Use Browse to select the directory or enter the path name that contains CAPT click Open
OK.
For example, if you are using the CD-ROM to install CAPT, and your CD-ROM drive is
drive “D:”, the path name would be “D:\English\WinNT40”.
Page 36
2-24
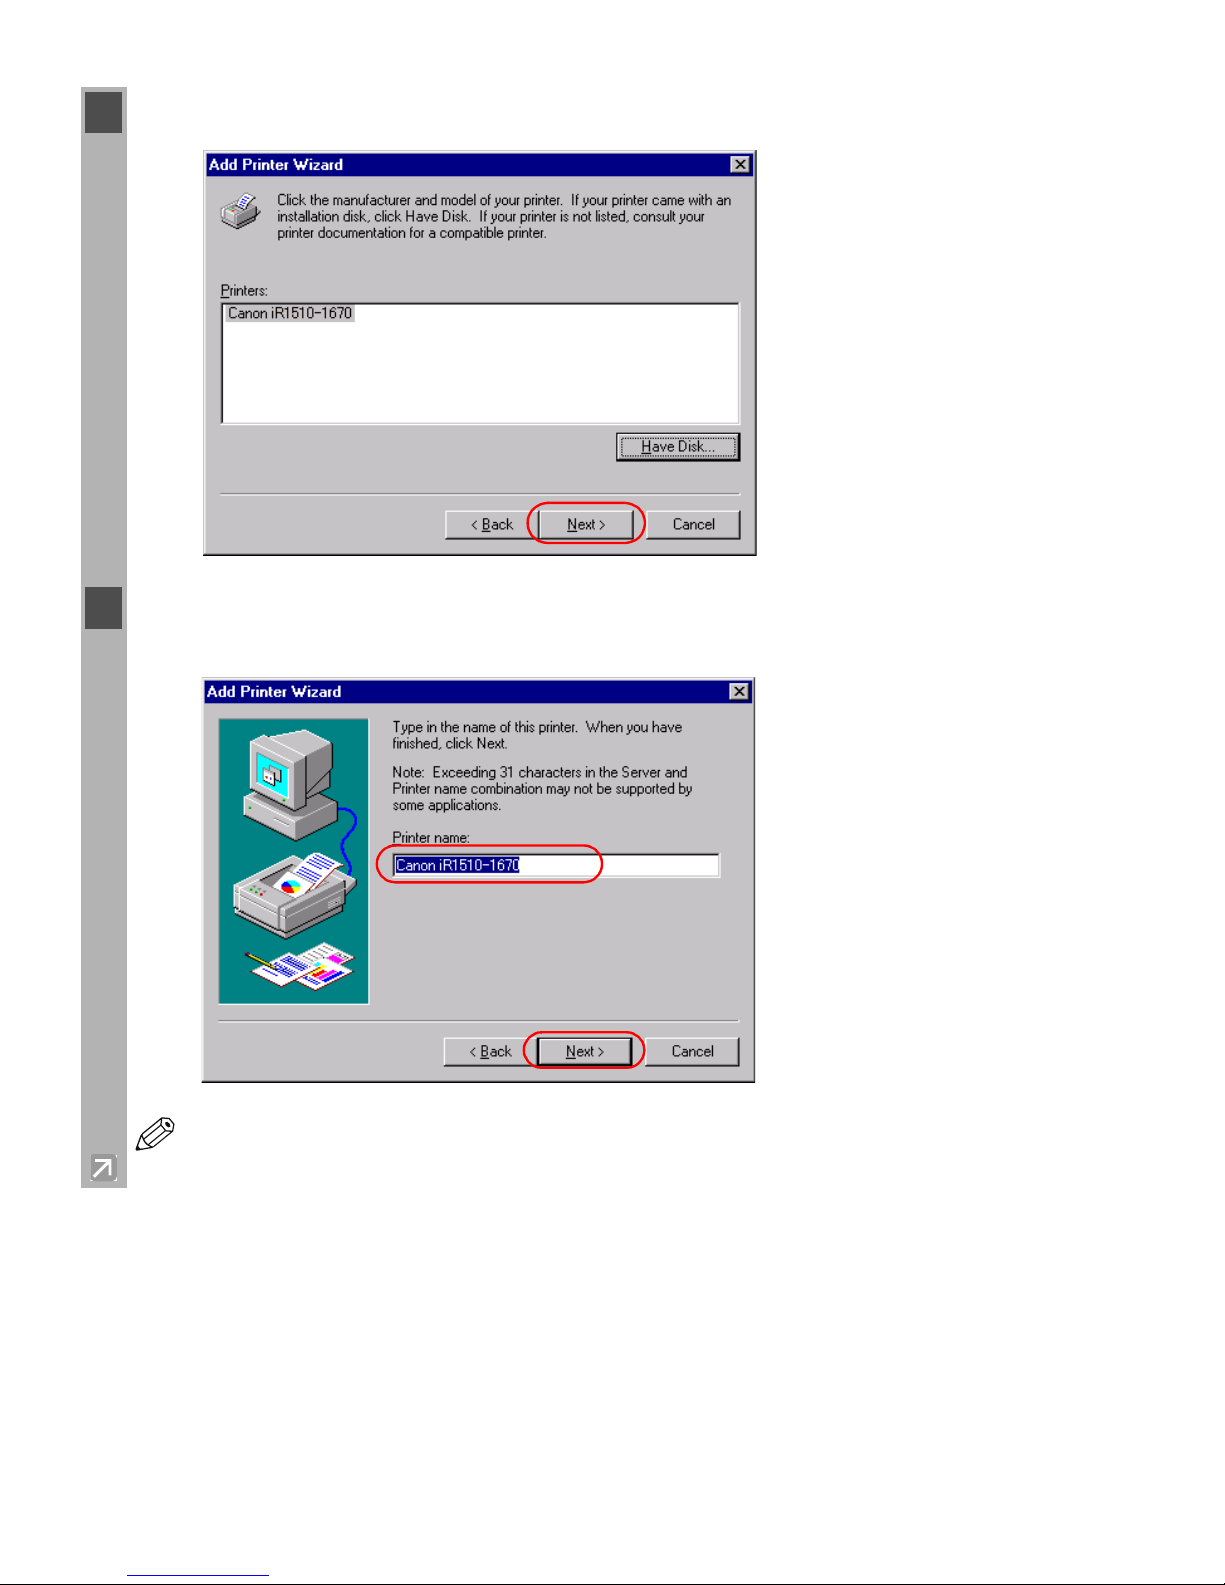
8 Select your printer model from the list of printers displayed click Next.
9 Click Next to accept the default printer name, or enter the name you wish to use click
Next.
NOTE
If you already have another printer installed, you will be asked whether to use this
printer as the default.
Page 37
2-25
2
Installing Canon Advanced Printing Technology (CAPT)
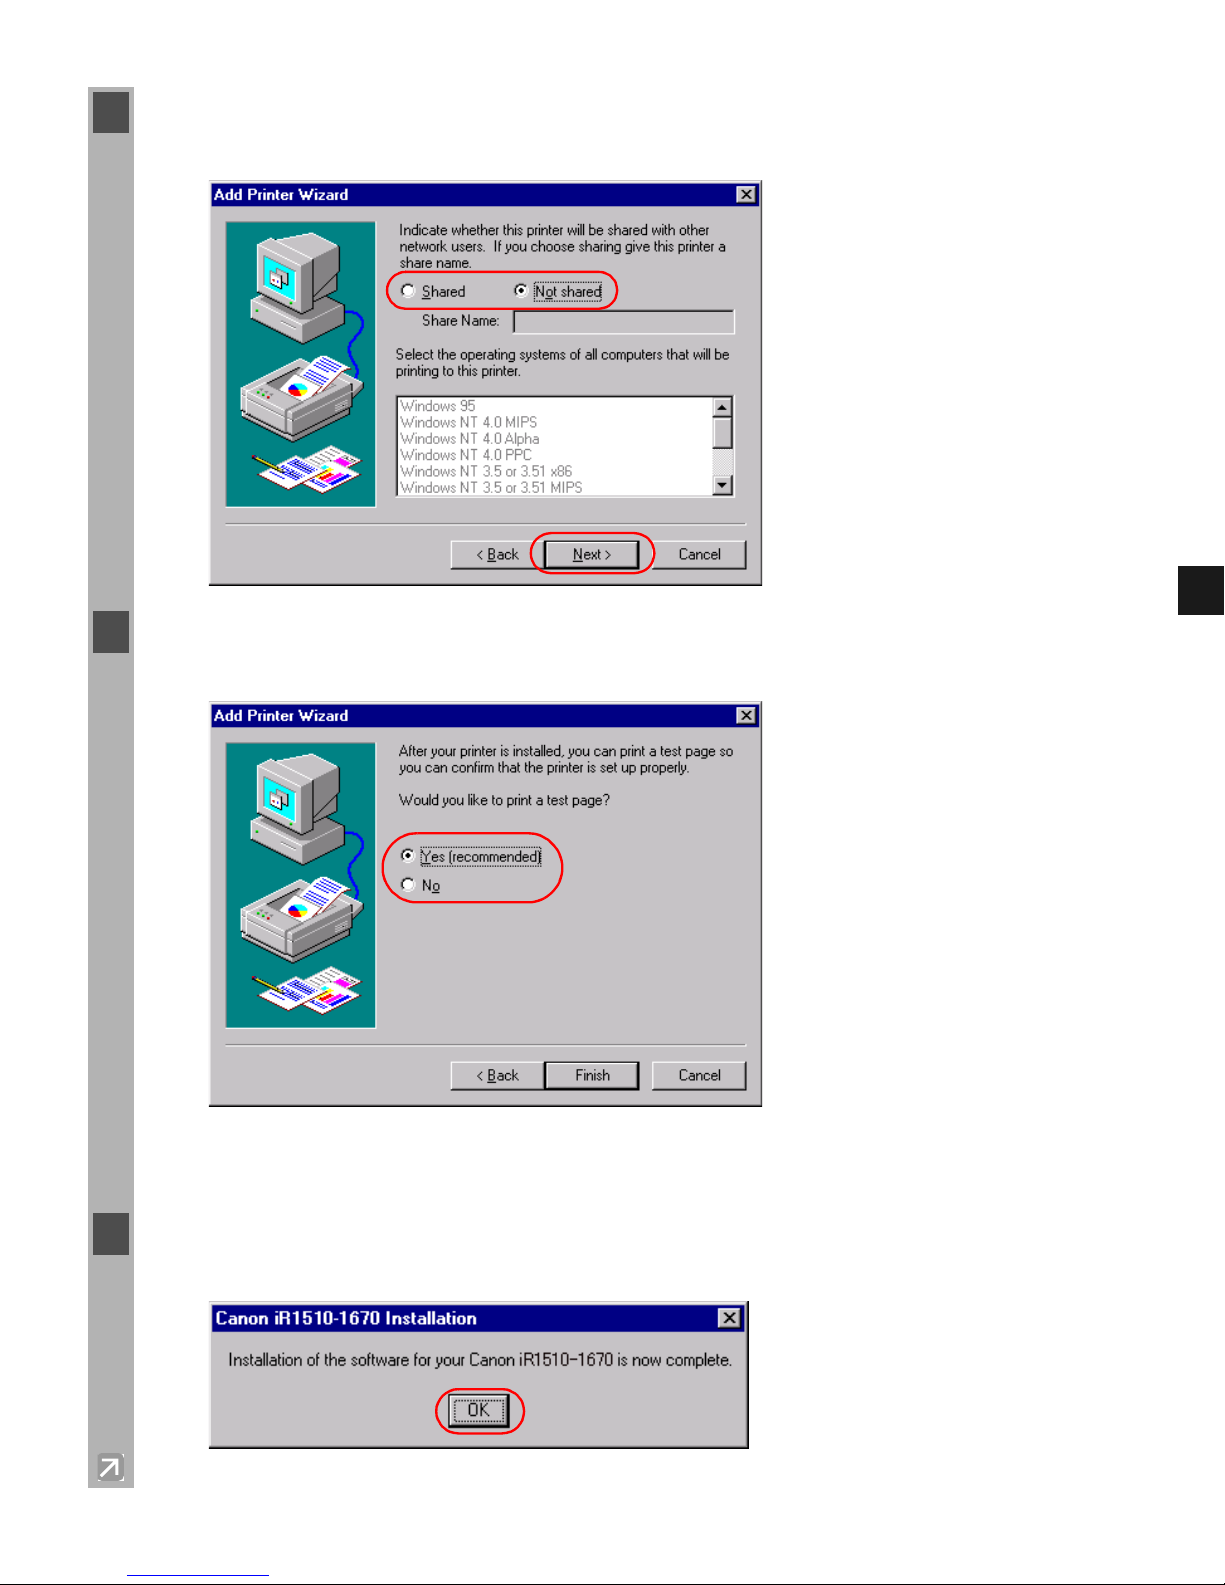
10 Select whether this printer is shared with other computers. If it is shared, select all the
operating systems that will use this printer. Click Next.
11 Click Yes (recommended) if you want to print a test page, or No if you do not want to print
a test page click Finish.
Windows creates the Canon iR1510-1670 icon on the Desktop, and the Canon iR1510-1670
icon is added to the Printers folder.
12 When the installation is complete, the following dialog box appears. Click OK to close the
box.
Page 38
2-26
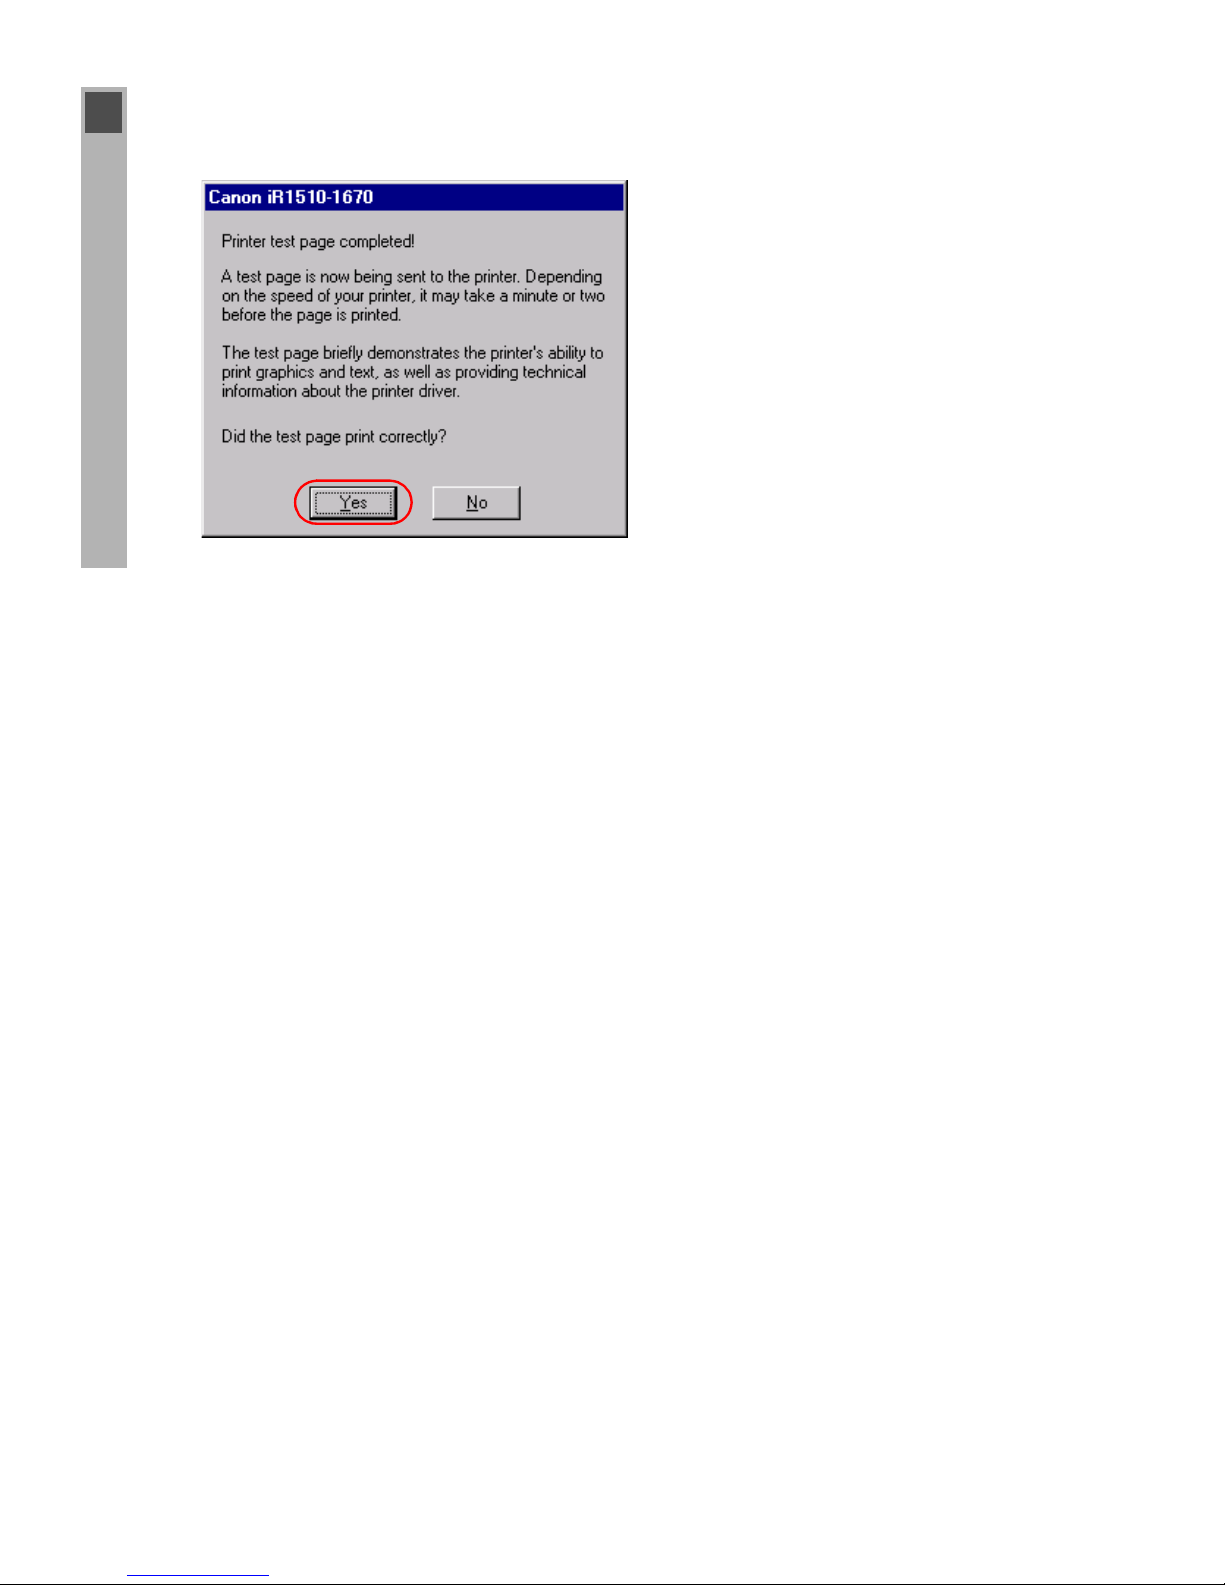
13 If you opted to print a test page, the test page prints after the installation completes, and the
following dialog appears. If the test page printed correctly, click Ye s.
Page 39
2-27
2
Installing Canon Advanced Printing Technology (CAPT)
■ Windows 2000 Add Printer Wizard
To install CAPT on a local computer using Windows 2000, you can use the Add Printer
Wizard.
The following is the installation procedure using a parallel port, under Windows 2000.
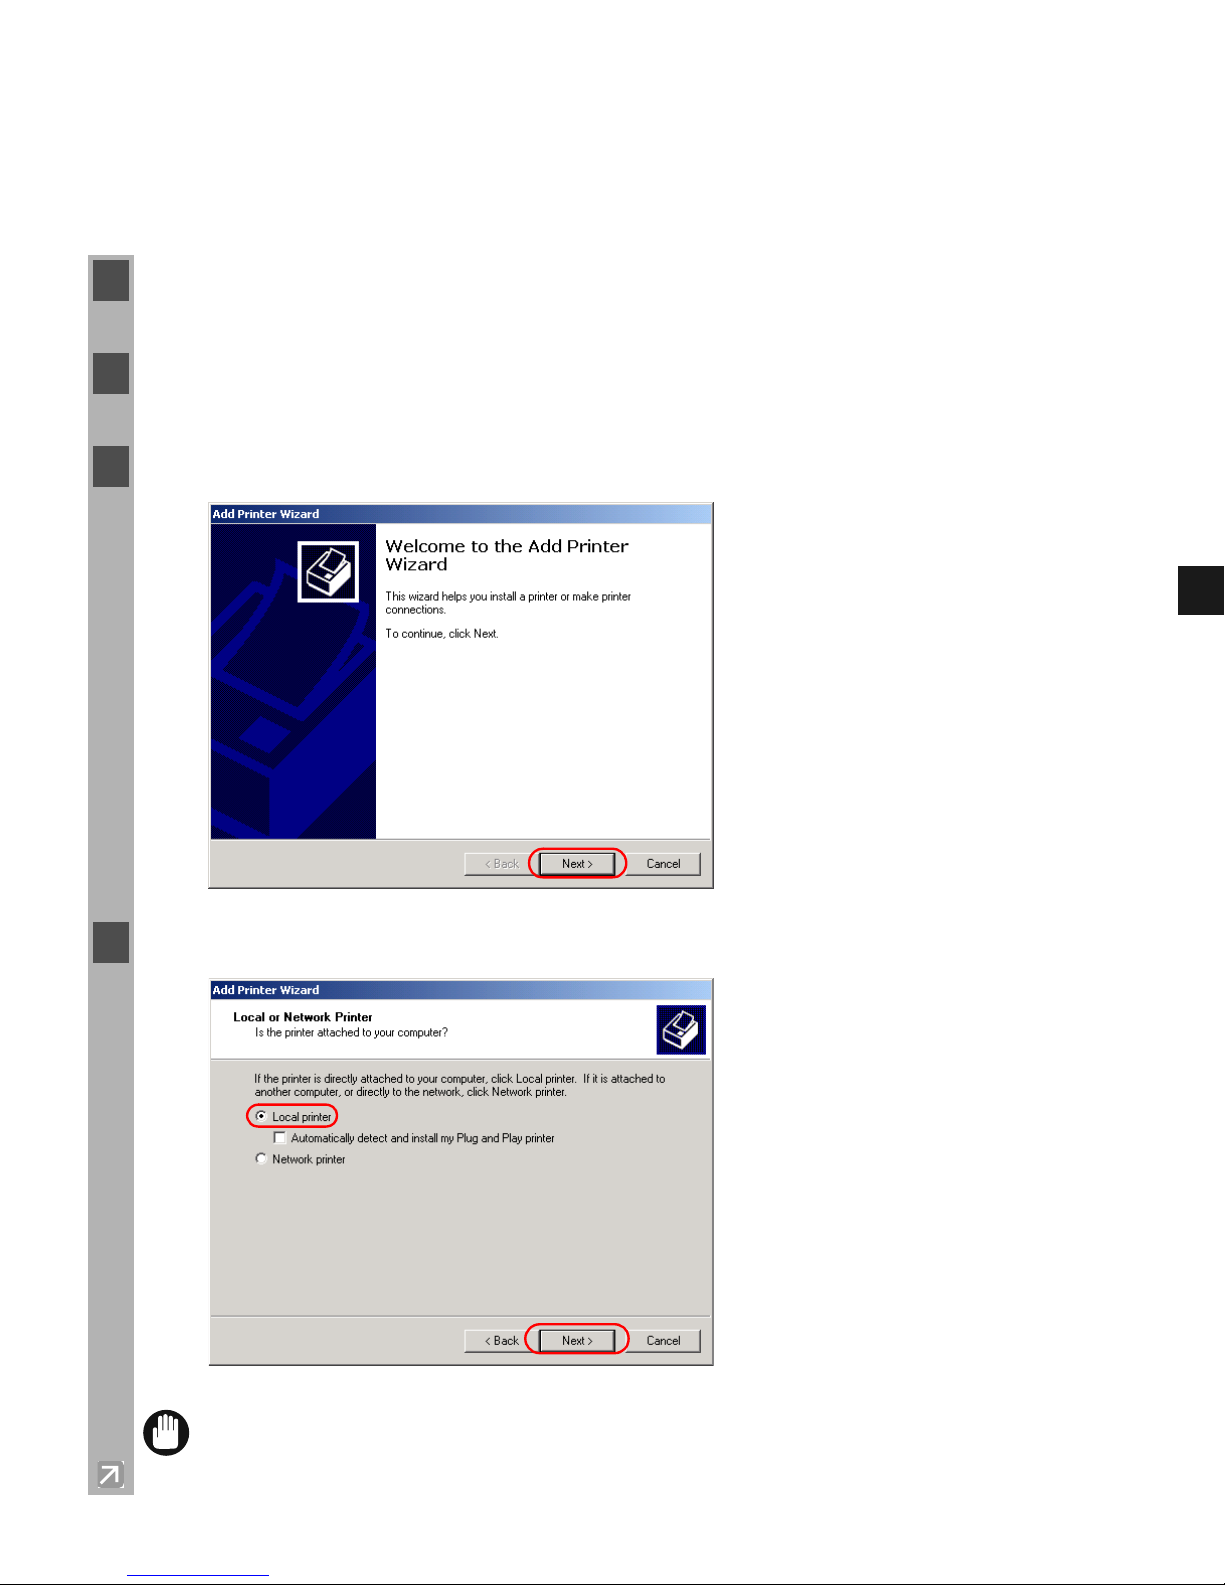
1 Log on as a member of Administrators. The full control access right for the printer is
necessary for installation of CAPT.
2 From the Start menu, select Settings Printers. The Printers folder appears.
3 Double-click the Add Printer icon. The Add Printer Wizard dialog box appears. Click Next.
4 Select Local printer click Next.
IMPORT ANT
Checking “Automatically detect and install my Plug and Play printer” is not
recommended.
Page 40
2-28
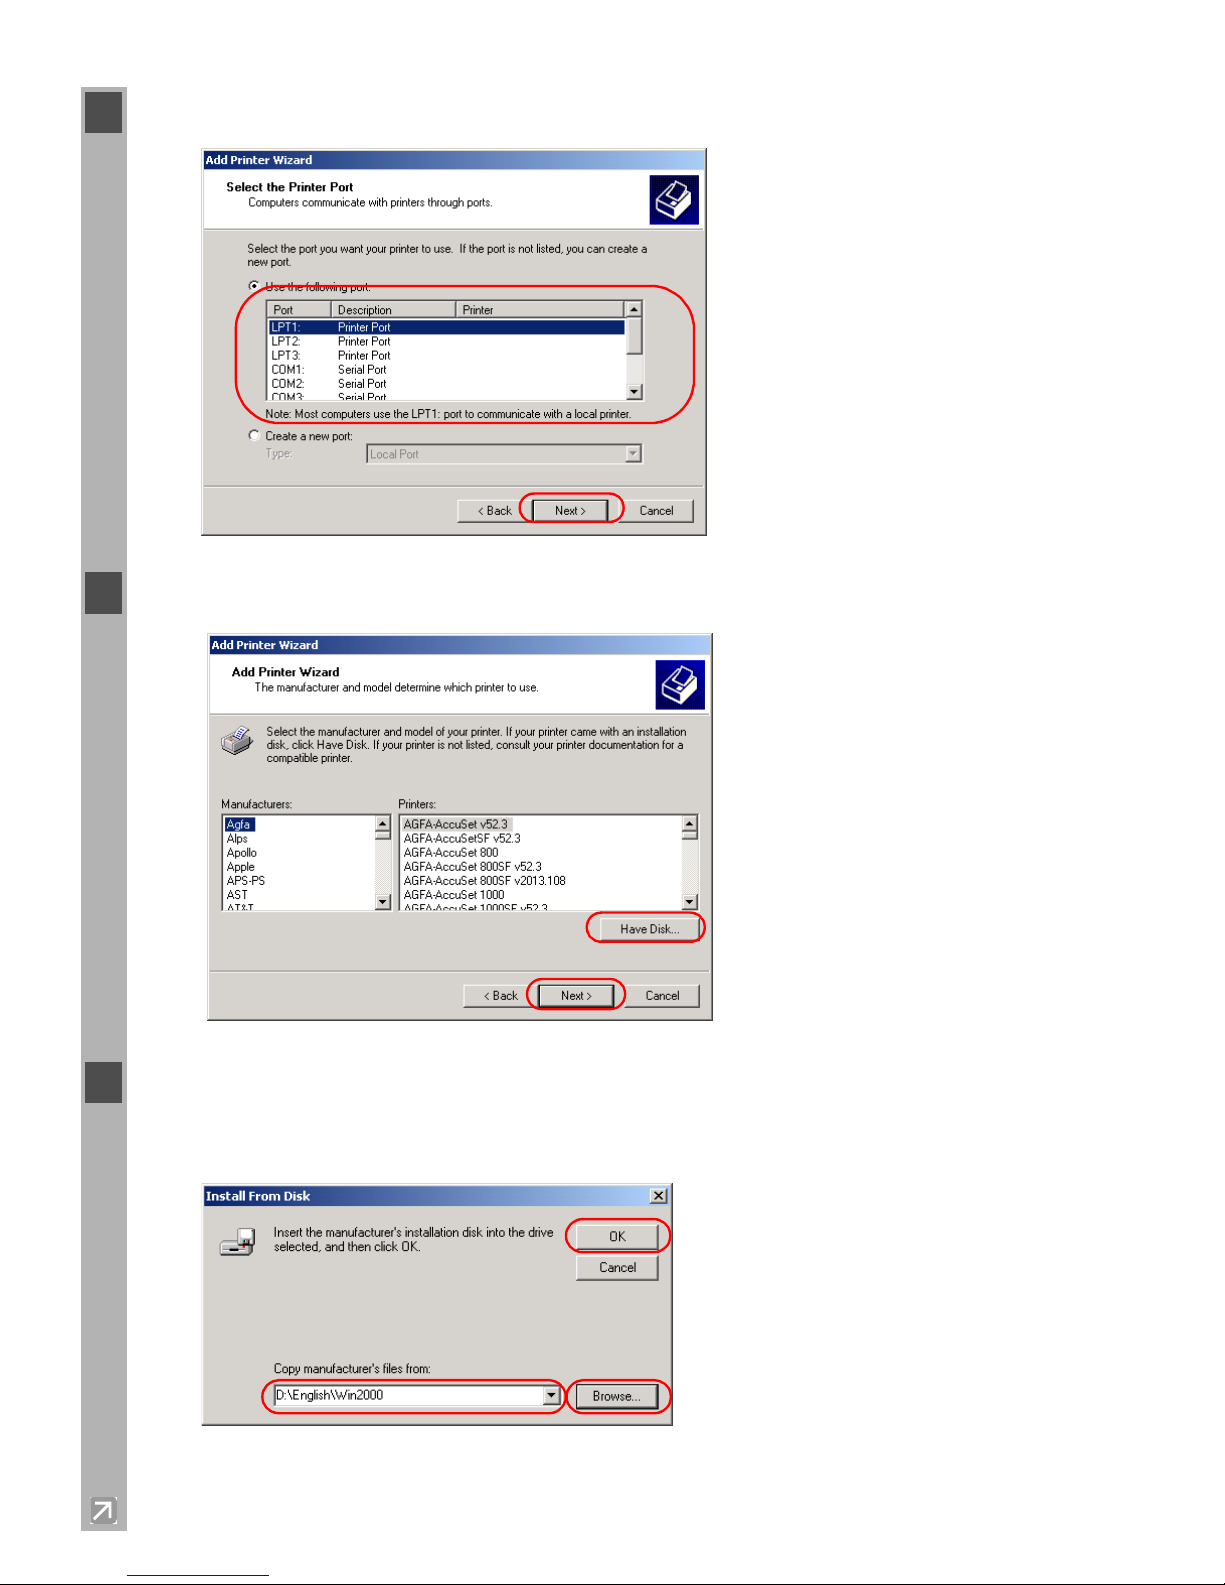
5 Select the printer port or ports you want to use click Next.
6 Click Have Disk in the Manufacturers/Printers dialog box.
7 The Install From Disk dialog box appears. Place the CD-ROM into the CD-ROM drive.
Use Browse to select the directory or enter the path name that contains CAPT click Open
OK.
For example, if you are using the CD-ROM to install CAPT, and your CD-ROM drive is
drive “D:”, the path name would be “D:\English\Win2000”.
Page 41
2-29
2
Installing Canon Advanced Printing Technology (CAPT)
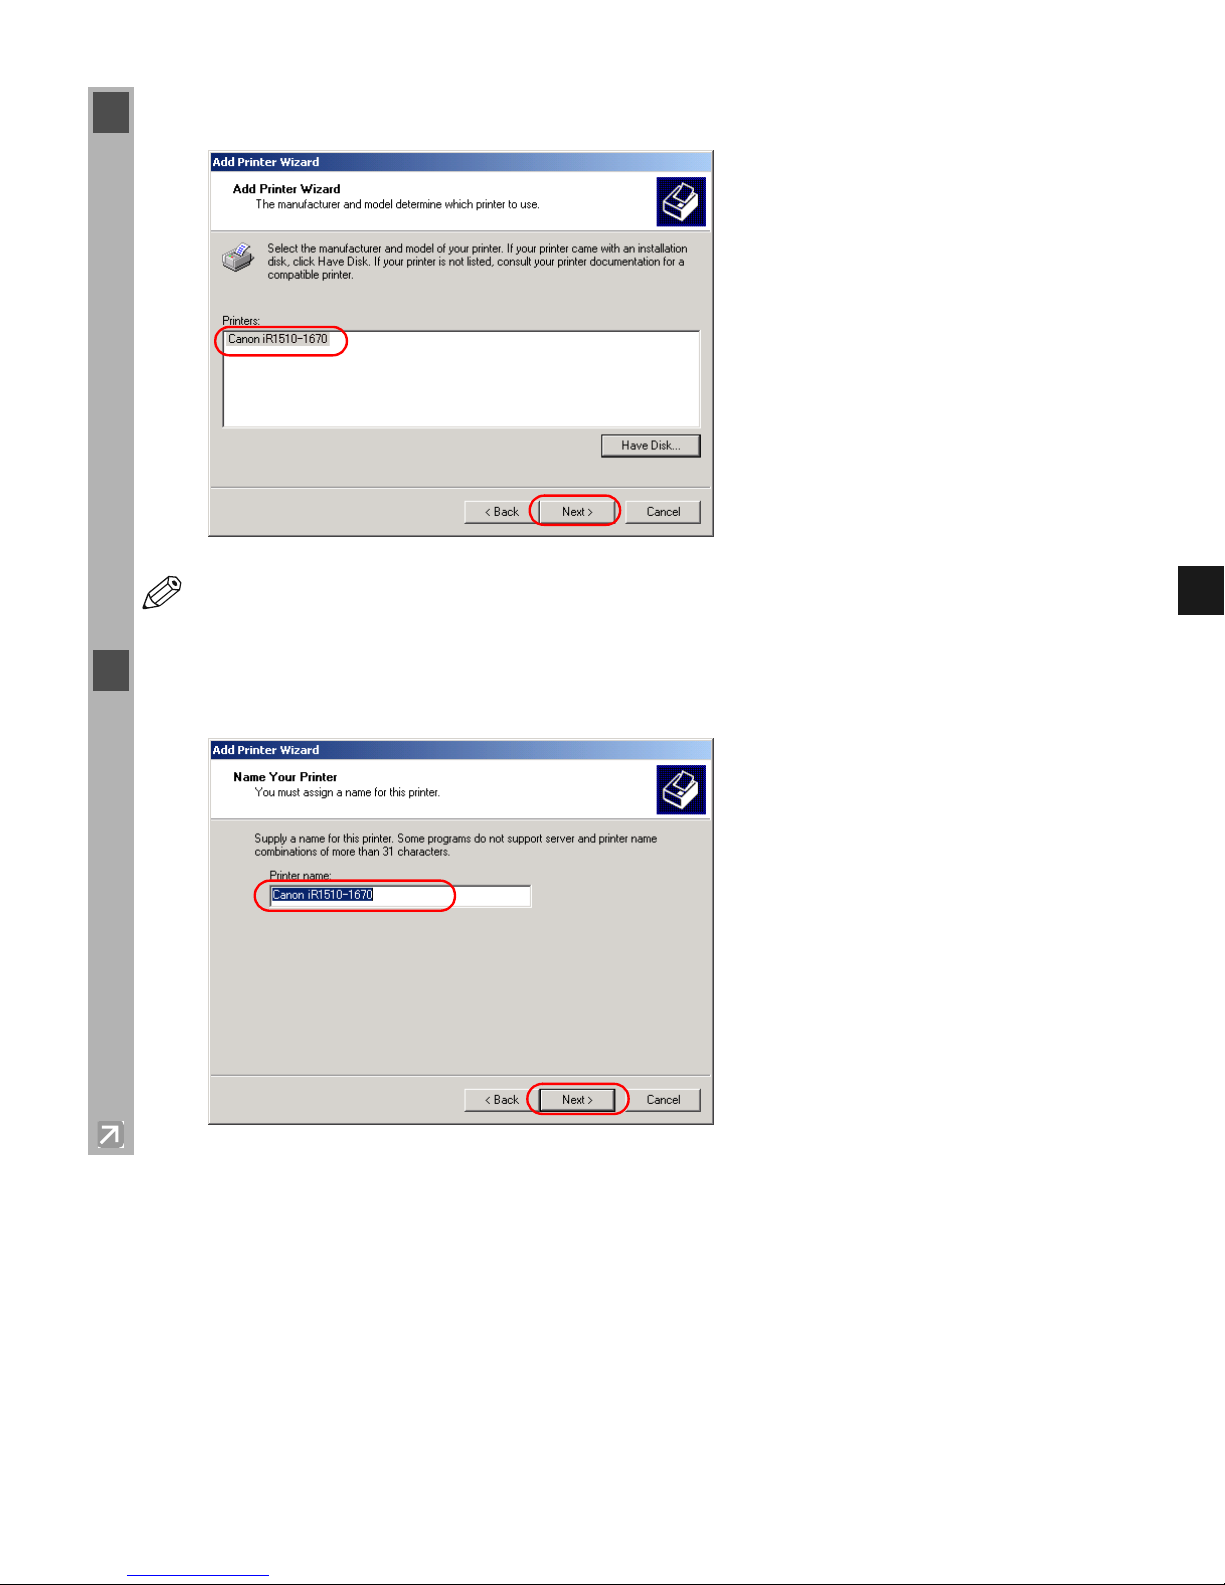
8 Select your printer model from the list of printers displayed click Next.
NOTE
If you already have another printer installed, you will be asked whether to use this
printer as the default.
9 Click Next to accept the default printer name, or enter the name you wish to use click
Next.
Page 42
2-30
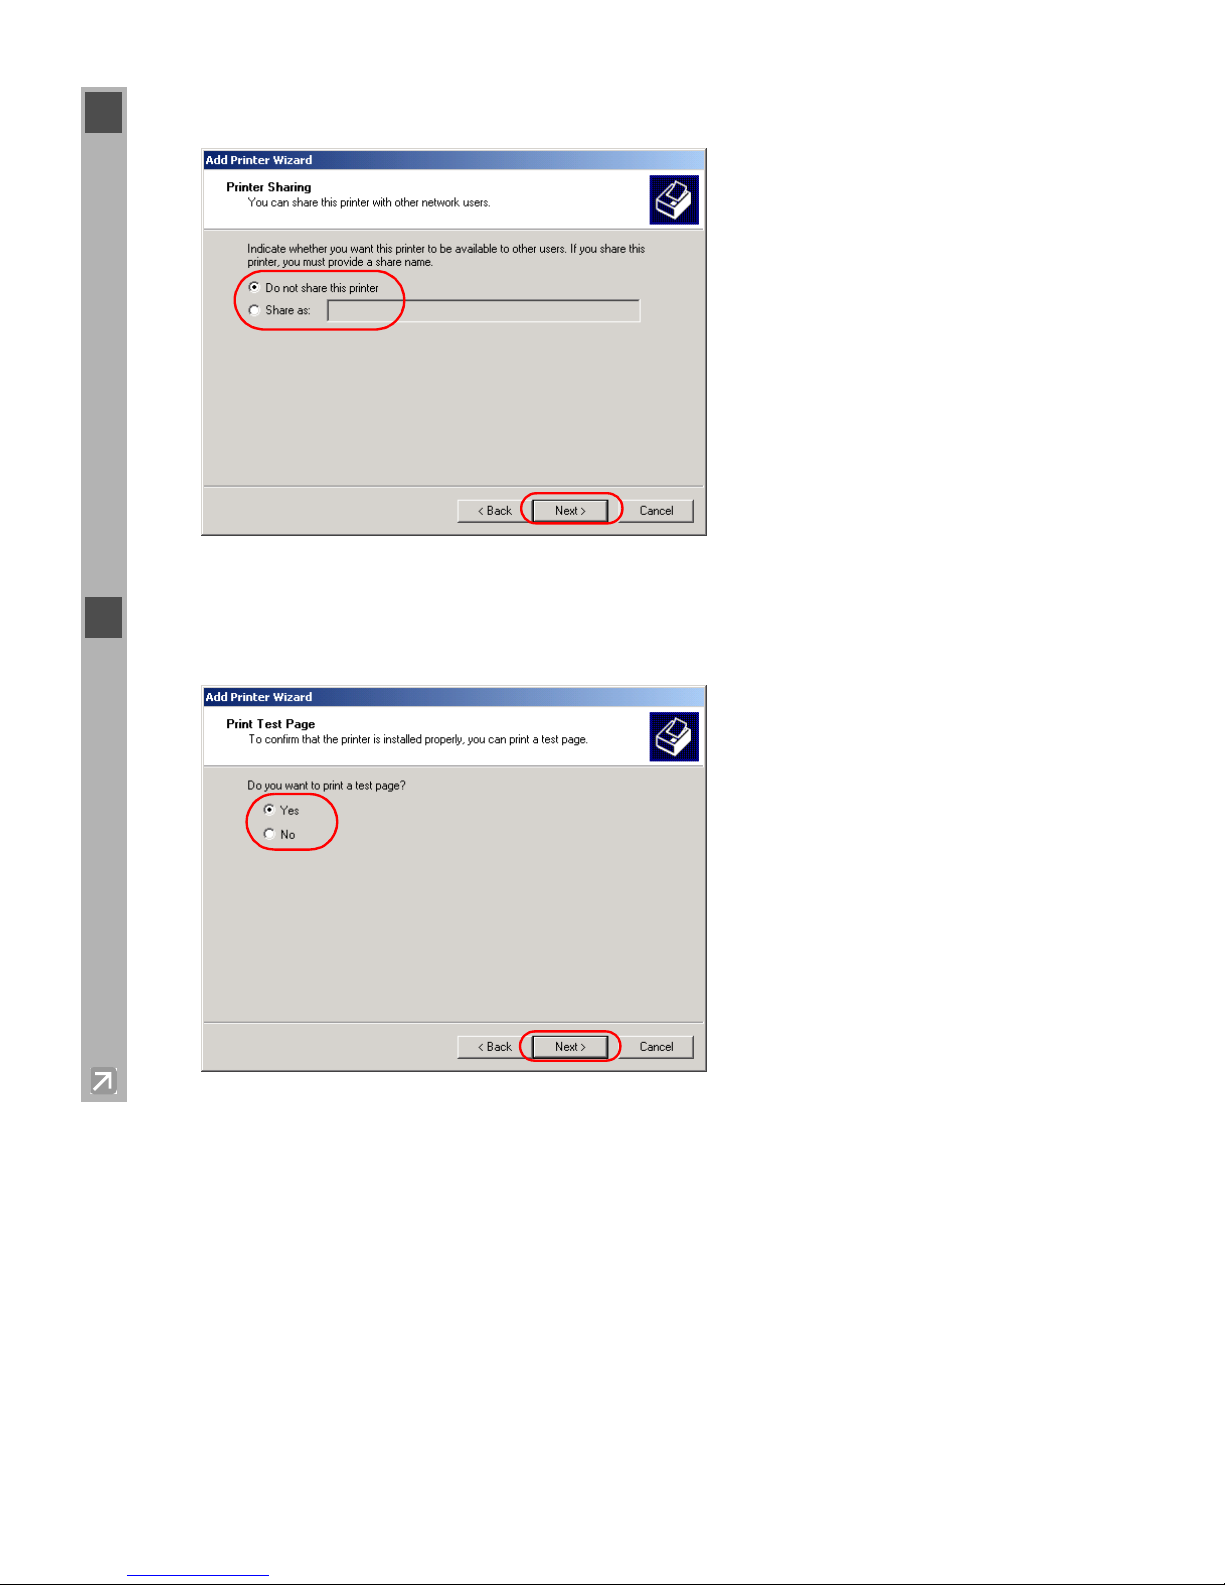
10 Select whether this printer is shared with other computers click Next.
11 Click Ye s if you want to print a test page, or No if you do not want to print a test page
click Next.
Page 43
2-31
2
Installing Canon Advanced Printing Technology (CAPT)
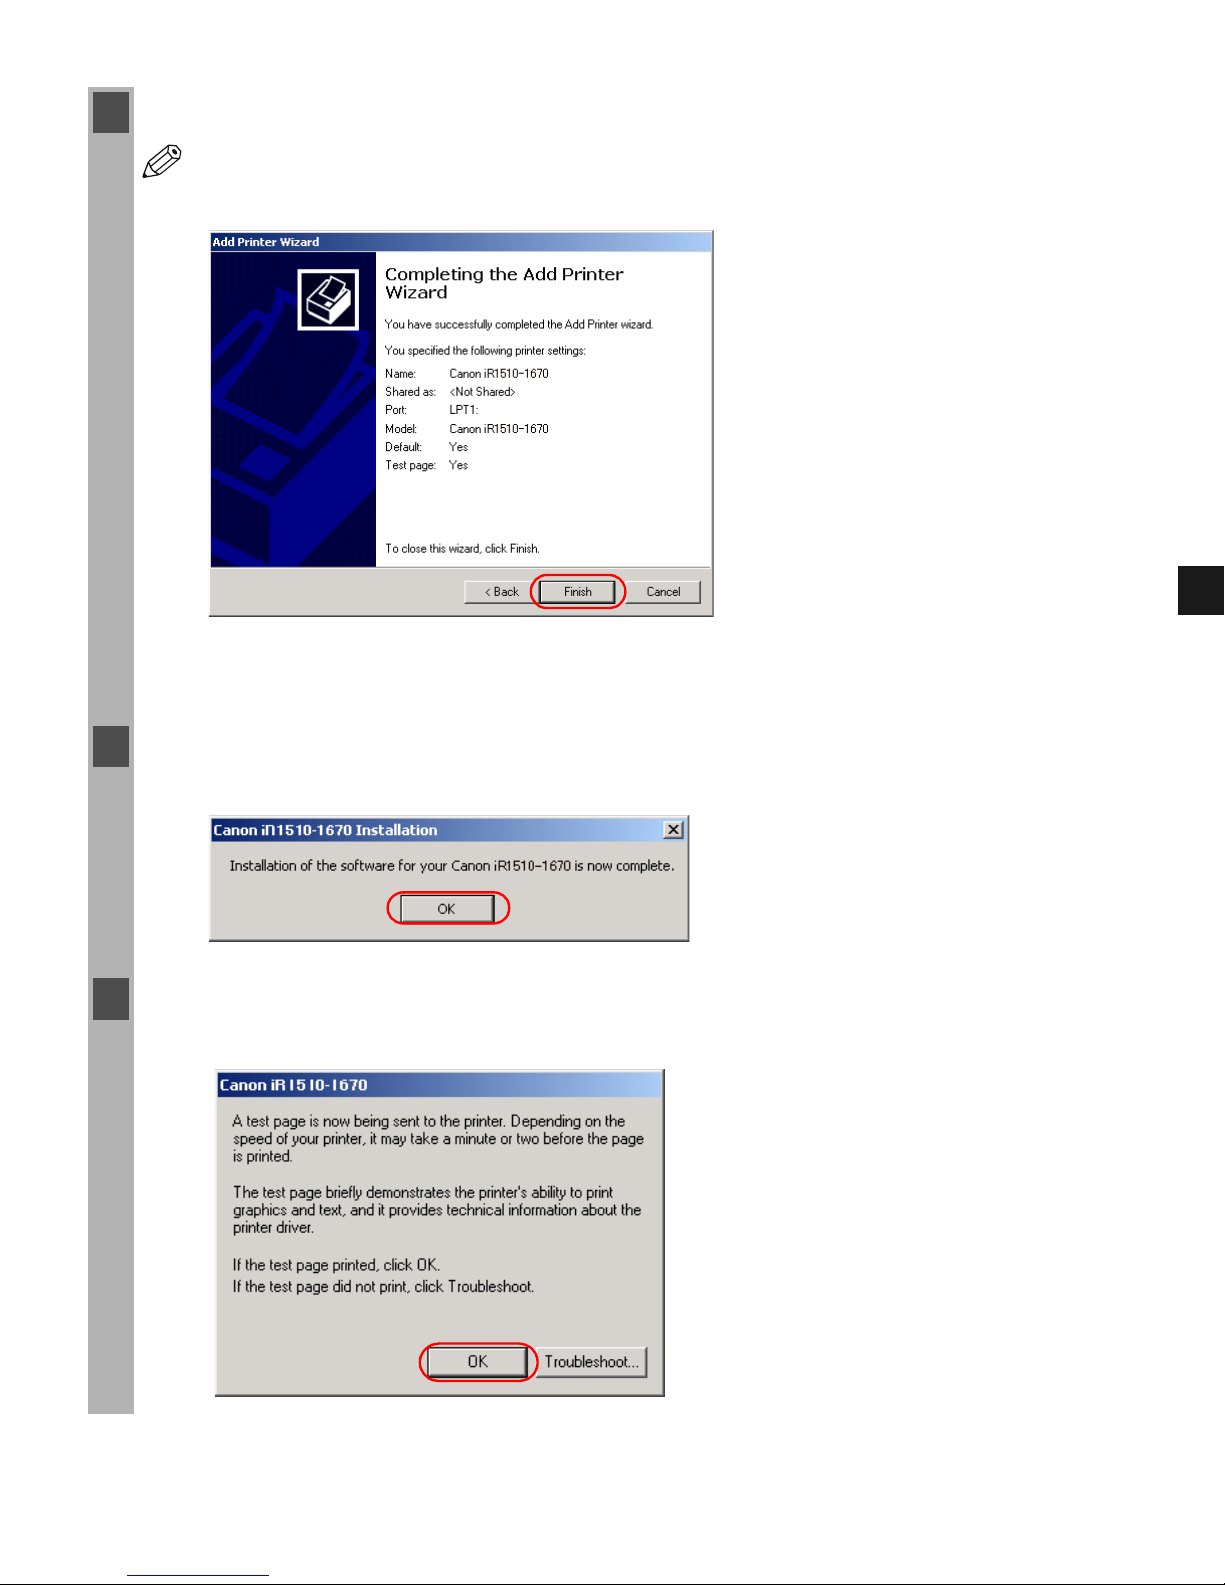
12 Click Finish.
NOTE
Click Yes if the Digital Signature Not Found dialog box appears.
Windows creates the Canon iR1510-1670 icon on the Desktop, and the Canon
iR1510-1670 icon is added to the Printers folder.
13 When the installation is complete, the following dialog box appears. Click OK to close the
box.
14 If you opted to print a test page, the test page prints after the installation completes, and the
following dialog appears. If the test page printed correctly, click OK.
Page 44
2-32
■ Windows XP/Server 2003 Add Printer Wizard
To install CAPT on a local computer using Windows XP/Server 2003, you can use the Add
Printer Wizard.
The following is the installation procedure using a parallel port, under Windows XP/Server
2003.
To install the Canon iR1510-1670 printer driver to a USB port, perform the “Plug and Play”
procedure.
1 Log on as a member of Administrators. The full control access right for the printer is
necessary for installation of CAPT.
2 From the Start menu, select Printers and Faxes. The Printers and Faxes folder appears.
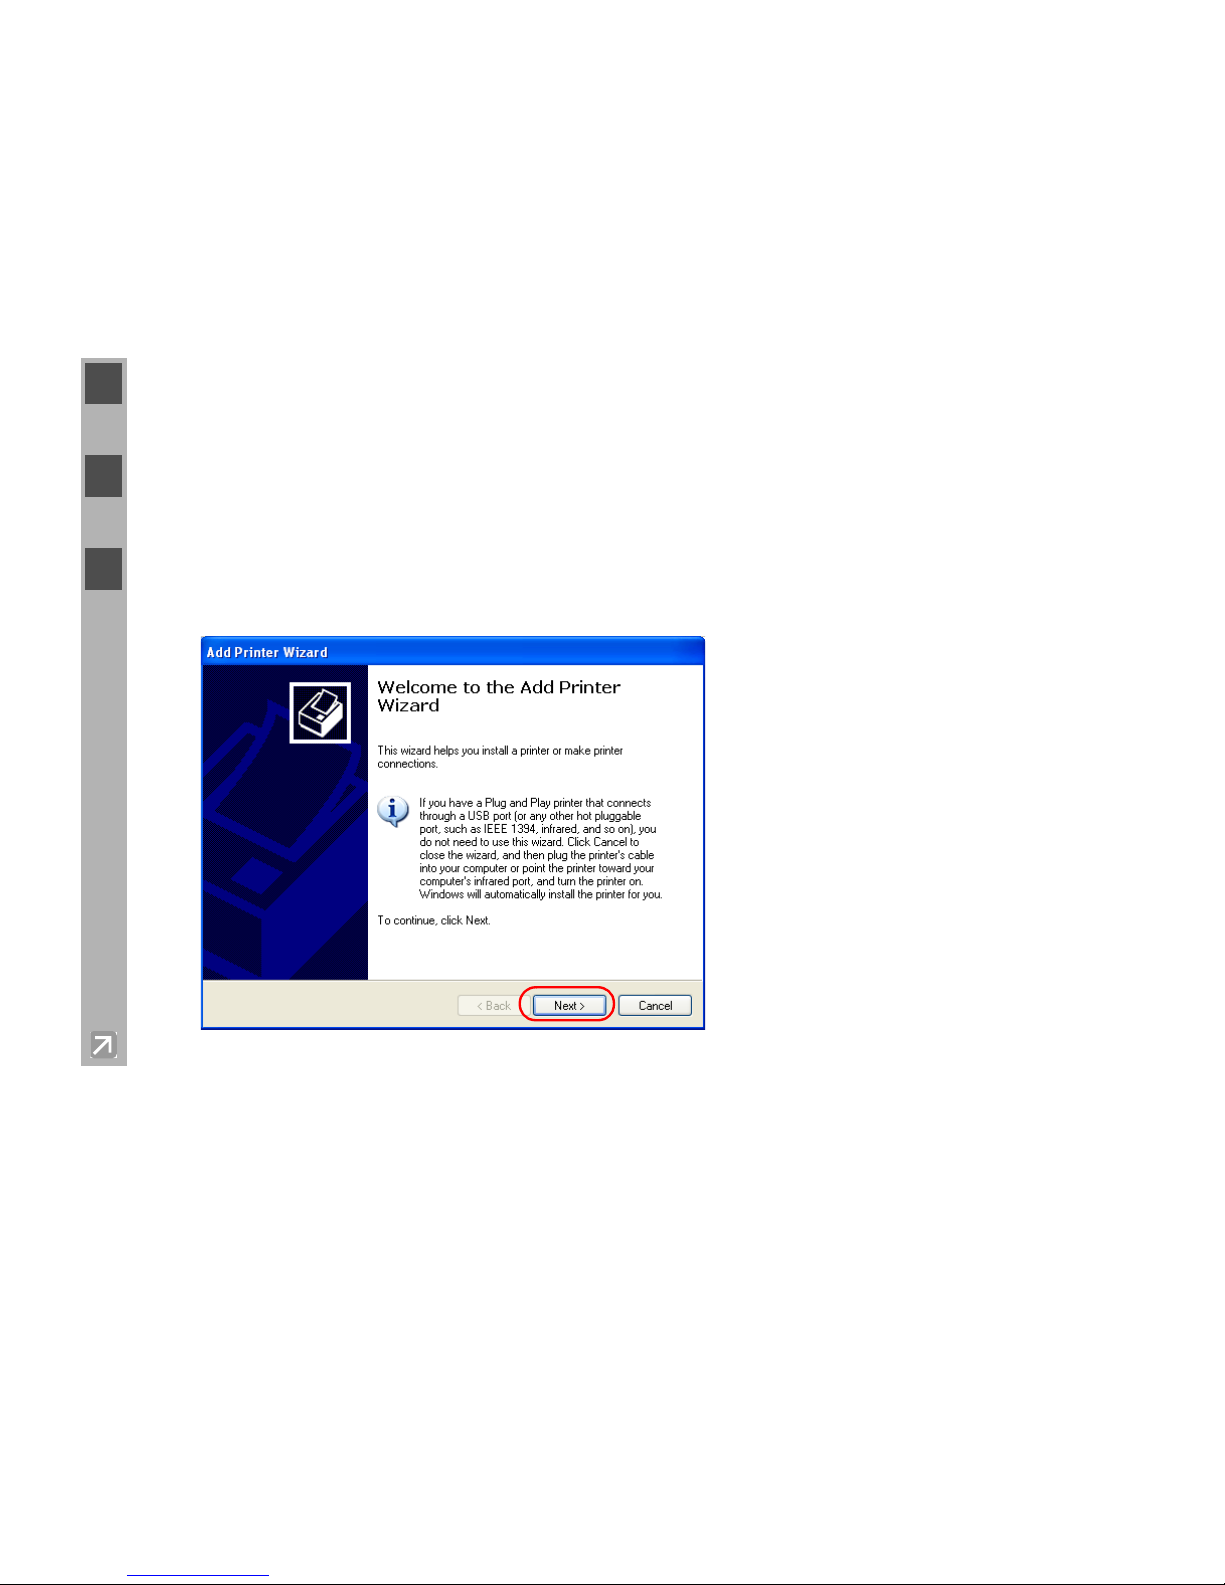
3 Double-click the Add a Printer in Printer Tasks. The Add Printer Wizard dialog box appears.
Click Next.
Page 45
2-33
2
Installing Canon Advanced Printing Technology (CAPT)
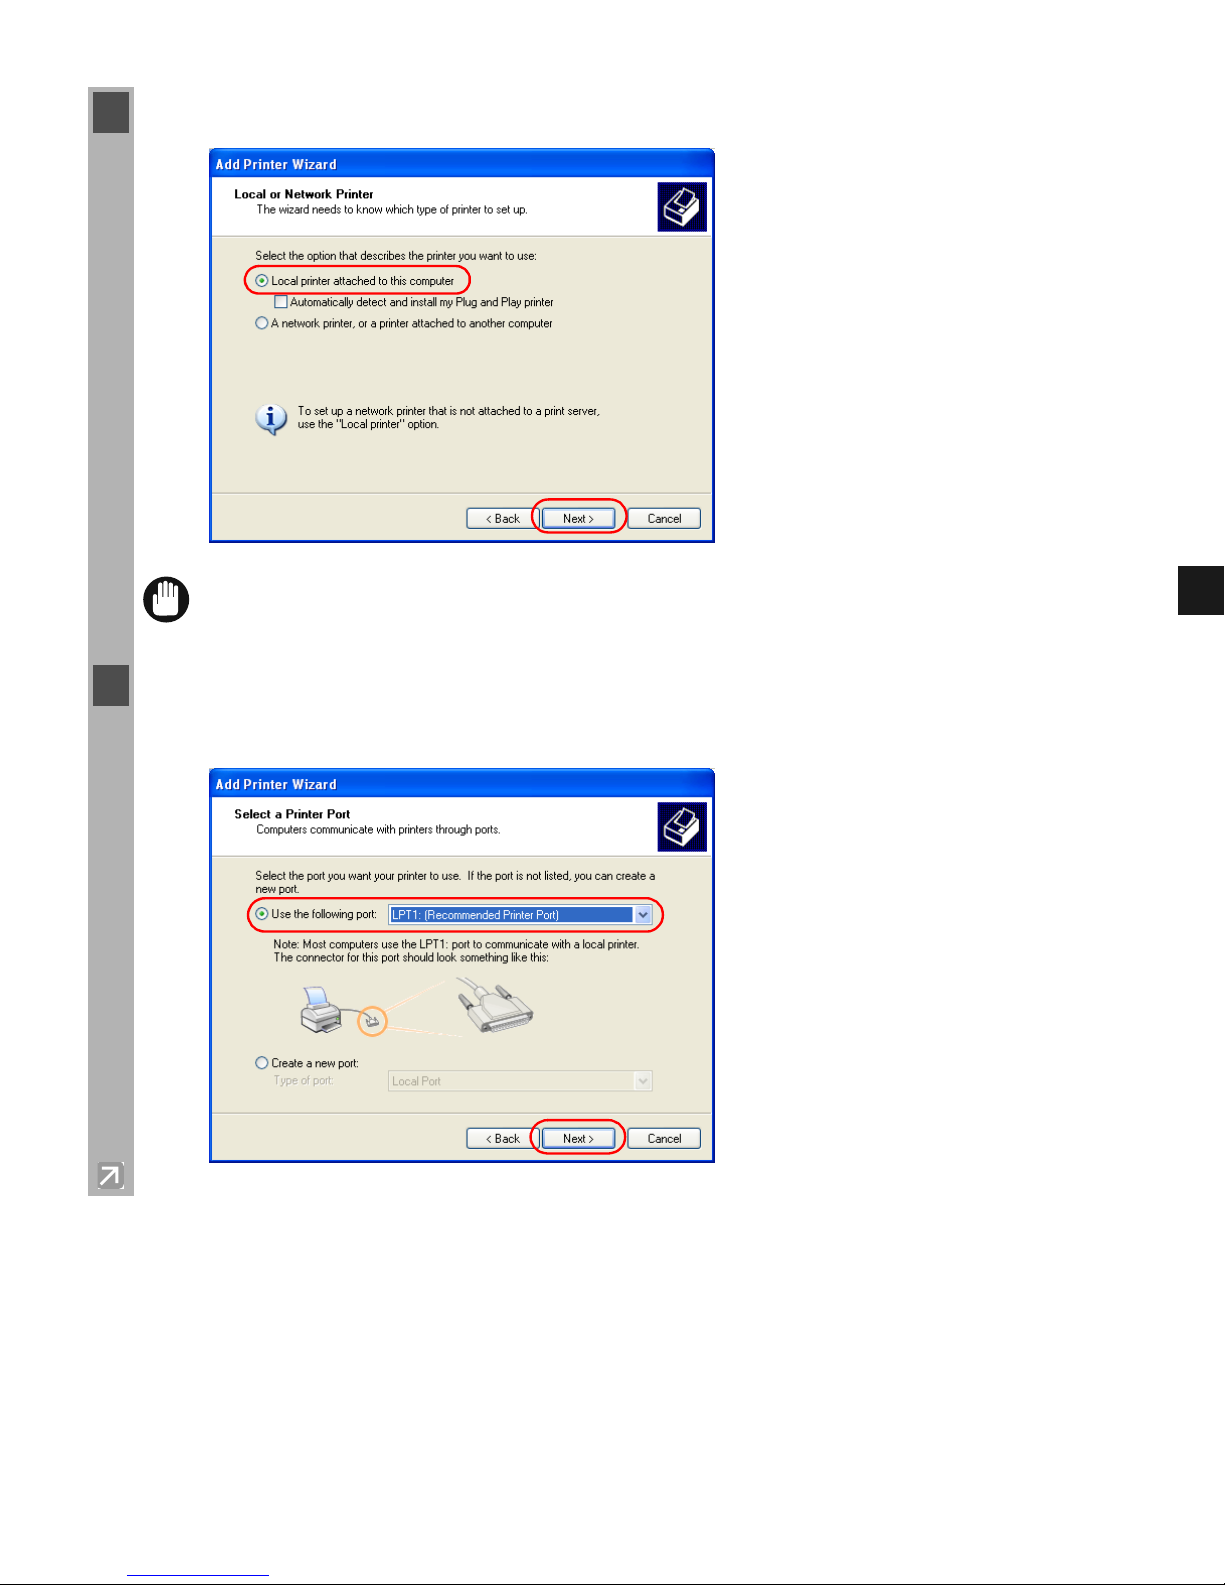
4 Select Local printer attached to this computer click Next.
IMPORT ANT
Checking “Automatically detect and install my Plug and Play printer” is not
recommended.
5 Confirm that Use the following port is selected and select the printer port you want to use
click Next.
Page 46
2-34
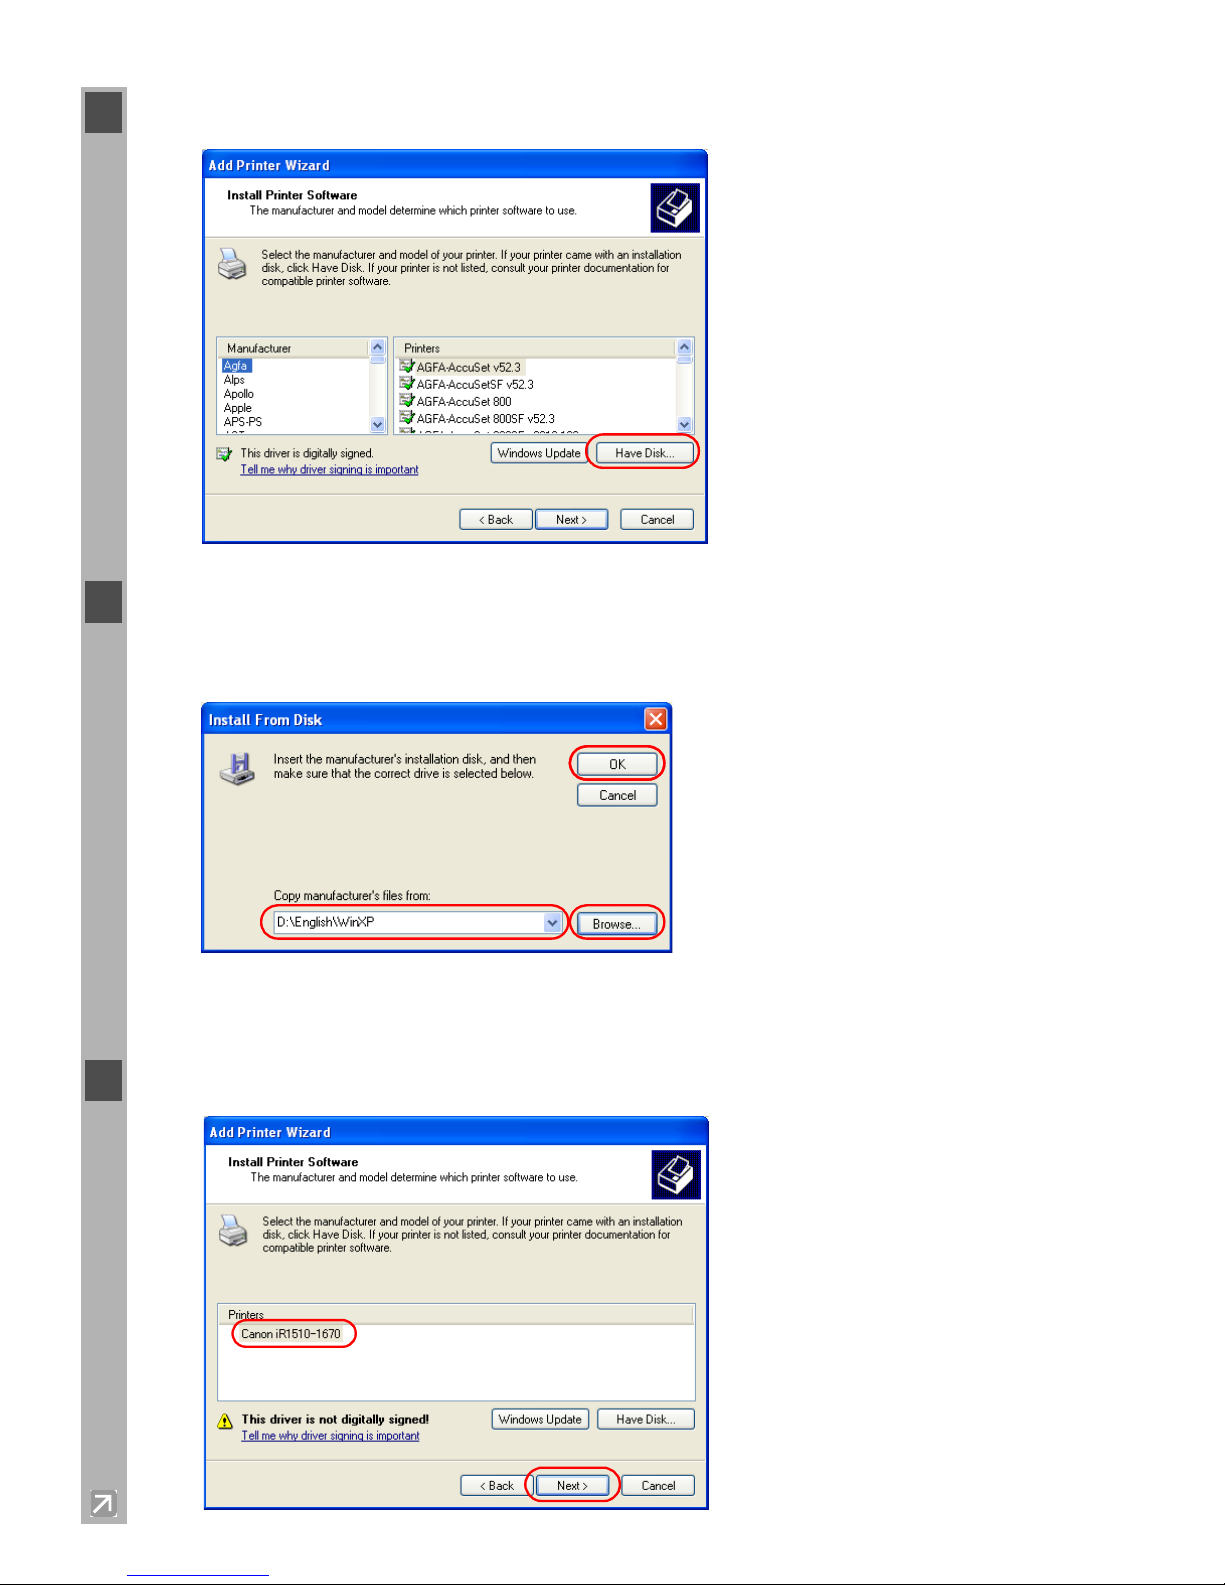
6 Click Have Disk in the Manufacturers/Printers dialog box.
7 The Install From Disk dialog box appears. Place the CD-ROM into the CD-ROM drive.
Use Browse to select the directory or enter the path name that contains CAPT click Open
OK.
For example, if you are using the CD-ROM to install CAPT, and your CD-ROM drive is
drive “D:”, the path name would be “D:\English\WinXP”.
8 Select your printer model from the list of printers displayed click Next.
Page 47
2-35
2
Installing Canon Advanced Printing Technology (CAPT)
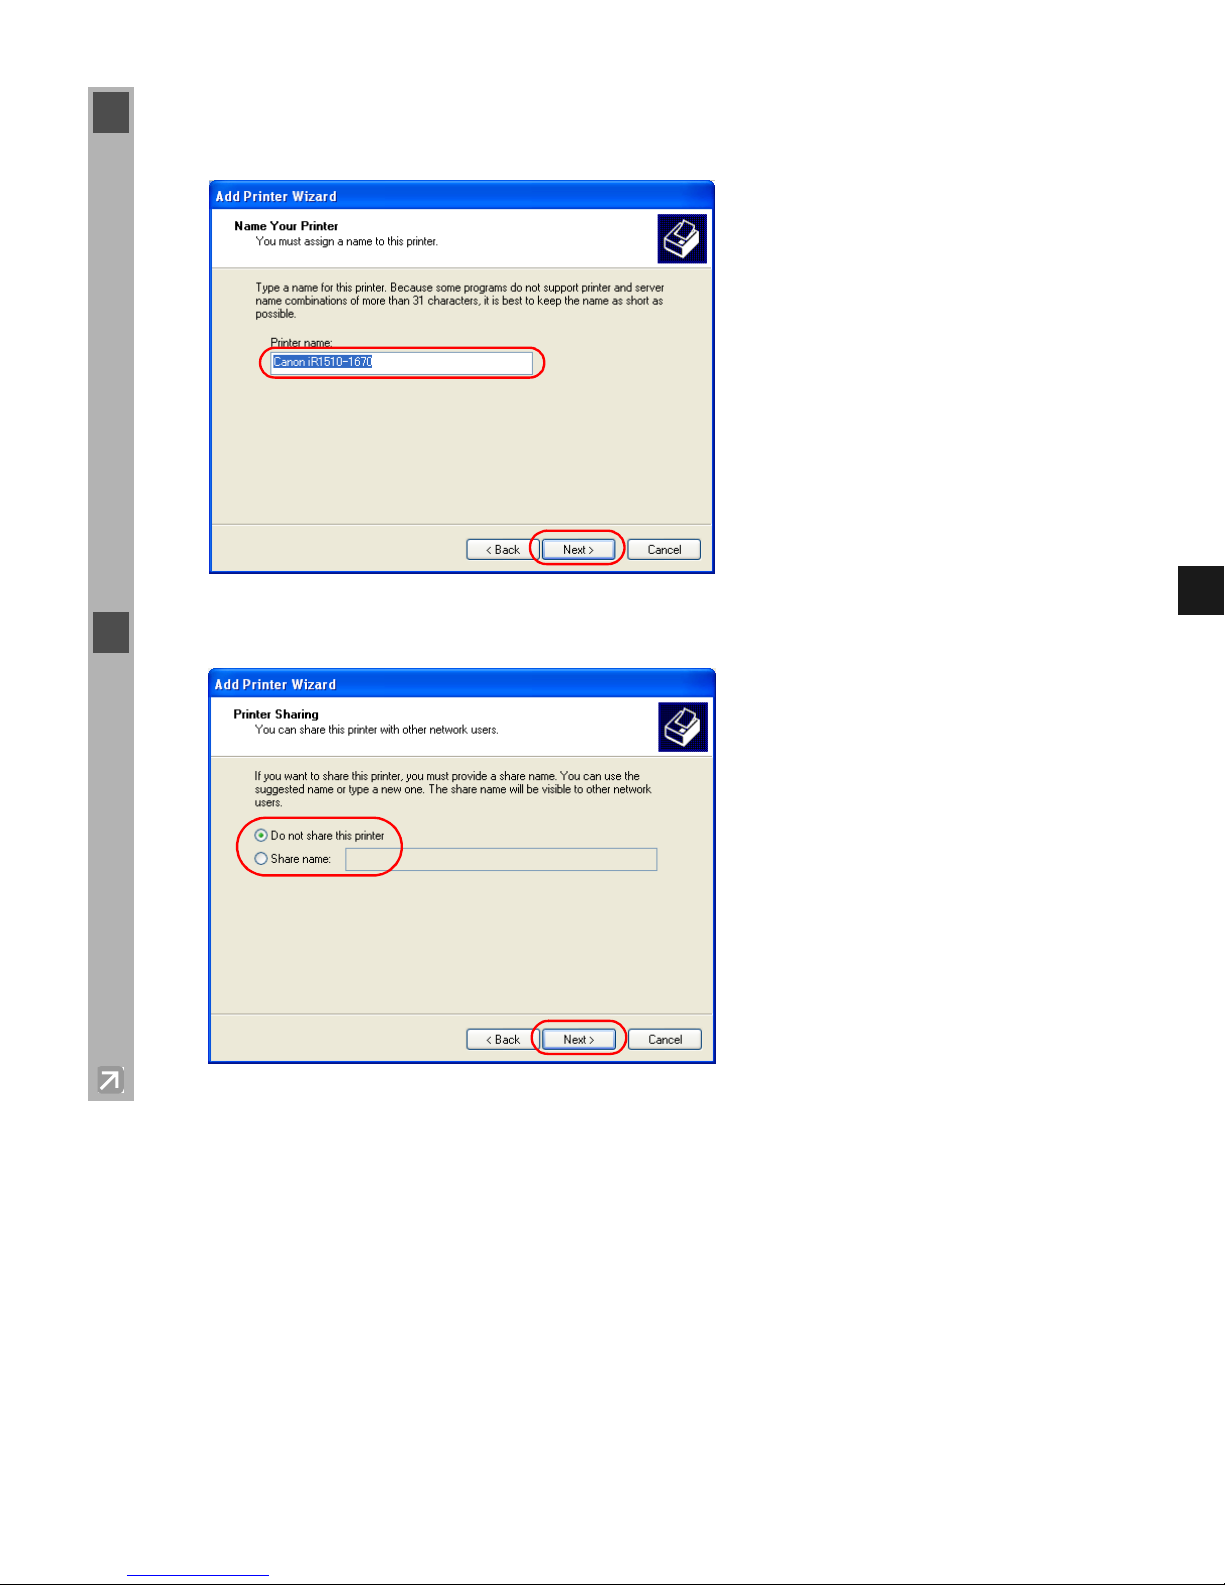
9 Click Next to accept the default printer name, or enter the name you wish to use click
Next.
10 Select whether this printer is shared with other computers click Next.
Page 48
2-36
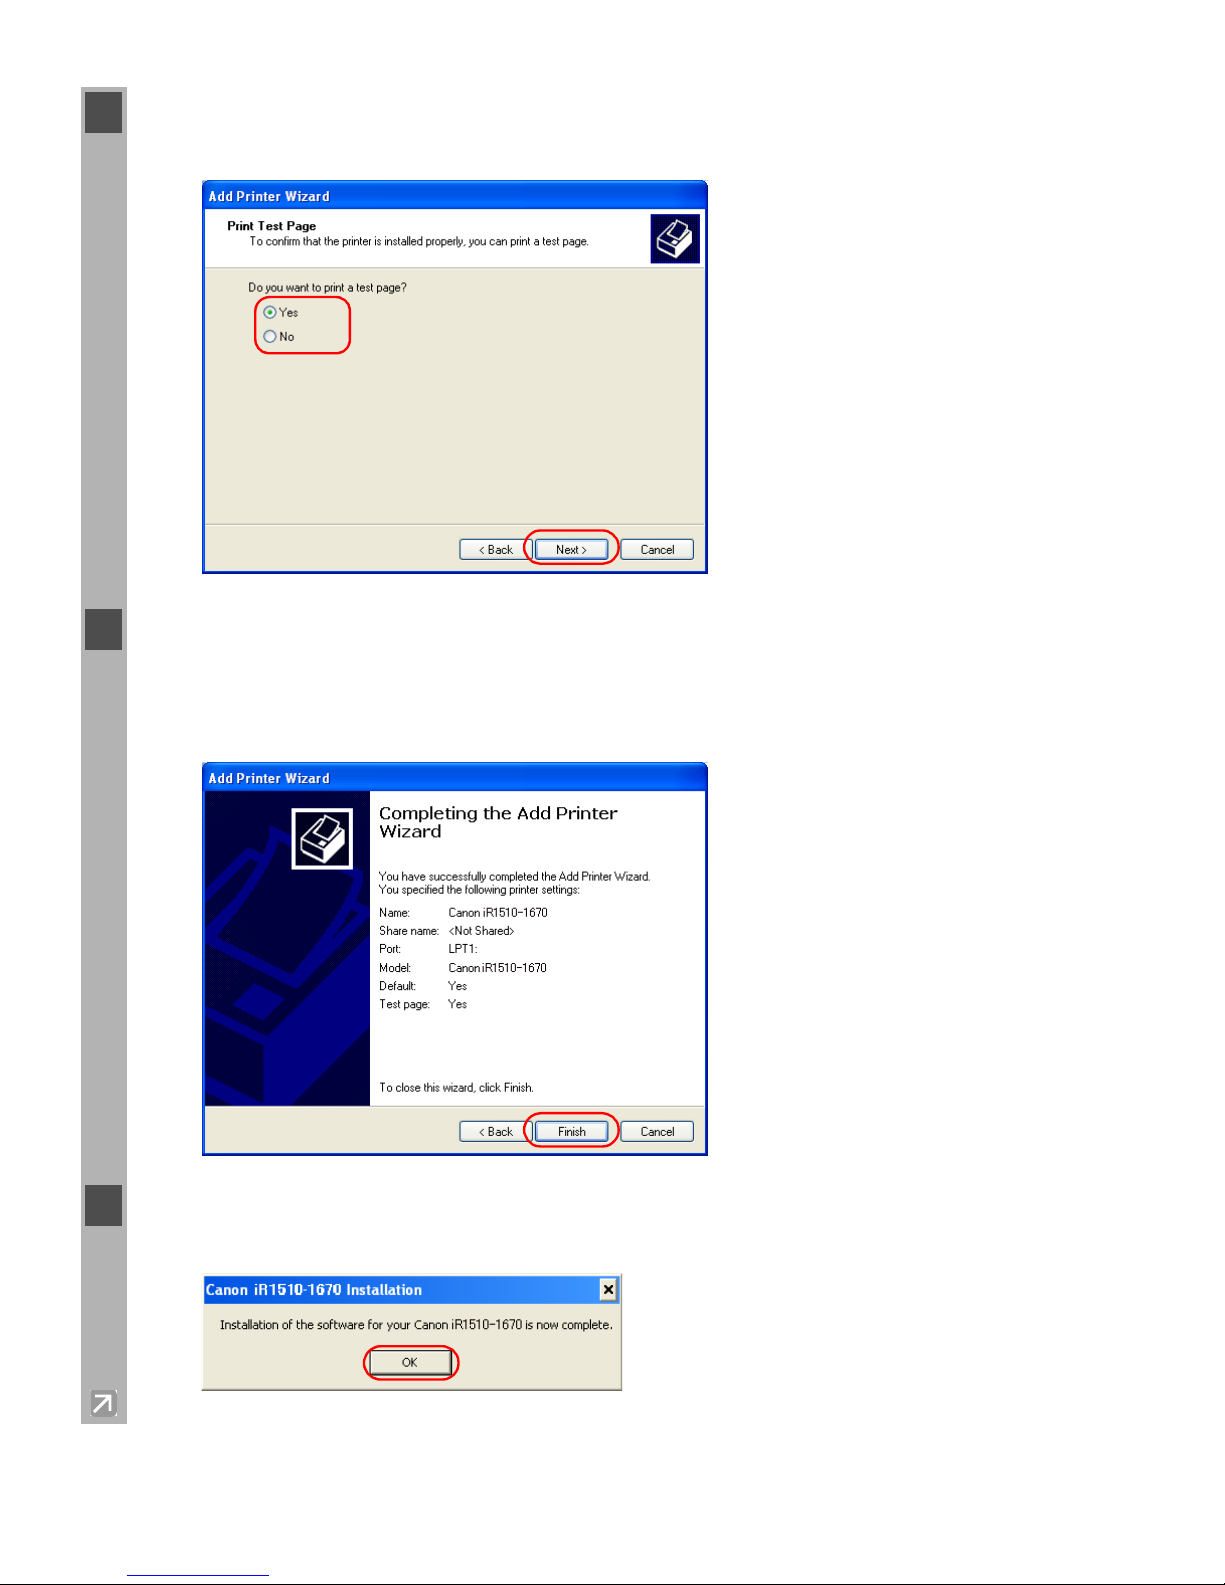
11 Click Ye s if you want to print a test page, or No if you do not want to print a test page
click Next.
12 Click Finish.
Click Continue Anyway if the Hardware Installation dialog box appears. Windows creates
the Canon iR1510-1670 icon on the desktop, and the Canon iR1510-1670 icon is added to
the Printers and Faxes folder.
13 When the installation is complete, the following dialog box appears. Click OK to close the
box.
Page 49
2-37
2
Installing Canon Advanced Printing Technology (CAPT)
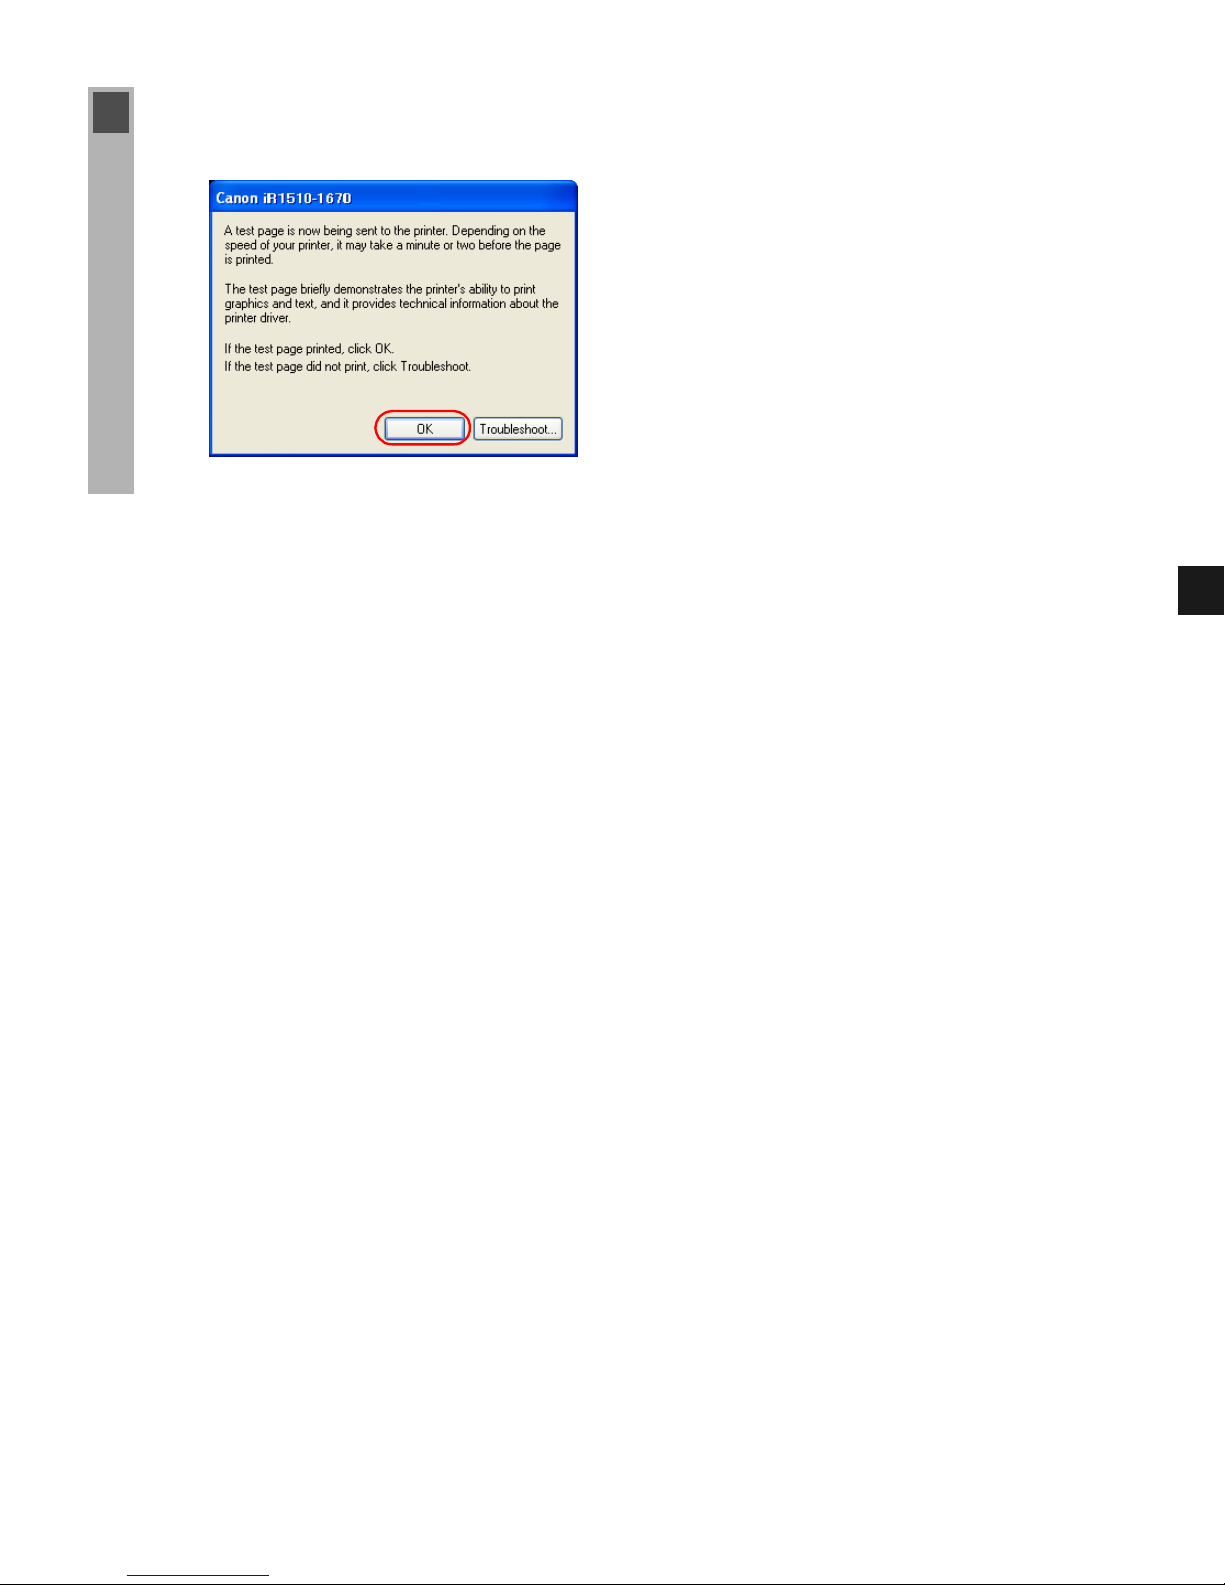
14 If you opted to print a test page, the page prints after the installation completes, and the
following dialog appears. If the test page printed correctly, click OK.
Page 50

2-38
If the imageRUNNER 1670F/1630/1610 is already on your network, you can install it in two
different ways. The easiest way is using automatic network download. If network download is
not available, you can use the Add Printer Wizard.
■
Network Download
Windows 95/98/Me and Windows NT/2000/XP/Server 2003 clients can download the drivers
for the imageRUNNER 1670F/1630/1610 automatically.
■
Windows 95/98/Me Add Printer Wizard
To install CAPT for a network printer, you can use the Windows 95/98/Me Add Printer
Wizard.
Network Users
Connecting to the imageRUNNER 1670F/1630/1610
Already on Your Network
1 Open Explorer and browse the network until you find the Canon iR1510-1670 printer icon.
2 Double-click the printer icon, or drag the printer icon to the Printers (in Windows XP/Server
2003, the Printers and Faxes) folder.
3 Follow the instructions on screen.
NOTE
• Service Pack 4 or later must be installed on Windows NT servers in order for
Windows 95/98/Me clients to use network download.
• Windows NT/2000/XP/Server 2003 clients cannot download the driver from
Windows 95/98/Me servers.
1 From the Start menu, select Settings Printers. The Printers folder appears.
2 Double-click the Add Printer icon. The Add Printer Wizard dialog box appears.
3 Select Network printer click Next.
Page 51
2-39
2
Installing Canon Advanced Printing Technology (CAPT)
4 Enter the network path or print queue that you want to connect to, or use Browse to open the
Browse for Printer dialog box to select the printer.
NOTE
Depending on your network environment, the installation of the driver may be carried
out automatically. In this case proceed to step 9.
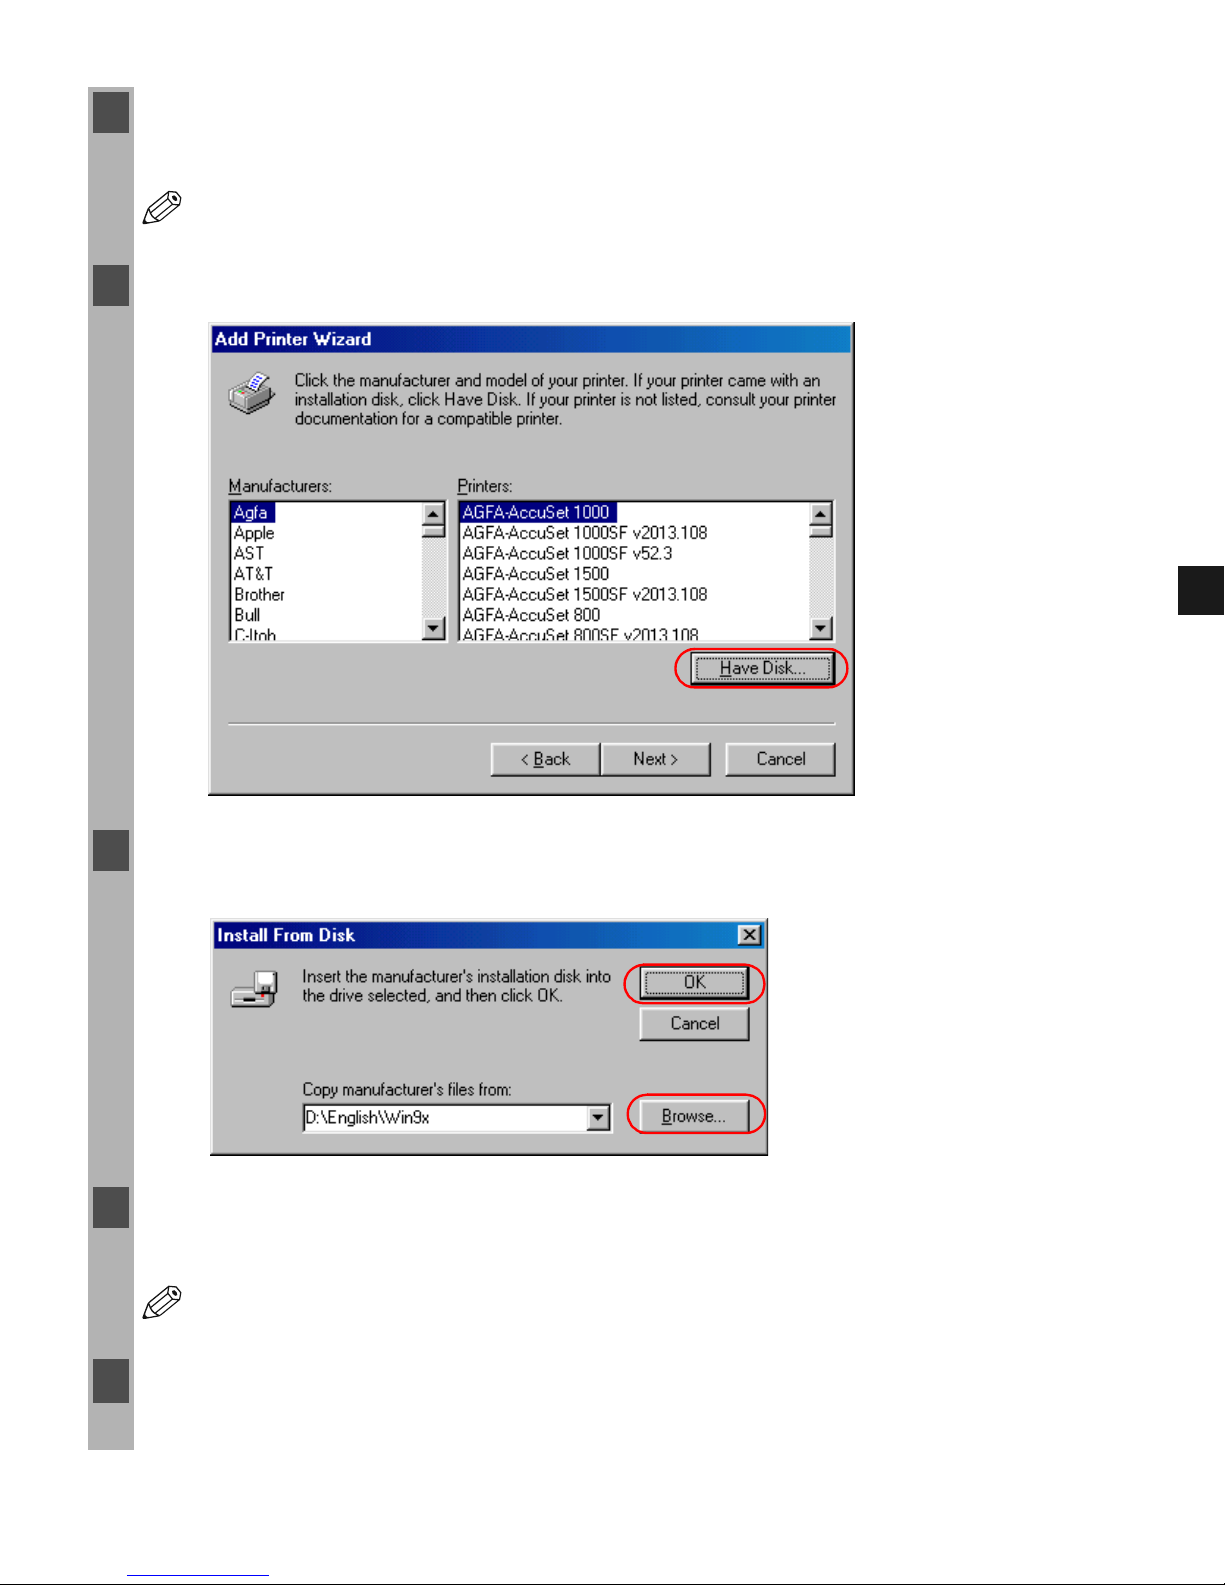
5 The Wizard displays a list of available printers. Click Have Disk.
6 The Install From Disk dialog box appears. Use Browse to select the directory or enter the
path name that contains the CAPT software click OK.
7 You can enter a name for the printer, or accept the default name click Next.
NOTE
If the connection fails you are able to install the printer, but you will not be able to use
the printer until it comes back online.
8 Follow the instructions on screen to complete installation.
Page 52

2-40
■ Windows NT/2000/XP/Server 2003 Add Printer Wizard
To install CAPT for a network printer, you can use the Windows NT/2000/XP/Server 2003
Add Printer Wizard.
1 Log on as a member of Administrators. The full control access rights for the printer is
necessary for installation of CAPT.
2 From the Start menu, select Settings Printers (in Windows XP/Server 2003, select
Printers and Faxes from the Start menu). The Printers (in Windows XP/Server 2003,
Printers and Faxes) folder appears.
3 Double-click the Add Printer icon (in Windows XP/Server 2003, click Add a printer in
Printer Tasks). The Add Printer Wizard dialog box appears.
4 Select Network printer server (in Windows XP/Server 2003, select A network printer, or
a printer attached to another computer) click Next. The Connect to Printer (Specify
a Printer in Windows XP/Server 2003) dialog box appears.
5 Select the printer you want to connect to click OK. If the printer name is invalid, it means
that the client could not connect to the network printer specified. If a suitable driver is not
found, it probably means that the server is a Windows 95/98/Me computer.
6 Follow the instructions on the screen to complete the installation.
Page 53

2-41
2
Installing Canon Advanced Printing Technology (CAPT)
By using your imageRUNNER 1670F/1630/1610 machine on a network, users can share the
device for printing. Printer sharing with the imageRUNNER 1670F/1630/1610 requires that
both the print server and the client devices are using Windows 95 or later, or Windows NT or
later. The print server and client do not need to use the same operating system, and it is
possible to print from a Windows 95/98/Me client to a Windows NT/2000/XP/Server 2003
print server, or vice versa.
You can start printing simply by starting the server, even if the server was not running when
the client was started.
If the server is running on Windows NT/2000/XP/Server 2003, you can print, even if no one is
logged into the server. Please note that there is no status display on the server when no one is
logged in. The status display is shown on the client.
Printer Sharing
Page 54
2-42
If you plan to share the imageRUNNER 1670F/1630/1610 on a network, install the print
server locally, then make the following settings. See your print server system documentation
for more information.
■
Windows 95/98/Me Server Settings
Network Settings
Connecting the imageRUNNER 1670F/1630/1610 as a
Network Printer
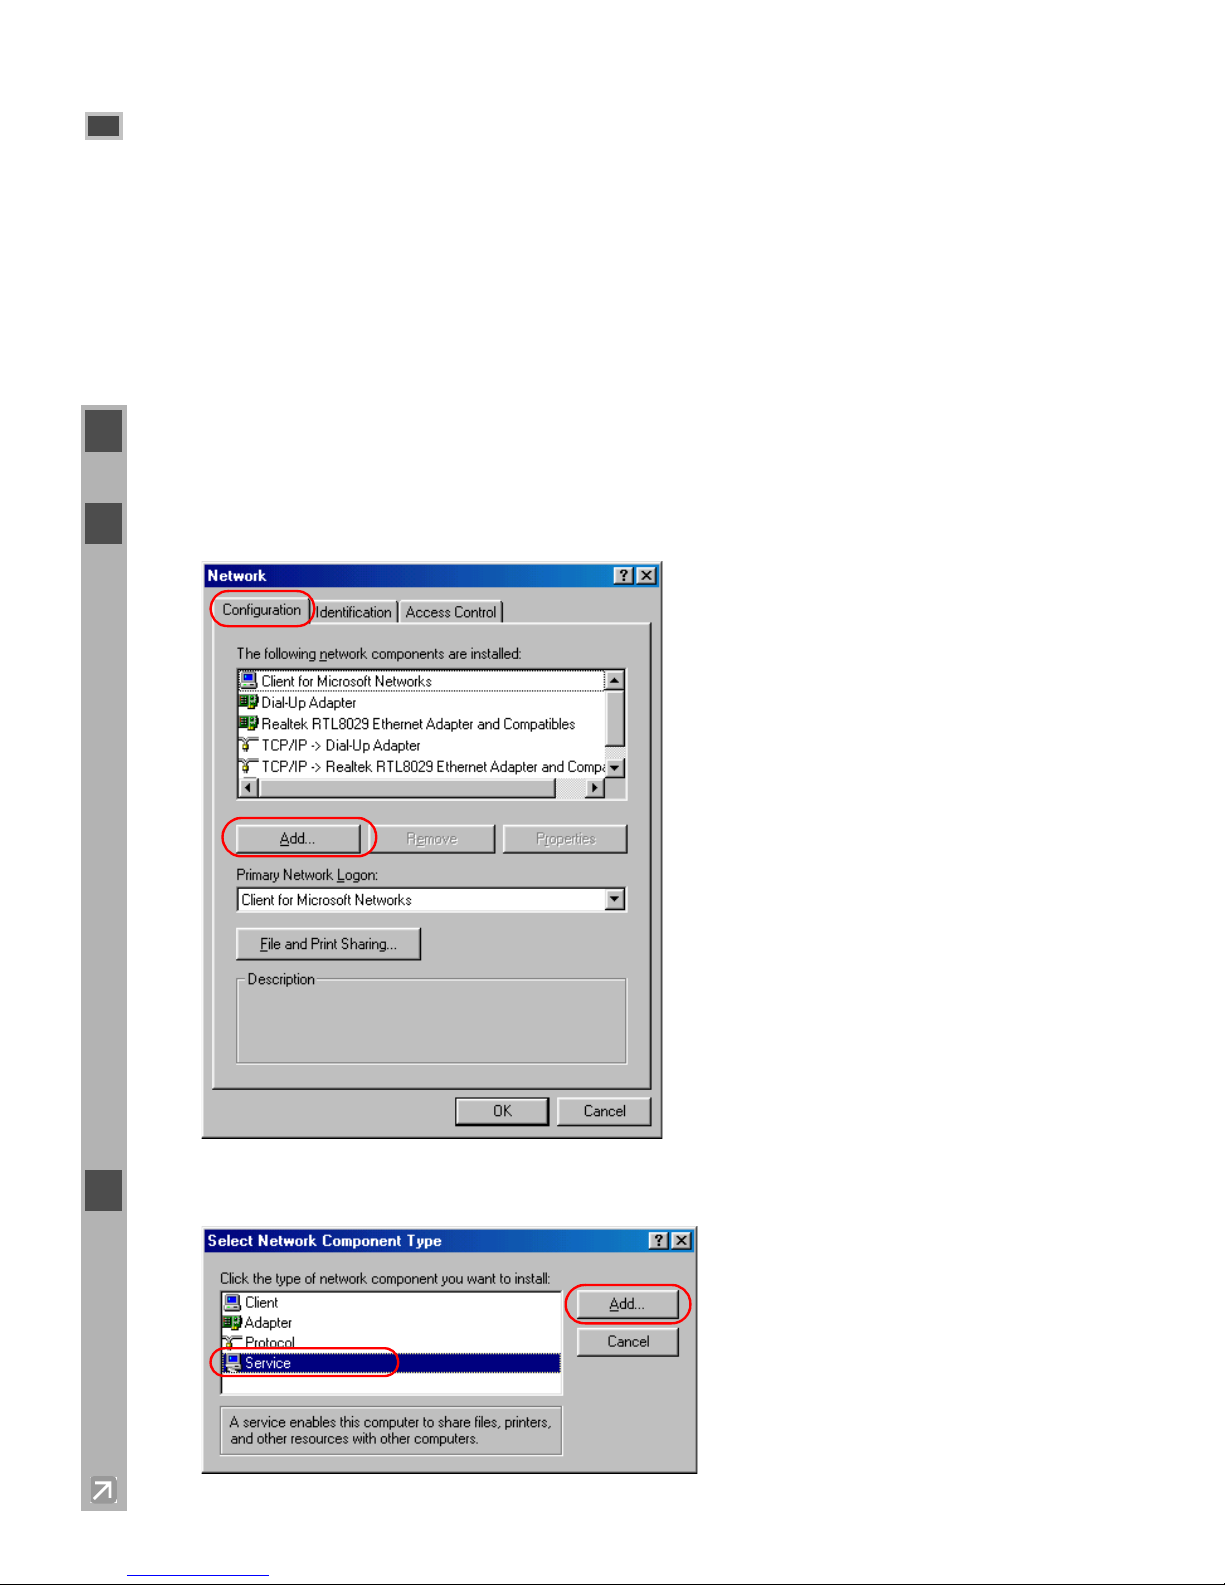
1 Double-click the Network icon in the Control Panel.
2 Select the Configuration tab click Add.
3 Select Service click Add.
Page 55
2-43
2
Installing Canon Advanced Printing Technology (CAPT)
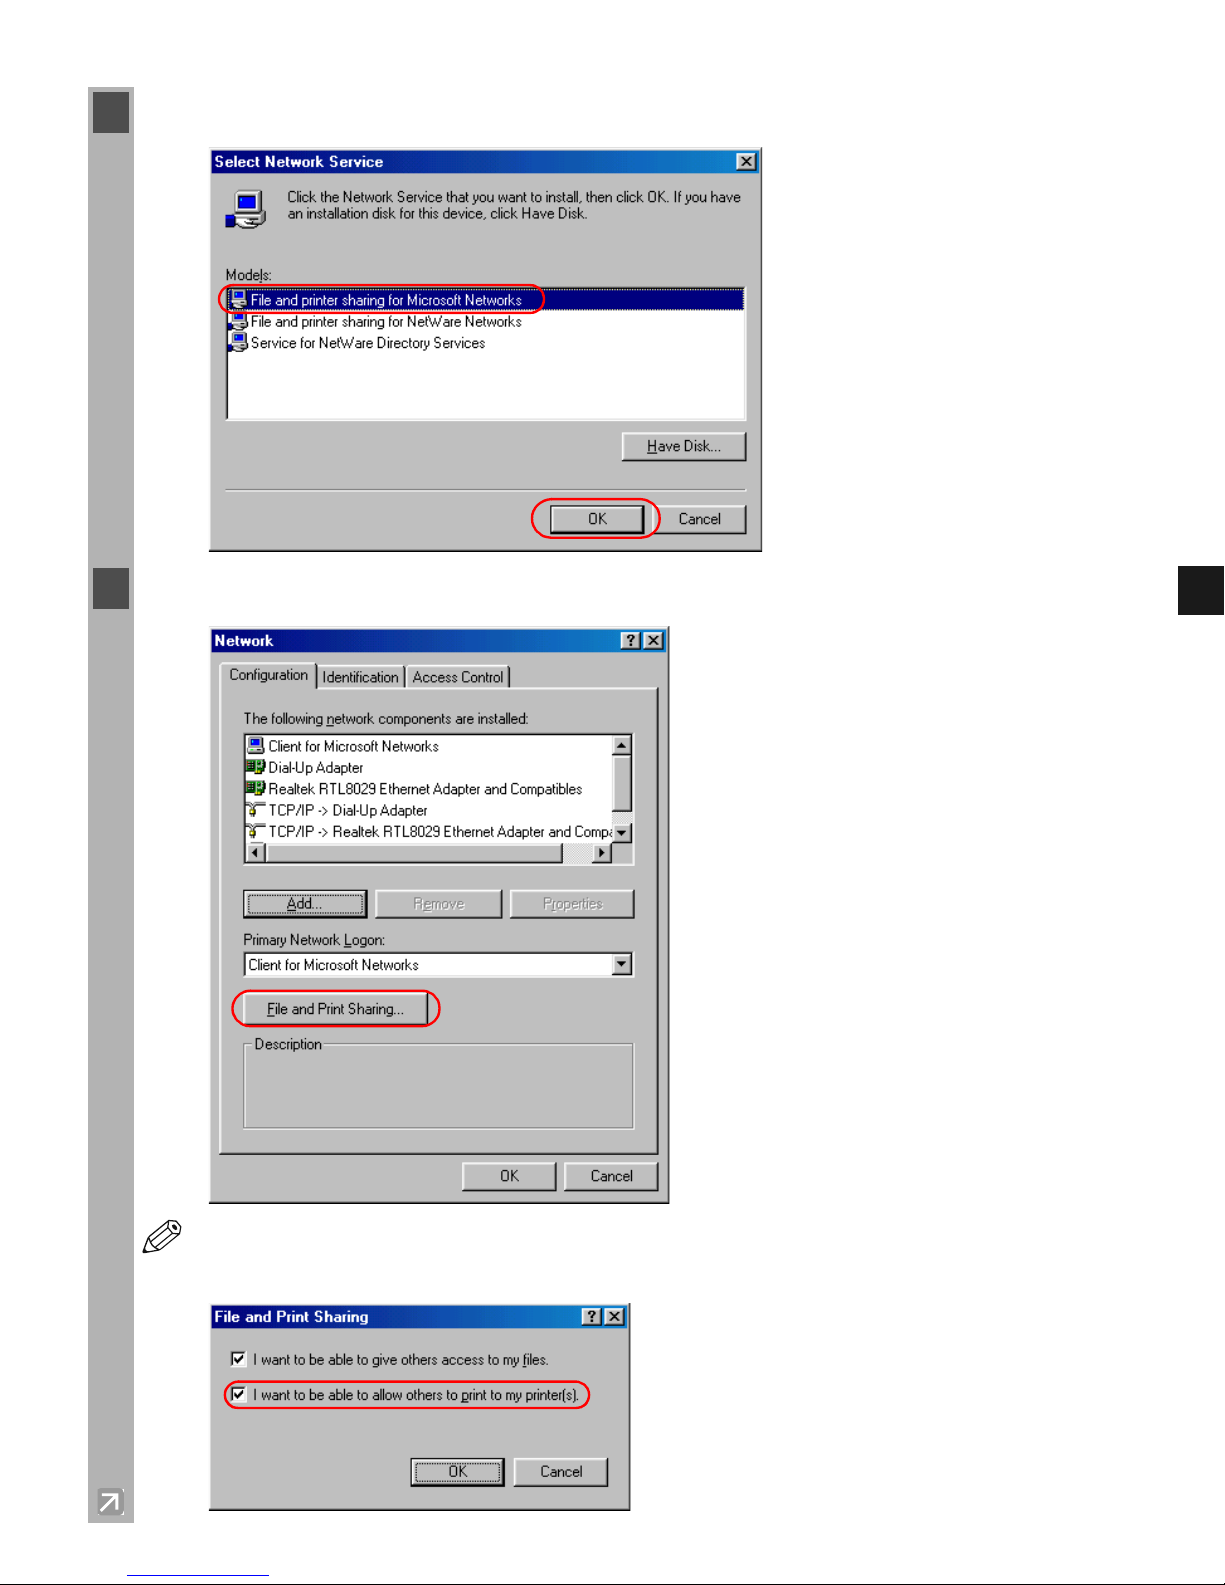
4 Select File and printer sharing for Microsoft Networks click OK.
5 Click File and Print Sharing.
NOTE
Be sure to select the I want to be able to allow others to print to my printer(s)
check box.
Page 56
2-44
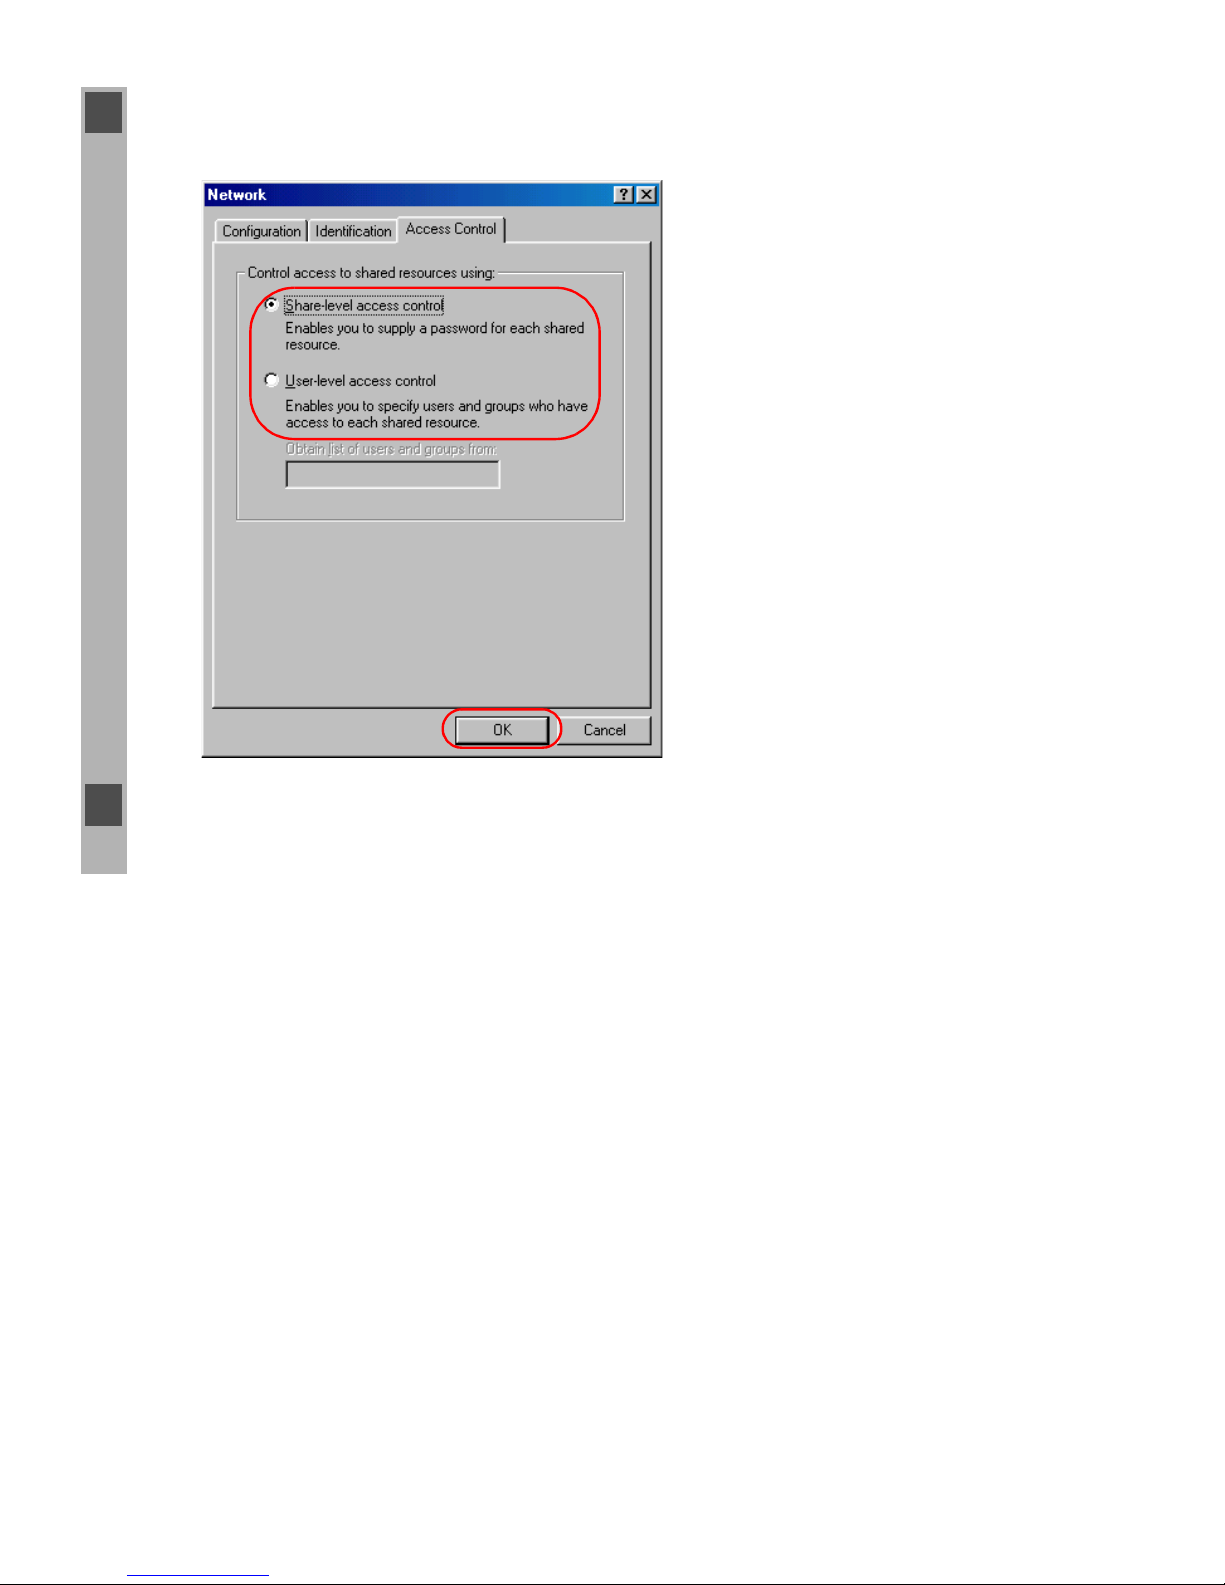
6 Select the Access Control tab check either Share-level access control or User-level
access control.
7 Click OK restart Windows.
Page 57
2-45
2
Installing Canon Advanced Printing Technology (CAPT)
Printer Settings
Share-level Access Control
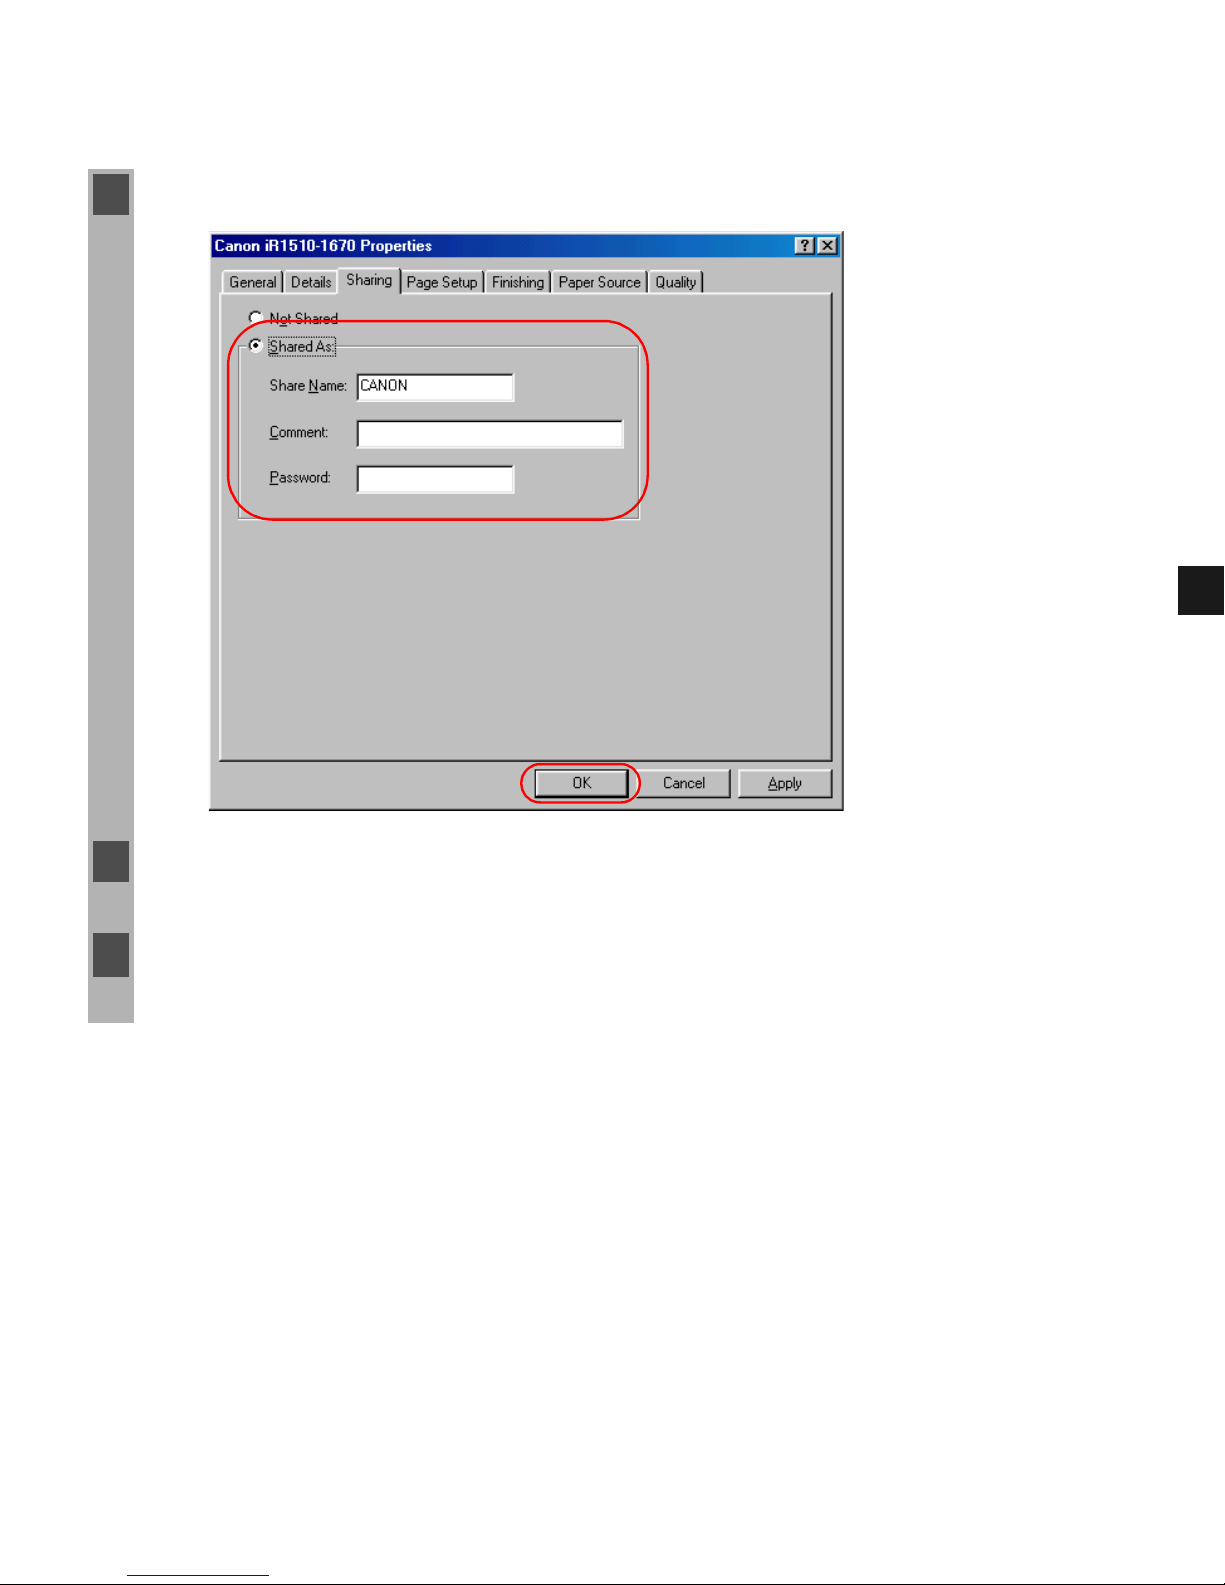
1 Open the Canon iR1510-1670 Properties window check Shared As in the Sharing tab.
2 Enter the Share Name, Comment, and Password, as needed.
3 Click OK.
Page 58
2-46
User-level Access Control
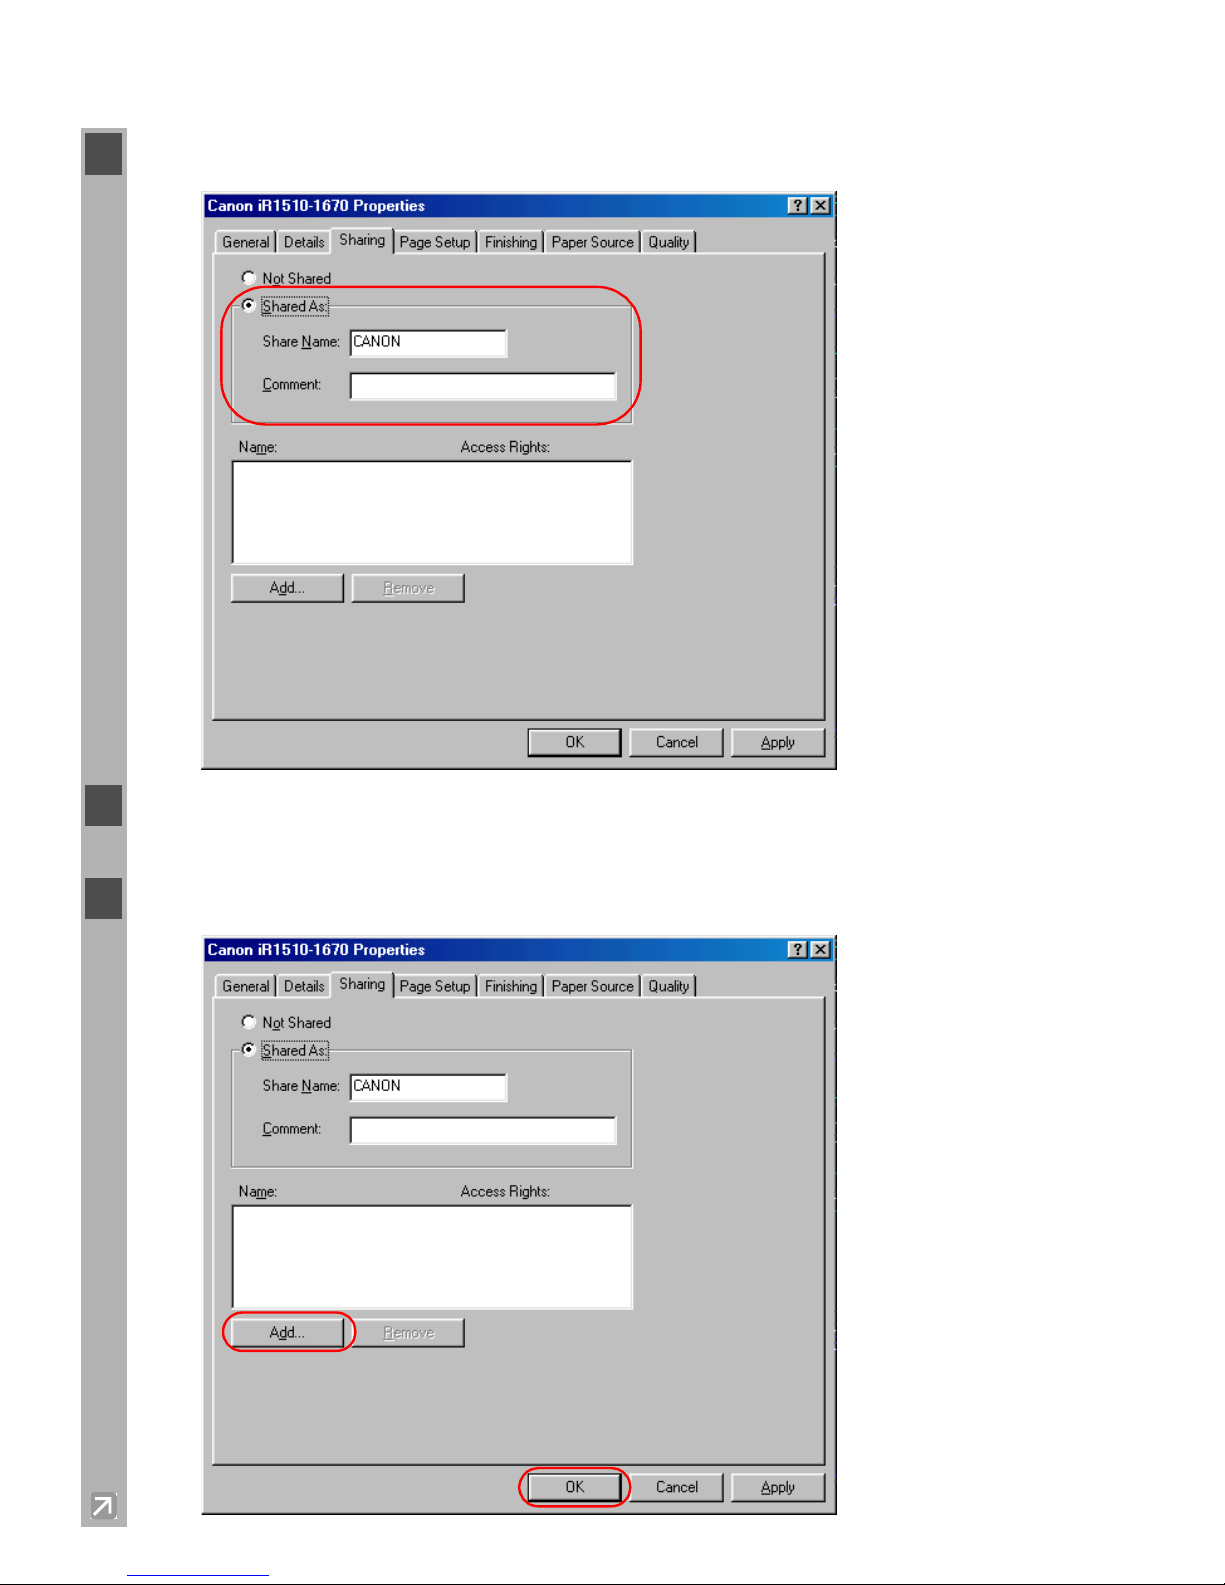
1 Open the Canon iR1510-1670 Properties window check Shared As in the Sharing tab.
2 Enter the Share Name and Comment, as needed.
3 Click Add select the users allowed to access the printer.
Page 59
2-47
2
Installing Canon Advanced Printing Technology (CAPT)
■ Windows NT/2000/XP/Server 2003 Server Settings
Add Server Service (Windows NT)
4 Click OK when you have finished adding users.
5 Click OK again.
NOTE
Do not enter a space or special character in Share Name.
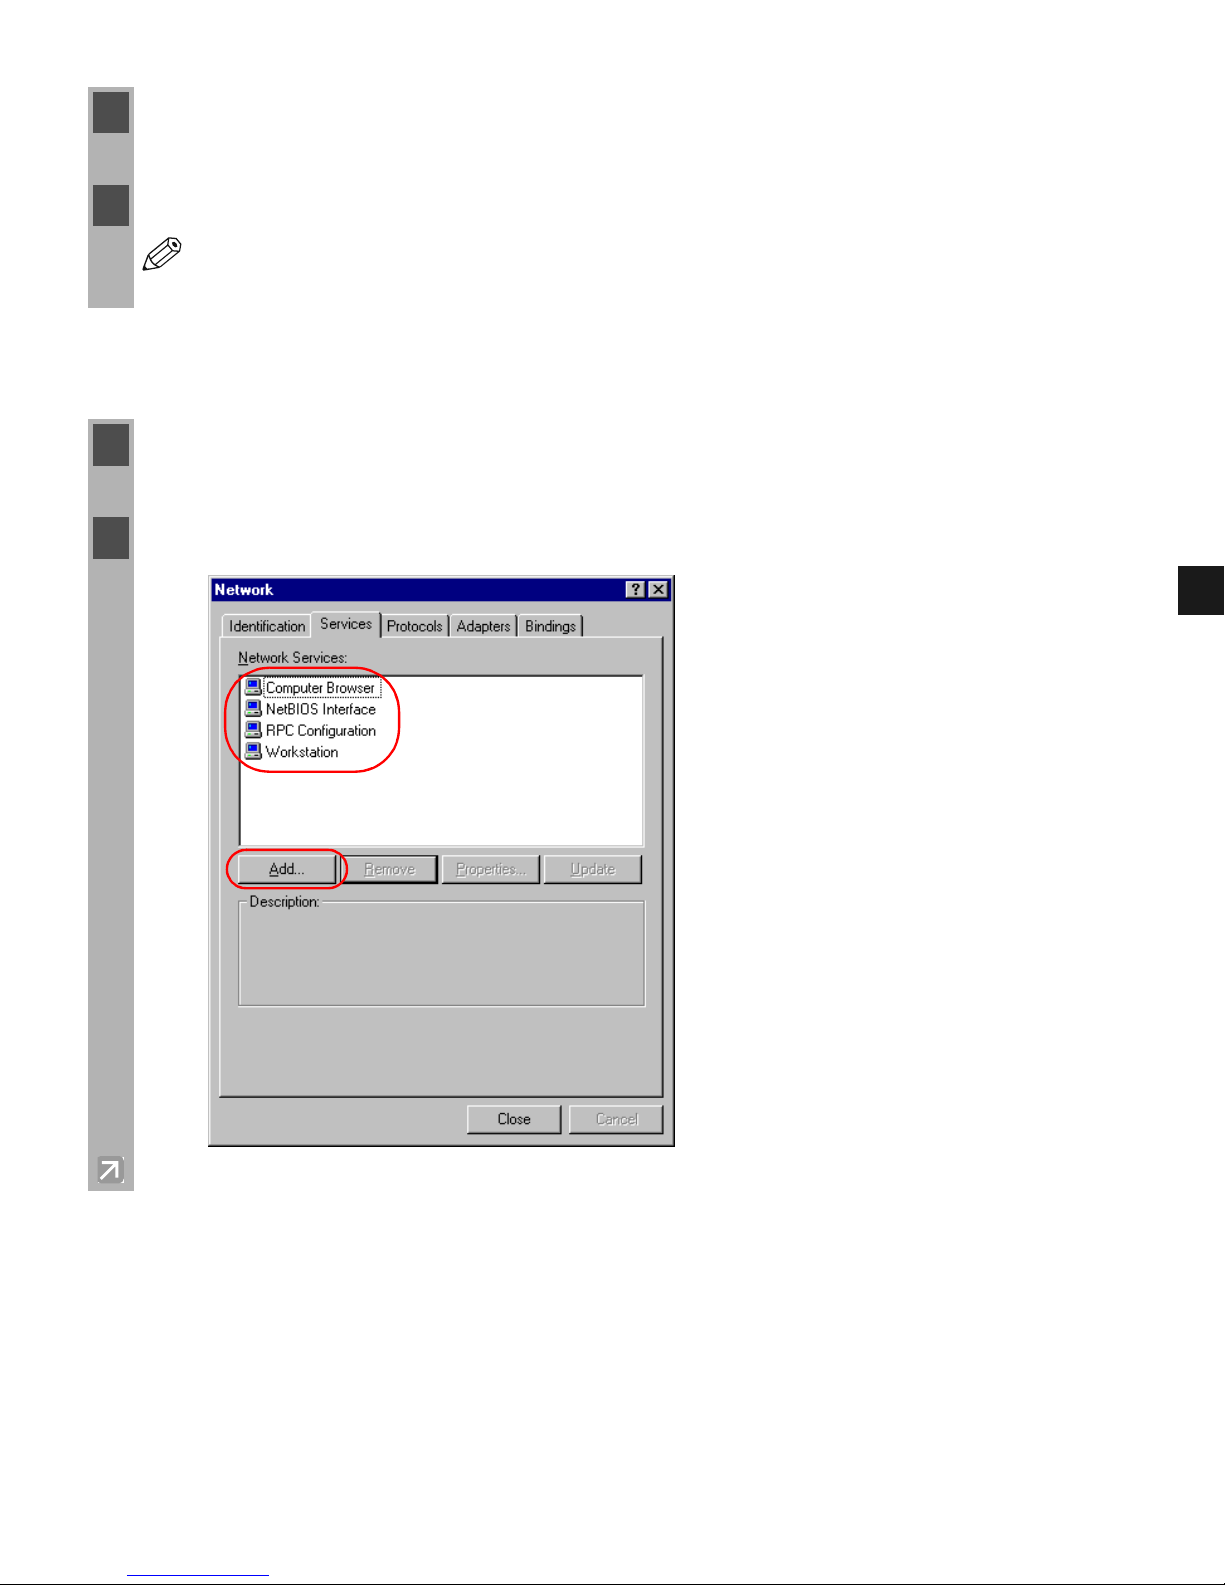
1 Double-click the Network icon from the Control Panel.
2 Select the Services tab, and if the Server is not shown, click Add.
Page 60
2-48
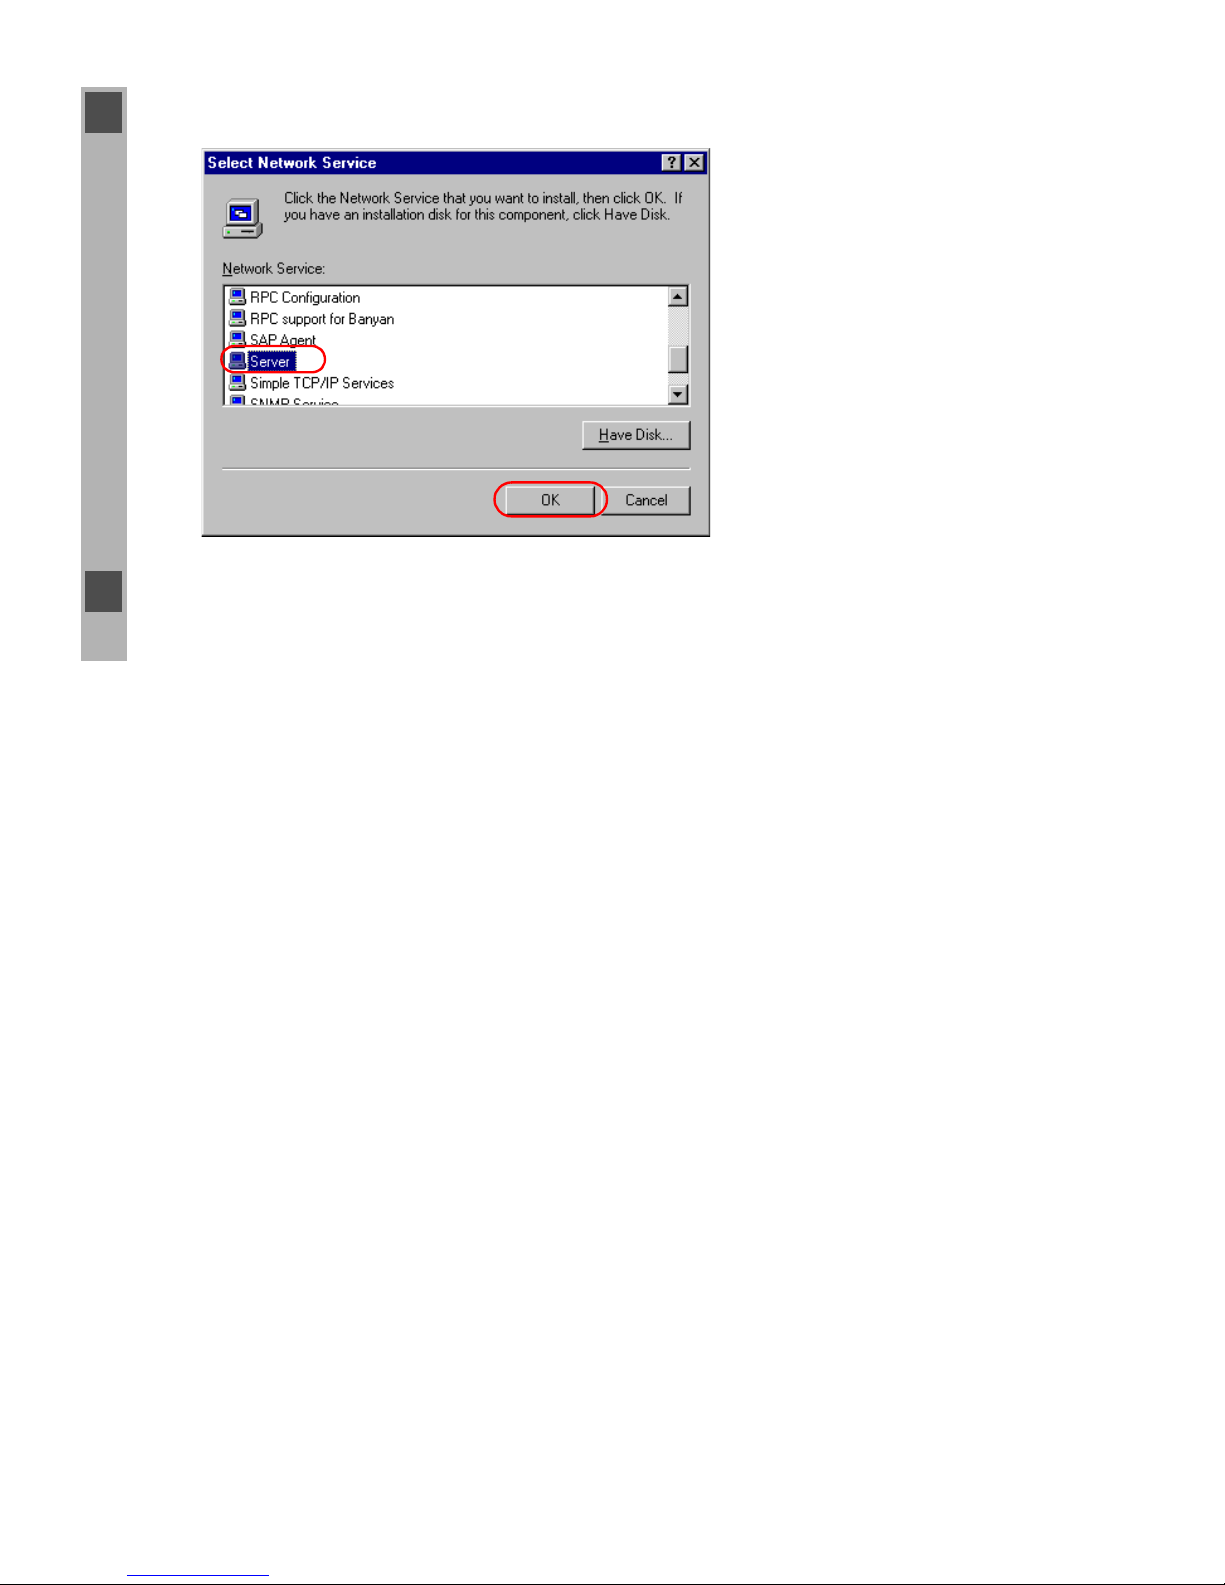
3 Select the Server click OK.
4 Restart Windows.
Page 61
2-49
2
Installing Canon Advanced Printing Technology (CAPT)
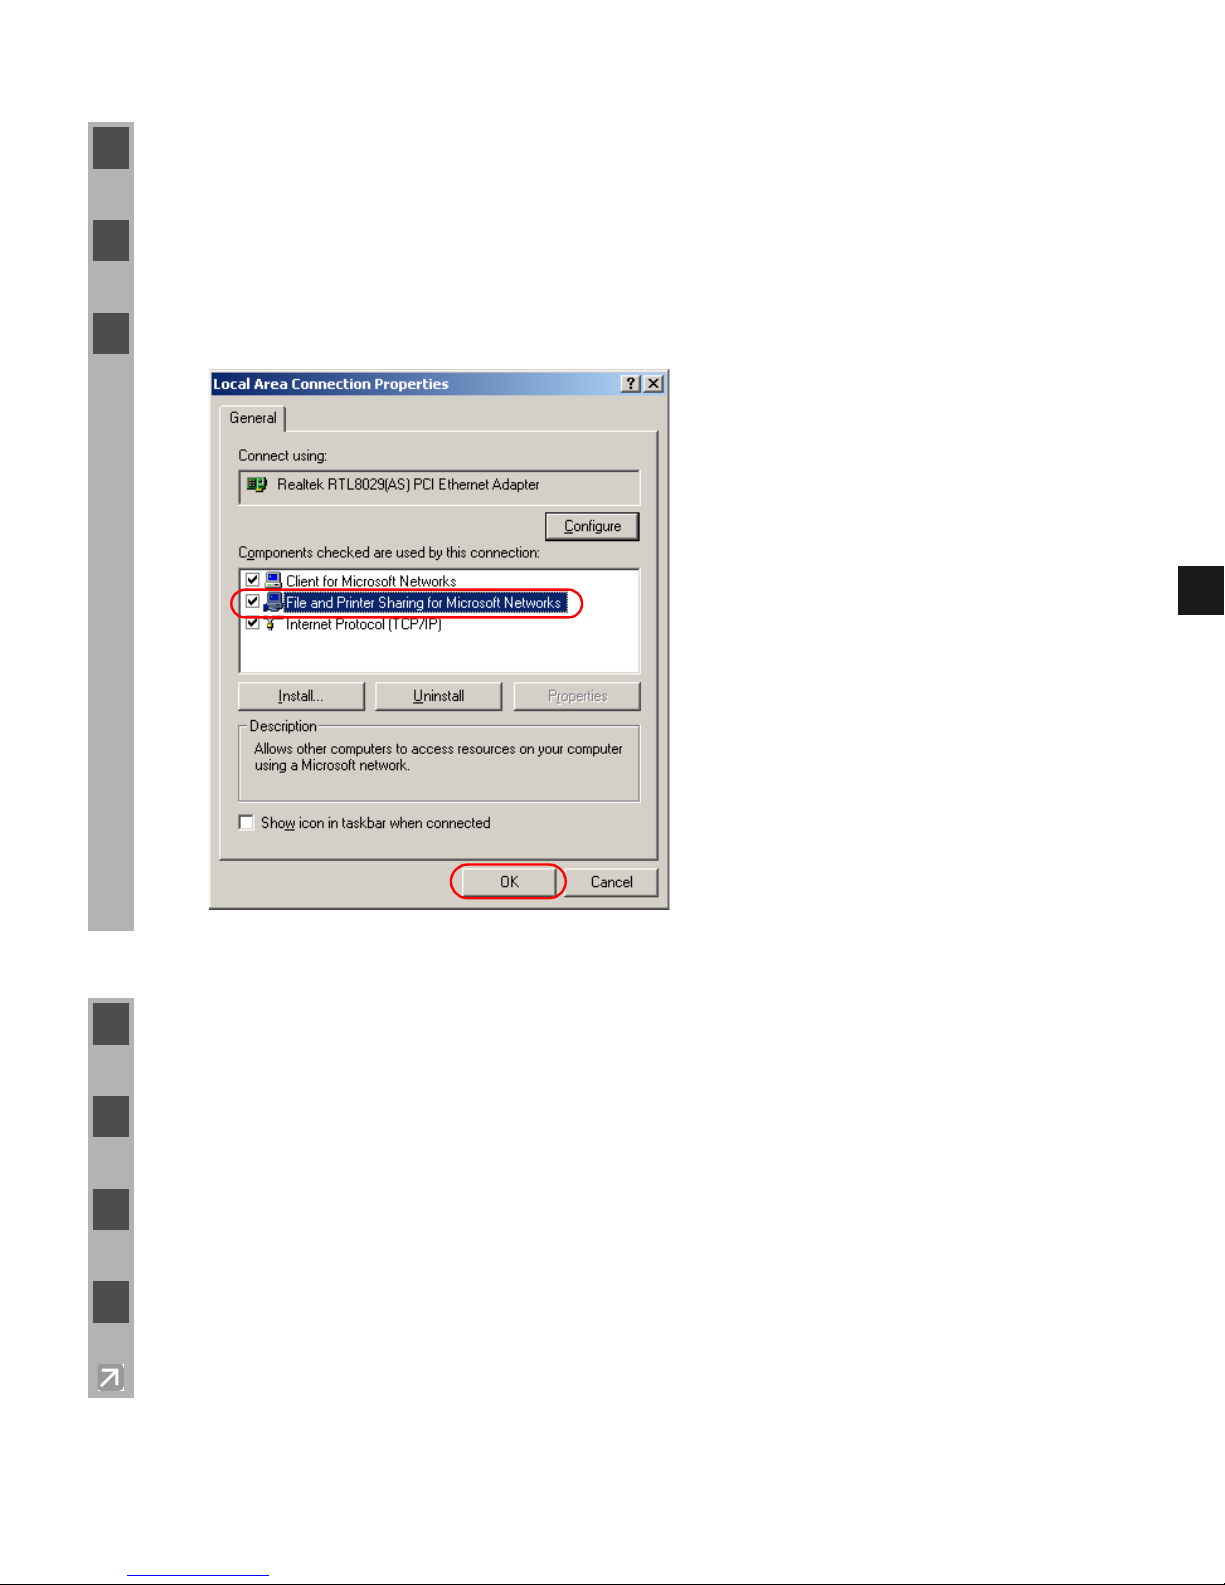
Add Server Service (Windows 2000)
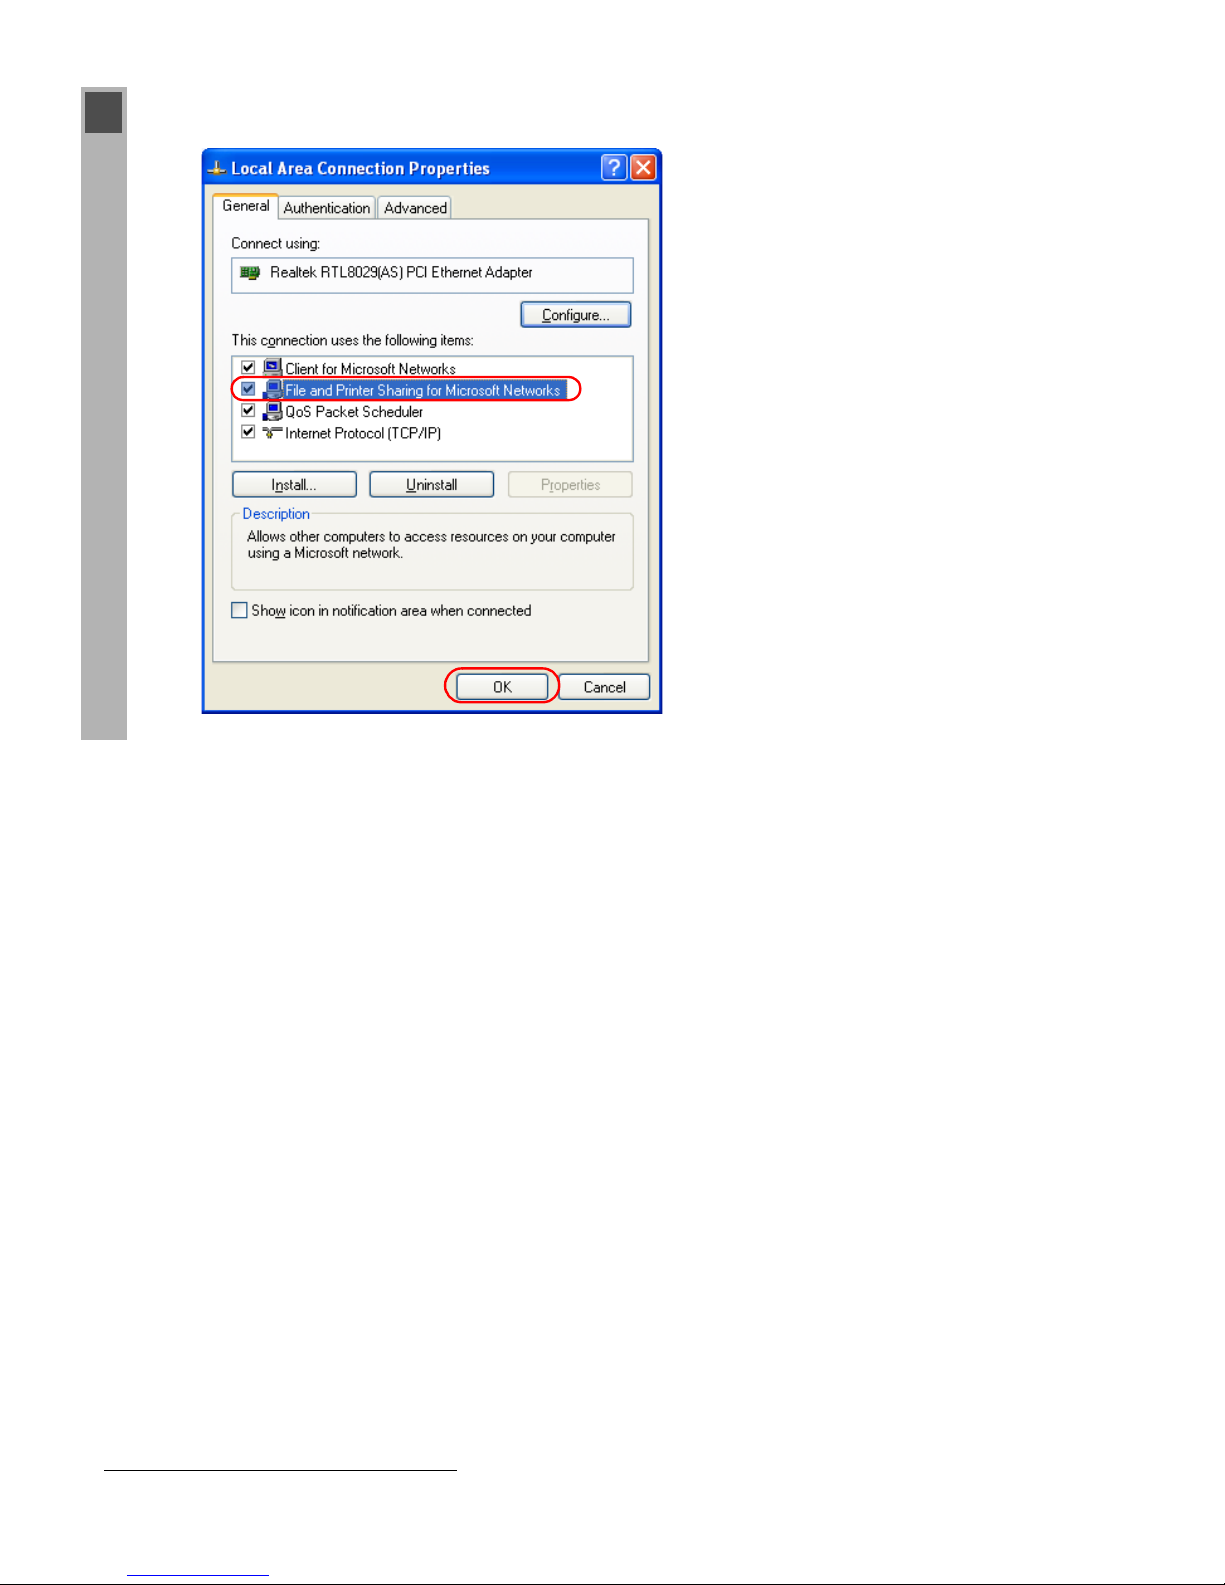
Add Server Service (Windows XP/Server 2003)*
1 From the Start menu, select Settings Network and Dial-up Connections.
The Network and Dial-up Connections folder appears.
2 Right-click the Local Area Connection icon select Properties from the pop-up menu.
The Local Area Connection Properties dialog box appears.
3 Select File and Printer Sharing for Microsoft Networks click OK.
1 From the Start menu, select Control Panel.
The Control Panel folder appears.
2 Click Network and Internet Connections.
The Network and Internet Connections folder appears.
3 Click Network Connections.
The Network Connections folder appears.
4 Right-click the Local Area Connection icon select Properties from the menu.
The Local Area Connection Properties dialog box appears.
Page 62
2-50
* The procedure for Windows XP is given for Category View Mode.
5 Select File and Printer Sharing for Microsoft Networks click OK.
Page 63
2-51
2
Installing Canon Advanced Printing Technology (CAPT)
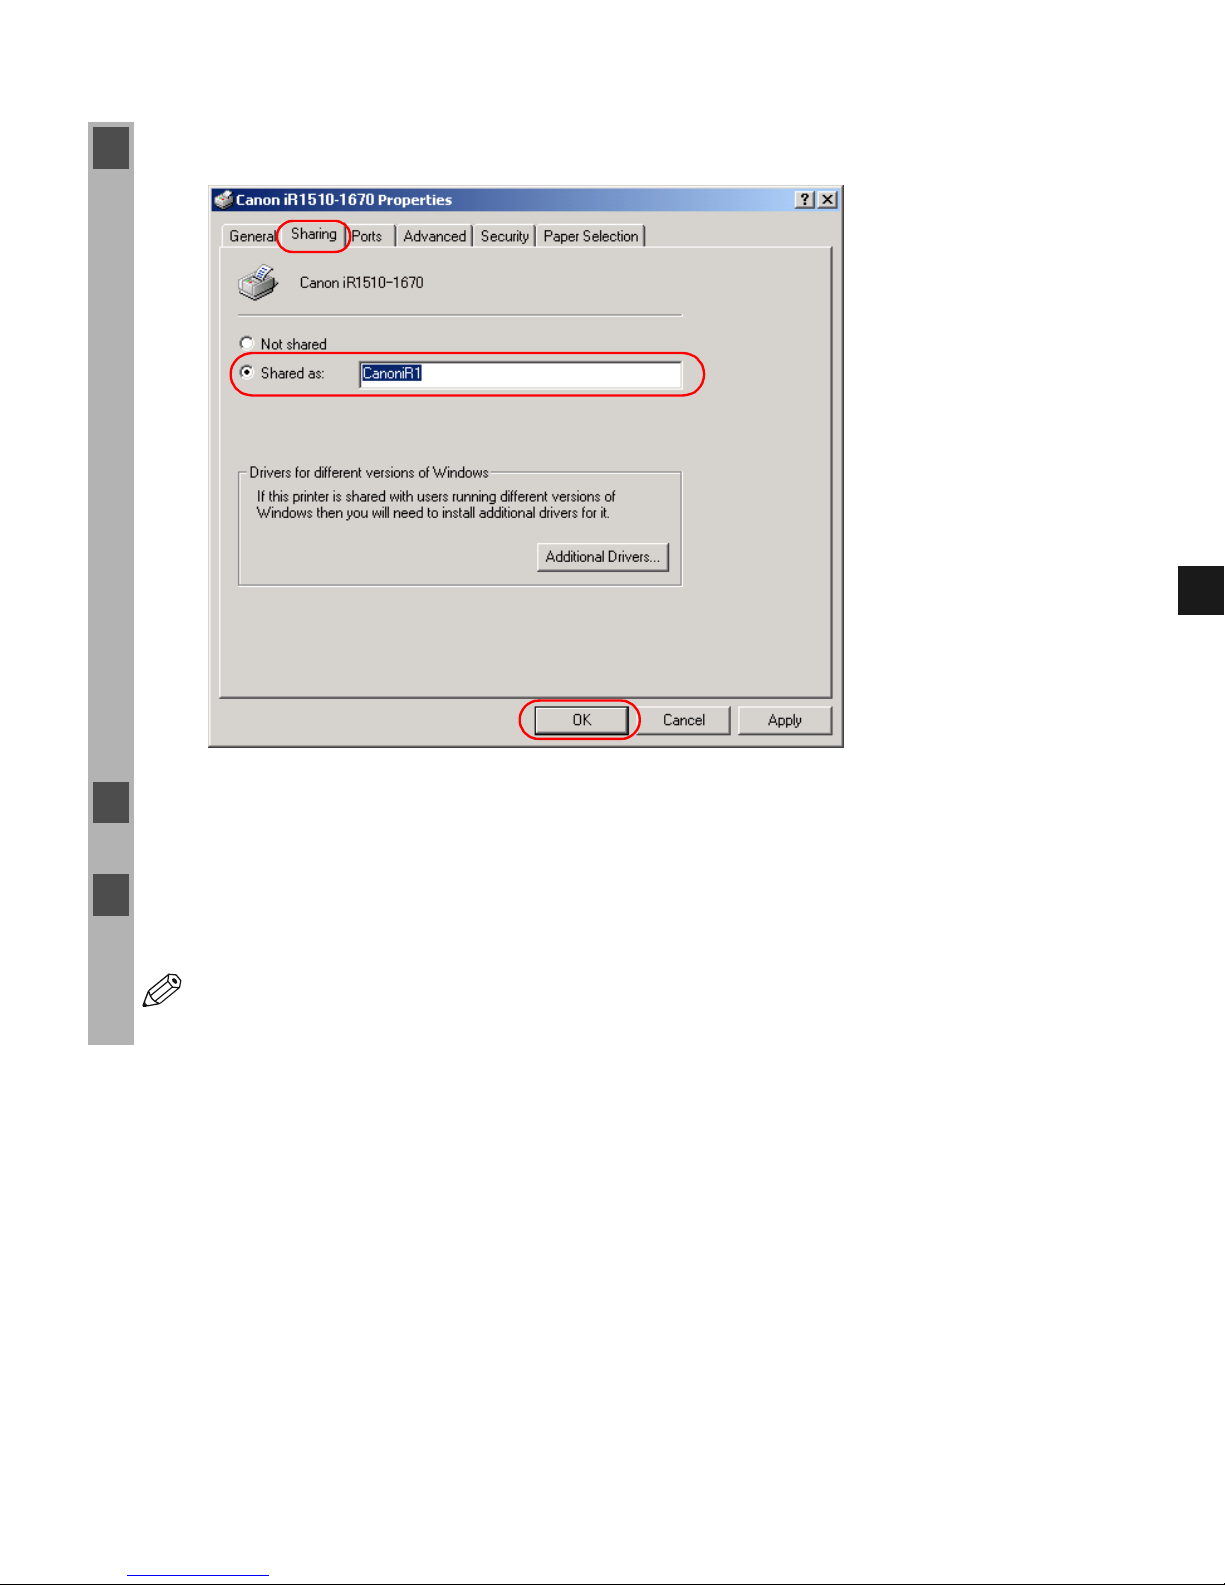
Printer Sharing Settings
■ Status Display
The status of a shared printer displays on both the print server and client computer, and job
operations can be executed from either.
Status display requires status exchanges between the print server and client using TCP/IP or
NetBEUI protocols. Status display is not supported if IPX/SPX is the only protocol used.
1 Open the Canon iR1510-1670 Properties window check Shared as in the Sharing tab.
2 Enter the share name in the edit box as needed.
3 Click OK. The printer icon changes to indicate sharing.
NOTE
Sharing settings may also be made during installation.
Page 64
2-52
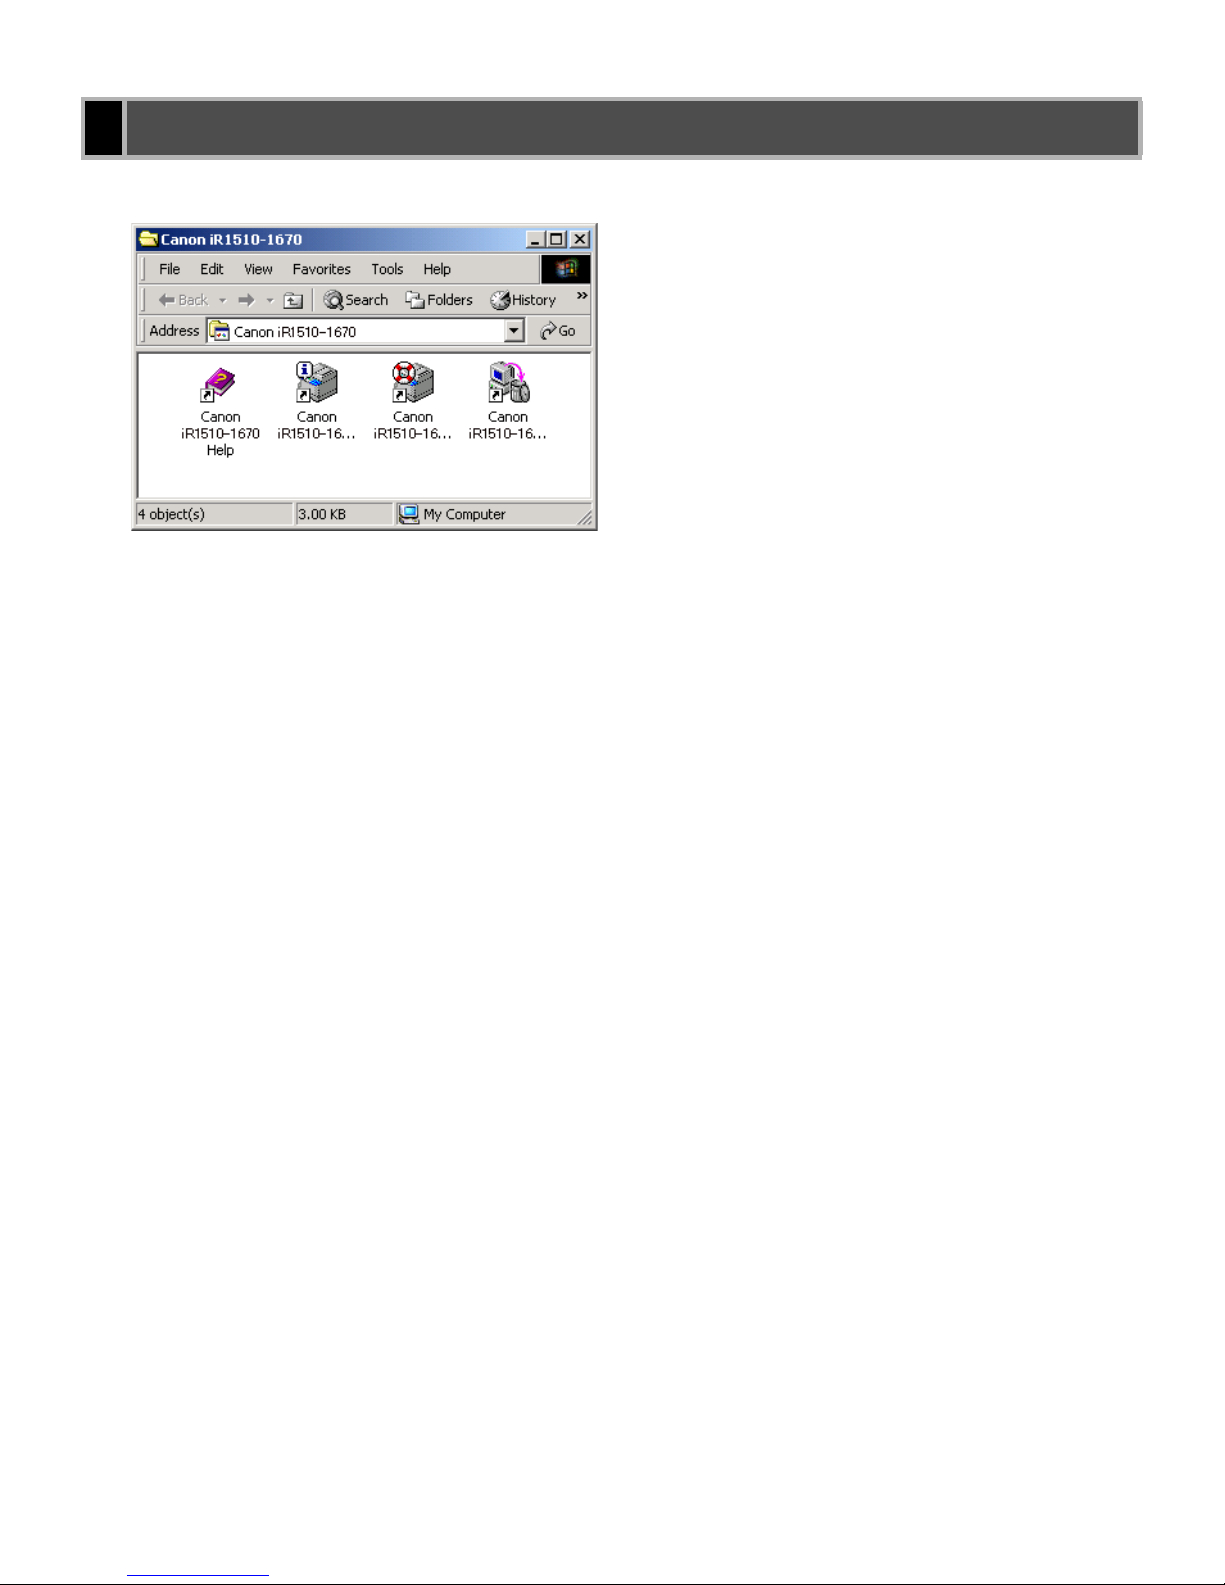
After installation is complete, the Canon iR1510-1670 group is created.
You can select the following from the Canon iR1510-1670 group:
• Canon iR1510-1670 Help
Selects the Canon iR1510-1670 Help file for CAPT.
• Canon iR1510-1670 Status Window
Displays the Canon iR1510-1670 Status Window.
• Canon iR1510-1670 Trouble Shooter
Starts the Trouble Shooter program for CAPT. It helps you solve printing problems in
Windows 95/98/Me or NT/2000/XP/Server 2003. ( Chapter 5, Troubleshooting.)
• Canon iR1510-1670 Uninstallation
Starts the uninstall program for CAPT. If CAPT is not working properly, it might help to
uninstall and then install it again. ( Chapter 5, Troubleshooting.)
Canon iR1510-1670 Group
Page 65
2-53
2
Installing Canon Advanced Printing Technology (CAPT)
CAPT offers bidirectional communication between the computer and machine.
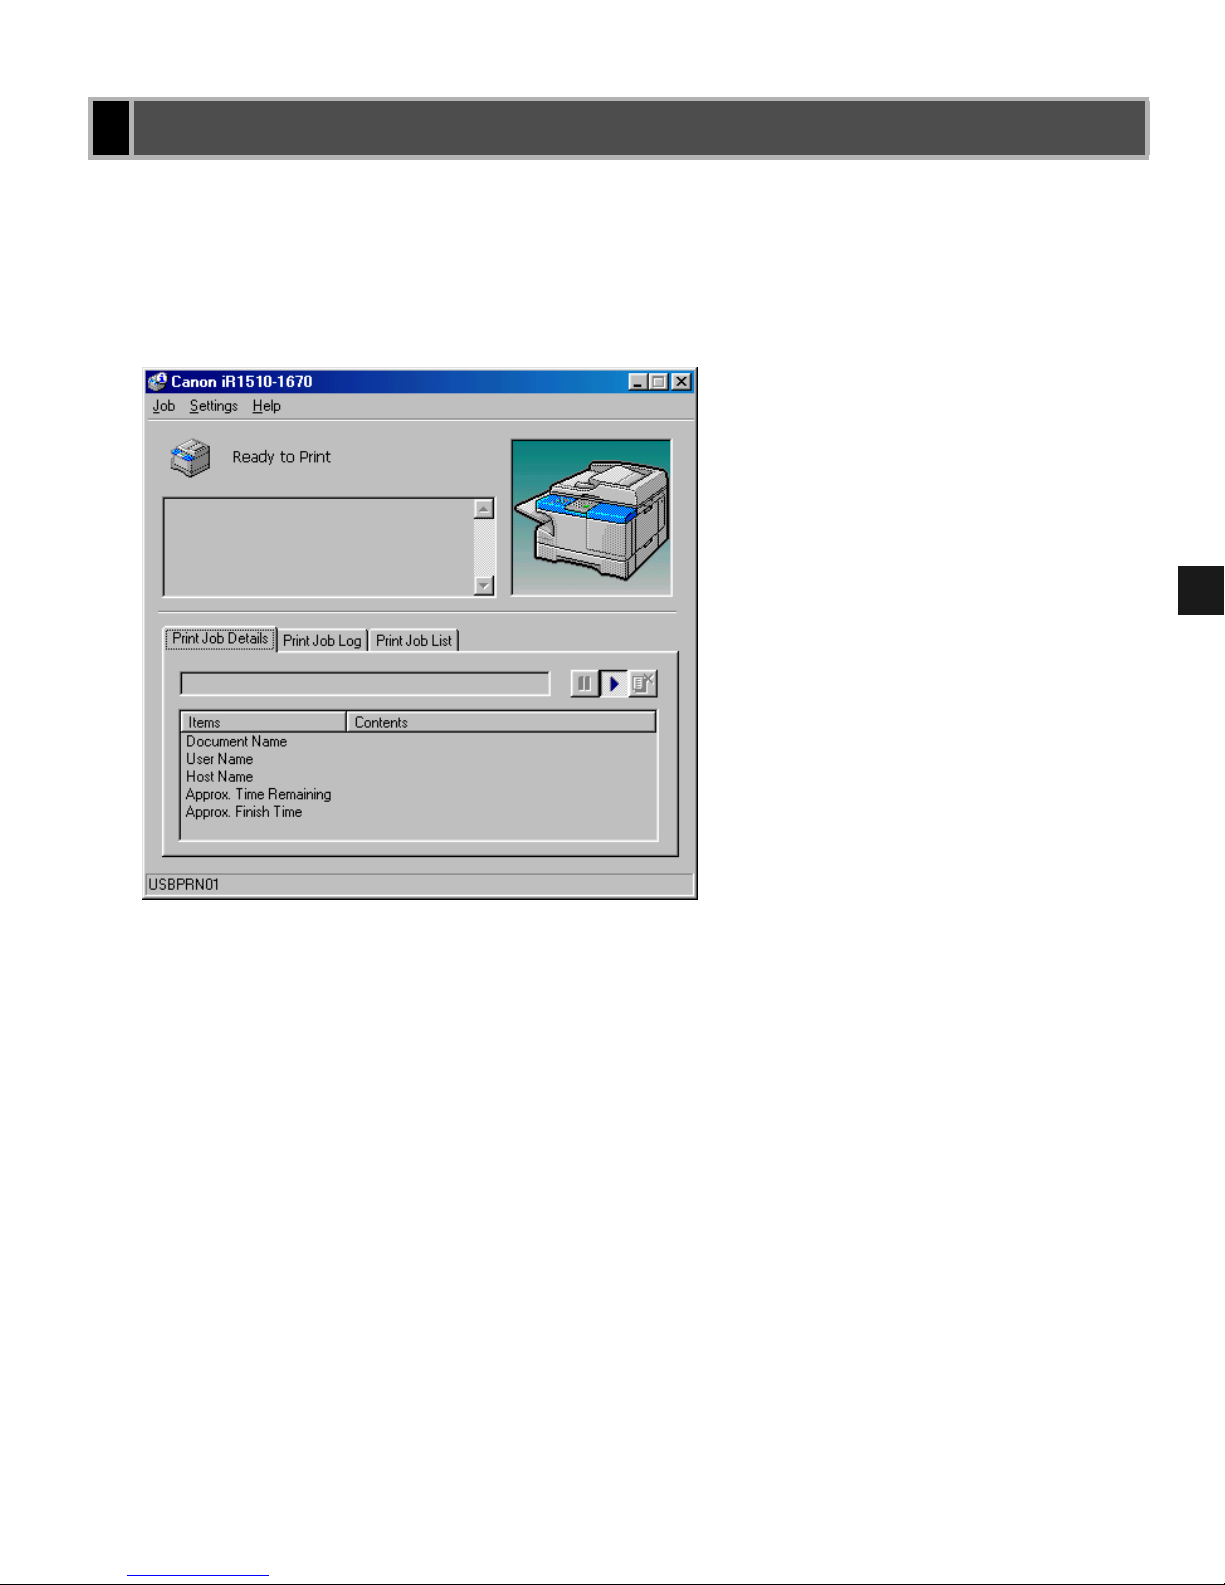
Every time you print, CAPT displays the Canon iR1510-1670 Status Window. This window
shows you the paper moving through the machine, how long it will take to print the document,
and how much of the document has printed. From the Status Window you can pause, resume,
or delete the current print job.
If a printing problem occurs, the Canon iR1510-1670 Status Window automatically opens and
identifies the problem.
Before using CAPT, make sure you select it as your current Windows printer driver.
Printing with CAPT
Page 66

2-54
Page 67

3-1
3
Printer Properties
CHAPTER
3
Printer Properties
This chapter describes the dialogs and settings on the Printer Properties screens. It includes the
following information:
Windows 95/98/Me Printer Properties ................................................................................... 3-2
Windows NT/2000/XP/Server 2003 Printer Properties and Default Document Properties. 3-16
Page 68

3-2
With CAPT, you initiate printing as you normally would from a Windows application. From the
Print dialog box, usually accessed from an application’s File menu, you can select Properties to
proceed to the Canon iR1510-1670 Properties dialog box and its printing options.
Windows 95/98/Me Printer Properties
NOTE
• You can also open the Properties dialog box from the Printers folder by right-clicking
the Canon iR1510-1670 icon and clicking Properties from the pop-up menu.
• The number of tabs displayed in the Properties dialog box will vary, depending on
the type of operating system you are using and the method you use to access
Properties.
• The screen shots shown are from Windows 98.
• The method you use to access the dialog boxes determines how long the printing
options remain in effect:
- If you start from an application's Print command, your choices apply only to that
print job. They will not be stored when you close the application.
- If you start from the Printers folder, the settings apply to all Windows
applications and remain in effect until you change those settings.
• For more information about the following features, see the online Help. To display the
online help, select the item you want more information about and press F1, or click ?
in the title bar and then select the item of interest.
Page 69
3-3
3
Printer Properties
■ General Tab
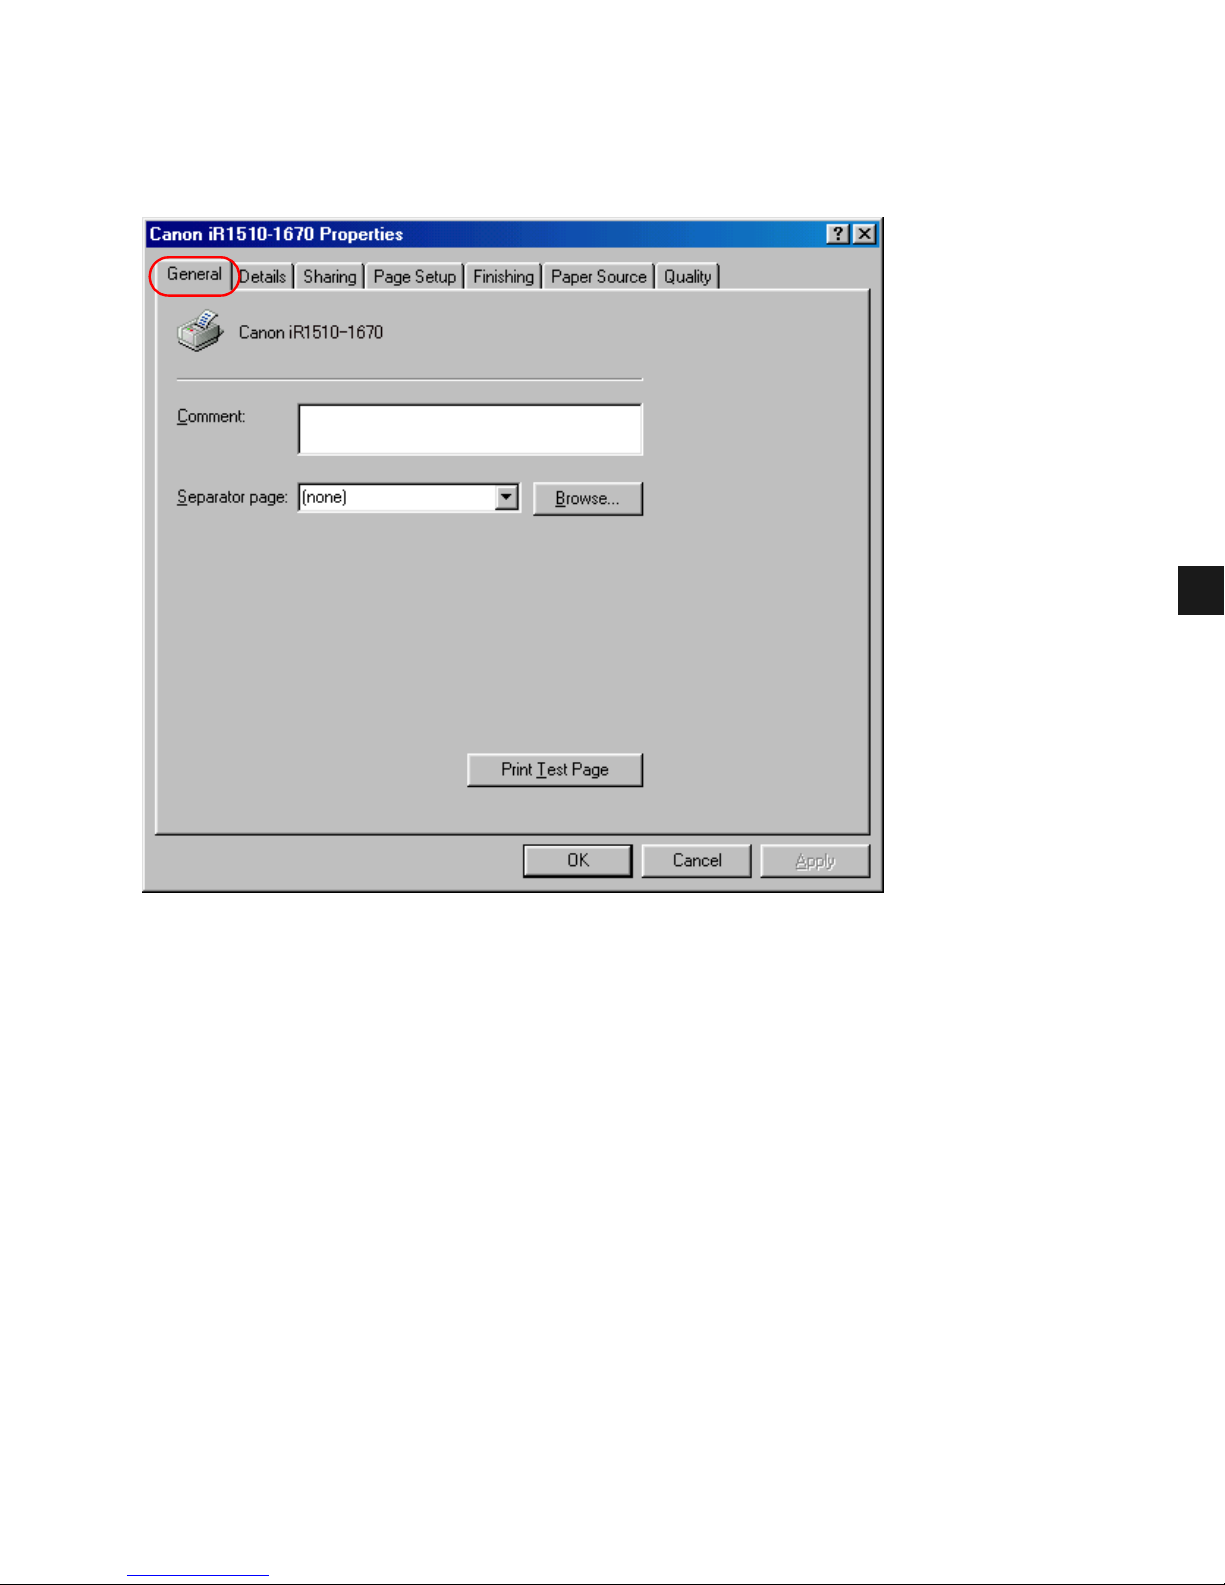
Lets you print a test page or define separator pages. Refer to your Windows operating system
documentation for more information.
Page 70
3-4
■ Details Tab
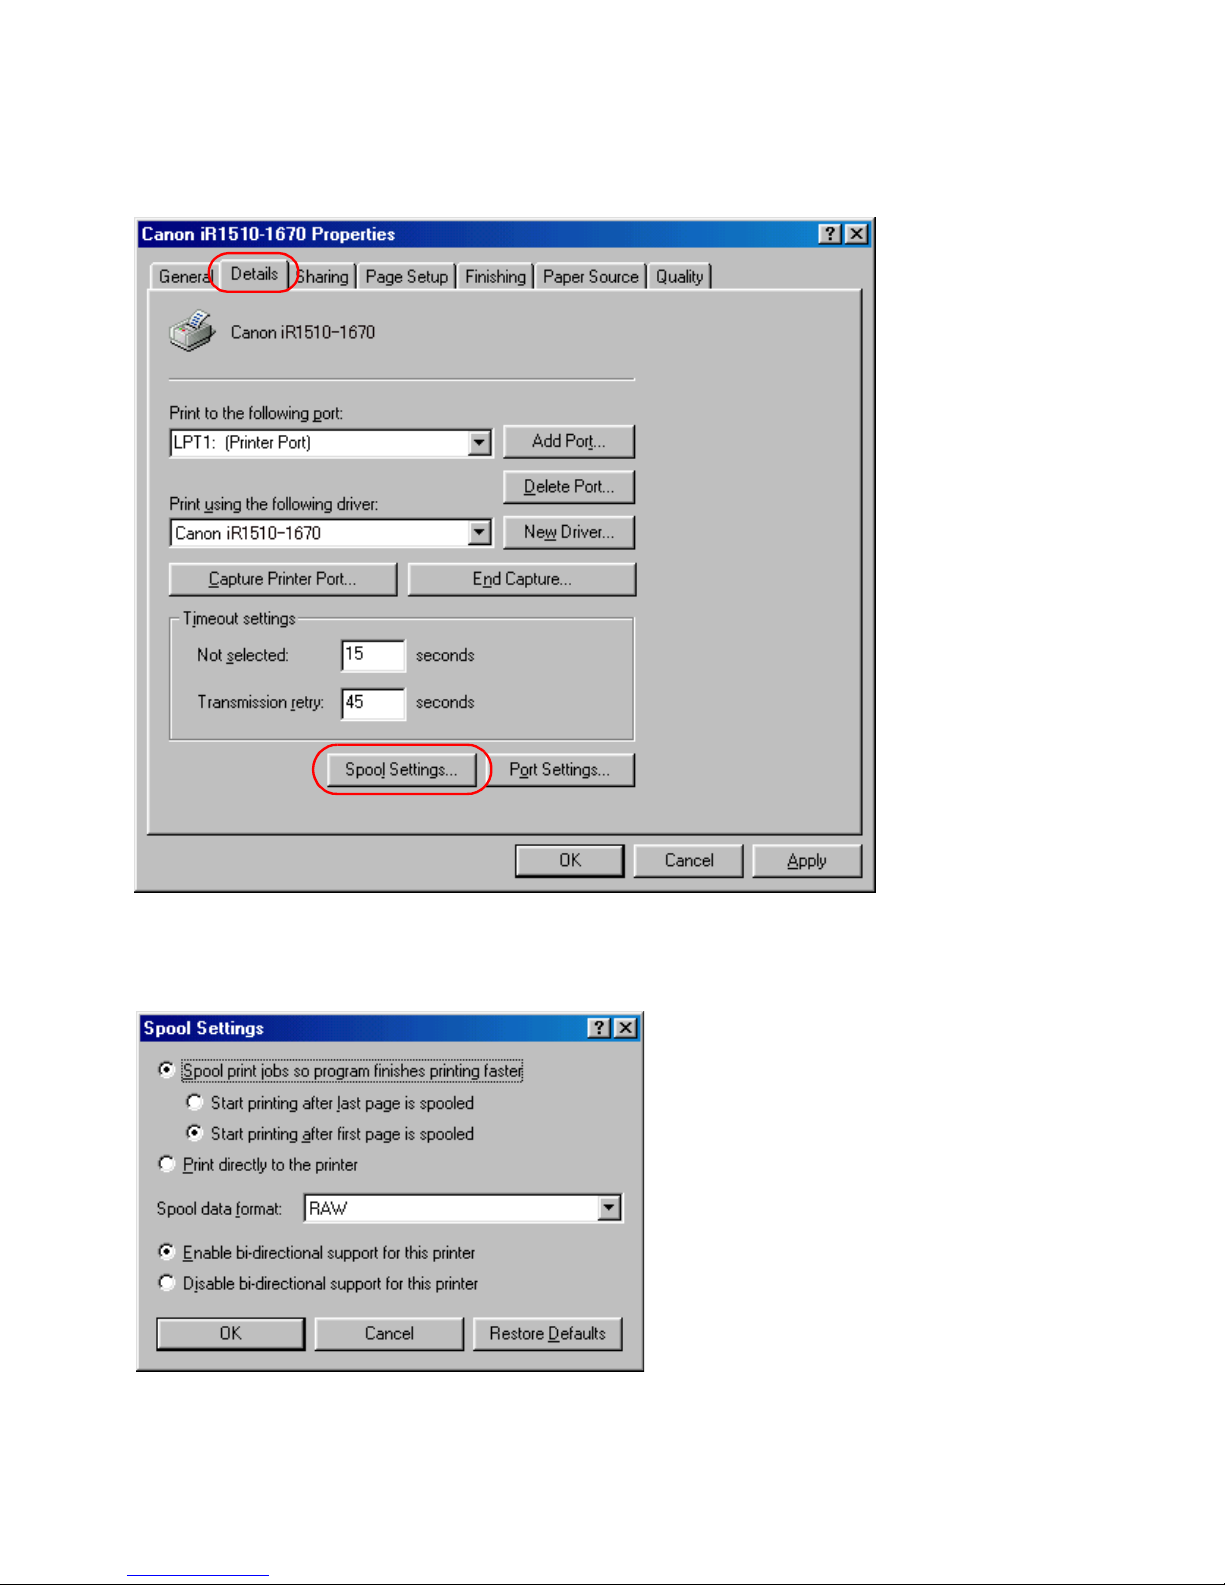
Specifies the printer port and time-out settings. Refer to your Windows operating system
documentation for more information.
Spool Settings
The installer sets the following defaults:
Page 71
3-5
3
Printer Properties
■ Sharing Tab
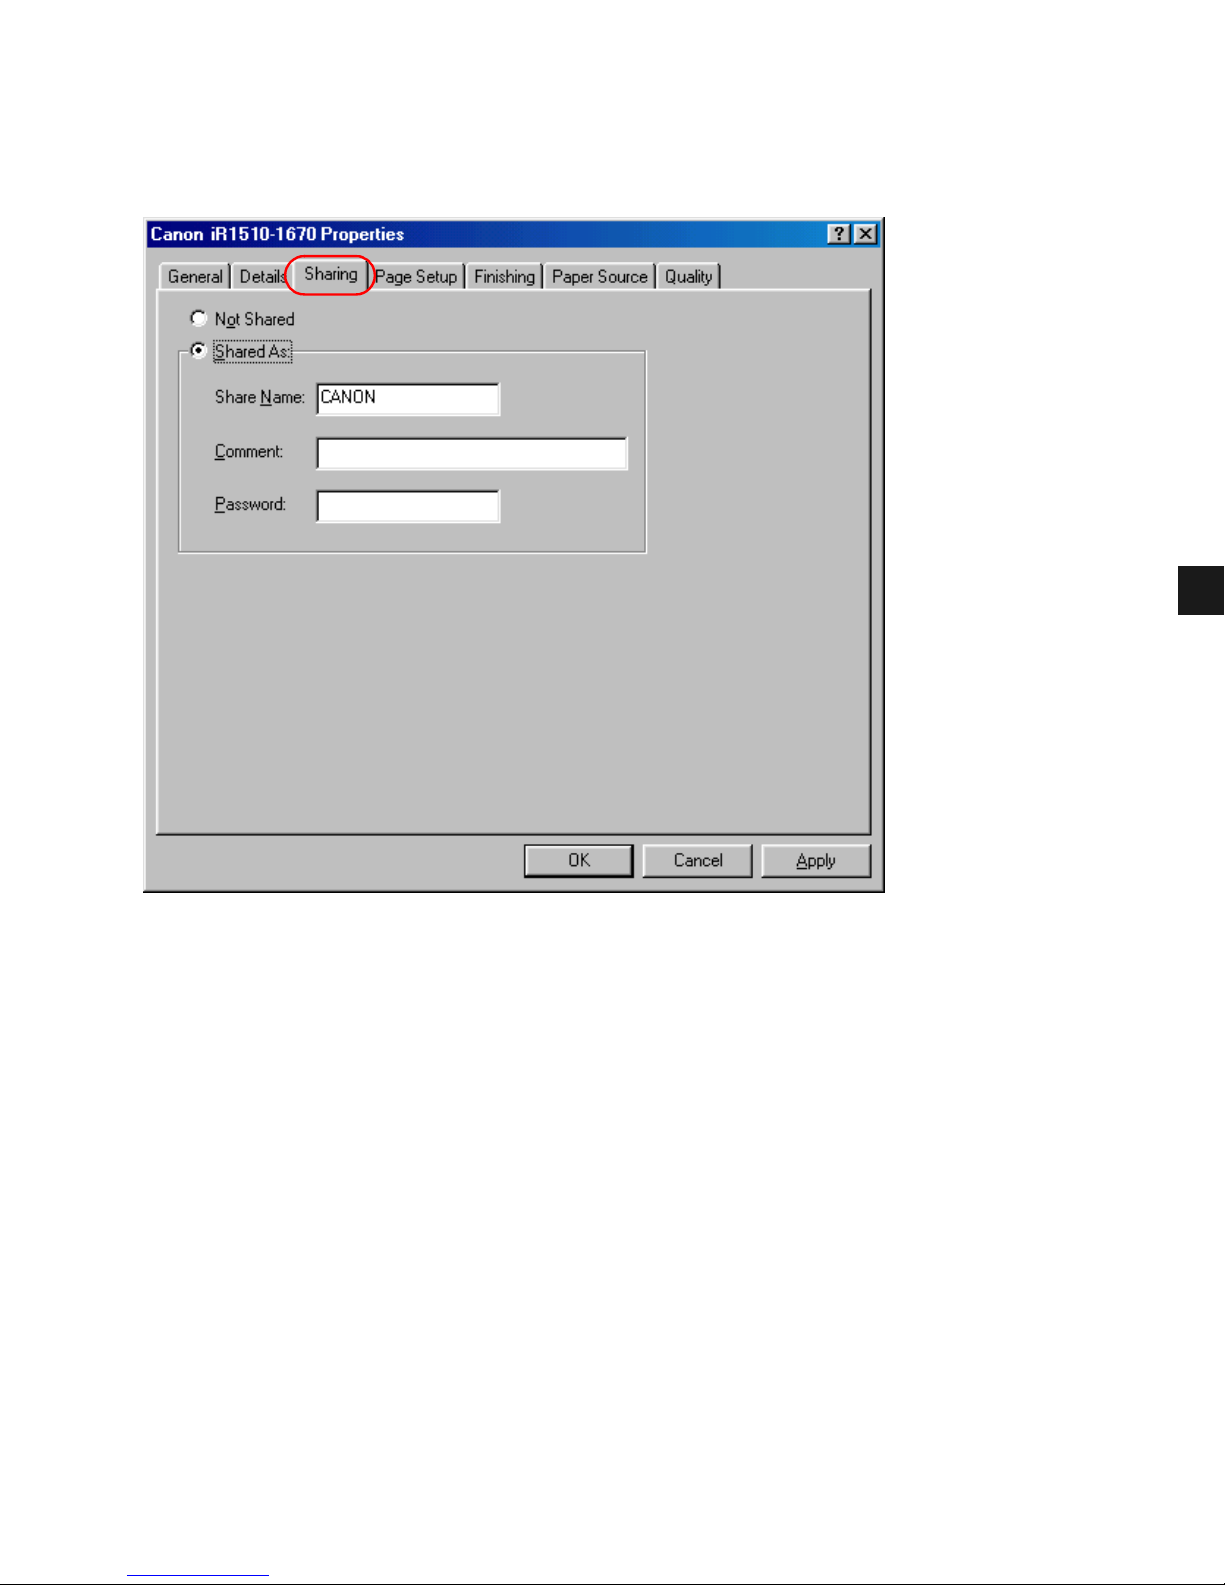
Specifies the printer-sharing settings. This tab is available only when file and printer sharing is
enabled. Refer to your Windows operating system documentation for more information.
Page 72
3-6
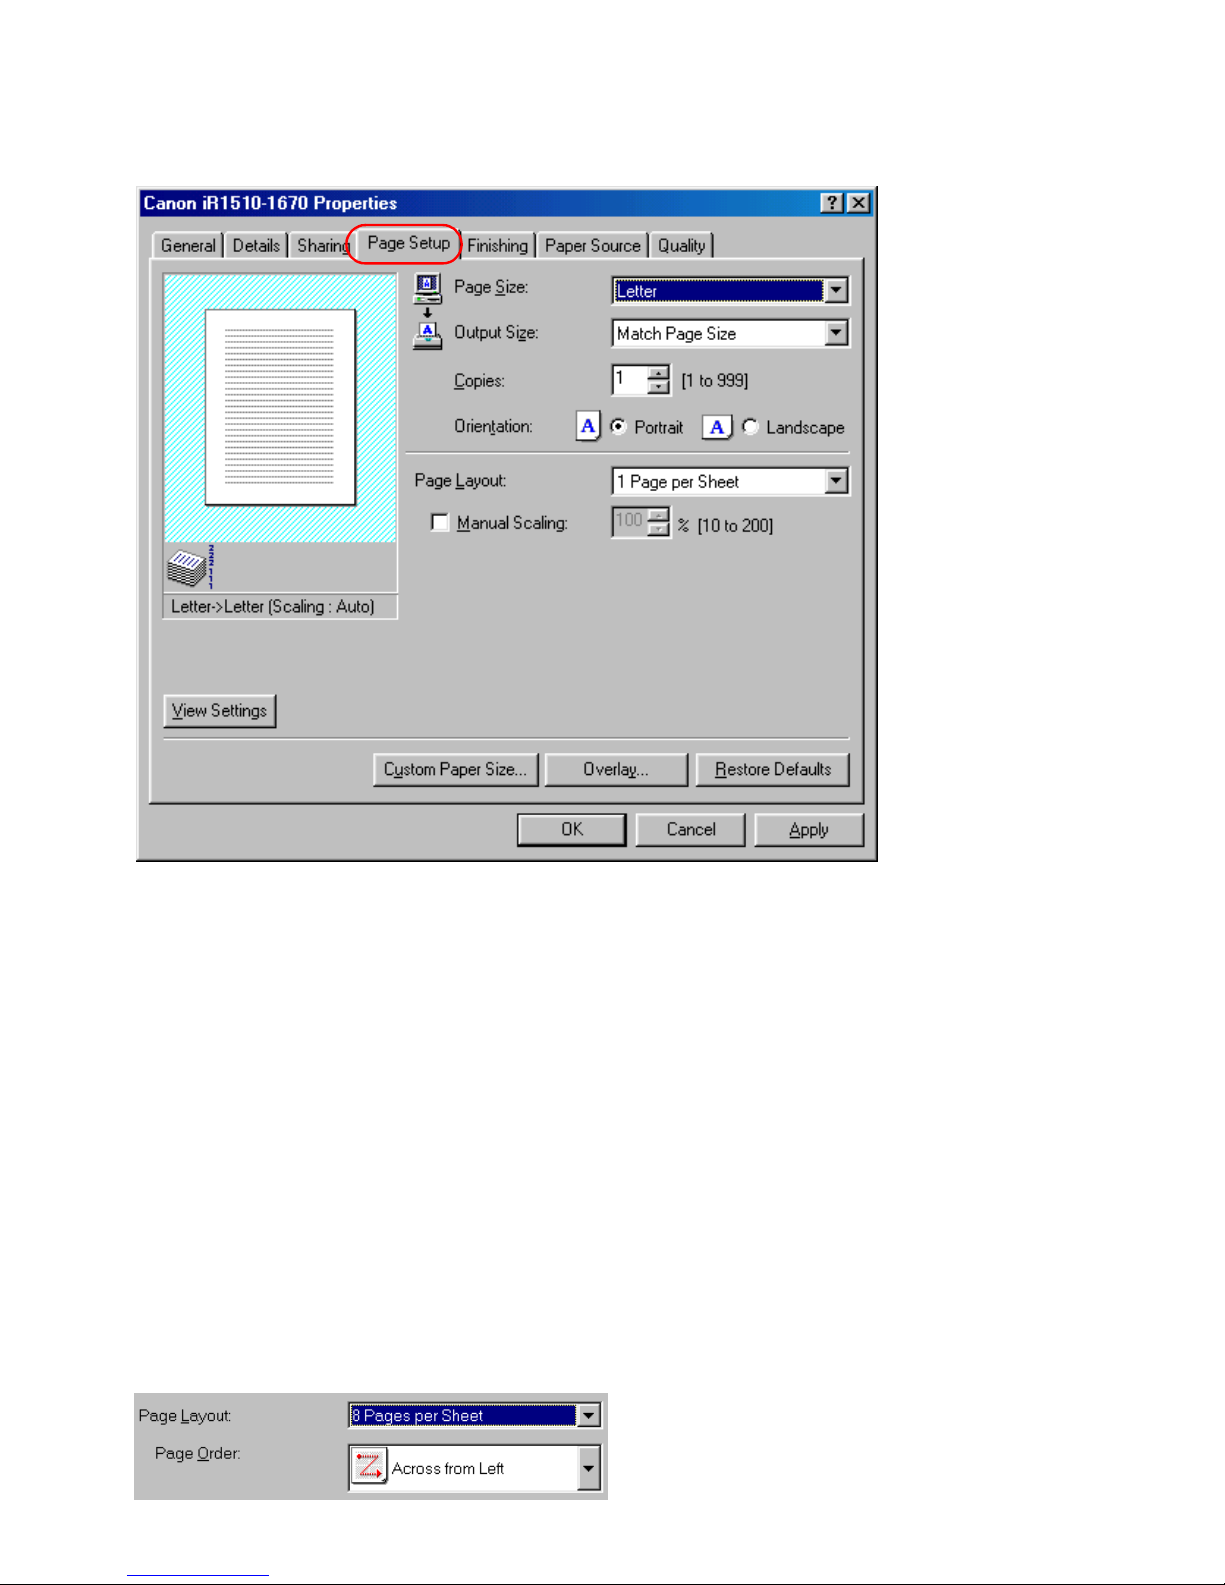
■ Page Setup Tab
Specifies paper size, scaling, number of copies, orientation, and pages per sheet.
Default settings depend on the country/region of purchase.
Page Size lets you select the paper size you are working with in your application. (A3, B4, A4,
B5, A5, Letter, Legal, Executive, Statement, DL, COM10, ISO-C5, Monarch, and three
custom paper sizes. The names of the custom paper sizes are set with the Custom Paper Size
option.)
Output Size lets you select the paper size to print on. If your output size is set to anything
other than Match Page Size, the image will be automatically reduced or enlarged to fit on the
page.
Copies lets you specify the number of copies to be printed (1 to 999).
Orientation lets you select the direction of printing relative to the paper (Portrait (vertical) or
Landscape (horizontal)).
Page Layout lets you select the number of pages per sheet (1, 2, 4, 8, 9). If you select more
than 1, the image may be reduced to fit on the selected output size. When 2, 4, 8, or 9 pages
per sheet is selected, Manual Scaling disappears and Page Order appears in its place.
Page 73
3-7
3
Printer Properties
Manual Scaling lets you shrink or enlarge images. This option only appears when 1 Page per
Sheet is selected as the Page Layout. Select the check box to set a reduction or enlargement
percentage (10 to 200).
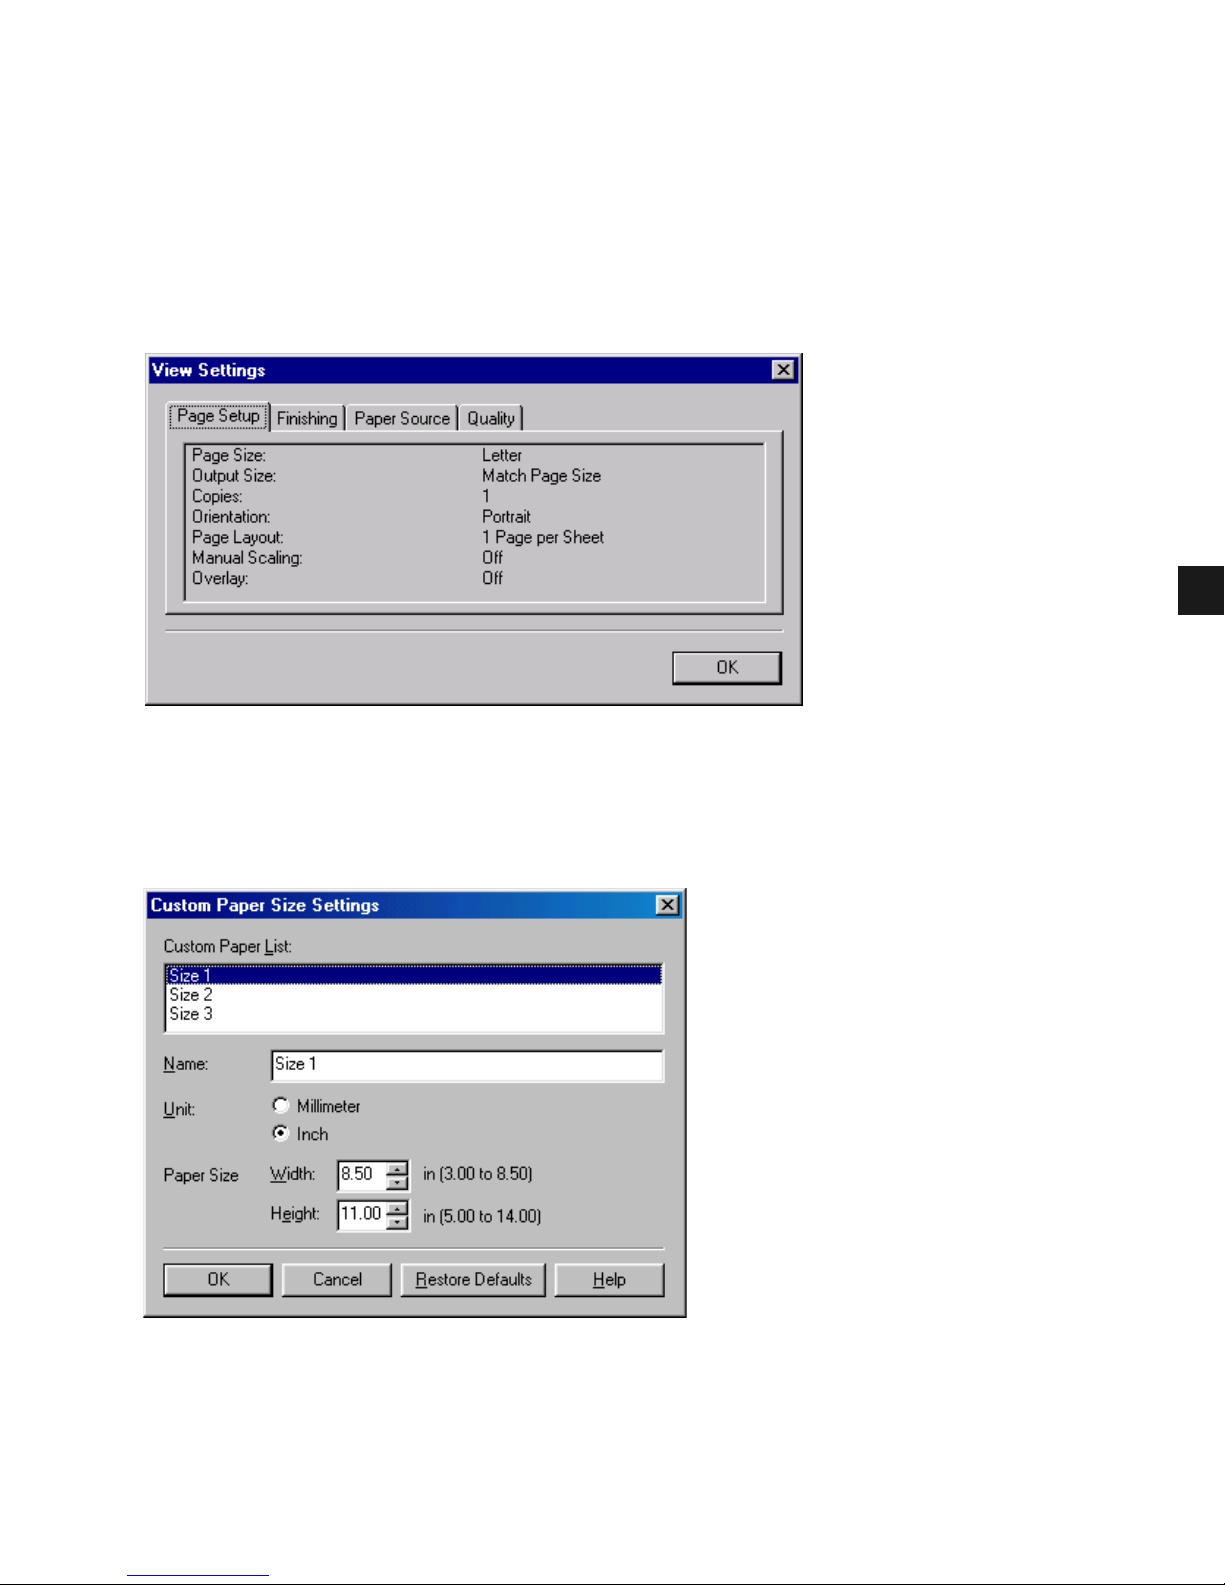
View Settings
To get a quick view of your current settings, click View Settings, which is located on the Page
Setup, Finishing, Paper Source, and Quality tabs. Click on the tabs in the View Settings
dialog box to view the settings for each tab.
Custom Paper Size Settings
Custom Paper Size in the Page Setup tab window allows you to define custom paper sizes
for quick selection. You can specify the name, width, and height of each size. You can
designate up to three custom sizes.
Default settings depend on the country/region of purchase.
Page 74

3-8
Selecting a Custom Paper Size Setting
If you wish to restore the default settings to all of the custom sizes, click Restore Defaults.
1 Select one of the predefined sizes from the Custom Paper List.
2 If you wish, enter a unique name in the Name area.
3 Select the Unit of measurement (Millimeter or Inch).
4 Define the Paper Size using the Width (3.00 to 8.50 inches (76.2 to 215.9 mm)) and Height
(5.00 to 14.00 inches (127.0 to 355.6 mm)) settings.
5 Click OK to accept your changes.
Page 75

3-9
3
Printer Properties
Overlay
Overlay Printing allows you to overlay the document created in any Windows application onto
a preselected form file.
For example, if there is a form file containing a company name, logo, or address, it will be
printed in the same position on each page of the document together with the print data created
in an application.
You can easily create perfectly formatted documents with the same appearance from any
Windows application.
Overlay Form File Formats
For overlay forms you can use files in the following formats:
• Windows Metafile (WMF)
• Windows Bitmap (BMP)
Creating an Overlay Form File
Before using Overlay Printing, you need to create an overlay form file in an application. To
create a form file, you can use applications from the Windows 95/98/Me package and from
commercially available software.
• Windows Metafile (WMF)
Windows metafile format is used in most commercially available draw applications. Create
the form data and save it in the metafile format.
• Windows Bitmap (BMP)
You can easily create a form file in this format using software included in the Windows
95/98/Me package, such as Paint. Windows 95/98/Me desktop wallpapers are also created in
this format. There are also a number of commercially available software products, (e.g. Corel
PhotoPaint), that use this format. Create the form data using such software and save it as a
BMP file.
Page 76
3-10
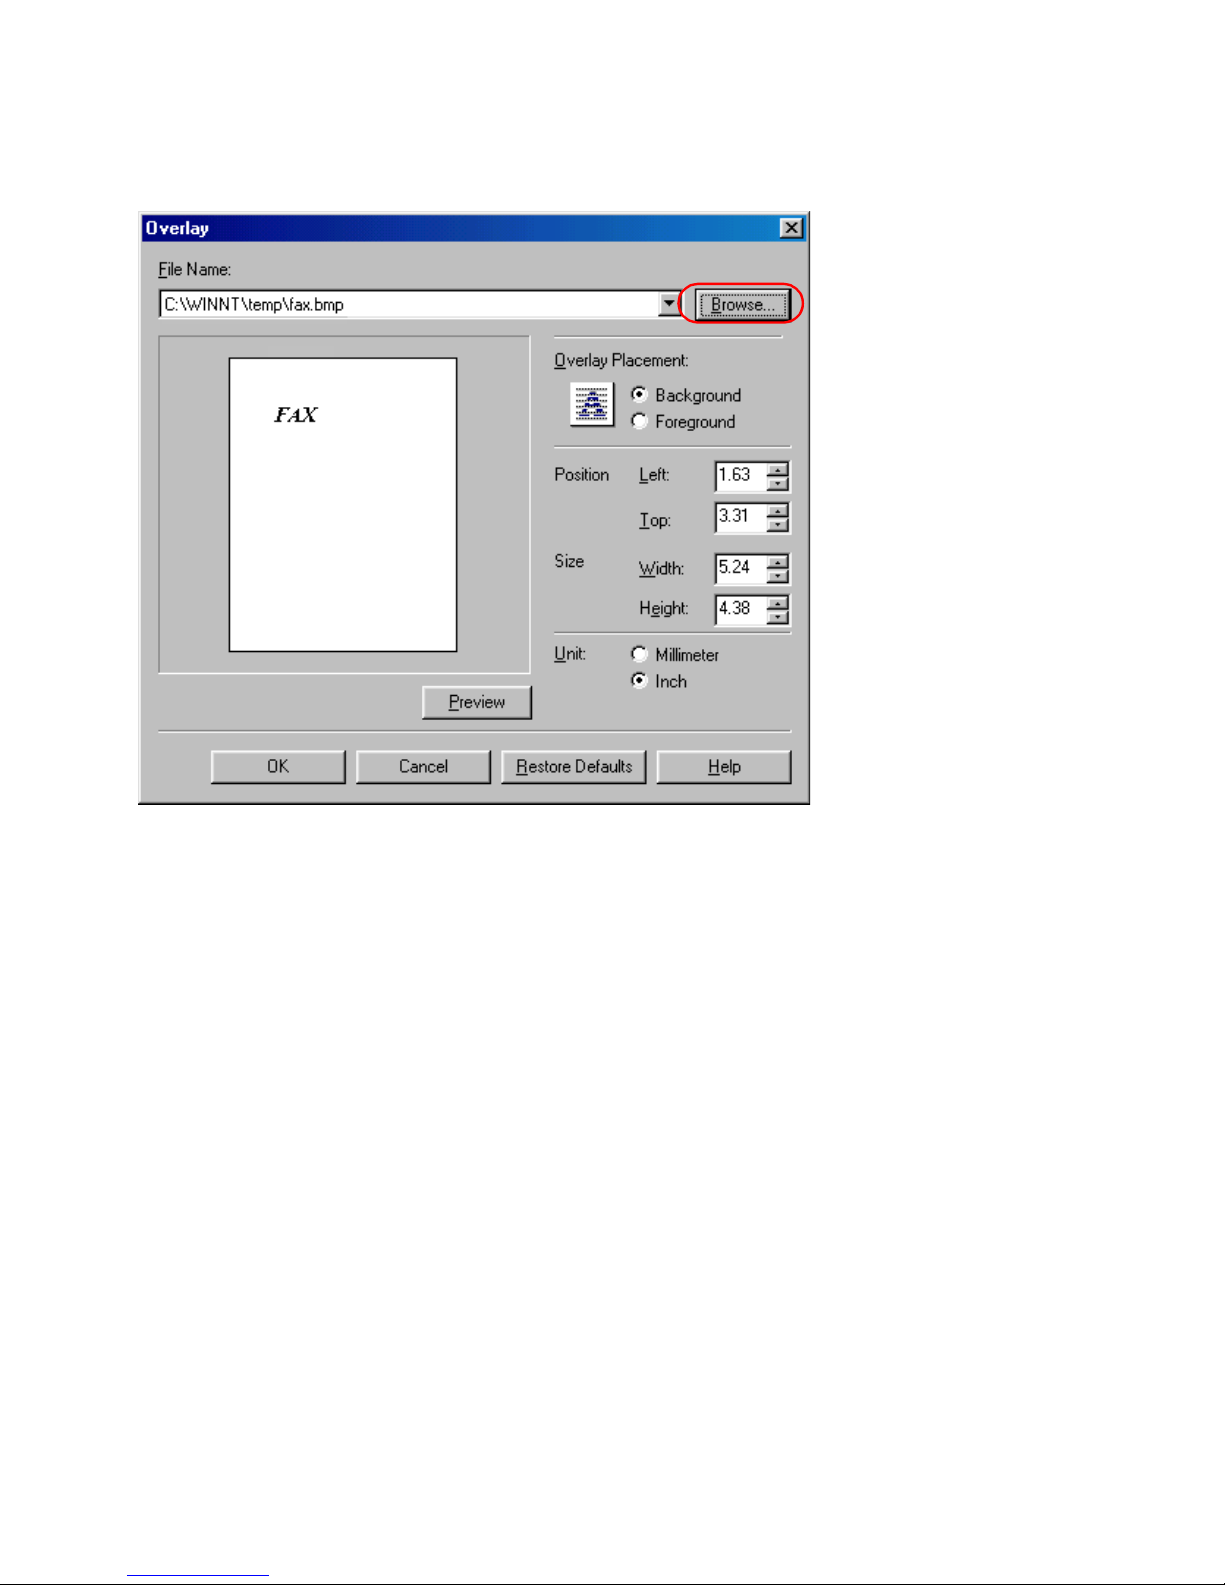
Setting Overlay
To make settings for overlay printing, click Overlay on the Page Setup tab. The Overlay
dialog box appears. Use Browse to select the file that contains the overlay data.
File Name sets the file name to use as the overlay form.
The File Name dropdown list stores up to nine file names in addition to the default (none)
setting.
You can use Browse to select the file that contains the overlay data.
Overlay Placement
• Background—Select this radio button to place the overlay data in back of (beneath) the
application data.
• Foreground—Select this radio button to place the overlay data in front of (over) the
application data.
Position lets you specify the position of the overlay based on its distance from the paper's left
and top edges. Select units of measurement for Left and Top using the Millimeter or Inch
radio buttons. The valid values interval for this setting is 0 to 16.5 inches (0 to 420 mm).
Size lets you set the size of the overlay. Select units of measurement for Width and Height
using the Millimeter or Inch radio buttons. The valid values interval for this setting is 0 to
16.5 inches (0 to 420 mm).
Unit lets you set units of measurement using the Millimeter or Inch radio buttons.
Restore Defaults resets Left, Top , Width, and Height to their default values.
Confirm the settings click OK. The Page Setup dialog box appears again.
Page 77
3-11
3
Printer Properties
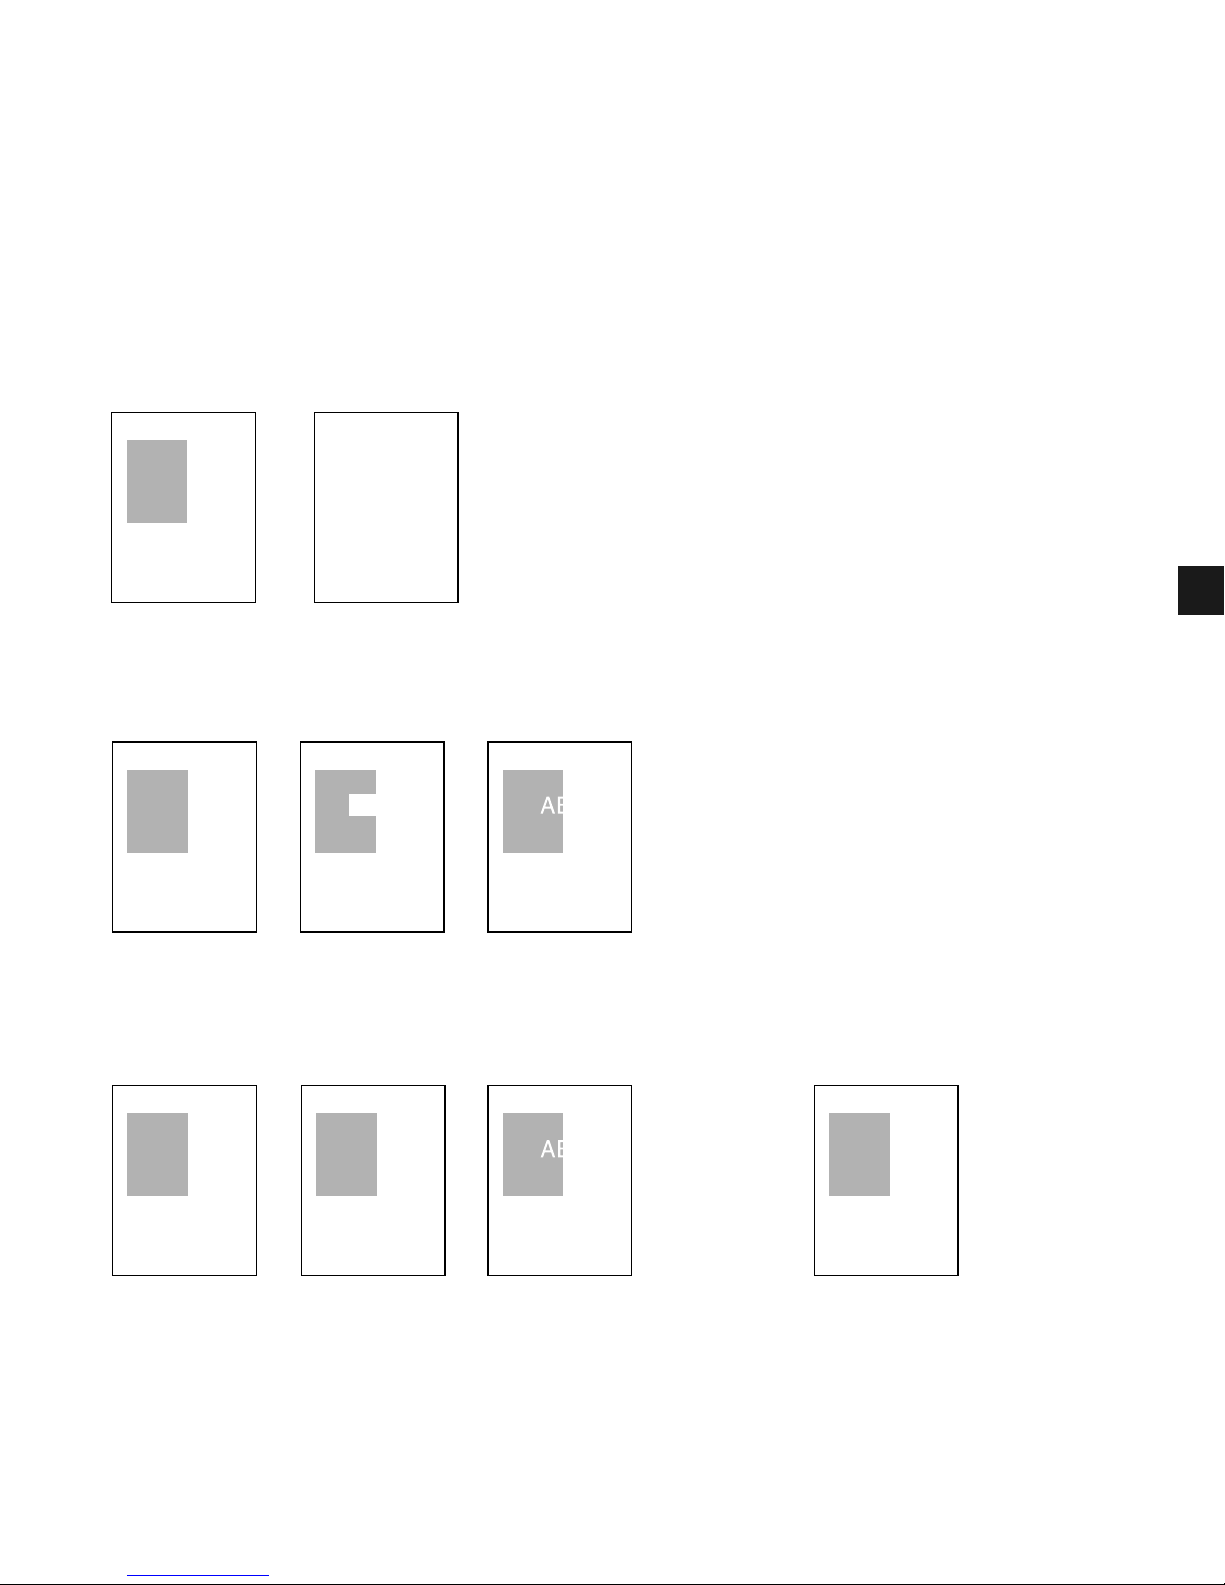
Overlay Placement
Print results may differ depending on the placement of the overlay and application print data
(Background/Foreground). When the overlay and application print data (original data)
overlap, the print result may differ depending on the overlay file format and the application
being used. Settings for overlay printing of your machine allow you to place the overlay form
in the foreground (in front) or in the background (in back) of the application print data.
ABC
ABC
ABC
ABC
ABCABC
ABC ABC
Original data
Overlay Application
[Overlay Placement: Background]
The result will appear similar to one of those shown below.
[Overlay Placement: Foreground]
The result will appear similar to one of those shown below.
Using Windows Metafile Using Windows BMP
The result will always be as shown below.
Page 78
3-12
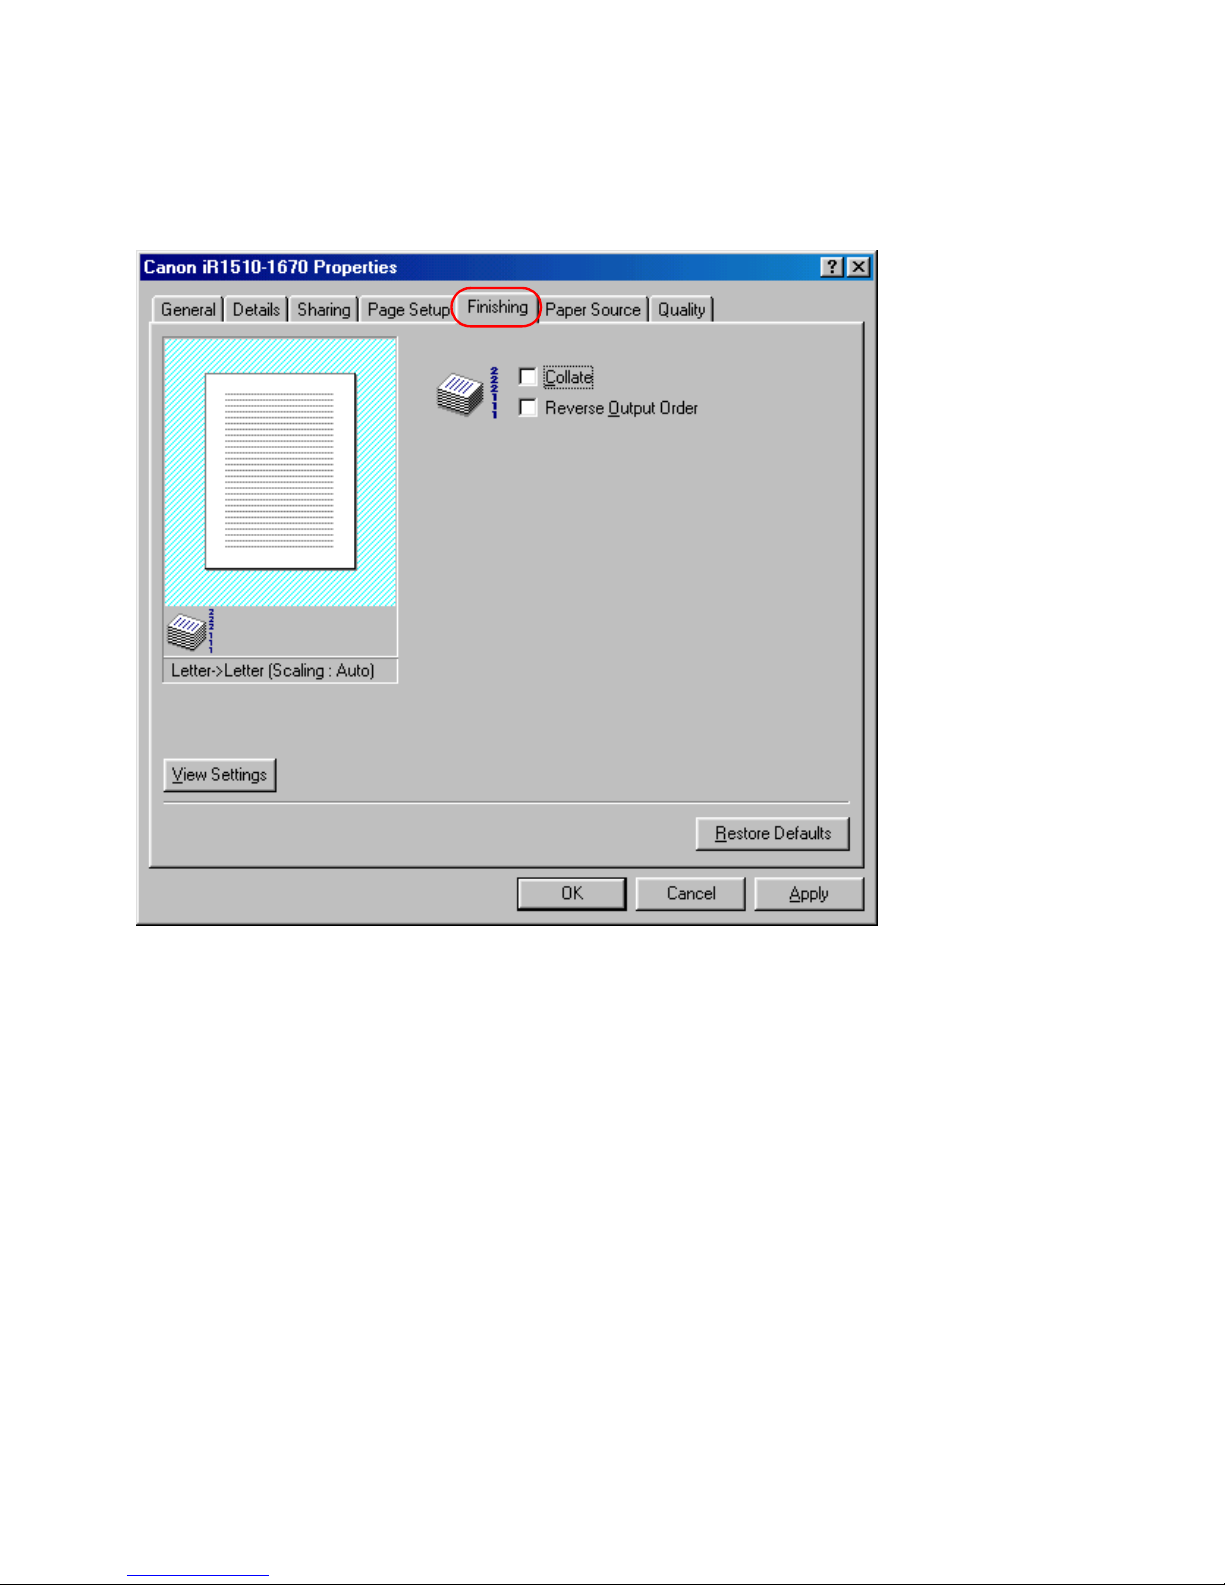
■ Finishing Tab
Specifies how the final output is collated and whether pages should be printed in reverse
output order. Select the appropriate check boxes to collate the document or print it in reverse
output order.
Page 79
3-13
3
Printer Properties
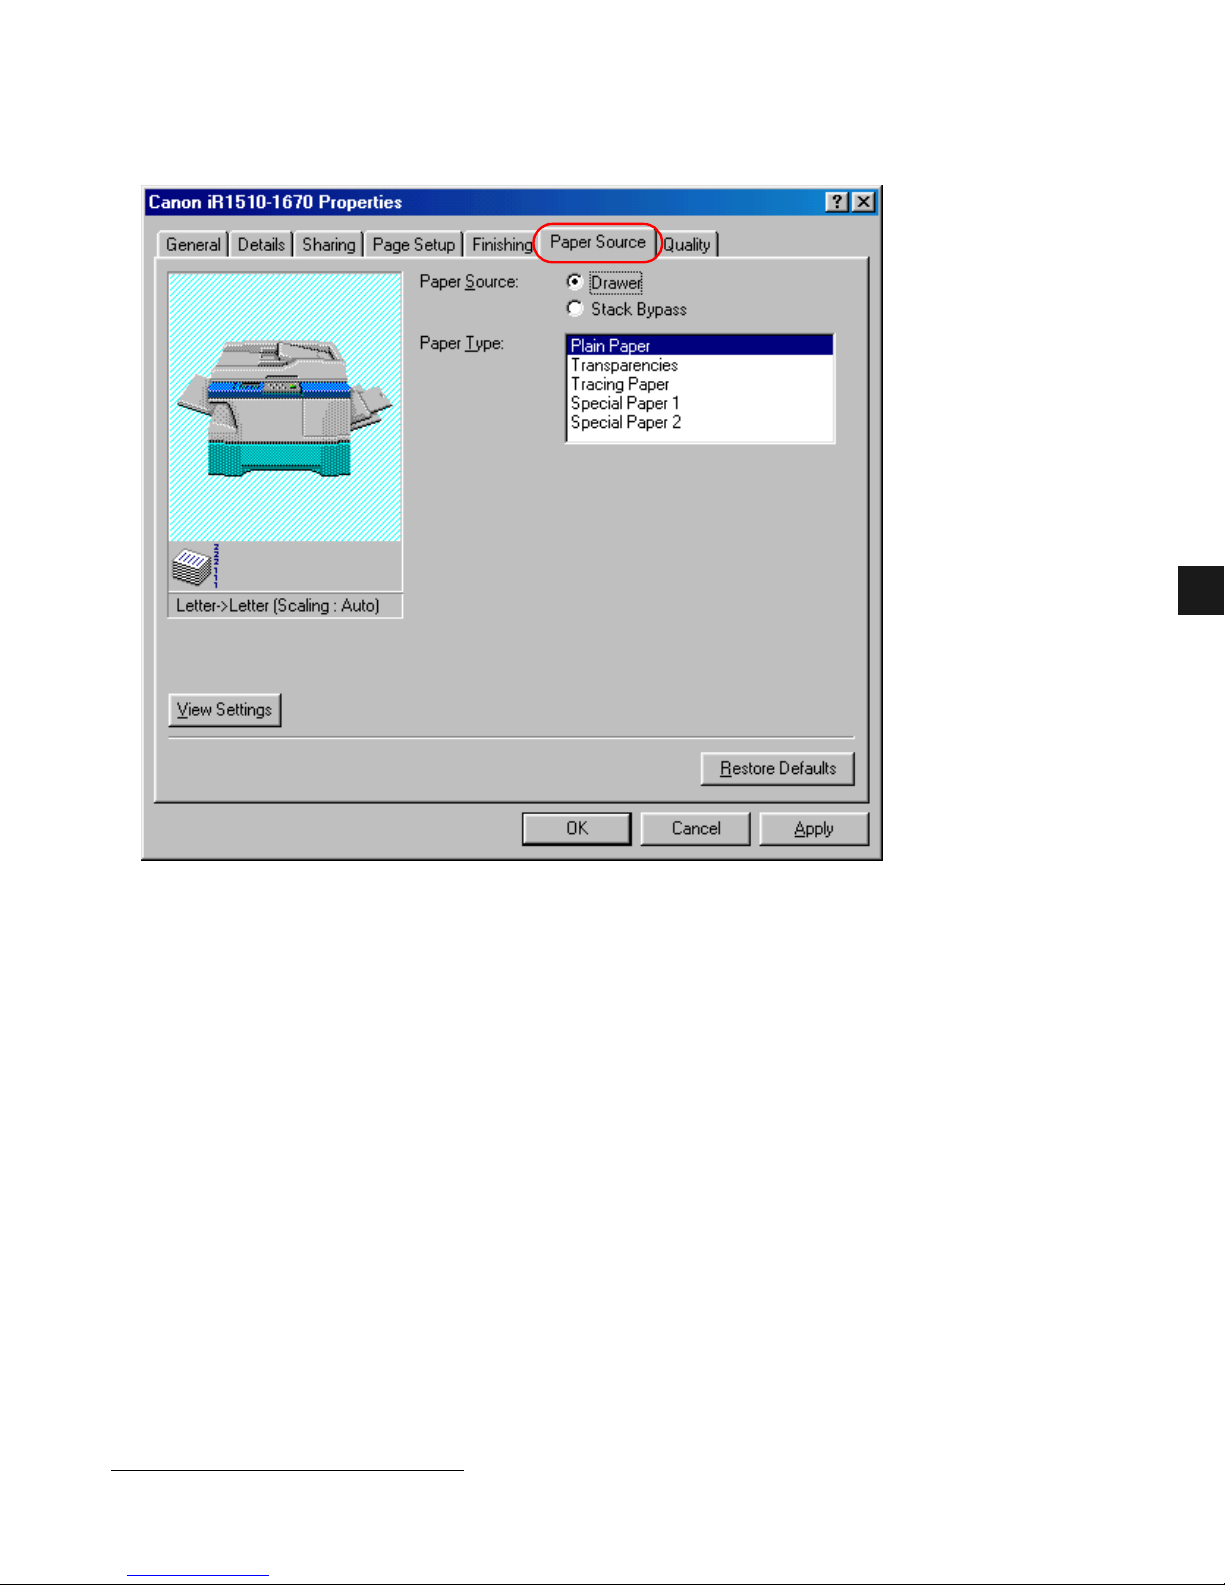
■ Paper Source
Specifies the paper source and paper type settings.
Paper Source lets you specify the paper feed method. Select from Drawer or Stack Bypass.
Paper Type lets you select from the following types of paper:
• Plain Paper (including colored paper, recycled paper: 64-80 g/m
2
)
• Transparencies*
• Tracing Paper* (tracing paper, thin paper: 52-63 g/m
2
)
• Special Paper 1* (thick paper)
• Special Paper 2* (postcards, envelopes: 81-128 g/m
2
)
*When Paper Source is set to Drawer, please do not select paper types other than Plain Paper.
Page 80
3-14
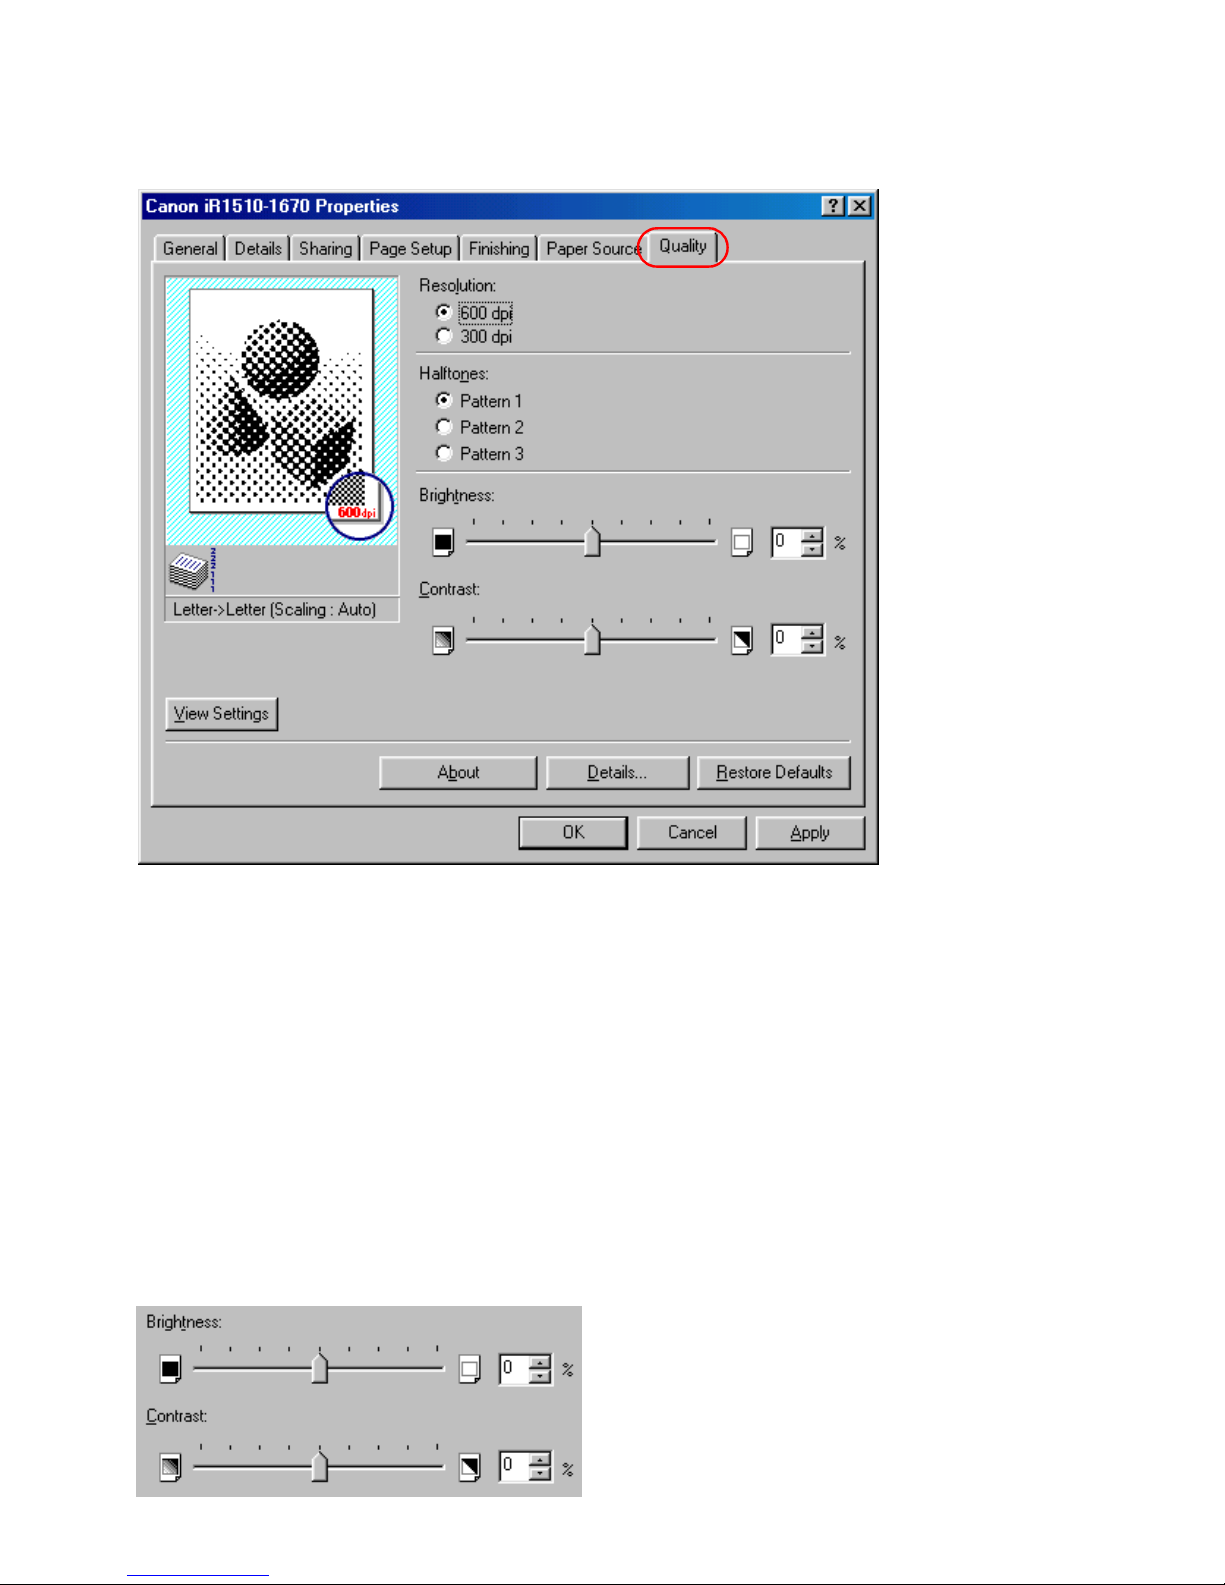
■ Quality Tab
Specifies the resolution, halftoning method, brightness, and contrast settings.
Resolution lets you specify the printer’s resolution in dots per inch (600 dpi, 300 dpi).
Halftones is the process of converting a grayscale image to black dots and white (unprinted)
dots that simulate the gray shades in the original image. Different halftone patterns give
different gray shade results.
Brightness is the relative proportion of light and dark areas. Decreasing brightness darkens
the overall image; increasing brightness lightens it. Brightness is expressed as a relative range
from -80% to +80%.
Contrast is the degree of difference between the lightest and darkest areas of an image.
Decreasing contrast lightens the dark areas and darkens the light areas; increasing it darkens
the dark areas and lightens the light areas. Contrast is expressed as a relative range from -80%
to +80%.
Page 81
3-15
3
Printer Properties
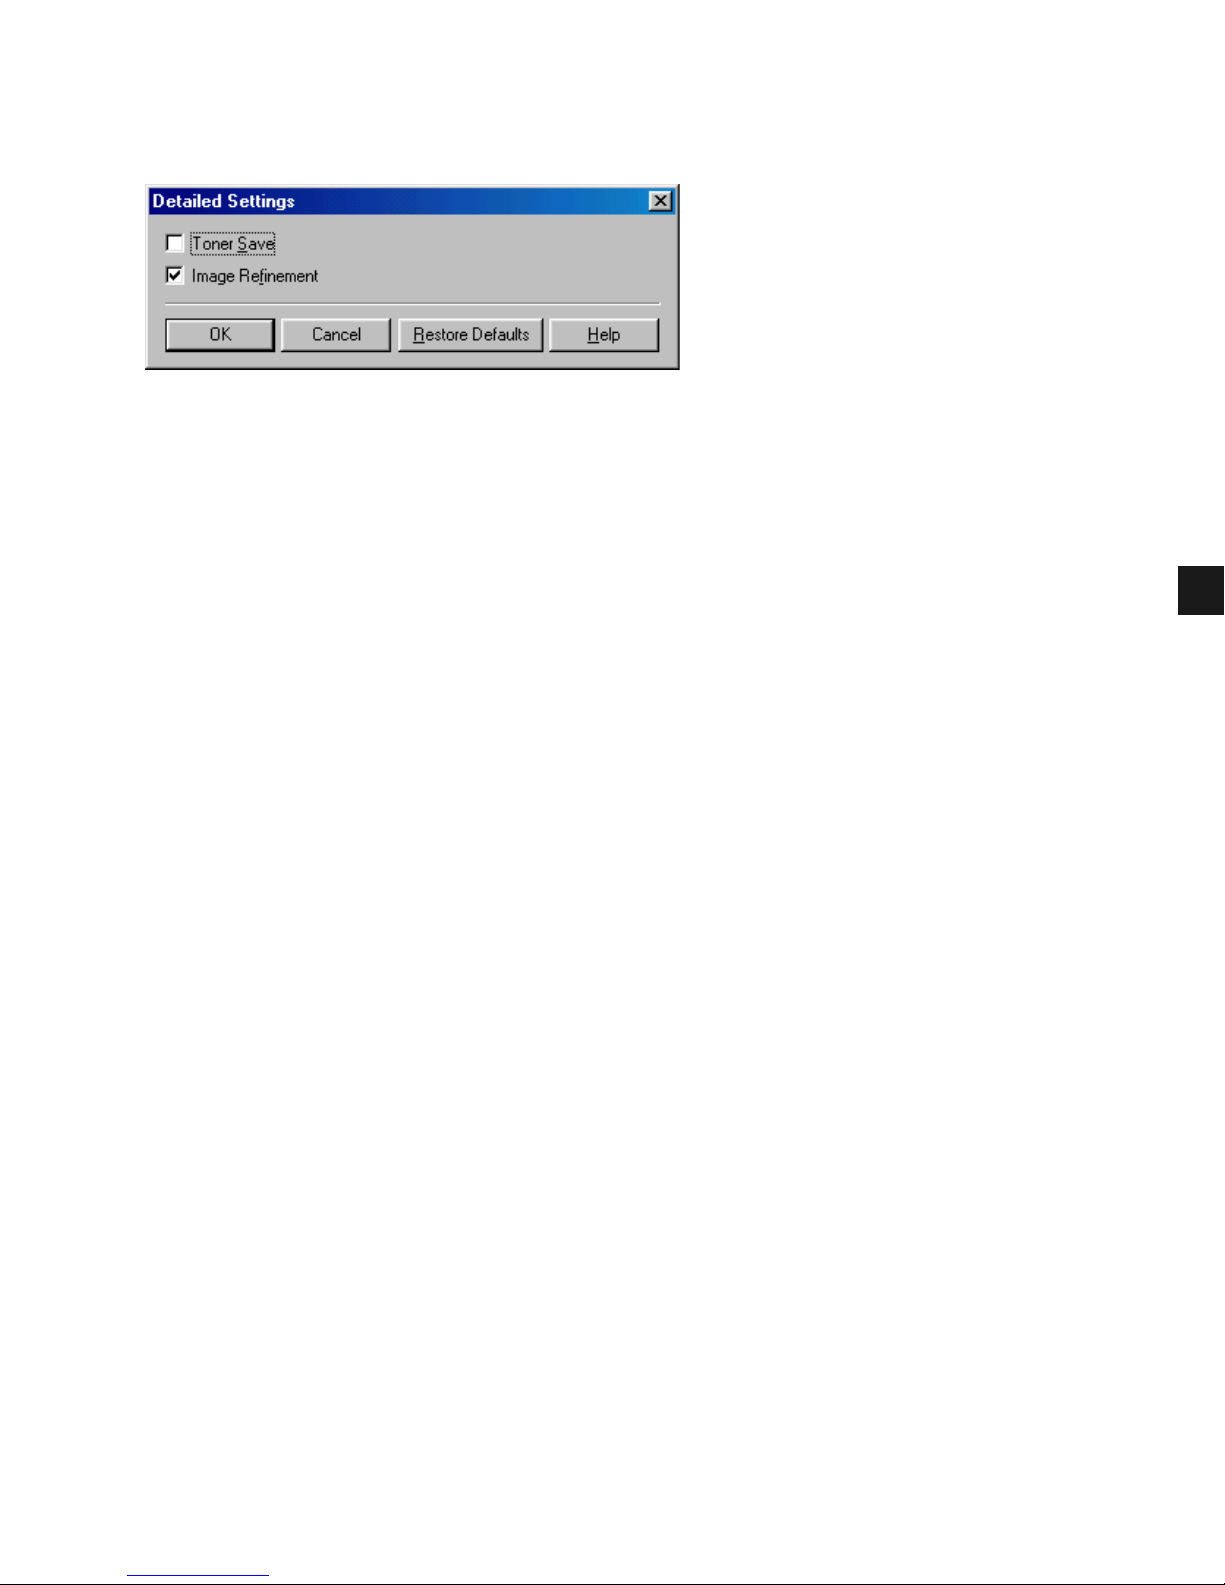
Detailed Settings
Details accesses the settings for Toner Save and Image Refinement.
Toner Save thins the black areas of print data, so toner consumption is reduced.
Image Refinement is a printer technology from Canon which automatically senses and
refines the jagged edges and ragged curves of characters and graphics.
Page 82
3-16
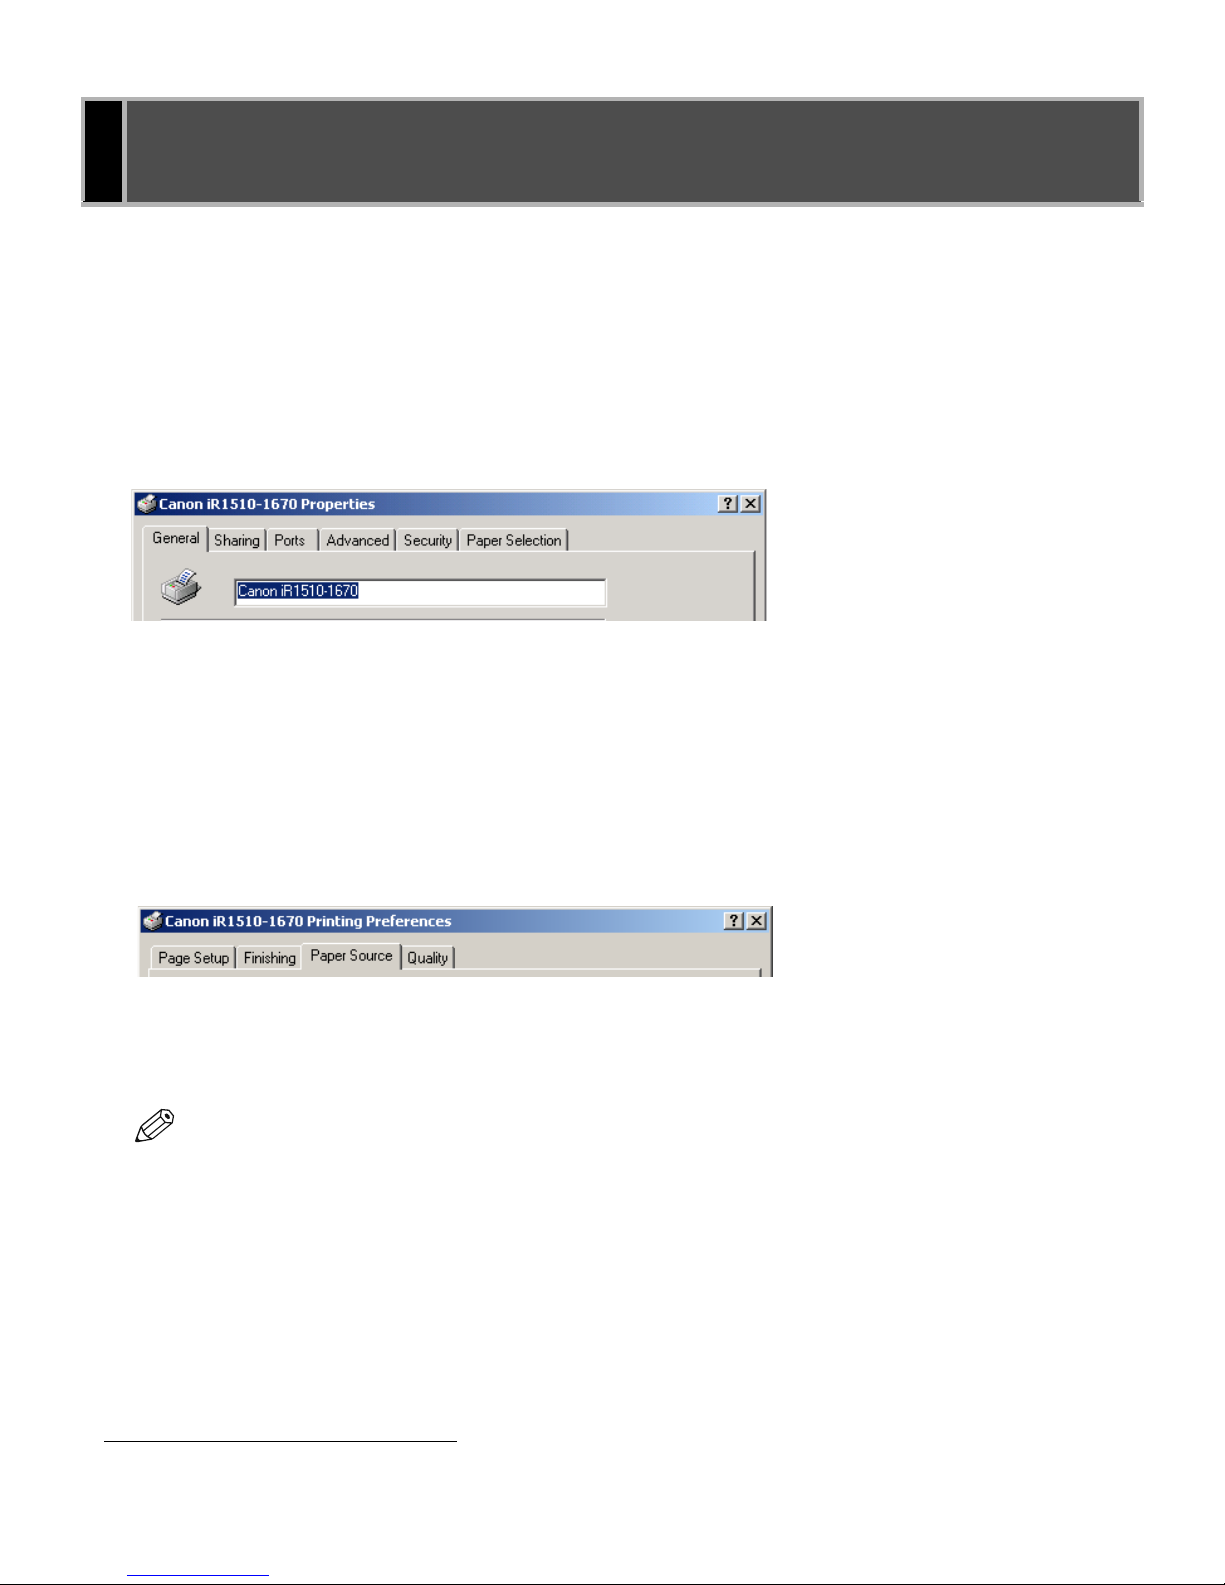
The CAPT driver for Windows NT/2000/XP/Server 2003 has two main dialog boxes: the
Printer Properties dialog box and the Default Document Properties* dialog box.
Printer Properties
To view the printer properties, select Properties from the File menu in the Printers (in
Windows XP/Server 2003, Printers and Faxes) folder, or click the right mouse button on the
Canon iR1510-1670 icon in the Printers (in Windows XP/Server 2003, Printers and Faxes)
folder and select Properties from the pop-up menu.
Default Document Properties*
In the Default Document Properties* dialog box, you can specify the default settings for the
printing options available when you print on the imageRUNNER 1670F/1630/1610. To view
the default document properties, select Document Defaults** from the File menu in the
Printers (in Windows XP/Server 2003, Printers and Faxes) folder, or click the right mouse
button on the Canon iR1510-1670 icon in the Printers (in Windows XP/Server 2003,
Printers and Faxes) folder, and select Document Defaults** from the pop-up menu.
You can also open an equivalent dialog box and specify the setting by selecting Print or Page
Setup from the File menu of an application.
Windows NT/2000/XP/Server 2003 Printer
Properties and Default Document Properties
* Printing Preference in Windows 2000/XP/Server 2003 (Except for Windows NT)
** Printing Preferences in Windows 2000/XP/Server 2003 (Except for Windows NT)
NOTE
• The number of tabs displayed in the Properties dialog box will vary, depending on
the type of operating system you are using and the method you use to access
Properties.
• The screen shots shown are from Windows 2000.
• For more information about the following features, see the online Help. To display
the online help, select the item you want more information about and press F1, or
click ? in the title bar and then select the item of interest.
Page 83
3-17
3
Printer Properties
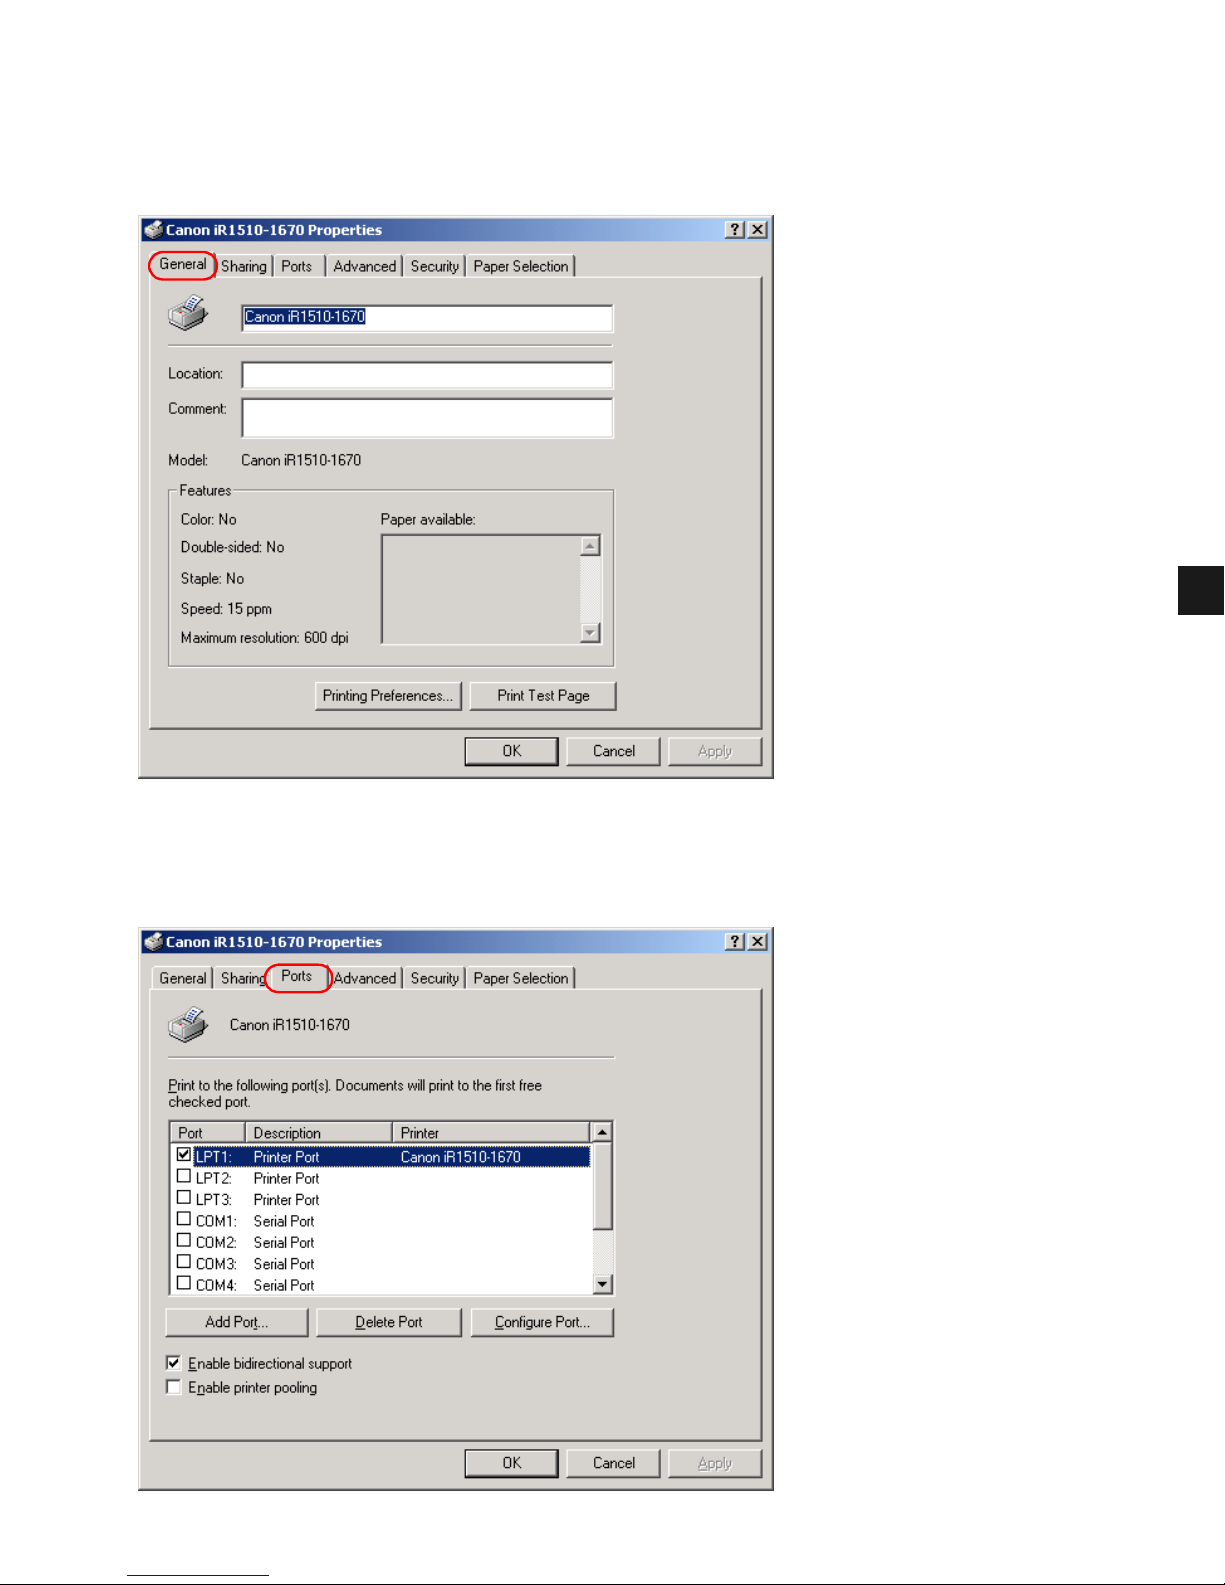
■ General Tab
Lets you specify whether to print a test page and separator pages. Refer to your Windows
operating system documentation for more information.
■
Ports Tab
Lets you specify the port to which the printer is attached. Refer to your Windows operating
system documentation for more information.
Page 84
3-18
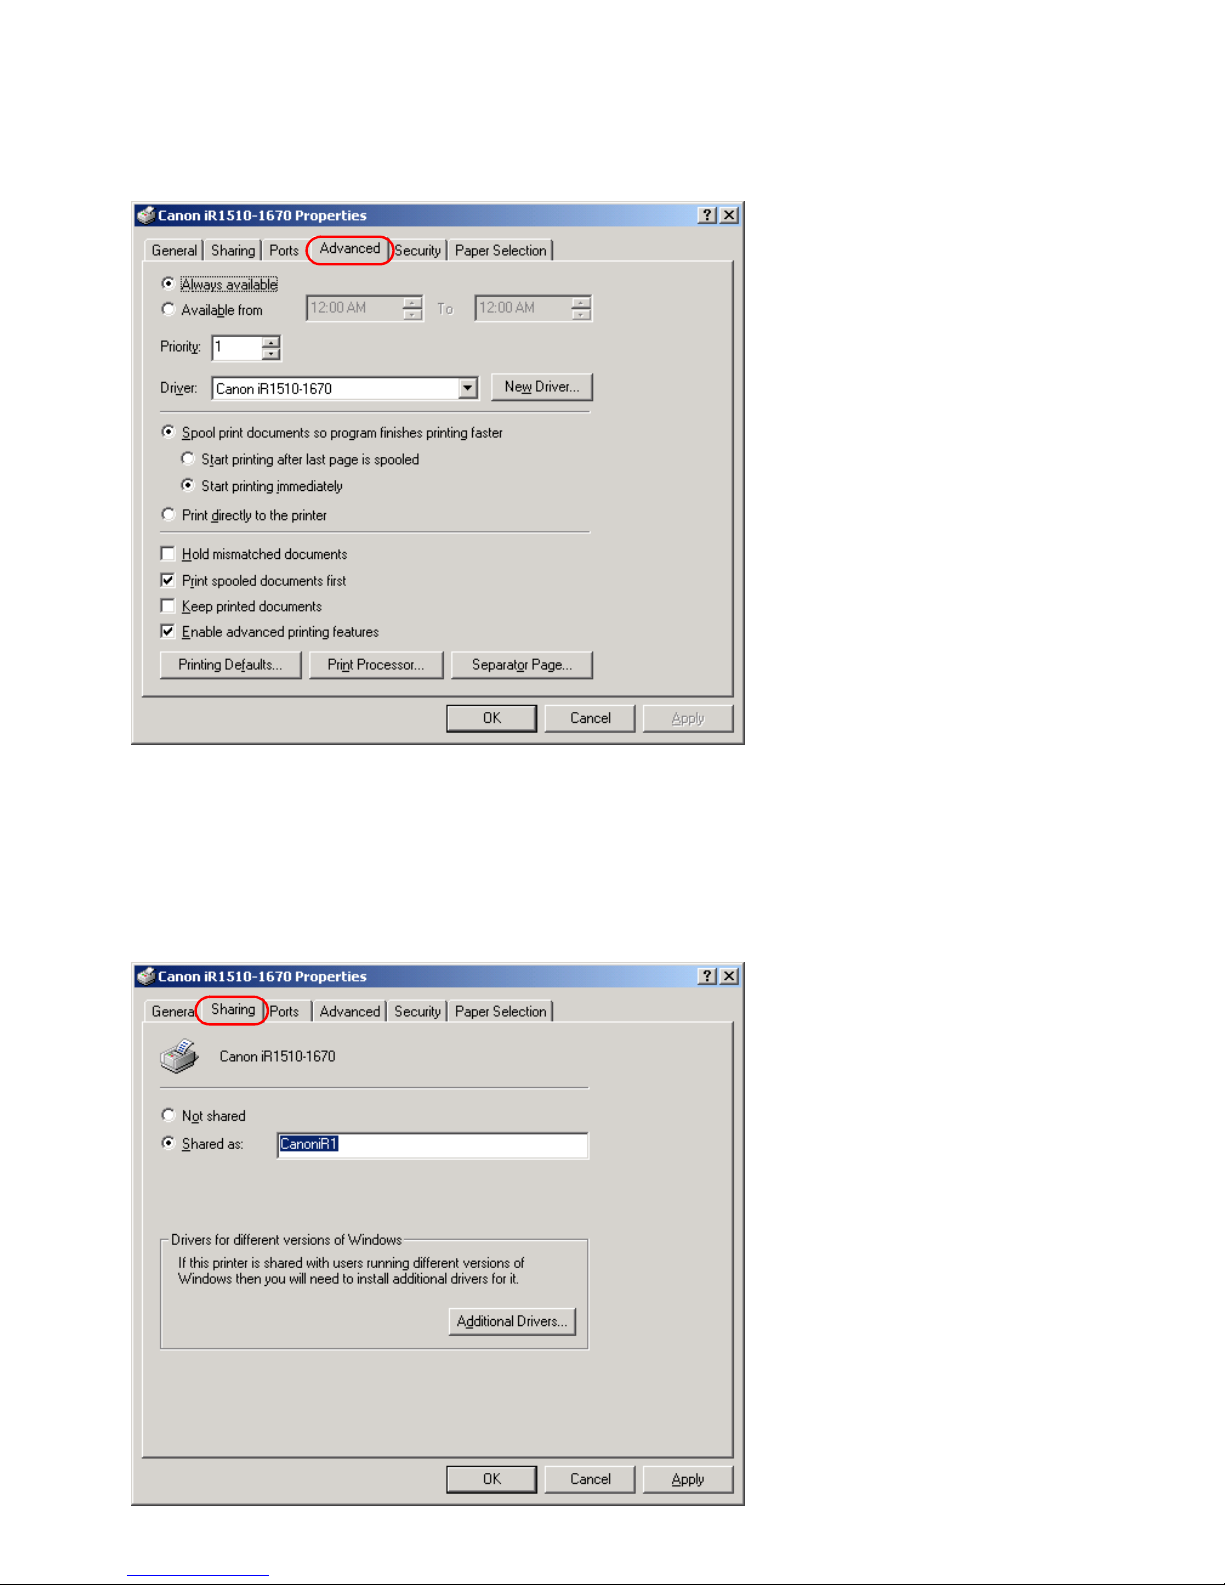
■ Advanced Tab
Lets you define print spooling settings. Refer to your Windows operating system
documentation for more information.
Spool print documents so program finishes printing faster and Start printing
immediately are set automatically when you install the printer driver.
■
Sharing Tab
Specifies the printer-sharing settings. Refer to your Windows operating system documentation
for more information.
Page 85
3-19
3
Printer Properties
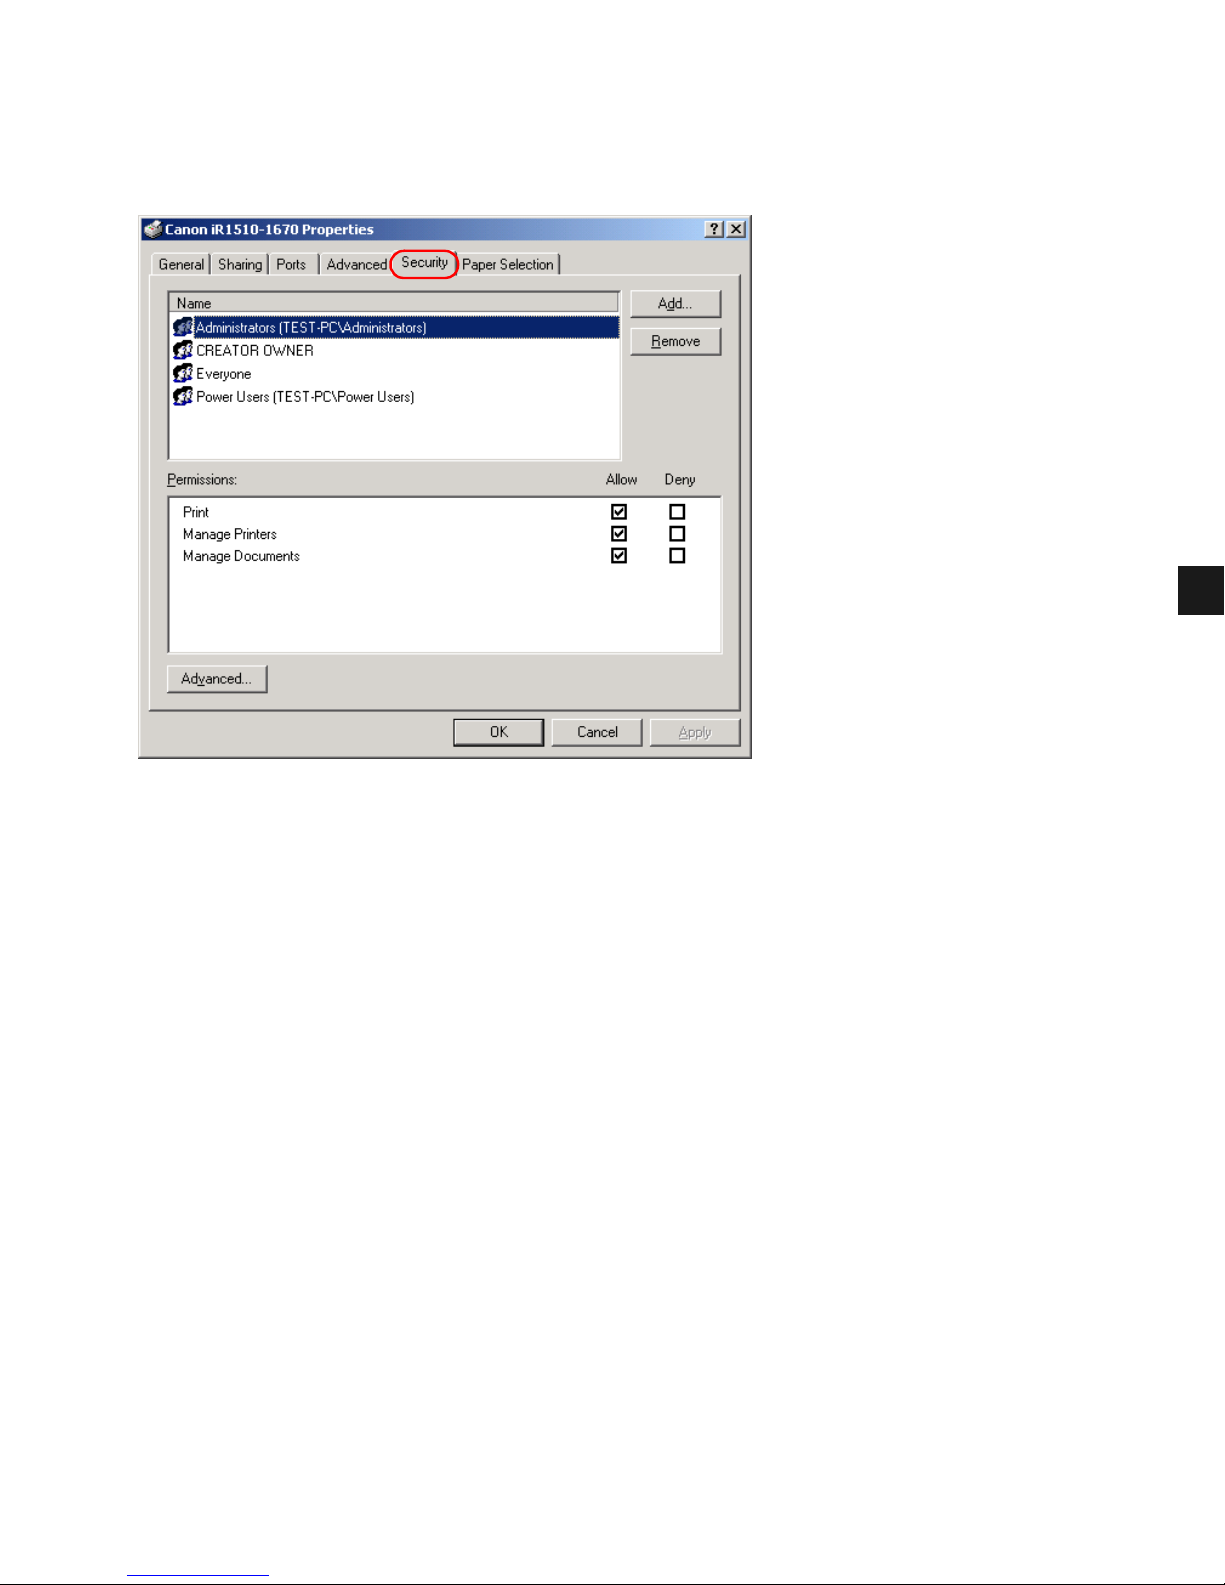
■ Security Tab
Lets you specify security settings. Refer to your operating system documentation for more
information.
Page 86
3-20
■ Paper Selection Tab
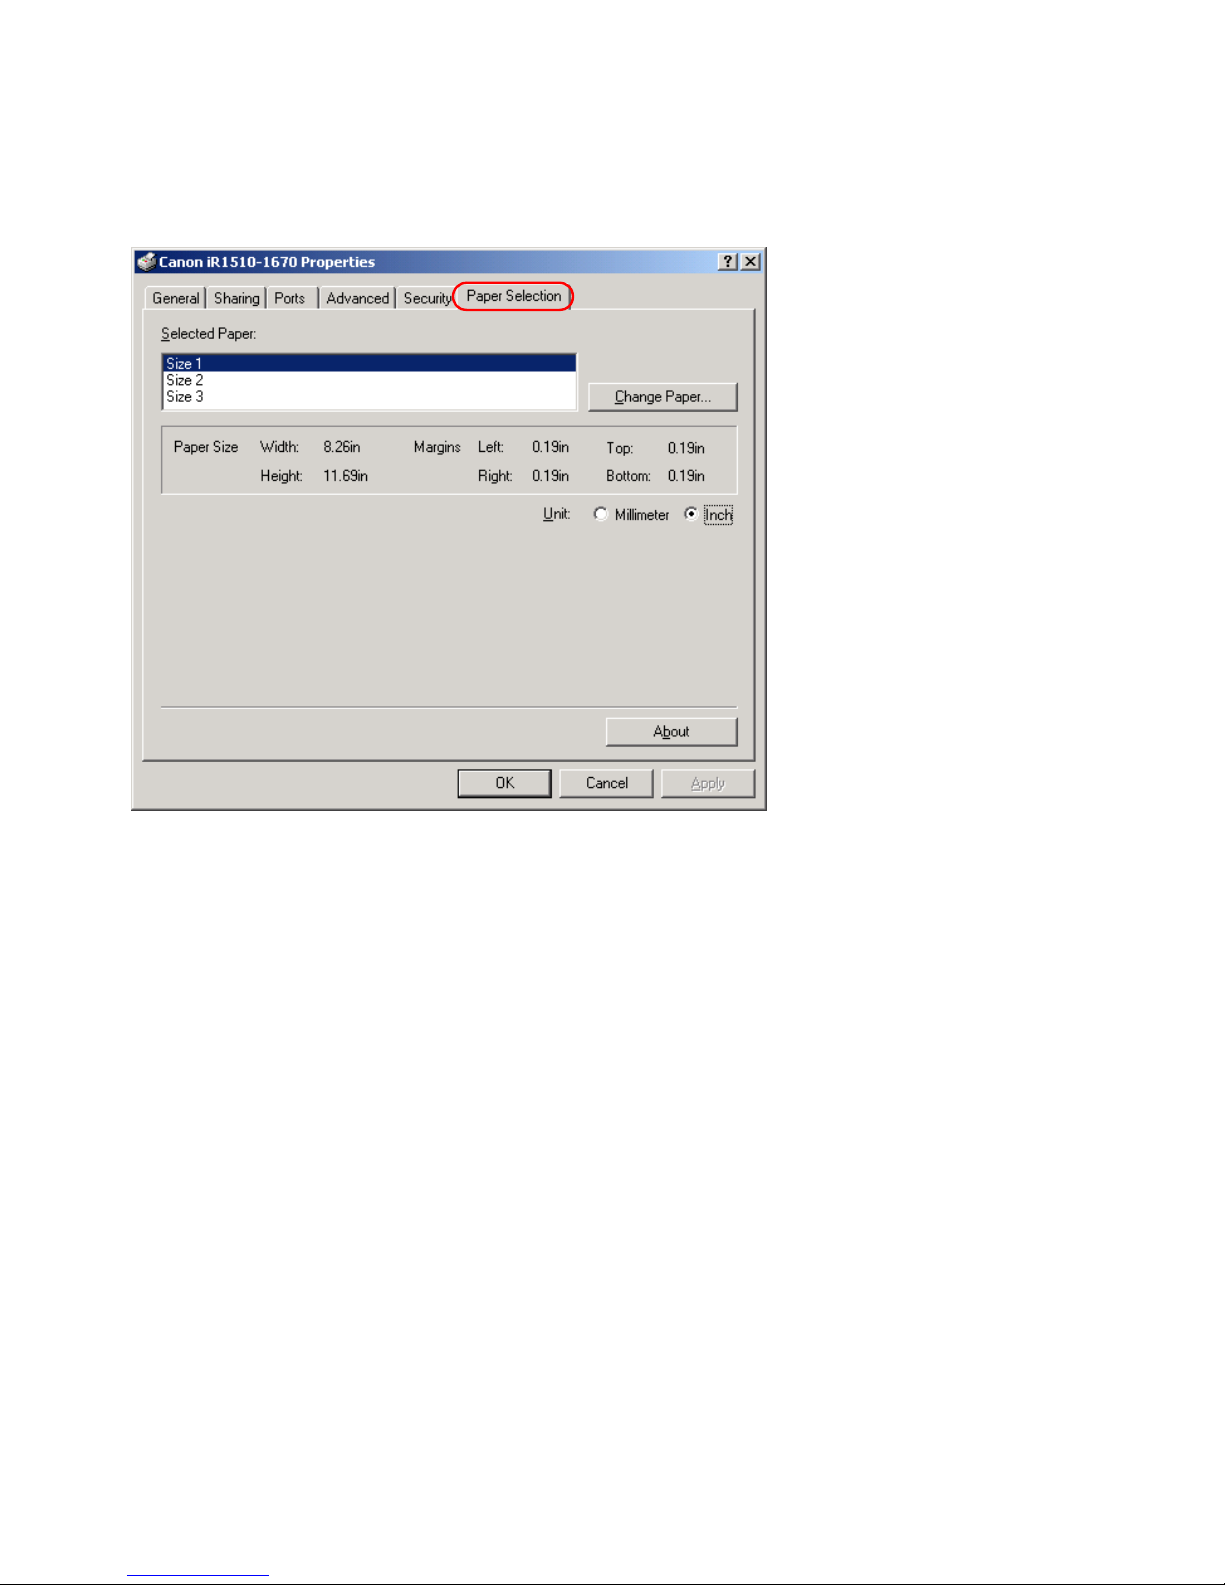
This printer driver supports three custom paper sizes. Using the custom forms defined on the
Forms tab in the Print Server Properties dialog box, you can add information about the
custom paper sizes. Form definitions must conform to the printer’s specifications.
Selected Paper shows the names of the three sizes.
Change Paper opens the Change Paper dialog box. This box contains a listing of the
available papers, and their definitions (Available Paper has Height: 5.00 to 14.00 inches
(127.0 to 355.6 mm) and Width: 3.00 to 8.50 inches (76.2 to 215.9 mm)) that were defined in
the Forms tab in the Print Server Properties dialog box. (The Print Server Properties
dialog box can be accessed by selecting Server Properties from the File menu of the Printers
(in Windows XP/Server 2003, Printers and Faxes) folder.)
Only sizes that conform to the printer’s specifications are listed as available. When you choose
a size in the list and click OK, the size information is copied to the selected paper in the
Selected Paper list on the Paper Selection tab. Click Millimeter or Inch to switch the Unit
of dimensions displayed on the screen.
* Be sure to designate values such that the height is equal to or greater than the width.
Page 87
3-21
3
Printer Properties
■ Page Setup Tab
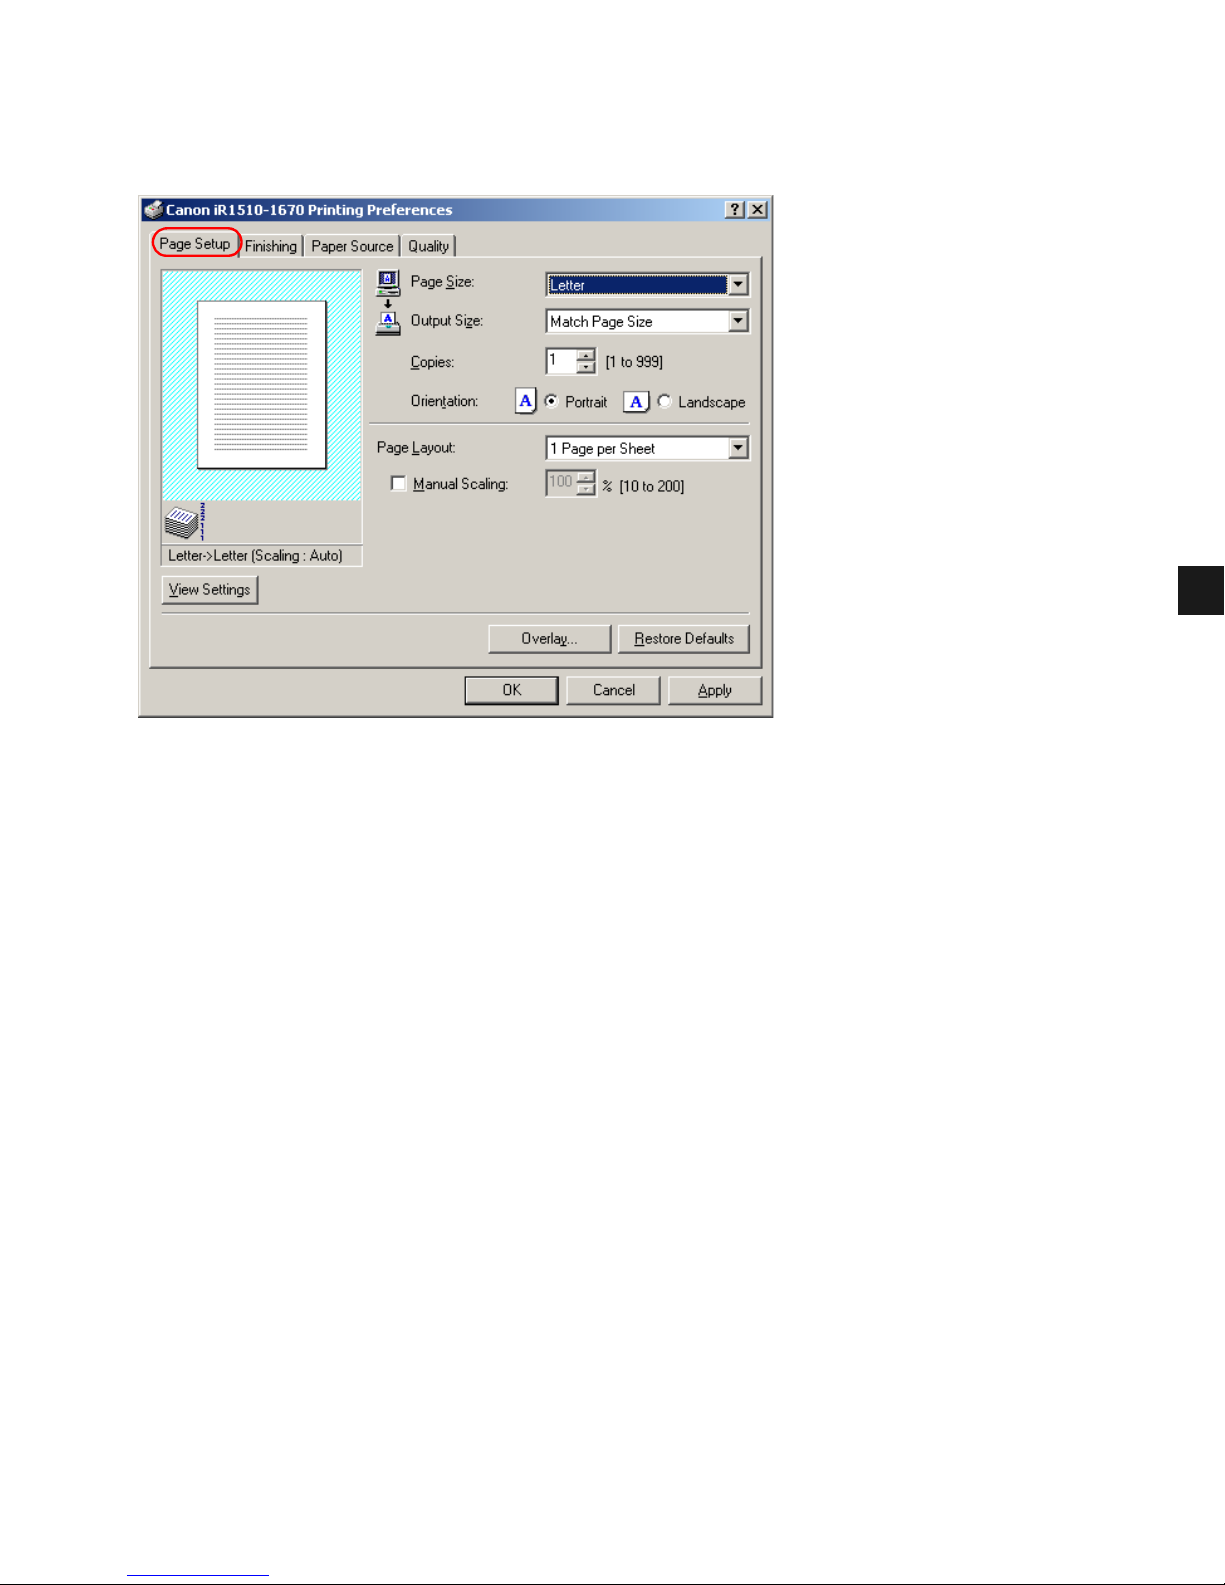
Specifies paper size, scaling, number of copies, orientation, and pages per sheet.
Default settings depend on the country/region of purchase.
Page Size lets you select the paper size you are working with in your application. (A3,
B4(JIS), A4, B5(JIS), A5, Letter, Legal, Executive, Statement, Envelope DL, Envelope #10,
Envelope C5, Envelope Monarch, and three custom paper sizes.)
Output Size lets you select the paper size to print on. If your output size is set to anything
other than Match Page Size, the image will be automatically reduced or enlarged to fit on the
page.
Copies lets you specify the number of copies to be printed (1 to 999).
Orientation lets you select the direction of printing relative to the printer’s paper (Portrait
(vertical) or Landscape (horizontal)).
Page Layout lets you select the number of pages per sheet (1, 2, 4, 8, 9). If you select more
than 1, the image may be reduced to fit on the selected output size. When 2, 4, 8, or 9 pages
per sheet is selected, Manual Scaling disappears and Page Order appears in its place.
Manual Scaling lets you shrink or enlarge images. This option only appears when 1 Page per
Sheet is selected as the Page Layout. Check the check box to set a reduction or enlargement
percentage (10 to 200).
Page 88
3-22
View Settings
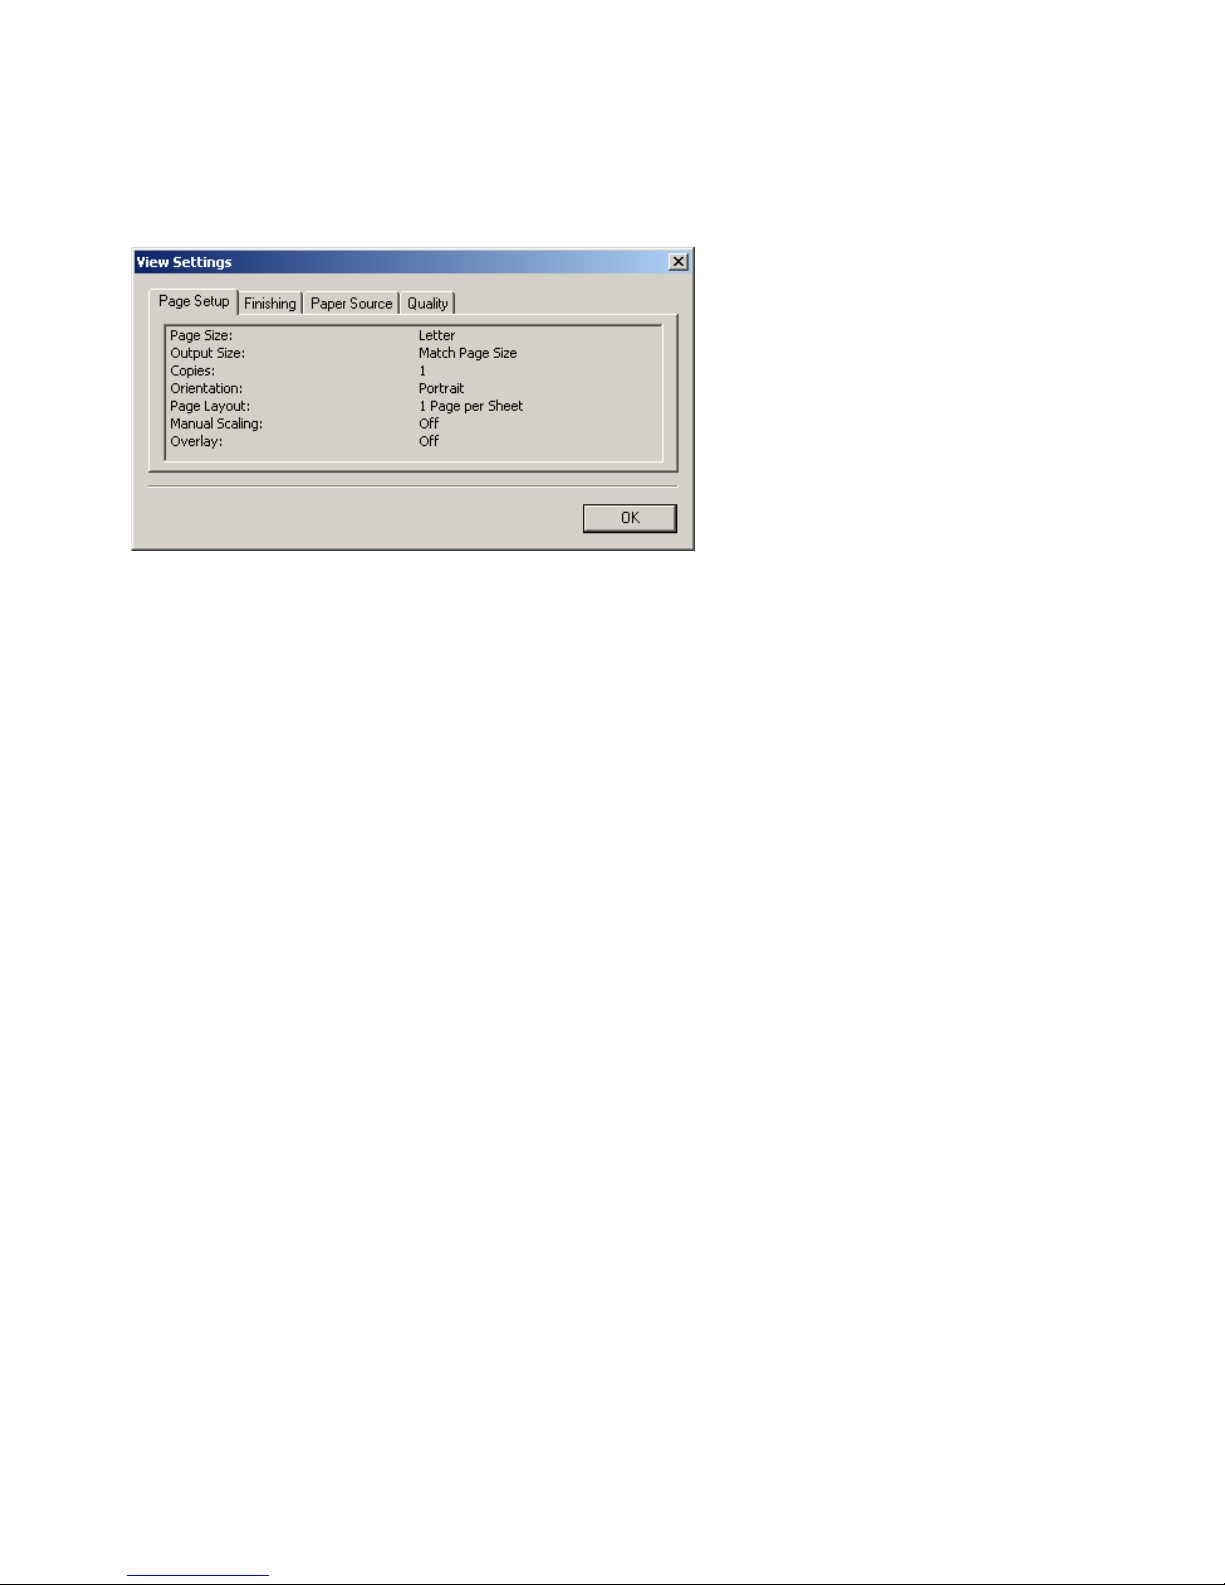
To get a quick view of your current settings, click View Settings, which is located on the Page
Setup, Finishing, Paper Source, and Quality tabs. Click on the tabs in the View Settings
dialog box to view the settings for each tab.
Overlay
Overlay Printing allows you to overlay the document created in any Windows application onto
a preselected form file.
For example, if there is a form file containing a company name, logo, or address, it will be
printed in the same position on each page of the document together with the print data created
in an application.
You can easily create perfectly formatted documents with the same appearance from any
Windows application.
Overlay Form File Formats
For overlay forms you can use files in the following formats:
• Windows Metafile (WMF)
• Windows Bitmap (BMP)
Creating an Overlay Form File
Before using Overlay Printing, you need to create an overlay form file in an application. To
create a form file, you can use applications from the Windows NT/2000/XP/Server 2003
package and from commercially available software.
• Windows Metafile (WMF)
Windows metafile format is used in most commercially available draw applications. Create
the form data and save it in the metafile format.
• Windows Bitmap (BMP)
You can easily create a form file in this format using software included in the Windows NT/
2000/XP/Server 2003 package, such as Paint. Windows NT/2000/XP/Server 2003 desktop
wallpapers are also created in this format. There are also a number of commercially available
software products, (e.g. Corel PhotoPaint), that use this format. Create the form data using
such software and save it as a BMP file.
Page 89
3-23
3
Printer Properties
Setting Overlay
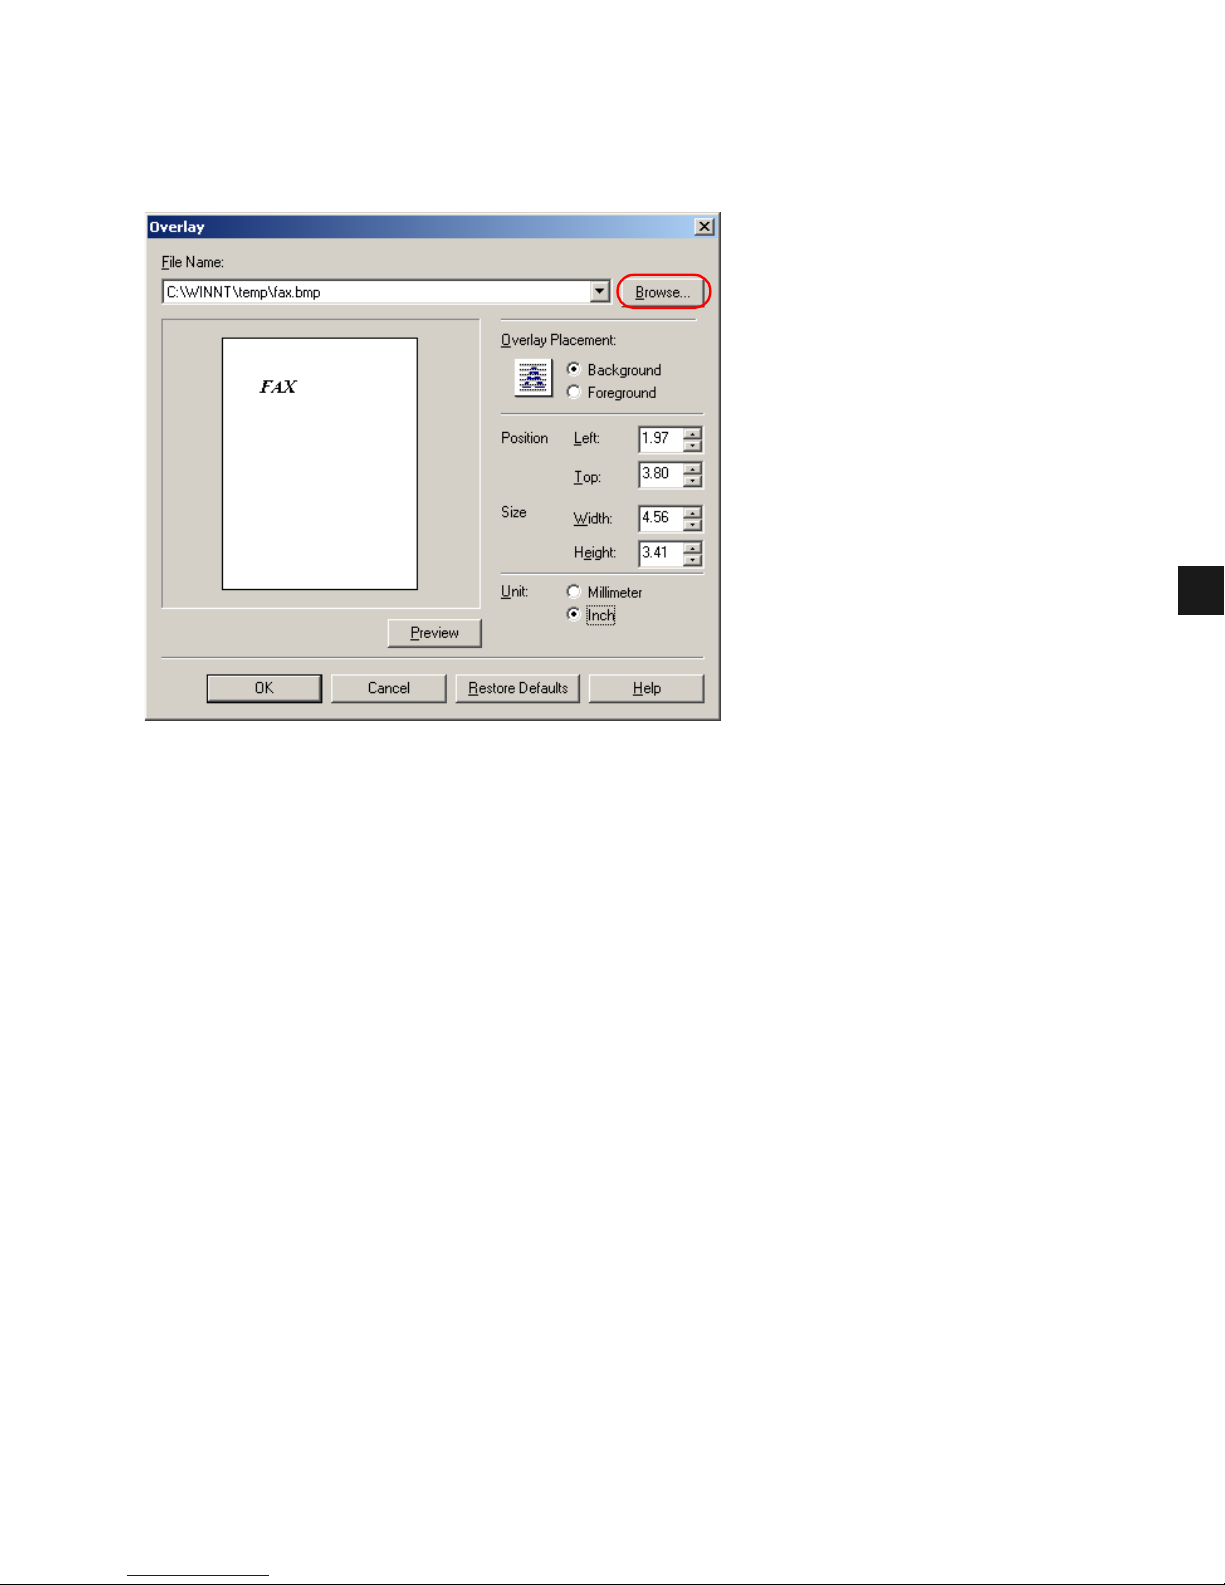
To make settings for overlay printing click Overlay on the Page Setup tab. The Overlay
dialog box appears. Use Browse to select the file that contains the overlay data.
File Name sets the file name to use as the overlay form.
The File Name dropdown list stores up to nine file names in addition to the default (none)
setting.
You can use Browse to select the file that contains the overlay data.
Overlay Placement
• Background—Check this radio button on to place the overlay data in back of (beneath)
the application data.
• Foreground—Check this radio button on to place the overlay data in front of (over) the
application data.
Position lets you specify the position of the overlay based on its distance from the paper's left
and top edges. Select units of measurement for Left and Top using the Millimeter or Inch
radio buttons. The valid values interval for this setting is 0 to 16.5 inches (0 to 420 mm).
Size lets you set the size of the overlay. Select units of measurement for Width and Height
using the Millimeter or Inch radio buttons. The valid values interval for this setting is 0 to
16.5 inches (0 to 420 mm).
Unit lets you set units of measurement using the Millimeter or Inch radio buttons.
Restore Defaults resets Left, To p, Width, and Height to their default values.
Confirm the settings click OK. The Page Setup dialog box appears again.
Page 90
3-24
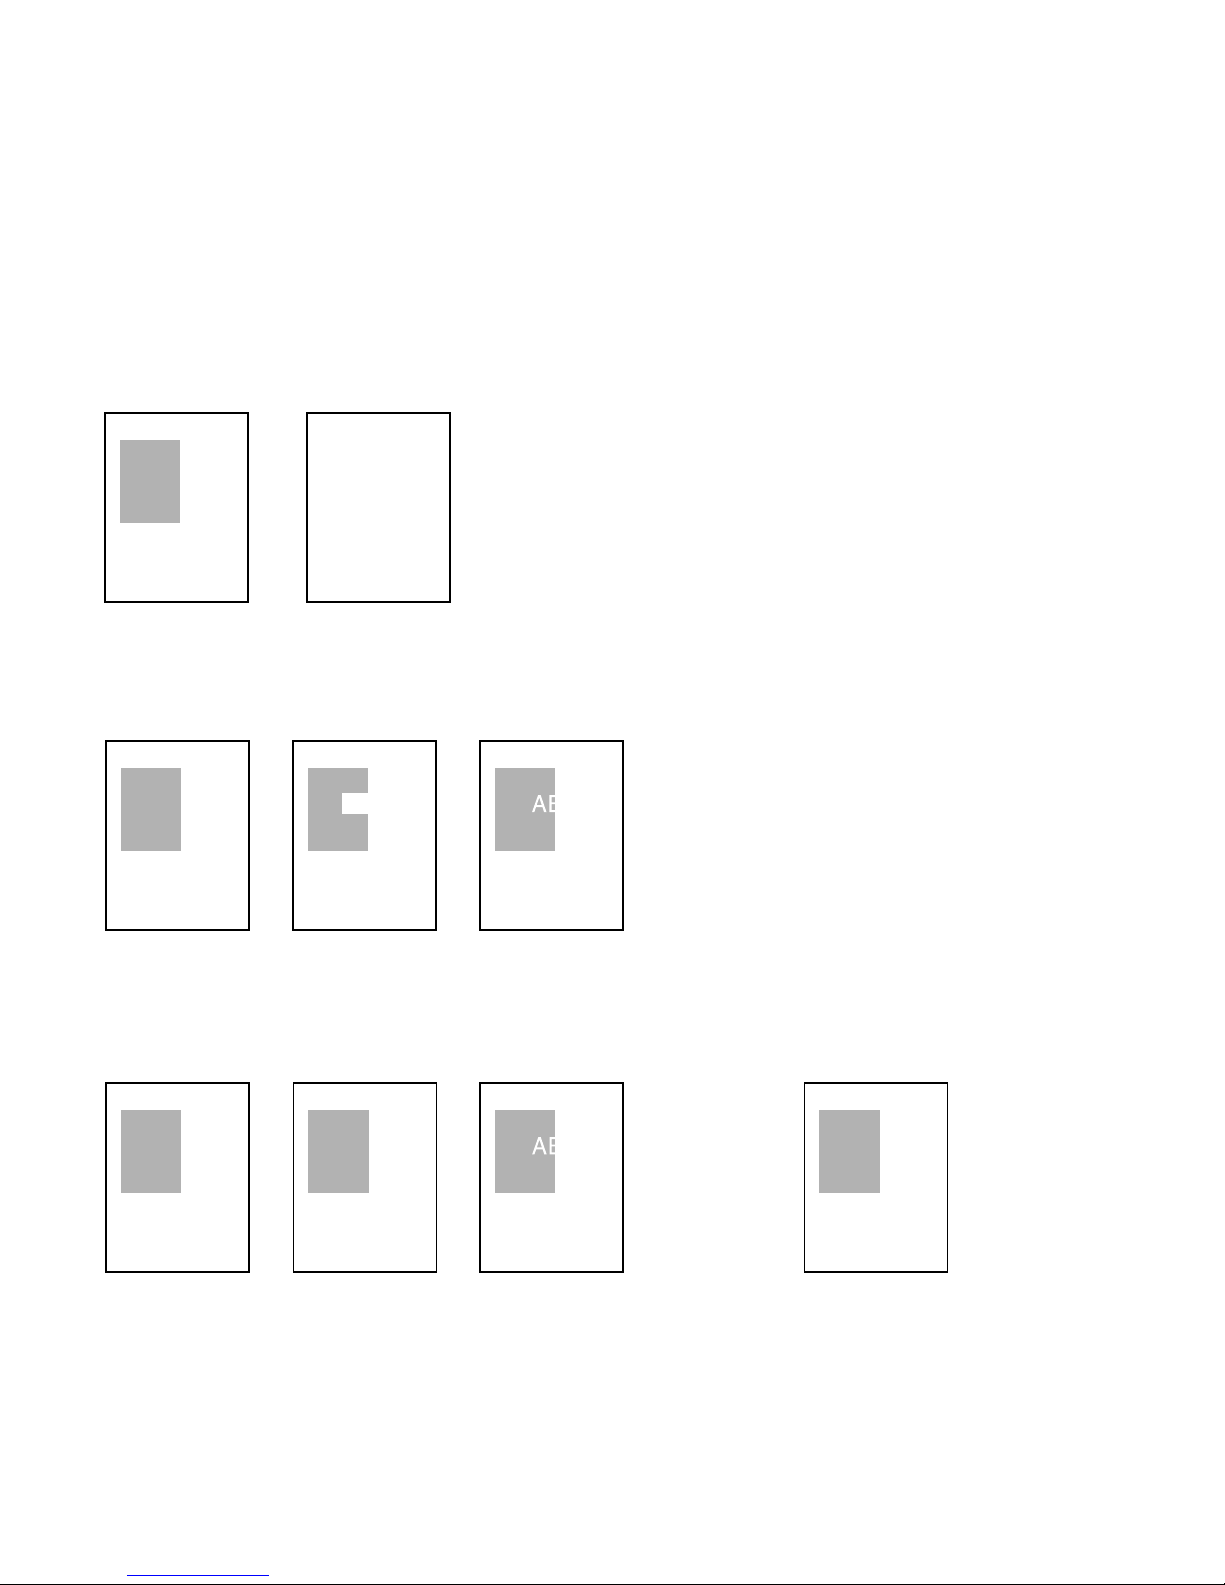
Overlay Placement
Print results may differ depending on the placement of the overlay and application print data
(Background/Foreground). When the overlay and application print data (original data)
overlap, the print result may differ depending on the overlay file format and the application
being used. Settings for overlay printing on your machine allow you to place the overlay form
in the foreground (in front) or in the background (in back) of the application print data.
ABC
ABC
ABC
ABC
ABCABC
ABC ABC
Original data
Overlay
Application
[Overlay Placement: Background]
The result will appear similar to one of those shown below.
[Overlay Placement: Foreground]
The result will appear similar to one of those shown below.
Using Windows Metafile
Using Windows BMP
The result will always be as shown below.
Page 91
3-25
3
Printer Properties
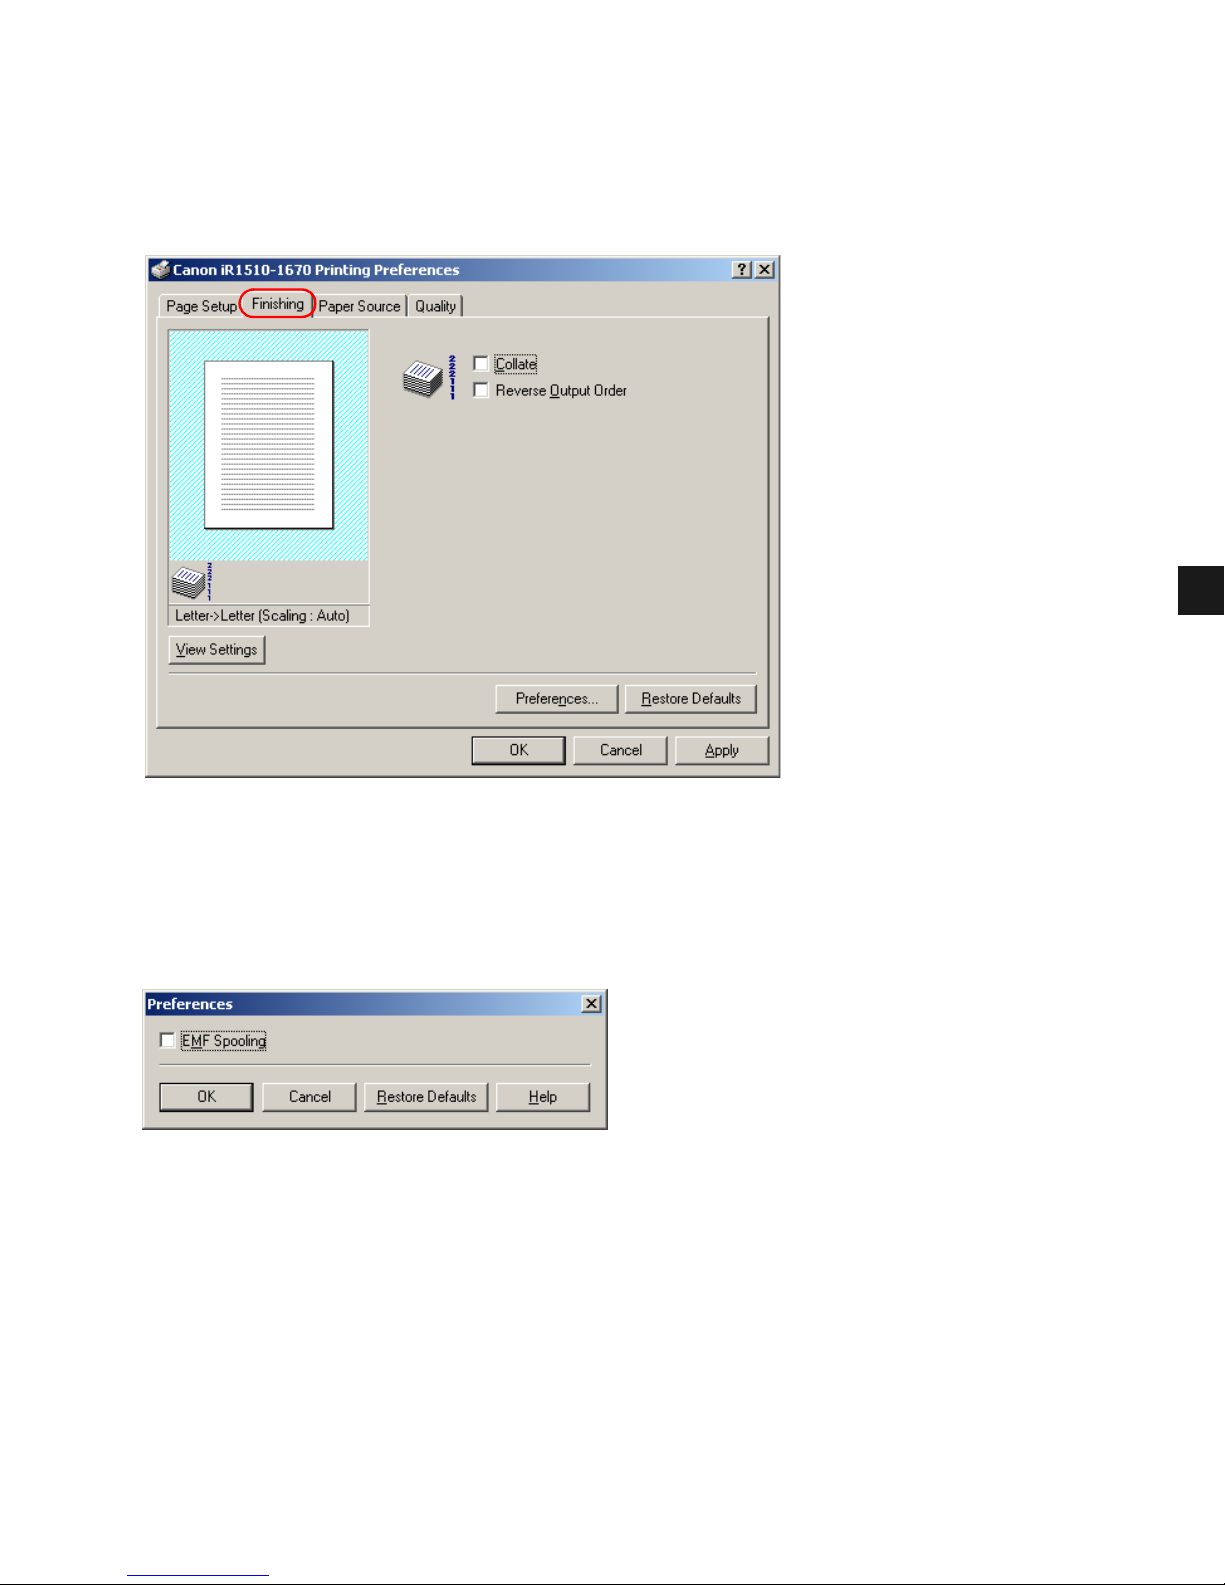
■ Finishing Tab
Specifies how the final output is collated and sets whether pages should be printed in reverse
output order. Select the appropriate check boxes to collate the document or print it in reverse
output order.
Preferences
Clicking Preferences on the Finishing tab window opens the Preferences dialog box.
Selecting the checkbox turns EMF Spooling on. If the box is not checked, EMF Spooling is
off. This setting is off by default.
Page 92
3-26
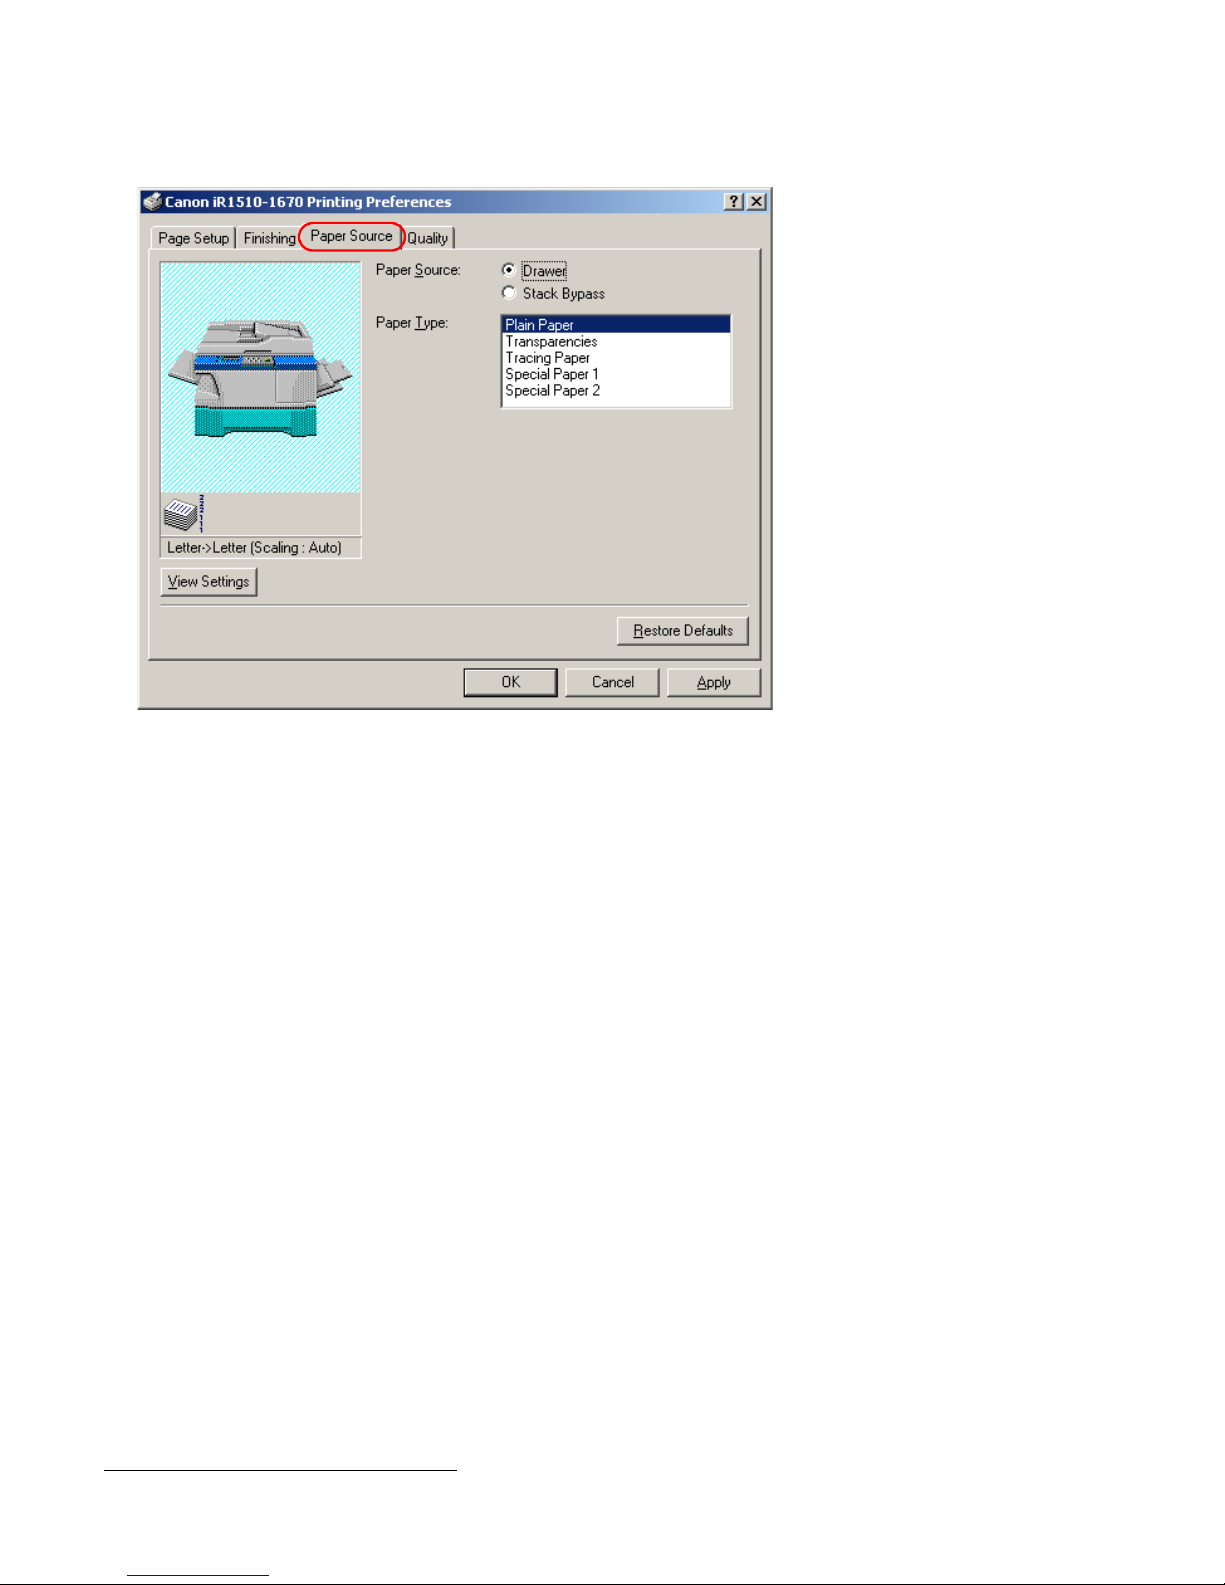
■ Paper Source Tab
Specifies the paper source and paper type settings.
Paper Source lets you specify the paper feed method. Select from Drawer or Stack Bypass.
Paper Type lets you select from the following types of paper:
• Plain Paper (including colored paper, recycled paper: 64-80 g/m
2
)
• Transparencies*
• Tracing P ap er * (tracing paper, thin paper: 52-63 g/m
2
)
• Special Paper 1* (thick paper)
• Special Paper 2* (postcards, envelopes: 81-128 g/m
2
)
*When Paper Source is set to Drawer, please do not select paper types other than Plain Paper.
Page 93
3-27
3
Printer Properties
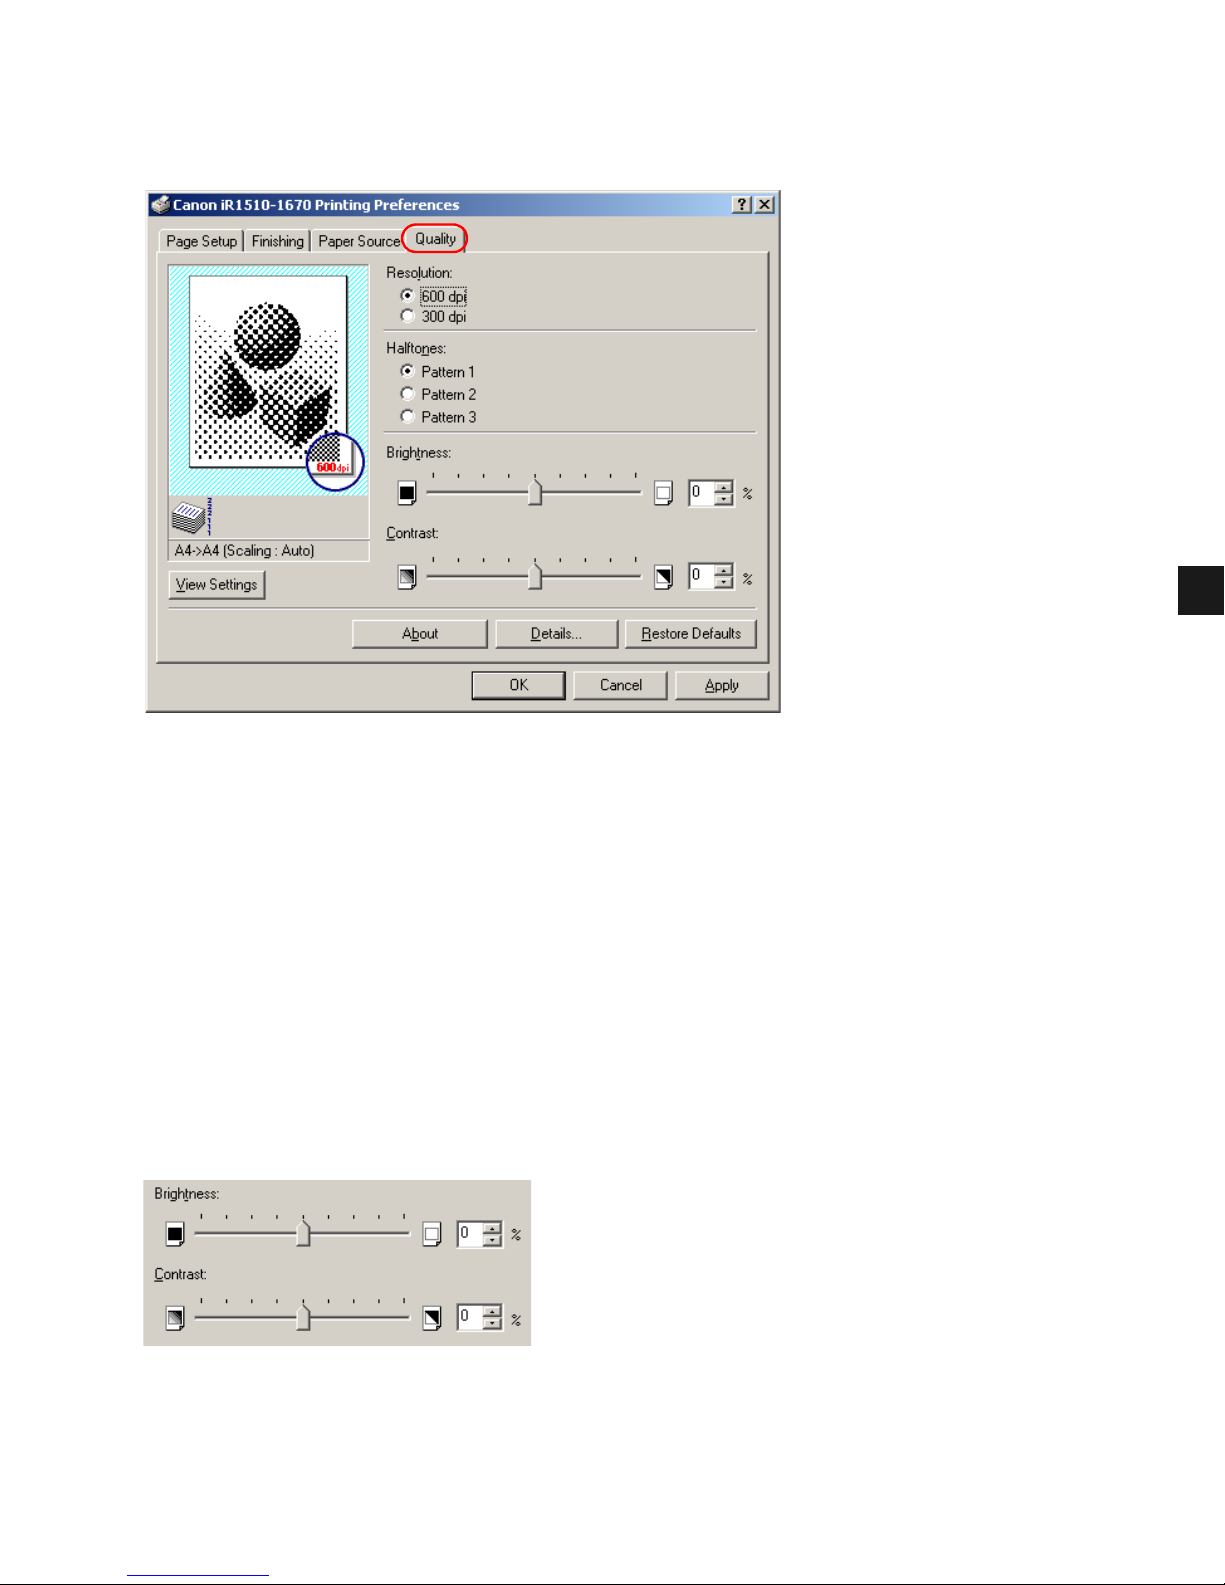
■ Quality Tab
Specifies the resolution, halftoning method, brightness, and contrast settings.
Resolution lets you specify the printer’s resolution in dots per inch (600 dpi, 300 dpi).
Halftones is the process of converting a grayscale image to black dots and white (unprinted)
dots that simulate the gray shades in the original image. Different halftone patterns give
different gray shade results.
Brightness is the relative proportion of light and dark areas. Decreasing brightness darkens
the overall image; increasing brightness lightens it. Brightness is expressed as a relative range
from -80% to +80%.
Contrast is the degree of difference between the lightest and darkest areas of an image.
Decreasing contrast lightens the dark areas and darkens the light areas; increasing it darkens
the dark areas and lightens the light areas. Contrast is expressed as a relative range from -80%
to +80%.
Page 94

3-28
Detailed Settings
Details accesses the settings for Toner Save and Image Refinement.
Toner Save thins the black areas of print data so toner consumption is reduced.
Image Refinement is a printer technology from Canon which automatically senses and
refines the jagged edges and ragged curves of characters and graphics.
Page 95

4-1
4
Checking the Status of a Print Job
CHAPTER
4
Checking the Status of a Print Job
This chapter describes how to check the status of print jobs.
Opening the Status Window ................................................................................................... 4-2
Using the Canon iR1510-1670 Status Window...................................................................... 4-3
Network Printer Status ......................................................................................................... 4-12
The Status Window Icon ...................................................................................................... 4-13
Closing the Status Window .................................................................................................. 4-13
Messages .............................................................................................................................. 4-13
You can track and control your print jobs using either of the following methods:
•The Canon iR1510-1670 Status Window
Tells you exactly what is happening with the current print job.
• The Windows Printers (in Windows XP/Server 2003, Printers and Faxes) folder
Helps you control and manage all print jobs in a queue for all printers installed in
Windows.
Page 96

4-2
The Canon iR1510-1670 Status Window opens automatically in the following situations:
• When you print a document, if While Printing is selected for Display Printer Status
Window in the Option Settings dialog box of the Status Window.
• When an error occurs or user action is required.
• When Windows starts, if the Status Window was open the last time Windows was closed.
You can also open the Status Window by clicking the Status Window icon in the Windows
taskbar and selecting the Canon iR1510-1670. If the icon is not displayed in the taskber, click
Start on the Windows task bar, select Program Canon iR1510-1670 Canon iR 15101670 Status Window and then the icon is displayed in the taskber.
If multiple imageRUNNER 1670F/1630/1610 machines are connected, select a printer from
the list. The Status Window opens and displays information for the selected printer.
Opening the Status Window
Status Window icon
Page 97
4-3
4
Checking the Status of a Print Job
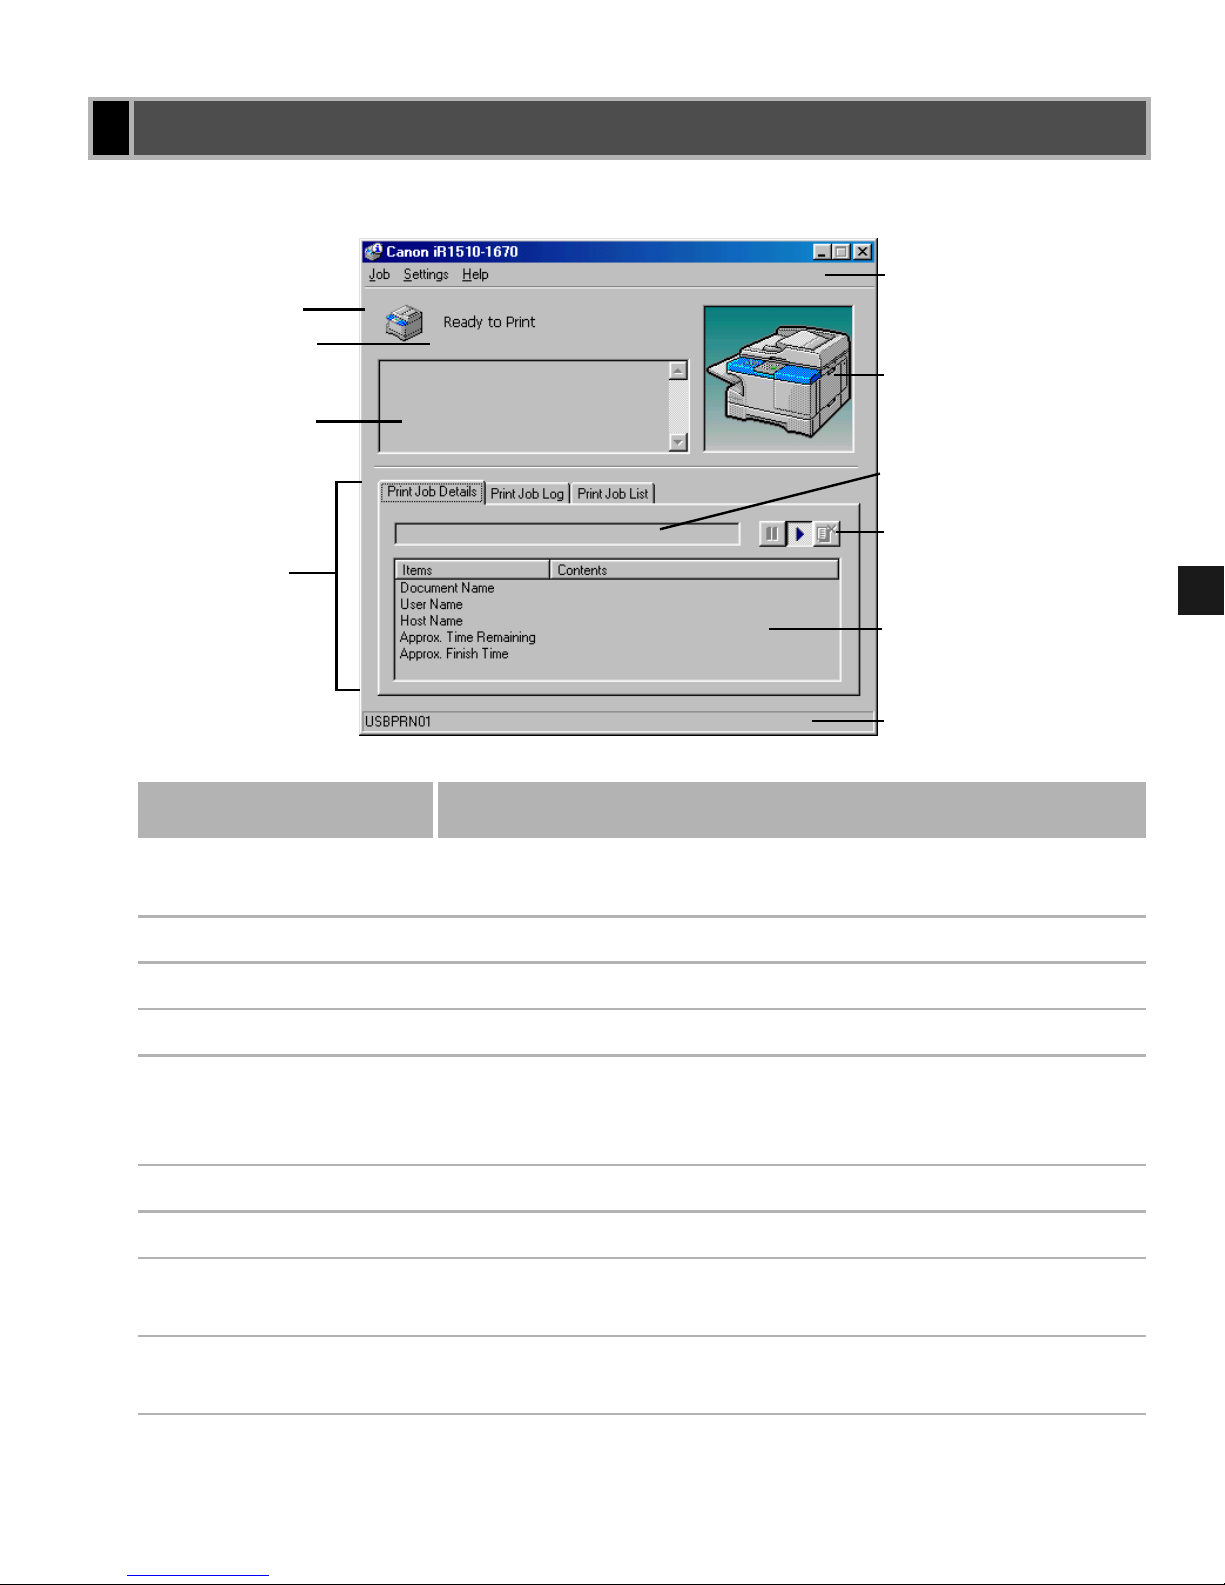
The Status Window is a program used to display the status of jobs and perform printer operations.
Using the Canon iR1510-1670 Status Window
Window area Description
Menu bar Contains menu options to control the Status Window and the
printer.
Printer icon Displays the current printing status and error conditions.
Printer status message area Displays the current status of the printer.
Error message area Gives a description of situations requiring action.
Animation area Shows an animated graphic indicating the current printer status.
The graphic background changes from blue (normal) to orange
when user action is required, or to red when a warning is issued.
Progress bar Indicates the progress of the current job.
Tool bar Use to pause, delete, or resume printing.
Job information area Displays information related to print jobs. The type of
information displayed changes with the selected tab.
Status bar Displays the name of the printer port and describes menu
options as you move your mouse over them.
To o l b a r
Menu bar
Progress bar
Job information
area
Error message
area
Printer status
message area
Status bar
Animation area
Tab window
Printer icon
Page 98
4-4
■ Using the Menu Bar
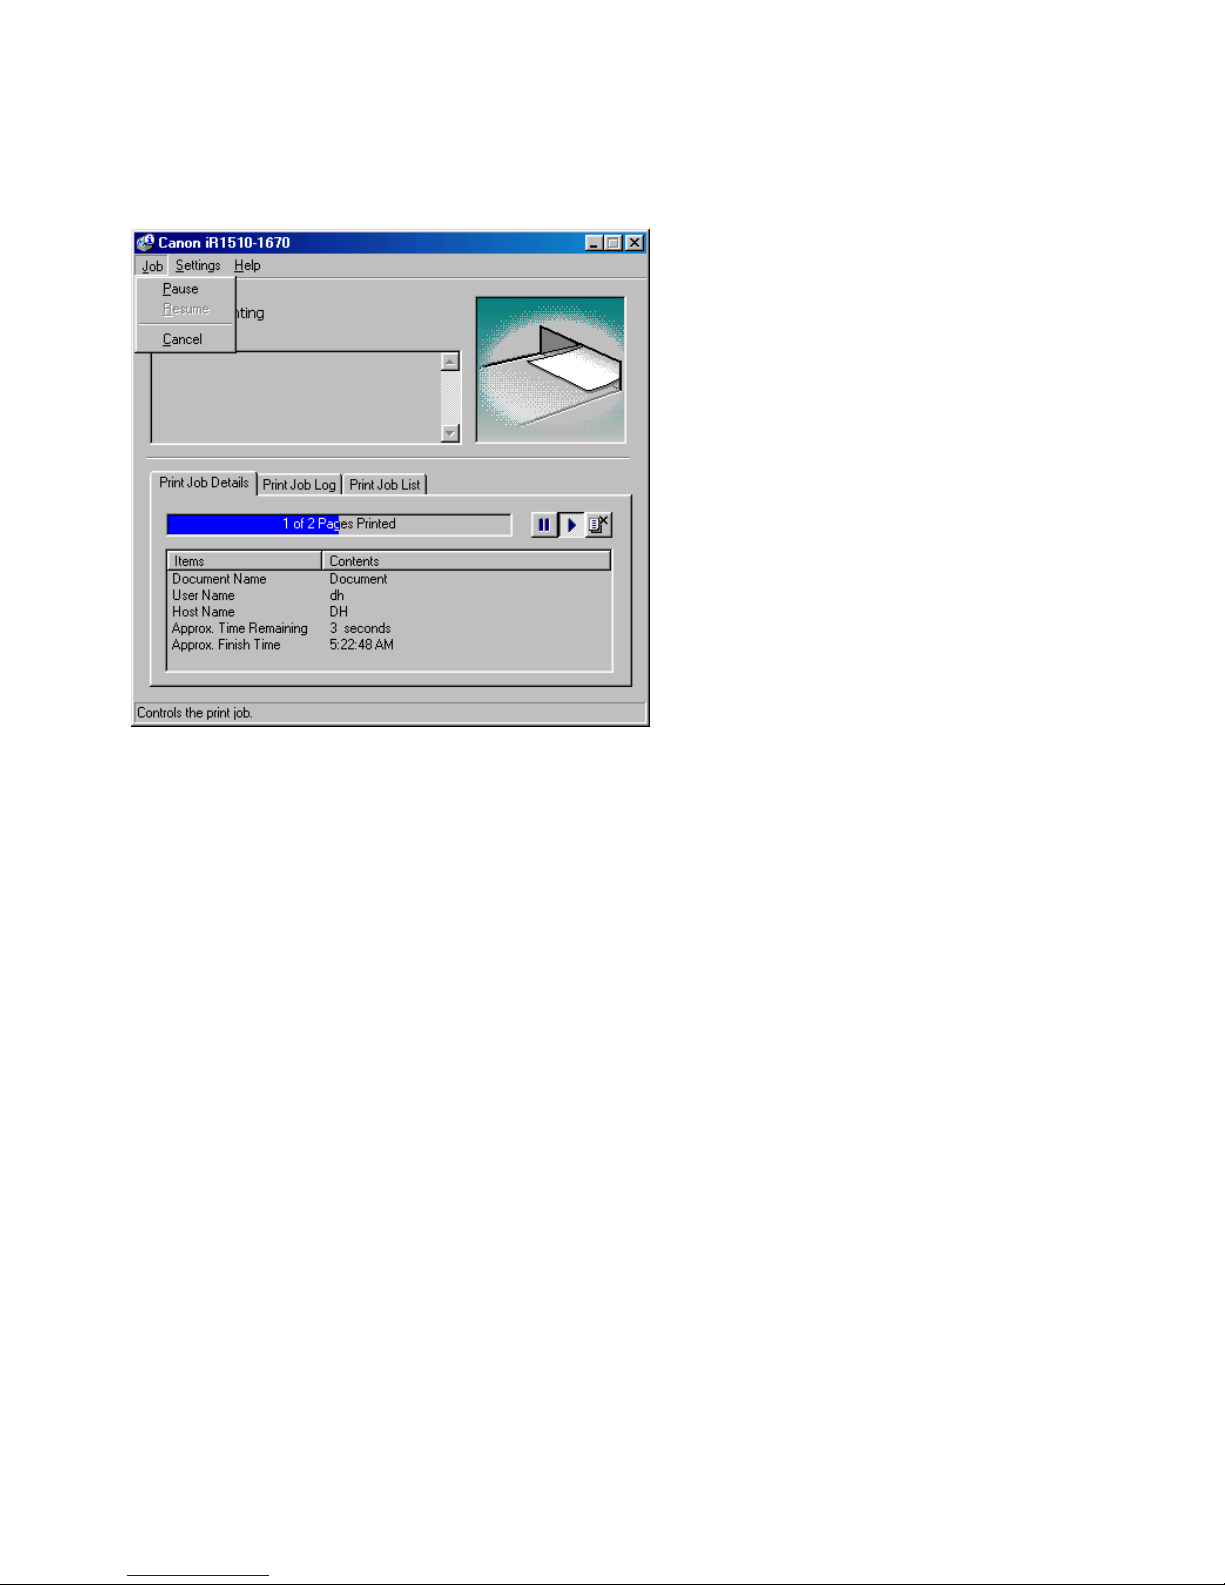
Job Menu
You can select the Job menu from the menu bar of the Canon iR1510-1670 Status Window:
The Job menu includes the following options:
• Pause temporarily halts printing of the current document. After the current page completes
printing, the printer pauses until you select Resume.
• Resume resumes printing with the next page of the document you paused.
• Cancel cancels printing of the document currently being printed.
Page 99
4-5
4
Checking the Status of a Print Job
Settings Menu
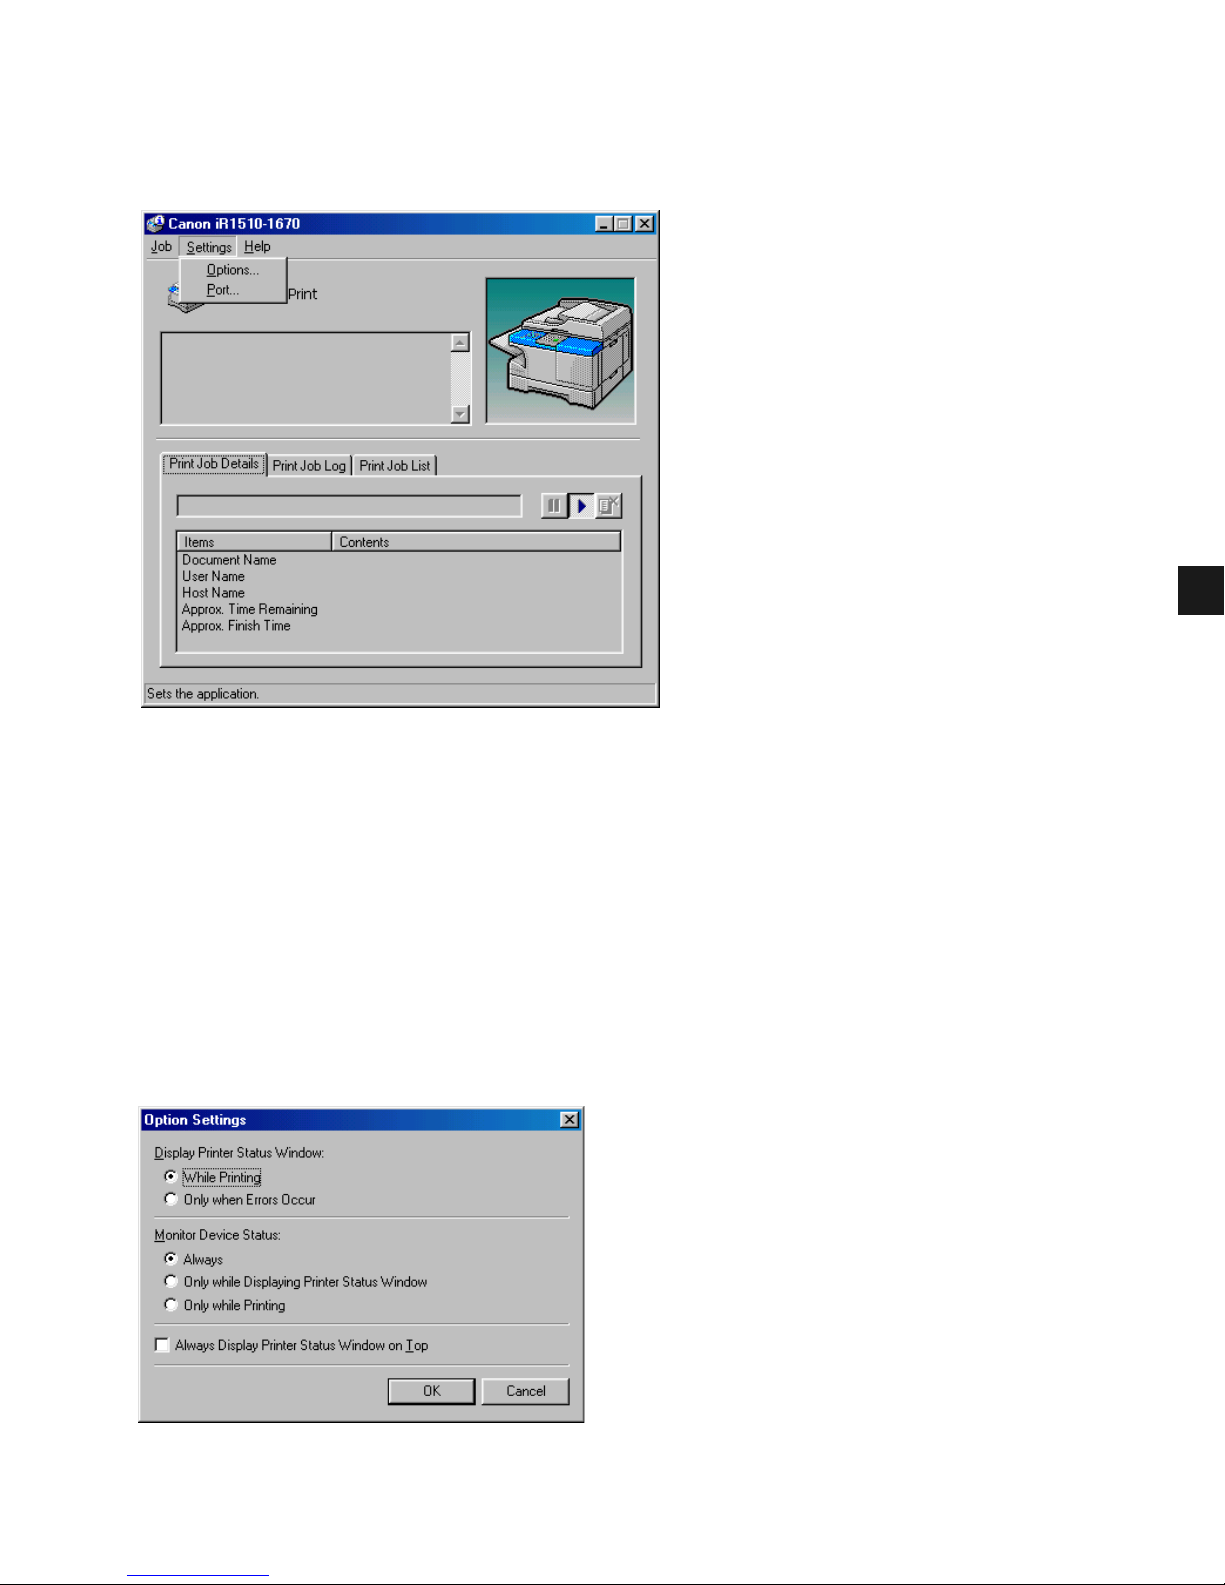
You can select the Settings menu from the menu bar of the Canon iR1510-1670 Status
Window:
The Settings menu includes the following selections:
• Options opens the Option Settings dialog box that lets you change the settings for the
Status Window.
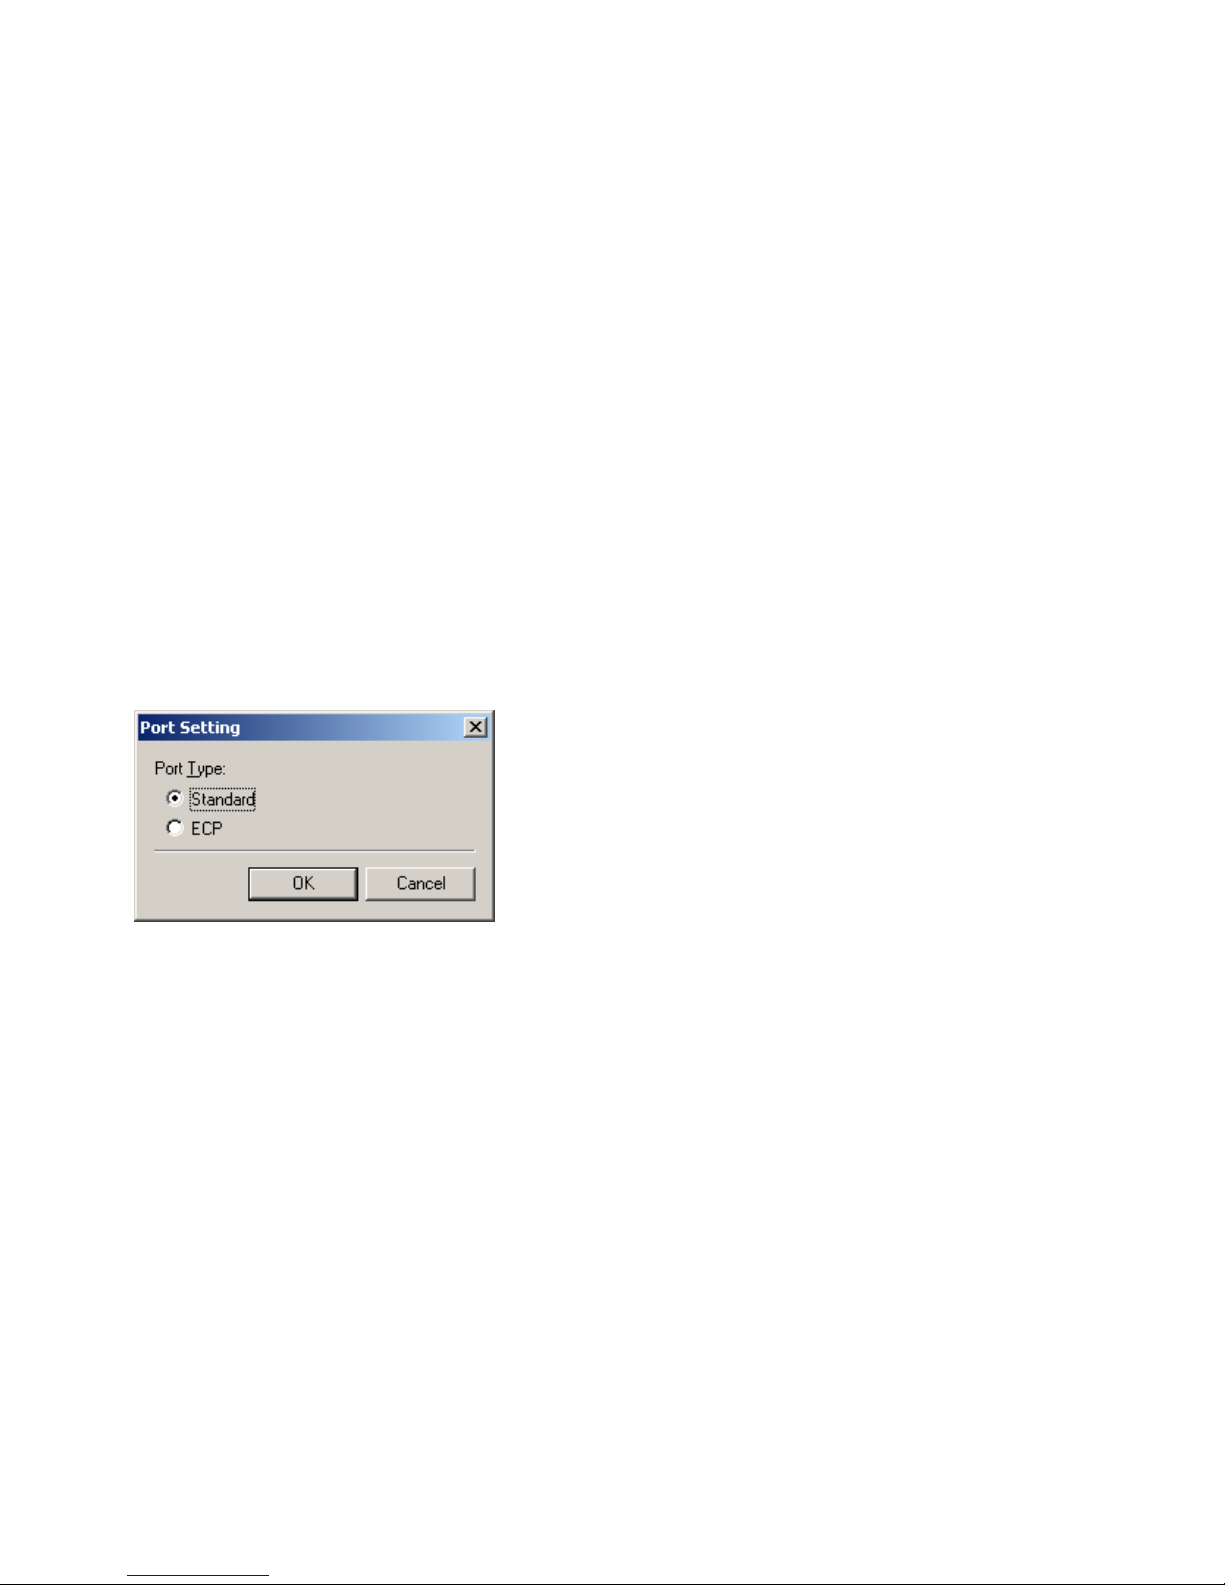
• Port opens the Port Setting dialog box when the printer is connected to a local parallel
port. This setting is unavailable if the printer is not connected to a local parallel port, or
while printing is in progress.
Option Settings
This dialog box lets you define when and how you want the Canon iR1510-1670 Status
Window to display.
Page 100
4-6
• Display Printer Status Window lets you select when the Status Window displays.
• While Printing—The Status Window opens automatically each time you print.
• Only when Errors Occur—The Status Window opens only when an error occurs.
To manually open the Status Window, click the Status Window icon in the Windows
taskbar click the Canon iR1510-1670.
You can change display options even as a document prints, but the changed settings do not
take effect until the next print job.
• Monitor Device Status lets you select when the Status Window is active.
• Always—The Status Window continually monitors the printer.
• Only while Displaying Printer Status Window—The Status Window monitors the
printer only when the Printer Status Window is displayed.
• Only while Printing—The Status Window monitors the printer only when printing a job.
• Always Display Printer Status Window on Top places the Status Window on top of all
windows on the desktop.
Port Setting
This dialog box lets you define how your computer communicates with your printer using the
parallel port. The type of port you have depends on your computer.
• Standard uses the parallel port as a standard parallel port.
• ECP uses the parallel port as an ECP (Enhanced Capabilities port) parallel port.
Before you make any changes, check the manual that came with your computer to determine
what type of port you have.
 Loading...