

Page 1
1
Printer Operations
Troubleshooting
2
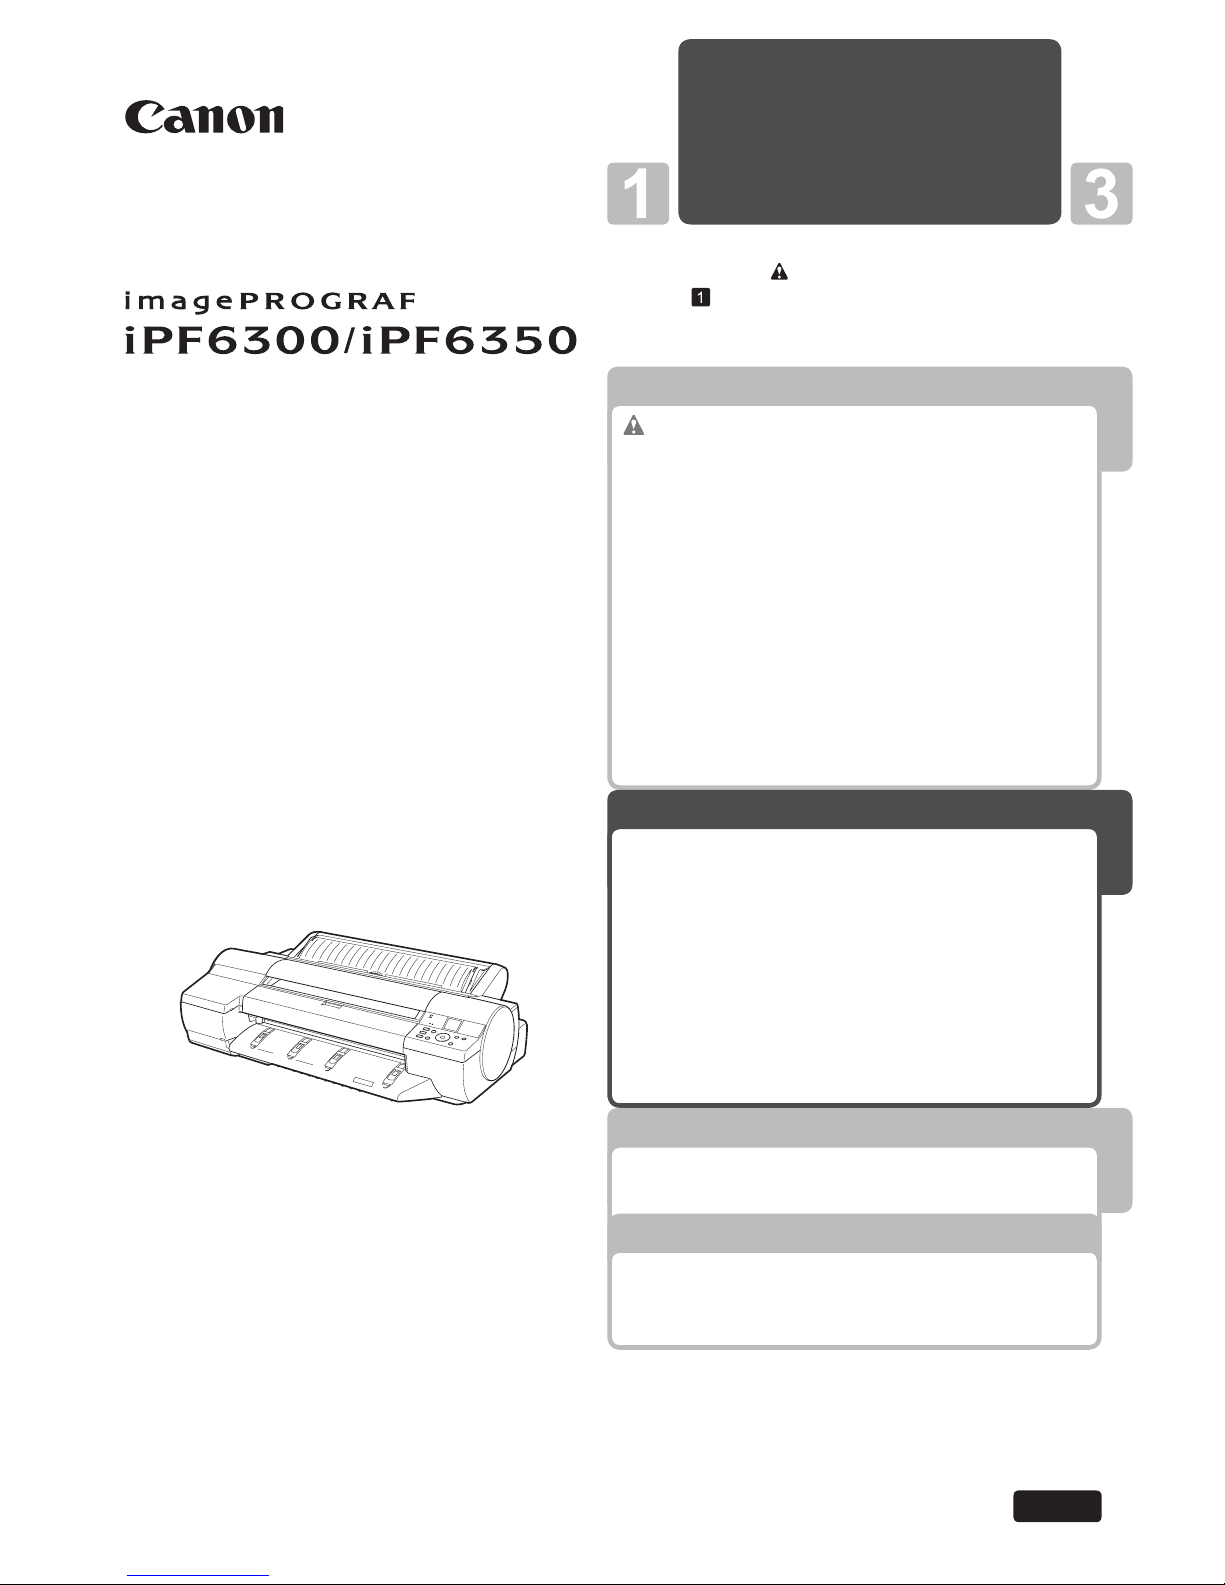
Be sure to read " Safety Precautions" in the fi rst
booklet, Printer Operations.
Read this manual before attempting to operate the printer.
Keep this manual in a handy location for future referencing.
This Basic Guide includes three booklets.
ENG
3
Printer Relocation
Printer Driver Installation
2
Troubleshooting
Basic Guide
Large-Format Printers
Safety Precautions ........................................2
Types of Manuals .............................................5
Documentation Conventions ............................6
Parts .................................................................8
Loading Rolls on the Roll Holder ....................14
Loading Rolls in the Printer ............................16
Removing the Roll from the Printer ................18
Loading Sheets in the Printer .........................20
Removing Sheets ...........................................25
Consumables..................................................27
Replacing Ink Tanks .......................................28
Replacing the Maintenance Cartridge ............32
Replacing the Printhead .................................36
Menu Map.......................................................41
Troubleshooting ................................................2
If Roll Paper Jams ..........................................18
If a Sheet Jams...............................................21
If Paper is Soiled ............................................23
If Printing is Faint ............................................25
If Vertical Lines are Warped or Colors are
Misaligned ..................................................26
If Banding Occurs ...........................................28
If Line Length Does Not Match .......................30
Error Messages ..............................................32
Preparing to Transfer the Printer ......................2
Reinstalling the Printer .....................................6
Installing the Printer Driver (Windows) .............9
Installing the Printer Driver (Mac OS X) .........11
Convenient Printer Driver Features ................13
Page 2
2
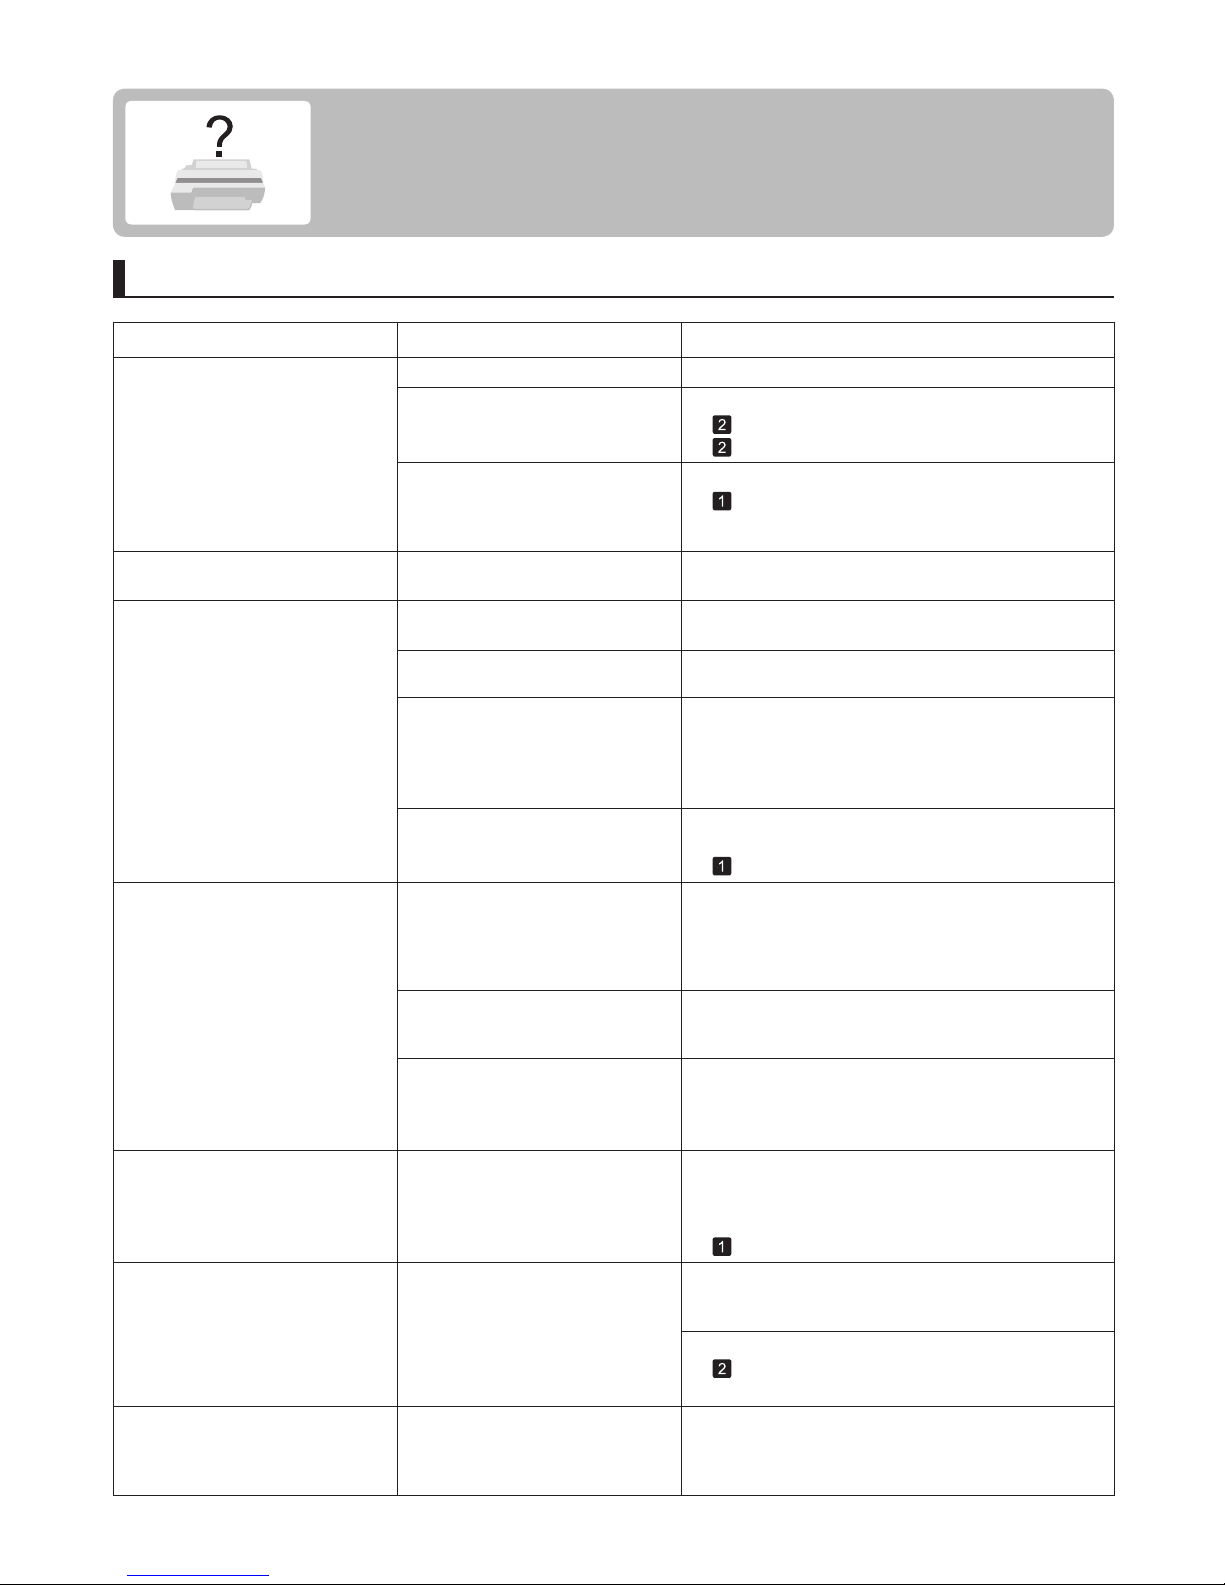
Paper Problems
Phenomenon
Roll paper cannot be inserted into
the paper feed slot
The roll paper is warped. Straighten out curls and reload the roll.
Cannot load sheets Press the Load button and select the paper source.The paper source selection is
incorrect.
Paper is not cut straight The paper is bent or curled at the
cut position.
Straighten out any curling by the edges of the paper.
Reload the paper correctly.Paper rises by the ends of the cut
position before it is cut.
Paper is not cut The printed document became
caught on a foreign object by
the Output Tray , which lifted the
document. The Cutter passed
under the paper.
In the printer driver, No or Print
Cut Guideline is specified in Auto
Cut .
Remove the foreign object by the Output Tray to
enable the printer to eject the printed document,
keeping it level.
Specify Yes in Auto Cut in the printer driver.
Cause Corrective Action
Troubleshooting
This section gives troubleshooting tips in case of problems.
A depression is left on the leading
edge
Keeping a roll in the printer for a
long time without printing on it may
leave a depression on the leading
edge.
When printing quality is most important, we
recommend setting TrimEdge Reload to On or
Automatic so that the paper edge is automatically cut
before printing.
Paper is jammed by the paper feed
slot.
(→ , If Roll Paper Jams)
(→
, If a Sheet Jams)
Remove the jammed paper.
You are using paper that cannot be
cut with the Cutter Unit .
Specify Manual in Cutting Mode in the Control
Panel menu and use scissors or a cutting tool to cut
the roll after printing.
(→"Specifying the Cutting Method for Rolls," User
Manual)
(→
, Menu Map)
Roller marks are left across the
trailing edge of paper
The paper was removed without
pressing the OK button after
printing from the Front Paper
Feed Slot .
Following the instructions displayed, press the OK
button, and after removing the paper, press the OK
button again.
After a roll was advanced, the
paper was manually pulled out
by force, closing the Paper Feed
Slot .
Remove the roll and open the paper feed slot.
(→
, Removing the Roll from the Printer)
In the Control Panel menu,
Cutting Mode is set to Eject or
Manual .
If the Cutting Mode is Eject , press the Cut button to
cut the paper.
If the Cutting Mode is Manual , cut rolls with scissors
or the like.
Wipe the rollers to clean them.
(→
, If Paper is Soiled)
(→"Cleaning the Paper Retainer," User Manual)
Cut Speed is not configured
correctly in the Control Panel
menu.
Change the Cut Speed setting in the Control Panel
menu.
(→
, Menu Map)
Margins are wide Rolls are advanced a specific
amount before cutting to prevent
problems with cutting and paper
ejection.
This operation is normal.
Page 3
3
Troubleshooting
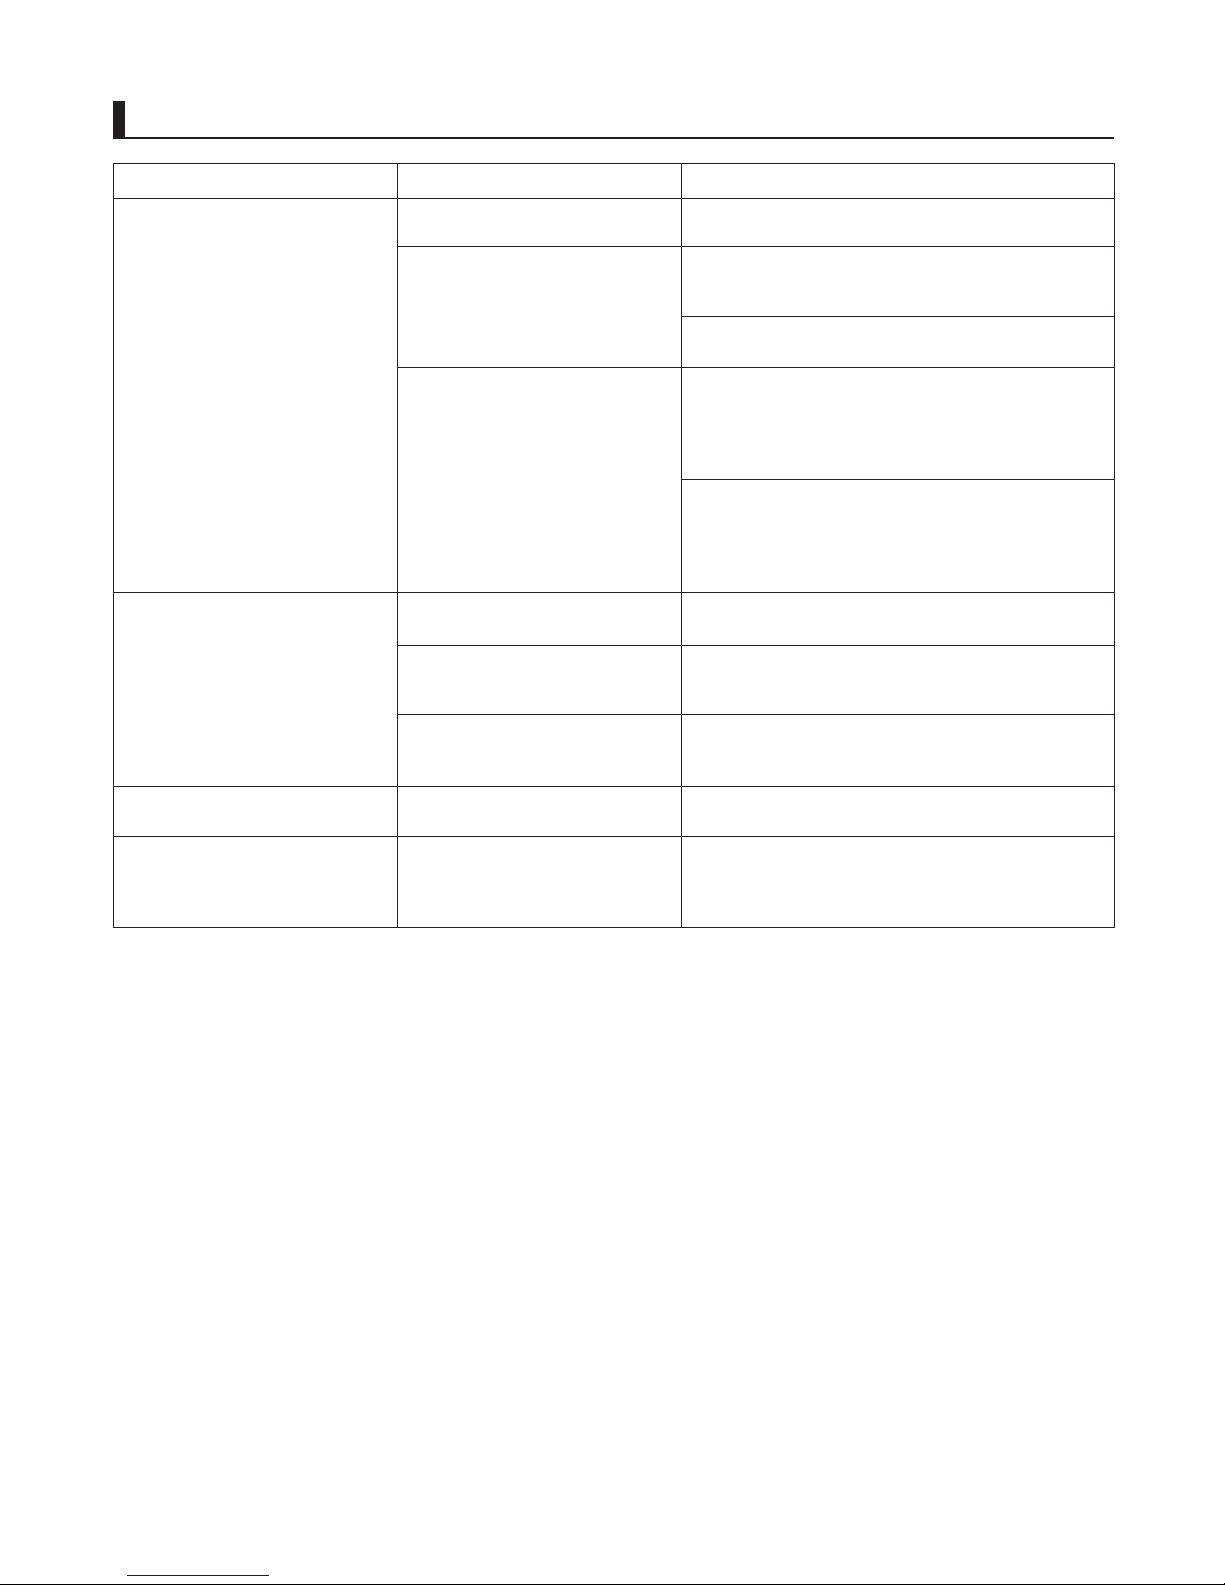
Printing Does Not Start
Phenomenon
The Data Reception Lamp on the
Control Panel does not light up
The printer does not respond even
if print jobs are sent
1.
2.
1.
2.
Ink Filling.. is displayed
Make sure the power cord is securely plugged in, all
the way. Press the Power button to turn on the printer.
Set Pause Print to Off .
In Windows, select the printer by clicking Select
Printer or Printer in the printing dialog box and try
printing again.
In Windows, restart the print job as follows.
In Mac OS X, select the printer by clicking Printer
Setup Utility (or Print Center ) and try printing again.
Select the printer icon in the Printers and Faxes (or
Printers ) window.
Clear Pause Printing in the File menu to restart the
print job.
In Mac OS X, restart the print job as follows.
Click Print & Fax . (This is identified as Printer
Setup Utility in some versions of Mac OS X.)
Select the printer, and then Start Jobs in the
Printers menu to restart the print job.
Wait until the system has been filled with ink. This
process may take about 12 minutes.
The printer is not on.
In the Control Panel menu, Pause
Print is On .
The printer is not selected in the
printer driver. (The printer is in
Sleep mode.)
The print job is paused. (The
printer is in Sleep mode.)
The printer was forced off during
operation.
Cause Corrective Action
The display screen indicates
Agitating
The time for agitation varies depending on how long
the printer was off. (Between about 30 seconds and
two minutes.)
Ink agitation is in progress.
(→"Pausing Printing," User Manual)
You have selected Save in mail
box in Output Method on the
printer.
Print the job saved on the printer's hard disk.
Print jobs are pending. Manage the jobs on hold and print as needed.
(→"Printing Saved Jobs," User Manual)
(→"Managing Pending Jobs (Printing or Deleting Jobs
on Hold)," User Manual)
Please wait until ink agitation is finished.
Page 4
4
Troubleshooting
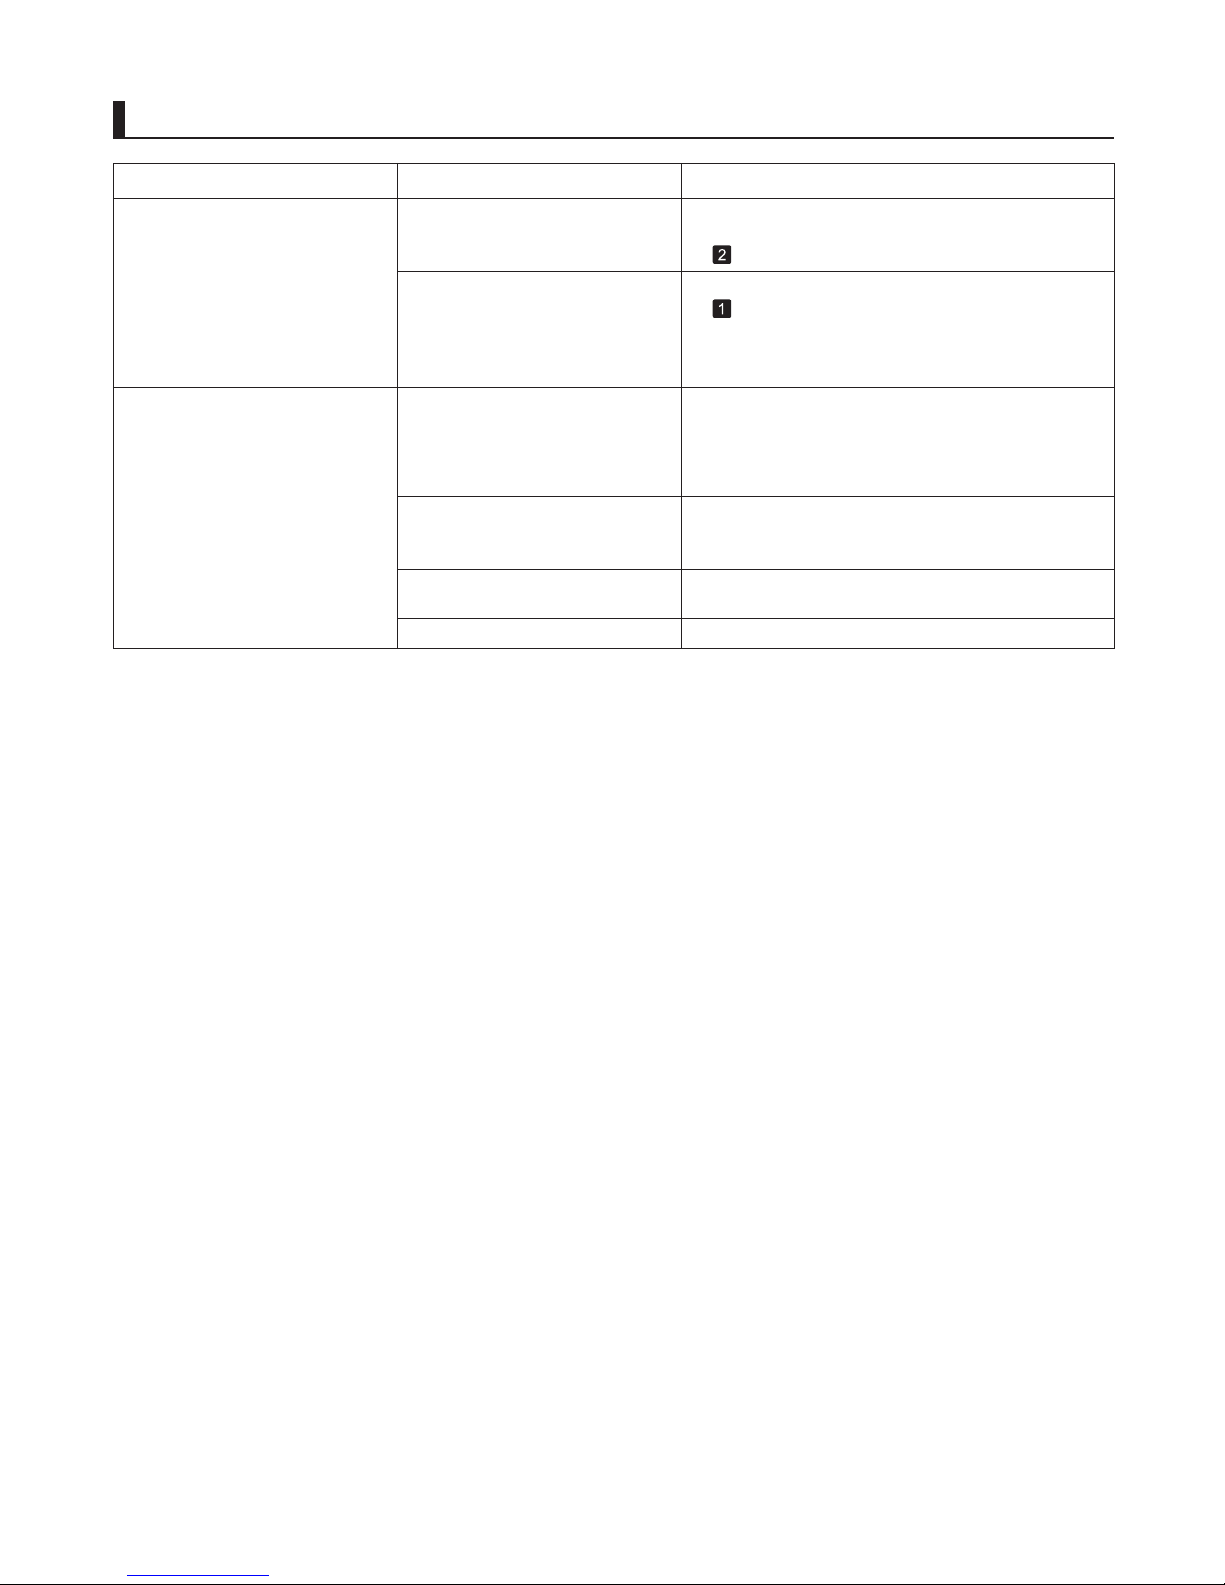
The printer stops during a print job
Phenomenon
The printer ejects blank, unprinted
paper
The leading edge of rolls may be cut to straighten
it if you have selected Trim Edge First > On or
Automatic in the Control Panel menu.
Print a test pattern to check the nozzles and make
sure the Printhead is in good condition for printing.
Use the correct imagePROGRAF printer driver for the
printer and try printing again.
(→"Cutting the Leading Edge of Roll Paper
Automatically," User Manual)
The leading edge of the roll paper
was cut to straighten it.
The Printhead nozzles are
clogged.
A print job was received from an
incompatible printer driver.
(→"Checking for Nozzle Clogging," User Manual)
An error message is shown on the
Display Screen
Check the error message and take action as
necessary.
Remove the used roll and insert a new roll.
An error message is displayed
during printing.
The last portion of roll paper was
used during a print job, and paper
could not be advanced because
the trailing edge is taped to the roll.
Status Corrective Action
(→ , Error Messages)
(→
, Removing the Roll from the Printer)
(→"Removing Rolls from the Roll Holder," User
Manual)
(→"Loading and Printing on Rolls," User Manual)
Contact your Canon dealer for assistance.The printer is damaged.
Page 5
5
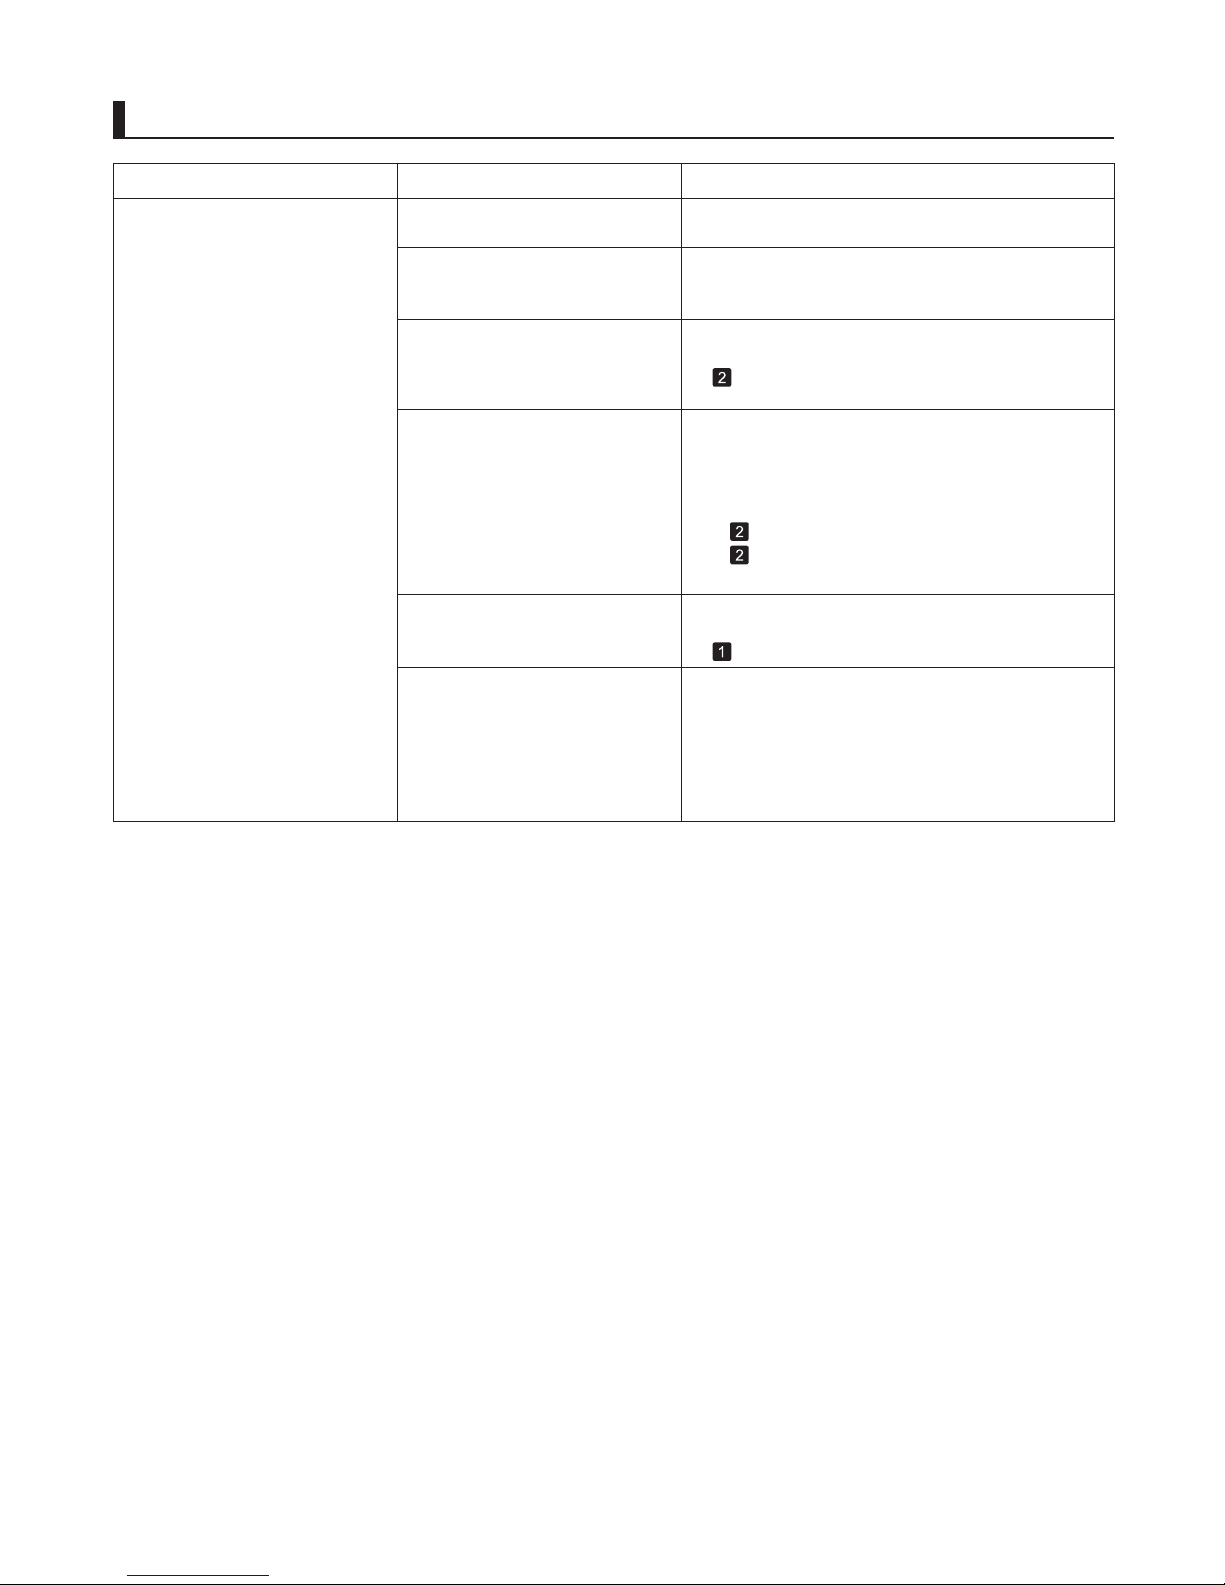
Troubleshooting
Problems with the Printing Quality
Phenomenon
Printing is faint
3.
1.
2.
You may be printing on the wrong
side of the paper.
The ink was not dry when paper
was cut.
The Printhead nozzles are
clogged.
Because the printer was left
without ink tanks installed for some
time, ink has become clogged in
the ink supply system.
Paper is jammed inside the Top
Cover .
Printing may be faint if Print
Quality in Advanced Settings
in the printer driver is set to
Standard or Draft .
Print on the printing surface.
Close the Top Cover .
Specify a longer drying period in the Control Panel
menu, in Paper Details > Roll DryingTime .
Print a test pattern to check the nozzles and see if
they are clogged.
After the ink tanks have been installed for 24 hours,
run Head Cleaning B from the Control Panel .
Follow the steps below to remove the jammed piece
of paper inside the Top Cover .
Open the Top Cover and make sure the Carriage
is not over the Platen .
Remove any scraps of paper inside the Top Cover .
In Advanced Settings of the printer driver, choose
Highest or High in Print Quality .
Cause Corrective Action
(→"Checking for Nozzle Clogging," User Manual)
(→ , If Printing is Faint)
(→
, Menu Map)
Printing in Draft or Standard mode is faster and
consumes less ink than in Highest or High modes,
but the printing quality is lower.
(→"Giving Priority to Particular Graphic Elements and
Colors for Printing," User Manual)
(→ , If Roll Paper Jams)
(→ , If a Sheet Jams)
Page 6
6
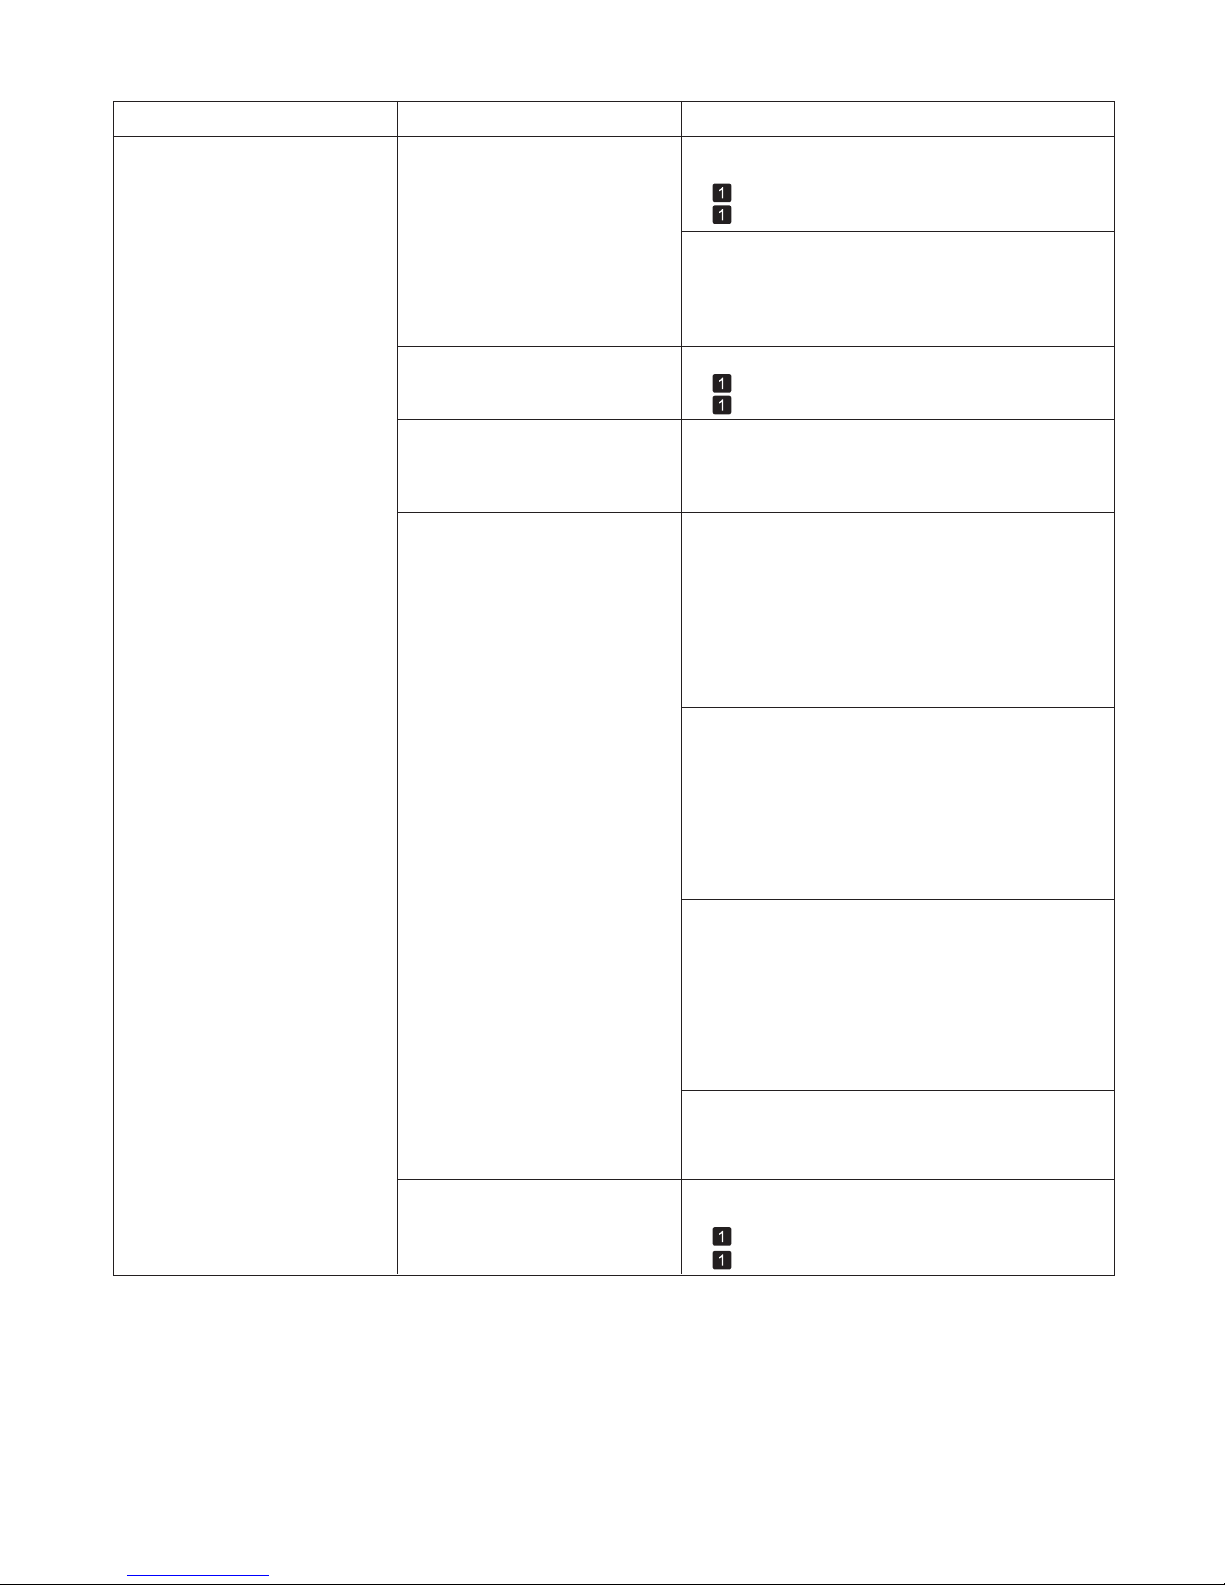
Troubleshooting
Phenomenon
Cause Corrective Action
Paper rubs against the printhead
1.
2.
The type of paper specified in the
printer driver does not match the
type loaded in the printer.
The Printhead is set too low in the
Control Panel menu.
Paper has been loaded incorrectly,
causing it to wrinkle.
You are printing on heavyweight
paper or paper that curls or
wrinkles easily after absorbing ink.
Load paper of the same type as you have specified in
the printer driver.
Make sure the same type of paper is specified in the
printer driver as you have loaded in the printer.
Press the Stop button and stop printing.
Change the type of paper in the printer driver and
try printing again.
In the Control Panel menu, set Head Height to
Automatic .
Reload the paper.
When printing on CAD Tracing Paper or other film-
based media, choose a VacuumStrngth setting of
Standard , Strong , or Strongest in the Control Panel
menu. If rubbing still occurs, in the Control Panel
menu, use a higher Head Height setting.
When printing on Heavyweight Coated Paper or
other paper-based media, choose a VacuumStrngth
setting of Strong or Strongest in the Control Panel
menu. If rubbing still occurs, in the Control Panel
menu, use a higher Head Height setting.
When printing on paper 0.1 mm (0.004 in) thick or
less, choose a VacuumStrngth setting of Weakest
in the Control Panel menu. If rubbing still occurs, in
the Control Panel menu, use a higher Head Height
setting.
(→
, Loading Rolls in the Printer)
(→
, Loading Sheets in the Printer)
(→
, Loading Rolls in the Printer)
(→
, Loading Sheets in the Printer)
(→"Troubleshooting Paper Abrasion and Blurry
Images (Head Height)," User Manual)
(→"Troubleshooting Paper Abrasion and Blurry
Images (Head Height)," User Manual)
(→"Adjusting the Vacuum Strength (VacuumStrngth),"
User Manual)
(→"Adjusting the Vacuum Strength (VacuumStrngth),"
User Manual)
(→"Adjusting the Vacuum Strength (VacuumStrngth),"
User Manual)
(→"Troubleshooting Paper Abrasion and Blurry
Images (Head Height)," User Manual)
(→"Troubleshooting Paper Abrasion and Blurry
Images (Head Height)," User Manual)
If edges of the paper curl and become soiled when
printing on rolls of glossy photo paper, in Paper
Detailed Settings in the printer driver, set Near End
Margin to 20mm .
When you have loaded paper, the
paper you have loaded does not
match the type selected on the
Control Panel .
Be sure to select the correct type of paper in the
Control Panel menu when loading paper.
(→
, Loading Rolls in the Printer)
(→
, Loading Sheets in the Printer)
Page 7
7
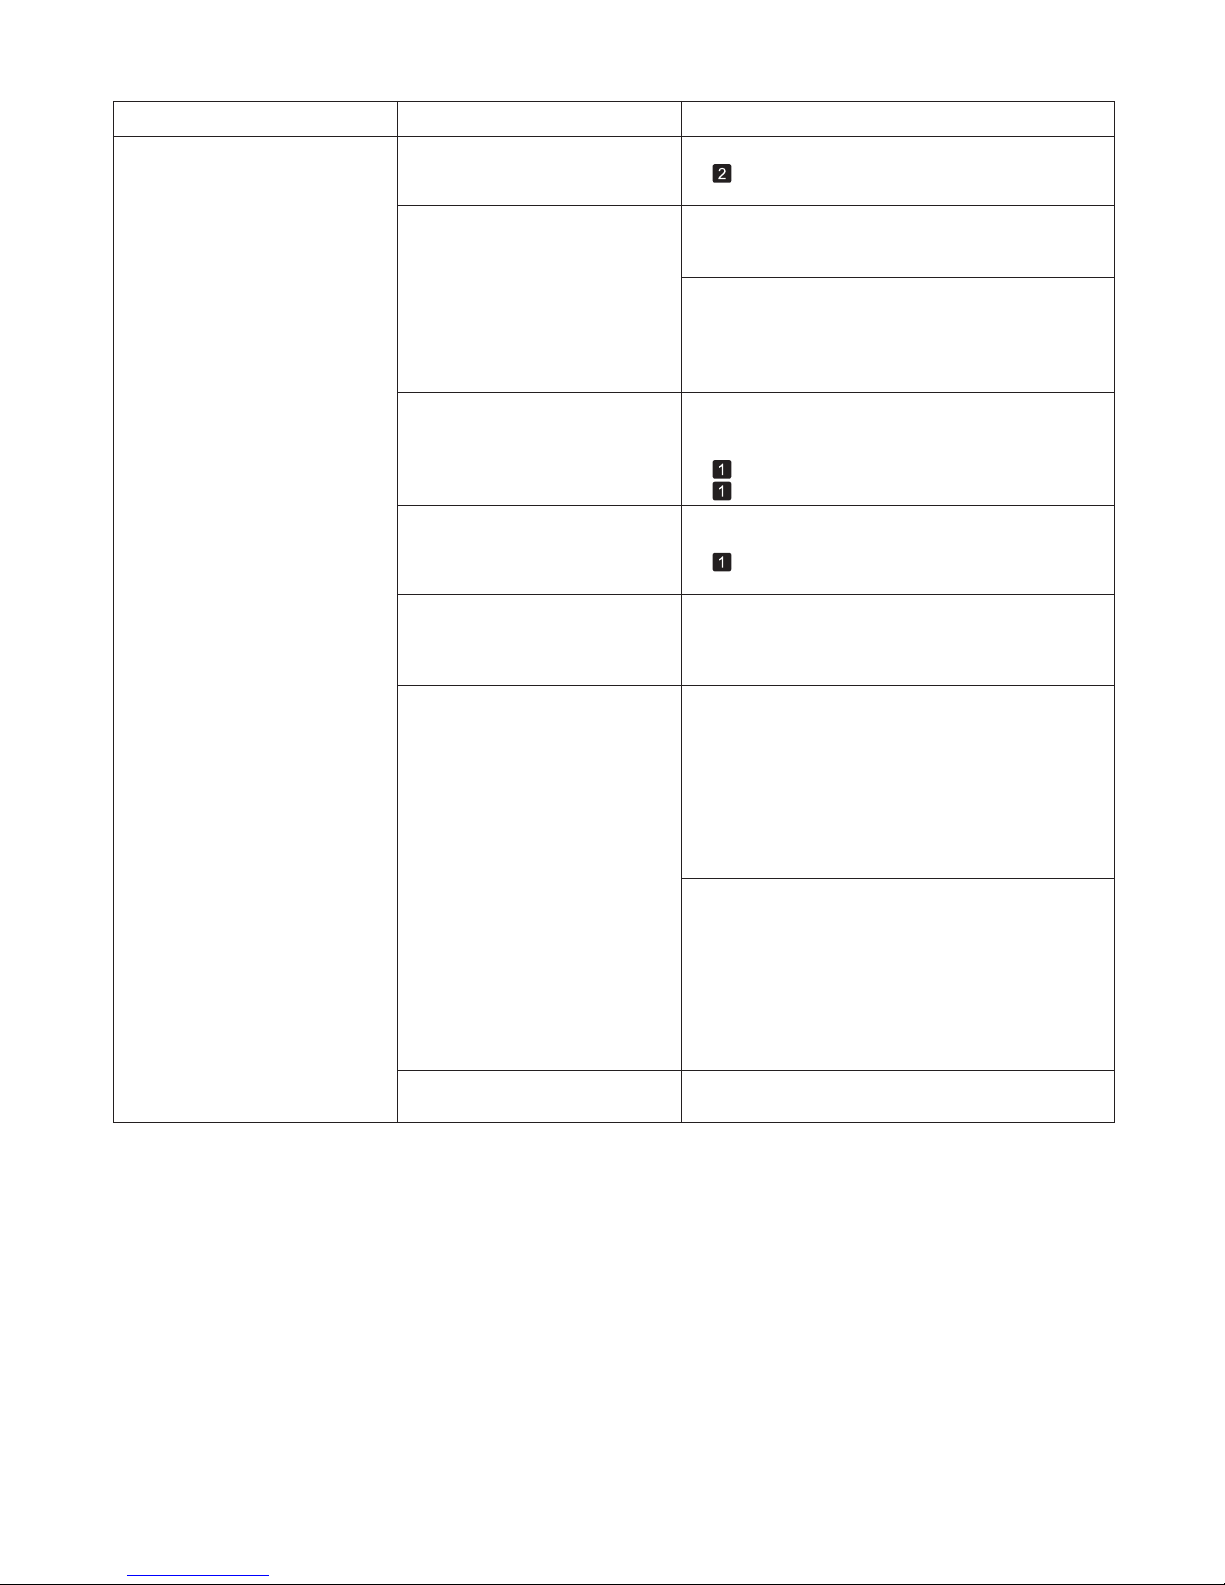
Troubleshooting
Phenomenon Cause Corrective Action
1.
2.
When printing on CAD Tracing Paper or other film-
based media, choose a VacuumStrngth setting of
Standard , Strong , or Strongest in the Control Panel
menu. If rubbing still occurs, in the Control Panel
menu, use a higher Head Height setting.
Straighten out the wrinkles or curls and reload the
paper. Do not use paper that has been printed on
previously.
Make sure the same type of paper is specified on the
printer as in the printer driver.
Make sure the same paper type is specified in the
printer driver as on the printer.
Press the Stop button and stop printing.
Change the type of paper in the printer driver and
try printing again.
If this function is not needed, set CutDustReduct. to
Off in the Control Panel menu.
Clean the Ejection Guide .
In the Control Panel menu, set Head Height to
Automatic .
When printing on Heavyweight Coated Paper or
other paper-based media, choose a VacuumStrngth
setting of Strong or Strongest in the Control Panel
menu. If rubbing still occurs, in the Control Panel
menu, use a higher Head Height setting.
The edges of the paper are dirty Open the Top Cover and clean the Platen .The Platen has become dirty after
borderless printing or printing on
small paper.
The paper is wrinkled or warped.
The type of paper as specified on
the printer does not match the type
specified in the printer driver.
A cut line is printed because
CutDustReduct. is On in the
Control Panel menu to reduce
cutting dust.
The Ejection Guide is soiled.
The Printhead
is set too low in the
Control Panel menu.
You are printing on heavyweight
paper or paper that curls or
wrinkles easily after absorbing ink.
(→ , If Paper is Soiled)
(→"Changing the Type of Paper," User Manual)
(→
, Loading Rolls in the Printer)
(→
, Loading Sheets in the Printer)
(→
, Menu Map)
(→"Troubleshooting Paper Abrasion and Blurry
Images (Head Height)," User Manual)
(→"Adjusting the Vacuum Strength (VacuumStrngth),"
User Manual)
(→"Troubleshooting Paper Abrasion and Blurry
Images (Head Height)," User Manual)
(→"Adjusting the Vacuum Strength (VacuumStrngth),"
User Manual)
(→"Troubleshooting Paper Abrasion and Blurry
Images (Head Height)," User Manual)
(→"Cleaning the Printer Exterior," User Manual)
Page 8
8
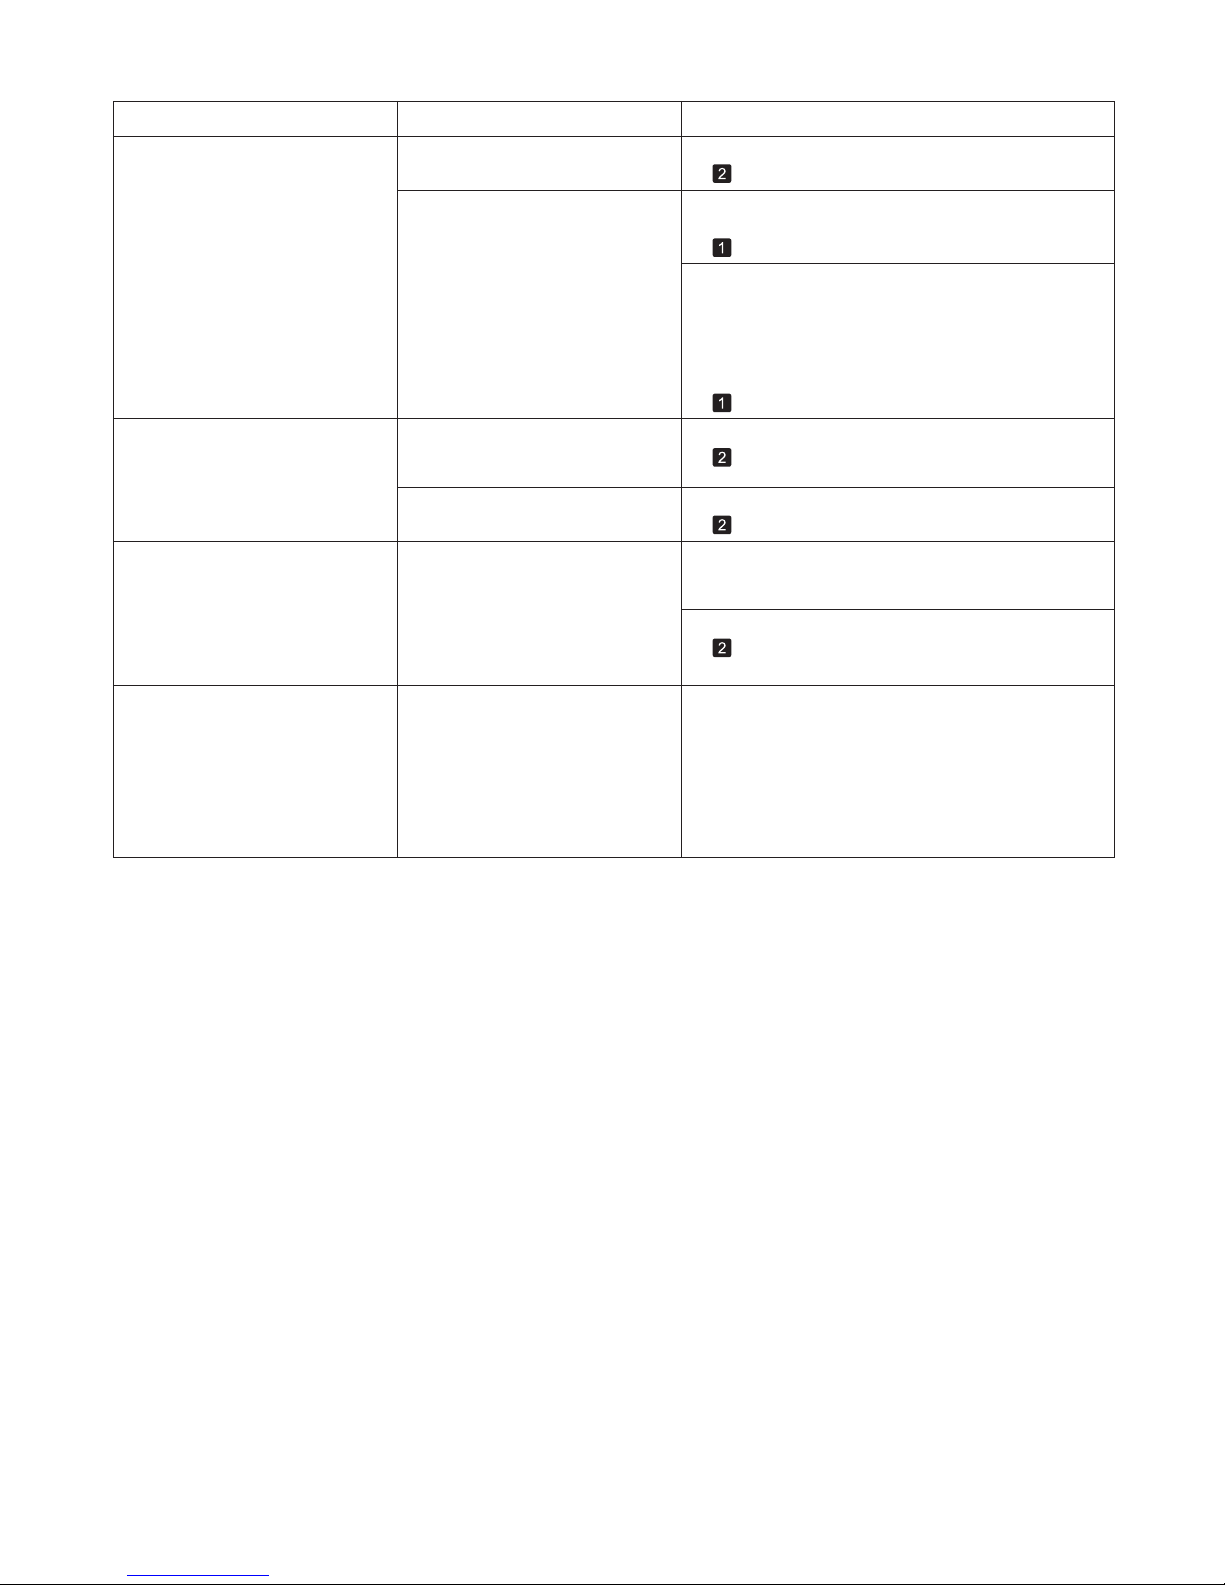
Troubleshooting
Phenomenon
Cause Corrective Action
The Paper Retainer is soiled.
The back side of the paper is dirty The Platen has become dirty after
borderless printing or printing on
small paper.
Open the Top Cover and clean the Platen .
(→
, If Paper is Soiled)
The surface of the paper is dirty Clean the Paper Retainer .
In the Control Panel menu, set Roll DryingTime to
at least 1 min.
The Paper Retainer is soiled.
You are using a paper that does
not dry easily.
(→
, If Paper is Soiled)
Clean the Paper Retainer .
(→
, If Paper is Soiled)
(→
, Menu Map)
When paper that does not dry easily is used for
printing, it may curl during printing and touch the
output tray.
(→
, Menu Map)
In this case, in the Control Panel menu, set Scan
Wait Time to an option other than Off .
However, note that printing will now take longer.
Roller marks are left across the
trailing edge of paper
The paper was removed without
pressing the OK button after
printing from the Front Paper
Feed Slot .
Following the instructions displayed, press the OK
button, and after removing the paper, press the OK
button again.
Immediately after borderless
printing, the trailing edge margin is
soiled during regular printing
Depending on your printing
environment, after borderless
printing in which the leading and
trailing edge of the roll is cut
automatically, any ink adhering to
the cutter unit may rub off on the
next printed document.
Follow these steps to change the Between Pages
setting of Drying Time to a value between about
30 seconds and 3 minutes before trying borderless
printing again.
Wipe the rollers to clean them.
(→
, If Paper is Soiled)
(→"Cleaning the Paper Retainer," User Manual)
On the Main sheet of the printer driver, click
Advanced Settings by Media Type .
1.
Select an ink drying time in the list for the Between
Pages setting of Drying Time .
2.
Page 9

9
Troubleshooting
Printed colors are inaccurate Color adjustment has not been
activated in the Advanced
Settings of the printer driver.
The Printhead nozzles are
clogged.
Adjust the settings of the color management software,
referring to the software documentation as needed.
There may be a slight difference
in how colors are printed after
Printhead replacement because
of individual variation among
printheads.
Colors have not been adjusted on
the computer or monitor.
In the Windows printer driver,
Application Color Matching
Priority is not selected.
In the Advanced Settings of the printer driver, access
Color Settings in Color Mode to adjust colors.
Print a test pattern to check the nozzles and see if
they are clogged.
Execute color calibration.
Refer to the computer and monitor documentation to
adjust the colors.
Click Special Settings on the Layout sheet of the
printer driver and select Application Color Matching
Priority in the dialog box.
(→"Checking for Nozzle Clogging," User Manual)
Printhead characteristics gradually
change through repeated use, and
colors may change.
Execute color calibration.
Color may change slightly even
on the same model of printer if
you use a different version of the
firmware or printer driver, or when
you print under different settings or
in a different printing environment.
Follow these steps to prepare the printing
environment.
Use the same version of firmware or printer driver.1.
Specify the same value for all settings items.2.
Execute color calibration.3.
When reinstalling the printer driver,
you changed the region selection
of the Media Configuration Tool .
Prepare paper compatible with calibration in the newly
selected region and perform calibration again.
Changing the region selection
of the Media Configuration Tool
deletes the region-specific paper
information originally registered
on the printer before installation.
Using paper with deleted
information when executing color
calibration will prevent the resulting
calibration adjustment value from
being applied to all other types of
the paper.
Phenomenon Cause Corrective Action
Page 10
10
Troubleshooting
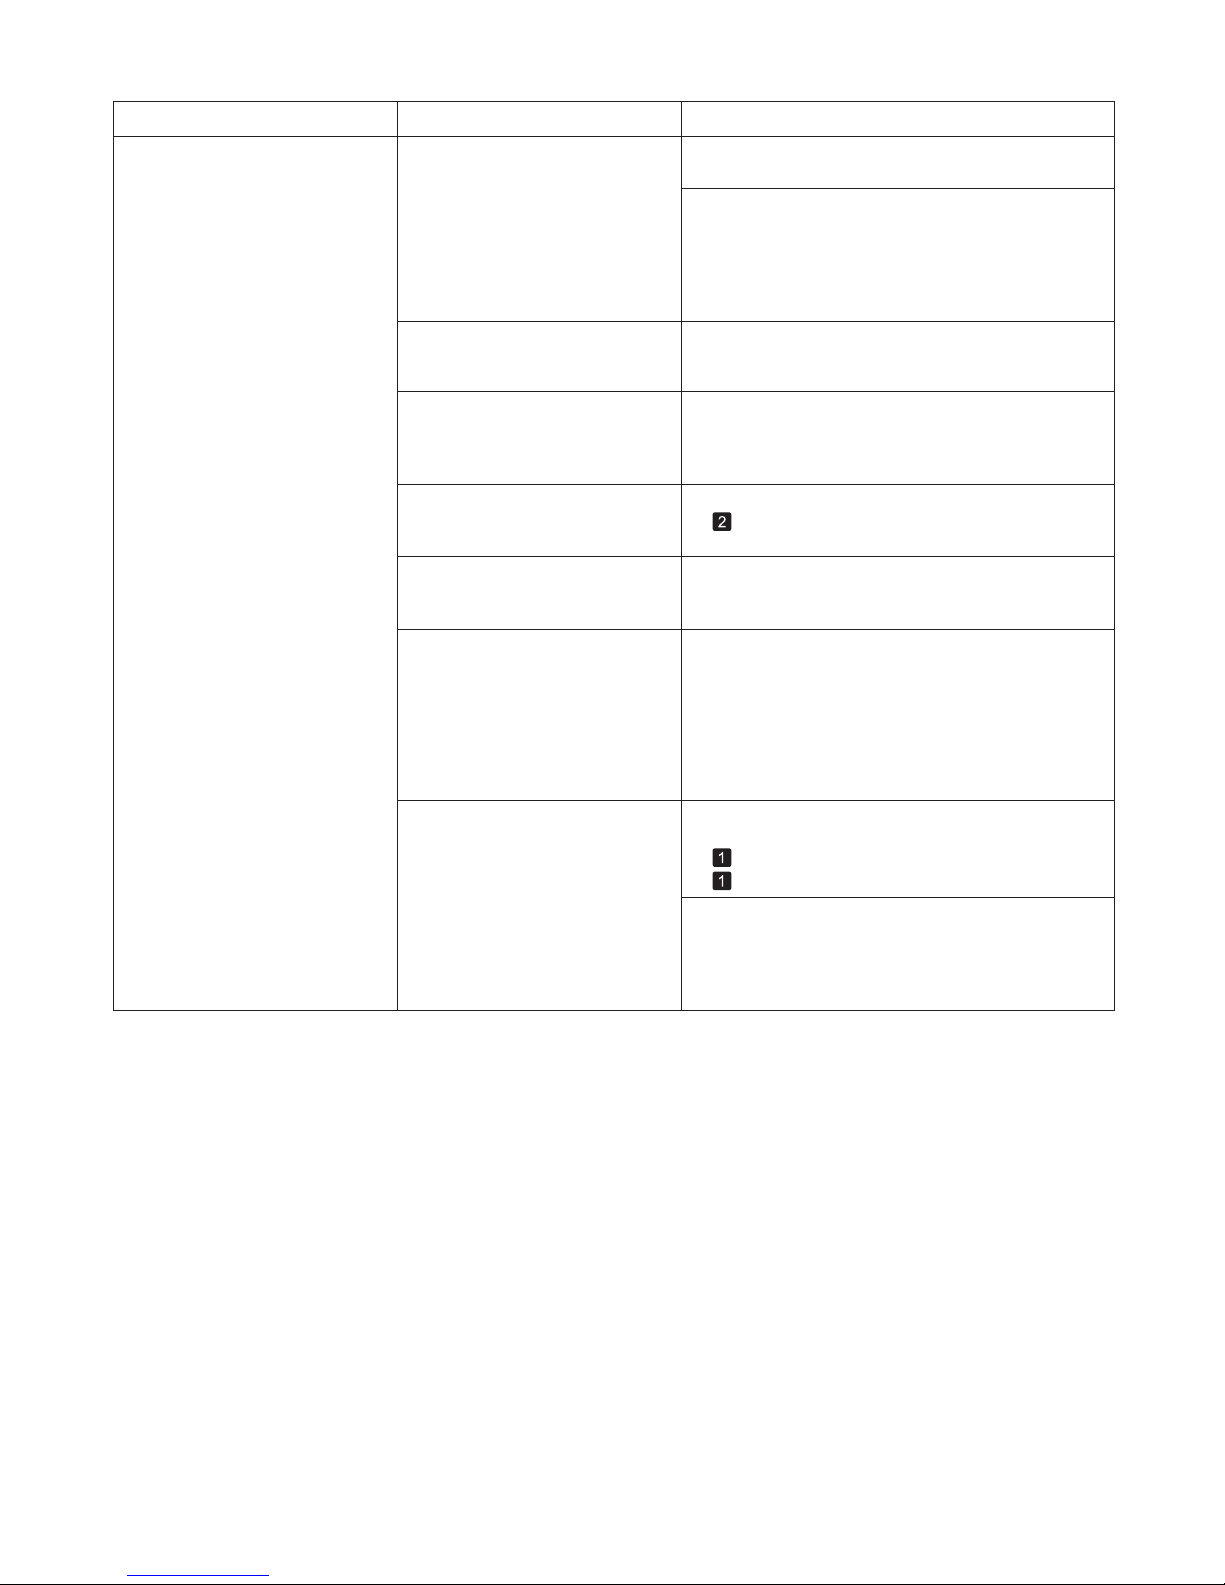
Phenomenon Cause Corrective Action
In the Control Panel menu, Adj.
Priority is set to Print Length .
Setting Adj. Priority to Print Quality in the Control
Panel menu and adjusting the feed amount may
improve results.
The type of paper specified in the
printer driver does not match the
type loaded in the printer.
(→"Adjusting the Feed Amount," User Manual)
The Printhead is out of alignment. Adjust the Printhead alignment.
(→
, If Vertical Lines are Warped or Colors are
Misaligned)
The Printhead nozzles are
clogged.
Print a test pattern to check the nozzles and see if
they are clogged.
(→"Checking for Nozzle Clogging," User Manual)
Streaks may occur if you set the
Print Quality too low.
Choose a higher level of Print Quality in the
Advanced Settings of the printer driver and try
printing again.
Printing in Draft or Standard mode is faster and
consumes less ink than in Highest or High modes,
but the printing quality is lower.
(→"Giving Priority to Particular Graphic Elements and
Colors for Printing," User Manual)
Banding in different colors occurs The paper feed amount is out of
adjustment.
Adjust the feed amount.
(→"Adjusting the Feed Amount," User Manual)
If printed sheets are affected by banding in different
colors by the trailing edge (about 20–30 mm (0.8–1.2
in) from the edge), try adjusting the feed amount of
the trailing edge of sheets.
Printing does not proceed
smoothly because print jobs are
interrupted during transmission.
Exit other applications and cancel other print jobs.
Make sure the same type of paper is specified in the
printer driver as you have loaded in the printer.
Press the Stop button and stop printing.1.
Change the type of paper in the printer driver and
try printing again.
2.
(→"Adjusting Color on the Trailing Edge of Sheets,"
User Manual)
Load paper of the same type as you have specified in
the printer driver.
(→
, Loading Rolls in the Printer)
(→
, Loading Sheets in the Printer)
Page 11
11
Troubleshooting
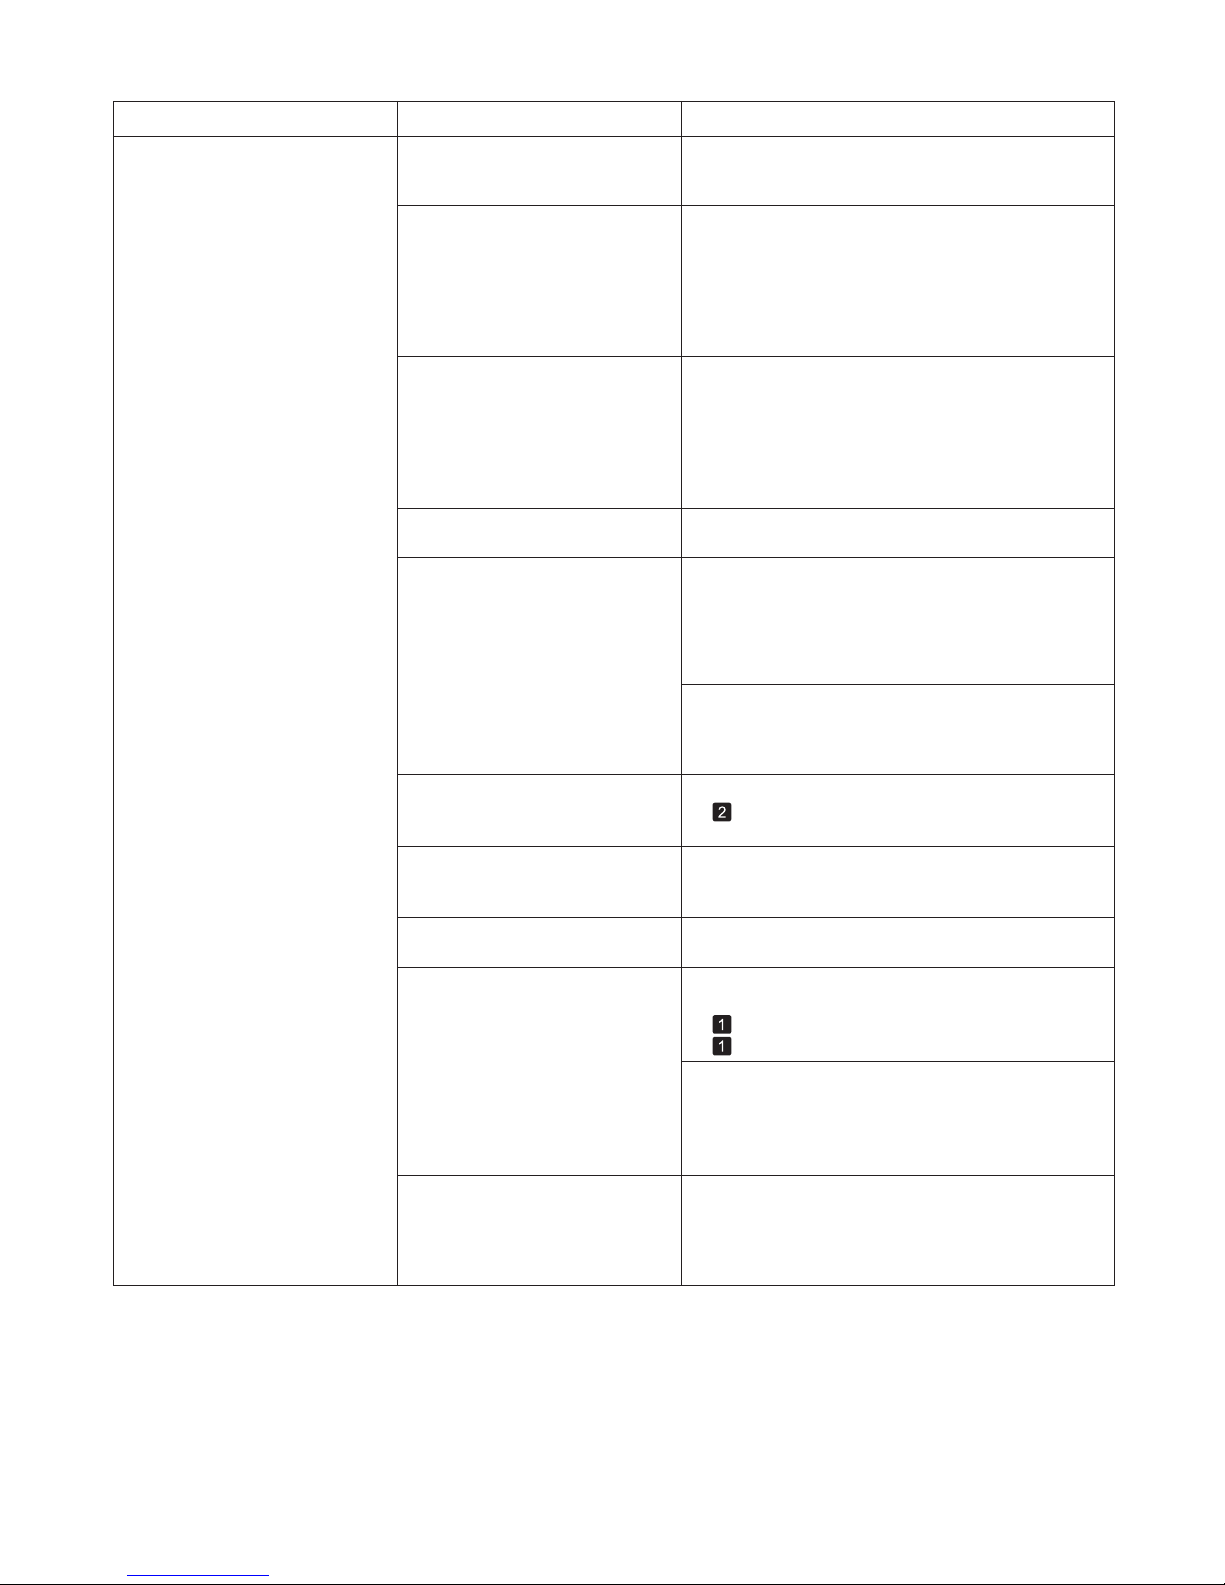
Colors in printed images are
uneven
Line Drawing/Text is selected
when printing images in many solid
colors.
You are printing on paper that curls
easily.
Printed colors may be uneven if
you set the Print Quality too low.
Color may be uneven between
dark and light image areas.
Density may be uneven if you use
Glossy Paper or Coated Paper .
When borderless printing is used,
the edge of the paper is cut during
printing. Thus, ink density may be
slightly uneven at the edges.
The Printhead is out of alignment.
Allowing printed documents to dry
on top of each other may cause
uneven colors.
In Print Priority in the Advanced Settings of the
printer driver, choose Image .
Printed colors may appear uneven on the leading
edge of paper that is susceptible to curling. Select
a stronger level in VacuumStrngth in the Control
Panel menu to increase suction against the paper, or
specify a leading margin of 20 mm (0.79 in) or more.
Choose a higher level of Print Quality in the
Advanced Settings of the printer driver.
Select Unidirectional Printing in the Advanced
Settings of the printer driver.
In Advanced Settings of the printer driver, choose
Highest or High in Print Quality .
Specify No in Auto Cut in the printer driver before
printing. In this case, the paper can be printed without
borders on the left and right sides only. Cut the printed
document ejected from the printer, and then use
scissors or a cutting tool to cut away the edges on the
top and bottom.
Adjust the Printhead alignment.
Choose a higher level of Print Quality in the
Advanced Settings of the printer driver.
To avoid uneven colors, we recommend drying each
sheet separately.
Phenomenon Cause Corrective Action
Printing in Draft or Standard mode is faster and
consumes less ink than in Highest or High modes,
but the printing quality is lower.
(→"Giving Priority to Particular Graphic Elements and
Colors for Printing," User Manual)
(→
, If Vertical Lines are Warped or Colors are
Misaligned)
The type of paper specified in the
printer driver does not match the
type loaded in the printer.
Load paper of the same type as you have specified in
the printer driver.
Make sure the same type of paper is specified in the
printer driver as you have loaded in the printer.
(→
, Loading Rolls in the Printer)
(→
, Loading Sheets in the Printer)
Press the Stop button and stop printing.1.
Change the type of paper in the printer driver and
try printing again.
2.
(→"Giving Priority to Particular Graphic Elements and
Colors for Printing," User Manual)
(→"Adjusting the Vacuum Strength (VacuumStrngth),"
User Manual)
Colors may be uneven at the
trailing edge when you print on
heavyweight sheets even if you
execute Adj Far Ed Feed .
For heavyweight sheets or similar paper, execute Adj
Far Ed Feed with the Front Tray Guides raised. Also
keep the Front Tray Guides raised during printing.
Lower the Front Tray Guides when printing on paper
other than heavyweight sheets.
Page 12
12
Troubleshooting
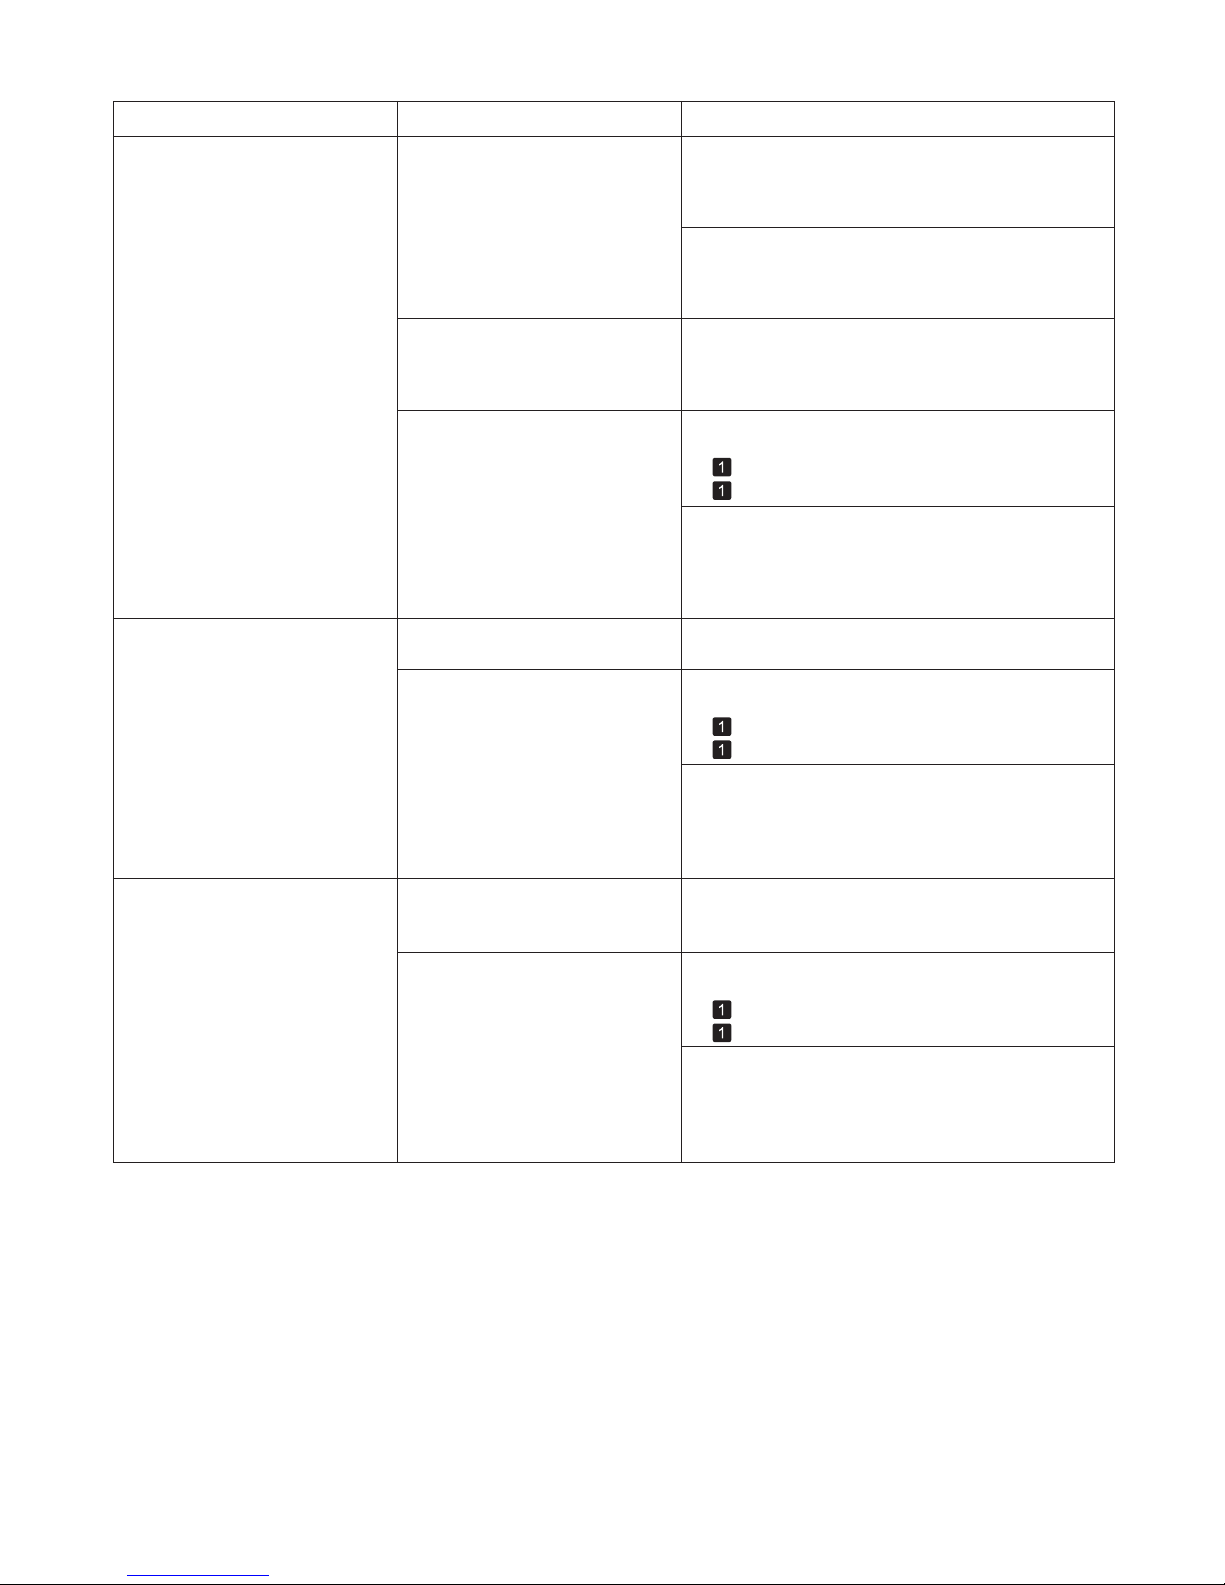
The length of printed images is
inaccurate in the feeding direction
Set Adj. Priority to Print Length in the Control
Panel menu, and then execute Adjust Length .
In the Control Panel menu, Adj.
Priority is set to Print Quality .
(→"Adjusting the Feed Amount," User Manual)
Phenomenon Cause Corrective Action
The type of paper specified in the
printer driver does not match the
type loaded in the printer.
Make sure the same type of paper is specified in the
printer driver as you have loaded in the printer.
Load paper of the same type as you have specified in
the printer driver.
Press the Stop button and stop printing.1.
Change the type of paper in the printer driver and
try printing again.
2.
(→
, Loading Rolls in the Printer)
(→
, Loading Sheets in the Printer)
Image edges are blurred or white
banding occurs
In the Control Panel menu, reduce the level of
VacuumStrngth .
The Platen suction is too strong.
Close the blue Switch on the platen so that it matches
the paper size.
The Printhead is set too high in the
Control Panel menu.
The type of paper specified in the
printer driver does not match the
type loaded in the printer.
In the Control Panel menu, use a lower Head Height
setting.
(→"Troubleshooting Paper Abrasion and Blurry
Images (Head Height)," User Manual)
The contrast becomes uneven
during printing
The paper feed amount is out of
adjustment.
Adjust the feed amount.
(→"Adjusting the Feed Amount," User Manual)
Make sure the same type of paper is specified in the
printer driver as you have loaded in the printer.
The type of paper specified in the
printer driver does not match the
type loaded in the printer.
Load paper of the same type as you have specified in
the printer driver.
(→
, Loading Rolls in the Printer)
(→
, Loading Sheets in the Printer)
Press the Stop button and stop printing.1.
Change the type of paper in the printer driver and
try printing again.
2.
(→"Adjusting the Vacuum Strength (VacuumStrngth),"
User Manual)
(→"Setting the Blue Switch on the Platen," User
Manual)
Load paper of the same type as you have specified in
the printer driver.
(→
, Loading Rolls in the Printer)
(→
, Loading Sheets in the Printer)
Make sure the same type of paper is specified in the
printer driver as you have loaded in the printer.
Press the Stop button and stop printing.1.
Change the type of paper in the printer driver and
try printing again.
2.
Page 13

13
Troubleshooting
Phenomenon Cause Corrective Action
Images are printed crooked In the Control Panel menu, set Skew Check Lv. to
High Accuracy or Standard .
In the Control Panel menu, Skew
Check Lv. is set to Loose or Off .
Documents are printed in
monochrome
In the Advanced Settings of the
printer driver, Monochrome or
Monochrome (Photo) is specified
in Color Mode .
The Printhead nozzles are
clogged.
In the Advanced Settings of the printer driver, specify
Color in Color Mode and try printing again.
Print a test pattern to check the nozzles and see if
they are clogged.
(→"Checking for Nozzle Clogging," User Manual)
Line thickness is not uniform
1.
2.
Access the printer driver Properties dialog box from
Print in the File menu of the source application, and
follow these steps to print.
In the Special Settings dialog box
of the Windows printer driver, Fast
Graphic Process is selected.
Clear the option Open Preview When Print Job
Starts on the Main sheet.
Clear the option Page Layout on the Layout sheet.
Click the Special Settings button on the Layout
sheet to display the Special Settings dialog box,
and then clear the option Fast Graphic Process .
3.
The blue Switch on the platen is
set incorrectly.
Move the Switch
numbered corresponding to the size
of paper for printing opposite to the ● position.
(→"Setting the Blue Switch on the Platen," User
Manual)
The type of paper specified in the
printer driver does not match the
type loaded in the printer.
Load paper of the same type as you have specified in
the printer driver.
Press the Stop button and stop printing.1.
Change the type of paper in the printer driver and
try printing again.
2.
Make sure the same type of paper is specified in the
printer driver as you have loaded in the printer.
(→
, Loading Rolls in the Printer)
(→
, Loading Sheets in the Printer)
The Printhead is set too high in the
Control Panel menu.
In the Control Panel menu, use a lower Head Height
setting.
(→"Troubleshooting Paper Abrasion and Blurry
Images (Head Height)," User Manual)
Depending on the type of paper,
the thickness of printed lines may
be noticeably inconsistent.
Select High-Precision Text and Fine Lines in the
printer driver.
(→"Giving Priority to Particular Graphic Elements and
Colors for Printing," User Manual)
Page 14
14
TroubleshootingTroubleshooting
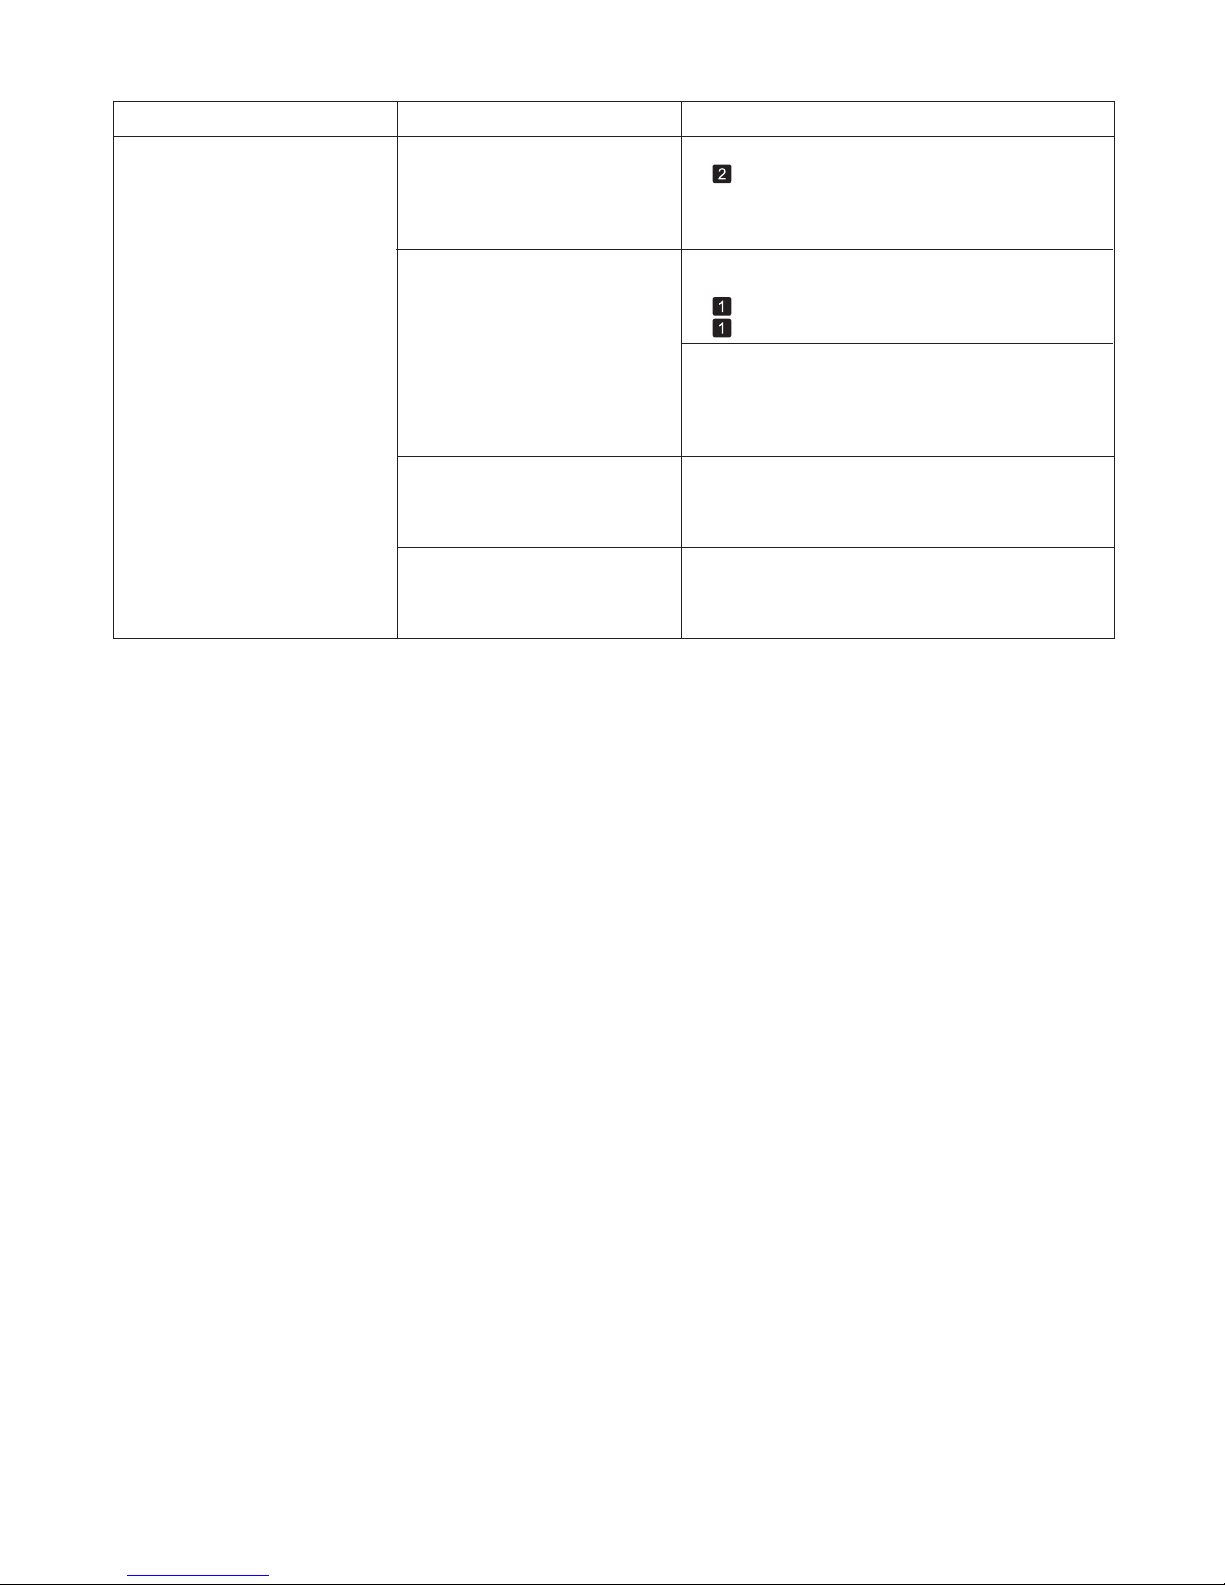
Phenomenon Cause Corrective Action
Lines are misaligned The Printhead alignment is not
adjusted.
Adjust the Printhead alignment.
(→
, If Vertical Lines are Warped or Colors are
Misaligned)
(→"Manual Adjustment to Straighten Lines and Colors
(Head Posi. Adj.)," User Manual)
The type of paper specified in the
printer driver does not match the
type loaded in the printer.
Make sure the same type of paper is specified in the
printer driver as you have loaded in the printer.
Load paper of the same type as you have specified in
the printer driver.
Press the Stop button and stop printing.1.
Change the type of paper in the printer driver and
try printing again.
2.
(→
, Loading Rolls in the Printer)
(→
, Loading Sheets in the Printer)
The Printhead is set too high in the
Control Panel menu.
In the Control Panel menu, use a lower Head Height
setting.
(→"Troubleshooting Paper Abrasion and Blurry
Images (Head Height)," User Manual)
Depending on the type of paper,
printed lines may be noticeably
misaligned.
Select High-Precision Text and Fine Lines in the
printer driver.
(→"Giving Priority to Particular Graphic Elements and
Colors for Printing," User Manual)
Page 15
15
Troubleshooting
Cannot Print Over Network
Phenomenon
Cannot print over a TCP/IP
network
Make sure the printer's IP address is configured
correctly.
Make sure the printer's TCP/IP network settings are
configured correctly.
Make sure the computer's TCP/IP network settings
are configured correctly.
The printer's IP address is not
configured correctly.
The printer's TCP/IP network
settings are not configured
correctly.
The computer you are trying
to print from is not configured
correctly.
(→"Configuring the IP Address Using
imagePROGRAF Device Setup Utility," User Manual)
(→"Configuring the IP Address Using the Printer
Control Panel," User Manual)
(→"Configuring the Printer's TCP/IP Network
Settings," User Manual)
(→"Configuring the Printer Driver Destination
(Windows)," User Manual)
(→"Configuring the Destination in TCP/IP Networks,"
User Manual)
Cannot connect the printer to the
network
The Ethernet cable is not
connected correctly to the printer's
Ethernet port.
1.2.Make sure the printer is connected to the network
with the correct Ethernet cable, and then turn the
printer on. For instructions on connecting the cable,
refer to the Setup Guide .
Make sure the Link indicator is lit.
The top and bottom indicators are lit if the printer
is connected via 1000Base-T. The bottom indicator
is green if the printer is connected via 100BASETX, and the top indicator is orange if connected via
10BASE-T.
If the Link indicator is not lit, check the following
points.
•
•
•
•
Make sure the hub is on.
Make sure the end of the Ethernet cable is
connected correctly.
Make sure there is no problem with the Ethernet
cable.
Check the communication mode with the hub.
Insert the Ethernet cable until it clicks and locks in
place.
If there is any problem, replace the Ethernet
cable.
Although the printer normally detects the hub
communication mode and transmission rate
automatically (in auto negotiation mode),
sometimes the hub settings cannot be detected.
In this case, configure the connection method
manually, specifying the communication mode in
use.
Cause Corrective Action
(→"Configuring the Communication Mode
Manually," User Manual)
Page 16
16
Troubleshooting
Cannot print over a NetWare
network
Make sure the printer's NetWare settings are
configured correctly. In particular, make sure a valid
frame type is selected.
Make sure the computer's NetWare settings are
configured correctly.
Check the following points.
The printer's NetWare settings are
not configured correctly.
The computer you are trying
to print from is not configured
correctly.
The NetWare server and services
are not configured correctly.
1.
2.
3.
4.
Make sure the NetWare file server is running.
Make sure there is enough free disk space on the
NetWare file server. Insufficient disk space may
prevent you from processing large print jobs.
Start NWADMIN or PCONSOLE and confirm that
the print service is configured correctly and the print
queue is available.
If data transmission to a printer on another subnet
fails, deactivate NCP burst mode in that printer's
network protocol settings.
If the printer is used in queue server mode, specify
" Other/Unknown " as the printer type.
5.
Phenomenon Cause Corrective Action
(→"Configuring the Printer's NetWare Network
Settings," User Manual)
(→"Configuring NetWare Network Settings," User
Manual)
Cannot print over AppleTalk or
Bonjour networks
Activate AppleTalk on the printer.
Make sure the computer's AppleTalk settings are
configured correctly.
Due to the nature of Bonjour, you cannot print if the
printer is on another network behind a router. Make
sure the computer and printer are on the same
network. For information about network settings, ask
your network administrator.
The AppleTalk protocol is not
enabled on the printer.
The computer you are trying
to print from is not configured
correctly.
The computer and printer are not
on the same network.
(→"Configuring the Printer's AppleTalk Network
Settings," User Manual)
(→"Configuring the Destination for AppleTalk
Networks," User Manual)
(→"Configuring the Destination for Bonjour Network,"
User Manual)
Page 17
17
Troubleshooting
Other Problems
Phenomenon
You suddenly hear the sound of ink agitation•
At regular intervals, to ensure optimal printing
quality, the ink is agitated automatically, even if the
printer is in Sleep mode. Ink agitation takes about
30 seconds.
The ink is also agitated automatically under the
following conditions. Note that other operations are
not possible while Agitating is displayed on the
control panel.
After the printer is turned on•
After data transmission•
After ink tank replacement•
The printer does not go on Plug the power cord into the outlet, and then turn on
the printer.
The printer is unplugged.
Check the voltage of the outlet and breaker. Use a
power source that conforms to the printer specifications.
The specified voltage is not
supplied.
Cause Corrective Action
If the Printer Makes a Strange
Sound
The following sounds do not indicate a problem with
the printer.
The printer makes a sound during
operation.
There is a sound of suction from the Platen .•
Roll paper makes a fl uttering sound during printing.•
You suddenly hear the sound of cleaning operations.•
To prevent paper from rising, paper is held against
the Platen by suction from Vacuum holes under it.
There may be a fl uttering sound when large paper is
advanced.
At regular intervals, for printer maintenance,
cleaning operations will begin automatically, even if
the printer is in Sleep mode.
(→"Specifications," User Manual)
The printer may have shut down
incorrectly last time. This may
happen after power outages or if
the printer is unplugged before it is
turned off.
Please wait a while, because it may take several
minutes to finish checking the hard disk.
The printer takes time to start up
In this case, the next time power
is restored, the printer's hard disk
is checked, and startup may take
some time.
If an error message is displayed after the hard disk
check, follow the instructions indicated to resolve the
problem.
Messages advising to check the
maintenance cartridge are not
cleared
The printer consumes a lot of ink
Remove the new Maintenance Cartridge you have just
installed and insert it again firmly.
Restart the printer.
In print jobs such as photos, images are filled with
color. This consumes a lot of ink. This does not
indicate a problem with the printer.
Head Cleaning B in the Control Panel menu
consumes a lot of ink. This does not indicate a problem
with the printer. Unless the printer has been moved
or stored for a long period or you are troubleshooting
Printhead problems, we recommend not performing
Head Cleaning B , to the extent possible.
After initial installation or at the first-time use after
transfer, ink flows into the system between the Ink
Ta nk and Printhead , which may cause the ink level
indicators to drop to 80%. This does not indicate a
problem with the printer.
The printer has not detected the
new Maintenance Cartridge that
was used to replace the old one.
Many full-page color images are
printed.
Head Cleaning B in the Control
Panel menu is executed
frequently.
You have just finished initial
installation, when more ink is
consumed to fill the system.
Check for nozzle clogging.The Printhead nozzles are
clogged.
(→"Checking for Nozzle Clogging," User Manual)
In other cases, contact your Canon dealer.
Page 18
18
When cutting paper, be careful to avoid injury or damage to the printer.•
For instructions on removing scraps from the paper feed slot after clearing jammed roll paper, see the following
procedure.
•
(→"Clearing Jammed Paper (Paper Feed Slot)," User Manual)
1
2
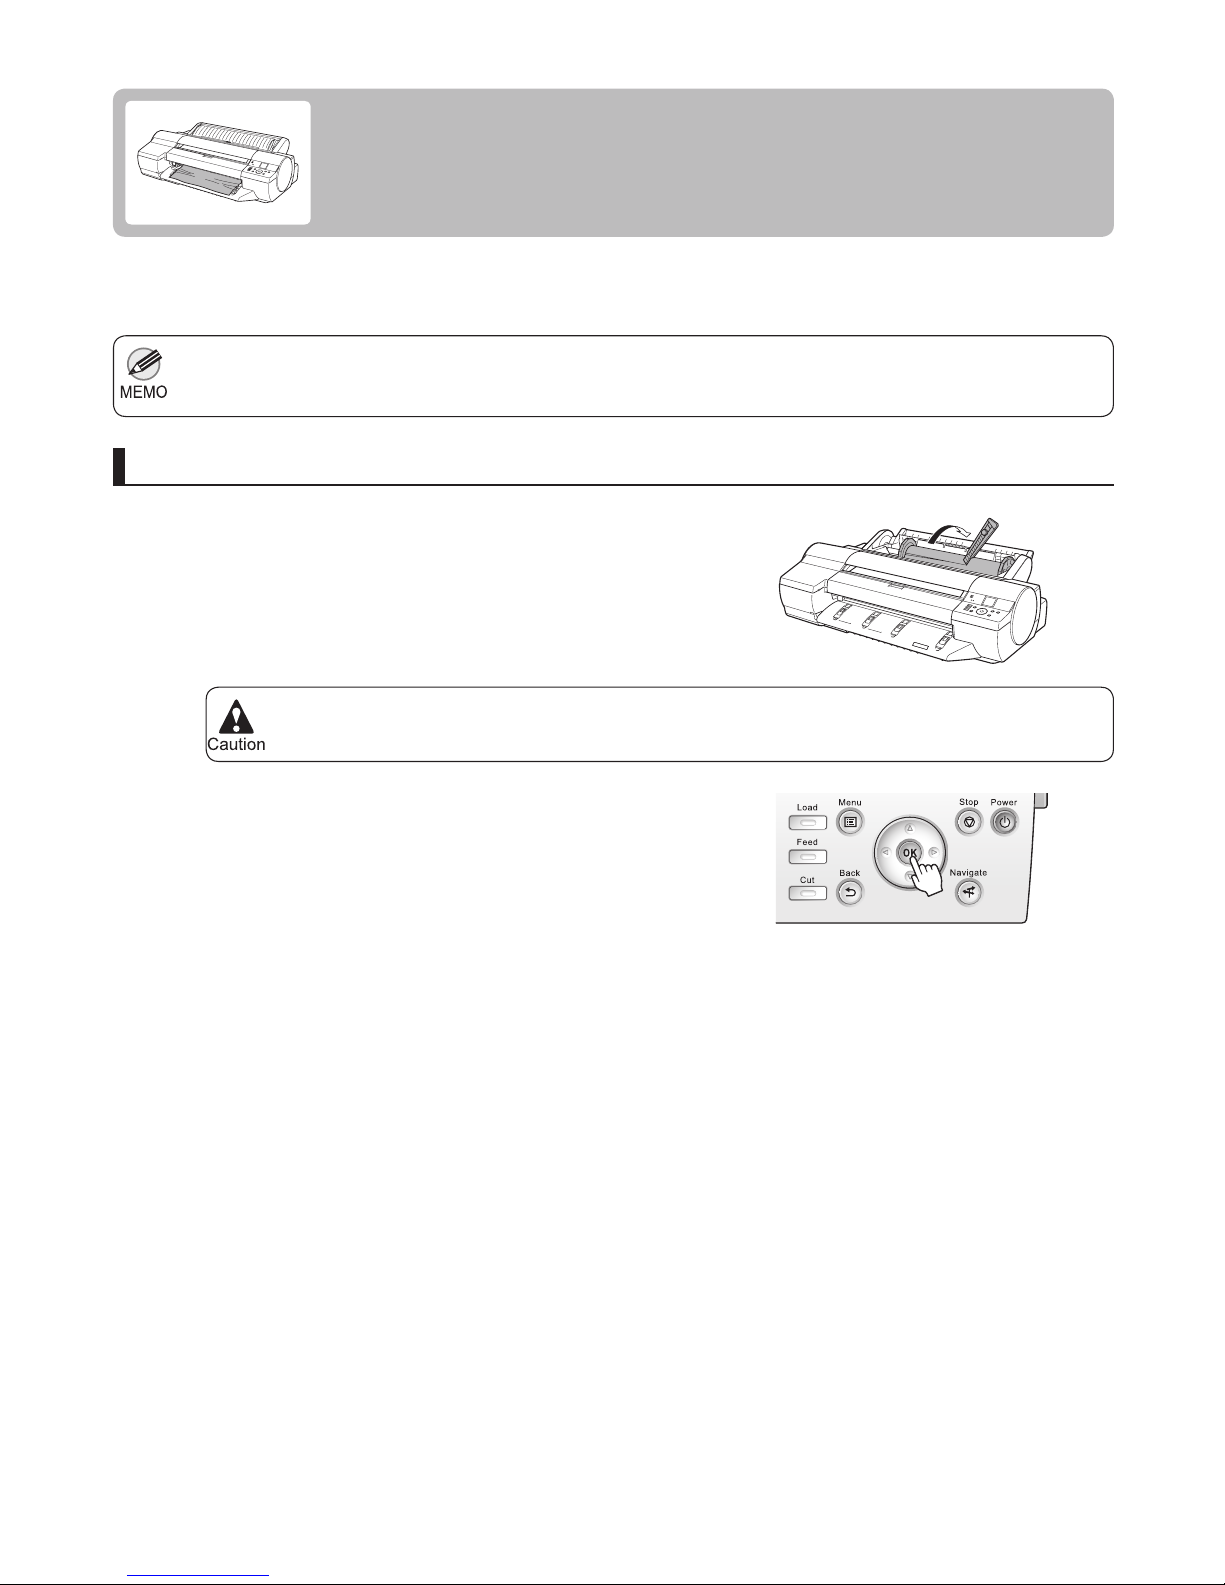
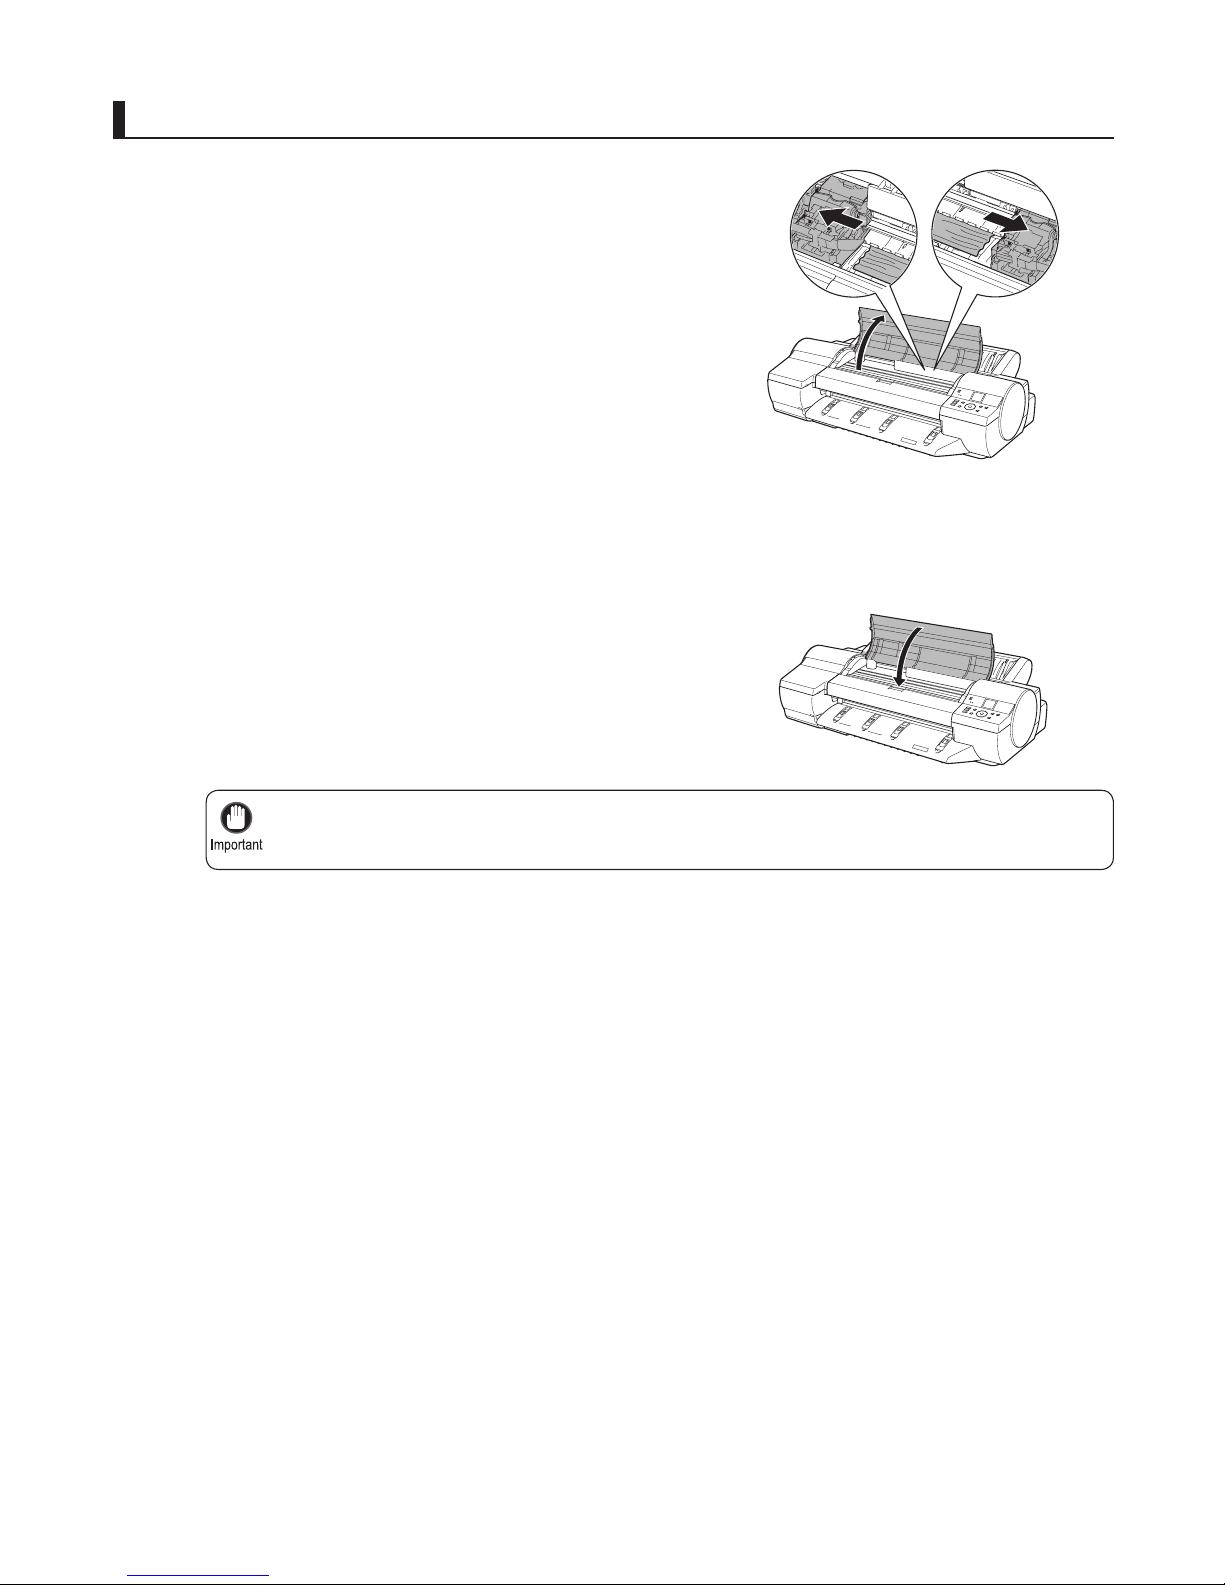
If paper from a roll becomes jammed, Paper jam is shown on the Display Screen of the Control Panel . Remove
the jammed paper as follows.
Open the Roll Feed Unit Cover . Use a commercially
available cutter or the like to cut the paper of the loaded
roll.
Press the OK button.
If Roll Paper Jams
Clear jammed roll paper as follows.
Prepare to remove the jammed paper
Page 19
19
If Roll Paper Jams
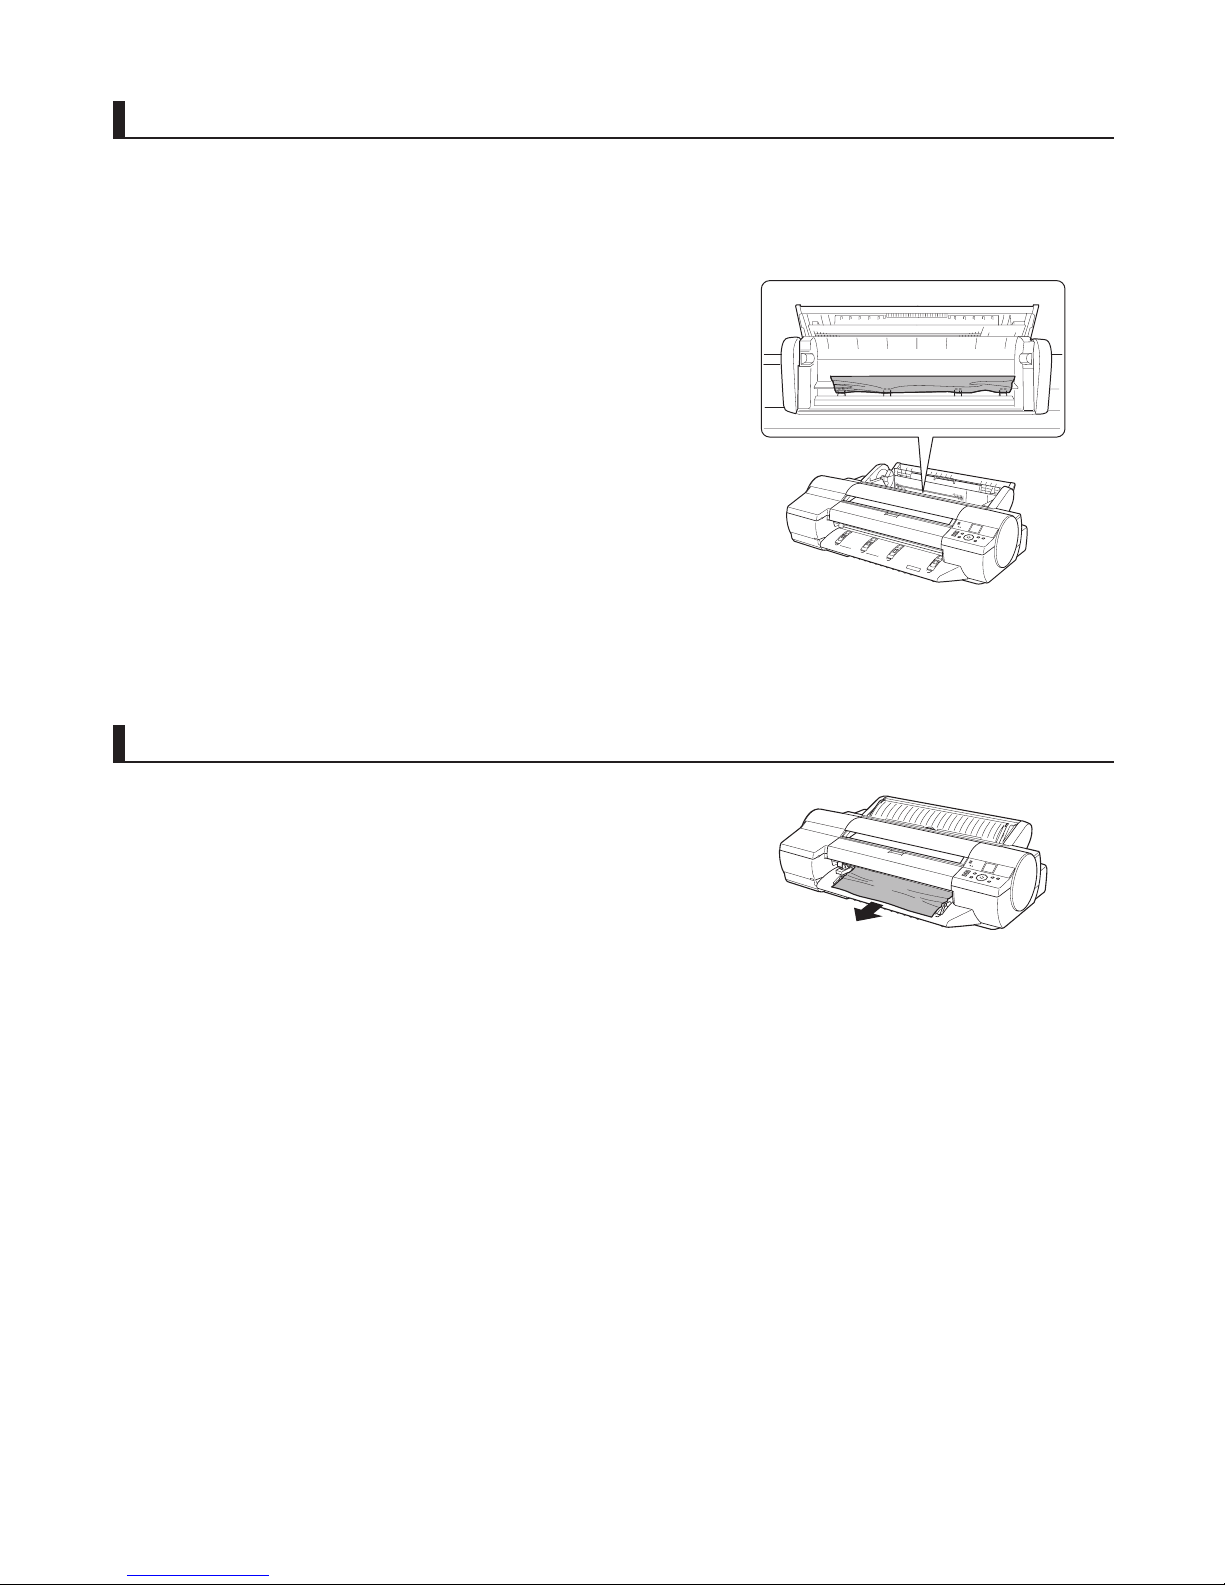
Do not move the Carriage over jammed paper. This may damage the Printhead .•
1
2
3
4
Clear any jammed paper from inside the Top Cover
Open the Top Cover and move the Carriage to the side.
Clear any jammed paper from inside the Top Cover .
Close the Top Cover .
Press the OK button.
After removing the paper, make sure there are no other
scraps of paper in the printer.
Page 20
20
If Roll Paper Jams
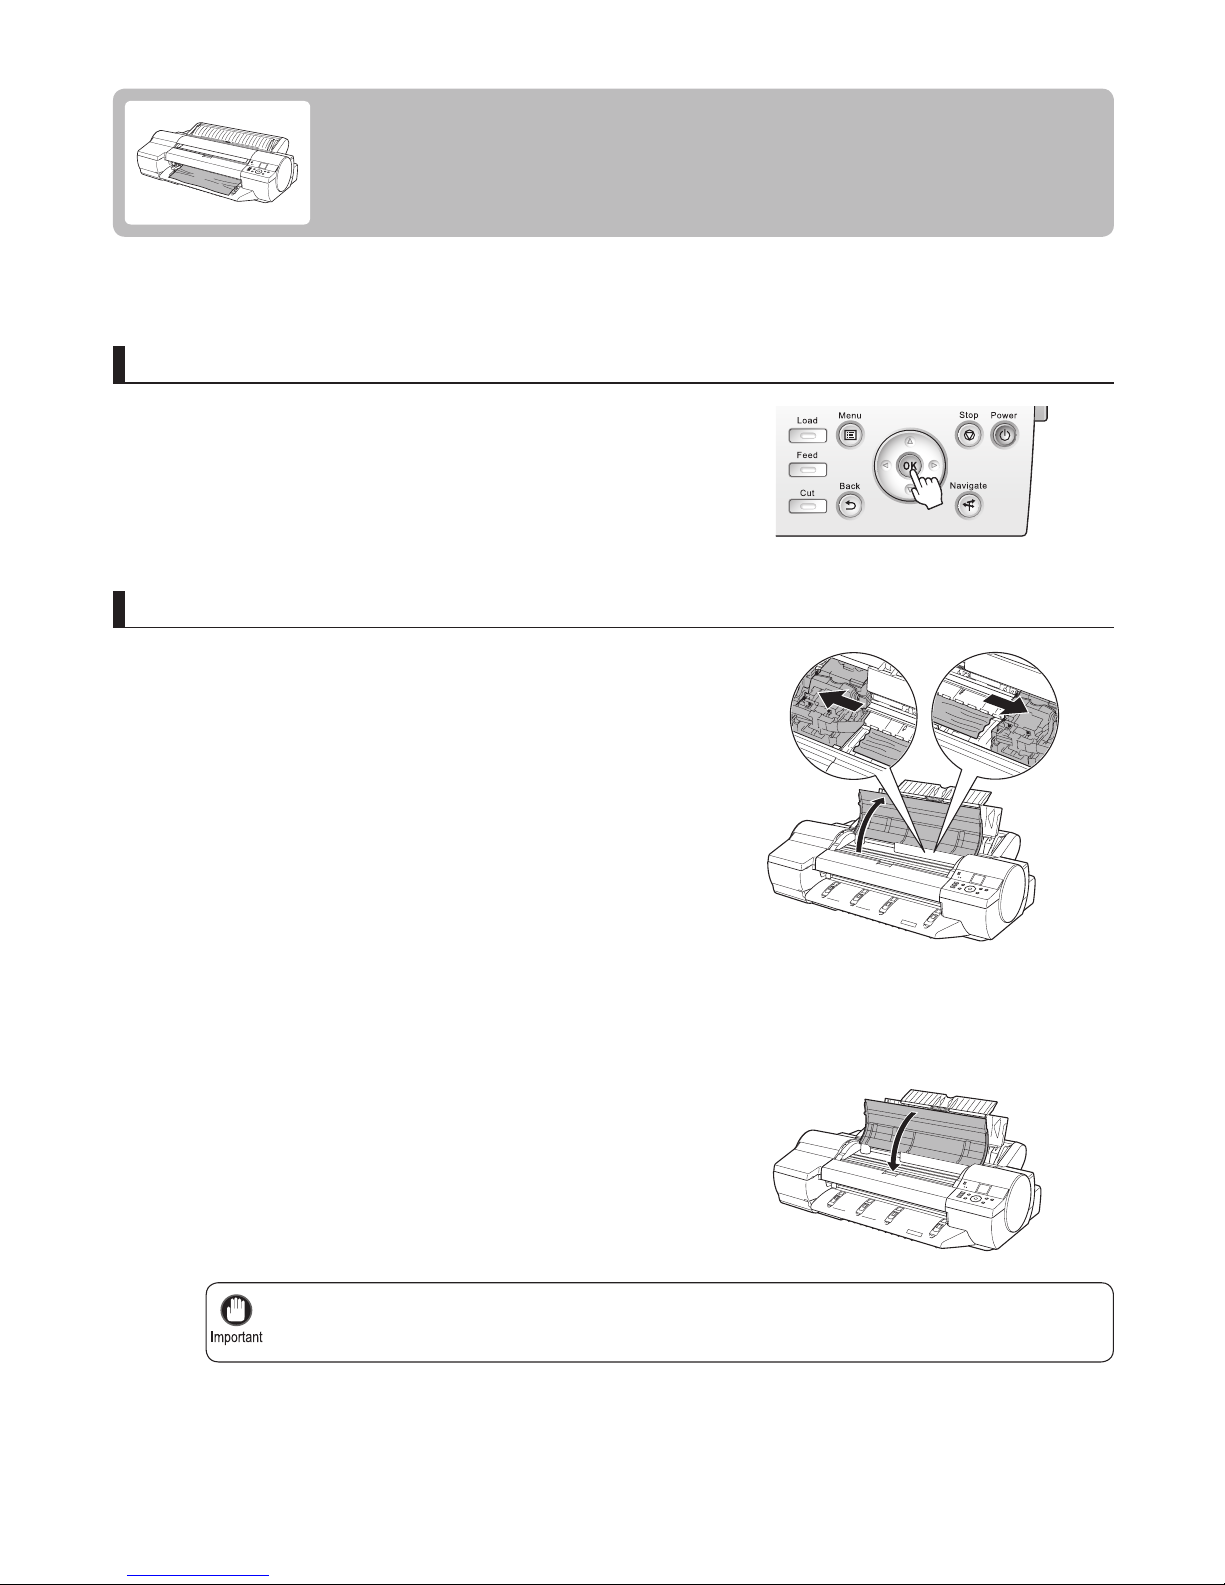
1
2
3
1
2
Clear any jammed paper from near the Paper Feed Slot for rolls
Open the Roll Feed Unit Cover .
Remove the jammed paper from the Paper Feed Slot .
Press the OK button.
Clear any jammed paper near the Ejection Guide
After removing the paper, make sure there are no other
scraps of paper in the printer.
Remove the jammed paper from the Output Tray .
Press the OK button.
After removing the paper, make sure there are no other
scraps of paper in the printer.
If paper is jammed deep in the Paper Feed Slot , remove
the roll feed unit, and then clear the paper jam.
(→"Clearing Jammed Paper (Paper Feed Slot)," User
Manual)
Page 21
21
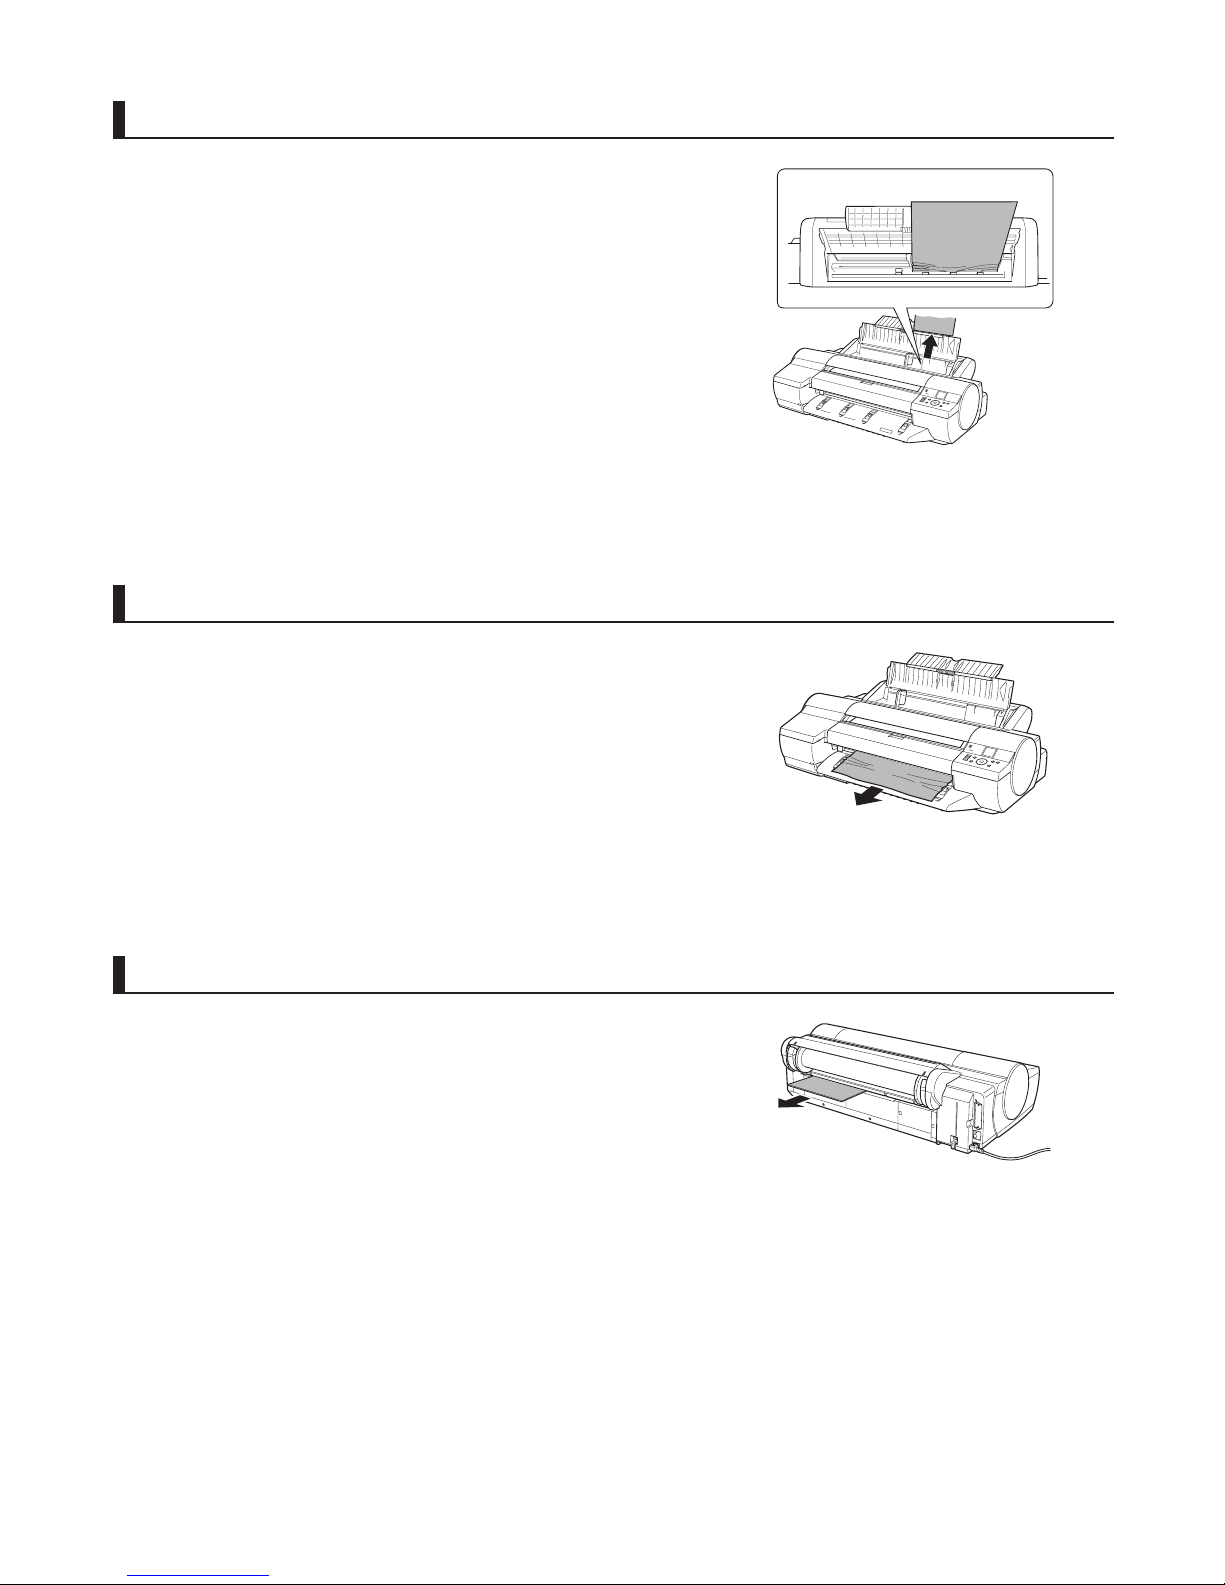
Do not move the Carriage over jammed paper. This may damage the Printhead .•
1
1
2
3
4
If a sheet you have fed manually becomes jammed, Paper jam is shown on the Display Screen of the Control
Panel . Remove the jammed paper as follows.
Press the OK button.
Open the Top Cover and manually move the Carriage to
the side.
Clear any jammed paper from inside the Top Cover .
Close the Top Cover .
If a Sheet Jams
Clear jammed sheets as follows.
Clear any jammed paper from inside the Top Cover
Prepare to remove the jammed paper
After removing the paper, make sure there are no other
scraps of paper in the printer.
Press the OK button.
Page 22
22
If a Sheet Jams
1
1
2
2
1
2
Remove the jammed paper from the Paper Feed Slot .
Remove the jammed paper from the Output Tray .
Clear any jammed paper near the Paper Feed Slot
Clear any jammed paper near the Ejection Guide
Press the OK button.
Press the OK button.
After removing the paper, make sure there are no other
scraps of paper in the printer.
After removing the paper, make sure there are no other
scraps of paper in the printer.
If paper is jammed deep in the Paper Feed Slot , remove
the roll feed unit, and then clear the paper jam.
(→"Clearing Jammed Paper (Paper Feed Slot)," User
Manual)
Remove the jammed paper from the back of the printer.
Clear any jammed paper in the back of the printer
After removing the paper, make sure there are no other
scraps of paper in the printer.
Press the OK button.
Page 23
23
If the Platen inside the Top Cover becomes dirty, it may soil the underside of paper. We recommend cleaning the
Platen after borderless printing or printing on small paper.
•
If the Ejection Guide is dirty, it may soil the edge of the paper when the paper is cut. We recommend cleaning the
Ejection Guide even if it does not appear dirty, because it may actually be covered with paper dust.
•
If the Tab Selection screen is not displayed, press the Menu button.•
1
2
3
4
5
Clean inside the Top Cover about once a month to maintain better printing quality and help prevent problems.
Also clean inside the Top Cover in the following situations to ensure optimal operation.
On the Tab Selection screen of the Control Panel , press
◄ or ► to select the Settings/Adj. tab (
).
Press the OK button.
If the printed surface or the underside of paper is dirty after printing•
After you have used up a roll•
After borderless printing•
After printing on small paper•
If you have replaced the roll•
After printing on paper that generates a lot of cutting debris•
After printing on paper that generates a lot of paper dust•
If the message Blue platen switch is dirty. is displayed•
If Paper is Soiled
Clean inside the top cover of the printer as follows.
The Set./Adj. Menu is displayed.
Press ▲ or ▼ to select Maintenance , and then press the
OK button.
Press ▲ or ▼ to select Clean Platen , and then press the
OK button.
A message on the Display Screen requests you to open
the Top Cover .
Open the Top Cover .
㪏㪇㩼
Remaining Amount
Maint. cart.
Ready
OK:Setting/Adj. Menu
Page 24
24
If Paper is Soiled
If the Cleaning Brush is dirty, rinse it in water.•
Do not use a dry cloth to wipe inside the Top Cover . This may create a static charge, which may attract
dust and affect the printing quality.
•
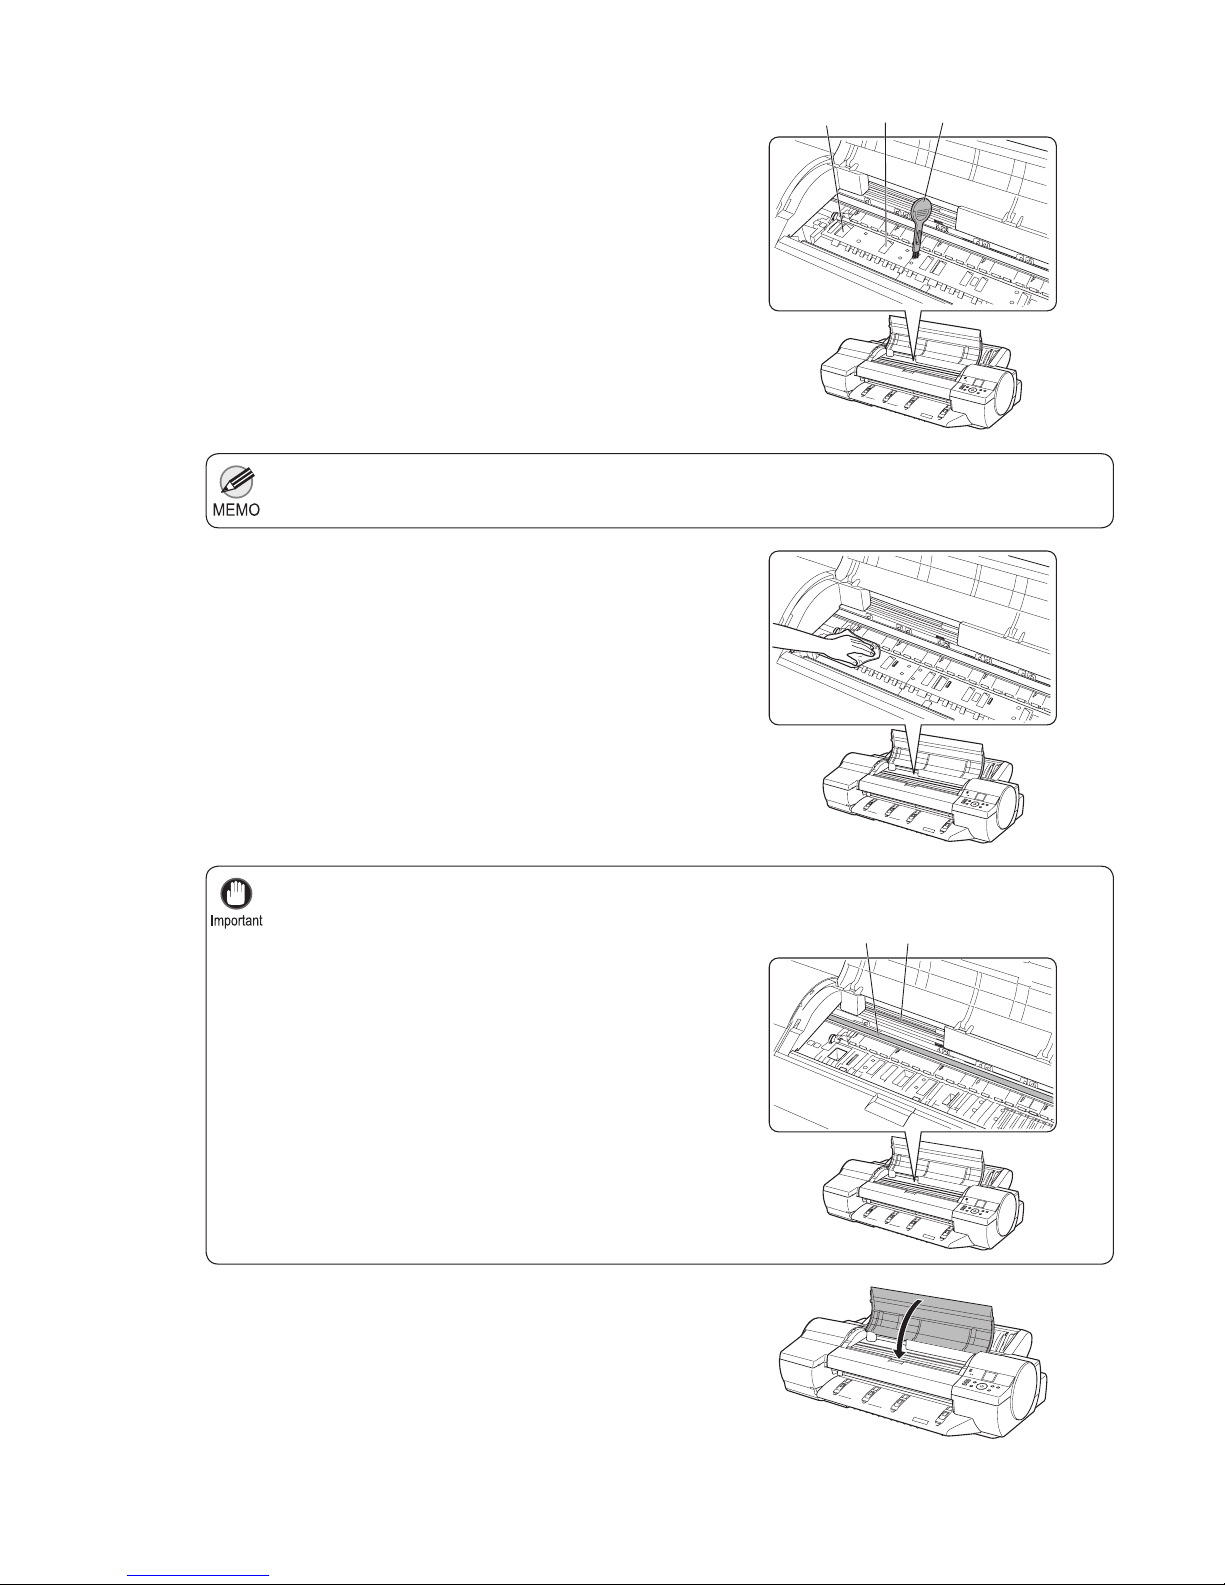
Do not touch the Linear Scale (a) or Carriage Shaft (b).
This may stain your hands and damage the printer.
•
6
7
8
If paper dust has accumulated in the Vacuum holes (a)
on the Platen or in the Borderless Printing Ink Grooves
(b), use the Cleaning Brush (c), provided with the printer,
to wipe it away.
Using a damp cloth that you have wrung out completely,
wipe inside the Top Cover to clean it. Wipe away any ink
residue on the Platen as a whole, on the Paper Retainer ,
Borderless Printing Ink Grooves , and blue Switch .
Close the Top Cover .
a
c
b
a
b
Page 25
25
Nozzles are periodically checked to ensure they are clear. Confi gure the setting for the checking interval on the
Control Panel menu in Nozzle Check .
•
(→
, Menu Map)
If printing does not improve after Head Cleaning B , try repeating Head Cleaning B once or twice. If this still does
not improve printing, the Printhead may have reached the end of its useful life. Contact your Canon dealer for
assistance.
•
Do not remove the Maintenance Cartridge or ink tanks during either Head Cleaning A or Head Cleaning B .•
If the Tab Selection screen is not displayed, press the Menu button.•
1
2
3
6
4
5
If printing is faint, cleaning the Printhead may improve results.
Choose one of two types of Printhead cleaning ( Head Cleaning A or Head Cleaning B ), depending on the problem
to resolve.
On the Tab Selection screen of the Control Panel , press
◄ or ► to select the Settings/Adj. tab (
).
Press the OK button.
Press ▲ or ▼ to select Maintenance , and then press the
OK button.
Print a test pattern to check the nozzles, and determine
whether cleaning has cleared the nozzles.
(→"Checking for Nozzle Clogging," User Manual)
If Printing is Faint
Clean the printhead as follows.
Head Cleaning A •
Use this mode if printing is faint or contains foreign substances. This method of cleaning consumes the least
amount of ink. It takes about six minutes to complete.
Head Cleaning B •
Use this mode if no ink is ejected at all, or if Head Cleaning A does not solve the problem. It takes about seven
minutes to complete.
The Set./Adj. Menu is displayed.
Press ▲ or ▼ to select Head Cleaning , and then press
the OK button.
Press ▲ or ▼ to select Head Cleaning A or Head
Cleaning B , and then press the OK button.
Head cleaning is now executed.
㪏㪇㩼
Remaining Amount
Maint. cart.
Ready
OK:Setting/Adj. Menu
Page 26
26
When printing on special paper, or if printing is not improved after Auto(Advanced) , try Manual .•
Always make sure the loaded paper matches the type of paper specifi ed on the printer. Adjustment cannot be
completed correctly unless the loaded paper matches the settings.
•
This function is not available with CAD Tracing Paper or CAD Translucent Matte Film .•
If adjustment is not possible as expected using highly transparent fi lm or similar media, try another type of paper, or
try Manual adjustment.
(→"Manual Adjustment to Straighten Lines and Colors (Head Posi. Adj.)," User Manual)
(→"Manual Adjustment to Straighten Lines and Colors (Head Posi. Adj.)," User Manual)
Use Auto(Standard) if you have switched to another type of paper or if you want the boundaries between colors to
appear as clear as possible.
•
Use Auto(Advanced) to fi ne-tune the space between nozzles or colors if you have switched the printhead or if
clearer printing is required. We recommend Auto(Advanced) for printing at the highest level of quality.
•
We recommend using the type of paper you use most often for adjustment.•
Auto(Expansion) may be unavailable in some cases, even if it is displayed in the menu.•
If so, execute Auto(Advanced) once.
If vertical lines in printed documents are warped or colors are out of alignment, execute Head Posi. Adj. . The
printer will print and read a test pattern, and the Printhead position will be adjusted automatically.
If Vertical Lines are Warped or Colors
are Misaligned
This section describes how to perform automatic adjustment of the printhead to
straighten lines and colors.
There are three modes for automatic Printhead adjustment: Auto(Standard) , Auto(Advanced) and
Auto(Expansion) .
Auto(Standard) •
Fixes slight distortion and color misalignment.
Auto(Advanced) •
Try adjustment in this mode if Auto(Standard) does not improve printing.
Auto(Expansion) •
Try adjustment in this mode if vertical lines are warped or colors are out of alignment when the printer driver
option High-Precision Photographs or High-Precision Text and Fine Lines is selected.
Items to Prepare
Rolls•
An unused roll at least 10 inches wide
Sheets•
Auto(Standard) : Two sheets of unused paper, A4/Letter size
Auto(Advanced) : Ten sheets of unused paper, A4/Letter size (or fi ve sheets when using A2)
Auto(Expansion) : Seven sheets of unused paper, A4/Letter size (or four sheets when using A2)
Page 27
27
If Vertical Lines are Warped or Colors are Misaligned
If the Tab Selection screen is not displayed, press the Menu button.•
1
2
3
4
5
7
6
Load paper.
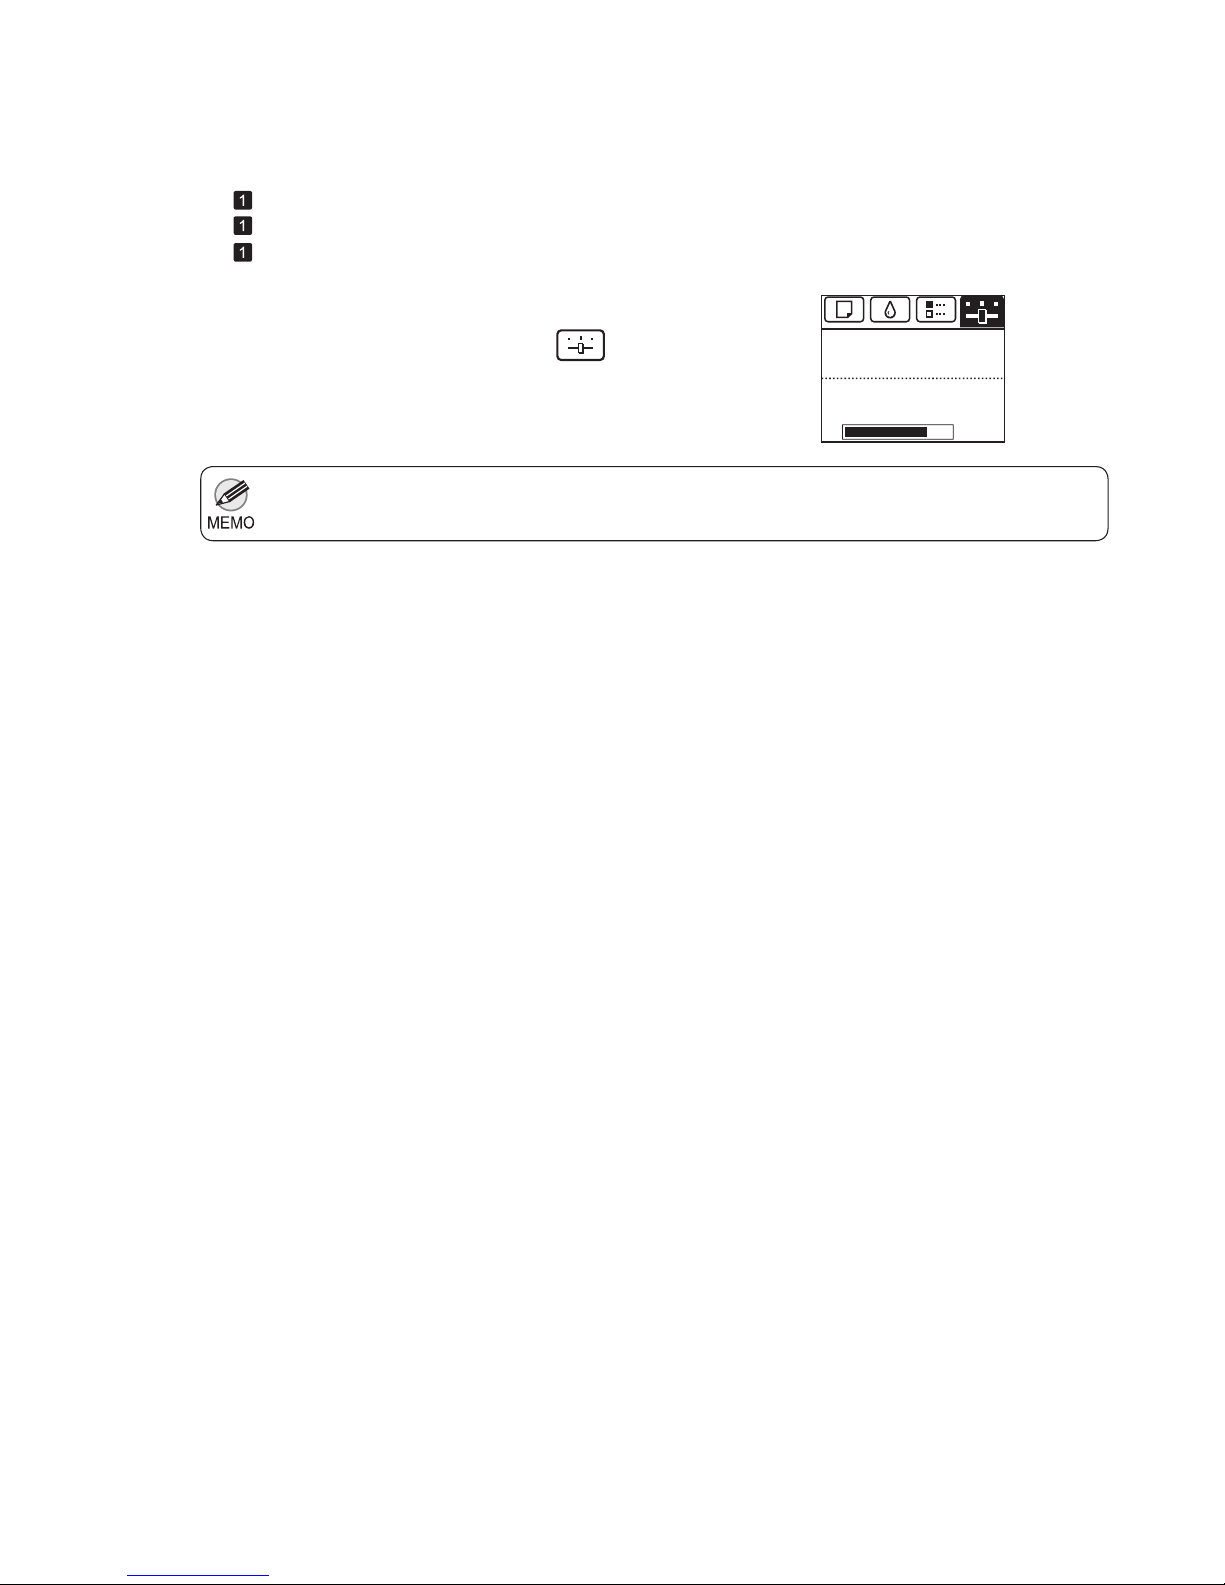
On the Tab Selection screen of the Control Panel , press
◄ or ► to select the Settings/Adj. tab (
).
Press the OK button.
Press ▲ or ▼ to select Adjust Printer , and then press
the OK button.
Press ▲ or ▼ to select Head Posi. Adj. , and then press
the OK button.
A test pattern is printed for adjustment.
Adjustment is now fi nished if you have printed on a roll.
If you are printing on sheets, a confi rmation message is
displayed requesting you to continue printing. Press the
OK button and follow the instructions displayed.
Perform adjustment as follows.
(→
, Loading Rolls on the Roll Holder)
(→
, Loading Rolls in the Printer)
(→
, Loading Sheets in the Printer)
The Set./Adj. Menu is displayed.
Press ▲ or ▼ to select Auto(Standard) ,
Auto(Advanced) , or Auto(Expansion) , and then press
the OK button.
㪏㪇㩼
Remaining Amount
Maint. cart.
Ready
OK:Setting/Adj. Menu
Page 28
28
Always check the Adj. Priority values before using Auto(GenuinePpr) or Auto(OtherPaper) .•
Adjustment is not possible with Auto(GenuinePpr) and Auto(OtherPaper) when using highly transparent media.•
If additional fi ne-tuning is necessary after Auto(GenuinePpr) and Auto(OtherPaper) , execute Adj. Fine Feed .•
This may take some time, depending on the type of paper.•
Use paper of the same type and size for adjustment as you will use for printing.•
Always make sure the loaded paper matches the type of paper specifi ed in the settings. Adjustment
cannot be completed correctly unless the loaded paper matches the settings.
•
Use Adjust Length to ensure that lines in CAD drawings are printed at exactly the right length.•
(→"Selecting a Feed Amount Adjustment Method (Feed Priority)," User Manual)
In this case, use Manual adjustment.
(→"Fine-Tuning the Paper Feed Amount (Adj. Fine Feed)," User Manual)
(→
, If Line Length Does Not Match)
(→"Manual Banding Adjustment (Adj. Quality)," User Manual)
1
Perform adjustment as follows.
If printed images are affected by banding in different colors across the sheet, execute Adj. Quality for automatic
adjustment of the paper feed amount.
There are two modes of automatic adjustment to correct banding: Auto(GenuinePpr) and Auto(OtherPaper) . In
either mode, the printer prints and reads a test pattern for automatic adjustment of the feed amount.
Items to Prepare
Rolls•
An unused roll at least 10 inches wide
Sheets•
Auto(GenuinePpr) : One sheet of unused paper, A4/Letter size
Auto(OtherPaper) : Two sheets of unused paper, A4/Letter size (or one sheet when using A2)
If Banding Occurs
This topic describes how to adjust the feed amount automatically.
Load paper.
(→
, Loading Rolls on the Roll Holder)
(→
, Loading Rolls in the Printer)
(→
, Loading Sheets in the Printer)
Use this mode with paper identifi ed in the Paper Reference Guide . (→
, Types of Manuals)
Use this mode with paper not in the Paper Reference Guide , or if Auto(GenuinePpr) does not eliminate
banding.
Auto(GenuinePpr) •
Auto(OtherPaper) •
Page 29

29
If Banding Occurs
If the Tab Selection screen is not displayed, press the Menu button.•
2
3
4
5
7
8
6
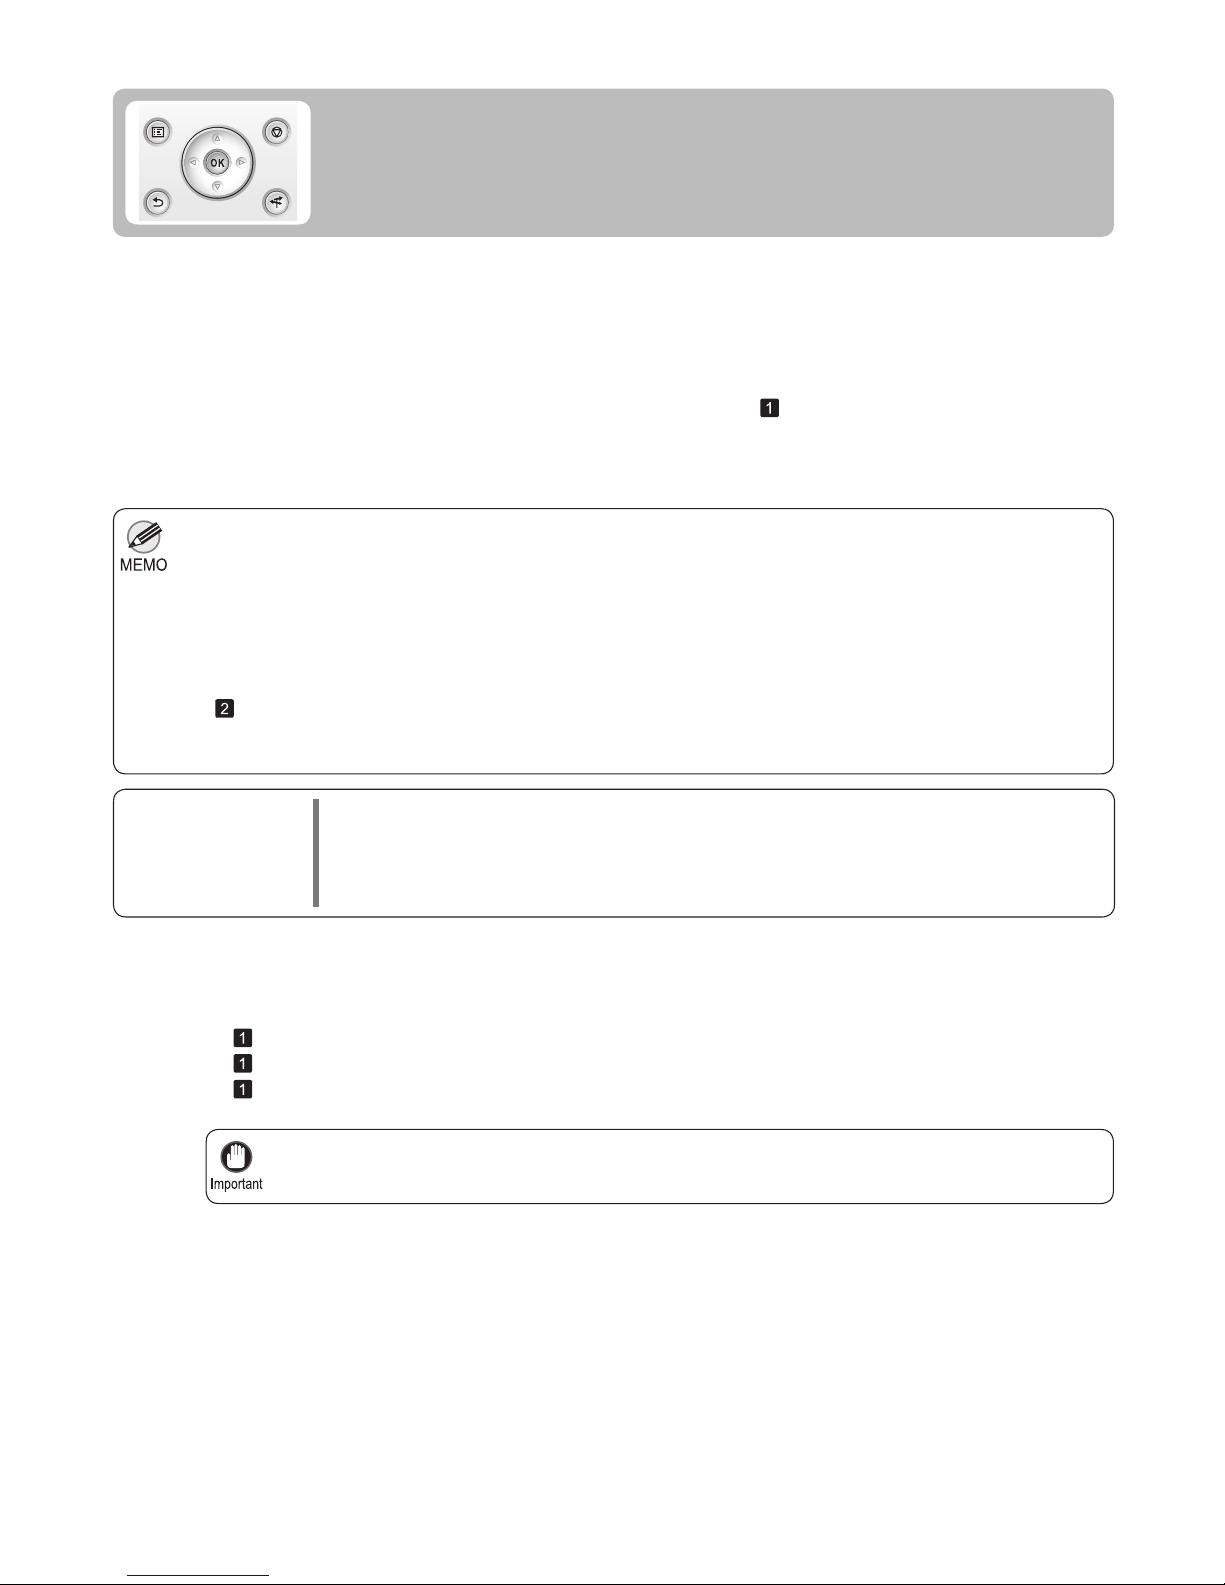
On the Tab Selection screen of the Control Panel , press
◄ or ► to select the Settings/Adj. tab (
).
Press the OK button.
Press ▲ or ▼ to select Adjust Printer , and then press
the OK button.
Press ▲ or ▼ to select Feed Priority , and then press the
OK button.
Press ▲ or ▼ to select Auto(GenuinePpr) or
Auto(OtherPaper) , and then press the OK button.
A test pattern is printed for adjustment.
Adjustment is now fi nished if you have printed on a roll or
a sheet of A2 size or larger.
If you are printing on sheets smaller than A2 size for
Auto(OtherPaper) , a confi rmation message is shown on
the Display Screen requesting you to continue printing.
The Set./Adj. Menu is displayed.
Press ▲ or ▼ to select Adj. Quality , and then press the
OK button.
Press the OK button and follow the instructions on the
Display Screen .
㪏㪇㩼
Remaining Amount
Maint. cart.
Ready
OK:Setting/Adj. Menu
Page 30
30
Use paper of the same type and size for adjustment as you will use for printing.•
Always make sure the loaded paper matches the type of paper specifi ed in the settings. Adjustment
cannot be completed correctly unless the loaded paper matches the settings.
•
Always check the Adj. Priority values before using Adjust Length .•
(→"Selecting a Feed Amount Adjustment Method (Feed Priority)," User Manual)
If the Tab Selection screen is not displayed, press the Menu button.•
1
2
To ensure that lines in CAD drawings are printed at exactly the right length, use Adjust Length to adjust the
amount that paper is advanced.
Additionally, two modes are available in both AdjustmentPrint and Change Settings : A:High or B:Standard/
Draft . Choose the mode that suits your particular printing application.
B:Standard/Draft •
A:High •
Items to Prepare
Rolls•
An unused roll at least 10 inches wide
Sheets•
One sheet of unused paper of at least A4/Letter size
Perform adjustment as follows.
Load paper.
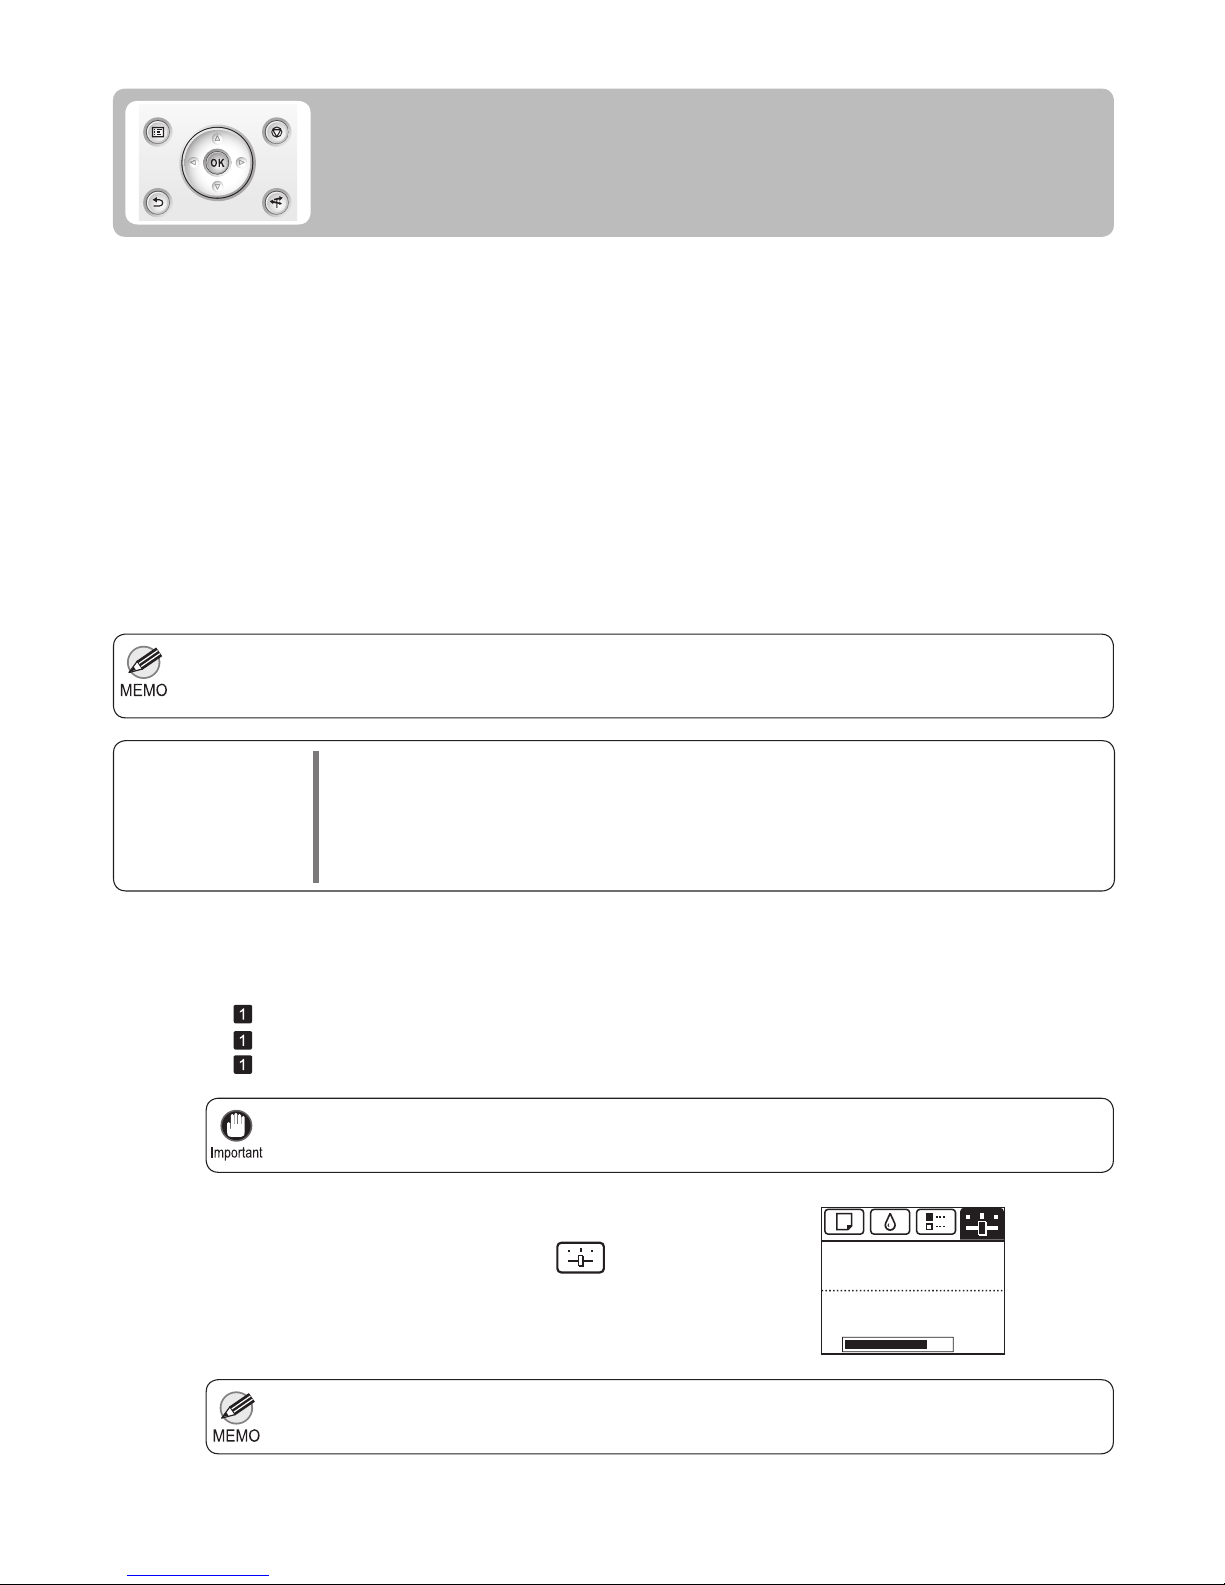
On the Tab Selection screen of the Control Panel , press
◄ or ► to select the Settings/Adj. tab (
).
If Line Length Does Not Match
Adjust the length of printed lines as follows.
(→
, Loading Rolls on the Roll Holder)
(→
, Loading Rolls in the Printer)
(→
, Loading Sheets in the Printer)
There are two options in Adjust Length : AdjustmentPrint and Change Settings .
Change Settings •
AdjustmentPrint •
High-precision ruler
High-precision ruler
After a test pattern is printed, you will measure the discrepancy based on the results of printing.
No test pattern is printed. Instead, you will measure a document already printed to determine the discrepancy.
This setting is applied when Highest or High is selected in Print Quality in the printer driver.
This setting is applied when Standard or Draft is selected in Print Quality in the printer driver.
㪏㪇㩼
Remaining Amount
Maint. cart.
Ready
OK:Setting/Adj. Menu
Page 31
31
If Line Length Does Not Match
A test pattern is printed in black when you choose A:High or in magenta if you choose B:Standard/
Draft .
•
To cancel printing the test pattern for adjustment, hold down the Stop button. When Stop printing? is
displayed, press ▲ or ▼ to select Yes , and then press the OK button.
•
4
5
6
7
8
3
Press ▲ or ▼ to select Adjust Printer , and then press
the OK button.
Press ▲ or ▼ to select Feed Priority , and then press the
OK button.
Press ▲ or ▼ to select Adjust Length , and then press
the OK button.
Press ▲ or ▼ to select AdjustmentPrint or Change
Settings , and then press the OK button.
Press ▲ or ▼ to enter the amount of discrepancy, and
then press the OK button.
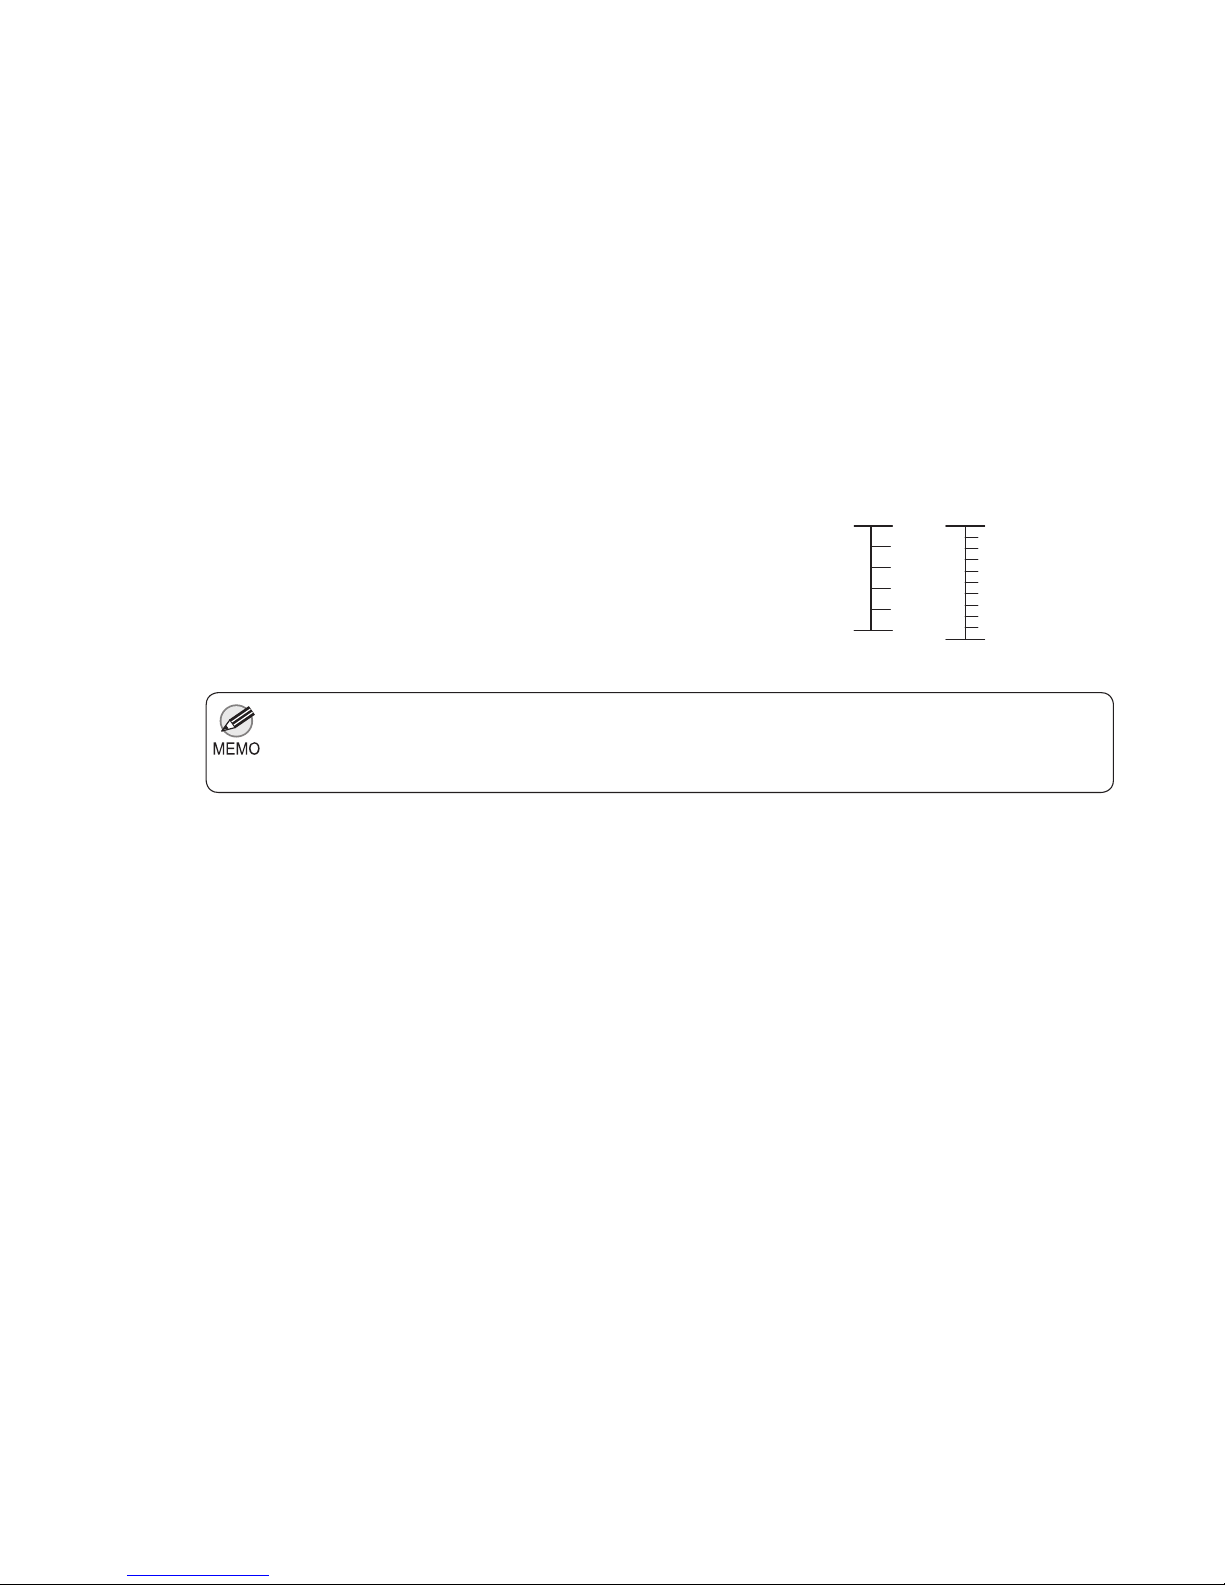
When you select AdjustmentPrint , a test pattern is
printed for you to measure the scale and calculate the
discrepancy. The scale bar shows " Millimeter " in 50 mm
increments and " Inch " in 1-inch increments.
If the scale is shorter than the actual size, use a positive
setting value. If it is longer, use a negative value.
The feed amount can be adjusted in 0.02% increments.
Press the OK button.
The Set./Adj. Menu is displayed.
Millimeter Inch
Page 32

32
Error messages
Check the message and take the appropriate action.
Before borderless printing, move the blue platen switch. •
Blue platen switch is dirty. •
Borderless printng not possible. •
Calibration There is a problem with the multi-sensor. •
Cannot adjust paper feed. •
Cannot adjust printhead. •
Cannot calibrate. •
Cannot cut paper. •
Cannot detect papr •
Cannot execute this command. Use other paper. •
Cannot feed paper. •
Cannot print as specifi ed. •
Check printed document. •
Close Ink Tank Cover •
End of paper feed. •
Excessive temperature or humidity. •
Execute printhead cleaning. •
File read error. •
GARO Wxxxx (x represents a number) •
Hard disk error. •
Hardware error. xxxxxxxx-xxxx (x represents a letter or number) •
Ink insuffi cient. •
Insuffi cient paper for job •
Mail box full. Now printing without saving data. •
Mail box nearly full. •
Maint. cart. The level is low •
Maintenance cartridge full. •
Maintenance cartridge problem. •
Manual printing is selected. •
Manual printing is selected, but a roll is loaded. •
Maximum jobs stored. •
MediaType Mismatch •
Move the blue platen switch No.xx to the right. (xx represents a number) •
Multi-sensor error •
No ink left. •
No ink tank loaded. •
No maintenance cartridge. •
No Maintenance Cartridge capacity. •
No Roll Unit. •
No x printhead (x is L, R, or not displayed) •
Not much ink is left. •
Paper loaded askew. •
Paper mismatch •
Paper not aligned with right guide. •
Paper size not detected. •
PaprWidth Mismatch •
Error Messages
Respond to error messages as follows.
Page 33

33
Error Messages
Parts replacement time has passed. •
PHeads: wrong pos. •
Prepare for parts replacement. •
Roll feed unit error. •
Roll paper is not securely in contact with roll holder. •
Roll printing is selected. •
Roll printing is selected, but manual paper is loaded. •
The mail box is full. •
The paper is too small. •
The paper is too small. •
The roll is empty. •
This paper cannot be used. •
Too many jobs for mail box. •
Unknown fi le. •
Wrong ink tank. •
Wrong maintenance cartridge. •
Wrong paper feed slot for manual paper. •
Wrong x printhead. (x is L, R, or not displayed) •
x printhead error (x is L, R, or not displayed) •
Page 34
34
Error Messages
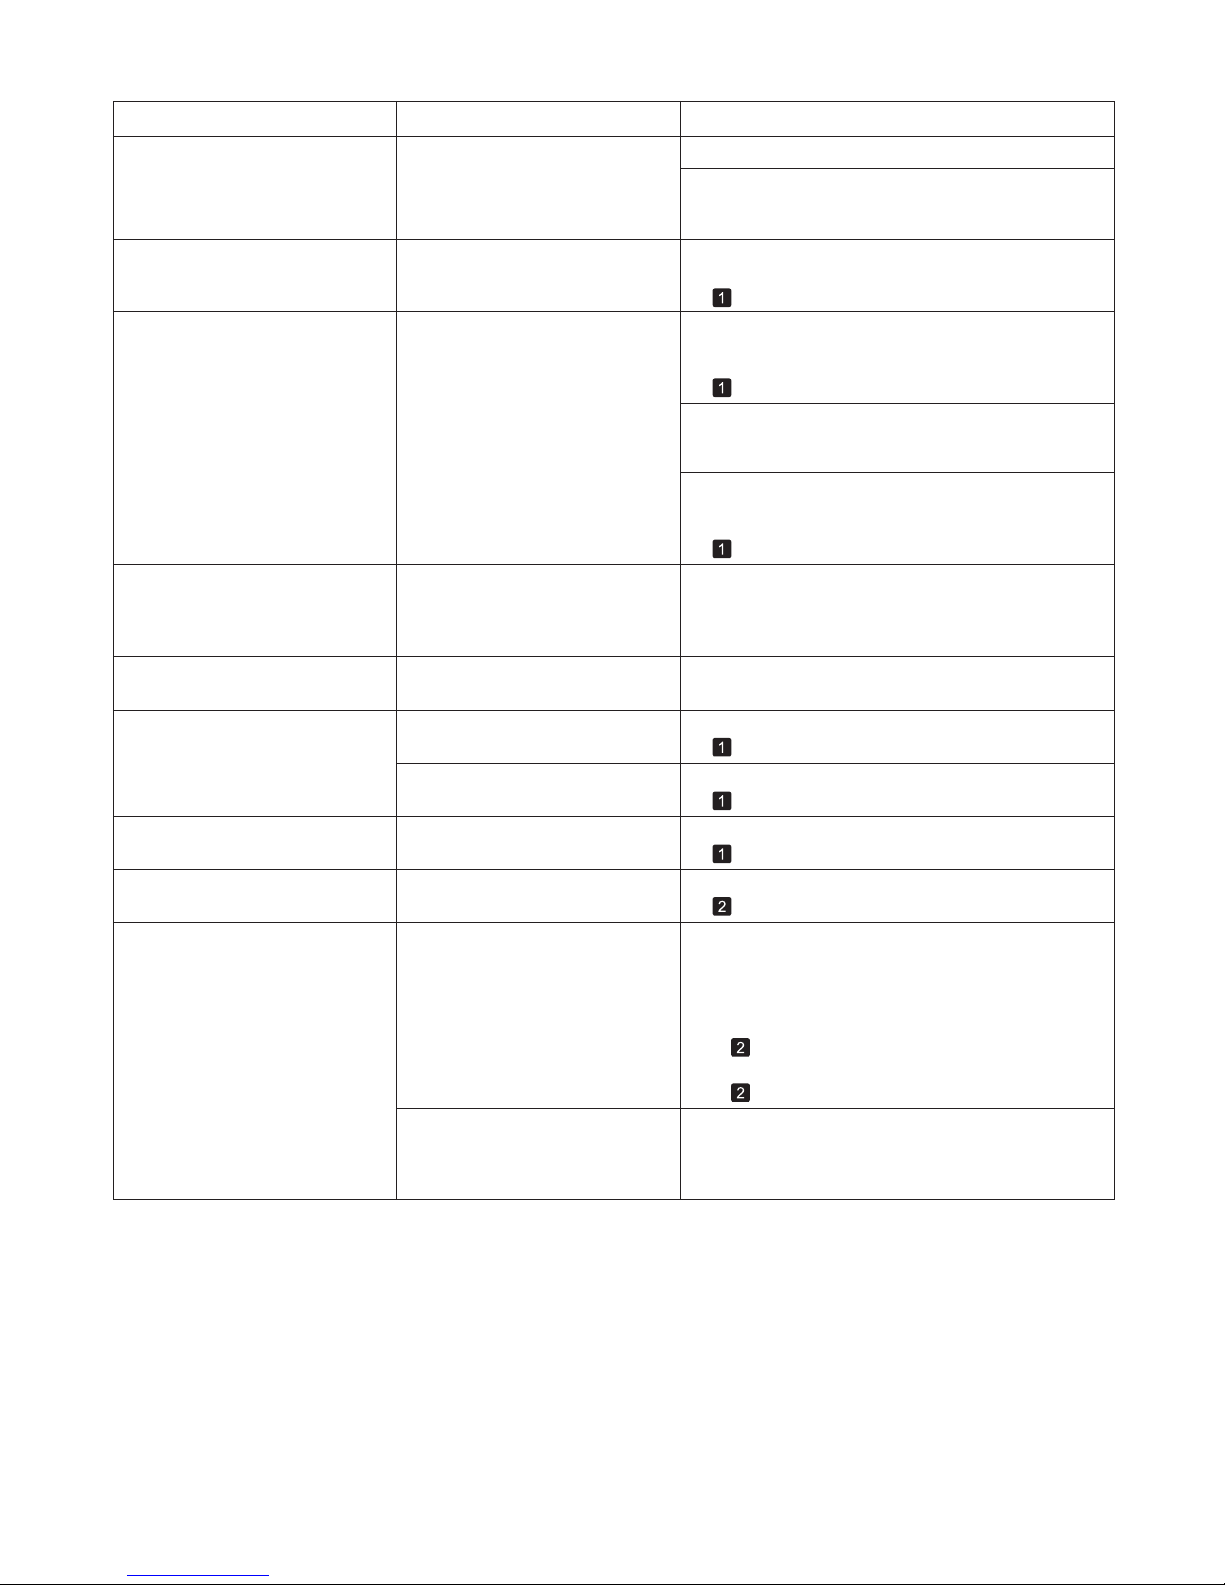
Error Message Cause Corrective Action
GARO Wxxxx (x represents a
number)
There is a problem with the print
job.
Try printing again, using the correct printer driver.
It is also possible to continue printing in this state.
However, you may not be able to obtain the desired
printing results.
No ink left. There is no ink left. Open the Ink Tank Cover and replace the Ink Tank for
which the Ink Lamp is flashing.
Ink insufficient. The ink level is low, so you cannot
print, clean the Printhead , or do
other operations that require ink.
Press ▲ or ▼ to select Rep. Ink Tank , and then
press the OK button. Replace the Ink Tank that is low
with a new Ink Tank .
Not much ink is left. Not much ink is left. Prepare a new Ink Tank .
We recommend replacing the Ink Tank with a new Ink
Ta nk at this point if you plan to print large-format or
high-quantity jobs.
Close Ink Tank Cover The Ink Tank Cover is open. Close the Ink Tank Cover .
Wrong ink tank. The Ink Tank in the printer is
incompatible.
Load an Ink Tank specified for use with the printer.
No ink tank loaded. There is no Ink Tank in the printer. Load or reload the Ink Tank .
(→
, Replacing Ink Tanks)
(→
, Replacing Ink Tanks)
(→
, Replacing Ink Tanks)
Check printed document. The Printhead nozzles are
becoming clogged.
If printing is faint, clean the Printhead .
(→ , If Printing is Faint)
The buzzer will stop once the error is cleared.
(→ , Replacing Ink Tanks)
Cannot adjust paper feed. The Printhead nozzles are
clogged.
Execute Adj. Quality again, as follows.
Press the OK button to clear the error.
Print a test pattern to check the nozzles.
Clean the Printhead if the nozzles are clogged.
2.
3.
1.
(→"Checking for Nozzle Clogging," User Manual)
(→ , If Printing is Faint)
Highly transparent film is loaded
that cannot be used for automatic
feed amount adjustment.
Press the OK button to clear the error, and then adjust
the feed amount manually.
Execute Adj. Quality again.4.
(→ , If Banding Occurs)
(→"Manual Banding Adjustment (Adj. Quality)," User
Manual)
There is a problem with the Ink
Ta nk .
Replace it with a new Ink Tank .
(→
, Replacing Ink Tanks)
Press ▲ or ▼ to select Continue to print , and then
press the OK button to resume printing. However,
note that this error may affect the printing quality.
If the printer is in Standby mode, press the OK button
and replace the Ink Tank that is low with a new Ink
Ta nk .
(→
, Replacing Ink Tanks)
Page 35
35
Error Messages
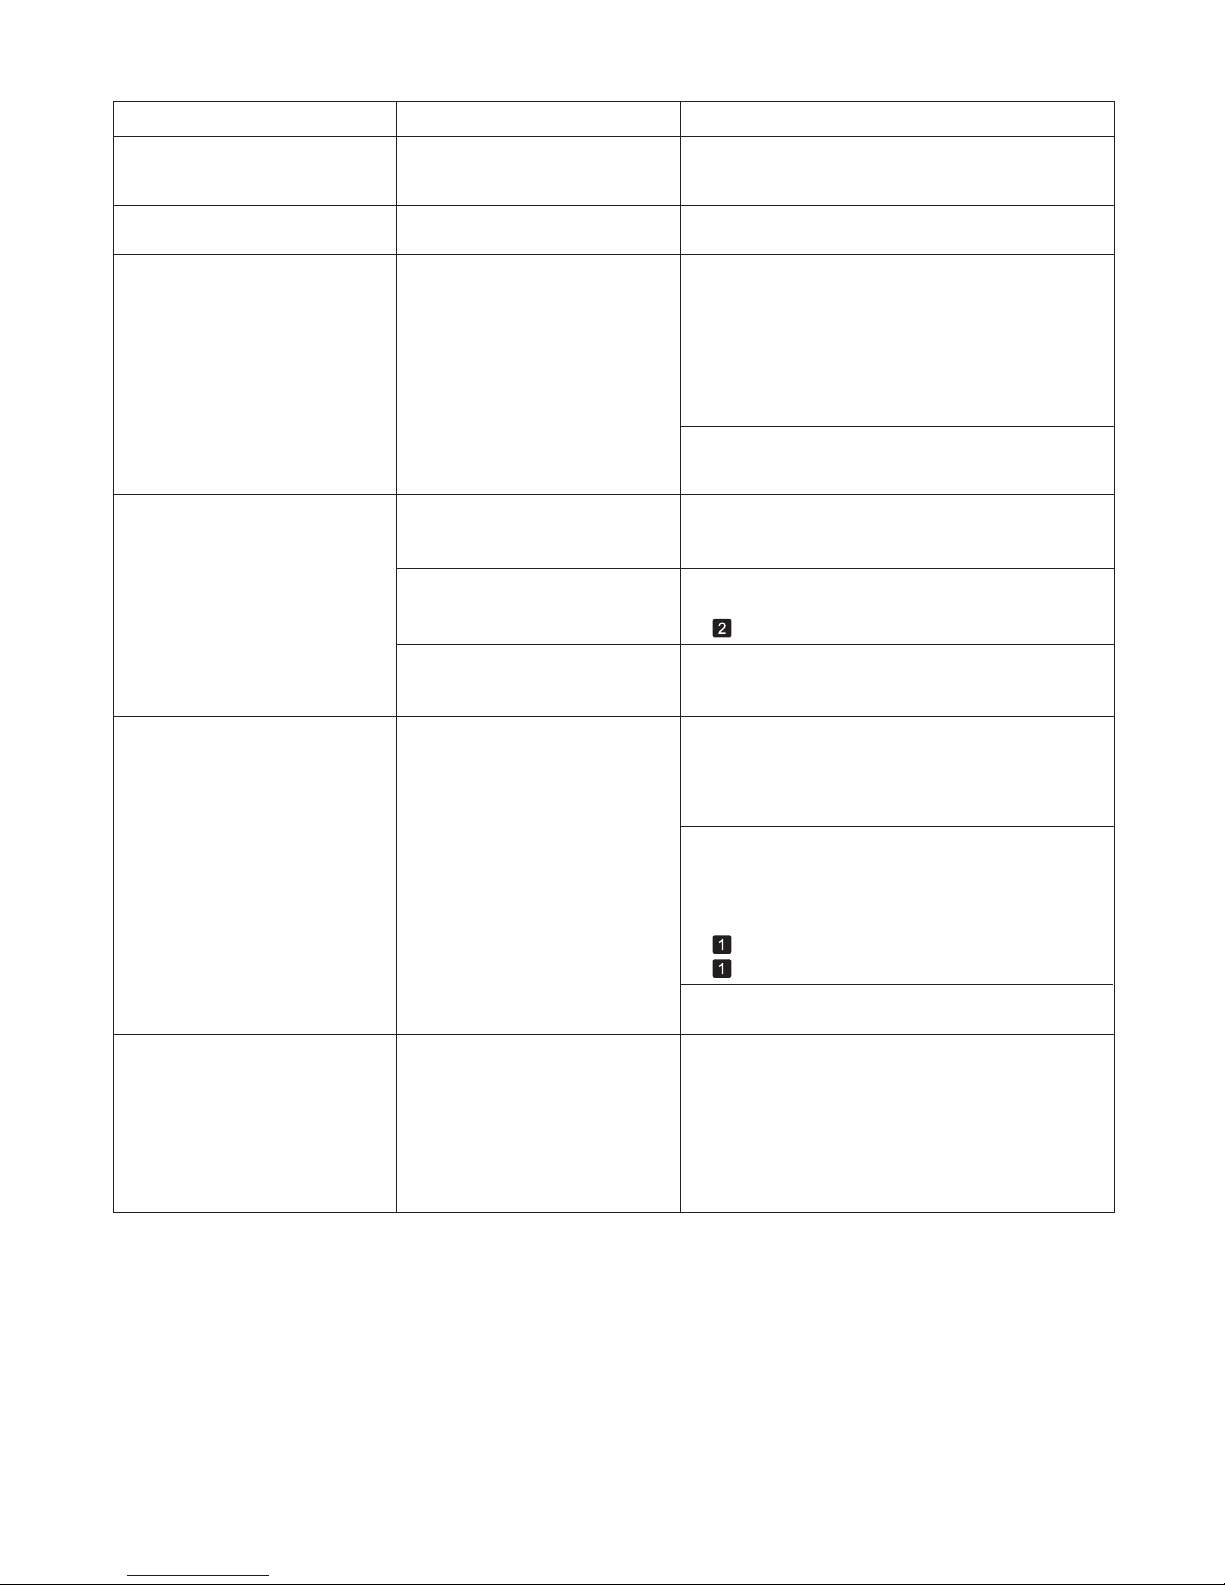
Excessive temperature or
humidity.
The temperature or humidity where
the printer is installed is out of the
acceptable range for operation.
Press ▲ or ▼ to select Stop , and then press the OK
button to stop printing.
Press ▲ or ▼ to select Continue , and then press the
OK button to continue with color calibration. However,
note that correct adjustment may not be possible.
Calibration There is a problem
with the multi-sensor.
The performance of a sensor
inside the printer may be impaired.
Press the OK button and cancel calibration. Contact
your Canon dealer for assistance.
Use the printer under suitable environmental
conditions. Also note that various environmental
conditions are recommended for various types of
paper. For details on the recommended environmental
conditions, see the Paper Reference Guide .
Error Message Cause Corrective Action
Cannot calibrate. The paper for printing a test
pattern is soiled. Otherwise, you
have loaded colored paper.
Press the OK button to clear the error.
Load unused paper compatible with color calibration.
End of paper feed. You are pressing the ▲ button on
the Control Panel and trying to
rewind the roll to the edge.
Release the ▲ button.
(→"Types of Paper," User Manual)
(→"Types of Paper," User Manual)
The test pattern was printed too
faintly.
Press the OK button to clear the error.
Direct sunlight or strong lighting
may be shining on the printer and
causing the sensor to malfunction.
Press the OK button to clear the error.
Take steps to remedy faint printing.
(→
, Troubleshooting)
Take steps to ensure the printer is not used when
exposed to direct sunlight or strong lighting.
Cannot execute this command.
Use other paper.
Paper compatible with color
calibration is not loaded.
Insufficient paper for job The printer has received
a print job longer than the
amount of roll paper left when
ManageRemainRoll in the
Control Panel menu is On .
Press ▲ or ▼ to select Print , and then press the OK
button to resume printing.
However, the roll paper may run out during the
print job and you may not be able to print all of the
document.
Press ▲ or ▼ to select Change Paper , and then
press the OK button to stop printing.
Either change the printer driver Paper Source setting
or replace the paper with paper long enough for the
print job, and then try printing again.
(→
, Removing the Roll from the Printer)
(→ , Loading Rolls in the Printer)
Press the OK button to clear the error.
Load paper that is compatible with color calibration.
See the Paper Reference Guide .
(→"Types of Paper," User Manual)
Always make sure the loaded paper matches the
type of paper in the printer paper settings. Adjustment
cannot be completed correctly unless the loaded
paper matches the settings.
1.
2.
Press ▲ or ▼ and select Stop Printing or press the
Stop button to stop printing.
Page 36
36
Error Messages
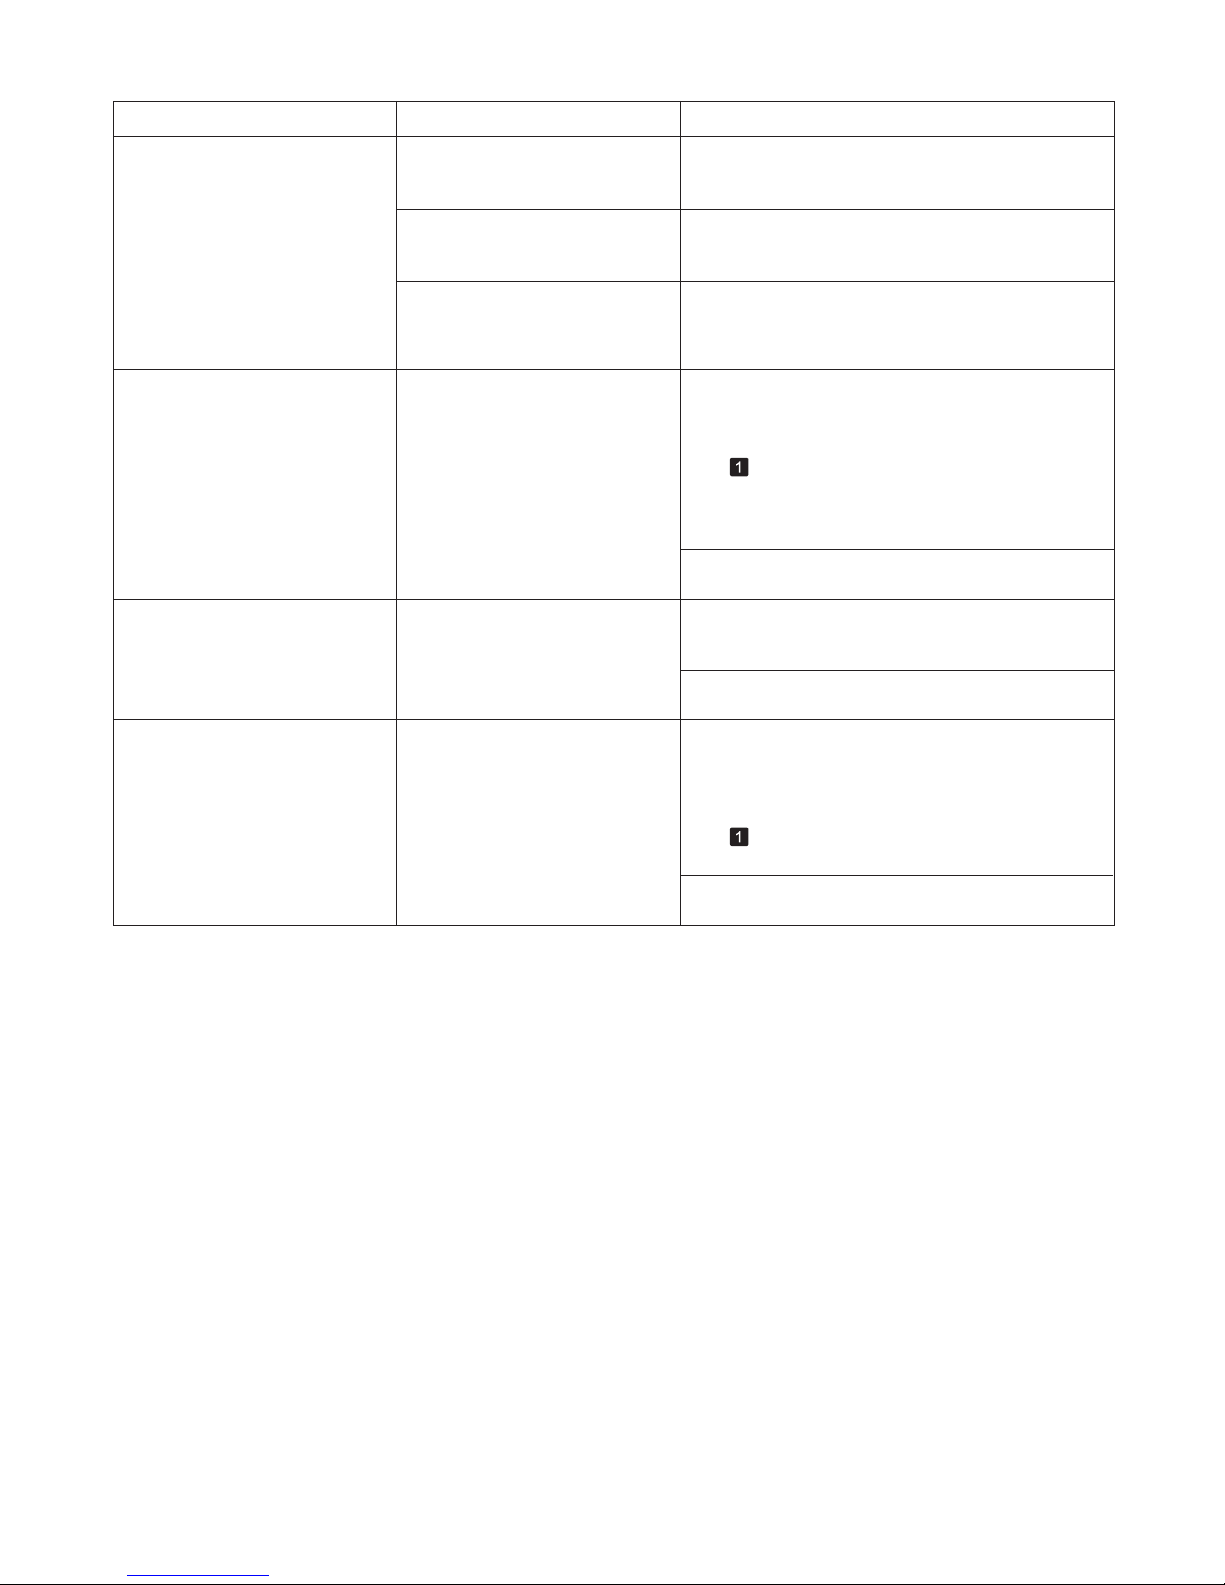
Error Message Cause Corrective Action
This paper cannot be used. Paper that is too large for the
printer has been loaded.
Press the OK button and load paper of the correct
size.
Paper that is too small for the
printer has been loaded.
Press the OK button and load paper of the correct
size.
Paper has been loaded that is too
small to print the test pattern for
printhead adjustment or nozzle
checking.
Press the OK button and load unused paper A4/Letter
(vertical) or larger. More than one sheet may be
required depending on the adjustment.
(→"Paper Sizes," User Manual)
(→"Paper Sizes," User Manual)
Manual printing is selected, but
a roll is loaded.
A print job for printing on sheets
was sent when a roll is loaded.
Press ▲ or ▼ to select Remove Roll Paper , and
then press the OK button to stop printing.
1.
After removing the roll, load and print on a sheet of
the type and size of paper you have specified in the
printer driver.
2.
(→
, Removing the Roll from the Printer)
(→"Loading and Printing on Sheets," User Manual)
Manual printing is selected. You have attempted to print on a
sheet, but no sheet is loaded.
Press ▲ or ▼ to select Load Paper , and then press
the OK button. Load a sheet, and then print.
Press ▲ or ▼ and select Stop Printing or press the
Stop button to stop printing.
(→"Loading and Printing on Sheets," User Manual)
Cannot print as specified. The loaded paper is too small.
Replace the paper with paper of A4/Letter (vertical)
size or larger as follows.
Press ▲ or ▼ to select Stop Printing , and then press
the OK button to stop printing.
Press ▲ or ▼ to select Change Paper , press the
OK button, and remove the paper.
1.
Switch to paper A4/Letter (vertical) or larger.2.
(→
, Removing Sheets)
(→"Loading and Printing on Sheets," User Manual)
The printer will resume printing.
Press ▲ or ▼ to select Stop Printing , and then press
the OK button to stop printing.
(When you are attempting to print
a test print sheet or other printer
status information.)
Page 37
37
Error Messages
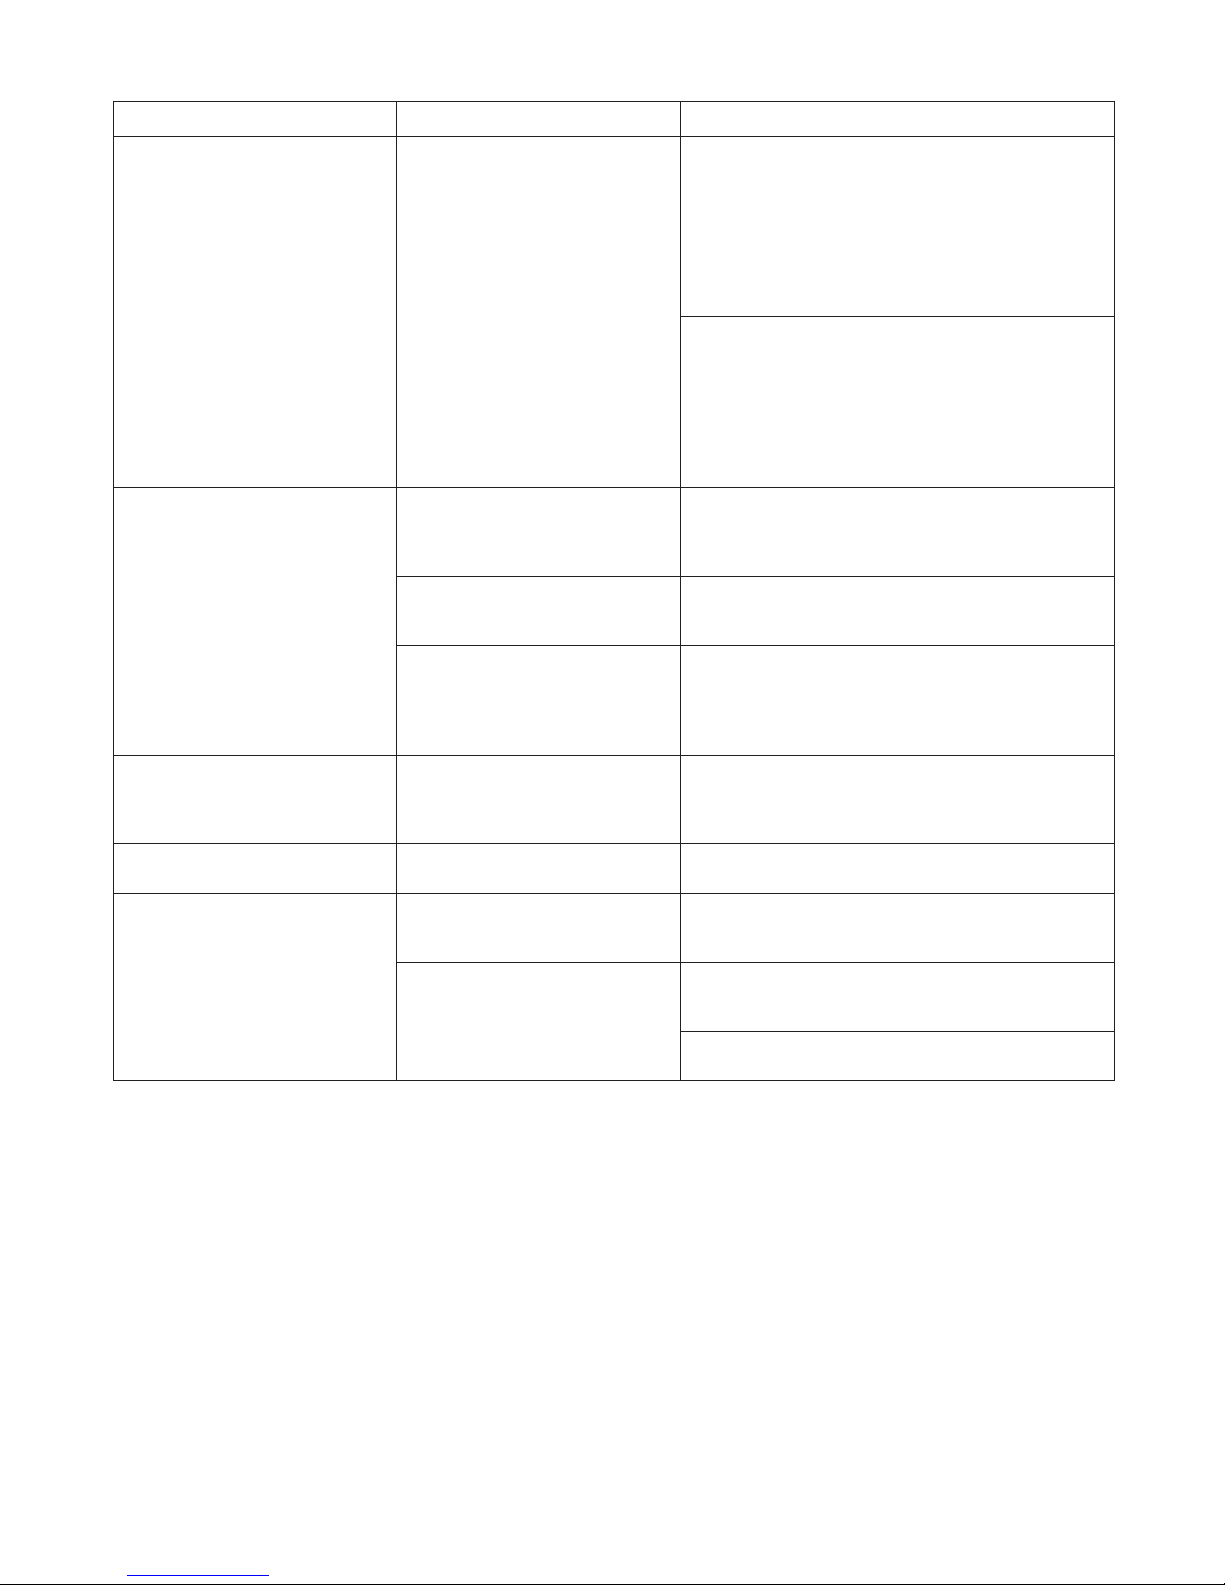
Error Message Cause Corrective Action
Hardware error. xxxxxxxx-xxxx
(x represents a letter or number)
The last portion of roll paper was
used during a print job. The paper
was not advanced because the
trailing edge is taped to the roll.
Turn off the printer and remove the roll from the printer
before restoring power.
Fastening tape or the Belt
Stopper has not been removed
inside the Top Cover .
Turn off the printer, open the Top Cover and remove
the tape or the Belt Stopper before restoring power.
An error requiring service may
have occurred.
Turn off the printer and wait at least three seconds
before restoring the power.
Hard disk error. The format of the printer's hard
disk is invalid.
Press the OK button to start reformatting the hard
disk. When formatting is finished, data on the printer
hard disk is erased and the printer automatically
restarts.
If the message is displayed again, write down the
error code and message, turn off the printer, and
contact your Canon dealer for assistance.
File read error. Files on the printer's hard disk
have become corrupted.
Restart the printer. Only the corrupted files will be
deleted, and the printer will restart.
Unknown file. Data sent to keep the printer up to
date (such as paper information) is
in the wrong format.
Check the data. Turn off the printer and wait a while
before restoring power, and then resend the data.
You have uploaded firmware for a
different model.
Check the firmware version. Turn off the printer and
wait a while before restoring power, and then resend
the firmware.
If the message is displayed again, contact your Canon
dealer for assistance.
Wrong paper feed slot for
manual paper.
The Paper Feed Slot used to
load the sheet is different from
the Paper Feed Slot specified in
Paper Source in the printer driver.
Load the sheet in the Paper Feed Slot matching the
printer driver Paper Source setting as follows.
Change the printer driver Paper Source setting to
match the Paper Feed Slot where the sheet is loaded
as follows.
Press ▲ or ▼ to select Eject Paper , and then
press the OK button to stop printing.
1.
Load the paper in the Paper Feed Slot specified in
the printer driver.
2.
Press ▲ or ▼ to select Stop Printing
, and then
press the OK button to stop printing.
1.
In the printer driver, change the Paper Source
setting to match the Paper Feed Slot where the
sheet is loaded, and then resend the print job.
2.
The sheet is now ejected.
The printer will resume printing.
Page 38
38
Error Messages
Error Message Cause Corrective Action
The print job received specifies
a type or width of paper that is
not compatible with borderless
printing.
Follow these steps to change the settings of the print
job to enable borderless printing.
Borderless printng not possible.
Press ▲ or ▼ to select Stop Printing , and then
press the OK button to stop printing.
1.
Make sure the correct printer driver for the printer is
selected and try printing again.
2.
For information on types of paper compatible with
borderless printing, refer to the Paper Reference
Guide .
Select None when you have set Detect Mismatch on
the control panel to Warning .
Press ▲ or ▼ to select Print With Border , and
then press the OK button to continue printing. The
document will be printed with a border.
Press ▲ or ▼ to select Stop Printing , and then press
the OK button to stop printing.
(→"Types of Paper," User Manual)
The loaded paper is a size not
compatible with borderless
printing.
Replace the paper with paper compatible for
borderless printing as follows.
Press ▲ or ▼ to select Print With Border , and
then press the OK button to continue printing. The
document will be printed with a border.
Press ▲ or ▼ to select Change Paper , and then
press the OK button to remove the roll.
1.
Replace the paper with paper compatible for
borderless printing.
2.
(→
, Removing the Roll from the Printer)
(→"Removing Rolls from the Roll Holder," User
Manual)
(→
, Loading Rolls on the Roll Holder)
(→
, Loading Rolls in the Printer)
The printer now starts printing the print job.
For information on types of paper compatible with
borderless printing, refer to the Paper Reference
Guide .
(→"Types of Paper," User Manual)
However, note that this error may cause paper jams
and affect the printing quality.
Because paper expands or
contracts depending on the
environment of use, it may
become narrower or wider than
the supported width for borderless
printing.
Press the OK button to stop printing.
Use each type of paper only where the recommended
environmental conditions are met. For details on
environmental conditions for various paper, see the
Paper Reference Guide .
(→"Types of Paper," User Manual)
Select None when you have set Detect Mismatch in
the Control Panel menu to Warning .
However, note that this error may affect the printing
quality.
Page 39
39
Error Messages
Borderless printng not possible.
Error Message Cause Corrective Action
Prepare for parts replacement. It is almost time to replace
consumables for which service is
required.
You can continue to use the printer for some time
until Parts replacement time has passed. will be
displayed.
Contact your Canon dealer for assistance.
Parts replacement time has
passed.
It is past the recommended time
to replace consumables for which
service is required.
Contact your Canon dealer for assistance.
No x printhead (x is L, R, or not
displayed)
No Printhead is installed. Install the Printhead L if " Printhead L " is displayed
and the Printhead R if " Printhead R " is displayed. If
neither left or right is indicated, install both Printhead
L and Printhead R .
(→ , Replacing the Printhead)
Before borderless printing,
move the blue platen switch.
The blue Switch on the platen was
set to the side opposite ● when a
borderless print job was received.
Blue platen switch is dirty. The blue Switch on the platen is
dirty.
Before borderless printing, set the blue Switch on the
platen to the ● side.
(→"Setting the Blue Switch on the Platen," User
Manual)
Open the Top Cover and clean the blue Switch on
the platen.
(→
, If Paper is Soiled)
Select None when you have set Detect Mismatch in
the Control Panel menu to Warning .
The paper is loaded askew. Press ▲ or ▼ to select Change Paper and straighten
the paper so that the edges are between the ink
grooves for borderless printing.
Insert the roll firmly until it touches the flange of the
Roll Holder . For borderless printing on A1 (594 mm
or 23.4 in) or A2 (420 mm or 16.5 in) rolls, attach the
Spacer for Borderless Printing on the Roll Holder .
(→
, Loading Rolls on the Roll Holder)
Press ▲ or ▼ to select Print With Border , and
then press the OK button to continue printing. The
document will be printed with a border.
However, note that this error may affect the printing
quality.
Press ▲ or ▼ and select Stop Printing or press the
Stop button to stop printing.
Move the blue platen switch
No.xx to the right. (xx represents
a number)
The printer has detected that the
blue Switch on the platen needed
in maintenance during printing is
set away from the ● mark.
Set blue Switch on the platen that is identified in the
message toward the ● side.
(→"Setting the Blue Switch on the Platen," User
Manual)
Page 40
40
Error Messages
Error Message Cause Corrective Action
Execute printhead cleaning. The Printhead nozzles are
clogged.
Follow these steps to clean the Printhead .
If this message is still displayed, replace the
Printhead .
Stop printing by pressing ▲ or ▼ to select Stop
Printing .
Clean the Printhead .2.
1.
(→
, If Printing is Faint)
(→ , Replacing the Printhead)
Press ▲ or ▼ to select Print , and then press the OK
button to resume printing. However, note that this
error may affect the printing quality.
If OK is shown on the Display Screen , clean the
Printhead .
If this message is still displayed, replace the
Printhead .
Clean the Printhead .2.
(→
, If Printing is Faint)
(→
, Replacing the Printhead)
Press the OK button on the Control Panel to stop
printing.
1.
Wrong x printhead. (x is L, R, or
not displayed)
An incompatible Printhead has
been installed.
Open the Top Cover . Replace the Printhead L
with a new one if " Printhead L " is displayed and the
Printhead R if " Printhead R " is displayed. If neither
left or right is indicated, replace both Printhead L and
Printhead R with new ones.
(→
, Replacing the Printhead)
x printhead error (x is L, R, or not
displayed)
There is a problem with the
Printhead .
Follow these steps to replace the Printhead .
Open the Top Cover .1.
Replace the Printhead L with a new one if
" Printhead L " is displayed and the Printhead R if
" Printhead R " is displayed. If neither left or right is
indicated, replace both Printhead L and Printhead
R with new ones.
2.
(→ , Replacing the Printhead)
Follow these steps to replace the Printhead .
Turn off the printer, wait a while, and then turn it on
again.
1.
Replace the Printhead L with a new one if
" Printhead L " is displayed and the Printhead R if
" Printhead R " is displayed. If neither left or right is
indicated, replace both Printhead L and Printhead
R with new ones.
2.
(→
, Replacing the Printhead)
PHeads: wrong pos. The printheads are installed in the
wrong positions.
Open the Top Cover and switch the Printhead used
once in the right side to the right side. Switch the
Printhead used once in the left side to the left side.
Page 41
41
Error Messages
Error Message Cause Corrective Action
Mail box full. Now printing
without saving data.
No more space is available on the
printer's hard disk, so jobs are now
printed without saving them. (Print
jobs can no longer be saved on the
hard disk.)
After printing, this message is cleared.
Maximum jobs stored. 100 jobs are stored in the personal
box.
Delete unneeded jobs stored in personal boxes.
(→"Deleting Saved Jobs," User Manual)
The mail box is full. There is no more space on the
printer's hard disk.
Press the Stop button and stop printing.
Delete print jobs from the queue.
Delete unneeded jobs stored in personal boxes (box
numbers in the range 01–29).
(→"Managing the Job Queue (Deleting or Preempting
Other Jobs)," User Manual)
(→"Deleting Saved Jobs," User Manual)
Cannot adjust printhead. The Printhead nozzles are
clogged.
Execute Head Posi. Adj. again, as follows.
Press the OK button to clear the error.1.
Print a test pattern to check the nozzles.2.
Clean the Printhead if the nozzles are clogged.3.
Execute Head Posi. Adj. again.4.
The Printhead cannot be aligned;
highly transparent film is loaded.
Press the OK button to clear the error.
(→"Checking for Nozzle Clogging," User Manual)
(→
, If Vertical Lines are Warped or Colors are
Misaligned)
(→
, If Printing is Faint)
(→
, If Vertical Lines are Warped or Colors are
Misaligned)
We recommend using a type of paper that you often
use, other than film, for Printhead adjustment.
Delete unneeded jobs stored in personal boxes (box
numbers in the range 01–29).
(→"Deleting Saved Jobs," User Manual)
Mail box nearly full. There is less than 1 GB of free
space left for personal boxes on
the printer hard disk.
Delete unneeded jobs stored in personal boxes.
(→"Deleting Saved Jobs," User Manual)
Mail box full. Delete unwanted
data
100 jobs are stored in the personal
box.
Delete unneeded jobs stored in personal boxes.
Multi-sensor error Direct sunlight or strong lighting
may be shining on the printer and
causing the sensor to malfunction.
Take steps to ensure the printer is not used when
exposed to direct sunlight or strong lighting.
The performance of a sensor
inside the printer may be impaired.
Contact your Canon dealer for assistance.
(→"Deleting Saved Jobs," User Manual)
Page 42
42
Error Messages
Error Message Cause Corrective Action
The paper is too small. When Detect Mismatch in the
Control Panel menu is set to
Pause , paper smaller than the size
specified in the printer driver is
loaded.
Press ▲ or ▼ to select Print , and then press the OK
button to resume printing.
However, note that this error may cause paper jams
and affect the printing quality.
Adjust the paper size setting in the printer driver to
match the size loaded in the printer as follows.
Press ▲ or ▼ to select Stop Printing , and then
press the OK button to stop printing.
1.
Change the paper size setting in the printer driver to
the size loaded in the printer and try printing again.
2.
Replace the loaded paper with paper of a size that
matches the size setting in the printer driver as
follows.
Press ▲ or ▼ to select Change Paper , and then
press the OK button to stop printing.
1.
Replace the loaded paper to match the paper width
setting in the printer driver and try printing again.
2.
When Detect Mismatch in the
Control Panel menu is set to
Warning , paper smaller than the
size specified in the printer driver
is loaded.
You can continue to print, but note that this error may
cause problems in the printing results.
No maintenance cartridge. The Maintenance Cartridge is not
installed.
Install the Maintenance Cartridge .
No Maintenance Cartridge
capacity.
The Maintenance Cartridge cannot
absorb enough ink for Printhead
cleaning or other operation.
After confirming that the printer has stopped
operating, replace the Maintenance Cartridge .
Maint. cart. The level is low The Maintenance Cartridge is
almost full.
You can continue to print, but prepare a new
Maintenance Cartridge to use when the message for
replacement is displayed.
Wrong maintenance cartridge. A Maintenance Cartridge for
a different model of printer is
installed.
Replace it with the Maintenance Cartridge for your
particular model.
(→
, Replacing the Maintenance Cartridge)
(→
, Replacing the Maintenance Cartridge)
Maintenance cartridge problem. An incompatible or used
Maintenance Cartridge has been
installed.
Install an unused Maintenance Cartridge specified for
use with the printer.
Maintenance cartridge full. The Maintenance Cartridge is full. After confirming that the printer has stopped
operating, replace the Maintenance Cartridge .
(→
, Replacing the Maintenance Cartridge)
(→
, Replacing the Maintenance Cartridge)
Page 43
43
Error Messages
Error Message Cause Corrective Action
The paper is too small. The loaded paper is too small. Replace the roll with a roll 10 inches in width or larger
as follows.
Press ▲ or ▼ to select Change Paper , and then
press the OK button to remove the roll.
(→ , Removing the Roll from the Printer)
(→
, Loading Rolls on the Roll Holder)
2.1.Replace the roll with a roll 10 inches wide or larger.
The printer will resume printing.
Press ▲ or ▼ to select Stop Printing , and then press
the OK button to stop printing.
(→"Removing Rolls from the Roll Holder," User
Manual)
(→
, Loading Rolls in the Printer)
Paper mismatch You tried to print a test pattern
for printer adjustment on several
sheets, but sheets of different
types or sizes of paper were used.
When printing a test pattern for adjustment, use
sheets of the same type of paper, in the required
quantity.
Replace the paper as follows and perform adjustment
again.
Press ▲ or ▼ to select Stop Printing , and then
press the OK button to stop printing.
1.
Replace the paper.2.
Press ▲ or ▼ to select Change Paper , press the OK
button, and replace the paper.
(→"Loading and Printing on Sheets," User Manual)
The printer now starts printing the test pattern.
Execute adjustment again from the control panel
menu.
3.
(→"Loading and Printing on Sheets," User Manual)
(When you are attempting to print
a test print sheet or other printer
status information.)
Paper loaded askew. Paper loaded crooked was
detected when the paper was
advanced.
Follow these steps to reload the roll.
Press the OK button.1.
Adjust the right edge of the roll to make it parallel to
the orange Paper Alignment Line .
2.
If this error recurs after you reload the roll, remove
the Roll Holder from the printer, push the roll firmly in
until it touches the Roll Holder flange, and reload the
Roll Holder in the printer.
Follow these steps to reload the sheet.
Press the OK button.1.
Pull out the sheet.2.
Adjust the right edge of the sheet to make it parallel
to the right Paper Alignment Line and the trailing
edge of the sheet to make it parallel to the paper
alignment line under the Paper Retainer .
3.
(→
, Loading Rolls in the Printer)
(→ , Loading Rolls on the Roll Holder)
(→
, Loading Sheets in the Printer)
Page 44
44
Error Messages
Error Message Cause Corrective Action
Paper not aligned with right
guide.
When paper was loaded, it was not
aligned with the guide on the right
side.
Follow these steps to reload the sheet.
Press the OK button to clear the error.1.
Adjust the right edge of the sheet to make it parallel
to the right Paper Alignment Line and the trailing
edge of the sheet to make it parallel to the paper
alignment line under the Paper Retainer .
2.
Paper size not detected. Paper has been loaded askew, or
warped paper has been loaded.
Follow these steps to reload the roll.
If this error recurs after you reload the roll, remove
the Roll Holder from the printer, push the roll firmly in
until it touches the Roll Holder flange, and reload the
Roll Holder in the printer.
Press the OK button.1.
Adjust the right edge of the roll to make it parallel to
the right Paper Alignment Line .
2.
Follow these steps to reload the sheet.
(→
, Loading Sheets in the Printer)
If Not finished printing. Finish printing
remaining jobs? is shown on the Display Screen ,
press the OK button.
3.
Printing will resume, starting from the page on
which the error occurred.
(→
, Loading Rolls in the Printer)
(→
, Loading Rolls on the Roll Holder)
Press the OK button.1.
Adjust the right edge of the sheet to make it parallel
to the right Paper Alignment Line and the trailing
edge of the sheet to make it parallel to the paper
alignment line under the Paper Retainer .
2.
If Not finished printing. Finish printing
remaining jobs? is shown on the Display Screen ,
press the OK button.
3.
Printing will resume, starting from the page on
which the error occurred.
Page 45
45
Error Messages
Error Message Cause Corrective Action
MediaType Mismatch When Detect Mismatch in the
Control Panel menu is set to
Pause , the type of paper loaded
does not match the type specified
in the printer driver.
Follow these steps to ensure the paper type matches
on the printer and in the printer driver.
Follow these steps to ensure the paper type matches
on the printer and in the printer driver.
When Detect Mismatch in the
Control Panel menu is set to
Warning , the type of paper loaded
does not match the type specified
in the printer driver.
You can continue to print, but note that this error may
cause problems in the printing results.
Press ▲ or ▼ to select Stop Printing , and then
press the OK button to stop printing.
1.
Replace the loaded paper with paper of the type
and size you have specified in the printer driver.
2.
The printer will resume printing.
(→"Loading and Printing on Rolls," User Manual)
(→"Loading and Printing on Sheets," User Manual)
Press ▲ or ▼ to select Stop Printing , and then
press the OK button to stop printing.
1.
Either change the type of paper specified in the
printer driver settings or replace the loaded paper
and change the paper type setting on the printer.
2.
(→"Loading and Printing on Rolls," User Manual)
(→"Loading and Printing on Sheets," User Manual)
Press ▲ or ▼ to select Print , and then press the OK
button to resume printing.
However, note that this error may cause paper jams
and affect the printing quality.
Page 46
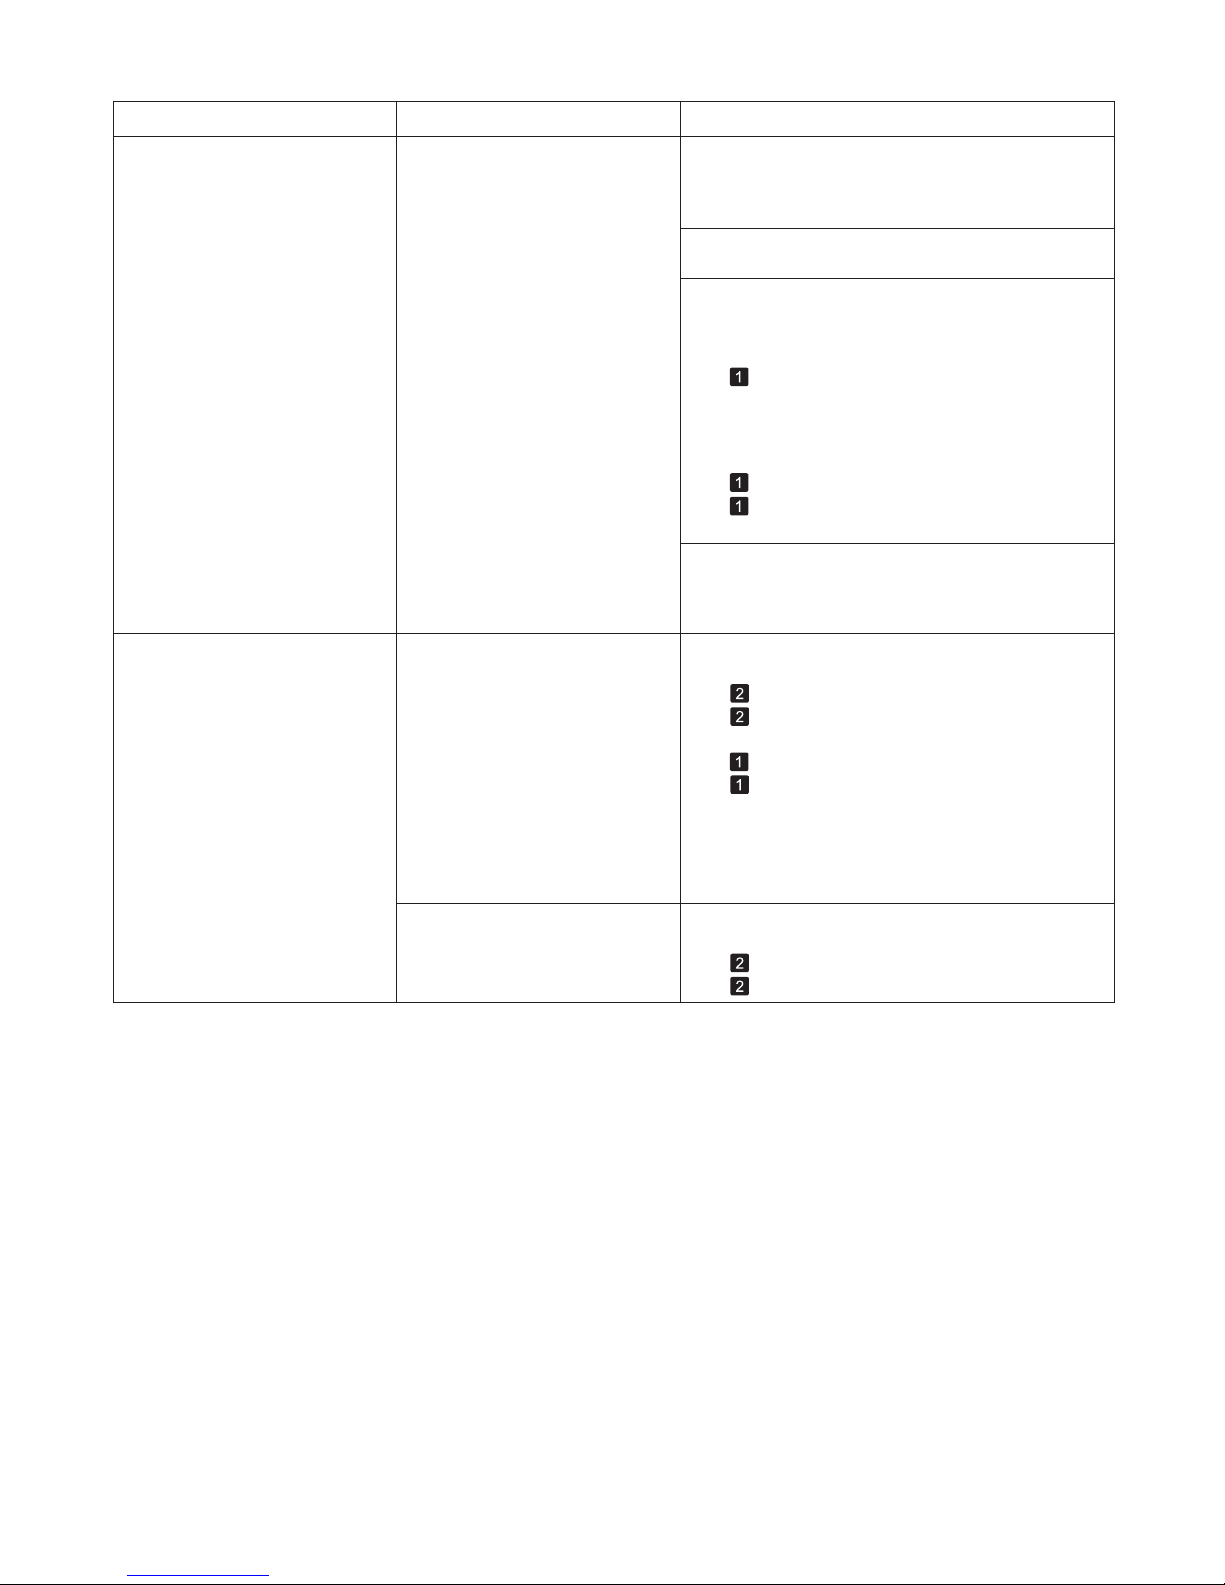
46
Error Messages
Error Message Cause Corrective Action
PaprWidth Mismatch When Detect Mismatch in the
Control Panel menu is set to
Pause or Warning , the width of
the loaded roll does not match the
width specified in Fit Roll Paper
Width in the printer driver.
Press ▲ or ▼ to select Print , and then press the OK
button to resume printing.
However, note that this error may cause paper jams
and affect the printing quality.
Make sure the roll width selected in the dialog box
displayed when you select Fit Roll Paper Width in
the printer driver matches the width of the roll loaded
in the printer, and then try printing again.
Press ▲ or ▼ to select Stop Printing , and then press
the OK button to stop printing.
Follow these steps to replace the roll to match the
width specified in the printer driver.
Press ▲ or ▼ to select Change Paper , and then
press the OK button to remove the roll.
1.
Replace the paper with paper compatible for
borderless printing.
2.
(→
, Removing the Roll from the Printer)
(→"Removing Rolls From the Roll Holder," User
Manual)
(→
, Loading Rolls on the Roll Holder)
(→
, Loading Rolls in the Printer)
The printer now starts printing the print job.
Cannot feed paper. Paper could not be advanced
correctly during feeding.
Press the OK button.1.
Remove the paper.2.
Load the paper.3.
(→ , Loading Rolls in the Printer)
(→
, If Roll Paper Jams)
(→
, If a Sheet Jams)
(→
, If Roll Paper Jams)
(→
, Loading Sheets in the Printer)
Paper could not be advanced
correctly during ejection.
Press the OK button.1.
Remove the paper.2.
If Not finished printing. Finish printing
remaining jobs? is shown on the Display Screen ,
press the OK button.
4.
Printing will resume, starting from the page on
which the error occurred.
(→
, If a Sheet Jams)
Page 47
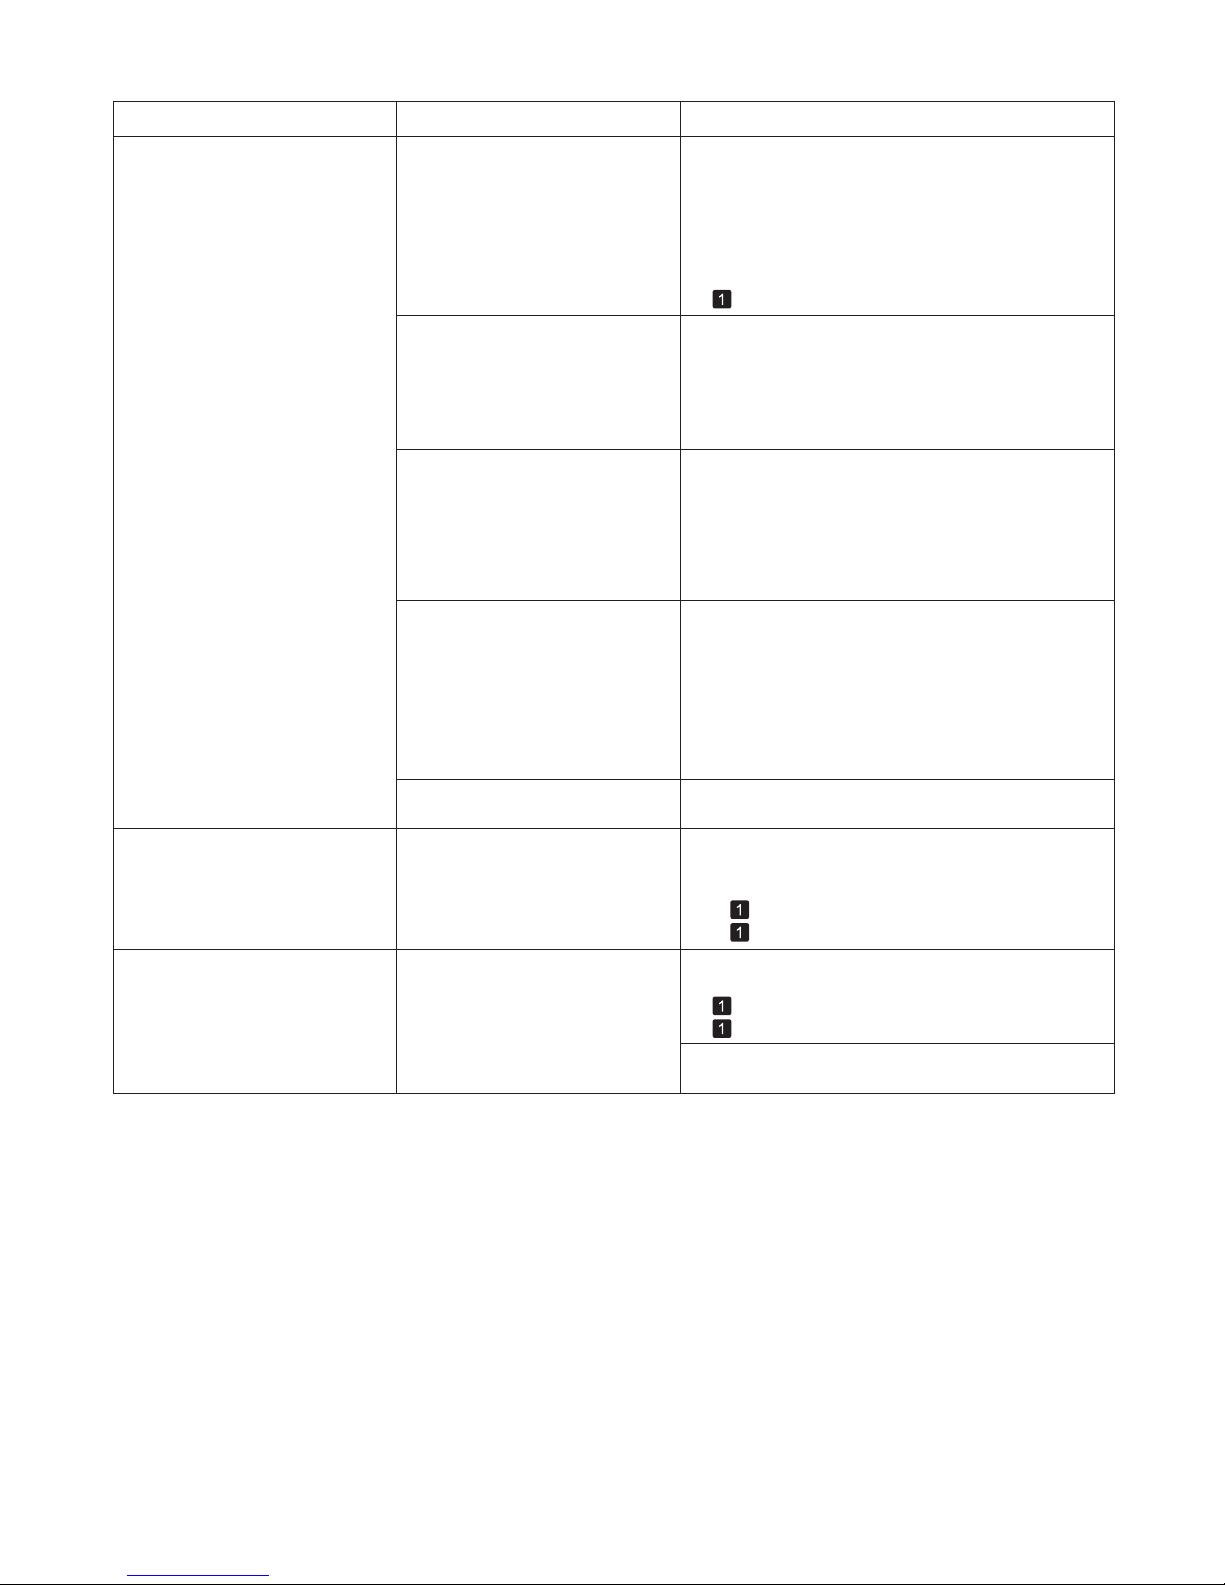
47
Error Messages
Error Message Cause Corrective Action
Cannot cut paper. There are sheets left on the
Ejection Guide .
(→
, Loading Rolls in the Printer)
In other cases, the Cutter Unit
may be damaged.
Contact your Canon dealer for assistance.
Press the OK button and remove the paper.1.
Load paper.2.
If Not finished printing. Finish printing
remaining jobs? is shown on the Display Screen ,
press the OK button.
3.
Printing will resume, starting from the page on
which the error occurred.
There is a foreign object by the
Output Tray , obstructing the
Cutter Unit .
Lift the Top Cover and remove the foreign object.1.
If Not finished printing. Finish printing
remaining jobs? is shown on the Display Screen ,
press the OK button.
2.
Printing will resume, starting from the page on
which the error occurred.
You are not using the printer under
the recommended environmental
conditions for the paper.
Use the printer only where the recommended
environmental conditions for the paper are met.
Note that various environmental conditions are
recommended for various types of paper. For details
on the recommended environmental conditions, see
the Paper Reference Guide .
(→"Types of Paper," User Manual)
You are using paper that is not
compatible with automatic cutting.
Specify Manual as the cutting method and use
scissors or a cutting tool to cut the roll.
1.
Press the OK button and remove the paper.2.
(→"Specifying the Cutting Method for Rolls," User
Manual)
For information about paper that is compatible with
automatic cutting, see the Paper Reference Guide .
(→"Types of Paper," User Manual)
Roll printing is selected. You have attempted to print on a
roll, but no roll is loaded.
Press ▲ or ▼ to select Load Roll Paper , and then
press the OK button. Load the roll, and then print.
Press ▲ or ▼ and select Stop Printing
or press the
Stop button to stop printing.
(→
, Loading Rolls on the Roll Holder)
(→
, Loading Rolls in the Printer)
Cannot detect papr The printer could not detect the
paper.
Reload the paper as follows.
1. Remove the paper and press the OK button.
2. Reload the paper.
(→ , Loading Sheets in the Printer)
(→
, Loading Rolls in the Printer)
Page 48
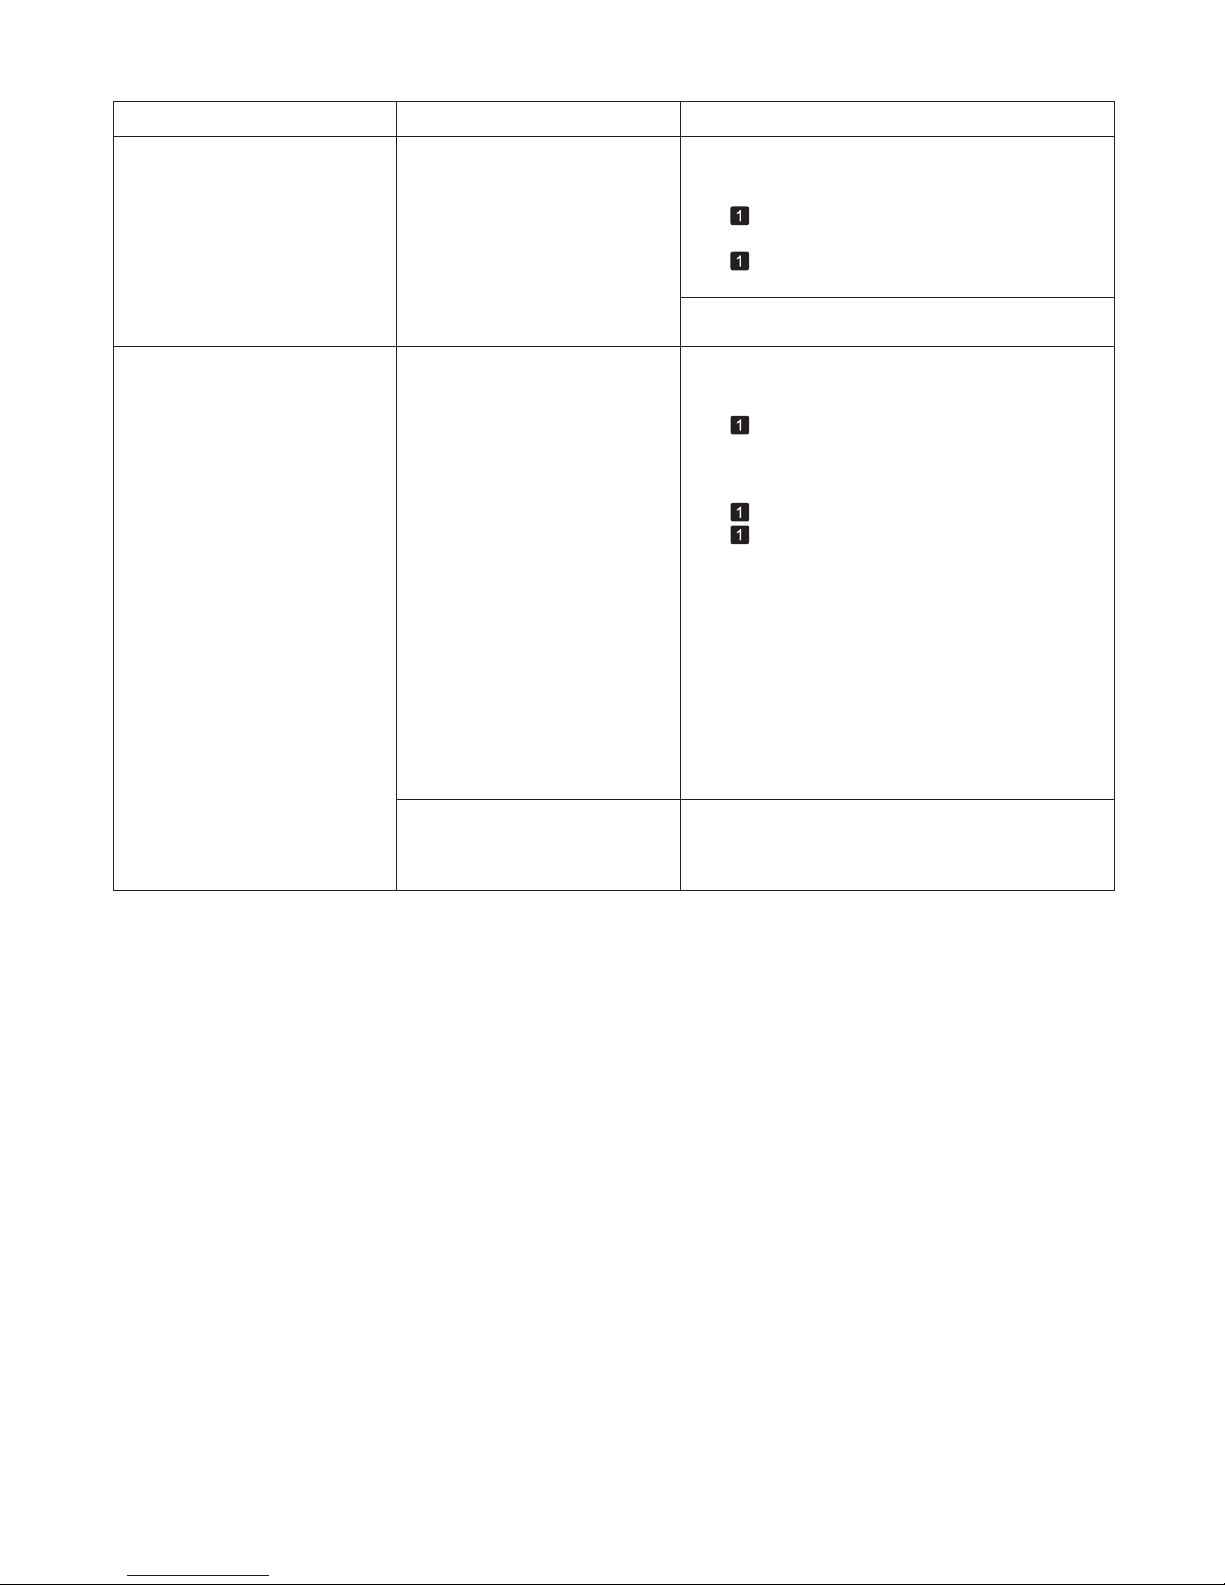
48
Error Messages
Error Message Cause Corrective Action
The roll is empty. The roll is empty. Follow these steps to replace the used roll with a new
roll of the same type and size.
Press the OK button and remove the roll.1.
Load the new roll.2.
If no barcode was printed on the roll, specify the
type of paper.
3.
When you have selected ManageRemainRoll >
On in the control panel menu and a barcode is not
printed on the roll, also specify the paper length.
4.
(→
, Removing the Roll from the Printer)
(→"Removing Rolls from the Roll Holder," User
Manual)
(→ , Loading Rolls on the Roll Holder)
(→
, Loading Rolls in the Printer)
(→"Specifying the Paper Length," User Manual)
(→"Changing the Type of Paper," User Manual)
If Not finished printing. Finish printing
remaining jobs? is shown on the Display Screen ,
press the OK button.
5.
Printing will resume, starting from the page on
which the error occurred.
There is remaining roll paper, but
because it could not be advanced,
it could not be detected.
Choose a higher level of Print Quality in the
Advanced Settings of the printer driver.
(→"Giving Priority to Particular Graphic Elements and
Colors for Printing," User Manual)
Roll printing is selected, but
manual paper is loaded.
A print job for rolls was received
when a sheet is loaded.
Press ▲ or ▼ to select Stop Printing , and then press
the OK button to stop printing.
Press ▲ or ▼ to select Eject Paper , press the OK
button, and remove the sheet.
(→
, Removing Sheets)
Load a new roll.
(→ , Loading Rolls in the Printer)
Follow these steps to load and print on a roll.
The printer now starts printing the print job.
1.
2.
Page 49
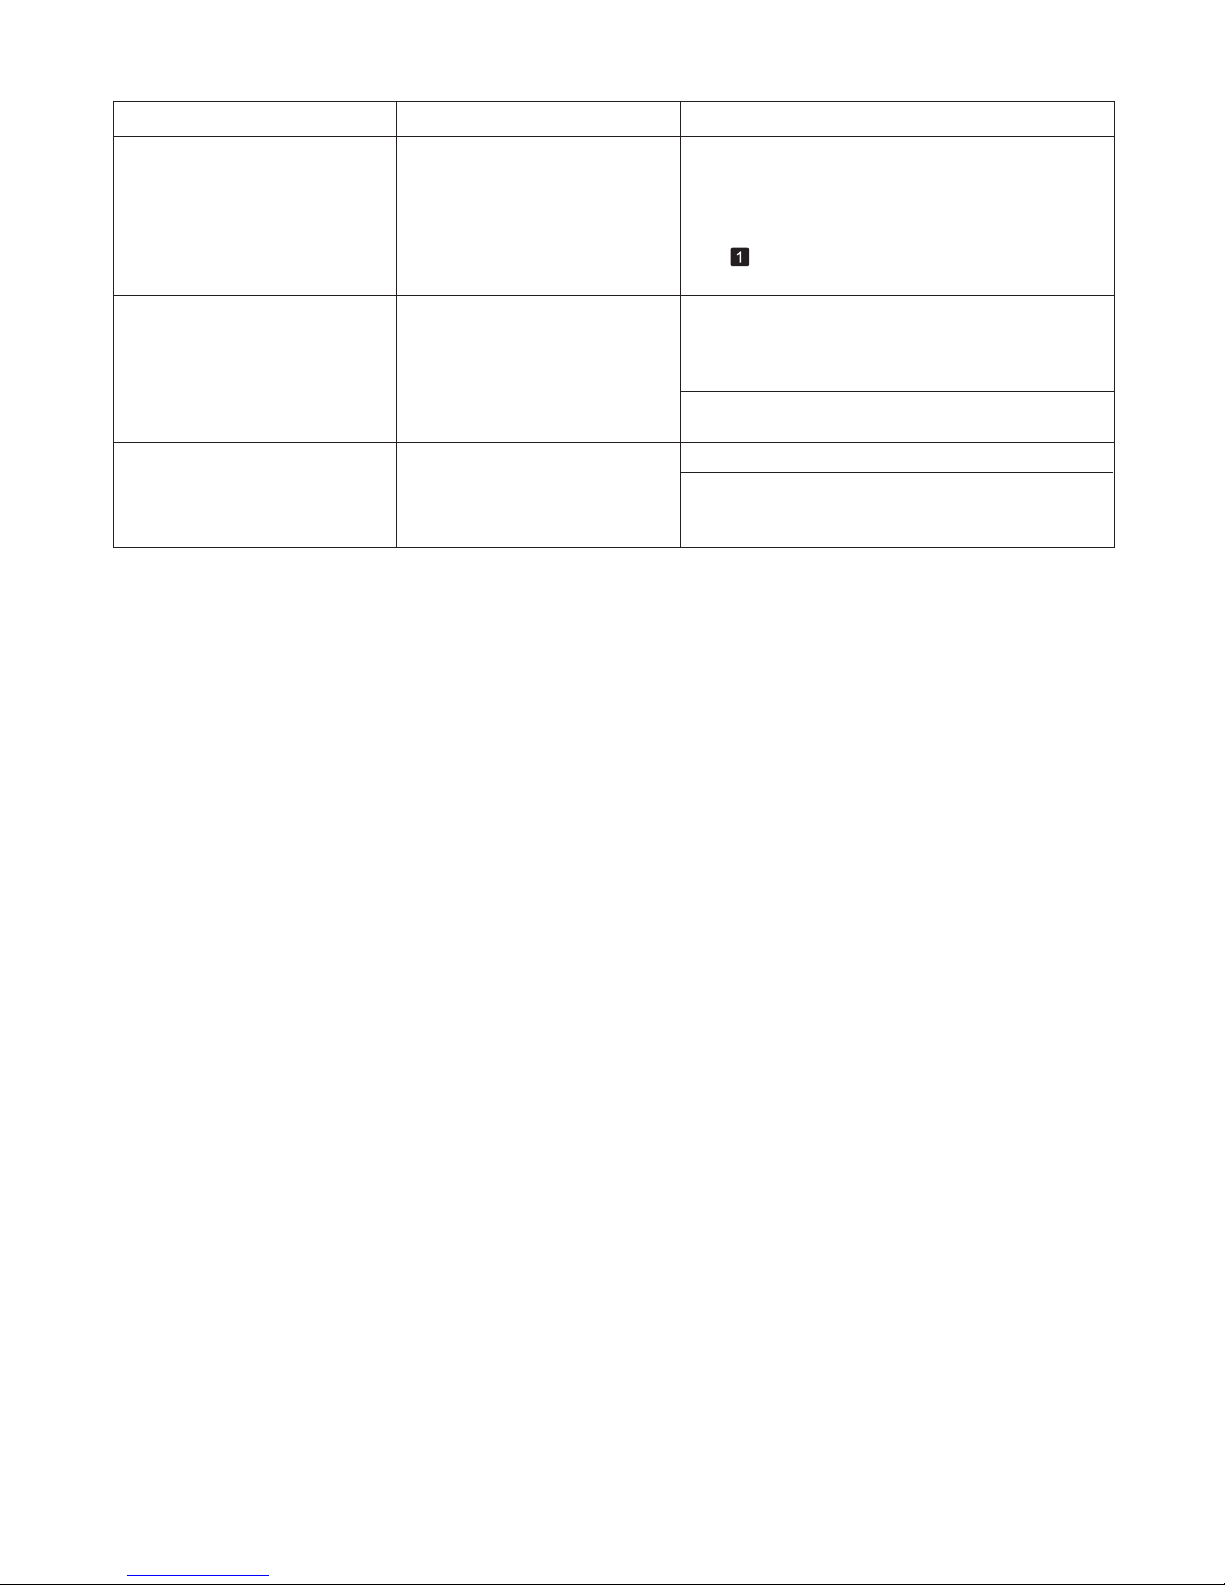
49
Error Messages
Error Message Cause Corrective Action
Roll paper is not securely in
contact with roll holder.
When the roll was loaded, the roll
was not inserted firmly all the way
on the Roll Holder .
Follow these steps to reload the roll.
Press the OK button and remove the roll holder
from the printer.
(→
, Loading Rolls on the Roll Holder)
Insert the roll firmly on the Roll Holder until it
touches the flange.
1.
2.
Load the Roll Holder in the printer.3.
Roll feed unit error. The Roll Feed Unit is not working. Turn off the printer, remove the Roll Feed Unit
momentarily, and then reinstall it.
(→"Removing the Roll Feed Unit," User Manual)
(→"Installing the Roll Feed Unit," User Manual)
If the message is displayed again despite these
measures, contact your Canon dealer for assistance.
No Roll Unit. The printer has received a print
job, but the Roll Unit is not
installed.
Press the Stop button to stop printing.
Turn the printer off and install the Roll Unit .1.
Turn the printer on and resend the print job.2.
Connect the Roll Unit Cable firmly and completely.
Page 50

50
a
Adj. Quality (adjustment quality) ................................. 28
Adjust Length..............................................................30
b
Banding ......................................................................28
Borderless Printing Ink Grooves ................................. 24
c
Carriage ................................................................ 19, 21
Carriage Shaft ............................................................24
Cleaning Brush ........................................................... 24
e
Ejection Guide ................................................ 20, 22, 23
f
Faint print....................................................................25
h
Head Cleaning A ......................................................... 25
Head Cleaning B ........................................................25
Head Posi. Adj. (head position adjustment)................26
j
Jammed roll paper ...................................................... 18
Jammed sheets .......................................................... 21
l
Line length that does not match .................................30
Linear Scale................................................................24
o
Output Tray ........................................................... 20, 22
p
Paper Feed Slot..............................................18, 20, 22
Paper Retainer ...........................................................24
Paper soiling ............................................................... 23
Platen .........................................................................23
r
Roll Feed Unit Cover ............................................ 18, 20
t
Top Cover ................................................................... 23
v
Vacuum holes ............................................................. 24
w
Warped vertical lines or misaligned colors ................ 26
Index
Page 51

Page 52

©CANON INC. 2010 Printed in JAPANQT5-2338-V1
Canon Inc.
30-2, Shimomaruko 3-chome, Ohta-ku, Tokyo 146-8501, Japan
Canon U.S.A., Inc.
One Canon Plaza, Lake Success, NY 11042 U.S.A
Canon Europe Ltd.
3 The Square, Stockley Park, Uxbridge, Middlesex, UB11 1ET United Kingdom
Canon (China) Co., Ltd.
15F Jinbao Building No.89 Jinbao Street, Dongcheng District, Beijing 100005, China
Canon Australia Pty. Ltd.
1 Thomas Holt Drive, North Ryde, Sydney, N.S.W.2113, Australia
*QT52338V1*
 Loading...