

Canon imageFORMULA CR-L1 User Manual

User Manual
Please read this manual before operating this scanner.

FCC REGULATIONS (For 120V model)
Check Reader, Model 6130110/6130120
This device complies with Part 15 of the FCC Rules. Operation is subject to the following two conditions: (1) This device
may not cause harmful interference, and (2) this device must accept any interference received, including interference
that may cause undesired operation.
Note: This equipment has been tested and found to comply with the limits for a Class B digital device, pursuant to Part
15 of the FCC Rules. These limits are designed to provide reasonable protection against harmful interference in a
residential installation. This equipment generates, uses, and can radiate radio frequency energy and, if not installed and
used in accordance with the instructions, may cause harmful interference to radio communications. However, there is
no guarantee that interference will not occur in a particular installation. If this equipment does cause harmful
interference to radio or television reception, which can be determined by turning the equipment off and on, the user is
encouraged to try to correct the interference by one or more of the following measures:
- Reorient or relocate the receiving antenna.
- Increase the separation between the equipment and receiver.
- Connect the equipment into an outlet on a circuit different from that to whic h the receiver is connected.
- Consult the dealer or an experienced radio/TV technician for help.
Use of shielded cable is required to comply with class B limits in Subpart B of Part 15 of FCC Rules.
Do not make any changes or modifications to the equipment unless otherwise specified in the manual. If such changes
or modifications should be made, you could be required to stop operation of the equipment.
Canon U.S.A. Inc.
One Canon Park, Melville, NY 11747, U.S.A.
Tel. No. (800)652-2666
RADIO INTERFERENCE REGULATIONS (For 120V models)
This digital apparatus does not exceed the Class B limits for radio noise emissions from digital apparatus as set out in
the interference-causing equipment standard entitled “Digital Apparatus”, ICES-003 of the Industry Canada.
Für EMVG
Dieses Produkt ist zum Gebrauch im Wohnbereich, Geschäfts-und Gewerbebereich sowie in Kleinbetrieben
vorgesehen.
Model Names
The following names may be provided for the safety regulations in each sales region of the Check Reader.
CR-L1: 6130110
CR-L1 UV: 6130120
Trademarks
• Canon and the Canon logo are registered trademarks, of Canon Inc. in the
United States and may also be trademarks or registered trademarks in other
countries.
• imageFORMULA is a trademark of CANON ELECTRONICS INC.
• Microsoft, Windows, Windows 7, Windows 8.1 and Windows 10 are registered
trademarks or trademarks of Microsoft Corporation in the United States and
other countries.
• Microsoft product screen shot(s) reprinted with permission from Microsoft
Corporation.
• Adobe and Adobe Reader are registered trademarks or trademarks of Adobe
Systems Incorporated in the United States and other countries.
• Other product and company names herein are, or may be, the trademarks of
their respective owners.
RÈGLEMENT SUR LE BROUILLAGE RADIOÉLECTRIQUE (For 120V
models)
Cet appareil numérique respecte les limites de bruits radioélectriques applicables aux appareils numériques de Classe
B prescrites dans la norme sur le matériel brouilleur: “Appareils Numériques”, NMB-003 édictée par l’Industrie Canada.
International ENERGY STAR® Office Equipment Program
As an ENERGY STAR® Partner, CANON ELECTRONICS INC. has determined that this machine meets
the ENERGY STAR® Program guidelines for energy efficiency.
The International ENERGY STAR® Office Equipment Program is an international program that
promotes energy saving through the use of computers and other office equipment. The program backs
consumption. It is an open system in which business proprietors can participate voluntarily. The targeted products are
office equipment, such as computers, monitors, printers, fax, machine, copiers, and scanners. The standards and logos
are uniform among participating nations.
This model doesn’t provide “setting options” for power management.
the development and dissemination of products with functions that effectively reduce energy
European Union (and EEA) only.
This symbol indicates that this product is not to be disposed of with your household waste, according to
the WEEE Directive (2002/96/EC) and you r national law. This product should be handed over to a
designated collection point, e.g., on an authorized one-for-one basis when you buy a new similar product
or to an authorized collection site for recycling waste electrical and electronic equipment (EEE). Improper
handling of this type of waste could have a possible negative impact on the environment and human
health due to potentially hazardous substances that are generally associated with EEE. At the same time, your
cooperation in the correct disposal of this product will contribute to the effective usage of natural resources. For more
information about where you can drop off your waste equipment for recycling, please cont act your local city office,
waste authority, approved WEEE scheme or your household waste disposal service. For more information regarding
return and recycling of WEEE products, please visit www.canon-europe.com/environment.
(EEA: Norway, Iceland and Liechtenstein)
Copyright
Copyright 2018 by CANON ELECTRONICS INC. All rights reserved.
No part of this publication may be reproduced or transmitted in any form or by any means, electronic or mechani cal,
including photocopying and recording, or by any information storage or retrieval system without the prior written
permission of CANON ELECTRONICS INC.
Reproduction Warning
This device is designed to be used in a legal manner, in accordance with all applicable laws, including, but not limited
to, counterfeit and copyright laws, as well as laws pertaining to national security.
Any person(s) found to have reproduced any of the following materials (regardless of whether such reproduction was
intentional or not) for the purpose of misrepresenting such material as the original may be prosecuted in accordance
with the applicable laws and regulations.
• Paper money or bank notes (domestic and foreign)
• Postage stamps, revenue stamps, or other similar stamps
• Stock certificates, bond certificates, promissory notes, cheques, or other valuable certificates
• Passports, licenses, or other certificates or documents issued by government officials or agencies
This is not an exhaustive list.
Canon is not responsible for how this scanner is used by an individual.
Please note that certain intellectual property is protected by copyright law, and copyrighted items may not be
reproduced without the express permission of the copyright holder except for personal or household use under limited
circumstances.
2
Disclaimers
NOTE
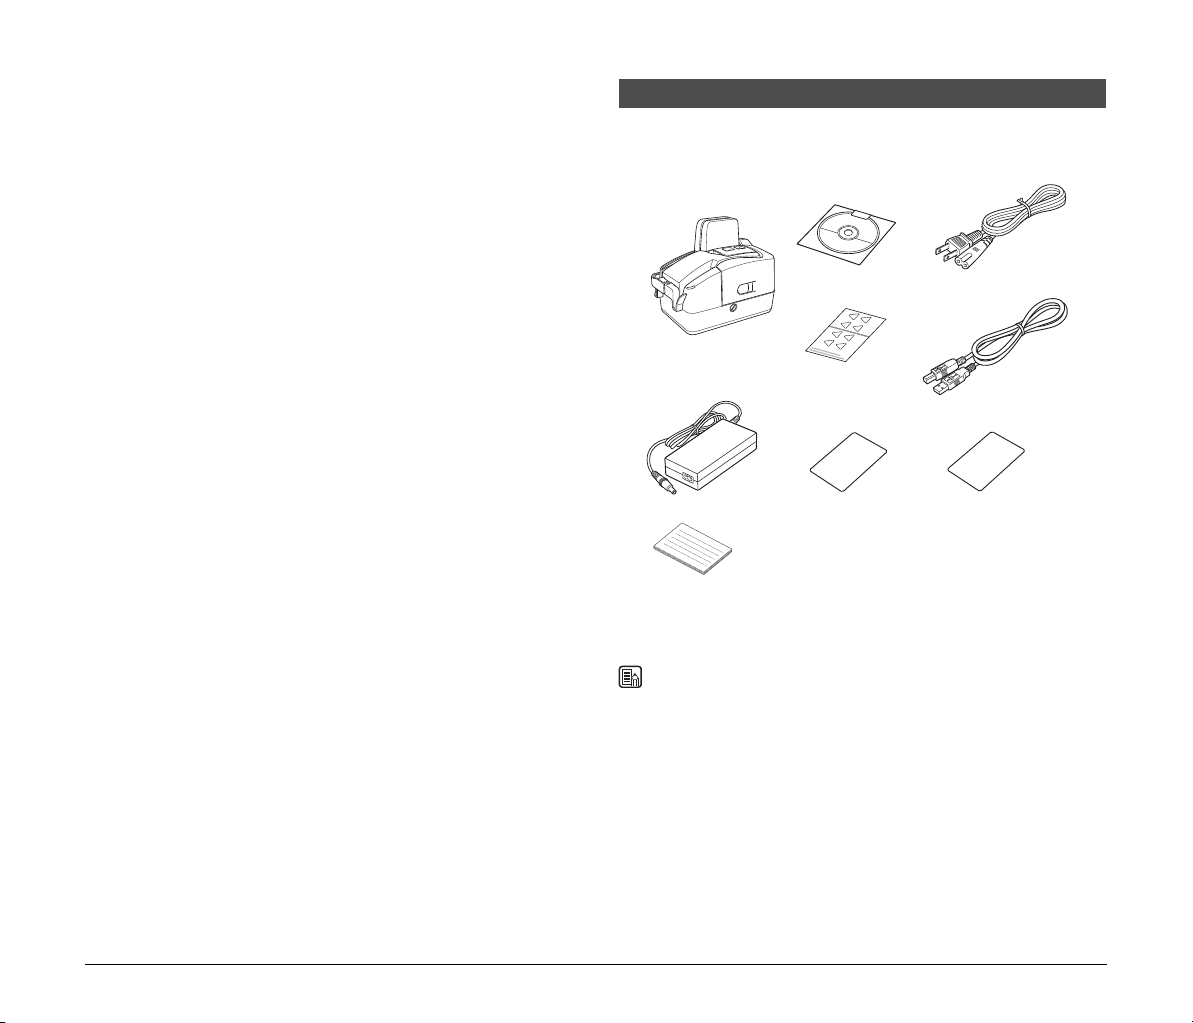
CR-L1
Disc
Power Cord
*1
Warranty Card
*2
USB Cable
User Registration Card
*2
AC Adapter
Marking Labels
for Thickness
Adjustment Dial
*1 The power cord varies, according to the country of purchase.
*2 For the United States and Canada only.
Setup & Operation Guide
The information in this document is subject to change without notice.
CANON ELECTRONICS INC. MAKES NO WARRANTY OF ANY KIND WITH REGARD TO THIS MATERIAL, EITHER
EXPRESS OR IMPLIED, EXPECT AS PROVIDED HEREIN, INCLUDING WITHOUT LIMIT ATION, THEREOF,
WARRANTIES AS TO MARKETABILITY, MERCHANTABILITY, FITNESS FOR A PARTICULAR PURPOSE OF USE OR
NON-INFRINGEMENT. CANON ELECTRONICS INC. SHALL NOT BE LIABLE FOR ANY DIRECT, INCIDENTAL, OR
CONSEQUENTIAL DAMAGES OF ANY NATURE, OR LOSSES OR EXPENSES RESULTING FROM THE USE OF THIS
MATERIAL.
CANON ELECTRONICS INC. IS NOT LIABLE FOR THE STORAGE AND HANDLING OF DOCUMENTS SCANNED WITH
THIS PRODUCT, OR THE STORAGE AND HANDLING OF THE RESULTING SCANNED IMAGE DATA.
IF YOU INTEND TO DISCARD THE ORIGINALS OF THE SCANNED DOCUMENTS, YOU ARE RESPONSIBLE FOR
INSPECTING THE SCANNED IMAGES AND VERIFYING THAT THE DATA IS INTACT.
THE MAXIMUM LIABILITY OF CANON ELECTRONICS INC. UNDER THIS WARRANTY IS LIMITED TO THE PURCHASE
PRICE OF THE PRODUCT COVERED BY THE WARRANTY.
Packaging: What Is in the Box?
Make sure that you have everything shown below. Check every item you have
removed from the box. If any items are missing, contact your local authorized
Canon dealer.
Items included in this package may change without any notice.
3
Preparation Before Use
IMPORTANT
Wizard Screen (Windows 7)
This chapter describes how to prepare the scanner to scan documents.
Setting Up the Scanner
Perform the following steps to set up the CR-L1. Refer to the section for each
step for details about that step.
A Check your operating environment. (See “Checking Your
Operating Environment,” on p. 5.)
B Install the software. (See “Installing the Software,” on p. 5.)
Install the Scanning Utility provided with the CR-L1.
C Connect the scanner to a computer. (See “Connecting the
Scanner to a Computer,” on p. 6.)
D Turn ON the power. (See “Turning ON the Power,” on p. 7.)
E Automatically installing the device driver. (See p. 7.)
The device driver is installed automatically when Windows recognizes the
CR-L1.
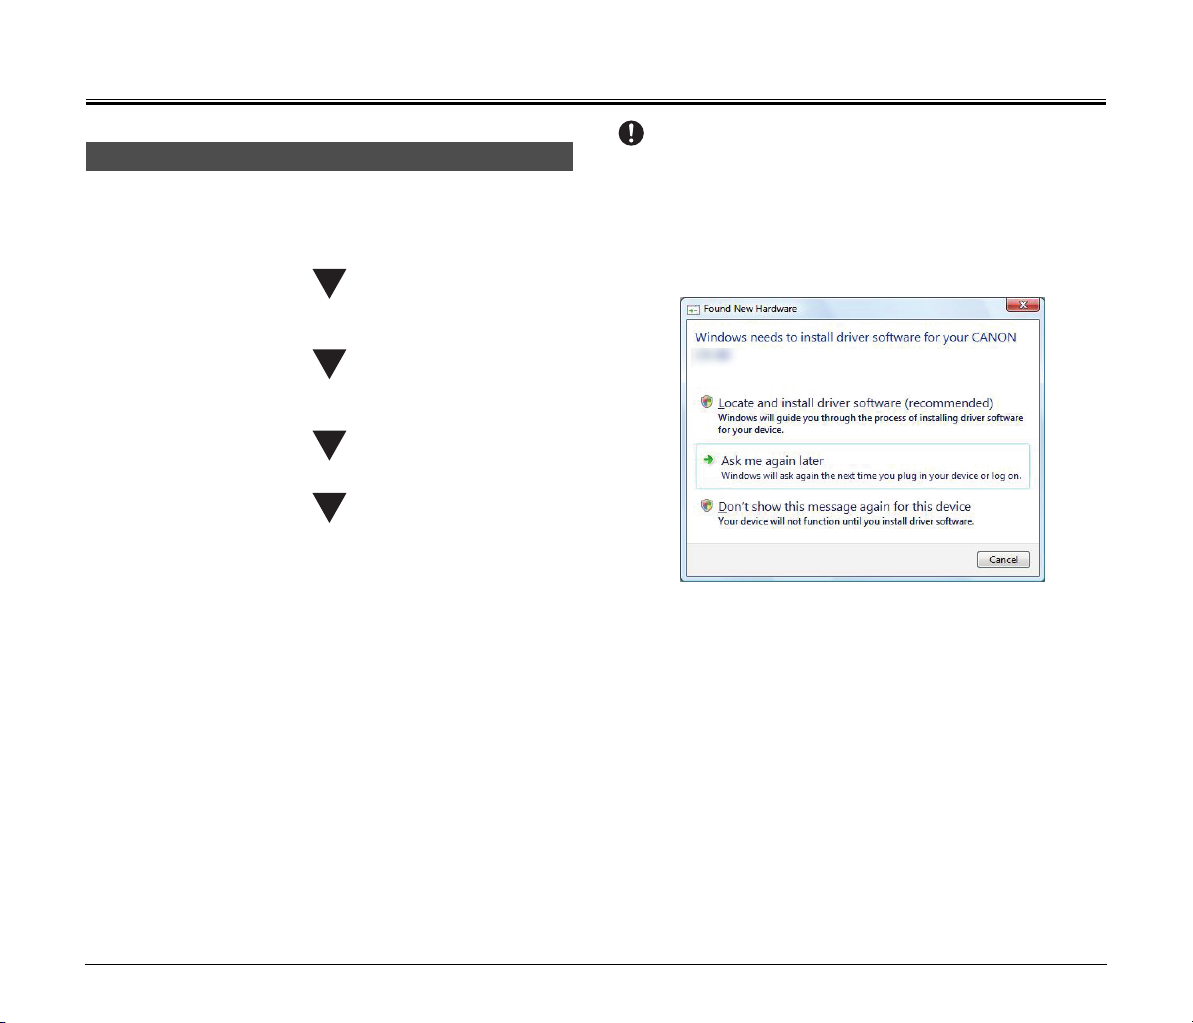
• To have the device drivers installed automatically when the computer recognizes
the CR-L1, the software needs to be installed before the CR-L1 is connected to the
computer.
• If you connect the computer and turn ON the CR-L1 before installing the software,
the following wizard screen appears. If this happens, click [Cancel], turn OFF the
CR-L1, and then install the software.
The following wizard screen is an example in Windows 7. When a similar wizard
screen appears in Windows 8.1/10, click [Cancel].
4

IMPORTANT
IMPORTANT
NOTE
IMPORTANT
IMPORTANT
Checking Your Operating Environment Installing the Software
The following computer system requirements are recommended for using the
CR-L1.
Operating Systems:
• Microsoft Windows 7 (32/64bit) SP1 or later
• Microsoft Windows 8.1 (32/64bit)
• Microsoft Windows 10 (32/64bit)
• Microsoft Windows Server 2008 R2 Service Pack 1 or later
• Microsoft Windows Server 2012 R2
• Microsoft Windows Server 2016
This is the environment as of July 2018.
For the latest software support information, go to the Products page on the
Canon website.
Specifications:
• CPU: Intel Core2 Duo 1.8 GHz or faster
• Memory: 1 GB or more
• USB 2.0 interface
Interface Cable
• Use the cable provided or a Hi-Speed USB 2.0 interface cable to connect to
the computer’s USB port.
• Scanning speed may vary depending on the specifications of your computer.
The following software applications are provided on the website.
There are 2 usable software applications.
For the latest software support information, go to the Products page on the
Canon website.
Canon Driver
The Canon Driver is the Canon original standard driver. You need this driver
to use the Scanning Utility.
Scanning Utility
Canon Scanning Utility is an application that provides scanning, file saving,
image viewing, printing, and various other functions. A dedicated scanner
driver is installed after you install the utility software.
• The Scanning Utility includes a device driver so that Windows can recognize the
CR-L1. Be sure to install the Scanning Utility before connecting the CR-L1 to the
computer.
• Some functions mentioned in this manual may not be operated in some
applications.
Installing the Scanning Utility
Follow the instructions below to install the Scanning Utility and the dedicated
driver.
• If you use the USB interface that was provided as standard with your computer:
• Use the most recently available USB 2.0 driver provided by Microsoft. Contact
your local authorized Canon dealer for more detailed information.
• Not all USB interfaces provided as standard with personal computers are
guaranteed. Contact your local authorized Canon dealer for more detailed
information.
• Scanning speeds are slower if your computer’s standard USB interface is USB
1.1.
• You should use the USB cable originally bundled with the scanner or a Hi-Speed
USB 2.0 compatible cable.
• If the CPU, memory, interface card, and other specifications do not satisfy the
installation requirements, the scanning speed may be greatly reduced and
transmission may take longer.
• Even if the computer satisfies the recommended specifications, the scanning
speed may vary, depending on the scan settings.
The dedicated scanner driver is installed after the Scanning Utility has been installed.
A Turn ON your computer, and log on to Windows.
Be sure to log on as the Administrator.
B Download usable software from the Canon Website.
After executing the downloaded file, follow the instructions on the screen
to complete the installation.
• The displayed screen, type, file name, and folder name will differ depending on
your environment or purpose. These items should be replaced as necessary.
• The computer may need to be restarted, after the installation, depending on the
operating system. If this is necessary, make sure to restart the computer.
5
IMPORTANT
CAUTION
NOTE
WARNING
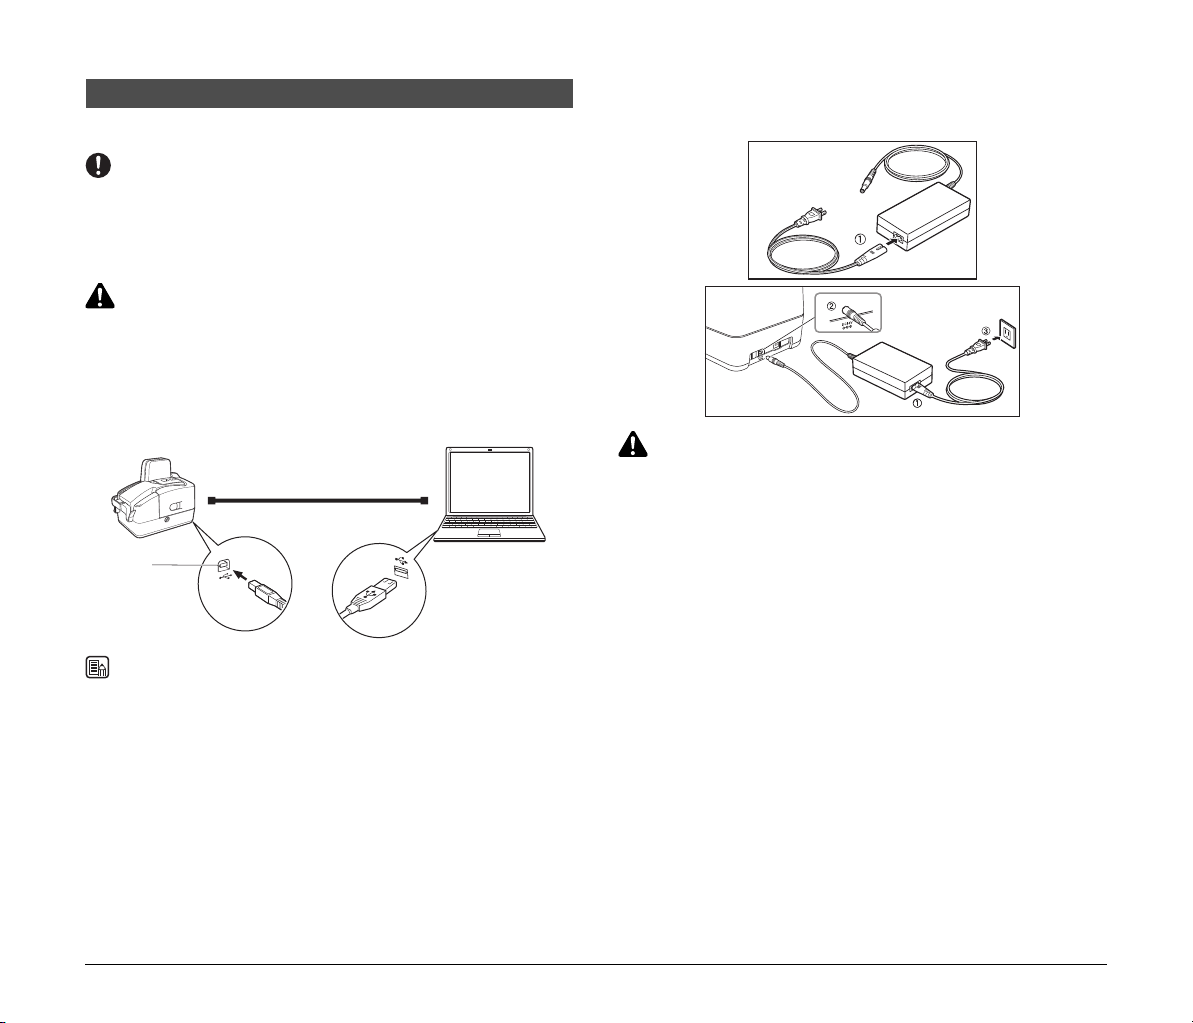
Connecting the Scanner to a Computer
Type B Plug Type A Plug
USB
Connector
The only way to connect the scanner to your computer is with a USB cable.
• Be sure to use the USB cable bundled with the scanner or a Hi-Speed
USB 2.0 compatible cable with the length less than 5 m.
• When the application is running, do not turn the scanner OFF or unplug the interface
cable.
• Do not connect multiple CR-L1 scanners to one computer.
• Do not turn OFF the scanner or remove the interface cable when an application
is running.
• Turn OFF the computer and the scanner before changing the cable.
USB Connections
Connect the scanner and the computer with the cable provided or a Hi-Speed
USB 2.0 cable.
Connect the type B plug (square) to the scanner and connect the type A plug (flat) to
the USB port on the computer.
Connecting the Power Cord
Connect the power cord.
Make sure to use only the power cord provided with the scanner.
When connecting the power cord, follow these precautions. Failure to do so may
cause a fire or electrical shock.
• Never grasp the power plug when your hands are wet.
• Never plug the scanner into a multiplug power strip.
• Never bundle or tie the power cord around itself or another object. Connect the
power plug securely into the power outlet.
• Use only the power cord and power plug provided with the scanner.
•
Before you connect the power cord, make sure to turn OFF the power switch.
•
Connect only to a power outlet of the rated voltage and power supply frequency (either
120V, 60 Hz or 220-240V, 50/60 Hz, depending on your region).
• Do not plug the scanner into a power outlet shared with another device. If you
use an extension cord, make sure that the extension cord is rated for the
current requirements of the scanner.
6
IMPORTANT
WARNING
NOTE
CAUTION
NOTE
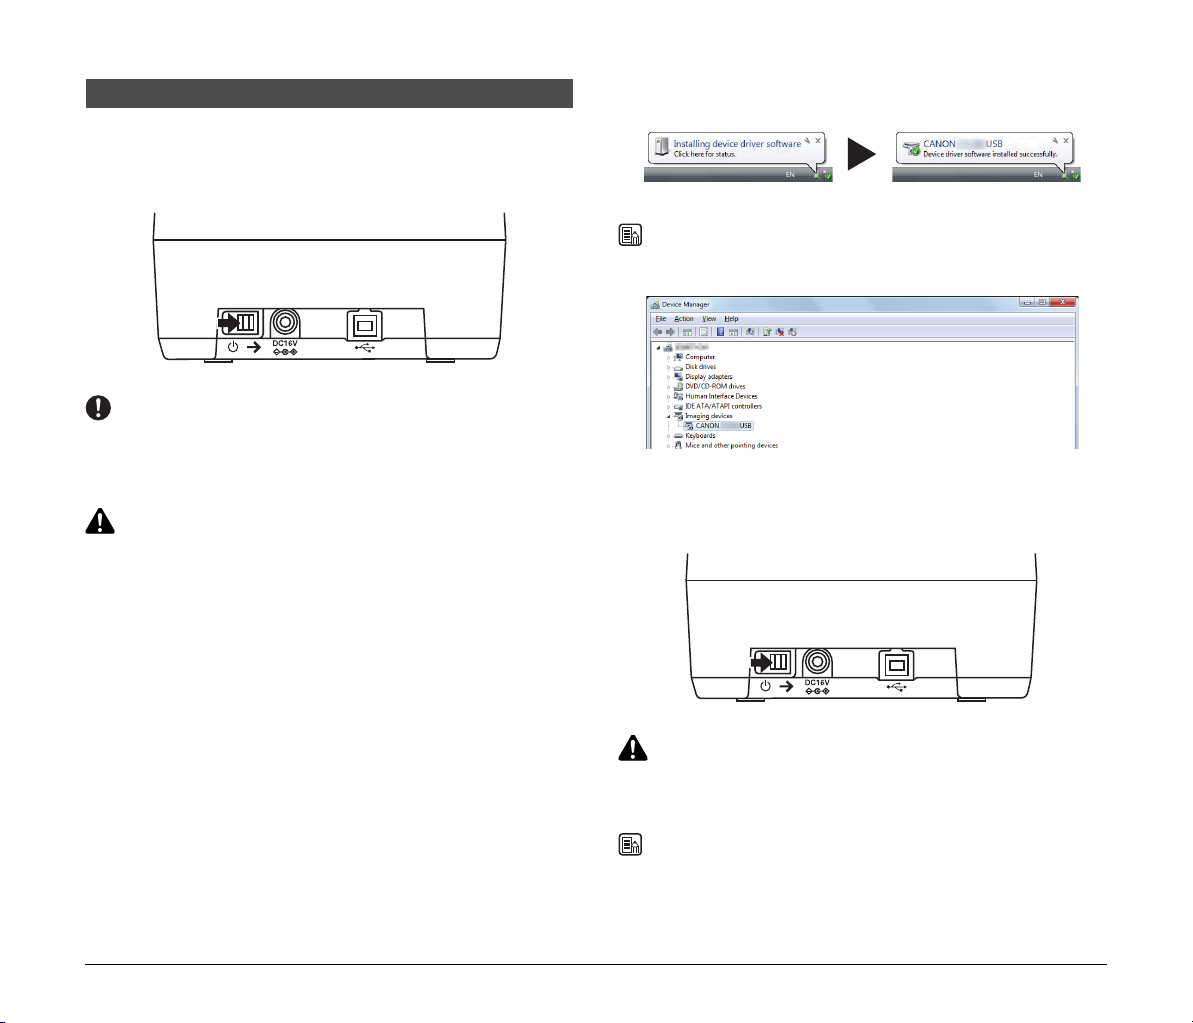
Turning ON and OFF the Power
(ON)
(Windows 7)
(OFF)
Follow the procedures below to turn the scanner power ON and OFF.
Turning ON the Power
A To turn ON the scanner, slide the Power Switch to the right.
• When you turn ON the power, the power LED flashes slowly, and then turns solid.
• If the scanner does not work, there is a problem with the scanner. Turn OFF the
power, and contact your local authorized Canon dealer or service representative to
have the scanner serviced.
If you hear strange sounds, detect smoke or abnormal heat, sense a vibration,
or smell odd odors around the scanner, turn OFF the power immediately and
disconnect the power cord from the power outlet. Contact your local authorized
Canon dealer or service representative to have the scanner serviced.
B Windows recognizes the CR-L1 as new hardware, and installation
starts automatically.
The CR-L1 will be registered as “CANON CR-L1 USB” in the Imaging Device
directory.
Turning OFF the Power
A Turn OFF your computer.
B To turn OFF the scanner, slide the Power Switch to the right.
• Wait at least 10 seconds before turning the scanner back ON.
• For your safety, disconnect the power plug from the power outlet if you are not
using the scanner for a long period of time.
The scanner’s auto power off setting is enabled by default, and the scanner will
turn off automatically if it is not operated for 4 hours. For details on how to
disable this setting, see “Auto Power Off,” on p. 27
7

INTRODUCTION
WARNING
CAUTION
IMPORTANT
NOTE
Thank you for purchasing the Canon Check Reader CR-L1.
Please read this manual thoroughly before using the machine in order to
familiarize yourself with its capabilities, and to make the most of its many
functions. Unless otherwise noted, CR-L1 is used for both the CR-L1 and the
CR-L1 UV models, throughout this manual.
Manuals for the CR-L1
The following manuals are provided with the CR-L1. Be sure to read these
manuals thoroughly before using the scanner. (The Setup & Operation Guide
extracted from the User Manual.) Electronic manual is stored as a PDF file on
the supplied Setup Disc and requires Adobe Reader to open. (You can
download Adobe Reader from the Adobe Web site.)
Setup & Operation Guide (Supplied with the scanner/Electronic Manual)
Describes the procedure for setting up the CR-L1 for scanning. Set up the CRL1 in accordance with the Setup & Operation Guide. For details on the CR-L1,
refer to the User Manual (electronic manual).
User Manual (Electronic Manual): This Manual
Describes how to use the scanner, and includes instructions for configuring the
scanner settings, as well as handling, maintenance, and troubleshooting
information.
Symbols Used in This Manual
The following symbols are used in this manual to explain procedures,
restrictions, handling precautions, and instructions that should be observed for
safety.
Indicates a warning concerning operations that may lead to death or injury to
persons if not performed correctly. To use the machine safely, always pay
attention to these warnings.
Indicates a clarification of an operation, or contains additional explanations for
a procedure. Reading these notes is highly recommended.
Indicates a caution concerning operations that may lead to injury to persons, or
damage to property if not performed correctly. To use the machine safely,
always pay attention to these cautions.
Indicates operational requirements and restrictions. Be sure to read these items
carefully to operate the machine correctly, and avoid damaging the machine.
8

Table of Contents
Packaging: What Is in the Box?......................................................3
Preparation Before Use ........................................................................ 4
Setting Up the Scanner...................................................................4
Checking Your Operating Environment .......................................... 5
Installing the Software ....................................................................5
Installing the Scanning Utility....................................................5
Connecting the Scanner to a Computer .........................................6
USB Connections......................................................................6
Connecting the Power Cord......................................................6
Turning ON and OFF the Power .....................................................7
Turning ON the Power ..............................................................7
Turning OFF the Power ............................................................7
INTRODUCTION ..................................................................................8
Manuals for the CR-L1..............................................................8
Symbols Used in This Manual ..................................................8
Important Safety Instructions .............................................................. 10
Handling.................................................................................. 10
Disposal ..................................................................................10
Installation Location ................................................................ 11
Power Supply..........................................................................11
Moving the Scanner................................................................11
Introduction to the CR-L1 ................................................................... 12
Features of the CR-L1 ..................................................................12
Features.................................................................................. 12
Part Names ................................................................................... 13
Front View...............................................................................13
Rear View ............................................................................... 15
Connectors/Power Switch.......................................................15
Exterior Dimensions......................................................................15
Preparing the Ink Cartridge........................................................... 16
About the Ink Cartridge ...........................................................16
Setting the Ink Cartridge and Adjusting the Print Position ......16
Software .............................................................................................19
How to Use the Software ..............................................................19
How to Use the Scanning Utility ..............................................19
Uninstalling the Software .............................................................. 20
Document Feeding and Scanning ......................................................22
Documents....................................................................................22
Document................................................................................22
Using Infrared Double Feed Detection....................................23
Placing Documents ................................................................. 23
Document Feeding and Scanning ................................................23
Scan Procedure ......................................................................23
Confirming Proper Document Feeding ...................................24
Long Document Mode ............................................................25
Auto Power Off ....................................................................... 27
Troubleshooting.................................................................................. 28
When the Scanner Is Not Recognized .........................................28
Clearing Paper Jams ....................................................................28
The Scanner Does Not Turn ON ..................................................30
Feeding Trouble ........................................................................... 30
When the Scanned Image Is Not Normal.....................................31
Maintenance.......................................................................................32
Daily Cleaning .............................................................................. 32
Cleaning the Main Unit ...........................................................32
Cleaning the Inside of the Scanner.........................................32
Cleaning the Scanning Glass and Rollers ..............................32
Cleaning the Magnetic Heads.................................................34
Cleaning the Ink Jet Nozzles ..................................................34
Cleaning with the Cleaning Cards (United States Only).........35
Maintenance .................................................................................37
Replacing the Ink Cartridge .................................................... 37
Adjusting the Separation Roller Gap ......................................40
Specifications ............................................................................... 42
Scanner Specifications ........................................................... 42
AC Adapter Specifications......................................................42
Index................................................................................................... 43
9

Important Safety Instructions
WARNING
CAUTION
Handling
■ Never install and operate the scanner near flammable substances, such as
alcohol, paint thinner, benzene, or any other type of volatile solution.
■ Never damage or modify the power cord, and never place heavy objects on
the power cord.
■ Always make sure that your hands are dry when you are handling the power
cord or power plug. Never grasp the power plug when your hands are wet.
■ Never plug the scanner into a multiplug power strip.
■ Never bundle, wrap, or tie the power cord around itself or another object.
Connect the power plug securely into the power outlet.
■ Use only the power cord and power plug provided with the scanner.
■ Never attempt to disassemble or modify the scanner.
■ Never use flammable aerosol products near the scanner.
■ Before you clean the scanner, turn the power OFF and disconnect the power
cord from the power outlet.
■ To clean the scanner’s exterior, use a firmly wrung cloth, moistened slightly
with water or mild detergent. Never use any type of volatile solution, such as
alcohol, benzene or paint thinner.
■ If you hear strange sounds, detect smoke or abnormal heat, sense vibration,
or smell odd odors around the scanner, turn OFF the power switch
immediately and disconnect the power cord from the power outlet. Contact
your local authorized Canon dealer or service representative to have the
scanner serviced.
■ Handle the scanner with care. Avoid shock and vibration to the scanner
caused by reckless handling. If you suspect the scanner has been
accidentally damaged, turn OFF the power switch immediately and
disconnect the power cord from the power outlet. Contact your local
authorized Canon dealer or service representative to have the scanner
serviced.
■ Before you move the scanner, always turn OFF the power and disconnect
the power cord from the power outlet.
■ This product emits low level magnetic flux. If you use a cardiac pacemaker
and feel abnormalities, please be away from this product and consult your
doctor.
■ To avoid damage to the scanner, never place the scanner on an unstable or
vibrating
■ Keep all liquids, beverages, or any type of liquid, and clips, staples,
■ Never install the scanner in humid or dusty locations. Doing so may cause a
■ Never place heavy objects on top of the scanner, as these objects may tip
■ When you remove the power cord, grip it by the power plug head. Never
■ Keep the area around the power outlet clear of all obstacles so you can
■ Never spill water or volatile solutions (alcohol, benzene, paint thinner) into
■ When the scanner is not being used for a long period of time, disconnect the
■ Avoid wearing loose fitting clothing, dangling jewelry, long ties, or long hair
■ Be careful when you are loading a document or clearing a paper jam. It is
■ Do not open the Maintenance Cover while the scanner is operating. Doing
■ Do not touch the pins and contacts on the scanner’s connector with your
surface. The scanner may tip or fall over, causing injury.
necklaces, or other metal objects away from the scanner. If you accidentally
spill liquid or drop a metal object into the scanner, turn OFF the power
immediately and disconnect the power cord from the power outlet. Contact
your local authorized Canon dealer or service representative to have the
scanner serviced.
fire or electrical shock.
or fall over, and cause injury.
attempt to disconnect the power cord from the power outlet by pulling on the
power cord. Doing so may damage or expose the cord’s internal wiring, and
cause a fire or electrical shock.
disconnect the power cord easily at all times.
the scanner. Doing so may cause a fire or electrical shock.
power cord from the power outlet.
that could become entangled with moving parts, especially the rollers that
feed paper into the scanner. If such objects become entangled, immediately
disconnect the power plug from the power outlet to stop the scanner.
possible that the paper edges may cut your fingers.
so may result in a malfunction or injury.
hands. Doing so may result in a malfunction.
Disposal
When disposing of this scanner, be sure to follow all local ordinances and laws
or consult with the retailer who sold you the scanner.
10

Installation Location
WARNING
For operation, maintenance, and ventilation, make sure that there is enough
space around the scanner.
Avoid placing the scanner in the following places. It may cause a malfunction
and adversely affect the scanner or your computer.
• Places exposed to direct sunlight
If installation in such places is unavoidable, provide a curtain or similar object
to shade the scanner.
• Places subject to dust and fumes
Dust and cigarette fumes adversely affect the components inside the
scanner.
• Near running water, a heat source, water vapor, or in an area, such as a
laboratory exposed to ammonia gas, paint thinner, or other volatile chemicals
• Places subject to excessive vibration and shock
• Places subject to rapid changes in temperature or humidity
Condensation occurring inside the scanner may impair image quality. Place
the scanner in a room that is within the following range:
Room temperature: 10°C to 32.5°C (50°F to 90.5°F)
Relative humidity: 20% to 80% RH
20% to 50% RH when using the imprinter
Use the recommended operating environment for the ink cartridge when
using the imprinter.
• Near electronic equipment or heavy equipment that generates a strong
magnetic field, such as a speaker, TV, and radio
Power Supply
• Connect only to a power outlet of the rated voltage and power supply
frequency (either 120V, 60 Hz or 220-240V, 50/60 Hz, depending on your
region).
• Make sure that the scanner is connected to an independent power outlet. Do
not plug the scanner into an outlet shared with another device. If you use an
extension cord, make sure that the extension cord is rated for the current
requirements of the scanner.
• If you are unsure of anything relating to the power supply, contact your local
authorized Canon dealer or service representative for further information.
• Never place an object on top of the power cord or step on the power cord.
• Never bundle the power cord or wrap the cord around an object, such as a
table leg.
• Do not tug on the power cord. When you remove the power cord, grip it by
the power plug head.
• Keep the area around the power outlet free of obstacles.
• Connect only to a power outlet of the rated voltage and power supply
frequency (either 120V, 60 Hz or 220-240V, 50/60 Hz, depending on your
region).
• Do not connect to power outlets with other electrical devices. Also, when
using an extension cord, make sure that the extension cord is rated for the
current requirements of the scanner.
• Disassembling and/or reassembling the AC adapter is extremely dangerous
and should not be attempted under any circumstances.
• Do not place heavy objects on the AC adapter or power cord. Do not place
the adapter or cords in an area where they are likely to be stepped on.
• Do not use the power cord while it is bundled.
• Never pull directly on the power cord. To remove the plug from the outlet,
grasp the plug directly and remove it from the outlet.
• Keep the area around the power plug clear of articles so that the power plug
can be disconnected in an emergency.
• Use only the AC adapter provided with the product. Do not use the scanner’s
AC adapter with any other product.
• If you have any questions about the AC adapter, contact your local authorized
Canon dealer or service representative for further information.
Moving the Scanner
When you move the CR-L1, hold it firmly with both hands and carry it carefully.
Do not hold the scanner by the Eject Stopper. The scanner weighs
approximately 2.1 kg (4.6 lb).
When moving the scanner, be sure to turn OFF the power and remove any
cables. If the cables are not removed before moving the scanner, you may
damage the plugs or connector by forcibly pulling them out.
11

Introduction to the CR-L1
This chapter describes the features of the CR-L1 scanner, what comes
packaged in the box, and the names and functions of parts on the scanner.
Features of the CR-L1
The Canon Check Reader CR-L1 is a scanner with magnetic heads that can
read checks and other documents that are printed with MICR (Magnetic Ink
Character Recognition) compatible fonts, and is capable of OCR (Optical
Character Recognition).
Features
Fast and Smooth Scanning
The CR-L1 performs high-speed scans of check-size documents at 45 cpm
(200 dpi resolution).
Supports Long Documents
Documents up to 108 mm x 2,000 mm (4.3" x 78.7") can be scanned.
Compact Size
140 mm (W) x 223 mm (D) x 188 mm (H) (5.5" (W) x 8.8" (D) x 7.4" (H))
Supports Color, Black-and-White (Binary) and Grayscale Output
Reads MICR Characters
A magnetic head is used to scan MICR characters that have been printed with
magnetic ink or toner.
Supports OCR (Optical Character Recognition)
Character images, such as E13B, OCR-A, OCR-B, and check writer are
recognized as characters by the OCR function.
Supports UV scanning (UV model only)
CR-L1 UV can scan images that are printed with UV fluorescent ink.
This function only scans the front side of documents.
Easy to Maintain
Maintenance Covers make handling paper jams and cleaning easy.
Paper Thickness Adjustment Mechanism
Adjust the Separation Roller gap to the thickness of the paper being fed.
Infrared Double Feed Detection
The scanner detects double-fed documents using infrared sensor.
Imprinter Is Standard Equipment
An imprinter mechanism, which prints text on documents as they are scanned,
comes standard equipped with the scanner. The imprinter’s ink cartridge is not
included, and must be purchased separately. (See “About the Ink Cartridge,”
on p. 16.)
12
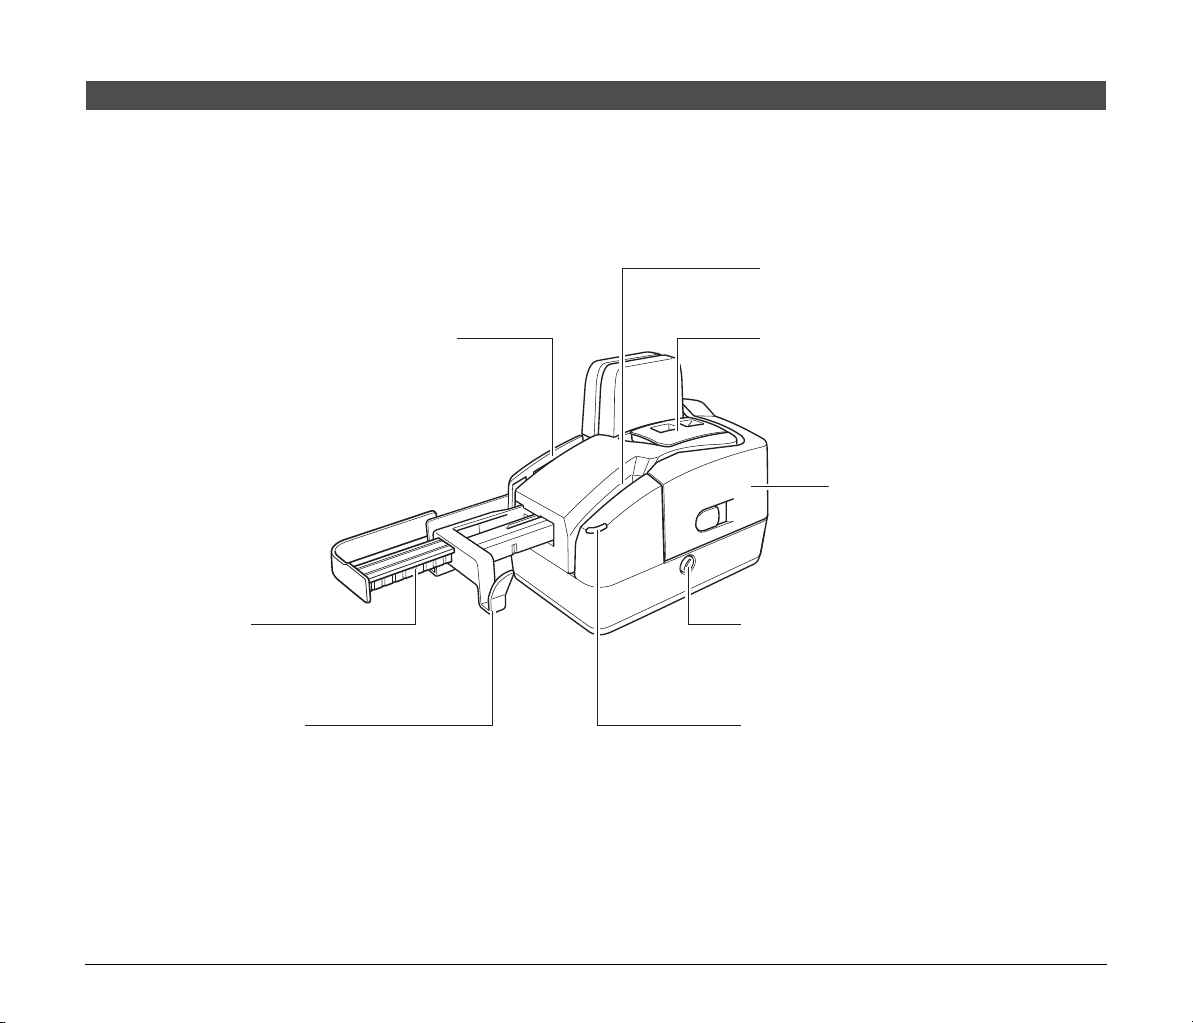
Part Names
Document Eject Opening
Paper Thickness Adjustment Dial
Adjust the gap between the separation roller and
feeding roller to the thickness of the paper being fed.
(See “Adjusting the Separation Roller Gap,” on
p. 40.)
Imprinter Cover
Maintenance Cover
Open this cover to clear paper jams or
clean the scanner.
Document Feed Opening
Power Indicator
Lights blue when the power is turned ON.
(See “Turning ON and OFF the Power,” on p. 7.)
Eject Stopper
Adjust to match the length of the document.
(See “Placing Documents,” on p. 23.)
Document Feed Tray
Pull out to load documents.
(See “Placing Documents,” on p. 23.)
This section describes the names and functions of each part. Before you connect the CR-L1, familiarize yourself with its parts and their functions.
Front View
13
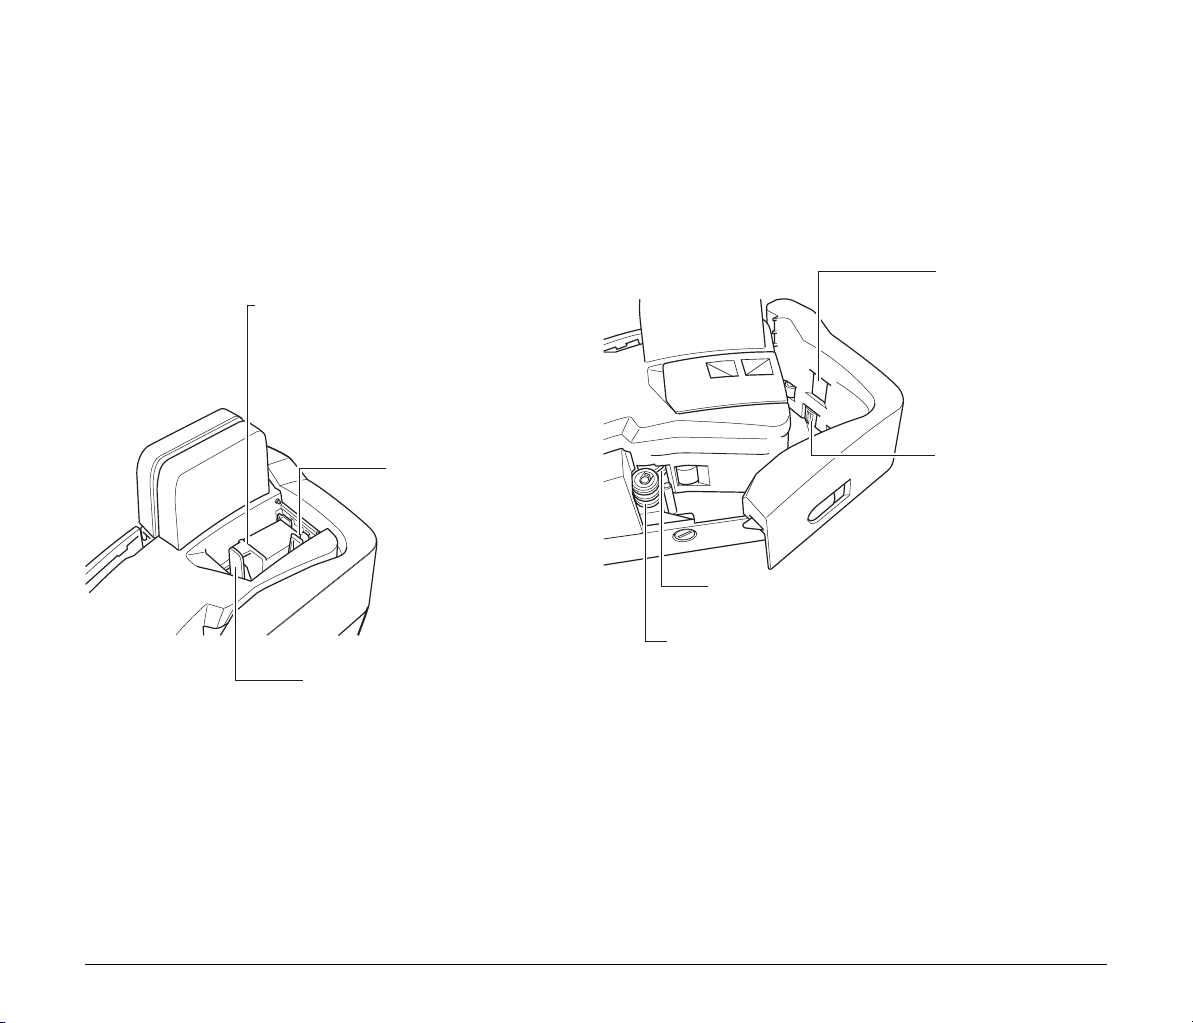
Print Position
Adjustment Lever
Adjusts the print
position.
(See “Setting the Ink
Cartridge and
Adjusting the Print
Position,” on p. 16.)
Feeding Roller
Feeds the document.
Ink Cartridge
The ink cartridge is not included, and must
be purchased separately.
(See “About the Ink Cartridge,” on p. 16.)
Lock Lever
Locks the ink cartridge in place.
Magnetic Head for
MICR
Reads MICR text
printed in magnetic
ink. (See “Cleaning the
Magnetic Heads,” on
p. 34.)
Separation Roller
Separates a stack of documents into single sheet one by one.
(See “Adjusting the Separation Roller Gap,” on p. 40.)
Feeding Roller
Feeds the document.
Ink Absorber
Absorbs any ink that
leaks out of the ink
cartridge.
14

Rear View
Reading Unit
(Access Hatch)
Open to clear paper jams or clean the
scanner.
(See “Clearing Paper Jams,” on
p. 28.)
Connectors/
Power Switch
Power Switch
Slide to turn the
scanner power ON.
Slide again to turn the
scanner power OFF.
(See “Turning ON
and OFF the Power,”
on p. 7.)
Power
Connector
Connect the included AC
adapter plug.
(See “Connecting the
Power Cord,” on p. 6.)
USB Connector
Connect a Hi-Speed USB 2.0
compliant USB cable. (See
“USB Connections,” on p. 6.)
140 mm (5.5")
144 mm (5.7") 223 mm (8.8")
188 mm (7.4")
Connectors/Power Switch
Exterior Dimensions
Units: millimeters (units in parenthesis are inches)
15
 Loading...