

Page 1

imageCLASS X
LBP1238
User
's Guide
USRMA-5305-00 2020-05 en Copyright CANON INC. 2020
Page 2

Contents
Setting Up
Main Functions ......................................................................................................................................................... 3
Preparations Required Before Use ............................................................................................................................. 4
Preventing Unauthorized Access ................................................................................................................................ 5
Setting Up Using the Setup Guide .............................................................................................................................. 7
Setting the Date/Time ............................................................................................................................................... 9
Setting Up the Network Environment ...................................................................................................................... 11
Selecting Wired LAN or Wireless LAN ..................................................................................................................... 13
Connecting to a Wired LAN .................................................................................................................................. 14
Connecting to a Wireless LAN ............................................................................................................................... 15
Setting IP Addresses ........................................................................................................................................... 28
............................................................................................................................................................ 2
Setting Up Connection Using WPS Push Button Mode ....................................................................................... 17
Setting Up Connection Using WPS PIN Code Mode ........................................................................................... 19
Setting Up Connection by Selecting a Wireless Router ....................................................................................... 21
Setting Up Connection by Specifying Detailed Settings ...................................................................................... 24
Checking the SSID and Network Key ............................................................................................................... 27
Setting IPv4 Address ..................................................................................................................................... 29
Setting IPv6 Addresses .................................................................................................................................. 32
Viewing Network Settings .................................................................................................................................... 35
Conguring Settings for Communication with a Computer ...................................................................................... 37
Conguring Printing Protocols and WSD Functions ........................................................................................... 38
Conguring Printer Ports ............................................................................................................................... 41
Setting Up Print Server .................................................................................................................................. 44
Conguring the Machine for Your Network Environment ......................................................................................... 47
Conguring Ethernet Settings ........................................................................................................................ 48
Changing the Maximum Transmission Unit ...................................................................................................... 50
Setting a Wait Time for Connecting to a Network .............................................................................................. 51
Conguring DNS .......................................................................................................................................... 52
Conguring SMB .......................................................................................................................................... 56
Conguring WINS ......................................................................................................................................... 58
Monitoring and Controlling the Machine with SNMP ......................................................................................... 60
Other Network Settings ................................................................................................................................. 64
Installing Drivers .................................................................................................................................................... 68
Basic Operations .......................................................................................................................................... 71
Parts and Their Functions ........................................................................................................................................ 74
Front Side .......................................................................................................................................................... 75
Back Side ........................................................................................................................................................... 77
Interior .............................................................................................................................................................. 78
Multi-Purpose Tray .............................................................................................................................................. 79
Paper Drawer ..................................................................................................................................................... 80
Operation Panel ................................................................................................................................................. 81
Turning ON the Machine ......................................................................................................................................... 83
I
Page 3

Turning OFF the Machine .....................................................................................................................................
Turning OFF the Machine by Remote Operation ............................................................................................... 85
Powering OFF at a Fixed Time ......................................................................................................................... 86
Restarting the Machine ....................................................................................................................................... 88
Using the Operation Panel ....................................................................................................................................... 90
Basic Screens ..................................................................................................................................................... 91
Home Screen ............................................................................................................................................... 92
<Status Monitor> Screen ............................................................................................................................... 94
Message Display ........................................................................................................................................... 96
Basic Operation .................................................................................................................................................. 97
Entering Text ................................................................................................................................................... 100
Logging in to the Machine ..................................................................................................................................... 102
Loading Paper ....................................................................................................................................................... 103
Loading Paper in the Paper Drawer .................................................................................................................... 105
Loading Paper in the Multi-Purpose Tray ............................................................................................................. 110
Loading Envelopes ............................................................................................................................................ 113
Loading Preprinted Paper .................................................................................................................................. 115
Specifying Paper Size and Type .......................................................................................................................... 119
Specifying Paper Size and Type in the Paper Drawer ....................................................................................... 120
Specifying Paper Size and Type in the Multi-Purpose Tray ................................................................................ 122
Registering Default Paper Settings for the Multi-Purpose Tray ......................................................................... 124
Registering a Custom Paper Size .................................................................................................................. 126
Limiting the Paper Sizes Displayed ................................................................................................................ 128
Automatically Selecting an Appropriate Paper Source for Each Function ............................................................ 129
84
Customizing the Display ........................................................................................................................................ 130
Customizing the Home Screen ........................................................................................................................... 131
Changing the Default Settings for Functions .......................................................................................................... 132
Setting Sounds ...................................................................................................................................................... 133
Entering Sleep Mode ............................................................................................................................................. 134
Using a USB Memory Device .................................................................................................................................. 136
Printing .............................................................................................................................................................. 139
Printing from a Computer ..................................................................................................................................... 140
Canceling Prints ............................................................................................................................................... 142
Checking the Printing Status and Log .................................................................................................................. 144
Various Printing Methods ...................................................................................................................................... 146
Printing a Document Secured by a PIN (Secure Print) ............................................................................................ 147
Printing via Secure Print .............................................................................................................................. 148
Printing from a USB Memory Device (Memory Media Print) .................................................................................... 151
Receiving I-Faxes for Printing ............................................................................................................................. 159
Linking with Mobile Devices ............................................................................................................ 163
Connecting with Mobile Devices ............................................................................................................................ 164
Connecting via a Wireless LAN Router (LAN Connection) ........................................................................................ 165
Connecting Directly (Access Point Mode) ............................................................................................................. 167
II
Page 4

Utilizing the Machine through Applications
Using AirPrint ....................................................................................................................................................... 172
Printing with AirPrint ........................................................................................................................................ 176
If AirPrint Cannot Be Used ................................................................................................................................. 179
Using Google Cloud Print ....................................................................................................................................... 180
Printing with Default Print Service (Android) .......................................................................................................... 182
Managing the Machine by the Remote Control ....................................................................................................... 183
........................................................................................................... 170
Managing the Machine ........................................................................................................................ 185
Setting Access Privileges ....................................................................................................................................... 187
Setting the System Manager ID and PIN .............................................................................................................. 188
Setting the Department ID Management ............................................................................................................. 190
Setting a Remote UI PIN .................................................................................................................................... 196
Conguring the Network Security Settings ............................................................................................................ 198
Restricting Communication by Using Firewalls ..................................................................................................... 200
Specifying IP Addresses for Firewall Settings .................................................................................................. 201
Specifying MAC Addresses for Firewall Settings .............................................................................................. 204
Changing Port Numbers .................................................................................................................................... 207
Setting a Proxy ................................................................................................................................................. 208
Conguring the Key and Certicate for TLS .......................................................................................................... 210
Generating the Key and Certicate for Network Communication ...................................................................... 213
Generating a Key and Certicate Signing Request (CSR) ................................................................................... 216
Registering the Key and Certicate for Network Communication ...................................................................... 219
Conguring IPSec Settings ................................................................................................................................. 221
Conguring IEEE 802.1X Authentication Settings .................................................................................................. 228
Restricting the Machine's Functions ...................................................................................................................... 232
Restricting Printing from a Computer .................................................................................................................. 233
Restricting USB Functions .................................................................................................................................. 234
Disabling HTTP Communication ......................................................................................................................... 235
Disabling Remote UI ......................................................................................................................................... 236
Managing the Machine from a Computer (Remote UI) ............................................................................................ 237
Starting Remote UI ........................................................................................................................................... 238
Checking the Status and Logs ............................................................................................................................ 242
Setting Up Menu Options from Remote UI ........................................................................................................... 248
Security Policy .................................................................................................................................................. 251
Importing/Exporting the Setting Data ................................................................................................................. 256
Updating the Firmware ......................................................................................................................................... 259
Initializing Settings ............................................................................................................................................... 261
Setting Menu List ...................................................................................................................................... 264
<Preferences> ....................................................................................................................................................... 265
<Display Settings> ............................................................................................................................................ 266
<English Keyboard Layout> ................................................................................................................................ 271
<Timer/Energy Settings> ................................................................................................................................... 272
III
Page 5

<Network>
<External Interface> .......................................................................................................................................... 290
<Accessibility> .................................................................................................................................................. 291
<Adjustment/Maintenance> .................................................................................................................................. 292
<Adjust Image Quality> ..................................................................................................................................... 293
<Maintenance> ................................................................................................................................................ 301
<Function Settings> .............................................................................................................................................. 302
<Common> ...................................................................................................................................................... 303
<Printer> ......................................................................................................................................................... 306
<Receive> ........................................................................................................................................................ 333
<Access Files> .................................................................................................................................................. 335
<Secure Print> .................................................................................................................................................. 339
<Management Settings> ....................................................................................................................................... 340
<User Management> ........................................................................................................................................ 341
<Device Management> ...................................................................................................................................... 342
<License/Other> ............................................................................................................................................... 344
<Data Management> ........................................................................................................................................ 346
<Security Settings> ........................................................................................................................................... 348
....................................................................................................................................................... 276
Maintenance ................................................................................................................................................. 351
Regular Cleaning .................................................................................................................................................. 353
Cleaning the Exterior ........................................................................................................................................ 354
Cleaning the Fixing Assembly ............................................................................................................................. 355
Replacing the Toner Cartridge ............................................................................................................................... 356
Checking the Remaining Amount of Consumables .................................................................................................. 360
Adjusting Image Quality ....................................................................................................................................... 361
Adjusting Print Density ...................................................................................................................................... 362
Adjusting Print Position ..................................................................................................................................... 363
Viewing the Counter Value .................................................................................................................................... 365
Printing Reports and Lists ..................................................................................................................................... 366
Replacement Parts ................................................................................................................................................ 369
Troubleshooting (FAQ) .......................................................................................................................... 372
Appendix ........................................................................................................................................................... 374
Third Party Software ............................................................................................................................................. 376
Feature Highlights ................................................................................................................................................ 377
Going Green and Saving Money ......................................................................................................................... 378
Improving Eciency ......................................................................................................................................... 379
So Much More .................................................................................................................................................. 380
Specications ....................................................................................................................................................... 382
Main Unit ........................................................................................................................................................ 383
Available Paper ................................................................................................................................................ 385
Cassette Feeding Module-AH ............................................................................................................................. 388
IV
Page 6

Printer Functions ..............................................................................................................................................
Management Functions ..................................................................................................................................... 391
System Environment ......................................................................................................................................... 393
Network Environment ....................................................................................................................................... 394
Options ................................................................................................................................................................ 395
Optional Equipment .......................................................................................................................................... 396
System Options ................................................................................................................................................ 397
Manuals and Their Contents .................................................................................................................................. 399
Using User's Guide ................................................................................................................................................ 400
Screen Layout of User's Guide ............................................................................................................................ 401
Viewing User's Guide ........................................................................................................................................ 404
Basic Windows Operations .................................................................................................................................... 405
Notice .................................................................................................................................................................. 412
389
V
Page 7

Setting Up
Setting Up
Setting Up ...............................................................................................................................................................
Main Functions ...................................................................................................................................................... 3
Preparations Required Before Use ....................................................................................................................... 4
Preventing Unauthorized Access .......................................................................................................................... 5
Setting Up Using the Setup Guide ........................................................................................................................ 7
Setting the Date/Time ........................................................................................................................................... 9
Setting Up the Network Environment ............................................................................................................... 11
Selecting Wired LAN or Wireless LAN .............................................................................................................. 13
Connecting to a Wired LAN ............................................................................................................................. 14
Connecting to a Wireless LAN ......................................................................................................................... 15
Setting Up Connection Using WPS Push Button Mode ............................................................................. 17
Setting Up Connection Using WPS PIN Code Mode .................................................................................. 19
Setting Up Connection by Selecting a Wireless Router ............................................................................. 21
Setting Up Connection by Specifying Detailed Settings ............................................................................ 24
Checking the SSID and Network Key ........................................................................................................ 27
Setting IP Addresses ....................................................................................................................................... 28
Setting IPv4 Address ................................................................................................................................ 29
Setting IPv6 Addresses ............................................................................................................................ 32
2
Viewing Network Settings ............................................................................................................................... 35
Conguring Settings for Communication with a Computer ............................................................................ 37
Conguring Printing Protocols and WSD Functions ................................................................................. 38
Conguring Printer Ports ......................................................................................................................... 41
Setting Up Print Server ............................................................................................................................ 44
Conguring the Machine for Your Network Environment ............................................................................... 47
Conguring Ethernet Settings ................................................................................................................. 48
Changing the Maximum Transmission Unit ............................................................................................. 50
Setting a Wait Time for Connecting to a Network .................................................................................... 51
Conguring DNS ...................................................................................................................................... 52
Conguring SMB ...................................................................................................................................... 56
Conguring WINS .................................................................................................................................... 58
Monitoring and Controlling the Machine with SNMP ............................................................................... 60
Other Network Settings ........................................................................................................................... 64
Installing Drivers ................................................................................................................................................. 68
1
Page 8

Setting Up
Setting Up
Befor
e using the functions of the machine, the environmental conditions must be set in advance. To begin with, check
the sequences of ow required to complete the setup, and then perform the actual settings.
Befor
e Use(P. 4)
Conguring Initial Settings of the Machine (Setup Guide)
● Y
ou can easily congure the initial settings required to use the machine, such as date, time, and network
settings, by following the on-screen guidance.
Setting Up Using the Setup Guide(P. 7)
Preparations Required
6FR8-000
2
Page 9
Main Functions
Setting Up
6FR8-001
This manual co
vers all the functions of the model series you purchased. Before getting started, check which functions
are available on the model you purchased.
: With function : Without function
Function LBP1238
Print
2-sided printing
Wired LAN connection
Wireless LAN connection
USB connection
Remote UI
Keys and Certicates
Linking with Mobile Devices
Display Touch panel
Default System Manager ID 7654321
Default System Manager PIN 7654321
Department ID Management
Application Library
Cassette Feeding Module-AH Optional
Barcode Printing Kit Optional
● For the available driver types, see the User Softwar
the Canon website (https://global.canon/).
LINKS
e CD-ROM/DVD-ROM supplied with the machine, or see
Viewing User's Guide(P. 404)
3
Page 10

Setting Up
Preparations Required Before Use
6FR8-002
Set up the machine follo
to the corresponding section. In addition, to use the machine safely, also check
Access(P
. 5) .
Step 1 Setting Up Using the Setup Guide(P. 7)
Step 2 Setting Up the Network Environment(P. 11)
wing steps 1 to 3 in order. For more information about a particular step, click on the link to go
● Congur
to use the Setup Guide, congure the network settings from here.
e the network settings that are not covered in the Setup Guide. If you do not need
Preventing Unauthorized
Step 3 Installing Drivers(P. 68)
Setting from the Remote UI
● When the network envir
using Remote UI.
Importing data fr
● As long as the model is the same, you can save setting data registered on another Canon printer/
multifunction machine to a computer (export) and load the setting data to this machine (import).
Importing/Exporting the Setting Data(P. 256)
onment settings are complete, you can eciently set the machine from a computer
Starting Remote UI(P. 238)
om another machine to save time
4
Page 11

Setting Up
Preventing Unauthorized Access
6FR8-003
This section describes the security measur
a must-read for all users and administrators before using this machine, other printers, and multifunction machines
connected to the network. In recent years, a printer/multifunction machine connected to the network can offer you a
variety of useful functions, such as printing from a computer, operating from a computer using the remote function,
and sending scanned documents via the Internet. On the other hand, it is essential to take security measures to
reduce the security risk for information leakage, as a printer/multifunction machine has become more exposed to
threats, such as unauthorized access and theft, when it is connected to the network. This section explains necessary
settings you need to specify to prevent unauthorized access before using a printer/multifunction machine connected
to the network.
es on how to prevent unauthorized access from the external network. This is
Security Measures to Prevent Unauthorized Access from the External Network
Assigning a Private IP Address(P. 5)
Using Firewall to Restrict Transmission(P. 6)
Specifying the TLS Encrypted Communication (P. 6)
Setting PIN to Manage Information Stored in the Multifunction Machine(P. 6)
Assigning a Private IP Address
An IP address is a numerical label assigned to each device participating in a computer network. A "global IP address" is
used for the communication connecting to the Internet, and a "private IP address" is used for the communication
within a local area network, such as a LAN in the company. If a global IP address is assigned, your printer/
multifunction machine is open to the public and can be accessed via the Internet. Thus, the risk of information leakage
due to unauthorized access from external network increases. On the other hand, if a private IP address is assigned,
your printer/multifunction machine is closed to a local area network and can be accessed by only users on your local
area network, such as a LAN in the company.
Global IP Address
Can be accessed fr
Basically, assign a private IP address to your printer/multifunction machine. Make sure to conrm the IP address,
assigned to the printer/multifunction machine you are using, is a private IP address or not. A private IP address is
found in one of the following ranges.
om the external network
Can be accessed from the users within a local area network
Private IP Address
Ranges for Private IP addresses
om 10.0.0.0 to 10.255.255.255
● Fr
● From 172.16.0.0 to 172.31.255.255
● From 192.168.0.0 to 192.168.255.255
For information on how to conrm the IP address, see
Setting IPv4 Address(P. 29) .
● If a global IP addr
to reduce the risk of unauthorized access by installing security software, such as a rewall that prevents
ess is assigned to a printer/multifunction machine, you can create a network environment
5
Page 12

Setting Up
access from the external networks. If you want to assign a global IP address to and use a printer/
multifunction machine, contact your network administr
ator.
Using Firewall to Restrict Transmission
A r
ewall is a system that prevents unauthorized access from the external networks and protects against attacks/
intrusions to a local area network. You can use a rewall on your network environment to block access from the
external network that appears to be dangerous, by restricting communication from specied IP address of the
external network. The function installed to a Canon printer/multifunction machine enables you to set up the IP
address lter. For information on how to set up an IP address lter, see
Settings(P
. 201) .
Specifying IP Addresses for Firewall
Specifying the TLS Encrypted Communication
For information on the TLS Encrypted Communication, see
and on the procedures to specify, see
Conguring the Ke
Conguring the Network Security Settings
y and Certicate for TLS(P. 210) .
(P. 198) ,
Setting PIN to Manage Information Stored in the Multifunction Machine
If a malicious thir
information stored in the machine will reduce the risk of information leakage. Canon printers/multifunction machines
enable you to protect various type of information by setting PIN.
Setting PIN to Each Function
● Setting PIN for Using Remote UI
For mor
● Setting PIN for the System Manager Settings
For mor
Listed abo
the other security measures, see
preventing unauthorized access to suit your environment.
ve are some examples of security measures for preventing unauthorized access. For more information on
d party attempts to gain unauthorized access to a printer/multifunction machine, setting PIN to
e information, see
e information, see
Setting a Remote UI PIN(P. 196) .
Setting the System Manager ID and PIN(P. 188) .
Managing the Machine(P. 185) and tak
e necessary security measures for
6
Page 13

Setting Up
Setting Up Using the Setup Guide
6FR8-004
1660-009
When the machine is turned on ( Turning ON the Machine(P. 83) ) for the rst time, the Setup Guide starts up to
assist you to congur
setting screens are displayed in the following order.
Step 1 Setting the Display Language and the Country or Region
e the initial settings of the machine by following the on-screen guidance. In the Setup Guide, the
Set the language to be displayed on the operation panel screen or in reports, as well as the
country or r
egion where the machine will be used.
Select a language.
1
Select <Yes>.
2
Select a country or region.
3
Step 2 Setting the Date and Time
Adjust the machine's date/time.
Select a time zone.
1
What is UTC?
● Coor
Enter the date and time, and select <Apply>.
2
● Tap the entry eld, and enter the date and time.
Step 3 Setting the Access Security Measures
Set the System Manager ID of the system manager account and a PIN to access the Remote UI.
Y
ou can only use the Remote UI if you set a PIN.
Select <Yes>.
1
● If you select <No>, the settings required for using the Remote UI are not
dinated Universal Time (UTC) is the primary time standard by which the
world regulates clocks and time. The correct UTC time zone setting is required
for Internet communications.
congured, and the Setup Guide proceeds to step 4.
Select <Yes>.
2
● If you select <No>, the System Manager ID and PIN are not changed from the
default settings, and the Setup Guide proceeds to number 4 in this step.
Specify the System Manager ID and PIN.
3
● Specify the <System Manager ID>
● Enter numbers for each item, and select <Apply>.
● The Conrm scr
● Do not for
een is displayed. Enter the PIN once again to conrm.
get your PIN.
<System Manager PIN>.
7
Page 14

Setting Up
● Y
ou cannot register an ID or PIN that consists only of zeros, such as "00" or
"0000000."
Select <Yes>.
4
● If you select <No>, a Remote UI Access PIN is not set, and the Setup Guide
proceeds to step 4.
Specify the Remote UI Access PIN.
5
● Enter a PIN, and select <Apply>.
● The Conrm screen is displayed. Enter the PIN once again to conrm.
● Do not for
ou cannot register a PIN that consists only of zeros, such as "00" or "0000000."
● Y
Step 4 Setting the Wireless LAN
Congure the settings to connect to the network using the wir
Select <Yes>.
1
● If you select <No>, wireless LAN is not set, and the Setup Guide proceeds to
step 5.
Select <OK>.
2
Select the setting method.
3
● For more information about the wireless LAN settings, see
Wir
Step 5 Viewing Application Library
The one-touch button referred to as "Application Library" is provided in the Home screen. You
can r
ead the description of each function.
get your PIN.
eless LAN(P. 15) .
eless LAN.
Connecting to a
To nish the Setup Guide, select <End>.
1
➠ When the Setup Guide is complete, the Home screen appears.
8
Page 15

Setting the Date/Time
Setting Up
6FR8-005
Set the date and time for the machine. The date and time ar
time, therefore, they need to be set accurately.
Setting the Time Zone(P. 9)
Setting the Current Date and Time(P. 9)
Setting the Daylight Saving Time(P. 10)
e used as the reference for the functions specifying the
Setting the Time Zone
If the time zone setting is changed, the values set in <Current Date/Time Settings> are also changed accordingly.
Select <Menu> in the Home screen.
1
Select <Preferences> <Timer/Energy Settings> <Date/Time Settings> <Time
2
Zone>.
Select the time zone.
3
Home Screen(P. 92)
What is UTC?
● Coor
dinated Universal Time (UTC) is the primary time standard by which the world regulates clocks and
time. Time differences exist depending on the country or area where the machine is used. The correct UTC
time zone setting is required for Internet communications.
Setting the Current Date and Time
Select <Menu> in the Home screen.
1
Select <Preferences> <Timer/Energy Settings> <Current Date/Time Settings>.
2
Enter the date and time.
3
● T
ap the entry eld, and enter the date and time.
Home Screen(P. 92)
9
Page 16

Select <Apply>.
4
Setting Up
● Set <Time Zone> befor
current date and time are also changed accordingly.
● The display format of the date and time can be changed, r
<Date Format>(P. 273)
<Time Format>(P. 273)
e setting the current date and time. If the <Time Zone> setting is changed later, the
Setting the Daylight Saving Time
If daylight saving time is enabled, specify the dates fr
Select <Menu> in the Home screen.
1
Select <Preferences> <Timer/Energy Settings> <Date/Time Settings> <Daylight
2
Saving Time Settings>.
om which and to which daylight saving time is in effect.
espectively.
Home Screen(P. 92)
Select <Off> or <On> in <Daylight Saving Time>.
3
● When you select <On>, select <Start Date> and <End Date>, and set the month and day for each item. T
the day, specify "what day of which week."
Select <Apply>.
4
o set
10
Page 17
Setting Up
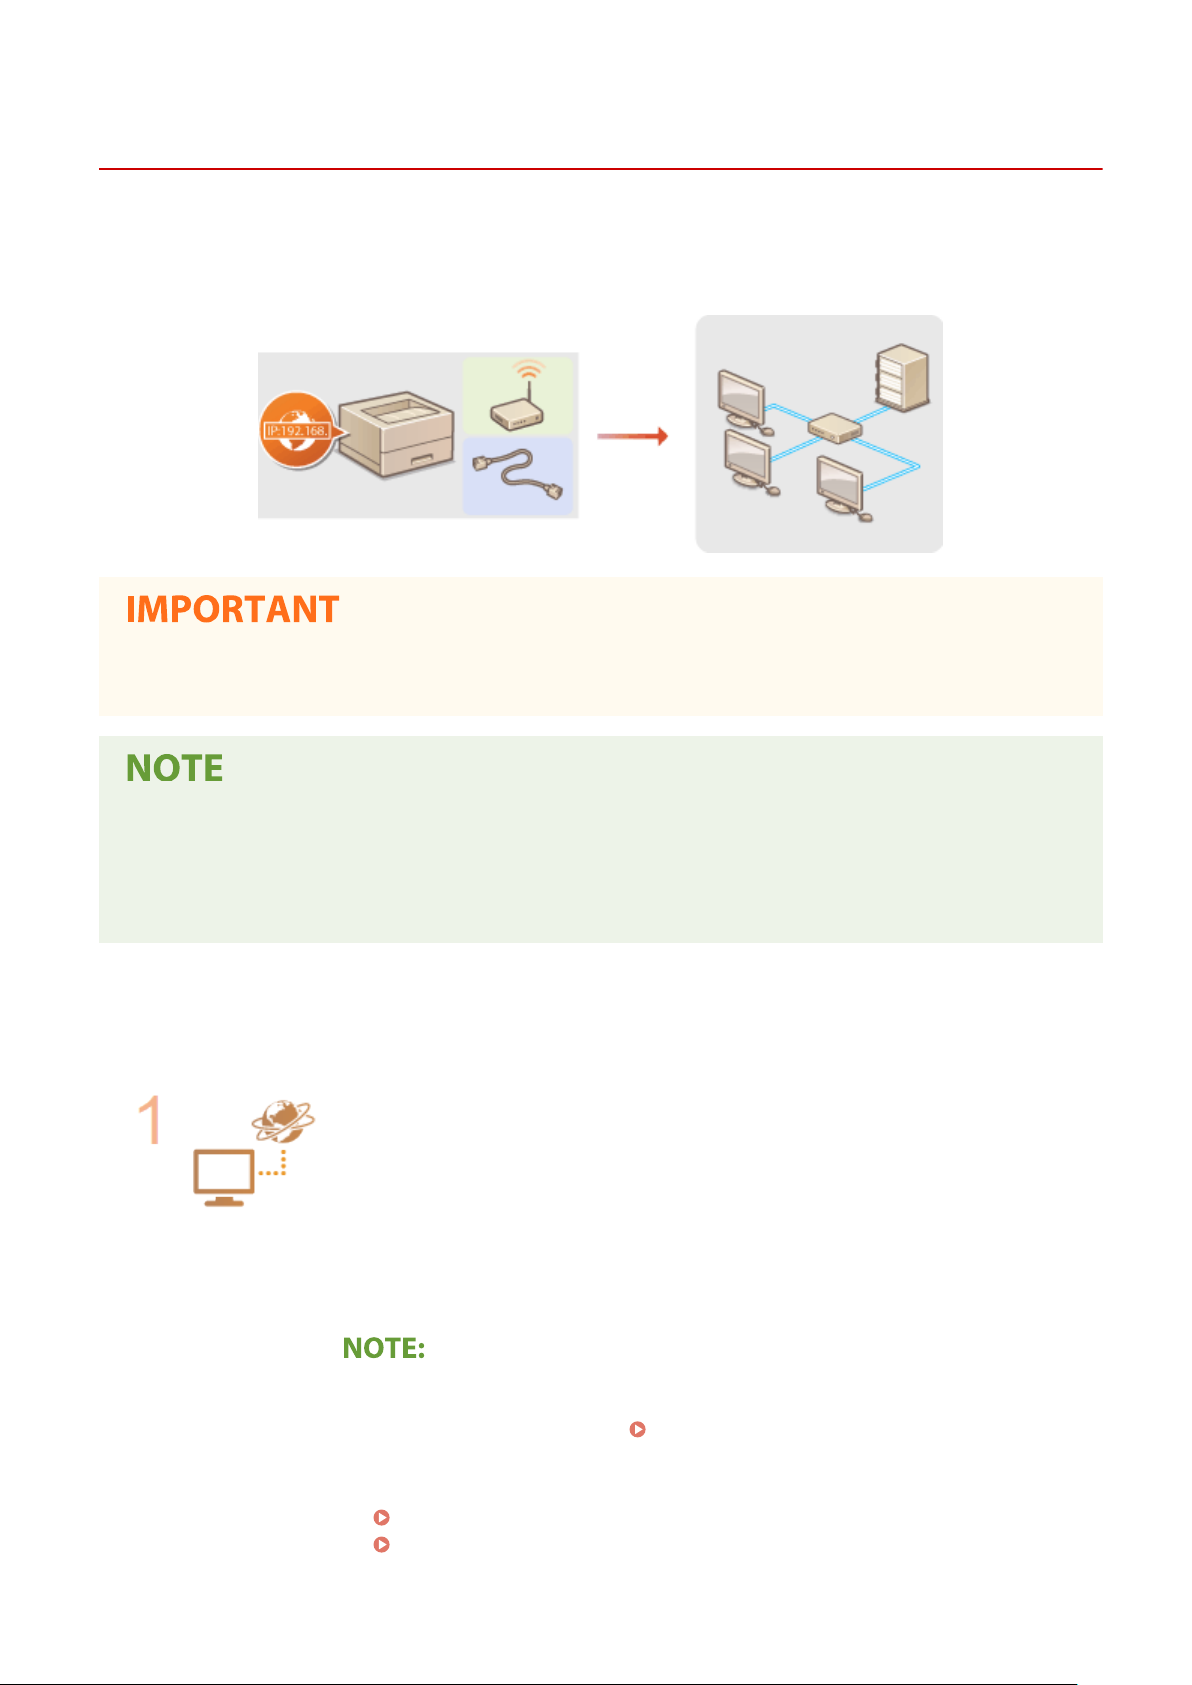
Setting Up the Network Environment
6FR8-006
When connecting the machine to a wir
the selected network. Select "wired" or "wireless" depending on your communication environment and networking
devices. For specic IP address settings, contact your Internet service provider or Network Administrator.
● If the machine is connected to an unsecur
party.
ed or wireless local area network (LAN), you need to set an IP address unique to
ed network, your personal information might be leaked to a third
● The machine cannot connect to both wir
● The machine does not come with a LAN cable or router. Have them ready as necessary.
● For more information about your networking devices, see the instruction manuals for the devices or contact
your manufacturer.
◼ Befor
Follow these steps to connect the machine to a network.
e You Start
Check your computer settings.
● Mak
e sure that the computer is correctly connected to the network. For more
information, see the instruction manuals for the devices you are using, or contact the
device manufacturers.
● Make sure that the network settings have been completed on the computer. If the
network has not been set up properly, you will not be able to use the machine on the
network, even if you perform the rest of the procedure below.
● Depending on the network, you may need to change settings for the communication
method or the Ethernet type ( Conguring Ethernet Settings(P
information, contact your Internet service provider or Network Administrator.
ed and wireless LANs at the same time.
. 48) ). For more
● To check the MAC address of the machine.
Viewing the MAC Address for Wired LAN(P. 35)
Viewing the MAC Address and Information for Wireless LAN(P. 36)
11
Page 18

Setting Up
● T
o connect to an IEEE 802.1X network, see
Authentication Settings
Select wired or wireless LAN.
Selecting Wired LAN or Wireless LAN(P. 13)
Connect to a wired or wireless LAN.
oceed to the section that corresponds to the setting you selected in step 2.
● Pr
Connecting to a Wired LAN(P. 14)
Connecting to a Wireless LAN(P. 15)
(P. 228) .
Conguring IEEE 802.1X
Set the IP address as necessary.
● At the time of pur
Change this setting if you want to use a specic IP address.
esses(P. 28)
Addr
chase, the machine is set to automatically acquire an IP address.
LINKS
Conguring Settings for Communication with a Computer
Conguring the Machine for Y
our Network Environment(P. 47)
Setting IP
(P. 37)
12
Page 19

Setting Up
Selecting Wired LAN or Wireless LAN
6FR8-007
After you decide on wir
using the operation panel. Note that if you change the setting from <Wired LAN> to <Wireless LAN> or vice versa, you
will need to uninstall the drivers installed on your computer and then reinstall them. For more information, see the
manuals for the relevant drivers on the online manual website.
Select <Menu> in the Home screen.
1
Select <Preferences> <Network>.
2
● If the login scr
Select <Select Wired/Wireless LAN>.
3
Select <Wired LAN> or <Wireless LAN>.
4
LINKS
Setting Up the Network Environment(P. 11)
Connecting to a Wired LAN(P. 14)
Connecting to a Wireless LAN(P. 15)
ed or wireless LAN to connect the machine to the computer, select wired LAN or wireless LAN
Home Screen(P. 92)
een appears, enter the correct ID and PIN.
Logging in to the Machine(P. 102)
13
Page 20
Setting Up
Connecting to a Wired LAN
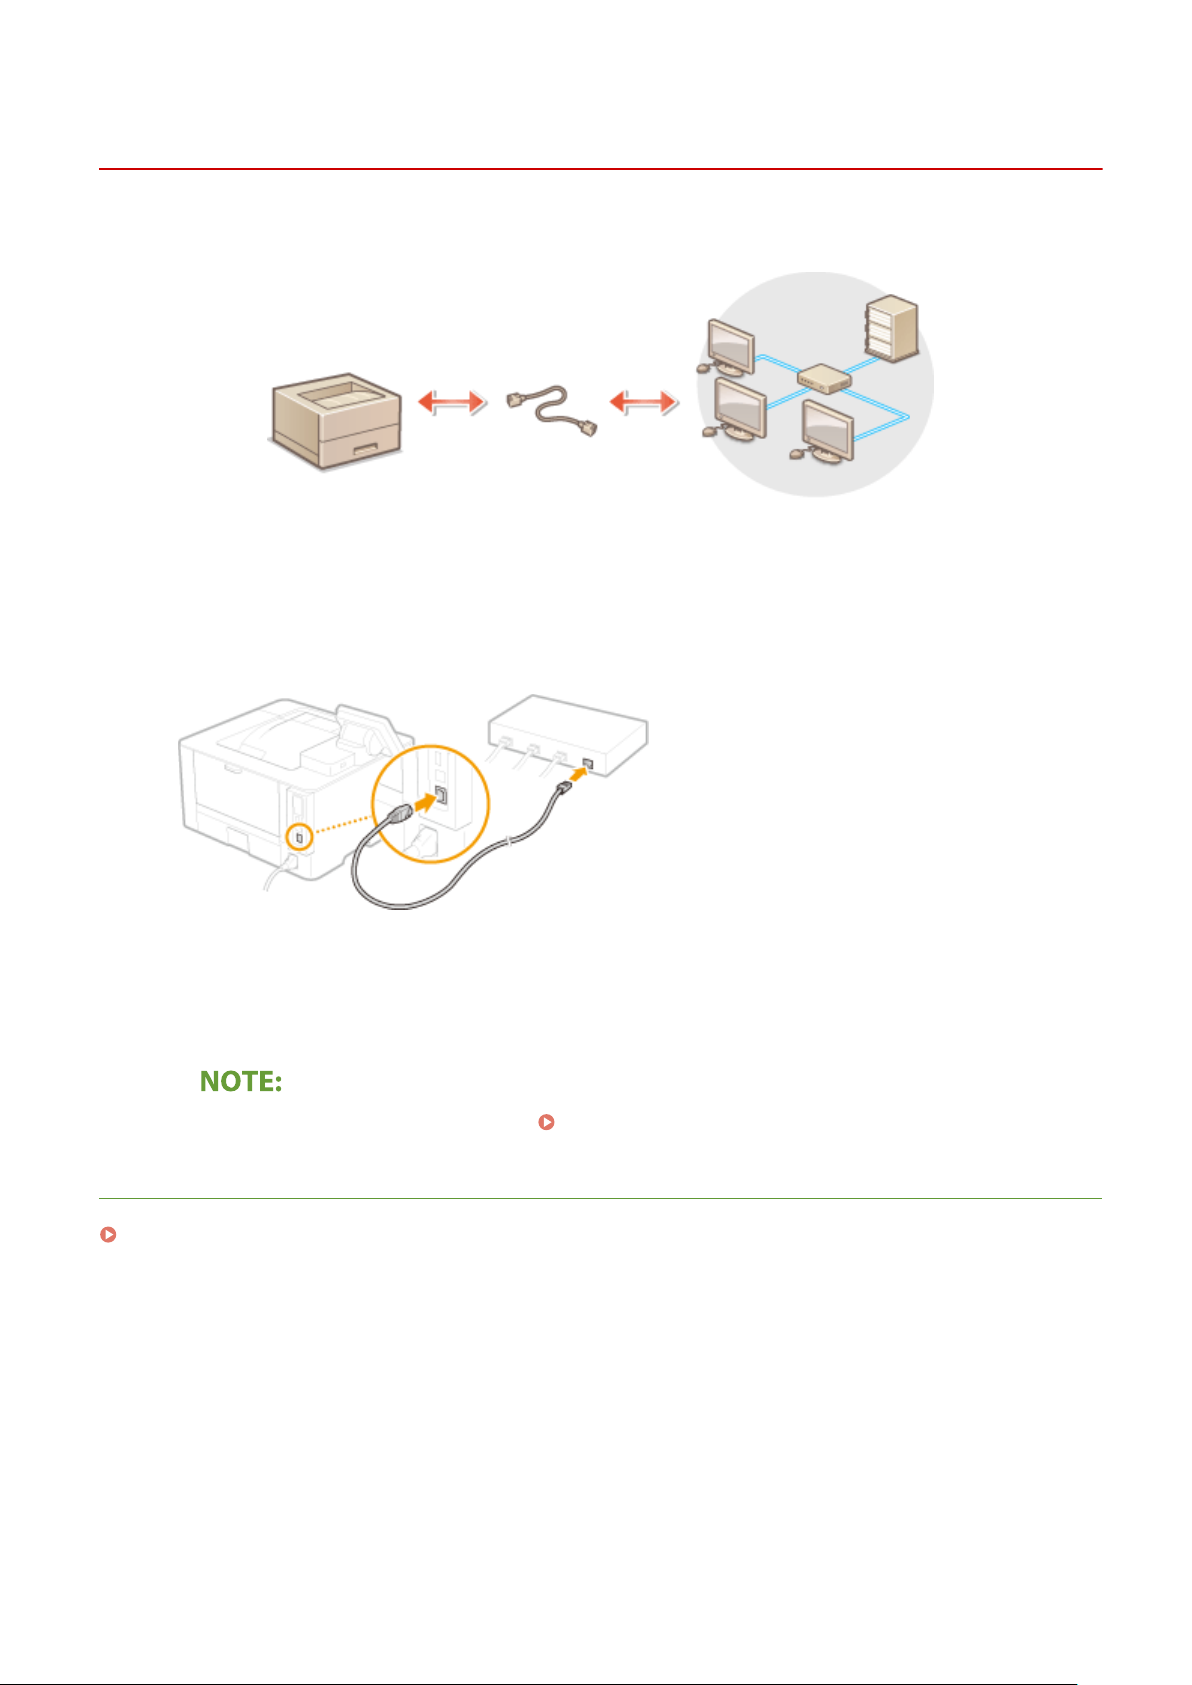
6FR8-008
Connect the machine to a computer via a r
Connect a LAN cable.
1
● Connect the machine to a r
● Push the connector in until it clicks into place.
outer by using a LAN cable.
outer. Use a LAN cable to connect the machine to the router.
Wait for several minutes.
2
➠ The IP addr
ou can set the IP address manually.
● Y
LINKS
Setting Up the Network Environment(P. 11)
ess is set automatically.
Setting IP Addresses(P. 28)
14
Page 21

Setting Up
Connecting to a Wireless LAN
6FR8-009
Wir
eless routers (or access points) connect the machine to a computer via radio waves. If your wireless router is
equipped with Wi-Fi Protected Setup (WPS), conguring your network is automatic and easy. If your networking
devices do not support automatic conguration, or if you want to specify authentication and encryption settings in
detail, you need to manually set up the connection. Make sure that your computer is correctly connected to the
network.
Setting Up Connection Using WPS(P. 15)
Manually Setting Up Connection(P. 16)
Risk of information leak
● Use wir
unsecured network, your personal information might be leaked to a third party because radio waves used in
wireless communication can go anywhere nearby, even beyond walls.
eless LAN connection at your own discretion and at your own risk. If the machine is connected to an
Wireless LAN security
● The wireless LAN function of this machine supports WEP, WPA-PSK, and WPA2-PSK. For the wireless security
compatibility of your wireless router, see the instruction manuals for your networking devices or contact
your manufacturer.
Required devices for wireless LAN connection
● The machine does not come with a wir
eless router. Have the router ready as necessary.
Setting Up Connection Using WPS
When using WPS, two modes ar
e available: push button mode and PIN code mode.
◼ Push Button Mode
Find the WPS mark shown below on the package of your wireless router. Also make sure that there is a WPS button on
your networking device.
Setting Up Connection Using WPS Push Button Mode(P. 17)
15
Page 22

◼ PIN Code Mode
Setting Up
Some WPS r
the instruction manuals of your networking device, set up the connection by entering the PIN code.
Connection Using WPS PIN Code Mode(P
● If the wir
outers do not support the push button mode. If WPS PIN code mode is mentioned on the package or in
Setting Up
. 19)
eless router is set to use WEP authentication, you may not be able to set up connection using WPS.
Manually Setting Up Connection
When manually setting up a wir
information. Regardless of the method, make sure that you have the required setup information, including the SSID
and network key.
◼ Selecting a Wir
Select this setup option if you need to manually set up the connection but want to complete the setup as easily as
possible.
Setting Up Connection by Selecting a Wireless Router(P. 21)
Checking the SSID and Network Key(P. 27)
eless Router
◼ Manually Entering the Setup Information
eless connection, you can either select a wireless router or manually enter the required
If you want to specify security settings in detail, such as authentication and encryption settings, manually enter the
SSID and network k
ey to set up the connection.
Setting Up Connection by Specifying Detailed Settings(P. 24)
LINKS
Setting Up the Network Environment(P. 11)
Selecting Wired LAN or Wireless LAN(P. 13)
16
Page 23

Setting Up
Setting Up Connection Using WPS Push Button Mode
6FR8-00A
1660-00J
If your wir
eless router supports WPS push button mode, you can easily set up a connection with a WPS button.
w to operate the wireless router may vary on each device. See the instruction manuals for your
● Ho
networking device for help.
Select <Menu> in the Home screen.
1
Select <Preferences>
2
● If the login scr
Select <Wireless LAN Settings>.
3
● If the <Do you want to enable the wir
Read the message that is displayed, and select <OK>.
4
Select <WPS Push Button Mode>.
5
Select <Yes>.
6
een appears, enter the correct ID and PIN.
<Network>.
eless LAN?> message is displayed, select <Yes>.
Home Screen(P. 92)
Logging in to the Machine(P. 102)
Press and hold the WPS button on the wireless router.
7
● The button must be pr
● Depending on the networking device, you may need to press and hold the button for 2 seconds or longer.
See the instruction manuals for your networking device for help.
If an error message is displayed during setup
● Select <Close> and r
essed within 2 minutes after selecting <Yes> in step 6.
eturn to step 5.
17
Page 24

Setting Up
Wait until message <Connected.> is displayed.
8
Select <Close>.
9
➠ W
ait several minutes until the IP address and other items are set automatically.
Signal strength
● When
more than one wireless router is available for connection, the machine connects to the device
with the strongest signal. Signal strength is measured using RSSI (Received Signal Strength Indication).
● Y
ou can set the IP address manually.
● While
the machine is connected to the wireless LAN, the Wi-Fi icon is displayed in the Home screen or
the Basic Features screen of each function.
Setting IP Addresses(P. 28)
Basic Screens(P. 91)
Reducing power consumption
ou can set the machine to enter <Power Save Mode> based on signals emitted from the wireless router.
● Y
<Power Save Mode>(P. 277)
If the IP addr
● In a DHCP environment, the IP address of the machine may be changed automatically. If this happens, the
connection is maintained as long as the machine and the computer belong to the same subnet.
ess of the machine has changed
LINKS
Connecting to a Wireless LAN(P. 15)
18
Page 25

Setting Up
Setting Up Connection Using WPS PIN Code Mode
6FR8-00C
If your wir
the networking device.
eless router supports WPS PIN code mode, generate a PIN code with the machine and register the code to
w to operate the wireless router may vary on each device. See the instruction manuals for your
● Ho
networking device for help.
From a Computer
Access your wireless router from a computer and display the screen for entering a
1
WPS PIN code.
● For more information, see the instruction manuals for your networking device.
From the Operation Panel
Select <Menu> in the Home screen. Home Screen(P. 92)
2
Select <Preferences>
3
● If the login scr
Select <Wireless LAN Settings>.
4
● If the <Do you want to enable the wir
Read the message that is displayed, and select <OK>.
5
Select <WPS PIN Code Mode>.
6
Select <Yes>.
7
➠ The PIN code is gener
From a Computer
een appears, enter the correct ID and PIN.
<Network>.
eless LAN?> message is displayed, select <Yes>.
ated and shown on the display.
Logging in to the Machine(P. 102)
Register the generated PIN code to the wireless router.
8
● Register the PIN code on the setup scr
een displayed in step 1.
19
Page 26

Setting Up
● The PIN code must be r
If an error message is displayed during setup
● Select <Close> and r
egistered within 10 minutes after selecting <Yes> in step 7.
eturn to step 6.
From the Operation Panel
Wait until the message <Connected.> is displayed.
9
10
Select <Close>.
➠ W
ait several minutes until the IP address and other items are set automatically.
Signal strength
● When
more than one wireless router is available for connection, the machine connects to the device
with the strongest signal. Signal strength is measured using RSSI (Received Signal Strength Indication).
● Y
ou can set the IP address manually.
● While
the machine is connected to the wireless LAN, the Wi-Fi icon is displayed in the Home screen or
the Basic Features screen of each function.
Setting IP Addresses(P. 28)
Basic Screens(P. 91)
Reducing power consumption
ou can set the machine to enter <Power Save Mode> based on signals emitted from the wireless router.
● Y
<Power Save Mode>(P. 277)
If the IP addr
● In a DHCP environment, the IP address of the machine may be changed automatically. If this happens, the
connection is maintained as long as the machine and the computer belong to the same subnet.
ess of the machine has changed
LINKS
Connecting to a Wireless LAN(P. 15)
20
Page 27

Setting Up
Setting Up Connection by Selecting a Wireless Router
6FR8-00E
Y
ou can search the wireless routers (or access points) available for connection and select one from the display of the
machine. For the network key, enter a WEP key or PSK. Before selecting a wireless router, check and write down the
required setup information, including the SSID and network key (
Security settings
Checking the SSID and Network Key(P. 27) ).
● If the wir
<Open System> or the WPA/WPA2 encryption method is set to <Auto> (AES-CCMP or TKIP). If you want to
select <Shared Key> for WEP authentication or <AES-CCMP> for WPA/WPA2 encryption, you need to set up
the connection using <Enter Manually>.
1
2
● If the login scr
3
● If the <Do you want to enable the wir
4
eless connection is set up by selecting a wireless router, the WEP authentication method is set to
Setting Up Connection by Specifying Detailed Settings(P. 24)
Select <Menu> in the Home screen. Home Screen(P. 92)
Select <Preferences>
een appears, enter the correct ID and PIN.
Select <Wireless LAN Settings>.
Read the message that is displayed, and select <OK>.
<Network>.
Logging in to the Machine(P. 102)
eless LAN?> message is displayed, select <Yes>.
Select <SSID Settings>.
5
Select <Select Access Point>.
6
➠ The machine starts sear
● If
a message is displayed telling that no access point can be found, check the network settings. For more
information, see "Troubleshooting (FAQ)" on the online manual website.
Select a wireless LAN router.
7
● Select the r
outer whose SSID matches the one that you have written down, and select <Next>
ching for available wireless routers.
<OK>.
21
Page 28

To view details of security settings
● Select the wir
eless LAN router, and select <Details>. To return to the original screen, select
Setting Up
.
If your wir
● Check whether the machine is properly installed and ready to connect to the network. For more
information, see "Troubleshooting (FAQ)" on the online manual website.
Enter the network key that you have written down.
8
● Enter the network key, and select <Apply>.
● On how to enter text, see
Select <Yes>.
9
If an error message is displayed during setup
● Select <Close>, check whether the network k
10
Wait until message <Connected.> is displayed.
eless router is not found
Entering Text(P. 100) .
ey is correct, and return to step 5.
11
Select <Close>.
➠ W
ait several minutes until the IP address and other items are set automatically.
Signal strength
● When
● Y
● While
more than one wireless router is available for connection, the machine connects to the device
with the strongest signal. Signal strength is measured using RSSI (Received Signal Strength Indication).
ou can set the IP address manually.
the machine is connected to the wireless LAN, the Wi-Fi icon is displayed in the Home screen or
the Basic Features screen of each function.
Setting IP Addresses(P. 28)
Basic Screens(P. 91)
Reducing power consumption
● Y
ou can set the machine to enter <Power Save Mode> based on signals emitted from the wireless router.
<Power Save Mode>(P. 277)
22
Page 29

Setting Up
If the IP address of the machine has changed
● In a DHCP envir
connection is maintained as long as the machine and the computer belong to the same subnet.
onment, the IP address of the machine may be changed automatically. If this happens, the
LINKS
Connecting to a Wireless LAN(P. 15)
23
Page 30

Setting Up
Setting Up Connection by Specifying Detailed Settings
6FR8-00F
If you want to specify the security settings in detail or cannot establish the wir
procedures, manually enter all the required information for the wireless LAN connection. Before specifying detailed
settings, check and write down the required information, including the SSID, network key, and wireless security
protocols.
1
2
3
4
5
Checking the SSID and Network Key(P. 27)
Select <Menu> in the Home screen.
Select <Preferences> <Network>.
● If the login scr
Select <Wireless LAN Settings>.
● If the <Do you want to enable the wireless LAN?> message is displayed, select <Yes>.
Read the message that is displayed, and select <OK>.
Select <SSID Settings>
een appears, enter the correct ID and PIN.
<Enter Manually>.
Home Screen(P. 92)
Logging in to the Machine(P. 102)
eless connection using the other
Enter the SSID that you have written down.
6
● Enter the SSID
● On how to enter text, see
Specify the security settings based on the information that you have written down.
7
● If you do not need to specify the security settings, select <None>.
Using WEP
Select <WEP>.
1
Select an authentication method.
2
, and select <Apply>.
Entering Text(P. 100) .
24
Page 31

Setting Up
<Open System>
Sets open system authentication, which is also called "
<Shared Key>
Uses the WEP key as a password.
When <Open System> is selected
● When connecting to a wir
authentication is set on the wireless router. If this happens, the machine automatically changes the
setting to <Shared Key> and retries the connection.
eless LAN, the machine experiences an authentication error if the shared key
open authentication."
Select the WEP key you want to edit.
3
● Select the WEP key (1 to 4), and select <Edit>.
● Up to four WEP keys can be registered.
Enter the network key that you have written down.
4
● Enter the network key, and select <Apply>.
Select the desired WEP key.
5
● Select the WEP key you have edited, and select <Register>.
Using WPA-PSK or WPA2-PSK
Select <WPA/WPA2-PSK>.
1
Select an encryption method.
2
<Auto>
Sets the machine to automatically select AES-C
<AES-CCMP>
Sets AES-CCMP as the encryption method.
Enter the network key that you have written down.
3
● Enter the network key, and select <Apply>.
CMP or TKIP to match the setting of the wireless router.
25
Page 32

Setting Up
Select <Yes>.
8
If an error message is displayed during setup
● Select <Close>, check whether the specied settings ar
Wait until message <Connected.> is displayed.
9
e correct, and return to step 5.
10
Select <Close>.
➠ W
ait several minutes until the IP address and other items are set automatically.
Signal strength
● When
● Y
● While
more than one wireless router is available for connection, the machine connects to the device
with the strongest signal. Signal strength is measured using RSSI (Received Signal Strength Indication).
ou can set the IP address manually.
the machine is connected to the wireless LAN, the Wi-Fi icon is displayed in the Home screen or
the Basic Features screen of each function.
Setting IP Addresses(P. 28)
Basic Screens(P. 91)
Reducing power consumption
● You can set the machine to enter <Power Save Mode> based on signals emitted from the wireless router.
<Power Save Mode>(P. 277)
If the IP addr
● In a DHCP environment, the IP address of the machine may be changed automatically. If this happens, the
connection is maintained as long as the machine and the computer belong to the same subnet.
ess of the machine has changed
LINKS
Connecting to a Wireless LAN(P. 15)
26
Page 33

Setting Up
Checking the SSID and Network Key
6FR8-00H
When manually setting up a wir
The SSID and network key may be indicated on these networking devices. Check your devices and write down the
necessary information before setting up the connection. For more information, see the instruction manuals for your
networking devices or contact your manufacturer.
SSID A name given for identifying a specic wir
Network Key A keyword or password used for encrypting data or authenticating a network. Some other
Wireless Security Protocols
(Authentication/Encryption)
◼ Checking the SSID and Network Ke
The SSID or the network key may have been changed. If you do not know the SSID or the network key, you can check
them by using the "Canon MF/LBP Wireless Setup Assistant." Download the "Canon MF/LBP Wireless Setup Assistant"
from the Canon website (https://global.canon/), and start it up from a computer connected to a wireless LAN.
eless connection, you need to specify the SSID and network key of your wireless router.
eless LAN. Some other terms used for SSID include
"access point name" and "network name."
terms used for network key include "encryption key," "WEP key," "WPA/WPA2 passphrase,"
and "preshared key (PSK)."
When manually setting up a wireless connection by specifying detailed settings, you need to
specify security settings. Check the following information:
● Security types (WEP/WPA-PSK/WPA2-PSK)
● Authentication method (Open System/Shared Key)
● Encryption method (TKIP/AES-CCMP)
y from a Computer
● If no access point is displayed on the scr
check if the setup is completed both on the computer and the wireless LAN router.
een after startup of the "Canon MF/LBP Wireless Setup Assistant,"
LINKS
Connecting to a Wireless LAN(P. 15)
Setting Up Connection by Selecting a Wireless Router(P. 21)
Setting Up Connection by Specifying Detailed Settings(P. 24)
27
Page 34

Setting IP Addresses
Setting Up
6FR8-00J
Connecting the machine to a network r
available: IPv4 and IPv6. Congure these settings depending on the network environment. To use IPv6 addresses, you
need to properly congure the IPv4 address settings.
Setting IPv4 Address(P. 29)
Setting IPv6 Addresses(P. 32)
equires a unique network IP address. Two versions of IP addresses are
28
Page 35

Setting IPv4 Address
1660-00W
The machine's IPv4 address can be either assigned automatically by a dynamic IP
addr
essing protocol, such as DHCP, or entered manually. When connecting the
machine to a wired LAN, make sure that the connectors of the LAN cable are rmly
inserted into the ports (
network connection if necessary.
Setting IPv4 Address(P. 29)
Testing the Network Connection(P. 30)
Setting IPv4 Address
Setting Up
Connecting to a Wired LAN(P. 14) ). Y
6FR8-00K
ou can test the
Select <Menu> in the Home screen.
1
Select <Preferences> <Network>.
2
● If the login scr
Select <TCP/IP Settings> <IPv4 Settings> <IP Address Settings>.
3
Congure IP addr
4
<Auto Acquire>
Select to automatically assign an IP addr
addressing is enabled.
een appears, enter the correct ID and PIN.
ess settings.
ess via DHCP protocol. When <On> is displayed, automatic
Home Screen(P. 92)
Logging in to the Machine(P. 102)
<Manually Acquire>
Select to congure the IP address settings by manually entering an IP address. In order to select this option,
the automatic acquirement must be set to <Off>.
<Check Settings>
Select when you want to view the current IP address settings.
Automatically assigning an IP address
Select <Auto Acquire>.
1
Select the protocol.
2
● Select <On> in <Auto Acquir
e>, and select <Select Protocol>
29
<DHCP>.
Page 36

Setting Up
If you do not want to use DHCP/BOOTP/RARP to assign an IP address
● Select <Off>. If you select <DHCP> when these services ar
and communications resources searching the network for these services.
Check that <Auto IP> is set to <On>.
3
● If <Off> is selected, change the setting to <On>.
Select <Apply>.
4
e unavailable, the machine will waste time
● IP addr
Manually entering an IP address
1
2
3
Select <OK>.
5
Restart the machine.
6
Checking whether the settings are correct
esses assigned via DHCP override the address obtained via Auto IP.
Congure a setting to disable auto-acquisition.
● Select <Auto Acquir
Select <Manually Acquire>.
Specify the IP address, subnet mask, and gateway address (or default gateway).
● Enter <IP Addr
e>, and select <Off> in <Auto Acquire>
ess>, <Subnet Mask>, and <Gateway Address>, and select <Apply>.
Restarting the Machine(P. 88)
<Apply> <OK>.
● Mak
e sure that the Remote UI screen can be displayed with your computer (
. 238) ). If a computer is not available, you can check the connection by using the operation panel (
UI(P
Testing the Network Connection(P. 30) ).
When you have changed the IP addr
● You need to add a new port.
Conguring Printer Ports(P
Testing the Network Connection
Select <Menu> in the Home screen.
1
Select <Preferences> <Network>.
2
● If the login scr
een appears, enter the correct ID and PIN.
Starting Remote
ess after installing the printer driver
. 41)
Home Screen(P. 92)
Logging in to the Machine(P. 102)
30
Page 37

Setting Up
Select <TCP/IP Settings>
3
Enter the IPv4 address of another device on the network, and select <Apply>.
4
➠ If a pr
LINKS
Setting IPv6 Addresses(P. 32)
Viewing Network Settings(P. 35)
Conguring WINS
oper connection has been established, <Received response from the host.> is displayed.
(P. 58)
<IPv4 Settings> <PING Command>.
31
Page 38

Setting IPv6 Addresses
Setting Up
6FR8-00L
The IPv6 addresses of the machine can be congur
setting IPv6 addresses, check the IPv4 address settings (
Settings(P
The machine can use the following multiple IPv6 addresses:
Type Description
Link-local address An address that is only valid within a subnet or link and cannot be used to communicate with
vices beyond a router. A link-local address is automatically set when the IPv6 function of the
de
machine is enabled.
Manual address An address that is entered manually. When using this address, specify the prex length and default
router address.
Stateless address An address that is generated automatically using the MAC address of the machine and the network
prex that is advertised by the router. Stateless addresses are discarded when the machine is
restarted (or turned ON).
Stateful address An address obtained from a DHCP server using DHCPv6.
. 35) ). You need to set the correct IPv4 settings to use IPv6 addresses.
ed via the Remote UI. Before
Viewing IPv4
● For mor
Remote UI, see
1
2
3
4
5
e information about the basic operations to be performed when setting the machine from the
Setting Up Menu Options from Remote UI(P. 248) .
Start the Remote UI and log in to System Manager Mode.
. 238)
UI(P
Click [Settings/Registration] on the Portal page.
Select [Network Settings] [IPv6 Settings].
Click [Edit].
Select the [Use IPv6] check box and congur
e the required settings.
Starting Remote
Remote UI Screen(P. 239)
32
Page 39

Setting Up
[Use IPv6]
Select the check bo
[Stateless Address 1]
Select the check box when using a stateless address. When not using a stateless address, clear the check box.
[Use Manual Address]
When you want to manually enter an IPv6 address, select the check box and enter the IP address, prex
length, and default router address in the corresponding text boxes.
[IP Address]
Enter an IPv6 address. Addresses that start with "ff" (or multicast address) cannot be entered.
[Prex Length]
Enter a number that indicates how many bits are available for the network address.
[Default Router Address]
Specify the IPv6 address of the default router as necessary. Addresses that start with "ff" (or multicast
address) cannot be entered.
[Use DHCPv6]
Select the check box when using a stateful address. When not using DHCPv6, clear the check box.
Click [OK].
6
x to enable IPv6 on the machine. When not using IPv6, clear the check box.
Restart the machine.
7
Restarting the Machine(P. 88)
Checking whether the settings are correct
● Mak
e sure that the Remote UI screen can be displayed with your computer by using the IPv6 address of the
machine.
Starting Remote UI(P. 238)
33
Page 40

Setting Up
Selecting settings from the operation panel
● IPv6 settings can also be accessed fr
When you have changed the IP addr
● You need to add a new port.
Conguring Printer Ports(P
LINKS
Setting IPv4 Address(P. 29)
Viewing Network Settings(P. 35)
om <Menu> in the Home screen.
<IPv6 Settings>(P. 280)
ess after installing the printer driver
. 41)
34
Page 41

Setting Up
Viewing Network Settings
Viewing IPv4 Settings(P. 35)
Viewing IPv6 Settings(P. 35)
Viewing the MAC Address for Wired LAN(P. 35)
Viewing the MAC Address and Information for Wireless LAN(P. 36)
6FR8-00R
● The IP addr
● Connecting the machine to a switching hub or bridge may result in a connection failure even when the IP
address is correctly congured. This problem can be solved by setting a certain interval before the machine
starts communicating.
ou can print a list of the current network settings.
● Y
ess is not correctly congured if it is displayed as "0.0.0.0".
Setting a Wait Time for Connecting to a Network(P. 51)
User Data List/System Manager Data List(P. 366)
Viewing IPv4 Settings
<Status Monitor> <Network Information> <IPv4> Select the setting to view Check the
settings
Viewing IPv6 Settings
<Status Monitor> <Network Information> <IPv6> Select the setting to view Check the
settings
Viewing the MAC Address for Wired LAN
Select <Menu> in the Home screen.
1
Select <Preferences> <Network>.
2
● If the login scr
Select <Ethernet Driver Settings>.
3
➠ The MA
een appears, enter the correct ID and PIN.
C address is displayed.
Home Screen(P. 92)
35
Logging in to the Machine(P. 102)
Page 42

Setting Up
Viewing the MAC Address and Information for Wireless LAN
Select <Menu> in the Home screen.
1
Select <Preferences> <Network>.
2
● If the login scr
Select <Wireless LAN Settings>.
3
Read the message that is displayed, and select <OK>.
4
Select <Connection Information>.
5
Select the setting to view.
6
een appears, enter the correct ID and PIN.
Home Screen(P. 92)
Logging in to the Machine(P. 102)
Viewing security information
o view WEP and WPA/WPA2-PSK information, select <Security Settings>.
● T
Viewing from the <Status Monitor> screen
● <Wireless LAN Status> and <Latest Error Information> can be viewed from <Status Monitor>.
<Status Monitor>
LINKS
Connecting to a Wireless LAN(P. 15)
Setting IPv4 Address(P. 29)
Setting IPv6 Addresses(P. 32)
Conguring DNS(P
. 52)
<Network Information> <Network Connection Type> Select the setting to view
36
Page 43

Setting Up
Conguring Settings for Communication with a
Computer
6FR8-00S
Specify the pr
machine for printing from a computer, perform the basic setup procedures. For more information, see the manuals
for the relevant drivers on the online manual website.
Conguring Printing Pr
Conguring Printer Ports(P
Setting Up Print Server(P. 44)
● Pr
otocol and port when operating the machine from a computer via the network. Before conguring the
otocols and WSD Functions(P. 38)
. 41)
otocols explained here are rules for delivering document data between a computer and the machine, and
can be selected according to intended purposes or the network environment.
● Ports are gateways for passing data between network devices. If a communication failure occurs in the
network connection, the port settings may be the cause of the problem.
37
Page 44

Setting Up
Conguring Printing Pr
Congur
e the protocols that are used for printing documents from a networked computer.
● For mor
Remote UI, see
1
2
3
e information about the basic operations to be performed when setting the machine from the
Setting Up Menu Options from Remote UI(P. 248) .
Start the Remote UI and log in to System Manager Mode. Starting Remote
UI(P
. 238)
Click [Settings/Registration] on the Portal page.
Click [Network Settings].
otocols and WSD Functions
6FR8-00U
Remote UI Screen(P. 239)
Congure printing pr
4
Conguring LPD or RAW
Select [LPD Settings] or [RAW Settings]
1
Congure the settings as necessary
2
[Use LPD Printing]
Select the check bo
otocols.
[Edit].
.
x to print via LPD. When not using LPD printing, clear the check box.
[Use RAW Printing]
Select the check box to print via RAW. When not using RAW printing, clear the check box.
[RX Timeout]
Set a value as the restart wait time for data reception. If data reception does not resume within the set
time, printing is canceled.
Click [OK].
3
38
Page 45

Conguring WSD
Select [WSD Settings] [Edit].
1
Setting Up
Congure the settings as necessary
2
[Use WSD Printing]
Select the check bo
[Use WSD Browsing]
Select the check box to obtain information about the machine from a computer via WSD. This check box is
automatically selected when the [Use WSD Printing] check box is selected.
[Use Multicast Discovery]
Select the check box to set the machine to reply to multicast discovery messages. If the check box is
cleared, the machine stays in sleep mode even when multicast discovery messages are owing on the
network.
x to print via WSD. When not using WSD printing, clear the check box.
.
Click [OK].
3
Restart the machine.
5
Restarting the Machine(P. 88)
Selecting settings from the operation panel
, RAW, and WSD settings can also be accessed from <Menu> in the Home screen.
● LPD
<LPD Settings>(P. 283)
<RAW Settings>(P. 283)
<WSD Settings>(P. 283)
Setting up WSD network de
● The WSD network devices can be added from the printer folder. Open the printer folder (
Printer Folder(P
mor
e information about how to install the driver for the WSD network, see the manuals for the relevant
drivers on the online manual website.
. 405) )
vices
Displaying the
click [Add a device] or [Add a printer] and follow the on-screen instructions. For
To change the port number
● The same port number used for the machine and a computer must be used for printing protocol.
Conguring Printer Ports(P
Changing Port Numbers(P. 207)
. 41)
39
Page 46

LINKS
Setting Up
Conguring Printer Ports(P
. 41)
40
Page 47

Conguring Printer Ports
Setting Up
6FR8-00W
Printing err
the Windows printer folder. These errors are typically caused by incorrect printer port settings. For example, an
incorrect port number or port type may have been specied. In such situations, your attempt to print fails because the
document data cannot reach the machine. To x this type of problem, congure the printer port settings on the
computer.
● T
ors can occur when the IP address of the machine has been changed, or when a printer has been added via
o perform the following procedure, log in to your computer with an administrator account.
Open the printer folder.
1
Right-click the driver icon for this machine, and click [Printer properties] or
2
[Pr
operties].
Click the [Ports] tab and congur
3
Displaying the Printer Folder(P. 405)
e the required settings.
Adding a port
If you have changed the IP addr
drivers, add a new port.
Click [Add Port].
1
Select [Standard TCP/IP Port] in [Available port types] and click [New Port].
2
Click [Next].
3
Enter the IP address or the DNS name of the machine, and click [Next].
4
● The [Port Name] is enter
ess of the machine or you have selected an incorrect port while installing
ed automatically. If necessary, you can change it.
41
Page 48

Setting Up
● When the ne
*
When you select the [De
Click [Finish].
5
Click [Close].
6
xt screen is displayed, follow the instructions on the screen.
vice Type], select [Canon Network Printing Device with P9100] under [Standard].
Changing the port type or number
If the printing pr
Pr
otocols and WSD Functions(P. 38) ) or the port number has been changed (
Numbers(P
not needed for WSD ports.
otocol (LPD or RAW) has been changed on the machine side (
. 207) ), the corresponding settings on the computer must also be congured. This operation is
Conguring Printing
Changing Port
Click [Congur
1
Under [Protocol], select [Raw] or [LPR].
2
● If you selected [Raw], change the [Port Number].
● If you selected [LPR], enter "lp" in [Queue Name].
Click [OK].
3
e Port].
Deleting ports
Select the port you want to delete, and click [Delete Port].
1
42
Page 49

2
Setting Up
ou cannot delete a port currently congured as the printer port. To delete this port, select a different
● Y
port and click [Apply] to congure it as the new printer port, and then delete the original port.
Click [OK].
Click [Close].
4
LINKS
Setting Up Print Server(P. 44)
43
Page 50

Setting Up Print Server
Setting Up
6FR8-00X
With a print server, you can r
possible to install the drivers on each computer over the network, which saves you the trouble of installing the drivers
on each computer by using the provided CD-ROM/DVD-ROM. To set up a computer on the network as a print server,
congure the settings for sharing the printer.
o perform the following procedure, log in to your computer with an administrator account.
● T
● You may be unable to install drivers over the network depending on the operating system and the bit
architecture (32-bit or 64-bit) of the print server and client computers.
● When implementing a print server in a domain environment, consult your Network Administrator.
To carry out Department ID Management when using a print server
● "Canon Driver Information Assist Service
information, see the manuals for the relevant drivers on the online manual website.
Open the printer folder.
1
educe the load on the computer that you print from. The print server also makes it
" must be added during the printer driver installation. For more
Displaying the Printer Folder(P. 405)
Right-click the printer driver icon for this machine and click [Printer properties] or
2
[Pr
operties].
Click the [Sharing] tab, select [Share this printer], and enter the share name of the
3
machine.
● Click the [Change Sharing Options] button if displayed.
Install additional drivers as necessary.
4
● This oper
architecture via the print server.
ation is required if you want to install the drivers in other computers running a different bit
44
Page 51

Setting Up
Click [Additional Drivers].
1
Select the check box for the bit architecture that other computers are running, and click [OK].
2
● Select additional drivers fr
Print server Select the check box for
32-bit operating systems [x64]
64-bit operating systems [x86] under [Processor]
● If you do not kno
Checking the Bit Architecture(P. 407) .
Insert the provided CD-ROM/DVD-ROM into the drive on the computer, click [Browse] to specify the folder
3
that contains the drivers, and then click [OK].
● If the print server runs a 32-bit oper
on the pr
● If the print server runs a 64-bit operating system, select [UFRII]
folders on the pr
Follow the on-screen instructions to install additional drivers.
4
ovided CD-ROM/DVD-ROM.
w whether your Windows operating system is a 32-bit or 64-bit version, see
ovided CD-ROM/DVD-ROM.
om the following, according to the operating system of the print server.
ating system, select [UFRII]
[us_eng] [x64] [Driver] folders
[us_eng] [32BIT] [Driver]
Click [OK].
5
◼ Installing the Drivers on a Computer via the Print Server
Locate the shared printer in the print server.
1
Print Server(P
Double-click the shared printer.
2
. 406)
45
Displaying Shared Printers in the
Page 52

Follow the on-screen instructions to install the drivers.
3
LINKS
Printing from a Computer(P. 140)
Setting Up
46
Page 53

Setting Up
Conguring the Machine for Y
our Network
Environment
6FR8-00Y
The congur
be compatible with as many network congurations as possible, and it is equipped with a variety of technologies.
Consult your Network Administrator and set a conguration to suit your network environment.
ation of a network varies depending on the purpose of the network. The machine has been designed to
Conguring Ethernet Settings(P
Changing the Maximum Transmission Unit(P. 50)
Setting a Wait Time for Connecting to a Network(P. 51)
Conguring DNS(P
Conguring SMB
Conguring WINS
Monitoring and Controlling the Machine with SNMP(P. 60)
Other Network Settings(P. 64)
. 52)
(P. 56)
(P. 58)
. 48)
47
Page 54

Setting Up
Conguring Ethernet Settings
Ethernet is a standard for communicating data in a local area network (LAN). You can set
the communication mode and the Ethernet type. In gener
without changing the defaults (
change these settings to suit your network envir
6FR8-010
al, the machine can be used
<Ethernet Driver Settings>(P. 287) ), but you can
onment.
Select <Menu> in the Home screen.
1
Select <Preferences>
2
● If the login scr
Select <Ethernet Driver Settings>.
3
Select whether to congur
4
● If auto-detection is enabled, the machine detects and automatically sets the Ethernet communication mode
and the type that can be used.
een appears, enter the correct ID and PIN.
<Network>.
e Ethernet settings automatically or manually.
Home Screen(P. 92)
Logging in to the Machine(P. 102)
Conguring Ethernet settings automatically
Select <On> in <Auto Detect>.
Conguring Ethernet settings manually
Select <Off> in <Auto Detect>.
1
<Communication Mode>
2
<Half Duplex>
Alternately sends and r
networking device using half duplex.
select the communication mode.
eceives communication data. Select when the machine is connected to a
48
Page 55

<Full Duplex>
Simultaneously sends and r
Setting Up
eceives communication data. Use this setting for most environments.
<Ethernet Type>
3
Select <Apply>.
4
Select <OK>.
5
Restart the machine.
6
LINKS
Changing the Maximum Transmission Unit(P. 50)
Setting a Wait Time for Connecting to a Network(P. 51)
select the Ethernet type.
Restarting the Machine(P. 88)
49
Page 56

Setting Up
Changing the Maximum Transmission Unit
6FR8-011
In most Ethernet networks, the maximum size of a pack
data into which the original data is divided before being sent. The maximum transmission unit (MTU) may vary on each
network. Change the settings of the machine as necessary. For more information, contact your Network Administrator.
Select <Menu> in the Home screen.
1
Select <Preferences> <Network>.
2
● If the login scr
Select <TCP/IP Settings> <MTU Size>.
3
Select the MTU.
4
een appears, enter the correct ID and PIN.
et that can be sent is 1500 bytes. A packet refers to a chunk of
Home Screen(P. 92)
Logging in to the Machine(P. 102)
Select <OK>.
5
Restart the machine.
6
LINKS
Conguring Ethernet Settings(P
Setting a Wait Time for Connecting to a Network(P. 51)
Restarting the Machine(P. 88)
. 48)
50
Page 57

Setting Up
Setting a Wait Time for Connecting to a Network
6FR8-012
When a network is designed to enjo
mechanism to prevent packets from looping. One effective solution is to dene the role of each switch port. However,
communication may still be disrupted for several tens of seconds immediately after you change the way that network
devices are connected, or if you add a new device. If this type of problem occurs, set a wait time for connecting to the
network.
Select <Menu> in the Home screen.
1
Select <Preferences> <Network>.
2
● If the login scr
3
4
LINKS
Select <Wait Time for Conn. at Startup>.
Enter the waiting time required to start a communication with the network, and
select <Apply>.
een appears, enter the correct ID and PIN.
y redundant connectivity with multiple switching hubs or bridges, it must have a
Home Screen(P. 92)
Logging in to the Machine(P. 102)
Conguring Ethernet Settings(P
Changing the Maximum Transmission Unit(P. 50)
. 48)
51
Page 58

Conguring DNS
Setting Up
6FR8-013
DNS (Domain Name System) pr
address. Congure the DNS, mDNS, or DHCP option settings as necessary. Note that the procedures for conguring
DNS are different for IPv4 and IPv6.
● For mor
Remote UI, see
1
2
e information about the basic operations to be performed when setting the machine from the
Start the Remote UI and log in to System Manager Mode. Starting Remote
UI(P
. 238)
Click [Settings/Registration] on the Portal page.
ovides a service for name resolution that associates a host (or domain) name with an IP
Setting Up Menu Options from Remote UI(P. 248) .
Remote UI Screen(P. 239)
Click [Network Settings].
3
Congure DNS settings.
4
Conguring IPv4 DNS
Select [IPv4 Settings]
1
Congure IPv4 DNS settings.
2
[Edit].
52
Page 59

Setting Up
[DHCP Option Settings]
[Acquire Host Name]
Select the check box to enable Option 12 to obtain the host name from the DHCP server.
[DNS Dynamic Update]
Select the check box to enable Option 81 to dynamically update the DNS records through the DHCP
server.
[Acquire DNS Server Address]
Select the check box to enable Option 6 to obtain a DNS server address from the DHCP server.
[Acquire Domain Name]
Select the check box to enable Option 15 to obtain a domain name from the DHCP server.
[Acquire WINS Server Address]
Select the check box to enable Option 44 to obtain a WINS server address from the DHCP server.
[Acquire POP Server Address]
Select the check box to enable Option 70 to obtain a POP3 server address from the DHCP server.
[DNS Settings]
[Primary DNS Server Addr
Enter the IP address of a DNS server.
[Secondary DNS Server Address]
Enter the IP address of a secondary DNS server, if any.
ess]
[Host Name]
Enter alphanumeric characters for the host name of the machine that is to be registered to the DNS
server.
[Domain Name]
Enter alphanumeric characters for the name of the domain the machine belongs to, such as
"example.com."
[DNS Dynamic Update]
Select the check box to dynamically update the DNS records whenever the machine's IP address is
changed. When specifying the interval between updates, enter the time in hours in the [DNS
Dynamic Update Interval] text box.
[mDNS Settings]
[Use mDNS]
53
Page 60

Adopted by Bonjour, mDNS (multicast DNS) is a protocol for associating a host name with an IP
addr
ess without using DNS. Select the check box to enable mDNS and enter the mDNS name in the
[mDNS Name] text box.
Click [OK].
3
Conguring IPv6 DNS
Select [IPv6 Settings] [Edit].
1
Congure IPv6 DNS settings.
2
● The [Use IPv6] check bo
Setting Up
x must be selected to congure the settings.
Setting IPv6 Addresses(P. 32)
[DHCP Option Settings]
[Acquire DNS Server Address]
Select the check box to enable Option 23 to obtain a DNS server address from the DHCP server.
[Acquire Domain Name]
Select the check box to enable Option 24 to obtain a domain name from the DHCP server.
[DNS Settings]
[Primary DNS Server Addr
Enter the IP address of a DNS server. Addresses that start with "ff" (or multicast address) cannot be
entered.
[Secondary DNS Server Address]
Enter the IP address of a secondary DNS server, if any. Addresses that start with "ff" (or multicast
address) cannot be entered.
[Use Same Host Name/Domain Name as IPv4]
Select the check box to use the same host and domain names as in IPv4.
[Host Name]
Enter alphanumeric characters for the host name of the machine that is to be registered to the DNS
server.
[Domain Name]
Enter alphanumeric characters for the name of the domain the machine belongs to, such as
"example.com."
ess]
[DNS Dynamic Update]
54
Page 61

3
Setting Up
Select the check box to dynamically update the DNS records whenever the machine's IP address is
changed. T
check box for [Register Manual Address], [Register Stateful Address], or [Register Stateless
Address]. To specify the interval between updates, enter the time in hours in the [DNS Dynamic
Update Interval] text box.
[mDNS Settings]
[Use mDNS]
Adopted b
address without using DNS. Select the check box to enable mDNS.
[Use Same mDNS Name as IPv4]
Select the check box to use the same mDNS name as in IPv4. To set a different name, clear the
check box and enter the mDNS name in the [mDNS Name] text box.
Click [OK].
o specify the type(s) of addresses you want to register to the DNS server, select the
y Bonjour, mDNS (multicast DNS) is a protocol for associating a host name with an IP
Restart the machine.
5
Restarting the Machine(P. 88)
Selecting settings from the operation panel
● DNS settings can also be accessed fr
om <Menu> in the Home screen.
LINKS
Setting IPv4 Address(P. 29)
Setting IPv6 Addresses(P. 32)
Viewing Network Settings(P. 35)
<DNS Settings>(P. 281)
55
Page 62

Setting Up
Conguring SMB
Server Message Block (SMB) is a protocol for sharing resources, such as les and
printers, among multiple de
machine as a shared printer on an SMB network. Depending on your network, you may
have to set the NetBIOS name and workgroup name.
NetBIOS Name
In a Windows network that uses NetBIOS, NetBIOS names are used for identifying network-connected
computers as well as for le sharing and other network services. Most computers use the computer name as
the NetBIOS name.
orkgroup Name
W
Workgroup name is a name for grouping multiple computers so that basic network functions, such as le
sharing, become available in a Windo
machine belongs to.
ws network. Specify the workgroup name to identify the group that the
vices on a network. You need to use it to congure the
6FR8-014
● For mor
Remote UI, see
1
2
3
4
5
e information about the basic operations to be performed when setting the machine from the
Setting Up Menu Options from Remote UI(P. 248) .
Start the Remote UI and log in to System Manager Mode.
. 238)
UI(P
Click [Settings/Registration] on the Portal page.
Select [Network Settings] [SMB Settings].
Click [Edit].
Specify the required settings.
Starting Remote
Remote UI Screen(P. 239)
56
Page 63

Setting Up
[NetBIOS Name]
Enter alphanumeric char
[Workgroup Name]
Enter alphanumeric characters for the name of the workgroup that the machine belongs to.
acters for the NetBIOS name of the machine.
● NetBIOS names or workgr
Click [OK].
6
Restart the machine.
7
LINKS
Conguring WINS(P. 58)
oup names that start with an asterisk (*) cannot be registered to a WINS server.
Restarting the Machine(P. 88)
57
Page 64

Setting Up
Conguring WINS
Windo
ws Internet Name Service (WINS) is a name resolution service that associates a NetBIOS name (a computer or
printer name in an SMB network) with an IP address. To enable WINS, the WINS server must be specied.
6FR8-015
● In or
● The function is not available in an IPv6 network.
● For mor
der to specify WINS server settings, NetBIOS name and workgroup name are required to be set.
Conguring SMB
e information about the basic operations to be performed when setting the machine from the
Remote UI, see
Start the Remote UI and log in to System Manager Mode.
1
. 238)
UI(P
Click [Settings/Registration] on the Portal page.
2
Select [Network Settings] [WINS Settings].
3
(P. 56)
Setting Up Menu Options from Remote UI(P. 248) .
Starting Remote
Remote UI Screen(P. 239)
Click [Edit].
4
Select the [WINS Resolution] check box, and specify the required settings.
5
[WINS Resolution]
Select the check bo
[WINS Server Address]
Enter the IP address of the WINS server.
x to use WINS for name resolution. When not using WINS, clear the check box.
58
Page 65

Setting Up
● If
the IP address of the WINS server is obtained from a DHCP server, the obtained IP address overrides the
IP address entered in the [WINS Server Address] text box.
Click [OK].
6
Restart the machine.
7
Selecting settings from the operation panel
● WINS settings can also be accessed fr
LINKS
Setting IPv4 Address(P. 29)
Restarting the Machine(P. 88)
om <Menu> in the Home screen.
<WINS Settings>(P. 283)
59
Page 66

Setting Up
Monitoring and Controlling the Machine with SNMP
6FR8-016
Simple Network Management Pr
network by using Management Information Base (MIB). The machine supports SNMPv1 and security-enhanced
SNMPv3. You can check the status of the machine from a computer when you print documents or use the Remote UI.
You can enable either SNMPv1 or SNMPv3, or both at the same time. Specify the settings for each version to suit your
network environment and the purpose of use.
otocol (SNMP) is a protocol for monitoring and controlling communication devices in a
SNMPv1
SNMPv1 uses information called "community" to dene the scope of SNMP communication. Because this
information is e
ensure network security, disable SNMPv1 and use SNMPv3.
xposed to the network in plain text, your network will be vulnerable to attacks. If you want to
SNMPv3
With SNMPv3, you can implement network device management that is protected by robust security features.
Note that TLS must be enabled for the Remote UI befor
Certicate for TLS(P. 210) ).
e conguring SNMPv3 (
Conguring the Ke
y and
● The machine does not support the tr
● To change the port number of SNMP, see
● SNMP management softwar
monitor, and control the machine remotely from the computer. For more information, see the instruction
manuals for your management software.
● For more information about the basic operations to be performed when setting the machine from the
Remote UI, see
Start the Remote UI and log in to System Manager mode.
1
UI(P
. 238)
Click [Settings/Registration] on the Portal page.
2
Select [Network Settings] [SNMP Settings].
3
Click [Edit].
4
Setting Up Menu Options from Remote UI(P. 248) .
e, when installed on a computer on the network, enables you to congure,
ap notication feature of SNMP.
Changing Port Numbers(P. 207) .
Starting Remote
Remote UI Screen(P. 239)
60
Page 67

Specify SNMPv1 settings.
5
Setting Up
● If you do not need to change SNMPv1 settings, pr
[Use SNMPv1]
Select the check bo
is selected.
x to enable SNMPv1. You can specify the rest of SNMPv1 settings only when this check box
oceed to the next step.
[Use Community Name 1]/[Use Community Name 2]
Select the check box to specify a community name. If you do not need to specify a community name, clear
the check box.
[Community Name]
Enter alphanumeric characters for the name of the community.
[MIB Access Permission]
For each community, select [Read/Write] or [Read Only] for the access privileges to MIB objects.
[Read/Write] Permits both viewing and changing the values of MIB objects.
[Read Only] Permits only viewing the values of MIB objects.
[Use Dedicated Community]
Dedicated Community is a pr
such as imageWARE Enterprise Management Console. Select the check box to use Dedicated Community, and
specify [MIB Access Permission]. If you do not need to use Dedicated Community, clear the check box.
Specify SNMPv3 settings.
6
● If you do not need to change SNMPv3 settings, pr
eset community, intended exclusively for Administrators using Canon software,
oceed to the next step.
61
Page 68

Setting Up
[Use SNMPv3]
Select the check bo
is selected.
[Enable User]
Select the check box to enable [User Settings 1]/[User Settings 2]/[User Settings 3]. To disable user settings,
clear the corresponding check box.
[User Name]
Enter alphanumeric characters for the user name.
[MIB Access Permission]
Select [Read/Write] or [Read Only] for the access privileges to MIB objects.
[Read/Write] Permits both viewing and changing the values of MIB objects.
[Read Only] Permits only viewing the values of MIB objects.
[Security Settings]
Select [Authentication On/Encryption On], [Authentication On/Encryption Off], or [Authentication Off/
Encryption Off] for the desir
[Authentication Algorithm]
If you have selected [Authentication On/Encryption On] or [Authentication On/Encryption Off] in [Security
Settings], select the appropriate authentication algorithm for your network environment.
[Encryption Algorithm]
If you have selected [Authentication On/Encryption On] in [Security Settings], select the appropriate
encryption algorithm for your network environment.
x to enable SNMPv3. You can specify the rest of SNMPv3 settings only when this check box
ed combination of authentication and encryption settings.
[Set/Change Password]
To set or change the password, select the check box and enter alphanumeric characters for the password in
the [Authentication Password] or [Encryption Password] text box. For conrmation, enter the same password
in the [Conrm] text box. Passwords can be set independently for authentication and encryption algorithms.
Specify Printer Management Information Acquisition Settings.
7
62
Page 69

Setting Up
● With SNMP
monitored and obtained regularly from a computer on the network.
[Acquire Printer Management Information from Host]
Select the check bo
To disable monitoring of the printer management information, clear the check box.
Click [OK].
8
Restart the machine.
9
, the printer management information, such as printing protocols and printer ports, can be
x to enable monitoring of the printer management information of the machine via SNMP.
Restarting the Machine(P. 88)
Disabling SNMPv1
● If SNMPv1 is disabled, some of the functions of the machine become unavailable, such as obtaining machine
information via the printer driver.
Using the oper
● You can enable or disable the SNMP settings from <Menu>.
Enabling Both SNMPv1 and SNMPv3
● If both versions of SNMP ar
[Read Only]. MIB access permission can be set independently in SNMPv1 and SNMPv3 (and for each user in
SNMPv3). Selecting [Read/Write] (full access permission) in SNMPv1 negates the robust security features
that characterize SNMPv3 because most of the machine settings can then be controlled with SNMPv1.
ation panel
<SNMP Settings>(P. 285)
e enabled, it is recommended that MIB access permission in SNMPv1 be set to
LINKS
Conguring the Ke
y and Certicate for TLS(P. 210)
63
Page 70

Other Network Settings
Setting Up
6FR8-017
Congur
e the following items according to your network environment.
Conguring SNTP
Monitoring the Machine from the Device Management Systems(P. 65)
(P. 64)
Conguring SNTP
Simple Network Time Protocol (SNTP) enables you to adjust the system clock by using the time server on the network.
If SNTP is used, the time server is checked at the specied intervals; therefore, the correct time can always be
maintained. The time is adjusted based on Coordinated Universal Time (UTC), so specify the time zone setting before
conguring SNTP ( Setting the Date/Time(P. 9) ). SNTP settings can be specied via the Remote UI.
● The SNTP of the machine supports both NTP (version 3) and SNTP (versions 3 and 4) servers.
● For mor
Remote UI, see
1
e information about the basic operations to be performed when setting the machine from the
Setting Up Menu Options from Remote UI(P. 248) .
Start the Remote UI and log in to System Manager Mode. Starting Remote
UI(P
. 238)
Click [Settings/Registration] on the Portal page.
2
Select [Network Settings] [SNTP Settings].
3
Click [Edit].
4
Select the [Use SNTP] check box and specify the required settings.
5
Remote UI Screen(P. 239)
[Use SNTP]
Select the check bo
[NTP Server Name]
x to use SNTP for synchronization. If you do not want to use SNTP, clear the check box.
64
Page 71

Setting Up
Enter the IP address of the NTP or the SNTP server. If DNS is available on the network, you can enter a host
name (or FQDN) consisting of alphanumeric char
[Polling Interval]
Specify the interval between one synchronization and the next.
Click [OK].
6
acters instead (example: ntp.example.com).
Restart the machine.
7
Restarting the Machine(P. 88)
Testing communication with the NTP/SNTP server
● Y
ou can view communication status with the registered server by clicking [Settings/Registration]
Settings] [Check NTP Server] in [SNTP Settings]. If a proper connection has been established, the result is
displayed as shown below. Note that this operation does not adjust the system clock.
Monitoring the Machine from the Device Management Systems
[Network
You can facilitate the collection and management of various information about networked devices by implementing
device management software, such as imageWARE Enterprise Management Console*, into the network. Information
such as device settings and error logs is retrieved and distributed via the server computer. If the machine is connected
to such a network, imageWARE Enterprise Management Console searches the network for the machine by using
protocols such as Service Location Protocol (SLP) to gather information from the machine, such as power supply status
information. SLP settings can be specied via the Remote UI. This section also describes the procedure to congure
settings for communication between the machine and plug-ins for imageWARE Enterprise Management Console.
*
For more information about imageWARE Enterprise Management Console, contact your local authorized Canon dealer.
To use imageWARE Enterprise Management Console plug-ins
● You need to enable the settings of the dedicated port and the SNMP settings. As for the SNMP settings, set
[MIB Access Permission] to [Read/Write] for both SNMPv1 and SNMPv3.
<Use Dedicated Port>(P. 286)
Monitoring and Controlling the Machine with SNMP(P. 60)
Remote UI Oper
● For more information about the basic operations to be performed when setting the machine from the
Remote UI, see
ations
Setting Up Menu Options from Remote UI(P. 248) .
65
Page 72

Setting Up
◼ Conguring SLP Communication with De
Start the Remote UI and log in to System Manager Mode.
1
. 238)
UI(P
Click [Settings/Registration] on the Portal page.
2
Click [Network Settings].
3
Specify SLP settings.
4
Specifying multicast device discovery
Select [Multicast Discovery Settings] [Edit].
1
Select the [Respond to Discovery] check box and specify the required settings.
2
vice Management Software
Starting Remote
Remote UI Screen(P. 239)
[Respond to Discovery]
Select the check bo
packets and enable monitoring by device management software.
● T
o change the port number for multicast discovery, see
[Scope Name]
T
o include the machine into a specic scope, enter alphanumeric characters for the scope name.
Click [OK].
3
Notifying a device management software of the power status of the machine
Select [Sleep Mode Notication Settings]
1
Select the [Notify] check box and specify the required settings.
2
x to set the machine to respond to device management software multicast discovery
Changing Port Numbers(P. 207) .
[Edit].
66
Page 73

Setting Up
[Notify]
Select the check bo
[Notify] is selected, you can expect the machine to avoid unnecessary communication during sleep mode
and reduce the total power consumption.
[Port Number]
Change the port number for this function according to the network environment.
[Number of Routers to Traverse]
Specify how many routers the notication packets can pass through.
x to notify a device management software of the power status of the machine. When
[Notication Interval]
Specify how often the machine noties a device management software of its power status.
Click [OK].
3
Restart the machine.
5
Restarting the Machine(P. 88)
◼ Conguring Settings for Communication between the Machine and Plug-ins
Y
ou can specify the settings to enable communication between the machine and imageWARE Enterprise Management
Console plug-ins. Use of plug-ins allows you to manage the machine's settings from imageWARE Enterprise
Management Console.
<Menu> <Preferences> <Network> <Device Settings Management> <On>
67
Page 74

Installing Drivers
Setting Up
6FR8-018
Install the various drivers and associated softwar
Make the necessary preparation before proceeding with the installation.
1
● Install the optional de
● If the machine is supplied with a CD-ROM/D
computer.
● You can download drivers and software you are going to use from the Canon website (https://global.canon/).
● When
● Depending on your machine or environmental conditions, some functions may not be available.
● Some of the drivers are not supported depending on the OS. For more information about the supported
Proceed with the installation.
2
● For mor
going to use.
new versions of drivers and software become available, they will be uploaded to the Canon website.
You can download them as necessary after checking their system requirements.
status of the latest OS, see the Canon website.
e information about the installation procedure, see the manuals for the drivers and software you are
vices on the main unit in advance.
e on your computer.
Optional Equipment(P. 396)
VD-ROM, insert the CD-ROM/DVD-ROM into the drive on the
● Installation of drivers is impossible if sending and receiving of the IP address are not permitted in [Firewall
Settings]. For more information, see Specifying IP Addresses for Firewall Settings(P. 201) .
● If sending and receiving of the IP address of the computer on which drivers are installed become disabled by
[Firewall Settings], it is no longer possible to perform printing from that computer.
68
Page 75

Basic Operations
Basic Operations
Basic Operations ...............................................................................................................................................
Parts and Their Functions ................................................................................................................................... 74
Front Side ....................................................................................................................................................... 75
Back Side ........................................................................................................................................................ 77
Interior ........................................................................................................................................................... 78
Multi-Purpose Tray ......................................................................................................................................... 79
Paper Drawer ................................................................................................................................................. 80
Operation Panel .............................................................................................................................................. 81
Turning ON the Machine ..................................................................................................................................... 83
Turning OFF the Machine ............................................................................................................................... 84
Turning OFF the Machine by Remote Operation ...................................................................................... 85
Powering OFF at a Fixed Time .................................................................................................................. 86
Restarting the Machine .................................................................................................................................. 88
Using the Operation Panel .................................................................................................................................. 90
Basic Screens .................................................................................................................................................. 91
Home Screen ........................................................................................................................................... 92
<Status Monitor> Screen .......................................................................................................................... 94
Message Display ...................................................................................................................................... 96
71
Basic Operation .............................................................................................................................................. 97
Entering Text ................................................................................................................................................ 100
Logging in to the Machine ................................................................................................................................ 102
Loading Paper .................................................................................................................................................... 103
Loading Paper in the Paper Drawer .............................................................................................................. 105
Loading Paper in the Multi-Purpose Tray ...................................................................................................... 110
Loading Envelopes ....................................................................................................................................... 113
Loading Preprinted Paper ............................................................................................................................ 115
Specifying Paper Size and Type .................................................................................................................... 119
Specifying Paper Size and Type in the Paper Drawer ............................................................................. 120
Specifying Paper Size and Type in the Multi-Purpose Tray ..................................................................... 122
Registering Default Paper Settings for the Multi-Purpose Tray .............................................................. 124
Registering a Custom Paper Size ........................................................................................................... 126
Limiting the Paper Sizes Displayed ........................................................................................................ 128
Automatically Selecting an Appropriate Paper Source for Each Function ............................................... 129
Customizing the Display ................................................................................................................................... 130
Customizing the Home Screen ..................................................................................................................... 131
69
Page 76

Basic Operations
Changing the Default Settings for Functions ..................................................................................................
Setting Sounds ................................................................................................................................................... 133
Entering Sleep Mode ......................................................................................................................................... 134
Using a USB Memory Device ............................................................................................................................. 136
132
70
Page 77

Basic Operations
Basic Operations
6FR8-019
This chapter describes basic oper
frequently performed to use the functions of the machine.
ations, such as how to use the operation panel or how to load the paper, that are
◼ Parts and Their Functions
This section describes the exterior and interior parts of the machine and their functions, as well as how to use the keys
on the operation panel and how to view the display.
urning ON the Machine
◼ T
This section describes how to turn the machine ON and OFF.
Parts and Their Functions(P. 74)
Turning ON the Machine(P. 83)
◼ Using the Oper
This section describes how to use the display for tasks such as selecting items and adjusting settings. Also, it describes
how to enter characters and numbers.
ation Panel
Using the Operation Panel(P. 90)
◼ Logging in to the Machine
This section describes ho
w to log in when a login screen is displayed.
Logging in to the Machine(P. 102)
71
Page 78

◼ Loading Paper
Basic Operations
This section describes ho
w to load the paper into the paper drawer and multi-purpose tray.
◼ Customizing the Display
This section describes ho
display.
Customizing the Display(P. 130)
w to rearrange the displayed items in order to make it easier to use screens shown in the
Loading Paper(P. 103)
◼ Changing the Default Settings for Functions
This section describes ho
Default Settings for Functions
w to change the setting that is displayed initially when a function is selected.
(P. 132)
◼ Setting Sounds
This section describes ho
occurs.
Setting Sounds(P. 133)
w to adjust the volume of various machine sounds, such as those produced when an error
Changing the
72
Page 79

◼ Entering Sleep Mode
Basic Operations
This section describes ho
◼ Using a USB Memory De
This section describes about the available USB memory devices and how to insert/remove the USB memory device.
Using a USB Memory Device(P. 136)
w to set the sleep mode.
vice
Entering Sleep Mode(P. 134)
73
Page 80

Basic Operations
Parts and Their Functions
6FR8-01A
This section describes the parts of the machine (e
addition to describing the parts of the machine used for such basic operations as loading paper and replacing the
toner cartridges, this section also describes the keys on the operation panel and display. Read this section for tips on
how to use the machine properly.
Front Side(P. 75)
Back Side(P. 77)
Interior(P. 78)
Multi-Purpose Tray(P. 79)
Paper Drawer(P. 80)
Operation Panel(P. 81)
xterior, front and back side, and interior) and how they function. In
74
Page 81

Front Side
Basic Operations
6FR8-01C
USB port (for USB device connection)
Use this port to connect a thir
device allows you to print data from the memory device.
Printing from a USB Memory Device (Memory Media Print)(P. 151)
d-party USB memory device or USB keyboard. Connecting a USB memory
Lift handles
Hold the lift handles when carrying the machine. When r
yourself. Instead, contact your local authorized Canon dealer.
elocating the machine, do not attempt to move it
Ventilation slots
Air from inside the machine is vented out to cool down the inside of the machine. Note that placing objects in
front of the ventilation slots prevents ventilation.
Multi-purpose tray
Load the paper into the multi-purpose tr
that which is loaded in the paper drawer.
ay when you want to temporarily use a type of paper different from
Loading Paper in the Multi-Purpose Tray(P. 110)
Front cover
Open the fr
Procedure for Replacing the Toner Cartridge(P. 358)
Interior(P. 78)
ont cover when replacing toner cartridges or removing jammed paper from inside the machine.
75
Page 82

Basic Operations
Paper stopper
Open the paper stopper when you want to pr
event paper from falling out of the output tray.
Paper drawer
Load the type of paper you fr
Dr
awer(P. 105)
equently use into the paper drawer.
Loading Paper in the Paper
Operation panel
The oper
perform all the operations and specify settings from the operation panel.
ation panel consists of keys such as Home key, Stop key, a display, and status indicators. You can
Operation Panel(P. 81)
Basic Screens(P. 91)
Output tray
Printed paper is output to the output tr
ay.
Power switch
T
urns the power ON or OFF. To restart the machine, turn OFF the machine, wait for at least 10 seconds, and
turn it back ON.
76
Page 83

Back Side
Rear cover
Open the r
online manual website.
Basic Operations
6FR8-01E
ear cover when clearing paper jams. For more information, see "Troubleshooting (FAQ)" on the
Ventilation slots
om inside the machine is vented out to cool down the inside of the machine. Note that placing objects in
Air fr
front of the ventilation slots prevents ventilation.
Rating label
The label sho
ws the serial number, which is needed when making inquiries about the machine.
Power socket
Connect the po
wer cord.
USB port (for USB device connection)
Use this port to connect de
vices such as a third-party USB keyboard.
USB port (for computer connection)
Connect a USB cable when connecting the machine and a computer.
LAN port
Connect a LAN cable when connecting the machine to a wir
LAN(P
. 14)
ed LAN router, etc.
Connecting to a Wired
77
Page 84

Interior
Basic Operations
6FR8-01F
Transport guide (at the back)
If ther
e is a paper jam inside the machine, raise the transport guide toward the front of the machine to
remove the jammed paper. For more information, see "Troubleshooting (FAQ)" on the online manual
website.
Transport guide (at the front)
e is a paper jam inside the machine, raise the transport guide toward the back of the machine to
If ther
remove the jammed paper. For more information, see "Troubleshooting (FAQ)" on the online manual
website.
Duplex transport guide
If paper has jammed during 2-sided printing, lo
For more information, see "Troubleshooting (FAQ)" on the online manual website.
wer the duplex transport guide to remove the jammed paper.
78
Page 85

Multi-Purpose Tray
Basic Operations
6FR8-01H
Paper guides
Adjust the paper guides to e
machine. Press the lock release lever that is indicated with an arrow in the illustration to release the lock and
slide the paper guides.
xactly the width of the loaded paper to ensure that paper is fed straight into the
Paper tray
Pull out the paper tr
ay when loading paper.
Tray extension
Open the tr
LINKS
Loading Paper in the Multi-Purpose Tray(P. 110)
ay extension when loading large paper.
79
Page 86

Paper Drawer
Basic Operations
6FR8-01J
Paper guides
Adjust the paper guides to e
machine. Press the lock release levers that are indicated with arrows in the illustrations to release the locks
and slide the paper guides.
xactly the size of the loaded paper to ensure that paper is fed straight into the
Paper level indicator
Indicates the r
decreases.
LINKS
Loading Paper in the Paper Drawer(P. 105)
emaining amount of paper. The mark moves downward as the remaining amount of paper
80
Page 87

Operation Panel
Basic Operations
6FR8-07L
● The angle of the oper
viewing the panel.
ation panel can be adjusted. Adjust it to an angle that is most comfortable for
Adjusting the Angle(P. 82)
Display
Y
ou can view the progress of the machine and error statuses. The display is also a touch panel, so you can
specify settings by touching the screen directly.
Basic Screens(P. 91)
Basic Operation(P. 97)
Sound Volume key
ess to adjust volume.
Pr
Setting Sounds(P. 133)
Energy Saver key
Pr
ess to put the machine into the sleep mode. The key lights up green when the machine is in the sleep
mode. Press the key again to exit sleep mode.
Entering Sleep Mode(P. 134)
Data indicator
Blinks while an oper
are documents waiting to be processed.
ation is being performed, such as data transmission or printing. Lights up when there
Error indicator
Blinks or lights up when an err
or such as a paper jam occurs.
Home key
Pr
ess to display the Home screen, which provides access to the setting menu and functions such as Memory
Media Print and Secure Print.
Home Screen(P. 92)
81
Page 88

Customizing the Home Screen(P. 131)
Stop key
ess to cancel printing and other operations.
Pr
Adjusting the Angle
When it is dicult to vie
LINKS
Basic Operation(P. 97)
Basic Operations
w the touch panel display, adjust the angle of the operation panel.
82
Page 89

Basic Operations
Turning ON the Machine
6FR8-01L
This section describes ho
Make sure that the power plug is rmly inserted into a po
1
Press the power switch.
2
➠ The Start scr
w to turn ON the machine.
een appears.
Operation Panel(P. 81)
wer outlet.
● Y
ou can select the screen that is displayed rst after the machine is turned ON.
Startup/Restor
LINKS
Turning OFF the Machine(P. 84)
Restarting the Machine(P. 88)
ation>(P. 266)
<Default Screen After
83
Page 90

Basic Operations
Turning OFF the Machine
6FR8-01R
This section describes ho
Press the power switch.
1
● It may tak
display turns off.
● To restart the machine, wait for at least 10 seconds after the machine is turned OFF.
● You can also turn OFF the machine from a computer.
Oper
e some time for the machine to completely shut down. Do not unplug the power cord until the
ation(P. 85)
w to turn OFF the machine.
Turning OFF the Machine by Remote
● You can specify the time for each day of the week and congure a setting to automatically turn OFF the
machine.
Powering OFF at a Fixed Time(P. 86)
84
Page 91

Basic Operations
Turning OFF the Machine by Remote Operation
6FR8-01S
Y
ou can turn OFF the machine from a computer on the same network without going to where the machine is installed.
Start the Remote UI and log in to System Manager Mode.
1
. 238)
UI(P
Click [Settings/Registration] on the Portal page.
2
Select [Device Management] [Remote Shutdown].
3
Check [Device Status] to make sure that no functions are being processed, and click
4
[Ex
ecute].
Click [OK].
5
Restarting the machine by remote operation
● You can restart the machine by clicking [Restart Device] on the [Settings/Registration] screen of the Remote
UI. Restarting the Machine(P. 88)
Remote UI Screen(P. 239)
Starting Remote
85
Page 92

Basic Operations
Powering OFF at a Fixed Time
6FR8-01U
Y
ou can make a setting so that the power is automatically tuned OFF at a specied time on each day of the week. This
allows you to avoid useless power consumption that may occur due to failure to turn OFF the power. By default, this
function is disabled.
● For information about the basic oper
Options fr
Start the Remote UI and log in to System Manager Mode.
1
UI(P
Click [Settings/Registration] on the Portal page.
2
Select [Timer Settings] [Edit].
3
Select the check box for [Set Auto Shutdown Weekly Timer], and set the time to turn
4
OFF the po
om Remote UI(P. 248) .
. 238)
wer.
ation to set up the machine from Remote UI, see
Starting Remote
Remote UI Screen(P. 239)
Setting Up Menu
[Set Auto Shutdown Weekly Timer]
Selecting the check bo
[Sunday] to [Saturday]
x allows you to set the time to turn OFF the power on each day of the week.
86
Page 93

Basic Operations
Enter the desired time to turn OFF the power. For any day of the week, leaving the time eld blank means
that the auto shutdo
Click [OK].
5
wn function is disabled for that day.
If the power is not turned OFF automatically at the specied time
● When the Data indicator is lit up or blinking
● When the menu scr
● When settings data is being imported/exported
● When the rmware is being updated
● When <Control Condensation> is set to <On>
*
If the power cannot be turned OFF automatically at the specied time, a retry will be performed up to ten times at intervals
of one minute. If the power cannot be turned OFF even after ten retries, auto shutdown will be impossible for that day.
een or Check Counter screen is displayed
*
87
Page 94

Restarting the Machine
Basic Operations
6FR8-01W
Depending on the setting items that have been changed, you may need to mak
the machine. This section describes how to restart the machine.
Restarting the Machine by an Operation on the Main Unit(P. 88)
Restarting the Machine by Remote Operation(P. 88)
e the changes effective by restarting
Restarting the Machine by an Operation on the Main Unit
Press the power switch.
1
● It may tak
➠ When the machine shuts down, the display or Energy Saver key of the operation panel turns off.
Wait at least 10 seconds after the shutdown, then press the power switch again.
2
➠ The machine starts.
e some time for the machine to completely shut down.
Restarting the Machine by Remote Operation
Start the Remote UI and log in to System Manager Mode.
1
UI(P
. 238)
Click [Settings/Registration] on the Portal page.
2
Click [Restart Device] in the menu on the left side of the screen.
3
Starting Remote
Remote UI Screen(P. 239)
88
Page 95

Basic Operations
Check [Device Status] to make sure that no functions are being processed, and click
4
[Ex
ecute].
Click [OK].
5
➠ A r
estart process begins. Communication remains disconnected until the main unit has restarted.
89
Page 96

Basic Operations
Using the Operation Panel
Y
ou can use the display and keys of the operation panel to congure machine settings or operate functions. This
section describes basic usage of the display and keys.
Basic Screens(P. 91)
Basic Operation(P. 97)
Entering Text(P. 100)
6FR8-01X
● If you want to invert the light and dark parts of the display: <Invert Screen Colors>(P. 291)
● If you want to adjust the brightness of the display: <Brightness>(P. 291)
LINKS
Operation Panel(P. 81)
90
Page 97

Basic Screens
Basic Operations
6FR8-01Y
The Home scr
Print and Secure Print. You can also use the display to check information such as error messages and the machine's
operation status. The screen is also a touch panel, so you can perform operations by touching the screen directly.
Home Screen(P. 92)
<Status Monitor> Screen(P. 94)
Message Display(P. 96)
● Y
een or settings screen appears on the display, allowing you to initiate functions such as Memory Media
ou can customize the Home screen by rearranging frequently used buttons for easier access to the
respective functions.
Customizing the Display(P. 130)
To Know How to Operate
● On some scr
eens, the <?> button allows you to view the descriptions of functions or how to operate.
91
Page 98

Home Screen
Basic Operations
6FR8-020
The Home scr
to specify settings for and r
een is displayed when the power is turned ON or by pressing
egister functions.
on the operation panel. Use this screen
Change page
Use this to vie
can also ick sideways to change pages.
Amount remaining in the toner cartridges
Displays the amount r
stages.
<Check Counter>
Displays the total volume of printouts. Viewing the
Counter V
<Log Out>
Use this button to log out fr
<Status Monitor>
w another page in the Home screen. You
emaining in the toner cartridges in
alue(P. 365)
om the machine.
Pr
ess to check the printing status, to view the usage
history, or to view the network settings such as the IP
address of the machine. You can also check the status of
the machine, such as the remaining amount of paper and
the amount remaining in the toner cartridges, or whether
any errors that occurred.
Scr
een(P. 94)
Wi-Fi icon
Displayed when the machine is connected to a wir
LAN.
User name/ID
The name or ID of the logged in user is displayed.
<Memory Media Print>
Prints les stor
from a USB Memory Device (Memory Media Print)
(P. 151)
<Secure Print>
ed in a USB memory device.
<Status Monitor>
Printing
eless
Use this function to print a secur
a Document Secur
ed by a PIN (Secure Print)(P. 147)
92
e document.
Printing
Page 99

Basic Operations
<Menu>
<Function Settings>, <Pr
machine settings start from this button.
List(P
. 264)
<Application Library Guide>
Displays a description of Application Libr
<Paper Settings>
This button is used for specifying the size and type of
paper loaded in the paper dr
Specifying Paper Size and Type(P. 119)
<Mobile Portal>
Use this to establish a connection to a mobile de
Connecting with Mobile Devices(P. 164)
<Home Screen Settings>
Allo
ws you to change the order that Home screen buttons
are displayed in.
Scr
een(P. 131)
<Update Firmwar
eferences>, and many other
Setting Menu
ary.
awer and multi-purpose tray.
vice.
Customizing the Home
e>
LINKS
Customizing the Home Screen(P. 131)
Allows you to update the rmware via the Internet.
Updating the Firmware(P. 259)
Application Libr
You can use these buttons to conveniently perform a
function by a one-touch operation. For more information,
see the manual for Application Library on the online
manual website.
<uniFLOW Online Setup>
Y
ou can check the usage status of the device and the user
by linking to cloud service. For more information, see the
Canon website.
ary button
93
Page 100

<Status Monitor> Screen
Basic Operations
6FR8-021
When you pr
status of the machine and network setting information.
ess <Status Monitor>, a screen appears in which you can check the progress of documents as well as the
<Error Information/Notication>
Displays the details of any err
online manual website.
ors that occurred. For more information, see "Troubleshooting (FAQ)" on the
<Device Information>
Displays the status of the machine.
<Paper Information>
Displays whether paper is loaded in each paper sour
<Cartridge Information>
Displays the amount of toner remaining in the toner cartridges. Other internal parts may reach the end of
their lifetime before the toner runs out.
<Secure Print Memory Usage>
Displays the amount of memory currently used for storing secured document data.
Document Secur
<Version Information>
Displays rmware version information.
<Serial Number>
Displays the serial number of the machine.
ed by a PIN (Secure Print)(P. 147)
ce.
Printing a
Status and logs of printed and received documents
Displays the curr
ent status of the selected item. The <Print Job> screen is shown below as an example.
94
 Loading...