

Canon imageCLASS MPC190 Basic Manual
Basic Guide
Basic Guide
Please read this guide before operating this equipment.
After you finish reading this guide, store it in a safe place for future reference.
ENG

Copyright
Copyright © 2003 by Canon Inc. All rights reserved. No part of this publication may be
reproduced, transmitted, transcribed, stored in a retrieval system, or translated into any
language or computer language in any form or by any means, electronic, mechanical, magnetic,
optical, chemical, manual, or otherwise, without the prior written permission of Canon Inc.
Trademarks
Canon and BJ are registered trademarks. BCI, MultiPASS, imageCLASS, and ScanGear are
trademarks of Canon Inc.
All other product and brand names are registered trademarks, trademarks, or service marks of
their respective owners.
As an ENERGY STAR® Partner, Canon Inc. has determined that this
product meets the ENERGY STAR® guidelines for energy efficiency.
II
Preface

How to use the documentation provided
START HERE
Printed sheet
This sheet includes instructions for setting up your machine and getting it ready for use.
Follow all steps in this sheet before using your machine.
Printed manual
After following instructions in the Setup Sheet, refer to this guide for instructions on all
functions of your machine.
Setup Sheet
Be sure to read this sheet first!
Basic Guide (This guide)
Software Guide
This guide, included as a PDF file in the MultiPASS Suite software CD-ROM, includes
comprehensive instructions on using the MultiPASS Suite software. Refer to this guide for
full instructions on printing and scanning from your computer.
NOTE
• In addition to the above documentation, you can also refer to the help in the MultiPASS Suite software
for information about a window or dialogue box, and for step by step instructions on performing
MultiPASS Suite tasks. To access the help, select or click [Help] in the software.
Viewing documentation provided in the CD-ROM
To view the Software Guide on your computer, you will need to have Adobe Acrobat Reader
installed. If you do not have this software installed, follow this procedure:
1
Insert the MultiPASS Suite CD-ROM in your CD-ROM drive.
2
When the main menu appears, click [INSTALL ADOBE ACROBAT READER].
3
Follow the on-screen instructions.
Preface
III

Type conventions
Please read the list below of symbols, terms, and abbreviations used in this guide.
WARNING
CAUTION
IMPORTANT
NOTE
( p. n-nn) Indicates a page number where additional information can be found.
Setup Sheet
Software
Guide
machine or printer General term used to represent the imageCLASS MPC190.
default A setting that remains in effect unless you change it.
document The original sheet(s) of paper you copy or scan with the machine.
Indicates a warning concerning operations that may lead to death or
injury to persons if not performed correctly. In order to use the
machine safely, always pay attention to these warnings.
Indicates a caution concerning operations that may lead to injury to
persons or damage to property if not performed correctly. In order to
use the machine safely, always pay attention to these cautions.
Indicates operational warnings and restrictions. Be certain to read
these items to operate the machine correctly, and to avoid damage to
the machine.
Indicates notes for operation or additional explanations. Reading these is
highly recommended.
Refer to the Setup Sheet for more details.
Refer to the MultiPASS Suite Software User’s Guide (included in the
CD-ROM) for more details.
menu A list of settings from which you select an item to set up or change. A menu
has a title which appears in the LCD.
[key name] Text enclosed in these brackets indicate a key name or item on the
computer you have to click, double-click, or point to.
<message> Text enclosed in these brackets indicate an LCD message or a message on
the computer.
click, double-click Term used to select or choose a command or option on your computer,
generally with a mouse.
IV
Preface

Contents
1: Introduction
What your machine can do..................................... 1-1
Main components of the machine....................... 1-2
Operation panel of the machine...................... 1-3
2: Document handling
Document requirements......................................... 2-1
Loading documents ..................................................2-1
3: Print media handling
Recommended print media and
requirements................................................. 3-1
General print media guidelines........................ 3-5
Setting the paper thickness lever......................... 3-6
Setting the print media size and type................. 3-7
Loading print media.................................................. 3-8
Loading paper......................................................... 3-8
Loading envelopes................................................ 3-8
Loading banner paper .......................................3-10
4: The MultiPASS Suite software
—Basic operation
Installing the software.............................................. 4-1
System requirements................................................ 4-1
Software components of the
MultiPASS Suite............................................. 4-2
My MultiPASS ............................................................... 4-3
Opening My MultiPASS........................................ 4-3
MultiPASS Viewer........................................................ 4-4
Opening a document in the Viewer................ 4-4
MultiPASS Status Monitor........................................ 4-5
Opening the Status Monitor.............................. 4-5
MultiPASS Toolbar ...................................................... 4-5
Opening the Toolbar............................................. 4-5
More information .......................................................4-5
5: Printing from your computer
—Basic operation
Before printing ............................................................5-1
Printing........................................................................... 5-1
Cancelling printing ....................................................5-2
Changing print settings ...........................................5-2
Changing print settings with the
Print Advisor .................................................. 5-2
Changing print settings manually................... 5-3
More information .......................................................5-3
6: Copying
Documents you can copy ........................................6-1
Making copies ..............................................................6-1
Improving copied images........................................6-2
Setting colour or black & white copying........6-2
Adjusting the image quality (resolution).......6-2
Adjusting the exposure (density) .....................6-2
Reducing or enlarging a copy ................................6-3
Using preset copy ratios ......................................6-3
Using custom copy ratios....................................6-3
Copying an image to fit the page.....................6-4
Advanced copy features...........................................6-5
Copying two pages on a single page..............6-5
Borderless copying ................................................6-6
Repeating an image on a page .........................6-7
Creating a mirror image.......................................6-9
Shrinking an image to fit the page ...............6-10
7: Scanning —Basic operation
Before scanning...........................................................7-1
Scanning methods .....................................................7-1
Scanning with the MultiPASS Toolbar.............7-1
Customising Toolbar buttons ........................7-2
Scanning from within an application..............7-3
Using the [Scan] key on
the operation panel.....................................7-4
More information........................................................7-4
8: Maintenance
Replacing ink tanks ....................................................8-1
Low ink warning......................................................8-1
When to replace an ink tank...............................8-1
Guidelines .................................................................8-1
Replacing an ink tank............................................8-2
Resetting the ink counter....................................8-4
Checking the ink level...........................................8-4
Maintaining the printhead ......................................8-5
Flowchart of printhead maintenance .............8-5
Printing the nozzle check pattern ....................8-6
Cleaning the printhead ........................................8-6
Aligning the printhead.........................................8-7
Aligning the printhead from the
operation panel.............................................8-7
Aligning the printhead from the
MultiPASS Suite .............................................8-7
Cleaning your machine.............................................8-9
Cleaning the exterior ............................................8-9
Cleaning the scanning area ................................8-9
Cleaning the roller..................................................8-9
Preface
V

9: Troubleshooting
Problems installing and removing software..... 9-1
Problems turning on the computer
(when the MultiPASS Suite opens) ........ 9-2
Problems printing from your computer............. 9-3
Copying problems...................................................... 9-5
Problems scanning to a computer....................... 9-6
If nothing displays in the LCD (if there is no
power).............................................................. 9-8
Removing jammed paper........................................ 9-9
Removing jams in the paper output
tray .................................................................... 9-9
Removing jams from the machine’s
interior ............................................................ 9-9
If there are repeated paper jams.................... 9-10
If the nozzle check pattern does not print
properly.........................................................9-10
Interpreting the messages....................................9-10
LCD messages .......................................................9-11
MultiPASS Status Monitor messages ............9-13
If you cannot solve the problem.........................9-13
10: Machine settings
Accessing the machine settings..........................10-1
Settings ........................................................................10-2
Menu: ENLARGE/REDUCE..................................10-2
Menu: PAPER SELECT ..........................................10-2
Menu: DENSITY .....................................................10-2
Menu: IMAGE QUALITY ......................................10-2
Menu: SPECIAL COPY..........................................10-2
Menu: INK VOLUME .............................................10-2
Menu: MAINTENANCE........................................10-3
Menu: USER DATA ................................................10-3
Appendix: Specifications
General specifications...............................................A-1
System requirements................................................A-4
Ink specifications ........................................................A-4
Print specifications.....................................................A-4
Copy specifications....................................................A-5
Scan specifications.....................................................A-5
Index
......................................................................................I-1
VI
Preface

Safety information
Read this safety information thoroughly before using your machine and keep it handy in case
you need to refer to it later.
WARNING
• This product emits low level magnetic flux. If you use a cardiac pacemaker and feel abnormalities,
please move away from this product and consult your doctor.
CAUTION
• Do not disassemble or modify. There are high-temperature and high-voltage components inside
the machine which may result in fire or electrical shock.
• Follow all warnings and instructions marked on the machine.
Location
WARNING
• Do not place the machine near alcohol, paint thinner, or
other flammable substances. If flammable substances
come into contact with electrical parts inside the
machine, it may result in fire or electrical shock.
CAUTION
• Do not place the machine on top of a carpet or rug which
has long pile. The threads may get inside the machine
and cause a fire.
• Do not block or cover the ventilation port or any
openings on the machine with objects as this may result
in fire.
• Place the machine on a flat, stable, vibration-free
surface that is strong enough to support its weight. (For
the weight of the machine, see the Appendix.)
• Do not place objects around the power plug so that you
are able to readily disconnect the power plug from the
wall socket at any time. Otherwise you will be unable to
disconnect the power plug in case of an emergency.
• Make sure the area is free from dust.
• Make sure the location is not affected by extreme
temperature changes and always stays between 15° and
27.5°C (59° and 81.5°F).
• Make sure the relative humidity of the area is between 20%
and 80%.
• Keep the machine away from direct sunlight.
• Do not use or store the machine outdoors.
• Do not install the machine near devices that contain
magnets or generate magnetic fields, such as speakers.
Preface
VII

• To ensure proper ventilation, make sure the machine is
approximately 10 cm (4 inches) away from walls and other
equipment.
Power supply
WARNING
• Do not damage or modify the power cord and power
plug. Also do not place heavy objects on the power cord,
pull on it, or extensively bend it. These actions may
cause electrical damage and result in fire or electrical
shock.
• Do not insert or unplug the power plug with wet hands
as this may result in electrical shock.
• Do not overload the wall outlet with too many electrical
appliances as this may result in fire or electrical shock.
• Plug the machine into a standard 200–240 V AC,
50/60 Hz, two-prong* outlet. Operate the machine only
from the type of power source indicated on the
machine’s label or a fire, electrical shock, or malfunction
may occur. If you are unsure of the type of power
available, consult your local power company.
• Do not allow the power cord to be near objects that emit
heat. The outer cover of the power cord may melt
resulting in fire or electrical shock.
• Make sure the power cord is fully extended and has no
knots in it when electricity is running through it. Knots
etc. in the cord may result in fire or electrical shock.
• Fully insert the power plug securely into the electrical
outlet. If the prongs of the power plug come into contact
with metallic objects etc., it may result in fire or
electrical shock.
• Do not use an extension cord as this may result in fire or
electrical shock.
• Turn off the power and disconnect the power cord if the
machine will not be used for a long period such as
during holidays.
IMPORTANT
• If dust accumulates around the power cord’s plug when
it is connected to a power outlet, unplug the machine
and wipe the plug with a clean, dry cloth.
• Whenever you turn off the power and unplug the machine,
wait at least five seconds before you plug it in again.
* The shape of the plug and outlet vary depending on the country of purchase.
VIII
Preface
• Use only the power cord that came with the machine.
• Turn off the power and unplug the machine in the following conditions:
– When the power cord or plug is damaged or frayed.
– If liquid has spilled into the machine.
– If the machine has been exposed to rain or water.
– If the machine does not operate normally when you have followed the instructions in the guides
included with your machine. Adjust only those controls that are covered by the instructions in the
guides since improper adjustment of other controls may result in damage and will often require
extensive work by a qualified technician to restore the product to normal operation.
– If the machine has been dropped or damaged.
– If the machine exhibits a distinct change in performance, indicating a need for servicing.
Handling
WARNING
• Do not drop paper clips, staples, or other metal objects
inside the machine. Also do not spill water, liquid, or
flammable substances inside the machine. If these items
come into contact with high-voltage parts inside the
machine, it may result in fire or electrical shock. If these
items are dropped or spilled in the machine, turn off the
power and unplug the power cord immediately with dry
hands. Then contact your local authorised Canon dealer
or the Canon help line.
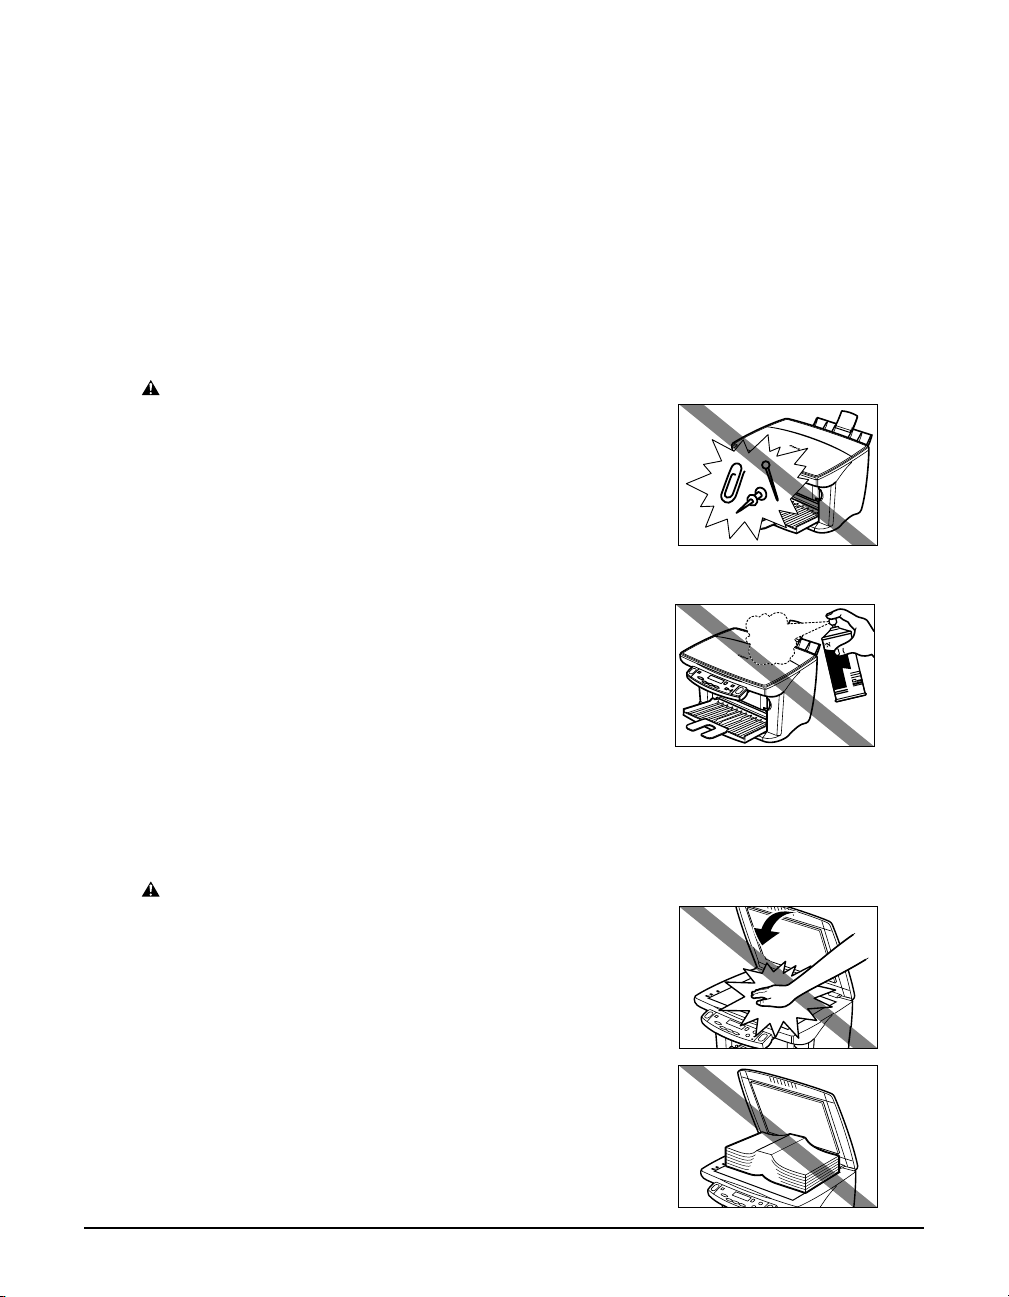
• Do not use any highly flammable sprays near the
machine. If gas from a spray comes into contact with the
electrical components inside the machine, it will result
in fire.
• There are high-voltage components inside the machine.
If you are looking inside the machine to remove paper
jams etc., do not allow metallic objects such as jewellery
to come into contact with the inside of the machine.
Contact may result in burns or electrical shock.
CAUTION
• Close the document cover gently to avoid catching your
hand. Failing to do so may result in injury.
• Do not press down hard on the document cover when
using the platen glass to scan thick books. This may
damage the platen glass and document cover,
and/or result in injury.
Preface
IX
• Do not place the following objects on top of the machine. If such objects come into contact
with internal electrical components, the machine may short-circuit resulting in fire or
electrical shock.
– Metallic objects such as jewellery and watches
– Containers of water or other liquids such as glasses, vases, or pot plants
If water etc. does spill inside the machine, turn off the power immediately, disconnect the
power cord and contact your local authorised Canon dealer or the Canon help line.
• Do not touch the high-voltage electrical parts as this may result in electrical shock.
• Do not place heavy objects on top of the machine as these may topple over and result in
injury.
• Do not insert your hands into the machine while it is printing as parts inside the machine are
moving and this may result in injury.
• After printing, do not touch the electrical contacts of the printhead. They will be hot and may
result in burns or electrical shock.
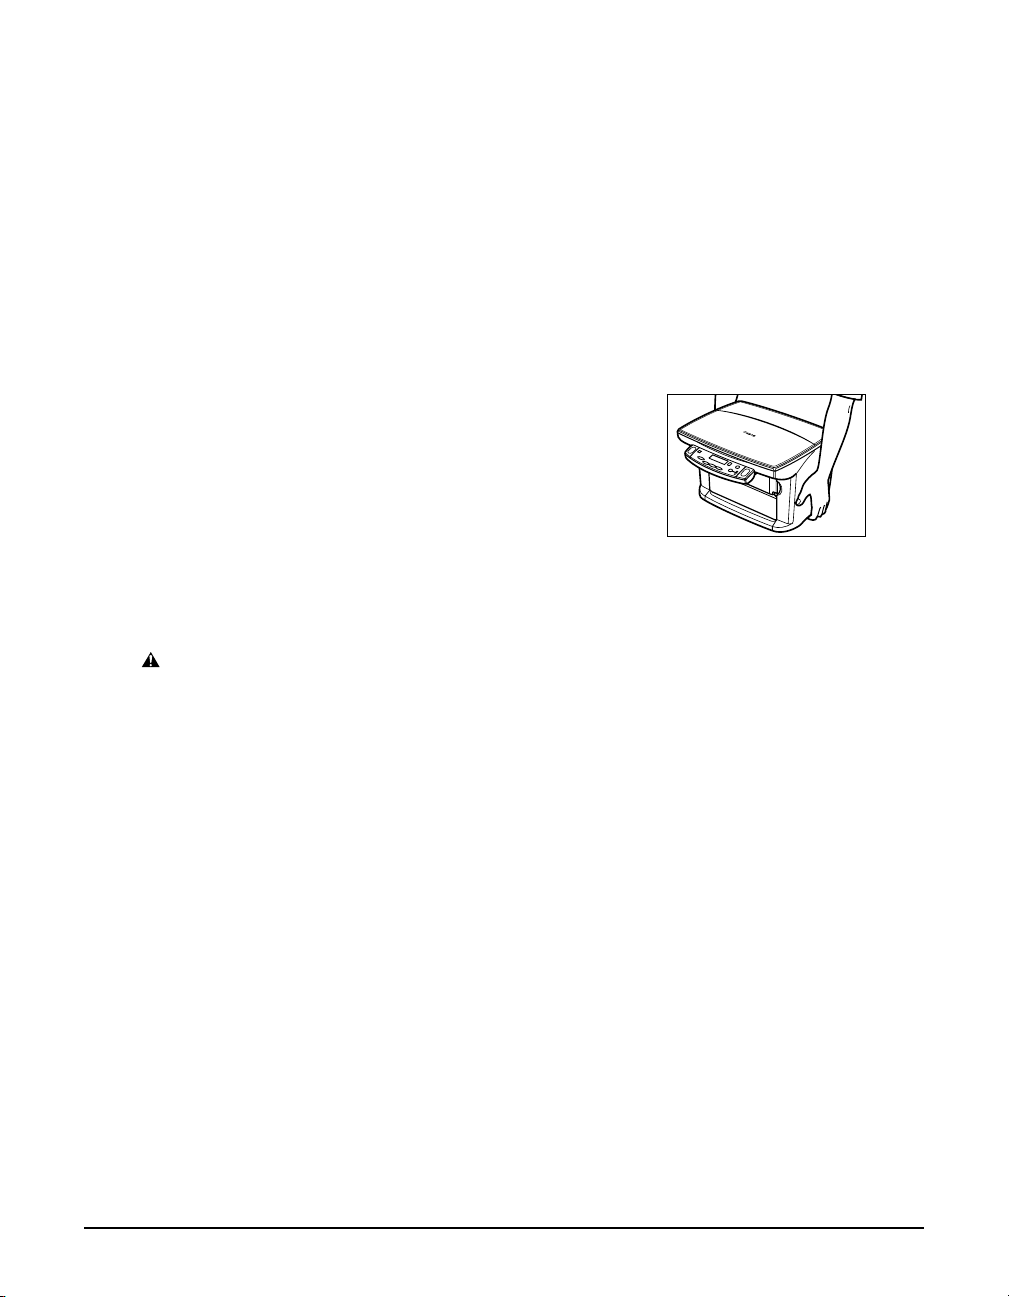
• Do not subject the machine to strong physical shock or
vibration.
• Before moving the machine, turn off the power and unplug
the machine.
• Do not lift the machine by any of its attachments. Close the
multi-purpose tray and paper output tray, and lift the
machine by the recessed areas on its sides as shown.
•A distinct change in performance may indicate a need for
servicing.
Maintenance
WARNING
• Do not service the machine yourself except as specifically described in this guide. If further
servicing is required, contact your local authorised Canon dealer or the Canon help line.
• Keep the machine clean. Dust accumulation may prevent the machine from operating properly.
X
Preface

Legal limitation on usage of your product and the use of images
Using your product to scan, print or otherwise reproduce certain documents, and the use of
such images as scanned, printed or otherwise reproduced by your product, may be prohibited
by law and may result in criminal and/or civil liability. A non-exhaustive list of these documents
is set forth below. This list is intended to be a guide only. If you are uncertain about the legality
of using your product to scan, print or otherwise reproduce any particular document, and/or of
the use of the images scanned, printed or otherwise reproduced, you should consult in advance
with your legal advisor for guidance.
• Paper money
• Money orders
• Certificates of deposit
• Postage stamps (cancelled or uncancelled)
• Identifying badges or insignias
• Selective service or draft papers
• Cheques or drafts issued by governmental
agencies
• Motor vehicle licenses and certificates of title
• Traveller’s cheques
• Food stamps
• Passports
• Immigration papers
• Internal revenue stamps (cancelled or uncancelled)
• Bonds or other certificates of indebtedness
• Stock certificates
• Copyrighted works/works of art without permission
of copyright owner
Preface
XI

XII
Preface

Chapter
1
What your machine can do
Thank you for purchasing the Canon imageCLASS MPC190. Your machine incorporates the
following functions in one simple-to-operate device:
Printer . . . . . . . . . . . . . . . . Print crisp, clear colour or black & white documents from your
Copier . . . . . . . . . . . . . . . . . Make colour or black & white copies from your machine. Also, apply
Scanner . . . . . . . . . . . . . . . Scan high-resolution images to your computer and process them
You may choose to use your machine as a stand-alone device for simply copying. Alternatively,
connect your machine to a computer and you will have a fully integrated printer/copier/
scanner. The MultiPASS Suite software provided with your machine will allow you to perform a
variety of tasks from your computer effortlessly and efficiently.
Introduction
computer.
advanced copy features to your copies.
easily using the software provided.
1
Introduction
Chapter 1 Introduction
1-1
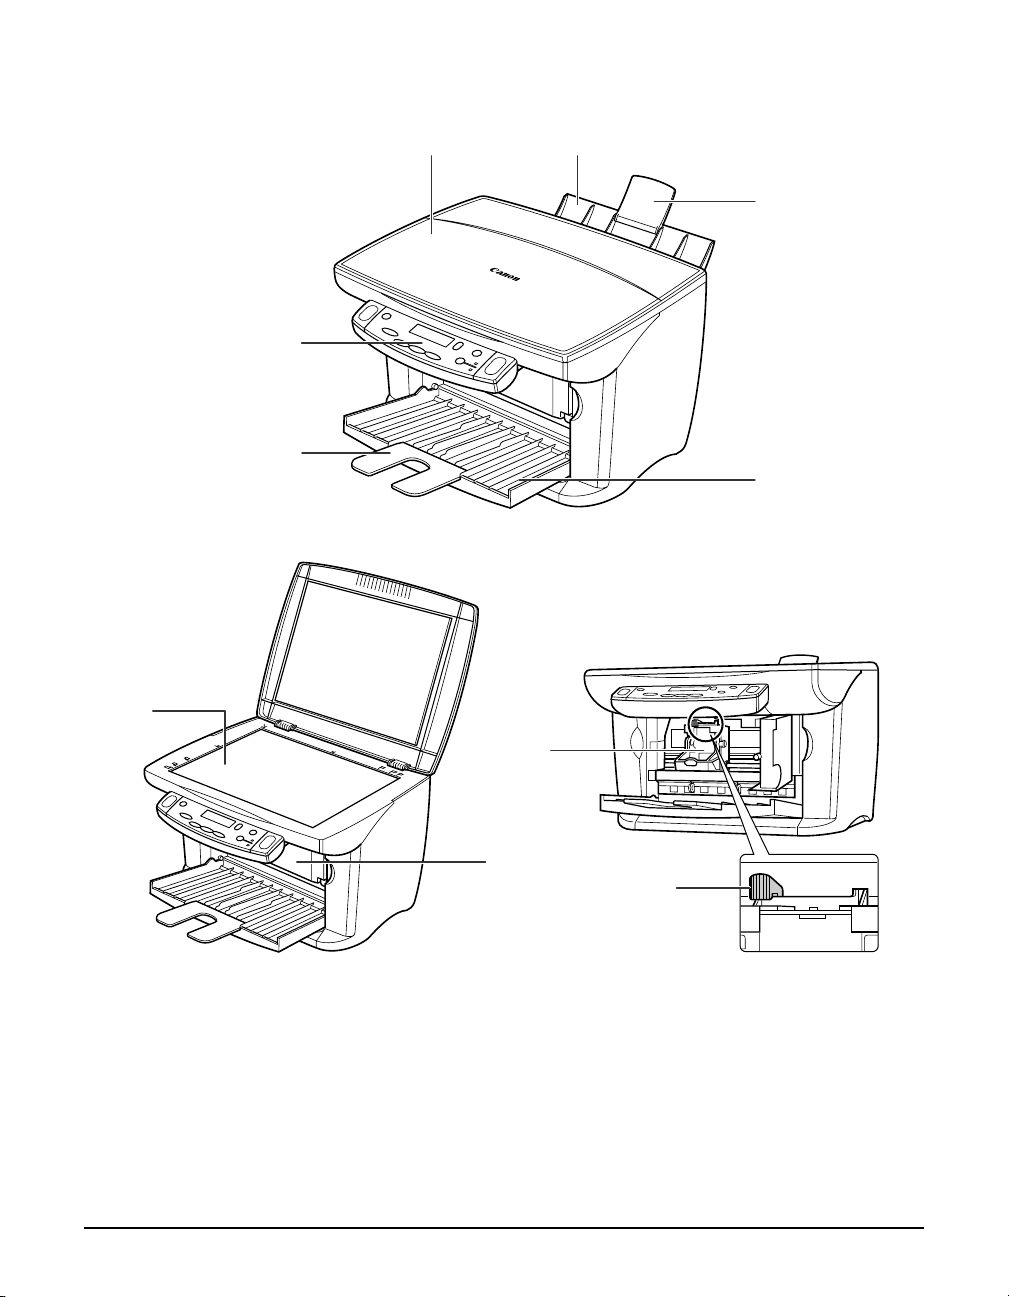
Main components of the machine
y
t
q
y
w
wq
e
r
u
o
i
Document cover
Multi-purpose tray
e Tray extension i Inner cover
r Paper output tray o Printhead holder
t Tray extension !0 Paper thickness lever
1-2
Introduction Chapter 1
Operation panel
u Platen glass
!0
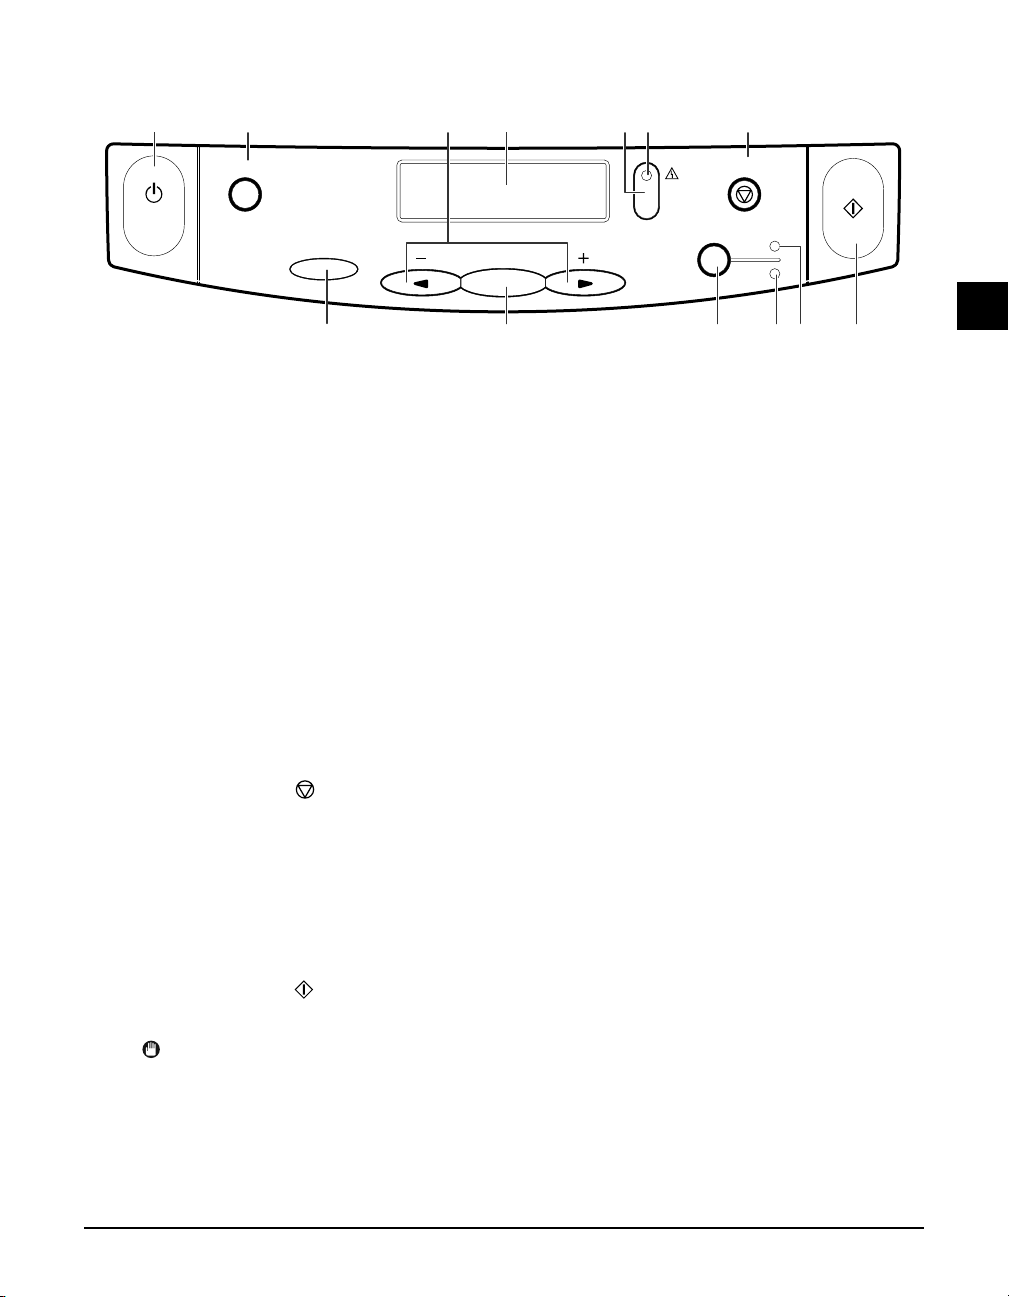
Operation panel of the machine
q iur ow t
Scan
Alarm
ON/OFF
Menu
OK
Resume
e y !3!0 !1 !2
q [ON/OFF] key
Turns the machine on and off (keep pressed for a brief interval).
Before turning on the machine, make sure the document cover is closed.
w [Scan] key
Scans a document to your computer according to the action selected.
e [Menu] ∞∞∞∞ key
Accesses the settings to customise operation of your machine.
r [2222 (-)] and [3333 (+)] keys
Scroll through selections, and increase or decrease the number of copies.
t LCD
Displays messages and selections, and prompts during operation.
y [OK] key
Selects or confirms settings.
u [Resume] key
Resumes an operation after an error is corrected.
i Alarm light
Blinks when an error occurs or when the machine needs attention.
o [Stop/Reset] ( ) key
Cancels operations and returns the machine to standby mode.
!0 [Colour/B&W] key
Sets the machine for colour or black & white copying.
!1 B&W light
Lights when black & white copying is selected.
!2 Colour light
Lights when colour copying is selected.
!3 [Copy/Start] ( ) key
Starts operation.
Stop/Reset
Colour
B&W
Copy
Start
1
Introduction
IMPORTANT
• To prevent the printhead from drying up, the machine automatically caps it when the power is
turned off with the [ON/OFF] key. If you need to disconnect the machine from the main power
source (e.g. disconnect the power cord), be sure to turn off the machine first by pressing [ON/OFF]
before disconnecting it.
• If you are not using the machine for a long period of time, we recommend that you print (in black
and colour) or clean the printhead approximately once a month to maintain the printhead in good
working condition. The printhead contains high-precision nozzles that will become blocked if the
printhead is not used for a long period of time.
Chapter 1 Introduction 1-3

NOTE
• The power cannot be turned off when the machine is operating.
• Your machine performs printhead cleaning every time you unplug and then plug in the machine. This
ensures optimum print quality but also consumes a small amount of ink during the cleaning process. For
this reason, it is recommended that you only turn the machine off and on with the [ON/OFF] key when
instructed to do so in this guide.
1-4 Introduction Chapter 1
Chapter
2
Document handling
Document requirements
The documents you load on the platen glass for copying or scanning must meet these
requirements:
Document
type
Size (W × L) Max. 216 × 297 mm (8 !/2 × 11 #/4 in.)
Quantity •1 sheet
Thickness • Max. 20 mm (#/4 in.)
• All types of documents
• Photographs
• Book
• 10 photographs for multi-scan
Loading documents
NOTE
• Make sure any glue, ink, or correction fluid on the document is completely dry before loading.
1 Lift the document cover.
2
Document handling
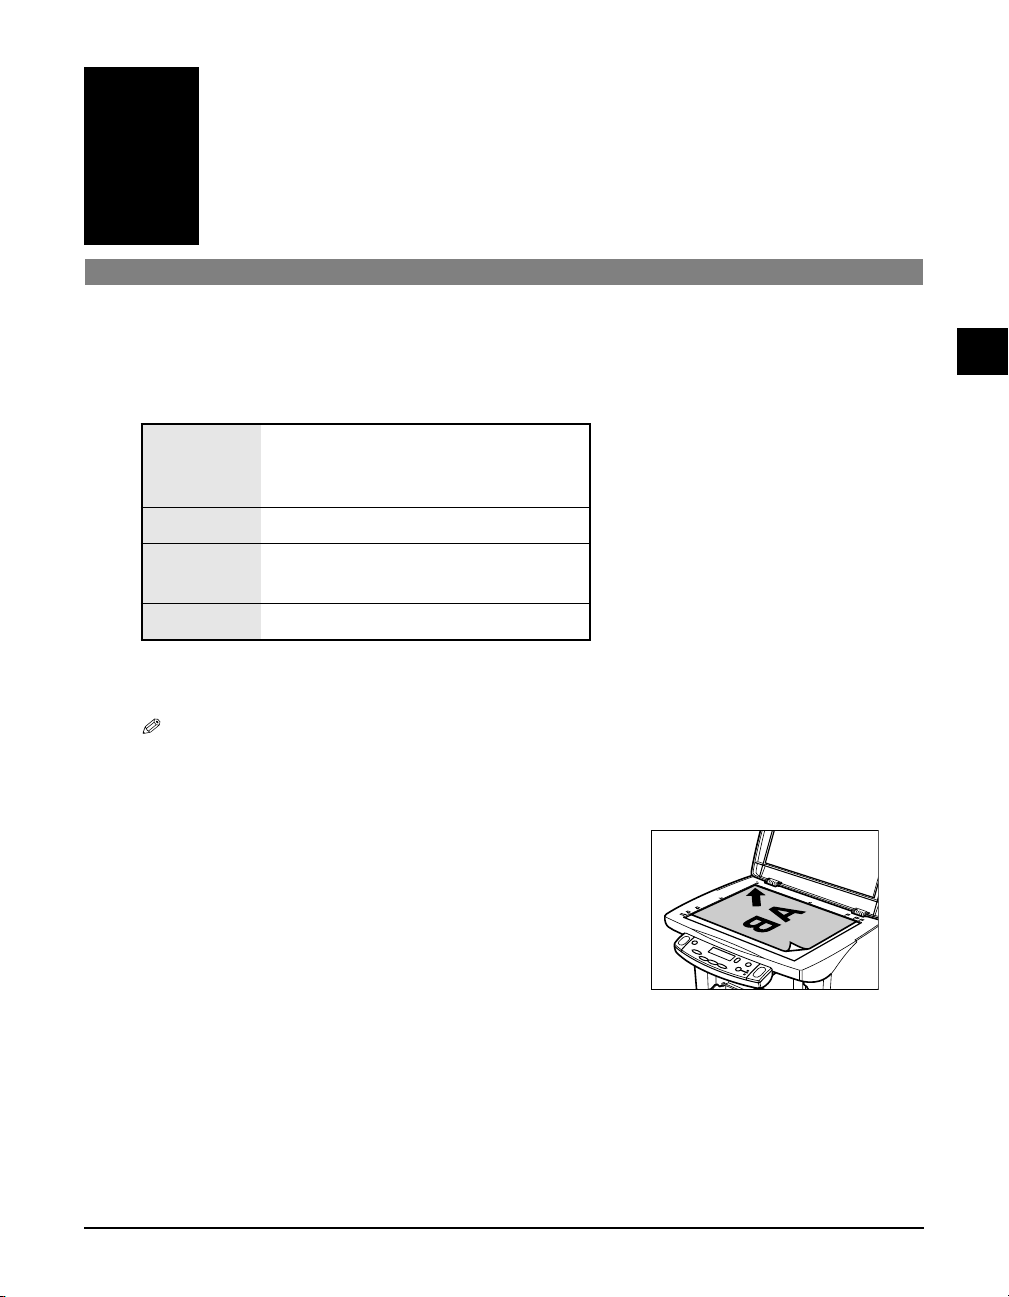
2 Place your document face down on the
platen glass. Align the upper left corner of
your document with the alignment mark on
the upper left corner of the platen glass.
3 Gently lower the document cover.
Chapter 2 Document handling 2-1

2-2 Document handling Chapter 2

Chapter
3
Print media handling
Recommended print media and requirements
The following print media is recommended for use with your machine. Please be sure to follow
the guidelines and meet the requirements when loading print media in the multi-purpose tray.
Plain Paper
Size: A5 (148 × 210 mm/5 & / 8 × 8 ! / 4 in.)
A4 (210 × 297 mm/8 ! / 4 × 11 # / 4 in.)
B5 (182 × 257 mm/7 ! / 8 × 10 ! / 8 in.)
Letter (215.9 × 279.4 mm/8 ! / 2 × 11 in.)
Legal (215.9 × 355.6 mm/8 ! / 2 × 14 in.)
Weight: 64–105 g/m2 (17–28 lb.)
Quantity: Approx. 100 sheets (75 g/m2 or 20 lb.) or maximum stack height of 10 mm (# / 8 in.)
Paper thickness lever position: Left
Use for: Printing from your computer/copying
• The machine supports the above paper sizes in portrait orientation.
• You can use regular copier paper, cotton bond paper, or typical letterhead.
• Your machine does not require special ink jet paper.
• Legal-size paper can only be used when printing from your computer.
Envelopes
Size: European DL (220 × 110 mm/8 % / 8 × 4 # / 8 in.)
U.S. Commercial No. 10 (241 × 105 mm/9 ! / 2 × 4 ! / 8 in.)
Quantity: 10 envelopes
Paper thickness lever position: Right
Use for: Printing from your computer
• You may be able to load other envelope sizes, but Canon cannot guarantee consistent
performance on these.
• Do not use the following types of envelopes since they may cause problems:
–Envelopes with windows, holes, perforations, cutouts, double flaps, pressure seals, and
peel-off sealing strips.
–Envelopes with letters enclosed.
–Sealed envelopes.
• Remove the envelopes from the paper output tray before the count reaches 10.
• For details on loading envelopes, see p. 3-8.
3
Print media handling
Chapter 3 Print media handling 3-1

Bubble Jet Paper LC-301
Developed for high quality printing with minimal or no smearing when in contact with water or
damp surfaces. This specially coated paper produces bright and vivid colours and stands up to
normal office highlighters.
Size: A4, Letter
Quantity: Approx. 100 sheets (75 g/m2 or 20 lb.) or maximum stack height of 10 mm (# / 8 in.)
Paper thickness lever position: Left
Use for: Printing from your computer/copying
High Resolution Paper HR-101N
Designed to produce near-photographic quality print output with sharp and vivid graphics.
Size: A4, Letter
Quantity: Approx. 80 sheets or maximum stack height of 10 mm (# / 8 in.)
Paper thickness lever position: Left
Use for: Printing from your computer/copying
• Load the paper with the whiter side facing up.
• Remove the sheets from the paper output tray before the count reaches 50. If the paper curls,
remove each sheet as it is delivered in the paper output tray.
Glossy Photo Paper GP-301/GP-301N
A high gloss, thick paper that produces the look and feel of a photograph.
Size: A4, Letter
Quantity: 10 sheets
Paper thickness lever position: Left
Drying time: 2 minutes
Use for: Printing from your computer/copying
• Remove the sheets from the paper output tray before the count reaches 10.
• Load the paper with the whiter side facing up.
• Do not use the loading support sheet included with this print media.
Glossy Photo Cards FM-101
Made from the same stock as Glossy Photo Paper GP-301, these cards allow you to print images
over the entire area of the card.
Size: 119 × 214 mm (4 # / 4 × 8 ! / 2 in.)
Quantity: 20 sheets
Paper thickness lever position: Left
Drying time: 2 minutes
Use for: Printing from your computer/copying
• Print the image so that it extends beyond the perforations and then trim off the unwanted
white margins.
• Load the paper with the glossy side facing up.
• Do not use the loading support sheet included with this print media.
• Remove the sheets from the paper output tray before the count reaches 20.
3-2 Print media handling Chapter 3

Matte Photo Paper MP-101
A matte, thick paper that produces vivid colour output and is waterproof. Ideal for many uses
such as paper crafts, calendars, and photographs with a matte finish. You can also use this paper
for borderless printing.
Size: A4
Quantity: 10 sheets
Paper thickness lever position: Left
Use for: Printing from your computer
• Load the paper with the whiter side facing up.
• In the printer driver, select “Matte Photo Paper” as the print media type.
• Remove each sheet as soon as it is printed.
Photo Paper Plus Glossy PP-101
A thick, coated paper designed to produce a glossy finish and vivid colour output. This paper is
also waterproof. Suitable for printing high-quality photographs and for borderless printing.
Size: A4, 101.6 × 152.4 mm (4 × 6 in.)
Quantity: 20 sheets
Paper thickness lever position: Left
Use for: Printing from your computer
• Load the paper with the glossy side facing up.
• In the printer driver, select “Photo Paper Plus Glossy” as the print media type.
• Remove each sheet as soon as it is printed.
Photo Paper Pro PR-101
A thick paper with a treated surface that enhances gloss and provides superior colour
reproduction. It is ideal for printing high-quality photographs.
Size: A4, Letter, 101.6 × 152.4 mm (4 × 6 in.)
Quantity: 1 sheet, 20 sheets (101.6 × 152.4 mm/4 × 6 in. size)
Paper thickness lever position: Left
Drying time: 30 minutes
Use for: Printing from your computer/copying
• Load the paper with the glossier side facing up.
• For 101.6 × 152.4 mm (4 × 6 in.) size paper, remove the sheets from the paper output tray
before the count reaches 20. For A4- or letter-size paper, remove each sheet as soon as it is
printed.
3
Print media handling
Photo Paper Pro PC-101S
Made from the same stock as Photo Paper Pro PR-101, these cards are intended for printing
images that cover the entire surface of the card, without a white border. This paper is ideal for
printing high quality photographs.
Size: 101.6 × 152.4 mm (4 × 6 in.)
Quantity: 20 sheets
Paper thickness lever position: Left
Drying time: 30 minutes
Use for: Printing from your computer
• Load the paper with the glossy side facing up.
• Remove the sheets from the paper output tray before the count reaches 20.
Chapter 3 Print media handling 3-3

High Gloss Photo Film HG-201
A bright white finish film that lends striking visual power to charts, graphs, and photographic
images. It creates a sharper and more vivid colour output than is possible with coated paper.
Size: A4, Letter
Quantity: 1 sheet
Paper thickness lever position: Left
Drying time: 2 minutes
Use for: Printing from your computer/copying
• If the film is curled, flatten it by curling it in the opposite direction.
• Load the film with the cut corner at the upper right.
Transparencies CF-102
Produce excellent contrast, sharpness, and colour, creating crisp and professional overhead
presentations.
Size: A4, Letter
Quantity: 30 sheets
Paper thickness lever position: Left
Drying time: 15 minutes
Use for: Printing from your computer/copying
• Although you can print on either side of CF-102 transparencies, best results can be obtained
by printing on the side towards which it curls when held by the edge.
• Remove each transparency after it is delivered being careful not to touch any surfaces.
Do not allow transparencies to stack up in the paper output tray.
• When your output has dried completely, cover its printed side with a sheet of plain (not
coated) paper before storing it.
• Load one sheet of plain paper as the last sheet in the stack.
Banner Paper BP-101
Specifically designed for printing one continuous sheet in a banner format. The connected
sheets are divided by perforations.
Size: 210 × 297 mm (8 ! / 4 × 11 # / 4 in.), Letter
Maximum length: 1782 mm (70 !/8 in.)
Quantity: 2 to 7 sheets (joined)
Paper thickness lever position: Right
Use for: Printing from your computer
• You can print from two to six continuous sheets at a time.
• When tearing the banner paper, tear off one more sheet than you actually need to print.
The maximum length for one print job is six sheets, so if you will be printing on six sheets, tear
off a seven-sheet length.
• Load banner paper print side up.
• Ensure the ink does not stain the table or floor.
• For details on loading banner paper, see p. 3-10.
T-Shirt Transfers TR-201
Used to produce iron-on transfers.
Size: A4, Letter
Quantity: 1 sheet
Paper thickness lever position: Right
Use for: Printing from your computer/copying
3-4 Print media handling Chapter 3

• Load the paper with the side that does not have green lines facing up.
• Use mirror printing to print or copy the image onto the T-shirt transfer.
• If the T-shirt transfer is curled, flatten it by curling it in the opposite direction.
General print media guidelines
• Paper types you cannot use
Do not use the following:
–Creased print media
–Curled print media
–Wrinkled print media
–Moist print media
–Print media that is too thin (It should be at least 64 g/m2 or 17 lb.)
–Print media that is too thick (It should not be more than 105 g/m2 or 28 lb. , except for Canon
print media.)
–Print media with holes (e.g. punched holes)
–Postcards with photographs or stickers adhered to them
• Hold the print media as closely as possible to its edges and try not to touch the printing
surface. Printing quality will deteriorate if the printing surface is damaged or becomes dirty.
• Do not touch the printing surface until the ink has dried.
• Some print media may curl and the printing surface may smudge if you have used a large
amount of ink for printing. If this occurs, move the paper thickness lever to the right ( p. 3-6).
Paper that tends to curl is not recommended for printing photographs or graphics. Use for
printing mainly text.
• Do not use print media that is in bad condition ( above). If the print media is curled, uncurl
it before printing.
• Place the print media you have not used back into its packet and store out of direct sunlight
in a place where temperature and humidity is low.
• Photo Paper Pro guidelines
–Do not touch the printed surface until the ink has fixed (approx. 30 minutes). Colours in dark
images may appear indistinct at first, but will become clearer after about 30 minutes.
–Images may smudge if you place them in an album before the ink is completely dry. It is
recommended that you allow the ink to dry for 24 hours.
–Do not attempt to dry the ink with a hairdryer or by exposing printed sheets to direct
sunlight.
–Do not store or display printouts in hot, damp, or humid conditions. Never expose them to
heat or direct sunlight.
–Store printouts in photo albums, photo frames, or presentation binders to protect them from
direct exposure to air or sunlight.
–Do not mount printouts in an adhesive-type album as you may not be able to remove them.
–Be aware that some types of clear plastic folders and albums may cause the edges of the
paper to turn yellow.
3
Print media handling
Chapter 3 Print media handling 3-5
Setting the paper thickness lever
The paper thickness lever adjusts the gap between the printhead and the print media to suit
the print media’s thickness. Before printing, be sure to set the paper thickness lever.
Follow this procedure to set the paper thickness lever:
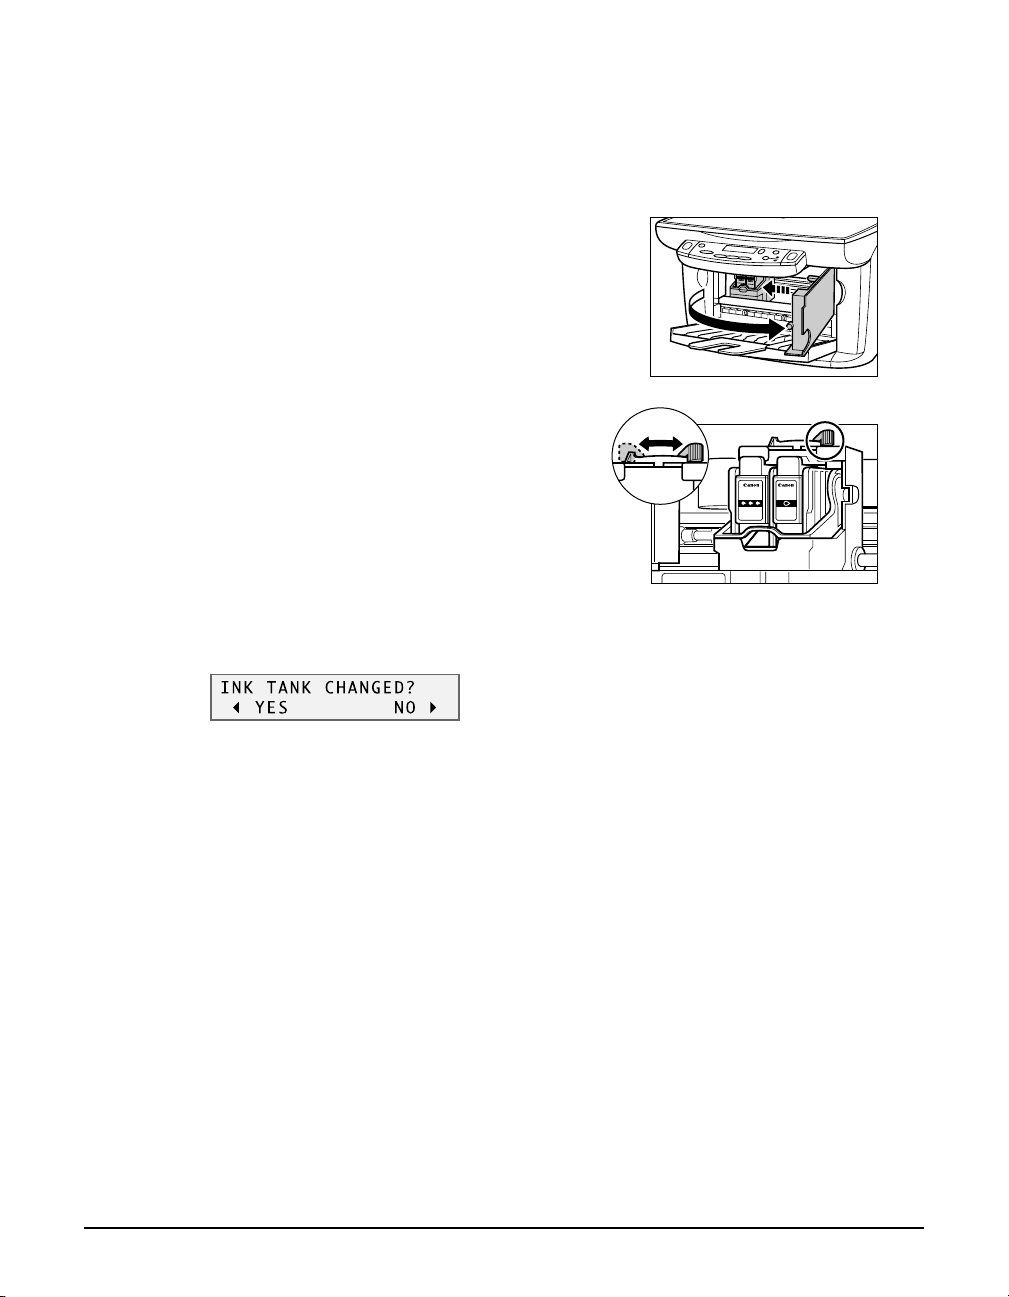
1 Open the inner cover.
• The printhead holder moves to the left.
2 Move the paper thickness lever to the
appropriate setting.
• For details on which position to set for the print
media you are using, see p. 3-1 to p. 3-5.
3 Close the inner cover.
4 The LCD displays the following message:
BCI-24
Color
BCI-24
Black
Press [3333].
3-6 Print media handling Chapter 3
Setting the print media size and type
For copying, you need to set the size and type of print media loaded in the multi-purpose tray.
NOTE
• For documents printed from your computer, specify the print media size and type on your computer (
Software Guide).
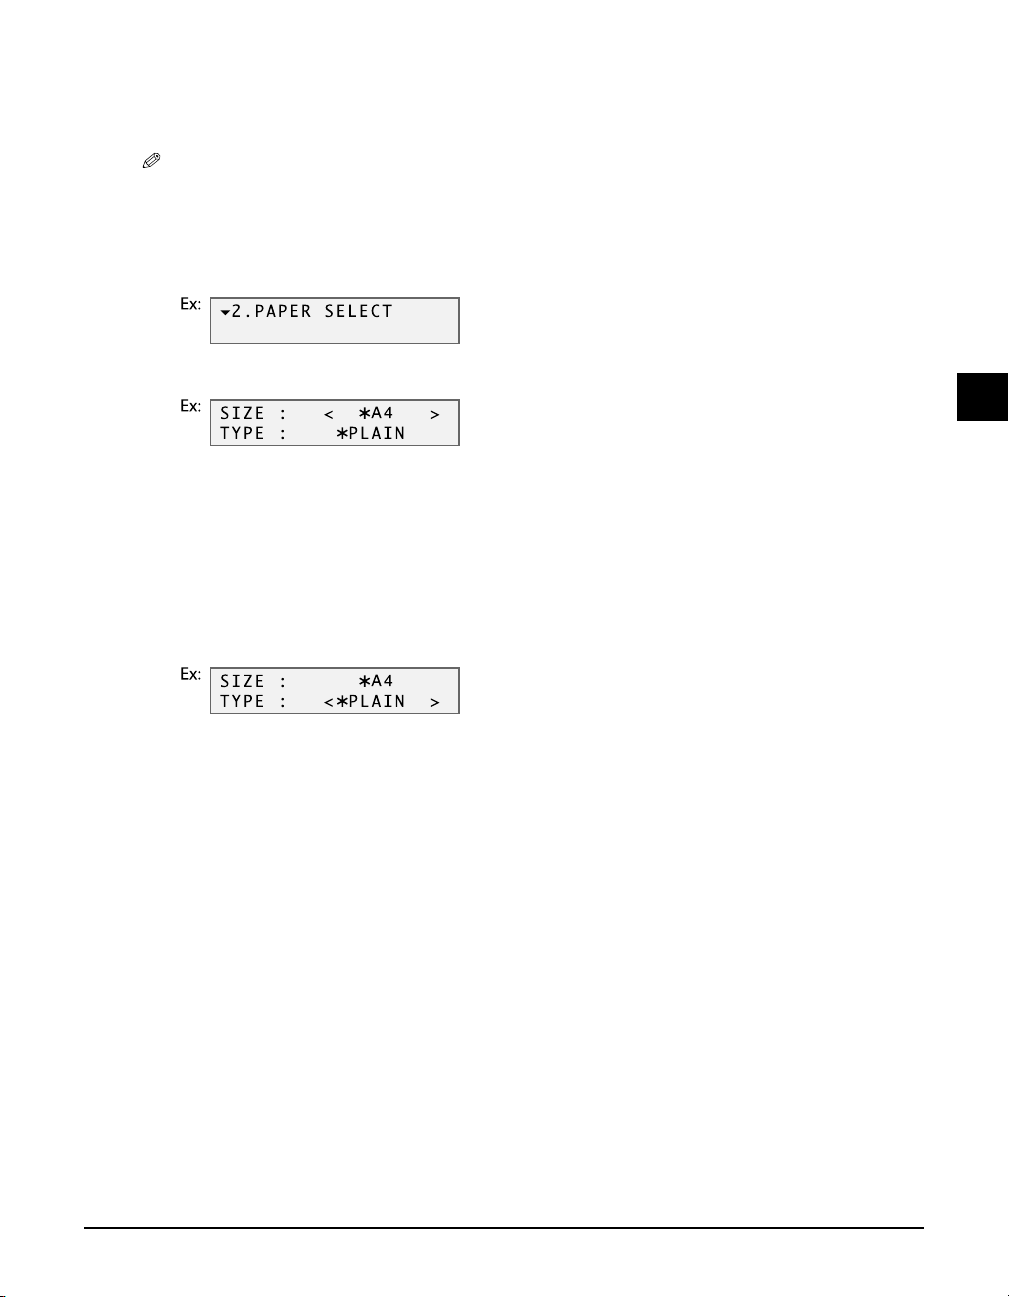
Follow this procedure to set the print media size and type:
1 Press [Menu] twice.
2 Press [OK].
3
3 Use [22
22
] or [3333] to select the print media size.
• Select:
– <A4> for A4-size print media.
– <LTR> for letter-size print media.
– <B5> for B5-size print media.
– <A5> for A5-size print media.
– <4" × 6"> for card-size print media.
4 Press [OK].
5 Use [22
22
] or [3333] to select the print media type.
• Select:
– <PLAIN> for plain paper.
– <GLOSSY> for glossy photo paper.
– <H.RES.> for high resolution paper.
– <TRANS.> for transparencies.
– <PHOTO> for Photo Paper Pro.
6 Press [OK].
• In copy mode, the LCD will display the print media size and type.
Print media handling
Chapter 3 Print media handling 3-7
Loading print media
Loading paper
Follow this procedure to load paper in the multi-purpose tray:
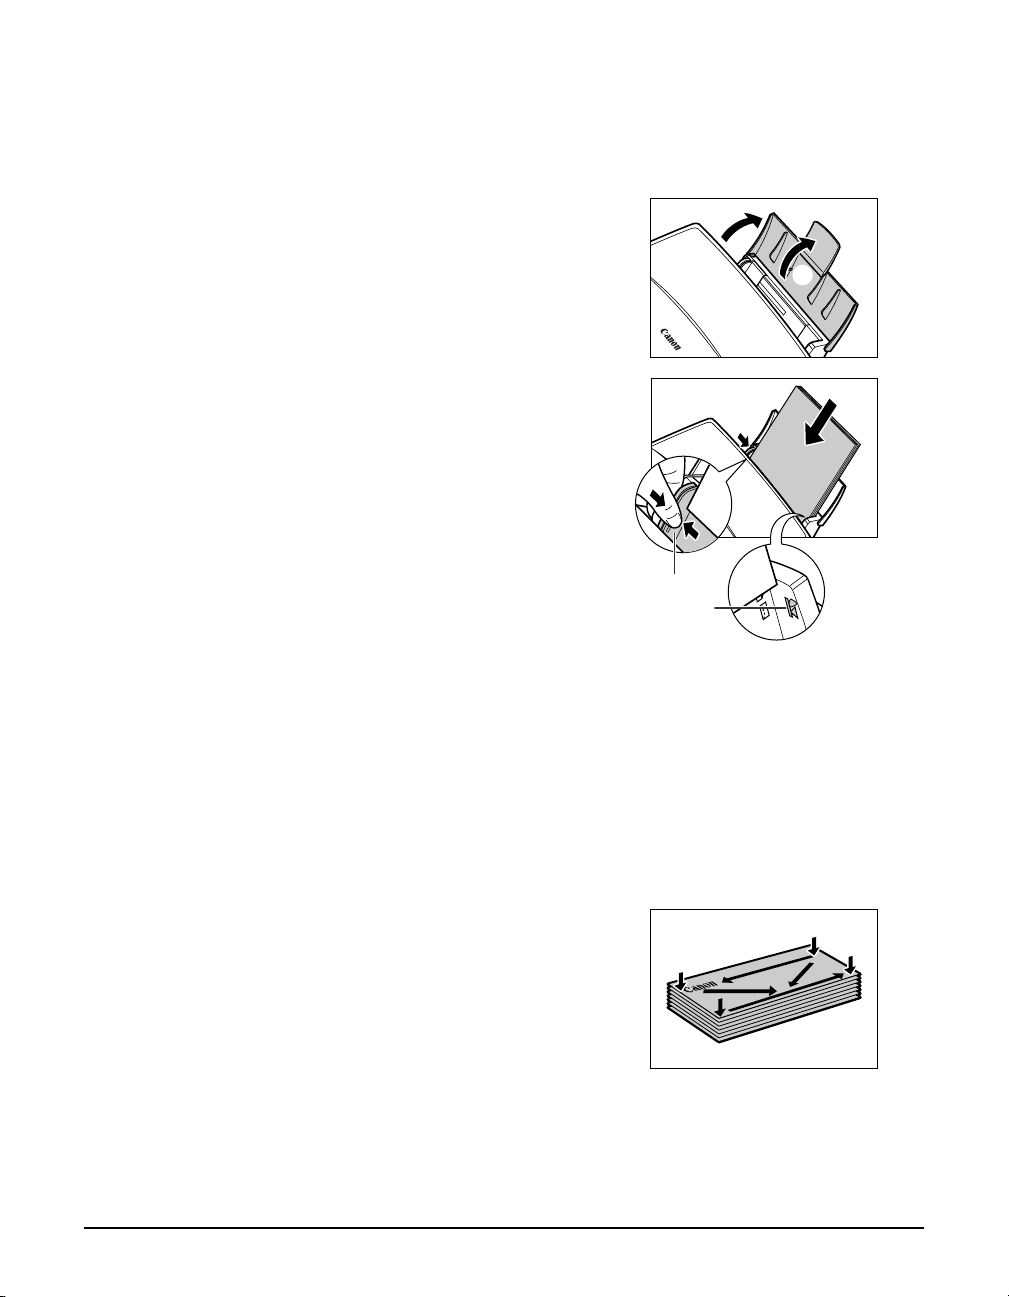
1 Open the multi-purpose tray q, then the
tray extension w.
2 Place a stack of paper (print side up) in the
multi-purpose tray q and adjust the paper
guide A to the width of the stack w.
• Make sure the stack does not exceed the paper
limit mark B.
A
B
q
w
w
q
Loading envelopes
Follow this procedure to load envelopes in the multi-purpose tray:
1 Make sure the paper thickness lever is set to
the right.
• For details, see p. 3-6.
2 Open the multi-purpose tray, then the tray
extension.
3 Prepare the envelopes for loading:
Press down firmly on the edges of the
envelopes to make the folds crisp. Also,
press firmly on the area that corresponds to
the edges of the back flap.
3-8 Print media handling Chapter 3
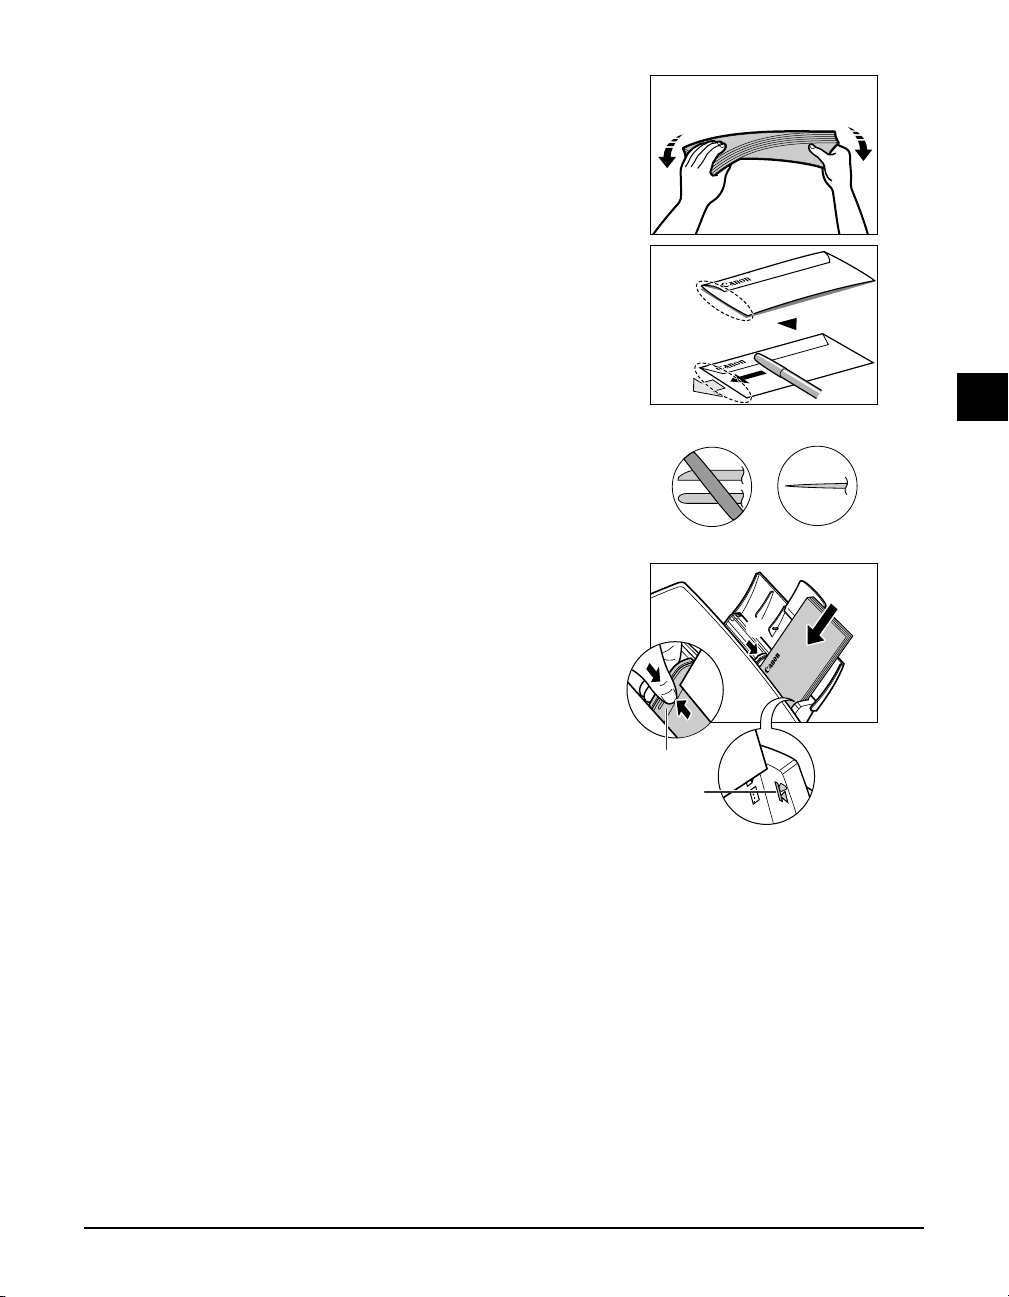
Remove any curling by holding the edges
diagonally and bending them gently.
If the edges of the envelope are inflated or
are curling up, place the envelope on a desk
and with a pen press down on it moving
from the centre towards the edges of the
envelope.
• Ensure that no curl or puff exceeds 3 mm (! / 8 inch).
4 Place the stack of envelopes (print side up)
in the multi-purpose tray q and adjust the
paper guide A to the width of the stack w.
• Feed the left side of the envelope (return address
portion) into the multi-purpose tray first.
• Make sure the stack does not exceed the paper
limit mark B.
3
Cross-sections of the envelope edge
Incorrect Correct
Print media handling
q
w
A
B
Chapter 3 Print media handling 3-9
Loading banner paper
NOTE
• Always leave an extra sheet at the end of the banner—just in case the type runs over.
• Printing on banner paper may require considerable amounts of ink so use new ink tanks if necessary.
• For best print results on banner paper, use light design patterns.
Follow this procedure to load banner paper in the multi-purpose tray:
1 Make sure the paper thickness lever is set to
the right.
• For details, see p. 3-6.
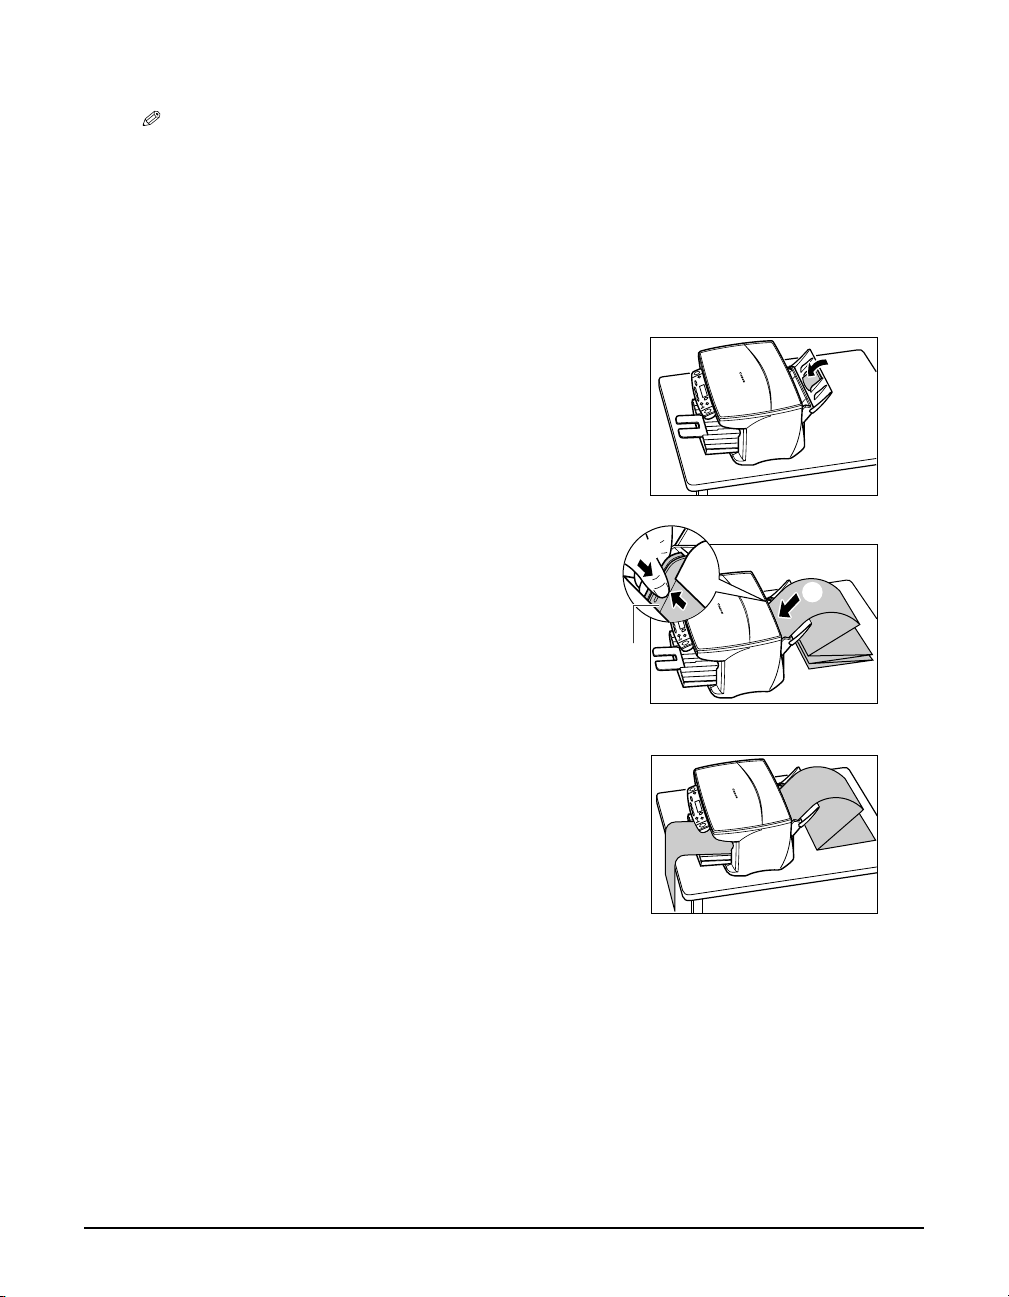
2 Lower the tray extension on the
multi-purpose tray.
3 Cut the banner paper to the required length
and place it behind the machine on a flat
surface. Then insert the first sheet in the
multi-purpose tray q and adjust the paper
guide A to the width of the sheet leaving a
1 mm (! / 8 inch) gap between the paper guide
and edge of the sheet w.
• Make sure the sheets behind the machine are
aligned with the first sheet.
4 Set your computer to print on banner
paper.
• Allow the paper to flow over the edge of the table
as it exits the machine.
w
q
A
3-10 Print media handling Chapter 3
 Loading...